Article

Influence of Build Orientation and Heat Treatment on the Microstructure and Mechanical Properties of SUS316L Fabricated by Selective Laser Melting

1
Department of Advanced Materials Engineering, Dong-Eui University, Busan 47340, Republic of Korea
2
Center for Brain Busan 21 Plus Program, Dong-Eui University, Busan 47340, Republic of Korea
3
Center for Converging Materials Core Facility, Dong-Eui University, Busan 47340, Republic of Korea
4
AI·Realistic Media Research Department, Gumi Electronics & Information Technology Research Institute, Gumi 39253, Republic of Korea
*
Author to whom correspondence should be addressed.
Metals 2025, 15(9), 971; https://doi.org/10.3390/met15090971 (registering DOI)
Submission received: 23 July 2025 / Revised: 25 August 2025 / Accepted: 28 August 2025 / Published: 30 August 2025
(This article belongs to the Special Issue Advances in Laser Processing of Metals and Alloys)

Abstract

Additive manufacturing (AM) via selective laser melting (SLM) is increasingly deployed in aerospace, biomedical, and tooling applications where complex geometries and high performance are required. Yet, process-induced anisotropy and microstructural heterogeneity can strongly affect mechanical and tribological behavior. This study systematically evaluates the combined effects of build orientation (0°, 45°, and 90° relative to the build plate) and post-build heat treatment (as-built, 600 °C, and 860 °C) on the phase constitution, microstructure, hardness, tensile response, and dry sliding wear of SLM-fabricated 316L stainless steel. X-ray diffraction indicated a fully austenitic (γ-fcc) structure without detectable secondary phases across all conditions. Orientation-dependent substructures were observed: ~1 µm equiaxed cellular features at 0°, finer 0.3–0.5 µm cells at 45°, and 1–2 µm elongated features at 90°. Microhardness varied with orientation; relative to 0°, 45° specimens were ~15 HV higher, whereas 90° specimens were ~10 HV lower. Heat treatment at 600 °C promoted refinement and recovery of the cellular network, most pronounced in the 45° orientation, while treatment at 860 °C largely erased melt pool boundary contrast, producing a more homogeneous particle-like microstructure. Tensile fractography revealed dimpled rupture in all cases; the 90° orientation showed finer dimples and lower hardness, consistent with a ductile failure mode under reduced constraint. Dry sliding wear tests identified adhesive wear, intensified by the build-up of transferred fragments, as the dominant mechanism in both as-built and 600 °C conditions. Changes to melt pool morphology after 860 °C heat treatment correlated with altered wear track widths, with the 0° condition showing a notable narrowing relative to the 600 °C state. These results highlight processing pathways for tailoring anisotropy, strength–ductility balance, and wear resistance in SLM 316L.

1. Introduction

Metal-based additive manufacturing (AM) technology is defined as a process that builds three-dimensional products layer by layer using high-density heat sources, such as lasers or electron beams [1]. This approach enables the production of complex geometries that are challenging or impossible to achieve with conventional manufacturing techniques, often in a single step and without extensive post-processing, which has garnered significant attention across various industries [2]. Among various AM techniques, selective laser melting (SLM) is one of the most widely used. These properties, combined with its good machinability, make 316L highly suitable for laser-based AM processes [3]. Moreover, Fe-based stainless steels have a relatively lower melting point compared to Ti- or Ni-based alloys, facilitating the cost-effective production of powders optimized for SLM [4].
With the advancement of SLM technology, research on the AM of STS 316L stainless steel has primarily focused on optimizing process parameters, investigating microstructural evolution, and mitigating the formation of defects and residual stresses. In particular, studies have examined the influence of process variables and post-process heat treatments on the mechanical properties of SLM-fabricated metallic components in conjunction with detailed microstructural characterization [5,6,7]. Key process parameters such as laser power, building orientation, and scan speed have been widely studied, with optimization efforts directed toward minimizing defects that may arise during fabrication [8,9]. Typical defects observed in SLM-processed parts include residual stresses, cracks, warping, and porosity [10]. Among these factors, the build orientation plays a crucial role in determining the morphology of melt tracks, the resulting microstructure of the final product. Previous studies have indicated that the build orientation can significantly affect microstructure, as variations in melting and solidification rates occur depending on the laser scanning strategy [11]. Castro et al. [12] reported that specimens produced at 0° exhibited finer structures and higher strength due to faster cooling rates and increased solidification rates with greater height. It has been reported that the building direction also significantly affects the friction and mechanical behavior of components produced by SLM [13,14]. Sun et al. [15] studied tensile and fatigue performance by producing components in three directions (0°, 45°, and 90°). They found that specimens built at 45° displayed superior tensile and fatigue properties compared to those produced at 0° and 90°, mainly due to a lower density of process-induced defects. Although build orientation exerts a pronounced effect on fatigue properties, its influence on tensile strength, ductility, and wear property is relatively limited. This is largely because mechanical properties are also governed by the layer deposition direction and the inherent characteristics of continuous fracture behavior [16].
AM offers significant advantages over conventional fabrication techniques, such as casting and forging, particularly in terms of design flexibility, reduced post-processing requirements, and accelerated production cycles. Despite these benefits, AM-fabricated components inherently exhibit defects, including surface roughness, porosity, residual stresses, and micro-cracking, which can severely compromise their mechanical performance and reliability. Therefore, post-processing heat treatments are essential to alleviate these defects and to optimize the microstructure, thereby enhancing mechanical properties such as strength, ductility, and wear resistance. Dong et al. [17] demonstrated that porosity in SLM 316L is primarily governed by parameters such as hatch spacing and scan speed, with optimized process conditions achieving densities exceeding 99.5%. In contrast, Kučerová, Deen et al. [18,19] reported that annealing within the temperature range of 600–1100 °C affects the microstructure but does not significantly alter the porosity, which remains below 0.5%. Annealing of the as-built condition primarily alters the cellular substructure, dislocation density, and melt pool/grain boundary morphology, which, in turn, affect hardness, strength, and ductility through mechanisms of recovery and partial recrystallization. However, process-induced defects, such as porosity and lack of fusion, are not effectively mitigated by annealing alone and typically require additional approaches, such as process parameter optimization, hot isostatic pressing (HIP), or thermomechanical treatments [18,20]. Conversely, annealing at elevated temperatures, such as 1100 °C, followed by air cooling can reduce hardness and tensile strength but significantly improve ductility through mechanisms like twin boundary reduction within the cellular microstructure. Moreover, heat treatment has been shown to improve tensile strength and decrease wear rates in components fabricated with specific build orientations, such as 45°, highlighting its importance in tailoring properties according to application requirements [21,22].
Therefore, in this study, STS 316L specimens were fabricated using the SLM process with different build orientations (0°, 45°, and 90°), followed by heat treatments under two conditions: (i) air cooling after holding at 600 °C for 2 h and (ii) heat treatment at 860 °C for 1 h, subsequent holding at 350 °C for 15 min, and final air cooling. Phase transformations induced by heat treatment were examined using X-ray diffraction (XRD, X’Pert PRO MPD, Panalytical, Almelo, The Netherlands). Microstructural evolution was characterized via field-emission scanning electron microscopy (FE-SEM, Quanta 200 FEG, FEI Company, Eindhoven, The Netherlands), while tensile properties were evaluated through tensile testing, fracture surface observations, and elongation measurements under various heat-treatment conditions and build orientations. In addition, wear behavior was assessed by determining the average friction coefficient, wear track width, and friction coefficient.

2. Materials and Methods

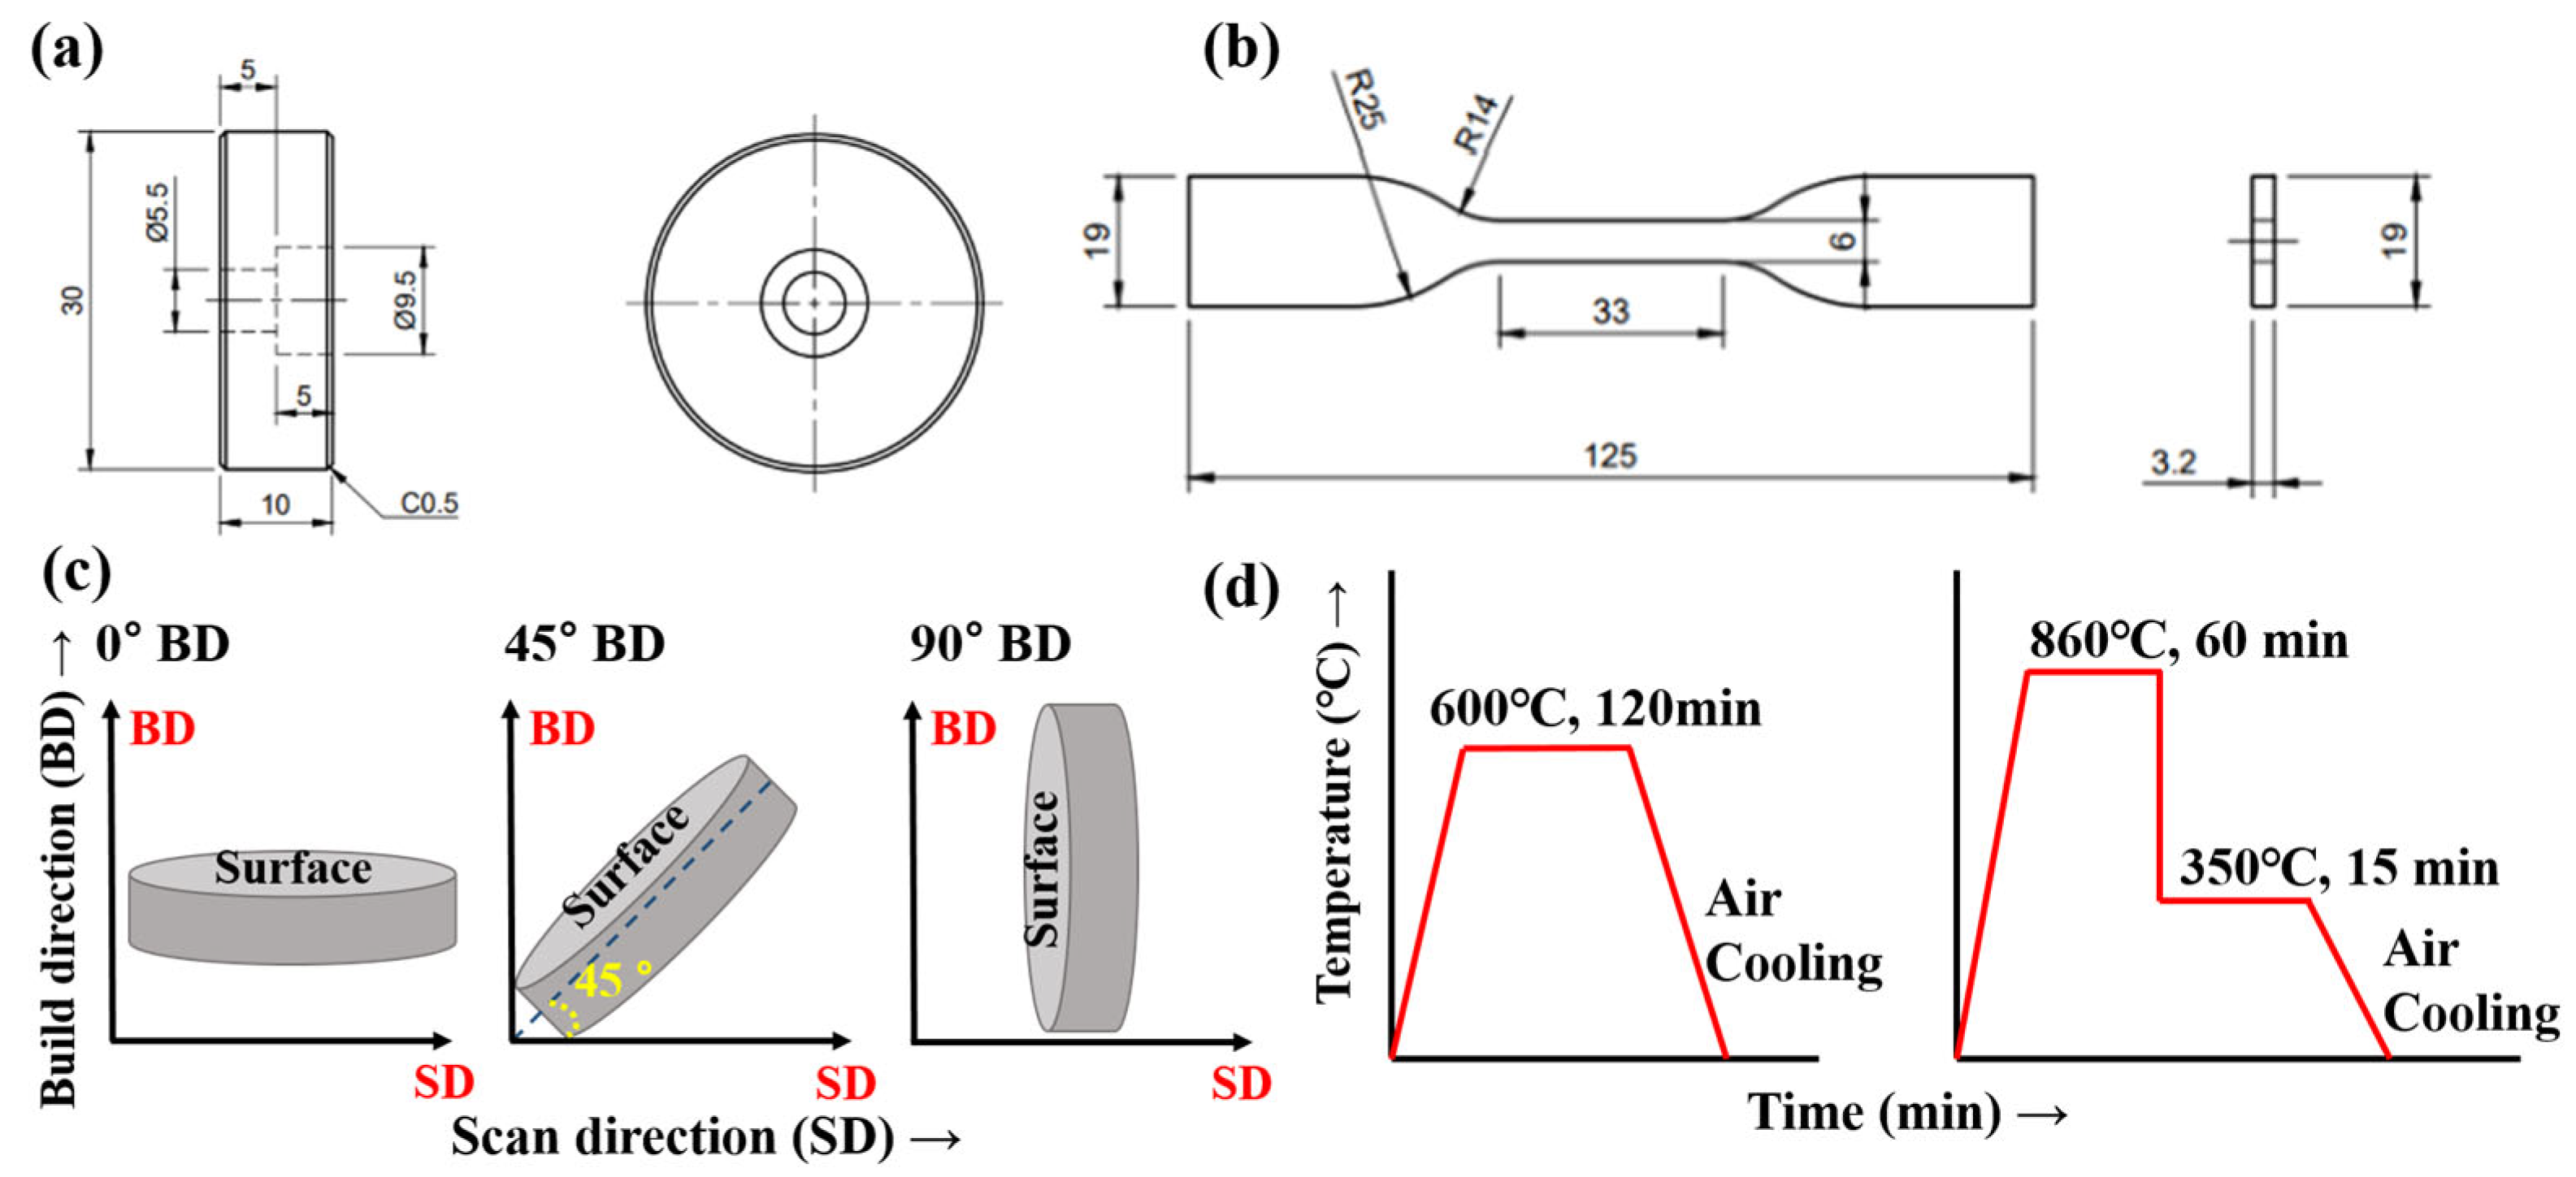
In this study, spherical STS 316L powder with an average particle size ranging from 15 to 45 μm was used to fabricate the test specimens. The morphology and chemical composition of the powder are presented in Figure 1 and Table 1, respectively. The powder was processed via selective laser melting (SLM) using a Concept Laser M1 system (Concept Laser, GE Additive, Cincinnati, OH, USA) at Dong-Eui University Converging Materials Core Facility supported by the Korea Basic Science (NFEC-2018-09-246087) to produce both wear and tensile specimens, as illustrated in Figure 2a. The SLM process was performed under an argon atmosphere, with an O2 content maintained below 0.2%. The process parameters were set as follows: laser power of 180 W, scan speed of 1200 mm/s, hatch spacing of 105 μm, and layer thickness of 35 μm. The build orientations of the specimens were 0°, 45°, and 90°, as shown in Figure 2c. To enhance hardness and mechanical strength, two types of post-processing heat treatments were applied. The first was a stress-relieving treatment, in which specimens were held at 600 °C for 2 h followed by air cooling. The second was a tempering treatment, consisting of heating at 860 °C for 1 h and then at 350 °C for 15 min and, finally, air cooling. A schematic of the SLM and heat-treatment processes is presented in Figure 2d.
For phase analysis of the STS 316L stainless steel fabricated by the SLM process, the specimens were polished sequentially using abrasive papers of 100, 180, 400, 600, 800, 1200, and 2000 grit (with overlap value of approximately 30%), followed by final polishing with MD-Nap and MD-Mol cloths to achieve surface finishes down to 3 μm and 1 μm, respectively. Phase identification was performed using an X-ray diffractometer (X’Pert Pro MPD, Panalytical, Almelo, The Netherlands) with Cu Kα radiation over a 2θ range of 20° to 80°. For microstructural analysis, the specimens were electrolytically etched in a solution composed of 350 mL nitric acid (HNO3) and 50 mL distilled water under a constant voltage of 4 V for approximately 5 s. Following etching, the microstructure was examined using an optical microscope (OM, ECLIPSE LV150L, Nikon, Tokyo, Japan) and a field emission scanning electron microscope (FE-SEM, Quanta 200 FEG, FEI Company, Amsterdam, The Netherlands). Vickers hardness testing was performed on the additively manufactured STS 316L specimens using a hardness tester (HM-210, Mitutoyo, Tokyo, Japan) with a 0.1 kgf load applied for a dwell time of 10 s. Five indentations were made per specimen, and the average hardness value was calculated. The tensile properties of the STS 316L specimens fabricated by the SLM process were evaluated using a universal testing machine (KSU-20M, Kyoungsung, Seoul, Republic of Korea). Tensile tests were performed on flat specimens with dimensions of 35 mm gauge length, 19 mm width, and 3.2 mm thickness. The tests were conducted in the transverse direction at room temperature, with three replicates for each condition. Following the tensile tests, tensile stress–strain curves were obtained, and elongation, tensile strength, and fracture surface characteristics were analyzed. For wear resistance evaluation, a wear tester (RB-102PD, R&B Co., Ltd., Seoul, Republic of Korea) was used following the Ball-on-disc test method. The tests were carried out at room temperature under a normal load of 70 N, with a linear sliding speed corresponding to 830 rpm, over a total sliding distance of 200 m. AISI 52100 carbon steel balls with a specified diameter (please specify diameter if known) were used as the counter body. The specimen and counter body masses were measured before and after the wear tests using a semi-micro balance (PX224KR, OHAUS CO., Parsippany, NJ, USA) to quantify wear loss by comparing mass changes.

3. Results and Discussion

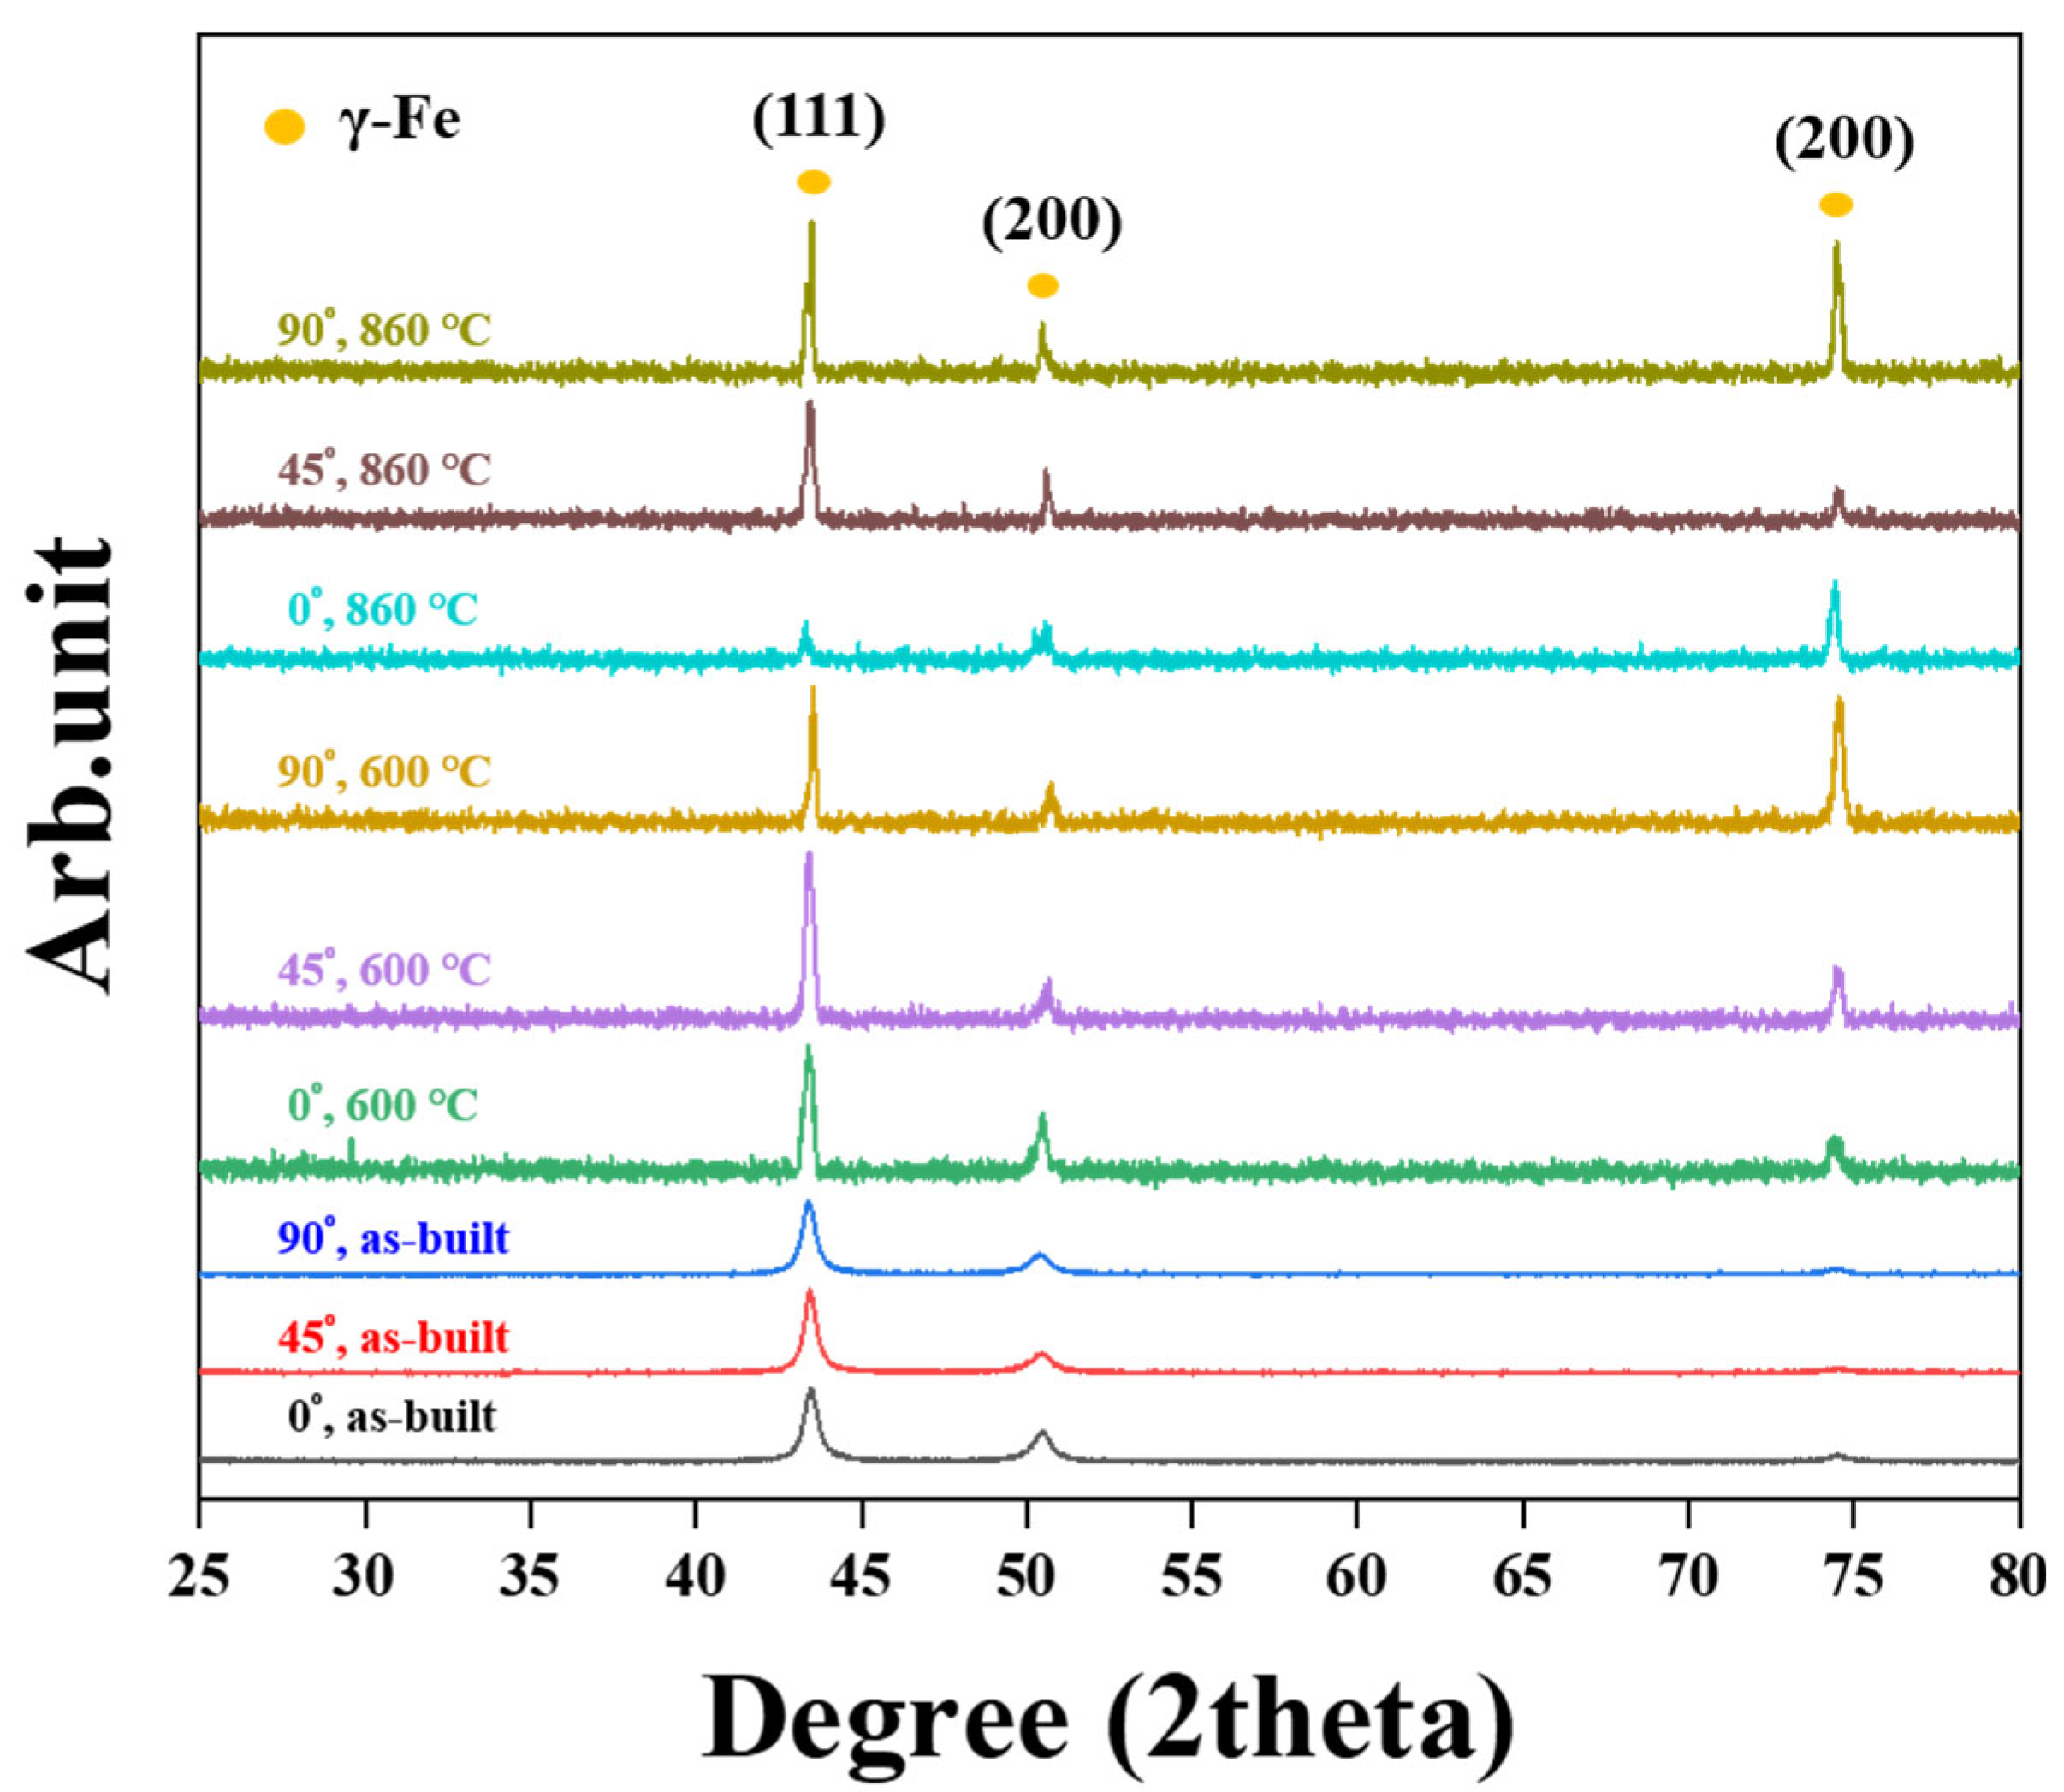
Figure 3 shows the X-ray analysis results of STS 316L manufactured by selective laser melting (SLM) with different build orientations, both before and after heat treatment. Distinct Fe peaks were detected at approximately 43°, 50°, and 74°, which correspond to the diffraction patterns of the face-centered cubic (FCC) austenite phase. The absence of ferrite peaks confirms that the material consists exclusively of a single austenitic phase under all conditions, indicating that none of the applied heat treatments induced a phase transformation from austenite to ferrite, consistent with the findings of O.O. Salman et al. [23]. For untreated STS 316L, the (111) peak exhibited a significantly higher intensity compared to other peaks. The Cr-to-Ni ratio in STS 316L stabilizes the austenitic structure, thereby suppressing ferrite formation even after rapid solidification during both the SLM process and subsequent heat treatments. As a result, no additional peaks corresponding to phase transformation were observed after the various heat treatments [24].
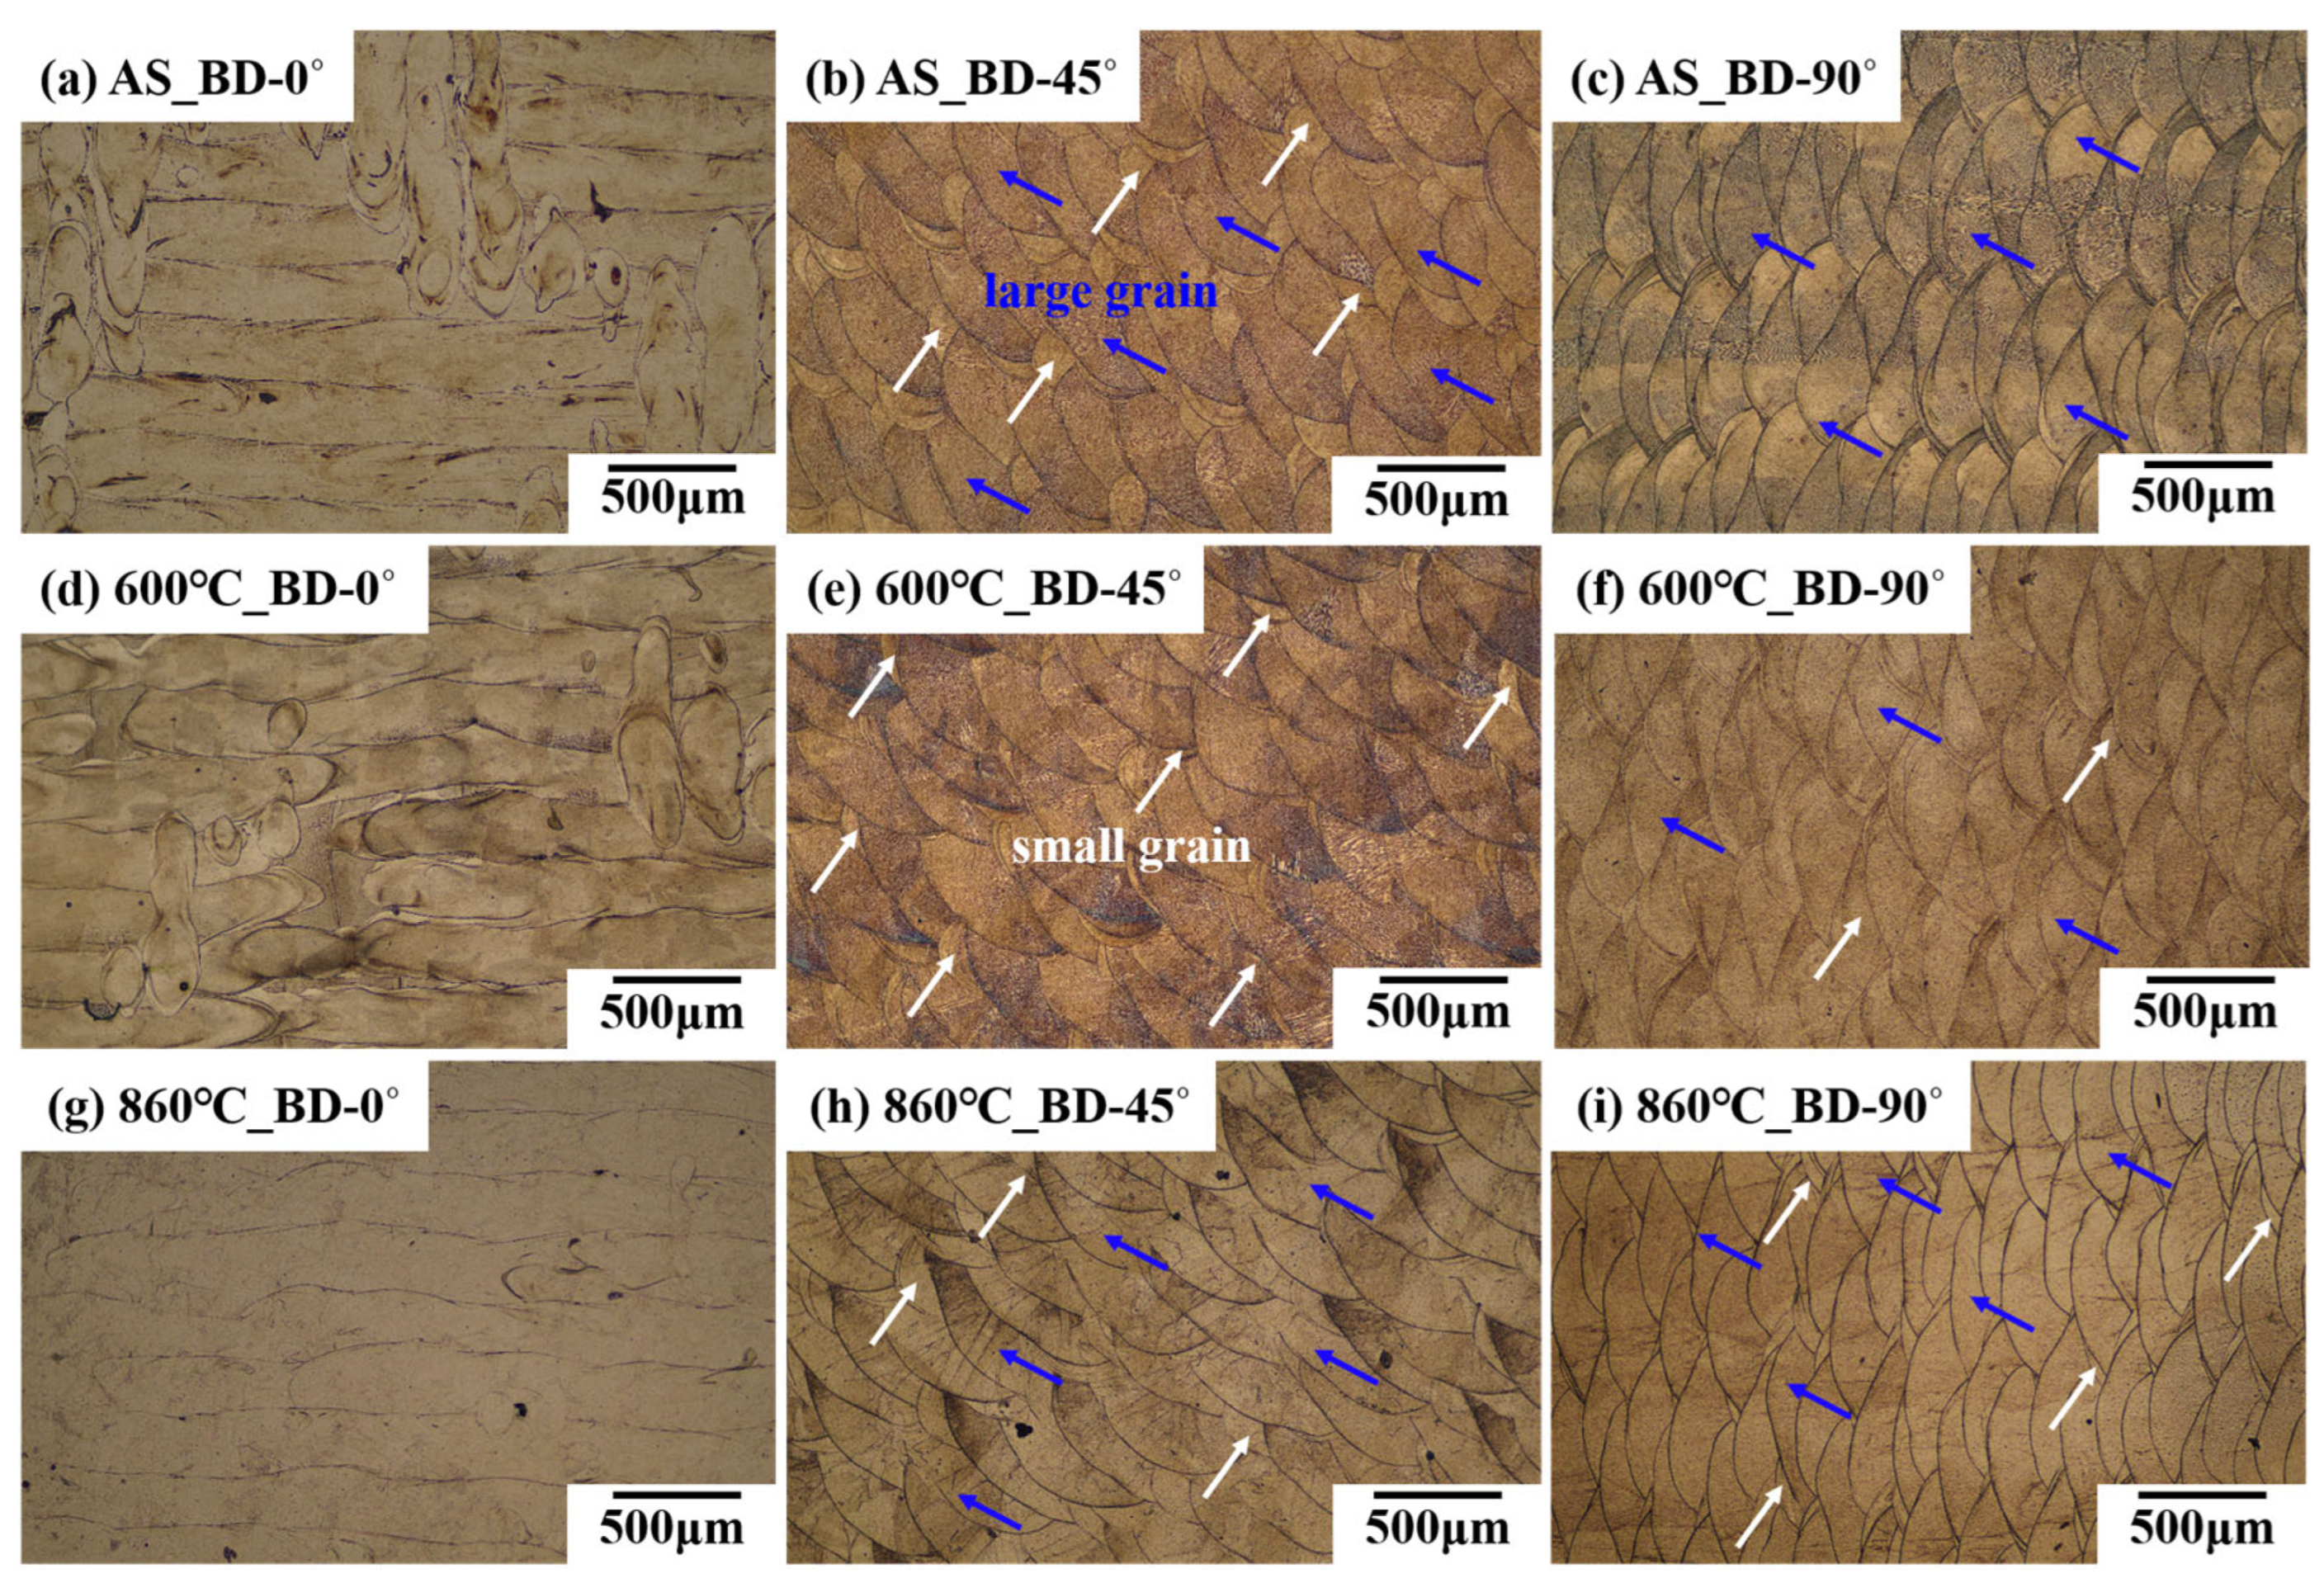
The microstructures of samples printed in the build directions of 0°, 45°, and 90° prior to heat treatment are shown in Figure 4 (Krakhmalev, Li et al. [25,26]). The microstructural morphologies presented in Figure 4 reflect the underlying solidification dynamics. A high thermal gradient-to-growth rate ratio (G/R) promotes the formation of columnar and cellular structures aligned with the build direction, whereas a lower G/R—typically observed near melt pool edges or following annealing—drives the columnar-to-equiaxed transition (CET). In LPBF 316L, the cellular structure begins to dissolve near ~800 °C and progressively transforms into equiaxed grains upon annealing at higher temperatures. Optical microscopy analysis clearly reveals the melt pool boundaries and scanning tracks, indicating that the previously solidified region is partially re-melted during subsequent layer deposition, resulting in improved consolidation and densification of the microstructure. Within the melt pools, several particles with similar contrast are observed, aligned along the direction of heat flow. The rapid cooling rate following laser melting and solidification, combined with the limited diffusion of alloying elements, leads to the formation of a characteristic microstructure featuring substructures (colonies) within the particles, which grow along the primary thermal gradient during laser scanning. Multiple grains are observed to form across adjacent melt pools, oriented along the main temperature gradient. Variations in sub-grain size at the microscopic level are also evident. The sample built in the 0° direction exhibited a columnar structure, with columnar grains approximately 0.2 mm in length and 300 μm in width. In the 45° and 90° build directions, the melt pool had a half-cylindrical shape, and its width was generally greater than its depth, indicating a conduction mode of melting. For both the 45° and 90° orientations, relatively uniform cooling rates promoted the formation of fine grains and cellular dendrites. However, in the 45° build direction, smaller melt pools were observed compared to the 90° direction, suggesting a faster cooling rate (indicated by the white arrows). In contrast, the 0° orientation, with its larger build area and longer build time, experienced slower cooling and formed coarser dendrites due to pronounced thermal gradients. The 90° orientation, having a narrower build area perpendicular to the build plate, resulted in localized heat accumulation and slower cooling, also leading to coarser grains and dendrites. These observations confirm that the variations in microstructure across the build directions are primarily attributed to differences in cooling rates during the process.
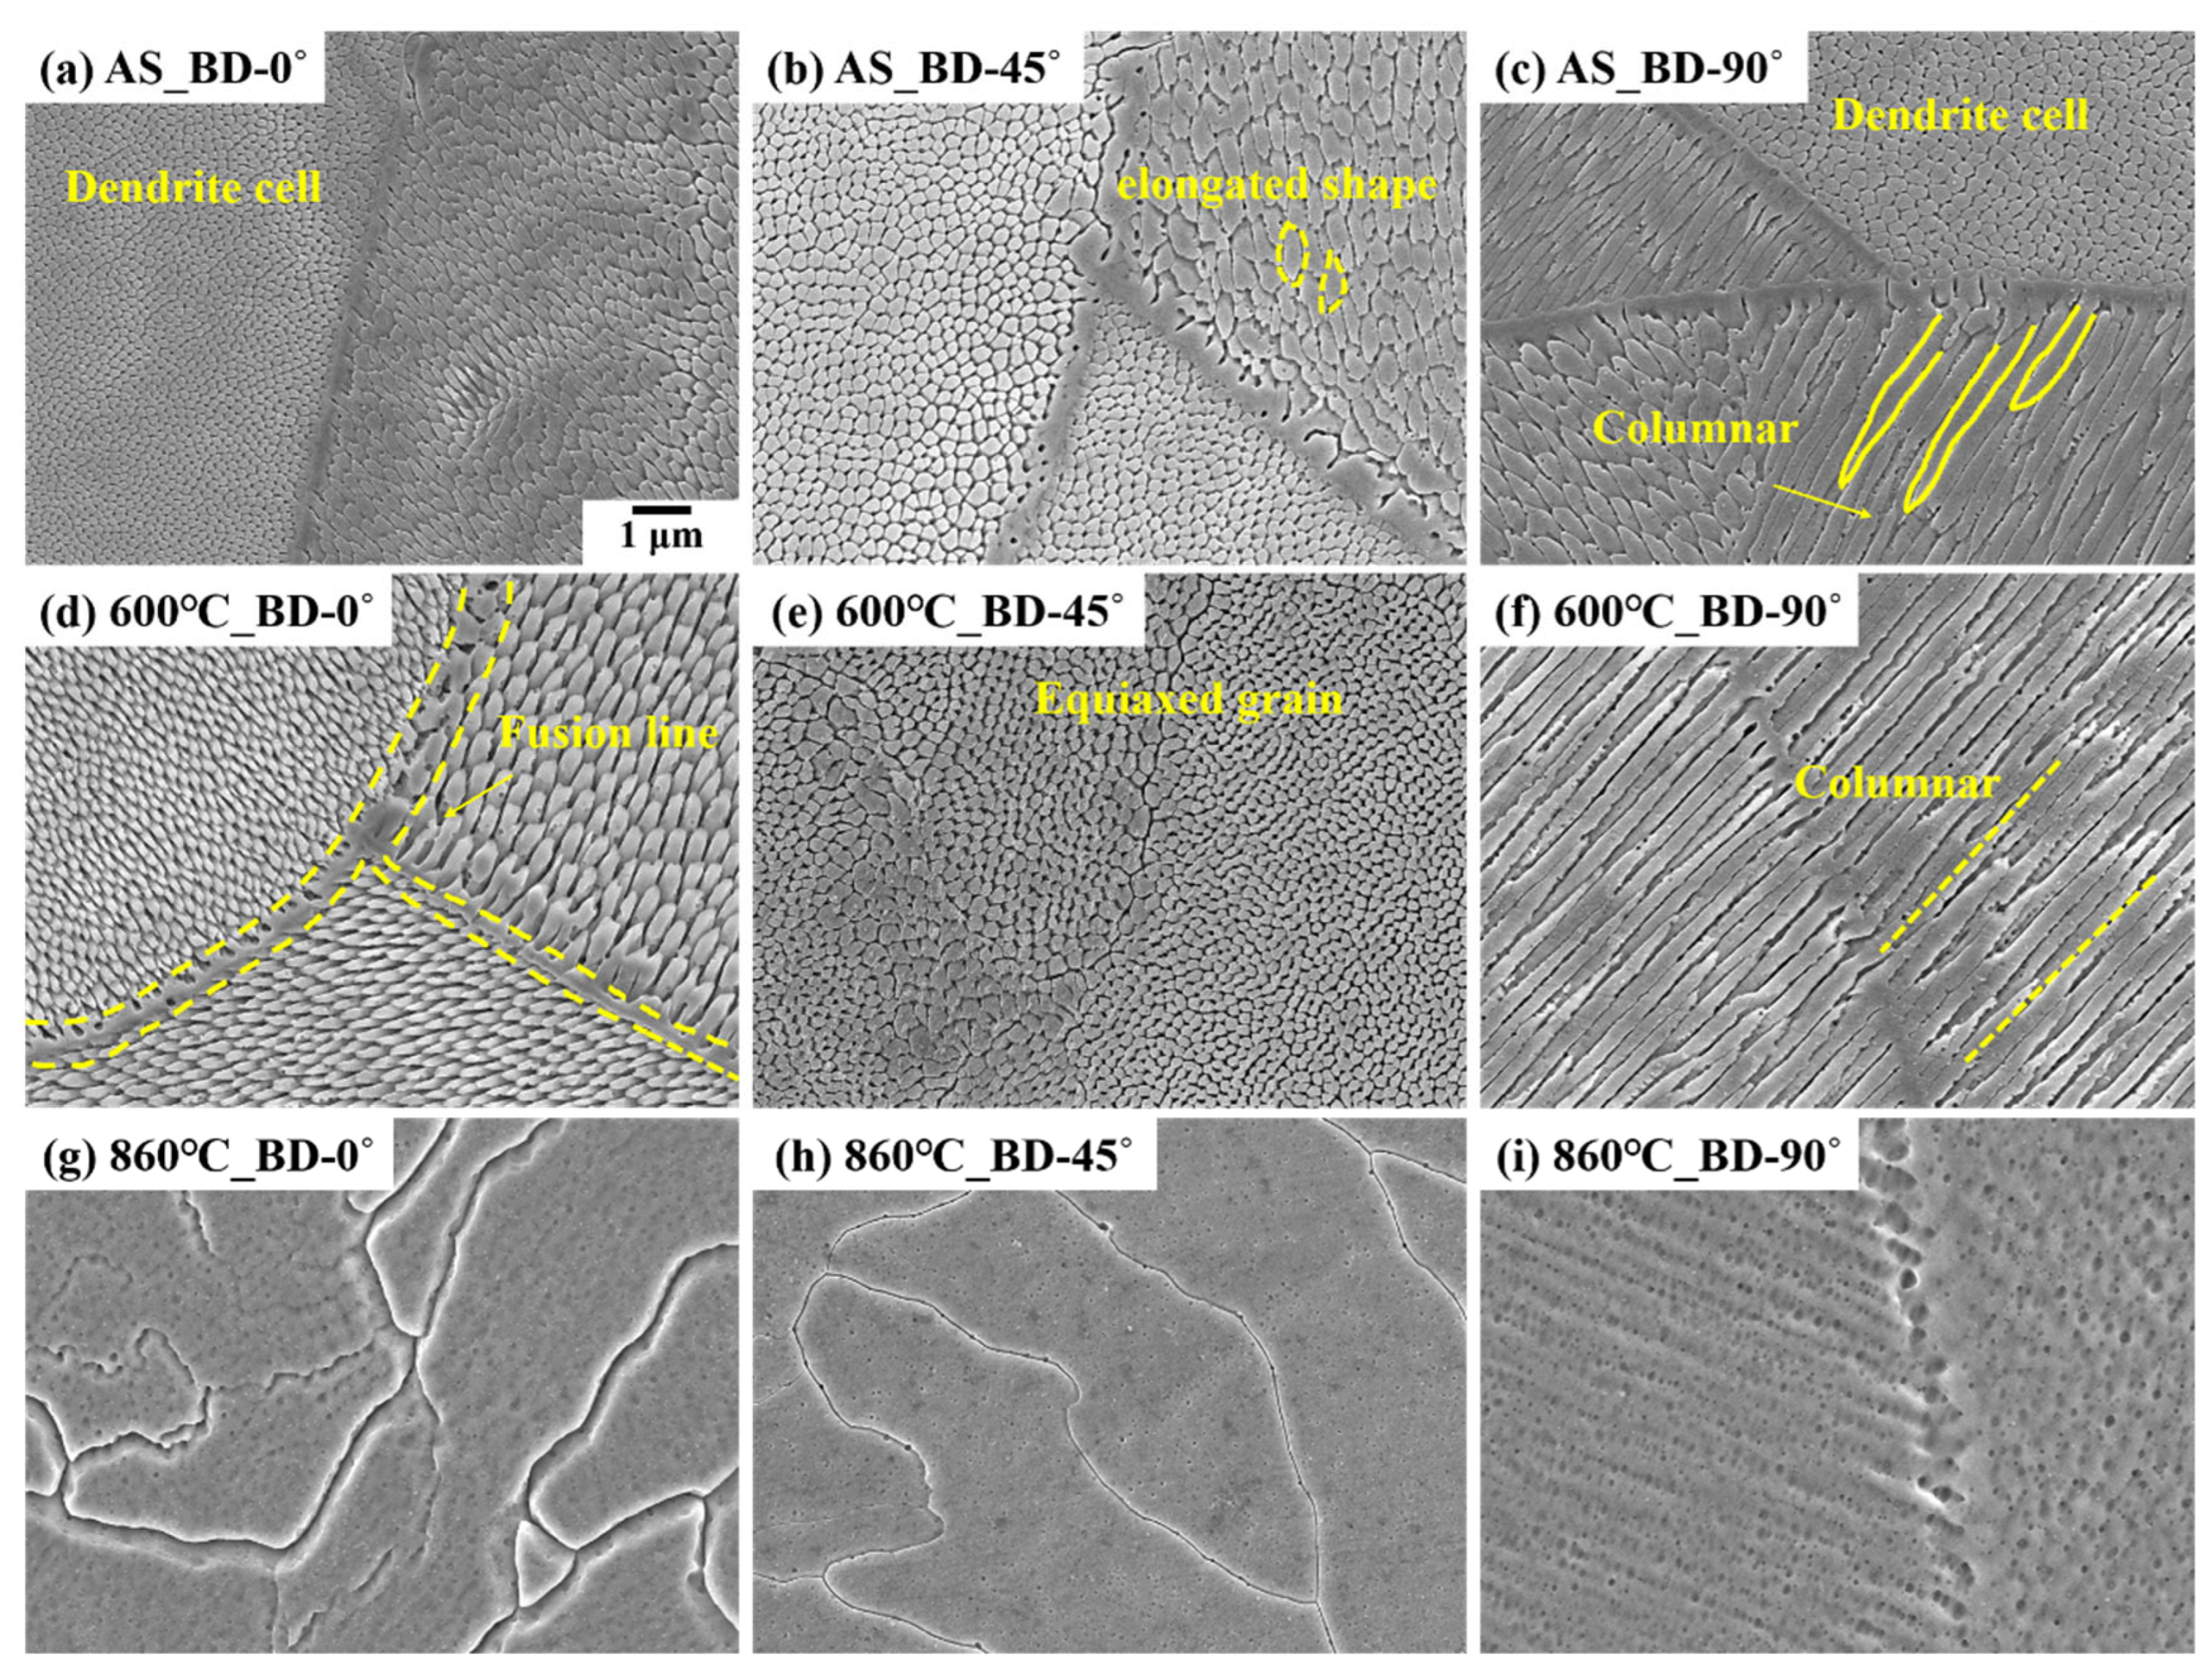
Figure 5 displays field-emission scanning electron microscope (FE-SEM, Quanta 200 FEG, FEI Company, Eindhoven, The Netherlands) observations of microstructure changes as a function of build orientation and heat-treatment conditions. The cellular microstructure exhibited cell sizes ranging from approximately 0.3 to 1.5 μm, depending on the build direction. High-magnification SEM images revealed a fine needle-like substructure colony with varying growth orientations. Such a cellular microstructure forms under a rapid cooling rate and generally develops along a consistent crystallographic direction. In the as-built state, the morphology and size of the dendritic sub-cells varied with build orientation: at 0°, the average size was approximately 1 μm, with a near-spherical shape; at 45°, the cells were smaller (0.3–0.5 μm) and predominantly spherical; and at 90°, the cells were elongated, with lengths of 1–2 μm. These variations are primarily attributed to the rapid cooling rate and non-equilibrium thermal conditions during selective laser melting (SLM) [27]. Upon heat treatment at 600 °C, minimal changes were observed in the cell structure at 0°, whereas at 45°, the cell size was slightly refined, and at 90°, the elongated cells transformed into spherical shapes. At 860 °C, the melt pool boundaries at 0° and 90° were nearly dissolved, with only isolated particles remaining, while partial substructure retention was observed at 45°. These results suggest that the SLM-produced microstructure is thermally unstable and tends to decompose during high-temperature annealing.
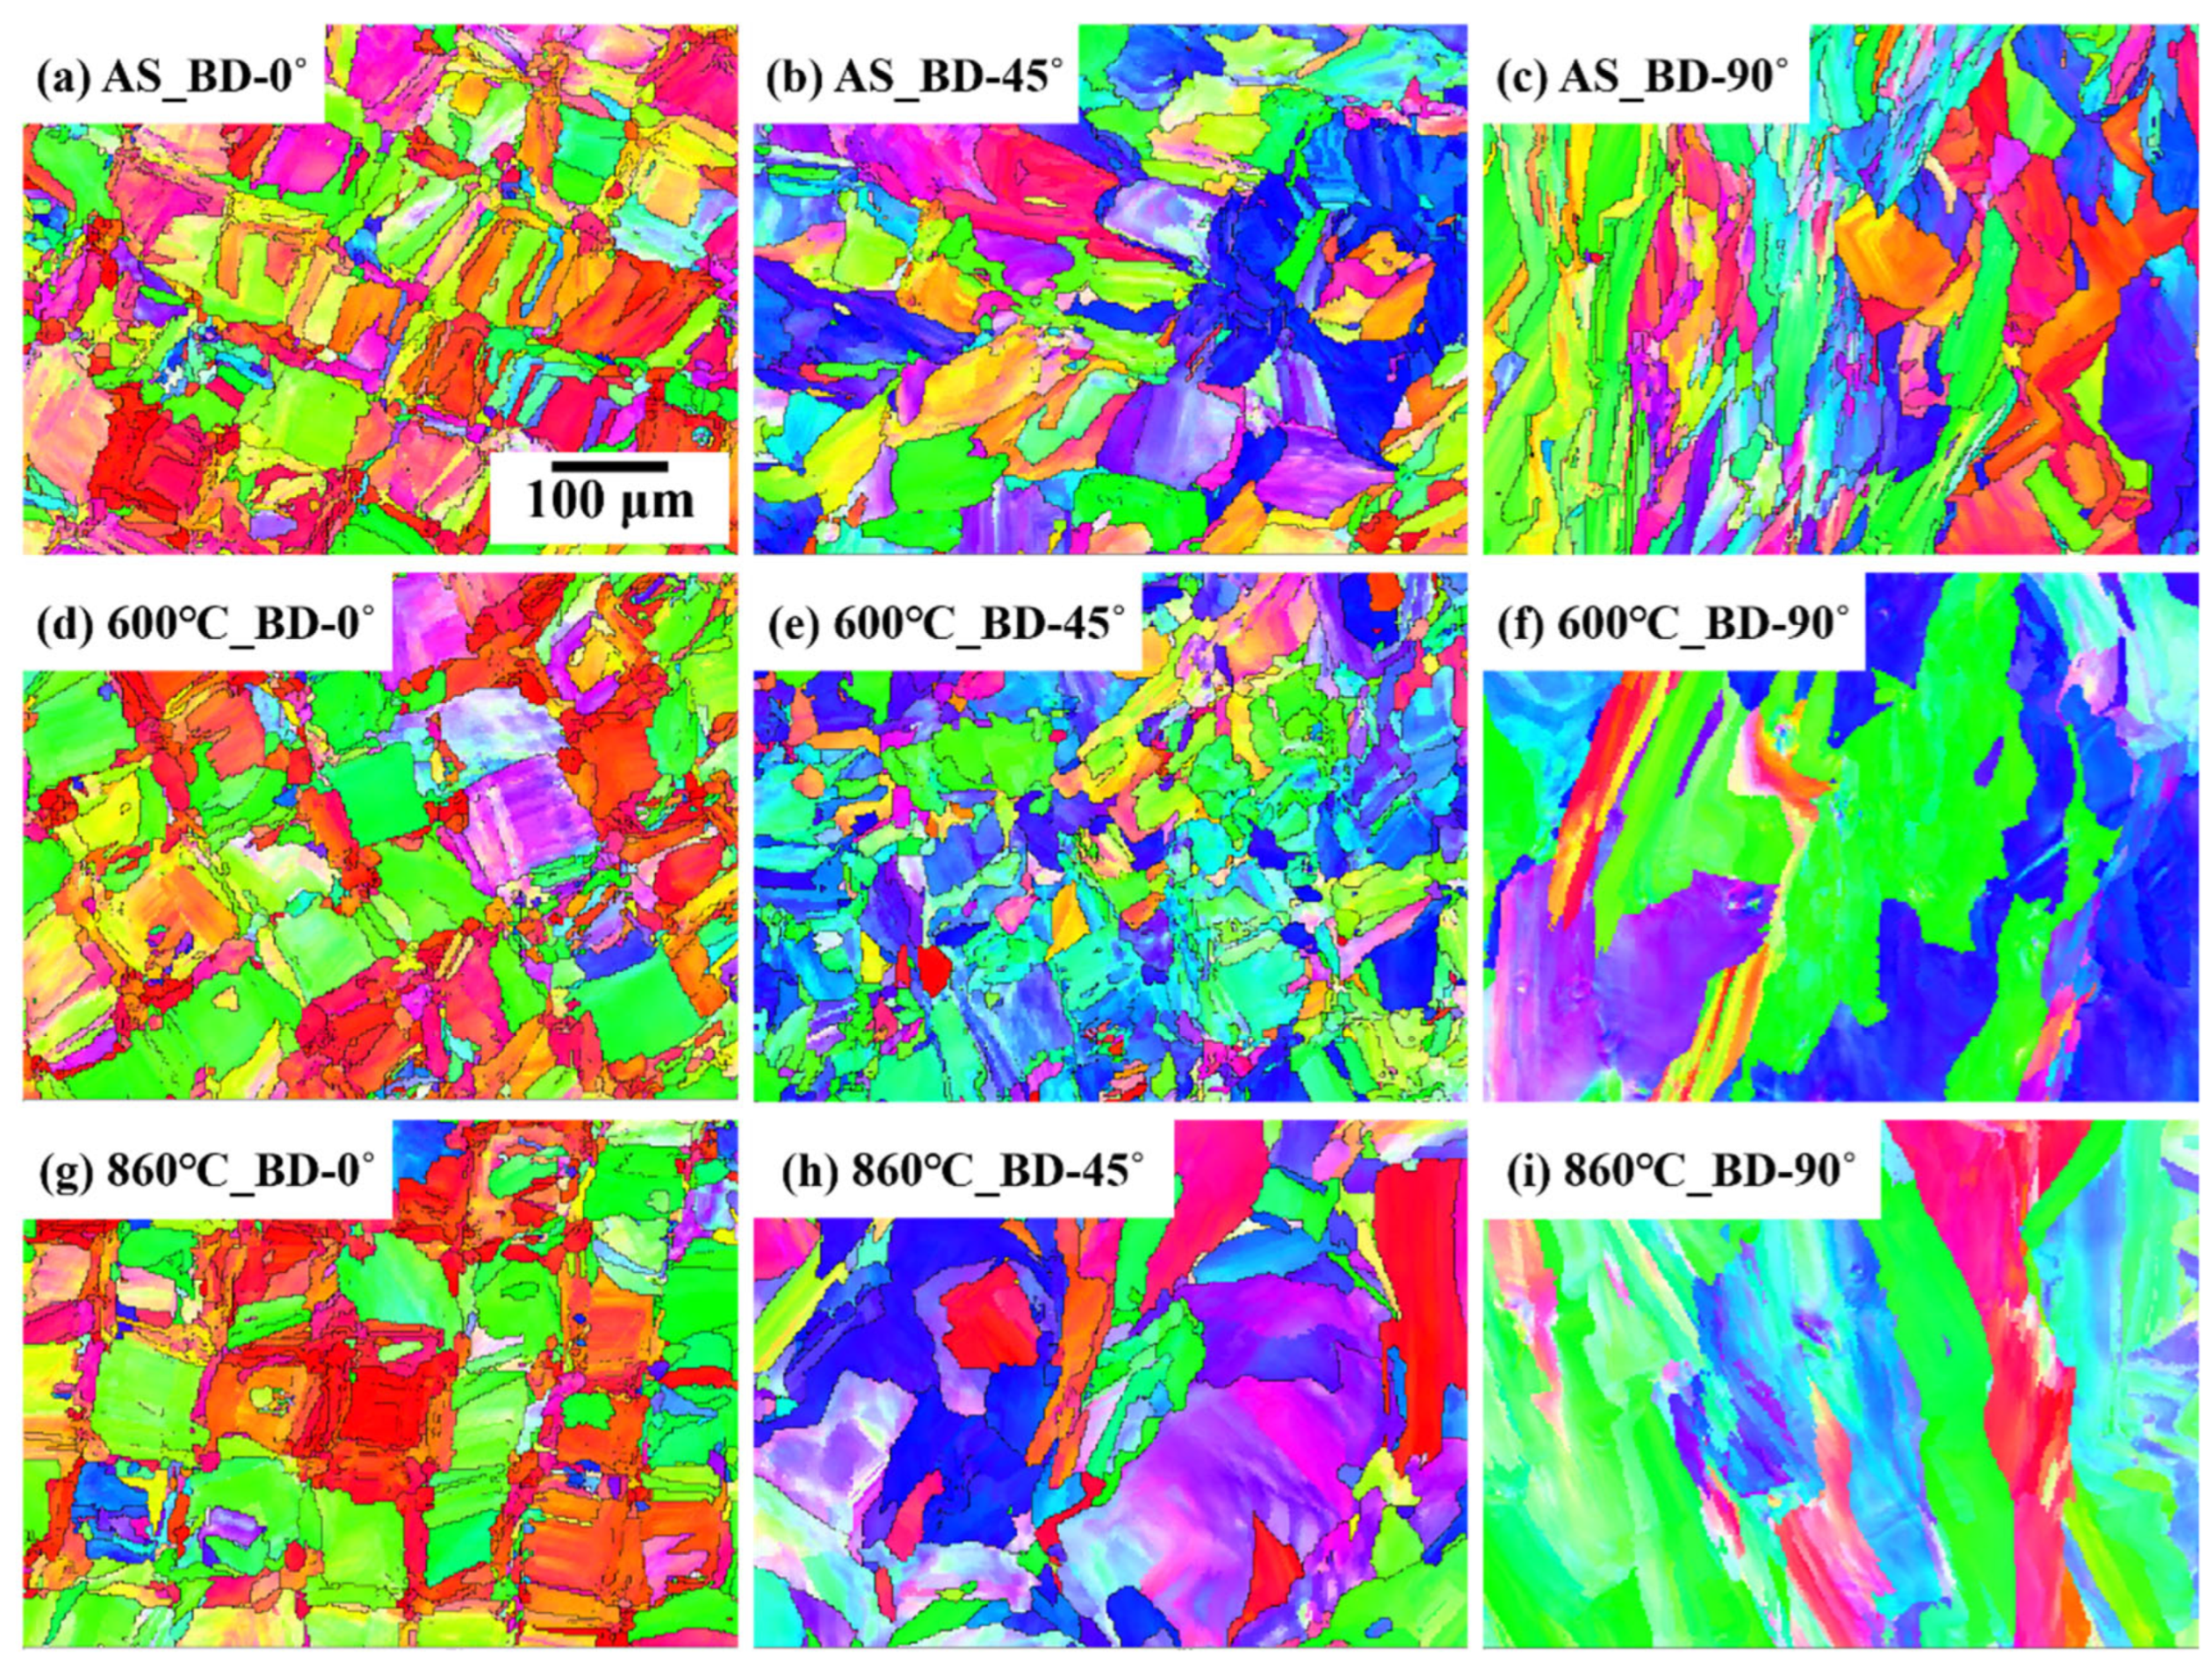
In Figure 6, the inverse pole figure (IPF) reveals that the STS 316L samples fabricated by SLM exhibit distinct particle shapes and sizes depending on the build direction. For the 0° specimen, the microstructure consists of large, circular particles aligned along the melt track, with smaller particles distributed between the larger ones in a perpendicular direction. These smaller particles form because the relatively lower temperature at the melt pool boundary promotes nucleation, followed by grain growth toward the center of the melt pool along the temperature gradient. In the 45° specimen, the laser scanning direction deviates from the melt track orientation, resulting in a mixture of particle shapes characteristic of both 0° and 90°. This occurs because the melt track orientations of adjacent layers differ, disrupting the continuous growth of grains. Consequently, the number of elongated particles is reduced, and the overall grain morphology becomes more complex compared to the 0° specimen. In contrast, the 90° specimen exhibits very thin and elongated columnar grains aligned with the build direction. Some columnar grains, exceeding 500 μm in length, grow across multiple melt tracks due to thermal flow and the consistent laser scanning direction parallel to the build direction. Smaller equiaxed grains are present near the center of the melt track as a result of final solidification. Since the boundary of the melt pool experiences lower temperatures compared to its center, nucleation initiates at the boundary, and grains subsequently grow inward, leading to the pronounced elongation of columnar grains perpendicular to the melt track boundary [27,28].
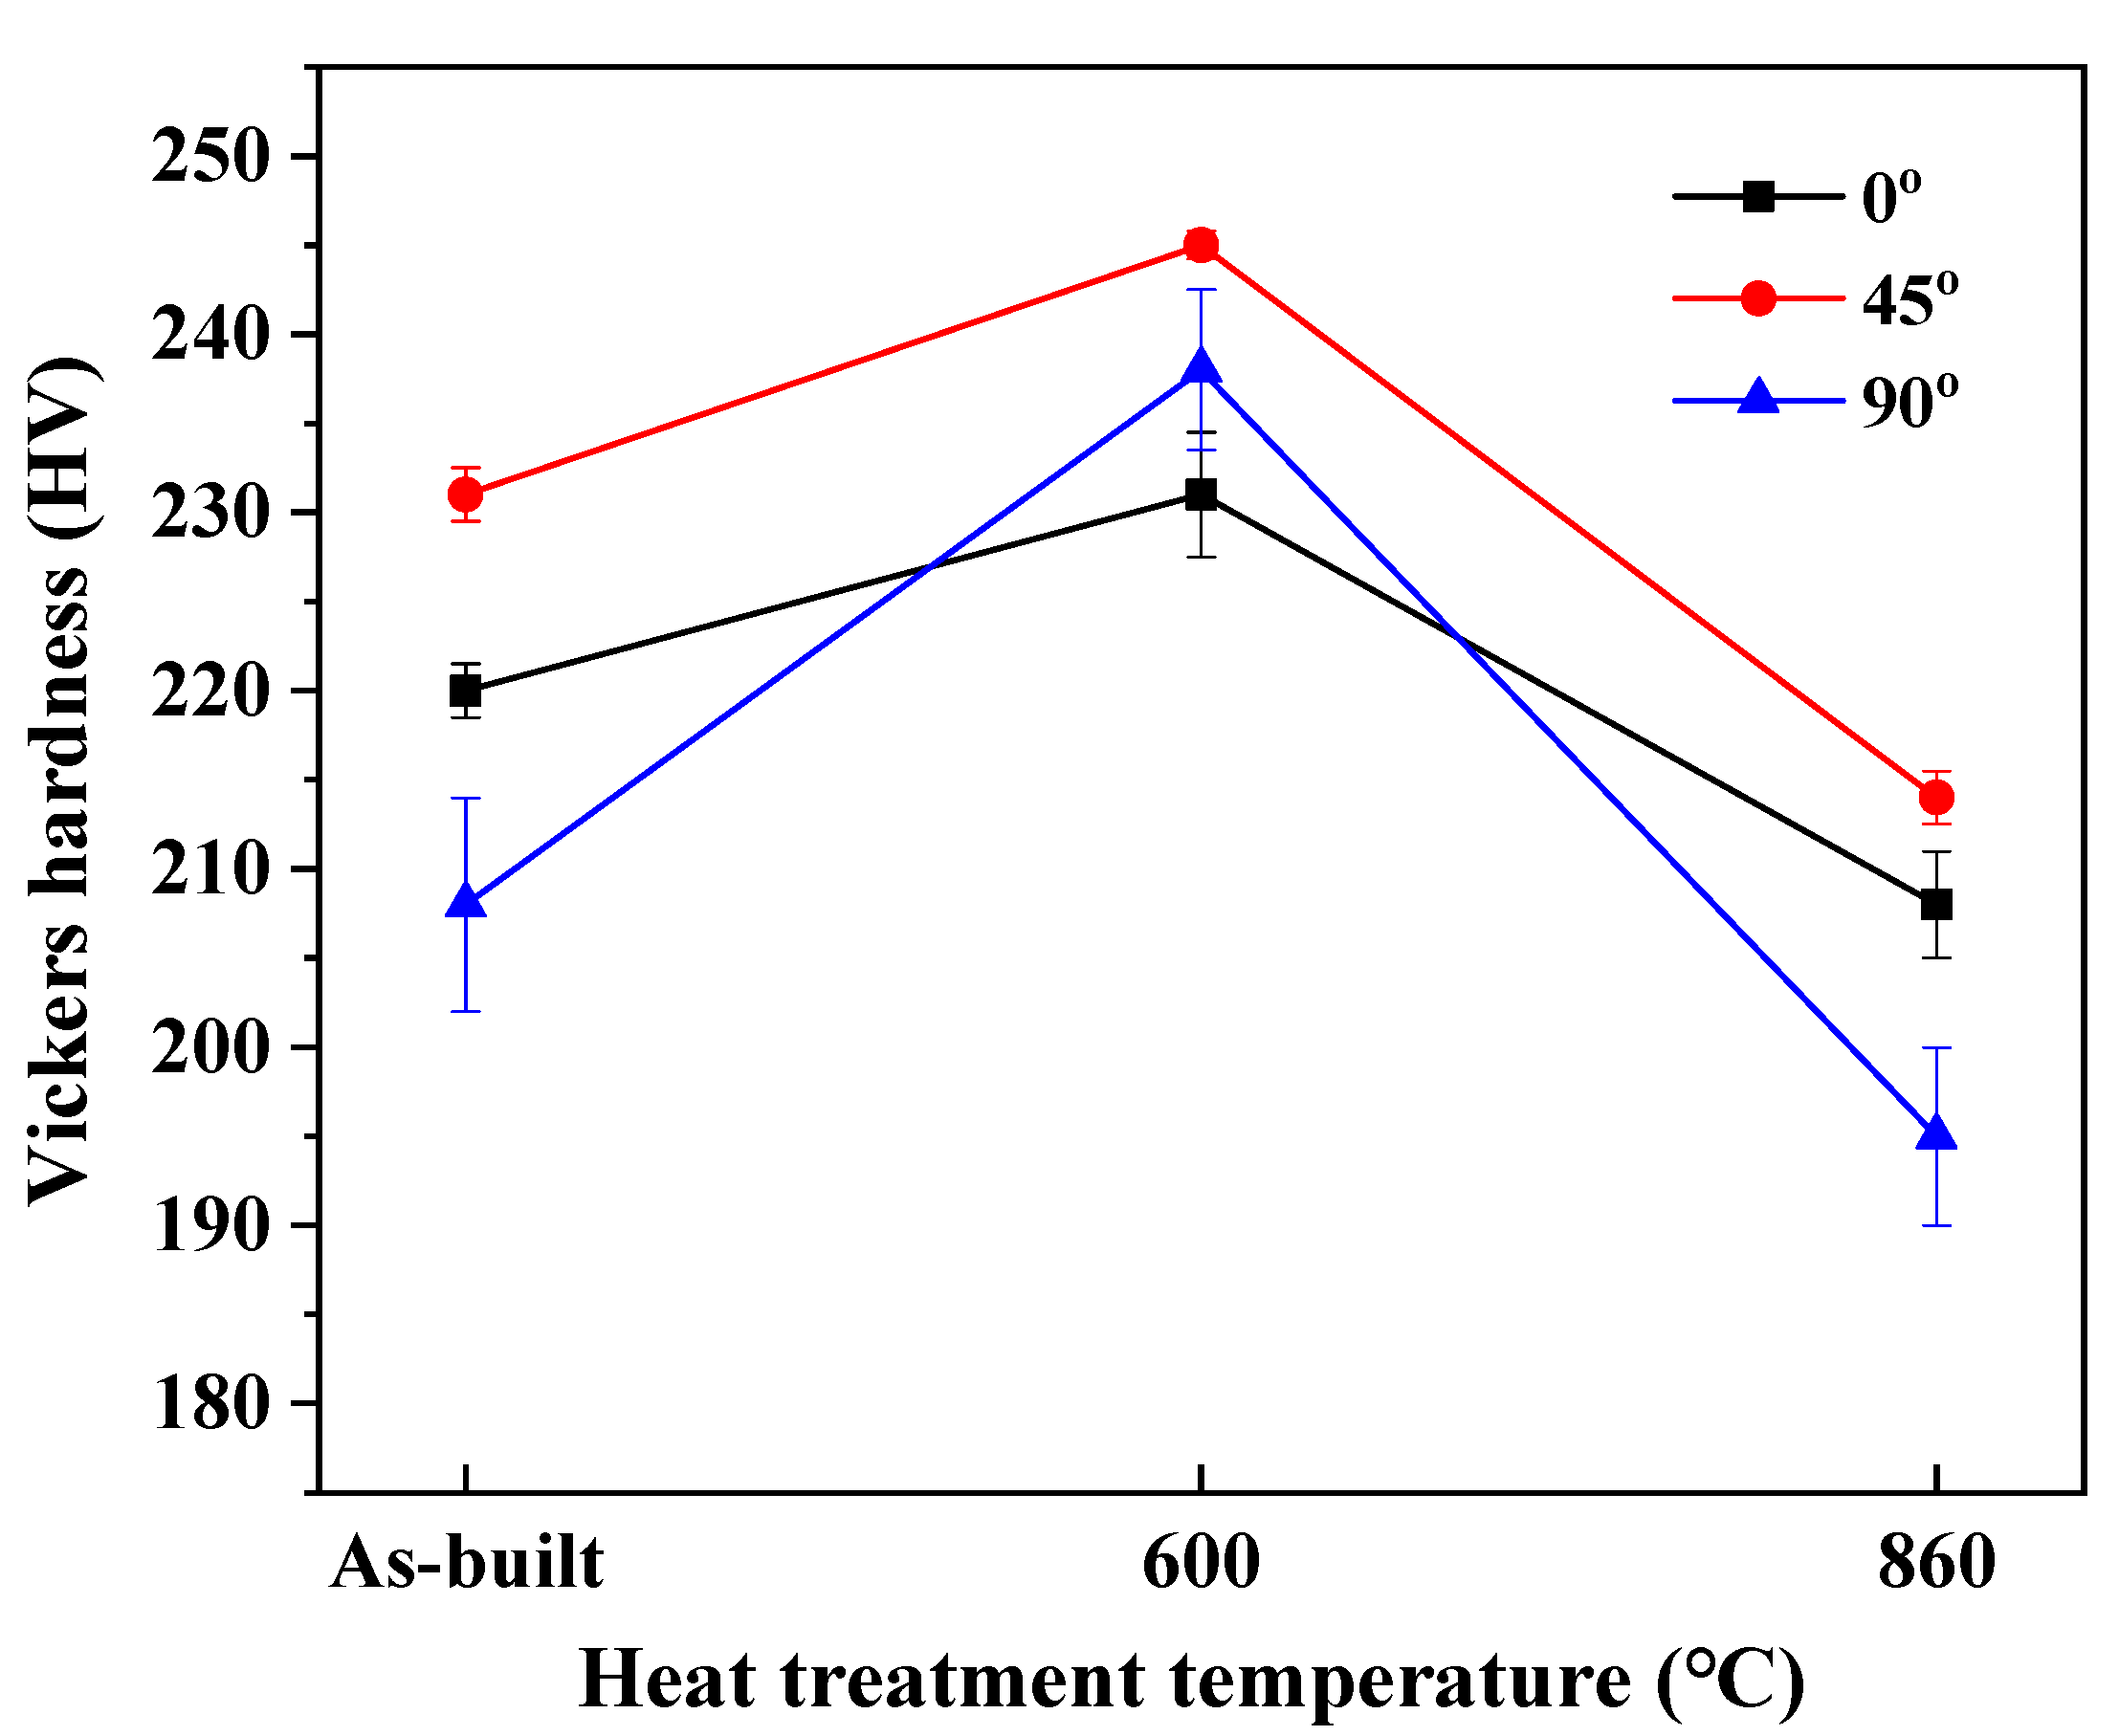
The Vickers hardness measurements according to build direction and heat-treatment conditions are presented in Figure 7. For the as-built specimens, hardness values are 220 HV at 0°, 231 HV at 45°, and 208 HV at 90°, indicating that the specimen built at 45° exhibits the highest hardness. The average hardness was approximately 220 ± 10 HV across all build orientations, confirming the orientation-independent behavior of SLM 316L [29,30]. As the build angle increases from 0° to 45°, the oblique orientation affects the melting and bonding behavior of the metal powders, causing crystallization at the interlayer interfaces, which results in a reduction in hardness. Furthermore, with increasing build angle up to 45° and the corresponding increase in the number of deposited layers, residual stresses tend to accumulate. These residual stresses promote grain boundary migration and distortion, leading to grain refinement and an increased density of grain boundaries, thereby enhancing the material’s hardness [27]. For the specimens heat-treated at 600 °C, the hardness values were measured as 231 HV for the 0° specimen, 245 HV for the 45° specimen, and 238 HV for the 90° specimen, with the 45° specimen exhibiting the highest hardness. This superior hardness is attributed to the finer microstructure developed at this build orientation. At a build angle of 45°, heat treatment at 600 °C leads to partial stabilization of the sub-cellular microstructure, which is not fully eliminated. This retained substructure contributes to additional strengthening, resulting in an overall increase in hardness under all conditions [21]. In contrast, specimens heat-treated at 860 °C showed a decrease in hardness, which is believed to result from the decomposition and coarsening of the cellular microstructure during annealing. Notably, when the build direction is 0°, the melt pool morphology remains distinctly visible up to 600 °C, whereas at 860 °C, the melt pool features disappear due to recovery and stabilization of the cellular microstructure and microstructural homogenization. The Vickers hardness values measured after heat treatment at 860 °C were 208 ± 20 HV for 0°, 214 ± 20 HV for 45°, and 195 ± 20 HV for 90°, all of which are lower than the maximum hardness observed at 600 °C (245 ± 20 HV). This reduction in hardness is attributed to the diminished strengthening effect of the sub-cellular boundaries due to partial recrystallization and thermal coarsening of precipitates. These findings align with prior studies that report softening behavior in SLM 316L subjected to annealing at 850–900 °C [18]. With increasing heat-treatment temperature, the dissolution of melt pool boundaries and dendritic structures becomes evident, maximum hardness observed in specimens built at a 45° orientation and heat-treated at 600 °C. The enhanced hardness at this temperature is ascribed to the presence of fine dendritic structures, which contribute to increased brittleness. Furthermore, residual stresses inherent in the as-built specimens can significantly influence hardness values. Heat treatment facilitates the relaxation of these residual stresses, which can also affect the measured hardness. Supporting this, Sprengel et al. [20] reported a reduction in residual stress levels following heat treatment. These results indicate that the decrease in hardness at elevated heat-treatment temperatures can be attributed to both microstructural evolution and the alleviation of residual stresses [31,32].
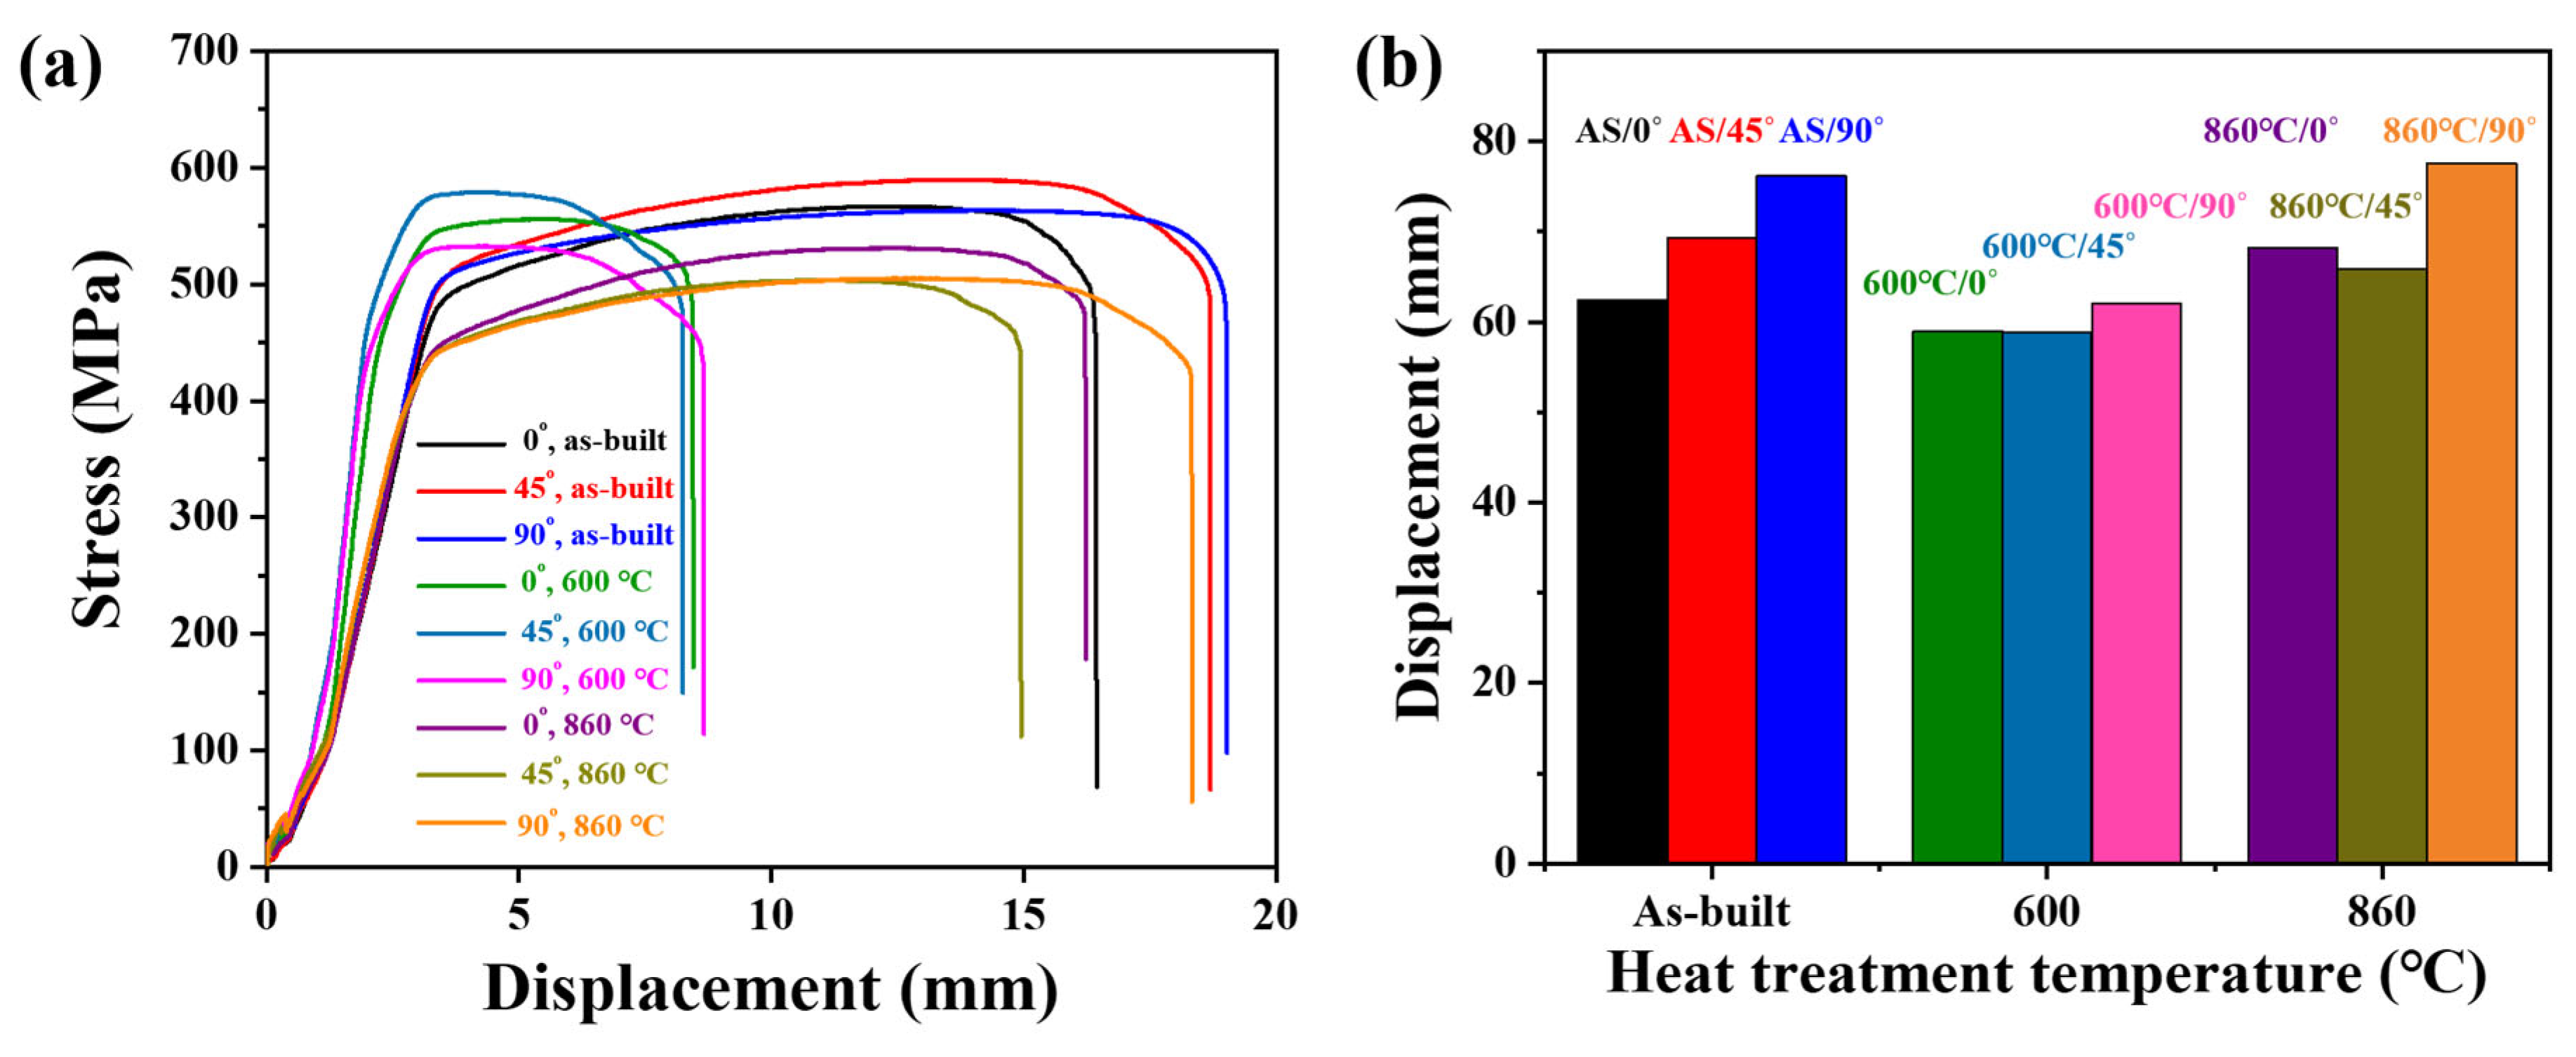
Figure 8 and Figure 9 show the tensile stress–strain curves and elongation rates as a function of build direction. Ultimate tensile strength, yield strength, elongation, and average grain count from the EBSD analysis are summarized in Table 2. For the as-built specimens, the 0° sample exhibits a tensile strength of 567 MPa, with an elongation of 62.4%. The 45° specimen shows a tensile strength of 590 MPa and an elongation of 69.2%. Among the as-built specimens, the 90° sample demonstrates the highest elongation of 76.12%, accompanied by a tensile strength of 563 MPa. After heat treatment at 600 °C, the 0° specimen shows a reduced elongation of 58.96% and a tensile strength of 556 MPa. Similarly, the 45° specimen exhibits a low elongation of 58.8%, comparable to the 0° sample, but with a slightly higher tensile strength of 579 MPa. The 90° specimen shows the highest elongation among the 600 °C heat-treated specimens at 62.04%, yet its tensile strength decreases to 533 MPa. This reduction in mechanical performance is attributed to microstructural changes caused by recrystallization and grain refinement at 600 °C, which induce anisotropy and promote premature fracture. At 860 °C heat treatment, the 0° specimen has a tensile strength of 532 MPa and an elongation of 68.24%. The 45° specimen exhibits a tensile strength of 504 MPa and an elongation of 65.88%. The 90° specimen shows a relatively lower tensile strength of 534 MPa but the highest elongation of 77.52%. The microstructure of the 0° specimen is characterized by spherical grains with vertical orientations, resulting in moderate elongation values across build directions. The 45° specimen’s anisotropic microstructure leads to stress concentration depending on build orientation, thereby reducing ductility and causing lower elongation. In contrast, the 90° specimen displays a cellular microstructure, which correlates with its superior tensile elongation.
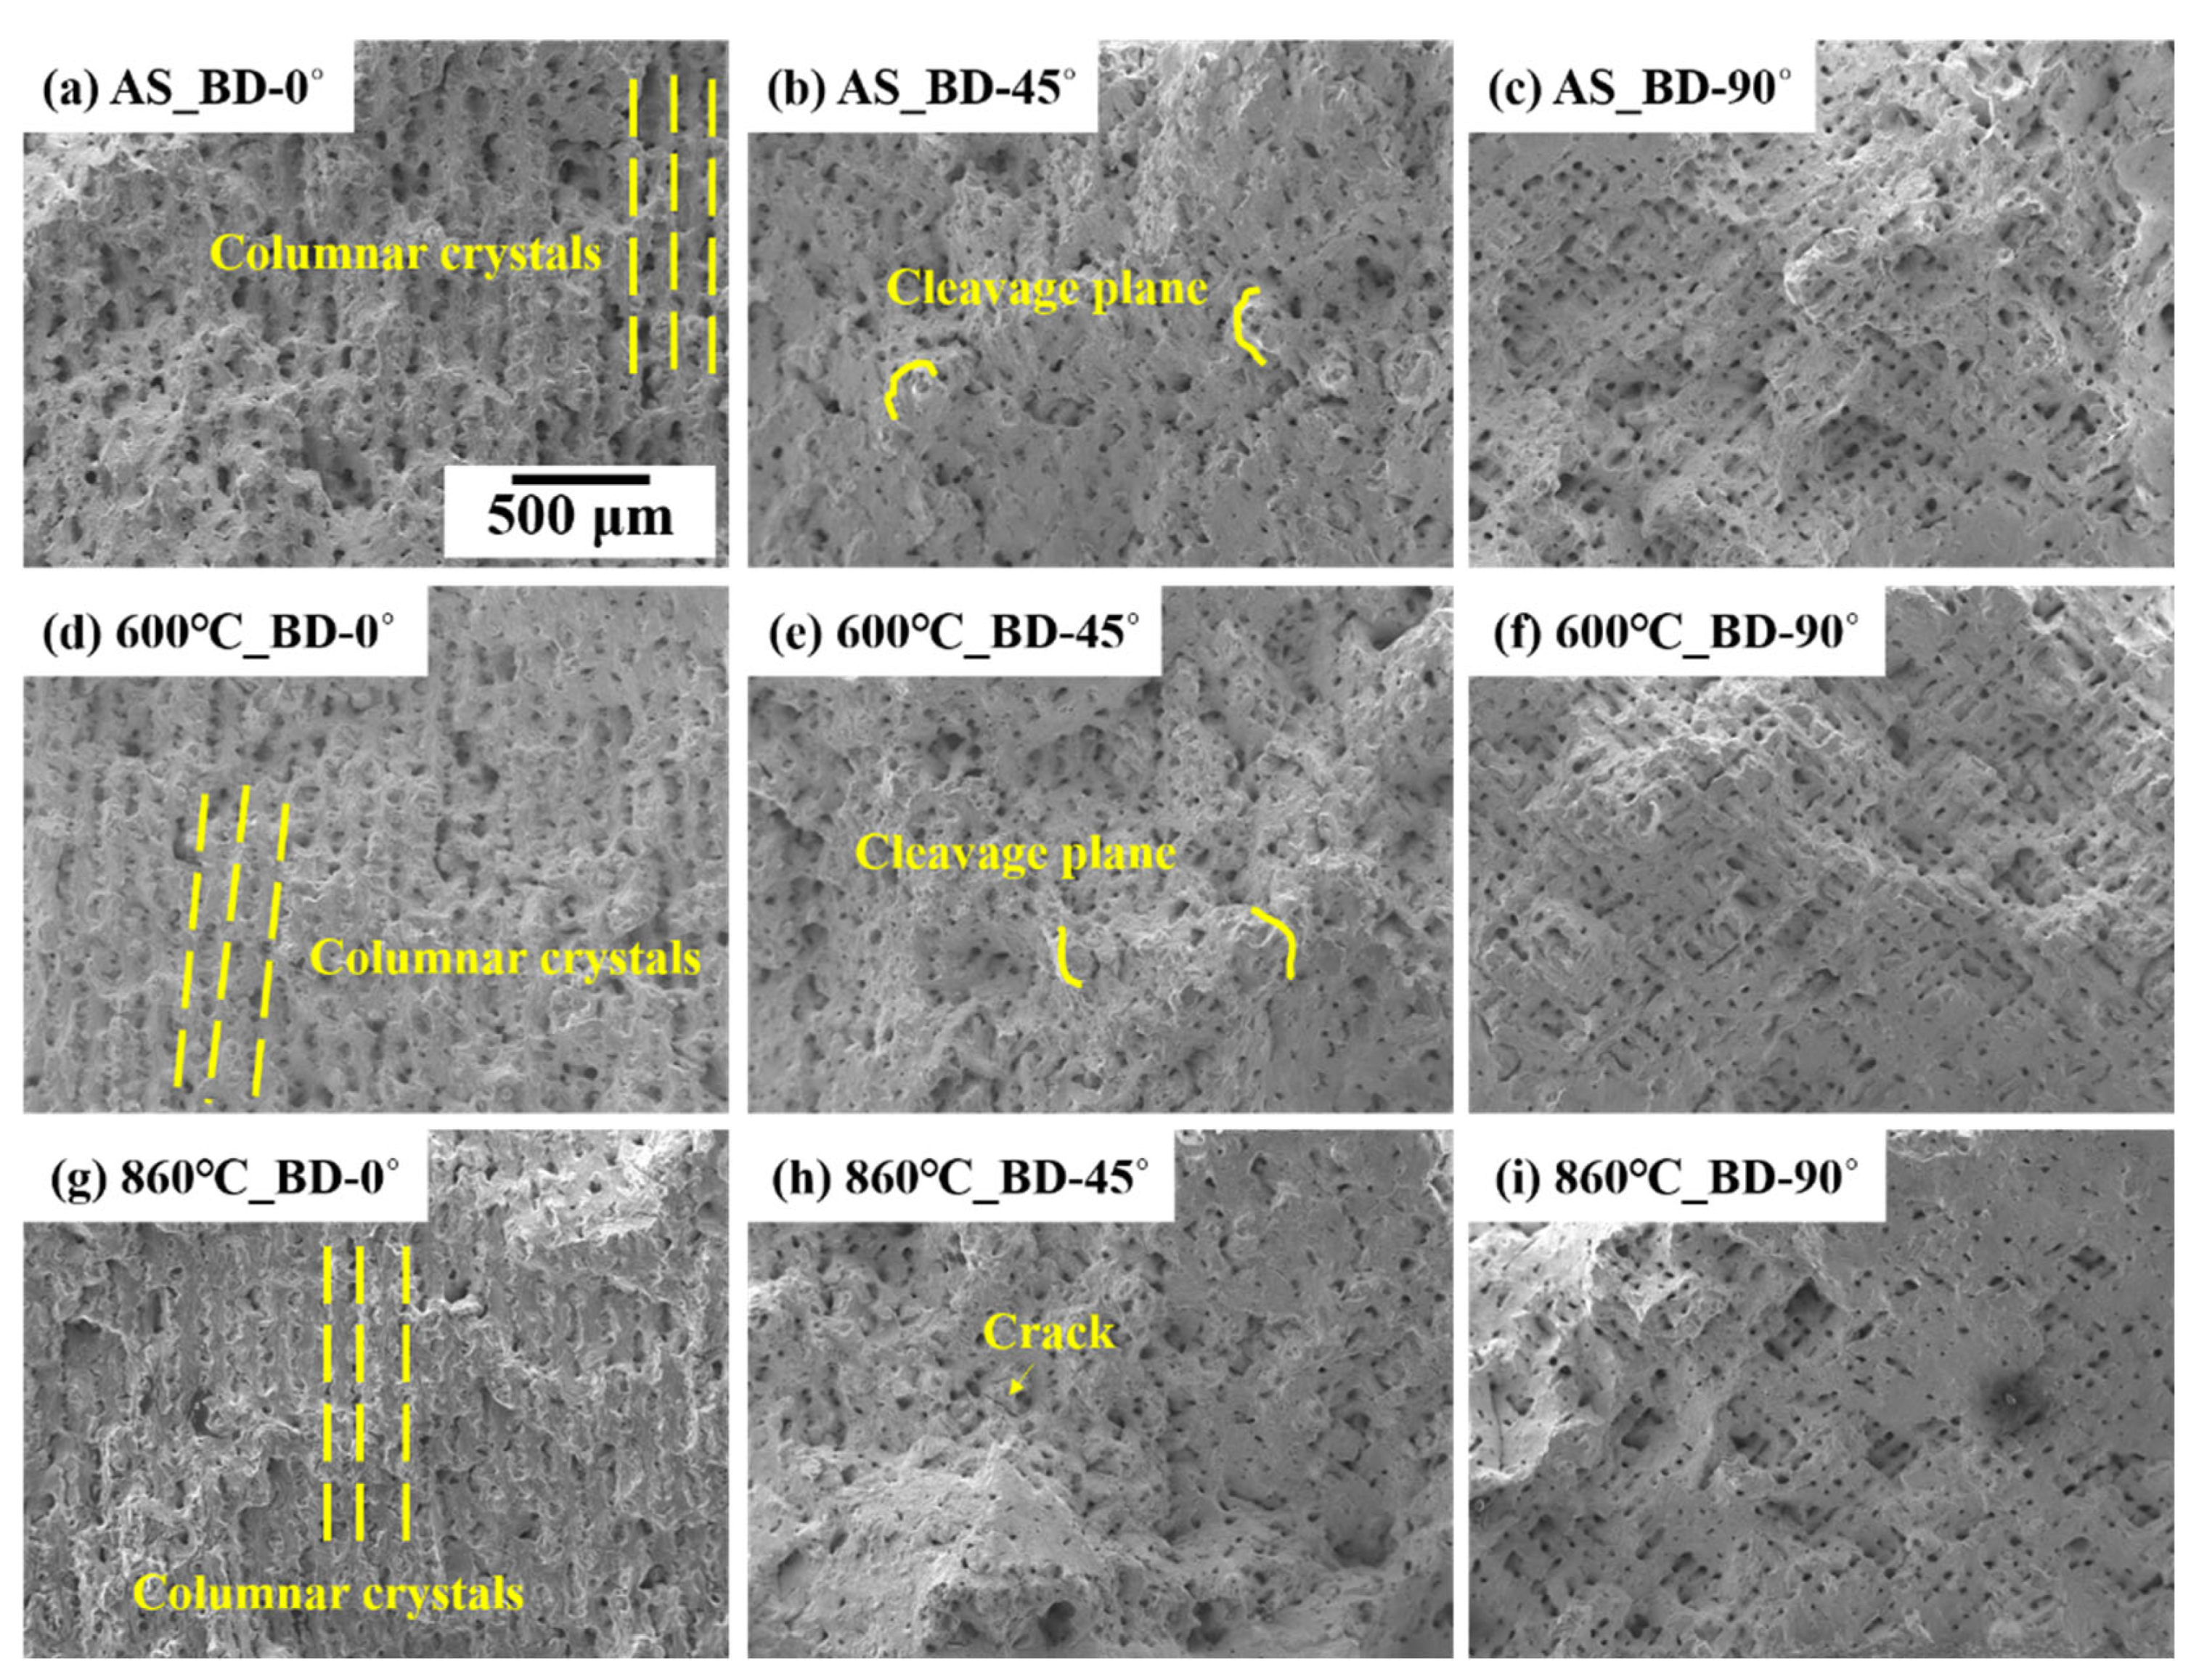
The tensile fracture surfaces according to build direction and heat-treatment conditions are presented in Figure 9. It is well established that crack initiation and propagation in materials are strongly influenced by microstructural features, including grain morphology, particle and phase distribution, and mechanical properties such as strength. In additive manufacturing (AM), internal defects, such as porosity defects, further affect fracture behavior. For the specimen built at 0°, the fracture surface reveals columnar grains with predominant intergranular fracture along grain boundaries. The higher ductility observed in the 0° orientation is attributed to the alignment of the cellular/columnar microstructure with the loading direction, which delays crack propagation [33,34]. In specimens built at a 45° orientation and heat-treated at 600 °C, both hardness and relatively high elongation were observed. This is attributed to the stabilization of sub-cell boundaries acting as a strengthening mechanism prior to complete recrystallization [23]. In contrast, the specimen built at 90° displays a ductile fracture characterized by numerous fine dimples. These dimples increase the effective fracture surface area, allowing for greater energy absorption during deformation, thereby delaying crack propagation and enhancing ductility, resulting in the highest elongation among the tested orientations. Crack propagation is governed by the microstructure and loading conditions, and the resulting mechanical properties provide indirect evidence of crack behavior [35,36,37]. The as-built tensile fracture surface exhibits unmelted powder particles trapped between melt pools, indicative of insufficient laser energy input causing lack of fusion defects. These unmelted powders act as stress concentrators, facilitating crack initiation and reducing mechanical performance. Regarding heat-treatment effects, the specimen treated at 600 °C shows reduced elongation compared to other conditions, attributable to increased hardness and decreased ductility associated with cellular structure refinement. Conversely, heat treatment at 860 °C leads to coarsening and partial melting of the cellular structures within the melt pools, which correlates with improved ductility and the highest elongation observed, likely due to stress relaxation and microstructural homogenization. The 90° specimens exhibit a characteristic columnar morphology on the tensile fracture surface, corresponding to the alignment of cellular substructures along the build direction. However, the cellular structure is not directly observable in Figure 9. This finding is in agreement with previous studies reporting that SLM 316L forms ultra-fine cellular substructures (<1 µm) aligned along the thermal gradient, which manifest macroscopically as columnar microstructures [18,38].
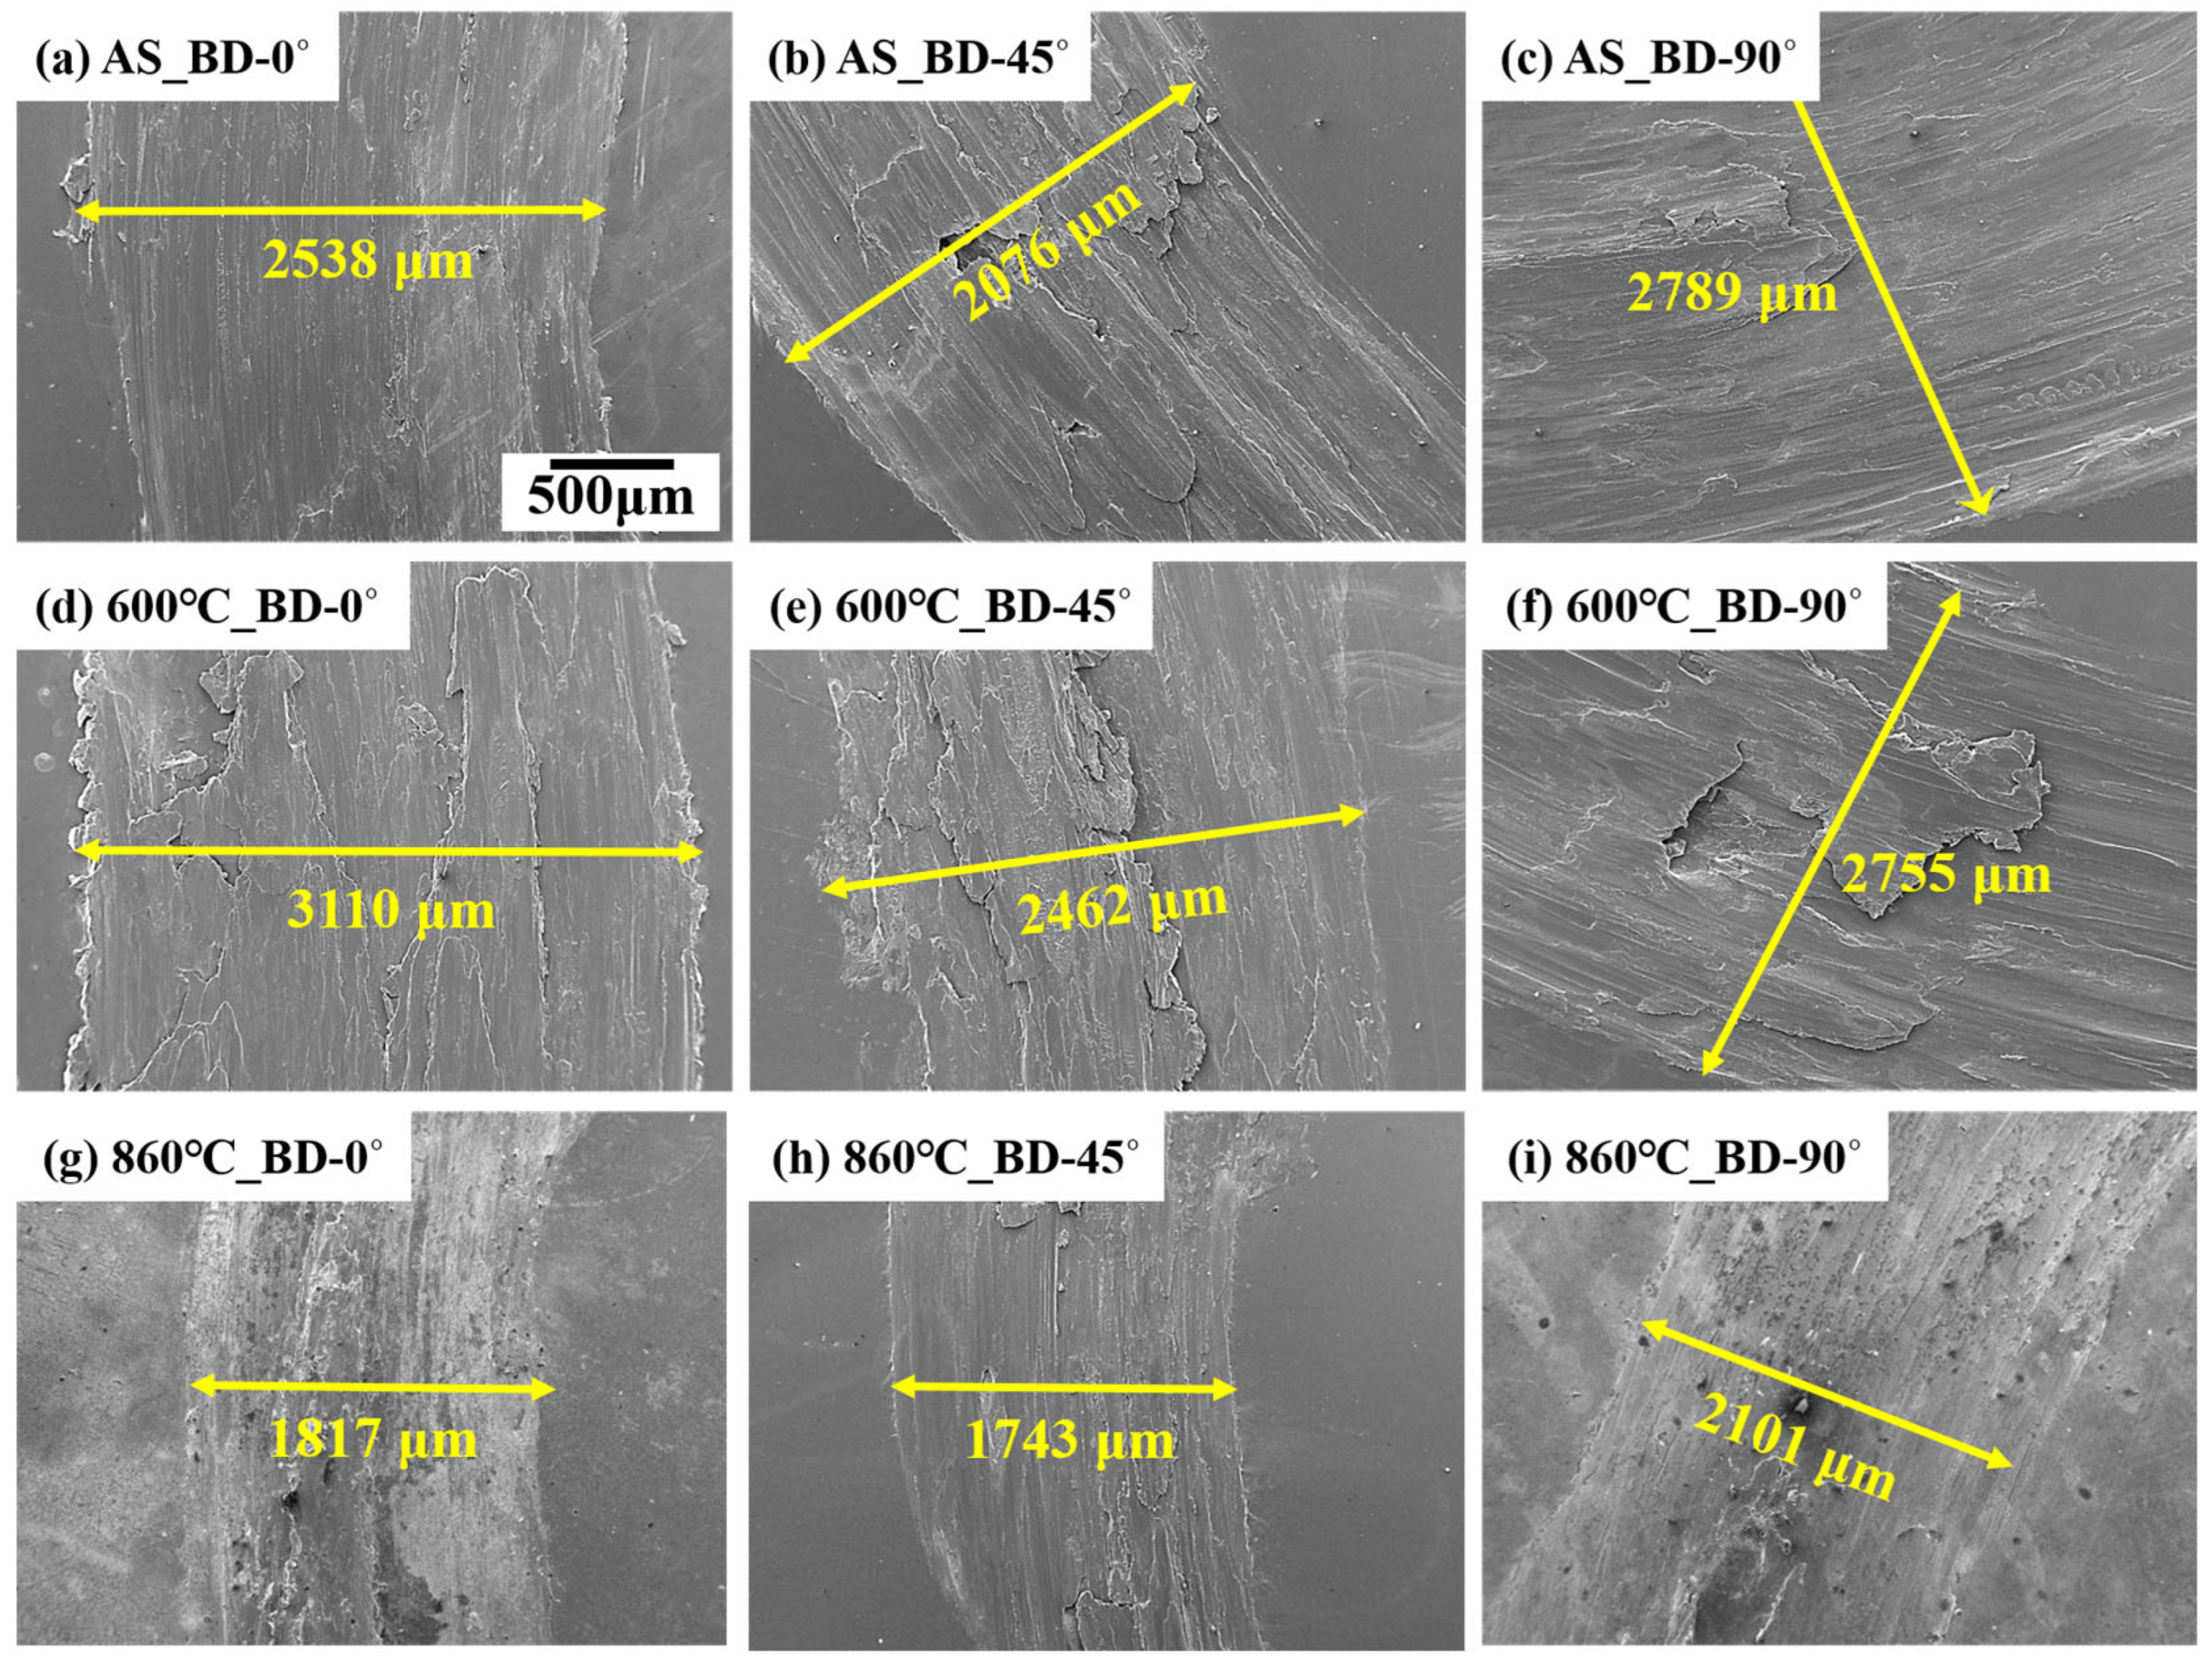
Figure 10 shows SEM images of the wear track widths after the wear tests. Wear debris was observed around the wear tracks of all specimens, indicating the occurrence of both adhesive and abrasive wear during the wear test. The wear track width of the unheat-treated specimen with a build direction of 0° was 2538 μm, which increased to 3110 μm at 600 °C but decreased significantly to 1817 μm at 860 °C, showing the narrowest width among the three conditions. For the 45° specimens, the unheat-treated sample exhibited a width of 2076 μm, which increased to 2426 μm at 600 °C and then decreased to 1743 μm at 860 °C, the smallest wear width among all specimens. In the case of the STS 316L specimens built at 90°, the wear track widths were 2789 μm (unheat-treated), 2755 μm (600 °C), and 2101 μm (860 °C), indicating a similar trend. The wear resistance was lowest at 600 °C, where adhesive wear was dominant. This adhesive wear was characterized by the formation of strong adhesive junctions between the two contact surfaces, leading to material transfer and delamination. EDS analysis of the adhered regions revealed high Cr and O contents, suggesting the formation of chromium oxides and the transfer of oxidized wear particles to the counterpart surface, thereby intensifying adhesive wear. At 860 °C, narrower wear tracks were observed, and the wear mechanism transitioned to mainly abrasive wear, likely due to the formation of a stable and protective oxide layer that reduced metal-to-metal contact. Furthermore, the difference in wear widths among build directions indicates that anisotropy in microstructure and residual stress, inherent to the additive manufacturing process, influenced the wear response. In particular, the 45° specimens exhibited superior wear resistance at high temperature (860 °C), which may be attributed to a more favorable grain boundary orientation that impedes crack propagation and promotes the retention of the oxide layer during sliding. Crack propagation is governed by the microstructure and loading conditions, and the resulting mechanical properties provide indirect evidence of crack behavior [35,36,37]. These observations highlight the combined effects of heat treatment, build orientation, and oxide film formation on the tribological performance of additively manufactured STS 316L.
Figure 11 summarizes the average friction coefficients (µ) for the three build orientations (0°, 45°, 90°) in the as-built condition and after post-heat treatments at 600 °C and 860 °C. In the as-built state, the 0° specimen showed a markedly lower friction (µ = 0.138) compared with the 45° and 90° orientations (µ ≈ 0.441 and 0.459, respectively). This large difference may reflect the alignment of the layer scan tracks relative to the sliding direction and/or orientation-dependent surface asperity morphology that reduced the real contact area during steady sliding; however, given the magnitude of the deviation, replicate testing is needed to confirm that this is not an outlier or an artifact of localized surface roughness. After heat treatment at 600 °C, the friction coefficients converged across orientations (µ = 0.462, 0.458, and 0.476 for 0°, 45°, and 90°), suggesting that tempering-related microstructural relaxation and the development of a thin surface oxide reduced the orientation sensitivity observed in the as-built condition. Heat treatment at 860 °C produced a modest overall reduction (µ = 0.423–0.459), indicating that the higher-temperature treatment may promote a more stable oxide/tribofilm and/or hardness homogenization that slightly lowers friction. Although the absolute differences among heat-treatment conditions are relatively small compared with typical scatter in pin-on-disk tests, the general trend toward lower friction at 860 °C is consistent with the narrower wear track widths observed for this condition (see Figure 10), implying reduced material removal and a shift toward less severe wear mechanisms.

4. Conclusions

In this study, STS 316L specimens were fabricated via the selective laser melting (SLM) process with three different build orientations (0°, 45°, and 90°). To improve the mechanical properties of the as-built specimens, two distinct heat-treatment routes were employed: (i) holding at 600 °C for 2 h, followed by air cooling, and (ii) a two-step treatment involving holding at 860 °C for 1 h and then at 350 °C for 15 min, followed by air cooling. The influence of build orientation and heat treatment on the microstructure, hardness, tensile properties, and wear behavior was systematically analyzed, and the key findings are summarized as follows:
  • The 0° specimens exhibited a distinct columnar microstructure, whereas the melt pool profiles in the 45° and 90° build directions displayed half-cylindrical shapes. The relatively uniform cooling rate in these orientations facilitated the fine growth of grains and cellular dendrites. After heat treatment at 600 °C, the cellular structure of the 0° specimens showed minimal changes. In contrast, the 45° specimens exhibited further refinement of the cell size, while the 90° specimens underwent noticeable spheroidization. At 860 °C, the melt pool boundaries of the 0° and 90° specimens were almost completely dissolved, leaving behind only particle-like features, whereas the 45° specimens partially retained their original morphology.
  • For the unheat-treated specimens, the hardness values were 220 HV at 0°, 231 HV at 45°, and 208 HV at 90°. After heat treatment at 600 °C, the average hardness increased by approximately 10–30 HV, which can be attributed to the refinement of the microstructure, particularly in the 45° specimens. In contrast, the hardness decreased by about 8–12 HV after heat treatment at 860 °C, likely due to the decomposition of the cellular structure during annealing. Among the different build directions, the specimens fabricated at 90° exhibited the highest average elongation. The maximum elongation (80.78%) was observed in the specimens heat-treated at 860 °C, whereas the lowest elongation (58.8%) occurred in the 45° specimens treated at 600 °C, resulting in a significant difference of 21.92%. Fracture surface analysis revealed that the 45° specimens exhibited cracks resembling cleavage planes, indicating limited plastic deformation. In contrast, the 90° specimens, which demonstrated superior tensile properties, showed fine dimples on the fracture surface. These small dimples increased the effective fracture surface area, enabling greater absorption of deformation energy and delaying fracture, thereby enhancing ductility. The effects of heat treatment vary depending on the build orientation. At 600 °C, sub-cell boundaries are stabilized, resulting in maximum hardness and relatively high elongation for specimens built at a 45° orientation. In contrast, at 860 °C, the cellular structure is eliminated, and equiaxed grains form due to recrystallization, leading to a decrease in hardness but an improvement in elongation.
  • For the unheat-treated specimens with a build direction of 0°, the wear track width was 2538 μm, which increased to 3110 μm after heat treatment at 600 °C but decreased to the narrowest width of 1817 μm at 860 °C. The 45° specimens showed a wear track width of 2076 μm in the unheat-treated state, 2426 μm at 600 °C, and the narrowest width of 1743 μm at 860 °C. In the case of 316L stainless steel specimens built at 90°, the wear track measured 2789 μm for the unheat-treated condition, slightly decreased to 2755 μm at 600 °C, and further decreased to 2101 μm at 860 °C. These results indicate that the specimens heat-treated at 860 °C demonstrated superior wear resistance across all build directions. Overall, the 45° build direction exhibited comparatively narrower wear tracks and lower friction coefficients, suggesting a more favorable wear performance.

Author Contributions

Conceptualization, I.J.; Methodology, Y.L., C.J. and Y.-S.L.; Validation, Y.L., Y.-S.L. and C.J., Formal analysis, Y.L.; Investigation, Y.L. and C.J.; Data curation, Y.L. and Y.-S.L.; Writing—original draft, Y.L. and C.J.; Writing—review and editing, Y.-S.L. and I.J.; Visualization, I.J.; Supervision, C.J. and Y.-S.L.; Project administration, I.J.; Funding acquisition, I.J. All authors have read and agreed to the published version of the manuscript.

Funding

This research was supported by the Korea Basic Science Institute (National research Facilities and Equipment Center) grant funded by the Ministry of Education (grant No. RS-2025-02317773).

Data Availability Statement

The raw data supporting the conclusions of this article will be made available by the authors on request.

Conflicts of Interest

The authors declare no conflicts of interest.

References

  1. Adeyemi, A.; Akinlabi, E.T.; Mahamood, R.M. Powder Bed Based Laser Additive Manufacturing Process of Stainless Steel: A Review. Mater. Today Proc. 2018, 9, 18510–18517. [Google Scholar] [CrossRef]
  2. Jagadeesh, B.; Kuppan, P. Experimental investigations on the material behavior of SLM fabricated SS316L. Mater. Today Proc. 2023. [Google Scholar] [CrossRef]
  3. Li, W.; Meng, L.; Wang, S.; Zhang, H.; Niu, X.; Lu, H. Plastic deformation behavior and strengthening mechanism of SLM 316L reinforced by micro-TiC particles. Mater. Sci. Eng. A 2023, 884, 14557. [Google Scholar] [CrossRef]
  4. Zhang, X.; Yang, D.; Jia, Y.; Wang, G.; Prashanth, K.G. Microstructure evolution and tensile property of high entropy alloy particle reinforced 316L stainless steel matrix composites fabricated by powder bed fusion. J. Alloys Compd. 2023, 965, 171430. [Google Scholar] [CrossRef]
  5. Li, Y.; Ma, C.; Qin, F.; Chen, H.; Zhao, X.; Liu, R.; Gao, S. The microstructure and mechanical properties of 316L austenitic stainless steel prepared by forge and laser melting deposition. Mater. Sci. Eng. A 2023, 870, 144820. [Google Scholar] [CrossRef]
  6. Olsén, J. Additive Metallurgy—Thermal Influences on Structure and Properties of Stainless Steel 316L. Ph.D. Dissertation, Department of Materials and Environmental Chemistry, Stockholm University, Stockholm, Sweden, 2020. Available online: https://www.diva-portal.org/smash/get/diva2:1376249/FULLTEXT01.pdf (accessed on 23 July 2025).
  7. Kumaran, M.; Senthilkumar, V.; Sathies, T.; Justus Panicker, C.T. Effect of heat treatment on stainless steel 316L alloy sandwich structure fabricated using directed energy deposition and powder bed fusion. Mater. Lett. 2022, 313, 131766. [Google Scholar] [CrossRef]
  8. Ogunlesi, C.O. The Effect of Process Parameter Variation on the Emissivity and Resistivity of 316L Stainless Steel Manufactured by Selective Laser Melting. Ph.D. Thesis, University of Southampton, Southampton, UK, 2022. [Google Scholar] [CrossRef]
  9. Wilson-Heid, A.E.; Qin, S.; Beese, A.M. Multiaxial plasticity and fracture behavior of stainless steel 316L by laser powder bed fusion: Experiments and computational modeling. Acta Mater. 2020, 199, 578–592. [Google Scholar] [CrossRef]
  10. Liverani, E.; Toschi, S.; Ceschini, L.; Fortunato, A. Effect of selective laser metling (SLM) process parameters on microstructure and mechanical properties of 316L austenitic stainless steel. J. Mater. Process. Technol. 2017, 249, 255–263. [Google Scholar] [CrossRef]
  11. Lin, K.; Gu, D.; Xi, L.; Yuan, L.; Niu, S.; Lv, P.; Ge, Q. Selective laser melting processing of 316L stainless steel: Effect of microstructural differences along building direction on corrosion behavior. Int. J. Adv. Manuf. Technol. 2019, 104, 2669–2679. [Google Scholar] [CrossRef]
  12. Feng, Z.; Pan, H.; Wu, W.; Wang, Z.; Jiang, P. Impact of Heat Treatment and Building Direction on Selective Laser-Melted 316L Stainless Steel: Microstructure and Mechanical Properties. Materials 2025, 18, 32. [Google Scholar] [CrossRef]
  13. Zhao, C.; Bai, Y.; Zhang, Y.; Wang, X.; Xue, J.M.; Wang, H. Influence of scanning strategy and building direction on microstructure and corrosion behavior of selective laser melted 316L stainless steel. Mater. Des. 2021, 209, 109999. [Google Scholar] [CrossRef]
  14. Thijs, L.; Verhaeghe, F.; Craeghs, T.; Humbeeck, J.V.; Kruth, J.P. A study of the microstructural evolution during selective laser melting of Ti-6Al-4V. Acta Mater. 2010, 58, 3303–3312. [Google Scholar] [CrossRef]
  15. Sun, W.; Ma, Y.; Huang, W.; Zhang, W.; Qian, X. Effects of build direction on tensile and fatigue performance of selective laser melting Ti6Al4V titanium alloy. Int. J. Fatigue 2020, 130, 105260. [Google Scholar] [CrossRef]
  16. Morvayova, A.; Fabbiano, L.; Contuzzi, N.; Caiazzo, F.; Casalino, G. On the influence of building position on dimensional accuracy and surface quality of aluminum blocks manufactured by L-PBF. Opt. Laser Technol. 2023, 167, 109830. [Google Scholar] [CrossRef]
  17. Dong, Z.; Liu, Y.; Wen, W.; Ge, J.; Liang, J. Effect of Hatch Spacing on Melt Pool and As-built Quality During Selective Laser Melting of Stainless Steel: Modeling and Experimental Approaches. Materials 2019, 12, 50. [Google Scholar] [CrossRef]
  18. Morozova, L.; Kehm, C.; Obrosov, A.; Yang, Y.; Miah, K.U.M.; Uludintceva, E.; Fritzsche, S.; Weiß, S.; Michailov, V. On the Heat Treatment of Selective-Laser-Melted 316L. J. Mater. Eng. Perform. 2023, 32, 4295–4305. [Google Scholar] [CrossRef]
  19. Andreatta, F.; Lanzutti, A.; Revilla, R.I.; Vaglio, E.; Totis, G.; Sortino, M.; de Graeve, I.; Fedrizzi, L. Effect of Thermal Treatment on Corrosion Behavior of AISI 316L Stainless Steel Manufactured by Laser Powder Bed Fusion. Materials 2022, 15, 6768. [Google Scholar] [CrossRef]
  20. Sprengel, M.; Ulbricht, A.; Evans, A.; Kromm, A.; Sommer, K.; Werner, T.; Kelleher, J.; Bruno, G.; Kannengiesser, T. Towards the Optimization of Post-Laser Powder Bed Fusion Stress-Relieve Treatments of Stainless Steel 316L. Metall. Mater. Trans. A 2021, 52, 1102–1115. [Google Scholar] [CrossRef]
  21. Chao, Q.; Thomas, S.; Birbilis, N.; Cizek, P.; Hodgson, P.D.; Fabijanic, D. The effect of post-processing heat treatment on the microstructure, residual stress and mechanical properties of selective laser melted 316L stainless steel. Mater. Sci. Eng. A 2021, 821, 141611. [Google Scholar] [CrossRef]
  22. Yan, X.; Gao, S.; Chang, C.; Huang, J.; Khanlari, K.; Dong, D.; Ma, W.; Fenineche, N.; Liao, H.; Liu, M. Effect of building directions on the surface roughness, microstructure, and tribological properties of selective laser melted Inconel 625. J. Mater. Process. Technol. 2021, 288, 116878. [Google Scholar] [CrossRef]
  23. Salman, O.O.; Gammer, C.; Chaubey, A.K.; Eckert, J.; Scudino, S. Effect of heat treatment on microstructure and mechanical properties of 316L steel synthesized by selective laser melting. Mater. Sci. Eng. A 2019, 748, 205–212. [Google Scholar] [CrossRef]
  24. Vinothraj, U.T.; Anthony Xavior, M. Effect of heat treatment on tribological properties of AISI 316L manufactured through selective laser melting. J. Mater. Res. Technol. 2025, 35, 7180–7192. [Google Scholar] [CrossRef]
  25. Krakhmalev, P.; Fredriksson, G.; Svensson, K.; Yadroitsev, I.; Yadroitsava, I.; Thuvander, M.; Peng, R. Microstructure, Solidification Texture, and Thermal Stability of 316 L Stainless Steel Manufactured by Laser Powder Bed Fusion. Metals 2018, 8, 643. [Google Scholar] [CrossRef]
  26. Li, C.; Liu, Z.; Liang, X.; Zhao, J.; Cai, Y.; Wang, B. Columnar-to-Equiaxed Transition on Laser Powder Bed Fusion Ultra-Precision Additive Manufacturing Accuracy and Surface Roughness for Solidified 316L Micro-Lattice Structure. Metals 2025, 15, 267. [Google Scholar] [CrossRef]
  27. Sangoi, K.; Nadimi, M.; Song, J.; Fu, Y. Heat Treatment Effect on the Corrosion Resistance of 316L Stainless Steel Produced by Laser Powder Bed Fusion. Metals 2025, 15, 41. [Google Scholar] [CrossRef]
  28. Leicht, A.; Yu, C.H.; Klement, U.; Hryha, E. Effect of scan rotation on the microstructure development and mechanical properties of 316L parts produced by laser powder bed fusion. Mater. Charact. 2020, 163, 110309. [Google Scholar] [CrossRef]
  29. Khatri, B.; Lappe, K.; Noetzel, D.; Pursche, K.; Hanemann, T. A 3D-Printable Polymer-Metal Soft-Magnetic Functional Composite—Development and Characterization. Materials 2018, 11, 189. [Google Scholar] [CrossRef]
  30. Chern, A.H.; Nandwana, P.; McDaniels, R.; Dehoff, R.R.; Liaw, P.K.; Tryon, R.; Duty, C.E. Build orientation, surface roughness, and scan path influence on the microstructure, mechanical properties, and flexural fatigue behavior of Ti-6Al-4V fabricated by electron beam melting. Mater. Sci. Eng. A 2020, 772, 138740. [Google Scholar] [CrossRef]
  31. Debroy, T.; Wei, H.L.l.; Zuback, J.S.; Mukherjee, T.; Elmer, J.W.; Milewski, J.O.; Beese, A.M.; Wilson-Heid, A.; De, A.; Zhang, W. Additive manufacturing of metallic components—Process, structure and properties. Prog. Mater. Sci. 2018, 92, 112–224. [Google Scholar] [CrossRef]
  32. Zhou, Y.; Chai, M.; Zheng, F.; Li, Z. The Effects of Heat Treatment Temperatures on the Properties of 316L Stainless Steel Produced via Laser Powder Bed Fusion. Materials 2025, 18, 3167. [Google Scholar] [CrossRef]
  33. Gorsse, S.; Hutchinson, C.; Gouné, M.; Banerjee, R. Additive manufacturing of metals: A brief review of the characteristic microstructures and properties of steels, Ti-6Al-4V and high-entropy alloys. Sci. Technol. Adv. Mater. 2017, 18, 584–610. [Google Scholar] [CrossRef]
  34. Suryawanshi, J.; Prashanth, K.G.; Ramamurty, U. Mechanical behavior of selective laser melted 316L stainless steel. Mater. Sci. Eng. A 2017, 696, 113–121. [Google Scholar] [CrossRef]
  35. Rafi, H.K.; Karthik, N.V.; Gong, H.; Starr, T.L.; Stucker, B.E. Microstructures and Mechanical Properties of Ti6Al4 Parts Fabricated by Selective Laser Melting and Electron Beam Melting. J. Mater. Eng. Perform. 2013, 22, 3872–3883. [Google Scholar] [CrossRef]
  36. Shi, J.J.; Li, X.; Zhang, Z.X.; Cao, G.H.; Russell, A.M.; Zhou, Z.J.; Li, C.P.; Chen, G.F. Study on microstructure and creep behavior of Inconel 718 superalloy fabricated by selective laser melting. Mater. Sci. Eng. A 2019, 765, 138282. [Google Scholar] [CrossRef]
  37. Luca, D.M.; Hamilton, A.R.; Reed, P.A.S. Influence of build orientation on high temperature fatigue crack growth mechanisms in Inconel 718 fabricated by laser powder bed fusion: Effects of temperature and hold time. Int. J. Fatigue 2023, 170, 107484. [Google Scholar] [CrossRef]
  38. Li, Z.H.; Wang, X.Y.; Hong, C.; Lu, Y.H.; Shoji, T. Fatigue crack initiation and propagation behavior of Inconel Alloy 690TT steam generator tube. Mater. Sci. Eng. A 2021, 811, 141090. [Google Scholar] [CrossRef]
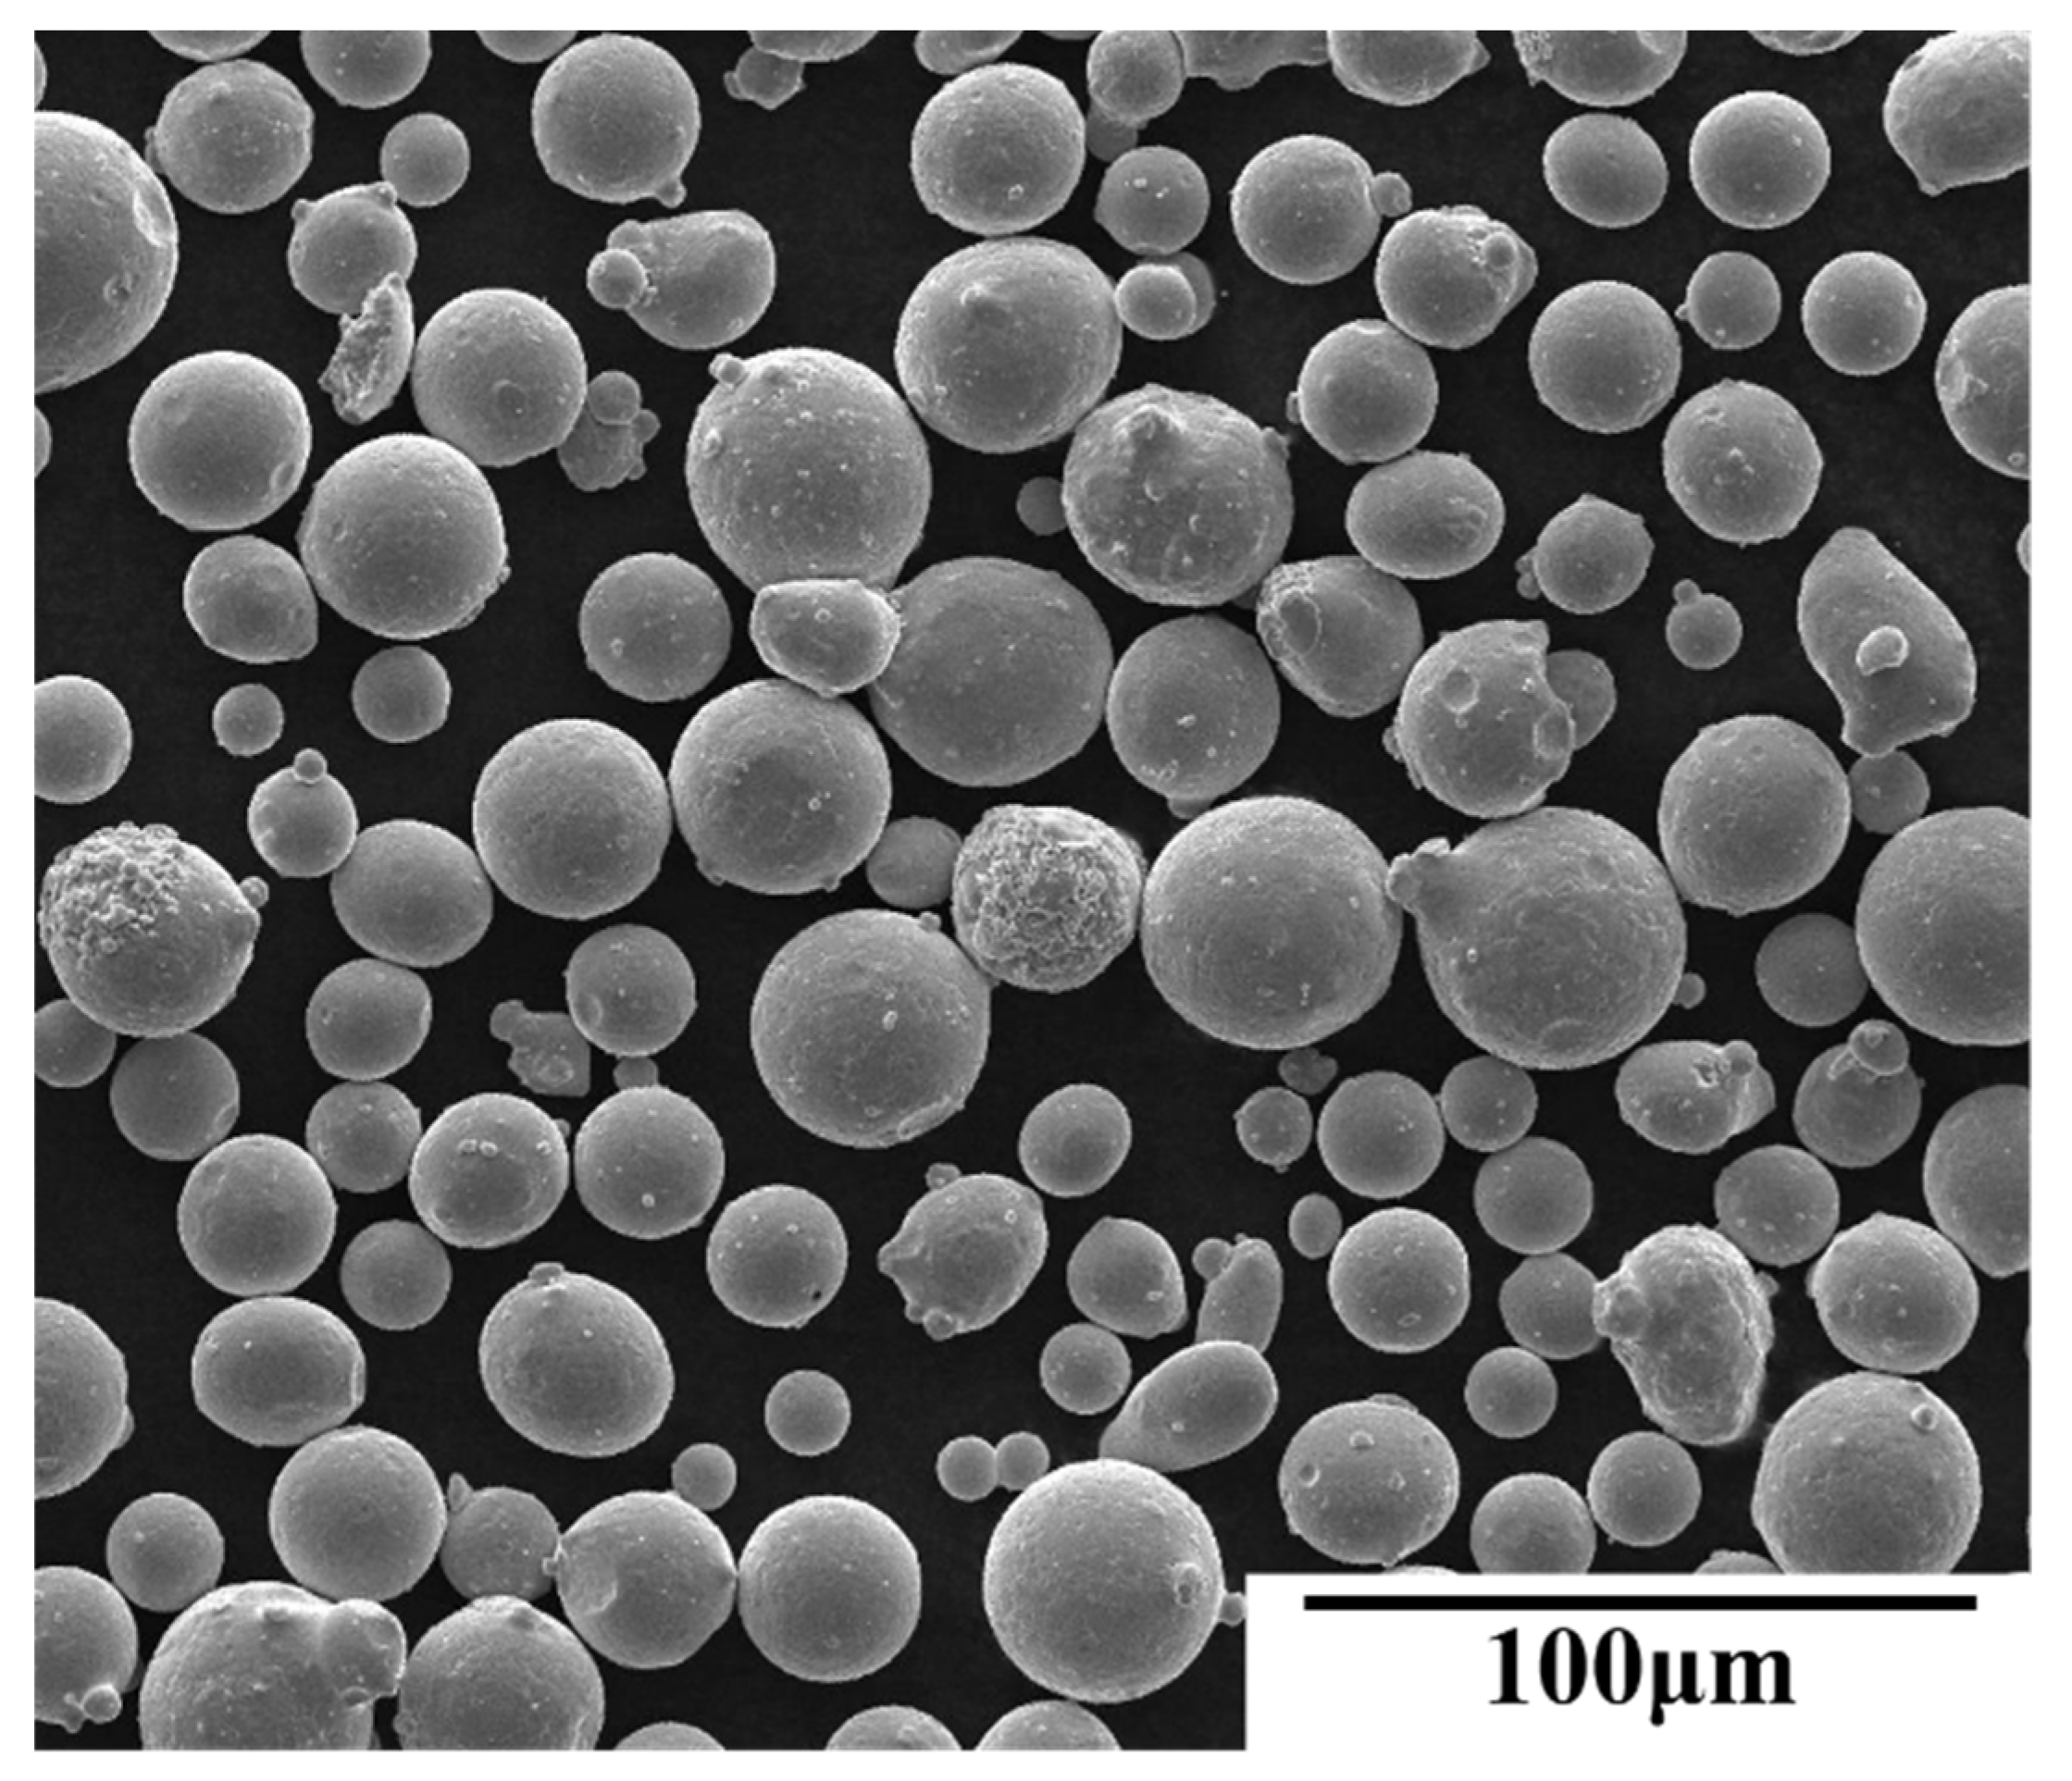
Figure 1. SEM micrograph of STS 316L powder.
Metals 15 00971 g001
Figure 2. Schematic of (a) analysis specimen specifications, (b) tensile test specimen geometry, (c) build orientations (0°, 45°, 90°), and (d) details of the corresponding post-treatment conditions (BD represents building direction, SD stands for scanning direction).
Metals 15 00971 g002
Figure 3. XRD patterns of STS 316L specimens fabricated by SLM with different build orientations and subjected to various heat treatments.
Metals 15 00971 g003
Figure 4. Optical microscopy images of STS 316L samples produced with various build orientations and heat-treated under different conditions: (ac) AS-built at 0°, 45°, and 90°; (df) heat-treated at 600 °C with 0°, 45°, and 90° orientations; (gi) heat-treated at 860 °C with 0°, 45°, and 90° orientations. The microstructural observations were performed on the X–Y plane (parallel to the build plate).
Metals 15 00971 g004
Figure 5. FE-SEM microstructures analyzed according to build direction and heat treatment: (ac) AS-built at 0°, 45°, and 90°; (df) heat-treated at 600 °C with 0°, 45°, and 90° orientations; (gi) heat-treated at 860 °C with 0°, 45°, and 90° orientations (same magnification).
Metals 15 00971 g005
Figure 6. EBSD maps of samples with different build directions and heat treatments: (ac) AS-built at 0°, 45°, and 90°; (df) heat-treated at 600 °C with 0°, 45°, and 90° orientations; (gi) heat-treated at 860 °C with 0°, 45°, and 90° orientations (same magnification).
Metals 15 00971 g006
Figure 7. Hardness values of SLM-fabricated STS 316L according to build direction and heat-treatment conditions.
Metals 15 00971 g007
Figure 8. (a) Tensile stress-displacement graphs and (b) elongation rates according to build direction and heat-treatment conditions.
Metals 15 00971 g008
Figure 9. Tensile fracture surfaces analyzed by FE-SEM with different build direction and heat-treatment conditions: (ac) AS-built at 0°, 45°, and 90°; (df) heat-treated at 600 °C with 0°, 45°, and 90° orientations; (gi) heat-treated at 860 °C with 0°, 45°, and 90° orientations (same magnification).
Metals 15 00971 g009
Figure 10. Wear tracks and track width variations as a function of build direction and heat treatment: (ac) AS-built at 0°, 45°, and 90°; (df) heat-treated at 600 °C with 0°, 45°, and 90° orientations; (gi) heat-treated at 860 °C with 0°, 45°, and 90° orientations (same magnification).
Metals 15 00971 g010
Figure 11. Variation in friction coefficient with build direction and heat-treatment conditions.
Metals 15 00971 g011
Table 1. Chemical composition of STS 316L powder (wt.%).
ElementCSiMnPSNCrNiMoFe
Wt.%≤0.03≤0.75≤2.00≤0.045≤0.03≤0.0116.00–18.0010.00–14.002.00–3.00Balance
Table 2. Summary of tensile properties and average grain counts.
Heat Treatment, Building DirectionTensile Strength,
MPa
Yield Strength,
Kqf
Elongation, %Grain Count
AS_BD-0°567117562.40430
AS_BD-45°590123069.24184
AS_BD-90°563121576.12143
600 °C_BD-0°556108058.96419
600 °C_BD-45°579110558.80147
600 °C_BD-90°533105462.0443
860 °C_BD-0°53292268.2443
860 °C_BD-45°50489165.88372
860 °C_BD-90°50588277.5224
Disclaimer/Publisher’s Note: The statements, opinions and data contained in all publications are solely those of the individual author(s) and contributor(s) and not of MDPI and/or the editor(s). MDPI and/or the editor(s) disclaim responsibility for any injury to people or property resulting from any ideas, methods, instructions or products referred to in the content.