Review

The Tribological Behavior of Electron Beam Powder Bed-Fused Ti-6Al-4V: A Review

by
Mohammad Sayem Bin Abdullah
and
Mamidala Ramulu
*
Department of Mechanical Engineering, University of Washington, Seattle, WA 98195, USA
*
Author to whom correspondence should be addressed.
Metals 2025, 15(11), 1170; https://doi.org/10.3390/met15111170
Submission received: 2 August 2025 / Revised: 19 September 2025 / Accepted: 21 September 2025 / Published: 23 October 2025

Abstract

This article comprehensively reviews the tribological behavior of a Ti-6Al-4V alloy manufactured via electron beam powder bed fusion (EB-PBF), an additive manufacturing process for aerospace and biomedical applications. EB-PBF Ti-6Al-4V demonstrates wear resistance that is superior or comparable to conventional Ti-6Al-4V. The reported average friction coefficient ranges between ~0.22 and ~0.75 during sliding wear in dry and lubricated conditions against metallic and ceramic counterparts when loading 1–50 N under varied surface and heat treatment conditions, and between 1.29 and 2.2 during fretting wear against EB-PBF Ti-6Al-4V itself. The corresponding average specific wear rates show a broad range between ~8.20 × 10⁻⁵ mm3/Nm and ~1.30 × 10⁻³ mm3/Nm during sliding wear. Lubrication reduces the wear rates and/or the friction coefficient. Wear resistance can be improved via machining and heat treatment. Wear anisotropy is reported and primarily attributed to microhardness variations, which can be mitigated through lubrication and post-processing. The effects of applied load and frequency on EB-PBF Ti-6Al-4V are also discussed. The wear resistance at elevated temperatures shows a mixed trend that depends on the counterpart material and the testing methods. Wear mechanisms involve oxide tribo-layer formation, abrasive wear, and adhesive wear. Current limitations, future research directions, and a standardization framework are also discussed.

1. Introduction

With the advent of additive manufacturing (AM) technologies in Industry 4.0, major industries such as aerospace, automobile manufacturing, biomedicine, and sports have started utilizing AM techniques to manufacture metallic parts. AM processes provide several advantages over traditional manufacturing methods like machining or casting, such as reduced waste, shorter manufacturing lead times, less greenhouse emissions, and the capability to manufacture complexly designed and customized components [1,2]. For these reasons, the additive and hybrid manufacturing market is expected to grow significantly over the next decades.
Metal additive manufacturing (MAM) is often termed metal 3D printing, where a part is built layer by layer by melting feedstock wire or powders using an external heat source. Layers are printed according to a 3D CAD model, where each layer represents a 2D slice. Metal additive manufacturing can be broadly categorized into Direct Energy Deposition (DED) and powder bed fusion (PBF). The two most common PBF processes for printing titanium are electron beam powder bed fusion (EB-PBF), also known as electron beam melting (EBM), and laser powder bed fusion (L-PBF), also known as selective laser melting (SLM). The EB-PBF process is completed inside a high-vacuum chamber, and the build plate and build chamber are preheated to 650 °C before the melting process begins and are maintained at 650 °C during the build process. Usually, high-temperature metals, i.e., titanium alloys and nickel-based alloys, are printed using the EB-PBF process as well as the L-PBF process. While a wide variety of materials can be printed using the L-PBF process, only electrically conductive materials can be printed using EB-PBF due to the difficulty in effectively processing non-conductive materials using the EB-PBF process.
Titanium alloys are widely used in many industries due to their high strength-to-weight ratio, biocompatibility, and corrosion resistance, despite titanium being an expensive metal. Among the different titanium alloys, Ti-6Al-4V is the most widely used in industries because of its excellent balance between strength and ductility due to the presence of both α phase and β phase. In the aerospace industry, approximately half of the titanium market is occupied by Ti-6Al-4V [3]. In addition, 45% of dental and hip implants are made of Ti-6Al-4V [4]. Although its higher specific strength and higher hardness make Ti6Al4V an attractive option for critical applications that cannot fail, its lower thermal conductivity and higher strain hardening make Ti6Al4V difficult to machine and process due to severe cutting tool wear. When printed with optimal process parameters, EB-PBF Ti-6Al-4V shows comparable tensile, fracture, and fatigue properties after removal of as-built surface asperities [1,2]. This is why industries are adopting AM technologies to make titanium parts, including EB-PBF and L-PBF titanium. Examples include titanium brackets by Airbus, Boeing, and GKN Aerospace; a compressor stator by Pratt and Whitney; an engine part by GE; etc. [5]. Due to the preheating of the build plate and powder inside the high-vacuum chamber, the EB-PBF process imparts negligible residual stress in fabricated Ti6Al4V parts and has no influence on gas flow inside the chamber, unlike L-PBF [6]. It is important to note that build plates are kept at room temperature during the L-PBF process, and argon gas replaces oxygen inside the L-PBF build chamber to avoid contamination and oxidation of Ti-6Al-4V. The vacuum chamber also protects the fabricated parts from any oxidation or contamination during the EB-PBF process.
Tribology is the science and technology that studies friction, wear, and lubrication at interactive surfaces in relative motion and provides scientific guidelines to reduce friction and wear to improve the efficiency, durability, and safety of mechanical systems. Many applications of EB-PBF Ti-6Al-4V are subjected to friction, wear, and erosion, i.e., rotors, fan blades, etc. Tribological failures are common in industries; i.e., in total, 6% of total failures in the aerospace industry are attributed to wear, abrasion, and erosion [7]. The America Makes & ANSI Additive Manufacturing Standardization Collaborative (AMSC), formed in 2016, has provided a roadmap to standardize additive manufacturing processes across many industries. Their latest report (V3.0), published in July 2023, identified 141 research gaps, with 54 being higher priorities [8]. The report briefly discussed the importance of the wear resistance (abrasive and erosive) and corrosion resistance of materials in the oil and gas industry within the service temperature range (−50 °C to +200 °C), and EB-PBF Ti-6Al-4V was identified as one material that requires further research. Although the tensile, fatigue, and fracture properties of EB-PBF Ti-6Al-4V are well understood and well reported, its tribological properties are comparatively less studied as per the existing literature and are not presented holistically, especially in relation to process parameters, process-induced defects, anisotropy, build variability, post-processing, environmental conditions, etc. [9]. Also, in existing reviews of the tribology of AM metals [4,10,11,12,13,14,15], EB-EBF is minimally discussed. Thus, there is a clear need for a research article highlighting the current state of knowledge related to the tribological performance of EB-PBF Ti-6Al-4V, its limitations, and future directions. This review article aims to comprehensively discuss the current state of knowledge related to the tribological behavior of EB-PBF Ti-6Al-4V, provide summaries of key findings, discuss them in relation to material properties and testing conditions, and highlight research gaps. Section 2 briefly discusses the process physics of EB-PBF as well as its advantages and disadvantages. Tribological theories and different tribological testing methods are presented briefly in Section 3, along with key investigations on EB-PBF Ti-6Al-4V. The effects of the testing environment, build and process variability, and post-processing on the tribological properties of EB-PBF Ti-6Al-4V are comprehensively discussed in Section 4. Section 5 illustrates the wear mechanisms of EB-PBF Ti-6Al-4V, along with the similarities and dissimilarities when compared with L-PBF Ti-6Al-4V and the conventional Ti-6Al-4V alloy. A summary, current challenges, and the outlook are presented in Section 6. In this article, EBM and EB-PBF are used interchangeably, as are SLM and L-PBF.

2. EB-PBF Process

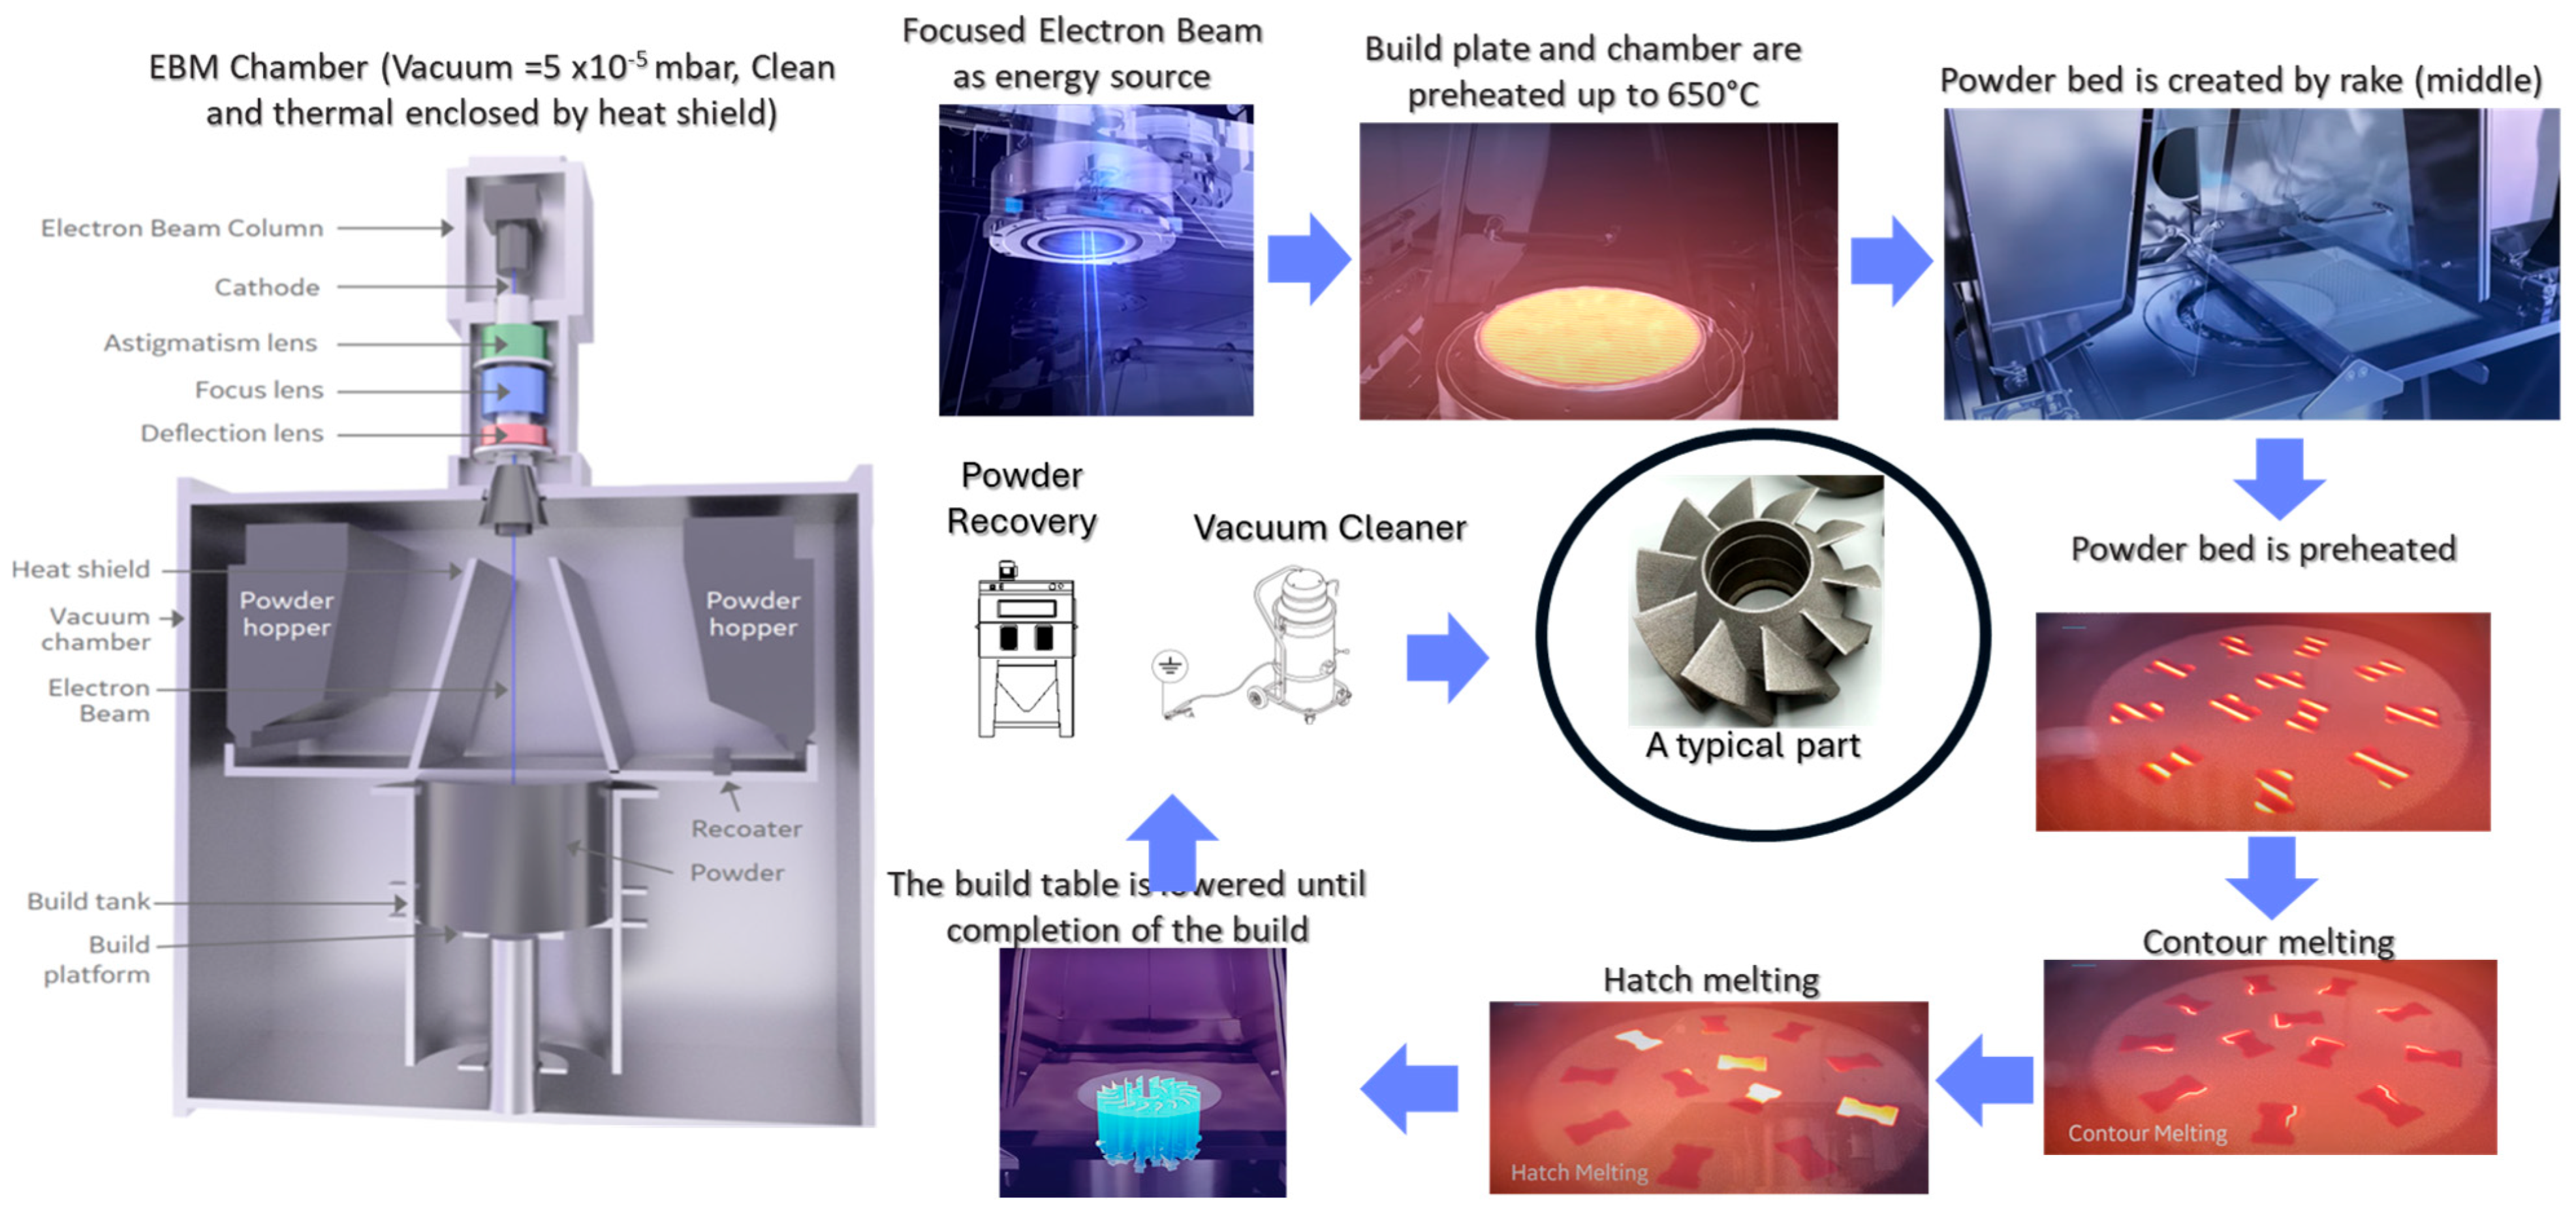
In the EB-PBF process, an electron beam is generated using a tungsten filament in an electron gun, as shown in Figure 1. A combination of lenses is used to transmit the electron beam to the powder bed. A build chamber is used to manufacture parts in very high-vacuum conditions. At the beginning, a fine and flattened powder bed is made surrounding the stainless-steel build plate. There are two powder hoppers to contain the powder on two sides of the build chamber. The build chamber is separated from its surroundings, including the powder hoppers, by heat shields. At the very beginning, the build plate and powder bed within the build chamber are preheated to ~650 °C, near the β-transus temperature. When the build starts, automatically programmed rakes mechanically collect powder from the hoppers and lay a layer of powder onto the powder bed. A highly concentrated electron beam is then used to melt each powder layer. Melting each layer consists of two stages: first, contour melting according to CAD and, second, hatching inside the contours of the layer. As soon as the electrons penetrate the powder surface and enter the powder grains, the kinetic energy of the electrons is converted into thermal energy and the metal powder melts. Electromagnetic lenses control the electrons. The build chamber is lowered after the completion of each layer, and powder for a new layer is again laid on the build plane and melted. This cycle continues until the completion of all layers. The build is then extracted from the powder cake using a powder recovery system (PRS), where jets of the same Ti-6Al-4V powders loosen the coalesced powder from the build.
During the EB-PBF process, some parameters determine the manufacturing process and the quality of the manufactured parts. These process parameters are the energy density, hatch spacing, hatching angles, scan speed, process maps, line offset, focus offset, etc. The manufacturer provides optimized parameters [16] to minimize defects, i.e., porosity, lack of fusion, delamination defects, and higher part roughness. In EB-PBF, builds are connected to stainless-steel build plates by perforated and thinner support structures, and the builds can be extracted very easily from the build plates by hand or using a soft hammer. In contrast, in L-PBF the builds are physically connected (like welding) to the titanium build plate, which requires band sawing the printed parts and support structures from the build plate, followed by surface milling of the build plate for the next build. The EB-PBF powder size is larger than the L-PBF powder size (30–45 µm), which results in higher roughness for EB-PBF Ti-6Al-4V than for L-PBF parts. One disadvantage of the EB-PBF process is the limited build chamber size, which limits the build geometry. Another disadvantage is the limited options for printed material since the material must be conductive.
Figure 1. The schematics of EB-PBF process (ARCAM) [9,17,18].
Metals 15 01170 g001
Fu and Corner [19] review state-of-the-art machines available for EB-PBF technology, and readers can learn further details about each currently available EB-PBF system. In this article [19], the authors emphasize further development of a better temperature- and metal vaporization-resistant electron optical imaging system for process monitoring, integration of in situ alloying systems, better control methods for reused powder, and to develop a deeper understanding of electron beam–material interactions. They also discuss new machine concepts with a higher acceleration voltage.

3. Tribological Theories and Tribological Studies of EB-PBF Ti-6Al-4V

Wear is a micro-fatigue process where material is removed from the parent material in the form of chips through plastic deformation and fracture from the surface due to continuous interaction with a mating surface under an applied load. Before the chips are dislodged from the surface, the subsurface undergoes plastic deformation as well. The extent of wear is dependent on the mechanical properties, subsurface properties, and surface topography (asperities) of the mating surfaces; the loading type; the conditions and environment; and the associated friction. The major types of mechanical wear are categorized as abrasive wear, adhesive wear, and erosive wear. Abrasive wear, adhesive wear, and their combinations occur when two counterparts interact with each other under a normal load. Sliding wear occurs when two surfaces rub each other, while fretting wear occurs due to a combination of rubbing between two mating surfaces and the presence of small oscillations within the surfaces under an applied load. The friction coefficient ( μ ) , also referred to as the CoF, is the ratio of the frictional force ( F s ) to the normal force ( F N ). The specific wear rate ( S W R ) is the amount of volume ( V ) removed per unit load ( F ) per unit sliding distance ( L ) . The specific wear rate is usually reported in mm3 N−1 m−1, but it can be reported in other units as well. Both the friction coefficient and the specific wear rate are utilized to describe the tribological properties of two mating surfaces during testing or application in environmental conditions. Usually, tribological testing is conducted for enough time to understand the workpiece–counterpart compatibility under testing conditions according to several ASTM and ISO testing methods. Erosive wear occurs when material is removed through particle impingement, where the kinetic energy of the impinging material exceeds the surface energy of the eroded material. This section briefly summarizes key tribological studies conducted on EB-PBF Ti-6Al-4V, including studies related to sliding wear, fretting wear, and erosive wear. Figure 2 represents tribological testing methods for sliding wear.
μ = F s F N   ;   a n d   S W R = V F L

3.1. Sliding Wear

Different types of sliding wear experiments were conducted on EB-PBF Ti-6Al-4V in [20,21,22,23,24,25,26,27,28,29,30,31,32,33,34,35,36,37,38,39,40,41,42,43,44,45,46,47], including block-on-ring tests, pin-on-disc tests, ball-on-disc tests, scratch tests, abrasive wheel tests, rotary abrasion tests, and tribo-corrosion tests against metallic and ceramic counterparts. The selection of the testing method depends on the specific application and the desired outcome.

3.1.1. Block-on-Ring Test

In block-on-ring tests, the test block is held under a certain load against a rotating ring, usually made of a harder material. Zhang et al. [20] investigated the tribological properties of Ti-6Al-4V manufactured through EBM, SLM, and conventional forging in block-on-ring experiments using a GCr15 steel (630 HV) ring in dry conditions under 50 N loads for up to 592.5 m. All specimens were polished to a surface roughness ( R a ) of 1.5 µm prior to the experiment. The EBM Ti-6Al-4V specimens showed superior wear resistance compared to the SLM and forged specimens. The EBM specimens exhibited the lowest wear rate, despite having moderate hardness (higher than the forged specimens but lower than the SLM specimens). Despite having the highest hardness, the SLM specimen experienced greater wear than the EB-PBF specimens due to the formation of multiple horizontal cracks that exacerbated wear through delamination. The forged samples experienced the highest wear and hence displayed the least wear resistance. The specific wear rates of the EB-PBF, L-PBF, and forged specimens were 16.6 × 10⁻⁵ mm3 N−1 m−1, 19.0 × 10⁻⁵ mm3 N−1 m−1, and 23.9 × 10⁻⁵ mm3 N−1 m−1, respectively. Based on chemical analysis, the EBM sample experienced the least material transfer (% of Fe) from the counter ring and the highest oxidation (% of O), which provided protection against wear. The SLM sample experienced the highest percentage of Fe transfer from the counter ring, which correlated with severe delamination resulting from more aggressive contact with the steel ring. The average friction coefficients of the EBM, SLM, and forged specimens were 0.5, 0.4, and 0.6, respectively.

3.1.2. Pin-on-Disc Test

In a pin-on-disc test, a pin is utilized to abrade a workpiece under a normal load, either in a linear reciprocating motion or a rotary motion. Al-Tamimi et al. (2020) [25] evaluated EBM and SLM Ti-6Al-4V plates in a pin-on-disc test against an alumina ball counterpart in a PBS (phosphate-buffered saline) solution at 37 °C, mimicking a physiological condition for medical applications, under 2, 6, 10, or 14 N loads for 9000 s at 5.24 cm/s (for a total of 471.6 m) in as-built conditions. According to their discussion, both exhibited acceptable wear resistance for medical applications, as the wear rates ranged between 1.5 and 2.2 × 10⁻⁴ mm3/Nm. Interestingly, the highest wear rates occurred at the lowest load (2 N) due to the dominant effects of as-built surface roughness. At higher loads (6–14 N), material hardness became the dominant factor. The average friction coefficient reached steady-state values of 0.6 at 2 N, 0.5 at 6 N, 0.45 at 10 N, and 0.4 at 14 N. Relevant effects of applied load and surface roughness are discussed in this study in Section 4.1.1 and Section 4.4.1, respectively.
Sharma et al. (2021) [26] conducted a pin-on-disc test of as-built and heat-treated EB-PBF Ti-6Al-4V (layer thickness: ~70 µm) using a steel E31 pin in dry conditions. The specimens were slid at 1.5 m/s under 1, 2.5, and 5 kgf (9.8, 24.5, and 49 N) loads for up to 2638.9 m. The specimens were polished to 0.19 µm before the experiments. The friction coefficient for the as-built specimen was ~0.53, and this value varied between 0.51 and 0.54 in the heat-treated specimens. The specific wear rate of the as-built specimen was ~1.2 × 10− 6 cm3/m at 9.8 N load. The specific wear rate was reduced by 9–18% when quenched and increased by 15–27% when annealed. Along with the as-built specimen, four other heat-treated conditions were tested, which are discussed in Section 4.3.

3.1.3. Ball-on-Disc Test

In a ball-on-disc test, a ball is utilized to abrade a workpiece under a normal load, either in a linear reciprocating motion or a rotary motion. Khun et al. [27] investigated the tribological properties of EB-PBF and commercial (CP) Ti-6Al-4V samples using 100Cr6 steel counter balls under 1 N loads (sliding velocity = 3 cm/s) in both dry and wet conditions (with Hank’s solution) at room temperature. The thickness of the fabricated specimens was 2.7 mm. In dry conditions, EB-PBF Ti6Al4V showed a higher friction coefficient (0.62) than CP Ti-6Al-4V (0.55) but a significantly lower specific wear rate (78.4 × 10⁻¹⁴ m3 N−1 m−1) than CP Ti-6Al4V (93.9 × 10⁻¹⁴ m3 N−1 m−1). The enhanced tribological performance of EB-PBF Ti-6Al-4V was attributed to its higher surface hardness (376 HV), resulting from a rapid cooling-induced martensitic transformation during the EBM process. The EB-PBF Ti-6Al-4V exhibited a heavily twinned martensitic microstructure that resulted in greater hardness and superior wear resistance compared to the commercial samples’ lamellar α + β structure. Toh et al. [21,28], from the same research group as Khun et al. [27], studied the wear properties of EB-PBF and cast Ti-6Al-4V against 100Cr6 steel counter balls under 1 N loads (sliding velocity = 2 cm/s) for 50,000 laps at room temperature and also reported greater wear resistance for EB-PBF samples compared to cast Ti-6Al-4V.
Li et al. [29] conducted a linear reciprocating ball-on-disc test of EB-PBF, L-PBF, and conventionally processed (CP) Ti-6Al-4V under a WC-Co ball under various loads (2–10 N) with various frequencies (2–8 Hz) at room temperature in dry conditions. Despite significant differences in hardness (428 HV for L-PBF, 359 HV for EB-PBF, and 324 HV for CP) and microstructure, all three sample types exhibited remarkably similar wear rates between ~4 × 10⁻³ mm3/m and ~5 × 10⁻³ mm3/m at 10 N within 2–8 Hz frequencies. They concluded that wear resistance is governed by the complex interaction between strength and ductility rather than hardness alone, which is discussed in detail in Section 4.5. In a later study, Li et al. [30] conducted a ball-on-disc test with similar loading conditions on EB-PBF Ti-6Al-4V at higher temperatures, which is discussed in Section 4.1.2.
Ryu et al. [31], Shrestha [32], and Riaz et al. [33] conducted a series of sliding contact tests on EB-PBF Ti6Al4V using 1 mm diameter CP Grade-2 Ti spheres with a nominal elastic load (25% of the yield strength) in dry and lubricated conditions and compared the results with mill-annealed Ti6Al4V. They also discussed the effects of anisotropy on wear resistance and the friction coefficient. The mill-annealed sample showed a greater friction coefficient and greater wear than EB-PBF specimens. Xiang et al. [34] utilized ball-on-disc reciprocating wear tests using ZrO2 and Al2O3 counterparts under both dry friction and simulated body fluid conditions (25 wt.% newborn calf serum) on EB-PBF and wrought Ti-6Al-4V under 3 N loads. The EB-PBF Ti6Al4V exhibited superior wettability characteristics and lower friction coefficients (0.48 against ZrO2 and 0.434 against Al2O3 in the dry conditions) compared to the wrought material (0.50 against ZrO2 and 0.452 against Al2O3 in the dry conditions), though both showed similar overall wear resistance.

3.1.4. Abrasive Wheel and Rotary Abrasion Test

In the abrasive wheel test, a workpiece is abraded by a wheel while abrasive particles are fed at the interface between the workpiece and the wheel. Herrera et al. investigated the abrasive wear resistance of EB-PBF Ti-6Al-4V according to ASTM G65 using a dry sand/rubber wheel apparatus and compared it with conventional Ti-6Al-4V [23]. Silica particles were fed on a rotating rubber wheel (200 rpm) while a stationary specimen was placed under a 130 N load. Despite having similar hardness values, the EB-PBF Ti-6Al-4V demonstrated inferior wear performance (a 120% higher wear rate) than conventional Ti-6Al-4V due to greater porosity and a difference in the microstructure, which is discussed in Section 5.2. The numerical wear rates for the EB-PBF were faster than the conventional Ti-6Al-4V. The conventional Ti-6Al-4V experienced 15.20 mm3 volume loss in 6000 revolution (2.53 × 10⁻³ mm3/rev). Whereas the EB-PBF Ti-6Al-4V experienced 11.12 mm3 volume loss in 2000 revolutions (5.56 × 10⁻³ mm3/rev), which is almost two times of the conventional specimens.
In the rotary abrasion test, a rotary workpiece is abraded by a rotary disc with an attached abrasive strip under a normal load. Usually, the abrasive strips are changed after certain cycles. While it is widely used for testing metallic coatings, it is also used for testing polymers (i.e., tires) and metals as well in the automobile industry. The authors, Bin Abdullah and Ramulu [35], also investigated the abrasive wear behavior of EB-PBF Ti6Al4V fabricated at three different build orientations (3°, 45°, and 90°) in both as-built and machined conditions. Using a Taber rotary abrader, the specimens were abraded for up to 4000 cycles (993 m) with abrasive alumina strips (size: ~78 µm) replaced every 100 cycles under a 25 N load. The wear rates ranged between 0.114 and 0.131 mg/cycle (2.57–2.96 × 10⁻² mm3/cycle calculated from Ti-6Al-4V density) in the as-built specimens and between 0.104 and 0.116 mg/cycle (2.35–2.62 × 10⁻² mm3/cycle) in the machined specimens. The variation was due to wear anisotropy in the as-built specimens. Their findings are elaborately discussed in Section 4.2 and Section 4.3.

3.1.5. Scratch Test

Sanni [24] investigated the tribological properties of thin Ti-6Al-4V plates manufactured using the EB-PBF process under 1–5 N loads by a diamond counterpart, and reported friction coefficient (μ) and wear depth. According to their research, at 1 N load, μ = 0.05 (Long-X), 0.07 (Long-Z), and 0.08 (Trans-X). At 5 N load, μ = 0.38 (Long-X), 0.38 (Long-Z), and 0.36 (Trans-X). The wear depths were 0.1 μm (Long-X), 0.09 μm (Long-Z), and 0.19 μm (Trans-X) at 1 N and 0.35 μm (Long-X), 0.70 μm (Long-Z), and 1.4 μm (Trans-X) at 5 N. Tribological testing demonstrated directionally dependent behavior. This investigation identified 2.5–4 N as the critical load when the friction coefficient stabilized. They identified the microstructure and microhardness as the dominant reasons for variable wear and friction properties.

3.1.6. Cylinder-on-Plate Test

Bruschi et al. conducted multiple cylinder-on-plate tests on EB-PBF Ti-6Al-4V to evaluate the effects of machining parameters and heat treatment on its tribological behavior [36,37,38]. Machining and heat treatment were reported to enhance its wear resistance. Bruschi et al.’s studies are discussed in detail in Section 4.3.
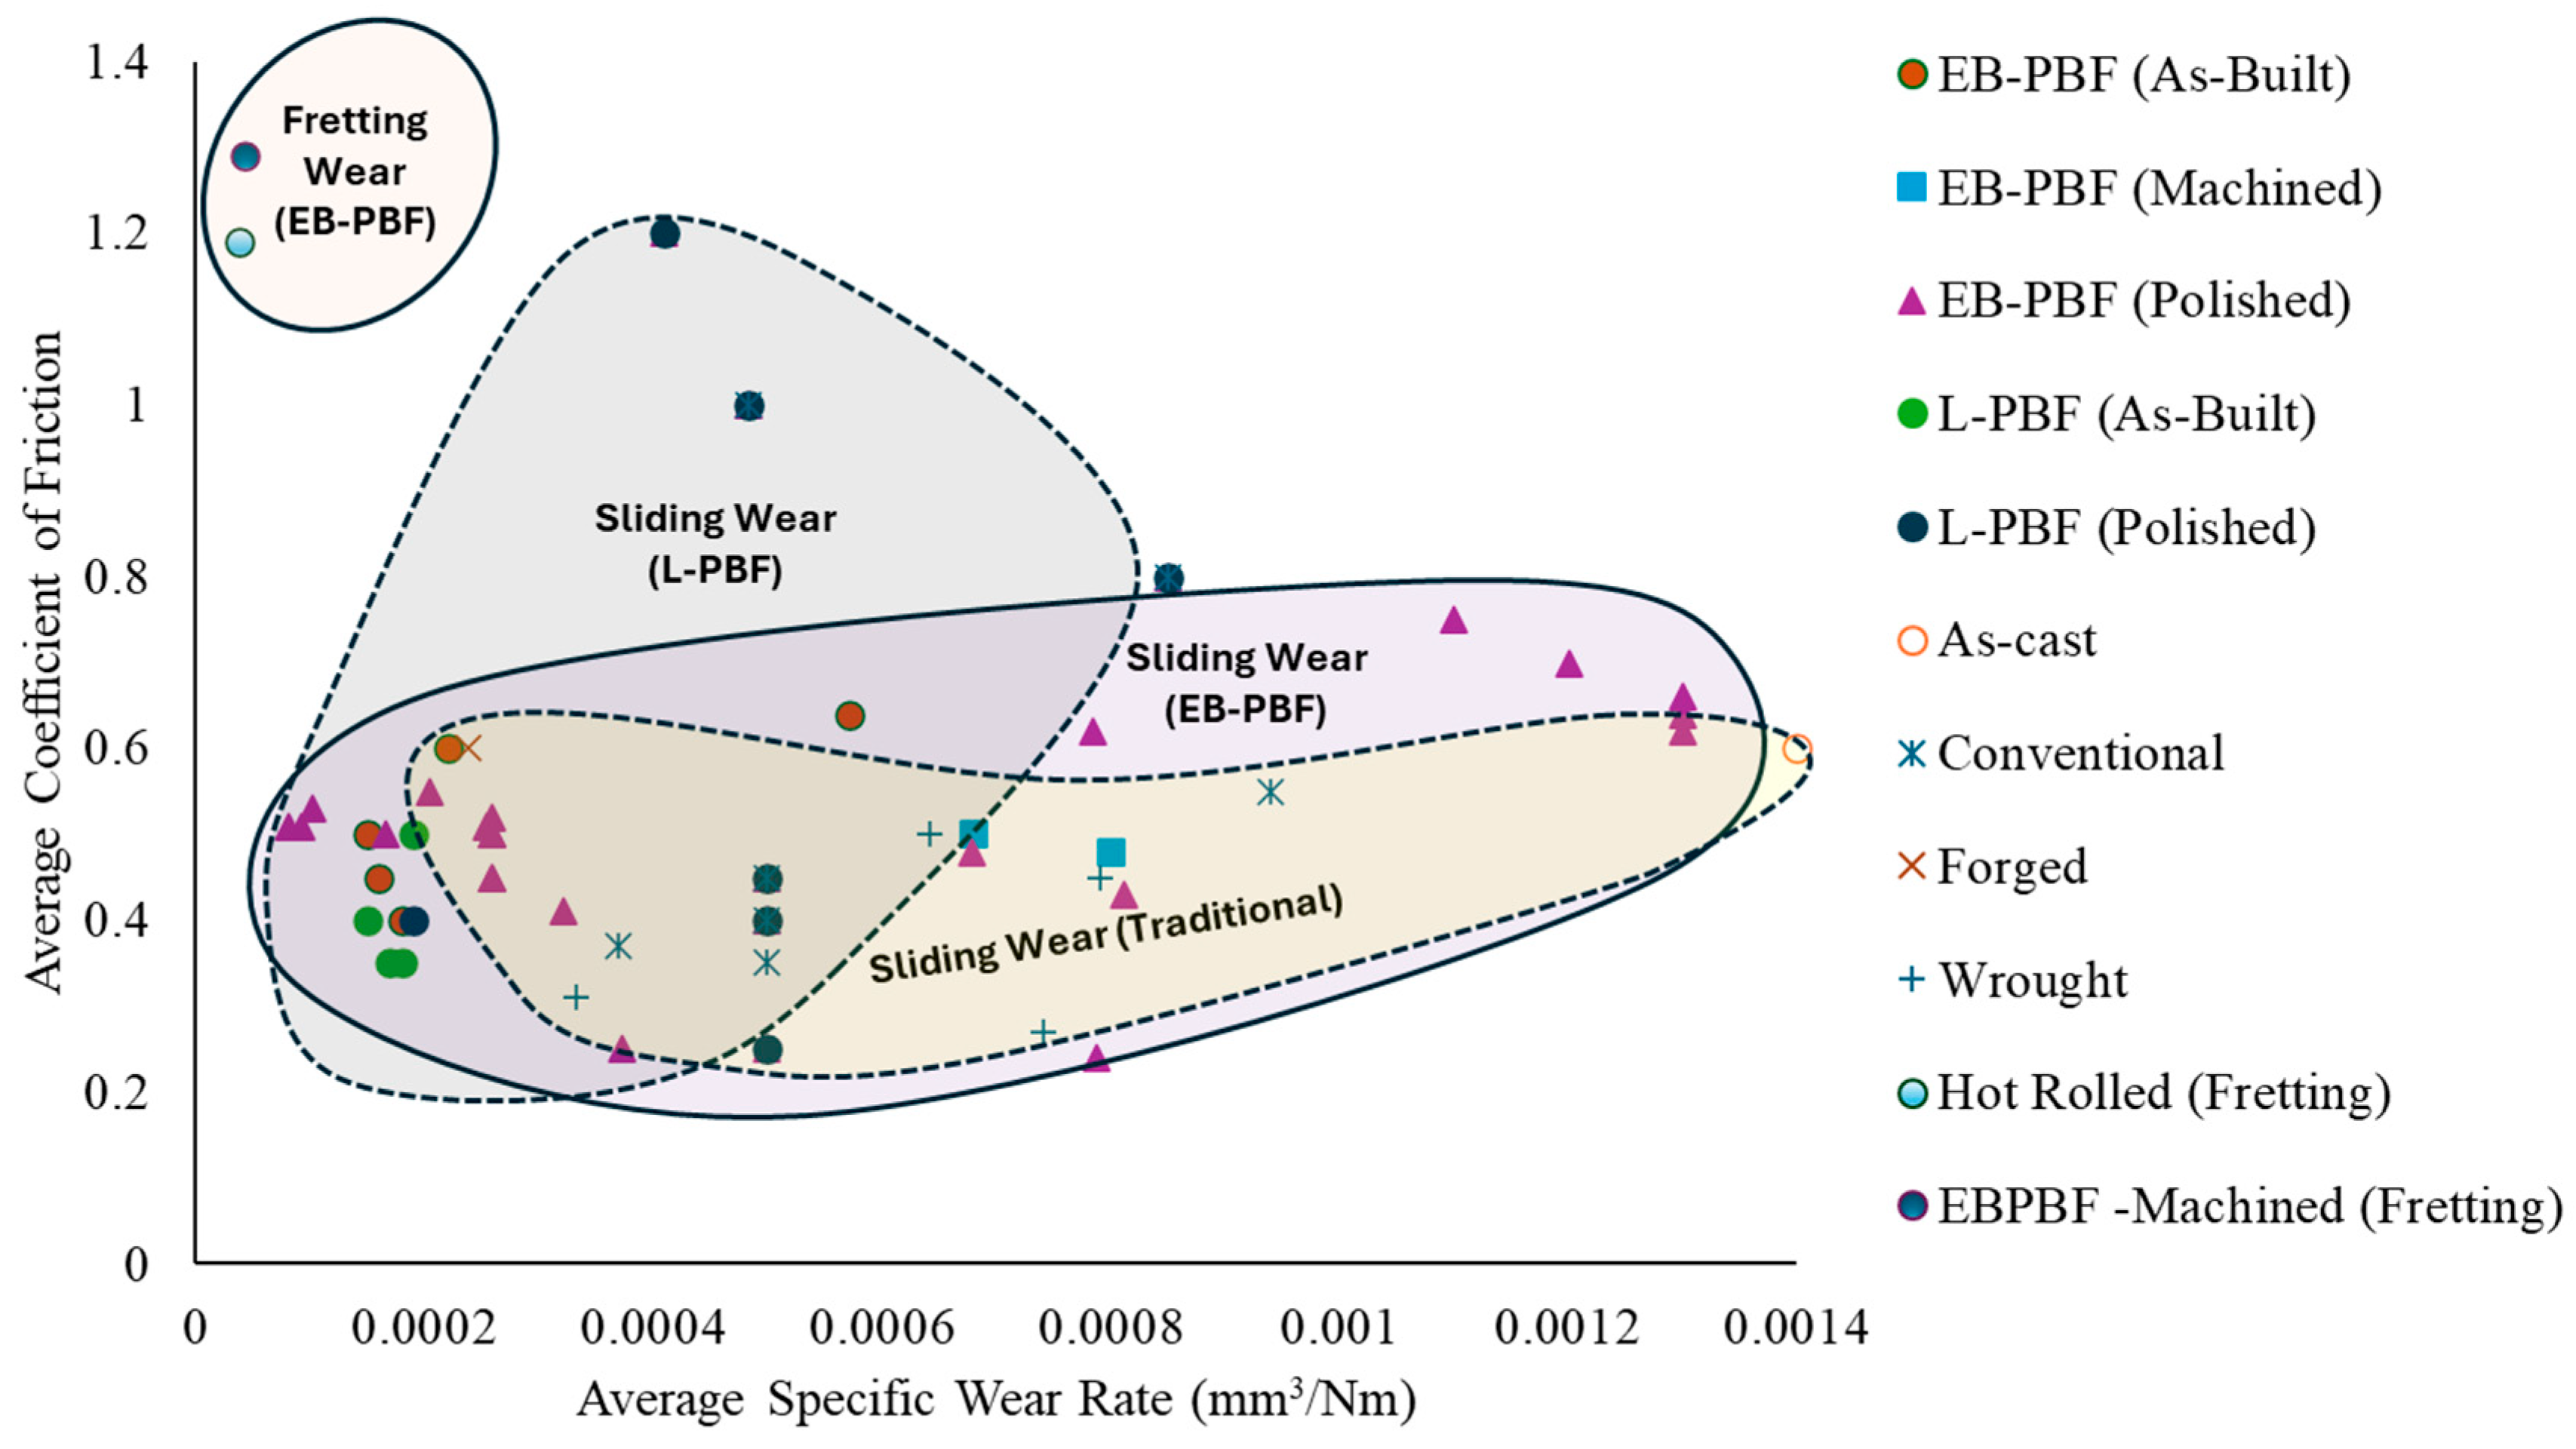
Figure 3 presents a plot of the average friction coefficient against the specific wear rate at room temperature or near room temperature in different conditions (dry and lubricated) against multiple counterparts (alumina, steel, zirconia, titanium, etc.) at different loads (1–50 N) in different types of sliding wear and fretting wear tests. Specific wear rates reported in units other than mm3/Nm have been carefully converted into mm3/Nm for plotting purposes [27,39,40]. For references [26,29,30,34,40], the specific wear rates in mm3/Nm were calculated from the provided information on the wear volume, load, and sliding distance (if not given, they were calculated from the sliding velocity and duration). It is clear that EB-PBF Ti-6Al-4V falls within the wear responses of traditional processes and the L-PBF process, with some overlap with both of them. The different loads, environments, and counterpart conditions are discussed in the later sections of this article.

3.2. Fretting Wear

Soria et al. [39] compared the fretting wear behavior of EB-PBF and hot-rolled Ti6Al4V against EB-PBF Ti6Al4V in as-built and machined conditions under a 10 N load with a 50 µm fretting amplitude in a cylinder-on-pad fretting test for up to 106 cycles. The average friction coefficients were reported to be 2.2, 1.29, and 1.19, respectively, for as-built EB-PBF, machined EB-PBF, and hot-rolled Ti6Al4V. The wear rates were reported to be 43 × 10−15 Pa−1 (4.3 × 10⁻⁵ mm3/Nm) and 38 × 10−15 Pa−1 (3.8 × 10⁻⁵ mm3/Nm), respectively, for the machined EB-PBF and hot-rolled specimens. The wear rate for the as-built specimens was not calculated due to the difficulty in measurement. The machined EB-PBF and hot-rolled Ti-6Al4V showed similar friction coefficients.

3.3. Erosive Wear

Bin Abdullah et al. [41] investigated the solid particle erosion behavior of as-built and machined EB-PBF Ti-6Al-4V at two orientations: horizontal XZ (0°) and vertical YZ (90°). Silica particles (~80 μm) were impinged at various angles (30°, 60°, and 90°) at a velocity of 28.5 m/s, closely following the ASTM G99 standard. Their results demonstrated that the build orientation significantly influenced erosion resistance, with XZ plates showing superior performance due to better solidification, higher microhardness (342 vs. 326 HV), and lower surface roughness. The erosion mechanism varied with the impact angle: shallow angles (30°) produced ductile cutting with crater formation, while perpendicular impacts (90°) formed deeper pits. This study confirmed that EB-PBF Ti6Al4V exhibits ductile erosion behavior regardless of the build orientation, but its anisotropic properties lead to directional differences in wear resistance. Machining possibly reduces the eroded volume.

3.4. Tribo-Corrosion Wear

Longhitano et al. [42] investigated the effect of the pore size on the corrosion and tribo-corrosion behavior of an EB-PBF Ti-6Al-4V lattice in a PBS solution for orthopedic applications. The built lattice structures had variable pore sizes (500, 700, and 900 µm), and their performance was compared with solid bulk samples. All geometries experienced a potential drop during sliding due to oxide layer removal, with the solid samples exhibiting larger drops (~0.6 V) compared to the porous samples (~0.4 V) due to differences in their active-to-passive area ratios. After sliding, all samples showed spontaneous re-passivation and recovered their initial protective properties. In a PBS solution, higher friction coefficients were reported compared to dry conditions, but lower volume losses were reported compared to dry conditions. Davoodi et al. [43] reported that EB-PBF–Ti6Al4V alloys manifest higher corrosion resistance relative to wrought titanium in a PBS + H2O2 solution with or without a bovine serum solution (BSA) due to increased presence of the β phase in the microstructure. Lapping and superfinishing treatments significantly improved the bio-tribo-corrosion resistance of EB-PBF–Ti6Al4V specimens; the corrosion potential showed a positive shift of 50%. Although BSA showed a corrosion-mitigating effect in all conditions, its impact on tribo-corrosion properties was reported as negligible. Bertolini et al. [44] reported that cryogenic cooling machining increased the tribo-corrosion resistance of EB-PBF Ti-6Al-4V.
Table 1 presents an up-to-date summary of tribological investigations related to EB-PBF Ti-6Al-4V. Among them, several studies reported that the wear behavior of EB-PBF Ti-6Al-4V was comparable to that of conventionally processed Ti-6Al-4V, i.e., casting [21,28], forging [20], hot-rolled [39], conventional (cast + hot-rolled + annealed) [23], conventional [29,30], wrought [34], and mill-annealed [31], as well as SLM Ti-6Al-4V [20,25,29]. Table 2 presents a summary of the key tribological properties reported in the literature.

4. Effects of Testing Environment, Build Variability, Process Variability, and Post-Processing on Tribological Properties of EB-PBF Ti-6Al-4V

This section discusses the effects of the testing environment, build variability, post-processing, and process variability.

4.1. Effects of Testing Environment

The testing environment includes the applied load and frequency, the lubrication conditions, the counterpart’s materials, the temperature/humidity, etc. Their effects are discussed in this section.

4.1.1. Applied Load and Frequency

The effects of load on EB-PBF Ti-6Al-4V have been studied by Li et al. [29], Al-Tamimi et al. [25], Sanni [24], and Sharma et al. [26]. The normal load emerges as the dominant factor influencing tribological performance, while Li et al. [29] proposed a non-linear power-law relationship between the wear rate (WR) and the normal force (FN), W R   =   a F N n , where n = 0.51–0.88, rather than the linear relationship typically assumed in classical wear theory (where n = 1). However, in a study by Al-Tamimi et al. [25], the highest wear rate occurred at the lowest load (0.22 ± 0.02 × 10⁻³ mm3/Nm at 2 N). The wear rate decreased at 6 N (0.15 ± 0.01 × 10⁻³ mm3/Nm), then increased at 14 N (0.18 ± 0.01 × 10⁻³ mm3/Nm). The lowest load caused more wear due to dominant surface rubbing with minimal plastic deformation, leaving high surface roughness to interact, causing a roughness-dominated mechanism. At 6 and 14 N, the wear was hardness-dominated.
Sanni reported that the evolution of the average friction coefficient showed distinct load-dependent patterns from low initial values (μ = 0.05–0.08 at 1 N) to stabilized higher values (μ = 0.36–0.38 at 5 N and above) [24]. Their study indicates a critical load threshold where the fundamental wear mechanism changes from mild surface interactions to more aggressive material removal processes. The effect of the frequency on the wear rate was weaker, although it caused a slight increase in the wear rate [29]. The change in the wear rate due to the load was greater by almost an order of magnitude compared to the change due to the frequency (3.2 × 10⁻⁴ vs. 1.2 × 10⁻⁴ (mm3/m) per unit change). Sharma et al. [26] also reported increasing trend of wear rate with applied load (wear rate of 1, 5.8, 11 × 10−6 cm3/m respectively at 9.8, 24.5 and 49 N).

4.1.2. Lubrication and Passivating Media

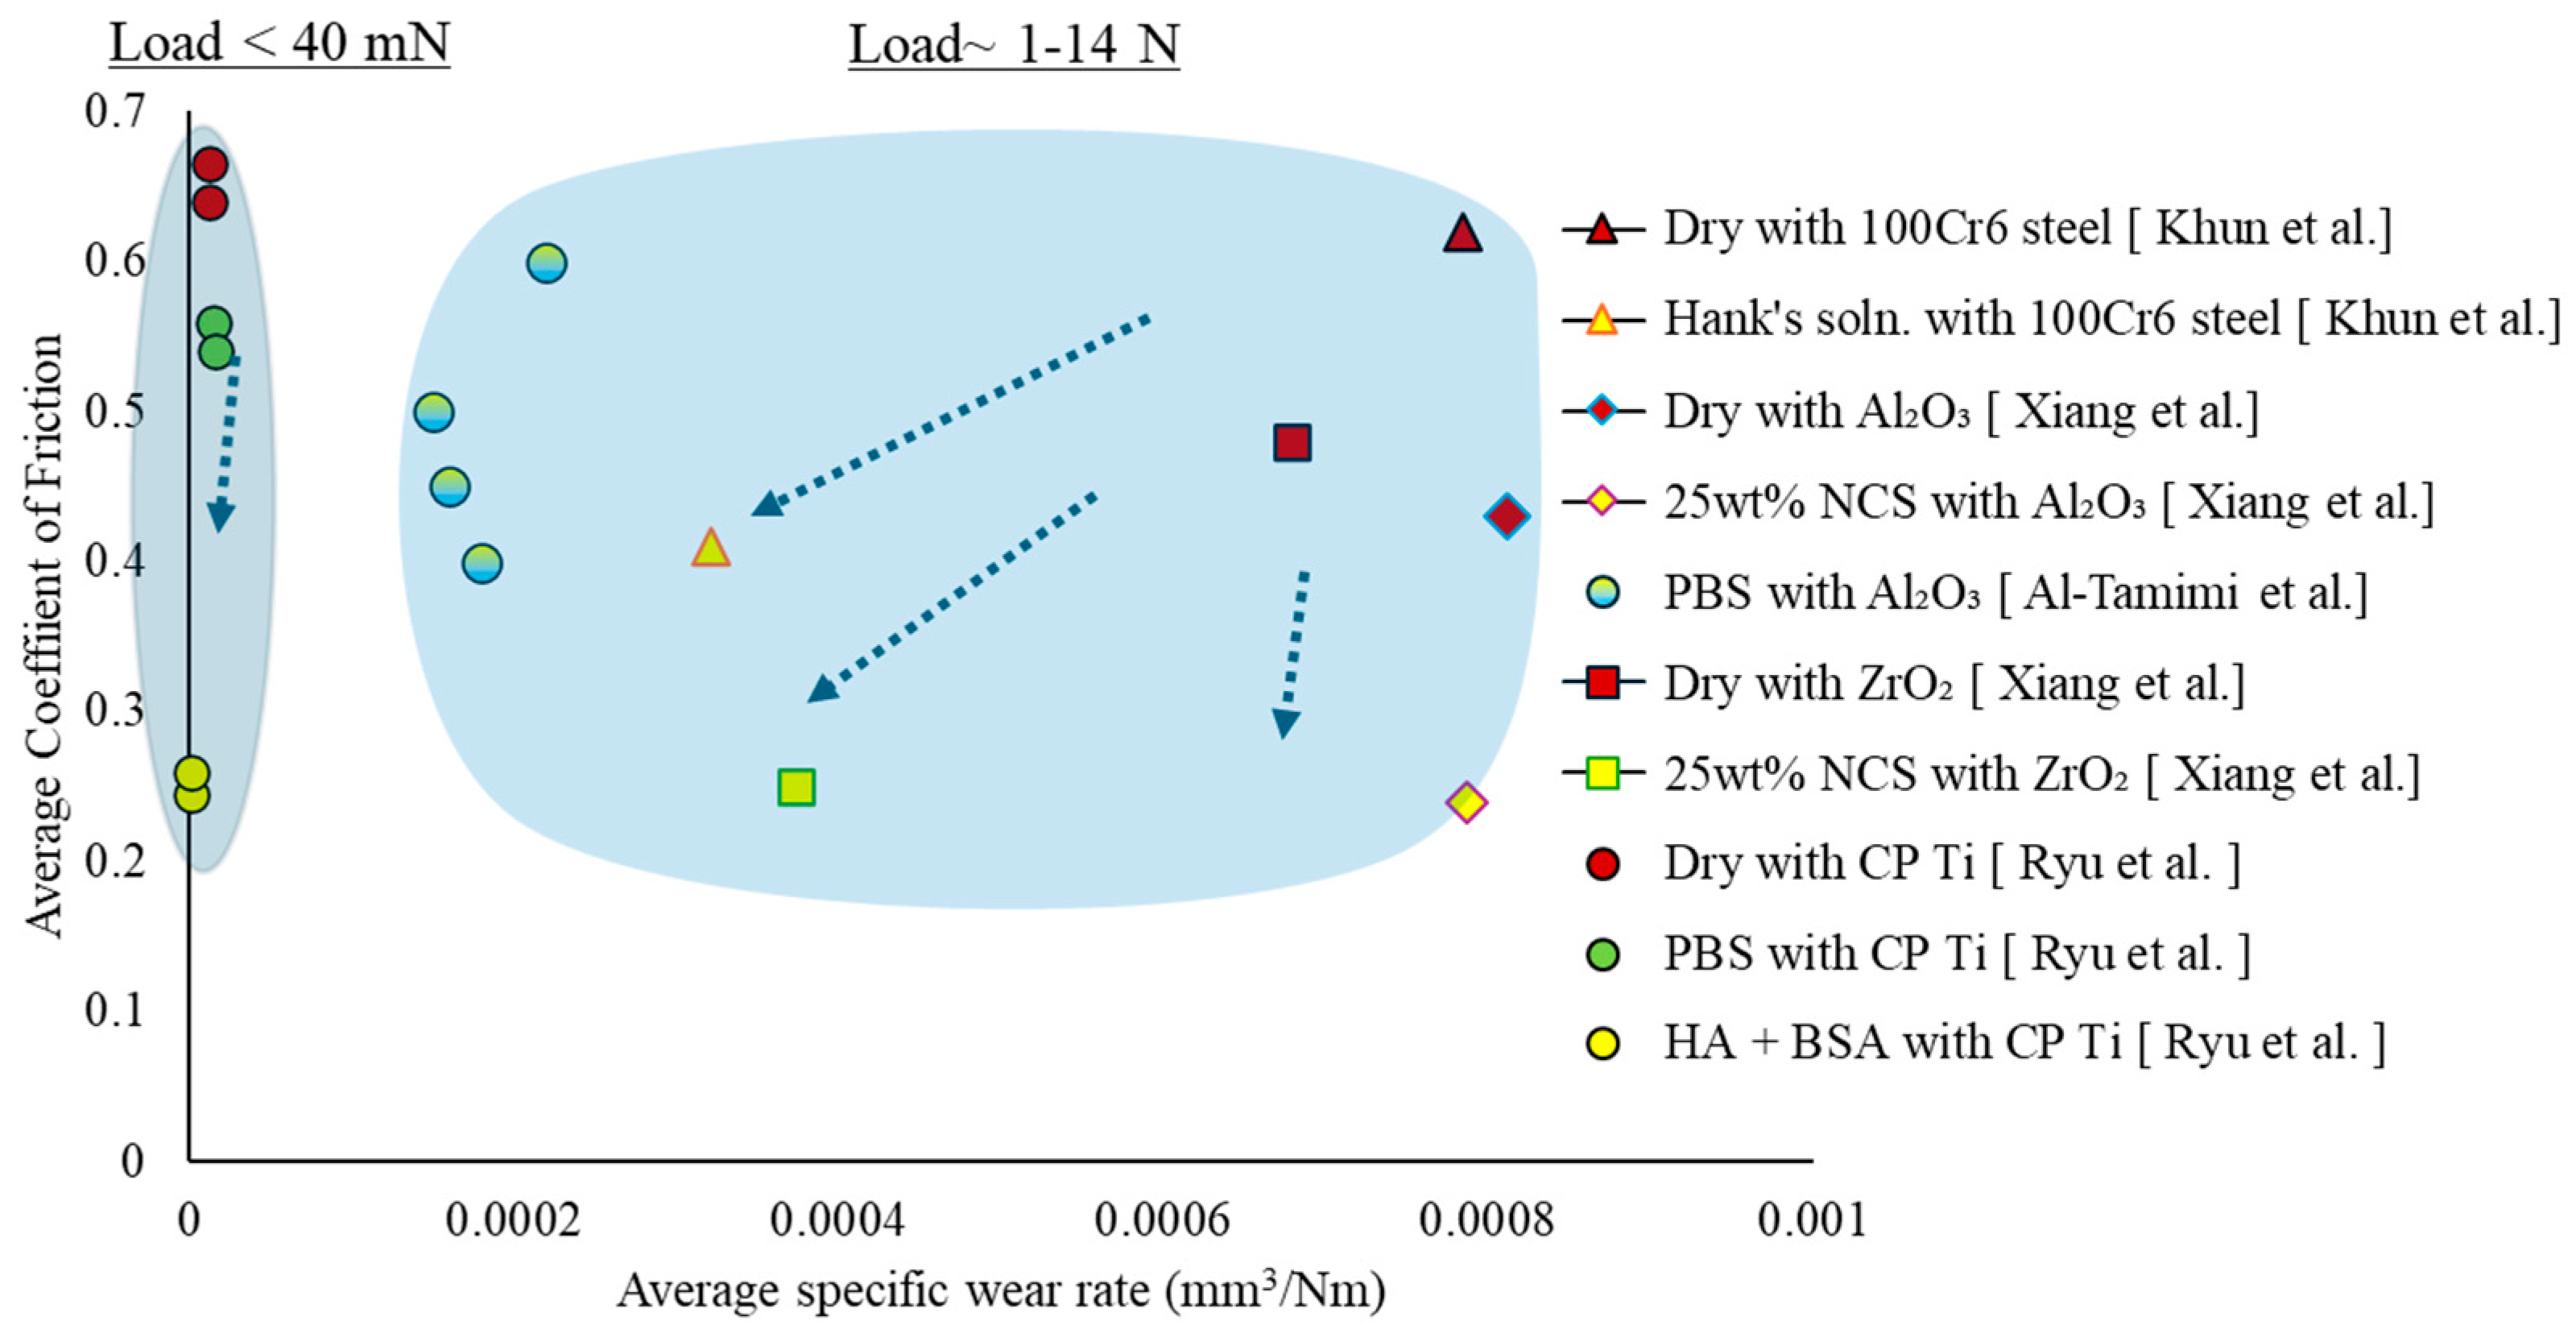
Al-Tamimi et al. [25], Khun et al. [27], Riaz et al. [33], Xiang et al. [34], and Ryu et al. [31] compared the wear properties of EB-PBF Ti6Al4V in dry conditions and lubricated conditions, i.e., in a PSB solution [25,31,33], Hunk’s solution [27], a Synovial HA + BSA solution [31,33], and 25 wt.% NCS [34]. Figure 4 presents a combined plot of the average coefficients of friction and specific wear rates in these studies under loadings lower than 40 mN and between 1 and 14 N. Both the friction coefficients and specific wear rates decreased by ~50–60% with the application of lubrication. The locus of the average friction coefficient vs. the specific wear rate moves from the upper right to the lower left in the graph in both the microscale loading and meso–macroscale loading. The lubricants often create a tribo-film, and the viscosity of the film inhibits contact and reduces wear. In the study by Ryu et al. on polished EB-PBF Ti-6Al4V, lubrication media reduced the anisotropic wear difference found in dry conditions [31], which is also discussed in Section 4.2.2. This is applicable even when EB-PBF Ti-6Al-4V is used as a counterpart to wear other softer materials, as reported by Mohammadhosseini et al. [47].

4.1.3. Counterparts

The counter ball material influenced the wear resistance and the average friction coefficient in a ball-on-disc test of EB-PBF Ti-6Al4V against an AISI 52100 steel and alumina ball, as reported by Alvi et al. [45]. They studied the tribological behavior of EB-PBF Ti-6Al-4V from 23 to 500 °C in dry conditions. Overall, steel counter balls caused lower wear rates in most temperature conditions and higher friction coefficients. At room temperature, the specific wear rates of EB-PBF Ti-6Al-4V are 6.8 × 10⁻⁴ mm3/Nm and 8 × 10⁻⁴ mm3/Nm, respectively, with steel and alumina, while the respective average CoF are ~0.48 and ~0.50. Alongside the wear mechanism, the greater hardness of alumina could lead to greater wear. Figure 5a illustrates a combined visual representation of the CoF and specific wear rates of EB-PBF Ti-6Al-4V (polished/machined conditions) in pin-on-disc and ball-on-disc tests against EN-31 steel [26], AISI 52100 steel [45], WC-Co [30], and alumina [45], regardless of the heat treatment, in dry conditions at room temperature under an ~10 N load. Figure 5b presents a similar plot of the average CoF vs. the specific wear rates of EB-PBF Ti-6Al-4V in polished/machined conditions against 100Cr6 steel [21,27,28], WC-Co [30], alumina [45], and ZrO2 [34] counter balls, regardless of the heat treatment, in dry conditions at room temperature during ball-on-disc sliding under 1–3 N loads. Overall, the metallic counterparts are seen to have slightly higher friction coefficients compared to their ceramic counterparts. However, due to many variables involved in the data, such as the ball geometry, hardness, sliding distance, etc., a concrete conclusion is difficult to make.

4.1.4. Temperature

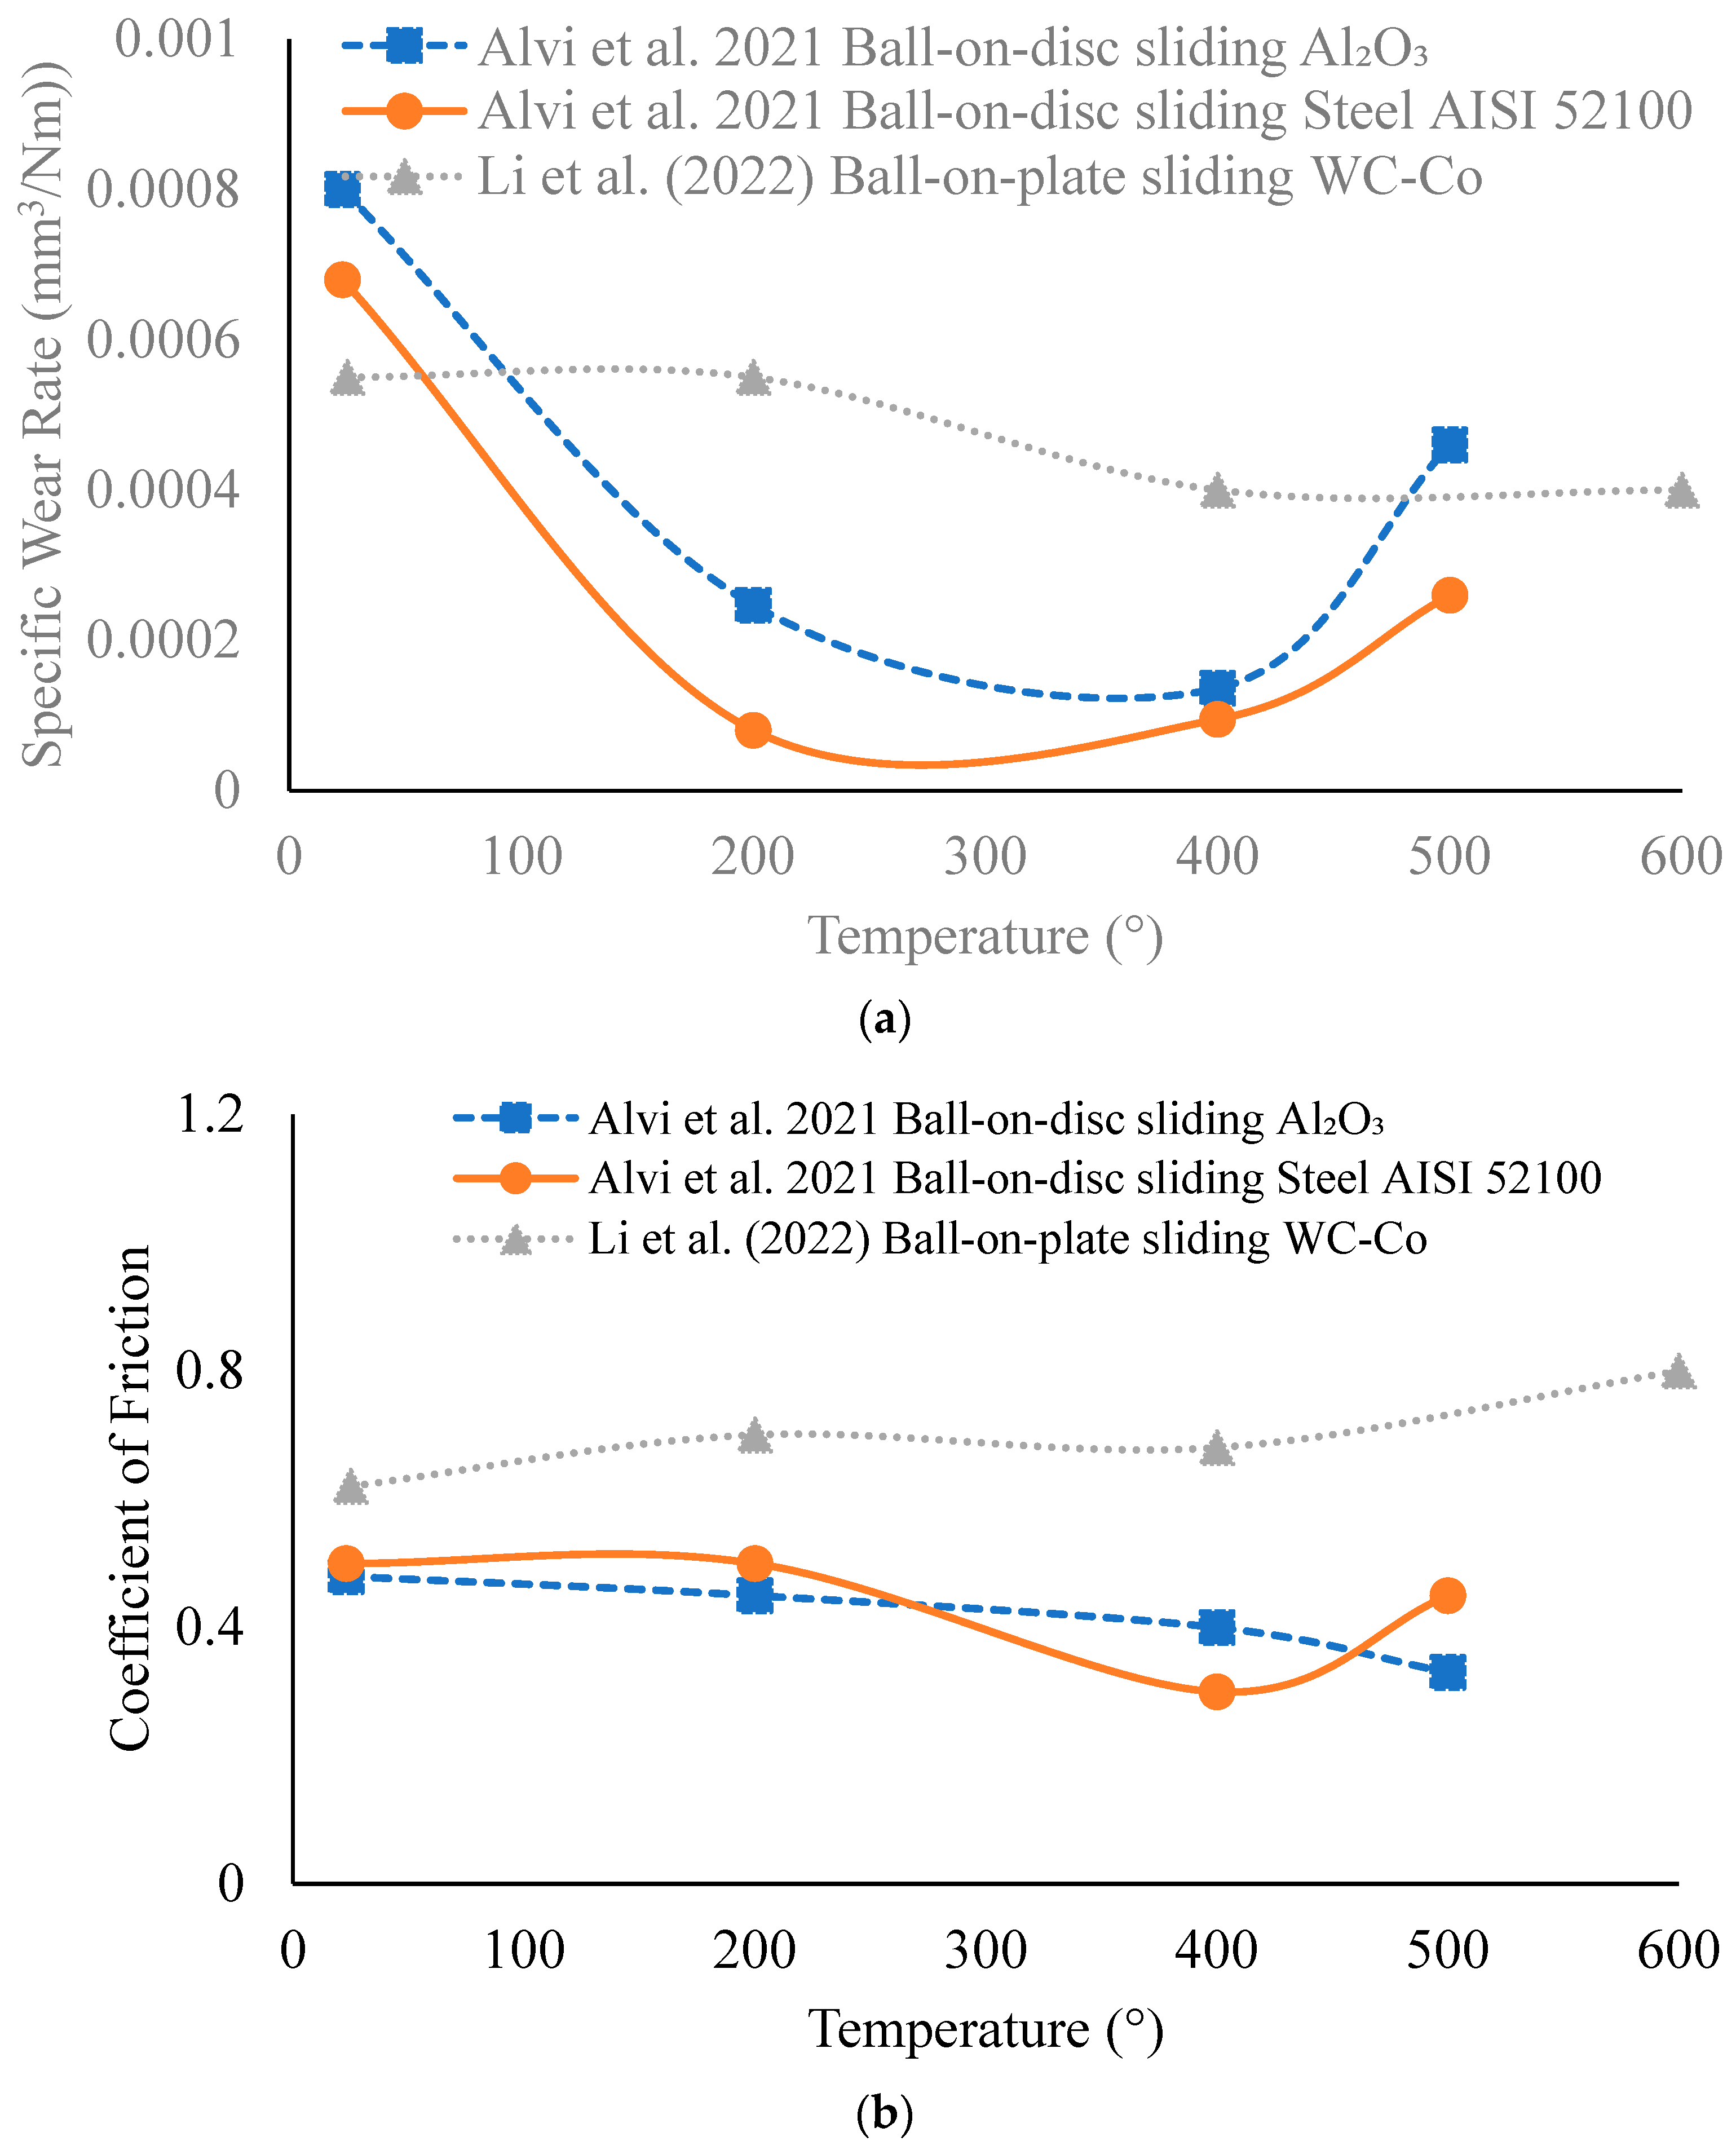
Alvi et al. [45] and Li et al. [30] investigated the effects of temperature on the tribological responses of EB-PBF Ti-6Al-4V up to 500 °C (10 N) and 600 °C (2–10 N), respectively, in ball-on-disc/plate tests. The variation in the specific wear rate and CoF is presented in Figure 6a,b. Alvi et al. reported decreased wear (increased wear resistance) up to 400 °C, followed by significant increases in the wear rate at 500 °C for both counterparts [45]. However, Li et al. [30] reported a continued steady decrement in the specific wear rate with temperature up to 600 °C, whereas there was a steady increase in the friction coefficient with temperature from ~0.62 to ~0.80. The CoF values in Alvi et al. steadily decreased with temperature with alumina counterparts (from ~0.48 to ~0.33), while showed mixed trend with steel counter parts (~0.5 to ~0.3 and 400 °C, then increase up to ~0.45 at 500 °C). The decrease in the wear rate in both studies has been attributed to the formation of oxide layers, which provided protection against wear. In Alvi et al.’s study [45], the steel counter ball showed material transfer to the EB-PBF Ti-6Al-4V and formation of an Fe-contaminated, inconsistent TiO2 layer, while alumina promoted a pure, thick (8–12 μm thick), and stable TiO2 glaze layer at all temperatures.
For steel balls, wear is abrasion-dominated at room temperature, adhesive and mildly abrasive at moderate temperatures, and oxidative (related to high material transfer) and mildly abrasive at 500 °C [45]. Li et al. [30] reported an increase in the oxygen percentage with increased temperature; however, they did not provide any reasoning for such an increment. Overall, the wear rate decreased with temperature in both studies up to 400 °C due to tribo-layer formation; however, it increased in Avi et al.’s work beyond 400 °C due to breakage of the glaze layer due to material transfer, which increased abrasive wear mildly via three-body abrasion. The oxide layers contaminated with iron and/or iron oxide formed in Alvi et al.’s work may have had different tribological properties than the pure titanium oxide layer formed in Li et al.’s work, which may have resulted in discrepancies in their results. Additional variation between the two studies could be due to the differences in their testing methods (linear reciprocating motion in the study by Li et al. and rotary motion in the study by Alvi et al.), wear quantification methods (techniques and statistics), and specimens’ surface roughness (0.05 μm in the study by Li et al. vs. 0.30 μm in the study by Alvi et al.). Linear reciprocating motion tends to retain debris in the contact zone, while rotary motion could throw debris away from the contact zone and could expose new surfaces. All of these differences could lead to variation in the wear resistance and friction coefficient of EB-PBF Ti-6Al-4V at various temperatures.

4.1.5. EB-PBF Ti-6Al-4V as a Counterpart

Mohammadhosseini et al. [47] investigated the wear performance of Ultra-High-Molecular-Weight Polyethylene (UHMWPE) against an EB-PBF Ti6Al4V pin in a pin-on-disc test under various loading conditions (1–3 kg) for various durations (0.5–8 h) in both dry and lubricated (Hank’s solution) conditions. Hank’s solution was used to simulate body fluid in biomedical implant applications. This study does not discuss much of the wear endured by the EB-PBF Ti-6Al-4V since it was used as an abrader. However, this study provides the wear rates and friction coefficients of plastics against EB-PBF Ti-6Al-4V and discusses their compatibility. After 8 h of testing, a steady-state wear regime was established, with the initial wear rates being higher than the long-term rates.

4.2. Effects of Build Variability of EB-PBF Ti-6Al-4V on Tribological Properties

Due to variation in build orientation, location, and part thickness, the tribological properties of EB-PBF Ti-6Al-4V may vary within the build envelope. The following sub-sections briefly discuss the tribological performance of EB-PBF Ti6Al4V, as per the current state of knowledge.

4.2.1. Specimen Thickness

Toh et al. [21,28], from the same research group as Khun et al. [27], studied the wear properties of mirror-like polished EB-PBF and cast Ti-6Al-4V against 100Cr6 steel counter balls under 1 N loads (sliding velocity = 2 cm/s) for 50,000 laps at room temperature. In their investigation on the effects of thickness variation from 0.5 to 20 mm on the wear behavior of EB-PBF Ti64 [21,28], it was found that the thinner the specimen, the higher the microhardness and thus the lower the wear rate. The thinner specimens (0.5 mm and 1 mm) had an acicular α’ martensite phase (BCT) in their microstructure (see Figure 7a,b), which was formed due to rapid solidification and a higher cooling rate. The thicker the specimen, the greater the stored thermal energy and thermal mass, which led to a coarser grain size and lower microhardness [48,49]. The thicker specimens (5 mm to 20 mm) had an α phase (BCC) and a β phase (HCP) in their microstructure and showed less hardness than the thinner specimens (see Figure 7c–f). Vicker’s hardness of EB-PBF Ti-6Al-4V specimens of varied thickness was between 330 and 380, while cast titanium has a microhardness of 290–310 HV (see Figure 7g).
The thinnest specimen (0.5 mm) had the lowest wear rate of ~115 × 10−5 mm3/Nm (~363 HV), and the thickest specimen (20 mm) showed the highest wear rate of ~135 × 10−5 mm3/Nm (~334 HV). However, the coefficient of friction was lower for the thinner specimens, which is counterintuitive, probably due to the higher roughness and dimensional inaccuracies of the thinner specimens [50,51,52].

4.2.2. Build Orientation

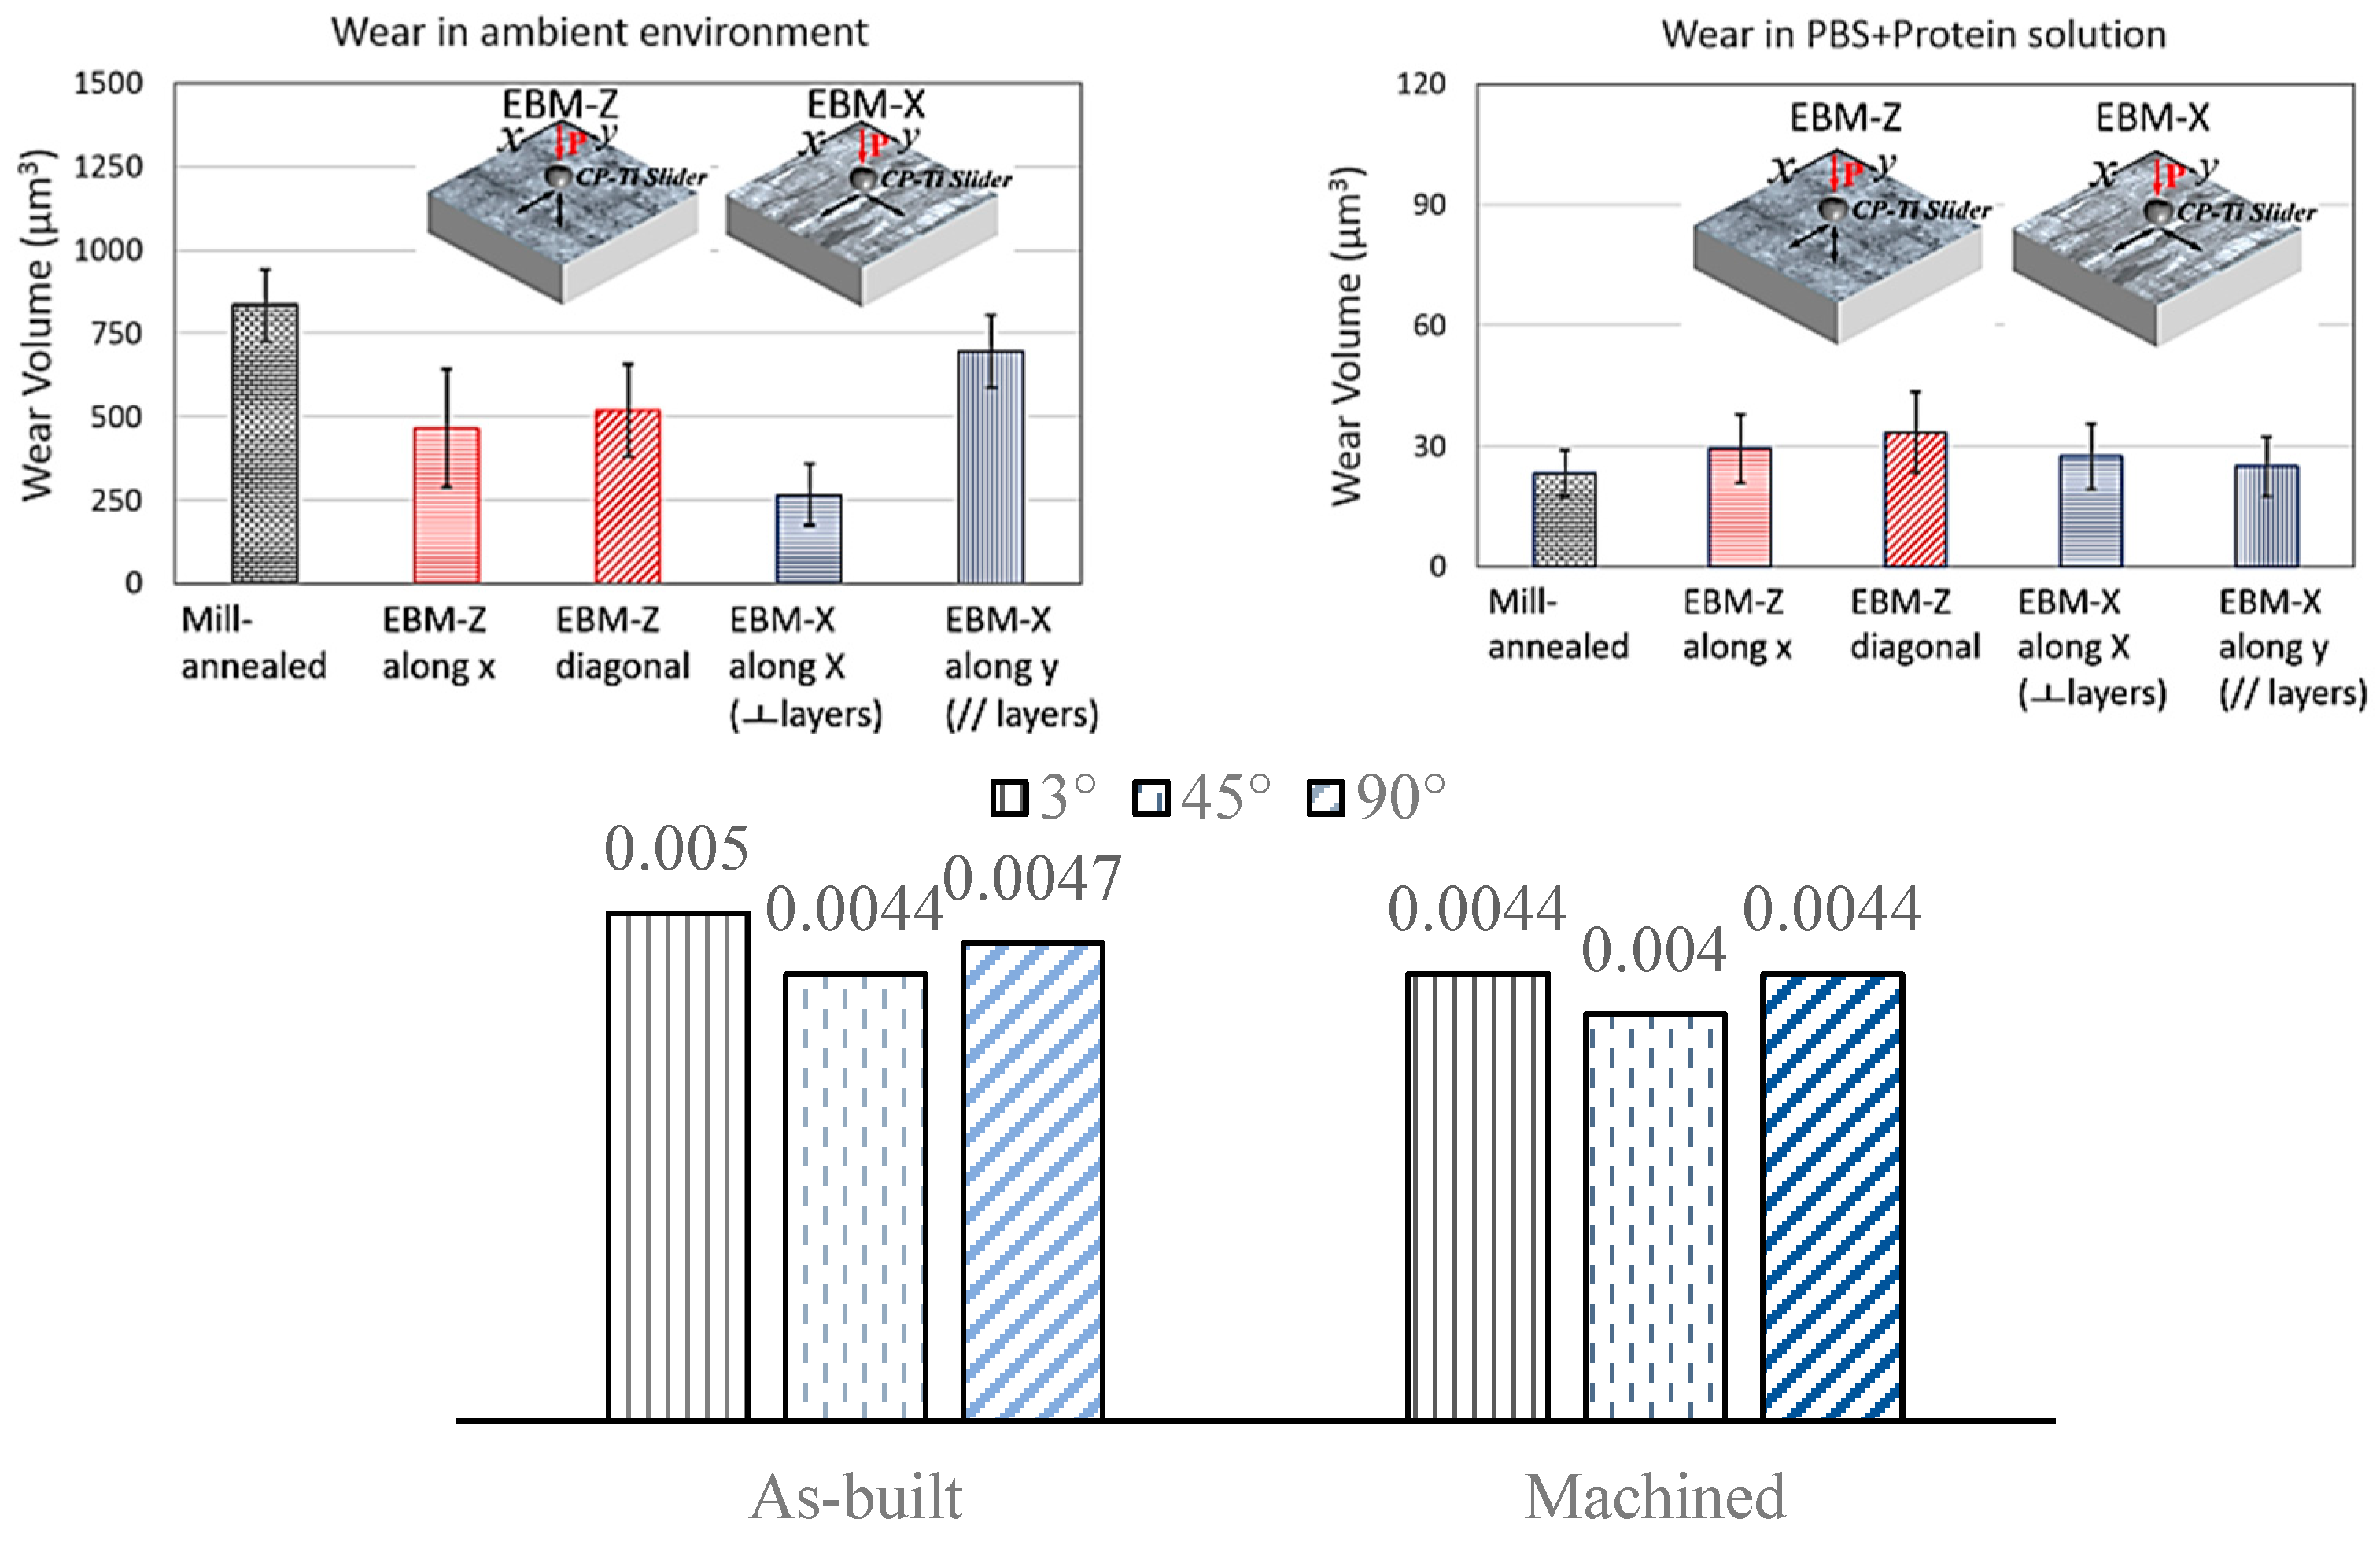
The build orientation is the angle between the up-skin surface of the built specimen and the top surface of the build plate (the XY plane). The microstructural gradient, microhardness, and surface roughness change with orientation. Ryu et al. conducted a sliding test on two faces (along X and Y) of vertically and horizontally built Ti6A14V alloys in both dry and lubricated conditions [31]. The wear resistance of Ti6Al4V is associated with the layer orientation. Sliding parallel to the layer resulted in more wear than sliding perpendicular to the layer (see Figure 8). Thus, the anisotropic columnar grains are sensitive to the sliding direction. However, usage of lubricating media (i.e., a PSB solution) during sliding reduced wear anisotropy significantly due to lower residual stress. Bin Abdullah and Ramulu also reported ~10% wear rate variation during rotary abrasion of EB-PBF Ti-6Al-4V due to a change in the build orientation, which was attributed to variation in the H/E ratio, microhardness, and surface roughness [35]. Table 3 presents the relevant friction coefficients for different build orientations.

4.2.3. Build Location

Bin Abdullah [9] briefly studied the effects of build location (height and radial location) on wear properties in EB-PBF Ti6Al4V during a rotary abrasion test against a Silicon Carbide (SiC) abrasive. Slight variations with respect to build height and radial location have been reported. They reported variation in wear properties with changes in the build height and radial direction due to the local microstructure, the microhardness, and variation in the thermal mass.

4.2.4. Lattice/Cellular Structure with Designed Porosity

Longhitano et al. [42] investigated the effect of the pore size on the electrochemical properties, wear, and tribo-corrosion behavior of EB-PBF Ti-6Al-4V lattice structures at room temperature for orthopedic implants. They built lattice structures with variable pore sizes (500, 700, and 900 µm) and compared their performance to solid bulk samples. Depending on the sliding time from 5 to 20 min, the friction coefficients were found to be in the ranges 0.63–0.72, 0.66–0.79, 0.73–0.79, and 0.63–0.66, respectively, for lattices with pore sizes of 500, 700, and 900 µm and solid bulk Ti-6Al-4V when slid under 1 N loads. The corresponding average specific wear rates when converted to mm3/Nm were 5.72 × 10⁻⁴, 6.60 × 10⁻⁴, 6.21 × 10⁻⁴, and 5.76 × 10⁻⁴ mm3/Nm. The lattices demonstrated abrasive and adhesive wear behavior similar to solid bulk materials during dry sliding and tribo-corrosion wear in a PBS solution while showing no trend and insignificant statistical variation. They concluded that lattice-structured implants can achieve the desired mechanical properties to match bones without compromising tribological performance, although porous materials, especially those with 50% porosity, may impact long-term durability.

4.3. Effects of Post-Processing on Tribological Properties of PBF Ti6Al4V

Post-processing methods are often applied to L-PBF-built and EB-PBF-built metals to enhance mechanical, fatigue, and roughness properties. Several post-processing methods have been reported to improve the tribological performance of EB-PBF Ti-6Al-4V, which include heat treatment [25,31,39,51], machining [35,36,38], and machining coupled with heat treatment [37]. The following sub-sections discuss how post-processing improves or influences wear resistance in EB-PBF Ti-6Al-4V.

4.3.1. Heat Treatment

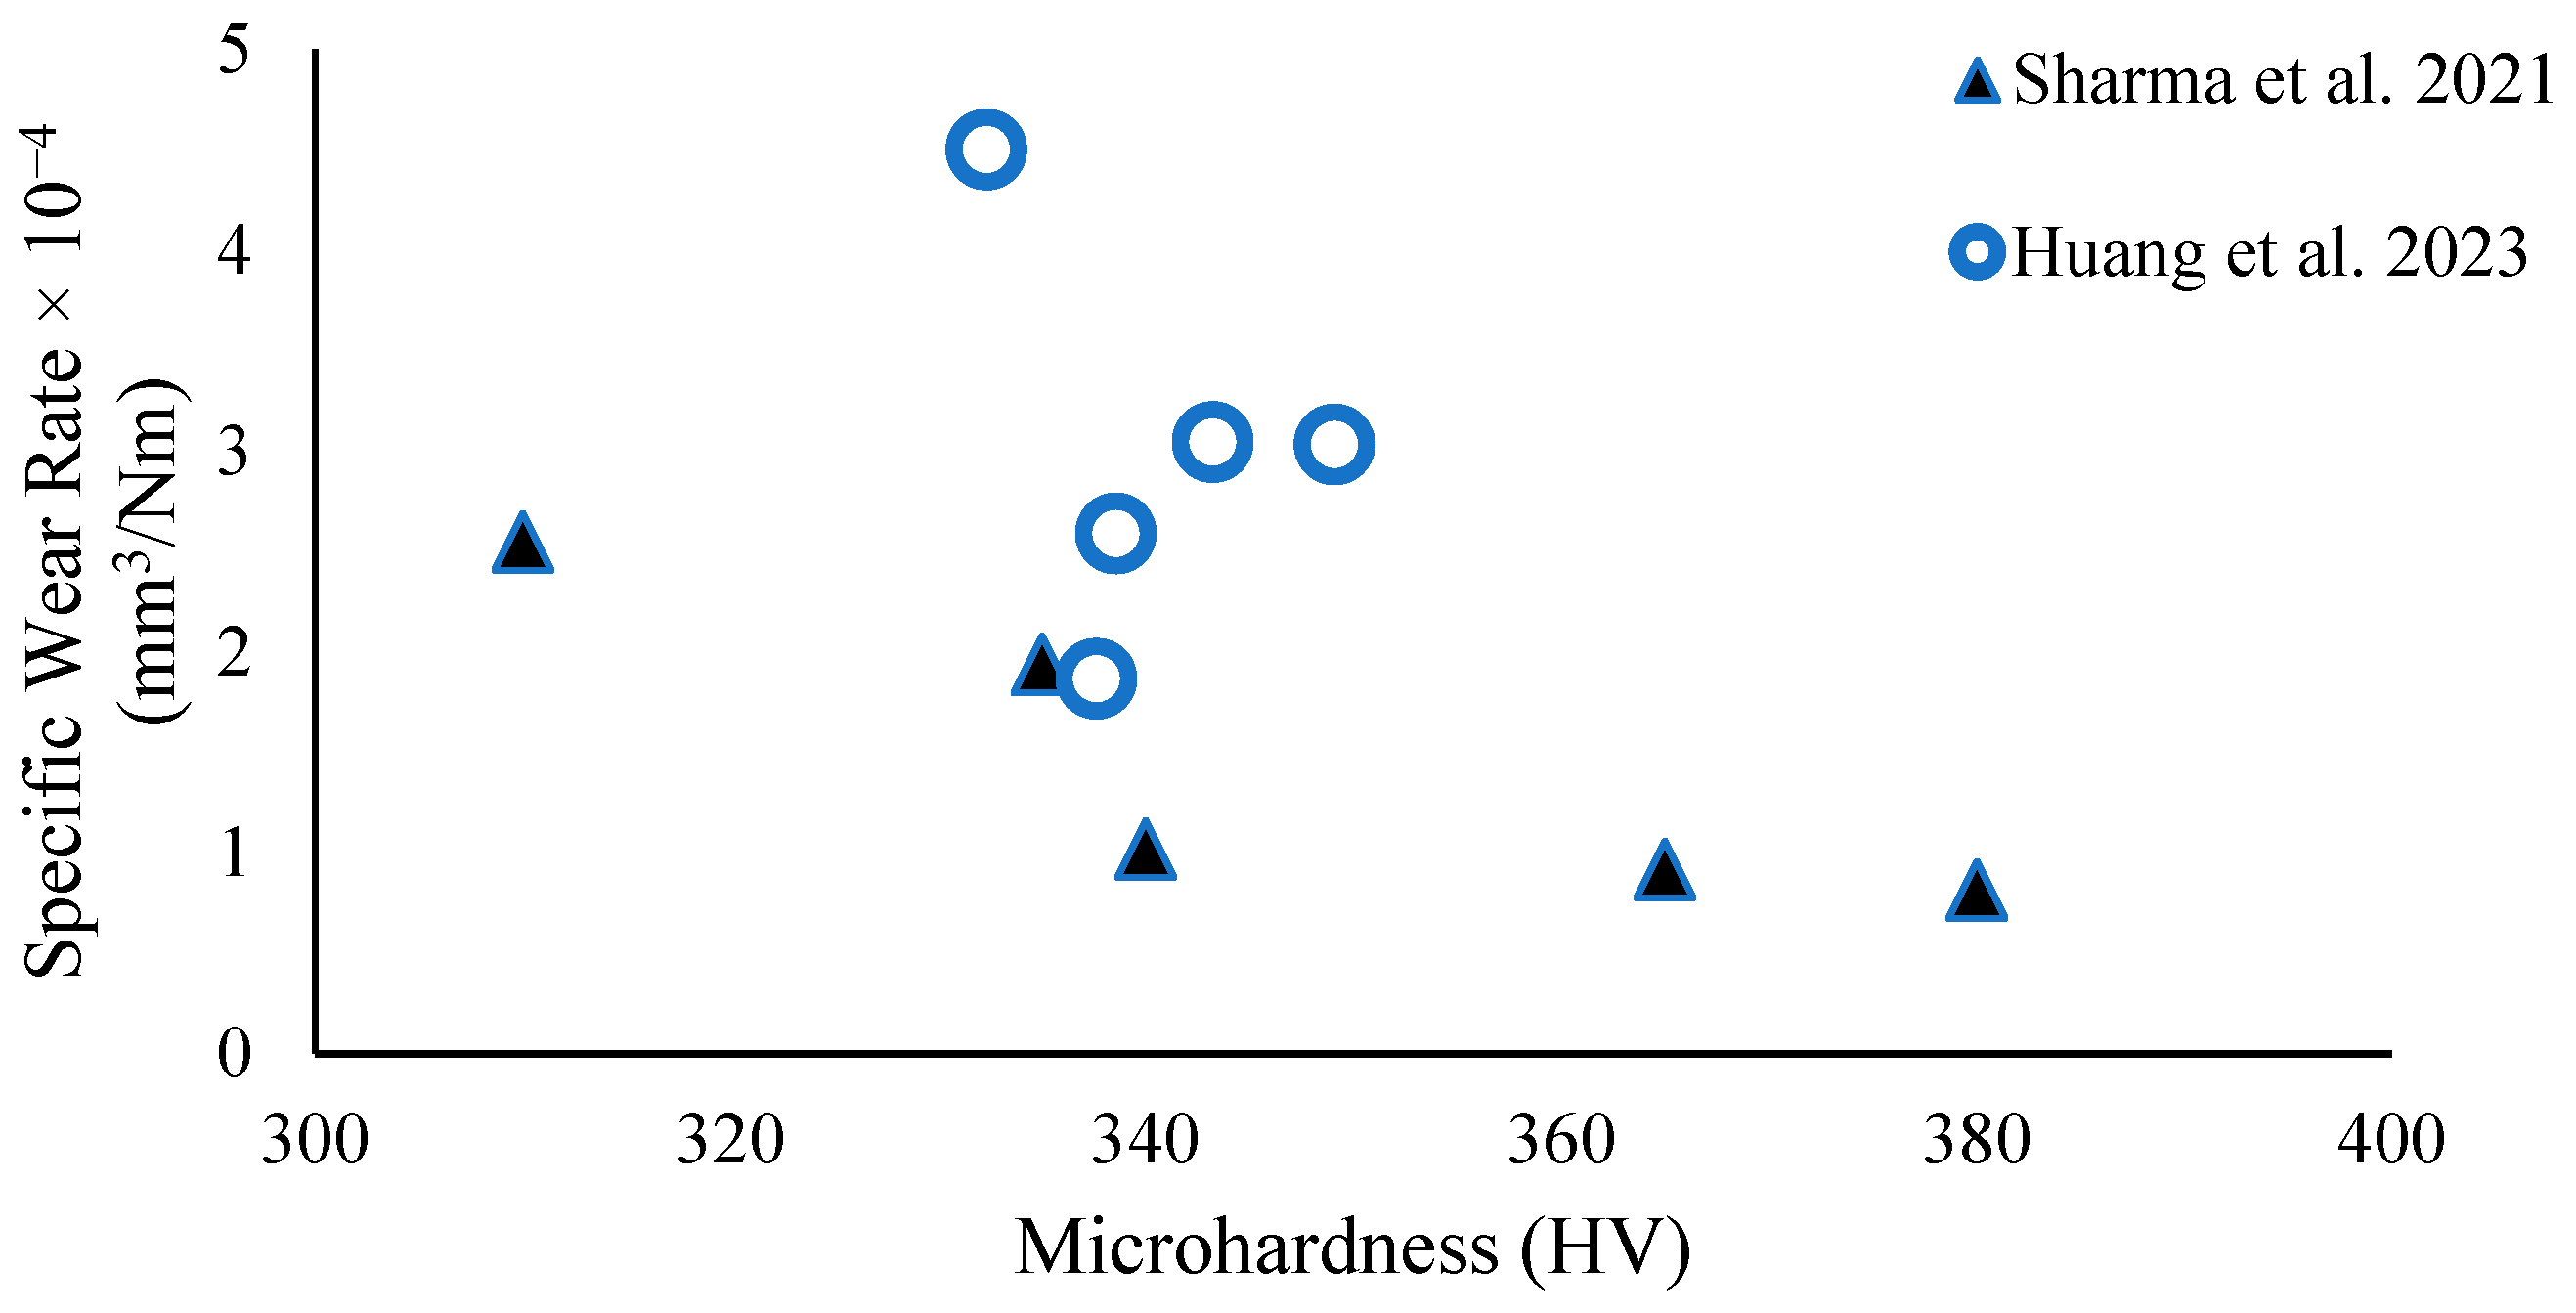
Heat treatment is often conducted to reduce residual stress in additively manufactured metals. Pushilina et al. (2019) [46] conducted the first study on the wear properties of EB-PBF-built heat-treated Ti-6Al-4V. They held EB-PBF Ti6Al4V specimens at 750 °C for 1 h in a vacuum (the cooling method was not reported), which resulted in recrystallization and reduced the microhardness from 416 HV to 377 HV [46]. Although the hardness decreased, the specific wear rate also decreased from 0.62 × 10⁻³ mm3/Nm to 0.57 × 10⁻³ mm3/Nm. The author reported reduced strength and ductility after the heat treatment. Such a conclusion is counterintuitive based on the general relationship between wear, microhardness, and strength. Although the authors concluded that ~8% of wear variation due to the heat treatment was negligible, their conclusion is incomplete. In addition, their research lacks a proper description of the wear testing methods and the analysis procedure. Sharma et al. [26] and Huang et al. [40] provided greater details on the effects of heat treatment on EB-PBF Ti-6Al-4V with extensive wear analysis. Figure 9 respectively represent their microhardness vs. specific wear rate plot. Table 4 shows the approximate mean coefficient of friction, hardness and specific wear rate values. For comparative analysis, the specific wear rate’s unit has been transformed into equivalent unit of mm3/Nm
Sharma et al. [26] compared the tribological properties of EB-PBF Ti-6Al-4V after four heat treatment methods in comparison to as-built samples against EN-31 steel counterparts. The methods were as follows: heat treatment at 920 °C or 1040 °C with either water quenching (920-WQ or 1040-WQ) or furnace cooling (920-FC or 1040-FC). The microstructural analysis revealed that heat treatment significantly altered the α and β phase morphologies, with the water-quenched samples developing acicular structures and α’ martensite, while the furnace-cooled samples showed coarser α-phase formations. The 1040-WQ specimens exhibited the best wear resistance due to their higher hardness from martensitic structures. Conversely, the furnace-cooled samples, especially the 1040-FC samples, showed the poorest wear performance due to coarse microstructures resulting in lower hardness. The hardness trend was as follows: 1040-WQ (highest) > 920-WQ > as-built > 920-FC > 1040-FC (lowest). The 1040-WQ samples had a 9% reduction in the wear rate vs. the as-built samples, while the 1040-FC samples had a 27% increase. This study concluded that appropriate heat treatment, specifically water quenching from above the β-transus temperature, can significantly improve the wear resistance of EB-PBF Ti-6Al-4V.
Huang et al. [40] heat-treated EB-PBF Ti6Al4V samples at 600 °C for varying durations (1–9 h), followed by furnace cooling, and conducted dry sliding friction tests using Si3N4 ceramic balls. The results revealed that HT3 (the 3 h treatment) achieved the lowest coefficient of friction (~0.45) due to the formation of metal oxide films that provided good anti-friction properties but exhibited the highest wear volume due to the lowest microhardness (332.34 HV). In contrast, HT9 (the 9 h treatment) maintained similarly low friction (~0.449) but demonstrated significantly better wear resistance through a combination of adhesive and corrosive wear mechanisms and greater hardness (337.63 HV). This study concluded that the heat treatment duration critically influences the surface oxide content, grain size, and hardness, which collectively determines the tribological performance of an EB-PBF Ti6Al4V alloy. Herrera [53] performed a deep cryogenic treatment on EB-PBF Ti-6Al-4V and compared it with an as-built specimen. He reported no significant improvement in wear resistance during an abrasive wear test. It is important to note that in cryogenic treatment, EB-PBF Ti6Al4V is treated in cryogenic conditions before wear testing, whereas in cryogenic machining, tool–workpiece cryogenic coolant is used at the interface during the machining process.

4.3.2. Machining

Bruschi et al. [36,37,38] applied machining as a post-processing technique to increase the wear resistance of EB-PBF Ti6Al4V in multiple studies. Bruschi et al. (2016) [38] studied the friction and wear properties of EB-PBF and wrought titanium after turning in dry and cryogenic conditions. Their feed rate was 0.1–0.2 mm/rev, and their cutting speed was 50–80 m/min, with a cut depth of 0.25 mm. Table 5 represents the detailed results obtained in their research. Machining induces higher microhardness and compressive residual stress, and cryogenic machining induces higher microhardness than dry machining. They reported lower COF values for both EB-PBF and wrought Ti6Al4V cylinders machined under cryogenic cooling compared to dry machining. The lower COF of cryogenic cutting was attributed to the higher initial microhardness. Despite affecting the other surface properties, the surface roughness was not influenced significantly by the cooling methods. In dry machining, resistance to sliding or abrasive wear increased with the feed rate. However, cryogenic machining resulted in increased weight after wear testing due to an increase in adhesion; therefore, there was a reduction in abrasive wear. Bruschi et al. reported the presence of a larger amount of CoCrMo from the sliding flat plate adhered to the cryogenically machined worn Ti-6Al-4V cylinders compared to the dry-machined Ti-6Al-4V. The friction coefficient also reduced for cryogenically machined specimens [38].
In a subsequent study in 2018, Bruschi et al. [36] studied the effects of both cryogenic machining and wet machining in increasing wear resistance with one pass or five passes at a constant feed rate (0.1 mm/rev) and a constant cutting speed (60 m/min). EB-PBF Ti6Al4V samples were wear-tested against a Co-Cr-Mo alloy in a saline solution. Cryogenic cooling showed lower volume loss compared to wet conditions due to a hardened and more compressed surface. The surface roughness, especially the reduced skewness of the cryogenically machined EB-PBF specimens, played an influential role in enhancing the wear resistance. Reduced skewness means fewer peaks to interact with the sliding material. The deformed layer thicknesses of the cryogenic specimens were 17.2 μm (one pass) and 29.4 μm (five passes), whereas the deformed layer thicknesses of the wet-machined specimens were 6.6 μm (one pass) and 21 μm (five passes). Cryogenic machining also induced higher compressive residual stress than wet machining. Similarly, the increased number of passes induced more compressive residual stress and higher hardness on the machined surface, which resulted in lower wear resistance after five passes. The average wear volumes for wet machining were 0.011 mm3 (one pass) and 0.013 mm3 (five passes), whereas the average wear volumes were 0.010 mm3 (one pass) and 0.007 mm3 (five passes) for the cryogenically machined EB-PBF Ti-6Al-4V specimens.

4.3.3. Combined Machining and Heat Treatment

Bruschi et al. (2017) [37] combined machining and heat treatment to further increase the wear resistance of EB-PBF Ti6Al4V. Their process parameters were as follows: a feed rate of 0.1–0.2 mm/rev, cutting speeds of 80 m/min and 110 m/min, and a cut depth of 0.25 mm. They further performed the heat treatment on half of their specimens to study the effects of machining coupled with heat treatment. The machined Ti6Al4V samples were heat-treated at a temperature of 980 °C in inert gas in order to remain with α + β microstructure, followed by cooling to room temperature at a cooling rate of 20 °C/s. Reciprocating sliding wear tests were conducted in a saline solution in a temperature-controlled environment. The results are summarized in Table 6. The additional heat treatment on machined EB-PBF specimens resulted in a lower coefficient of friction, a reduced wear rate, and a higher degree of adhesive wear. The enhanced tribological performance is attributed to the increased surface hardness resulting from the heat treatment. Bertolini et al. [44] reported that cryogenic cooling machining increased the tribo-corrosion resistance of EB-PBF Ti-6Al-4V.

4.4. Implications of EB-PBF Process’s Influence on Tribological Properties of Ti6Al4V

This section discusses the effects of process-induced porosity, the powder condition, and process parameters on tribological properties.

4.4.1. Influence of Process-Induced Roughness

Most studies have conducted tribological tests in polished conditions [20,26,27,29,30,31,33,45], whereas few studies have conducted tribological tests in either as-built [25] or machined [36,37,38] conditions or both [35,39]. Table 7 shows the wear resistance, the friction coefficient, and the corresponding roughness conditions reported in the literature. The as-built surface roughness is pretty high due to partly melted balls on the solidified surface, and the roughness also changes with the build orientation due to partly melted powder and changes in the contour line spacing along the build direction with changes in orientation [54].
In a fretting test against EB-PBF Ti-6Al4V [39], the author was unable to calculate the specific wear rate of EB-PBF Ti-6Al4V in the as-built condition due to difficulty in setting a reference plane, while the specific wear rate was reported to be 4.3 × 10⁻⁵ mm3/Nm. In the fretting test of the as-built specimen (Ra = 8.82 µm), the friction coefficient was 2.2; it was 1.29 (Ra = 1 µm) for the machined specimen, which was ~70%, due to roughness effects. This study found that while the surface roughness primarily influences friction behavior, the material’s microstructure dominates the energy dissipation mechanisms. In the study by Al-Tamimi et al. [25], EB-PBF specimens showed slightly higher wear rates at low loads due to their rougher surfaces (Ra = 19.16 μm for EB-PBF vs. 15.11 μm for L-PBF) but demonstrated better overall wear resistance at higher loads due to hardness domination at higher loads. L-PBF specimens also showed better stability and smaller oscillations in the friction coefficient.
In a rotary abrasion wear test against abrasive alumina, the as-built surface’s roughness also affected the wear resistance of EB-PBF Ti-6Al-4V [35]. The greater roughness resulted in greater wear until steady-state wear was reached in all build orientations. The 3° specimens experienced 13–15% more material loss compared to the other orientations due to higher surface roughness (Sa ≈ 19.29 μm) and the presence of sharp-edged asperities formed during the printing process. Machining significantly improved wear resistance and reduced anisotropy by removing surface irregularities and increasing hardness through strain hardening.

4.4.2. Powder Reuse and Wear Properties

After the completion of each build, Ti6Al4V powders are re-collected using a powder recovery system (PRS) and sieving. During this process, powders accumulate more oxygen from the environment and undergo physical deformation. The oxygen content in the powders increases due to oxygen diffusion into the powders during the preheating process and powder handling [55]. The flowability of the powders also decreases as the powder size increases and the sphericity decreases with build cycles [55]. The tensile properties are affected by the increase in the oxygen content after 12 build cycles, when the oxidation content increases beyond 0.2% [16]. The ductility decreases as the build cycles continue and the oxygen content increases. However, the ultimate tensile strength increases with the oxygen content. Oxygen often acts as a stabilizer for HCP α-phase, as it strengthens the solid solubility of Aluminum in the α-phase. Also, the nanohardness of a powder particle’s surface increases with powder reuse due to oxygen accumulation. A significant trend was observed in powder cores, where the nano-hardness in powder cores increased from virgin powder until the 20th build cycle. Bin Abdullah [9] reported increases in microhardness and wear resistance with powder reuse in their initial study. Grell et al. also reported an increase in microhardness with build cycles due to an increase in the oxygen content [56].

4.4.3. EB-PBF Process Parameters and Tribological Properties

The relationship between wear properties and EB-PBF process parameters for Ti-6Al-4V is not reported in the literature. Xu et al. conducted the only study on the effects of the EB-PBF beam current on wear and hardness during the fabrication of Inconel [57]. They reported a decrease in microhardness with an increase in the beam current from 10 mA to 16 mA, which resulted in a higher wear rate, a larger wear volume, and a higher friction coefficient [57]. Although not explicitly reported in the literature, the effects of other parameters can be predicted by the relationships of porosity, hardness, and roughness with EB-PBF process parameters. Hatch spacing is disproportionally related to densification and proportionally related to porosity [2,17,58]. Thus, wear may increase with hatch spacing.

4.5. Mechanical and Tribological Properties

In most studies, the tribological properties and variation in wear resistance within EB-PBF Ti-6Al-4V have been identified due to the major influence of changes in microhardness due to heat treatment [26,40,46] and a thickness-dependent microstructure [21,28], while few studies have identified hardness as a key reason for the variation in wear resistance in comparison to conventionally produced Ti-6Al-4V [20,21]. Bin Abdullah et al. identified microhardness (H) and the ratio of hardness to Young’s modulus (H/E) as a possible reason for variation in wear resistance within EB-PBF Ti-6Al-4V [35,41].
However, Li et al. stated that wear resistance is governed by the interaction between strength and ductility (% of elongation), rather than hardness alone [29]. Higher strength reduces the amount of deformation under a load, while higher ductility increases the tolerable amount of material deformation before fracture. The interaction between strength and ductility could surpass the effects of hardness. In their study, LPBF samples, despite having the highest hardness due to their martensitic structure, did not show superior wear resistance because their lower ductility led to easier fracture and material removal. Conversely, the softer but more ductile EB-PBF and CP samples could withstand greater deformation before fracturing, resulting in similar overall wear performance.

5. Wear Mechanism

5.1. General Wear Mechanism of EB-PBF Ti-6Al-4V

Overall, the wear mechanism was identified as abrasive, adhesive, and oxidative in multiple studies, along with their combination. Titanium, being highly reactive to oxygen, rapidly forms an oxidized layer of TiO2. As the EB-PBF process is conducted in a high-vacuum environment, the thickness of the surface oxide is minimal after the manufacturing process. The oxide layer formed during the wear process plays a key role, as its composition, thickness, and nature were determined to influence the wear mechanism. The wear mechanism occurs through multiple steps involving abrasion, oxide-layer dynamics, and tribo-layer formation. Toh et al. [21] reported four stages of the wear mechanism: the wearing-in period, cushioning of the oxide layer, breaking the oxide layer into fragments, and stabilization. Figure 10 represents the schematics of wear mechanism by Toh et al. [21]. As wear begins (in the wearing-in period), the counterparts directly contact the oxide layer, which prevents direct counterpart–metal contact and is termed cushioning. As wear progresses, the oxide layer is fragmented into oxide debris because of repeated loading and stress cycles during sliding, eventually allowing direct counterpart–Ti-6Al-4V contact. Usually, the CoF starts to stabilize when the wear reaches a steady state. As the new intact metal is exposed, further oxidation occurs, forming a tribo-layer that prevents direct contact between the Ti6Al4V and the counterpart, thereby preventing wear. The friction coefficient then stabilizes. During fragmentation of the oxide layer, three-body wear is often expected, resulting in high variation in the friction coefficient. However, the tribo-layer starts to provide protection in the steady state, and the wear mode becomes two-body abrasion. Both the thickness and oxygen content of the tribo-layer increase with further sliding, resulting in a smaller wear gradient. However, the wear mechanism can also be altered due to the nature of the tribo-layer, which is dependent on the counter-part’s materials and the temperature. As mentioned earlier when discussing a study by Alvi et al. [45], steel counterparts resulted in Fe transfer to the oxide layer, which caused inconsistency in layer thickness during sliding, with loose and less adherent wear debris, which promoted three-body abrasion. On the contrary, a ceramic counterpart contributed to consistent tribo-layer formation, as there was no material transfer.
Other reported wear mechanisms in EB-PBF Ti-6Al-4V include ploughing, grooving, and oxidation [25]. In the presence of passivating media, i.e., PBS [31], wear is mitigated through chemical interaction and viscous film formation to protect the sliding part. Erosive wear is characterized by shearing, micro-cutting, and ploughing in the direction of the erodent, regardless of the build orientation. However, the shape of the erosion scar (the sphericity, circularity, and perimeter) is influenced by the angle of attack, as well as the surface conditions, whether as-built or machined [41].

5.2. Influence of Microstructure and Process on Wear Mechanism

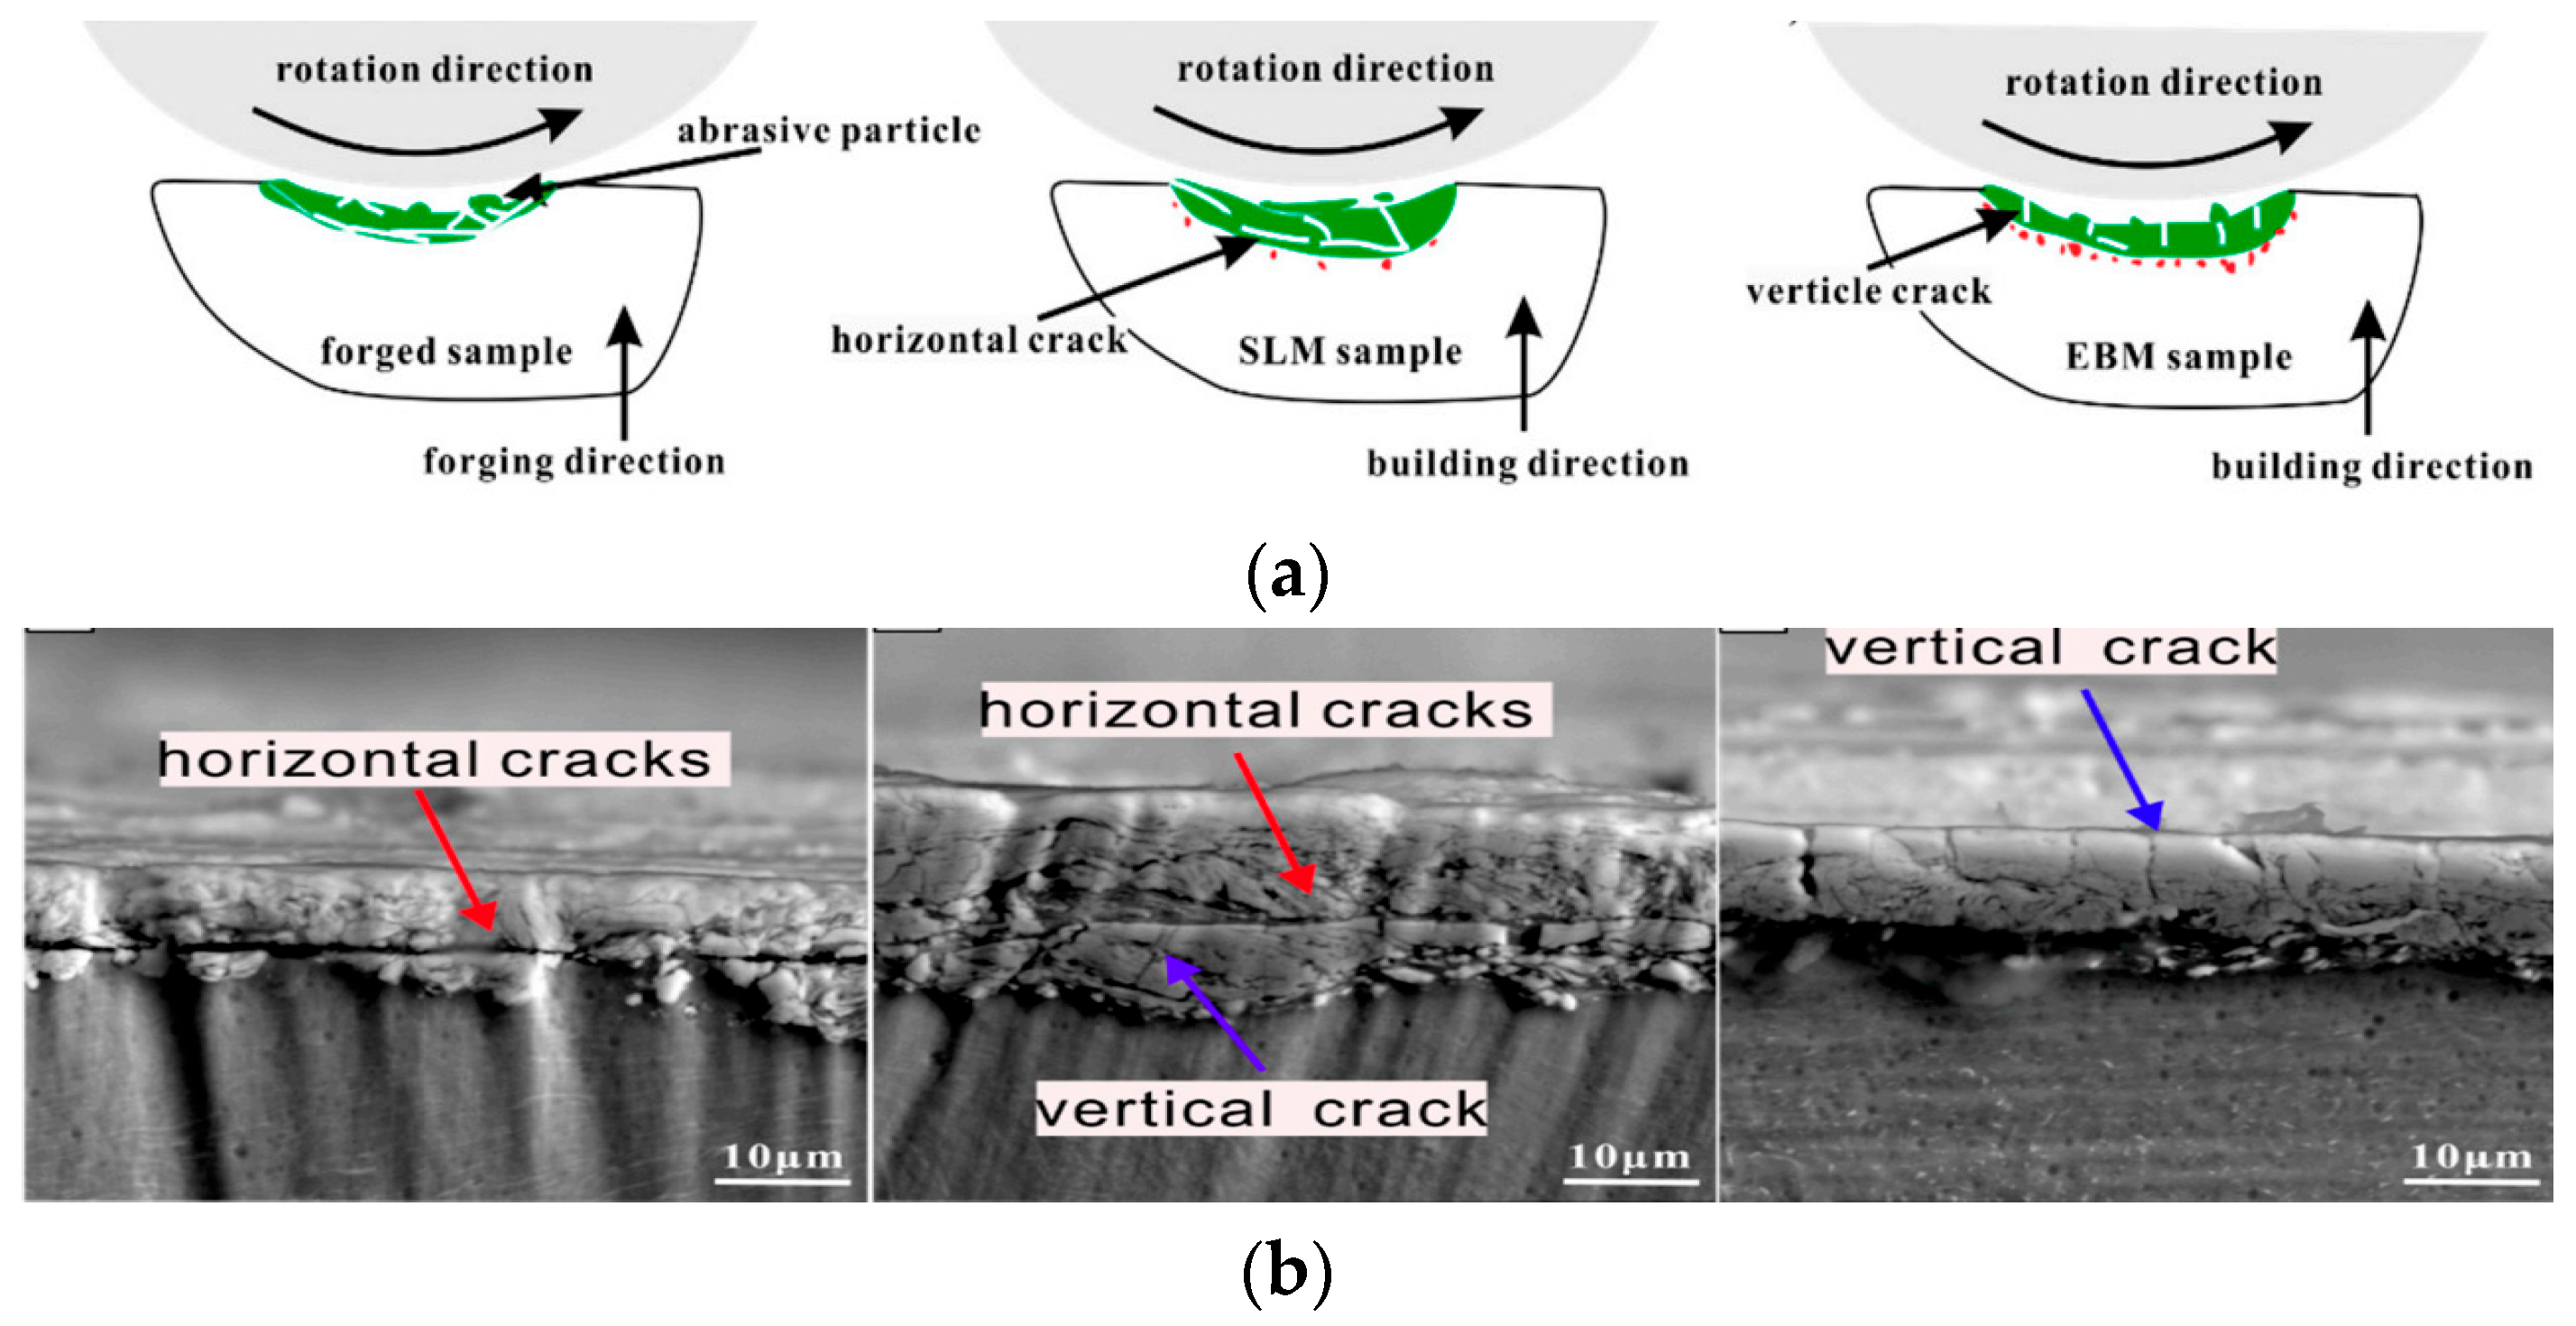
The wear mechanism is also influenced by the process-induced microstructure, microscopic crack formation, and porosity during PBF processes, depending on the application. Regarding the microstructure, the general Hall–Petch relation remains valid. In research by Huang et al. and Sharma et al., wear resistance increased with increased microhardness in most cases [26,40]. A finer microstructure was associated with greater microhardness, as reported by Huang et al., Sharma et al., and Toh et al. [21,26,40]. In Zhang et al.’s study [20] as shown in Figure 11, EB-PBF samples experienced less wear despite lower hardness than L-PBF samples due to predominantly vertical cracks that resisted delamination wear, while L-PBF and forged samples formed horizontal cracks, leading to severe tribo-layer delamination and material removal. The columnar microstructure affected the vertical direction of the cracks, whereas the forged specimen’s microstructure played a role in horizontal crack formation. In the as-built condition, the wear mechanism was dominated by the surface roughness when the load was < 2 N. In such a case, EB-PBF specimens with more surface asperities led to increased initial contact stress and material removal compared to L-PBF specimens. However, at higher loads (6–14 N), the hardness had a greater effect on the wear rate, regardless of the process, and could be correlated with microstructural features.
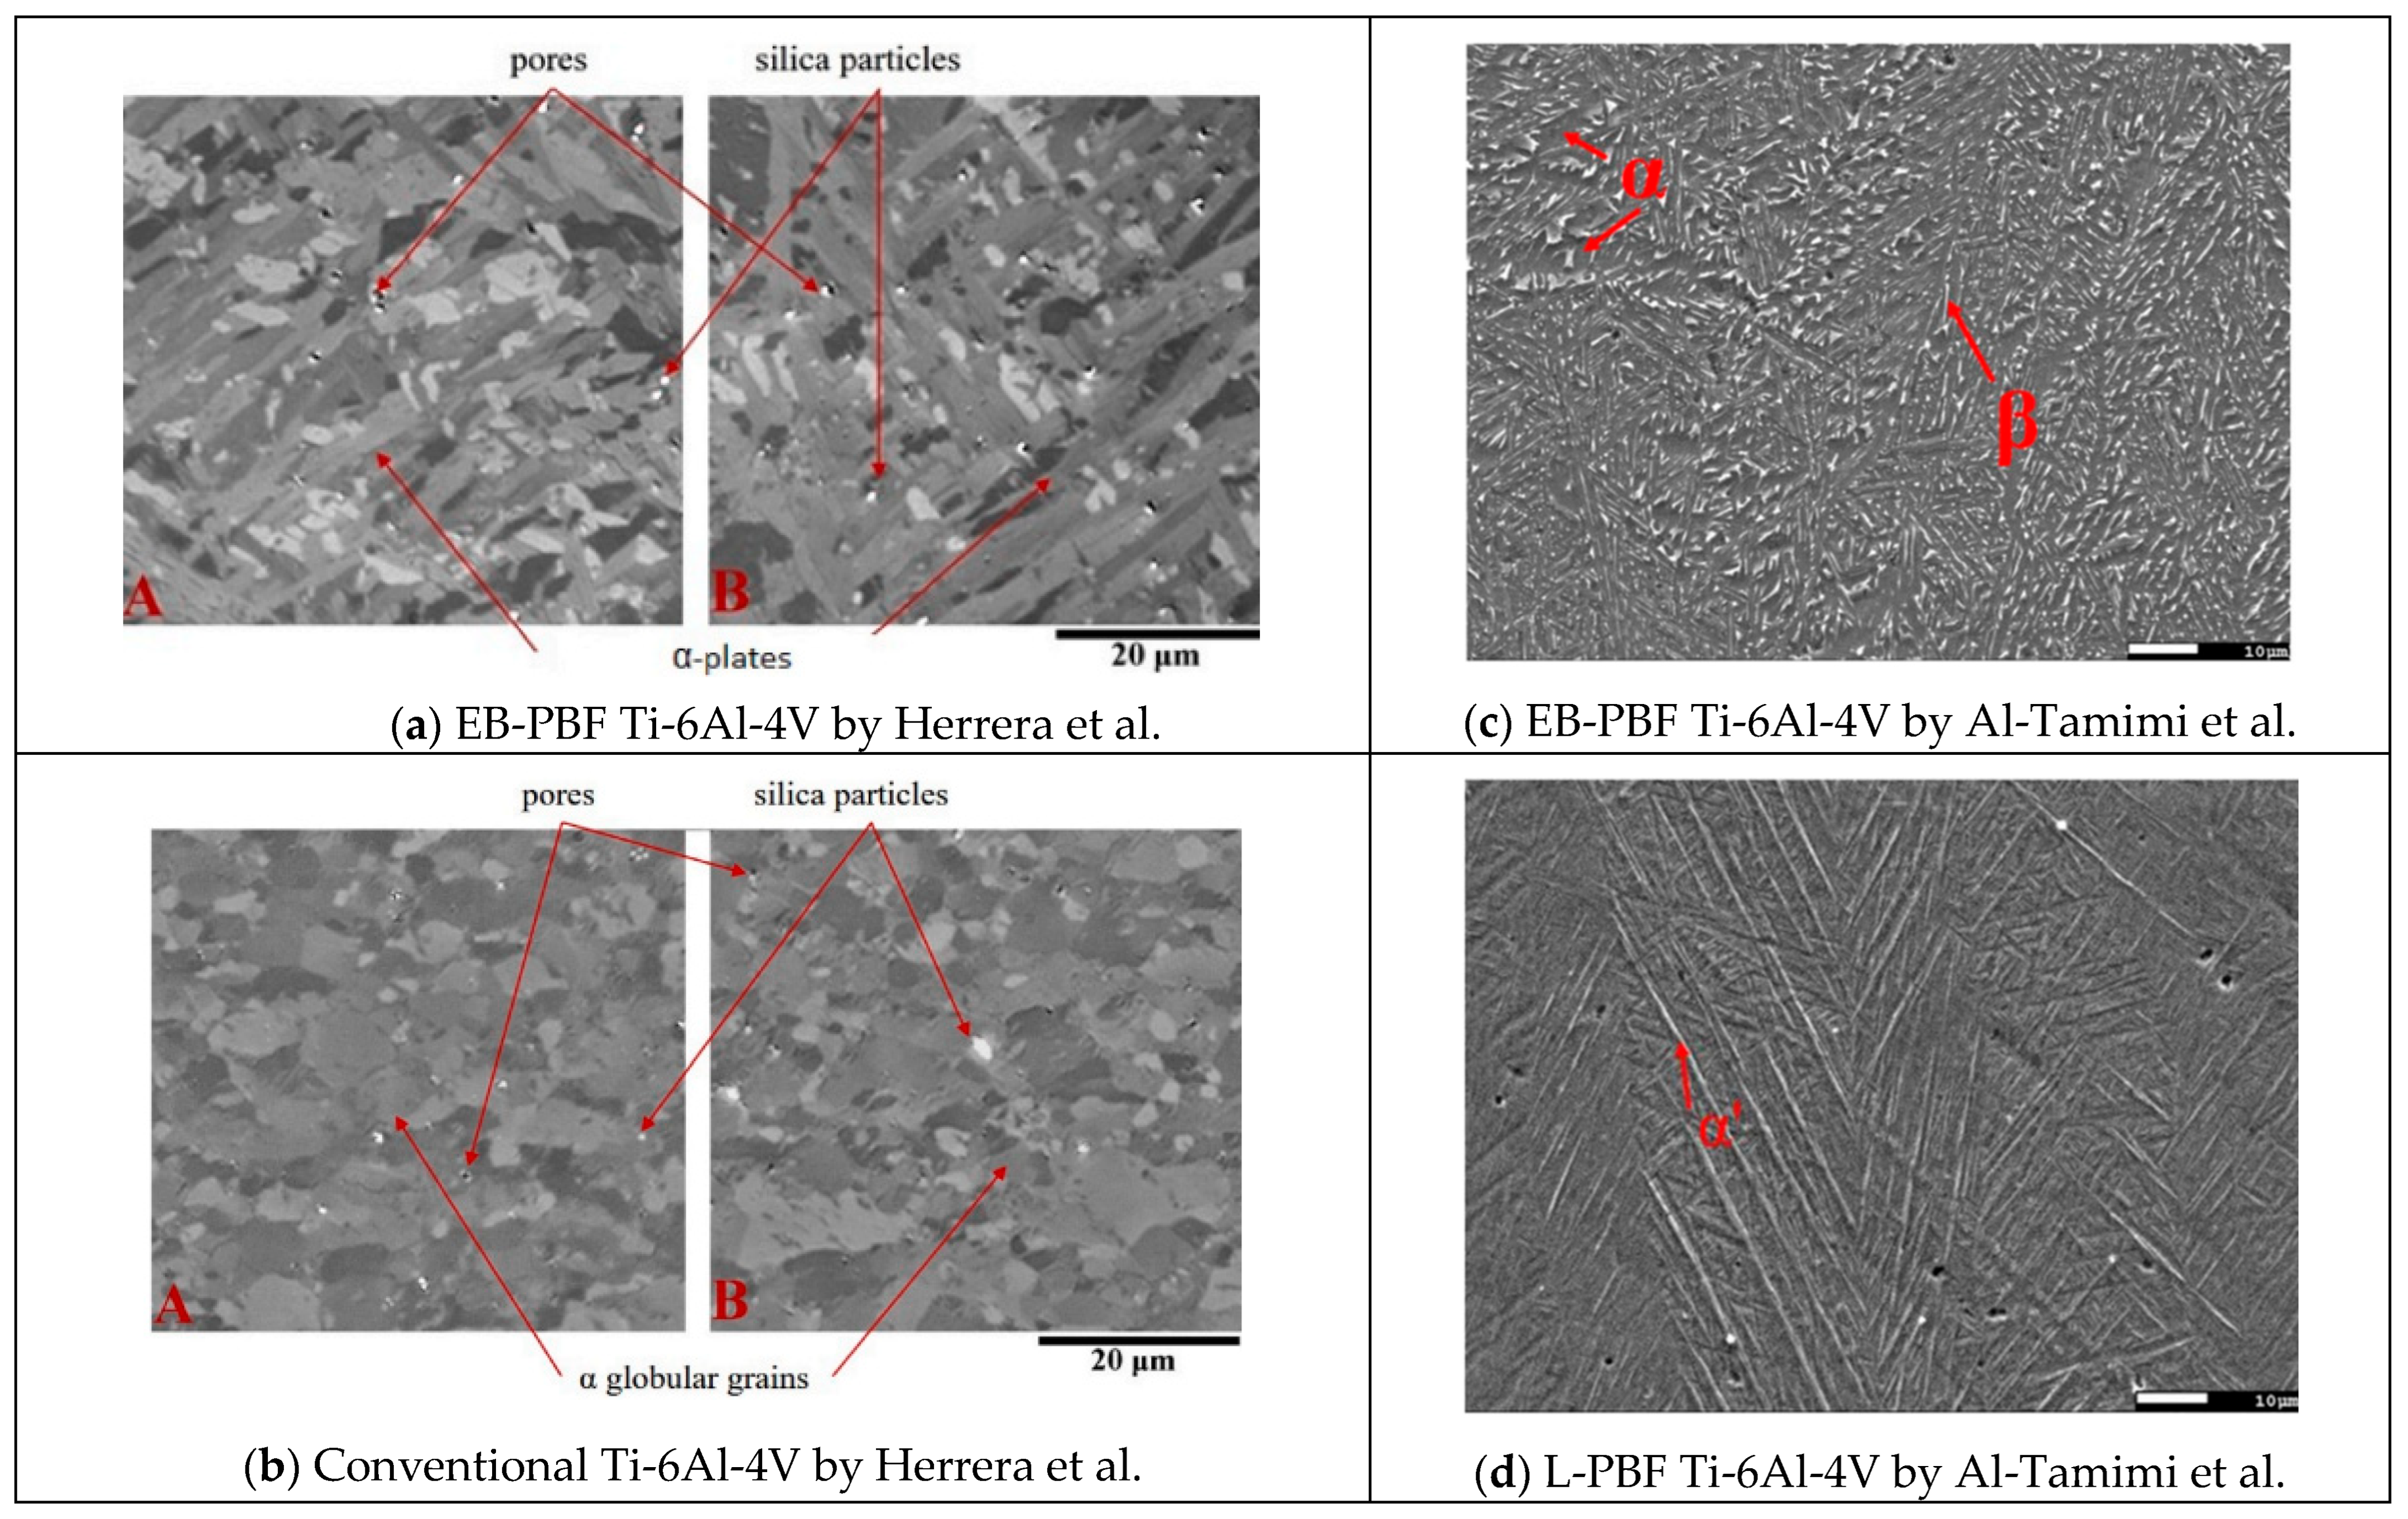
Figure 12 represents the EB-PBF Ti-6Al-4V microstructure reported by Herrera et al. [23,53] and At-Tamimi et al. [25]. In the abrasive wheel test, the wear mechanisms of EB-PBF and conventional Ti-6Al-4V differed due to microstructural and defect variations between the two manufacturing processes [23]. EB-PBF samples had 6.8 times as many pores per unit area. The higher porosity created stress concentrators that facilitated abrasive particle entrapment, leading to more scratching and material removal in EB-PBF samples. The conventional Ti-6Al-4V, with an equiaxed globular microstructure, primarily experienced three-body abrasive wear characterized by rolling marks and wavy horizontal deformation patterns across the wear scar. In contrast, the EB-PBF Ti-6Al-4V, with a lamellar α + β microstructure and more porosity, predominantly showed two-body abrasion. The abrasive particles became trapped in the pores and acted as fixed micro-cutting tools rather than rolling elements, resulting in more wear. Herrera et al. [23] reported a deeper plastically deformed layer (~10 μm) in the conventional material than in the EB-PBF material (~5 μm), which is suggestive of more severe surface cutting in the EB-PBF material and extensive subsurface plastic deformation in the conventional material during the wear process. Despite having similar hardness values in their study (EB-PBF = 373 HV and conventional = 383), the combination of increased porosity and a different microstructural response in the EB-PBF material led to greater variation in wear.
Debris analysis during fretting wear revealed that both conventional and EB-PBF samples produced similar wear particles consisting of fine rutile TiO2 powders and metallic flakes, suggesting no effect on the fundamental wear mechanisms due to the manufacturing process [39]. The tribo-layers are formed regardless of the manufacturing process.

6. Summary, Challenges, and Outlook

In this review article, the current state of the literature on the tribological properties of electron beam powder bed-fused (EB-PBF) Ti-6Al-4V was comprehensively discussed. This article also provided a comparative discussion on the tribological performance of EB-PBF Ti-6Al-4V with respect to conventional Ti-6Al-4V, along with the influence of the testing conditions (the applied load, frequency, counterpart, temperature, etc.), build variability (the thickness, location, and design configuration), and process variability (as-built roughness, powder reuse, etc.).
Overall, EB-PBF Ti-6Al-4V demonstrates tribological performance that is superior or comparable to conventionally manufactured Ti-6Al-4V across various testing conditions. Post-processing strategies are seen as effective methods to further improve tribological performance. The build orientation can affect tribological properties. Environmental conditions, i.e., lubrication, temperature, etc., influence wear behavior. Lubrication and passivating media reduce the friction coefficient and specific wear rate. Elevated temperatures generally improve wear performance by providing an oxide glaze layer; however, this is dependent on the counterpart’s properties and adherence. Wear mechanisms include abrasion, adhesion, and oxidation, which were also discussed in this article. Overall, the average friction coefficients range between ~0.22 and ~0.75 during sliding wear in dry and/or lubricated conditions against metallic and ceramic counterparts when loading 1–50 N under varied surface and heat treatment conditions, and between 1.29 and 2.2 during fretting wear against EB-PBF Ti-6Al-4V itself. The corresponding specific wear rates have a broad range between ~8.20 × 10⁻⁵ mm3/Nm and ~1.30 × 10⁻³ mm3/Nm during sliding wear.
The current state of the literature on EB-PBF Ti6Al4V lacks a detailed understanding of the influence of process variability, including process parameters, geometric variability, and powder reuse. Also, most studies have been conducted at room temperature, except for two, which provide some contradictory conclusions. As a significant number of Ti-6Al-4V applications involve high temperatures, more studies are required to understand high-temperature tribological properties up to 600 °C and beyond, mimicking real-life conditions. For space applications, using vacuum lubricants with EB-PBF Ti-6Al-4V needs to be explored. Future work is also needed to establish comprehensive process–property relationships through strong statistical analyses integrating numerical modeling; further standardization of tribological testing of AM metals, including EB-PBF Ti-6Al-4V; and long-term wear testing and evaluation mimicking real-life conditions. Also, extensive efforts are needed to understand powder reuse effects and the effects of inter-machine variability on wear and erosion resistance. A standardized framework for tribo-testing EB-PBF Ti6Al4V can be developed by combining the current tribological testing methods with the following considerations: the responses of as-built and processed (polished or machined) surfaces and their differences; build orientations for critical applications; multiple build orientations for tribo-testing; limiting powder reuse cycles as per both the powder conditions (the oxygen content, flowability, sphericity, etc.) and the application; using optimized fabrication and post-processing parameters; and comprehensive reporting of the powder cycle, fabrication, post-process parameters, etc. The current knowledge on the effect of lubrication on the tribological properties of EB-PBF Ti-6Al-4V is mostly limited to 14 N; thus, further studies are required to understand lubrication behavior in higher-load regions. Also, the geometric effects of counterparts can be studied. Rolling contact fatigue and general fatigue wear of EB-PBF Ti-6Al-4V are not reported in the literature. The comparative effects of process-induced porosity, lack-of-fusion defects, and their distributions on wear properties also have not been evaluated. Further studies on surface treatments to improve biocompatibility might be needed as well for EB-PBF Ti-6Al-4V [59].

Author Contributions

Conceptualization, methodology, investigation, formal analysis, validation, resources, and data curation, M.R. and M.S.B.A.; software, M.S.B.A.; writing—original draft preparation, M.S.B.A.; writing—review and editing, M.R. and M.S.B.A.; visualization, M.S.B.A.; supervision, project administration, and funding acquisition, M.R. All authors have read and agreed to the published version of the manuscript.

Funding

This research was supported by Boeing–Pennell Professorship Funding (awarded to M. Ramulu by the Boeing Company). The authors would like to thank the department of Mechanical Engineering at UW-Seattle for the support provided during this study.

Data Availability Statement

No new data were created or analyzed in this study. Data sharing is not applicable to this article.

Acknowledgments

During the preparation of this manuscript/study, the authors used Claude 4.0 to extract graphical data from some articles for the purposes of analyzing it, comparing it with the literature (the data was verified), and restructuring a few sentences. The authors have reviewed and edited the output and take full responsibility for the content of this publication.

Conflicts of Interest

The authors declare that this study received funding from Boeing Company. The funder was not involved in the study design, collection, analysis, interpretation of data, the writing of this article or the decision to submit it for publication.

References

  1. Lewandowski, J.J.; Seifi, M. Metal Additive Manufacturing: A Review of Mechanical Properties. Annu. Rev. Mater. Res. 2016, 46, 151–186. [Google Scholar] [CrossRef]
  2. Chern, A.H.; Nandwana, P.; Yuan, T.; Kirka, M.M.; Dehoff, R.R.; Liaw, P.K.; Duty, C.E. A Review on the Fatigue Behavior of Ti-6Al-4V Fabricated by Electron Beam Melting Additive Manufacturing. Int. J. Fatigue 2019, 119, 173–184. [Google Scholar] [CrossRef]
  3. Liu, S.; Shin, Y.C. Additive Manufacturing of Ti6Al4V Alloy: A Review. Mater. Des. 2019, 164, 107552. [Google Scholar] [CrossRef]
  4. Okolie, O.; Stachurek, I.; Kandasubramanian, B.; Njuguna, J. Material Challenges and Opportunities in 3D Printing for Hip Implant Applications. Recent Prog. Mater. 2022, 4, 004. [Google Scholar] [CrossRef]
  5. Blakey-Milner, B.; Gradl, P.; Snedden, G.; Brooks, M.; Pitot, J.; Lopez, E.; Leary, M.; Berto, F.; Du Plessis, A. Metal Additive Manufacturing in Aerospace: A Review. Mater. Des. 2021, 209, 110008. [Google Scholar] [CrossRef]
  6. Abeyta, A.; Nouwens, C.; Jones, A.M.; Haworth, T.A.; Montelione, A.; Ramulu, M.; Arola, D.D. Characterizing Gas Flow in the Build Chamber of Laser Powder Bed Fusion Systems Utilizing Particle Image Velocimetry: A Path to Improvements. Addit. Manuf. 2025, 106, 104810. [Google Scholar] [CrossRef]
  7. Findlay, S.J.; Harrison, N.D. Why Aircraft Fail. Mater. Today 2002, 5, 18–25. [Google Scholar] [CrossRef]
  8. America Makes & ANSI Additive Manufacturing; Standardization Collaborative (AMSC); America Makes Standardization Roadmap for Additive Manufacturing Version 3 2023. Available online: https://www.ansi.org/standards-coordination/collaboratives-activities/additive-manufacturing-collaborative (accessed on 20 September 2025).
  9. Bin Abdullah, M.S. Characterization of Tribological Behavior Ti-6Al-4V Fabricated by Electron Beam Powder Bed Fusion. Ph.D. Thesis, University of Washington, Seattle, WA, USA, 2025. [Google Scholar]
  10. Orgeldinger, C.; Seynstahl, A.; Rosnitschek, T.; Tremmel, S. Surface Properties and Tribological Behavior of Additively Manufactured Components: A Systematic Review. Lubricants 2023, 11, 257. [Google Scholar] [CrossRef]
  11. Ralls, A.M.; Kumar, P.; Menezes, P.L. Tribological Properties of Additive Manufactured Materials for Energy Applications: A Review. Processes 2020, 9, 31. [Google Scholar] [CrossRef]
  12. Dass, A.; Moridi, A. State of the Art in Directed Energy Deposition: From Additive Manufacturing to Materials Design. Coatings 2019, 9, 418. [Google Scholar] [CrossRef]
  13. Shah, R.; Pai, N.; Rosenkranz, A.; Shirvani, K.; Marian, M. Tribological Behavior of Additively Manufactured Metal Components. J. Manuf. Mater. Process. 2022, 6, 138. [Google Scholar] [CrossRef]
  14. Teixeira, J.V.U.; Santos, A.A.; Pinto, B.O.; Capelin, G.R.; Pintão, C.A.F.; Correa, D.R.N.; Grandini, C.R.; Lisboa-Filho, P.N. Tribological Behavior Study of New Titanium Alloys for Biomedical Applications. Proc. Inst. Mech. Eng Part. J J. Eng. Tribol. 2025, 239, 767–775. [Google Scholar] [CrossRef]
  15. Saha, S.; Roy, S. Metallic Dental Implants Wear Mechanisms, Materials, and Manufacturing Processes: A Literature Review. Materials 2022, 16, 161. [Google Scholar] [CrossRef]
  16. Ghods, S.; Schultz, E.; Wisdom, C.; Schur, R.; Pahuja, R.; Montelione, A.; Arola, D.; Ramulu, M. Electron Beam Additive Manufacturing of Ti6Al4V: Evolution of Powder Morphology and Part Microstructure with Powder Reuse. Materialia 2020, 9, 100631. [Google Scholar] [CrossRef]
  17. Gong, H.; Rafi, K.; Starr, T.; Stucker, B. The Effects of Processing Parameters on Defect Regularity in Ti-6Al-4V Parts Fabricated by Selective Laser Melting and Electron Beam Melting. In Proceedings of the 24th Annual International Solid Freeform Fabrication Symposium—An Additive Manufacturing Conference, Austin, TX, USA, 12–14 August 2013; pp. 12–14. [Google Scholar]
  18. GE Additive Inside Electron Beam Melting 2025. Available online: https://go.additive.ge.com/rs/706-JIU-273/images/GE%20Additive_EBM_White%20paper_FINAL.pdf (accessed on 20 September 2025).
  19. Fu, Z.; Körner, C. Actual State-of-the-Art of Electron Beam Powder Bed Fusion. Eur. J. Mater. 2022, 2, 54–116. [Google Scholar] [CrossRef]
  20. Zhang, W.; Qin, P.; Wang, Z.; Yang, C.; Kollo, L.; Grzesiak, D.; Prashanth, K. Superior Wear Resistance in EBM-Processed TC4 Alloy Compared with SLM and Forged Samples. Materials 2019, 12, 782. [Google Scholar] [CrossRef] [PubMed]
  21. Toh, W.; Wang, P.; Tan, X.; Nai, M.; Liu, E.; Tor, S. Microstructure and Wear Properties of Electron Beam Melted Ti-6Al-4V Parts: A Comparison Study against As-Cast Form. Metals 2016, 6, 284. [Google Scholar] [CrossRef]
  22. TriboNet Pin on Disk Test 2022. Available online: https://www.tribonet.org/wiki/pin-on-disk-test/ (accessed on 20 September 2025).
  23. Herrera, P.; Hernandez-Nava, E.; Thornton, R.; Slatter, T. Abrasive Wear Resistance of Ti-6AL-4V Obtained by the Conventional Manufacturing Process and by Electron Beam Melting (EBM). Wear 2023, 524–525, 204879. [Google Scholar] [CrossRef]
  24. Sanni, O.C. Microstructural, Mechanical and Tribological Studies of Ti-6Al-4V Thin Plates Produced by EBM Process. Master’s Thesis, Dalarna University, Borlänge, Sweden, 2019. [Google Scholar]
  25. Al-Tamimi, A.A.; Hernandez, M.A.; Omar, A.; Morales-Aldana, D.F.; Peach, C.; Bartolo, P. Mechanical, Biological and Tribological Behaviour of Fixation Plates 3D Printed by Electron Beam and Selective Laser Melting. Int. J. Adv. Manuf. Technol. 2020, 109, 673–688. [Google Scholar] [CrossRef]
  26. Sharma, D.; Kamran, M.; Paraye, N.K.; Anant, R. Insights into the Wear Behaviour of Electron Beam Melted Ti–6Al–4V Alloy in the as-Built and the Heat-Treated Conditions. J. Manuf. Process. 2021, 71, 669–678. [Google Scholar] [CrossRef]
  27. Khun, N.W.; Toh, W.Q.; Tan, X.P.; Liu, E.; Tor, S.B. Tribological Properties of Three-Dimensionally Printed Ti–6Al–4V Material Via Electron Beam Melting Process Tested Against 100Cr6 Steel Without and With Hank’s Solution. J. Tribol. 2018, 140, 061606. [Google Scholar] [CrossRef]
  28. Toh, W.Q.; Tan, X.; Sun, Z.; Liu, E.; Tor, S.B.; Chua, C.K. Comparative Study on Tribological Behavior of Ti-6Al-4V and Co-Cr-Mo Samples Additively Manufactured with Electron Beam Melting. In Proceedings of the 2nd International Conference on Progress on Additive Manufacturing Conference, Singapore, 16–19 May 2016. [Google Scholar]
  29. Li, H.; Ramezani, M.; Chen, Z.W. Dry Sliding Wear Performance and Behaviour of Powder Bed Fusion Processed Ti–6Al–4V Alloy. Wear 2019, 440–441, 203103. [Google Scholar] [CrossRef]
  30. Li, H.; Chen, Z.W.; Ramezani, M. Effect of Temperature on Sliding Wear Behavior of Ti-6Al-4V Alloy Processed by Powder Bed Fusion Additive Manufacturing Techniques. J. Mater. Eng. Perform. 2022, 31, 8940–8954. [Google Scholar] [CrossRef]
  31. Ryu, J.; Shrestha, S.; Manogharan, G.; Jung, J. Sliding Contact Wear Damage of EBM Built Ti6Al4V: Influence of Process Induced Anisotropic Microstructure. Metals 2018, 8, 131. [Google Scholar] [CrossRef]
  32. Shrestha, S. Wear Behavior of Ti-6Al-4V for Joint Implants Manufactured by Electron Beam Melting. Master’s Thesis, Youngstown State University, Youngstown, OH, USA, 2017. [Google Scholar]
  33. Riaz, M.Q.; Caputo, M.; Ferraro, M.M.; Ryu, J.J. Influence of Process-Induced Anisotropy and Synovial Environment on Wear of EBM Built Ti6Al4V Joint Implants. J. Mater. Eng. Perform. 2018, 27, 3460–3471. [Google Scholar] [CrossRef]
  34. Xiang, D.; Tan, X.; Liao, Z.; He, J.; Zhang, Z.; Liu, W.; Wang, C.; Shu, B.T. Comparison of Wear Properties of Ti6Al4V Fabricated by Wrought and Electron Beam Melting Processes in Simulated Body Fluids. Rapid Prototyp. J. 2020, 26, 959–969. [Google Scholar] [CrossRef]
  35. Bin Abdullah, M.S.; Mamidala, R. Sliding Wear Behavior of Electron Beam Melted (EBM) Ti6Al4V. In Proceedings of the ASME 2022 International Mechanical Engineering Congress and Exposition, Volume 2B: Advanced Manufacturing, Columbus, OH, USA, 30 October–3 November 2022. [Google Scholar]
  36. Bruschi, S.; Bertolini, R.; Medeossi, F.; Ghiotti, A.; Savio, E.; Shivpuri, R. Case Study: The Application of Machining-Conditioning to Improve the Wear Resistance of Ti6Al4V Surfaces for Human Hip Implants. Wear 2018, 394–395, 134–142. [Google Scholar] [CrossRef]
  37. Bruschi, S.; Bertolini, R.; Ghiotti, A. Coupling Machining and Heat Treatment to Enhance the Wear Behaviour of an Additive Manufactured Ti6Al4V Titanium Alloy. Tribol. Int. 2017, 116, 58–68. [Google Scholar] [CrossRef]
  38. Bruschi, S.; Bertolini, R.; Bordin, A.; Medea, F.; Ghiotti, A. Influence of the Machining Parameters and Cooling Strategies on the Wear Behavior of Wrought and Additive Manufactured Ti6Al4V for Biomedical Applications. Tribol. Int. 2016, 102, 133–142. [Google Scholar] [CrossRef]
  39. Soria, S.R.; Soul, H.; Bergant, M.; Yawny, A. Fretting Wear Behaviour of Biomedical Grade Ti6Al4V Produced by Electron Beam Powder Bed Fusion. Addit. Manuf. 2024, 86, 104217. [Google Scholar] [CrossRef]
  40. Huang, J.; Zhang, W.; Fang, W.; Yi, Y. Tribology Properties of Additively Manufactured Ti6Al4V Alloy after Heat Treatment. Tribol. Int. 2023, 185, 108485. [Google Scholar] [CrossRef]
  41. Bin Abdullah, M.S.; Alajmi, A.F.; Ramulu, M. Solid Particle Erosion Behavior of Electron Beam Melted (EBM) Ti6Al4V at Different Built Orientation. In Proceedings of the ASME 2021 International Mechanical Engineering Congress and Exposition, Volume 2A: Advanced Manufacturing, Virtual, 1–5 November 2021; American Society of Mechanical Engineers: New York, NY, USA, 2021; p. V02AT02A016. [Google Scholar] [CrossRef]
  42. Longhitano, G.A.; García, I.M.; Arenas, M.A.; De Damborenea, J.J.; Maciel Filho, R.; Conde, A. Effect of Designed Pore Size on Electrochemical, Wear, and Tribocorrosion Behavior of Additively Manufactured Ti-6Al-4V Lattice Structures. Addit. Manuf. 2024, 79, 103931. [Google Scholar] [CrossRef]
  43. Davoodi, F.; Varmaziar, S.; Atapour, M.; Iuliano, L.; Saboori, A. In Vitro Corrosion and Bio-Tribocorrosion Performance of Electron Beam Powder Bed Fusion Ti6Al4V Specimens with Lapping and Superfinishing Treatments. Prog. Addit. Manuf. 2025, 10, 9117–9132. [Google Scholar] [CrossRef]
  44. Bertolini, R.; Bruschi, S.; Ghiotti, A.; Pezzato, L.; Dabalà, M. Influence of the Machining Cooling Strategies on the Dental Tribocorrosion Behaviour of Wrought and Additive Manufactured Ti6Al4V. Biotribology 2017, 11, 60–68. [Google Scholar] [CrossRef]
  45. Alvi, S.; Neikter, M.; Antti, M.-L.; Akhtar, F. Tribological Performance of Ti6Al4V at Elevated Temperatures Fabricated by Electron Beam Powder Bed Fusion. Tribol. Int. 2021, 153, 106658. [Google Scholar] [CrossRef]
  46. Pushilina, N.S.; Stepanova, E.N.; Kudiiarov, V.N.; Laptev, R.S.; Syrtanov, M.S. Heat Treatment of the Ti-6Al-4V Alloy Manufactured by Electron Beam Melting. AIP Conf. Proc. 2019, 2167, 020290. [Google Scholar]
  47. Mohammadhosseini, A.; Fraser, D.; Masood, S.H.; Jahedi, M. Investigation of Wear Properties of EBM Processed Ti6Al4V with UHMWPE for Biomedical Applications. Appl. Mech. Mater. 2015, 811, 14–18. [Google Scholar] [CrossRef]
  48. Tan, X.; Kok, Y.; Tan, Y.J.; Descoins, M.; Mangelinck, D.; Tor, S.B.; Leong, K.F.; Chua, C.K. Graded Microstructure and Mechanical Properties of Additive Manufactured Ti–6Al–4V via Electron Beam Melting. Acta Mater. 2015, 97, 1–16. [Google Scholar] [CrossRef]
  49. Bin Abdullah, M.S.; Bol, E.; Kelley, G.; Doyle, C.; Schleusener, R.; Mojib, M.; Chen, X.; Arola, D.; Ramulu, M. Microstructure and Microhardness of Electron Beam Melted Ti–6Al–4V Components with Differential Thickness in Initial Deposition Layers. J. Mater. Res. Technol. 2023, 26, 6493–6507. [Google Scholar] [CrossRef]
  50. Cunningham, R.; Narra, S.P.; Ozturk, T.; Beuth, J.; Rollett, A.D. Evaluating the Effect of Processing Parameters on Porosity in Electron Beam Melted Ti-6Al-4V via Synchrotron X-Ray Microtomography. Jom 2016, 68, 765–771. [Google Scholar] [CrossRef]
  51. Wu, Z.; Narra, S.P.; Rollett, A. Exploring the Fabrication Limits of Thin-Wall Structures in a Laser Powder Bed Fusion Process. Int. J. Adv. Manuf. Technol. 2020, 110, 191–207. [Google Scholar] [CrossRef]
  52. Bol, E.; Ramulu, M. Dimensional Accuracy of Electron Beam Powder Bed Fusion with Ti-6Al-4V. Designs 2023, 7, 53. [Google Scholar] [CrossRef]
  53. Herrera, P. Effect of Cryogenic Treatment on the Abrasive Wear Resistance of Engineering Alloys. Ph.D. Thesis, University of Sheffield, Sheffield, UK, 2020. [Google Scholar]
  54. Bin Abdullah, M.S.; Mojib, N.M.; Atmadja, N.; Ramulu, M. Machinability of Electron Beam Powder Bed Fused Ti-6Al-4V in Face Milling with Coated Carbide End Mill. J. Mater. Eng. Perform. 2025, 34, 21430–21444. [Google Scholar] [CrossRef]
  55. Montelione, A.; Ghods, S.; Schur, R.; Wisdom, C.; Arola, D.; Ramulu, M. Powder Reuse in Electron Beam Melting Additive Manufacturing of Ti6Al4V: Particle Microstructure, Oxygen Content and Mechanical Properties. Addit. Manuf. 2020, 35, 101216. [Google Scholar] [CrossRef]
  56. Grell, W.A.; Solis-Ramos, E.; Clark, E.; Lucon, E.; Garboczi, E.J.; Predecki, P.K.; Loftus, Z.; Kumosa, M. Effect of Powder Oxidation on the Impact Toughness of Electron Beam Melting Ti-6Al-4V. Addit. Manuf. 2017, 17, 123–134. [Google Scholar] [CrossRef] [PubMed]
  57. Xu, D.; Wang, H.; Tao, X.; Yao, Z.; Zhang, S.; Oleksander, M. Investigation on Microstructure, Hardness and Wear Resistance of Electron Beam Wire-Feeding Deposited Inconel 718 Alloy Coatings. Met. Mater. Int. 2019, 27, 1263–1272. [Google Scholar] [CrossRef]
  58. Chern, A.H.; Nandwana, P.; McDaniels, R.; Dehoff, R.R.; Liaw, P.K.; Tryon, R.; Duty, C.E. Build Orientation, Surface Roughness, and Scan Path Influence on the Microstructure, Mechanical Properties, and Flexural Fatigue Behavior of Ti–6Al–4V Fabricated by Electron Beam Melting. Mater. Sci. Eng. A 2020, 772, 138740. [Google Scholar] [CrossRef]
  59. Xu, J.; Zhang, J.; Shi, Y.; Tang, J.; Huang, D.; Yan, M.; Dargusch, M.S. Surface Modification of Biomedical Ti and Ti Alloys: A Review on Current Advances. Materials 2022, 15, 1749. [Google Scholar] [CrossRef]
Figure 2. The experimental setups of different tribological testing methods reported in the literature: (a) block-on-ring test [20], (b) ball-on-disc test [21], (c) pin-on-disc test [22], (d) abrasive wheel test [23], (e) rotary abrasion test [9], and (f) scratch test [24]. (The images were collected from open sources.)
Metals 15 01170 g002
Figure 3. The average friction coefficient vs. the specific wear rate of EB-PBF Ti-6Al-4V regardless of heat treatment, surface condition, counterpart, test load (1-50 N), combined dry and lubricated conditions and test types (sliding and fretting) at room temperature, in comparison with conventionally processed Ti-6Al-4V and LPBF Ti-6Al-4V, as reported in Refs. [20,21,25,26,28,29,30,34,39,40].
Metals 15 01170 g003
Figure 4. The effects of lubrication on the average friction coefficient and the specific wear rate in EB-PBF Ti-6Al-4V [25,27,31,34]. The arrows show the shift of the locus for load < 40 mN and load ~1–14 N.
Metals 15 01170 g004
Figure 5. Comparisons of the average CoF and specific wear rates of EB-PBF Ti-6Al-4V in polished/machined conditions against different counterparts, regardless of the heat treatment, in dry conditions at room temperature during wear tests (a) under a load of ~10 N and (b) under 1–3 N loads during ball-on-disc sliding.
Metals 15 01170 g005
Figure 6. The variation in the specific wear rate (a) and the average friction coefficient (b) with respect to temperature [30,45].
Metals 15 01170 g006
Figure 7. Changes in microstructure and wear rate of EB-PBF titanium specimens with variable thickness of (ae). 5, 1, 5, 10, and 20 mm and (f) the as-cast Ti64 samples, respectively with indication of microstructural features by arrow; (g) the change in specific wear rate in Toh et al. [28].
Metals 15 01170 g007
Figure 8. Wear anisotropy of EB-PBF Ti-6Al-4V during sliding wear, as reported by Ryu et al. [31] and Bin Abdullah & Ramulu [35].
Metals 15 01170 g008
Figure 9. Specific wear rate of EB-PBF Ti-6Al-4V with microhardness due to heat treatment [26,40].
Metals 15 01170 g009
Figure 10. Steps of wear mechanism of EB-PBF Ti-6Al-4V, according to Toh et al. [21,28].
Metals 15 01170 g010
Figure 11. (a) Steps of wear mechanism of EB-PBF Ti-6Al-4V, according to Zhang et al. [20], and (b) subsurface cracks that dictated wear mechanism, as reported by Zhang et al. [20].
Metals 15 01170 g011
Figure 12. The microstructures of EB-PBF, L-PBF, and conventional Ti-6Al-4V reported in the literature [23,25]. The figures represent; (a) α-β phases with α-plate in EB-PBF Ti-6Al-4V in both (aA,aB) subfigures from Herrera et al.; (b) globular α grains in conventional Ti-6Al-4V in both (bA,bB) subfigures from Herrera et al.; (c) α-β phases in EB-PBF Ti-6Al-4V from Al Tamimi et al.; (d) α-β phases with the presence of α’-phase (martensitic) in L-PBF Ti-6Al-4V from Al Tamimi et al. (The images were collected from open-source articles.)
Metals 15 01170 g012
Table 1. Current state of original research articles on tribological properties of EB-PBF Ti-6Al-4V.
ReferenceKey Objective/Outcomes
Toh et al. [21,28]Ball-on-disc sliding wear to understand the effects of build thickness on wear properties, microstructure, and hardness and to compare with cast Ti6Al4V (metal on metal).
Xiang et al. [34]Ball-on-disc reciprocating tests against ZrO2 and Al2O3 to compare with wrought Ti64 in a dry condition and a lubricated condition with 5 wt.% newborn calf serum (NCS) (ceramic on metal).
Ryu et al. [31], Shrestha [32], Riaz et al. [33]Reciprocating sliding contact wear by a titanium sphere (ball-on-disc test) to understand the influence of anisotropy in dry and lubricated (PBS) conditions (metal on metal).
Khun et al. [27]Ball-on-disc tests using a 100Cr6 steel ball to understand the tribological properties (sliding wear) in dry conditions, in PBS, and in Hunk’s solution (metal on metal).
Li et al. [29,30]Ball-on-disc (linear reciprocating) tests using WC-Co counterparts on EB-PBF, L-PBF, and conventional Ti6Al4V at room temperature and an elevated temperature (ceramic on metal).
Sanni [24] A scratch test against a diamond stylus to measure the friction coefficients of thin plates (ceramic on metal).
Zhang et al. [20]Block-on-ring sliding wear test using GCr15 steel to compare results with forged and LPBF Ti6Al4V (metal on metal).
Herrera et al. [23]A sand–rubber wheel (DSRW) abrasive wear test at a higher load (130 N) to compare with conventional Ti6Al4V (ceramic on metal).
Bin Abdullah and Ramulu [35]Understanding the influence of build orientation in as-built and machined conditions on sliding wear by abrasive alumina particles (ceramic abrasive on metal).
Alvi et al. [45]Ball-on-disc sliding tests in dry conditions using steel and alumina counterparts to understand the wear behavior up to 400 °C (metal on metal and ceramic on metal).
Pushilina et al. [46]A preliminary study on the effects of heat treatment on wear resistance. However, it did not mention of wear test method or the wear analysis procedure.
Sharma et al. [26]Dry pin-on-disc sliding using EN-31 steel to study the influence of heat treatment on wear resistance (metal on metal).
Huang et al. [40]A reciprocating friction test using Si3N4 ceramic balls to study the influence of the duration of heat treatment at 600 °C, followed by cooling by 100 °C/h.
Al Tamimi et al. (2020) [25]Dry pin-on-disc sliding using an alumina counterpart to study the wear resistance of EB-PBF and L-PBF Ti-6Al-4V (ceramic on metal).
Bruschi et al. [36,37,38]Studied the friction and wear properties of EB-PBF Ti6Al4V after machining in dry and cryogenic conditions; studied the effects of both cryogenic machining and wet machining in increasing wear resistance; and studied the wear behavior of EB-PBF titanium after a combination of machining and heat treatment (metal on metal).
Soria et al. [39]Measured fretting wear by Ti-6Al-4V counterparts to compare with hot-rolled Ti-6Al-4V (metal on metal).
Bin Abdullah et al. [41] Understanding the solid particle erosion mechanism in as-built and machined conditions due to silica impingement (abrasive impingement on metal).
Bin Abdullah [9]Understanding the influence of build anisotropy and powder reuse in the sliding and erosion wear of EB-PBF Ti-6Al-4V in as-built and machined conditions (ceramic abrasive on metal and abrasive impingement on metal).
Longhitano et al. [42]The effect of the pore size on the electrochemical properties, wear, and tribo-corrosion behavior of additively manufactured Ti-6Al-4V lattice structures designed for orthopedic implants (ceramic on metal).
Mohammadhosseini et al. [47]The behavior of an EB-PBF Ti-6Al-4V pin on plastics during a pin-on-disc test (metal on plastic).
Table 2. Summary of basic tribological properties of EB-PBF, L-PBF, and conventional Ti-6Al-4V.
Ring-on-Block
Experimental and Counterpart Details
ProcessWear RateAvg. Friction CoefficientHardnessWear Depth
(mm3 N−1 m−1) (HV)(mm)
Zhang et al. [20]
Load = 50 N
GCr15 steel, dry (Ø47.15 mm, 630 HV)
Forged23.9 ± 4.6 × 10−50.6 ± 0.3368 ± 120.24
EB-PBF16.6 ± 4.2 × 10−50.5 ± 0.1383 ± 130.17
L-PBF19.0 ± 3.7 × 10−50.4 ± 0.2399 ± 140.21
Ball-on-Disc
Experimental and Counterpart Details
Process~Wear Rate~Avg. Friction Coefficient~Hardness~Wear Depth
(mm3 N−1 m−1) (HV)(mm)
Al-Tamimi et al. [25]
Load = 2–14 N
Al2O3 ball, PBS Soln.
EB-PBF0.15–0.22 × 10−30.35–0.67337.40 ± 17.600.125 at 14 N
(Ø5 mm)L-PBF0.15–0.19 × 10−30.37–0.60312.60 ± 7.370.136 at 14 N
Toh et al. [28]
Load = 1 N
100Cr6 steel ball, dry
(Ø6 mm)
Cast140 × 10−50.623000.05–0.06
As-built EB-PBF110–135 × 10−50.62–0.71330–3700.06
Experimental and Counterpart DetailsProcess~Wear Rate~Avg. Friction Coefficient~Hardness~Wear Depth
(mm3m−1) (HV)(μm)
Li et al. [29]
Load = 2–10 N; Freq = 2–8 Hz
WC-Co ball, dry
(Ø10 mm)
Conventional1–5 × 10−30.35–0.45324-
EB-PBF1–4.3 × 10−30.25–0.45 359-
L-PBF1–5 × 10−30.25–0.45428-
Experimental and Counterpart DetailsProcess~Wear Rate~Avg. Friction Coefficient~Hardness~Wear Depth
(m3 N−1 m−1) (HV)(μm)
Khun et al. [27]
Load = 1 N
100Cr6 steel ball, dry and Hank’s Soln.
(Ø6 mm)
Commercial (dry)93.9 × 10−140.55371-
Commercial (Hank’s)36.9 × 10−140.37376-
EB-PBF (dry)78.4 × 10−140.62371-
EB-PBF (Hank’s)32.1 × 10−140.41376
Fretting Wear
Experimental and Counterpart Details
Process~Wear Rate~Avg. Friction Coefficient~Hardness~Wear Depth
(Pa−1) (HV)(μm)
Soria et al. [39]
Load = 10 N
Amplitude = 50 μm
EB-PBF Ti-6Al-4V
EB-PBF (as-built)N/A2.2 ± 0.228025
EB-PBF (machined)43 ± 5 × 10⁻¹⁵ 1.29 ± 0.05300–36035
Hot-rolled38.0 ± 0.1 × 10−151.19 ± 0.01 40
Table 3. A summary of the effects of the build orientation on EB-PBF Ti-6Al-4V.
ReferenceSurface ConditionProcess and Orientation~CoFHardness
Ryu et al. [31]Polished
Load: 0.032–0.032 N
EB-PBF Z (Along X)~0.65 420 HV
EB-PBF X (Along X)~0.60385 HV
EB-PBF X (Along Y)~0.68385 HV
Sanni * [24]As-built
Load: 1–5 N
Along X~0.05–0.30389 HV
Along Z~0.10–0.32389 HV
Transverse~0.10–0.40465 HV
* This study does not report on wear resistance or volumetric wear.
Table 4. A summary of the effect of heat treatment on the wear properties of EB-PBF Ti6Al4V.
Reference Heat Treatment Method~CoF~Hardness (HV) ~Specific Wear Rate (mm3/Nm)
Pushilina et al. [46]As-EB-PBFN/A4160.62 × 10−3
750 °C/1 hN/A3770.57 × 10−3
Sharma et al. [26]As-Built0.533401.02 × 10−4
1040 °C/2 h-FC0.533102.55 × 10−4
1040 °C/2 h-WQ0.513800.82 × 10−4
920 °C/2 h-FC0.553351.94 × 10−4
920 °C/2 h-WQ0.513650.92 × 10−4
Huang et al. [40]600 °C/1 h-FC0.503392.59 × 10−4
600 °C/3 h-FC0.453324.50 × 10−4
600 °C/5 h-FC0.503493.03 × 10−4
600 °C/7 h-FC0.523433.04 × 10−4
600 °C/9 h-FC0.453381.87 × 10−4
Table 5. The wear enhancement due to machining reported by Bruschi et al. [38].
ConditionFeed Rate, (mm/rev)Speed
Vc (m/min)
Microhardness, HV0.05Coefficient of Friction~Wear
(Weight Loss in %)
Machining Condition
(Bruschi et al., 2016 [38])
WroughtEB-PBFWroughtEB-PBFWroughtEB-PBF
Dry0.150365 ± 5379 ± 60.430.54−0.0070−0.0008
0.180364 ± 6370 ± 40.440.46−0.0030−0.0038
0.250366 ± 4372 ± 70.420.51−0.0015−0.0022
0.280340 ± 4367 ± 50.390.42−0.0012−0.0022
Cryogenic0.150393 ± 7409 ± 80.410.360.00380.0038
0.180391 ± 8400 ± 50.580.41−0.00200.0038
0.250408 ± 6389 ± 70.400.370.00100.0039
0.280403 ± 4385 ± 50.370.420.00250.0035
Reference Post-Processing Hardness ~Mean Wear volume
Bruschi et al., 2018 [36]EB-PBF + wet machining (1 pass)-0.011 mm3
EB-PBF + wet machining (5 passes) 290–295 HV 0.013 mm3
EB-PBF + cryogenic machining (1 pass) 325–350 HV 0.010 mm3
EB-PBF + cryogenic machining (5 passes) 315–350 HV 0.007 mm3
Table 6. A summary of the effects of machining and heat treatment on the wear properties of EB-PBF Ti-6Al-4V (Bruschi et al., 2017 [37]).
Parameters~ COF~ Hardness (HV)~ Wear Volume (mm3)
Speed, Vc (m/s)Feed Rate
(mm/rev)
TurnedTurned + HTTurnedTurned + HTTurnedTurned + HT
800.10.560.453554407.6 ± 1 × 10−30.5 ± 0.8 × 10⁻³
1100.10.550.483604203.8 ± 2 × 10−31.5 ± 1 × 10⁻³
800.20.580.57360 4257.6 ± 3 × 10−31.7 ± 1 × 10⁻³
1100.20.570.543654252.9 ± 1.5 × 10−30.8 ± 1.3 × 10⁻³
Table 7. Summary of roughness due to post-processing and influence of roughness of AM titanium on its wear properties.
Test TypeSurface conditionsRoughness, Ra (μm)Specific Wear Rate (mm3/Nm)Avg. CoF
Pin-on-disc test in PBS Soln.
using alumina ball [25]
(Al-Tamimi et al.)
As-built19.161.5–2.2 × 10−40.4–0.6
Fretting wear in dry conditions
using EB-PBF Ti-6Al-4V [39]
As-built8.82-2.2
Machined14.3 × 10−51.29
Rotary abrasion in dry conditions using abrasive alumina [35]As-built at 3° orientation19.295.0 × 10−3-
As-built at 45° orientation18.494.4 × 10−3-
As-built at 90° orientation17.854.7 × 10−3-
Machined at 3° orientation9.454.4 × 10−3-
Machined at 45° orientation10.464.0 × 10−3-
Machined at 90° orientation3.344.4 × 10−3-
Disclaimer/Publisher’s Note: The statements, opinions and data contained in all publications are solely those of the individual author(s) and contributor(s) and not of MDPI and/or the editor(s). MDPI and/or the editor(s) disclaim responsibility for any injury to people or property resulting from any ideas, methods, instructions or products referred to in the content.