Article

Resonant Fatigue Tests on Polished Drill Pipe Specimens

1
Department of Civil and Industrial Engineering—DICI, University of Pisa, Largo Lucio Lazzarino 1, 56122 Pisa, Italy
2
ACTA Srl, Via della Villana 154, 57016 Rosignano Solvay, Italy
3
Engineering Department, JAMSTEC—Japan Agency for Marine-Earth Science and Technology, Yokosuka 238-8550, Japan
*
Author to whom correspondence should be addressed.
Machines 2024, 12(5), 314; https://doi.org/10.3390/machines12050314
Submission received: 28 March 2024 / Revised: 19 April 2024 / Accepted: 1 May 2024 / Published: 3 May 2024

Abstract

:
In this study, the fatigue strength of polished drill pipe specimens was investigated and compared with previous test results of corroded and not-corroded pipes. The resonant fatigue test rig, which was designed and implemented by the University of Pisa, is initially presented by providing a detailed description of the set-up of the machine, the calibration of the strain gauges, the control system, and the correct identification of the vibrational node locations. A polishing rig was also designed and put into operation to remove the corrosion pits from the outer surface of almost the entire length of the drill pipe specimens. After the fatigue tests with the resonant rig, and the observation of the fatigue fracture of the specimens, a few samples were extracted from different zones (corroded and not corroded) of the failed drill pipe specimens. This allowed for investigations to be carried out using a scanning electronic microscope. The obtained results were analyzed using the Murakami model, and a discussion is presented about the effect of the corrosion pits on the fatigue strength.

1. Introduction

At present, the employment of drill strings for oil and gas extraction [1,2] and in various scientific investigations, for example, to reach deep sub-seafloor sediments [3,4,5], is widespread. The dimensions of drill strings are defined by the American Petroleum Institute (API) standard [6], and these long tubular elements are mainly composed of drill pipes. These latter feature two mating parts, the pin and the box tool joints, which are connected by a threaded connection. Both the pin and the box are then composed of three parts: the connection zone, the upset region and the pipe body. The upset region provides a link between the connection zone and the pipe body, which has a classical cylindrical tubular section, and can also smooth the stress concentration during the transition from the connection zone to the pipe body. As highlighted in Refs. [7,8,9,10,11], the fatigue strength of drill pipes is a widespread topic among researchers, and in Ref. [12] several factors that could trigger the initiation of cracks are highlighted, such as the stress concentration at the upset region and at the threaded connection zone and the effect of the corrosion pits.
Several investigations have been carried out by researchers in recent years regarding the stress concentration effect provided by the threaded connection in the drill pipe. In Ref. [13] an elastic–plastic finite element (FE) model was set up to investigate the effect of tensile compression and bending loads on a conical threaded connection obtained by downscaling, maintaining the same stress concentration factor, the real conical threaded connection of the API standards. A 2D axisymmetrical model was built for the tensile compression case, while a complete 3D model was employed for the bending loading case. The maximum stress concentration effect was found at the root of the last engaged thread of the pin (LET) or at the root of the first engaged thread of the box (FET). Alternatively, given the high computational cost of the employed FE model, a purely elastic closed-form expression was proposed to easily compute the stress distribution at the threaded zone. Similar analyses of the threaded connection zone were developed in other research, as in Refs. [14,15,16,17,18,19,20]. In addition to the numerical investigations, researchers proposed optimized geometrical solutions to reduce the stress concentration effects in the connection zone. For example, in Ref. [21], FE and experimental analyses found that the maximum value of the stress was located at the FET of the pin, so FE analyses were performed to optimize the taper of the pin thread to reduce the stress concentration factor.
Numerical investigations were also performed regarding the upset area, as in Ref. [22], where FE analyses of this part of the drill pipe were carried out to analyze the effects of the wall thickness and the length of the upset transition area on the stress concentration factor. Finally, an optimized geometrical solution of the upset area, with respect to the classical API standard, was proposed to reduce the stress concentration factor, and it moves the maximum stress value from the vanishing area of the internal upset taper to the external wall. Other solutions to reduce the stress concentration effect at the upset area can be found in the literature, as in Ref. [23]. As concerns the analysis of the upset region, another scientific topic of interest is the erosion of the drilling fluid on the internal upset area, as investigated in Ref. [24]. In this latter piece of research, computational fluid dynamics simulations were performed to obtain the values of the pressure and the shear stress at the interface between the fluid and the upset.
Finally, corrosion pits can have detrimental effects on the fatigue strength of drill pipes [25]. In Ref. [26], the inner diameters of the drill pipe connections were coated with a Nichel plating, and the drilling fluid had an erosive action on the protective Nichel plating, which consequently fell off. After that, the oxygen content in the drilling fluid underwent corrosive reactions with the steel matrix of the inner diameter by forming corrosion pits in which the cracks started. The quantitative effects of these latter chemical reactions were analyzed by the authors with a 3D FE model, where the stress concentration of the corrosion pits was estimated. In addition to the oxygen, even the H2S, which typically comes from the decomposition of sulfonated drilling fluid or from the environment where the drill pipe is used [27], can have a detrimental effect on the fatigue strength of drill pipe steel, as shown in Ref. [28]. In this latter, the effect of H2S on specimens made of V150 steel, which is gaining considerable attention with respect to classical drilling steel due to its high strength and low cost, was investigated. The authors proposed a fatigue test machine, which allowed them to perform fatigue tests in an environment permeated by H2S, and the obtained results clearly showed that the fatigue strength of the V150 steel was weaker when tested in an environment with H2S with respect to the same tests carried out in air. In these cases, the hydrogen can act in two ways: with an electrochemical reaction between the steel and H2S or by diffusing into the metal lattice, causing hydrogen embrittlement. Similar studies about the corrosive effect of oxygen and H2S on the fatigue strength of drill pipe steel were performed in other research, as in Refs. [29,30,31,32,33,34,35,36] for G105, S135, and V150 steels. There are also other chemical elements that can have detrimental corrosive effects on the fatigue strength of drill pipes, such as Si, Cl, Al, and Ca, as highlighted in Refs. [12,37,38]. Considering the strong effect of corrosion on drill pipes’ strength, several techniques have been adopted by researchers over the years to prevent this phenomenon: in Ref. [39], the authors suggested that the steel of the drill pipes should undergo heat treatment to reduce the band structure segregation and they also suggested using drill pipes with a double shoulder instead of those with a single shoulder. This latter was investigated by the authors in high-salt and polysulfonate mud environments, and they observed that a liquid vortex channel can occur at the end-face clearance area of the single shoulder, and this can enrich the drill pipe steel with chloride ions, which can trigger the corrosion phenomenon. Some researchers suggested moving from the use of steel to the use of aluminium alloy for the drill pipes, as in Refs. [40,41,42], where it was suggested that aluminium alloys, such as, for example, the superficially treated 2024 aluminium alloy, could be valid alternatives to steel due to their specific strength, their lightness compared to steel, and for their resistance to corrosion. In some situations, titanium alloys have also been promoted as good alternatives to steel for drill pipes in horizontal wells [43].
Another challenging aspect of drill pipes is performing fatigue tests on full-scale specimens with less energy and in a reasonable time. Quasi-static fatigue tests can be employed to characterize the fatigue strength of drill pipes, and in Ref. [44], the authors developed an apparatus for classical rotating bending tests. The design of the proposed test rig was inspired by the classical rotating bending test for laboratory-scale specimens. Quasi-static fatigue test rigs for drill pipes were also proposed in other research, as in Refs. [45,46]. As highlighted in Ref. [47], fatigue strength analyses of complex structures under complex loadings in a high-cycle fatigue regime could take a large amount of time and have high energy costs; thus, resonant fatigue test rigs appear as valid alternatives. The resonant fatigue test rig used in this research was first presented by the authors in Ref. [48], showing two kinds of resonant fatigue test rigs. The first one is suitable for testing short connection regions, for example, drill collars [49], and it includes two couples of counter-rotating eccentric masses, which rotate at the same angular velocity but with different phases. The structure operates at a frequency near to (but lower than) the first natural frequency of the system and the specimens undergo an in-plane alternating bending moment. The second proposed test rig is suitable for longer connection specimens, for example, drill pipes, and it includes two fixed masses at both ends and one rotating eccentric mass at one end. The bending moment provided by the eccentric mass is small in modulus, but the rotating eccentric mass is spun at a slightly lower frequency than the first natural frequency of the structure. It is important to note that the two latter resonant test rigs are able to reproduce fully alternating loadings ( R = 1 ), and thus with a null value of the mean stress. The resonant fatigue test rig for long tubular structures was utilized by the authors of this research in previous studies, as in Refs. [50,51], and in subsequent years, some changes were proposed to improve the performance of the tests. This test rig is similar to other testing machines, as shown in Refs. [52,53]. The principle of the resonant fatigue test rig was that it could be used not only for drill pipe specimens but also for other components. In Ref. [54], a resonant test rig was proposed to investigate the fatigue behaviour of full-scale railway rails using counter-rotating eccentric masses and springs to apply a mean stress to the tested specimens, thus obtaining a not fully alternating load. Some other examples of fatigue resonant test rigs were proposed to test other components in the field of mechanical and civil engineering, for example, crankshafts in Ref. [47], cylindrical specimens made of concrete or rolled plates made of S355 structural steel in Ref. [55], high-strength, self-compacting concrete in Ref. [56], marine risers with flange joints in Ref. [57], and casing joints of offshore architectures in Ref. [58]. Recently, resonant test rigs have been also used to investigate the structural behaviour of components in the field of the renewable energies, as in Ref. [59] for wind turbine blades, in Ref. [60] for the rotor blades of the wind turbines, and in Ref. [61] to study the bolt force relaxation in wind towers.
Given the corrosive effect of the marine environment, the drill pipe specimens generally present several corrosion pits, as highlighted in Ref. [62]. In order to investigate the possibility of reusing older and corroded drill pipe specimens, in this research, a novel investigation into the fatigue strength of drill pipe specimens after a polishing operation at the external surface was carried out. A bench to polish corroded drill pipe specimens (not connection) made of S150 and S140 steels was then proposed, and the resonant fatigue test rig developed by the University of Pisa in collaboration with ACTA Srl was employed to perform fatigue tests at alternating imposed stresses. Several aspects of the resonant test rig are emphasized here, such as the strain gauges’ calibration, the research on the correct node locations, and the control system that regulates the test rig during the tests. Some small samples were then extracted from the failed drill pipe specimens, and they were analyzed via scanning electron microscope (SEM) to better understand where the crack initiations were located and the impact of the corrosion pits on the fatigue strength. The effect of the observed corrosion pits on the fatigue strength was then quantified with the Murakami model, and a final discussion is presented.

2. Theoretical Background

In this research, the Murakami model was employed to quantify the impact of the corrosion pits on the fatigue strength. In Ref. [63], Murakami proposed Equation (1) for a plain specimen under a uniform remote tensile stress ( σ 0 ), to quantify the mode I threshold stress intensity factor, and Equation (2) for the stress intensity factor. In this latter equation, the coefficient 0.65 is valid for the surface defects. The term a r e a in Equations (1) and (2) indicates the square root of the projected area of the various defects and inclusions on the plane perpendicular to the axial loading, as shown in Figure 1. Both Equations (1) and (2) are only defined for symmetrical loadings ( R = 1 ), and by combining these two equations, paying attention to the units of measurement, as shown in [63], Equation (3) can then be obtained. According to this equation, the fatigue limit ( σ w ) linearly depends on the Vickers hardness ( H V ) of the material with the two constants 1.43 and 120. The constant 1.43 can change depending on the location of the defects, and this value is valid for surface defects, while 1.41 and 1.56 are valid for defects in contact with the surface and internal defects, respectively. The main concept of this model is that the fatigue limit also depends on the term a r e a . Murakami [63,64] also developed an expression to make an equivalence between the surface roughness and the term a r e a to capture the impact of the surface roughness on the fatigue strength. When the Murakami formula is employed to analyze not-symmetrical loadings, a corrective multiplicative factor can be added to account for the mean stress [63], and this latter can, for example, be inspired by the well-known Smith Watson and Topper fatigue model [65,66,67]. In principle, in the current study, the Murakami formula could not be applied given that the drill pipe specimens were tested at an imposed alternating stress, which did not correspond to the fatigue limit. However, Equation (3) can be still considered a valid indicator to quantify the impact of the corrosion pits on the fatigue strength, which allows for comparisons between the pipe specimens and the samples extracted from the pipes.
Δ K th = 3.3 × 10 3 H V + 120 a r e a 1 / 3
Δ K I = 0.65 Δ σ 0 π a r e a
σ w = 1.43 H V + 120 ( a r e a ) 1 / 6

3. Materials and Methods

3.1. Description of the Resonant Test Rig and the Tested Specimens

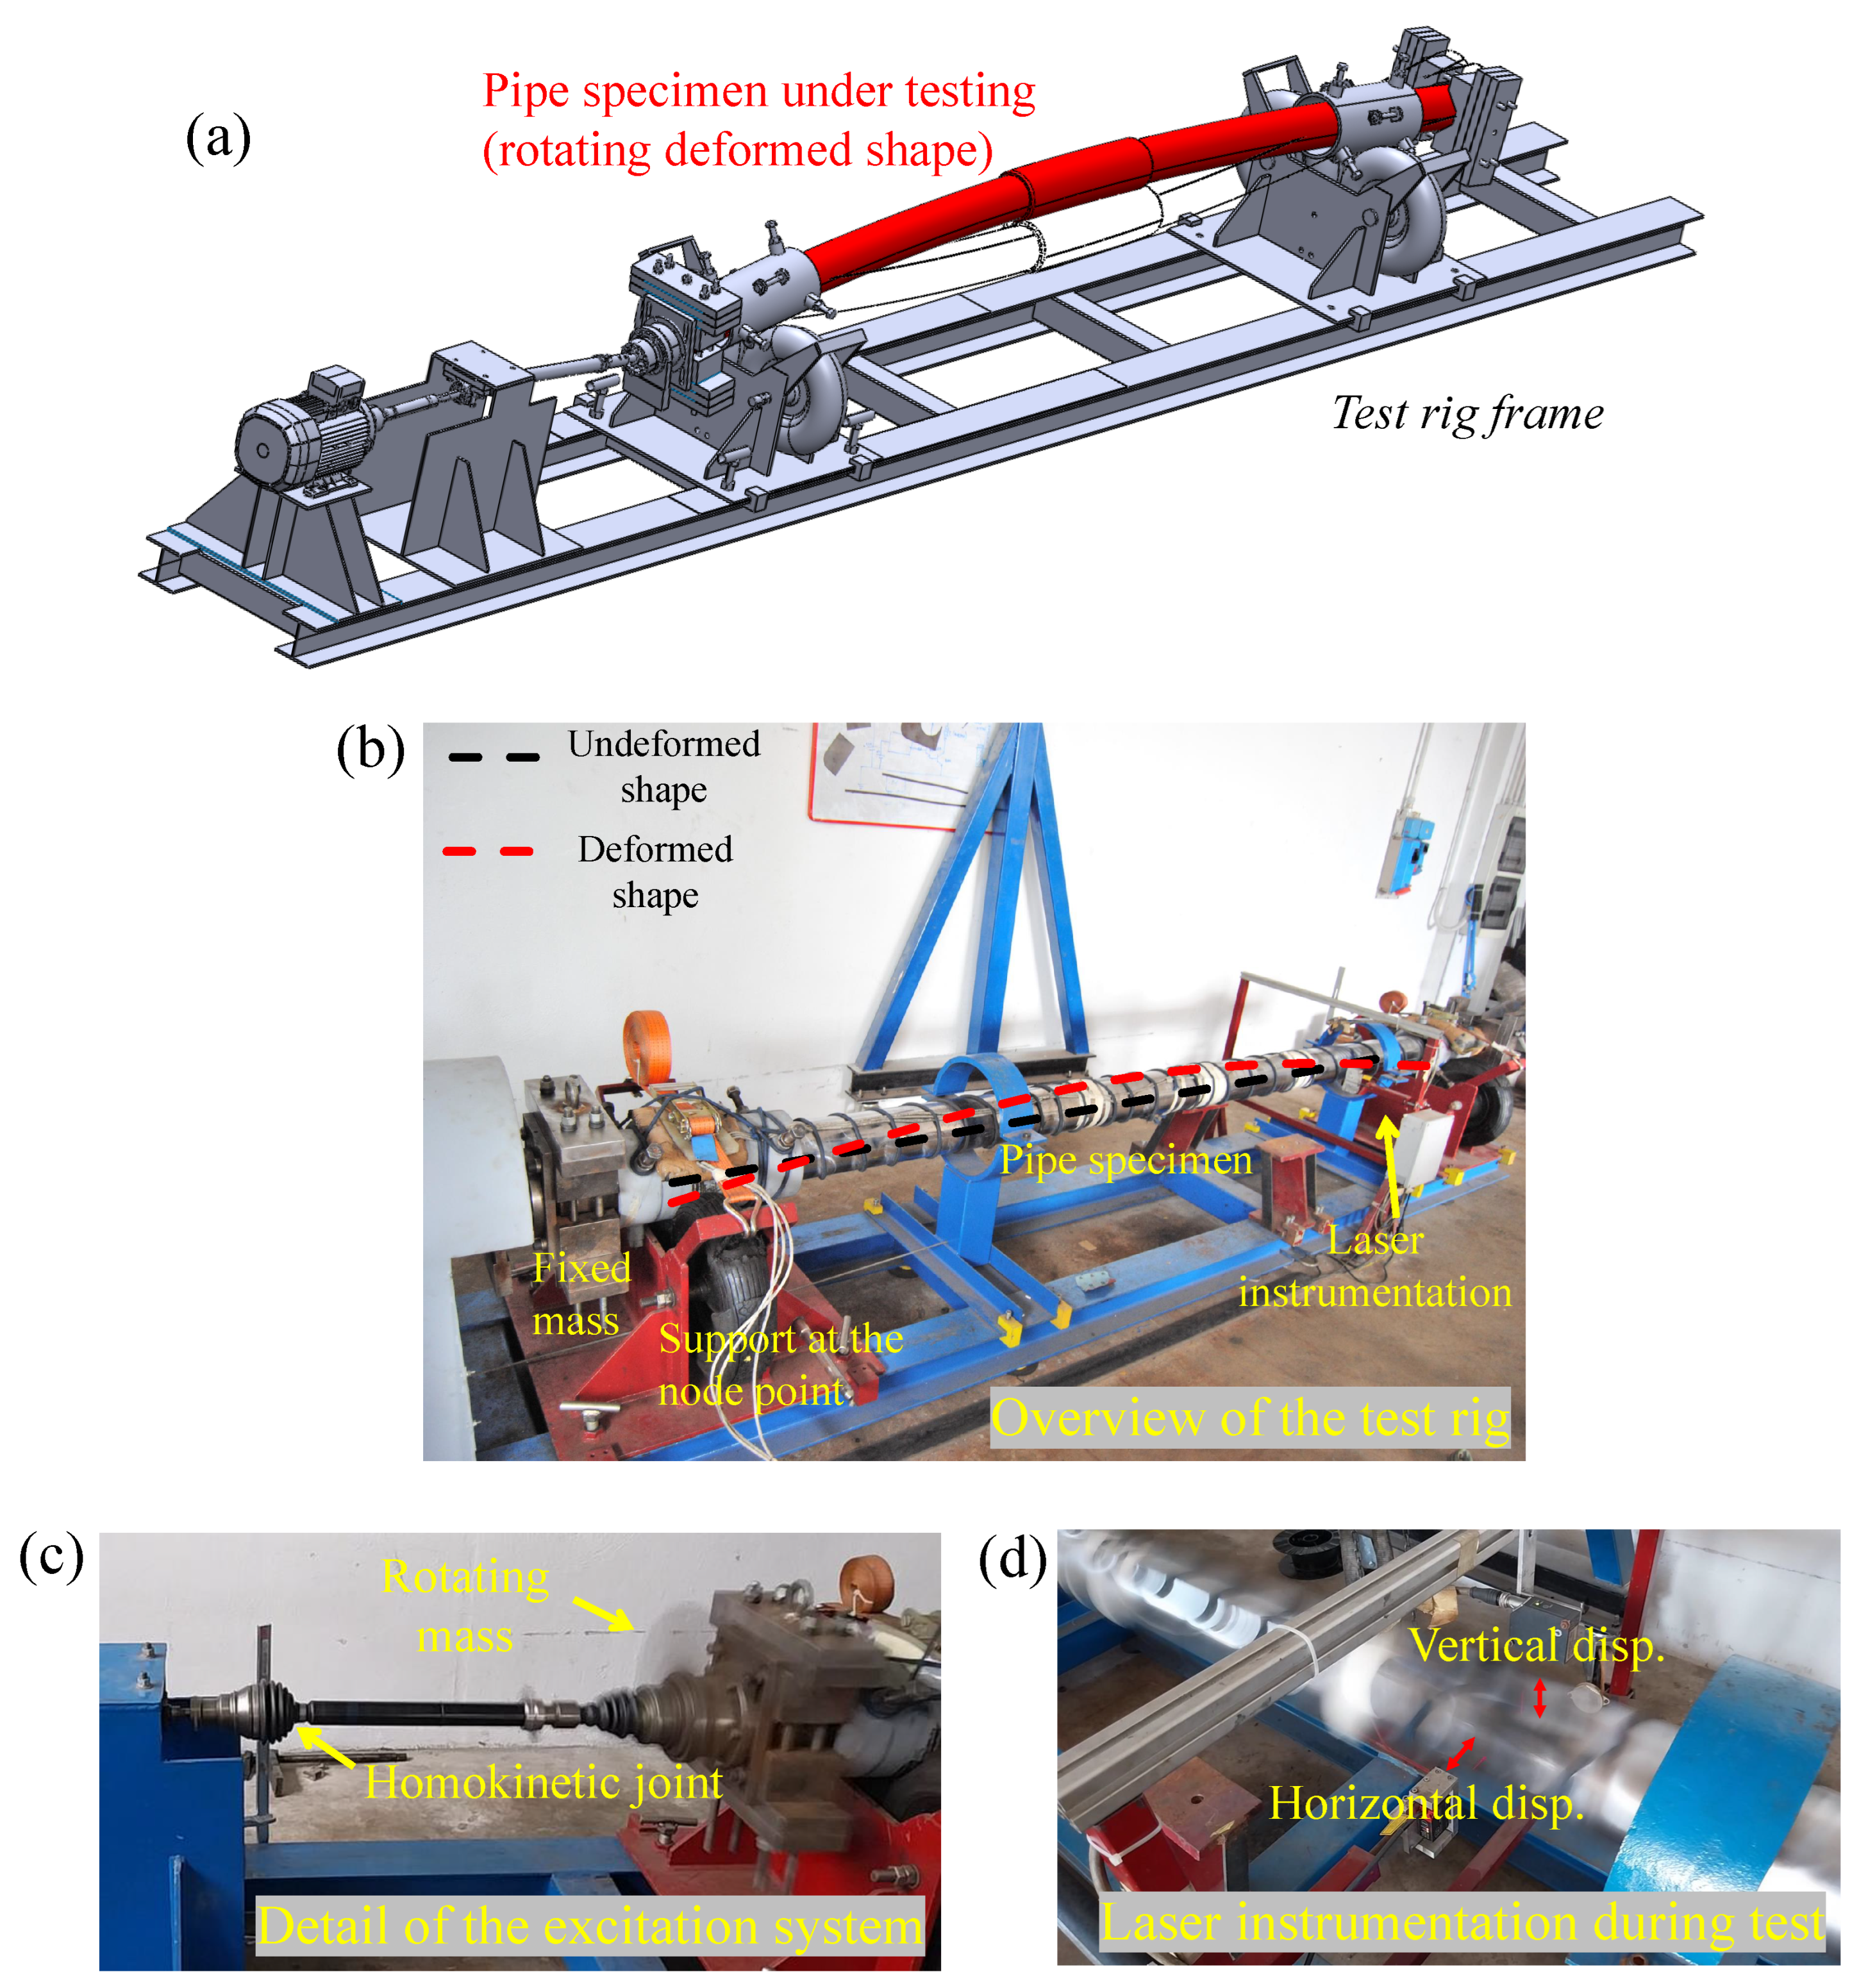
The resonant fatigue test rig was designed by the University of Pisa in collaboration with ACTA Srl and is shown in Figure 2. Figure 2a represents the CAD design of the entire test rig, while Figure 2b provides a real and almost complete overview of the test rig with the various components. Two fixed masses were added to reduce the first natural frequency of the tubular structure and the two supports were placed at the two corresponding nodes; thus, they were only able to balance the weight of the drill pipe specimens. Figure 2c shows the rotating eccentric mass at one end, driven by an asynchronous electric motor, that rotates at a frequency close to (actually slightly lower than) the first natural frequency of the tubular structure. This generates a rotating bending moment on the drill pipe specimen, which does not rotate instead. The electric motor is linked to the rotating eccentric mass by a homokinetic joint for angular and displacement misalignments. In Figure 2d, the two lasers employed to measure the horizontal and vertical displacements at a specific location are shown, and their role is further clarified below.
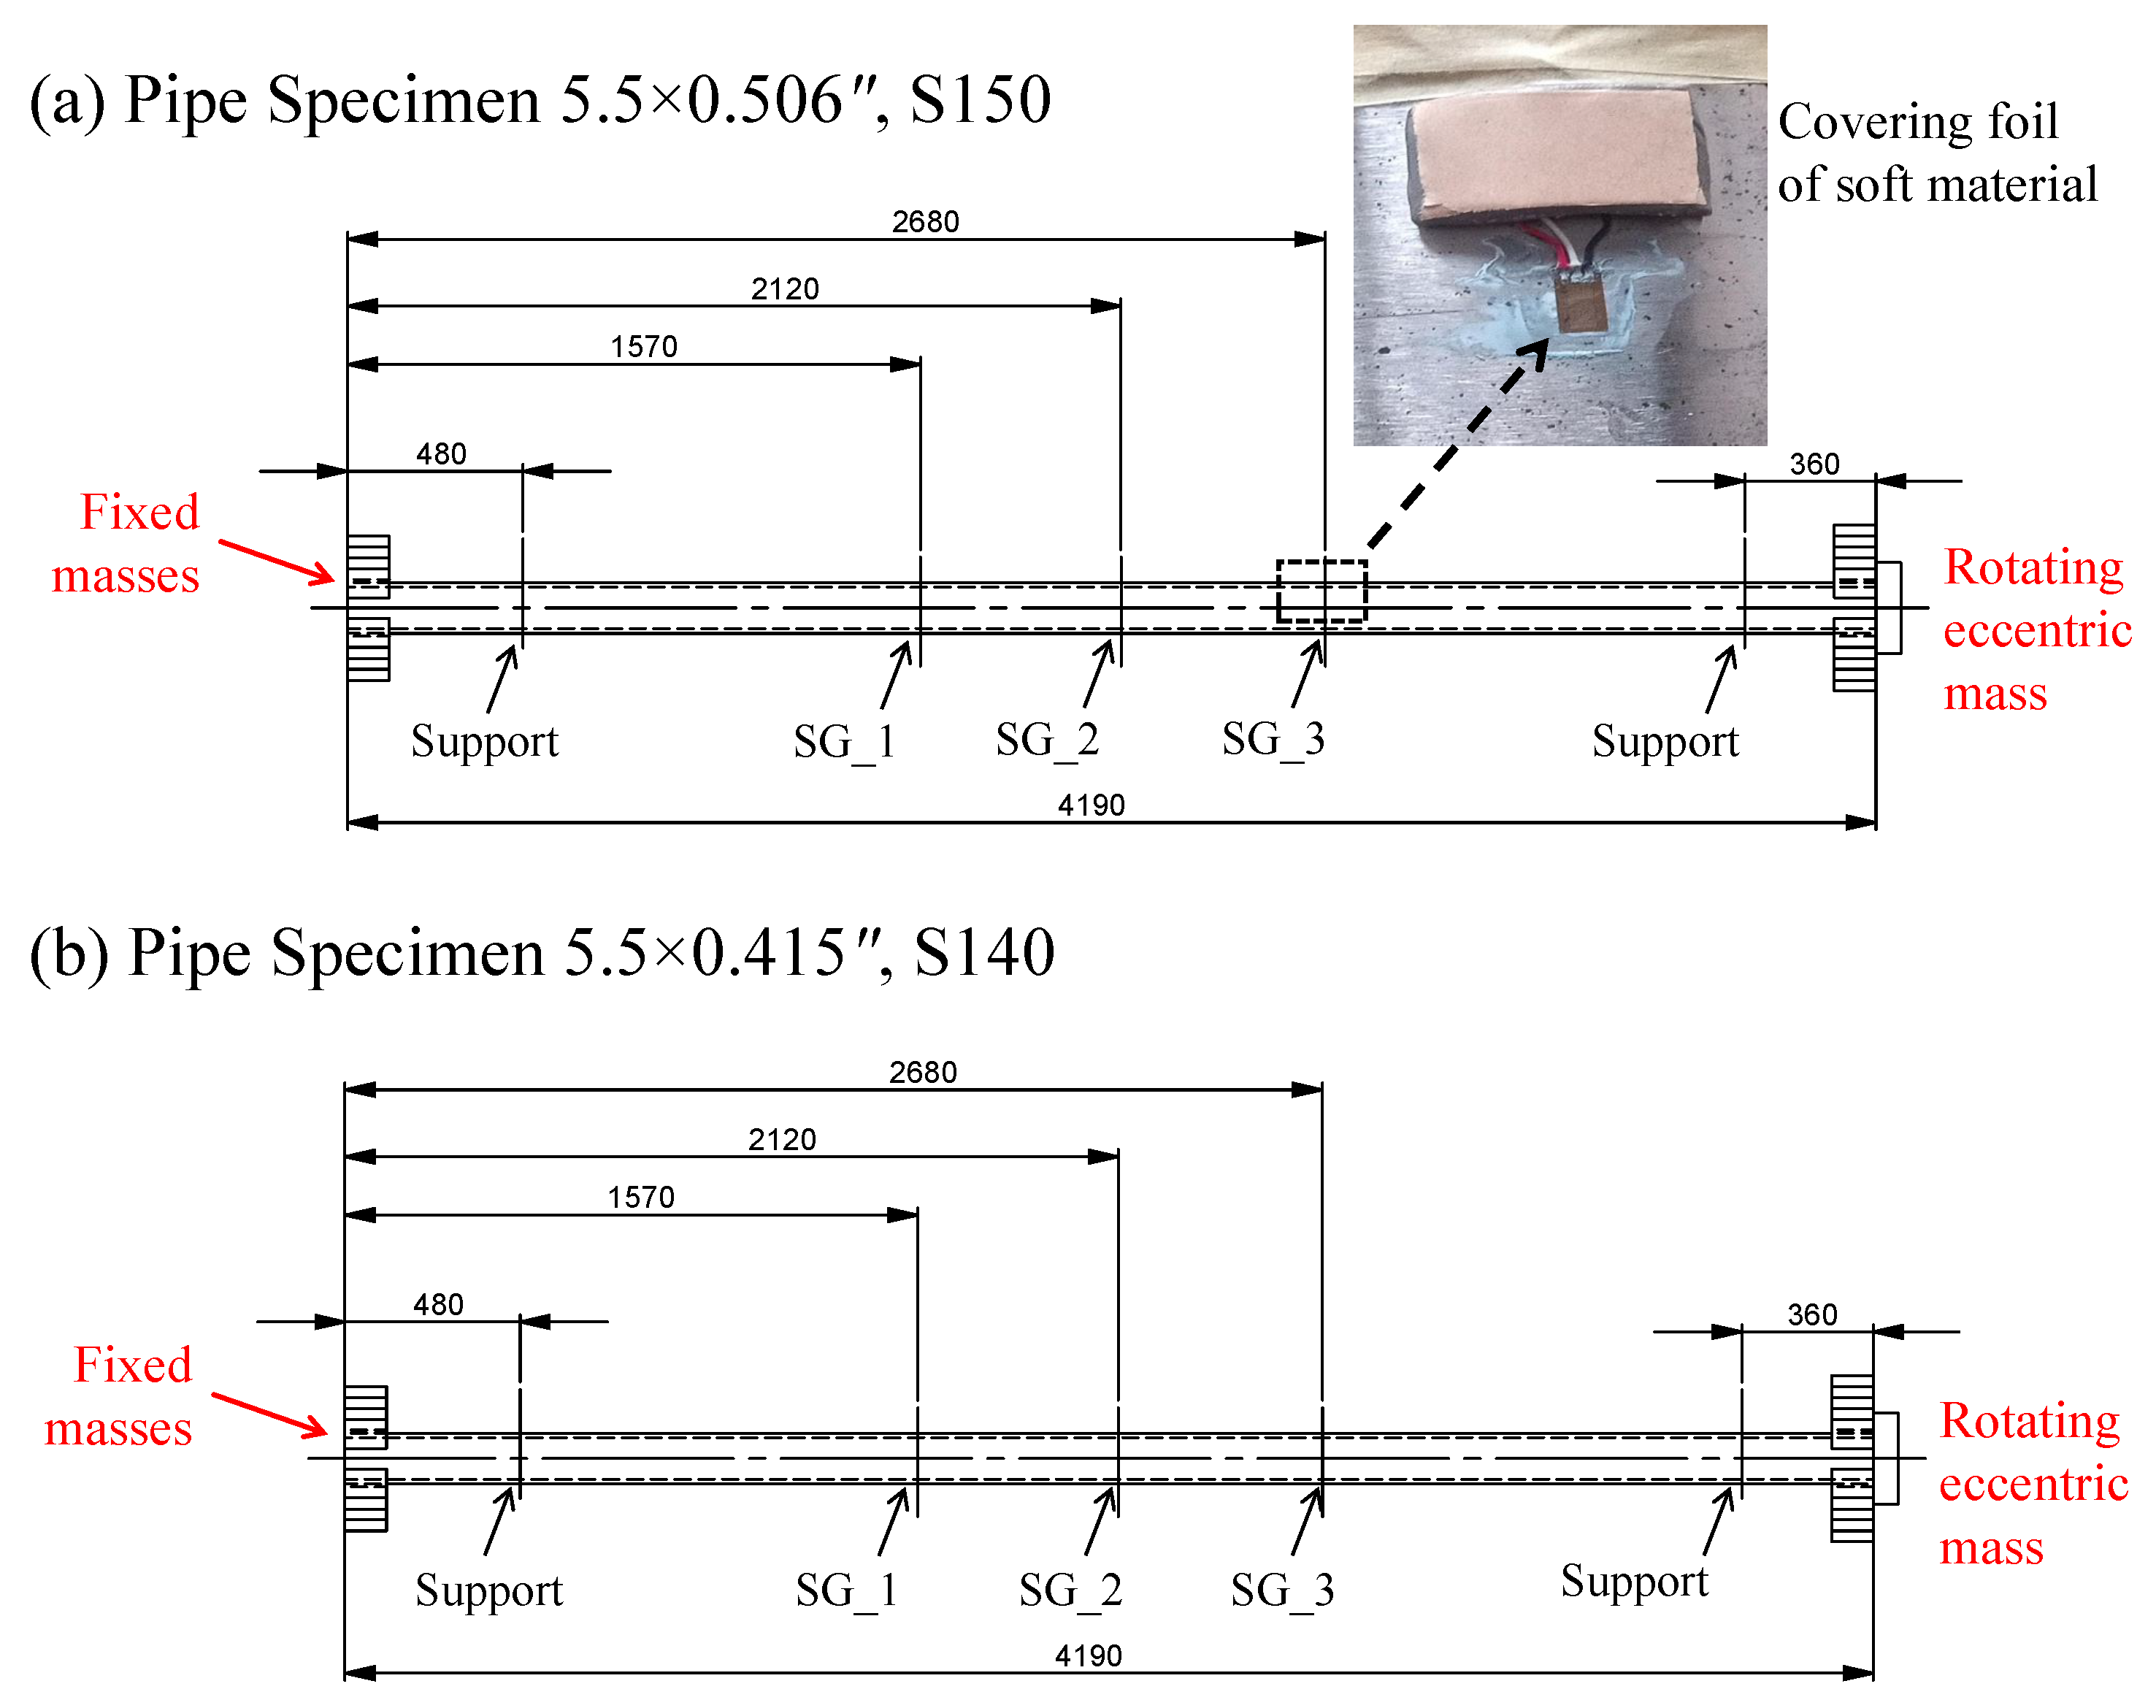
The tested geometries are presented in Figure 3, and they are just two kinds of drill pipe specimen without a connection. Drill pipe specimen 1 was made of steel grade S150, which provides a yield strength equal to S Y = 150 ksi ( S Y = 1034 MPa) or greater, while drill pipe specimen 2 was made of steel grade S140 with a yield strength equal to S Y = 140 ksi ( S Y = 965 MPa) or greater. Both pipe specimen 1 and the pipe specimen 2 presented an external diameter equal to D ext = 139.7 mm, while pipe specimen 1 presented a thickness of approximately 12.9 mm and pipe specimen 2 presented a thickness of approximately 10.5 mm. As shown in Figure 3a,b, strain gauges 1, 2 and 3 (SG_1, SG_2 and SG_3) were attached to three locations of the specimens to correctly monitor the applied alternating stress, and the imposed alternating stress during the tests was σ a , ref = 270 MPa in correspondence of the SG_2. This latter aspect will be clarified below. The gluing of the strain gauges to the specimens has received attention as they could fail during the tests, and, as shown in Figure 3a, a covering foil of soft material was used to avoid large vibrations during the tests.
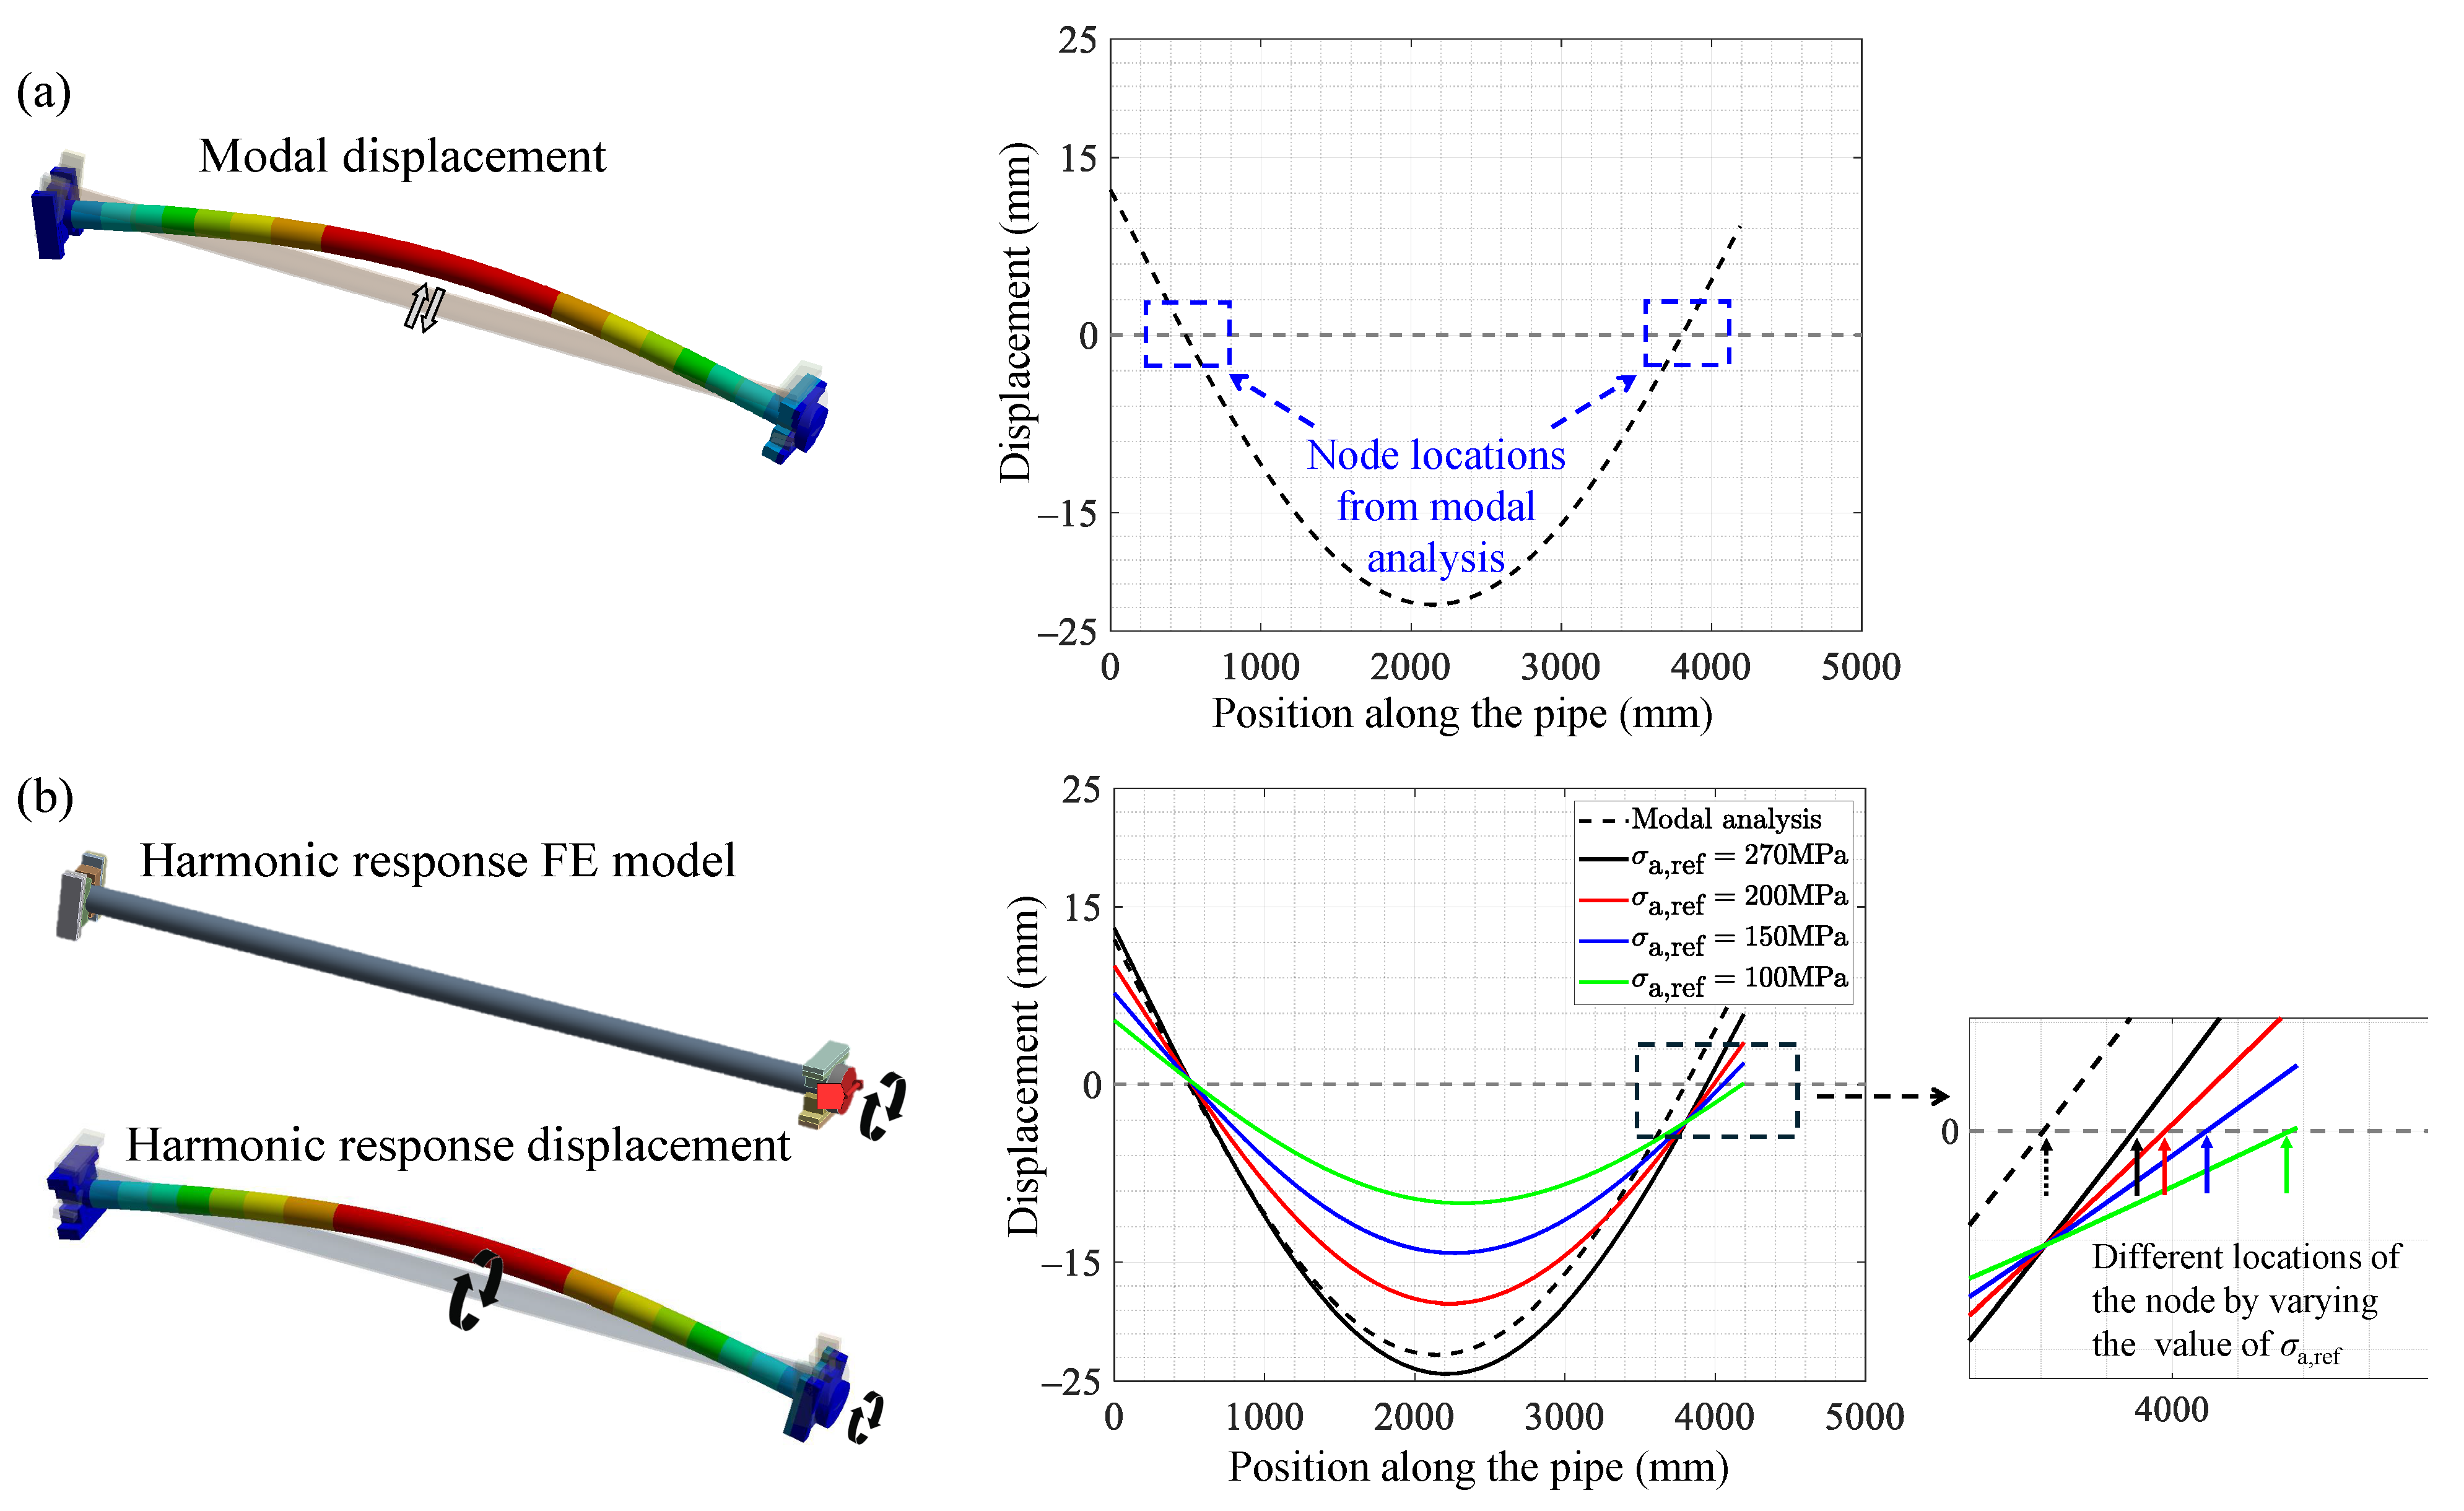
FE simulations of the pure modal and the harmonic response were implemented to obtain the first natural frequency of the structure, the correct locations of the nodes, and the evaluation of the expected stress at the strain gauge locations. Although the two structural steels of the drill pipe specimens were different, the slight differences in the material properties were negligible. Therefore, in all the performed FE analyses, the Young’s modulus of the material was set equal to E = 205,000 MPa, the Poisson’s ratio was set equal to ν = 0.3 , and the volumetric density was set equal to ρ = 7860 Kg/m3. Given that the tests were not performed at exactly the first natural frequency of the structure, where the internal and external dissipations can play significant roles, structural damping was not considered in the FE simulations. The FE modal analysis of the entire structure was useful to obtain the value of the first natural frequency of the tubular structure and the node locations, as shown in Figure 4a. The eccentric rotating mass is represented in the FE model by an additional cylindrical mass at one end, which includes the eccentric rotating mass and the the bearings between the eccentric rotating mass and the pipe specimen. Given that the pure modal analysis is an eigenvalues problem, the displacement is defined at least of one constant, and the graphic shown in Figure 4a was obtained by imposing the stress in the correspondence of the SG_2 equal to σ a , ref = 270 MPa. Given that, during the tests, there was a pulsating load, FE models of the harmonic response of the tubular structure were implemented to better investigate the structural behaviour, as shown in Figure 4b. The FE model of the harmonic response was implemented by applying a rotating force at the location of the rotating eccentric mass. This latter force had two components: the horizontal one was equal to F H = m ω 2 R cos ( ω t ) , while the vertical one was equal to F V = m ω 2 R sin ( ω t ) . In the two expressions of the applied rotating force, m and ω are the mass and the angular velocity of the rotating eccentric mass, respectively, while R is the radius of the circumference described by the rotating eccentric mass. The FE simulations of the harmonic response allowed to obtain the rotating frequency to have an alternating stress equal to σ a , ref = 270 MPa at the location of the SG_2. The obtained value of the frequency from the FE simulation of the harmonic response was near to (lower than) the value of the first natural frequency of the structure extracted from the modal analysis. In addition to this, it was found that the location of the node near the load application point changed appreciably with respect to that obtained from the modal analysis, as shown in Figure 4b. The support of the test rig near the eccentric rotating mass was then moved to the location obtained from the FE analysis of the harmonic response. This latter aspect was of fundamental importance to avoid the presence of spurious external forces during the fatigue tests, and the two supports were then only employed to balance the weight of the drill pipe specimen. Several other FE simulations of the harmonic response were performed to calculate the frequency, which allowed for different and lower values of the alternating stress to be obtained at the SG_2. The differences between the first natural frequency obtained from the modal analysis and those obtained from the harmonic response analyses became higher by lowering the imposed alternating stress. In addition to this, even the discrepancies between the location of the node near the load application point obtained from the modal analysis and the corresponding locations extracted from the harmonic response analyses became higher by lowering the imposed alternating stress, as highlighted in Figure 4b.

3.2. Strain Gauges and Lasers Calibrations

The use of the strain gauges during the tests was of fundamental importance to record the alternating stress at specific locations in the drill pipe specimens. A static vertical load was applied by a hydraulic actuator at the point approximately located in the middle of the specimen, as highlighted in Figure 5a. The voltage signals indicated by the strain gauges were recorded and the nominal stress values at the strain gauges’ locations were calculated by the beam theory, as shown in Figure 5b. Finally, the ratios between the nominal stress values and the voltage signals were calculated. In addition to this, the adequate calibration of the load cell at the end of the hydraulic actuator was verified to ensure its proper functioning. The vertical displacement of the load application point was calculated for a given load by using the classical Mohr integral, and it was also measured by the use of a comparator, as shown in Figure 5a. The two obtained results were very similar, thus confirming the proper functioning of the load cell.
The proper calibration of the strain gauges was also essential for the correct functioning of the control system beyond the test rig. The pipe specimens were tested under an imposed alternating stress equal to σ a , ref = 270 MPa at the SG_2 of Figure 3a,b, while the expected stress at the SG_1 and SG_3 was approximately equal to 90% of σ a , ref . To accomplish this, a control system was necessary to reach and maintain the imposed level of stress. The voltage signal recorded from the SG_2 was converted into a stress value through the previously calculated scale factor, and it was then compared with the reference value of σ a , ref ; thus, the error e between the value of the stress obtained through the strain gauges and the corresponding reference value was obtained. The obtained value of e was employed in a proportional integrative control where the output quantity was represented by a pulse–width modulation (digital) voltage signal, which was then converted into an averaged voltage signal (analog), and this latter became the input quantity of the inverter. The inverter output quantity was an alternating power current with a frequency f, which powered the electric asynchronous motor. The excitation frequency of the eccentric rotating mass was then f = k f , given that the electric asynchronous motor scaled the input frequency f through the sliding factor k. Regardless of all the precautions taken during the gluing of the strain gauges, these latter may fail during the tests, and the voltage signal can then be recorded from one of the other strain gauges that did not fail, for example, the SG_1 and SG_3. The lasers can also be considered a valid alternative to the use of the strain gauges to control the imposed alternating stress during the tests after the stress amplitude is correctly imposed. During the initial phase of the tests, the alternating stress is controlled with the strain gauges up to the value of σ a , ref , and the displacement amplitude δ a , ref related to the lasers’ application point is initially recorded. The value of δ a , ref can be then assumed as the target displacement amplitude that should be maintained during the test. In case of failure of the strain gauges, the value of the displacement at the laser location can be compared with the value of δ a , ref , and then the error e is found for the proportional integrative control. It should be noted that even if the quantity δ a , ref measured by the lasers may be slightly incorrect, or does not perfectly match the FE simulation, it does not represent a problem for the control system given that it is calibrated with respect to the alternating stress during the initial phase.

3.3. Test Rig for the Polishing Operations

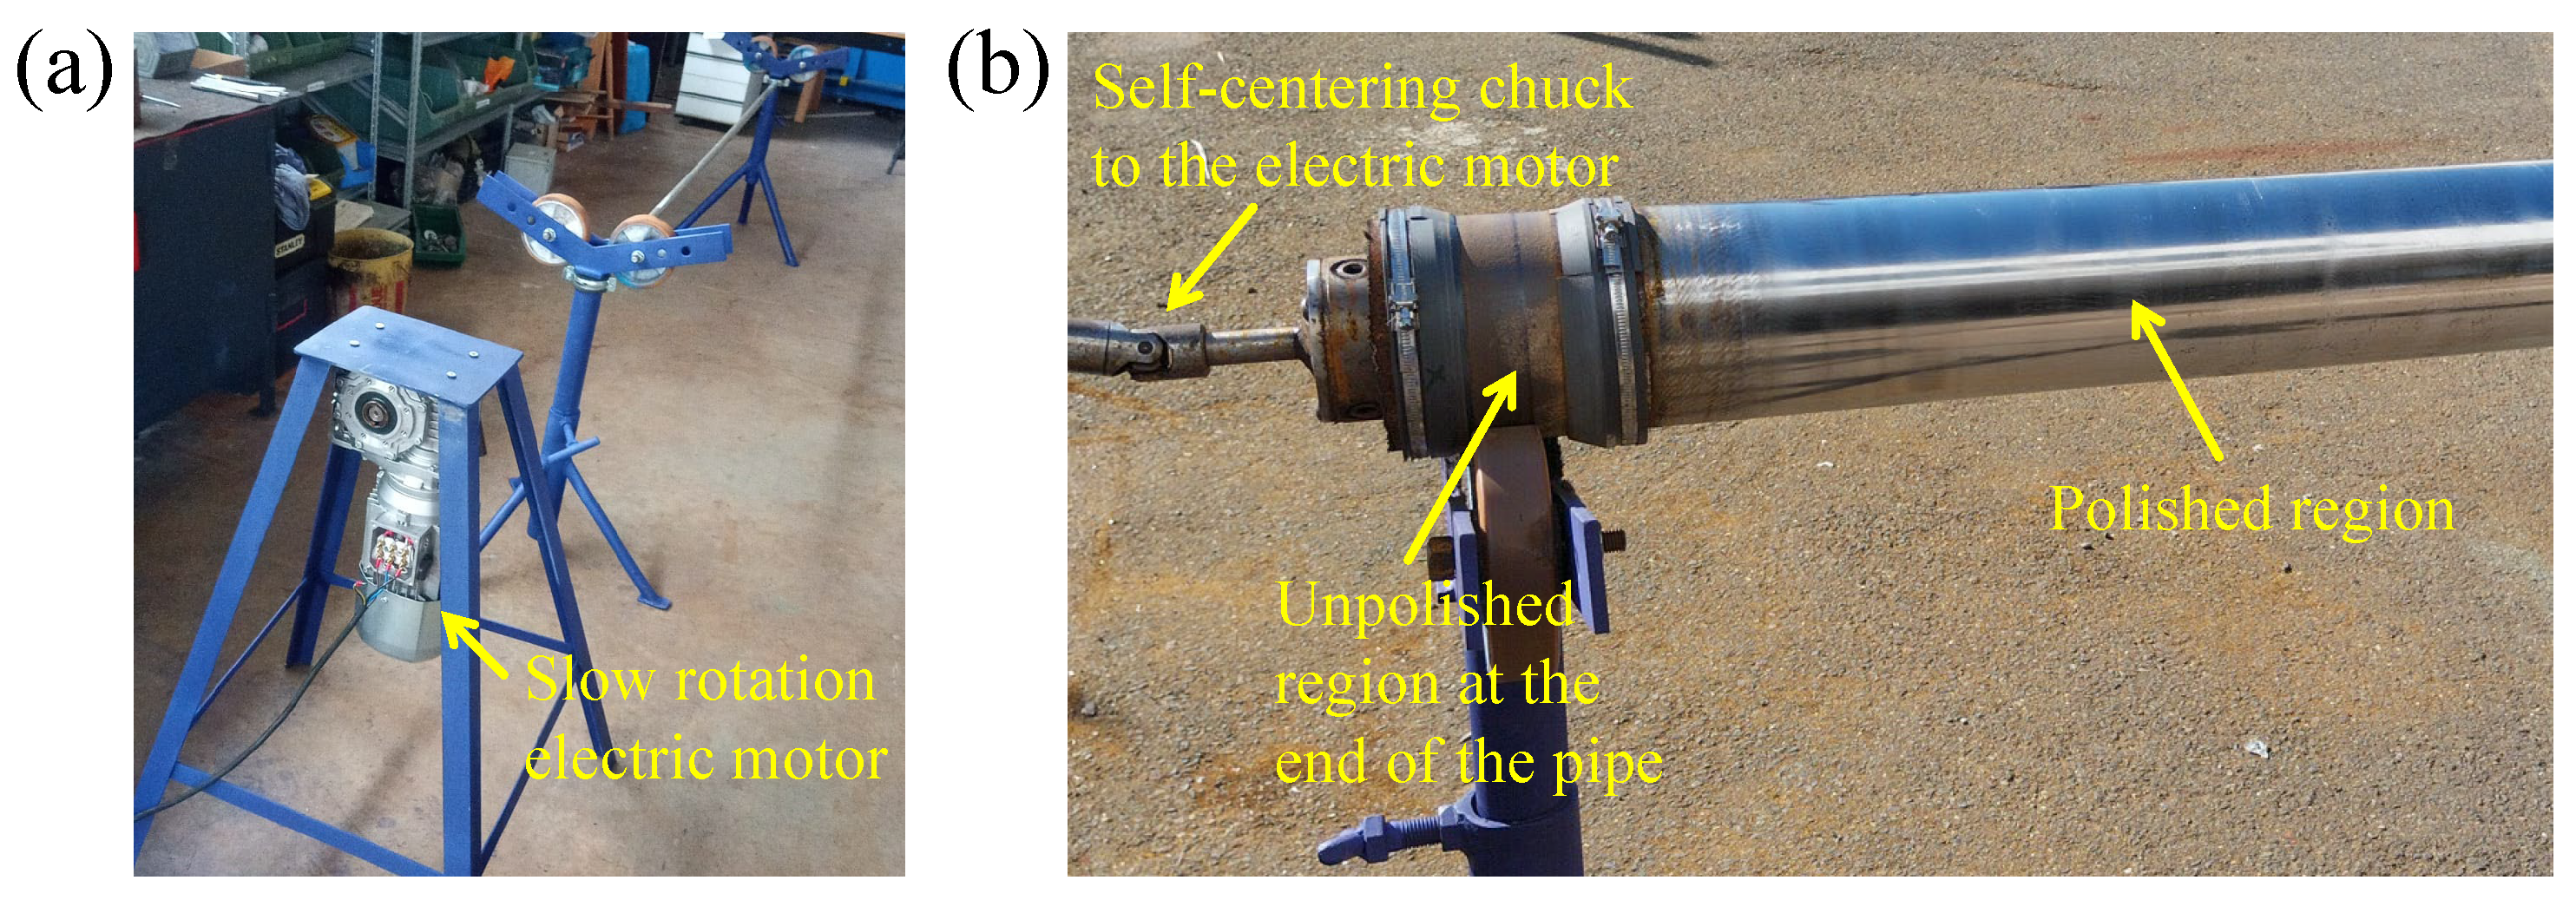
In this research, the fatigue behaviour of polished drill pipe specimens was investigated. In particular, a polishing test rig was developed, as shown in Figure 6, to polish the external and corroded surface of the specimens. As shown in Figure 6a, a slow-rotation electric motor powered a self-centering chuck, which allowed for the specimens to be rotated along their longitudinal axis, as shown in Figure 6b. While rotating, the specimens underwent polishing operations via grinding. As indicated in Figure 6b, only small portions of the the extremities of the specimen remained unpolished, and these zones were needed to compare the surface morphology of the polished zones with the surface morphology of the corroded zones. The polishing operation consisted of three different phases, as shown in Figure 7, which are listed below:
The technical data about the rotational speeds of the grinding wheel and the specimens to be polished and the dimensions of the diameters of the grinding wheels are reported in Table 1. The entire polishing operation for each pipe specimen was considered to be completed when the value of R a , obtained by means of a portable roughness tester, was equal to or less than 0.4 μ m over almost all the polished region’s length. The roughness of 0.4 μ m is generally considered a reference value for a well-performed grinding process. In specimen 1, the value of R a along the entire length of the polished region was even lower than 0.2 μ m, while in specimen 2 the value of R a in the polished region was higher than that of the specimen 1; however, in any case, it was lower than 0.4 μ m over almost all the polished region’s length. As discussed in the following sections, the drill pipe specimen 2 featured several residual corrosion pits, which were too deep to be removed with a polishing operation of this kind.

4. Results

4.1. Fatigue Strength Results and Crack Location Analyses

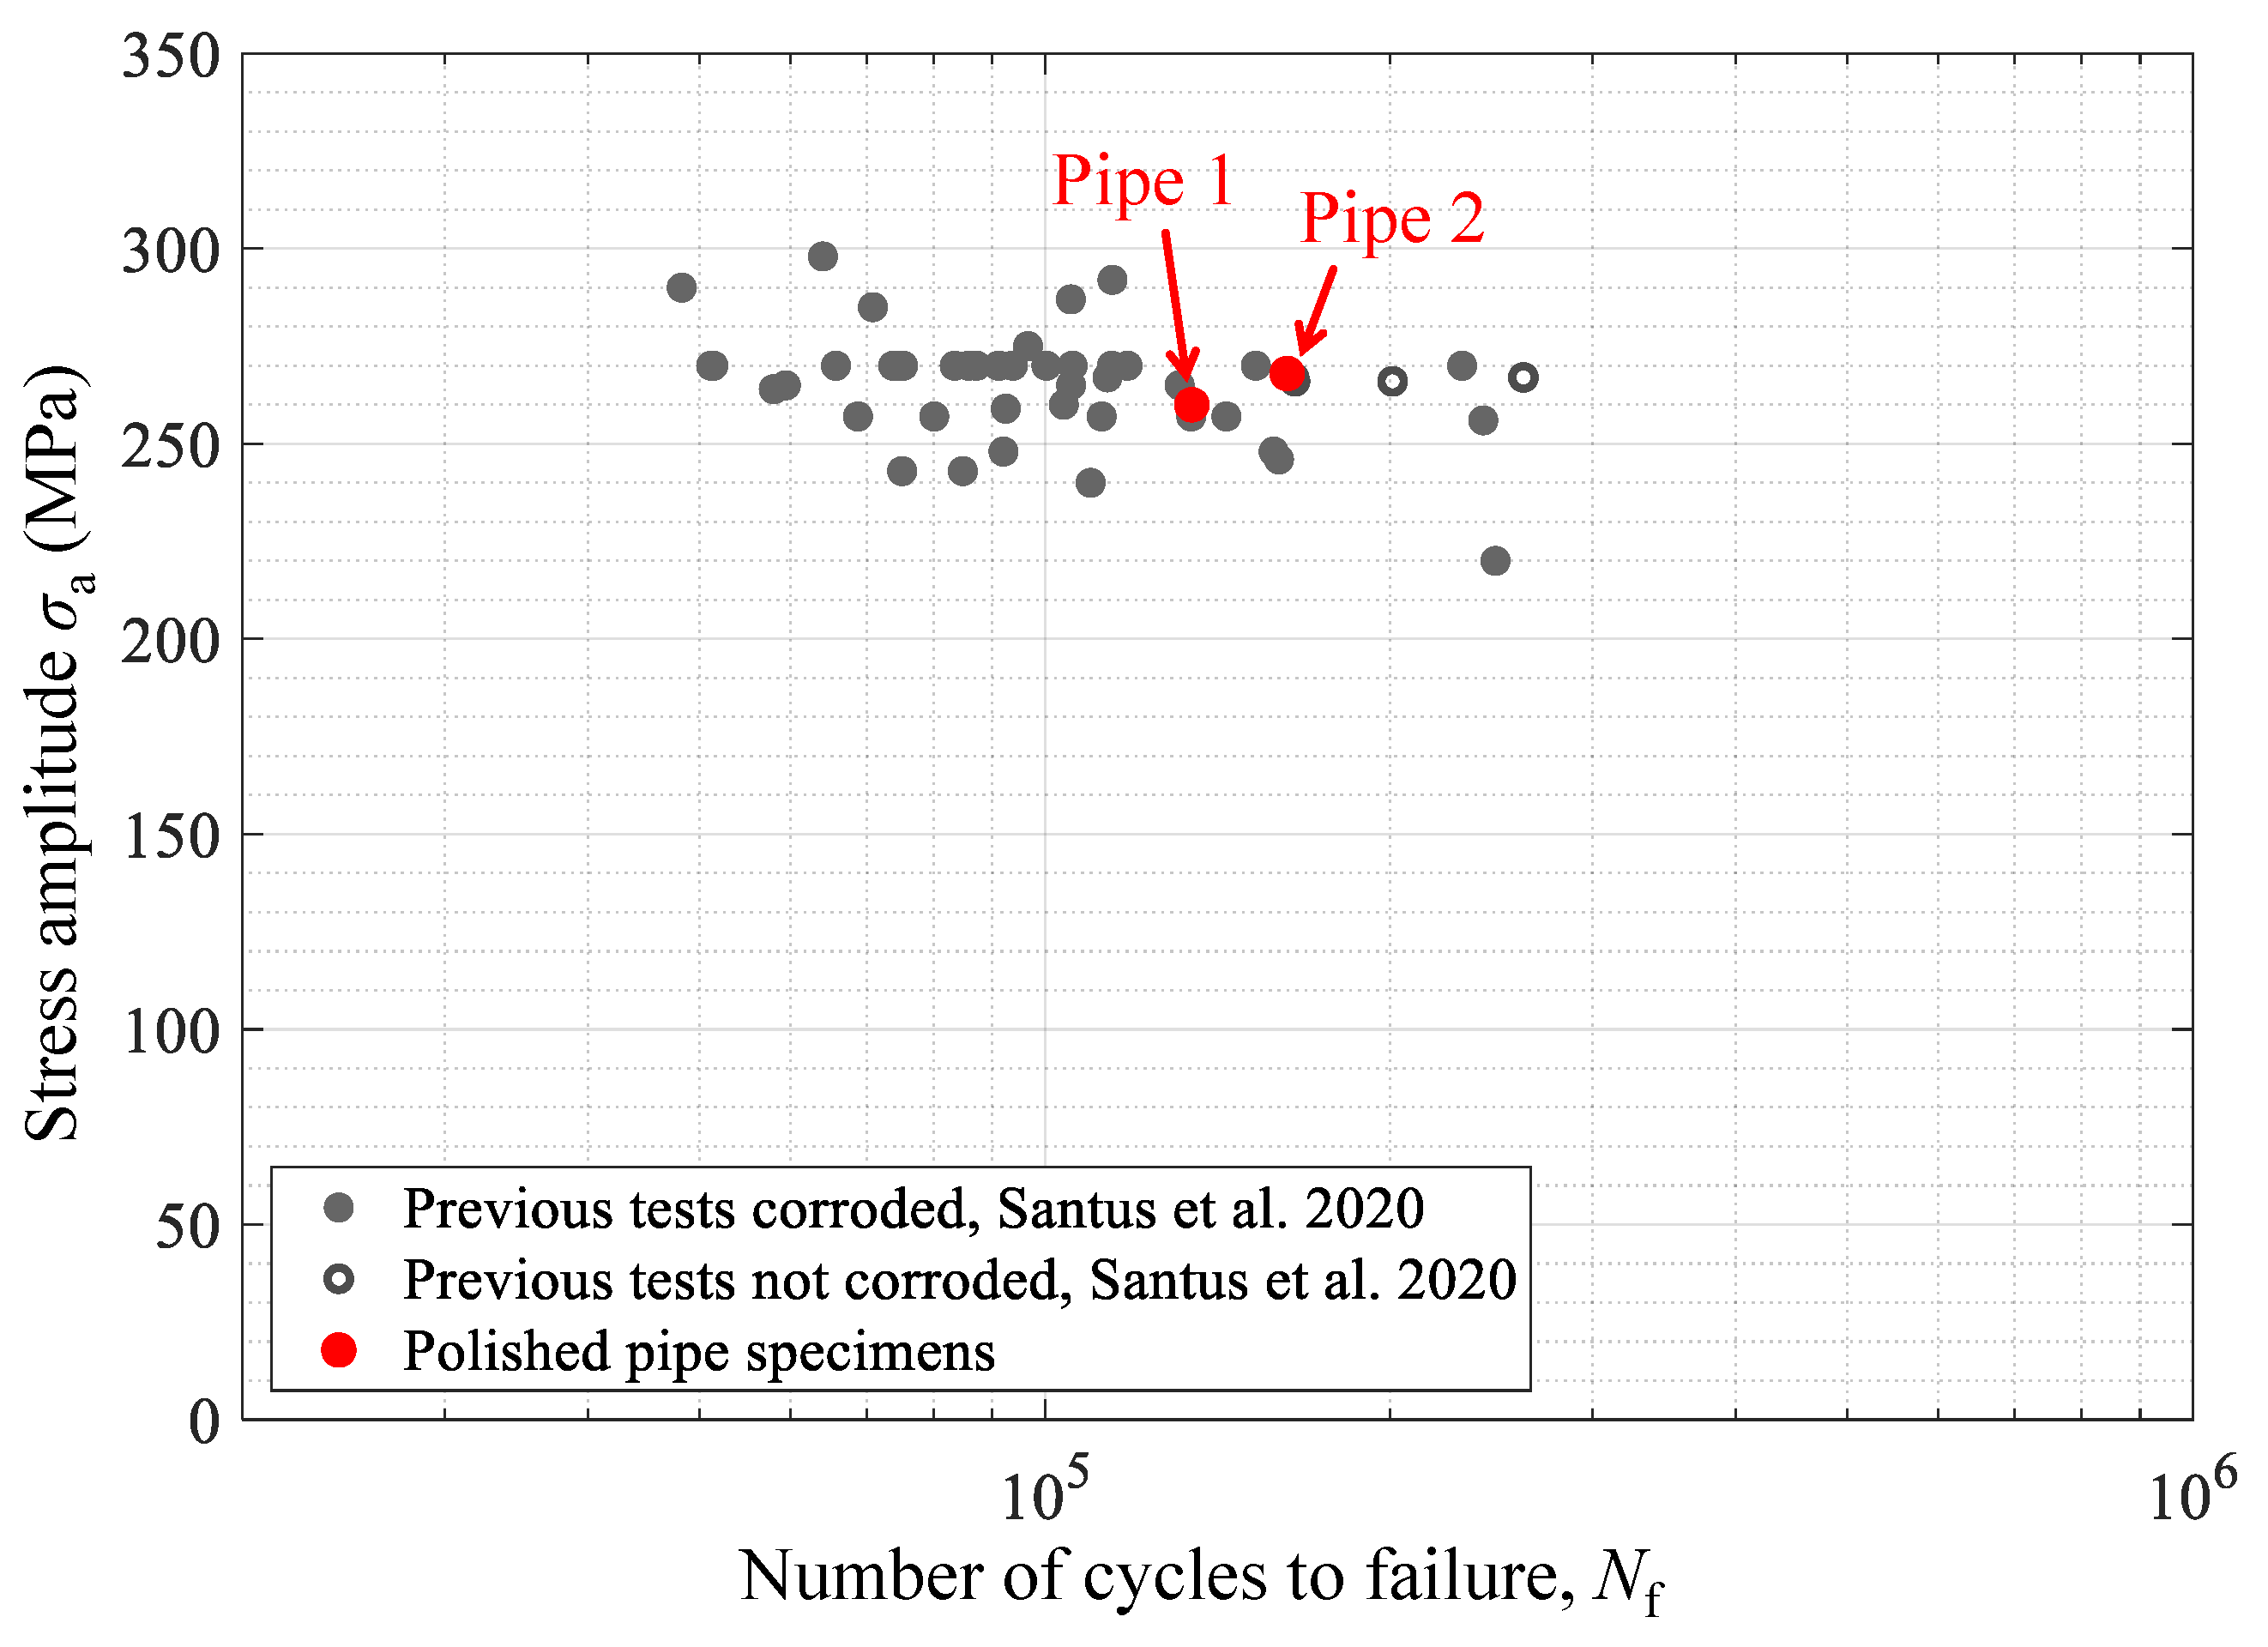
The fatigue test results of the polished pipe specimens in terms of stress amplitude and number of cycles to failure are reported in Figure 8, along with those of our previous research [50] for a direct comparison. Pipe specimen 1 failed after N f = 134,300 cycles and at a stress amplitude σ a = 260 MPa, while pipe specimen 2 failed after N f = 162,600 cycles and at a stress amplitude σ a = 268 MPa. The imposed alternating stress in both tests was σ a , ref = 270 MPa. Among the specimens of the same group, the dispersion of the points of Figure 8 can be motivated by considering the quite large dimensions of the tested specimens compared to the laboratory scale specimens. As highlighted in Figure 8, the number of cycles to failure for these polished specimens was higher than the average value of the corroded pipe specimens of the experiment described in Ref. [50].However, the number of cycles to failure of these polished pipes was lower than the average value of the not-corroded pipes, again reported in Ref. [50]. This could be because the not-corroded drill pipe specimens were new; thus, both the inner and the outer surfaces were free of corrosion marks.
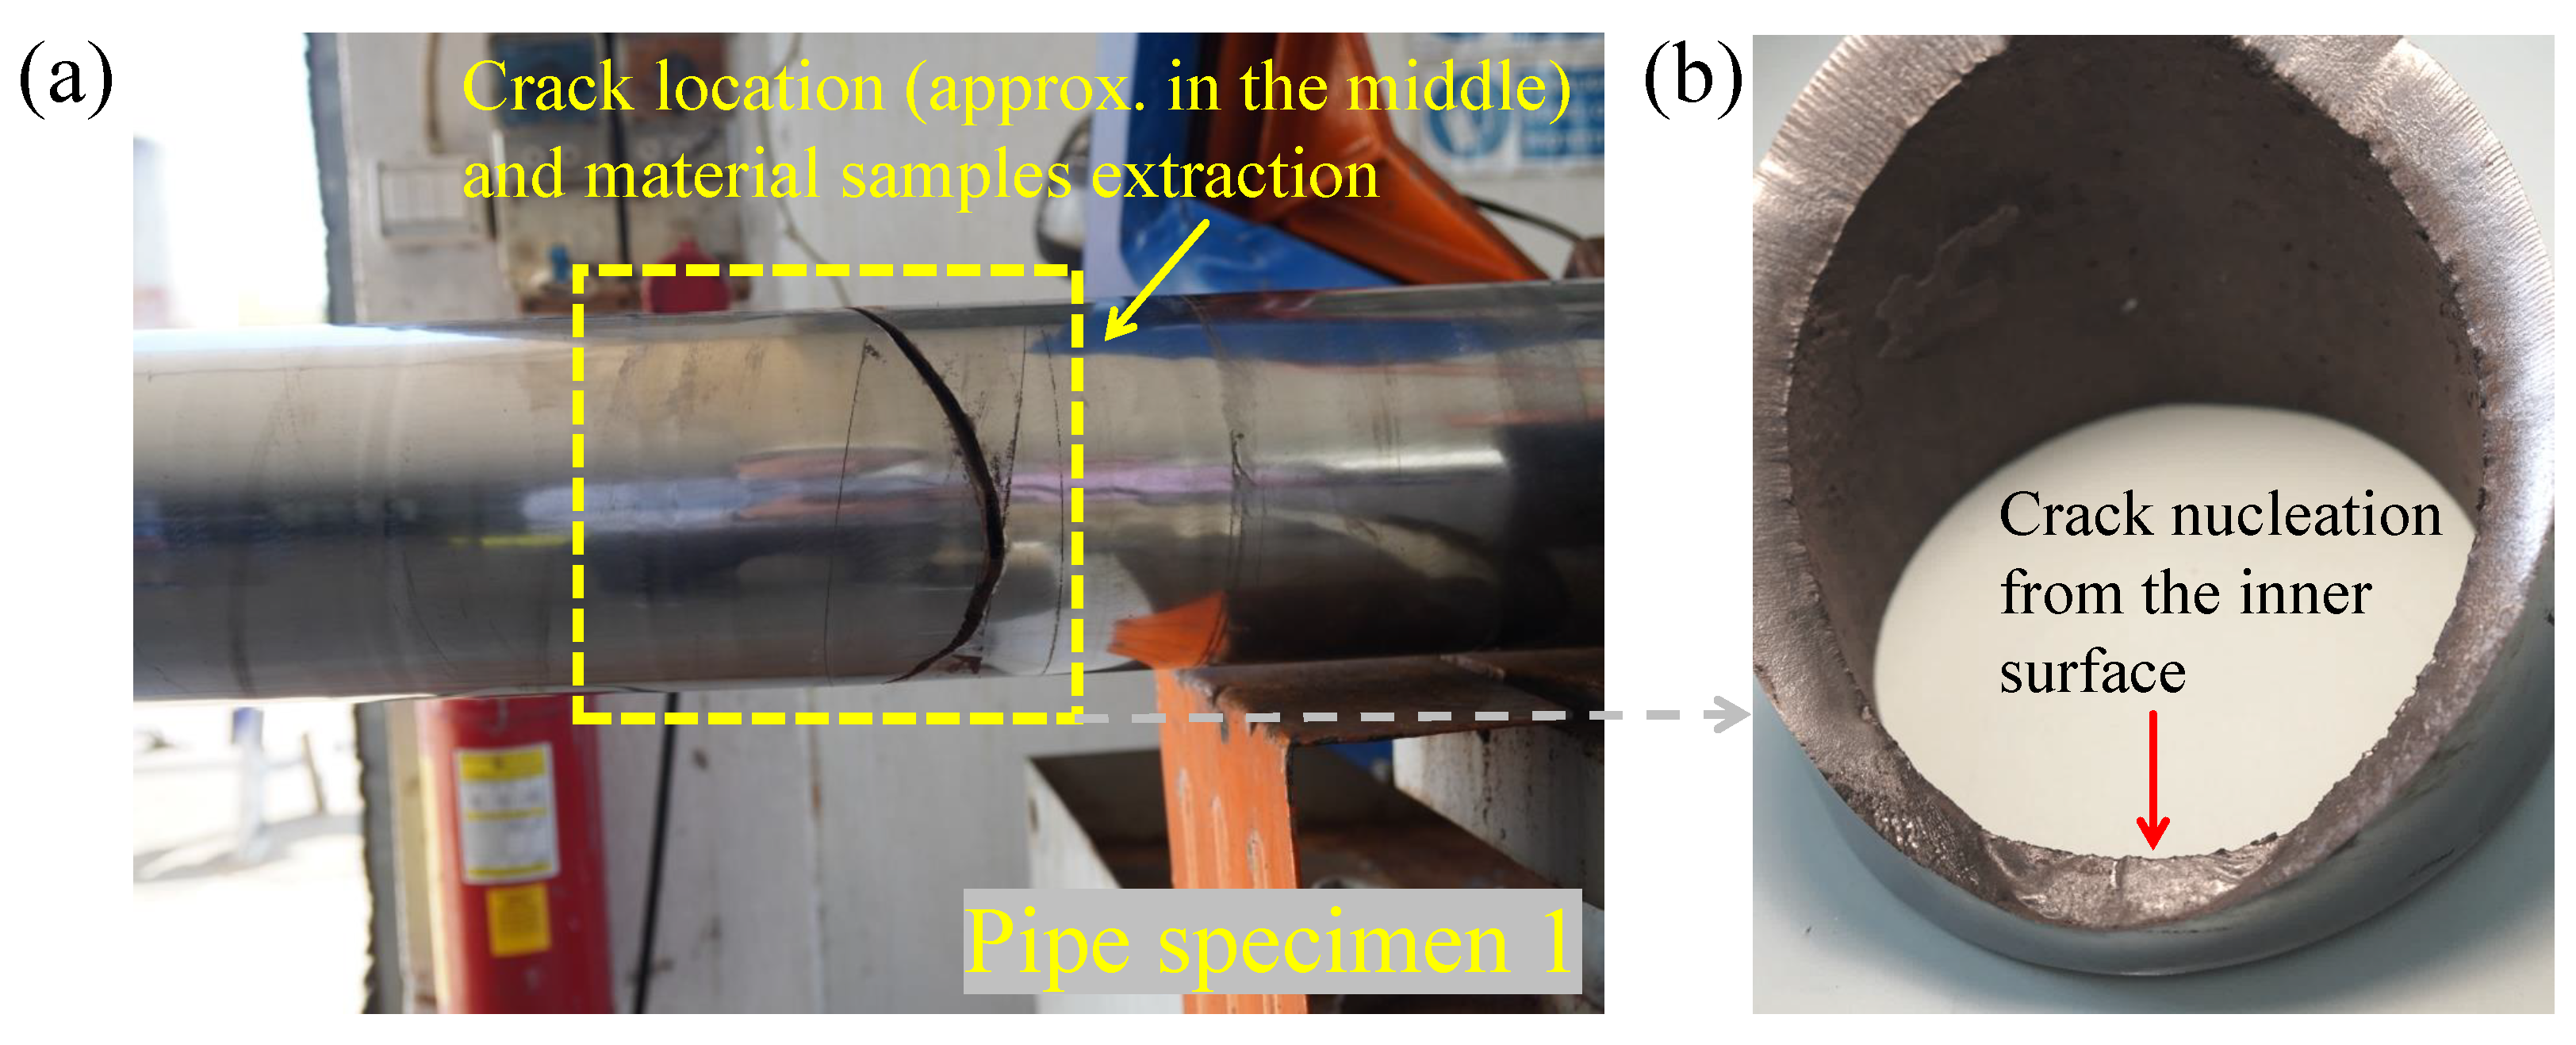
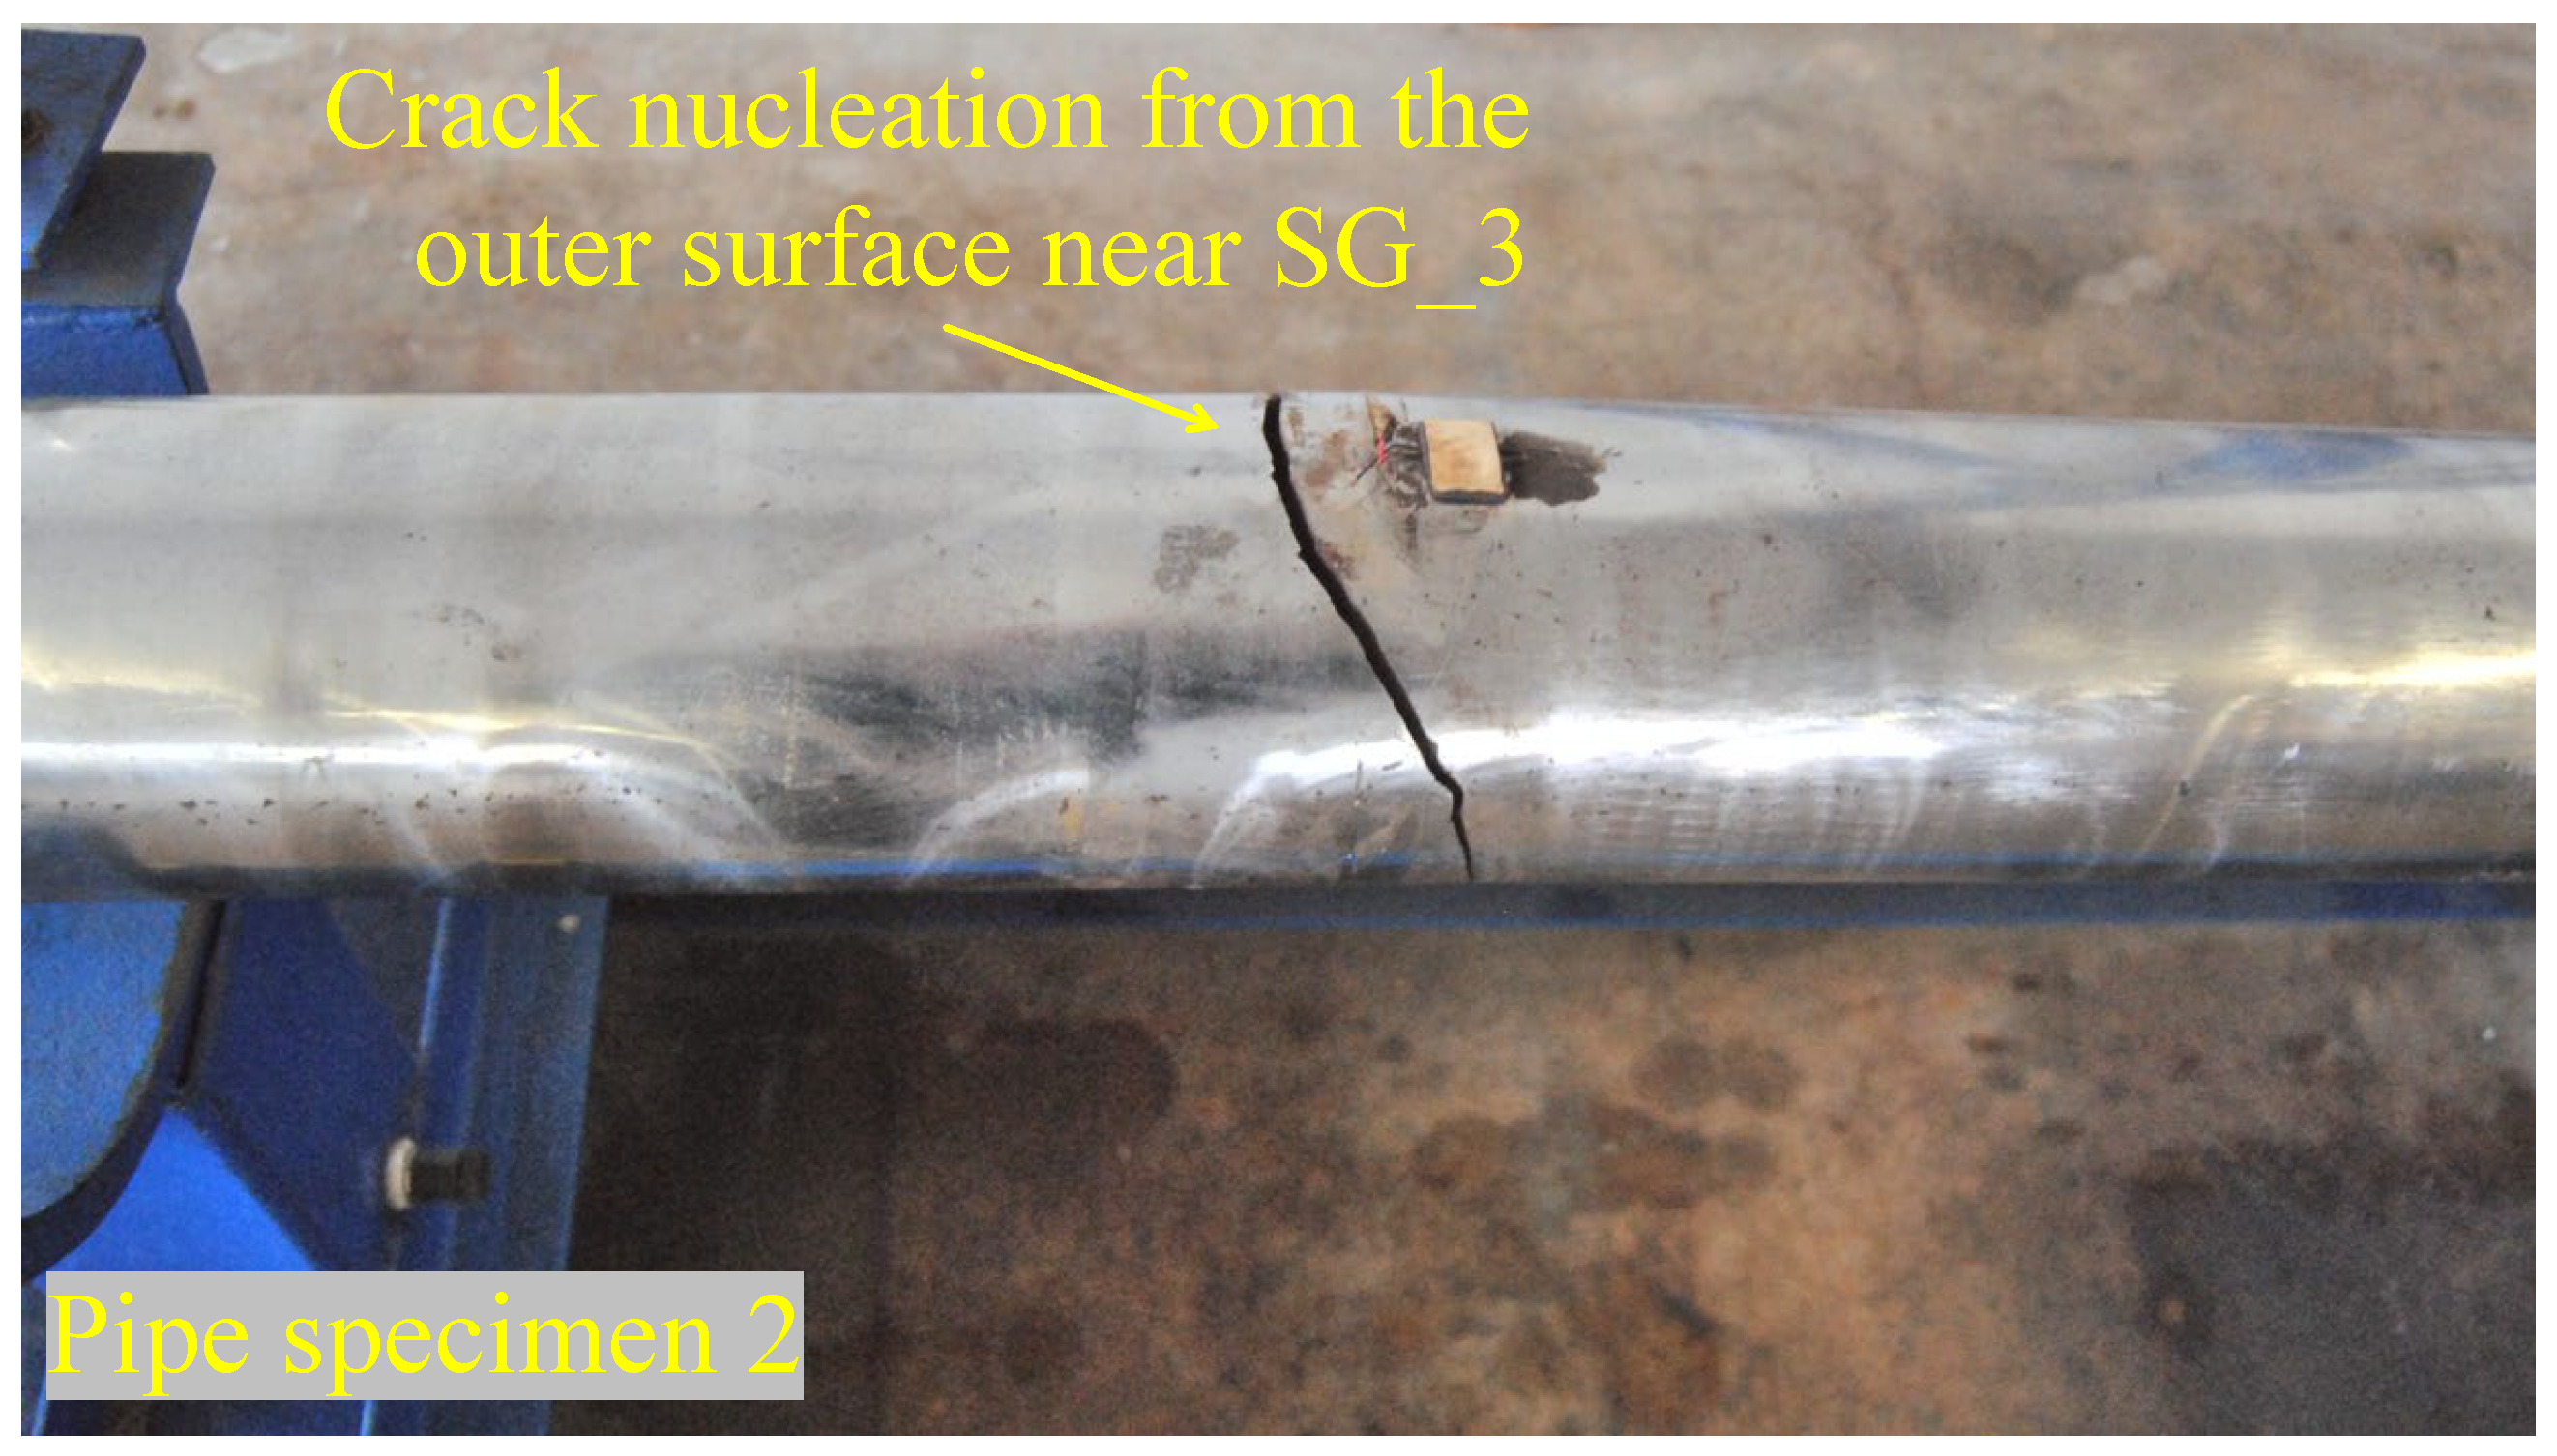
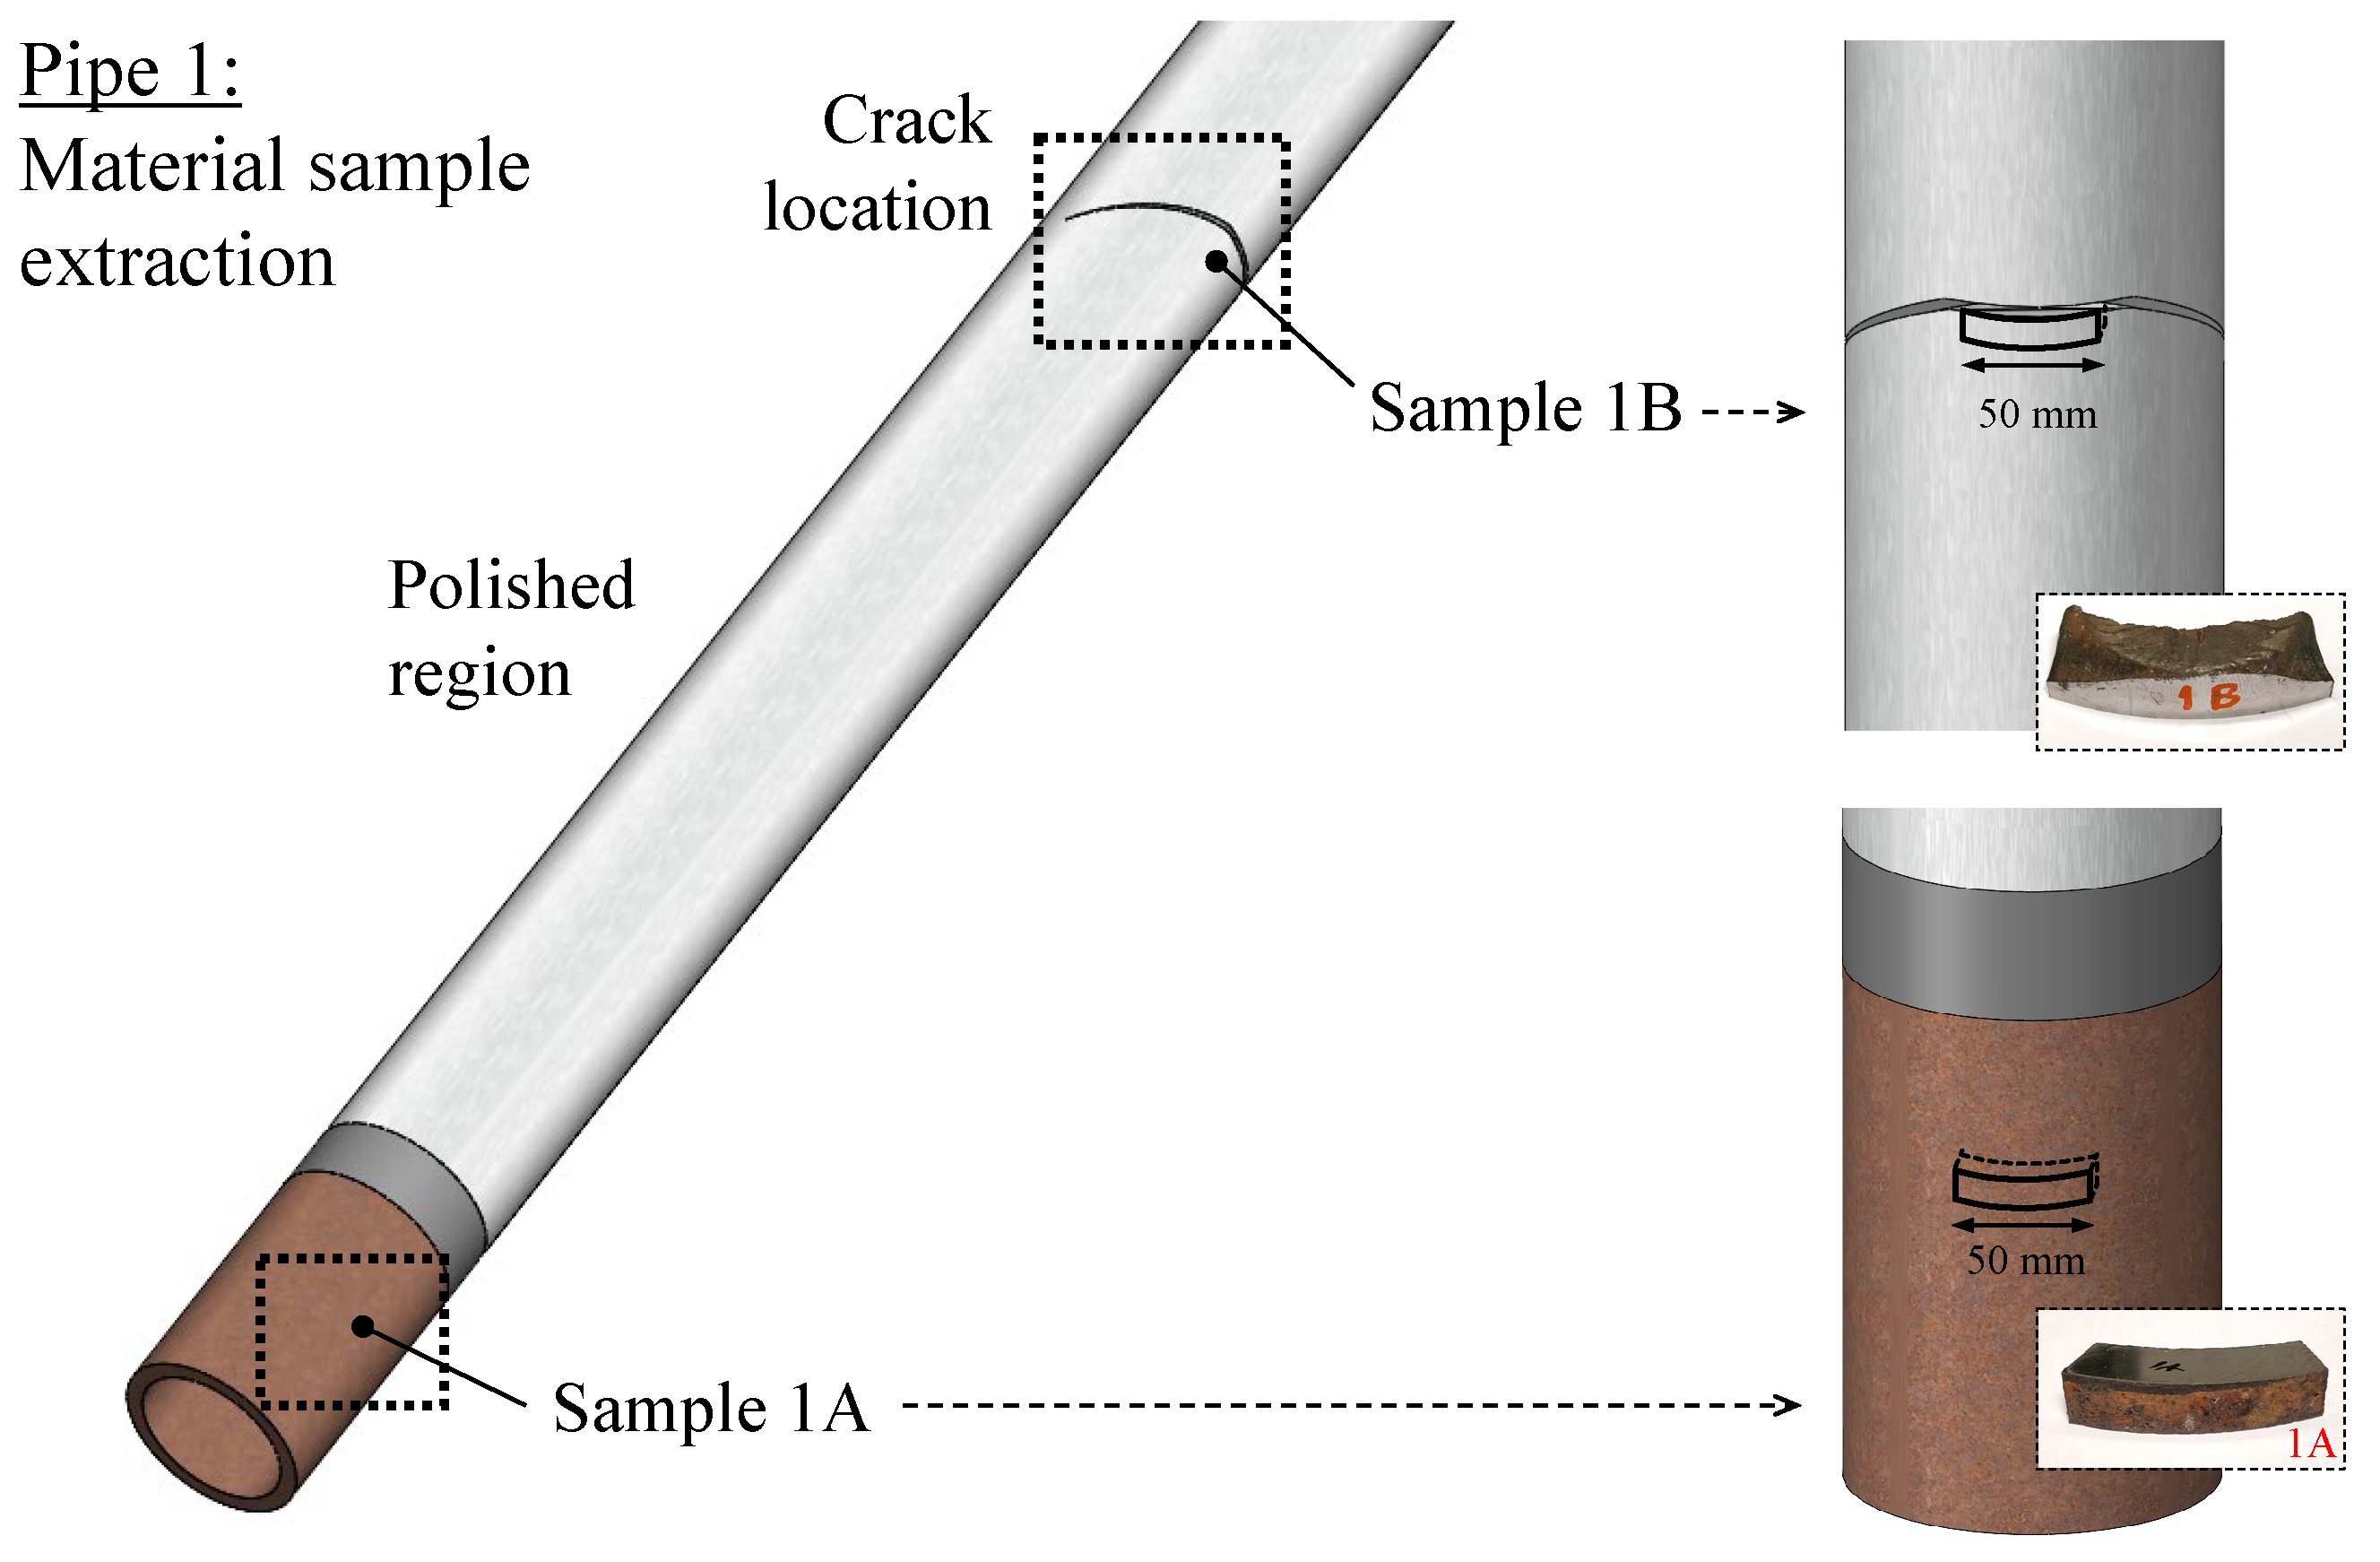
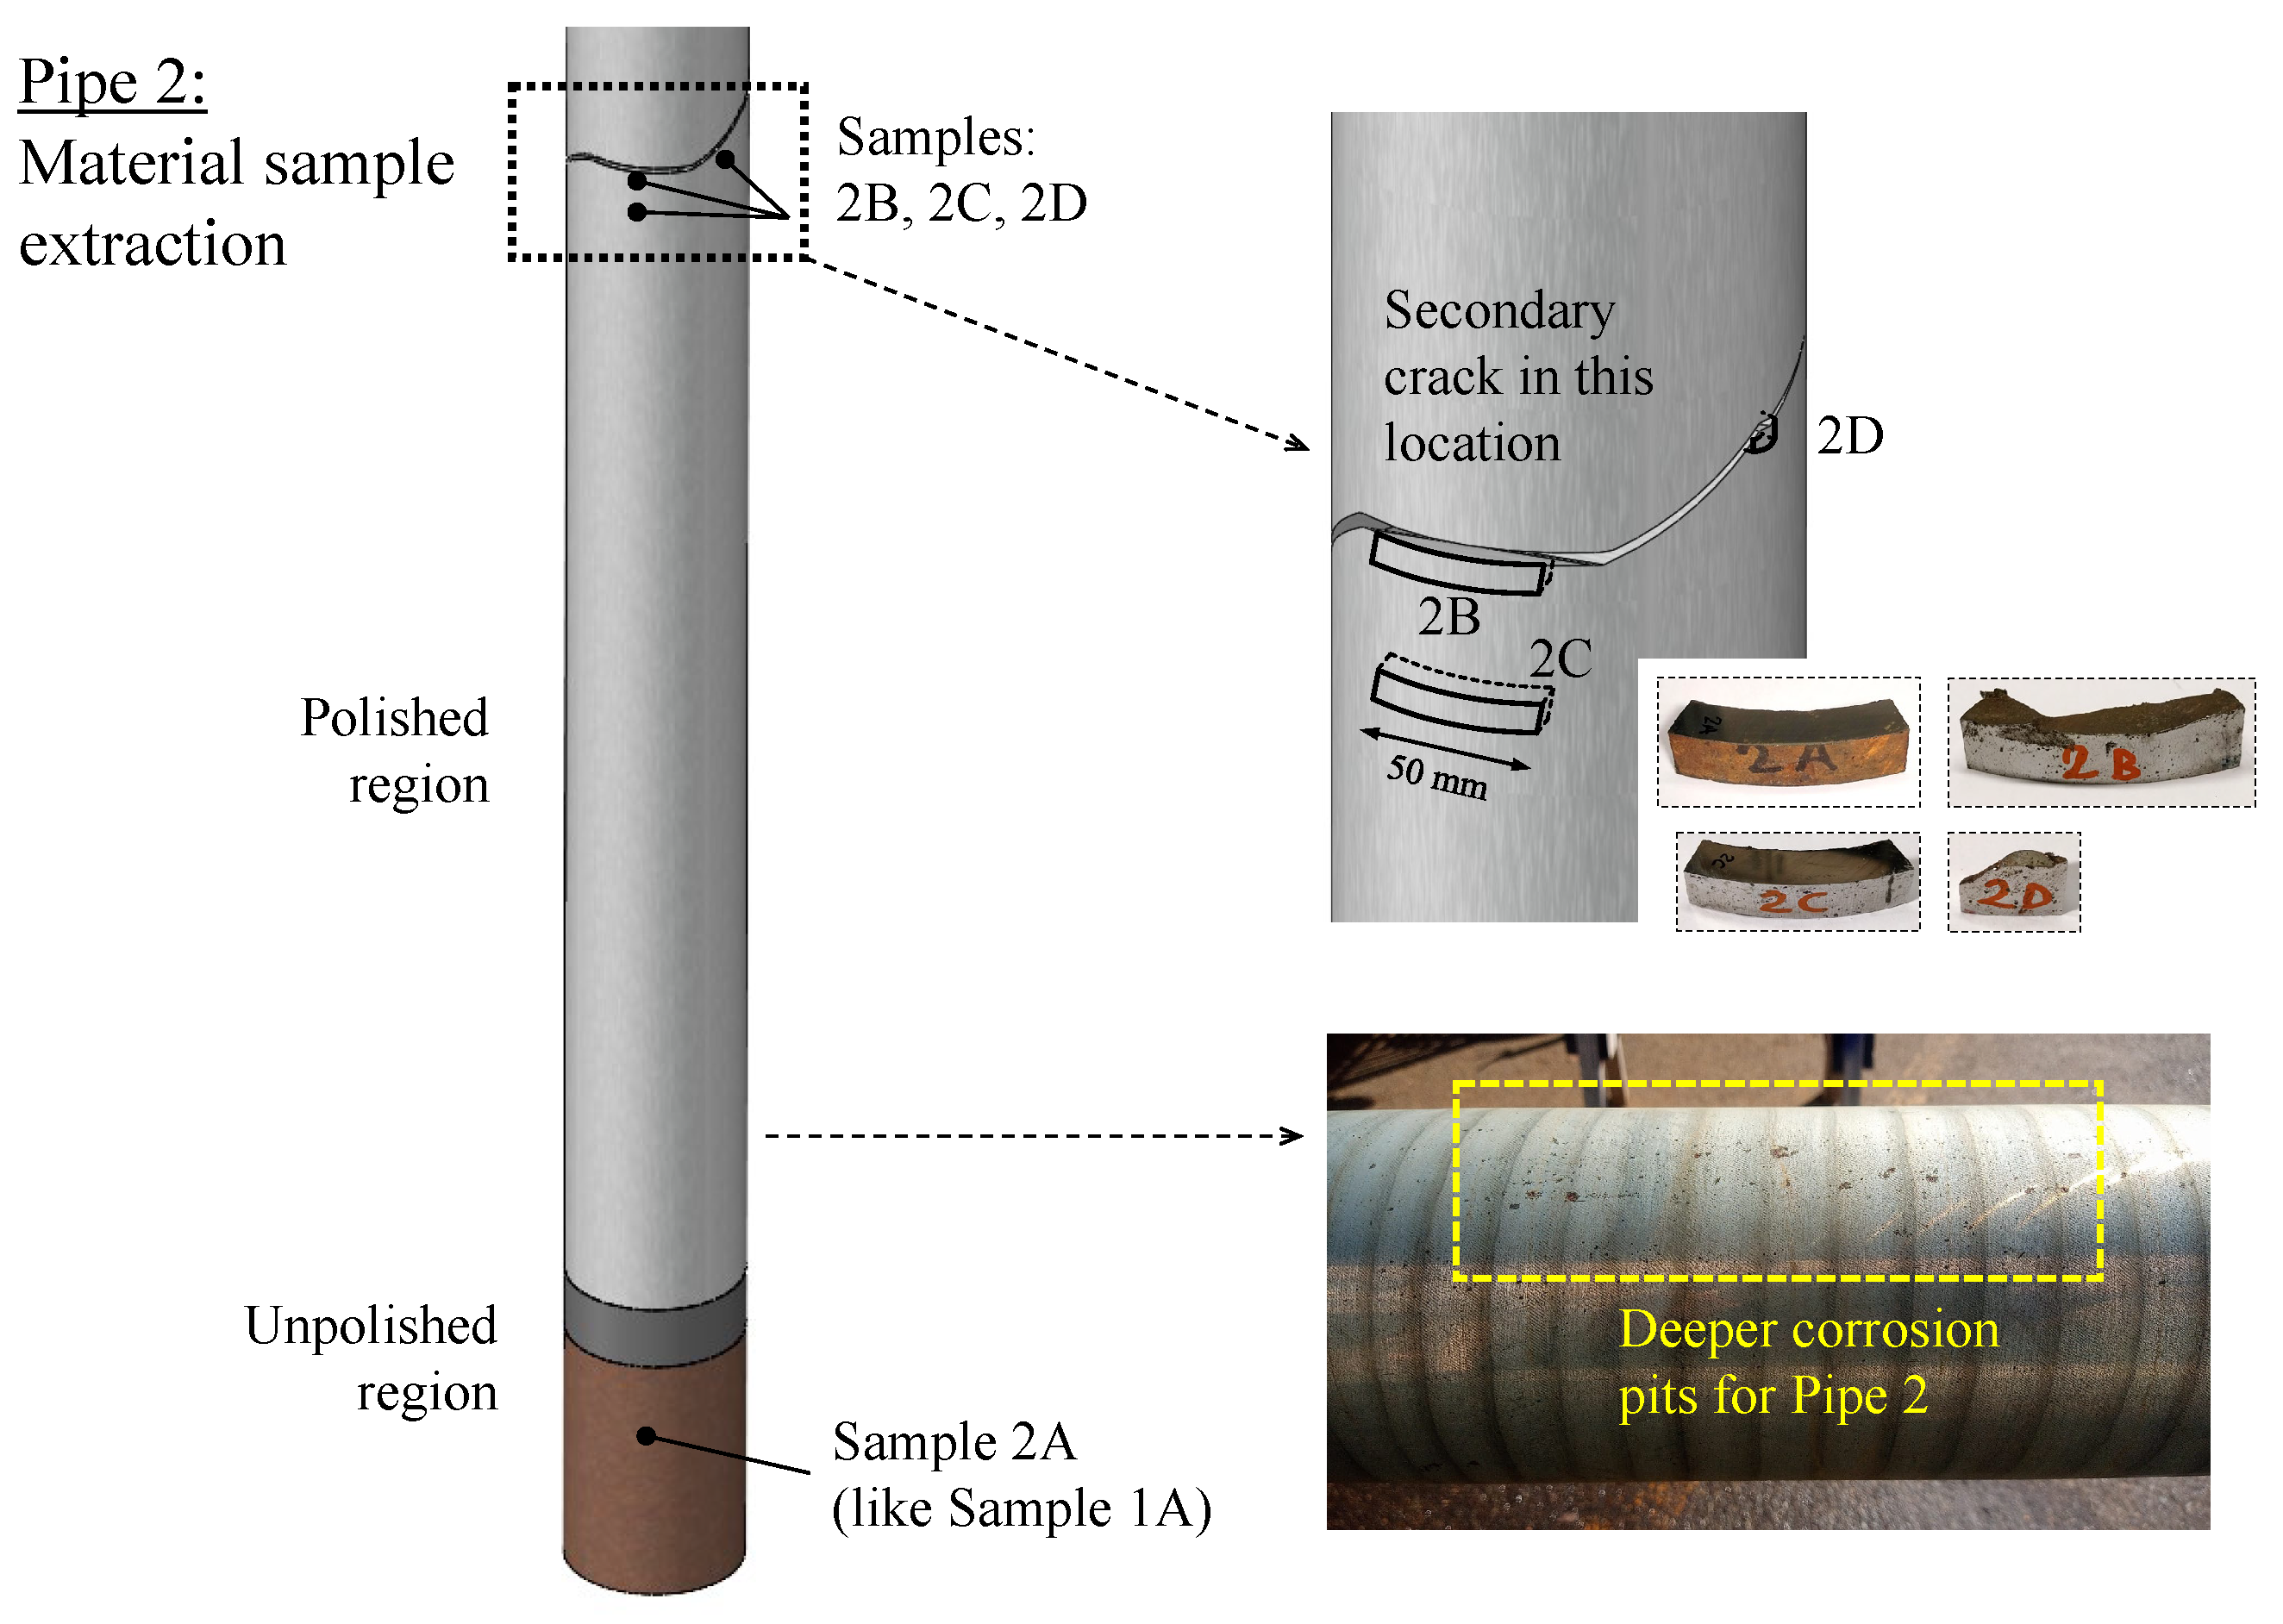
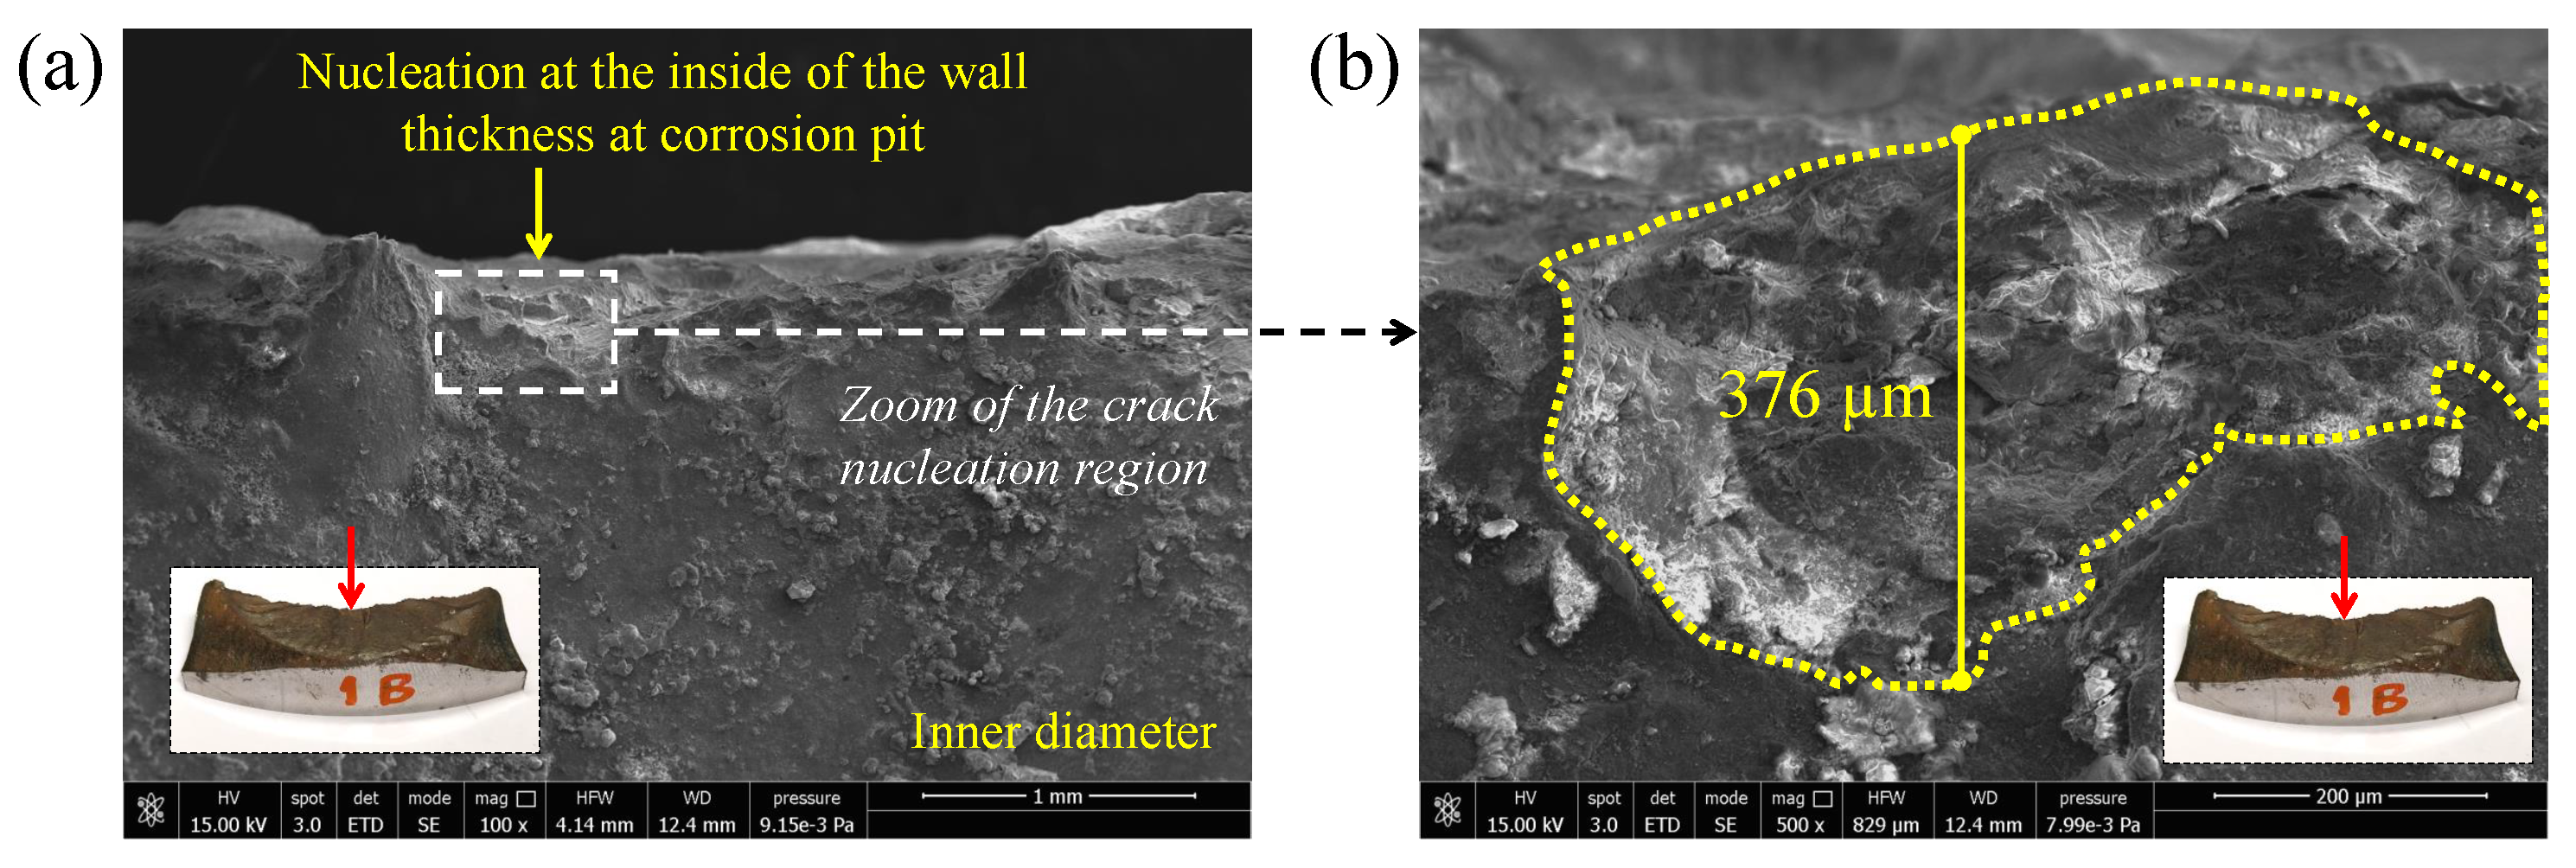
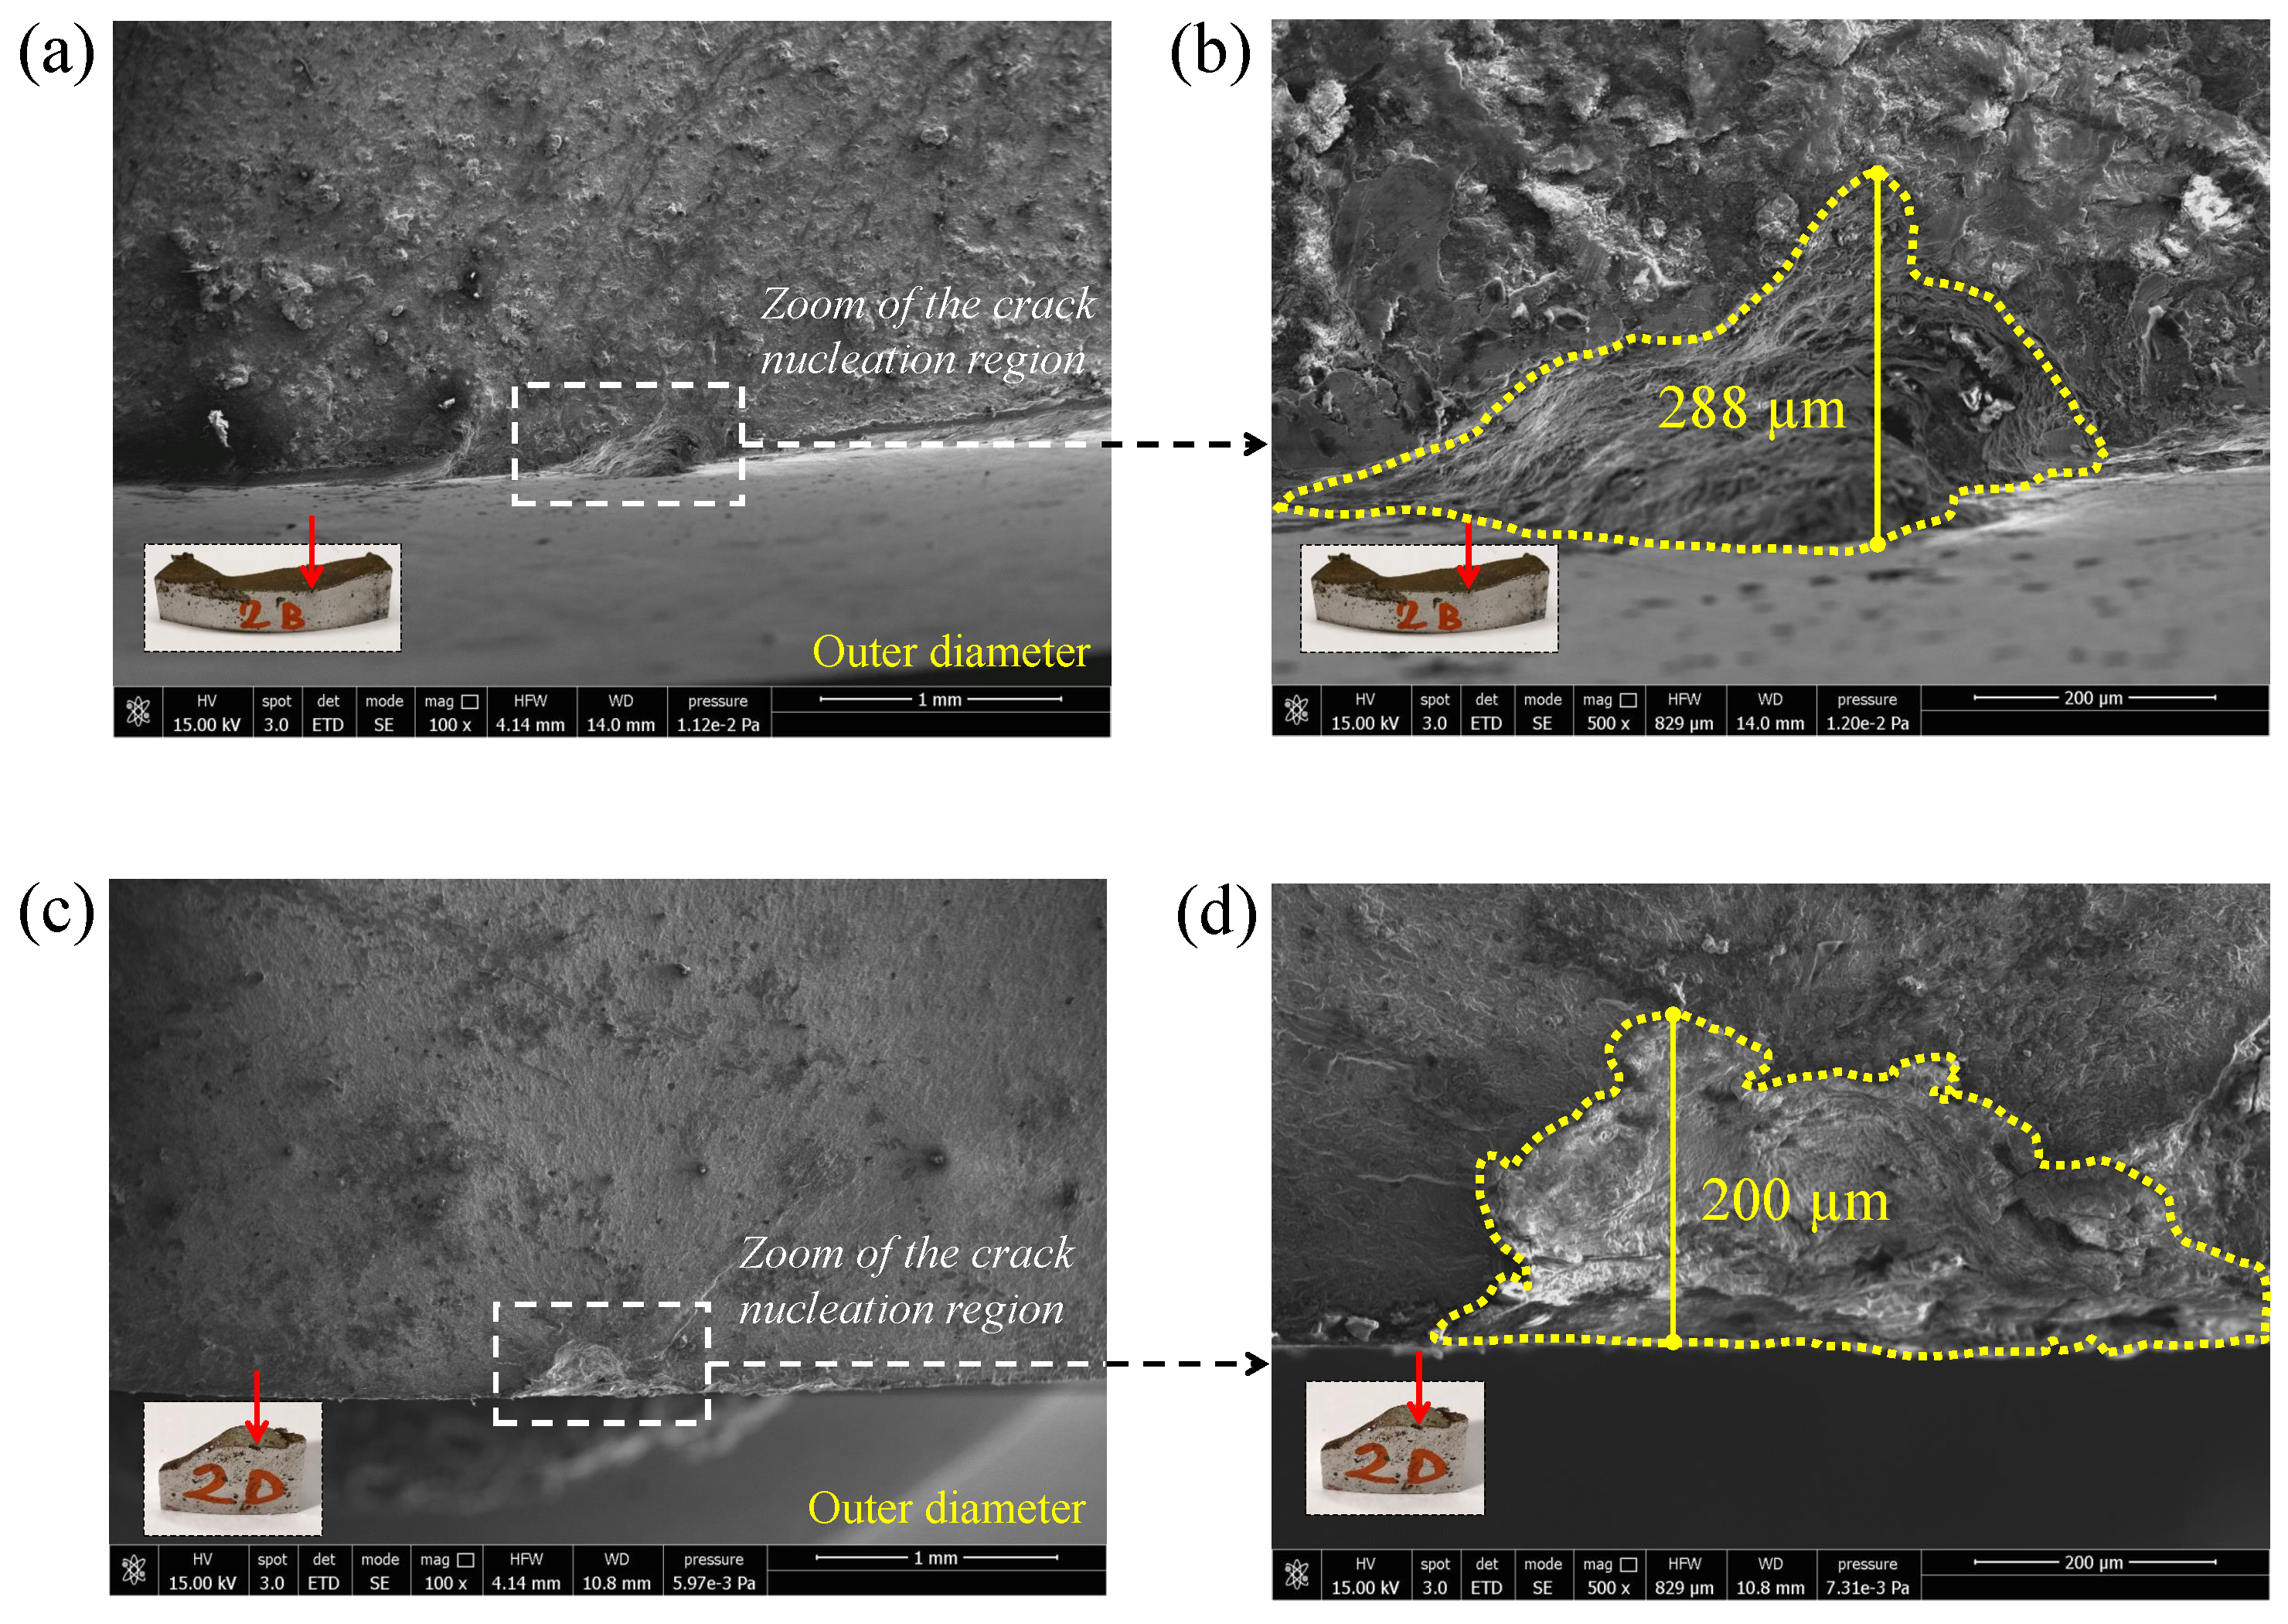
The crack location of the specimen 1 was found approximately in the middle of the specimen, as indicated in Figure 9a. The specimen region containing the crack location was extracted from the entire specimen via cutting, and it was evident that the crack initiated from the inner (not polished) diameter, as shown in Figure 9b. On the contrary, the crack location of pipe specimen 2 was not exactly in the middle of the specimen, while it started near SG_3, as highlighted in Figure 10. In addition, the crack of pipe specimen 2 nucleated from the outer diameter, despite its being polished. To better investigate the role and the impact of the corrosion pits on the fatigue strength, several samples were extracted from specimens 1 and 2 to perform several observations using SEM. The samples extracted from specimen 1 are outlined in Figure 11: sample 1A was obtained from the corroded and unpolished zone, while sample 1B was extracted at the crack nucleation zone. The surface dimensions of both samples 1A and 1B were approximately equal to 50 × 10 mm. Other samples were also extracted from specimen 2, as shown in Figure 12: sample 2A was obtained from the corroded and unpolished zone, while samples 2B, 2C, and 2D were extracted at the crack nucleation zone. In particular, two nucleation sites were observed for specimen 2: the primary was found at sample 2B, while the secondary site was found where the 2D sample was extracted. The surface dimensions of samples 2A, 2B, and 2C were again equal to 50 × 10 mm, while the surface dimensions of sample 2D were smaller and approximately equal to 15 × 10 mm.

4.2. Performed Investigations with the SEM

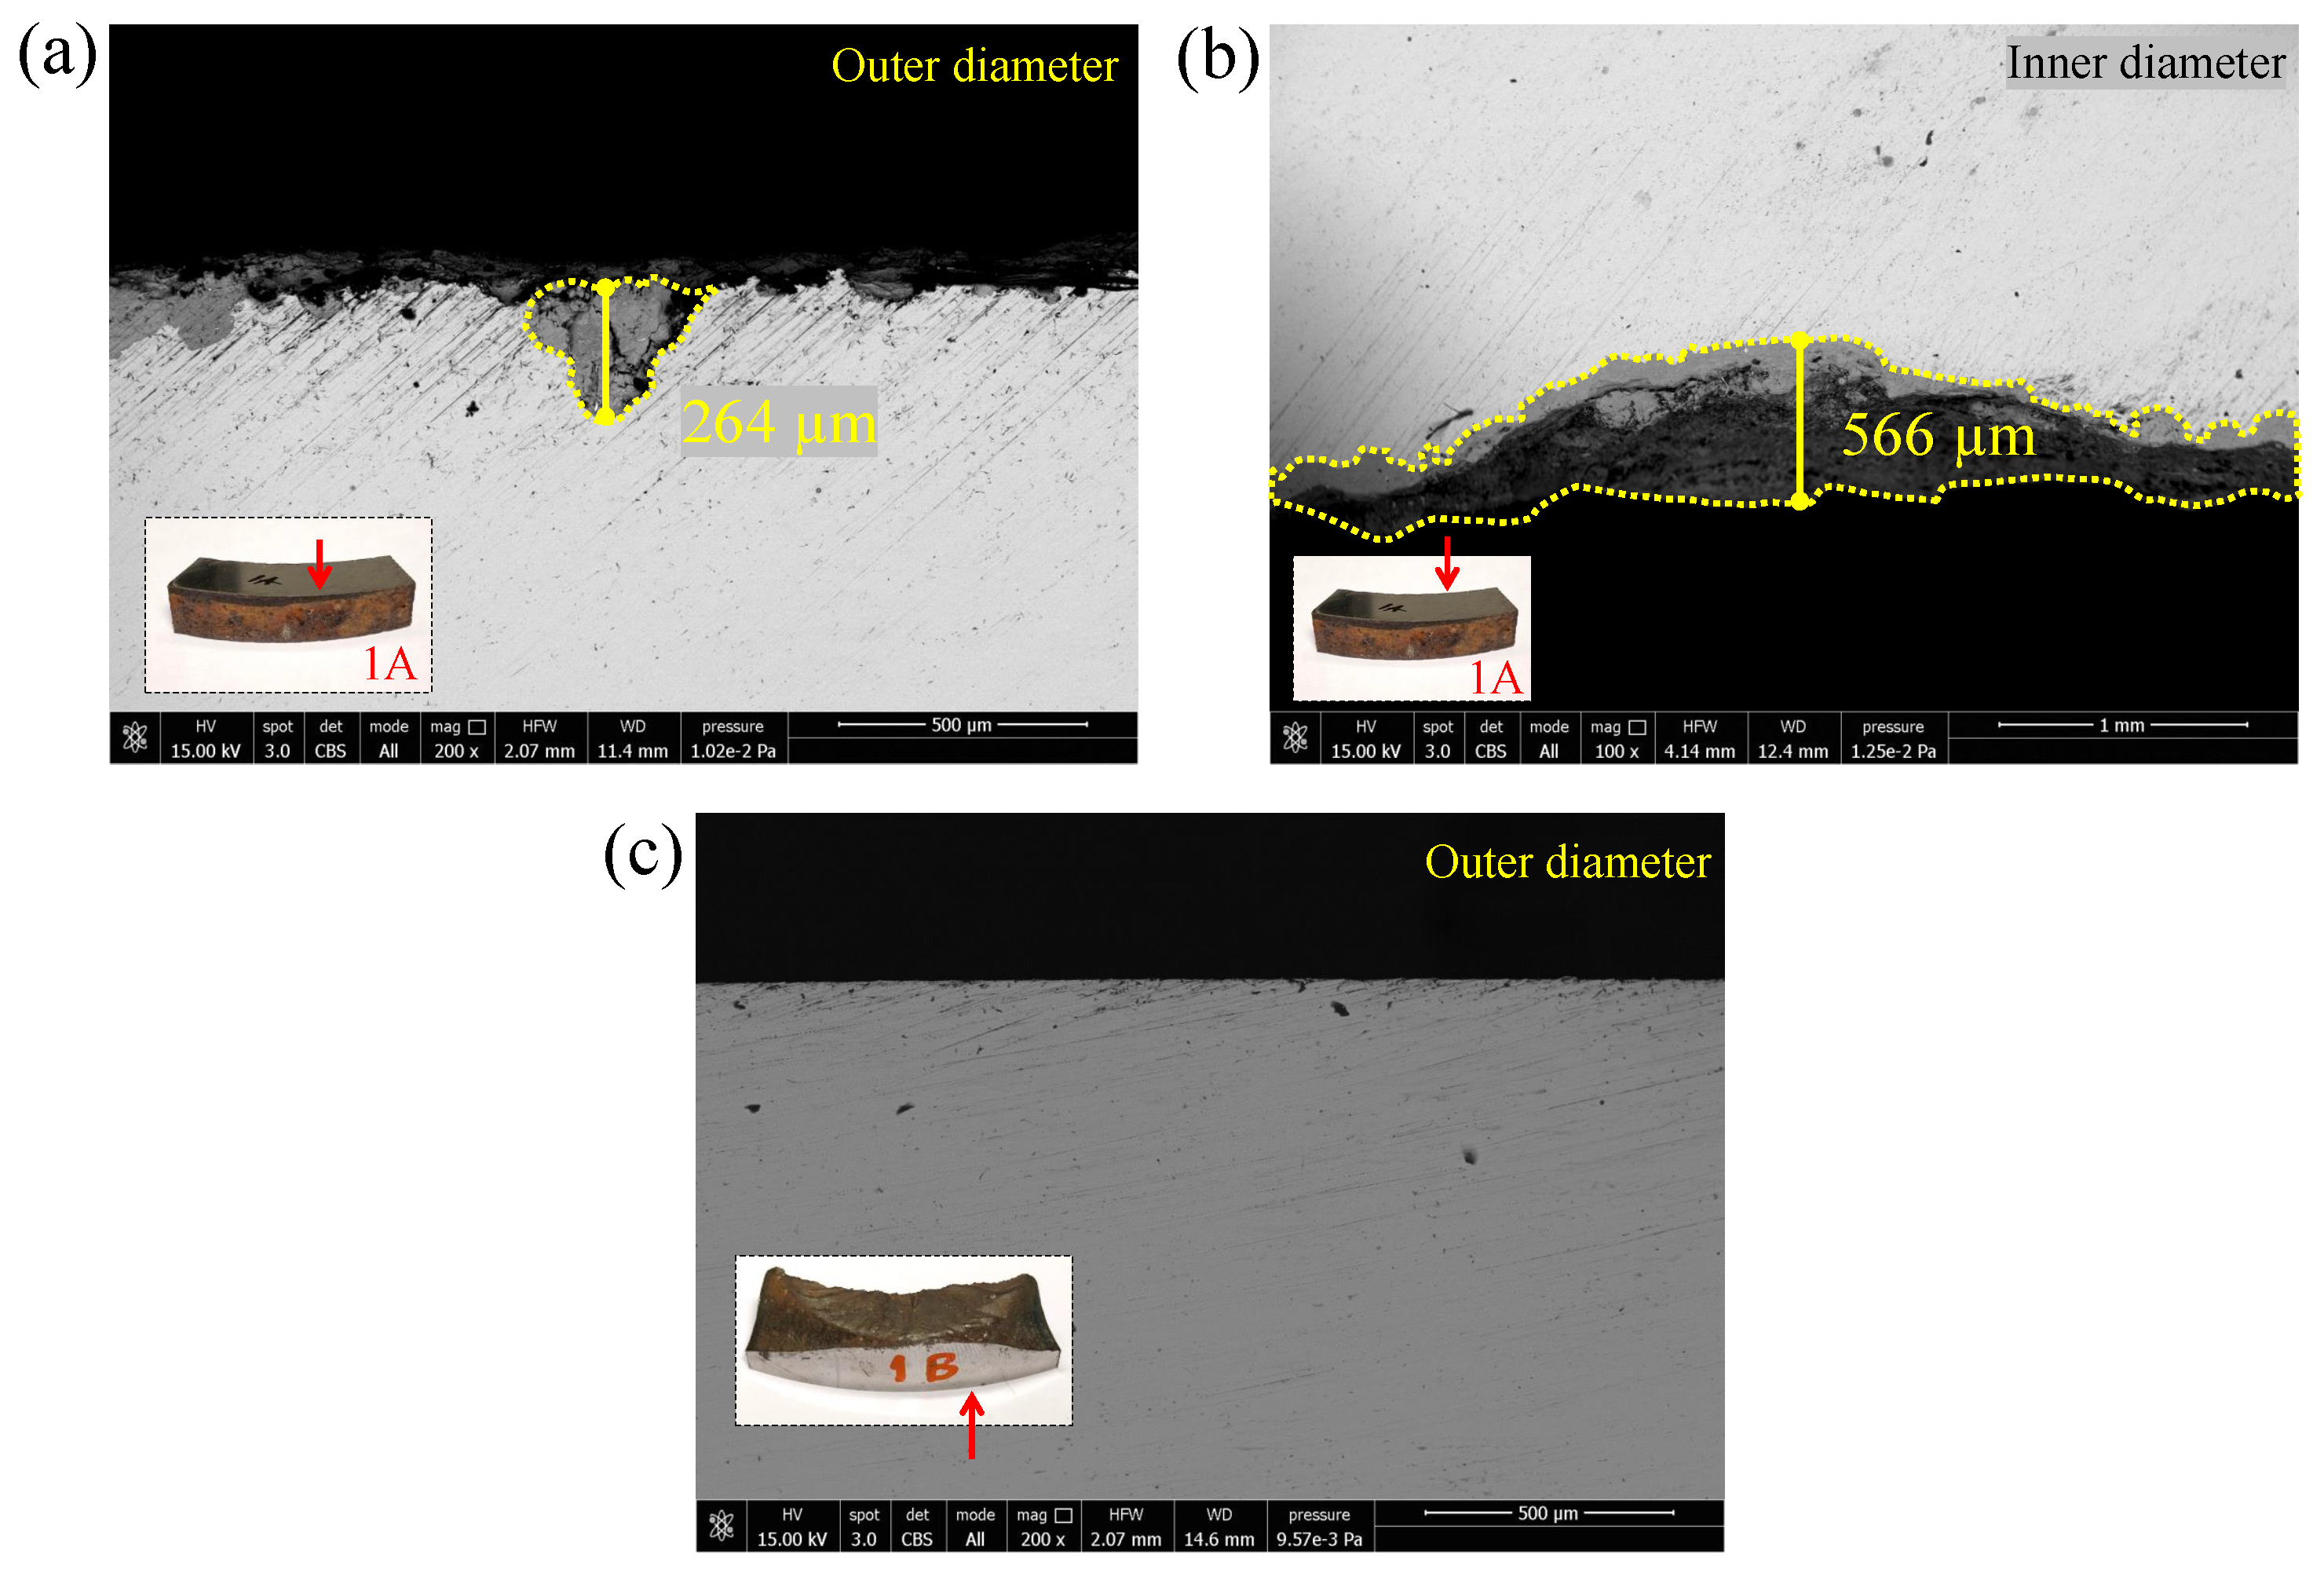
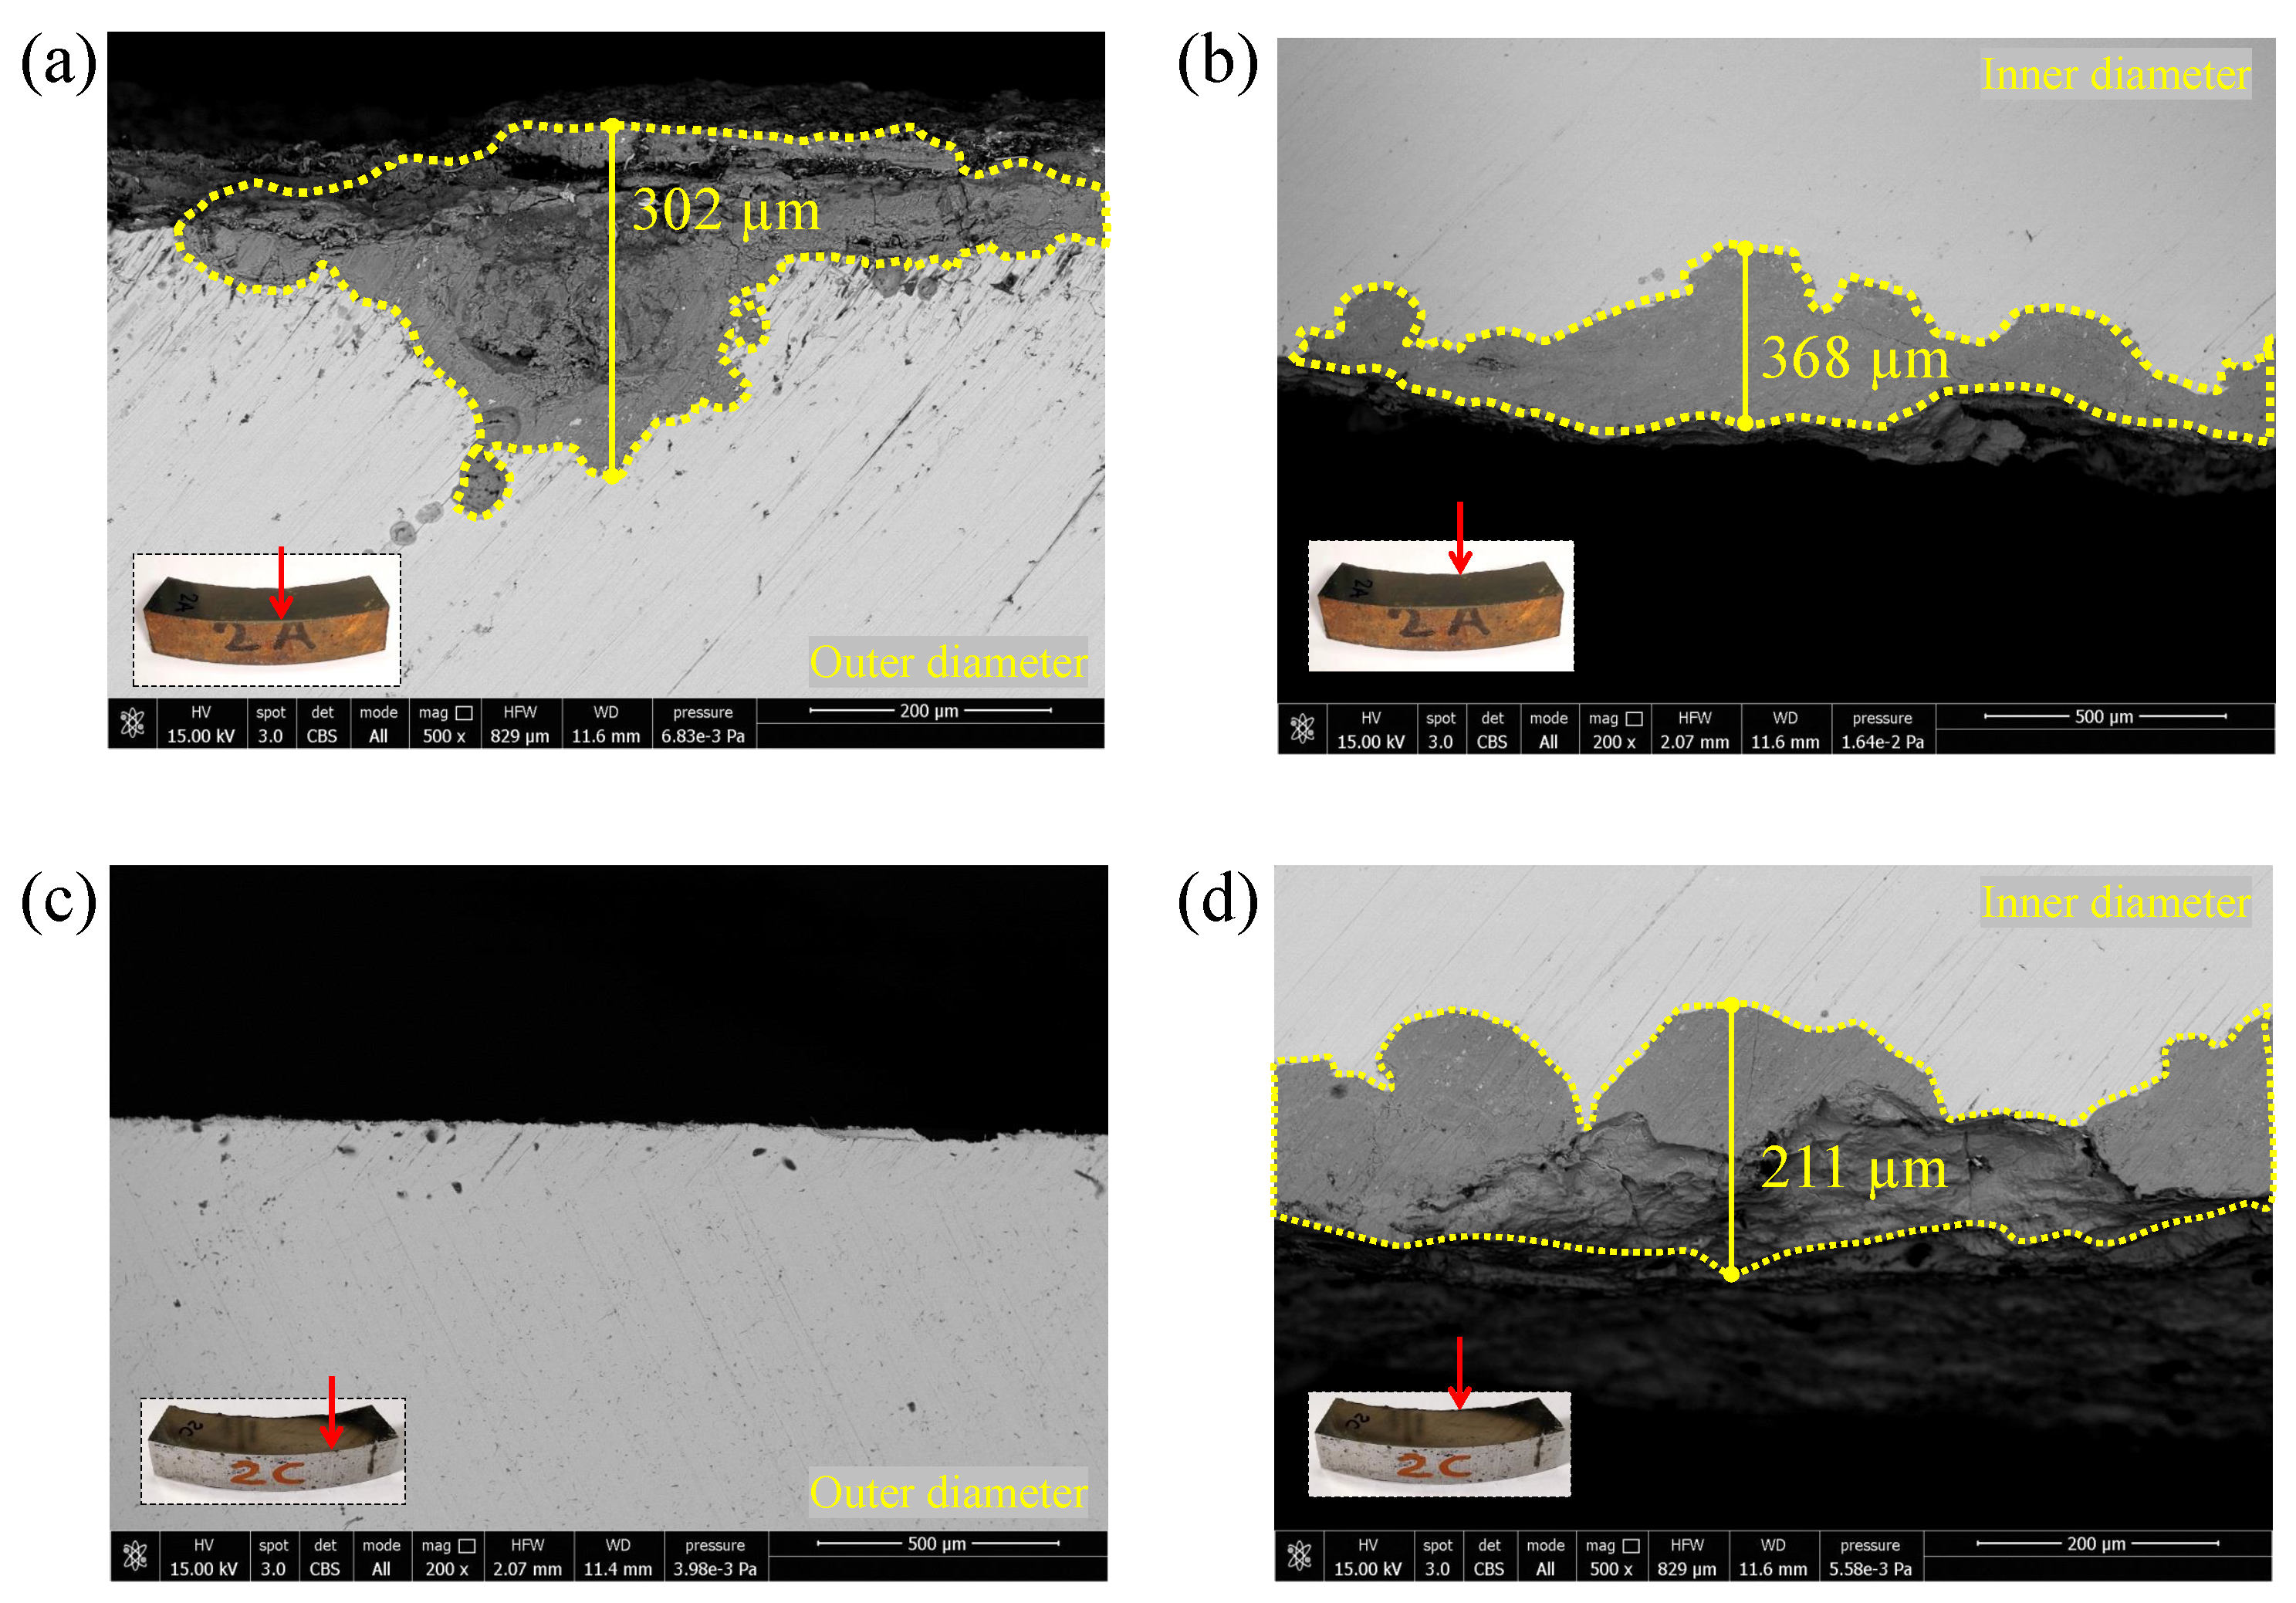
Before performing the SEM investigations, the samples were first cleaned in an ultrasonic bath to remove any residual grease or dirt. After that, the surfaces to be observed were polished using different grades of polishing papers up to grit 1200, and were then finally polished by using 1 μ m diamond paste. Samples 1A and 1B were analyzed at both the inner diameter and the outer diameter, as shown in Figure 13 and Figure 14. Samples 2A and 2C of the pipe specimen 2 were scanned at both the inner and the outer diameters, as shown in Figure 15, while samples 2B and 2D were only scanned near the crack location zone, which was at the outer diameter, as noted previously.
Several observations were made of the extracted samples from specimens 1 and 2, and those reported in Figure 13, Figure 14, Figure 15 and Figure 16 correspond to the largest obtained a r e a of the corrosion pits for each kind of sample and location. The obtained numerical results of the parameter a r e a for all the investigated samples and for the different locations are reported in Table 2. The values of this parameter for samples 1B and 2C at the outer diameter were not reported as, due to the polishing operation, no evident corrosion pits were found at the outer diameter, and this is evident in Figure 13c and Figure 15c. In order to apply Equation (3), the Vickers hardness was measured with an AFFRI hardness tester where a load of 10 kg was applied for a duration of 10 s. The obtained Vickers hardness values were H V = 378 HV and H V = 351 HV for drill pipe specimens 1 and 2, respectively. The obtained values of the Vickers hardness are similar, and they are also consistent with the fact that the pipe specimen 1 was made of S150 ( S Y = 1034 MPa or grater) while the pipe specimen 2 was made of S140 ( S Y = 965 MPa or grater); thus, the first specimen accordingly had a (slightly) higher Vickers hardness than the other one. After that, Equation (3) was applied, and the obtained results are reported in Table 2.
The values of σ w at the inner diameter are always lower than the corresponding values obtained at the outer diameter. This is quite obvious for the samples extracted from the polishing zones but is also true for the samples extracted from the corroded zones. The crack location of specimen 1 was at the inner surface of sample 1B, which was located in the middle of the specimen and thus experienced the maximum bending moment. The obtained value of σ w at the inner surface of sample 1B is lower than that expected at the outer surface, which was not calculated since there was no evident defect. This latter, despite the gradient stress distribution from the external to the internal surface, justifies the failure at the inner diameter. The obtained values of σ w for samples 2B and 2D at the outer diameter are similar to the corresponding value obtained at the inner diameter of sample 2C. For this reason, and considering the gradient stress distribution due to bending, the initiation at the outer diameter of samples 2B and 2D is acceptable. As previously shown in Figure 12, deeper corrosion pits were found in the outer surface of specimen 2, and they were not completely removed after the polishing operation. The failure of pipe specimen 2 was located near the SG_3; thus, the combination of a bending moment near to the maximum (90%) and the consistent dimensions of the corrosion pits led to failure.

5. Conclusions

In this research, the fatigue strength of polished drill pipe specimens made of S150 and S140 steel was investigated. The polishing operations of the specimens at the outer diameter were performed with a rig designed and commissioned for this purpose. The polished specimens were then tested, at an imposed alternating stress ( σ a , ref = 270 MPa), by means of the resonant test rig designed and implemented by the University of Pisa in collaboration with ACTA Srl. After the tests, some samples were then extracted from the specimens at different locations and were observed via SEM. In order to investigate the effects of the corrosion pits on the fatigue strength, the latter were then analysed with the Murakami model, which allowed for their impact on the fatigue strength to be quantified. After that, quantitative comparisons were made of the different samples, and the main findings of the study are reported below.
The FE modal analysis was initially performed to identify the node locations and the first natural frequency of the specimen tubular structure. After that, an FE model of the harmonic response was performed to extract the frequency which allowed to obtain the imposed value of the alternating stress in correspondence of the central strain gauge. As expected, the obtained value of this frequency was very close (but lower) to the corresponding value of the first natural frequency. However, the position of the node near the eccentric rotating mass changed appreciably with respect to that extracted from the modal analysis. As a consequence of this, FE simulations of the harmonic response are necessary to obtain the correct locations of the nodes during the tests.
The combination of corrosion pits and the high bending moment has a strong influence on the fatigue strength of the drill pipes and their crack initiation location. Regarding the sample extracted at the crack location zone of the pipe specimen 1, the calculated value of parameter σ w , with the Murakami model, at the inner surface is lower than the expected value of σ w at the outer surface, which could not be calculated since there was no evident defect in this region. This latter, despite the stress gradient from the outer to the inner diameter, justifies the nucleation of the crack at the inner diameter. On the other hand, the scans performed with the SEM on the samples extracted at the crack location zone of specimen 2 revealed that several corrosion pits were still found, despite the polishing, at the outer diameter; thus, similar values of σ w were obtained between the inner and outer surfaces. Considering the gradient stress distribution, specimen 2 failed at the outer diameter and near the SG_3, where the imposed alternating stress was approximately equal to 90 % of the maximum alternating stress at the middle of the specimen; thus, the crack nucleation was driven by a synergistic combination of the corrosion pits and the high bending moment near to the maximum.
The results of the fatigue tests showed that the numbers of cycles to failure of the polished drill pipe specimens were higher than the average value of the corroded drill pipe specimens of previous research by the authors in Ref. [50], thus confirming the good impact of the polishing operation on the fatigue strength. However, the number of cycles to failure of the polished drill pipe specimens is lower than the average value of the not-corroded specimens presented in Ref. [50]. This can be easily explained by the fact that the specimens in this research were only polished at the outer diameter, while the not-corroded specimens had no defects at both the outer and at the inner diameters. According to this latter finding, the investigation into the fatigue strength of drill pipe specimens polished at both the inner and at the outer diameters could be a valid target for future research.

Author Contributions

Conceptualization, C.S., L.R., L.B. and A.B.; methodology, C.S., L.R., L.B. and A.B.; software, A.B.; validation, C.S., L.R., L.B. and A.B.; formal analysis, C.S., L.R. and L.B.; investigation, C.S., L.R., L.B. and A.B.; resources, C.S., L.R., L.B., A.B. and T.I.; data curation, C.S., L.R., L.B. and A.B.; writing—original draft preparation, C.S., L.R., L.B. and T.I.; writing—review and editing, C.S., L.R., L.B. and T.I.; visualization, C.S., L.R. and L.B.; supervision, T.I.; project administration, C.S., L.R., L.B. and T.I.; funding acquisition, T.I. All authors have read and agreed to the published version of the manuscript.

Funding

This research received no external funding.

Data Availability Statement

Data are contained within the article.

Acknowledgments

Scanning electron microscopy analyses were performed using a FEI QUANTA 450 ESEM-FEG at the Centro per la Integrazione della Strumentazione della Università di Pisa (CISUP).

Conflicts of Interest

Author Alessandro Burchianti was employed by the company ACTA Srl. The remaining authors declare that the research was conducted in the absence of any commercial or financial relationships that could be construed as a potential conflict of interest.

Abbreviations

The following abbreviations are used in this manuscript:
APIAmerican petroleum institute
FEFinite element
LETLast engaged thread
FETFirst engaged thread
SG_1Strain gauge 1
SG_2Strain gauge 2
SG_3Strain gauge 3
SEMScanning electronic mycroscope

References

  1. Dong, G.; Chen, P. A Review of the Evaluation, Control, and Application Technologies for Drill String Vibrations and Shocks in Oil and Gas Well. Shock Vib. 2016, 2016, 7418635. [Google Scholar] [CrossRef]
  2. Ma, T.; Chen, P.; Zhao, J. Overview on vertical and directional drilling technologies for the exploration and exploitation of deep petroleum resources. Geomech. Geophys. Geo-Energy Geo-Resour. 2016, 2, 365–395. [Google Scholar] [CrossRef]
  3. Inoue, T.; Wada, K.; Miyazaki, E.; Miyazaki, T. Scientific Drilling Program of Drilling Vessel Chikyu and Drilling Data Acquisition for Future Technical Development. In Proceedings of the Volume 5: Ocean Space Utilization; Ocean Renewable Energy. ASMEDC, Rotterdam, The Netherlands, 19–24 June 2011. OMAE2011. [Google Scholar] [CrossRef]
  4. Inoue, T.; Kyo, M.; Sakura, K. Fatigue Strength Evaluation of Drill Pipe for Challenging Deep Drilling Project-Japan Trench Fast Drilling (JFAST). In Proceedings of the Twenty-Third International Offshore and Polar Engineering Conference, Anchorage, AK, USA, 30 June–5 July 2013. [Google Scholar]
  5. Inoue, T.; Kyo, M.; Sakura, K.; Fukui, T. Fatigue Strength Investigation of Drill Pipe for Challenging Scientific Deep Drilling and Utilization of Drilling Data to Estimate Cumulative Fatigue. In Proceedings of the Offshore Technology Conference, Houston, TX, USA, 5–8 May 2014. 14OTC. [Google Scholar] [CrossRef]
  6. American Petroleum Institute. Specification for Rotary Drill Stem Elements; American Petroleum Institute: Washington, DC, USA, 2006. [Google Scholar]
  7. Santus, C. Fretting fatigue of aluminum alloy in contact with steel in oil drill pipe connections, modeling to interpret test results. Int. J. Fatigue 2008, 30, 677–688. [Google Scholar] [CrossRef]
  8. Fangpo, L.; Yonggang, L.; Xinhu, W.; Caihong, L. Failure analysis of ⌀ 127mm IEU G105 drill pipe wash out. Eng. Fail. Anal. 2011, 18, 1867–1872. [Google Scholar] [CrossRef]
  9. Haagensen, P.J.; Grøttum, T.I. Fatigue Assessment of Drill Pipes. In Proceedings of the Volume 4: Materials Technology. American Society of Mechanical Engineers, Trondheim, Norway, 25–30 June 2017. OMAE2017. [Google Scholar] [CrossRef]
  10. Luo, S.; Liu, M.; Zheng, X. Characteristics and life expression of fatigue fracture of G105 and S135 drill pipe steels for API grade. Eng. Fail. Anal. 2020, 116, 104705. [Google Scholar] [CrossRef]
  11. Inoue, T.; Fujikubo, M. Fatigue evaluation of drill pipe by considering ship motions and its application in scientific drilling. J. Mar. Sci. Technol. 2020, 26, 525–540. [Google Scholar] [CrossRef]
  12. Zamani, S.M.; Hassanzadeh-Tabrizi, S.A.; Sharifi, H. Failure analysis of drill pipe: A review. Eng. Fail. Anal. 2016, 59, 605–623. [Google Scholar] [CrossRef]
  13. Ferjani, M.; Averbuch, D.; Constantinescu, A. A computational approach for the fatigue design of threaded connections. Int. J. Fatigue 2011, 33, 610–623. [Google Scholar] [CrossRef]
  14. Tafreshi, A.; Dover, W. Stress analysis of drillstring threaded connections using the finite element method. Int. J. Fatigue 1993, 15, 429–438. [Google Scholar] [CrossRef]
  15. Macdonald, K.; Deans, W. Stress analysis of drillstring threaded connections using the finite element method. Eng. Fail. Anal. 1995, 2, 1–30. [Google Scholar] [CrossRef]
  16. Macdonald, K.A. The effectiveness of stress relief features in austenitic drillcollar connections. Eng. Fail. Anal. 1996, 3, 267–279. [Google Scholar] [CrossRef]
  17. Van Wittenberghe, J.; De Pauw, J.; De Baets, P.; De Waele, W.; Ost, W.; De Roeck, G.; Bui, T.T. Fatigue investigation of threaded pipe connections. Int. J. Sustain. Constr. Des. 2010, 1, 182–189. [Google Scholar] [CrossRef]
  18. Van Wittenberghe, J.; De Baets, P.; De Waele, W.; Galle, T.; Bui, T.T.; De Roeck, G. Design characteristics that improve the fatigue life of threaded pipe connections. Int. J. Sustain. Constr. Des. 2011, 2, 334–341. [Google Scholar] [CrossRef]
  19. Luo, S.; Wu, S. Effect of stress distribution on the tool joint failure of internal and external upset drill pipes. Mater. Des. (1980–2015) 2013, 52, 308–314. [Google Scholar] [CrossRef]
  20. Ozguc, O. Analysis of fatigue behaviour of drill pipe on pin-box connection. Proc. Inst. Mech. Eng. Part M J. Eng. Marit. Environ. 2020, 235, 68–80. [Google Scholar] [CrossRef]
  21. Liu, H.; He, Y.; Wan, J.; Chen, L.; Yi, X.; Hou, S.; Wang, Y.; He, D.; Li, G. New design method of unequal taper thread (UTT) pairs and its application in API NC38 thread improvement. Petroleum 2023, 9, 439–453. [Google Scholar] [CrossRef]
  22. Lin, Y.; Qi, X.; Zhu, D.; Zeng, D.; Zhu, H.; Deng, K.; Shi, T. Failure analysis and appropriate design of drill pipe upset transition area. Eng. Fail. Anal. 2013, 31, 255–267. [Google Scholar] [CrossRef]
  23. Yonggang, L.; Fangpo, L.; Xin, X.; biyu, Y.; caihong, L. Simulation Technology in Failure Analysis of Drill Pipe. Procedia Eng. 2011, 12, 236–241. [Google Scholar] [CrossRef]
  24. Zhu, H.; Lin, Y.; Zeng, D.; Zhou, Y.; Xie, J. Simulation analysis of flow field and shear stress distribution in internal upset transition zone of drill pipe. Eng. Fail. Anal. 2012, 21, 67–77. [Google Scholar] [CrossRef]
  25. Spasova, D.; Argirov, Y.; Atanasov, N.; Yankova, R. Analysis of failure causes of S135 drill pipe. Mater. Today Proc. 2022, 59, 1719–1725. [Google Scholar] [CrossRef]
  26. Yu, Z.; Zeng, D.; Hu, S.; Zhou, X.; Lu, W.; Luo, J.; Fan, Y.; Meng, K. The failure patterns and analysis process of drill pipes in oil and gas well: A case study of fracture S135 drill pipe. Eng. Fail. Anal. 2022, 138, 106171. [Google Scholar] [CrossRef]
  27. Luo, S.; Liu, M.; Shen, Y.; Lin, X. Sulfide Stress Corrosion Cracking Behavior of G105 and S135 High-Strength Drill Pipe Steels in H2S Environment. J. Mater. Eng. Perform. 2019, 28, 1707–1718. [Google Scholar] [CrossRef]
  28. Yu, H.; Peng, X.; Lian, Z.; zhang, Q.; Shi, T.; Wang, J.; Zhao, Z. Experimental and numerical simulation of fatigue corrosion behavior of V150 high-strength drill pipe in air and H2S-dilling mud environment. J. Nat. Gas Sci. Eng. 2022, 98, 104392. [Google Scholar] [CrossRef]
  29. Lu, S.; Feng, Y.; Luo, F.; Qin, C.; Wang, X. Failure analysis of IEU drill pipe wash out. Int. J. Fatigue 2005, 27, 1360–1365. [Google Scholar] [CrossRef]
  30. Han, Y.; Zhao, X.; Bai, Z.; Yin, C. Failure Analysis on Fracture of a S135 Drill Pipe. Procedia Mater. Sci. 2014, 3, 447–453. [Google Scholar] [CrossRef]
  31. Liu, W.; Liu, Y.; Chen, W.; Shi, T.; Singh, A.; Lu, Q. Longitudinal crack failure analysis of box of S135 tool joint in ultra-deep well. Eng. Fail. Anal. 2015, 48, 283–296. [Google Scholar] [CrossRef]
  32. Liu, Y.; Lian, Z.; Lin, T.; Shen, Y.; Zhang, Q. A study on axial cracking failure of drill pipe body. Eng. Fail. Anal. 2016, 59, 434–443. [Google Scholar] [CrossRef]
  33. Liu, M.; Luo, S.; Shen, Y.; lin, X. Corrosion fatigue crack propagation behavior of S135 high–strength drill pipe steel in H2S environment. Eng. Fail. Anal. 2019, 97, 493–505. [Google Scholar] [CrossRef]
  34. Zeng, D.; Li, H.; Tian, G.; Liu, F.; Li, B.; Yu, S.; Ouyang, Z.; Shi, T. Fatigue behavior of high-strength steel S135 under coupling multi-factor in complex environments. Mater. Sci. Eng. A 2018, 724, 385–402. [Google Scholar] [CrossRef]
  35. Han, L.; Liu, M.; Luo, S.; Lu, T.J. Fatigue and corrosion fatigue behaviors of G105 and S135 high–strength drill pipe steels in air and H2S environment. Process Saf. Environ. Prot. 2019, 124, 63–74. [Google Scholar] [CrossRef]
  36. Peng, X.; Yu, H.; Lian, Z.; Dong, B.; Zhong, W.; Zhang, Y.; Hu, Z. Material optimization of drill pipe in complex wellbore environments by comparing fatigue life and cost. Energy Rep. 2021, 7, 5420–5430. [Google Scholar] [CrossRef]
  37. Ziomek-Moroz, M. Environmentally Assisted Cracking of Drill Pipes in Deep Drilling Oil and Natural Gas Wells. J. Mater. Eng. Perform. 2011, 21, 1061–1069. [Google Scholar] [CrossRef]
  38. Kryzhanivskyi, E.I.; Nykyforchyn, H.M.; Student, O.Z.; Krechkovska, H.V.; Chudyk, I.I. Role of Nonmetallic Inclusions in Premature Stress-Corrosion Fractures of Drill Pipes. Mater. Sci. 2020, 55, 822–830. [Google Scholar] [CrossRef]
  39. Zhao, J.; Bai, X.; Qu, T.; Li, D.; Liu, W.; Wei, Z.; Xiaolong, L. Corrosion Failure Analysis of a S135 Drill Pipe. J. Fail. Anal. Prev. 2024, 24, 368–379. [Google Scholar] [CrossRef]
  40. Santus, C.; Bertini, L.; Beghini, M.; Merlo, A.; Baryshnikov, A. Torsional strength comparison between two assembling techniques for aluminium drill pipe to steel tool joint connection. Int. J. Press. Vessel. Pip. 2009, 86, 177–186. [Google Scholar] [CrossRef]
  41. Belkacem, L.; Abdelbaki, N.; Otegui, J.L.; Gaceb, M.; Bettayeb, M. Using a supperficially treated 2024 aluminum alloy drill pipe to delay failure during dynamic loading. Eng. Fail. Anal. 2019, 104, 261–273. [Google Scholar] [CrossRef]
  42. Liu, W.; Li, J.; Zhong, Y.; Shi, T.; Zhang, J.; Li, S. Failure analysis on aluminum alloy drill pipe with pits and parallel transverse cracks. Eng. Fail. Anal. 2022, 131, 105809. [Google Scholar] [CrossRef]
  43. Mou, Y.; Lian, Z.; Li, W.; Zhong, X.; Li, J.; He, Y.; Cao, J.; Eliaz, N. The effect of friction welding on the mechanical properties and corrosion fatigue resistance of titanium alloy drill pipe. Fatigue Fract. Eng. Mater. Struct. 2021, 45, 466–481. [Google Scholar] [CrossRef]
  44. Miscow, G. Techniques to characterize fatigue behaviour of full size drill pipes and small scale samples. Int. J. Fatigue 2004, 26, 575–584. [Google Scholar] [CrossRef]
  45. Teodoriu, C. Oil Country Tubular Goods Fatigue Testing: Do We Test Them Enough? In Proceedings of the Volume 4: Materials Technology, American Society of Mechanical Engineers, Trondheim, Norway, 25–30 June 2017. OMAE2017. [Google Scholar] [CrossRef]
  46. Zou, H.; Tan, Z. Fatigue life analysis of rotary drill pipe. Int. J. Press. Vessel. Pip. 2023, 201, 104874. [Google Scholar] [CrossRef]
  47. Huertas, J.I.; Navarrete, N.; Giraldo, M.; Uribe, J.D.; Gasca, J.J. Resonant fatigue test bench for shaft testing. Fatigue Fract. Eng. Mater. Struct. 2016, 40, 364–374. [Google Scholar] [CrossRef]
  48. Bertini, L.; Beghini, M.; Santus, C.; Baryshnikov, A. Resonant test rigs for fatigue full scale testing of oil drill string connections. Int. J. Fatigue 2008, 30, 978–988. [Google Scholar] [CrossRef]
  49. Santus, C.; Bertini, L.; Burchianti, A.; Inoue, T.; Sakurai, N. Fatigue resonant tests on drill collar rotary shouldered connections and critical thread root identification. Eng. Fail. Anal. 2018, 89, 138–149. [Google Scholar] [CrossRef]
  50. Santus, C.; Burchianti, A.; Inoue, T.; Ishiguro, H. Fatigue resonant tests on S140 and S150 grade corroded drill pipe connections and pipe bodies. Int. J. Press. Vessel. Pip. 2020, 184, 104107. [Google Scholar] [CrossRef]
  51. Santus, C.; Romanelli, L.; Burchianti, A.; Inoue, T. Resonant Fatigue Tests on Drill Pipe Connections with Different Geometries and Sizes. Appl. Sci. 2023, 13, 8006. [Google Scholar] [CrossRef]
  52. Van Wittenberghe, J.; De Baets, P.; De Waele, W.; Ost, W.; Verstraete, M.; Hertelé, S. Resonant Bending Fatigue Test Setup for Pipes With Optical Displacement Measuring System. J. Offshore Mech. Arct. Eng. 2012, 134. [Google Scholar] [CrossRef]
  53. Oku, Y.; Sugino, M.; Ando, Y.; Makino, T.; Komoda, R.; Takazaki, D.; Kubota, M. Fretting fatigue on thread root of premium threaded connections. Tribol. Int. 2017, 108, 111–120. [Google Scholar] [CrossRef]
  54. Schneider, S.; Herrmann, R.; Marx, S. Development of a resonant fatigue testing facility for large-scale beams in bending. Int. J. Fatigue 2018, 113, 171–183. [Google Scholar] [CrossRef]
  55. Schramm, C.; Birkner, D.; Marx, S. Resonance-based testing facility for fatigue tests of different axially loaded structural elements. Eng. Struct. 2024, 298, 117045. [Google Scholar] [CrossRef]
  56. Thomas, C.; Sainz-Aja, J.; Setien, J.; Cimentada, A.; Polanco, J.A. Resonance fatigue testing on high-strength self-compacting concrete. J. Build. Eng. 2021, 35, 102057. [Google Scholar] [CrossRef]
  57. Chuan, W.; Zhu, H.; Wang, D. Test System and Model for Fatigue Performance Evaluation of Marine Riser. J. Appl. Sci. 2013, 13, 854–861. [Google Scholar] [CrossRef]
  58. Xu, Z.; An, C.; Xie, Z.; Zhang, J.; Lim, F.; Zhang, Y. Full-scale resonant bending fatigue testing of casing joints under bending moment load. Int. J. Press. Vessel. Pip. 2024, 207, 105105. [Google Scholar] [CrossRef]
  59. Snowberg, D.; Dana, S.; Hughes, S.; Berling, P. Implementation of a Biaxial Resonant Fatigue Test Method on a Large Wind Turbine Blade; National Renewable Energy Lab.: Golden, CO, USA, 2014. [Google Scholar] [CrossRef]
  60. Melcher, D.; Bätge, M.; Neßlinger, S. A novel rotor blade fatigue test setup with elliptical biaxial resonant excitation. Wind Energy Sci. 2020, 5, 675–684. [Google Scholar] [CrossRef]
  61. Van Wittenberghe, J.; Vanden Haute, C.; Shirzadeh, R.; Thibaux, P. On the Feasibility of Large-Scale Resonant Fatigue Testing to Study Bolt Force Relaxation. In Proceedings of the Volume 3: Materials Technology; Pipelines, Risers, and Subsea Systems, Hamburg, Germany, 5–10 June 2022; American Society of Mechanical Engineers: New York, NY, USA, 2022. OMAE2022. [Google Scholar] [CrossRef]
  62. Luo, S.; Liu, M.; Lin, X. Corrosion fatigue behavior of S135 high-strength drill pipe steel in a simulated marine environment. Mater. Corros. 2018, 70, 688–697. [Google Scholar] [CrossRef]
  63. Murakami, Y. Metal Fatigue; Elsevier: Amsterdam, The Netherlands, 2019. [Google Scholar] [CrossRef]
  64. Macoretta, G.; Romanelli, L.; Santus, C.; Romoli, L.; Lutey, A.H.A.; Uriati, F.; Nicoletto, G.; Raghavendra, S.; Benedetti, M.; Monelli, B.D. Modelling of the surface morphology and size effects on fatigue strength of L-PBF Inconel 718 by comparing different testing specimens. Int. J. Fatigue 2024, 181, 108120. [Google Scholar] [CrossRef]
  65. Łagoda, T.; Vantadori, S.; Głowacka, K.; Kurek, M.; Kluger, K. Using the Smith-Watson-Topper Parameter and Its Modifications to Calculate the Fatigue Life of Metals: The State-of-the-Art. Materials 2022, 15, 3481. [Google Scholar] [CrossRef] [PubMed]
  66. Santus, C.; Romanelli, L.; Grossi, T.; Neri, P.; Romoli, L.; Lutey, A.H.A.; Pedranz, M.; Benedetti, M. Torsional-loaded notched specimen fatigue strength prediction based on mode I and mode III critical distances and fracture surface investigations with a 3D optical profilometer. Int. J. Fatigue 2022, 161, 106913. [Google Scholar] [CrossRef]
  67. Santus, C.; Romanelli, L.; Grossi, T.; Bertini, L.; Le Bone, L.; Chiesi, F.; Tognarelli, L. Elastic–plastic analysis of high load ratio fatigue tests on a shot-peened quenched and tempered steel, combining the Chaboche model and the Theory of Critical Distances. Int. J. Fatigue 2023, 174, 107713. [Google Scholar] [CrossRef]
Figure 1. Graphical introduction of the term a r e a according to the Murakami model.
Machines 12 00314 g001
Figure 2. (a) CAD model of the test rig, (b) overview of the resonant fatigue test rig, (c) rotating mass during tests and (d) lasers to measure the horizontal and vertical displacements at a specific location.
Machines 12 00314 g002
Figure 3. (a) Drill pipe specimen 1, 5.5 × 0.506 and (b) drill pipe specimen 2, 5.5 × 0.415 .
Machines 12 00314 g003
Figure 4. (a) Modal displacement at the first natural frequency of the pipe specimen and (b) displacements obtained with the harmonic response analysis by varying the imposed frequency and, in turn, the alternating stress amplitude.
Machines 12 00314 g004
Figure 5. (a) Strain gauges’ calibration and the use of a comparator to measure the displacement in accordance with the load application point and (b) beam scheme for strain gauges’ calibration.
Machines 12 00314 g005
Figure 6. (a) Test rig for polishing operations and (b) pipe specimens on the test rig for polishing operation.
Machines 12 00314 g006
Figure 7. Steps during polishing operations: (a) coarse grinding, (b) coarse polishing, and (c) fine polishing.
Machines 12 00314 g007
Figure 8. Fatigue test results of the present campaign compared with those of previous test series, including corroded and not-corroded pipes of a similar type [50].
Machines 12 00314 g008
Figure 9. Analysis of the crack nucleation of pipe specimen 1: (a) location of the crack and (b) extracted part located at the crack nucleation zone.
Machines 12 00314 g009
Figure 10. Analysis and location of the crack nucleation of pipe specimen 2.
Machines 12 00314 g010
Figure 11. Extraction of the samples from the polished and corroded zones of pipe specimen 1.
Machines 12 00314 g011
Figure 12. Extraction of the samples from the polished and corroded zones of pipe specimen 2.
Machines 12 00314 g012
Figure 13. SEM investigations of drill pipe specimen 1, not at the crack location zone: (a) sample 1A, scanned at the outer diameter; (b) sample 1A, scanned at the inner diameter; and (c) sample 1B, scanned at the outer diameter.
Machines 12 00314 g013
Figure 14. SEM investigations of the drill pipe specimen 1 at the crack location zone: (a) sample 1B, scanned at the inner diameter, and (b) zoom of sample 1B, scanned at the inner diameter.
Machines 12 00314 g014
Figure 15. SEM investigations of drill pipe specimen 2, not at the crack location zone: (a) sample 2A, observed at the outer diameter; (b) sample 2A, observed at the inner diameter; (c) sample 2C, observed at the outer diameter; and (d) sample 2C, observed at the inner diameter.
Machines 12 00314 g015
Figure 16. SEM investigations of drill pipe specimen 2 at the crack location zone: (a) sample 2B, observed at the outer diameter; (b) zoom of sample 2B, observed at the outer diameter; (c) sample 2D, observed at the outer diameter; and (d) zoom of sample 2D, observed at the outer diameter.
Machines 12 00314 g016
Table 1. Significant technical data of the polishing operations.
Step of the Polishing OperationGrinding Wheel Rotational Speed (rpm)Pipe Specimen’s Rotational Speed (rpm)Grinding Wheel Diameter (mm)
First step (coarse grinding500060150
Second step (coarse polishing)8000–10,00060100
Third step (fine polishing)500060125
Table 2. Obtained values of the Murakami parameter a r e a and of σ w .
Sample NumberLocation a r e a (mm) σ w (MPa)
Sample 1Aouter diameter0.263281
Sample 1Ainner diameter1.28216
Sample 1Bouter diameter
Sample 1Binner diameter0.463256
Sample 2Aouter diameter0.333256
Sample 2Ainner diameter0.632230
Sample 2Bouter diameter0.327257
Sample 2Couter diameter
Sample 2Cinner diameter0.349254
Sample 2Douter diameter0.361252
Disclaimer/Publisher’s Note: The statements, opinions and data contained in all publications are solely those of the individual author(s) and contributor(s) and not of MDPI and/or the editor(s). MDPI and/or the editor(s) disclaim responsibility for any injury to people or property resulting from any ideas, methods, instructions or products referred to in the content.