Article

Automatic Defect Inspection for Coated Eyeglass Based on Symmetrized Energy Analysis of Color Channels

1
Institute of Photonics Engineering, National Kaohsiung University of Science and Technology, Kaohsiung 80778, Taiwan
2
Departmentof Electronic Engineering, I-Shou University, Kaohsiung 84001, Taiwan
3
Departmentof Computer Science, Purdue University Fort Wayne, Fort Wayne, IN 46805, USA
*
Author to whom correspondence should be addressed.
Symmetry 2019, 11(12), 1518; https://doi.org/10.3390/sym11121518
Submission received: 26 October 2019 / Revised: 6 December 2019 / Accepted: 12 December 2019 / Published: 15 December 2019
(This article belongs to the Special Issue Information Technologies and Electronics)

Abstract

:
Nowadays, eyeglassesare used for vision correction as well as in the fashion industry. Eyeglasses have become more expensive and the eyewear industry has grown rapidly, thereby requiring the development of advanced coating technologies. However, defect detection by visual inspection in the manufacturing process of eyeglass coatings is difficult. To solve this problem, we propose the coated eyeglass defect detection system framework based on machine vision for real-time inspection. First, we locate and extract regions of interest (ROI) ofthe coated eyeglass by adopting cross-projection based on symmetrizedenergy analysis. Next, we propose an efficient method based on the symmetrized energy analysis of color channelsto enhance defectsin each color channel of the ROI of the coated eyeglass. Then, we adoptsymmetrized cross-projection energy analysis for locating defective areas inside the ROI of the coated eyeglass. Finally, we compare the defect detection resultsfor the coated eyeglass with the standard manufacturingquality. An experiment is conducted using real data collected froma Taiwanese eyeglass factory to validate the performance of the proposed framework. This framework achieves a 100% defect detection rate, demonstrating that it is valid and useful for inspecting coated eyeglasses in industries.

1. Introduction

In Industry 4.0, an automatic optical inspection (AOI) system is a key technique in the manufacturing and testing of products to ensure that the products leaving the production line are high-quality and defect-free. Nowadays, manual inspection is not viable because of the increasing complexity and size minimization of products. Although this approach is widely accepted, obviously, it is not particularly effective, as inspectors soon become tired and may let inferior goods pass through quality control. Because businesses now require high-end products to be brought to the market rapidly and reliably in high volumes, an effective method is required to ensure product quality. AOI is an indispensable tool that uses optics to capture images of the product being tested. This integrated test strategy minimizes costs by detecting faults early in the production line.
AOI has been increasingly used for automatic defect detection in industry product quality control. One mature application of AOI is the inspection of the printed circuit board [1,2,3,4]. Recently, the use of AOI-based defect inspection systems has been extended to several industries, such as steel [5,6,7,8,9,10], textile and garment [11,12,13], solar cells [14,15,16,17,18], plastic [19,20], and liquid crystal display (LCD) [21,22,23,24] industries. Recently, glass is being used increasingly in various applications, and thus, the glass industry is growing rapidly. The human eye cannot keep up with a machine’s running speed to identify defects in time, and the reflectivity and transparency of glass make it difficult to examine. Therefore, some researchers have used AOI systems for defect inspection to obtain results faster and more effectively. AOI systems have been developed for different types of glass products, such as float glass [25], satin glass [26], glass bottle bottoms [27], and glass containers [28]. Although automated inspection systems have successfully replaced manual ones, the analysis process must be enhanced to improve assessments and reduce processing times.
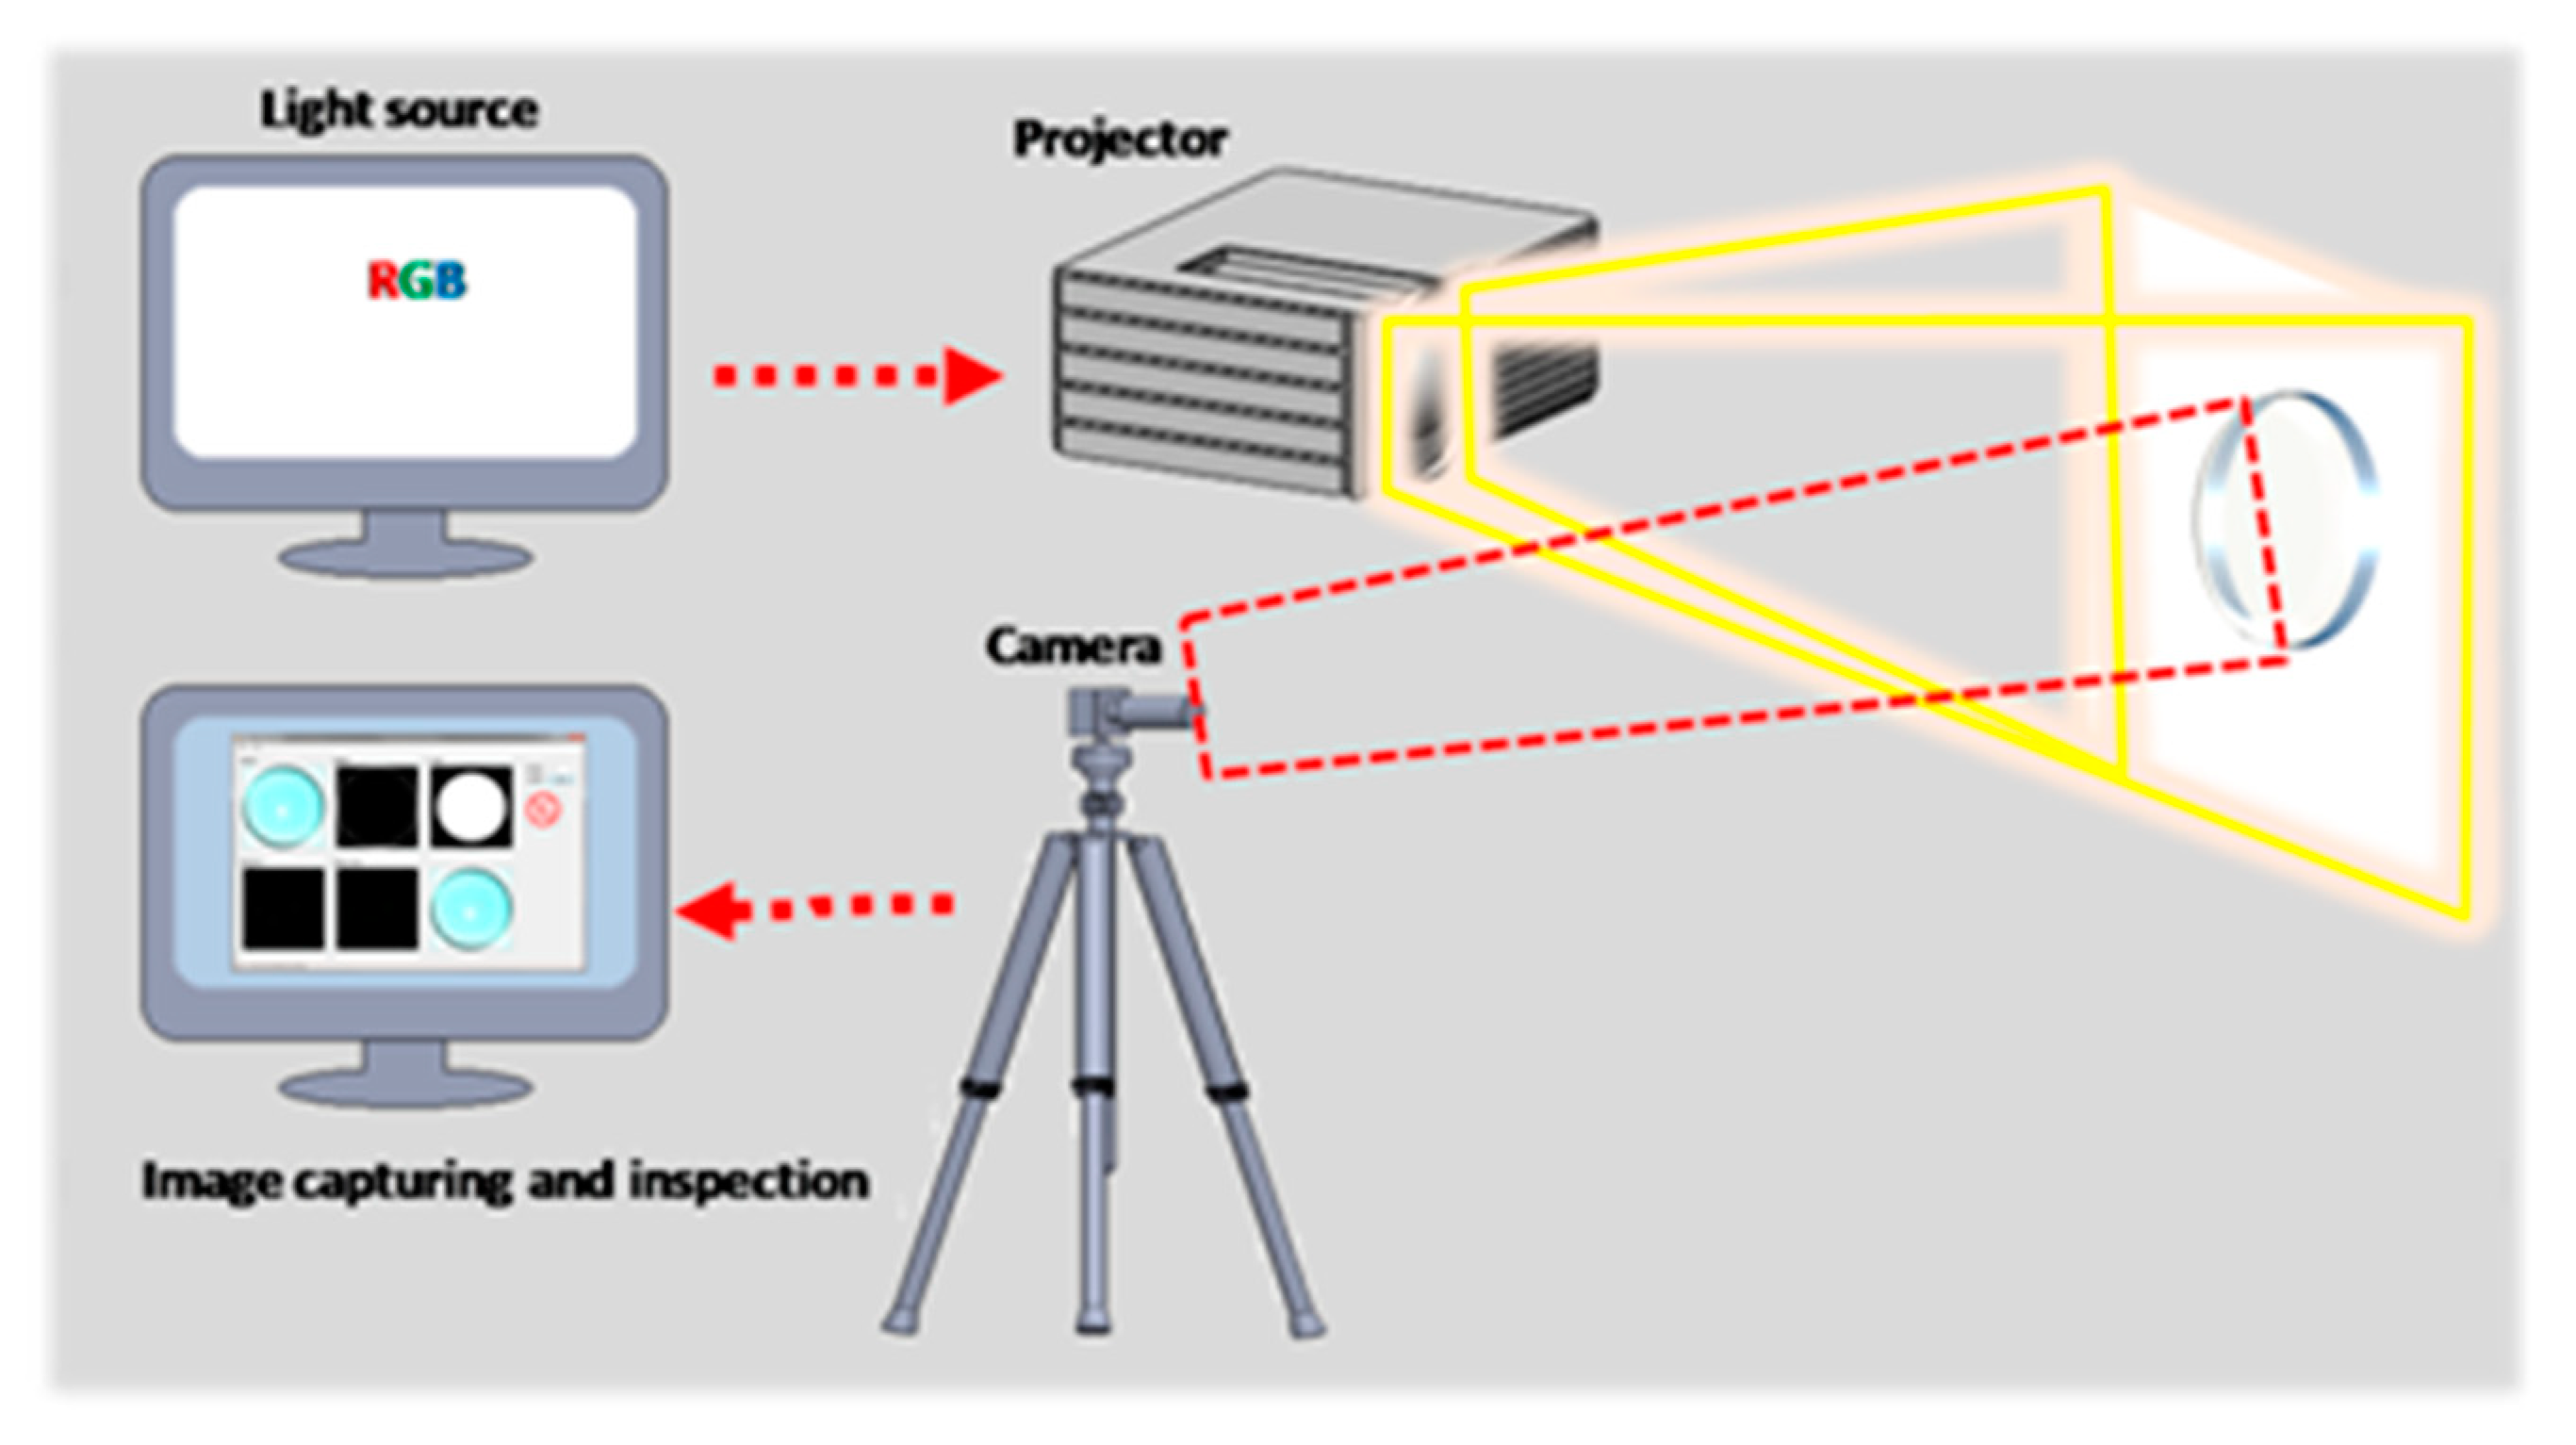
Glasses or eyeglasses are used to enable people with poor vision to see clearly. They typically consist of a metal or a plastic frame and two lenses to improve vision. Furthermore, eyeglasses must also be light, thin, and anti-reflective to protect the wearer’s eyes from harmful ultraviolet (UV) radiation or glare and provide impact and abrasion resistance. Lightness and thinness can be achieved by using specific materials such as polycarbonates (PCs) to produce eyeglasses. Anti-reflectivity can be achieved by applying a specific coating on the surface of the eyeglass. Such coatings are made of a very thin film that is layered on the eyeglass; the film has arefractive index between that of air and of glass. Such coatings make eyeglasses more expensive, and therefore, the eyewear industry has actively focused on coating technologies. Various coating technologies exist, however, all require a high heat process, and the coating process still produces many unwanted defects. If a defect is detected early in the high heat process, the product can be corrected by repeating this process until it is satisfactory. However, once exposure starts in the high heat process, an inspector cannot detect defects and manually intercede, making it impossible to recover a coating defect. If a coating defect were to be detected during exposure in the high heat process, the coating process could be stopped immediately. In this study, we propose a coated eyeglass defect detection system (CEDDS) that can efficiently detect defects occurring in the coating process, as shown in Figure 1. If a coating is defective or is scratched, the coating process could be re-performed until the piece passes the quality examination. CEDDS can be used to examine the coating quality in each stage of the coating process, thereby avoiding reprocessing and unnecessary waste. In experiments on 50 pieces of each of the four types of eyeglasses, our system achieved 100% defect detection accuracy, demonstrating its efficiency.
The remainder of this paper is organized as follows. Section 2 briefly reviews eyeglass types and their coating processes. Section 3 describes the image acquisition system. Section 4 describes our defect detection method. Section 5 presents the experimental results. Finally, Section 6 presents the conclusions of this study.

2. Overview of Eyeglass Types and Their Coating Process

Here, we perform experiments on 50 pieces of each of the four types of spherical eyeglasses, for a total of 200 eyeglasses. Each eyeglass type has a different edge thickness (ET) and diameter (Dia.), as shown in Figure 2 and Figure 3.
Different manufacturing processes can be used to apply a coating onto the surface of an eyeglass. One method involves coating on the eyeglass and then exposing it to high heat for an extended period, thereby causing the liquid solution to harden and adhere to the eyeglass. Another method involves a type of vacuum application in which the eyeglass is placed inside a large machine and then coated with a liquid. Then, the final vacuum procedure combined with high heat helpsadhere the coated layer to the eyeglass. In this manner, the coating is actually built into the material and distributed throughout the eyeglass.
The eyeglass coating defect detection standard is defined by two tests before and after applying the eyeglass coating. Before the coating is applied, an inspection is performed and the number of acceptable defects is recorded. After the coating is applied, another inspection is performed to detect defects; if the number of defects is increased, the coated eyeglass is considered substandard and recoating is considered to be required.

3. Image Acquisition System

This section presents the system architecture of the coated eyeglass inspection apparatus and discusses specific considerations for the illumination scheme. The image properties and the challenges faced in defect detection are then investigated.
In every image acquisition device, lighting conditions play a major role in deciding the quality of the acquired images and therefore in the inspection task. When light meets a glass surface, some of it is reflected, depending on the angle of incidence, the refractive indices of the glass, and the medium the light is originating from (e.g., air). The light passing through the glass is reflected off both the front and the back surfaces. In fact, light may be reflected back and forth several times. When inspecting an eyeglass surface to find defects, the glass background is misleading for the camera. Therefore, the camera should not simply focus on the glass surface. To normalize the illumination variation and increase the contrast between defects and the glass, different lighting systems such as background lighting [29], parallel lighting [30], and infrared lighting [31] have been proposed. However, these methods are unsuitable for application to spherical eyeglasses.
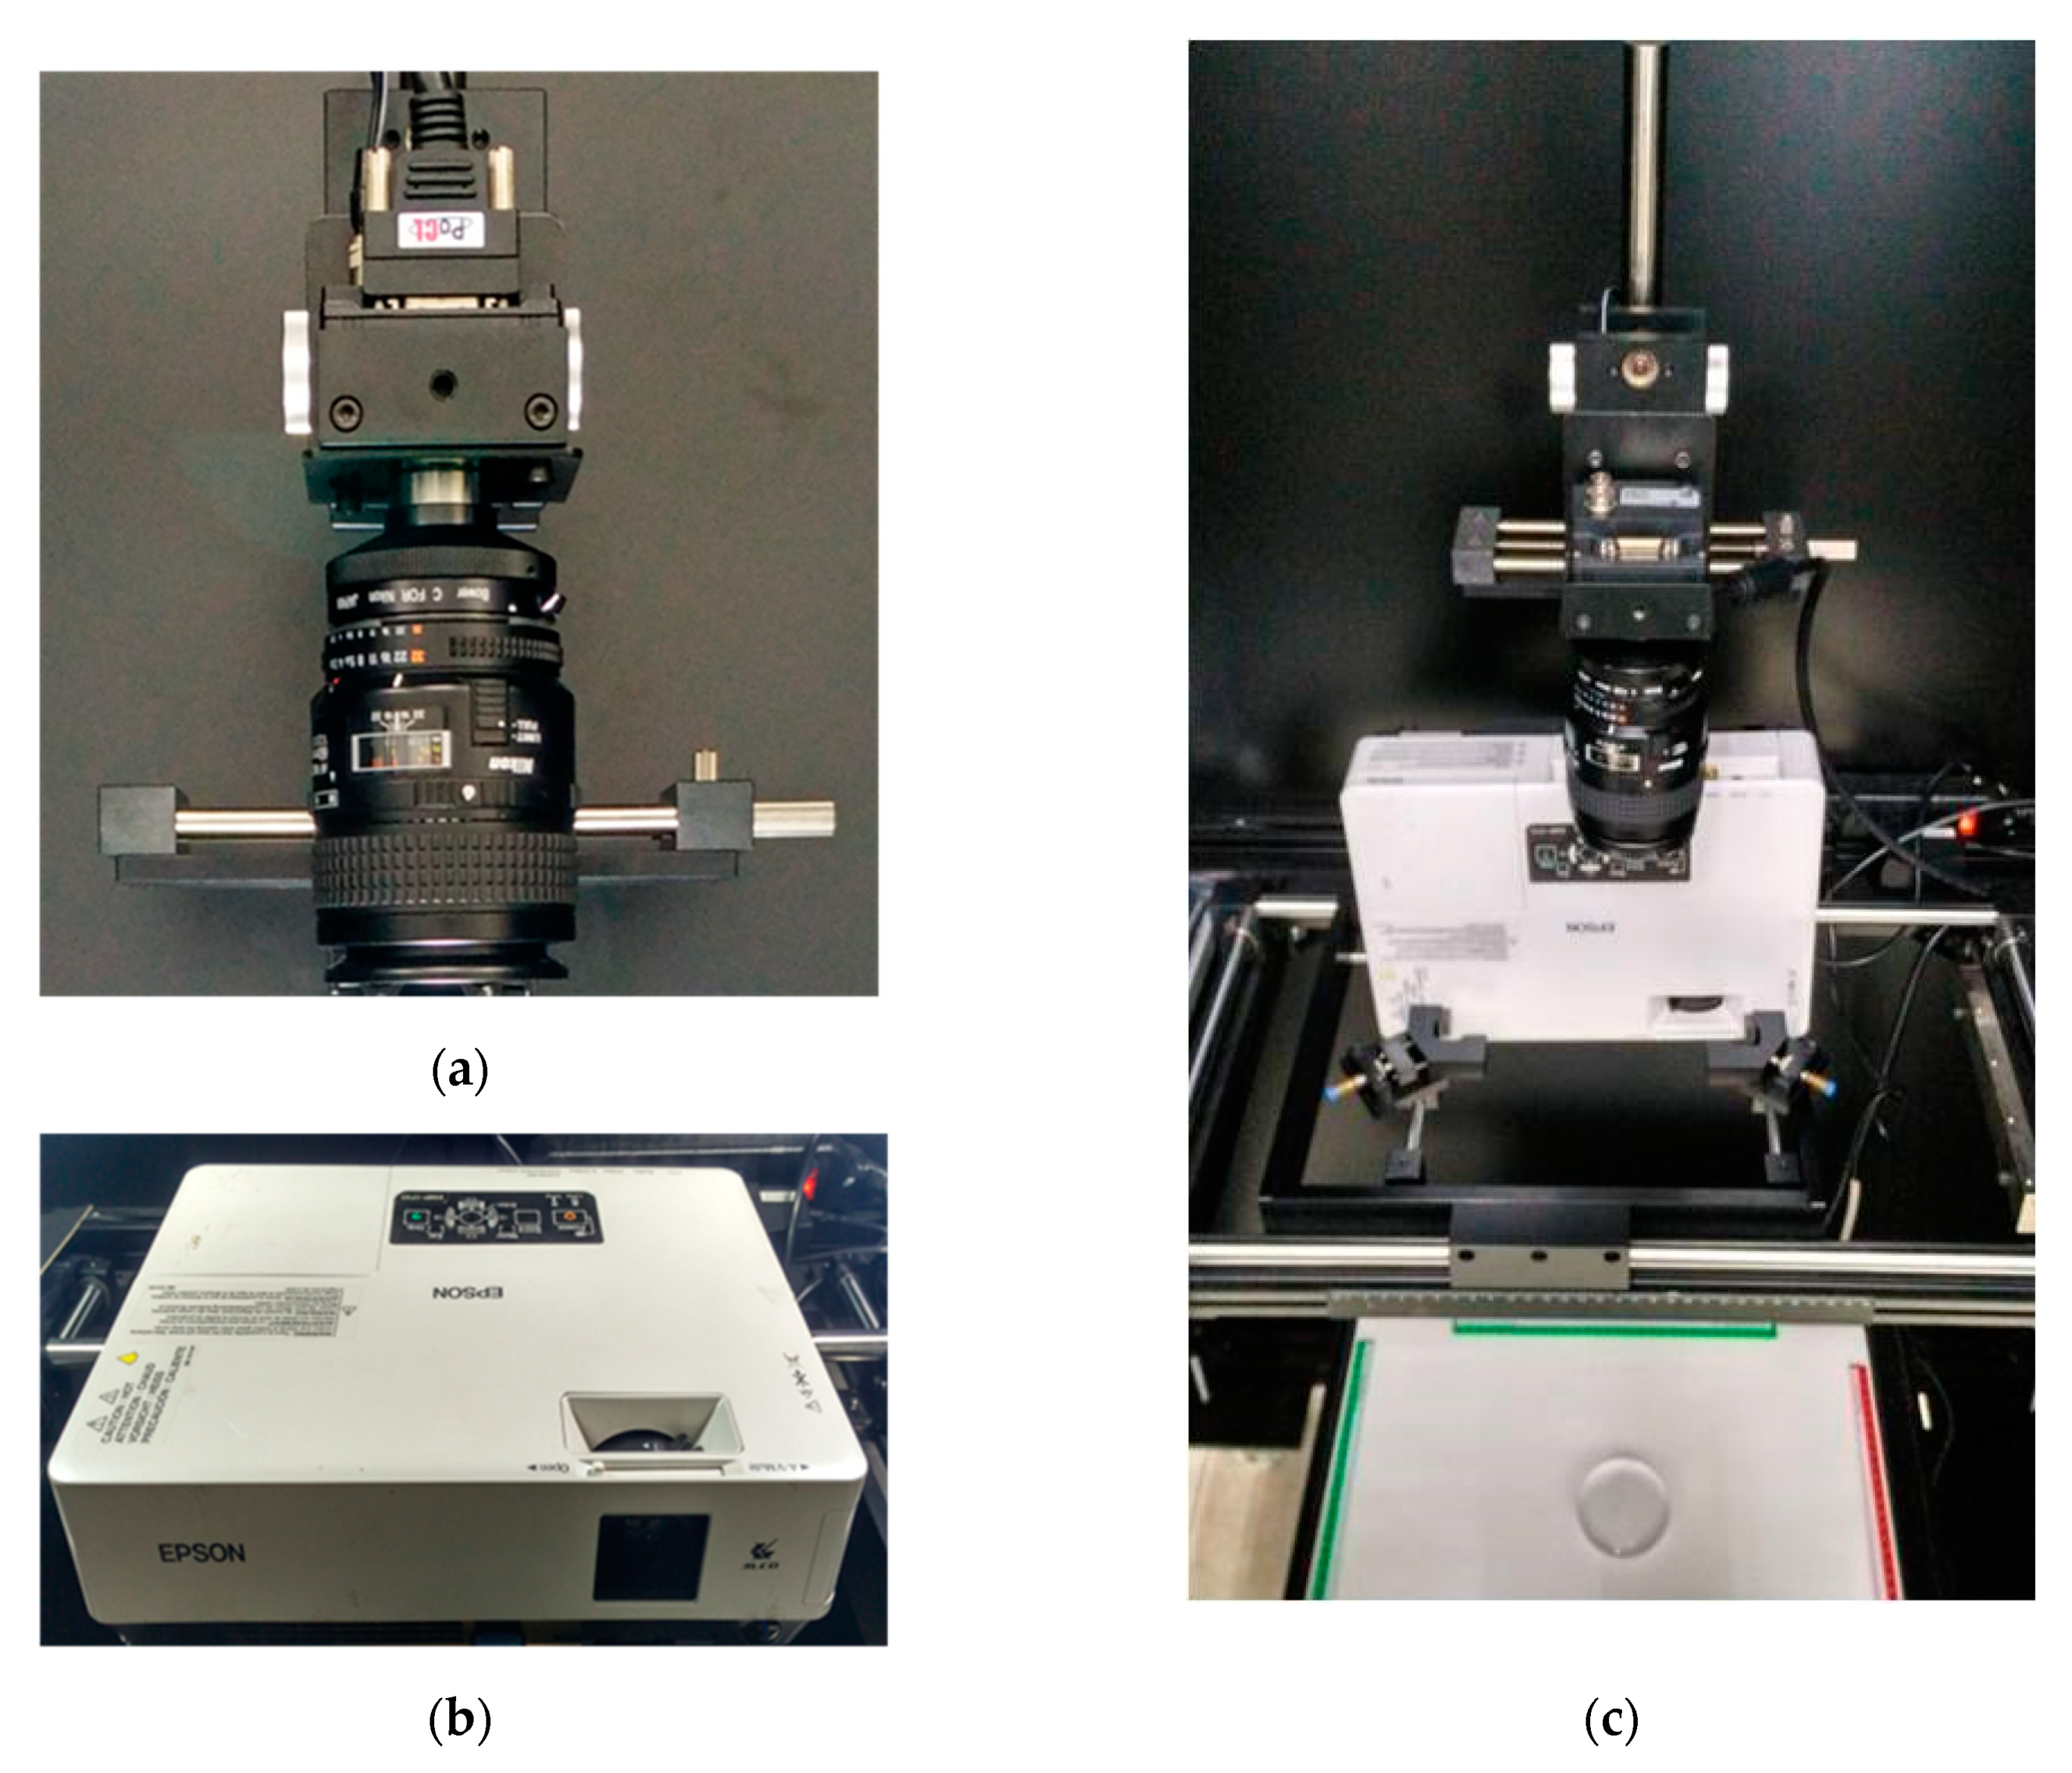
According to our study, the quality of a spherical eyeglass image is influenced by three factors: (1) purity of the background, (2) curvature of the eyeglass, (3) and focal length of the photographic lens, which varies depending on the thickness and curvature of the eyeglass. Furthermore, an uneven coating does not change the brightness of the light owing to the influence of the illumination source. Therefore, to overcome the first two aforementioned factors, a high-brightness projector is adopted as a light source, and then, the detection is performed. The projector lamp minimizes light diffraction and leakage and focuses the maximum possible brightness onto the glasses. With the strong blinding light from the lamp, the interference of ambient light can be avoided completely and the projection color can be changed easily through computer settings to achieve uniformity. The camera takes photographs of the eyeglass on a pure white background screen, as shown in Figure 4. To overcome the abovementioned factor without changing the distances among the projector, screen, and camera, we vary the exposure time of the camera on the basis of the thickness of the eyeglass. Figure 5 shows the proposed image acquisition system, which has been equipped with a servomechanism to overcome the variation of angles since there is curvature on the eyeglass surface.
In general, eyeglass defects are small and difficult to detect for the human eye. Therefore, image acquisition is a critical step in the defect inspection system. Although a high-resolution image can help make defects clearer, it increases the processing time required. To solve this problem, we extract the region of interest (ROI) of the coated eyeglass with a quasi-circular shape and then extract defects within this circle. Figure 6 shows examples of images captured using our system for the four types of eyeglasses examined in this study; the images have a resolution of 2330 × 1750 pixels and are stored in 24-bit BMP format. These images are used for defect detection to optimize the running time and ensure synchronization with the factory’s production line.

4. CEDDS

First, the ROI with a quasi-circular shape is extracted automatically to remove background interference and therefore shorten the defect detection time. Next, symmetrized energy analysis is used to enhance the defect contour within the ROI, and then, partial cross-projection is used to cut out the defect image. The defect number and size are finally calculated to determine whether the manufacturer’s specifications are met.

4.1. Eyeglass Extraction

To extract the correct position of the eyeglass in the image, we detect the contour of the eyeglass by following its quasi-circular shape. Traditional contour detection is based on edge detection approaches [32], such as the Sobel or Canny operator, which commonly extract edges by adopting a specific template or combining a smoothing function. A Sobel edge detector can be employed to find vertical and horizontal edges in an image. Nevertheless, the Sobel edge detector is highly sensitive to noise. Besides, the kernel filters’ size and its coefficients are unaltered and cannot be modified to a given image. The Canny edge detector has been developed as an optimal edge detector that provides good performance for detection and localization, and a unique solution for a true edge. It performs better than the Sobel detector and gradient-based operators in most cases. Even so, its performance strongly depends on adjustable parameters, similar to the Gaussian filter’s standard deviation and the threshold value. Studies have recently developed various edge detection operators based on the different types of edges [33,34]. However, these approaches still depend heavily on the contrast of the image. They require different parameters to adjust the sensitivity based on the associated content in an image. The symmetrized energy-based edge detector proposed in this study cannot only detect edge pixels equally well in all directions but also afford the concernment of no parameter-tuning, low sensitivity to noise, and isotropy.
Contour detection is usually used to detect important discontinuities for feature extraction and object recognition in digital image analysis. Color is a powerful and strong visual cue to recognize an object from others. Recently, color segmentation has been used widely in computer vision fields, such as visual tracking, object recognition, and vision-based robotics. However, color segmentation exposes color variation incurred by uneven illumination and the position of the camera. Especially, the variation of light and the surface materials of the object is the major problem, limiting color segmentation application to visual inspection tasks. The changing illumination conditions alter the color characteristics, while complex environments increase false-positive pixels. In digital image processing, the YCbCr color space is often used to exploit the lower resolution capability of the human visual system for color with respect to luminosity. Y is the luma component and Cb and Cr are the blue- and red-difference chroma components, respectively. Defects on the eyeglass are relatively more sensitive to illumination. Therefore, we use the luma component Y of the YCbCr color space as a gray level for contour detection. It is more useful for defect detection and can greatly reduce the processing time. Rather than processing the 24-bit coated eyeglass color image, we process the 8-bit Y-channel image in the YCbCr color space to reduce the running time of the proposed CEDDS system.
Without generality loss, f is assumed to be a coated eyeglass color image with a resolution of M × N, and f A ,   A { R , G , B } represents the RGB color channels. Therefore, f M   ×   N   ×   3 and { f R , f G , f B } M   ×   N . The luma component f Y of f in the YCbCr color space can be calculated as
f Y ( x , y ) =   0.299   f R ( x , y ) +   0.587   f G ( x , y ) +   0.114   f B ( x , y ) .
Before contour object extraction is perfumed, a smoothing filter is used to smooth the image and enhance the desired local edge. The local standard average μ Y and energy f E defined by the mask with 3 × 3 pixels are respectively expressed as
μ Y = 1 η i = 1 1 j = 1 1 f Y ( x + i , y + j ) ,
f E ( x , y ) =   1 η i = 1 1 j = 1 1 { f Y ( x + i , y + j ) μ Y } 2 ,
where η = 9 is a normalizing constant, μ Y the average value of the pixels in the mask, and f Y ( x , y ) the luma component of the input image in the YCbCr color space.
To extract the object of interest from the background, many methods based on the binary image have been used. For example, the fuzzy binarization has been used successfully in arrow detection in biomedical image problems [35,36,37]. In this study, the binary image based on an automatic threshold proposed by Otsu [38] is adopted to extract the object of interest from the background. Otsu’s algorithm for the automatic binary threshold τ O t s u is as follows:
τ O t s u = M a x ( ω 1 ( t ) ω 2 ( t ) [ μ 1 ( t ) μ 2 ( t ) ] 2 ) ,
ω 1 ( t ) = i = 0 t 1 p ( i ) ,
ω 2 ( t ) = i = t 255 p ( i ) ,
μ 1 ( t ) = i = t 255 p ( i ) i ω 1 ( t ) ,
μ 2 ( t ) = i = t 255 p ( i ) i ω 2 ( t ) ,
where t is the current histogram level value from 0 to 255; ω 1 ( t ) the cumulative probability from 0 to t−1, ω 2 ( t ) the cumulative probability from t to 255, μ 1 ( t ) the cumulative expected average from 0 to t−1, μ 2 ( t ) the cumulative expected average from t to 255, and p(i) the probability of distribution in the image. The binary image based on an automatic threshold value τ O t s u , denoted as f B , is selected from the energy f E as follows:
f B ( x , y ) = { 255 , f E ( x , y ) τ O t s u 0 , o t h e r w i s e
where pixel values labeled 255 are objects of interest, whereas pixel values labeled 0 are undesired ones. Figure 7 illustrates the resulting binary images for contour detection. The binary image in Figure 7d is used for contour detection.
To detect the exact location of the circular coated eyeglass with a circular shape, this study adopts the cross-projection method to determine the detection range. The cross-projection includes two projection mirrors interchangeably to detect marginal points on the contour of the eyeglass in the image. For the binary image f B , the first projection, called the forward projection, uses the mask M1 from the top left to the bottom right of the image to obtain the maximum value coordinate p m a x ( x m a x , y m a x ) in the projection. The second projection, called the reverse projection, uses the mask M2 from the bottom right point to the top left point of image to obtain the minimum value coordinate p m i n ( x m i n , y m i n ) in the projection. The masks M1 and M2 are defined in Equations (10) and (11), respectively.
M 1 = [ f B ( x , y ) f B ( x + 1 , y ) f B ( x + 2 , y ) f B ( x , y + 1 ) f B ( x + 1 , y + 1 )   0 f B ( x , y + 2 )   0   0 ] ,
M 2 = [   0   0 f B ( x , y 2 )   0 f B ( m 1 , n 1 ) f B ( x , y 1 ) f B ( x 2 , y ) f B ( x 1 , y ) f B ( x , y ) ] .
Figure 8 presents the results with both forward and backward projections. The center point of the coated eyeglass, denoted as O(x0, y0), is then calculated as
x 0 = x m a x + x m i n 2 ,
y 0 = y m a x + y m i n 2 .
On the basis of the center point O of the overlapping circles shown in yellow color, as shown in Figure 8d, we can precisely extract the ROI of the coated eyeglass with a circular shape shown in aqua blue color, as shown in Figure 8e.

4.2. Defect Detection Based on Symmetrized Energy Analysis of Three Color Channels

In the production line, various types of defects can occur on the coated eyeglass. Most defects appear in the B channel, and the rest are located in the G and R channels, as shown in Figure 9. In our experiment, defect enhancement is first performed on each color channel by using local energy analysis. Three energy images of the color channels are then superimposed to obtain the enhanced image for defect detection.
The ROI of the coated eyeglass image is first separated into the R, G, and B color channels, and then, the defects are enhanced by symmetrized energy analysis on each color channel separately. Because the ROI of the coated eyeglass with circular shape and the defect may lie near the contour of the coated eyeglass, a circular mask is adopted to solve this problem. The circular mask can not only detect the defect but also localize the contour of the coated eyeglass. The symmetrized energy image f E C _ A of each color channel is calculated as
f E C _ A ( x , y ) =   1 η i = r r j = r r { f ( x + i ,   y + j ) μ M } 2 ,   | i | + | j | < d 2 ,
μ M = 1 η i = r r j = r r f ( x + i ,   y + j ) ,   | i | + | j | < d 2 ,
where η is the number of pixels,   μ M the average value of the pixels in the circular mask   M , d the diameter of the circular mask and an odd number ≥3, and r = d 2 the radius of the circular mask.
The circular mask with diameter of 5 pixels is presented as
M 5 = [ f ( x 2 , y ) f ( x 1 , y 1 ) f ( x 1 , y ) f ( x 1 , y + 1 ) f ( x , y 2 ) f ( x , y 1 ) f ( x , y ) f ( x , y + 1 ) f ( x , y + 2 ) f ( x + 1 , y 1 ) f ( x + 1 , y ) f ( x + 1 , y + 1 ) f ( x + 2 , y ) ] .
After enhancing defects in each color channel based on M 5 , the energy image of the ROI of the coated eyeglass, denoted as f E C , is calculated using the OR operator as
f E C ( x , y ) =   f E C _ R ( x , y ) OR   f E C _ G ( x , y ) OR   f E C _ B ( x , y ) .
Figure 10a shows the energy image for the ROI of the coated eyeglass. Figure 10b–d provides the energy image for the R, G, and B color channels of Figure 9b–d, respectively. As shown in Figure 10, the defects are detected accurately.
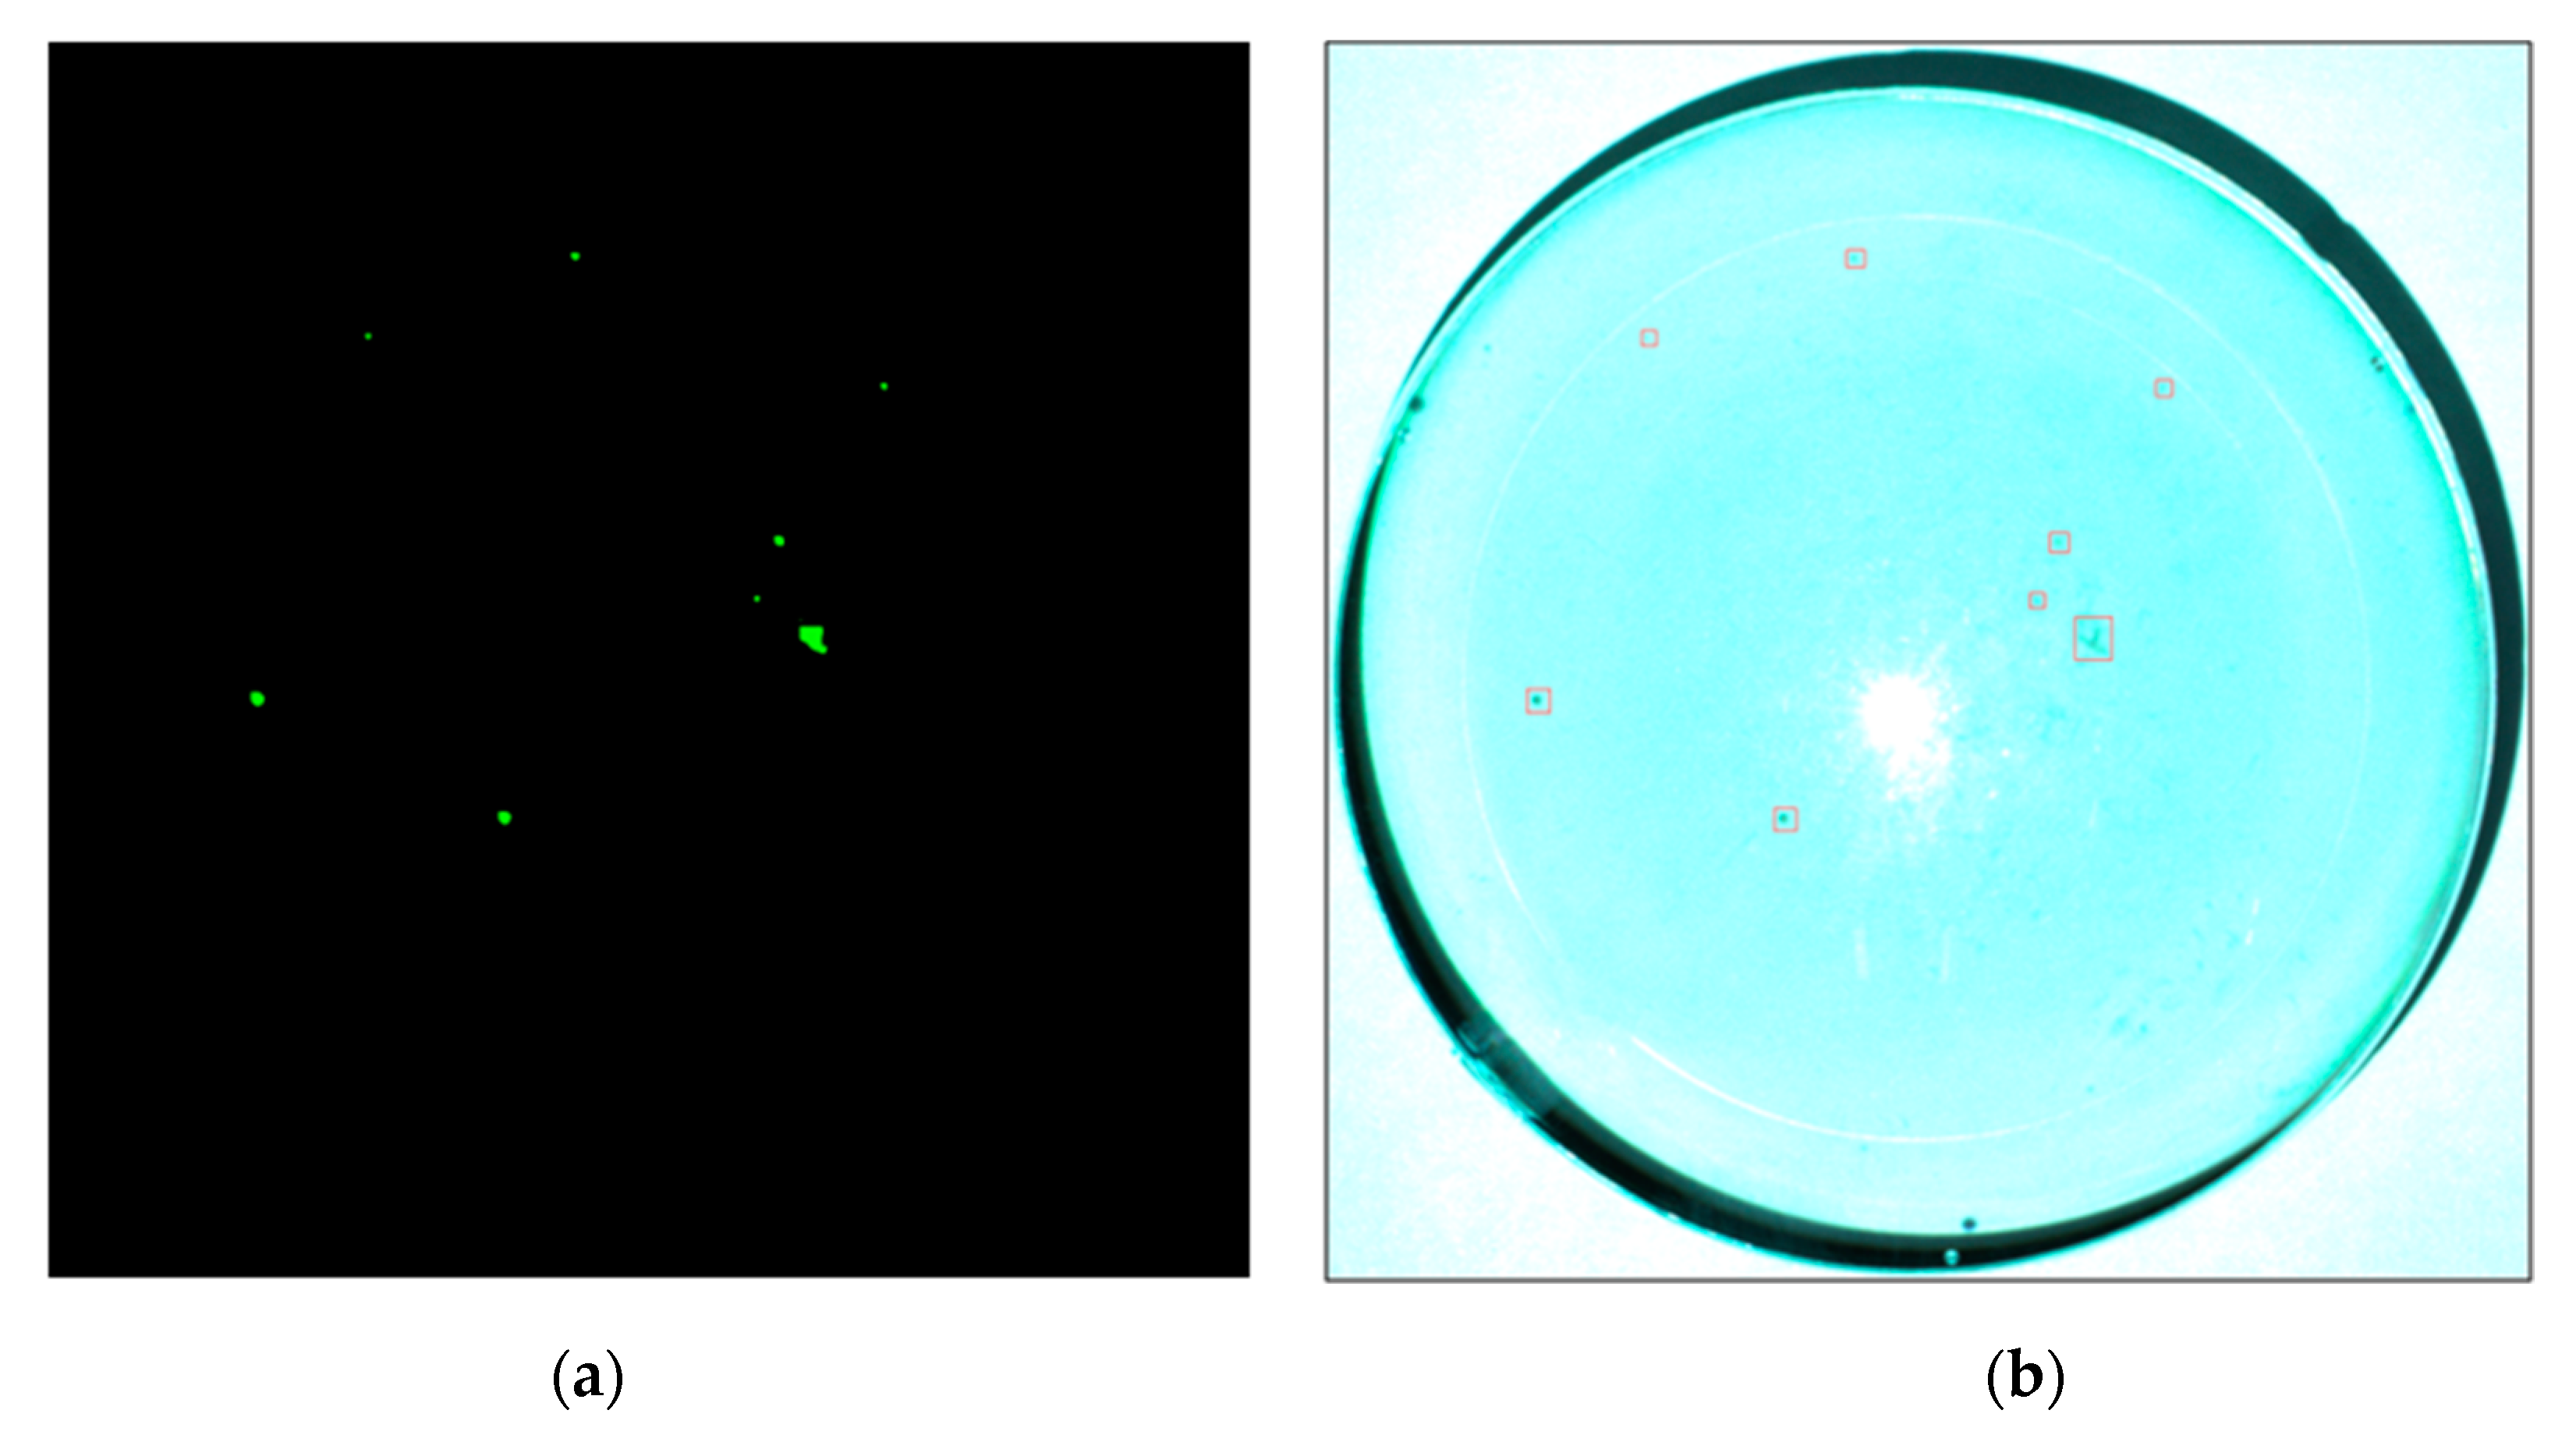
To locate and extract defects within the ROI of the coated eyeglass, we use the cross-projection method as discussed in Section 4.1. First, the contour of the ROI of the coated eyeglass is removed, and then, cross-projection is adopted with the energy analysis result to locate and extract defects. Then, based on the cross-projection result, defects are automatically extracted to detect their numbers, sizes, and coordinates. The manufacturer’s specifications are then used to determine whether the defects are acceptable. Figure 11a shows the symmetrized cross-projection result for the ROI of the coated eyeglass, and Figure 11b shows the final defect detection result for the GO/NG decision. As shown, our method can efficiently locate and extract defects on the coated eyeglass.

5. Experimental Results and Discussion

The defect detection algorithm was tested on the four types of coated eyeglasses. The 200 eyeglass samples had diameters of 70–80 mm and edge thicknesses of 2.9–13 mm. Each type of eyeglass had a different curvature, as shown in Figure 2 and Figure 3. Figure 4 illustrates the optical architecture of our automatic defect detection system and Figure 5 shows the acquisition equipment. The proposed system was implemented in Microsoft Visual Studio C# Express 2010. The experiments were conducted on a PC with an Intel Core i7-4790 CPU @3.60GHz and 8GB of DDR3 RAM running the Windows 10 operating system.
The system used a Basler avA2300-30kc camera with a Camera-Link interface. The camera was equipped with a KAI-4050 CCD sensor delivering 31 frames per second at 4 MP resolution. The sensor size was12.8 × 9.6 mm2 and resolution (H × V) was 2330 × 1750 pixels, with a pixel size (H × V) of 5.5 × 5.5 µm2. The camera had a Nikon 60mm f/2.8 microlens. This lens is an excellent normal and short telephoto lens as well as an excellent close-up lens; it can focus on life-size objects, implying that objects as small as an inch across can fill the frame. The light source uses the Epson EMP-1700 projector. The camera, projector, and eyeglass were placed at 680, 715, and 0 mm from the screen, respectively, as listed in Table 1. Table 2 shows the balanced ratio of the light source and the exposure time of the camera based on different thicknesses of the eyeglass.
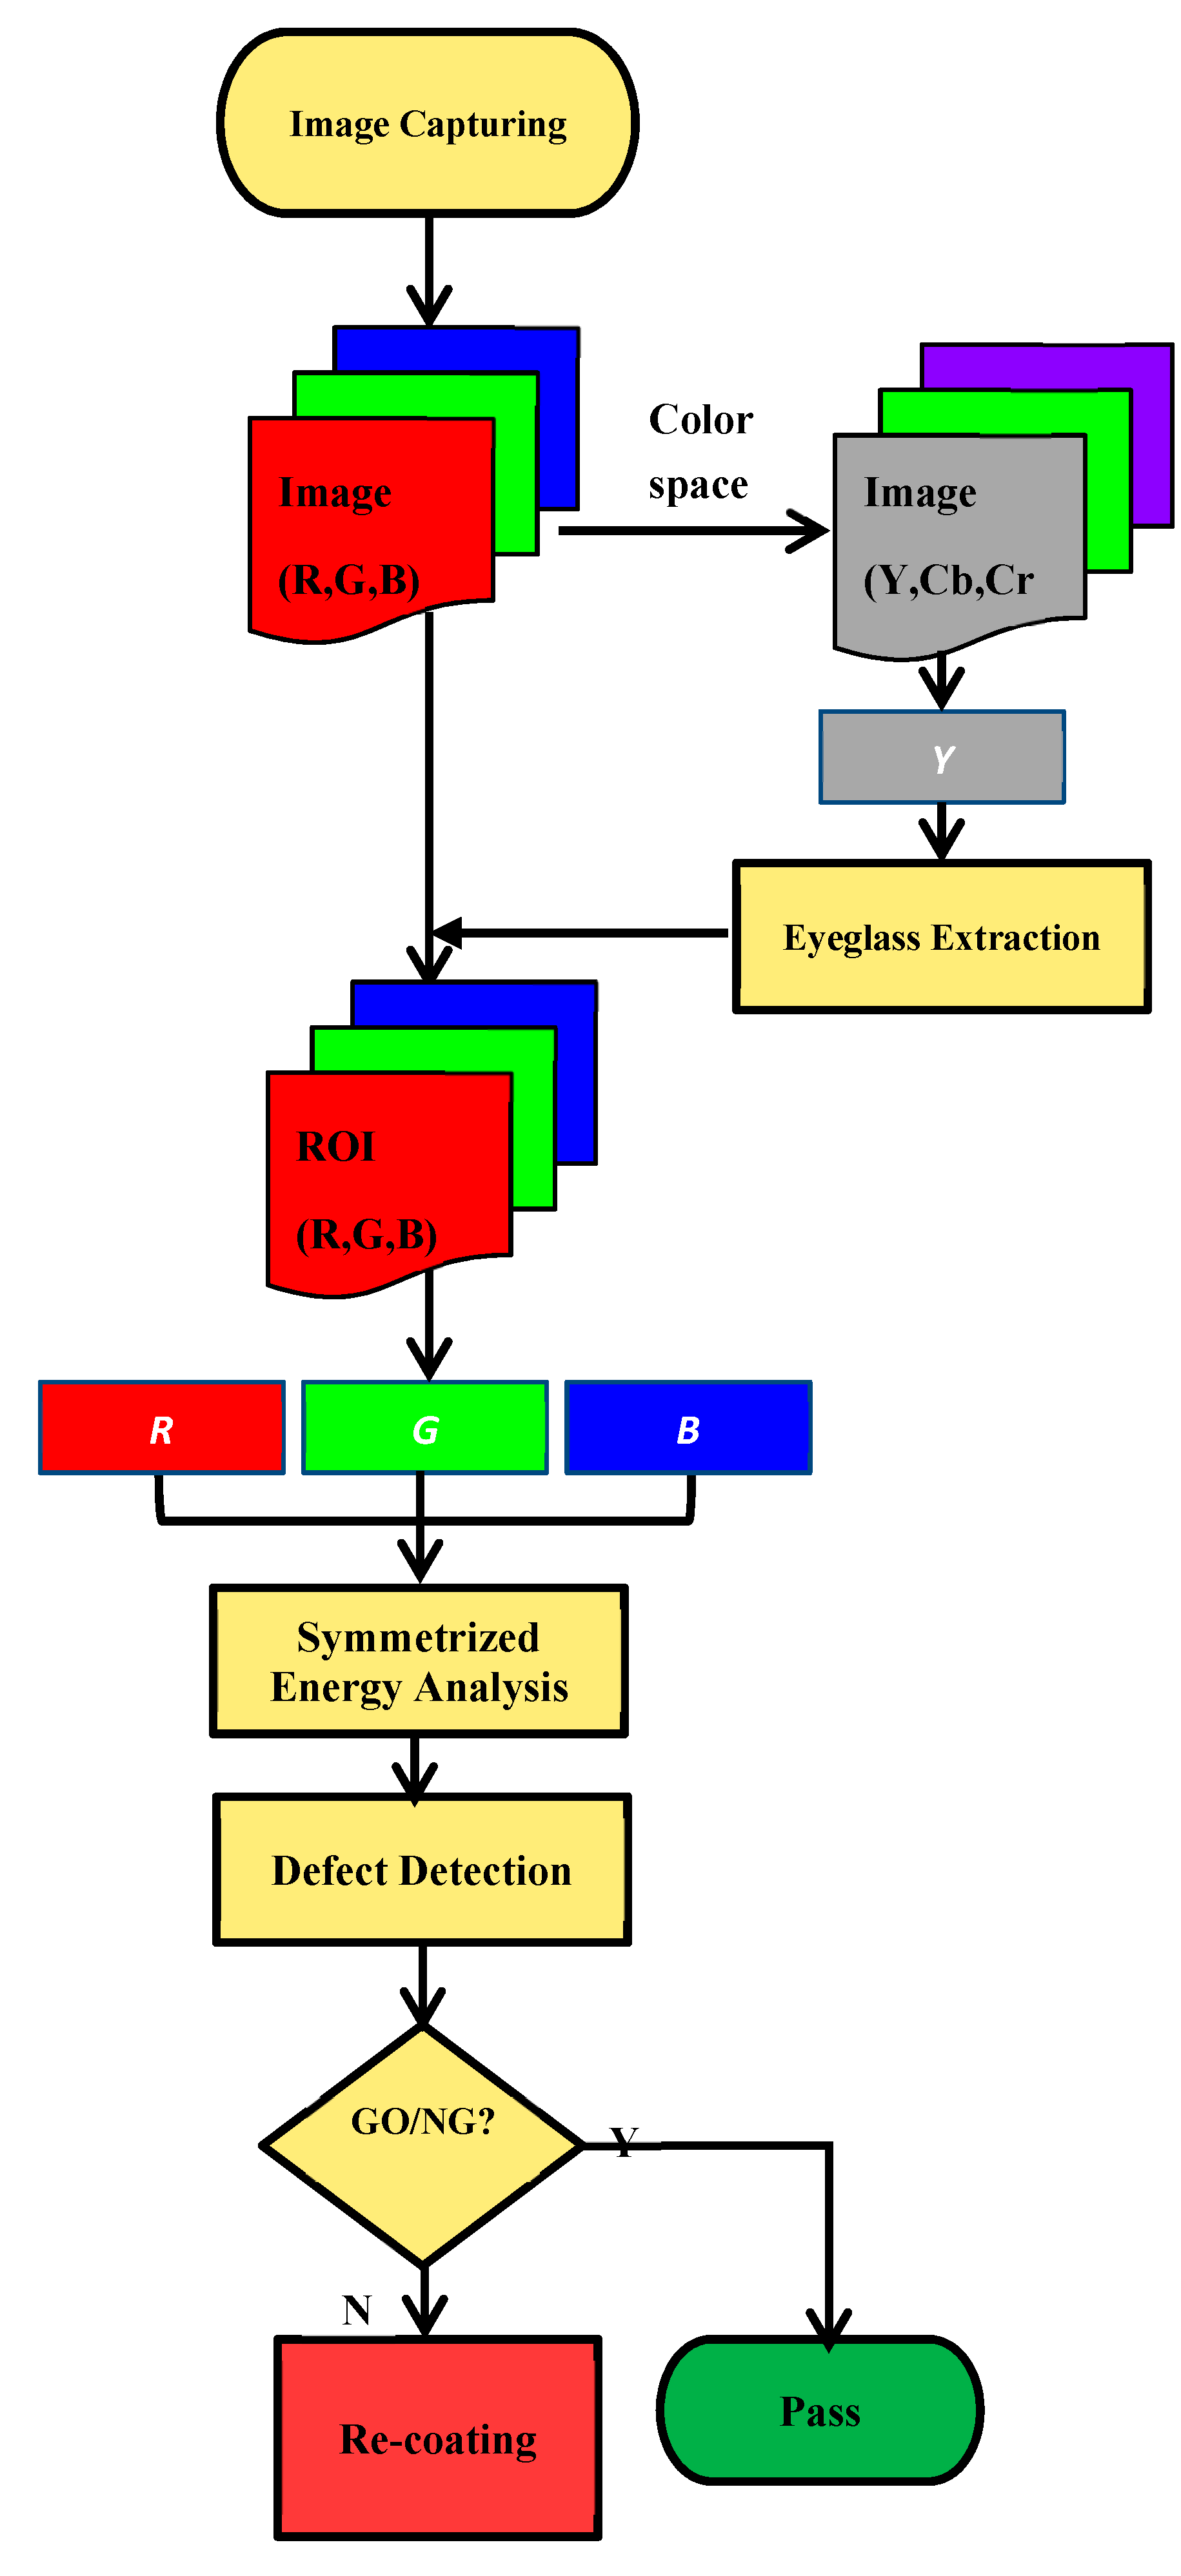
To inspect whether the coated eyeglass satisfies the manufacturer’s requirements, the ROI on the coated eyeglass was first located and extracted. To reduce the processing time, the color image was then transformed to the YCbCr color space to obtain the Y-channel image for contour extraction. On the basis of the symmetrized energy analysis of the Y-channel image, defects were extracted in sequence using cross-projection in both horizontal and vertical directions. The size and number of defects were then calculated against the manufacturer’s requirement to judge whether the eyeglass could be passed or whether it required recoating. Section 4 discusses the details of this algorithm and Figure 12 shows a diagram of the overall algorithm.
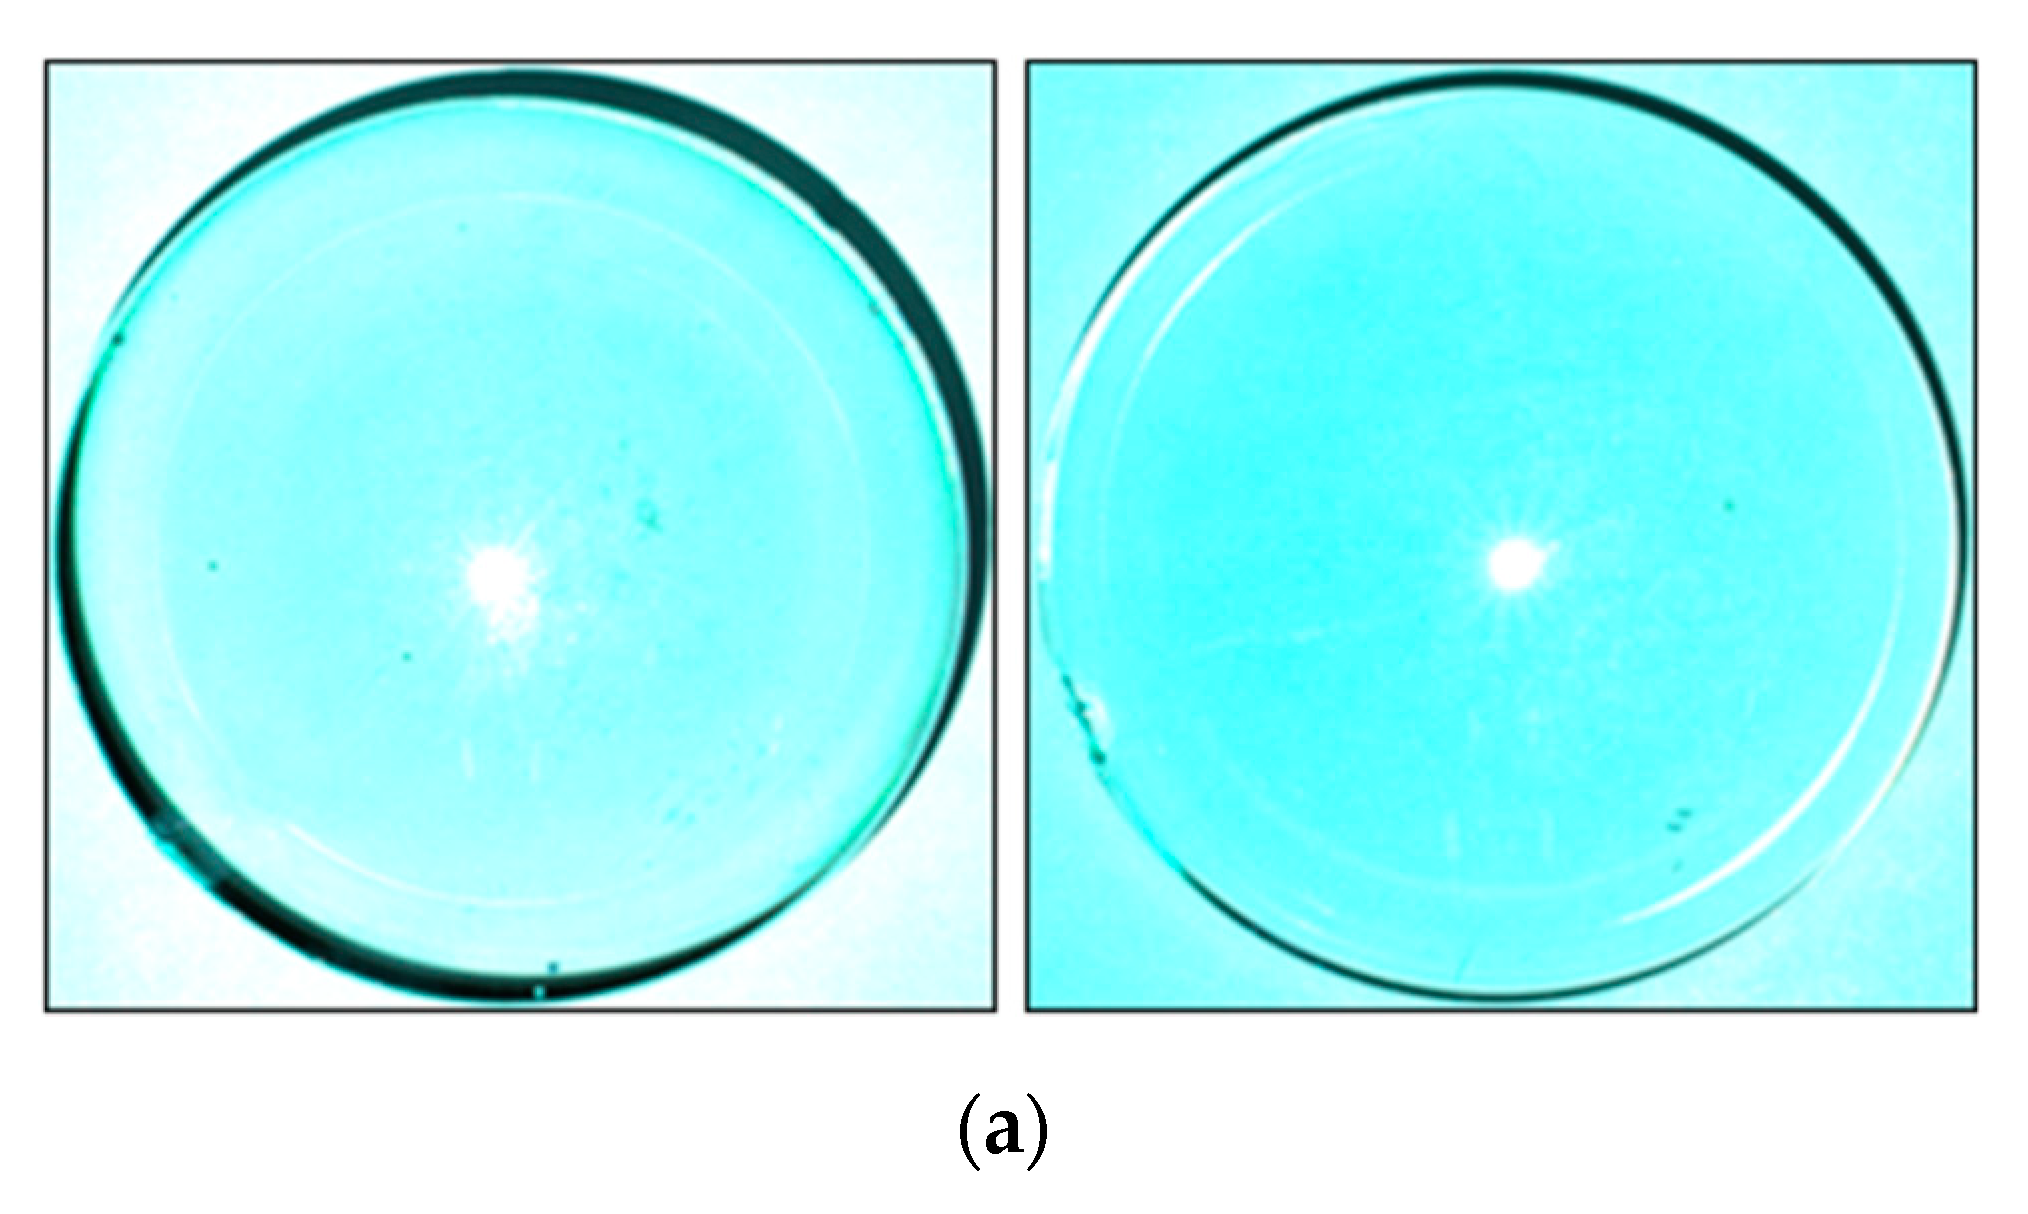
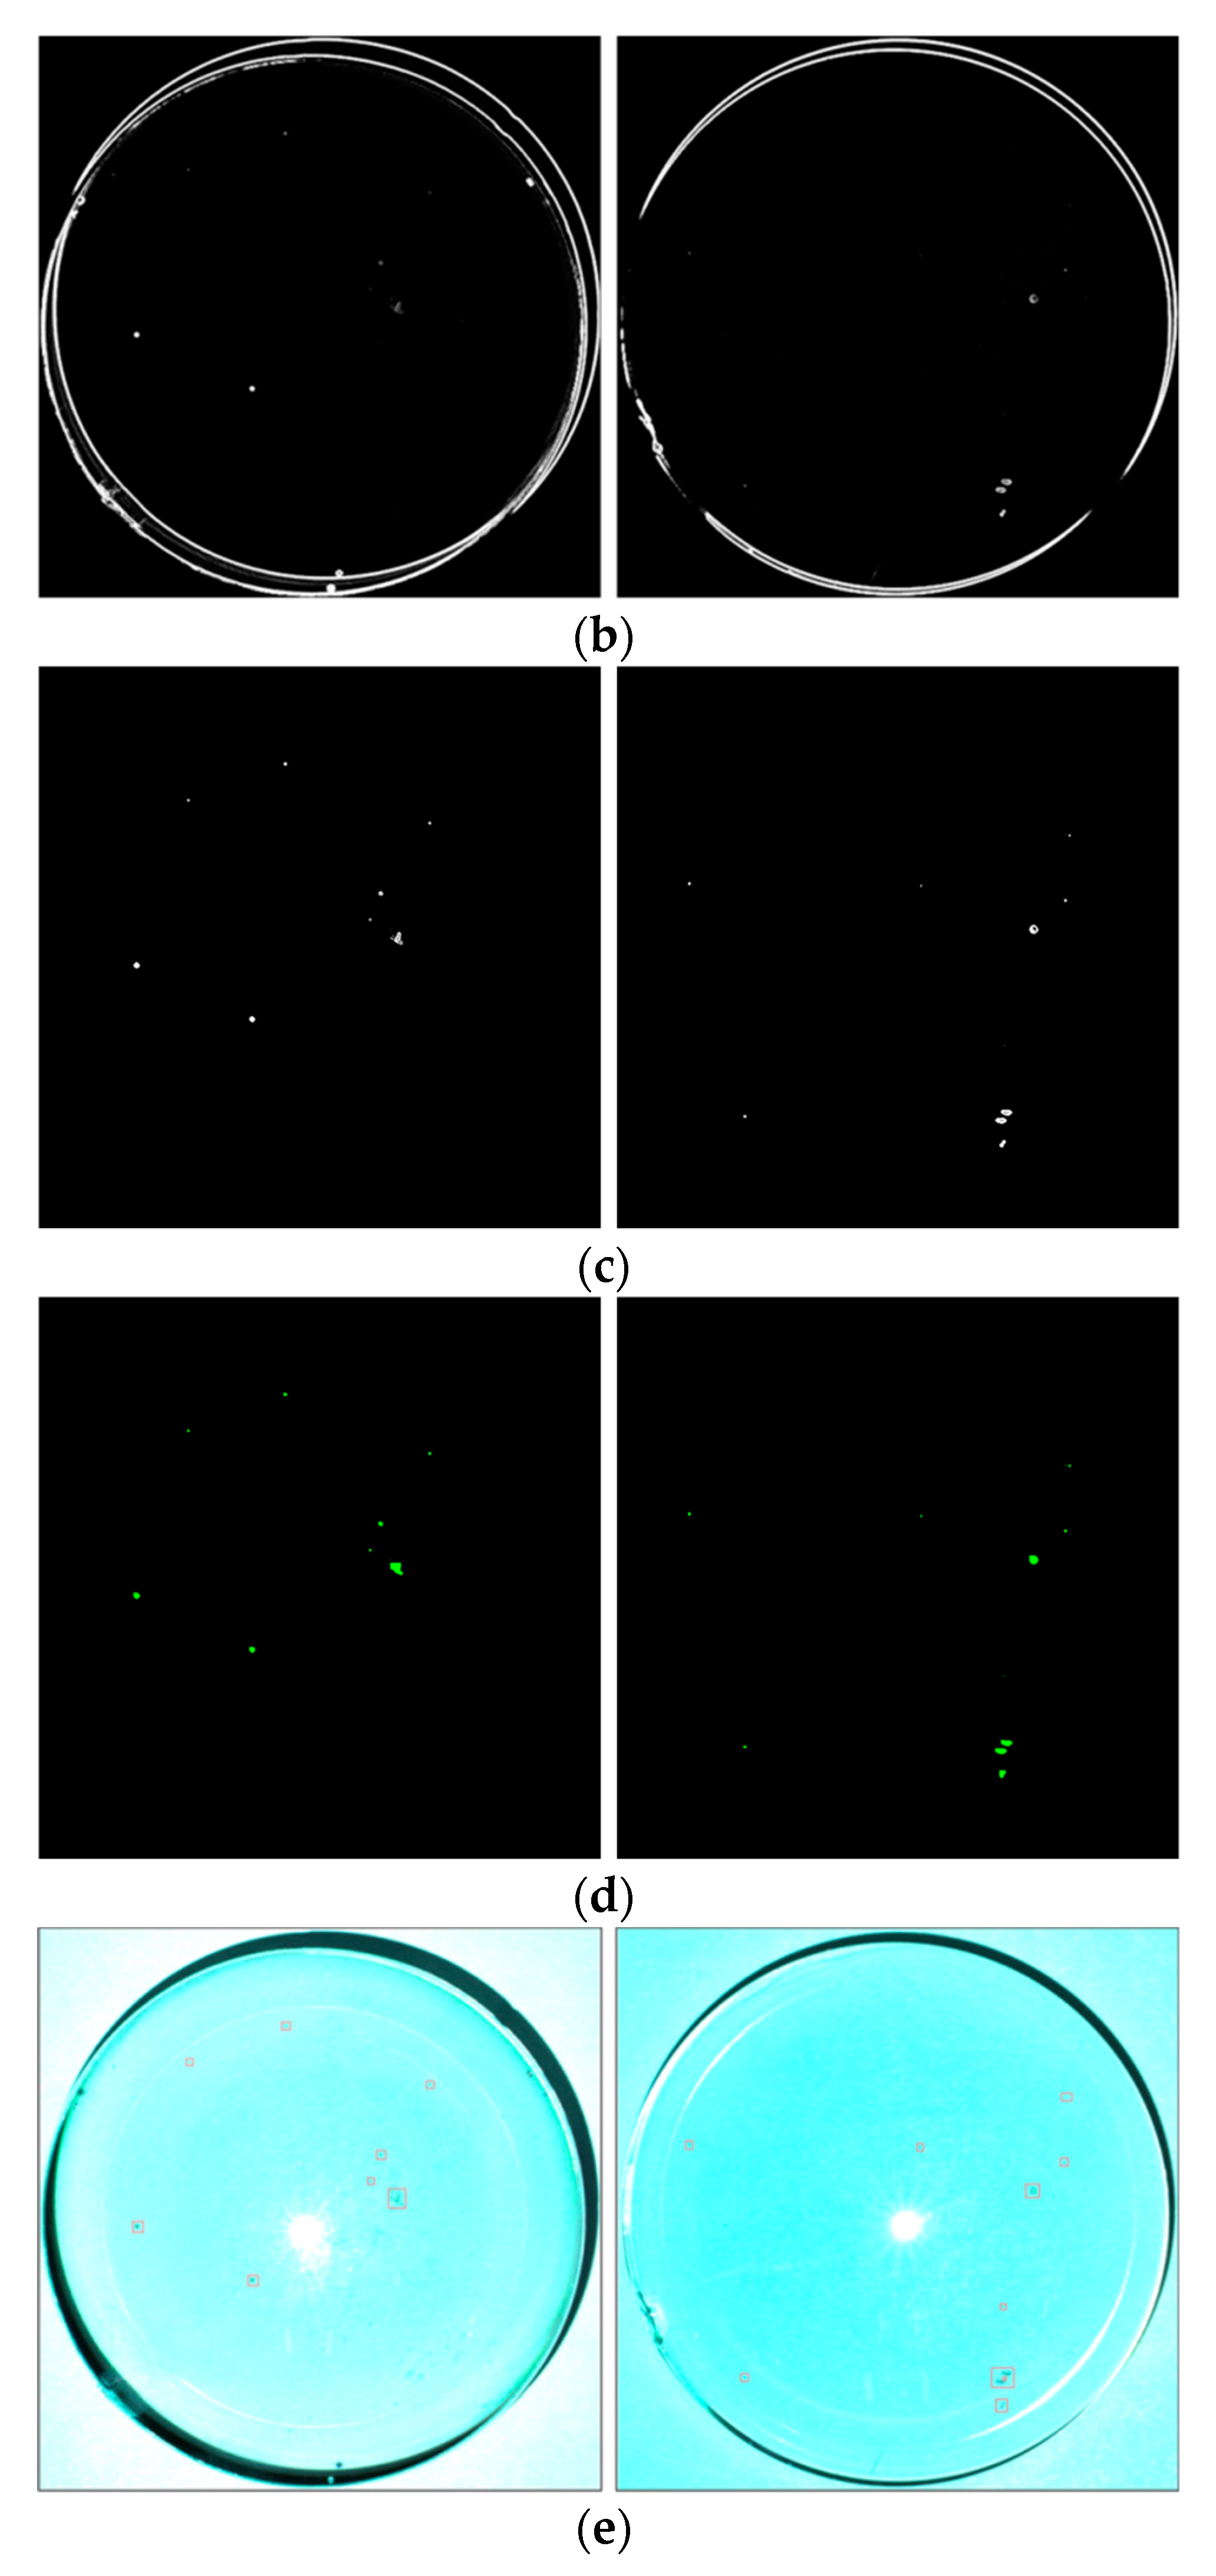
Figure 13 illustrates the defect detection results obtained using the proposed method. To reduce the processing time, which has a crucial impact on the production line, we extracted the ROI of the coated eyeglass image, as shown in Figure 13a, and then detected defects in this area. Next, the ROI of the coated eyeglass was enhanced by symmetrized energy analysis of each color channel separately; the result is shown in Figure 13b. Then, the arc contours of the enhanced ROI circles wereremoved for defect detection, as shown in Figure 13c. Next, the defects were accurately detected by applying symmetrized cross-projection for ROI. Defects were correspondingly mapped back to the original image in Figure 13a to obtain the defect detection result on the coated eyeglass, as shown in Figure 13d,e. Table 3 lists the type and size of typical defects on each of the four types of eyeglasses.
Before locating and extracting defects for the ROI of the coated eyeglass by using the cross-projection method, three color channels of the coated eyeglass image were computed by symmetrized energy analysis. This pre-process has an important role in our system. To show the effectiveness of the proposed method, we did experiments by usingPugin and Zhiznyakovmethod [39]. Instead of performing a transfer to fuzzy sets in the late stages of processing and analysis, Pugin and Zhiznyakov translated the original image into a fuzzy view in the first step. Table 4 summarizes the average defect detection rates and average running times for each eyeglass piece. Through experimental tests on 200 eyeglass samples, our method has the detection rate of 100%, whilePugin and Zhiznyakov’s method is achieved with a detection rate of 98.6%. The difference in results is because some defects have a low contrast between the defect and background and even a tiny defect. Some defects are lost throughout the binarization process. The results confirm that our system can efficiently detect defects on the coated eyeglass, even if they have an extremely small size and cannot be seen clearly by the human eye. Moreover, the running time is short, and therefore, the proposed framework fully meets the manufacturer’s requirement.
In this experiment, the defects were provided by the cooperative manufacturer. Therefore, there are maybe some types of defects which we have not yet done. On the other hand, the fuzzy binarization [35,36,37] could be adopted to help produce multiple image layersand we could find more hidden defects in the coated eyeglass to help the manufacturer improve eyeglass product quality.

6. Conclusions

In this study, we have proposed an effective CEDDS, which consists of two parts, including (1) an optical structure for image acquisition that can remove the environmental lighting interference and then detect a defect and (2) an efficient algorithm based on symmetrized energy analysis to detect defects on the eyeglass. Experimental results for 200 coated eyeglass pieces provided by a manufacturer demonstrated that our system could achieve a 100% defect detection rate. Moreover, inspection of each eyeglass piece required only 6 s on average.

Author Contributions

N.T.L. developed the AOI hardware and software codingand wrote the original draft. J.-W.W. guided the research direction and edited the paper. C.-C.W. and T.N.N. contributed to editing the paper. All authorsdiscussed theresultsandcontributedtothe final manuscript.

Funding

This research was funded in partbyMOST 107-2218-E-992-310 from the Ministry of Science and Technology, Taiwan.

Acknowledgments

The authors appreciate the support from National Kaohsiung University of Science and Technology in Taiwan.The authors would like to thank Tair Ying Scientific Co., Ltd., Taiwan, for their joint development of the inspection systemwith C++ language.

Conflicts of Interest

The authors declare no conflict of interest.

References

  1. Moganti, M.; Ercal, F. Automatic PCB inspection systems. IEEE Potentials 1995, 14, 6–10. [Google Scholar] [CrossRef]
  2. Kaur, K. Various techniques for PCB defect detection. Int. J. Eng. Sci. 2016, 17, 175–178. [Google Scholar]
  3. Ong, A.T.; Ibrahim, Z.B.; Ramli, S. Computer machine vision inspection on printed circuit boards flux detects. Am. J. Eng. Appl. Sci. 2013, 6, 263–273. [Google Scholar]
  4. Mar, N.; Yarlagadda, P.; Fookes, C. Design and development of automatic visual inspection system for pcb manufacturing. Robot. Comput. Integr. Manuf. 2011, 27, 949–962. [Google Scholar] [CrossRef] [Green Version]
  5. Yun, J.P.; Kim, D.; Kim, K.H.; Lee, S.J.; Park, C.H.; Kim, S.W. Vision-based surface defect inspection for thick steel plates. Opt. Eng. 2017, 56, 053108. [Google Scholar] [CrossRef]
  6. Luo, Q.; He, Y. A cost-effective and automatic surface defect inspection system for hot-rolled flat steel. Rob. Comput. Integr. Manuf. 2016, 38, 16–30. [Google Scholar] [CrossRef]
  7. Zhao, Y.J.; Yan, Y.H.; Song, K.C. Vision-based automatic detection of steel surface defects in the cold rolling process: Considering the influence of industrial liquids and surface textures. Int. J. Adv. Manuf. Technol. 2016, 90, 1–14. [Google Scholar] [CrossRef]
  8. Yun, J.P.; Choi, D.C.; Jeon, Y.J.; Park, C.Y.; Kim, S.W. Defect inspection system for steel wire rods produced by hot rolling process. Int. J. Adv. Manuf. Technol. 2014, 70, 1625–1634. [Google Scholar] [CrossRef]
  9. Kang, D.; Jang, Y.J.; Won, S. Development of an inspection system for planar steel surface using multispectral photometric stereo. Opt. Eng. 2013, 52, 039701. [Google Scholar] [CrossRef] [Green Version]
  10. Li, Q.; Ren, S. A real-time visual inspection system for discrete surface defects of rail heads. IEEE Trans. Instrum. Meas. 2012, 61, 2189–2199. [Google Scholar] [CrossRef]
  11. Pan, R.; Gao, W.; Liu, J.; Wang, H. Automatic recognition of woven fabric pattern based on image processing and BP neural network. J. Text. Inst. 2011, 102, 19–30. [Google Scholar] [CrossRef]
  12. Kumar, A. Computer-vision-based fabric defect detection: A survey. IEEE Trans. Ind. Electron. 2008, 55, 348–363. [Google Scholar] [CrossRef]
  13. Yang, X.; Pang, G.; Yung, N. Robust fabric defect detection and classification using multiple adaptive wavelets. IEE Proc. Vis. Image Signal Process. 2005, 152, 715–723. [Google Scholar] [CrossRef]
  14. Tsai, D.-M.; Li, G.-N.; Li, W.-C.; Chiu, W.-Y. Defect detection in multi-crystal solar cells using clustering with uniformity measures. Adv. Eng. Inform. 2015, 29, 419–430. [Google Scholar] [CrossRef]
  15. Li, W.-C.; Tsai, D.-M. Automatic saw-mark detection in multi crystal line solar wafer images. Sol. Energy Mater. Sol. Cells 2011, 95, 2206–2220. [Google Scholar] [CrossRef]
  16. Chiou, Y.-C.; Liu, F.-Z. Micro crack detection of multi-crystalline silicon solar wafer using machine vision techniques. Sens. Rev. 2011, 31, 154–165. [Google Scholar] [CrossRef]
  17. Tsai, D.-M.; Chang, C.-C.; Chao, S.-M. Micro-crack inspection in heterogeneously textured solar wafers using anisotropic diffusion. Image Vis. Comput. 2010, 28, 491–501. [Google Scholar] [CrossRef]
  18. Fuyuki, T.; Kitiyanan, A. Photographic diagnosis of crystalline silicon solar cells utilizing electroluminescence. Appl. Phys. A 2009, 96, 189–196. [Google Scholar] [CrossRef]
  19. Michaeli, W.; Berdel, K. Inline inspection of textured plastics surfaces. Opt. Eng. 2011, 50, 027205. [Google Scholar] [CrossRef]
  20. Liu, B.; Wu, S.J.; Zou, S.F. Automatic detection technology of surface defects on plastic products based on machine vision. In Proceedings of the 2010 International Conference on Mechanic Automation and Control Engineering, Wuhan, China, 26–28 June 2010; pp. 2213–2216. [Google Scholar]
  21. Gan, Y.; Zhao, Q. An effective defect inspection method for LCD using active contour model. IEEE Trans. Instrum. Meas. 2013, 62, 2438–2445. [Google Scholar] [CrossRef]
  22. Bi, X.; Zhuang, C.G.; Ding, H. A new Mura defect inspection way for TFT-LCD using level set method. IEEE Signal Process. Lett. 2009, 16, 311–314. [Google Scholar]
  23. Chen, S.L.; Chou, S.T. TFT-LCD Mura defect detection using wavelet and cosine transforms. J. Adv. Mech. Des. Syst. Manuf. 2008, 2, 441–453. [Google Scholar] [CrossRef]
  24. Lee, J.Y.; Yoo, S.I. Automatic detection of region-Mura defect in TFT-LCD. IEICE Trans. Inf. Syst. 2004, 87, 2371–2378. [Google Scholar]
  25. Peng, X.; Chen, Y.; Yu, W.; Zhou, Z.; Sun, G. An online defects inspection method for float glass fabrication based on machine vision. Int. J. Adv. Manuf. Technol. 2008, 39, 1180–1189. [Google Scholar] [CrossRef]
  26. Adamo, F.; Attivissimo, F.; Nisio, A.D.; Savino, M. An online defects inspection system for satin glass based on machine vision. In Proceedings of the 2009 IEEE Instrumentation and Measurement Technology Conference, Singapore, 5–7 May 2009; pp. 288–293. [Google Scholar]
  27. Zhou, X.; Wang, Y.; Xiao, C.; Zhu, Q.; Lu, X.; Zhang, H.; Ge, J.; Zhao, H. Automated visual inspection of glass bottle bottom with saliency detection and template matching. IEEE Trans. Instrum. Meas. 2019, 1–15. [Google Scholar] [CrossRef]
  28. Liang, Q.; Xiang, S.; Long, J.; Sun, W.; Wang, Y.; Zhang, D. Real-time comprehensive glass container inspection system based on deep learning framework. Electr. Lett. 2018, 55, 131–132. [Google Scholar] [CrossRef]
  29. Jin, Y.; Wang, Z.; Zhu, L.; Yang, J. Research on in-line glass defect inspection technology based on dual CCFL. Proc. Eng. 2011, 15, 1797–1801. [Google Scholar] [CrossRef] [Green Version]
  30. Adamo, F.; Attivissimo, F.; Nisio, A.D.; Savino, M. An automated visual inspection system for the glass industry. In Proceedings of the 16th IMEKOTC4 International Symposium, Florence, Italy, 22–24 September 2008. [Google Scholar]
  31. Liu, Y.; Yu, F. Automatic inspection system of surface defects on optical IR-CUT filter based on machine vision. Opt. Laser Eng. 2014, 55, 243–257. [Google Scholar] [CrossRef]
  32. Gonzalez, R.C.; Woods, R.E. Digital Image Processing, 3rd ed.; Prentice-Hall: Englewood Cliffs, NJ, USA, 2008. [Google Scholar]
  33. Lu, S.; Wang, Z.; Shen, J. Neuro-fuzzy synergism to the intelligent system for edge detection and enhancement. Pattern Recognit. 2008, 36, 2395–2409. [Google Scholar] [CrossRef]
  34. Lu, D.S.; Chen, C.C. Edge detection improvement by ant colony optimization. Pattern Recognit. Lett. 2008, 29, 416–425. [Google Scholar] [CrossRef]
  35. Santosh, K.C.; Wendling, L.; Antani, S.; Thoma, G.R. Overlaid arrow detection for labeling regions of interest in biomedical images. IEEE Intell. Syst. 2016, 31, 66–75. [Google Scholar] [CrossRef]
  36. Santosh, K.C.; Alam, N.; Roy, P.P.; Wendling, L.; Antani, S.; Thoma, G.R. A simple and efficient arrowhead detection technique in biomedical images. Int. J. Pattern Recognit. Artif. Intell. 2016, 30, 1657002. [Google Scholar] [CrossRef] [Green Version]
  37. Santosh, K.C.; Roy, P.P. Arrow detection in biomedical images using sequential classifier. Int. J. Mach. Learn. Cybern. 2018, 9, 993–1006. [Google Scholar] [CrossRef]
  38. Otsu, N. A threshold selection method from gray-level histograms. IEEE Trans. Syst. Man Cybern. 1979, 9, 62–66. [Google Scholar] [CrossRef] [Green Version]
  39. Pugin, E.; Zhiznyakov, A. Histogram Method of Image Binarization based on Fuzzy Pixel Representation. In Proceedings of the Dynamics of Systems, Mechanisms and Machines, Omsk, Russia, 14–16 November 2017. [Google Scholar]
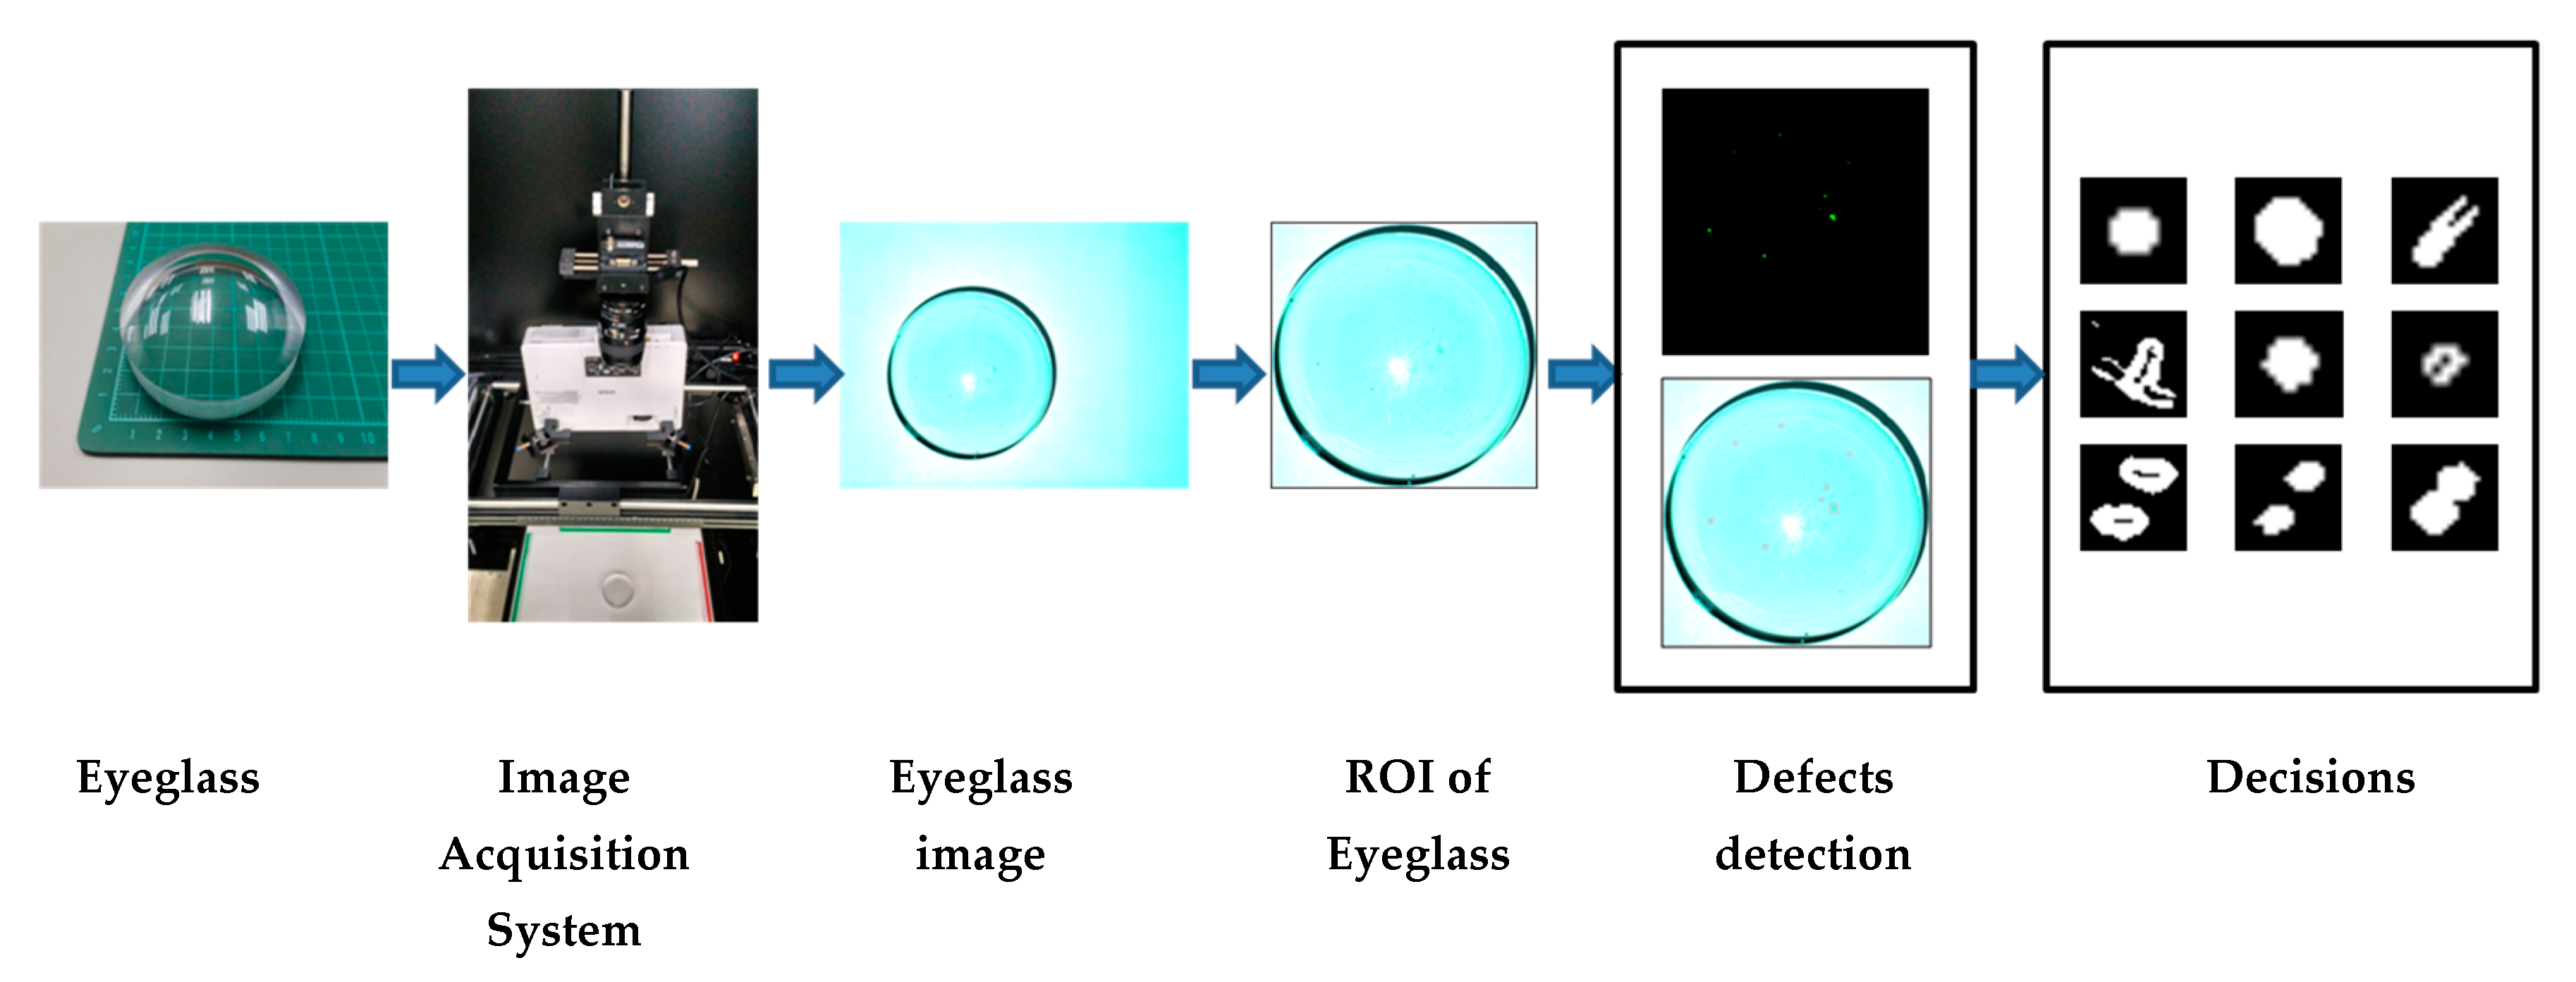
Figure 1. The graphical abstract is presented with an overview of the proposed framework for the coated eyeglass defect detection system (CEDDS).
Symmetry 11 01518 g001
Figure 2. Four types of eyeglasses: (a) Dia. 80, ET 13.0; (b) Dia. 75, ET 7.0;(c) Dia.72, ET 3.2; and (d) Dia.72, ET 2.9.
Symmetry 11 01518 g002
Figure 3. Actual size of different types of eyeglasses: (a),(b) Dia.72, ET 2.9; (c),(d) Dia. 75, ET 7.0; and (e),(f) Dia. 80, ET 13.0.
Symmetry 11 01518 g003
Figure 4. Optical architecture of our automatic defect detection system.
Symmetry 11 01518 g004
Figure 5. Actual eyeglass image acquisition system: (a) camera, (b) projector, and (c) proposed image acquisition system.
Symmetry 11 01518 g005
Figure 6. Result of images taken using our image acquisition system for the four types of coated eyeglasses: (a) ET 13.0, (b) ET 7.0, (c) ET 3.2, and (d) ET 2.9.
Symmetry 11 01518 g006
Figure 7. (a) Coated sample captured using the camera (ET 13.0), (b) Y-channel image, (c) energy image, and (d) binary image based on Otsu’s algorithm.
Symmetry 11 01518 g007
Figure 8. (a) Binary image based on Otsu’s algorithm; (b) result of forward projection of (a); (c) result of reverseprojection of (a); (d) location of detected points p m a x ( x m a x , y m a x ) and ( p m i n ( x m i n , y m i n ) ; and (e) ROI of the coated eyeglass image.
Symmetry 11 01518 g008
Figure 9. (a) ROI of the coated eyeglass, (b) R color channel of (a), (c) G color channel of (a), (d) B color channel of (a).
Symmetry 11 01518 g009
Figure 10. (a) Energy analysis results of Figure 9a, (b) energy analysis result of Figure 9b, (c) energy analysis result of Figure 9c, and (d) energy analysis result of Figure 9d.
Symmetry 11 01518 g010
Figure 11. (a) Result of symmetrized cross-projection for ROI of the coated eyeglass and (b) corresponding result shown on the coated eyeglass.
Symmetry 11 01518 g011
Figure 12. Overall algorithm of our proposed method.
Symmetry 11 01518 g012
Figure 13. Defect detection result of our proposed method: (a) ROI of coated eyeglass image, (b) energy image of ROI, (c) enhanced image after removing the contour, (d) defect detection result obtained using symmetrized cross-projection for ROI of the coated eyeglass; and (e) corresponding result shown on the coated eyeglass.
Symmetry 11 01518 g013aSymmetry 11 01518 g013b
Table 1. Distances among components in the image acquisition system.
ObjectThe Distance between Two Objects
Projector to ScreenCCD Camera to ScreenSample to Screen
Distance680 mm715 mm0 mm
Table 2. Balanced ratio of light source and camera exposure time parameter settings based on thickness of eyeglass.
Item ModeBalanced RatioExposure Time
RGB
E.T. 13.0
E.T. 7.0
1208012060 ms
E.T. 3.2
E.T. 2.9
1208012056 ms
Table 3. Defect on each type of eyeglass (size in pixels).
Type of Coated Eyeglass
E.T. 13.0E.T. 7.0E.T. 3.2E.T. 2.9
No.DefectSizeDefectSizeDefectSizeDefectSize
1 Symmetry 11 01518 i0017 × 8 Symmetry 11 01518 i0025 × 5 Symmetry 11 01518 i0037 × 5 Symmetry 11 01518 i00427 × 20
2 Symmetry 11 01518 i0055 × 5 Symmetry 11 01518 i0066 × 12 Symmetry 11 01518 i0075 × 3 Symmetry 11 01518 i00818 × 9
3 Symmetry 11 01518 i0096 × 6-- Symmetry 11 01518 i0106 × 6 Symmetry 11 01518 i0115 × 6
4 Symmetry 11 01518 i0129 × 9-- Symmetry 11 01518 i01317 × 17 Symmetry 11 01518 i01417 × 17
5 Symmetry 11 01518 i0155 × 5-- Symmetry 11 01518 i01628 × 33 Symmetry 11 01518 i0175 × 5
6 Symmetry 11 01518 i01831 × 26-- Symmetry 11 01518 i0195 × 6 Symmetry 11 01518 i02015 × 14
7 Symmetry 11 01518 i02113 × 13-- Symmetry 11 01518 i02215 × 13 Symmetry 11 01518 i0234 × 5
8 Symmetry 11 01518 i02412 × 12---- Symmetry 11 01518 i02514 × 11
Table 4. Defect detection rate and running time on average.
ItemDefect Detection RateGo/NG
Decision Time
Total Running Time
Method
ModePugin and Zhiznyakov MethodOur Method
E.T. 13.0
E.T. 7.0
98.6%100%1.583 s/pc.6.022 s/pc.
E.T. 3.2
E.T. 2.9
98.6%100%1.596 s/pc.6.102 s/pc.