Abstract
For the inspection of structures, particularly bridges, it is becoming common to replace humans with autonomous systems that use unmanned aerial vehicles (UAV). In this paper, a framework for autonomous bridge inspection using a UAV is proposed with a four-step workflow: (a) data acquisition with an efficient UAV flight path, (b) computer vision comprising training, testing and validation of convolutional neural networks (ConvNets), (c) point cloud generation using intelligent hierarchical dense structure from motion (DSfM), and (d) damage quantification. This workflow starts with planning the most efficient flight path that allows for capturing of the minimum number of images required to achieve the maximum accuracy for the desired defect size, then followed by bridge and damage recognition. Three types of autonomous detection are used: masking the background of the images, detecting areas of potential damage, and pixel-wise damage segmentation. Detection of bridge components by masking extraneous parts of the image, such as vegetation, sky, roads or rivers, can improve the 3D reconstruction in the feature detection and matching stages. In addition, detecting damaged areas involves the UAV capturing close-range images of these critical regions, and damage segmentation facilitates damage quantification using 2D images. By application of DSfM, a denser and more accurate point cloud can be generated for these detected areas, and aligned to the overall point cloud to create a digital model of the bridge. Then, this generated point cloud is evaluated in terms of outlier noise, and surface deviation. Finally, damage that has been detected is quantified and verified, based on the point cloud generated using the Terrestrial Laser Scanning (TLS) method. The results indicate this workflow for autonomous bridge inspection has potential.
1. Introduction
1.1. Autonomous Bridge Inspection Approaches
Bridges are an essential part of transportation infrastructure, and it is necessary to monitor their operation during their service life. To ensure the safety of a bridge, regular inspections are required to detect areas that may have become damaged. A measurement regime can be implemented to provide a proactive approach to maintenance services. All the information collected during regular inspections can be used as input data to a Bridge Management Systems (BMSs), such as BaTMan in Sweden, which reports the condition of structural members of a bridge. The process of regular inspection, coupled with performance analysis strategies, for engineering structures is defined as Structural Health Monitoring (SHM) [1], which can be carried out by visual inspection, using instrumentation or utilization of more advanced technology.
Typically, a routine inspection consists of field measurements and visual observations carried out by a bridge inspector. In Sweden, the main inspection is carried out every 6 years, which has many challenges including high cost, total inspection time, subjective standards of quantification and documentation, and the risk to inspectors when examining potentially hazardous parts of the structure. For example, inspectors cannot access critical parts of a bridge without costly equipment such as snooper trucks or scaffolding. A study by Graybeal et al. [2] showed that 81% of visual inspections were usually evaluated correctly. Phares et al. [3] studied the accuracy of visual inspections and found that at least 48% of individual condition ratings were incorrect. Thus, there is a need to develop simple, inexpensive, and yet practical methods for routine bridge inspection as an alternative to traditional visual inspections.
1.2. Sensors and Vehicles
Modern techniques usually involve non-contact methods and are able to collect a large amount of data extremely quickly with high accuracy. Therefore, to overcome inspection challenges, there is increasing interest in modern techniques for off-site bridge inspection in addition to in-person visual assessment. Recently, Popescu et al. [4] compared modern techniques and found close-range photogrammetry (CRP) to be more efficient and cost-effective for bridge inspection. A summary of the obtained accuracy from modern and traditional methods over the last twenty years is presented in Figure 1 [5,6,7,8,9,10,11,12,13,14,15,16,17].
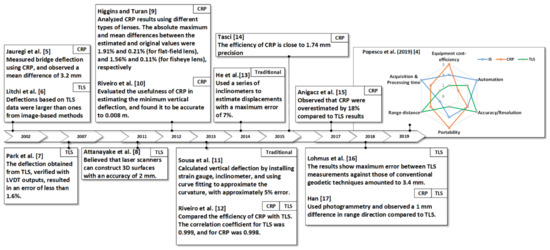
Figure 1.
Review of the obtained accuracy from optical and traditional methods over the last twenty years.
Off-site bridge inspection can be carried out using unmanned aerial vehicles (UAVs) equipped with sensors such as laser scanners, and infrared, ultrasonic, or digital single-lens reflex (DSLR) cameras. The latter were reviewed by Duque et al. [18] who also highlighted how UAVs have successfully been used to detect damage such as cracks and corrosion. In addition to carrying a wide range of task-specific sensors, UAV-based inspection can offer the combined advantages of robot inspection and remote sensor inspection including better site visibility and optimized views of hard-to-reach areas, coupled with significant financial benefits.
Laser scanners are able to provide high-quality 3D point clouds but, due to their high cost and weight, it is problematic to install them on fixed-wing UAVs. Therefore, standard digital images have been more widely used for UAV-based data acquisition.
1.3. Damage Recognition
After data acquisition, processing the data to recognize damage is another significant challenge in autonomous bridge inspection. There are two methods of processing an image-based dataset: image processing and computer vision techniques. Previously, image-processing technology (IPT) was used to detect and evaluate the distribution of damage. However, the results were susceptible to noise, which was mainly caused by light, image blur and distortion. IPT works only with certain images and, due to the effects of noise from sources such as illumination, shadows, and the combination of several different surface imperfections, the detection results may be inaccurate [19]. Image processing algorithms are designed to aid the inspector in finding damage and still rely on human judgment for final decisions [19]. However, with computer vision, it is possible to differentiate objects, then classify and localize them, much like the process of visual recognition in human vision. Therefore, some researchers have tried to improve the efficiency and robustness of autonomous detection in real-world conditions using computer vision techniques.
Computer vision techniques, such as autonomous classification, localization and segmentation methods do not require manually assigned threshold values or rules. To generate an intelligent machine requires selection of a suitable network structure, a function to evaluate the model output, and a reasonable optimization algorithm. The main advantage of such a machine is its automatic feature extraction once the Convolutional Neural Network (ConvNet or CNN) has been trained. Object detection algorithms have evolved from simple image classification into multiple object detection and localization including Region-Based Convolutional Neural Networks (R-CNN) [20], Fast R-CNN [21], Faster R-CNN [22], You only look once (YOLO) [23], SSD [24], and Mask R-CNN [25]. It is only recently that neural networks have been used for damage detection. In recent years, research has mainly been focused on damage detection based on ConvNets and remarkable progress has been made in areas such as classifying individual cracks from images and locating them [26,27,28] using a bounding box. However, the segmentation [29,30,31,32,33] and quantification [34,35,36,37] of defects has been little researched because the lack of labeled data makes it difficult to generalize training models across a wide range of defect shapes.
In order to quantify defects from images, it is necessary to carry out semantic segmentation on those images. Semantic segmentation is an important task in computer vision where its goal is pixel-wise classification. To achieve this, End-to-End networks that consist of two cooperative sub-networks (encoding and decoding) are usually used to classify each pixel and thus segment the whole image. For instance, U-Net [38] and SegNet [39] were tested in the International Society of Photogrammetry and Remote Sensing (ISPRS) semantic segmentation challenge and achieved outstanding performance.
For concrete defect assessment, it is also important to work in three dimensions for more accurate quantification, localization and documentation. Both the perspective and the geometry distortion of structural surfaces in the images can be corrected after projecting and stitching images from different point of views into the single 3D model. Therefore, for the aim of damage assessment in 3D models [40,41], the photogrammetric technique of converting sets of 2D images into 3D point cloud models has become increasingly popular.
1.4. Hierarchical 3D Model Generation
Such models must have sufficient accuracy and resolution to represent all kinds of small-scale visual details, often less than a millimeter in size. Khaloo et al. [42] described the use of UAVs to produce 3D models with enough accuracy to detect defects on an 85 m-long timber truss bridge. They proposed a hierarchical algorithm for dense structure from motion and compared the output against that from laser scanning with respect to the quality of the captured point clouds, the local noise level, and the ability to render damaged connections. There are many variables which affect the accuracy of the resulting 3D models, including interior characteristics of the camera sensor, camera imaging parameters, camera placement, scene complexity, surface texture, environmental conditions, and targeted object size, all of which will be discussed more in this paper. However, there are two issues that need to be addressed in their proposed hierarchical dense structure from motion (DSfM) algorithm. The first is the requirement for an on-site inspection to find areas that are most-likely damaged so that closer images of these regions can be taken. The second is outlier noise and surface deviation caused by errors in the triangulation procedure and inaccuracy in matching tie points.
1.5. Research Significance
The aim of the paper is to improve the hierarchical DSfM method described in [42], by using it for autonomous damage detection, and explore how to improve the quality of 3D reconstructions of defects on structural elements, by generating more detail with less noise. The case study is of a single-span simple supported concrete bridge, that was scanned twice in a year. During the first scan, images were captured in two series of datasets. The first dataset was collected with the aim of identifying bridge components and areas of damage. The second dataset was used for pixel-wise damage segmentation in the areas of potential damage, using fine-scale details. To develop the method of hierarchical 3D model generation proposed by Khaloo et al. [42], a ConvNet was trained to detect regions that were potentially damaged. To achieve this, a computer vision method based on an Inception v3 [43] network was used to detect areas of damage with autonomous detection of critical regions. This method generated denser point clouds. In terms of semantic segmentation for bridge component detection, SegNet was used to detect background and unnecessary parts of the raw UAV images to reduce outlier noise. Then, U-Net was used for pixel-wise defect segmentation to quantify joint opening in the generated 3D model. All the trained ConvNets were utilized in the autonomous inspections. Thus, it is only necessary to update the datasets when new damage appears on the structure over its service life. The usefulness and importance of this proposed workflow is discussed with reference to a case study of the Pahtajokk Bridge, in terms of data acquisition, model reconstruction, and damage quantification. In order to assess the accuracy of the proposed method regarding point cloud generation and defect quantification, a 3D model was compared with laser scanning data.
2. Field Deployment and Methodology
2.1. Case Study
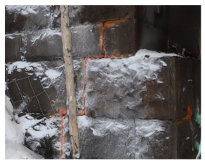
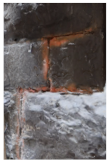
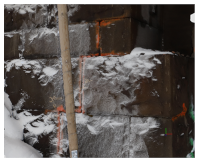
Pahtajokk Bridge was used as a case study, Figure 2. It is a simply supported bridge with a 6.9 m span and 3.9 m width. This bridge was scanned twice in just under a year. The first scan was carried out on a cloudy day, and the second scan carried out in almost the same lighting conditions after a heavy snowfall.
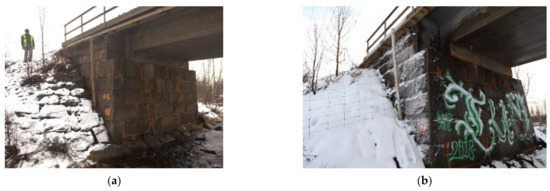
Figure 2.
The same part of the Pahtajokk Bridge (a) first scan, (b) second scan. One year between photos.
2.2. Workflow
The workflow starts with a pre-check of the site, determining the strength of GPS coverage, testing suitable UAVs for flying in narrow/irregular spaces, planning the flight routes, and data collection. It is a good idea to walk around the bridge and nearby terrain a few times to check the access to designated spaces before data collection begins, to understand issues such as clearing shady vegetation and control of lighting conditions, and to carry out dust removal from enclosed spaces. Then, the flight path, work distance and camera angle need to be optimized to minimize the ground sampling distance (GSD) and maximize the field of view (FOV). After data collection for the first scan using a suitable flight path, a dataset is generated for training of the damage and bridge component recognition models and is utilized in the autonomous routine inspections. Input data for training CNN models to mask the background, detect areas of potential damage, and pixel-wise joint opening segmentation, were prepared while taking into account lighting conditions and blurriness of images to achieve greater accuracy.
Based on the hierarchical DSfM workflow [44], damaged areas are detected by on-site inspection while, in this proposed method, areas that are potentially damaged are detected autonomously by a ConvNet model. A drone can be used to capture high-resolution images from nearer to detected areas of damage, with that distance dependent on the intended scale of joints to be monitored. The final 3D model can be achieved by merging all dense point clouds with an overall 3D model of the bridge. Figure 3 shows the proposed workflow for four main tasks to achieve a systematic and reliable bridge inspection. It should be noted that dataset preparation for training ConvNets only requires data from the first scan. If new damage occurs, that dataset will need updating.
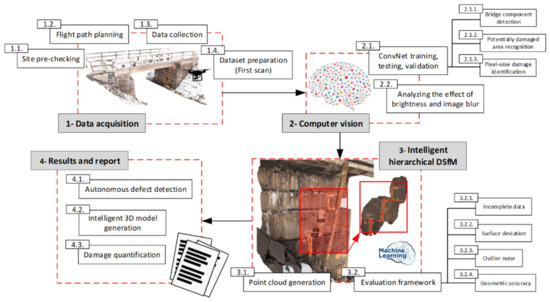
Figure 3.
The schematic workflow of the proposed intelligent hierarchical structure from motion.
2.3. Data Acquisition
The Structure-from-Motion process (SfM) starts with image acquisition. These images are fed into a commercial SfM software package, Agisoft PhotoScan Pro (LLC, 2017), which simultaneously determines the interior orientation and defines parameters relating to the exterior orientation of the camera, such as camera angle and work distance, relative to the scanned object.
The generated point cloud must have sufficient accuracy and resolution to represent the types of small-scale visual details that inspectors look for during an inspection, details that are often less than a millimeter in size. For scanning the structure using CRP, images of the bridge were captured from several points of view, corresponding to the standoff distance of the camera from the bridge. The flight path plan arguably has the greatest impact on data quality since it affects light conditions, camera angle, offset distances, flight pattern, and degree of overlap between images.
Images were taken using a 3DR Site Scan drone equipped with a Sony R10C camera with a 16–50 mm zoom lens, see Figure 4. The Sony camera has a resolution of 20.1 megapixels, using an APS-C size sensor, and has an interior orientation as shown in Table 1. This information was used to calculate GSD and FOV versus work distance, as shown in Figure 5. The GSD equals the distance between the center of two consecutive pixels on the target surface. Ideally, a smaller GSD value is better, but the FOV value should be considered as well, because a larger FOV minimizes the number of images required for data collection (refer to Chen et al. [45] for further details).
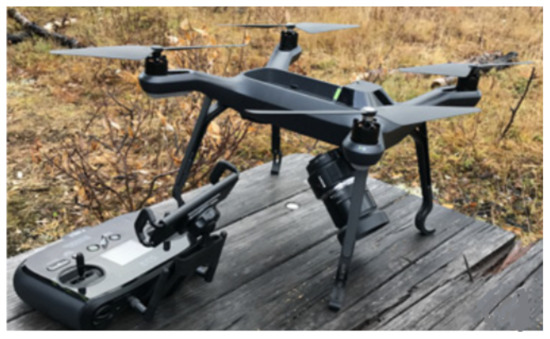
Figure 4.
Data acquisition equipment: unmanned aerial vehicle 3DR Site scan.

Table 1.
Interior orientation of the sensor installed on the UAV.
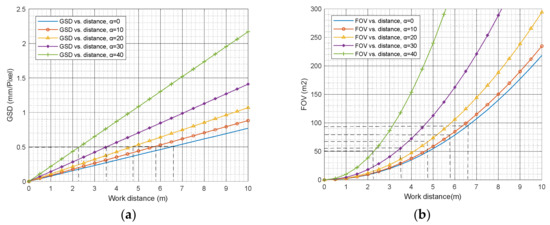
Figure 5.
Correlation of (a) GSD and (b) FOV versus work distance.
2.4. Data Preparation
There are three steps to apply computer vision, before point cloud generation and damage quantification. The first is bridge component detection using background masking. For this, the dataset contained 419 outdoor scene images (6240 × 4160 pixels) of the bridge captured by the authors and an amateur photographer. Some examples of these images and their corresponding binary labels are shown in Figure 6. Images tend to show the bridge as the main object and were labeled manually by the authors into the two classes. The pixel-wise labels of the dataset were converted into high-level scene classes (bridge and background) as binary images, using Agisoft PhotoScan Pro (LLC, 2017). The prepared dataset was resized to 448 × 448 pixels, which was the acceptable input size for the considered ConvNets architecture.

Figure 6.
Examples of the prepared dataset for bridge component detection and their corresponding labels.
The second step is damaged area recognition. To generate a dataset containing damage information, 140 images (5634 × 3753 pixels) were captured with different perspectives and lighting conditions during the first scan, from a distance of 2.0–4.0 m from the surface. The aim was to collect images of both damaged and undamaged parts of the bridge which had different surface appearances, to increase the diversity of the dataset. Images were then sliced into 227 × 227 pixels, and 8344 cropped images were collected from them to generate the dataset. These prepared images were divided into two categories, damaged and undamaged surfaces, and used for training ConvNet. Overall, the classification datasets used 3612 images of damaged and 4732 images of undamaged surfaces. Some examples of these images are shown in Figure 7.

Figure 7.
Examples of the prepared dataset for detection of potentially damaged areas.
The third step is joint segmentation to facilitate the quantification of joint length and width. To generate a dataset containing damage information, 283 close-range images (448 × 448 pixels) were captured. Then, they were labeled with their corresponding binary version. Some examples are shown in Figure 8.

Figure 8.
Examples of the prepared dataset used for pixel-wise damage segmentation.
3. Experiments and Results
3.1. ConvNets Training, Validation, and Testing
All the models were trained using image data and their corresponding labels, but before the training phase, generated datasets were divided into training and validation groups at an 80/20 ratio, to validate and assess the CNNs during training. The learning rate was set to 0.001; the mini-batch size was set to 128 and 1 images for image classification and segmentation, respectively, with the verification frequency set to 20 iterations. The training was carried out using an Intel® Core™ i9-9880H CPU running at 2.30 GHz.
3.1.1. Bridge Component Detection
Figure 9 shows the changes in training accuracy and training loss for both studied models, with SegNet having a better performance compared to U-Net. Both SegNet and U-Net use encoder–decoder architecture, but some differences meant SegNet performed better in terms of bridge component detection. In the decoding part (upsampling layers) of SegNet, the “max pooling indices” computed in the encoding part (downsampling layers) were recalled [39]. This made the training process easier since the network did not need to relearn the upsampling weights and explains why SegNet is more memory efficient than U-Net. In addition, all fully connected layers were replaced in SegNet by Softmax [39]. Thus, the number of trainable parameters reduced significantly (from 134 M to 17.4 M) making it computationally faster and more memory efficient. This scenario is beneficial for semantic segmentation when the object being analyzed is considered to be the main object in the images. Otherwise, for small-scale objects such as joints or cracks, U-Net performs better; its tests are described in Section 3.1.3 Pixel-wise damage detection.

Figure 9.
(a) Accuracy and (b) loss training curves for both studied CNNs.
In machine learning, different metrics are usually used to compare semantic segmentation accuracy with ground truth. In terms of accuracy, global accuracy is the ratio of correctly classified pixels, regardless of class, to total number of pixels in all test datasets. Mean accuracy is the metric that represents the average percentage of pixels that are classified correctly for all classes. By comparing these metrics in SegNet and U-Net, as shown in Table 2, it is clear that SegNet outperforms U-Net.

Table 2.
Accuracy metrics for both trained models.
Mean intersection over union (IoU) shows the average overlap between predicted segmentation and ground truth. The Weighted IoU represents weighted accuracy by number of pixels in each class to reduce the effect of errors in small-scale objects, as is seen in joint segmentation. The Mean BF Score represents the correlation and similarity of the predicted boundary with that of ground truth, on average. Figure 10 shows the masked raw images produced by both ConvNets. The Mean IoU in SegNet is 0.95, while that of U-Net is 0.66, which is why there is less overlapped segmentation in the detected bridge component and background in the images from SegNet compared to U-Net.
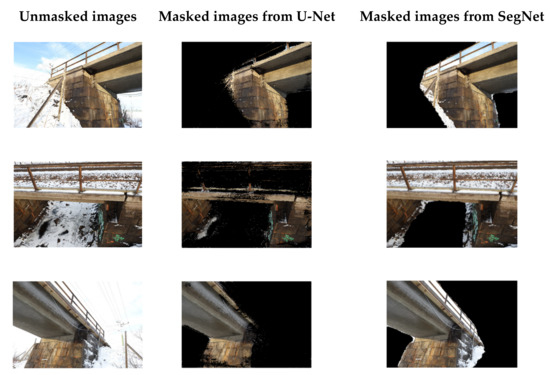
Figure 10.
Detected bridge component by the studied CNNs.
3.1.2. Areas of Potential Damage Detection
To detect and localize damage, two ConvNets (Inception v3 [35], and GoogleNet [38]) were used to classify images, damaged or undamaged. As shown in Figure 11, the experimental results show that Inception v3 performed better compared with GoogleNet in terms of accuracy and precision, based on generated confusion matrix for 1668 images as test dataset.
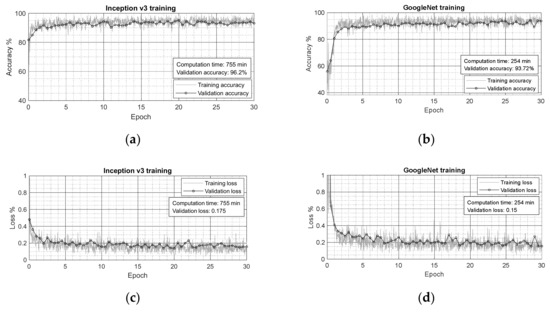
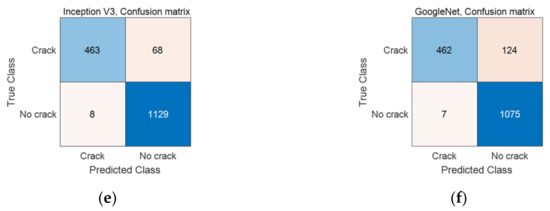
Figure 11.
(a,c,e) Accuracy and (b,d,f) loss curves for training and validation process of the studied CNNs, together with their corresponding confusion matrix of test dataset.
This method draws a bounding box around the potentially damaged regions. It slides a 227 × 227-pixel window across the whole image to detect damaged regions. There is a trade-off for selecting a suitable size for this window. A smaller size will increase the precision of localization. However, if the region is more finely divided, the information contained therein may not be sufficiently precise enough to judge whether damage exists or not.
To test the performance of the trained ConvNets utilized for removing background and detecting potential damage, a new image (6240 × 4160 pixels) was chosen, as shown in Figure 12. One interesting thing about the image chosen for verification was the graffiti drawn on the target wall, see Figure 12. It made a complex pattern that posed a real challenge to the trained network when detecting areas of potential damage. Figure 12 shows areas of the image that were removed and areas of potential damage, which are enclosed by green bounding boxes, while blue highlighted strips are joint gaps identified by an expert human inspector. In addition, the blue boxes are damaged areas detected by CNN which were not detected by human inspector, and orange boxes are the false detected damaged areas.
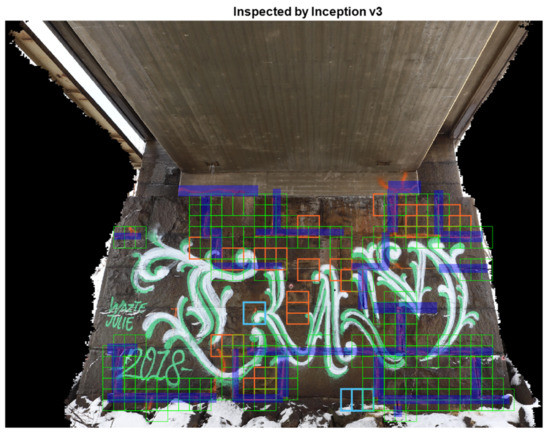
Figure 12.
Damage detected by studied CNNs (green bounding boxes) compared to on-site inspection (highlighted blue strips), together with damaged areas detected by CNN which were not detected by human inspector (blue bounding boxes) and false detected damaged areas (orange bounding boxes).
3.1.3. Pixel-Wise Damage Detection
Two ConvNets (U-Net [38], and SegNet [39]) were used to detect joint openings on the surface of the structure. As shown in Figure 13, the experimental results show that U-Net performed better than SegNet in terms of joint gap segmentation.

Figure 13.
(a) Accuracy and (b) loss training curves for both studied CNNs.
Figure 13 shows the changes in training accuracy and training loss for both SegNet and U-Net models. U-Net is the better model for small-scale object segmentation compared to SegNet, which performed bridge component segmentation better, which was the main object in the images. Table 3 shows the metric used to evaluate defect segmentation by both studied models. Figure 14 shows the pixel-wise joint opening segmentation results from U-Net, in both correct and false detected potentially damaged areas.

Table 3.
Accuracy metrics of both trained models.
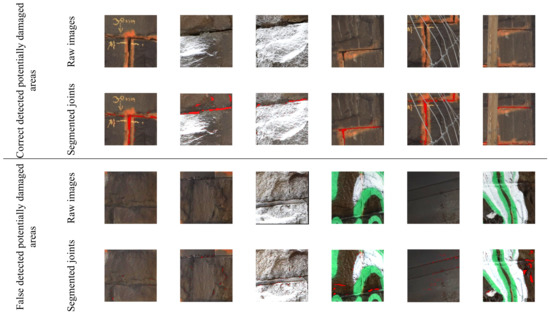
Figure 14.
The performance of the trained semantic segmentation model in both correct and false detected potentially damaged areas, based on U-Net architecture; red pixels are detected segments of the joint opening.
3.2. Analyzing the Effect of Brightness and Blurring on Computer Vision Detection and Point Cloud Generation
Collecting a sufficient number of high-quality images of the bridge is essential for successful damage identification and measurement. An image histogram is a chart that shows the distribution of intensities in an image for each of its red, green and blue (RGB) components. This information can aid the choice of an appropriate image status. A sensitivity analysis was used to test the accuracy of bridge component and defect recognition by changing the visibility of the image with two adjusted image properties, brightness and blurriness. Figure 15 shows the brightness of the captured images and their corresponding image histogram.
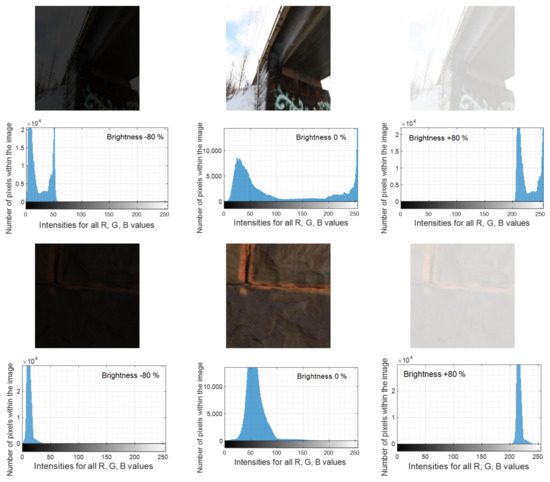
Figure 15.
How the image histogram changes with changing brightness of the images.
Figure 16 shows the effect of brightness on the accuracy of bridge component and joint recognition models trained by the datasets generated in normal light conditions, where brightness is considered to be 0%. However, the benefit of using deep learning techniques compared to image processing for optical component/damage detection is that there is no need to optimize for brightness, unless the dataset has been generated with different light conditions [46]. Such optimization could also be achieved by data augmentation. During training, image normalization and augmentation were carried out enabling the network to extract features with different intensity values. Thus, it is important to capture images which are as unblurred as possible.
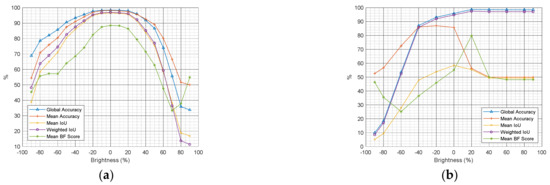
Figure 16.
The effect of brightness on the accuracy of bridge component detection (a) and damage segmentation (b).
To analyze the effect of camera movement on object detection and point cloud generation, the blurring operator, which is also known as the point spread function (PSF), was used to simulate blurriness. It represents the degree of convolution required to blur a point of light and returns a filter that approximates the linear motion of a camera when convolved with the image (refer to Tiwari et al. [47] for further details).
The electronic shutter speed of the camera installed on the 3DR Site Scan drone can be set up in the range 8–1/8000 s ( in Equation (1)). Therefore, it is necessary to set the speed of the UAV, , based on the shutter speed and the GSD, to minimize the length of linear motion in pixels (L) caused by camera movement, based on Equation (1):
The image quality issues associated with blurring affect the semantic segmentation utilized for pixel-wise bridge component and damage segmentation, due to mixing of each pixel’s RGB values caused by the fast movement of the drone. Figure 17 shows the effect of camera movement on bridge component and damage detection.
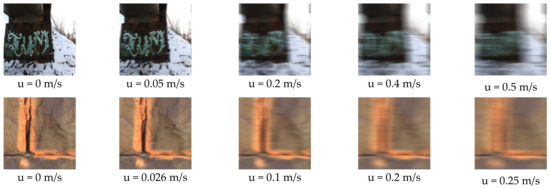
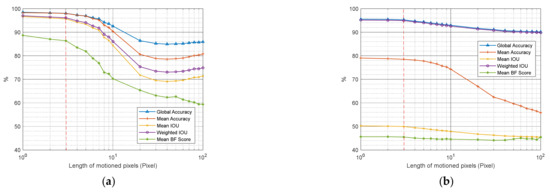
Figure 17.
The effect of the UAV’s speed (logarithmic axis) on image acquisition and the accuracy of computer vision-based bridge component (a) and joint (b) segmentation.
Figure 17 shows that the camera movements, which result in motion blurring of more than three pixels, reduced the accuracy of semantic segmentation in both bridge component and defect recognition. Thus, using Equation (1), the maximum speed of the drone, in both u and v directions, during data acquisition can be evaluated with Equation (2):
In addition to the computer vision effects, point cloud generation is also affected by changes in the brightness and blurring. The basic steps of photogrammetry involve (1) detecting features within each image, (2) matching these features in multiple images, and (3) reconstructing their relative 3D position in the observed scene. Local features and their descriptors are the building blocks of the SfM algorithm. There are many algorithms, such as FAST [48] or Harris [49] corner detectors, and the SURF [50] or KAZE [51] blob detectors, which can be applied depending on the requirements of the feature detection used. In the case of SfM by Agisoft PhotoScan Pro (LLC, 2017), the SURF algorithm is used to detect features (tie points) that are used for matching and stitching images together, see Figure 18. Table 4 shows the change in numbers of detected features (tie points) versus changes in brightness, and the blurriness of the images. Error (pix) is the root mean square projection error calculated over all valid tie points detected in the middle image. In order to compare the performance of feature detection and matching, an index is defined, shown in the last column of Table 4. This index is equal to the mean percentage of detected tie points multiplied by the mean percentage of matched tie points, in both the side images, divided by the error in the middle image.
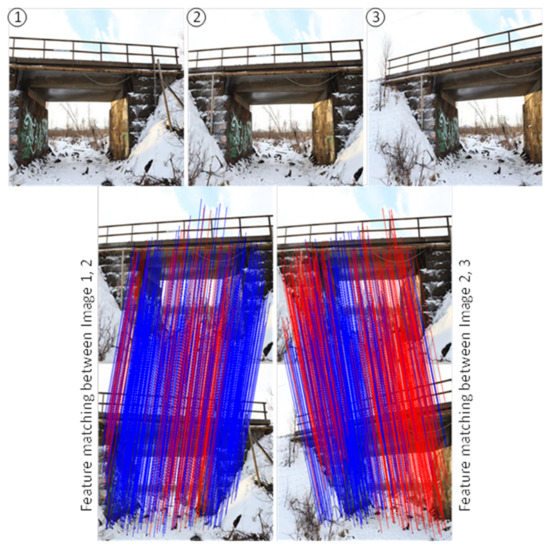
Figure 18.
Matching the detected feature through structure from motion.

Table 4.
Effect of changing the brightness and the blurriness of the images on detected and matched features (tie points).
Masking extraneous parts of the image can boost/improve the SfM’s operation as this means that more extracted features belong to the structure being examined and not the background. Therefore, matching more features on the structure results in more accurate stitching across the surface of the structure. Figure 19 shows all the matched tie points across the 2D masked and unmasked images. Table 5 shows the status of detected and matched features (tie points) in both masked and unmasked images. Based on the calculated indexes, masked images perform better at feature detection and matching using the structure-from-motion method.
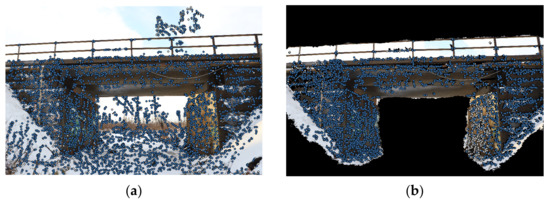
Figure 19.
Detected features on the images defined by the software and matched features (Blue points) in both unmasked (a) and masked (b) images.

Table 5.
Effect of masking background on detecting and matching features (tie points).
Utilization of semantic segmentation showed a potentially important part of point cloud generation as it improves computation time and accuracy. There are also potential advancements in autonomous navigation of UAV that will improve image collection when detecting bridge components, although these are not discussed further here.
3.3. Intelligent Hierarchical DSfM
The generated point cloud is not intended to represent high-resolution information for the whole bridge but is instead designed to capture the overall geometry of the structure. High-resolution point clouds are then generated for each region of potential damage using close-range photogrammetry of the autonomously detected areas. The optimum work distance to monitor areas and provide corresponding joint widths depends on the required resolution of monitoring (see Figure 5).
3.4. Evaluation Framework
Three versions of 3D point clouds were successfully generated from the second scan data. Two models were generated from the CRP scan data using both regular and proposed methods, and one model was generated using laser scanning data for verification (see Figure 20). The differences between point clouds generated by the regular and proposed workflows are the local density and accuracy of the point clouds generated for the damage regions. The TLS dataset is considered as the reference to discuss the degree of differences in the generated point clouds.
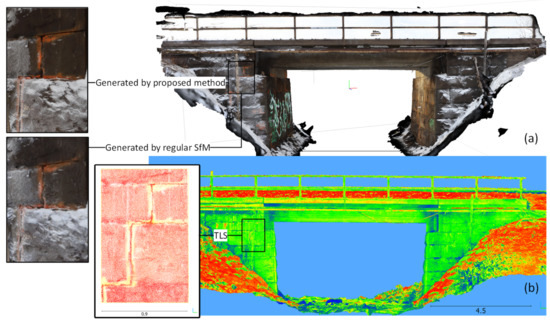
Figure 20.
3D point clouds generated by CRP (a) and laser scanning (b) which is considered as a reference model, together with detected regions of damage in both.
Generally, generated point clouds include missing data or noise. This is caused by inaccurate geometric positioning (Sargent et al. 2007 [52]), surface deviation (Koutsoudis et al. 2014 [53]), and outlier-based noise (Cheng and Lau [54]). Each type of noise or defect listed has been described in detail by Chen et al. [45].
Outlier noise usually appears around the boundary of the structure due to shadows, light reflection or the background, and tends to confuse the triangulation procedure in SfM methods. Those outlier points will affect subsequent steps including mesh generation and surface reconstruction. For this reason, part of the point clouds generated by both SfM and the proposed method were aligned to the TLS data and then the offset distance was assessed, see Table 6.

Table 6.
Deviation in point clouds generated by both regular SfM and the proposed method, corresponding to the point cloud generated from laser scanning data.
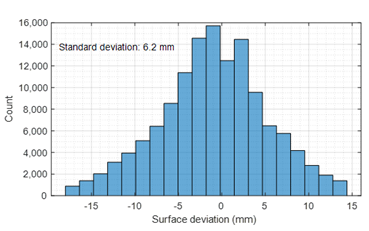
It is difficult to notice differences in the quality of the two generated models with the naked eye, so other comparison methods have to be considered. Table 7 shows a comparison of point cloud density and deviation for the different scanning methods. It has been produced using the open-source software program CloudCompare Version 2.6.1 (developed by Girardeau-Montaut et al. [55], this is a 3D point cloud editing and processing software) and commercial software Agisoft PhotoScan Pro (LLC, 2017).

Table 7.
Resolution level of CRP generated using both methods compared to TLS data.
A higher point cloud density and a lower standard deviation corresponds to a greater number of details with higher resolution. As shown in Table 7, the proposed method with close-range images (3 m) produces a higher density and lower deviation compared to regular SfM using 3–10 m as the work distance, showing the importance of having high-quality data for potentially damaged areas.
3.5. Damage Quantification
Compared with image-based 2D inspection, reconstructed 3D point clouds provide depth information for detected damage regardless of perspective and distortion effects, which is important for structural health evaluation. Thus, the global coordinates of the detected joints were determined, and the relative positions of the detected joints were marked on the 3D model of the bridge. Then, the damaged area extracted from the generated point cloud and its dimensions were compared with that generated from laser scanner data. Figure 21 and Figure 22 show the measurements from the point clouds generated from laser scanning data and the proposed method, respectively.
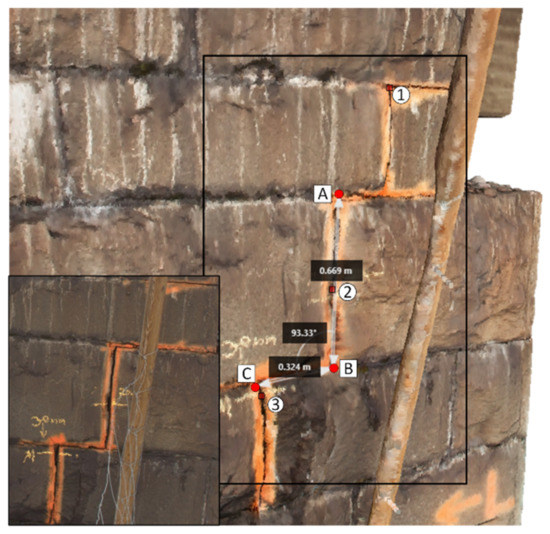
Figure 21.
Damage measurement from TLS point cloud.
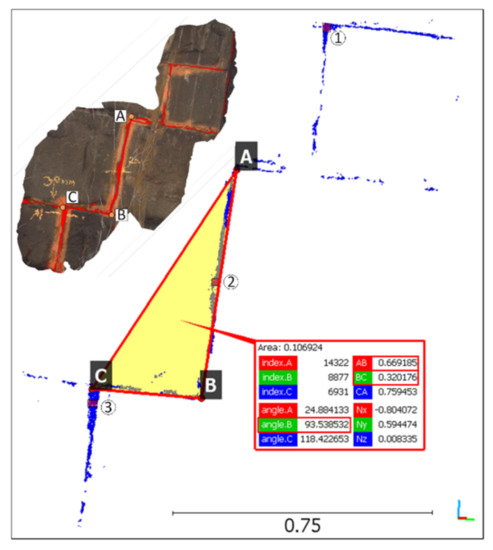
Figure 22.
Damage measurement of detected damage by intelligent hierarchical DSfM.
All the measurements are summarized in Table 8. The proposed method has shown an acceptable performance, since it can detect damage autonomously with a maximum deviation of about 3 mm. At this point in its development, continuous feedback with corrections from expert inspectors to supplement the training dataset, and smoothing filters on the 3D point cloud data to increase the precision of the generated point cloud, are both needed to improve the results.

Table 8.
Measurement carried out on both point clouds generated by TLS and the proposed method.
4. Discussion
The proposed method uses automatic per-pixel segmentation of joint gap measurements, it could also be used to quantify other types of damage such as concrete section loss, efflorescence, spalling, or delamination using the geometry information from the generated point cloud and the visual information from the 2D images. This might be achieved by developing a hierarchical DSfM method coupled with computer vision techniques to map this information onto a 3D model of the structure for easy visualization, but this is still in an early stage of development.
Using the proposed hierarchical DSfM method with computer vision for damage detection, localization and quantification allows the inspection of areas that might prove impossible for a human to reach, as well as removing much of the uncertainty associated with an inspector’s personal judgment. This framework can provide important structural condition information that is essential for accurate structural health assessment.
In this regard, the proposed workflow used for the Pahtajokk Bridge case study also included damage quantification. The 2D imagery data can be quickly used to establish a basic understanding of the bridge condition, or even used for autonomous damage detection by application of computer vision techniques. Computer vision was used with the images taken from the first scan as a training dataset. However, it makes the workflow more efficient if the training dataset is updated when new data becomes available from subsequent scans, thereby gradually replacing the developed ConvNets. However, some issues may affect data processing and the decisions implemented about the bridge’s condition. These issues include GSD, brightness and blurriness of the images. Therefore, the effects of these parameters on feature detection and matching have been studied from both computer vision and SfM perspectives.
5. Conclusions
Based on the knowledge obtained from our experiences, from both computer vision and point cloud generation work, we conclude:
- Comparisons of semantic segmentation for both pixel-wise bridge components and damage detection show that U-Net performs better for joint gap segmentation (small objects), while SegNet is more efficient with large-scale objects, and so is better at bridge component detection;
- Image normalization and augmentation expand the diversity of the generated dataset by involving random rescaling, horizontal flips, changes to brightness, contrast, and color, as well as random cropping. Thus, the network learnt to extract features in different conditions, although it is important to capture images with the least blurring. The maximum allowed camera movement to achieve the best performance in pixel-wise bridge component and joint gap segmentation is suggested by Equation (2);
- Application of semantic segmentation in the SfM workflow, to mask background and other unnecessary parts of raw UAV images, showed potential improvement in point cloud generation in both computation time and accuracy;
- As a part of verification and error estimation, the point cloud generated using the proposed method was compared to that generated using regular SfM for a region of damage. It was found that the proposed method produced higher point cloud density and lower deviation compared with results from regular SfM. This shows the importance of image distance for accurate detection of damaged areas.
The proposed intelligent hierarchical DSfM workflow provides a simple proof-of-concept visualization and processing tool for automated damage segmentation and analysis. However, some outlier noise may reduce the performance of this method when used for damage quantification. Therefore, additional development is needed in the future to improve the performance of this method. These include eliminating the shadow and light reflections on the structural surface by using End-to-End ConvNets and applying a Savitzky–Golay [56] smoothing filter to the 3D point cloud data in order to increase the precision of the generated point cloud without distorting the final 3D model.
Author Contributions
Conceptualization, A.M., C.P.; Methodology and Software, A.M.; Computer vision, A.M.; Analysis, A.M., C.P., T.B. and B.T.; Writing original draft, A.M.; Writing—review and editing, A.M., C.P., T.B. and B.T.; Funding acquisition, C.P.; All authors have read and agreed to the published version of the manuscript.
Funding
The research has been carried out with funding from FORMAS, project number 2019-01515. Any opinions, findings and conclusions expressed in this paper are those of the authors and do not necessarily reflect the views of FORMAS.
Institutional Review Board Statement
Not applicable.
Informed Consent Statement
Not applicable.
Data Availability Statement
Not applicable.
Conflicts of Interest
The authors declare no conflict of interest.
References
- Li, H.-N.; Yi, T.-H.; Ren, L.; Li, D.-S.; Huo, L.-S. Reviews on innovations and applications in structural health monitoring for infrastructures. Struct. Monit. Maint. 2014, 1, 1–45. [Google Scholar] [CrossRef]
- Graybeal, B.A.; Phares, B.M.; Rolander, D.D.; Moore, M.; Washer, G. Visual Inspection of Highway Bridges. J. Nondestruct. Eval. 2002, 21, 67–83. [Google Scholar] [CrossRef]
- Phares, B.M.; Washer, G.A.; Rolander, D.D.; Graybeal, B.; Moore, M. Routine Highway Bridge Inspection Condition Documentation Accuracy and Reliability. J. Bridg. Eng. 2004, 9, 403–413. [Google Scholar] [CrossRef]
- Popescu, C.; Täljsten, B.; Blanksvärd, T.; Elfgren, L. 3D reconstruction of existing concrete bridges using optical methods. Struct. Infrastruct. Eng. 2018, 15, 912–924. [Google Scholar] [CrossRef]
- Jáuregui, D.V.; White, K.R.; Woodward, C.B.; Leitch, K.R. Static Measurement of Beam Deformations via Close-Range Photogrammetry. Transp. Res. Rec. J. Transp. Res. Board 2002, 1814, 3–8. [Google Scholar] [CrossRef]
- Lichti, D.; Gordon, S.; Stewart, M.; Franke, J.; Tsakiri, M. Comparison of Digital Photogrammetry and Laser Scanning. Available online: https://www.researchgate.net/publication/245716767_Comparison_of_Digital_Photogrammetry_and_Laser_Scanning (accessed on 29 June 2021).
- Park, H.S.; Lee, H.M.; Adeli, H.; Lee, I. A New Approach for Health Monitoring of Structures: Terrestrial Laser Scanning. Comput. Civ. Infrastruct. Eng. 2006, 22, 19–30. [Google Scholar] [CrossRef]
- Attanayake, U.; Tang, P.; Servi, A.; Aktan, H. Non-Contact Bridge Deflection Measurement: Application of Laser Technology. 2011. Available online: http://dl.lib.uom.lk/bitstream/handle/123/9425/SEC-11-63.pdf?sequence=1&isAllowed=y (accessed on 29 June 2021).
- Higgins, C.; Turan, O.T. Imaging Tools for Evaluation of Gusset Plate Connections in Steel Truss Bridges. J. Bridg. Eng. 2013, 18, 380–387. [Google Scholar] [CrossRef]
- Riveiro, B.; Jauregui, D.; Arias, P.; Armesto, J.; Jiang, R. An innovative method for remote measurement of minimum vertical underclearance in routine bridge inspection. Autom. Constr. 2012, 25, 34–40. [Google Scholar] [CrossRef]
- Sousa, H.; Cavadas, F.; Henriques, A.; Figueiras, J.; Bento, J. Bridge deflection evaluation using strain and rotation meas-urements. Smart Struct. Syst. 2013, 11, 365–386. [Google Scholar] [CrossRef]
- Riveiro, B.; González-Jorge, H.; Varela, M.; Jauregui, D. Validation of terrestrial laser scanning and photogrammetry techniques for the measurement of vertical underclearance and beam geometry in structural inspection of bridges. Measurement 2013, 46, 784–794. [Google Scholar] [CrossRef]
- He, X.; Yang, X.; Zhao, L. Application of Inclinometer in Arch Bridge Dynamic Deflection Measurement. TELKOMNIKA Indones. J. Electr. Eng. 2014, 12, 3331–3337. [Google Scholar] [CrossRef]
- Taşçi, L. Deformation Monitoring in Steel Arch Bridges through Close-Range Photogrammetry and the Finite Element Method. Exp. Tech. 2015, 39, 3–10. [Google Scholar] [CrossRef]
- Anigacz, W.; Beben, D.; Kwiatkowski, J. Displacements Monitoring of Suspension Bridge Using Geodetic Techniques. In Proceedings of the EECE 2020; Springer Science and Business Media LLC: Berlin/Heidelberg, Germany, 2018; pp. 331–342. [Google Scholar]
- Lõhmus, H.; Ellmann, A.; Märdla, S.; Idnurm, S. Terrestrial laser scanning for the monitoring of bridge load tests–two case studies. Surv. Rev. 2017, 50, 270–284. [Google Scholar] [CrossRef]
- Lee, H.; Han, D. Deformation Measurement of a Railroad Bridge Using a Photogrammetric Board without Control Point Survey. J. Sens. 2018, 2018, 1–10. [Google Scholar] [CrossRef]
- Duque, L.; Seo, J.; Wacker, J. Synthesis of Unmanned Aerial Vehicle Applications for Infrastructures. J. Perform. Constr. Facil. 2018, 32, 04018046. [Google Scholar] [CrossRef]
- Dorafshan, S.; Thomas, R.J.; Maguire, M. Comparison of deep convolutional neural networks and edge detectors for image-based crack detection in concrete. Constr. Build. Mater. 2018, 186, 1031–1045. [Google Scholar] [CrossRef]
- Girshick, R.; Donahue, J.; Darrell, T.; Malik, J. Rich feature hierarchies for accurate object detection and semantic segmen-tation. In Proceedings of the IEEE Conference on Computer Vision and Pattern Recognition, Columbus, OH, USA, 23–28 June 2014; pp. 580–587. [Google Scholar]
- Girshick, R. Fast R-CNN. In Proceedings of the 2015 IEEE International Conference on Computer Vision (ICCV), Santiago, Chile, 7–13 December 2015; pp. 1440–1448. [Google Scholar]
- Ren, S.; He, K.; Girshick, R.; Sun, J. Faster r-cnn: Towards real-time object detection with region proposal networks. arXiv 2015, arXiv:1506.01497. [Google Scholar] [CrossRef]
- Redmon, J.; Divvala, S.; Girshick, R.; Farhadi, A. You only look once: Unified, real-time object detection. In Proceedings of the 2016 IEEE Conference on Computer Vision and Pattern Recognition, Las Vegas, NV, USA, 27–30 June 2016; pp. 779–788. [Google Scholar]
- Liu, W.; Anguelov, D.; Erhan, D.; Szegedy, C.; Reed, S.; Fu, C.-Y.; Berg, A.C. Ssd: Single shot multibox detector. In European Conference on Computer Vision; Springer: Cham, Switzerland, 2016. [Google Scholar]
- He, K.; Gkioxari, G.; Dollar, P.; Girshick, R. Mask R-CNN. In Proceedings of the IEEE International Conference on Computer Vision, Venice, Italy, 22–29 October 2017; pp. 2961–2969. [Google Scholar]
- Cha, Y.-J.; Choi, W.; Suh, G.; Mahmoudkhani, S.; Buyukozturk, O. Autonomous structural visual inspection using re-gion-based deep learning for detecting multiple damage types. Computer-Aid. Civil Infrast. Eng. 2018, 33, 731–747. [Google Scholar] [CrossRef]
- Wang, N.; Zhao, Q.; Li, S.; Zhao, X.; Zhao, P. Damage Classification for Masonry Historic Structures Using Convolutional Neural Networks Based on Still Images. Comput. Civ. Infrastruct. Eng. 2018, 33, 1073–1089. [Google Scholar] [CrossRef]
- Wu, W.; Qurishee, M.A.; Owino, J.; Fomunung, I.; Onyango, M.; Atolagbe, B. Coupling deep learning and UAV for infra-structure condition assessment automation. In 2018 IEEE International Smart Cities Conference (ISC2); IEEE: Piscataway, NJ, USA, 2018; pp. 1–7. [Google Scholar]
- Choi, W.; Cha, Y.-J. DDNet: Real-time crack segmentation. IEEE Trans. Ind. Electron. 2019, 67, 8016–8025. [Google Scholar] [CrossRef]
- Liang, X. Image-based post-disaster inspection of reinforced concrete bridge systems using deep learning with Bayesian optimization. Comput. Civ. Infrastruct. Eng. 2018, 34, 415–430. [Google Scholar] [CrossRef]
- Liu, Z.; Cao, Y.; Wang, Y.; Wang, W. Computer vision-based concrete crack detection using U-net fully convolutional networks. Autom. Constr. 2019, 104, 129–139. [Google Scholar] [CrossRef]
- Dais, D.; Bal, I.E.; Smyrou, E.; Sarhosis, V. Automatic crack classification and segmentation on masonry surfaces using convolutional neural networks and transfer learning. Autom. Constr. 2021, 125, 103606. [Google Scholar] [CrossRef]
- Zhang, C.; Chang, C.-C.; Jamshidi, M. Simultaneous pixel-level concrete defect detection and grouping using a fully convolutional model. Struct. Health Monit. 2021. [Google Scholar] [CrossRef]
- Yang, X.; Li, H.; Yu, Y.; Luo, X.; Huang, T.; Yang, X. Automatic Pixel-Level Crack Detection and Measurement Using Fully Convolutional Network. Comput. Civ. Infrastruct. Eng. 2018, 33, 1090–1109. [Google Scholar] [CrossRef]
- Ni, F.; Zhang, J.; Chen, Z. Zernike-moment measurement of thin-crack width in images enabled by dual-scale deep learning. Comput. Aided Civil Infrastruct. Eng. 2019, 34, 367–384. [Google Scholar] [CrossRef]
- Kim, B.; Cho, S. Image-based concrete crack assessment using mask and region-based convolutional neural network. Struct. Control. Health Monit. 2019, 26, e2381. [Google Scholar] [CrossRef]
- Li, S.; Zhao, X.; Zhou, G. Automatic pixel-level multiple damage detection of concrete structure using fully convolution-al network. Comput. Aided Civil Infrastruct. Eng. 2019, 34, 616–634. [Google Scholar] [CrossRef]
- Ronneberger, O.; Fischer, P.; Brox, T. U-Net: Convolutional Networks for Biomedical Image Segmentation. arXiv 2015, arXiv:1505.04597. [Google Scholar]
- Badrinarayanan, V.; Kendall, A.; Cipolla, R. Segnet: A deep convolutional encoder-decoder architecture for image seg-mentation. IEEE Trans. Pattern Anal. Machine Intell. 2017, 39, 2481–2495. [Google Scholar] [CrossRef] [PubMed]
- Liu, Y.-F.; Cho, S.; Spencer, B.F., Jr.; Fan, J.-S. Concrete crack assessment using digital image processing and 3D scene reconstruction. J. Comput. Civil Eng. 2016, 30, 04014124. [Google Scholar] [CrossRef]
- Liu, Y.; Nie, X.; Fan, J.; Liu, X. Image-based crack assessment of bridge piers using unmanned aerial vehicles and three-dimensional scene reconstruction. Comput. Civ. Infrastruct. Eng. 2019, 35, 511–529. [Google Scholar] [CrossRef]
- Khaloo, A.; Lattanzi, D.; Cunningham, K.; Dell’Andrea, R.; Riley, M. Unmanned aerial vehicle inspection of the Placer River Trail Bridge through image-based 3D modelling. Struct. Infrastruct. Eng. 2018, 14, 124–136. [Google Scholar] [CrossRef]
- Szegedy, C.; Vanhoucke, V.; Ioffe, S.; Shlens, J.; Wojna, Z. Rethinking the Inception Architecture for Computer Vision. In Proceedings of the 2016 IEEE Conference on Computer Vision and Pattern Recognition (CVPR) 2016, Las Vegas, NV, USA, 27–30 June 2016. [Google Scholar]
- Khaloo, A.; Lattanzi, D. Hierarchical dense structure-from-motion reconstructions for infrastructure condition assess-ment. J. Comput. Civil Eng. 2017, 31, 04016047. [Google Scholar] [CrossRef]
- Chen, D.F.; Laefer, E.; Mangina, S.; Zolanvari, I.; Byrne, J. UAV bridge inspection through evaluated 3D reconstruc-tions. J. Bridge Eng. 2019, 24, 05019001. [Google Scholar] [CrossRef]
- Szegedy, C.; Liu, W.; Jia, Y.; Sermanet, P.; Reed, S.; Anguelov, D.; Erhan, D.; Vanhoucke, V.; Rabinovich, A. Going Deeper with Convolutions. In Proceedings of the IEEE Conference on Computer Vision and Pattern Recognition (CVPR), Boston, MA, USA, 7–12 June 2015; pp. 1–9. [Google Scholar]
- Tiwari, S.; Shukla, V.P.; Biradar, S.; Singh, A. Texture Features based Blur Classification in Barcode Images. Int. J. Inf. Eng. Electron. Bus. 2013, 5, 34–41. [Google Scholar] [CrossRef][Green Version]
- Dollar, P.; Appel, R.; Belongie, S.; Perona, P. Fast Feature Pyramids for Object Detection. IEEE Trans. Pattern Anal. Mach. Intell. 2014, 36, 1532–1545. [Google Scholar] [CrossRef]
- Derpanis, K.G. The Harris Corner Detector; York University: Toronto, ON, Canada, 2004; Volume 2. [Google Scholar]
- Bay, H.; Tuytelaars, T.; Van Gool, L. Surf: Speeded up robust features. In European Conference on Computer Vision; Springer: Berlin/Heidelberg, Germany, 2006; pp. 404–417. [Google Scholar]
- Alcantarilla, P.F.; Bartoli, A.; Davison, A.J. KAZE Features. In Advances in Computational Intelligence; Springer Science and Business Media LLC: Berlin, Germany, 2012; Volume 7577, pp. 214–227. [Google Scholar]
- Sargent, I.; Harding, J.; Freeman, M. Data quality in 3D: Gauging quality measures from users requirements. Int. Arch. Photog. Remote Sens. Spatial Inf. Sci. 2007, 36, 8. [Google Scholar]
- Koutsoudis, A.; Vidmar, B.; Ioannakis, G.; Arnaoutoglou, F.; Pavlidis, G.; Chamzas, C. Multi-image 3D reconstruction data evaluation. J. Cult. Heritage 2014, 15, 73–79. [Google Scholar] [CrossRef]
- Cheng, S.-W.; Lau, M.-K. Denoising a point cloud for surface reconstruction. arXiv 2017, arXiv:1704.04038. [Google Scholar]
- Girardeau-Montaut, D.; Roux, M.; Marc, R.; Thibault, G. Change detection on points cloud data acquired with a ground laser scanner. Int. Archives Photog. Remote Sens. Spatial Inf. Sci. 2005, 36, W19. [Google Scholar]
- Schafer, R.W. What Is a Savitzky-Golay Filter? IEEE Signal Process. Mag. 2011, 28, 111–117. [Google Scholar] [CrossRef]
Publisher’s Note: MDPI stays neutral with regard to jurisdictional claims in published maps and institutional affiliations. |
© 2021 by the authors. Licensee MDPI, Basel, Switzerland. This article is an open access article distributed under the terms and conditions of the Creative Commons Attribution (CC BY) license (https://creativecommons.org/licenses/by/4.0/).
