Article

3D Point Cloud Analysis for Damage Detection on Hyperboloid Cooling Tower Shells

Department of Land Surveying, Faculty of Environmental Engineering and Land Surveying, University of Agriculture in Kraków, 30-059 Kraków, Poland
*
Author to whom correspondence should be addressed.
Remote Sens. 2020, 12(10), 1542; https://doi.org/10.3390/rs12101542
Submission received: 28 February 2020 / Revised: 17 April 2020 / Accepted: 11 May 2020 / Published: 12 May 2020

Abstract

:
The safe operation and maintenance of the appropriate strength of hyperboloid cooling towers require special supervision and a maintenance plan that takes into consideration the condition of the structure. With three series of terrestrial laser scanning data, the paper presents an automatic inspection system for reinforced concrete cooling tower shells that ensures detection and measurement of damage together with the verification of the quality and durability of surface repairs as required by industry standards. The proposed solution provides an automatic sequence of algorithm steps with low computational requirements. The novel method is based on the analysis of values of the local surface curvature determined for each point in the cloud using principal component analysis and transformed using the square root function. Data segmentation into cloud points representing a uniform shell and identified defects was carried out using the region growing algorithm. The extent of extracted defects was defined through vectorisation with a convex hull. The proposed diagnostics strategy of reinforced concrete hyperboloid cooling towers was drafted and validated using an object currently under repair but in continuous service for fifty years. The results of detection and measurement of defects and verification of surface continuity at repaired sites were compared with traditional diagnostics results. It was shown that the sequence of algorithm steps successfully identified all cavities, scaling, and blisters in the shell recorded in the expert report (recognition rate—100%). Cartometric vectorisation of defects determined the scope of necessary shell repairs offering higher performance and detail level than direct contact measurement from suspended platforms. Analysis of local geometric features of repaired surfaces provided a reliable baseline for the evaluation of the repairs aimed at restoring the protective properties of the concrete surround, desirable especially in the warranty period.

1. Introduction

1.1. Problem Statement

Hyperboloid cooling towers are counted among the largest cast-in-place industrial structures. They are the foundation for closed-circuit process water cooling systems used for most industrial processes. Their main structural component, the reinforced concrete shell in the form of a hyperboloid of revolution with bidirectional curvature continuity, makes them stand out against other towers not only with their different shape but also several hundred times lesser shell thickens to size ratio [1]. Large-sized hyperboloid structures featuring thin shells burdened with adverse service conditions and aggressive industrial atmospheres are susceptible to gradual degradation that hinders their strength over time [2]. The loss of protective properties of the concrete surround in the form of blistering, delamination, scaling, and spalling is the most important external defect calling for repairs of operational cooling towers. Potential structural safety hazards include, in particular, deep cavities in the concrete surround, which reduce the thickness and integrity of the shell thus promoting corrosion of steel reinforcement [3,4,5]. To facilitate further safe operation of the cooling tower, it is imperative to prevent further degradation of the shell through repairs of surface defects [6]. Another important aspect is to exclude potential discontinuities in the surface at repair sites, which are indicative of a failure of the bond between the mortar and the original material, which poses a risk of rapid degradation of the structure [7].
Any supervision and development of maintenance plans that could take into consideration the conditions of the hyperboloid structure require diagnostics aimed at the identification, classification, and quantification of damage. Detection of the inconsistency and surface defects of the reinforced concrete shell most often involve direct visual inspection, with the optional use of optical instruments (such as powerful binoculars and telescopes) [8]. A mere inspection of the shell from the ground or water distribution level is insufficient. In order to visually determine the condition of the shell surface in a reliable manner, mountaineering equipment has to be used [9]. This methodology makes the detection of damage over several hundred square meters of cooling tower shell a daunting and arduous task. This is why the visual inspection performed by climbers is usually fragmentary and focuses on locations determined from the ground. To consider the financial aspect as well, note that repair costs should be proportionate to the condition of the structure and as low as possible. It is necessary to determine the size of identified defects [9] and record them on inspection sheets that make up a maintenance map [10]. The size of defects on the surface of the reinforced concrete shell of the cooling tower is determined with measures and measuring tapes [11].
The reliability of the traditional methods for assessing the condition of the reinforced concrete structure depends on human, physical, environmental, and organisational factors [12]. It is a particular effort and burden to record imperfections and defects of several hundred square meters of cooling tower shells without any permanent and clear identification marks [13]. The anonymity of the surface inhibits clear-cut location of defects and measurements are inherently prone to errors [11]. This inconvenience contributes to the growing acceptance for modern diagnostic approaches in the recent decade. They are based on remote non-destructive testing (NDT) methods that offer effective and accurate detection of changes in material properties [12]. The application of the terrestrial laser scanning technique (TLS), which provides a contactless and automatic measurement of spatial coordinates of millions of points in near real time [14], is a relatively new and growing research field. The key application of scanners for the assessment of object’s condition is structural deformation monitoring [15], including cooling towers [16,17,18]. A detailed 3D structure model built from point clouds acquired with a scanner is often a reference for other data types such as digital images [19,20]. High-resolution TLS data with accurate measurements are increasingly more often considered an alternative solution for visual structural inspection [21].
Terrestrial laser scanners can record a complete, 3D condition of the object [22], which does away with the issue of subjective visual inspection [23], prevents omission of important information [24], and gives no room for free interpretation of reports and vague results of inspections [25]. Another noteworthy feature of TLS is its remote-sensing nature [26]. It facilitates inspection without any interference with the operation of the facility and reduces the human resources requirements (expert personnel needed to perform visual inspections) [24,27]. With the remote assessment of object’s condition possible even in unfavourable lighting [28], terrestrial laser scanning does not require suspended platforms, improving the cost-effectiveness (compared to traditional techniques) [29]. The small laser spot diameter and insignificant beam divergence, combined with adequate measurement resolution of scanners [30] and correct location of equipment in relation to the scanned surfaces [25], facilitate measurement of down to submillimetre surface defects [29,31,32]. The replacement of single-point observations with large datasets that are the key to satisfactory inspection results requires appropriate procedures and strategies. Impracticality, subjectivity, and susceptibility to error of manual point cloud data extraction techniques [33] calls for automation through techniques and algorithms adapted to specific conditions of construction practice [12,34]. To this end, this paper proposes an original procedure for using 3D point clouds for automated identification of phenomena indicative of degradation of cooling tower shells or confirming the continuity of surface at repair sites as applied for a hyperboloid cooling tower shell under repair. TLS data were used to determine three conditions of the structure (before repairs, after repairs, and after a winter, which is destructive for the multilayered arrangement at repaired sites) and develop a sequence of algorithm steps for detection, localisation, and cartometric documentation of visible defects as well as assessment of the quality and durability of the repairs of the hyperboloid shell.

1.2. Related Work

The literature offers multiple case studies of the application of TLS for automatic surface health inspection of various structures. Because of the focal point of the present research, the review of relevant literature was limited to surface damage detection using 3D point clouds. Publications on the application and correction of radiometric data defined by the intensity of laser beam reflection [35,36,37,38,39,40,41,42,43] or realistic visualisations of damage through the integration of point clouds with digital images [19,20,44] were not discussed in depth. The state of the art about the Unmanned Aerial Vehicle (UAV) based inspection of structures was also deliberately left out (comprehensive reviews of the recent developments can be found in [45,46,47,48,49]). Methods for the identification of phenomena indicative of surface degradation using 3D scanning data are developed towards special-purpose algorithm solutions dedicated to specific applications [31,50,51]. Most research is focused on the detection of concrete surface defects (hairline cracks, cracks, blisters, and scaling) [27,50,52,53] and steel structures (corrosion, dentures) [26,54] as reports on laboratory tests [21,25,30] or case studies on existing objects. The solutions found in the literature intended mainly for bridges [28,50,55], tunnels [31], or aircraft [26,54] are usually adapted to the needs of specific applications such as assessment of earthquake damage [23,25] or discussions on the need, scope, and time of repairs [50,53,55]. Approaches and strategies for detecting defects using TLS data described in the literature can be categorised into three research categories based on:
(1)
reference planes;
(2)
point cloud processing, common in deformation monitoring applications;
(3)
local geometric features of surfaces of interest.

1.2.1. Reference Plane

Solutions that employ the reference plane are set to identify missing material, dents, or cracks in the analysed surface by comparing each cloud point with a theoretical plane representing a healthy structure. The plane is approximated or a piece of a theoretical model of the analysed structure [12,32]. Surface damage detection is based on deviation analysis (cloud point–plane) and assessment of the consistency of their distribution with normal distribution [31], verification of standard deviation values [25], or extraction of data that exceeds threshold values that are distances [30] or gradients [50] defined in relation to the reference plane. This approach was employed by Reyno et al. [26]. Distances between the point cloud and the undamaged surface were used to determine the depth of indents of structural panels of an aircraft in line with results of a manual gauge. This solution was considered to be a more reliable and accurate NDT tool than solutions used in the aeronautics industry today. Liu et al. [50] used simulated reference planes and TLS data to locate and represent the measured range of surface damage of a reinforced concrete bridge girders and develop a repair plan. Anil et al. [25] confirmed the effectiveness of the analysis of the standard deviation of the distance of cloud points to reference planes fitted into them in detecting cracks and hairline cracks in concrete surfaces. Their results were deemed promising for the assessment of post-earthquake damage and repair planning, in particular. Still, according to Laefer et al. [21], the effectiveness of damage detection using methods based on reference planes depends to a large extent on the quality of the point cloud; particularly, the small angle of incidence of the laser beam limits the detection performance due to measurement noise. High quality of TLS data and correct measurement geometry must not be assumed when analysing a hyperboloid shell of a cooling tower on industrial premises. Another reason this approach was abandoned was its dedication to analysing plane-like structures [12], which was not the case here.

1.2.2. Processed Point Clouds as in Deformation Monitoring Applications

Another technique used for TLS damage detection, applied also to structural deformation monitoring, are periodic comparisons of point clouds or even results of their processing such as sections or models [34]. This approach was employed by Olsen et al. [22] who performed laboratory detection of damage to a reinforced concrete beam growing deeper by analysing 2D sections generated from TLS data. The progressive degradation of the structure was successfully analysed by comparing surface areas of sections of the object extracted from point clouds to the surface area of its original structure. Similarly, Mosalam et al. [23] detected damage to reinforced concrete structures by analysing geometries of sections generated from point clouds and distances of TLS data to theoretical models both under laboratory and real-life conditions (a bridge and three buildings damaged by an earthquake). The study has shown a significant consistency of the results with results of visual assessment of the damage using traditional measurement methods. Mizoguchi et al. [55], on the other hand, presented promising methods for quantitative analysis of scaling of concrete piers using distances determined with the Iterative Closest Point algorithm (ICP) between pairs of scans acquired at different times. The proposed solution facilitated comprehensive assessment of the depth and range of damage (consistent with a traditional measurement) and helped consider the necessity to repair the structure and determine the appropriate repair methods. Similarly, Law et al. [53] presented a periodic assessment of the degradation of the surface of a reinforced concrete breakwater by determining differences between periodic point clouds in the same frame of reference. TLS data distances were estimated using the M3C2 algorithm (Multiscale Model to Model Cloud Comparison), which takes into consideration data uncertainty sources. The results demonstrated the usability of the approach for the identification of unambiguous defects growing deeper and development of a structural renovation strategy, which is necessary for proper object management. According to Law et al. [53], however, there is a correlation between measurement uncertainty and the performance of an approach based on comparison of periodic point clouds. The reliability of results hinges upon the registration and data georeferencing procedures and the stability of the frame of reference, in particular. The effective performance of surface damage detection using strategies commonly used in deformation monitoring requires geometrical invariability of the analysed object [34]. TLS data differentiation cannot be used to assess the condition of the cooling tower shell because of such variable factors as the wind, temperature, sunlight exposure, or periodic deformations of thin-wall hyperboloid structures [1].

1.2.3. Local Surface Geometric Properties

An alternative and more universal approach to damage detection using TLS data uses local geometric properties of the surface. It involves an analysis of orientations of normals and/or curvature values for each cloud point. Such an approach can be found in the work by Kim et al. [52] on experimental tests demonstrating the performance of the TLS technology in detecting damage to precast concrete slabs. Surface defects were successfully extracted by integrating normal vector orientation analysis and solutions employing distances to surfaces locally fitted to TLS data. Similarly, Erkal and Hajjar [27] compared normal vectors of each cloud point with the normal of a healthy surface, and automatically identified, classified, localised, and recorded significant defects of a concrete testing frame. Teza et al. [28] used distribution analysis of mean and Gaussian curvature determined from the sum or product of principle curvatures to detect damage to reinforced concrete bridge girders in scanning data. The study confirmed the approach performed well (in particular for the Gaussian curvature) and the computation cost was satisfactory. This solution managed to identify surface damage of the structure and replace visual inspections in a reliable manner. Jovančević et al. [54] presented an inspection of aircraft surface using terrestrial laser scanning and an analysis of the local curvature and orientation of normals for each cloud point. The usefulness of detection of various types of defects (such as indents, bulges, and scratches) was confirmed by comparing results with results of a visual inspection and measurements of damages with a gauge. The approach employing local geometric properties of analysed surfaces not restricted to plane-like or periodically comparable structures was assumed the basis of the method aimed at developing specialised, automated procedures dedicated to diagnosing hyperboloid shells of cooling towers using terrestrial laser scanning data. The present solution utilises a novel method for transforming the values of local surface curvature determined using principal component analysis with the square root function in order to unambiguously represent the shape of damage and improve the effectiveness of extraction. As opposed to the currently applied solutions based on untransformed curvature, the implemented transformation facilitated further algorithm steps to develop a cartometric documentation of defects in the reinforced concrete surface and verification of surface continuity at repaired sites.

2. Materials

2.1. Test Cooling Tower

The proposed diagnostics strategy of the reinforced concrete hyperboloid cooling tower was drafted and validated using an object in continuous service for fifty years. The cooling tower, situated on the premises of the historical Tadeusz Sendzimir Steelworks in Kraków, provides cooling for the only operational blast furnace No. 5 of ArcelorMittal Poland Unit in Kraków. The test object (Figure 1a) was constructed in the second half of the 20th century and features typical flaws of the period together with age defects caused by the years-long operation. This type of cooling tower is the most popular in Poland. The reinforced concrete shell of the structure is a hyperboloid of revolution with variable thickness (0.4 m–0.12 m). The height of the structure from the ground is 65 m. Its diameter at the ring beam is 43 m and reaches 27 m at the crest. The shell is supported by 3 m high V-shaped inclined columns.
An expert report on the condition of the object based on a visual inspection of the cooling tower shell performed indirectly (from the ground, using binoculars with 10× magnification) or directly (by a team of climbers instructed from the ground) identified vast corrosion damage at various stages, i.e., clearly visible spalling, delamination, and blistering of concrete. The expert opinion recommended low-interference surface repairs to remove surface defects, inhibit damage propagation, and restore the protective properties of the concrete surround. The repair works involved the local replacement of loose shotcrete and reprofiling of local concrete surround losses by filling with appropriate patching compounds. The repair works were conducted from suspended platforms (Figure 1b). To assess the effectiveness and durability of the surface repairs (Figure 1c), the surface smoothness and integrity of the multi-layered arrangement resulting from the repair were verified after winter.

2.2. Experimental Data

Terrestrial laser scanning of the test cooling tower was performed with a phase-based Z+F Imager 5010 (suitable for remote damage detection [25,32]) with the maximum measurement range of 187.3 m, spherical field of view (360° horizontal and 320° vertical) and a million pixel per second data acquisition rate. The angular accuracy of the device is 0.007° RMS and the linearity error is below 1 mm at 50 m. The angular resolution, which is of particular importance for the research is 0.0002° horizontal and 0.0004° vertical, while the resolution range is 0.1 mm. The equipment features small beam diameter and insignificant beam divergence below 0.3 rad.
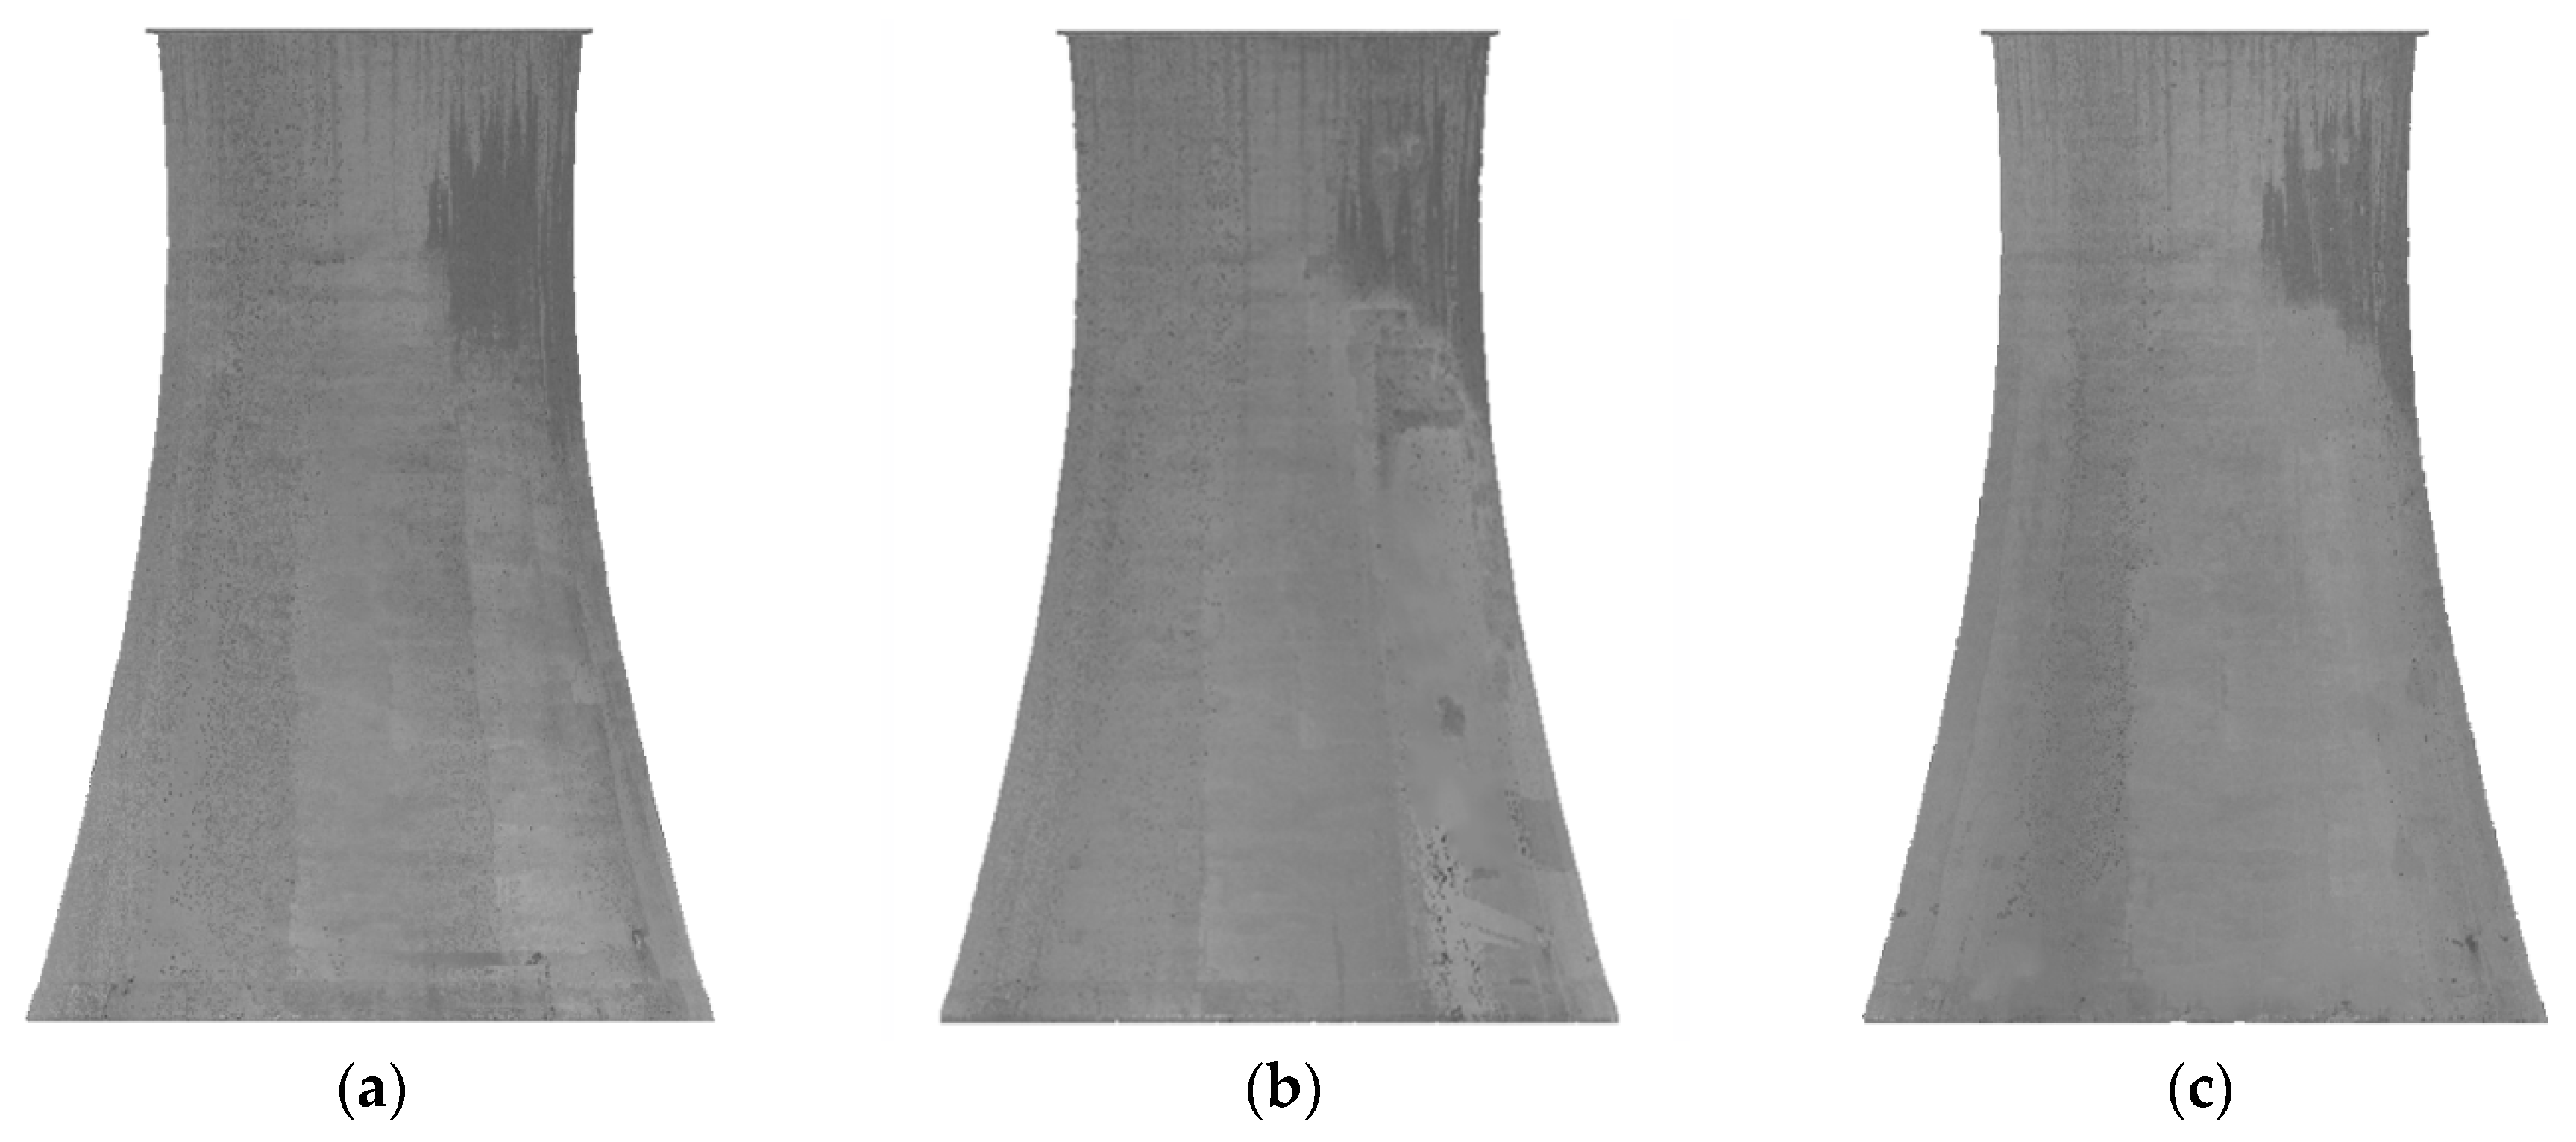
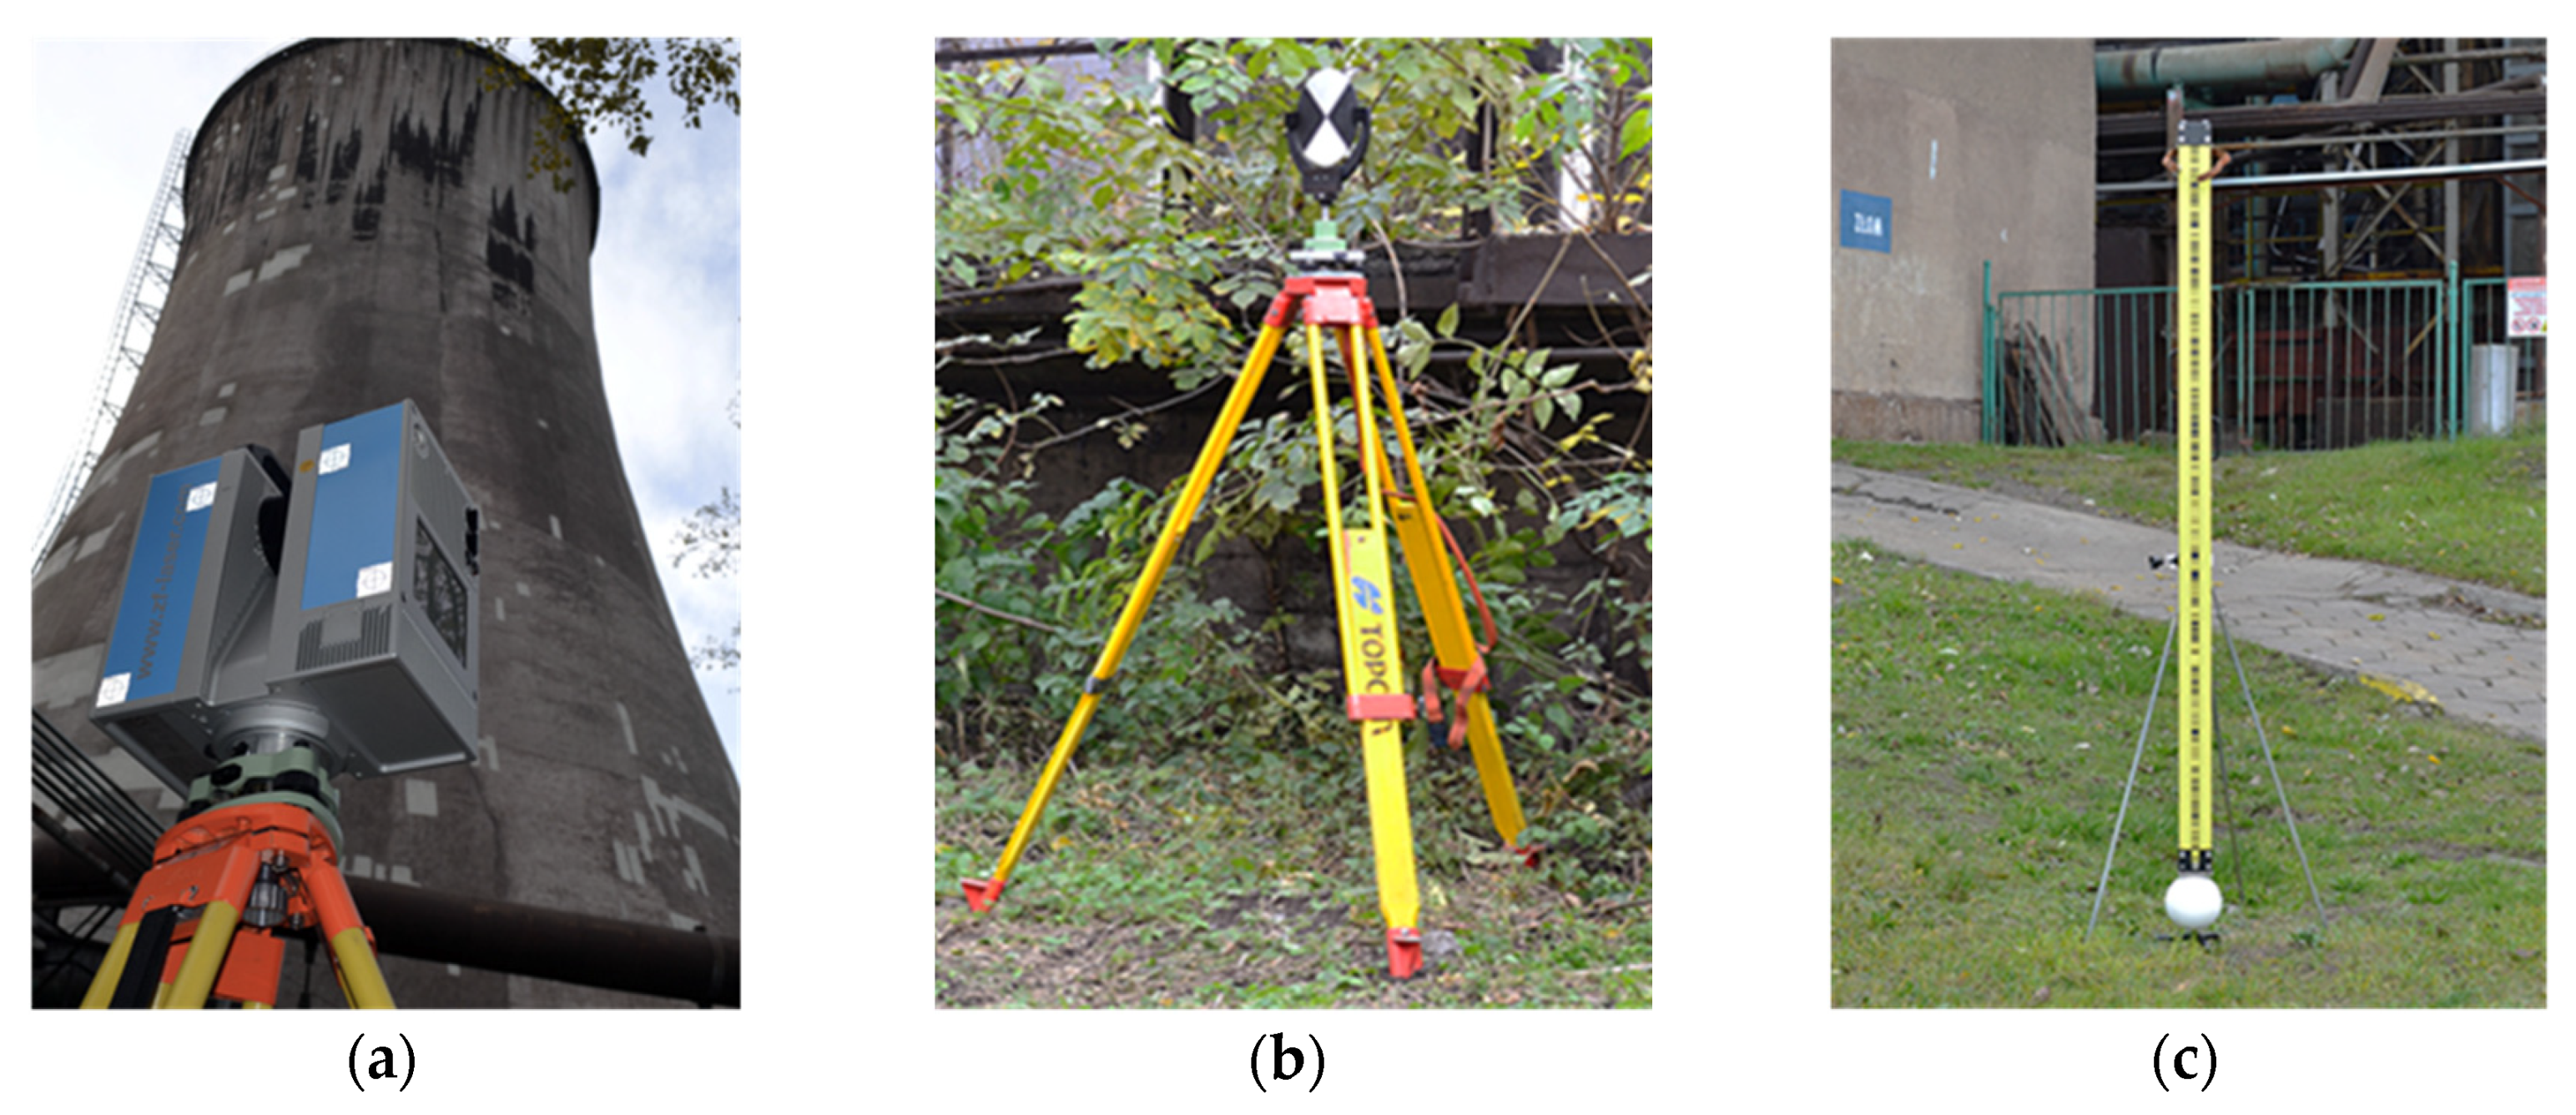
The cooling tower shell was measured with Z+F Imager 5010 three times (in each series, see Figure 2 and Figure 3a) from nine stations around the structure. The station positions were selected with the optimisation of TLS data acquisition for the whole shell and measurement geometry in mind. The measurement was performed with the ultra-high angular resolution and high quality.
Periodic observations of the object were referenced to a stable monitoring network and relevant reference frame, which is the foundation for TLS data registration and georeferencing. The monitoring network fixed the positions of measuring stations and tie points for almost a year of the research, and ensured the stability of measurement procedures and minimised any factors differentiating data obtained for each series. The measurement method applied involved positioning the scanner on stations with defined coordinates and tying to reference objects clearly identifiable in the point cloud, i.e.,
  • black and white Z+F Professional 6˝ targets centred and levelled over the monitoring network points (Figure 3b);
  • 150 mm steel reference spheres with adapters for fixed, stable mounting, precision levelled (Figure 3c).
The TLS data was oriented in Cyclone. The transformation from the frame of reference (for a specific data acquisition series) to the coordinate system of registered scans was verified using centres of targets, and reference spheres read from point clouds. The mean data consistency was ±1 mm. The maximum divergence was ±2 mm horizontal and ±2 mm vertical.
Figure 4 shows an excerpt of a cooling tower shell point cloud (H = 55 m above ground), acquired in three series and used to present the research methodology. To represent local properties of the analysed surface, a sample excerpt of the data was structured using a Triangulated Irregular Network (TIN).

3. Methods

3.1. Overview of Research Methodology

The proposed diagnostic method for reinforced concrete cooling tower shells using TLS data assumes a series of algorithm steps to identify signs of degradation or confirm surface continuity. The present approach involved the detection of damage to determine necessary repairs such as cavities, spalling, and blistering of concrete surround. The more detailed specification of the degree of degradation by cartometric representation of damage range and their quantification to determine the cost of repairs were considered. The present strategy was adapted to inspect and verify the correctness and durability of repair works. Surface repairs involved filling in of all scaling, cavities, and blisters of the concrete surround as well as profiling of a smooth coat resistant to the aggressive industrial environment. The multi-layered arrangement resulting from the repairs of the reinforced concrete shell was evaluated in terms of continuity (smoothness) of the surface at repaired sites, which was indicative of appropriate bonding of the patching compound with the original material. The detection method consisted of a detailed analysis of the local surface curvature. The curvature was estimated directly from a point cloud to facilitate streamlined analysis of the data using generally available mainstream computers.
Assuming limited computing resources, the shell condition verification was optimised through reduction of the amount of data by preliminary segmentation of the research material to ensure cost- and time-effective performance. Point cloud segmentation into smaller patches is a popular solution to streamline TLS data processing [56,57]. The best-justified segmentation method was the one consistent with the expert evaluation of the condition of the external surface of the shell. Consecutive algorithm steps for delineated patches of the reinforced concrete structure, verified with the direct visual method, ensured efficient and effective assessment of the condition of the repaired surface as well as reliable verification of the results.
Conclusions regarding local properties of the scanned shell were based on point neighbourhood defined by the set of k-nearest neighbours (k-NN) [58,59,60,61,62,63] with the assumption that discrete observations that determine similar properties of the surface are located in a specific, small distance (defined by a specified tolerance value). The problem of determining points in the nearest neighbourhood is related strictly to the specific metric space. The theoretical formulation of geometric representation for point p , where:
P k = { p 1 k p i k }    
is a set of points in its nearest neighbourhood expressed as:
p i k p x d m
where d m is the maximum distance of point p to neighbouring points, and . x is the Euclidean distance. Assuming the neighbourhood size is small enough, a set of points P k represents a surface with similar geometric properties so that k-NN can be used as the base sample to estimate local surface properties [61]. The k-NN method was the foundation of all algorithm steps. This method required that neighbourhood size P k be determined either by setting a fixed number of nearest neighbouring points (k) or a neighbourhood radius (r) [62].
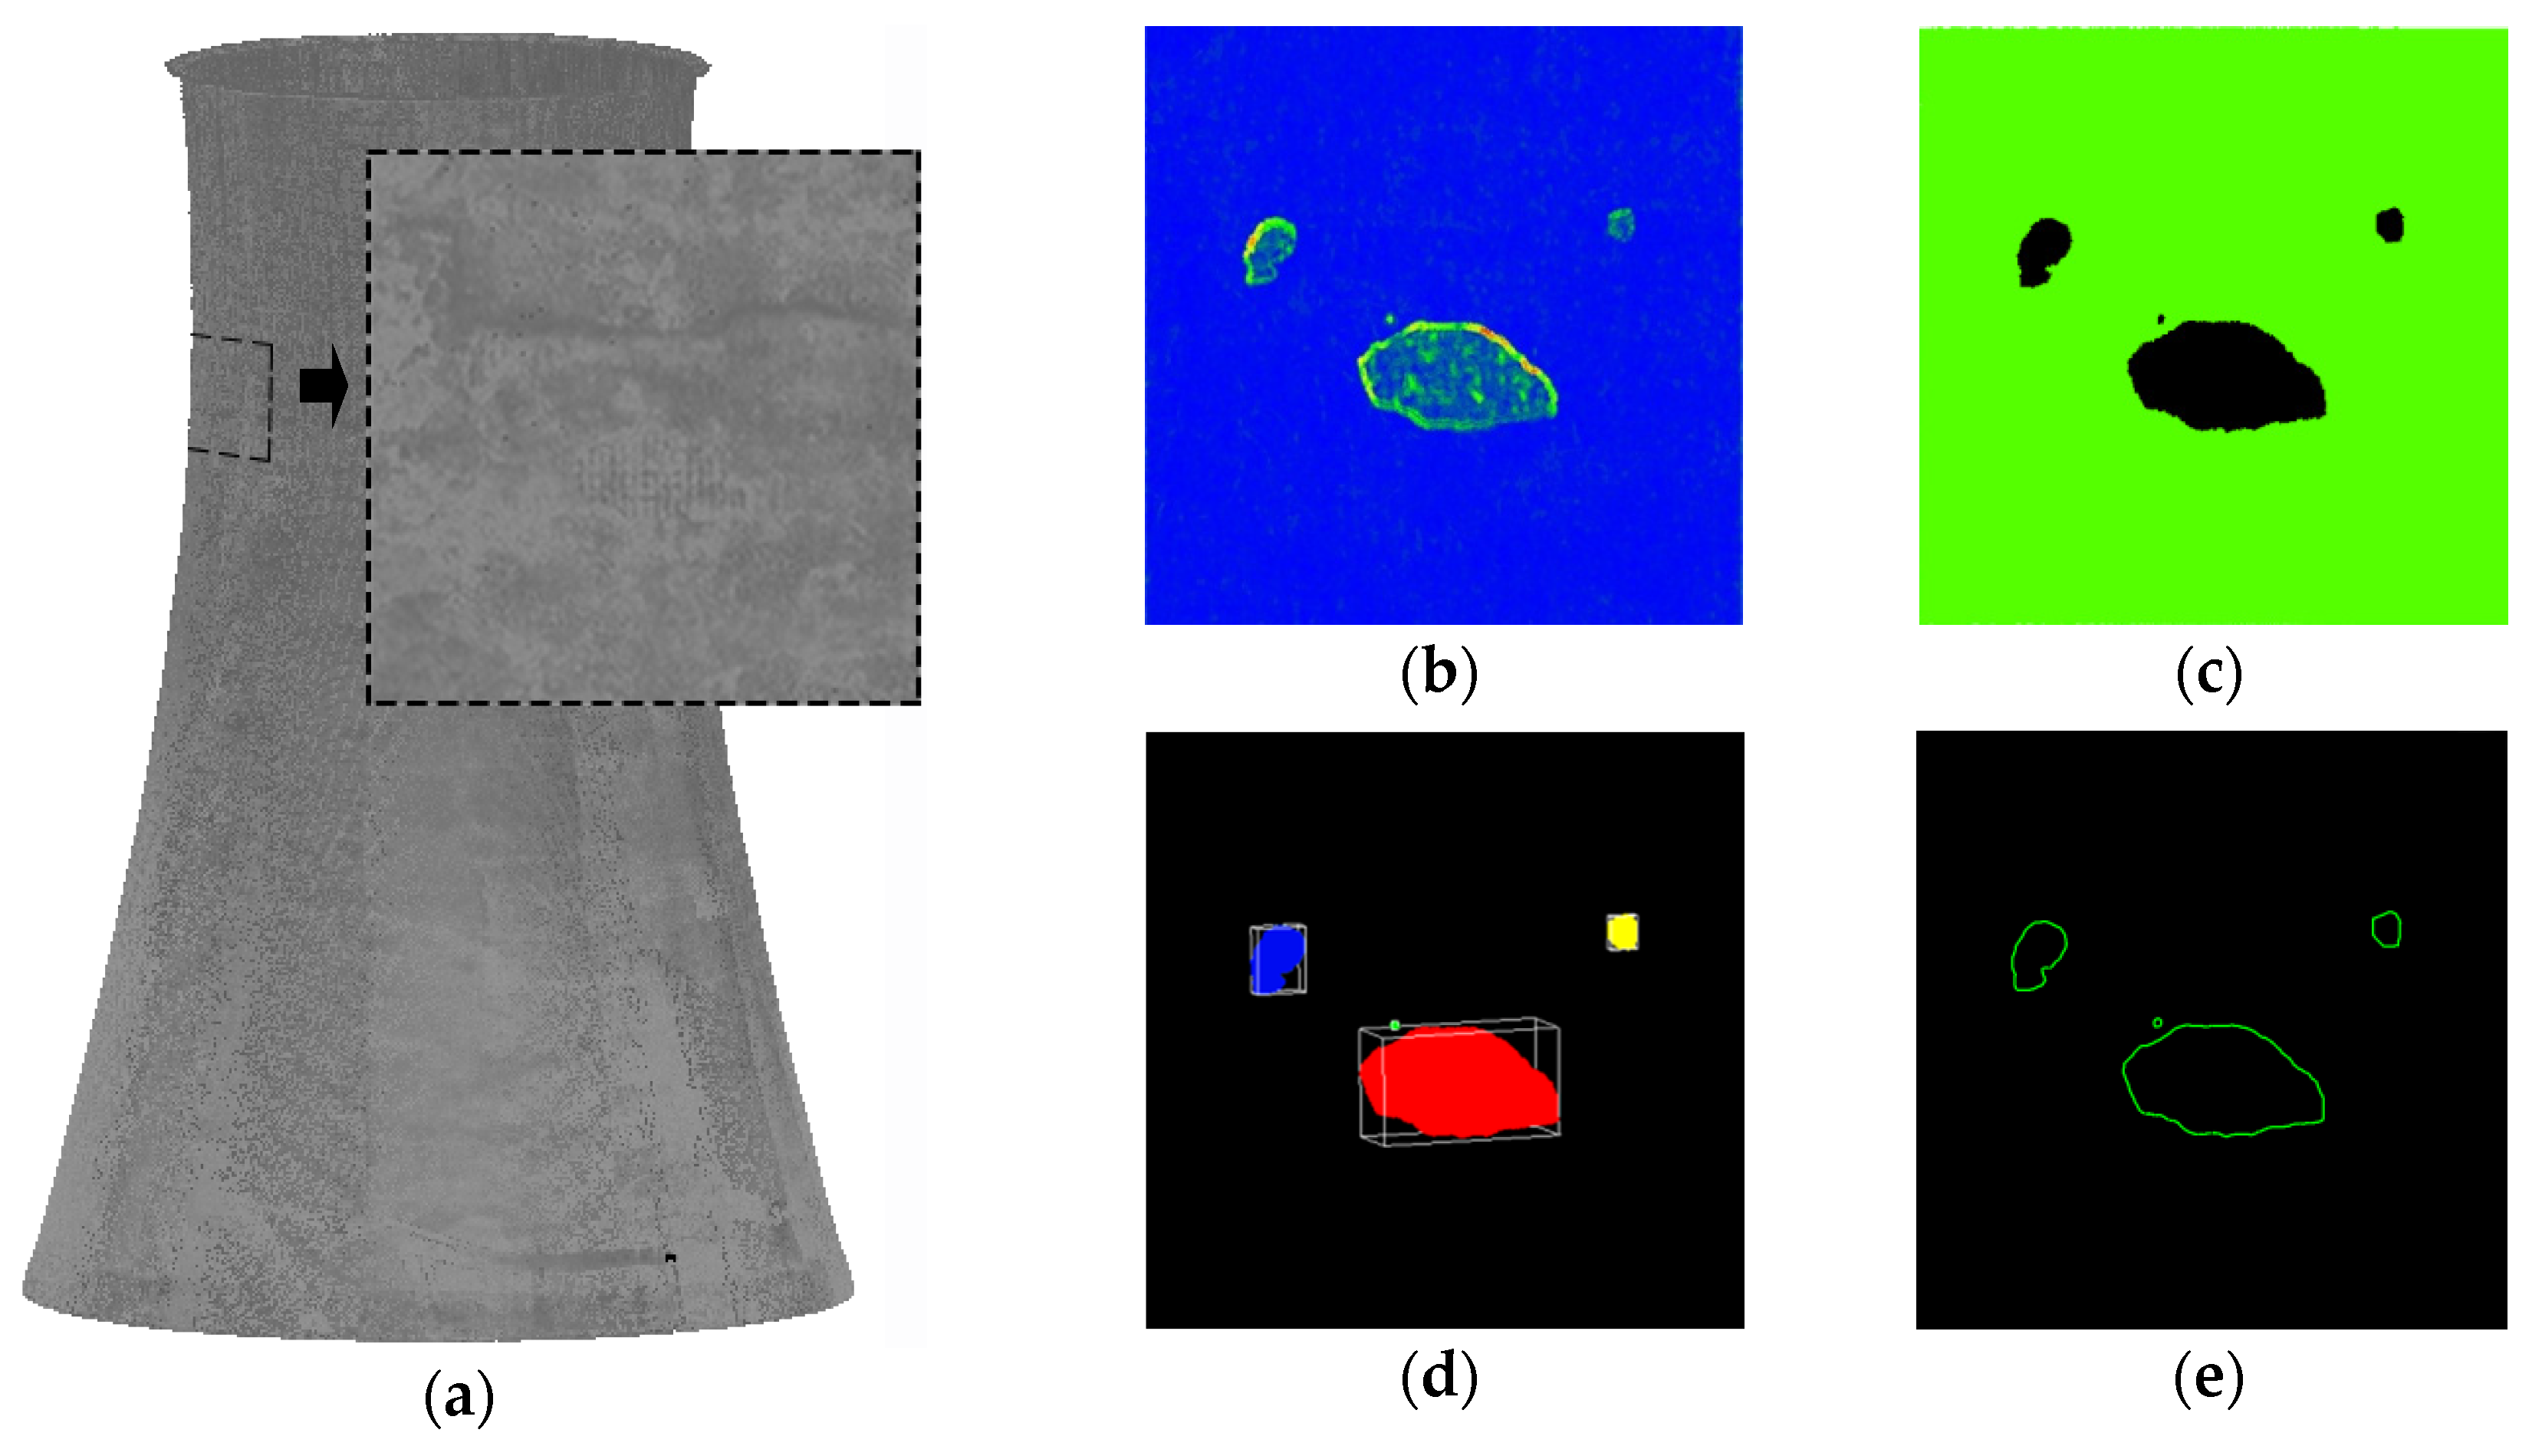
The concept of the sequence of algorithm steps (Figure 5) was devised using open-source CloudCompare software [64] compatible with the Point Cloud Library. The proposed solutions were implemented in the powerful free access application with many procedures for effective processing and visualisation of point clouds. The task was further supported by the option to assign function values (so-called scalar field, SF) to each cloud point. Association of specific curvature values with individual cloud points, colourful visualisation, arithmetic operations, and algorithm processing of scalar fields helped bring the proposed solutions to life.

3.2. Data Pre-Processing

The first step of the damage detection strategy, the preliminary processing, involves the removal of outliers that distort local curvature estimates. The noise is an unavoidable flaw of scanning data. It results mainly from beam divergence and depends on the type of the scanned surface and the geometry of the setup. Automatic noise reduction assumed that point p and its immediate neighbourhood P k belong to the same surface and should be located close to each other. The SOR (Statistical Outlier Removal) filtration algorithm proposed by Rusu [61] and implemented here provided for statistical analysis of the neighbourhood of each point in the cloud and removal of outliers that did not meet a preconceived criterion. The maximum Euclidean distance d ¯ criterion defined for each point p   ϵ   P k as:
( μ k α   ·   σ k ) d ¯   ( μ k + α   ·   σ k )    
where α is a multiplication of the standard deviation assuming values depending on the noise σ k , and μ k is the mean distance of point p to k nearest neighbouring points. The value of the k parameter was determined using an auxiliary data structure, octree, taking into account the mean distance between cloud points (0.0017 m) and the nature of the scanned surface [61]. Further analyses employed data with noise reduced using the SOR filter algorithm, which represented the cooling tower shell of interest.

3.3. Curvature Estimation

The local surface geometry, defined by the nearest neighbourhood points, was estimated by determining the value of the curvature using the principal component analysis (PCA) [59]. The basic notion behind PCA is to reduce the dimensionality of data that have a multitude of interrelated variables while retaining their variability [65]. The reduction involves a transformation of original data into a new set of uncorrelated variables ordered hierarchically where the number of the variables equals the number of dimensions of the analysed data [66]. Principal component analysis can extract features from massive datasets [67] and is successfully implemented to point cloud processing (normal vector and local curvature calculation) for segmenting and detecting features or objects in TLS data today [54,68,69].
The effectiveness of the proposed solution for estimating the local curvature using TLS data was determined by the right size of the neighbourhood (defined as sphere radius r). The value of r was determined in an adaptive manner based on data resolution [24] and local properties of the scanned surface [70] using an auxiliary data structure, an octree [61,64,71]. The PCA, based on covariance defining variability, employed a neighbourhood point covariance matrix P k [72]:
C O V ( X ) = [ σ x x σ x y σ x z σ x y σ y y σ y z σ x z σ y z σ z z ]
where the diagonal entries of matrix C, component variances, are determined as:
σ x x = v a r   ( x ) = E ( x 2 ) E ( x ) 2 = 1 k i = 1 k ( x i x ¯ ) 2
and other entries of matrix C, covariances between the components, are defined by the relationship:
σ x y = c o v   ( x , y ) = E ( x y ) E ( x ) E ( y ) = 1 k j = 1 k ( x i x ¯ ) ( y i y ¯ )
The procedure aims at determining eigenvalues λ i (from the set of real numbers greater than or equal to zero) that are solutions to the characteristic equation of the covariance matrix [73]. Eigenvectors v i corresponding to primary components of matrix C are determined from eigenvalues ( λ i ) [74] that are the basis vectors (directions and orientations of the neighbourhood P k ). The normal vector at point p of the cloud is approximated by eigenvector v 0 of the smallest eigenvalue ( λ 0 ) [52]. The proposed method for curvature (N) calculation is the ratio of the smallest eigenvalue to the sum of all eigenvalues (defining the total variance of the neighbourhood points). Value N calculated with the equation [59]:
N = λ 0 λ 0 + λ 1 + λ 2 ,               where             0   λ 0 λ 1 λ 2
determining a part of the total variance determined by component λ 0 , estimates the curvature of neighbourhood P k of cloud point p.
To facilitate unequivocal detection of surface damage, the surface shape measure (N)—which assumes values from 0 (for neighbourhood points on a plane) to 1/3 (for k-NN points with isotropic dispersion) [75]—was converted into a more convenient form. The empirical analysis of the research material resulted in the square root function as the appropriate transformation of the set of non-negative real numbers that are estimates of the curvature values. The CloudCompare software offers sufficient capabilities regarding arithmetic operations on scalar field values to transform values N of individual points in the cloud into values N . The implemented novel transform of the curvature estimated from principal component analysis expanded the range of the investigated property and improved the damage–detection performance of the approach.
The usefulness of the value of local curvature of the surface estimated from principal component analysis transformed with the square root function for the assessment of the condition of the cooling tower shell was confirmed using scalar fields (Figure 6) that are colour visualisations of values N and their distribution histograms (Figure 6) for damaged (series I) and healthy (series II and III) surfaces. Following an analysis of statistical parameters of values N of the shell considered in patches, the implementation of a relative dispersion measure was proposed as the initial criterion for defect detection. The coefficient of variation (CV), which is the percentage measure of sample diversification (as the quotient of the standard deviation and the average value of a feature), was used to define the boundary condition (CVth) empirically. If the boundary value was exceeded (because of excessive differentiation of value N ), it was indicative of inconsistency of (damage to) parts of the structure and identified areas in need of further analyses.

3.4. Segmentation

Local curvature values determined for every cloud point were used to identify and delineate the uniform surface from defects of the reinforced concrete shell requiring further processing in pre-identified damaged parts of the reinforced concrete shell ( N CV > CVth). The extent of the healthy surface was identified using the region growing algorithm. It was originally designed for image analysis [76]. Now, it is a popular automatic point cloud segmentation tool [77,78,79,80]. The principle of the algorithm was to verify the conformity of values of consecutive points in a scalar field with values of the uniform surface. The algorithm threshold value cth was determined empirically with curvature value histograms estimated from principal component analysis after square root transformation. The parameter estimation employed the Weibull distribution, which offers sufficient flexibility to model diverse datasets and takes the form of the normal distribution, log-normal distribution, or exponential distribution depending on its parameters [81]. Local extrema of distribution plots for the damaged (series I) and healthy (series II and III) parts of the cooling tower shell (Figure 7) helped define the right inclusion criterion to specify the slight variability of the curvature of the uniform surface.
The algorithm, initialised by indicating a point in a region or automatic selection of a point with the lowest curvature value, increased the region of the uniform surface by encompassing consecutive neighbouring points that met the inclusion criterion [60,82]. The implemented segmentation method facilitated grouping of cloud points with similar properties that satisfy the threshold condition (<cth) adapted to data quality, which represents the healthy shell of the cooling tower. The pseudocode for this method is given in Algorithm 1.
Algorithm 1: Point cloud segmentation based on curvature
Input: Point cloud P = p1,p2…, pn; Point curvatures C; Curvature threshold cth; Neighbour finding function F(∙)
 
Process:
1: Region list {R} ← ∅
2: Available points list {L} ← {l..|P|}
3: While {L} is not empty do
4:    Current region {Rc} ← ∅
5:    Current seeds {Sc} ← ∅
6:    Point with minimum curvature in {L} = Pmin
7:    {Sc} ← {Sc} ∪ Pmin
8:    {Rc} ← {Rc} ∪ Pmin
9:    {L} ← {L} \ Pmin
10:    For i = 0 to size ({Sc}) do
11:      Find nearest neighbors of current seed point
          {Bc} ← F(Sc{i})
12:      For j = 0 to size ({Bc}) do
13:         Current neighbor point PjBc{j}
14:         If Pj ϵ L and
              c{Pj} < cth then
15:             {Sc} ← {Sc} ∪ Pj
16:             {Rc} ← {Rc} ∪ Pj
17:             {L} ← {L} \ Pj
18:           End if
19:       End for
20:     End for
21:     Global segment list {R} ← {R} ∪ {Rc}
22: End while
23: Return the global segment list {R}
 
Outputs: a set of homogeneous regions R = {Ri}
P in Algorithm 1 represents the whole initial point cloud. The segmentation starts with a selected seed point (Pmin) of the identified healthy surface (Rc). Consecutive points of the cloud are added to it as the region grows (Pj). Individual neighbour points of the seed are grouped into a region, a set of seeds (Sc) if their curvature is sufficiently similar. This similarity is expressed by the predicate (c{Pj} < cth), referred to as the uniformity criterion. If the uniformity criterion is satisfied for a cloud point (the point curvature is lesser than the curvature threshold), it becomes part of the identified surface. The growth continues until all cloud points are tackled. The result of Algorithm 1 is a region uniform in terms of curvature representing a healthy surface.

3.5. Labelling

Next, points that failed to meet the uniformity criterion, representing defects of the reinforced concrete shell, needed to be segmented further to delineate observation subsets representing individual defects. The connected component labelling (CCL) algorithm used to this end was originally dedicated to the classification of binary images [83]. Today, it is successfully implemented for point cloud segmentation [84,85]. It processed the input TLS datasets to assign unique labels to the nearest neighbouring points. The labels were used to extract separate, coherent components representing individual defects. The CCL algorithm required analysis detail level to be determined by the appropriate level of the octree structure (o) defining the minimum distance between neighbouring components and the smallest number of component points (p) below which point sets were ignored [64]. Assuming the adaptive values of parameters, cloud points were assigned appropriate labels to extract coherent components representing individual defects in different colours.

3.6. Defect Vectorisation

Coherent components, representing individual defects, identified through segmentation were verified as metric information (reliably defining the surface degradation progress) useful for specifying defect size and extent. Quantitative analyses employed a basic computational geometry function, convex hull, applicable both to planes and 3D spaces [86]. A hull of a 2D point set is the smallest convex polygon that includes the points at the edge of and inside the set [87]. The approach yielding results on the plane can be used in three dimensions as well to determine the volume of defects. The hull becomes a convex polygon that wraps around all specified points in the dataset building a triangular surface around them [87]. The implementation of the time- and resource-effective method would, however, require significant generalisation of shapes that would restrict the accuracy of defect surface estimation. To improve the detail level of defect contour and the extent estimate precision, and additional parameter was introduced that restricted the maximum length of the edge of the hull and effectively rid of the over-generalisation problem. Shell defect contours vectorised using the convex hull were exported to DXF (Data Exchange Format) so that the extent of individual defects and the degree of degradation of the reinforced concrete shell could be determined, and the results shared freely.

4. Results and Discussion

4.1. Experimental Results

The strategy for diagnosing the reinforced concrete shell of the cooling tower using TLS data was validated for three conditions of the structure: before repairs (series I), after repairs (series II), and after a winter, which was a time of trial for the multi-layered arrangement after repairs (series III). The right foundation for epoch measurements of the objects was provided in the form of a stable monitoring network that fixed measuring stations and tie points for the device so that periodic stability of measurement procedures and relative comparability of the data was ensured. Point clouds from ten stations with 0.002 m RMS orientation accuracy and mean distance between points of 0.0017 m that made up fully metric, quasi-continuous models of the cooling tower shell were used to determine the properties of the structure. They were used to develop the sequence of algorithm steps with low computational requirements that could detect surface damage and represent it cartometrically and facilitated quality and durability assessment of repair works. Appropriate input parameters for the algorithms, empirically determined and adapted to data quality and analysis of the three conditions of the hyperboloid shell (series I, II, III), that affected the effectiveness of the approach are shown in Table 1.
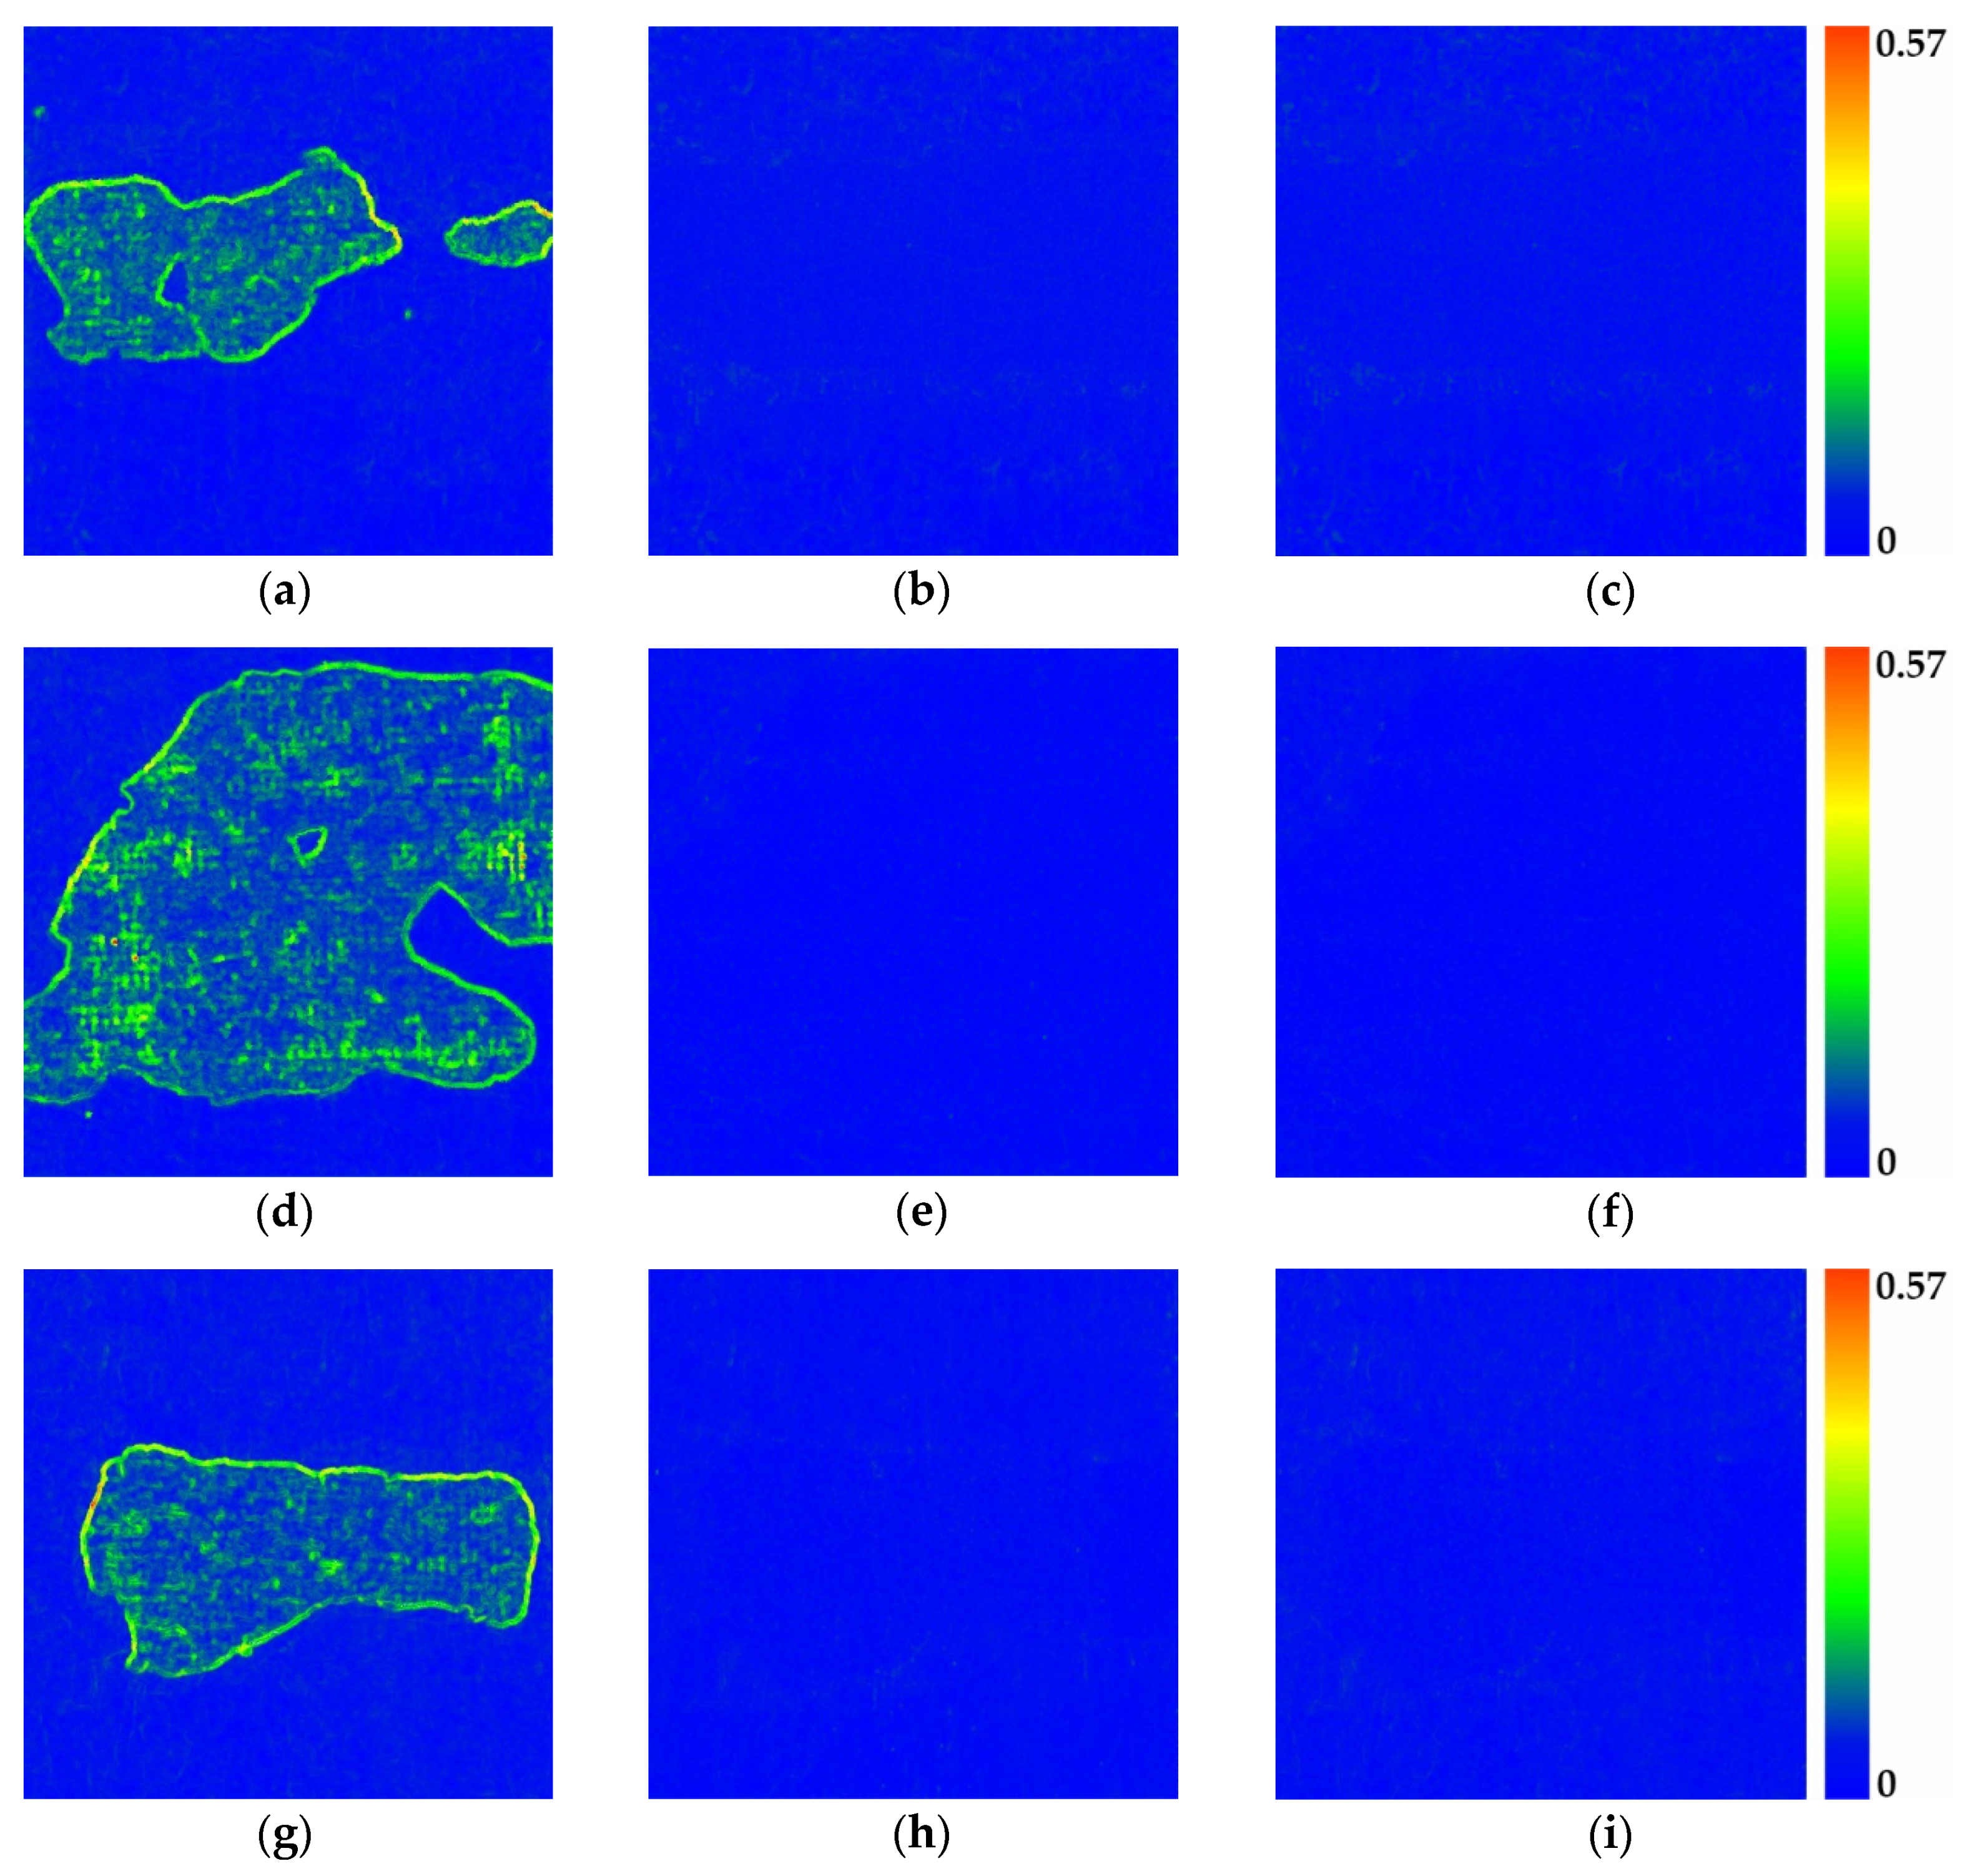
The proposed specialised procedures for detecting cooling tower shell damage are founded on the estimation of the local surface curvature based on the principal component analysis. The reliability of this approach depends particularly on the right size of the neighbourhood (defined as sphere radius r) that is the basis for surface curvature estimates for each specific point. The appropriate value of r that would provide sufficient resistance to noise and reflect imperfections in the shell was determined in an adaptive manner as twice the minimum neighbourhood size (r = 2rmin) resulting from data resolution (rmin → kmin = 6). Another key factor affecting the performance of the method was the transformation of the local curvature value with the square root function that guaranteed clear representation of the shape of defects (clear enough to facilitate quantitative analyses) and verification of the effective surface repairs aimed at restoring the protective properties of the concrete surround. The proposed original transform of the curvature value increased the range of the investigated local geometric feature of the surface, thus improving the operational applicability of the approach to damage detection (due to a significant increase of rooted curvature on edges of defects). Contrary to the currently applied solutions based on untransformed curvature (Figure 8) [28,54], the proposed solution faithfully represented the shape of damage (Figure 9). The implemented square root transformation of a local curvature estimated from principal component analysis facilitated further algorithm steps to develop a cartometric documentation of defects in the reinforced concrete shell of the cooling tower. Empirical analyses of the research material demonstrated an average five-fold increase in the standard deviation of values N of damaged areas of the reinforced concrete shell compared to the uniform (continuous) surface, while arithmetic means remained virtually the same. This relationship between basic statistical parameters facilitated the implementation of the coefficient of variation as the initial criterion for damage detection (CVth ≤ 30%). Because of the extent of the analysed material, promising results of the experiment are presented for a selected sample of three test fields (with dimensions of 5 by 5 m). They are representative areas of the shell situated along a vertical line of the structure at 50, 30, and 10 m above ground (Figure 8 and Figure 9, Table 2).
The performance of the proposed diagnostic method for the condition of the cooling tower shell based on the local curvature estimation from principal component analysis and transformed with the square root function depends on the effective segmentation of TLS data as well. The region growing algorithm and empirically determined threshold value (cth = 0.02), which specifies the trivial variability of value N of the uniform surface helped specify the shell degradation degree (series I) and verify its continuity (smoothness) at repair sites (series II and III). Coherent components extracted with the CCL algorithm point cloud segmentation that represent individual defects of the reinforced concrete shell facilitated reliable determination of the extent of damage to specify the scope of necessary repairs (such as cavities, scaling, and blisters in the concrete surround). The convex hull with a parameter that restricted its maximum edge length (L = 0.01 m) provided cartometric vectorisation of defects by determining their extent in line with the course of defect edge using detailed TIN models. Figure 10 shows vectorised defects in three test fields in series I against reference TIN models.
The computational complexity of the proposed diagnosis of reinforced concrete cooling tower shells is difficult to determine unambiguously as it depends on the density of the point cloud and number and size of defects. The approximate processing time of three test fields with the algorithm steps was 20 s. For a cloud with 500,000 points, the detection procedure took almost 2 s and defect vectorisation took 1 to 3 s depending on the shape and size. These results are for a PC with 2.6 GHz Core™ i7 CPU and 16 GB RAM.

4.2. Evaluation Using Traditional Methods

The reliability of the proposed approach as an alternative solution for traditional methods of evaluating the condition of the reinforced concrete shell of the cooling tower was verified by comparing the results with an expert opinion on the condition of the external shell. The scope of the analyses was profoundly affected by the hampered registration of imperfections over the several-hundred-metre cast-in-place surface without fixed and legible identification marks, which hindered the reliability of conventional diagnostic methods. The verification of the damage detection on the reinforced concrete shell consisted of comparing the number of detected defects and their approximate locations. The proposed sequence of algorithm steps facilitated automatic identification of all cavities, scaling and blisters in the shell recorded in the expert report (recognition rate—100%). The reliability of the metric information was verified by juxtaposing damage surfaces from point clouds with results of direct contact measurement from suspended platforms for selected areas of the structure clearly defined with optical instruments. As the reference measurement method involved measuring and multiplying two longest dimensions, longitudinal and transverse, to define the extent of defect with 0.01 m2 accuracy, the extent of defects extracted from TLS data was determined from the width and length derived from contours.
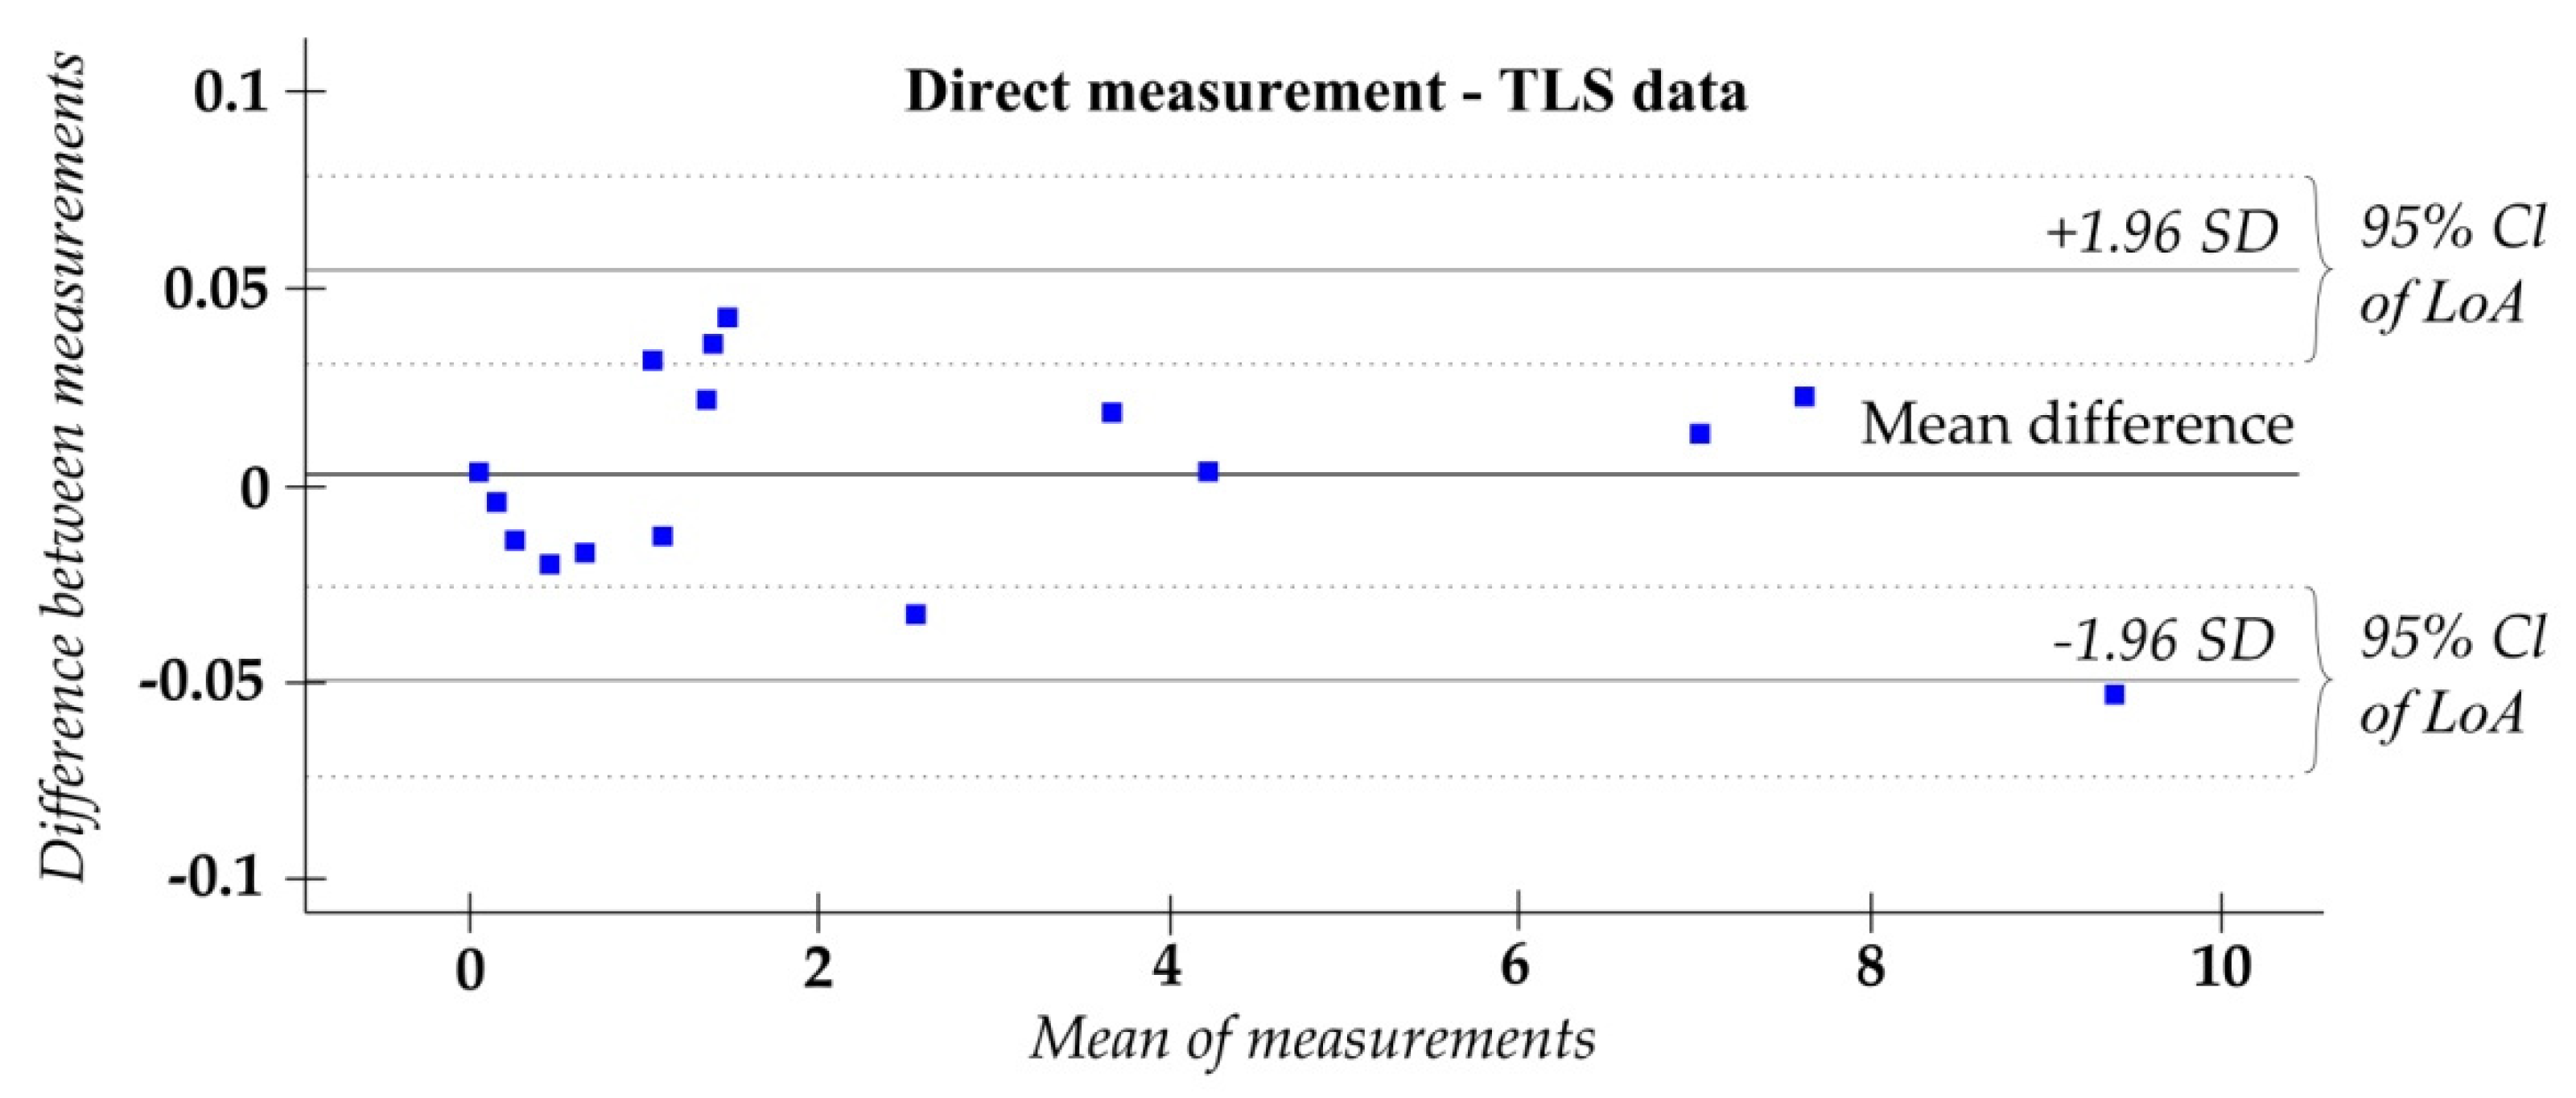
The divergence distribution normality hypothesis for the same defects (direct measurement—TLS data) as the expected model of random error was confirmed with the Shapiro–Wilk test assuming a five per cent significance level (W = 0.97913, p = 0.96 > 0.05). The interpretation of the structure of the population of differences was supplemented with basic descriptive statistics (range—0.1024 m2, mean—0.003 m2, standard deviation—0.027 m2), which initially indicated satisfactory, regarding the industry, consistency of the defect surfaces estimated from point clouds and measured directly. The consistency of distributions of the determined surfaces of the reinforced concrete shell damage was confirmed with the Wilcoxon signed-rank test for two paired populations of equal sizes [88]. A test statistic for a small sub-sample (16 pairs) was calculated from the sum of ranks with the same signs. The surface distribution consistency hypothesis was verified at a five per cent significance level (q = 0.05). The test statistic determined for pairs of observations based on a sum of negative ranks was 57 (sum of positive ranks was 79). The test probability (p = 0.60), higher than the significance level, did not reject the zero hypothesis concerning the consistency of distribution in both datasets, thus indicating lack of statistically significant differences between extents of defects identified from point clouds and by direct measurement. The graphical analysis also confirmed that the zero hypothesis should not be rejected. The differences (within their possible limits of variability) were illustrated on a Bland-Altman plot made using PQStat (Figure 11) [89]. Fifteen out of the 16 differences (94%) were included in the 95% limits of agreement (0.1045 m2), and none of the differences exceeded the confidence interval for the specified limits (set for the representative sample based on its size).
Apart from the assessment of the condition of the reinforced concrete shell necessary to determine the extent of repairs, the usability of the proposed solutions for verifying the effectiveness and durability of the surface repairs aimed at restoring the protective properties of the concrete surround was considered. The region growing algorithm grouped all points of the scalar field of series I and II into healthy surface areas and confirmed the relative invariability of the curvature of the shell following repairs. This was indicative of appropriate removal of loose concrete, effective reprofiling of local scaling, cavities, and blisters of the concrete surround and integrity of the multi-layered arrangement resulting from the repairs (necessary to ensure the durability of the repairs). The results of the novel methods that confirmed the successful repair and durability of the bond between the patching compound and the original material of the shell (delamination of the compound, which could cause quick degradation of the repaired shell, was ruled out) was confirmed in a traditional visual inspection through optical instruments.

4.3. Future Work

The priority in future work will be to conduct case studies illustrating practical applications of the proposed diagnostics concept for assessment of large-geometry objects because of the unquestionable difference between the test object and dimensions of modern hyperboloid structures (the cooling tower of the Jaworzno power plant completed in 2017, for example, is 181.5 m high). The future work will include, in particular, analysis of the usefulness of latest models of terrestrial laser scanners and consideration of the need and cost-effectiveness of using aerial work platforms, lifts, scaffolds or UAV-borne. Another critical direction of future work is accuracy assessment and laboratory analysis of the resolving power of the approach as regards the geometry of the measurement and capabilities of various scanners based on reliable, objective, and complete reference data (obtained by different methods, including UAV). Moreover, an attempt will be made to develop a comprehensive system for defining input parameters that would render the proposed solution completely automatic. Next, research by the authors will focus on the assessment of the use of received beam intensity to analyse the condition of hyperboloid structures. Radiometry could complement the proposed damage detection method based on local curvature analysis in particular as regards shell perforations with moisture leakage, often accompanied by stains and weeping on the shell. Intensity analysis could be used to identify material changes at repair sites, thus improving the reliability of the repair assessment and helping verify the amount of patching compound used. Another planned publication will focus on the usability of terrestrial laser scanning for investigating the geometry of hyperboloid cooling towers (analysis of deflection, ovalisation, and geometric imperfections of the structure and assessment of the distribution of the thickness of the reinforced concrete shell considering potential changes after repairs and reinforcement) and construction of a diagnostics model that would correctly reflect the behaviour of the object under actual operating conditions. Numeric simulations that take into consideration basic loads and material and geometric non-linearity of the hyperboloid shell will be implemented to account for the nature of structural damage and deformations. They will be considered as the foundation for determining the appropriate extent of structure management interventions.

5. Conclusions

The paper presents a highly-specialised solution for detecting damage to the hyperboloid shell of a cooling tower using laser scanning point clouds of an object after fifty years of service. The proposed sequence of algorithm steps requiring low computing power involves classification and segmentation of TLS data into points representing a uniform surface and its individual defects using principal component analysis, region growing, and connected component labelling. The present solution utilises an original method for transforming the values of local surface curvature determined using PCA with the square root function in order to unambiguously represent the shape of defects and improve the effectiveness of extraction. Cartometric vectorisation of defects of the reinforced concrete shell was performed using a convex hull with a parameter that restricted its maximum edge length.
The empirical research aimed at verifying the procedures for detecting and classifying cooling tower shell damage facilitated the assessment of the condition of the several-hundred-metre cast-in-place structure. Results of the method (consistent with the reference measurement in 94%) confirmed the effectiveness of the automatic extraction and cartometric representation of defects while demonstrating a greater efficiency and detail level than a direct measurement from suspended platforms. Another application for the solutions was presented as well: verification of the effectiveness and durability of surface repairs. Analysis of the local curvature of the repaired shell, transformed with the square root function, proved to be a reliable baseline for the assessment of the repairs aimed at restoring the protective properties of the concrete surround, desirable especially in the warranty period. The comparability of datasets from TLS data acquired in three consecutive series facilitated verification of the filling in of all scaling, cavities, and blisters in the concrete surround as well as a periodic verification of the continuity of the surface at repair sites, which was indicative of appropriate bonding of the patching compound with the original material.
The proposed strategy for assessing the condition of the hyperboloid cooling tower shell, which provides for automatic detection and cartometric representation of damage as well as verification of surface continuity at repair sites, does not use the theoretical shape of the hyperboloid cooling tower shells, so is very promising also considering diagnostics of other reinforced concrete objects. The series of algorithmic steps with low computing requirements based on the analysis of a local curvature transformed with the novel transform (square root function) implemented in open source software is a reliable and cheaper alternative for subjective and arduous conventional methods. Automated point cloud processing can be used to identify scaling, cavities, and blisters, even those scattered over hundreds of metres of non-plane-like surfaces. Apart from determining the degree of degradation, the proposed solution can provide diagnostic supervision over repair works to verify the effectiveness and durability of repairs. Nevertheless, its effectiveness hinges upon the measurement resolution of the data. In addition, the input algorithm parameters that affect the effectiveness of the approach are adapted to the technical specifications of the equipment used, data resolution, and surface properties of the test object and are not universal solutions. These specific input parameters for the algorithms may be of small value in the case of different technical parameters and settings of the equipment, measurement geometries, or nature of the scanned surface. The planned high-priority further research is to develop a comprehensive system for defining input parameters for consecutive algorithm steps of the present approach to inspect other structures.

Author Contributions

All authors contributed significantly to the manuscript. M.M. was responsible for the original idea, collected data, conducted data analysis, and contributed to manuscript revision. P.G. contributed to field data collection and provided theoretical and conceptual inputs. All authors have read and agreed to the published version of the manuscript.

Funding

This research was partly financed by the Ministry of Science and Higher Education of the Republic of Poland (4363/KG/2015, 2307/KG/2018) and is a part of sewed up PhD thesis [90] of the first Author. APC was funded by the subvention of Minister of Science and Higher Education for the University of Agriculture in Krakow in 2019.

Conflicts of Interest

The authors declare no conflict of interest.

References

  1. Bamu, P.C.; Zingoni, A. Damage, deterioration and the long-term structural performance of cooling-tower shells: A survey of developments over the past 50 years. Eng. Struct. 2005, 27, 1794–1800. [Google Scholar] [CrossRef]
  2. Konderla, P.; Kutyłowski, R.; Stefanek, K. Koncepcja wzmocnienia konstrukcji chłodni kominowej materiałem kompozytowym z matrycą cementową. [Concept for reinforcing the structure of a cooling tower with a cement matrix composite]. In Proceedings of the Construction Failures, 26th Scientific Conference, Szczecin-Miedzyzdroje, 21–24 May 2013; pp. 251–258. Available online: http://www.awarie.zut.edu.pl/files/ab2013/referaty/03_Diagnostyka_w_ocenie_bezpieczenstwa_konstrukcji/04_Konderla_P_i_inni_Koncepcja_wzmocnienia_konstrukcji_chlodni_kominowej_materialem_kompozytowym_z_matryca_cementowa.pdf (accessed on 15 January 2020).
  3. Etcheverry, L. Cooling Tower Repairs. Power 2004, 7–8, 17–18. Available online: http://www.chemistry.uoc.gr/demadis/pdfs/9-Scale%20Power%202004.pdf (accessed on 15 January 2020).
  4. Harte, R.; Krätzig, W.B.; Montag, U.; Petryna, Y.S. Damage, rehabilitation and residual life duration of natural draft cooling towers. VGB PowerTech 2005, 6, 61–65. Available online: https://www.vgb.org/en/pt_06_2005_e-p-10487.PDF (accessed on 15 January 2020).
  5. Zacharopoulou, A.; Zacharopoulou, E.; Batis, G. Statistics Analysis Measures Painting of Cooling Tower. Int. J. Corros. 2013, 1, 1–9. [Google Scholar] [CrossRef]
  6. Jawański, W.; Stefanek, K. Remonty chłodni kominowych—20 lat technologii firmy Sika w Polsce. [Cooling tower renovation. 20 years of Sika technology in Poland]. In Proceedings of the Construction Failures, 25th Scientific Conference, Szczecin-Miedzyzdroje, 24–27 May 2011, pp. 337–348. Available online: http://www.awarie.zut.edu.pl/files/ab2011/referaty/T1_03_Referaty_sponsorowane/01_Jawanski_W_i_inni_Remonty_chlodni_kominowych_20_lat_technologii_firmy_Sika_w_Polsce.pdf (accessed on 15 January 2020).
  7. Chung, H.W. Assessment and classification of damages in reinforced concrete structures. ConcrInt 1994, 16, 55–59. Available online: https://www.concrete.org/publications/internationalconcreteabstractsportal/m/details/id/4611 (accessed on 15 January 2020).
  8. Chmielewski, T.; Górski, P. O ocenie stanu technicznego chłodni kominowych. [On assessing the condition of cooling towers]. Prz. Bud. 2010, 81, 48–51. Available online: http://yadda.icm.edu.pl/baztech/element/bwmeta1.element.baztech-article-BTB2-0061-0068 (accessed on 15 January 2020).
  9. Kutyłowski, R. Diagnostyka Chłodni Kominowych. [Diagnostics of Cooling Towers]; Oficyna Wydawnicza Politechniki Wrocławskiej: Wrocław, Poland, 2013; pp. 5–136. [Google Scholar]
  10. Lechman, M.; Chruściel, W.; Lamenta, A. Program utrzymania z uwzględnieniem trwałości hiperboloidalnych chłodni kominowych po 30 latach eksploatacji. [Maintenance programme considering life expectancy for cooling towers after 30 years of service]. Prz. Bud. 2012, 5, 30–35. Available online: http://yadda.icm.edu.pl/baztech/element/bwmeta1.element.baztech-article-BTB6-0003-0036?q=bwmeta1.element.baztech-volume-0033-2038-przeglad_budowlany-2012-r__83_nr_5;5&qt=CHILDREN-STATELESS (accessed on 15 January 2020).
  11. Dubis, J.; Persona, M. Komputerowy system rejestracji, obróbki i przetwarzania parametrów z inwentaryzacji uszkodzeń chłodni kominowych. [Computer system for registering, treatment, and processing of parameters for cooling tower damage records]. Conf. Cool. Towers Eff. Prot. Repair Syst. 1991, 55–60. [Google Scholar]
  12. Kim, M.K.; Wang, Q.; Li, H. Non-contact sensing based geometric quality assessment of buildings and civil structures: A review. Autom. Constr. 2019, 100, 163–179. [Google Scholar] [CrossRef]
  13. Antoniszyn, K.; Hawro, L.; Konderla, P.; Kutyłowski, R. Wybrane problemy procesów modernizacji i remontów chłodni kominowych. [Selected issues with upgrading and repairing cooling towers]. Mater. Bud. 2016, 5, 24–25. [Google Scholar] [CrossRef]
  14. Mills, J.; Barber, D. An Addendum to the Metric Survey Specifications for English Heritage—The Collection and Archiving of Point Cloud Data Obtained by Terrestrial Laser Scanning or Other Methods; The Metric Survey Team: York, UK, 2003. [Google Scholar]
  15. Park, H.S.; Lee, H.M.; Adeli, H.; Lee, I. A New Approach for Health Monitoring of Structures: Terrestrial Laser Scanning. Comput. Aided Civ. Infrastruct. Eng. 2007, 22, 19–30. [Google Scholar] [CrossRef]
  16. Ioannidis, C.; Valani, A.; Georgopoulos, A.; Tsiligiris, E. 3D model generation for deformation analysis using laser scanning data of a cooling tower. In Proceedings of the 3rd IAG 12th FIG Symposium on Deformation Measurements, Baden, Austria; pp. 22–24. Available online: http://www.fig.net/commission6/baden_2006/ (accessed on 15 January 2020).
  17. Ioannidis, C.; Valani, A.; Soile, S.; Tsiligiris, E.; Georgopoulos, A. Alternative techniques for the creation of 3D models for finite element analysis—Application on a cooling tower. Proc. Opt. 3-D Meas. Tech. VIII Vol. II 2007. [Google Scholar] [CrossRef]
  18. Głowacki, T.; Grzempowski, P.; Sudoł, E.; Wajs, J.; Zając, M. The assessment of the application of terrestrial laser scanning for measuring the geometrics of cooling towers. Geomat. Landmanag. Landsc. 2016, 4, 49–57. [Google Scholar] [CrossRef]
  19. Piot, S.; Lançon, H. New Tools for the Monitoring of Cooling Towers. 6th European Workshop on Structural Health Monitoring. In Proceedings of the 6th European Workshop on Structural Health Monitoring, Germany, 2012. Available online: https://www.ndt.net/article/ewshm2012/papers/tu4b3.pdf (accessed on 15 January 2020).
  20. Camp, G.; Carreaud, P.; Lançon, H. Large Structures: Which Solutions for Health Monitoring? Int. Arch. Photogramm. Remote Sens. Spat. Inf. Sci. 2013, XL-5/W2, 137–141. [Google Scholar] [CrossRef] [Green Version]
  21. Laefer, D.F.; Truong-Hong, L.; Carr, H.; Singh, M. Crack Detection Limits in Unit Based Masonry with Terrestrial Laser Scanning. NDT&E Int. 2014, 62, 66–76. [Google Scholar] [CrossRef] [Green Version]
  22. Olsen, M.J.; Kuester, F.; Chang, B.J.; Hutchinson, T.C. Terrestrial laser scanning-based structural damage assessment. J. Comput. Civ. Eng. 2009, 24, 264–272. [Google Scholar] [CrossRef]
  23. Mosalam, K.M.; Shakhzod, M.; Park, S.T. Applications of laser scanning to structures in laboratory tests and field surveys. Struct. Control Health Monit. 2014, 21, 115–134. [Google Scholar] [CrossRef]
  24. Chen, S.E. Laser Scanning Technology for Bridge Monitoring. In Laser Scanner Technology; IntechOpen: London, UK, 2012; pp. 71–92. [Google Scholar] [CrossRef] [Green Version]
  25. Anil, E.B.; Akinci, B.; Garrett, J.H.; Kurc, O. Characterization of Laser Scanners for Detecting Cracks for Post-earthquake Damage Inspection. Proc. Int. Symp. Autom. Robot. Constr. Min. 2013, 313–320. [Google Scholar] [CrossRef] [Green Version]
  26. Reyno, T.; Marsden, C.; Wowk, D. Surface damage evaluation of honeycomb sandwich aircraft panels using 3D scanning technology. NDT&E Int. 2018, 97, 11–19. [Google Scholar] [CrossRef]
  27. Erkal, B.G.; Hajjar, J.F. Laser-based surface damage detection and quantification using predicted surface properties. Autom. Constr. 2017, 83, 285–302. [Google Scholar] [CrossRef]
  28. Teza, G.; Galgaro, A.; Moro, F. Contactless recognition of concrete surface damage from laser scanning and curvature computation. NDT&E Int. 2009, 42, 240–249. [Google Scholar] [CrossRef]
  29. Laefer, D.F.; Gannon, J.; Deely, E. Reliability of crack detection methods for baseline condition assessments. J. Infrastruct. Syst. 2010, 16, 129–137. [Google Scholar] [CrossRef]
  30. Tang, P.; Huber, D.; Akinci, B. Characterization of Laser Scanners and Algorithms for Detecting Flatness Defects on Concrete Surfaces. J. Comput. Civ. Eng. 2010, 25, 31–42. [Google Scholar] [CrossRef]
  31. Yoon, J.; Sagong, M.; Lee, J.S.; Lee, K. Feature extraction of a concrete tunnel liner from 3D laser scanning data. NDT&E Int. 2009, 42, 97–105. [Google Scholar] [CrossRef]
  32. Suchocki, C.; Błaszczak-Bąk, W. Down-Sampling of Point Clouds for the Technical Diagnostics of Buildings and Structures. Geosciences 2019, 9, 70. [Google Scholar] [CrossRef] [Green Version]
  33. Maalek, R.; Lichti, D.D.; Walker, R.; Bhavnani, A.; Ruwanpura, J.Y. Extraction of Pipes and Flanges from Point Clouds for Automated Verification of Pre-Fabricated Modules in Oil and Gas Refinery Projects. Autom. Constr. 2019, 103, 150–167. [Google Scholar] [CrossRef]
  34. Janowski, A.; Nagrodzka-Godycka, K.; Szulwic, J.; Ziolkowski, P. Remote sensing and photogrammetry techniques in diagnostics of concrete structures. Comput. Concr. 2016, 18, 405–420. [Google Scholar] [CrossRef] [Green Version]
  35. Armesto-González, J.; Riveiro Rodríguez, B.; González-Aguilera, D.; Rivas-Brea, M.T. Terrestrial laser scanning intensity data applied to damage detection for historical buildings. J. Archaeol. Sci. 2010, 37, 3037–3047. [Google Scholar] [CrossRef]
  36. Hancock, C.M.; Roberts, G.W.; Bisby, L.; Cullen, M.; Arbuckle, J. Detecting fire damaged concrete using laser scanning. Proc. FIG Work. Week 2012, 1–9. Available online: https://www.researchgate.net/publication/275581624_Detecting_Fire_Damaged_Concrete_Using_Laser_Scanning (accessed on 15 January 2020).
  37. Tsai, Y.C.J.; Li, F. Critical assessment of detecting asphalt pavement cracks under different lighting and low intensity contrast conditions using emerging 3D laser technology. J. Transp. Eng. 2012, 138, 649–656. [Google Scholar] [CrossRef]
  38. Xu, X.; Yang, H.; Neumann, I. Concrete Crack Measurement and Analysis Based on Terrestrial Laser Scanning Technology. Sens. Transducers 2015, 186, 168–172. [Google Scholar]
  39. Cho, S.; Park, S.; Cha, G.; Oh, T. Development of Image Processing for Crack Detection on Concrete Structures through Terrestrial Laser Scanning Associated with the Octree Structure. Appl. Sci. 2018, 8, 2373. [Google Scholar] [CrossRef] [Green Version]
  40. Tan, K.; Cheng, X. Correction of incidence angle and distance effects on TLS intensity data based on reference targets. Remote Sens. 2016, 8, 251. [Google Scholar] [CrossRef] [Green Version]
  41. Höfle, B.; Pfeifer, N. Correction of laser scanning intensity data: Data and model-driven approaches. ISPRS J. Photogramm. Remote Sens. 2007, 62, 415–433. [Google Scholar] [CrossRef]
  42. Yan, W.Y.; Shaker, A. Radiometric normalization of overlapping LiDAR intensity data for reduction of striping noise. Int. J. Digit. Earth 2016, 9, 649–661. [Google Scholar] [CrossRef]
  43. Kaasalainen, S.; Jaakkola, A.; Kaasalainen, M.; Krooks, A.; Kukko, A. Analysis of incidence angle and distance effects on terrestrial laser scanner intensity: Search for correction methods. Remote Sens. 2011, 3, 2207–2221. [Google Scholar] [CrossRef] [Green Version]
  44. López, M.; Martínez, J.; Matías, J.M.; Vilán, J.A.; Taboada, J. Application of a Hybrid 3D-2D Laser Scanning System to the Characterization of Slate Slabs. Sensors 2010, 10, 5949–5961. [Google Scholar] [CrossRef] [Green Version]
  45. Hildmann, H.; Kovacs, E. Review: Using Unmanned Aerial Vehicles (UAVs) as Mobile Sensing Platforms (MSPs) for Disaster Response, Civil Security and Public Safety. Drones 2019, 3, 59. [Google Scholar] [CrossRef] [Green Version]
  46. Kerle, N.; Nex, F.; Gerke, M.; Duarte, D.; Vetrivel, A. UAV-Based Structural Damage Mapping: A Review. ISPRS Int. J. Geo-Inf. 2020, 9, 14. [Google Scholar] [CrossRef] [Green Version]
  47. Morgenthal, G.; Hallermann, N. Quality Assessment of Unmanned Aerial Vehicle (UAV) Based Visual Inspection of Structures. Adv. Struct. Eng. 2014, 17, 289–302. [Google Scholar] [CrossRef]
  48. Na, W.S.; Baek, J. Impedance-Based Non-Destructive Testing Method Combined with Unmanned Aerial Vehicle for Structural Health Monitoring of Civil Infrastructures. Appl. Sci. 2017, 7, 15. [Google Scholar] [CrossRef] [Green Version]
  49. Yao, H.; Qin, R.; Chen, X. Unmanned Aerial Vehicle for Remote Sensing Applications—A Review. Remote Sens. 2019, 11, 1443. [Google Scholar] [CrossRef] [Green Version]
  50. Liu, W.; Chen, S.; Hauser, E. LiDAR-Based Bridge Structure Defect Detection. Exp. Tech. 2011, 35, 27–34. [Google Scholar] [CrossRef]
  51. Chen, X.; Li, J.A. Feasibility Study on Use of Generic Mobile Laser Scanning System for Detecting Asphalt Pavement Cracks. ISPRS Int. Arch. Photogramm. Remote Sens. Spat. Inf. Sci. 2016, XLI-B1, 545–549. [Google Scholar] [CrossRef]
  52. Kim, M.K.; Cheng, J.C.P.; Sohn, H.; Chang, C. A framework for dimensional and surface quality assessment of precast concrete elements using BIM and 3D laser scanning. Autom. Constr. 2014, 49, 225–238. [Google Scholar] [CrossRef]
  53. Law, D.W.; Silcock, D.; Holden, L. Terrestrial laser scanner assessment of deteriorating concrete structures. Struct. Control Health Monit. 2018, 25, 2156. [Google Scholar] [CrossRef]
  54. Jovančević, I.; Pham, H.; Orteu, J.; Gilblas, R.; Harvent, J.; Maurice, X.; Brethes, L. 3D Point Cloud Analysis for Detection and Characterization of Defects on Airplane Exterior Surface. J. Nondestruct. Eval. 2017, 36, 74. [Google Scholar] [CrossRef] [Green Version]
  55. Mizoguchi, T.; Koda, Y.; Iwaki, I.; Wakabayashi, H.; Kobayashi, Y.; Shirai, K.; Hara, Y.; Lee, H.S. Quantitative scaling evaluation of concrete structures based on terrestrial laser scanning. Autom. Constr. 2013, 35, 263–274. [Google Scholar] [CrossRef]
  56. Wang, M.; Tseng, Y.H. LIDAR data segmentation and classification based on octree structure. Proc. ISPRS Congr. 2004, 286–291. Available online: https://pdfs.semanticscholar.org/8523/d435f3d0772454fe7e2547ae0a51290bf59a.pdf (accessed on 15 January 2020).
  57. Von Hansen, W.; Michaelsen, E.; Thoennessen, U. Cluster analysis and priority sorting in huge point clouds for building reconstruction. Proc. Int. Conf. Pattern Recognit. 2006, 23–26. [Google Scholar] [CrossRef]
  58. Hoppe, H.; DeRose, T.; Duchamp, T.; McDonald, J.; Stuetzle, W. Surface Reconstruction from Unorganized Points. In Proceedings of the 19th Annual Conference on Computer Graphics and Interactive Techniques, 1992; pp. 71–78. Available online: http://hhoppe.com/recon.pdf (accessed on 15 January 2020).
  59. Pauly, M.; Gross, M.; Kobbelt, L.P. Efficient simplification of point-sampled surfaces. IEEE Vis. 2002, 163–170. [Google Scholar] [CrossRef] [Green Version]
  60. Rabbani, T.; van Den Heuvel, F.; Vosselmann, G. Segmentation of Point Clouds Using Smoothness Constraint. International Archives of Photogrammetry. Remote Sens. Spat. Inf. Sci. 2006, 36, 248–253. Available online: https://www.isprs.org/proceedings/XXXVI/part5/paper/RABB_639.pdf (accessed on 15 January 2020).
  61. Rusu, R.B. Semantic 3D Object Maps for Everyday Manipulation in Human Living Environments. Künstl. Intell. 2010, 24, 345–348. [Google Scholar] [CrossRef] [Green Version]
  62. Weinmann, M. Reconstruction and Analysis of 3D Scenes; Springer International Publishing: Cham, Switzerland, 2016. [Google Scholar] [CrossRef]
  63. Ni, H.; Lin, X.; Ning, X.; Zhang, J. Edge Detection and Feature Line Tracing in 3D-Point Clouds by Analyzing Geometric Properties of Neighborhoods. Remote Sens. 2016, 8, 710. [Google Scholar] [CrossRef] [Green Version]
  64. CloudCompare. Available online: https://www.cloudcompare.org (accessed on 20 October 2019).
  65. Karhunen, J.; Joutsensalo, J. Generalizations of principal component analysis, optimization problems, and neural networks. Neural Netw. 1995, 8, 549–562. [Google Scholar] [CrossRef]
  66. Abdel-Qader, I.; Pashaie-Rad, S.; Abudayyeh, O.; Yehia, S. PCA-Based algorithm for unsupervised bridge crack detection. Adv. Eng. Softw. 2006, 37, 771–778. [Google Scholar] [CrossRef]
  67. Jollife, I.T. Principal Component Analysis; Springer: New York, NY, USA, 1986. [Google Scholar] [CrossRef]
  68. Shen, Y.; Lindenbergh, R.; Wang, J.; G. Ferreira, V. Extracting Individual Bricks from a Laser Scan Point Cloud of an Unorganized Pile of Bricks. Remote Sens. 2018, 10, 1709. [Google Scholar] [CrossRef] [Green Version]
  69. Maalek, R.; Lichti, D.D.; Ruwanpura, J.Y. Automatic Recognition of Common Structural Elements from Point Clouds for Automated Progress Monitoring and Dimensional Quality Control in Reinforced Concrete Construction. Remote Sens. 2019, 11, 1102. [Google Scholar] [CrossRef] [Green Version]
  70. Cheng, Z.; Zhang, X. Estimating differential quantities from point cloud based on a linear fitting of normal vectors. Inf. Sci. 2009, 52, 431–444. [Google Scholar] [CrossRef]
  71. Vo, A.V.; Truong-Hong, L.; Laefer, D.F.; Bertolotto, M. Octree-based Region Growing for Point Cloud Segmentation. ISPRS J. Photogramm. Remote Sens. 2015, 104, 88–100. [Google Scholar] [CrossRef]
  72. Belton, D.; Lichti, D.D. Classification and segmentation of terrestrial laser scanner point clouds using local variance information. Proc. ISPRS Comm. V Symp. Image Eng. Vis. Metrol. 2006, 44–49. Available online: https://www.isprs.org/PROCEEDINGS/XXXVI/part5/paper/BELT_619.pdf (accessed on 15 January 2020).
  73. Morrison, D.F. Wielowymiarowa Analiza Statystyczna. [Multi-Dimensional Statistical Analysis]; Państwowe Wydawnictwo Naukowe: Warszawa, Poland, 1990. [Google Scholar]
  74. Bronsztejn, I.N.; Musiol, G.; Siemiendiajew, K.A. Nowoczesne Kompendium Matematyki. Nowoczesne Kompendium Matematyki [Modern Compendium of Mathematics]; Wydawnictwo Naukowe PWN: Warszawa, Poland, 2017. [Google Scholar]
  75. Jaboyedoff, M.; Metzger, R.; Oppikofer, T.; Couture, R.; Derron, M.H.; Locat, J.; Durmel, D. New insight techniques to analyze rock-slope relief using DEM and 3D-imaging clouds points: COLTOP-3D software. In Rock Mechanics: Meeting Society’s Challenges and Demands; Taylor & Francis: Abingdon, UK, 2007; pp. 61–68. [Google Scholar] [CrossRef]
  76. Besl, P.J.; Jain, R.C. Segmentation through Variable-order Surface Fitting. IEEE Trans. Pattern Anal. Mach. Intell. 1988, 10, 167–192. [Google Scholar] [CrossRef] [Green Version]
  77. Poux, F.; Billen, R. Voxel-Based 3D Point Cloud Semantic Segmentation: Unsupervised Geometric and Relationship Featuring vs Deep Learning Methods. ISPRS Int. J. Geo-Inf. 2019, 8, 213. [Google Scholar] [CrossRef] [Green Version]
  78. Xu, Y.; Tuttas, S.; Hoegner, L.; Stilla, U. Voxel-based segmentation of 3D point clouds from construction sites using a probabilistic connectivity model. Pattern Recognit. Lett. 2018, 102, 67–74. [Google Scholar] [CrossRef]
  79. Wang, L.; Huang, Y.; Shan, J.; He, L. MSNet: Multi-Scale Convolutional Network for Point Cloud Classification. Remote Sens. 2018, 10, 612. [Google Scholar] [CrossRef] [Green Version]
  80. Vieira, M.; Shimada, K. Surface Extraction from Point-sampled Data through Region Growing. Int. J. CAD/CAM 2009, 5, 1–15. Available online: http://www.koreascience.or.kr/article/JAKO200503018236590.page (accessed on 15 January 2020).
  81. Weibull, W. A statistical distribution function of wide applicability. J. Appl. Mech. Trans. 1951, 18, 293–297. Available online: http://www.barringer1.com/wa_files/Weibull-ASME-Paper-1951.pdf (accessed on 15 January 2020).
  82. Pu, S.; Vosselman, G. Automatic extraction of building features from terrestrial laser scanning. Proc. ISPRS Comm. V Symp. Image Eng. Vis. Metrol. 2006, 5–9. Available online: https://www.isprs.org/proceedings/XXXVI/part5/paper/1219_Dresden06.pdf (accessed on 15 January 2020).
  83. Samet, H.; Tamminen, M. Efficient Component Labeling of Images of Arbitrary Dimension Represented by Linear Bintrees. IEEE Trans. Pattern Anal. Mach. Intell. 1988, 10, 579–586. [Google Scholar] [CrossRef] [Green Version]
  84. Trevor, A.J.; Gedikli, S.; Rusu, R.B.; Christensen, H.I. Efficient organized point cloud segmentation with connected components. Semant. Percept. Map. Explor. 2013. Available online: https://cs.gmu.edu/~kosecka/ICRA2013/spme13_trevor.pdf (accessed on 15 January 2020).
  85. Poux, F.; Neuville, R.; Van Wersch, L.; Nys, G.-A.; Billen, R. 3D Point Clouds in Archaeology: Advances in Acquisition, Processing and Knowledge Integration Applied to Quasi-Planar Objects. Geosciences 2017, 7, 96. [Google Scholar] [CrossRef] [Green Version]
  86. De Berg, M.; Van Kreveld, M.; Overmars, M.; Schwarzkopf, O.C. Computational Geometry: Algorithms and Applications; Springer: Berlin/Heidelberg, Germany, 2000. [Google Scholar] [CrossRef]
  87. Barber, C.B.; Dobkin, D.P.; Huhdanpaa, H. The Quickhull Algorithm for Convex Hulls. ACM Trans. Math. Softw. 1996, 22, 469–483. [Google Scholar] [CrossRef] [Green Version]
  88. Wilcoxon, F. Individual comparisons by ranking methods. Biometrics 1945, 80–83. [Google Scholar] [CrossRef]
  89. Bland, J.M.; Altman, D.G. Measuring agreement in method comparison studies. Stat. Methods Med. Res. 1999, 8, 135–160. [Google Scholar] [CrossRef]
  90. Makuch, M. Application of Terrestrial Laser Scanning in the Process of Modernization of Hyperboloid Cooling Towers. Ph.D. Thesis, University of Agriculture in Krakow, Kraków, Poland, 21 March 2018. (In Polish). [Google Scholar]
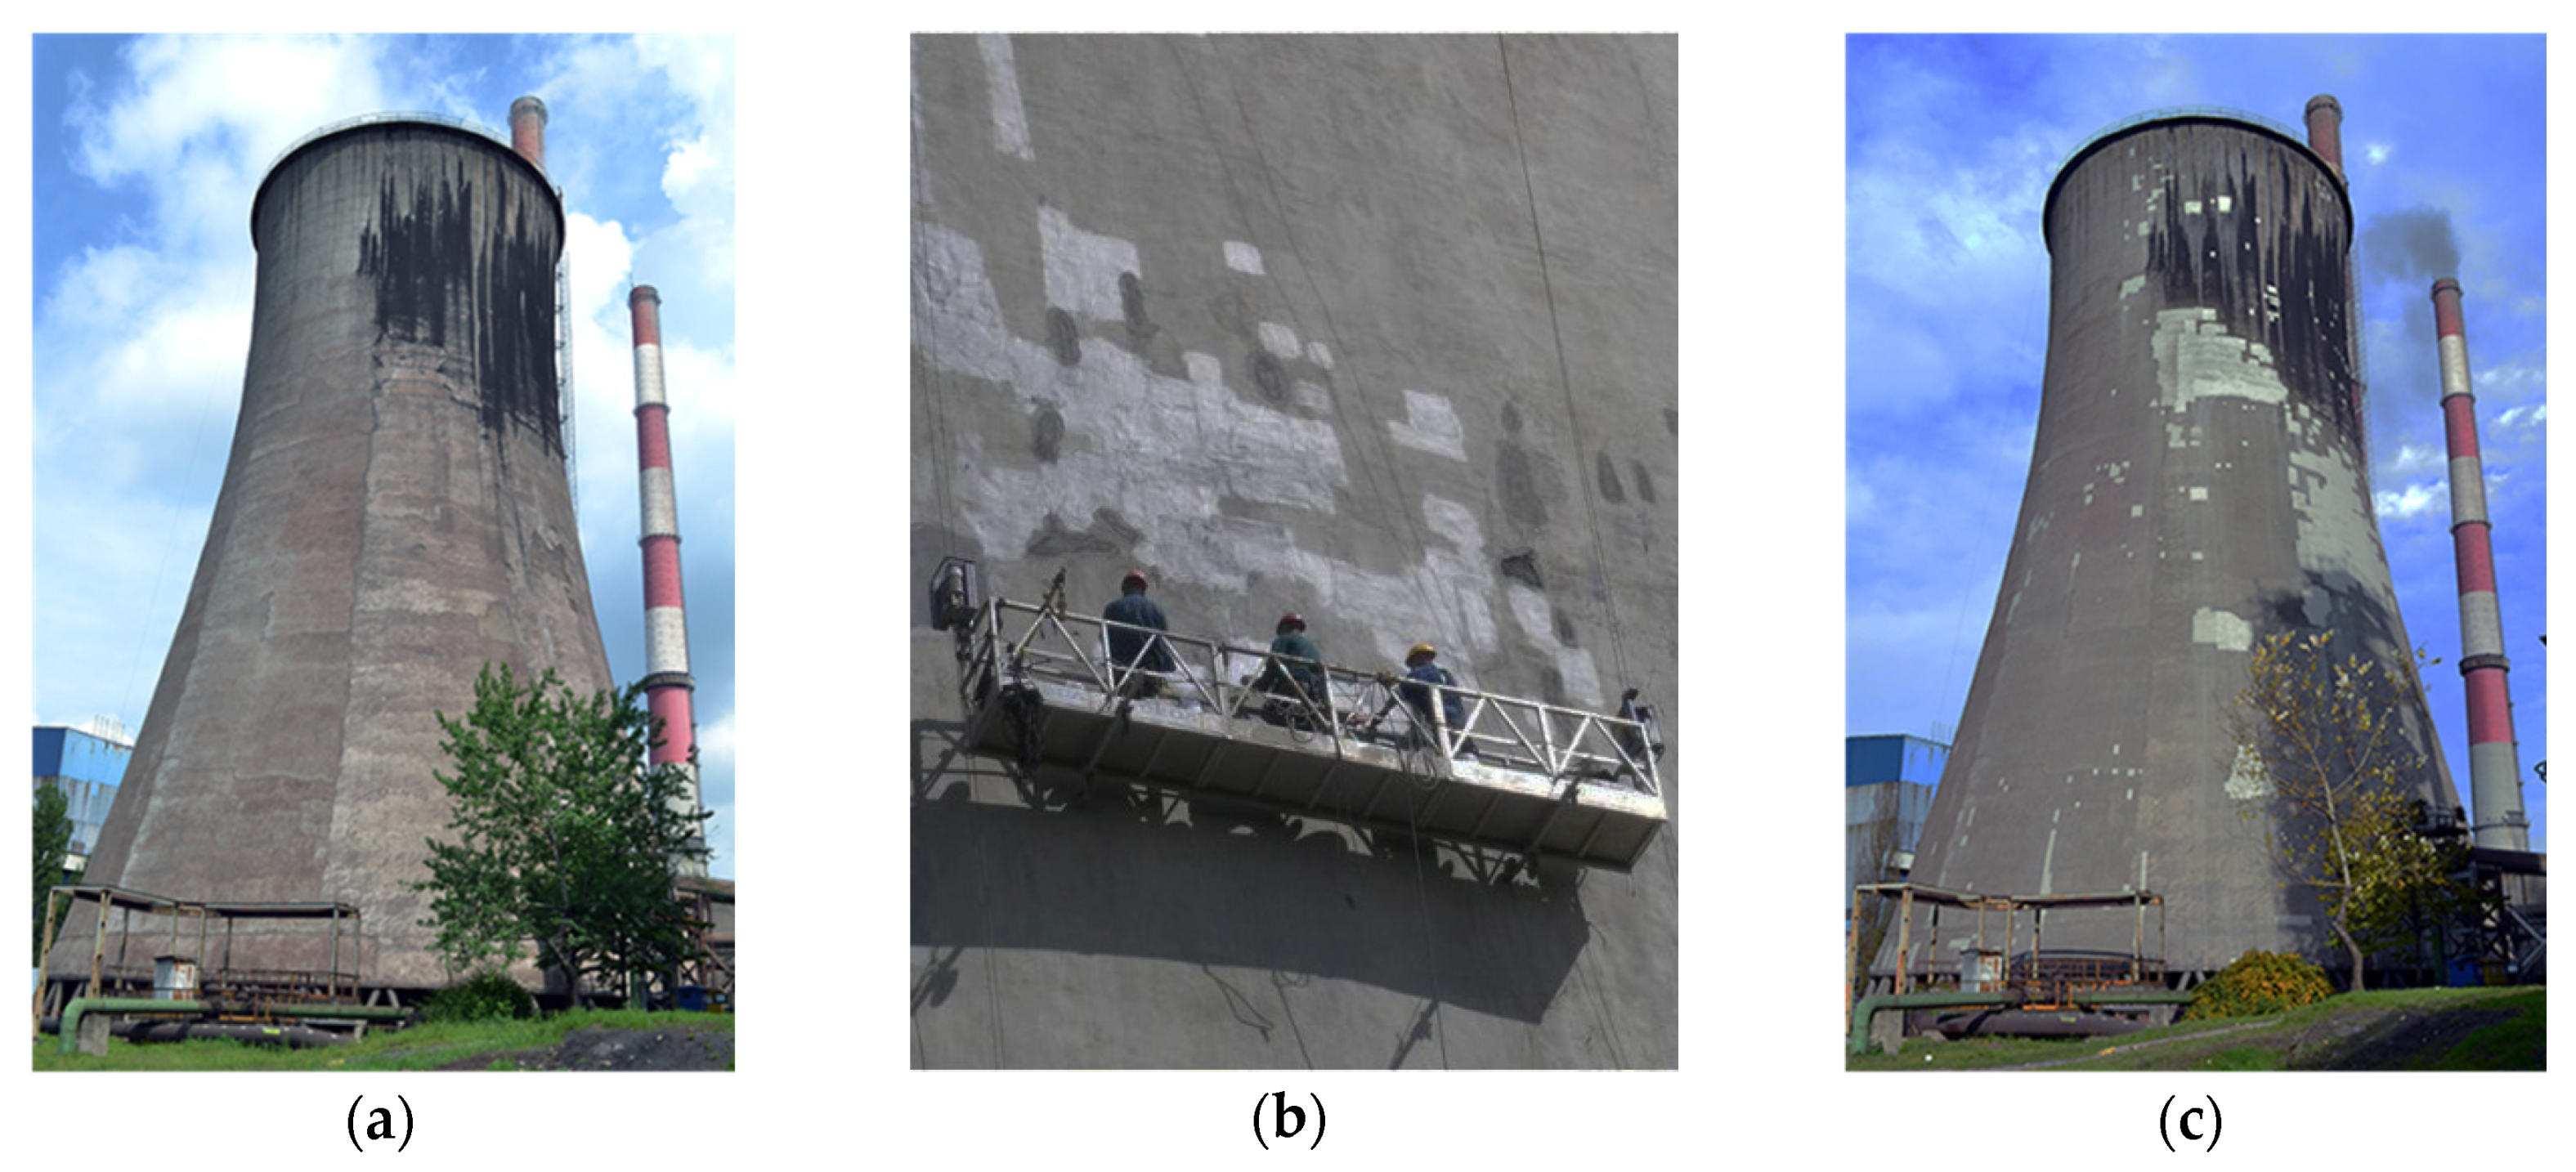
Figure 1. The test object and repairs: (a) the cooling tower before repairs; (b) shell repair; (c) the cooling tower after repairs.
Remotesensing 12 01542 g001
Figure 2. Test object measurement series: (a) Series I—before repairs; (b) Series II—after repairs; (c) Series III—after a winter.
Remotesensing 12 01542 g002
Figure 3. Laser scanning of the test object: (a) Cooling tower measurement with Z+F Imager 5010; (b) Targets Z+F Professional; (c) Steel reference spheres with adapters (protected by registered utility model No. W.126075, creator: Maria Makuch).
Remotesensing 12 01542 g003
Figure 4. Terrestrial laser scanning (TLS) data excerpt with Triangulated Irregular Network (TIN): (a) Series I—damaged shell; (b) Series II—healthy shell; (c) Series III—healthy shell.
Remotesensing 12 01542 g004
Figure 5. Step-by-step research methodology: (a) Step 1: Data pre-processing; (b) Step 2: Curvature estimation; (c) Step 3: Segmentation; (d) Step 4: Labelling; (e) Step 5: Defect vectorisation.
Remotesensing 12 01542 g005
Figure 6. Example data with results of local curvature estimation ( N ): (a) Series I—damaged shell (CV = 67.16%); (b) Series II—healthy shell (CV = 25.11%); (c) Series III—healthy shell (CV = 23.61%).
Remotesensing 12 01542 g006
Figure 7. Value N distribution charts with Weibull distribution density curves for sample data: (a) Series I—damaged shell; (b) Series II—healthy shell; (c) Series III—healthy shell.
Remotesensing 12 01542 g007
Figure 8. Example data with results of local curvature estimation, not transformed (N)—Series I: (a) Test field 1; (b) Test field 2; (c) Test field 3.
Remotesensing 12 01542 g008
Figure 9. Results of local curvature analysis with the square root function ( N ); Test field 1: (a) Series I; (b) Series II; (c) Series III; Test field 2: (d) Series I; (e) Series II; (f) Series III; Test field 3: (g) Series I; (h) Series II; (i) Series III.
Remotesensing 12 01542 g009
Figure 10. Data sample (series I) demonstrating the conformity of extracted damage contours with reference TIN models: (a) Test field 1; (b) Test field 2; (c) Test field 3.
Remotesensing 12 01542 g010
Figure 11. A Bland-Altman plot of differences and their possible limits of variability.
Remotesensing 12 01542 g011
Table 1. Input parameters for the sequence of algorithm steps—series I, II, III.
StepAlgorithm/FunctionParameters
1: Data pre-processingstatistical outlier removalk=20, 2σ
2: Curvature estimationprincipal component analysis, square root functionr=2rmin
3: Segmentationcoefficient of variation, region growingCVth = 30%, cth =0.02
4: Labellingconnected component labellingo = 8, p = 10
5: Defect vectorizationconvex hullL = 0.01 m
Table 2. Statistical parameters of value N   of sample test fields.
Test Field SERIES ISERIES IISERIES III
x ¯ σCV x ¯ σCV x ¯ σCV
1: 50 m above ground0.0290.02483%0.0210.00524%0.0220.00627%
2: 30 m above ground0.0490.03471%0.0170.00422%0.0180.00422%
3: 10 m above ground0.0310.02168%0.0180.00422%0.0200.00525%