Article

Comparison of Computer Extended Descriptive Geometry (CeDG) with CAD in the Modeling of Sheet Metal Patterns

by
Manuel Prado-Velasco
* and
Rafael Ortiz-Marín
Multiscale Modelling in Bioengineering Group, Department of Engineering Graphics, University of Seville, 41092 Seville, Spain
*
Author to whom correspondence should be addressed.
Symmetry 2021, 13(4), 685; https://doi.org/10.3390/sym13040685
Submission received: 27 March 2021 / Revised: 11 April 2021 / Accepted: 12 April 2021 / Published: 15 April 2021
(This article belongs to the Special Issue Advances on Engineering Graphics: Improvements and New Proposals)

Abstract

:
The emergence of computer-aided design (CAD) has propelled the evolution of the sheet metal engineering field. Sheet metal design software tools include parameters associated to the part’s forming process during the pattern drawing calculation. Current methods avoid the calculation of a first pattern drawing of the flattened part’s neutral surface, independent of the forming process, leading to several methodological limitations. The study evaluates the reliability of the Computer Extended Descriptive Geometry (CeDG) approach to surpass those limitations. Three study cases that cover a significative range of sheet metal systems are defined and the associated solid models and patterns’ drawings are computed through Geogebra-based CeDG and two selected CAD tools (Solid Edge 2020, LogiTRACE v14), with the aim of comparing their reliability and accuracy. Our results pointed to several methodological lacks in LogiTRACE and Solid Edge that prevented to solve properly several study cases. In opposition, the novel CeDG approach for the computer parametric modeling of 3D geometric systems overcame those limitations so that all models could be built and flattened with accuracy and without methodological limitations. As additional conclusion, the success of CeDG suggests the necessity to recover the relevance of descriptive geometry as a key core in graphic engineering.

1. Introduction

The sheet metal engineering field is a discipline dedicated to the building of technical parts through the bending and joining of flat and thin patterns of sheet metal. This field had a well-established body of knowledge in the early 1900s, with applications to pipes, sheet-iron ware, elbows, derivations, and even architectural molding forms [1]. The design was divided in a first stage where a flat pattern drawing is calculated from the part’s faces through descriptive geometry techniques that include triangulation and radial lines developments. A key issue that characterizes this stage is that no attention is paid to the thickness of the covering of the different solid parts [1]. The pattern drawing is modified in a second stage to take into account considerations related to the type of material, thickness, and forming process. Two types of changes need to be applied during the second stage: First, those that allow bending the material. Second, those that require joining it with others patterns: laps, locks, and edges.
The sheet metal field has evolved dramatically from the beginning of the 1900s until now, both in technologies [2] and fields of application, which now include very advanced and multidisciplinary areas such aerospace [3] and biomedicine [4]. The evolution has been propelled with the development of the Computer-Aided Design (CAD) technology, which emerged in the middle of the 1990s as a software approach for the definition of mechanical systems through 2D drawing. Modern CAD technologies support 3D parametric modeling, with and without history tree, based on sketch-based solidification techniques, boolean operations of solid primitives, and surfaces definition [5]. In addition, most CAD tools can operate inside a Computer-Aided Manufacturing (CAM) environment and connect with Computer Numerical Control (CNC) machines.
The sheet metal-forming process includes different operations associated to compression–tension efforts (including rigid tooling or female dies among others), which depend on the material. It has been considered an art rather than a science for a long time due to the dependence on the manufacturer’s experience and intuition [3,6]. A main goal of sheet metal design CAD implementations is to consider the influence of the material and forming process in the pattern drawing calculation, with the aim of reducing the influence of the manufacturer’s knowhow [7].
The fulfillment of that goal requires the implementation of techniques that exceed the general methodologies of solid modeling in CAD tools. This fact promoted the development of Add-on software for sheet metal design in CAD tools, like SmartUnfold for AutoCAD© and other CAD tools [8], or LITIO for AutoCAD© and GStarCAD© [9]. An Add-on software is a piece of software that implements new functionalities through calls to the Application Program Interface (API) library of the reference CAD tool. In addition, it must be written in a programming language supported by the CAD tool. This is the case of AutoLISP language, created for AutoCAD in 1986 as a derivation of the well-known LISP programming language [10], and improved until the current AutoCAD version. A disadvantage of the Add-on software approach is that both the supported language and the API library may limit its functional scope and computational efficiency with respect to a built-in CAD solution. The importance of the supported language in the parametric solid modeling was the goal of a recent comparison between FreeCAD Python against OpenSCAD languages [11].
CAD tools evolved to incorporate built-in sheet metal modules that overpass the disadvantages of the Add-on software. Some relevant CAD tools that include sheet metal modules are Creo© [12], CATIA© [13], Autodesk Inventor© [14], and Solid Edge© [15]. However, the consideration of the material and the forming process in these modules makes a seamless connection with solid models created under the general (non sheet metal based) methodology difficult. In this manner, it may lead to the development of different types of sheet metal modules as a function of the parts’ complexity. This is the case of CATIA that provides three related workbenches: sheet metal design, generative sheet metal design, and aerospace sheet metal design [16].
In parallel with the incorporation of built-in sheet metal modules to general CAD tools, sheet metal-specialized CAD solutions have been developed. Solid models are restricted to a set of supported types of surfaces and patterns (grouped in libraries) in this type of CAD tools. Some relevant examples are Lantek Expert for automating the CNC programming of sheet metal devices [17], and LogiTRACE for sheet metal parts that may include conduits, elbows, transitions, and many other elements and combinations of these ones [18].
The two sheet metal CAD approaches—built-in modules in general CAD and specialized CAD—have two main limitations: First, it is not possible to flatten or unbend any general CAD solid model. It has to be modeled in a specific manner within the sheet metal module, and it must verify geometrical requirements that depend on the material properties, the forming process, and even the methodology of the sheet metal CAD tool. Second, the first stage of computation of a pattern drawing is removed. Therefore, the final pattern drawing, which depends on material and forming process, must be calculated in a unique step. This approach may hinder the addressing of complex geometric surfaces, as those presented in sheet metal treatises [19].
The Computer Extended Descriptive Geometry (CeDG) is a novel approach for the parametric modeling of 3D geometric systems [20]. It is founded on descriptive geometry techniques, and it must be implemented in a Dynamic Geometry Software (DGS). Geogebra is a widely spread DGS [21] selected in this study to implement CeDG [20].
In opposition to CAD, the CeDG approach allows flattening the part’s faces of any 3D solid part that has been previously modeled. No geometrical requirements are needed, excepting that the surfaces are developable. The CeDG could be extended to include additional algebraic objects that automate the modification of the pattern drawing according to material and forming process requirements [20]. We are interested in comparing the reliability and accuracy of CeDG and CAD approaches in the computation of patterns’ drawings that do not depend on the manufacturing process. This type of pattern can be adapted to the forming process in a subsequent step, although that step is beyond the scope of this study.
The objective of this work is to evaluate the CeDG approach against two cutting edge CAD approaches in the process of modeling sheet metals parts and their associated patterns’ drawings. Three study cases that cover a significant range of sheet metal systems, together with the comparison metrics, are defined in the methods section. Their parametric computer models will be built and subsequently flattened to calculate their associated patterns’ drawings using a Geogebra-based CeDG, Solid Edge 2020, and LogiTRACE v14, in the results section. Solid Edge 2020 is an advanced 3D CAD system that includes a sheet metal module [15], whereas LogiTRACE is a specialized sheet metal CAD software [18]. The potential advantages of CeDG with respect to the two selected CAD tools are addressed in the light of the outcomes at the discussion section.

2. Methods

We consider the process of creation of the graphical pattern of a sheet metal part divided in two stages. The first stage is focused on the calculation of the accurate flattened state of the neutral surface that may be as complex as needed [19,22]. This pattern drawing is modified as a function of the material properties and thickness during the second stage, to consider the bends (adding allowance and notches) and the junctions between pieces (through laps, locks, and edges) [1,7].
The three sheet metal study cases defined in the following subsections are focused on the first stage of the pattern computation, in agreement with the objective of the study. The common objective of all of them is the parametric modeling of the sheet metal part and its flattened state, to obtain a flat pattern drawing or cutout. This pattern is thus independent of the manufacturing forming process.
The sheet metal parts are defined by the orthographic views of their setting geometric elements and their parameters. They will be modeled using a Geogebra-based CeDG, Solid Edge 2020 (Siemens PLM Software, Munich, Germany), and LogiTRACE v14 (PROfirst Group, Bavaria, Germany). The accuracy of the pattern’s dimensions from each study case is computed and presented in the results section, including a succinct description of the advantages and limitations of each technological approach.
The accuracy of a flat pattern is computed by means of the relative errors of the main dimensions, which includes the intersections of the cylindric and conical surfaces (junctions), according to Equation (1). We take the advantage that they are invariant during a right flattening process. In addition, all the pattern’s drawings will be laid out completely dimensioned (in the main text or in the Supplementary file).
R E L i = | L i L i , r e f | L i , r e f · 100 %
Variables L i and L i , r e f are the evaluated and true dimension, respectively, for all considered dimensions i. The true value is obtained by geometrical-mathematical analyses.
The influence of some relevant model parameters in the accuracy of the pattern solution is evaluated for each study case and technological approach. We use the normalized sensitivity of the relative error of the flat pattern dimension L i to the model parameter θ , SE L i ( θ ) , defined as follows:
SE L i ( θ ) = θ R E L i R E ^ L i R E L i θ ^ θ · 100 %
where R E ^ L i and R E L i are the relative errors of the dimension L i as a function of the model parameter values θ ^ and θ , respectively. In the event that R E ^ L i or R E L i is less than 0.1%, the sensitivity is normalized by ( R E ^ L i + R E L i ) / 2 instead of R E L i .
The following equation gives the Mean Absolute Error Sensitivity (MAES) of the flat pattern to all considered dimensions, L i :
MAES ( θ ) = i | SE L i ( θ ) |
The value SE ( θ ) will be calculated for each sheet metal study case and technological approach (Geogebra-based CeDG, LogiTRACE v14, Solid Edge 2020).
The following subsections define the geometrical setting and the requirements of each sheet metal part, besides the main procedures followed to model and flatten them using CeDG and the two selected CAD tools.
The computational models and associated patterns will be generated for the reference values of their parameters. They are updated automatically when the parameters change, as is expected in computer parametric modeling.

2.1. Four-Way Cylindric Hopper with Conical Coupling

The fist study case is a cylindric hopper with circular section (radius rCil = 3 m) and axis defined by projections in the Figure 1. The hopper connects the elliptic section at the horizontal plane with two lateral holes generated by a revolution cylindric surface with axis perpendicular to that of the hopper and radius rLat = 1.5 m. The hopper’s upper border is generated by the intersection with the right circular cone surface.
Dimensions presented in Figure 1 give the neutral surface of the required hopper. Radius of the cylindric hopper, rCil, and lateral cylindric surface rLat are taken as model parameters. The accuracy defined by Equation (1) will be obtained for the reference values of the parameters (rCil = 3 m and rLat = 1.5 m) and for the modified values (rCil = 2.5 m and rLat = 1 m). The MAES with respect to the analyzed parameters, rCil and rLat, will be computed according to the Equation (3).
The methodology followed to build each hopper’s computer model and associated pattern is as follows:
  • LogiTRACE approach. The cylindric hopper was built by means of the LogiTRACE Expert library, using a hierarchic process where the main cylinder is intersected first with the conical surface, and second with the lateral revolution cylinder. The sheet metal thickness was set to zero, according to objective of the first stage of pattern drawing creation process. Flat patterns in LogiTRACE are calculated by the method of inscribed prim [23] using chords instead of arcs. The number of generatrix lines was set to 20, 72, and 120 to evaluate its influence in the solution accuracy. Straight lines of transformed junctions were converted to arcs with an error tolerance of 0.1 mm. Dimensions of transformed junctions were calculated by summing the arcs lengths after importing the pattern as a DXF format.
  • Solid Edge approach. The cylindric hopper surface cannot be modeled as a general 3D surface in Solid Edge but using the Sheet Metal Design Module, which allows computing the pattern solution. We selected the Contour Flange command as the easiest method to construct the required hopper by the open profile feature, with a minimal value of the opening angle (0.0001°). Because the sheet metal design module does not allow the division of the flat pattern computation process in two stages, the material thickness, bend radius, and bend relief parameters were set to the minimal allowed value of 0.0001 mm, with the aim of achieving a pattern solution hardly dependent of the material and forming process.
  • CeDG approach. The spacial hopper was obtained using descriptive geometry procedures in agreement with the CeDG foundation [20]. The intersection of the main cylinder with the upper conical surface is computed using the technique of auxiliary planes containing generatrix lines [24] and extended by the mathematical locus function. Lateral holes are obtained by carrying over points pertaining to their vertical projection circle to the horizontal projection by means of their generatrix lines. The mathematical locus function allows the extension of this geometric procedure after one point is obtained. The hopper is flattened using the mathematical locus extension of the general method of inscribed prism [23], which gives the true (limited by the computer machine precision) transformed curve.
In opposition to the well-known LogiTRACE and Solid Edge CAD approaches, CeDG is a very novel technique [20] that needs a deeper and comprehensive description. This is presented in the Supplementary file.
A key property of the CeDG approach followed to build the computer model and pattern of the 4-way cylindric hopper is the fact that descriptive geometry techniques are graphical expressions of mathematical theorems. As a consequence, CeDG should give a true flat pattern of the sheet metal part.

2.2. Cylindric Connection of Tronco-Conic Hopper Outlet with Round Head

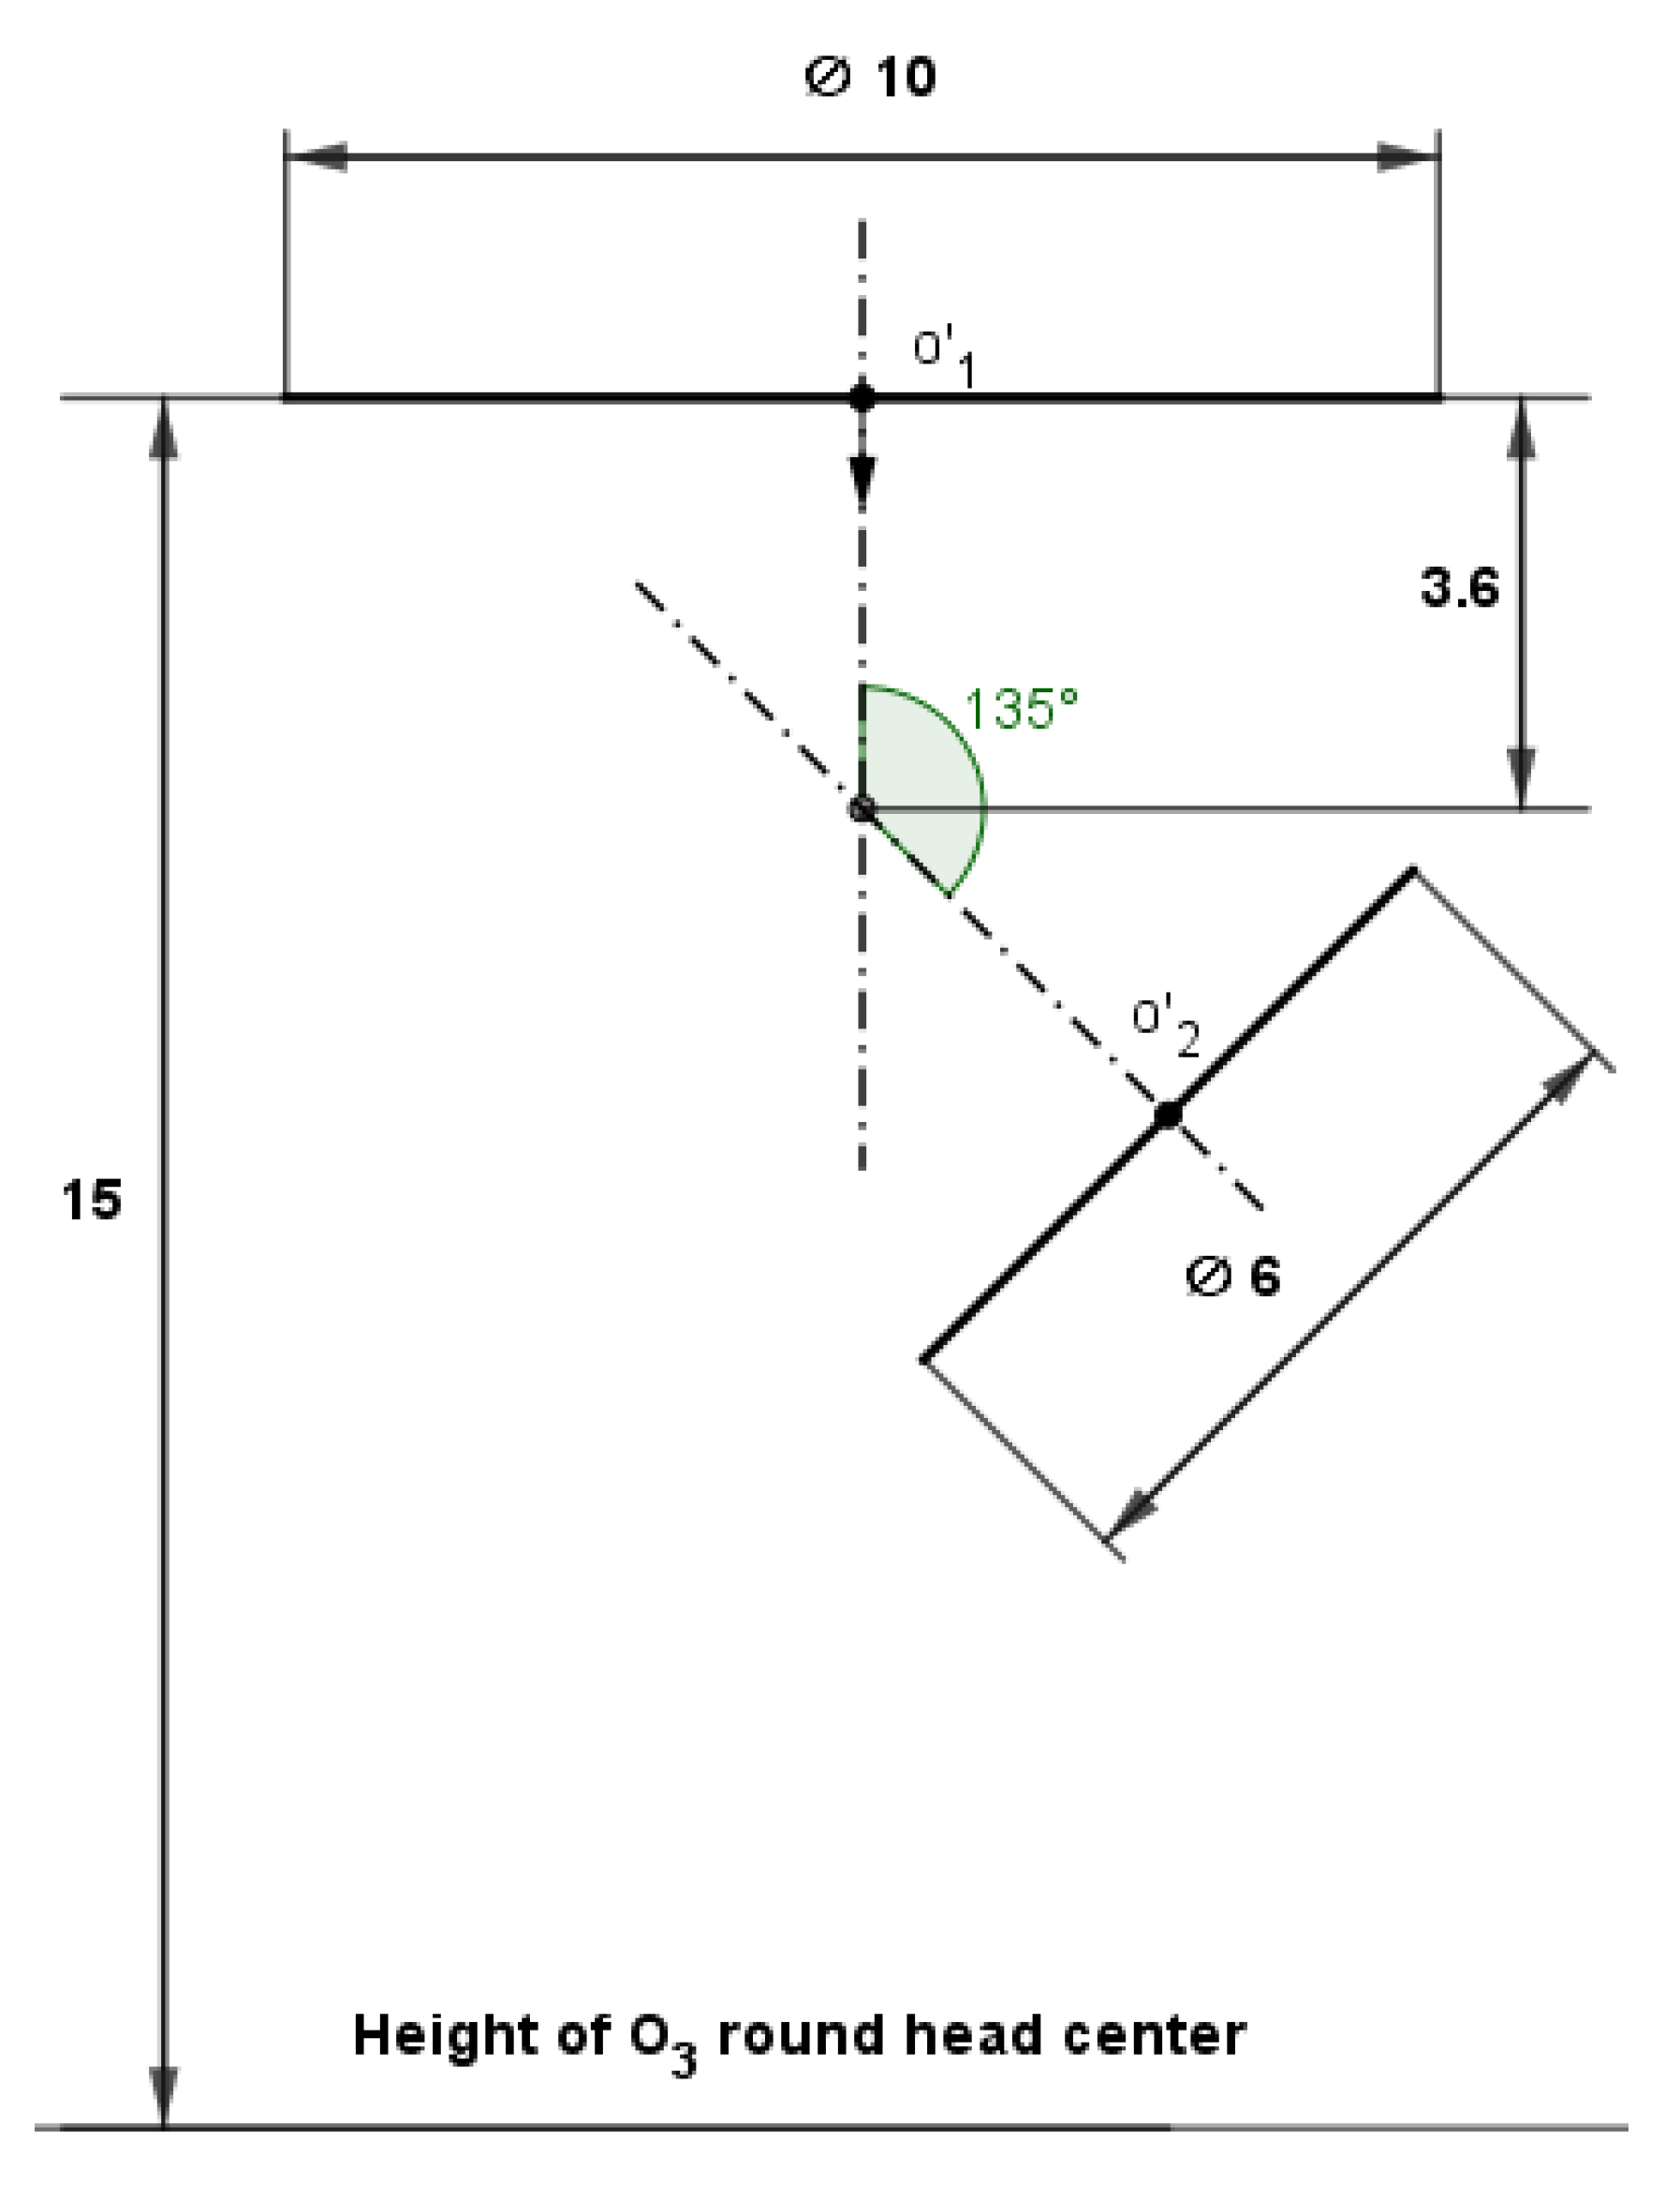
The second study case is a system composed by a tronco-conic surface with an horizontal o 1 center-round inlet (diameter 10 m) and an oblique o 2 center-round outlet (diameter 6 m), which is in turn connected by a vertical pipe to a o 3 center-round head (diameter 6 m), non-parallel to the hopper round outlet. The center o 3 is 15 m below the horizontal round inlet. Figure 2 shows the vertical projections of these elements, and includes the angle between the horizontal round inlet axis and the oblique round outlet axis (alpha = 135°). The  o 2 center should be moved along the axis to fulfill with cyclic conditions of non-parallel directions in conical surfaces [23].
We want to calculate the flat pattern of the vertical pipe. With that goal, a parametric model of the whole system must be generated. Diameters of round mouths, relative height of o 3 , and angle between axes will be parameterized. The accuracy of the pattern will be calculated first for the reference values of the parameters that are shown in Figure 2, and second, after modifying the alpha angle value to 120°. The MAES given by Equation (3) will be computed with respect to the alpha parameter.
The methodology followed to build the computer model of the part and the pattern drawing is as follows:
  • LogiTRACE approach. The dimensions of the vertical pipe are computed from the whole 3D system modeled with Solid Edge, due to limitations of LogiTRACE to model general 3D parts. The pipe was built from an oblique cylinder with round non-parallel sections of the in-series library. Thickness was set to zero. The flat pattern was calculated by the method of inscribed prims [23] using chords, for three values of generatrix lines: 20, 72, and 120. Straight lines of transformed junctions were converted to arcs with error tolerance equal to 0.1 mm.
  • Solid Edge approach. A whole model of the 3D system was built as a general 3D part, from which the vertical pipe dimensions were extracted. The vertical pipe was then created in the sheet metal design module using the Lofted Flange command, which was the easiest method to construct a pipe connecting two sections that can be flattened. Due to Solid Edge requirements, both sections must be open. Therefore, an empirical minimal value of 0.004° was assigned to the opening angle. In the same way as study case 1, minimal allowed values were assigned to material thickness (0.0030 mm), bend radius (0.0001 mm), and bend relief (0.0001 mm).
  • CeDG approach. The tronco-conic surface was obtained using descriptive geometry procedures, after moving the o 2 center-round along its axis to match with a circular direction of the non-revolution cone. The pipe connecting that round outlet with a non-parallel round head centered in o 3 was then created. The pipe was unfolded to the flat state by means of the same extension of the method of inscribed prism used in the study case 1. Additional details of the method appear in the Supplementary file.
In a similar way to the first study case, the CeDG method used to compute the flat pattern of the cylindric connection does not apply any mathematical approximation.

2.3. Round-Poligonal Section Transition with Circular Branch

The third study case is a sheet metal transformer from round to polygonal opening section, with a lateral connection to a circular pipe. The polygonal section is a rectangle with dimensions LengthA = 60 cm and LengthB = 40 cm, whereas the round section (head) has a diameter DiamC = 25 cm, an angle HeadAng = 30° with respect to the polygonal section, and its center o 1 is placed 30 cm over it (Height = 30 cm). The orthographic views are shown in Figure 3. A lateral round pipe with axis perpendicular to the one of the polygonal section, 15 cm over it (HeightCylAxis = 15 cm), and diameter DiamCyl = 20 cm is connected to the transformer. The material thickness is not defined, because we want to solve the first stage of sheet metal design (neutral surface).
A computer parameterized model of the transformer and its flat pattern drawing is required. The pattern will be calculated for the following three sets of parameter values:
  • Dimensions presented in Figure 3 (reference values).
  • Reference values with HeadAng changed to 45°.
  • Reference values with the maximum value of the lateral round pipe diameter (DiamCyl) that avoids the intersection of this pipe with the conical surfaces of transformer.
The MAES with respect to HeadAng and DiamCyl parameters will be obtained through Equation (3). The methodology followed to build the computer model and pattern drawing of the transformer is as follows:
  • LogiTRACE approach. The transition surface connected with the lateral round pipe was built by means of the Expert Library using a hierarchic process, where the transition surface was solved as a part of the in-series library and then included in the Combi-Figure kit to give the intersection with a lateral round cylinder. Thickness was set to zero. The flat pattern was calculated by the method of inscribed prims [23] using chords, for three values of generatrix lines: 20, 72, and 120. Straight lines of transformed junctions were converted to arcs with error tolerance equal to 0.1 mm.
  • Solid Edge approach. The transition surface was implemented in the sheet metal design module with the Lofted Flange command, which was the best method able to give the required flat pattern. Round and rectangular sections must be open due to Solid Edge requirements, which impeded modeling the full transformer. A half-transformer that includes the half circular branch was then built, taking advantage of its symmetry. Sheet metal thickness, bend radius, and bend relief parameters were empirically minimized to achieve a flat pattern solution hardly dependent of the material selection. The minimal thickness was 0.0021 mm for the reference values of the model’s parameters and 0.0027 mm for the two sets of modified values. Minimal bend relief was 0.0001 mm and minimal bend radius was 0.0016 mm. Rectangle corners are automatically rounded with the bend radius.
  • CeDG approach. The transition surface is obtained applying the general descriptive geometry procedure for non-parallel openings [25], which gives a surface composed by triangles jointed with conical surfaces whose vertices are placed at the rectangle corners. The lateral hole connecting the transformer with the round pipe is obtained by the intersection pipe-triangle plane, according to the position of the pipe and the reference diameter (Figure 3). This condition is kept for all the parameters’ sets. The flat transformed of a cone directrix cannot be obtained in an exact mode through the locus mathematical object used for cylinders. The reason is that there is not a straight line in the flat pattern associated with a known section of the conic surface. We developed a scripting code that implements the general method of inscribed pyramid [23], using true arc lengths, for three values of the number of generatrix lines—20, 72, and 120, with the aim of comparing the accuracy with the others CAD approaches. More details are shown in the Supplementary file.
The maximum value of lateral round pipe diameter, DiamCyl, is computed in Solid Edge using a projection technique to give 27.09 cm, and in CeDG by means of the rotation of the triangle face of the transition surface, to give 27.06 cm. A complete description is presented in the Supplementary file, and commented in the discussion section.

3. Results

3.1. Four-Way Cylindric Hopper with Conical Coupling

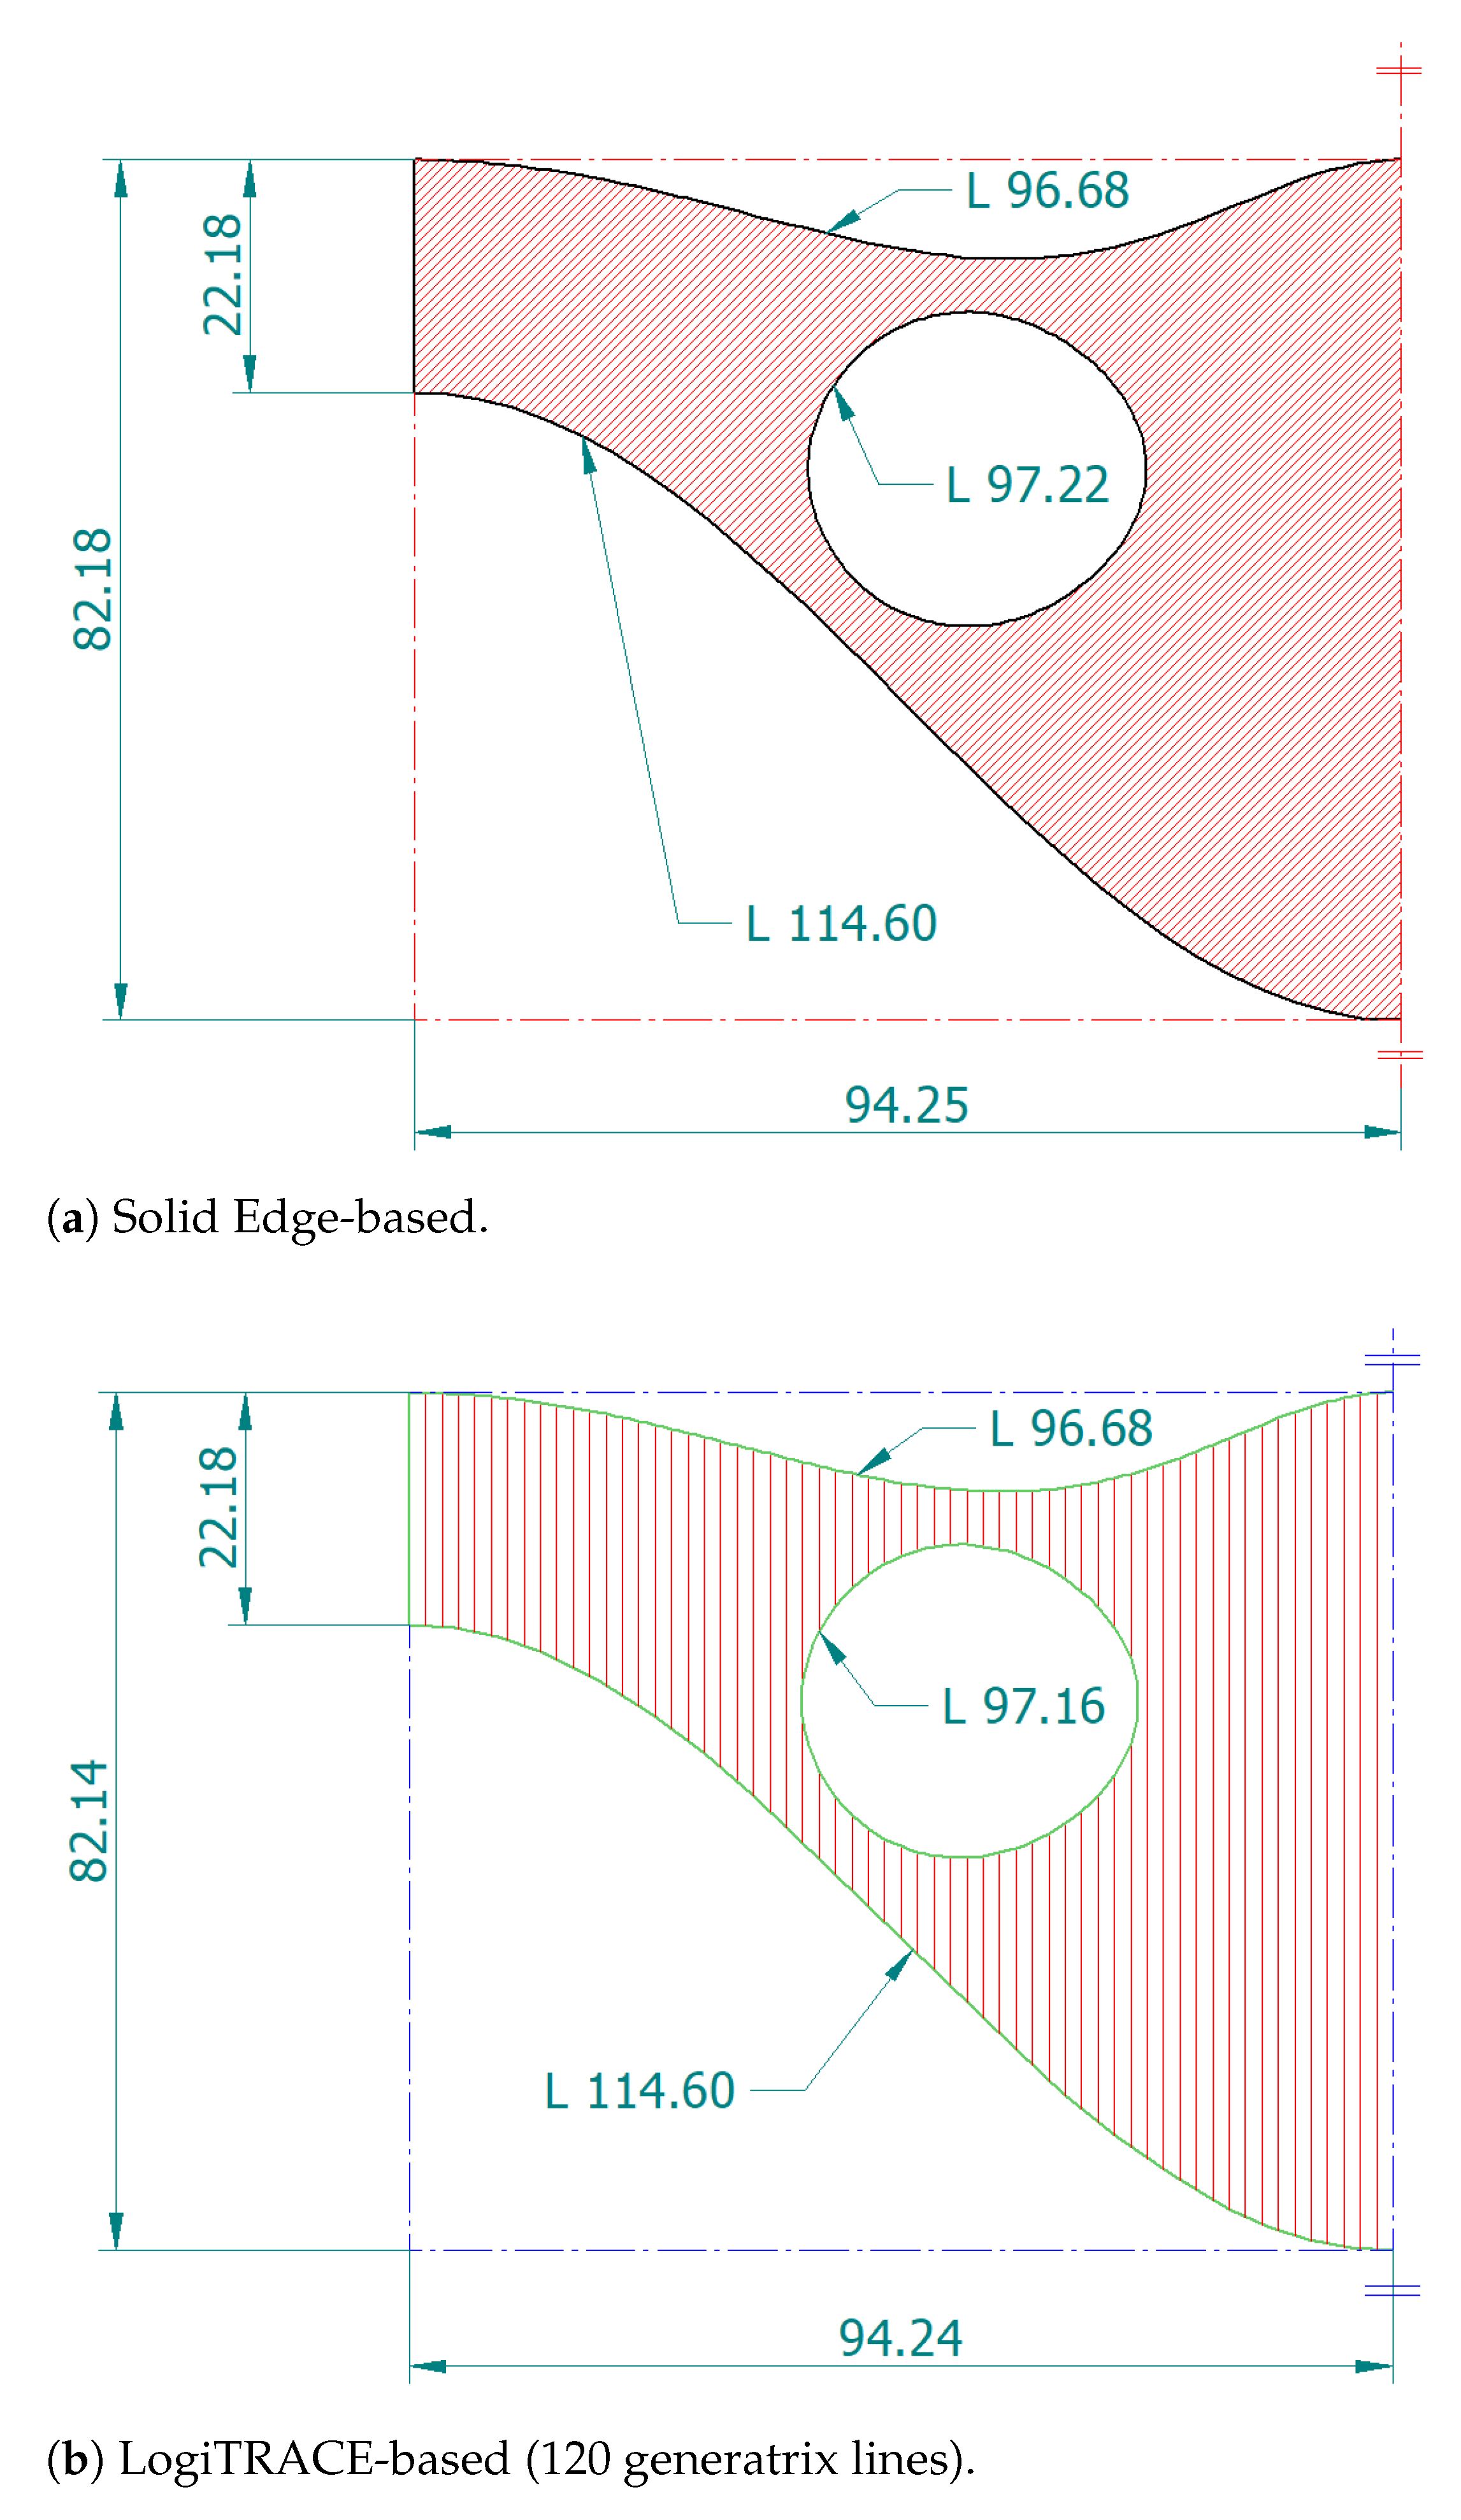
Figure 4 shows the flat pattern solutions calculated using the CAD approaches for rCil = 3 m and rLat = 1.5 m (reference values). We selected the half-pattern drawings to take advantage of their symmetry. However, the full patterns are presented for the set of modified values, rCil = 2.5 m and rLat = 1 m, in the Supplementary file.
The half-pattern drawing solution computed using the CeDG approach for the reference set of parameters’ values is presented in Figure 5. All pattern drawings include their main dimensions according to methods section’s requirements, which are summarized in Table 1 together with the relative errors given by Equation (1). We use the dimension notation pointed in the CeDG pattern drawing of Figure 5.
The exact values of the pattern dimensions were obtained using basic mathematical procedures, to verify that these were the same that those computed through the CeDG approach. This is expected, as we applied descriptive geometry theorems without any mathematical approximation. More details concerning the CeDG model’s building appear in the Supplementary file.
We show here the analytic calculation of some dimensions for the sake of clarity. The  L G value is just the length of the greatest cylinder generatrix line. Considering the dimensions of the cone of Figure 1, its greatest generatrix length can be obtained as L G C = 2 × 7.5 m. Considering the right triangle with length L G , homothetic to the cone vertical projection, the following equation is verified:
L G L G C = 7.5 + 3 2 15 L G = 3 + 7.5 2 m
We may convert to cm and round to two decimals to obtain L G = 83.03 m. The  L g value is the length of the smallest cylinder generatrix line. A geometrical inspection of the vertical projection of Figure 1 shows L g = L G 60 cm. The lengths of the transformed junctions in patterns L e , L c , and L h are the same than the lengths of the non-flattened junctions in the 4-way cylindric hopper, due to invariance of the flattening transformation [23]. This was verified in the CeDG parametric model.
The MAES calculated through Equation (3) after removing normalized sensitivities of L e , with relative error much lesser than 0.01 %, is 74.3% for LogiTRACE and 65.7% for Solid Edge. The dimensions of the flat pattern for the modified parameters’ values that are required to calculate the MAES are presented in the Supplementary file.
This study case shows that absolute errors of CAD approaches are approximately 1 cm for pattern dimensions of approximately 1–2 m, and error sensitivity is approximately 60%. The accuracy was maximized in LogiTRACE using 120 generatrix lines, which is a recommended value [26]. Dimensions L G , L g keep their geometrical relation L g = L G 60 in Solid Edge, but not in LogiTRACE.
As a main limitation of the methodological workflow, LogiTRACE could not give a clean and completed solution of the lateral holes in this pattern that involves three surfaces. The flattened holes had to be corrected from gross dashed lines provided by LogiTRACE, using a manual procedure. The later was executed into Solid Edge, after the importation of the LogiTRACE pattern as a dxf format file.

3.2. Cylindric Connection of Tronco-Conic Hopper Outlet with Round Head

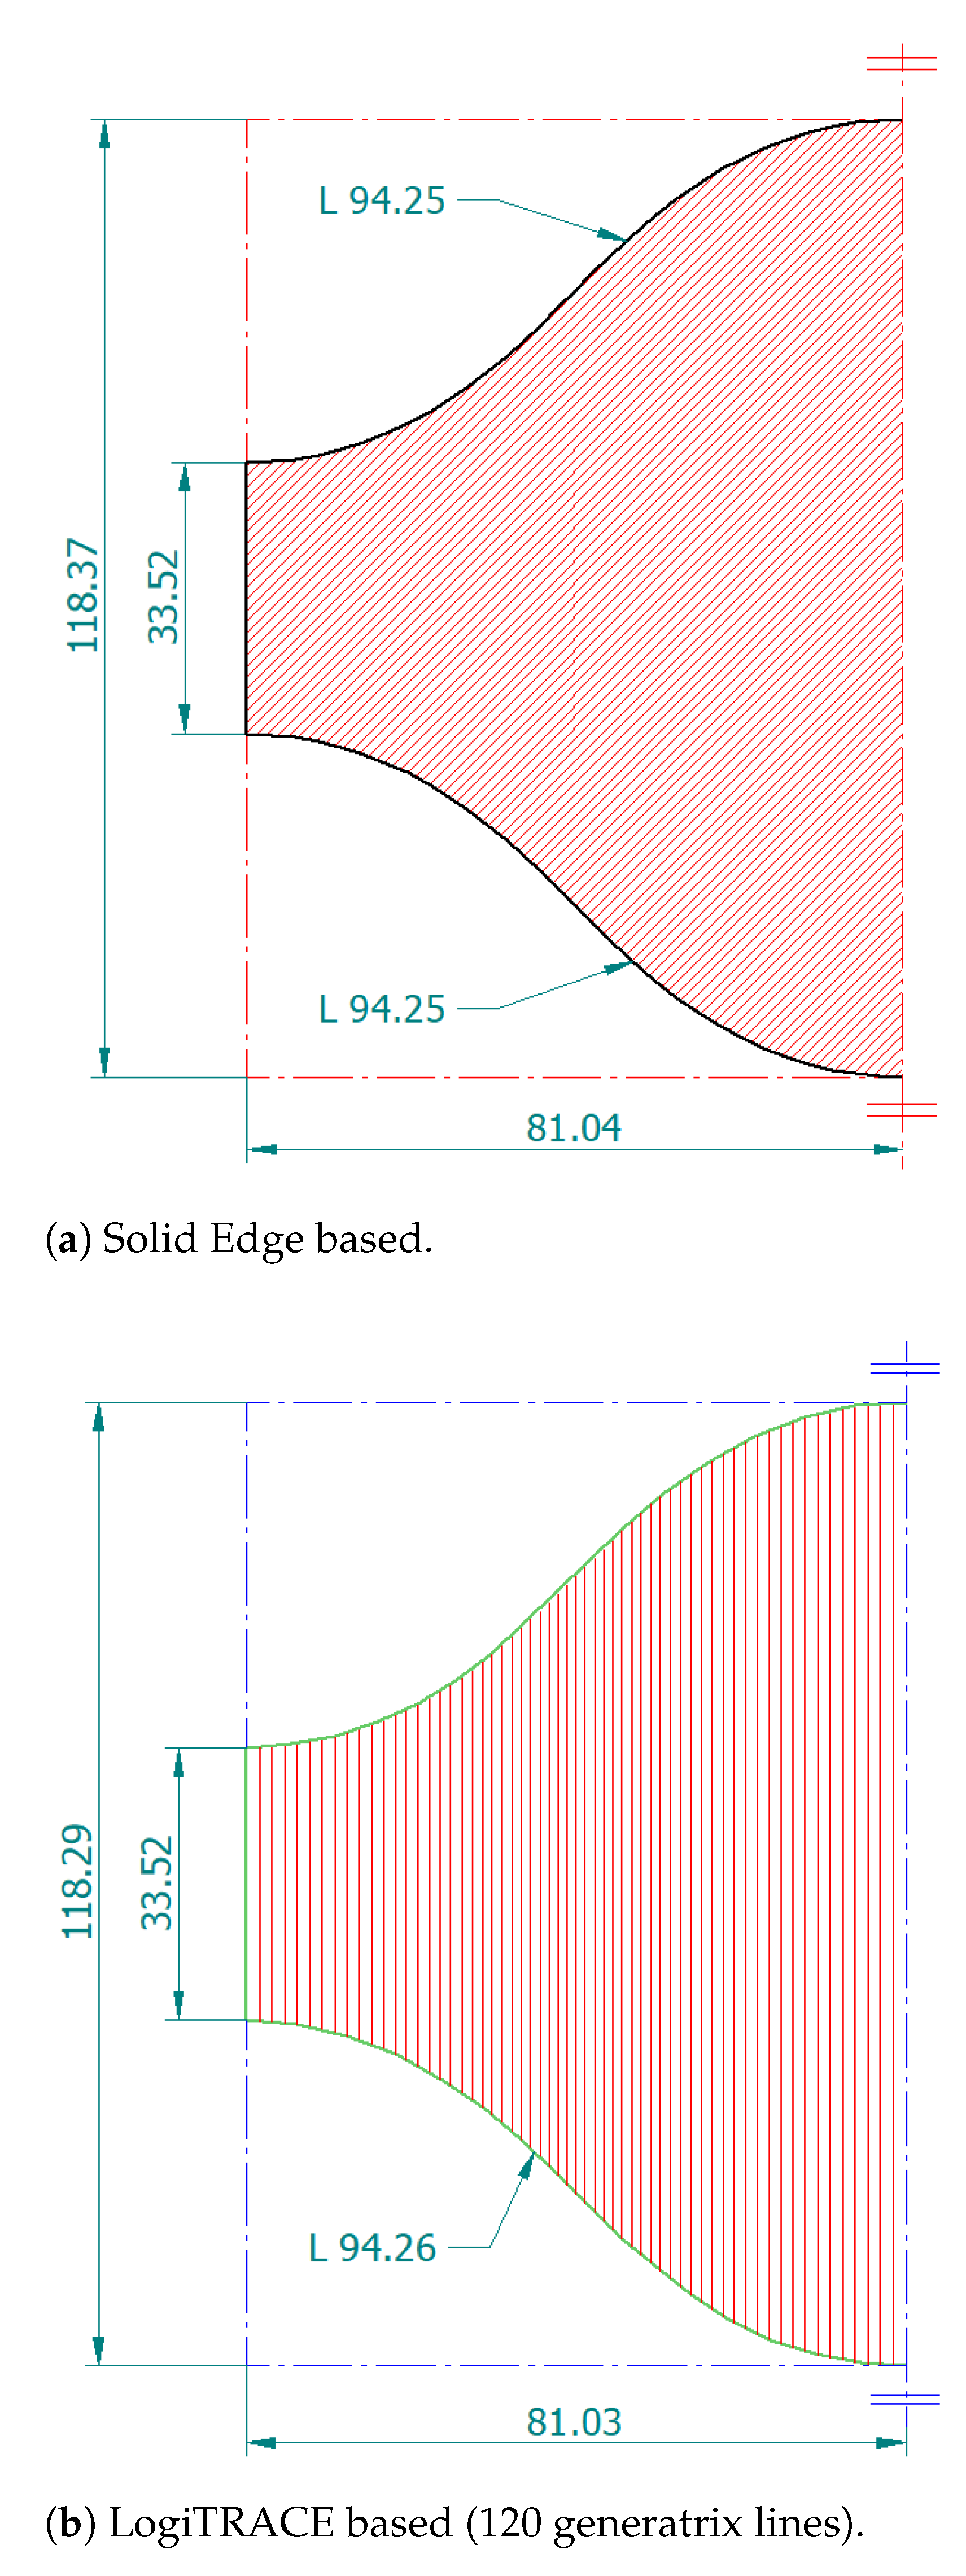
The half-pattern drawing solution computed using the CeDG approach for the reference set of parameters’ values (defined in Figure 2) is presented in Figure 6, whereas the Figure 7 shows the flat pattern calculated using the CAD approaches. We selected the half-pattern drawings taking advantage of their symmetry.
The full patterns and the associated dimensions when the alfa angle is changed to 120° (modified parameters’ values) are presented in the Supplementary file.
All pattern drawings include their main dimensions, which are summarized in Table 2, together with the relative errors given by Equation (1). We use the dimension notation pointed in the CeDG pattern drawing of Figure 6.
Equally to the previous study case, the exact values of the pattern dimensions obtained through analytical procedures match with those computed with the CeDG approach. This is expected, as it is based on descriptive geometry and other algebraic results, and no additional mathematical approximations are needed in this study case. Details concerning the CeDG model’s building may be accessed in the Supplementary file.
It is interesting to note that L G and L g are the lengths of the highest and smallest cylindric connection generatrix lines, respectively, and  L c and L e must be equal to the perimeter lengths of the round head and any horizontal section of cylindric connection, respectively, because of their invariance in the flattening process.
Errors in Table 2 are much smaller than 0.1 % for L c and L e , demonstrating that both CAD approaches satisfy their invariance. However, LogiTRACE provides two slightly different values for L c (upper and bottom transformed curves).
The errors in the L g dimension were equal in both CAD approaches, whereas they differ in the L G dimension, with values of approximately 1%. In fact, these errors are generated in the orthographic views computed from the 3D model from Solid Edge and propagated to LogiTRACE (see Method Section). Differences in the flattening procedure of Solid Edge and LogiTRACE explain the slight deviation between the L G values. The dimensions of the flat pattern for the modified parameter (alpha = 120°) are presented in the Supplementary file, together with their associated full patterns drawings.
The MAES index calculated by Equation (3) is 395% for LogiTRACE and 530% for Solid Edge. However, normalized error sensitivities are approximately 150% for L G and L g dimensions. Normalized error sensitivities were greater for L c and L e dimensions because their errors are slightly larger than 0.01% (i.e., near null for the accuracy of the study).
In agreement with the CAD methodological workflow, the vertical cylindric connection could not be flattened from the 3D model of the whole system in Solid Edge. A different instance of the cylindric connection was built in the sheet metal module of Solid Edge, using the dimensions extracted from the whole 3D model. The same dimensions were used to build the cylindric connection to be flattened in LogiTRACE.

3.3. Round-Poligonal Section Transition with Circular Branch

The half-pattern drawing of the Round-poligonal section transition with circular branch obtained by the CeDG approach for the reference parameters’ values (see Figure 3) is shown in Figure 8, whereas Figure 9 and Figure 10 present the patterns computed through the CAD approaches.
We use the dimension notation indicated in the CeDG pattern drawing of Figure 8 to emphasize the lengths of the cone junctions, L c 1   and   L c 2 ; the length of the circular branch junction, L h ; and the heights of triangle faces into the symmetry plane, L t 1 and L t 2 .
Their reference values have been computed using basic mathematical procedures. The values of L c 1 and L c 2 , computed in CeDG using the general method of inscribed pyramid for three values of the number of generatrix lines, NG (see methods section), have been compared to those ones obtained by LogiTRACE and presented in Table 3.
As seen, the values of L c 1 and L c 2 converge faster to the true values with CeDG than LogiTRACE. Their sum converges to π ϕ / 2 = 392.69 mm, where ϕ = 25 mm is the diameter of the round section, thanks to the invariance of the round section perimeter. The greatest accuracy of CeDG in this task may be due to the use of true arch lengths instead of chords lengths (see methods section in the Supplementary file).
We verified that the CeDG pattern dimensions computed with NG = 120 are the same as the exact (reference) values for the accuracy used in the study. Table 4 summarizes the relevant dimensions of the pattern drawings calculated with CeDG and CAD approaches.
Only the L c 2 and L h dimensions obtained with LogiTRACE have an error greater than 0.01% (relative error that can be neglected for the considered accuracy).
This accuracy is kept when HeadAng is modified to 45° in the second set of model parameters, with a slight deviation lesser than 0.03% in the transformed curve lengths for LogiTRACE. The patterns’ drawings and associated relative errors are presented in the Supplementary file.
The near null values of the relative errors are kept when the diameter of the circular branch, DiamCyl, is set to the maximum value in the third set of parameters values, except for its flattened transformed dimension, L h , which deviates approximately 0.1 % in the CAD approaches. Additional details are shown in the Supplementary file.
The MAES index relative to the HeadAng parameter calculated by Equation (3) is 0% for Solid Edge (no significative errors) and 116% for LogiTRACE (significative errors in L c 1 , L c 2 , and L h ). In the case of the DiamCyl parameter, the MAES index is associated only to the normalized sensitivity of L h , and Equations (3) and (2) give 564% for Solid Edge and 397% for LogiTRACE.
With regard to the methodological workflow, Solid Edge cannot build a full model of the system due to limitations of the Lofted Flange command into the Sheet Metal Design module. This is a serious limitation that impedes the addition of non-symmetrical branches and features. In opposition, the model could be fully built in LogiTRACE.

4. Discussion

The outcomes point to several methodological shortfalls in the CAD approaches. LogiTRACE could not complete the intersection of lateral cylinders in the first study case, whereas it required the vertical pipe length from the whole solid model built with Solid Edge in the second study case. Notwithstanding, it allowed computing the patterns drawings with null thickness as needed in the first stage of pattern drawing (neutral surface).
With regard to Solid Edge, the parametric solid models were built in the sheet metal module in order to obtain the required patterns’s drawings. This task was more complex than the building of general parametric solid models. The parameters related to the forming process were minimized in each study case, trying to reduce their influence. The full Round-poligonal transformer of the third study case could not be built due to limitations of the Lofted Flange command, and thus a half-system was built instead. This lack impedes the addition of non-symmetrical branches and features to the transformer. In addition, we checked that the pattern drawing could not be obtained in Solid Edge if DiamCyl is greater than the maximum value that avoids the intersection among the lateral pipe and conical surfaces.
With regard to CeDG, the parametric models were built and flattened as required without any methodological limitation. This result is in agreement with the preliminary analysis of the novel CeDG methodology [20].
Despite the methodological shortfalls found in CAD approaches, the relative errors of the dimensions were very low in all patterns’ drawings. Due to the ability to work with the neutral surface and the foundation on descriptive geometry theorems, the pattern dimensions of the CeDG models were considered exact for the first and second study cases. This asseveration was analytically verified. In the third study case, and despite CeDG applying an approximated discretization method for two pattern’s cone edges, we verified that they converge to the exact values (for the study’s accuracy) for NG = 120.
The difference between the maximum value of the circular branch, DiamCyl, calculated with Solid Edge (27.09 cm) and CeDG (27.06 cm) was due to the slight deviation from the neutral surface in Solid Edge, which is associated to the material thickness, bend relief, and bend radius.
The average normalized sensitivity of the dimensions relative errors to the variation of the selected models’ parameters was smaller than 100%, except for those dimensions with near null errors. This outcome confirms the robustness of all the computed models and their flat patterns.
In summary, our findings demonstrate that the novel computer parametric modeling of 3D geometric systems founded on descriptive geometry techniques, CeDG, overcomes some limitations of modern CAD approaches in the modeling of sheet metal parts and their pattern’s drawings. The study has been limited to the first stage of pattern drawing computation. However, the nature of CeDG mathematical models allows the addition of new algorithmic procedures to modify the pattern drawing for the forming process [27]. This issue defines an additional research direction.
It is important to emphasize that the CeDG approach recovers the relevance of descriptive geometry as a key core in graphic engineering, which is under analysis from the emergence of CAD at the early 2000s [28,29]. Descriptive geometry techniques constitute the basis that supports another relevant advantage of CeDG, as is the ability to solve geometrical parameters that fulfill with functional requirements during the model building process. This capability was demonstrated in a preliminary study [20] and surpasses the capability of CAD software tools to solve unknown geometrical dimensions through the manipulation of 3D spatial primitives [30].

Supplementary Materials

Supplementary information for this paper is available online at https://www.mdpi.com/article/10.3390/sym13040685/s1.

Author Contributions

Conceptualization, M.P.-V.; methodology, M.P.-V.; models and patterns building in CeDG, M.P.-V. and CAD, R.O.-M.; investigation, M.P.-V.; writing—original draft preparation, M.P.-V. and R.O.-M.; writing—review and editing, M.P.-V. All authors have read and agreed to the published version of the manuscript.

Funding

This research received no external funding.

Conflicts of Interest

The authors declare no conflict of interest.

References

  1. The Colliery Engineer Company. A Textbook of Sheet Metal Pattern Drafting; Burr Printing House: New York, NY, USA, 1901; p. 734. [Google Scholar]
  2. Trzepieciński, T. Recent Developments and Trends in Sheet Metal Forming. Metals 2020, 10, 779. [Google Scholar] [CrossRef]
  3. Kakandikar, G.M.; Nandedkar, V.M. Sheet Metal Forming Optimization Bioinspired Approaches; Taylor & Francis Group: Boca Raton, FL, USA, 2018. [Google Scholar]
  4. Cheng, Z.; Li, Y.; Xu, C.; Liu, Y.; Ghafoor, S.; Li, F. Incremental sheet forming towards biomedical implants: A review. J. Mater. Res. Technol. 2020, 9, 7225–7251. [Google Scholar] [CrossRef]
  5. Marsh, D. Applied Geometry for Computer Graphics and CAD, 2nd ed.; Springer Undergraduate Mathematics Series; Springer: New York, NY, USA, 2005; p. 350. [Google Scholar]
  6. Fournier, R.; Fournier, S. Sheet Metal Handbook, 1st ed.; HPBooks: Los Angeles, CA, USA, 1989; p. 138. [Google Scholar]
  7. Bowman, M. Sheet Metal Work; The Crowood Press Ltd.: Wiltshire, UK, 2014; p. 500. [Google Scholar]
  8. Smartunfold. Available online: www.smartunfold.com/ (accessed on 10 April 2021).
  9. LITIO. Available online: www.litio.si/litio2.htm (accessed on 10 April 2021).
  10. Poleschuk, N. AutoCAD Developer’s Guide to Visual LISP; Charles River Media: Newton, MA, USA, 2001; p. 500. [Google Scholar]
  11. Machado, F.; Malpica, N.; Borromeo, S. Parametric CAD modeling for open source scientific hardware: Comparing OpenSCAD and FreeCAD Python scripts. PLoS ONE 2019, 14, e0225795. [Google Scholar] [CrossRef] [PubMed] [Green Version]
  12. PTC CREO. Available online: www.ptc.com/en/products/creo (accessed on 10 April 2021).
  13. CATIA. Available online: www.3ds.com/products-services/catia/ (accessed on 10 April 2021).
  14. AUTODESK Inventor. Available online: www.autodesk.com/products/inventor/features (accessed on 10 April 2021).
  15. Solid Edge. Available online: solidedge.siemens.com/en/ (accessed on 10 April 2021).
  16. Tickoo, S. CATIA V5R21 for Designers; CADCIM Technologies: Schererville, IN, USA, 2014. [Google Scholar]
  17. Lantek Expert. 2021. Available online: www.lantek.com/us/nesting-cad-cam-2d-software (accessed on 10 April 2021).
  18. LogiTRACE. 2021. Available online: www.profirst-group.com/logitrace-blechabwicklungen (accessed on 10 April 2021).
  19. Díaz Díaz, E. Tratado de Trazados y Desarrollos de Calderería [Treatise of Drawing and Development in Sheet Metal]; Marcombo: Barcelona, Spain, 2010; p. 158. [Google Scholar]
  20. Prado-Velasco, M.; Ortíz Marín, R.; García, L.; Rio-Cidoncha, M.G.D. Graphical Modelling with Computer Extended Descriptive Geometry (CeDG): Description and Comparison with CAD. Comput. Aided Des. Appl. 2021, 18, 272–284. [Google Scholar] [CrossRef]
  21. Hohenwarter, M.; Hugh Jarvis, D.; Lavicza, Z. Linking geometry, algebra, and mathematics teachers: GeoGebra software and the establishment of the International GeoGebra Institute. Int. J. Technol. Math. Educ. 2009, 16, 83–87. [Google Scholar]
  22. Siebert, H. Layout Drafting and Pattern Making for Heat and Frost Insulators; Apprentice Work Book and Journeyman Review Manual. 2000. Available online: https://www.exlagger.org/Drafting4Insulators.pdf (accessed on 1 January 2021).
  23. Izquierdo Asensi, F. Geometría Descriptiva Superior y Aplicada [Superior and Applied Descriptive Geometry], 4th ed.; Paraninfo: Madrid, Spain, 1996; p. 642. [Google Scholar]
  24. Leighton Wellman, B. Technical Descriptive Geometry; Mc Graw-Hill: New York, NY, USA, 1948; p. 615. [Google Scholar]
  25. Giménez Peris, V. Diédrico Directo, Tomo II: Superficies, Intersecciones, CAD, Sombras [Direct Diedric, Volume II: Surfaces, Intersections, CAD and Shadows]; Tip. Mazuelos s.l.: Cadiz, Spain, 2014; Volume 2, p. 237. [Google Scholar]
  26. PROfirst. User Manual LogiTRACE Unfolding Software Version 14; Technical Report; PROfirst: Birmingham, UK, 2011; p. 70. Available online: www.profirst-group.com/programs/help_pdf/help_logitrace.pdf (accessed on 10 April 2021).
  27. Dana-Picard, T.N.; Kovács, Z. Networking of technologies: A dialog between CAS and DGS. Electron. J. Math. Technol. 2021, 15, e1–e17. [Google Scholar]
  28. Frank, M.; Croft, J. The Need for Descriptive Geometry in a World of 3D Modeling. Eng. Des. Graph. J. 1998, 62, 4–8. [Google Scholar]
  29. Migliari, R. Descriptive Geometry: From its Past to its Future. Nexus Netw. J. 2012, 14, 555–571. [Google Scholar] [CrossRef] [Green Version]
  30. Ortiz-Marín, R.; Del Río-Cidoncha, G.; Martínez-Palacios, J. Where is Descriptive Geometry Heading? In Proceedings of the XXIX International Congress INGEGRAF; Advances in Design Engineering; Springer International Publishing: Berlin/Heidelberg, Germany, 2019; pp. 365–373. [Google Scholar]
Figure 1. Orthographic views with reference dimensions (m) of the four-way cylindric hopper to be built, where the wrapping cone intersecting the cylinder defines the upper border or junction (see text).
Symmetry 13 00685 g001
Figure 2. Orthographic projection with reference dimensions (m) of round mouths (centers O 1 , O 2 ) of tronco-conic hopper and relative height of the connected round head center ( O 3 , see text).
Symmetry 13 00685 g002
Figure 3. Orthographic views with reference dimensions (cm) of transformer sections with round cylindric branch (see text).
Symmetry 13 00685 g003
Figure 4. Half-patterns of the 4-way cylindric hopper obtained by computer-aided design (CAD) approaches for the reference parameters’ values. Dimensions are in cm.
Symmetry 13 00685 g004
Figure 5. Dimensioned (cm) half-pattern of the 4-way cylindric hopper obtained by CeDG approach for the reference parameters’ values.
Symmetry 13 00685 g005
Figure 6. Dimensioned (cm) half-pattern of the cylindric connection between the hopper and round head obtained by the CeDG approach for the reference parameters’ values.
Symmetry 13 00685 g006
Figure 7. Half-patterns of the cylindric connection between hopper and round head obtained by CAD approaches for the reference parameters’ values. Dimensions are in cm.
Symmetry 13 00685 g007
Figure 8. Dimensioned (mm) half-pattern of the Round-poligonal transformer with circular branch obtained by the CeDG approach with 120 generatrix lines for the reference parameters’ values.
Symmetry 13 00685 g008
Figure 9. Dimensioned (mm) half-pattern of the Round-poligonal transformer with circular branch obtained by Solid Edge approach for the reference parameters’ values.
Symmetry 13 00685 g009
Figure 10. Dimensioned (mm) half-pattern of the Round-poligonal transformer with circular branch obtained by LogiTRACE approach with 120 generatrix lines for the reference parameters’ values.
Symmetry 13 00685 g010
Table 1. Calculated dimensions (cm) and associated relative errors (%) of the cylindric hopper flat pattern for the reference parameters’ values, as a function of the technological approach.
Approach L e ( RE % ) L c ( RE % ) L h ( RE % ) L G ( RE % ) L g ( RE % )
CeDG229.21 (0%)192.50 (0%)95.50 (0%)83.03 (0%)23.03 (0%)
LogiTRACE 229.20 (0.004%)193.36 (0.4%)97.16 (1.738%)82.14 (1.07%)22.18 (3.69%)
Solid Edge229.20 (0.004%)193.36 (0.4%)97.22 (1.801%)82.18 (1.024%)22.18 (3.69%)
† 120 generatrix lines.
Table 2. Calculated dimensions (cm) and associated relative errors (%) in the pattern drawing of the cylindric connection between hopper and round head for the reference parameters’ values, as a function of the technological approach.
Approach L c ( RE % ) L G ( RE % ) L g ( RE % ) L e ( RE % )
CeDG 188.50 (0%)118.93 (0%)34.07 (0%)162.08 (0%)
LogiTRACE 188.46 (0.021%) 118.29 (0.538%)33.52 (1.614%)162.06 (0.012%)
Solid Edge188.50 (0%)118.37 (0.471%)33.52 (1.614%)162.08 (0%)
† 120 generatrix lines. ‡ Bottom Lc length is 188.52 (see text).
Table 3. Values (mm) of L c 1 and L c 2 pattern dimensions and their sum of the Round-poligonal transformer (see Figure 8) calculated through CeDG and LogiTRACE for three numbers of generatrix lines (NG).
CeDG LogiTRACE
NG L c 1 L c 2 L c 1 + L c 2 L c 1 L c 2 L c 1 + L c 2
20230.93161.82392.75229.97161.12391.09
72230.88161.82392.70230.81161.77392.58
120230.87161.82392.69230.85161.80392.65
† True values L c 1 = 230.87 mm, L c 2 = 161.82 mm, L c 1 + L c 2 = 392.69 mm.
Table 4. Calculated dimensions (mm) and associated relative errors (%) in the flat pattern of the Round-poligonal transformer with circular branch for the reference parameters’ values, as a function of the technological approach.
Approach L c 1 ( RE % ) L c 2 ( RE % ) L h ( RE % ) L t 1 ( RE % ) L t 2 ( RE % )
CeDG 230.87 (0%)161.82 (0%)638.26 (0%)254.60 (0%)373.93 (0%)
LogiTRACE 230.85 (0.009%)161.80 (0.012%)638.14 (0.019%)254.61 (0.004%)373.93 (0%)
Solid Edge230.87 (0%)161.82 (0%)638.26 (0%)254.61 (0.004%)373.93 (0%)
† 120 generatrix lines.
Publisher’s Note: MDPI stays neutral with regard to jurisdictional claims in published maps and institutional affiliations.