Article

Verification of Microprobe Calibration Based on Actual Diameter Measurement of the Probe Tip Sphere

Department of Intelligent Robotics, Faculty of Information Engineering, Toyama Prefectural University, Toyama 939-0398, Japan
*
Author to whom correspondence should be addressed.
Metrology 2025, 5(4), 73; https://doi.org/10.3390/metrology5040073
Submission received: 3 October 2025 / Revised: 3 November 2025 / Accepted: 10 November 2025 / Published: 1 December 2025

Abstract

In three-dimensional measurement using a microprobing system with a micrometric spherical tip, a deviation in the diameter of the probe tip sphere causes measurement errors. In a typical probing system calibration, the effective diameter of the probe tip sphere is estimated based on the probing coordinates obtained on a calibration artifact with guaranteed dimensional accuracy. On the other hand, the calibration results of the effective diameter of the probe tip include uncertainty sources derived from errors inherent to the calibration artifacts and probing system itself, which cannot be eliminated. In this study, a micro-stylus with a tip sphere having a diameter less than 25 μm was fabricated. The actual diameter of its tip sphere was measured based on the contour form obtained along with the high-precision plane. The effective diameter of the same microprobe tip sphere was also measured by probing inside the precision micro-slit constructed with three gauge blocks. The measurement uncertainties of the actual and effective diameters were calculated and compared to each other. The measurement uncertainty of the actual diameter of the microprobe tip sphere based on the contour form measurement was confirmed to be smaller than that of the effective diameter measurement uncertainty, as it did not include errors inherent in the probing system. Furthermore, because the difference between the actual and effective diameters was smaller than that of the measurement uncertainties, the effectiveness of measuring actual diameter in microprobe calibration has been demonstrated.

1. Introduction

Coordinate measuring machines (CMMs) with tactile microprobing systems have been developed for three-dimensional measurement with nanometer-scale accuracy for micrometric structures [1,2,3]. Microprobing systems equipped with a micro-stylus having spherical tips with diameters less than 100 μm enable good accessibility for micrometer-scale complex inner features [4,5]. Therefore, these are likely to become a useful method for nondestructive precision measurement inside micro-holes [6,7,8] and micro-slits [9,10]. In CMM measurements using a tactile microprobing system, the dimensions of the measured parts are calculated based on the probing coordinates and diameter of the probe tip sphere [11]. Therefore, errors in the diameter and shape of the tip sphere of the microprobe become uncertainty sources in dimensional measurements performed using CMMs. This necessitates a precise calibration of the tip sphere diameter. In typical macroscopic CMM probes having diameters of several millimeters, the diameter of the probe tip sphere is calibrated by probing a master sphere with a diameter of several tens of millimeters [12]. The master sphere has a diameter accuracy of less than 100 nm, and the tip sphere diameter of the macroscopic CMM probe can be calibrated to the sub-micrometer order [13]. However, CMMs using microprobing systems require a nanometer-order resolution and require measurement uncertainty. Thus, the accuracy of conventional macroscopic master spheres is insufficient. Therefore, the calibration of the diameter of the microprobe tip sphere requires a master sphere with an assured sphericity at the nanometer scale [5]. However, the fabrication and use of micro-precision master spheres with nanometer-scale accuracy are expensive and challenging.
The diameters of microprobe tip spheres were measured using precision micro-slits with assured slit gap widths [5,10,14,15]. The diameter of the microprobe tip sphere was estimated based on the probing coordinates inside a precision micro-slit consisting of three wrung gauge blocks. The probe tip sphere diameter calculated based on the probing coordinates is called the effective diameter. It is commonly used in CMM dimension calculations because it reflects the characteristics of the probing system, such as the pre-travel of the probe and deviation of the probe tip sphere [4,11]. The gauge blocks were traceable to the length standards. The wringing error of the gauge blocks was estimated to be less than 10 nm. Micro-slits consisting of gauge blocks are commonly available and can be used as highly accurate dimensional standards to measure the tip sphere diameter of a microprobe. However, the diameter of the probe tip sphere that can be measured with a micro-slit is limited to one location, whereas measuring multiple diameters requires several processes and time. A three-sphere calibration method was developed to measure the diameter and roundness of the probe tip sphere based on the probing coordinates obtained using the CMM [16,17]. In the three-sphere calibration method, three probe tip spheres were alternately used as reference artifacts for probe calibration, and the absolute diameter and form deviation of the probe-tip sphere were calculated based on the probing coordinates. This method can obtain the absolute diameter and form deviation of the probe tip sphere, independent of the accuracy of the reference artifact. However, it is also time-consuming. Furthermore, the measurement results for the effective diameter include uncertainties inherent to the probing system itself.
Several methods have been developed to precisely measure the diameter of the sphere using optical measuring instruments. The optical measuring instruments enable non-contact and rapid measurement of the sphere diameter. Mitutoyo [18] precisely measured two-point diameter using a precision laser interferometer. In the Avogadro Project (in which national metrology institutes (NMIs) from various countries participated), ultra-high-precision sphere diameter measurement was achieved using the laser interferometer installed at NMIJ [19,20]. NIST [21,22] and PTB [23,24] achieved precise diameter measurements by simultaneously measuring the sphericity and radius of curvature using Fizeau interferometry. These methods are capable of measuring the diameter of spheres larger than tens of millimeters with nanometer-scale uncertainties. However, it is difficult to apply these to the measurement of tip sphere diameters of the order of micrometers. A method utilizing whispering gallery mode (WGM) resonance was developed to measure the tip sphere diameter of a microprobe with sub-nanometer resolution [25,26]. However, the WGM resonance method measures the circumference of a certain part of the probe tip sphere. Therefore, it is infeasible to determine the measured diameter. The diameters measured by these optical instruments are referred to as the actual diameters of the probe tip sphere and do not include the uncertainties derived from the probing system itself. On the other hand, when the difference between the effective diameter and the actual diameter is small, and the measurement uncertainty of the actual diameter is smaller than that of the effective diameter, it will be possible to treat the actual diameter of the microprobe tip sphere as equivalent to the effective diameter, which will be applied to dimensional measurement.
In this study, the actual diameter of the microprobe tip sphere was measured using an optical contour measuring instrument. The final objective of the research is to measure the diameters and shape deviation inside the circular micro-apertures using a microprobing system. In this manuscript, the diameter of the microprobe tip sphere was measured on the equatorial plane in this experiment, and the possibility of treating the actual diameter as equivalent to the effective diameter for dimensional measurement is verified based on uncertainty analysis. The tip of the microprobe was brought into marginal contact with the optical flat (OF) surface. The contour form on the equator of the microprobe tip was measured using the OF surface by a commercially available non-contact contour measuring instrument. The diameter of the microprobe tip sphere was calculated as the distance from the OF surface to the sphere apex. The contact between the tip sphere and the OF surface was detected by the laser probe of the contour measuring instrument. Therefore, the deformation of the tip sphere owing to contact was estimated based on the Hertzian contact theory. Actual diameter measurements were conducted at multiple locations on the probe tip sphere to evaluate repeatability and reproducibility. The uncertainty in the actual diameter measurements was then estimated.
In contrast, the effective diameter of the same-tip sphere was measured using a precision micro-slit consisting of three wrung gauge blocks. To detect the measured surface, a method of local surface interaction force detection [6,27] was introduced owing to its low measuring force and high sensitivity. The effective diameter of the probe tip sphere was calculated based on the probing coordinates and micro-slit width. Then, the uncertainty of the effective diameter measurement was evaluated. The actual and effective diameters of the same microprobe tip were compared to verify the validity of each measurement method. Furthermore, the uncertainties of each diameter measurement result were compared. Additionally, the validity of the microprobe tip sphere diameter measurement based on the contour form measurements was verified.
This paper describes a method for fabricating a stylus with a microtip sphere (the object measured in this study). Next, the method for measuring the actual diameter of the microprobe tip sphere using an optical contour shape measurement instrument is explained, and the measurement results and uncertainties are presented. Subsequently, a method for measuring the effective diameter of the microprobe tip sphere based on probing inside the precision micro-slit is described, and the measurement results and uncertainty are presented. Finally, the measurement results and uncertainties of the actual and effective diameters are compared, and the validity of the proposed actual diameter measurement method was evaluated.

2. Fabrication of Stylus with a Micro-Tip Sphere

CMMs equipped with microprobing systems widely employ a micro-stylus with a spherical tip having a diameter less than 100 μm for three-dimensional measurement [2]. In this experiment, the micro-stylus was fabricated by attaching a precision glass sphere to the tip of a hollow glass shaft [28,29]. This shaft was sharpened by thermally pulling a borosilicate glass tube (GD-1.5, Narishige, Tokyo, Japan) with an inner diameter of 1.0 mm and outer diameter of 1.5 mm using a commercially available puller (PN-31, Narishige, Tokyo, Japan). After the thermal pulling process, the sharpened glass tube was cut using a microforge (MF2, Narishige, Tokyo, Japan) at a position where the outer diameter was 10 μm. A borosilicate precision glass particle (9020, Thermo Scientific, Waltham, MA, USA) with an NIST-traceable diameter accuracy was used as the micro-stylus tip sphere. The nominal diameter of the glass particle was 22.2 ± 0.9 μm. Precision glass particles were fixed to the edge of the glass shaft using a UV-curable adhesive (MAGIC BOND, Asahi Engineering, Osaka, Japan). Figure 1a,b shows the procedure for attaching a glass particle to the edge of a glass shaft. First, the edge of the hollow glass shaft was immersed in a droplet of a UV-curable adhesive on a glass slide. This is shown in Figure 1a. The position of the glass shaft edge relative to the droplet surface was observed using optical microscopy (OM). When the edge of the glass shaft came into contact with the UV-curable adhesive droplets, the inside of the glass shaft was filled with the adhesive owing to the capillary phenomenon. The glass particles were then dispersed on a dry glass slide, and the adhesive-filled glass shaft was brought close to one of the particles (Figure 1b). When the glass particles came into contact with the adhesive at the edge of the glass shaft, they were adsorbed onto the glass shaft edge via the surface tension of the adhesive. After a short time, the glass particles aligned spontaneously to the center of the hollow glass shaft owing to surface tension. Finally, the edge of the stylus was exposed to ultraviolet light with a wavelength of 395 nm for 3 min to cure the adhesive. Figure 1c shows a microphotograph of the edge of the fabricated micro-stylus.

3. Actual Diameter Measurement Using a Contour Measuring Instrument

3.1. Principle and Methodology of Actual Diameter Measurement

The diameter of the microprobe tip sphere can also be calculated by applying a least-squares fitting to the partial contour shape. However, least-squares fitting for the partial contour shape generally induces an error in the estimated diameter owing to the deviation of the measurement positions [11]. This results in errors between the calculated and actual diameters. To eliminate errors in diameter calculation performed using the least-squares method, the actual diameter of the microprobe tip sphere is measured based on the contour shape of the microprobe tip sphere and a reference surface. Figure 2a shows the experimental configuration of the actual diameter measurement using a non-contact contour-shaped measurement instrument. The contour shape of the microprobe tip sphere was measured using a point autofocus probe of a commercial non-contact contour measuring machine (NH-3s, Mitaka Kohki, Tokyo, Japan). NH-3s can detect the position of the workpiece surface using the principle of a point autofocus probe. Since the point autofocus probe installed in the NH-3s detects scattered light from the sample surface, the influence of the sample’s refractive index can be ignored. The distance between the objective lens and the workpiece surface is maintained constant during the measurement by closed-loop control [30,31]. Point autofocus probes are standardized by ISO, and measurement systems are commercially available. The contour shape of the workpiece was measured based on the Z-directional displacement of the objective lens. The diameter of the laser spot was 1.0 μm, and it was maintained constant by the closed-loop control. First, the tip of the microprobe was brought into marginal contact with the OF. The contact between the probe tip sphere and optical flat surface was detected by measuring the displacement of the probe tip sphere using a point autofocus probe. The partial contour form passing through the apex of the sphere tip was measured simultaneously with the OF surface. The contour form of the OF surface was used as the datum for the diameter measurement. Therefore, the sphere tip diameter Dp was calculated using the following equation:
D p = H a p e x H O F _ a v e
Hapex is the apex height of the probe tip sphere and HOF_ave is the average height of the OF surface. As described below, the contour form of the OF surface was applied to compensate for the alignment errors in the measurement system.
The experimental conditions were as follows: Figure 2b shows photographs of the actual diameter measurement setup. The magnification and numerical aperture of the objective lens of the point-autofocus probe were 100× and 0.7, respectively. The vertical and horizontal resolutions of the NH-3s were 1 and 20 nm, respectively. The contour shapes of the microprobe tip sphere were measured after attaching it to the edge of the glass shaft. This is described in Section 2. The shaft of the microprobe was held by a pin vice placed over a groove in a V-block. The V-block was mounted on a manual XY positioning stage for alignment with the NH-3s. An OF (OF-60A, Mitutoyo, Kawasaki, Japan) with a nominal flatness of 0.1 μm was mounted on a manual Z positioning stage, which was used as the reference surface for the diameter measurement.
The procedure for contour measurement was as follows. First, the apex coordinates of the microprobe tip sphere were searched for using the lens-measuring function of the NH-3s with the tip sphere separated sufficiently from the OF surface. As shown in Figure 3, the point autofocus probe was scanned in the X- and Y-directions near the apex of the probe tip sphere. The apex coordinates were estimated from the contour shapes of the tip sphere. The search for the tip sphere apex was repeated three times. The variation in the XY-coordinates of the apex was verified to be within ±20 nm. Assuming the probe sphere is a perfect sphere with a nominal diameter, the angular deviation from the probe sphere center to the apex due to the XY variation in the apex position was estimated to be 3.63 × 10⁻¹⁵ rad. Therefore, the effect of the cosine error on the calculated diameter is negligible. As a result, the effect of the XY variation in the apex within ±20 nm range has almost no effect on the measurement uncertainty. The position of the pin vise was fixed by a jig to prevent axial movement of the microprobe stylus caused by rotation. In addition, to reduce errors caused by horizontal displacement due to probe rotation, the search for the apex of the probe tip sphere was carried out after each probe rotation. Because the microprobe tip sphere was not in contact with the OF surface, the stylus shaft of the microprobe vibrated owing to air fluctuations, and the Z position of the probe tip sphere varied within a range of several nanometers. The average Z-coordinate of the tip sphere apex when the OF surface is sufficiently separated from the probe tip is called “pre-contact Z coordinate” for this experiment. Next, the OF surface was brought into marginal contact with the tip of the microprobe using a manual Z stage. While approaching the OF surface, the Z-coordinate of the probe tip sphere was monitored using a point autofocus probe. When the OF surface came into contact with the probe tip sphere, the Z-coordinate of the tip sphere apex moved in the +Z-direction. The point autofocus probe detected this displacement. The probe tip sphere was adsorbed onto the OF surface via a thin surface water layer or van der Waals forces. Therefore, after the probe tip sphere came into contact with the OF surface, the vibration of the probe tip sphere decreased, and the Z-coordinate of the tip sphere apex became stable. After verifying the contact between the OF surface and probe tip sphere, the Z-coordinate of the probe tip sphere apex was returned to the vicinity of the pre-contact Z-coordinate using the manual Z stage. The Z-coordinate of the probe tip sphere apex after contact was adjusted within a range of ±300 nm relative to the pre-contact Z-coordinate. The deformation of the tip sphere was caused by the contact force between the OF surface and probe tip sphere. The intensity of the contact force was determined by both spring constant of the stylus shaft and displacement of the tip sphere along the Z-direction. The deformation of the probe tip sphere owing to the contact is discussed in Section 3.2.
After positioning the apex coordinate of the microprobe tip sphere near the pre-contact Z-coordinate, the coordinates of the probe tip sphere apex were determined. After repeating the search for the apex coordinate of the tip sphere, the point autofocus probe was scanned in the ±X-direction, starting from the apex of the tip sphere, to measure the contour shape, including the OF surface. This is shown in Figure 4. Figure 5a shows a schematic of the contour shape measured using a point autofocus probe. Because the measured contour shape included the tilt owing to the alignment error between the OF surface and probe scanning axis, the least-squares method was applied to the contour shape of the OF part to calculate an approximate line. This is shown in Figure 5a. Subsequently, the inclination of the measured contour shape was corrected based on the tilt of the approximate line. After inclination correction, the actual diameter of the tip sphere was calculated using Equation (1). The difference between the average Z-coordinate of the OF surface and the Z-coordinate of the apex of the probe tip sphere was calculated as the actual diameter of the probe tip sphere, as shown in Figure 5b. When the measurement position was located away from the apex of the sphere tip, the incidence angle of the measurement light of the point autofocus probe increased. Consequently, artifacts occurred in the contour shape owing to a decrease in the reflected light intensity and scattered light. According to the specification of NH-3s, the point autofocus probe has an incident angle tolerance of ±30°. In this experiment, the highest position was searched for within a range of ±20° of the incident angle from the apex of the probe tip sphere (the start point for the contour shape measurement). Then, the diameter of the probe tip sphere was calculated from the difference from the average height of the OF surface. The incidence angle range of ±20° corresponded to a range of ±4 μm from the apex of the probe tip sphere.

3.2. Estimation of Contact Force and Deformation

In the actual diameter measurement using the contour shape measuring machine, the deformation owing to the contact between the microprobe tip sphere and OF surface should be considered. When the OF surface comes into contact with the tip sphere of the microprobe, the stylus shaft of the microprobe is deflected, and a repulsive force acts between the OF surface and probe tip sphere because of the restoring force of the stylus shaft.
Therefore, the deformation of the microprobe tip sphere and the OF surface owing to the repulsive force was calculated based on the Hertzian contact theory. Figure 6a shows a schematic of the deformation of the stylus shaft owing to the contact with the OF surface. As shown in Figure 6b, the inner and outer diameters of the stylus shaft were assumed to be constant. The length, inner diameter, and outer diameter of the stylus shaft are denoted as l, d, and D, respectively. Because the diameter of the probe tip sphere is significantly smaller than the length of the stylus shaft, the stylus shaft can be considered a cantilever. The Z-directional displacement of the probe tip sphere owing to the contact with the OF surface is denoted by Δz. Because the stylus shaft has a high aspect ratio (i.e., the ratio of the stylus length to its outer diameter), the contact force determined from the shear stress is sufficiently small compared with that obtained from the bending moment. Therefore, the influence of the shear stress is negligible. Consequently, the load P applied to the contact point between the probe tip sphere and OF surface can be expressed as follows:
P = 3 E s π D 4 d 4 64 l 3 Δ z
where Es is the Young’s modulus of the stylus shaft material. According to the Hertzian contact theory, the Hertzian deformation of the probe tip sphere δ can be calculated using the following equation:
δ = 9 16 R p 1 ν p 2 E p + 1 ν O F 2 E O F 2 P 2 1 3
where Rp is the radius of the microprobe tip sphere. νp and νOF are the Poisson’s ratios of the tip sphere and OF, respectively. Similarly, Ep and EOF are the Young’s moduli of the tip sphere and OF, respectively.
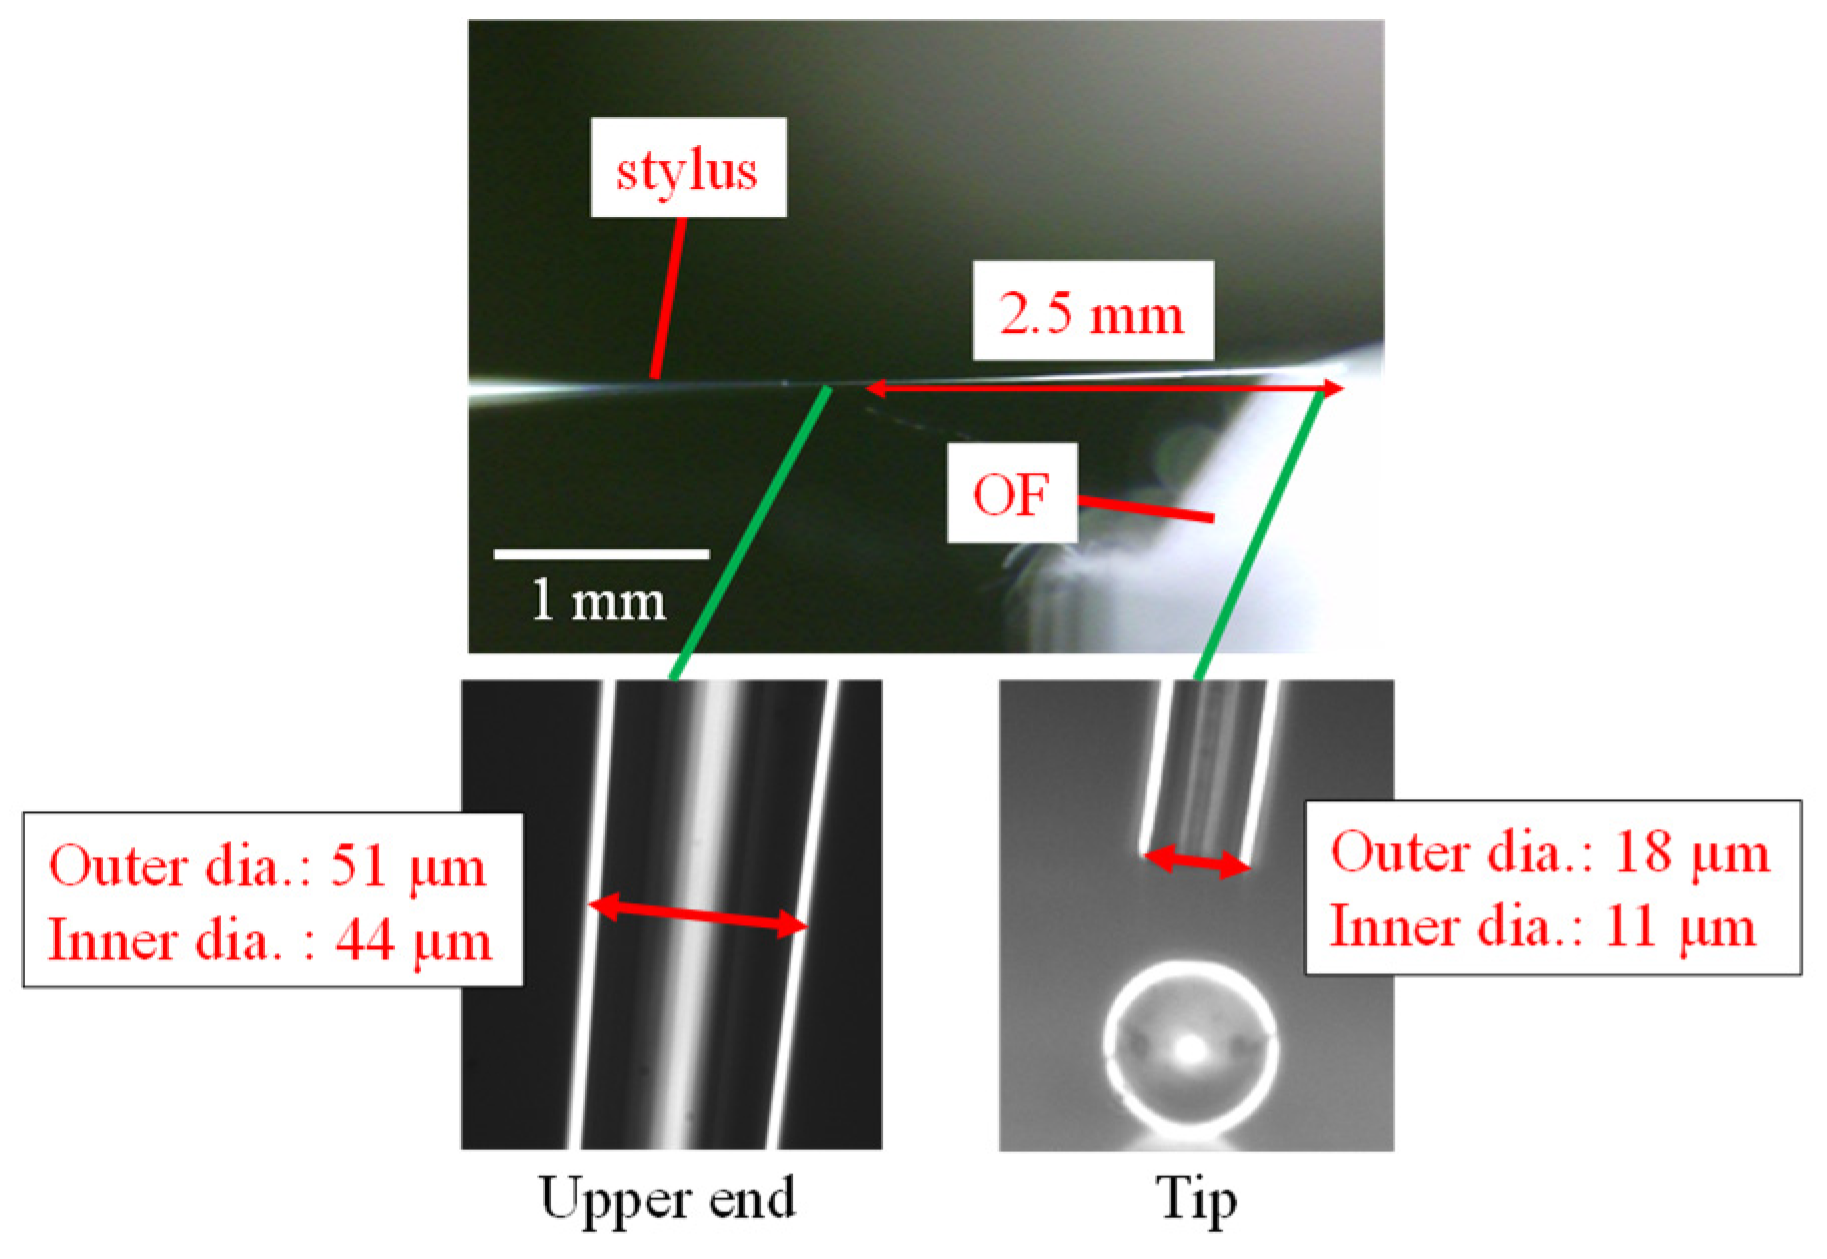
Figure 7 shows the microprobe tip sphere in contact with the OF surface (as observed using an optical microscope). After detecting the contact between the probe tip sphere and OF surface, the OF was displaced upward by approximately 1 mm using the manual Z stage. Although a deflection of the stylus shaft was observed, no damage to the stylus was apparent. The thinned glass tubes became flexible, as shown in Figure 7. A straight line is drawn through the center of the glass tube shown in Figure 7. The intersection with the deflected stylus shaft is regarded as the fixed end of the stylus shaft. The distance from the fixed end to the point where the tip sphere was attached is defined as the shaft length, l. l was estimated to be 2.5 mm from the optical microscopy images. The outer diameters of the stylus shaft at the tip and fixed ends were 18 μm and 51 μm, respectively. The stylus shaft was tapered because it was thinned and sharpened by the thermal pulling. There was no significant variation in the inner/outer diameter ratio of the hollow glass tube before and after the thermal pulling process [32,33]. Therefore, the inner diameters at the upper and lower ends of the stylus shaft were estimated to be 11 μm and 44 μm, respectively. To simplify the calculations, the inner and outer diameters of the stylus shaft were assumed uniform. The average values of the inner and outer diameters of the tip and fixed end of the stylus shaft were adapted. The average inner and outer diameters were set to 28 μm and 35 μm, respectively. During the contour shape measurement, the displacement at the tip sphere was adjusted to within ±300 nm. Consequently, the load P applied to the probe tip sphere and the deformation δ of the probe tip sphere were determined to be 117.75 nN and 0.0785 nm, respectively, using Equations (2) and (3). Because the average values of the inner and outer diameters of the stylus shaft were used for the calculation, the actual load and deformation were expected to be smaller than the calculated results. Thus, the influence of the deformation of the tip sphere during the contour shape measurement was significantly small, and the error in the diameter measurement owing to deformation could be omitted.

3.3. Actual Diameter Measurement and Uncertainty Analysis

As mentioned in Section 3.1, the actual diameter of the microprobe tip sphere was calculated based on the contour shape of the probe tip sphere and the OF surface. Figure 8 shows the measurement results for the contour shape of the microprobe tip sphere on the OF surface. The time required for the total measurement, including equipment setup, was approximately three hours. Of the total measurement time, approximately 150 min were required for measuring the contour shapes of the microprobe tip sphere. The measurement was conducted in a temperature-controlled room. The variation in temperature during the experiment was 19.8 ± 0.5 °C. The contour shapes shown in Figure 8 were corrected for the inclination based on the contour shape of the OF surface. The contour shape measurements were performed at eight locations on the same microprobe tip sphere by rotating it by 45° around the stylus shaft axis. The probe tip sphere was separated from the OF surface during the rotation of the microprobe shaft. Since the rotating microprobe was not in contact with the OF surface, the wear of the probe tip sphere was not observed. The microprobe shaft was rotated by manually rotating the pin and holding the microprobe. The rotational angle of the microprobe shaft θ was measured using a protractor. The rotation angle of θ = 0° indicates an arbitrary position at which the contour measurement was first performed. The contour shape of the microprobe sphere was repeated five times at each rotational angle θ. The laser spot diameter of the point autofocus probe was 1.0 μm. The measurement interval along the X-direction was set to be 20 nm. The contour measurement range in the X-direction was set to be ±30 μm from the apex of the microprobe tip sphere. Table 1 summarizes the average diameter and standard deviation of the diameter of the microprobe tip sphere for each rotation angle θ. The maximum and minimum values of the average diameter were estimated to be 21.422 μm and 21.299 μm, respectively. The variation in these diameters was 0.123 μm. This was within the nominal diameter tolerance of the precision glass sphere used as the tip sphere. The average diameter calculated from all the contour shapes was 21.362 μm. The variation in the measurement results was evaluated based on the standard deviation of the average diameter at each stylus shaft rotation angle. The maximum variation was 0.146 μm.
To evaluate the accuracy of the actual diameter measurement of the microprobe tip sphere, an uncertainty analysis was performed for each term in Equation (1), based on the ISO Guide to the Expression of Uncertainty in Measurement (GUM) [34]. Table 2 summarizes the uncertainty budget for measuring the actual diameter of the microprobe tip sphere. First, the uncertainty in the Z-directional coordinate measurement using the contour measuring machine NH-3s was estimated. Because the Z-directional resolution of NH-3s is 1 nm, the uncertainty owing to its resolution, uz_res_NH, was evaluated to be 0.3 nm. This was a uniform distribution of its half-value. The accuracy of the Z-coordinate measurement was evaluated by measuring the height of the calibrated gauge blocks with nominal dimensions ranging from 1 to 10 mm with 1 mm increments. The average error of the height measurement for the 1 mm step by NH-3s was 10 nm. The difference between the maximum and minimum errors was estimated to be 227 nm. Therefore, the uncertainty in the Z-coordinate measurement of NH-3s, uz_acc_NH, was evaluated as a uniform distribution of the half values of the maximum–minimum difference in the errors, which was calculated to be 65.5 nm. Next, the uncertainty in the Z-coordinate of the probe tip sphere apex Hapex was considered. As listed in Table 1, the maximum standard deviation of the actual diameter measurements was 146 nm. Because the contour measurement was repeated five times at the same stylus shaft rotation angle, the uncertainty owing to the repeatability of the diameter measurement, urep_act_dia, was calculated to be 65.3 nm. The uncertainty determined from the thermal expansion of the probe tip sphere diameter owing to temperature variation during the actual diameter measurement was verified. The sensitivity coefficient of the probe tip sphere diameter for temperature variation was calculated as 0.073 nm/K based on the thermal expansion coefficient of borosilicate glass (3.3 × 10⁻⁶/K). The temperature variation during the measurement was ±0.5 °C. The probability distribution of the temperature variation was assumed to be uniform. The uncertainty in the microprobe tip sphere diameter owing to the temperature variation during the measurement, utemp_act, was estimated to be 0.02 nm. Finally, the uncertainty in the average height of the OF surface, Have_OF, was considered. The average height of the OF surface was calculated by extracting the OF surface portion from the contour shape. This is shown in Figure 8. Table 3 lists the maximum and minimum standard deviations of the average Z-directional coordinates of the OF surface for each stylus shaft rotation angle. As shown in Table 3, the maximum standard deviation was 70 nm. Thus, the uncertainty of the OF mean height, uave_OF, was evaluated to be 70 nm. Consequently, the expanded uncertainty Uact of the measurement of the actual diameter of the microprobe tip sphere was estimated to be 232.0 nm (k = 2). As shown in Table 2, it can be verified that the measurement accuracy and repeatability of the contour measuring machine were the main factors affecting the measurement uncertainty.

4. Effective Diameter Measurement Using a Precision Micro-Slit

4.1. Principle and Methodology of Effective Diameter Measurement

The effective diameter of the microprobe tip sphere differs from the actual diameter owing to factors such as the pre-travel of the probing system or deflection of the stylus shaft. In this experiment, the effective diameter of the tip sphere of the microprobing system was evaluated using a method of local surface interaction force detection [6,27]. This was because it allows for a low measuring force and high sensitivity of surface detection. Figure 9a shows the experimental configuration of the microprobing system used in this method. The nanometer-scale approach between the probe tip sphere and measured surface was detected as a variation in microprobe vibration owing to the local surface interaction force. Figure 9b shows a photograph of the microprobe. The shaft of the micro-stylus was cut at a distance of 1.5 mm from the probe tip sphere and glued to one of the beams of a tuning-fork quartz crystal resonator (TF-QCR). Figure 10 shows a photograph of the micro-slit consisting of three wrung gauge blocks. The measurement position of the probe tip ball was adjusted to within ±1° perpendicular to the micro-slit by observing the tilt of the stylus shaft from the X and Y axis directions, and the deviation of the measurement position in the probe tip ball was estimated to be within ±3 nm. The gauge blocks placed on the microprobing system were kept in a temperature-controlled room for more than 24 h to ensure sufficient temperature equilibrium before measurements were performed. During the measurement, the microprobe was oscillated in the Z-direction at its resonance frequency using a PZT transducer. The microprobe vibration was detected by the piezoelectric effect of the TF-QCR with an original resonance frequency of 32.768 kHz. When the probe tip sphere approached the measured surface to within a few nanometers, local interaction forces such as electrostatic and van der Waals forces began to act on the microprobe tip sphere. This resulted in variations in the amplitude and frequency of the microprobe vibration. In this experiment, the resonance frequency shift owing to the local surface interaction force was employed as the trigger signal for probing. The frequency shift Δf was detected using a commercially available tuning fork sensor controller (TFSC, NanoAndMore) consisting of a phase-locked loop (PLL) circuit. The obtained Δf signal was fed into a personal computer (PC) via an analog-to-digital (A/D) converter as a trigger signal, and was compared with the threshold ΔfTh for probing. The measured workpiece was placed on the table of a PZT-driven XY precision positioning stage (MAP-F21C, MESS-TEK). A precise positioning was achieved via closed-loop control using built-in capacitive-type displacement sensors. The stage motion range and the resolution were 152 μm and 1 nm, respectively. Probing was performed by approaching the measurement point of the microprobe tip sphere at 10 nm/step using precision positioning stages. The precision positioning stage was displaced by converting the PC output into a drive signal using a digital-to-analog (D/A) converter. Δf and ΔfTh were compared for each approach step. The position at which Δf > ΔfTh was obtained as the probing coordinate. The resonance frequency of the microprobe was 31.571 kHz. It became lower than that of the TF-QCR owing to the attachment of the micro-stylus on the beam. ΔfTh was set as ±20.8 Hz. The probing coordinates were obtained using displacement sensors built into the precision-positioning stages. The output of the built-in displacement sensor was inputted to a PC via an A/D converter. In this experiment, the center coordinates of the probe tip sphere were considered as the probing coordinates. The measurements were conducted in a temperature-controlled room. The variation in temperature during the experiment was 20.0 ± 0.5 °C. The effective diameter of a microprobe tip sphere, Deff, can be determined by probing a precision micro-slit with a known gap width W as follows [9,14,15]:
D e f f = W L
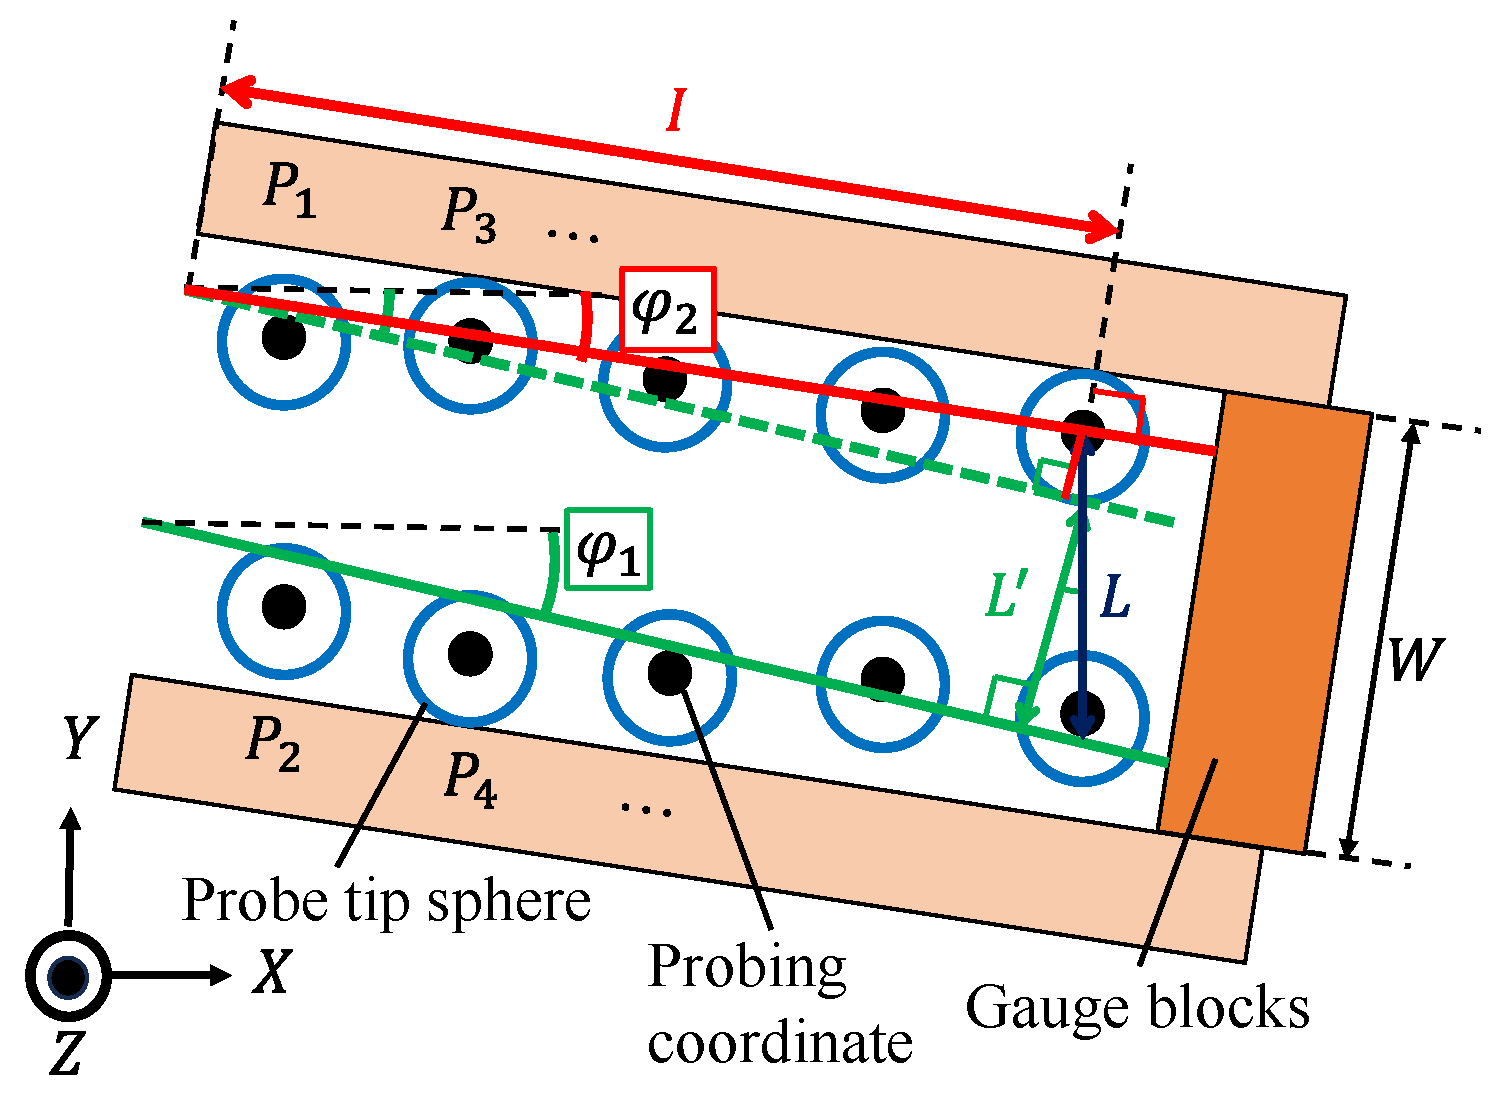
where L is the distance between the probing coordinates on both inner sidewalls of the micro-slit. The micro-slit consists of three wrung gauge blocks, as shown in Figure 10. The two-gauge blocks were attached to both sides of a K-grade gauge block with a nominal dimension of 0.1 mm by wringing. Consequently, a precision micro-slit with a width of 0.1 mm could be configured between the gauge blocks on both sides. The micro-slit was placed on the stage table parallel to the X-axis of the PZT stage. The tip of the microprobe was inserted into the micro-slit. The inner wall was probed by finely moving the PZT positioning stage in the Y-direction. To evaluate the parallelism between the micro-slit and X-axis of the PZT stage, after probing both sides of the micro-slit inner walls, the probing position was moved +20 μm along the X-axis, and the inner walls were probed again. Figure 11 shows a schematic of the probing inside the micro-slit. Probing was performed at five locations along the X-axis. The average probing coordinates were obtained at each measurement point (P1P10). The approximate lines along the probing coordinates were calculated using the least-squares method for each slit wall. The distance L between the approximate lines corresponding to the Y-axis is expressed as follows:
L = L cos φ 1 + I sin φ 1 φ 2 cos φ 1
where L′ is the distance between the lower approximate line and a line parallel to it that is drawn from a point on the upper approximate line. I is the distance from the intersection of the upper approximate line and the line parallel to the lower approximate line to the intersection of the upper approximate line and L. φ1 and φ2 are the angles between the X-axis and the approximate lines. The parallelism of the micro-slit was assumed to be assured by the geometries of the gauge blocks, so that φ1 appeared to be identical to φ2. Equation (5) was approximated as follows:
L = L cos φ 1
Therefore, the effective diameter of the microprobe tip sphere Deff was calculated as
D e f f = W L cos φ 1
The diameter that can be measured by a micro-slit consisting of wrung gauge blocks is only one diameter on the tip sphere of the microprobe. In addition, although the effective diameter of the same sphere tip was measured by the contour shape measurement instrument, the position of the effective diameter measurement on the microprobe tip sphere did not necessarily coincide with that of the actual diameter measured by the contour measurement.

4.2. Effective Diameter Measurement and Uncertainty Analysis

Figure 12 shows the experimental results for the probing coordinates obtained inside the micro-slit. The total measurement time, including equipment setup, was approximately three hours. Probing was performed 50 times within the micro-slit while changing the measurement position, and the time required for whole probing was approximately 140 min. Figure 12a shows the probing coordinates and approximated lines on the inner walls of the micro-slit. Figure 12b shows the standard deviations of the Y-axis coordinates for each measurement position. Probing was repeated five times at each inner wall of the micro-slit. The inclinations between the X-axis of the PZT stage and the upper and lower approximate lines (φ1 and φ2) were calculated to be −1.44° and −1.24°, respectively. The difference in inclination between the approximated lines was calculated to be 0.2°. The measurement error in L resulting from the difference in the inclination between each approximated line was 0.2°. This corresponded to 0.35% of the distance between the approximated lines. Therefore, both the inner walls of the micro-slit were assumed to be parallel, and the effective diameter of the microprobe tip sphere was calculated. Table 4 summarizes the effective diameter measurements. The average, maximum, and minimum diameters of the microprobe tip sphere were calculated to be 21.45 μm, 21.58 μm, and 21.32 μm, respectively. The difference between the maximum and minimum diameters was 260 nm. The measured effective diameters of the glass spheres used in this study were within the nominal diameter range of 22.2 ± 0.9 μm for the glass sphere used in this study.
The accuracy of the effective diameter measurement of the microprobe tip sphere was evaluated based on uncertainty analysis. The uncertainty in the effective diameter measurements was determined for each term in Equation (7) based on the GUM [34]. Table 5 summarizes the uncertainty budget for measuring the effective diameter of the microprobe tip sphere. First, the combined standard uncertainty in the micro-slit gap width, uW, was calculated. According to the experimental results listed in Table 4, the error in the gap width determined from the parallelism of both sides of the inner walls of the micro-slit was estimated to be 260 nm. The uncertainty owing to the parallelism of the micro-slit, uW_para (which was considered a uniform distribution of the half value of the maximum error of the gap width), was calculated to be 75.1 nm. The flatness of the K-grade gauge block that constitutes the micro-slit is stipulated by ISO 3650:1998 [35] to be at most 50 nm.
In the measurement of the effective diameter, the flatness of the upper and lower sides of the micro-slit became uncertain, uW_flat_up and uW_flat_low. These were considered as uniform distributions and estimated to be 14.4 nm each. According to the gauge block data sheet, the dimensional error of the gauge block owing to wringing (wringing error) is less than 10 nm [9,14,36]. Because there were two wringing events in the micro-slit, the uncertainty of the wringing error, uW_wringing, was evaluated to be 11.5 nm. The uncertainty of the measurement (the sensitivity coefficient) was calculated to be 1.08 × 10⁻⁹ m/K based on the thermal expansion coefficient of the gauge block (1.08 × 10⁻⁶/K) and nominal dimension of the gauge block at the center of the micro-slit (0.1 mm). The uncertainty of the gauge block dimensions owing to the temperature variation during the measurement, uW_therm, was estimated to be 0.3 nm. Consequently, the combined standard uncertainty of gap width of the micro-slit, uW, was calculated to be 78.6 nm.
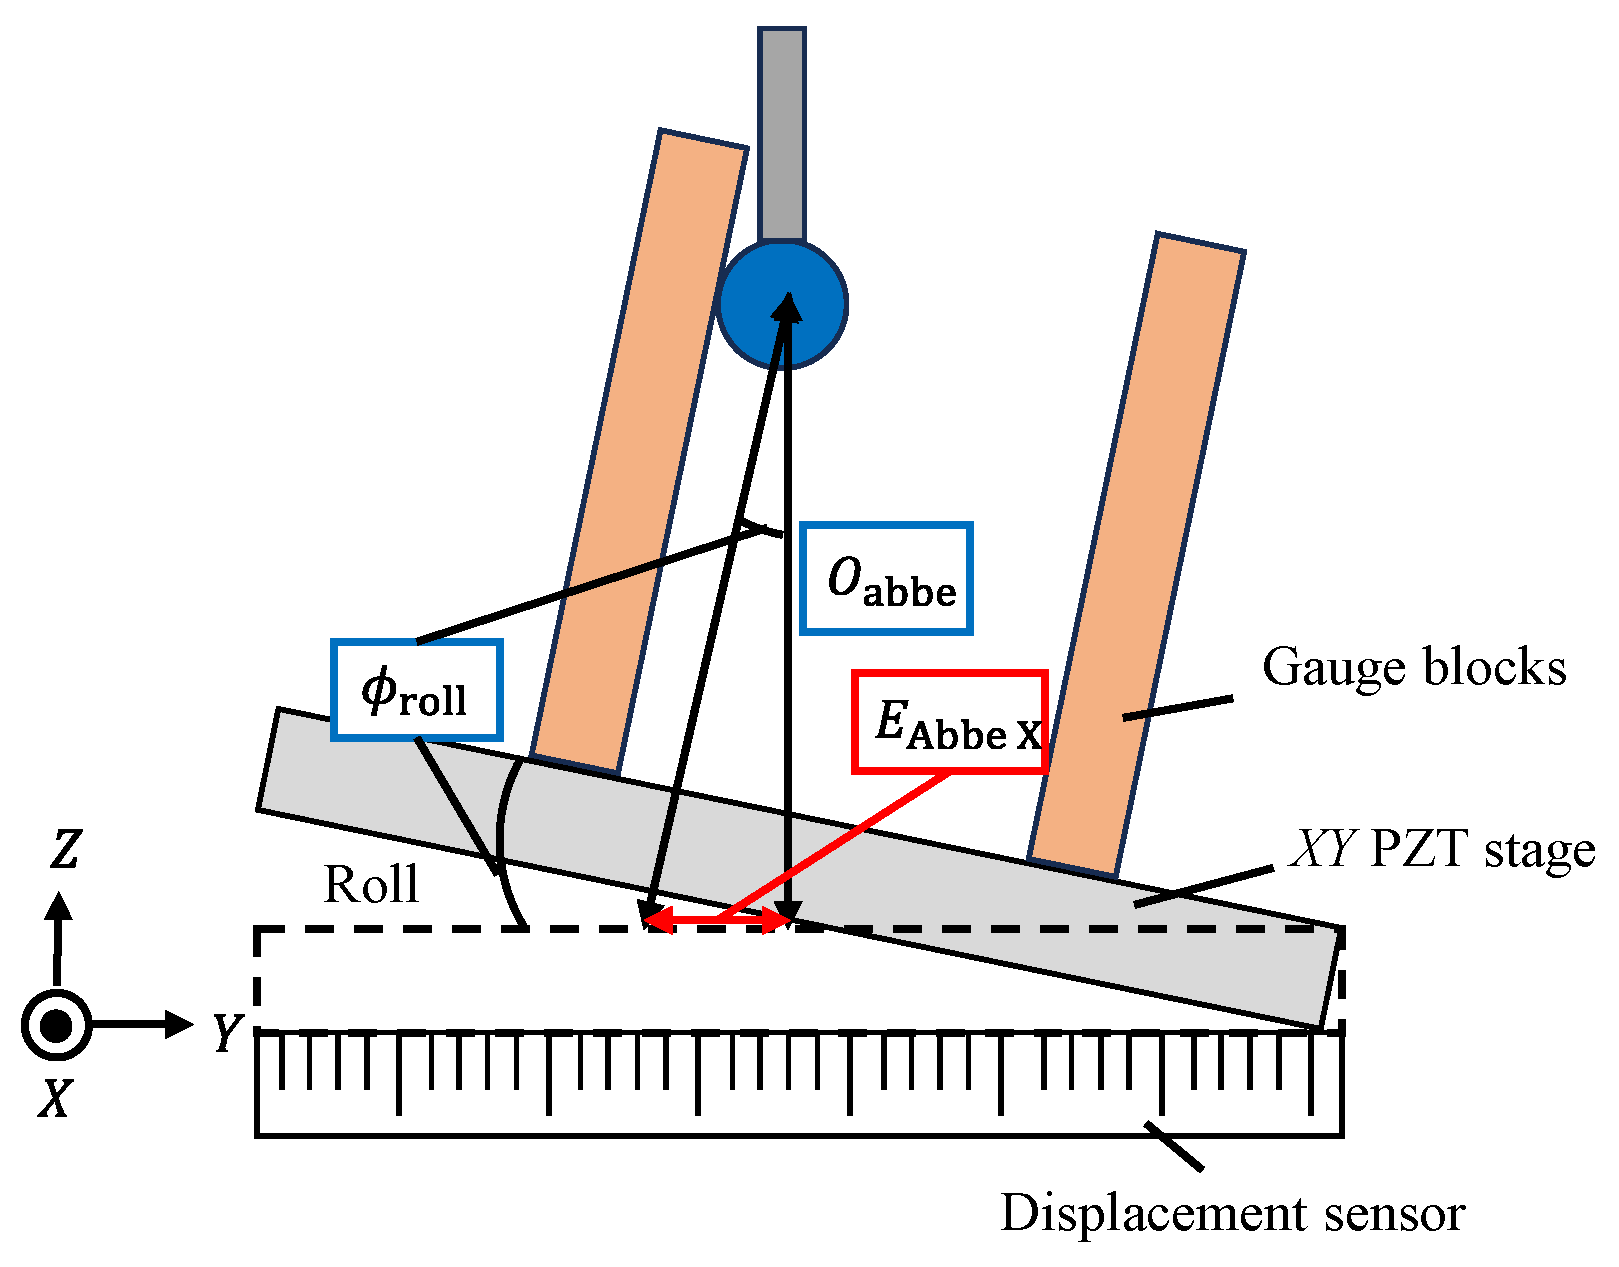
Next, the combined standard uncertainty uL in the distance L between two approximated lines in Figure 12a was calculated. The repeatability of the probing was evaluated based on the standard deviation, as shown in Figure 12b. In Figure 12b, the maximum standard deviation was evaluated to be 571 nm at P5. However, the standard deviation at P5 was larger than that at 2σ of the standard deviations at P1 to P10. Therefore, it was recognized as an outlier and excluded from the uncertainty analysis, and the maximum standard deviation excluding outliers was evaluated to be 180 nm. The number of probing repeats was five. Thus, the uncertainty of the probing repeatability uL_rep was calculated to be 80.5 nm. Probing was performed by displacing the measured workpiece in the Y-direction at 10 nm/step. Therefore, the resolution of the probing coordinate detection was 10 nm, and the uncertainty owing to the resolution was evaluated to be 2.9 nm. Because the tip of the microprobing system was not located on the measurement axis of the displacement sensor built into the PZT-driven positioning stage in the developed probing system, the uncertainties caused by Abbe’s principle should be considered. Figure 13 shows a schematic of the measurement error caused by the motion error of the stage table around the X-axis (rolling). The Abbe error EAbbe x caused by rolling of the stage table can be expressed by the following equation:
E Abbe   X = O A b b e   tan ϕ r o l l
where OAbbe is the Abbe offset between the displacement sensor and microprobe tip sphere (=18 mm). ϕroll is the motion error of the stage table caused by rolling. It is within 10 arcsec according to the specifications of the positioning stage. The maximum Abbe error owing to the rolling of the stage table was calculated to be 873 nm. Therefore, the uncertainty owing to the Abbe error around the X-axis, uL_Abbe X, was estimated to be 251.9 nm. A similar Abbe error was caused by the motion error of the stage table around the Y-axis (pitching). As shown in Figure 12a, the micro-slit was tilted at a maximum of −1.44° with respect to the X-axis. Therefore, the Abbe error EAbbe Y owing to pitching can be expressed as follows:
E Abbe   Y = O A b b e tan ϕ p i t c h · tan φ 1
where ϕpitch is the motion error of the stage table caused by the pitching. It is within 5 arcsec according to the specification of the positioning stage. The maximum Abbe error owing to pitching was calculated to be 17.4 nm. Therefore, the uncertainty owing to the Abbe error around the Y-axis, uL_Abbe Y, was estimated to be 5.0 nm. Measurement errors owing to Abbe’s principle also occurred because of the motion error of the Z-axis stage of the stage table (yawing). Figure 14 shows a schematic of the measurement error caused by the yawing of the stage table. The Abbe error EAbbe Z caused by yawing of the stage table can be expressed by the following equation:
E Abbe   Z = W 1 cos ϕ y a w 1
where ϕyaw is the motion error of the stage table caused by yawing. It is within 5 arcsec according to the specifications of the positioning stage. The uncertainty owing to the Abbe error around the Z-axis, uL_Abbe Z, was estimated to be 8.48 × 10⁻⁶ nm according to Equation (10). Therefore, it was omitted as an uncertainty source. The uncertainties caused by the Abbe error were calculated assuming a uniform distribution. With regard to the uncertainty of the microprobe tip sphere owing to the temperature variation during the measurement, the sensitivity coefficient was calculated to be 0.071 nm/K. This was based on the thermal expansion coefficient of the glass sphere made of borosilicate glass (3.3 × 10⁻⁶/K) and the average effective diameter of the microprobe tip sphere (21.45 μm). The uncertainty owing to the temperature variation during the measurement, uL_therm, was estimated to be 0.02 nm. Consequently, the expanded uncertainty Ueff of the measurement of the effective diameter of the microprobe tip was estimated to be 551.9 nm (k = 2). As shown in Table 5, it can be verified that the Abbe errors of the probing system and probing repeatability were the main factors causing the measurement uncertainty.

5. Discussion

As described in Section 3 and Section 4, the actual and effective diameters of the same microprobe tip sphere were measured, and the measurement uncertainties for each method were estimated. Table 6 summarizes the diameter measurements. As shown in the table, the difference between the actual and effective diameters of the microprobe tip was 88 nm. The microprobe employed in this experiment detected the workpiece surface based on the variation in the probe vibration induced by non-contact local surface interaction forces such as electrostatic, van der Waals, and adhesion forces owing to the surface water layer [27,37]. Therefore, the effective diameter was larger than the actual diameter. A comparison of the repeatability of the actual and effective diameter measurements revealed that the actual diameter measurement based on the contour shape measurement was better. The difference in repeatability between the two measurement methods was 34 nm. Therefore, the actual diameter measurement had an advantage in terms of repeatability. With respect to the uncertainties of the diameter measurements, the uncertainty in the effective diameter measurement was evaluated to be 2.38 times larger than that of the actual diameter measurement. It was verified that the difference in uncertainty between the two measurement methods was significantly larger than the differences in diameter and repeatability. In the uncertainty budget for the effective diameter measurement shown in Table 5, the main sources of the uncertainty were derived from the Abbe offset between the probe tip and the positioning sensors built in the PZT-driven XY precision positioning stage. Coordinate measuring systems that satisfy Abbe’s principle, such as SIOS NMM-1 [38], can significantly improve measurement uncertainty due to Abbe offset. However, measurement errors due to Abbe offset are involved in the measurement results, including those from typical macroscopic CMMs. Therefore, it is difficult to improve the measurement uncertainty derived from Abbe’s principle when calibrating the effective diameter of the probe tip using calibration artifact.
On the other hand, in the actual diameter measurement of the probe tip based on the contour form measurement, the error due to Abbe offset was significantly small and therefore negligible. Because the probe tip sphere is brought into contact with the OF surface, the measurement error owing to the contact force should be considered. However, as mentioned in Section 3.2, the contact force was estimated to be approximately one hundred and several tens of nano-Newtons. Moreover, the deformation owing to the contact force was estimated to be of the order of picometers. Consequently, the deformation owing to contact was sufficiently small to be omitted as an uncertainty source.
The method using a micro-slit or slit made of a gauge block allows calibration as long as the probe sphere has a diameter that can be inserted into the slit. On the other hand, the contour shape measurement method requires simultaneous measurement of both the reference surface (optical flat surface) and the contour shape, including the probe tip. For microspheres with diameters of 500 μm or larger, the feedback control of the point autofocus probe could not keep up due to discontinuous shape between the probe ball and the OF surface, making measurement difficult. The range of possible diameter measurements will be limited by the specifications of the contour measuring instrument used.
Since the microprobing system using a method of local surface interaction force detection can detect the surface of the workpiece with sensitivity [27,28,29], wear of the surface on the microprobe tip sphere cannot be observed after the measurement shown in Figure 12. The evaluation of the long-term reliability of calibration results is planned as a future research topic.

6. Conclusions

This study aimed to verify the effectiveness of microprobe calibration based on the actual diameter measurement of the probe tip sphere and conducted actual diameter measurement using a contour form measuring instrument. The actual diameters of the microprobe tip were calculated from the probe sphere contour shape obtained by laser probing relative to the optical flat (OF) surface. Deformation caused by contact between the microprobe tip and the OF surface was estimated based on Hertz’s contact theory. The deformation due to contact was on the sub-nanometer order and was negligible as an error in actual diameter measurement. The measured actual diameter was compared with the effective diameter measured using a precision micro-slit. The difference between the measured results for the actual diameter and the effective diameter was less than 90 nm. The measurement uncertainties for the actual and effective diameters were calculated, and the difference between the uncertainties for each diameter measurement was more than twice as large. Therefore, the difference between the measured values of the actual and effective diameters was smaller than their measurement uncertainties; it is presumed that the actual diameter of the microprobe tip sphere can be used as a calibration value for the probing system. Calibration based on the actual diameter of the microprobe tip sphere achieved the measurement uncertainty of less than 300 nm. This is expected to enable measurements of the inside of submillimeter-order apertures with nanometer-order uncertainty using the microprobing system. On the other hand, precision measurement of micro-apertures with diameters of less than 100 μm, which is known as nano-CMM [1], requires a measurement accuracy of 50 nm or less. To achieve these target specifications, it is necessary to improve the measurement accuracy based on uncertainty analysis in future work.
Contour measurements for the actual diameter calculation in this study can be performed at any position on the microprobe tip sphere. Therefore, it will be possible to measure the actual diameter of the microprobe sphere in three dimensions. However, since the obtained contour shape is a two-dimensional cross-sectional profile, there is difficulty in the spatial alignment between the actual diameter measurement value and the probe system. Future efforts will involve measuring the diameter and shape deviation of the probe sphere based on surface measurement and spatial alignment on a coordinate measuring system.

Author Contributions

Conceptualization, S.I. and K.K.; methodology, S.I., D.I. and T.T.; software, D.I. and T.T.; validation, S.I. and D.I.; investigation, T.T. and Y.S.; resources, K.M. and K.K.; writing—original draft preparation, S.I.; writing—review and editing, S.I.; visualization, D.I. and T.T.; project administration, S.I.; funding acquisition, S.I. All authors have read and agreed to the published version of the manuscript.

Funding

This research was supported by the Japan Society for the Promotion of Science (JSPS), KAKENHI (Grant Number: 23K03606), the grant program for research and development from the Mazak foundation, Machine Tool Engineering Foundation, and TAKEUCHI foundation (takeuchi-2025-J24).

Data Availability Statement

The original contributions presented in this study are included in the article. Further inquiries can be directed to the corresponding author.

Conflicts of Interest

The authors declare no conflicts of interest.

References

  1. Takamasu, K.; Ozawa, S.; Asano, T.; Suzuki, R.; Furutani, R.; Ozono, S. Basic Concepts of Nano-CMM (Coordinate Measuring Machine with Nanometer Resolution). In Proceedings of the 1996 The Japan-China Bilateral Symposium on Advanced Manufacturing Engineering, Kanagawa, Japan, 4 October 1996; pp. 155–158. [Google Scholar]
  2. Michihata, M. Surface-Sensing Principle of Microprobe System for Micro-Scale Coordinate Metrology: A Review. Metrology 2022, 2, 46–72. [Google Scholar] [CrossRef]
  3. Fan, K.C.; Fei, Y.T.; Yu, X.F.; Chen, Y.J.; Wang, W.L.; Chen, F.; Liu, Y.S. Development of a low-cost micro-CMM for 3D micro/nano measurements. Meas. Sci. Technol. 2006, 17, 524–532. [Google Scholar] [CrossRef]
  4. Weckenmann, A.; Estler, T.; Peggs, G.; McMurtry, D. Probing Systems in Dimensional Metrology. CIRP Ann.-Manuf. Technol. 2004, 53, 657–684. [Google Scholar] [CrossRef]
  5. Claverley, J.D.; Leach, R.K. A review of the existing performance verification infrastructure for micro-CMMs. Precis. Eng. 2015, 39, 1–15. [Google Scholar] [CrossRef]
  6. Aruga, M.; Ito, S.; Kato, D.; Matsumoto, K.; Kamiya, K. Investigation of probing repeatability inside a micro-hole by changing probe approach direction for a local surface interaction force detection type microprobe. Front. Manuf. Technol. 2023, 3, 1104742. [Google Scholar] [CrossRef]
  7. Murakami, H.; Katsuki, A.; Sajima, T.; Suematsu, T. Study of a vibrating fiber probing system for 3-D micro-structures: Performance improvement. Meas. Sci. Technol. 2014, 25, 094010. [Google Scholar] [CrossRef]
  8. Cao, S.; Brand, U.; Kleine-Besten, T.; Hoffmann, W.; Schwenke, H.; Bütefisch, S.; Büttgenbach, S. Recent developments in dimensional metrology for microsystem components. Microsyst. Technol. 2002, 8, 3–6. [Google Scholar] [CrossRef]
  9. Ito, S.; Kikuchi, H.; Chen, Y.L.; Shimizu, Y.; Gao, W.; Takahashi, T.; Toshihiko, K.; Kunmei, A.; Atsushi, H. A Micro-Coordinate Measurement Machine (CMM) for Large-Scale Dimensional Measurement of Micro-Slits. Appl. Sci. 2016, 6, 156. [Google Scholar] [CrossRef]
  10. Li, R.J.; Xiang, M.; He, Y.X.; Fan, K.C.; Cheng, Z.Y.; Huang, Q.X.; Zhou, B. Development of a High-Precision Touch-Trigger Probe Using a Single Sensor. Appl. Sci. 2016, 6, 86. [Google Scholar] [CrossRef]
  11. Flack, D.; Claverley, J.; Leach, R. Chapter 9—Coordinate Metrology. In Fundamental Principles of Engineering Nanometrology, 2nd ed.; A Volume in Micro and Nano Technologies; Elsevier: Amsterdam, The Netherlands, 2014; pp. 295–325. [Google Scholar]
  12. ISO 10360-5:2020; Geometrical Product Specifications (GPS)—Acceptance and Reverification Tests for Coordinate Measuring Systems (CMS), Part 5: Coordinate Measuring Machines (CMMs) Using Single and Multiple Stylus Contacting Probing Systems Using Discrete Point and/or Scanning Measuring Mode. ISO: Geneva, Switzerland, 2020.
  13. Mitutoyo Corporation. Coordinate Measuring Machine Probe Accessories, E16005. Available online: https://www2.mitutoyo.co.jp/eng/support/service/catalog/01/E16005.pdf (accessed on 1 August 2025).
  14. Chen, Y.L.; Ito, S.; Kikuchi, H.; Kobayashi, R.; Shimizu, Y.; Gao, W. On-line qualification of a micro probing system for precision length measurement of micro-features on precision parts. Meas. Sci. Technol. 2016, 27, 074008. [Google Scholar] [CrossRef]
  15. Ito, S.; Chen, Y.L.; Shimizu, Y.; Kikuchi, H.; Gao, W.; Takahashi, K.; Kanayama, T.; Arakawa, K.; Hayashi, A. Uncertainty analysis of slot die coater gap width measurement by using a shear mode micro-probing system. Precis. Eng. 2016, 43, 525–529. [Google Scholar] [CrossRef]
  16. Küng, A.; Meli, F.; Thalmann, R. Ultraprecision micro-CMM using a low force 3D touch problem. Meas. Sci. Technol. 2007, 18, 319–327. [Google Scholar] [CrossRef]
  17. Thalmann, R.; Meli, F.; Küng, A. State of the Art of Tactile Micro Coordinate Metrology. Appl. Sci. 2016, 6, 150. [Google Scholar] [CrossRef]
  18. Sawabe, M.; Maeda, F.; Yamaryo, Y.; Simomura, T.; Saruki, Y.; Kubo, T.; Sakai, H.; Aoyagi, S. A new vacuum interferometric comparator for calibrating the fine linear encoders and scales. Precis. Eng. 2004, 28, 320–328. [Google Scholar] [CrossRef]
  19. Becker, P.; Friedrich, H.; Fujii, K.; Giardini, W.; Mana, G.; Picard, A.; Pohl, H.J.; Riemann, H.; Valkiers, S. The Avogadro constant determination via enriched silicon-28. Meas. Sci. Technol. 2009, 20, 092002. [Google Scholar] [CrossRef]
  20. Andreas, B.; Azuma, Y.; Bartl, G.; Becker, P.; Bettin, H.; Borys, M.; Busch, I.; Fuchs, P.; Fujii, K.; Fujimoto, H.; et al. Counting the atoms in a 28Si crystal for a new kilogram definition. Metrologia 2011, 48, S1. [Google Scholar] [CrossRef]
  21. Griesmann, U.; Soons, J.; Wang, Q.; Debra, D. Measuring Form and Radius of Spheres with Interferometry. CIRP Ann.-Manuf. Technol. 2004, 53, 451–454. [Google Scholar] [CrossRef]
  22. Schmitz, T.L.; Evans, C.J.; Davies, A.; Estler, W.T. Displacement Uncertainty in Interferometric Radius Measurements. CIRP Ann.-Manuf. Technol. 2002, 51, 451–454. [Google Scholar] [CrossRef]
  23. Bartl, G.; Krystek, M.; Nicolaus, A. PTB’s enhanced stitching approach for the high-accuracy interferometric form error characterization of spheres. Meas. Sci. Technol. 2014, 25, 064002. [Google Scholar] [CrossRef]
  24. Bartl, G.; Krystek, M.; Nicolaus, A.; Giardini, W. Interferometric determination of the topographies of absolute sphere radii using the sphere interferometer of PTB. Meas. Sci. Technol. 2010, 21, 115101. [Google Scholar] [CrossRef]
  25. Michihata, M.; Hayashi, T.; Adachi, A.; Takaya, Y. Measurement of probe-stylus sphere diameter for micro-CMM based on spectral fingerprint of whispering gallery modes. CIRP Ann.-Manuf. Technol. 2014, 63, 469–472. [Google Scholar] [CrossRef]
  26. Kobayashi, Y.; Michihata, M.; Zhao, Z.; Chu, B.; Takamasu, K.; Takahashi, S. Radial mode number identification on whispering gallery mode resonances for diameter measurement of microsphere. Meas. Sci. Technol. 2019, 30, 065201. [Google Scholar] [CrossRef]
  27. Ito, S.; Shima, Y.; Kato, D.; Matsumoto, K.; Kamiya, K. Development of a Microprobing System for Side Wall Detection Based on Local Surface Interaction Force Detection. Int. J. Autom. Technol. 2020, 14, 91–98. [Google Scholar] [CrossRef]
  28. Gao, W. Chapter 7—Precision Nanometrology: Sensors and Measuring Systems for Nanomanufacturing; Springer Series in Advanced Manufacturing; Springer: Berlin/Heidelberg, Germany, 2010; pp. 211–243. [Google Scholar]
  29. Ito, S.; Kodama, I.; Gao, W. Development of a probing system for a micro-coordinate measuring machine by utilizing shear-force detection. Meas. Sci. Technol. 2014, 25, 064011. [Google Scholar] [CrossRef]
  30. Miura, K.; Nose, A.; Suzuki, H.; Okada, M. Cutting Tool Edge and Textured Surface Measurements with a Point Autofocus Probe. Int. J. Autom. Technol. 2017, 11, 761–765. [Google Scholar] [CrossRef]
  31. ISO 25178-605:2014; Geometrical Product Specification (GPS)—Surface Texture: Areal—Part 605: Nominal Characteristics of Non-Contact (Point Autofocus Probe) Instruments. ISO: Geneva, Switzerland, 2014.
  32. Iwata, F.; Sumiya, Y.; Sasaki, A. Nanometer-Scale Metal Plating Using a Scanning Shear-Force Microscope with an Electrolyte-Filled Micropipette Probe. Jpn. J. Appl. Phys. 2004, 43, 4482–4485. [Google Scholar] [CrossRef]
  33. Kawata, Y.; Urahama, S.; Murakami, M.; Iwata, F. The use of capillary force for fabricating probe tips for scattering-type near-field scanning optical microscopes. Appl. Phys. Lett. 2003, 82, 1598–1600. [Google Scholar] [CrossRef]
  34. JCGM 100:2008; Evaluation of Measurement Data–Guide to the Expression of Uncertainty in Measurement (GUM). Joint Committee for Guides in Metrology: Sèvres, France, 2008.
  35. ISO 3650:1998; Geometrical Product Specifications (GPS)—Length Standards—Gauge Blocks. ISO: Geneva, Switzerland, 1998.
  36. Doriton, T.; Beers, J. The Gauge Block Handbook; CreateSpace Independent Publishing Platform: North Charleston, SC, USA, 2014; pp. 138–139. [Google Scholar]
  37. Goj, B.; Dressler, L.; Hoffmann, M. Semi-contact measurements of three-dimensional surfaces utilizing a resonant uniaxial microprobe. Meas. Sci. Technol. 2014, 25, 064012. [Google Scholar] [CrossRef]
  38. SIOS Meßtechnik GmbH. Available online: https://www.sios-precision.com/en/products/nanopositioning-and-nanomeasuring-machine-nmm-1 (accessed on 1 October 2025).
Figure 1. Fabrication of micro-stylus with tip sphere: (a) Filling glass tube with UV-curable adhesive, (b) Attachment of precision glass particles, (c) Microphotograph of microprobe tip sphere.
Metrology 05 00073 g001
Figure 2. Experimental configuration of actual diameter measurement: (a) Experimental setup, (b) Photographs of experimental setup.
Metrology 05 00073 g002
Figure 3. Searching for apex of the microprobe tip sphere.
Metrology 05 00073 g003
Figure 4. Measurement of contour shape of the tip sphere.
Metrology 05 00073 g004
Figure 5. Principle of actual diameter measurement: (a) Contour shape inclination correction, (b) Actual diameter calculated from the contour shape.
Metrology 05 00073 g005
Figure 6. Schematic diagram of deformation based on Hertz’s contact theory: (a) Schematic of stylus shaft deflection, (b) Inner and outer diameters of the glass tube stylus shaft.
Metrology 05 00073 g006
Figure 7. Dimensions of stylus shaft of the microprobe.
Metrology 05 00073 g007
Figure 8. Experimental results of the contour shape measurement.
Metrology 05 00073 g008aMetrology 05 00073 g008b
Figure 9. Experimental configuration of microprobe: (a) Schematic of the microprobing system, (b) Microprobe tips.
Metrology 05 00073 g009
Figure 10. Micro-slit consisting of wrung gauge blocks.
Metrology 05 00073 g010
Figure 11. Principle of effective diameter measurement of microprobe tip sphere.
Metrology 05 00073 g011
Figure 12. Experimental results of probing inside the micro-slit: (a) Probing results inside the micro-slit, (b) Standard deviation of the probing coordinates along Y-axis.
Metrology 05 00073 g012
Figure 13. Abbe error around X-axis.
Metrology 05 00073 g013
Figure 14. Abbe error around Z-axis.
Metrology 05 00073 g014
Table 1. Measurement results of the actual diameter measurement of the microprobe tip sphere (μm).
Angle θ (°)04590135180225270315Average
Average diameter21.32621.35221.42221.36221.29921.34221.41321.38621.362
Standard deviation0.1330.0920.1420.1460.0140.0870.0120.016-
Table 2. Uncertainty budget of actual diameter measurement of the microprobe tip sphere (nm).
Source of UncertaintySymbolValueTypeDistributionDivisorSensitivity CoefficientStandard Deviation
Z-directional resolution of NH-3s u z _ r e s _ N H 1BRectangular 2 3 0.3
Z-directional accuracy of
NH-3s
u z _ a c c _ N H 227BRectangular 2 3 65.5
Repeatability of diameter measurement u r e p _ a c t _ d i a 146A 5 65.3
Effect of temperature variation to tip sphere diameter u t e m p _ a c t 0.5 °CBRectangular 3 0.07
(nm/K)
0.02
Accuracy of average height of the OF surface u a v e _ O F 70A 1 70
Combined standard uncertainty 116.0
Expanded uncertainty U a c t ( k = 2 ) 232.0
Table 3. Standard deviations of the average Z-directional coordinates on the OF surface (nm).
Angle θ (°)04590135180225270315
Maximum671352701691225
Minimum111112108644
Table 4. Measurement results of effective diameter (μm).
AverageMaximumMinimumMax-Min
21.4521.5821.320.26
Table 5. Uncertainty budget of effective diameter measurement of the microprobe tip sphere (nm).
Source of UncertaintySymbolValueTypeDistributionDivisorSensitivity CoefficientStandard Deviation
Combined standard uncertainty of micro-slit gap width u W 78.6
Parallelism of both sides of the micro-slit inner walls u W _ p a r a 260BRectangular 2 3 75.1
Flatness inside the upper slit u W _ f l a t _ u p 50BRectangular 2 3 14.4
Flatness inside the lower slit u W _ f l a t _ l o w 50BRectangular 2 3 14.4
Micro-slit gap width error due to wringing of the gauge blocks (Wringing error (double side)) u W _ w r i n g i n g 20BRectangular 3 11.5
Thermal effect to the center gauge block u W _ t h e r m 0.5 °CBRectangular 3 1.08
(nm/K)
0.3
Combined standard uncertainty in L u L 183.4
Repeatability of probing u L _ r e p 180A- 5 80.5
Abbe error (rolling) u L _ A b b e X 872.7BRectangular 2 3 251.9
Abbe error (pitching) u L _ A b b e Y 17.4BRectangular 2 3 5.0
Abbe error (yawing) u L _ A b b e Z 2.9 × 10⁻⁵BRectangular 2 3 8.5 × 10⁻⁶
Thermal effect on the probe tip sphere u L _ t h e r m 0.5 °CBRectangular 3 0.07
(nm/K)
0.02
Combined standard uncertainty 276.0
Expanded uncertainty U e f f ( k = 2 ) 551.9
Table 6. Comparison of diameter measurement results.
Average
(μm)
Repeatability
(nm)
Uncertainty
(nm)
D a c t 21.362146232.0
D e f f 21.45180551.9
Disclaimer/Publisher’s Note: The statements, opinions and data contained in all publications are solely those of the individual author(s) and contributor(s) and not of MDPI and/or the editor(s). MDPI and/or the editor(s) disclaim responsibility for any injury to people or property resulting from any ideas, methods, instructions or products referred to in the content.