Article

Investigating the Detection Capability of Acoustic Emission Monitoring to Identify Imperfections Produced by the Metal Active Gas (MAG) Welding Process

1
School of Mechanical, Aerospace and Automotive Engineering, Faculty of Engineering, Environment and Computing, Coventry University, Gulson Road, Coventry CV1 2JH, UK
2
University of Sheffield, Department of Materials Science and Engineering, Sir Robert Hadfield Building Mappin Street, Sheffield S1 3JD, UK
*
Author to whom correspondence should be addressed.
Acoustics 2023, 5(3), 714-745; https://doi.org/10.3390/acoustics5030043
Submission received: 24 March 2023 / Revised: 20 June 2023 / Accepted: 11 July 2023 / Published: 20 July 2023

Abstract

:
Welding inspection is a critical process that can be severely time-consuming, resulting in productivity delays, especially when destructive or invasive processes are required. This paper defines the novel approach to investigate the physical correlation between common imperfections found in arc welding and the propensity to determine these through the identification of signatures using acoustic emission sensors. Through a set of experiments engineered to induce prominent imperfections (cracks and other anomalies) using a popular welding process and the use of AE technology (both airborne and contact), it provides confirmation that the verification of physical anomalies can indeed be identified through variations in obtained noise frequency signatures. This in situ information provides signals during and after solidification to inform operators of the deposit/HAZ integrity to support the advanced warning of unwanted anomalies and of whether the weld/fabrication process should be halted to undertake rework before completing the fabrication. Experimentation was carried out based on an acceptable set of parameters where extracted data from the sensors were recorded, analysed, and compared with the resultant microstructure. This may allow signal phenomena to be captured and catalogued for future use in referencing against known anomalies.

1. Introduction

More holistic integrity assessments involving integrated non-destructive testing are becoming more widely adopted with greater emphasis on a connected manufacturing philosophy via Industry 4.0. Such initiatives are now enabling manufacturers to analyse those welding characteristics and determine whether the integrity of the weld and its heat-affected zone (HAZ) satisfies the defined quality standard. Fusion welding may be the defined requirement or only solution available for fabricating complex assemblies commonly found in the production of safety-critical structures deployed within the nuclear and aerospace sectors, and as such, its integrity and thus its quality are of paramount importance for such structures to achieve design performance. Present inspection methods can be time-consuming, destructive, and often not representative of the whole part. With the increasing fidelity of non-destructive evaluation (NDE) methods through the development of improved sensor technology, it is possible to monitor the weld quality in situ and in real time, thereby offering cost-effective solutions that contribute to improved sustainability and mitigate rectification complexity, which further reduce the assigned non-value-added effort that is unfairly placed on the inspection process.
Through the integration of various acoustic emission (AE) sensors within the mechanised MAG welding set-up, utilising an eight-axes robotic system and a Fronius TPS 500i CMT™ welding power source, experiments were completed using a “bead-on-plate” configuration to detect emitted elastic waves discharged during material solidification and cooling. Any change in the solidification and cooling noise patterns was investigated to identify anomalies or gross imperfections within and around the thermally disrupted material. This is to correlate any modifications in noise frequency at any point in time, with specific microstructural analysis at that time interval, utilising recorded soundwave signals of both airborne and contact ultrasonic emissions. This also included monitoring any changes in amplitude and energy, throughout the event duration, which may potentially lead to exploiting opportunities to create autonomous welding and inspection systems, based on enhanced decision-making protocols.

1.1. Fusion Welding Characteristics Involving Arc Welding

Whilst fusion welding is recognised as being a major and complex manufacturing engineering discipline, it nonetheless needs to be recognised as a method for indicatively inducing flaws into structures, even if the weld and HAZ regions are classified as 100% dense. This is because a fusion weld induces significant phase changes, as a result of converting the substrate and any filler metal into a liquid state that subsequently solidifies non-isothermally, forming a cast structure, encouraging varying levels of compositional variance (segregation). This conversion locally modifies the component material’s original condition of supply. This is where the engineering community would clarify the original base metal structure as now being “flawed”.
There are several key conditions that can significantly contribute to morphing such conditions into flaws or even defects, some examples of these are as follows:
  • Material chemistry combinations and microstructures;
  • Filler metal chemistry (if used);
  • Geometry and thickness;
  • Heat source power density;
  • Heat flow/thermal cycle;
  • Gas–metal reactions.
The constituency and complexity of a material’s chemistry can have a substantial effect on its mechanical and geometrical response to welding, e.g., hardenability and toughness, and distortion, respectively, and in some instances, its sensitivity to forming low-melting point compounds and brittle intermetallic phases. High-strength steels are prone to hydrogen cracking if their hardness values are >350 HV, austenitic stainless steels are susceptible to solidification cracking if they contain no or very low Delta ferrite contents, or if their chromium equivalent to nickel equivalent ratios are below 1.6 [1]. Nickel-base alloys are prone to micro-fissuring in the weld and HAZ when significant compositional gradients exist [2].
The profile or shape of the weld, the type of joint used, the volume of liquid metal produced, and the type and magnitude of restraint all contribute to the level of strain, shrinkage, and residual stress encountered within the final weld.
Power density, also known as heat source intensity, is a factor that has a major effect on both the heating and cooling rates encountered within the weld and the size of the isotherm, extending axially and perpendicularly to the direction of heat source travel. In this study involving the MAG process, the typical values produced were in the range between 1 × 10⁴ and 5 × 10⁴ W/cm2 [3].
The weld’s thermal cycle is also a critical parameter that is dependent upon three key variables:
  • Prior substrate temperature;
  • Welding power;
  • Travel speed.
The quotient value between that of welding power and travel speed determines the amount of energy delivered per unit length and is always required in formulating a weld procedure specification. This is due to it being a key parameter in qualifying a weld’s mechanical properties, specifically impact toughness and hardness.
These interrelating heat input variables are known to affect the final transformation products. This is especially so when considering allotropic materials wherein metastable phases such as martensite and bainite are predominantly produced when welding high-strength steels and low-alloy steels. The evolution of such phases associated with welding these types of materials results from rapid cooling through the austenite region (800 °C and 500 °C), also referred to as the Δt8−5. Dixon and Håkansson [4] researched the effect from increasing the welding heat input between 1 and 5 kJ/mm and reported a notable difference in hardness.
Gas–metal reactions used within this context concern those chemical reactions that take place at the interface between the gas phase and the liquid metal. Such reactions involve the dissociation of carbon dioxide and the dissolution of nitrogen, oxygen, and hydrogen. Gas–metal reactions are complex and known to affect the enthalpy of the welding arc and the level of interstitial elemental pick-up, which can adversely affect the response to embrittlement and porosity in the weld and HAZ region [5,6]. The combination of gas mixtures and varying material chemistries within the weld pool were chosen to accentuate the exothermic reaction to create insoluble compounds that promote the onset of porosity or cracking.
In summary, several variables need to be considered in determining a successful weldment. The effects arising from the interrelationship between heat input, cooling rates, shrinkage, and weld metal chemistry are major influences on cracking sensitivity during fusion welding. Accentuating these interactions to induce flaws was the main driver within this research to create an acoustic signature that can be remotely detected.

1.2. Welding Imperfections and Non-Destructive Evaluation (NDE)

Previous research [7] into the use of acoustic emission to determine the arc stability of the gas–metal arc welding process has identified the potential use of this technology to perceptibly detect instabilities in the arc that could offer the potential of locating defects in a welded foil. Furthermore, the use of acoustic emission techniques to evaluate hydrogen cracking in slow strain-rate tensile (SSRT) tests in various hydrogen-charged specimens proved that cracking could be estimated and monitored rather successfully from the total acoustic emission (AE) [8].
The work presented here focuses on the weldability response of carbon–manganese (C–Mn) steel utilising a fully austenitic stainless steel filler metal and a combination of varying alloy inserts.
The main imperfections commonly found when welding these types of steels are as follows:
  • Inadequate fusion;
  • Lack of penetration/excessive penetration;
  • Porosity;
  • Metallic and non-metallic inclusions;
  • Cracking;
  • Undercutting;
  • Lamellar tearing.
Such imperfections normally found in a weld or its HAZ can be deemed innocuous under certain operating conditions defined by the design and quality assurance standard, hence the term “imperfection” rather than “defect”. However, if certain conditions arise, then these conditions may induce a growth in regions of higher stress intensities, which can ultimately result in failure. This work encompasses studies aimed at inducing “cracking” within the weld, which at the same time provides energy emissions for exploitation by an NDE technique. The chosen NDE technique this research is investigating involves the application of AE sensor technology to detect crack formation in a weld. Cracks are classified under two distinctive headings: hot cracking, also known as solidification cracking and cold cracking or hydrogen-induced cracking.
Solidification cracking occurs during the initial stages of solidification and are commonly associated with the formation of low-temperature interdendritic phases and the shape of the weld incapable of withstanding the terminal solidification stresses. The termination stresses and corresponding cracking sensitivity are further accentuated in joints that are highly restrained and of large cross-sectional thickness. Thin weld beads are more sensitive to cracking when the alloy contains volume fractions high in sulphur, Phosphorus, and carbon, and when the depth-to-width ratio of weld promotes a horizontal solidification profile. Prevention methods that must be considered when adopting arc welding technologies are as follows:
  • Selection of appropriate filler wire size and welding parameters;
  • Consumables with low carbon and higher manganese and silicon;
  • Fusion profile that promotes depth-to-width ratio no greater than 2:1;
  • Weld pool surface profiles;
  • Avoidance of significant gaps;
  • Removal of surface contaminants.
Hydrogen-induced cracking (HIC) is more common in C-Mn and low-alloy steels where the hardness values are >350 HV, and occurs when four factors have been simultaneously satisfied, these being microstructural sensitivity, highly stressed joints, increased hydrogen enrichment and an Mf temperature near to normal ambient.
  • Microstructural sensitivity is due primarily to the HAZ having a hard and brittle microstructure or if the martensitic finish temperature (Mf) is below normal ambient temperature.
  • Significant tensile stresses arising from high restraint and steep cooling curves, or a high yield strength filler metal used to join a lower yield strength substrate.
  • Hydrogen sources arising from decomposition of hydrocarbons and moisture sources, e.g., flux-based welding processes.
  • A temperature near to ambient that retards the rate at which nascent hydrogen diffuses to a position where the above three factors overlap, causing the coalescence of hydrogen molecules (gas) to induce a significant hydrostatic pressure.
The HAZ microstructure is more liable to result in failure from hydrogen cracking due to low-heat inputs, giving rise to steep cooling curves, which in turn simultaneously increases hardness and tensile stress. Solutions to overcome this problem involve using higher heat inputs or pre-heating the substrate.
In a weldment, HIC is more prone to occur at the toe of weld (the junction between the fusion zone and near-HAZ), due to a combination of geometrical change and higher hardness experienced in the HAZ region. Many anomalies identified can be detected using existing NDE techniques but, as previously mentioned, AE sensors are particularly sensitive to detecting such phenomena and offer significant benefits to monitor time-delayed cracking. Another method assessed for inducing flaws within a weld was undertaken through introducing the fusing of non-compliant materials to stimulate cracking responses during welding. In the work completed by Ser’eznov et al. [9], titanium and aluminium inserts were fused within the substrate to cause brittle intermetallic phases within the weld pool to promote a cracking tendency. Such flaws caused an increase in the amplitude and total count of AE signals, characterising the process of nucleation and development of cracks in the solidified weld.
Standard fusion welding of alloys (non-pure systems) indicatively produces a columnar grain structure that results from heterogeneous nucleation promoted through epitaxial growth. This mechanism promotes the direction of crystal growth from the substrate–liquid interface through to the formation of dendrites within the liquid. Within this thermodynamically controlled mechanism, it is possible that steep compositional gradients are created that incubate the formation of intermetallic and low-melting point compounds, which under a favourable stress level rupture during the cooling phase, and it is here where the emission of acoustic signals would exist.

1.3. Acoustic Emission (AE) Sensors

AE alters the shape of piezo-electric material, which in turn alters the respective electrical signal. This is due to the elastic waves deforming the atomic structure, which is further refined using specialist amplification electronics/measuring equipment. The analysis of AE signals can help to understand the details in respect to the origin of the defect/discontinuity in the material.
AE is different from most other sensing technologies for two reasons:
  • Instead of transmitting energy to the material being examined, it simply records emitted energy over a defined threshold. Weld solidification provides enough energy for generating elastic waves that are above such defined thresholds.
  • AE testing is concerned with changes in material discontinuities or density, as it providesthe detection of active features like crack growth or spot indication, respectively, which can be used to determine the quality of the weld.
AE emissions can be produced from crack initiation and growth in a metal during dislocation and slip movements or phase transformations in allotropic metals. AE detection takes place mostly when the material under load exhibits plastic deformation or is loaded at the onset of its yield point. The presence of cracks in a metal implies that the level of stress at the crack tip is many times higher than the surrounding area; therefore, AE can provide distinguishing features when the material along the crack tip undergoes plastic deformation. The output scale of energy produced by AE is in the form of waveform amplitude, velocity, and signal attenuation (due to damping effects). The stress intensity factor, load at the crack tip, and material modulus will then affect the crack growth rate, which is proportional to the acoustic emission amplitude.
Investigating the weld after completion is a major consideration in which the welding operator and welding inspector need to know whether the defined weld quality standard has been achieved. Surface imperfections beyond the allowable magnification level may, in fact, lead to consequences in service and thus require tests for validation. Combining this with planar and non-planar imperfections, as well as their location, requires additional classification. There are a variety of tests, both destructive and non-destructive, to ascertain pre and post-process capability; acid etch, guided bends, tensile, X-ray, and ultrasonic tests to name a few. All these methods are “after the fact” tests. Therefore, there is a need to introduce less obtrusive real-time methods such as that provided by the AE NDE technique, which can be suitably integrated for determining and measuring flaws and defects in situ. This is the focus within the work presented here.

2. Literature

2.1. Investigating Sensor Technologies Applied to Welding Quality

Zhang et al. [10] investigated image-based acquisition systems utilising charge couple devices (CCDs) to monitor weld pool profiles within the keyhole mode of the plasma arc welding (PAW) process. During the PAW process, the keyhole status could be characterised by indirect signals (generated when the keyhole is formed) and direct signals (keyhole shape and size is maintained). However, all the detected information could only be used to demonstrate the establishment of an open through-thickness keyhole but could not give its dimensional information, the weld pool size, or any volumetric imperfections. Rosado et al. [11] investigated a new non-destructive testing (NDT) system that focused on the application of a new ionic eddy current method to assess the evolution of micro-size superficial defects in metallic joints. Another addition is plasma optical spectroscopy by Ferrara et al. [12], which is also an advancement in weld monitoring, where the emitted plume provides indications of the weld quality; however, there is little publicised literature available suggesting barriers to industrial practicalities. Yi et al. [13] carried out trials using the AE system applied to assessing the metal droplet transfer characteristics within the MAG process and Kamal et al. [14] compared the arc sound of a pulsed MAG sequence at various process parameters and found that the welding arc sound was strongly related to both metal droplet transfer and weld quality, which enhances the ability to detect welding stability and defects. Paoletti et al. [15] investigated the impact of material transform parameters influencing the joint quality. Spot bonding using the friction stir technique (FSSB) applied to polycarbonate sheets was monitored through torque signals via piezo-electric dynamometers distinguishing abusive from normal conditions. In addition to this, temperature (infrared radiation) could be extracted from an infrared pyrometer. Eriksson et al. [16] created a method to characterise imperfections during laser welding employing a mix of sensors that utilised spectrometry, photodiode analysis, and visible imaging; such techniques can lead to numerous physical features being quantified. Sibillano et al. [17] investigated a technique for on-line identification of joint penetration utilising spectroscopic analysis of the optical emission collected from the laser–metal interaction zone. From examining the optical emission from the connection zone between the laser and metal, the resulting spectra reveal unique signatures of different phenomena. Guokai et al. [18] also carried out studies using a CCD camera and an infrared camera to visually monitor the weld pool. The dynamic dimensional transformations that occur in the weld pool/keyhole for short periods were obtained with confidence. Suárez et al. [19] explored different avenues using fibre Bragg grating sensors during tungsten inert gas (TIG) welding of aluminium–magnesium alloy plates, where tests found transient and residual strains located within the HAZ. Their view was that, once detected, distortion would be actively decreased to ensure the process is corrected in situ.
The discussed research shows an increase in technologies that have been used to define the parameters for welding and the determination between a good and a poor weld. Such processes require further investigations, and one process specifically that has been targeted is the application of AE to the MAG process, which may give valuable in situ information that is also consistent with conventional NDE techniques. In the next section, AE sensors applied to welding will be discussed in greater depth.

2.2. Acoustic Emission Sensors Applied to Monitoring Weld Quality In Situ

Ladislav et al. [20] carried out a feasibility study on acoustic signals for the on-line monitoring of the MAG welding process using the short circuit (dip transfer) mode. Microphones and PZT sensors were used to detect the responsive behaviour of any weld defects by using different inserted steel materials. The study concluded that AE sensors can be used for detecting short circuits. The measured signals from the PZT sensor showed complexity and it was not possible to find any direct relation with welding current as the distance of the microphone from the weld surface induced a delay when reading the results.
AE produced by metal droplet transfer gives a very strong signal for monitoring. From measuring metal drop transfer using AE signatures, the authors of [9] were able to measure the following phenomena: flow of the molten pool, microstructure phase changes, liberation of internal tension, dilatations, and plastic deformation. The AE study opens up the possibilities of locating defects within the welded joint during the cooling phase where microstructural phase changes and plastic deformations were identified.
The measurements found in [20] of the arc acoustic waveforms and welding currents within the short circuit transfer mode were completed using two arc voltage settings: 19 and 21 Volts. Airborne acoustic emission measurements were completed by a microphone and a contact PZT sensor positioned at a fixed distance of 350 mm from the welding arc. During the tests, peaks in acoustic pressure were observed by the airborne microphone (time domain) and correlated with measured current peaks of short circuits. The variations in the signals provided by the PZT sensor during welding, however, were imperceptible in the time domain and were difficult to correlate to those changes in welding current. Their conclusions were that the arc behaviour can be monitored to detect weld quality and that the soundwaves from metal droplet transfer are easier to detect than those of arc re-ignition and produce the most perceptible acoustic patterns. Arc re-ignition is an important facet to monitor during welding, as arc extinguishment can lead to material irregularities. This, however, is difficult to distinguish from other phenomena.
Cayo and Absi [21] examined acoustic signals emitted from three welding transfer modes; within this work, the microphone position was of 150 mm from the weld pool. The study was based on analysing sound waves resultant from changes within the electric arc and impact of the molten drops into the weld pool. Nevertheless, they have found that the acoustic signals of the impacted droplets in the spray transference mode are difficult to perceive due to the smaller sizes and reduced specific droplet mass during this mode of transfer. Their study showed that the sound pressure can be a good online indicator for globular transfer, the intermediate mode between dip and spray. For the short circuit transfer mode, the variation in the sound pressure is not very clear and the authors could not correlate them with the defected welds.
Karlsson [22] investigated monitoring acoustic patterns emitted from weld cooling with no defect. Such monitoring was carried out to detect crack initiations, growth, and their locations by analysing the acoustic signals emitted during the material transformation. The monitoring of the airborne acoustic emissions for several welds was conducted in the range of 5–15 s after finishing the weld. Furthermore, Karlsson’s work stated that “emitted spikes and noise have frequencies around 150–200 kHz indicating crack growth in the material” and the study again concluded the theory of an increase in AE by the initiation and propagation of cracks within cooling welds.
Cayo and Alfaro [23] made the comparative analysis in the time and frequency domain with the acoustical pressure generated by the electric arc to determine which of the two analysis methods was better to evaluate the stability in the MAG welding process. They concluded that the integrity of a weld can be disturbed through the introduction of grease contaminants and that the welding arc becomes unstable when passing over an unclean surface, resulting in an acoustic pressure decrease, but with increased variations in its AE. Moreover, the analysis of AE in the time domain is more helpful in distinguishing the variations in the acoustic pressures than in the frequency domain.
Wadley and Scruby [24] measured the static component of displacement using conventional strain gauge arrangements. This enabled the development of a reasonable understanding in linking AE outputs to the microstructure’s static mechanical properties. The method allows for the detection to locate the site of active defects, especially those that grow under service loads. This technique, however, is insensitive to flaws that are not critically stressed. It should also be noted that some processes of deformation/fracture are undetectable (such as ductile fracture). Typical AE data for the steels show that carbon concentration clearly has a strong effect upon the AE activity.
Interestingly, these researchers [24] noticed that, during plastic deformation, the duplex microstructure gave the most AE with medium carbon bainite and austenite phases being the only other structures giving detectable emission. For a slow-cooled ferrite–pearlite structure, the AE was associated with the nucleation of slip bands. This research concluded that intermediate cooling rates resulted in a dual-phase microstructure consisting of ferrite and austenite (α/γ) in low carbon steel. Subsequent straining generated very intense acoustic emissions, believed to be associated with retained austenite slip occurring from the diffusionless martensitic transformation. However, when an intergranular crack advances in such steels, this is the most readily detectable fracture process.
Sharma et al. [25] used the following incidents to promote welding defects: cotton thread for inclusion, grease for porosity, and metallic wire inserted in different parts to promote cracking. All five specimens had the following AE parameters recorded: amplitude, duration, count, RMS, energy, and event all vs. time. Their observations identified that an 85–100 dB signal was recorded for normal welding and 120–125 ms was recorded as the standard duration time for all welding. There was no identification of defects during the “welding only” detection phase, but during the cooling phase the following imperfections were identified: porosity, shrinkage, and cracks. Radiographic results verified these defects in the weld and corroborated the AE results. It was also noticed that if a change occurred in the range from 80 to 100 amps, an increase in hardness resulted.
Very similar to AE and strain gauges is the use of fibre Bragg grating (FBG), wherein strain released from thermal variations can be extracted from the waveform travelling through optic fibre waveguide. When variation is subjected to the FBG in the form of strain, this waveform is changed, and such variations measured. FBGs were used to determine material differences during welding by Rodriguez-Cobo et al. [26].
The discussed investigations reinforce the applicability of using both airborne and contact methods of AE for the determination of weld surface and volumetric integrity both in situ or off-line.
As there are many thermal and kinematic events occurring during the weld cycle, it is important to deliberately force or seed the correct defect for detection. Out of all the deliberate defect tests, it is thought that the use different material inserts promotes cracks more readily than other techniques. The experimentation of the presented work will follow the ideas presented by [9]. Such tests will investigate alternative, but more compliant, insert materials to closely obtain more expansive realistic datasets wherein both time and frequency domains will show distinguishing phenomena. By using advanced PAC wideband AE sensors, it is possible to acquire a higher-resolution recording, displaying the suitability for such technologies, which was not displayed by [9]. Other authors also concluded that it was not possible to detect ductile fracture mechanisms as well as flaws that were stressed sufficiently to detect initial crack growth; such sensor enhancements should now ensure this is possible where both elastic and plastic material phenomena are identified during scratch tests [27]. The setup of using an AE contact sensor to distinguish crack initiation/propagations with such a setup using different insertable inserts has not been seen before in the literature.
In terms of the specific digital signal processing techniques to show separation between the two sources of extracted acoustic date, the following discussions are necessary.
He and Li’s work [28] used time–frequency analysis in the form of continuous wavelet transform (CWT) in order to compress the AE signal and use it as a signature fingerprint to discriminate between a good/bad MIG weld. Principal Component Analysis (PCA) are used to determine the most significant compressed–transformed data of the CWT-applied AE data. A support vector machine is then used to provide automated classifications between a good/bad weld. PCA used as the CWT AE information can produce computationally heavy data signatures on their own. This is perhaps the closest work completed when compared with the discussed work here, where short-time Fourier transform (STFT) is used a method to differentiate such phenomena. STFT was chosen as CWT was considered more computationally expensive and needing techniques such as PCA to display signal differences. STFTs have been used by the authors before in previous work [27] with the setup experiment providing definite phenomena from material interactions. STFT is perfectly adequate to describe such a focused phenomenon of interest, because converting from CWT to the time–frequency domain can result in a loss of substantial information.
Basantes-Defaz et al.’s [29] research also discusses very similar work to what is discussed here. However, instead of using a non-contact microphone and a contact acoustic emission sensor (AE), as in this paper’s research [29], it looks at using two contact AE sensors as airborne sensors, which is certainly novel, because the use of contact dedicated to non-contact, airborne audio acoustic activity is very unorthodox. Surely, using dedicated airborne microphones as in the research presented here is more appropriate and sensitive to airborne change phenomena? Within the work presented in this paper, both contact and non-contact microphones have been used, where the former monitors phenomena in the ultrasonic frequency range and the latter monitors phenomena in the audio frequency range. Nevertheless, the airborne acoustic signature is obtained in [29] and used in a qualitative manner to represent the depth of penetration of the weld where different signatures result in different achieved depths of weld penetration. The two AE sensors work independent of each other as they both have different characteristics; one being specifically used for a low frequency range, and the other a wide-band frequency range. In addition, the dB noise threshold for sensitivity is set differently for each sensor. The third sensor, however, is configured in a conventional manner on a track to move along at the same rate as the weld torch. The sensor in this case is a contact ultrasonic pulse echo system and based on time-of-flight measurements, which can discriminate between different material characteristics through a change in boundaries based on different recorded penetration energies.
This work not only verifies the setup with the work being discussed here, it also discusses that such technologies play a vital role in the detection of welding anomalies. Finally, the work discussed by [29] concentrates specifically on anomaly identification, namely burn through. Further work will look at using machine learning technologies to provide automatic detection. The work presented in this paper also concentrates on anomalies, namely weld quality and crack detection. Future work will also look at automated discrimination through the use of machine learning technologies.
Interrogating Basentes-Defaz et al.’s research work [29] revealed that the data collected by these AE sensors also provided information on possible superficial discontinuities or defects in the weld metal. If a superficial indentation or defect is displayed, both the ASL scan and the AE absolute energy plot showed the exact location of this surface discontinuity, which was located at 85 mm from the start of the weld. The sudden signal burst that occurred at the exact location of the superficial indication was determined, confirming that, where a non-uniform condition or weld defect appears, this appears as a sudden surge in the AE absolute energy and therefore a key indicator in determining the signature and potential characteristic for automatic detection. These observations correlate very well with the findings in the work and displayed in this paper.
There are a few sources, such as Madhvacharyula et al. [30], Kanungo et al. [31], and Kale et al. [32], which have started reporting machine learning techniques applied to detected AE sources that can indicate welding defects. Moreover, Kanungo et al.’s work [31] used cluster k-means analysis to show the more significant features from several AE parameters, namely peak amplitude, kurtosis, energy, and the number of counts. As there are several dimensions here and cluster k-means analysis requires the most significant features, principal component analysis is used.
AE signals used to distinguish cracks from porosity would look at short-burst high-amplitude data vs. shorter decay time and lower amplitude, respectively, as discussed by Roca et al. [33]. These differences were stored within an artificial neural network to give a computer model of the gas–metal arc welding (GMAW) process. This research is perhaps the closest research discussed in the paper where several AE parameters are used to distinguish different crack phenomena. However, no machining learning work has been used within this research work, as the focus is purely on connecting the signal analysis phenomena with the physical material analysis phenomena.
The review made by [33] discussed frequency domain, time–frequency analysis methods such as empirical mode decomposition (EMD), and STFT, which provide useful information about the type and location of the defect. This is one major reason why STFT is used over other techniques. As an extension of this work, the research completed by [28] reinforces the use of STFTs to provide demagnetisation fault diagnosis of permanent magnet synchronous motors (PMSMs). The STFT provided the stator current signals for both the fault and non-fault case wherein significant harmonics were in more abundance and more salient for the former compared with the latter. STFTs, however, have not been seen before in fault diagnostics where CWTs, Hilbert–Huang transform (HHTs), and Wigner–Ville distribution (WVD) have been used before. This is not the case for joining technologies wherein anomalies and none anomalies have been displayed before using STFTs. However, specific to the setup in terms of material inserts and MAG processes, the authors of this paper believe this to be a first. Kale et al. [32] used a number of machine learning techniques to separate the anomalies, which is promising considering that future work associated with this research is intended to pursue future ideas, correlating automatically welding defects using AE sensors (both contact and none contact) along with DSP to discriminate between an acceptable and non-acceptable weld. Work presented in a paper by Pietrzakand Wolkiewicz [34] identified that STFT analysis of vibration signals allowed for the differentiation between a good machine cutting tool and machine cutting tools with five different faulty conditions. Similar to this work, refs. [32,34] used deep belief networks to differentiate between different states. Vibration-extracted signals use similar technologies to AE, which again reinforces why STFTs should be used over other techniques.
All the above reinforces the use of STFTs over other transforms. Using STFTs with the specific setup has not been reported before in previous published work. Furthermore, while the raw AE parameters are recorded to distinguish welding defects, AE rise time has not been used before. The reason for such a parameter being used was down to it being less noise-prone as a source of error when obtaining other parameters such as ASL scan and amplitude energy. Another aspect to the novelty of using this parameter is based on the recording after the welding event to note anomalies during material settlement during the cooling phase, and this has also not been communicated in the previous literature.

3. Initiated Cracks during MAG Welding

This section concentrates on the welding experiment strategy aimed at engineering flaws within a controlled “flawed” framework using the MAG welding process.

3.1. Experimentation Phase

ASTM A36 carbon–manganese steel was used as the substrate for these experiments—the chemistry is provided in Table 1 with its respective carbon equivalent value and the internationally accepted formula used for its evaluation (1) [35].
The calculated carbon equivalent value was used to determine hardenability and hydrogen cracking susceptibility, as a CEv around 0.4 is deemed readily weldable without the need for any special precautions such as pre-heat and controlled restraint. The value of 0.45 places the ASTM A36 plate very favourably in this range for determining a baseline value to establish an imperfection-tolerant deposition based on the ASTM A36 plate, EN8 insert, and 307Si filler wire combination.
C E V = C + M n 6 + C r + M o + V 5 + C u + N i 15
The plate was fixed to an ABB robotic tilt and turn manipulating table, part of an eight-axes system integrated with a Fronius TPS 500i CMT™ MAG-welding power source. Heat input and deposition parameters were developed for a simple bead-on-plate using a 1.0 mm diameter 307Si welding wire employing an Ar-2.5% CO2 gas—shield mixture (Classification ISO 14175–M12) to maintain a dip transfer mode. This is because this gas mixture elevates the transition current threshold value needed to enter the spray mode region. The contact-tip-to-work distance (CTWD) was set at 14 mm with the torch maintained in a 90-degree position to the substrate Figure 1.
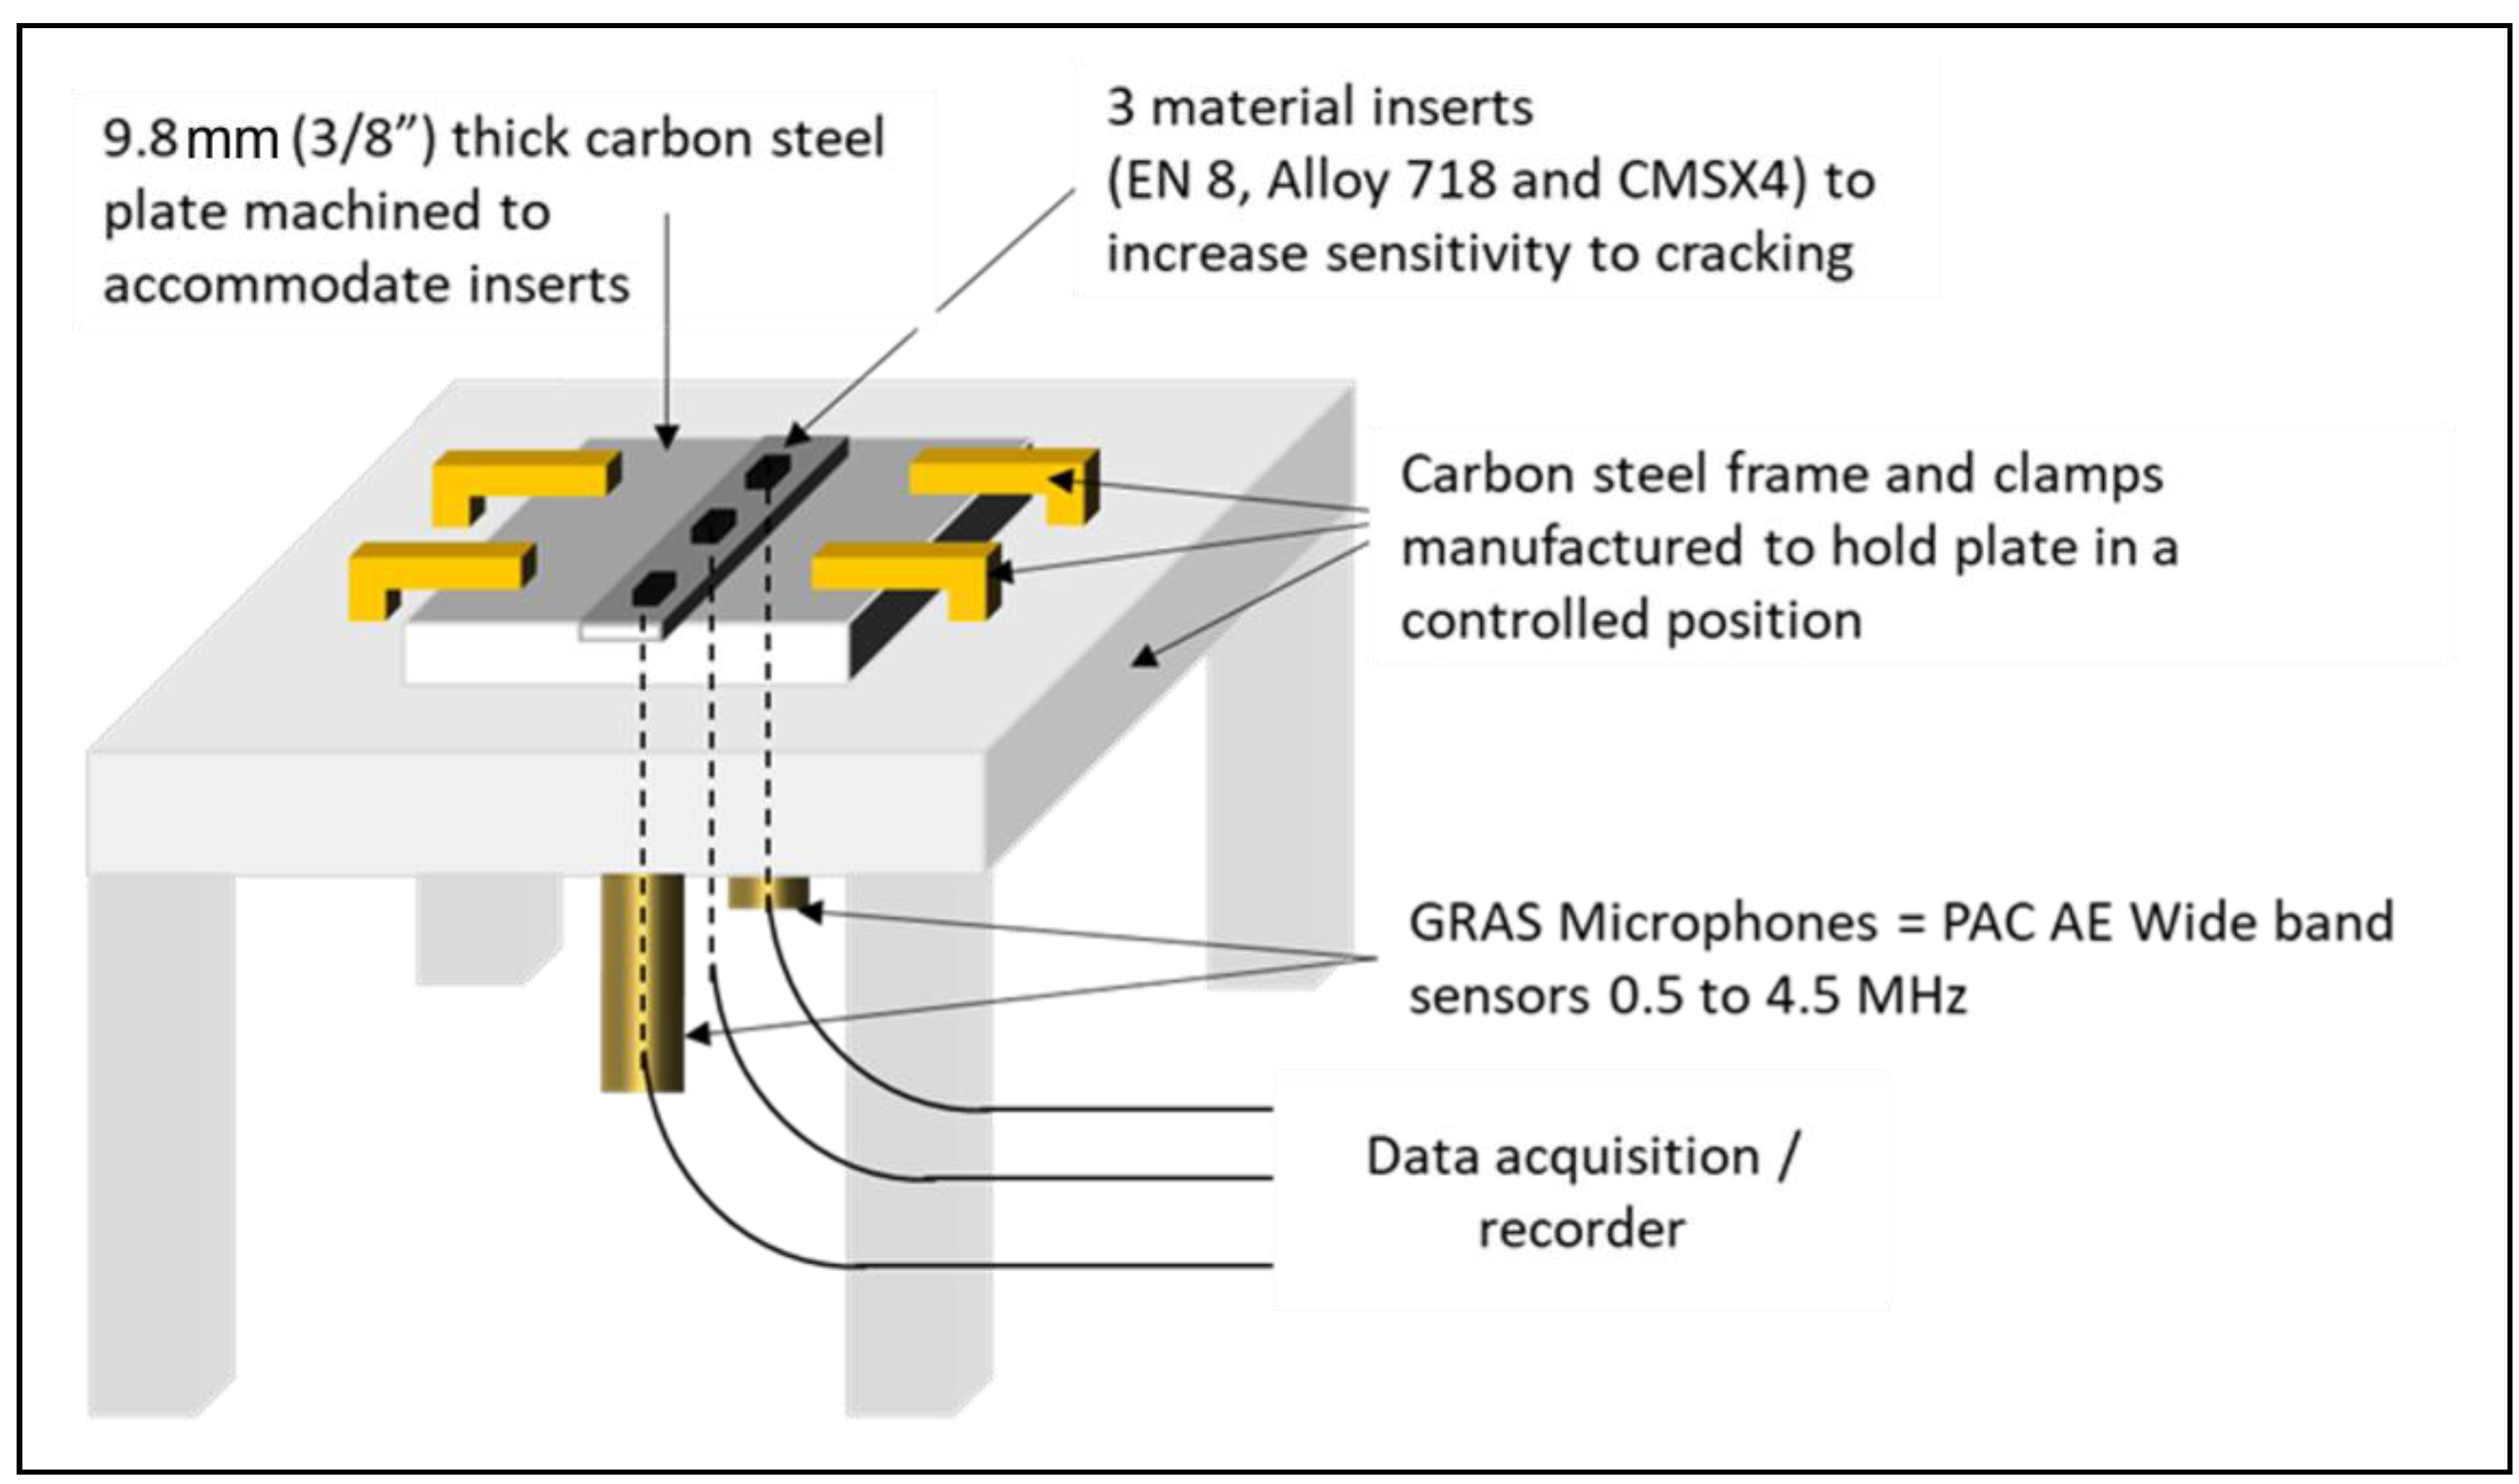
Linked to this set up were the GRAS airborne and PAC contact AE microphones to ensure maximum signal extraction, as seen in Figure 2. Initially, baseline welding conditions were carried out to gain comparable normal operating conditions and to calibrate the substrate weldability baseline to observe the nominal/neutral signal response seen in Figure 2, as the far-right-inclined deposits. Bead-on-plate runs were then undertaken with different inserts being sited to promote an imperfection response within the solidifying weld and cooling region. Imperfections within or around the weld were analysed both visually and via optical microscopy, and regions of interest relating to particular phase developments were also assessed using scanning electron microscopy.

Welding Material Considerations

ASTM A36 carbon–manganese steel is a commonly used structural steel that has excellent fabrication properties, i.e., good weldability, machinability, forming, and punching. It has a defined minimum yield strength of 36 ksi (250 MPa) with a UTS ranging from 58 to 80 ksi (circa 400–550 MPa) [36].
The filler material used for these experiments was a 1.0 mm diameter Nexus 307Si solid wire classified as ISO 14343—A:G 18 8 Mn.
Varying metal inserts of increasing complexity in chemistry were deployed to enhance imperfection sensitivity within the deposit. The chemistry of the three types of inserts used (Alloy 718, CMSX4, and EN8 Steel) are provided in Table 2.
Cannon Muskegon Corporation’s CMSX-4 is a second-generation single crystal nickel-based superalloy containing rhenium. It is used within aerospace gas-turbine power units and is known to have an extremely poor weldability due to the combination of a large solidification range and complex creep-resistant mechanism that exacerbates this poor response.
EN8 is a medium carbon steel material with a carbon equivalent value (CEv) > 0.4 and was used as an insert to determine the lower-level sensitivity response. This steel, with a typical carbon range from 0.36 to 0.44, achieves increased hardness through thermal modifications and has a CEv ranging from 0.46 to 0.63. The material also contains phosphorous and sulphur contents controlled to a maximum and minimum content of 0.05 and 0.005, respectively. These elements are strictly controlled as they widen the solidification temperature of a carbon steel, resulting in an extension of grain boundary area, which in turn increases the metal’s solidification cracking tendency.
Alloy 718 is a complex gamma/gamma double-prime precipitation nickel-based alloy also used within gas-turbine power units for high-temperature strength and was the third insert used in this experimental phase. The alloy was initially developed by the International nickel company as a material to enhance material performance at temperatures approaching 650 °C. In developing this requirement, the alloy’s composition becomes rather complex to create stable intermetallic precipitation phases consisting of the ordered body centred tetragonal (BCT) Ni3Nb compound through reducing the Al/Ti ratios [37]. Developing such a complex metallurgical phase for performance properties consequently promotes weldability challenges when grain sizes increase, and although Alloy 718 has proved to have enhanced weldability in a wrought form when compared to other performance alloys, its sensitivity heightens if grain size becomes too large, circa < ASTM3. It is worth noting that the grain size number increases with decreasing grain size.
The experimental strategy is based on the work carried out by [9] wherein simultaneous inspection using dual sensors (GRAS airborne and PAC wide band acoustic emission sensors) enables the ability to differentiate a weld with or without defects. This strategy was further confirmed by Merchant [38] who assessed the effect of cooling and hardness using the manual metal arc welding process, enabling the potential cross-examination of the fidelity and sensitivity in extracting soundwaves to determine the increasing range of hardness susceptible to brittle fracture.

3.2. Sensor Setup

The GRAS sensor enables airborne/contactless assessments by providing a highly sensitive capability to detect sound phenomena. It was positioned 35 mm from the heat-affected zone (HAZ) to maximise signal-to-noise ratios (SNRs). The physical acoustics corporation sensor (PAC), now operating as MISTRAS, was attached to the base material.
These sensors are sensitive pieces of equipment, so their placement was seen to be critical to prevent excessive thermal exposure from heat conductivity during welding. The derivation of a safe placement distance for these sensors was determined through using Adams [39] relationship given in Equation (2).
1 T p T o = A ρ C p t Y H n e t + 1 T m T o  
where Tp = peak temperature
To = initial temperature of the plate;
Tm = melting point of carbon steel 1510 °C;
A = constant for carbon steel (4.13);
Cp = specific heat capacity of solid metal at constant pressure;
t = thickness of substrate metal;
Y = distance at which Tp is set.
Solving for Y to avoid sensor overheating during welding gives the following value of 49.7 mm to achieve 50 °C. Therefore, a sensor positioned at 100 mm was deemed “thermally safe” for these experiments. For future experiments, sensors rated above a 100 °C contact temperature could be positioned 25 mm from the weld junction if an equivalent plate thickness and energy rate is used.
In addition to this, the PAC sensors were placed in a specially designed sensor housing and fixed to the weld plate with lubricant in between to promote a good signal attenuation response. It is worth noting that the weld direction is towards the sensor.
Such distances are susceptible to noise, and therefore filtration is provided through software and hardware means. The hardware filtering on the sensor used a Chebyshev 20 kHz high-pass filter to remove any unwanted mechanical and audible noise and a Chebyshev 1000 kHz low-pass filter was used to remove any unwanted white noise. The software filtering is based around recording past a defined noise limit, which was set at 35 dB. It is expected that the contact sensors will give a higher resolution to distinguish finer features than that expected of the airborne sensors.
Where the airborne sensor is more focused towards analysing the sound during the welding process, the AE contact sensor concentrates on obtaining the emission during the immediate cooling phase.
Since this experimental phase adopted the “bead-on-plate” format rather than the more conventional welding method of joining two plates together, it allowed for the use of pre-shaped inserts with different chemical compositions strategically positioned along the welding line to seed various chemistry disparities and induce imperfections, which facilitates the identification from a change in noise at that point of cracking. At this point, it was perceived that it would display different characteristics in both the frequency and time domains, reflecting similar attributes observed in tangential research previously completed. Therefore, any abnormalities in the noise level of the weld could be identified from using accurate/sensitive sensors.

3.3. Material Inspection

The results from these weld sequences were verified through both visual and microstructural analysis, where the welded material was sectioned in both the longitudinal and transverse directions, and optically analysed. Results were then correlated and compared to the emitted wave phenomenon.

Experimental Setup: Automated MAG Welding with Inserts and Sensing

The deployed sensors were the GRAS 46 BE, ¼ inch constant current power CCP airborne microphone (contactless), and MISTRAS (PAC) ISPKWDI wide band microphone (contact). The GRAS airborne microphones were placed a distance of 35 mm to reflect the work of [20] Ladislav et al. (2003). The contact AE sensor was connected 100 mm from the start of the weld line [21] (Cayo and Absi, 2008) to record the phenomena further away. The setup schematic for welding insert tests can be seen in Figure 3. The GRAS microphone used Sinus’s Apollo USB acoustics analyser to record the airborne sound acquisition. The sampling rate used to capture the airborne soundwaves was 200 kHz. The MISTRAS sensor, however, used AE Win for USB where the acquisition system could be run from a laptop USB as a portable solution simulating real-time monitoring in the field. The sampling rate used for the contact AE sensor was 2 MHz to ensure that the full bandwidth of the ISPKWDI sensor could be recorded between 100 and 800 kHz. The ISPKWDI sensor is an intrinsically safe AE sensor with a low-power integral pre-amplifier. Each recording (both contact and none contact sensors) were triggered when the machine controller started the welding process, and was therefore synchronised to the phenomena of interest.
In terms of limitations for the experiments carried out within this research, the different insert materials stimulate the majority of the joining anomalies, specifically those of crack formation and propagation, which affects the weld integrity and is therefore important for proof-of-concept for a welding defect detection system. There are other recognised anomalies indicative of a poor setup; however, these are for future work.

4. Results and Discussion: Mag Welding

Several essential variable recordings were made during the welding process, these being welding current (I), voltage (V), wire feed speed (WFS), and travel speed (υ). The power and heat energy per unit length value (Hnet) for the baseline bead-on-plate conditions using the 307Si to C–Mn sequence were all calculated using Equation (3) and reported in Table 3.
Heat Input (HNet) = k (I × U)/υ
where I = Welding arc current;
U = Arc voltage;
υ = Heat source velocity;
k = Thermal efficiency of the welding process (EN1011-1).
The system utilised a constant voltage characteristic to maintain near-consistent energy density throughout all experiments.
It is worth noting that the derivation in thermal efficiency for this work was taken directly from the European standard but the principles of its origin can be extracted from experimentation work completed by several authors but summarised by DuPont and Marder, 1995, [40] in Equation (4). The thermal efficiency simply reflects the losses accounted for within the total energy balance:
k = (Efz + Ebm)/(Earc + electrode)
where Earc + electrode = the input electrical values per second (J) *;
k = the quantification of energy lost to the environment;
Efz = the energy used for melting of the fusion zone;
Ebm = the energy lost to the surrounding base metal.
* It should be noted that the definition of arc efficiency is a representation of energy transferred to the base metal from both the arc and electrode. The “true” arc efficiency value would require a voltage measurement from the electrode tip to the base metal that has been reported to be difficult and impractical, so a combined electrode and arc voltage recorded at the power source is commonly adopted.

Material Preparation Phase

Figure 4 exhibits the plate and insert configuration. Thickness microscopy specimens with length and width dimensions of 16 mm × 25 mm, respectively, were prepared and analysed using optical microscopy to correlate signal to features of interest.
Table 4 provides the deposition parameters used for the bead-on-plate experiments.
Table 5 exhibits the solidification proportion of elemental combination values of the ASTM A36 steel plate chemistry, the 307 Si filler wire, and the respective inserts for each combination.
Through considering appropriate dilution values of the final solidified weld, it was possible to exacerbate the chemical heterogeneity that significantly affects the solidification range and solid-state transformation products in the more complex Alloy 718 and CMSX4 fusion deposits.
Figure 5a displays a plan view exhibiting a crack between the 307Si, ASTM A36 plate, and 718 alloy insert. Figure 5b,c provide the sectional region and the macrographic view, respectively, identifying the faceted crack area within the junction between the geometrical region, the Alloy 718 insert, and the ASTM A36 plate welded with the 307Si filler wire. Figure 5d displays the detailed cracked region exhibiting a more detailed view of the dendritic structure commonly observed with arc welding with the highly alloyed nickel-based alloys of the type 718. Figure 5e depicts the formation of the brittle intermetallic Laves phase within the interdendritic regions resulting from segregation.
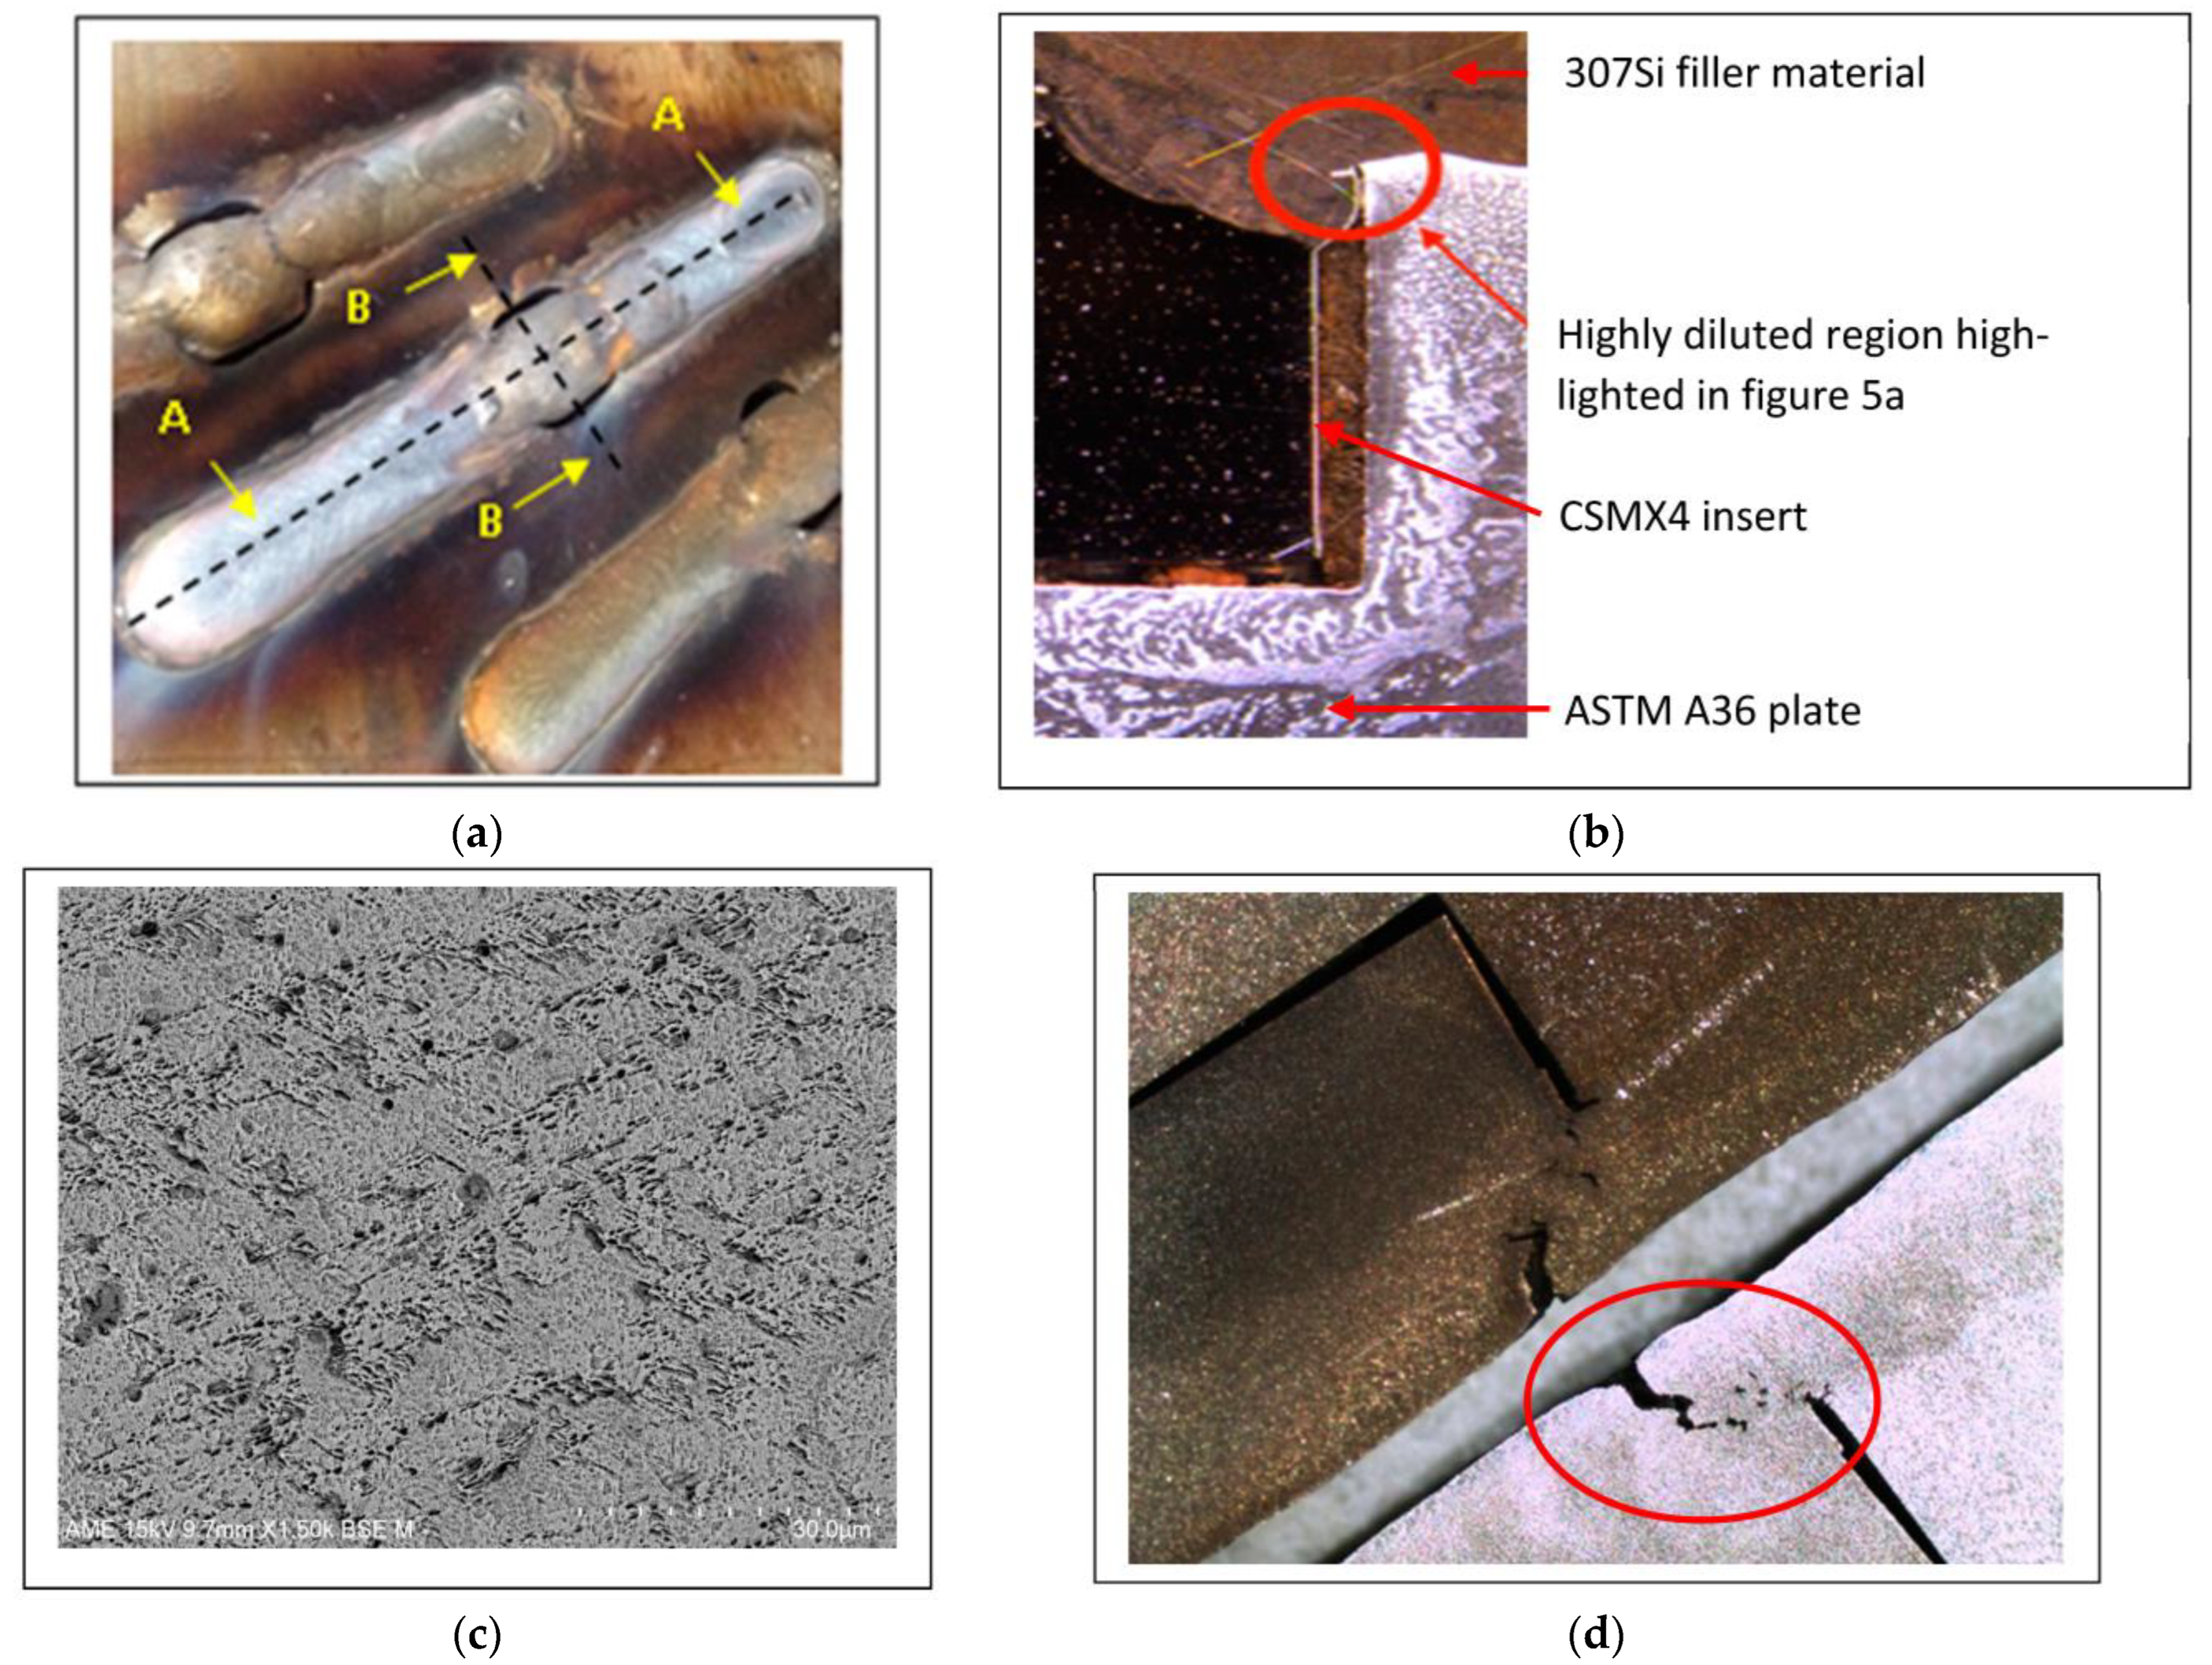
Figure 6a displays a plan view that exhibits three sample combinations between the ASTM A36 baseplate, CMSX4, and the 307Si filler material. Longitudinal and transverse sectional assessment is taken between A–A and B–B, respectively.
Figure 6b displays a macrographic transverse region of the three-material combination and the highly diluted complex region at the triple interface region, which coincides with a change in geometry and developed a notch to accentuate a separation/tearing/crack initiation position.
The fusion region containing 35:50:15 dilution ratios of CMSX 4:307Si:ASTM A36, respectively, seems to have a reduced sensitivity to cracking at the surface region, as seen in Figure 6c. However, as the concentration changes and favours a composition richer in CMSX 4 and ASTM A36 at the toe of the melt run, this, combined with a geometrical change observed at the triple-interface region, cracking and lack of fusion imperfections were observed. It is hypothesised that the toe crack is simply due to the solidifying liquid being incapable of withstanding the stress levels. Internal cracking appears to have initiated at a grain boundary, due to the crack being deflected around the primary dendrite arms, insinuating that cracking occurred before solidification was complete.
Figure 6d exhibits a lack of fusion imperfection, also defined within ISO 6520-1 as a group 4 (4013) imperfection providing an interesting yet salient anomaly for detection by acoustic emission and/or airborne microphone NDT methods. Figure 6e is a zoomed-in image of Figure 6d.
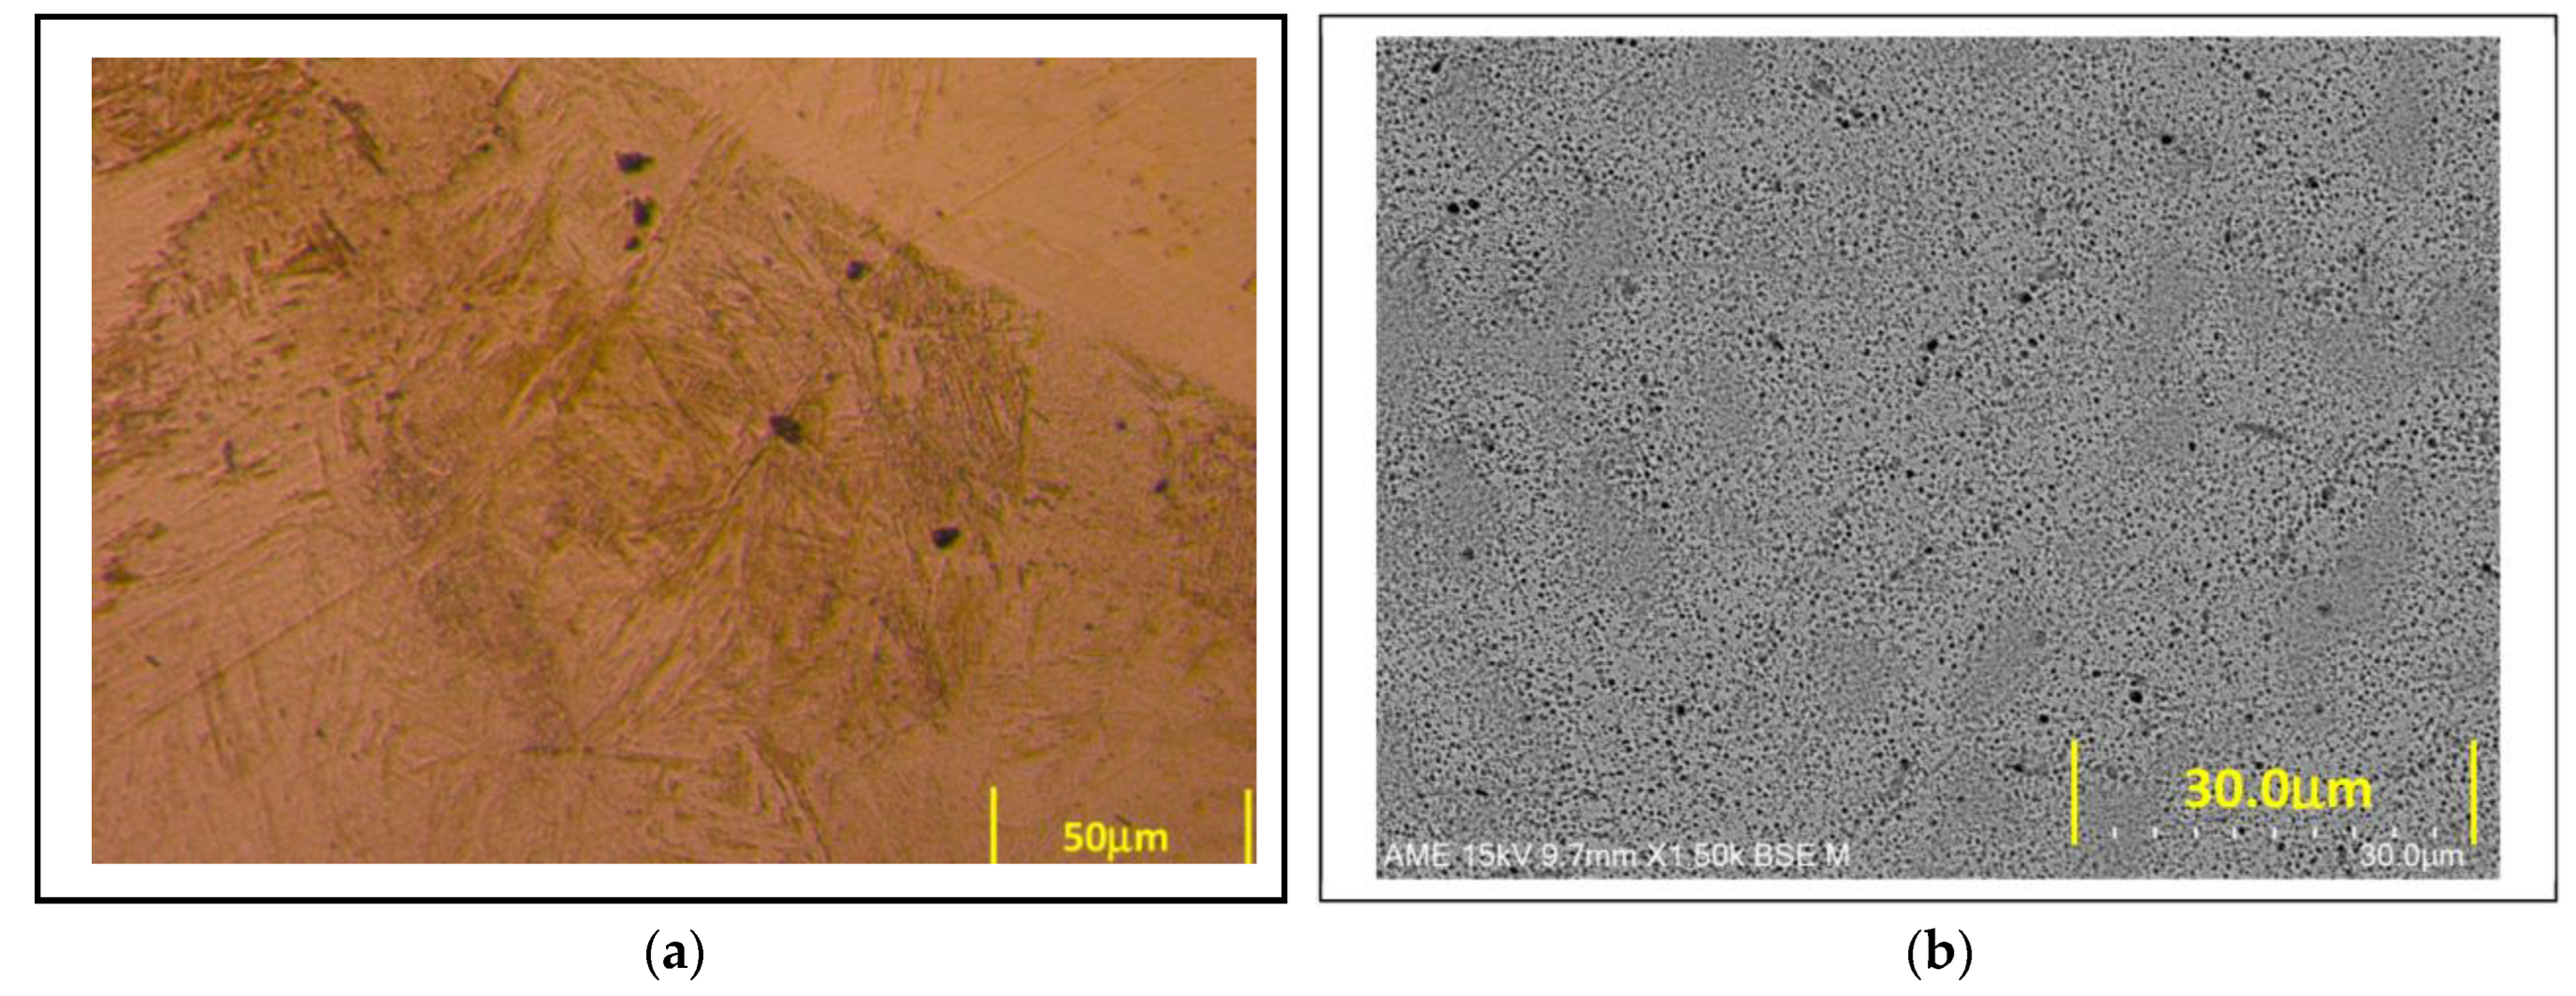
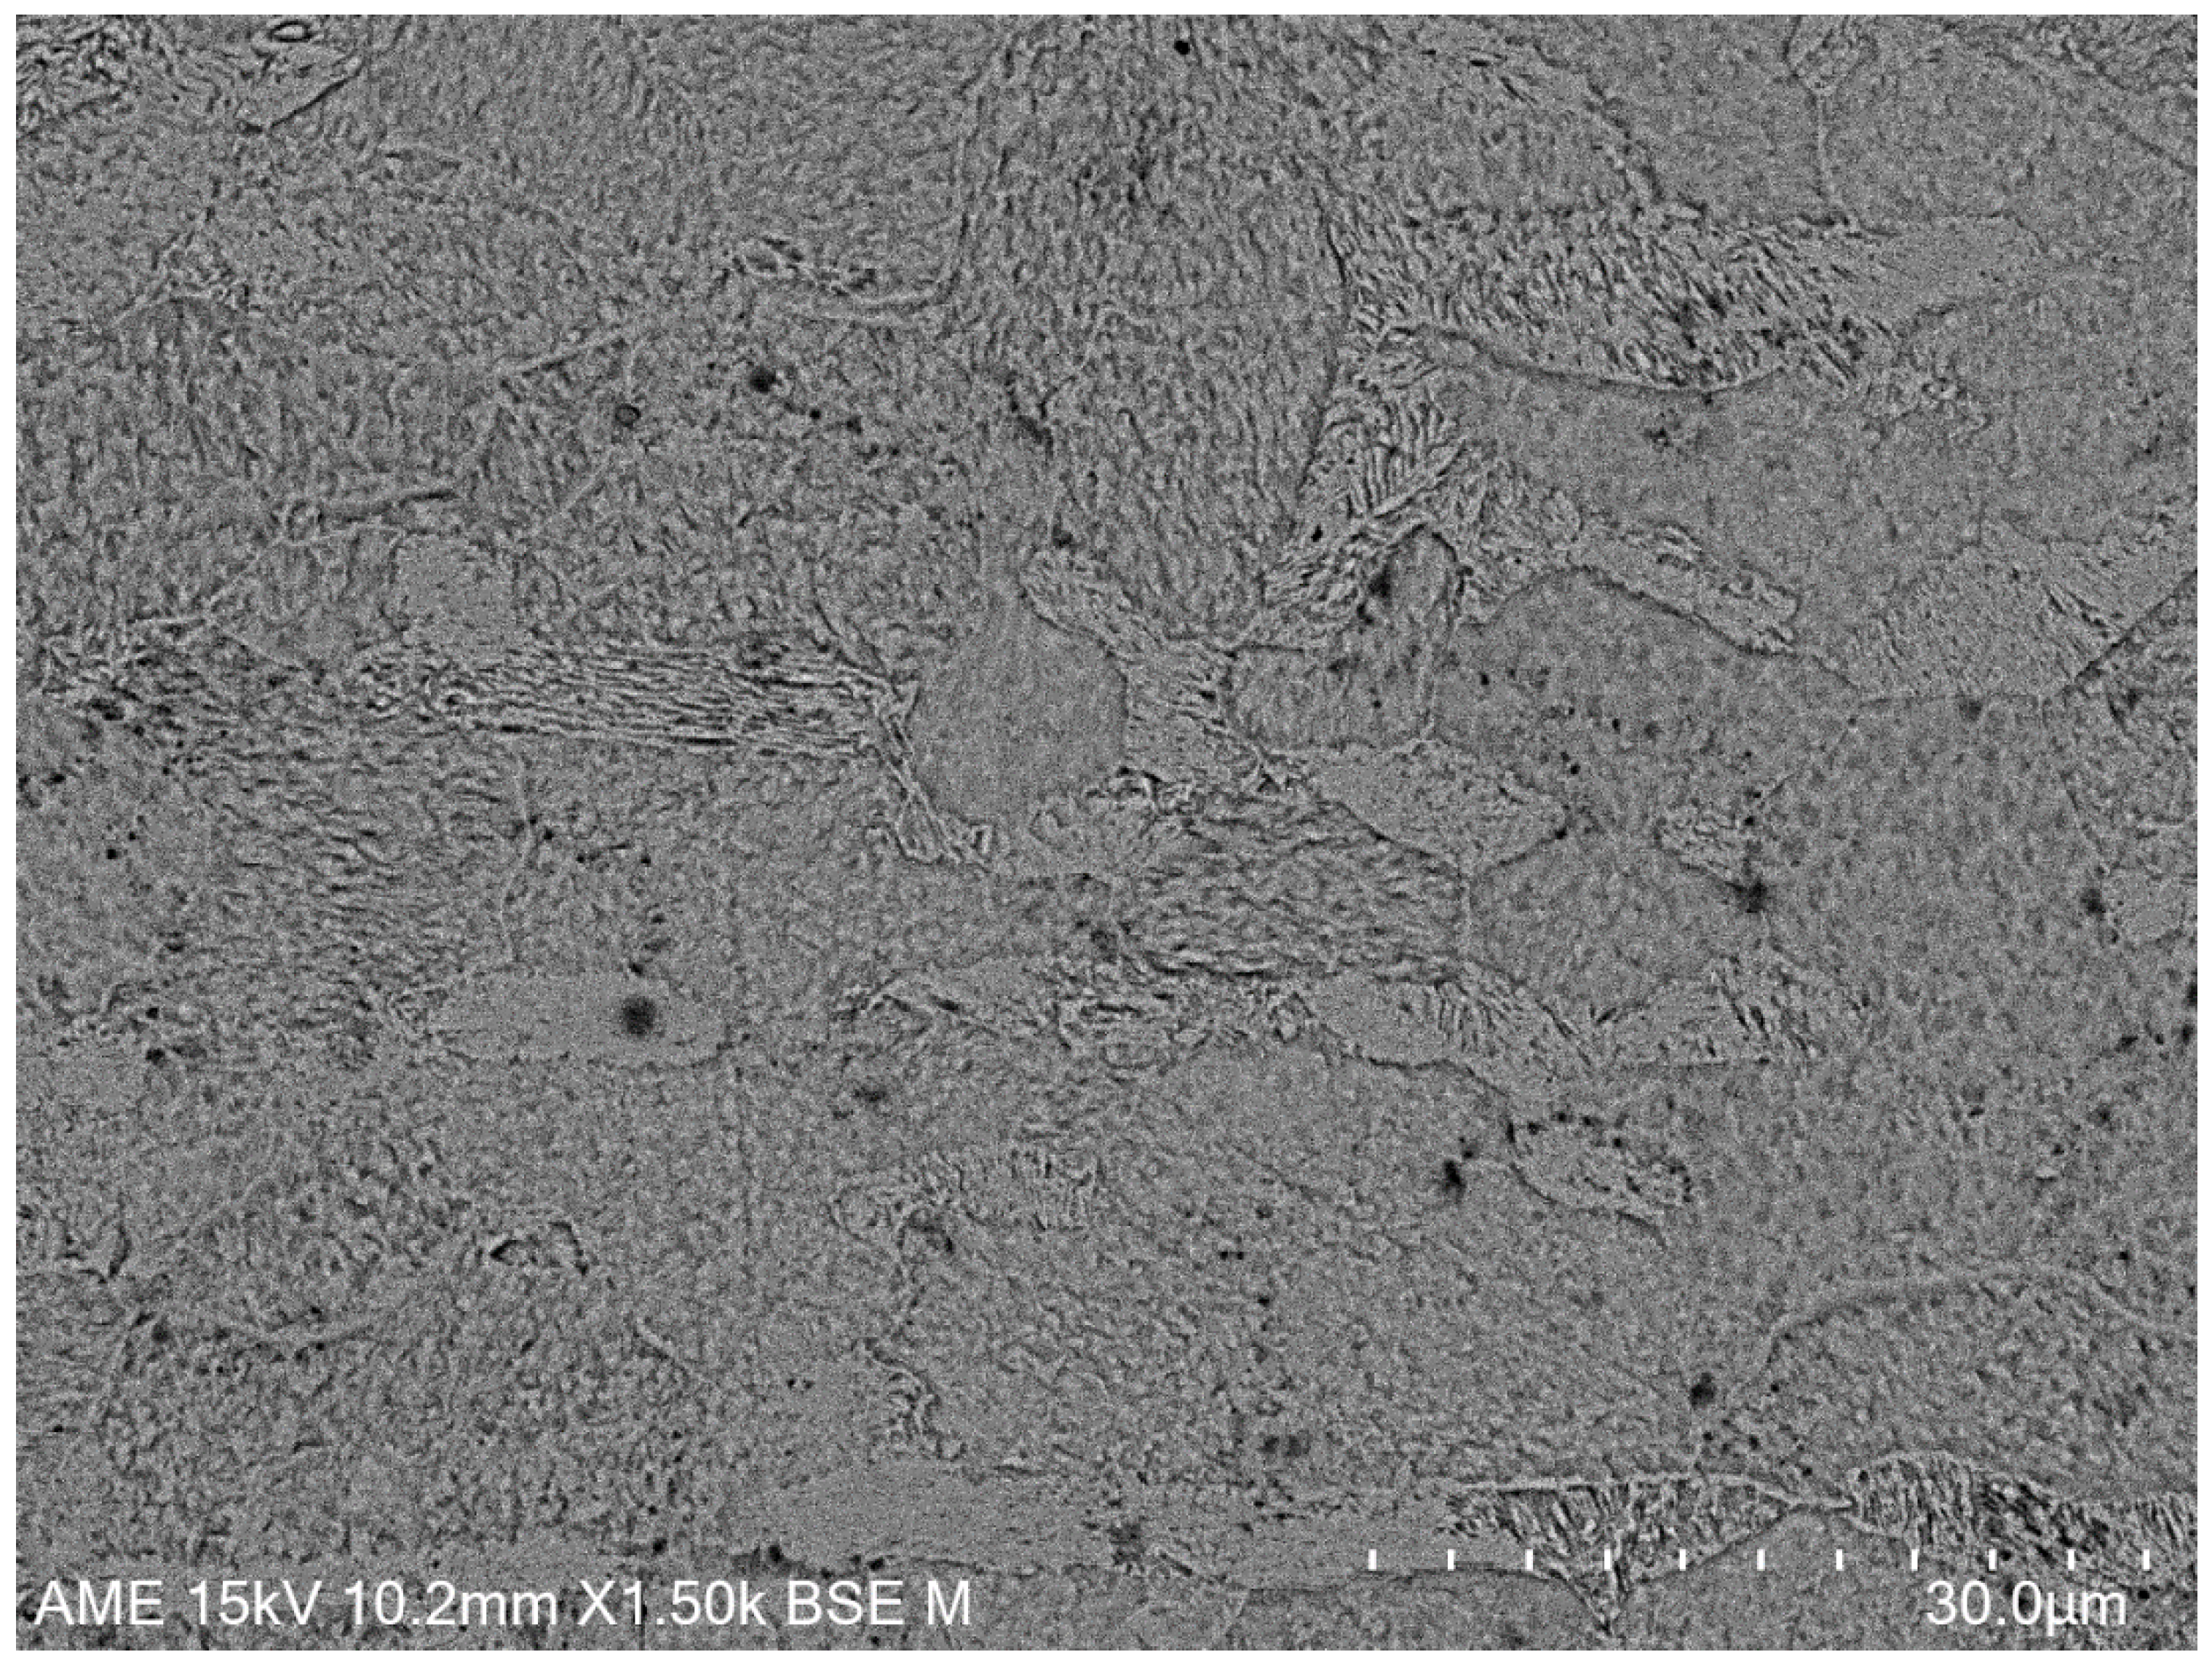
Completing melt runs between the ASTM A36, EN8, and 307Si did not show any major imperfections due to the highly tolerant chemistry in maintaining a reduced solidification zone, as seen in Figure 7a,b. There would, however, be a region within the fusion zone that favoured a chemistry profile that promotes a martensitic microstructure, but due to the process having a low hydrogen value in terms of mL/100 g of weld metal, no time-delay cracking mechanism was observed nor expected.

5. Results and Discussion: AE (Contact and Airborne Sensors)

5.1. GRAS Acoustic Emission Results

The following sub-sections display the airborne GRAS microphone results for the following materials: baseline condition (bead-on-plate weld material) with no insert, baseline condition with Alloy 718 insert, baseline condition with CMSX4 insert, and baseline condition with EN8 Steel insert.
Within these results, the corresponding microstructures that correlate the extracted signal phenomena with physical material conditions are displayed. It should be noted that the signal recordings were achieved during welding and not during the cooling phase (sound pressure waves). These conditions are based on the welding parameters defined within Table 4 for each condition assessed.
For the GRAS airborne microphone, the system’s software allows the user to action the acquisition with the parameters set for recording, as mentioned in the setup. This is also the same for the MISTRAS contact AE sensor, where the synchronisation comes about from the activity of the MAG arc phenomena recorded at the same time where both events are aligned. The USB AE MISTRAS system produced a parameter-recorded file where outputs such as amplitude, AE energy, AE counts, and time responses were used to discriminate the phenomena at the position of interest.
As the airborne microphone records a constant recording, which is a continuous time series waveform, it can be easily converted into time–frequency content. The MISTRAS contact AE sensor, however, records events as output parameters and each parameter contains a short burst of waveform data. However, this is not a continuous time series and therefore only time–frequency content can result from the burst waveform data attached to each output parameter.
The matlab function specgram and selected parameters were used to define the STFT for GRAS airborne signal:
specgram (filename, 128, 204,800, Kaiser (128, 10), 87):
Where the sampling rate was 204,800 kHz, 128 was the number of points for block size within the signal, the window allows for the FFT segments and, in this case, a Kaiser matlab window function is used, which has a resolution length of 128 points and shape factor beta value of 10. The parameter at the end gives a number of points that overlap to embed the window function into the signal, giving a continuous image. Such parameters gave significantly more resolution in the time domain compared to the frequency domain where more clarity was required.
specgram (filename, 1024, 2,000,000, Kaiser,(1024, 10), 875):
The above function and parameter values was used for the AE contact sensors which translated the AE data into burst-mode time–frequency AE data. As the AE contact sensors provide much higher pickup bandwidth frequency, the sampling frequency was 2 MHz and a resolution time length for the Kaiser window at 1024 points, giving better resolution in the time domain than the frequency domain (a similar amount was used for the window overlap to embed the continuous signal into the image).

5.1.1. Baseline Welding Assessment

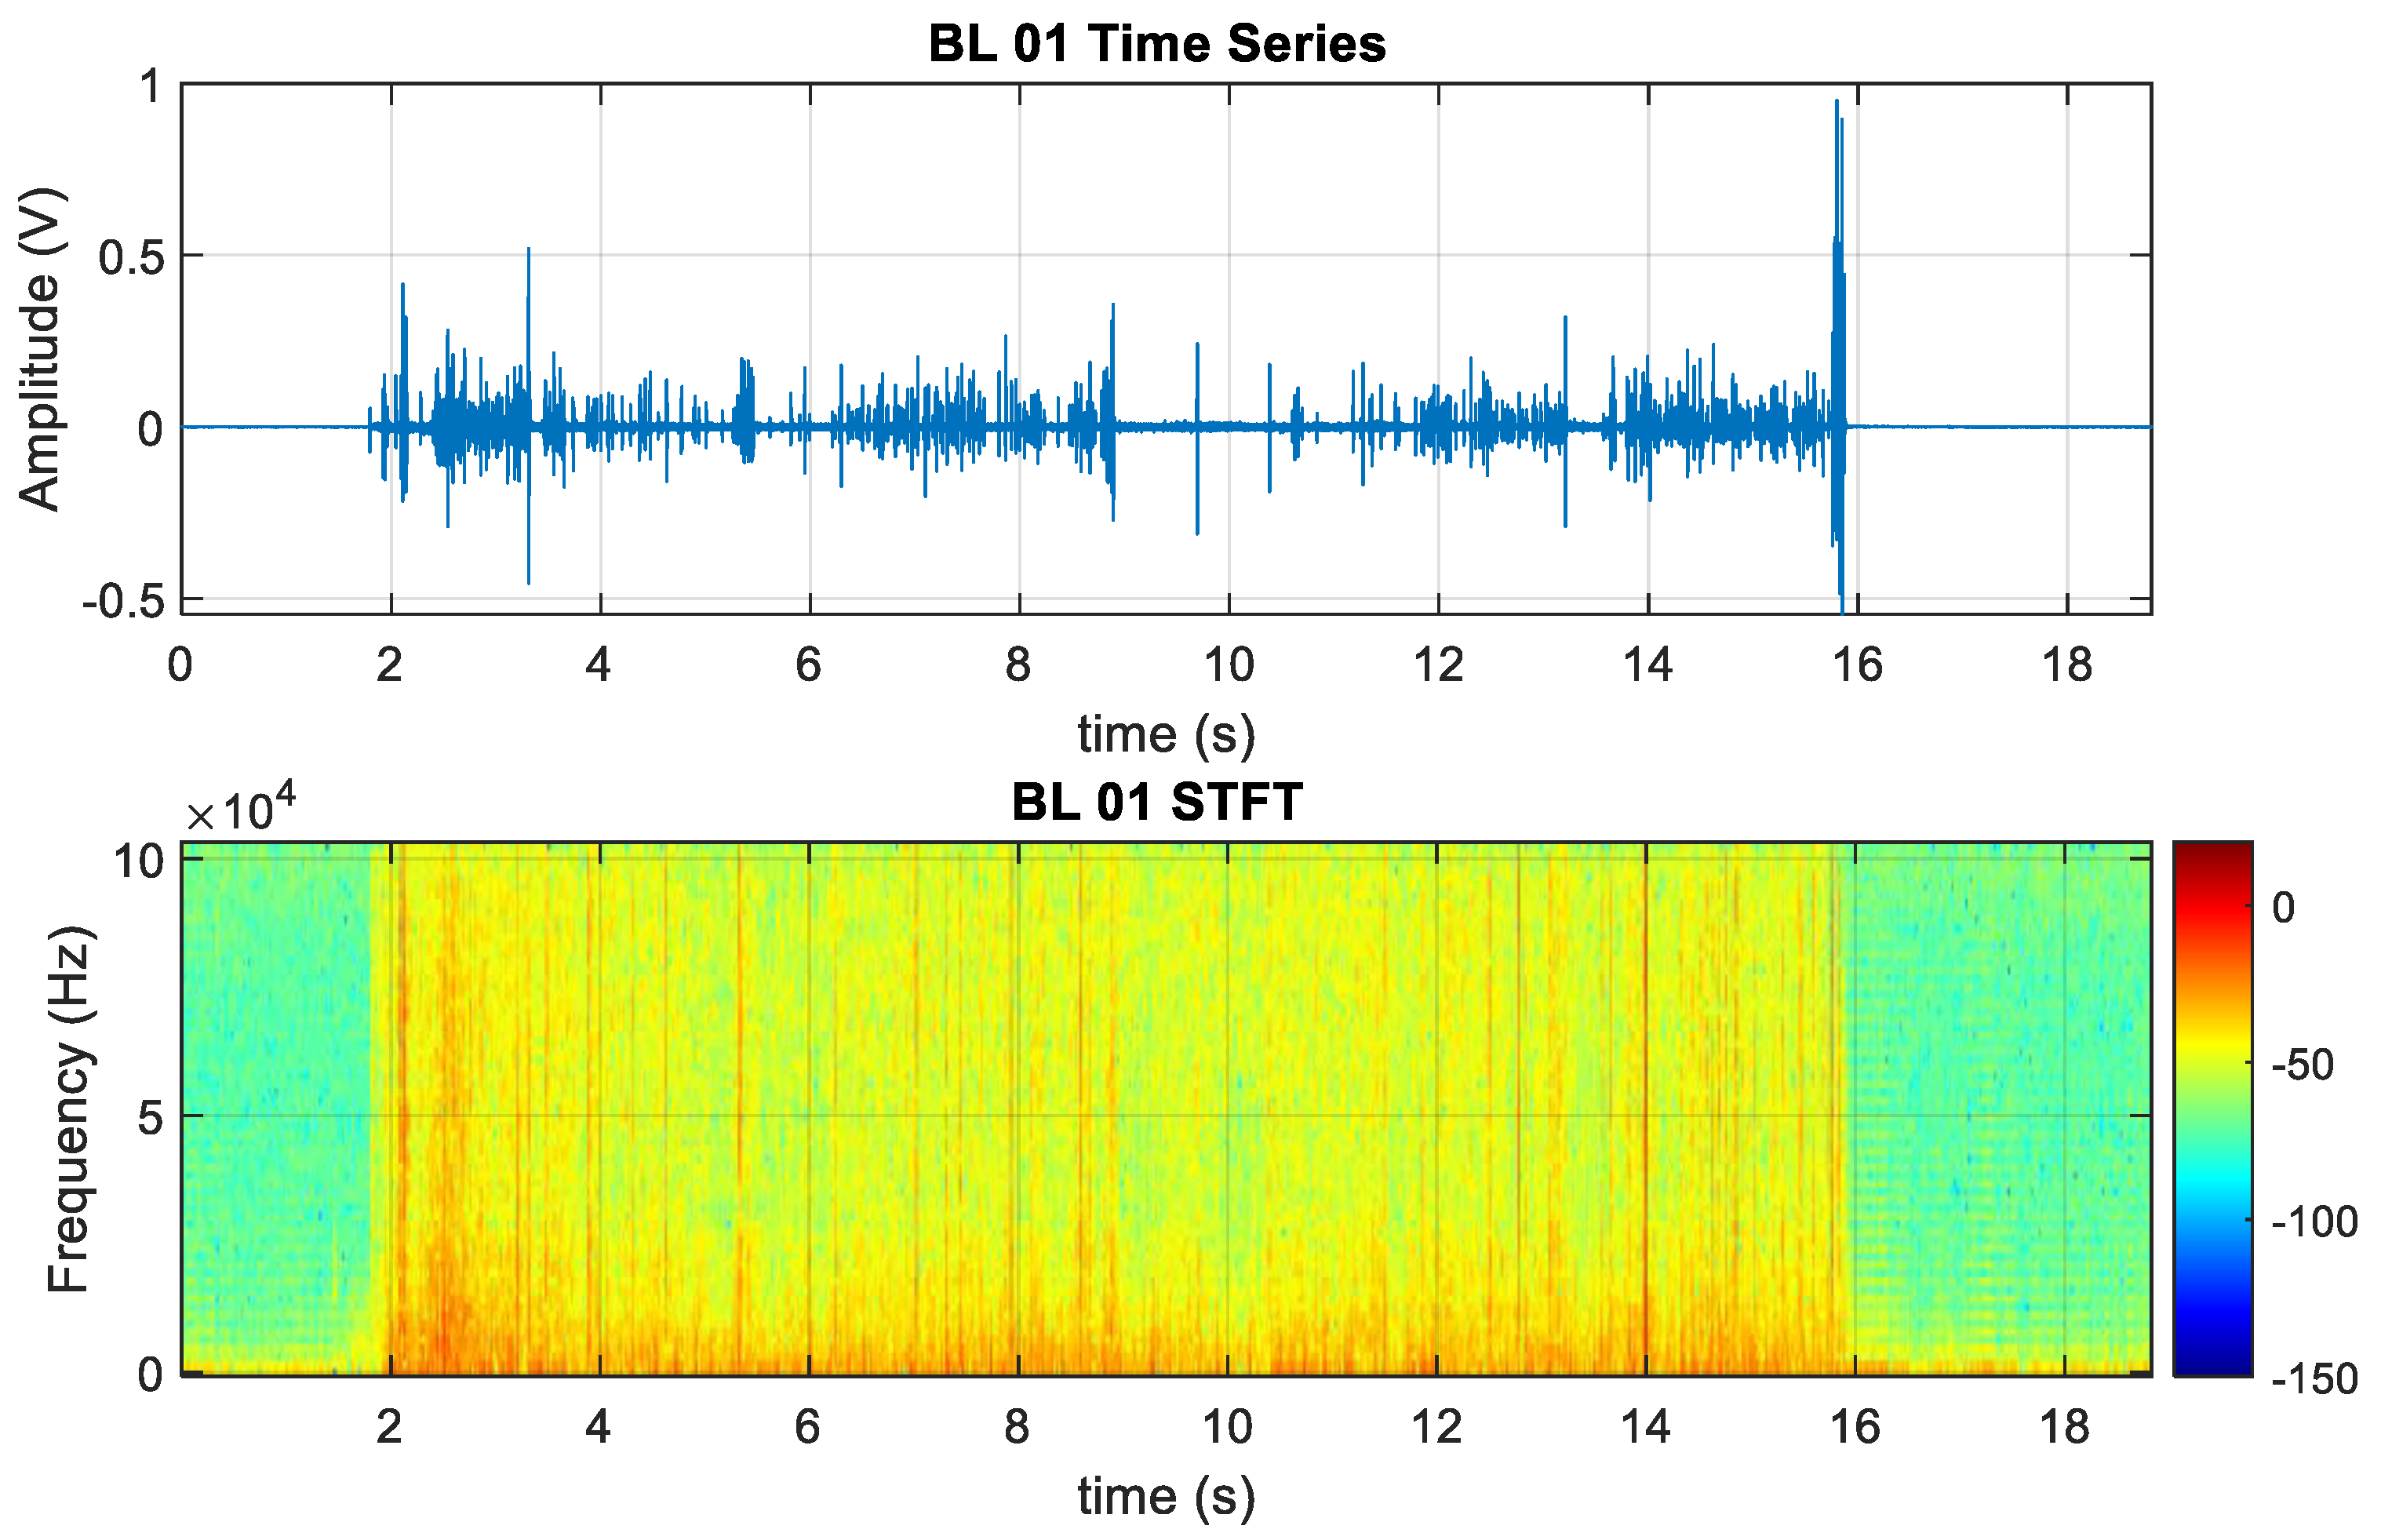
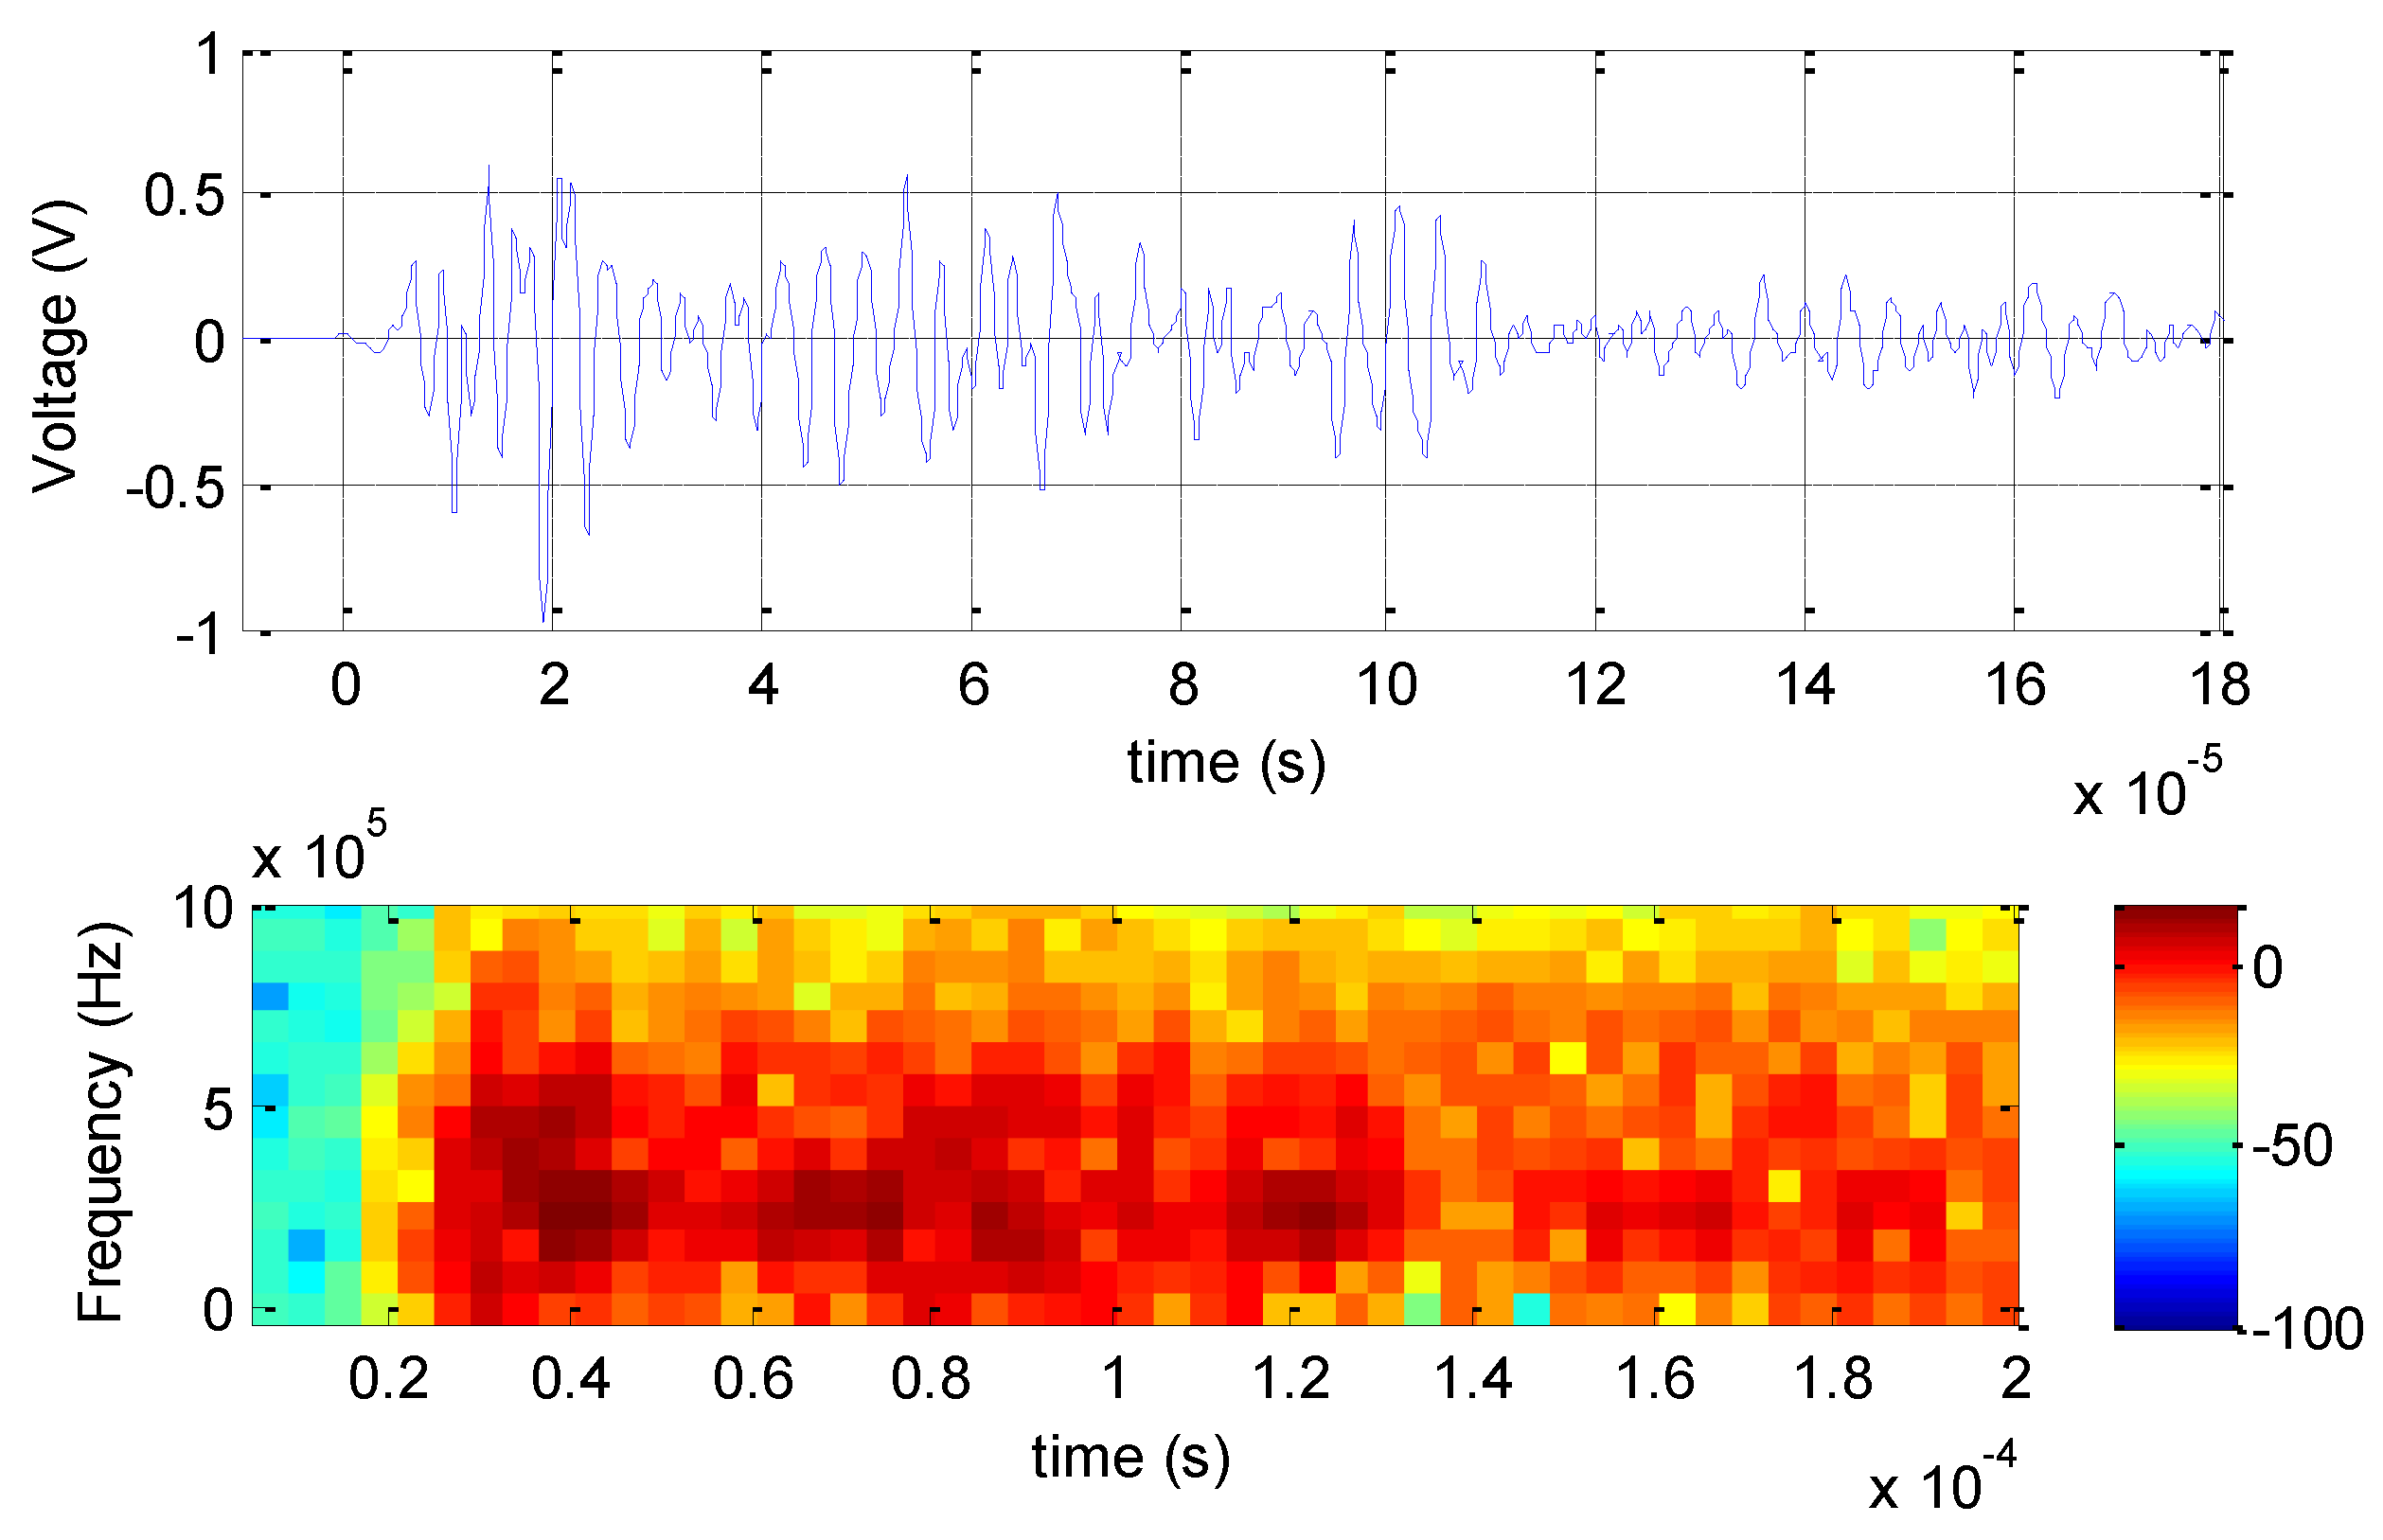
Figure 8—Bottom displays the short-time Fourier transform (STFT) of the airborne AE sensor of the baseline welding condition associated only with carbon–manganese steel. Such signals give the normal welding noise a baseline for comparing the baseline condition with the modified material inserts to promote different levels of phenomena of interest. Looking at both parts, the starting amplitudes and frequency ranges are significant aspects of the arc starting condition. Thereafter, the signal noise amplitudes and frequencies are low and uniform, signifying a defect-free weld.

5.1.2. Alloy 718 Insert Welding Assessment

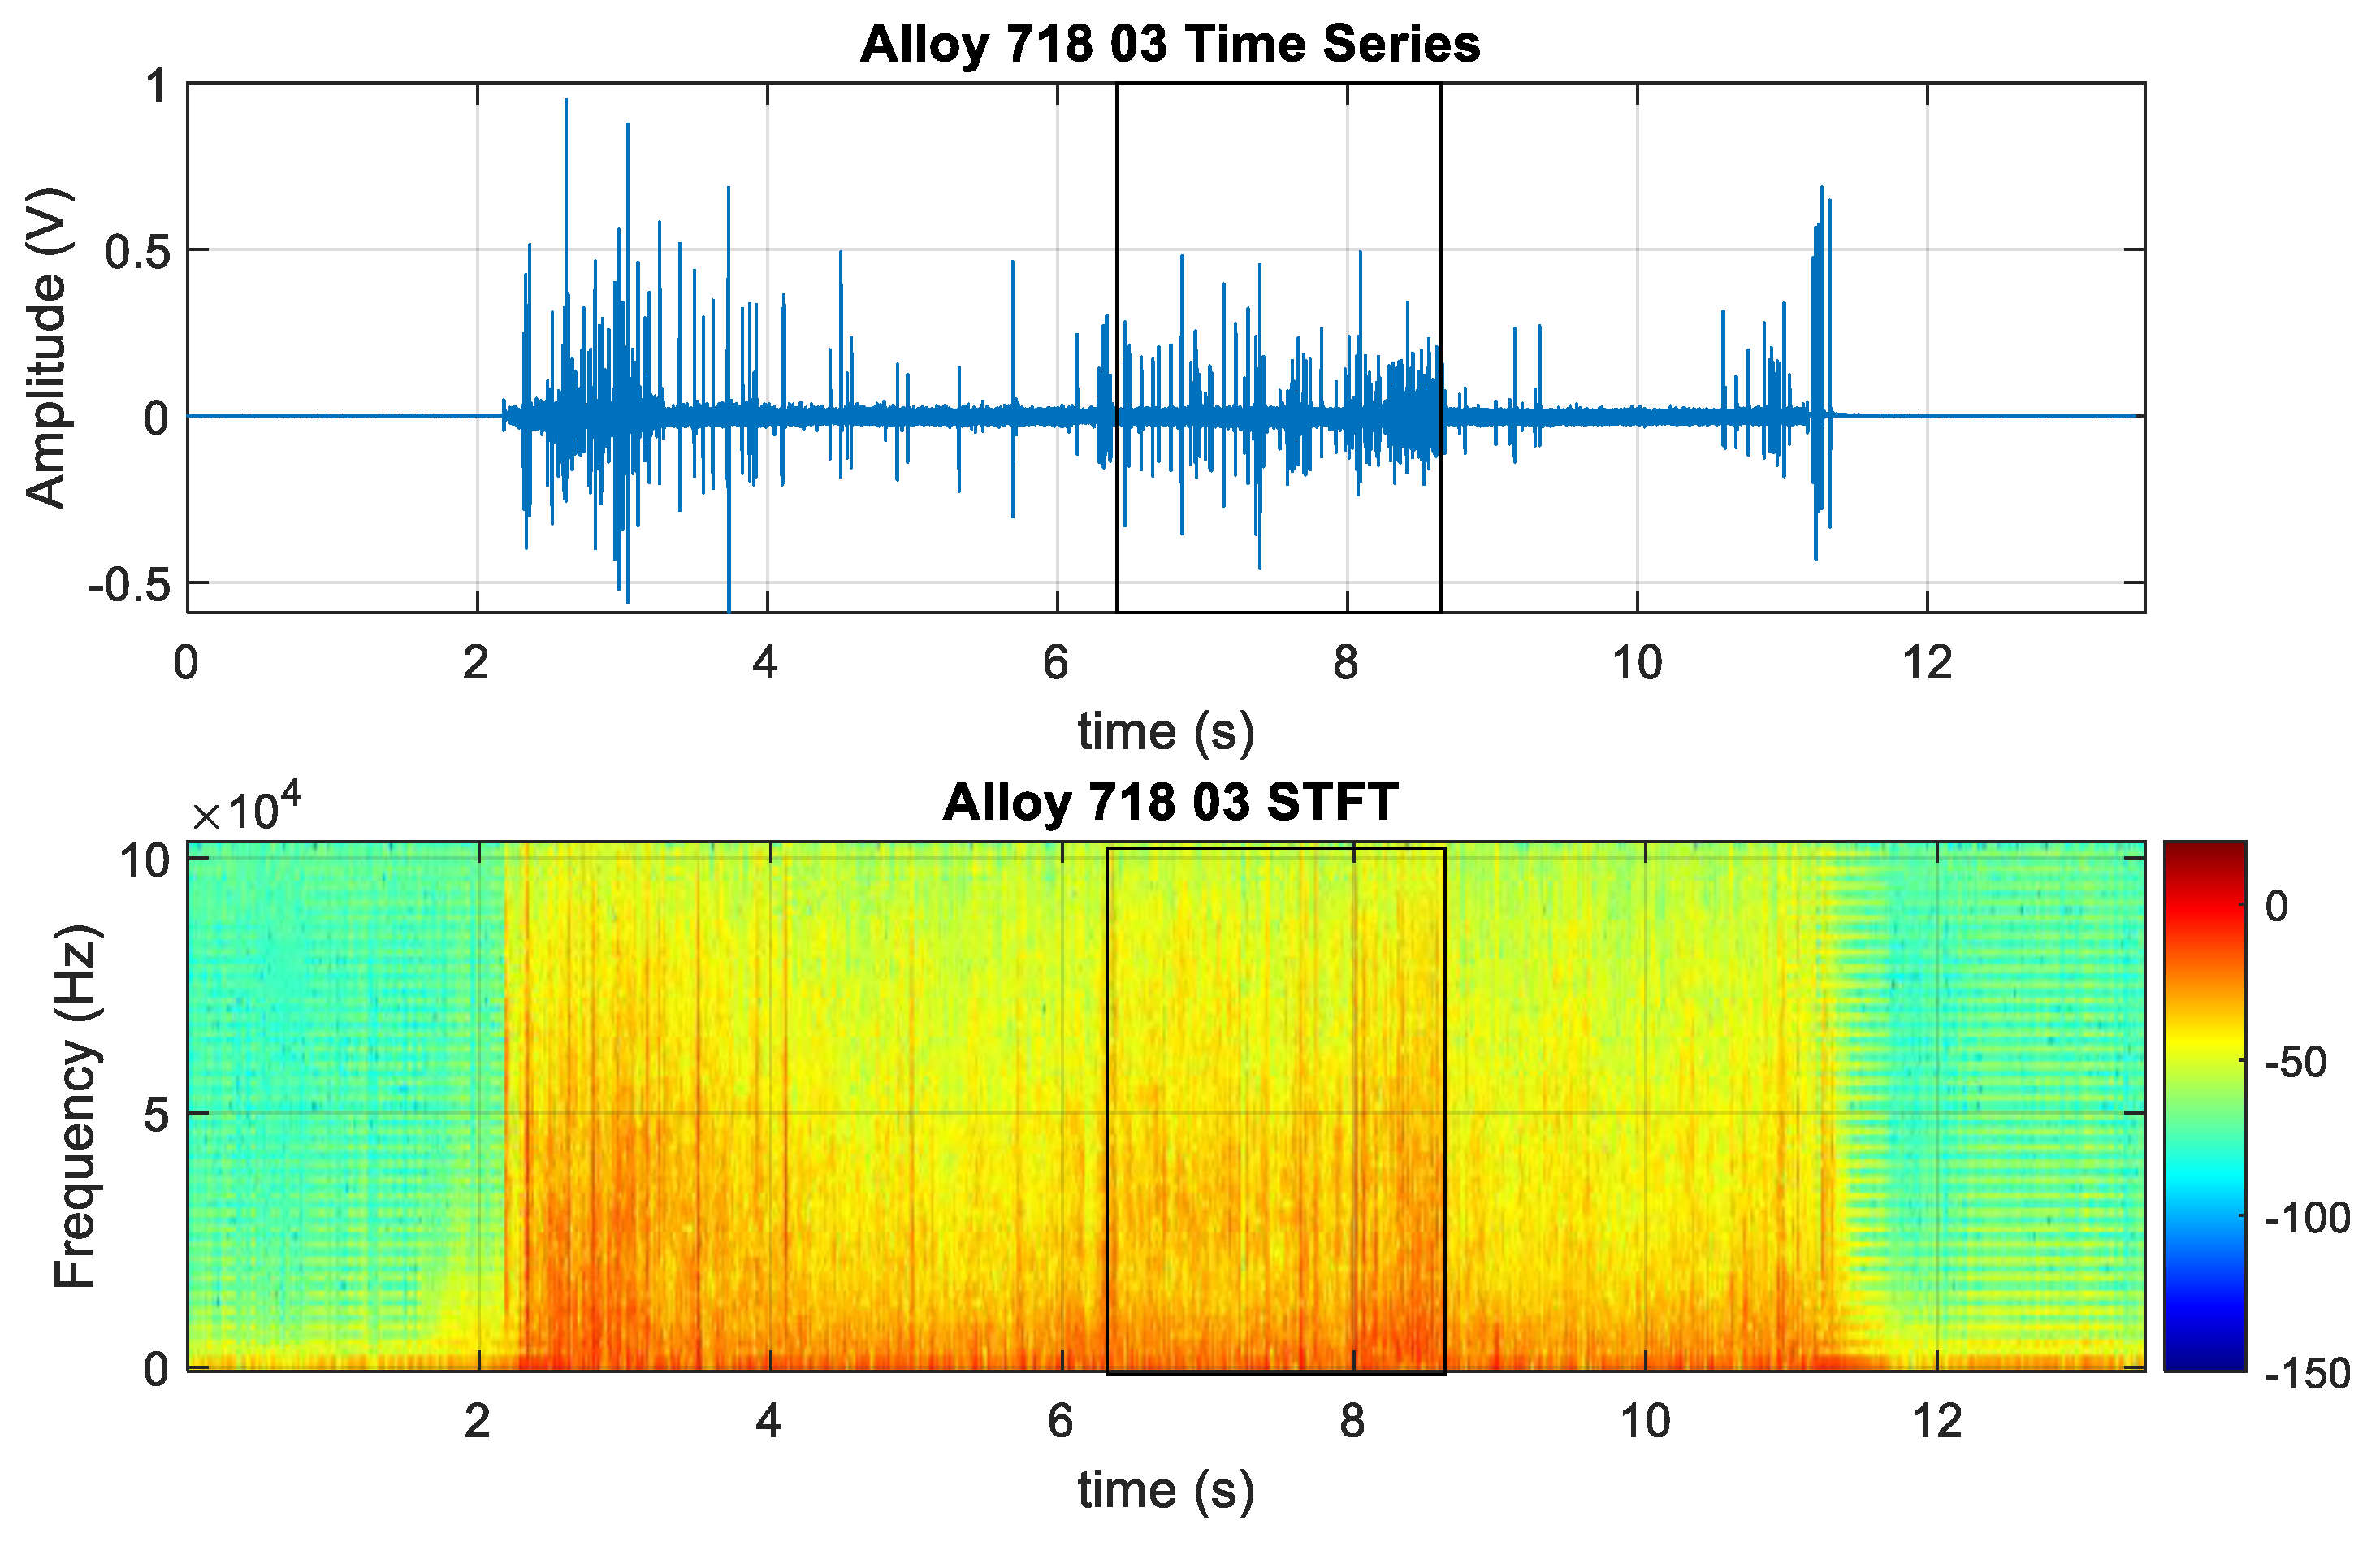
When compared with the airborne AE STFT of Figure 9–Bottom; specifically looking around the 8 s mark, and immediately after observing the weld nozzle exiting the interface of C–Mn and Alloy 718, several sharp high-frequency bands were emitted, therefore correlating Figure 9 STFT with significant abnormalities in the weld area, specifically, where a crack occurred. The remainder of the emitted higher frequencies display the continued weld over the insert material in comparison with Figure 8, the baseline case. The displayed amplitude intensities are much higher in the Alloy 718 insert case displayed in Figure 9, the baseline case. Such results give credence to detecting welding anomalies in situ with airborne sensors. The differences in emitted frequencies and noise levels can be attributed to the changes in arc noise relating to abnormalities during the solidification terminus.

5.1.3. CMSX4 Insert Welding Assessment

Figure 10 shows the corresponding signal emissions during the weld sequence. Looking at the time axis at 5.8–7.8 s when the weld promotes fusion of the CMSX4 insert, a more dominant frequency region is emitted where the discontinuity of the weld bead is found between 7.5 and 7.8 s. This was confirmed from the corresponding microstructure seen in Figure 6d.

5.1.4. EN8 Insert Welding Assessment

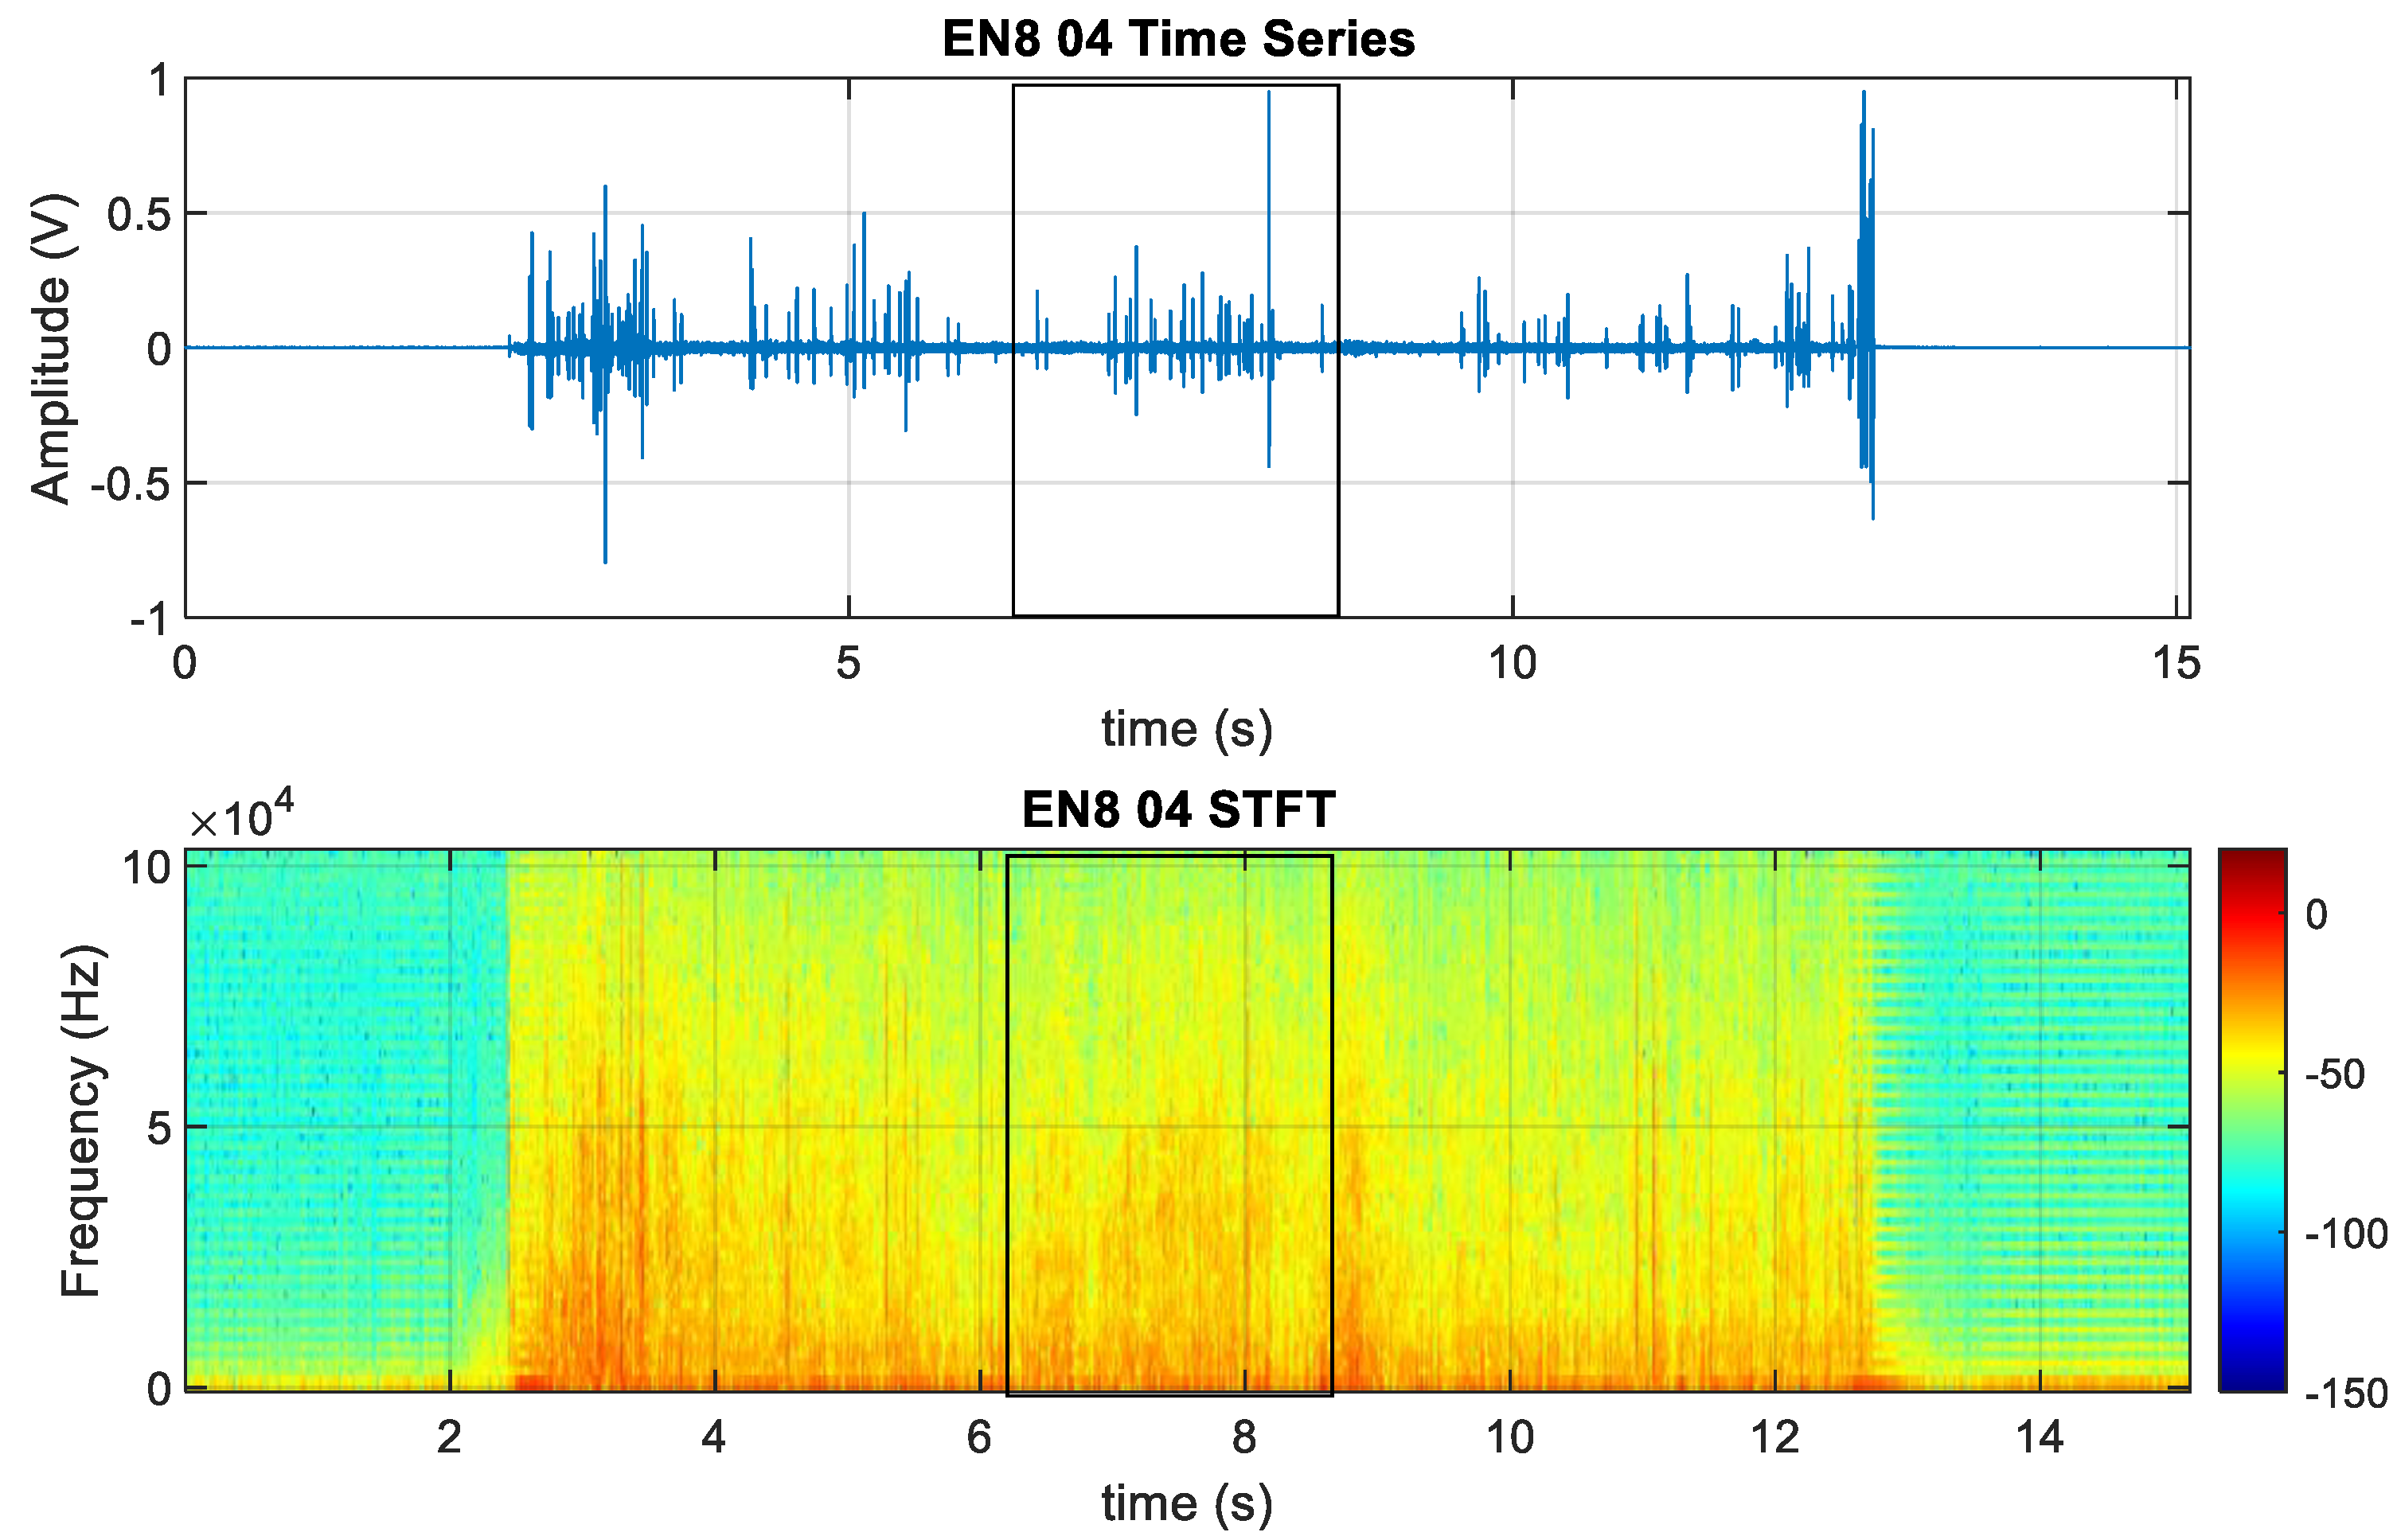
The use of EN8 Steel inserts using standard C–Mn welding consumables would generally be more tolerant to cracking than Alloy 718 and CMSX-4. However, through using a welding wire alloy that could modify the chemistry to one that extends the solidification range may sufficiently shift the level of indifference that could challenge the sensitivity of the sensor system. Figure 11 shows signal emissions during welding where, at time periods of 5.5, 10.5, and 12.5 s, some discontinuities or imperfections may have existed. However, no significant indications were found from the microstructural analysis. The significant frequency bursts, however, for the EN8 insert, are across the pickup spectrum from 80 to 1000 kHz and smaller in energy intensity (less dominant) when compared with the anomalies seen in Figure 7a,b. The baseline case displayed by Figure 8 is less dominant in signal phenomena when compared with all the welding cases with added inserted materials.
In summary, the C–Mn/Alloy 718/307Si and C–Mn/CMSX4/307Si combinations reveal little difference with respect to the time series associated with the airborne microphones. However, when transforming to the frequency domain, the STFT mappings do display higher intensities across the recording spectrum within the regions of 70–1000 kHz. Here, it can be seen that significant inconsistencies were noted between the three alloy mixtures.
This finding is different to what was discussed in the background and due mainly to using more sensitive instrumentation coupled with time–frequency analysis. It can be stated that, in both the time and frequency domain, it is possible to distinguish differences in situ (such as the variation in arc noise and other process inconsistencies).

5.2. PAC Contact Acoustic Emissions Sensor Results

Table 6 provides rise-time measurement data from the AE contact sensor to give an idea of the differences between each insert state. From the table, it is possible to see that the standard deviation differences in the rise-time measurements are all within a similar percentage, suggestive of pattern trends. The max rise time shows higher differences for Alloy 718 and CMSX4, which is expected considering the differences in chemistry where EN8 and BL are very similar to the plate chemistry and, therefore, the differences are fewer. Only the rise-time parameter was discussed here as this was not seen in research before and showed good demarcation from other parameters. The data from Table 7 are based around the STFT energy utilisation and, again, the maximum bandwidth and high amplitude energy utilisation is found with the inserts with the very different chemistries when compared with chemistries that are similar to the plate material. Such differences show a good case for using machine learning techniques and providing automated classification/prediction wherein all the data would be used in the sensor fusion approach. To apply full uncertainty, considerations to measurements need to be applied at the beginning of the measurement campaign, and this will be applied to future work.

5.2.1. Baseline Welding Condition

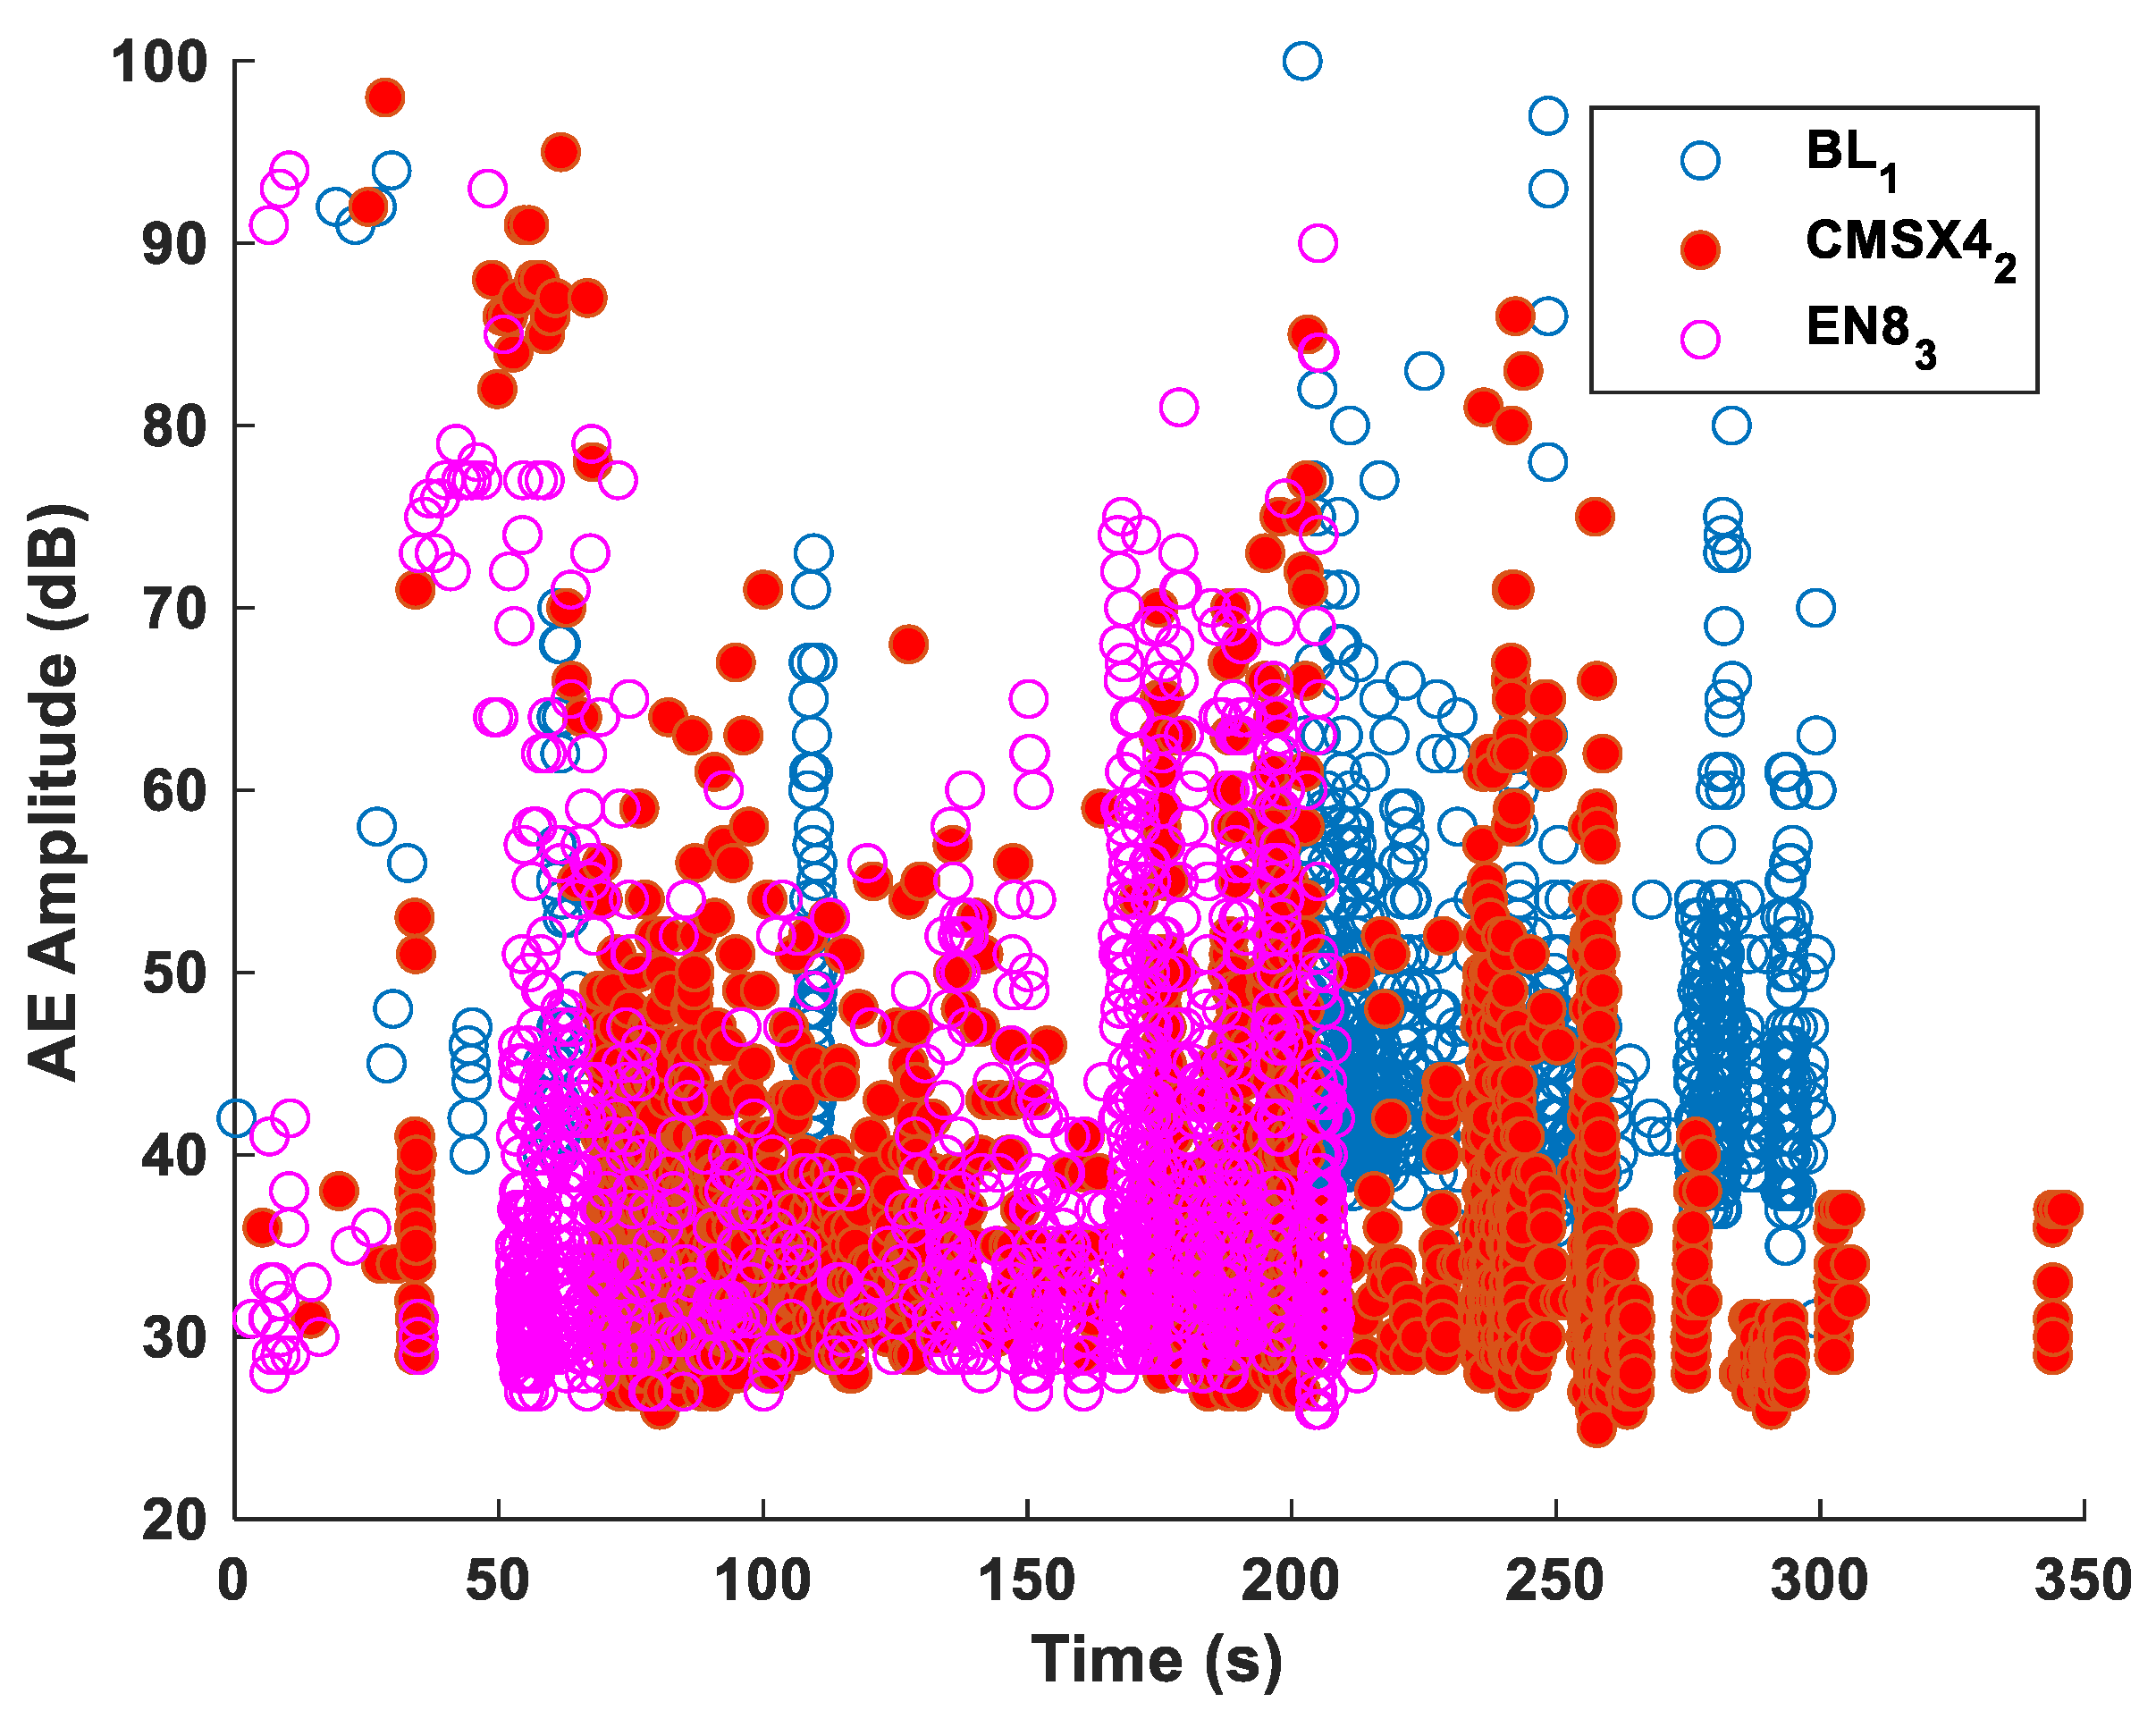
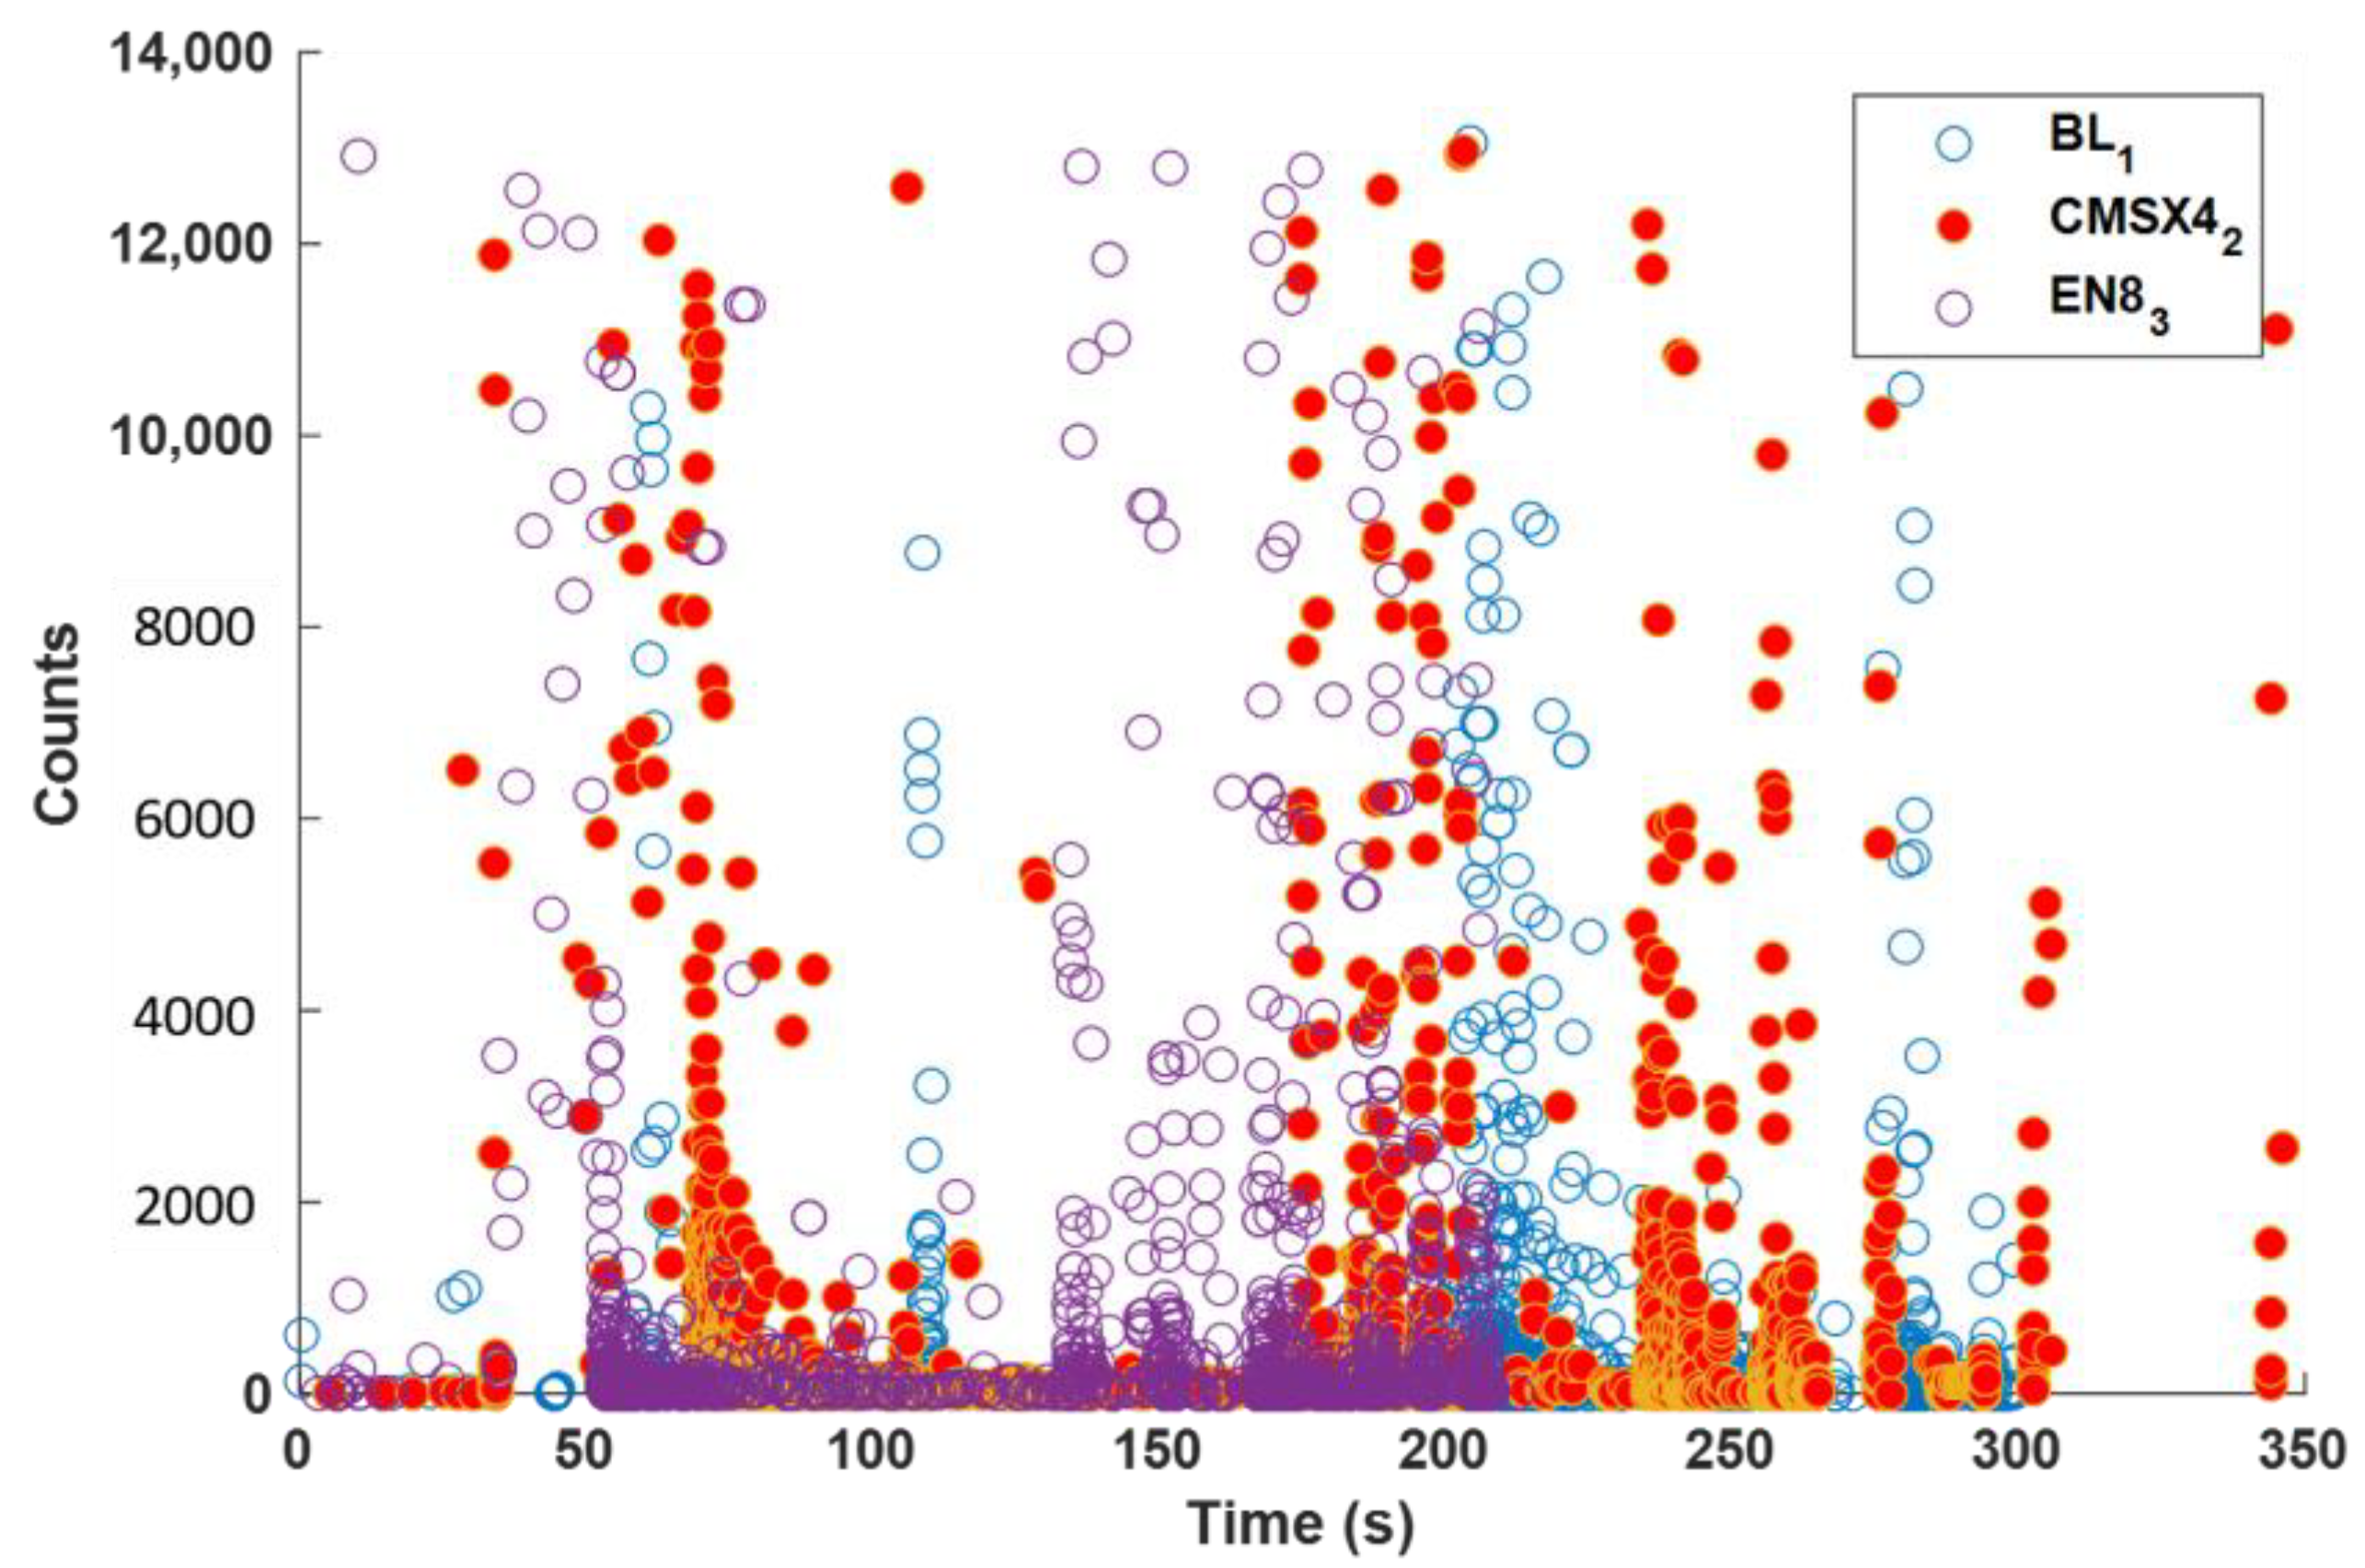
Although the metallographic analysis of the C–Mn welded samples revealed no significant metallurgical anomalies for regions within baseline weld, as seen in Figure 12 (BL1), the corresponding cooling phase from 200 s to 300 s regions do have some facets that are of interest. The associated AE amplitudes of Figure 12, AE rise time of Figure 13, and AE counts of Figure 14 may allude to another welding anomaly (it is worth noting that the dB amplitudes are much lower than those alloy insert cases wherein a range of lower emissions was recorded for the welding phase). The initial 10 s for all tests relates to the actual welding process for in situ monitoring, after which this becomes the cooling phase.
Figure 15 represents a time-frequency STFT plot for 175 s during the cooling phase of welding CMSX4 insert test case and gives an indication of the recorded high-energy patterns especially where the same is not recorded with the baseline welding cases. Figure 16 displays the microstructure analysis for EN8 insert weldment material, and this corresponds with the PAC sensor recordings wherein no cracks were observed from the AE signal analysis.
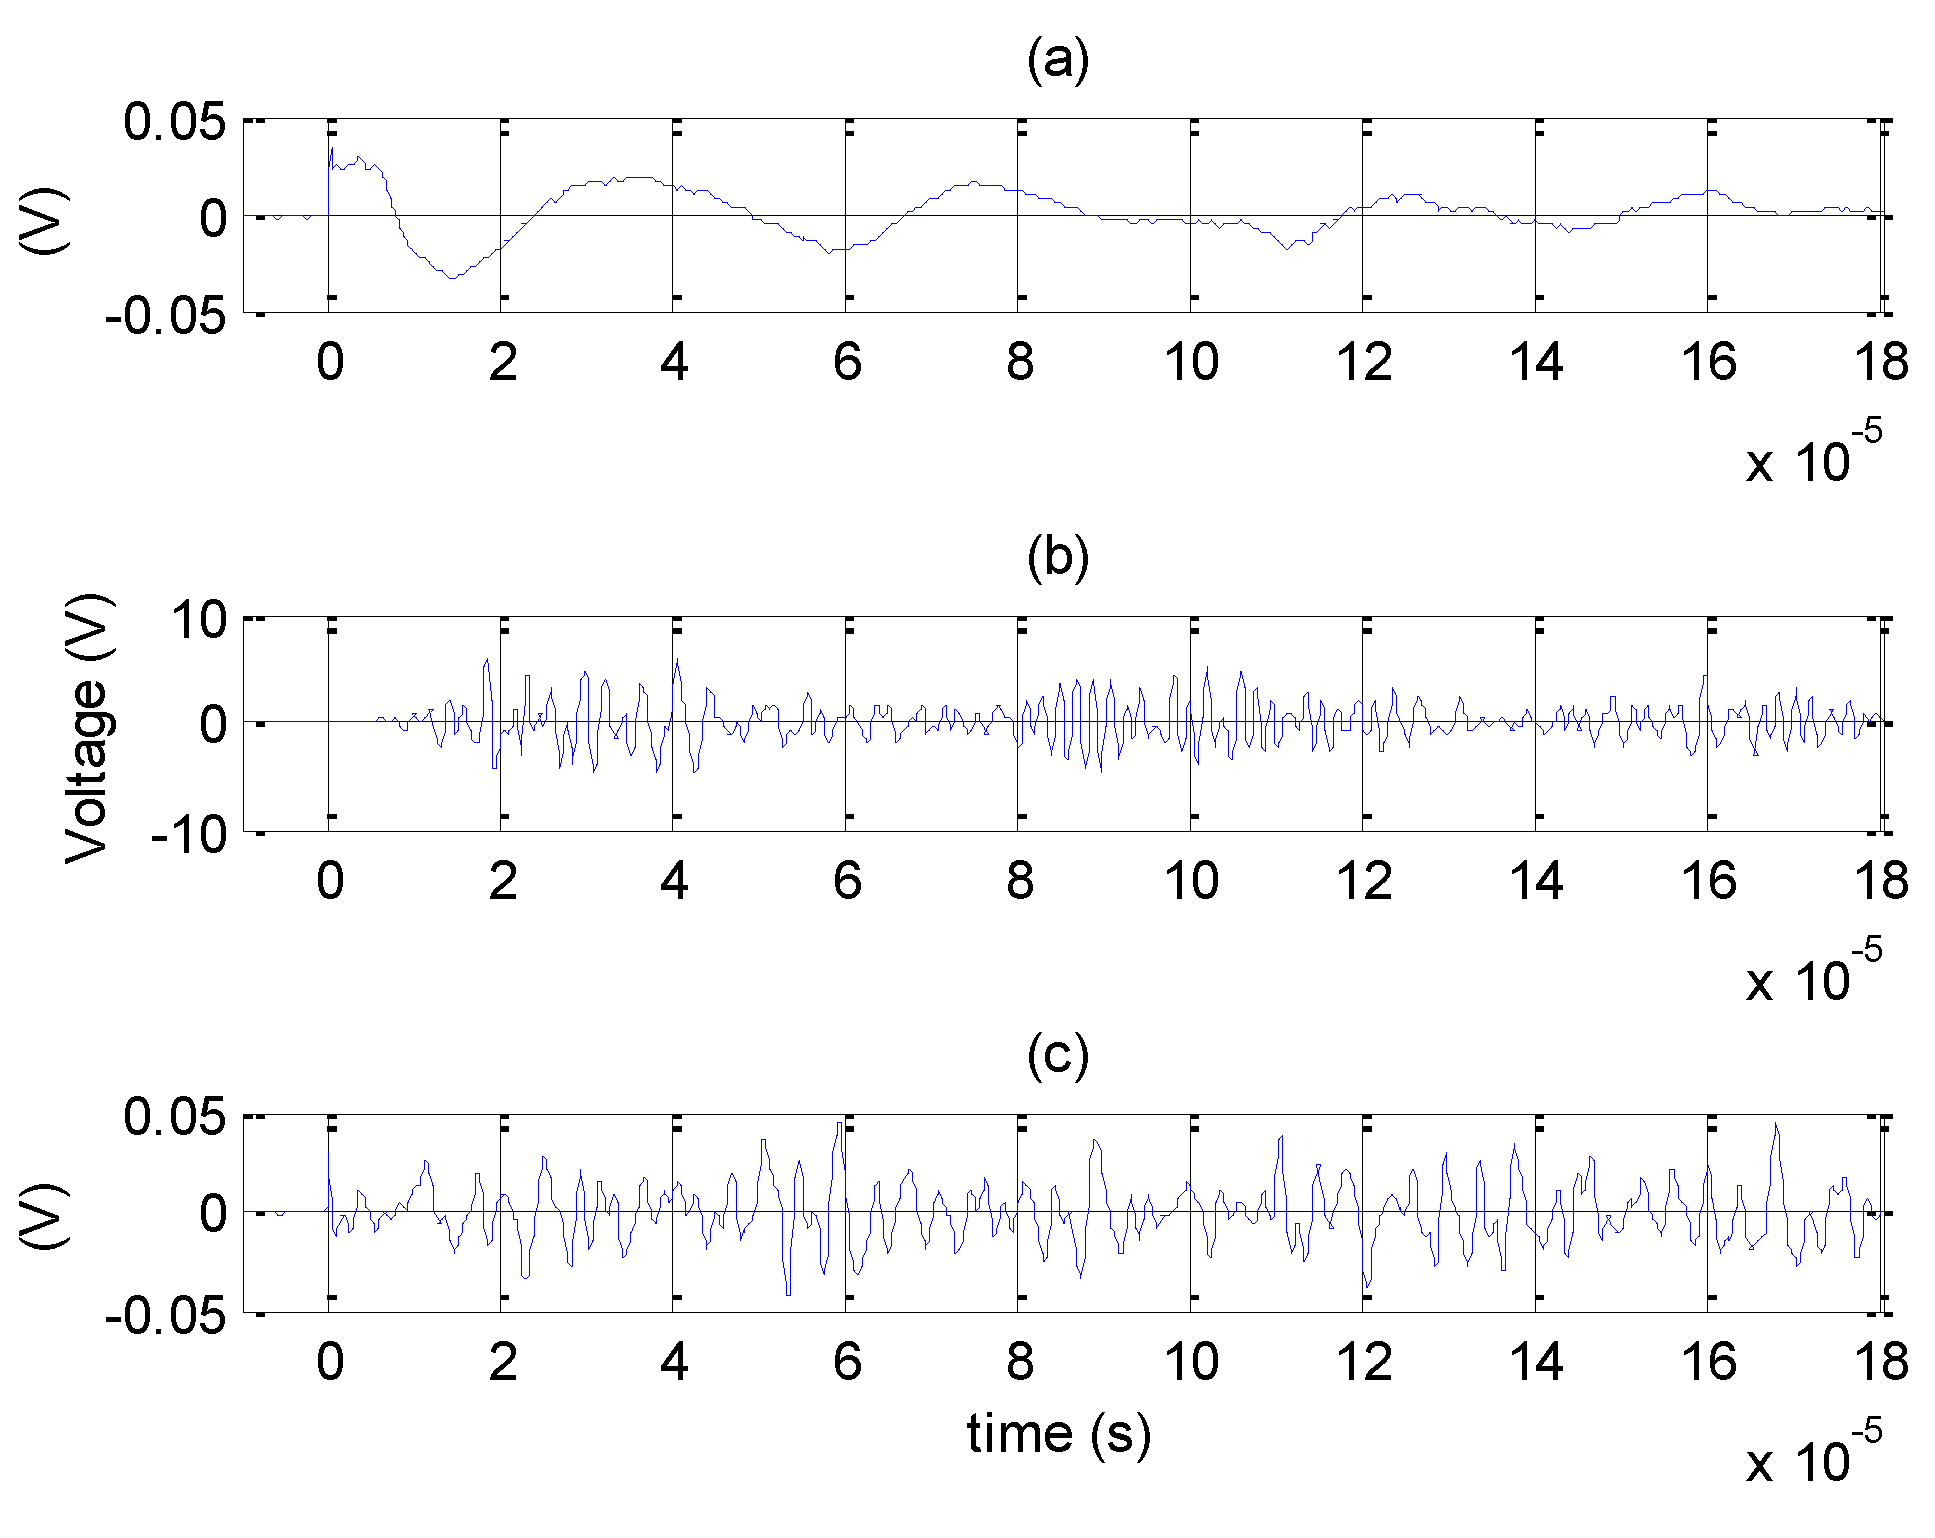
The cooling phase is scrutinised further in Figure 17 and Figure 18 for the respective time series, and Figure 19 and Figure 20 for the corresponding STFTs. Figure 18 and Figure 19 are split into sub images (a), (b), and (c), which relates to the different welding conditions (a) baseline, (b) CMSX4, and (c) EN8 insert conditions, respectively. Here, the baseline conditions, the amplitudes, energy rise time, and counts are displayed, where there appears to be an energy release that is both continuous and uniform, signifying a ductile “oscillating” emission rather than a sporadic brittle “burst”. The intensities of the baseline case are similar to CMSX4 and EN8, albeit significantly less in accumulative energy density.
The baseline C–Mn weld was initially carried out to signify the normalised condition. Figure 8 displays the normal frequency range wherein sharp amplitudes are not present. The only sharp amplitude and wide frequency utilisation is noticed at the start of the weld due to arc initiation. For this part of the analysis using the PAC AE wideband contact sensor, only the C–Mn baseline, EN8, and CMSX4 material cases are displayed. The choice of selected output signal data is based on the different material inserts chosen to represent different signal phenomena. This, however, is not to the point where patterns are not distinguishable from one another.

5.2.2. CMSX4 Insert Weld

The weld bead can be analysed with the naked eye, and the existence of certain abnormalities in the insert welded region can be found.
Figure 12 displays the PAC AE contact sensor results for the CMSX4 insert, which specifically refers to test 2, of a set 3 “CMSX4 insert experiments”. From looking at the AE amplitude from 70 s to 245 s, this is representative of the material cooling from the initial to the intermediate phase. When comparing the CMSX4 with the baseline C–Mn, the AE amplitude energy (Figure 12), rise time (Figure 13), and counts (Figure 14) are all higher and indicative of a potential anomaly; in this case, a crack. It can be inferred that Figure 13 and Figure 14 give a more focused dimension of anomaly detection where higher accumulations of rise time and counts activity can be noted when compared with the baseline case.
When comparing the AE signal amplitude with the baseline and CMSX4 cases, the material changes just after welding and towards the end of the intermediate cooling phase. These physical phenomena can be seen with AE sensors (see Figure 12) and are also correlated against Figure 8, the baseline case of the airborne sensor. With the crack condition, the frequencies and amplitudes are much higher than for other anomaly cases, which is especially true when compared with the nominal baseline case and consistent with literature [22].
Analysing Figure 12 and Figure 14 in detail revealed that the original cracks observed during the initial part of the 70 s timeline of cooling are at the same intensity as the baseline sample; however, there is a greater utilisation across the frequency spectrum due to greater levels of radiated heat.
At the 245 s point, as seen in Figure 12, Figure 13 and Figure 14, in the CMSX4 signals, the intensity and frequency range is much higher, indicative of a higher probability of cracking during the cooling phase. This is further reinforced with what can be found in Figure 15, wherein the whole STFT represents very high energies across the whole AE contact sensor bandwidth.
Looking at Figure 12 and Figure 14, the initial cooling phase is similar for all inserts; however, towards the end of the cooling phase, differences can be seen. When looking at the amplitude peaks of Figure 12, the high-intensity amplitude peaks seen at the start and end of the cooling phase are viewed in greater depth through Figure 17 and Figure 18 from a time series perspective, and through Figure 19 and Figure 20 from a time–frequency perspective.
Figure 17 and Figure 18 are significant of the raw associated AE burst represented by the individual amplitude peaks, as seen in Figure 12. Figure 18b shows higher peaked energy when compared with the beginning of its cooling phase displayed by Figure 17a. Figure 17a is very similar to the other signals taken at the start and end of the cooling phase, seen in Figure 17c, Figure 18a and Figure 19c. This difference in magnitude is significant to different experienced noise intensities and hence no normalisation was applied to suppress this. Such increased noise levels may be indicative of porosity or micro-cracking.
Figure 17b and Figure 19b display a similar image as Figure 17a and Figure 19a; however, the anomalies towards the end of the recorded cooling phase display a higher level of AE activity, in terms of energy, amplitudes, threshold counts, rise time event duration, and increased bandwidth. Looking at Figure 12, the actual welding phase has much higher amplitudes than the cooling phase, though all the intermittent amplitudes are not recorded. This is due to the welding process being too high in terms of noise to record, and instead the recordings of interest start once the physical welding process has ended. Future work should also be directed towards the effects after welding over longer durations using increased sensing instrumentation.

5.2.3. 307Si- CMn-EN8 Insert Weld

The magnitude of heat input per unit length used for the EN8 insert was 120 J/mm less than that used for the CMSX4 insert weld due to the extensive chemistry variance.
Figure 12, Figure 13 and Figure 14 display the PAC AE contact sensor signal emissions, where the position point at the start of cooling is very similar to both the C–Mn baseline and CMSX4 insert. The significance here, however, is more apparent at 150 s after welding where the intermediate cooling rate is depicted towards the end of the sequence. The emissions are similar to the C–Mn baseline results wherein signal phenomena associated with the weld deposit appear to be exhibiting a ductile response, expected of a less rapid release of energy.

6. Discussion

Comparative studies were completed using GRAS airborne AE microphones and PAC AE contact sensors to investigate defects formed either during the weld or during its cooling cycle, specifically at the critical cooling region notified as being between 800 °C and 500 °C for high-strength steels.
The welding setup was designed to promote imperfections such as cracks, lack of fusion, and porosity to assess whether the monitoring process could distinguish between an acceptable integrity and an anomaly.
From the three inserts used, the CMSX4 and Alloy 718 materials exhibited weld imperfections in the form of lack of fusion, cracks, and gas porosity. From both sensors, it was found that the PAC AE microphones produced the best results, where the defects were easily identifiable from the normal to abnormal case; these were confirmed by microstructural analysis.
The GRAS airborne microphones provided sufficient confidence in terms of distinguishing discernible features and were used for in situ welding process monitoring. Such sensors can encroach much closer to the weld zone and are only susceptible to emitted sound wave change. The distance used was a trade-off between unwanted noise and being sufficiently near to-pick up signals of interest confirming the presence of several facets that can be recorded in situ, which can provide key information in terms of the process quality.
In summary, when Alloy 718 and CMSX4 inserts were fused, the amplitudes were significantly higher than their C–Mn and C–Mn + EN8 counterparts, where much higher amplitudes were displayed, signifying crack anomalies.
Contact AE was found to give more significant results in the identification of defects within the weld in real time and during its cooling phase.
During the cooling phase, it was found that the contact AE gave much higher amplitudes and frequency utilisation for Alloy 718 and CMSX4 inserts when compared with the C–Mn baseline. Since the process is completely automated by feeding the sensor data into a closed-loop control system, the chances of not identifying defects will be fewer, giving the opportunity for in situ/off-line quality checks for immediate rework or proceeding according to the completion of the joint.
The research discussed here displays the benefits of using the airborne microphones in situ. Having this information could give suitable outputs to determine the weld quality during solidification and through the critical cooling region where transformation products and higher tensile stresses are encountered. Future work should focus on investigating these latter points by recording the signals for longer durations to promote a better understanding and identification of the weld condition.

7. Connecting with the State of the Art

It is always important, where possible, to align current research with previous research to substantiate outputs and to have more confidence in the obtained results. Nonetheless, with the amount of data available to date, this can be a very difficult task if not an impossible task at present. In addition, comparing early research with work carried out in this paper, the sensor technologies used within our work are much more sensitive to change and have greater resolution. Therefore, such comparisons can be difficult to achieve where larger data volumes are produced and will naturally require higher computational power and storage or advanced processing analytics when addressing large fabrications. Nevertheless, those patterns and bandwidth frequencies for anomalies do show good correlation as well as similar trends and should be investigated further.
The research by authors [9], used AE contact sensors which were inferior to the AE contact sensors used here. The total count of AE signals for the same time of 350 s was 1400 counts, but regarding those recorded for the CMSX4 cracking evaluation, it was 11,000 counts.
It can be concluded from such results that the AE contact sensors used within this study are far more superior, providing greater resolution and sensitivity. Therefore, it is now possible to detect finer anomalies and the possible onset of cracks resulting from poor joining practices and preparation.
In terms of patterns, however, both pieces of work display high amplitudes for the onset and continuation of crack activity. For crack detection, the authors were not aware at the time of completing these experiments that researchers had studied such phenomena using both contact and airborne AE sensors.
From work carried out by [20] Grad et al. (2003), an AE contact sensor was used as a microphone to monitor and understand the quality of gas–metal arc welds. Here, the recording of the arc process provided a view into the quality of the welding process. If, however, an electromagnetic acoustic transducer (EMAT) AE sensor is used instead, then this is perhaps more appropriate to record airborne signatures, but it should be noted that it still implies detecting elastic waves, albeit via a non-contact method.
Finally, we use STFTs where we can such as when transforming a continuous waveform from the time series to time–frequency domain. The reasons for using STFT in favour of other transform techniques is based on it being less computationally demanding as well as the amount of the information not being massive, requiring a high-performance computer. In addition, AE parameters are used to give a rich summary picture of the AE events and parameters such as rise time, which has not been used in the literature before for this type of work. Therefore, with a robust picture of the phenomena taking place, there is good confidence in verifying the findings within this paper. This is another novel aspect of the work carried out here.
The STFT analysis of the GRAS airborne acoustic signal makes it difficult to see the changing amplitude, as all signals recorded for the baseline cases have a frequency coverage across the whole sensor bandwidth spectrum. In addition, to make easy comparisons, all the amplitude colour maps were normalised by the same amount. Providing such normalisation can restrict features from being more salient.
The MISTRAS contact AE sensor produces output parameters that are recorded based on passing a dB noise threshold, which means that the overall signal is not continuous with time; however, it gives snap shots of events and each one of those snap shots gives small continuous waveforms which can have STFTs applied to it. For future work, a two-channel system would be more beneficial, wherein STFTs could be compared and wherein both channels would give two fully continuous signals. In addition, phenomena location may also be required. The work mentioned here looks at a single AE USB system, which is more appropriate for a test engineer as it is easier to setup in remote locations.

8. Conclusions

The use of materials offering a weldability gradient that vary significantly, welded to an ASTM A36 steel plate with a fully austenitic welding wire (307Si), promotes a varied set of events by expanding the solidification profile. Alloy 718 and CMSX-4 have proven to be ideal candidates in inducing favourable imperfections with such a combination of base metal and filler metal chemistries. These materials promote the formation of topological close-packed phases, e.g., the intermetallic and brittle Laves phase that accentuates an enhances crack sensitivity, which in turn increases the possibility of testing the potential use of remote NDT methods to determine a weld’s integrity.
Through using nickel-base alloy inserts, it has been possible to create additional complexities to promote geometrical changes to instigate gross imperfections in the form of porosity. This combination increased the sensitivity reminiscent of the circular patch weldability test developed by R.D. Stout and published within the welding research council in 1987, which was used to determine the weldability of steels. This chemistry combination heightens micro-segregation due to the rejection of solute elements that coalesce and promote low-temperature liquid films, which decorate grain boundaries and rupture. Combining this with the change in metal flow, resulting from differential rheological properties and thermal expansion values, further induced microscopical stress regions at the dendritic and grain boundary scale that grew into macro-stressed regions, which resulted in cracking. This is the result experienced with the ASTM A36 and 307Si + Alloy 718 and ASTM A36 and 307Si + CMSX-4 combinations. Such multipart solutions were proven to increase the propensity for hot cracking and cavities that release sonic waves at specific frequencies.
It was concluded that there could be a strong correlation between ultrasound emitted during MAG welding and corresponding joint integrity in terms of crack response that could be of significant value to fabricators. Certain frequency ranges and amplitudes are potentially unique for different material chemistries exposed to welding. The frequency rise during and immediately after the process denotes the formation of imperfections, phase transformation, or defects in the weld. AE sensors, both airborne and contact, can identify such frequencies and amplitudes, which guides automation in terms of acceptable or non-acceptable weld integrity. AE sensors can be integrated into manufacturing systems for real-time inspection rather than having to undertake timely, expensive, and destructive material analysis to qualify the weld structure.
It was noticed that STFT plots of the AE airborne microphone gave much higher intensities and frequency band utilisation for regions consistent with cracking. The same was observed for the contact sensors wherein the frequency range was between 250 and 550 kHz with high intensities of 70 dB. Such values were significant indicators of cracking during the cooling phase, circa 80 s after welding. This shows that, by using high-resolution instrumentation and advanced digital signal processing (DSP) techniques, it is possible to obtain useful in situ and post-machining information to discern cracks, and thus the general weld quality.
For this work to be accepted into the general fabrication mainstream, further material analysis with AE sensors is required, which should aim to generalise all welding anomaly conditions in situ. In addition to this, such anomalies are indicative of certain frequency ranges and amplitudes. This information could, in the future, be directly fed into filter banks and real-time monitoring control systems as well as advanced material models and machine learning architecture. Further work will look into similar work using thermocouples or IR camera systems processed with digital image correlation. More work will be designed around establishing the different associated welding anomalies and all data will be processed using established and novel machine learning techniques to show the accuracy and acceptance of automated signature inspection.

Author Contributions

Conceptualization, J.M.G. and S.J.; Validation, J.M.G., S.J., B.P. and C.P.; Formal analysis, J.M.G., S.J. and B.P.; Investigation, J.M.G. and S.J.; Resources, C.P.; Writing—original draft, J.M.G. and S.J.; Writing—review & editing, J.M.G., S.J. and C.P.; Funding acquisition, C.P. All authors have read and agreed to the published version of the manuscript.

Funding

This research received no external funding.

Data Availability Statement

The data presented in this study are available on request from the corresponding author pending.

Conflicts of Interest

The authors declare no conflict of interest.

References

  1. Shankar, V.; Gill, T.P.S.; Mannan, S.L. Solidification cracking in austenitic stainless steel welds. Sadhana Acad. Proc. Eng. Sci. 2003, 28, 359–382. [Google Scholar] [CrossRef]
  2. Rush, M.T.; Colegrove, P.A.; Zhang, Z.; Courtot, B. An investigation into cracking in nickel-base superalloy repair welds. Adv. Mater. Res. 2010, 89–91, 467–472. [Google Scholar] [CrossRef] [Green Version]
  3. ASM Handbook Vol. 6 Welding Brazing and Soldering; ASM International: Materials Park, OH, USA, 1993; p. 2. ISBN 978-0-87170-382-8.
  4. Dixon, B.; Hakansson, K. Effects of Welding parameters on weld zone toughness and hardness in 690 MPa steel. Weld. J. 1995, 74, 122s–133s. [Google Scholar]
  5. Pollard, P.; Milner, D.R. Gas-metal reactions in CO2 arc welding. J. Steel Iron Inst. 1971, 209, 291–300. [Google Scholar]
  6. Littleton, J. Gas-Metal Reactions and Porosity in the Inert Gas Arc Welding of Copper. Ph.D. Thesis, Aston University, Birmingham, UK, 1974; pp. 9–26. [Google Scholar]
  7. Drouet, M.G.; Nadeau, F. Pressure Waves due to Arcing Faults in a Substation. IEEE Trans. Power Appar. Syst. 1979, 5, 1632–1635. [Google Scholar] [CrossRef]
  8. Shiraiwa, T.; Kawate, M.; Briffod, F.; Kasuya, T.; Enoki, M. Evaluation of hydrogen-induced cracking in high-strength steel welded joints by acoustic emission technique. J. Mater. Des. 2020, 190, 108573. [Google Scholar] [CrossRef]
  9. Ser’eznov, A.N.; Stepanova, L.N.; Lebedev, E.Y.; Kabanov, S.I.; Chaplygin, V.N.; Laznenko, K.V.; Ramazanov, I.S. Acoustic-Emission Study of the Possibilities of Localizing Flaws of a Welded Joint during Cooling. Russ. J. Nondestruct. Test. 2009, 45, 310–316. [Google Scholar] [CrossRef]
  10. Zhang, G.; Song Wu, C.; Liu, X. Single Vision System for Simultaneous Observation of Keyhole and Weld Pool in Plasma Arc Welding. J. Mater. Process. Technol. 2015, 215, 8. [Google Scholar] [CrossRef]
  11. Rosado, L.S.; Santos, T.G.; Piedade, M.; Ramos, P.M.; Vilaca, P. Advanced Technique for Non-Destructive Testing of Friction Stir Welding of Metals. Measurement 2010, 43, 1021–1030. [Google Scholar] [CrossRef]
  12. Ferrara, M.; Ancona, A.; Lugara, P.; Sibilano, M. Online quality monitoring of welding processes by means of plasma optical spectroscopy. In High Power Lasers in Manufacturing; SPIE: Bellingham, WA, USA, 2000; p. 750. [Google Scholar]
  13. Yi, L.; Yan, Z.; Xiaojian, X.; Yang, Z.; Rui, W. Effect of Welding Heat Input to Metal Droplet Transfer Characterized by Structure-Borne Acoustic Emission Signals Detected in MAG. Measurement 2015, 70, 8. [Google Scholar] [CrossRef]
  14. Kamal, P.; Sandip, B.; Surjya, K.P. Investigation on arc sound and metal transfer modes for on-line monitoring in pulsed gas metal arc welding. J. Mater. Process. Technol. 2010, 210, 1397–1410. [Google Scholar]
  15. Paoletti, A.; Lambiase, F.; Di Ilio, A. Optimization of Friction Stir Welding of Thermoplastics. In Proceedings of the 9th CIRP Conference on Intelligent Computation in Manufacturing Engineering—CIRP ICME, Gulf of Naples, Italy, 12–14 July 2015; pp. 562–567. [Google Scholar]
  16. Eriksson, I.; Powell, J.; Kaplan, A.F.H. Signal overlap in the monitoring of laser welding. Meas. Sci. Technol. 2010, 21, 105705. [Google Scholar] [CrossRef]
  17. Sibillano, T.; Rizzi, D.; Ancona, A.; Saludes-Rodil, S.; Rodriguez Nieto, J.; Chmelíčková, H.; Šebestová, H. Spectroscopic Monitoring of Penetration Depth in CO2 Nd: YAG and Fiber Laser Welding Processes. J. Mater. Process. Technol. 2011, 212, 910–916. [Google Scholar] [CrossRef]
  18. Zhang, G.; Wu, C.S.; Liu, Z. Experimental observation of both keyhole and its surrounding thermal field in plasma arc welding. Int. J. Heat Mass Transf. 2014, 70, 439–448. [Google Scholar] [CrossRef]
  19. Suárez, J.; Remartínez, B.; Menéndez, J.; Güemes, A.; Molleda, F. Optical Fibre Sensors for Monitoring of Welding Residual Stresses. J. Mater. Process. Technol. 2003, 143–144, 316–320. [Google Scholar] [CrossRef]
  20. Grad, L.; Grumb, J.; Polajnar, I.; Slabe, J.M. Feasibility study of acoustic signals for on-line monitoring in short circuit gas metal arc welding. Int. J. Mach. Tools Manuf. 2004, 44, 555–561. [Google Scholar] [CrossRef]
  21. Cayo, E.H.; Absi Alfaro, S.C. Welding Quality Measurement Based on Acoustic Sensing. ABCM Symp. Ser. Mechatron. 2008, 3, 571–579. [Google Scholar]
  22. Karlsson, L. Crack Detection in Welding Process Using Acoustic Emission. Master’s Thesis, Mälardalen University, Västerås, Sweden, 2008. [Google Scholar]
  23. Cayo, H.E.; Alfaro, A. MAG process stability evaluation through acoustic emission by time and frequency domain analysis. J. Achiev. Mater. Manuf. Eng. 2009, 34, 157–164. [Google Scholar]
  24. Wadley, H.; Scruby, C.B. Elastic wave radiation from cleavage crack extension. Int. J. Fract. 1993, 23, 111–128. [Google Scholar] [CrossRef]
  25. Sharma, A.; Junaidh, M.I.; Purushothaman, K.K.; Kotwal, C.P.; Paul, J.; Tripathi, S.; Pant, B.; Sankaranarayanan, A.S. Online Monitoring of Electron Beam Welding of TI6AL4V Alloy through Acoustic Emission. In Proceedings of the National Seminar on Non-Destructive Evaluation, Hyderabad, India, 7–9 December 2006. [Google Scholar]
  26. Rodriguez-Cobo, L.; Mirapeix, J.; Ruiz-Lombera, R.; Cobo, A. Fiber Bragg Grating Sensors for On-Line Welding Diagnostics. J. Mater. Process. Technol. 2015, 214, 839–843. [Google Scholar] [CrossRef]
  27. Griffin, J.; Chen, X. Real-time Neural Network classifications of characteristics from emitted Acoustic Emission during Horizontal Single Grit Scratch Tests. J. Intell. Manuf. 2014, 2014, 1–17. [Google Scholar] [CrossRef]
  28. He, K.; Li, X. Time–Frequency Feature Extraction of Acoustic Emission Signals in Aluminum Alloy MIG Welding Process Based on SST and PCA. IEEE Access 2019, 7, 113988–113998. [Google Scholar] [CrossRef]
  29. Zhang, L.; Basantes-Defaz, A.C.; Ozevin, D.; Indacochea, E. Real-time monitoring of welding process using air-coupled ultrasonics and acoustic emission. Int. J. Adv. Manuf. Technol. 2019, 101, 1623–1634. [Google Scholar] [CrossRef]
  30. Madhvacharyula, A.S.; Pavan, A.V.S.; Gorthi, S.; Chitral, S.; Venkaiah, N.; Kiran, D.V. In situ detection of welding defects: A review. Weld. World 2022, 66, 611–628. [Google Scholar] [CrossRef]
  31. Kanungo, T.; Mount, D.M.; Netanyahu, N.S.; Piatko, C.D.; Silverman, R.; Wu, A.Y. An efficient k-means clustering algorithm: Analysis and implementation. IEEE Trans. Pattern Anal. Mach. Intell. 2002, 24, 881–892. [Google Scholar] [CrossRef]
  32. Kale, A.P.; Wahul, R.M.; Patange, A.D.; Soman, R.; Ostachowicz, W. Development of Deep Belief Network for Tool Faults Recognition. Sensors 2023, 23, 1872. [Google Scholar] [CrossRef]
  33. Roca, A.S.; Fals, H.; Fernández, J.; Macias, E.; De La Parte, M. Artificial neural networks and acoustic emission applied to stability analysis in gas metal arc welding. Sci. Technol. Weld. Join. 2009, 14, 117–124. [Google Scholar] [CrossRef]
  34. Pietrzak, P.; Wolkiewicz, M. Demagnetization Fault Diagnosis of Permanent Magnet Synchronous Motors Based on Stator Current Signal Processing and Machine Learning Algorithms. Sensors 2023, 23, 1757. [Google Scholar] [CrossRef]
  35. BS EN 1011-2; Welding—Recommendations for Welding of Metallic Materials, Part 2: Arc Welding of Ferritic Steels. European Standards: London, UK, 2001.
  36. MatWeb, Material Property Data. Available online: https://www.matweb.com/search/DataSheet.aspx?MatGUID=afc003f4fb40465fa3df05129f0e88e6&ckck=1 (accessed on 14 June 2023).
  37. Merchant, S.Y. Investigation on Effect of Heat Input on Cooling Rate and Mechanical Property (Hardness) of Mild Steel Weld Joint by MMAW Process. Int. J. Mod. Eng. Res. 2015, 5, 34–41. [Google Scholar]
  38. Adams, C.M. Cooling rate and peak temperature in fusion welding. Weld. J. 1958, 37, 210S–215S. [Google Scholar]
  39. Paulonis, D.F.; Oblak, J.M.; Duvall, D.S. Precipitation in Nickel-Base Alloy 718. Trans. ASM 1969, 62, 611–622. [Google Scholar]
  40. Dupont, J.N.; Marder, A.R. Thermal Efficiency of Arc Welding Processes. Weld. Res. Suppl. 1995, 74, 406s. [Google Scholar]
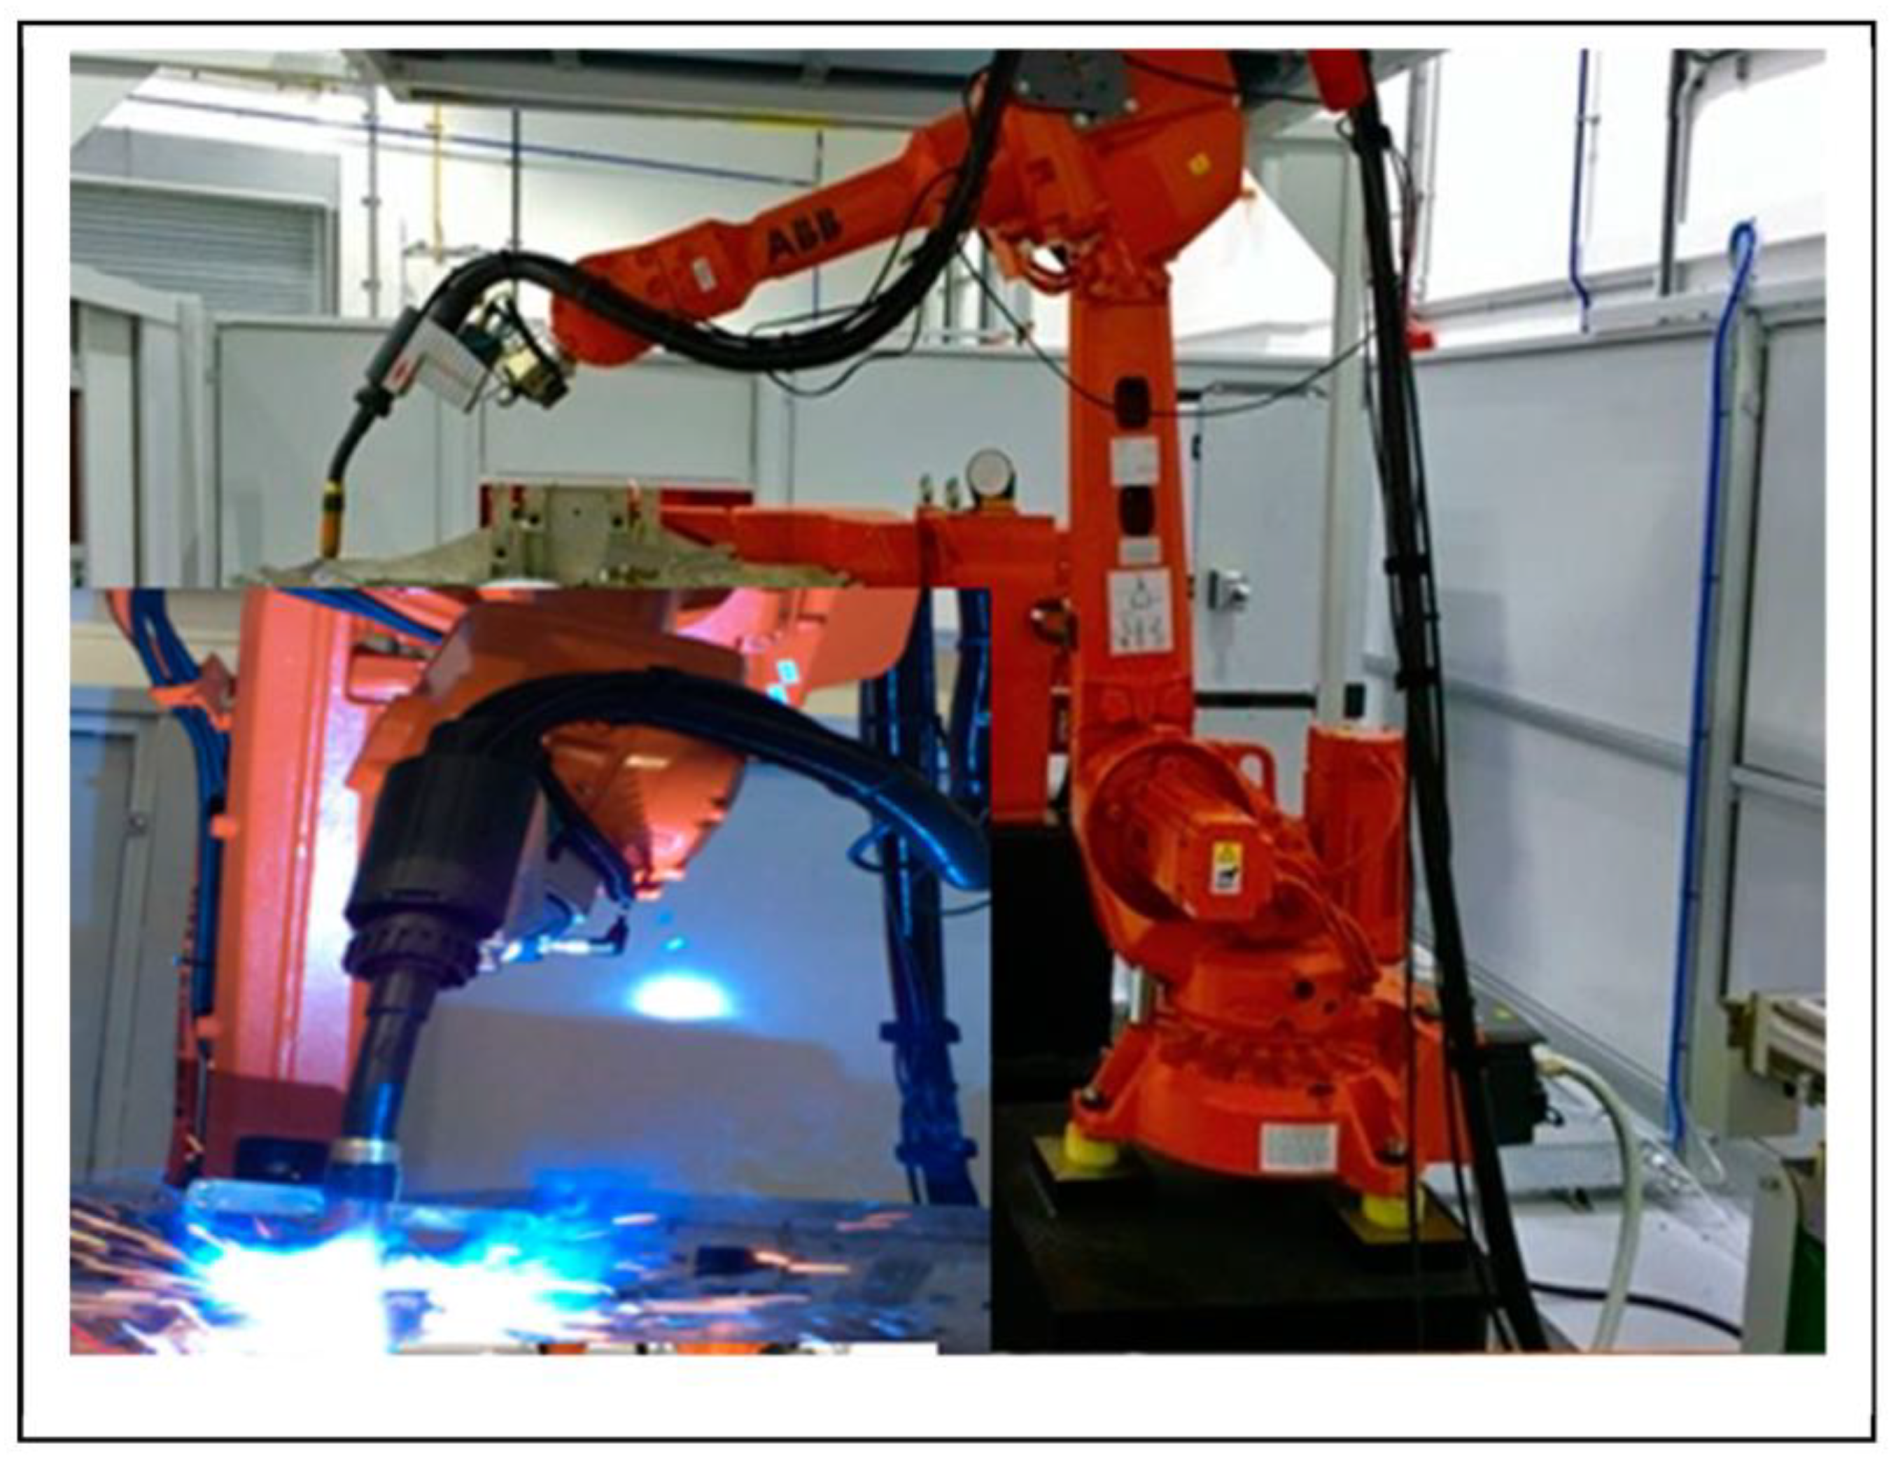
Figure 1. Eight-axes ABB robotic system utilising Fronius TPS 500i CMT™ MAG-welding power source.
Acoustics 05 00043 g001
Figure 2. Exhibiting the MISTRAS contact sensor located in the top left of the image, with positions 1 to 4, denoted within the red circles identifying the location of the CMSX4 insert; positions 5 and 6 denoted within the red rectangle identifying the location of the EN8 inserts; and the inclined beads completed over alloy 718 inserts. Baseline bead-on-plate fusion runs presented in an inclined format to the far right.
Acoustics 05 00043 g002
Figure 3. Schematic diagram of the experimental configuration showing the position of the GRAS and PAC microphones with respect to the ASTM A 36 carbon steel plate and inserts.
Acoustics 05 00043 g003
Figure 4. Showing the configuration and positioning of samples.
Acoustics 05 00043 g004
Figure 5. (a) Welded Alloy 718 Insert at ×0.5 mag. (b) Identifying cross-section A–A (×0.5 mag). (c) Section A–A at (×10 mag). (d) Showing crack region. (e) Highlighting sporadic Laves.
Acoustics 05 00043 g005
Figure 6. (a) Exhibiting the longitudinal and transverse regions between ASTM A36 plate, CMSX-4 insert, and 307Si filler (×0.5 mag). (b) Showing a notch region where fusion between the CMSX-4 insert, ASTM A36 steel plate, and 307Si—separation/tearing and crack initiation region. (c) Exhibiting the mixture region between the CMSX-4, 307Si, and ASTM A36 steel with dilution ratios of 35:50:15. (d) Transverse section at lack of fusion and cracking region ×4 mag.
Acoustics 05 00043 g006
Figure 7. (a) Fusion section between the ASTM A36 plate, 307Si filler, and the EN8 insert. (b) SEM image detailing the tolerant chemistry between the steels.
Acoustics 05 00043 g007
Figure 8. Baseline (BL) first test (Top) Time series, (Bottom) STFT (acoustic emission: GRAS airborne microphone 1/8 inch).
Acoustics 05 00043 g008
Figure 9. Alloy 718 (Inco 718) third test (Top) Time series, (Bottom) STFT (acoustic emission: GRAS airborne microphone 1/8 inch).
Acoustics 05 00043 g009
Figure 10. CMSX4 third test (Top) Time series, (Bottom) STFT (acoustic emission: GRAS airborne microphone 1/8″).
Acoustics 05 00043 g010
Figure 11. EN8 Test 4 (Top) Time series, (Bottom) STFT (acoustic emission: GRAS airborne microphone 1/8 inch).
Acoustics 05 00043 g011
Figure 12. AE amplitude comparison for PAC contact sensors and different insert placements.
Acoustics 05 00043 g012
Figure 13. AE rise time comparison for PAC contact sensors and different insert placements.
Acoustics 05 00043 g013
Figure 14. AE counts comparison for PAC contact sensors and different insert placements.
Acoustics 05 00043 g014
Figure 15. CMSX4 welding condition for PAC sensors; cooling phase after 175 s welding—top time series AE signal and below time–frequency signal.
Acoustics 05 00043 g015
Figure 16. Microstructure of EN8 Steel Insert weld (centre layer).
Acoustics 05 00043 g016
Figure 17. Time series AE contact sensor comparison signals start of cooling phase for (a) baseline case, (b) CMSX4, and (c) EN8 insert MAG weld tests.
Acoustics 05 00043 g017
Figure 18. Time series AE contact sensor comparison signals at the end of the cooling phase for (a) baseline case, (b) CMSX4, and (c) EN8 inset MAG weld tests.
Acoustics 05 00043 g018
Figure 19. STFT AE contact sensor comparison signals at beginning of the cooling phase for (a) baseline case, (b) CMSX4, and (c) EN8 inserts MAG weld tests (reference to corresponding time series of Figure 12a).
Acoustics 05 00043 g019
Figure 20. STFT AE contact sensor comparison signals at the end of the cooling phase for (a) baseline case, (b) CMSX4, and (c) EN8 inserts MAG weld tests (reference to corresponding time series of Figure 12b).
Acoustics 05 00043 g020
Table 1. Chemical composition for ASTM A36 plate and its CEV (carbon equivalent).
Chemical Composition wt.%
CMnSiCuPSCEv
0.2701.0300.2700.1000.0200.0150.45
Table 2. Specified chemical composition of material inserts Alloy 718, CMSX-4, and EN8 steel.
Material InsertElementwt.%Elementwt.%
Alloy 718Ni + Co50–55Mn0.35 max
Cr17–21Si0.35 max
Nb + Ta4.75–5.5P0.015 max
Ti0.65–1.15S0.015 max
Al0.2–0.8B0.006 max
Co1.00 maxCu0.30 max
C0.08 maxFeBalance
Material insertElementwt.%Elementwt.%
CMSX-4Cr6.5Al5.6
Co9.6Ti1.0
W6.4Ta6.5
Re3.0Hf0.1
Mo0.6NiBalance
Material insertElementwt.%Elementwt.%
EN8 *C0.36–0.44Cr-
Si0.1–0.4Mo-
Mn0.6–1.0Ni-
S0.05 maxFeRemainder
* The CEv for EN8 steel ranges from 0.46 to 0.63.
Table 3. Baseline welding conditions used for the bead-on-plate runs (2 decimal places).
Current (I)Wire Feed Speed (m/min)Arc Voltage (U)Power (kW)Efficiency Factor
k
Velocity (mm/s)
υ
Hnet (kJ/mm)
186.009.2022.504.180.808.000.42
Table 4. Deposition parameters used for the various insert tests.
Welding Parameters (2 Decimal Places)
Insert MaterialCurrent (I)Voltage (U)Wire Feed Speed (m/min)Power
(kW)
Thermal
Efficiency
k
Velocity (υ)
mm/s
Hnet (kJ/mm)
N/A186.0022.509.204.180.808.000.42
Alloy 718171.0022.309.203.810.808.000.38
CMSX-4131.0022.809.202.990.808.000.30
EN8118.0021.909.202.580.808.000.26
The thermal efficiency (k) is taken from the standard EN1011-1 for the MAG process.
Table 5. Approximate composition of the final weld (2 decimal places).
Approximate Composition of the Final Weld (2 Decimal Places)Dilution
%
MaterialCrMoSiFeNiCMn
307Si12.950.070.7045.715.950.074.5570
Baseplate0.000.000.0829.530.000.080.3130
Totals12.950.070.7875.245.950.154.86
307Si9.240.050.5032.654.250.053.2550
Baseplate0.000.000.0414.770.000.040.1615
EN80.000.000.0934.490.000.140.2835
Totals9.240.050.6381.914.250.233.69
307Si9.240.050.5032.654.250.053.2550
Baseplate0.000.000.0414.760.000.040.1615
Alloy 7186.650.000.057.2118.380.010.0535
Totals15.890.050.5954.6222.630.103.46
307Si9.240.050.5032.654.250.053.2550
Baseplate0.000.000.0414.770.000.040.1615
CMSX-42.280.210.000.0020.890.000.0035
Totals11.520.260.5447.4225.140.093.40
Table 6. Average of rise-time measurements for each insert state (contact AE sensor).
Average Rise Time Parameter for AE Contact Sensor
Insert MaterialMax Rise Time (µS)Min Rise Time (µS)Standard Deviation% Difference SD from Max RT
N/A25,360118297.2%
Alloy 71831,628126078.2%
CMSX-428,422127169.5%
EN830,225126888.9%
Table 7. Average of STFT measurements (airborne AE sensor).
Average STFT Energy Utilisation for Airborne Sensor
Insert MaterialFrequency Band UtilisationPercentage Amplitude Energy Utilisation
N/APartial30%
Alloy 718Full50%
CMSX-4Almost Full: 90 kHz40%
EN8Full60%
Disclaimer/Publisher’s Note: The statements, opinions and data contained in all publications are solely those of the individual author(s) and contributor(s) and not of MDPI and/or the editor(s). MDPI and/or the editor(s) disclaim responsibility for any injury to people or property resulting from any ideas, methods, instructions or products referred to in the content.