1. Introduction
Magnesium aluminate spinel (MgAl
2O
4) is a remarkable ceramic material, widely recognized for its high optical transparency and mechanical strength. These properties make it an excellent candidate for various industrial applications, particularly in optics [
1], mechanics, and electronics [
2,
3,
4]. In optics, windows, lenses, and other components that require both high light transmission and excellent durability are commonly fabricated using MgAl
2O
4 [
5]. Moreover, MgAl
2O
4 is known as one of the best dielectric materials for nuclear applications, as well as a material for humidity sensors [
6] and luminescent materials [
7].
With the growing demand for high-performance transparent ceramics, it has become increasingly important to use characterization methods precise, reliable and tailored to the specific properties of such materials [
8]. However, conventional techniques for characterizing transparent ceramics are often destructive and insufficiently sensitive to microdefects, which can compromise the performance of MgAl
2O
4 spinel.
In this context, non-destructive and non-contact methods, such as moiré interferometry, are promising alternatives. This innovative technique enables the detection and analysis of defects and irregularities, both on the surface of ceramic structures.
The objective of this study is to examine the surface properties of spinel (MgAl2O4) and the advanced characterization techniques employed to optimize its performance. The detection, localization, and quantification of micro-defects are essential to ensure the quality and performance of transparent ceramics used in sensitive applications. Among the many available methods, moiré interferometry stands out as a non-destructive, contactless, and highly sensitive method capable of detecting and quantifying surface and internal defects. Its main contribution is providing a reliable and accurate approach to evaluate the quality of transparent ceramics, overcoming the limitations of conventional methods. It allows the generation of precise maps of physical quantities such as displacements, deformations, curvatures, and surface topography. The richness of data obtained through this method explains its growing appeal in both research and industrial settings.
Previous works [
9,
10] have confirmed the effectiveness of the technique in various industrial environments, highlighting its capacity to produce consistent and reliable results. By further analyzing moiré patterns, this study aims deepen the understanding of the underlying physical mechanisms involved and explore the practical potential of this approach for evaluating transparent ceramics.
The moiré phenomenon, which originates purely from geometric effects [
11,
12], results from the superposition of two periodic structures with closely related spatial frequencies [
13,
14]. This superposition generates macroscopic patterns known as moiré fringes, alternating light and dark bands, whose contrast varies according to the deformations of the observed object. Analyzing these fringes allows for a detailed evaluation of surface or internal irregularities, thereby facilitating the detection of defects that may compromise the material’s structural integrity.
In the context of this research, we used a precision optical system based on the moiré technique to evaluate the quality of spinel (MgAl2O4). This method offers exceptional measurement accuracy. By analyzing the shape and brightness of the moiré fringes, it becomes possible to reliably detect and quantify surface defects at the microscopic scale, such as grooves, cracks, scratches, or pits, as well as internal anomalies, including impurities, contamination, or structural in homogeneities. Moreover, moiré interferometry provides rapid experimental results, allows easy real-time monitoring, and can be implemented with equipment that does not require high costs.
2. Evaluation and Characterization Method of MgAl2O4-Based Spinel
In this study, the quality and optical homogeneity of transparent MgAl2O4-based ceramic samples were assessed using the moiré technique, implemented through a specifically designed experimental optical setup.
2.1. Experimental Setup Used for the Evaluation of MgAl2O4-Based Ceramics
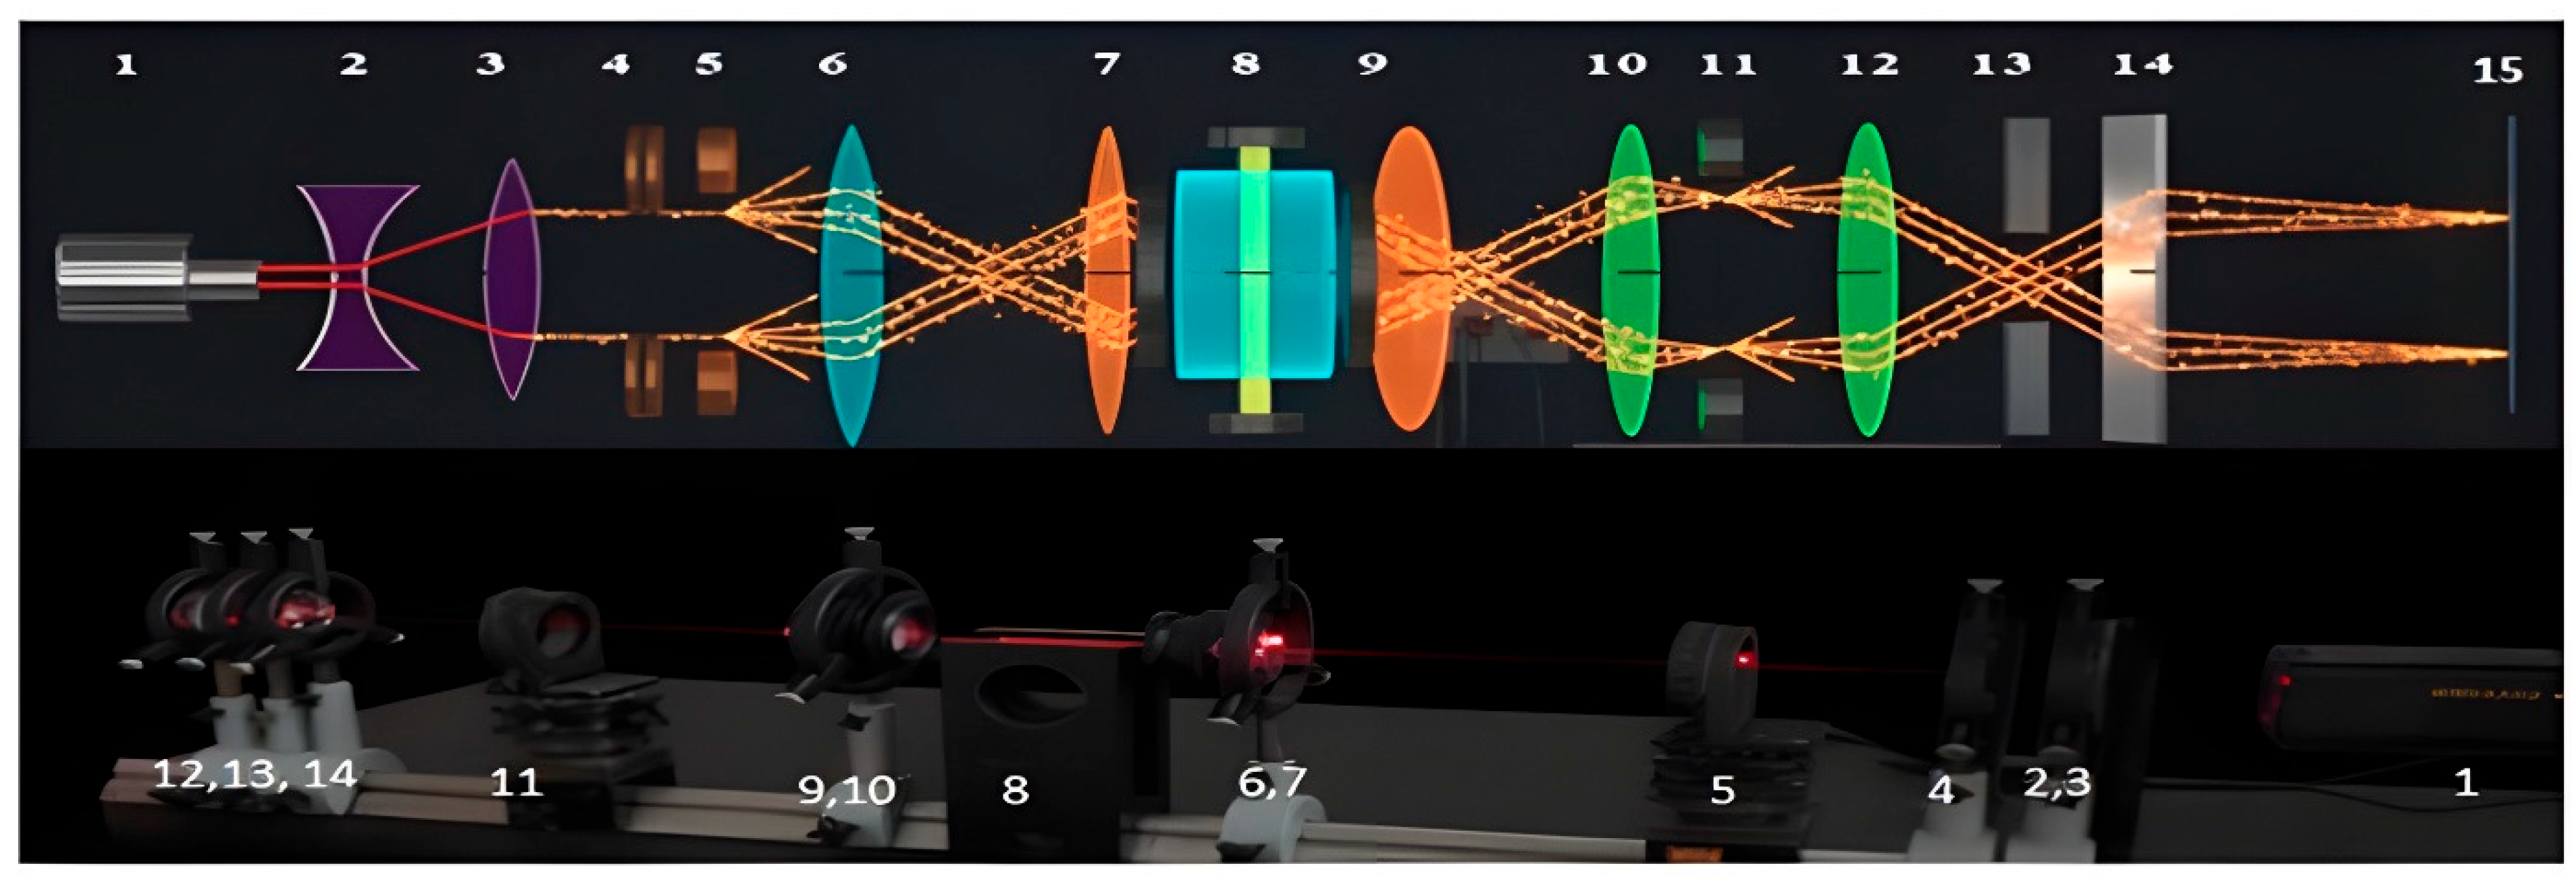
Figure 1 presents the principle of the experimental setup used in this study to evaluate the quality of transparent ceramics based on MgAl
2O
4. A laser (1) beam is first expanded using a lens system (2 and 3) and then collimated through a diaphragm (4) before reaching a linear transmission grating (5), called the test grating. The image of this grating (called the virtual grating) then undergoes a double Fourier transformation using lenses (6 and 7) and is projected onto the sample plane (8).
The resulting image passes through the ceramic sample, is optically scanned it, and undergoes a second Fourier transformation by the lens (9 and 10). It is then superimposed onto the reference grating (11), which has the same nature and spatial frequency as the test grating but is inclined at a slight angle within its plane (θ ≈ 0°). The interference between the two gratings, test and reference, generates a moiré effect characterized by the appearance of parallel, equidistant fringes, alternating light and dark, visible on the plane of the reference grating.
These fringes are then enlarged and projected onto the observation plane (15) using a second lens system (12 and 14), also based on a double Fourier transform. A spatial filter (13) is integrated into this system to suppress parasitic images and improve fringe contrast. Finally, a camera (16) placed at the observation plane captures the moiré fringe image, thus allowing for a detailed analysis of the sample’s defects and irregularities. A CCD camera (17) used for data acquisition and automatic processing [
15].
2.2. Principle of Evaluation and Anomaly Detection
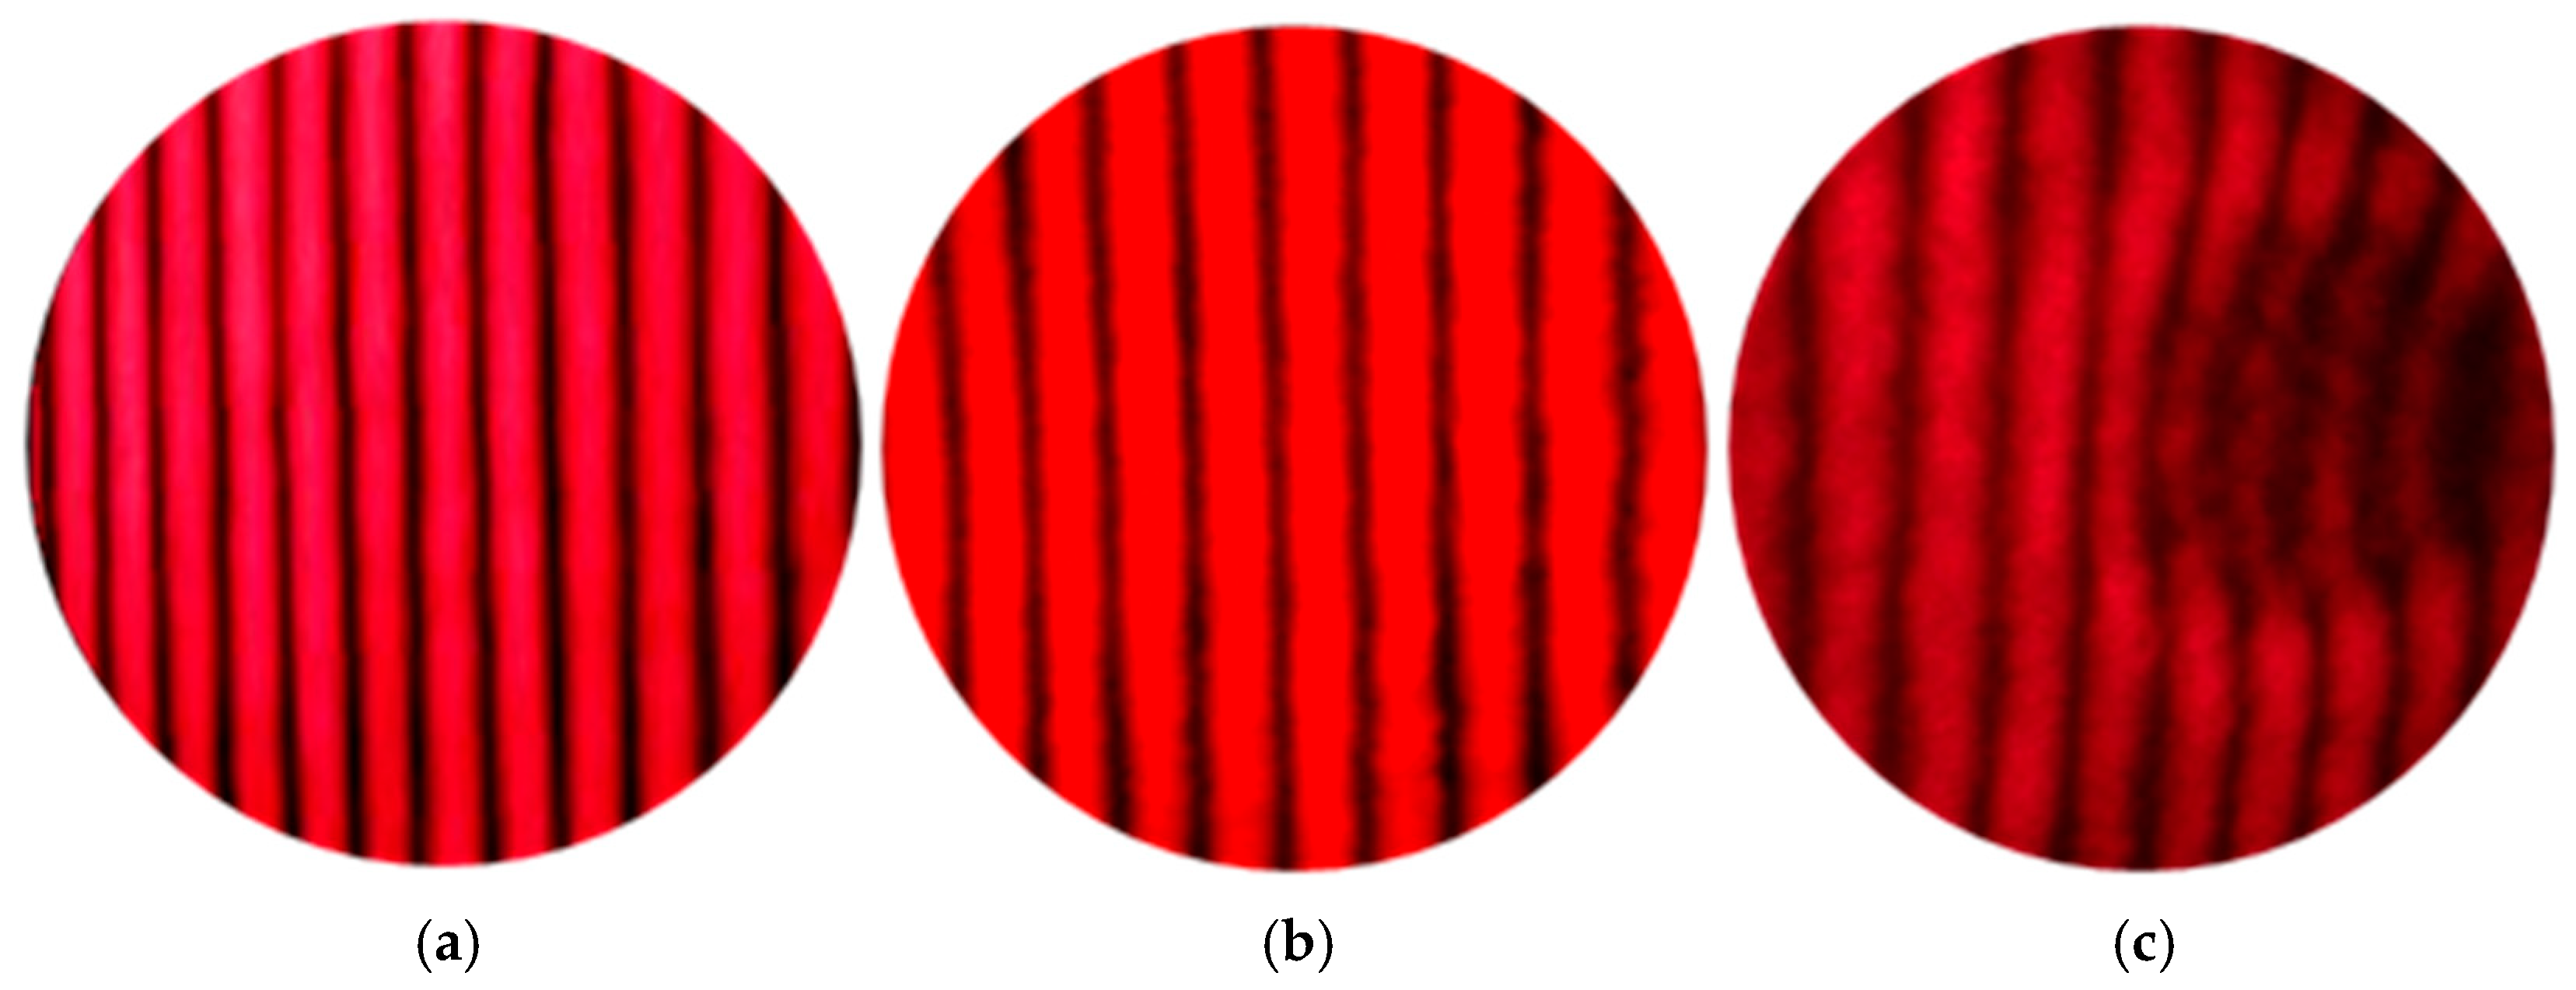
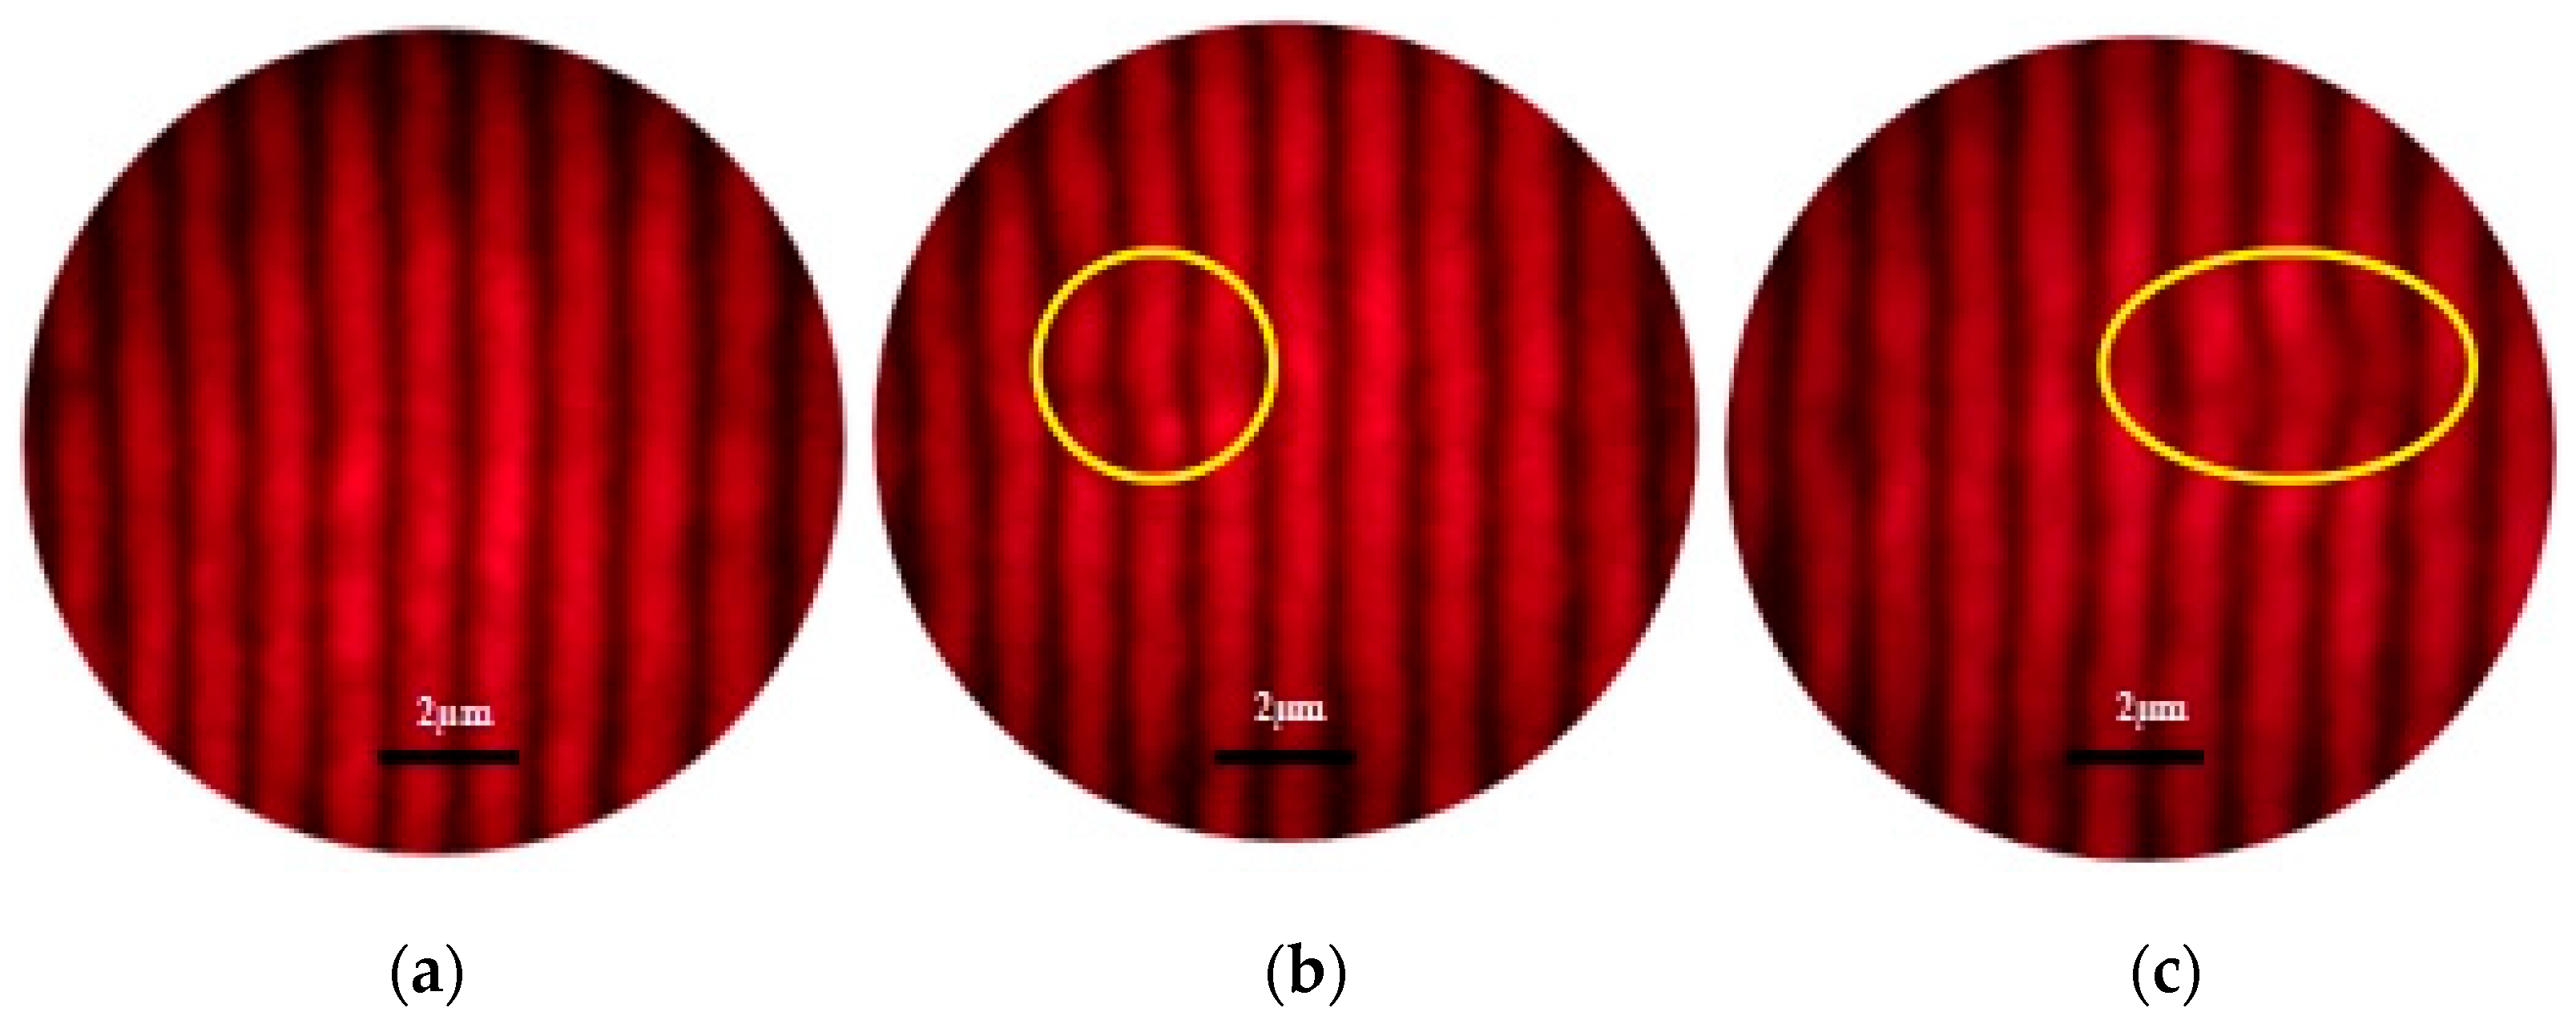
First, the setup is initially calibrated without the sample to ensure the perfect superposition of the test-grating image and the reference grating only. The moiré fringes, formed on the observation plane, appear as straight, parallel, and equidistant lines alternating between light and dark, as shown in
Figure 2a.
Next, the sample is positioned in the optical path. The image of the test grating, carried by the laser beam, passes through the sample’s thickness, scanning it before being projected and superimposed onto the reference-grating plane, where the moiré fringes are generated. If the image of the test grating undergoes no alteration, the moiré fringes retain their shape and brightness, appearing as straight, parallel, and equidistant lines alternating between light and dark (
Figure 2b), indicating that the sample contains no anomalies. However, if the image of the test grating is altered due to the presence of defects, this results in a change in the shape and brightness of the moiré fringes (
Figure 2c). Microscopic defects thus become instantly visible in the form of moiré patterns at a macroscopic scale, with magnification that can reach up to 1000 times. This high degree of magnification significantly enhances the sensitivity and precision of defect detection.
2.3. Defect Measurement Method
The detected defect, although microscopic in scale, is immediately revealed at the macroscopic level through the moiré patterns formed on the observation plane. These patterns enable both visualization and amplification of the initial defect with a magnification factor reaching up to 1000× This magnification is defined by the ratio Dobs/p. It is the ratio between the moiré fringe pitch on the observation plane Dobs, and the pitch of the finest grating p. The microscopic displacement experienced by the grating lines as they propagate through the material is thus translated into a macroscopic displacement of the moiré fringes on the observation plane, thereby facilitating both the detection and quantitative measurement of defects.
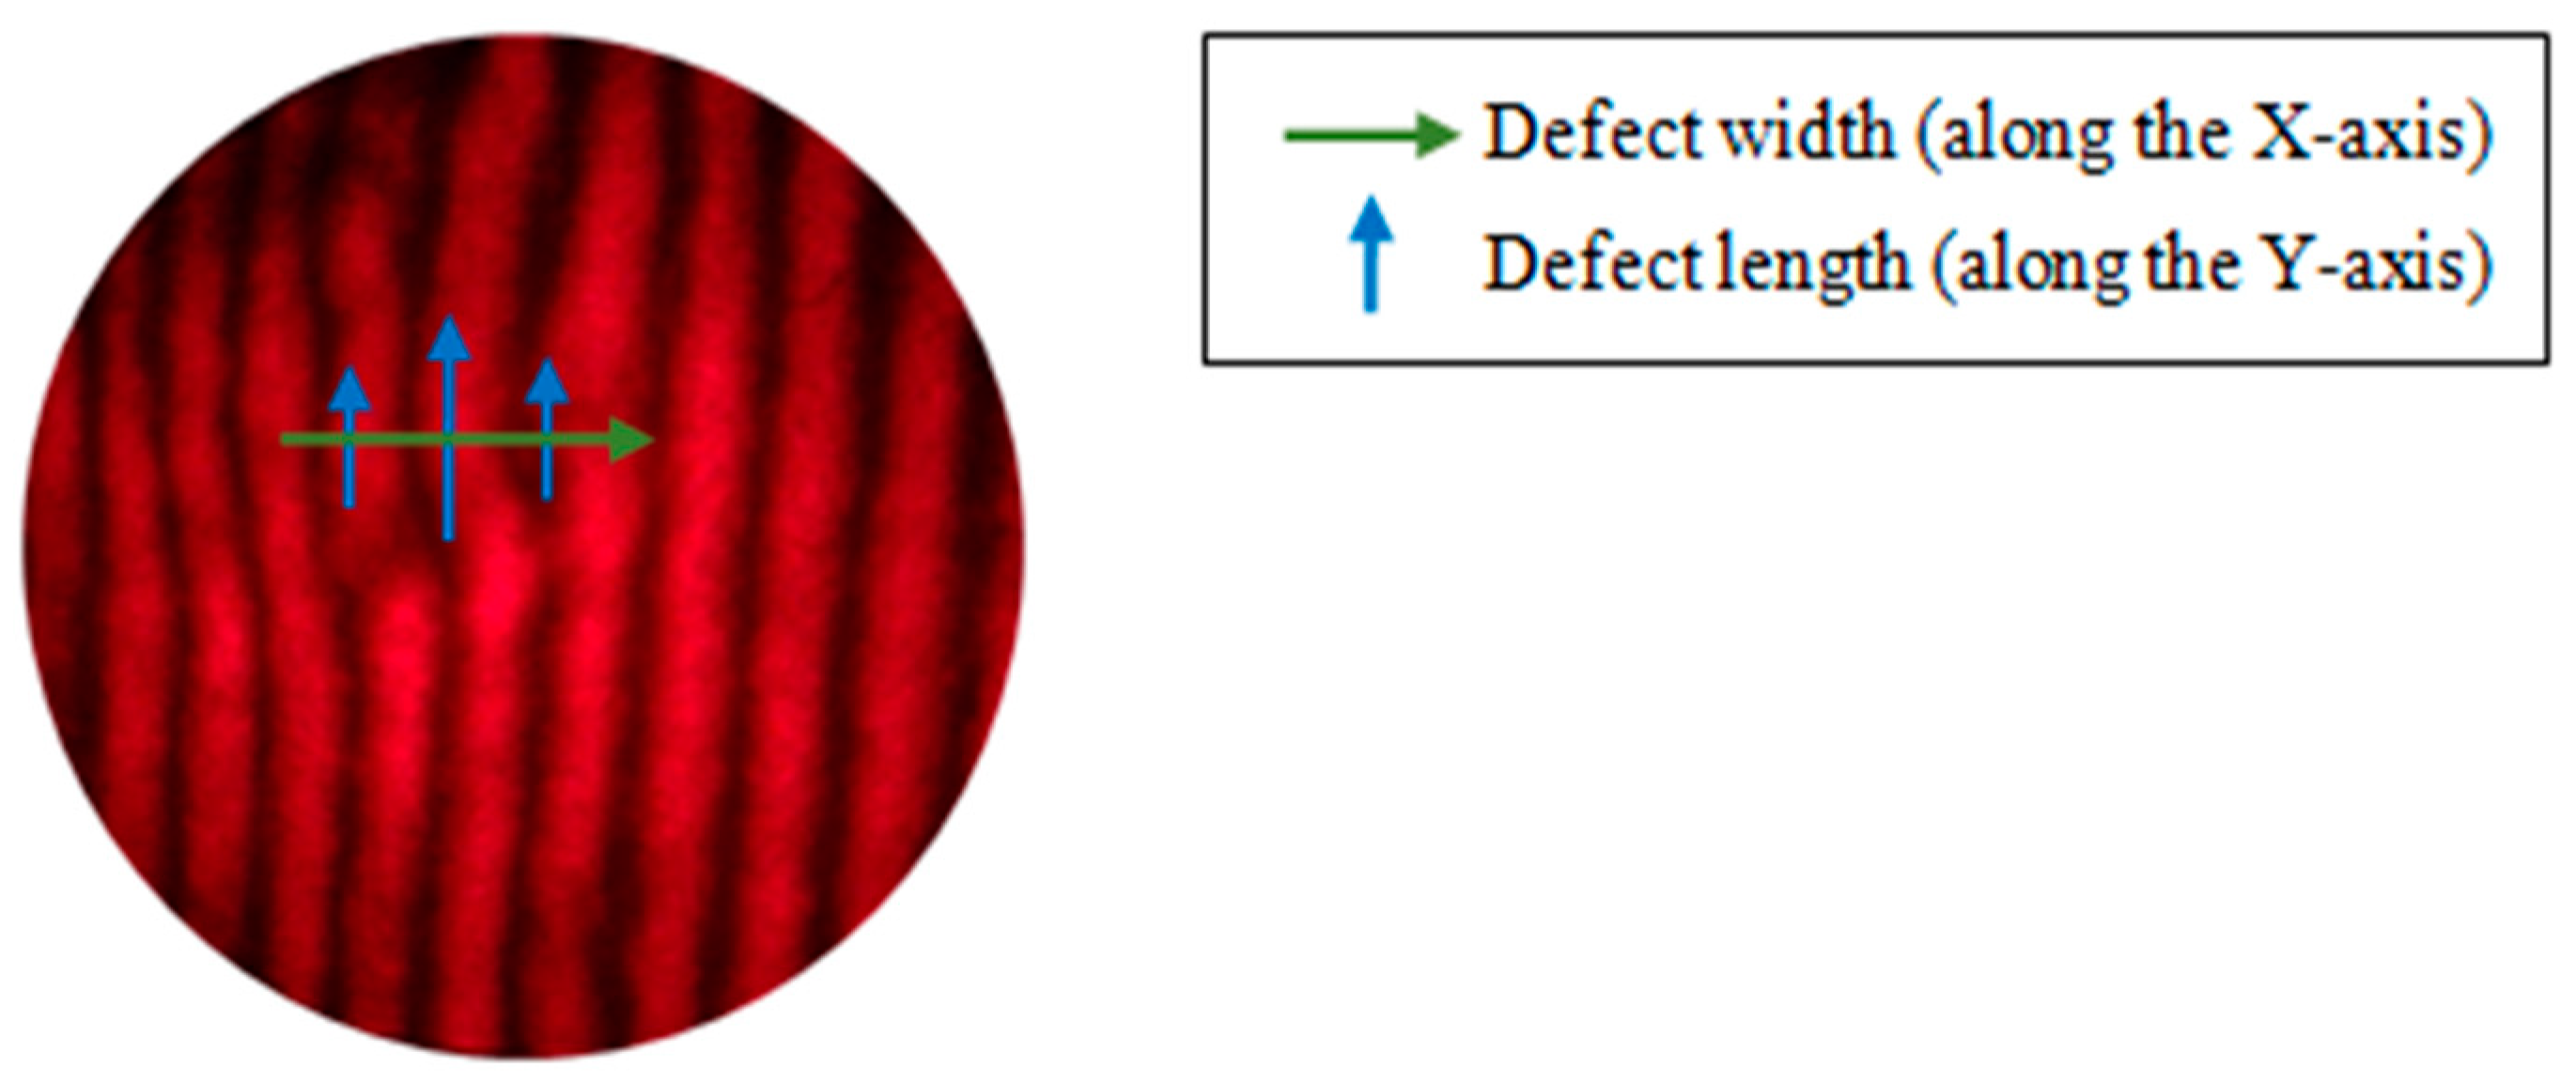
The moiré method further allows for two-dimensional (2D) characterization of defect size. The number of deviated fringes provides a measurement in the horizontal direction (X-axis), while the extent of the deviation along a fringe allows for the evaluation of the defect size in the vertical direction (Y-axis).
Figure 3 presents an explanatory image illustrating the dimensions of the defect along the two axes: X for width and Y for height.
In order to validate and further analyze the characterization results of MgAl2O4 spinel sintered at different temperatures, a quantitative evaluation of surface defect dimensions identified in the moiré images was conducted. For each sintering temperature, the entire sample surface was scanned and the largest defect observed—before and after sandblasting, was selected for detailed analysis. These measurements were performed using a MATLAB R2013b (8.2.0.701) program specifically developed for this purpose. The procedure was carried out according to the following steps:
Image selection: For each sintering temperature, and for both before and after sandblasting conditions, the image exhibiting the most significant deformation was selected.
Image loading: The selected image is loaded into MATLAB, allowing the user to manually define a horizontal reference pointPx0.
Definition of measurement parameters:
- ○
Total number of points to be selected along the horizontal axis.
- ○
Step size between each measurement point Px.
Measurement of vertical deviations: For each position Px, the user clicks to indicate the upper (Yup) and lower positions in Ylo, allowing the local height of the defect to be determined.
Coordinate conversion: X and Y data are converted into physical units (millimeters).
Plotting of defect profiles: A graph was generated to visualize the variation in vertical deviations Y as a function of horizontal position X for each sintering condition (before and after sandblasting).
Data interpolation:
- ○
An interpolation vector was generated for standardize the Px positions across the different samples.
- ○
Linear interpolation was applied to adjust the Y values to the new X positions.
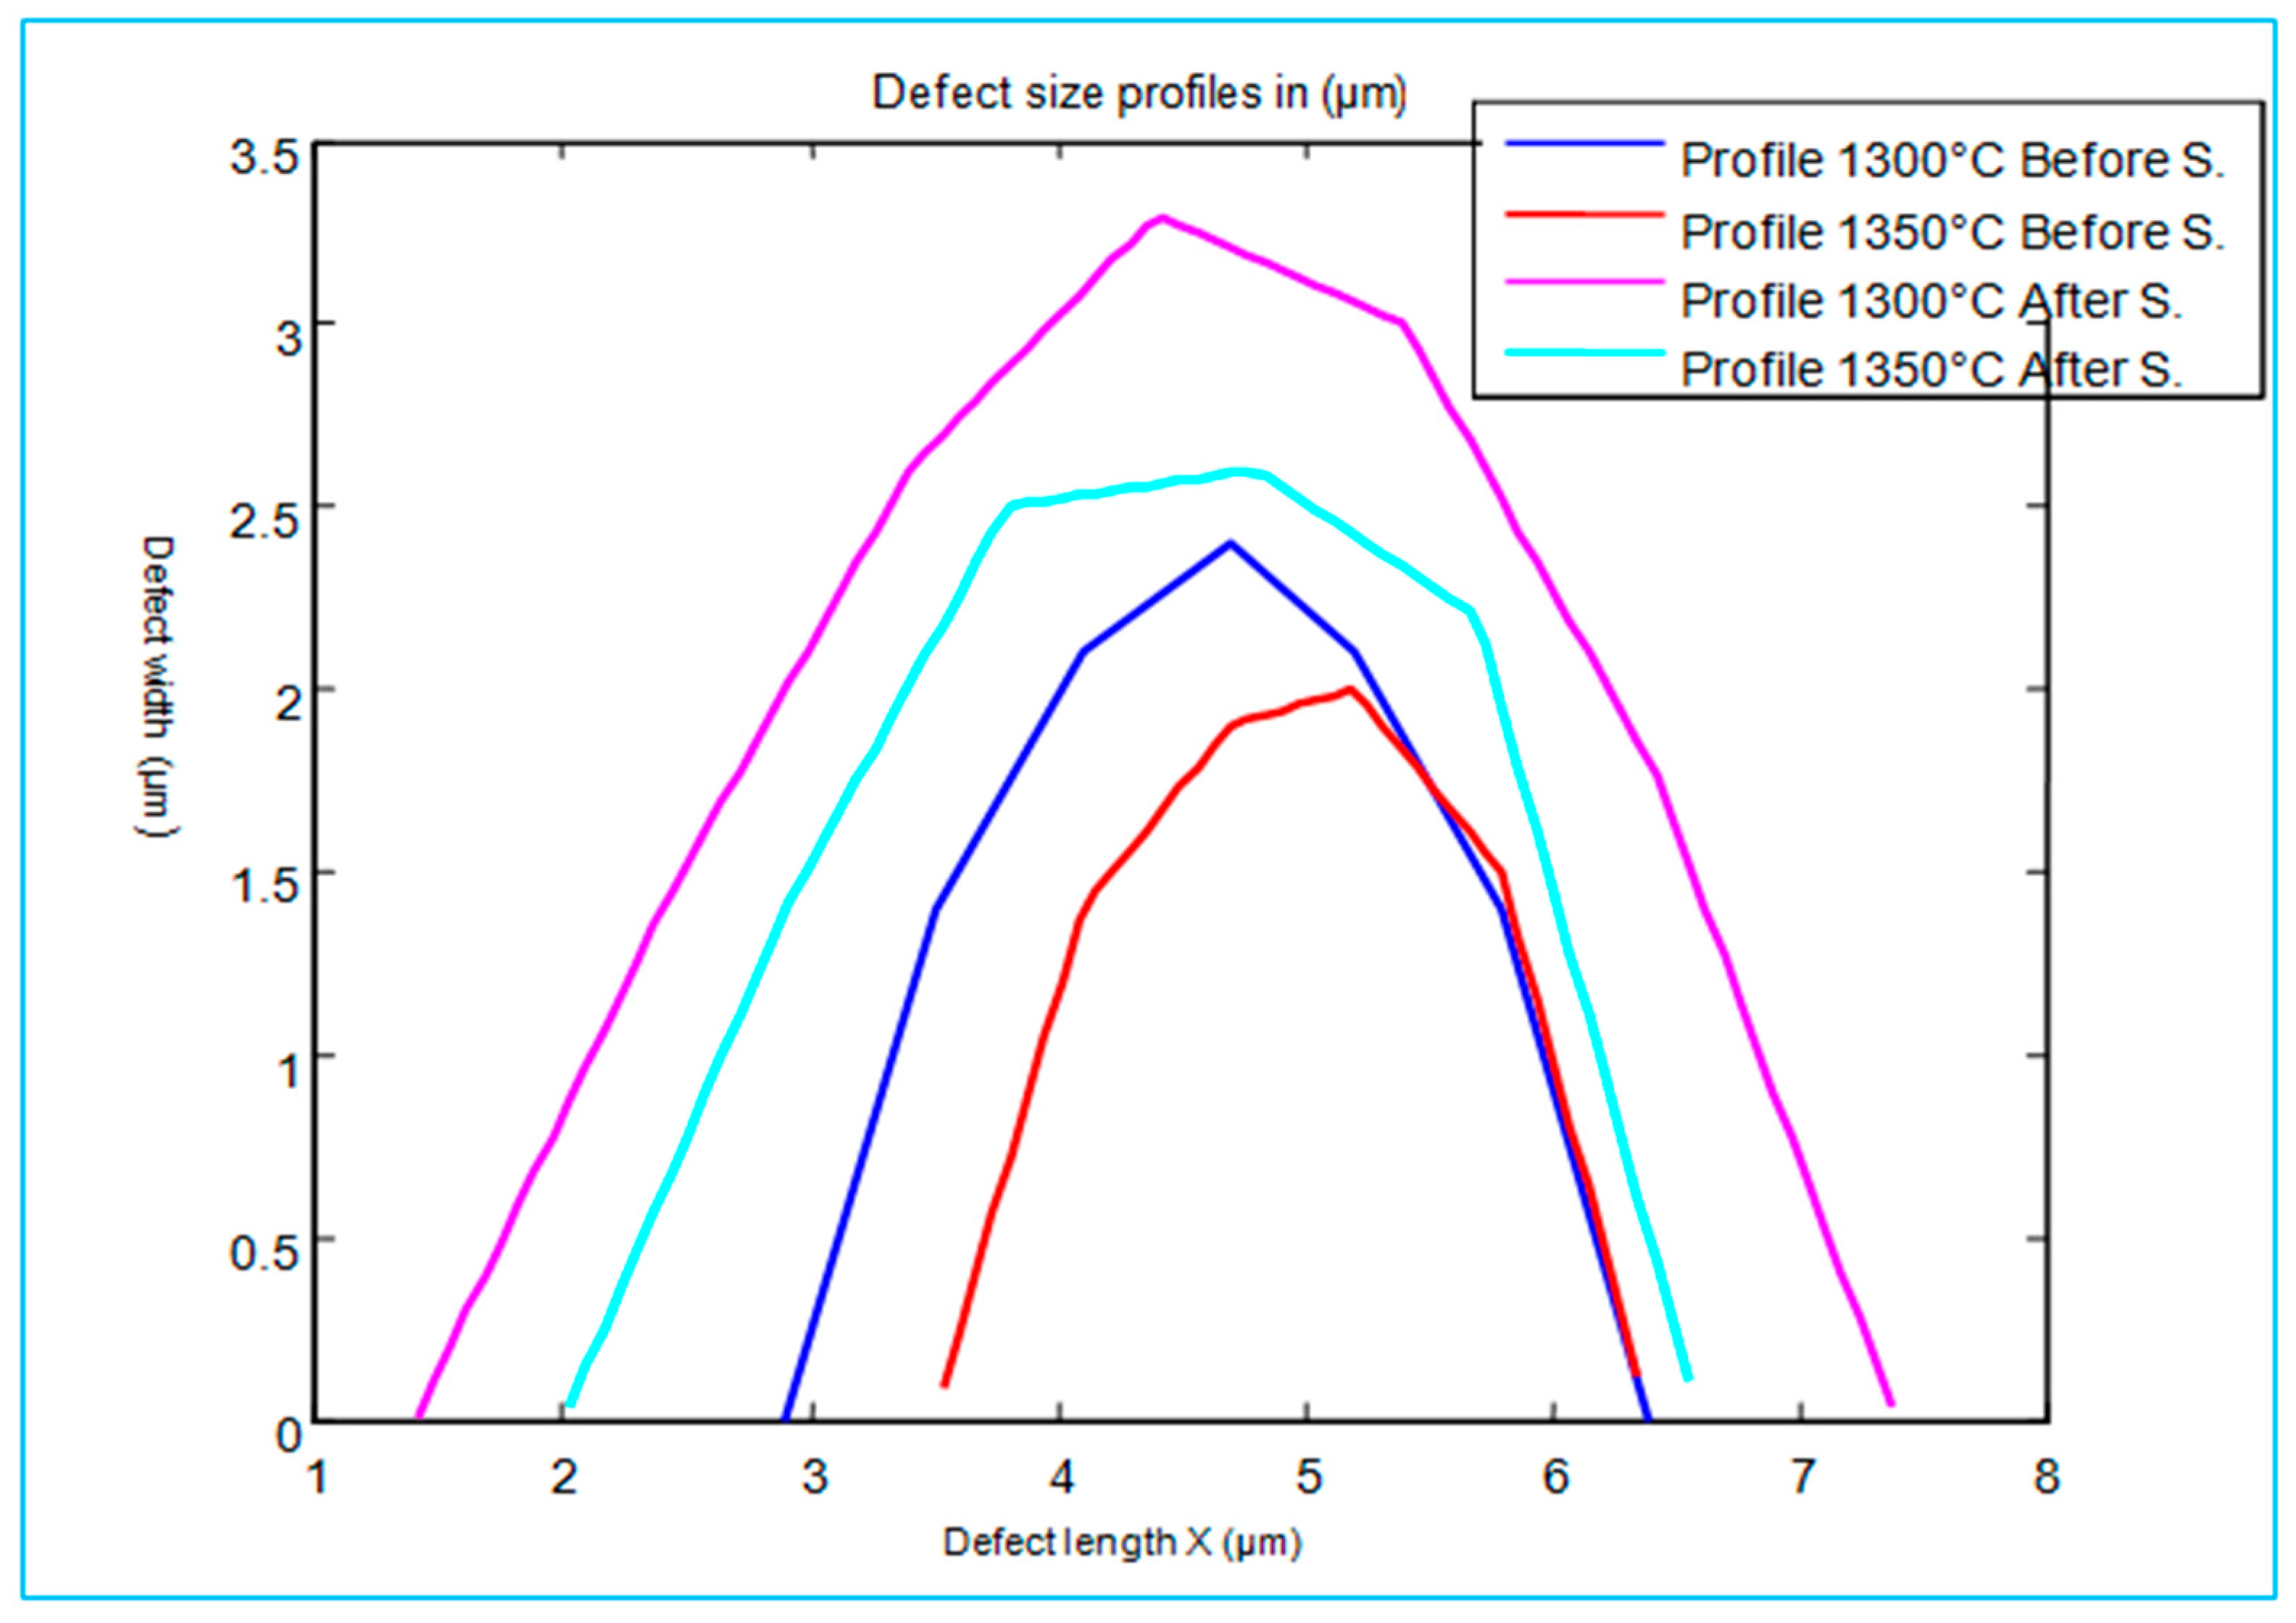
Final visualization: The interpolated curves representing the defect profiles were plotted on a single graph, allowing for direct comparison between the different sintering temperatures, both before and after surface treatment.
3. Experimental Results
The samples were sintered using a Spark Plasma Sintering SPS furnace (FCT System HP D25, manufactured in Germany). A mass of 3.5 g of spinel powder was placed into a graphite mold with an internal diameter of 20 mm. The sintering of the pellets was performed under a pressure of approximately 73 MPa at temperatures of 1300 °C, 1350 °C, and 1400 °C, following a three-step heating profile: 100 °C/min up to 800 °C, 10 °C/min up to 1100 °C, and then 1 °C/min up to the final sintering temperature. A thermal dwell of 10 min at 1100 °C was maintained during the cooling phase to promote the relaxation of residual stresses. This sintering cycle was adopted in accordance with the protocols established by Benaissa et al. [
1,
2] in their work on spinel powders.
Before characterization, both surfaces of the pellets were carefully polished to eliminate geometric defects as well as the superficial layer contaminated by carbon originating from the mold and the graphite punch. The samples were subjected to a polishing process using a Mecatech 334 device. This operation was carried out in several successive stages. In the first stage, polishing was performed for 60 s using a fixed diamond abrasive with a grain size of 40 µm, under a force (F) of approximately 3 daN, a plate speed (Vp) of 300 rpm, and a head speed (Vt) of 150 rpm. During the second stage, the same operating conditions (F, Vp, Vt) were maintained, but a diamond abrasive of 20 µm was used for 120 s. In the third stage, a suspension of diamond abrasives (6 µm and 3 µm) was applied under the following conditions: flow rate = 0.3 mL/30 s, F = 4 daN, Vp = 300 rpm, Vt = 135 rpm, and a polishing duration of 300 s. Subsequently, a 1 µm diamond abrasive suspension was used under the same parameters for 120 s. Finally, polishing was completed using a 0.25 µm diamond abrasive suspension for 60 s. After each polishing step, the samples were subjected to ultrasonic cleaning. After polishing, the final thickness of the samples was reduced to approximately 2 mm. However, the average surface roughness RMS values obtained by AFM, in the same scanning area (25 μm
2), were 5.8 ± 0.74, 8.2 ± 2.03 and 61.9 ± 5.06 nm for the samples sintered at 1300, 1350 and 1400 °C, respectively [
4].
3.1. Before Sandblasting
The shape and brilliance of the moiré fringes depend on both the light transmission rate and the surface condition of the analyzed pellets. To evaluate the influence of sintering temperature on the optical and mechanical properties of spinel, the moiré technique was applied to pellets fabricated by SPS at three different temperatures: 1300 °C, 1350 °C, and 1400 °C. For each sample, the moiré fringes were systematically observed and analyzed in terms of intensity, regularity, and sharpness. The results reveal that the pellets sintered at 1400 °C exhibit distinct optical and structural characteristics, reflecting notable variations in material quality.
3.1.1. S25CRX14 Spinel Sintered at 1300 °C
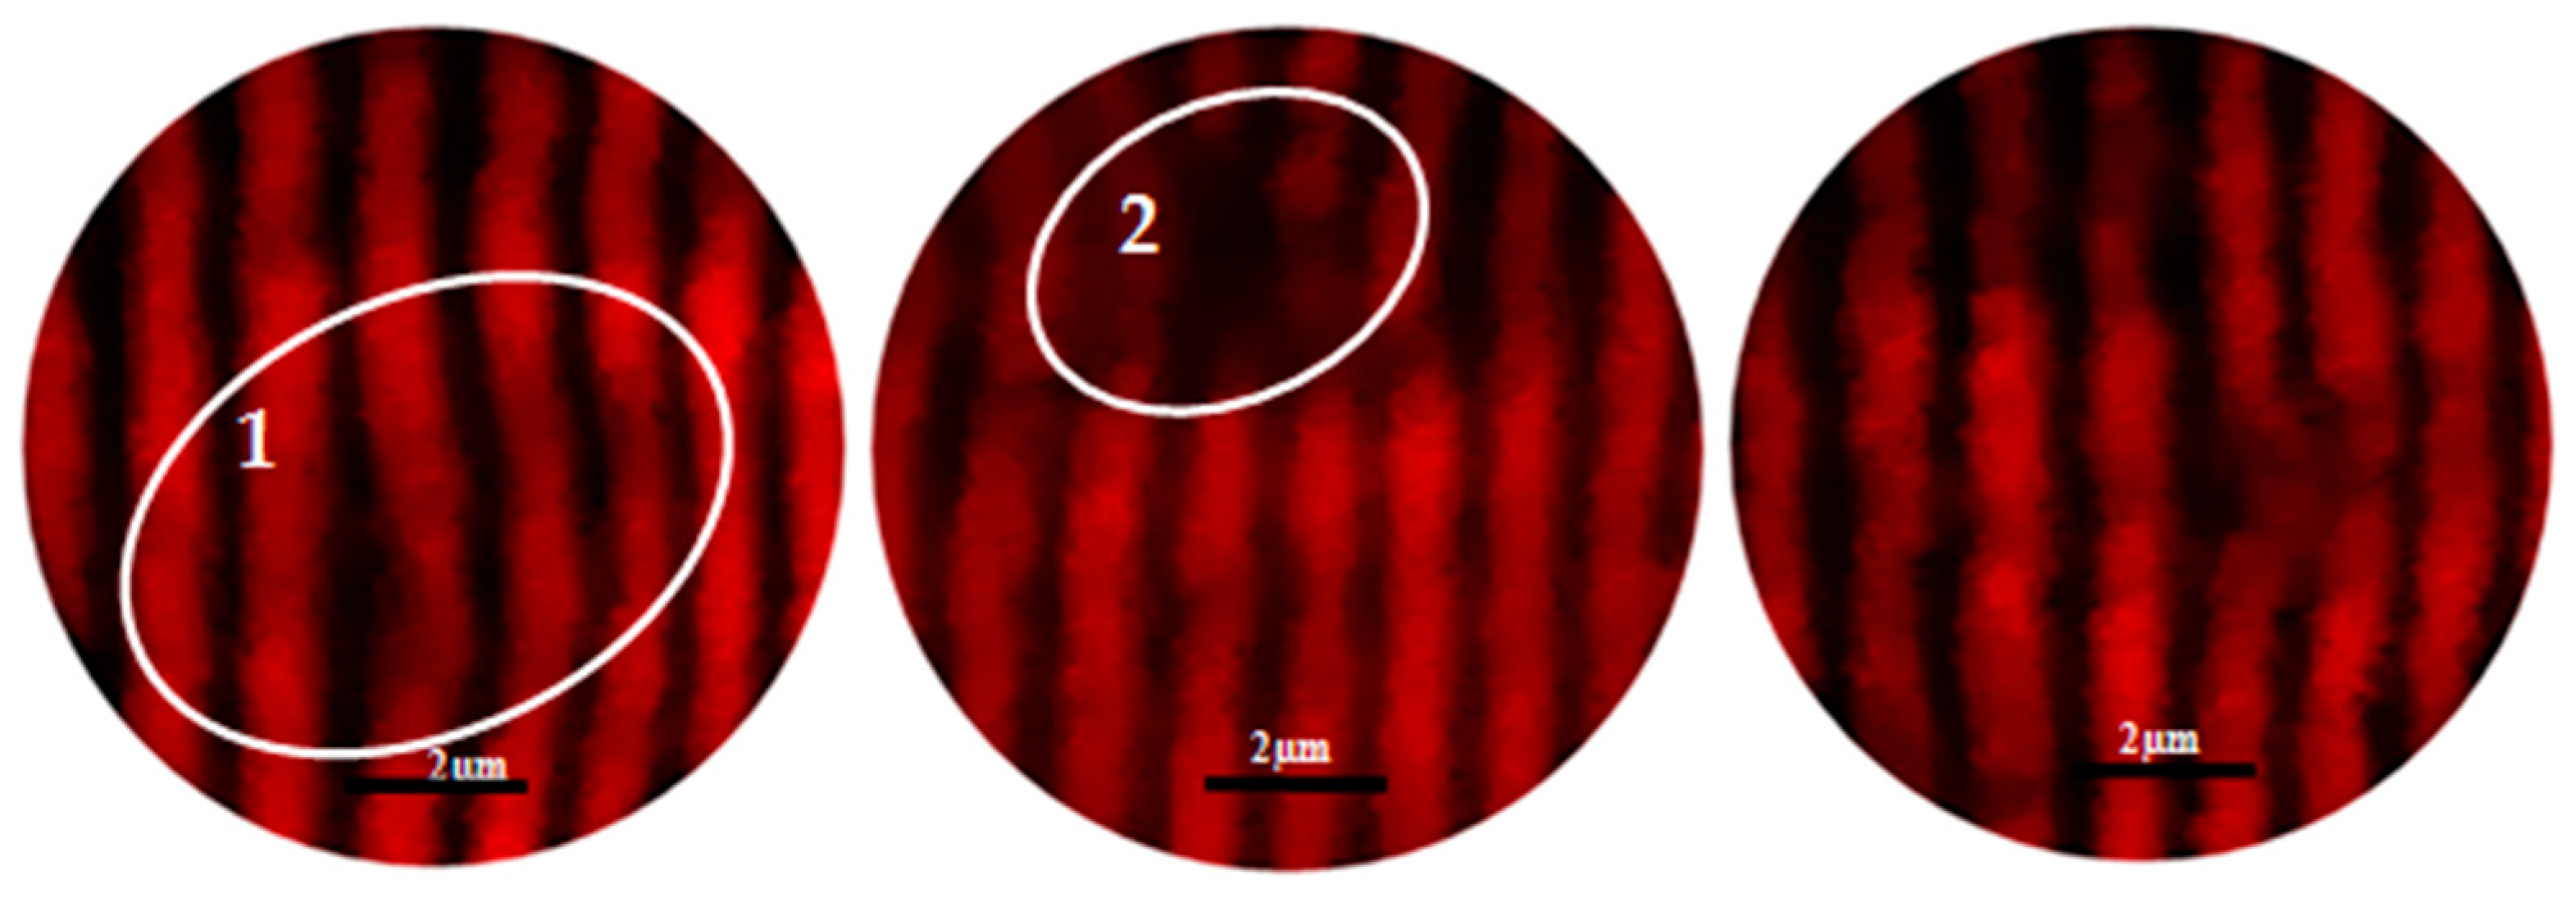
The moiré fringe images (
Figure 4) obtained from a spinel pellet sintered at 1300 °C reveal patterns indicative of surface irregularities and significant deformations related to the sintering process. Although the fringes are visible in all three images, their degree of regularity varies.
Figure 4a,b exhibit undulations and irregularities in fringe alignment and spacing, indicating the presence of local defects such as streaks, grooves, and scratches, etc., as well as slight surface roughness. These defects, likely accentuated by the sintering temperature of 1300 °C, may result from insufficient material consolidation. In contrast, the third image shows more regular fringes, implying a slightly more homogeneous surface, although the overall quality remains affected. These observations indicate that sintering at this temperature does eliminate internal stresses and material in homogeneities, which negatively affect light transmission and degrade the surface stats of the spinel. Thus, although sintering at 1300 °C allowed for some densification, the optical quality remains limited. An increase in sintering temperature therefore seems necessary to improve transparency and reduce surface defects.
3.1.2. Spinel S25CRX14 Sintered at 1350 °C
The moiré images presented in
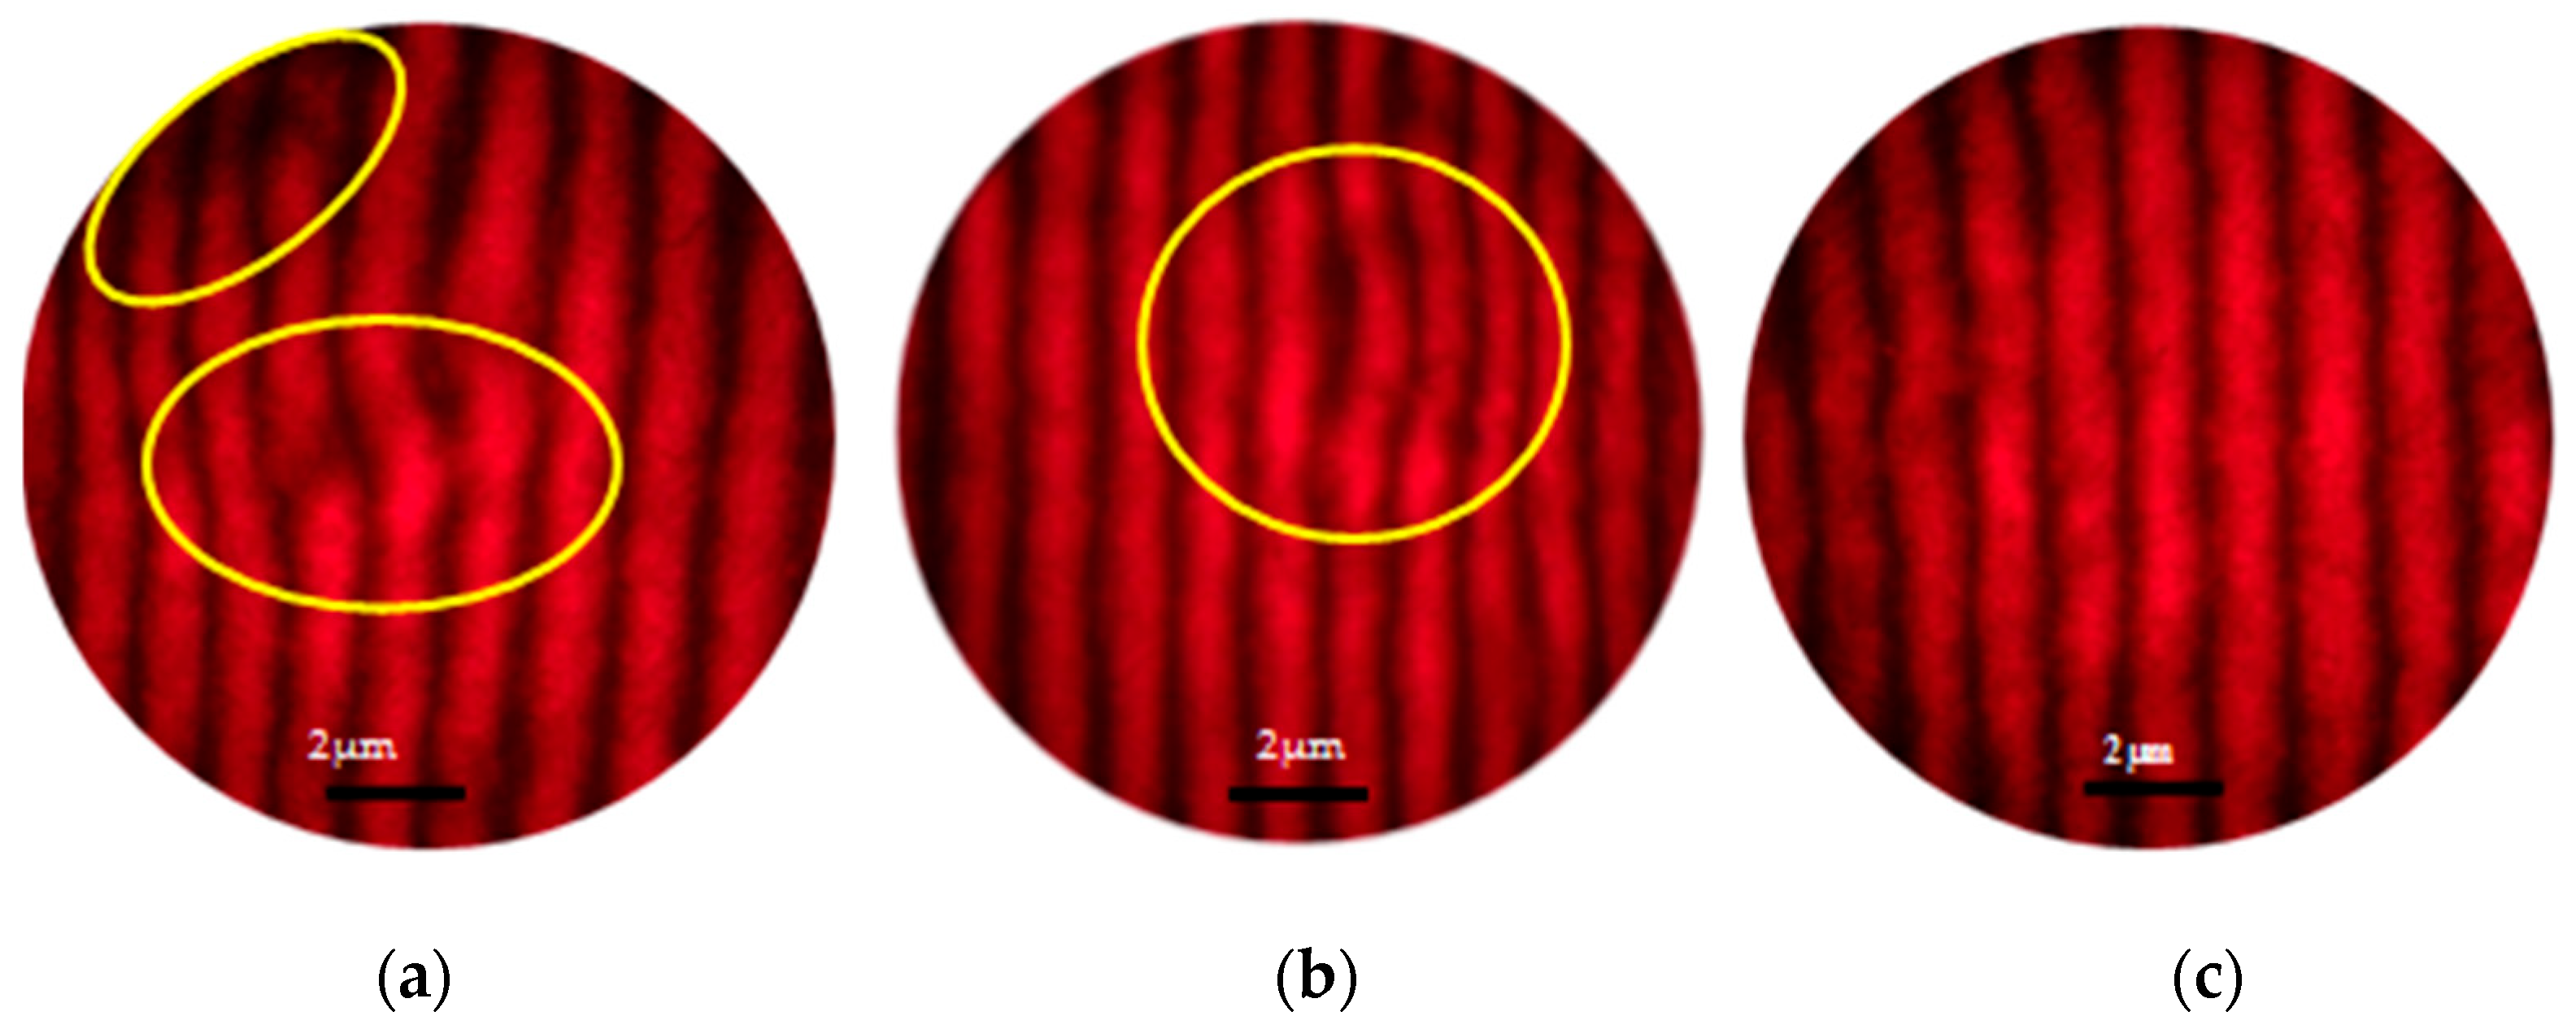
Figure 5 provide a detailed analysis of the S25CRX14 pellet sintered at 1350 °C, in different areas of its surface.
Figure 5a shows straight, parallel, and equidistant fringes, indicating a homogeneous zone with a uniform distribution of stresses and deformations, which suggests effective sintering and consistent density. On the other hand,
Figure 5b,c reveal slight deviations in the fringes, indicating the presence of surface defects that locally disturbed light transmission, without significantly affecting the overall structure of the sample. The continuity and brightness of the fringes across all images confirm the absence of contamination or major imperfections on the pellet. These observations demonstrate the good optical quality of the sample, with high light transmission despite minor surface heterogeneities, indicating that a sintering temperature of 1350 °C produces a pellet with generally high optical quality, albeit with some residual surface defects.
3.1.3. Spinel S25CRX14 Sintered at 1400 °C
The images in
Figure 6 reveal low brightness in the light fringes. The first image displays blurred moiré fringes, indicative of a non-homogeneous surface with slight light scattering. In contrast, the second image highlights distinct and dense fringes, particularly in the center, which may indicate local surface variations or more pronounced internal stresses in certain areas. Finally, the third image shows an overall lower light intensity, accompanied by less distinct fringes. These observations point to the presence of shape defects, increased roughness, or contamination, all of which affect the optical quality of the sample and indicate significant alterations in the internal structure or surface of the material. These results confirm that the spinel sintered at 1400 °C exhibits poor optical quality, likely due to the elevated temperature, which promoted grain growth and introduced impurities via carbon contamination from the graphite mold. Consequently, these sintering conditions are unsuitable for producing spinel with high optical quality at this temperature [
4].
3.1.4. Measurement of Defect Size Before Sandblasting
Figure 7a,b present the surface defects, based on the moiré fringes, on pellets sintered at 1300 °C and 1350 °C, respectively, before sandblasting.
The curves illustrated in
Figure 8 show the two-dimensional (2D) defect sizes, expressed in terms of deformation measured before sandblasting, for sintering temperatures of 1300 °C and 1350 °C.
The results indicate that the defects are slightly smaller at 1350 °C, with a length of about2 µm and a width of 2.9 µm, as illustrated by curve 8b, than at 1300 °C, where they reach around 2.4 µm in length and 3.5 µm in width, as shown by curve 8a. This suggests that the higher densification achieved at 1350 °C contributes to a reduction in surface defects, which could enhance light transmission.
Light transmission measurements at the 500 nm wavelength confirm the influence of surface defects on the transparency of the pellets before sandblasting. At 1300 °C, the transmission reaches 39.99%, while it increases to 46.97% at 1350 °C. This difference reflects the improved optical quality of the pellets sintered at the higher temperature (1350 °C).
3.1.5. Discussion of the Results Before Sandblasting
The images of S25CRX14 spinel samples sintered at different temperatures (1300 °C, 1350 °C, and 1400 °C) reveal a marked influence of the sintering temperature on the material’s, However, a significant increase in grain size was observed with increasing sintering temperature. The sample sintered at 1300 °C exhibited the smallest average grain size of approximately 685 nm. This size increased to about 1.9 μm for the sample sintered at 1350 °C and reached its maximum at 1400 °C, where the average grain size was around 5.3 μm. Such grain growth is expected to influence the optical quality of the material, as reported in [
4]. At 1300 °C, the moiré fringes highlight surface irregularities and deformations, such as undulations, as well as localized defects, notably grooves, streaks, and scratches. These anomalies indicate insufficient densification and moderate roughness, probably due to incomplete sintering at this relatively low temperature. The presence of defects of significant size (approximately 2.4 µm long and 3.5 µm wide) alters the surface state of the spinel and accentuates the specular reflection on both sides of the sample. This results in increased light scattering and absorption, which reduce light transmission and, consequently, the material’s transparency. In summary, these defects adversely affect the optical quality of the pellets. Furthermore, the presence of such imperfections also compromises the mechanical properties, as the weak zones they create make the pellets more susceptible to crack formation under stress.
At 1350 °C, a temperature considered optimal, the moiré fringes appear sharp, straight, parallel, and regular, with moderate brightness. This pattern reflects a homogeneous surface and a uniform densification, associated with high light transmission, resulting in an overall satisfactory optical quality, as reported by Hoggas et al. [
4]. Some minor surface defects nevertheless remain, causing slight deviations in the fringes; however, these imperfections do not significantly alter the overall sample structure. The defects observed at this temperature are smaller in size (approximately 2 µm in length and 2.9 µm in width) and less disruptive, thereby promoting enhanced light transmission and preserving the optical properties of the material. In addition, the good grain coalescence achieved at this optimal temperature also contributes to improving the mechanical strength of the pellets.
Finally, at 1400 °C, the optical quality deteriorates noticeably: the moiré fringes become blurred, and brightness decreases significantly. This degradation probably results from several factors, including surface defects, the introduction of impurities via carbon contamination during sintering, and excessive grain growth induced by the elevated temperature. These alterations modify the material’s structure and considerably reduce its light transmission capability.
The larger defect size at this temperature further amplifies light absorption and scattering, rendering the sample more opaque and compromising its optical properties. Moreover, these large-scale defects weaken the pellet, increasing its susceptibility to cracking and deformation under stress. These findings underscore the crucial influence of sintering temperature on the optical quality of spinel. A temperature of 1350 °C appears optimal for achieving satisfactory optical performance, while higher temperatures, such as 1400 °C, result in significant degradation of both optical and mechanical properties.
3.2. After Sandblasting
In this section of the study, the samples underwent a sandblasting treatment involving the projection of a sand jet onto their surface (sandblasting effect). Subsequently, each pellet was re-examined using the moiré technique. The analysis of moiré fringe quality, along with the comparison of images obtained before and after sandblasting, allows for the evaluation of the impact of sandblasting on the transparency of ceramics fabricated by SPS. The sand flow parameters used were the identical as those defined by Hoggas et al. [
4].
3.2.1. Spinel S25CRX14 Sintered at 1300 °C After Sandblasting
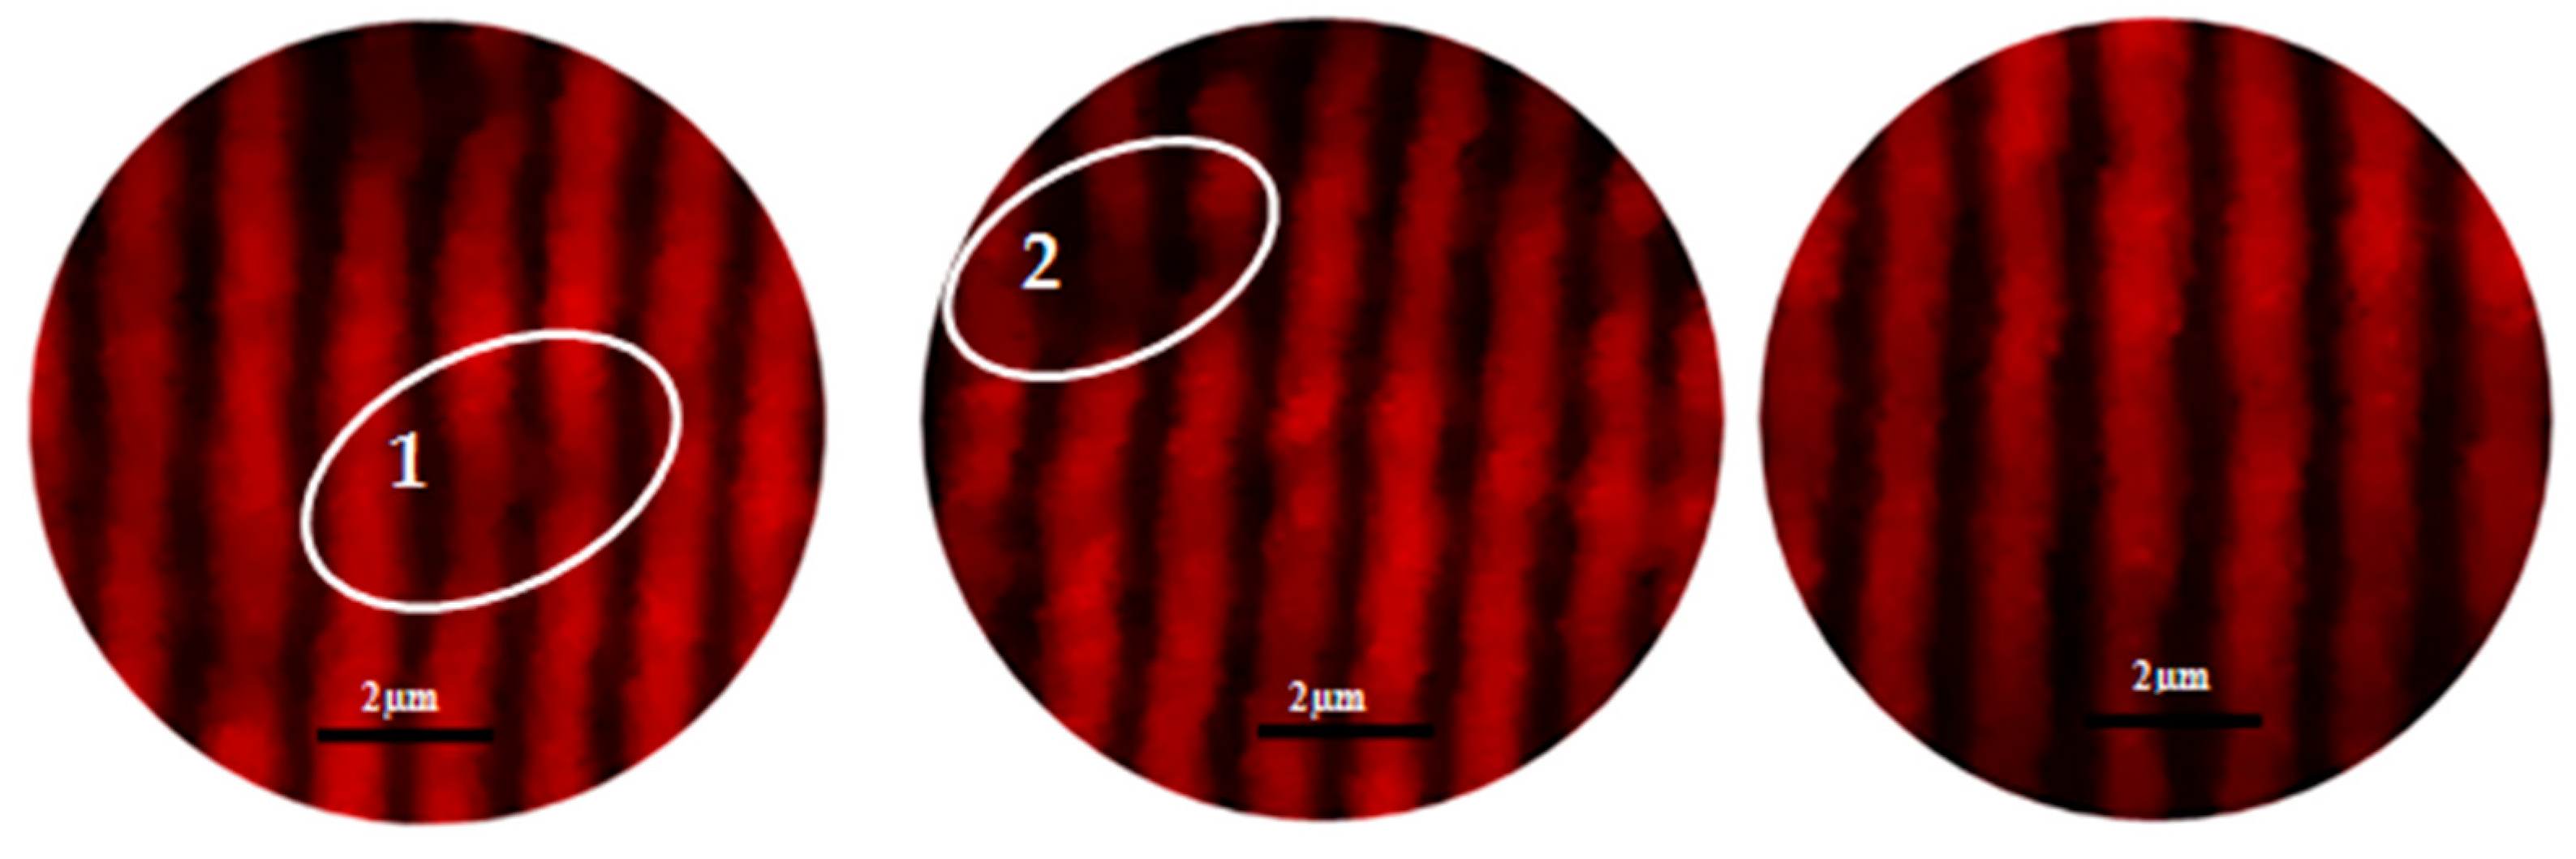
The moiré images of the S25CRX14 spinel pellet sintered at 1300 °C after sandblasting (
Figure 9) clearly reveal deviations, distortions, and discontinuities in the fringes. In the first image, the fringes exhibit significant deformations, with irregular spacing and pronounced curvatures (zone 1), indicating important shape defects. The second image shows fringes that are less deformed but still affected by persistent irregularities and discontinuities (zone 2), suggesting the presence of superficial scratches, streaks, and grooves, probably caused by material grain pull-out during the sandblasting process, which degrades the surface condition. The third image displays slightly less disturbed fringes, indicating a partially damaged surface with less pronounced defects, but still present.
These observations confirm that sandblasting significantly altered the surface quality of the pellets by introducing new defects, such as scratches, while also exacerbating pre-existing imperfections resulting from insufficient sintering at 1300 °C. This mechanical treatment caused material pullout from the spinel; a phenomenon exacerbated by the low hardness and reduced toughness of the pellets, characteristics of incomplete densification at this temperature. The deformations observed in the moiré fringes indicate a notable decrease in light transmission, a direct consequence of the irregularities and defects induced by the combined effect of inadequate sintering and sandblasting.
In conclusion, the moiré images reveal that the pellets sintered at 1300 °C and subjected to sandblasting treatment exhibit a highly altered surface, characterized by disturbed, irregular, and discontinuous fringes. These results confirm that this sintering temperature is insufficient to ensure adequate densification, thereby compromising both the optical quality of the material and its resistance to mechanical stresses, such as sandblasting. It therefore appears that higher sintering temperatures are necessary to obtain pellets with satisfactory optical and mechanical properties.
3.2.2. S25CRX14 Spinel Sintered at 1350 °C After Sandblasting
The moiré images of the pellet sintered at 1350 °C after sandblasting (
Figure 10) reveal slightly deviated and irregular fringes, indicating the presence of minor surface defects. In the first image, the fringes appear generally regular, although slight undulations are visible (zone 1), suggesting limited superficial imperfections. The second image shows more disrupted fringes, accompanied by low-brightness areas, suggesting more pronounced localized alteration, probably due to a heterogeneous distribution of defects and roughness induced by sandblasting. In contrast, the third image shows comparatively regular fringes, indicating a relatively preserved surface and heterogeneity in the impact of the mechanical treatment.
The quality of the fringes observed in all the images suggests limited MgAl2O4 grain pull-out during sandblasting (zone 2), indicating moderate surface damage. The presence of luminous fringes, moderately bright, suggests well-controlled and relatively homogeneous surface roughness. These observations demonstrate that sintering at 1350 °C largely preserves the mechanical and optical integrity of the pellet surfaces, thus ensuring satisfactory quality even after mechanical treatment such as sandblasting.
3.2.3. S25CRX14 Spinel Sintered at 1400 °C After Sandblasting
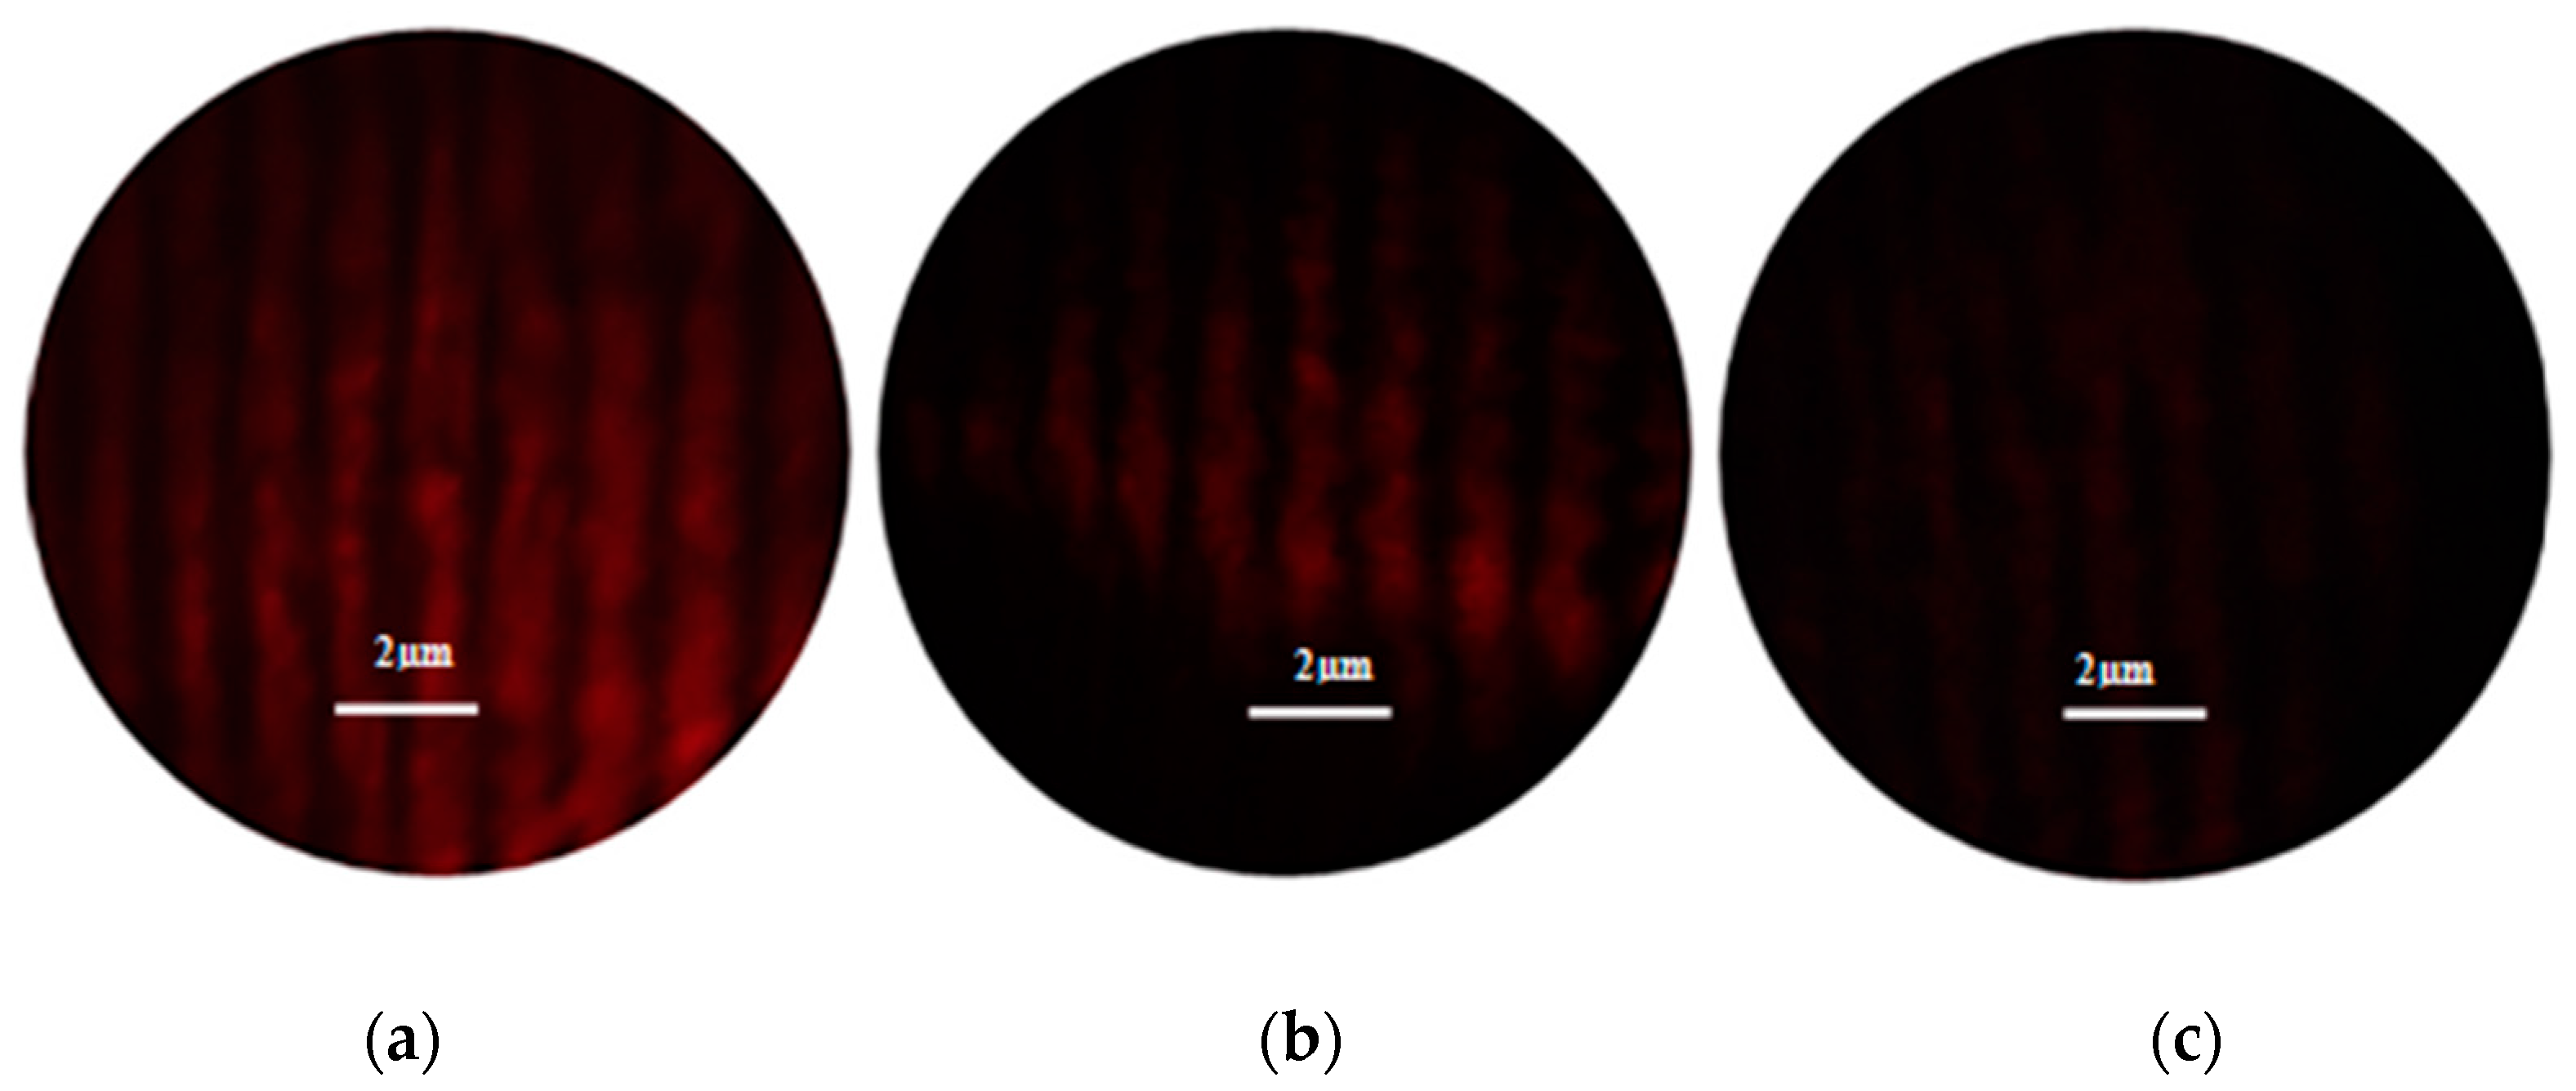
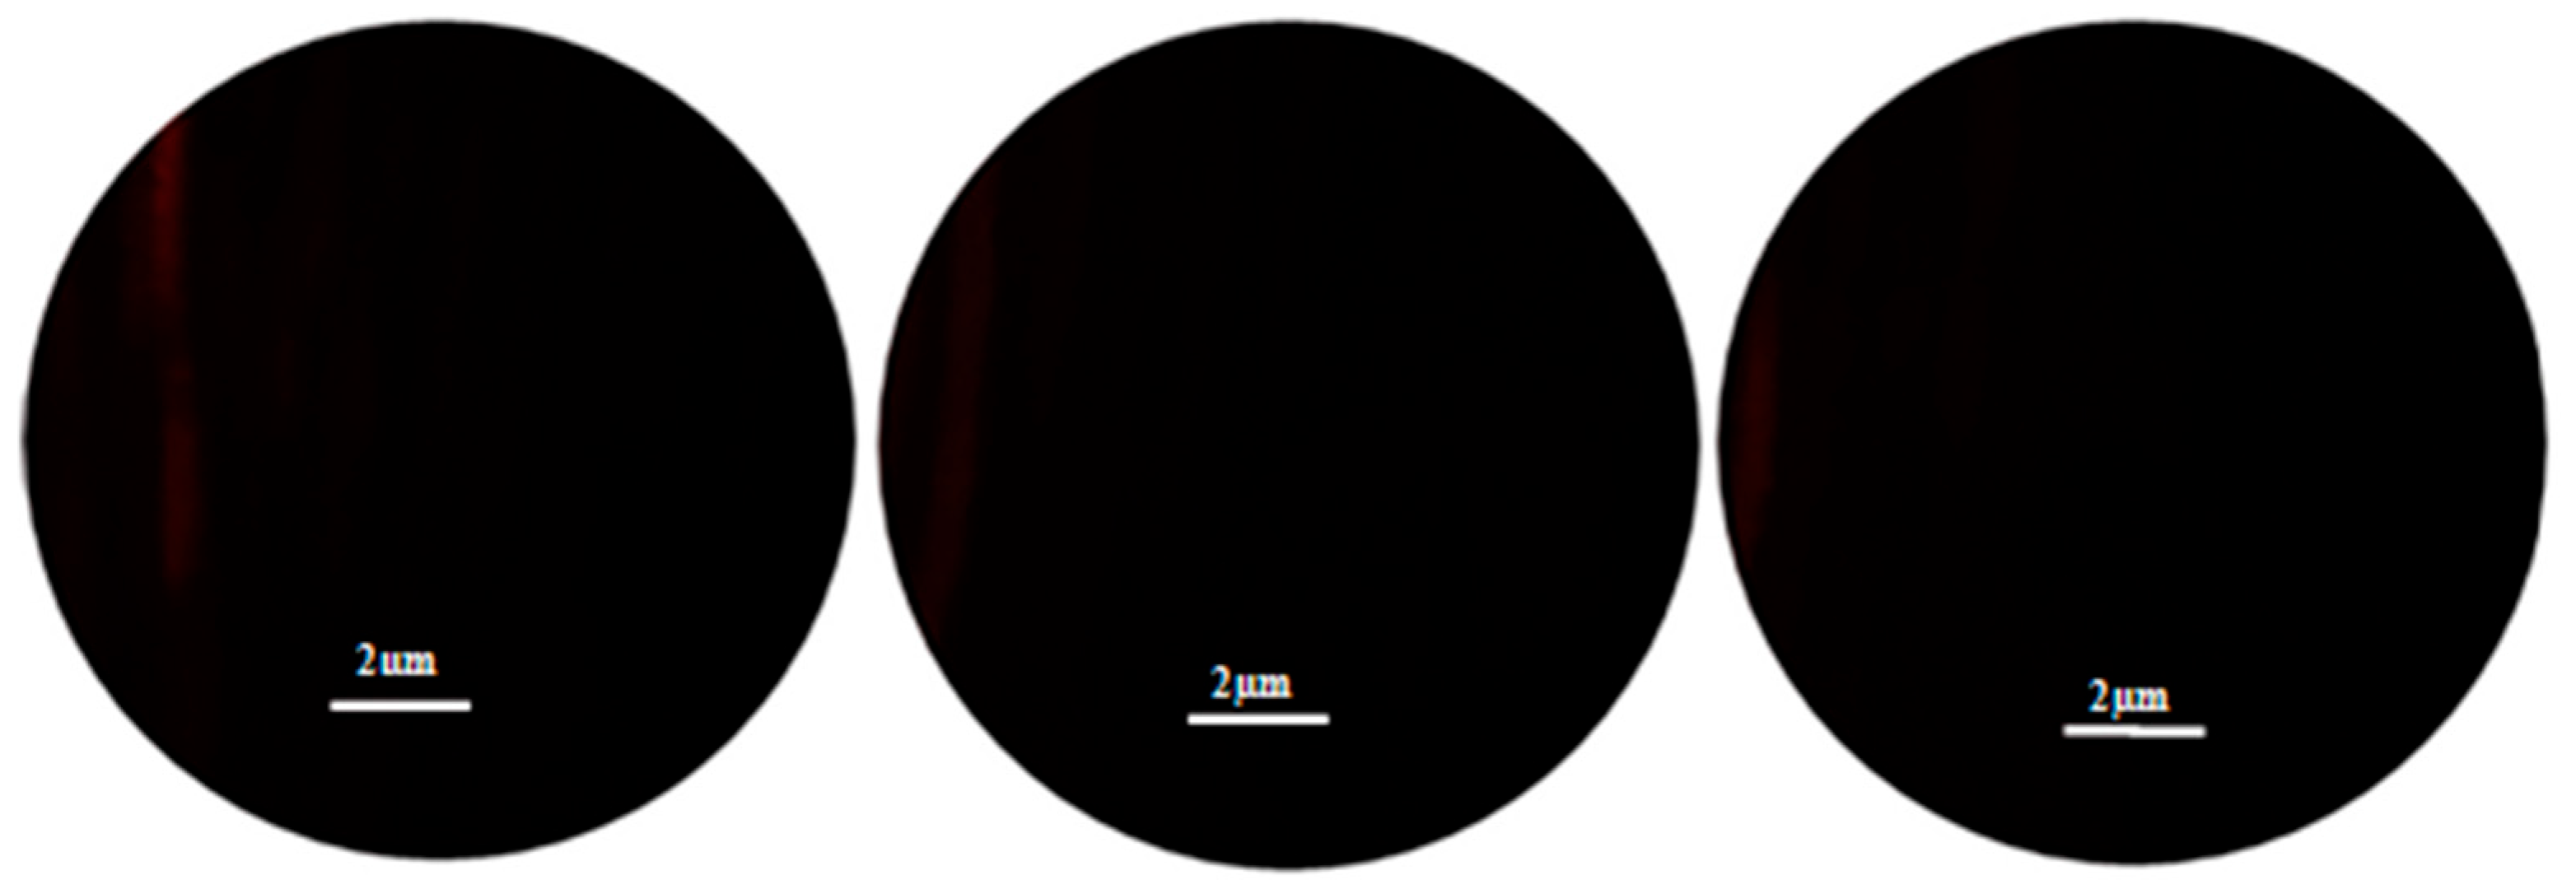
The moiré fringes observed on the spinel pellet sintered at 1400 °C after sandblasting (
Figure 11) appear generally dark, with some areas showing subtle red bands. These bands may reflect localized variations in surface topography or in the internal structure of the material. The observations confirm that this pellet exhibits increased contamination and a highly rough surface, resulting from initial defects related to high-temperature sintering, further amplified by the mechanical action of sandblasting.
The marked roughness appears to result from excessive grain growth and deformation induced by sintering at 1400 °C. Sandblasting further worsened this condition by causing the pullout of weakened grains, thereby accentuating surface irregularities. The low light intensity and poor definition of the moiré fringes are indicators of a severely altered light transmission directly linked to structural and surface defects, seriously compromising the optical quality of the pellet. These results clearly demonstrate that the combined effect of sintering at 1400 °C and sandblasting leads to significant surface degradation, critically affecting the material’s optical properties. At this temperature, the internal structure of the spinel appears particularly vulnerable to the introduction of impurities and to mechanical erosion, which markedly reduces the overall performance of the pellet.
3.2.4. Measurement of Defect Size After Sandblasting
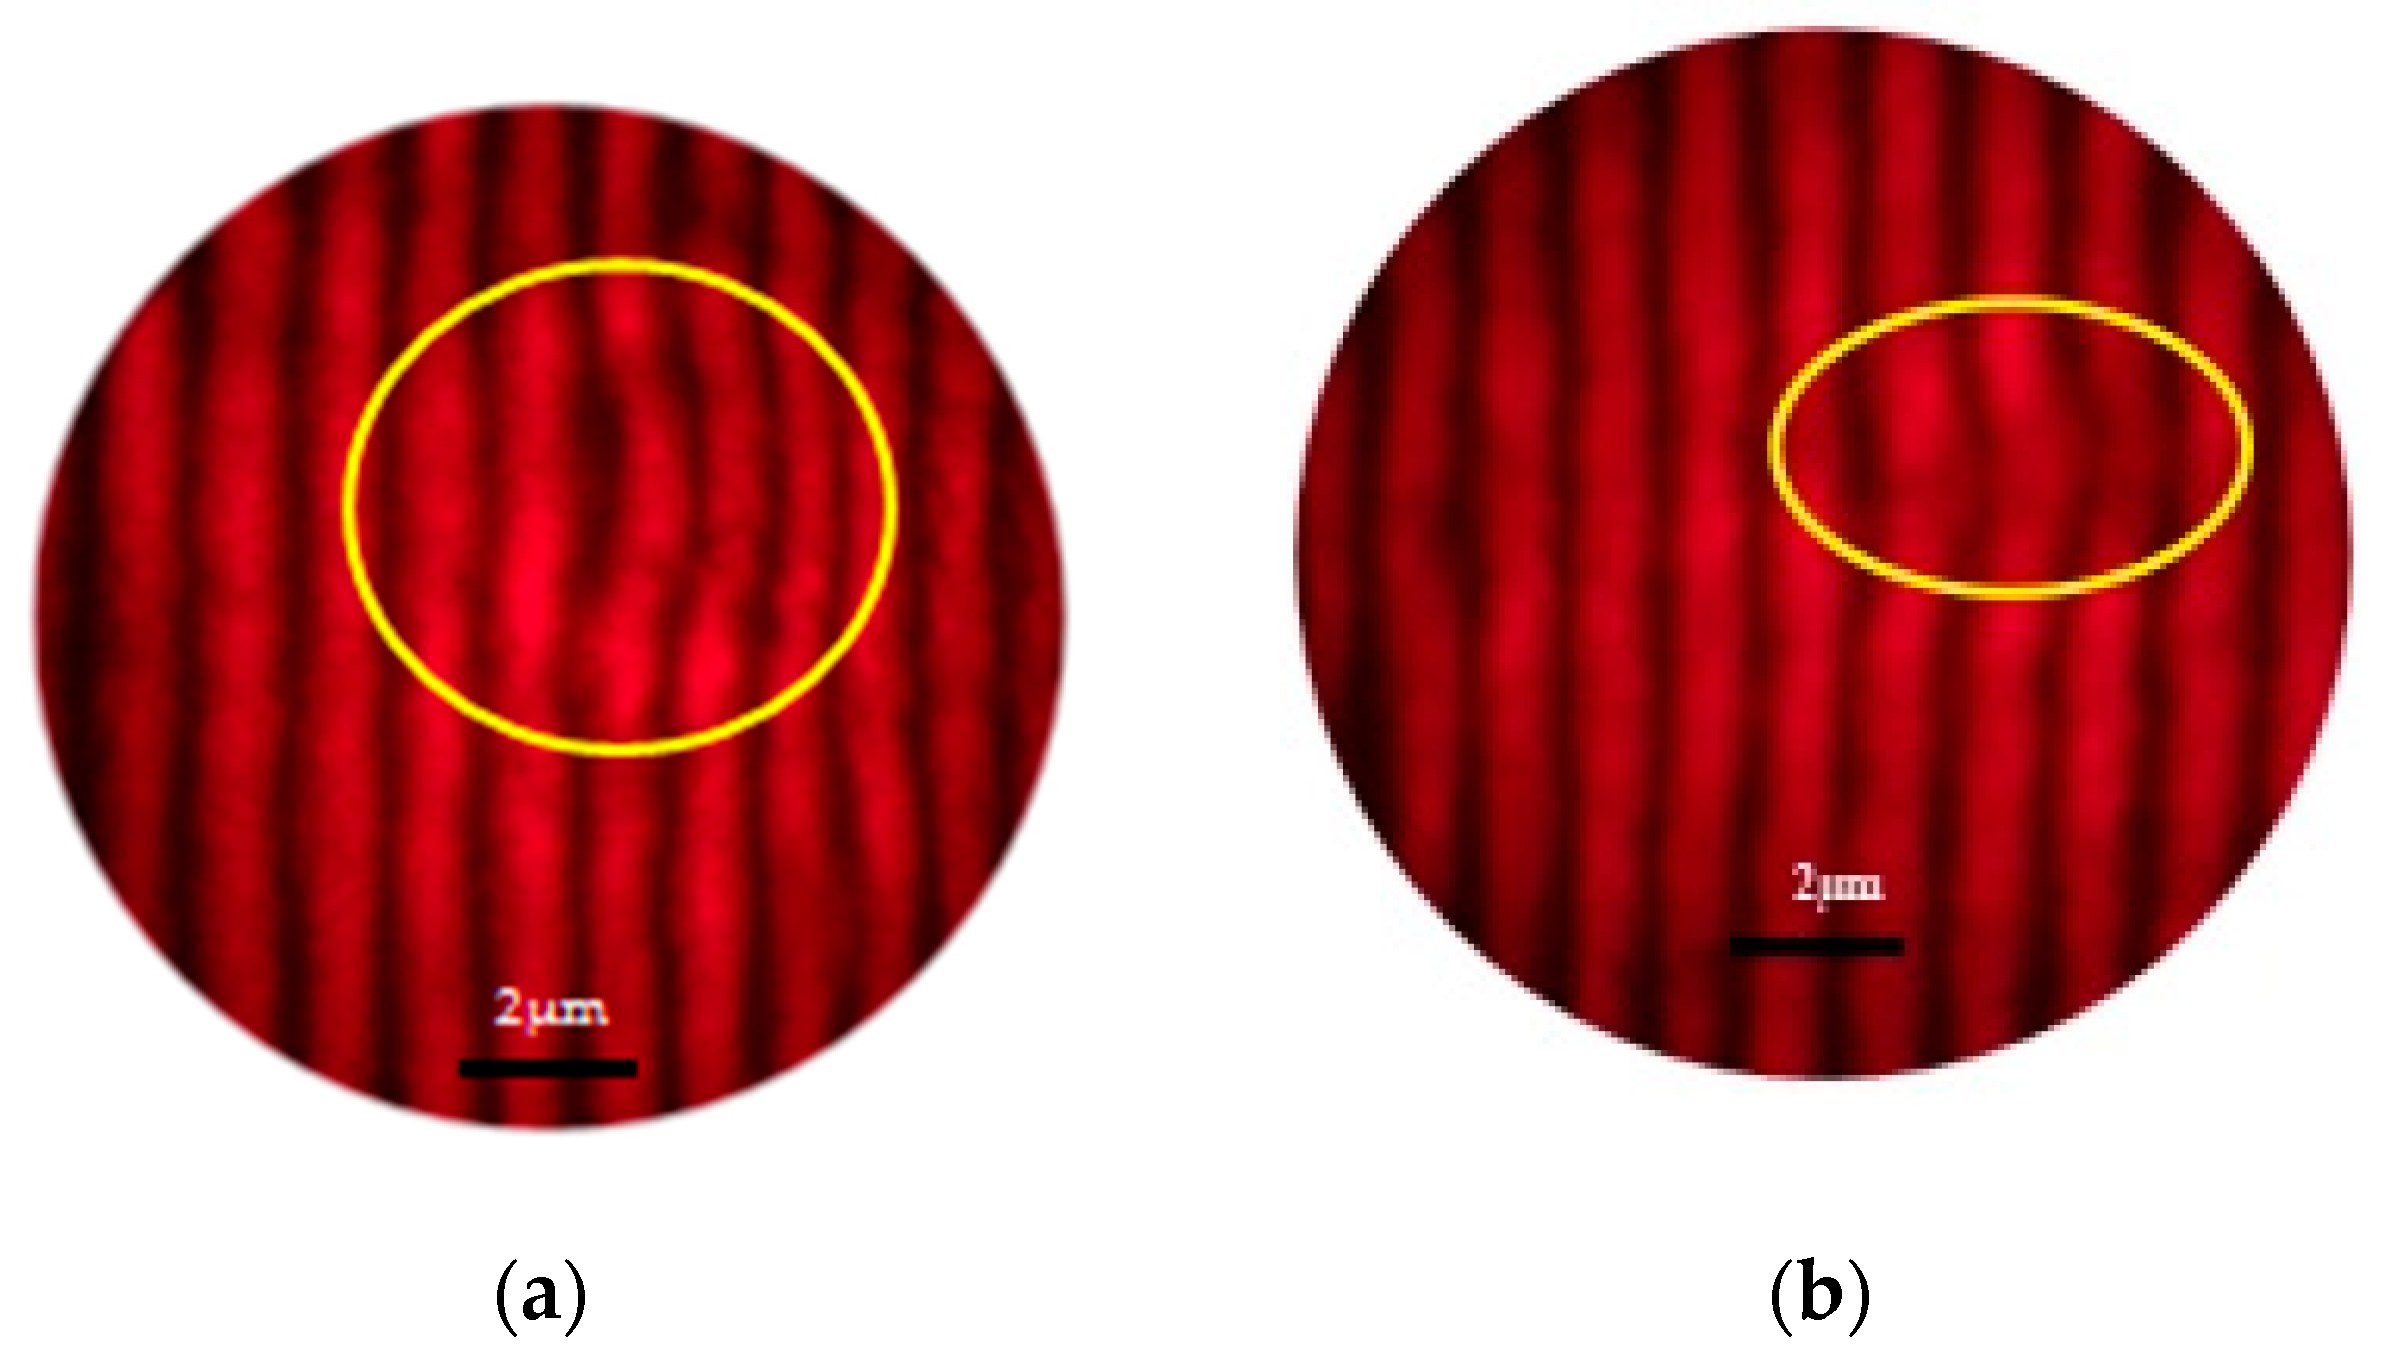
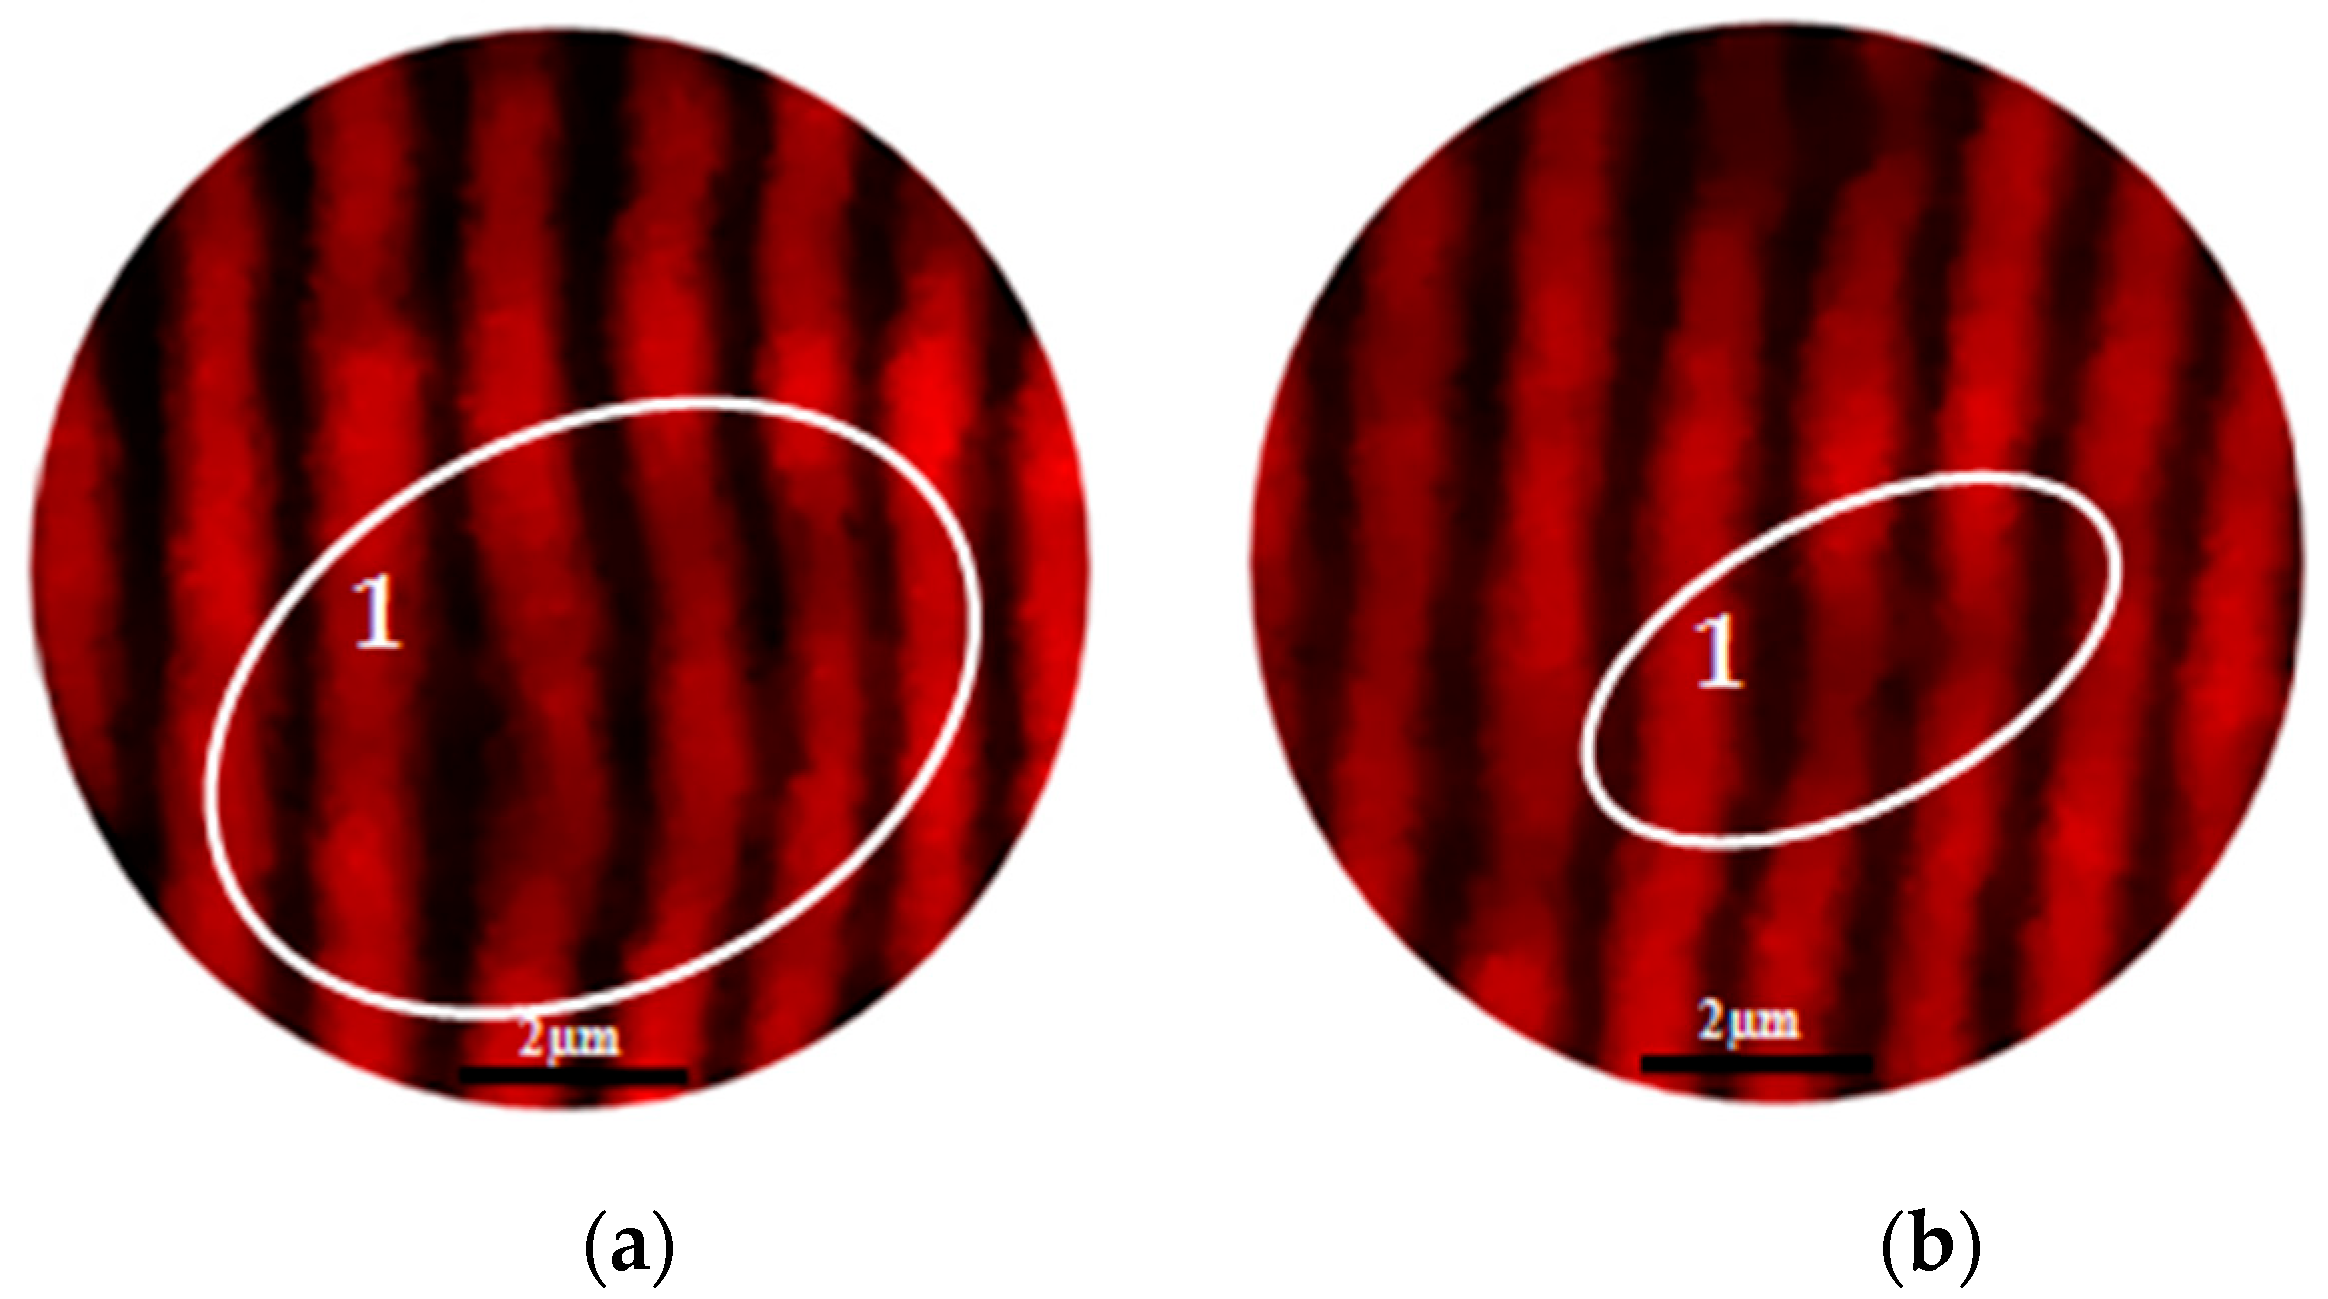
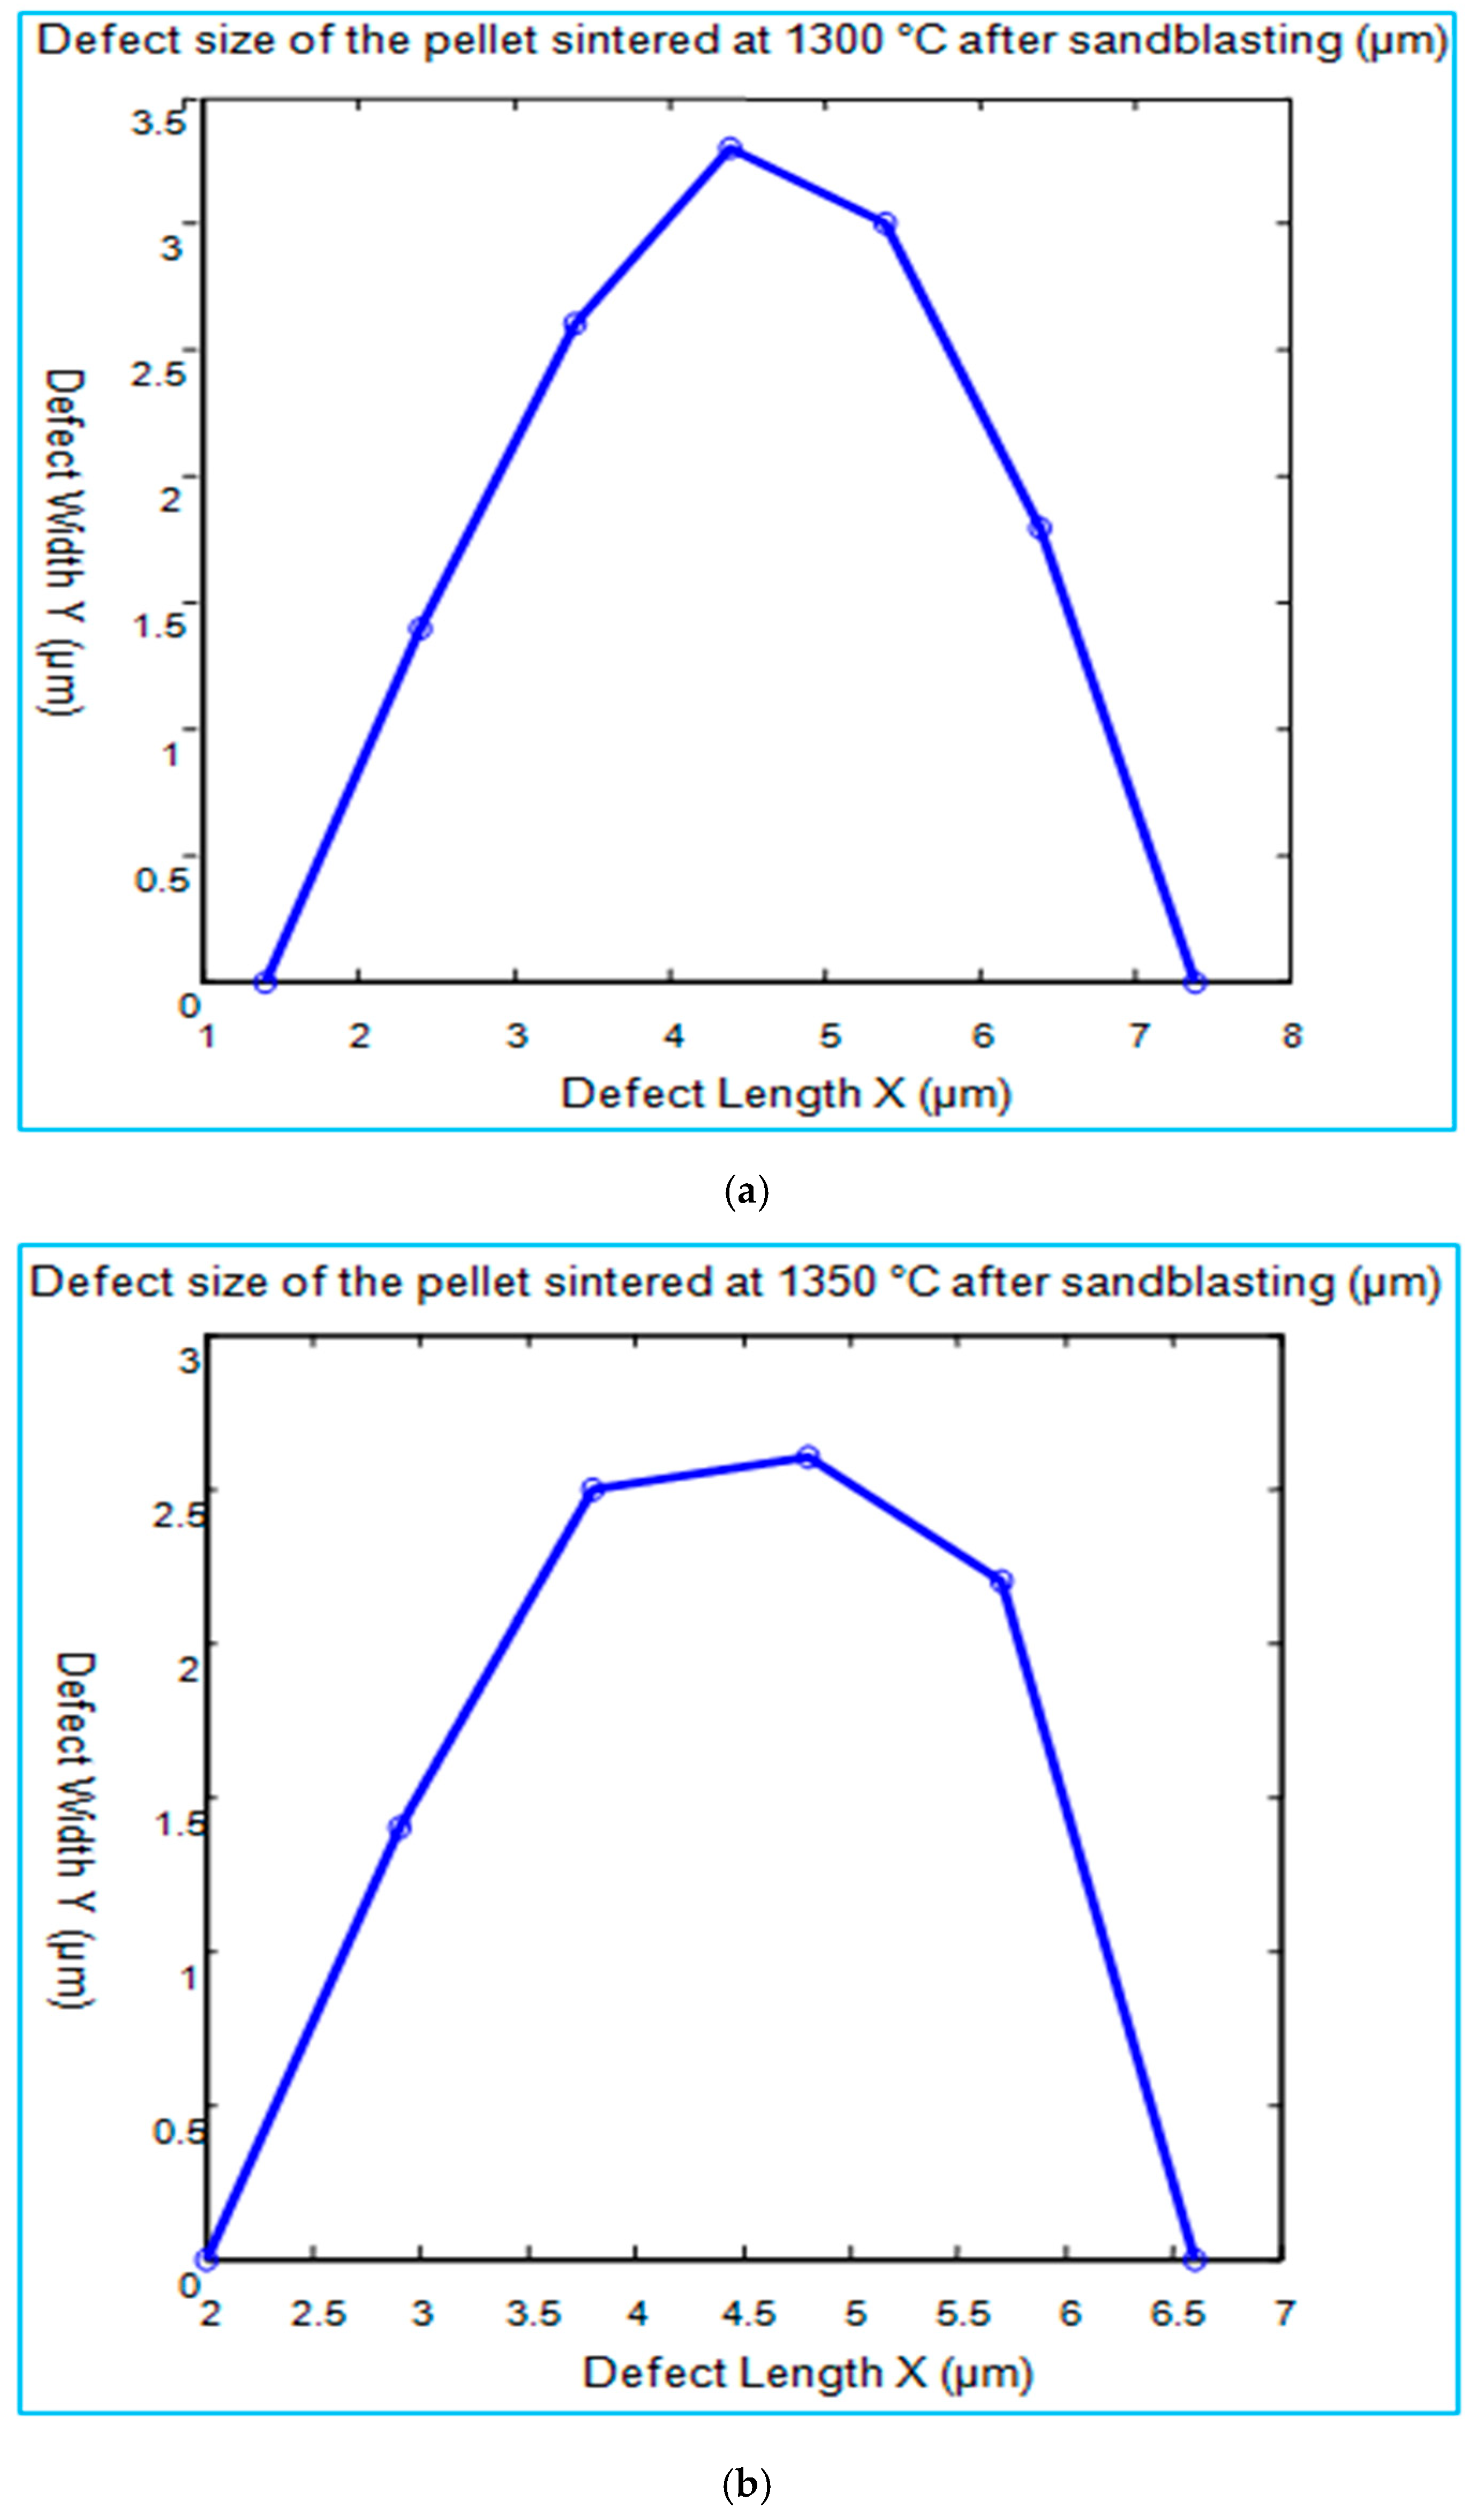
Figure 12a,b present the defects observed by the moiré fringes on the pellets sintered at 1300 °C and 1350 °C, respectively, after sandblasting.
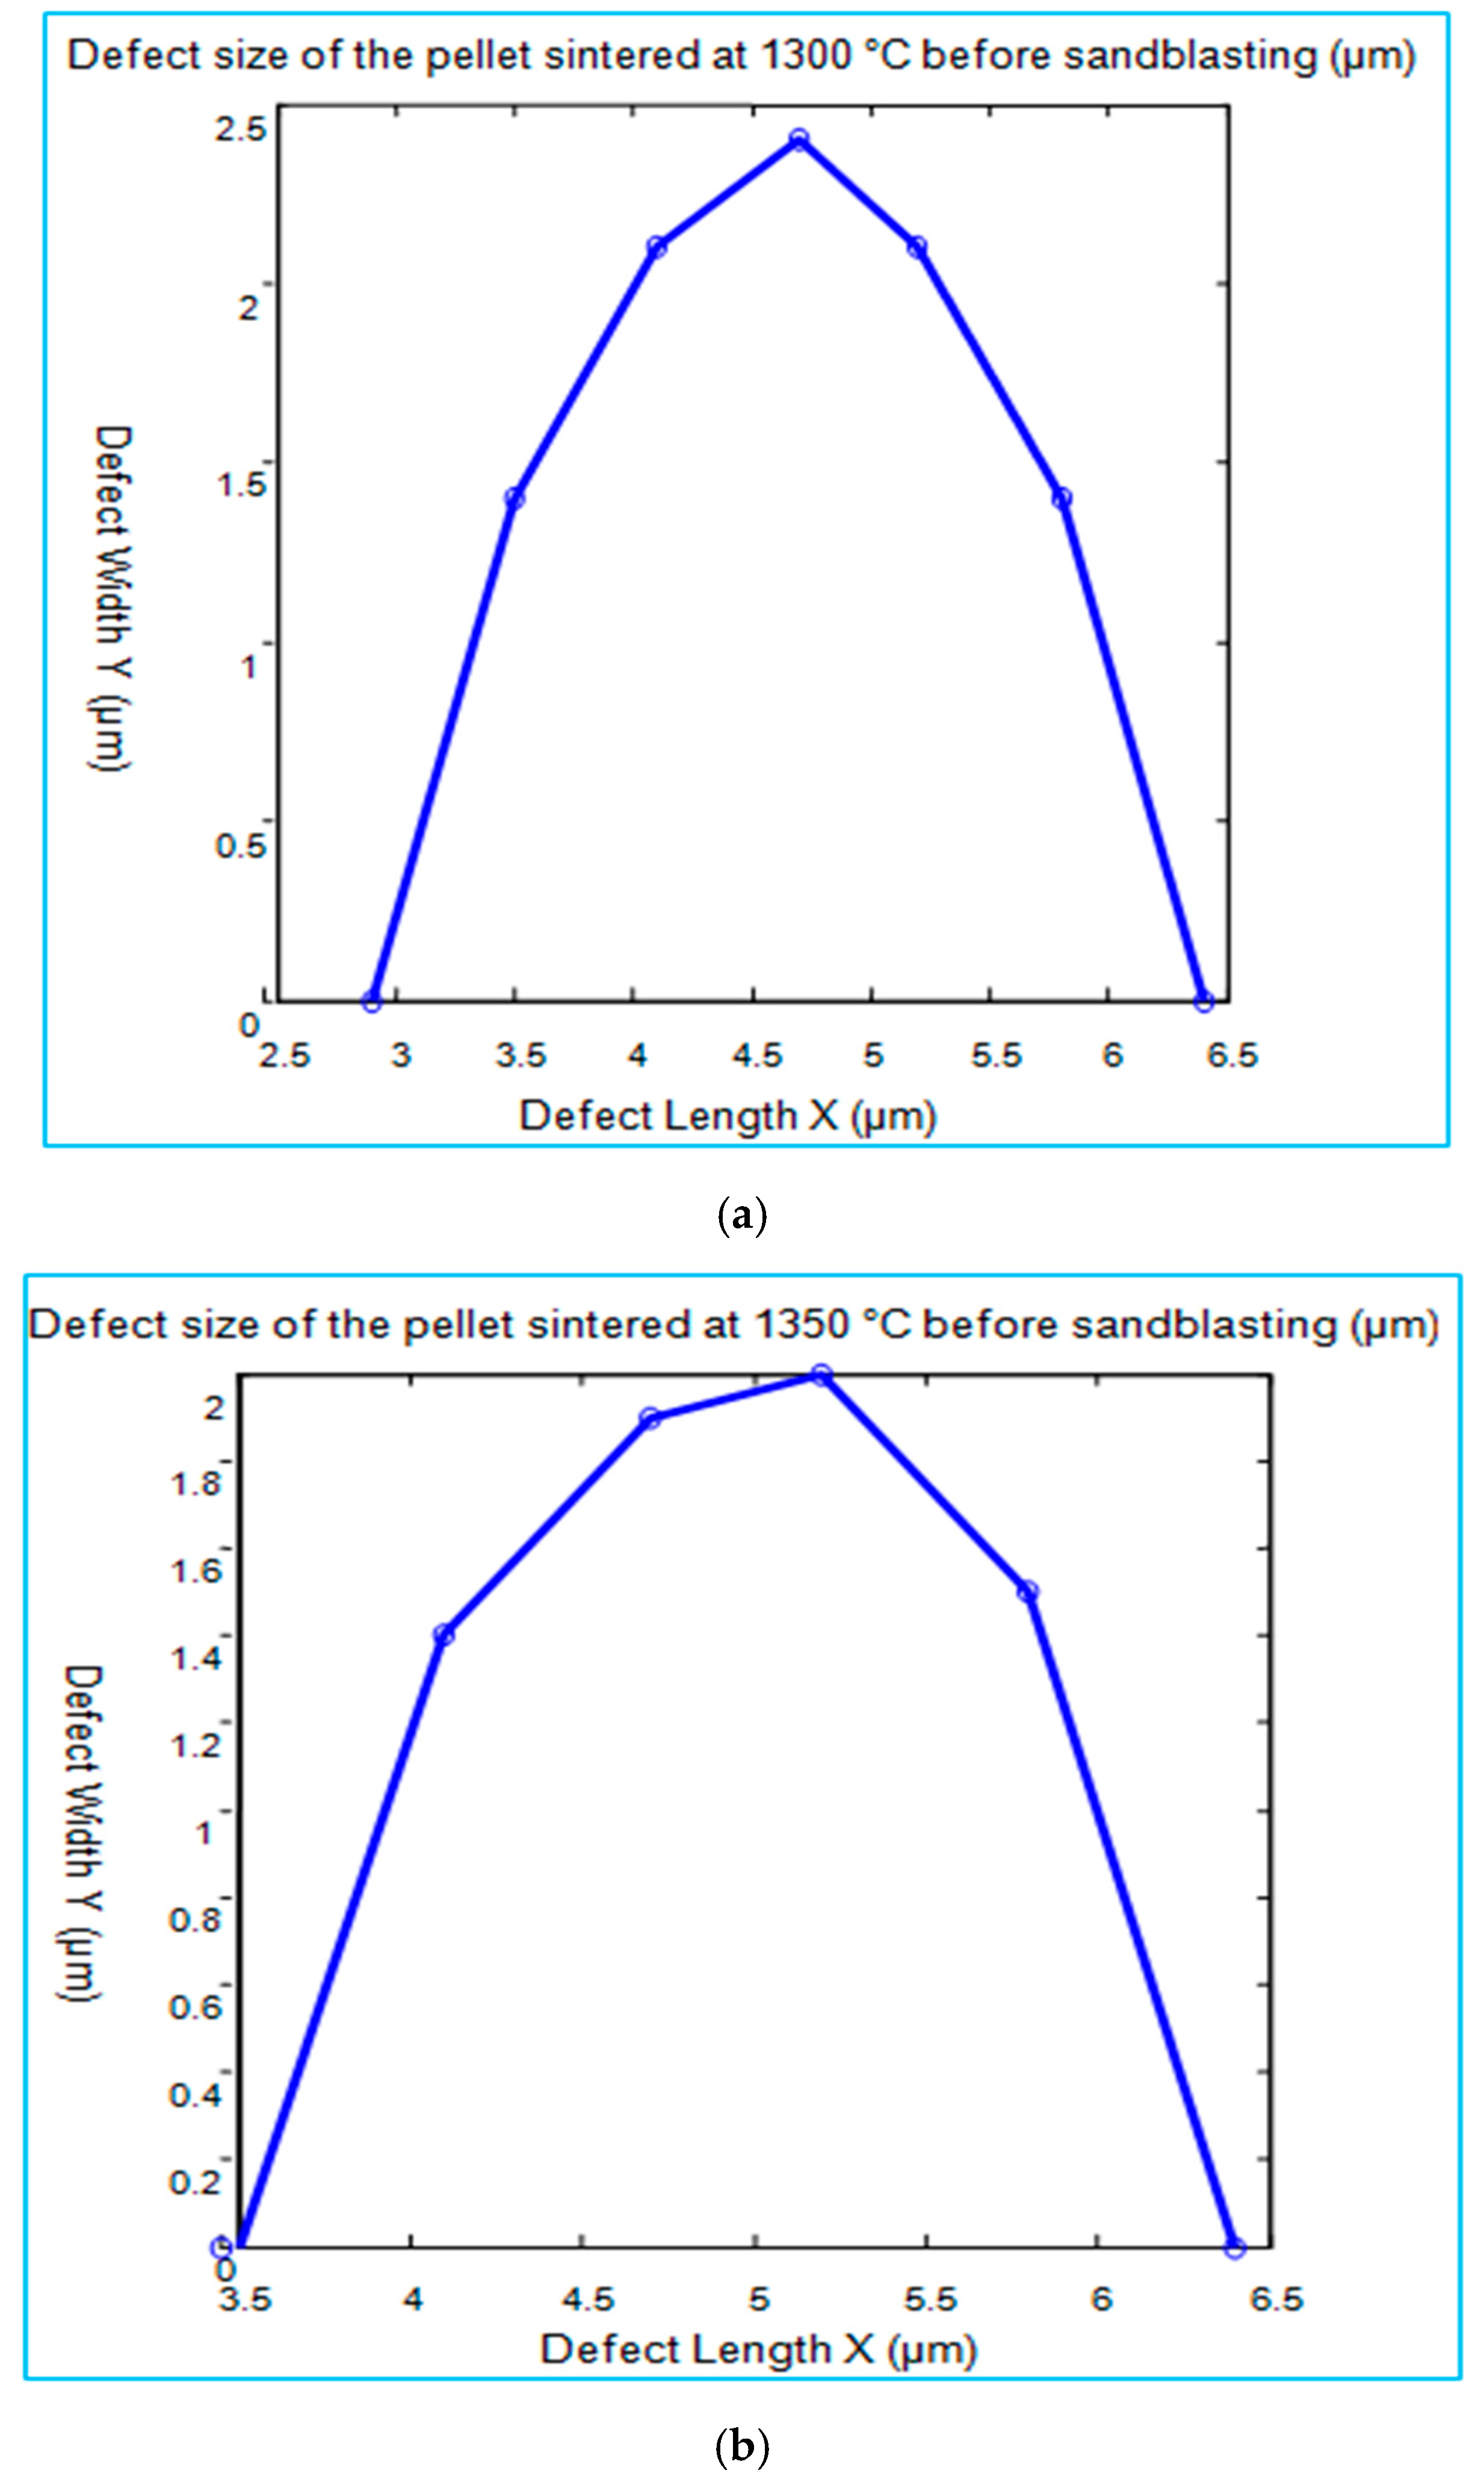
Figure 13 shows the curves representing the two-dimensional defect size, expressed in terms of deformation measured after sandblasting, for the sintering temperatures of 1300 °C and 1350 °C.
After sandblasting, an increase in defect size is observed at both temperatures. At 1300 °C, the defects reach 3.3 µm in length and 6.0 µm in width, while at 1350 °C; they measure approximately 2.6 µm in length and 4.6 µm in width. These results indicate that although the defects are generally smaller at 1350 °C, sandblasting still induces a notable enlargement in their dimensions. This evolution has adversely affects light transmission, as larger surface defect correlate with a reduced transmission, which degrades the optical quality of the pellet. Consequently, even though the defects remain smaller at 1350 °C, their enlargement after sandblasting contributes to a decrease in transparency.
The light transmission measurements conducted at a wavelength of 500 nm after sandblasting show a significant decrease for both temperatures: the transmission drops to 30.76% for the pellet sintered at 1300 °C and to 34.34% for that sintered at 1350 °C, corresponding, respectively, to losses of 9.23% and 12.63% [
4]. These results demonstrate that sandblasting increases surface roughness by intensifying localized defects. This surface degradation increases light scattering, leading to a reduction in light transmission and, consequently, a deterioration of the pellets’ optical quality. The measurements taken before and after sandblasting show that the largest surface defect appear in the moiré image of the MgAl
2O
4 pellet sintered at 1300 °C after sandblasting, while the smallest defect is observed in the image corresponding to the pellet sintered at 1350 °C before sandblasting, as illustrated by the curves in
Figure 14. These observations suggest that the pellet sintered at 1350 °C before sandblasting possesses a more homogeneous surface, leading to better light transmission. Furthermore, it is evident that the sintering temperature significantly affects the nature and size of the defects observed before and after sandblasting.
In summary, sintering at 1350 °C results in a more homogeneous initial surface, which enhances optical transmission. However, sandblasting increases the size and density of defects, which deteriorates the pellets’ transparency and reduces their overall optical quality.
Finally, for the sintering temperature of 1400 °C, the moiré fringes become almost invisible both before and after sandblasting, rendering the pellet nearly opaque, with a very low transmission of 0.032%. In this case, the measurement of surface defects becomes impossible, as it depends on fringe deviation.
In conclusion, the measurement results support the initial observations. They confirm that sintering at 1350 °C produces a higher-quality surface prior to sandblasting, consistent with the less pronounced defects at this temperature. Furthermore, although the increase in defect size after sandblasting is less significant at 1350 °C than at 1300 °C, it remains consistent with the previously observed trends.
3.2.5. Discussion of the Results After Sandblasting
The results of moiré fringe observations on S25CRX14 spinel pellets sintered at 1300 °C, 1350 °C, and 1400 °C after sandblasting demonstrate a clear correlation between the sintering temperature, surface condition, and the optical and mechanical properties of the material. They also emphasize the significant influence of sandblasting depending on the treatment temperature. At 1300 °C, the moiré fringes appear distorted, irregular, and discontinuous, indicating a severely deteriorated surface characterized by numerous scratches, streaks, and grooves. This alteration is associated with high surface roughness and reduced hardness (Hv < 16 GPa [
4]). The low hardness makes the surface more susceptible to grain pullout, reflecting insufficient densification, which leads to decreased light transmission and degraded optical and mechanical quality.
The increase in defect size after abrasive treatment accentuates light scattering, thereby deteriorating the optical quality of the pellets. Moreover, the presence of pronounced surface defects further weakens the mechanical strength of the material, favoring the initiation of microcracks and reducing its overall robustness.
At 1350 °C, the moiré fringes remain mainly regular, and the defects observed before sandblasting are smaller, indicating lower roughness and more uniform densification. This compact and homogeneous microstructure contributes to improved light transmission and the preserved optical properties. After sandblasting, although the defect size increases slightly (2.6 µm in length and 4.6 µm in width), their effect remains moderate compared with that observed at 1300 °C (3.3 µm in length and 6.0 µm in width), indicating better resistance to abrasive stress. The higher density and hardness (Hv > 16 GPa, [
4]) limit grain pull-out, thereby minimizing the degradation of both mechanical and optical performance.
Conversely, the pellets sintered at 1400 °C exhibit dark and poorly defined fringes, revealing a severely damaged surface marked by pronounced roughness and large-scale defects. This deterioration results from the combined effect of excessive sintering temperature and surface abrasion induced by sandblasting, leading to a notable decline in both optical and mechanical properties. Furthermore, the presence of larger defects compromises the pellet integrity, increasing the risk of cracking and undermining its global performance.
Therefore, sintering at 1350 °C represents the optimal compromise between densification, mechanical strength, and optical efficiency. These findings underscore the crucial importance of precise control over sintering parameters to meet the stringent requirements of advanced optical applications.
4. Conclusions
The moiré fringe analyses conducted before and after sandblasting clearly demonstrate that the sintering temperature exerts a direct significant influence on the optical and mechanical quality of S25CRX14 spinel pellets.
Before sandblasting, the pellets sintered at 1300 °C exhibit irregular and deformed fringes, revealing insufficient densification and pronounced surface roughness, both of which impair light transmission. At 1350 °C, the fringes appear sharp, regular, and well-aligned, reflecting a more homogeneous density and good optical quality, although a few minor surface imperfections persist. Conversely, at 1400 °C, the fringes are blurry and dim, indicating severe surface degradation caused by excessive grain growth, increased roughness, and possible contaminations effects.
The defect size measurements confirm these observations. They demonstrate that sintering at 1350 °C leads to a marked improvement in surface quality before sandblasting, associated with a reduction in defect dimensions. In contrast, larger defect sizes before sandblasting increase light scattering and absorption, thereby reducing light transmission and altering optical performance. Moreover, these defects can constitute zones of mechanical weakness that may promote crack propagation under stress.
After sandblasting, the differences between the sintering temperatures become even more pronounced. At 1300 °C, the fringes are severely disrupted and discontinuous, indicating a highly damaged surface resulting from grain pullout, due to low density and reduced hardness. At 1350 °C, however, the fringes remain mainly regular, with limited defect formation, demonstrating good resistance to sandblasting due to more effective densification. Quantitative analyses of defect dimensions confirm that, although sandblasting increases defect size at all temperatures, the amplitude of this increase remains smallest for the sample sintered at 1350 °C.
The amplification of surface defects after sandblasting negatively affects light transmission by increasing light scattering and absorption. From a mechanical standpoint, it weakens the pellets by increasing the risk of cracking. At 1400 °C, this degradation becomes more severe, the dark and blurred fringes indicate a heavily damaged surface, where pre-existing defects are exacerbated by sandblasting, leading to a substantial deterioration in both optical and mechanical properties.
In summary, sintering at 1350 °C represents an optimal compromise between densification, controlled surface roughness, and resistance to abrasive treatments. This condition yields satisfactory surface quality, high light transmission, and improved mechanical strength. Overall, these results emphasize the importance of strictly controlling sintering parameters, particularly temperature, to satisfy the requirements of advanced optical applications.
Author Contributions
Conceptualization, R.M., S.B. (Salim Benaissa), A.C., S.B. (Sofiane Bouheroum), K.H., S.M., M.H. and G.F.; methodology, R.M., S.B. (Salim Benaissa), A.C., K.H., S.M., M.H. and G.F.; validation, S.B. (Salim Benaissa) and G.F.; formal analysis, S.B. (Salim Benaissa) and G.F.; writing—original draft preparation, R.M., S.B. (Salim Benaissa), A.C., S.B. (Sofiane Bouheroum), K.H., S.M., M.H. and G.F.; writing—review and editing, R.M., S.B., M.H. and G.F.; visualization, R.M., S.B. (Salim Benaissa) and G.F.; supervision, R.M., S.B. (Salim Benaissa), M.H. and G.F. All authors have read and agreed to the published version of the manuscript.
Funding
This research received no external funding.
Institutional Review Board Statement
Not applicable.
Informed Consent Statement
Not applicable.
Data Availability Statement
Data available upon request.
Conflicts of Interest
The authors declare no conflicts of interest.
References
- Benaissa, S.; Hamidouche, M.; Kolli, M.; Fantozzi, G. Optical and mechanical characterization of transparent α-alumina fabricated by Spark Plasma Sintering. Int. J. Appl. Ceram. Technol. 2018, 16, 638–646. [Google Scholar] [CrossRef]
- Benaissa, S.; Hamidouche, M.; Kolli, M.; Bonnefont, G.; Fantozzi, G. Characterization of nanostructured MgAl2O4 ceramics fabricated by spark plasma sintering. Ceram. Int. 2016, 42, 8839–8846. [Google Scholar] [CrossRef]
- Madireddy, B.S.; Papiya, B.; Bhaskar, P.S.; Roy, J. Fabrication of optically transparent MgAl2O4 polycrystalline ceramics and evaluation of high temperature dielectric, impedance spectroscopy & AC conductivity. J. Mater. Sci. Mater. Electron. 2023, 34, 1–12. [Google Scholar] [CrossRef]
- Hoggas, K.; Benaissa, S.; Cherouana, A.; Bouheroum, S.; Assali, A.; Hamidouche, M.; Fantozzi, G. Mechanical Behavior of Transparent Spinel Fabricated by Spark Plasma Sintering. Ceramics 2023, 6, 1191–1209. [Google Scholar] [CrossRef]
- Zegadi, A.; Ayadi, A.; Khellaf, I.; Hamidouche, M.; Gilbert, F.; Durán, A.; Castro, Y. Improving the Transparency of a MgAl2O4 Spinel Damaged by Sandblasting through a SiO2-ZrO2 Coating. Ceramics 2024, 7, 743–758. [Google Scholar] [CrossRef]
- Akilbekov, A.; Kiryakov, A.; Baubekova, G.; Aralbayeva, G.; Dauletbekova, A.; Akylbekova, A.; Ospanova, Z.; Anatoli, P. Optical Characteristics of MgAl2O4 Single Crystals Irradiated by 220 MeV Xe Ions. Materials 2023, 16, 6414. [Google Scholar] [CrossRef] [PubMed]
- Yerpude, A.N.; Maske, R.T.; Padole, A.S.; Wandhare, R.S.; Pawar, N.R. Photoluminescence study of combustion synthesis of Sm3+ and Dy3+ activated MgAl2O4 phosphor for w-LEDs. Chem. Pap. 2025, 79, 6935–6945. [Google Scholar] [CrossRef]
- Wang, S.F.; Zhang, J.; Luo, D.W.; Gu, F.; Tang, D.Y.; Don, Z.L.; Tan, G.E.B.; Que, W.X.; Zhang, T.S.; Li, S.; et al. Transparent ceramics: Processing, materials and applications. Prog. Solid State Chem. 2013, 41, 20–54. [Google Scholar] [CrossRef]
- Wang, W.C.; Kang, W.Y. Measurement of surface topography of transparent objects by using digital phase-shifting shadow moiré method without painting. In Advancement of Optical Methods in Experimental Mechanics; Conference Proceedings of the Society for Experimental Mechanics Series; Springer International Publishing: Berlin/Heidelberg, Germany, 2014; Volume 3, pp. 221–227. [Google Scholar]
- McKenzie, B.M.; Bragab, R.A.; Coelho, D.E.C.; Krol, M.; Horgan, G.W. Moiré as a low-cost, robust, optical-technique to quantify soil surface condition. Soil Tillage Res. 2016, 158, 147–155. [Google Scholar] [CrossRef]
- Lehman, M. Superposition of Cantor gratings II: Factuality of the moiré profiles. Optik 2005, 116, 281–287. [Google Scholar] [CrossRef]
- Seo, K.B.; Kim, B.M.; Kim, E.S. Digital holographic microscopy based on a modified lateral shearing interferometer for three-dimensional visual inspection of nanoscale defects on transparent objects. Nanoscale Res. Lett. 2014, 9, 471. [Google Scholar] [CrossRef] [PubMed]
- Zhou, S.; Fu, Y.; Tang, X.; Hu, S.; Chen, W.; Yang, Y. Fourier-based analysis of moiré fringe patterns of superposed gratings in alignment of nanolithography. J. Opt. Express 2008, 16, 7869–7880. [Google Scholar] [CrossRef] [PubMed]
- Surrel, Y. Images Optiques: Mesures 2D et 3D; Polycopié de cours; Conservatoire National des Arts et Métiers, Cours: Paris, France, 2004; Volume 71–72, pp. 133–137. [Google Scholar]
- Meziane, R.; Meguellati, S.; Messagier, M. Precision inspection of transparent component quality. Int. J. Adv. Manuf. Technol. 2023, 125, 1731–1741. [Google Scholar] [CrossRef]
Figure 1.
Experimental setup illustrating the optical detection principle.
Figure 1.
Experimental setup illustrating the optical detection principle.
Figure 2.
Moiré fringes materializing different tests: (a) test without sample, (b) Sample without defect detection, (c) Sample with defect detection.
Figure 2.
Moiré fringes materializing different tests: (a) test without sample, (b) Sample without defect detection, (c) Sample with defect detection.
Figure 3.
Explanatory image presents the dimensions of the defect along the X and Y axes.
Figure 3.
Explanatory image presents the dimensions of the defect along the X and Y axes.
Figure 4.
Moiré images of the S25CRX14 spinel sample sintered at 1300 °C: (a) Moiré fringes showing pronounced undulations and irregular spacing associated with surface defects such as streaks and grooves; (b) Moiré fringes exhibiting similar irregularities, confirming local surface roughness and deformation; (c) More regular and homogeneous moiré fringes, indicating a slightly smoother surface despite remaining imperfections.
Figure 5.
Moiré images of the S25CRX14 spinel sample sintered at 1350 °C: (a) Straight, parallel, and equidistant fringes indicating a homogeneous and well-densified region; (b) Slightly distorted fringes revealing localized surface defects affecting fringe regularity; (c) Similar deviations in fringe alignment, confirming the presence of minor surface heterogeneities.
Figure 6.
Moiré images of the S25CRX14 spinel sample sintered at 1400 °C: (a) Blurred and low-contrast fringes indicating a non-homogeneous surface with light scattering; (b) Dense and more pronounced fringes at the center, suggesting localized surface variations or internal stresses; (c) Globally reduced brightness with weakly defined fringes, reflecting additional surface or structural irregularities.
Figure 7.
Moiré images of defects measured on S25CRX14 spinel pellets sintered at 1300 °C (a) and 1350 °C (b) before sandblasting.
Figure 7.
Moiré images of defects measured on S25CRX14 spinel pellets sintered at 1300 °C (a) and 1350 °C (b) before sandblasting.
Figure 8.
Two-dimensional (2D) representation of surface defects observed on sintered pellets before sandblasting at 1300 °C (a) and 1350 °C (b).
Figure 8.
Two-dimensional (2D) representation of surface defects observed on sintered pellets before sandblasting at 1300 °C (a) and 1350 °C (b).
Figure 9.
Moiré images of the S25CRX14 spinel sample sintered at 1300 °C after sandblasting.
Figure 9.
Moiré images of the S25CRX14 spinel sample sintered at 1300 °C after sandblasting.
Figure 10.
Moiré images of the S25CRX14 spinel sample sintered at 1350 °C after sandblasting.
Figure 10.
Moiré images of the S25CRX14 spinel sample sintered at 1350 °C after sandblasting.
Figure 11.
Moiré images of the S25CRX14 spinel sample sintered at 1400 °C after sandblasting.
Figure 11.
Moiré images of the S25CRX14 spinel sample sintered at 1400 °C after sandblasting.
Figure 12.
Moiré images of defects measured on S25CRX14 spinel pellets sintered at 1300 °C (a) and 1350 °C (b) after sandblasting.
Figure 12.
Moiré images of defects measured on S25CRX14 spinel pellets sintered at 1300 °C (a) and 1350 °C (b) after sandblasting.
Figure 13.
Two-dimensional (2D) representation of surface defects observed on sintered pellets after sandblasting at 1300 °C (a) and 1350 °C (b).
Figure 13.
Two-dimensional (2D) representation of surface defects observed on sintered pellets after sandblasting at 1300 °C (a) and 1350 °C (b).
Figure 14.
Interpolated defect profiles in 2D for both sintering temperatures, before and after sandblasting.
Figure 14.
Interpolated defect profiles in 2D for both sintering temperatures, before and after sandblasting.
| Disclaimer/Publisher’s Note: The statements, opinions and data contained in all publications are solely those of the individual author(s) and contributor(s) and not of MDPI and/or the editor(s). MDPI and/or the editor(s) disclaim responsibility for any injury to people or property resulting from any ideas, methods, instructions or products referred to in the content. |
© 2025 by the authors. Licensee MDPI, Basel, Switzerland. This article is an open access article distributed under the terms and conditions of the Creative Commons Attribution (CC BY) license (https://creativecommons.org/licenses/by/4.0/).
