1. Introduction
Aluminum (Al) 6061 is commonly used in aerospace, automotive, and marine components due to its strength and resistance to corrosion [
1,
2,
3]. As product requirements become more demanding, manufacturers are turning to new techniques that can produce lightweight and detailed geometries efficiently. Conventional methods like casting or machining often fall short in this respect and lead to considerable waste. For example, aerospace parts may show buy-to-fly ratios as high as 12 to 25 [
4].
Additive manufacturing (AM) is increasingly being adopted for making shapes that are not easily formed by traditional means. Laser-powder bed fusion (L-PBF), directed energy deposition (DED), and binder jetting (BJ) are among the methods explored for this purpose [
5]. L-PBF and BJ have shown good results for dense and complex components [
5]. However, processes like BJ and LPBF use loose metal powders, which are hazardous when dealing with aluminum [
6]. These powders are prone to combustion under certain conditions [
7]. Additionally, LPBF of Al 6061 tends to suffer from solidification cracking because of its wide freezing range (~70 °C) and poor liquid flow near the end of solidification [
8,
9,
10]. Given these issues, alternative manufacturing options are being considered.
Material extrusion (MEX), which uses a metal–polymer filament, is one such method. Unlike powder-based systems, it avoids reactive powders and does not need specialized infrastructure. It is also easier to handle and safer to operate [
11,
12,
13,
14,
15,
16,
17].
Despite these benefits, processing Al 6061 via MEX presents its own difficulties. These include keeping the filament flexible while loading it with a high fraction of metal [
11,
12,
13,
14,
15,
16,
17], ensuring binder performance during debinding [
11,
12,
13,
14,
15,
16,
17,
18,
19], breaking through the oxide layer that slows sintering [
18], and achieving age hardening with proper thermal cycles [
1,
2,
18].
Past research has shown success with metals such as 316L, 17-4PH, copper, and Ti-6Al-4V [
11,
12,
13,
14,
15,
16,
17]. But aluminum, especially Al 6061, has not been studied as extensively [
3]. Few studies report densities above 97% without additional processing steps like hot isostatic pressing for AM Al 6061 components [
7,
8,
9,
10].
This work examines how varying solids content affects filament behavior during extrusion. Thermal analysis is used to guide the debinding and sintering steps. Mechanical and microstructural data are collected across different extrusion multipliers to evaluate final part quality. The results are intended to clarify how feedstock formulation and process settings affect the outcome in MEX-printed Al 6061 parts.
According to the NASA Materials Data Handbook, 6061 aluminum alloy in its fully annealed condition exhibits an ultimate tensile strength of 124–186 MPa, a yield strength of 55–83 MPa, and an elongation of 25–40%, indicating excellent ductility. The Young’s modulus remains nearly constant at 68.9 GPa, with a density of 2.70 g/cm
3. These properties reflect the alloy’s softened state, making it ideal for forming and machining prior to subsequent strengthening heat treatments [
20].
The Material Extrusion (MEX) process for Al 6061 offers a compelling alternative to conventional fusion-based methods, mitigating inherent drawbacks such as handling hazardous loose powders and avoiding high thermal stress and solidification cracking commonly occurring in Laser Powder Bed Fusion (L-PBF) [
2,
3] and is considerably more affordable in comparison with other methods. While Al 6061 parts fabricated by L-PBF often yield poor mechanical performance (UTS typically below 84 MPa and elongation below 3%) [
2] due to processing defects, the MEX process achieved a superior balance of properties, resulting in an Ultimate Tensile Strength (UTS) of 153.5 ± 3 MPa, a Yield Strength (YS) of 68.2 ± 11.7 MPa, and significant ductility (elongation of 28 ± 3%). This strength profile is slightly higher than MIM Al 6061(UTS of 143.0 ± 5.0 MPa, YS of 52.6 ± 8.8 MPa, as sintered) and offers enhanced ductility (28 ± 3% vs. MIM 22.0 ± 0.4%, as sintered) without requiring secondary treatments like hot isostatic pressing (HIP). From
Table 1, the MEX approach in this work successfully produced parts with high sintered density (99% for the density cube and 97 ± 0.9% for the tensile bars) comparable to other AM technologies using the standard Al 6061 alloy and features a stable, homogeneous microstructure characterized by equiaxed grains and evenly distributed beta-phase precipitates. This demonstrates that MEX provides a safer and more accessible route for structural Al 6061 components with reliable mechanical properties, avoiding the complex optimization required by fusion systems or the challenges in achieving full consolidation.
3. Results and Discussion
3.1. Powder and Feedstock Characterization
3.1.1. Al-6061 Powder Properties
The SEM images (
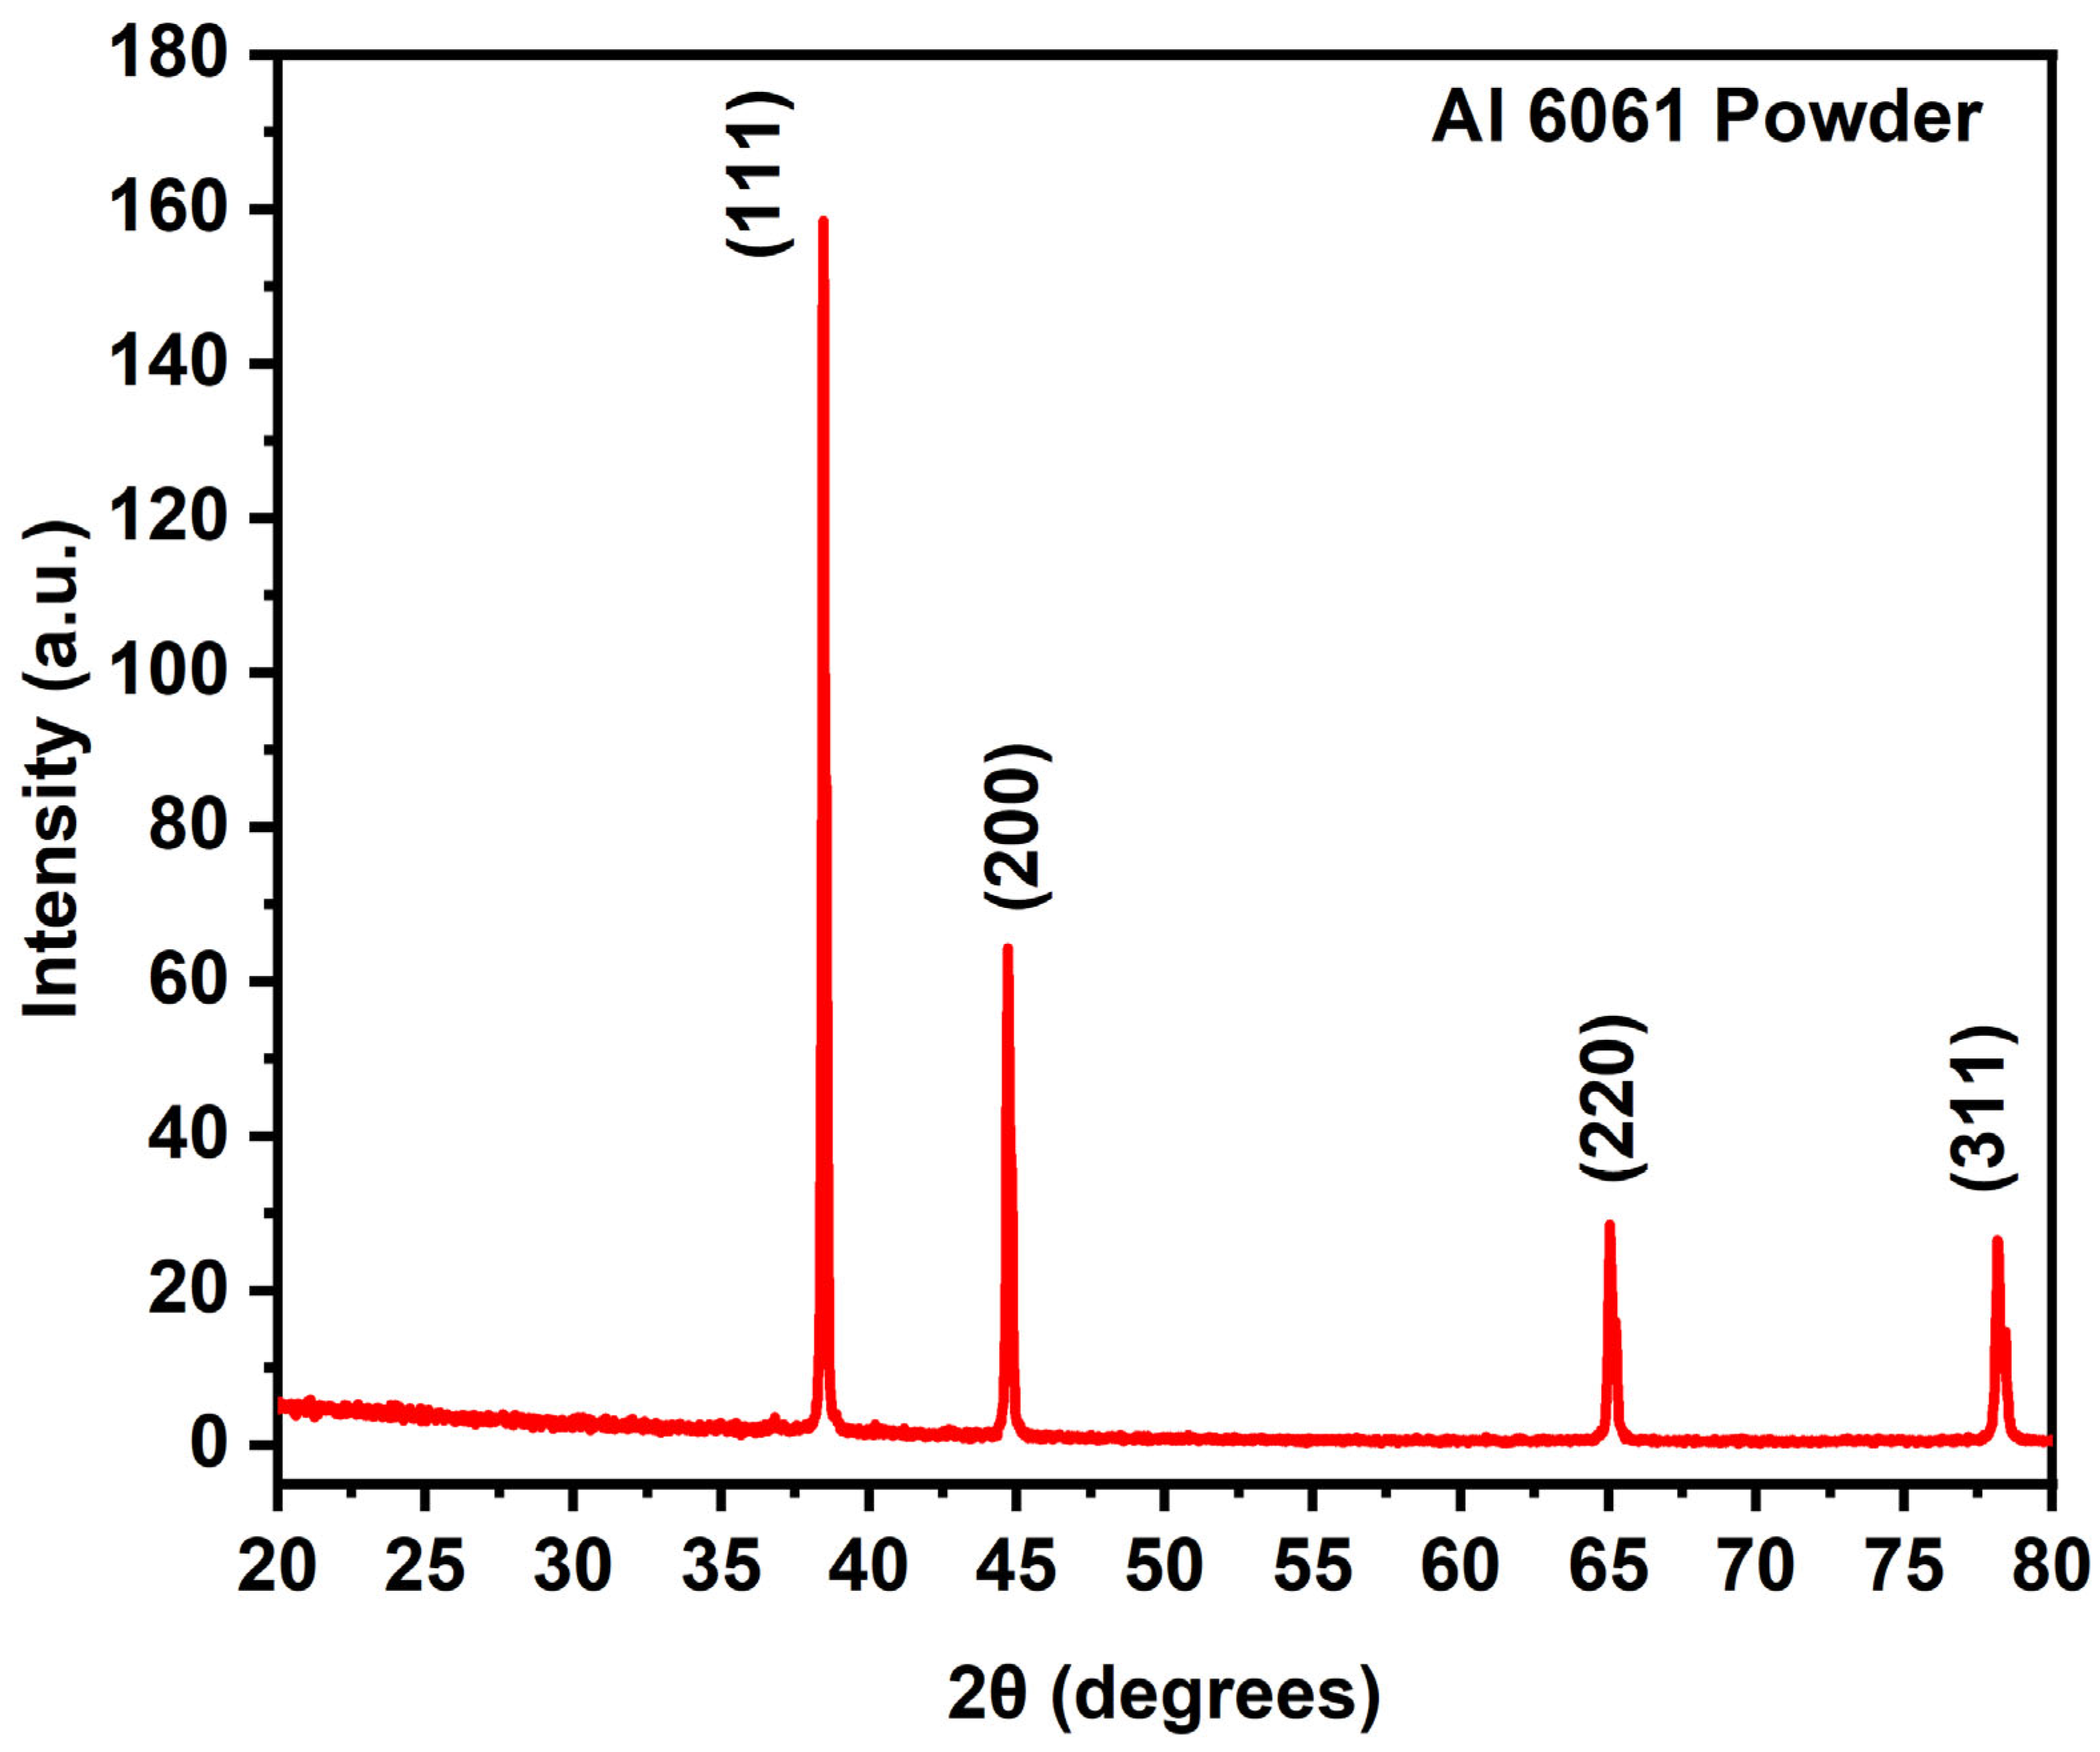
Figure S5) of the Al 6061 powder showed mostly spherical powder particles with a few microscopic satellites adhered to their surfaces. This is typical in gas-atomized aluminum powders and facilitates good flow and efficient packing during feedstock preparation. X-ray diffraction on powder has shown a face-centered cubic crystal structure with diffraction peaks corresponding to the (111), (200), (220), and (311) planes of aluminum (
Figure 1). The powder’s flow behavior, indicated by the Hausner ratio was calculated to be 1.13, which is below the accepted threshold of 1.25 for better packing. The packing fraction was measured to be 66%, indicating that the powder has a favorable bulk-to-tap density ratio for achieving high solids loading in the feedstock [
13,
14,
15].
3.1.2. Critical Solids Loading Determination
To evaluate the mixing behavior of the Al 6061 feedstock and determine the critical solids loading (CSL), the Al 6061 compounded feedstock was evaluated using torque rheometry and is shown in
Figure 2. The torque versus solids loading curve in the figure shows a distinct change in slope at a powder loading of 65%. This indicates the percolation threshold and transition point in flow behavior in the feedstock, and the transition is divided into two linear regions: (1) Region 1: y
1 = 1.8410x − 87.06 (2) Region 2: y
2 = 4.2347x − 242.33. Each linear fit demonstrated a strong correlation (R
2 = 0.99), supporting the validity of torque-based CSL determination. This behavior is similar to the work presented in Singh et al. on different metal alloys [
14,
15]. The optimal solids loading was selected at 57 volume%, which is below the identified CSL to maintain the reliable filament extrusion and avoid nozzle clogging. Operating below the percolation limit is a well-established strategy in feedstock design and has been successfully applied in systems like Ti-6Al-4V to balance printability and mechanical performance. In fact, Rodríguez Alvarez et al. emphasized in their work that fine-tuning the solids content in highly filled thermoplastic mixtures is crucial, as it helps achieve stable flow, a uniform microstructure, and strong, defect-free parts [
26].
3.1.3. Rheological Behavior
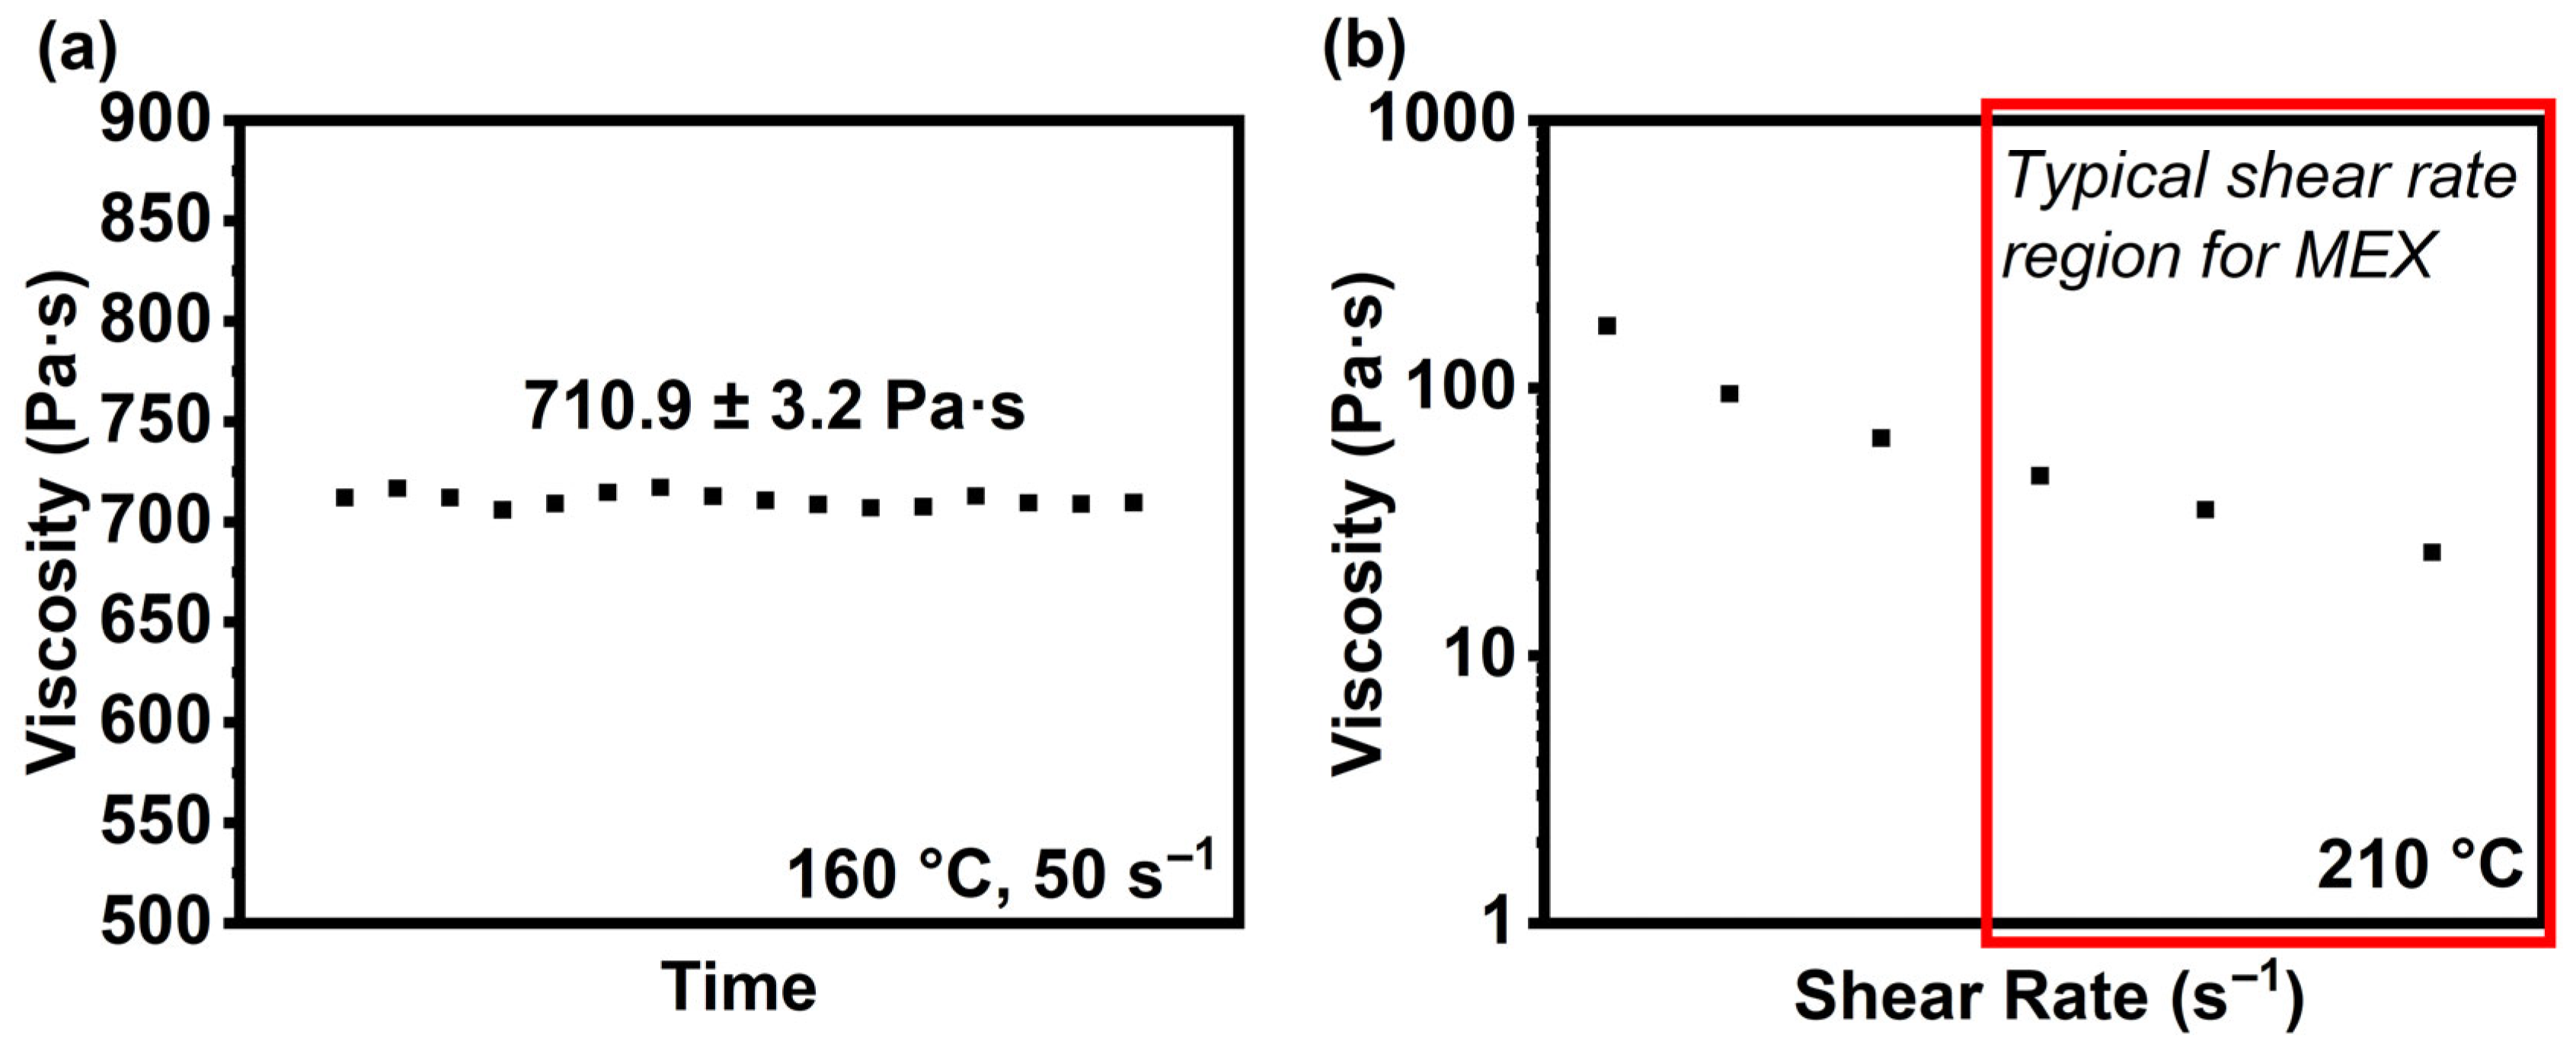
The viscosity of the Al 6061 feedstock was measured at two temperatures to understand its behavior during extrusion. At 160 °C and a shear rate of 50 s
−1, the feedstock showed a viscosity of 710.9 ± 3.2 Pa·s (
Figure 3a), which reflects stable powder–binder interaction and reliable thermal behavior [
13,
14,
15,
18,
19]. That’s generally what helps prevent clogging during extrusion. At 210 °C, the material exhibited strong shear-thinning. When shear rate increased from 1 to 1000 s
−1, viscosity dropped to under 100 Pa·s (
Figure 3b), which lines up with typical extrusion behavior. It also helps the material pass through the nozzle cleanly without deforming [
13,
14,
15,
26].
According to Singh et al. [
14] and Ajjarapu et al. [
26], metal-filled filaments perform best when viscosity is in the 50–200 Pa·s range. Staying in this range reduces the likelihood of pressure buildup or uneven flow. The Al 6061 feedstock reported here meets that criterion and is expected to print without major issues.
These results also follow the trend seen in stainless steel, copper, and titanium systems processed with similar techniques [
3,
13,
14,
15,
26]. It suggests that the same binder and loading strategy works well for aluminum.
3.2. Filament Quality and Printing Performance
The diameter of the filament was measured with a digital caliper (0.01 mm resolution) at ten different locations. The average diameter was 1.74 mm, and the standard deviation was 0.0064 mm, which fell within the range suitable for reliable feeding and printing of green parts. Cross-sectional examination (
Figure 4) showed that aluminum particles were evenly distributed throughout the filament, with each particle coated by a continuous polymer layer. SEM images showed no particle agglomeration, suggesting that the mixing and compounding were effective. The filaments also had enough flexibility to be spooled without cracking, which helps prevent handling problems. Brittleness during coiling is a common issue in metal-filled thermoplastics and often leads to cracking during transport or use [
3,
12,
13,
14,
15,
26].
Printing was tested using extrusion multipliers of 0.9, 0.95, and 1.0. In all cases, the resulting parts had sharp edges, accurate shapes, and clean profiles. Both the tensile test bars (ASTM E8M [
27]) and density cubes held their dimensions well and showed solid bonding between printed layers. These outcomes are in line with results reported by Bankapalli et al. [
12] in similar MEX systems. Likewise, Singh et al. [
14] and Ajjarapu et al. [
26] observed that when the feedstock and printing parameters are properly tuned, part accuracy and layer adhesion improve noticeably.
There were no signs of warping, cracks, or layer separation in any of the parts, issues that usually show up when the material mix isn’t right or flow behavior is inconsistent [
14,
26].
3.3. Debinding and Sintering Behavior
Thermal Analysis
Thermal analysis of the green and solvent-debound brown bodies was performed using TGA and DTG. The TGA-DTG curve for the Al 6061 green specimens is shown in
Figure 5. The TGA and DTG curves help in understanding the binder decomposition behavior and guide the design of a controlled de-binding cycle [
18,
19]. The total mass loss was around 22% by weight, which indicates that the binder system was fully removed. A small drop in weight loss of about 2% occurred between 50 °C and 200 °C, indicating the evaporation of moisture and low-boiling-point plasticizers. The most significant weight loss is about 12%, which was observed between 200 °C and 400 °C, with the highest rate of change at 339.3 °C, corresponding to the breakdown of the polymer backbone. The final stage, showing a weight loss of roughly 6%, took place between 400 °C and 500 °C. This phase, which peaked at 443.8 °C on the DTG curve, is linked to the decomposition of long-chain additives and higher molecular weight residues.
These findings confirm that the binder burns off in multiple stages, supporting the use of a stepwise thermal de-binding cycle to mitigate internal pressure buildup, reduce cracking risk, and preserve part geometry during processing. Following solvent de-binding, the thermal decomposition profile of the brown part shifted, as shown in
Figure 6. The TGA curve recorded a total mass loss of approximately 14%, indicating that around 8% of the binder was successfully removed during the solvent step. The DTG curve displayed two prominent peaks at 254.4 °C and 422.7 °C, which correspond to the continued breakdown of intermediate- and high-temperature binder constituents. The lower intensity of these peaks, compared to the green parts, confirms that the solvent step effectively extracted low-temperature volatiles, thereby increasing pore connectivity and minimizing the risk of gas entrapment or cracking during thermal debinding [
18].
The thermal results match what was reported in earlier work by Bankapalli [
12], Singh [
14], and Ajjarapu [
26], who described similar step-by-step binder removal patterns in metal extrusion systems. Those studies also pointed out the value of combining solvent and heat-based debinding to slowly clear out organics while keeping parts intact. Based on the TGA and DTG data from this study, a custom debinding cycle was created for the Al-6061 feedstock. This approach helped remove the binder effectively while keeping the printed shape stable before sintering.
3.4. Properties of Sintered Parts
3.4.1. Sintered Density and Dimensional Shrinkage
The Al 6061 sintered parts density was measured and reported in
Figure 7. The sintered density of 1.0 EM samples was obtained from measuring six density cubes extruded at 1.0 EM. The sintered density of 0.95 EM was obtained from measuring five tensile bars, which were used for subsequent tests. The sintered density of 0.90 EM was obtained from measuring three tensile bars, which were used for subsequent tests. Sintered samples from three extrusion multipliers have been measured, and the highest density recorded was 97.1 ± 1% of Al 6061’s theoretical value (2.70 g/cm
3), achieved at the 0.9 setting. The small variation across the different settings points to good layer fusion and solid particle bonding during sintering, even with slight differences in the printed strand width.
This level of density shows that the combination of feedstock design and the controlled de-binding-sintering process was effective at reducing pores and managing shrinkage. However, the density of Al 6061 parts reported in this paper is slightly lower than the MIM and L-PBF Al 6061 density values [
8,
9,
10,
21,
24,
29,
30]. For reference, Joys [
29] reported up to 98.6% density in Al 6061 parts made by metal injection molding, using optimized sintering near the eutectic temperature range (640–650 °C). Similar results were shown by Cao et al. [
9] and Ince et al. [
10] using laser powder bed fusion, where fine-tuned scan strategies and preheating helped push densities to between 98.7% and 99.1%. Those processes, however, often deal with issues like high thermal stress, magnesium or silicon loss, and increased risk of hot cracking—problems largely avoided by extrusion-based methods like the one used here.
The dimensional shrinkage of samples was evaluated by measuring the length (X direction), grip width (Y direction) and thickness (Z direction) of tensile bars with a digital caliper (0.01 mm resolution). As shown in
Table 2, dimensional shrinkage in the X and Y directions among three different groups was close whereas the shrinkage in the Z direction showed a bigger difference. The shrinkage values could be used as scaling factors in the future to minimize dimensional differences between design and product.
3.4.2. Microstructural Characterization of Sintered Parts
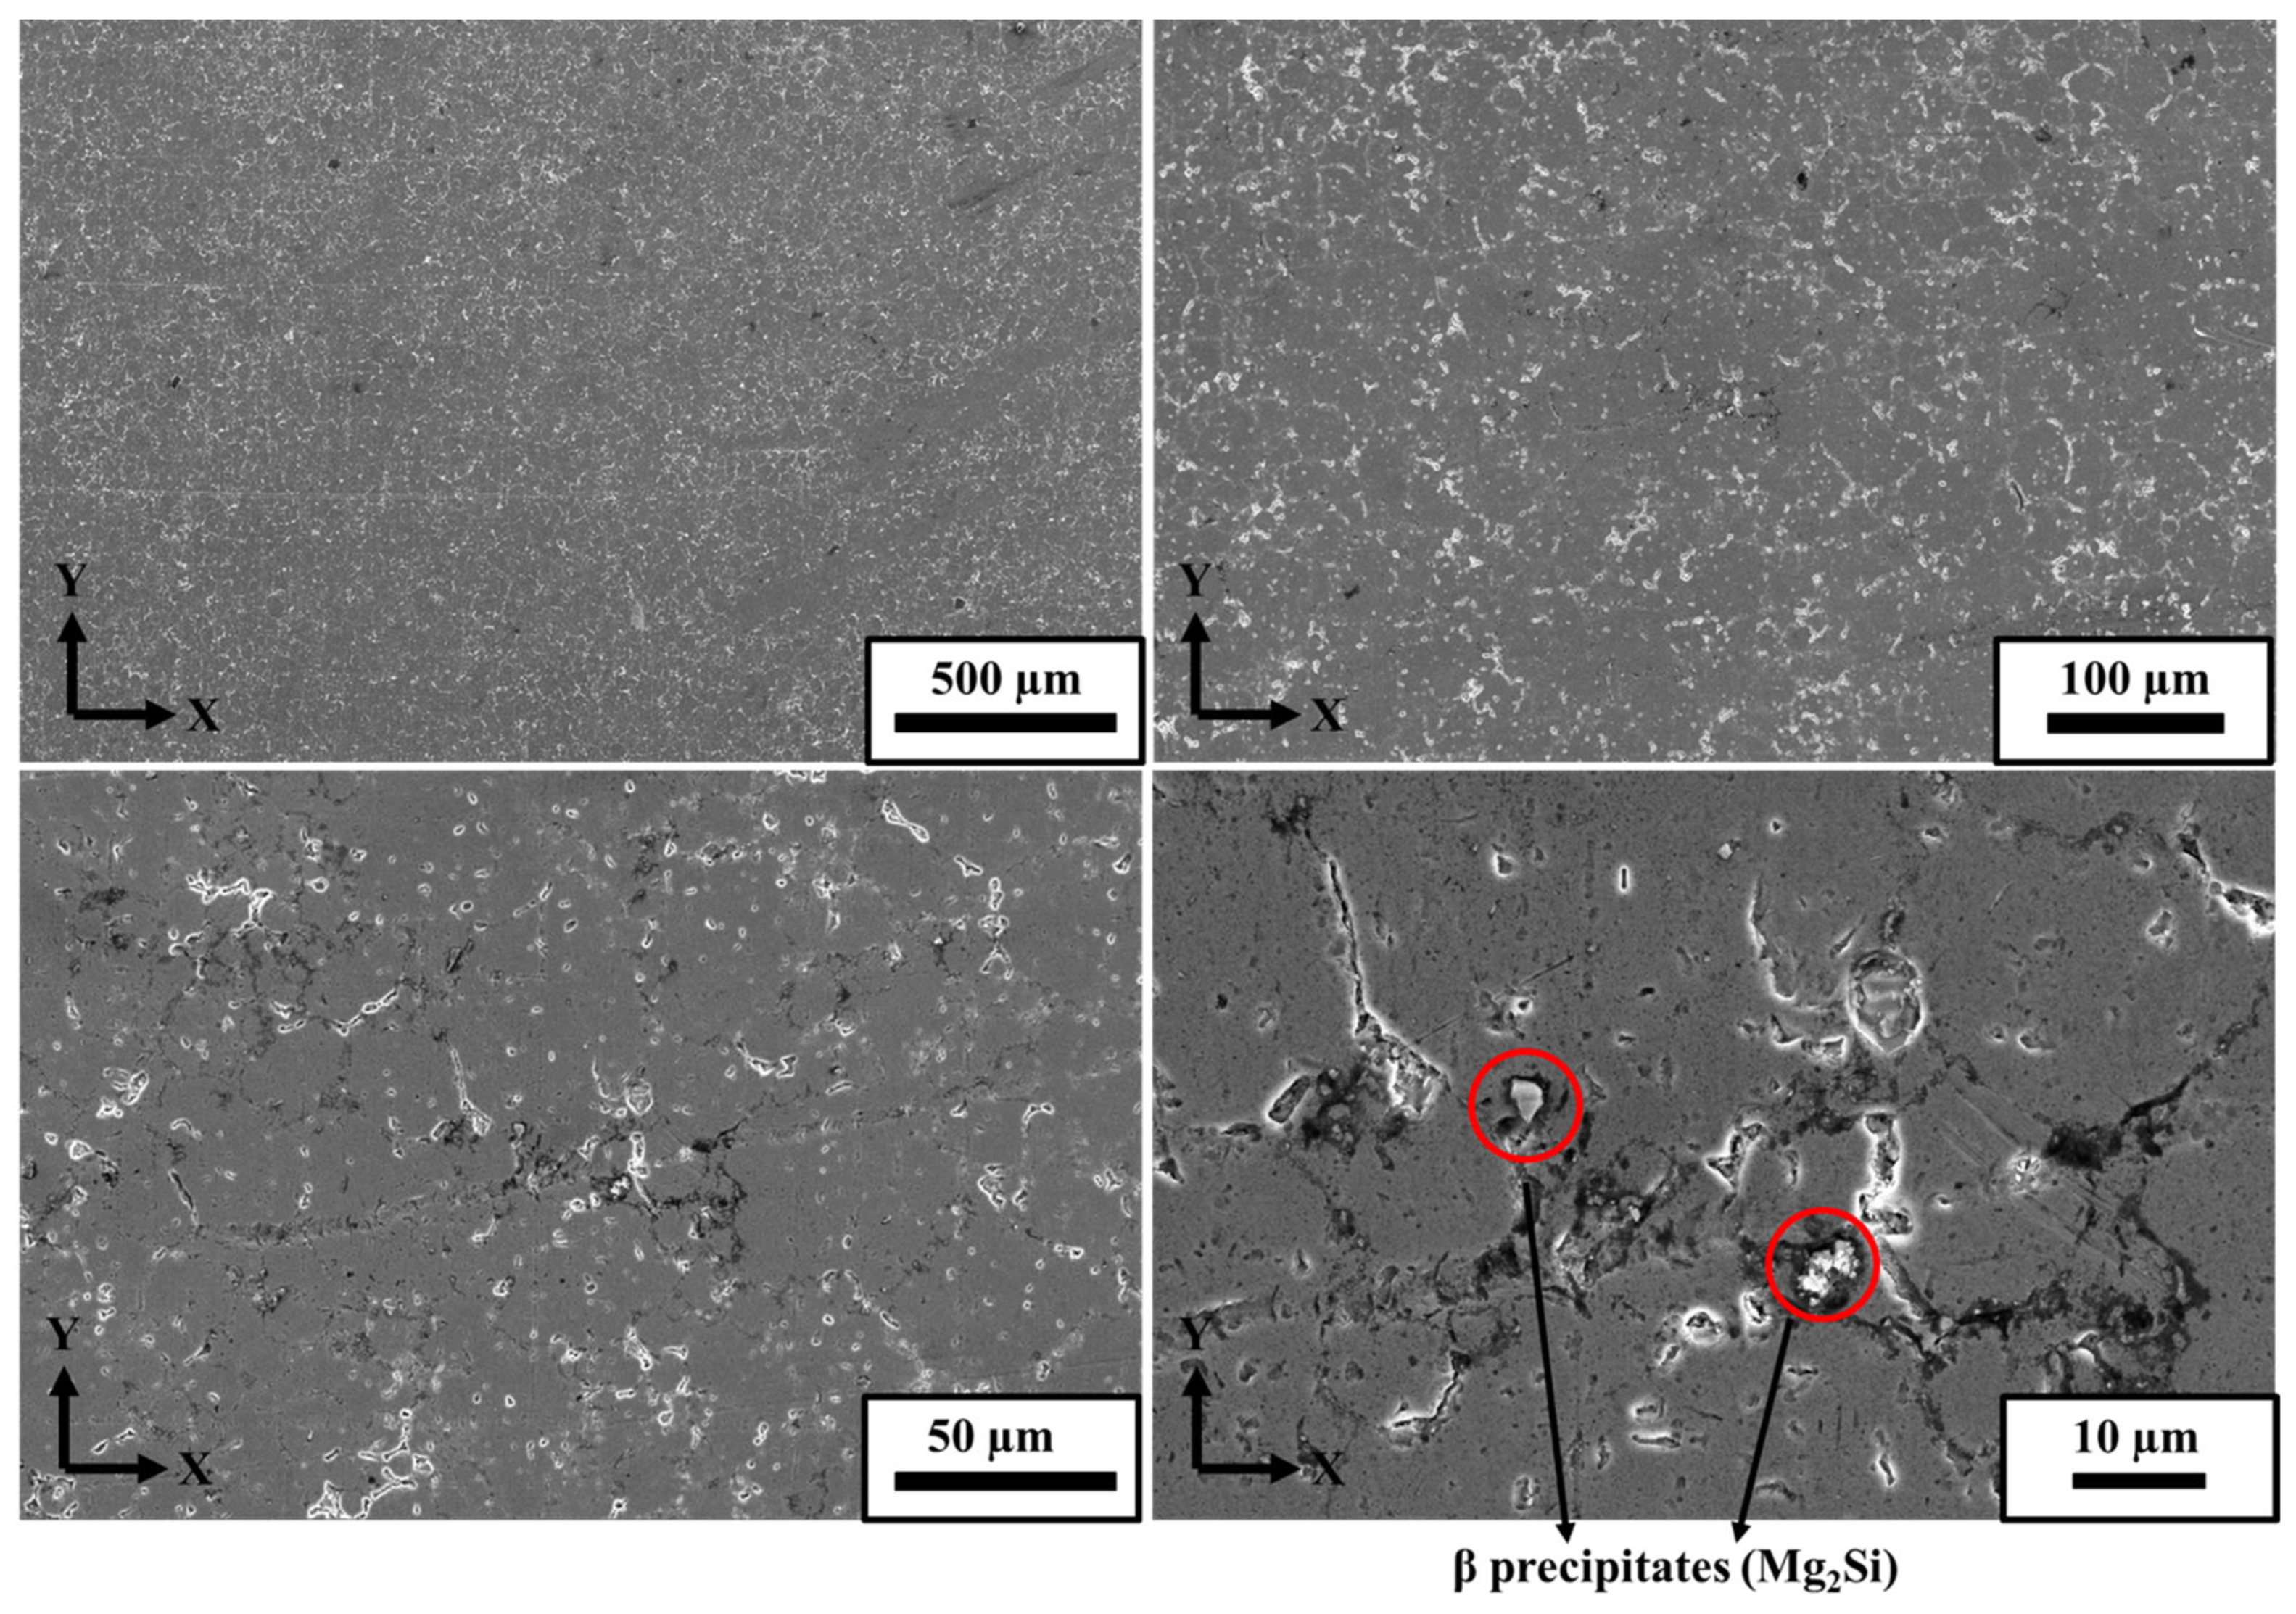
Scanning electron microscopy was used to analyze the microstructure of one sintered density cube printed at an extrusion multiplier of 0.95. The density of the cube was measured to be 99%.
Figure 8 and
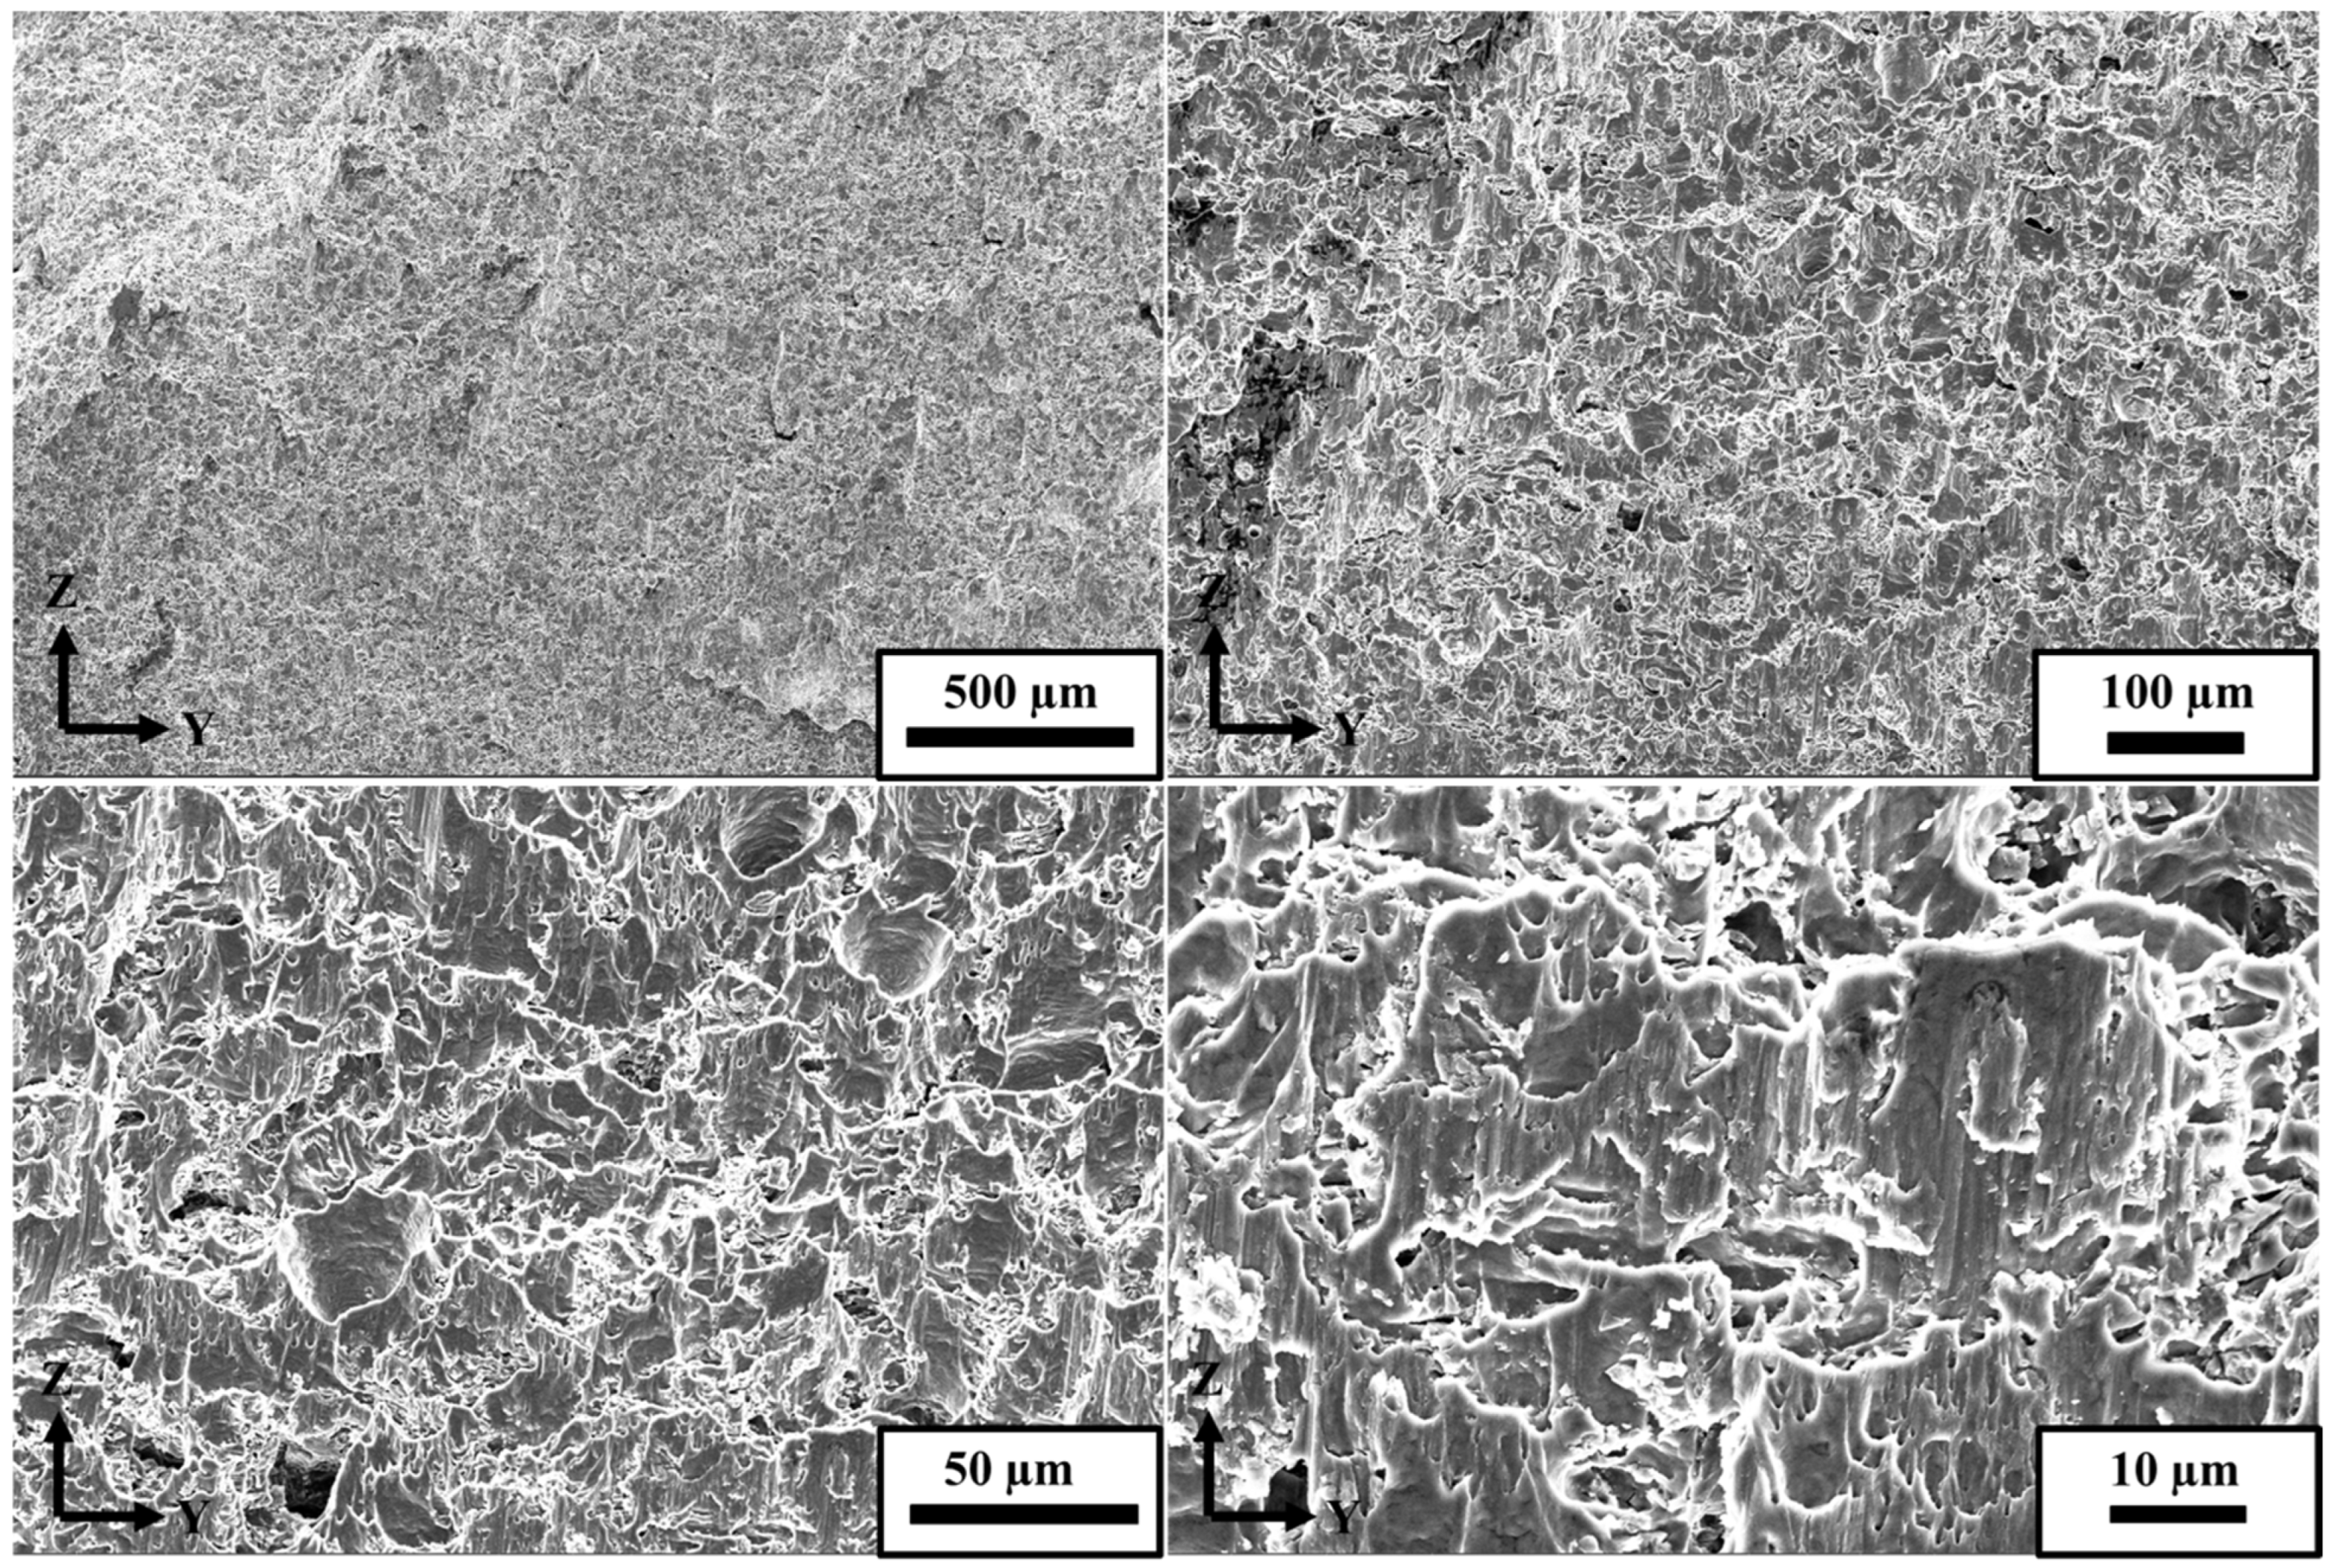
Figure 9 present views of the X–Y plane (parallel to the build platform) and Y–Z plane (along the build direction), respectively. The X–Y cross-section in
Figure 8 shows a microstructure made up of relatively large equiaxed grains, along with evenly distributed beta-phase magnesium silicide (Mg
2Si) precipitates. These Mg
2Si precipitates are typical in Al 6061 and help strengthen the alloy by limiting dislocation movement during age-hardening treatments [
1,
2]. Their even distribution, with no visible clumping or segregation, suggests that the sintering process might have helped to maintain a stable grain structure and uniform microstructure in the X–Y plane.
Figure 9 shows the Y–Z plane, where the grains appear finer and slightly stretched along the build direction. This kind of structure is common in extrusion-based additive manufacturing due to directional cooling and the layered build approach [
10,
11,
12,
13,
14,
26]. The red-circled areas in the image mark regions where beta-phase precipitates are spread across the matrix. There are no signs of delamination or large voids in this section, which backs up the earlier density results.
Anisotropic grain structures like this are often seen in both laser powder bed fusion and extrusion processes for aluminum alloys. In both cases, thermal gradients and build orientation have a big impact on how grains grow and how the part performs mechanically [
10,
11,
12,
13,
14]. The microstructure is free from internal cracks or voids and points to the effectiveness of the staged binder removal and careful sintering steps. These results, along with the ~97% measured density, show that MEX can produce Al 6061 parts with good dimensional accuracy and strength, without needing loose powders or post-processing like hot isostatic pressing.
3.4.3. Sintered Part Mechanical Properties
The mechanical performance of the sintered Al 6061 parts was strongly affected by the choice of extrusion multiplier, as shown in
Figure 10. Among the three conditions tested, parts printed with a 0.95 extrusion multiplier achieved the most favorable combination of properties: an ultimate tensile strength of 153.5 ± 3 MPa, a yield strength of 68.2 ± 11.7 MPa, and an elongation of 28 ± 3%. In comparison, parts printed using a 0.9 extrusion multiplier showed slightly lower performance, with an ultimate tensile strength of 143 ± 11 MPa, a yield strength of 64 ± 2.2 MPa, and an elongation of 20.2 ± 3.3%. Samples printed at a 1.0 extrusion multiplier showed the lowest strength and ductility among the tested conditions. These parts had an ultimate tensile strength of 122.3 ± 5.7 MPa, a yield strength of 62.5 ± 4.3 MPa, and an elongation of 12.2 ± 0.9%. The drop in mechanical performance is likely the result of over-extrusion, which can disrupt proper layer bonding and lead to uneven sintering. Despite the mechanical properties differences across samples printed with different extrusion multipliers, the sintered part densities were relatively similar, averaging around 97%, as shown in
Figure 7. This mismatch between mechanical performance and sintered density highlights that high sintered density alone doesn’t guarantee strong interlayer adhesion or good mechanical properties of MEX-printed samples.
A similar pattern was seen in other systems. For example, Singh [
14] reported that Ti-6Al-4V samples with nearly identical densities showed very different tensile strengths. The variation was traced back to changes in binder removal behavior, leftover stresses, and how well the layers stuck together. Ajjarapu et al. [
13] reported comparable findings in their study of copper and stainless-steel MEX filaments, where even small changes in extrusion multiplier or feedstock formulation led to significant variations in strength and ductility, even when overall density was unchanged.
When compared to parts made through traditional routes, the Al 6061 samples produced in this study demonstrate promising results. For instance, metal injection molded Al 6061 has been reported to achieve ultimate tensile strengths of about 153 MPa, yield strength of around 73 MPa, and elongation near 22% under optimized sintering near the eutectic range of 640 to 650 degrees Celsius [
29,
30]. In comparison, laser powder bed fusion (LPBF) can reach higher tensile strengths, typically between 230 and 280 MPa, but often relies on extra steps like powder bed preheating or hot isostatic pressing to address problems such as hot cracking and porosity [
10,
11]. Interestingly, the Al 6061 parts produced in this study, especially those printed with a 0.95 extrusion multiplier, show strength levels close to those of metal injection molded (MIM) parts, while offering better ductility. These results were achieved without any secondary treatments like HIP, which points to the potential of MEX as a safer, more cost-effective, and accessible method for manufacturing structural aluminum parts with solid strength and good formability.
3.4.4. Fracture Surface Analysis
Figure 11 shows the fracture surface of a tensile sample printed with a 0.95 extrusion multiplier. The surface is covered with equiaxed dimples, typical of micro-void coalescence, which is a well-known sign of ductile fracture in aluminum alloys, as described by Polmear et al. [
1,
2]. This matches the elongation values reported for sintered Al 6061 samples of 28 ± 3%, as shown in the figure, indicating it went through significant plastic deformation before breaking.
No evidence of brittle fracture, delamination, or large voids was found on the fracture surface. This absence of defects indicates solid interlayer bonding and uniform sintering, which are both key factors for maintaining structural reliability in extrusion-based aluminum components. Overall, the features seen on the fracture surface are consistent with the mechanical test results and suggest that the feedstock and processing approach used here performed as intended.
While fracture surface analysis was conducted only for the 0.95 extrusion multiplier, the mechanical property variations seen across the other extrusion settings, despite similar sintered densities, imply that interlayer bonding quality and bead geometry may have a significant influence on local stress distributions and failure modes. Comparable findings have been reported in prior MEX and metal fused filament fabrication studies. For example, Ajjarapu et al. [
26] noted that minor changes in extrusion settings or formulation could alter ductility due to shifts in interfacial fusion. Similarly, Singh et al. [
14,
15] observed that interlayer fusion quality had a stronger effect on tensile strength than overall part density in metal FFF systems.
Future investigations should include a broader fracture morphology comparison across different extrusion multipliers to better understand how process conditions affect failure mechanisms in aluminum extrusion additive manufacturing. This could offer further insight into optimizing both part strength and durability without reliance on post-processing.
3.5. Conclusions and Future Work
The results of this study demonstrate that metal material extrusion (MEX) is a feasible approach for manufacturing Al-6061 components with high relative density and reliable mechanical strength. Of the process settings evaluated, an extrusion multiplier of 0.95 delivered the most balanced performance, offering good material flow, strong layer bonding, and accurate part geometry. At this setting, the sintered samples reached an ultimate tensile strength of 153.5 MPa, 28% elongation, and 97.1% of the theoretical density.
Microstructural analysis showed even distribution of β-Mg2Si precipitates and strong layer fusion, with no signs of large voids or delamination. The combined solvent and thermal debinding process, followed by sintering in a nitrogen atmosphere, supported densification while keeping the part structure intact. These results suggest that MEX can be a cost-effective, powder-free alternative for producing structural aluminum parts, with performance close to what’s seen in metal injection molding (MIM) and powder bed fusion systems.
Future studies will look at fracture surfaces from parts printed under a broader range of conditions to better understand how different extrusion settings influence bonding quality and failure behavior. Post-processing methods like thermal aging or hot isostatic pressing may also be explored to further enhance the mechanical performance of Al-6061 parts made through MEX.


