Abstract
The effects of multiple austenitizing and quenching (AQ) thermal cycles on the microstructure and hardness of AISI O2 (90MnCrV8), D2 (X153CrMoV12), and D3 (X210Cr13) tool steels were systematically investigated. Up to four consecutive AQ treatments were applied to assess the influence of repeated austenitization on grain refinement, carbide dissolution, martensitic transformation, and retained austenite. The microstructure was investigated by optical and SEM observations, supported with XRD analyses. The results were correlated with Rockwell and Vickers hardness measurements. In AISI O2, the mean austenitic grain size decreased from (6.5 ± 0.8) μm to (4.3 ± 0.4) μm, accompanied by an increase in hardness from ~800 HV1 to ~950 HV1 (63 HRC), mainly due to the progressive carbide dissolution and a reduction in retained austenite. In AISI D2 and D3, repeated AQ cycles led to a marked reduction in carbide size and volume fraction (up to 25%), with D2 showing partial coarsening beyond the third cycle and D3 exhibiting continuous dissolution owing to higher carbide stability. A linear correlation between the carbide volume fraction and Rockwell hardness was established. Compared with conventional single-step treatments, the multi-cycle AQ approach also promote spheroidization of small carbides.
1. Introduction
Cold-work tool steels such as AISI O2, D2, and D3 are widely used in forming, cutting, and blanking applications due to their high hardness, dimensional stability, and wear resistance. These properties are largely governed by heat treatment, which determines key microstructural features including austenitic grain size, carbide morphology, and martensitic transformation behavior. Conventional single-step austenitizing and quenching (AQ) treatments, typically followed by tempering, are standard practice; however, such processes often result in incomplete carbide dissolution and heterogeneous microstructures. These microstructural features can limit hardness uniformity and reduce wear life during service [,].
Carbides play a central role in controlling both the microstructural evolution and mechanical performances of tool steels. The type, size, and distribution of carbides (typically M7C3, M23C6, and MC) are strongly influenced by their chemical composition and thermal history. Controlled carbide dissolution and redistribution affect martensite formation and, consequently, the hardness of the steel [,]. Kim et al. [], in a comprehensive study on 8% Cr cold-work tool steel, demonstrated the transformation sequence of carbides through the entire processing route, from casting to tempering. MC and M7C3 phases were observed in as-produced steel, while intermediate M2C and M6C carbides formed during annealing and subsequently decomposed during tempering into stable M23C6 and MC particles.
In recent years, several studies were focused on the potential of multi-stage or repeated heat treatments to refine the microstructure and improve hardness. Salunkhe et al. [] reported that double austenitization of AISI D2 steel produced finer carbide dispersion and a more homogeneous martensitic matrix, resulting in increasing hardness. Celtik et al. [] observed that double austenitization in 41Cr4 steel refined both carbide size and austenitic grains. Alza [] further demonstrated that multiple tempering cycles of AISI D3 steel improved hardness and wear resistance through uniform secondary carbide precipitation. Collectively, these results indicate that repeated thermal cycles can promote microstructural refinement, enhance hardness, and mitigate grain coarsening. Nevertheless, the response to repeated austenitizing and quenching depends strongly on alloy composition and carbide stability. Shengrui et al. [] demonstrated incomplete carbide dissolution in AISI D2 subjected to multistage AQ at 1200 °C and 1050 °C, followed by tempering. In high-carbon, high-chromium tool steels, excessive carbide dissolution may produce an oversaturated matrix and compromise stability, while insufficient dissolution can retain coarse carbides and limit hardenability [,]. Therefore, optimizing multiple AQ cycles is essential to balance carbide dissolution, grain refinement, and martensitic strengthening.
Within this framework, microstructural optimization and the resulting enhancement of the mechanical performance of tool steels contribute to maximizing resource efficiency and reducing carbon emissions, which have emerged as key research priorities in industrialization processes. A well-balanced combination of hardness, toughness, wear resistance, and fatigue resistance in tool steels extends service life by minimizing maintenance requirements and the frequency of tool replacements. Furthermore, costs and carbon emissions can be mitigated through improvements in steelmaking quality, which influence both the intrinsic properties of the steel (e.g., a more precisely controlled chemical composition) and subsequent heat treatment procedures []. Accordingly, carbon emissions can be further reduced or controlled by tailoring furnace operations to industry- and process-specific requirements, including the increased integration of renewable energy sources and/or waste heat recovery, throughout industrialization processes [,,].
For these reasons, the present work systematically investigates the influence of multiple austenitizing and quenching cycles, ranging from one to four repetitions, on the microstructural optimization and hardness improvement of AISI O2 (90MnCrV8), D2 (X153CrMoV12), and D3 (X210Cr13) tool steels with an increment in carbon content. Unlike previous studies, the repeated AQ cycles in the present work are characterized by reduced holding time at the austenitization temperatures, with no tempering performed between AQ cycles. Emphasis is placed on the correlation between carbide dissolution, austenitic grain refinement, and hardness evolution. Establishing these relationships provides new insight into the role of repeated austenitization in enhancing hardness and wear resistance, offering a practical strategy for optimizing multi-cycle heat treatments in cold-work tool steels before applying a tempering treatment to recover toughness and trigger the precipitation of secondary carbides.
2. Materials and Methods
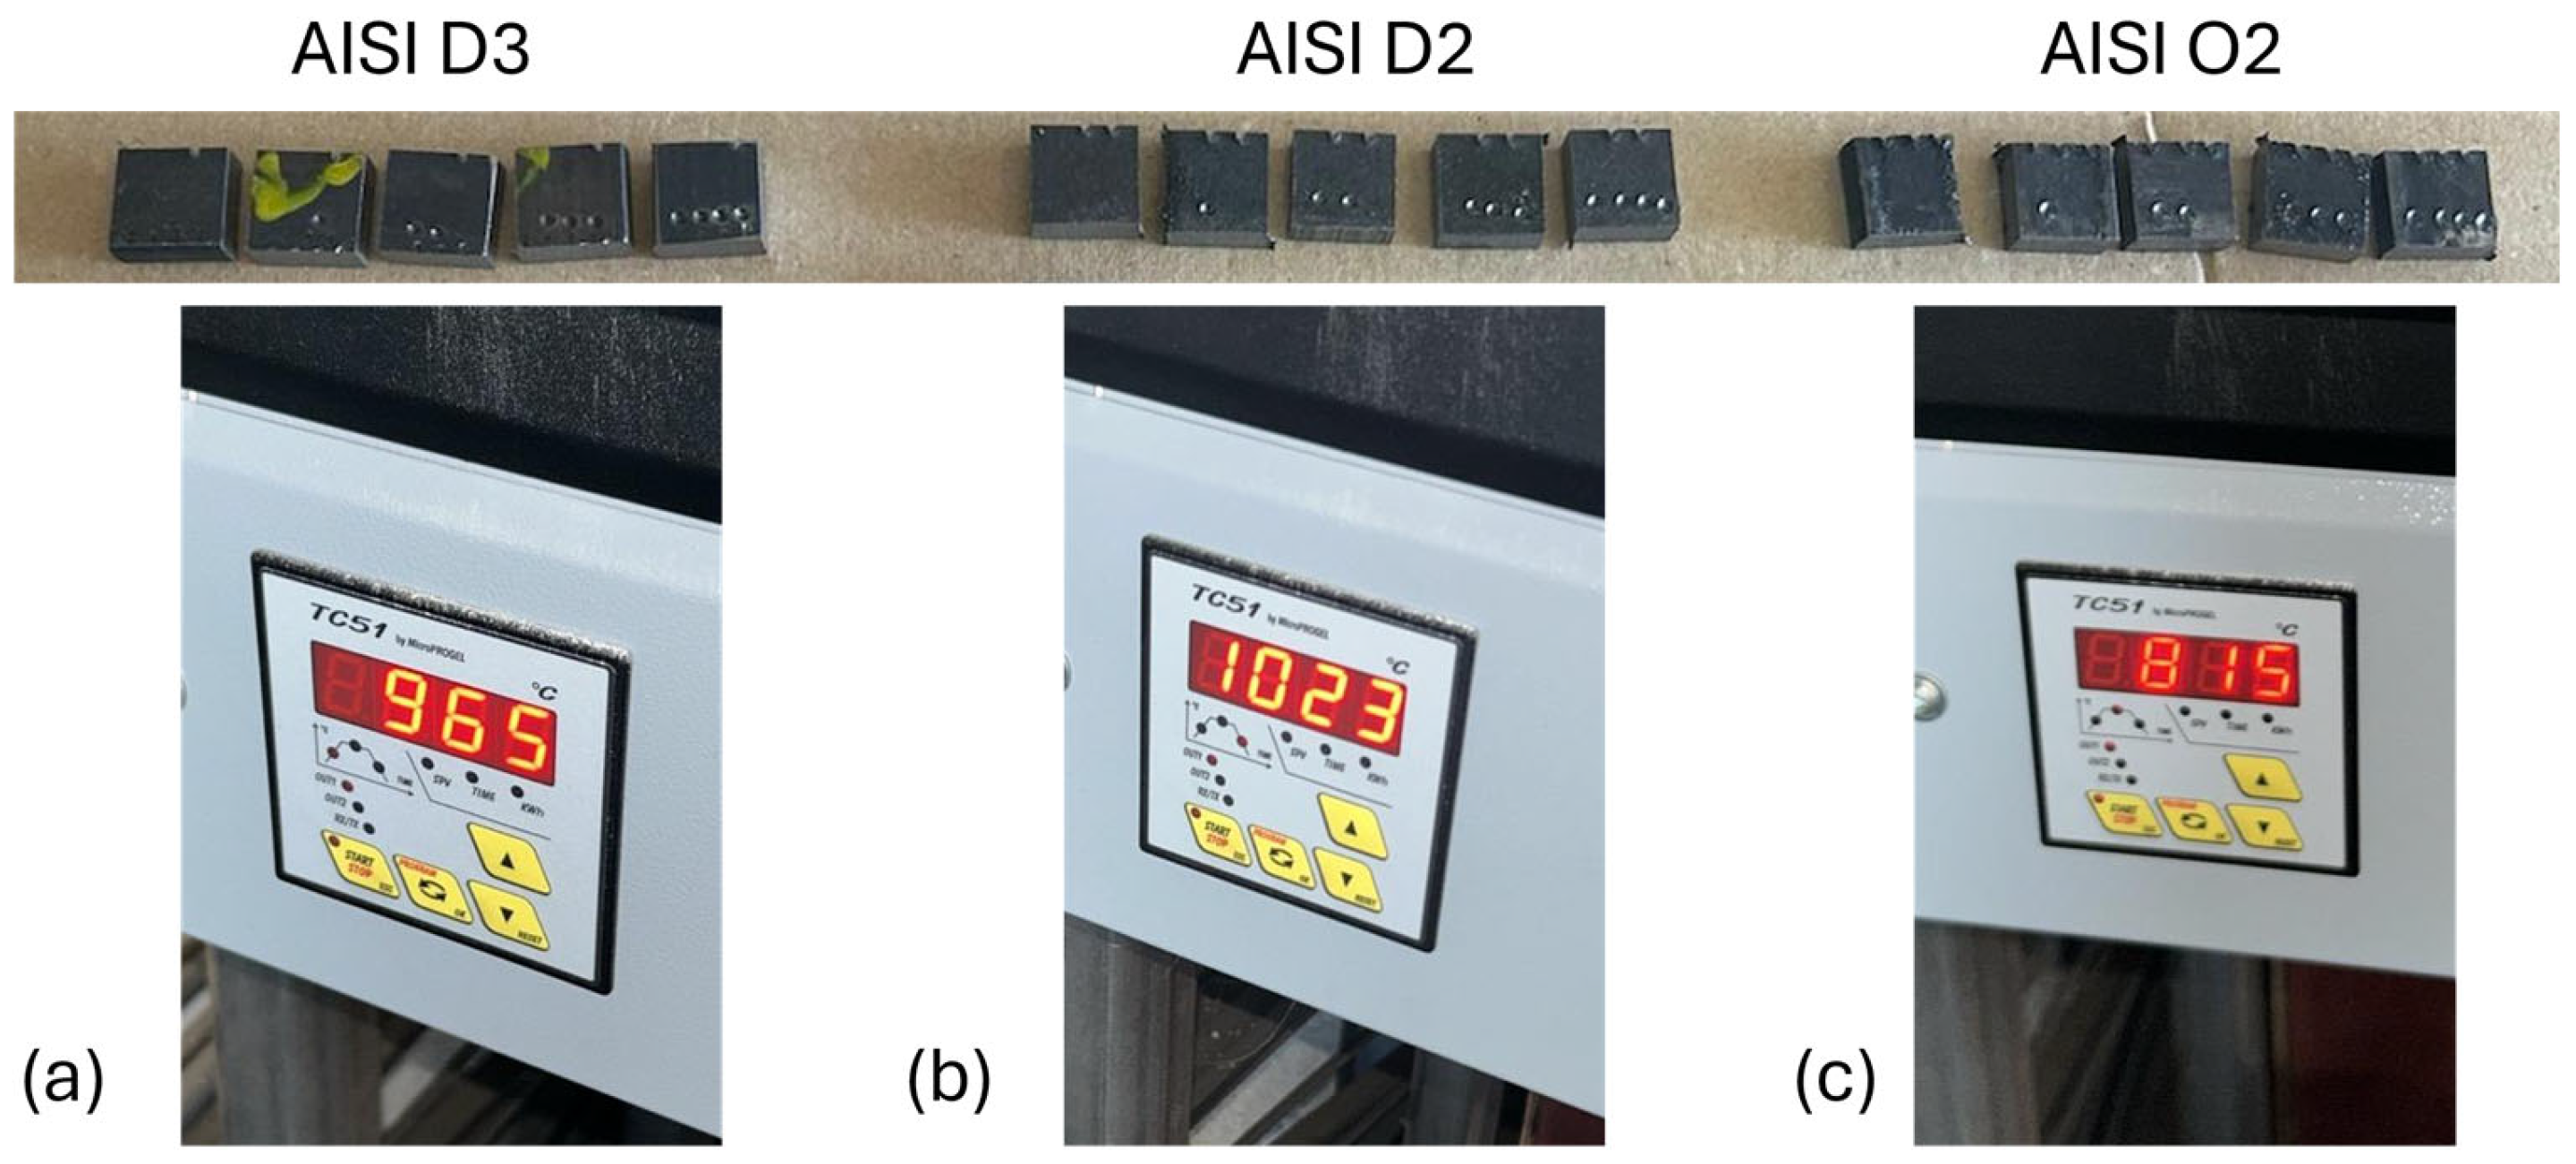
Plates with dimensions of 15 × 15 × 5 mm (Figure 1) were cut from three different sheets of AISI O2, AISI D2, and AISI D3, each supplied by the manufacturer in annealed conditions. Their chemical compositions are listed in Table 1.
Figure 1.
AISI plates with dimensions of 15 × 15 × 5 mm: (a) D3, (b) D2, (c) O2, and the austenitization temperatures used in AQ thermal cycles.
Table 1.
Mean values in wt.% of the chemical composition of AISI O2, D2, and D3 steels.
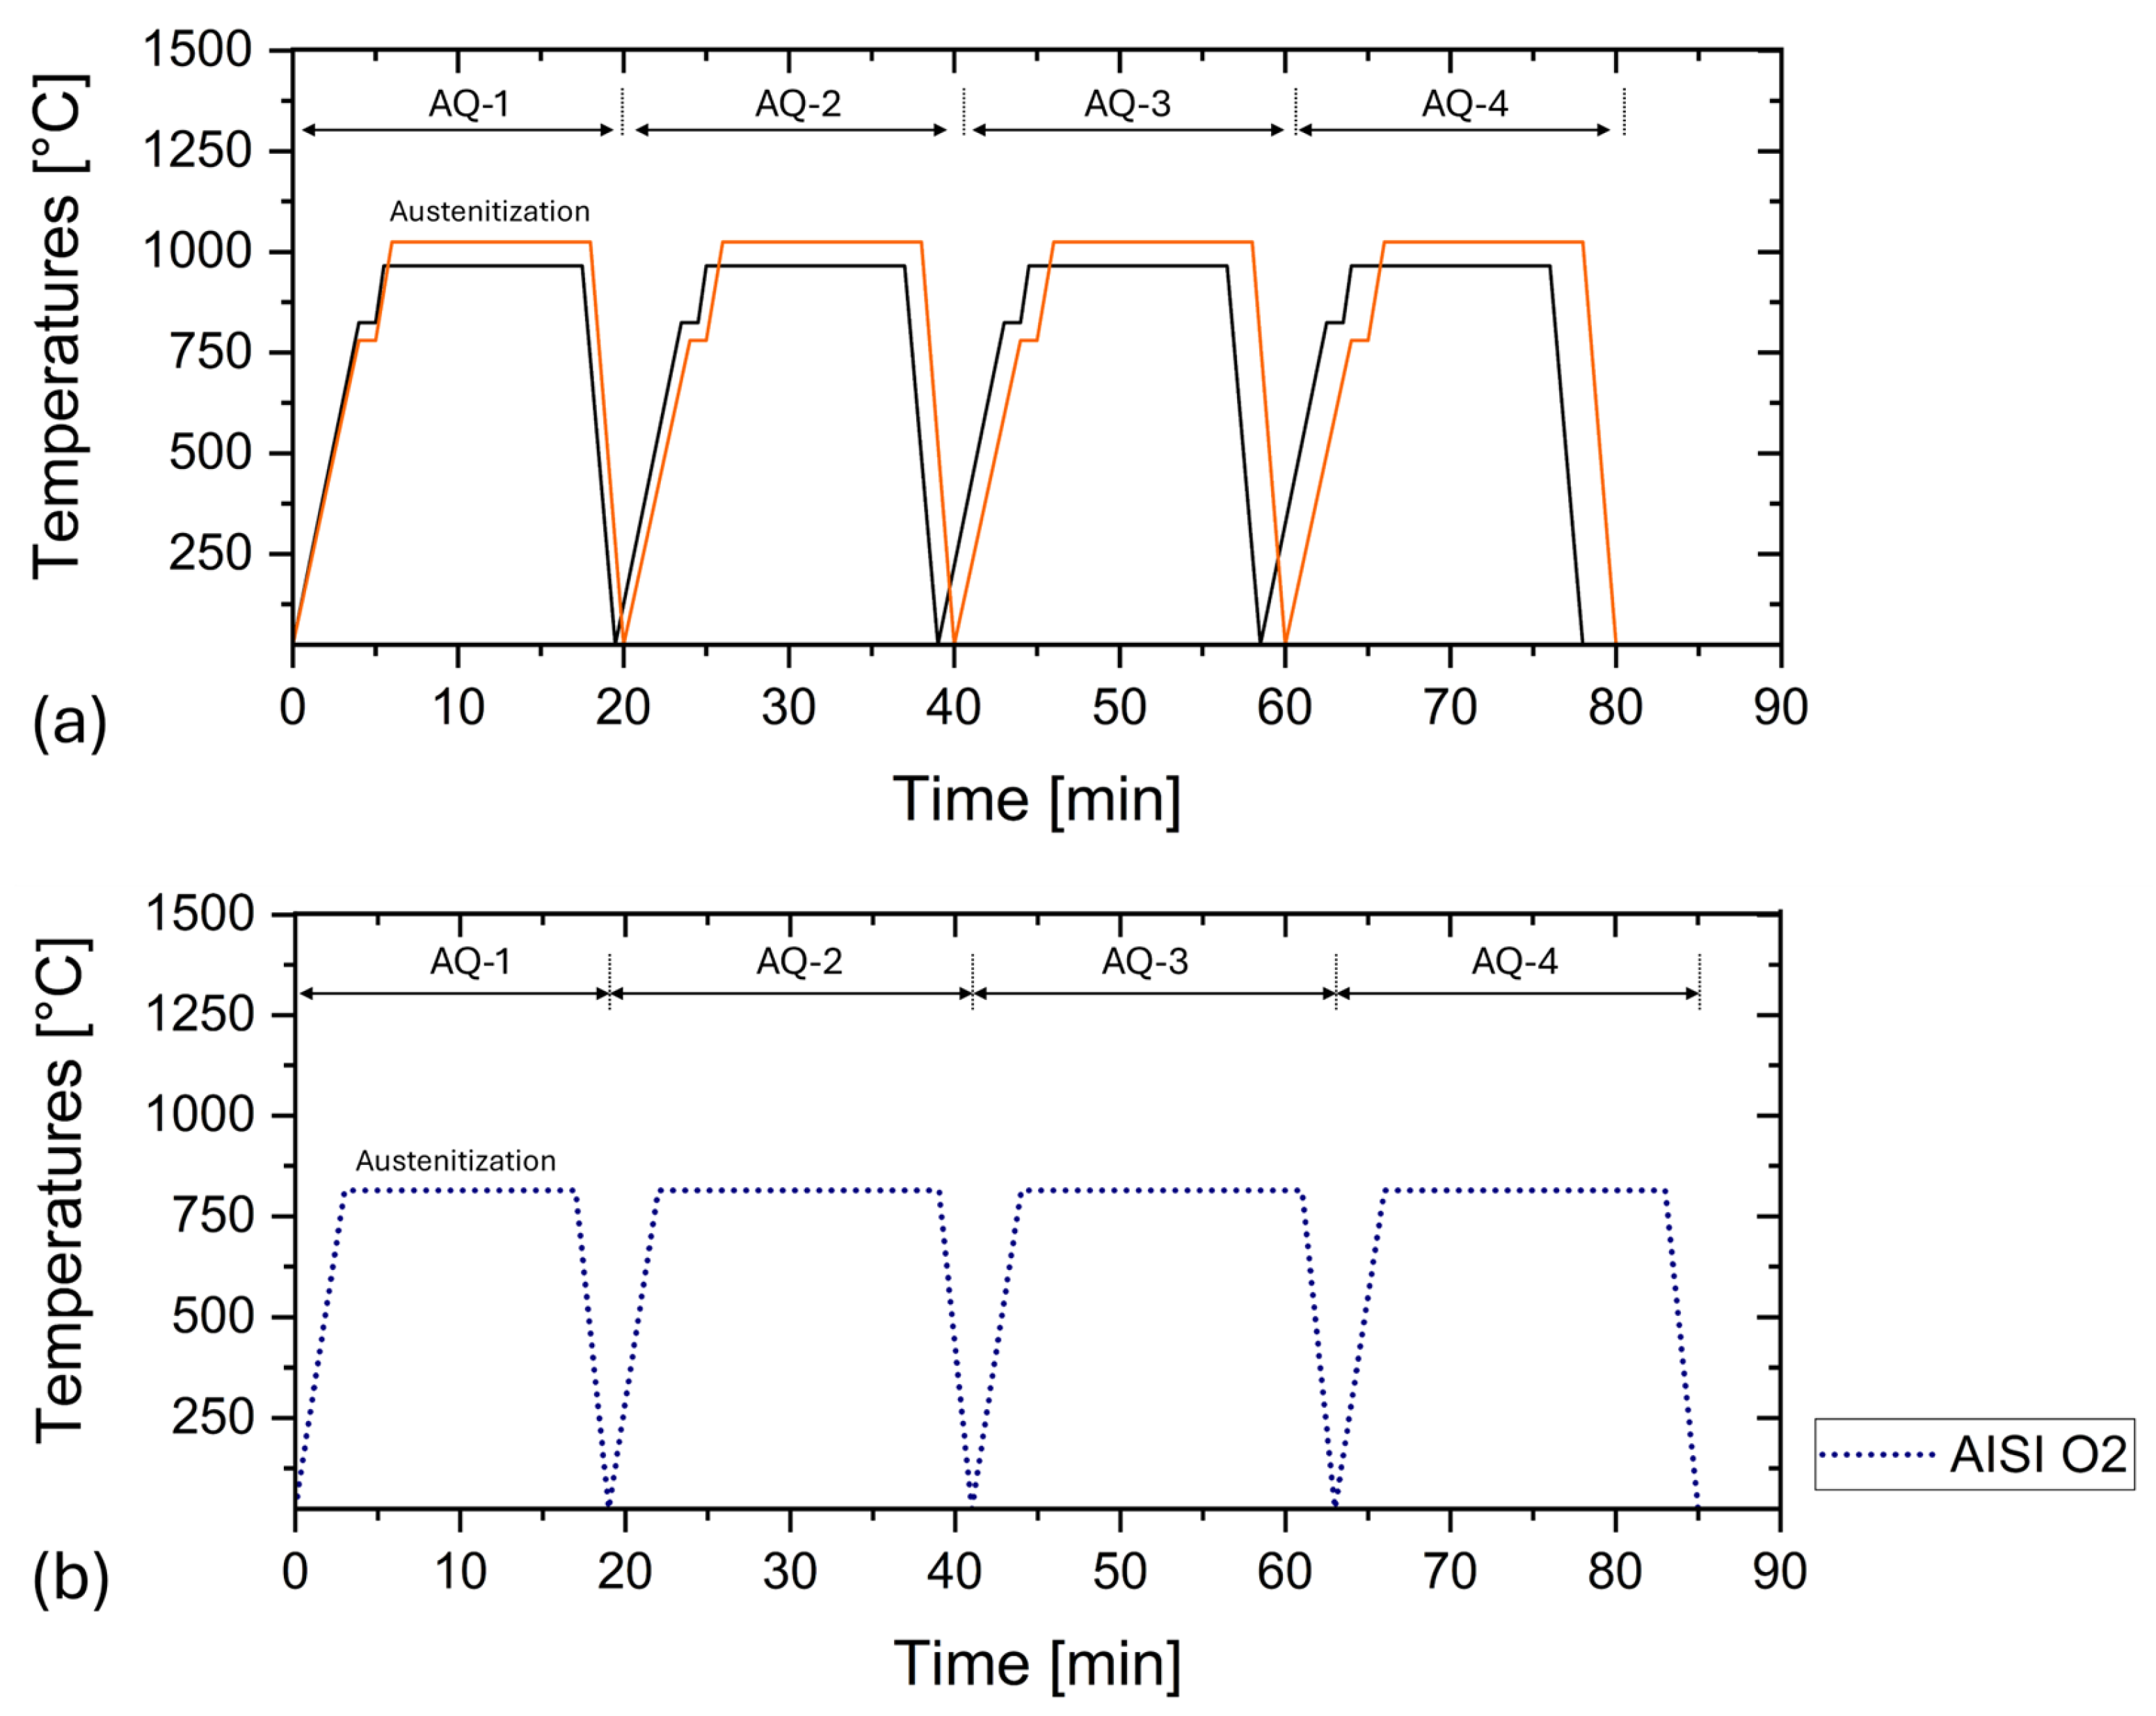
Austenitizing heat treatments were conducted at (815 ± 5) °C, (965 ± 5) °C, and (1025 ± 5) °C, as indicated in Figure 1 by the TC51 temperature controller, with holding times ranging between 15 and 20 min. After each austenitization step, the specimens were quenched in calm synthetic oil. The austenitization temperatures were selected based on other studies [,,,,,,] and because they correspond to the temperatures commonly used for hardening in industrial practice.
Figure 2 shows the austenitizing and quenching cycles applied for each tool steel. These cycles were repeated from one (AQ-1) up to four times (AQ-4) using a muffle furnace controlled by a TC51 temperature controller. The label “AQ-0” is used to indicate the annealed conditions (i.e., without any austenitizing and quenching cycle).
Figure 2.
Schematic representation of thermal cycles applied to (a) AISI D2 and AISI D3 tool steels and to (b) AISI O2 tool steel.
Hardness testing was carried out using both a Vickers hardness tester (Leica, Wetzlar, Germany) and a Rockwell hardness tester (Zwick/Roell, Ulm, Germany). Vickers measurements were performed with a load of 1 kgf and a dwell time of 15 s, in accordance with the UNI EN ISO 6507 standard []. Each reported Vickers hardness value represents the average of 9 indentations arranged into a 3 × 3 matrix. Rockwell hardness measurements (HRC) were carried out using a conical-shaped indenter under a load of 150 kgf, in accordance with the UNI EN ISO 6508 standard []. Each reported HRC value represents the average of 3 indentations taken at the center zone of the mechanically ground plates. All measurements were performed at room temperature, both before (AQ-0) and after each thermal cycle (from AQ-1 to AQ-4).
Microstructural characterization was performed on polished and chemically etched specimens by using both an optical microscope (Leica, Wetzlar, Germany) equipped with the LAS-X image analysis software and a scanning electron microscope (SEM, Gemini, Zeiss, Oberkochen, Germany). Micrographs, EDS spectra, and EDS maps were acquired at a working distance of 8 mm and an acceleration voltage of 15 kV. Untreated and heat-treated samples were first mechanically ground using SiC abrasive papers (from P80 to P4000), polished with colloidal silica, and etched in a solution containing 1 g of picric acid, 100 mL of ethanol, and 5 mL of hydrochloric acid. For AISI O2 steel, prior austenite grain boundaries were revealed by alternating 30 s chemical etching and lapping with P4000 SiC paper. Grain size was measured using the linear intercept method on three optical micrographs acquired at 1000× magnification. The fractions of large and small carbides were determined as the ratio between the total carbide area within the investigated region and the total measured area (optical micrographs). Quantification was performed manually on three optical micrographs (1000×). The associated measurement errors were estimated following the experimental procedure described in []. XRD patterns were acquired using the X’PertPRO diffractometer (PANAlytical, Amlmelo, NL, USA) equipped with a Cu-Kα radiation emitter from a conventional source operating at 40 kV and 40 mA.
3. Results
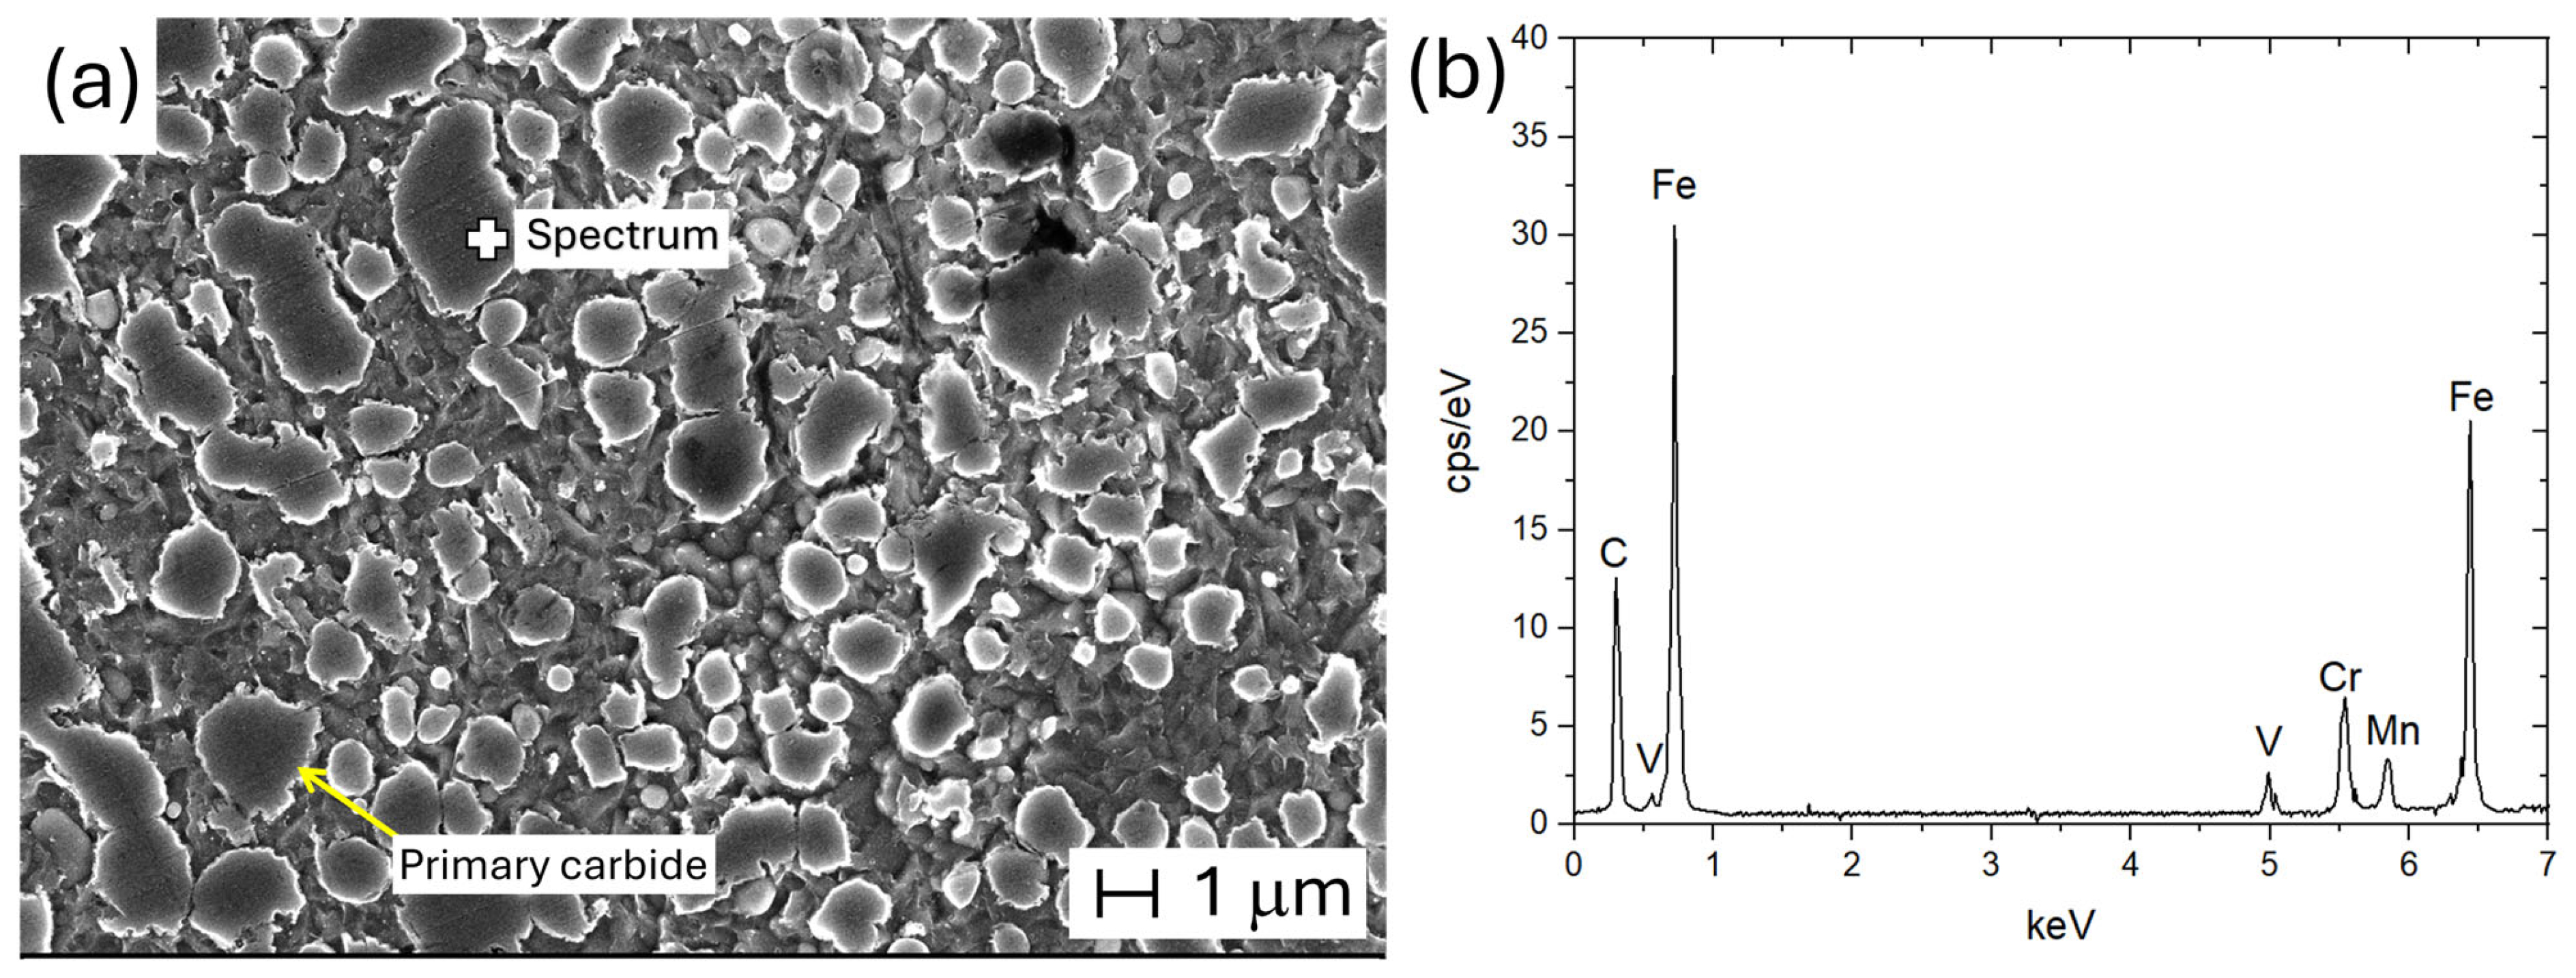
Figure 3a shows the microstructure of AISI O2 steel in the AQ-0 state (i.e., annealed conditions). The SEM micrograph reveals a homogeneous distribution of primary, relatively large carbides formed during steel production. According to the EDS spectrum in Figure 3b, these primary carbides contain Fe and the main alloying elements of AISI O2: Cr, Mn, and V. Similar findings were discussed by []. The high Fe peaks are attributed to the signals originating both from the carbide and from areas of the matrix underlying the carbide.
Figure 3.
(a) SEM micrograph of AISI O2 steel in the AQ-0 (annealed conditions) state (10k×, 15 kV). (b) Spectrum acquired on a primary carbide in (a).
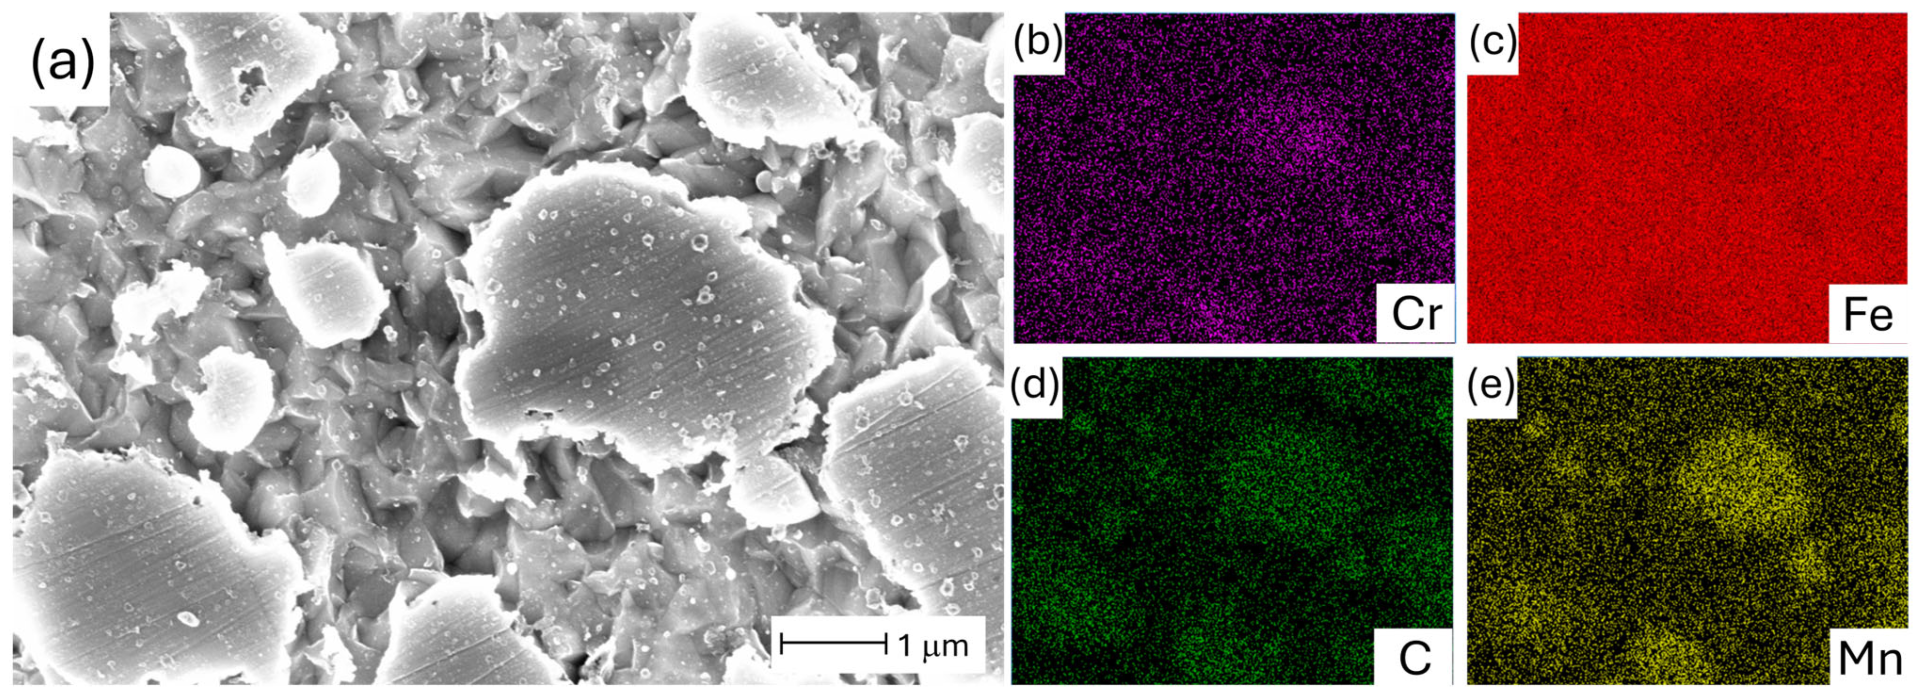
The secondary carbides formed within the AISI O2 matrix are shown in the high-magnified micrograph in Figure 4a. These fine carbides were likely formed during slow furnace cooling. The EDS maps indicate that the carbides are composed primarily of alloying elements such as Mn and Cr. In contrast to the primary carbides shown in Figure 3b, the carbides in Figure 4b exhibited no detectable traces of V.
Figure 4.
(a) High-magnification SEM micrograph of AISI O2 steel in AQ-0 (as-received) conditions (30k×, 15 kV). (b–e) EDS maps of Cr, Fe, C, and Mn.
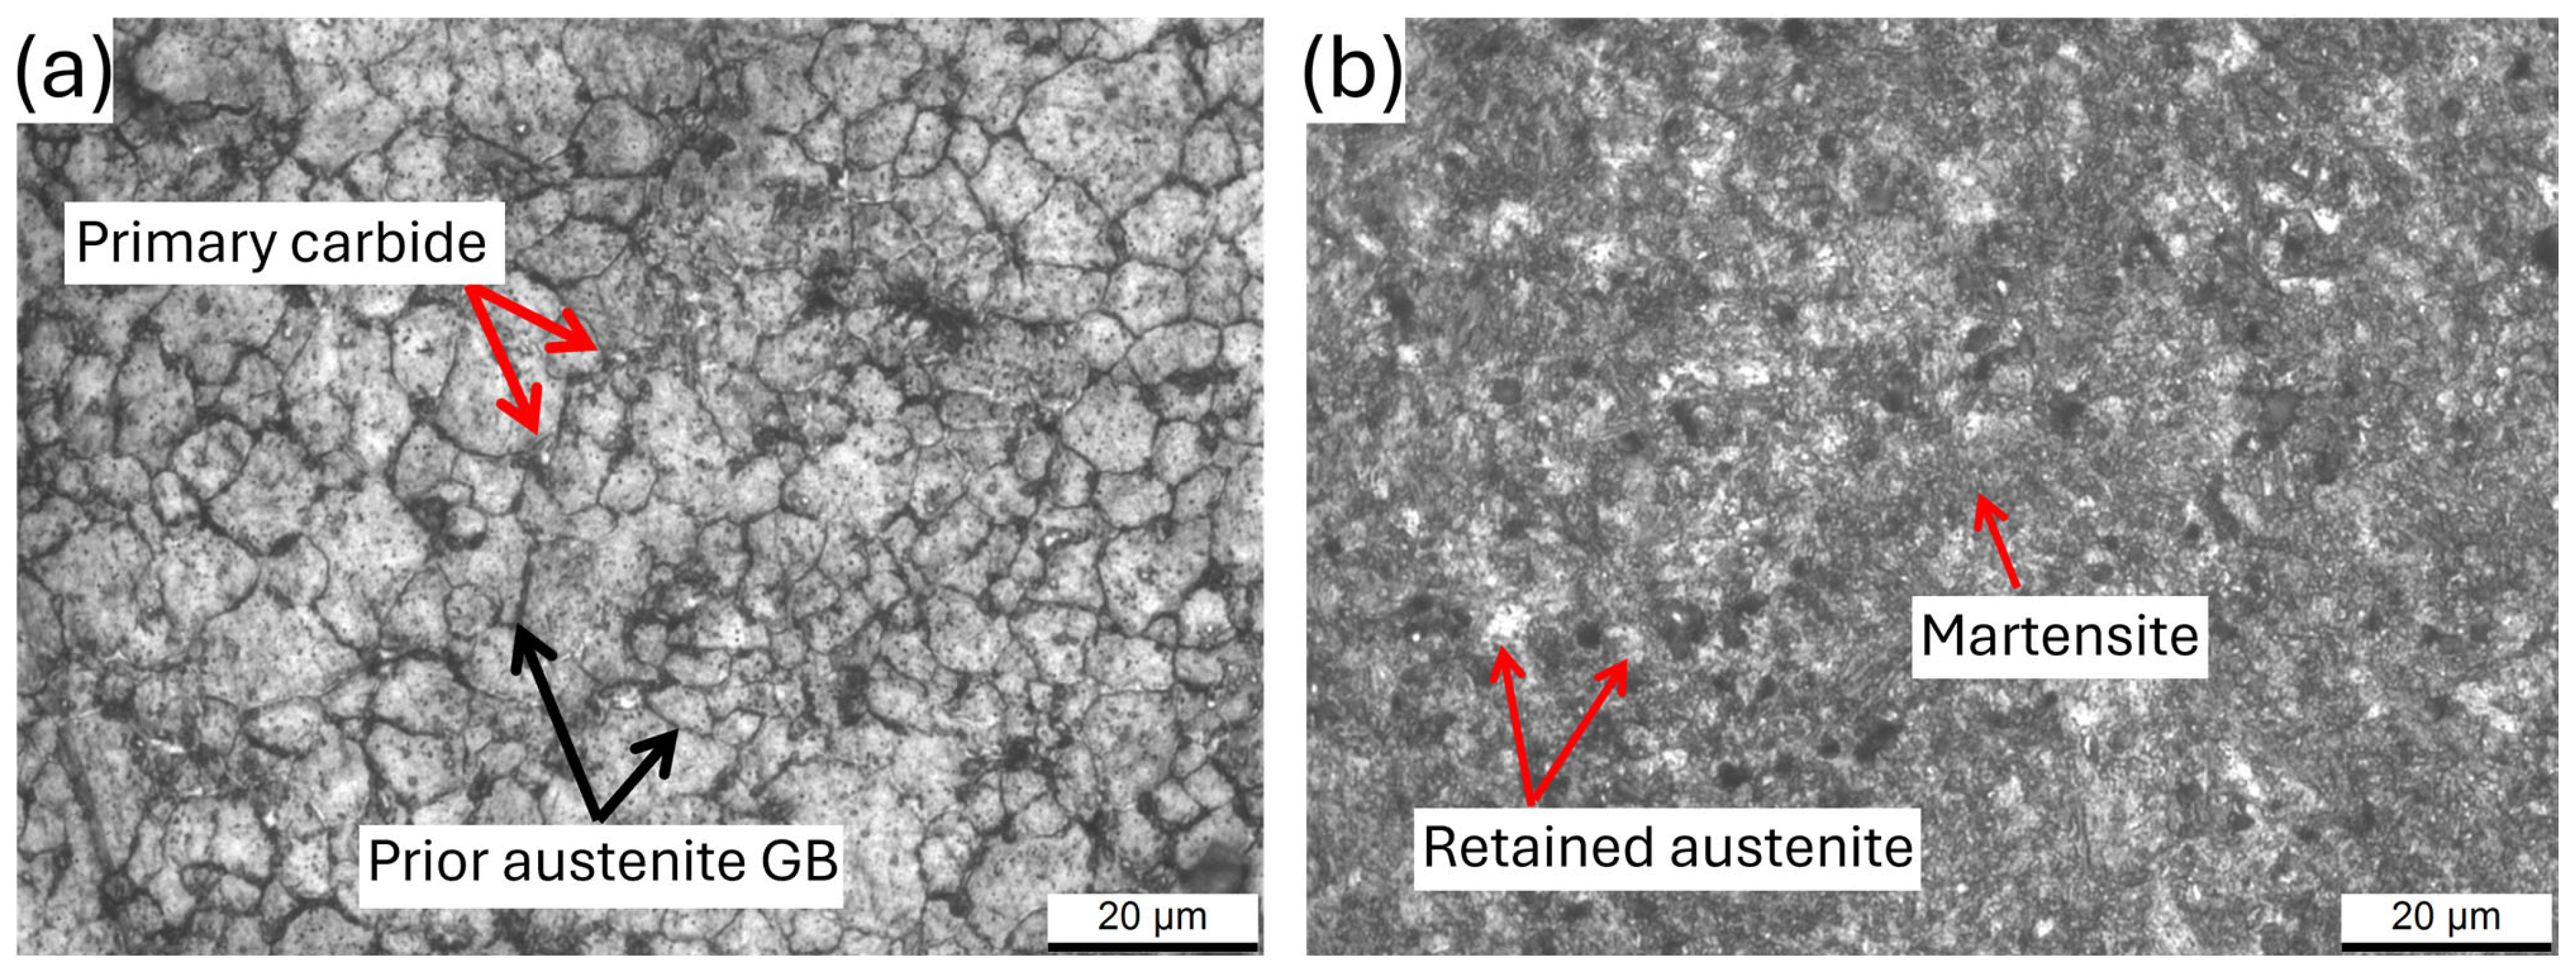
After exposure to the AQ-2 thermal cycle, most of the carbides were dissolved, as shown in Figure 5a, where the visible prior austenite GBs surround grains with a mean dimension of (6.2 ± 1.0) μm. Simultaneously, rapid cooling from the austenitizing temperatures induced an incomplete diffusionless martensite transformation. As a matter of fact, Figure 5b shows the presence of martensitic laths and retained austenite. A similar microstructure evolution was observed by [].
Figure 5.
Microstructures of AISI O2 tool steel after the AQ-2 thermal cycle: panel (a) highlights primary carbide and prior austenite GB, panel (b) displays martensite and retained austenite.
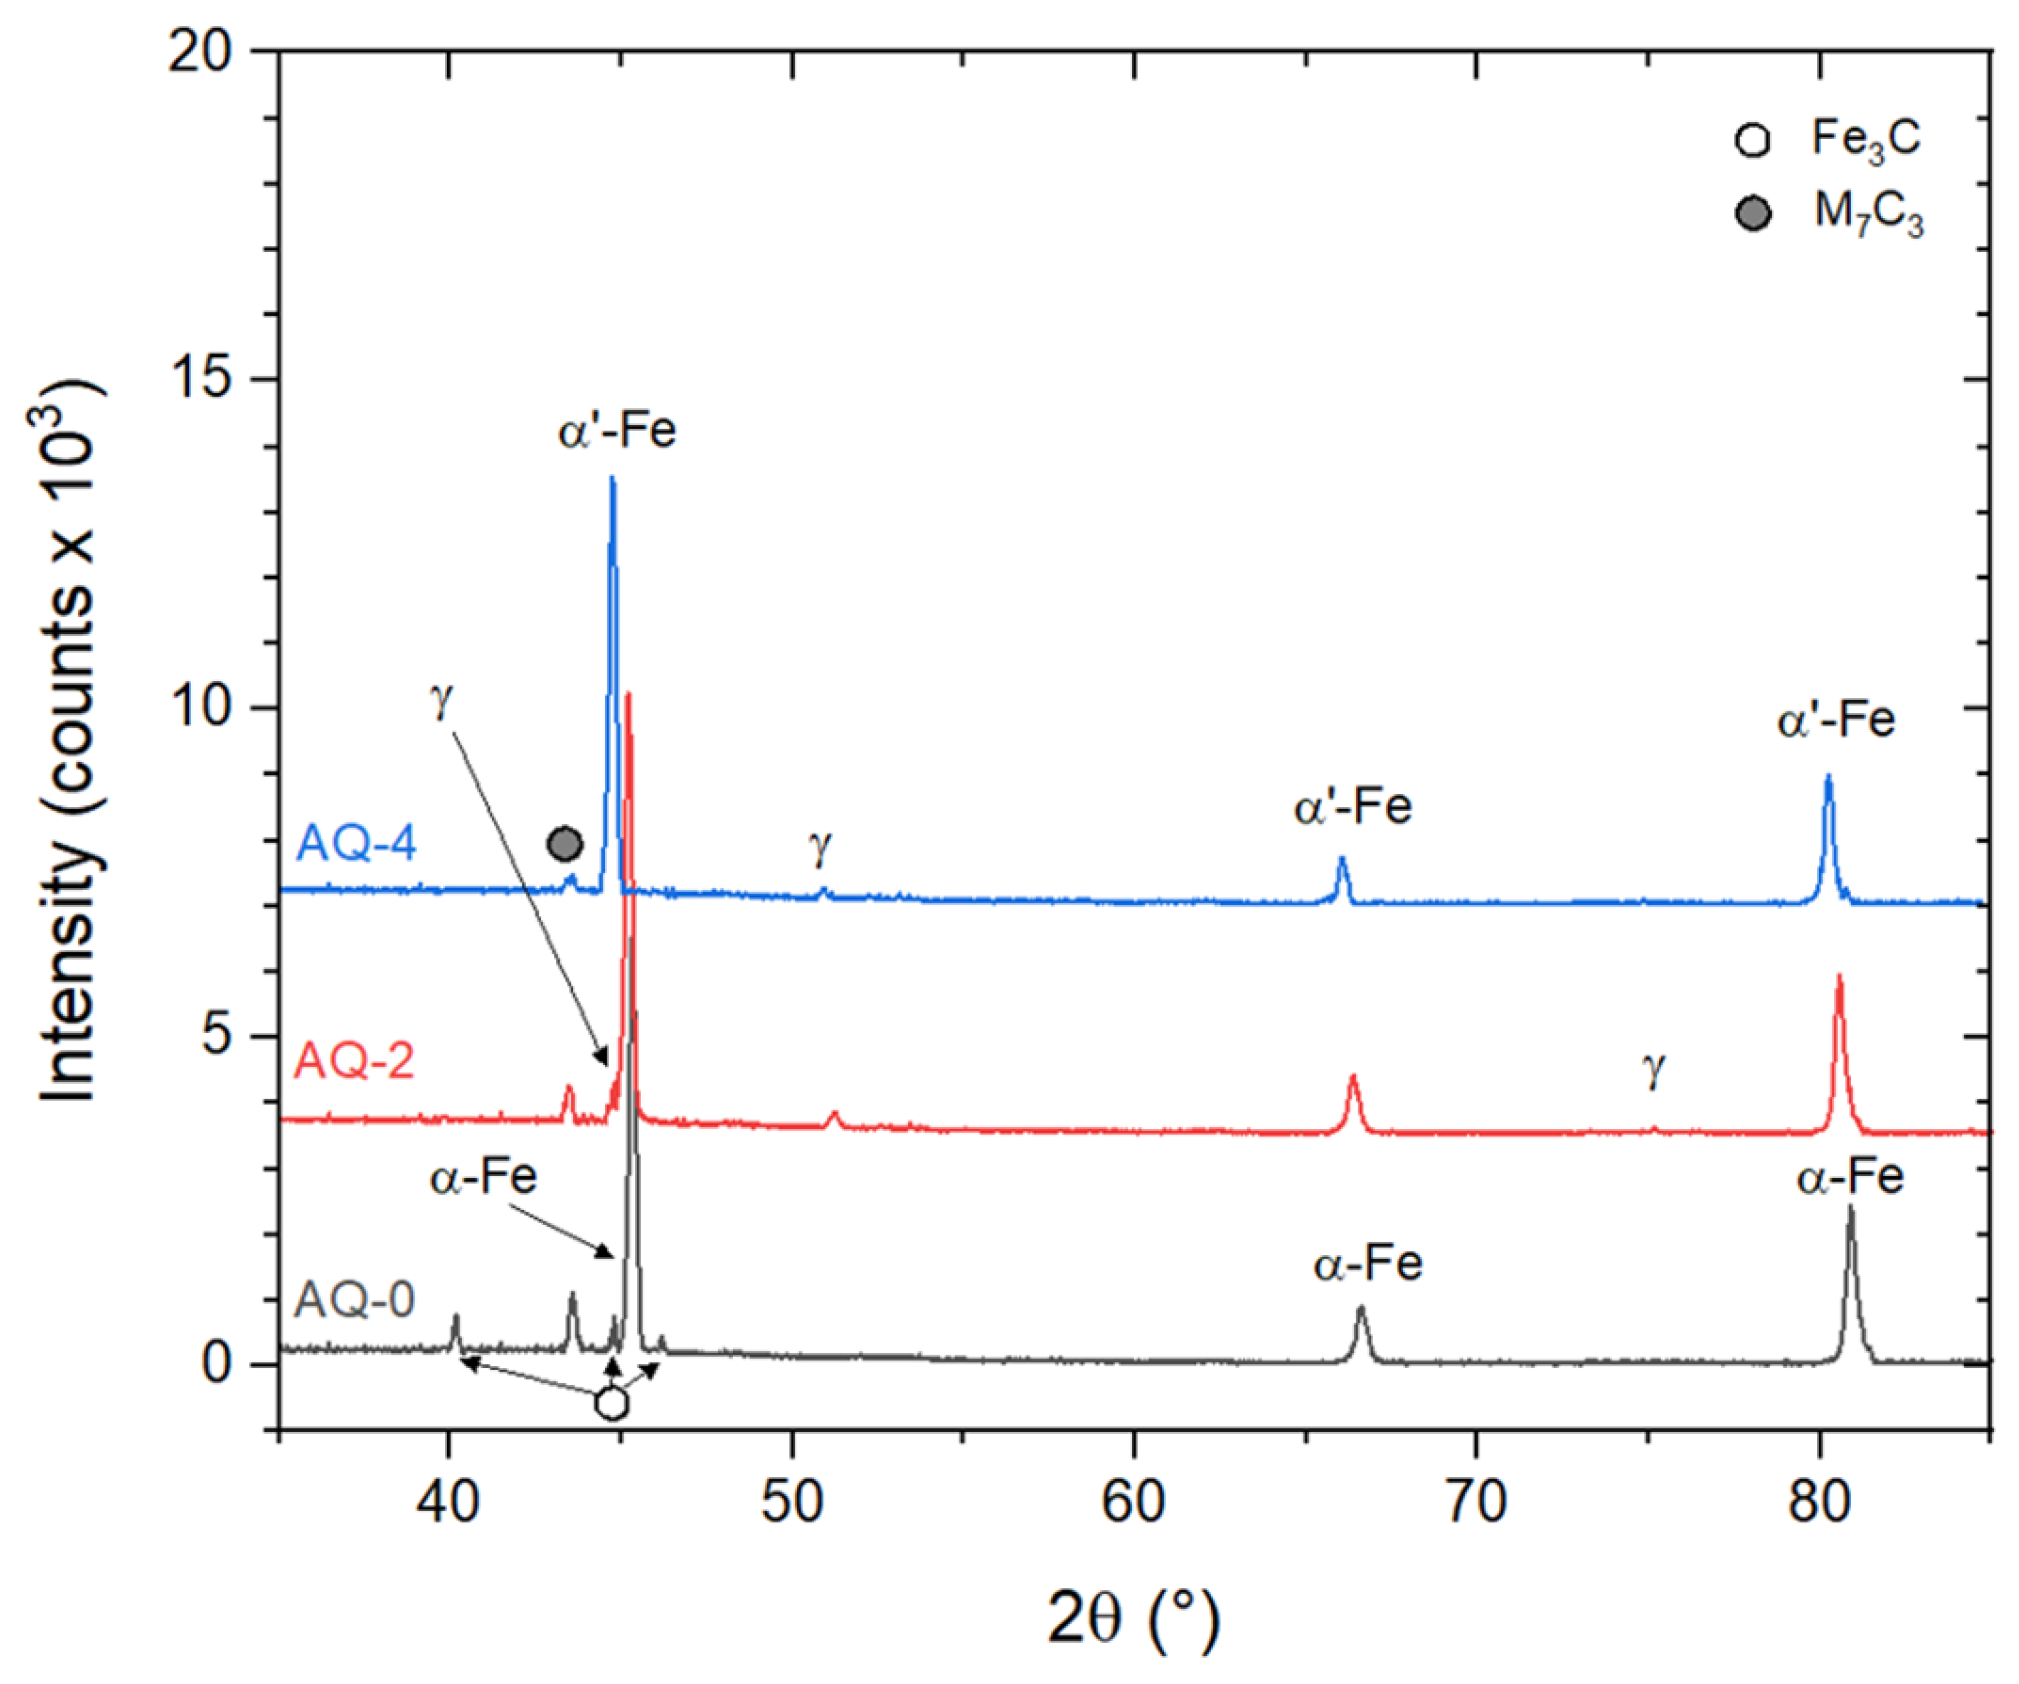
The XRD patterns in Figure 6 illustrate the microstructural variations that occurred during multiple quenching cycles of AISI O2 tool steel. In the AQ-0 state, AISI O2 exhibited M7C3 carbides containing Cr and Mn alloying elements (Figure 3b and Figure 4b–e), which were dispersed within a ferritic–pearlitic matrix. The absence of the M4C3 carbide type at diffraction angles of approximatively 36° and 63° confirms that V-related peaks in Figure 3b are the signal originating from the matrix underlying the carbide (Figure 3a). On the other hand, the carbides containing the V element may be so few in number that their signal is not detectable. Due to the slow furnace cooling of the AQ-0 state, the Fe3C-related peaks may be attributed to the presence of pearlitic structures, as similarly discussed in []. During the AQ cycles, the Fe3C carbides were completely dissolved into the austenitic phase. As a results of the same diffusion processes, the intensities of M7C3-related peaks decreased from AQ-2 to AQ-4. In addition, the α-Fe matrix transformed into an α’-martensitic structure due to oil quenching. At the same time, γ-related peaks confirmed the presence of retained austenite (Figure 5b), which decreased from 4.5% in the AQ-2 state to 3.7% in the AQ-4 state. These percentages were determined as the ratio between the area of the γ-related peaks and the total area of the XRD spectrum. Similar findings were reported in [,].
Figure 6.
XRD patterns of AISI O2 tool steel, acquired before and after the AQ-2 and AQ-4 thermal cycles.
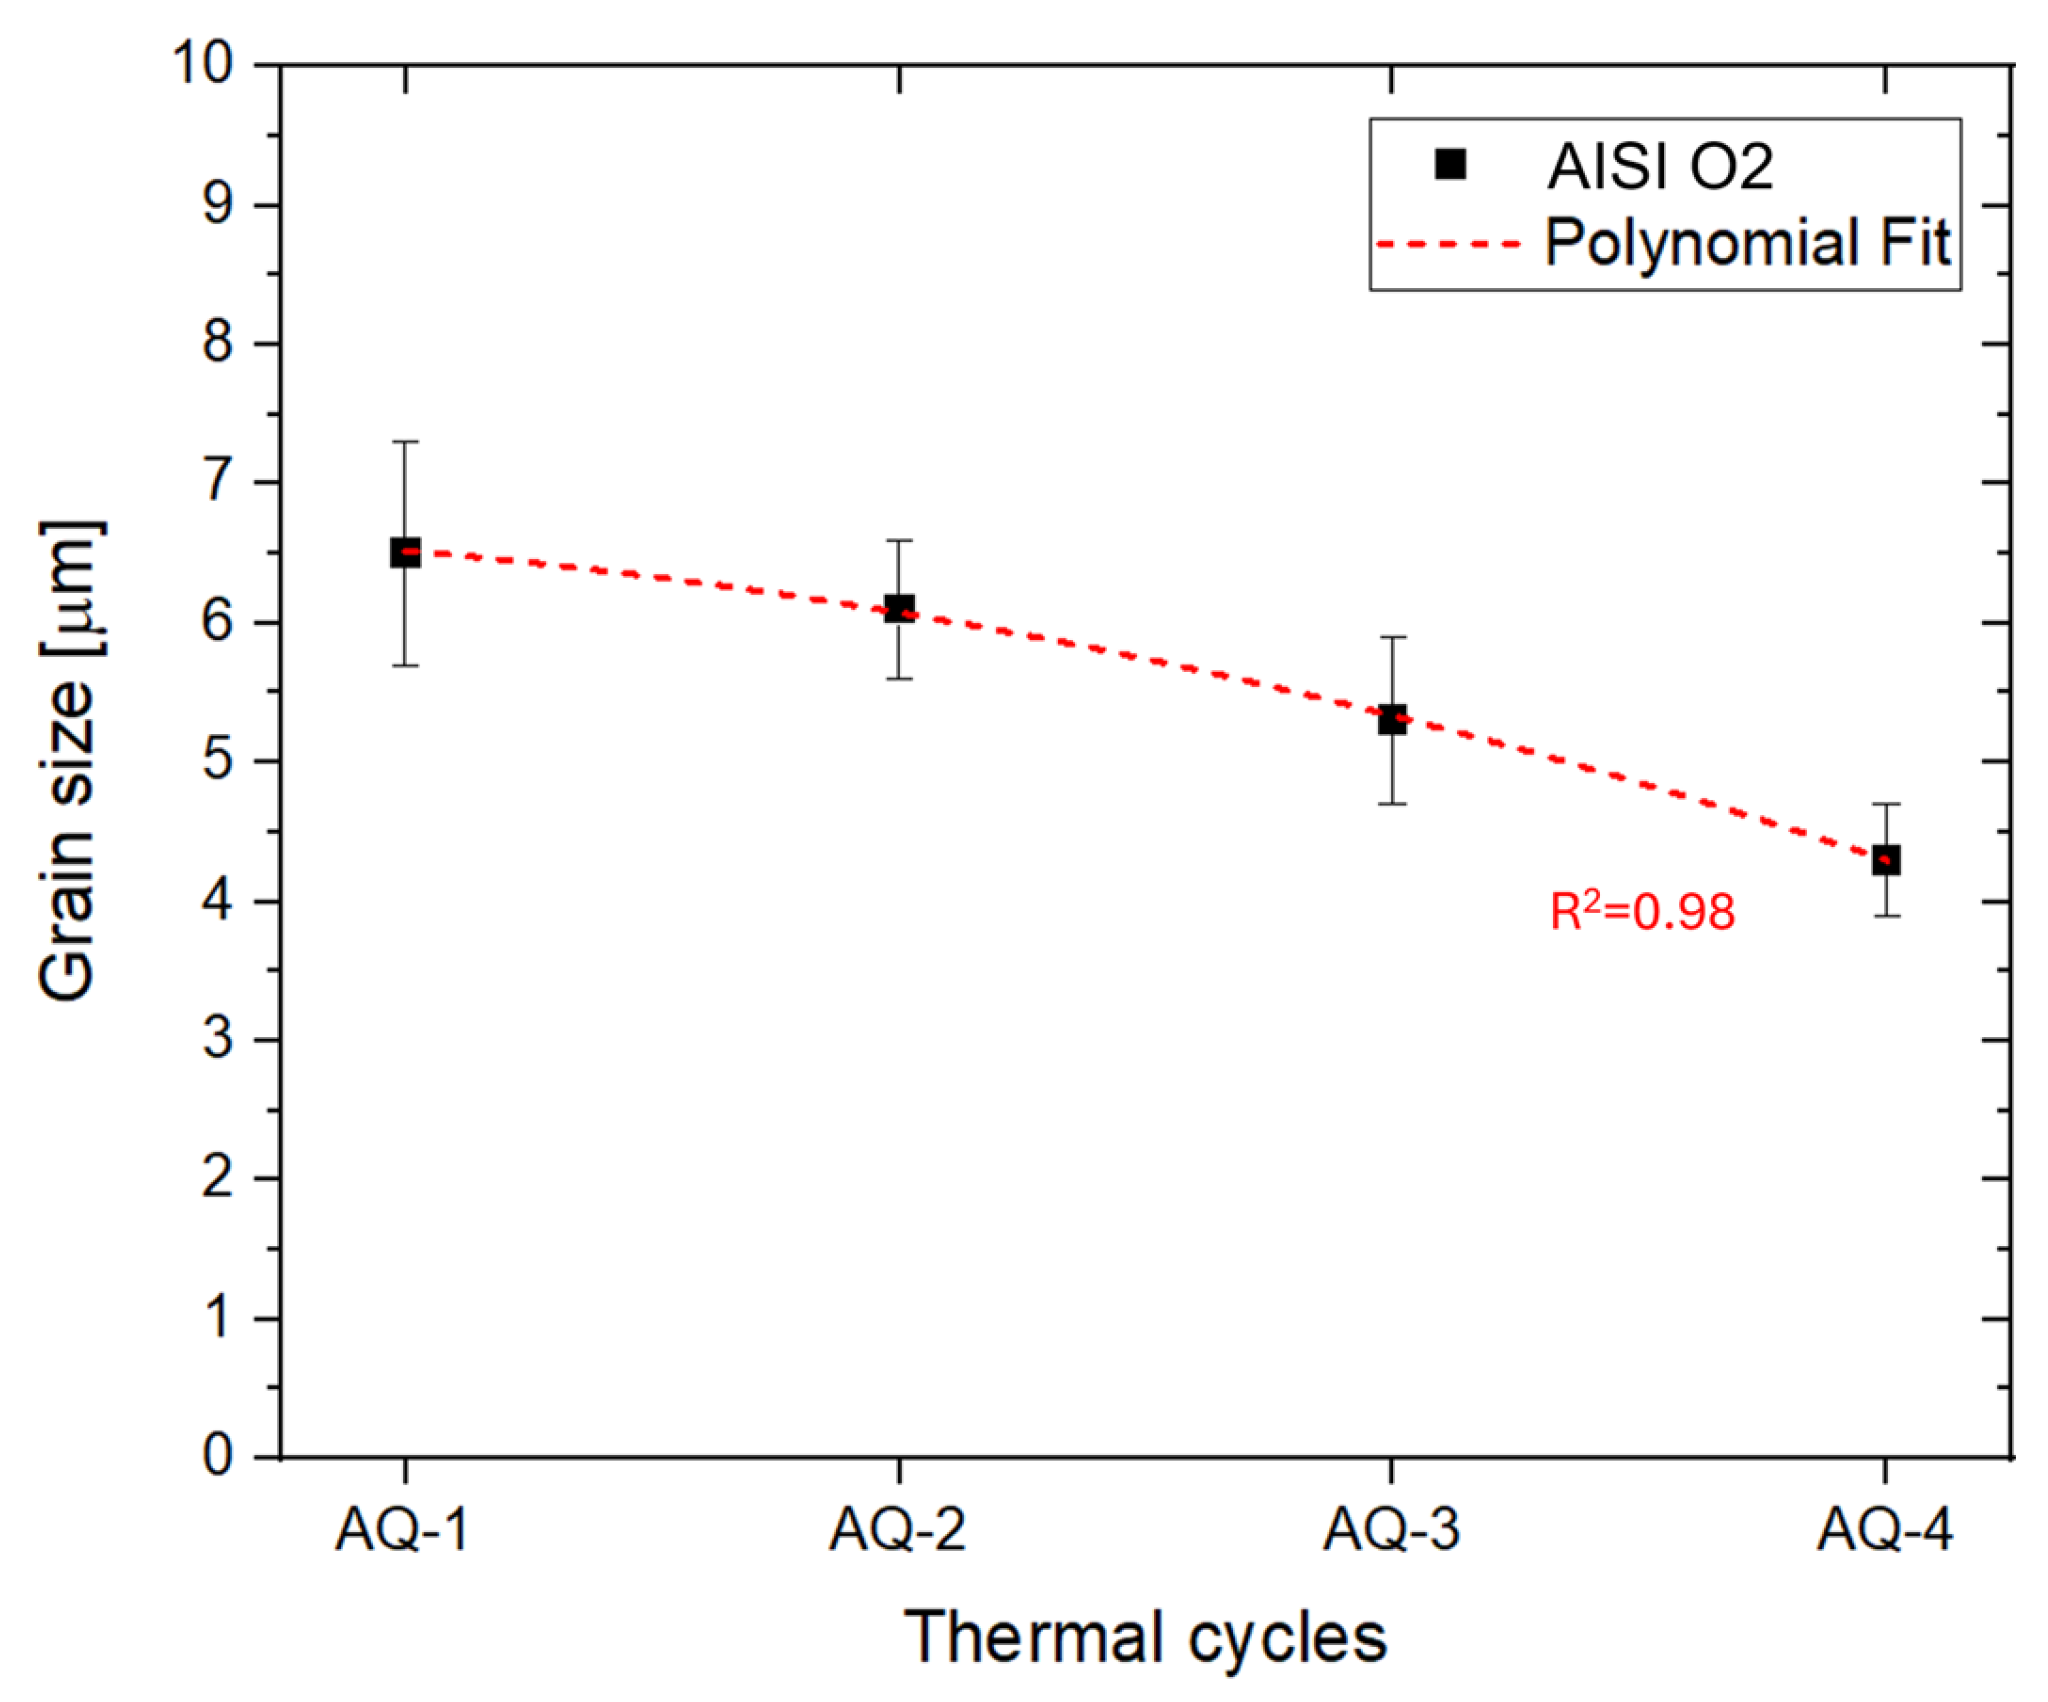
Figure 7 shows the grain refinement trend observed in AISI O2 samples after the thermal cycles from AQ-1 to AQ-4. The average grain size decreased monotonically from (6.5 ± 0.8) μm to (4.3 ± 0.4) μm. This refinement can be attributed to the microstructural evolution occurring during repeated austenitizing, in which the high dislocation density and associated strain energy accumulated in each cycle provide a strong driving force for austenite nucleation. Consequently, this condition promoted grain refinement in the final microstructure []. Moreover, due to the relatively low austenitizing temperature used from AQ-1 to AQ-4, the grains were not subject to coarsening. In fact, an austenitizing temperature of 815 °C effectively limits grain growth, as discussed in [,]. Cui et al. [] reported grain refinement in two-stage quenched tool steel after austenitization at 1030 °C for 30 min, followed by grain coarsening after three-stage quenching. Similarly, Celtik et al. [] observed a decrease in austenite grain size in 41Cr4 steel subjected to double austenitization at 940 °C and 850 °C for 40 min each.
Figure 7.
Refinement of austenite grains of AISI O2 during the thermal cycles from AQ-1 to AQ-4. The red dotted curve represents the polynomial fit.
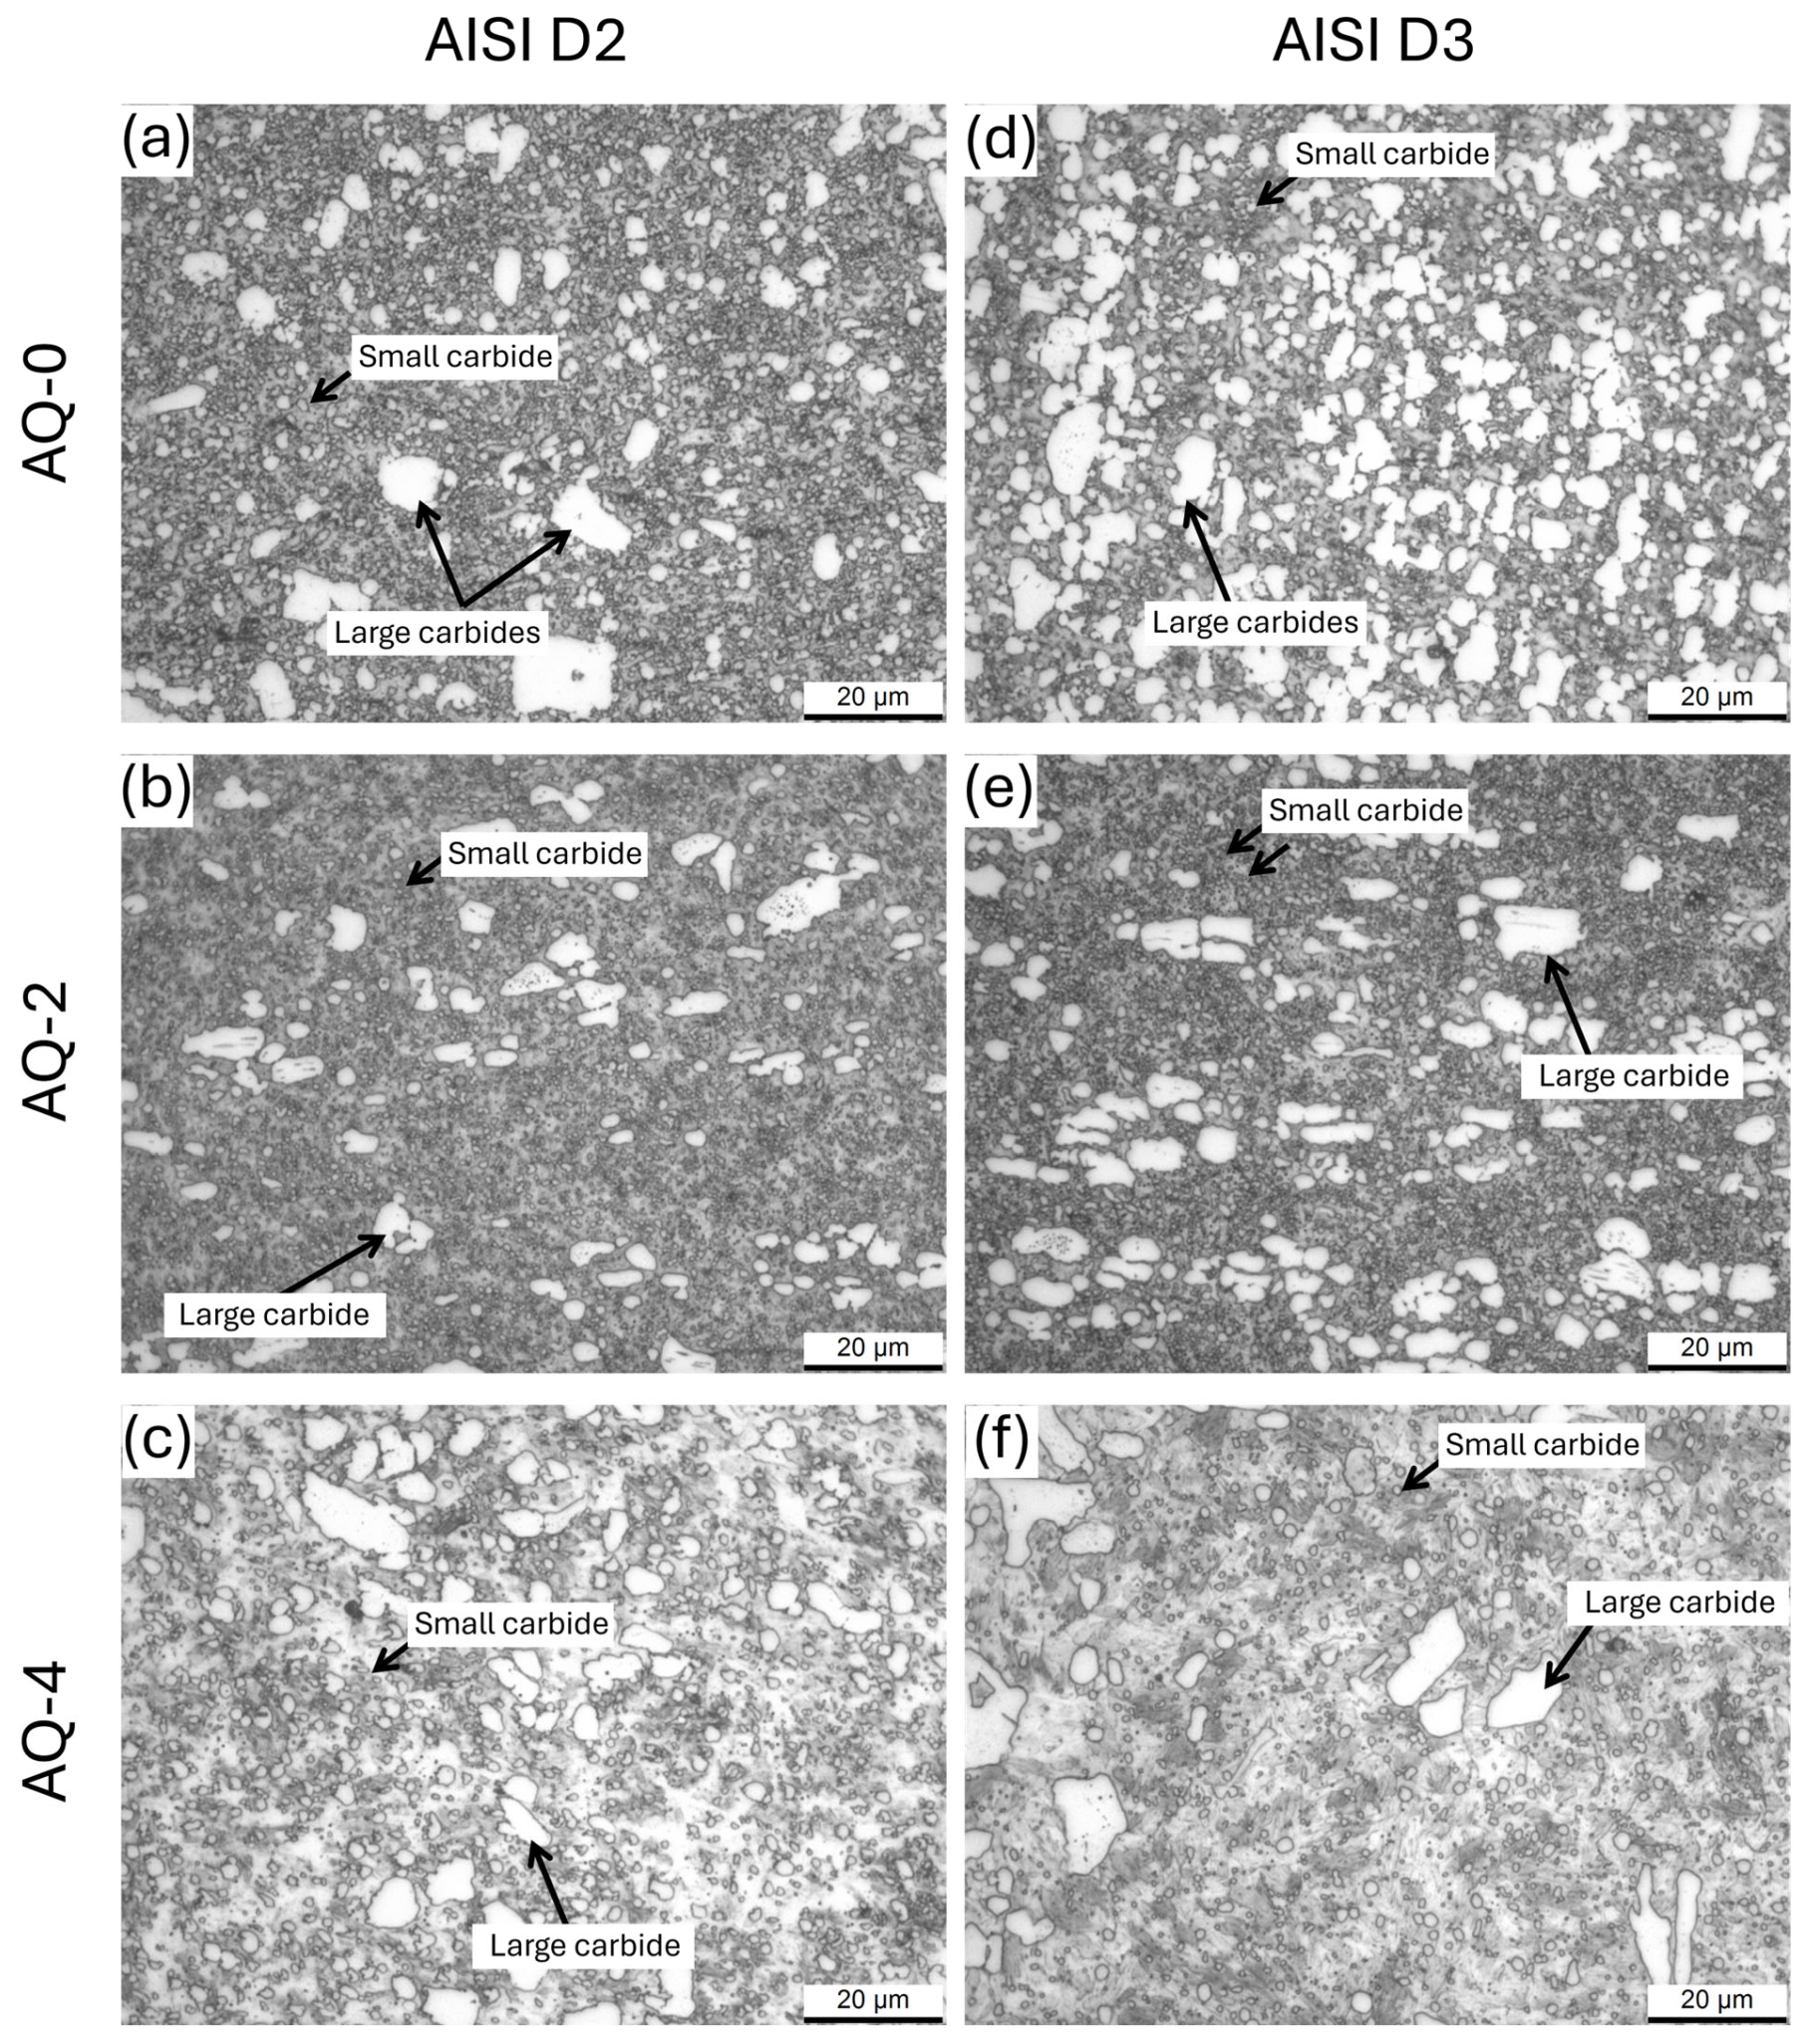
Figure 8 shows the microstructures of the AISI D2 and AISI D3 tool steels before (Figure 8a,d) and after (Figure 8b,d,e,f) double (AQ-2) and quadruple (AQ-4) austenitizing cycles. In the annealed condition (AQ-0 in Figure 8a,d), both steels exhibit a microstructure consisting of large and small carbides dispersed in a pearlitic matrix, as also discussed by []. By comparing Figure 8a to Figure 8d, the carbide volume fraction in AISI D2 (Figure 8a) is approximatively 29%, whereas in AISI D3 (Figure 8d), it is about 34%, reflecting the higher carbon content of the latter steel (Figure 8). During the AQ-2 treatment cycle, AISI D2 shows a reduction in the carbide fraction, from (29.8 ± 1.2)% to (18.9 ± 0.9)%, accompanied by a decrease in its carbide size (see Table 2).
Figure 8.
Microstructural evolution of both (a–c) AISI D2 and (d–f) AISI D3 steels (a,d) before and after the (b,e) AQ-2 and (c,f) AQ-4 thermal cycles.
Table 2.
Equivalent diameters (mm) of large and small carbides in both AISI D2 and D3 tool steels before and after AQ thermal cycles.
Specifically, the equivalent diameters of the large and small carbides decrease by 23% and 16%, respectively. After subsequent austenitizing and quenching cycles (AQ-4), the equivalent diameter of the large carbides remains nearly constant at (2.5 ± 1.0) μm, while the smaller carbides increase by approximatively of 19%. These variations in carbide size and volume fraction suggested that, when processing from the AQ-2 cycle to the AQ-4 cycle, some of the smallest carbides may dissolve into the matrix, while others may coarsen. In the case of AISI D3 steel (Figure 8d–f), increasing the number of thermal cycles from AQ-0 to AQ-4 led to pronounced carbide dissolution, which was reflected by a reduction in both size and amount. The equivalent diameters decrease by 26% for the large carbides and by 25% for small carbides (see Table 2). Similar results were reported and discussed by [,].
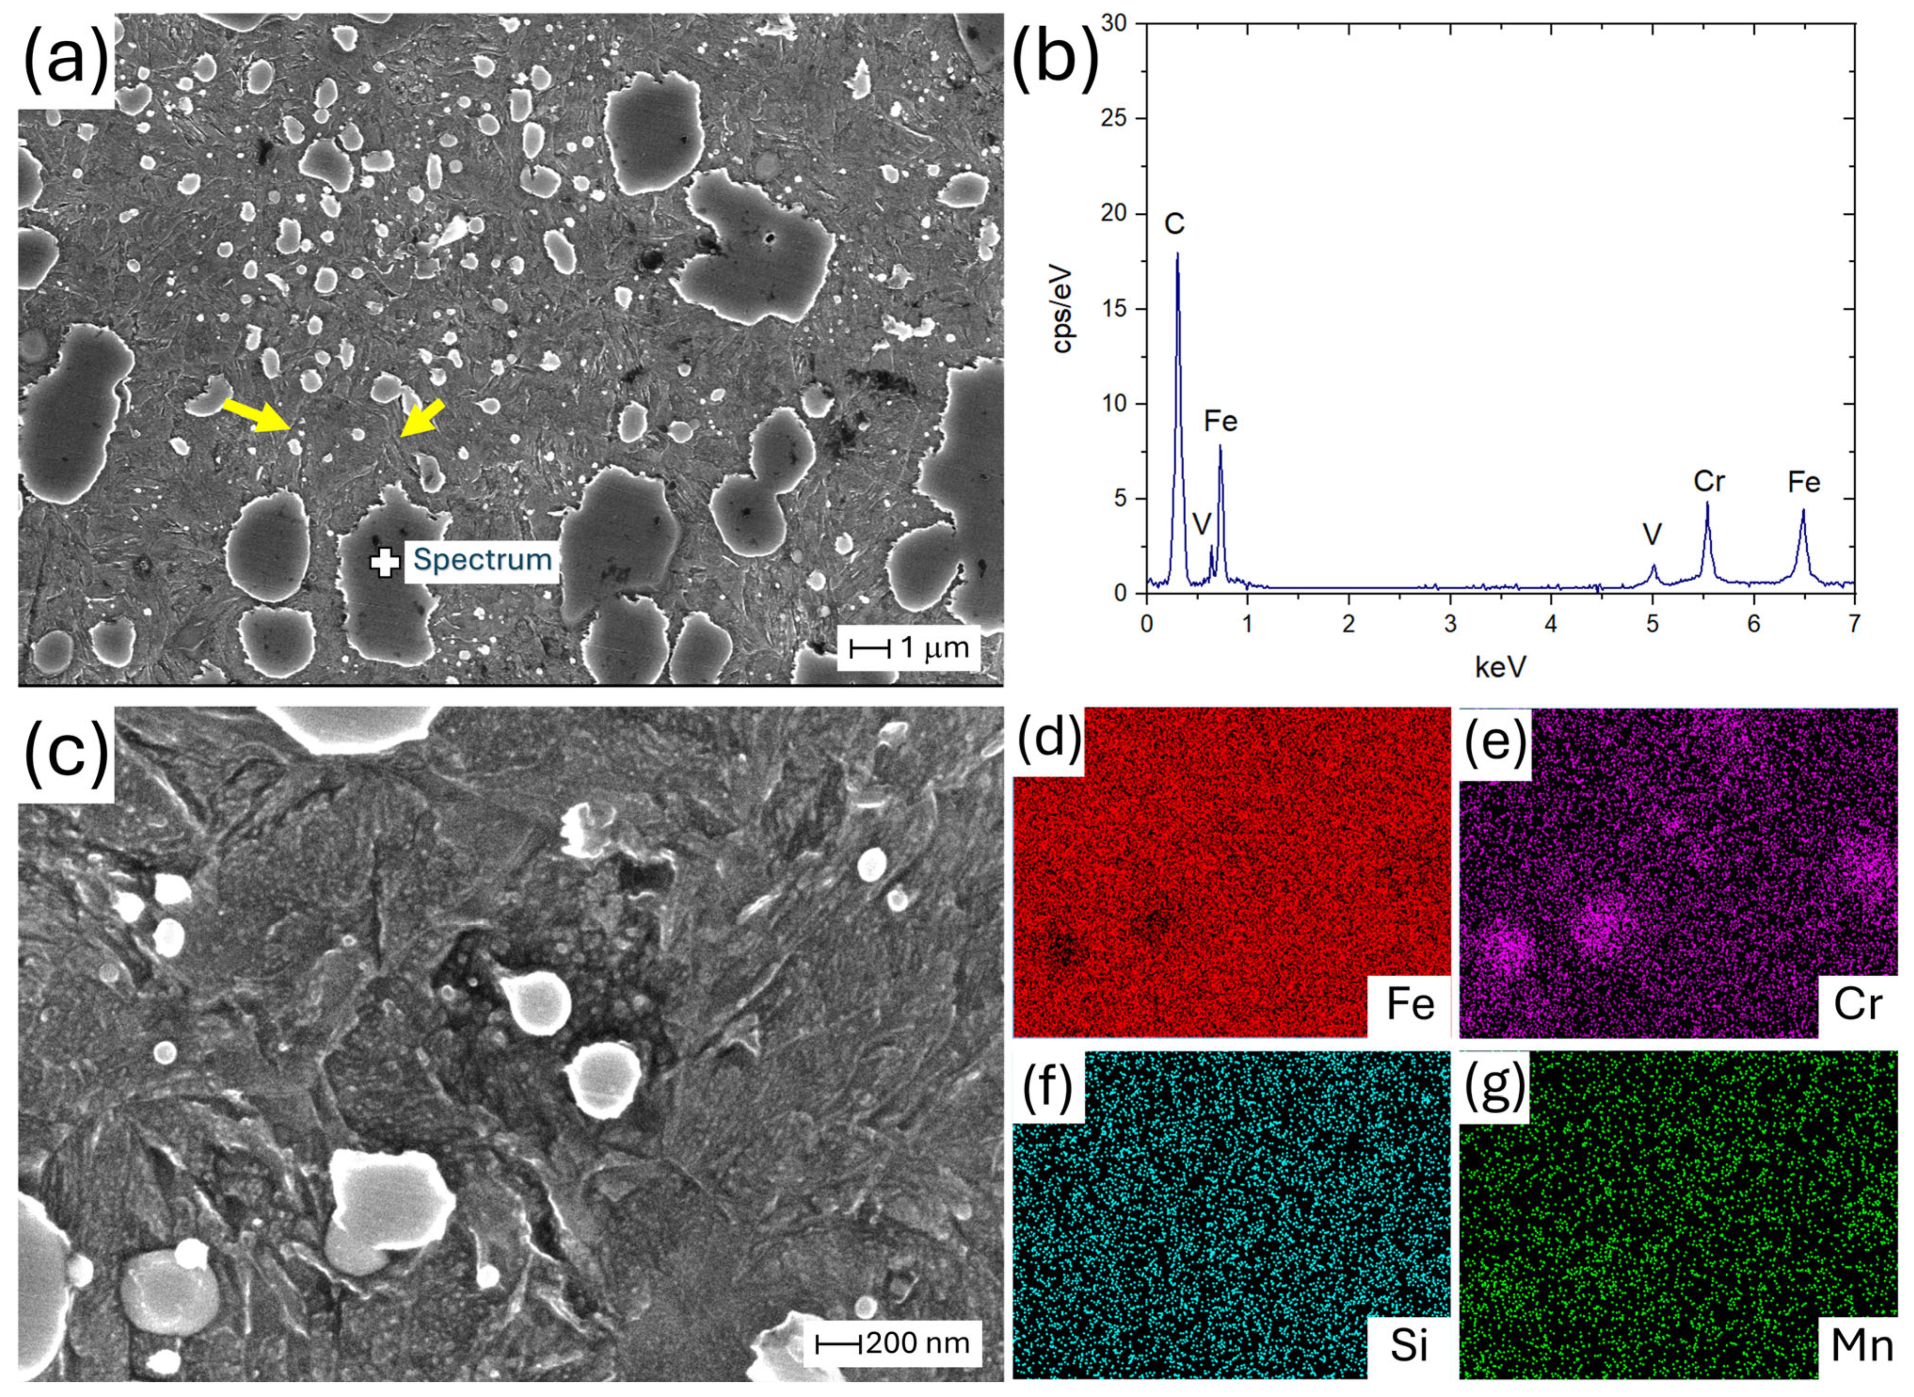
Figure 9a,c show high-magnification SEM micrographs of the AISI D3 microstructure in the AQ-4 state, highlighting the presence of large, irregularly shaped carbides (Figure 9a) as well as small spheroidized carbides (Figure 9a,c). The large carbides exhibit a chemical composition formed by Fe with alloying elements such as Cr and V. In the latter case, the relatively low V peak may be attributable to the signal originating from the matrix under the observed carbide. Figure 9a also reveals the presence of austenitic grain boundaries, as indicated by the yellow arrows. As extensively discussed by [,,], the presence of carbides, together with the relatively low austenitizing temperatures, contributes to hindering the coarsening of austenitic grains. Finally, Figure 9b shows the smallest carbides, which are visible at 60k× magnification, dispersed within a martensitic structure (as will also be discussed with XRD patterns). These small carbides can be attributable to Fe- and Cr-rich carbides, as confirmed by the EDS maps in Figure 9d,e. These statements are consistent with the resutls previously discussed in Figure 8 and with investigations made in [,,,]. Regarding the Si and Mn alloying elements (Figure 9f,g), they appear to be homogeneously distributed in the matrix.
Figure 9.
(a,b) SEM micrographs of AISI D3 steel in the AQ-4 condition, acquired at 10k× (a) and 60k× (b). (c) EDS spectrum acquired from a large carbide in panel (a). (d–g) EDS elemental maps of Fe, Cr, Si, and Mn. The yellow arrows indicate prior austenitic grain boundaries.
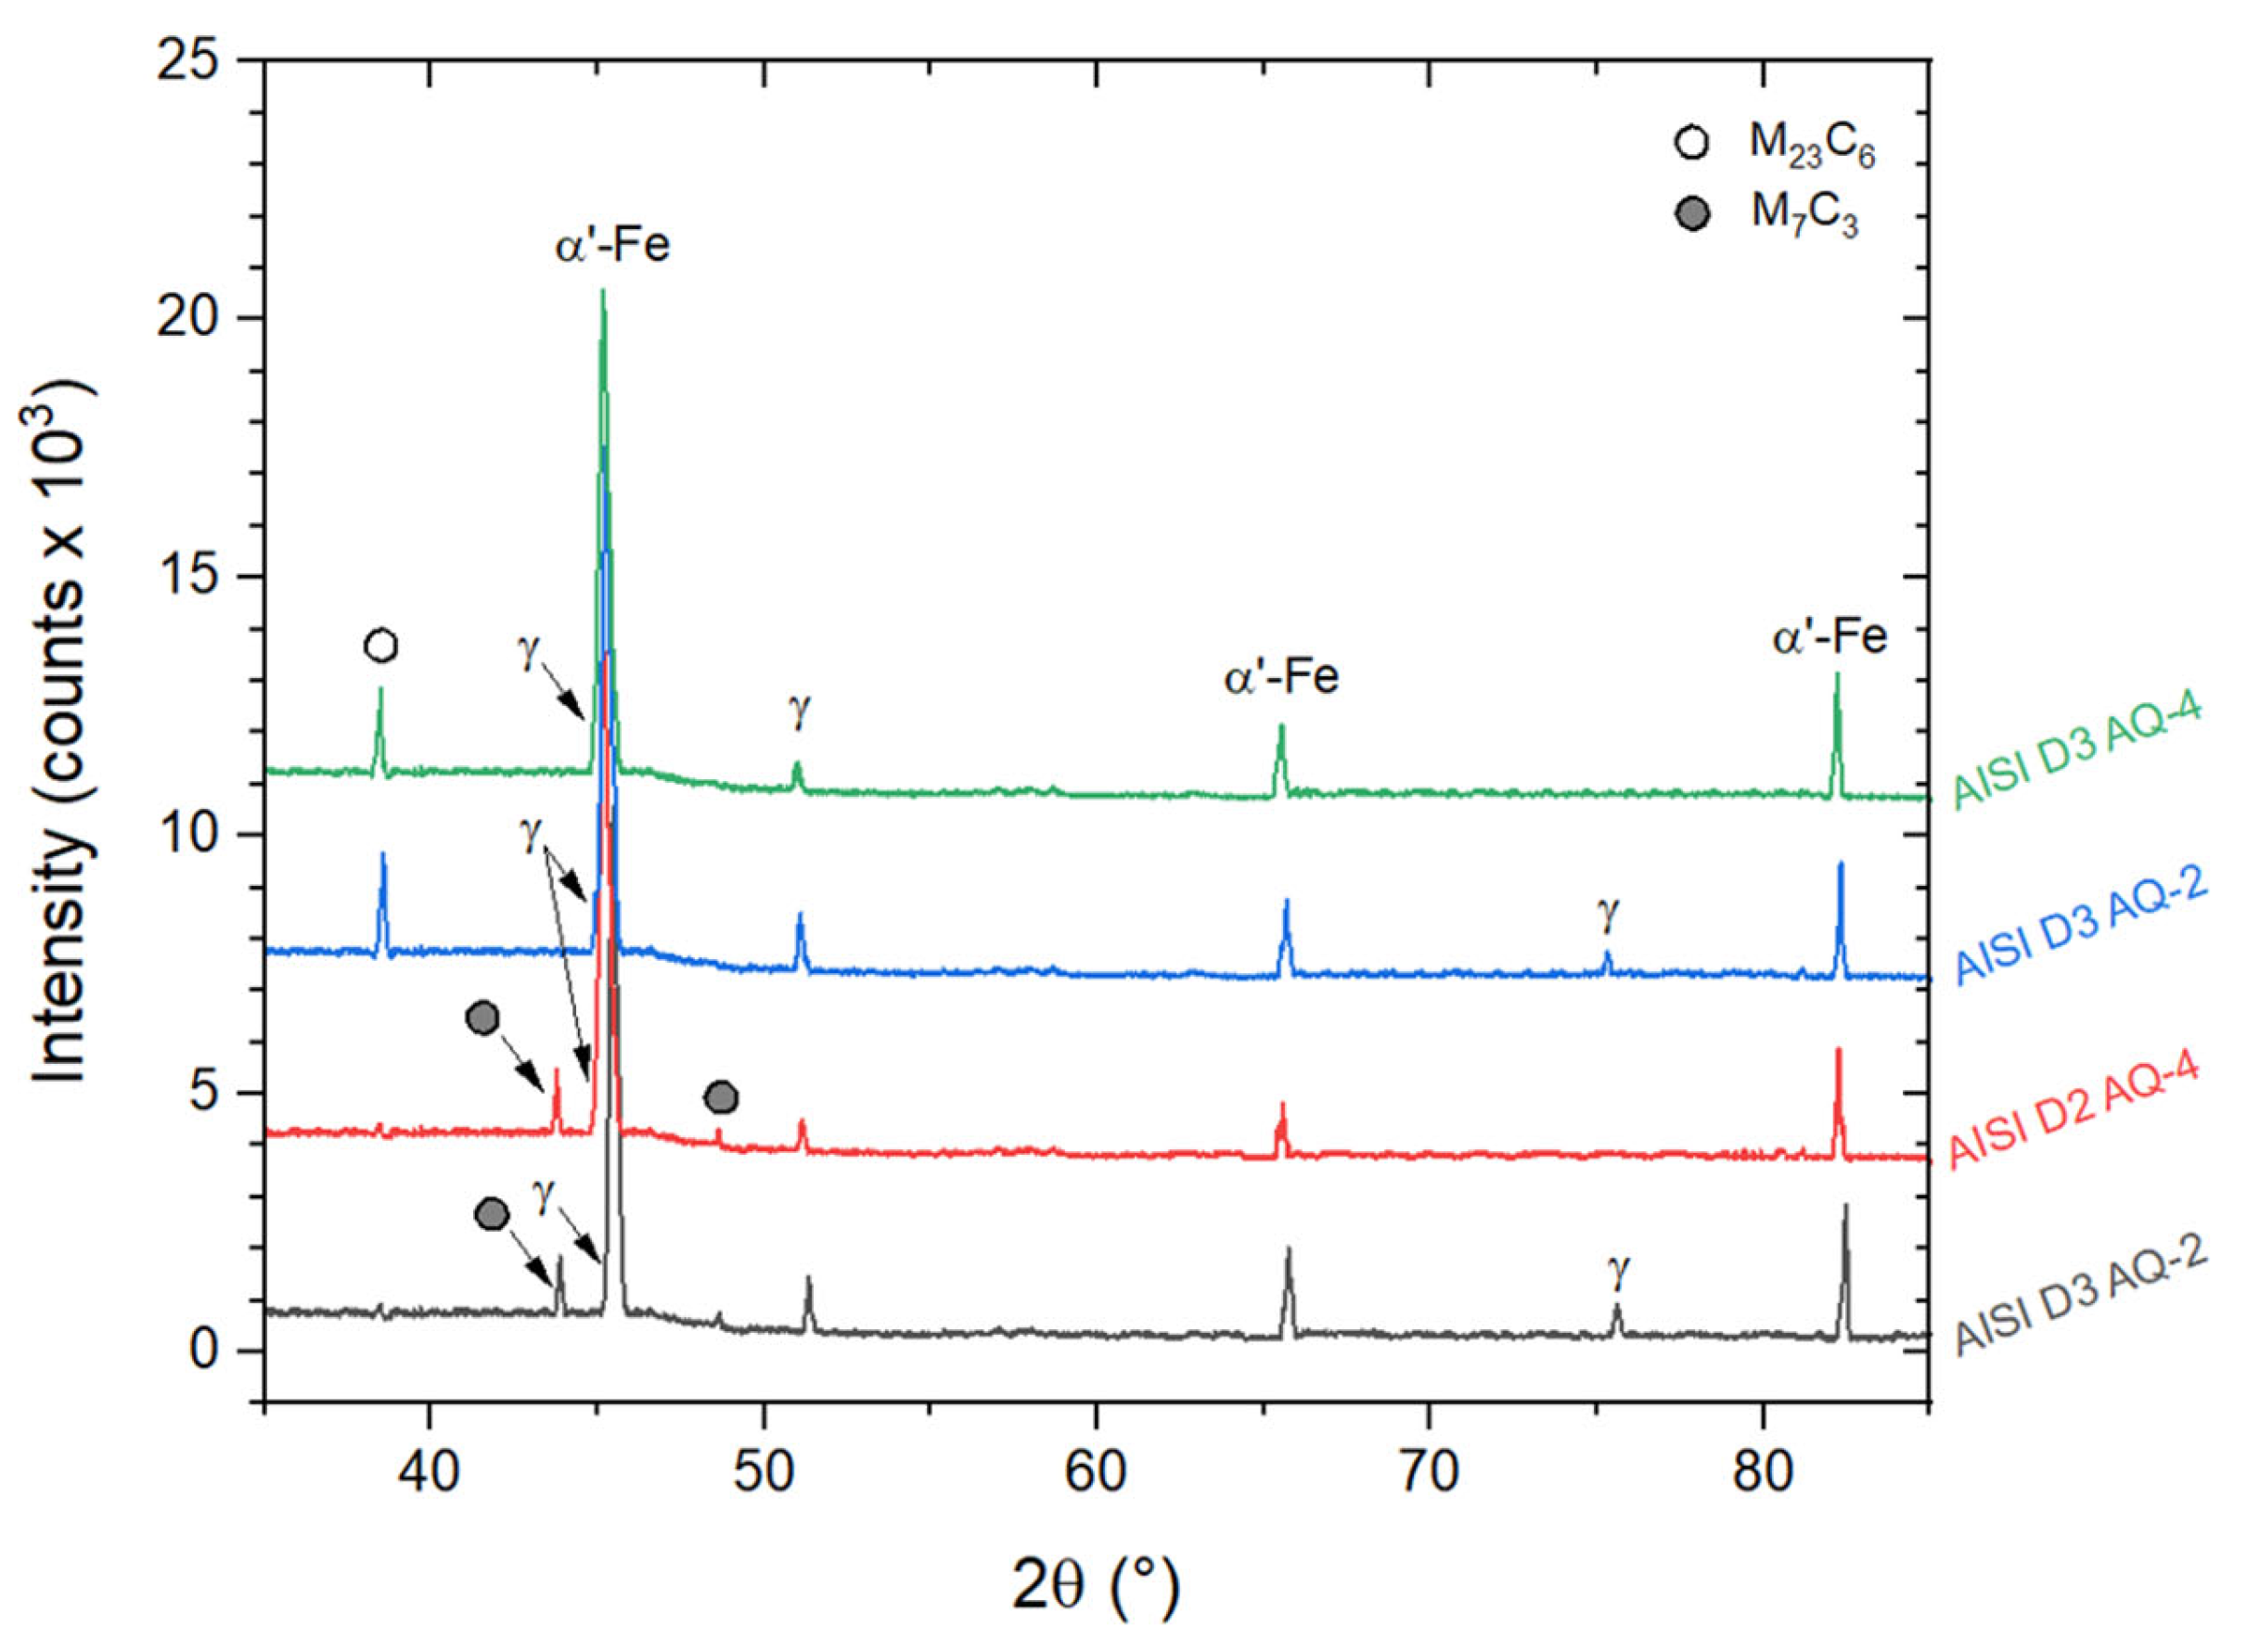
The XRD patterns shown in Figure 10 confirm the presence of M7C3 carbides in AISI D2 and M23C6 carbides in AISI D3. These carbides decrease with an increase in the number of AQ cycles. As a matter of fact, the intensities of peaks related to carbides decrease from AQ-2 to AQ-4, given the same spectrum acquisition time during XRD analyses. Both M7C3 and M23C6 carbides were dispersed in a matrix composed of both α’-martensite and retained austenite. Similar observations were reported in [,,,]. Man et al. [] classified the large and small carbides in annealed tool steel as M7C3 and M23C6, respectively. Similar findings on (Fe,Cr)7C3 and (Fe,Cr)23C6 carbides were reported in [,,]. The XRD patterns reveal that in AISI D2, the amount of retained austenite decreased from 3.3% to 1.8%, while in AISI D3, it was reduced from 2.9% to 1.8%.
Figure 10.
XRD patterns of both AISI D2 and AISI D3 tool steels after the AQ-2 and AQ-4 thermal cycles.
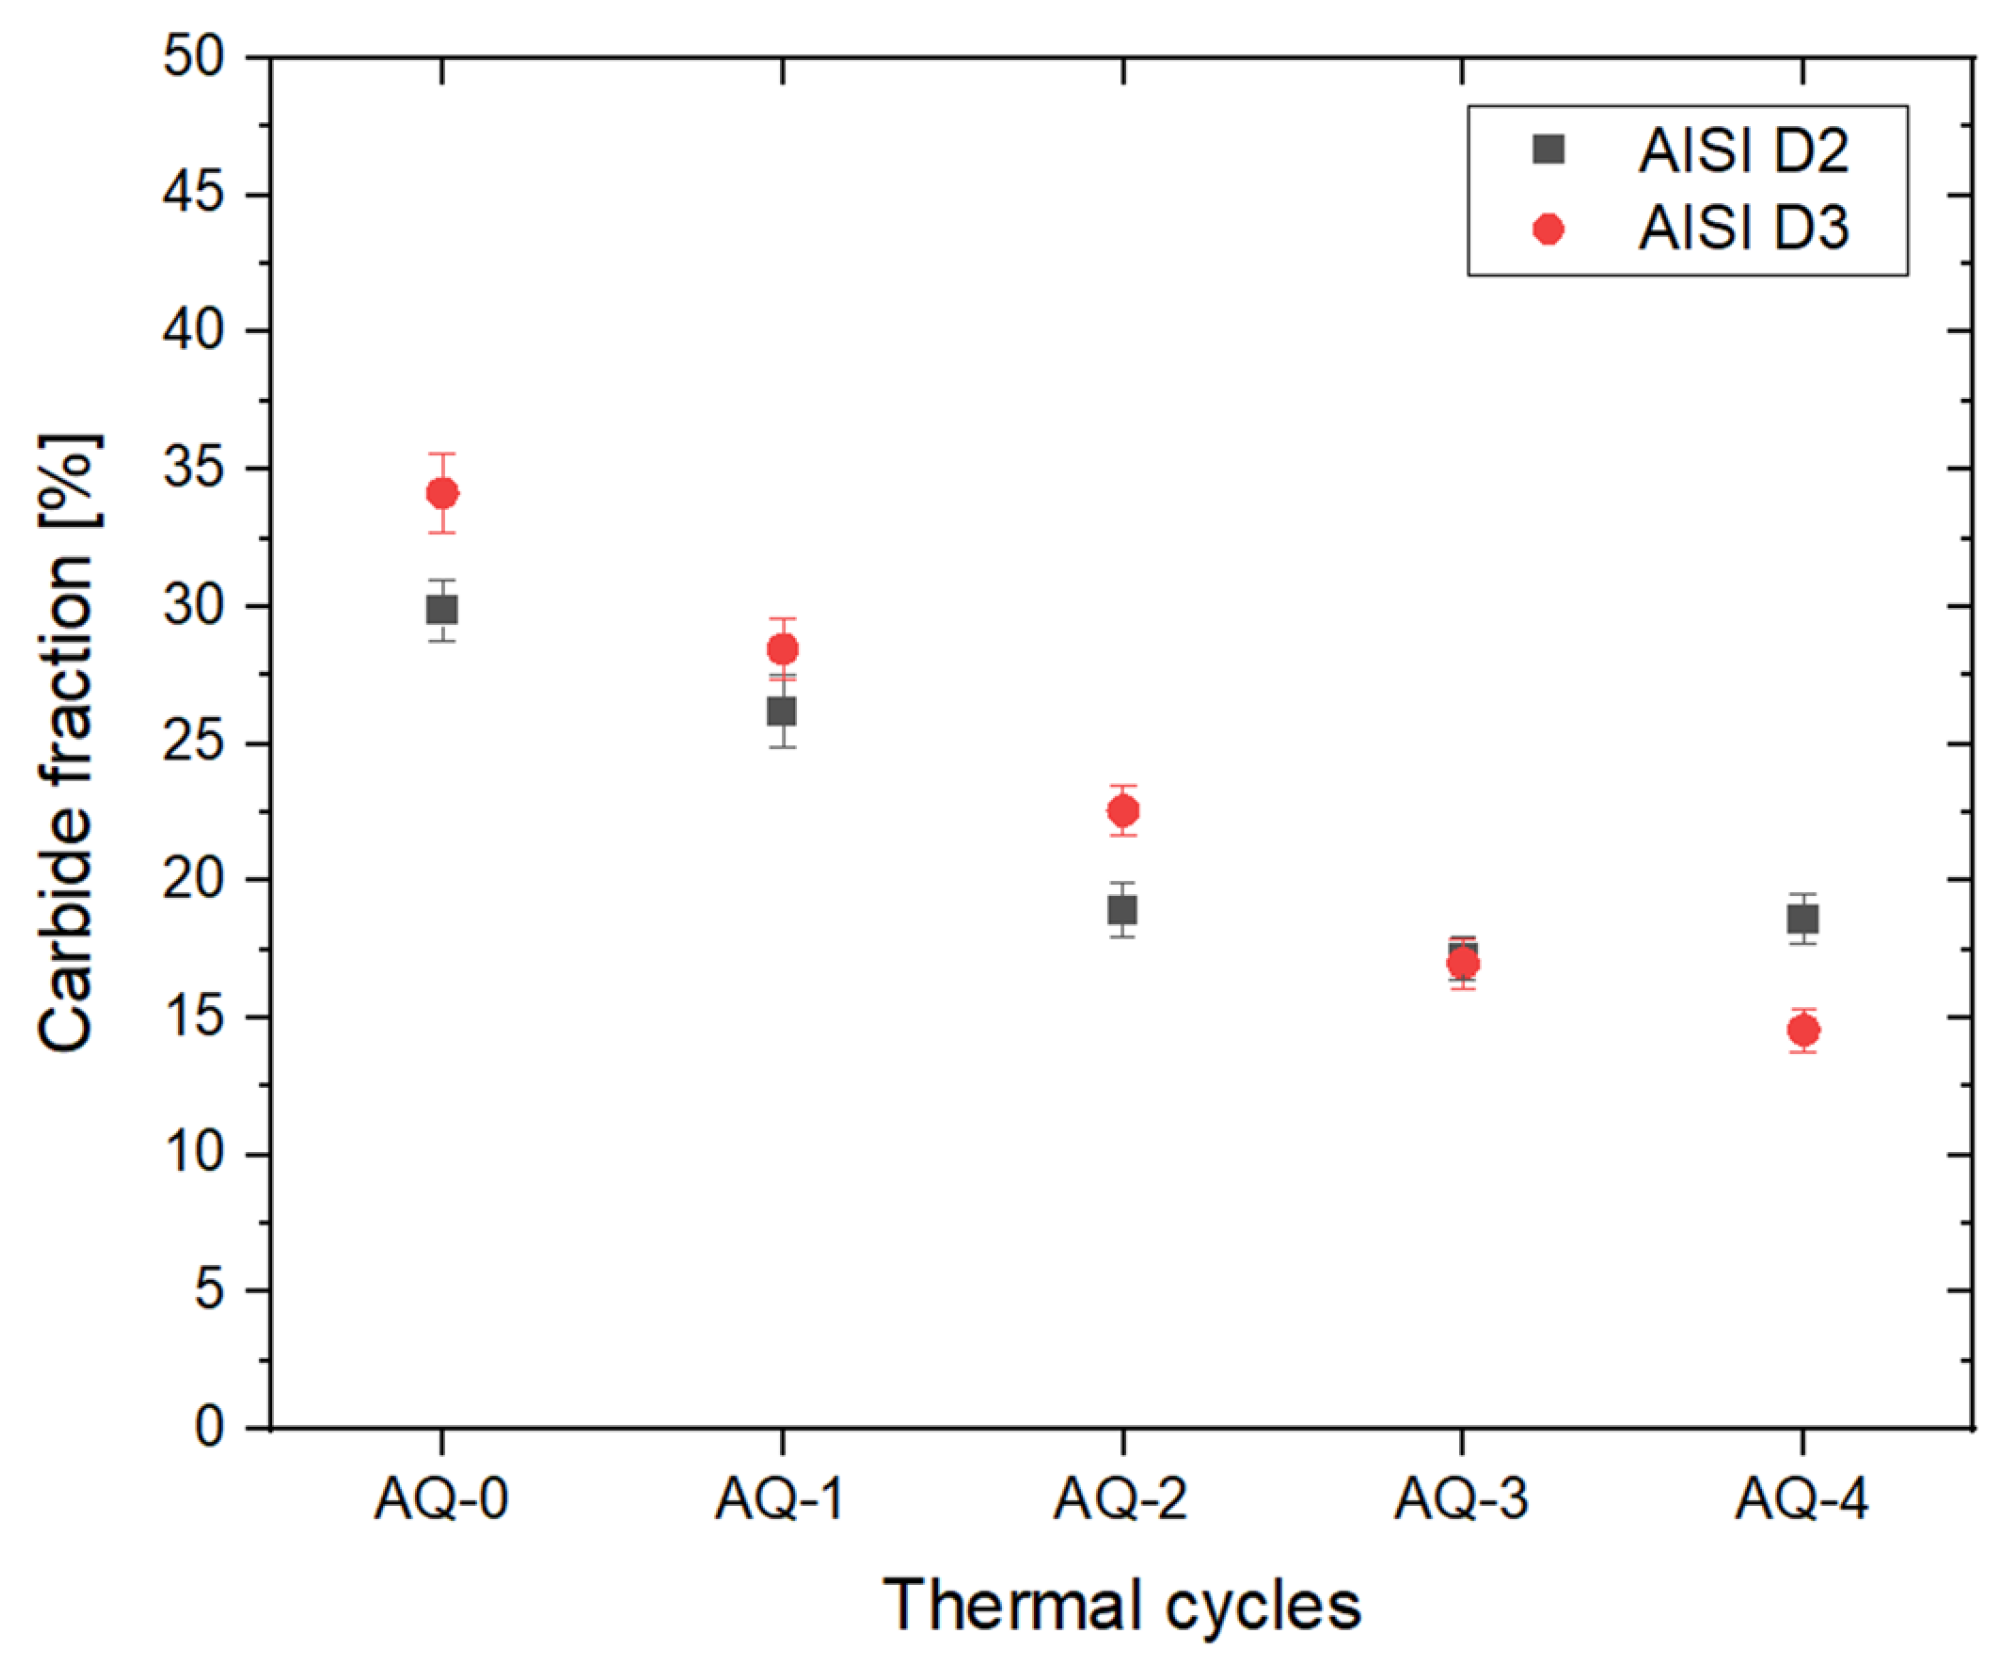
Figure 11 shows the variation in total carbide fractions in AISI D2 (black symbols) and AISI D3 (red symbols) tool steels as a function of the number of thermal cycles (from AQ-1 to AQ-4). The values were obtained through manual analysis of optical micrographs by calculating the ratio between the total carbide area and the total micrograph area for each condition. From the distributions of data points in Figure 11, it is evident that the number of carbides dissolved within the austenitic matrix depends on the number of thermal cycles, particularly for AISI O2 steel (see Figure 6). The carbide fraction was stabilized between the AQ-3 and AQ-4 cycles, with values of (17.2 ± 0.8)% and (18.6 ± 0.9)%, suggesting an apparent absence of dissolution. However, based on the data reported in Table 2 and Figure 8b,c, the nearly constant values do not indicate a lack of carbide transformation. Rather, they suggest that fine carbides have already dissolved and that coarsening of retained carbides may occur. Indeed, the large carbides exhibit no significant variation in equivalent diameter (see Table 2), implying that AQ-4 promoted both dissolution of finer carbides and limited coarsening of larger ones. In contrast, AISI D3 steel (red symbols in Figure 11) exhibits a monotonically decreasing trend in the carbide fraction with AQ thermal cycles (see Figure 10). This behavior, combined with the observed reduction in carbide size (see Table 2), indicates that the austenitization temperatures used for D3 steel favored continuous carbide dissolution rather than coarsening. Celtik et al. [] similarly affirmed that a 50% decrease in carbide fraction, per unit of area, was revealed when comparing single- to double-AQ cycles.
Figure 11.
Variation in carbide fraction (%) in both AISI D2 and AISI D3 tool steels during the AQ thermal cycles.
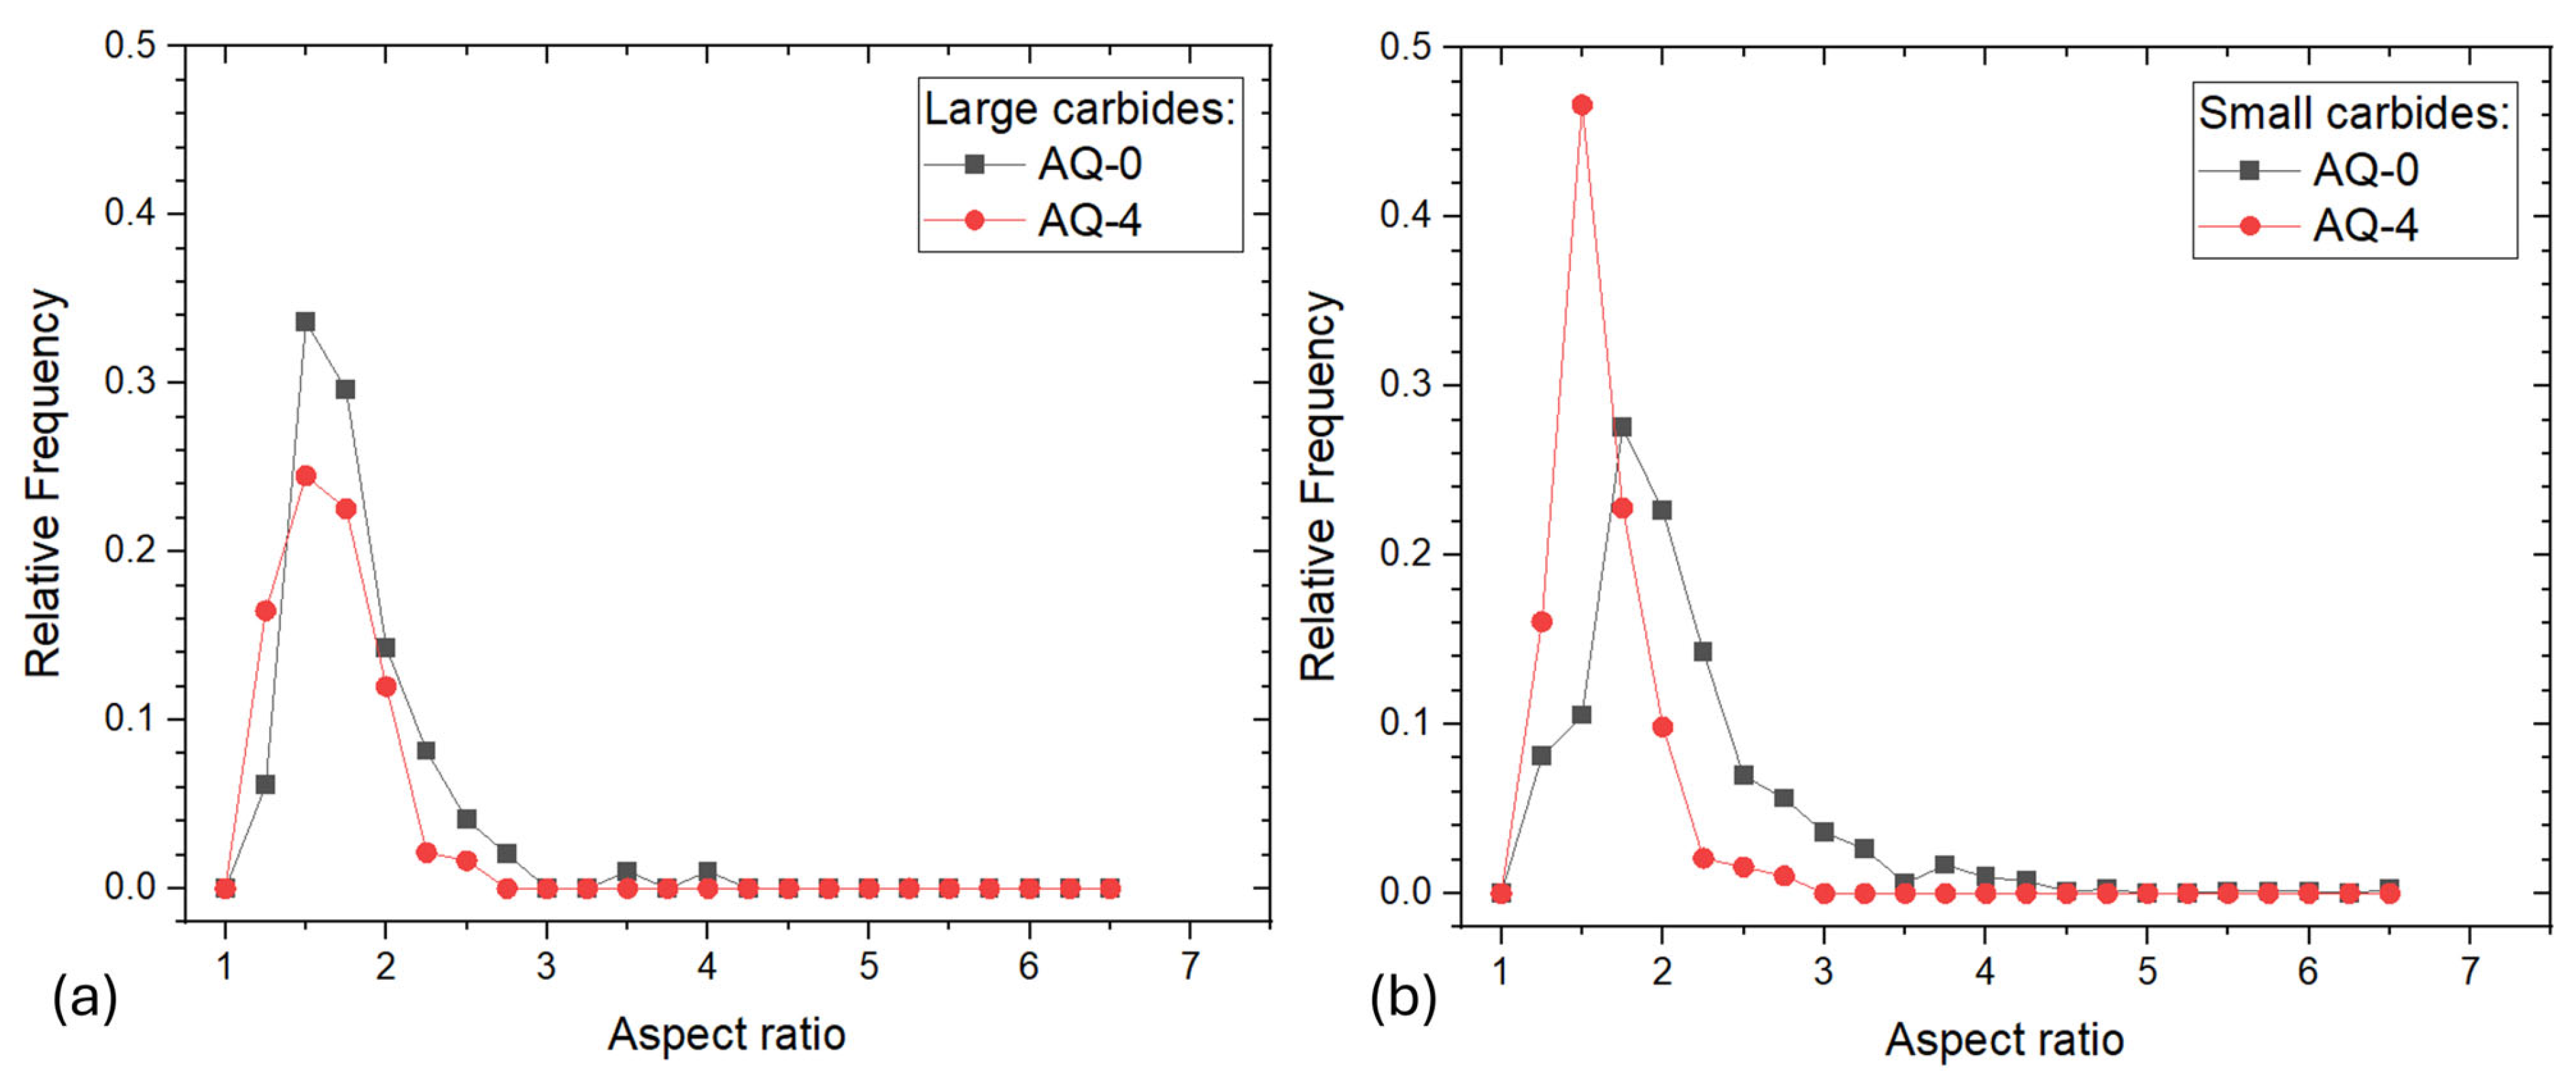
At the same time, multiple AQ cycles promoted carbide spheroidization. In fact, Figure 12 presents the distributions of the aspect ratio for large (Figure 12a) and small (Figure 12b) carbides before and after four AQ thermal cycles. As shown in Figure 12a, the curves shift slightly toward an aspect ratio of one, corresponding to a perfectly spherical morphology. This observation suggests that the AQ-4 condition promotes a moderate degree of spheroidization in the coarse carbides. In contrast, the four AQ cycles result in a more pronounced spheroidization of the finer carbides, as evidenced by the leftward shift in the red curve in Figure 12b toward lower aspect ratio values, as suggested in Figure 8.
Figure 12.
Relative frequencies of the aspect ratio values of both (a) large and (b) small carbides before and after the AQ-0 and AQ-4 thermal cycles.
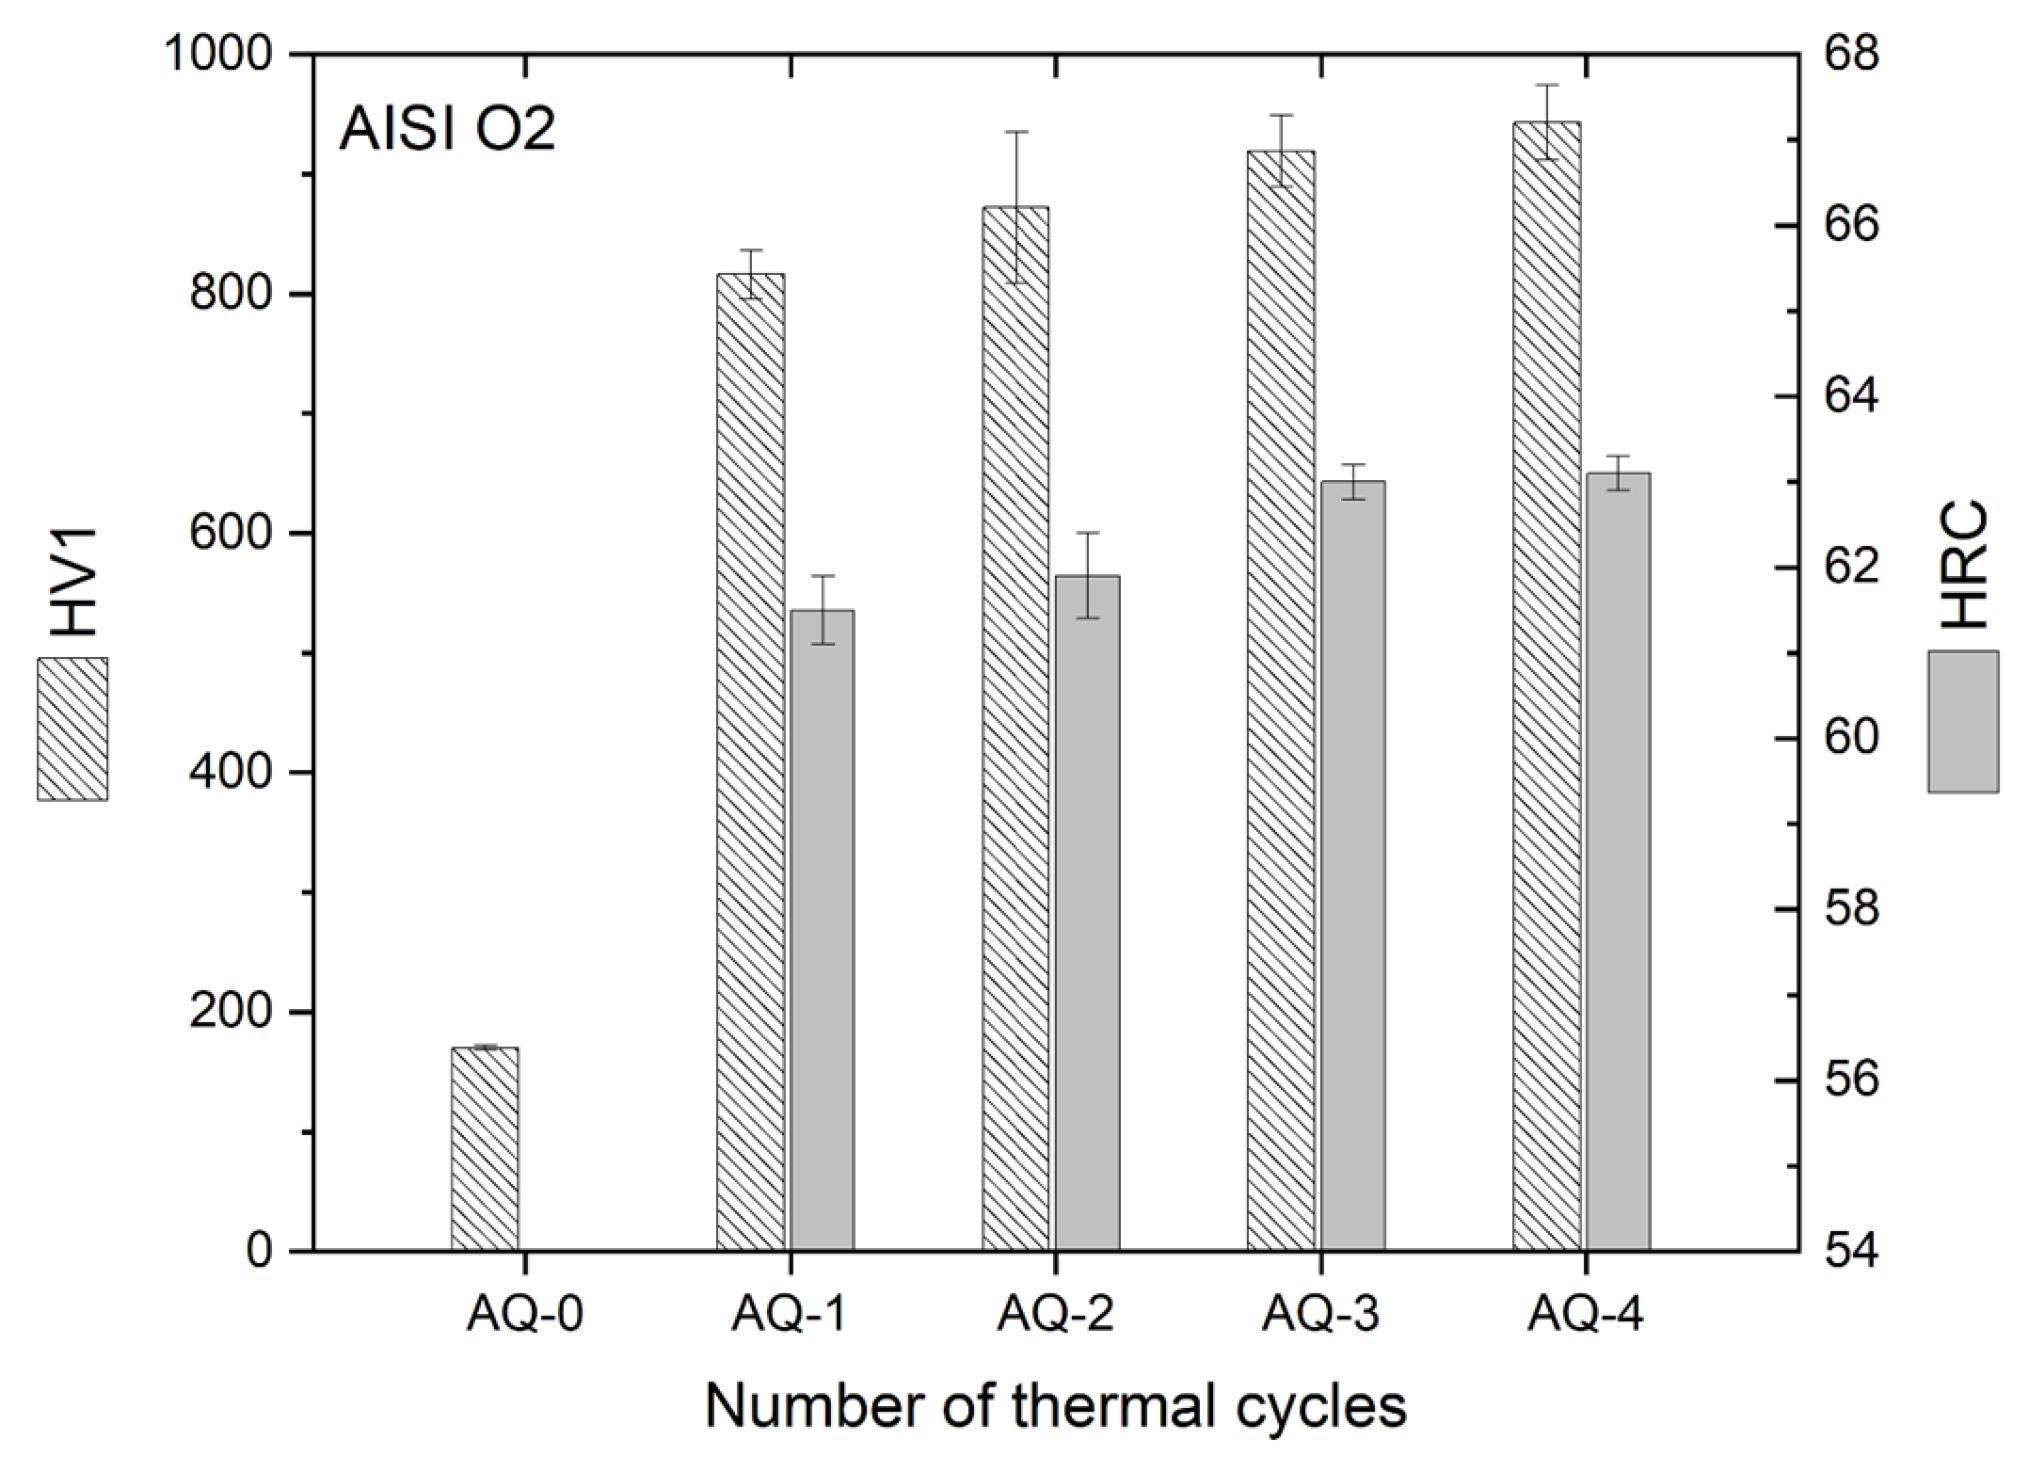
Figure 13 shows the variations in Vickers and Rockwell hardness measurements during AQ thermal cycles, from AQ-0 to AQ-4 for Vickers hardness and from AQ-1 for Rockwell hardness. In the latter case, HRC values were not obtained for AISI O2 in the AQ-0 state because of the drop in the lower limit of the HRC scale. Indeed, a hardness of approximately (156 ± 5) HV1 (AQ-0 in Figure 13) would correspond to a Rockwell value falling below the lower limit of the HRC scale, in agreement with standard conversion tables. Overall, Figure 13 highlights that the hardness of AISI O2 tool steel increased exponentially after the first AQ cycle, reflecting the formation of a predominantly martensitic microstructure. Therefore, hardness continues to increase linearly with the number of thermal cycles up to AQ-4. Vickers values increased from (816 ± 20) HV1 to (943 ± 31) HV1, while Rockwell measurements rose from (61.5 ± 0.4) HRC to (63.1 ± 0.2) HRC. Both Vickers and Rockwell values are in agreement with [,,,]. Considering the grain refinement discussed in Figure 7, the reduction in grain size contributes to the increase in hardness according to the Hall–Petch relationship, which is expressed as
where is the yield stress (MPa), is the friction stress of lattice (MPa), is the Hall–Petch slope (a material constant expressed in MPa·mm1/2), and d is the average grain diameter (mm). By applying Tabor’s relation , with the constant C equal to C ≈ 2.85 for steel [], the Hall–Petch law can also be written in terms of hardness (HV) []:
where and . This formulation supports the observed increase in hardness with decreasing grain size (Figure 7) using the constant reported in [,] and the austenitic grain sizes. Equation (2) indicates that grain refinement contributes to an increase of approximately 20 HV to the overall hardness of 127 HV, as shown in Figure 13. Additional strengthening is likely provided by the finer martensitic laths [] and by a reduction in retained austenite, as shown in Figure 5. A detailed quantification of the main strengthening contributions will be analyzed in future work, as it was out of the scope of the present paper. Based on Tabor’s relation between hardness and yield strength, the estimated yield strength of AISI O2 increases from approximately 475 MPa in the AQ-0 state to 2640 MPa in the AQ-4 condition. These values are in agreement with [,].
Figure 13.
Variations in Vickers and Rockwell hardness of AISI O2 tool steels during the AQ thermal cycles.
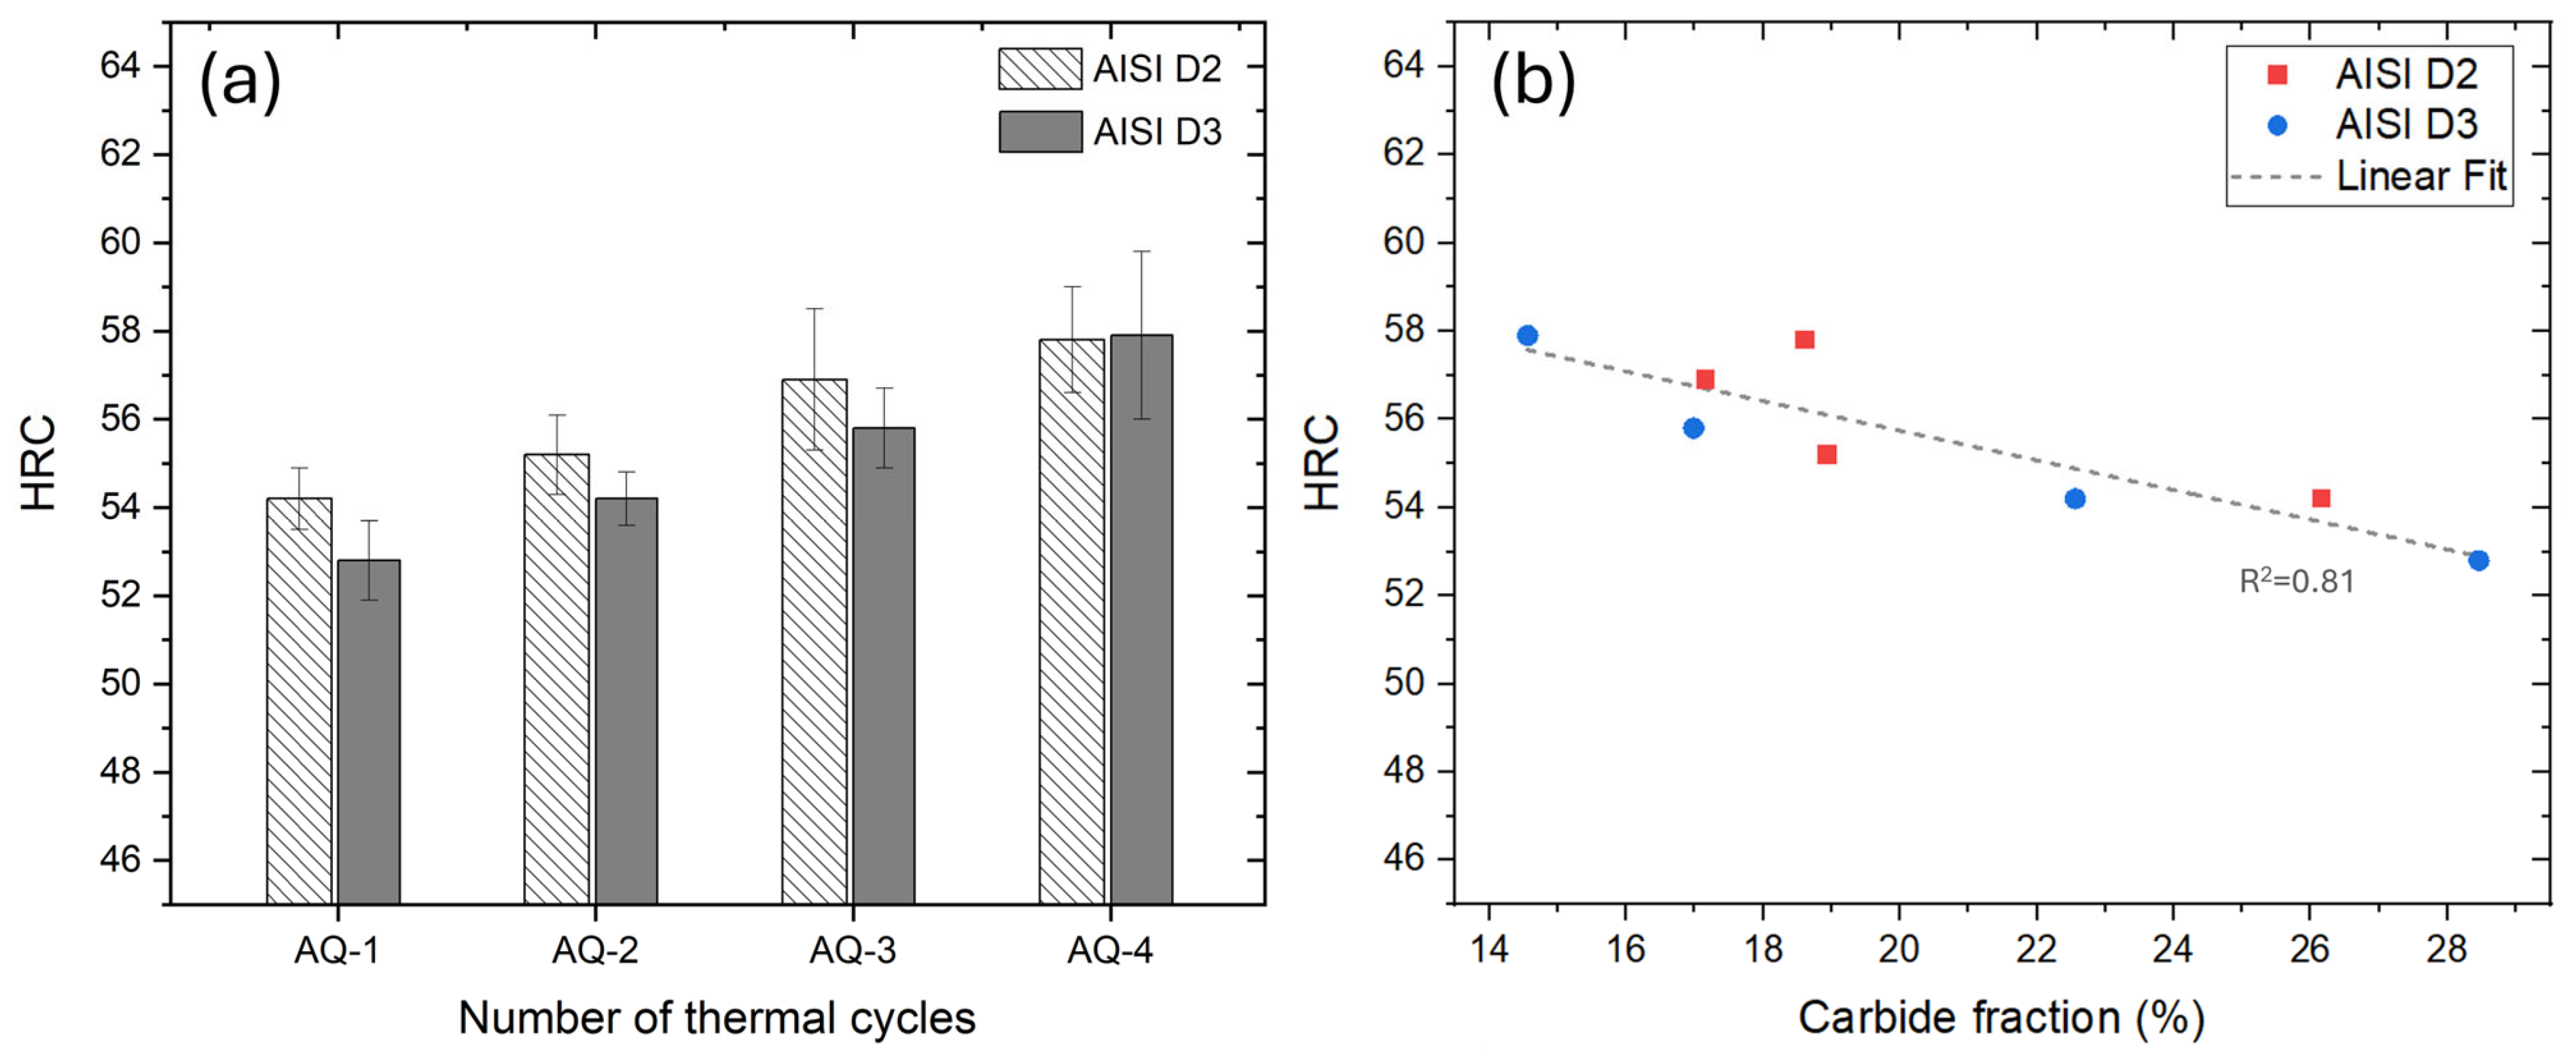
Figure 14 summarizes the variations in Rockwell hardness for AISI D2 and D3 steels as a function of AQ thermal cycles (Figure 14a) and their correlation with the carbide fraction (Figure 14b). Figure 14a exhibits that hardness increased from 52–54 HRC to approximately 58 HRC as the number of thermal cycles increases. The as-received tool steels (AQ-0) exhibited hardness increment from 229–236 HV1 in AQ-0 to 616–637 HV1 in AQ-1 conditions. Similar to AISI O2, the Rockwell values of both as-supplied AISI D2 and AISI D3 (AQ-0) fall below the lower value of the HRC scale. The hardness increases between AQ-0 and AQ-1 were primarily conferred by the transformation of γ-austenite into α’-martensite during rapid quenching following austenitization. The gradual increase in HRC values also depended on the reduction in the amount of retained austenite (Figure 10) and carbide dissolution (Figure 8 and Figure 11). The combination of data from Figure 14b and Figure 11 revealed a clear linear correlation, which is characterized by a high R-square value, between carbide dissolution and hardness improvement.
Figure 14.
(a) Variation in Rockwell hardness measurements as a function of AQ thermal cycles. (b) Linear correlation (dotted line) between the carbide fraction (%) and the Rockwell hardness values (HRC).
Laslty, Table 3 summarizes both the Vickers microhardness and estimated yield strength values of AISI D2 and AISI D3 tool steels. The Vickers hardness measurement shows a significant increment from AQ-0 to AQ-1 due to the martensitic transformation induced by the quenching treatment after austenitization. From AQ-1 to AQ-4, the Vickers hardness measurement follows the same increasing trends as the HRC values in Figure 14. Given the increase in hardness and considering its direct linear relationship with yield strength, the estimated yield strength increased from 660 MPa in the AQ-0 state to 1950 MPa in the AQ-4 state for AISI D2 and from approximately 640 MPa in AQ-0 to 1890 MPa in AQ-4 in for AISI D3. These values are in agreement with other studies [,].
Table 3.
Vickers hardness and estimated yield strength values of both AISI D2 and AISI D3 tool steels during the AQ-2 and AQ-4 thermal cycles.
4. Conclusions
The influence of multiple austenitizing and quenching (AQ) cycles on the microstructure and hardness of AISI O2, D2, and D3 tool steels was investigated. The main findings are summarized as follows:
- Repeated AQ cycles promoted progressive grain refinement in AISI O2 steel, reducing the mean prior austenitic grain size from (6.5 ± 0.8) μm to (4.3 ± 0.4) μm. This refinement, combined with carbide dissolution (after AQ-2), martensite formation, and a reduction in retained austenite, resulted in a continuous hardness increase up to ~ 950 HV1 (63 HRC).
- In AISI D2 and D3 steels, the AQ treatments induced both carbide dissolution and their spheroidization. In AISI D2, partial coarsening was observed after AQ-3, likely due to the complete dissolution of the smallest carbides, while AISI D3 exhibited a monotonic reduction in both the size and volume fraction of the M23C6 carbides.
- A linear correlation was established between carbide dissolution and the hardness for both D2 and D3 steels. Increased carbide dissolution enhanced the matrix’s hardness, leading to a Rockwell hardness of ~58 HRC.
Overall, multiple quenching cycles promote microstructural refinement and hardness enhancement through the combined effects of grain size reduction, carbide dissolution, martensitic transformation, and a decrease in retained austenite.
Author Contributions
Conceptualization, E.G. and R.G.; methodology, E.G. and M.F.; software, E.G.; validation, E.G. and M.F.; investigation, M.F.; resources, E.G. and R.G.; data curation, E.G.; writing—original draft preparation, E.G.; writing—review and editing, M.F. and R.G.; visualization, E.G.; supervision, E.G. and R.G.; project administration, E.G. All authors have read and agreed to the published version of the manuscript.
Funding
This research received no external funding.
Data Availability Statement
Data will be made available upon request.
Acknowledgments
The authors would like to thank Luigi Cristofolini and Laura Righi for their support with SEM and XRD analyses.
Conflicts of Interest
The authors declare no conflicts of interest.
References
- Alza, V.A. Effect of Multiple Tempering on Mechanical Properties and Microstructure of Ledeburitic Tool Steel AISI D3. Int. J. Recent Technol. Eng. IJRTE 2020, 8, 2514–2521. [Google Scholar] [CrossRef]
- Mohammed, M.N.; Omar, M.Z.; Jameel Al-Tamimi, A.N.; Sultan, H.S.; Abbud, L.H.; Al-Zubaidi, S.; Abdullah, O.I.; Abdulrazaq, M. Microstructural and Mechanical Characterization of Ledeburitic AISI D2 Cold-Work Tool Steel in Semisolid Zones via Direct Partial Remelting Process. J. Manuf. Mater. Process. 2022, 7, 11. [Google Scholar] [CrossRef]
- Cui, Y.; Zhang, Y.F.; Yu, F.; Wang, Y.; Zhao, Y.L.; Cao, W.Q. Influence of Multiple Quenching Treatment on Microstructure and Tensile Property of AISI M50 Steel. Mater. Lett. 2023, 340, 134175. [Google Scholar] [CrossRef]
- Kang, J.-Y.; Kim, H.; Son, D.; Kim, C.; Park, S.K.; Lee, T.-H. Hot-Worked Microstructure and Hot Workability of Cold-Work Tool Steels. Mater. Charact. 2018, 135, 8–17. [Google Scholar] [CrossRef]
- Kim, H.; Kang, J.-Y.; Son, D.; Lee, T.-H.; Cho, K.-M. Evolution of Carbides in Cold-Work Tool Steels. Mater. Charact. 2015, 107, 376–385. [Google Scholar] [CrossRef]
- Salunkhe, S.; Fabijanic, D.; Nayak, J.; Hodgson, P. Effect of Single and Double Austenitization Treatments on the Microstructure and Hardness of AISI D2 Tool Steel. Mater. Today Proc. 2015, 2, 1901–1906. [Google Scholar] [CrossRef]
- Celtik, C.; Ayhan, I.I.; Yurekturk, Y. Effect of Double Austenitization and Pre-Annealing Heat Treatment on the Microstructural and Mechanical Properties of QT 41Cr4 Steel. Trans. Indian Inst. Met. 2023, 76, 2845–2855. [Google Scholar] [CrossRef]
- Su, S.; Song, R.; Quan, S.; Li, J.; Wang, Y.; Cai, C.; Wen, E. A Fe-Cr-C Steel Based on Gradient Scale Precipitation Hardening: Hardening and Toughening Mechanism of Multistage Heat Treatment. J. Alloys Compd. 2023, 946, 169355. [Google Scholar] [CrossRef]
- Colla, V.; Branca, T.A. Sustainable Steel Industry: Energy and Resource Efficiency, Low-Emissions and Carbon-Lean Production. Metals 2021, 11, 1469. [Google Scholar] [CrossRef]
- Jouhara, H.; Khordehgah, N.; Almahmoud, S.; Delpech, B.; Chauhan, A.; Tassou, S.A. Waste Heat Recovery Technologies and Applications. Therm. Sci. Eng. Prog. 2018, 6, 268–289. [Google Scholar] [CrossRef]
- Buchner, K.; Uhlig, J. Discussion on Energy Saving and Emission Reduction Technology of Heat Treatment Equipment. BHM Berg Hüttenmännische Monatshefte 2023, 168, 109–113. [Google Scholar] [CrossRef]
- Yi, Q.; Wu, X.; Zhuo, J.; Li, C.; Li, C.; Cao, H. An Incremental Data-Driven Approach for Carbon Emission Prediction and Optimization of Heat Treatment Processes. Case Stud. Therm. Eng. 2025, 72, 106320. [Google Scholar] [CrossRef]
- Hermawan, F.H.; Mochtar, M.A. Effect of Austenitizing Temperature on Microstructure, Amount of Retained Austenite, and Hardness of AISI O1 Tool Steel. In Proceedings of the 17th International Conference on Quality in Research (Qir) 2021 in Conjunction with the 6th ITREC 2021 and the 2nd CAIC-SIUD, Depok, Indonesia, 13–15 October 2021; p. 070001. [Google Scholar]
- Çivici, M.; Özer, M.; Altuntaş, G.; Yilmaz, T.; Shelar, A.R.; Altuntaş, O.; Özer, A. Advanced Heat Treatment Strategies for Optimizing Microstructure and Mechanical Integrity of AISI O2 Tool Steel. Ironmak. Steelmak. Process. Prod. Appl. 2025, 52, 1232–1242. [Google Scholar] [CrossRef]
- Mochtar, M.A.; Putra, W.N.; Abram, M. Effect of Tempering Temperature and Subzero Treatment on Microstructures, Retained Austenite, and Hardness of AISI D2 Tool Steel. Mater. Res. Express 2023, 10, 056511. [Google Scholar] [CrossRef]
- Kaya, E.; Kılıçay, K.; Ulutan, M. Microstructure and Tribological Properties of Tool Steel AISI O2 After Thorough Cryogenic Heat Treatment. Met. Sci. Heat Treat. 2020, 62, 399–404. [Google Scholar] [CrossRef]
- UNI EN ISO 6507-1:2023; Metallic Materials—Vickers Hardness Test—Part 1: Test Method. ISO: Milan, Italy, 2023.
- UNI EN ISO 6508-1:2024; Metallic Materials—Rockwell Hardness Test—Part 1: Test Method. ISO: Milan, Italy, 2024.
- Cerri, E.; Ghio, E.; Bolelli, G. Defect-Correlated Vickers Microhardness of Al-Si-Mg Alloy Manufactured by Laser Powder Bed Fusion with Post-Process Heat Treatments. J. Mater. Eng. Perform. 2022, 31, 8047–8067. [Google Scholar] [CrossRef]
- Elhelaly, M.A.; El-Zomor, M.A.; Attia, M.S.; Youssef, A.O. Characterization and Kinetics of Chromium Carbide Coatings on AISI O2 Tool Steel Performed by Pack Cementation. J. Mater. Eng. Perform. 2022, 31, 365–375. [Google Scholar] [CrossRef]
- Masoumi, M.; Echeverri, E.A.A.; Tschiptschin, A.P.; Goldenstein, H. Improvement of Wear Resistance in a Pearlitic Rail Steel via Quenching and Partitioning Processing. Sci. Rep. 2019, 9, 7454. [Google Scholar] [CrossRef]
- Günerli, E.; Bayramoğlu, M.; Geren, N. Volume Fraction of Retained Austenite in 1.2842 Tool Steel as a Function of Tempering Temperature. Eur. Mech. Sci. 2022, 6, 263–268. [Google Scholar] [CrossRef]
- Shirazi, H.; Miyamoto, G.; Hossein Nedjad, S.; Chiba, T.; Nili Ahmadabadi, M.; Furuhara, T. Microstructure Evolution during Austenite Reversion in Fe-Ni Martensitic Alloys. Acta Mater. 2018, 144, 269–280. [Google Scholar] [CrossRef]
- Verdiere, A.; Castro Cerda, F.; Béjar Llanes, A.; Wu, J.; Crebolder, L.; Petrov, R.H. Effect of the Austenitizing Parameters on the Microstructure and Mechanical Properties of 75Cr1 Tool Steel. Mater. Sci. Eng. A 2020, 785, 139331. [Google Scholar] [CrossRef]
- Yaghoubi, M.; Rezaeian, A.; Toroghinejad, M.R.; Mojgani, A.; Gholamalian Dehaghani, H. Effect of Prior Austenite Grain Size on Strength-Ductility Trade-off, Phase Evolution, and Fracture Behavior in a Fully Austenitizated QP Steel: Insights into TRIP Behavior. J. Mater. Res. Technol. 2025, 37, 2434–2448. [Google Scholar] [CrossRef]
- Liu, Y.; Wang, Z.; Hu, X.; Zhu, P.; Xiong, Y.; Zhao, A.; Cao, K. Effects of Y Addition on Carbide Morphology and Impact Properties of D2 Cold Work Die Steel. J. Mater. Res. Technol. 2024, 33, 5040–5051. [Google Scholar] [CrossRef]
- Man, T.; Dai, Y.; Yao, J.; Xu, L.; Li, P.; Zhao, M.; Liu, Y.; Zhao, H. Segregation and Carbide Evolution in AISI D2 Tool Steel Produced by Curved Continuous Casting. J. Mater. Res. Technol. 2023, 26, 8254–8262. [Google Scholar] [CrossRef]
- Moustafa, I.M.; Moustafa, M.A.; Nofal, A.A. Carbide Formation Mechanism during Solidification and Annealing of 17% Cr-Ferritic Steel. Mater. Lett. 2000, 42, 371–379. [Google Scholar] [CrossRef]
- Kumar, S.; Maity, S.R.; Patnaik, L. Effect of Surface Modification on the Nanomechanical and Wear Properties of AISI D3 Cold Work Tool Steel. In Recent Advancements in Mechanical Engineering, Select Proceedings of ICRAME 2021, The 2nd International Conference on Recent Advancements of Mechanical Engineering (ICRAME 2021), Silchar, India, 7–9 February 2021; Springer Nature: Singapore, 2023; pp. 105–113. [Google Scholar]
- Navasingh, R.J.H.; Rajendran, T.P.; Nikolova, M.P.; Goldin Priscilla, C.P.; Niesłony, P.; Żak, K. Improved Microstructure Evolution and Corrosion Resistance in Friction-Welded Dissimilar AISI 1010/D3 Steel Joints Through Post-Weld Heat Treatment. J. Manuf. Mater. Process. 2025, 9, 124. [Google Scholar] [CrossRef]
- Bole, S.; Sarkar, S.B. A Study on the Effect of Prior Hot Forging on Microstructure and Mechanical Properties of AISI D2 Steel After Quenching. Met. Sci. Heat Treat. 2024, 65, 683–690. [Google Scholar] [CrossRef]
- Singh, K.; Khatirkar, R.K.; Sapate, S.G. Microstructure Evolution and Abrasive Wear Behavior of D2 Steel. Wear 2015, 328–329, 206–216. [Google Scholar] [CrossRef]
- Pavlina, E.J.; Van Tyne, C.J. Correlation of Yield Strength and Tensile Strength with Hardness for Steels. J. Mater. Eng. Perform. 2008, 17, 888–893. [Google Scholar] [CrossRef]
- Pelleg, J. Testing. In Basic Compounds for Superalloys; Elsevier: Amsterdam, The Netherlands, 2018; pp. 7–84. [Google Scholar]
- Seok, M.-Y.; Choi, I.-C.; Moon, J.; Kim, S.; Ramamurty, U.; Jang, J. Estimation of the Hall–Petch Strengthening Coefficient of Steels through Nanoindentation. Scr. Mater. 2014, 87, 49–52. [Google Scholar] [CrossRef]
- Armstrong, R. Crystal Engineering for Mechanical Strength at Nano-Scale Dimensions. Crystals 2017, 7, 315. [Google Scholar] [CrossRef]
- Wang, J.; Tao, Q.; Fan, J.; Fu, L.; Shan, A. Enhanced Mechanical Properties of a High-Carbon Martensite Steel Processed by Heavy Warm Rolling and Tempering. Mater. Sci. Eng. A 2023, 872, 144958. [Google Scholar] [CrossRef]
- Majerík, J.; Barényi, I.; Kohutiar, M.; Chochlíková, H.; Escherová, J. Experimental Research and Evaluation of Mechanical Properties of Microstructural Components of High Strenght Steels by Quasistatic Nanoindentation. Eng. Rev. 2024, 44, 1–10. [Google Scholar] [CrossRef]
- Torkamani, H.; Raygan, S.; Rassizadehghani, J. Comparing Microstructure and Mechanical Properties of AISI D2 Steel after Bright Hardening and Oil Quenching. Mater. Des. (1980–2015) 2014, 54, 1049–1055. [Google Scholar] [CrossRef]
Disclaimer/Publisher’s Note: The statements, opinions and data contained in all publications are solely those of the individual author(s) and contributor(s) and not of MDPI and/or the editor(s). MDPI and/or the editor(s) disclaim responsibility for any injury to people or property resulting from any ideas, methods, instructions or products referred to in the content. |
© 2025 by the authors. Licensee MDPI, Basel, Switzerland. This article is an open access article distributed under the terms and conditions of the Creative Commons Attribution (CC BY) license (https://creativecommons.org/licenses/by/4.0/).