3.1. General
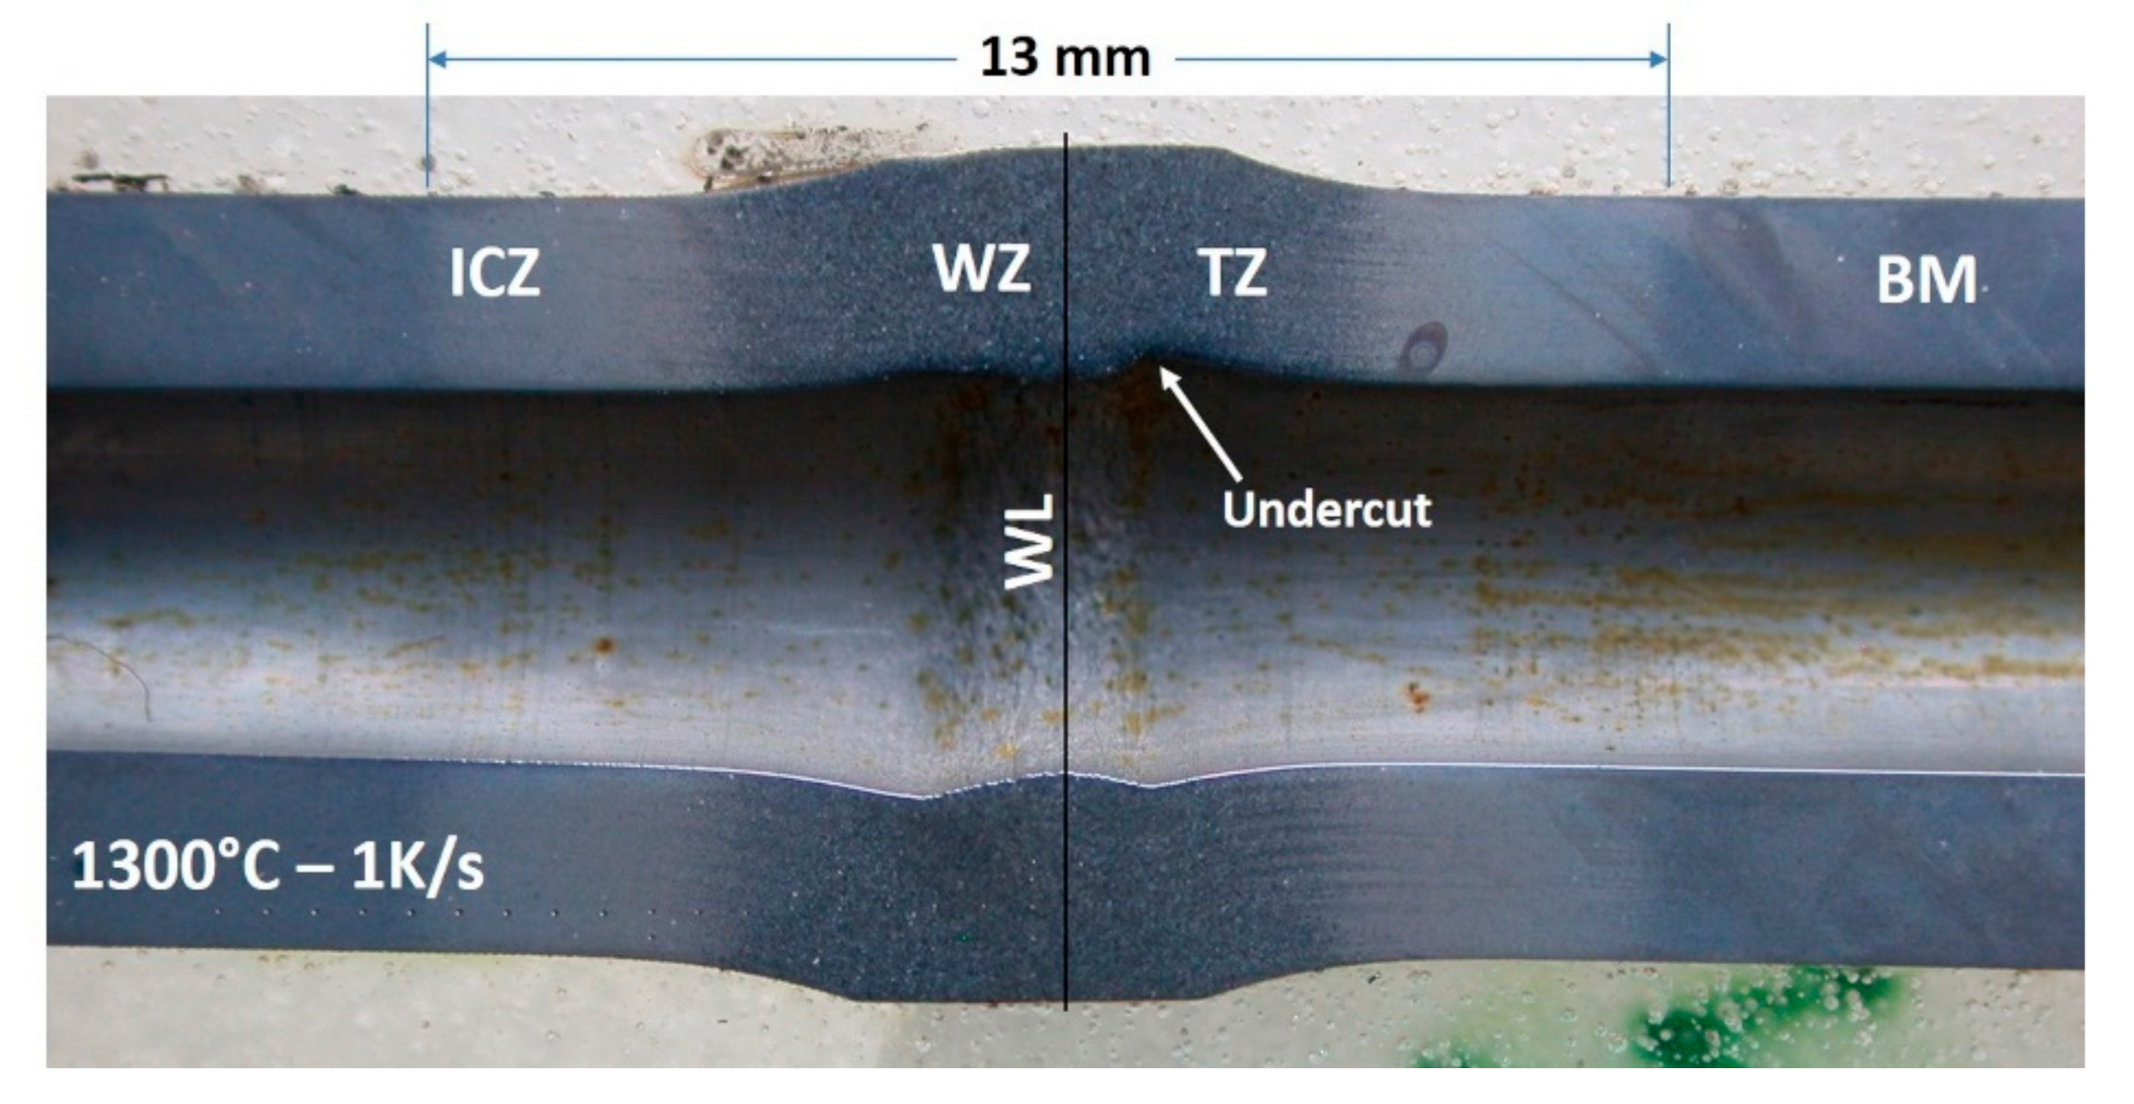
Figure 3 shows a typical length section of a welded pipe. The applied bevel design is seen to have produced a smooth outer cap and an inner cap with a small undercut in the weld zone WZ. An increase in the pipe thickness had occurred in the weld zone. The reason for this is the difficulty in limiting the width of the thermal zone for small specimens, leading to a broad deformation zone which causes the pipe wall to bend outwards. The undercut is also attributed to the long thermal zone of the small-scale weld samples.
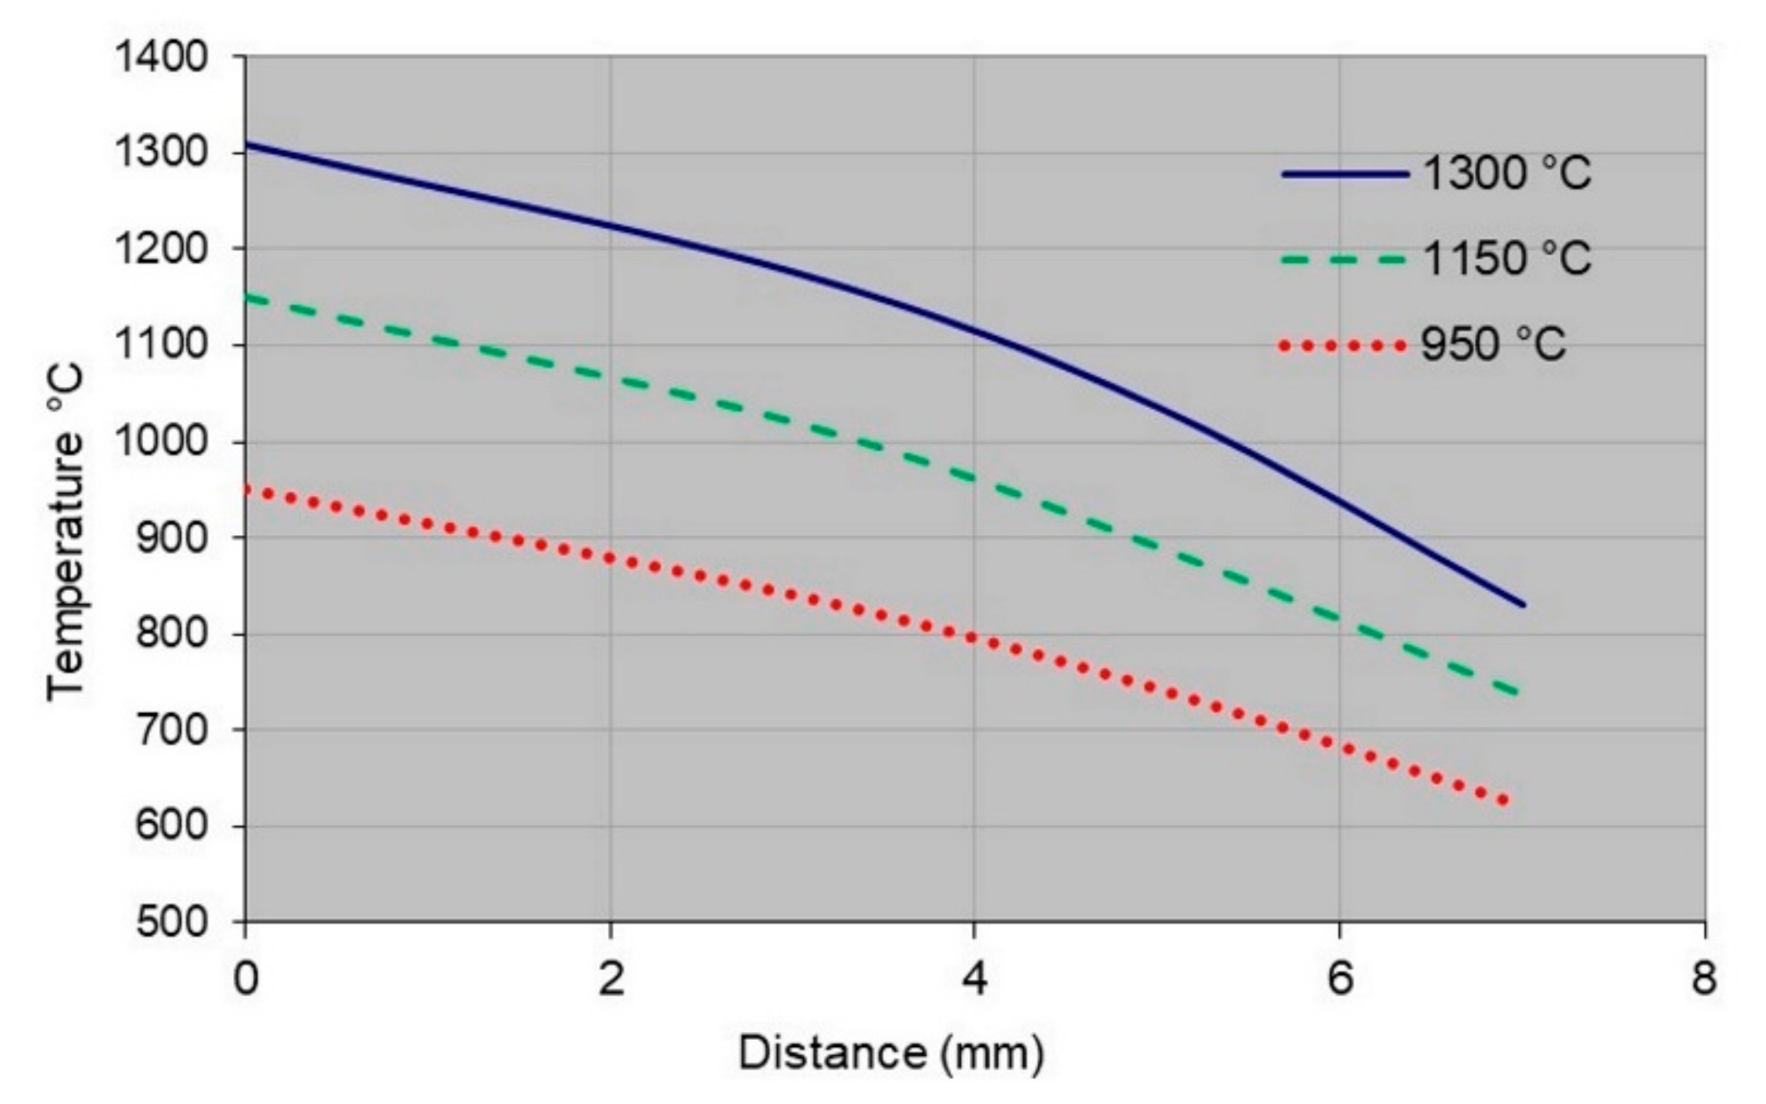
Figure 4 shows the temperature prior to the forging step at different distances from the mating surface along the longitudinal axis of the pipe. These temperatures were measured by heating a specimen to different forging temperatures while measuring the temperature with thermocouples fixed at distances of 0.5, 3, 5 and 7 mm from the mating surface. The Ac
3 temperature for the L80 casing grade steel was calculated to be 827 °C.
Figure 4 clearly shows that, before forging, the Ac
3 temperature was achieved at a distance of 7 mm from the mating surface for the pipe that was welded at 1300 °C forging temperature. Higher temperatures produced wider thermal zones than what lower temperatures did. It is believed that a reasonable estimate of the width of the heat affected zones can be obtained from the temperature graphs in
Figure 4, which is seen by comparing
Figure 4 with the hardness plots in
Section 3.3. The reason for the good correspondence between the temperature profiles of Figure 4 and the hardness plots for the same temperatures is that the temperature plots at any distance from the weld line probably represent the maximum temperature that was obtained during the welding process. One reason for this is that no temperature increase is generally expected to occur due to the forging step, which is initiated a fraction of a second after the heating is turned off. During that time, a temperature drop of 50–100 K occurs due to significant heat conduction, radiation and convection at high temperatures, Moreover, since plastic deformation is only localized to the weld zone (and partly to the transition zone), it occurs at relatively high temperature at which the flow stress is low and little deformation heat is generated. Another reason why the local temperatures should not increase above the values given in
Figure 4, is that the temperature gradient of each graph is relatively gentle, and more gentle the higher the temperature is, so heat should not be transferred so fast to cooler adjacent regions that a temperature increase should occur there. Therefore, the temperature graphs are assumed to define the heat affected zones of the welded specimens quite well, and to some degree also define the microstructures that can be expected there, although these microstructures also will strongly depend on the local cooling rate. The end of the intercritical zone ICZ should roughly be identified by the localization of the Ac
1 temperature (720 °C) on the profiles. The heat affected zone continues somewhat outside ICZ where tempering of the base metal will continue to some degree, but not at long distances since the martensite was strongly tempered at the steel plant.
In line with the above discussion the forge weld in
Figure 3 can be divided into three different zones, i.e., the weld zone WZ, the transition zone TZ and the intercritical zone ICZ. WZ is the zone where the highest temperatures and strains were involved. The weld line is located in the middle of the weld zone, but it cannot be seen, neither in
Figure 3 nor in most high magnification micrographs recorded from the region around the weld line (
Section 3.2.1).
Figure 5 shows one of a number of qualitative WDS OK
α line scans that were acquired across the weld line of weld W9. The line scan shows an oxygen peak from an oxide particle 0.5 mm away from the weld line, but no oxygen was detected at the weld line itself, neither in this nor in the other line scans. The reason why no oxide film had formed at the weld line is that utmost care was taken to avoid oxidation of the mating surfaces during the welding experiments.
3.3. Hardness
Vickers HV
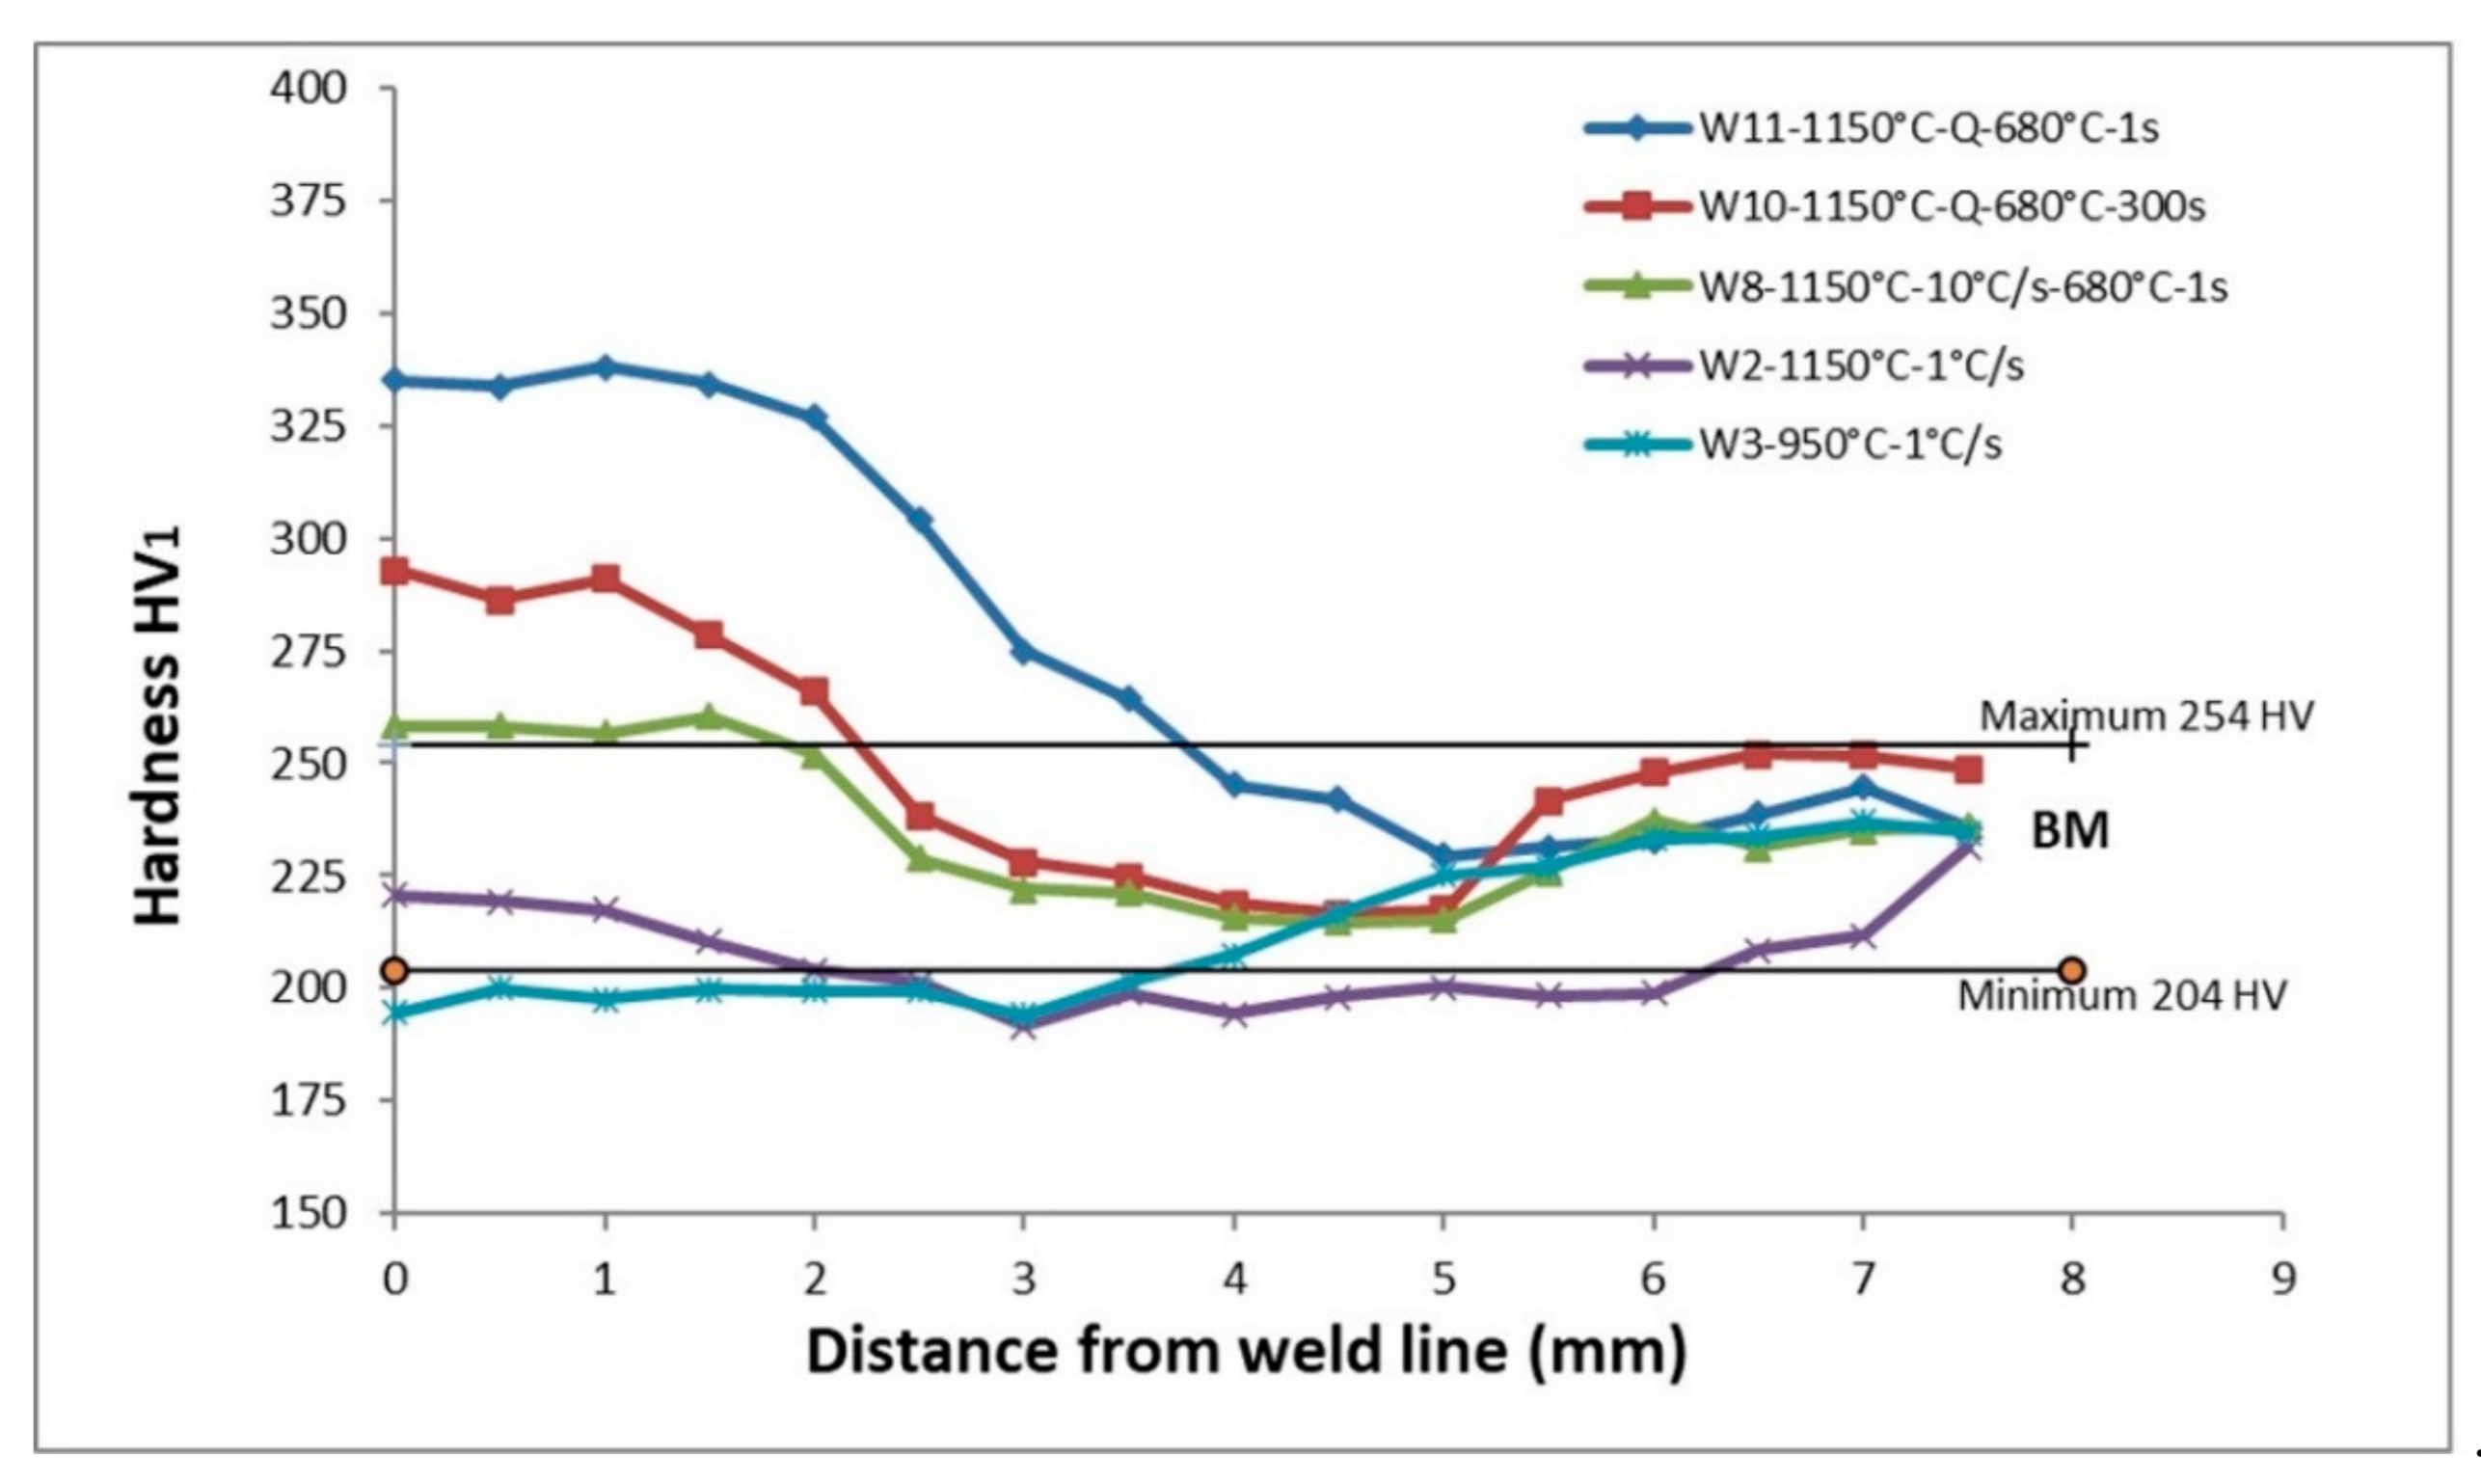
1 hardness as a function of distance from the weld line is shown in
Figure 9 and
Figure 10 for samples forged at 1300 °C and 1150/950 °C, respectively. The unaffected base metal of tempered martensite is located outside the intercritical zone where the hardness has reached the value of the base metal, 6–7.5 mm from the weld line. The width of the heat effected zone decreased somewhat with decreasing forging temperature. For the welds forged at 1300 °C, the unaffected base metal starts about 7–8 mm from the weld line, and for the weld forged at 1150 °C the unaffected base metal starts about 5–7 mm from the weld line.
For all pipes, the highest hardness was observed in the weld zone, and the hardness in the heat affected zone decreased with increasing distance from the weld zone to the location of the unaffected base material. Weld W4 containing bainite and untempered martensite had the highest weld line hardness,
Figure 9. According to the API 5CT requirements, the hardness values should be in the range 204–254 HV, see
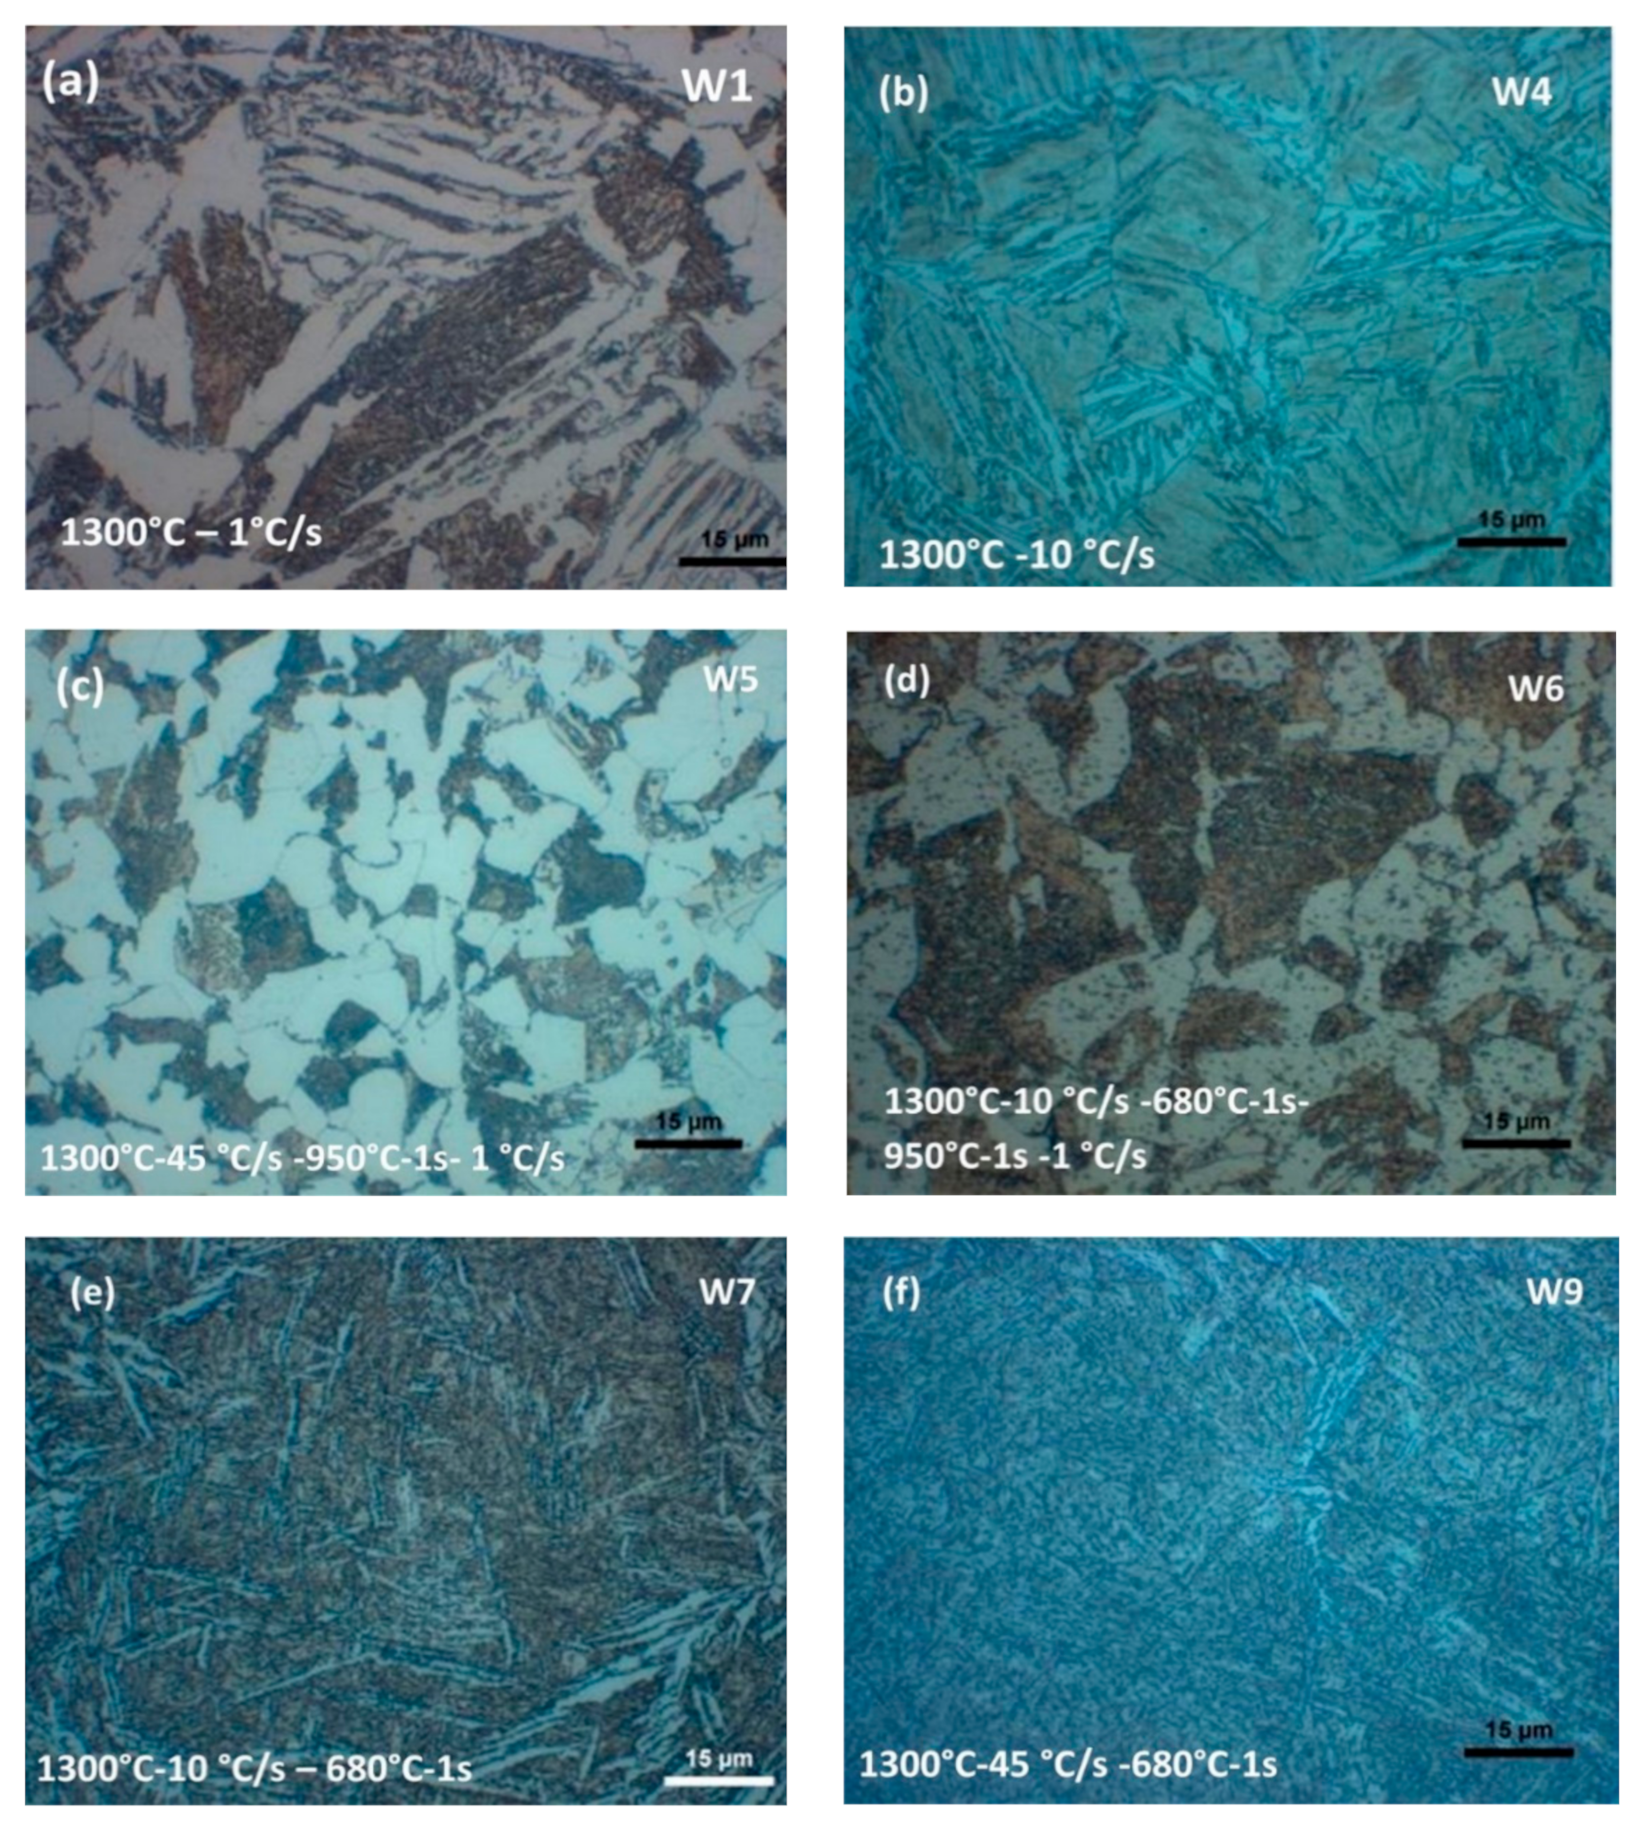
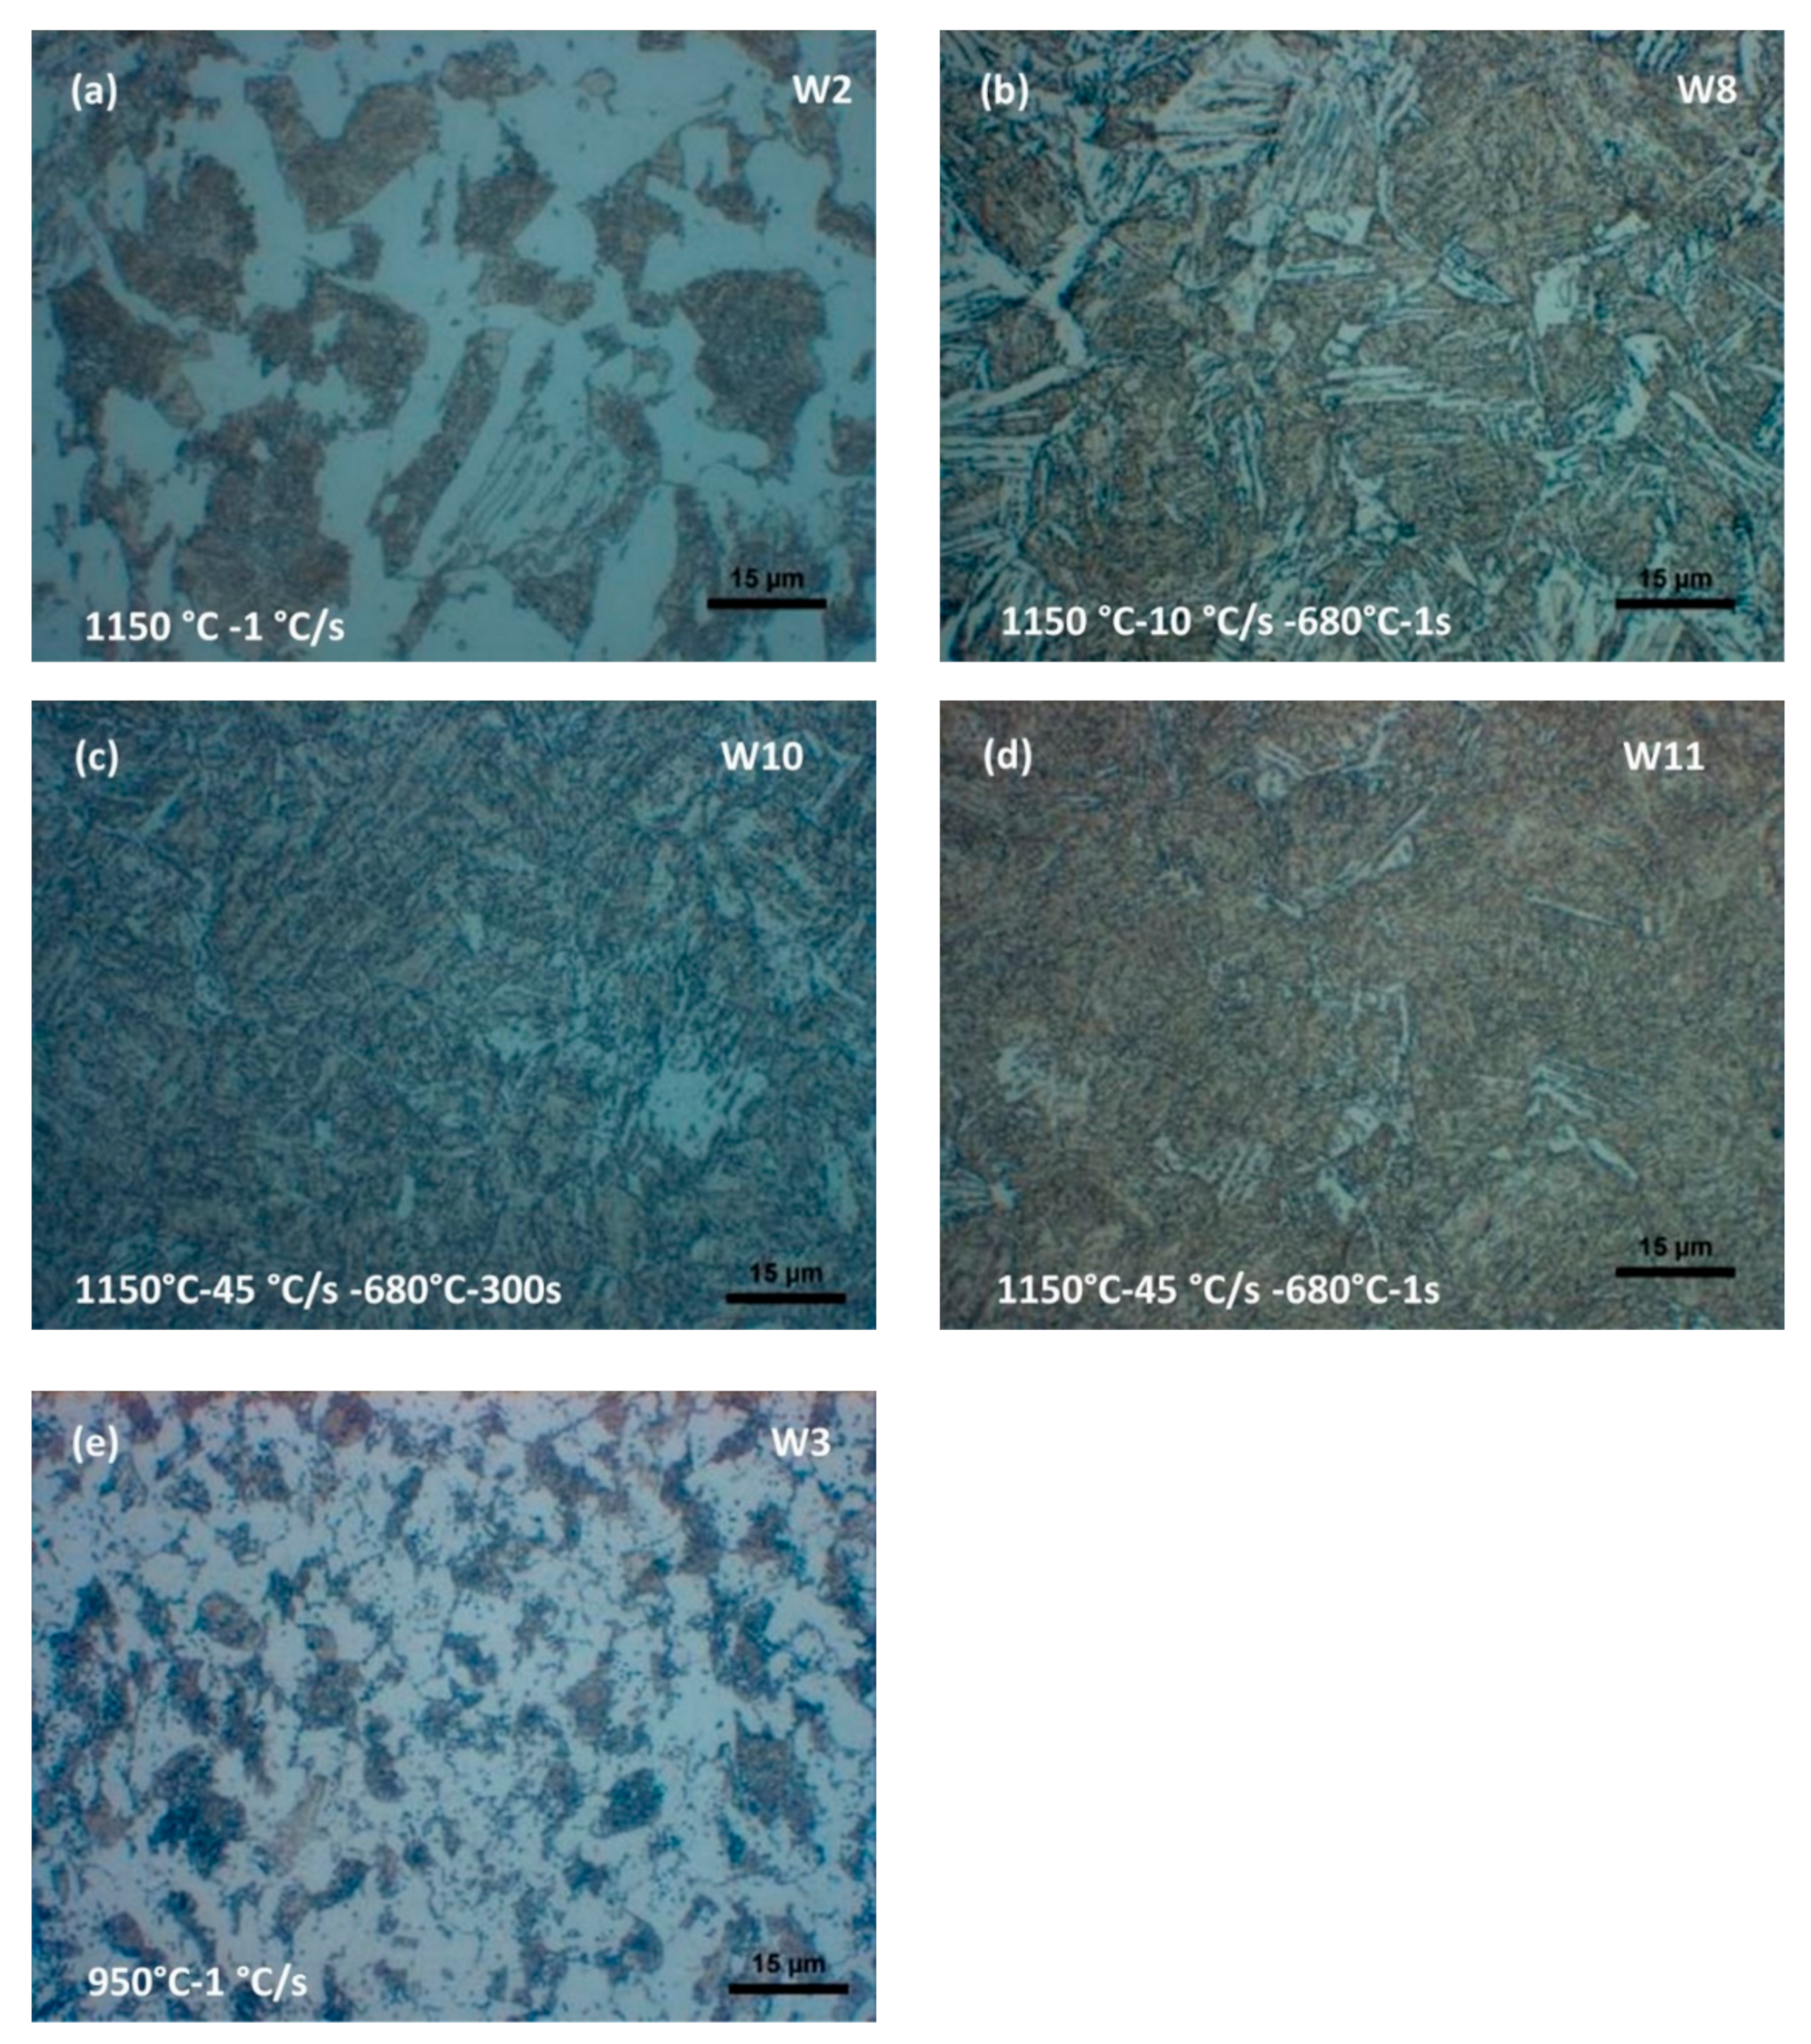
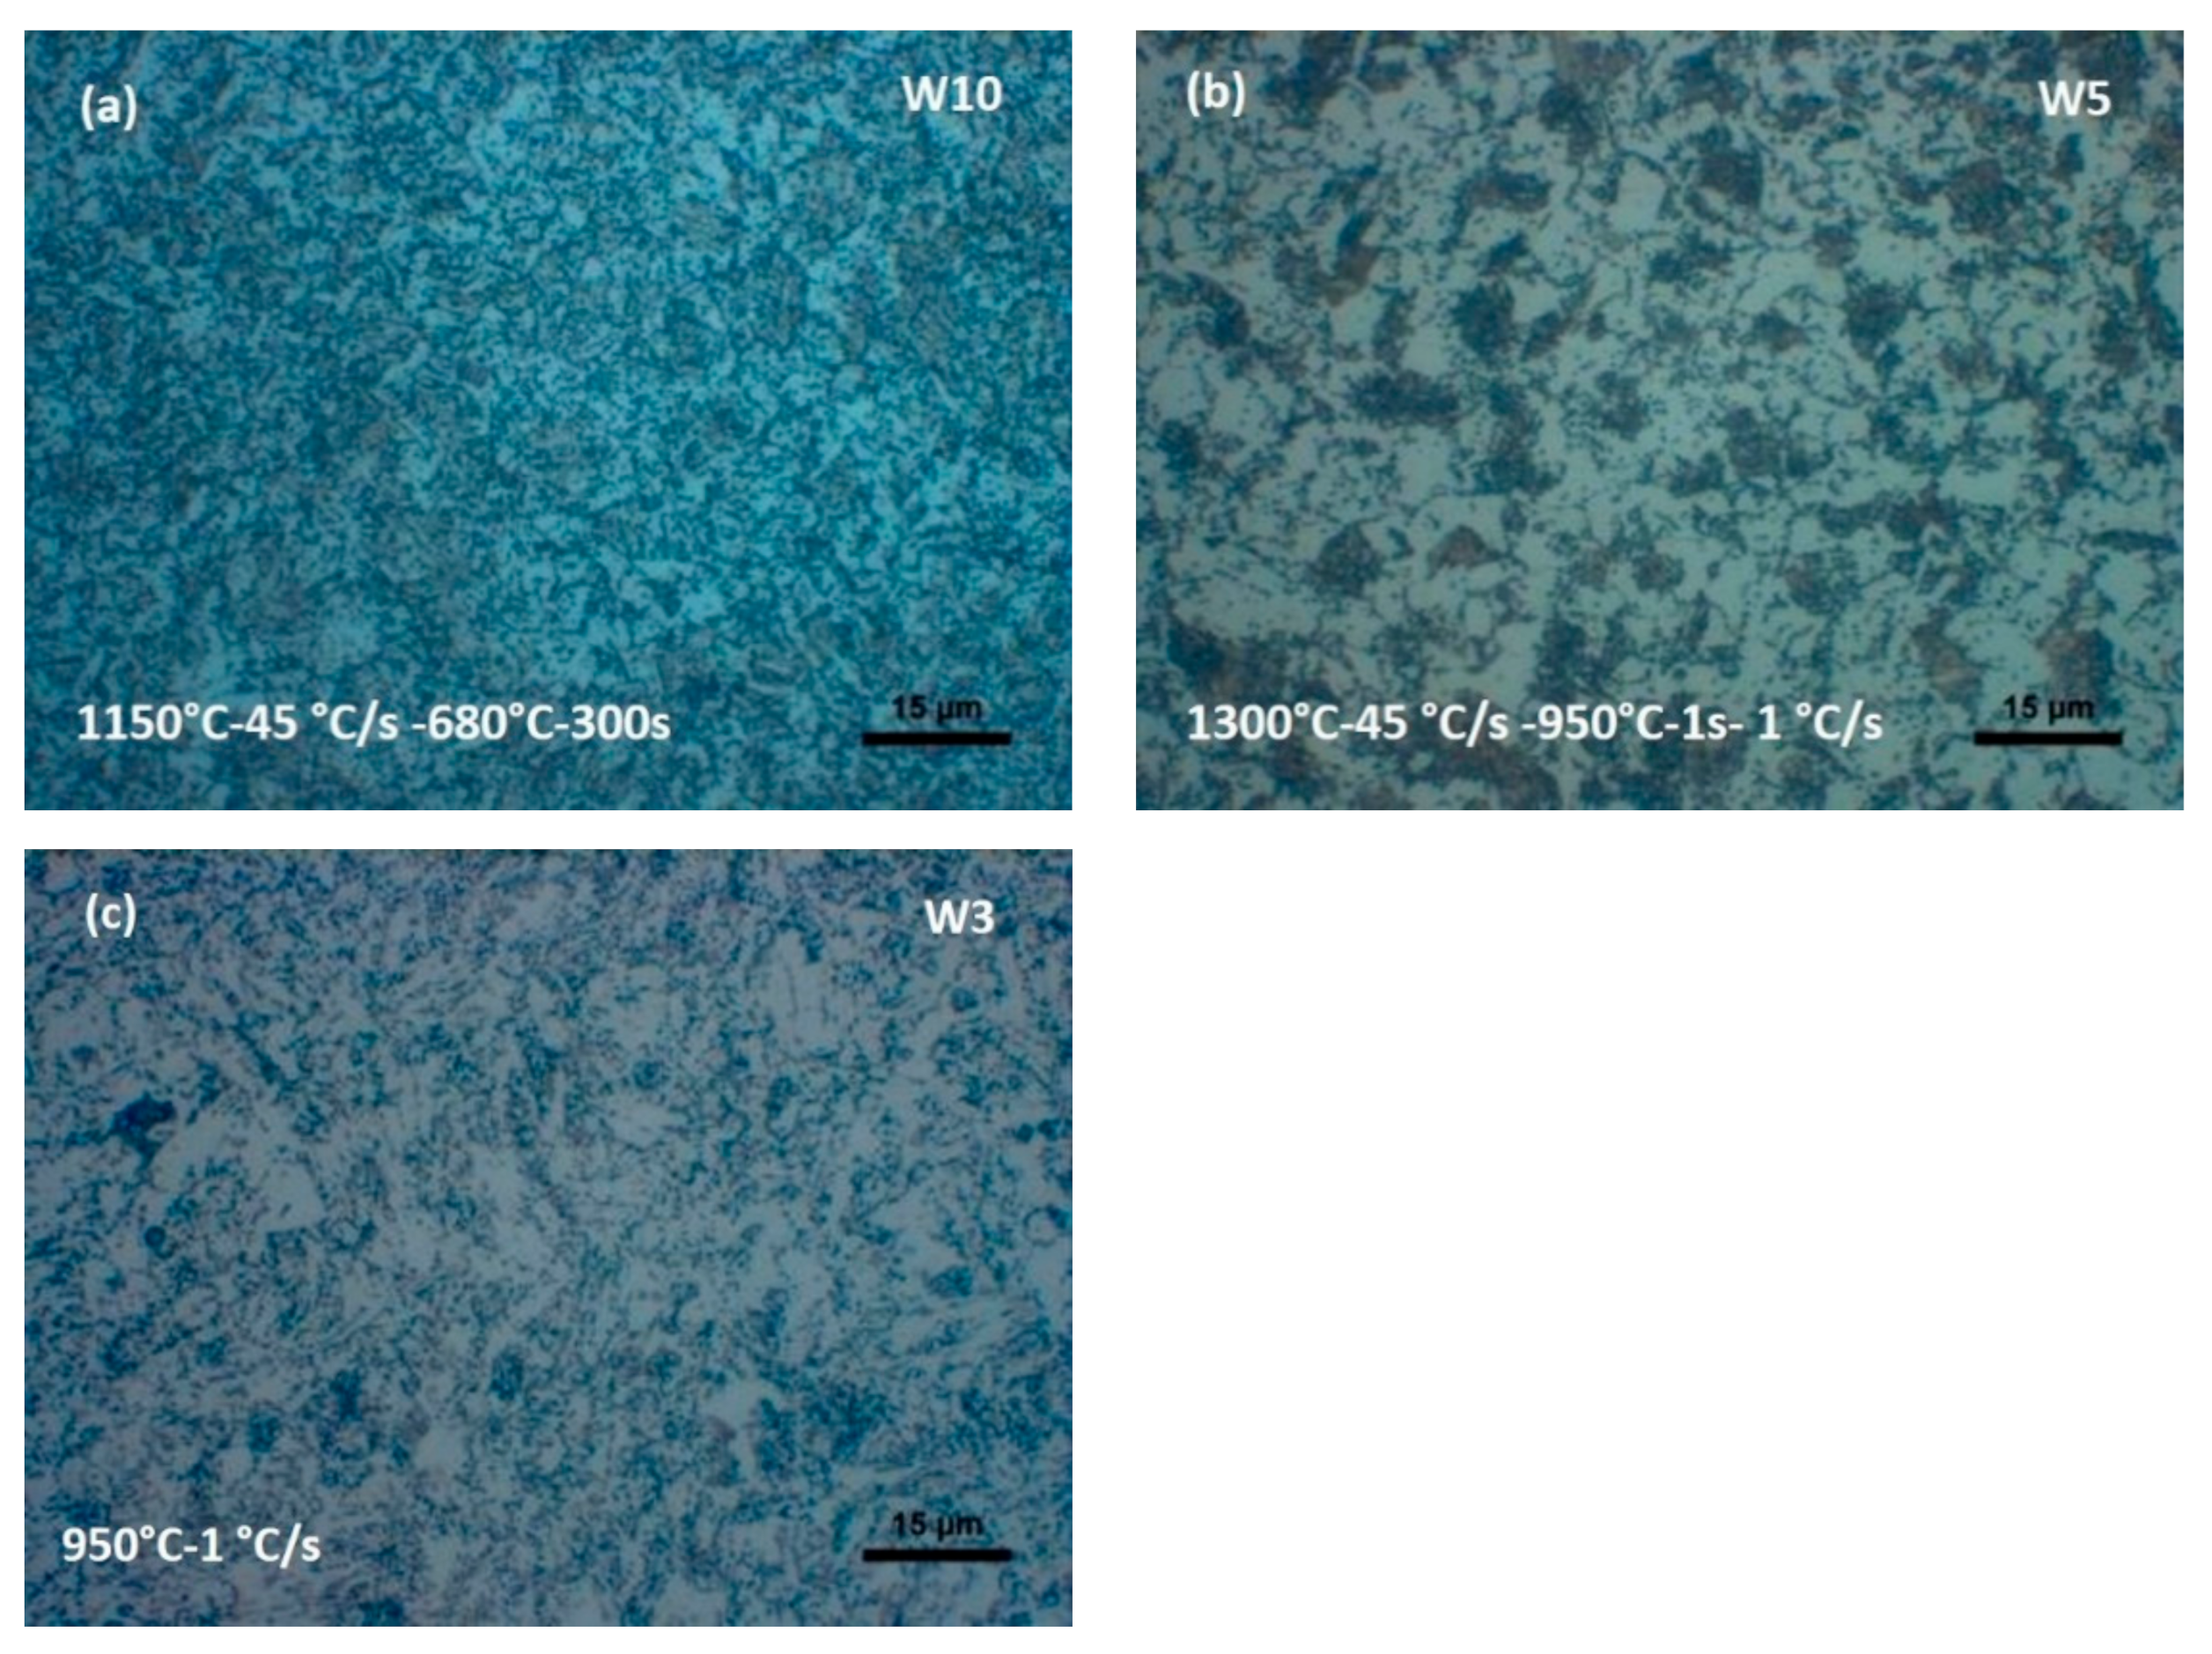
Section 1. Only weld W5 (1300 °C) fully meets this requirement over the whole heat affected zone. In addition, the 1300 °C welds W1 and W6, the 1150 °C welds W2 and W8, and the 950 °C weld W3 are close to fulfilling the hardness requirement (only one of the hardness values of weld W1 fails to meet the criterion). Except from W8, all these welds had been slowly cooled through the austenite to ferrite transformation range during the final stage of the welding process, and they contained a microstructure consisting of ferrite and pearlite. This microstructure gave a satisfactory low hardness in the weld zone. For these welds, the hardness was nearly unchanged throughout the whole heat affected zone. Most welds that had not been slowly cooled during the austenite-to-ferrite transformation, contained a microstructure consisting mainly of martensite in the weld zone, and even though subsequent tempering at 680 °C was applied for most of these welds, the martensite was too hard to fulfil the hardness requirement.
Of the welds that had been cooled at a medium cooling rate (10 °C/s), W8 (hardness 258 HV
1 at the weld line) nearly satisfied the maximum hardness requirement, and only small adjustments of the welding parameters would probably bring this hardness to a value within the requirement. Weld W8 had been forged at 1150 °C, so its prior austenite grain size was finer than in the specimens that had been forged at 1300 °C, and its weld zone contained fair amounts of grain boundary ferrite and bainite in addition to tempered martensite
Figure 7b, compare with W4 that was forged at 1300 °C and cooled at the same rate
Figure 6b, and with W11 that was forged at the same temperature, but quenched directly from the forging temperature
Figure 7d. The hardness of the welds that were cooled at a high (Q) or medium rate, was in most cases reasonably constant to a distance of 2–3 mm from the weld line. This is in agreement with observations of the microstructure that was fairly unchanged in the same area. However, a slight increase in the amount of grain boundary ferrite away from the weld line caused a certain hardness drop in the same direction.
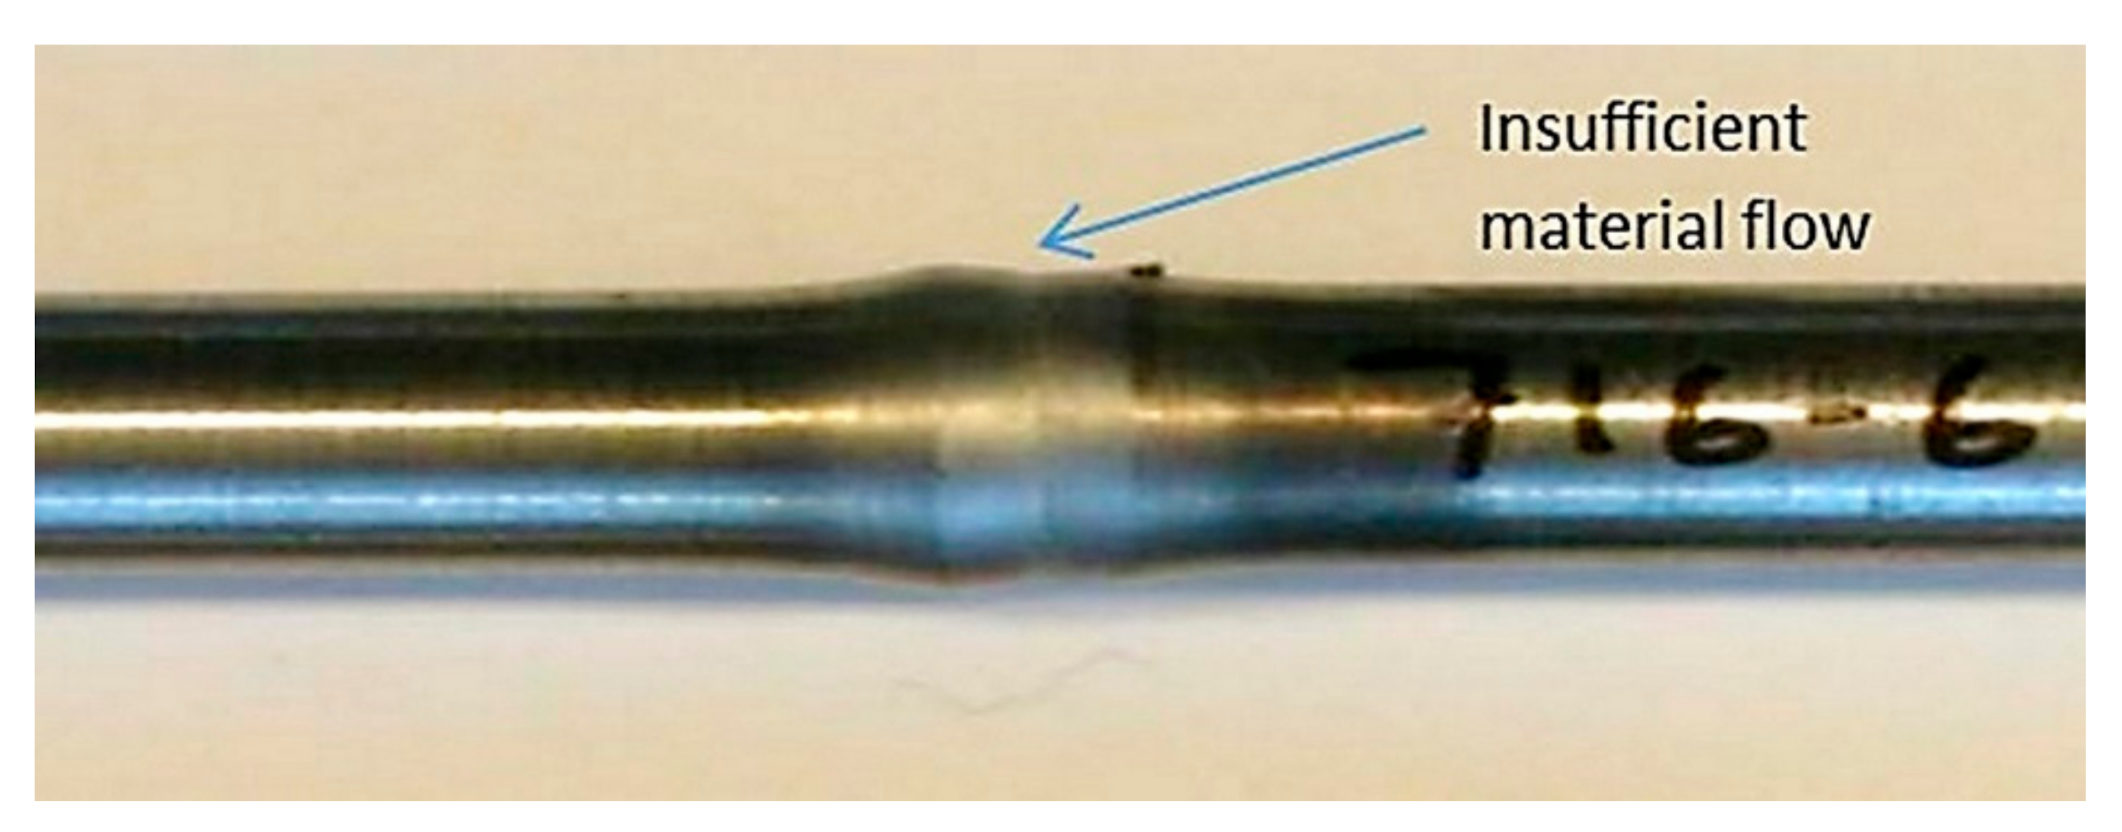
Although weld W3 possessed an acceptable hardness and microstructure, the forging temperature was unfortunately not sufficiently high to provide the necessary material flow (due to a relatively high flow stress) to achieve good outer and inner weld caps for this weld.
Figure 11 shows a macro image of the as welded W3 specimen. Even though a small undercut is expected at the inner cap, W3 had not a smooth outer cap either.
3.5. Toughness of Weld Zone
Charpy V-notch values obtained at 0 °C for the small scale (miniature) forge welded specimens are given in
Table 3. Conversion of miniature specimen values into full size values is not available, but
Table 3 contains instead a comparison with the full size Charpy V values reported by the present authors in ref. [
14] for specimens that were thermally simulated in a SMITWELD simulator at the same temperature conditions as welds W1–W11. There is no one-to-one correspondence between the two sets of Charpy values, but the thermal conditions that resulted in the most brittle miniature forge weld (W4), did also by far give the most brittle thermally simulated (full size) specimen. The weld zone of W4 had a hard microstructure of untempered martensite and bainite, which is the cause of the low toughness value of this weld. The largest difference between the two types of toughness values appears for the temperature cycle applied to weld W3, i.e., forging temperature 950 °C followed by slow cooling at 1 °C/s, giving a relatively fine-grained polygonal ferrite/pearlite microstructure. Even though the SMITWELD specimen simulated at this condition had the highest toughness of them all, the forge welded specimen W3 had the next lowest toughness of them all. Probably, the low forging temperature of 950 °C resulted in high material flow stress and insufficient material flow during the forge welding process, resulting in low impact toughness, see also
Figure 11 that shows an undercut in the outer weld cap of the W3 specimen. The small scale welds forged at 1150 °C (W2, W8, W10 and W11) possessed the highest Charpy values, probably because of the finer microstructures formed after forging at 1150 °C than after forging at the higher forging temperature 1300 °C.
Charpy testing at 0 °C was also performed on miniature specimens that had been extracted from SMITWELD specimens that had been thermally simulated to a peak temperature of 1300 °C and cooled at different rates during the work reported in Ref. [
14].
Figure 14 gives a comparison of the obtained miniature Charpy values and the corresponding full size Charpy values given in Ref. [
14]. It is seen that the toughness values of the two sets of specimens roughly follow the same trend. Despite the more plain stress experimental condition for the small size samples, the shapes of the two graphs in
Figure 14 are similar, showing that small scale toughness testing gives useful experimental results.
From
Figure 14 it is seen that the full size thermally weld simulated specimens that had been cooled from 1300 °C at a rate of 60 °C/s, possessed a higher toughness than the specimen that had been cooled at 1 °C/s. In Ref. [
14] this is related to the difference in microstructure of the two specimens. The microstructure of the specimen cooled at 1 °C/s consisted of a very coarse mixture of Widmanstätten ferrite and pearlite, both being brittle constituents, while the microstructure in the specimen cooled at 1 °C/s consisted of martensite that might have gone through some self-tempering below the M
s temperature (392 °C).
If we had made graphs corresponding to those in
Figure 14 for full scale and small scale forge welded specimens, these graphs would probably have resembled those in
Figure 14. The only difference in experimental conditions would have been the forging step prior to specimen cooling, resulting in deformation induced recrystallization of the austenite and refined and tougher room temperature microstructures of the forge welded specimens. The two FW graphs would therefore probably have been lifted somewhat above those in
Figure 14, and probably there would have been some local differences in slope. But it is expected that the two sets of graphs would have been similar to each other.
Table 4 gives some support to the idea that the weld zone of a forge welded specimen is somewhat tougher than a SMITWELD specimen thermally simulated at corresponding thermal conditions. The table gives toughness values for weld zones of SSFW specimens and corresponding small scale SMITWELD specimens. The first three rows in the table indicate higher toughness of the SSFW specimens, but the differences in average value are too small, and the scatter is too large to serve as a proof. (The toughness value of weld W9 in
Table 4 distinguishes from the other values. From the microstructure images of welds W7 and W9 (
Figure 6e,f), it is difficult to understand why W9 has a lower toughness than W7. It might be due to experimental scatter outside the range given in the table).
Although the cooling rate dependency is similar for the two graphs in
Figure 14, the detailed correlation between them is far from an easy one. The full scale values cannot be deduced from the small scale values in an obvious way. For instance, the ratio R between full scale and corresponding small scale values varies very much along the graphs. Roughly, the trend is that R increases with increasing toughness, being 20–33 for the four specimen couples having the lowest Charpy values on the graphs to the left in
Figure 14, and 95–124 for the other couples possessing higher Charpy values (including tempered specimens and base metal). As a comparison, the ratio between the specimen cross sections minus notch is about 44, which ideally would be the scaling factor between full scale and small scale values if other differences in experimental conditions did not matter. The ratio between the cross section areas (about 44) has a value between the R ratios of the most brittle specimens and the toughest specimens, and this indicates that the small scale toughness tests have overestimated the toughness of the most brittle specimens and underestimated the toughness of the tougher specimens. Three factors associated with the experimental setup may have contributed to this result. First, specimen size affects the constraint of the notch during deformation. This means that the amount of plane strain and plane stress at the notch is significantly different for the two specimen dimensions. A smaller specimen experiences more plane stress conditions (i.e., lower constraint). Another aspect that probably has affected the correlation between the specimen sizes is the width of the specimen fixture during the testing, i.e., the anvil gap of the test machine. This has not been scaled, as the smaller specimens have a significantly larger ratio between the outer anvil gap (20 mm) and the specimen height than what is the case in the standard Charpy setup (45 mm anvil gap). Third, the strain rate at the notch tip is different for the two pendulum test machines. A standard Charpy machine has around 5.5 m/s impact speed. The small-scale machine used in this work has an impact speed of 3.8 m/s. A reduced speed increases the measured toughness. Of these three factors, the effect of the constraint is considered to have had the largest influence on the obtained results. So, the experimental circumstances around the toughness testing have been very complicated, and it is outside the scope of this work to analyse and explain the obtained toughness results in detail. However, assuming that the full-size toughness values are the more true ones, it can be concluded that the obtained small scale toughness values for miniature specimens are too high in the low ductility range and too low in the high ductility range. Probably, it is the small size effect on the ratio between plain strain and plain stress at the notch that is most responsible for this result.
Another factor that is not connected to the experimental setup, but which may have contributed to a scatter in toughness values obtained during the small-scale testing, might be the specimen grain size relative to the specimen thickness. The thermally simulated specimens of
Figure 14 had been heated to a peak temperature of 1300 °C, and at this high temperature they obtained an average austenite grain size of 80 µm [
14]. This implies that the remaining specimen thickness inside the notch of the tested miniature specimen only covered a distance of 15 prior austenite grains, which may not represent the average microstructure of the weld zone. This should at least have had an influence on the experimental scatter.
To summarize, it is evident that the small scale toughness tests of the weld simulated specimens do not provide data for reliable estimates of the true toughness of full size specimen volumes (e.g., by multiplying the small scale values by the ratio between the cross section areas). They only provide trends of how the toughness varies with the thermal conditions during the weld simulations (i.e., cooling rate). Of course, this relation between small scale and full-scale toughness testing would also apply to toughness testing of forge welded specimens. The toughness values given in
Table 3 cannot be used to obtain true toughness values for real forge welds, but the values represent important trends and can be applied to obtain promising welding parameters for full scale SAG-FW welding.
From
Table 3, it is seen that the only full size SMITWELD specimens that did not satisfy the API 5CT toughness requirement of 27 J with a good margin, are the specimens that were given the same temperature exposures as the forge welded specimens W1 and W4 (giving coarse microstructures of grain boundary ferrite, Widmanstätten ferrite and pearlite (W1), and untempered martensite/bainite (W4)).
Table 3 shows relatively high toughness values for the other thermally weld simulated specimens, may be with exception of weld W3 (0.65 J) and weld W9 (0.67 J). Due to the similarity between the full size and small scale toughness of the SMITWELD specimens in
Figure 14, and partly due to the (not well documented) similarity between the small scale toughness values of forge welded and thermally simulated specimen in
Table 4, it is fairly reasonable to assume that all welds except welds W1, W4, W3 and W9 probably satisfy the API 5CT toughness requirement with a good margin Welds W3 and W9 are questionable and would require more testing. (However, of other reasons that are reported in previous sections, they can be excluded from further evaluation due to, respectively, bad weld cap (
Figure 11) and too high hardness (
Figure 9)).
3.6. Summary of Mechanical Tests
To sum up the results from the mechanical testing, only weld W5 fully satisfies the API 5CT requirements for the L80 casing steel. Welds W2, W6 and W8 satisfy the ductility and probably also the toughness requirement, but they slightly fail the hardness demands. W2 and W6 are slightly too soft in a part of the heat affected zone, and W8 is slightly too hard in the weld zone. Welds W2 and W6 can probably be brought within the hardness requirements by slightly increasing the final cooling rate from 1 °C/s or by decreasing the reheating temperature below 950 °C. Likewise, the weld zone hardness of W8 may easily be reduced to a value within the requirement by increasing the holding time at the post weld heat treatment temperature 680 °C. Weld W1 is also promising since it practically fulfils the hardness requirements, and its SSFW Charpy V value of 0.83 J is probably satisfactory high. But weld W1 requires a closer evaluation since the full size Charpy V toughness of the thermally simulated specimens corresponding to this weld only barely passed the minimum toughness requirement of 27 J. However, the toughness of a full size SAG-FW weld produced by the welding parameters of weld W1 will probably be tougher than the SMITWELD specimens due to the forging step, which causes deformation induced recrystallization and grain refinement. So it is probable that also weld W1 fulfils the API 5CT requirements. All the other welds fail the requirements by a clear margin.
The validity of the above and previous discussions of the hardness results, does to some degree depend on the cooling rate as a function of HAZ temperature being equal during SSFW and full-size FW welding. The final microstructures and hardness values depend on both maximum temperature and cooling rate. Further studies need to be carried out to confirm this.
The mechanical tests also document that SSFW tests provide an effective tool for establishing welding parameters for full size SAG-FW welding. Within a single specimen, the method provides microstructure and hardness information along the whole weld width, including HAZ. It must be confirmed, however, whether HAZ locations that have been heated to the same maximum temperature during full scale and small scale forge welding, experience the same succeeding cooling rate. The final microstructure and mechanical properties depend both on maximum temperature and cooling rate. The toughness values that are obtained from SSFW testing do not provide values that are directly applicable to an actual full-size weld due to the small size of the SSFW specimens, being limited by the pipe wall thickness of the investigated pipe. The SSFW toughness values that were obtained by the small-scale machine used in the present work seem to be too high for microstructures of low toughness and too low for microstructures of high toughness. However, the trends in the SSFW toughness results seem to be realistic, and this trend can be utilized in the development of welding parameters for real welds. It might be an idea to examine to which degree small size FW toughness values can be converted into full-size values by applying the ratios R that can be extracted from
Figure 14. (A plot of R as a function of small size (Smitweld) toughness could be made and applied to convert SSFW toughness values into full size FW toughness values.) At least, such a conversion should give an indication of full-size toughness values. Finally, it should be mentioned that toughness tests need to be carried out for critical parts of the heat affected zones in addition to the weld zone.
3.7. General Corrosion Properties
Immersion corrosion tests were performed on the welds that had the most promising mechanical properties, i.e., W1, W2, W5, W6 and W8. The first four of these welds had been cooled from austenite temperatures at a rate of 1 °C/s as the final welding step and contained a variety of ferrite/pearlite microstructures in the central weld zone. Weld W1 had a Widmanstätten ferritic-pearlitic microstructure in the central weld zone, while the ferrite in W2, W5 and W6 was mainly polygonal. During the corrosion tests, these welds suffered heavier corrosion than the base metal in either the entire weld zone, W1 and W2, or in parts of the weld zone, W5 and W6.
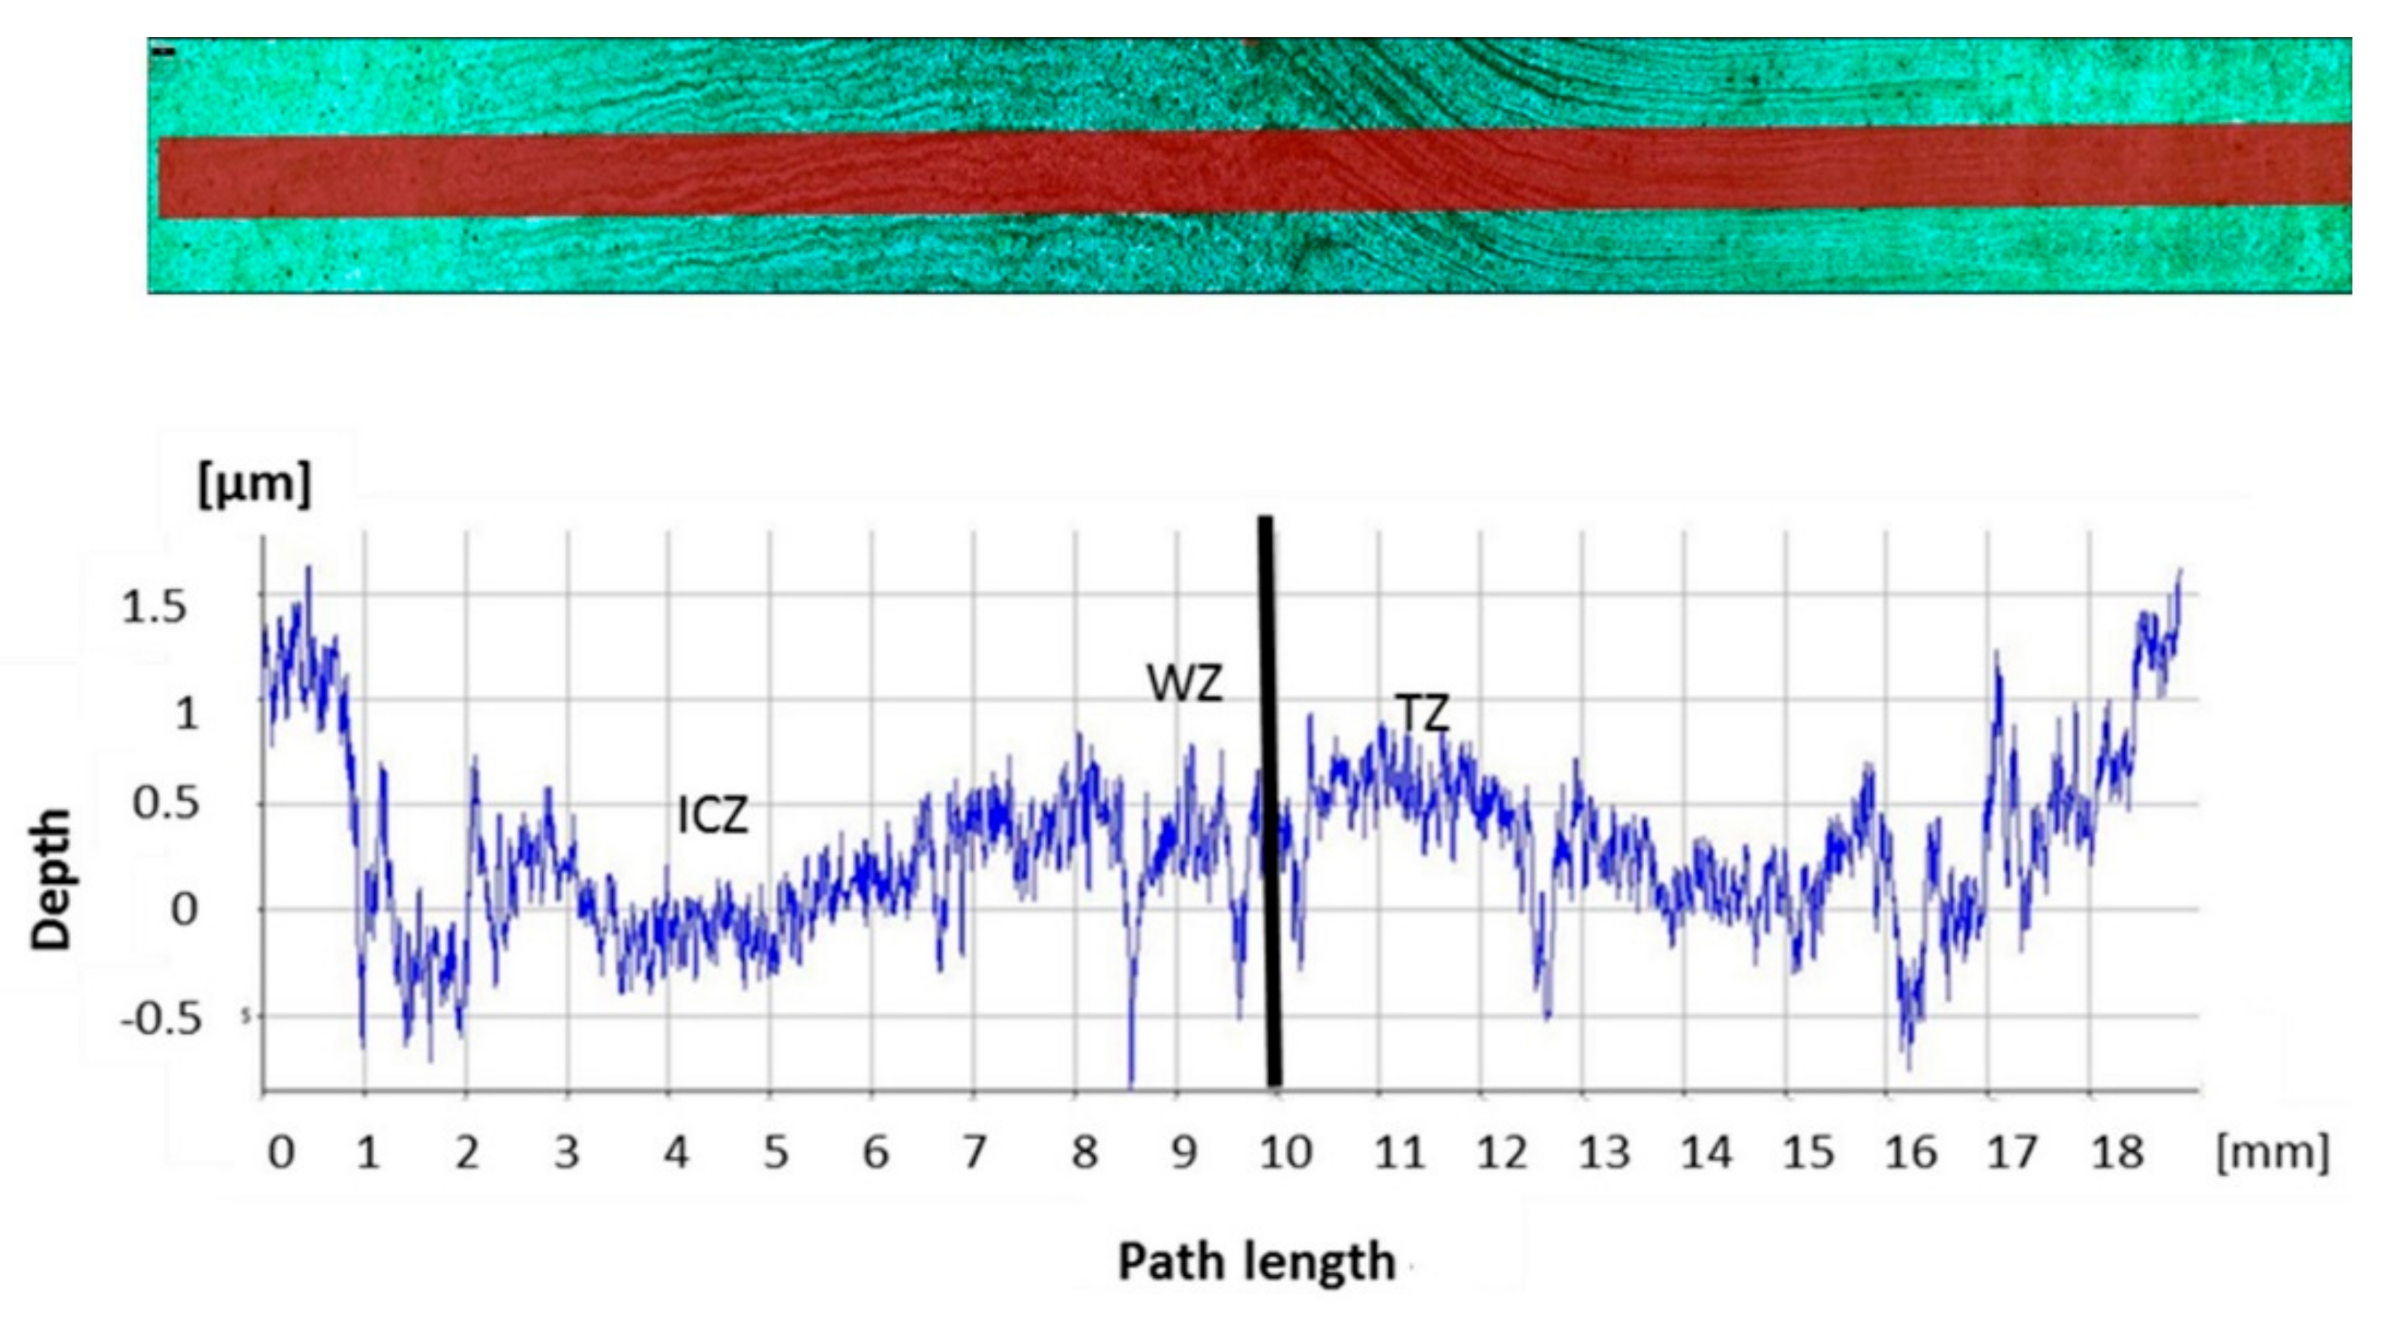
Figure 15 shows the depth topography graph of the corroded surface of weld W1. In the scanned IFM image at the top of the figure, the flow lines of the weld microstructure can clearly be seen after the specimen had been rinsed in running water. The position of the weld line is indicated by the thick vertical line in the below topography graph that was recorded along the thick line in the IFM image. A relatively even and symmetric corrosion attack is seen to have taken place within the entire weld zone (the base metal begins about 9 mm on either side of the weld line). The corrosion depth is seen to be in the range 1–3 µm with some deep pits.
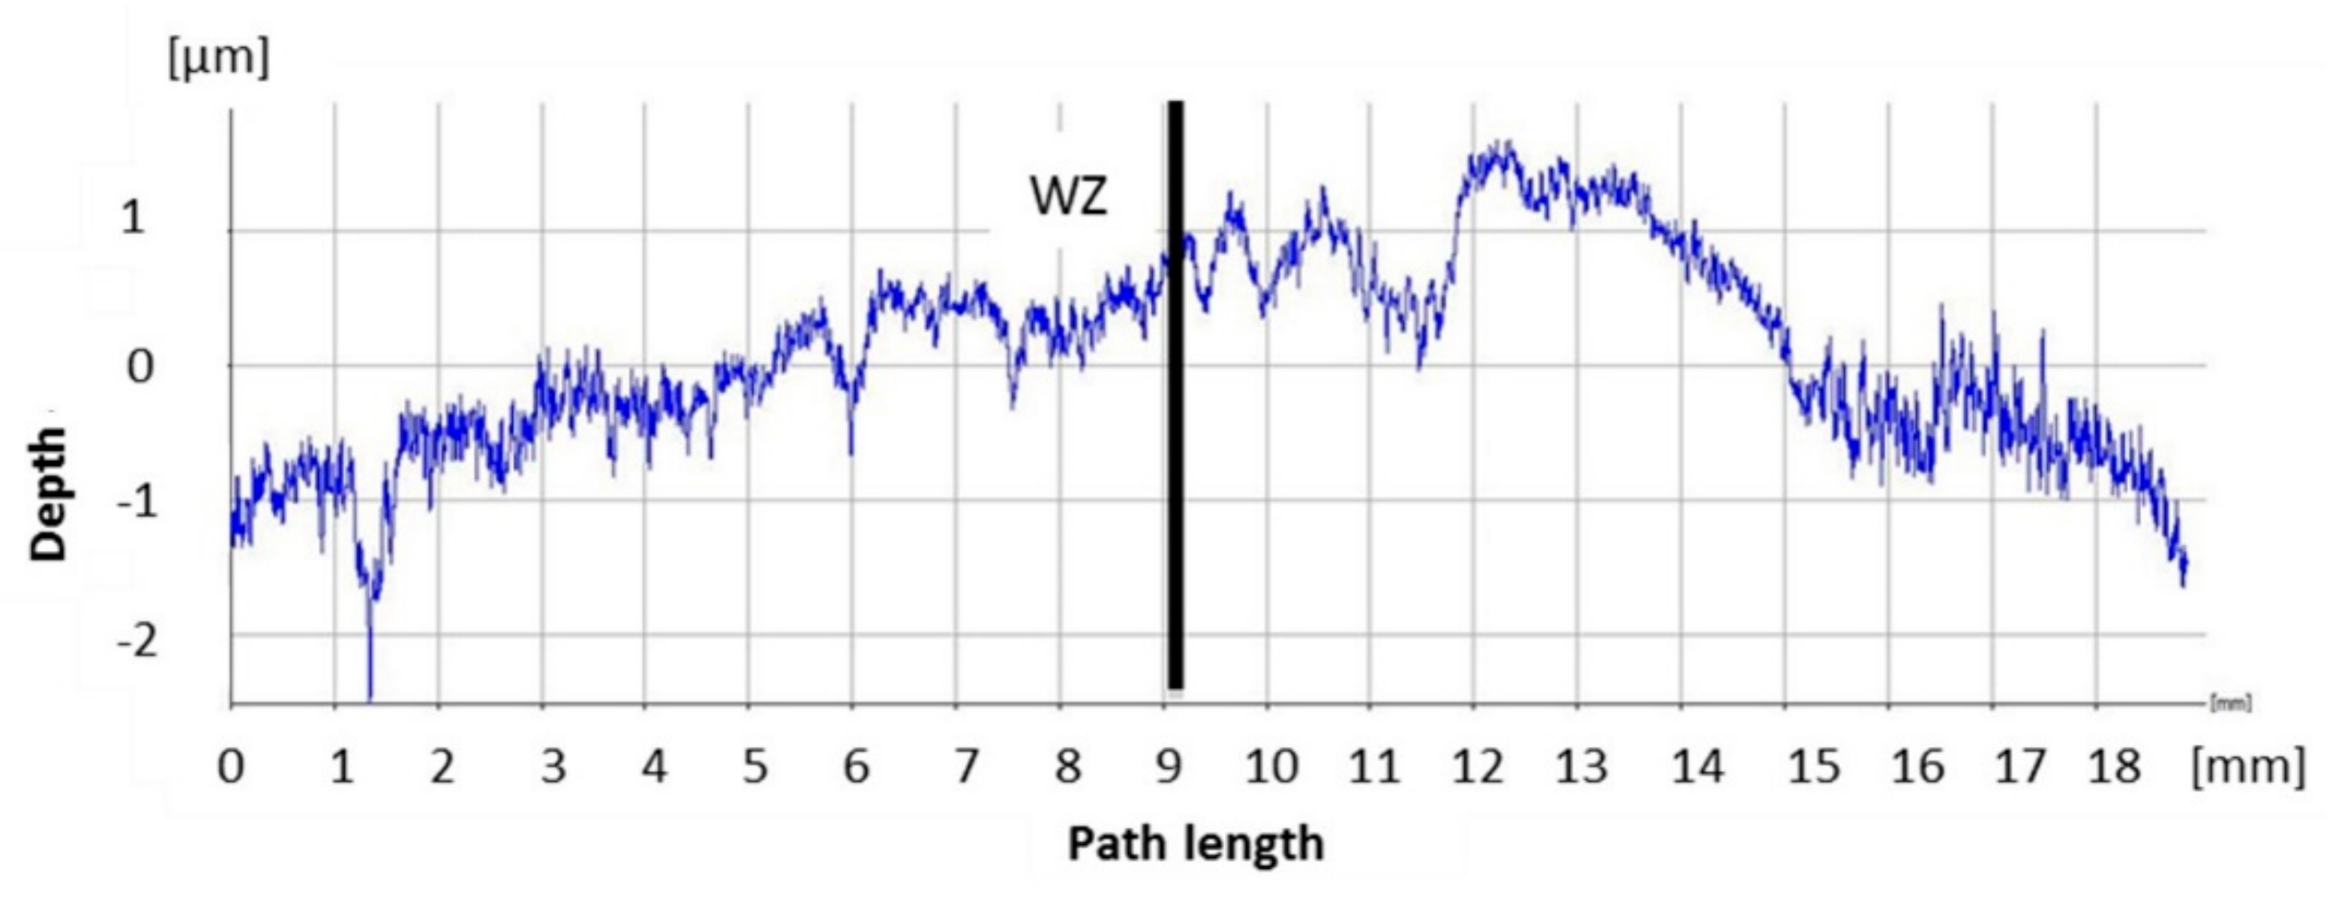
Weld W8 that had been cooled at 10 °C/s from 1150 °C and afterwards tempered, had suffered very little corrosion in the weld zone, see
Figure 16. The weld zone in this case was, in fact, less corroded than the tempered martensitic base metal which, according to the hardness profile in
Figure 10, starts about 7 mm from the weld line (to confirm the high corrosion resistance of weld W8, a supplementary corrosion test was performed on weld W7 that had been processed with the same parameters as W8 except for a higher welding temperature (1300 °C). Weld W7 possessed almost identical corrosion properties to W8).
To conclude, of the welds that possess the most promising mechanical properties, weld W8 is the one that has the highest corrosion resistance, even superior to the base metal. This weld has mainly a tempered martensitic/bainitic microstructure after having been rapidly cooled from the welding temperature and subsequently post weld heat treated. The other welds with promising mechanical properties had ferrite/pearlite microstructures and poorer corrosion properties than the base metal.
The difference in corrosion resistance between the tested welds might be associated with the homogeneity of their microstructure. Welds W8 and W7 had a microstructure consisting mainly of ferritic constituents, i.e., grain boundary ferrite, bainite and tempered martensite, the latter two being ferrite with a distribution of small carbides. The other and less corrosion resistant welds had, on the microscale, a heterogeneous microstructure of ferrite grains and a high-volume fraction of perlite colonies. The electric contact between alternating layers of Fe
3C and ferrite in the pearlite, may have caused galvanic corrosion of the pearlite in electrolytic environments, involving anodic dissolution of the ferrite phase. J. Dong et al. describe this phenomenon in Ref. [
24].
