1. Introduction
Ball-end mills are among the most used cutting tools for machining free-form surfaces, molds, and dies, where complex part geometries and high surface-quality requirements are common [
1,
2,
3]. Their hemispherical geometry allows for material removal of complex surfaces, making them highly suitable for finishing operations and precision manufacturing [
4,
5]. The very same geometry that makes them versatile also introduces unique challenges in surface quality, cutting tool deflection, and process optimization [
6,
7]. Achieving a predictable and controllable surface finish is essential for industries such as aerospace, automotive, and medical device manufacturing, where tight dimensional tolerances and high surface integrity are mandatory [
8,
9,
10].
Cutting tools for milling operations can generally be divided into three categories based on the radius of the tool tip:
Flat-end mills—cutting tools with zero corner radius, providing sharp edges suitable for slotting or shoulder milling but leaving distinct cusps during 3D surfacing.
Corner radius-end mills—cutting tools with a radius smaller than the shank radius, offering improved cutting tool life and smoother transitions but still producing measurable surface scallops.
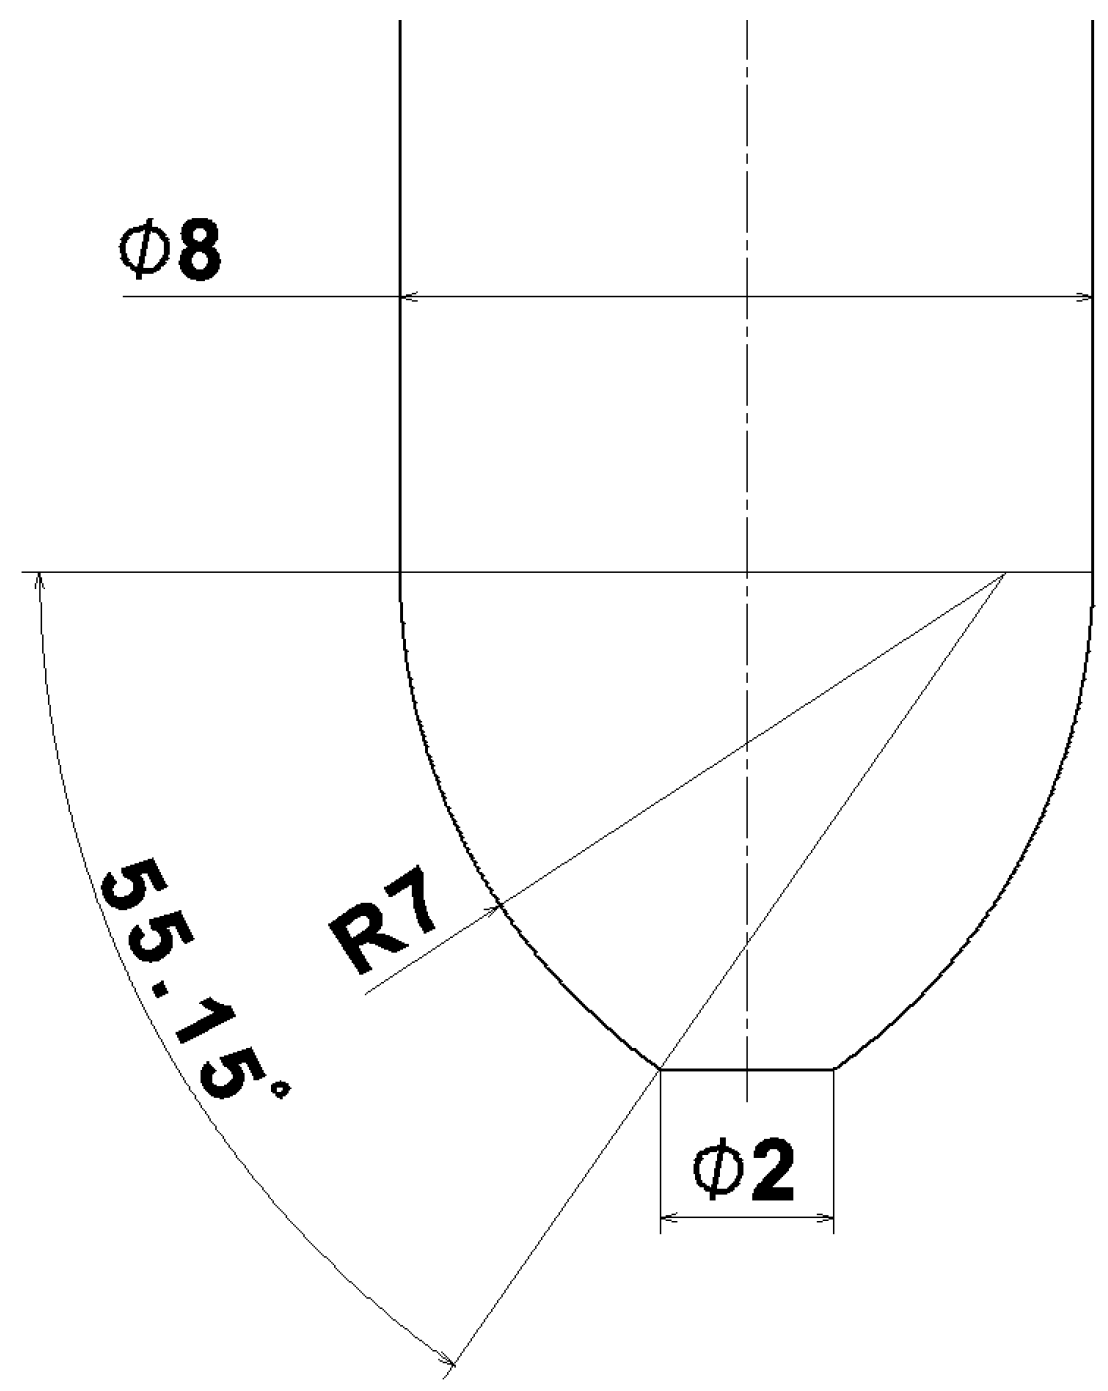
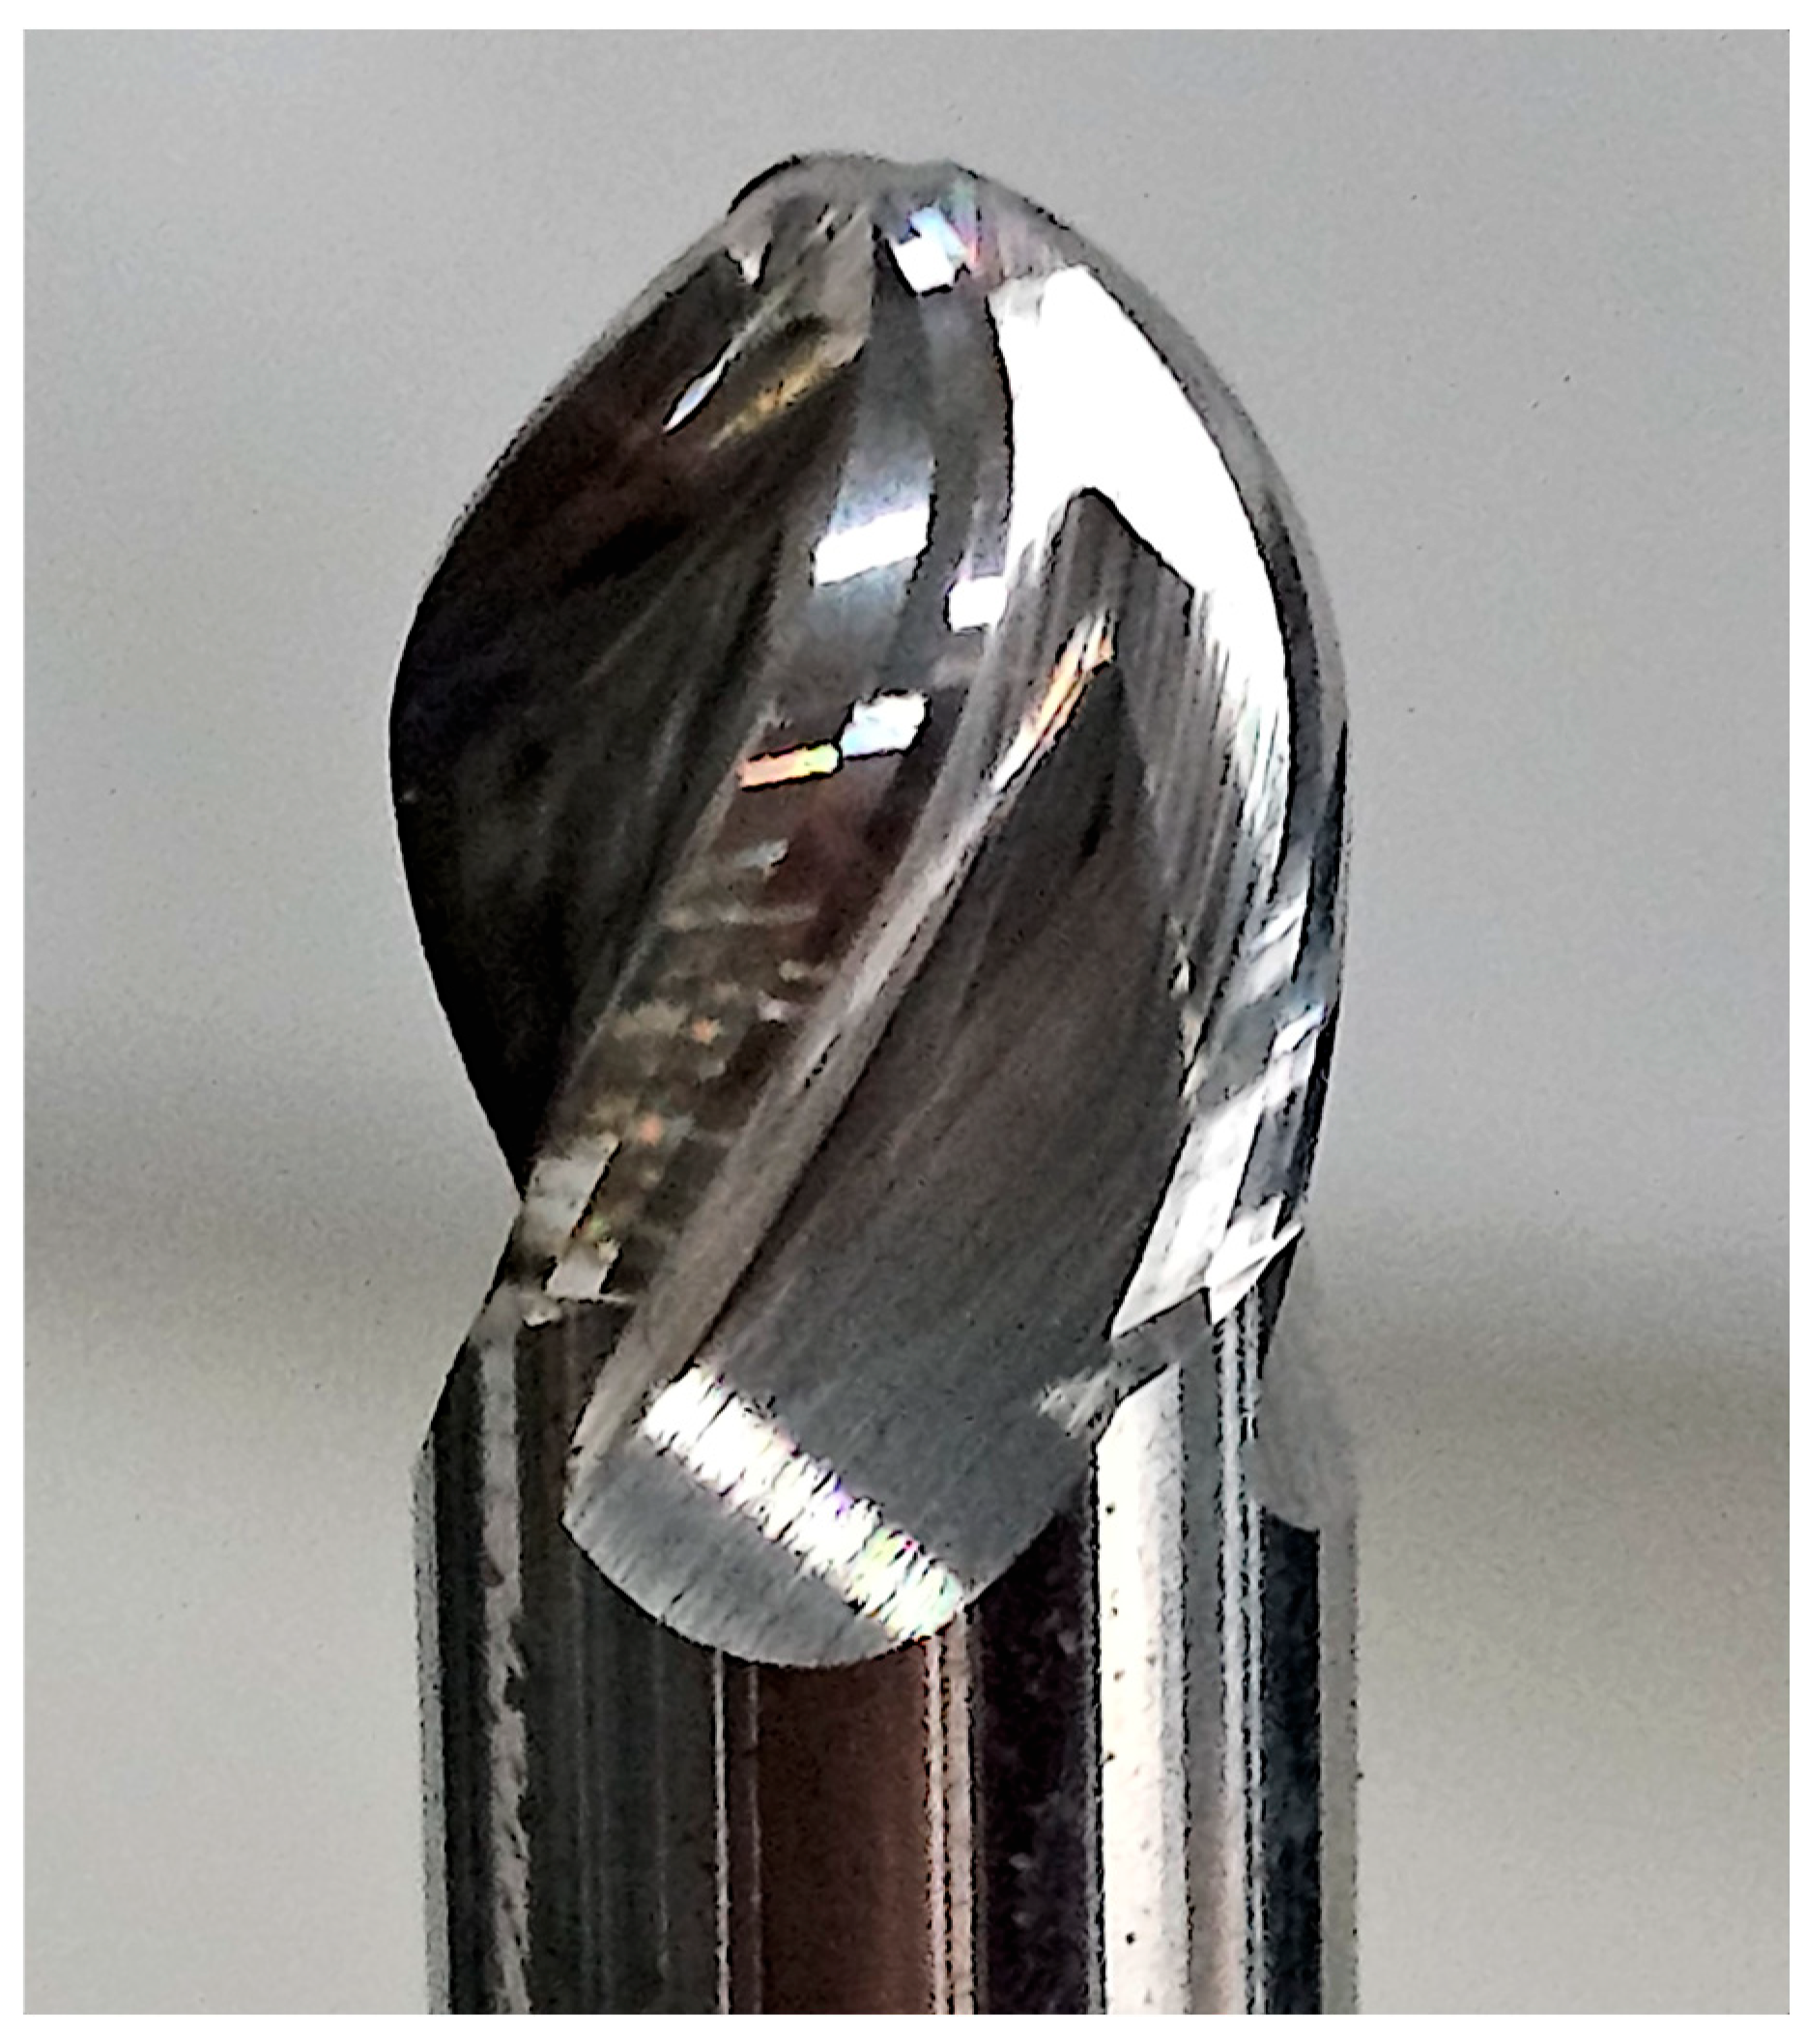
Ball-end mills—cutting tools where the tip radius is equal to the shank radius, allowing smooth freeform surface generation and predictable scallop formation, making them the preferred choice for finishing complex geometries.
Surface roughness, often quantified by parameters such as R
a and R
z, is a key metric in assessing the quality of a machined surface in the scope of part manufacturing processes [
11,
12]. Numerous studies have demonstrated that roughness is influenced by a combination of cutting tool geometry, cutting parameters, and process kinematics [
13,
14,
15]. In the case of ball-end mills, the effective cutting speed varies significantly along the cutting edge due to the changing engagement radius, resulting in variable chip thickness and sometimes unstable cutting conditions [
16,
17]. This phenomenon becomes even more pronounced when finishing inclined or curved surfaces, where the cutter contact point continuously shifts [
18]. Consequently, predicting surface finish in such scenarios requires models that account not only for feed per tooth and radial step-over, but also for cutting tool radius, inclination angle, and machine–tool dynamics [
19,
20,
21].
Recent research efforts have focused on response surface methodology (RSM) and statistical modeling to better understand and optimize these multi-factor interactions [
22,
23]. RSM provides a structured approach for designing experiments and developing empirical models capable of predicting responses within a defined parameter space [
24,
25]. While these models have been widely applied to conventional milling operations, their application to ball-end milling with modified cutting tool geometries remains relatively limited.
In a similar research endeavor, Zurawski tested a lens-shaped cutting tool, which by design represents a similar concept of cutting tool geometry but with a different curved cutting-edge position. The lens-shaped cutting tool had a large radius on the cutting tool end plane, reducing the number of required toolpath passes during milling. It is important to emphasize that, similar to cutting tools presented in this paper, the lens cutting tools also required an inclination angle; otherwise, they would engage in center-cutting conditions. In their study, the lens-shaped cutting tools were evaluated through an experimental model, and based on the results, a simulation model of surface topography generation was created. One of their conclusions was that, despite developing a statistically valid simulation model, further research is required to integrate additional parameters. They also noted that a purely kinematic simulation was inadequate to realistically capture the response development. Based on their findings, it can be assumed that even macro-geometric modifications of cutting tools have a significant effect on cutting processes and measurable responses such as surface quality indicators and cutting forces [
26].
In another machining study, Duc et al. analyzed cutting edge geometry and its effect on surface quality when machining AISI 1055 steel in a hardened state. They employed an RSM-based Central Composite Design (CCD) experimental model, which was verified through a prediction-versus-validation approach similar to that used in the present work. Although their cutting tools were cutting inserts used in turning rather than ball-end mills, their methodology offers a valuable comparison on how different machining processes can yield analogous insights. In their ANOVA analysis, several selected factors were statistically significant; however, for the response parameter R
a, a Lack-of-Fit test value of 0.09 was reported. While technically not significant, this value was close to the critical threshold, indicating the complexity of the surface roughness response and justifying the use of higher-order models. Their secondary response, Vb (tool wear), showed a significant Lack-of-Fit result. Although such a result questions the validity of the model form, their prediction-versus-validation comparison aligned with ours in emphasizing that numerical tests should not be interpreted in isolation during model evaluation [
27].
The selection of factors was determined by the characteristics of the chosen cutting tools. Parameters such as radius and stepover height are almost mandatory, as they are the two primary variables used in analytical equations for calculating Rz values found in the literature. The inclusion of inclination angle was driven by the nature of ball-end milling, where the cutting tool’s performance is significantly influenced by the effective cutting radius.
Cutting tool inclination has been widely investigated in machining research, particularly in studies analyzing surface topography formation through analytical or CAD-based simulations. Villarazo et al. examined the influence of cutting tool inclination angle on surface roughness within an interval of 15° to 60°. They utilized a MATLAB algorithm to generate analytical solutions for their experimental configuration. Similar to findings in this study, their R
a values were generally lower than the analytical predictions, while R
z values exhibited larger deviations. The authors attributed this difference primarily to plastic deformation effects. Their results reaffirm the importance of cutting tool inclination as a significant factor deserving further research attention [
28].
Villarazo et al. also avoided center-cutting conditions due to the effective cutting speed reaching zero at the cutting tool tip. This reinforces the assumption that optimal conditions for machining with hemispherical cutting tools occur at specific inclination angles. Conversely, standard ball-end mills are capable of center cutting; however, it is important to consider that during cutting tool geometry definition in software such as Numroto PLUS 3.7.1, achieving cutting edges precisely at the center is challenging. Excessive grinding in this area can undesirably reduce cutting edge thickness, compromising cutting tool strength and stability. Center-cutting options on cutting tools are usually attributed to being a requirement for certain machining operations and strategies.
The present work performs a complete experimental investigation of ball-end mill geometry modifications, with a focus on surface roughness influence. A central composite design (CCD), derived from a factorial experiment, was employed. Response surface models were constructed for both Ra and Rz parameters. The statistical significance of each factor and their interactions were evaluated using ANOVA and Pareto analysis. In addition to model development, this study emphasizes verification: Model predictions were validated experimentally using both stylus-based roughness measurements and optical 3D microscopy. Furthermore, a custom 2D CAD-based analytical model was developed to reconstruct theoretical surface profiles and compare them with both predicted and experimental results. This dual-validation approach provides a deeper insight into the reliability of statistical models and highlights their limitations at extreme parameter settings.
By integrating statistical modeling, experimental validation, and CAD-based simulation, this work presents a comprehensive methodology for evaluating and optimizing ball-end mill performance. The results contribute to a better understanding of how geometrical modifications and process parameters affect surface finish, providing a foundation for improved cutting tool design and process planning in precision machining applications.
3. Results
Data collected during the main experiment were compiled and saved in accordance with the statistical matrix. Due to key differences between the responses, despite being sourced from the same specimen, they had to be analyzed individually in terms of model evaluation and testing. The design matrix with averaged responses across all five replicates can be seen in
Table 6; the average responses in this table are shown as a visualization of the general results of our study without statistical evaluation. Runs were not randomized due to technological limitations during machining operations.
3.1. Data Evaluation
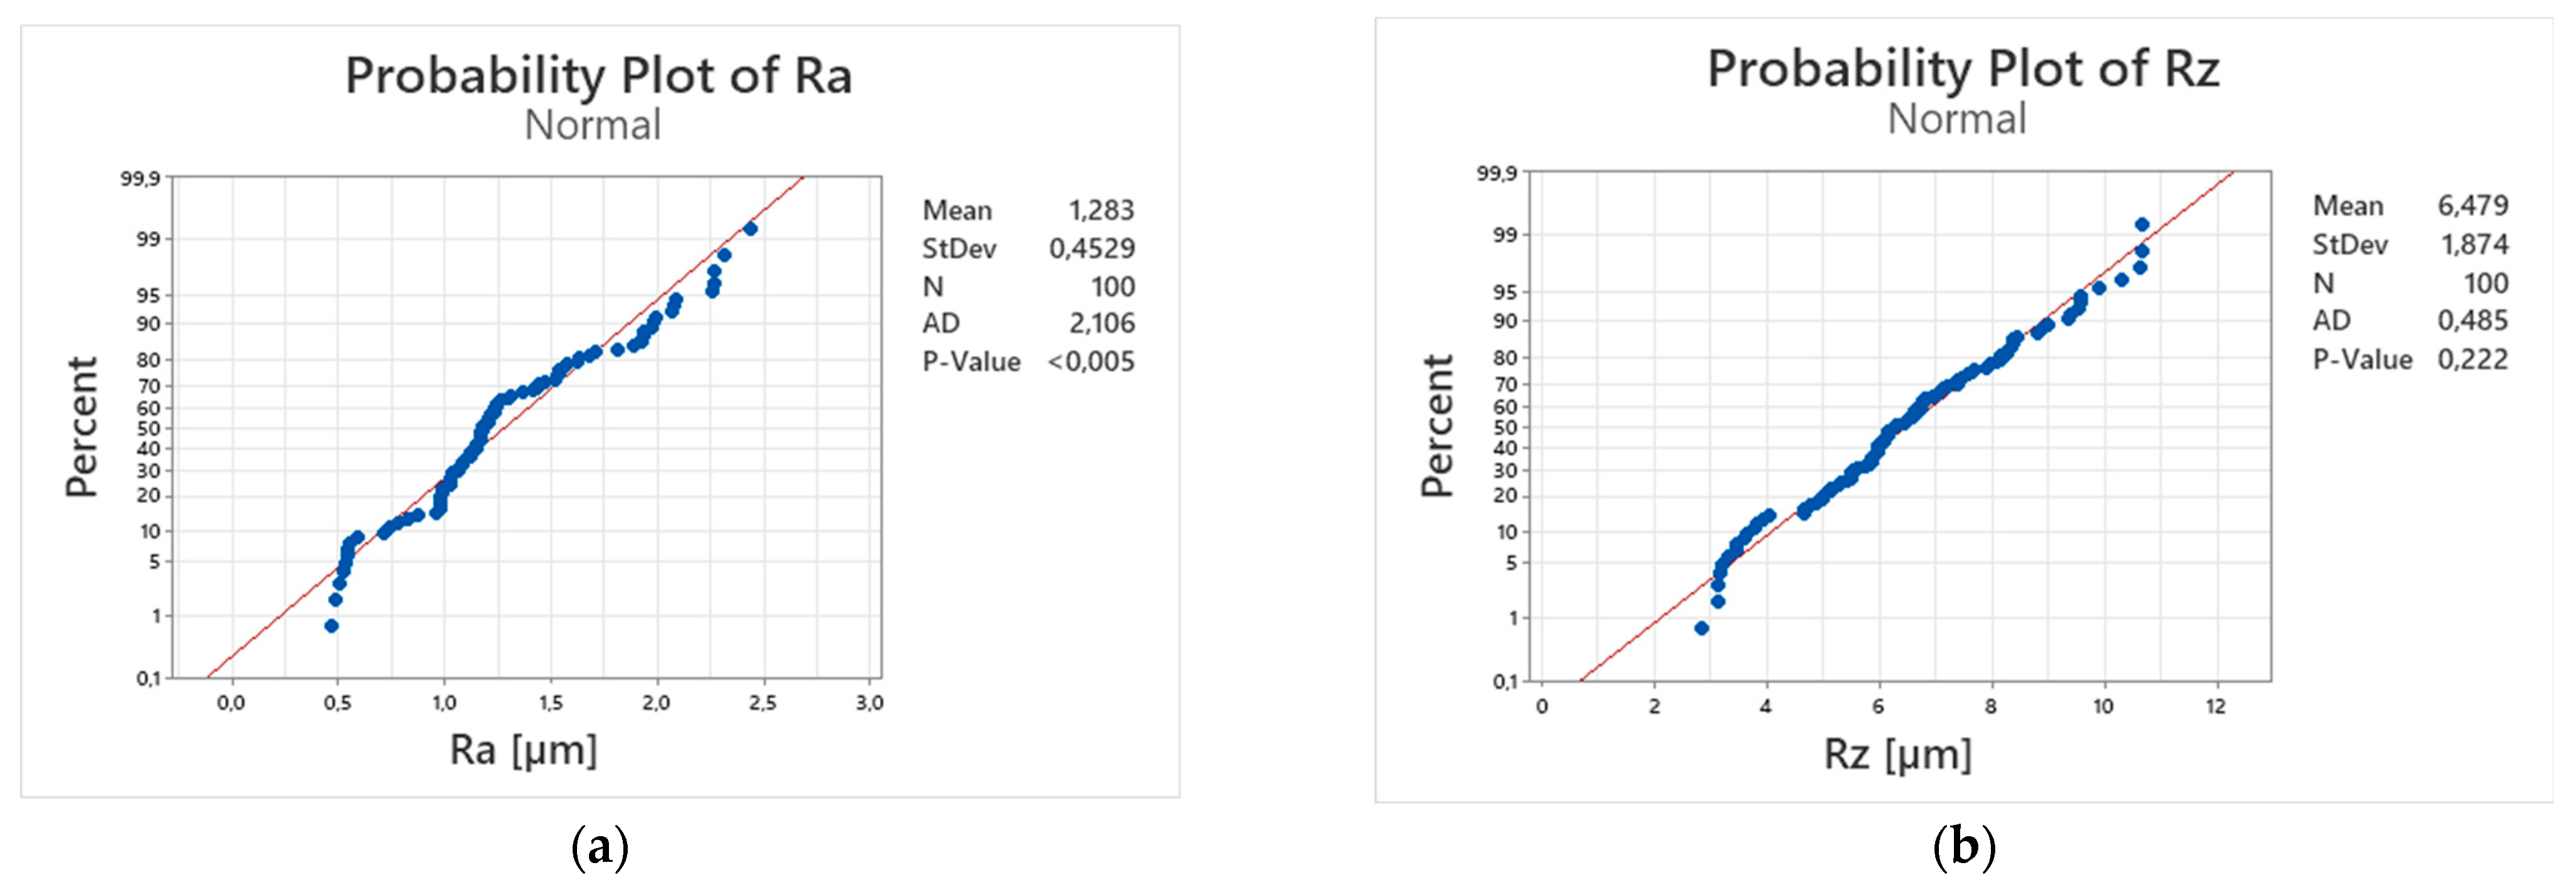
Given the stochastic nature of machining processes, experimental data are often subject to unpredictable variations that may lie outside the expected distribution. To ensure the validity of subsequent statistical analyses, the full data set was subjected to a normality assessment using the Anderson–Darling test and to a homogeneity of variances check using Levene’s test.
As shown in
Figure 6a, the response R
a exhibits a slight deviation from normality at the 5% significance level. This is consistent with the inherent variability and dynamic nature of machining operations. While the result does not necessarily indicate model inadequacy, it warrants cautious interpretation of model diagnostics. In contrast, response R
z, as seen in
Figure 6b, does not show significant departure from normality and can be considered approximately normally distributed for the purposes of regression modeling.
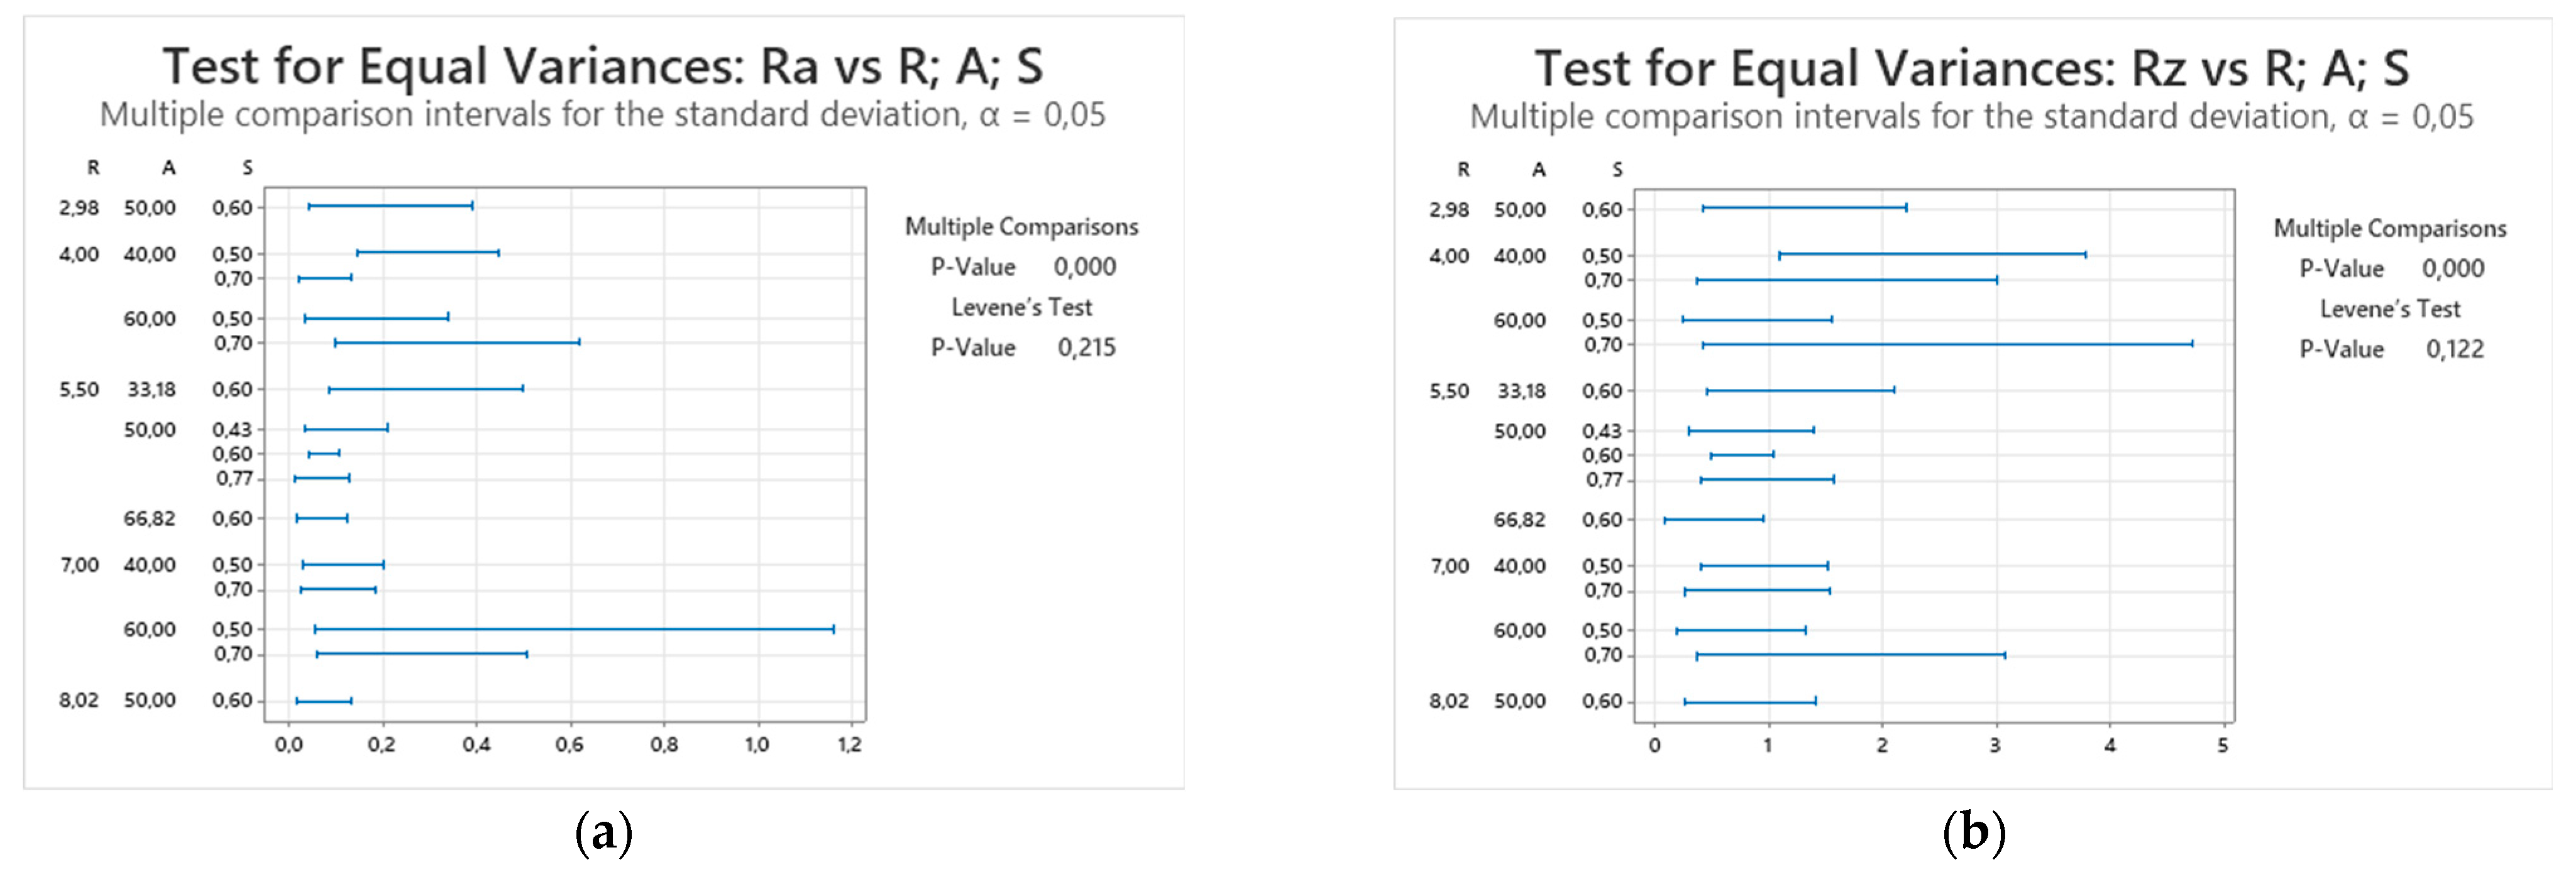
Based on
Figure 7, both responses satisfy the assumption of equal variances according to Levene’s test,
p > 0.05. Findings from both response tests should be considered during model diagnostics. The multiple comparison procedure flagged significant differences in variance between certain data pairs. This does not contradict the global Levene’s test result but indicates that a few factor combinations may exhibit higher variability, a phenomenon commonly observed in machining experiments due to their dynamic nature. Furthermore, some data points exhibit relatively large standard deviation intervals, which could be attributed to process instability, improper tool engagement, or tool deflection caused by certain factor combinations.
3.2. Model Analysis and Diagnostics of Response Ra
A second-order response surface model was developed for Ra using backward elimination at a 10% significance level to remove statistically insignificant terms. The final model retained all three factors, R, A, and S, and their quadratic terms, while all two-way interactions were excluded. Variance inflation factors, VIF < 1.5, for all terms confirmed the absence of multicollinearity among predictors.
Analysis of variance confirmed that the quadratic model was highly significant and captured 90.76% of the total variation in R
a. Adjusted and predicted coefficients of determination, R
2adj = 90.17% and R
2pred = 88.95%, were in close agreement, indicating good model generalization and no evidence of overfitting. ANOVA results can be seen in
Table 7.
The statistically significant lack-of-fit is likely a consequence of highly consistent replicate runs, very small pure-error estimates, and the use of Ra as a mean roughness parameter, which inherently reduces variability. This leads to hypersensitive lack-of-fit statistics rather than a practical inadequacy of the fitted model. This interpretation is further supported by the absence of lack-of-fit when analyzing Rz under the same model structure.
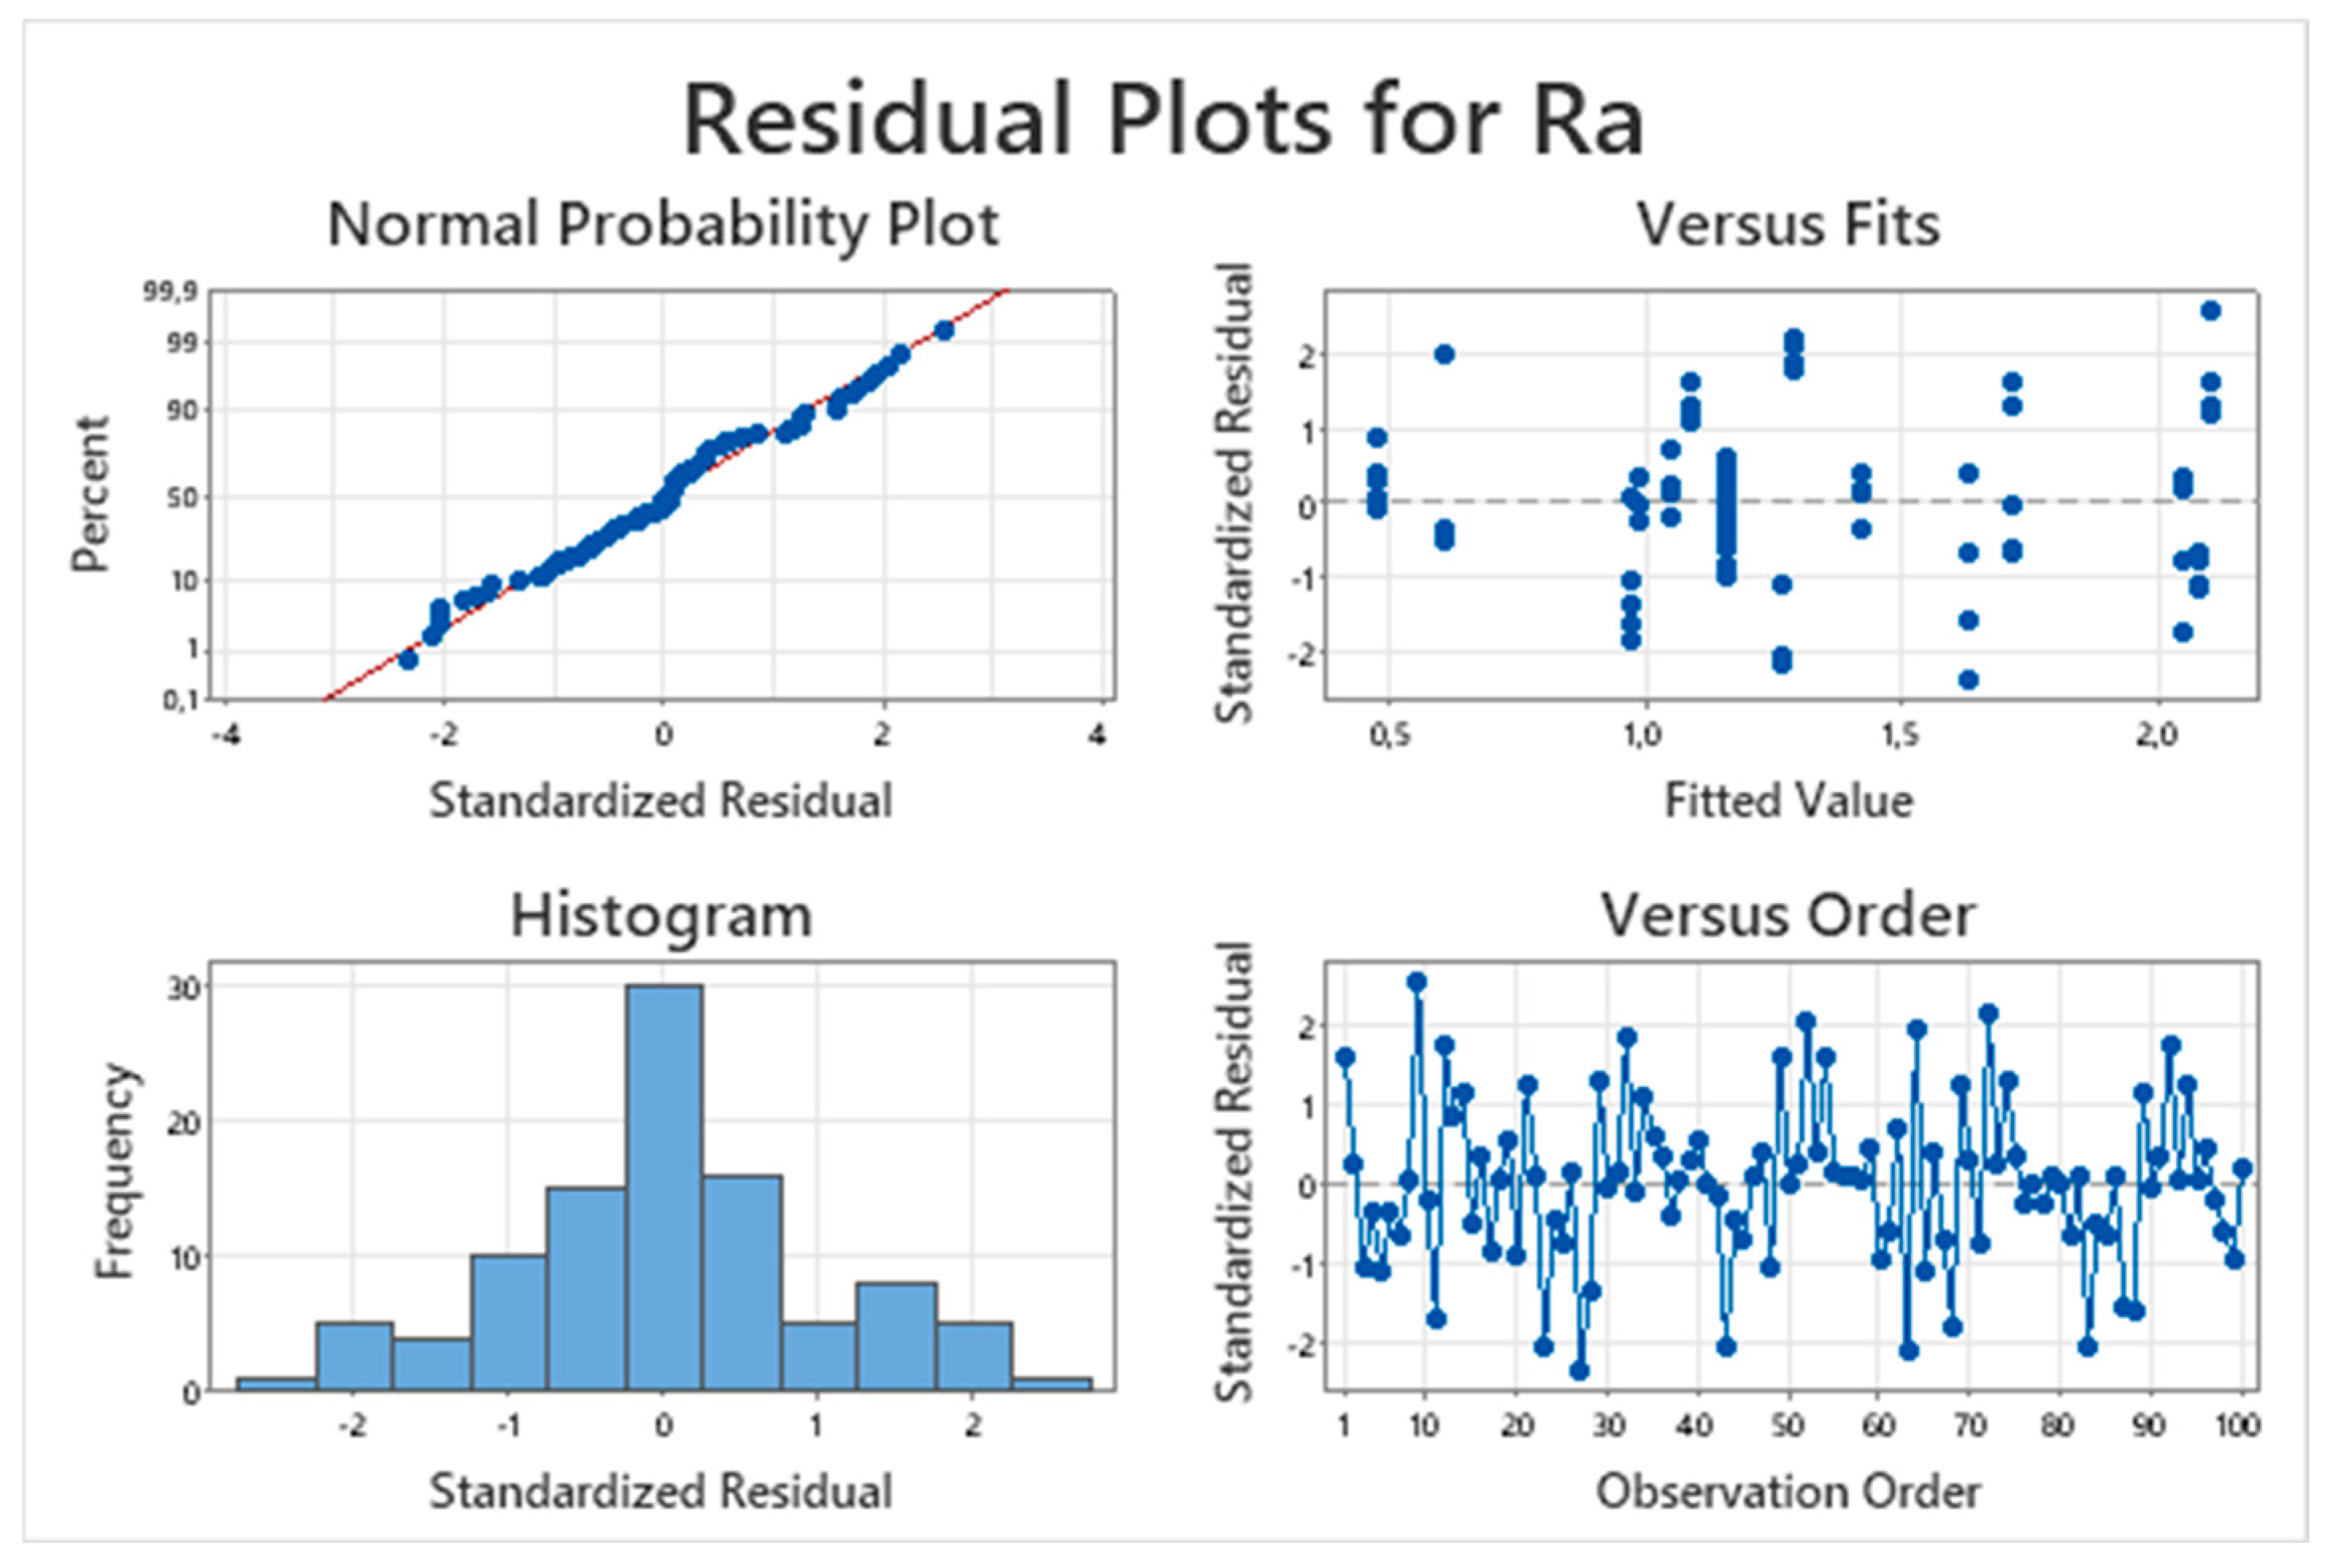
Model residuals were analyzed using normal probability plots, histograms, residual-versus-fit, and residual-versus-order plots in
Figure 8. Residuals followed an approximately normal distribution, were homoscedastic, and showed no observable trends with respect to fitted values or run order. These results confirm that model assumptions were satisfied and that the quadratic model adequately describes the behavior of R
a within the experimental domain.
3.3. Model Analysis and Diagnostics of Response Rz
A second-order response surface model was also developed for Rz, including both linear and quadratic terms, as well as two-way interactions that were statistically significant at the selected 10% significance level. Unlike Ra, where all main factors and their quadratic terms were retained but two-way interactions were excluded, the Rz model required the inclusion of two interaction terms to adequately capture the behavior of the response. The quadratic term of Radius was eliminated, but the interaction between Inclination Angle and Radius, as well as Inclination Angle and Stepover height, remained in the model. Variance inflation factors (VIF < 1.5) indicated the absence of problematic multicollinearity among predictors.
The coefficients of determination for the R
z model were R
2adj = 89.12% and R
2pred = 88.14%. The close agreement among these values indicates that the model neither overfits nor underfits the data and has good predictive capability within the experimental region. The actual predictive performance will be tested after the main model analysis of both responses. ANOVA results can be seen in
Table 8.
Analysis of variance confirmed that the Rz model was statistically significant and that both the linear and quadratic components were needed. Interaction effects were also significant, supporting the inclusion of two-way terms in the final model. Importantly, the lack-of-fit test was not significant, which demonstrates that the selected model adequately represents the underlying process without missing systematic variation. This result contrasts with Ra, where the lack-of-fit test was hypersensitive due to very low pure error. The absence of significant lack-of-fit for Rz supports the conclusion that the model provides a suitable description of surface roughness variation. Another key metric that indicates that the lack-of-fit test is performing within expectation is pure error Adj MS, which, compared to lack-of-fit, does not show a major underestimation.
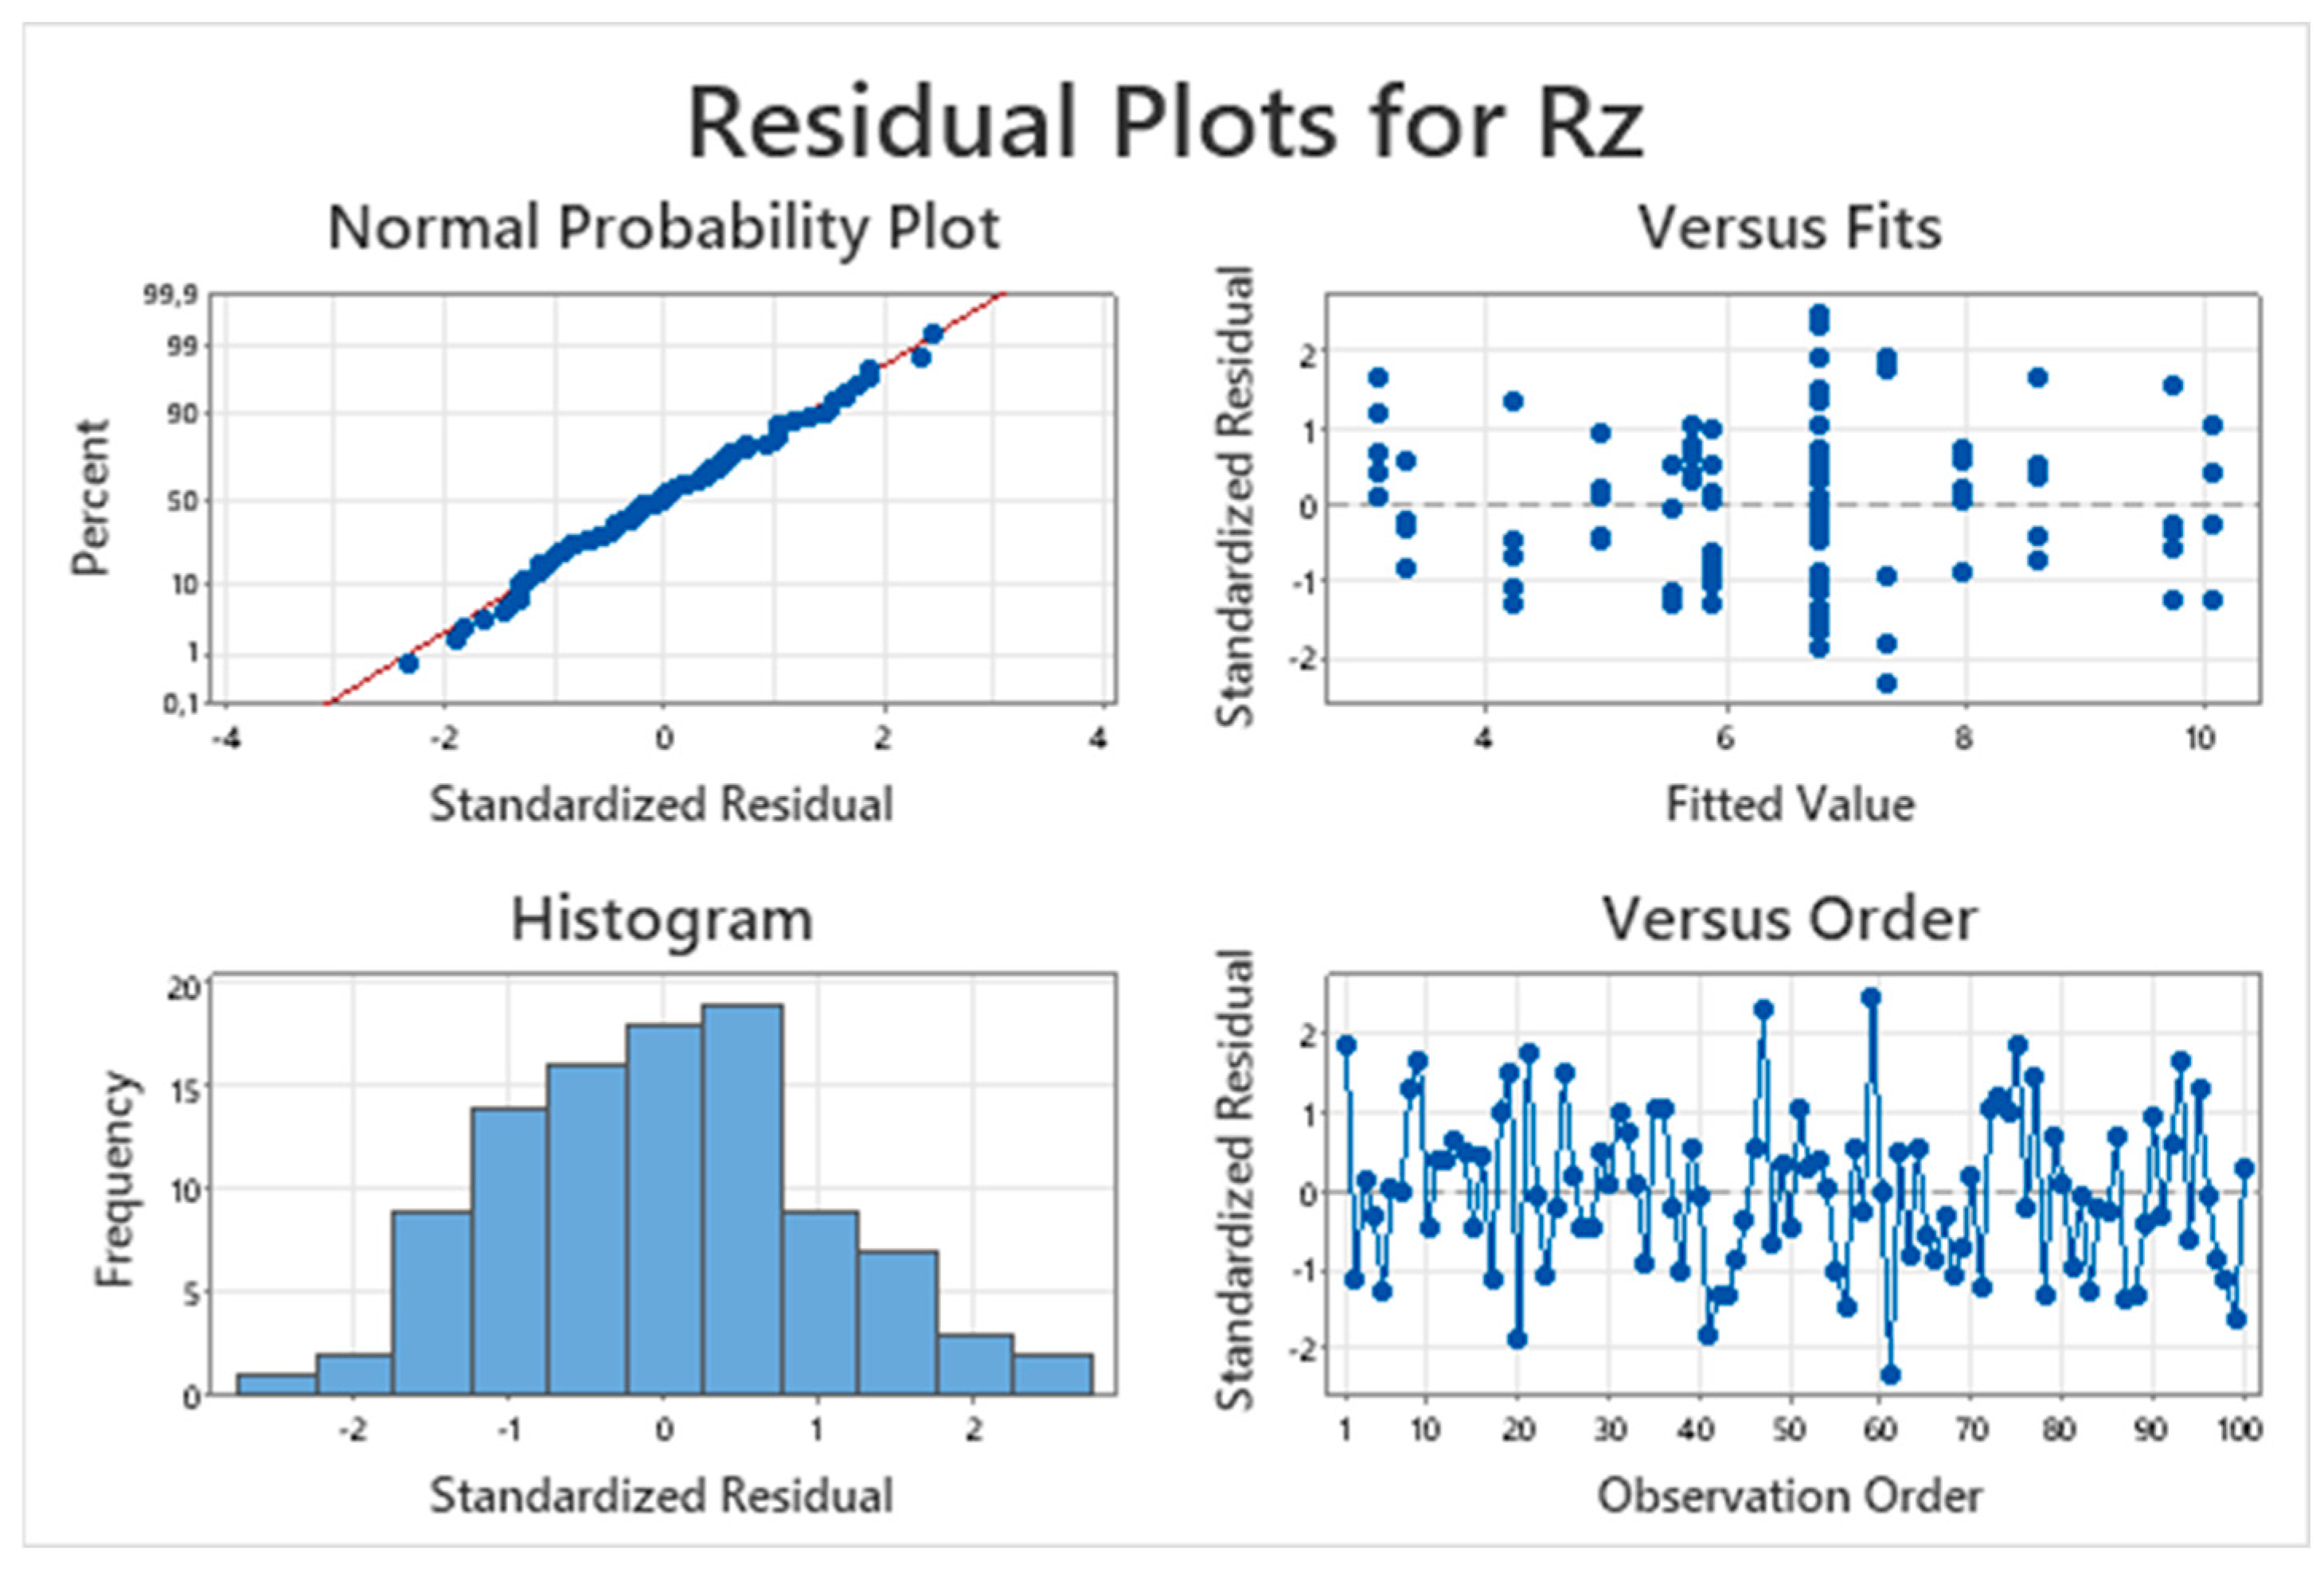
Residual diagnostics in
Figure 9 confirmed that model assumptions were satisfied. Normal probability plot and histogram indicated that the residuals followed an approximately normal distribution, while residuals-versus-fits and residuals-versus-order plots showed no heteroscedasticity or systematic trends. These results confirm that the R
z model is statistically adequate.
3.4. Analysis of Standardized Effects
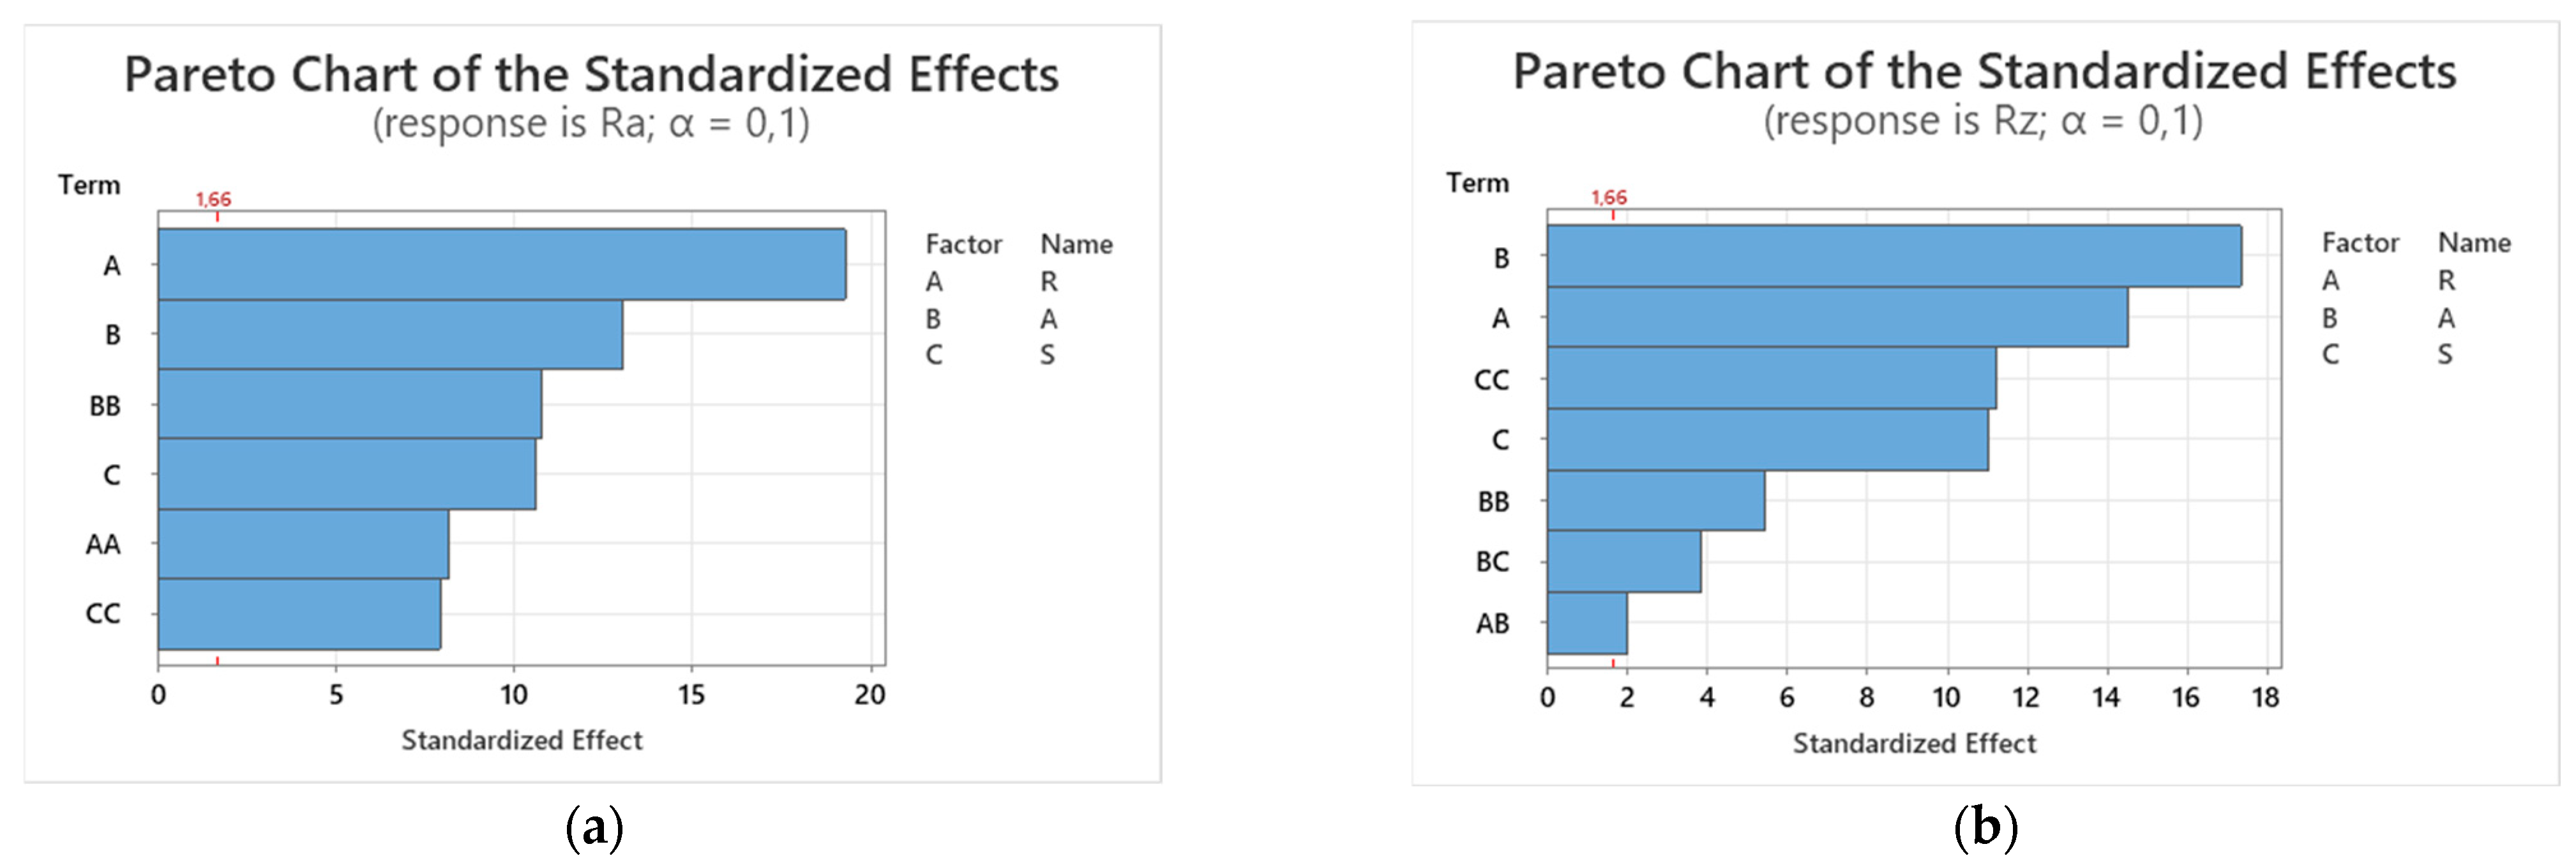
Analysis of main effects shows that the variability of response R
a is explained entirely by individual factors and their quadratic terms, with no statistically significant interactions retained in the model, as seen in
Figure 10a. The dominant factor is radius, which aligns with literature findings, followed by inclination angle and stepover height. The strong effect of radius can be attributed to cusp height reduction when using larger radii at the same stepover height. Inclination angle shows a more pronounced effect than stepover height, suggesting that the dynamic component of the machining process plays a substantial role in determining R
a. This effect would likely be amplified if the experiment were conducted on a 5-axis machine with active tool inclination.
Effect analysis for response R
z in
Figure 10b shows similarities but also clear differences compared to R
a. The dominant factor for R
z is inclination angle rather than radius. This can be explained by the nature of R
z, which is defined as the peak-to-valley height and is thus more sensitive to random surface phenomena and local deformations. Interestingly, Radius does not retain a quadratic term in the R
z model, indicating a certain degree of asymmetry between the R
a and R
z responses. Stepover height exhibits a comparable trend to R
a, with a quadratic term slightly stronger than its linear counterpart.
Interactions between certain factors were also present in the model; however, their overall contribution to response variability was minor. For this reason, interaction plots are not included, as they would offer limited additional insight. The interaction terms were retained in the model solely because they were statistically significant.
3.5. Contour and Surface Plots of Both Response Models
Surface plots of response R
a provide key insights into the position of the proposed model relative to the chosen response. As shown in
Figure 11a, factors R and A occupy a region relatively close to a local optimum within the experimental settings. In contrast,
Figure 11b,c reveals a local saddle point. This saddle point is particularly useful for guiding additional experimental steps and identifying promising directions for future research. Certain factor combinations, primarily near model edge cases, yield R
a values below 0.8 μm, suggesting that results that are lower than commonly achievable roughness levels are possible.
To provide a clearer visualization of the model results, response R
a is shown as 3D surface plots in
Figure 12a–c. All factors exhibit curvature, as confirmed statistically in
Table 7, and this is now visually evident. Without the quadratic terms, the model would not capture the true nature of the R
a response. The results presented in
Figure 11 and
Figure 12 are closely tied to the chosen experimental settings and the specially designed ball-end cutting tool. It is very likely that, if the entire experiment were conducted with R factor intervals between 10 mm and 20 mm, the results would vary significantly due to cutting dynamics.
Response R
z models are visualized in
Figure 13 and
Figure 14 as contour and surface plots, respectively. Visual inspection confirms that factor R contributes only a linear effect, consistent with the statistical confirmation in
Table 8. Similarly to response R
a, the model space lies between peak and valley points of the response surface, indicating potential directions for further research.
The 3D surface plots of response R
z shown in
Figure 14a–c provide additional insight into the linear behavior observed for factor R. In
Figure 14a, the response surface appears nearly planar along the R-axis, confirming the absence of a significant quadratic effect. The smooth nature of these surfaces also indicates that the process window explored in this study is stable, with no abrupt changes in surface quality across the tested range.
3.6. Model Validation with Prediction
Through model testing, using cutting tools from the main experiment, it was determined that statistical models are sufficiently accurate, predicting the response with an accuracy of approximately 90%. To verify the models beyond mathematical analysis, a dedicated validation experiment was designed to assess the real predictive capability of the developed models. This validation was performed under certain limitations regarding the settings of selected factors and included verification of the optimal solution.
The factor limitations applied to the designed cutting tools were as follows: All validation cutting tool samples were produced with the radius factor fixed at 7 mm. Designing a new cutting tool according to the predicted optimum would have been economically and time-demanding; therefore, the calculation of the optimum solution and the prediction of the validation values were performed with the radius factor maintained at 7 mm. Limiting the validation samples to a radius of 7 mm, affects the overall performance of the validation due to the curved nature of factor A in terms of response R
a. The authors acknowledge this design choice as a limiting factor in terms of robustness and repeatability. The remaining factors were left unrestricted. The validation comprised one optimum solution and three randomly selected predictive solutions. For the manufacturing of the optimum solution, the objective function was set to minimize response, thereby achieving the best possible surface finish within the region of our study.
Table 9 presents the factor settings based on the selected solutions together with the results of the validation compared to the model predictions. Solution 1 represents the optimum solution, while the remaining solutions correspond to random predictions.
Prediction and validation data were compared both mathematically and visually. On average, the validation data points of response R
a were offset by approximately 0.24 µm above the predicted values, while R
z values were offset by 1.16 µm. As shown in
Figure 15a, the predicted R
a (P) and measured values R
a (V) follow a similar trend across all four tested solutions, with a nearly parallel progression, confirming that the model correctly captures the overall shape of the response surface.
The scatter plot in
Figure 15b further confirms this observation quantitatively. The data show a coefficient of determination close to 100%, indicating excellent agreement between predicted and measured values. The slight positive slope deviation reflects a small systematic overestimation of the measured response, which is expected due to process variability and measurement uncertainty.
It is important to note that prediction accuracy decreases for very low surface roughness values, where machining dynamics and surface effects dominate the response and approach limits of the measurement systems. This is particularly evident near 0.5 μm, which approaches a polished surface finish and is inherently difficult to model precisely with general cutting tools.
Prediction and validation data for response R
z were also compared visually and mathematically. As shown in
Figure 16a, the overall trend of predicted and measured values is consistent for the first three solutions, with Solution 4 showing a significant deviation. This discrepancy is attributed to the extreme value of the stepover height factor, which was outside typical finishing operation conditions and likely introduced higher variability.
The scatter plot in
Figure 16b excludes Solution 4 to prevent skewing of the regression fit. Even with this exclusion, the regression shows good agreement with the model predictions. The slope of 0.779 indicates that measured values tend to be slightly higher at low predictions and lower at high predictions, suggesting a mild underestimation at the lower range and overestimation at the upper range of the response. This behavior is typical for models approaching the limits of their design space and highlights the importance of avoiding extreme factor settings during finishing operations.
The average error rate between validation and prediction in terms of Ra corresponds to 34%, and for Rz, 25%, excluding the result of Solution 4. The results show that while the model captures general trends, it fails to accurately predict the actual values machined, or the predictions are slightly offset. These facts show that the models generalize poorly, which is expected due to rather large stepover heights used overall in this study, considering finishing machining operations
While the proposed response surface model provides reasonable predictions within the design space, the validation experiments revealed a non-negligible prediction error. During further analysis, it was found that applying transformations to the response improves predictive accuracy while preserving the same model structure and factor terms. This indicates that the underlying relationship between the machining parameters and the resulting surface roughness is more curved and nonlinear than initially assumed. Resulting effects due to transformations are shown on
Table 10.
Although the transformations enhance the model’s performance, it also suggests that the physical behavior of related processes may require more comprehensive or higher-order models to fully capture the responses’ complexity. Therefore, the logarithmic model is presented as an improved statistical fit, but it also highlights potential directions for future work in refining and expanding the predictive framework.
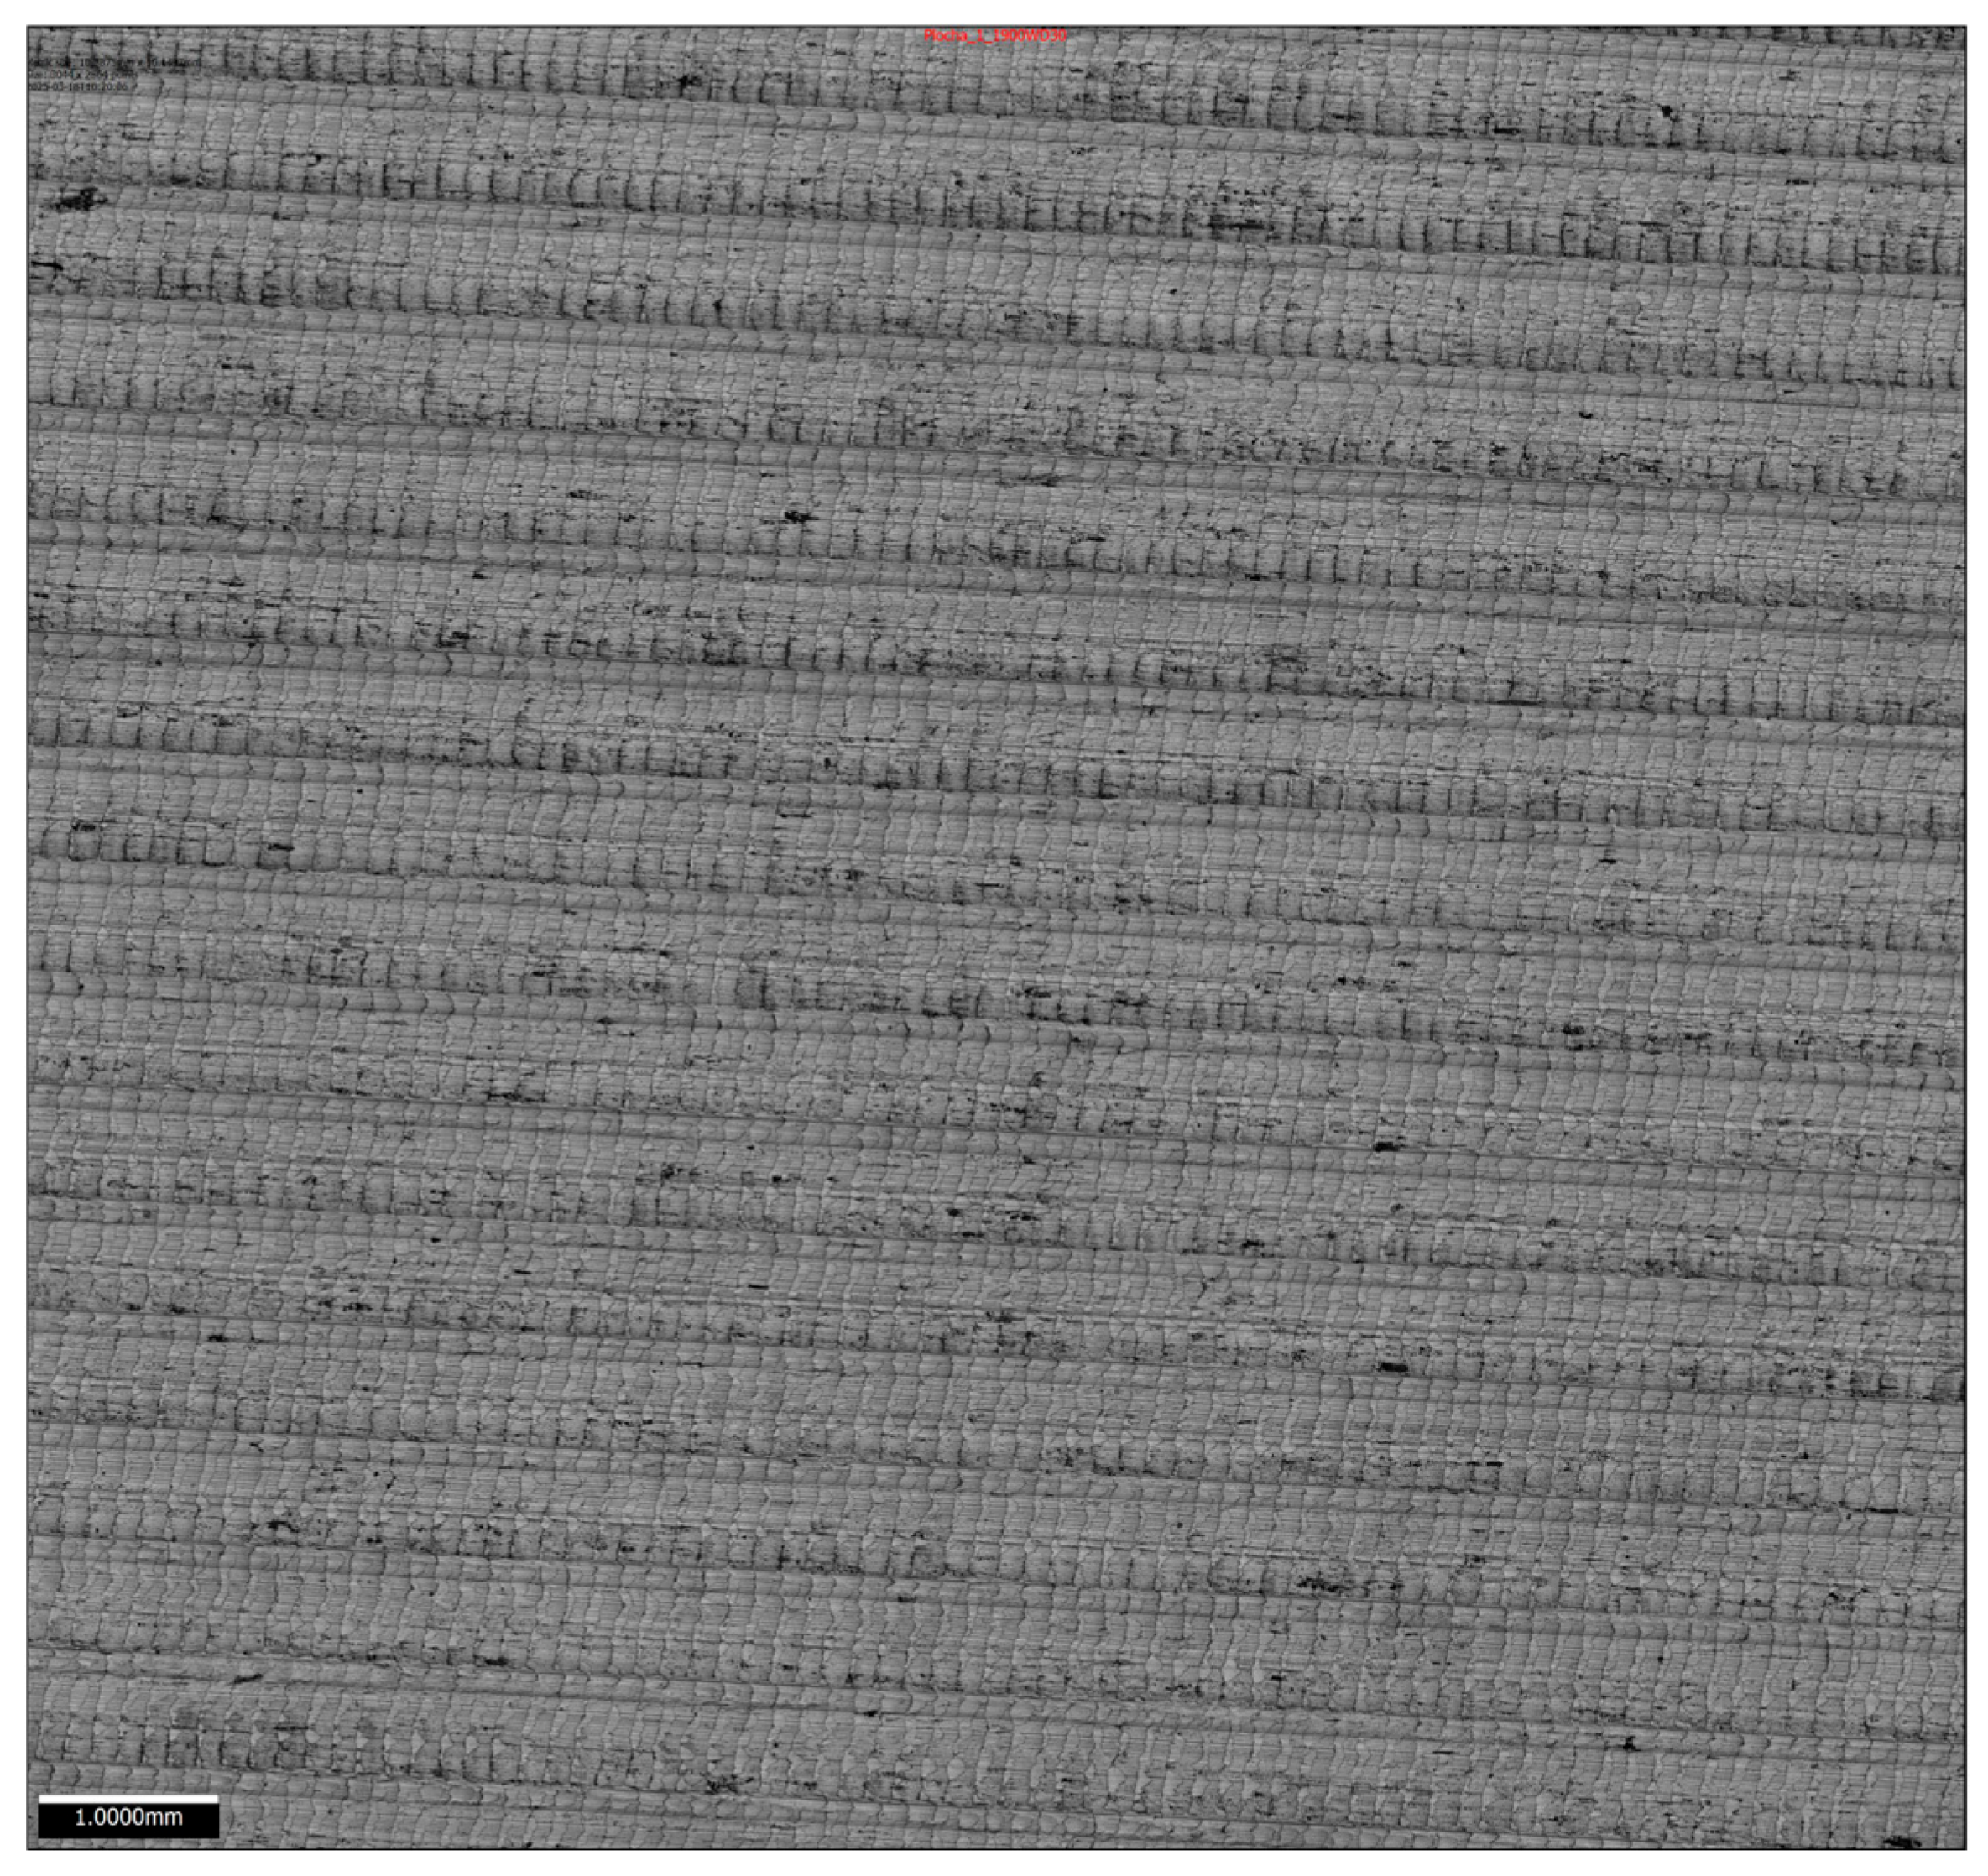
As an additional step, selected validation samples, solutions 1 and 3, were analyzed using a 3D optical measurement system Alicona Focus X(Alicona Imaging GmbH, Austria, Graz). Other solutions could not be measured due to microscope workspace size constraints. The device was employed to capture detailed surface topographies using a 1900 WD 30 lens, as shown in
Figure 17. The resulting image clearly reveals the cutting tool feed marks and scallops caused by the programmed stepover height. The machining traces appear evenly distributed without abrupt changes or deformation, confirming that the process was relatively stable. Dark spots visible on the image are considered either optical artifacts or minor surface defects not representative of the overall surface texture.
To further illustrate the surface characteristics, a 2D surface roughness profile was extracted, as presented in
Figure 18. The measured profile shows a characteristic pattern corresponding to the cutting tool geometrical profile, which is expected when machining with a ball-end mill. The average surface roughness R
a obtained from the Alicona measurement was approximately 0.2 μm higher than the values measured by the stylus instrument, which can be attributed to the different measurement principles and filtering methods of the optical device.
These additional measurements provide an independent confirmation of the process stability and help contextualize the experimental results by offering a complementary view of the surface topography.
3.7. Comparison with Analytical Results
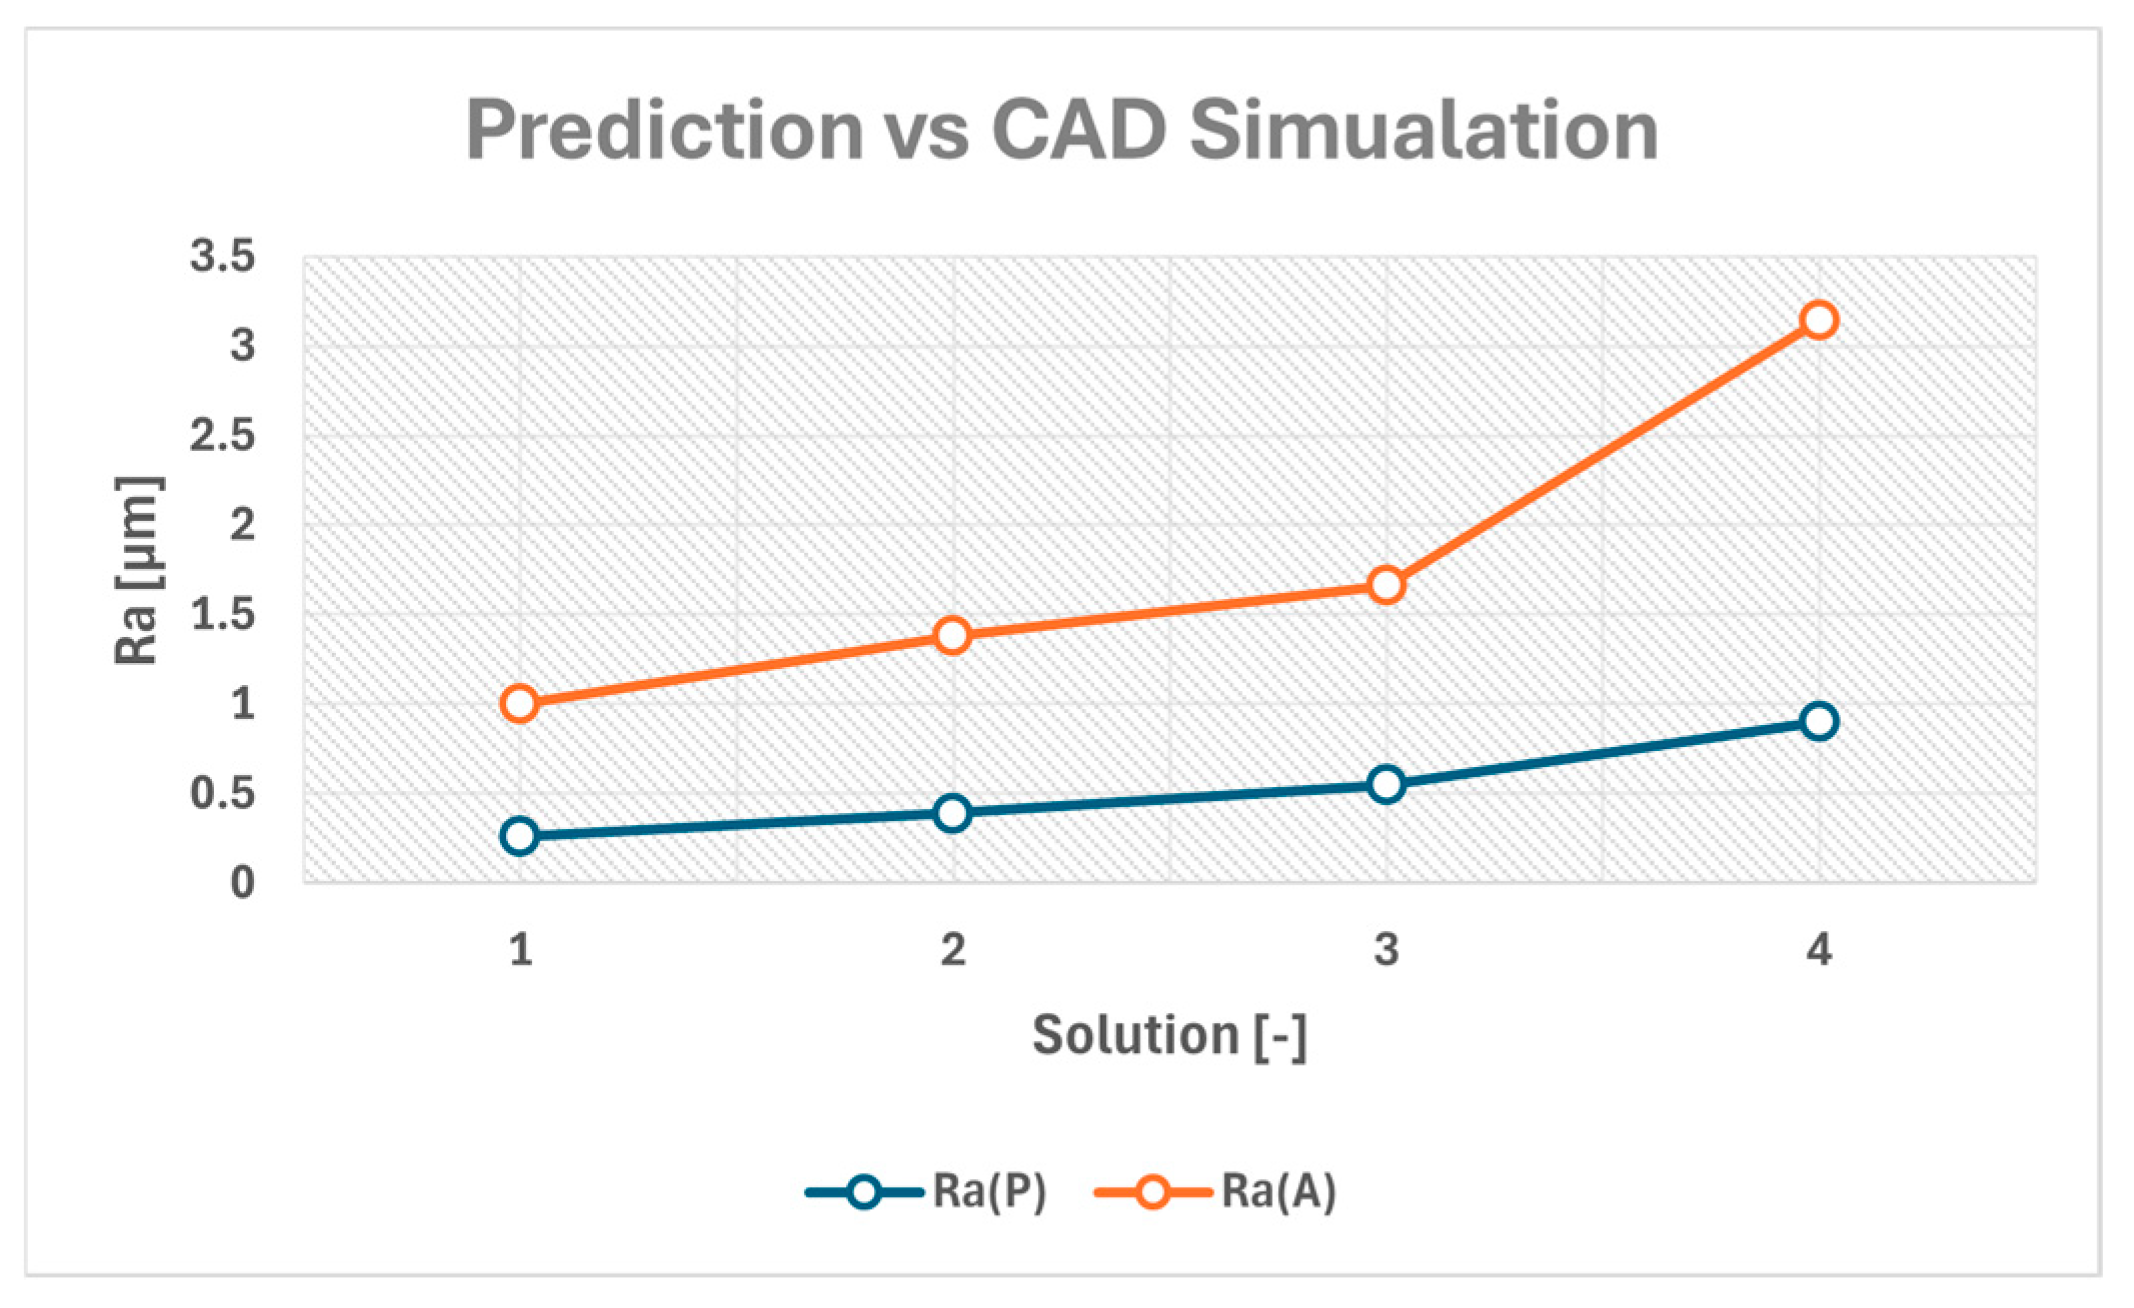
Figure 19 presents a comparison of predicted R
a values obtained from the response surface model, R
a (P), with analytically determined values from CAD simulation R
a (A), at identical factor settings. As expected, CAD simulation consistently produces higher R
a values, since it represents a purely geometric lower bound without considering machine dynamics, cutting tool edge effects, or process damping that can further smooth surfaces. The prediction model follows the same increasing trend with respect to decreasing cutting tool radius R and increasing stepover height S. The prediction model produces lower absolute results, which is consistent with real machining processes achieving better-than-ideal roughness due to burnishing and elastic recovery effects. The near-parallel nature of the two curves indicates that the prediction model is well-calibrated and captures the influence of input factors reliably, with a nearly constant offset between analytical and predicted values. This comparison strengthens confidence that the response surface model reflects the real physical process within the expected range of machining behavior.
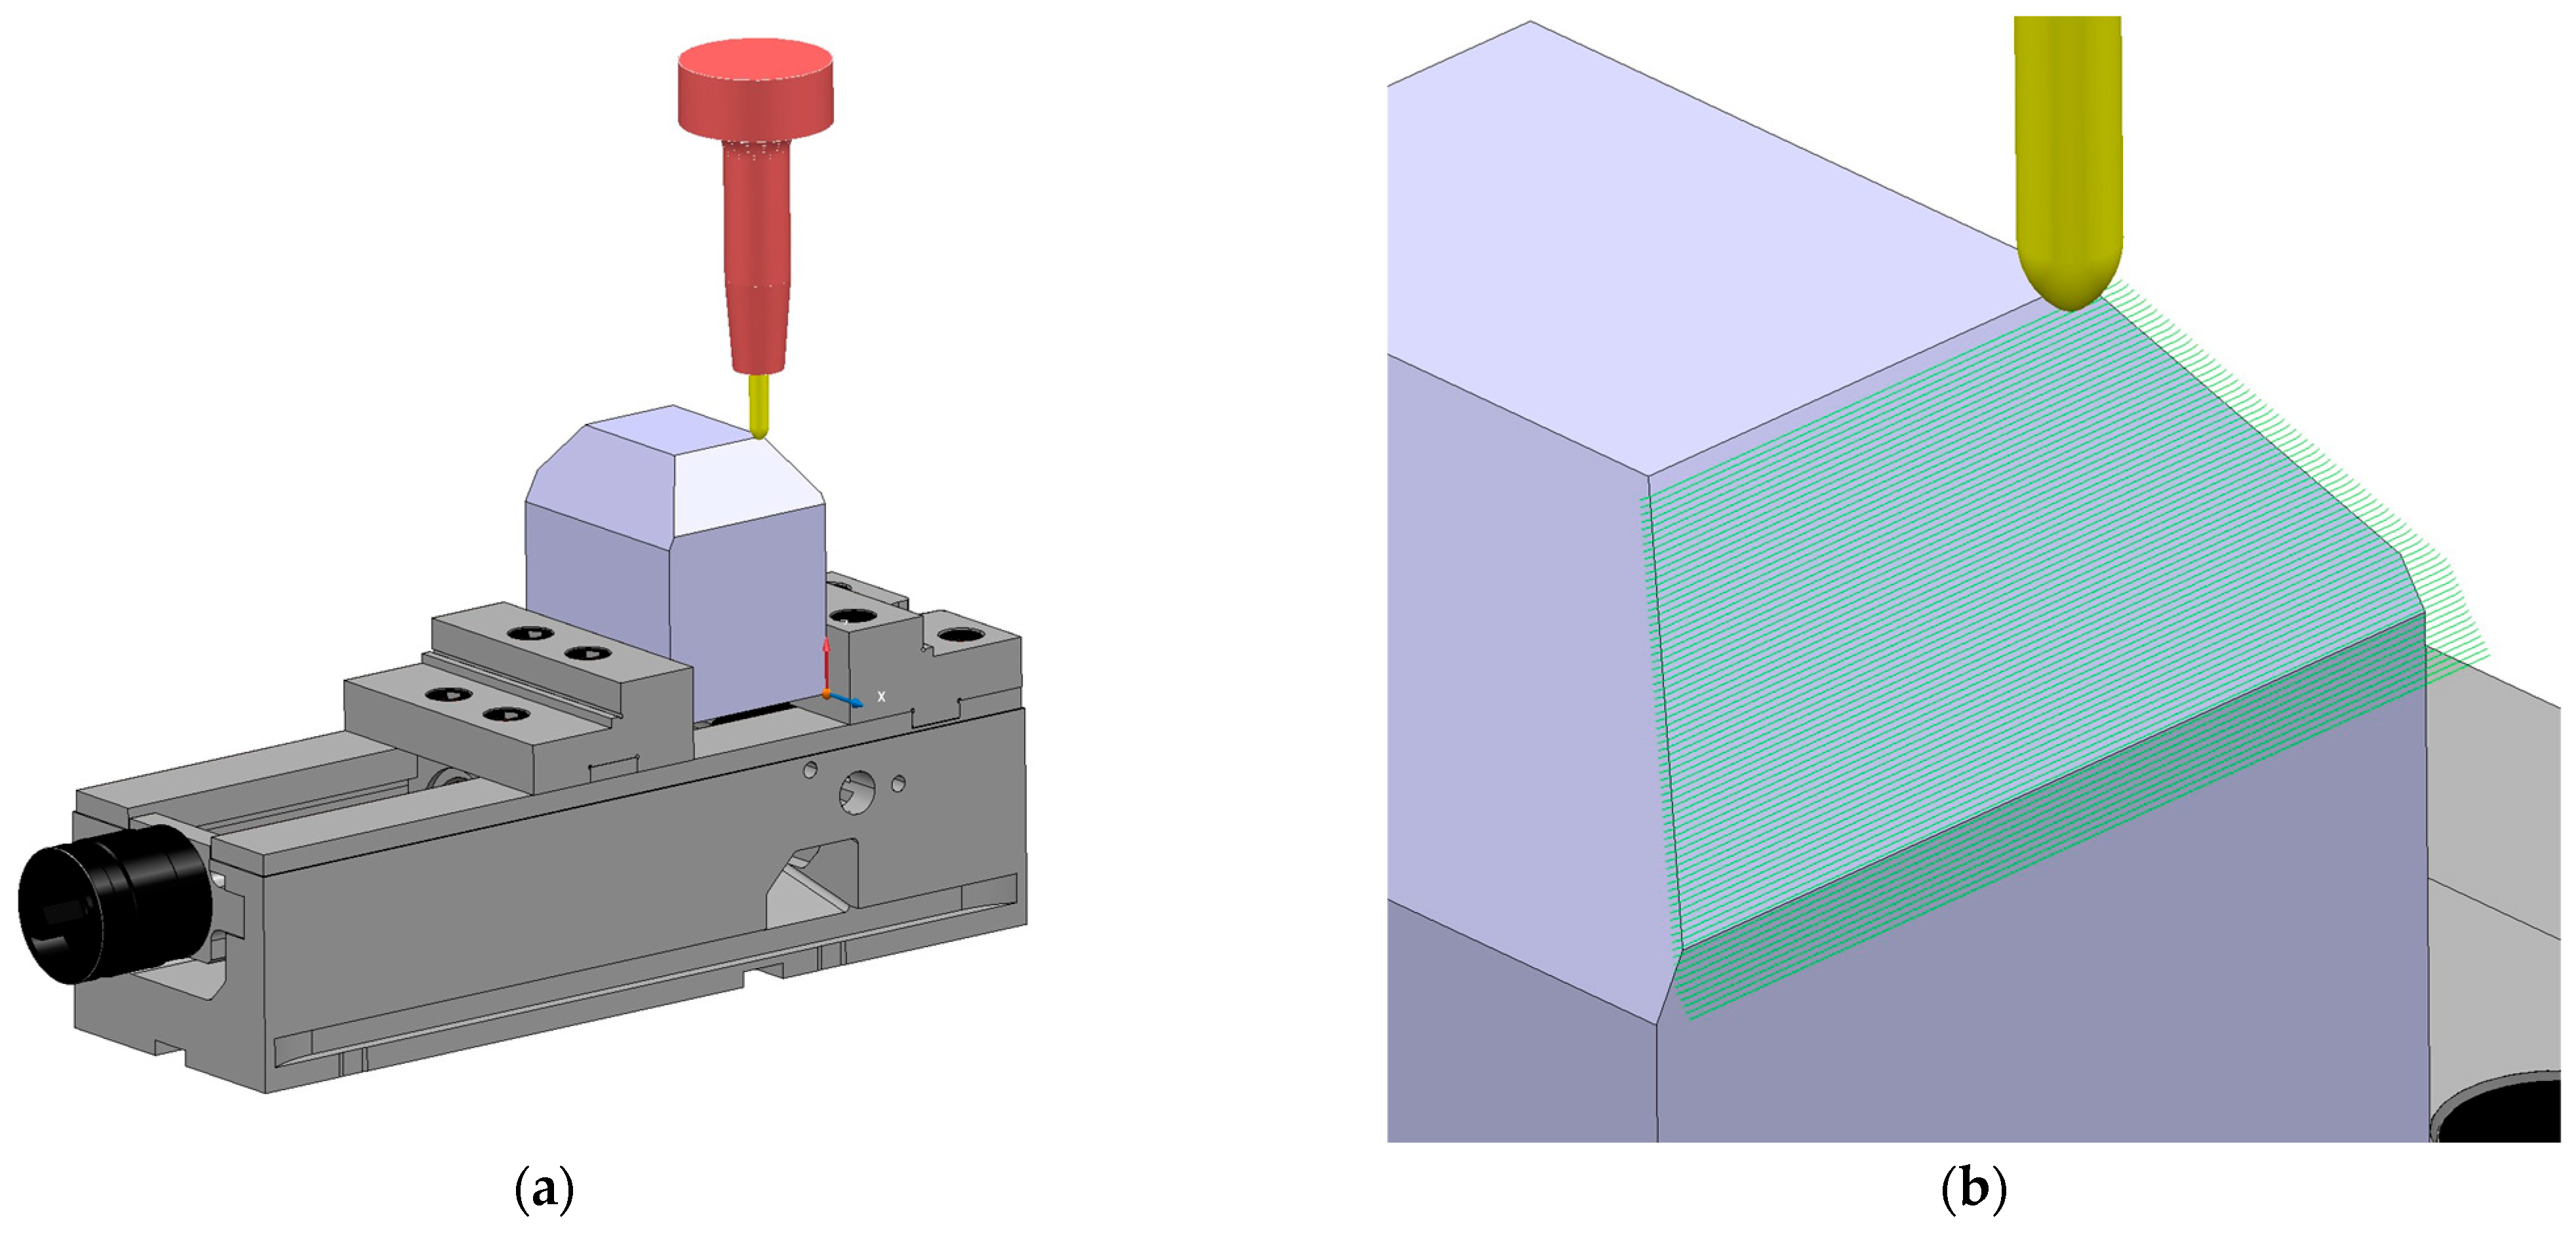
The simulation was constructed as a 2D sketch with overlapping toolpath geometries at factor settings. While Catia V5 R19 does not have a direct feature or module to calculate resulting Ra and Rz values, it is possible to parametrically extract them via a set number of measurements from the 2D sketch profile. The number of measurements increases the accuracy of the resulting approximation; however, since this is an ideal toolpath overlap without vibration or dynamic effects, the resulting number of measurements required is low. The Rz and Ra values were obtained with a series of parametric measurements and computations, similarly to how a stylus-based measurement instrument performs computation of measured values at the microcontroller firmware level.
4. Discussion
The proposed cutting tools have achieved a satisfactory result in terms of evaluated responses Ra and Rz. Through statistical modeling using a quadratic CCD model, we have achieved a predictive model with a relative error rate. The study featured ball-end cutting tools with the factor radius in the interval of 2.98 to 8.02 mm. Cutting tools were limited to a constant stock material, a carbide rod of diameter 8h6 mm.
Residual analysis presented in
Figure 8 and
Figure 9 confirms that the adopted quadratic model satisfies the fundamental assumptions of normality, independence, and constant variance. Similar behavior of residuals has been reported in other machining studies employing quadratic response surface models, where increased model complexity did not lead to violations of statistical assumptions [
22]. In this context, residual plots are not compared in terms of their numerical distribution but rather in terms of the absence of systematic patterns and trends. Normal probability plots serve as a diagnostic tool for identifying potential measurement errors or outliers; however, no such anomalies were observed in the present study.
Table 7 and
Table 8 show the model-testing statistic lack-of-fit, while response R
a shows significant lack-of-fit, response R
z shows a non-significant lack-of-fit; however, the threshold is very close to the significance level. This might be an indication of a higher-order model requirement in the scenario of model expansion to a larger factor range. Alternatively, a logarithmic transformation might provide insight into the process, as higher-order models require many data sets as well as computational power. Higher-order models are also sensitive to response data and might start showing modeling errors. The lack-of-fit difference between responses and its effect on the results has already been discussed in
Section 3,
Section 2 of this article.
The present experiment was conducted without randomization due to technical constraints associated with repeated machine setup and specimen alignment. While randomization is generally recommended to minimize the influence of gradual tool wear or machine-state variations, several factors in this study limited such effects. Each cutting pass involved a very small material-removal volume, resulting in negligible wear progression over the duration of the experiment; this has not yet been experimentally validated and could be further tested in future scientific endeavors. The absence of randomization is acknowledged as a methodological limitation, especially considering the fact that the proposed cutting tools were manufactured without coatings or cutting edge modifications.
While this study focused on radius, inclination angle, and stepover height, other factors, such as feed rate, also influence surface roughness. Ginta et al. [
36] reported that Feed was the dominant factor and a linear model was inadequate. Tool wear was not included in the present experiment; however, Kasim et al. [
37] observed a negligible effect of flank wear on R
a in ball-end milling, indicating that wear-related effects may be limited under comparable conditions. The general literature features studies focusing on process parameters such as feed rate or cutting speed, feed etc.; the proposed study added a unique factor, as under normal circumstances, the experiment would require ball-end tools manufactured from a carbide rod of diameter 16h6 mm. Proposed cutting tools can reach similar results while preserving a relatively small cutting tool footprint. Nicola et al. used a ball-end mill of diameter 16 mm, which showed near R
a µm in terms of downward milling compared to run number 13 from
Table 6, where we saw a similar R
a value of 0.51 µm at radius 5.5 mm. While their parameter settings were slightly different in terms of a
e, their results show how our proposed cutting tools produce similar results [
38].
The cutting parameters used in this study featured similar values to optimal results from studies with coated cemented-carbide tools of diameter 20 mm, and the resulting optimal parameter settings were V
c = 159.42 m/min and f = 0.06 mm; for comparison, the cutting parameters of this study shown in
Table 5 are V
c = 150 m/min and f = 0.062 mm [
39].
Alternative cutting tools that can be used for finishing operations, as mentioned in this study, include toroidal endmills. Płodzień et al. found R
a values below 0.4 µm when milling with cutting inserts. The insert radius was 4 mm; the key difference lies in the measuring directions of surface roughness being along the feed direction. The surface roughness in the feed direction is mostly influenced by vibrations; our study measured the surface roughness values perpendicular to the feed direction [
40].
Another study featured toroidal cutting tools with round cutting inserts milling concave and convex surfaces and varying degrees of curvature or tool inclination angle. Their findings showed that curvature mostly affect R
a values, ranging from approximately 0.25 µm from the lowest to the highest value, with varying trends. Their lowest possible values were near R
a = 0.3 µm, compared to our study’s findings, where the lowest possible value of R
a was 0.51 µm [
41]. Their study featured a true five-axis setup, which affected the cutting tool and workpiece interaction. The actual difference between the curved and linear surfaces in this comparison is only viable in super finishing criterion requirements.
The tool overhang used in this study featured a constant setting of 30 mm, this value was chosen based on the required minimal clamping length of diameter 8h6 for cylindrical shanks according to DIN 6535 HA [
42]. Studies have featured the tool overhang lengths as a noise control factor. Arrunda et al. found, during quadratic modeling of ball-end milling processes, a conflict between results in combination with f
z and a
e, suggesting a search for robust factor levels. This conflict suggests that the overhang length affects cutting tool deflection, which, in some cases, as per their findings, can affect surface roughness in both directions [
43].
A study performed by Zhao et al. featured numerous ball-end mill solid carbide cutting tools with a Taguchi matrix. Their study featured numerous cutting radii and process parameters; however, the number of flutes varied between two and four. This was included in the design matrix as a cutting tool-specific factor, compared to our study, which featured a constant design rule of four flutes per cutting tool. Their results show a per-radius difference in obtained R
a values of almost 0.2 µm between the 2-, 3-, and 4-flute cutting tools, suggesting that the number of flutes must either be included as a factor or set as a constant. Cutting tool flutes are generally constrained by cutting tool diameter and machined material [
44].
Comparable surface roughness values were reported by Varga et al. [
45] for concave and convex surface machining. Their experimental setup used similar cutting parameters—a
e = 0.3 mm and f = 0.04 mm—and ball-end cutting tools. Although their study focused on tool inclination and effective radius, the best results of R
a = 0.491 μm and R
z = 2.713 μm were achieved for a convex surface. Direct comparison between inclined and curved surfaces is not appropriate; however, the results indicate that similar surface quality levels can be achieved as seen in
Figure 11 and
Figure 13.
The study employed a three-factor quadratic model. From a tooling perspective, the tool radius is considered a cutting-tool-specific parameter, whereas stepover height and inclination angle are process-specific parameters defined relative to the selected machining process.
Figure 20a presents a comparison of cutting tool performance for tool radii ranging from 4 to 8 mm under a surface roughness criterion of R
a ≤ 1 µm. For reference, the R4 cutting tool is considered a standard tool, as it does not incorporate the proposed cutting tool modification. All R
a values shown in
Figure 20a are based on model predictions evaluated within, or near, the original design space, with the Inclination angle factor fixed at its center level.
As shown in
Figure 20a, all cutting tools investigated satisfy the specified R
a criterion. The primary difference lies in the allowable stepover height. From R4 to R7, the Stepover height increases in approximately 0.05 mm increments, whereas no further increase is observed between R7 and R8, indicating a saturation effect. The total increase in allowable stepover height between R4 and R7 is 0.2 mm, corresponding to a 33.33% increase. Although the absolute magnitude of this improvement appears modest, such an increase in Stepover height can significantly enhance process efficiency in finishing operations. Larger allowable Stepover heights directly reduce toolpath density and machining time, thereby improving overall productivity and economic output in production environments. Direct economic comparison of tooling costs or cost per part is currently not feasible, as the investigated cutting tools were specifically designed for the purposes of this study and are considered special cutting tools at the present stage of development. A detailed cost-per-part analysis will be addressed in future work once the proposed cutting tool concept reaches a level of manufacturing maturity suitable for industrial deployment.
Figure 20b presents a corresponding comparison of cutting tool performance based on an R
z criterion. The overall trend is similar to the observed R
a criterion, with the primary difference occurring between the R4 and R5 cutting tools, where the change in allowable stepover height is approximately 0.025 mm. As expected, R
z values exhibit higher deviations compared to R
a, which is consistent with the general behavior of peak-to-valley roughness parameters.
Pesice et al. investigated ball-end milling processes considering lead angle modification as well as different ball-end cutting tools. Their reported results show significantly larger R
z deviations occurring at irregular intervals, strongly influenced by lead angle variation. Specifically, R
a deviation intervals ranged from ±0.01 to ±0.21 µm, whereas R
z deviation intervals ranged from ±0.03 to ±0.48 µm [
46].
R
z does not contradict the observed improvement in allowable stepover height but rather reflects the higher sensitivity to stepover height change. It should be emphasized that the response values shown in
Figure 20a,b are model-based predictions evaluated within the defined design space. The differences observed between individual data points are primarily driven by changes in the Stepover factor.
Consequently,
Figure 20a,b does not represent a direct comparison of surface roughness stability between R
a and R
z but rather illustrates how the respective response models behave under nearly identical input conditions. A more direct assessment of R
z variability is provided by the standard deviation interval magnitudes shown in
Figure 7b and by the residual distribution histogram presented in
Figure 9.
