1. Introduction
Inconel 718 is a precipitation-hardenable Ni–Cr superalloy with an fcc γ matrix. Its strength is derived primarily from coherent γ″ (Ni
3Nb) precipitates, with a secondary contribution from γ′ (Ni
3 (Al, Ti)) [
1]. Depending on the heat treatment, the δ phase (Ni
3Nb) may form at grain boundaries for grain-size control; however, it does not enhance the alloy’s strength [
2]. Common to both is the presence of MC and M
23C
6 type carbides [
3]. Because it combines high strength, oxidation and corrosion resistance, and stable mechanical properties up to about 650 °C, Inconel 718 is among the most used nickel-based alloys today [
4]. Alongside these benefits, Inconel 718 is notoriously difficult to machine. Cutting tools must withstand elevated heat in the cutting zone due to Inconel’s relatively low thermal conductivity. Apart from high thermal loads, the cutting tool must also endure high cutting forces, as Inconel tends to work harden and exhibit elevated high-temperature strength. As a consequence, finishing operations also face challenges, including accelerated tool wear, which typically manifests as adhesive wear, abrasion wear, or notch wear [
5,
6]. Additionally, some studies report risks to surface integrity from so-called white-layer formation and tensile residual stresses. These challenges significantly influence process stability and create constraints that limit productivity [
7].
Inconel 718 has gained additional industrial relevance through metal additive manufacturing. It is used both to build new parts and for repair via directed energy deposition (DED), where post-processing can deliver properties comparable to those of wrought material after proper heat treatment [
8]. In the case of laser powder bed fusion (LPBF), the near-net-shape production of geometrically complex parts enables rapid prototyping and the creation of functional components [
9]. The rapid solidification that occurs during additive manufacturing results in a microstructure that differs significantly from that of wrought or cast Inconel 718. Mainly columnar grains with crystallographic texture, anisotropy, pronounced Nb microsegregation that promotes Laves-phase formation in interdendritic regions and elevated residual stresses. Process-induced defects, such as lack-of-fusion porosity, may also be present if parameters are suboptimal [
10,
11]. Post-processing is used primarily to reduce residual stress, close pores, and mitigate Laves-related segregation. Examples of methods used include hot isostatic pressing (HIP), solution annealing, and precipitation hardening [
12,
13]. But as-built surface roughness and dimensional tolerances typically still necessitate material removal. Consequently, finish machining remains essential to achieve functional surfaces and tight dimensional control [
14].
An alternative method for employing nickel-based alloys, including Inconel, is thermal spraying, such as high-velocity oxy-fuel (HVOF) [
15]. Thermal spraying deposits a thin coating, typically in the range of hundreds of micrometres thick, onto the substrate surface [
16]. In HVOF, powder particles are accelerated to supersonic velocities before impacting the substrate and solidifying [
17]. Compared to other thermal spray techniques, this method typically produces dense coatings with low porosity, strong adhesion to the substrate, and low oxidation [
18]. As a result, HVOF is commonly used to improve wear and corrosion resistance, thereby extending the service life of valuable components. The coating microstructure consists of lamellar splats and may include hard or abrasive phases originating from the feedstock material [
19]. HVOF coatings also tend to exhibit compressive residual stress, and the as-sprayed coatings often fail to meet the required specifications for surface quality and dimensional accuracy [
17]. Therefore, finishing is usually necessary to meet required specifications for surface roughness and geometric and dimensional accuracy [
20,
21].
To finish Inconel 718 surfaces efficiently, the industry employs a range of strategies. Precision grinding with CBN superabrasives is widely used to achieve low roughness, with high-speed regimes enabling Ra values of 0.4 µm while controlling temperature [
22,
23]. If grinding is infeasible due to access limitations or cost, finish turning or milling is used, but Inconel 718’s poor machinability forces conservative cutting parameters to avoid rapid tool wear and surface damage. Reviews of ceramic and CBN tooling indicate that advanced SiAlON and whisker-reinforced ceramics can operate at cutting speeds exceeding 200 m/min in finishing cuts, whereas coated carbides are typically used at significantly lower cutting speeds, on the order of 50–100 m/min, to maintain acceptable tool life [
24,
25]. Cooling and lubrication methods that extend tool life include high-pressure cooling, minimum-quantity lubrication, nanofluid-enhanced MQL and cryogenic cooling; a comprehensive review for Inconel 718 reports that these strategies generally reduce cutting forces, cutting temperature and tool wear compared with conventional flood cooling, while experimental work with high-pressure coolant confirms improved surface quality and controlled tool wear under appropriate cutting conditions [
25,
26,
27]. In parallel, adapting the tool microgeometry and applying surface texturing are used to lower friction and promote chip flow. For example, micro-textured carbide tools in face turning of Alloy 718 under high-pressure cooling show reduced cutting forces and improved tribological conditions in the tool–chip contact [
28]. Additionally, macro and microgeometry are also leveraged to improve surface integrity. Shen et al. combined finite-element simulations with experiments and showed that changing from a symmetrical honed edge to an unsymmetrical honed edge form factor K ≈ 0.5–2, rβ ≈ 45–75 µm can shift the residual-stress state significantly: maximum compressive subsurface residual stresses on the order of −570 MPa at depths of ≈300 µm were obtained, while surface tensile stresses approached ~+1400 MPa, demonstrating how cutting-edge microgeometry controls both magnitude and depth of residual stresses in Inconel 718 [
29].
Beyond conventional machining, recent work has focused on synergistic hybrid processes that combine optimised tool design with non-standard processing routes. In laser-based manufacturing of nickel-based superalloys, Kaščák et al. reviewed the use of simulation tools for laser powder bed fusion (L-PBF) and showed that calibrated thermo-mechanical models can be used to predict distortion, residual stresses and defects such as porosity before printing, enabling virtual optimisation of scanning strategy and support design and reducing the number of costly trial builds [
30]. Mohsan et al. surveyed ultrasonic-vibration-assisted laser manufacturing (UVA-LM) and reported that, across a wide range of alloys and processes, ultrasonic assistance generally leads to grain refinement and microhardness increases of the order of several tens of percent, for example, up to ~60% grain refinement and ~17% higher microhardness in ultrasonic-vibration-assisted laser cladding compared with conventional laser processing, mainly due to acoustic streaming and cavitation in the melt pool. A complementary review of ultrasonic-vibration-assisted laser cladding (UVALC) documents that introducing ultrasonic amplitudes of the order of 5 µm helps suppress pores and cracks, widens the clad track, improves wetting, and promotes a transition from columnar to more equiaxed grains, thereby enhancing coating consistency and surface integrity [
31,
32].
Beyond these strategies, a further finishing solution might be to employ a tool with a linear cutting edge. In this concept, material is removed by a linear cutting edge set at an edge inclination angle λs, so the edge is not parallel to the workpiece axis, and the insert nose radius does not enter the cut [
33,
34]. Compared with conventional nose radius turning (Rε), linear cutting-edge engagement occurs only at the micro edge radius Rn, typically a few micrometres to a few dozen micrometres [
35]. The linear edge kinematics enable minimal depths of cut; however, the near-surface plastic deformation is relatively severe compared to nose-rounded turning. The resulting residual stresses are typically compressive with a maximum close to the surface [
35]. Because a long segment of the edge is active, the load is redistributed along the edge. However, radial force components increase, and a sufficiently rigid setup is required to avoid chatter [
35,
36]. The resulting surface finish depends on feed, λs, and workpiece curvature. With a suitable λs, the linear cutting edge can achieve finishing grade roughness at relatively high feed rates [
34,
37].
These advances in machining Inconel 718 aim to increase the efficiency and cost-effectiveness of the process. Similarly, this article investigates a cutting-tool concept designed to be effective in both turn milling and turning configurations, utilising a linear cutting edge and topology optimisation. The focus is on the geometric and functional aspects of such a tool, as well as how it can complement or, in some cases, reduce reliance on grinding in the post-processing of nickel alloys, particularly for LPBF parts and HVOF coatings.
This research aimed to design, manufacture, and experimentally evaluate a specialised cutting tool for machining HVOF-sprayed and additively manufactured Inconel 718 coatings. The primary goal was to verify how a linear cutting edge, combined with a topology-optimised body and directed internal cooling, can improve cutting efficiency and roughness compared to conventional tools.
2. Materials and Methods
2.1. Tool Design and Topology Optimisation
The cutting tool developed in this study was designed to perform both turning and milling operations, using a shared concept based on linear cutting-edge engagement. To achieve this, the inserts were positioned at specific angles relative to the tool axis, allowing full utilisation of the cutting-edge length during machining. The initial design employed a triangular insert arrangement using square indexable inserts, each providing four usable edges that can be rotated up to four times. This configuration maximised tool life and flexibility, allowing quick transitions between roughing and finishing without tool replacement.
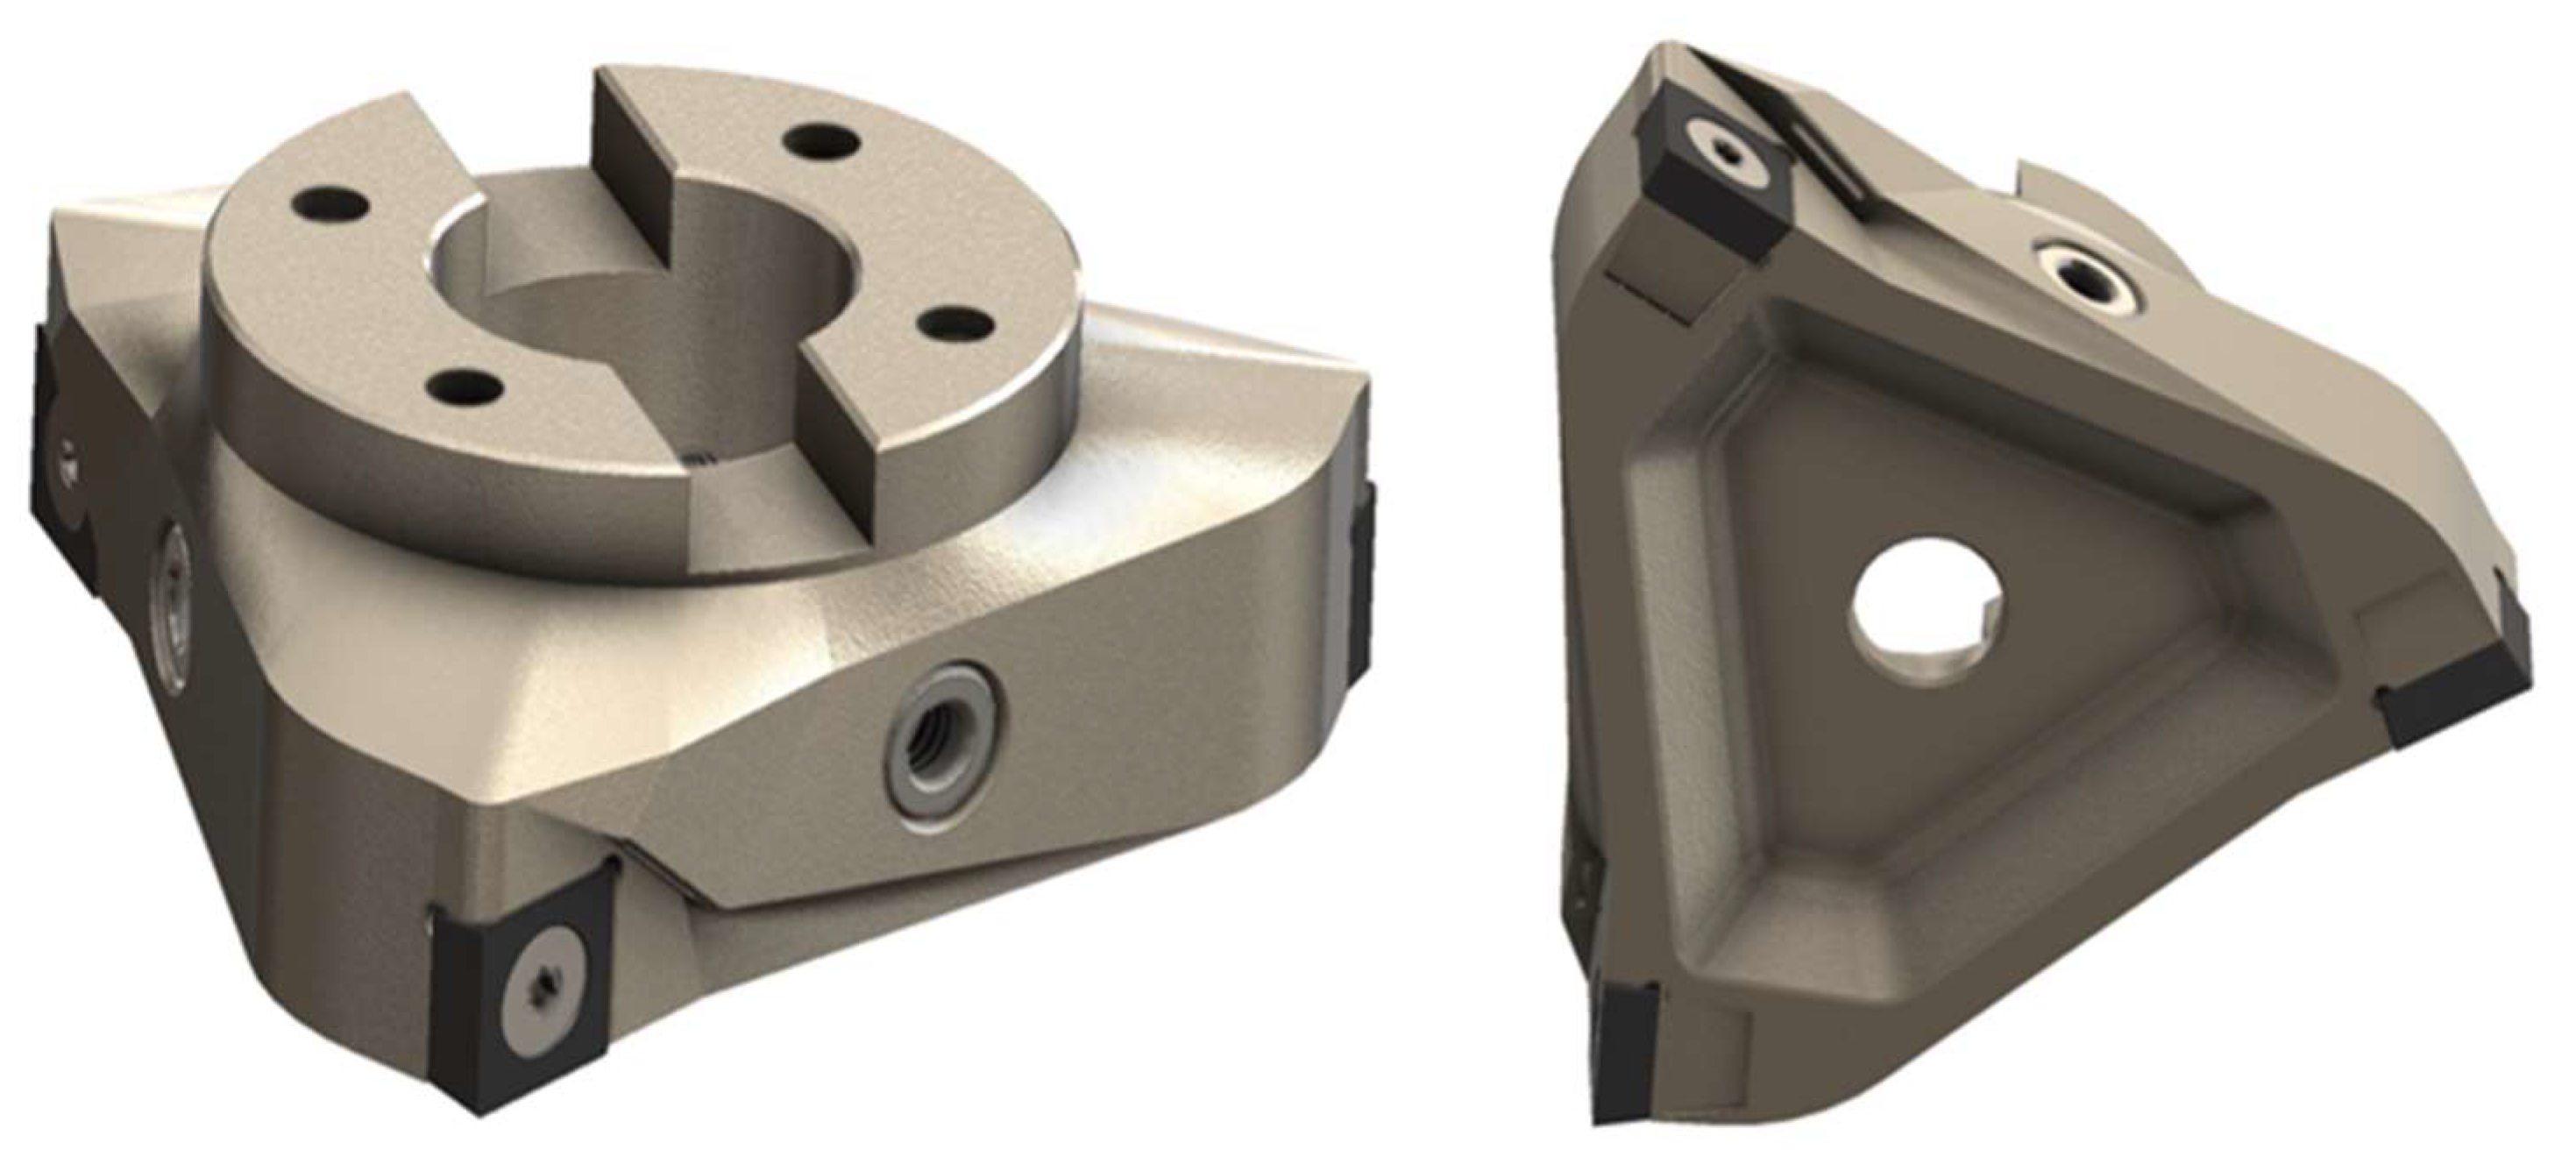
The first version of the tool (
Figure 1) was experimentally tested to validate the feasibility of linear-edge machining. These results provided valuable input for the next design stage, which implemented topology optimisation (TO) to improve the structural stiffness and dynamic behaviour of the tool.
The objective of the TO process was to achieve a uniform stress distribution, minimise deformation, and ensure that the resultant cutting forces act along the tool and spindle axis, thereby reducing vibration. Based on previous experimental findings, the lead angle (λs) was set to 60°, which was identified as the optimal value for balancing cutting forces and chip flow.
The optimised design also enabled a six-insert configuration, effectively doubling the cutting performance compared with the previous version. This arrangement increases tool efficiency in both turning and milling, allowing higher feed rates and more uniform load distribution along the tool body. All calculations and simulations, as well as topological optimisation, were performed in Siemens NX software (version 1953).
Subsequently, it was necessary to define the boundary conditions, and the following calculation objective was established: achieving the best possible stiffness-to-weight ratio. In the next step, the constraints and preserved areas of the model were specified. The selected constraint was that the target weight must not fall below 500 g, as a lower mass would not provide any meaningful benefit for the machining tool and would significantly reduce its resulting stiffness.
All functional and channel-related surfaces were designated as preserved areas. These included the clamping surfaces, the contact surfaces for the indexable insert (VBD), the clamping screw seat, and the entire cooling channel system. Each of these surfaces was assigned a minimum wall thickness requirement, typically ranging from 2 to 4 mm.
For the calculation, the tool was assumed to be perfectly rigidly clamped in the holder, meaning that the clamping surfaces were defined as a fully rigid connection. This approach was chosen primarily to simplify the simulation’s complexity.
For the optimisation study, the tool–holder interface and coolant channels were treated as preserved regions, while other parts of the body were free for material redistribution—the objective function aimed to achieve the best stiffness-to-weight ratio, thereby ensuring both rigidity and lightweight construction. Boundary conditions were defined assuming a rigid tool–holder connection and realistic cutting loads derived from previous measurements during linear-edge machining of HVOF coatings.
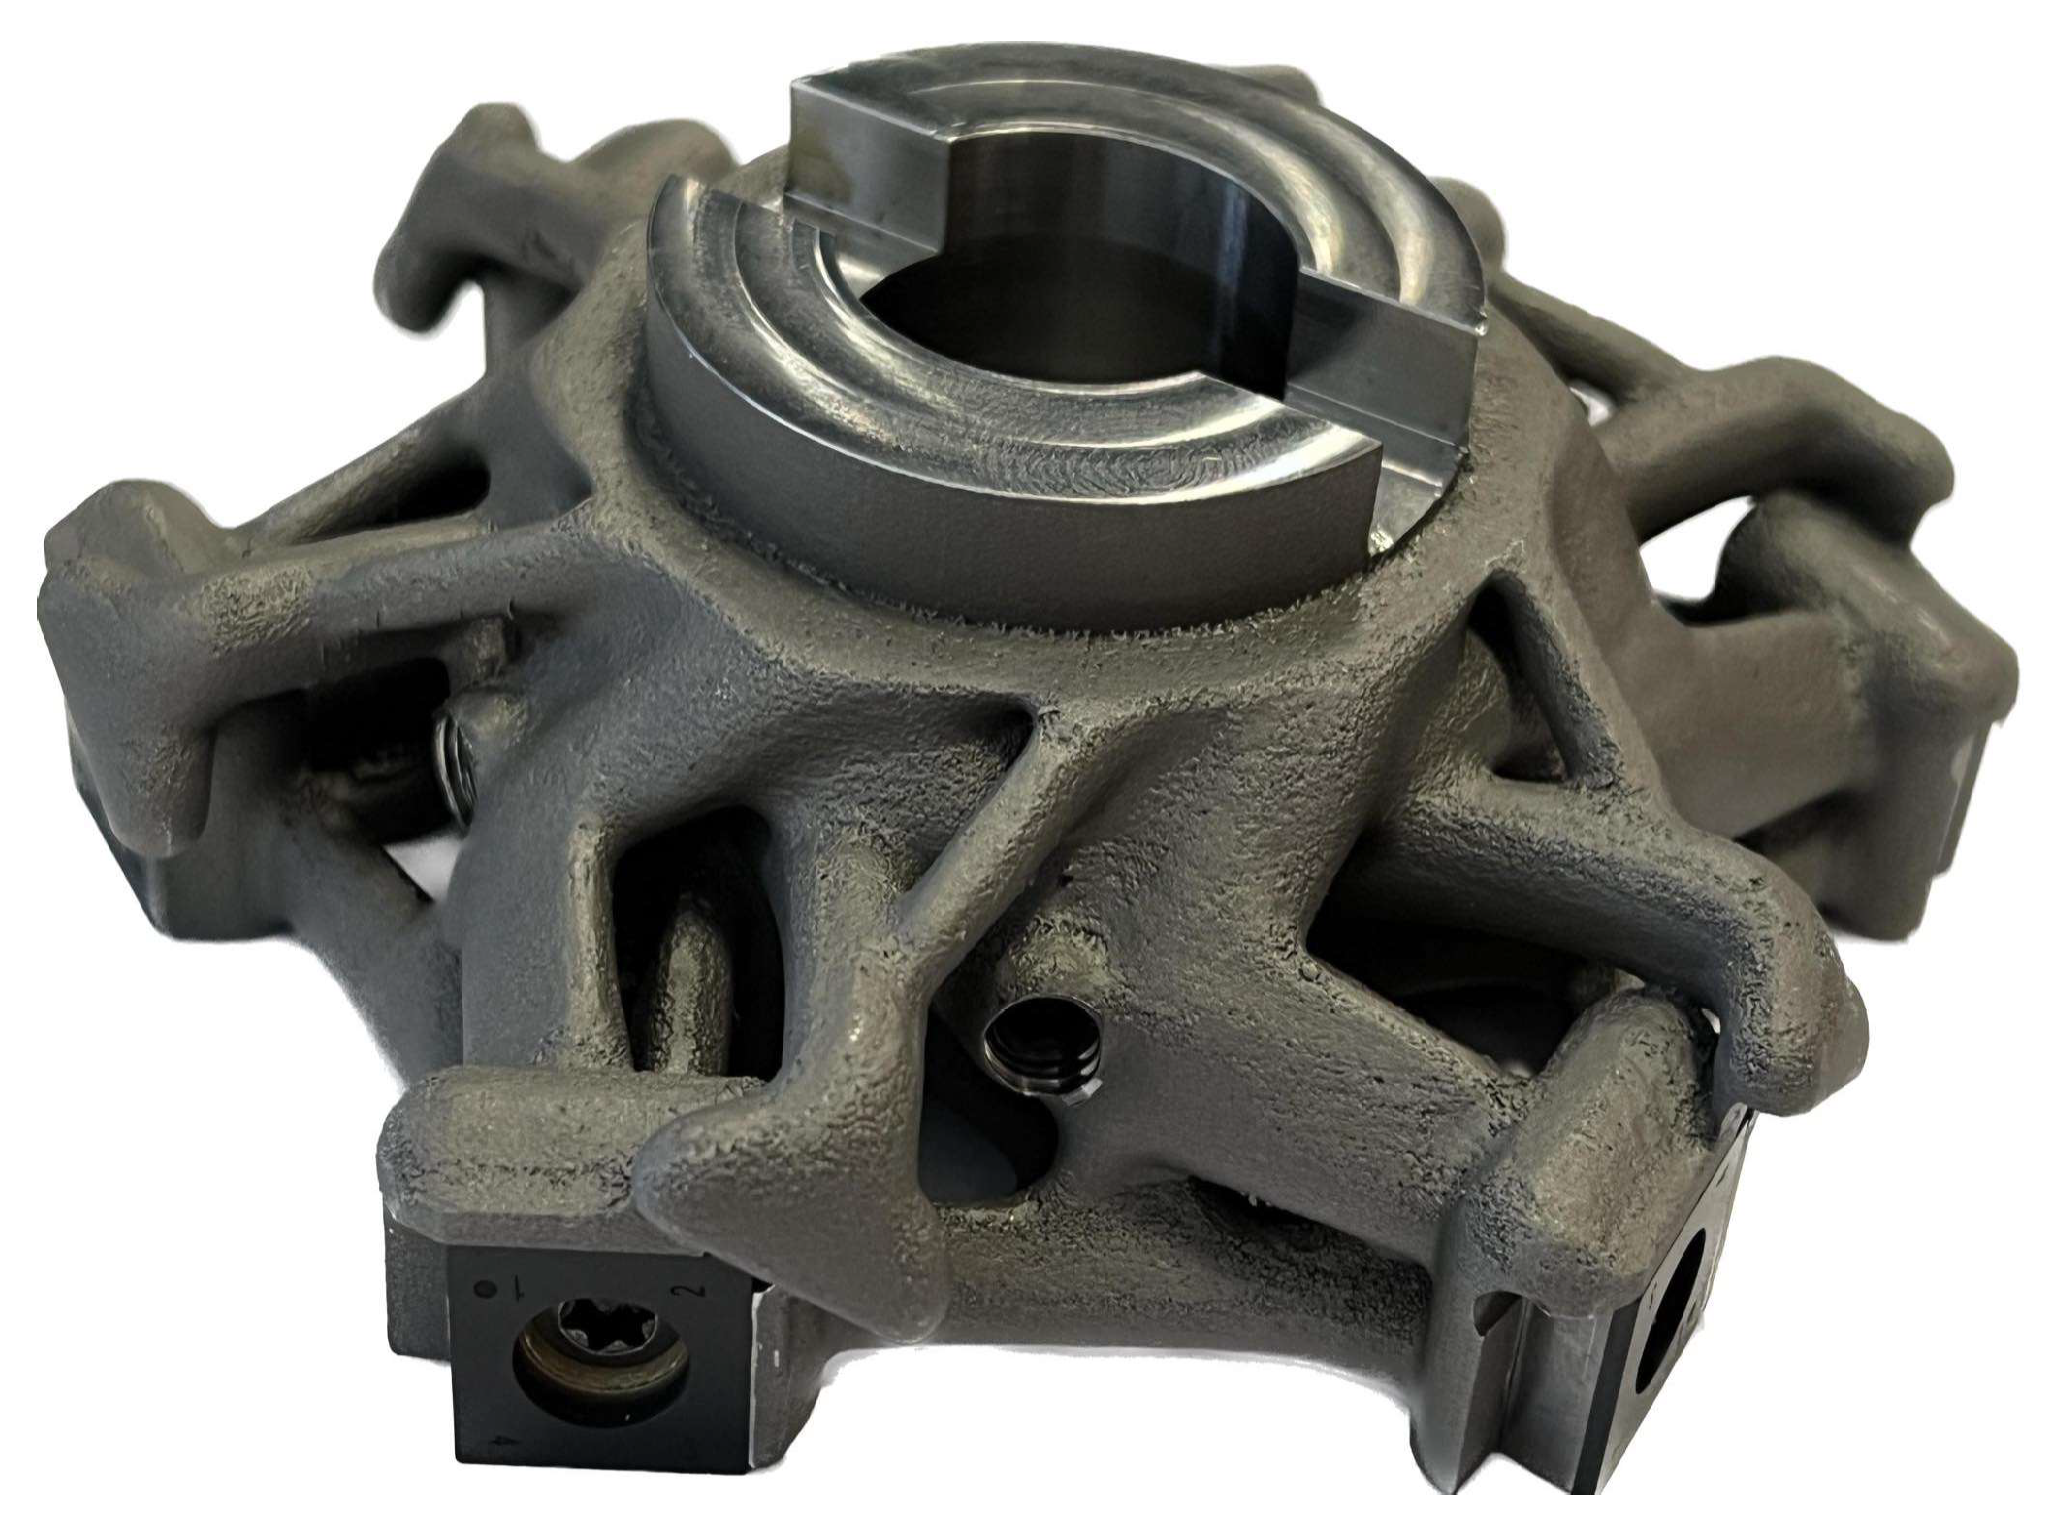
A load magnitude of 2000 N was applied to the insert seats in the simulation—five times higher than the measured forces—to include a sufficient safety margin. The final topology-optimised geometry showed a more balanced load distribution and improved stiffness, which were later validated through experimental testing (
Figure 2).
2.2. Tool Material
The tool body was manufactured by metal additive manufacturing (EOS M290) using EOS MaragingSteel MS1, equivalent to DIN 1.2709/X3NiCoMoTi 18-9-5 (
Table 1). The additive process enabled the integration of internal cooling channels with optimised geometry for efficient coolant delivery along the full cutting edge. The cooling system supports both standard and high-pressure modes, with adjustable flow direction depending on the machining operation (turning or milling). This configuration ensures effective heat removal from the cutting zone, contributing to improved tool life and process stability.
This maraging steel is characterised by high strength and toughness, combined with excellent dimensional stability after heat treatment. Due to its precipitation-hardening response, ageing at 490 °C for 6 h can achieve hardness levels above 50 HRC. As a result of the additive manufacturing process, the material exhibits a certain degree of anisotropy, which can be reduced or eliminated through appropriate heat treatment [
38].
Compared to conventional tool steel 1.2709, MS1 produced by additive manufacturing exhibits slightly different mechanical and thermal properties, which must be considered during FEM analyses and topology optimisation. For this reason, the material was implemented in the simulation software as a custom-defined material model with experimentally verified mechanical parameters.
After printing, each tool underwent a two-step heat treatment consisting of annealing followed by precipitation hardening (ageing) to obtain optimal mechanical properties. The key mechanical properties used for simulation and design purposes are summarised in
Table 2.
2.3. Experiment
The experimental procedure was divided into two phases. The first phase was a pre-experimental phase focused on identifying suitable cutting parameters, and the second phase was a final experimental phase aimed at quantitatively comparing the optimised and non-optimised tool designs. The experiments involved the turn milling of additively manufactured (DMLS) Inconel 718 and HVOF-sprayed Inconel 718 coatings. For both materials, cylindrical specimens with a diameter of 50 mm were prepared. Each specimen contained centring holes and a driving pin to allow mounting between lathe centres, ensuring precise alignment and repeatability. Two types of inserts were used. The first was a cemented carbide insert with a nose radius of rn = 45 μm (Iscar—SK 432-RM3, SCMW 120408) (Tefen, Israel). The second was a cubic boron nitride insert with a nose radius of rn = 15 μm (Bonar—CBN BBW85, SCMW F 120404) (Scotland, UK).
The pre-experimental phase was conducted using additively manufactured Inconel 718 samples. The choice of printed material allowed for repeated testing under controlled and consistent conditions, as thicker layers could be machined compared to thin sprayed coatings. The non-optimised tool, initially equipped with cemented carbide inserts, was used to identify baseline parameters. Afterwards, the tool was fitted with CBN inserts designed explicitly for hard-to-machine coatings and superalloys.
The primary variable parameters included cutting speed (vc), feed rate (f), spindle speed (nrev), and tool eccentricity (e). The depth of cut (ap) was fixed at 0.1 mm to ensure consistency and to simulate realistic finishing conditions for HVOF coatings. Shallower depths were avoided to prevent incomplete machining due to variations in local coating thickness. Tool eccentricity was varied between −40 mm and +40 mm to evaluate the tool’s ability to engage the linear edge under different entry conditions. The best surface quality was obtained at an eccentricity of 20 mm, corresponding to an effective lead angle (λs) between 50° and 70°. This finding is consistent with prior research on turning with linear edges, which identified similar lead-angle ranges as optimal for minimising surface roughness and tool wear.
A total of 28 pre-experimental trials were performed. Each surface was visually inspected, and only those with continuous cylindrical profiles and no insert chipping were further evaluated. The resulting data were used to define the variable parameters and constant parameters listed in
Table 3 for the final experiment.
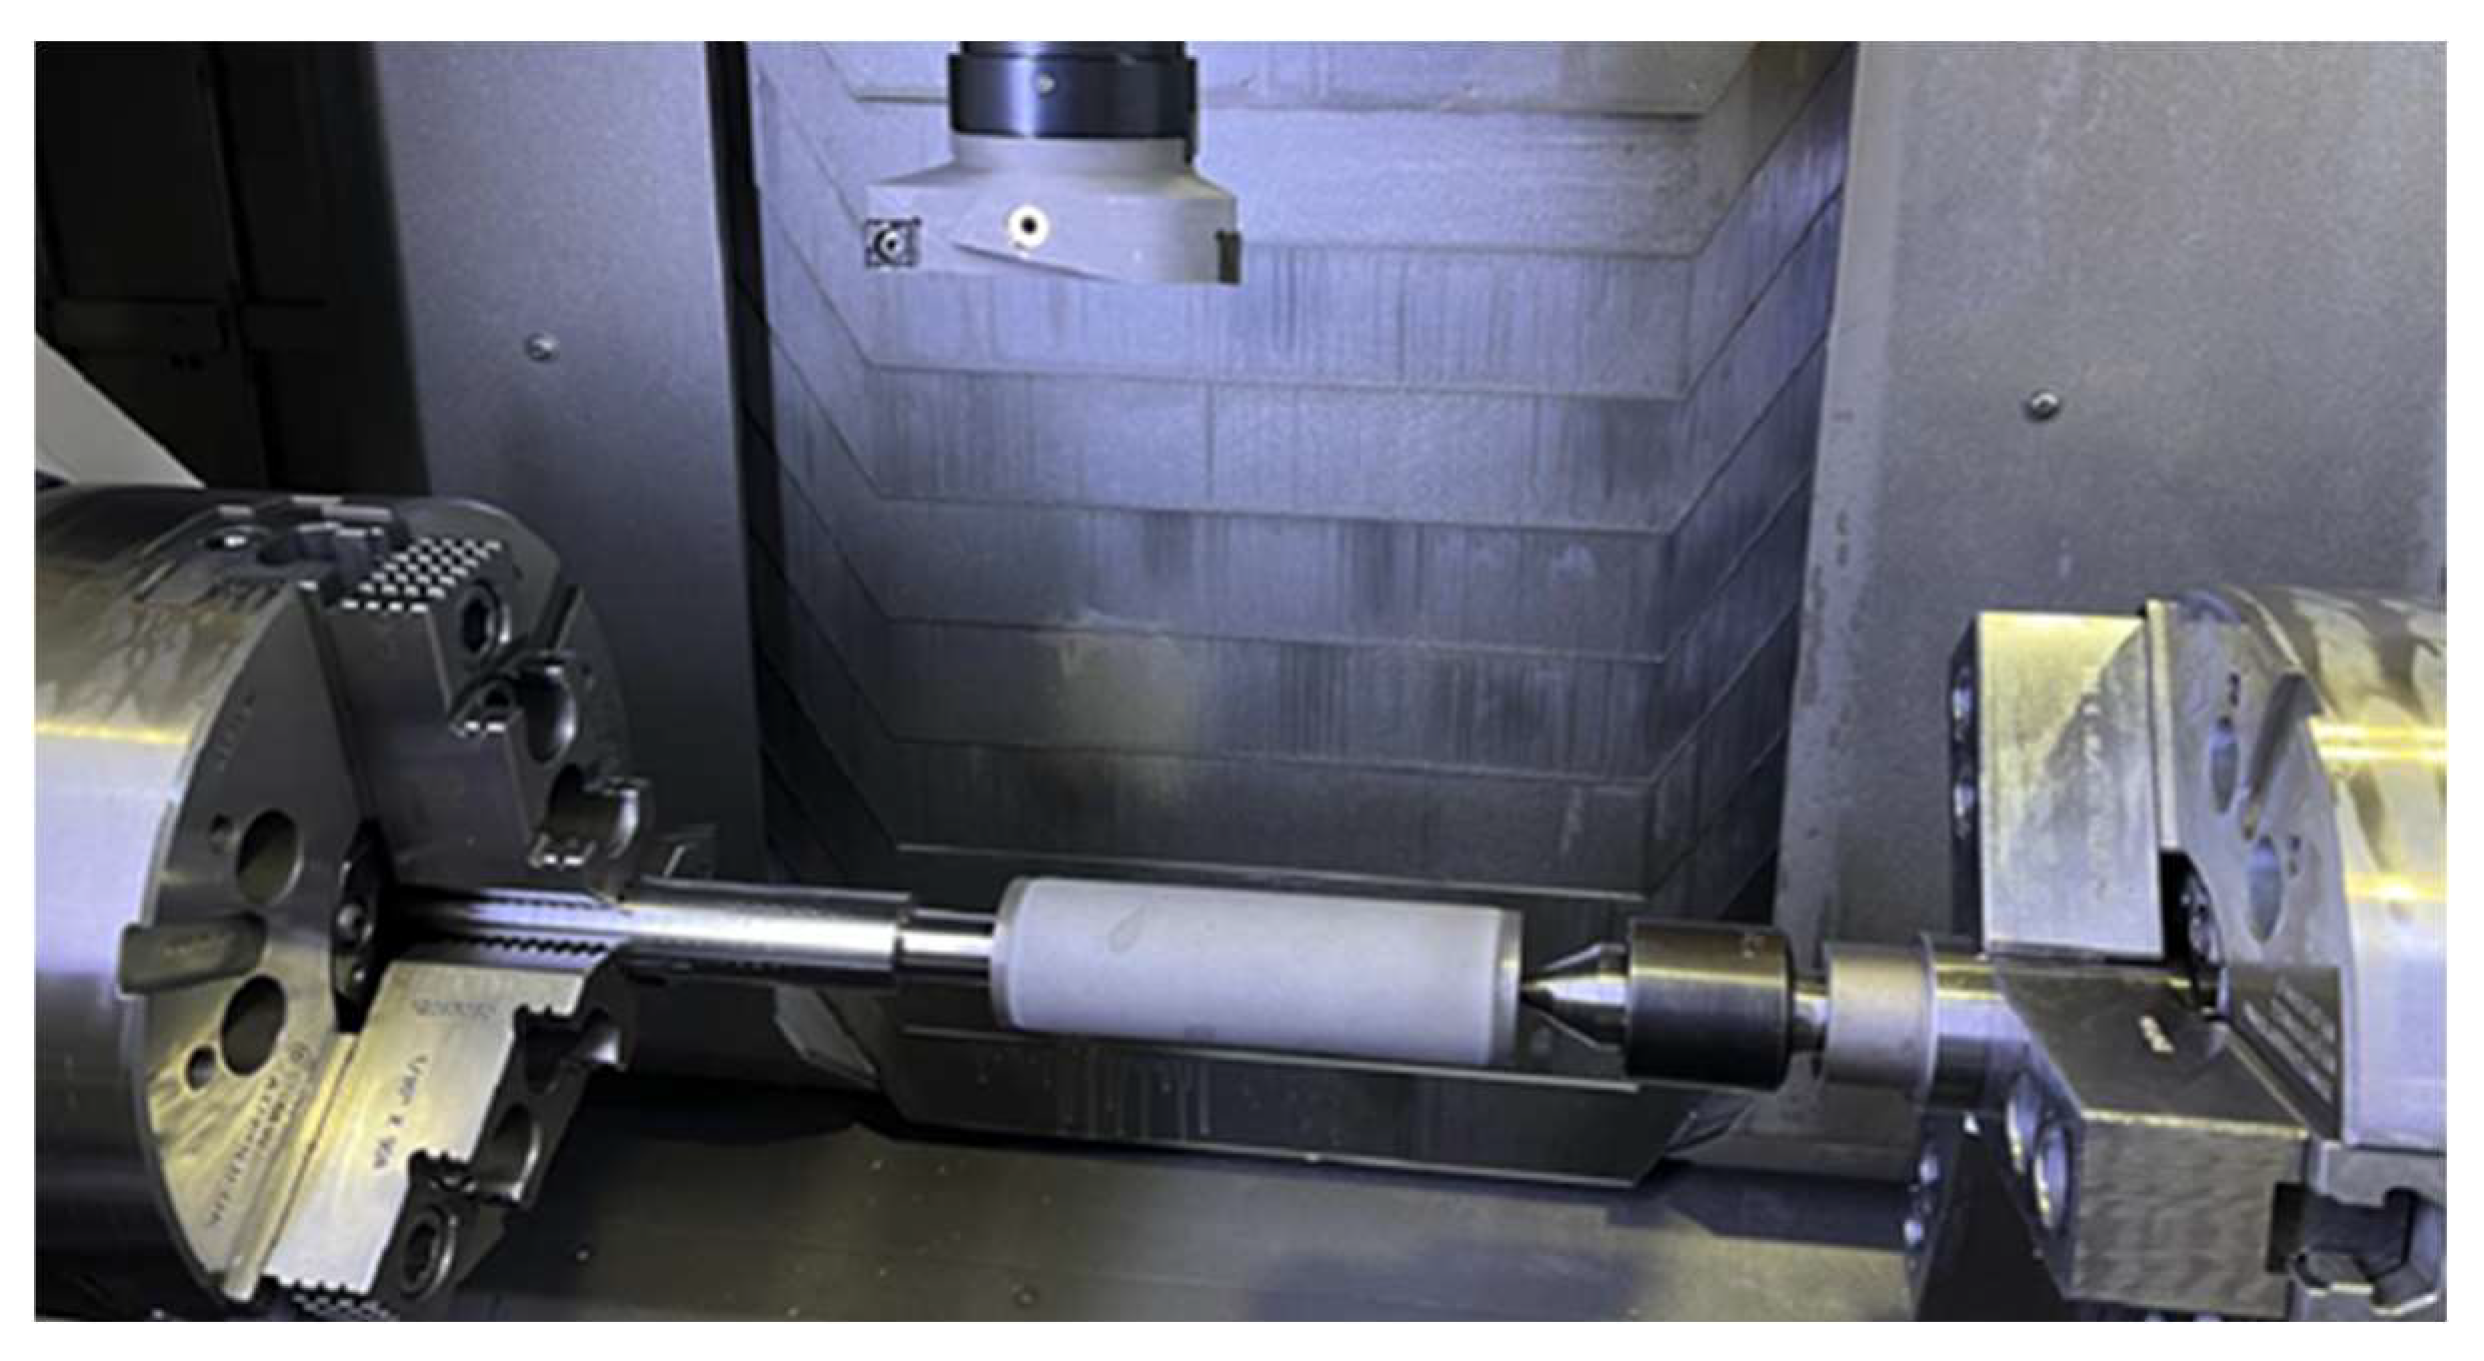
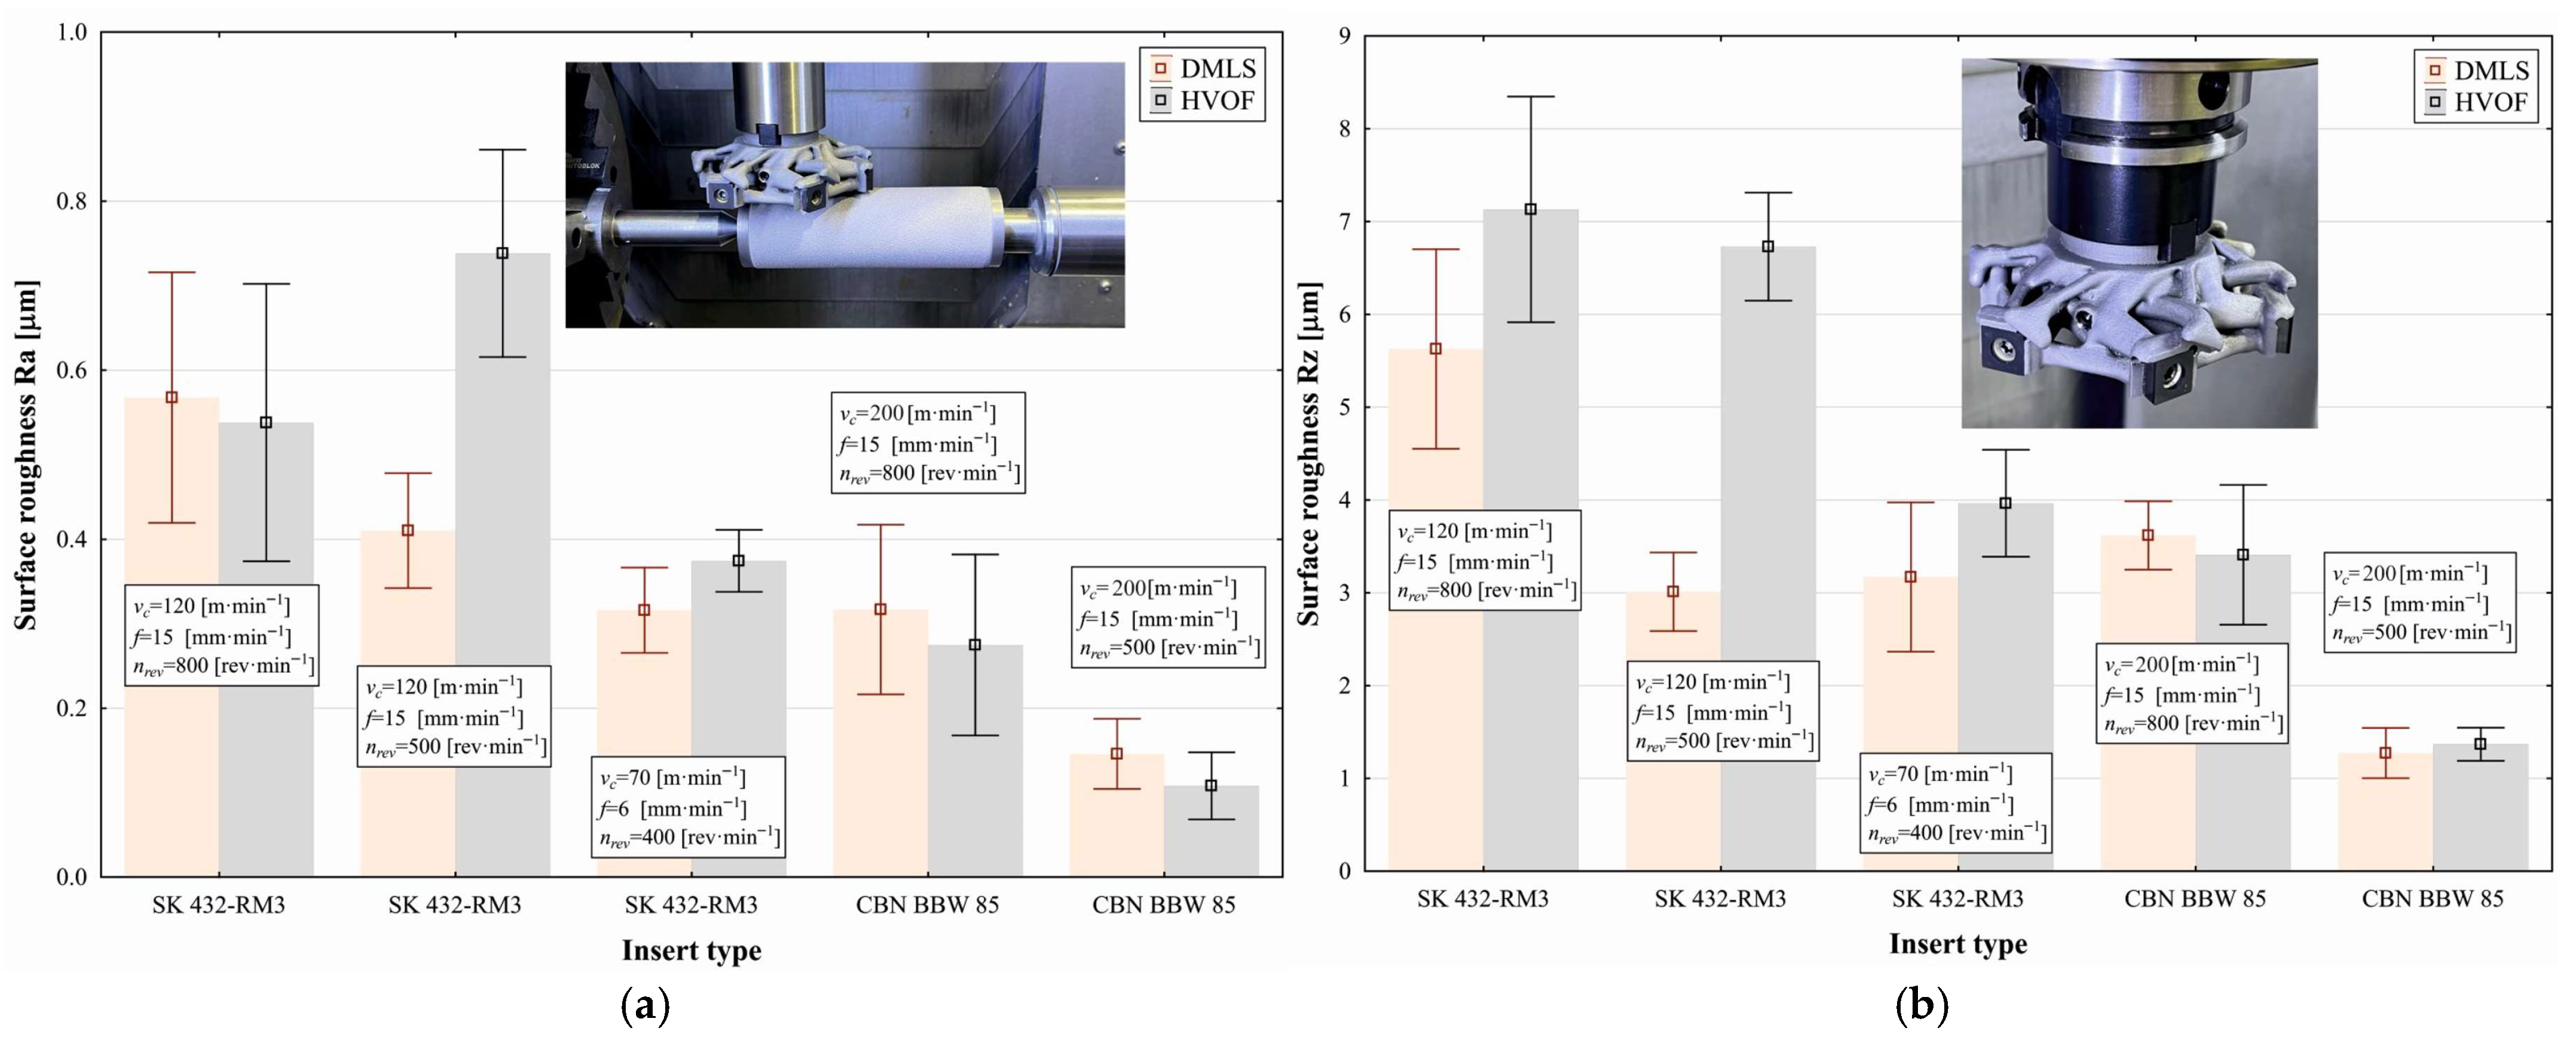
After the pre-experimental phase, the optimised cutting conditions were applied to allow a direct comparison between the optimised and non-optimised tool. The main criteria for evaluation were the surface roughness parameters Ra and Rz. Both DMLS Inconel 718 and HVOF-sprayed Inconel 718 were machined under identical settings, with the only difference being the tool design. The experimental setup is shown in
Figure 3. Both CBN and cemented carbide inserts were used as in the previous phase. A total of 12 specimens per material were processed. Mounting, alignment, and centring followed the same procedure as before to keep repeatability.
3. Results
3.1. Comparison of Tools
To verify the structural integrity and performance of the designed tools, a finite element method (FEM) analysis was conducted to determine the maximum stress and deformation. The study was performed for both the non-optimised and topology-optimised tool versions, and the results were compared. The primary objective was to assess the stress distribution within the tool and confirm that the optimised design achieves a more uniform stress distribution, without localised concentrations, thereby ensuring sufficient stiffness and strength under cutting loads.
All calculations and simulations were carried out in Siemens NX, following the same procedure as used for the topology optimisation. The tool was loaded with a resultant force of 2000 N applied to each insert seat. This value is approximately five times higher than the cutting forces measured in previous experiments with linear cutting-edge machining, where the average resultant cutting forces ranged between 300 and 400 N. The relatively low cutting forces observed in experiments are primarily due to the nature of linear-edge machining, which removes only a skinny layer of material. Applying a load five times higher than the actual forces ensured a sufficient safety margin in the simulation.
For simplicity and computational efficiency, the tool–holder interface was defined as a perfectly rigid connection. Two main outputs were evaluated from the simulation: the stress distribution and the deformation of the tool body.
3.1.1. Stress Analysis
For the non-optimised tool, the maximum equivalent (von Mises) stress reached approximately 70 MPa, concentrated mainly in the region around the insert seats. The rest of the tool body exhibited minimal stress levels. In contrast, the topology-optimised tool achieved a maximum stress value of only around 30 MPa, i.e., roughly half that of the non-optimised version. This reduction primarily results from the improved orientation of the inserts relative to the tool axis, which directs the resultant cutting forces and associated pressure more effectively toward the tool’s central axis. Another contributing factor is the set of boundary conditions applied during topology optimisation: the clamping surfaces—representing the tool–holder interface—were preserved. At the same time, the rest of the structure was allowed to evolve freely. The optimisation also considered self-supporting geometries suitable for additive manufacturing. As a result, the optimised design transmits the cutting and feed forces directly along the tool axis and into the spindle, thereby minimising the influence of passive and tangential force components. The FEM analysis confirmed this behaviour: the stress in the optimised tool was evenly distributed throughout the tool body, with the lowest stress values occurring in the clamping region and around the insert seats—precisely the opposite pattern observed in the non-optimised tool. To visualise this comparison,
Figure 4 presents both results with the same stress range scale (0–30 MPa) applied to the left-hand image (non-optimised tool,
Figure 4a) to match the maximum stress observed in the optimised tool (
Figure 4b). The comparison clearly highlights the stress concentration around the insert pocket in the original design. In contrast, in the optimised version, the load path is effectively aligned with the tool’s axis, confirming improved stiffness and mechanical efficiency.
3.1.2. Deformation
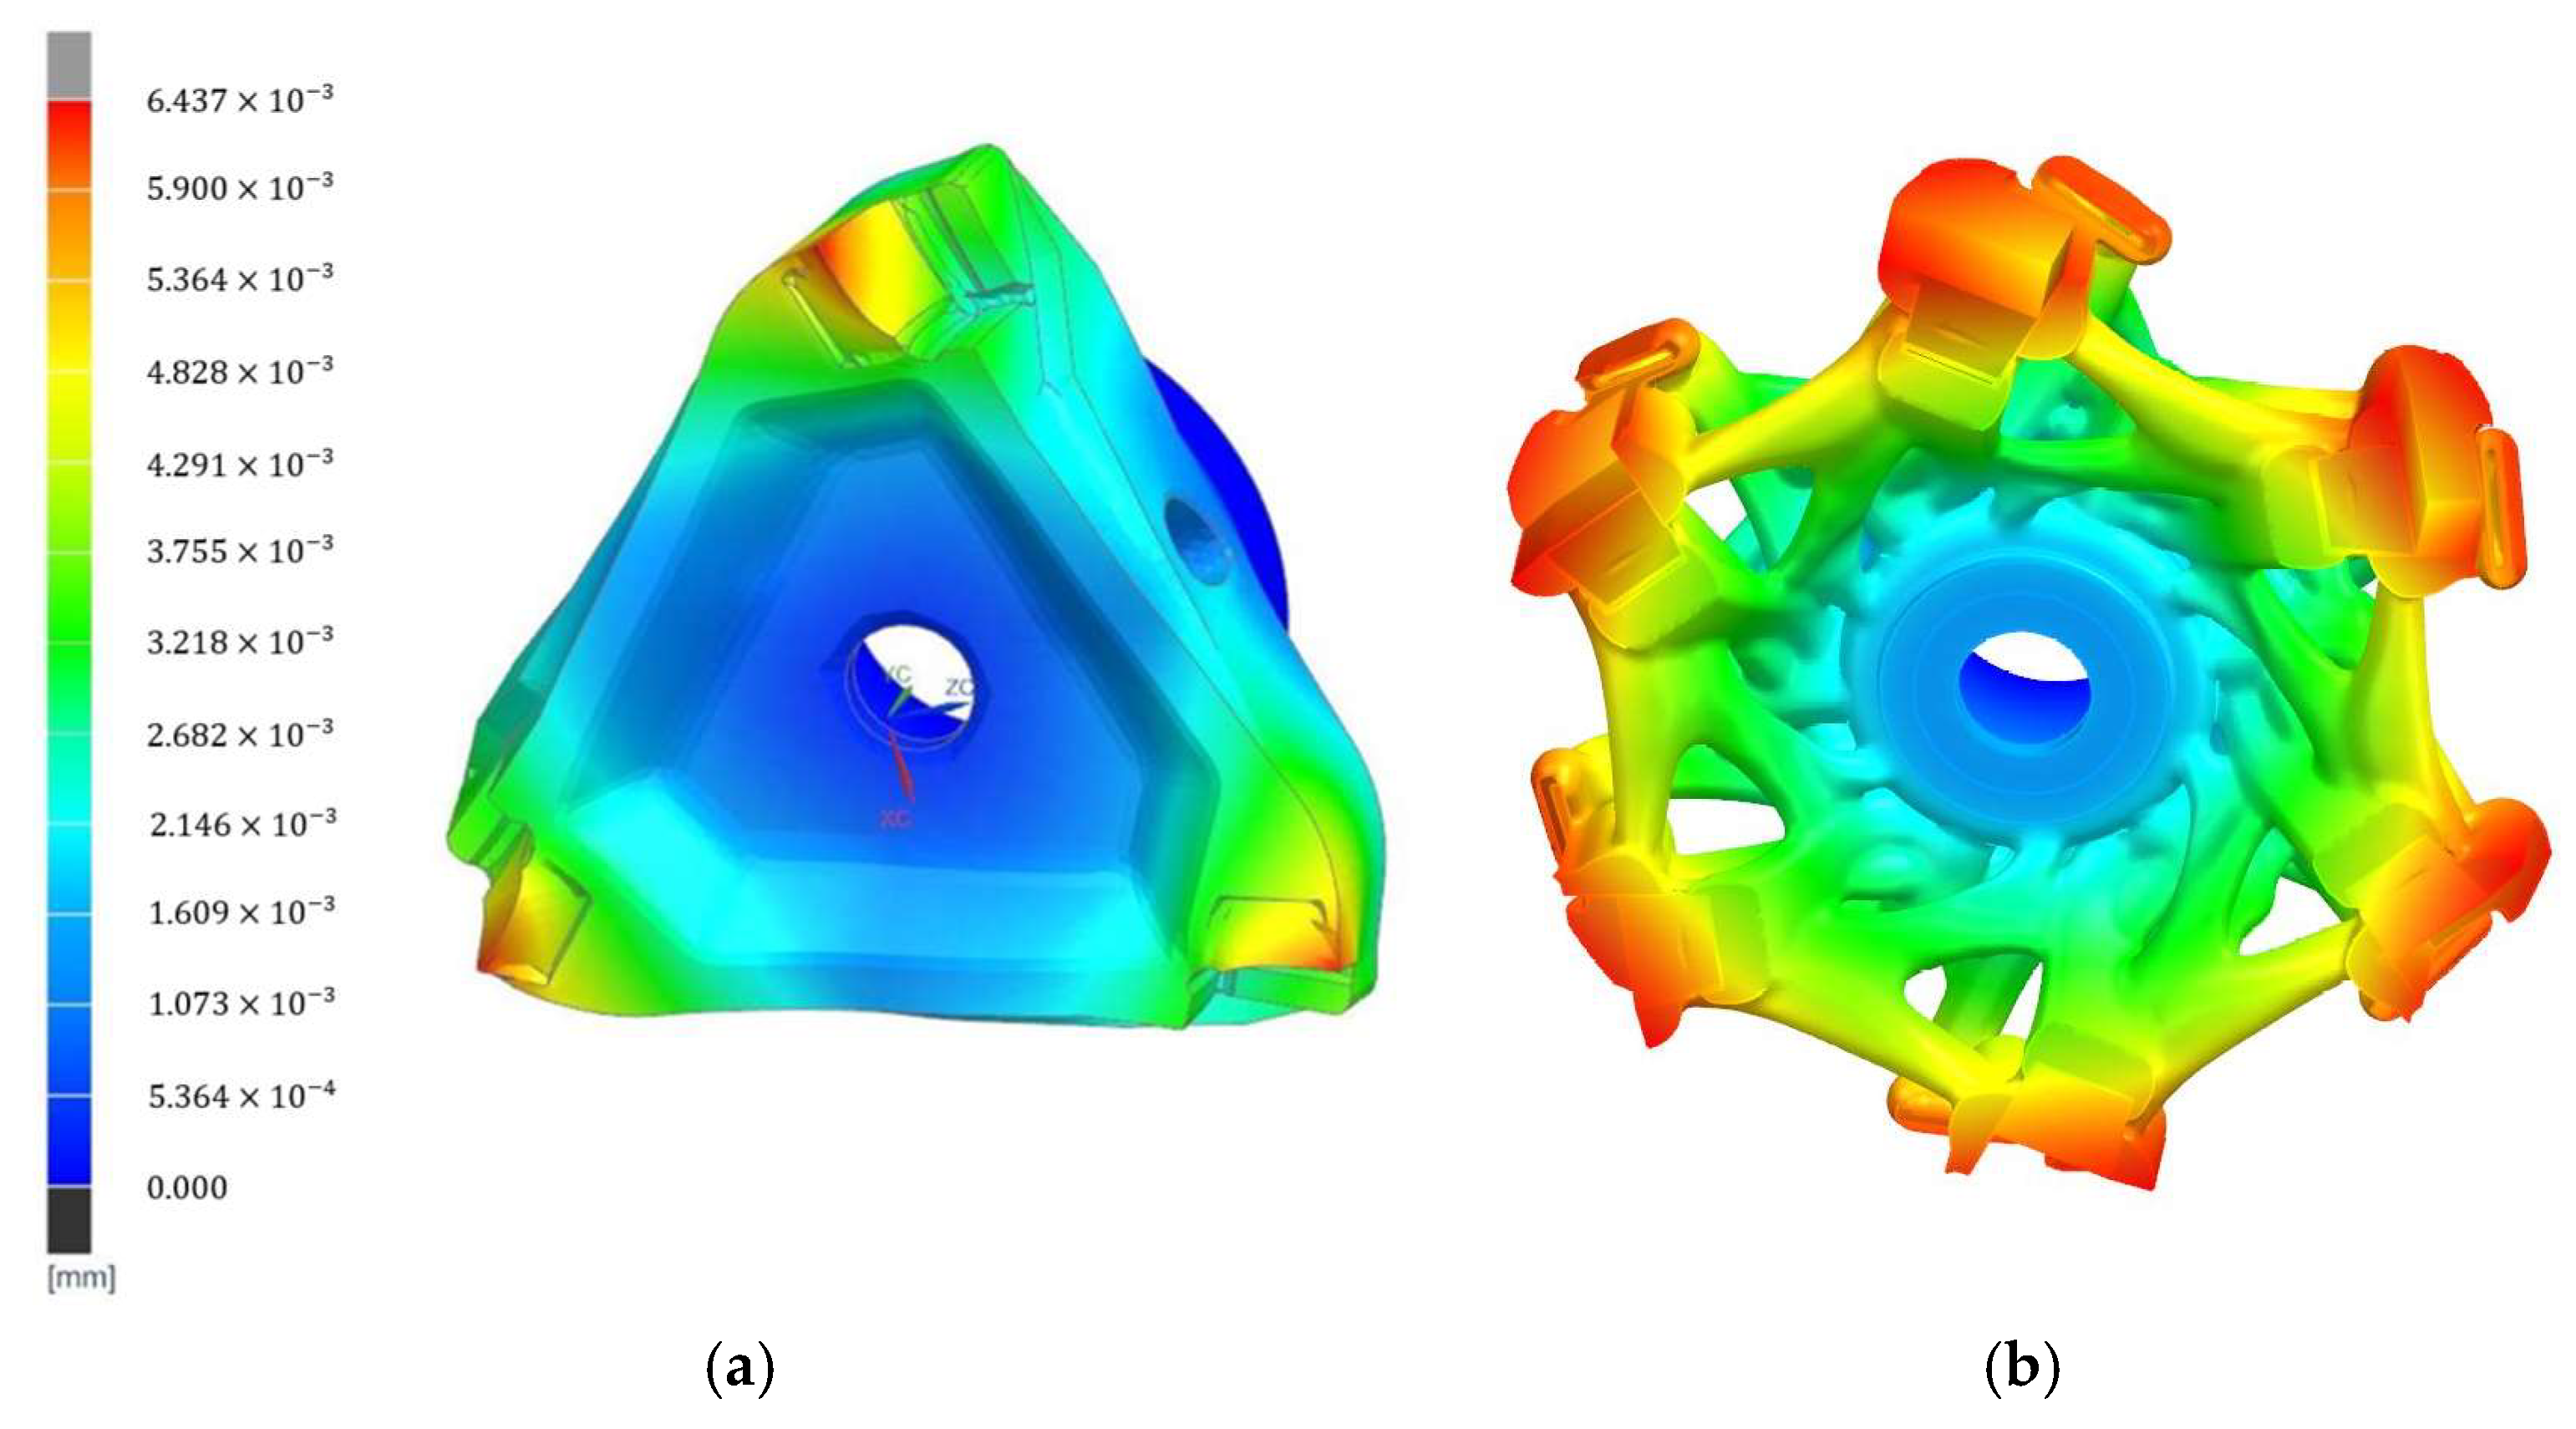
In terms of deformation, no significant differences were observed between the two tool versions in the absolute magnitude of displacement, which remained below 0.006 mm. However, the deformation pattern differs substantially. For the non-optimised tool (
Figure 5a), the highest deformation occurred at the outermost insert seat, indicating that the insert pocket at the tool periphery is the most affected by bending. Such deformation can lead to insert misalignment or clamping stress during machining, increasing the risk of local overloading and potential insert fracture. In contrast, for the topology-optimised tool (
Figure 5b), the deformation is distributed much more uniformly along the tool body, gradually decreasing toward the central region. This behaviour confirms that the optimised structure provides higher stiffness and a more balanced load transfer. As a result, the cutting inserts are not exposed to excessive tensile or compressive stresses that could cause cracking solely due to structural deflection. The improved deformation uniformity thus contributes directly to enhanced tool stability, dimensional accuracy, and longer insert life during machining operations.
3.2. Surface Roughness Evaluation
A total of 24 cutting tests were performed, from which 11 representative samples were selected for detailed laboratory analysis of surface roughness. The selection ensured that both production technologies were represented—HVOF (thermal spraying) and DMLS (additive manufacturing). Samples were chosen based on the best preliminary surface roughness values obtained using a handheld shop-floor roughness tester. All selected samples were machined under identical cutting conditions, using the same insert type, which differed only in the workpiece material. Tool wear was not considered in the final evaluation, as the focus was on comparing surface quality between the two materials. A new cutting edge was used for each pass to eliminate the influence of wear.
Although tool wear is typically an essential indicator when evaluating the machinability of nickel-based superalloys such as Inconel 718, the present study could not include a conventional tool-wear analysis for a fundamental methodological reason. For every individual cutting pass, a new cutting edge was used, regardless of whether carbide or CBN inserts were applied. This approach was necessary to ensure that surface roughness results could be directly compared across materials and tool variants without the influence of progressive wear. As a result, the inserts were exposed only to very short cutting engagement times and extremely small depths of cut (ap = 0.10 mm), which are characteristic of linear-edge machining and generate significantly lower cutting forces than conventional turning. Under these conditions, the level of wear remained below the threshold of measurable or classifiable degradation, and no meaningful wear patterns (flank wear, crater wear, notch wear, or chipping) were observed during inspection with optical magnification. Therefore, a systematic wear evaluation, including SEM analysis, could not be reliably performed.
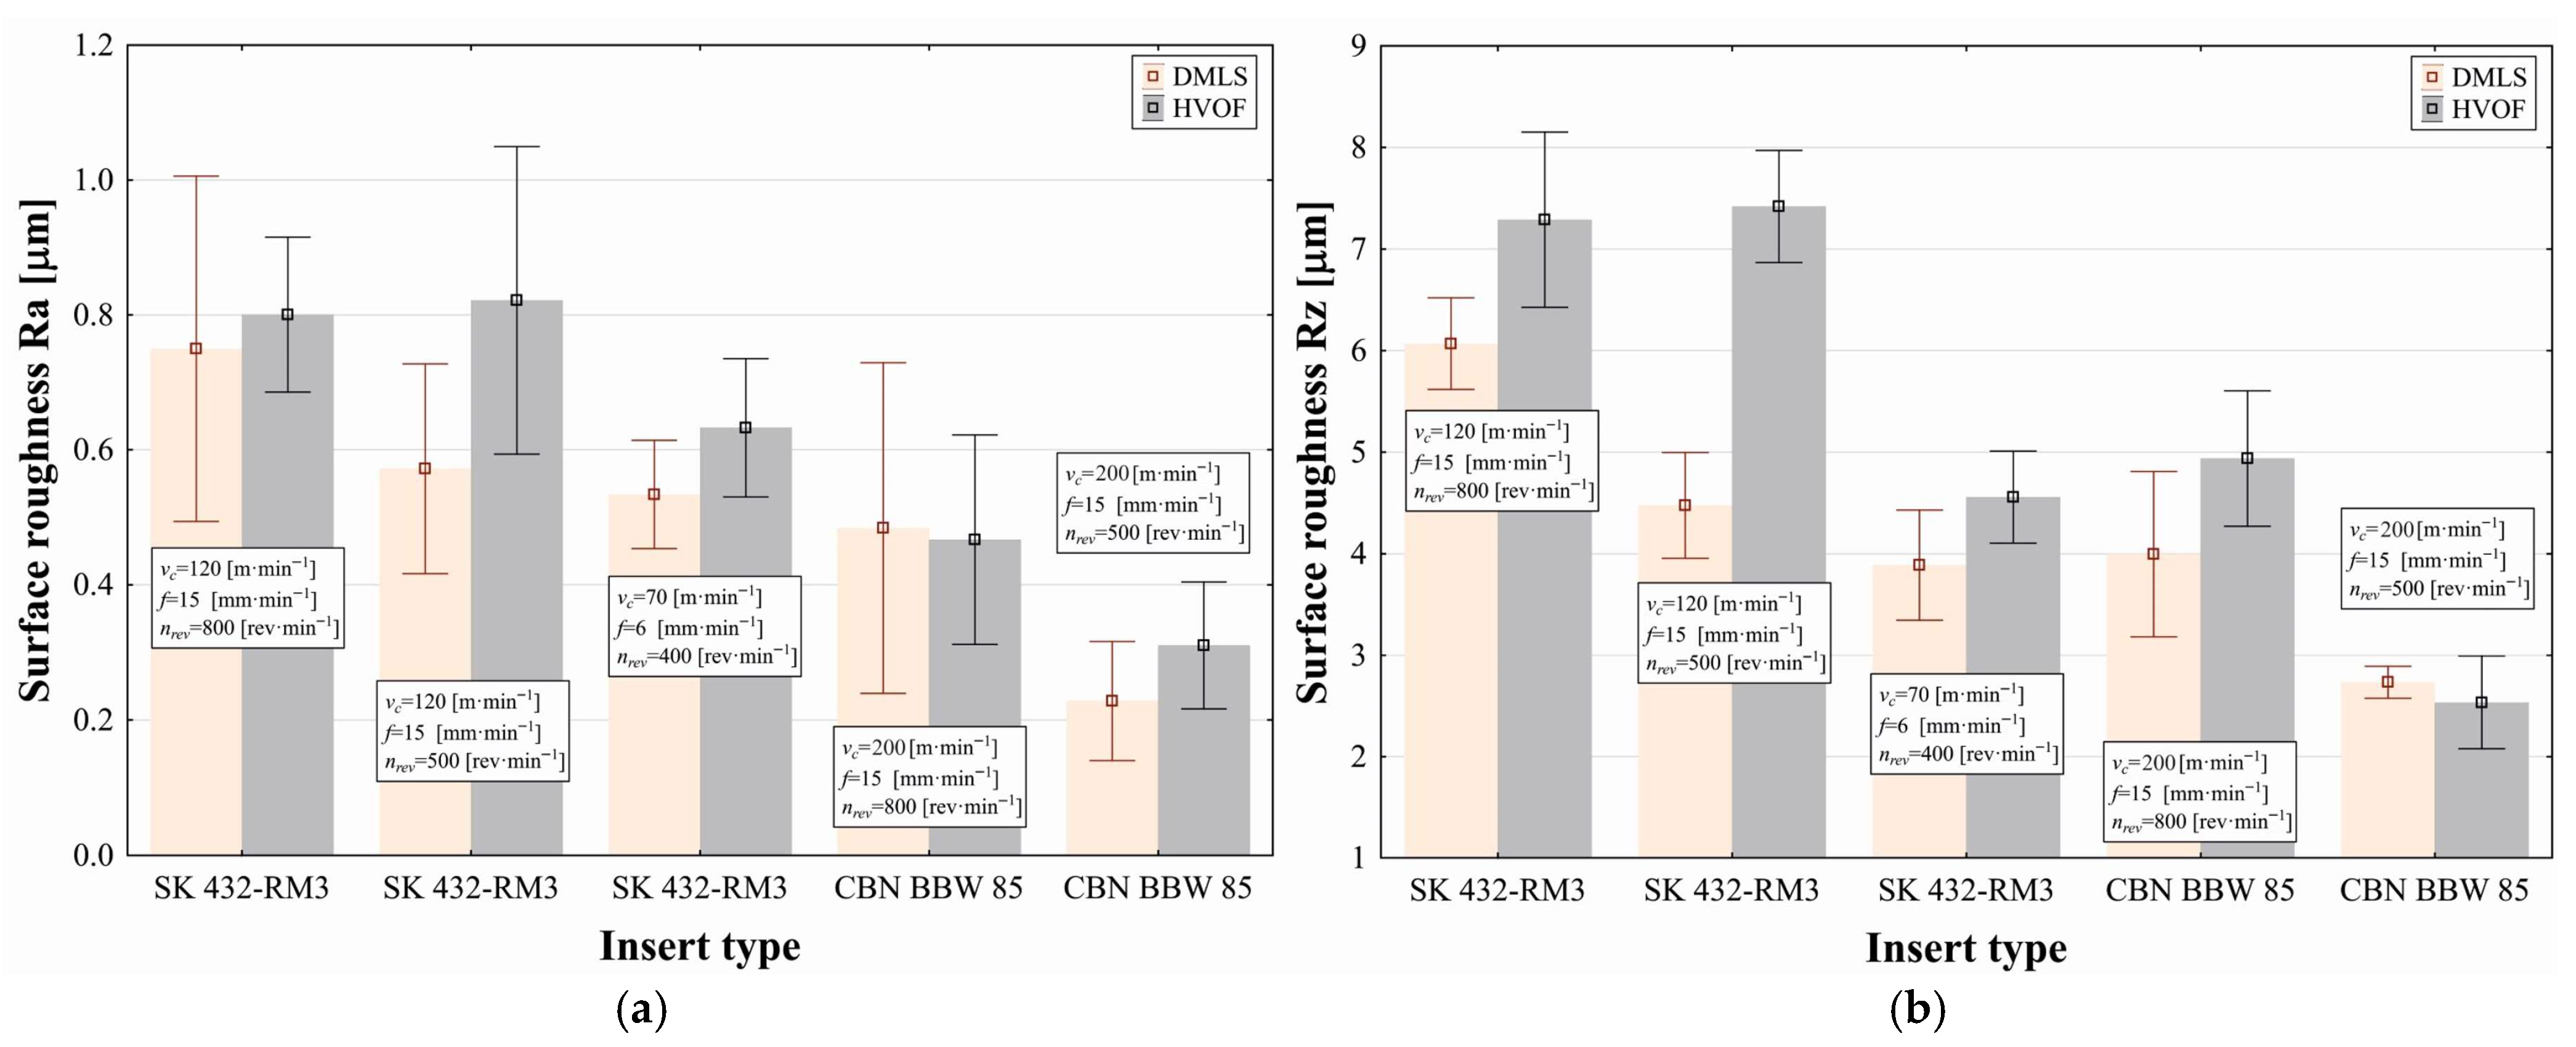
The primary evaluated parameter was surface roughness. Tables below summarise the measured values of Ra and Rz for both DMLS and HVOF Inconel 718 surfaces. For each pair of tests, identical cutting conditions and insert types were used, with the only difference being the material. From the graphical results, it is evident that lower surface roughness values were achieved when machining DMLS, compared to HVOF specimens. Furthermore, CBN inserts provided superior performance compared to carbide inserts (SK), delivering significantly lower Ra and Rz values even at higher cutting speeds under otherwise identical conditions (
Figure 6).
The results of the experiment conducted with the optimised tool version (
Figure 7) indicate that lower surface roughness values Ra compared to the non-optimised tool (
Figure 7a) were achieved during turn milling using CBN inserts (BBW 85), both at 800 rev·min
−1 and 500 rev·min
−1, when machining Inconel 718 produced by either the HVOF or DMLS method. At the higher spindle speed (800 rev·min
−1), the difference between the two materials was 0.042 ± 0.074 µm, which, according to Fisher’s LSD test, was not statistically significant (
p = 0.345) at the selected significance level α = 0.05. At the lower spindle speed (500 rev·min
−1), the difference in average surface roughness Ra between the DMLS and HVOF samples was 0.038 ± 0.029 µm (
p = 0.394). When machining Inconel 718 by turn milling with carbide inserts (SK 432-RM3) under cutting conditions vc = 120 m·min
−1, f = 15 mm·min
−1, n
rev = 500 rev·min
−1 and vc = 70 m·min
−1, f = 6 mm·min
−1, n
rev = 400 rev·min
−1, the surface roughness Ra was lower for the DMLS method compared to the HVOF method. A statistically significant difference (
p < 0.001), however, was observed only under the higher-speed cutting condition (vc = 120 m·min
−1, f = 15 mm·min
−1, n
rev = 500 rev·min
−1), where the difference in mean Ra values was 0.328 ± 0.068 µm.
When analysing the surface roughness Rz (
Figure 7b), significant differences in the mean Rz values were observed only when machining with the tool fitted with carbide inserts (SK 432-RM3). In all cases, higher Rz values were obtained for Inconel 718 produced by the HVOF method. The maximum difference in Rz (3.718 ± 0.360;
p < 0.001) occurred under cutting conditions vc = 120 m·min
−1, f = 15 mm·min
−1, n
rev = 500 rev·min
−1. When machining with the CBN BBW 85 inserts, no statistically significant differences in surface roughness Rz between DMLS and HVOF materials were observed at the α = 0.05 significance level. When comparing the surface roughness Ra between the non-optimised and optimised tools during the turn milling of Inconel 718 produced by DMLS (
Figure 8a) and HVOF (
Figure 8b), it is evident that the optimised tool consistently achieves lower Ra values for both materials compared to the non-optimised tool. For DMLS Inconel 718, the average Ra using the non-optimised tool was 0.514 ± 0.069 µm, while the optimised tool achieved 0.351 ± 0.047 µm. The lowest Ra value was recorded in the final test with CBN BBW 85 inserts at vc = 120 m·min
−1, f = 15 mm·min
−1, n
rev = 500 rev·min
−1, where Ra = 0.146 ± 0.030 µm. The mean difference in Ra between the non-optimised and optimised tools (0.162 ± 0.058 µm) was statistically significant (
p < 0.001) at the α = 0.05 level. A similar conclusion can be drawn for the machining of HVOF-coated Inconel 718 (
Figure 8b). Here, the mean Ra for the non-optimised tool was 0.606 ± 0.069 µm, while for the optimised tool, it was 0.407 ± 0.069 µm. The average difference in Ra between the non-optimised and optimised tools (0.200 ± 0.069 µm) was also statistically significant (
p < 0.001) at the α = 0.05 significance level.
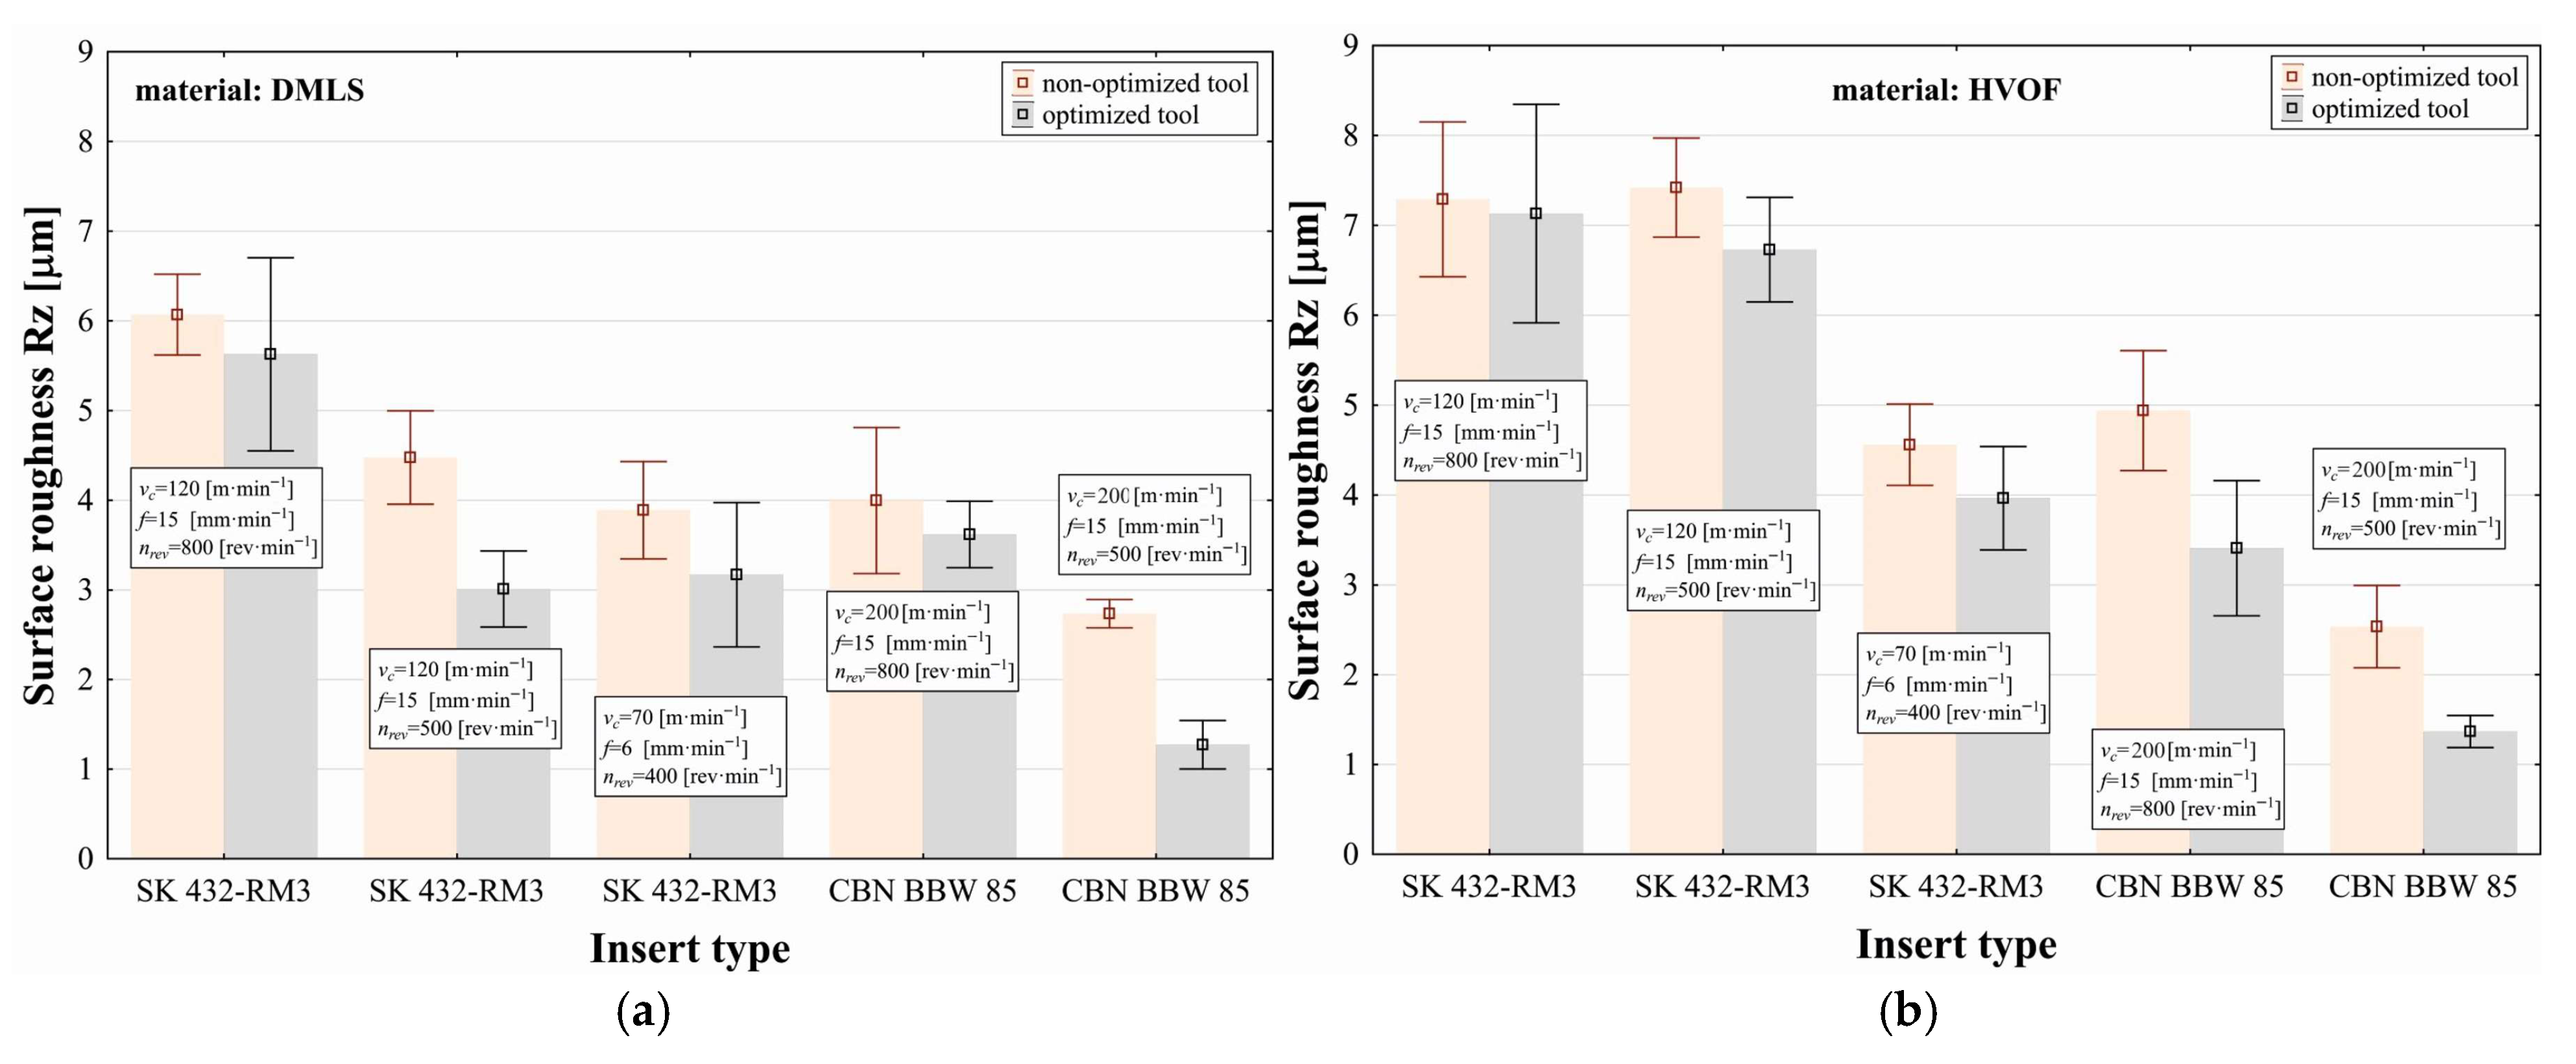
When analysing the surface roughness Rz during turn milling of Inconel 718 produced by the DMLS method (
Figure 9a) and the HVOF method (
Figure 9b), using both the non-optimised and optimised tools, the results lead to the same conclusion as in the case of the Ra surface roughness evaluation. For DMLS-produced Inconel 718 (
Figure 9a), lower Rz values were achieved when machining with the optimised tool compared to the non-optimised tool. The average Rz obtained with the optimised tool was 3.340 ± 0.439 µm, compared to 4.234 ± 0.343 µm for the non-optimised tool. The mean difference in Rz between the non-optimised and optimised tools (0.894 ± 0.391 µm) was statistically significant (
p < 0.001). For HVOF-sprayed Inconel 718 (
Figure 9b), the average surface roughness Rz for the non-optimised tool was 5.349 ± 0.552 µm, while the optimised tool achieved 4.521 ± 0.650 µm. Similarly, the difference in mean Rz values between the non-optimised and optimised tools (0.828 ± 0.601 µm) was also statistically significant (
p < 0.001).
These results confirm that the topology-optimised tool consistently produces superior surface finish across both manufacturing methods, highlighting the benefits of improved tool stiffness, balanced force distribution, and enhanced dynamic stability during the cutting process.
4. Discussion and Conclusions
This study aimed to develop and validate an effective alternative to conventional grinding for finishing Inconel 718 produced by DMLS and HVOF. The approach utilised a tool with a linear cutting edge, whose properties were further enhanced through topology optimisation.
The experimental results supported the central hypothesis. The topologically optimised tool produced statistically significant reductions in surface roughness (Ra and Rz) compared with the non-optimised baseline, consistently for both DMLS and HVOF specimens.
A comprehensive analysis of the experiments that accounted for cutting conditions (v
c, f, n
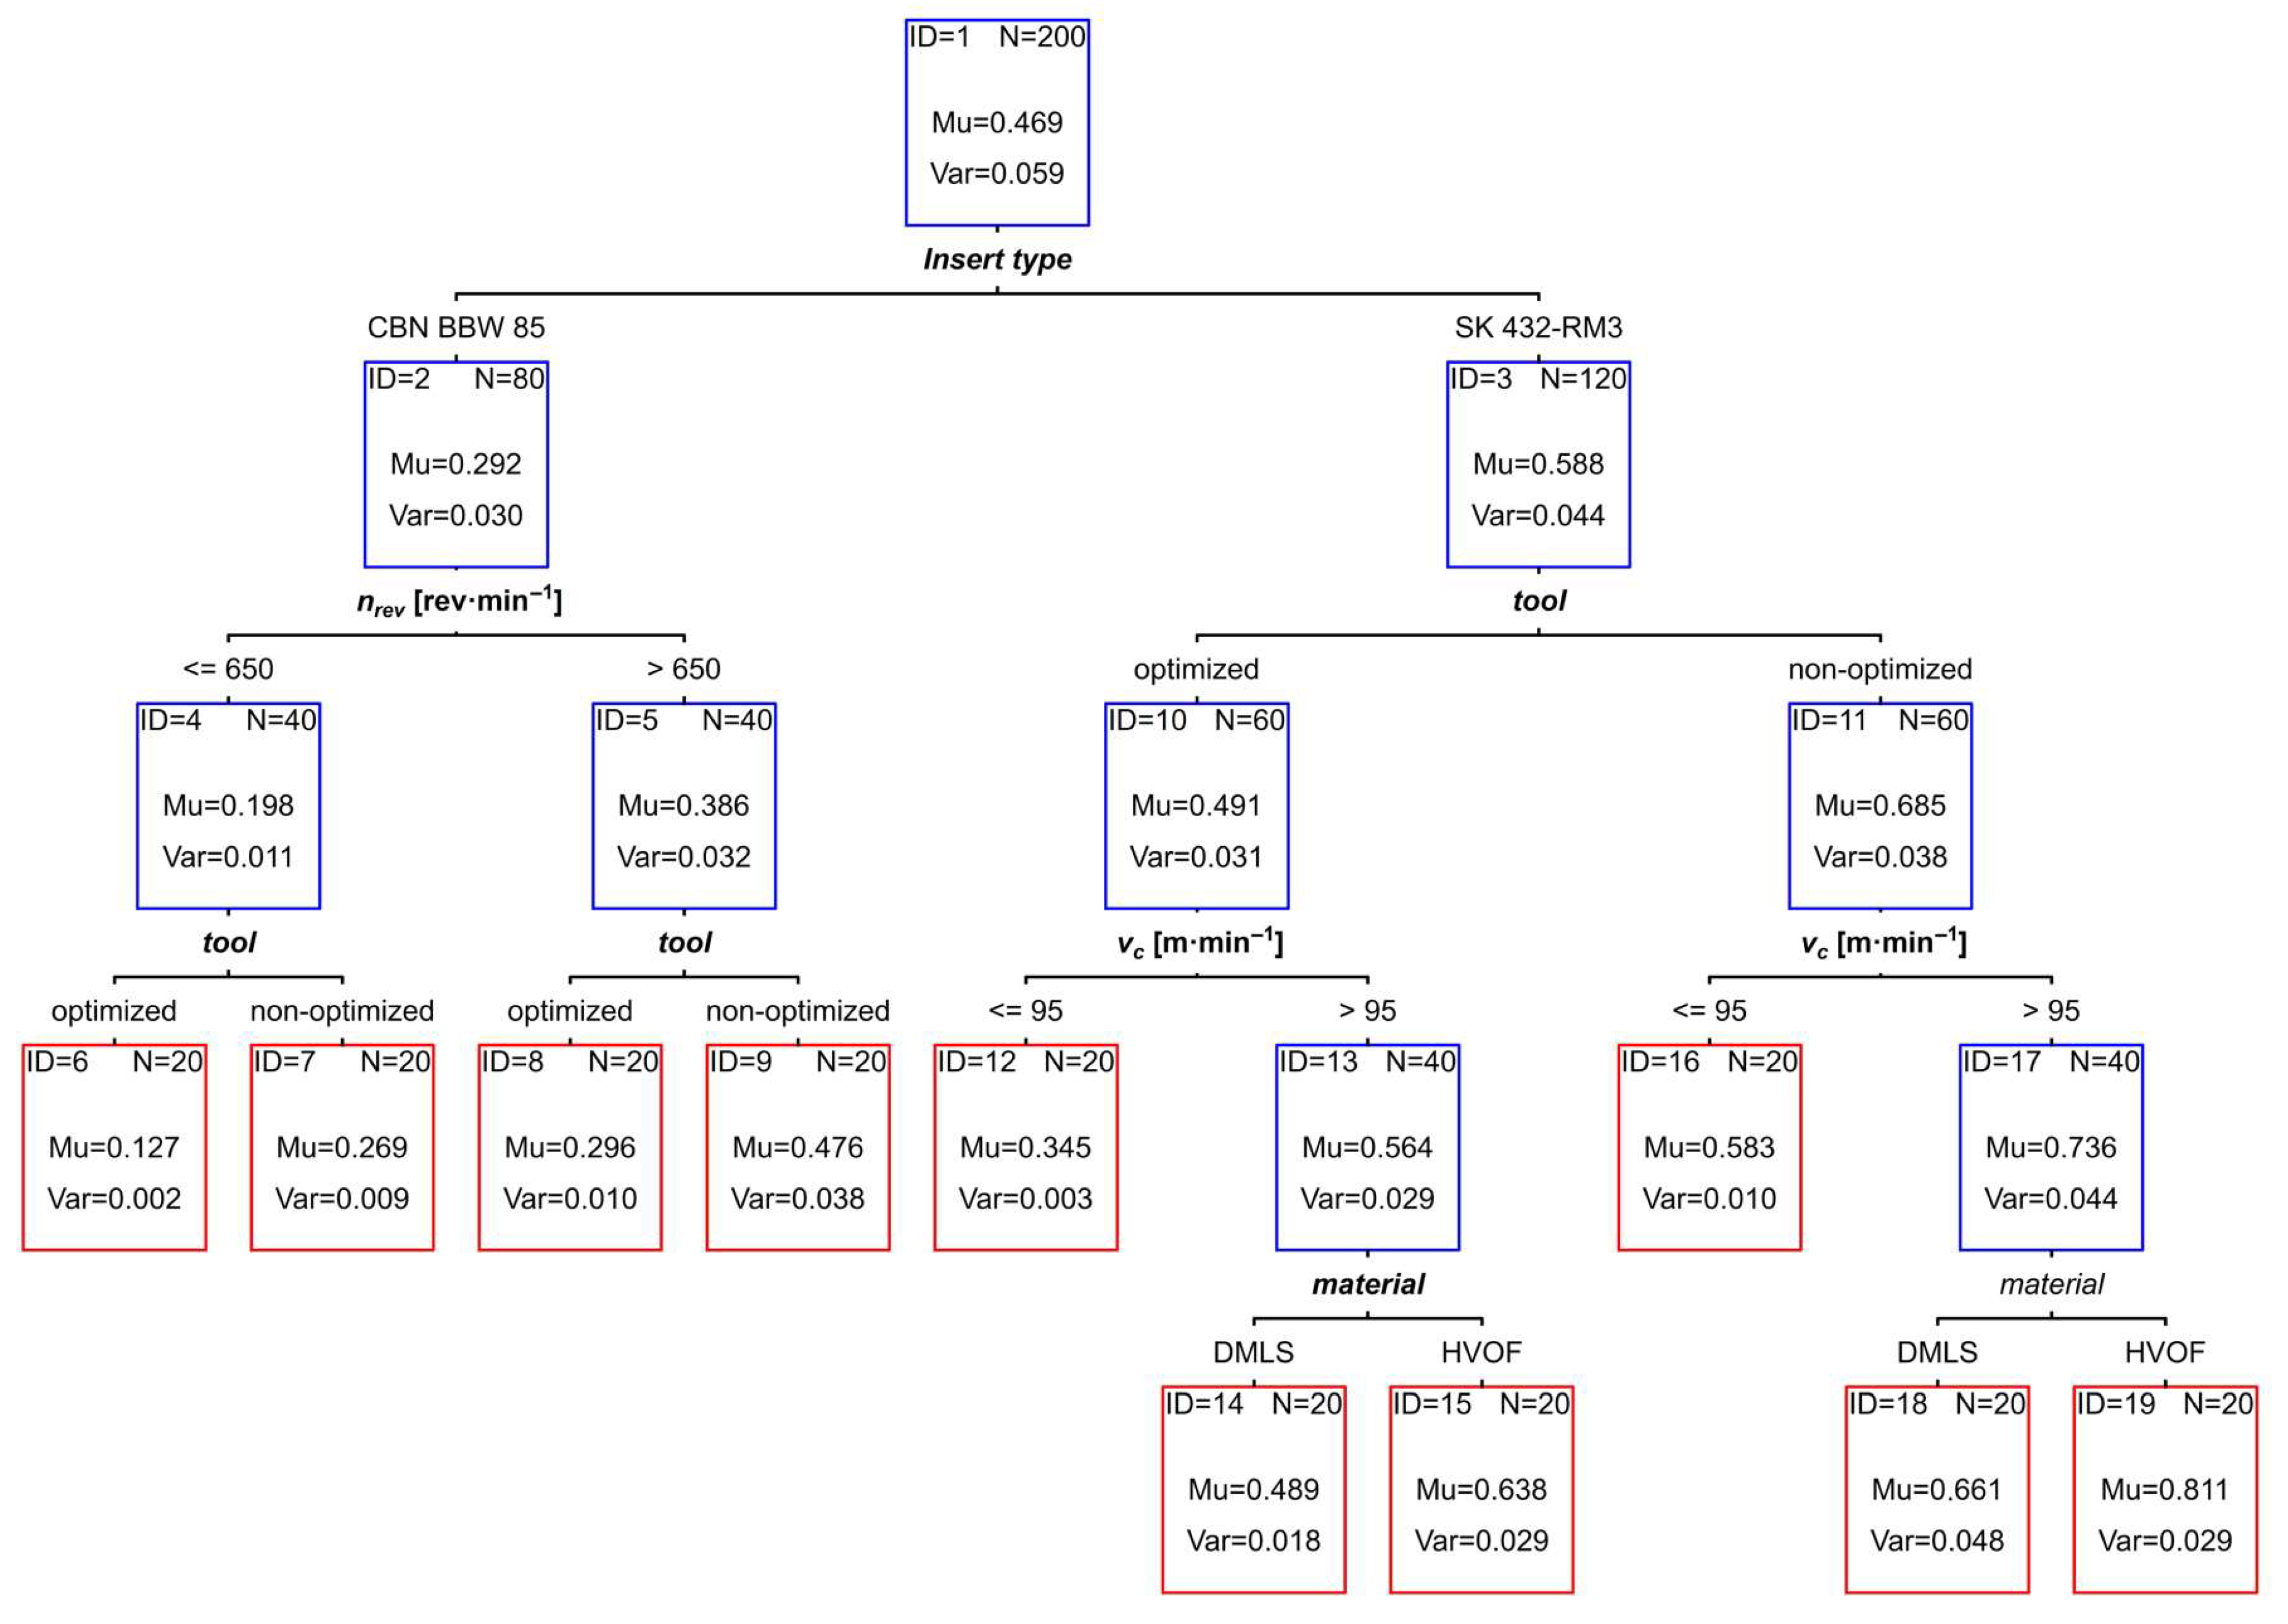
rev) and used Classification and Regression Trees (CART) [
39] identified the indexable insert type as the principal factor influencing variation in surface roughness Ra (
Figure 10). The following values were obtained directly from the Classification and Regression Trees model. When using the tool fitted with the insert designated CBN BBW 85, lower Ra values were achieved (0.292 µm) compared to those with the insert designated SK 432-RM3 (0.588 µm). For the insert type CBN BBW 85, the effect of tool optimisation on Ra varies with the workpiece rotational speed (n
rev). At speeds below 650 rev·min
−1, the optimised tool yields Ra values that are 133.9% lower compared with the non-optimised tool. At speeds above 650 rev·min
−1, the optimised tool still produces lower Ra than the non-optimised tool, with a difference of 60.8%. For the second insert type (SK 432-RM3), the effect of tool optimisation on Ra appears independent of the cutting conditions. With the optimised tool, the achieved surface roughness Ra is 39.5% lower than with the non-optimised tool.
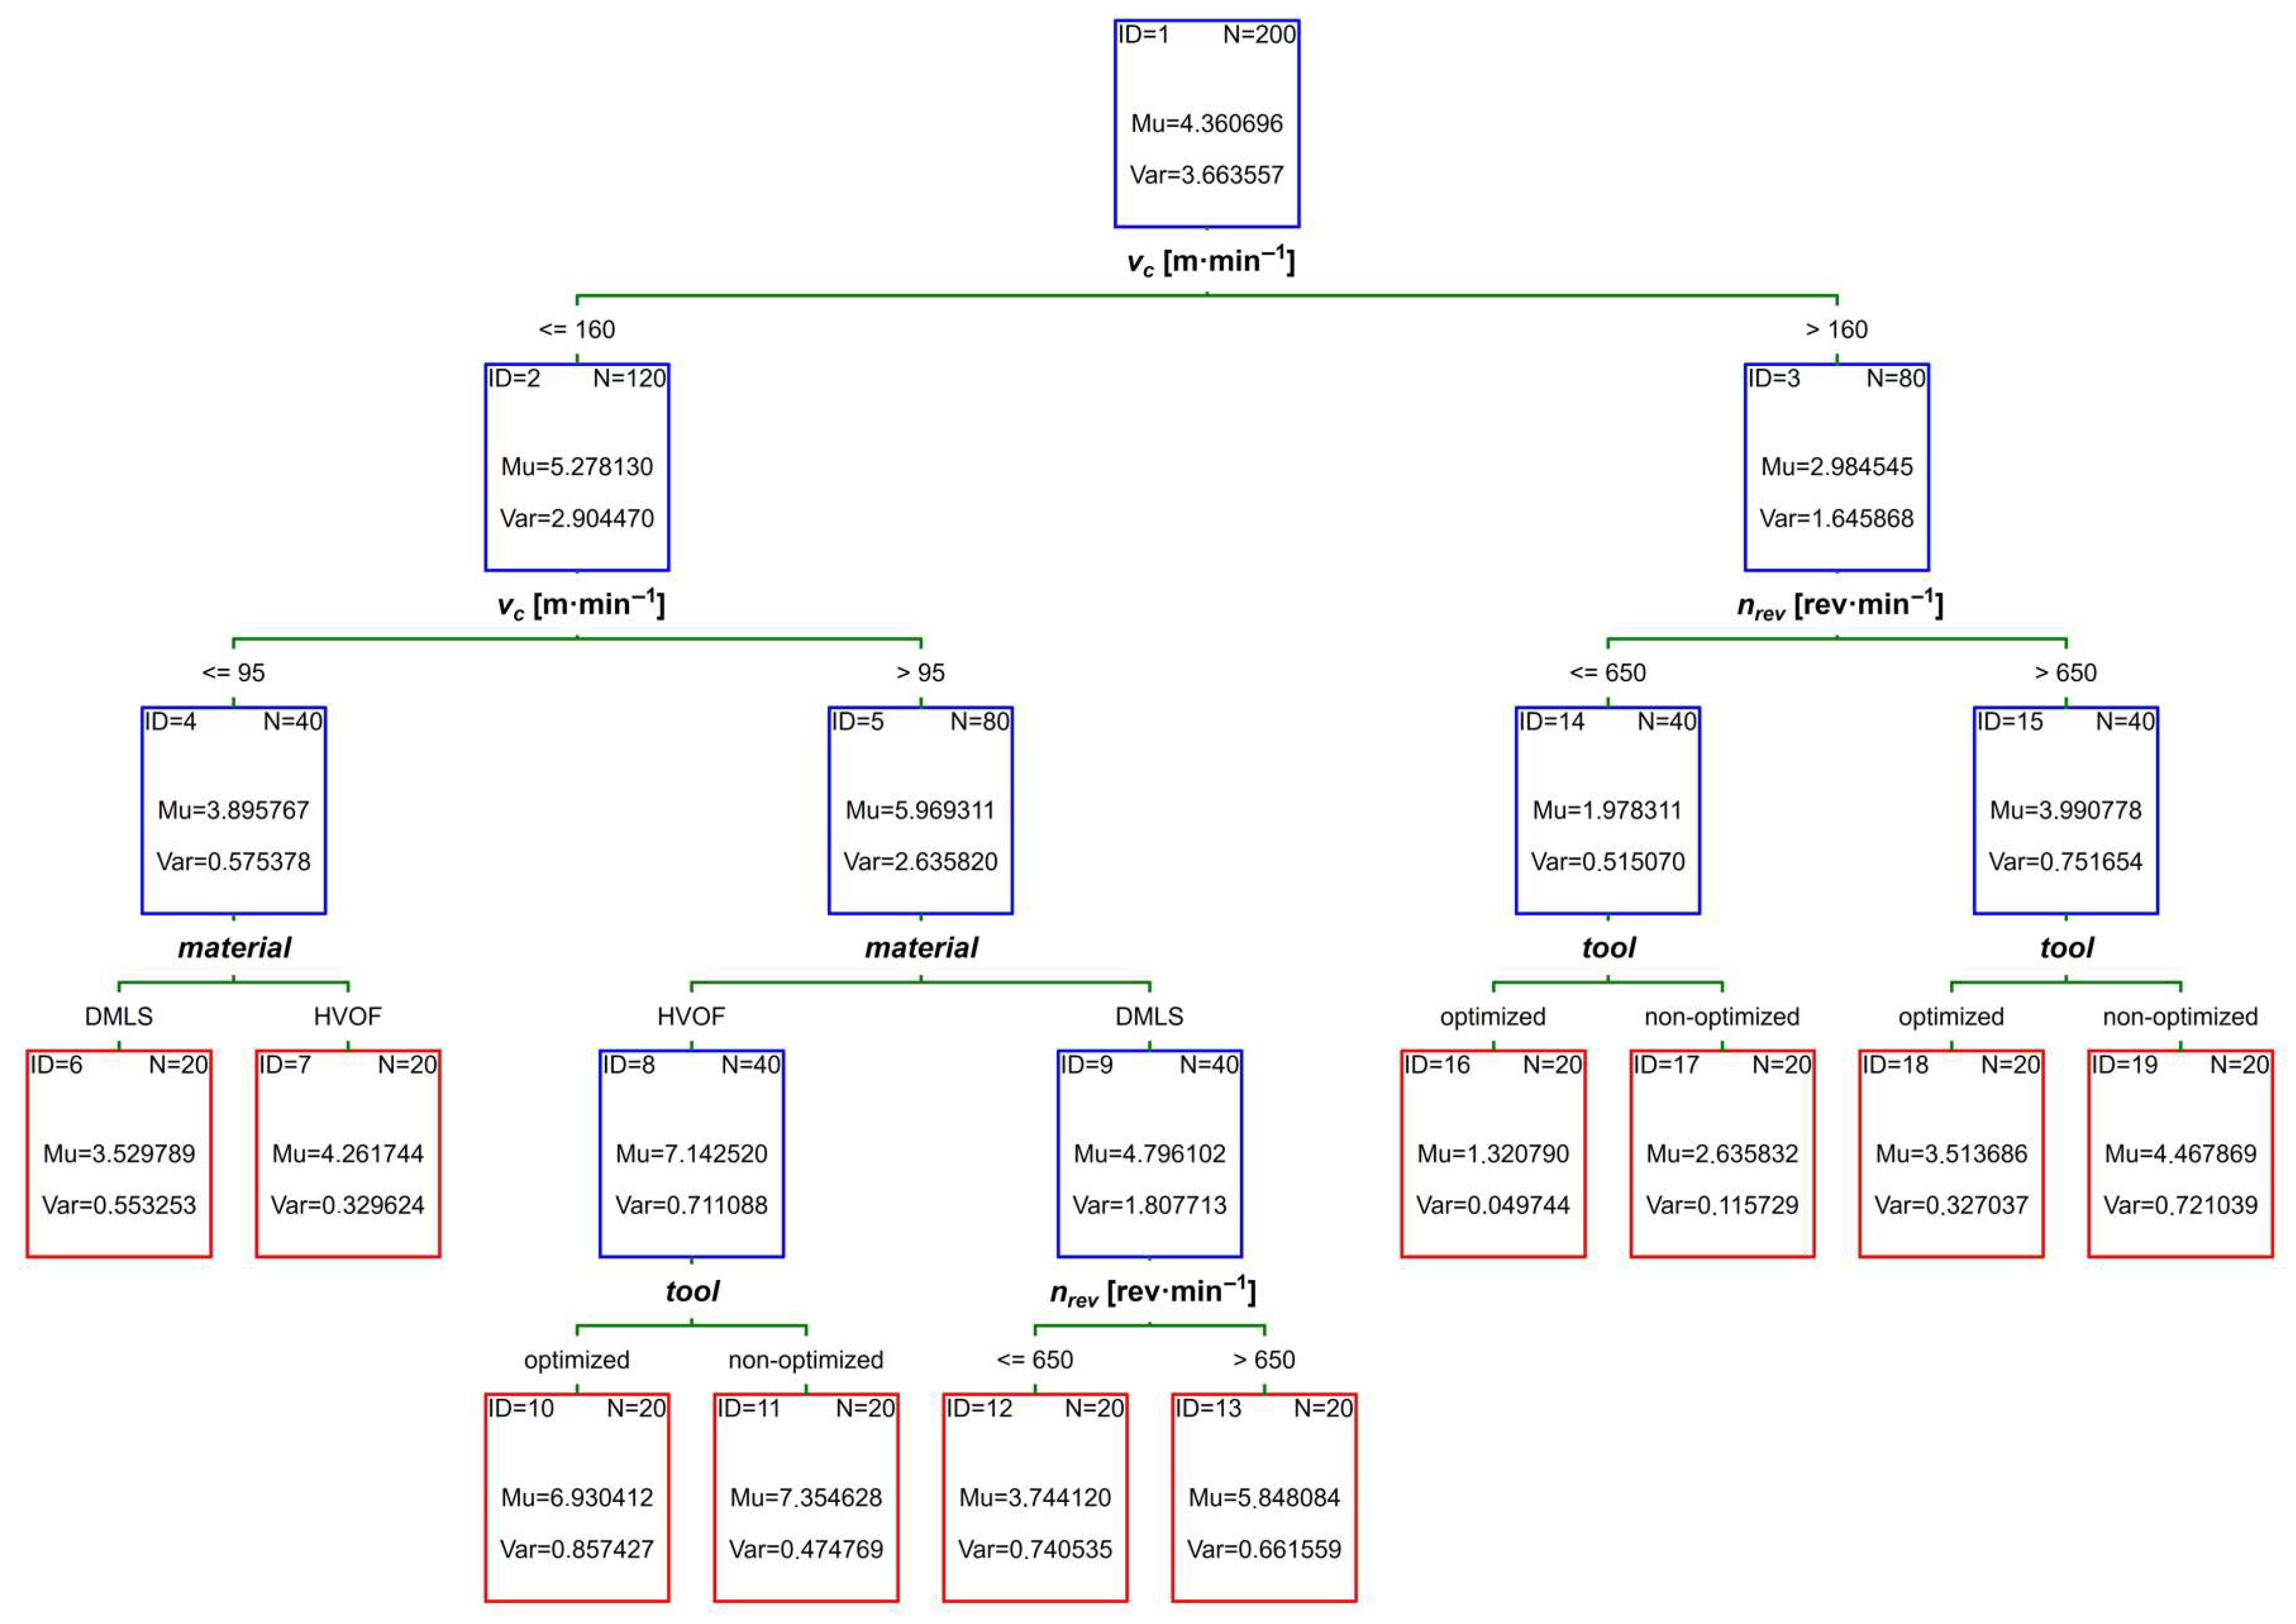
Using the same analysis of changes for surface roughness Rz (
Figure 11), cutting speed (v
c) is identified as the primary factor governing variation in the response. At higher cutting speeds (v
c > 160 m·min
−1), surface roughness is reported to be 76.8% lower than at lower cutting speeds. At lower cutting speeds (v
c ≤ 160 m·min
−1), an effect of tool optimisation on Rz is observed only within the interval (95 < v
c ≤ 160 m·min
−1) during turn milling of an HVOF-sprayed Inconel 718 surface. Under these conditions, surface roughness achieved with the optimised tool is 6.1% lower than with the non-optimised tool. At higher cutting speeds (v
c > 160 m·min
−1), two rotational-speed intervals are indicated by the decision tree (
Figure 11) when assessing the effect of tool optimisation on Rz. In the first interval (n
rev ≤ 650 rev·min
−1), mean Rz values are 99.5% lower with the optimised tool than with the non-optimised tool. In the second interval (n
rev > 650 rev·min
−1), mean Rz values are 27.1% lower with the optimised tool than with the non-optimised tool.
The results showed a consistent trend: Inconel 718 samples produced by the DMLS method exhibited lower surface roughness (Ra, Rz) than HVOF coatings under identical cutting conditions and using the same insert types. This difference can be explained by the fundamentally different microstructural characteristics of both materials, which significantly influence the machining behaviour of superalloys with low thermal conductivity.
DMLS material is characterised by a fully dense, finely dendritic microstructure with higher homogeneity and lower internal porosity [
11,
12,
13]. This structure enables stable chip formation and more uniform loading of the cutting edge, which directly supports achieving low Ra and Rz values.
In contrast, HVOF coatings exhibit a classical lamellar splat-based microstructure, characterised by typical porosity, oxide layers, partially melted particles, and local hardness variations [
15,
16,
17]. These microstructural heterogeneities lead to non-uniform chip formation, local pull-out of splats, and microcracking, all of which contribute to increased surface roughness. The results correspond with the findings of Valíček et al., who also observed higher sensitivity of HVOF NiCrBSi coatings to microdefect formation and a more pronounced influence of splat texture on the resulting roughness during machining [
40].
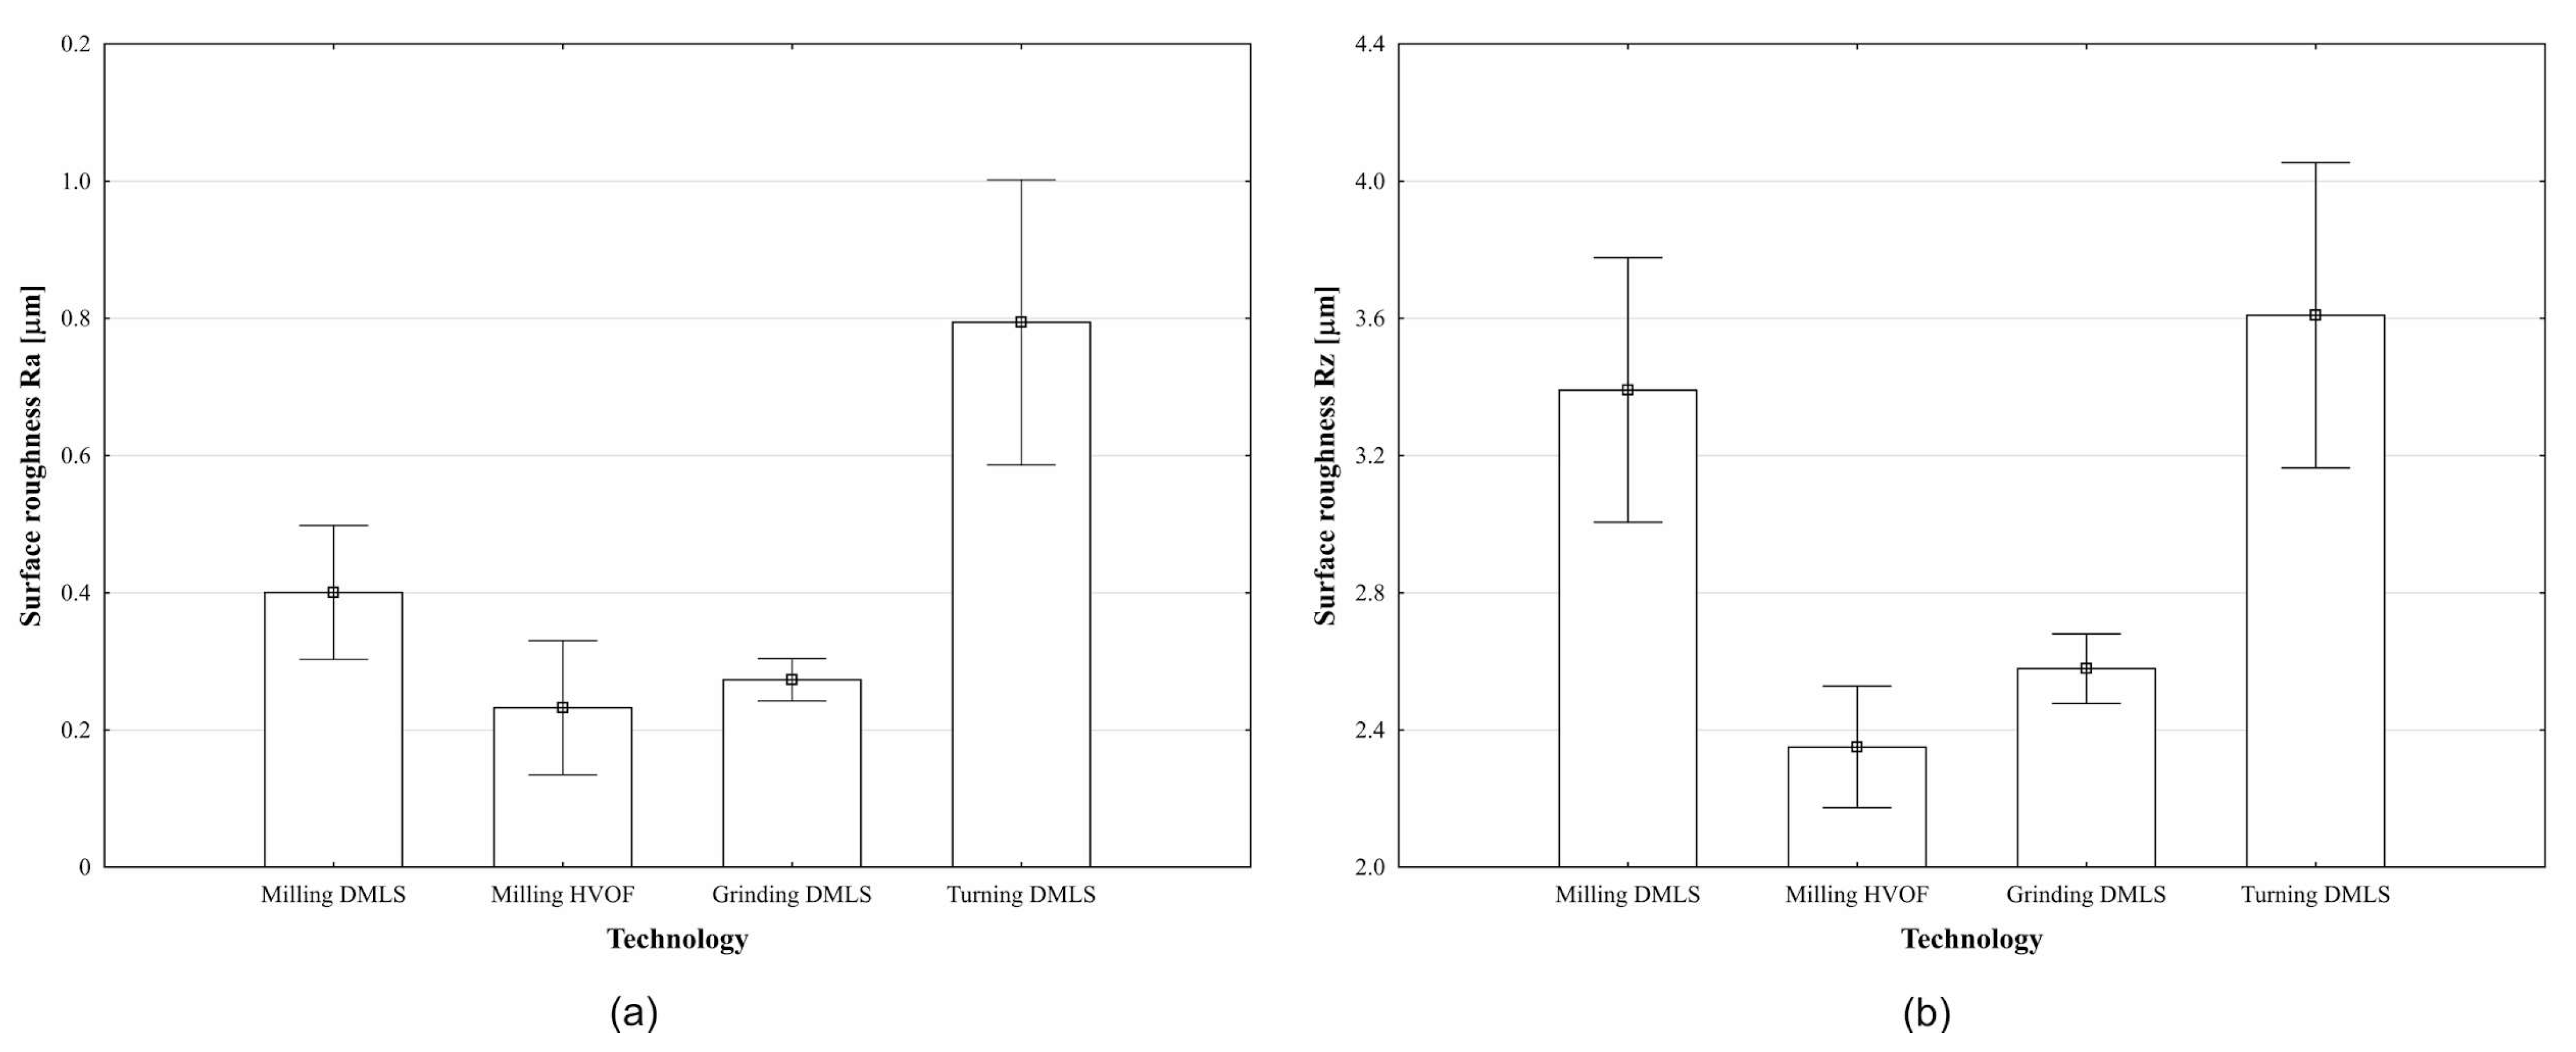
In the chart below, turning and grinding are compared with turn milling. The experiments demonstrate that turn milling can achieve surface roughness values (Ra and Rz) comparable to those obtained by turning and grinding. It should be noted, however, that circularity and cylindricity after milling do not reach the low levels achieved by grinding and turning. The turning and grinding reference values were obtained directly from previous experiments under comparable conditions. Nevertheless, the experiments can be considered successful, and turn milling can be applied where tight circularity and cylindricity tolerances are not required (
Figure 12).
As indicated by the accompanying finite element analysis (FEA), the optimised design met its objectives by improving the distribution of cutting forces along the tool axis and increasing the stiffness-to-mass ratio. The increased stiffness likely suppressed vibrations during cutting, while the more effective force distribution reduced local loading of the cutting edge. The combination of these factors directly led to the higher surface quality achieved.
A practical takeaway is that the achieved surface quality was comparable to that of grinding and markedly better than that of conventional turning. This is important because grinding difficult-to-machine superalloys is often slow and costly, whereas conventional turning does not reach the final surface finish required in many applications. Our results, therefore, demonstrate that the proposed method—turn milling with an optimised tool featuring a linear cutting edge—can effectively replace grinding for finishing Inconel 718 produced via DMLS and HVOF. The fact that the tool performed effectively on both fully dense DMLS material and an HVOF-sprayed coating demonstrates the robustness and versatility of this solution for different forms of Inconel 718.
It is worth noting that this study primarily focused on validating the tool design and the resulting surface quality. Although carbide and CBN inserts were used, a detailed analysis of tool life and wear mechanisms was not the primary objective of this study. Future work should therefore quantify tool life and assess subsurface integrity.
In summary:
A new tool with a linear cutting edge for machining Inconel 718 was successfully designed, topology-optimised, and experimentally validated.
The topology-optimised variant delivered substantially better surface roughness (Ra, Rz) than the baseline tool for both DMLS and HVOF materials.
The achieved surface quality was comparable to conventional grinding and markedly better than conventional turning.
The study shows that combining topology optimisation with a linear cutting-edge tool provides a practical and effective approach to finishing additively manufactured and thermally sprayed Inconel 718 components.
The novelty of this study lies in the integration of a linear cutting-edge concept with a topology-optimised tool body specifically designed for finishing DMLS and HVOF Inconel 718. For the first time, a single tool capable of both turning and turn-milling is combined with additively manufactured internal cooling channels and a six-insert configuration optimised for force alignment. The work provides the first experimental and statistically supported comparison between an optimised and non-optimised linear-edge tool on both DMLS and HVOF surfaces, demonstrating surface qualities comparable to grinding.
