Article

Plasticity Enhancement by Fe-Addition on NiAl Alloy: A Synchrotron X-ray Diffraction Mapping and Molecular Dynamics Simulation Study

1
Department of Materials Science and Engineering, National Chiao Tung University, 1001 University Road, Hsinchu 30010, Taiwan
2
Materials and Chemistry Laboratories, Industrial Technology Research Institute, Hsinchu 31057, Taiwan
3
Department of Mechanical Engineering, National Cheng Kung University, 1 University Road, Tainan City 70101, Taiwan
4
Department of Chemical & Materials Engineering, National Central University, Taoyuan 32001, Taiwan
5
National Synchrotron Radiation Research Center, Hsinchu 30076, Taiwan
6
Department of Materials Science and Engineering, University of Tennessee, Knoxville, TN 37996, USA
7
Instrument and Source Division, Oak Ridge National Laboratory, Oak Ridge, TN 37831, USA
8
Department of Materials Science and Engineering, Indian Institute of Technology, New Delhi 110016, India
9
Department of Materials Science and Engineering, McCormick School of Engineering and Applied Science, Northwestern University, Evanston, IL 60208, USA
*
Author to whom correspondence should be addressed.
Deceased.
Quantum Beam Sci. 2018, 2(3), 18; https://doi.org/10.3390/qubs2030018
Submission received: 6 June 2018 / Revised: 3 August 2018 / Accepted: 13 September 2018 / Published: 19 September 2018
(This article belongs to the Special Issue Strain, Stress and Texture Analysis with Quantum Beams)

Abstract

:
Unalloyed nickel aluminide has important applications but lacks ductility at room temperature. In this study, iron-added nickel aluminide alloys exhibit plasticity enhancement. The nickel aluminide alloys are prepared with different iron contents (0, 0.25, and 1 at%) to study their plasticity. The indentation-induced deformed areas are mapped by the synchrotron X-ray diffraction to compare their plastic zones. A complimentary tight binding calculation and generalized embedded atom method demonstrate how the Fe-addition enhances the plasticity of the iron-added nickel aluminide alloys.

1. Introduction

Nickel aluminide (NiAl) alloys are famous for their anti-oxidation, anti-corrosion, and wear resistance [1]. The density of NiAl alloys are two thirds of the Ni-based alloys and the thermal conductivity is much higher than that of the Ni-based alloys [2]. The inter-metallics of NiAl systems can strengthen the steels [3]. Particularly, adding nanoscale NiAl precipitates can strengthen iron (Fe)-based alloy [4]. Fine et al. described the strengthening mechanism of the NiAl as the NiAl precipitates can create misfit centers to decrease the Peierls stress [5]. However, NiAl alloys are infamous for lack of plasticity [6]. To improve the ductility of the NiAl, metallurgists have tried to add small amounts of different elements, such as gold [7], gallium, molybdenum, and Fe [8]. With comparable sizes of the aforementioned atoms, the addition of different elements is substitutable to Ni or Al lattice sites, but not interstitial. Specifically, the addition of Fe can enhance the yield strength and elongation for bulk performance. However, the underlying mechanisms of how Fe-addition enhances the plasticity are still unclear, for example, phenomena happening at the lattice level and microstructural accommodation of the Fe-addition having subjected to deformation.
Nowadays, the synchrotron X-ray diffraction (XRD) technique enables measurements to reveal the microstructure at lattice levels [9]. Nondestructive diffraction mapping can estimate plastic zone sizes by comparing diffraction patterns of the gauged plastically-deformed regions. The residual lattice strains and peak widths can correlate the distribution of the dislocation density locally [10]. On the other hand, several theoretical models have provided possible mechanisms for microstructure predictions, such as ab initio, tight-binding, and embedded-atom calculations [11].

2. Materials and Methods

Ishida et al. reported that when 0.25 (at%) Fe is added, the plastic strain increases to 6% [2]. Fine et al. [5], Rigney and Lewandowski [12] suggested that misfit centers play a key role for the plasticity enhancement. In this paper, NiAl alloys with different amounts of Fe-additions were prepared. According to Ishida et al.’s summary [2], three NiAl samples with atomic percentages of 0 at% Fe (Ni50Al50), 0.25 at% Fe (Ni49.875Al49.875Fe0.25), and 1 at% Fe (Ni49.5Al49.5Fe1)-additions with the thickness of about 70 µm, were prepared. All specimens were mechanically polished with the fine SiC sand paper up to the grit number of 2000, and then 0.05 μm γ-Al2O3 slurry was sprayed on the napped cloth.
The samples were then indented by the same level of loads. Micro-indentation tests were conducted under the continuous stiffness measurement module of the FISCHERSCOPE H100C Hardness Measurement System at a constant strain rate, following the Vickers hardness testing protocol [13]. The applied load was 500 mN, and dwell time was 30 s. The results of loading-unloading curves were analyzed, following Ahn et al.’s [14] and Zeng et al.’s [15] methods and discussed elsewhere [16].
In order to map the plastic-zone sizes, the indented specimens were examined by synchrotron radiation XRD mapping measurements. The advantage of the synchrotron X-ray diffraction was facilitated for its spatially-resolved mapping resolution as well as its nondestructive nature to gauge a greater volume of the indented regions of the samples in-depth direction. Residual strains of the indented regions were compared to the peak-width distributions. The diffraction peak widths could be correlated with the dislocation [17] and stacking faults [18].
Specifically, the synchrotron X-ray diffraction experiments were performed at the National Synchrotron Radiation Research Center (NSRRC) in Taiwan. The details of the instrument configuration could be found in our recent reports [19,20]. The plastic-zone sizes were mapped at the wavelength of 0.56 Å (22 keV) at the beamline (BL) 01C2 with the controlled beam size about 500 × 500 µm2 and the probing depth of a few tens of micrometers for spatial resolution. Meanwhile, the indented region was scanned in an area size of 2500 × 2500 µm2. In addition, we employed BL 23A1 to obtain a more complete microstructure evolution at a localized region of the deformation center before and after the deformation process at the wavelength of 0.88 Å (14 keV) with the beam size about 50 × 50 µm2. The grain sizes of three specimens, Ni50Al50, Ni49.875Al49.875Fe0.25, and Ni49.5Al49.5Fe1 were 183 ± 15 µm, 248 ± 25 µm, and 245 ± 25 µm, respectively.
According to the standard data-reduction procedures [21], the 2-dimensional (2D) XRD patterns data was reduced into 1-dimensional (1D) profiles as a function of the scattering vector, Q (=4π/λsin(θ/2); θ is the scattering angle, and λ is the incident radiation wavelength, respectively). The main scattering vector closes to the Ewald sphere, resulting in the shorter projection of the reciprocal lattice vector. The mosaic spread of the crystallites may project the real reciprocal lattice vector. The diffraction peaks of (110), (200), and (211) of the body-centered-cubic (bcc) structure were identified. After the diffraction-profile refinement, the lattice-strain evolution ( ε h k l ) was calculated using the change in the d-spacing (dhkl) of the refined peak positions of each hkl as a function of deformation with respect to the initial d-spacing (d0hkl). The peak width was normalized.
The tight binding calculation and generalized embedded atom method (GEAM) were applied to simulate the microstructure landscapes of the Fe-addition effect on the NiAl systems. With the intention of modeling the microstructure evolution, seven NiAl systems with atomic percentages of 0 at%, 0.1 at%, 0.2 at%, 0.5 at%, 1 at%, 2 at%, and 3 at% Fe-additions were developed. The comparison between the experimental and the simulated results were discussed in light of the residual strain and dislocation, together with Fe-addition effects.
Based on our previous molecular dynamics (MD) simulation [21,22], the tight binding calculation was employed to describe the interactions among Ni–Ni, Al–Al and Ni–Al pairs. For the Fe-addition effect in this study, GEAM was utilized to simulate the interaction between Fe–Ni, Fe–Al, and Fe–Fe.
The calculations were performed in collaboration with the National Center for High-Performance Computing (NCHC) in Taiwan on a range of massively-parallel platforms. AtomEye and ParaView [23,24] were applied to examine the simulation results. A bcc unit cell was constructed as Al at the center and Ni atoms at the corners. The sites of Al were then randomly substituted by Ni. After that, the sites of Ni and Al were randomly substituted by Fe elements for 0, 0.1, 0.2, 0.5, 1, 2, and 3 at%, respectively.

3. Results

Figure 1a shows the center point for mapping. Along the horizontal direction (yellow arrow), nine different regions were measured. The nine scanned regions overlapped each other by an area about 250 × 500 μm. The nine mapping points along the horizontal direction were depicted in Figure 1b. Most diffraction patterns were described as spots in Figure 1c. These diffraction spots revealed the information from each grain, but not averaged by many randomly-oriented grains. The area mapping results of the normalized diffraction-peak width were plotted in a 2D contour map in Figure 1d. Due to the plastic deformation, the diffraction spots may become some azimuthal broadening [25].
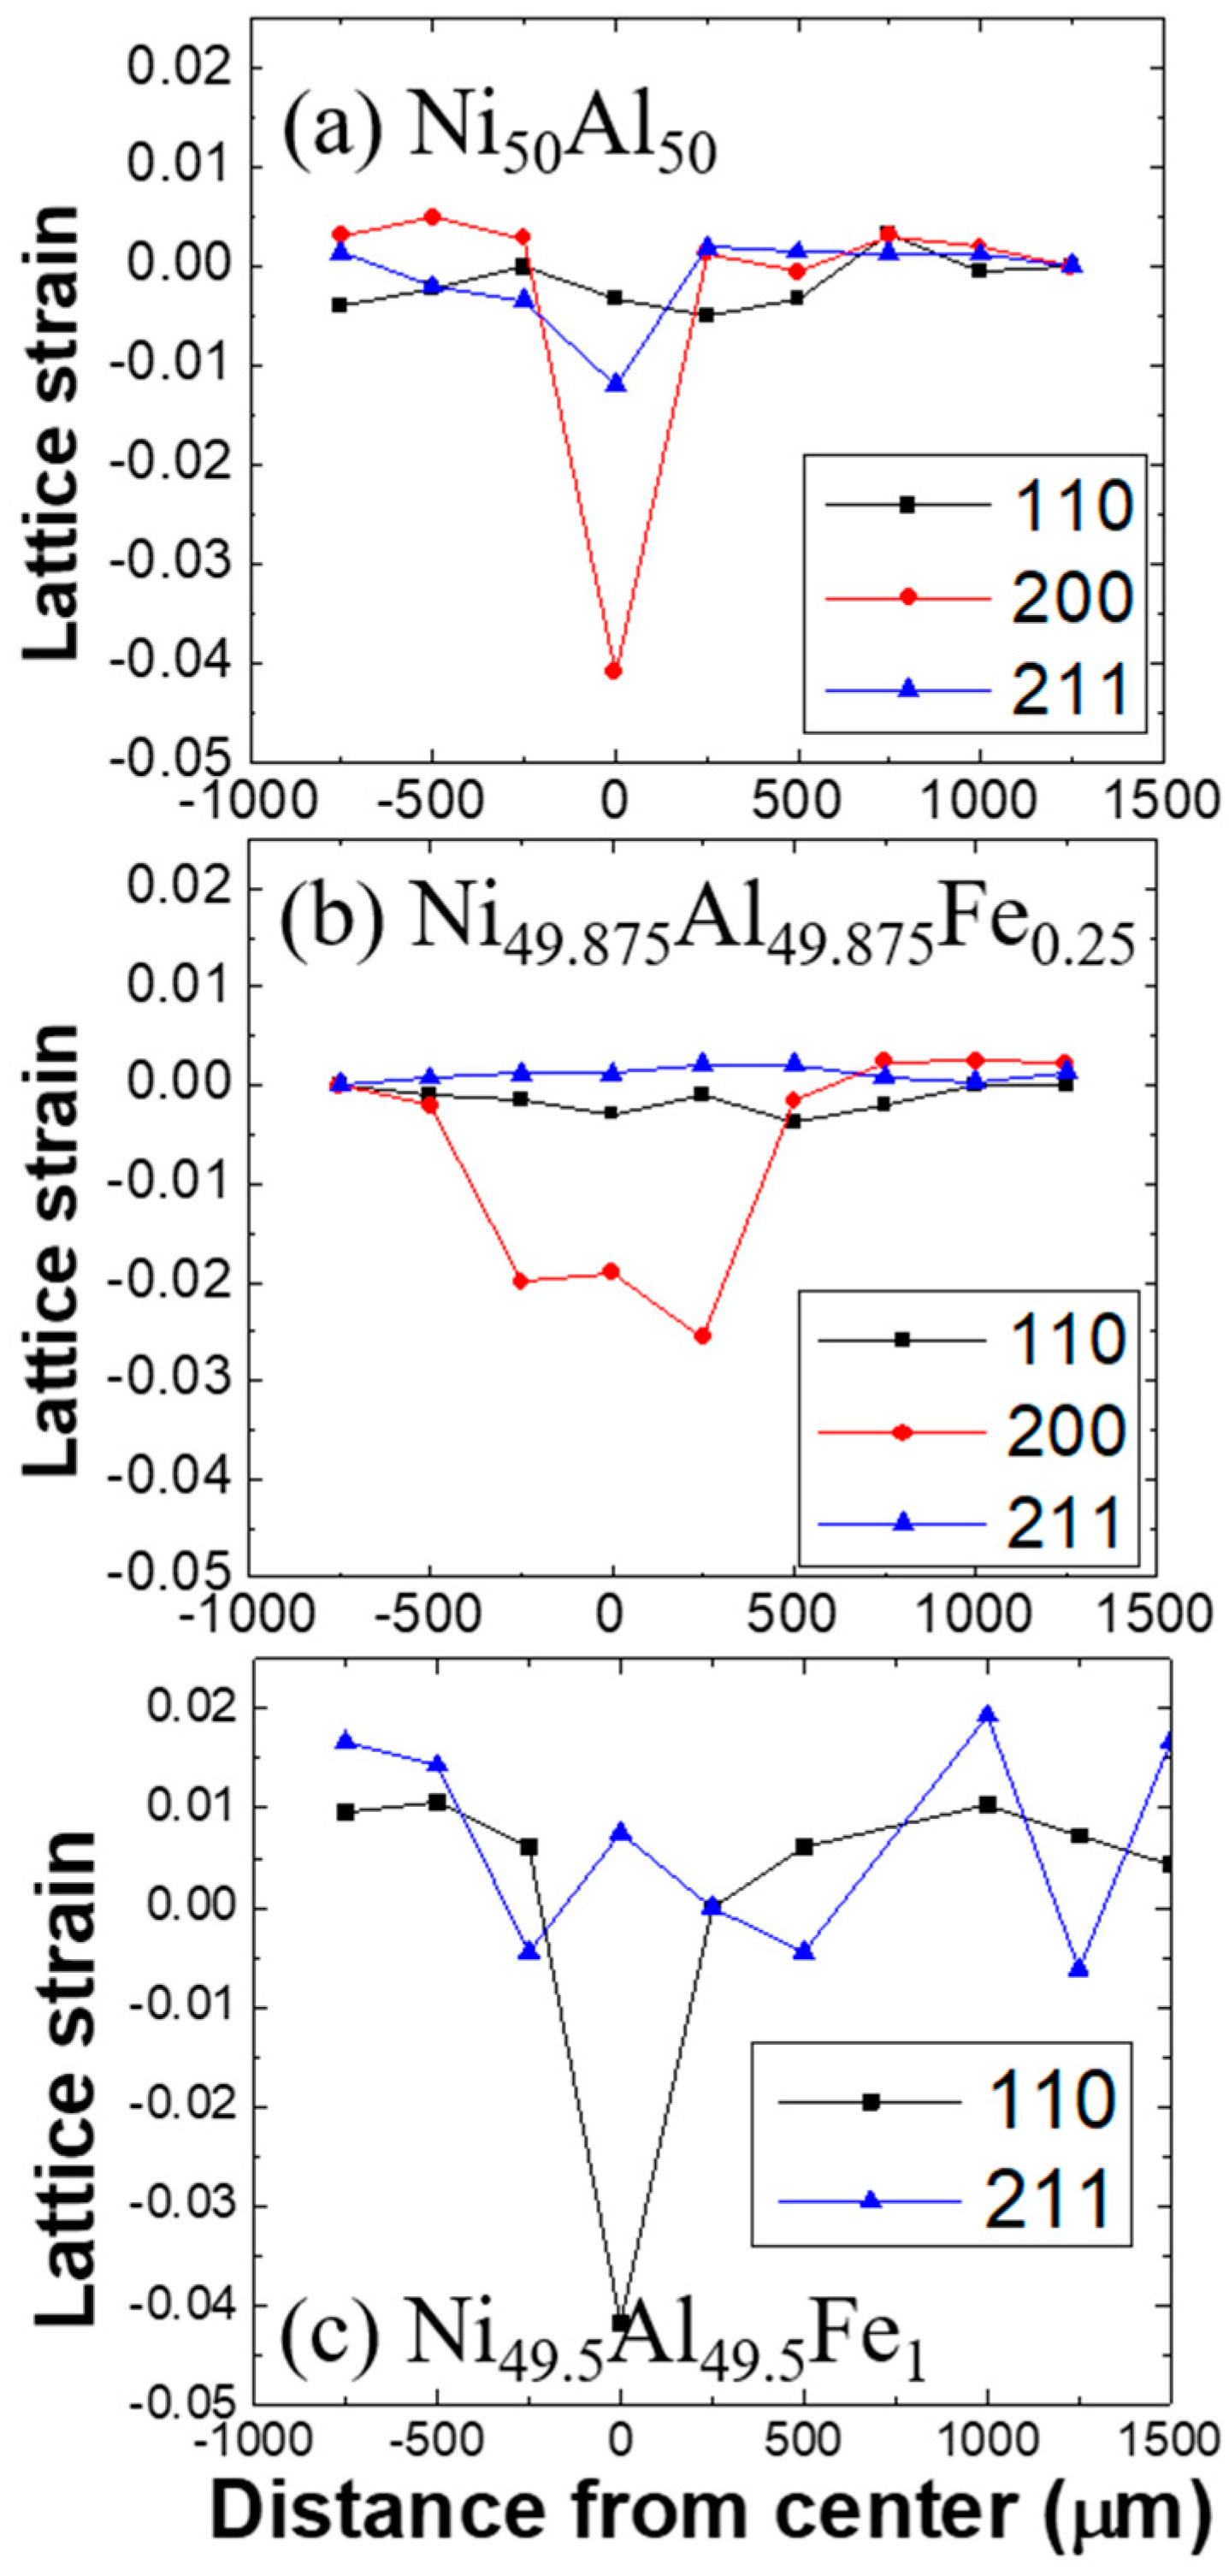
In Figure 2, the lattice strain of the (110), (200), and (211) were shown as legends of squares (), circles (), and triangles (), respectively. Since the mappings were a little off the indented centers as observed in Figure 1b, three representative lines across the indented centers, which display significant compressive strains were presented in Figure 2. The sizes of compressive lattice-strain distributions of both Ni50Al50 in Figure 2a and Ni49.5Al49.5Fe1 in Figure 2c were smaller than that of Ni49.875Al49.875Fe0.25 in Figure 2b. The compressive residual strain distribution of Ni49.875Al49.875Fe0.25 was about 1250 μm wide (from −500 to 750 μm). The compressive region of Ni50Al50 was about 500 and that of Ni49.5Al49.5Fe1 was about 480 μm wide. Additionally, the maximum compressive strain near the indented center of the Ni50Al50 and Ni49.875Al49.875Fe0.25 was found at the (200) plane, while that of the Ni49.5Al49.5Fe1 was detected at the (211) plane. To further discuss the aforementioned indentation results, Kramer et al.’s [26] theoretical model of the plastic zone size was recalled, considering the indentation load, yield strength, and zone size. The greater plastic-zone size and the smaller compressive strain indicated that the plasticity of Ni49.875Al49.875Fe0.25 was better than Ni50Al50 and Ni49.5Al49.5Fe1, consistent with Fine et al.’s prediction [5] and Ishida et al.’s results [2].
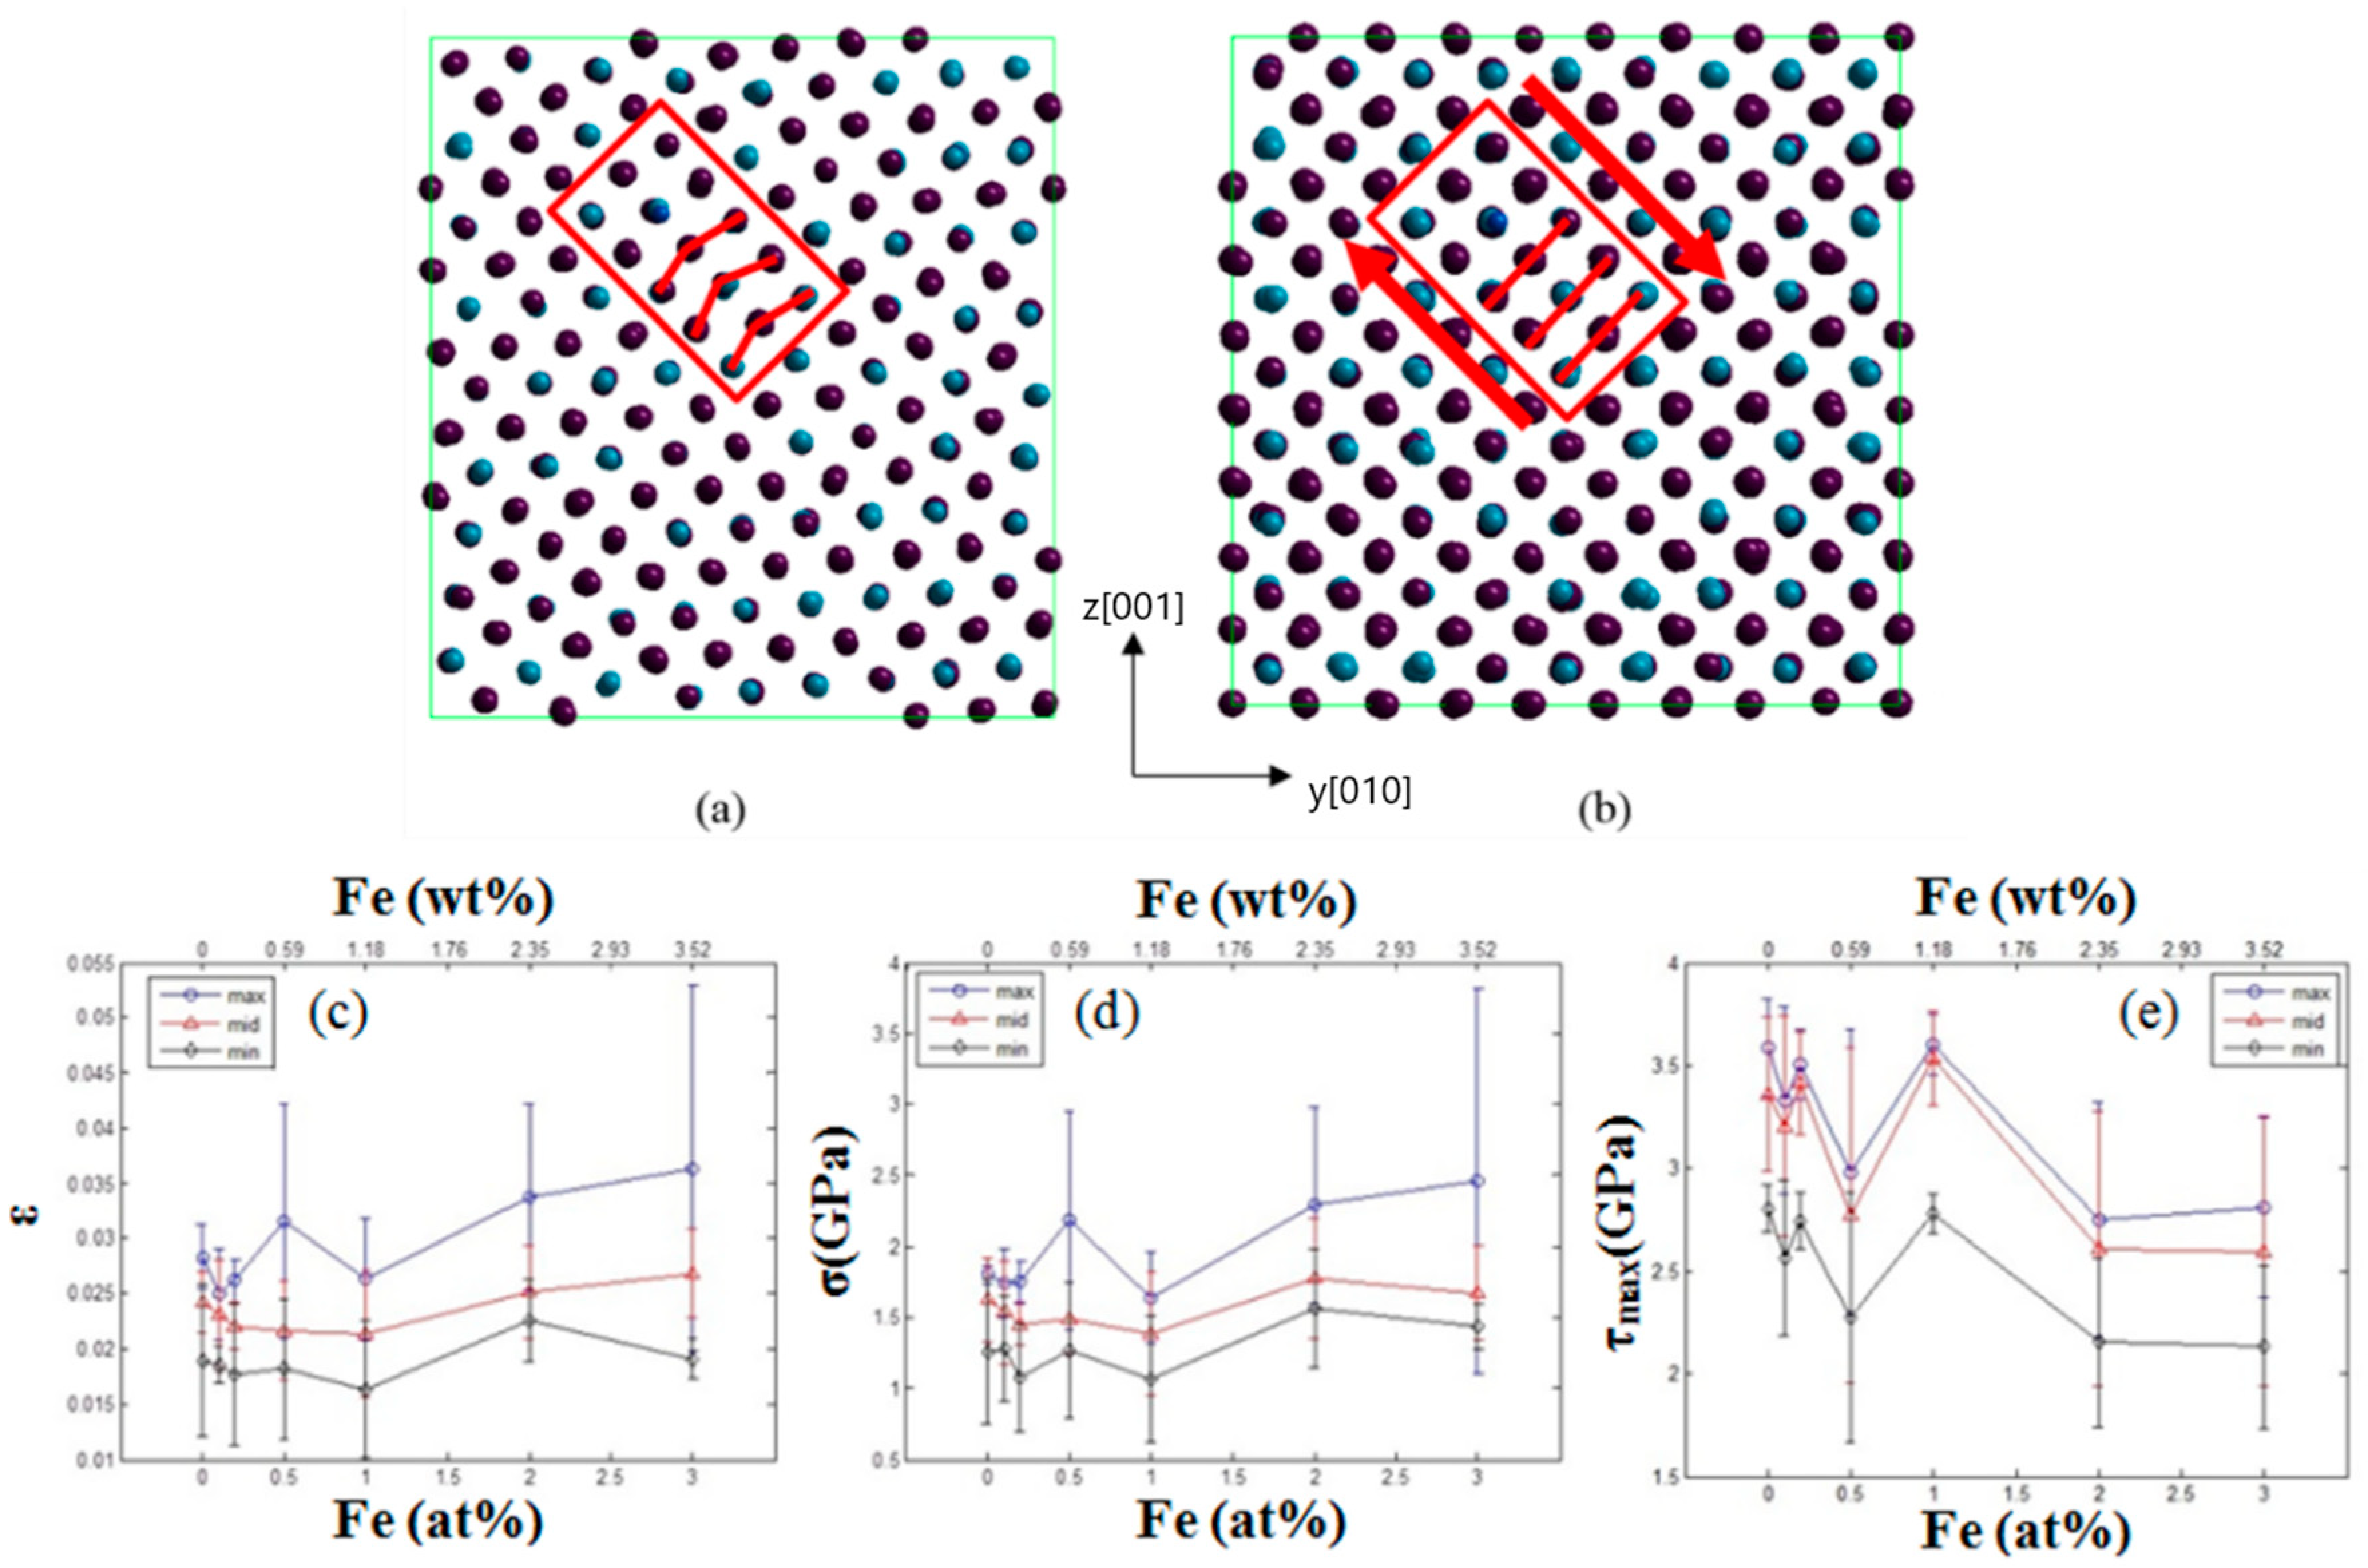
We utilized MD simulations to identify the lattice-misfit distortion through the individual interaction between Ni and Al atoms. The microstructure before yielding was shown in Figure 3a. There had already been some local lattice-misfit-induced distortions in the microstructure before yielding. After yielding, the distorted shuffles could temporally occupy high-energy sites, as seen Figure 3b. With the aim of quantifying the results, the evolution of tensors subjected to deformation was observed for the characteristic principal stresses such as σ 1 , σ 2 and σ 3 . The maximum shear stress (τmax) could be calculated in Equation (1),
τ max = σ 1 σ 3 2   ( σ 1 > σ 2 > σ 3 ) .
The associated evolution of principal stresses and strains at yielding could also be quantified. The results were presented in Figure 3c for lattice strains, Figure 3d for local stresses, and Figure 3e for the maximum shear stresses (τmax) as a function of Fe-addition from the minimum (◊), to the medium (Δ) and the maximum () stresses. In Figure 3c, the differences between minimum and maximum strains are the largest at the 0.5% Fe-addition, suggesting a saddle point around 0.5% Fe-addition. Similarly, another saddle point was found at the 0.5% Fe-addition in Figure 3d. An associated local minimum was also found for τmax at 0.2% Fe-addition in Figure 3e. Based on the simulated microstructures addressed in Figure 3a,b, the model indicates that Fine et al.’s [5] lattice misfit effect will be maximized at the Fe-addition around 0.2~0.5%.

4. Discussion

We conducted the mapping for nine successive regions whose overlapping distance was 250 µm in order to examine the centered regions induced by the indented zone with plasticity with respect to the addition of the Fe content. In our work, we assumed the undeformed region to be the farthest away from the indented center. Thus the lattice-strain variation in the deformed regions as a function of the distance from center was calculated accordingly. In Figure 2, the indented center determined based on the lattice strain and full width half maximum (FWHM) evolution was already shifted to the zero position, which was considered to be deformed the most. The distribution mapping of the normalized diffraction-peak width at the indented center in Figure 1d exhibited the broadening of peak-width, which correlates with the wide range of compressive residual strain of the (110) lattice plane in the microscopic view and also the plastic zone size in the macroscopic view. The gradient from black to white in the color scale bar represents the relative distribution of FWHM from the least to the most broadening. The red color corresponds to the more broadening of diffraction-peak width at the center compared to the surrounding region around the center, implying the more deformed at the center area. The mapping results of the peak width provide an additional evidence to support the lattice-strain evolution.
The maximum compressive strain of the (200) plane near the indented center of the Ni49.875Al49.875Fe0.25 was about −0.026, which was less than −0.041 of the Ni50Al50. With the increase of the Fe-addition up to 1.0%, the level of the maximum compressive strain reached −0.042 at the (211) plane. The enhancement of plasticity with respect to the addition of a certain Fe amount was attributed to the distortion and dislocation-density distribution in the microstructure evolution induced by the lattice-misfit effect which was demonstrated by MD simulations, resulting in a smaller compressive strain and a larger indentation-induced plastic zone size determined by X-ray results. The lattice strain value of the (200) of the Ni49.875Al49.875Fe0.25 achieved from the X-ray experiment was in the range 0.02–0.026, which was in agreement with the one attained from the MD simulation of 0.018–0.027. The MD simulation strongly supports the experimental X-ray results in which the strong impact of the lattice misfit on the plastic enhancement of NiAl alloys was evidently observed with the addition of Fe around 0.2~0.5%.

5. Conclusions

In summary, three NiAl alloys, Ni50Al50, Ni49.875Al49.875Fe0.25, and Ni49.5Al49.5Fe1 were prepared to investigate Morris E. Fine’s lattice-misfit effect by Fe-addition. All the three samples were indented under the same load conditions. Nondestructive synchrotron diffraction mapping was employed to quantify the plastic-zone sizes around the indented areas. The Fe-addition in stoichiometry of Ni49.875Al49.875Fe0.25 could most improve the ductility. Molecular dynamics simulation was applied to model the microstructure evolution and validates the aforementioned plasticity enhancement phenomenon. The results suggest that the Fe-addition around 0.2~0.5% can create the energy-saddle point, relaxing the lattice-misfit effect at the yielding the most.

Author Contributions

All authors have participated sufficiently in the present work. Conceptualization, M.E.F.; Methodology, M.E.F.; Investigation, T.-Y.L.; Project administration, E.-W.H.; Resources, I.-L.C., W.-J.H., C.-J.S. and L.S.; Supervision, E.-W.H., M.E.F. and P.K.L.; Writing—original draft, E.-W.H.; Writing—review & editing, T.-N.L. and J.J.

Funding

This work is supported by the Ministry of Education through the SPROUT Project- Center for Semiconductor Technologies of National Chiao Tung University, Taiwan. EWH appreciates the support from Ministry of Science and Technology (MOST) Programs 104-2628-E-009-003-MY3, 106-2811-E-009-032, 106-2218-E-007-019, 106-2514-S-007-004, and 106-3011-F-002-002. T.-N.L. was supported by MOST Programs 104-2628-E-009-003-MY3 and 106-2811-E-009-032. P.K.L. very much appreciate the support from the National Science Foundation (DMR-1611180 and 1809640).

Acknowledgments

This paper is dedicated to Morris E. Fine, a pioneer who initiated this four-generation research collaboration. We would like to thank National Center for High-performance Computing of National Applied Research Laboratories (NARLabs) of Taiwan for providing a computational platform. EWH and his group members appreciate the beam time from the beamlines 01C2 and 23A1 of National Synchrotron Radiation Research Center very much. Research conducted at Oak Ridge National Laboratory (ORNL) was sponsored by the Scientific User Facilities Division, Office of Basic Energy Sciences, US Department of Energy.

Conflicts of Interest

The authors declare no conflict of interest.

References

  1. Han, Y.; Ünal, B.; Evans, J.W. Formation of a novel ordered Ni3Al surface structure by codeposition on NiAl(110). Phys. Rev. Lett. 2012, 108, 216102. [Google Scholar] [CrossRef] [PubMed]
  2. Ishida, K.; Kainuma, R.; Ueno, N.; Nishizawa, T. Ductility enhancement in NiAl (B2)-base alloys by microstructural control. Metall. Trans. A 1991, 22, 441–446. [Google Scholar] [CrossRef]
  3. Jiao, Z.; Luan, J.; Zhang, Z.; Miller, M.; Liu, C. High-strength steels hardened mainly by nanoscale NiAl precipitates. Scr. Mater. 2014, 87, 45–48. [Google Scholar] [CrossRef]
  4. Teng, Z.; Ghosh, G.; Miller, M.K.; Huang, S.; Clausen, B.; Brown, D.; Liaw, P.K. Neutron-diffraction study and modeling of the lattice parameters of a NiAl-precipitate-strengthened Fe-based alloy. Acta Mater. 2012, 60, 5362–5369. [Google Scholar] [CrossRef]
  5. Fine, M.; Vaynman, S.; Isheim, D.; Chung, Y.-W.; Bhat, S.; Hahin, C. A new paradigm for designing high-fracture-energy steels. Metall. Mater. Trans. A 2010, 41A, 3318–3325. [Google Scholar] [CrossRef]
  6. Iqbal, F.; Ast, J.; Göken, M.; Durst, K. In situ micro-cantilever tests to study fracture properties of NiAl single crystals. Acta Mater. 2012, 60, 1193–1200. [Google Scholar] [CrossRef]
  7. Sheng, L.; Zhang, W.; Guo, J.; Yang, F.; Liang, Y.; Ye, H. Effect of Au addition on the microstructure and mechanical properties of NiAl intermetallic compound. Intermetallics 2010, 18, 740–744. [Google Scholar] [CrossRef]
  8. Darolia, R.; Lahrman, D.; Field, R. The effect of iron, gallium and molybdenum on the room temperature tensile ductility of NiAl. Scr. Metall. Mater. 1992, 26, 1007–1012. [Google Scholar] [CrossRef]
  9. Hutchings, T.; Withers, P.J.; Holden, T.M.; Lorentzen, T. Introduction to the Characterization of Residual Stress by Neutron Diffraction; Taylor & Francis: London, UK, 2005. [Google Scholar]
  10. Huang, E.-W.; Lee, S.Y.; Woo, W.; Lee, K.-W. Three-orthogonal-direction stress mapping around a fatigue-crack tip using neutron diffraction. Metall. Mater. Trans. A 2012, 43, 2785–2791. [Google Scholar] [CrossRef]
  11. Mishin, Y.; Mehl, M.; Papaconstantopoulos, D.; Voter, A.; Kress, J. Structural stability and lattice defects in copper: Ab initio, tight-binding, and embedded-atom calculations. Phys. Rev. B 2001, 63, 224106. [Google Scholar] [CrossRef]
  12. Rigney, J.D.; Lewandowski, J.J. Fracture toughness of monolithic nickel aluminide intermetallics. Mater. Sci. Eng. 1992, 149, 143–151. [Google Scholar] [CrossRef]
  13. Giannakopoulos, A.; Larsson, P.-L.; Vestergaard, R. Analysis of Vickers indentation. Int. J. Solids Struct. 1994, 31, 2679–2708. [Google Scholar] [CrossRef]
  14. Ahn, J.-H.; Kwon, D. Derivation of plastic stress–strain relationship from ball indentations: Examination of strain definition and pileup effect. J. Mater. Res. 2001, 16, 3170–3178. [Google Scholar] [CrossRef]
  15. Zeng, K.; Chiu, C.H. An analysis of load–penetration curves from instrumented indentation. Acta Mater. 2001, 49, 3539–3551. [Google Scholar] [CrossRef]
  16. Lin, T.-Y. Using Synchrotron Radiation Mapping to Investigate the Iron-Addition Effects on the Nickel-Aluminide Alloys. Master’s Thesis, National Central University, Taoyuan City, Taiwan, July 2013. [Google Scholar]
  17. Leonardi, A.; Scardi, P. Dislocation effects on the diffraction line profiles from nanocrystalline domains. Metall. Mater. Trans. A 2015, 47, 5722–5732. [Google Scholar] [CrossRef]
  18. Zilahi, G.; Ungár, T.; Tichy, G. A common theory of line broadening and rocking curves. J. Appl. Crystallogr. 2015, 48, 418–430. [Google Scholar] [CrossRef]
  19. Huang, E.W.; Hsu, Y.-H.; Chuang, W.-T.; Ko, W.-C.; Chang, C.-K.; Lee, C.-K.; Chang, W.-C.; Liao, T.-K.; Thong, H.C. Visible-light modulation on lattice dielectric responses of a piezo-phototronic soft material. Adv. Mater. 2015, 27, 7728–7733. [Google Scholar] [CrossRef] [PubMed]
  20. Huang, E.-W.; Qiao, J.; Winiarski, B.; Lee, W.-J.; Scheel, M.; Chuang, C.-P.; Liaw, P.K.; Lo, Y.-C.; Zhang, Y.; Di Michiel, M. Microyielding of core-shell crystal dendrites in a bulk-metallic-glass matrix composite. Sci. Rep. 2014, 4, 4394. [Google Scholar] [CrossRef] [PubMed]
  21. Toby, B.H. EXPGUI, a graphical user interface for GSAS. J. Appl. Crystallogr. 2001, 34, 210–213. [Google Scholar] [CrossRef]
  22. Huang, E.W.; Csiszar, G.; Lo, Y.C.; Huang, Y.L.; Lee, W.J.; Ungar, T.; Liaw, P.K. Plastic deformation of a nano-precipitate strengthened Ni-base alloy investigated by complementary in situ neutron diffraction measurements and molecular-dynamics simulations. Adv. Eng. Mater. 2012, 14, 902–908. [Google Scholar] [CrossRef]
  23. Li, J. AtomEye: An efficient atomistic configuration viewer. Model. Simul. Mater. Sci. Eng. 2003, 11, 173–177. [Google Scholar] [CrossRef]
  24. Lathrop, S. Hands-On Paraview Tutorial. Available online: https://hub.vscse.org/resources/89 (accessed on 1 September 2010).
  25. Liss, K.-D.; Yan, K. Thermo-mechanical processing in a synchrotron beam. Mater. Sci. Eng. A 2010, 528, 11–27. [Google Scholar] [CrossRef]
  26. Kramer, D.; Huang, H.; Kriese, M.; Robach, J.; Nelson, J.; Wright, A.; Bahr, D.; Gerberich, W. Yield strength predictions from the plastic zone around nanocontacts. Acta Mater. 1998, 47, 333–343. [Google Scholar] [CrossRef]
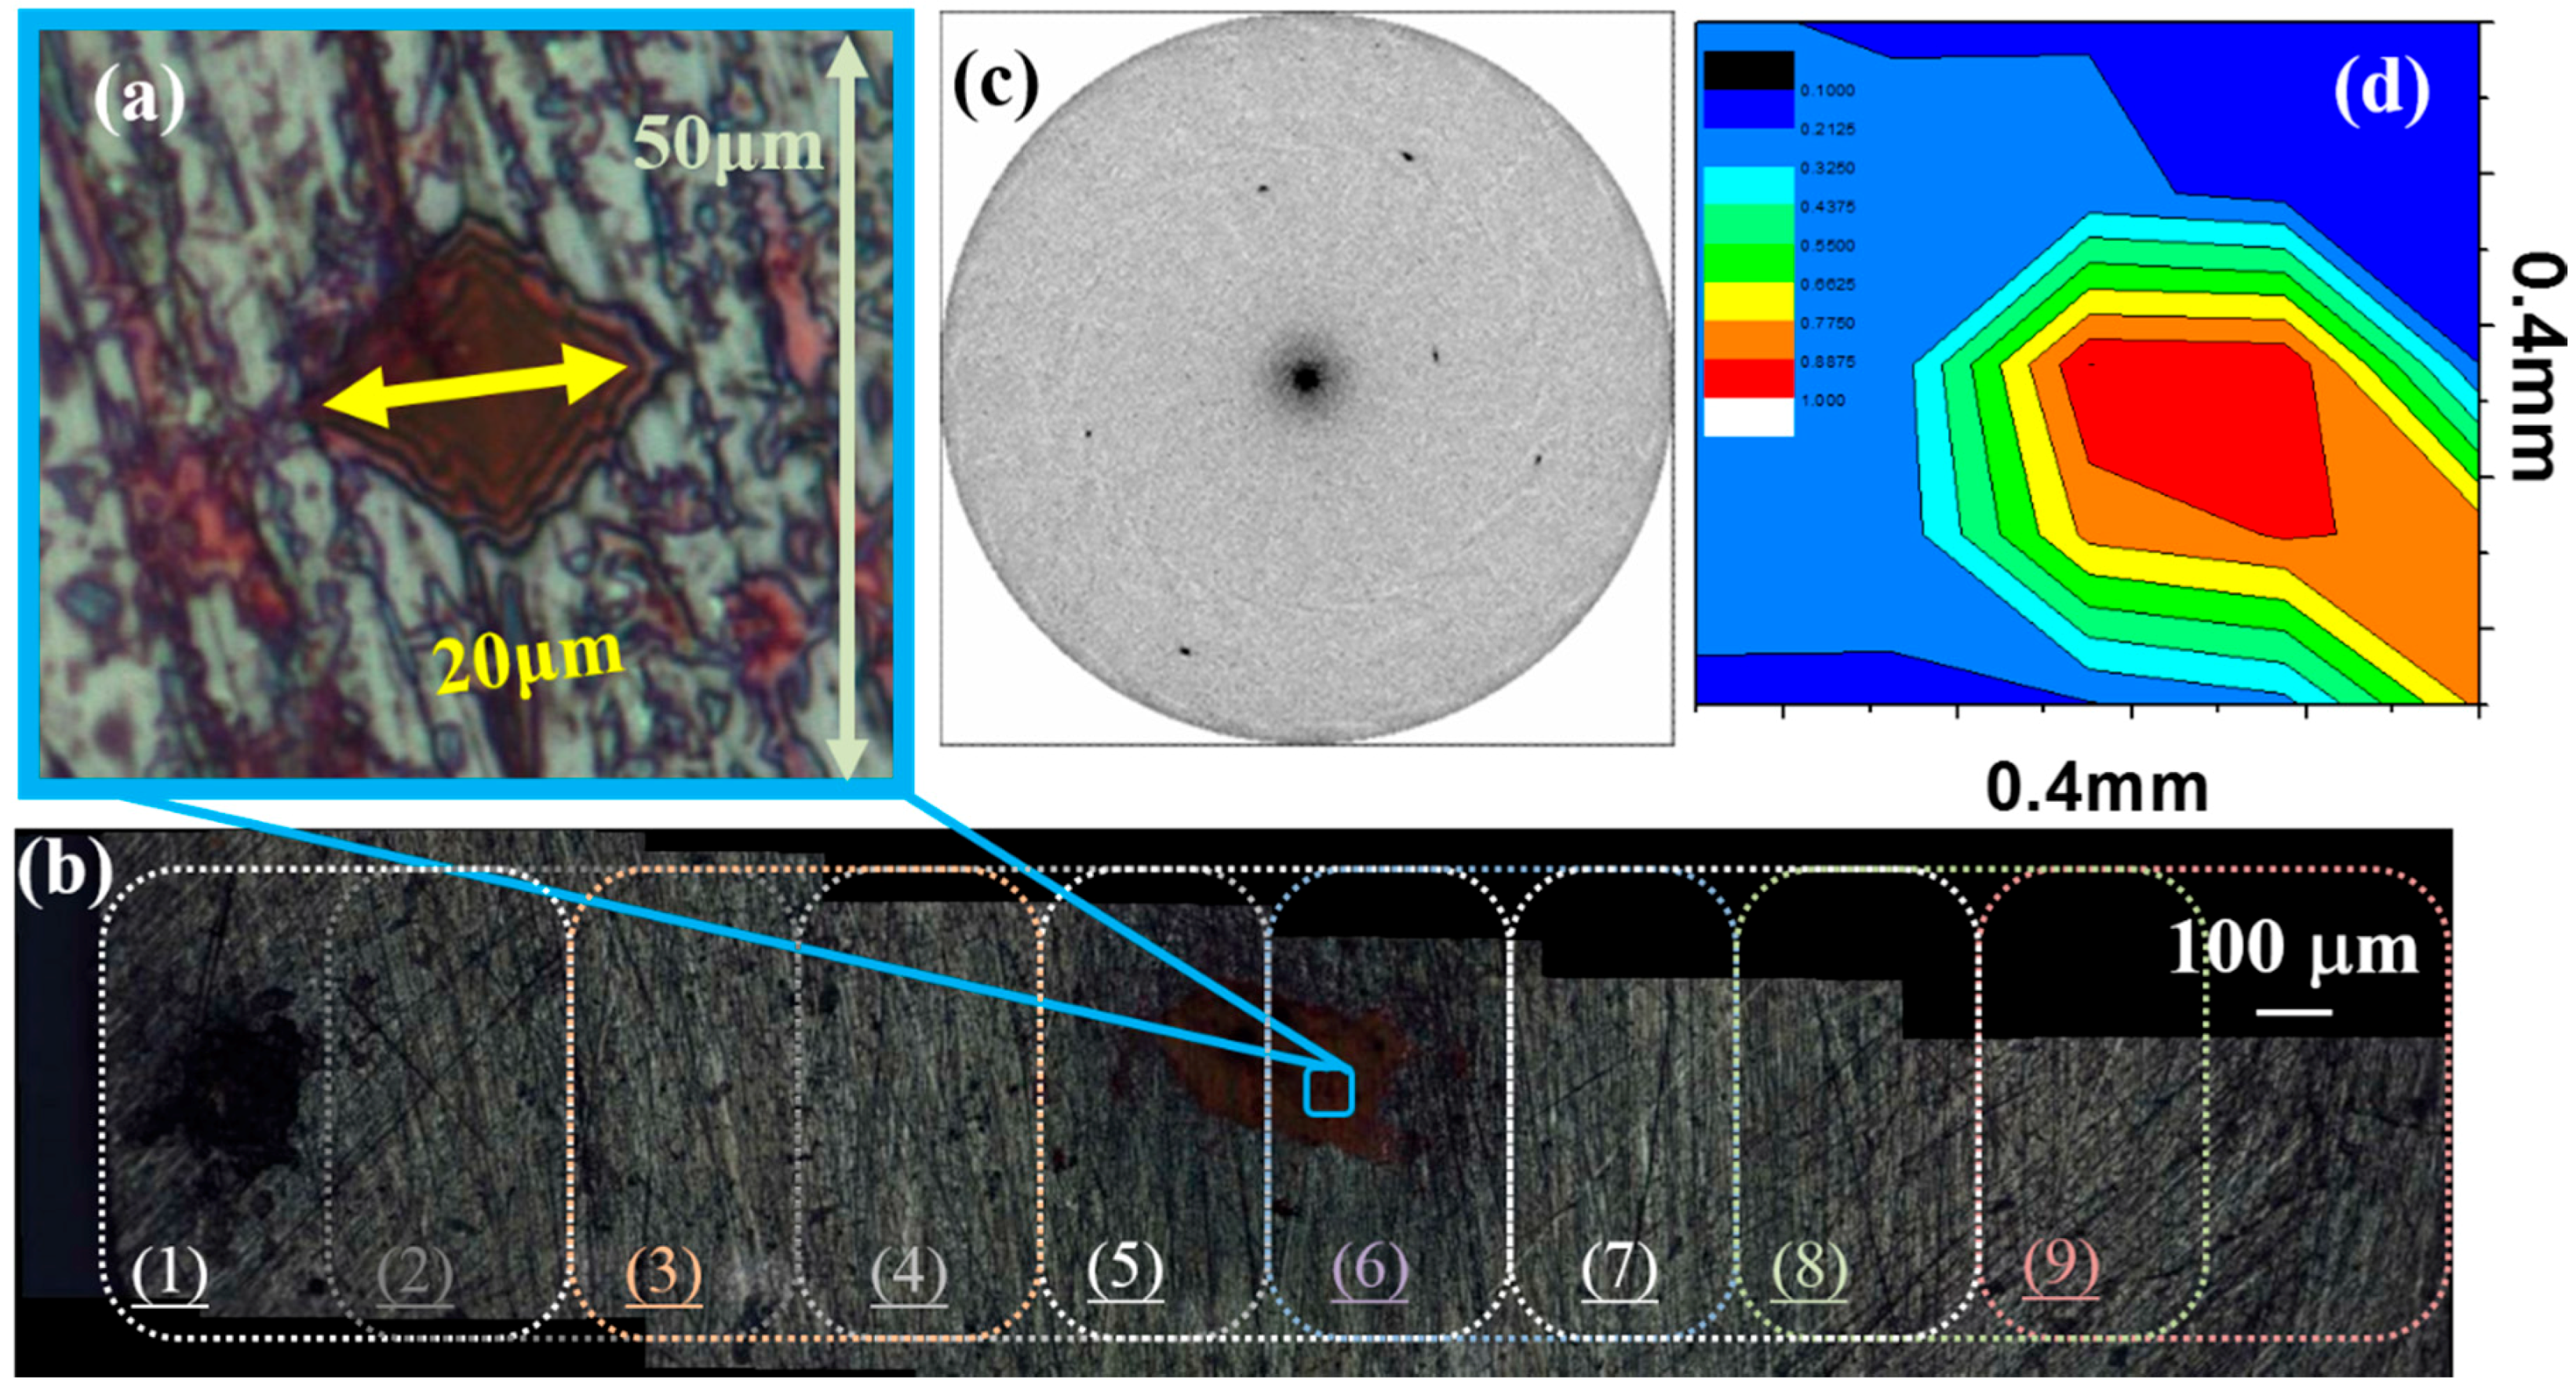
Figure 1. Synchrotron measurements: (a) the indented region of the specimen is set at the center; (b) nine measured areas in one direction are scanned and overlapping each other; (c) ypical diffraction spots of the measured results, which are from the Ni50Al50 sample; (d) normalized diffraction peak-width distribution of Ni50Al50.
Qubs 02 00018 g001
Figure 2. Lattice-strain distributions of (110) as squares (), (200) as circles (), and (211) as triangles (), respectively, around indented centers for (a) Ni50Al50; (b) Ni49.875Al49.875Fe0.25; and (c) Ni49.5Al49.5Fe1.
Qubs 02 00018 g002
Figure 3. Molecular dynamics simulation results. The darker and light-colored symbols represent the Ni and Al atoms, respectively. (a) Lattice-misfit distortion before yielding; (b) distorted atoms shuffle to high-energy sites. The calculated parameters of minimum (), medium (Δ), and maximum () values at the yielding as a function of Fe-addition for (c) lattice strain; (d) local stress; and (e) τmax, respectively.
Qubs 02 00018 g003