Article

Investigation of Duplex Brass Membranes with Metallography, Permeability and Treatments: Work-Hardening, Annealing and Quenching

by
Sofia Kavafaki
,
George Bomis
,
Kyriaki Drakaki
,
Athanasios Varoutoglou
,
Konstantinos Kiourtzidis
,
George Z. Kyzas
and
Athanasios C. Mitropoulos
*
Department of Chemistry, International Hellenic University, GR 65404 Kavala, Greece
*
Author to whom correspondence should be addressed.
ChemEngineering 2021, 5(4), 76; https://doi.org/10.3390/chemengineering5040076
Submission received: 2 August 2021 / Revised: 16 September 2021 / Accepted: 4 October 2021 / Published: 3 November 2021
(This article belongs to the Special Issue Feature Papers in Chemical Engineering)

Abstract

:
This paper consists of the fabrication and investigation of metal membranes and the study of their behaviour and applications in gas separation processes. The scope is to produce and characterize the porous crystal structure of brass alloy (standardization: DIN 17660) membranes and measure their permeability with helium as a penetrant medium. Another part of this study is to alter the brass alloy’s structure throughout metallurgical treatments and investigate how the permeability is allied to the structure’s alteration. This work merges the knowledge and technology of inorganic porous materials science in metallurgy. The novelty of the current research resides in the process to alternate the brass alloy structure throughout metallurgical treatments and how it is allied to the permeability of the membrane, which is of interest to be investigated. The results of the research are analysed and compared conducting the final inferences. All metallurgical treatments resulted in low permeability values when compared to a non-treated specimen. Specifically, the drop in permeance ranged from 76 up to 99.56%. It is noted that consecutive treatments contributed to even further decreases.

1. Introduction

Inorganic membrane science and technology is an attractive field of membrane separation technology, having advantages such as resisting harsh chemical cleaning, high temperature and wear resistance, high chemical stability, long lifetime and autoclavability [1,2,3]. Membrane technology covers all engineering approaches, such as the transport of substances between two fractions. In general, membranes are used for mechanical separation processes for separating gaseous or liquid streams [4].
A membrane is a selective barrier, which allows molecules, ions or other small particles with certain properties to travel through, limiting other interventions [5]. In recent years, the development and synthesis of inorganic membranes for gas separation has been growing at high rates and has achieved interest in research and technology sectors [6]. The definition “membrane” is used for a solid means of allowing selective separation of the components of a mixture [5]. The stream that is intended to undergo this separation is called the “feed”, the part of the feed that penetrates through the feed is called the “permeate”, while the part that is withheld is called the “retentate” [7].
Due to their more durable matrix, metal membranes can withstand high-pressure back-flushing, offering more options for easier cleaning of their surface with less need for cleaning agents [8]. Although a wide range of materials is available for the production of commercial porous metal membranes, the majority of current commercially available porous metal membranes are made of stainless steel or based on stainless steel [9]. Apart from stainless steel, a wide range of metal alloys has also been used for the fabrication of commercial porous metal filters/membranes by many companies due to their unique characteristics, including good thermal conductivity, high mechanical strength and corrosion resistance [10,11]. Other metals used for manufacturing commercial porous metal filters/membranes include titanium [12,13], nickel [14], palladium–silver alloy [15] and aluminium [16,17].
Porous metal membranes have attracted research interest, and new preparation and characterization techniques are used as they are developed. As a result, they have been used for applications in the industry, including wastewater treatment, dairy processing, wineries and biofuel purification [9].
During the past few decades, various new porous metal membranes have been developed for use in a range of fields such as chemical/petrochemical processing [18], liquid/solids, gas/solid separation and biofuel processing [19]. In addition, there are implementations in medical filtration applications [20], solid-phase extraction [19] and a number of studies related to water purification [21,22,23].
Due to excellent mechanical properties, corrosion resistance, casting properties and formability, brasses alloys are widely used in many industries such as sanitary ware and electronic product and equipment manufacturing [24]. Lead (Pb) is often alloyed to brasses to improve their machinability [25]; 3 wt% Pb is added to brass alloys to improve their cutting performance [24]. The melting point of Pb is considerably lower than that of Cu and Zn and is distinguished as a separate phase in the brass alloy, allowing it to act as a lubricant and coolant during the cutting processes. However, Pb is highly toxic [26,27] in its handling and possesses a threat to humans during all the manufacturing stages of production and processing, as well as for its final product usage. One major concern arises when brass comes in contact with water, where Pb can be leached away and into the water as ions [28]. Toxicity of Pb in humans can lead to lead poisoning, damaging the circulatory, nervous, digestive and reproductive systems [26].

2. Experimental Section

A study was conducted in order to evaluate the permeability of brass alloy membranes. An X-ray fluorescence (XRF) apparatus was used to determine the composition of a bulk brass alloy cylinder. Five sample cylinders were cut from the bulk cylinder, and one of them was used for membrane fabrication as a non-treated brass alloy. This non-treated alloy was subjected to various cutting parameters of the electrical discharge machining (EDM) process in order to determine the dependence of the membrane’s surface from the parameters of the apparatus and determine the optimal parameters.
The remaining four cylinders were subjected to various metallurgical treatment methods, such as work-hardening, quenching and annealing. Membranes were manufactured from the four treated cylinders in two different thickness values (0.100 mm and 0.120 mm) using the EDM process with the optimal parameters that were predetermined. The permeability of the membranes was determined via a permeability experimental setup. Finally, structure analysis comparisons were conducted on the sample cylinders via the use of optical microscopy, and morphology of the brass alloys was captured via the use of scanning electron microscopy (SEM).
The study of the microstructure includes grain boundary observation, phase observation and phase characterization. The optical microscope used for this study was a ZEISS Axio Observer 3 microscope. The SEM apparatus used to capture the morphology of the brass alloy was a JEOL JSM-6390LV SEM.

2.1. Sample Preparation

The experimental process contained the sample preparation and all procedures that the samples underwent: metallurgical treatments, metallography procedure for microscopy and cutting. The experimental process used for sample preparation was divided into multiple stages. An initial cylinder of the bulk brass alloy with a diameter of 35 ± 0.02 mm was used in order to perform composition characterization of the alloy using an x Olympus XRF (X-ray Fluorescence) analyser. A review of the alloy’s composition was made in order to classify the material and to determine its physical and chemical properties. The composition of the brass alloy was detected as follows:
57.95% Cu 37.92% Zn 3.65% Pb
This brass alloy according to its consistency is defined in DIN 17660 [29], with material designation CuZn39Pb3. In addition, it is called duplex brass and is a two-phase microstructure (phase α + β ), where one of the phases is distributed through the other one [30].

2.2. Alloy Treatment

The cylinder was cut into five (5) test cylinders with an approximate length of 2 cm. One of the cylinders was set as the non-treated specimen, while the four (4) remaining were subject to the various metallurgical treatment methods, resulting in the specimens seen in Table 1. The treatments were applied with respect to temperature.
The heating time in work-hardening treatments was adjusted in a heating chamber until the desired temperature equilibrium was achieved. After the heating process, the material was removed from the heating chamber and inserted in a hydraulic press, where it was compressed with a pressure of 450 bar for 15 min. This time was chosen so that the temperature of the specimen did not decrease to temperatures where hot-working, and in consequence, cold-working would not be possible. Hot-working is carried out above the recrystallization temperature but below the melting point, while cold working is carried out below the recrystallization temperature, and as such, there is no appreciable recovery of metal [31].
The annealing was done in 2 steps, with an added step of passive cooling. Annealing is preferred for its restoration results, after hot-working, and is achieved from two different processes that occur at elevated temperatures, namely recovery and recrystallization, which may be followed by grain growth [11]. The specimen was inserted in the cold heating chamber. After the initiation of the heating process, the specimen underwent recovery for 7 min, after which the temperature was increased to the final crystal growth temperature and left for 1 h. These values were chosen according to [32,33]. After the annealing was done, the specimen was removed left to passively cool at room temperature.
The heating time in quenching treatments was adjusted in a heating chamber for 1 h to the desired temperature. The specimen was then removed from the heating chamber and quenched by a cold air stream until room temperature was achieved. This heating time was chosen as adequate for achieving temperature equilibrium for the size of the specimen. Air was used as a medium, as tests with water-cooling made the material extremely brittle and led to mechanical failures of the resulting membranes.

2.3. Membrane Fabrication

From the test cylinders (non-treated and treated) several membranes were cut in specific width values. Since the membrane had to be thin, the method that was chosen was electric discharge machining (EDM), a well-known computer numerical control (CNC) method for precise and fine cutting with high slenderness ratios [34]. The specimens were cut in two different width values of 0.100 mm and 0.120 mm. While a minimum thickness of 0.080 mm was achievable, the apparatus failed to reproduce a constant quality surface, introducing even bending during the cutting process. Hence, a minimum value of 0.100 mm was chosen. A sample size of 3 membranes was extracted from each cylinder, serving as a means for repeatability. The non-treated cylinder was also used for the fabrication of further additional membranes in order to determine the optimal parameters of the test that were determined with the use of optical microscopy, SEM and a tachometer on the membranes that were created.

3. Results

3.1. Microscopy

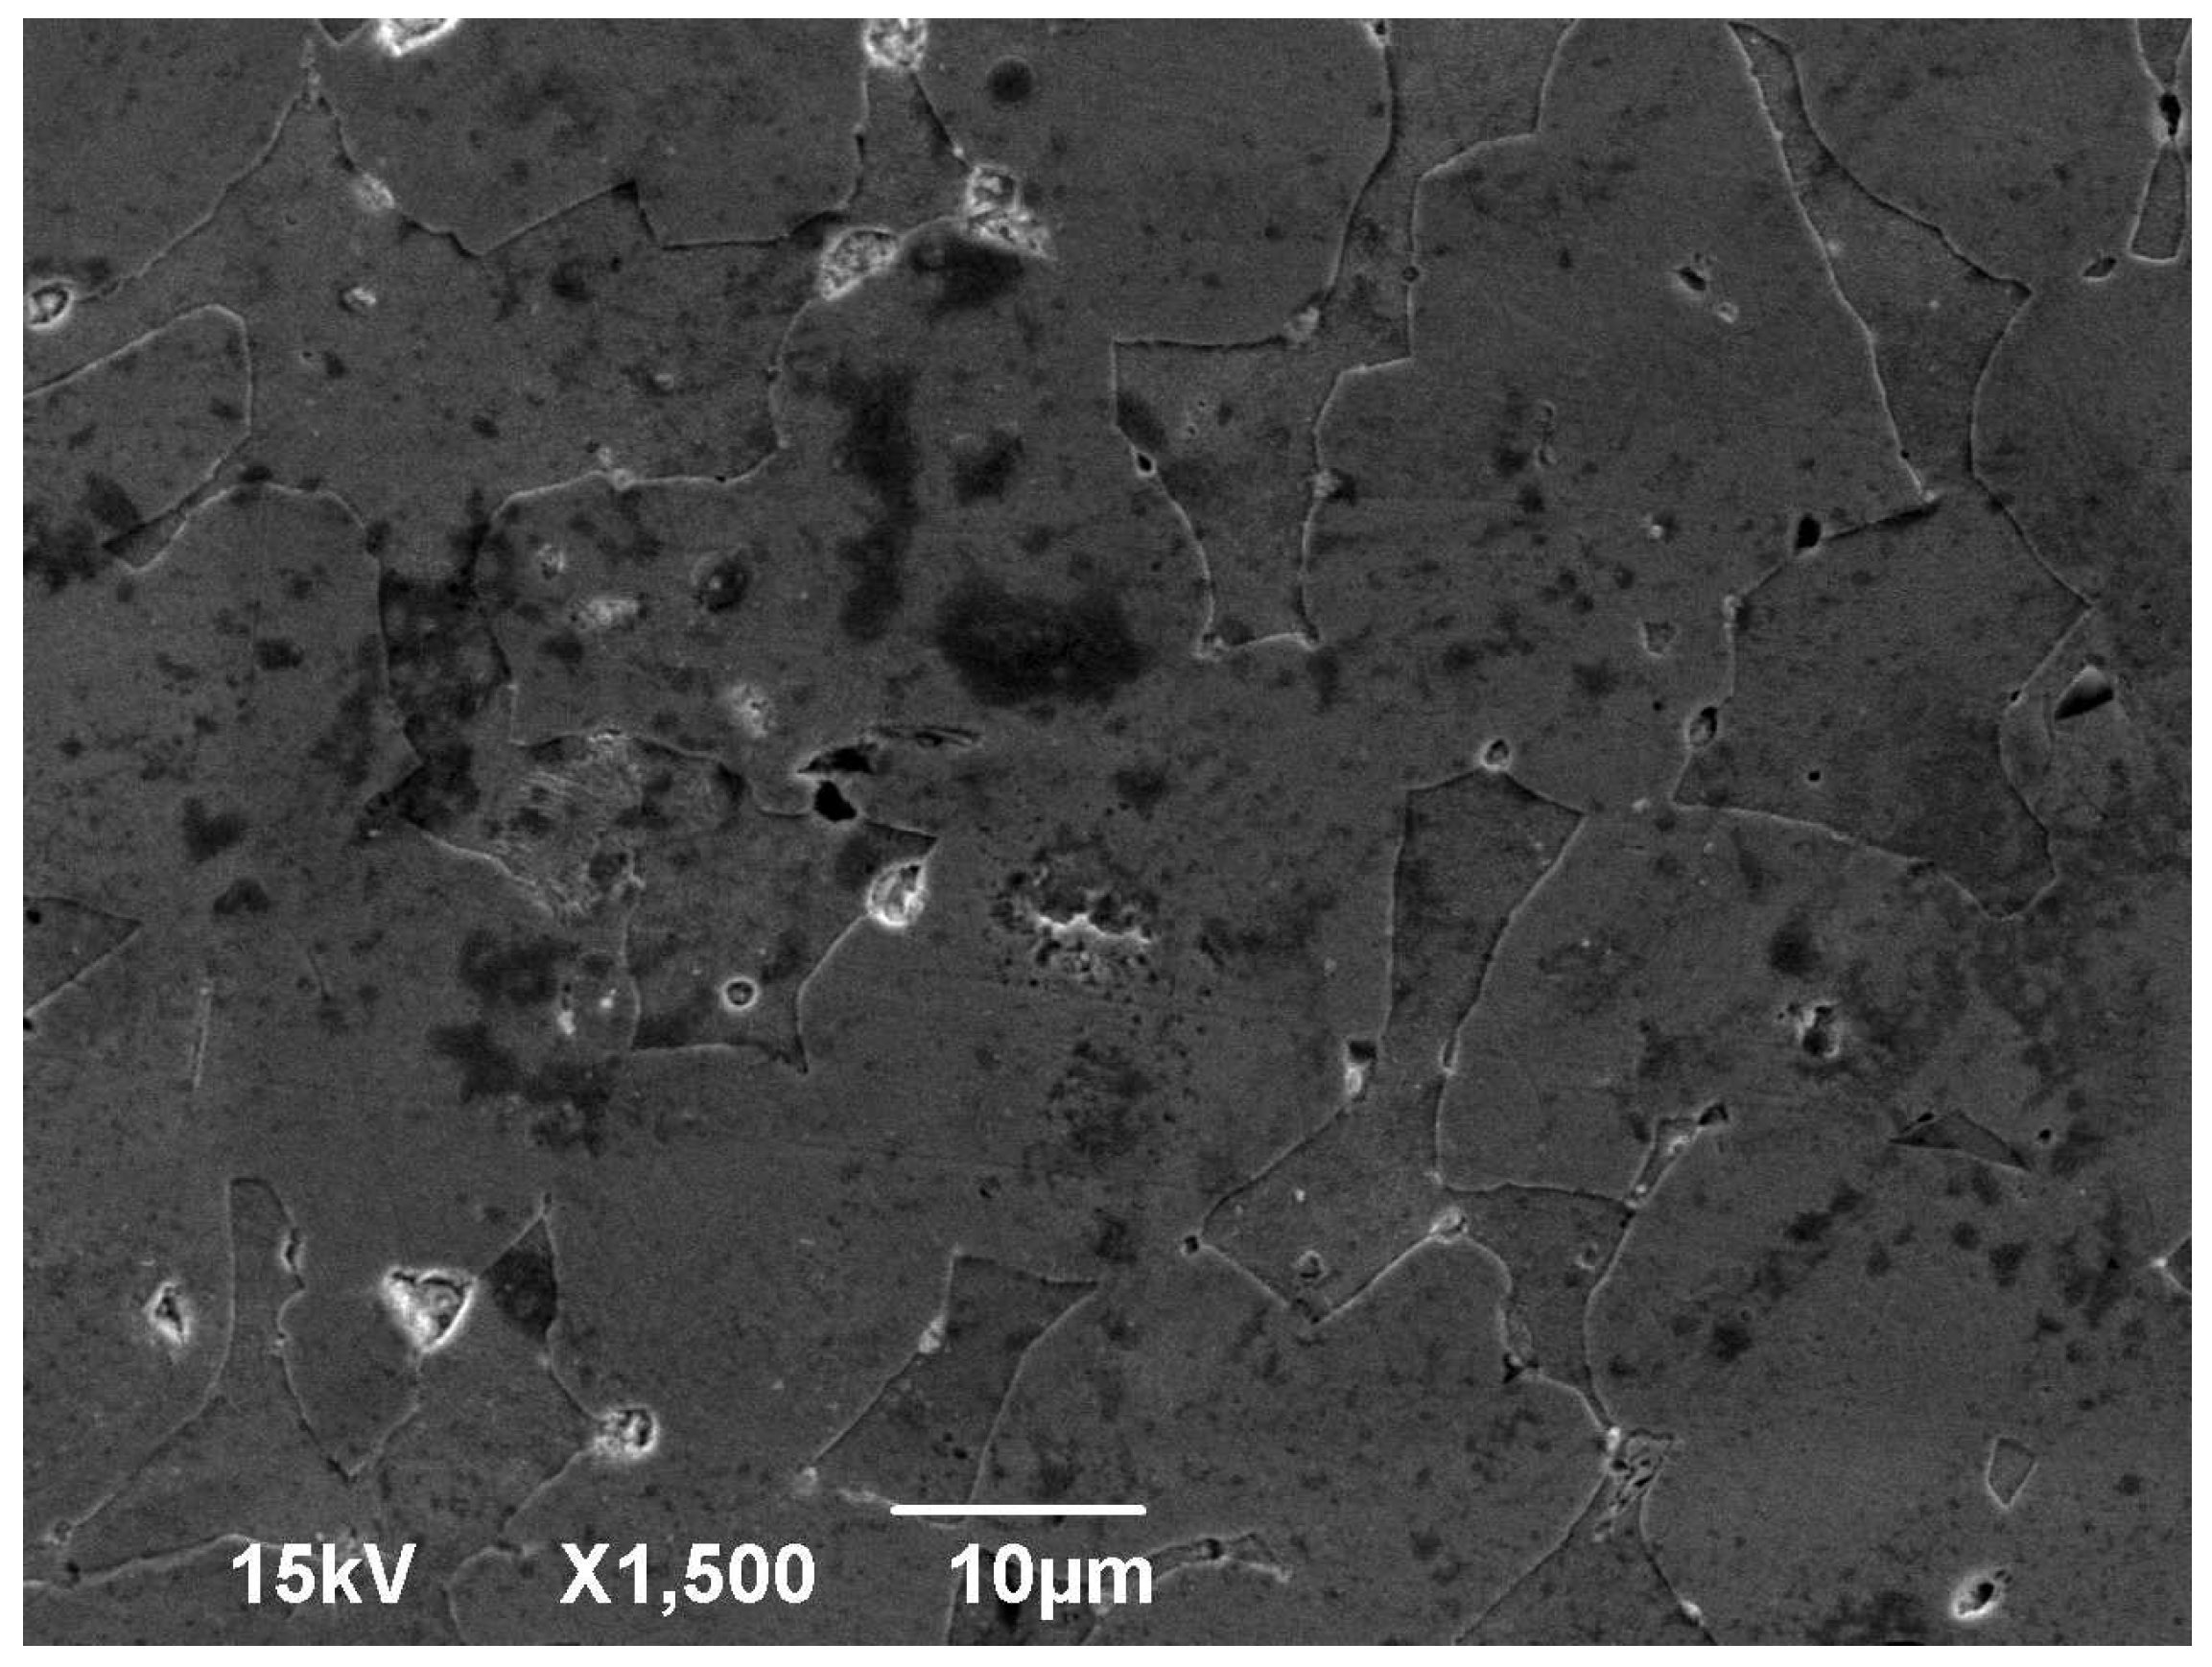
The SEM images included in Figure 1, when compared to Figure 2, present the effect of the EDM process on the surface of the membrane. While the surface without the EDM processing was polished before imaging, polishing the EDM processed surface would remove the recast layer and therefore not allow any comparison. As a result, the post-EDM images were taken from an unpolished surface.
After applying metallurgical treatments on the initial brass alloys, alterations were expected on the microstructure. The grains would have different shapes and extents. According to literature reviews, cold-worked grains are elongated after compression at high temperatures [35]. As the recrystallization starts, new grains are reformed [33], growing in size as the temperature is increased [36].
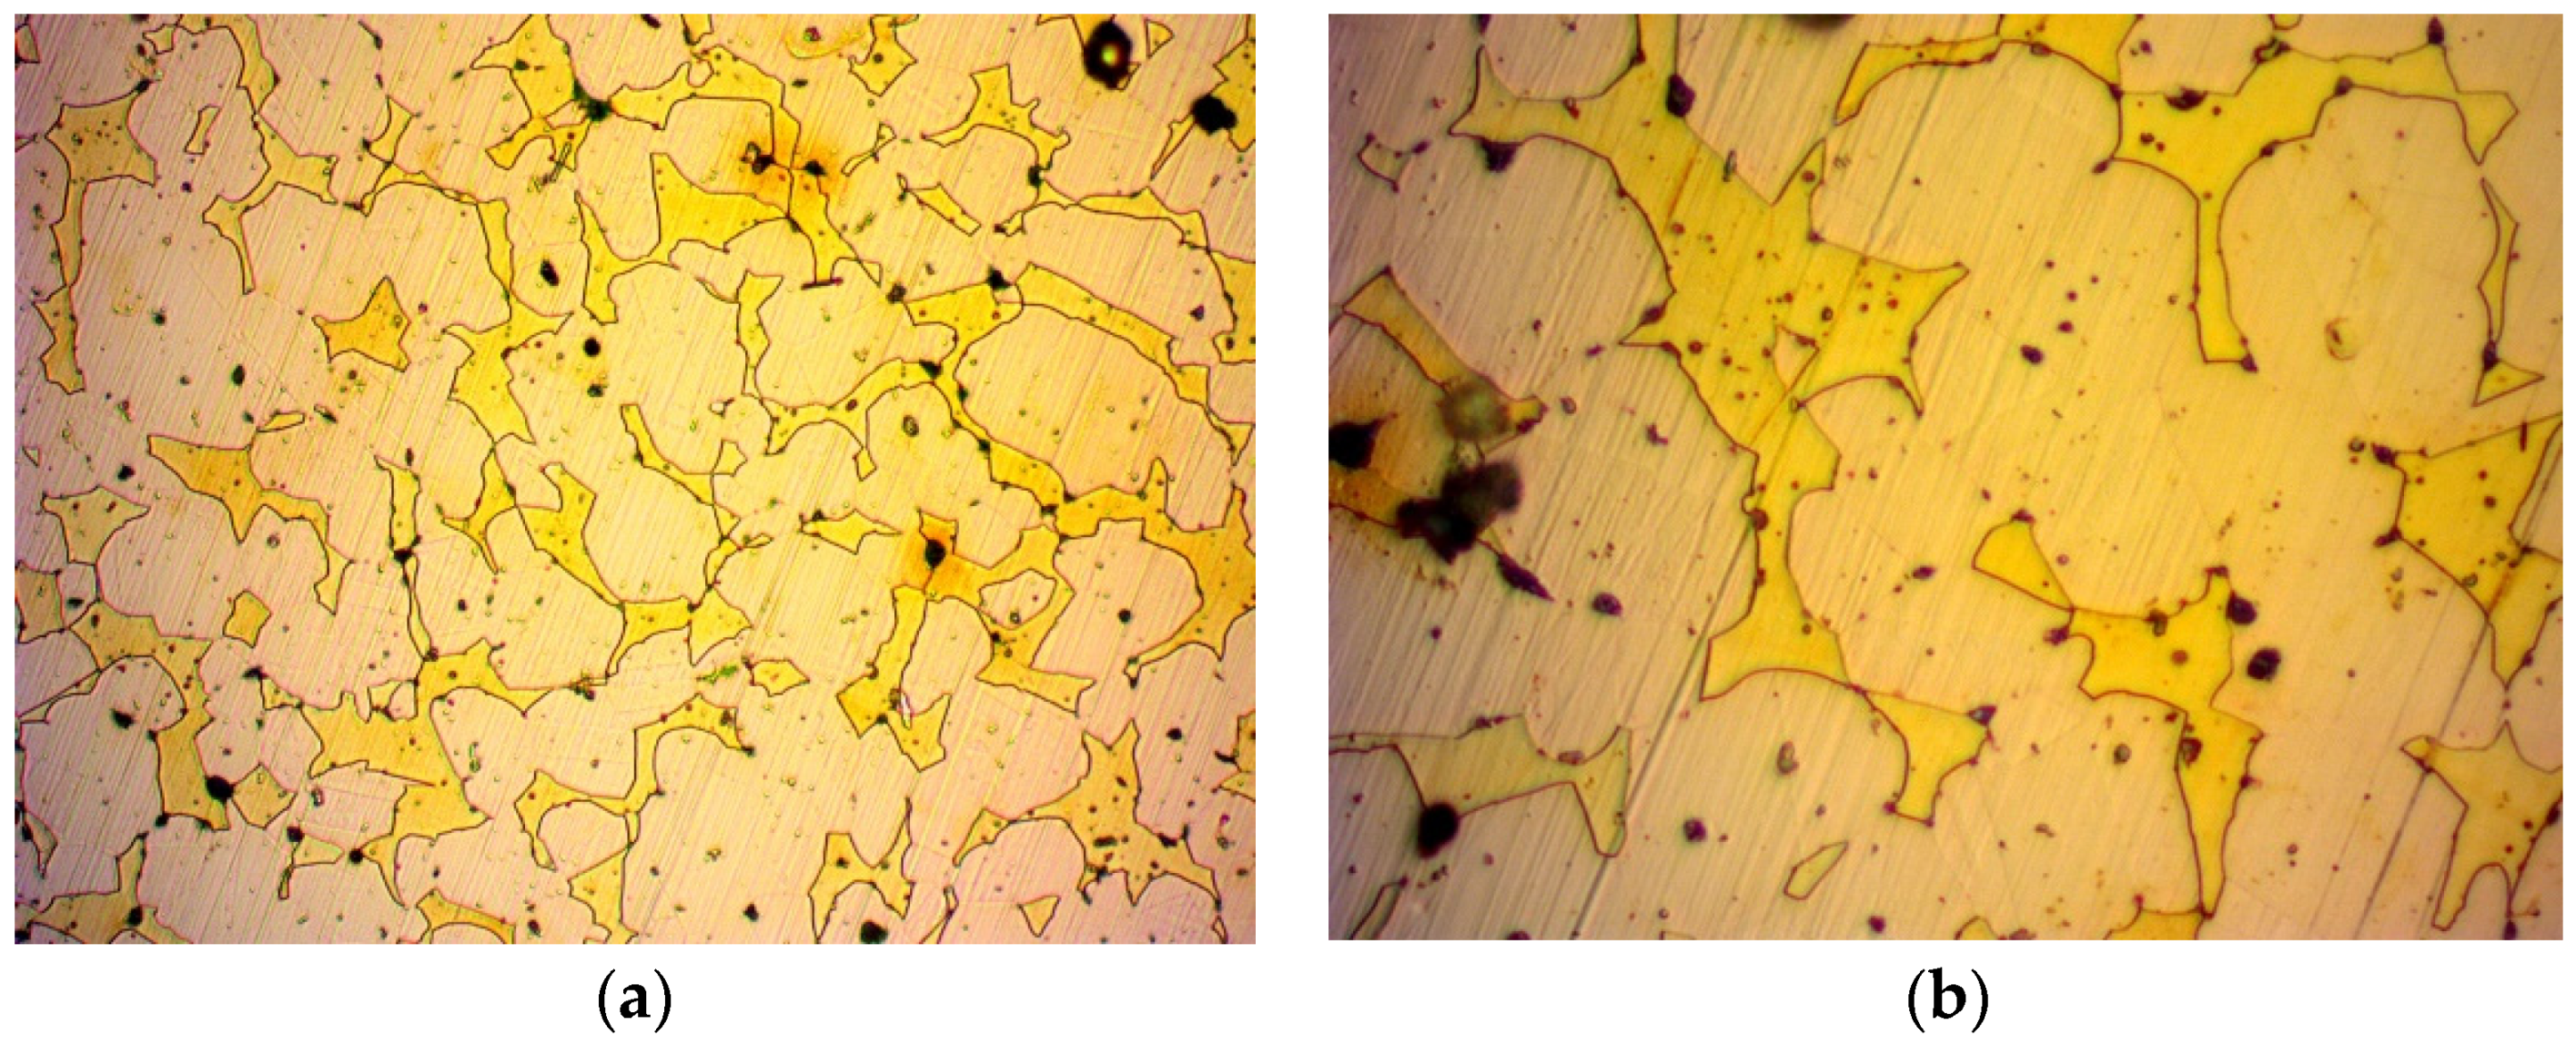
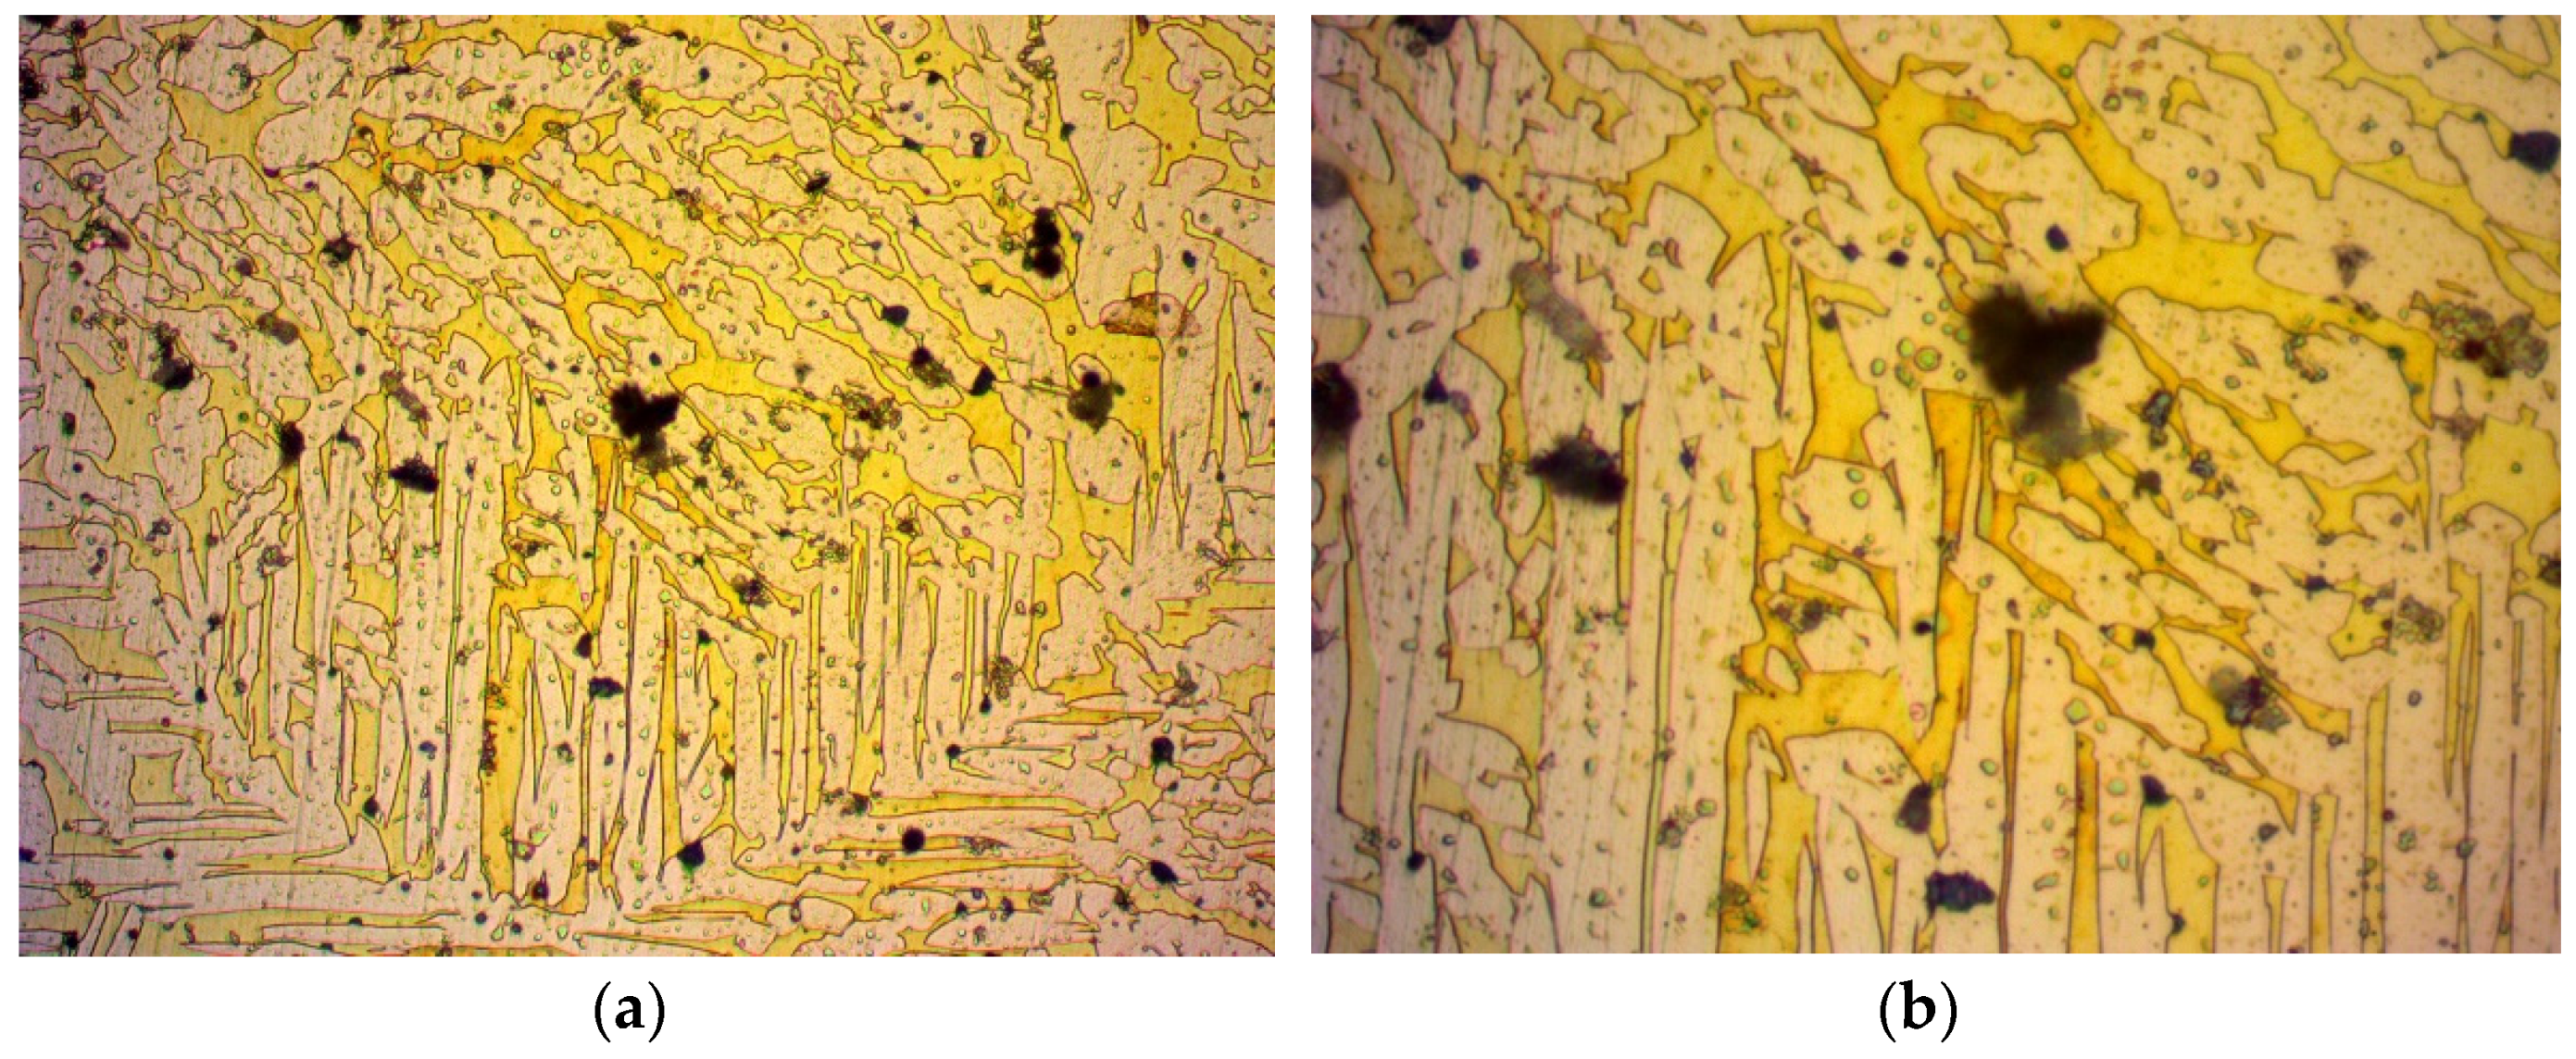
Figure 3 shows the structure of the initial non-treated brass alloy specimen. In Figure 3a,b, the boundaries are clearly present despite the minimal colour difference of the phases. The lighter colour represents the α phase, while the dense yellow colour represents the α + β phase. Furthermore, the lead presence is clearly denoted by the black marks. Figure 4, Figure 5, Figure 6 and Figure 7 show the structures of the treated alloys.
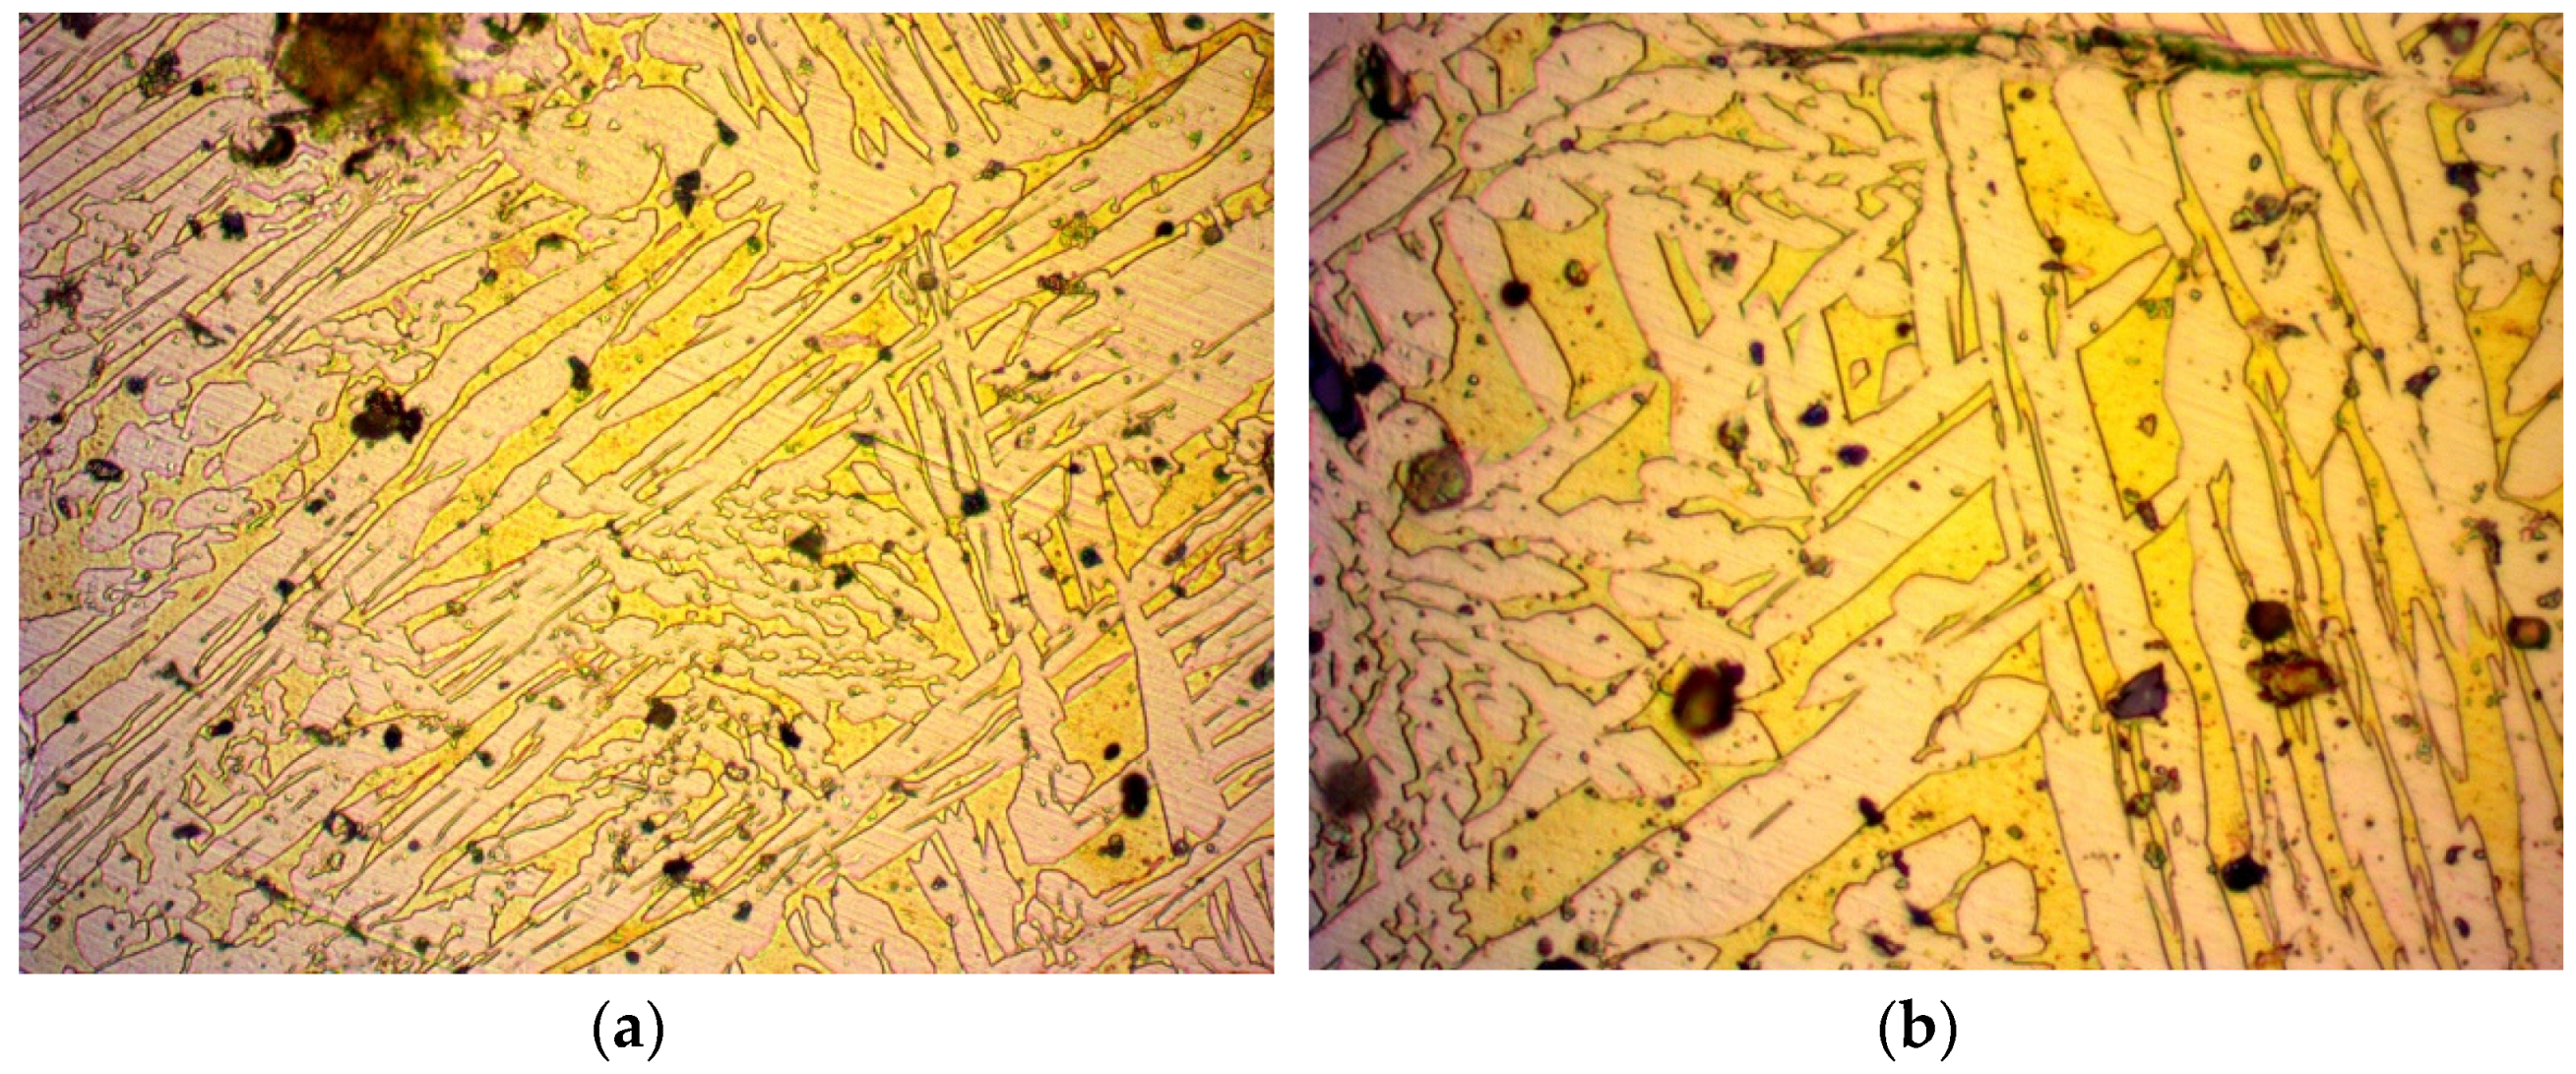
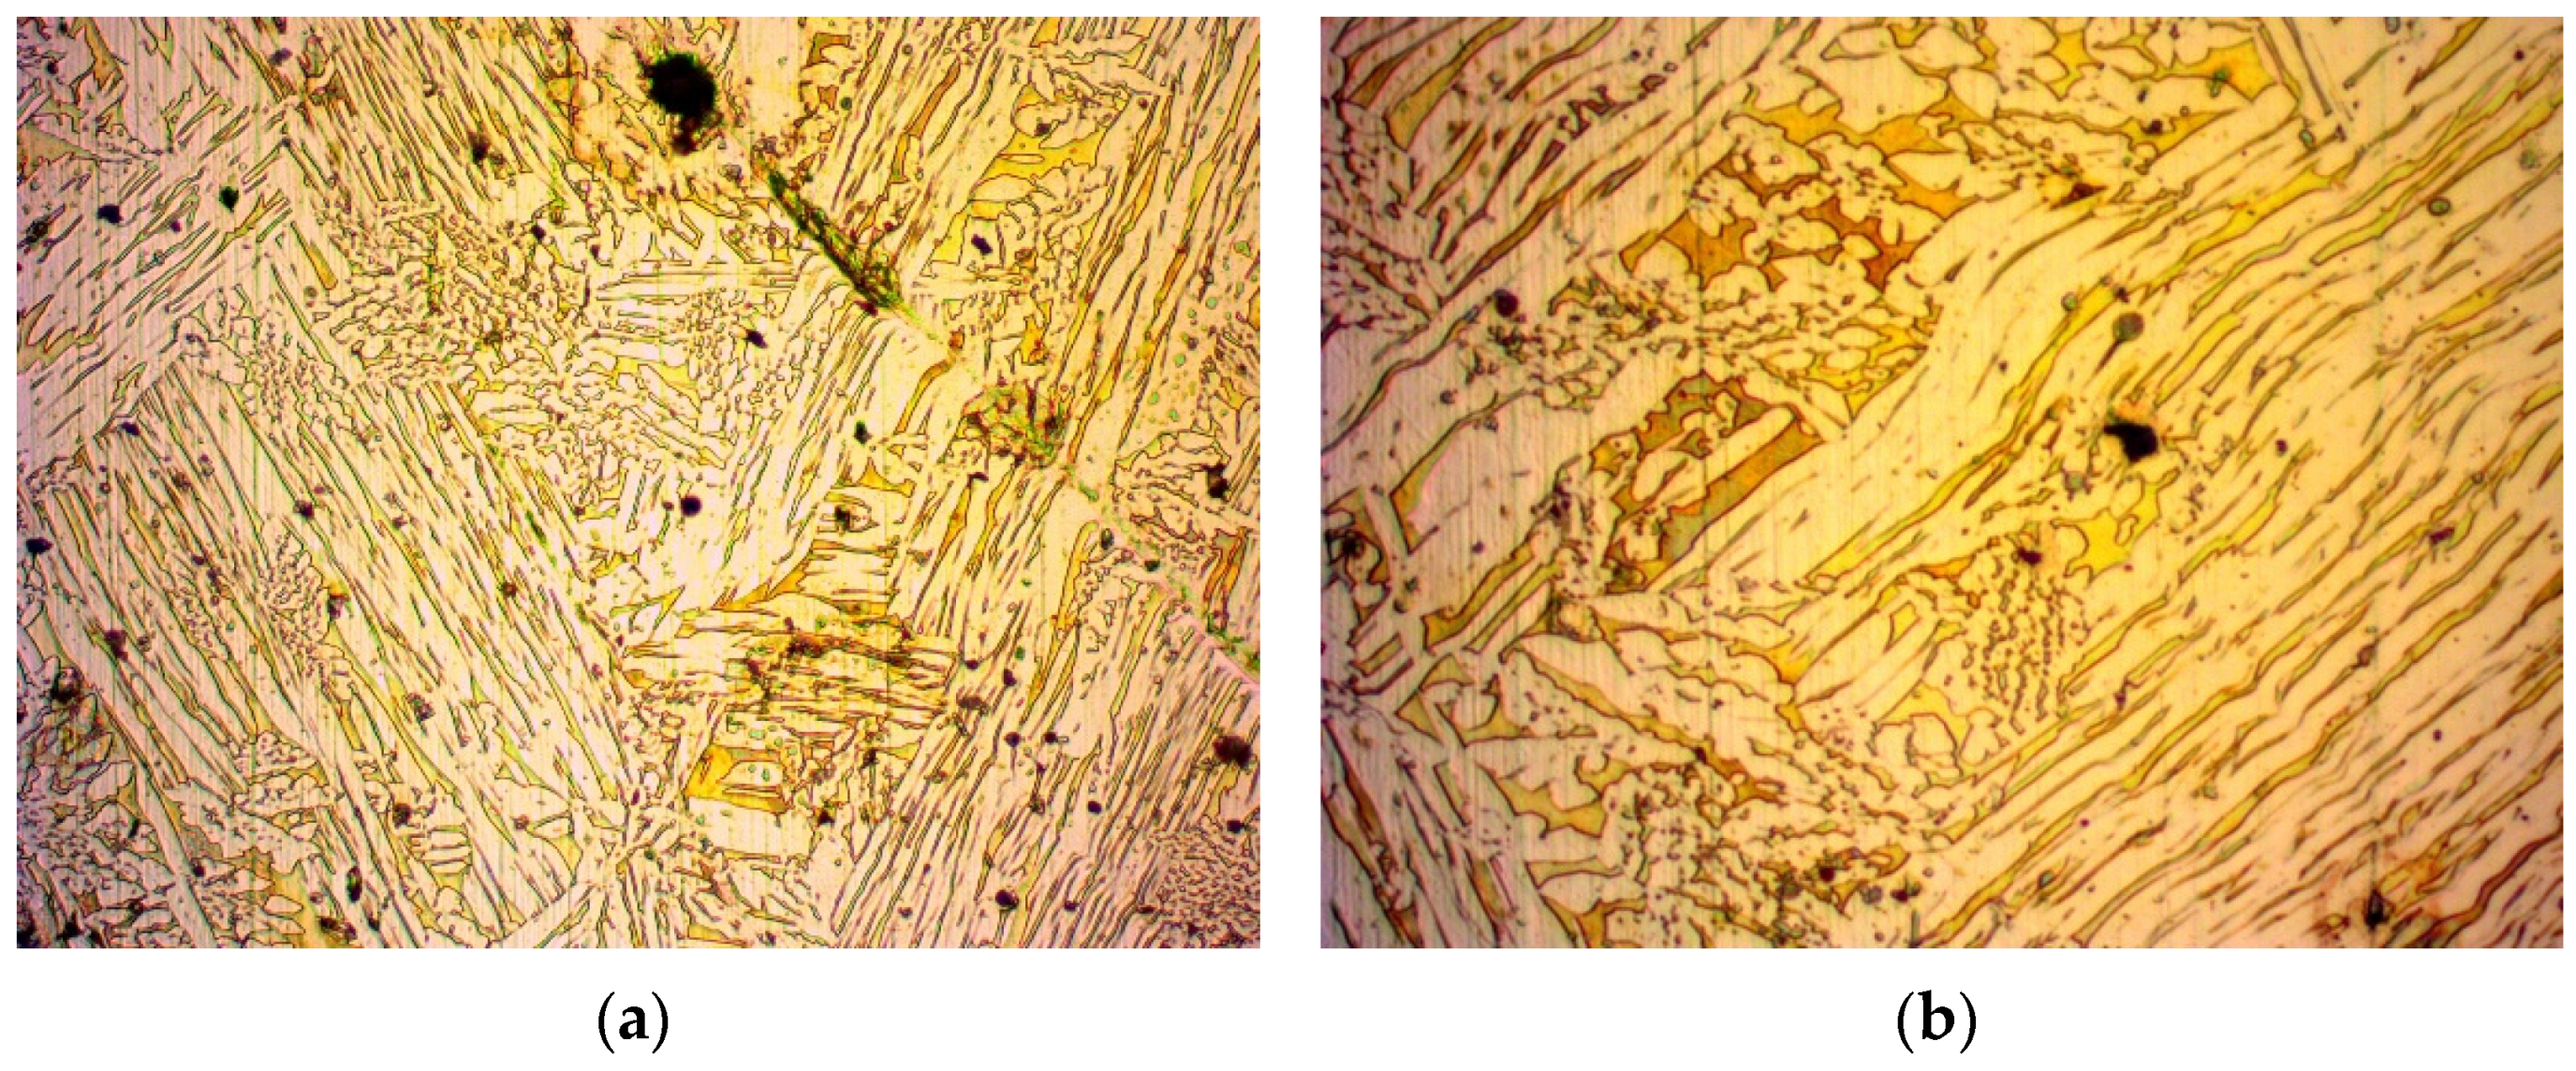
In Figure 4, optical microscope images of the treated brass alloy cylindrical specimen are captured after being work-hardened at 750 °C and compressed at 450 bar. The grains were acicular (needle-like formation). In an attempt to investigate the behaviour of the brass alloy after continuous stressing, an optical microscope image was captured, as seen in Figure 5. The treatment used was work-hardening in consecutive steps, after which the grains appeared to be more elongated: heat at 780 °C and compress at 450 bar, heat at 860 °C and compress at 450 bar, heat at 820 °C and compress at 450 bar and heat at 900 °C and compress at 450 bar. After the prementioned treatments, a decrease in permeability was expected due to the compressional forces that reduce porosity, leading to fewer and narrower flow paths for a fluid.
Another specimen underwent work-hardening at 750 °C, followed by compression at 450 bar and finally annealing at 700 °C. The result is shown in Figure 6.
The following could be seen:
  • During the annealing process, the internal stress of the material that was a result of its manufacturing method was reduced. This was due to the molecules repositioning in the crystal structure, inhibiting the presence of crystal structure faults. Such a crystal structure has a homogenous set of pathways for fluid to pass through, in contrast with a work-hardened one, which has locally compressed pathways. Due to this recovery of the crystal structure, easier flow of a fluid is possible and thus, an increase in permeability is expected.
  • The grains grew in size. While larger grains do not necessarily contribute to a larger porosity of a material, since the packing factor can be kept constant, the pore size should be increased in a crystal structure. However, a crystal structure contains less dislocations as opposed to an amorphous material [37,38]. These dislocations can create wider pores in the material, thus creating more favourable flow conditions and increased permeability. On the contrary, a material with a crystal structure has thinner pores and is expected to present a decrease in permeability. However, one should take into consideration that amorphous materials do not have a certain pattern and are subject to blind or closed pores, which can decrease permeability in amorphous materials.
  • Regarding the crystal structure faults that can reduce the pore size, the annealing process inhibits such faults from forming, greatly supporting even further permeability increases.
The last treatment was heating at 850 °C and air stream quenched. Some grains appeared to be smaller and some more elongated, as is depictured in Figure 7.

3.2. Porosity

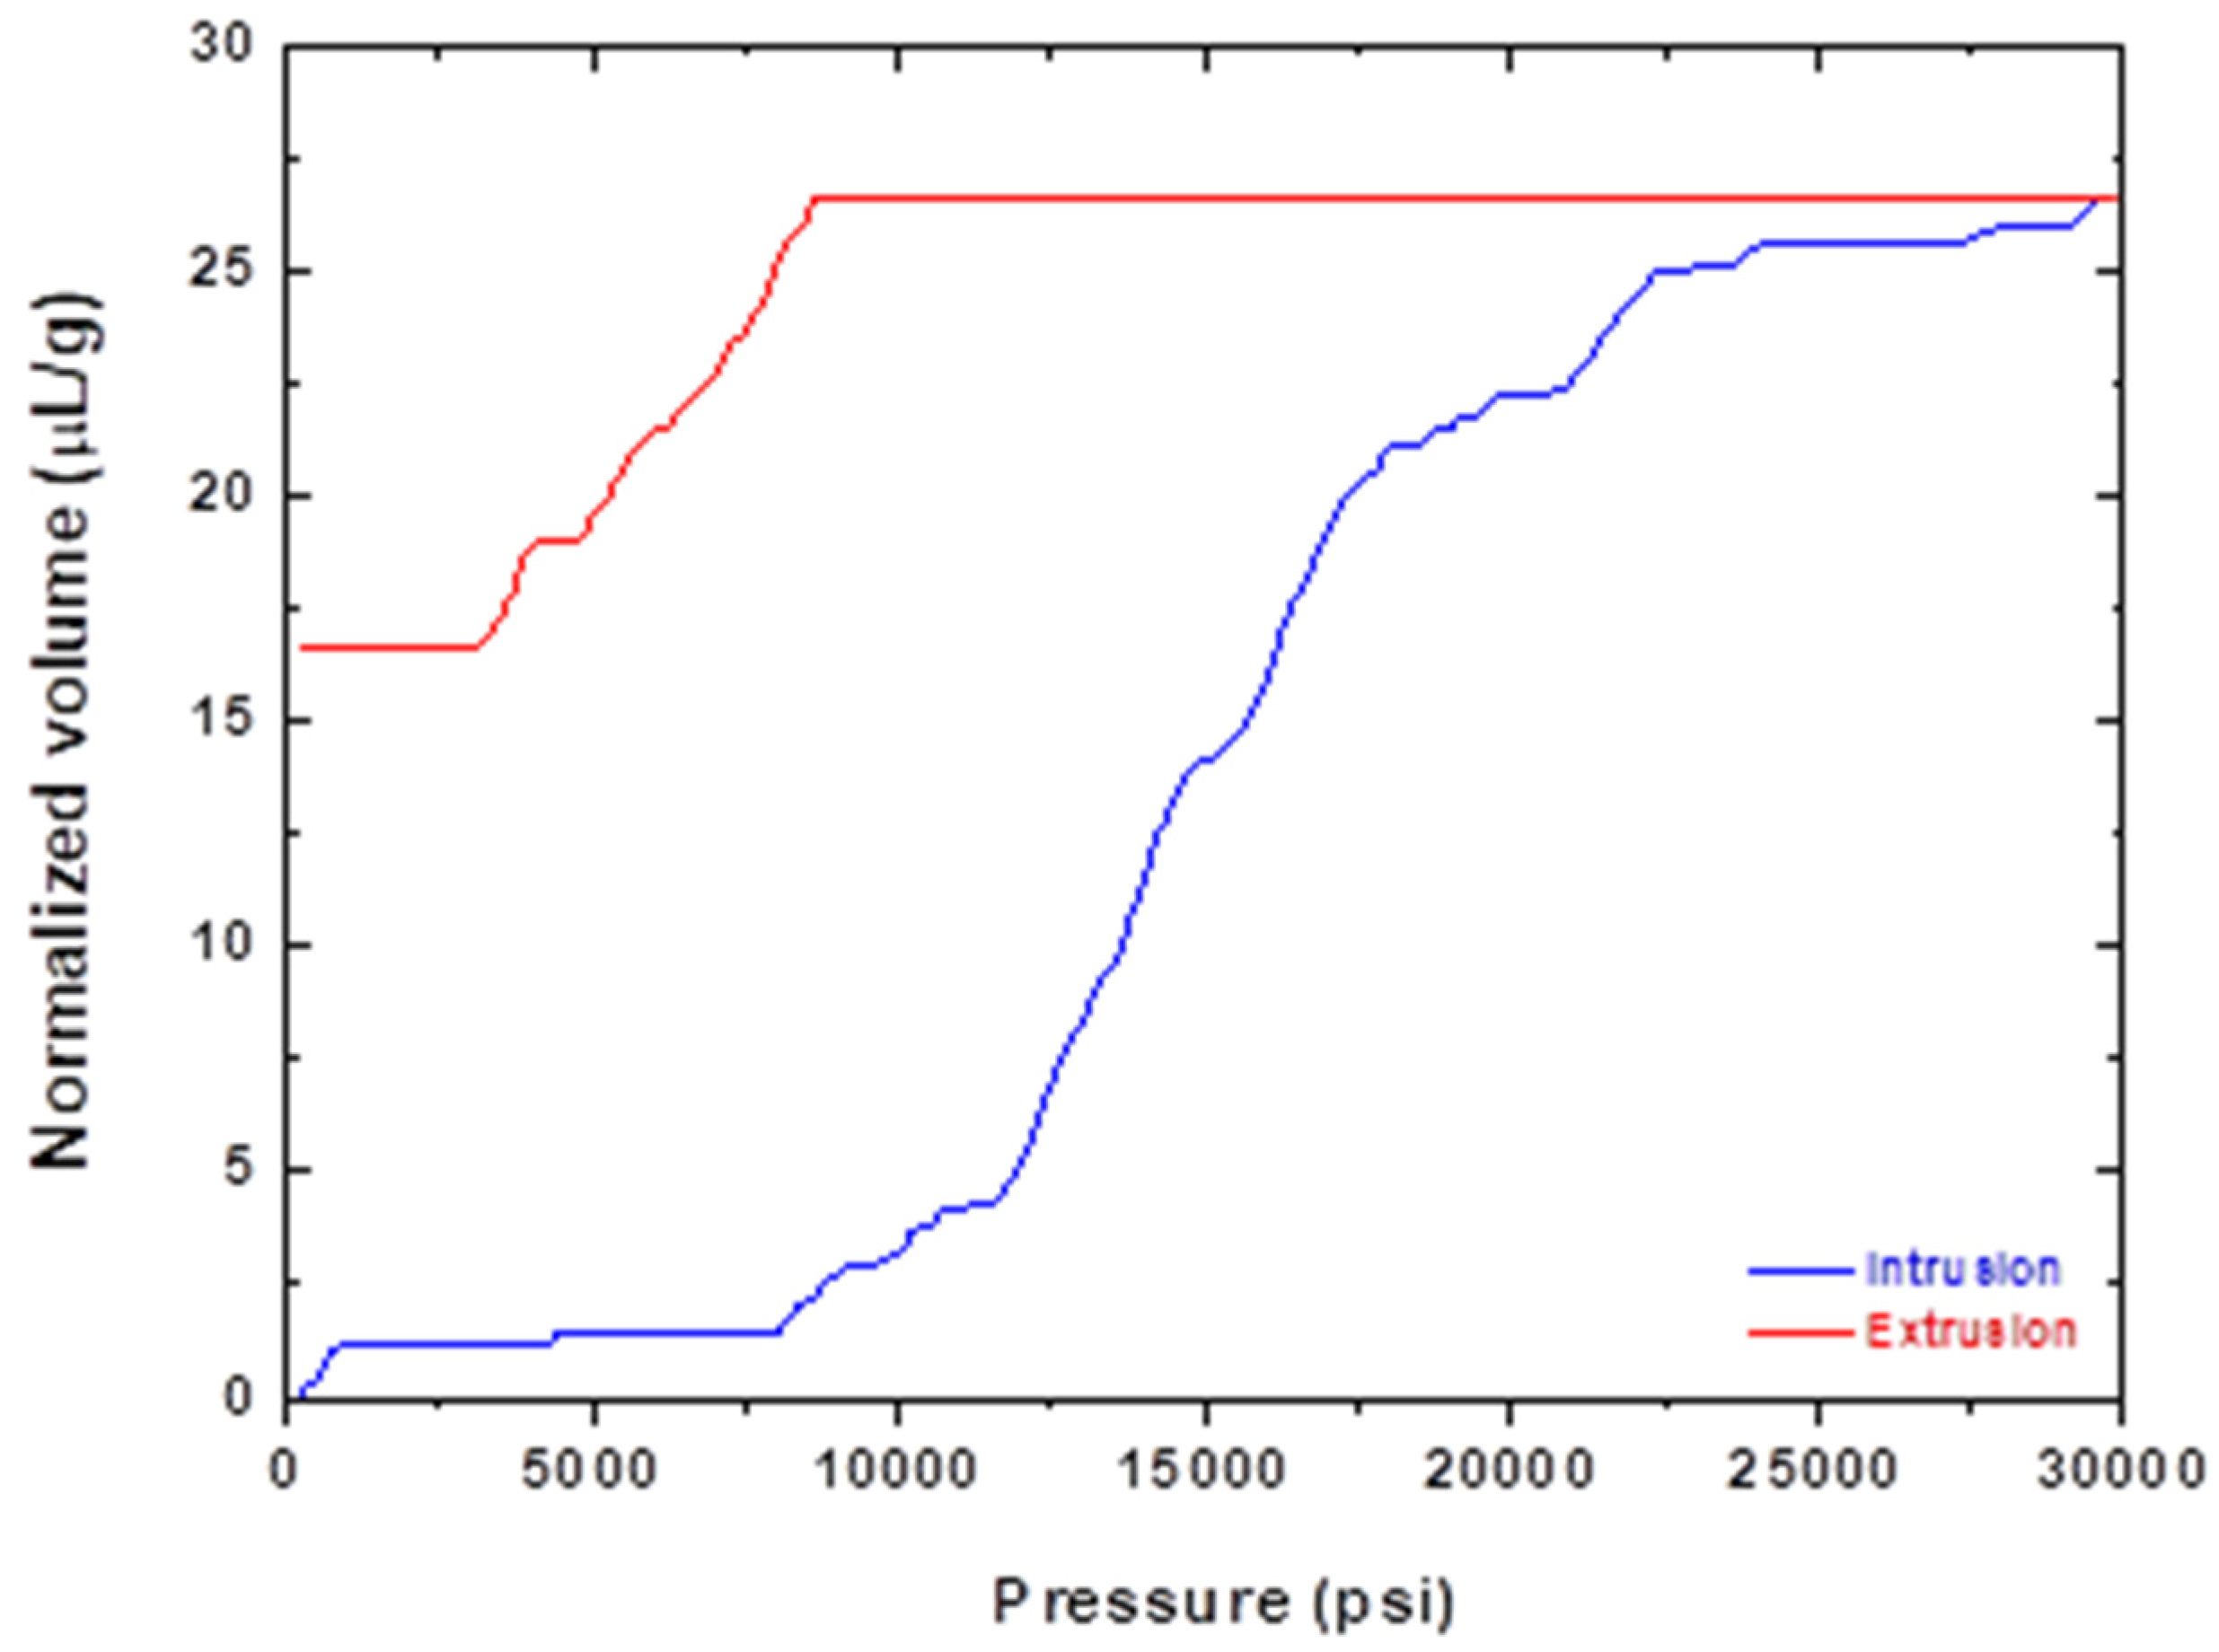
Porosity was determined via an indirect determination by using the mercury intrusion method. The volume of the mercury that was intruded in the sample was recorded with respect to the applied pressure. The volume was normalized to the sample’s weight, and the results can be seen in the graph of Figure 8.
The active porosity Φ was then determined from Equation (1), where ρ is the density of the sample; V g a s is the volume of the gas at pore saturation; and m s a m p l e is the mass of the sample.
Φ % = ρ · V g a s m s a m p l e · 100
The normalised saturation volume was determined as 25.62 μL/g at a saturation pressure of 8700 psi. After measuring the density of the sample at 8.48 g/cc, the porosity of the sample was found to be 21.73%. The profile of the graph seemed to exhibit a large deviation of mercury volume between the intrusion and extrusion phases when compared at the same pressure. It can equally be said that a certain volume of mercury intruded at a much smaller pressure than the one required for its extrusion. This dependence of variable alteration from the direction of the alteration is called the hysteresis phenomenon. In this case, the mercury entered the sample and found itself trapped in the pores of the sample (mercury trapping), requiring a further decrease in pressure than could be estimated from the intrusion graph. This could have been due to the capillary forces. While the mercury could easily penetrate the sample, due to it not having any significant opposite force, the capillary forces acted as reaction forces to the fluid driving force (pressure difference) during the extrusion phase. The size of the pores r can be estimated from Equation (2). The relationship between the pressure and capillary diameter is described by Washburn [39] as
r = 2 · σ H g · cos ( θ ) p s a t
where σ H g is the surface tension of mercury, approximately equal to 480 mN/m; θ is the contact angle of mercury, approximately equal to 140 degrees; p s a t is the minimum pressure at the saturation volume. The pore size was found to be 1.2259 · 10 8   m or 122.6     A ˙ .
All of the results can be seen in Table 2.

3.3. Volumetric Flow Measurement

The pressure of the gas after penetrating the membrane p o u t is approximately equal to the atmospheric pressure p a t m . Therefore, the relative pressure value of the gas before penetrating the membrane p r e l is equal to the pressure drop value Δ p , as shown in Equation (3), where p i n is the absolute pressure of the gas before penetrating the membrane.
Δ p = p i n p o u t = ( p r e l + p a t m ) p a t m = p r e l
After the placement of the sample in the permeability measurement setup, the gas flow was optimized for each sample. The steady-state conditions were achieved when a steady pressure drop across the sample was achieved.
On the bubble flowmeter, two marks were placed in order to define a certain volume. The time recording was initiated when a soapy bubble passed the first mark and ended when the soapy bubble reached the second mark. The volumetric flow V ˙ was determined by dividing the volume V with the time t . It should be noted that the flow was stabilized prior to the flow time measurement. Therefore, small-time values are precise and reliable.

3.4. Permeability

For permeability calculations, both permeance and permeation are determined. Permeance is defined as the volume of the feed passing through a unit area of membrane at a unit of time and under a unit of pressure [40]. In the same manner, permeation is defined as the volume of the feed passing through a unit area of membrane over a certain thickness at a unit of time and under a unit of pressure [41]. For the evaluation of these quantities, the equations used are shown in Equations (4) and (5).
P e r m e a n c e = Q S · Δ p
  P e r m e a t i o n = Q · L S · Δ p = P e r m e a n c e · L
As per the definitions of b a r r e r and G P U , their derivation from SI units is shown below:
1   b a r r e r = 10 10 cm 3 ( S T P ) · cm s · cm 2 · cmHg = 10 10 [ ( 10 2 m ) 3 ( S T P ) ] · ( 10 2 m ) s · ( 10 2 m ) 2 · ( 1333.22   Pa ) = 10 10 [ ( 10 2 ) 3 m 3 ( S T P ) ] · ( 10 2 m ) s · ( 10 2 ) 2 m 2 · 1333.22   Pa = 10 10 ( 10 2 ) 3 · 10 2 ( 10 2 ) 2 · 1333.22 m 3 ( S T P ) · m s · m 2 · Pa = 10 10 10 6 · 10 2 10 4 · 1333.22 m 3 ( S T P ) · m s · m 2 · Pa = 1 1333.22 10 14 m 3 ( S T P ) · m s · m 2 · Pa = 7.5006 · 10 4 · 10 14 m 3 ( S T P ) · m s · m 2 · Pa = 7.5006 · 10 18 m 3 ( S T P ) · m s · m 2 · Pa 1   G P U = 10 6 cm 3 ( S T P ) s · cm 2 · cmHg = 10 6 ( 10 2 m ) 3 ( S T P ) s · ( 10 2 m ) 2 · ( 1333.22   Pa ) = 10 6 ( 10 2 ) 3 m 3 ( S T P ) s · ( 10 2 ) 2 m 2 · 1333.22   Pa = 10 6 ( 10 2 ) 3 ( 10 2 ) 2 · 1333.22 m 3 ( S T P ) s · m 2 · Pa = 10 6 10 6 10 4 · 1333.22 m 3 ( S T P ) s · m 2 · Pa = 1 1333.22 10 8 m 3 ( S T P ) s · m 2 · Pa = 7.5006 · 10 4 · 10 8 m 3 ( S T P ) s · m 2 · Pa = 7.5006 · 10 12 m 3 ( S T P ) s · m 2 · Pa
Equations (6) and (7) were used for conversion to commonly used units b a r r e r and G P U . These equations were adjusted according to the units that were used in the experimental procedure. The active cross-sectional flow S was in m 2 , volumetric flow Q was in m 3 / s , pressure drop Δ p was in Pa and thickness L was in m .
1   b a r r e r = 7.5006 · 10 18 m 3 ( S T P ) · m s · m 2 · Pa
1   G P U = 7.5006 · 10 12 m 3 ( S T P ) s · m 2 · Pa
The gas flowed from the holes of the substrate, which can be seen in Figure 9, without a significant pressure drop, compared to its flow through the membrane. However, due to the continuity of the flow, the gas was forced to follow the paths of the holes. Therefore, the cross-section of the flow was limited to the holes of the metal substrate.
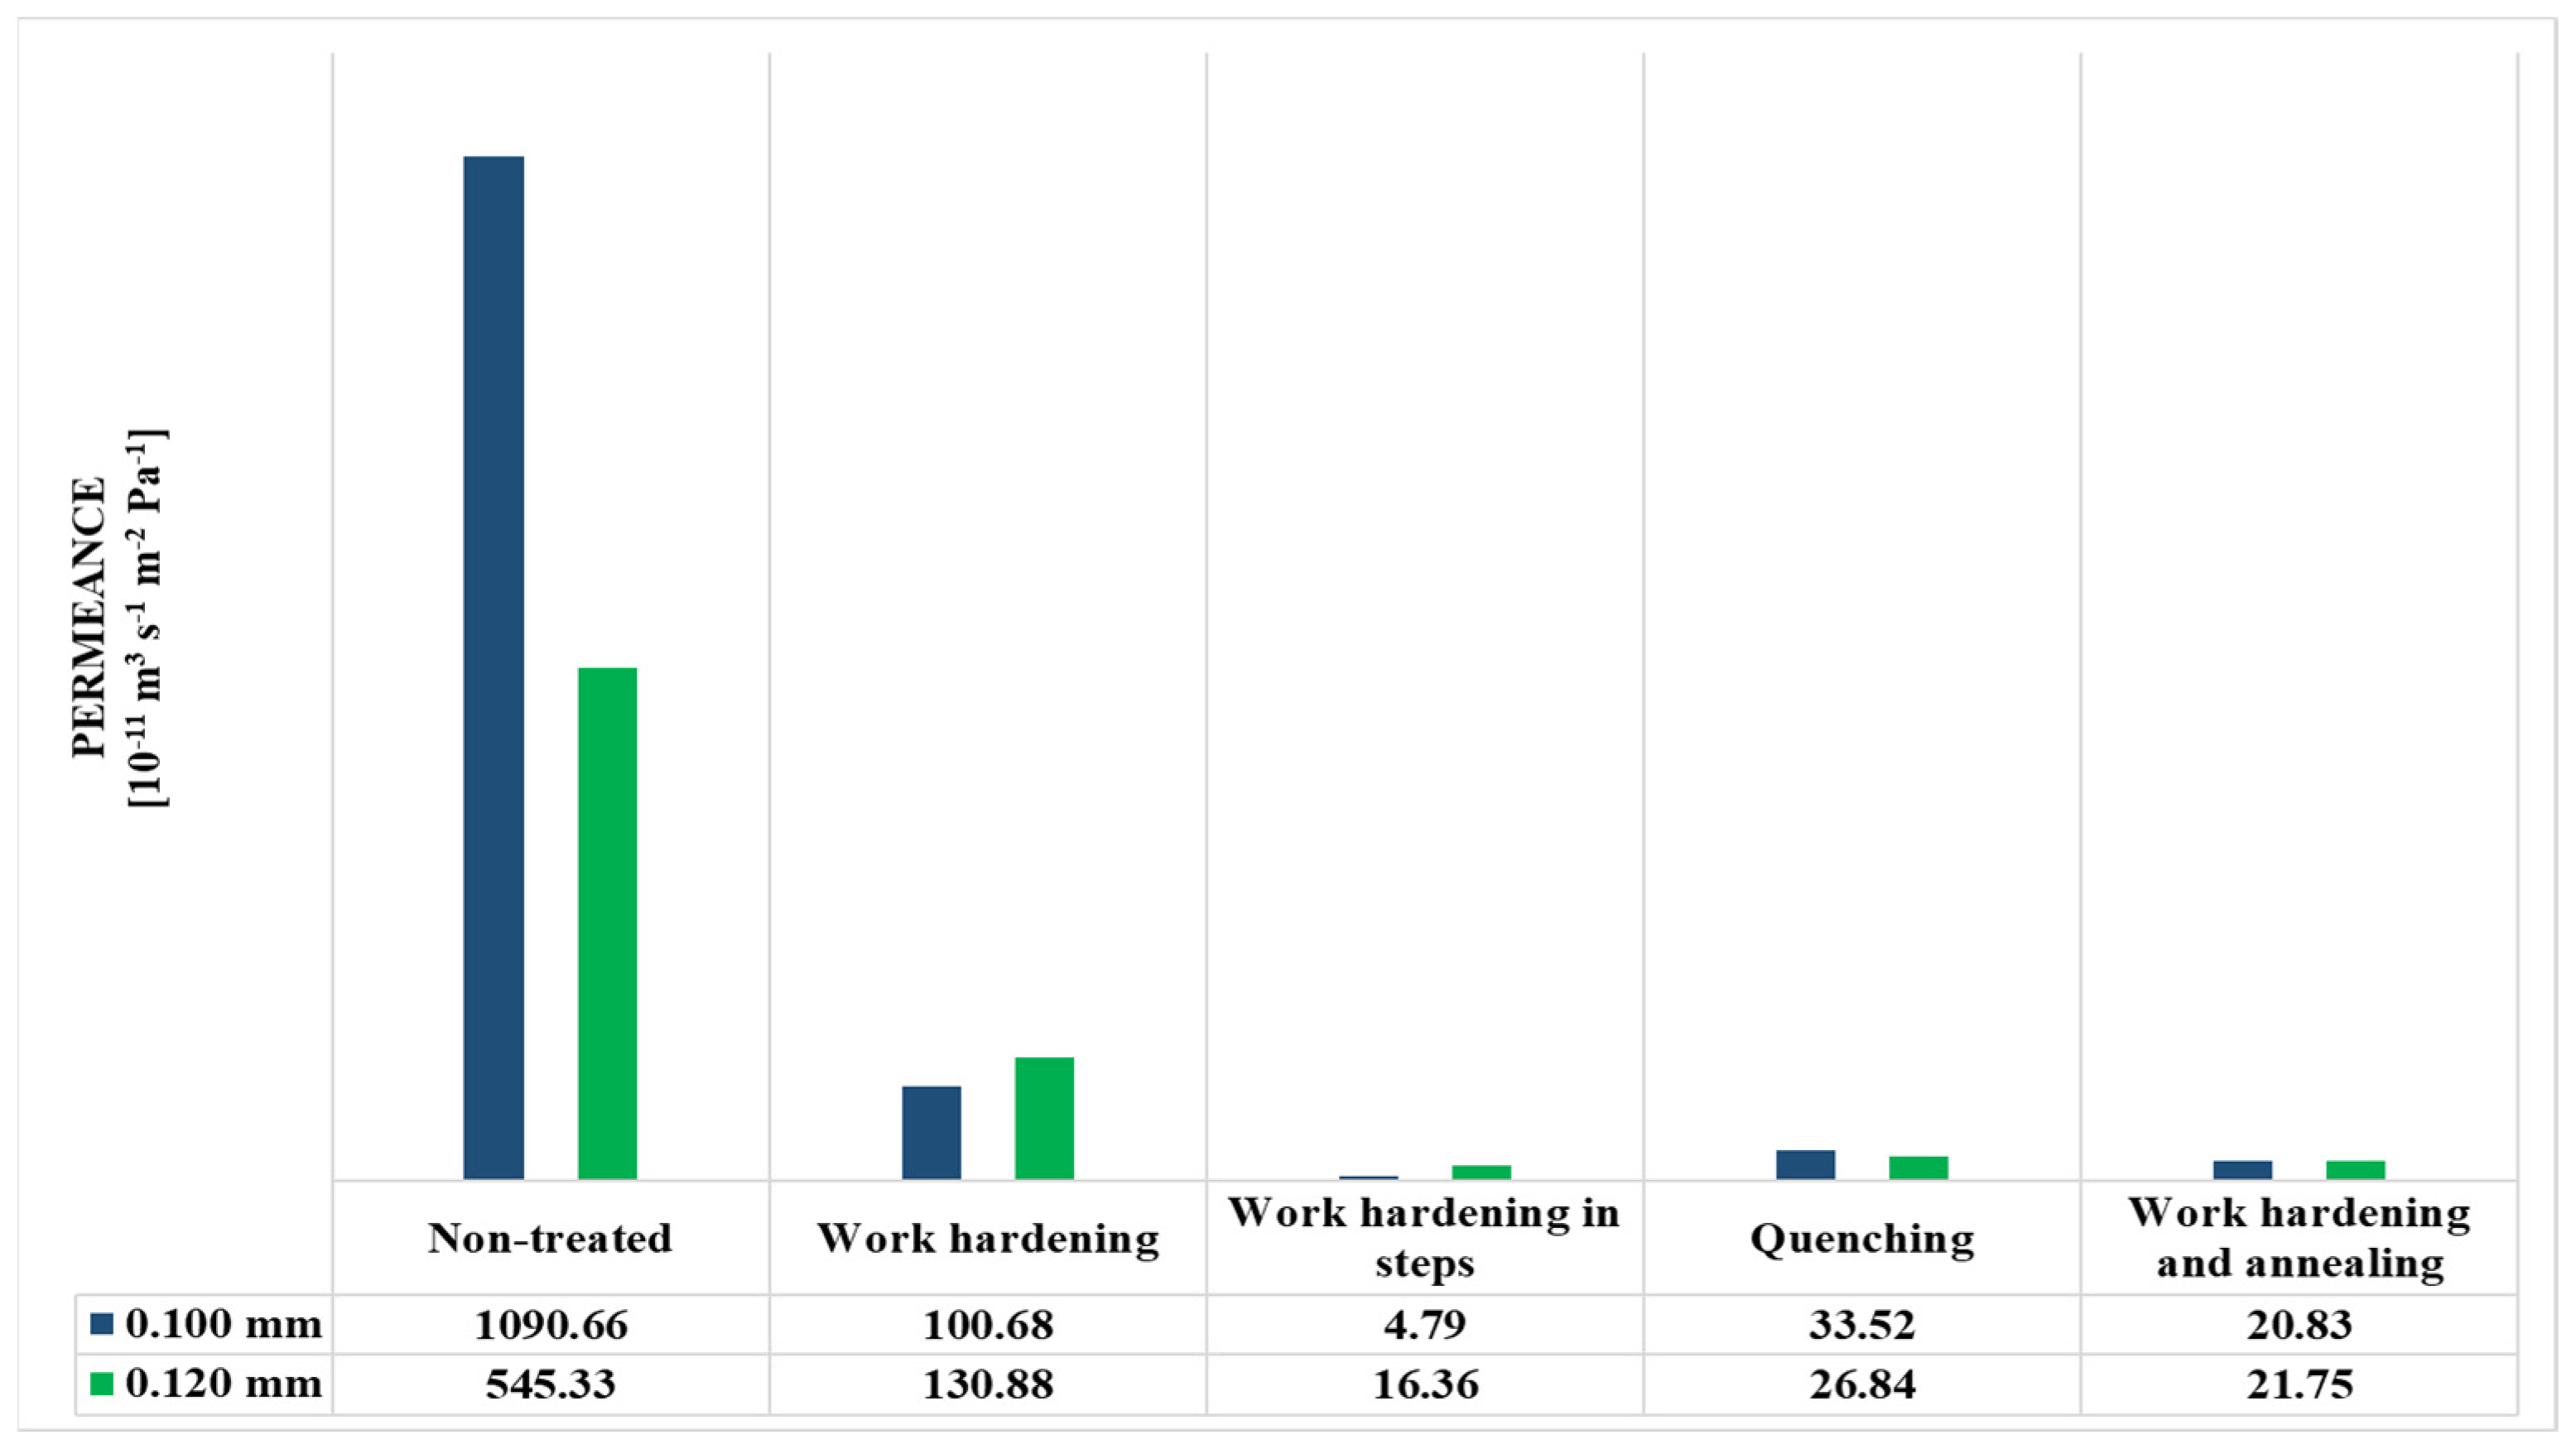
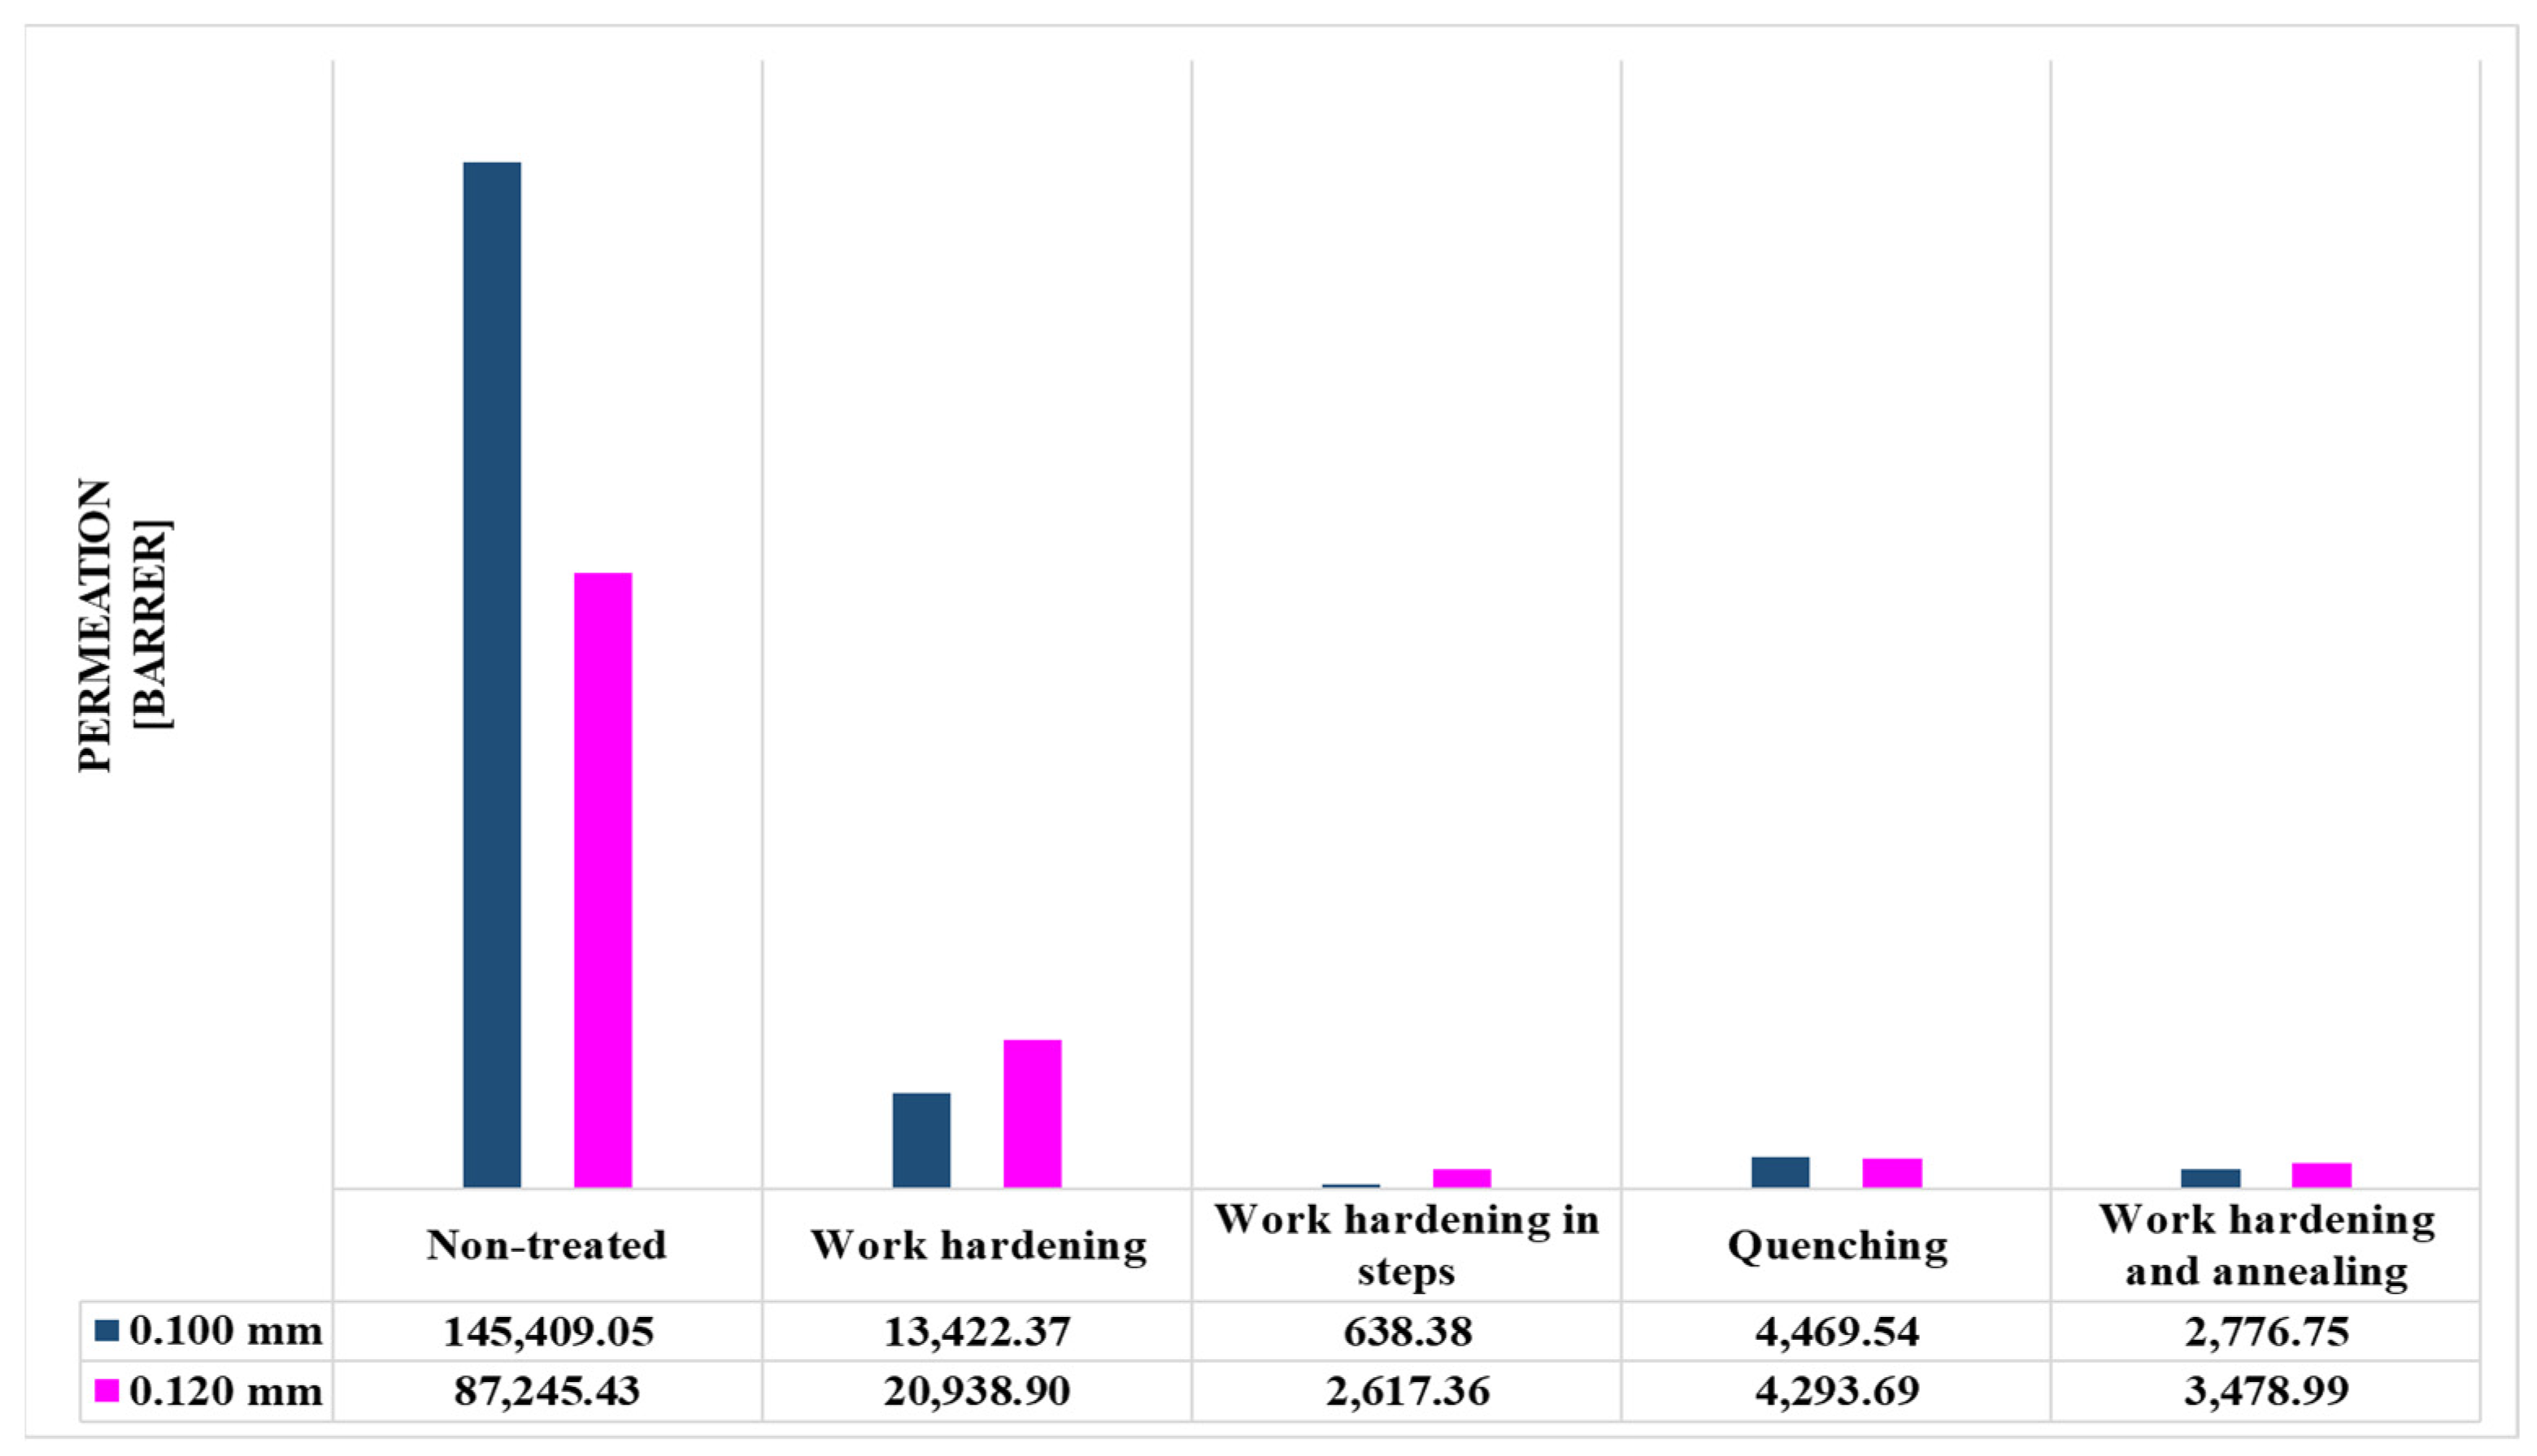
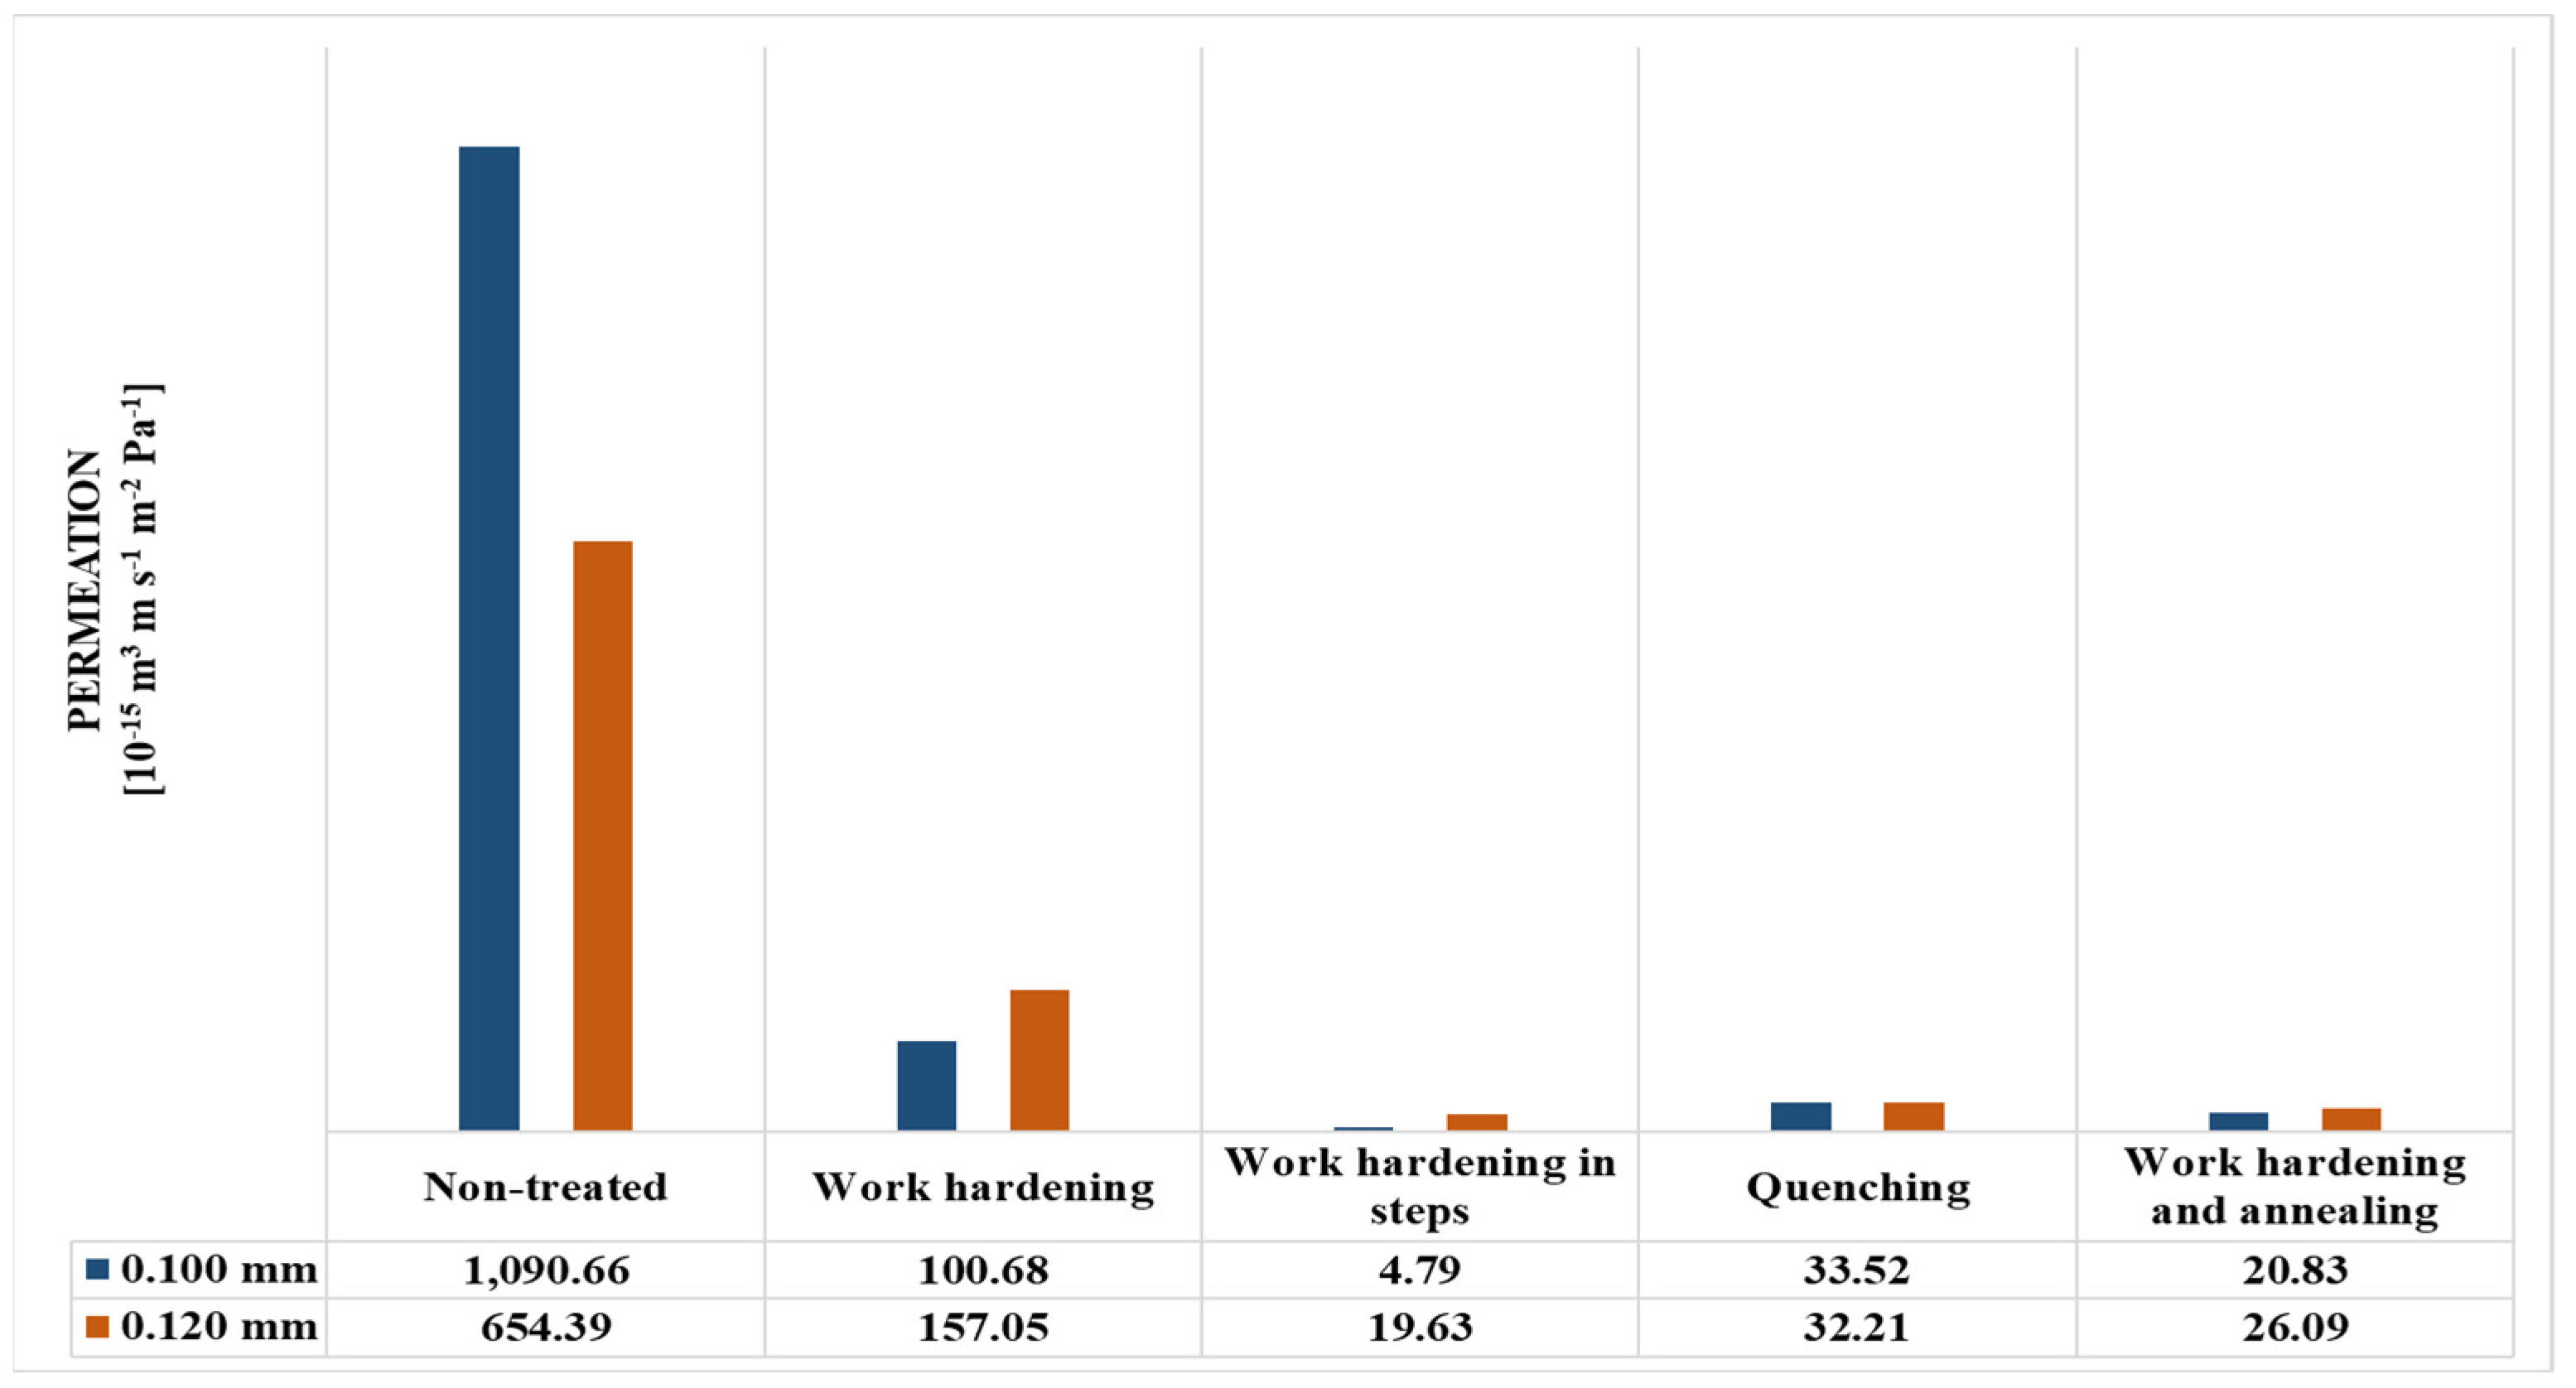
The permeance values of the metal membranes were determined and presented in Figure 10, Figure 11, Figure 12 and Figure 13 and Table 3 and Table 4. The sample size that was chosen was 3 membranes, where the final results were chosen as the average value of the 3 measurements, as their deviations were minor.

4. Discussion

According to the permeance values that were obtained through the experimental process, the reduction in permeance due to the metallurgical treatments can be seen in Table 5 by using the formula in Equation (8).
σ % = P n o n   t r e a t e d P t r e a t e d P n o n   t r e a t e d · 100
It can be observed that the drop in permeance was greater with a smaller thickness value in every treatment method regardless. While part of the permeance reduction can be credited to the treatment, another part can be credited to the recast layer. The recast layer has the same depth in both membranes since it occurs at the boundaries of the membrane. However, the treatment method affects the whole mass of the object. Since the object with the most mass is more greatly affected by the treatment, it should be less affected (as a percentage) from the recast layer. In this case, the object with the least mass is the 0.100 mm membrane, assuming the same flow area value. Therefore, it is indeed expected to have a greater reduction in permeance.
By comparing the reduction values of work-hardening with those of the work-hardening and annealing, a further decrease of permeability can be observed by annealing the specimen after work-hardening. Normally, a restoration of the crystal structure after the compression caused by work-hardening is expected to restore the flow paths and increase permeability to that of the untreated specimen. By studying their microscope images in Figure 4 and Figure 6, respectively, the pore size seems to increase after annealing. Additionally, the flow paths seem to have no direction. However, the annealing process partially restores the crystal lattice to a more compact one, thereby reducing the porosity. Assuming preservation of chemical composition, this reduction in porosity reduces the probability of an open pore, thereby reducing the overall permeance.
Finally, a comparison between work-hardening and work-hardening in steps reveals a further drop in permeance by additional work-hardening. By studying their microscope images in Figure 4 and Figure 5, respectively, a great reduction in pore size can be observed. Contrary to the annealing process, the pores are not redistributed and maintain a direction, so the flow paths remain unaltered. However, the extreme reduction of pore size chokes the flow of the fluid, causing extreme friction, which results in greater pressure drop or, in this case, lower flow rate.

5. Conclusions and Future Prospects

According to the results obtained concerning the permeance of the membranes, the permeance of a membrane, which is fabricated from brass alloy (standardization: DIN 17660), is affected by its crystal structure. The metallurgical treatments that were included in the current study, featuring work-hardening, annealing and quenching, resulted in a drop of permeance for the fabricated membrane. Specifically, the drop in permeance ranged from 76 up to 99.56%. Considering different membrane thickness values, thicker membranes seemed to be affected at a slightly lower, but still high, level, according to Table 5. All metallurgical treatments that were performed seemed to result in a drop of permeance, regardless of the way the crystals were rearranged. This effect can possibly be used in separation processes when one wants to separate molecules according to their molecular size, albeit this requires further investigation through different gas mixtures.
Consecutive treatments seem to further decrease the permeability of the alloy, as shown in work-hardening in steps and work-hardening and annealing compared to just work-hardening. As such, consecutive treatments could be a viable technique to reduce or even fine-tune the pore size distribution in order to make it suitable for filtering of certain molecules.
The relative permeance reductions with respect to the treatment method are subject to change in case a different fluid is used. A fluid with lower viscosity and low molecular weight can achieve better flow rates due to the reduction of the pore size, as seen in the optical microscope images. Due to this effect, the selectivity of the membrane towards a certain component of the fluid can be increased, and thus the membrane can be suitable for separation and filtering processes. While selectivity behaviour is suspected in the brass alloy membranes, such behaviour was not confirmed by experimental means. The usage of various fluids can achieve different relative drops in permeance, while the usage of composite fluids can confirm the effect of the membranes in separation and filtering processes.

Author Contributions

Methodology, S.K., G.B., K.D., A.V., K.K., G.Z.K. and A.C.M.; supervision, A.C.M. All authors have read and agreed to the published version of the manuscript.

Funding

This work was funded by the project entitled Development of Nanotechnology-Enabled Next-Generation Membranes and their Applications in Low-Energy, Zero-Liquid Discharge Desalination Membrane Systems/NAMED (T2ΔΓΕ-0597), which is greatly acknowledged.

Institutional Review Board Statement

Not applicable.

Informed Consent Statement

Not applicable.

Data Availability Statement

All data are available upon request to Corresponding author.

Conflicts of Interest

The authors declare no conflict of interest.

References

  1. Kayvani Fard, A.; McKay, G.; Buekenhoudt, A.; Al Sulaiti, H.; Motmans, F.; Khraisheh, M.; Atieh, M. Inorganic Membranes: Preparation and Application for Water Treatment and Desalination. Materials 2018, 11, 74. [Google Scholar] [CrossRef] [PubMed] [Green Version]
  2. Yoshino, Y.; Suzuki, T.; Nair, B.N.; Taguchi, H.; Itoh, N. Development of tubular substrates, silica based membranes and membrane modules for hydrogen separation at high temperature. J. Membr. Sci. 2005, 267, 8–17. [Google Scholar] [CrossRef]
  3. Burggraaf, A.J.; Cot, L. Fundamentals of Inorganic Membrane Science and Technology; Elsevier: Amsterdam, The Netherlands, 1996. [Google Scholar]
  4. Peinemann, K.V.G.; Nunes, S. Membrane Technology; Wiley Online Library: Hoboken, NJ, USA, 2021. [Google Scholar]
  5. Baker, R.W. Membrane Technology and Applications; John Wiley & Sons: Hoboken, NJ, USA, 2012. [Google Scholar]
  6. Pandey, P.; Chauhan, R.S. Membranes for gas separation. Prog. Polym. Sci. 2001, 26, 853–893. [Google Scholar] [CrossRef]
  7. Crespo, J.G.; Böddeker, K.W. Membrane Processes in Separation and Purification; Springer Science & Business Media: Berlin/Heidelberg, Germany, 2013; Volume 13. [Google Scholar]
  8. Dumée, L.F.; He, L.; Lin, B.; Ailloux, F.M.; Lemoine, J.B.; Velleman, L.; Kong, L. The fabrication and surface functionalization of porous metal frameworks—A review. J. Mater. Chem. A 2013, 1, 15185–15206. [Google Scholar] [CrossRef] [Green Version]
  9. Zhu, B.; Duke, M.; Dumée, L.F.; Merenda, A.; Des Ligneris, E.; Kong, L.; Gray, S. Short Review on Porous Metal Membranes—Fabrication, Commercial Products, and Applications. Membranes 2018, 8, 83. [Google Scholar] [CrossRef] [PubMed] [Green Version]
  10. González-Carrasco, J.L.; Cifuentes Cuellar, S.C.; Lieblich Rodríguez, M. 5-Metals. In Bone Repair Biomaterials, 2nd ed.; Pawelec, K.M., Planell, J.A., Eds.; Woodhead Publishing: Sawston, UK, 2019; pp. 103–140. [Google Scholar]
  11. Callister, W.D.; Rethwisch, D.G. Materials Science and Engineering: An Introduction; Wiley: New York, NY, USA, 2018; Volume 9. [Google Scholar]
  12. David, O.Y.; Gendel, Y.; Wessling, M. Tubular macro-porous titanium membranes. J. Membr. Sci. 2014, 461, 139–145. [Google Scholar] [CrossRef]
  13. Duan, Y.; Hui, H.; Wang, H.; Kang, J.; Li, J. Fabrication and characterization of hierarchically porous titanium membrane for dye wastewater treatment. Mater. Res. Express 2019, 6, 115534. [Google Scholar] [CrossRef]
  14. Ryi, S.-K.; Park, J.-S.; Kim, D.-K.; Kim, T.-H.; Kim, S.-H. Methane steam reforming with a novel catalytic nickel membrane for effective hydrogen production. J. Membr. Sci. 2009, 339, 189–194. [Google Scholar] [CrossRef]
  15. Lin, W.-H.; Liu, Y.-C.; Chang, H.-F. Hydrogen production from oxidative steam reforming of ethanol in a palladium–silver alloy composite membrane reactor. J. Chin. Inst. Chem. Eng. 2008, 39, 435–440. [Google Scholar] [CrossRef]
  16. Song, J.; Oh, H.; Kong, H.; Jang, J. Polyrhodanine modified anodic aluminum oxide membrane for heavy metal ions removal. J. Hazard. Mater. 2011, 187, 311–317. [Google Scholar] [CrossRef] [PubMed]
  17. Wu, T.N.; Prasetya, N.; Li, K. Recent advances in aluminium-based metal-organic frameworks (MOF) and its membrane applications. J. Membr. Sci. 2020, 615, 118493. [Google Scholar] [CrossRef]
  18. Ho, W.; Sirkar, K. Membrane Handbook; Springer Science & Business Media: Berlin/Heidelberg, Germany, 2012. [Google Scholar]
  19. Singh, H.P.; Saxena, P.; Puri, Y.M. Materials selection and manufacturing of metal membranes for industrial applications. Mater. Lett. 2020, 269, 127557. [Google Scholar] [CrossRef]
  20. Adiga, S.P.; Jin, C.; Curtiss, L.A.; Monteiro-Riviere, N.A.; Narayan, R.J. Nanoporous membranes for medical and biological applications. Wiley Interdiscip. Rev. Nanomed. Nanobiotechnol. 2009, 1, 568–581. [Google Scholar] [CrossRef] [Green Version]
  21. Ang, T.W.; Wang, J.; Zhang, C.; Yang, Z.; Dai, X.; Cheng, M.; Hou, X. Metal–organic framework MIL-101(Cr) as a sorbent of porous membrane-protected micro-solid-phase extraction for the analysis of six phthalate esters from drinking water: A combination of experimental and computational study. Analyst 2015, 140, 5308–5316. [Google Scholar] [CrossRef]
  22. Leiknes, T.; Ødegaard, H.; Myklebust, H. Removal of natural organic matter (NOM) in drinking water treatment by coagulation–microfiltration using metal membranes. J. Membr. Sci. 2004, 242, 47–55. [Google Scholar] [CrossRef]
  23. Zhang, S.; Qu, Y.; Liu, Y.; Yang, F.; Zhang, X.; Furukawa, K.; Yamada, Y. Experimental study of domestic sewage treatment with a metal membrane bioreactor. Desalination 2005, 177, 83–93. [Google Scholar] [CrossRef]
  24. Yang, C.; Tao, Q.; Ding, Y. Recent Progress in Lead-free Environmentally-friendly Brasses. Cailiao Daobao Mater. Rep. 2019, 33, 2109–2118. [Google Scholar]
  25. Vilarinho, C.; Davim, J.; Soares, D.; Castro, F.; Barbosa, J. Influence of the chemical composition on the machinability of brasses. J. Mater. Process. Technol. 2005, 170, 441–447. [Google Scholar] [CrossRef] [Green Version]
  26. Ab Latif Wani, A.A.; Usmani, J.A. Lead toxicity: A review. Interdiscip. Toxicol. 2015, 8, 55. [Google Scholar] [CrossRef] [PubMed] [Green Version]
  27. Goyer, R.A. Lead toxicity: Current concerns. Environ. Health Perspect. 1993, 100, 177–187. [Google Scholar] [CrossRef] [PubMed]
  28. Boruah, B.S.; Biswas, R. An optical fiber based surface plasmon resonance technique for sensing of lead ions: A toxic water pollutant. Opt. Fiber Technol. 2018, 46, 152–156. [Google Scholar] [CrossRef]
  29. German Institute for Standardisation (Deutsches Institut für Normung). Wrought Copper Alloys-Copper-Zinc Alloys-(Brass)-(Special Brass)-Composition; German Institute for Standardisation: Berlin/Heidelberg, Germany, 2018; Available online: https://www.copper.org/resources/properties/db/datasheets/wrought-brasses.pdf (accessed on 10 June 2021).
  30. Hingwe, A.K.; Subramanian, K.N. Deformation of duplex crystals and two-phase bicrystals of alpha-beta brass. J. Mater. Sci. 1975, 10, 183–188. [Google Scholar] [CrossRef]
  31. Rao, K.V. Manufacturing Science and Technology-Manufacturing Processess and Machine Tools; New Age International Publishers: New Delhi, India, 2020. [Google Scholar]
  32. Xu, J.; Guo, B.; Wang, C.; Shan, D. Blanking clearance and grain size effects on micro deformation behavior and fracture in micro-blanking of brass foil. Int. J. Mach. Tools Manuf. 2012, 60, 27–34. [Google Scholar] [CrossRef]
  33. Doherty, R.; Hughes, D.; Humphreys, F.; Jonas, J.; Jensen, D.J.; Kassner, M.; King, W.; McNelley, T.; McQueen, H.; Rollett, A. Current issues in recrystallization: A review. Mater. Sci. Eng. A 1997, 238, 219–274. [Google Scholar] [CrossRef] [Green Version]
  34. Ekmekci, B. White Layer Composition, Heat Treatment, and Crack Formation in Electric Discharge Machining Process. Met. Mater. Trans. A 2009, 40, 70–81. [Google Scholar] [CrossRef]
  35. Alaneme, K.K.; Okotete, E.A. Recrystallization mechanisms and microstructure development in emerging metallic materials: A review. J. Sci. Adv. Mater. Devices 2019, 4, 19–33. [Google Scholar] [CrossRef]
  36. Koo, J.B.; Yoon, D.Y. Abnormal grain growth in bulk Cu—The dependence on initial grain size and annealing temperature. Met. Mater. Trans. A 2001, 32, 1911–1926. [Google Scholar] [CrossRef]
  37. Brooks, C.R. Heat Treatment, Structure, and Properties of Nonferr Ous Alloys; ASM International: Geauga County, OH, USA, 1982. [Google Scholar]
  38. Butts, A. Copper: The Science and Technology of the Metal, Its Alloys and Compounds; Reinhold Publishing Corporation: New York, NY, USA, 1954; Volume 122. [Google Scholar]
  39. Washburn, E.W. Note on a Method of Determining the Distribution of Pore Sizes in a Porous Material. Proc. Natl. Acad. Sci. USA 1921, 7, 115–116. [Google Scholar] [CrossRef] [PubMed] [Green Version]
  40. Tabe-Mohammadi, A. A review of the applications of membrane separation technology in natural gas treatment. Sep. Sci. Technol. 1999, 34, 2095–2111. [Google Scholar] [CrossRef]
  41. Ismail, A.F.; Khulbe, K.C.; Matsuura, T. Fundamentals of Gas Permeation Through Membranes. In Gas Separation Membranes: Polymeric and Inorganic; Springer International Publishing: Cham, Switzerland, 2015; pp. 11–35. [Google Scholar]
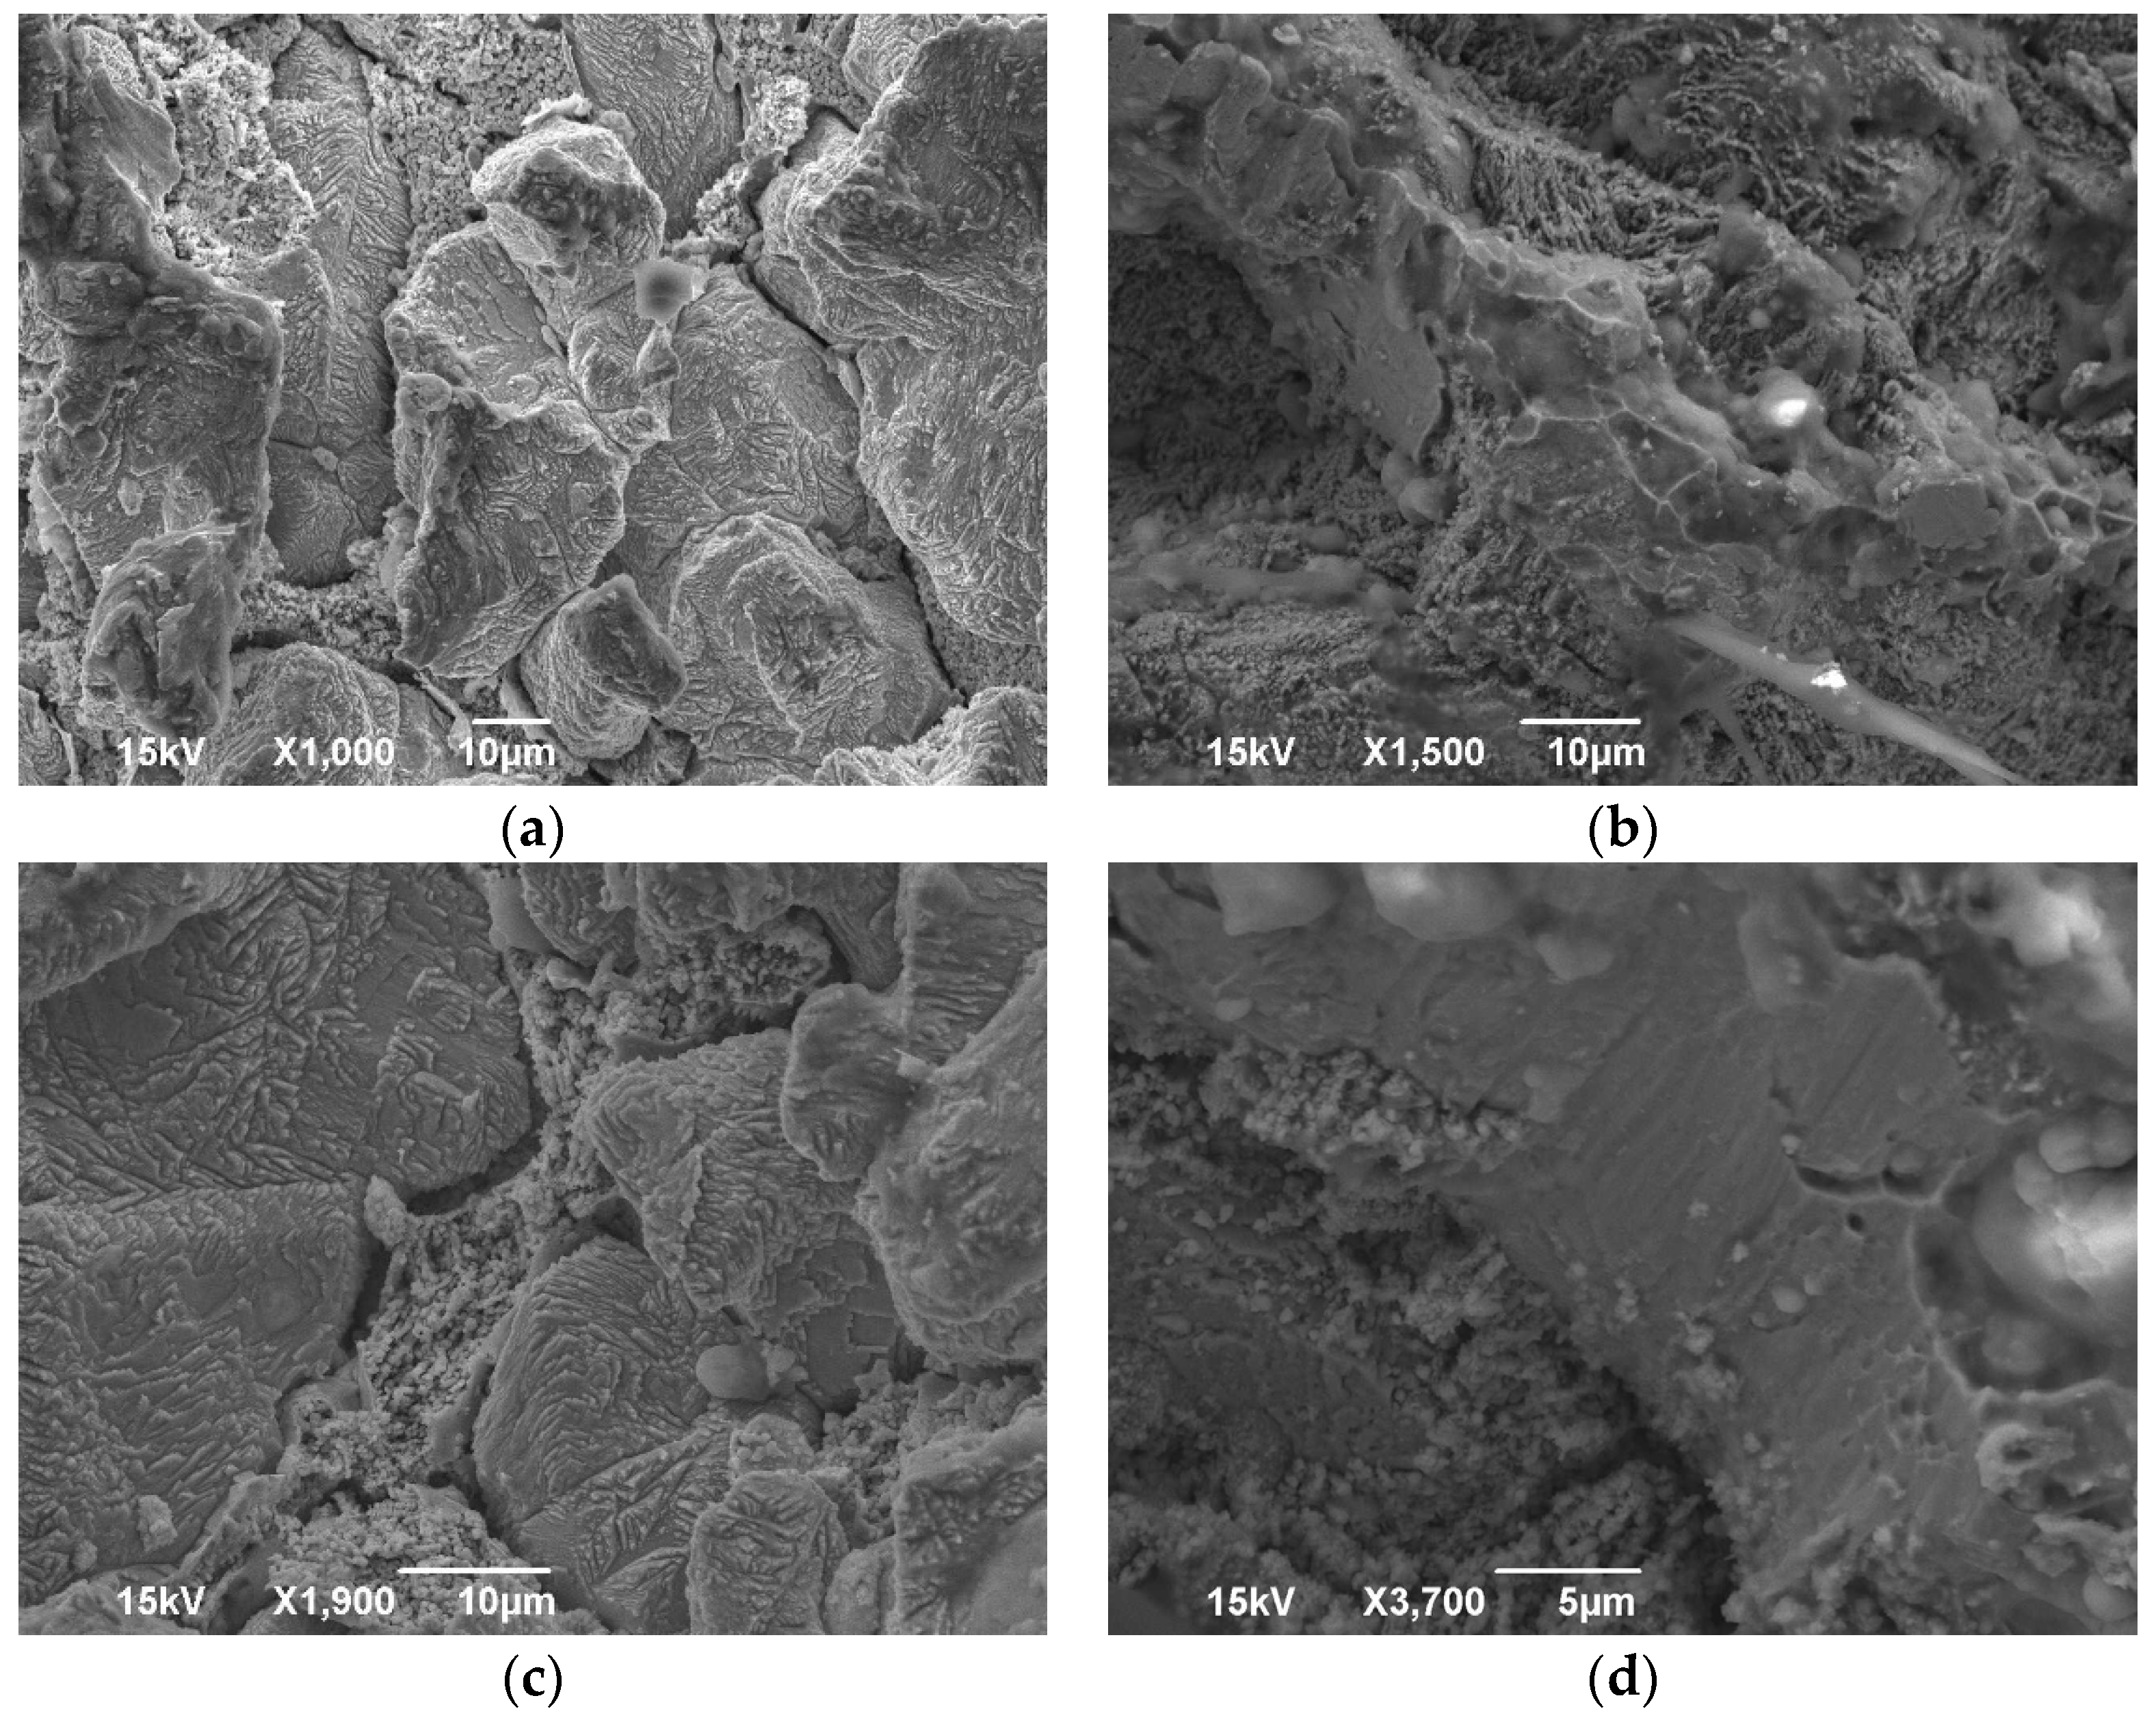
Figure 1. Brass alloy images from SEM after EDM: (a) magnification ×1000; (b) magnification ×1500; (c) magnification ×1900; (d) magnification ×3700.
Chemengineering 05 00076 g001
Figure 2. SEM image of brass alloy; magnification ×1500.
Chemengineering 05 00076 g002
Figure 3. Specimen 1: Image from optical microscope after metallography of non-treated alloy brass: (a) magnification ×500; (b) magnification ×1000.
Chemengineering 05 00076 g003
Figure 4. Specimen 2: Image from optical microscope after metallography of work-hardened brass alloy: (a) magnification ×500; (b) magnification ×1000.
Chemengineering 05 00076 g004
Figure 5. Specimen 3: Image from optical microscope after metallography of work-hardened in steps brass alloy: (a) magnification ×500; (b) magnification ×1000.
Chemengineering 05 00076 g005
Figure 6. Specimen 4: Image from optical microscope after metallography of work-hardened and annealed brass alloy: (a) magnification ×500; (b) magnification ×1000.
Chemengineering 05 00076 g006
Figure 7. Specimen 5: Image from optical microscope after metallography of air stream quenched heated at 850 °C brass alloy: (a) magnification ×500; (b) magnification ×1000.
Chemengineering 05 00076 g007
Figure 8. Mercury intrusion porosimetry results.
Chemengineering 05 00076 g008
Figure 9. Substrate front view.
Chemengineering 05 00076 g009
Figure 10. Permeance values (in GPU units) of metal membranes.
Chemengineering 05 00076 g010
Figure 11. Permeance values (in m3stp m s−1 m−2 Pa−1 units) of metal membranes.
Chemengineering 05 00076 g011
Figure 12. Permeation values (in barrer units) of metal membranes.
Chemengineering 05 00076 g012
Figure 13. Permeation values (in m3stp m s−1 m−2 Pa−1 units) of metal membranes.
Chemengineering 05 00076 g013
Table 1. Treatments of specimens.
Specimen
Number
Treatment Type
1Non-treated brass alloy
2Work-hardening at 750 °C heating temperature and compressed at 450 bar
3Work-hardening in consecutive steps: heating at 780 °C and compressed at 50 bar, then 860 °C and 450 bar, 820 °C and 450 bar, and 900 °C and 450 bar
4Work-hardening at 750 °C and annealing: recovery at 400 °C, crystal growth at 650 °C
5Heating at 850 °C for and quenching by an air stream
Table 2. Porosity determination parameters.
ParameterUnitsValue
Saturation volume(μL/g)25.62
Minimum saturation pressure(psi)8700
Density(g/cm3)8.48
Porosity(%)21.73
Pore size(A)122.6
Table 3. Permeance values of metal membranes in CGS units.
TreatmentThickness: 0.100 mmThickness: 0.120 mm
Permeance
(GPU)
Permeation
(Barrer)
Permeance
(GPU)
Permeation
(Barrer)
Non-treated1454.09145,409727.0487,245
Work-hardening134.2213,422174.4920,939
Work-hardening in steps6.3863821.812617
Quenching44.70447035.784294
Work-hardening and annealing27.77277728.993479
Table 4. Permeance values of metal membranes in SI units.
TreatmentThickness: 0.100 mmThickness: 0.120 mm
Permeance
(m3 s−1 m−2 Pa−1)
Permeation
(m3 m s−1 m−2 Pa−1)
Permeance
(m3 s−1 m−2 Pa−1)
Permeation
(m3 m s−1 m−2 Pa−1)
Non-treated1091 × 10−81091 × 10−125453 × 10−96544 × 10−13
Work-hardening1007 × 10−91007 × 10−131309 × 10−91571 × 10−13
Work-hardening in steps4788 × 10−114788 × 10−151636 × 10−101963 × 10−14
Quenching3352 × 10−103352 × 10−142684 × 10−103221 × 10−14
Work-hardening and annealing2083 × 10−102083 × 10−142175 × 10−102609 × 10−14
Table 5. Values of permeance reduction with different thickness values.
Treatment Method Thickness   ( σ   [ % ] )
0.100 mm 0.120 mm
Work-hardening90.7776.00
Work-hardening in steps99.5697.00
Work-hardening and annealing98.0996.01
Quenching96.9395.08
Publisher’s Note: MDPI stays neutral with regard to jurisdictional claims in published maps and institutional affiliations.