Article

Equivalent Measurement and Real-Time Compensation of Error Caused by Intensity Change in Deep Sub-Nanometer Displacement Measuring Interferometry

1
School of Instrumentation Science and Engineering, Harbin Institute of Technology, Harbin 150080, China
2
Key Laboratory of Ultraprecision Intelligent Instrumentation, Ministry of Industry and Information Technology, Harbin 150080, China
*
Author to whom correspondence should be addressed.
Photonics 2022, 9(10), 714; https://doi.org/10.3390/photonics9100714
Submission received: 6 September 2022 / Revised: 27 September 2022 / Accepted: 28 September 2022 / Published: 30 September 2022
(This article belongs to the Special Issue Micro-Nano Optics and High-End Measurement Instruments)

Abstract

:
Heterodyne interferometry is playing an increasingly important role in the field of high-end equipment manufacturing. In photolithography, the precision requirement of displacement metrology is increasing to a deep sub-nanometer scale with the decrease in the critical dimension of chips. The error caused by light intensity changes was investigated, and its principle was found to be related to the time difference in photoelectric conversion. On the basis of the analysis of dynamic characteristics of interference light intensity changes in a heterodyne Michaelson interferometer, the influencing factors, and the features of the measurement error, equivalent measurement and real-time compensation methods were investigated and proposed. Experiments revealed that the error was 220 pm using the method of best-gain detection, while it was 4.8 nm using the method of auto-gain detection over a wide dynamic range when the light intensity was reduced by 30%. However, the proposed compensation method successfully reduced the error to less than 40 pm. Therefore, the real-time compensation method based on equivalent measurement can maintain the signal-to-noise ratio while improving the precision of photoelectric conversion, removing the error caused by intensity changes, and helping heterodyne interferometry achieve deep sub-nanometer precision.

1. Introduction

Heterodyne interferometry has the advantages of large range, high resolution, noncontact measurement, and good traceability [1,2], and it is widely used in gravitational-wave measurement [3], high-end equipment manufacturing [4], and many other fields. In photolithography machines, the precision requirement of displacement metrology is increasing to a deep sub-nanometer scale with the decrease in the critical dimension of chips [5,6,7]. Thus, there is an urgent demand for heterodyne interferometry with precision on the deep sub-nanometer scale. However, in multi-axis interferometric systems, the moving stage might be subjected to tipping and tilting [8], which will cause mismatches in the reference and measurement lights. Thus, the total detected light intensity and the effective interference light intensity will accordingly decrease [9].
When the interference light intensity decreases, the signal-to-noise ratio (SNR) of the output signal in the photoelectric detection system also decreases, thus increasing the error of the interferometer. Thus, researchers have made great efforts to maintain the SNR [10,11,12], identifying the avalanche photodiode (APD) as suitable for multi-axis interferometry because of its high gain factor. Subsequently, the best-gain detection method and the auto-gain detection method were proposed [13,14]. Su built an SNR model of APD to determine the best gain factor [13]. The precision of detection could be effectively improved by preventing the SNR from decreasing, but its dynamic range was limited. When the intensity became lower, Su’s method had worse precision performance. Yu et al. proposed a method of controlling the bias voltage to adjust the gain factor of APD [15], which could maintain a constant output current, representing an effective method to maintain the SNR of photoelectric conversion with high dynamic performance. On the basis of Yu’s method, Cao et al. used machine learning to judge the states of laser and APD for compensation, thereby highlighting the best working conditions of the APD for photoelectric detection using the auto-gain method with a constant SNR [16].
In addition to the interference light intensity, a decrease in the total detected light intensity can directly cause measurement errors [17]. In the best-gain detection method, a decrease in light intensity leads to time changes of photoelectric conversion; in the auto-gain detection method, a change in gain-factor leads to a larger change in the conversion time [18]. As a result, extra phases are introduced when using both detection methods. The errors caused by these extra phases cannot be ignored in displacement measurements at the deep sub-nanometer scale.
In this paper, we analyzed the effect of decreasing interference light intensity in a heterodyne Michaelson interferometer. On the basis of the characteristics of APD and extra phases, an equivalent measurement method of phase drift, which is resistant to environmental disturbances, is proposed, whose results can be used to compensate for the displacement measurement error in real time. Experiments show that the error was 220 pm using the best-gain detection compared to 4.8 nm using auto-gain detection over a wide dynamic range when the light intensity was reduced by 20%. The proposed compensation method successfully reduced the error to less than 40 pm.

2. Displacement Measuring Error and Compensation Method

2.1. Displacement Measuring Error Caused by Intensity Changes

In an ideal Michaelson interferometer, supposing that the amplitude of the electric field of two laser beams are equal to A, the reference intensity Ir and measurement intensity Im can be expressed as Equations (1) and (2)
I r 2 A 2 + 2 A 2 cos [ ( ω 1 ω 2 ) t + ( φ 1 φ 2 ) ] ,
I m 2 A 2 + 2 A 2 cos [ ( ω 1 ω 2 ) t + ( φ 1 φ 2 ) + ω d t ] ,
where ω 1 and ω 2 are the angular frequencies of the two beams emitted from the dual-frequency laser, φ 1 and φ 2 are the initial phases of the two beams, and ω d is the angular Doppler frequency caused by the movement of the measured target.
A phasemeter can be used to calculate the phase difference between the two signals; then, when the ωdt is known, the displacement can be expressed as Equation (3)
x = λ ω d t 2 π n N ,
where λ is the laser wavelength, n is the refractive index of air, and N is the fold factor.
In the photoelectric conversion process, when the light reaches the PN junction, ionization occurs, with holes and electron pairs being generated. Under the action of an applied electric field, electrons and holes move toward the cathode and anode, respectively, resulting in a photocurrent [19]. The transit time of the process for electrons and holes moving to the cathode and anode is usually related to the electric field, the concentration of electrons and holes, and the moving distance. When the light intensity changes, the concentration of electrons and holes also changes, thus altering the transit time [20,21,22].
Since the photodetector receives the interference light intensity of the two laser beams, essentially representing the detection of the sinusoidal modulation of the laser light intensity, the transit time τ in the laser interferometer can be represented by the extra phase Δφ of the sinusoidal modulation. According to [23], the extra phase can be expressed as Equation (4)
Δ φ = tan 1 f f 0 = tan 1 f M k ,
where f0 is the cutoff frequency, k is a constant determined by the material of APD, f is the frequency of the input signal, and M is the gain of the APD.
The value of M is affected by the external reverse bias voltage, output current, PN junction material, and other factors, and it can be calculated using an experience function as Equation (5).
M 1 1 ( U P U b r ) n ,
where U b r is the reverse breakdown voltage, n is a constant related to the structure and material of APD, and U P is the internal bias voltage, which is determined as a function of the external voltage U, resistance ρ, and output current i as Equation (6).
U p = U ρ i .
The current in Equation (6) is the sum of the output light current and the dark current of the APD, related to the received light intensity. Thus, when the best-gain detection method is used, the changes in light intensity cause an additional displacement drift error; when the auto-gain detection method is used, the amplitude of the output AC signal is stabilized by adjusting the APD bias voltage, but the changing gain causes a larger displacement measurement error.
In a distance measuring system, Yokoyama et al. proposed a method of light compensation to maintain the detected intensity of light for a constant delay [24]. However, this method is difficult to apply in a real interferometer. Furthermore, the added DC intensity decreases the AC/DC ratio, thereby affecting the measurement performance. Miyata et al. considered the combined effect of the loss of light intensity and the external high voltage of the APD, and they proposed a method to adjust the external high voltage to compensate for the additional phase change [25]. This method can accurately detect the interference light, but it might reduce the detection SNR and ultimately reduce the measurement precision. Compensation by Equation (4) would be too complex.
According to the above analysis, the drift of displacement measurement results caused by light intensity attenuation has the following characteristics:
  • Differences. The gain, noise, and delay of the APD are all related to its internal structure and materials. Even when different APDs exist in the same batch, the characteristics are not the same.
  • Nonlinearity. There is a serious nonlinearity between the delay and the input light intensity.

2.2. Compensation Method

Thus, a simple and effective method to reduce the error is to measure the phase drift of each APD under different light intensities and to establish a database to realize real-time phase compensation. However, since the displacement measurement results in the interferometer contain various errors, in order to measure the phase error caused by the attenuation of light intensity, it is necessary to avoid the interference of other factors as much as possible.
The optical configuration for the APD phase shift error equivalent measurement is shown in Figure 1. After using NPBS to combine two laser beams with frequencies f1 and f2 with perpendicular polarization directions, one laser beam passes through the analyzer C and interferes, before being received by a fixed position photodetector as a reference signal, and the other beam passes through the analyzers A and B and is received by the fixed position APD, which is the testing object, as a measurement signal. The reference signal and the measurement signal are simultaneously transmitted to the phase meter, which can calculate the phase difference between the reference signal and the measurement signal in real time.
In this equivalent method, the reference signal is fixed, and the analyzers A and B in the optical path of the measurement signal are adjusted to change the interference contrast and light intensity. Taking the laser with an angular frequency of ω1 emitted by the laser as an example, the Jones matrix is expressed as Equation (7):
E 1 = G 2 G 1 E 01 = [ cos 2 α sin α cos α sin α cos α sin 2 α ] × [ cos 2 β sin β cos β sin β cos β sin 2 β ] × A e i ω 1 t [ cos 0 sin 0 ] , = A cos ( α β ) cos ( β ) e i ω 1 t [ cos α sin α ]
where E1 is the vector of the light received by the photodetector with an angular frequency of ω1, E01 is the vector of the light emitted by the laser with an angular frequency of ω1, and G1, G2, and G3 are Jones matrices of the analyzers A, B, and C.
Supposing that the vector of the initial light coincides with the x-axis, the Jones matrix of another laser beam with an angular frequency of ω2 is expressed as Equation (8):
E 2 = G 2 G 1 E 02 = A cos ( α β ) sin ( β ) e ( i ω 2 t + φ ) [ cos α sin α ] ,
where A is the amplitude of the vector of initial light, φ is the initial phase and β and α are the angles between the light transmission axis of the analyzers A and B and the x-axis.
Then, the light intensity of the measurement interference intensity can be expressed as Equation (9):
I m A 1 2 + A 2 2 + 2 A 1 A 2 cos [ ( ω 1 ω 2 ) t φ ] A 1 = A cos ( α β ) cos ( β ) A 2 = A cos ( α β ) sin ( β )
The simulation result is shown in Figure 2. RA represents the angle difference between the analyzers A and B. RB represents the absolute angle of axis of analyzer B. Therefore, rotating the analyzer A can directly change the amplitudes of E1 and E2, such that the interference occurs between the two laser beams with different amplitudes, which are completely overlapping with each other. Rotating the analyzer B can change the light intensity of the two laser beams in the same proportion. By changing the analyzers A and B, the intensity and amplitude of the interference light can be adjusted.
The intensity of the reference signal is expressed as Equation (10)
I r 2 A 2 cos [ ( ω 1 ω 2 ) t ] .
According to Equations (9) and (10), changing the analyzer A and analyzer B not only adjusts the intensity and amplitude of the interference, but also ensures the change of phase difference between the reference signal and measurement signal before photoelectric conversion to zero. If the phase measured by the phase meter is changed, the photoelectric conversion process is mixed with the phase error, which is represented by the displacement error in the interferometer. Unlike the conventional heterodyne laser interferometer, the reference beam and the measurement beam are transmitted in the same path from the laser to the photoelectric detection module with no dead path existing. The authors of [26] showed that this test method of two laser beams propagating together can resist vibration and other environmental errors under the action of the zoom factor. Therefore, the phase change measured using this method during the process of adjusting the light intensity is the additional phase during photoelectric conversion.

3. Experiments and Results

3.1. Attenuation Calculation

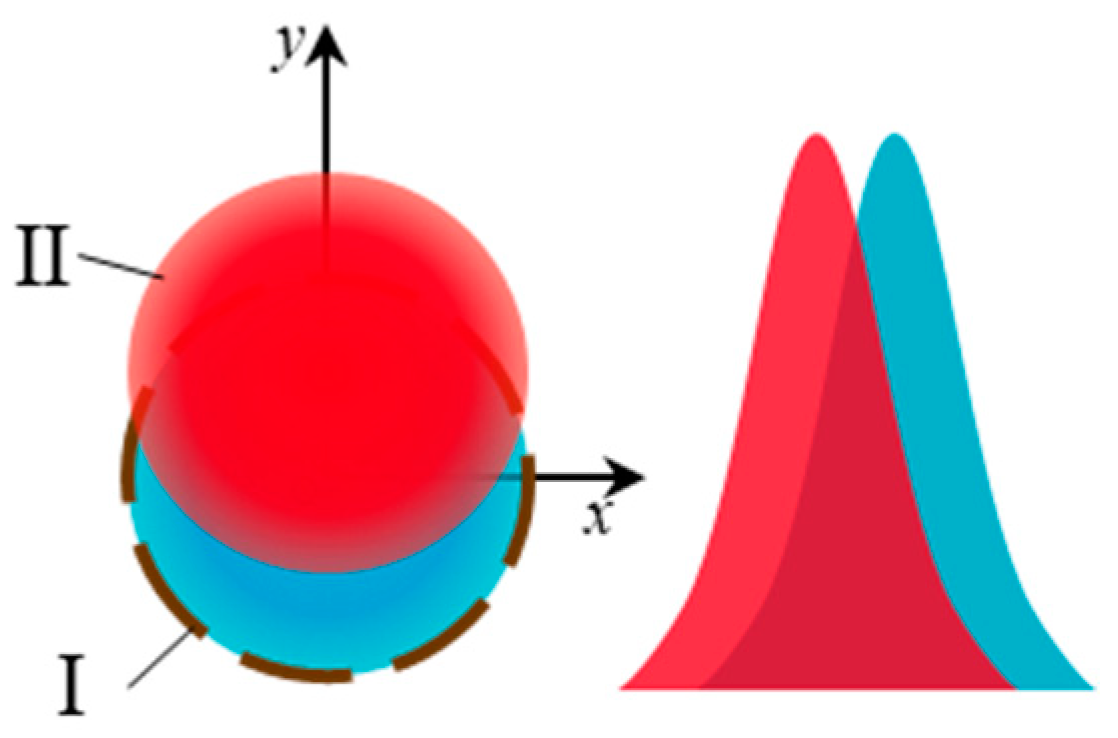
In the laser interferometer, in order to reduce the influence of background light and reduce the DC signal energy in the photodetection circuit, the clear aperture of the photodetector is usually close to the beam spot. As shown in Figure 3, circle I represents the clear aperture, and the reference beam completely passes through the clear aperture and converges on the photodiode; circle II represents the measurement beam. Because of the deflection of the target mirror, its offset distance from the clear aperture is d.
Ignoring the influence of the divergence angle of the light spot, a Cartesian coordinate system was established with the center of the clear aperture as the origin. The circle equations of the reference and measurement spot positions can be expressed as Equations (11) and (12):
x 2 + y 2 = R 2 ,
x 2 + ( y d ) 2 = R 2 ,
where R is the radius of the beam spot.
Considering the Gaussian distribution of a laser beam, the reference and measurement intensity at a point in the circle can be expressed as Equations (13) and (14):
Δ E r = a exp ( x 2 + y 2 R 2 ) cos ( ω 1 t ) ,
Δ E m = a exp ( x 2 + ( y d ) 2 R 2 ) cos ( ω 2 t + φ ) ,
where a is amplitude of the reference and measurement beam, and φ is the phase to be measured.
According to the principle, the intensity at a point in the interference area can be expressed as Equation (15):
Δ I = ( Δ E r + Δ E m ) ( Δ E r + Δ E m ) * = Δ I r ¯ + Δ I m ¯ + Δ I ˜ = a 1 2 exp [ 2 ( x 2 + y 2 ) R 2 ] + a 2 2 exp { 2 [ x 2 + ( y d ) 2 ] R 2 } + 2 a 1 a 2 exp [ x 2 + y 2 R 2 x 2 + ( y d ) 2 R 2 ] cos [ ( ω 2 ω 1 ) t + φ ]
where ΔIr and ΔIm are the intensities of the reference and measurement beam at a point in the interference zone, and ΔI is the intensity of the interference light.
The light intensity received by the photodiode is all the light intensity passing through the clear aperture. Since the position of the reference light spot remains unchanged, the measured light intensity and the interference light intensity need to be integrated in the interference area, which can be expressed as Equation (16):
I = I r ¯ + I m ¯ + I ˜ = D 1 Δ I r ¯ d s + D 2 ( Δ I m ¯ + Δ I ˜ ) d s
In actual experiments, the AC/DC ratio is involved for adjustment as Equation (17).
α = I ˜ I r ¯ + I m ¯ .
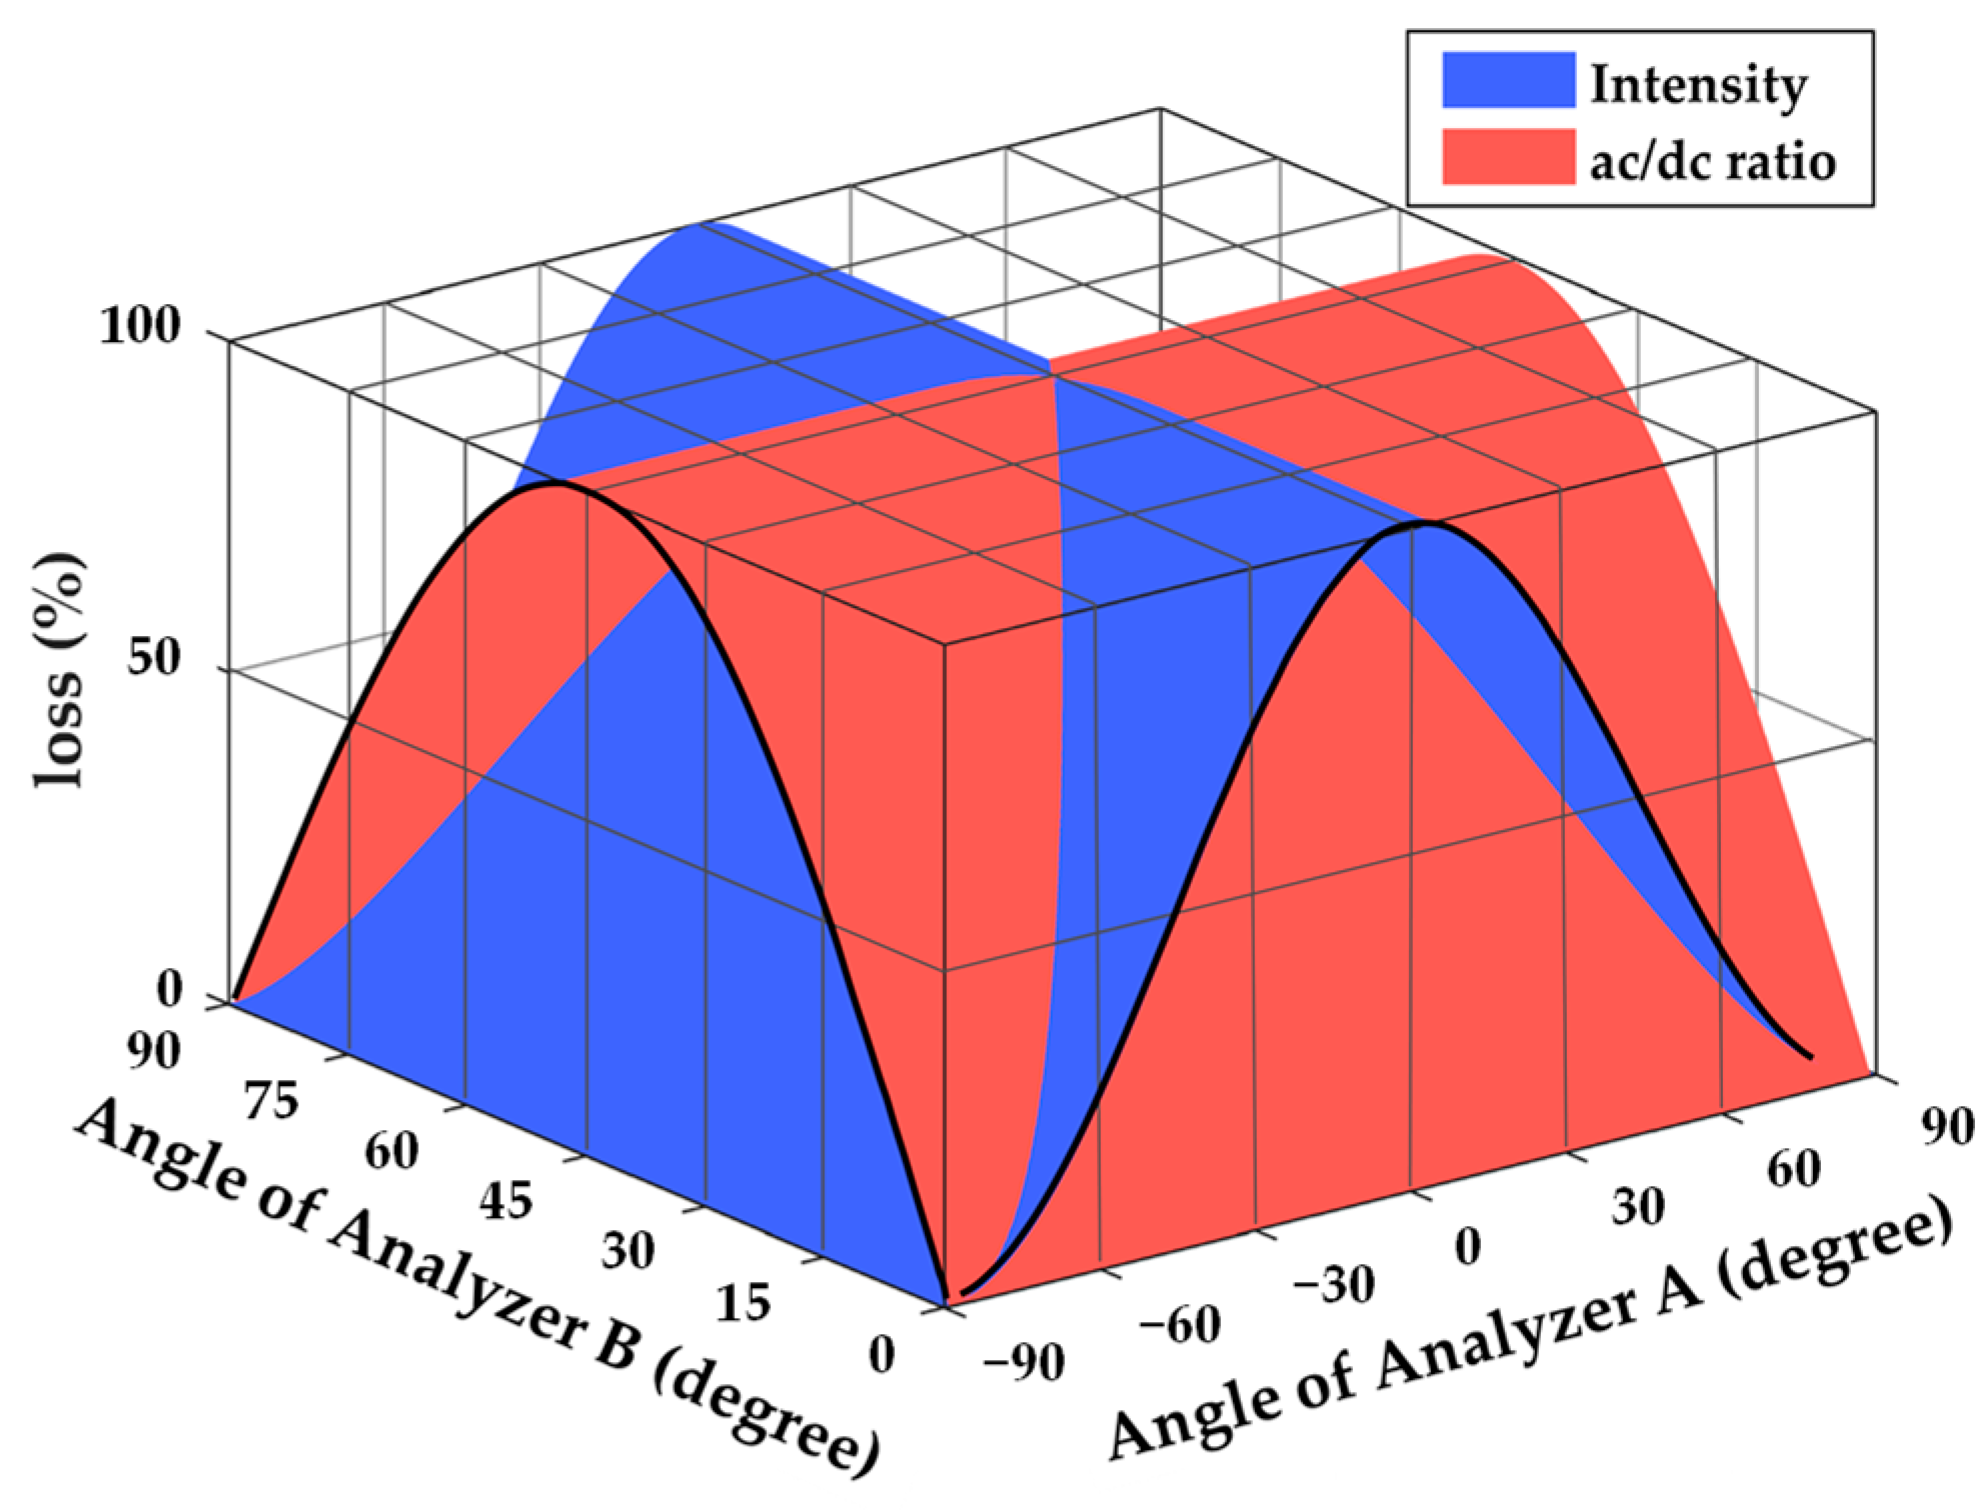
Taking the same initial reference light intensity and measurement light intensity as an example, supposing that the spot diameter is 6 mm, the optical fold factor is 4, the maximum return light length of the measurement light is 400 mm, and the rotation angle of the mirror ranges from −1.5 mrad to 1.5 mrad, the measurement light deviation is within the range of ±2.4 mm. The numerical method was used to calculate the signal intensity of DC and AC components, and then the AC/DC ratio was calculated. The normalized results are shown in Figure 4. When the initial value was fixed, there was a mapping between the DC light intensity and the AC/DC ratio. When the maximum loss of the DC signal exceeds 20%, the maximum loss of the AC signal would exceed 40%, and the maximum AC/DC ratio would decrease more than 30%.

3.2. Experimental Principle and Device

To compare the drift error caused by the APD using the best-gain method and auto-gain method, the optical configuration in Figure 5 was built for equivalent tests. The light source was a ZYGO ZMI-7714 dual-frequency laser, which can emit two dual-frequency laser beams whose polarization directions are perpendicular to each other and the beat frequency signal of the two beams. The two beams, which pass through analyzers A, B, and C, as well as the NPBS, generate the measurement signal. The beat frequency signal generated by the laser serves as the reference signal. Among them, analyzers A and B adjust the interference light intensity and DC light intensity, respectively, while analyzer C maintains the laser polarization direction in the fiber. The interferometric light signal reflected by the NPBS is received by a commercial detector Thorlabs APD430A and transmitted to an oscilloscope Tektronix DPO-3034 to measure the change in DC and AC amplitudes. A Thorlabs PM100D optical power meter is used to measure the intensity of each optical signal.
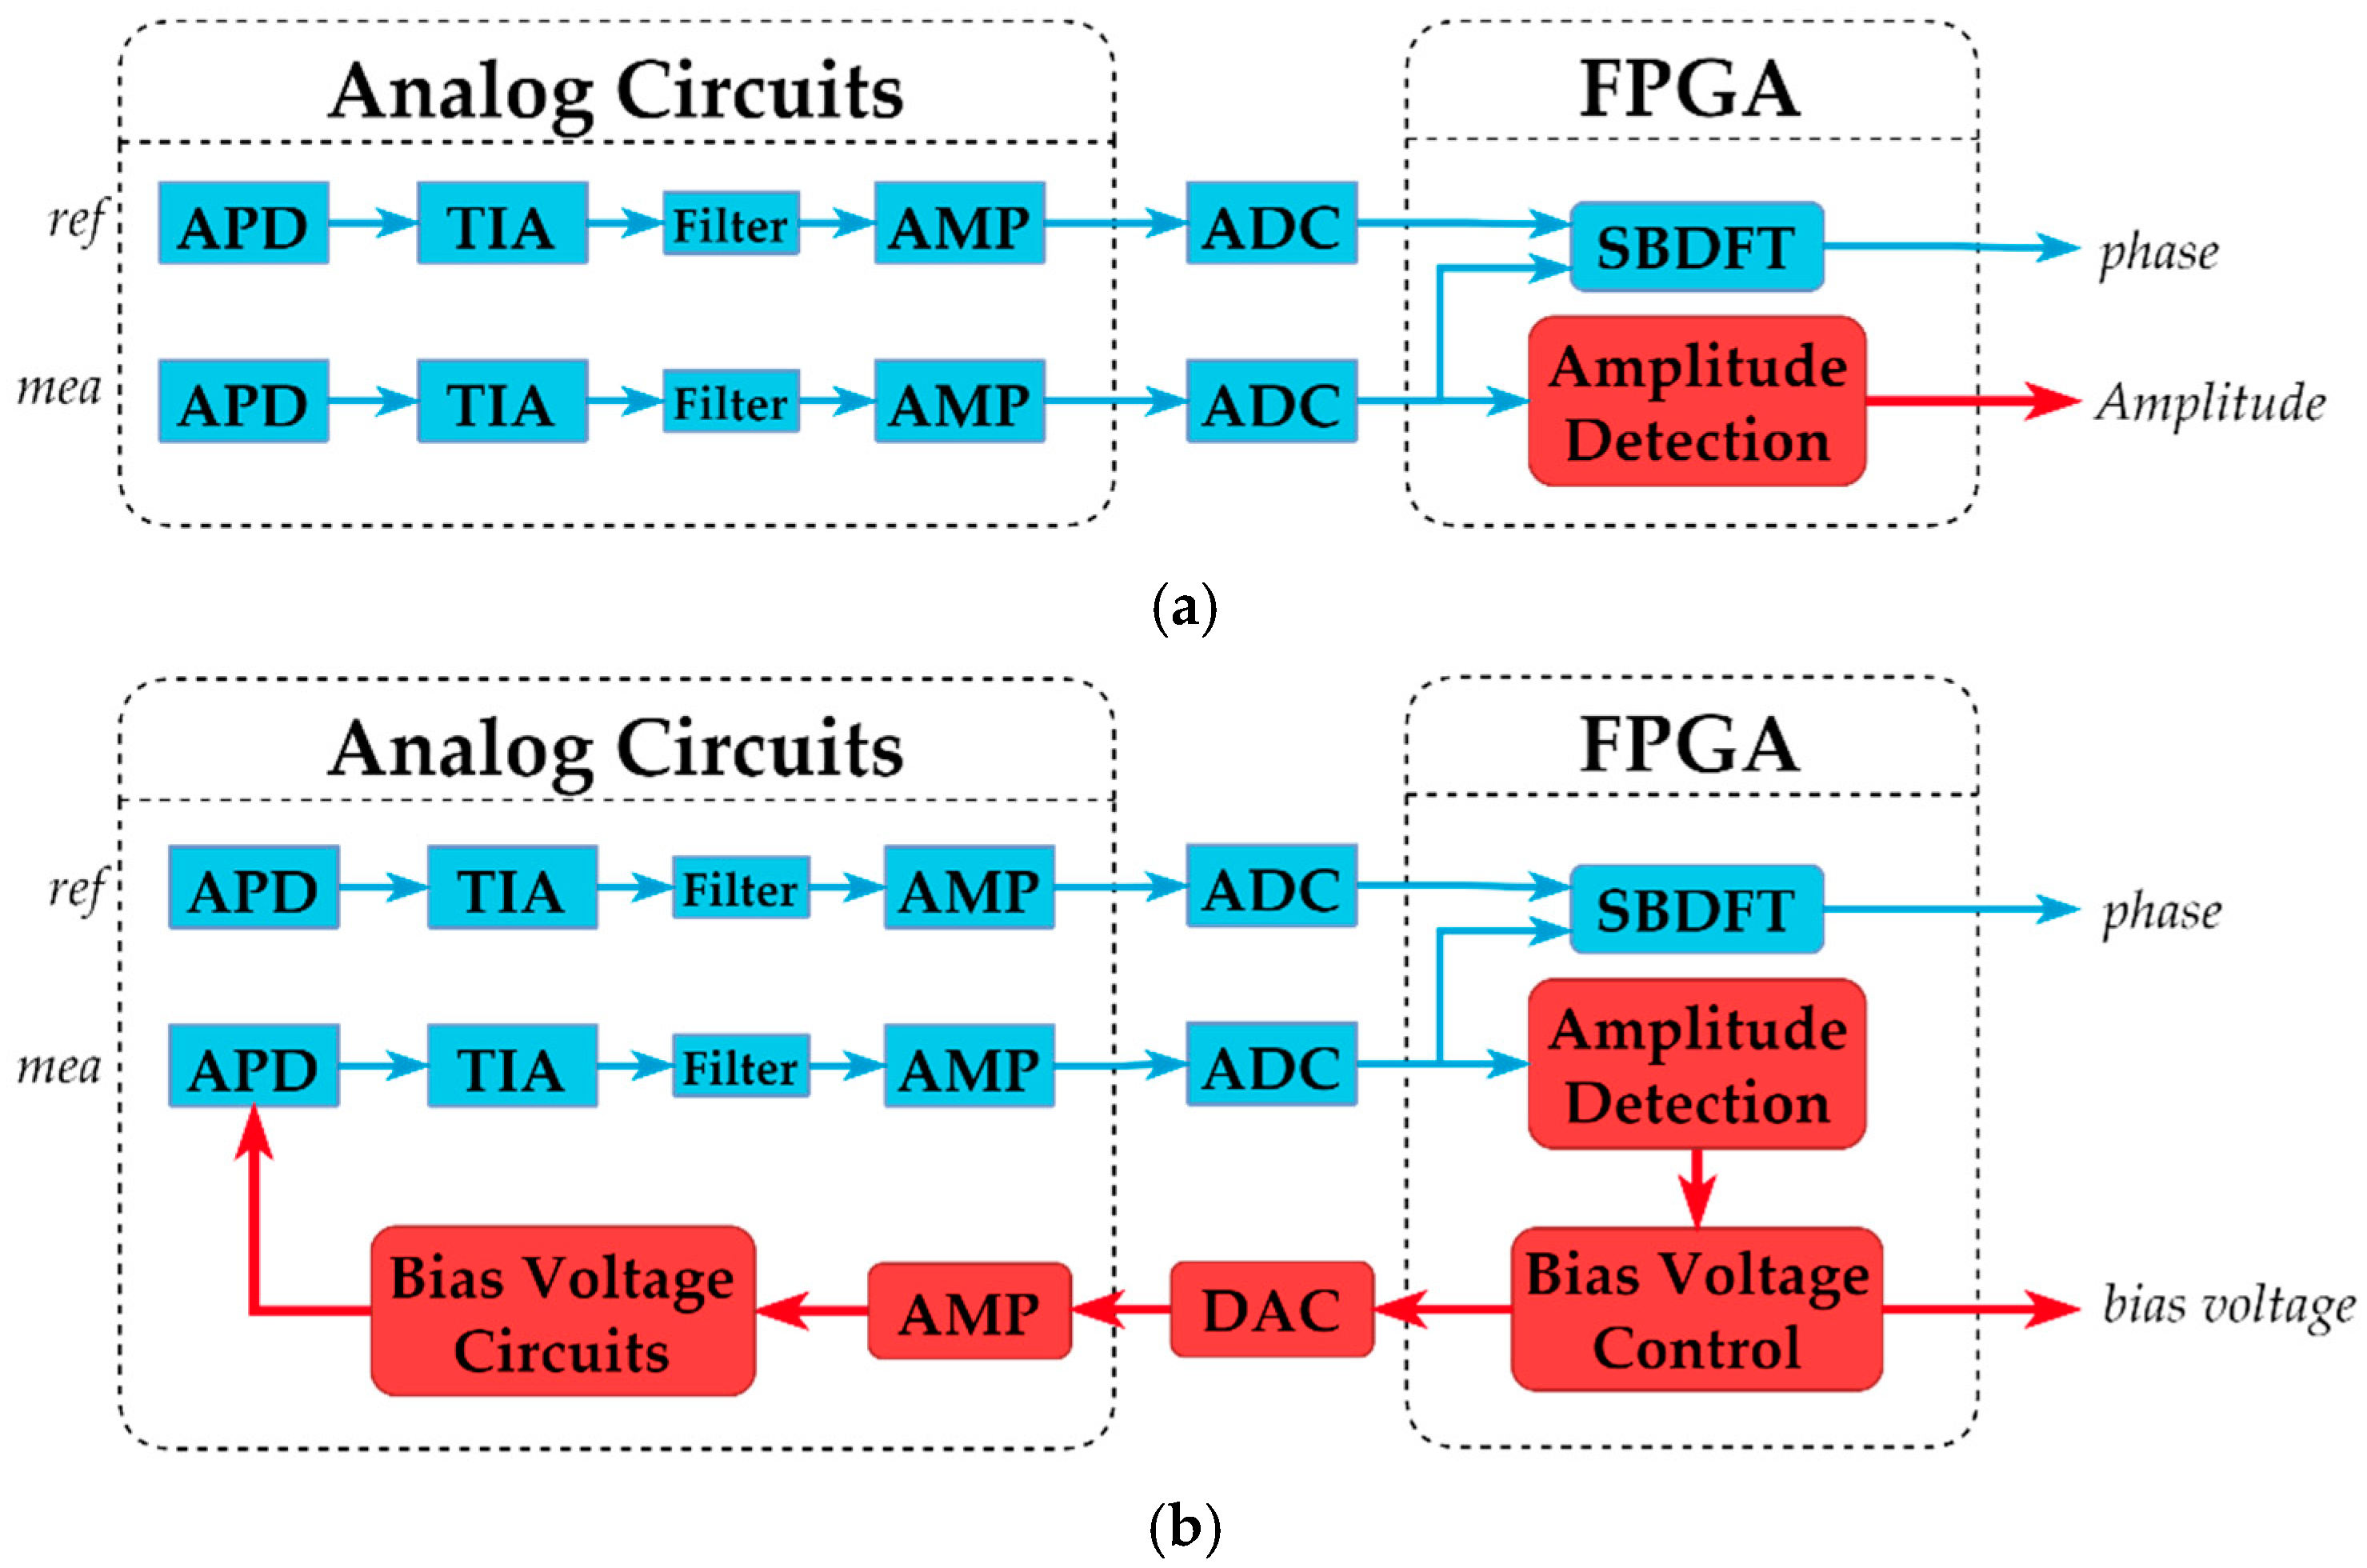
According to the previous analysis, the best-gain detection method and the auto-gain detection method are the main detection methods used in the laser interferometer at present. This experiment integrates APD S12051 produced by Hamamatsu and the phase meter. As shown in Figure 6, in the best-gain detection method, the interference light signal received by the APD is amplified and filtered, collected by a 16 bit analog-to-digital converter as a digital signal, and transmitted to the FPGA, where the phase solution and AC amplitude calculation are performed. In the auto-gain detection method, the AC amplitude detection is used to realize the bias voltage control, and the digital-to-analog converter and the bias voltage circuit are used to realize the gain control, to achieve the purpose of stabilizing the amplitude. The nominal phase resolution of the integrated processing module was 0.0055°, the nominal displacement resolution with the fourfold factor was 2.4 pm, and the range of input light intensity was 1–30 μW after temperature compensation.

3.3. Equivalent Measurement of the Error

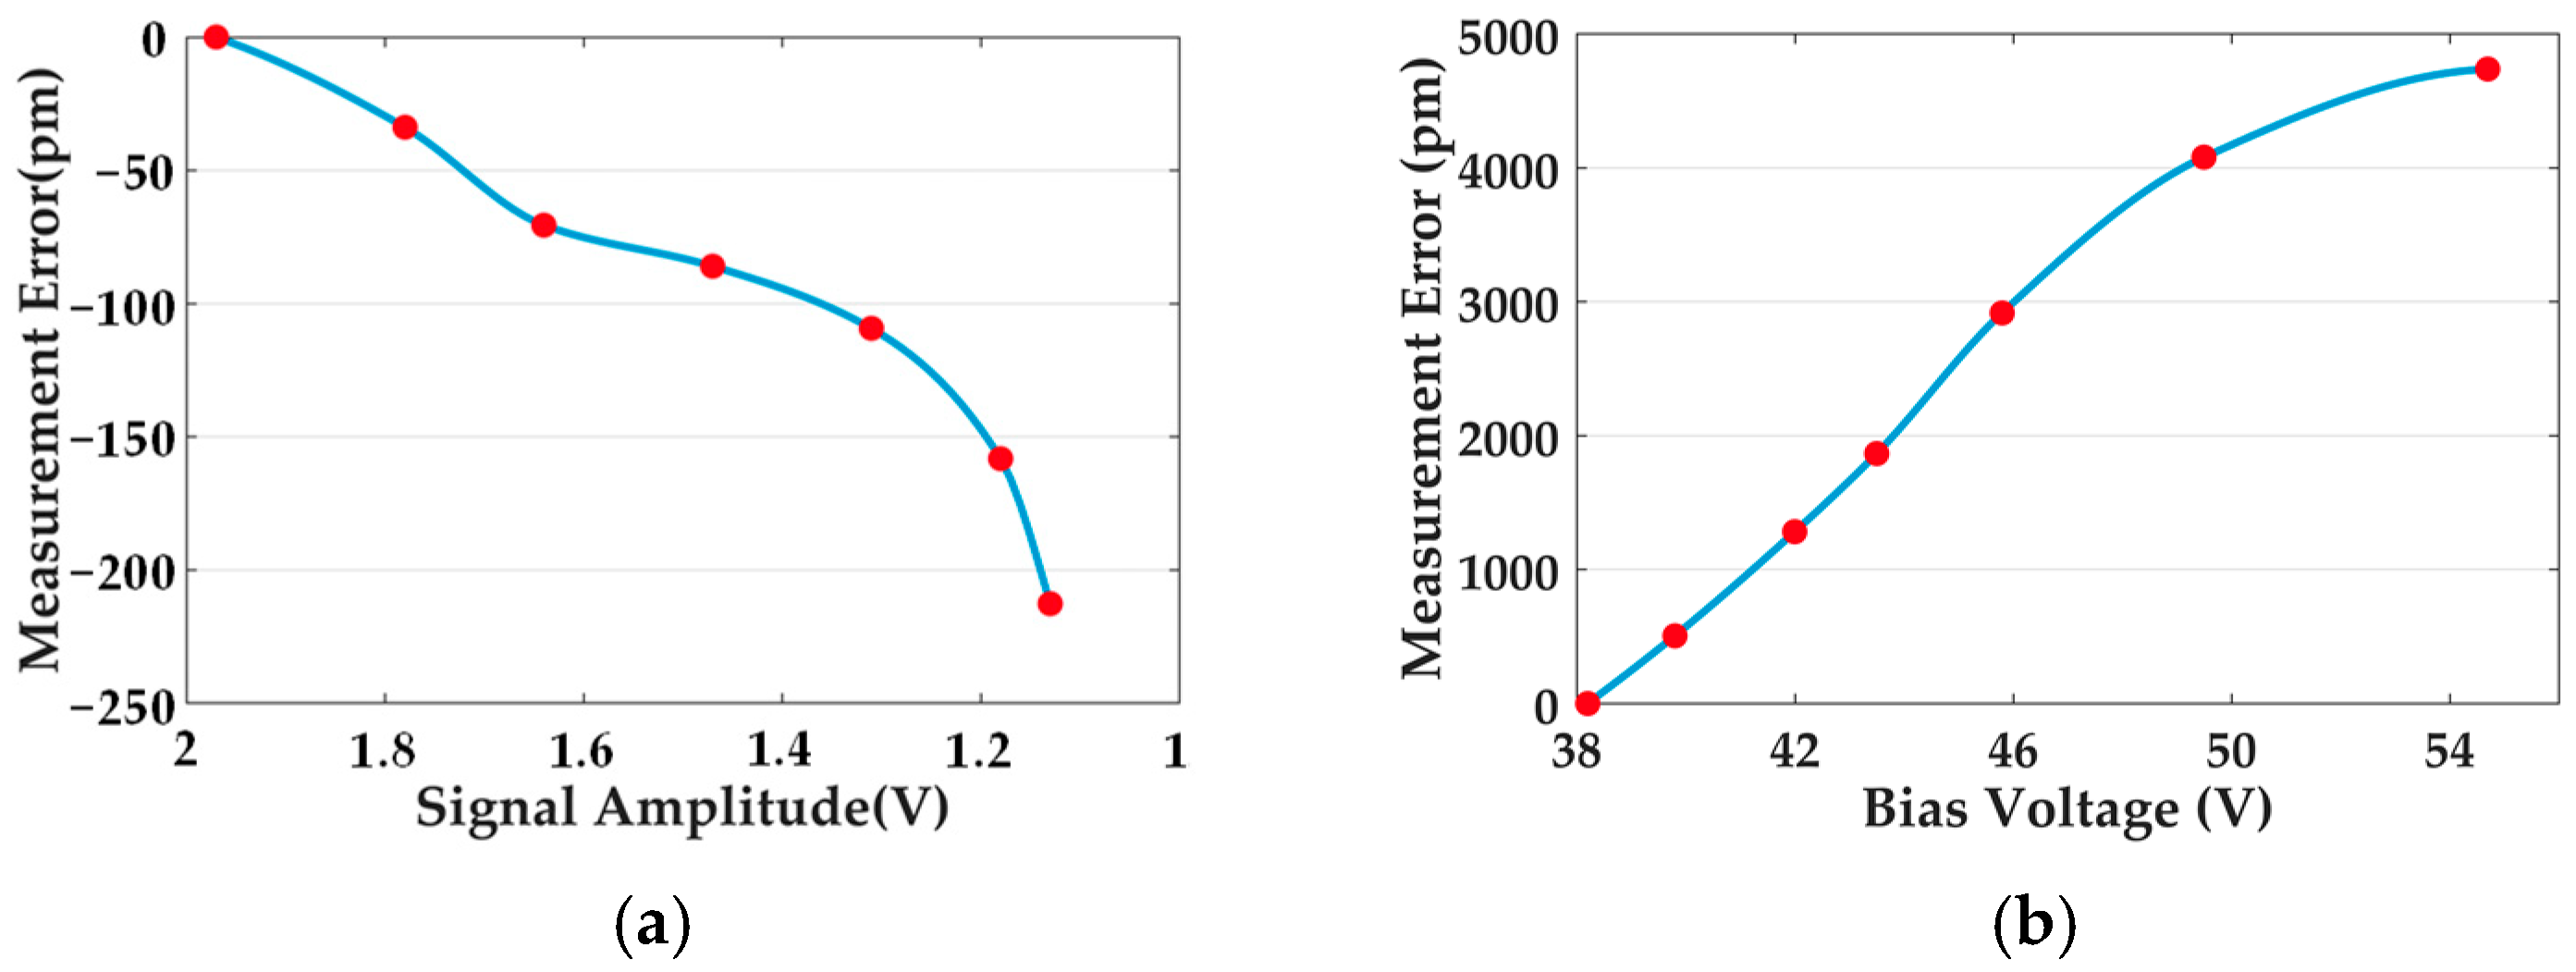
Observing the DC voltage and AC amplitude by the oscilloscope, analyzer A was adjusted to make the AC/DC ratio reach 100% of the preset initial value, and analyzer C was adjusted to maximize the signal amplitude on the oscilloscope. Connecting Signal II to the probe of the optical power meter, analyzer B was adjusted so that the optical power reached the preset initial value of 25 μW, and the initial DC voltage and AC amplitude were recorded on the oscilloscope at this time. Then signal I and signal II were connected to the phase meter to measure the phase difference between the reference signal and the measured signal after photoelectric conversion. After the circuit temperature was stable, the AC/DC ratio of signal II was adjusted to decay from 100% to 70% step by step with 5%, and the DC voltage was adjusted to conform to the DC attenuation curve calculated earlier. When the best gain detection method was used, the amplitude and phase changes of the signal output from the FPGA were recorded. In the method of automatic gain detection, the bias voltage control value and phase changes were recorded. The mean was calculated after repeated measurements three times. The measurement results are shown in Figure 7, where Figure 7a shows the equivalent displacement and signal amplitude measurement results of the best-gain detection method, and Figure 7b shows the equivalent displacement and bias voltage measurement results of the auto-gain detection method.
The results in Figure 7 show that, as the light intensity gradually decreased, the drift errors of the two detection methods both increased. Under the fourfold factor optical configuration, when the AC/DC ratio was attenuated to 70%, the displacement drift error under best-gain detection was 220 pm, but an increase in the gain could cause a larger error in the measurement of up to 4.8 nm. Therefore, this would seriously affect the measurement accuracy of the displacement measurement system.

3.4. Verification of the Error Compensation

To compensate for the errors, the signal amplitude, and the bias voltage were taken as the independent variables, the displacement error was taken as the dependent variable, and the shape-preserving piecewise cubic interpolation method was used to fit the curve, as shown in Figure 8. The fitting results were coded into the real-time phase measurement system in a look-up table, and the changes in the signal amplitude and the bias voltage were monitored for phase compensation.
Because there are many errors in the laser interference displacement measurement system, to verify the error compensation effect, the equivalent measurement method proposed in this paper was also used. In the optical configuration as illustrated in Figure 5, the verification process was consistent with the measurement process. The analyzer A and the analyzer B were adjusted to keep the initial value the same as the initial value in the error measurement experiment, i.e., AC/DC ratio of 100%, the light intensity of 25 μW, and different light intensities were selected in the attenuation curve to verify the compensation effect. After the circuit temperature was stable, analyzer A and analyzer B were adjusted to make the AC/DC ratio and light intensity as shown in Table 1. In each case, 4000 points of displacement data were collected, and the mean and standard deviation were calculated [27] to represent the displacement drift error and measurement accuracy, respectively. The experimental results are shown in Figure 9.
The blue curve represents the phase compensation results under best-gain detection, while the red curve represents the phase compensation results under auto-gain detection. It can be seen from Figure 9 that, after gain compensation and phase compensation, the displacement drift error of both detection methods was reduced to less than 40 pm. It can also be seen that the best-gain detection could not achieve SNR compensation, whereby the standard deviation increased with the decrease in AC/DC ratio, resulting in a decrease in the measurement accuracy, while the standard deviation under auto-gain detection was unchanged, thus ensuring the high measurement accuracy of the laser interferometric displacement measurement system.

4. Discussion

This paper studies a dynamic error equivalent measurement and compensation method which is easily ignored in the displacement-measuring interferometer system of photolithography. This error is essentially caused by the transit time change of the photoelectric conversion process in different light intensities. The existing compensation methods are implemented by changing the light intensity and controlling the bias voltage of the APD [24,25], which leads to a decrease in displacement measurement accuracy, because of additional mixed noise during the photoelectric conversion process. In this paper, the method of error measurement and compensation is presented, with the requirement of a high signal-to-noise ratio taken into account and the error reduced to sub-nanometer depth. In addition, this equivalent measurement method can also become one of the means to test the dynamic performance of the photodetector. In the future improved compensation method, the compensation dimension can be added to make the photoelectric detection applicable to various lighting conditions.

5. Conclusions

In this paper, it was found that the measurement error caused by the reduction in the total laser light intensity is a non-negligible error source in deep sub-nanometer measurement. According to the characteristics of the APD, considering the high SNR of the photodetector, an equivalent measurement photoelectric device against environmental disturbances was proposed, which can detect phase drift and realize real-time displacement compensation. The experimental results showed that, in the fourfold optical path, when the AC/DC ratio of the interference signal was reduced by 30%, the displacement error using the best-gain detection method was 220 pm, while the displacement drift error using the auto-gain detection method could reach 4.8 nm. After compensation, the error of both methods could be reduced to 40 pm by reducing the displacement measurement error caused by the attenuation of light intensity. The novel method proposed in this paper can help to progress the dynamic heterodyne laser interferometry system toward deep sub-nanometer precision.

Author Contributions

Conceptualization, J.W. and Y.S.; methodology, J.W.; validation, X.X. and P.H.; formal analysis, J.W.; investigation, J.W. and Y.S.; resources, P.H.; data curation, X.X.; writing—original draft preparation, J.W.; writing—review and editing, D.C.; visualization, X.X.; supervision, J.T.; project administration, P.H. All authors have read and agreed to the published version of the manuscript.

Funding

This research was funded by the National Natural Science Foundation of China, grant number 52061135114, and by the National Major Science and Technology Projects of China, grant number 2017ZX02101006-005.

Institutional Review Board Statement

Not applicable.

Informed Consent Statement

Not applicable.

Data Availability Statement

Data are available on request.

Conflicts of Interest

The authors declare no conflict of interest.

References

  1. Lawall, J. Interferometry for Accurate Displacement Metrology. Opt. Photon. News 2004, 15, 40–45. [Google Scholar] [CrossRef]
  2. Weichert, C.; Köchert, P.; Köning, R.; Flügge, J.; Andreas, B.; Kuetgens, U.; Yacoot, A. A heterodyne interferometer with periodic nonlinearities smaller than ±10 pm. Meas. Sci. Technol. 2012, 23, 094005. [Google Scholar] [CrossRef]
  3. Abbott, B.P.; Abbott, R.; Abbott, T.D.; Abernathy, M.R.; Acernese, F.; Ackley, K.; Adams, C.; Adams, T.; Addesso, P.; Adhikari, R.X.; et al. Observation of Gravitational Waves from a Binary Black Hole Merger. Phys. Rev. Lett. 2016, 116, 061102. [Google Scholar] [CrossRef] [PubMed]
  4. Pisani, M.; Yacoot, A.; Balling, P.; Bancone, N.; Birlikseven, C.; Celik, M.; Flugge, J.; Hamid, R.; Kochert, P.; Kren, P.; et al. Comparison of the performance of the next generation of optical interferometers. Metrologia 2012, 49, 455–467. [Google Scholar] [CrossRef]
  5. Pease, R.F.; Chou, S.Y. Lithography and Other Patterning Techniques for Future Electronics. Proc. IEEE 2008, 96, 248–270. [Google Scholar] [CrossRef]
  6. Kochert, P.; Flugge, J.; Weichert, C.; Koning, R.; Manske, E. Phase measurement of various commercial heterodyne He-Ne-laser interferometers with stability in the picometer regime. Meas. Sci. Technol. 2012, 23, 6. [Google Scholar] [CrossRef]
  7. Manske, E.; Jager, G.; Hausotte, T.; Fussl, R. Recent developments and challenges of nanopositioning and nanomeasuring technology. Meas. Sci. Technol. 2012, 23, 10. [Google Scholar] [CrossRef]
  8. Lou, Y.T.; Yan, L.P.; Chen, B.Y.; Zhang, S.H. Laser homodyne straightness interferometer with simultaneous measurement of six degrees of freedom motion errors for precision linear stage metrology. Opt. Express 2017, 25, 6805–6821. [Google Scholar] [CrossRef] [PubMed]
  9. Rowley, W.R.C. Signal Strength in Two-beam Interferometers with Laser Illumination. Opt. Acta Int. J. Opt. 1969, 16, 159–168. [Google Scholar] [CrossRef]
  10. Huang, J.J.S.; Chang, H.S.; Jan, Y.H.; Ni, C.J.; Chen, H.S.; Chou, E. Temperature Dependence Study of Mesa-Type InGaAs/InAlAs Avalanche Photodiode Characteristics. Adv. Optoelectron. 2017, 2017, 5. [Google Scholar] [CrossRef] [Green Version]
  11. Kharraz, O.; Forsyth, D. Performance comparisons between PIN and APD photodetectors for use in optical communication systems. Optik 2013, 124, 1493–1498. [Google Scholar] [CrossRef]
  12. Yan, L.P.; Yan, Y.C.; Chen, B.Y.; Lou, Y.T. A Differential Phase-Modulated Interferometer with Rotational Error Compensation for Precision Displacement Measurement. Appl. Sci. 2022, 12, 5002. [Google Scholar] [CrossRef]
  13. Su, Z.; Liang, X.; Bi, S. Noise analysis and determination method of optimum multiplication rate for APD sensor. In Proceedings of the International Conference on Automatic Control and Artificial Intelligence (ACAI 2012), Xiamen, China, 3–5 March 2012; pp. 1403–1406. [Google Scholar]
  14. Wu, X.Y.; Cui, J.Y.; Xu, C.X.; Zheng, W.; Zheng, Y.C. The design of laser detection circuit with high reliability and large dynamic range based on APD. In Proceedings of the Conference on Optical Sensing and Imaging Technologies and Applications/International Symposium on Optoelectronic Technology and Application (OTA)/Annual Conference of the Chinese-Society-for-Optical-Engineering (CSOE), Beijing, China, 22–24 May 2018. [Google Scholar]
  15. Yu, X.N.; Tong, S.F.; Dong, Y.; Song, Y.S.; Hao, S.C.; Lu, J. Design and performance testing of an avalanche photodiode receiver with multiplication gain control algorithm for intersatellite laser communication. Opt. Eng. 2016, 55, 5. [Google Scholar] [CrossRef]
  16. Cao, Y.H.; Bu, X.Z.; Xu, M.M.; Han, W. APD optimal bias voltage compensation method based on machine learning. ISA Trans. 2020, 97, 230–240. [Google Scholar] [CrossRef]
  17. Budzyn, G.; Podzorny, T. Study on avalanche photodiode influence on heterodyne laser interferometer linearity. In Proceedings of the 12th International AIVELA Conference on Vibration Measurements by Laser and Noncontact Techniques—Advances and Applications, Ancona, Italy, 29 June–1 July 2016. [Google Scholar]
  18. Wang, B.H.; Huang, Z.H.; Zeng, X.G.; Sorin, W.V.; Liang, L.; Fiorentino, M.; Beausoleil, R.G. A Compact Model for Si-Ge Avalanche Photodiodes Over a Wide Range of Multiplication Gain. J. Lightwave Technol. 2019, 37, 3229–3235. [Google Scholar] [CrossRef]
  19. Bielecki, Z.; Achtenberg, K.; Kopytko, M.; Mikolajczyk, J.; Wojtas, J.; Rogalski, A. Review of photodetectors characterization methods. Bull. Pol. Acad. Sci. Tech. Sci. 2022, 70, 26. [Google Scholar] [CrossRef]
  20. Campbell, J.C.; Demiguel, S.; Ma, F.; Beck, A.; Guo, X.Y.; Wang, S.L.; Zheng, X.G.; Li, X.W.; Beck, J.D.; Kinch, M.A.; et al. Recent advances in avalanche photodiodes (vol 10, pg 777, 2004). IEEE J. Sel. Top. Quantum Electron. 2004, 10, 1446–1447. [Google Scholar] [CrossRef]
  21. Merhav, N. Optimal Correlators for Detection and Estimation in Optical Receivers. In Proceedings of the IEEE International Symposium on Information Theory (ISIT), Electr Network, Melbourne, Australia, 12–20 July 2021; pp. 3097–3102. [Google Scholar]
  22. Ray, S.; Hella, M.M.; Hossain, M.M.; Zarkesh-Ha, P.; Hayat, M.M. Speed Optimized Large Area Avalanche Photodetector in Standard CMOS Technology for Visible Light Communication. In Proceedings of the 13th IEEE Sensors Conference, Valencia, Spain, 2–5 November 2014; pp. 2147–2150. [Google Scholar]
  23. Yokoyama, S.; Okamoto, A.; Araki, T.; Suzuki, N. Examination to eliminate undesirable phase delay of an avalanche photodiode (APD) for intensity-modulated light. Rev. Sci. Instrum. 1995, 66, 5331–5336. [Google Scholar] [CrossRef]
  24. Yokoyama, S.; Suzuki, N.; Araki, T. Correction of intensity-dependent phase delay in avalanche photodiodes for high-frequency modulation-light. Rev. Sci. Instrum. 1995, 66, 4391–4392. [Google Scholar] [CrossRef]
  25. Miyata, T.; Araki, T.; Iwata, T. Correction of the intensity-dependent phase delay in a silicon avalanche photodiode by controlling its reverse bias voltage. IEEE J. Quantum Electron. 2003, 39, 919–923. [Google Scholar] [CrossRef]
  26. Chang, D.; Wang, J.N.; Hu, P.C.; Tan, J.B. Zoom into picometer: A picoscale equivalent phase-difference-generating method for testing heterodyne interferometers without ultraprecision stages. Opt. Eng. 2019, 58, 8. [Google Scholar] [CrossRef]
  27. Demarest, F.C. High-resolution, high-speed, low data age uncertainty, heterodyne displacement measuring interferometer electronics. Meas. Sci. Technol. 1998, 9, 1024–1030. [Google Scholar] [CrossRef]
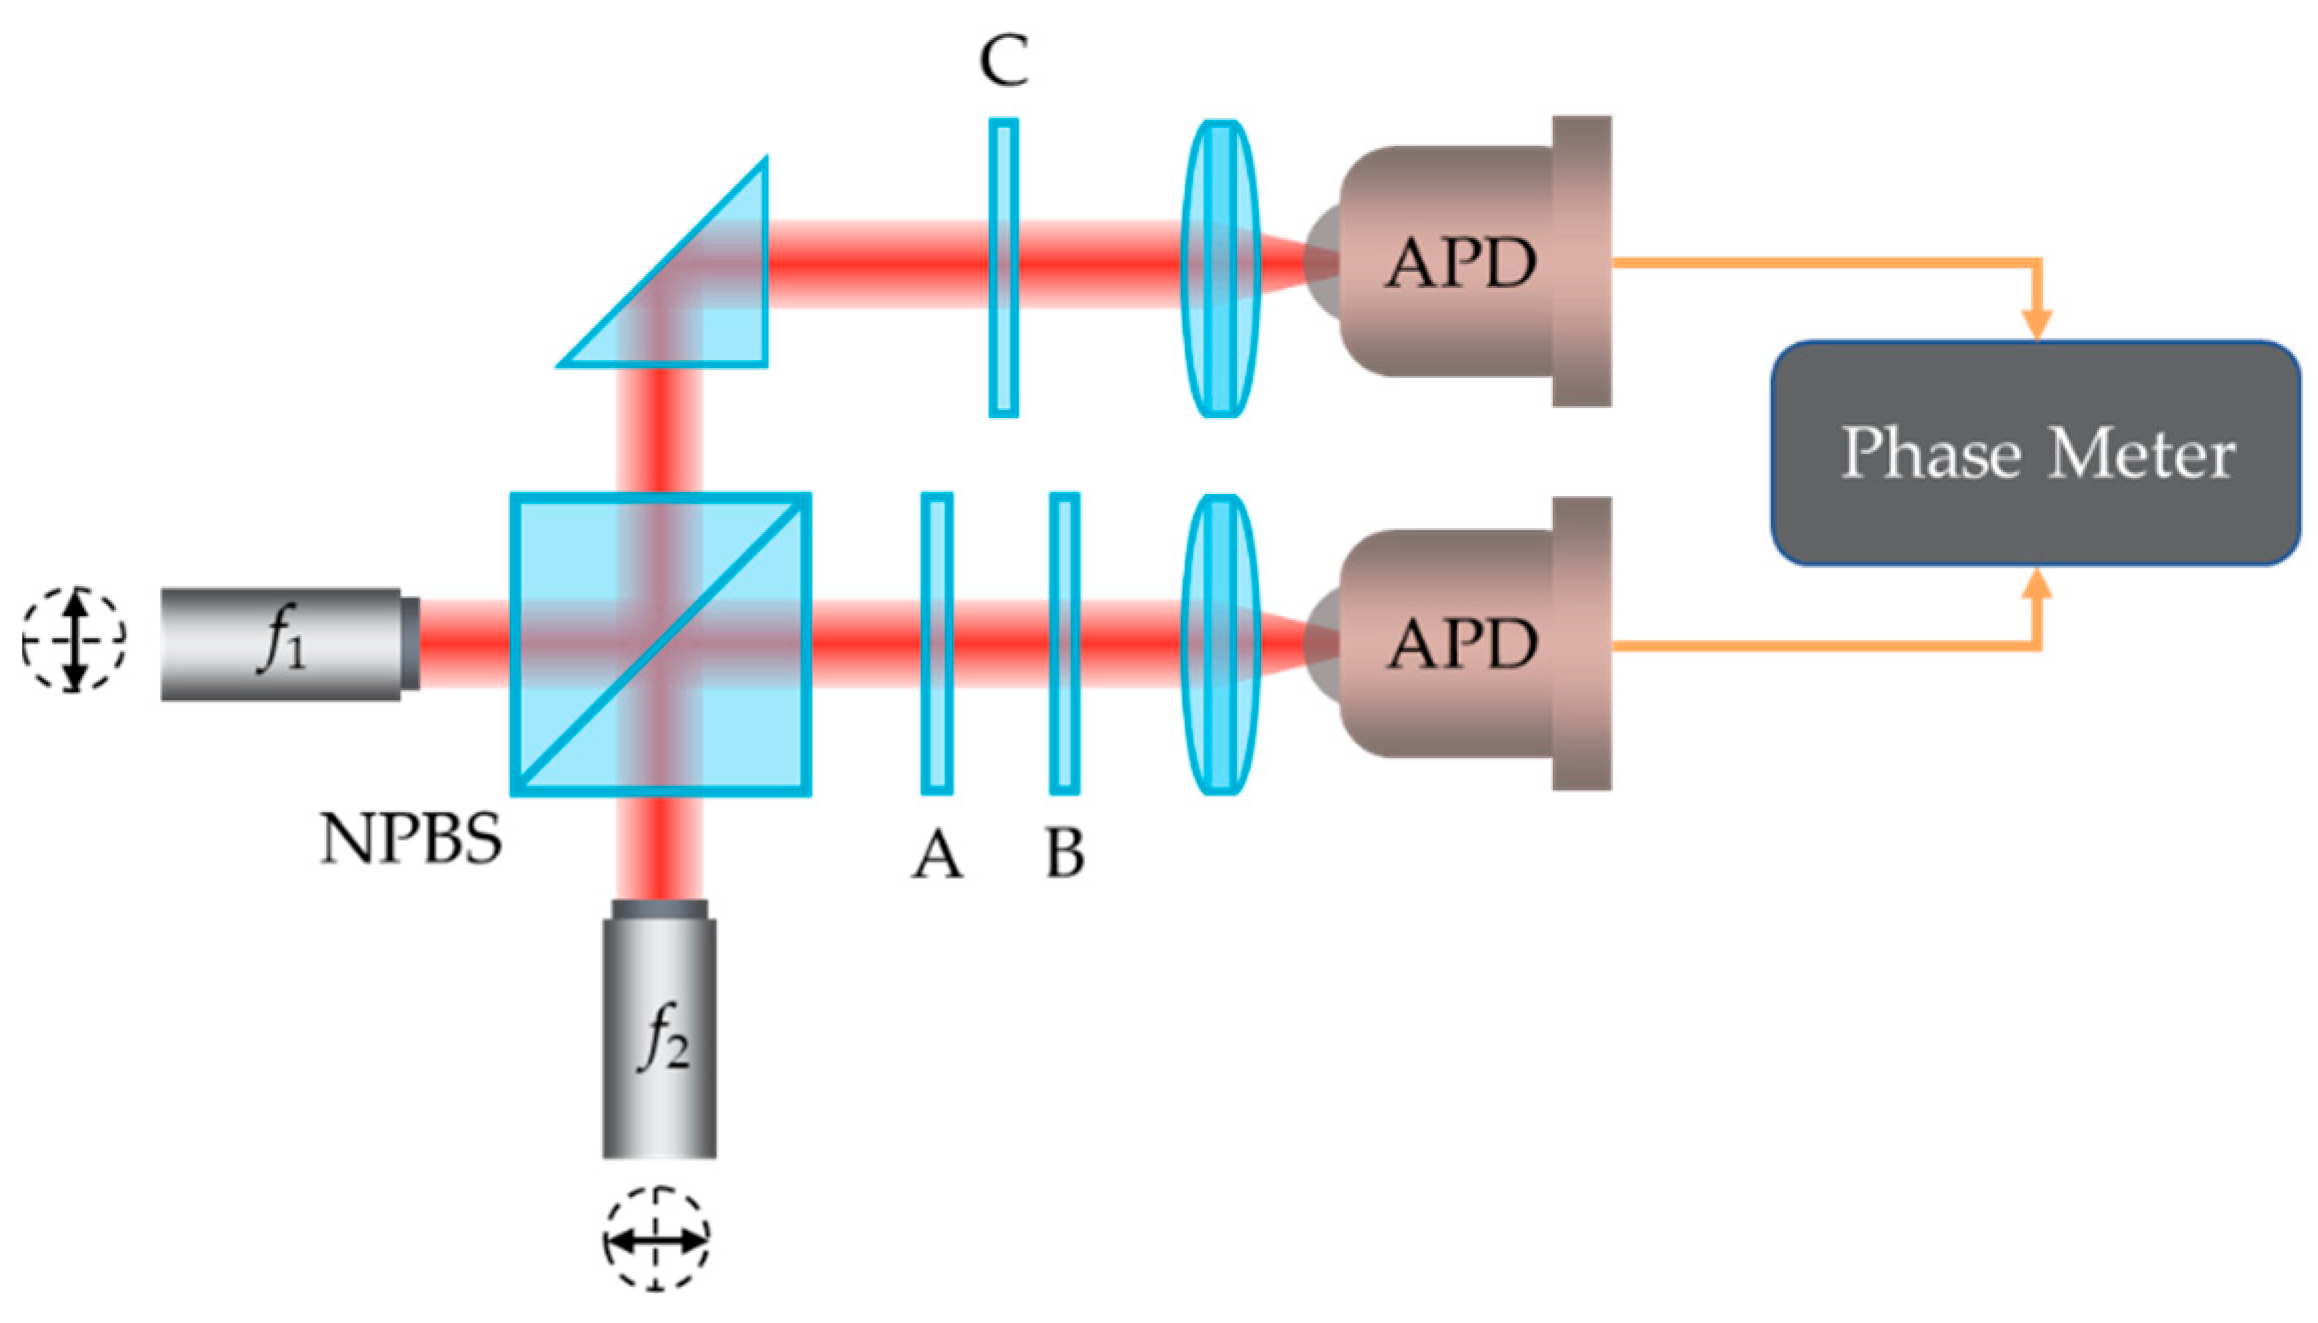
Figure 1. The optical configuration of APD phase drifts error equivalent measurement method.
Photonics 09 00714 g001
Figure 2. Simulation results of equivalent measurement method.
Photonics 09 00714 g002
Figure 3. Position mismatch between aperture and measurement beam in interferometry.
Photonics 09 00714 g003
Figure 4. Simulation results of normalized DC and AC intensity, as well as the AC/DC ratio.
Photonics 09 00714 g004
Figure 5. Optical configuration for equivalent tests of intensity drift error.
Photonics 09 00714 g005
Figure 6. Schematic of two detection methods: (a) best-gain detection method; (b) auto-gain detection method.
Photonics 09 00714 g006
Figure 7. Results of signal amplitude and bias voltage using (a) best-gain detection method and (b) auto-gain detection method.
Photonics 09 00714 g007
Figure 8. Fitting curves of experiment results for displacement error compensation using (a) best-gain detection method and (b) auto-gain detection method.
Photonics 09 00714 g008
Figure 9. Results of displacement compensation method under different light intensities.
Photonics 09 00714 g009
Table 1. Light intensity results under different AC/DC ratios.
Times1234567
AC/DC ratio (%)100989388837873
Light intensity (μW)2524.623.823.022.221.420.6
Publisher’s Note: MDPI stays neutral with regard to jurisdictional claims in published maps and institutional affiliations.