Article

Non-Circular Domain Surface Figure Analysis of High-Dynamic Scanning Mirrors Under Multi-Physics Coupling

by
Xiaoyan He
1,2,
Kaiyu Jiang
3,
Penglin Liu
4,
Xi He
1,2 and
Peng Xie
1,2,*
1
Changchun Institute of Optics, Fine Mechanics and Physics, Chinese Academy of Sciences, Changchun 130033, China
2
University of Chinese Academy of Sciences, Beijing 100049, China
3
School of Physical Sciences, Nankai University, Tianjin 300071, China
4
School of Physical Sciences, Changchun University of Science and Technology, Changchun 130022, China
*
Author to whom correspondence should be addressed.
Photonics 2026, 13(1), 65; https://doi.org/10.3390/photonics13010065
Submission received: 6 December 2025 / Revised: 3 January 2026 / Accepted: 6 January 2026 / Published: 9 January 2026
(This article belongs to the Special Issue Advances in Optical Precision Manufacturing and Processing)

Abstract

The use of large-aperture scanning mirrors for high-resolution and wide-swath imaging represents a major trend in Earth observation technology. However, to improve dynamic response performance, scanning mirror assemblies are highly lightweighted, resulting in reduced overall stiffness. This makes the mirror surface susceptible to thermal and inertial loads during operation, leading to degraded surface accuracy and poor imaging quality. Moreover, dynamic scanning mirror has the multi-disciplinary coupling effects and non-circular structural characteristics. It poses significant challenges for surface figure analysis. To address these issues, this paper proposes a surface analysis method for high-dynamic scanning mirrors under multi-physics coupling in non-circular domains. First, a finite element model of the mirror assembly is established based on the minimum aperture and angular velocity parameters. Through finite element analysis, the surface response of the scanning mirror assembly under thermal loads, dynamic inertial loads, and their coupled effects is quantitatively investigated. Subsequently, an analytical approach, which combines rigid-body displacement separation and Gram–Schmidt orthogonalization, is developed to construct non-circular Zernike polynomials, enabling high-precision fitting and reconstruction of the mirror’s dynamic surface distortions. Numerical experiments validate the accuracy of the model. Results show that for a scanning mirror with an aperture of 466 mm × 250 mm under the coupled condition of a 5 °C temperature rise and 50 N·mm torque, the surface figure achieves RMS < 2 nm and PV < 22 nm, with a fitting accuracy achieves 10−6. These results verify the accuracy and reliability of the proposed method. The surface analysis approach presented in this study provides theoretical guidance and a design framework for subsequent image quality evaluation and assurance.

1. Introduction

Space-based optical remote sensing is a crucial means of acquiring terrestrial information. According to the imaging mode, it can be categorized into push-broom imaging and whisk-broom imaging. Push-broom imaging features simple control, few structural degrees of freedom and small dynamic range. It is mainly suitable for narrow-swath, high-resolution remote sensing tasks. Facing the demand for simultaneous high-resolution and wide-swath imaging, the field of view (FOV) of push-broom imaging payloads which is limited by the designing traditional optics difficult to achieve wide-swath imaging while maintaining high resolution [1]. To address the constraint between high resolution and wide swath, the whisk-broom imaging mode has appeared [2]. This mode can maintain the along-track field of view while expanding the effective field to the order of hundreds of kilometers through cross-track scanning by a scanning mirror, representing a new direction in the development of remote sensing technology [3].
As a critical component in whisk-broom imaging systems, the scanning mirror’s surface figure accuracy affects the optical system’s imaging quality [4]. Increasing swath requirements drive the need for larger mirror apertures, which increase mass, reduce response speed, and complicate control. To enhance dynamic performance, large-aperture scanning mirrors must be lightweighted, but this generally reduces overall stiffness [5], subjecting them to a more complex mechanical environment during dynamic operation. On the one hand, significant rotational inertia during scanning induces distributed stress, causing surface deformation. On the other hand, the mirror is more sensitive to temperature gradients. Due to the material’s thermophysical properties, such gradients cause differential thermal expansion across the mirror, leading to uneven thermal stress and aggravating surface distortion [6]. These factors collectively degrade imaging performance. Furthermore, the non-circular aperture of the scanning mirror assembly renders traditional circular-domain surface analysis methods inadequate, posing additional challenges. Therefore, a dynamic surface analysis method which is established suitable for non-circular domains, it is essential for ensuring imaging quality [4].
In the field of optical surface figure analysis, existing research has established a relatively mature methodological framework. A data interface between Finite Element Analysis (FEA) and optical software was developed early on by Genke et al. [7], who also systematically proposed an optical surface figure analysis workflow and compared various surface fitting methods, thus laying the foundation for surface figure analysis. Shi et al. [8] achieved topology optimization of mirror support structures directly targeted at Zernike coefficients by integrating Zernike polynomial fitting within a finite element analysis (FEA) framework and utilizing the adjoint variable method for efficient sensitivity analysis. While traditional fitting methods were well-established, Hu et al. [9] and Li et al. [10] recently provided a systematic review of Zernike coefficient-solving algorithms within the IOA framework and proposed a neural network-based approach to improve the fitting accuracy. Lee et al. [11] used a finite element system to analyze the influence of gravitational loads on mirror surface figure at different azimuth angles, while Xu et al. [12] evaluated the surface figure of a mirror assembly under coupled gravitational and thermal loads. Qu et al. [13] presented a method combining multi-objective topology optimization and parametric optimization to simulate stiffness and surface accuracy under axial/lateral gravity and polishing pressure. Despite these advancements, existing methods still exhibit notable limitations. First, while recent studies by Lee [11] and Tian [14] evaluated mirror deformations under coupled gravity and thermal loads, these analyses primarily focus on quasi-static conditions., with insufficient investigation into the multi-physics coupling effects induced by thermal and inertial loads. Second, surface fitting predominantly relies on traditional circular-domain Zernike polynomials, which struggle to accurately represent the boundary constraints of rectangular mirrors, for instance, Shi [8] established a connection between finite element analysis and traditional Zernike fitting, but it was unable to accurately represent the boundary constraints of rectangular mirrors, resulting in large fitting errors at the edges.
In response to the issues, this paper proposes a multi-physics analysis and non-circular domain Zernike polynomial computation method for high-dynamic scanning mirrors surface figures. Via an inertial–thermal coupled model and high-precision fitting with non-circular domain Zernike polynomials, this method achieves high-precision fitting and reconstruction of the dynamic distorted surface, intended for subsequent image quality compensation and optimization design.

2. Object-Image Mapping Function for High-Dynamic Scanning Mirrors

To overcome the swath-resolution trade-off in push-broom sensing, whisk-broom imaging employs a rotating scanning mirror to achieve cross-track coverage across hundreds of kilometers. As the critical component, the mirror’s aperture and surface figure directly determine both imaging quality and swath width.

2.1. Object-to-Image Mapping Relationship in Cross-Track Scanning

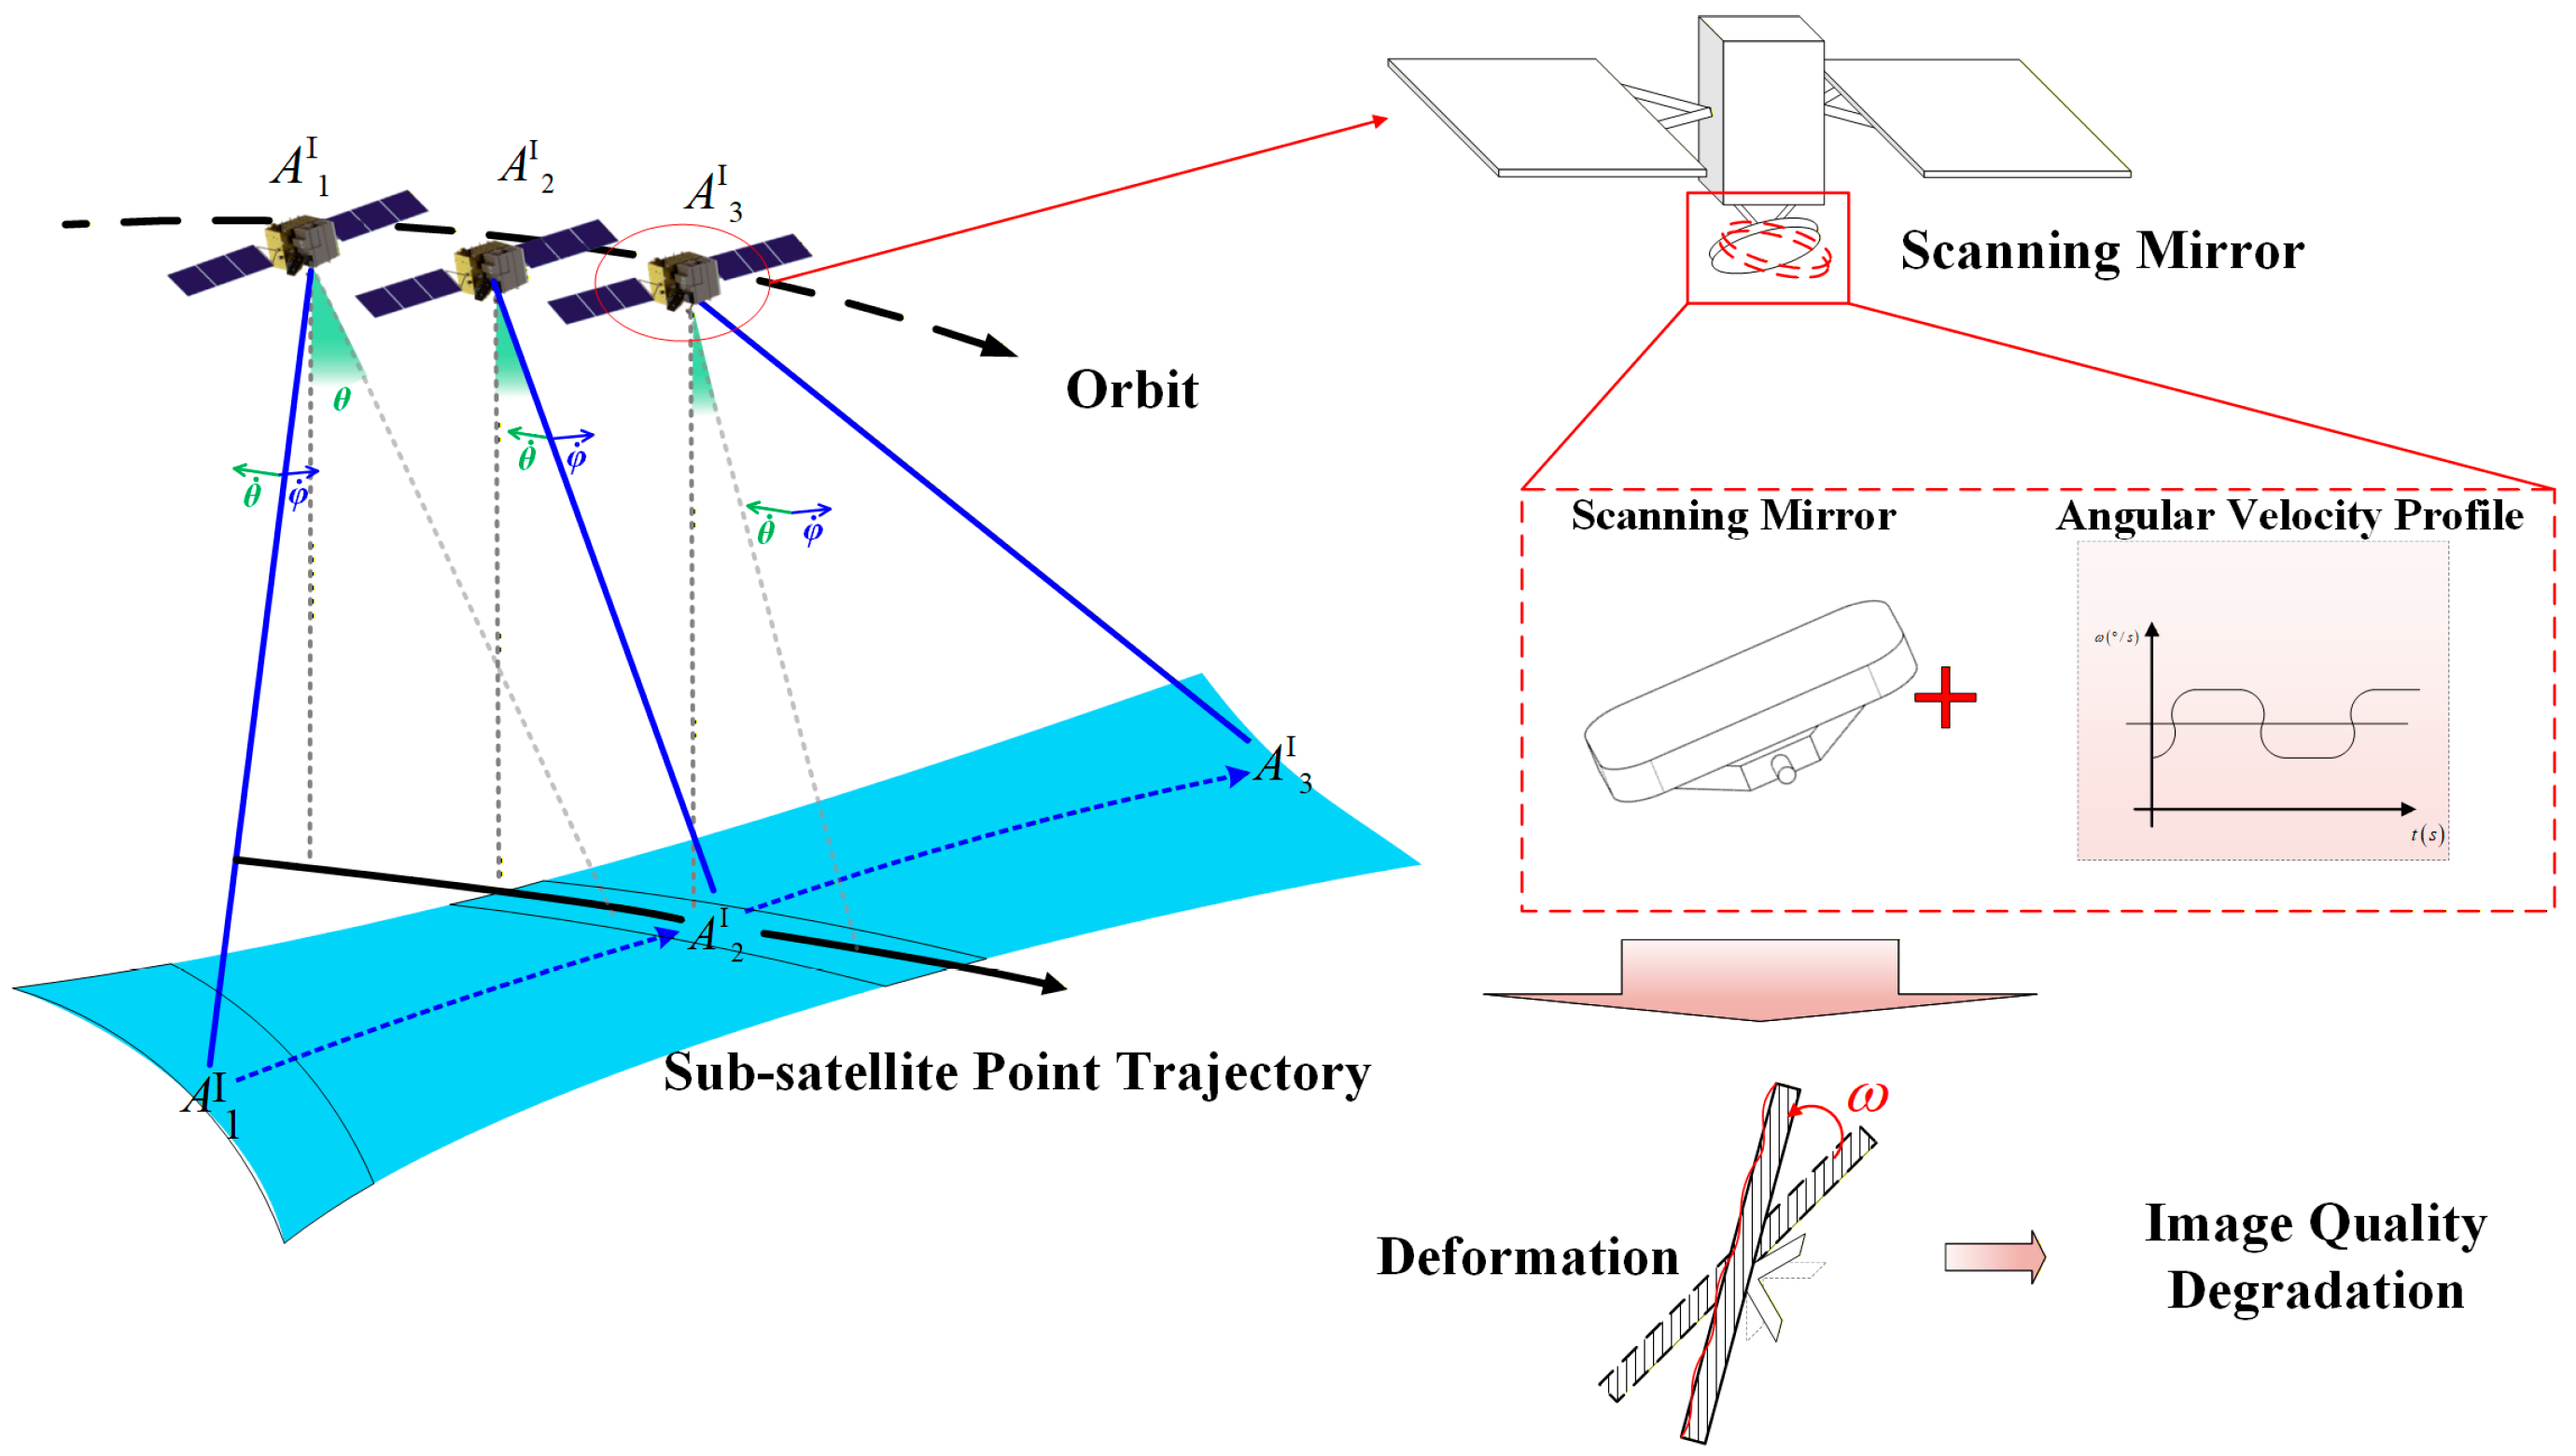
The scanning mirror’s periodic rotational motion in whisk-broom imaging is shown in Figure 1. Within one scanning cycle, when the mirror rotates to a position A 1 1 away from the nadir point, the detector begins exposure; at time t later, the mirror rotates to position A 3 1 , and the exposure ends. A single scan thus acquires a ground swath image, as shown by the blue area on the left side of Figure 1. By mosaicking multiple swath frames, wide-swath coverage can be achieved [15].
While scanning mirror aperture dictates swath width, larger apertures increase mass and rotational inertia. During dynamic scanning, inertial loads induce elastic deformation of the mirror surface, resulting in deflection and scattering of the reflected light path. This causes significant degradation in the system Modulation Transfer Function (MTF) and simultaneously increases launch costs [5]. Therefore, it is imperative to determine the minimum feasible size required for the target imaging swath through aperture calculation and to synergize with lightweight design strategies to balance optical performance against structural loads.

2.2. Determining the Minimum Aperture and Rate of Change for a Scanning Mirror

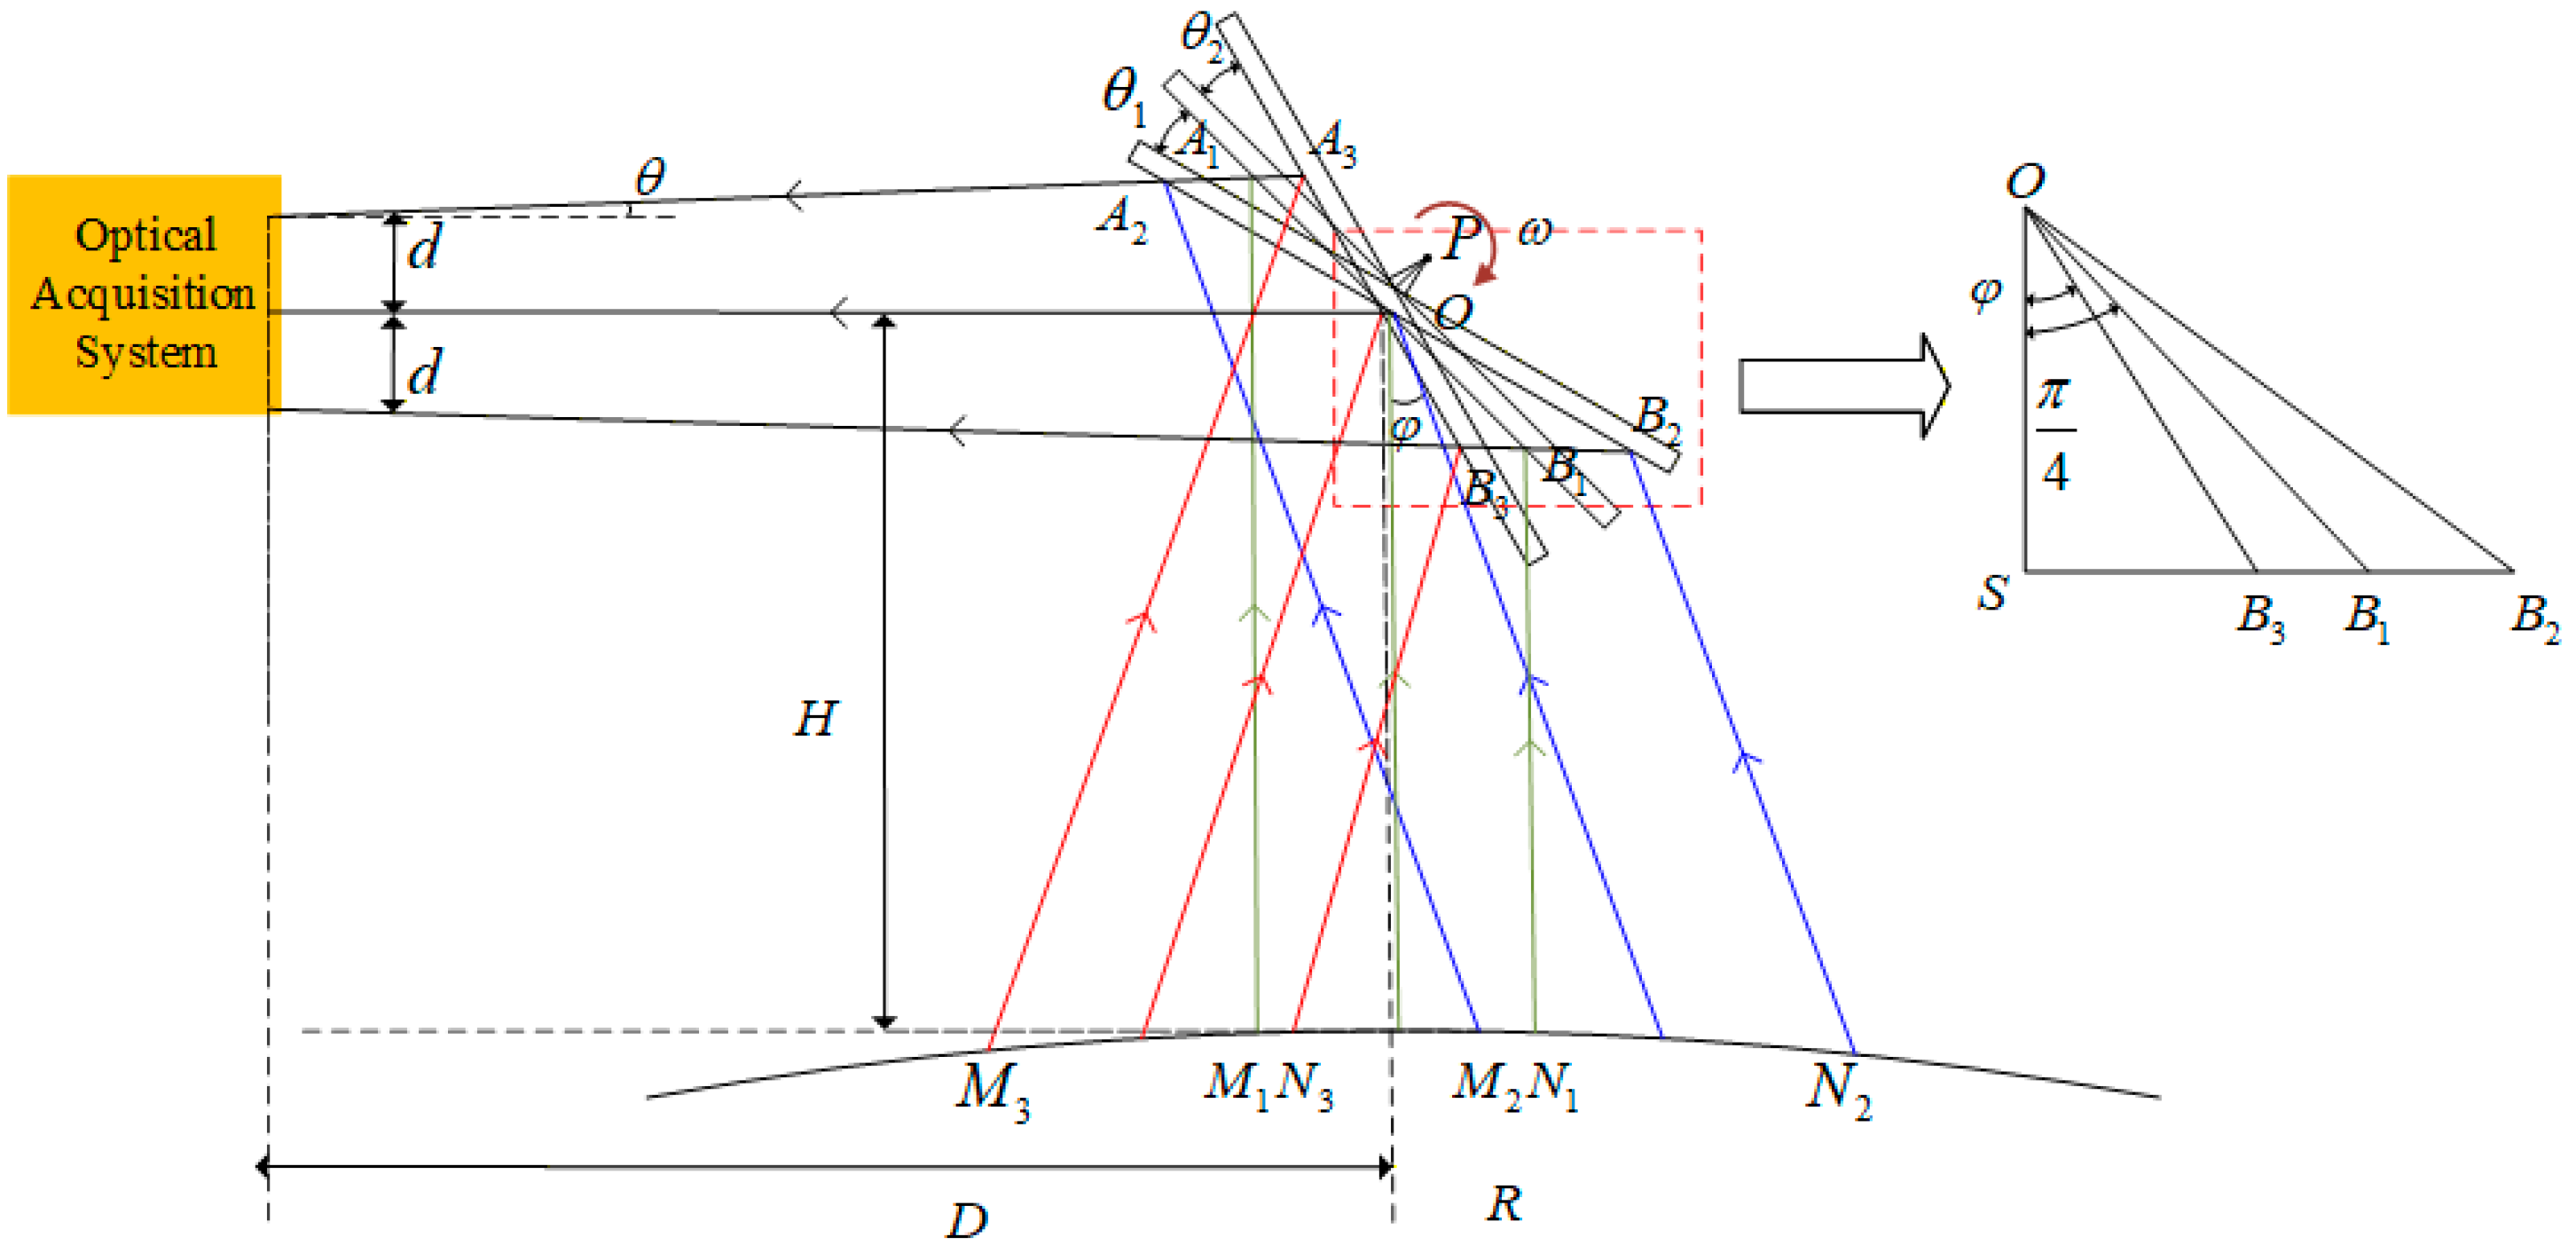
A schematic of the scanning mirror’s operational mode and its light reflection is shown in Figure 2.
The scanning mirror rotates about the p-axis at an angular velocity ω. To ensure the reflected light covers an area not smaller than the clear aperture d , mirror aperture must be calculated. As shown in Figure 2, With a fixed imaging field of view (FOV), the mirror reaches its maximum length at position A 2 B 2 Here, θ 1 and θ 2 are scanning compensation angles, the radius of the circular clear aperture is d , 2 φ is the cross-track scanning angle of the mirror, θ 1 = θ 2 = φ is the compensation angle, and D is the horizontal distance from the mirror center to the system. Applying the law of sines gives the minimum mirror dimension to ensure full coverage of marginal rays:
L 1 = A 2 B 2 = 2 d sin π 4 φ L 2 = 2 D tan θ + d
Furthermore, an additional margin beyond the clear aperture must be reserved in subsequent design and engineering. This margin accounts for machining tolerances, coating, and mechanical alignment.
The cross-track swath width W X of a single strip acquired by the scanning mirror within time t can be derived by the following formula:
W X = 2 R arcsin ( H + R ) sin φ R φ
Given a satellite orbital altitude H and the Earth’s radius R, the angular velocity ω of the scanning mirror is given by:
ω = 2 φ t = 2 arctan sin W X 2 R R + H R cos W X 2 R t
Controlling the scanning mirror’s aperture size, improving surface machining and alignment accuracy, and implementing lightweight design for the mirror assembly can effectively reduce the overall system load, thereby partially suppressing surface error. However, due to the operational characteristics of high-frequency dynamic scanning with large-aperture mirrors and the influence of extreme on-orbit thermo-mechanical coupling environments, non-negligible surface distortion inevitably occurs on the optical surface. Consequently, a multi-physics coupled dynamic model is essential to systematically quantify the temporal evolution of surface errors induced by inertial and thermal disturbances, providing a critical theoretical foundation for error compensation and control.

3. Finite Element Analysis of High-Dynamic Scanning Mirrors

This study employs the Finite Element Method (FEM) as the core tool for numerical simulation. Based on the governing equations of elasticity and structural mechanics, the element stiffness matrices are formulated to solve for global system responses under defined boundary and loading conditions [16]. These matrices enable the solution of system responses under specified boundary and loading conditions.

3.1. Influence of the Temperature Field

The scanning mirror assembly serves as the front-end component of the optical system. During on-orbit operation, the scanning mirror is subjected to spatial external heat flux, resulting in an uneven temperature field across its surface [17,18]. This generates temperature gradients within the structure, leading to non-uniform thermal expansion. This, in turn, induces thermal stress and strain, ultimately causing thermal deformation of the mirror surface. In thermoelasticity, the relationship between the stress tensor σ i j , the strain tensor ε i j , and the temperature change Δ T can be expressed by the generalized Hooke’s law:
ε x = 1 E σ x μ σ y + σ z + α Δ T ε y = 1 E σ y μ σ x + σ z + α Δ T ε z = 1 E σ z μ σ x + σ y + α Δ T γ x y = τ x y G , γ y z = τ y z G , γ z x = τ z x G
Taking into account the influence of the temperature field, the finite element equation for thermoelastic equilibrium can be expressed as:
K T U = F + F Δ T T
In the equation, T represents the structural temperature field, U denotes the structural displacement field, F is the mechanical load vector applied to the structure, F Δ T indicates the equivalent thermal load of the structure, K T represents the temperature-dependent stiffness matrix.
From these solutions, the stress and strain distributions are computed using the appropriate physical relations.

3.2. Influence of Inertial Loads

The optical system imposes stringent constraints on the surface figure accuracy of the scanning mirror under both static and dynamic operating conditions. Owing to its high-inertia, the large-aperture scanning mirror is prone to significant surface distortion under dynamic loads during whisk-broom imaging [19]. Therefore, the analysis must focus on the surface figure variation of the scanning mirror under dynamic operating conditions.
The nodal displacement vector for each element is denoted as u = u r , u z T . The internal energy of an elastic element can be expressed as the difference between the strain energy E and the work done by external forces W :
I = E W = V 1 2 ε T σ d V V u T N T f d V
Substituting the constitutive equation σ = D ε and the strain-displacement relation ε = B u into the above Equation (6) yields, by extending the internal energy formulation to the entire structure and assembling all elements, the global internal energy in matrix form is obtained as:
I = 1 2 U T K U U T F
where U is the global nodal displacement vector, K is the global stiffness matrix, and F is the global nodal force vector.
According to the principle of minimum potential energy, the elemental equilibrium equation is derived as:
K U = F e
Solving this system yields the nodal displacement field. These results are then substituted into the kinematic and constitutive equations to derive the strain and stress distributions within each element can be derived. This process fully characterizes the optical surface deformation behavior and internal stress state of the scanning mirror under inertial loads.

3.3. Coupled Analysis of Inertial and Thermal Loads

The centrifugal force induced by the rotation of the scanning mirror generates stress, while temperature variations produce thermal stress. Both factors affect the surface figure of the mirror. Therefore, the analysis of the surface variation requires simultaneous consideration of these two influences. The coupled thermo-mechanical finite element equation, accounting for inertial loads, can be expressed as follows:
K + K T U = F + F Δ T + F e
In the equation, K is the structural stiffness matrix, K T is the temperature-dependent stiffness matrix, U is the structural displacement field, F is the external mechanical load vector, F Δ T represents the equivalent thermal load vector of the structure, and F e denotes the inertial load vector. The nodal displacement field is subsequently obtained by solving Equation (10).

3.4. Scanning Mirror Surface Figure Variation

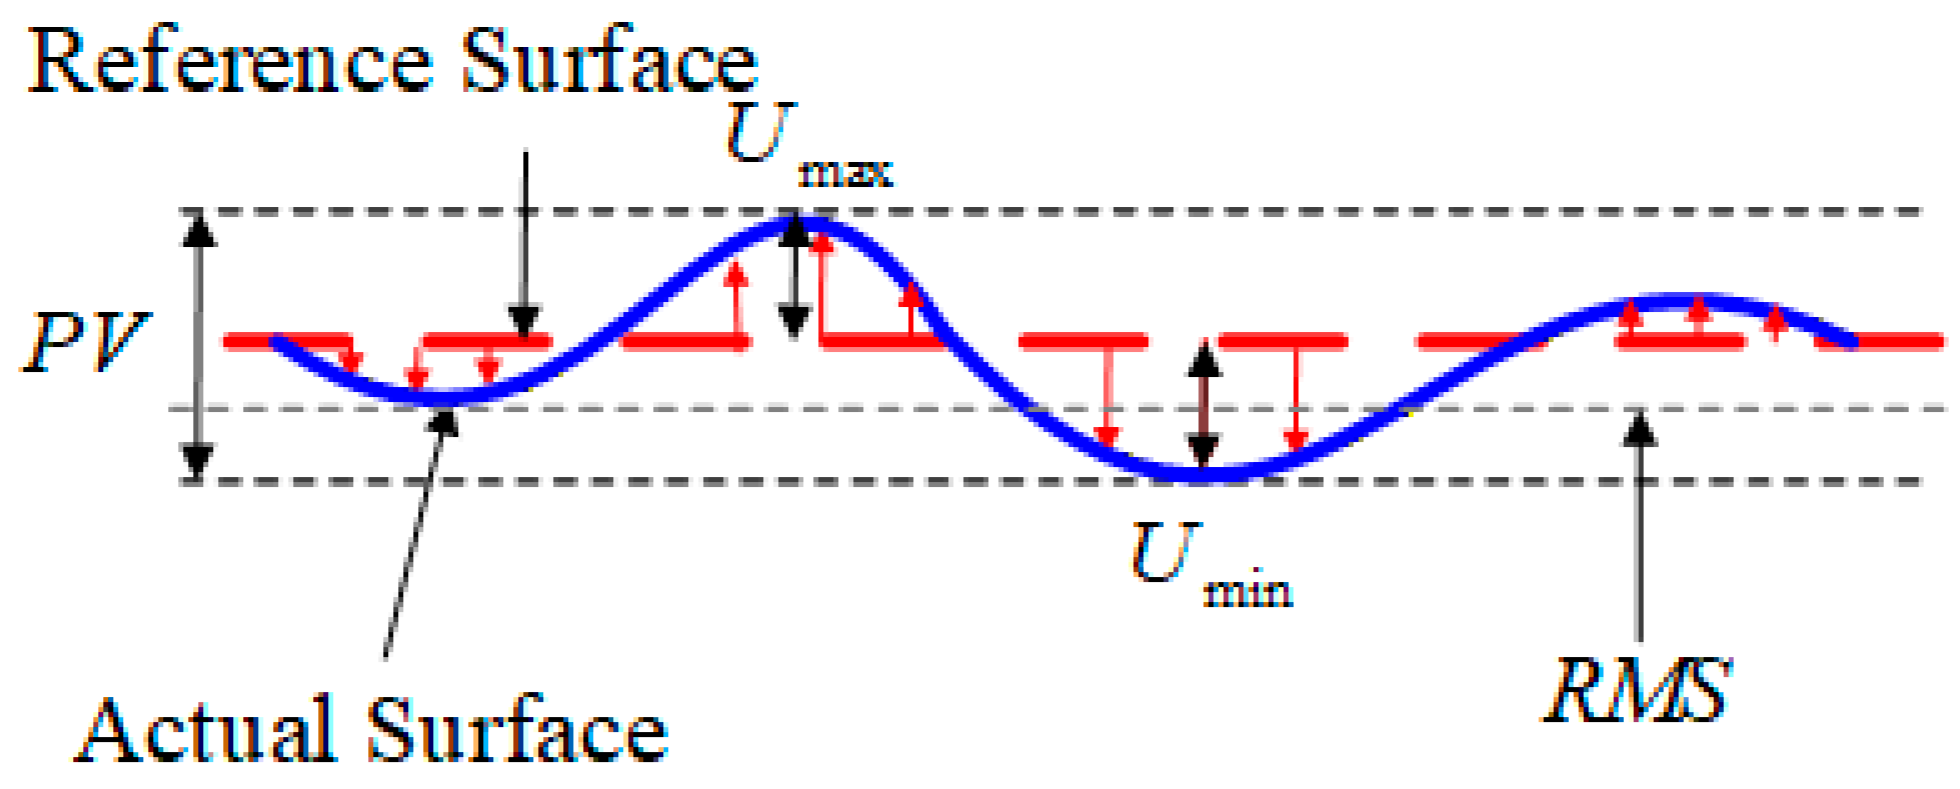
A schematic diagram of the optical surface figure variation under external loads is shown in Figure 3.
The surface figure of an optical surface is typically characterized by two parameters: the Peak-to-Valley (PV) value and the Root Mean Square (RMS) value. Their definitions are as follows:
P V = U max U min
R M S = 1 N s n = 1 N s U n 2
In the equation, U n represents the axial displacement of a nodal point on the scanning mirror surface under load, and N s denotes the total number of surface nodes.
According to engineering application parameter data, the surface figure of the scanning mirror must satisfy specific P V < λ / 10 and R M S < λ / 50 requirements to achieve high-precision imaging.

4. Zernike Polynomial Fitting for the Surface Figure of an Oscillating Mirror

Surface figure fitting reconstructs a continuous surface from discrete finite element analysis (FEA) data. While Shi Yincheng et al. established a link between FEA and Zernike polynomials for static mirrors [20], their method did not account for coordinate grid changes or rigid-body displacement. For high-dynamic scanning mirrors, factors such as mechanical and environmental loads can cause simultaneous optical surface deformation and rigid body displacement. Hence, rigid-body displacement must be subtracted prior to surface fitting.

4.1. Computation of Rigid Body Displacement

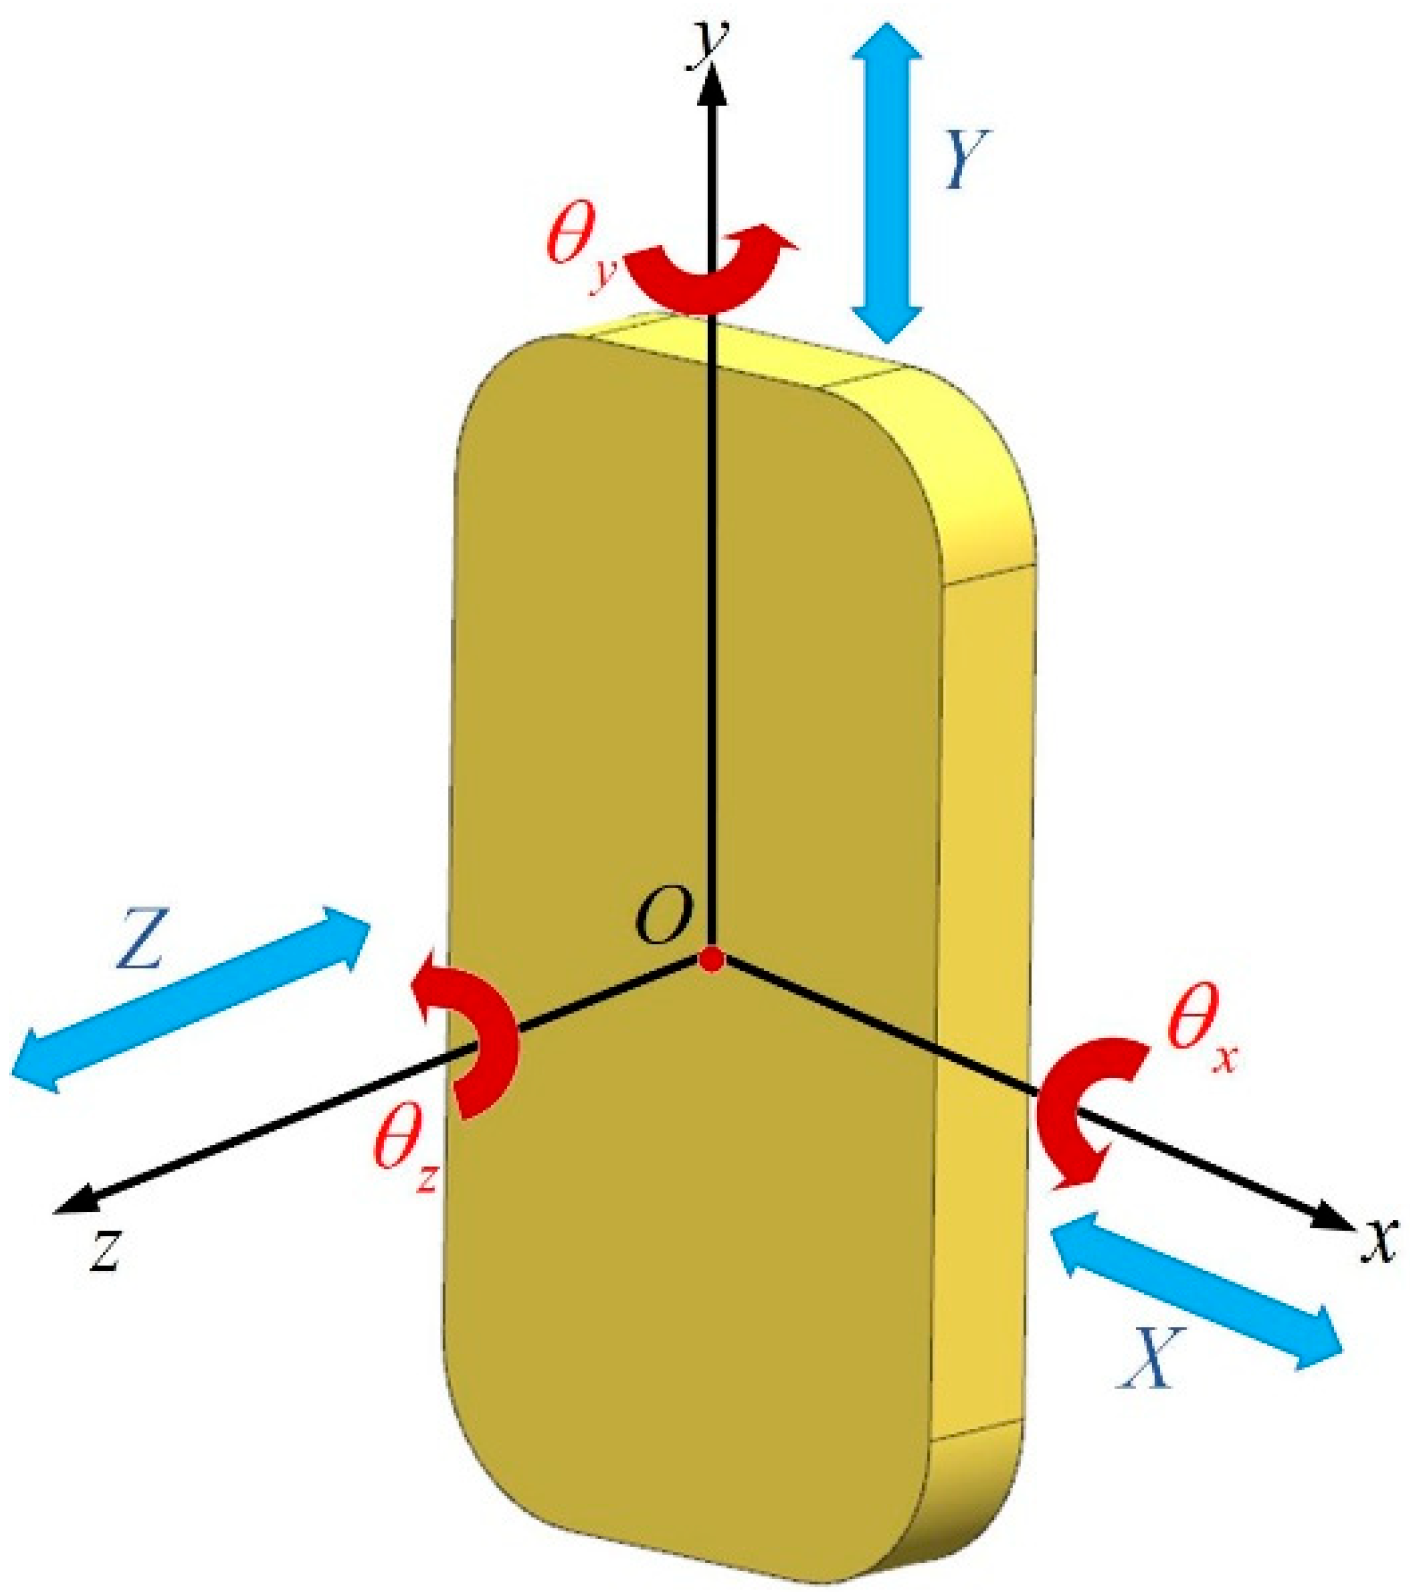
As shown in Figure 4, the rigid body displacement manifests as: translation along the optical axis, decentration perpendicular to the optical axis, and tilt resulting from rotation.
A coordinate transformation matrix is first established, followed by the application of the least squares method to calculate the rigid body displacement. For optical surfaces with non-uniform coordinate grid distributions, the rigid body motion can be computed using an area-weighted average motion. The deformed coordinates x i , y i , z i of a surface point x i , y i , z i on the optical element can be expressed as:
x i y i z i 1 = T × x i y i z i 1 + x i y i z i 0 = 1 θ z θ y X θ z 1 θ x Y θ y θ x 1 Z 0 0 0 1 × x i y i z i 1 + x i y i z i 0
Here, T denotes the coordinate transformation matrix accounting for both rotation and translation. A fitting error E is defined as the weighted sum of squares of the residuals in the x , y , and z directions. The rigid-body displacement is estimated via the least squares method, yielding the displacement transformation matrix T . This matrix is then used to extract the surface distortion data of the scanning mirror, which subsequently serves as the input for surface fitting.

4.2. Zernike Polynomial Surface Reconstruction Based on Finite Element Analysis

Zernike polynomials are widely used in optics, image processing, and surface figure fitting. From an engineering perspective, to accurately capture the critical higher-order aberrations inherent in rectangular scanning mirrors, this study adopts the Fringe indexing scheme [21]. Specifically, the first 37 terms of the Zernike polynomials under this indexing convention are utilized for surface fitting.
The basic functions of traditional Zernike polynomials are orthogonal by construction within a unit circle. Nevertheless, this property does not hold for our rectangular scanning mirror, compromising fitting accuracy. To address this, a common technique for non-circular wavefronts is to regenerate an orthogonal basis from the Zernike polynomials via the Gram–Schmidt process [22,23,24]. Given that our surface reconstruction is fundamentally a matrix transformation—akin to wavefront fitting—we adopt this same approach.
First, the grid coordinates x , y of the rectangular scanning mirror are normalized to ensure numerical stability and unit consistency for the subsequent orthonormalization process. Let the center coordinates of the sample points be x 0 , y 0 . For a rectangular aperture with length 2a and width 2b, the radius of its circumscribed circle R is defined as:
R = a 2 + b 2
The original coordinates are then mapped onto the unit disk. The normalized coordinates x ¯ , y ¯ are calculated as follows:
x ¯ = x x 0 R , y ¯ = y y 0 R
Second, the Gram–Schmidt orthogonalization method is applied to construct a new set of orthogonal basis functions for the non-circular domain. Here, using the non-circular domain transformation matrix K , a linear transformation relationship is established between the circular-domain Zernike polynomials Z i and the rectangular-domain Zernike polynomials S i :
S i = j = 1 N K i j Z j
Here, Z i and S i represent the i -th Zernike polynomial matrix in the non-circular domain and circular domain, respectively. With N set to 37, each non-circular domain has a one-to-one correspondence with the transformation matrix K .
Let the reflective surface area of the scanning mirror be denoted as A = x , y d x d y . Combining the inner product Ζ i , S i = 1 A x , y Z i S i d x d y  between the matrices and leveraging the orthogonality of Z i and S i the following expression is derived:
S i , S j = 0 , i j 1 , i = j Z i , Z j = 0 , i j 1 , i = j
Based on Equations (15) and (16), the following transformation can be derived:
Z k , S i = j = 1 N K i j Z j , Z k T = j = 1 N Z k , Z i K j i S i , S j = j = 1 N K i j Z j , S j = 0 , i j 1 , i = j
Expressed in the complete Zernike matrix form as:
Z , S = Z , Z K T
K Z , S = E
Substituting Equation (18) into Equation (19):
K Z , Z K T = E
Therefore, the equation of the transformation matrix K can be expressed as the inner product of the Zernike polynomial matrix in the circular field
K 1 K T 1 = Z , Z
This process enables the conversion of Zernike polynomials from a circular domain to a non-circular domain while preserving their orthogonality.
Subsequently, the fitted coefficient matrix is utilized to form a linear combination of the non-circular domain Zernike polynomial basis functions for surface reconstruction:
W ρ , θ = i = 1 N α i S i ρ , θ
Based on the distribution of non-uniform discrete nodes in the finite element model, the area represented by each node is calculated. The coefficient matrix α i is then determined using the weighted least squares method. By substituting α i into the original coordinate system and performing the operation in Equation (22), the fitted and reconstructed surface form is obtained. Finally, the RMS and PV values of the surface deformation are computed by subtracting the deformed surface height data from the initial surface data. This calculation quantifies the deformation induced by gravity, motion, and other factors, thereby enabling the subsequent evaluation of imaging quality.
5. Simulation and Results

Precision fabrication of rectangular mirrors is constrained by high costs and long production cycles. This makes the acquisition of physical samples for experimental validation unfeasible during the current stage of study. However, numerical simulation is widely recognized in the field of Integrated Optomechanical Analysis as a reliable and high-fidelity approach for predicting the structural and optical responses of components under complex operating conditions. Consequently, this study employs a numerical simulation methodology based on Finite Element Analysis (FEA) and wavefront reconstruction. By establishing high-precision physical models, this approach not only effectively validates the accuracy of the proposed non-circular Zernike fitting algorithm but also provides a solid theoretical foundation and preliminary data for future prototype development, surface compensation, and metrology.

5.1. Parameter Setting

The relevant parameters were configured with reference to the whisk-broom mirror model presented in HE [25]. The input specifications, which are based on an aerial camera model, are listed in Table 1.
The minimum dimensions of the scanning mirror in the length and width directions, calculated using Equation (1), are L 1 = 423 mm and L 2 = 226 mm, respectively.
In subsequent design and engineering implementation, a 10% margin must be reserved beyond the clear aperture (to accommodate lens machining tolerances, coating, and mechanical alignment requirements). Therefore, the final dimensions are determined to be L 1 = 466 mm by L 2 = 250 mm.
For the high-dynamic rotating scanning mirror, the time-varying angular velocity calculated from Equation (3) is ω = 12.37 °/s.
The angular velocity of the scanning mirror needs to increase from 0°/s to 12.37°/s within 1 s. During this phase, the maximum angular acceleration is 12.37°/s2. In this paper, peak load scenarios are employed to quantitatively assess the structural integrity and response under worst-case operational environments.
The required torque for the oscillating mirror can be calculated using the torque formula M = J , where J represents the moment of inertia and α denotes the angular acceleration.

5.2. Structural Design and Finite Element Modeling of the Scanning Mirror

5.2.1. Structural Design and Material Selection

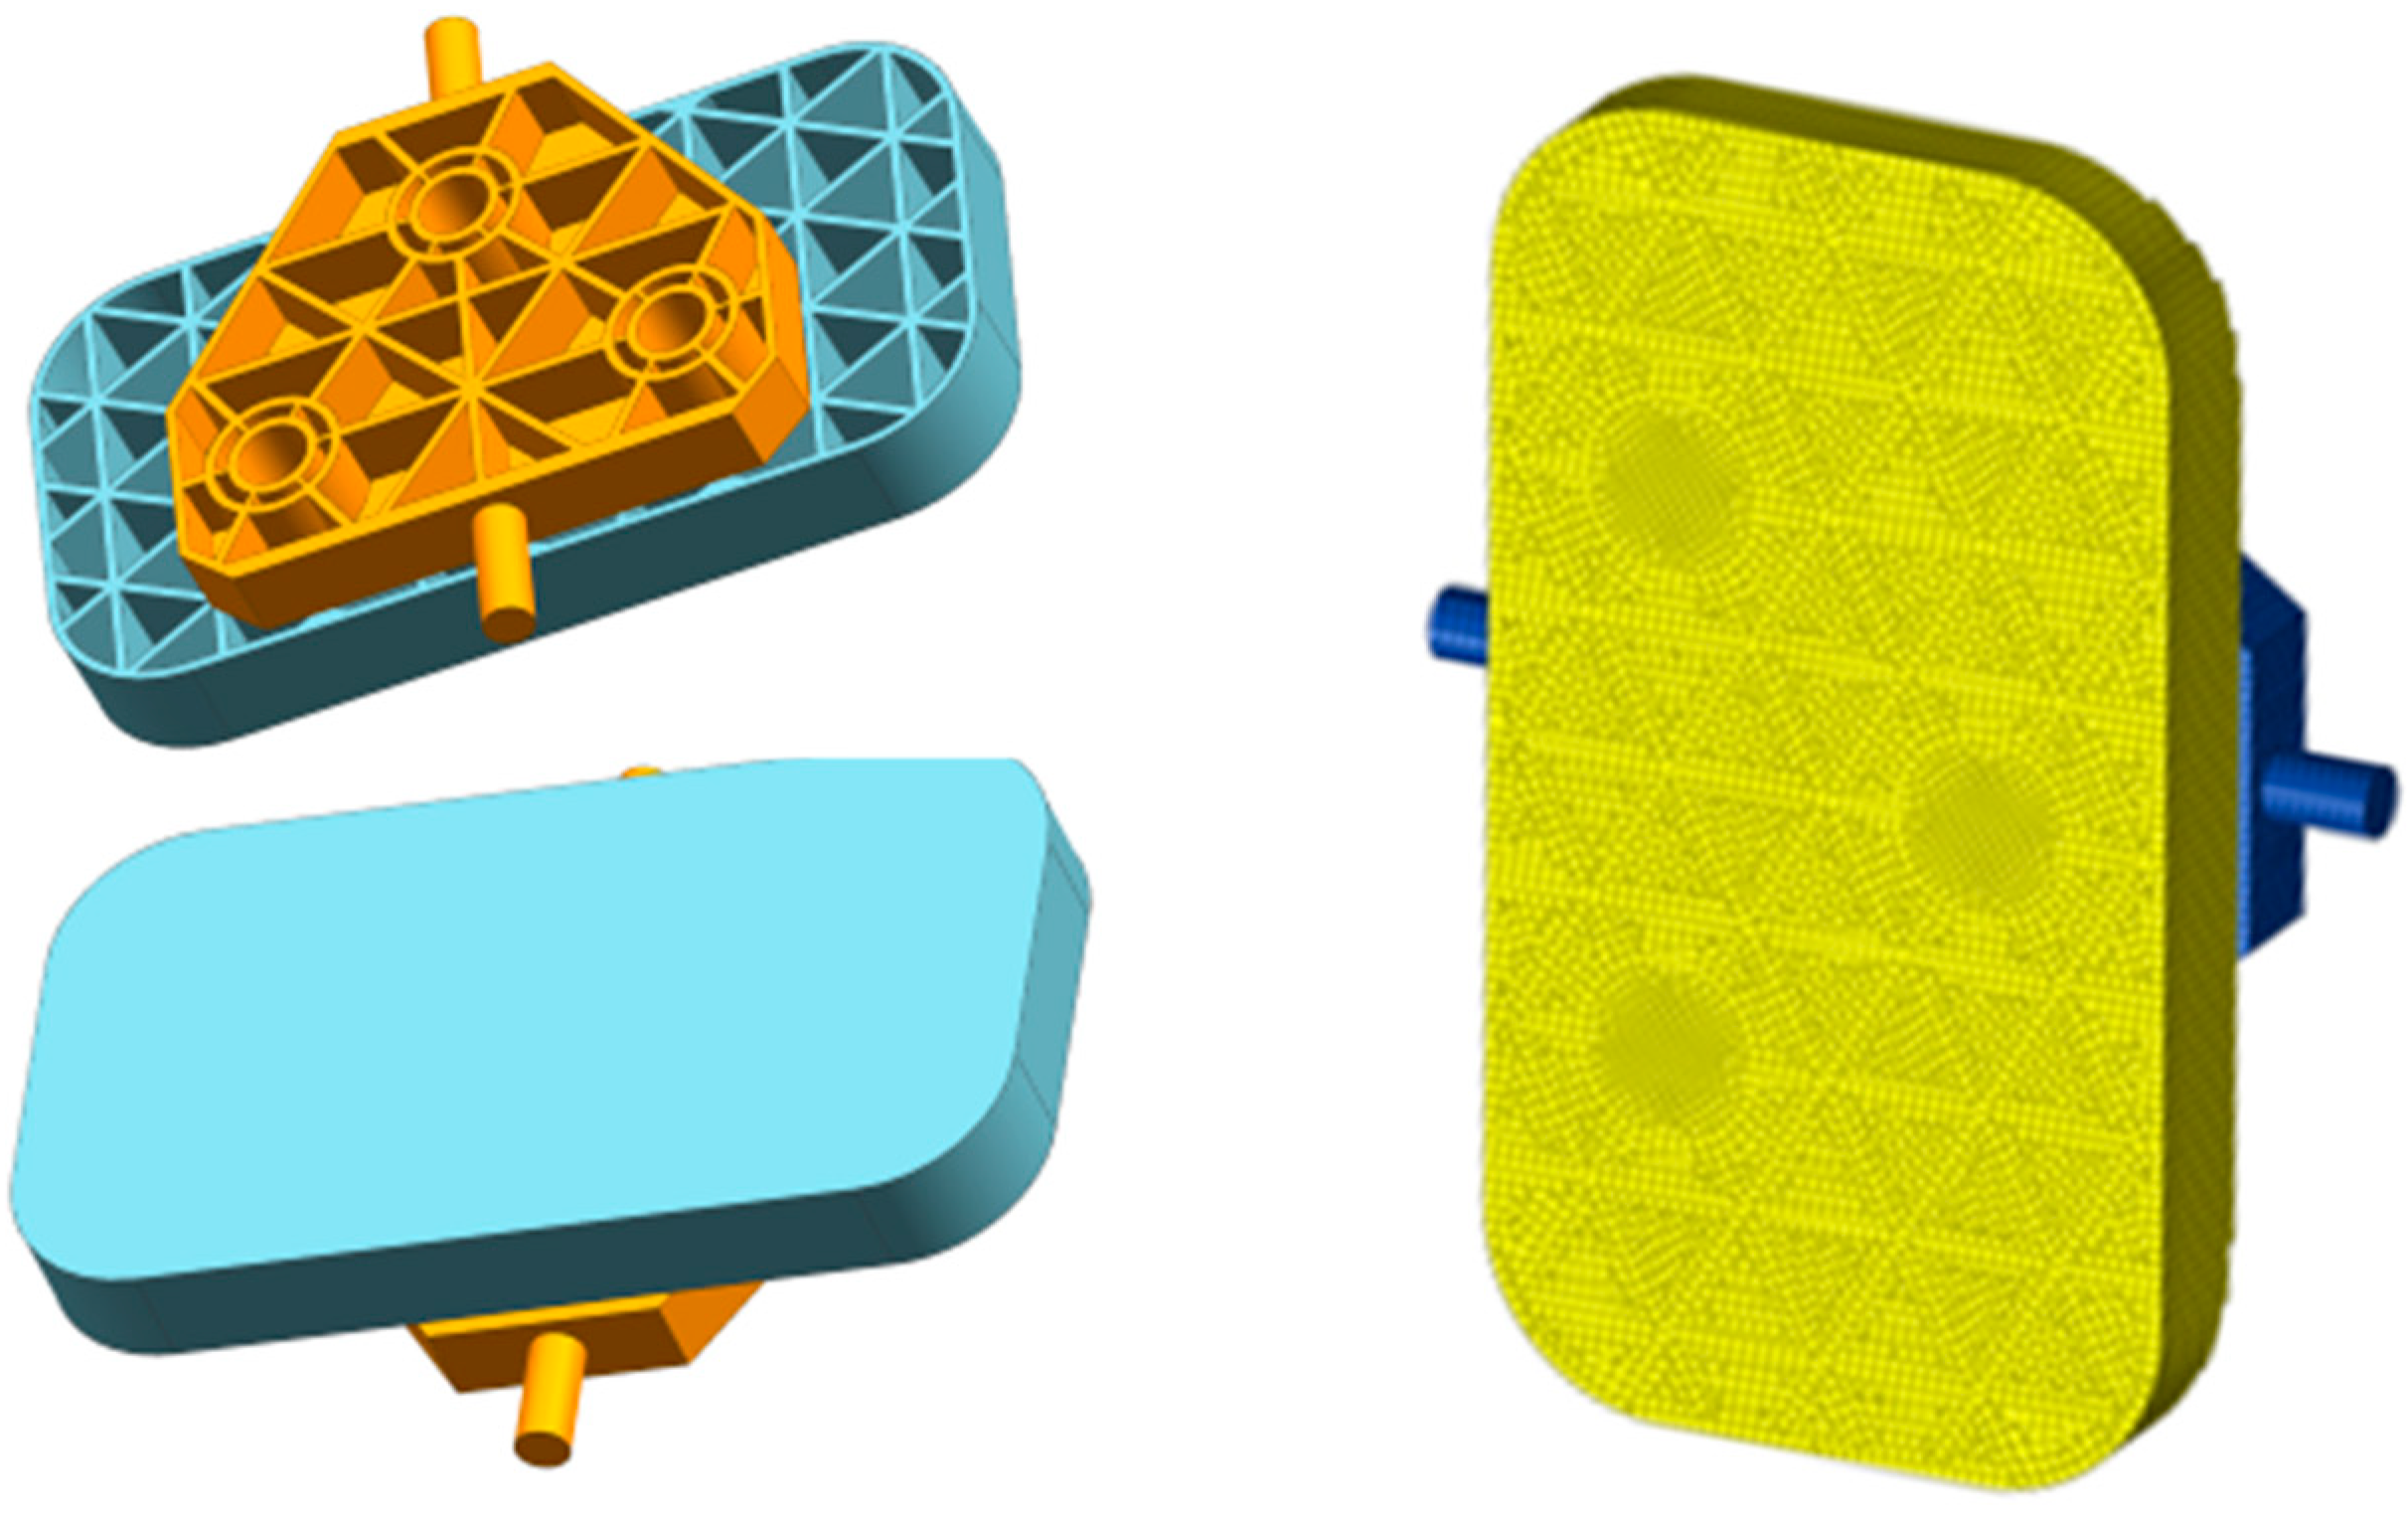
The scanning mirror body is fabricated from silicon carbide (SiC). This material offers a high elastic modulus (400 GPa) and a high specific stiffness, which effectively suppress surface distortion induced by internal stress and facilitate a lightweight assembly design. Given the rectangular aperture of the 466 mm × 250 mm scanning mirror, a three-point back-mounted flexure support structure was adopted to ensure structural stability. The locations of the support points are optimized such that the shaft extends from both sides of the backplate to the assembly’s center of gravity. This “center-of-gravity drive” configuration ensures surface figure accuracy and support stability during dynamic scanning.
To mitigate localized thermal stress resulting from mismatched coefficients of thermal expansion (CTE), the material selection for all components adheres to a “thermal matching” principle. The conical sleeve bonded to the mirror’s backside is made of Invar due to its CTE compatibility with SiC. The flexible supports utilize titanium alloy, a material recognized for its excellent dimensional stability. The backplate employs a medium-volume fraction Al/SiC composite, selected for its high stiffness. The material parameters listed in Table 2 are obtained from the technical specifications provided by the manufacturers of the materials used in this project, supplemented by data from established literature [11].
To balance structural stiffness and weight, a triangular lightweight cells design was implemented on the mirror’s rear surface. Parametric analysis of the lightweight ratio reveals that a rib thickness of 4 mm, corresponding to a 76.1% lightweight ratio, represents an optimal trade-off between dynamic stiffness and manufacturing feasibility. Consequently, a 4 mm rib thickness was selected for the final design. This configuration ensures that the structural frequency meets the dynamic excitation requirements while minimizing the inertial load on the scanning system.
Figure 5 shows an assembly diagram of the scanning mirror assembly. The assembly primarily comprises the scanning mirror, backplate, sleeve, flexible hinge, and flexible supports. The scanning mirror is positioned at the forefront of the optical system. Its oscillation reflects target light, thereby extending the imaging coverage to a range of hundreds of kilometers.

5.2.2. Finite Element Model Construction and Component Modal Analysis

The scanning mirror assembly was discretized in finite element software, primarily using hexahedral elements. During the finite element modeling process, a finite element mesh convergence test was conducted for the scanning mirror component. The results are shown in Table 3 below. Considering the root mean square convergence and computing time, this paper selected a finite element mesh size of 5 mm (approximately 5342 mirror surface nodes). The finite element model is shown in Figure 5. A Cartesian coordinate system was defined for the model, with the Y-axis aligned along the mirror’s rotation axis and the Z-axis along the mirror surface normal.
According to the engineering specifications, the scanning mirror must meet the following performance indicators: the surface figure error must satisfy P V < λ / 10 and R M S < λ / 50 . Simultaneously, to ensure the mirror assembly can withstand harsh launch environments, its fundamental frequency should exceed 100 Hz to avoid resonance.
The material parameters were assigned to the model in the finite element software. Fixed constraints were applied to both ends of the backplate shaft. A modal analysis was then conducted, and the resulting first six mode shapes of the scanning mirror assembly are listed in Table 4.
The results indicate a first-order modal frequency of 104.28 Hz for the scanning mirror assembly. This value demonstrates that the designed structure possesses sufficient dynamic stiffness to resist low-frequency vibrations encountered during the launch phase.
The scanning mirror assembly experiences distinct environments and load conditions across different phases, including ground development, experimental testing, and in-orbit operation. During ground development, gravity is the primary load. Motion experiments require consideration of both gravity and dynamic inertial loads. In contrast, during in-orbit operation, the effects of microgravity are negligible, and the temperature field combined with dynamic inertial loads become the dominant factors. Consequently, a detailed analysis of surface figure variations under these different working conditions is essential, considering the respective operational context.

5.3. Static Gravity Analysis

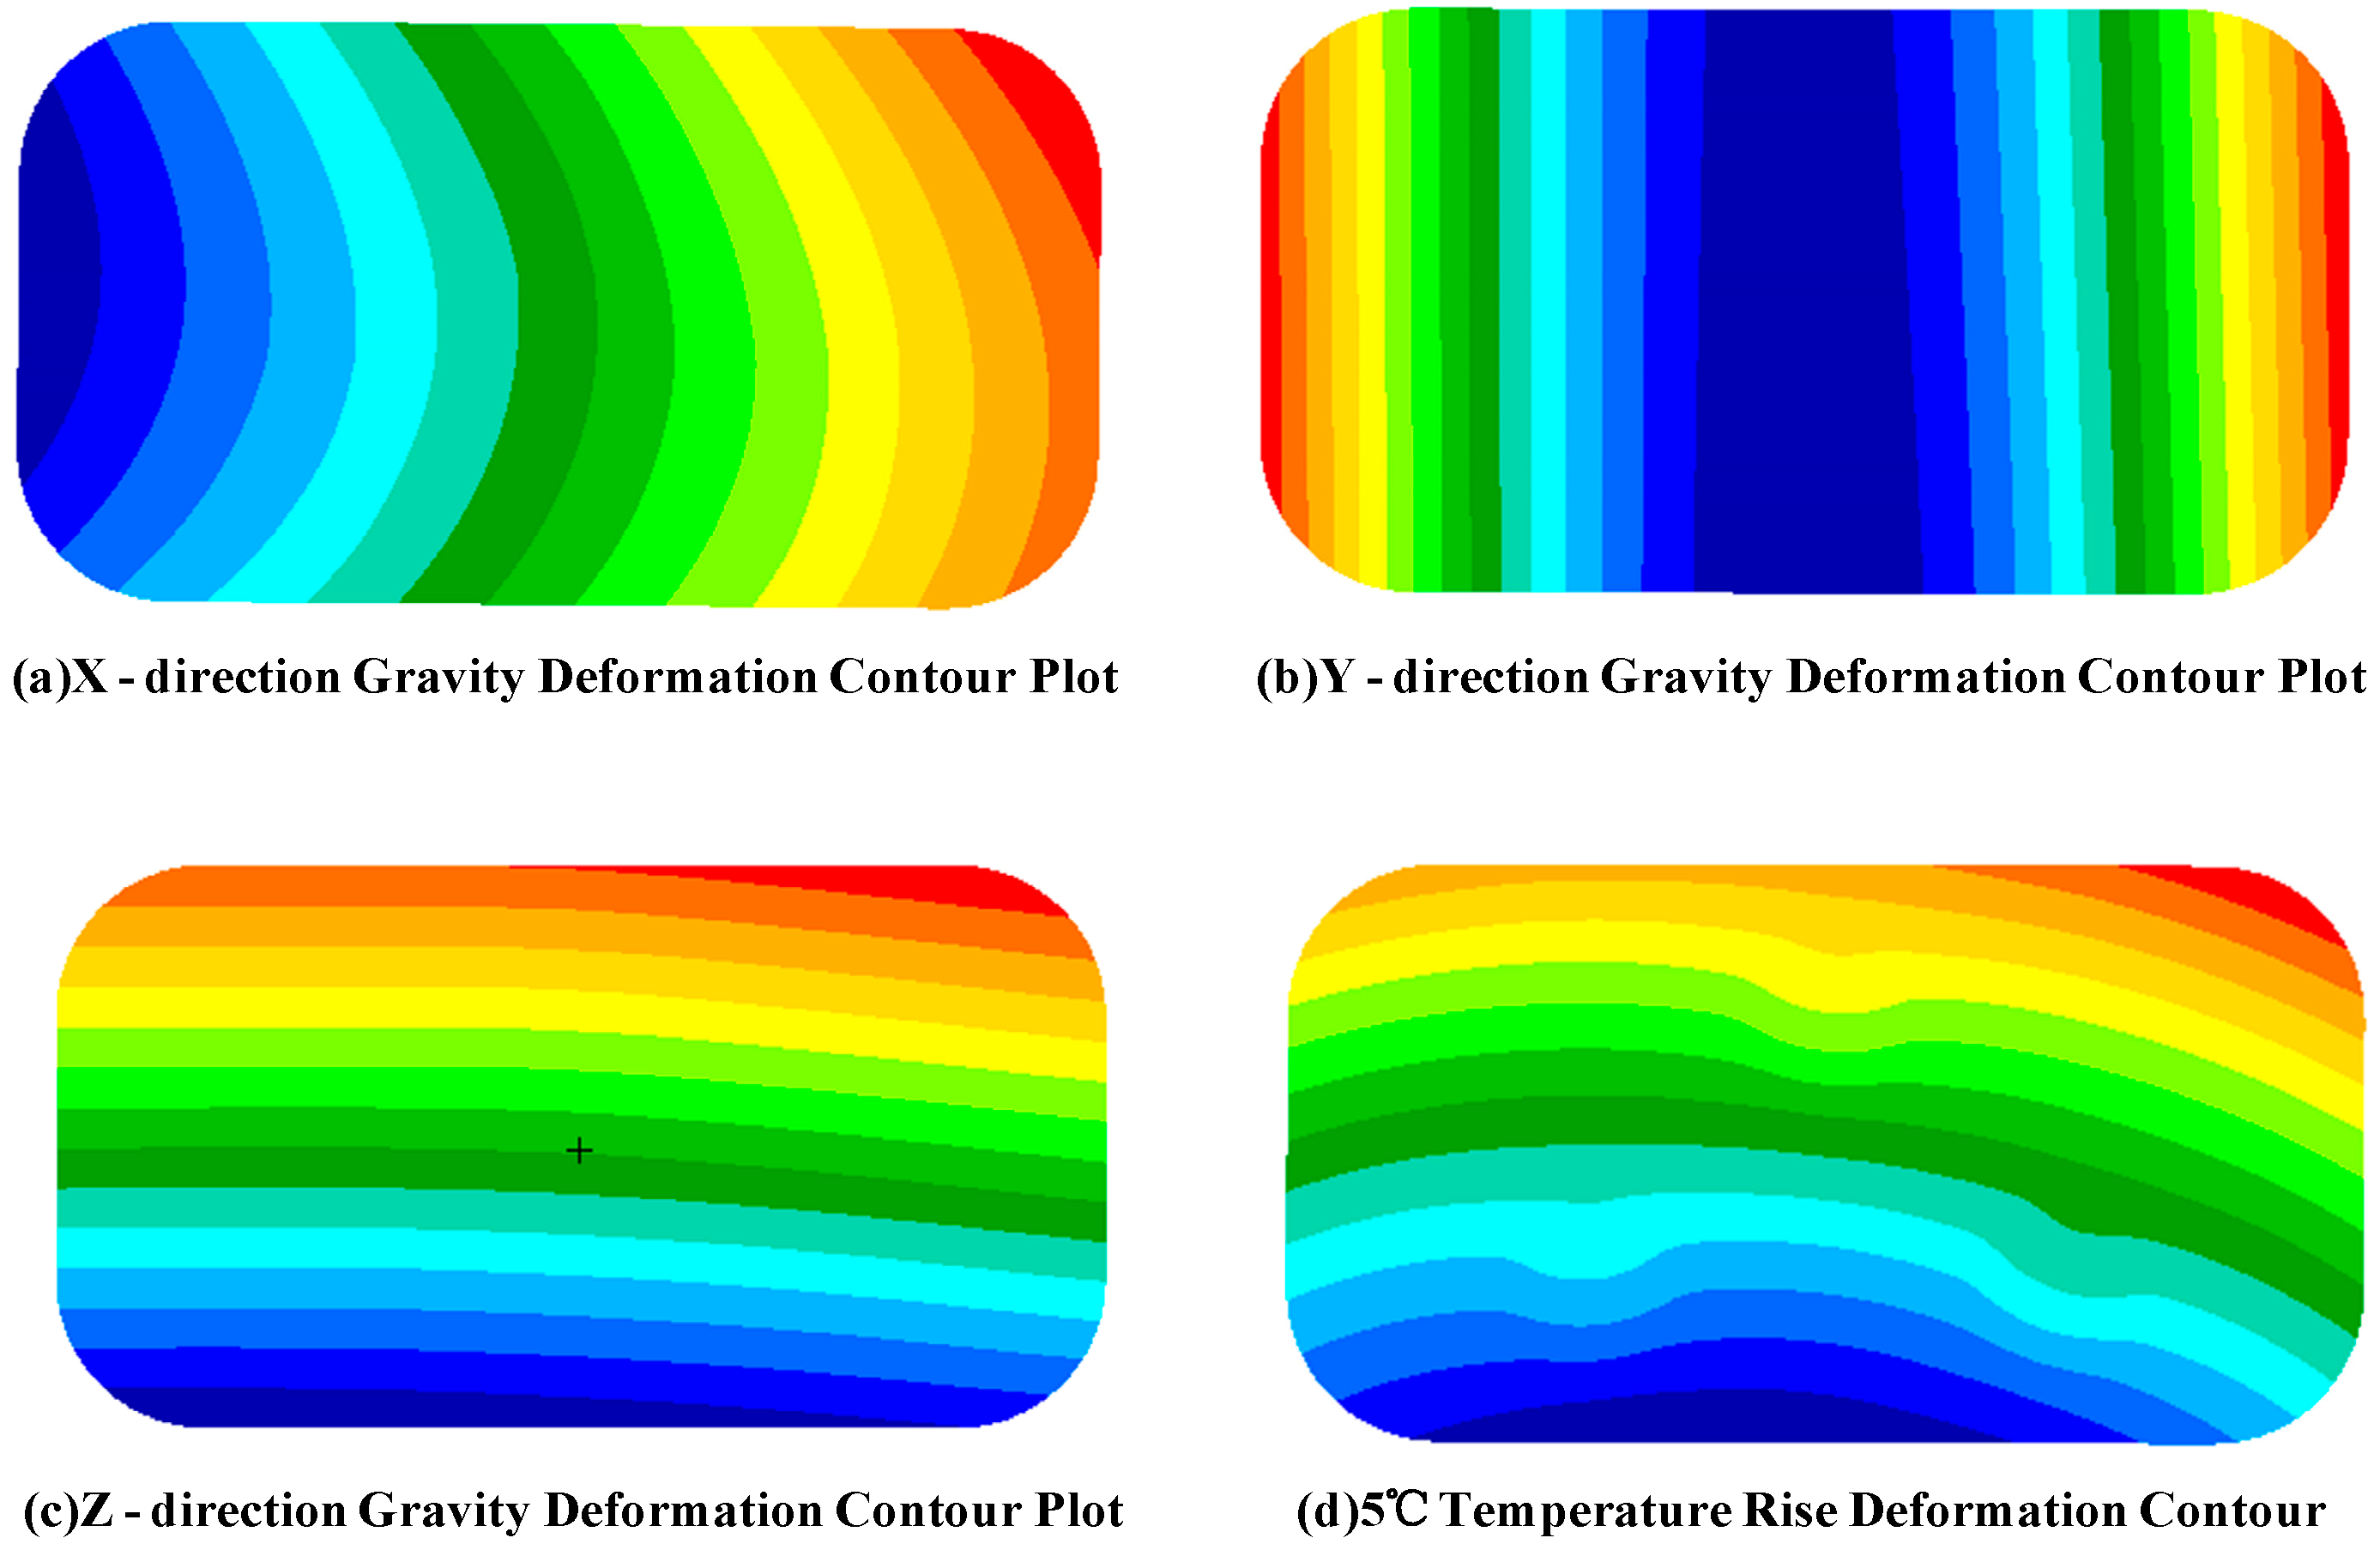
Finite element analysis was performed on the scanning mirror assembly to evaluate its gravitational deformation under self-weight conditions. The model was subjected to gravitational loads separately along the X-axis, Y-axis, and Z-axis (optical axis), with constraints applied at the rotation shaft. The resulting surface figure contours are presented in Figure 6, while the quantitative surface figure calculation results are summarized in Table 5.
From the surface figure results, under the conditions of gravity in the X-direction, Y-direction, Z-direction, and a 5 °C temperature increase, the scanning mirror exhibits a surface figure with an R M S value of less than 10 nm and a P V value of less than 28 nm, which meets the operational requirements.

5.4. Coupled Analysis of High-Dynamic Loads

To simulate the dynamic loads experienced by the scanning mirror during periodic rotational motion, a time-varying moment about the Z-axis was applied to the model to achieve a varying angular velocity. The surface figure variation of the scanning mirror during the imaging phase within the entire rotation cycle needs to be analyzed. Additionally, coupling analysis between the dynamic load and either the gravitational field or the thermal field should be performed for different environmental conditions.

5.4.1. Surface Figure Analysis Under Dynamic Loads

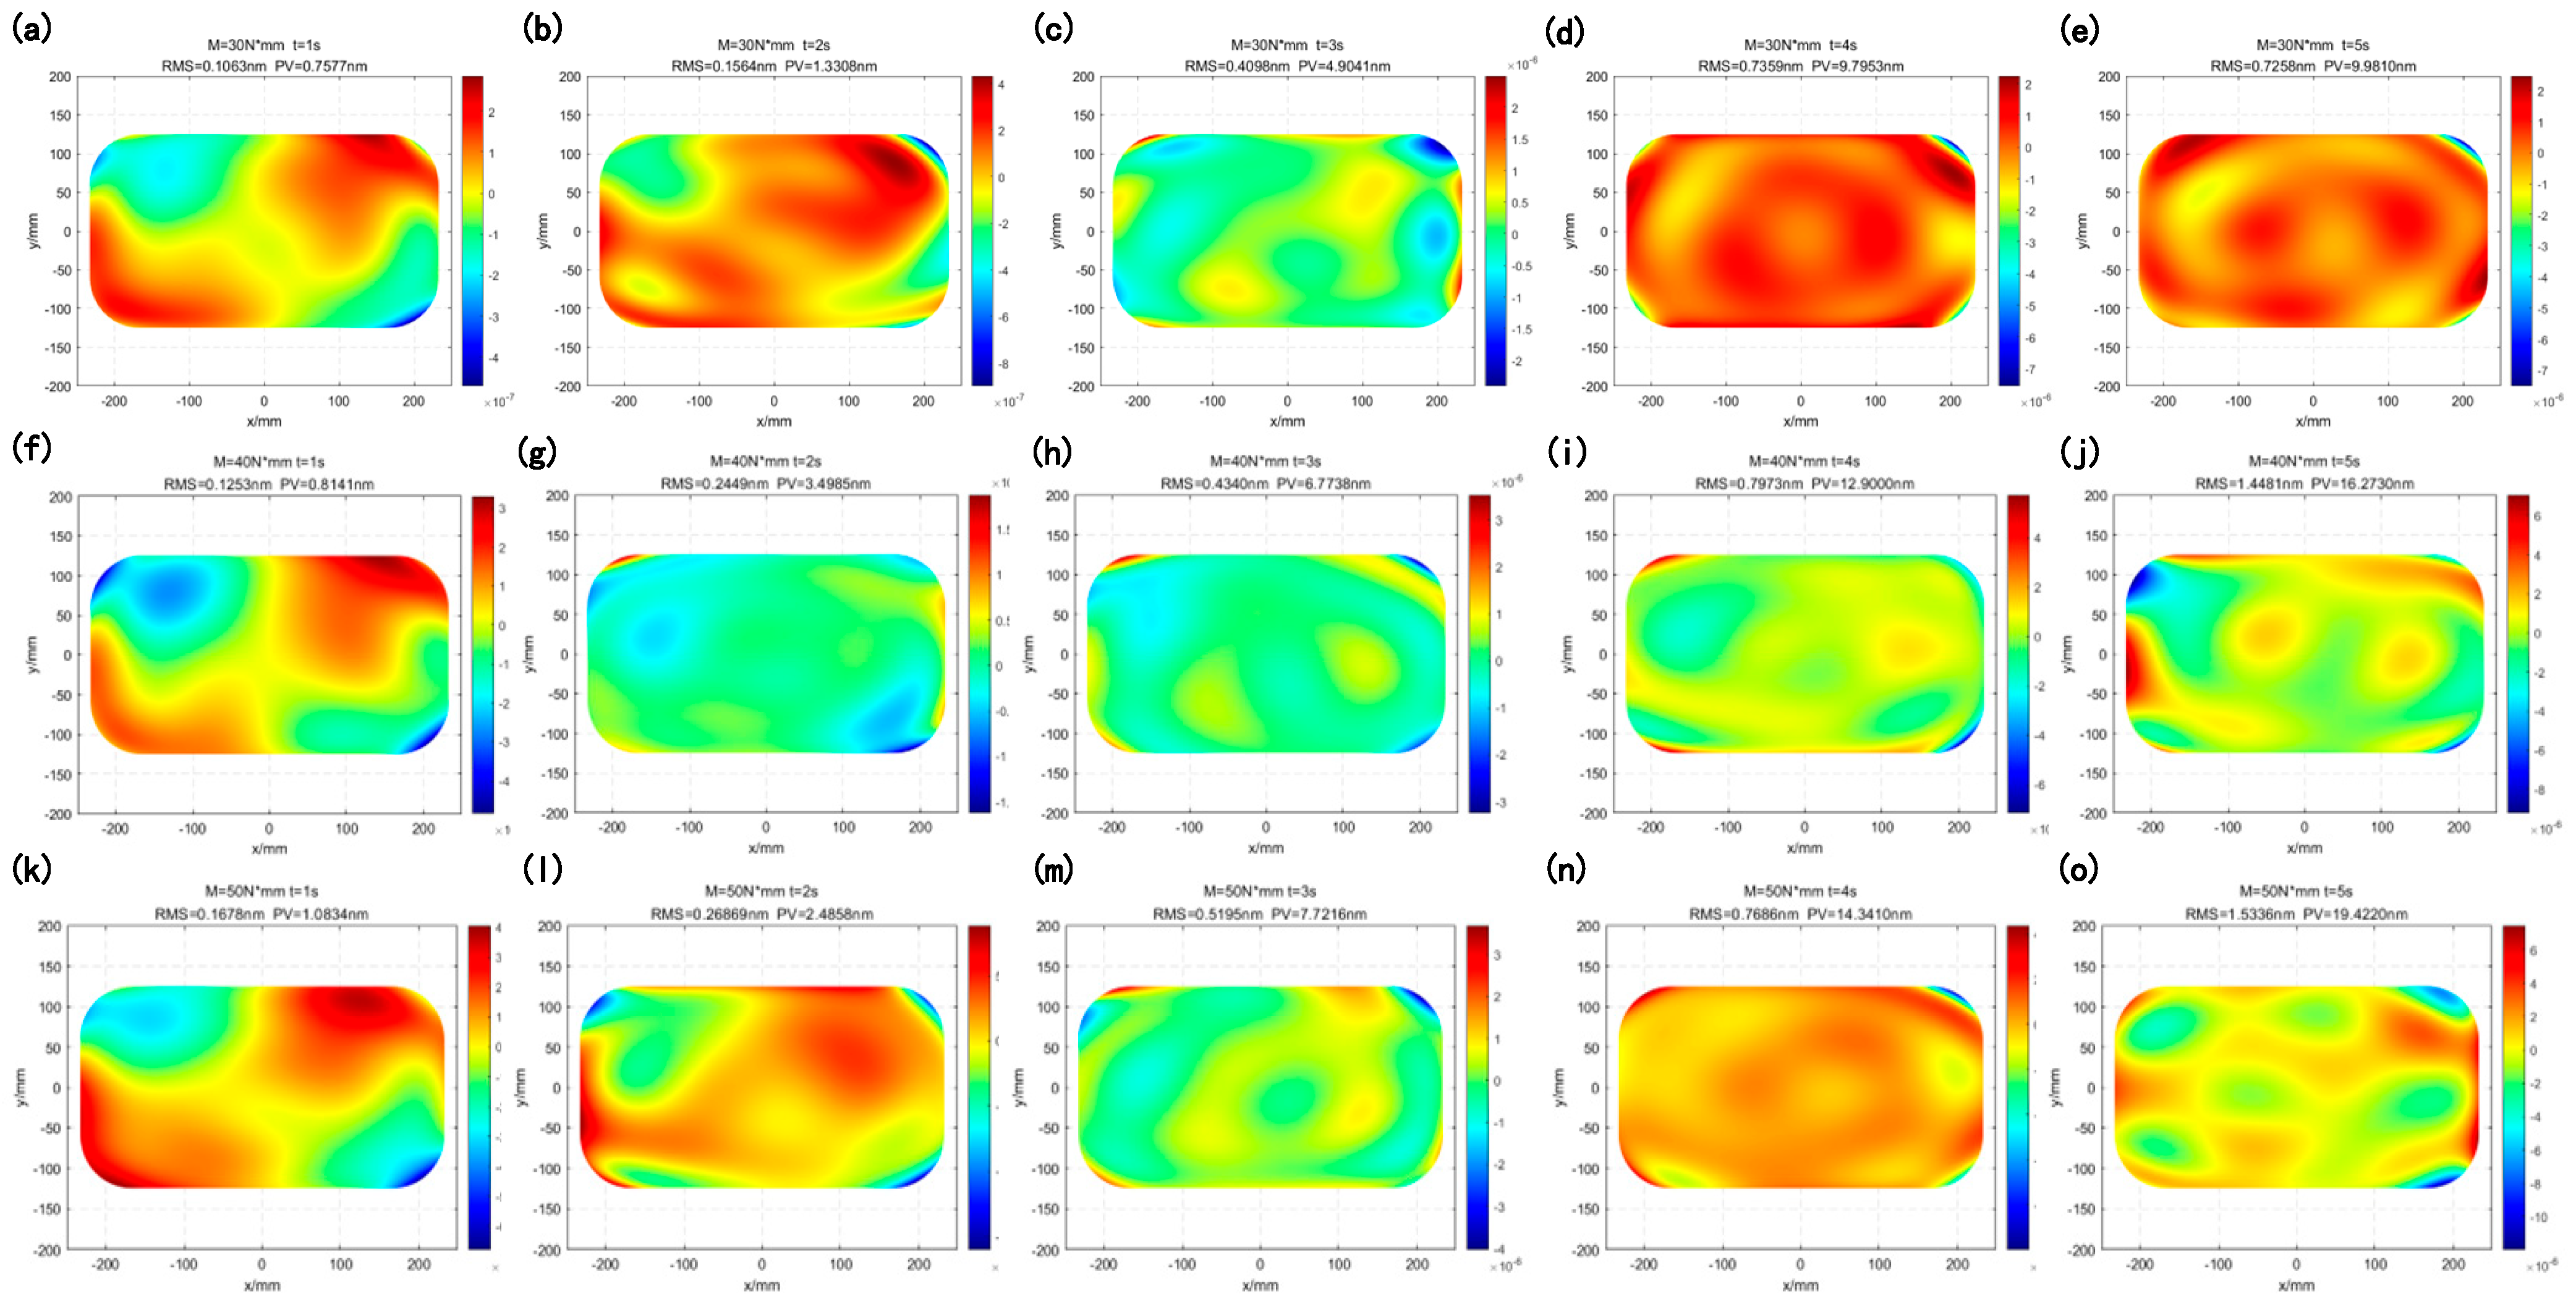
To simulate the state of the mirror assembly in a ground laboratory environment, a coupled analysis of dynamic load and gravitational field was performed. To intuitively reflect the variation in the surface figure of the scanning mirror under dynamic conditions, torques of 30 N·mm, 40 N·mm, and 50 N·mm were applied to the rotation axis during the simulation. The resulting surface figure variations are shown in Figure 7, while Table 6 lists the surface figure values at 30 N·mm.
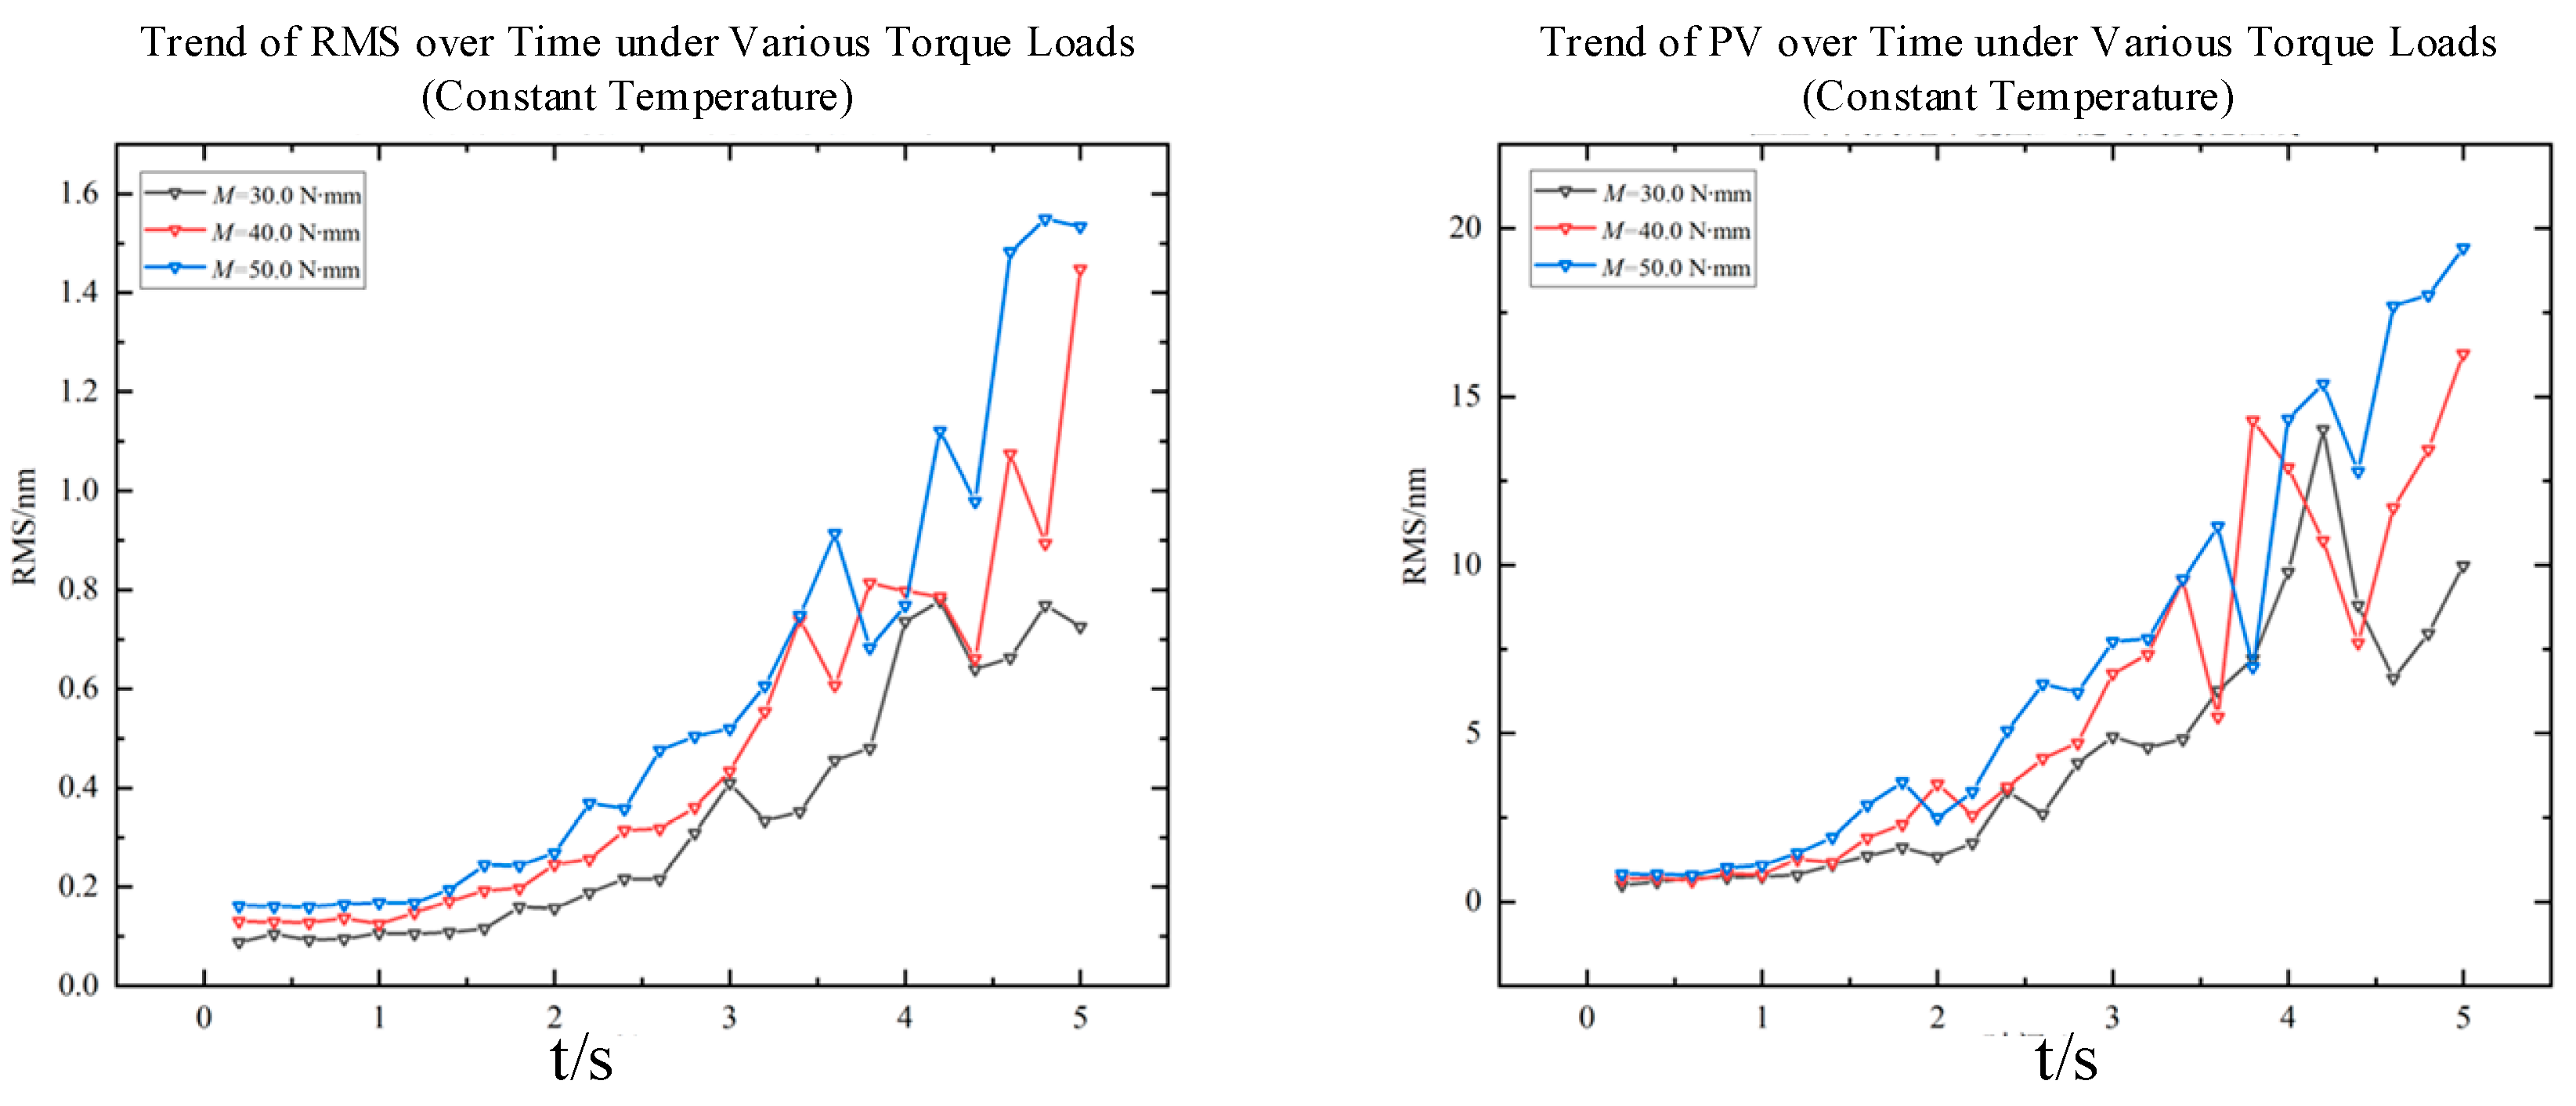
As shown in Figure 8, the scanning mirror under dynamic load exhibits a surface figure with an R M S value of less than 2 nm and a P V value of less than 20 nm, which meets the operational requirements.

5.4.2. Surface Figure Analysis Under Coupled Fields

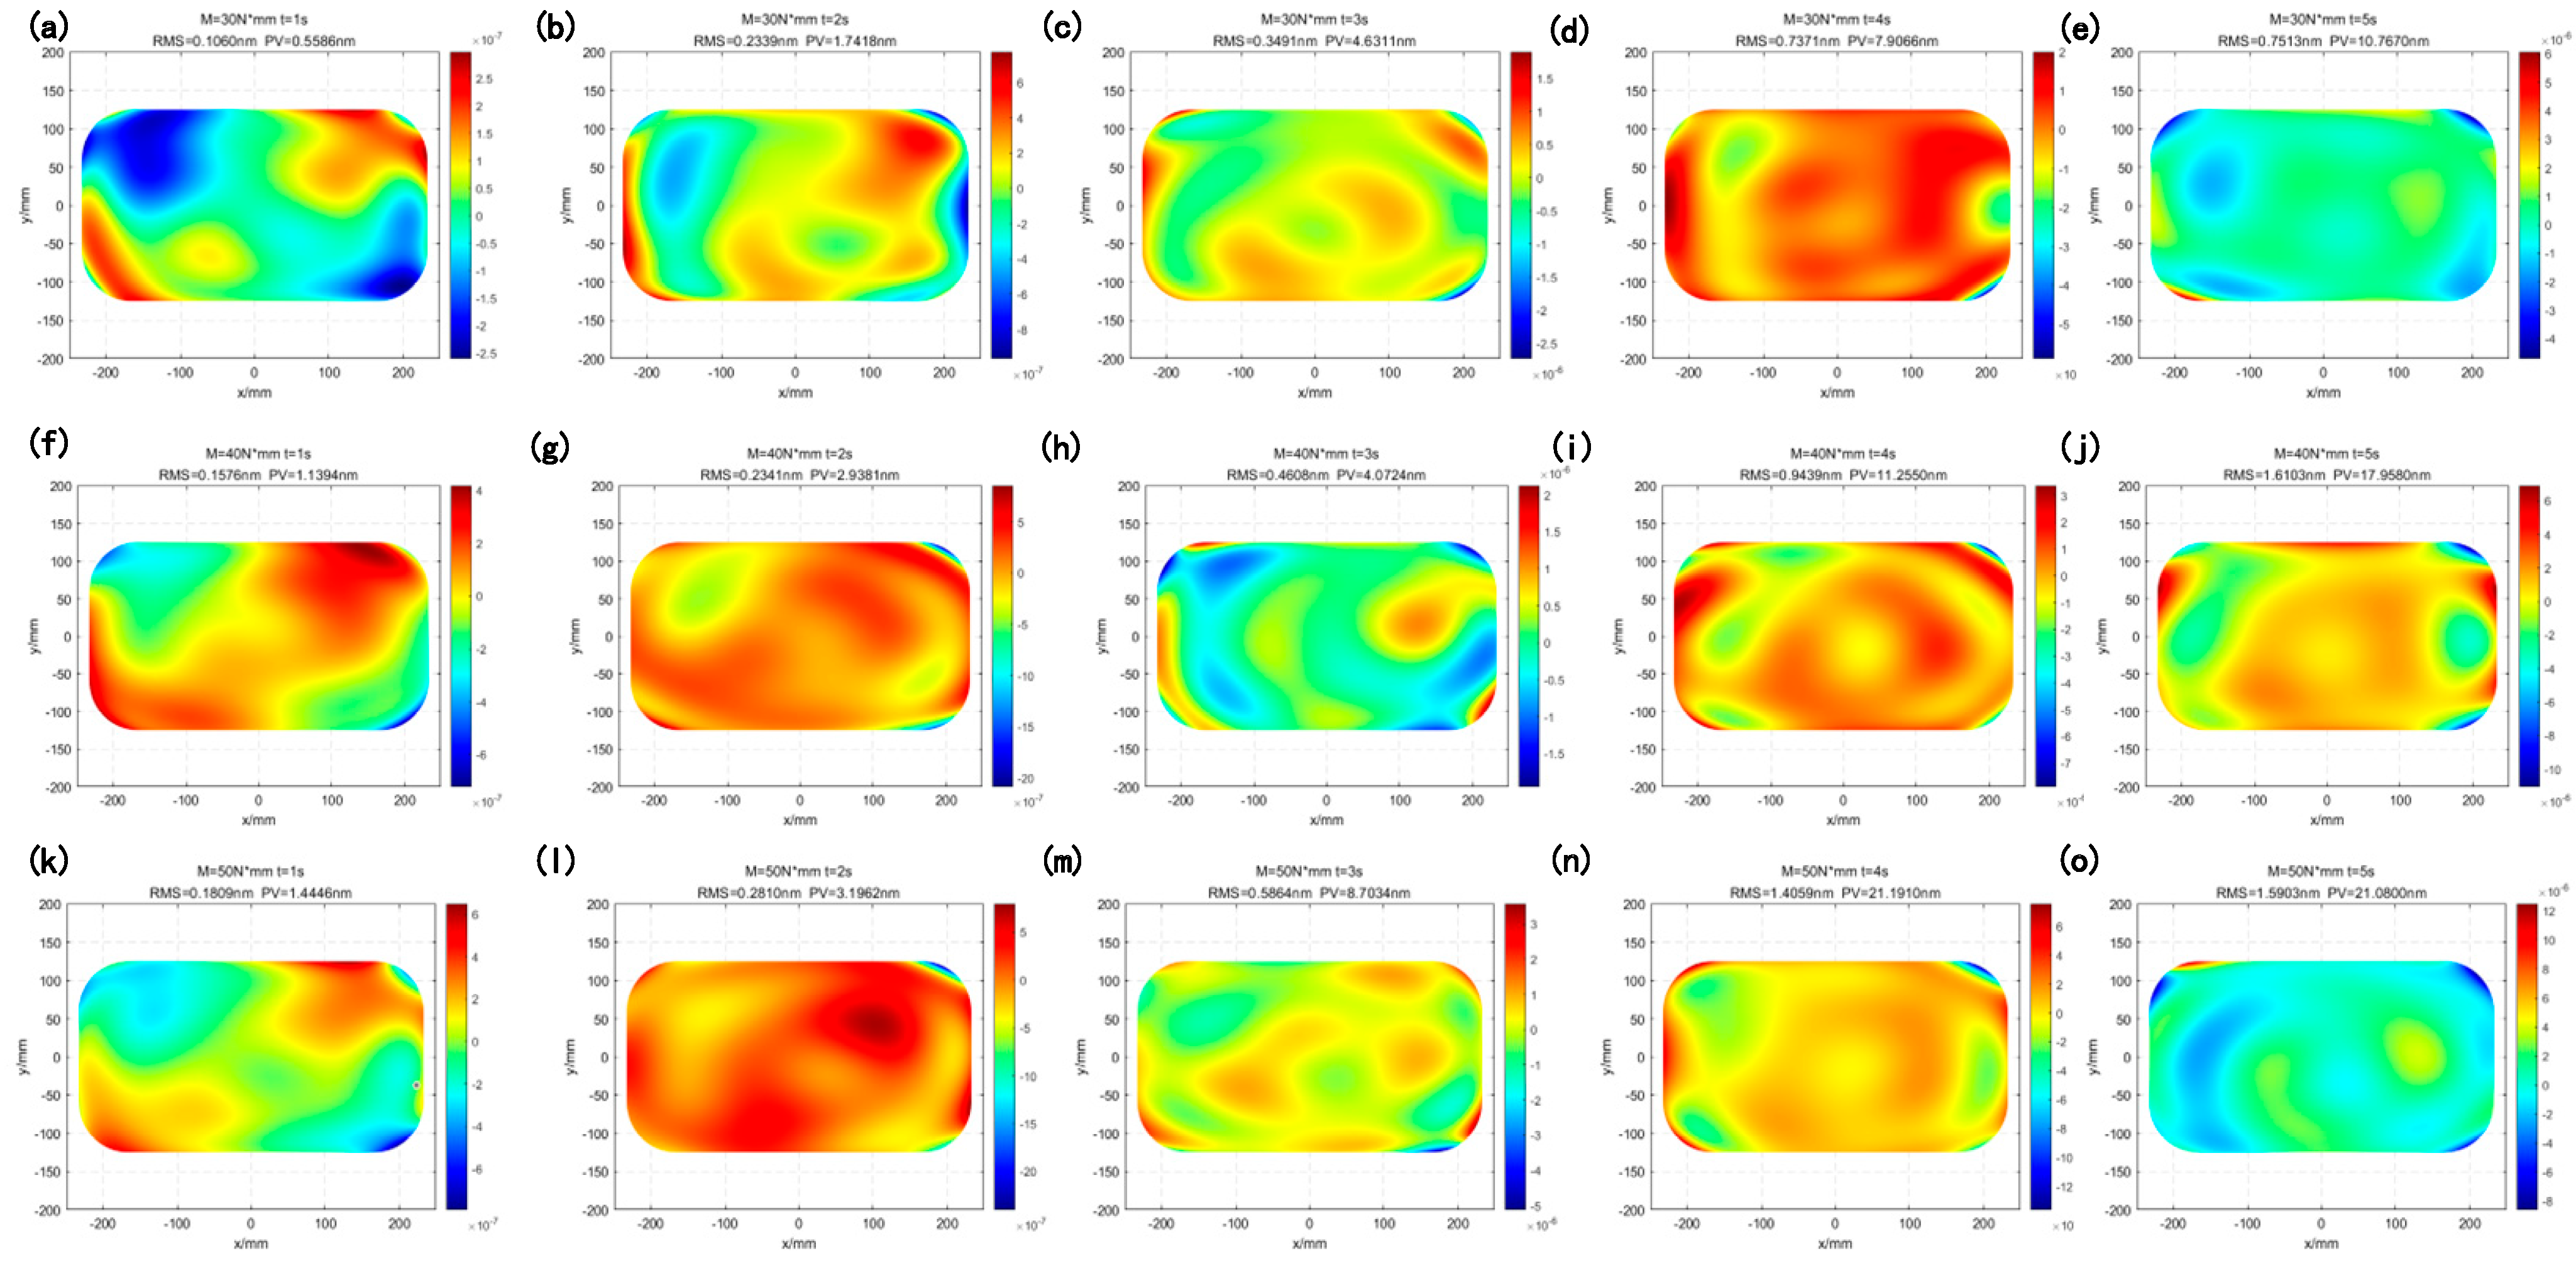
The state of the mirror assembly in the space environment was simulated, and a coupled analysis of dynamic load and thermal field was conducted. During the simulation, torques of 30 N·mm, 40 N·mm, and 50 N·mm, along with a temperature increase of 5 °C, were applied to the rotation axis. The resulting surface figure variations are shown in Figure 9, and the surface figure values under 30 N·mm are listed in Table 7.
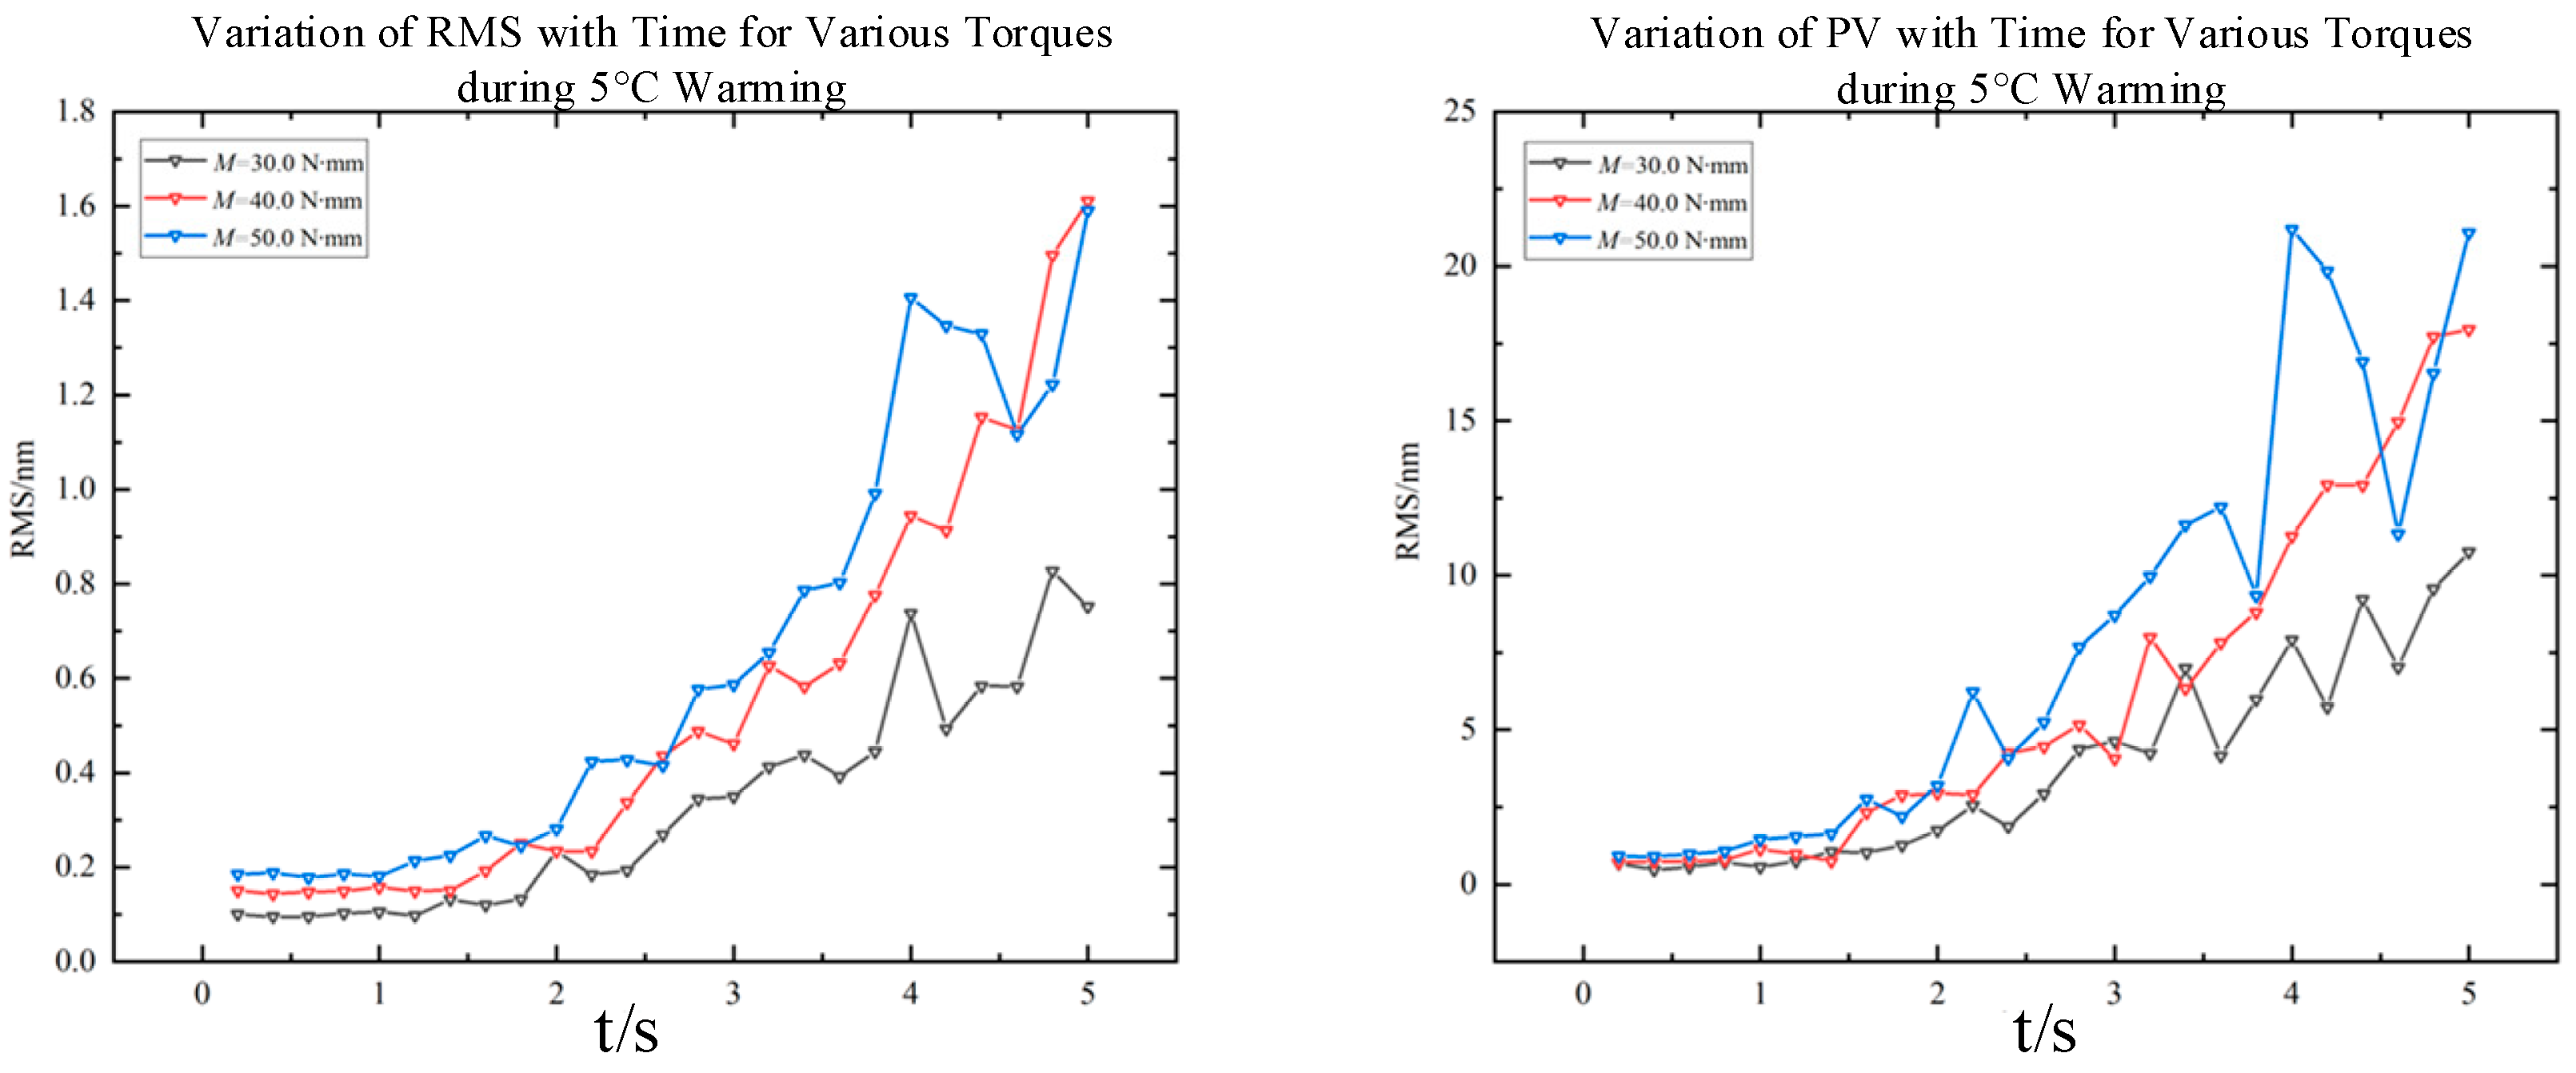
As shown in Figure 10, under the coupled conditions of three torque loads and a 5 °C temperature increase, the scanning mirror exhibits a surface figure with an R M S value of less than 2 nm and a P V value of less than 22 nm, meeting the operational requirements.
Based on the above analysis, it can be concluded that as the torque increases, both the R M S and P V values of the optical surface figure demonstrate a clear increasing trend. Detailed evaluation confirms that the current surface figure of the scanning mirror satisfies the engineering requirements of P V < λ / 10 and R M S < λ / 50 , ensuring reliable operation and performance stability under multi-physical field coupling and high-dynamic working conditions.

5.5. Fitting Performance Analysis

To quantitatively evaluate the accuracy and reliability of the Zernike polynomial fitting method proposed in this study for optical surface characterization, the residual root mean square (RMS) and residual peak-to-valley (PV) values are introduced to validate the fitting precision. The residual RMS serves as the core metric for assessing overall fitting accuracy:
R M S r e s i d u a l = 1 N i = 1 N W i F i 2
where W i and F i represent the original surface value and the fitted surface value at the i th data point, respectively, and N denotes the total number of data points in the fitting process. A smaller R M S r e s i d u a l indicates closer agreement between the fitted surface and the original data, reflecting higher overall fitting accuracy. Table 8 presents a comparative summary of the fitting accuracy of the scanning mirror surface under various operational conditions. The results demonstrate that:
The fitting accuracy achieved by this method under different working conditions meets the optical design requirement of 10 6 .
To analyze the applicability of the non-circular domain surface shape analysis method proposed in this paper, the surface shapes of optical components with different apertures under gravity are fitted, and the goodness of fit is used for evaluation. The results are shown in Table 9.

6. Conclusions

To address the challenges of surface figure variation in large-aperture high-dynamic scanning mirrors induced by coupled thermal–inertial loads, and the added complexity of multi-physics coupling and non-circular geometry, this paper successfully establishes a comprehensive quantitative analysis framework for characterizing optical surface variations under multi-physics field coupling. By coupling inertial loads with thermal fields, this framework effectively simulates the high-speed rotational motion and complex on-orbit operational conditions of the scanning mirror. Simultaneously, it integrates coordinate transformation with non-circular domain Zernike polynomials to achieve high-precision reconstruction of the dynamic surface profile, thereby overcoming the limitations inherent in traditional static analysis and circular-mirror fitting methods. Simulation results indicate that for a scanning mirror with an aperture of 466 mm × 250 mm, under the coupled conditions of a 5 °C temperature rise and 50 N·mm torque, the surface figure achieves RMS < 2 nm and PV < 22 nm, with a fitting accuracy achieves 10−6, and the fitting accuracy of this method meets engineering requirements for both circular and non-circular apertures. This methodology provides a universal and reliable theoretical tool as well as critical technical support for the opto-mechanical design, on-orbit performance evaluation, and subsequent image quality assurance of high-precision dynamic scanning mirrors.

Author Contributions

Conceptualization, X.H. (Xiaoyan He) and P.X.; methodology, X.H. (Xiaoyan He) and K.J.; software, X.H. (Xi He); validation, X.H. (Xiaoyan He), K.J. and P.L.; formal analysis, X.H. (Xiaoyan He) and K.J.; investigation, X.H. (Xiaoyan He); resources, P.X.; data curation, X.H. (Xiaoyan He); writing—original draft preparation, X.H. (Xiaoyan He) and K.J.; writing—review and editing, X.H. (Xiaoyan He) and P.L.; visualization, K.J. and P.L.; supervision. All authors have read and agreed to the published version of the manuscript.

Funding

This work is funded by the Jilin Province Young and Middle-aged Scientific and Technological Innovation Talent Team Project Grant/Award Number: No. 20250601090RC.

Institutional Review Board Statement

Not applicable.

Informed Consent Statement

Not applicable.

Data Availability Statement

The original contributions presented in this study are included in the article. Further inquiries can be directed to the corresponding author.

Acknowledgments

The authors would like to thank all of the reviewers for their valuable contributions to our work.

Conflicts of Interest

The authors declare no conflicts of interest.

References

  1. Wang, F.; Xi, R.; Yue, C.; Li, H.; Cao, X. Conceptual rotational mode design for optical conical scanning imaging small satellites. Sci. China Technol. Sci. 2020, 63, 1383–1395. [Google Scholar] [CrossRef]
  2. Bautz, M.; Pivovaroff, M.; Baganoff, F.; Isobe, T. X-ray CCD Calibration for the AXAF CCD Imaging. Proc. SPIE 1998, 3444, 210–240. [Google Scholar] [CrossRef]
  3. Hu, Z.; Li, X.; Li, L.; Su, X.; Yang, L.; Zhang, Y.; Hu, X.; Lin, C.; Tang, Y.; Hao, J.; et al. Wide-swath and high-resolution whisk-broom imaging and on-orbit performance of SDGSAT-1 thermal infrared spectrometer. Remote Sens. Environ. 2024, 300, 113887. [Google Scholar] [CrossRef]
  4. Tang, L.; Han, M.; Yang, S.; Sun, Y.; Qiu, L.; Zhao, W. High-precision large-aperture single-frame interferometric surface profile measurement method based on deep learning. Int. J. Extrem. Manuf. 2025, 7, 055601. [Google Scholar] [CrossRef]
  5. Ma, B.; Li, Z.; Li, L.; Li, Y.; Peng, Y.; Ren, S.; Li, Q.; Xu, J. Structural Dynamics Analysis of a Large Aperture Space Telescope Based on the Linear State Space Method. Sensors 2025, 25, 2476. [Google Scholar] [CrossRef]
  6. Li, X.; Wang, B.; Wu, Y.; Han, C.; Cao, Q.; Zhou, S.; Wang, W.; Li, P. Study on the improvement of scan mirror thermal radiation correction on the calibration accuracy of FY-4A AGRI. J. Infrared Millim. Waves 2022, 41, 608–617. [Google Scholar] [CrossRef]
  7. Genberg, V.; Michels, G.; Doyle, K. Making FEA Results Useful in Optical Analysis. Proc. SPIE 2002, 4769, 24–33. [Google Scholar] [CrossRef]
  8. Shi, Y.; Yan, H.; Gong, P.; Liu, T. Topology Optimization Design Method for Supporting Structures of Optical Reflective Mirrors Based on Zernike Coefficient Optimization Model. Acta Photonica Sin. 2020, 49, 203–214. [Google Scholar]
  9. Hu, M.; Pan, Y.; Zhang, N.; Xu, X. A Review on Zernike Coefficient-Solving Algorithms (CSAs) Used for Integrated Optomechanical Analysis (IOA). Photonics 2023, 10, 177. [Google Scholar] [CrossRef]
  10. Li, X.; Wang, A.; Fan, M.; Yu, L.; Liang, X. Multi-Spectral and Single-Shot Wavefront Detection Technique Based on Neural Networks. Photonics 2025, 12, 1110. [Google Scholar]
  11. Lee, J.; Park, K.; Son, E.S.; Jeong, S.; Kim, D.-W.; Oh, H.-G.; Kang, P.; Rhee, H.-G. Design optimization of a lightweight secondary mirror assembly for a 1-m class ground telescope for satellite laser ranging. Int. J. Optomechatron. 2025, 19, 2467152. [Google Scholar] [CrossRef]
  12. Xu, G.; Zhao, X.; Liu, M.; Liu, Y. Design of Mirror Assembly and Surface Simulation for Cpa. Optik 2019, 192, 162939. [Google Scholar] [CrossRef]
  13. Qu, Y.; Jiang, Y.; Feng, L.; Li, X.; Liu, B.; Wang, W. Lightweight Design of Multi-Objective Topology for a Large-Aperture Space Mirror. Appl. Sci. 2018, 8, 2259. [Google Scholar] [CrossRef]
  14. Tian, X.; Yuan, J.; Chen, S.; Cao, X.; Mu, T.; Cheng, G. Multiphysics Coupling Simulation of Off-Axis Integrated Cavity Optical Sensing System. Photonics 2024, 11, 720. [Google Scholar] [CrossRef]
  15. Du, J.; Yang, X.; Wu, M.; He, X.; Fu, Z.; Gao, S. Design of Matching Imaging on Agile Satellite with Wide-Swath Whiskbroom Payloads along the Coastal Zone. Photonics 2022, 9, 930. [Google Scholar] [CrossRef]
  16. Mo, Z.; Yang, Z. Parallel computing component model for interdisciplinary multiphysicscoupling. Sci. Sin. Informationis 2023, 53, 1560. [Google Scholar] [CrossRef]
  17. Zheng, J.; Chen, H.; Jiang, C. Robust topology optimization for structures under thermo-mechanical loadings considering hybrid uncertainties. Struct. Multidiscip. Optim. 2022, 65, 29. [Google Scholar] [CrossRef]
  18. Cheng, X.; Zhang, H.; Shang, J.; Bai, H.; Lu, C.; Guo, Y. Analysis of Thermal Effects in Yb:YAG Laser Amplifiers with Active-Mirror Structure. Photonics 2025, 12, 1123. [Google Scholar] [CrossRef]
  19. Zhai, Y.; Jiang, H.; Mei, G.; Jiang, F. Material selection and design of beryllium-aluminum alloy mirror assembly for large-diameter space infrared camera. Infrared Laser Eng. 2020, 49, 20190390. [Google Scholar] [CrossRef]
  20. Wei, L.; Zhang, L.; Gong, X.; Ma, D.-M. Design and optimization for main support structure of a large-area off-axis three-mirror space camera. Appl. Opt. 2017, 56, 1094–1100. [Google Scholar] [CrossRef] [PubMed]
  21. Niu, K.; Tian, C. Zernike polynomials and their applications. J. Opt. 2022, 24, 123001. [Google Scholar] [CrossRef]
  22. Mafusire, C.; Krüger, T.P.J. Strehl ratio and amplitude-weighted generalized orthonormal Zernike-based polynomials. Appl. Opt. 2017, 56, 2336–2345. [Google Scholar] [CrossRef] [PubMed]
  23. Dai, G.-M.; Mahajan, V.N. Nonrecursive determination of orthonormal polynomials with matrix formulation. Opt. Lett. 2007, 32, 74–76. [Google Scholar] [CrossRef] [PubMed]
  24. Ye, J.; Wang, W.; Gao, Z.; Liu, Z.; Wang, S.; Benítez, P.; Miñano, J.C.; Yuan, Q. Modal wavefront estimation from its slopes by numerical orthogonal transformation method over general shaped aperture. Opt. Express 2015, 23, 26208–26220. [Google Scholar] [CrossRef]
  25. He, X.; Yang, X.; Liu, P.; Du, J.; Fu, Z.; Cheng, M.; Xu, T. Wide-Swath and High-Resolution Continuous Multistrip Scanning Imaging Technology Based on Satellite-Payload Collaboration. IEEE Trans. Geosci. Remote Sens. 2025, 63, 5618014. [Google Scholar] [CrossRef]
Figure 1. The schematic diagram of scanning mirror imaging.
Photonics 13 00065 g001
Figure 2. Scanning mirror model.
Photonics 13 00065 g002
Figure 3. Representation of optical surface deformation.
Photonics 13 00065 g003
Figure 4. Schematic diagram of rigid-body displacement of scanning mirror.
Photonics 13 00065 g004
Figure 5. Assembly drawing and finite element model of scanning mirror assembly.
Photonics 13 00065 g005
Figure 6. Deformation contour plot under static gravity and a temperature rise of 5 °C.
Photonics 13 00065 g006
Figure 7. Contour plots of surface shapes at different moments under various torques. (ae) show the PV and RMS values at different moments under a torque of 30 N·mm; (fj) display the PV and RMS values at different moments under a torque of 40 N·mm; (ko) show the PV and RMS values at different moments under a torque of 50 N·mm.
Photonics 13 00065 g007
Figure 8. Line charts of PV and RMS at different moments under various torques.
Photonics 13 00065 g008
Figure 9. Contour plots of surface shapes at different moments under different torques with a temperature rise of 5 °C. (ae) show the PV and RMS values at different moments under a torque of 30 N·mm; (fj) display the PV and RMS values at different moments under a torque of 40 N·mm; (ko) present the PV and RMS values at different moments under a torque of 50 N·mm).
Photonics 13 00065 g009
Figure 10. Line charts of PV and RMS at different moments under different torques and temperature rises.
Photonics 13 00065 g010
Table 1. Design specifications of the optical system.
ParametersCompensation Angle
(θ1 = θ2)
Field of View (FOV)Clear Aperture (d) D Modulation Transfer Function (MTF)
Value12°3.2°220 mm900 mm0.4
ParametersAcross-track swath width
W X
Satellite orbit heightScan cycle ( T )Imaging time ( t 1 )Non-imaging time ( t 2 )
Value600 km500 km7 s5 s2 s
Table 2. Material parameters.
Component PartsMaterial TypeDensity
(103 kg/m3)
Poisson RatioYoung’s Modulus (GPa)Thermal Expansion Coefficients (/°C)
MirrorSiC3.050.1684002.8 × 10−6
Tapered Sleeve4J328.10.251382.6 × 10−6
Flexible SupportTC44.440.361099.1 × 10−6
Back PlateAI/SiC2.940.31508.0 × 10−6
Table 3. Influence of various mesh sizes on RMS, PV, and computation time.
Mesh Size (mm)10876543
Surface Elements6312115280037575342804613,143
RMS (nm)1.191.611.641.681.741.821.83
PV (nm)5.447.687.798.018.418.738.83
Computation Time (s)74.07490.61596.825126.43143.203294.650395.459
Table 4. The first six modal shapes of the scanning mirror assembly.
OrderF1F2F3F4F5F6
Frequency104.28217.46235.10289.45298.89317.40
Table 5. PV and RMS of mirror surface shape under static gravity in all directions and temperature rise.
LoadsPV/nmRMS/nm
Gx9.01111.6341
Gy6.35691.0777
Gz27.12307.5360
Temperature increment34.35049.6019
Table 6. PV and RMS of mirror surface shape under high dynamic loads.
Torque (N·mm)Moment (s)PV/nmRMS/nm
3010.75770.1063
3021.33080.1564
3034.90410.4098
3049.79530.7359
3059.98100.7258
Table 7. PV and RMS of mirror surface shape under the coupling of high dynamic loads and temperature field.
Torque (N·mm)Moment (s)PV/nmRMS/nm
3010.55860.1060
3021.74180.2339
3034.63110.3491
3047.90660.7371
30510.76700.7513
Table 8. Surface figure fitting accuracy under different working conditions.
Operating ConditionsFitting Error
Grave-xRMS4.6530 × 10−7
PV3.9535 × 10−6
Grave-yRMS8.0230 × 10−7
PV6.6774 × 10−6
Grave-zRMS4.6560 × 10−7
PV3.2158 × 10−6
tempRMS7.5249 × 10−7
PV6.0482 × 10−6
30 N·mmRMS4.5900 × 10−7
PV3.6462 × 10−6
40 N·mmRMS5.6070 × 10−7
PV4.1631 × 10−6
50 N·mmRMS6.305 × 10−7
PV4.5703 × 10−6
30 N·mm 5 °C (1 s)RMS4.5110 × 10−7
PV3.3240 × 10−6
40 N·mm 5 °C (1 s)RMS6.2160 × 10−7
PV4.2573 × 10−6
50 N·mm 5 °C (1 s)RMS7.4610 × 10−7
PV5.9605 × 10−6
Table 9. Fitting accuracy for different aperture geometries.
Apertures ShapeRMSPVR2
Circle0.45792.19180.99
Rectangle1.995411.52960.9523
Disclaimer/Publisher’s Note: The statements, opinions and data contained in all publications are solely those of the individual author(s) and contributor(s) and not of MDPI and/or the editor(s). MDPI and/or the editor(s) disclaim responsibility for any injury to people or property resulting from any ideas, methods, instructions or products referred to in the content.