Article

Improved Optics for Super-Resolution Time-Lapse Observations of Biological Phenomenon Using Speckle Interferometry

Department of Mechanical Engineering, Faculty of Engineering Science, Kansai University, 3-3-35 Yamate-cho, Suita 564-8680, Osaka, Japan
Photonics 2024, 11(5), 427; https://doi.org/10.3390/photonics11050427
Submission received: 26 March 2024 / Revised: 24 April 2024 / Accepted: 29 April 2024 / Published: 3 May 2024
(This article belongs to the Special Issue Coherence Properties of Light: From Theory to Applications)

Abstract

:
This study proposes a new optical system with the potential for time-lapse observation of living cellular tissue beyond the diffraction limit through speckle interferometry to facilitate biological research. The spatial resolution of this optical system was investigated and improved upon. This study also experimentally verified a finding from an earlier simulation study that the new super-resolution technology could be realised by analysing the phase distribution related to the shape of the measured object, preserved in the light reflected from the object. Additionally, a method was presented to confirm the positions of microstructures, based on the extracted characteristics of the structure.

1. Introduction

Diffraction of light [1,2] impedes the observation of microstructures beyond the diffraction limit [1,2,3,4]. As a result, the observation of microstructures, such as viruses using traditional optical microscopy in biological research, has long been considered impossible. However, since the development of green fluorescent proteins (GFPs) [5,6], bioimaging techniques using fluorescent proteins [7,8,9,10,11,12,13,14] have facilitated the observation of biological phenomena inside living cells using cryoelectron microscopy and other techniques, as well as the use of fluorescent proteins [15,16]. Consequently, biological research has flourished in recent years [13,14,17,18,19,20]. However, the continuous evolution of research based on biological observation techniques using traditional optical microscopes relies on the imminent development of techniques that can instantly capture and process 2D images unique to optical microscopy in real time.
Considering the need for tools to observe cellular tissues beyond the diffraction limit, a new observation method using speckle interferometry [21,22,23] was reported, which could provide super-resolution two-dimensional images [24]. This new technology [25] achieves super-resolution by analysing the phase distribution contained in the reflected light from the observed object. However, in the optical systems adopted in super-resolution technologies based on speckle interferometry developed thus far, the optical axis is set parallel to the horizontal plane of the vibration–isolation table; this setup is identical to that of general interferometry [24]. Therefore, even in this new technique, the observation plane of the object is set perpendicular to the horizontal plane, and not parallel the horizontal plane. As a result, observing biological tissue that has been in a static culture for a long period of time has not been possible with a horizontal setup.
To solve this problem, this study fabricated an optical system based on an upright dropshot microscope structure that allows the object of interest, namely a biological cell, to be installed horizontally, and aims to realise a time-lapse observation of the same beyond the diffraction limit. Such an optical observation system has the potential to contribute to the future development of biological research.
Furthermore, using this new optical system and simulation results from a previous study [25], this study experimentally clarified that the phase distribution of the reflected light from the measured object would propagate accurately with the shape information of the observation object. Analysis of this phase distribution at a high resolution confirmed that super-resolution could be achieved using only the light that passed through the lens aperture without any higher-order diffracted light. Based on this concept, the following hypotheses were formulated and experimentally proven in this study: (1) forming an image of the measured object is not necessary, as is the case of conventional optical systems that use lenses; (2) the observation position does not necessarily have to be positioned at the focus of the image as long as the path is long. Specifically, experiments were conducted under the assumption that it would be possible to reconstruct the shape of the measured object by detecting the phase distribution of light with high resolution at the out-of-focus position where the light propagated. Consequently, the experimental results demonstrated that detecting the phase distribution according to the shape of the object was possible, even outside of the focal plane. Additionally, the validity of the simulation results presented in a previous paper [25] was experimentally confirmed. In the course of this verification process, it was also demonstrated that the spatial resolution of the present optical system could be easily improved by applying to it the traditional speckle-handling methods [26], commonly used in speckle interferometry.
Furthermore, a processing method was discussed that confirmed the position of the measured object beyond the diffraction limit, using a representative position that extracted the characteristics of the structure.
Conventional image observation technology utilises an imaging method based on the intensity distribution of light with the use of a lens system. By contrast, the new three-dimensional shape observation technique used in this study would suggest that observing the phase distribution of light, rather than its intensity distribution, would be a critical aspect for the future development of super-resolution technology.

2. Super-Resolution Optics Based on Speckle Interferometry with the Object Placed Horizontally

Speckle interferometry [21,22,23] is an analysis technique that can measure deformation with a resolution of several tens of nanometres. The technique involves collecting speckle patterns before and after the deformation caused by an object with a rough surface and analysing the phase changes in the speckle pattern at a high resolution. This study investigated a super-resolution technology based on speckle interference shape measurement. In the shape measurement analysis conducted in this research, a known lateral shift is intentionally applied to the measurement object. Speckle patterns are collected before and after the lateral shift, and are analysed to detect the amount of change in the direction of the optical axis of the measurement object, caused by the lateral shift at each measurement point with a high resolution. The amount of shape change at each point is divided by the amount of lateral shift. By dividing the amount of change in the shape of the object at each point by the amount of lateral displacement, a derivative distribution with respect to the shape of the object to be measured is obtained. By integrating this derivative distribution, the shape of the object can be reconstructed with a spatial resolution of approximately 50 nm in the lateral direction [26].
Furthermore, if the lateral shift is set to approximately 10 nm, it would be small compared to the speckle diameter (typically approximately several microns). In such cases, a second speckle pattern can be created virtually on a computer by taking one speckle pattern and shifting its information (lateral shift) in the computer memory without necessarily having to displace the test object laterally. It has already been confirmed that the newly created speckle pattern can be used as a second speckle pattern to achieve similar shape results as those obtained by an actual lateral displacement [27]. This method, which uses only a single speckle pattern, enables the observation of dynamic objects. In this study, a new optical system was developed that has the potential to apply these techniques to the observation of biological living cellular tissue. The optical system used in this study was based on that used in speckle interferometry, as shown in Figure 1, which has been reported in previous studies [24]. Based on the original speckle interferometer [23] shown in Figure 1, the optical system was structured in such a way that the illumination light would fall on the object in the direction of gravity, as shown in Figure 2.
Specifically, the elements designated by alphabets from ‘a’ to ‘k’ in Figure 1 were installed in the new optical system, shown in Figure 2a. The details are as follows.
The light source shown at ‘a’ in Figure 2a consists of a diode-pumped solid state (DPSS) laser (Kyocera, Kyoto, Japan, JUNO532S) with a wavelength of 532 nm and an output of 150 mW. The beam from the light source at ‘a’ is split by the polarising beam splitter shown at ‘b’ into an illumination light for illuminating the object and a reference light for generating interference phenomenon. The splitting occurs under a controlled light intensity. The illumination light passes through ‘b’, travels horizontally straight ahead, passes through a node filter and collimator, and is directed vertically downward by the mirror at ‘c’. It then passes through a ground glass (Edmund Optics, Barrington, NJ, USA, 50 × 50 mm 220 Grit Ground Glass Diffuser) and as scattered light through the objective lens (Nikon, T Plan EPI SLWD 100×, NA: 0.6) shown in ‘d’ on the object at ‘e’, which is illuminated in the downward direction.
The reflected light (object light) from object at ‘e’ is again focused by the objective lens, passed through the beam splitter, and propagated horizontally along the optical axis of the lens. The object light passes through a pinhole in the observation optics at ‘f’, interferes with the reference light along the horizontal optical axis at the beam splitter at ‘g’, and reaches the camera at ‘h’. This resulting image is recorded as a speckle pattern.
On the other hand, the reference light, which is obtained after the laser light emitted from the light source at ‘a’ has been split by the polarising beam splitter at ‘b’, travels along the horizontal optical axis from ‘i’ and is adjusted to the horizontal height level of the camera optical axis by the two upper and lower mirrors installed at position ‘j’. Then, after being formed into a parallel plane wave by the collimator lens, the angle of the wavefront with the optical axis is adjusted by the mirror at ‘k’. This angle results in the formation of interference fringes in the corresponding speckle. When the speckle pattern is Fourier-transformed, the bias component of the intensity distribution can be processed to remove it [24,28]. This process enables an analysis using only the two speckle patterns before and after the deformation. Thus, optical processing is a key feature of this type of optical system [24,28].
Another important feature of this optical system is that it was improvised so that the measurement object could be installed horizontally, as shown in Figure 2c ‘e’, where the observation object enclosed by the red dashed line in Figure 2a was installed.
Conventional optical systems, such as the one shown in Figure 1, require the measurement object to be installed vertically; however, the optical system shown in Figure 2 has been improved to allow the measurement object to be installed horizontally for a longer period of time. This modified setup would enable long-term time-lapse observation of cellular tissues in the culture medium using immersion objective lenses, although an ordinary super working distance objective lens (Nikon, T Plan EPI SLWD) is currently used.
Figure 2b shows the actual optical system, in which the optical elements are arranged according to the alphabet symbols of each element in Figure 2a. The optical system was then designed to obtain higher-contrast images, for example, by adjusting the optical path of the object light to match the interference distance of the laser between the object and reference light beams. However, this setup resulted in a scale of approximately 1 m in length. My future work will improve the optical system to a size that can be used more conveniently in actual experiments on living cells.

3. Results and Discussion

3.1. Verification of the Super-Resolution Function of the Newly Constructed Optical System

This section discusses the verification of the super-resolution function of the newly constructed optical system. As shown in a previous report [24], the verification was performed by observing a holographic grating with a period of 278 nm and 3600 grating stripes per mm (Edmund, 3600 grooves/mm, 12.7 mm square, UV holographic grating). The diffraction limit of the lens was 540 nm, which presented the Rayleigh limit [1,2,3,4] because the NA of the objective lens was 0.6 and the wavelength of the light source was 532 nm. The grating pitch (278 nm) of the observed object, as shown in Figure 3, was clearly beyond the diffraction limit of the objective lens.
The verification results are shown in Figure 4. In the verification process, a grating with a period of 833 nm (Edmund, 1200 grooves/mm, 12.7 mm square, UV Holographic Grating) was first used to confirm that the objective lens was focused on the grating surface. As this holographic grating did not exceed the diffraction limit of the optical system, the ability to image the grating strips allowed it to determine whether they were in focus. After confirming that the grating surface was in focus, a grating with a period of 278 nm was observed under a plane wave illumination (without ground glass). The captured image is shown in Figure 4a. Because the period of the grating exceeded the diffraction limit of the lens, an image of the grating stripes could not be observed.
Using this method, the obtained image could be processed to detect the phase distribution. Figure 4b can therefore be treated as the phase distribution, even though the grating strips cannot be observed in the speckle pattern shown in Figure 4a. In this case, the illumination light made a double pass over the measured surface; therefore, the results are summarised over a unit length of 2π rad, which corresponded to a phase of 266 nm.
Figure 4b shows a resulting grating period of 285 nm, which is approximately equivalent to the period of the diffraction grating. These results were confirmed using the optical system shown in Figure 1, which was used in a previous study [24]. The measured grating period confirmed super-resolution.
Under this condition, the same diffraction grating as in Figure 4a was observed by changing the illumination light from a plane wave to scattered light by inserting a ground glass at point “c” in the optical system shown in Figure 2a. Scattered light, used to illuminate the object, produced speckle that resembled light grains, as shown in Figure 4c. In speckle interferometry, the size of these speckles varies with the diameter of the pinhole in the observation optics and the image magnification [21,22,23]. In this case, the aperture (F) of the observation optics was set to 11, which resulted in speckles with a relatively large diameter of approximately 10 μm due to interference between the originally scattered light.
Figure 4d shows the analysis of the produced specks pattern shown in Figure 4c. The grating period was determined to be 285 nm, identical to that in Figure 4b, which was similar to the period of the grating strips of the diffraction grating. As shown in Figure 4d, the amplitude of the phase distribution increased from 20 to 30 nm compared with that of Figure 4b. The reason for this will be discussed in Section 3.3.2. The results shown in Figure 4b,d indicate that although the period of the grating strips was slightly longer, the microstructure of the grating could be observed using phase analysis. In other words, the new optical system achieved super-resolution.
Furthermore, Figure 5 shows a comparison of the results of the (A)–(A) and (B)–(B) cross-sections shown in Figure 4b and Figure 4d, respectively, using atomic force microscopy (AFM) images. The solid line represents the plane wave result shown in Figure 4b, i.e., (A)–(A), and the dashed line represents the scattered light illumination result shown in Figure 4d, i.e., (B)–(B). Although the AFM results showed a slight deviation in the cross-sectional shape from the sinusoidal wave, the results obtained in this study had a period and amplitude that corresponded to those of the AFM results in each case, indicating that the newly constructed optical system in this study allowed measurements to be obtained using a phase analysis of the structure of the object beyond the diffraction limit.

3.2. Investigation of the Case Where the Objective Lens Was out of Focus on the Measured Surface

The simulation results in a previous study [25] reported that the phase information contained within the light reflected from the surface of the object depended on the shape of the object. By proving that the surface shape information of an object would be preserved in the phase component of the light reflected from the object, this study experimentally confirmed that the proposed method enables the observation of microstructures beyond the diffraction limit. The results were used to justify the principle, by which this method could achieve super-resolution.
Firstly, the surface of the object was pre-focused using the method described in Section 3.1. Next, the object was replaced by moving it 20 µm out-of-focus towards the lens. The experiment was meant to investigate whether the phase distribution could be detected based on the shape of the object.
Figure 6a shows the resulting speckle pattern, which was formed because the light was not concentrated at a single point, as it would be if the object were in focus, even with plane wave illumination. Consequently, the reflected light, containing various ray vectors from the object, passed through the lens and interferes, which produced a speckle pattern.
If the shape information of the object is preserved in the phase distribution of the reflected light, the phase change of the light corresponds to a change in the optical path length by the lateral shift of the object, even if the light passing through the lens consists of different light vectors. In this case, the change in the optical path length directly corresponds to a change in the phase. Therefore, if the phase distribution is preserved in the reflected light, the phase difference before and after the lateral shift of the object can be analysed at a high resolution using speckle interferometry, which can detect the size of phase change and convert it into a change in the optical path length, even if the light is not in focus. Furthermore, the shape of the object can be reconstructed by calculating and integrating the derivative of the shape at each point. Based on this concept, this study experimentally investigated whether the shape of an object could be reconstructed using an out-of-focus image. Figure 6b shows the analysis of the speckle pattern shown in Figure 6a. The results are similar to those presented in Figure 4. However, the grating period increased slightly from 285 to 290 nm, which was attributed to the effect of varying positions of the object throughout the measurement. However, the sinusoidal shapes of the grating strips did not collapse.
Next, the light was changed to scattered light by inserting a ground glass from the position shown in Figure 6a to the position ‘c’ shown in Figure 2a. This spherical speckle pattern, shown in Figure 6c, resembles that in Figure 4c.
Under the condition shown in Figure 6, the aperture of the lens of the observation optical system was set to 11, which was identical to the setup shown in Figure 4. In this case, the observed speckle pattern was attributed to the interference of the scattered light.
Figure 6d shows an analysis of the speckle pattern shown in Figure 6c. In this case, the sinusoidal shape of the grating stripes was also observed, although the grating period was slightly longer at 290 nm.
Figure 6b,d show that a sinusoidal shape could be observed in almost the same manner, although the amplitudes were slightly different. These results show that the shape information of the object was preserved in the phase distribution of the reflected light from the object, not only considering the simulation results shown in [25], but also the experimental results.
The analysis principle of the speckle interferometry used in this study departs from the conventional idea of analysing the intensity distribution of light by imaging it, in line with Abbe’s image formation theory [4]. This shows that even without higher-order diffracted light passing through the lens, super-resolution can be achieved by analysing the phase distribution of the light at a high resolution without the need for the lens to form an image.

3.3. Investigation of Spatial Resolution of the Proposed Optical System

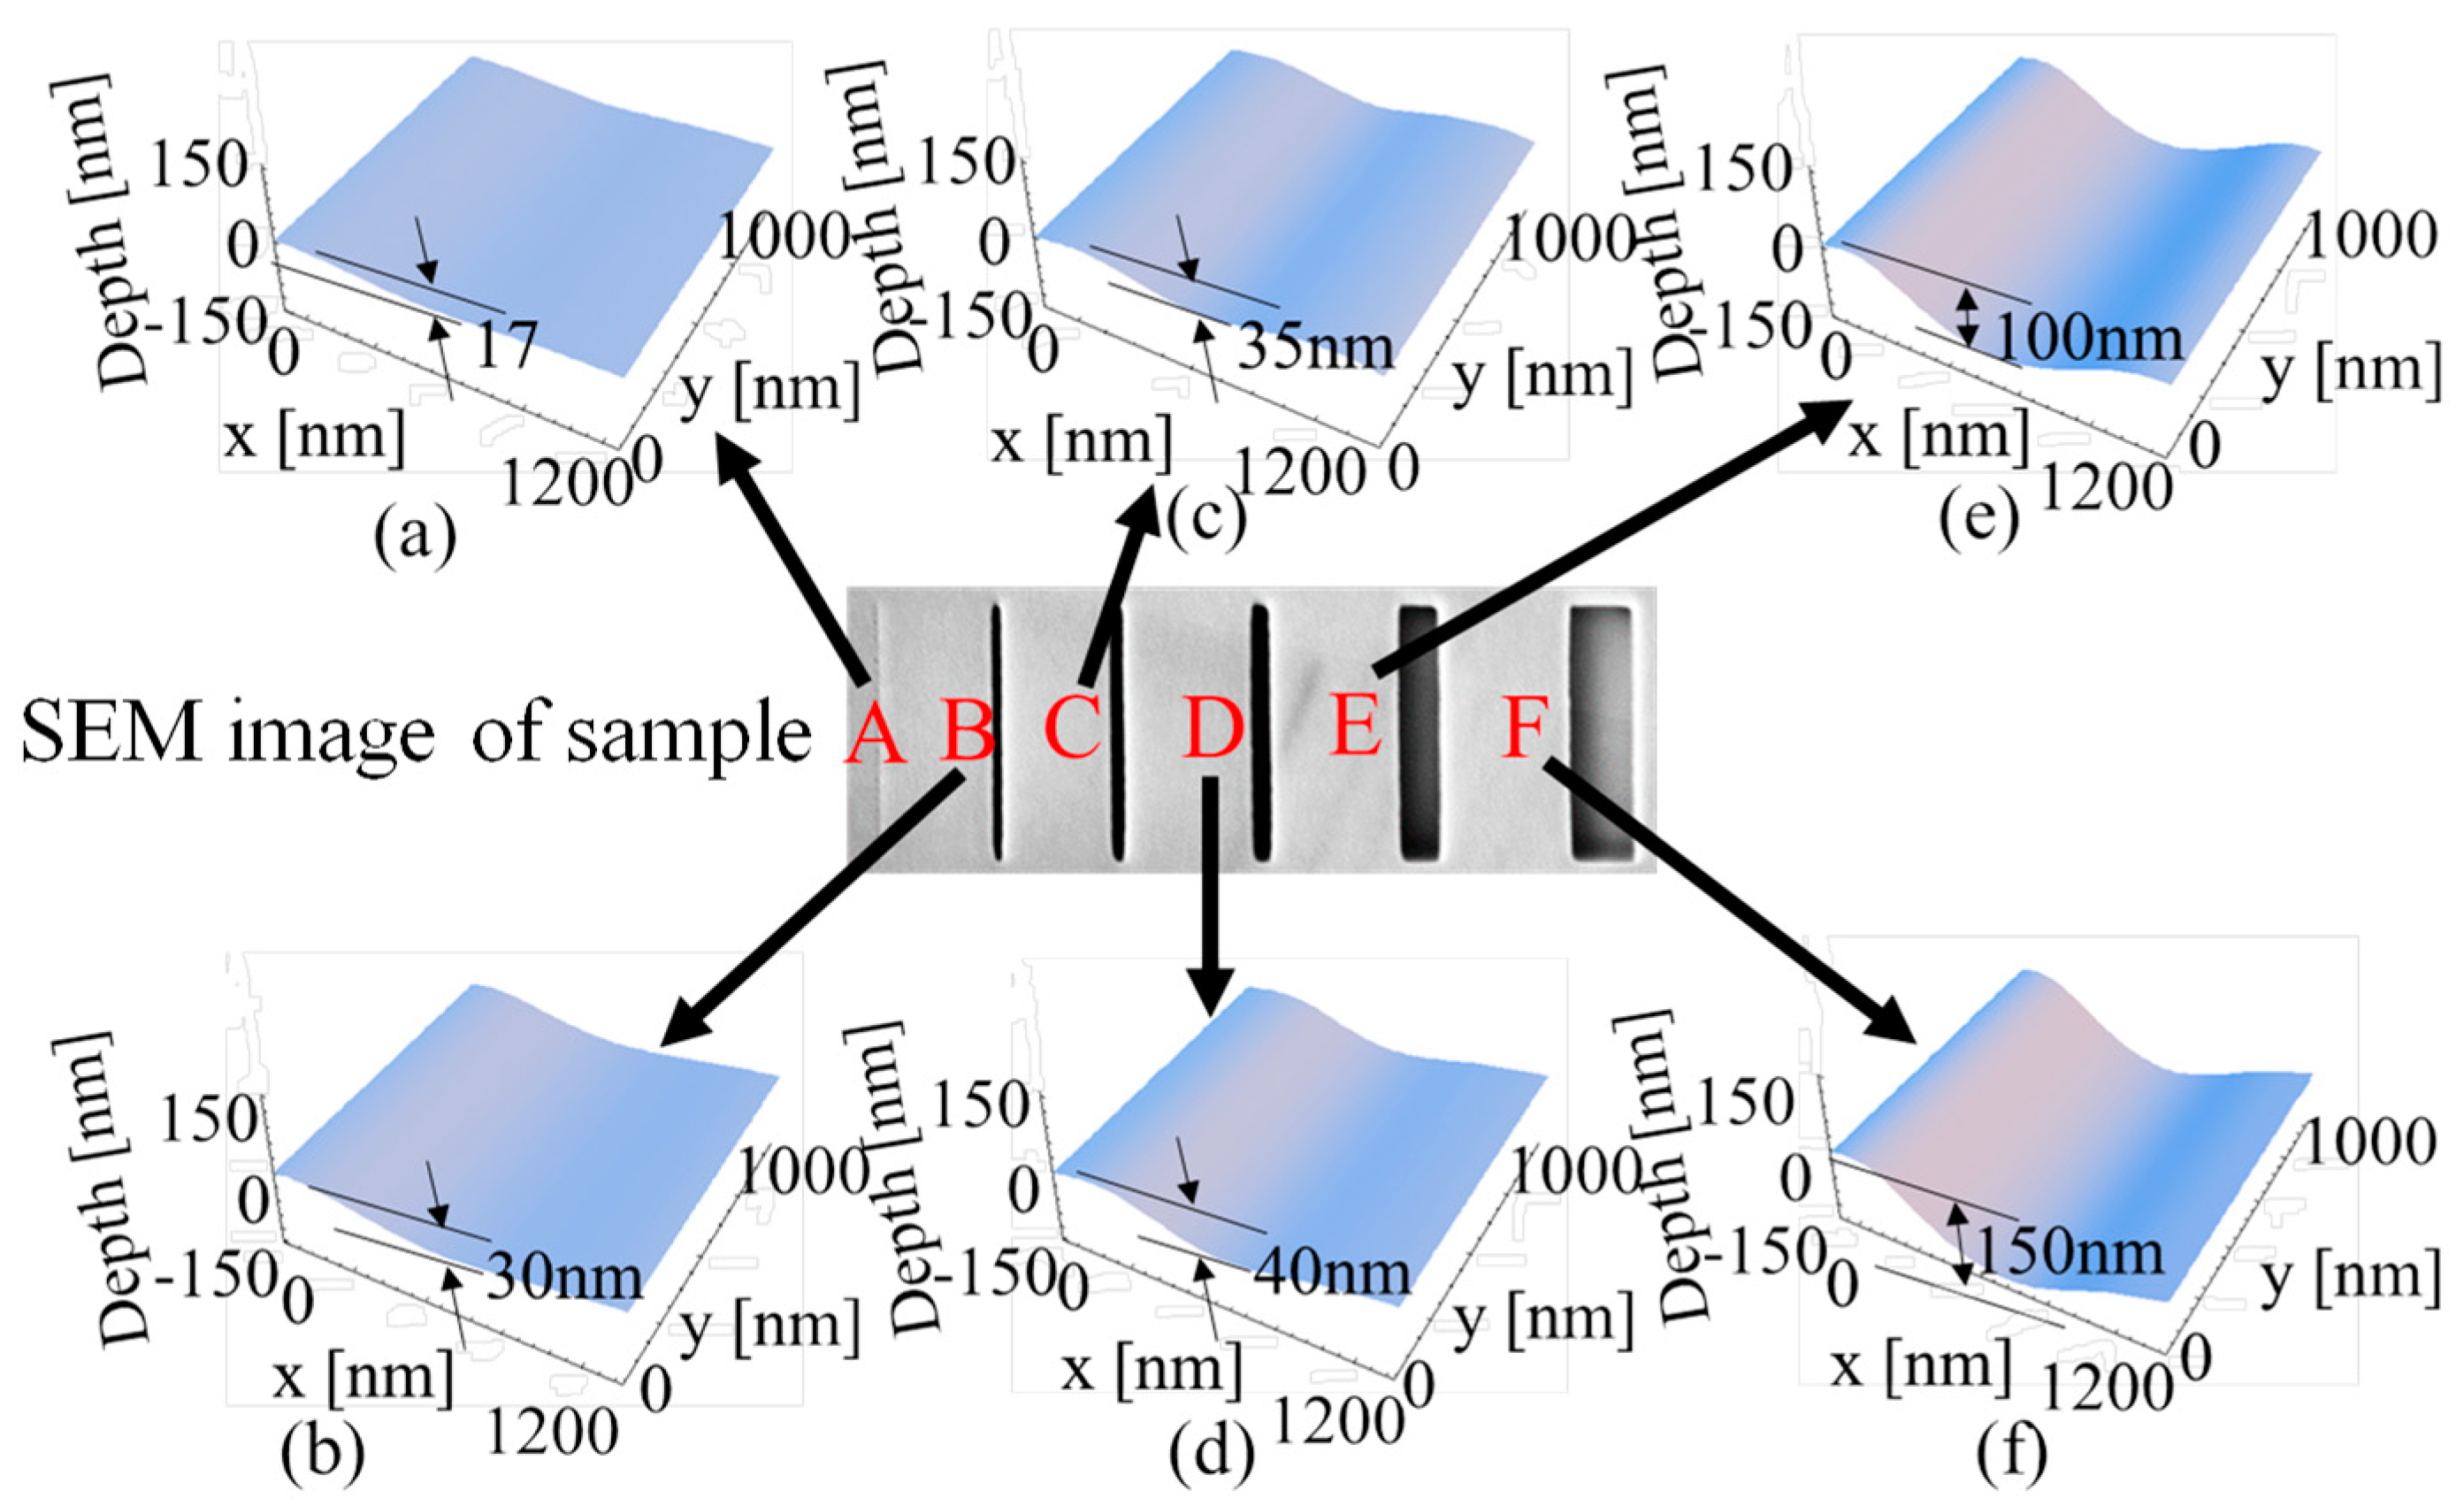
The SEM image shown in Figure 7 is that of a test sample composed of a 200 nm thick resist-coated thin film on a silicon wafer that contained a pattern of different line widths drawn using an electron beam lithography machine. In the test sample, the spatial resolution of the system was investigated by observing six different fine grooves of 350, 150, 100, and 50 nm from 20 nm at position “A” to a depressed line of 550 nm at “F”, which was approximately the diffraction limit of the system.
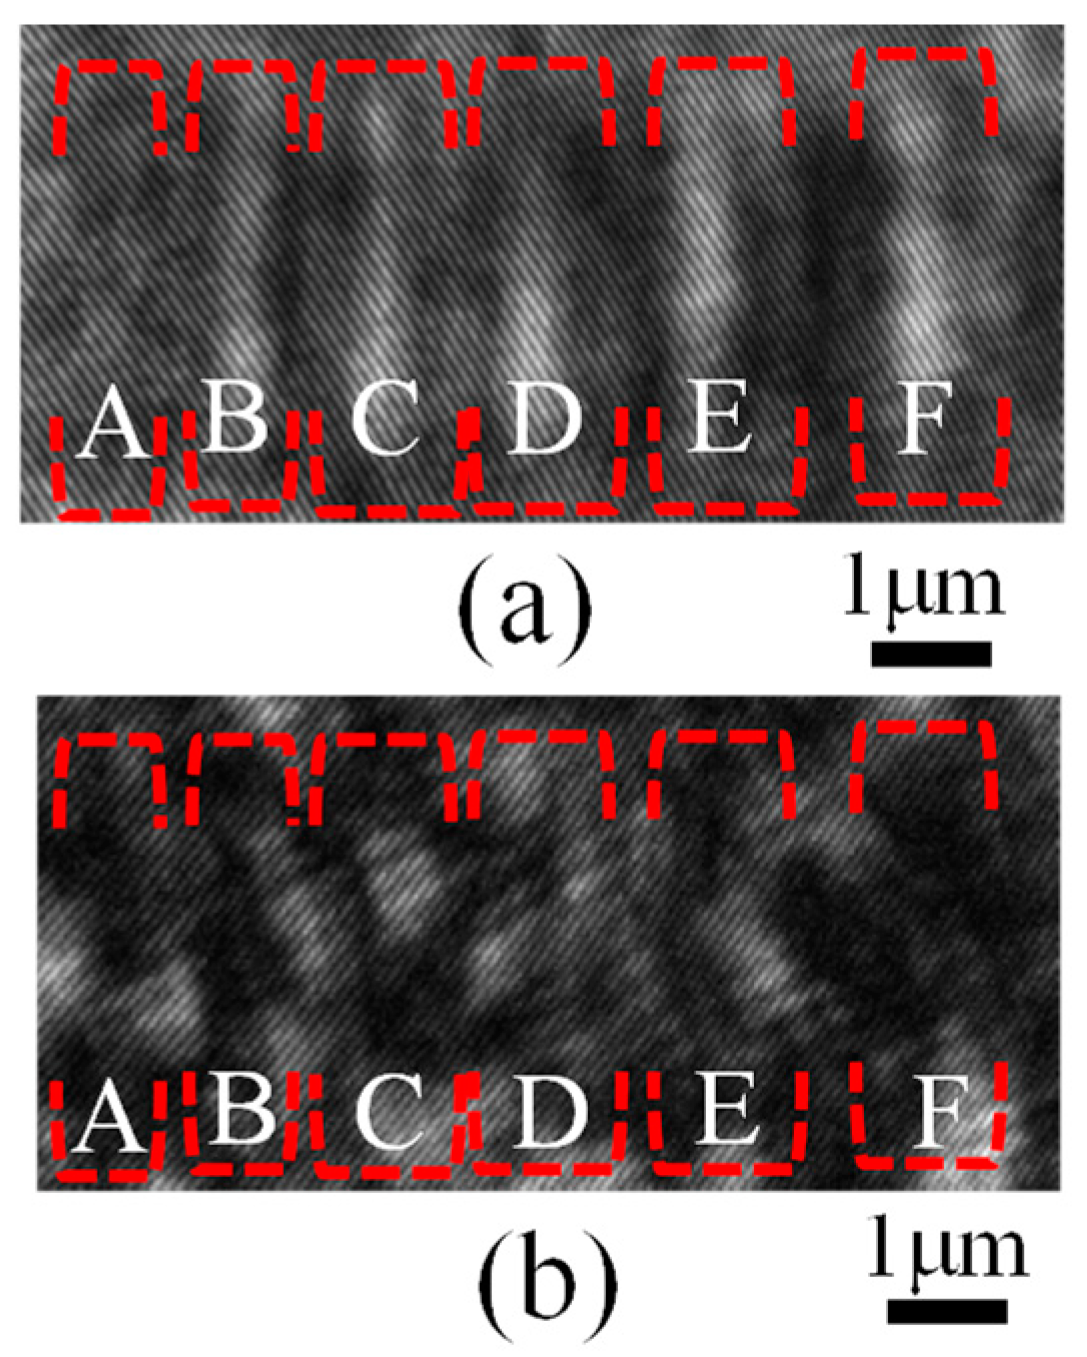
Figure 8 shows the obtained sample images. To ensure that the phase distribution detection of the image could be implemented with only two speckle patterns before and after the deformation used as a speckle interferometry technique [28], fringes with high spatial frequency are present in both images in Figure 8a,b. Figure 8a was captured with the objective lens focused on the surface of the sample, whereas Figure 8b was captured with the sample in focus and illuminated by scattered light passing through the ground glass. The Rayleigh limit obstructed the ability to capture each groove as an intensity distribution, as the grating strips were continuously aligned in parallel and their period exceeded the diffraction limit, in the diffraction grating shown in Figure 4a.
Figure 8a shows the focused image of the test sample. Even though the grooves exceeded the diffraction limit of this optical system (540 nm), as shown in Figure 7, the grooves could be resolved from “A” to “E”, although their images were blurred, because the distance between adjacent grooves did not exceed the diffraction limit. However, the grooves were difficult to resolve in region “A” of Figure 8a, where the line width was 20 nm. This may be due to the fact that it was originally difficult to confirm the groove in “A” in the SEM image shown in Figure 7, and that one pixel of the image element was set to approximately 25 nm at the time of image acquisition in Figure 8. Therefore, the spatial resolution of the new optical system was investigated using the sample shown in Figure 7 and considering the difficulty of observing “A”.

3.3.1. Investigation of Measurement Resolution of the Proposed Optical System with Objects of Different Line Widths

This section discussed the resolution of the new optical system, which is one of the main objectives of this study. The measured sample contained six different types of fine lines, as shown in Figure 7. First, plane waves were used as the illumination light source, and the aperture of the observation optics was narrowed to make it easier to capture the focused image, as shown in Figure 8a. “F” of the lens of the observation optics was set to 11. Figure 8a shows that although the grooves of each width are somewhat blurred, even the widest line width groove of 550 nm, which did not exceed the diffraction limit shown at “F”, was not sufficiently sharp. However, the diffraction grating of Figure 4, which exceeded the diffraction limit described above, showed grating stripes that were continuously adjacent to each other at a distance (278 nm) beyond the diffraction limit, and the existence of grating stripes beyond the diffraction limit could not be confirmed in Figure 4a,c. However, even for grooves with line widths beyond the diffraction limit, the groves could be vaguely resolved, although the grooves are not clearly visible in Figure 8a, because the grooves existed independently at intervals that did not exceed the diffraction limit. This is because the adjacent grooves were arranged without exceeding the Rayleigh limit. However, the presence of the 20 nm line width groove shown in “A” is not clearly visible in Figure 8a.
The position of each groove in Figure 8a was confirmed using the previously imaged SEM sample. The results obtained under the same processing conditions as those shown in Figure 4b are presented in Figure 9. The conditions to obtain the same were as follows: plane wave illumination, F = 11, and the sample surface was in focus. The presence of each groove was confirmed using the phase distribution. The depth distribution of each groove was converted into its length by assuming that the light was double passing, with 2π rad as half of the wavelength (266 nm). The groove with a line width of 20 nm in “A”, whose presence could hardly be resolved in Figure 8a, was detected using the depth of the groove, although the depth of 17 nm was considered very shallow. These results suggest that this optical system could also detect a 20 nm groove. Next, the possibility of an even higher resolution using the higher-resolution speckle interferometry described in a previous report [26] was investigated.

3.3.2. Resolution Enhancement by Scattered Light Illumination When Observing Object Measurements with 20 nm Line Widths

Next, the presence the 20 nm wide groove shown at “A”, whose presence is barely detected in Figure 8a, based on the results of the measurement resolution enhancement technique in the speckle interferometry discussed in a previous study [26] was investigated.
The light illumination source was changed from plane wave to scattering light illumination by inserting a ground glass slide at position ‘c’, as shown in Figure 2a. The obtained image is shown in Figure 8b.
The area of groove “A” could be framed by the red dashed line using the coordinate value, as shown in Figure 8b, by detecting the coordinate value of the area, where groove “A” shown in Figure 8a was located.
Figure 8b shows that under scattered light illumination, the grooves could not be located even for the widest line width of 550 nm. The presence of the 20 nm grooves shown in “A” are also more difficult to resolve.
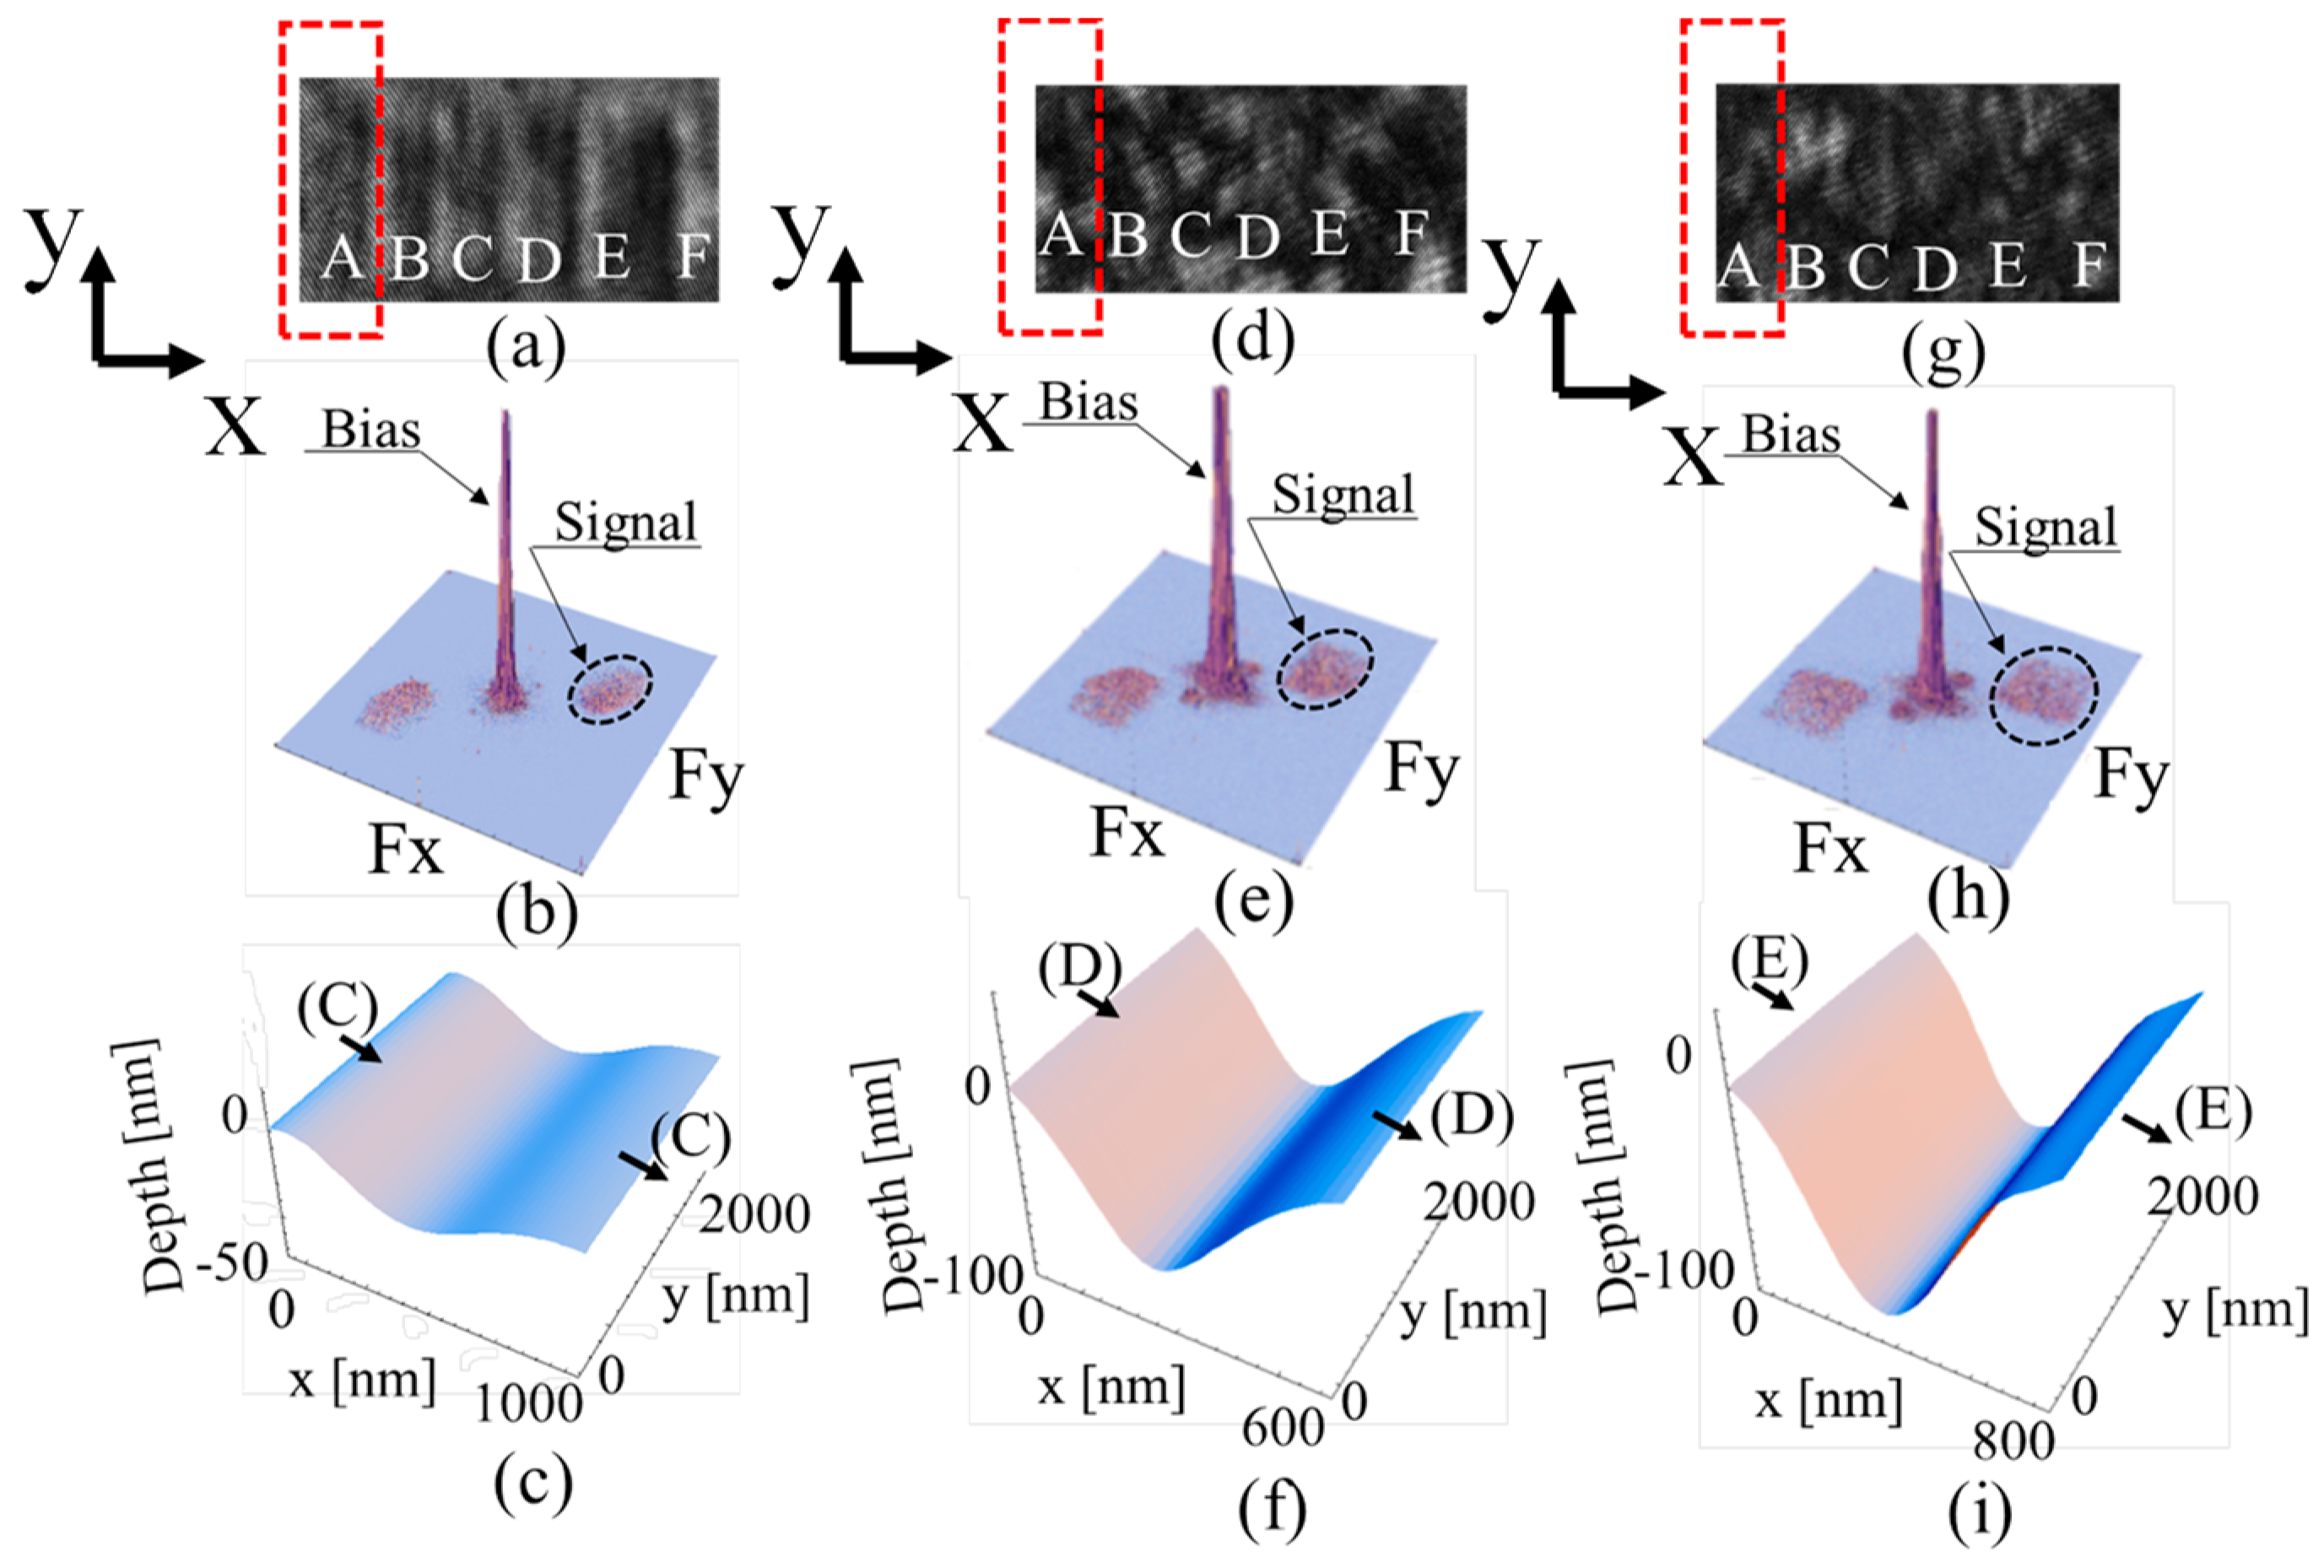
In Figure 10, the speckle pattern, distribution of the Fourier transform information in the frequency domain, and analysis results for different measurement conditions are shown in the upper row (a)–(g), middle row (b)–(h), and lower row (c)–(i), respectively, for the groove shown in “A”.
The speckle pattern captured with an aperture of F = 11 and plane wave illumination is shown in Figure 10a, and the result of observing the image in the frequency domain using the Fourier transform is shown in Figure 10b. The shape, based on the results of the phase distribution analysis, is shown in Figure 10c. Figure 10d shows the speckle pattern obtained using an F of 11 and a scattered light source; the results of observing the signal components in the frequency domain using the Fourier transform are shown in Figure 10e. Finally, the result of analysing region “A” under this condition is shown in Figure 10f.
The amplitude component in Figure 10f was clearly larger than that in Figure 10c. This can be understood by comparing the signal spread in the frequency domain between Figure 10b,e. In other words, it is clear that the distribution in Figure 10e, under scattered light illumination, is more widespread in the frequency domain. This means that the scattered light illumination allowed signals with higher frequency components to be used in the analysis process, and consequently, larger amplitude components could be detected in the phase analysis results.
Furthermore, Figure 10g shows the speckle pattern in speckle interferometry using a more open aperture, with F = 1.2. Under this condition, higher-frequency components were expected to be handled more than in the observation condition shown in Figure 10d. Figure 10h, where the signal was observed in the frequency domain using Fourier transform, shows that the signal component was more spread out in the frequency domain than in Figure 10e. Consequently, the amplitude of the analysed result was greater, as shown in Figure 10i.
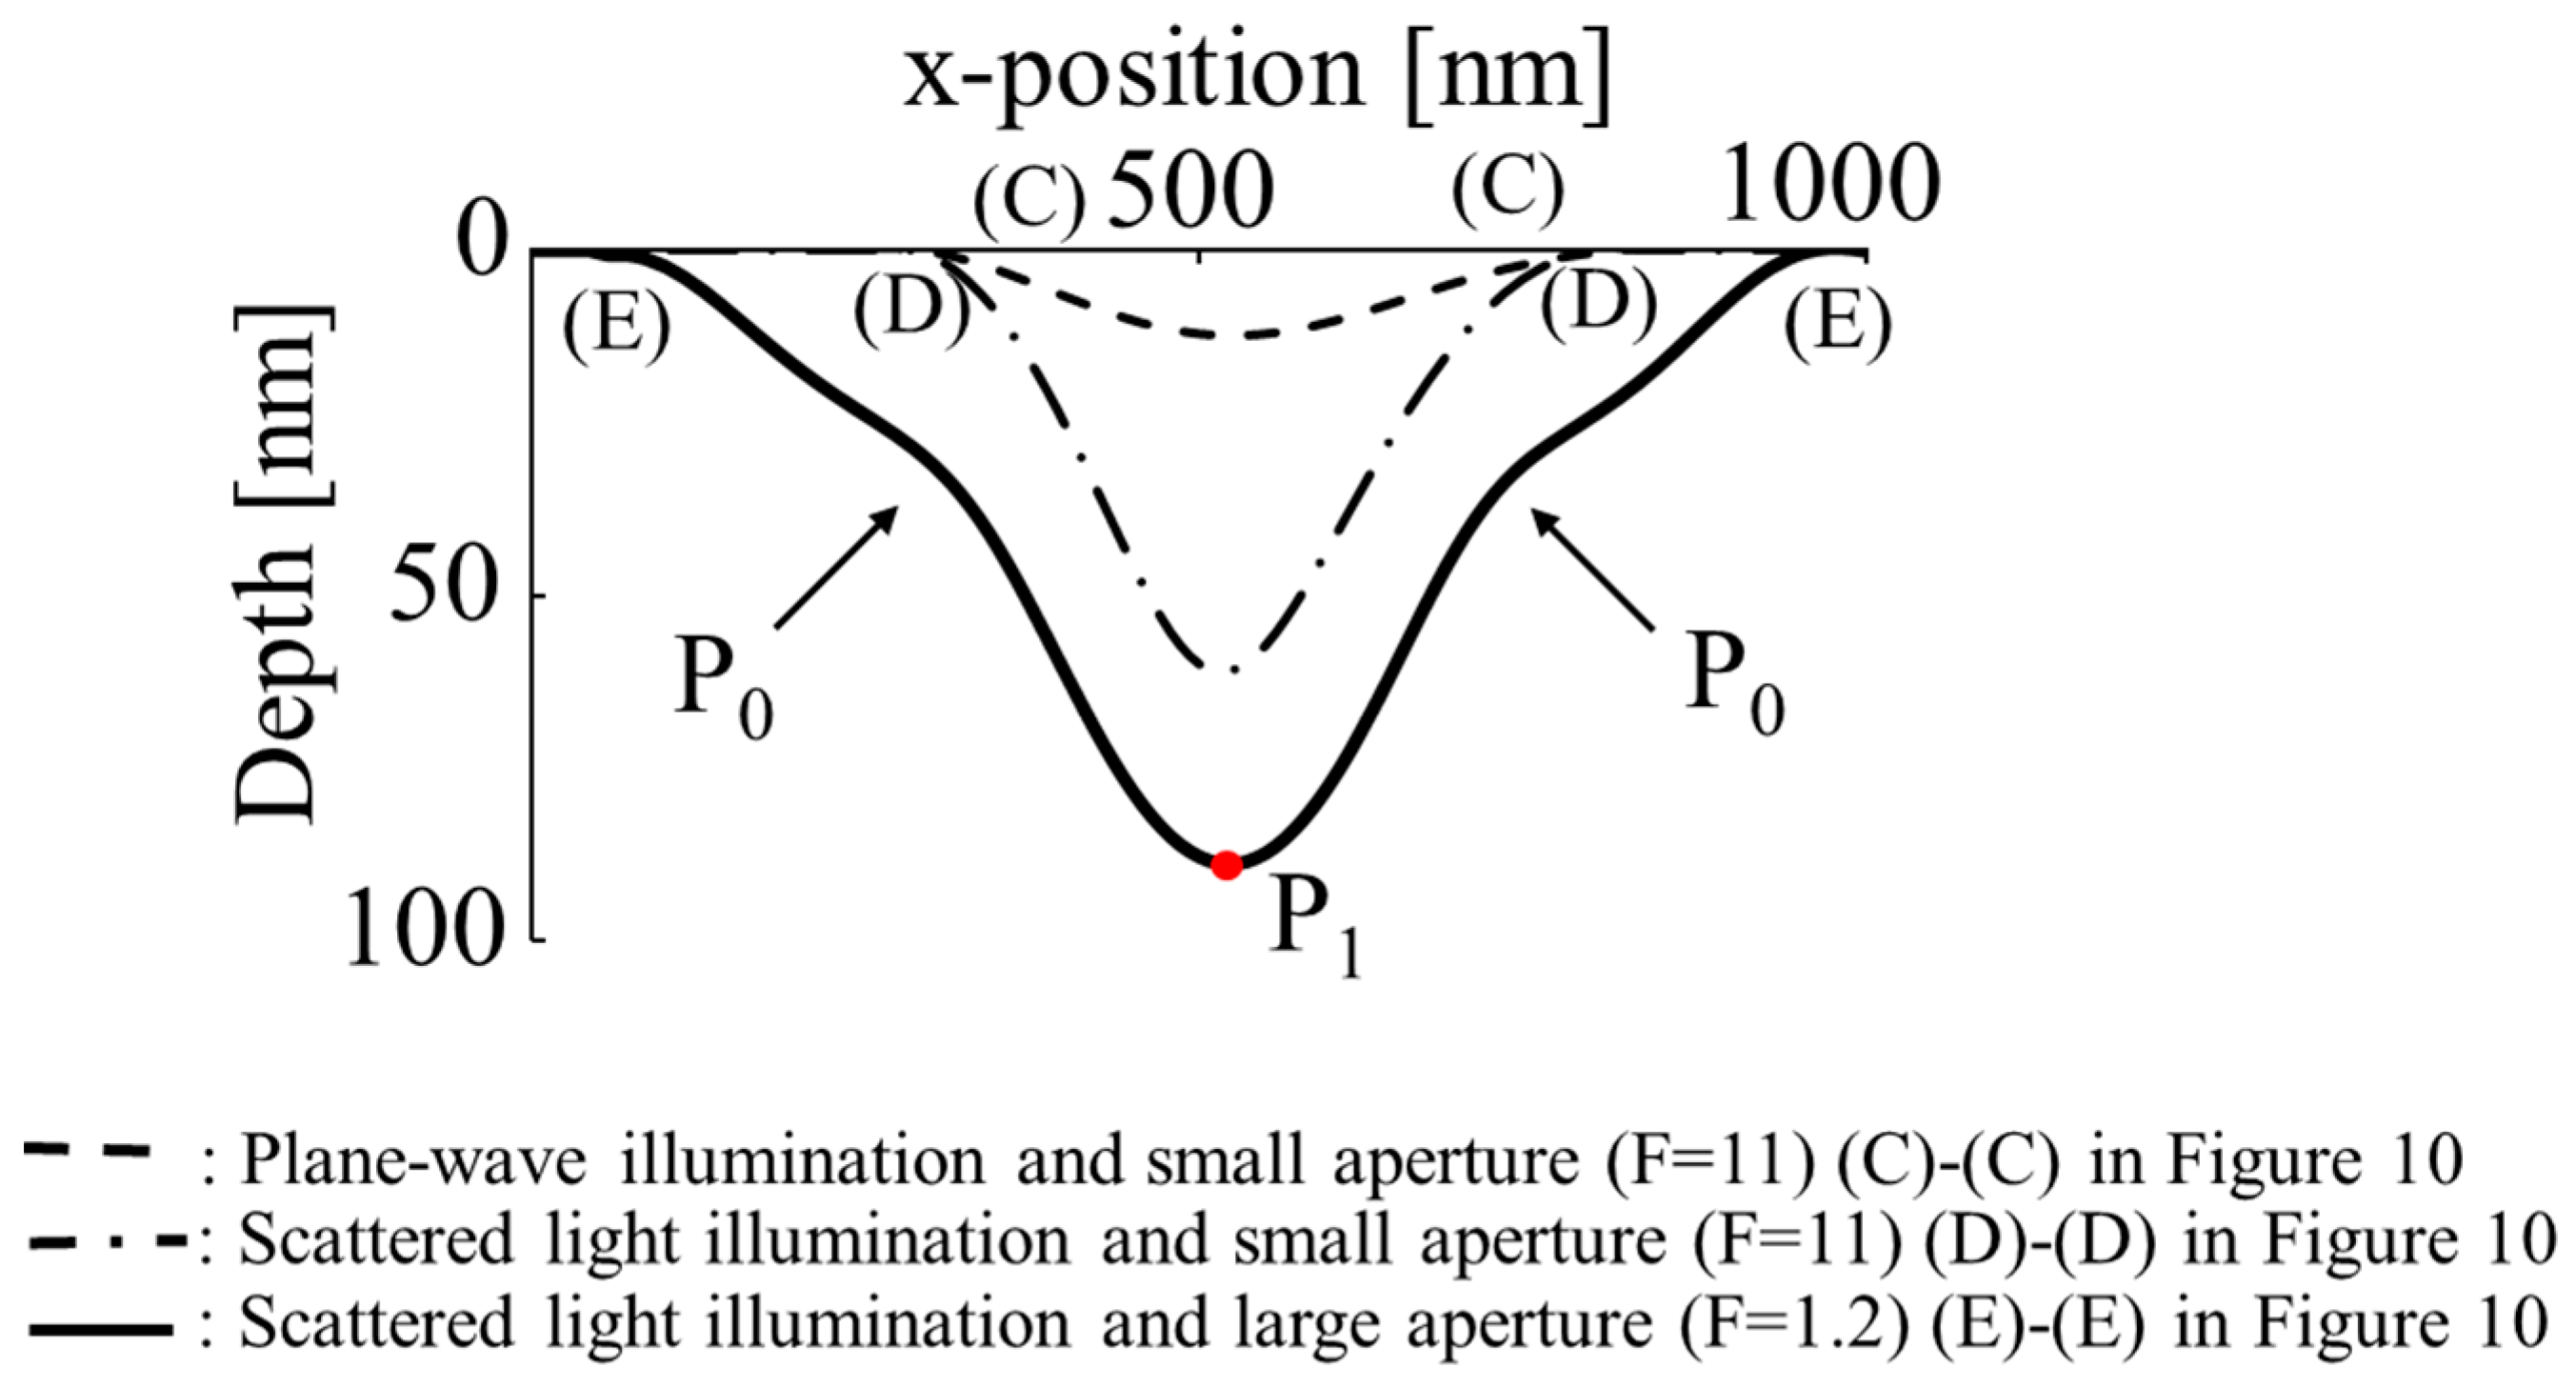
A comparison of cross-sections (C)–(C), (D)–(D), and (E)–(E) in Figure 10c, Figure 10f, and Figure 10i, respectively, is shown in Figure 11, which indicates that the (E)–(E) cross-section was larger when the aperture of the observation optics was open (F = 1.2). In speckle interference optics, the speckle becomes larger when the aperture of the observation optics is narrowed, and the optics can be adjusted to avoid the situation, wherein a deformation analysis cannot be performed if the speckles do not overlap before and after deformation. However, under this setup, the high-frequency signal components would be missing.
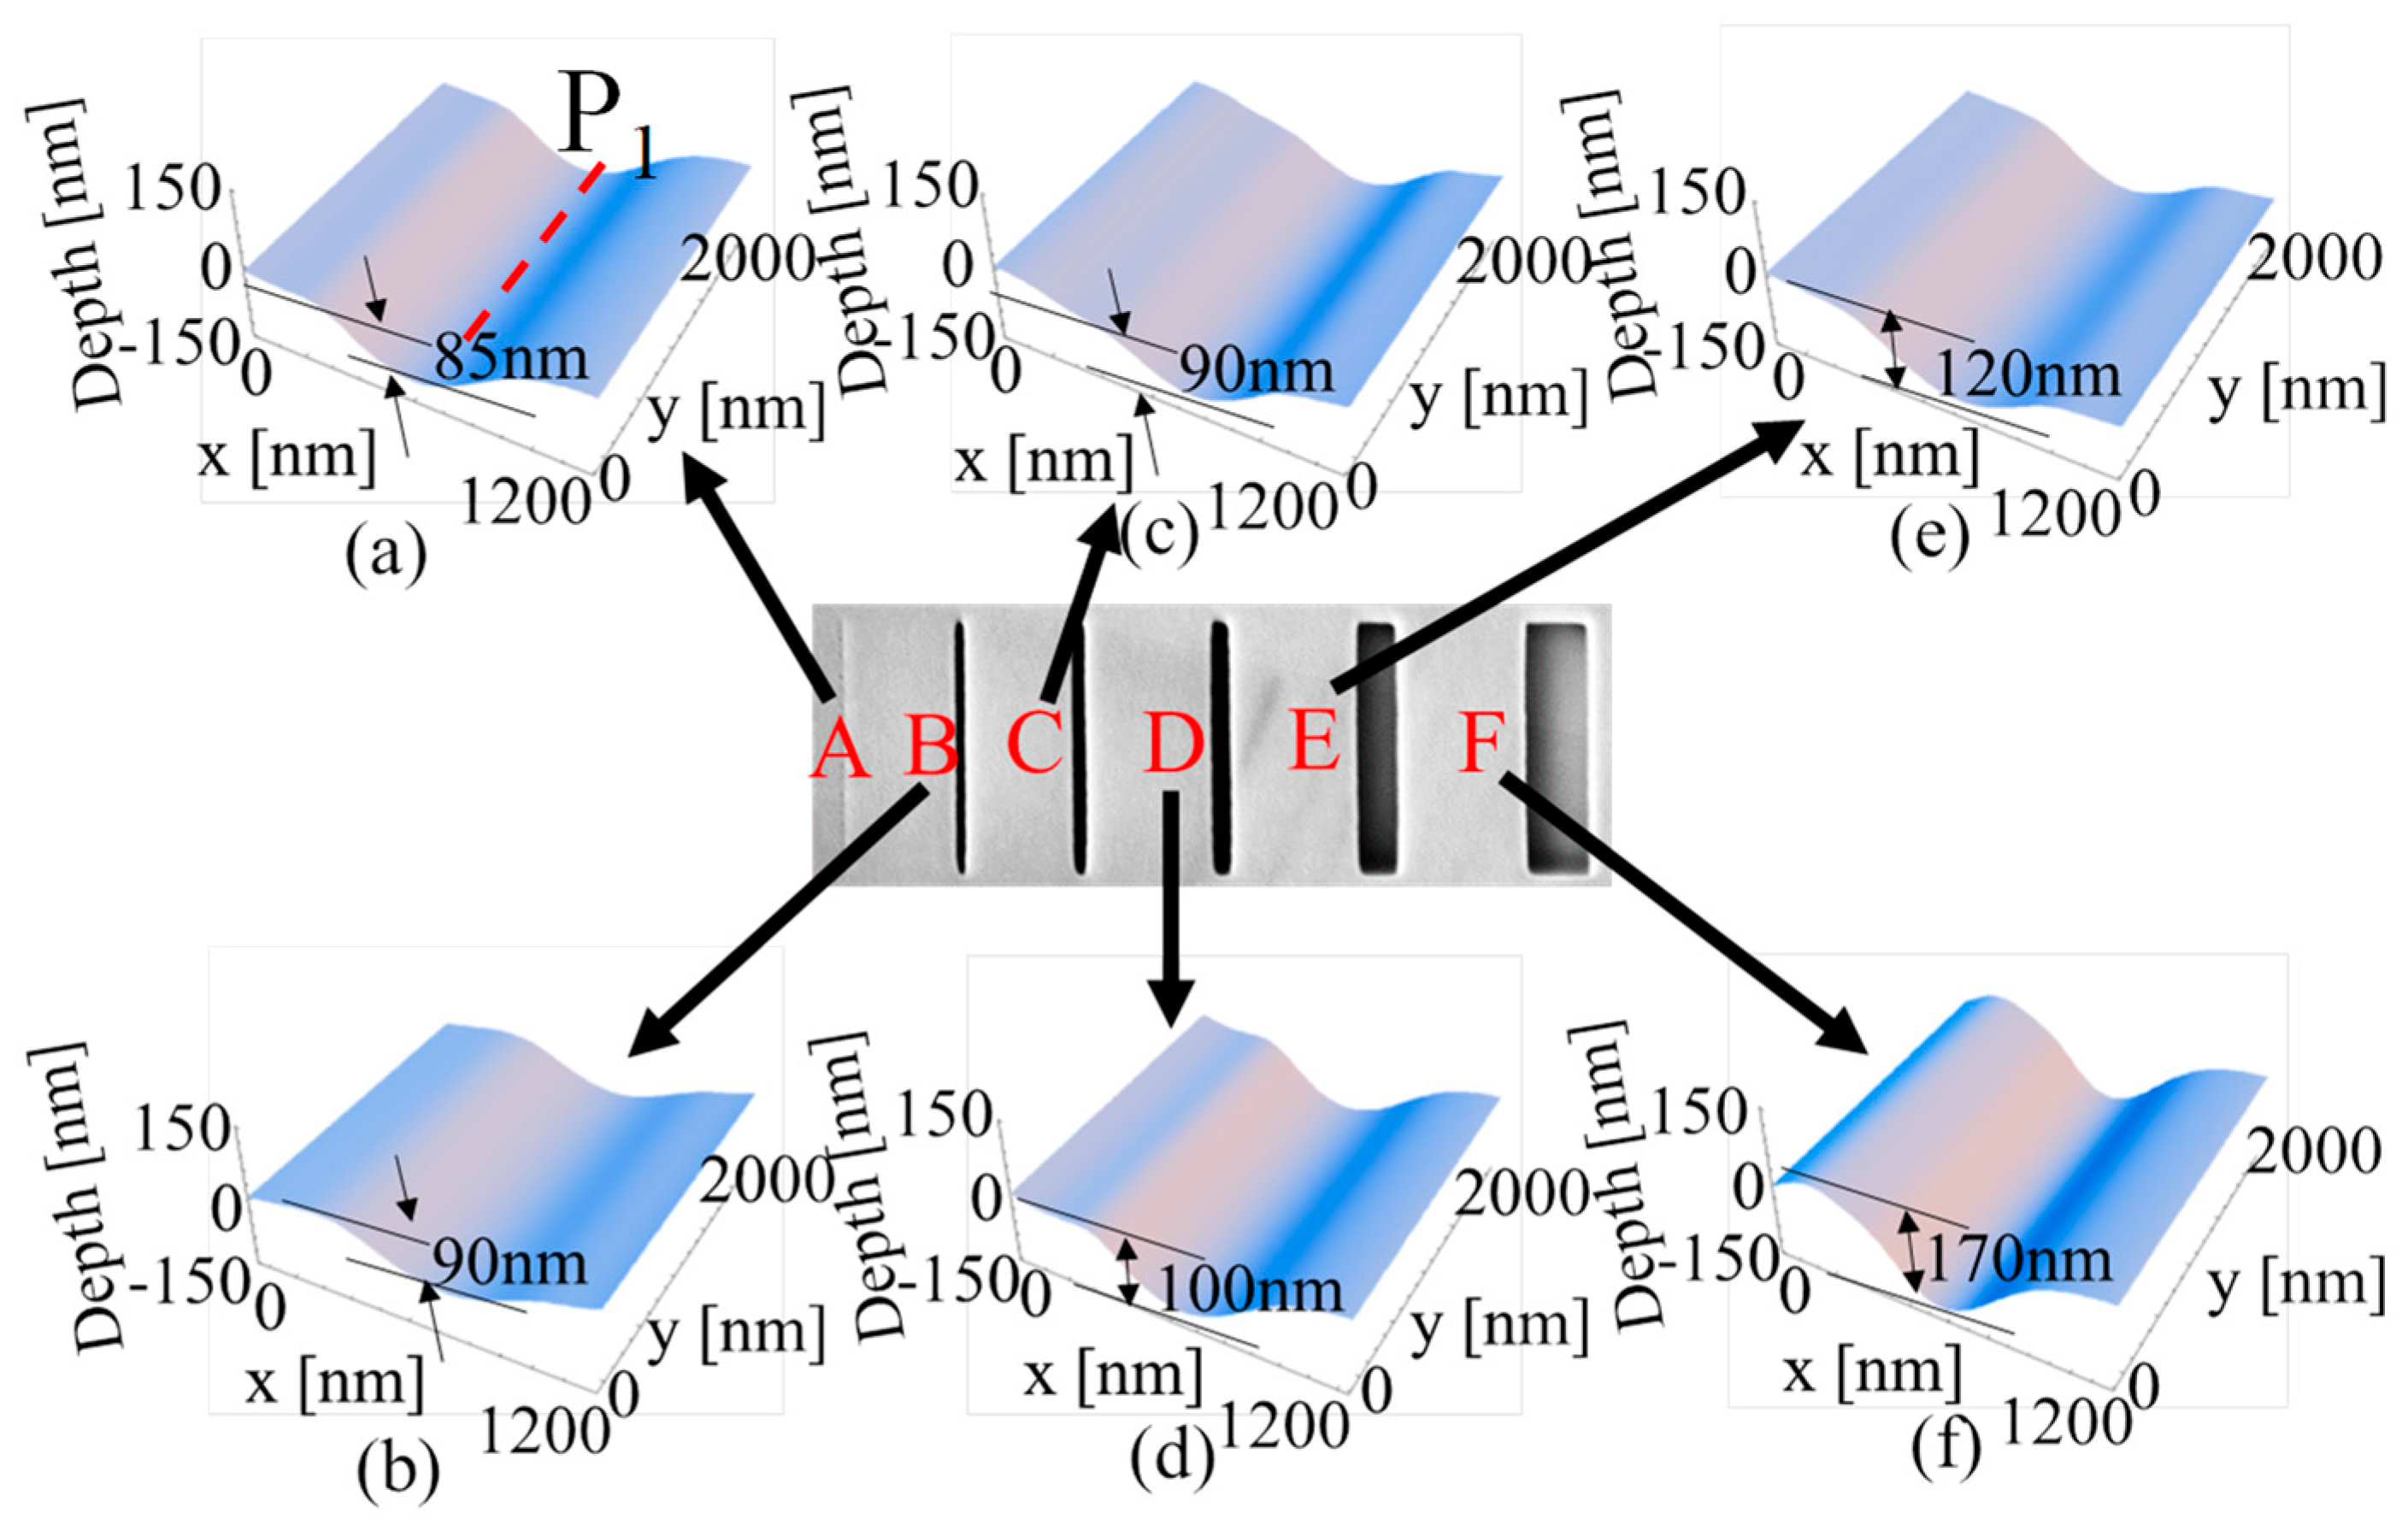
Because speckles with high-frequency components can be obtained when the aperture of the observation optical system is open, complex shapes are better observed if the aperture is not narrowed. However, a smaller speckle diameter cannot allow the measurement of large deformations because the speckles before and after the deformation no longer overlap. Nevertheless, the lateral shift is very small (approximately 10 nm) during this speckle interferometry; therefore, even a relatively small speckle diameter is not expected to obscure the observation, and making the aperture of the observation optical system as open as possible is considered effective. Based on this concept, Figure 12 shows the measurement at F = 1.2, which corresponds to the six grooves measured in Figure 9 at F = 11. A greater groove depth was detected among all grooves in Figure 12, compared with those in Figure 9; this was attributed to the adjustments made to the aperture.

3.3.3. Response to Lateral Resolution Spread of Measurement Results

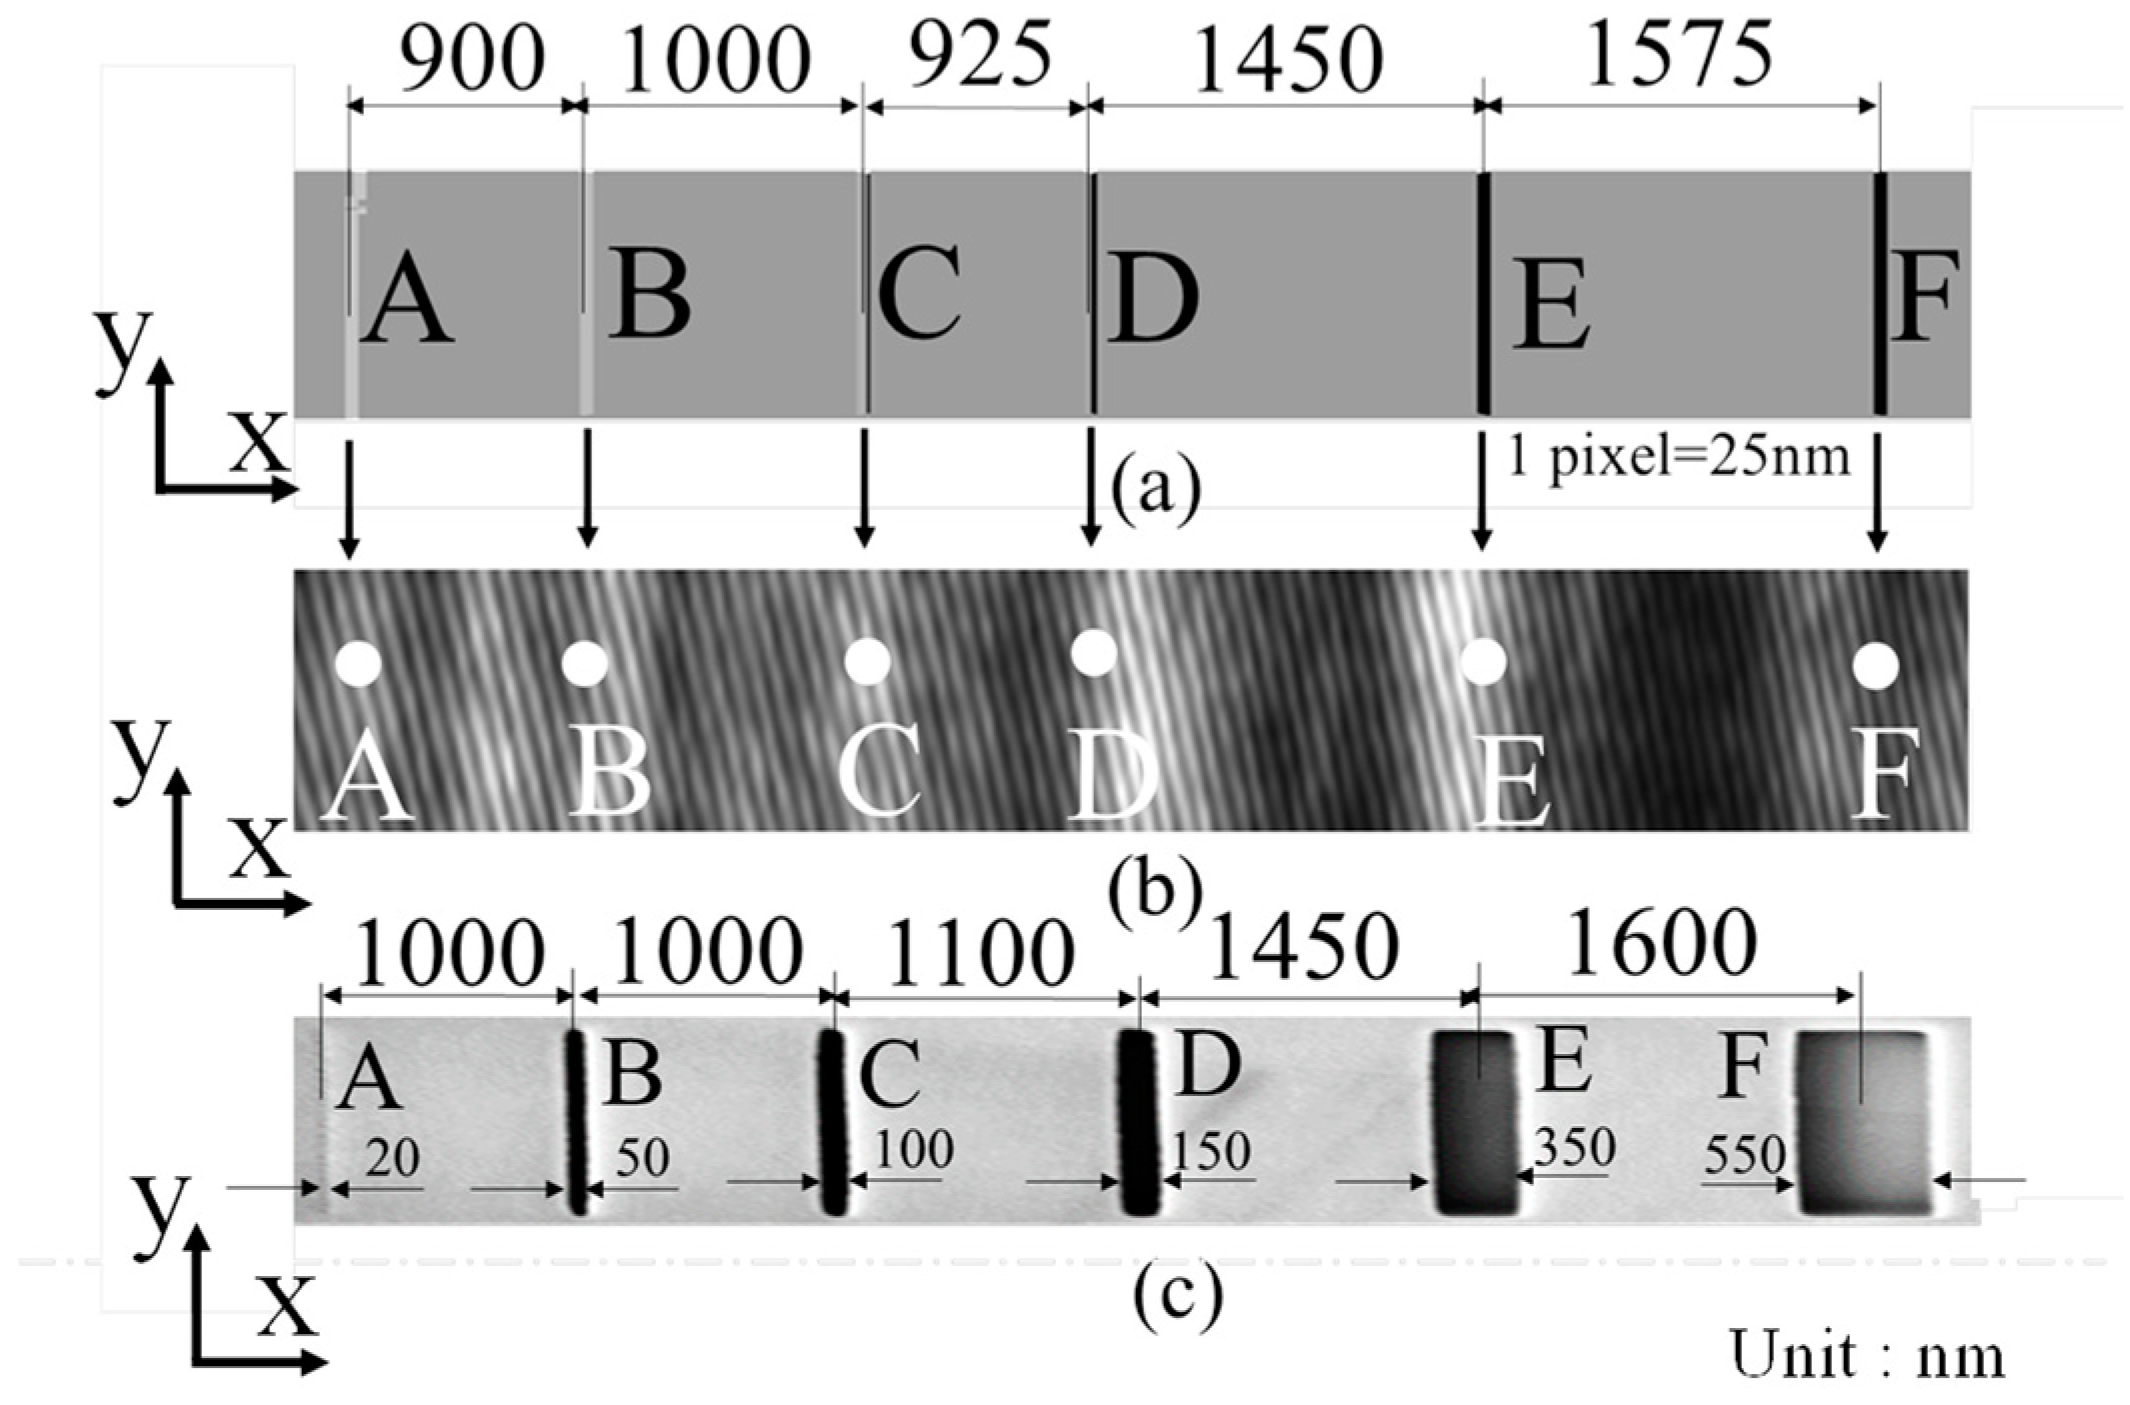
The shape of the object may be more clearly captured by opening the aperture of the observation optics and using scattered light for the imaging. In Figure 12, although one pixel was set at approximately 25 nm, a groove with a line width of 20 nm was detected, and this setup could possibly measure grooves with even narrower line widths. As shown in Figure 11, the 20 nm groove shown in Figure 7 had a maximum width of 1 µm. However, for F = 1.2, the width was spread in two steps at point P0 in Figure 11, suggesting that the grooves were not actually dug in such a way that they were cut with clear edges, as can be observed in the SEM images. This necessitated a method for representing the processed results in a manner that provided a detailed representation of the features of the measurement object. For example, super-resolution images have been generated using fluorescent materials by localising adjacent luminescent materials as a single luminescent material and determining the centre of gravity of the activated luminescent material [19,20]. In future, some new handling techniques may further improve the lateral resolution for confirming the presence of each groove. Therefore, this study also investigated the simplest method for confirming the presence of a groove using representative positions that express the features of the structure. Taking the deepest point of each groove in Figure 12 as the corresponding representative position of each groove, this study investigated the extent to which it was possible to observe the presence of a groove with lateral resolution.
For example, in section (E)–(E) of Figure 11, the point with the deepest phase (depth) at point P1 was extracted to serve as the representative coordinate of the position of the groove. In other words, point P1, indicated by the red dashed line in Figure 12a, served as the representative position of the groove in “A”. Therefore, determining the deepest point of each groove in Figure 12 provided the representative position of each groove from “A” to “F” spatially as each line, as shown in Figure 13a.
When Figure 13a is then superimposed on the speckle pattern shown in Figure 13b, the overlap is roughly superimposed by a fuzzy image of lines, although the superimposed image does not always align precisely with the original images at all locations. A comparison of the groove positions with the SEM image in Figure 13c shows that the position of each groove corresponds to the deepest points shown in Figure 13a, although the distance between grooves “C” and “D” was slightly narrower. The mean difference between the distance of each groove measured using SEM and the deepest point in the phase distribution obtained using this method was 62.7 nm with a standard deviation of 76.2 nm. Because 1 pixel was approximately 25 nm, the mean of the difference was approximately 2.5 pixels and the standard deviation was approximately 3 pixels. The results shown in Figure 13 indicate that the value of one pixel was approximately 25 nm, which was large because six types of grooves were observed over a wide area of approximately 6 µm. However, narrowing the measurement area might allow for high-resolution imaging using this simple method. The result shown in Figure 13 indicates that the locations of the grooves could be approximately identified because the distance between the grooves was relatively large. The results of the same analysis method as in Figure 13 for adjacent line segments beyond the Rayleigh limit are shown in Figure 14, wherein the lowest point of the phase analysis was considered representative of the location of the line segment.
Figure 14a shows the deepest point and the valley line indicated by the red dashed line, corresponding to the image shown in Figure 3, which consisted of diffraction grating with 3600 grating strips per mm. The points with the lowest phase in the “G”, “H”, and “I” regions shown in Figure 14b were extracted using the phase distribution (depth) results of Figure 14a. Figure 14c shows the superimposition of the coordinates onto the speckle pattern, with 1 pixel set to approximately 7 nm. The distance between the lines was measured to be approximately 290 nm. Because the measurement result of the grating period in Figure 4 was 285 nm and that in Figure 6 was 290 nm, it is not clear what specific quantitative errors can be observed for the result shown in Figure 14; however, even with such a simple process, the representative position of the object, which is beyond the diffraction limit, can be located with variations within a few pixels.
A future work entails a discussion of not only the observation of objects beyond the diffraction limit, but also of the process of extracting the characteristics of objects beyond the diffraction limit and handling the collected images with clearer meaning. Additionally, improvements to the developed optical system are necessary to open it up to practical use by performing time-lapse observations of biological living cells over longer periods of time.

4. Conclusions

In this study, a new optical system based on a drop-shot upright microscope structure that has the potential to provide time-lapse observation of living cell cultures beyond the diffraction limit in order to facilitate biological research, along with its lateral resolution, was investigated. Furthermore, a technique that can improve the spatial resolution of the proposed system using traditional speckle interferometry handling methods was proposed. Additionally, this study experimentally demonstrated using the new optical system that super-resolution technology measurements based on speckle interferometry can be realised by analysing the phase distribution that preserves the shape information of the measured object in the reflected light, thereby corroborating the simulation findings reported in a previous study [25]. The proposed technique can overcome challenges posed by the diffraction limit in the traditional lens imaging technique based on the intensity distribution of light by analysing the phase distribution of light. Simultaneously, this study showed that using a representative position that extracts the features of the structure of the measured object can confirm the position of the microstructure in the image captured. The proposed optical system could detect the position of the microstructure within a few pixels of the image element of the camera.
However, in the process of investigating tools for detecting the location of microstructures in 2D images, it was determined that this super-resolution technology relies on several measurement conditions in addition to the conventional idea of the diffraction limit based on the Rayleigh criteria. Various situations were assessed throughout this study, which facilitated the development of different observation techniques, such as those for isolated objects of a scale beyond the diffraction limit (groove “A” in Figure 7) and those beyond the diffraction limit that are densely spaced beyond the diffraction limit (groove in Figure 14). It was also considered that practical applications could be limited if the analysis method could not be adapted to different properties of the observed object. The super-resolution technique was confirmed to be capable of analysing both standalone (Figure 10 and Figure 13) and dense (Figure 14) objects that exceeded the analysis limit. However, in actual biological research, the development of observation techniques based on phase analysis must deal simultaneously with some of these conditions.
The clarification of the aforementioned problems by classifying the situations of the observed objects in more detail and addressing the issues related to the ease of handling the system in real-life use warrant future study. The limitations of the proposed method will be investigated for observing objects beyond the diffraction limit.

Funding

This research was funded by JSPS KAKENHI, grant number 20H02165.

Institutional Review Board Statement

Not applicable.

Informed Consent Statement

Not applicable.

Data Availability Statement

The datasets analyzed during the current study are available from the corresponding author upon reasonable request.

Conflicts of Interest

The author declares no conflicts of interest.

References

  1. Born, M.; Wolf, E. Principles of Optics, 7th ed.; Cambridge University Press: Cambridge, UK, 2019; pp. 370–374, 167–177 and 290–292. [Google Scholar]
  2. Hecht, E. Optics, 4th ed.; Addison Wesley: San Francisco, CA, USA, 2002; pp. 24–31, 149–165, 393–400 and 467–474. [Google Scholar]
  3. Feynman, P.R. The Feynman Lectures on Physics; Addison-Wesley Publishing Co., Ltd.: Reading, MA, USA, 1989; Chapter 30–33. [Google Scholar]
  4. Kohler, H. On Abbe’s theory of image formation in the microscope. Opt. Acta: Int. J. Opt. 1981, 28, 1691–1701. [Google Scholar] [CrossRef]
  5. Chalfie, M.; Tu, Y.; Euskirchen, G.; Ward, W.W.; Prasher, D.C. Green Fluorescent Protein as a Marker for Gene Expression. Science 1994, 263, 802–805. [Google Scholar] [CrossRef] [PubMed]
  6. Remington, S.J. Green fluorescent protein: A perspective. Protein Sci. 2011, 20, 1509–1519. [Google Scholar] [CrossRef] [PubMed]
  7. Wustner, D.; Modzel, M.; Lund, F.W.; Lomholt, M.A. Imaging approaches for analysis of cholesterol distribution and dynamics in the plasma membrane. Chem. Phys. Lipids 2016, 199, 106–135. [Google Scholar] [CrossRef] [PubMed]
  8. Garini, Y.; Vermolen, B.J.; Young, I.T. From micro to nano: Recent advances in high-resolution microscopy. Curr. Opin. Biotechnol. 2005, 16, 3–12. [Google Scholar] [CrossRef] [PubMed]
  9. Hell, S.W.; Wichmann, J. Breaking the diffraction resolution limit by stimulated emission: Stimulated-emission-depletion fluorescence microscopy. Opt. Lett. 1994, 19, 780–782. [Google Scholar] [CrossRef] [PubMed]
  10. Heilemann, M.; van de Linde, S.; Schüttpelz, M.; Kasper, R.; Seefeldt, B.; Mukherjee, A.; Tinnefeld, P.; Sauer, M. Subdiffraction-resolution fluorescence imaging with conventional fluorescent probes. Angew. Chem. Int. Ed. 2008, 47, 6172–6176. [Google Scholar] [CrossRef] [PubMed]
  11. Heintzman, R.; Ficz, G. Beaking the resolution limit in light microscopy. Brief. Funct. Genom. Proteom. 2006, 5, 289–301. [Google Scholar] [CrossRef] [PubMed]
  12. Hess, T.S.; Girirajan, P.K.T.; Mason, D.M. Ultra-high resolution imaging by fluorescence photoactivation localization microscopy. Biophys 2006, 91, 4258–4272. [Google Scholar] [CrossRef]
  13. Huang, B. Super-resolution optical microscopy: Multiple choices. Curr. Opin. Chem. Biol. 2010, 14, 10–14. [Google Scholar] [CrossRef]
  14. Huang, B.; Babcock, H.; Zhuang, X. Breaking the Diffraction Barrier: Super-Resolution Imaging of Cells. Cell 2010, 143, 1047–1058. [Google Scholar] [CrossRef]
  15. Xu, B.; Liu, L. Developments, applications, and prospects of cryo-electron microscopy. Protein Sci. 2020, 29, 872–882. [Google Scholar] [CrossRef] [PubMed]
  16. Saibil, H.R. Cryo-EM in molecular and cellular biology. Mol. Cell 2022, 82, 274–284. [Google Scholar] [CrossRef] [PubMed]
  17. Li, J.; Goh, C.; Keeble, J.L.; Qin, J.S.; Roediger, B.; Jain, R.; Wang, Y.; Chew, W.; Weninger, W.; Ng, L. Intravital multiphoton imaging of immune responses in the mouse ear skin. Nat. Protoc. 2012, 7, 221–234. [Google Scholar] [CrossRef] [PubMed]
  18. Cox, S. Super-resolution imaging in live cells. Dev. Biol. 2015, 401, 175–181. [Google Scholar] [CrossRef] [PubMed]
  19. Mahecic, D.; Testa, I.; Griffie, J.; Manley, S. Strategies for increasing the throughput of super-resolution microscopies. Curr. Opin. Chem. Biol. 2019, 51, 84–91. [Google Scholar] [CrossRef] [PubMed]
  20. Chakkarapani, S.K.; Park, G.; Kang, S.H. Base pair distance analysis in single DNA molecule by direct stochastic optical reconstruction microscopy. Chin. Chem. Lett. 2015, 26, 1490–1495. [Google Scholar] [CrossRef]
  21. Sirohi, R.S. Speckle Metrology; Marcel Dekker: New York, NY, USA, 1993; pp. 99–234. [Google Scholar]
  22. Cloud, G. Optical Methods of Engineering Analysis; Cambridge University Press: New York, NY, USA, 1995; pp. 395–476. [Google Scholar]
  23. Malacara, D. Optical Shop Testing; John Wiley &Sons: New York, NY, USA, 1992; pp. 501–652. [Google Scholar]
  24. Arai, Y. Three-dimensional shape measurement beyond the diffraction limit of lens using speckle interferometry. J. Mod. Opt. 2018, 65, 1866–1874. [Google Scholar] [CrossRef]
  25. Arai, Y. Role of Phase Information Propagation in the Realisation of Super-Resolution Based on Speckle Interferometry. Photonics 2023, 10, 1306. [Google Scholar] [CrossRef]
  26. Arai, Y. Factors affecting the measurement resolution of super-resolution techniques based on speckle interferometry. J. Mod. Opt. 2022, 69, 897–910. [Google Scholar] [CrossRef]
  27. Arai, Y. Three-Dimensional shape measurement beyond diffraction limit for measurement of Dynamic Events. In Progress in Optomechatronic Technologies, Springer Proceedings in Physics; Springer: Singapore, 2019; p. 233. [Google Scholar] [CrossRef]
  28. Arai, Y. Electronic speckle pattern interferometry based on spatial information using only two sheets of speckle patterns. J. Mod. Opt. 2014, 61, 297–306. [Google Scholar] [CrossRef]
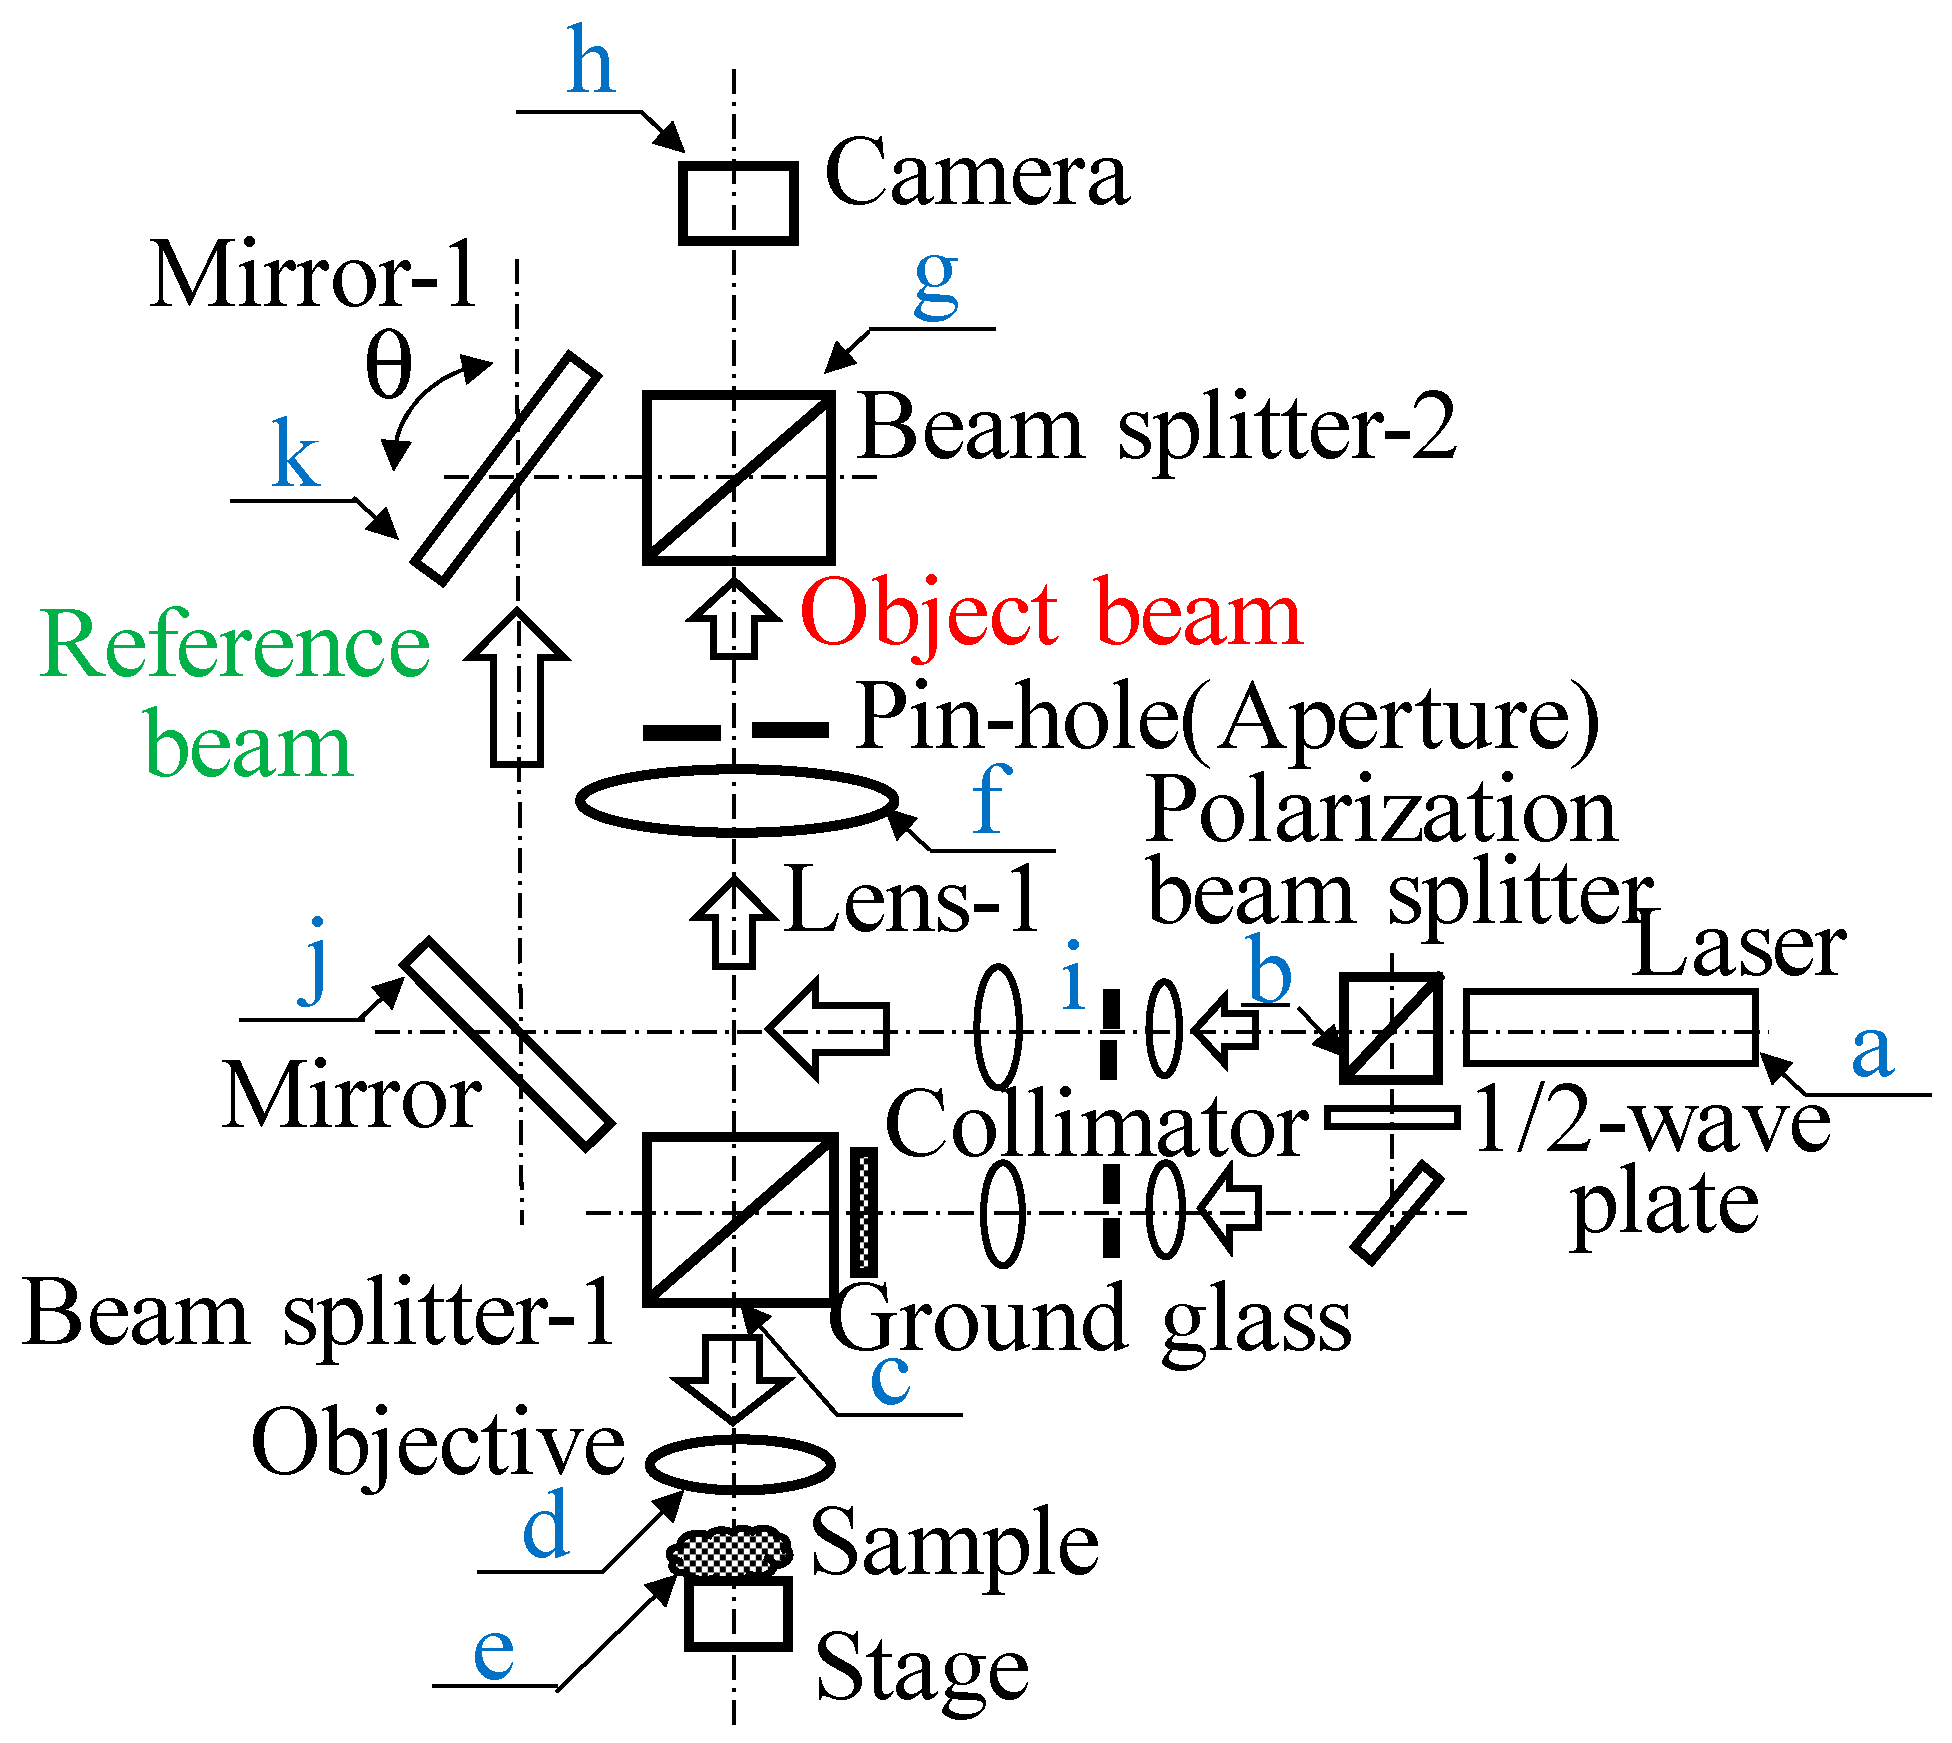
Figure 1. Original optical system based on speckle interferometer.
Photonics 11 00427 g001
Figure 2. Setup of new optical system. (a) Schematic of optical system. (b) Image of optical system. (c) Sample installation location (within the red dashed line in (a)).
Photonics 11 00427 g002
Figure 3. Scanning electron microscope (SEM) image of measured object (diffraction grating with 3600 grids per mm).
Photonics 11 00427 g003
Figure 4. Validation of new optical systems. (a) Image taken using plane waves. (b) Analysis result of image-(a). (c) Image taken using scattered light. (d) Analysis result of image-(c).
Photonics 11 00427 g004
Figure 5. (A)–(A) and (B)–(B) cross-section in Figure 4.
Photonics 11 00427 g005
Figure 6. Experimental validation of simulation results. (a) Out-of-focus image of a 3600 grids/mm diffraction grating with plane wave illumination. (b) Analysis result of image-(a). (c) Out-of-focus image of a 3600 grids/mm diffraction grating with scattered light. (d) Analysis result of image-(c).
Photonics 11 00427 g006
Figure 7. SEM image of test sample.
Photonics 11 00427 g007
Figure 8. Images of test sample. (a) Image for plane wave illumination. (b) Image for scattered light illumination.
Photonics 11 00427 g008
Figure 9. Consideration of measurement limits using test sample (plane wave illumination, and F = 11 aperture); (a) 20 nm, (b) 50 nm, (c) 100 nm, (d) 150 nm, (e) 350 nm, (f) 550 nm.
Photonics 11 00427 g009
Figure 10. Analysis of line-A with varying apertures. (a) Image with plane wave illumination for aperture (F = 11). (b) Analysis result of image-(a) in frequency domain. (c) Analysis result of line-A in image-(a). (d) Image with scattered light for aperture (F = 11). (e) Analysis result of image-(d) in frequency domain. (f) Analysis result of line-A in image-(d). (g) Image with scattered light for aperture (F = 1.2). (h) Analysis result of image-(g) in frequency domain. (i) Analysis result of line-A in image-(g).
Photonics 11 00427 g010
Figure 11. Comparison of (C)–(C), (D)–(D), and (E)–(E) cross-sections in Figure 10.
Photonics 11 00427 g011
Figure 12. Consideration of measurement limits using test sample (scattered light illumination, and F = 1.2 aperture); (a) 20 nm, (b) 50 nm, (c) 100 nm, (d) 150 nm, (e) 350 nm, (f) 550 nm.
Photonics 11 00427 g012
Figure 13. Position of the presence of fine lines using the results of Figure 12. (a) Detected position of each groove. (b) Position on speckle pattern. (c) SEM image of each groove.
Photonics 11 00427 g013
Figure 14. Position of the presence of grid of a grating with a period beyond the diffraction limit of the objective lens (3600 grids/mm). (a) Shape of diffraction grating by phase distribution measurement. (b) Minimum position of each groove shape. (c) Estimated position of each groove.
Photonics 11 00427 g014
Disclaimer/Publisher’s Note: The statements, opinions and data contained in all publications are solely those of the individual author(s) and contributor(s) and not of MDPI and/or the editor(s). MDPI and/or the editor(s) disclaim responsibility for any injury to people or property resulting from any ideas, methods, instructions or products referred to in the content.