Article

Numerical Prediction of the Performance of Chamfered and Sharp Cutting Tools during Orthogonal Cutting of AISI 1045 Steel

by
Zakaria Ahmed M. Tagiuri
,
Thien-My Dao
,
Agnes Marie Samuel
and
Victor Songmene
*
Department of Mechanical Engineering, École de Technologie Supérieure (ÉTS), 1100 Notre-Dame Street West, Montréal, QC H3C 1K3, Canada
*
Author to whom correspondence should be addressed.
Processes 2022, 10(11), 2171; https://doi.org/10.3390/pr10112171
Submission received: 17 August 2022 / Revised: 14 October 2022 / Accepted: 18 October 2022 / Published: 23 October 2022

Abstract

:
This paper presents a numerical investigation of the effects of chamfered and sharp cemented carbide tools using finite element method-based DEFORM-2D software and cutting parameters on different machining characteristics during the orthogonal cutting of AISI 1045 steel. The objective is to study the interactions between chamfer width, chamfer angle, sharp angle and the cutting speed and feed rate on the cutting temperature, effective stress and wear depth. These effects were investigated statistically using the analysis of variance (ANOVA) test. The obtained numerical results showed that for the chamfer tool, high values of temperature, stress and wear depth were obtained for chamfer widths of 0.35 mm and 0.45 mm. In terms of combined influences, for the cutting temperature and stress, a strong interaction between the cutting speed and chamfer width was obtained. For the sharp tool design, and in terms of temperature, strong interactions are mostly observed between cutting speeds and feed rates. The ANOVA showed that for both chamfer and sharp tools, the feed rate, the cutting speed and their interactions are the most significant parameters that influence temperature and stress.

1. Introduction

In different machining companies, the production demands for machined metal structural components with good surface finish and close dimensional tolerances continue to increase. However, manufacturing such parts requires a good knowledge of cutting technology as, during the machining process, there is much waste of material in the form of chips, resulting in long cycle times, particularly in the case of complex parts that are difficult to cut. Such long cycle times can lead to the eventual presence of defects and irregularities due to excessive heat generation; this can lead to the breakage and damage of cutting tools, reducing the machining performance and increasing manufacturing costs. Thus, in order to circumvent these problems, realize these demands and meet the market requirements, it is necessary to develop new methods for the cutting tool edge preparation, which is one of the important aspects in the development of cutting tools and improving the machining performance.
Cutting tool-manufacturing engineers use the tool edge preparation process to design the cutting-edge geometry and in order to remove edge defects and prepare the tool surface for coating, especially for the machining of difficult-to-cut materials. It has been demonstrated that cutting tool parameters, such as cutting speed, feed rate and the selection of tool edge geometry, e.g., edge radius or rake angle, have an impact on machining operations. There are several research studies in the literature, for example, the work of Rodriguez [1] and the investigations of Shfnir et al. [2], that show the effects of cutting tool edge preparation on tool life and the thermomechanical aspects of the cutting process, such as temperature distribution, cutting forces and effective stresses, chip formation, surface roughness and tool wear resistance.
Denkena and Biermann [3] reviewed the development of different tool edge preparation technologies and the interactions between cutting edge microgeometry and their effects on machining processes. They concluded that cutting processes with high performance are based on the good performance of the cutting tools in order to realize good surface finish quality and thus reduce manufacturing costs. They stated that the adoption of cutting-edge preparation methods results in improving tool wear and increasing the cutting temperature and cutting forces. The majority of such research studies have been conducted on the interactive effects of cutting tool geometry and machining conditions were limited to the round tool geometry.
Yen et al. [4] carried out a numerical investigation of the effect of round/honed edge and T-land/chamfered edge tools on the orthogonal machining performance of AISI 1020 steels. Their results showed that there are no significant variations in terms of maximum temperature and chip thickness. Cheng et al. [5] investigated the influence of honed tool geometry and the rake angle on the machining temperature and stress during the orthogonal machining of stainless steel using numerical methods. They showed that with increasing tool edge radius, the temperature increases slightly and the stress decreases, but increases, instead, with an increase in the rake angle. Emamian [6] performed finite element analysis on the effects of tool edge radius and feed rate during orthogonal turning of AISI 1045 steel. He found that the feed rate increases the cutting force for all studied edge radii and the maximum temperature increases with increasing edge radius only for higher feed rates. Daoud et al. [7] studied the cutting force behavior with variation of rake angle during the orthogonal machining of Al 2024-T3 alloy. They found that cutting forces decrease with increasing rake angle. Davoudinejad and Noordin [8] investigated the effects of honed and chamfered edge tools prepared with ceramic materials on the tool life, cutting forces and surface finish during the hard turning of DF-3 tool steel under various cutting experimental conditions using ANOVA. Their results showed that longer machining lengths were obtained in all cutting conditions (i.e., longer tool life), lower roughness for chamfered edge geometry and higher forces for honed tools design. Gao et al. [9] studied the influences of different cutting tool chamfer lengths on cutting stress, tool wear and surface roughness using a series of slot milling experiments and 3D finite element numerical simulations on aluminum alloy 7075. They found that higher chamfer lengths reduced tool wear (i.e., resulted in longer tool life) but higher flank wear width was obtained for higher stress. In addition, the contact stress with the workpiece increased with the increase of cutting-edge chamfer length.
Wan et al. [10] numerically analyzed the effects of chamfered geometry cutting tool on machining force in orthogonal cutting of P20 material under different cutting speeds. Their findings showed that as the chamfer angle increased the cutting and thrust forces increased but when the cutting speed increased, these forces decreased.
Despite the large volume of research realized on using the concept of cutting-edge preparation for developing different machining processes, machining problems still remain, due to a lack of understanding of the mechanical behavior and mechanisms that occur during cutting, especially in regard to the impact of interactions between microgeometry and cutting conditions, which have not been extensively studied and analyzed thus far [3]. The topic is still of actuality. Gregório et al. [11] have depicted the impact on tool edge preparation (sharp-edge and rounded edge) and its interaction with tool rake angle on chip formation, friction on tool, material flow and pressure on tool. Their work clearly shows the importance that the edge preparation has on the cutting process. With the exception of some recent works, such as the experimental study realized by Javidikia et al. [12] on the interactive impact between the cutting tool parameters of cutting-edge radius and rake angle, the machining parameters of cutting speed, feed rate and rake angle on the cutting and feed forces, chip thickness, maximum and average cutting temperature during orthogonal turning of 6061-T6 aluminum alloy, and that of Zhuang et al. [13] on Ti6Al4V and Inconel 718, few studies report on the interaction between the cutting speed, feed rate and cutting tool geometries (i.e., chamfer and sharp tool designs), and their effects on the machining characteristics of steel, in particular for carbon steels.
While studying the impact of tool geometry on low and high-speed turning of AA6061-T6, Javidikia et al. [12] found that the machining forces increased in both conventional and high-speed cutting regimes when using tool with large nose radius; additionally, the location of the maximum temperature on the tool depends on tool geometry and on cutting parameters. With high-speed machining, however, the average temperatures increased in the tool tip with increasing cutting speed.
Among the few studies on the machining process of metallic materials using chamfered and sharp tools for investigating the effects of the cutting parameters and the geometrical parameters of these tool shapes on the machining performance, there is the finite numerical model developed by Zhuang et al. [13] who examined the impacts of chamfer length, chamfer angle and feed rate on the cutting forces in the orthogonal cutting of Ti6Al4V and Inconel 718. They found that the cutting forces are significantly affected by chamfer length and angle. Altintas and Ren [14] predicted the impacts of chamfer angle and cutting parameters on the cutting forces and temperature. The obtained results showed that with increasing chamfer angle the total forces increase and the temperatures remain nearly constant. Tagiuri et al. [15] studied and numerically predicted the interactive effects between tool nose geometries (honed tools) and the cutting parameters on cutting temperature, effective stress, machining forces and tool wear during the orthogonal cutting of AISI1045 steel. The obtained results showed strong interactions between tool nose radius and cutting speed/feed rate on cutting stress and tool wear rate but not on the cutting temperature. Choudhury et al. [16] investigated the impacts of chamfer tool geometries (chamfer width and chamfer angle) on machining performance in terms of cutting force, chip thickness and tool life in the turning of medium carbon low alloy steel. They observed that the cutting and feed forces increased as the chamfer width and chamfer angle increased but at large values of these parameters, the cutting forces were low. With increase in chamfer width, the chip thickness decreased but presented a non-significant variation with chamfer angle. Khalili and Safaei [17] carried out a numerical study of the effects of the chamfer width and chamfer angle on cutting force, effective stress, tool temperature and tool stress during the two-dimensional (2D) orthogonal cutting of AISI 1045 steel by developing two finite element models. They found that there is almost no variation of cutting forces with increase in cutting speed, and that the thrust force is significantly influenced by the chamfer width and the chamfer angle. As cutting speed increases the maximum temperature increases at the tool tip and presents the optimum chamfer angle.
Despite the investigations presented above on the effects of tool edge geometries on machining process performance in cutting carbon steed materials, the data on different interactive configurations between tool edge geometries, such as chamfer width, chamfer angle, sharp angle and cutting parameters, e.g., cutting speed and feed rate, is still scarce. For various reasons, most of these studies were carried out for few and limited designed tests. This would imply a lack of understanding of the actual mechanisms responsible for the effects involved around the cutting edge during the cutting process, such as tribological and heat transfer aspects, for example. Thus, the ultimate goal would be to comprehend these mechanisms, rendering possible the means for the future preparations of design cutting tools.
In view of the above, the present work focuses on the influence of chamfered tool edge geometries and sharp edge on the machining performance. The objective of this article is to investigate the interactions in terms of the effects of cutting speed, feed rate, and chamfer and sharp tool geometries on the cutting temperature, cutting stress and tool wear depth. The main cutting parameters that influence these performance characteristics will be assessed using statistical analysis employing the analysis of variance (ANOVA) technique.

2. Materials and Methods

The numerical study consists of conducting different simulations of the two-dimensional (2D) orthogonal cutting of AISI 1045 steel using the commercial DEFORM software based on the finite element method (FEM) in order to predict the effects of the specified tool edge geometries and their interactions with machining parameters on the cutting temperature, cutting stress and tool wear. The two tool geometries examined are the chamfer and sharp tool geometry. Figure 1 and Figure 2 show the 2D model geometry of the workpiece and the tool, respectively. These interactive effects will be evaluated based on a design plan which comprises different parameter combinations, namely cutting speed, feed rate, chamfer angle and chamfer width for the chamfer tool geometry and cutting speed, feed rate and cutting angle for the sharp tool geometry.

2.1. Material and Machining Process Characterization

The machining process specified for the present numerical simulation tests is orthogonal cutting. The studied workpiece material is high carbon steel AISI 1045, which is often selected for different product applications that necessitate higher strength and resistance than other materials of the same category. The material selected for the cutting tool was uncoated cemented carbide, which it is also widely used in many industrial applications due to its hardness, as it gives a better surface finish to the machined part and provides higher productivity than high-speed steel.

2.2. Finite Element Simulation Model

In order to simulate the orthogonal milling process of high carbon steel AISI 1045, a 2D finite element model using DEFORM software was developed. The model includes the cutting tool, the workpiece and the chip. The meshing that was used in this cutting geometry model was created systematically using a default algorithm for solid modeling. The mesh consists of 2D free quadrilateral elements. The DEFORM software uses nodal finite elements for linear approximation. Each element has four nodes, and each node can have different degrees of freedom, such as temperature, force, stress, tool wear, chip thickness, etc.
Table 1 and Table 2 present the thermal and mechanical properties of these materials, respectively. It is assumed that the thermal properties of the cutting tool and workpiece materials are constant by neglecting the thermal gradient. Due to the shortened time, the steady state is attained very fast (about 0.3 ms), causing little variation in thermal conductivity and specific heat with temperature. This statement has already been referred to by Zakaria et al. [15].
During cutting simulation, the software used two numerical modules: heat transfer and motion analysis. In the DEFORM program, the transient mode was selected and the cutting temperature, force and stress were calculated by solving heat transfer and motion equations as follows [12]:
[ C T ] { T ˙ } + [ K T ] { T } = { Q ˙ g }
[ M ] { U ̈ } + { Rint } = { Rext }
where [CT], [KT], { Q ˙ g } , {Ü}, {U}, {Rint} and {Rext} are the volume heat capacitance, the thermal conduction matrices, the total heat generated, the acceleration vector, the displacement, the vector of internal force and the vector of external force, respectively.
During the cutting process, two heat transfer mechanisms occur: conduction and convection. Conduction occurs between cutting tool, workpiece and chip, whereas convection occurs between workpiece, tool surfaces and the ambient air. In order to simulate these mechanisms in 2D, the mentioned components were considered as superficial geometries in contact without internal heat generation.
k n Δ T = h ( T a i r T )
where Tair is the ambient temperature, T is the temperature, kn is the thermal conductivity of the studied materials, h is the convection heat transfer coefficient (h = 20 W/(m2 °C)) and ΔT is temperature difference between cutting tool and workpiece at the tool-chip contact.
The considered value of the convection heat transfer coefficient h for air flow was determined by approximation according to the following equation [18]:
h = 10.45 − v + 10 v1/2
where v is the relative velocity between object surface and surrounding air (m/s).
The boundary conditions were stated as that (i) there was no motion for the cutting tool and that (ii) the workpiece was cut at the specified machining speed (V).
For material modeling, the Johnson–Cook constitutive model was adopted, because it gives accurate results for machining process simulations. The flow stress model can be formulated as follows [12]:
σ ¯ = [ A + B ( ε n ) ] [ 1 + C · ln ( ε · ε 0 ) ] [ 1 ( T T r o o m ) ( T m e l t T r o o m ) m ]
where σ ¯ is the cutting stress, ε is the plastic strain,   ε ˙ (s−1) is the plastic strain rate, ε ̈ 0 (−1) is the reference plastic strain rate, T (°C) is the workpiece temperature, Tmelt (°C) is the melt temperature, Troom (°C) is the room temperature and A (MPa), B (MPa), C, n and m are the initial yield strength, the hardening modulus, strain rate sensitivity coefficient, hardening coefficient and thermal softening coefficient, respectively. The constants of AISI 1045 steel that were used for Johnson–Cook model are displayed in Table 3.
For modeling tool wear, the Usui wear model was used by the DEFORM software, based on nodal displacement which is characterized by the calculated wear rate at each node. For the tool wear simulation, the Usui model was expressed as follows [20]:
W = A ·   P · V ·   e B T ·   d t
where W is the tool wear, P is the interface pressure, V is the sliding velocity, T is the temperature and dt is the time increment. A and B are constants that are determined experimentally.

2.3. Design of Experiments

The orthogonal cutting numerical tests were realized to investigate the interactive effects of tool chamfer angle, chamfer width and sharp cutting angle on the temperature, stress and tool wear depth under different cutting process parameters. Table 4 and Table 5, respectively, present the design plan for the chamfer and sharp tool geometry numerical simulations.
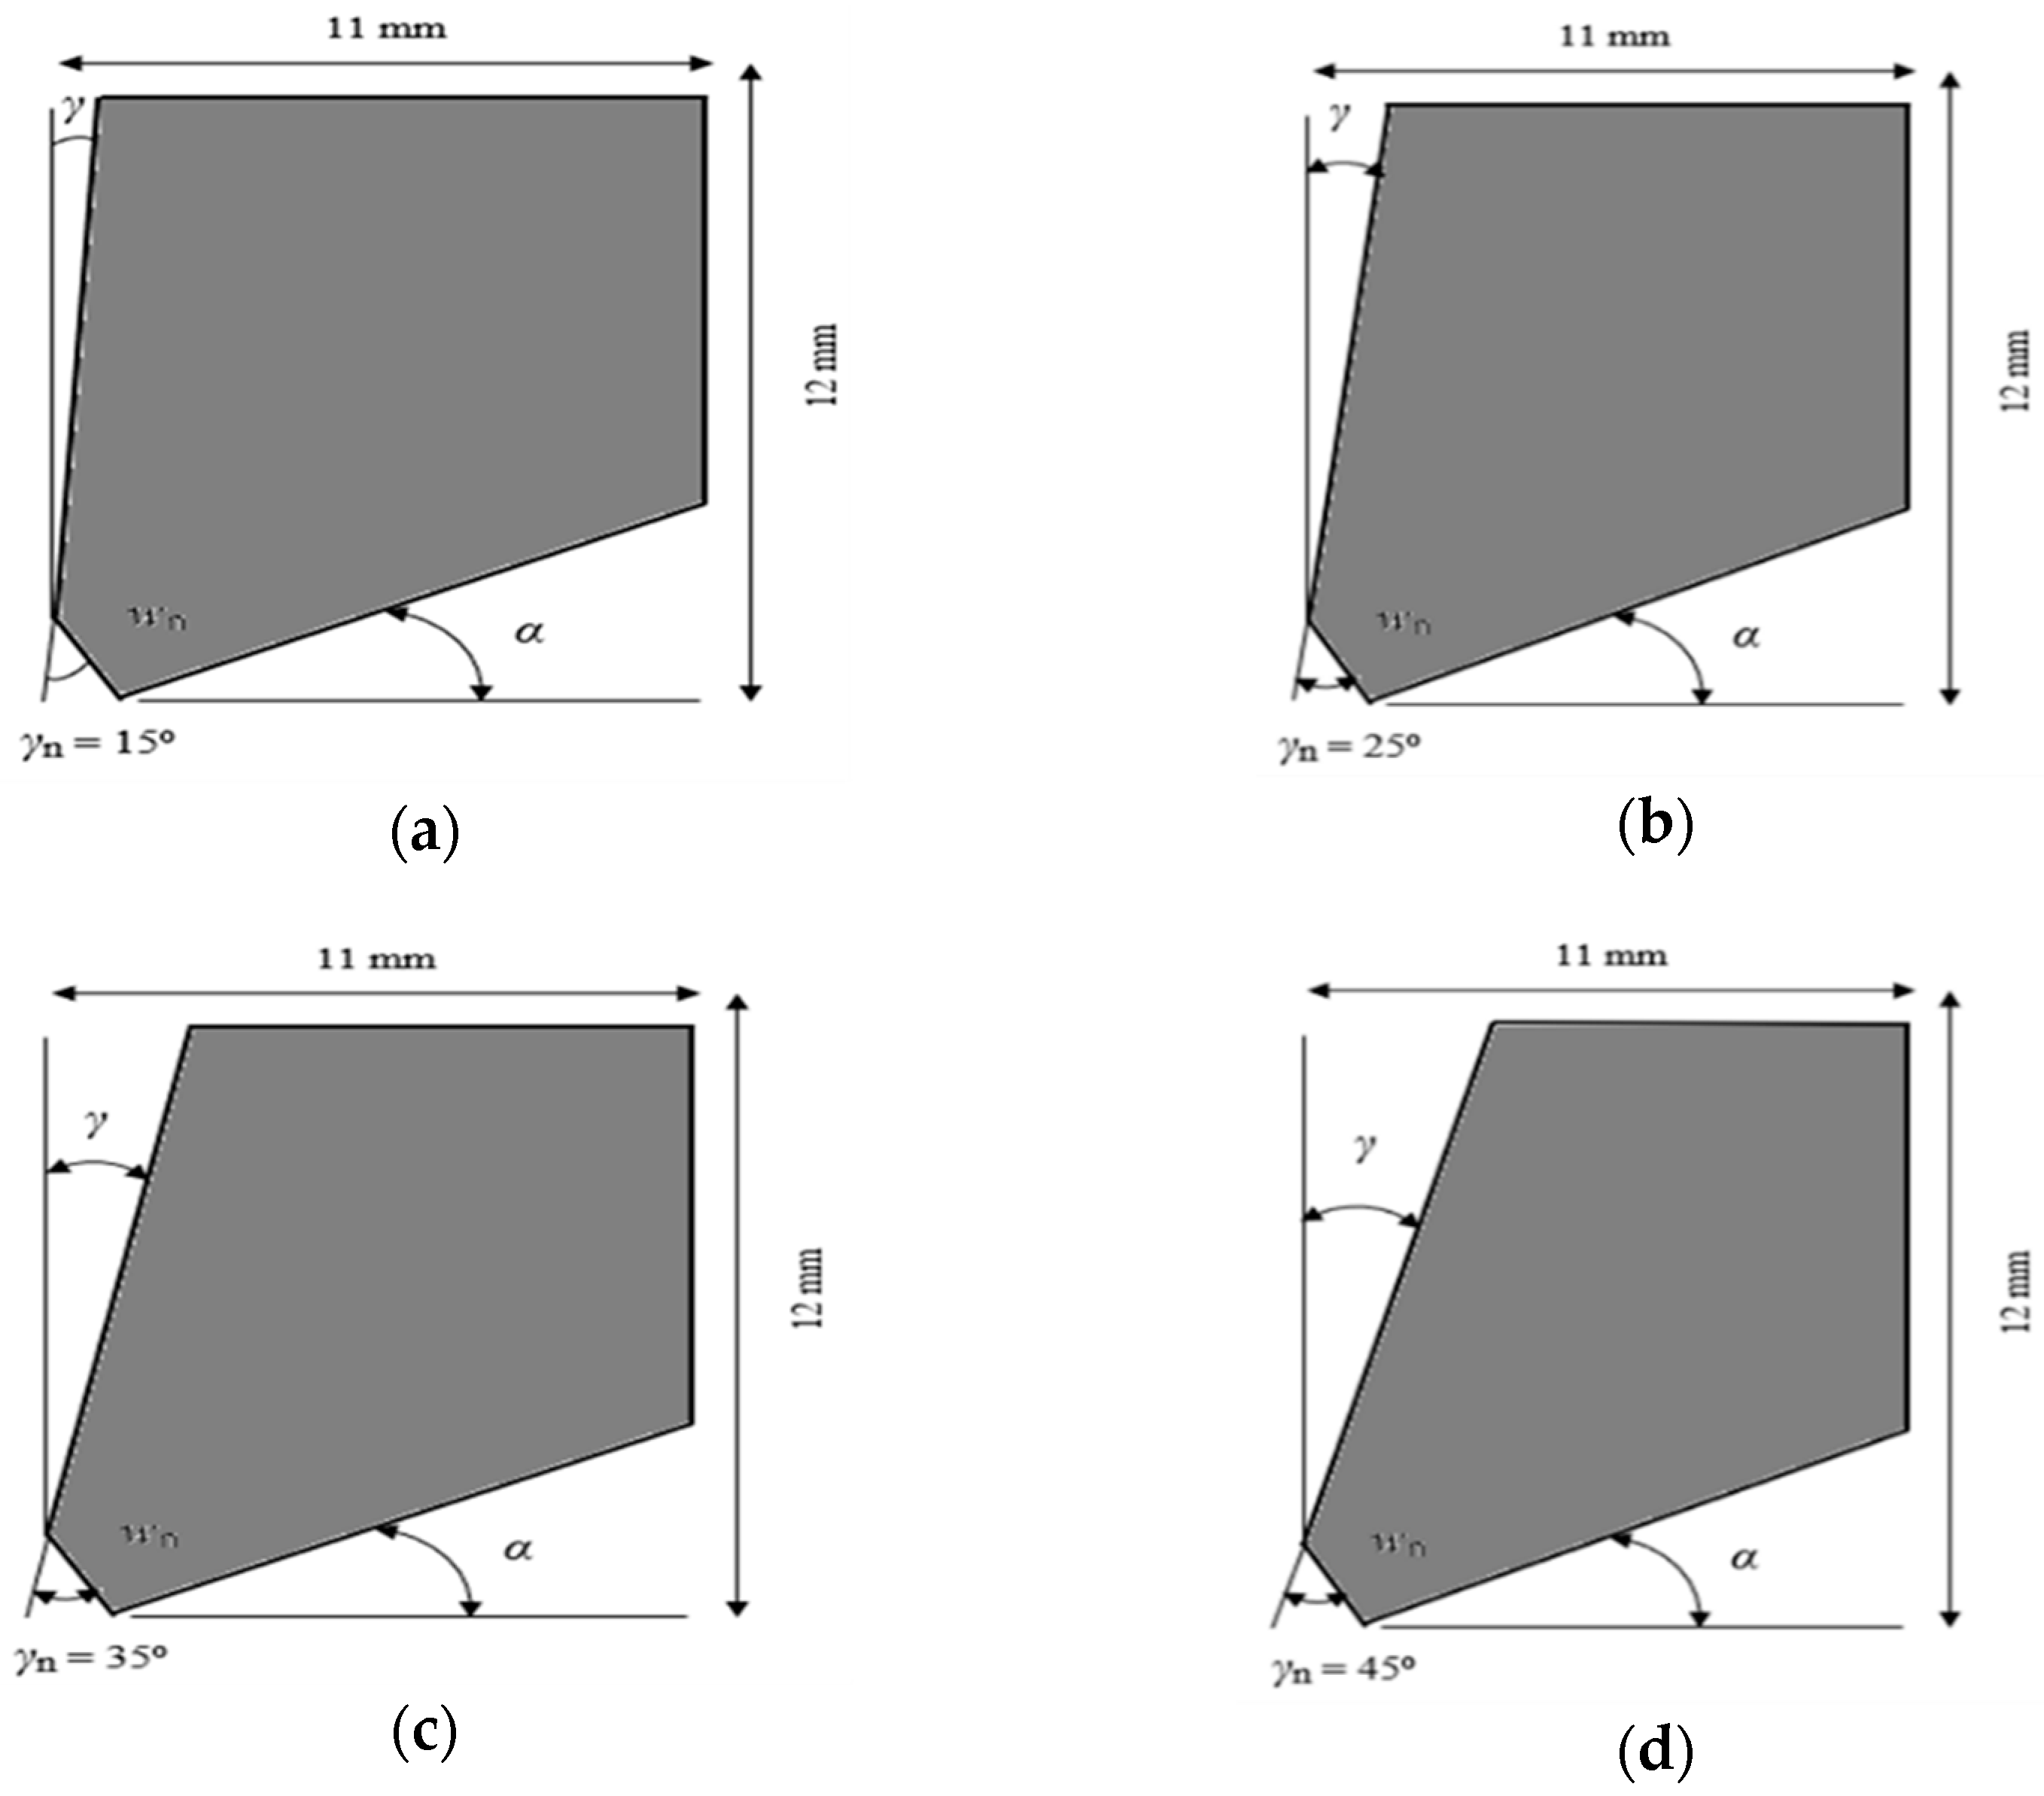
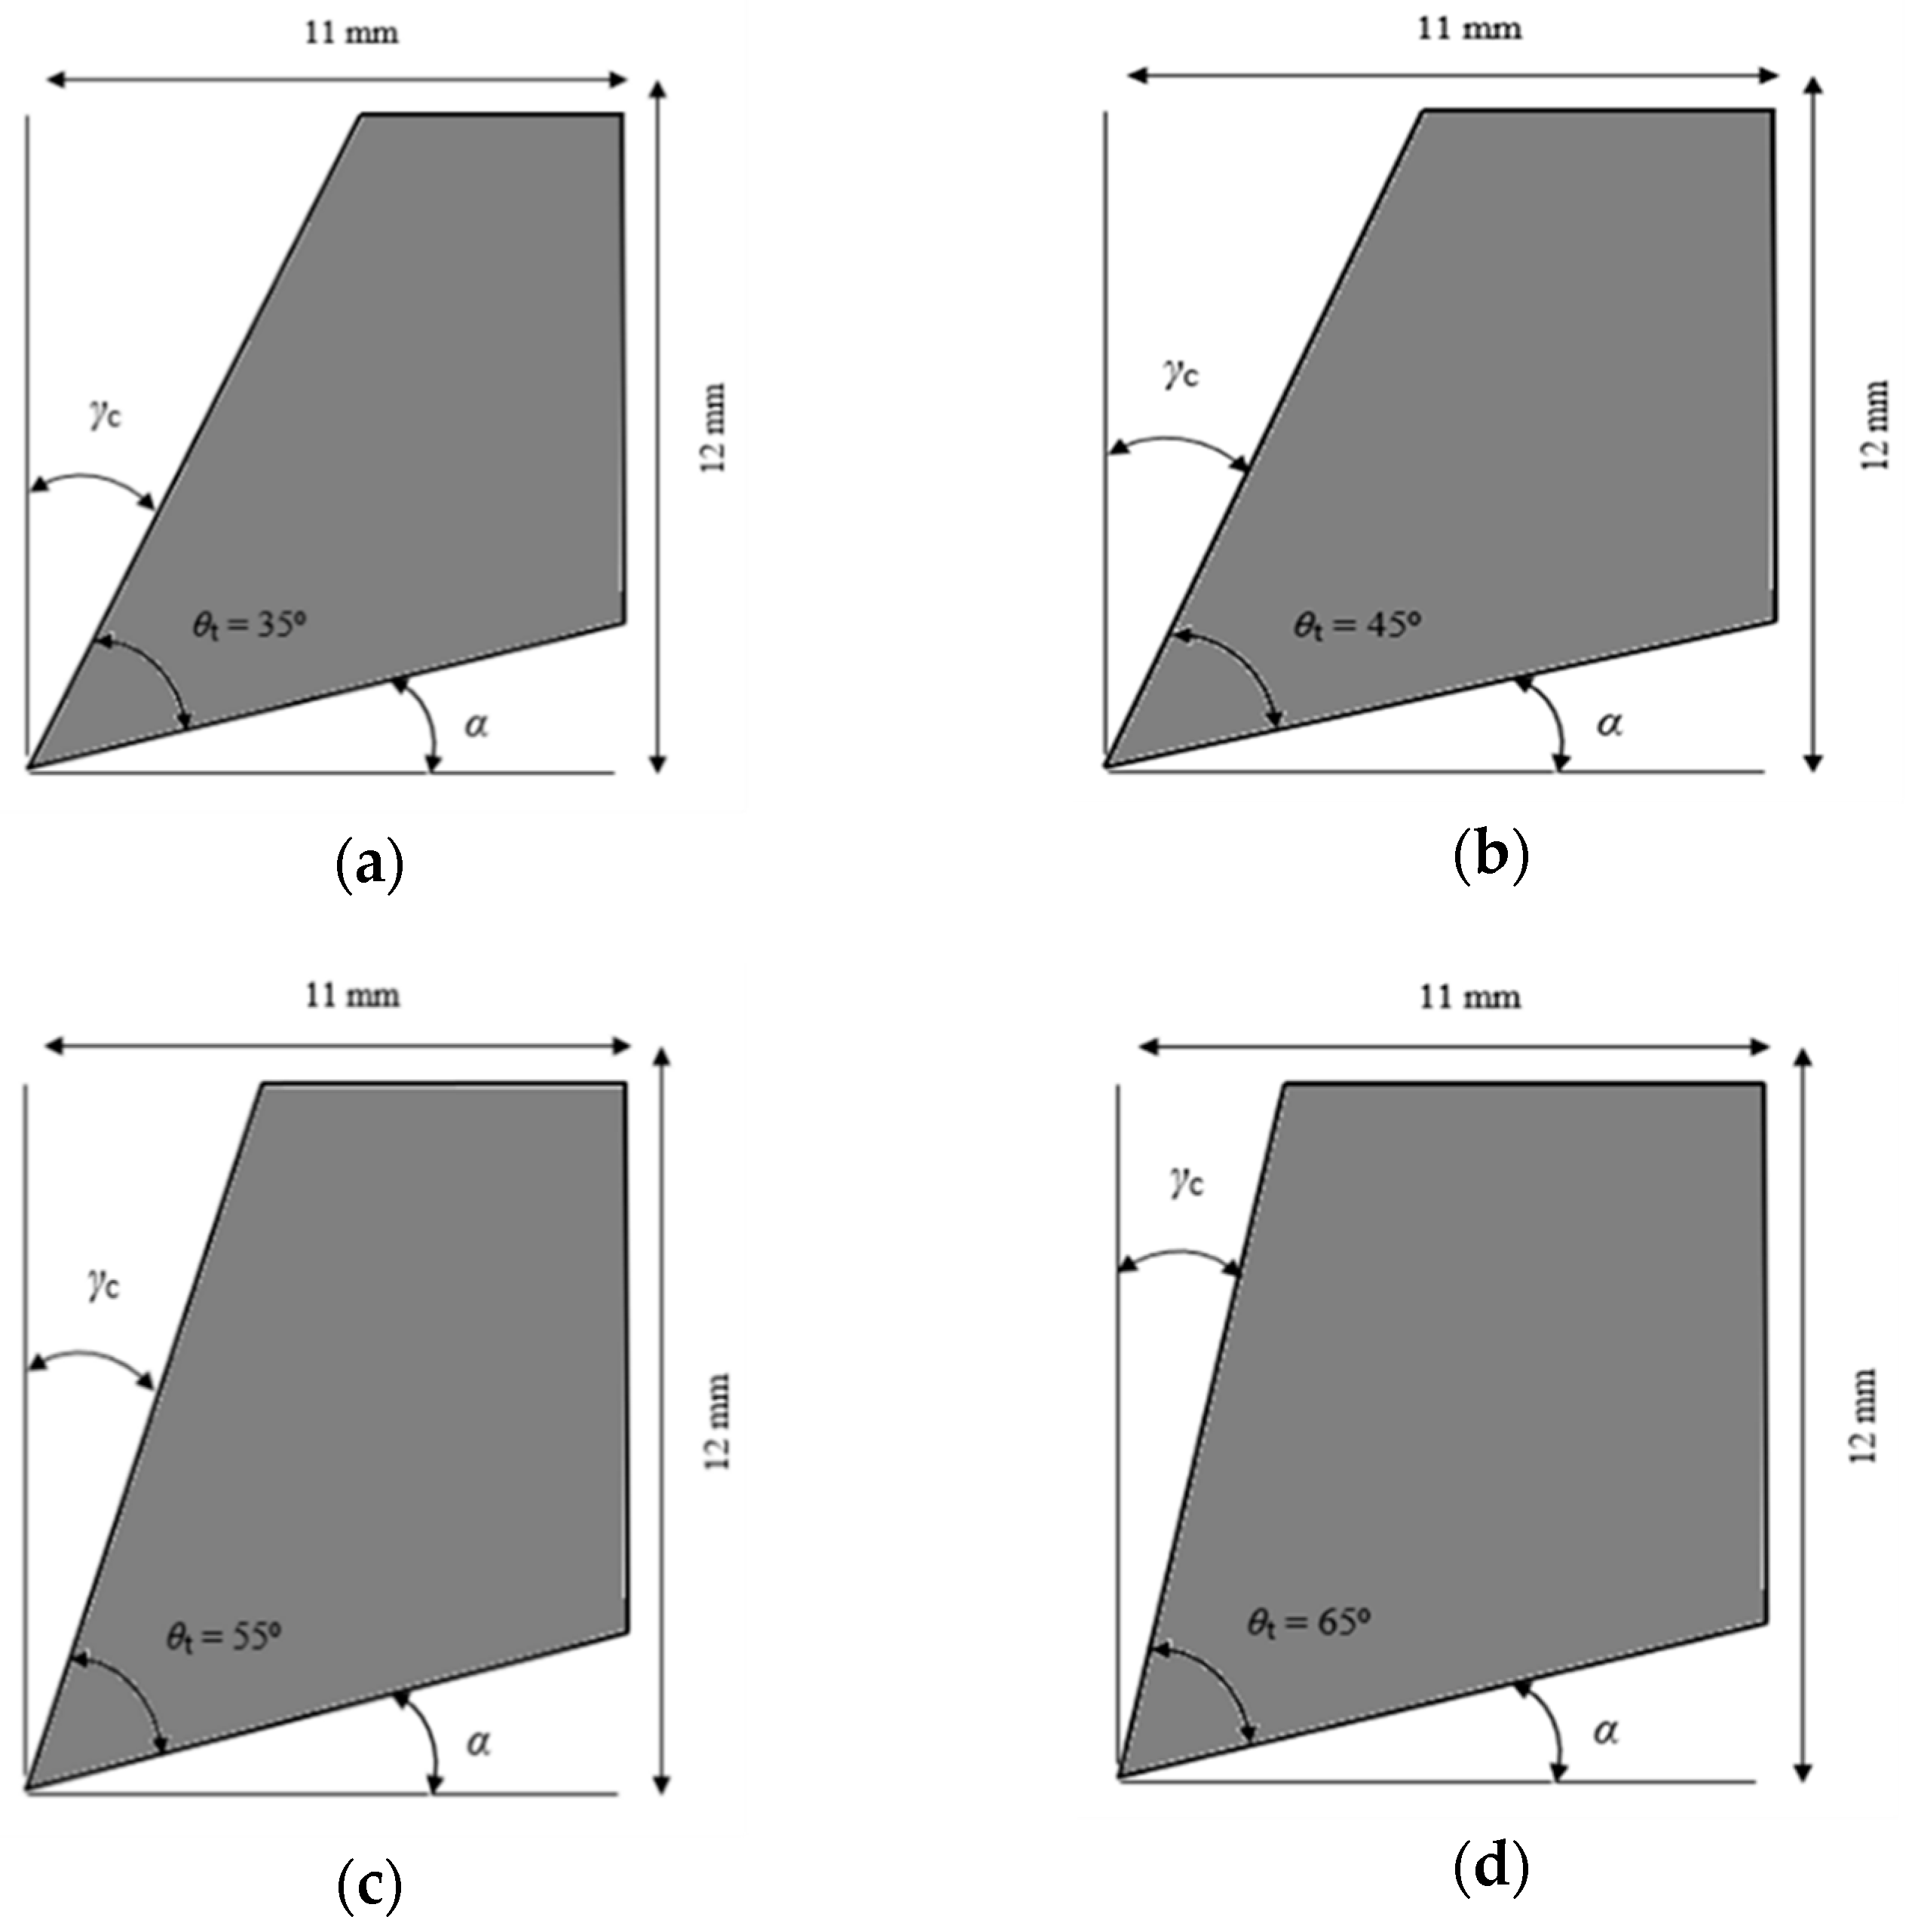
The first numerical simulation tests were conducted to study only the effects of chamfer and sharp tool geometry on the different machining characteristics. For the chamfer tool design, the chamfer width (wn) was varied and the other machining and tool parameters were kept constant. Then, chamfer angle (γn) was varied, with the other machining and tool parameters kept constant. For the sharp tool design, θt was varied and the other parameters were kept constant.
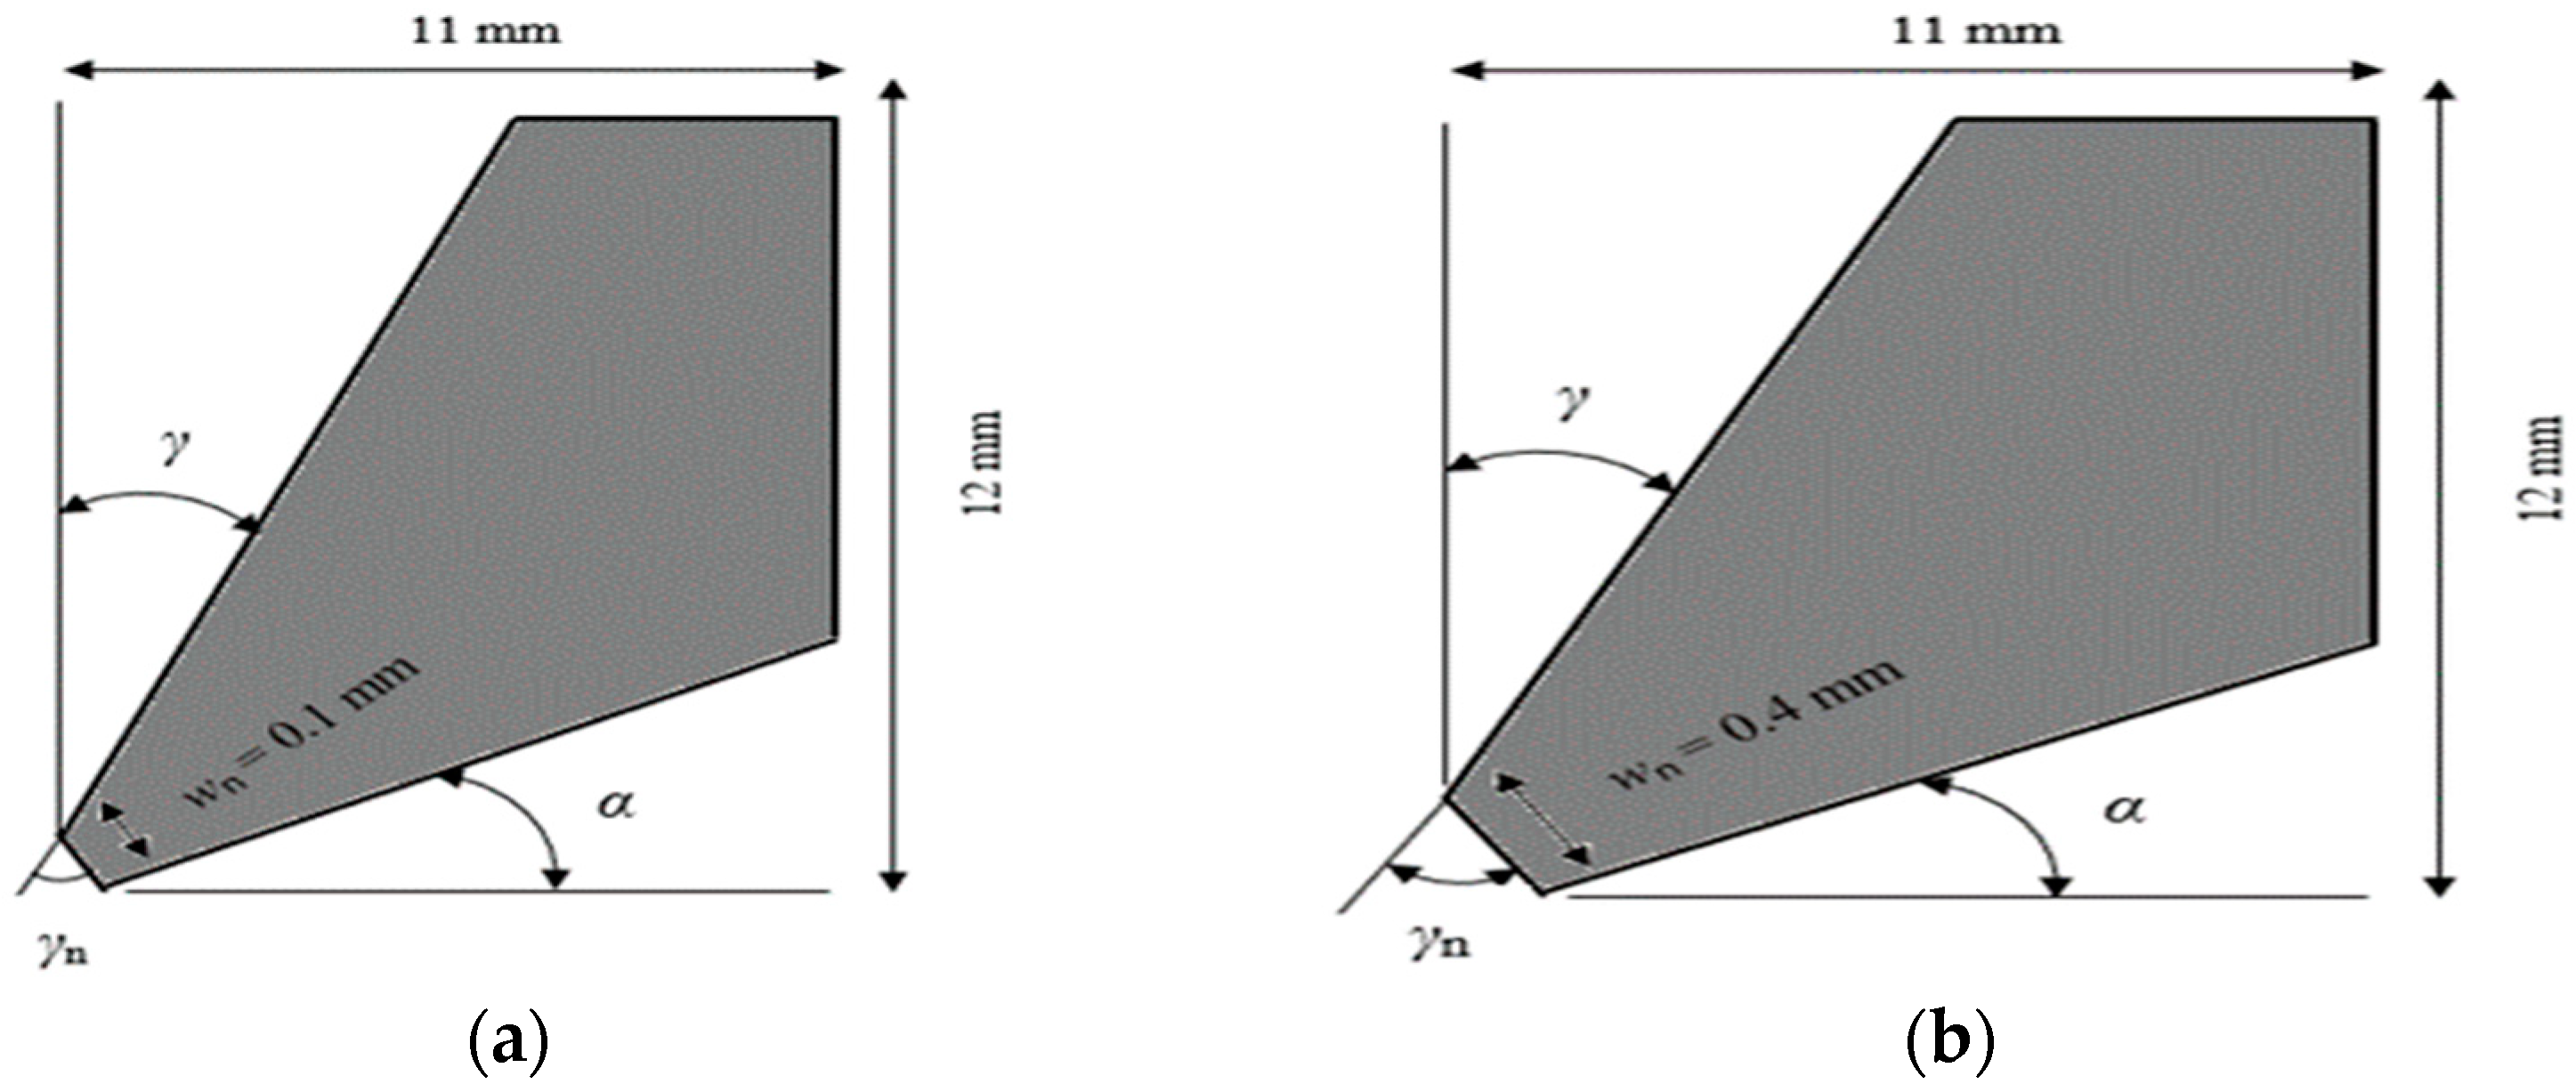
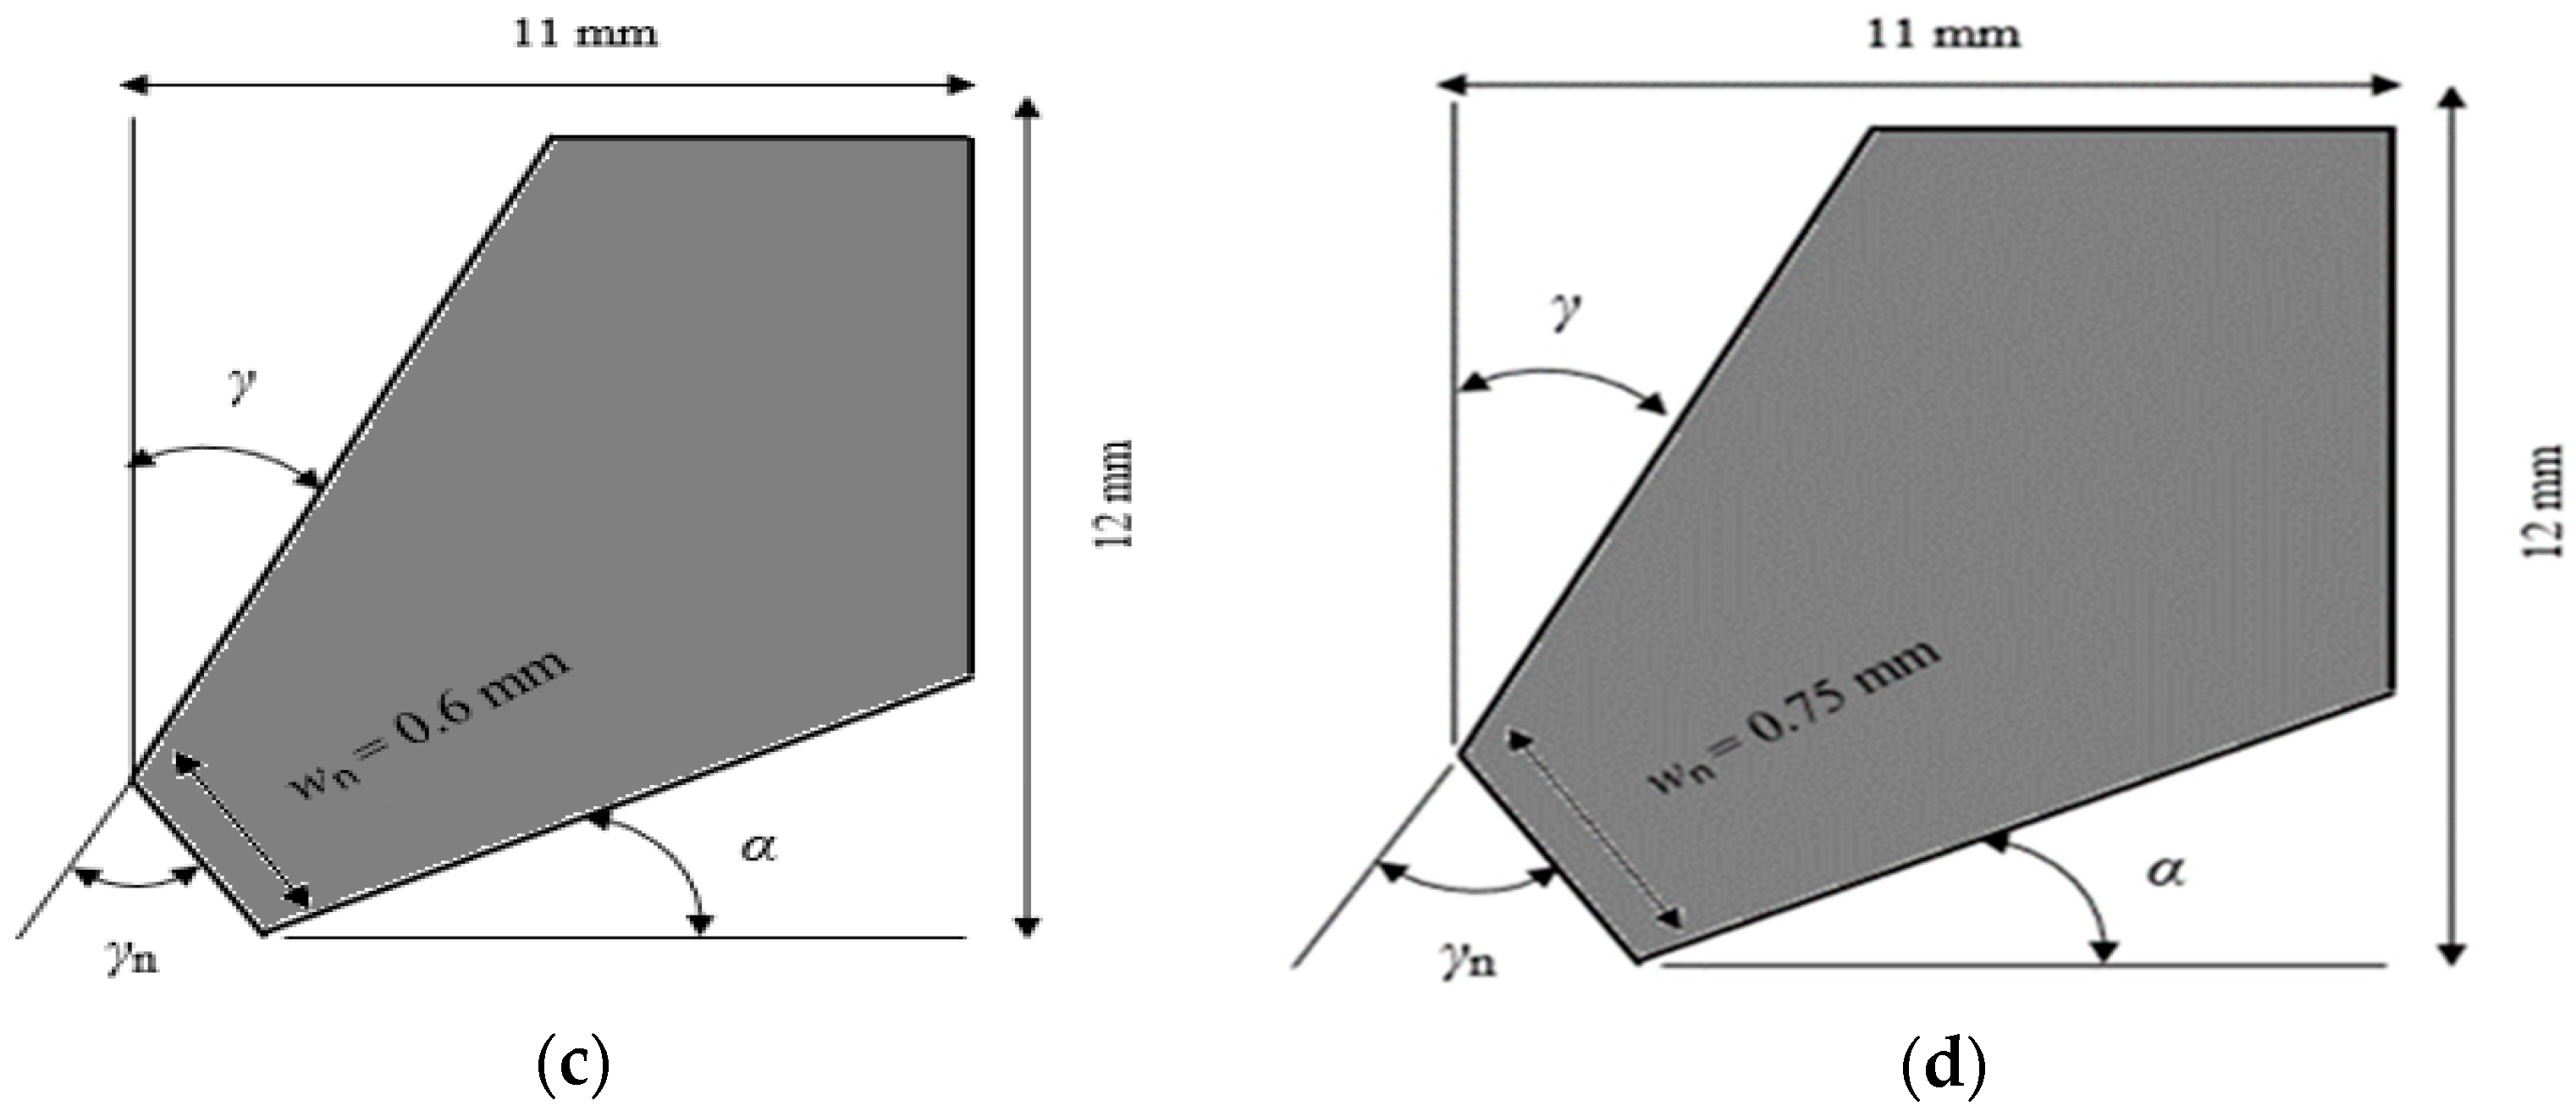
Throughout the study, the clearance angle (α) was kept constant at α = 15°. For the chamfer tool, the rake angle (γ) was kept constant (γ = 10°) for different tested chamfer widths. For the sharp tool, the rake angle (γc) changes when the sharp angle (θt) varies.
In order to illustrate the influence of chamfer width, chamfer angle and sharp angle on cutting temperature, effective stress and tool wear, four tool designs were proposed. Figure 3, Figure 4 and Figure 5 display the schematic representations of the cutting tool geometries with different chamfer widths chamfer angles and sharp angles, respectively.

3. Results and Discussion

3.1. Influence of Tool Geometry on Machining Process Performance Indicators

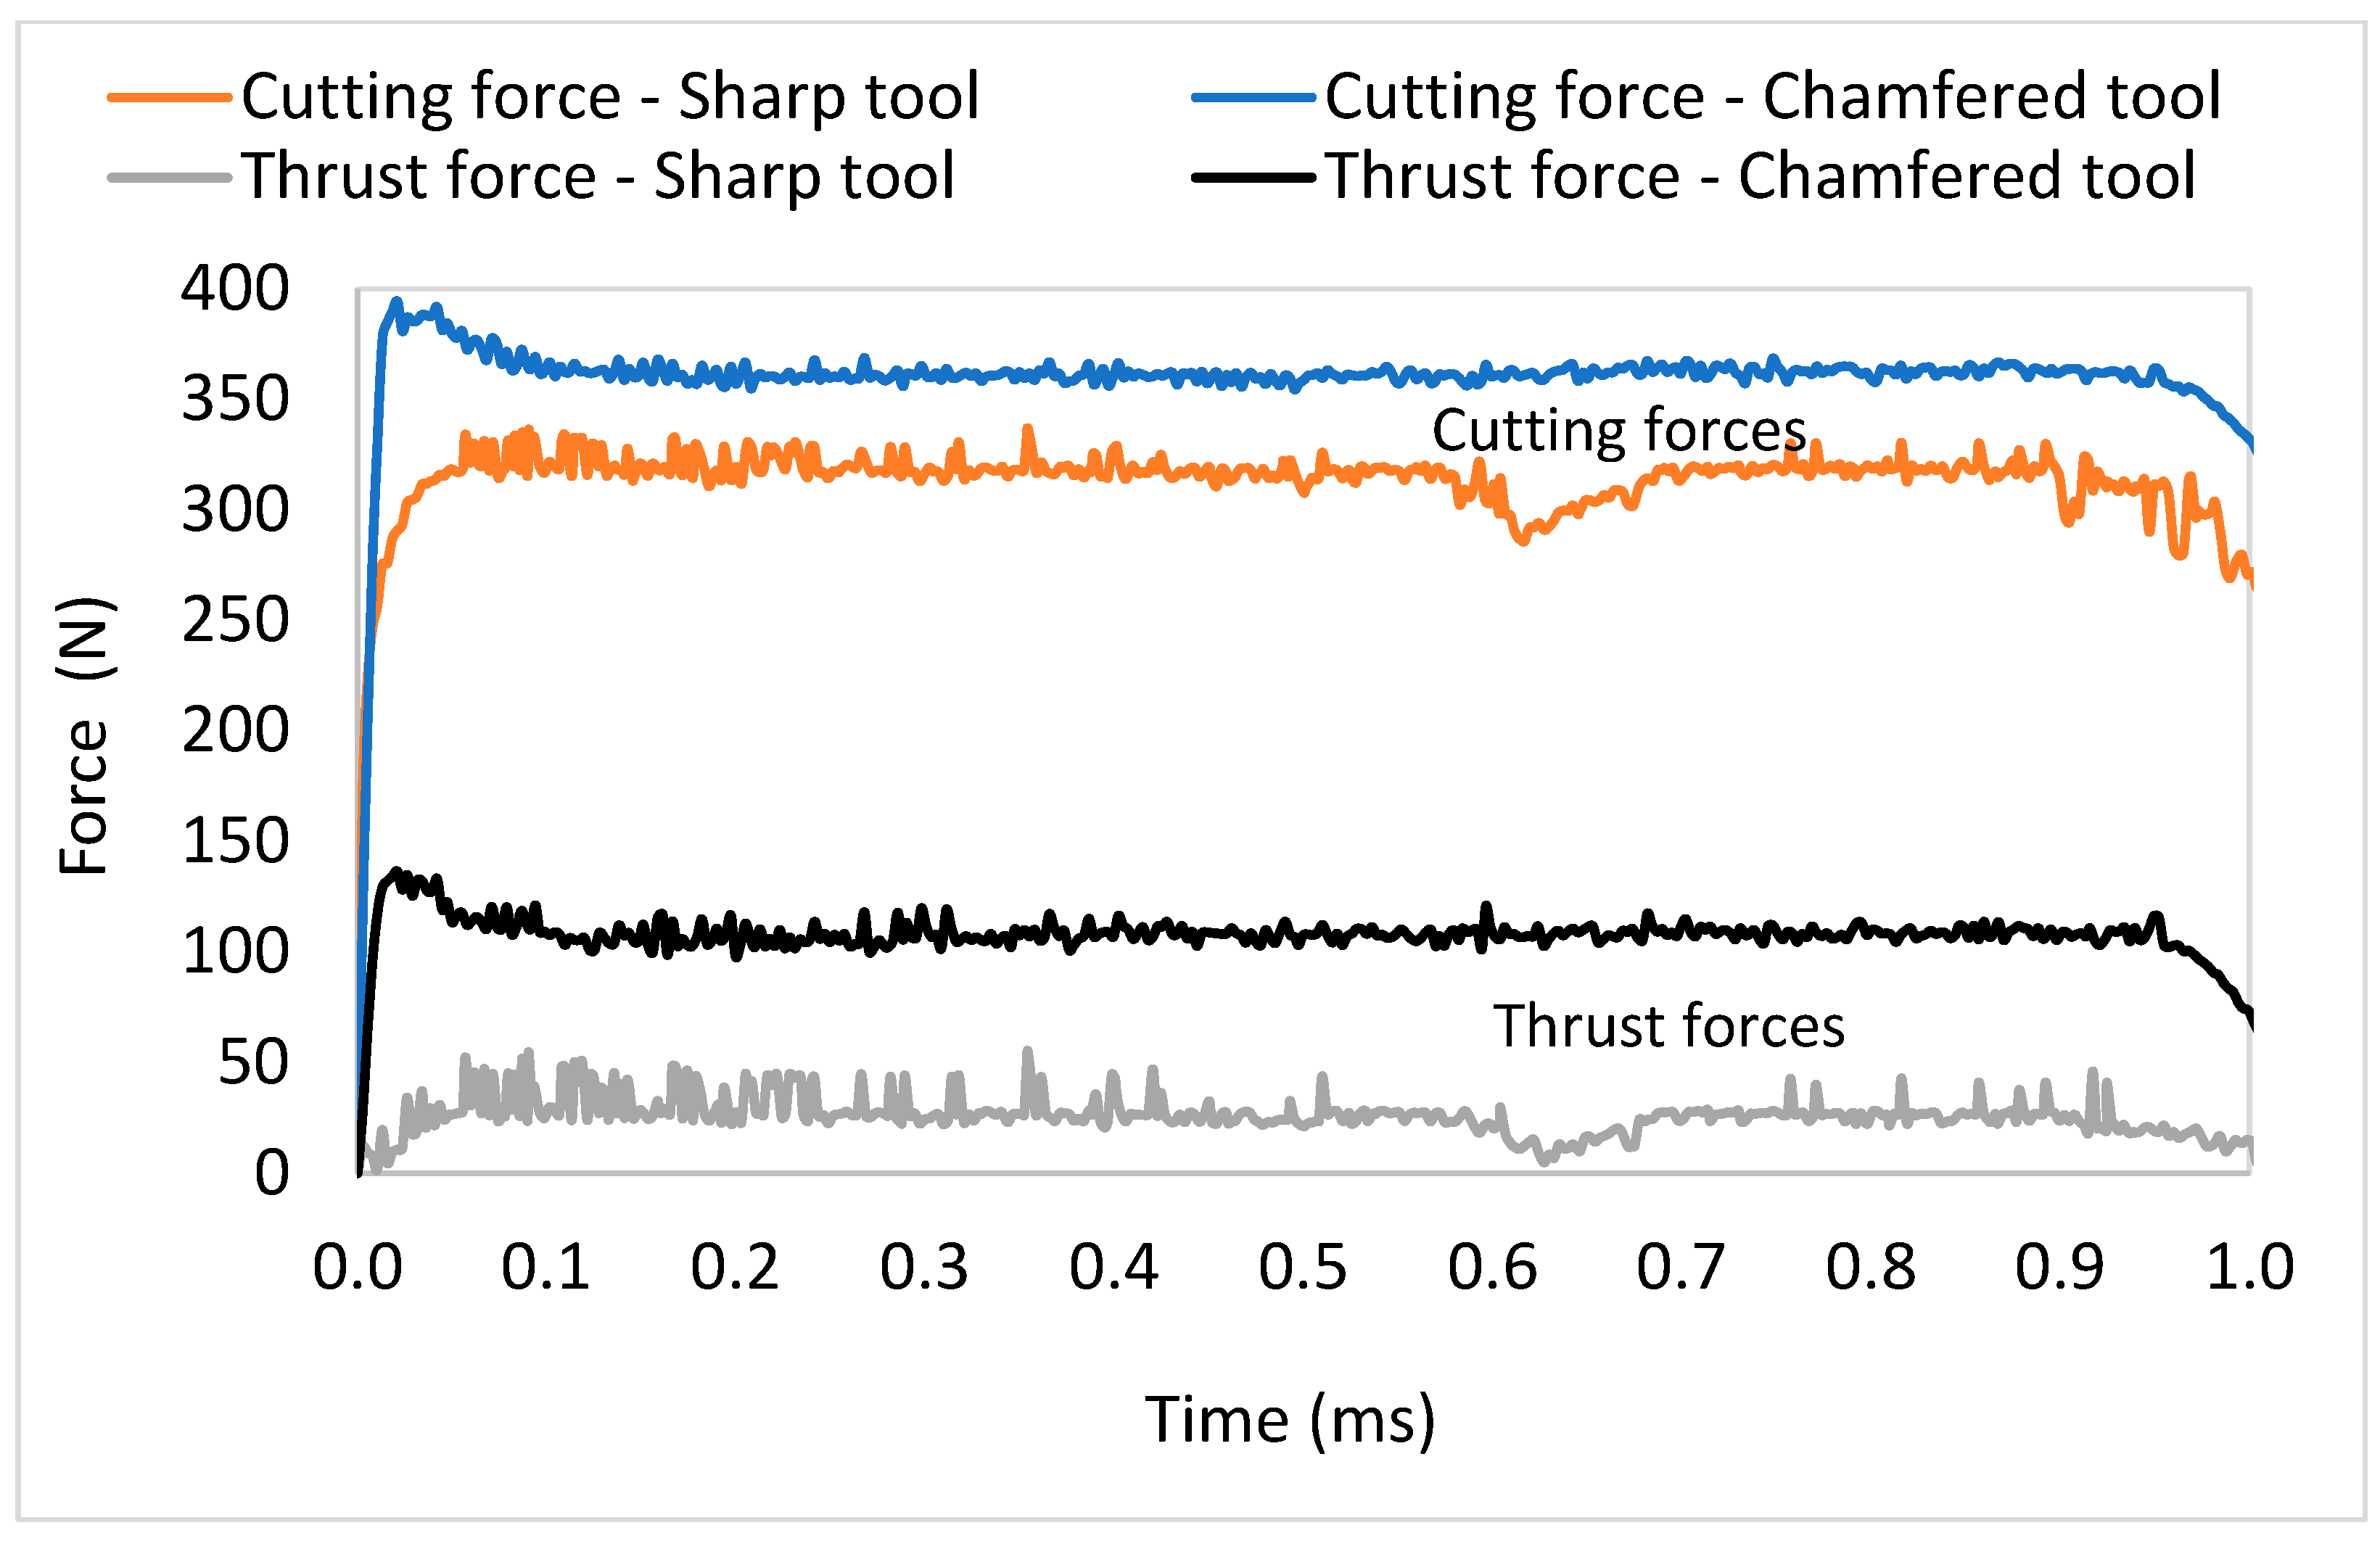
The simulated machining characteristics were cutting force, temperature, stress and tool wear. The transient mode was selected in order to evaluate the evolution of forces, temperature and stress in the model with increments of time. The machining force results comprise cutting forces and thrust forces. Figure 6 shows the variation of these forces as a function of time for chamfer and sharp geometries, respectively, at V = 150 m/min, wn = 0.10 mm, f = 0.2 mm/rev, γn =10° and at θt = 45°.
The numerical calculation of the machining force was carried out in the plane defined by the cutting direction and the one perpendicular to it. Thus, the cutting and thrust forces were obtained in the cutting direction and the thrust force in the direction perpendicular to the cutting one. For every numerical test, the simulated forces reached the steady state rapidly as shown in Figure 6. The total workpiece length set took about 1 ms to be completed; that is why the drop of forces is noted at the end of the cutting process.
It may be seen from Figure 6 that for both the chamfer and sharp geometries, the cutting forces are higher than the thrust forces because the cutting forces are applied in the machining direction and represent 70 to 80% of the total force, which contributes to determining the global power necessary for performing the machining process [21]. Additionally, the cutting and thrust forces for the chamfer tool (apparent negative rake angle) are higher than those for the sharp tool.
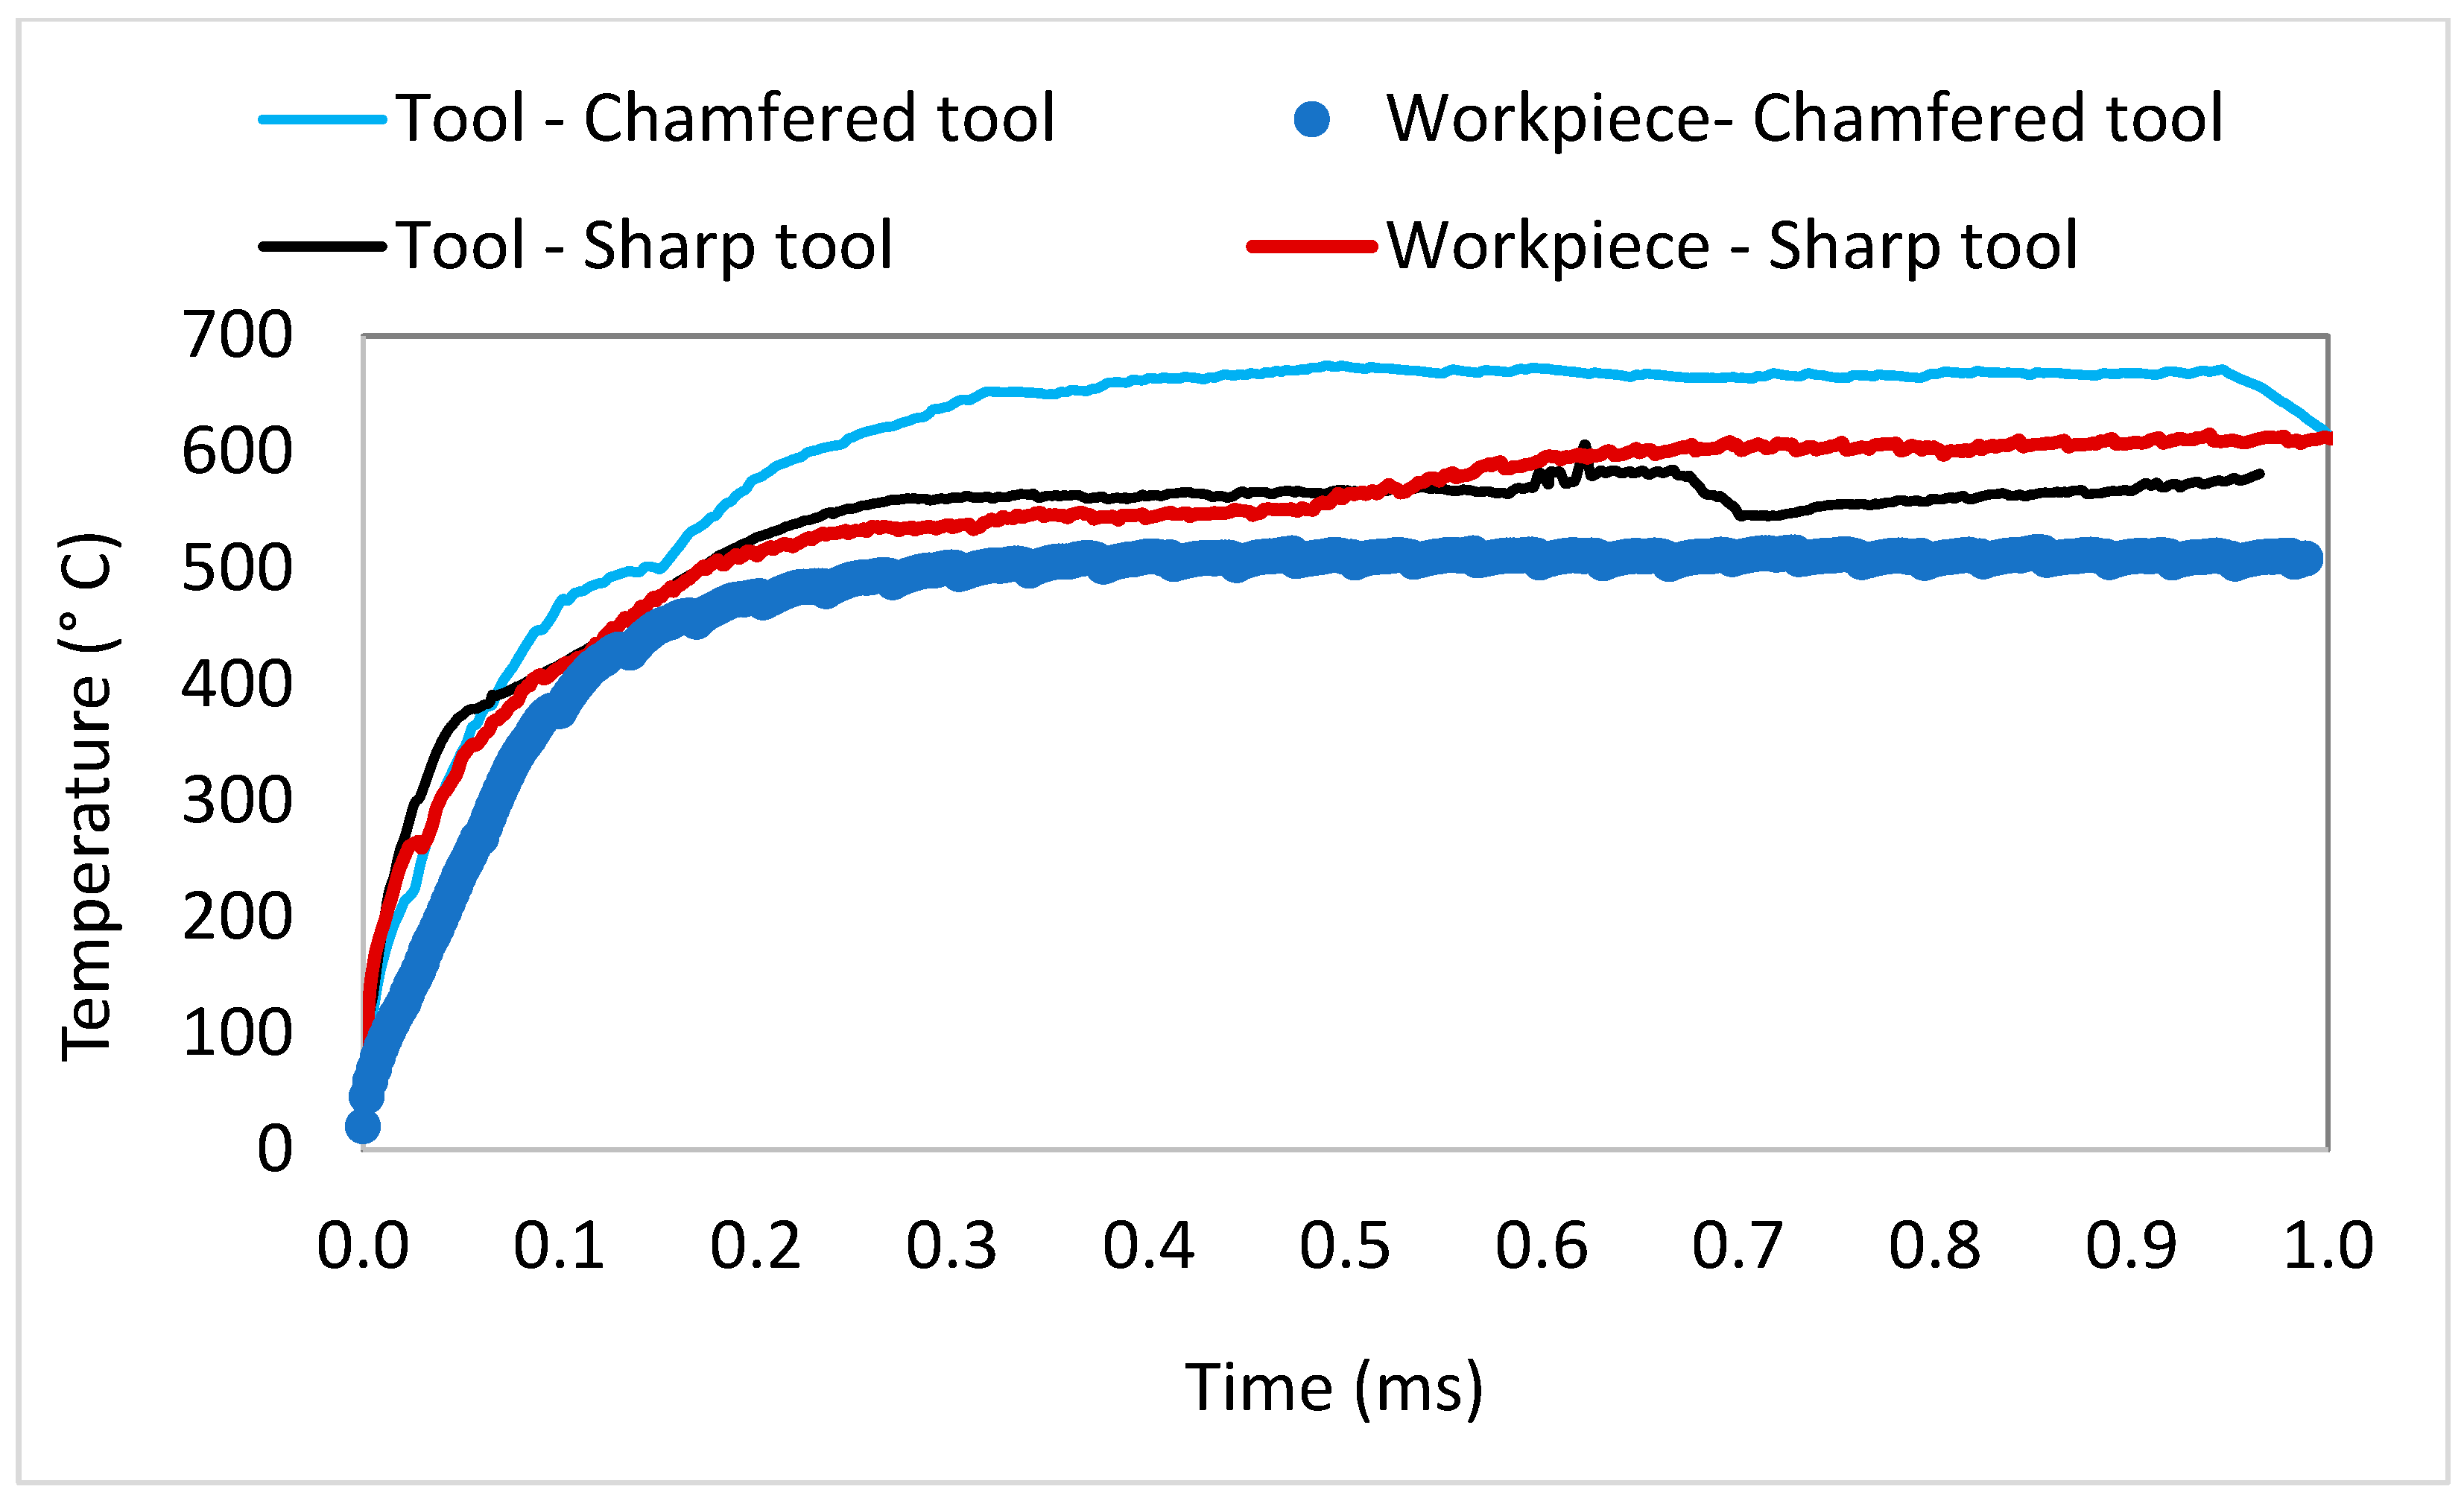
Figure 7 shows the variation of the workpiece and tool temperatures in the cutting zone as a function of the cutting time. The steady state for the temperature is reached at about 0.4 ms, depending on the cutting parameters used. That is to say, the maximum temperature is attained at about half of the sample length (30 mm) when using a sharp or chamfered edge tool. The tool temperature was higher when using a chamfered tool as compared to that obtained with a sharp tool; this can be explained by the higher forces and stresses acting on the tool when using a chamfered tool and also by the high deformation accompanying the cutting process with negative effective rake angle near the tool tip.
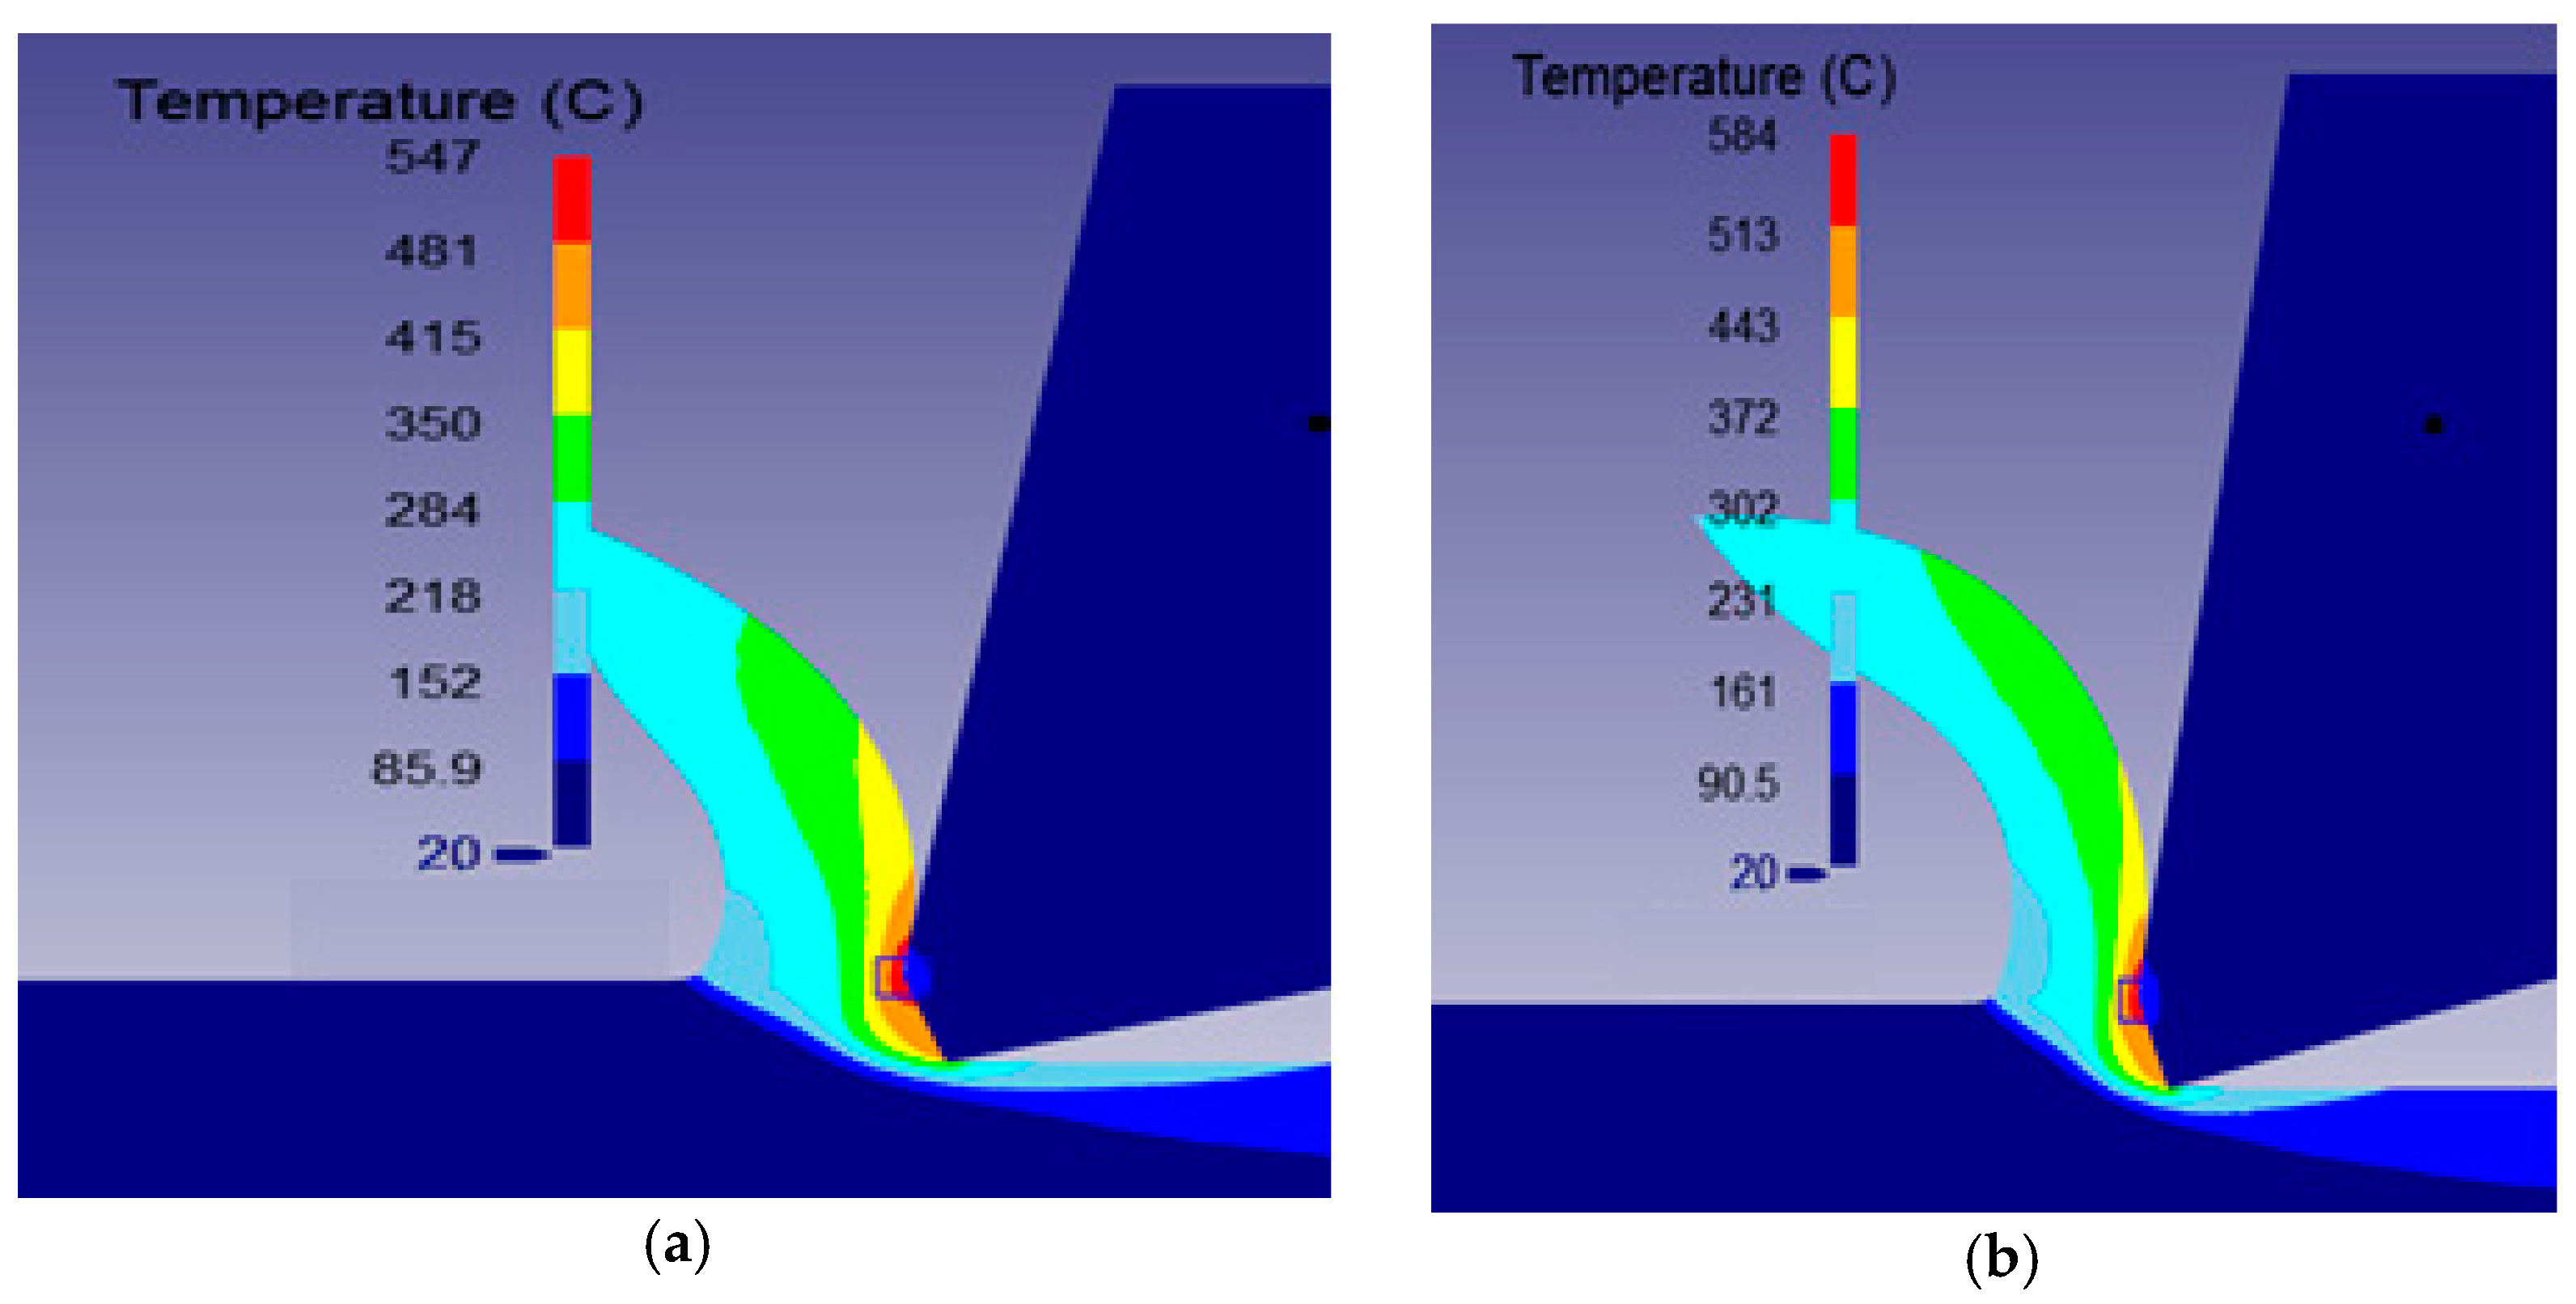
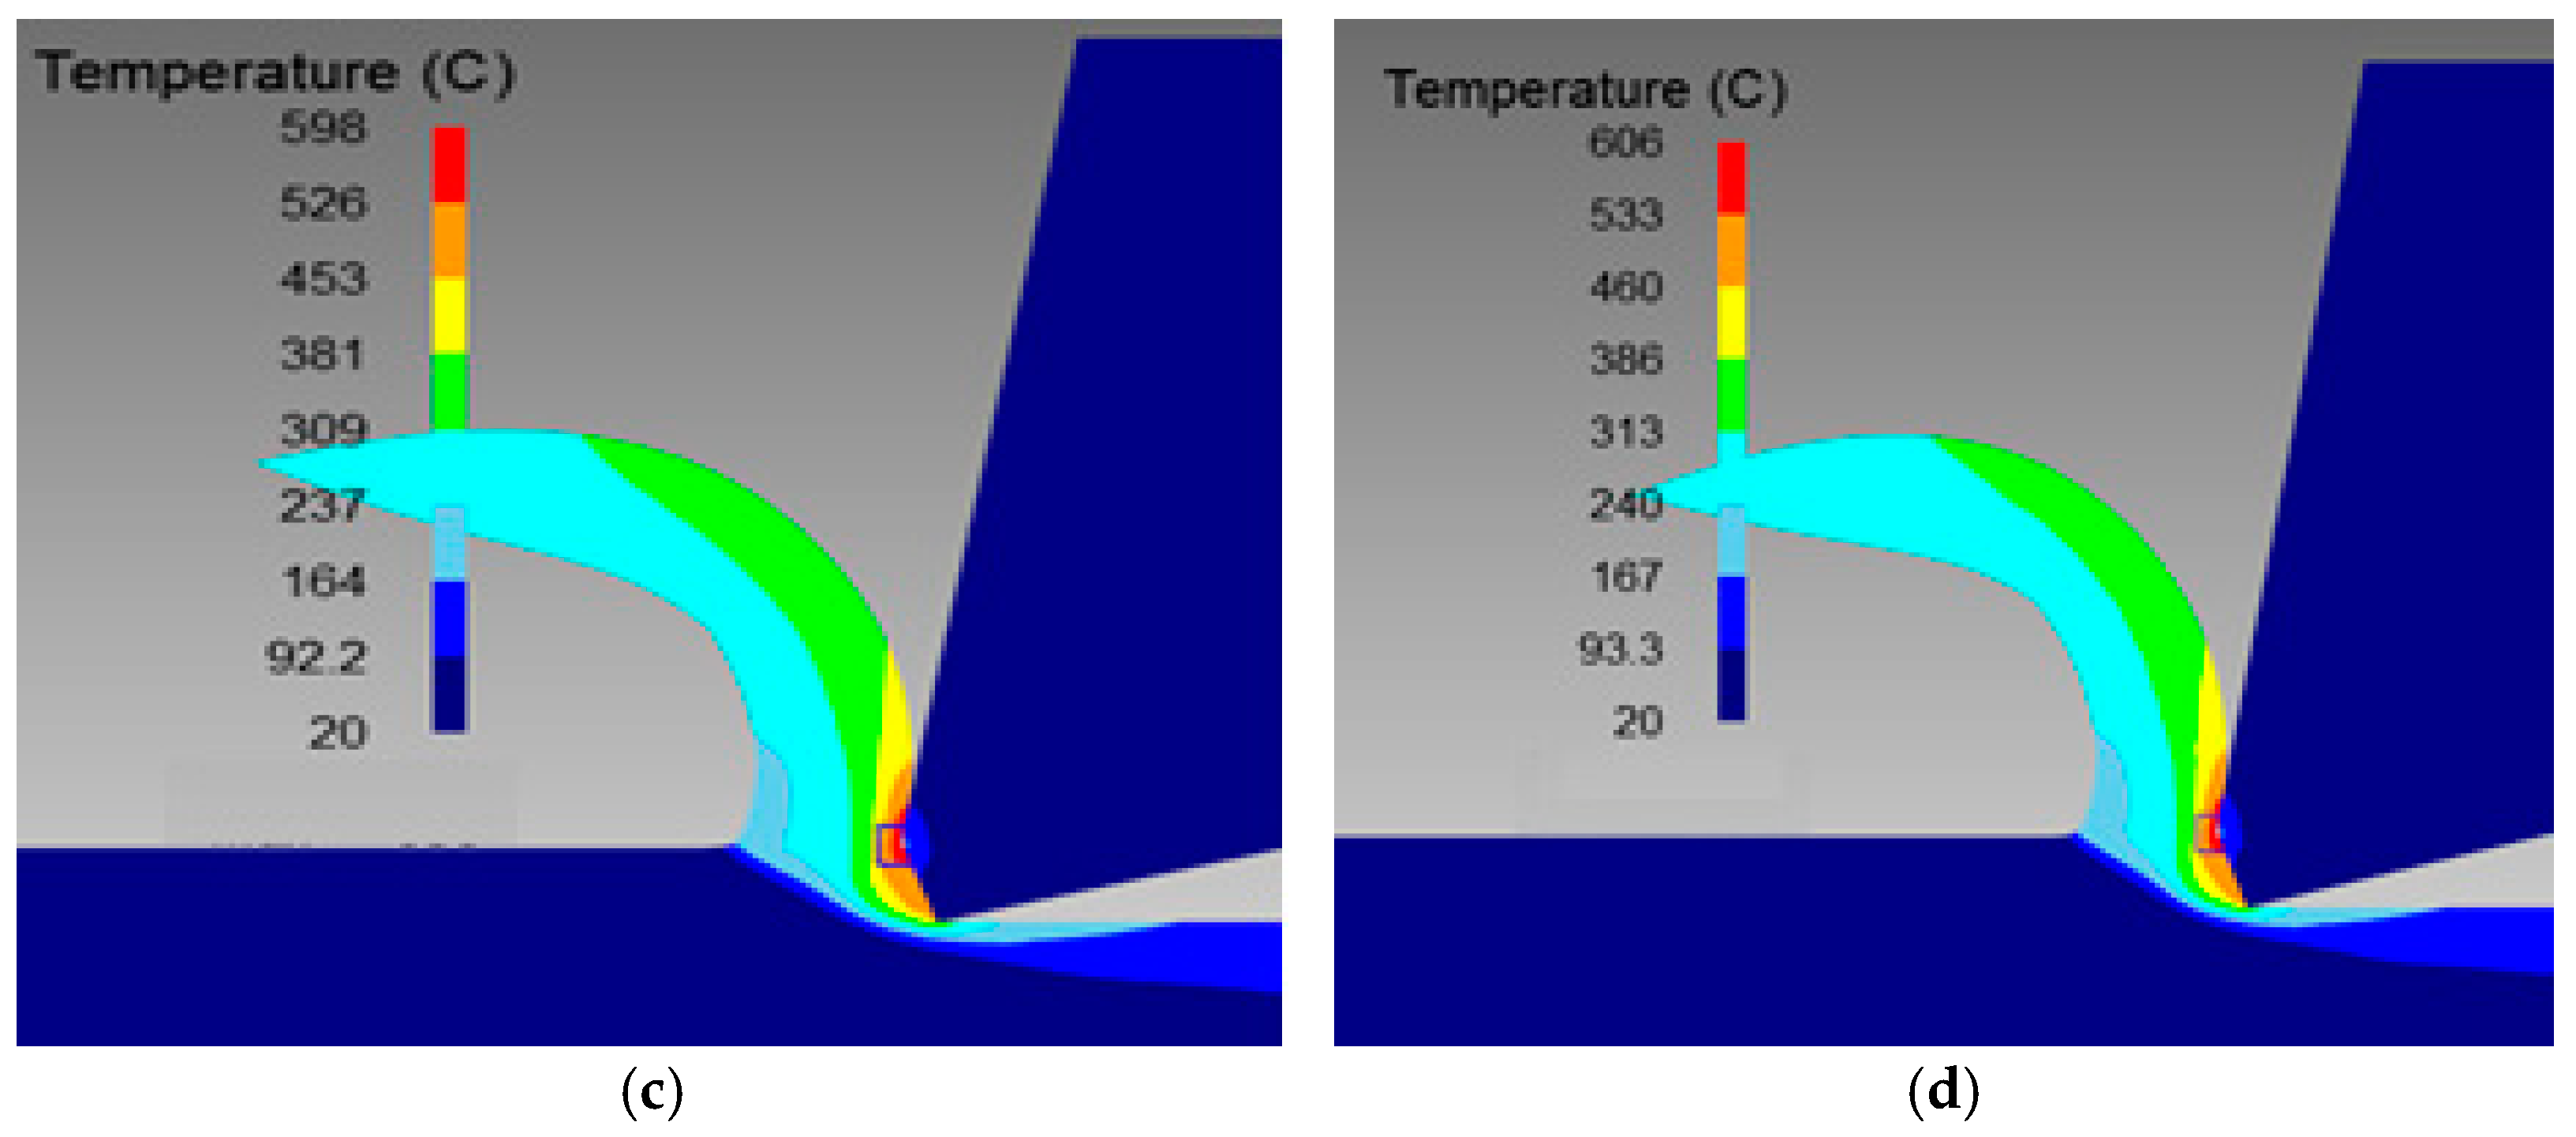
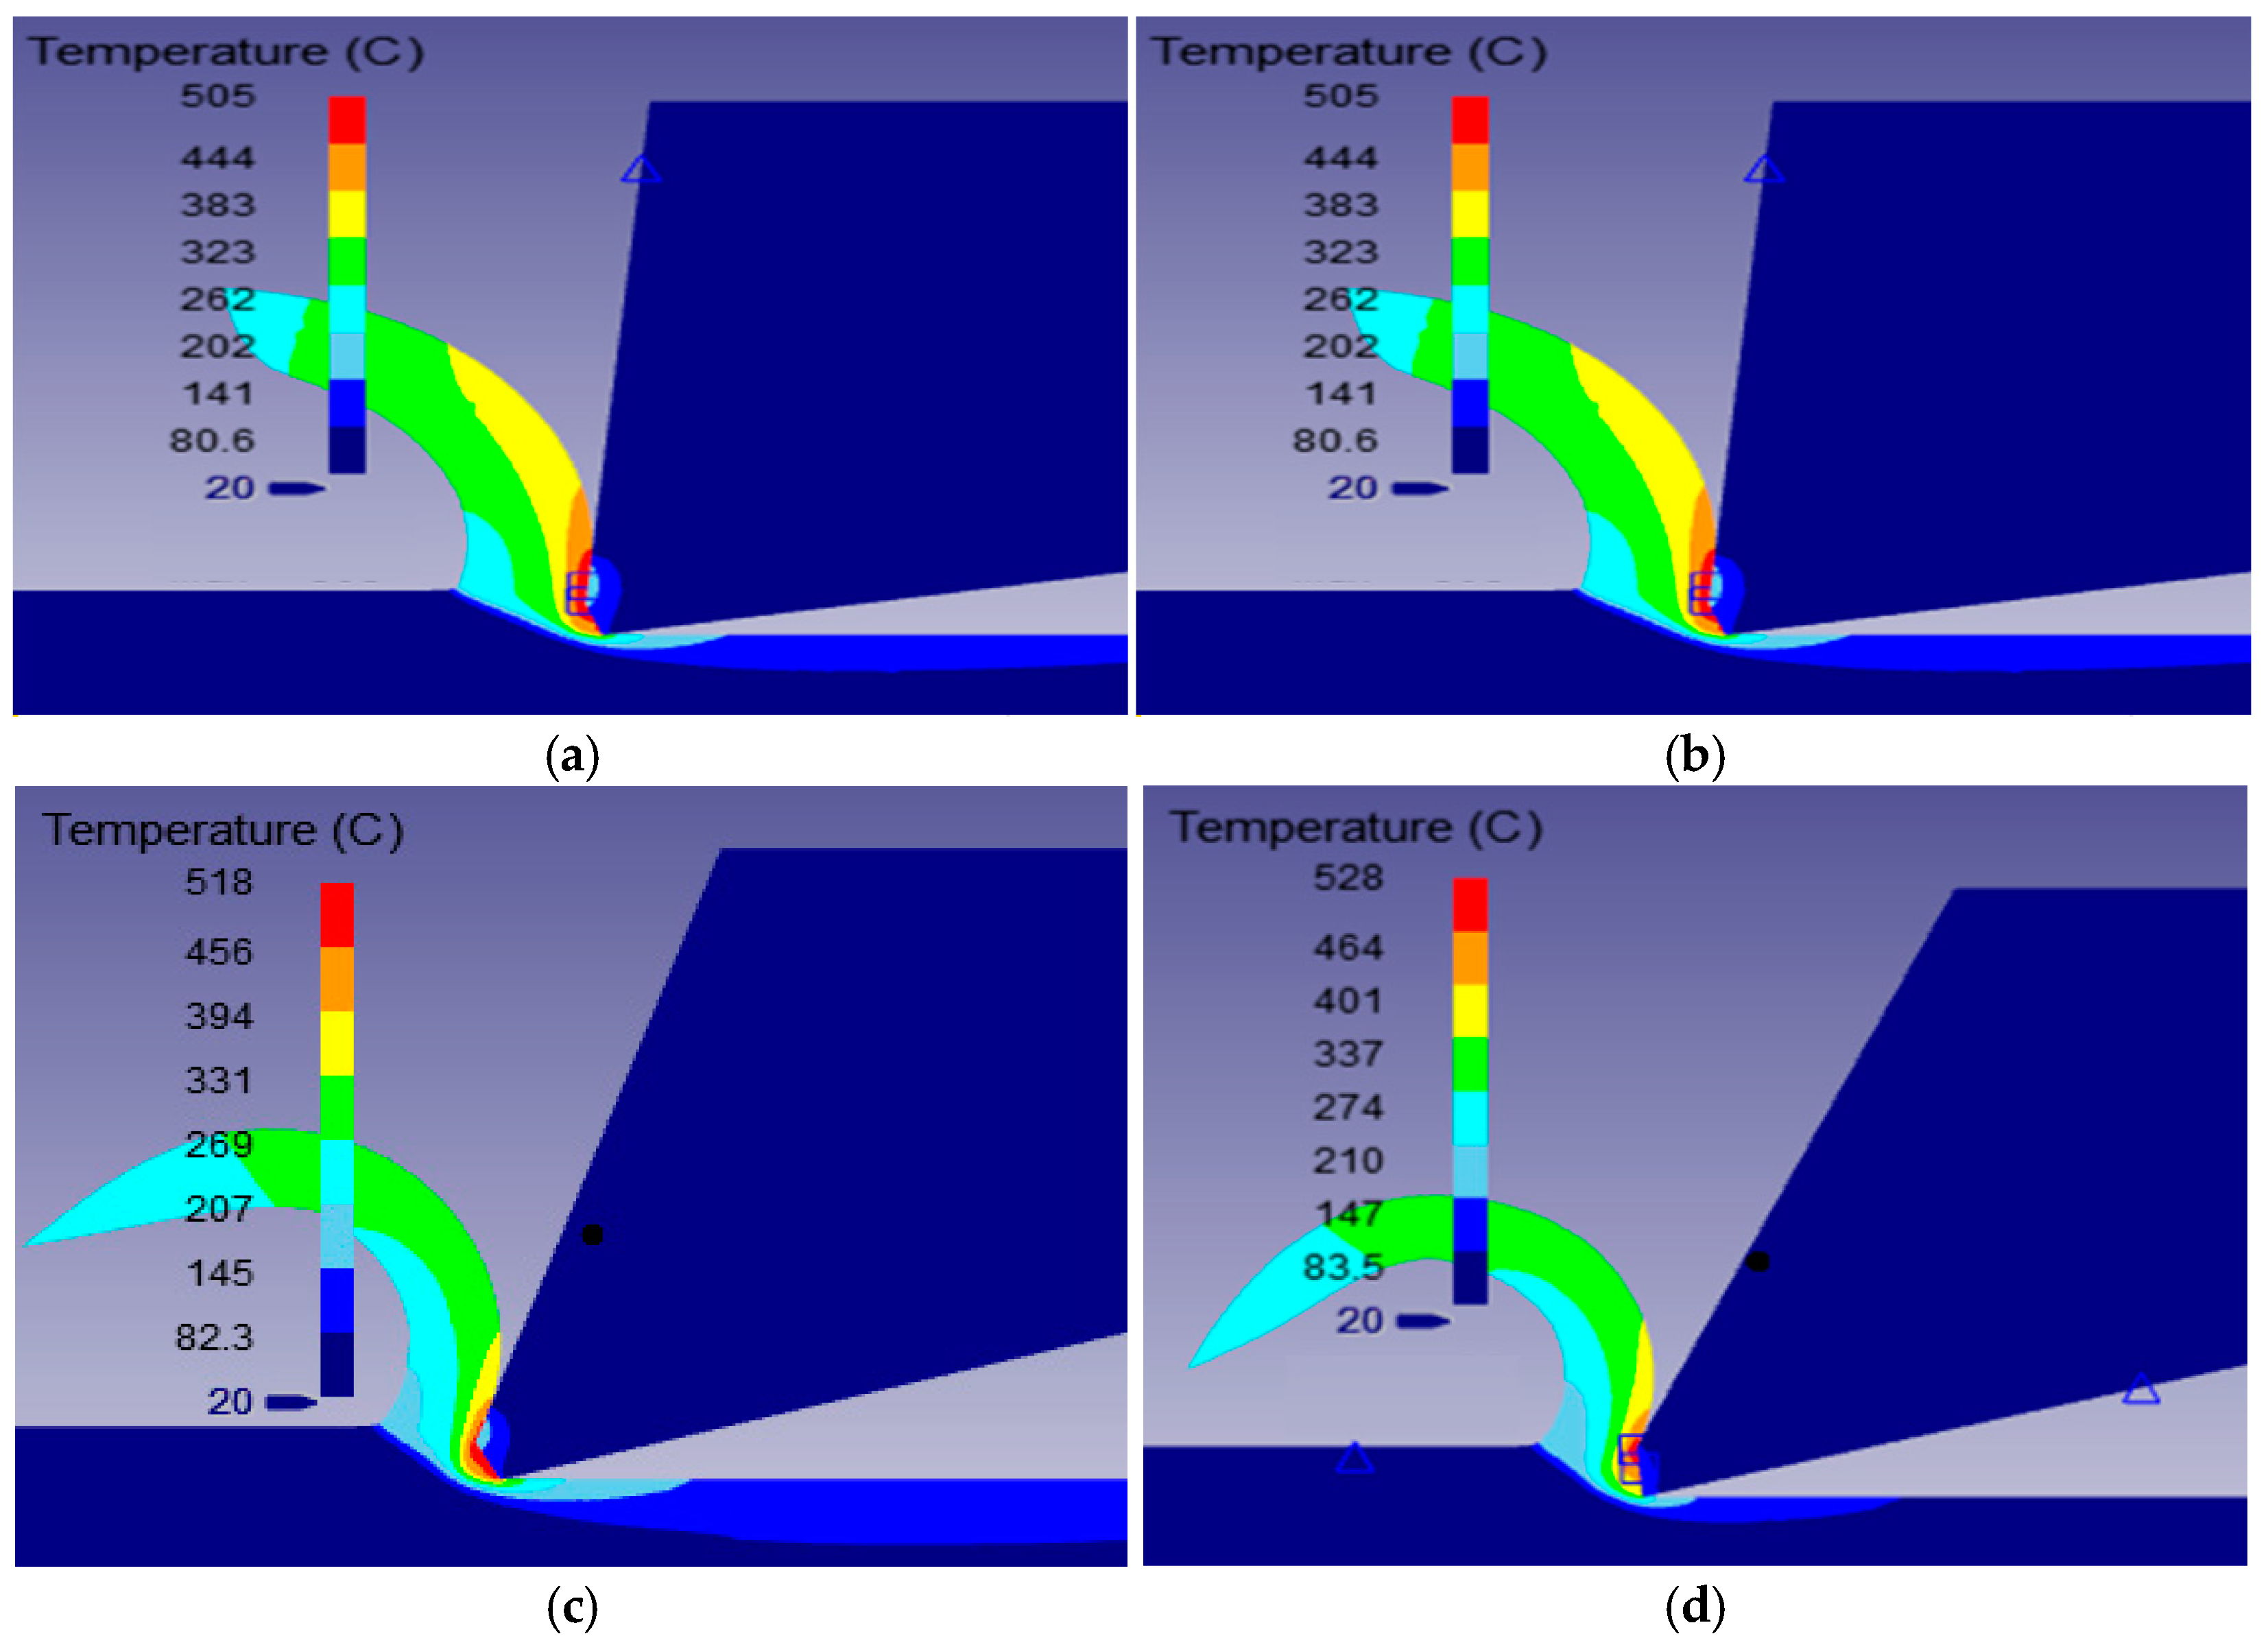
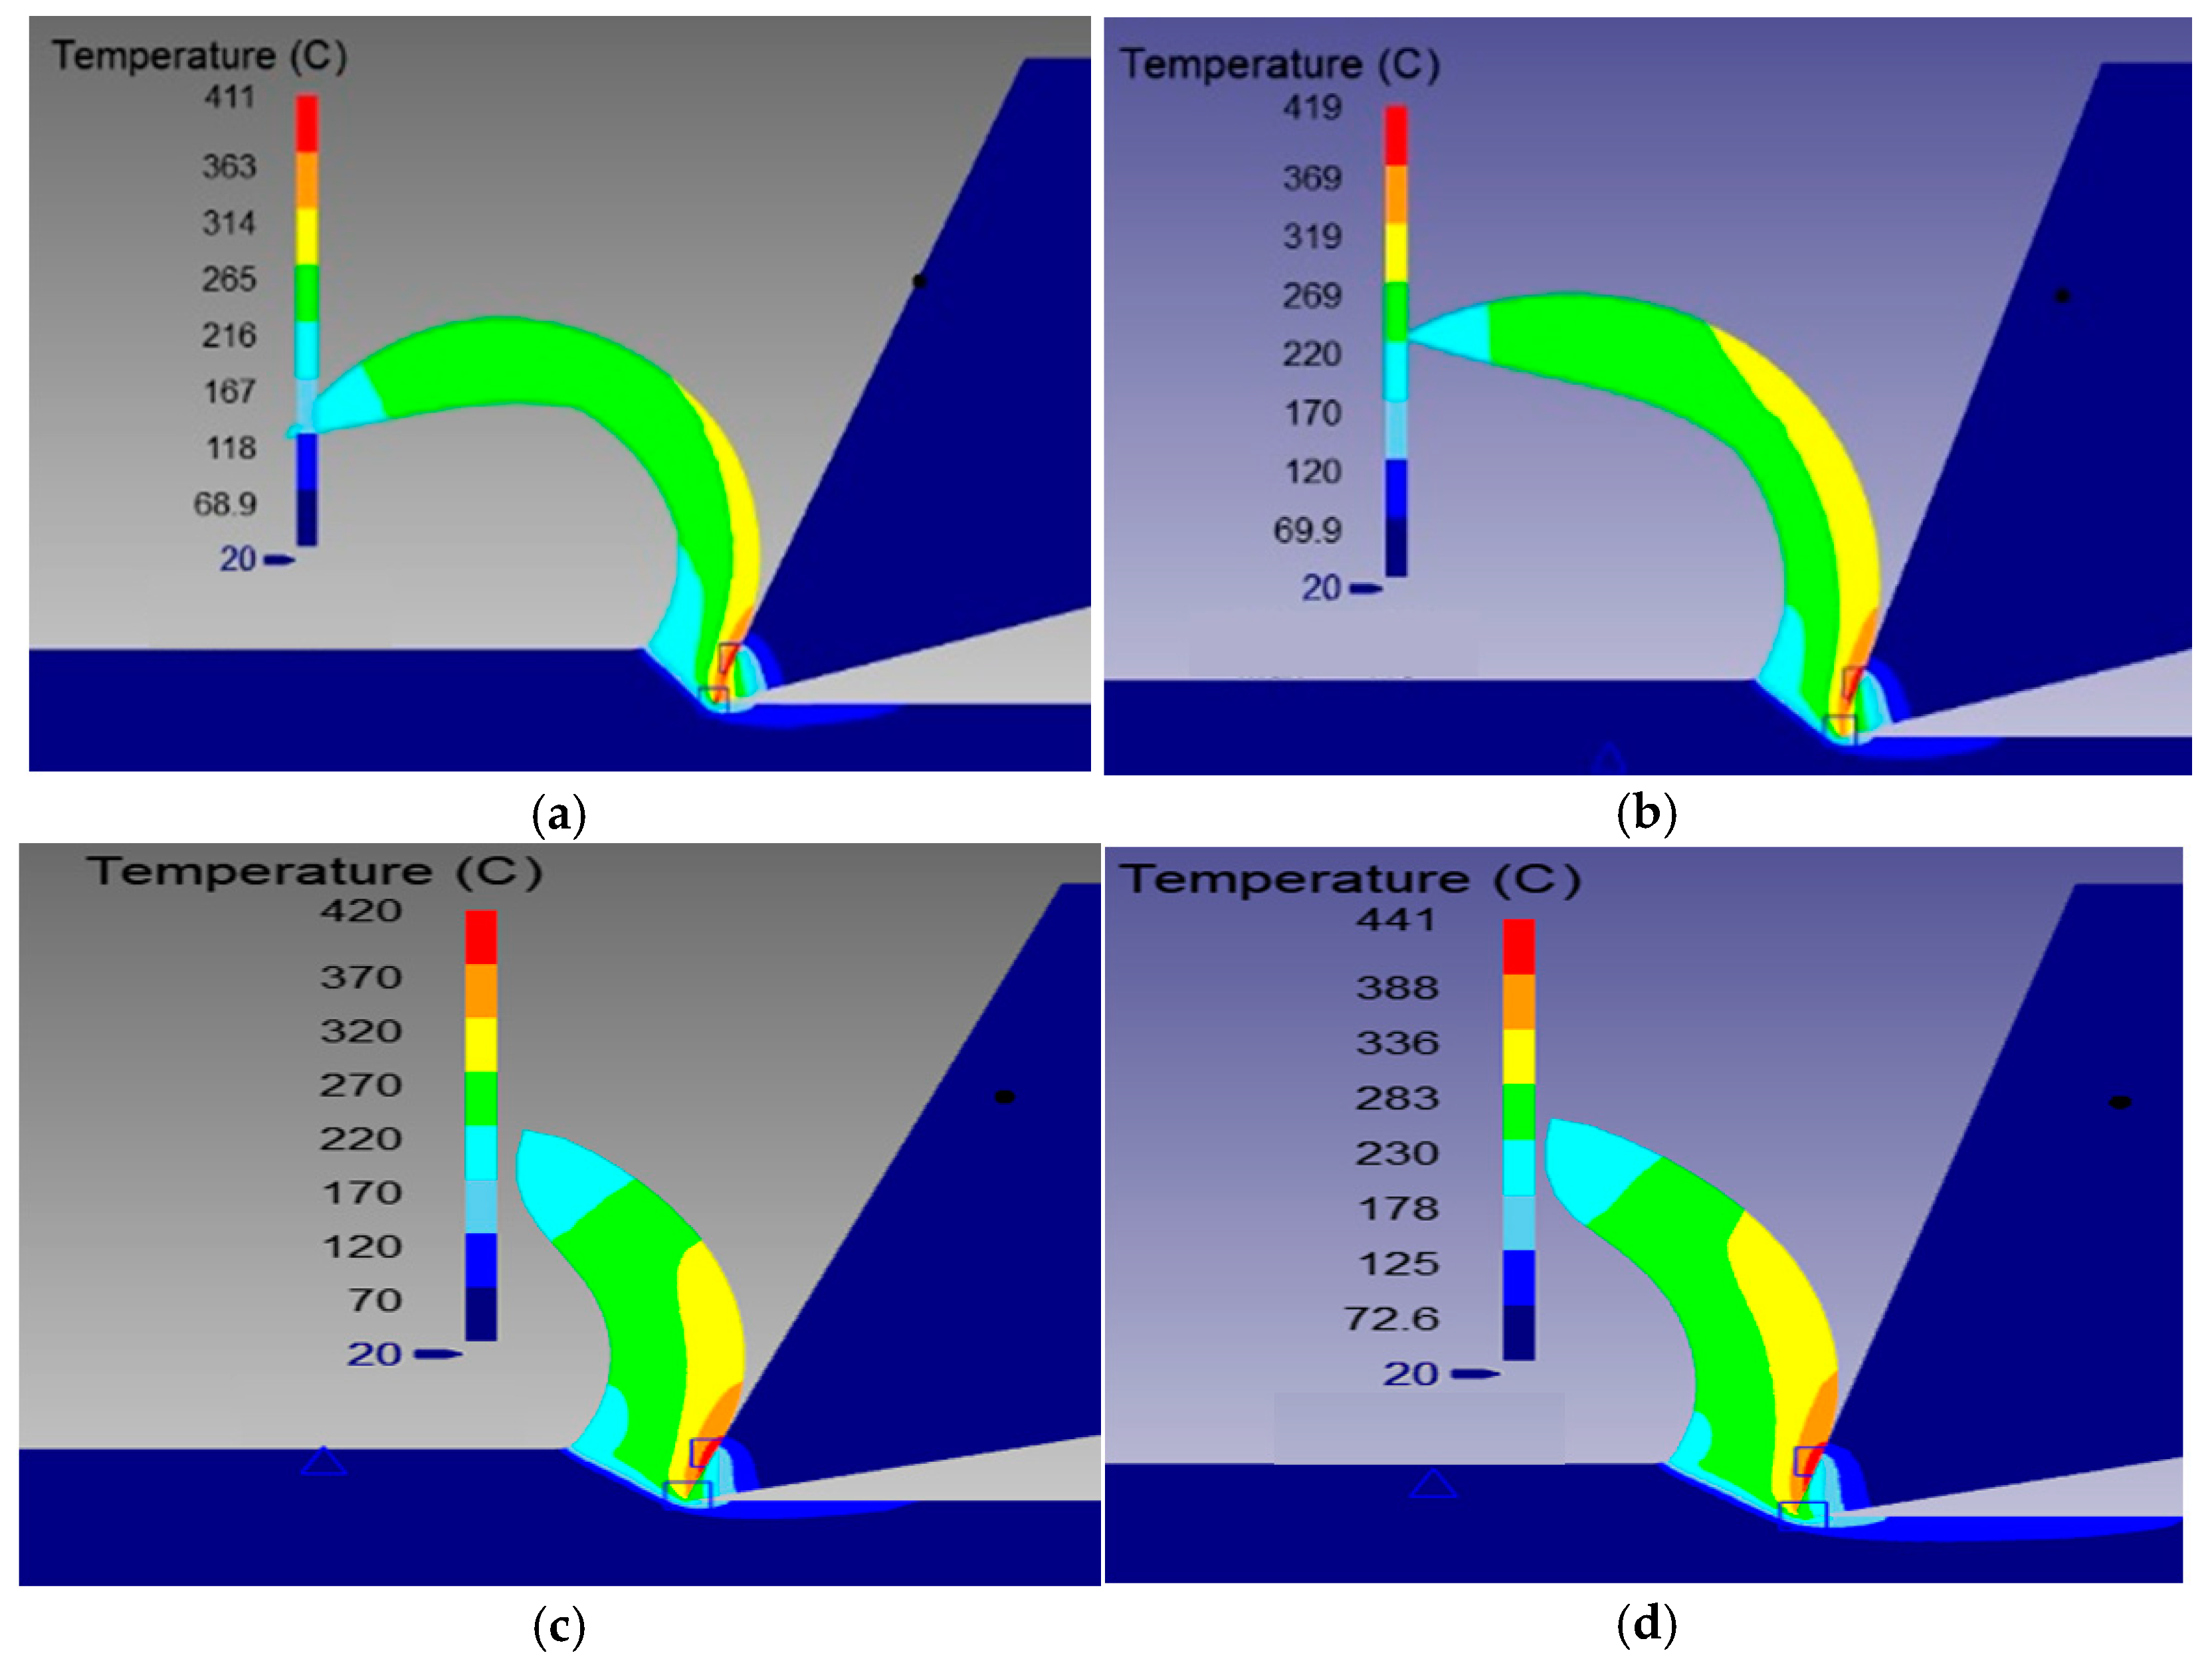
Figure 8 shows the distribution of cutting temperature in the model at V = 150 m/min, f = 0.2 mm/rev, γn =10° for different chamfer widths. From Figure 8 it may be noted that the cutting temperature increases when the chamfer width increases. For chamfer widths from 0.1 mm to 0.75 mm, the increase in cutting temperature is around 10%. The higher temperatures were located in the chip-tool contact zone due to the higher heat generated in this area. Additionally, the more the chamfer width increased, the more the maximum temperatures were pronounced in this zone, extending to the rake face.
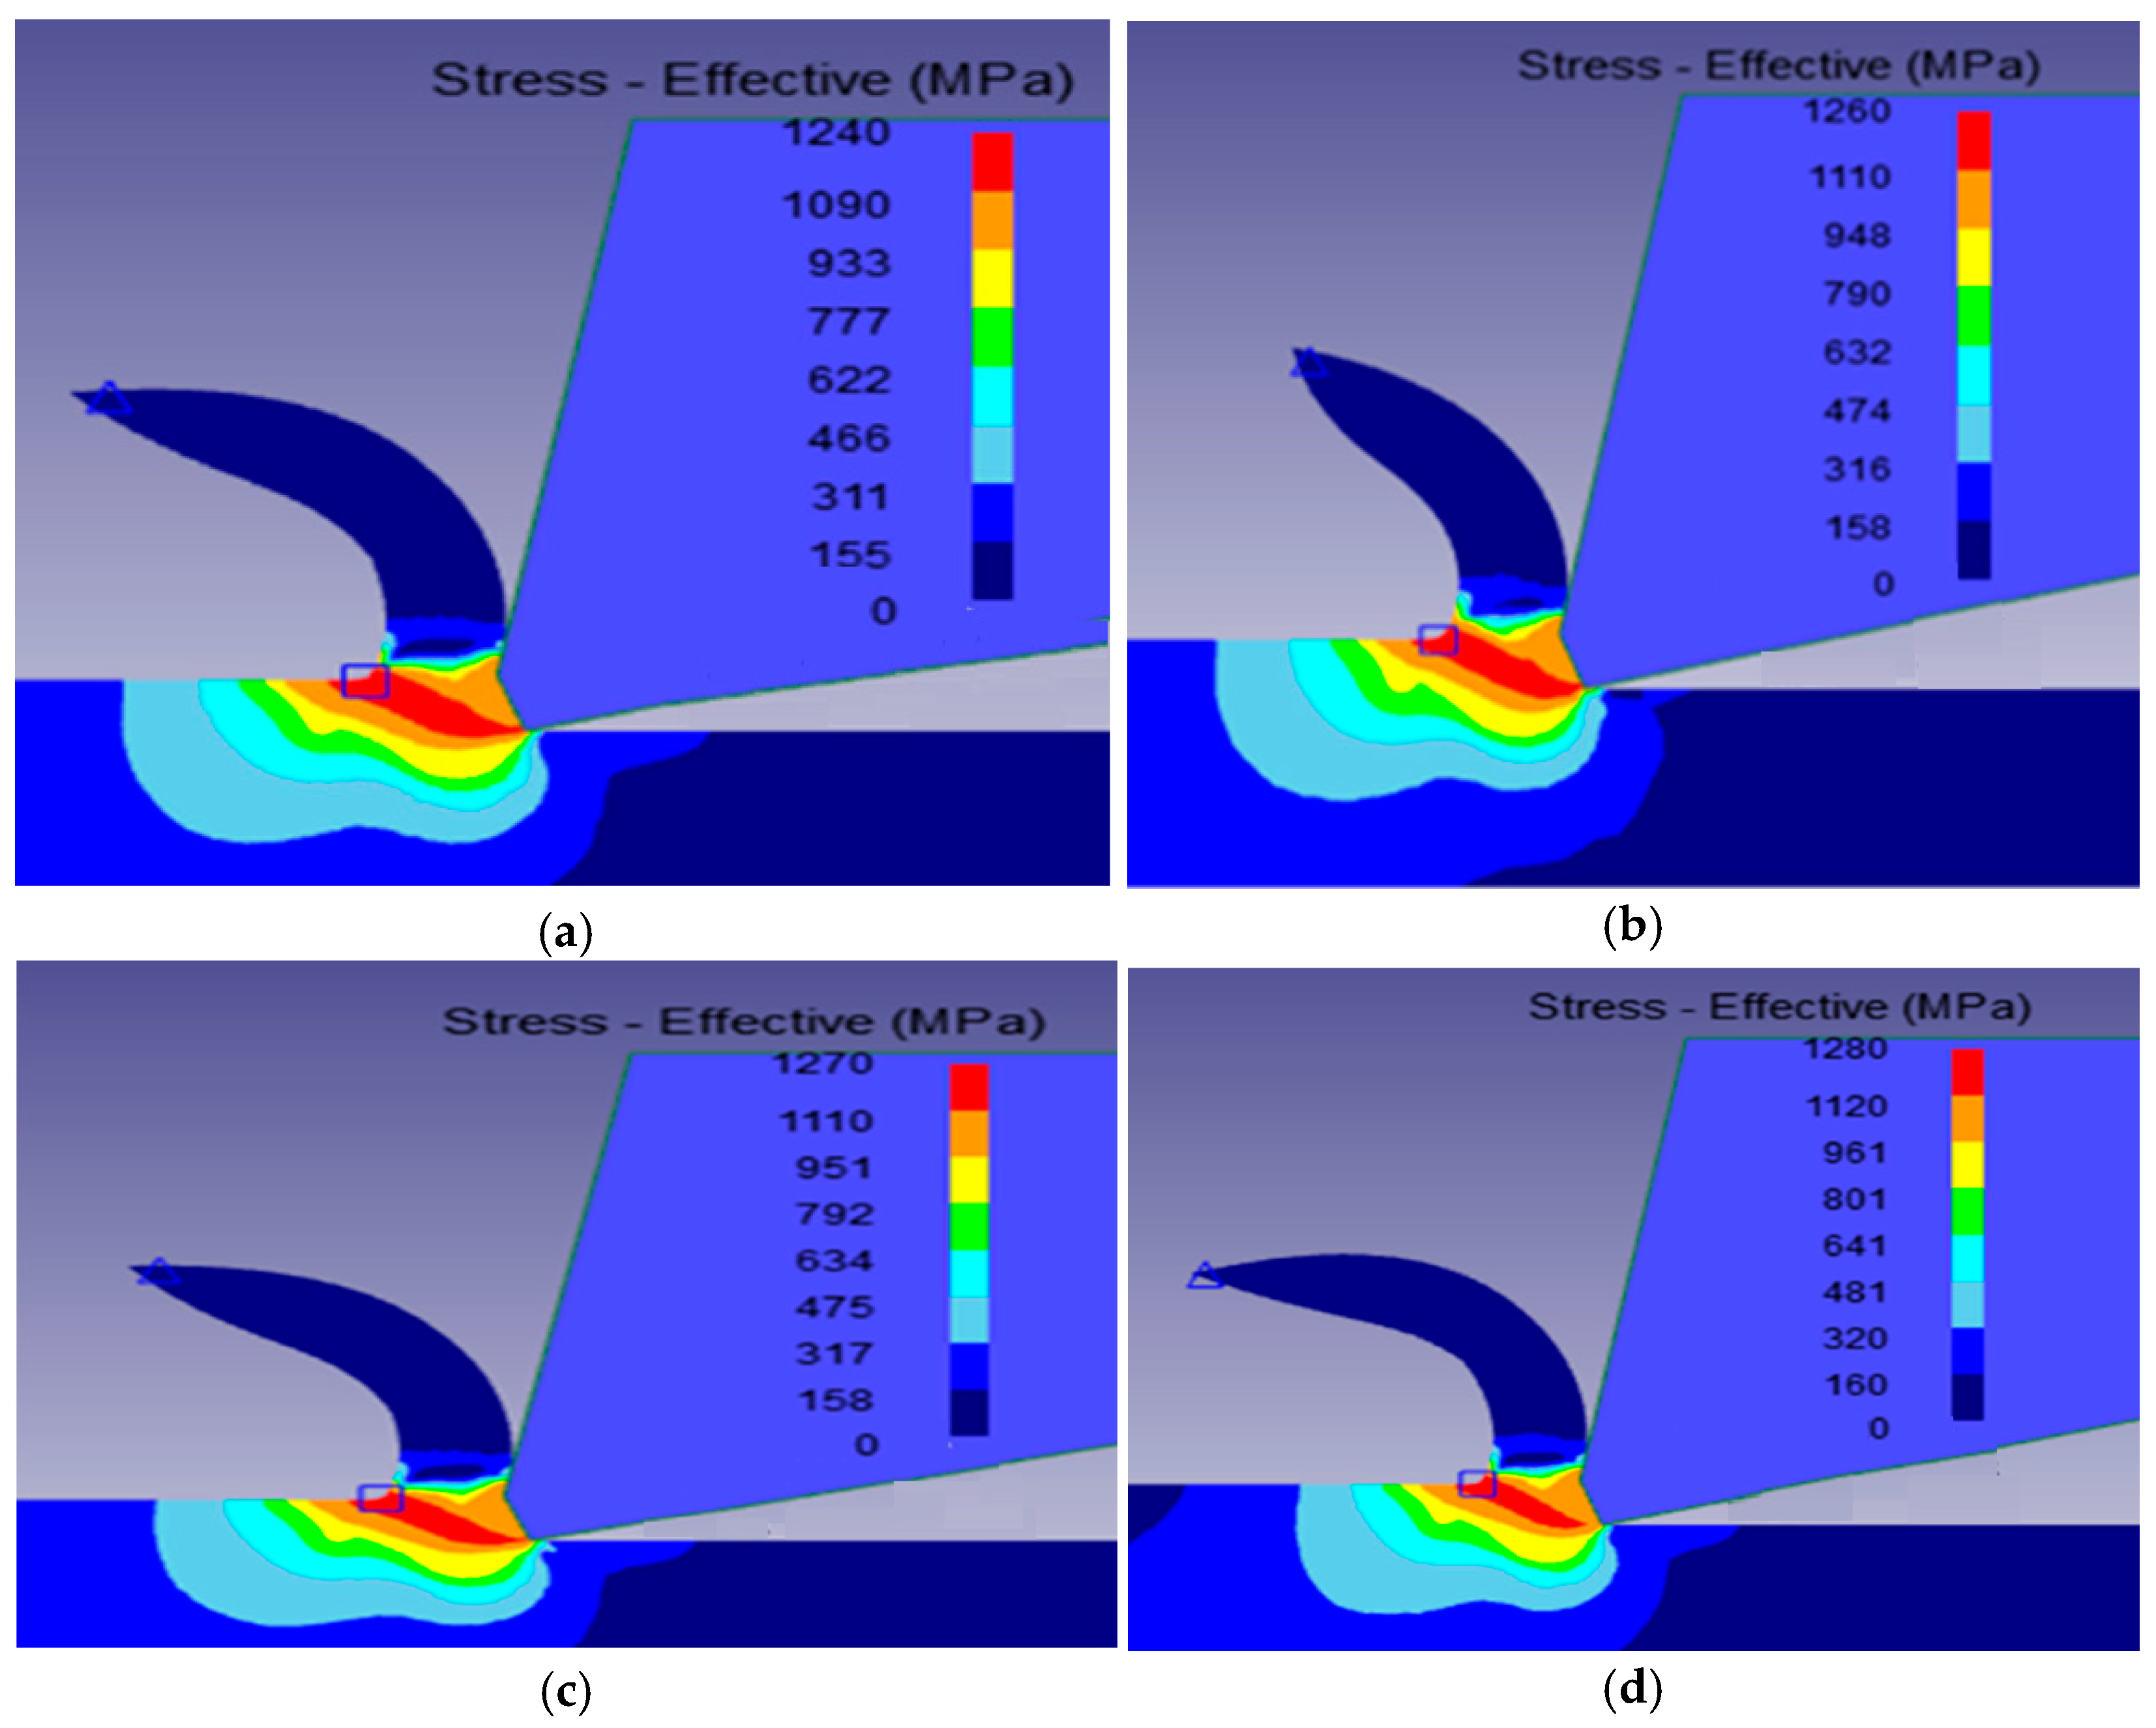
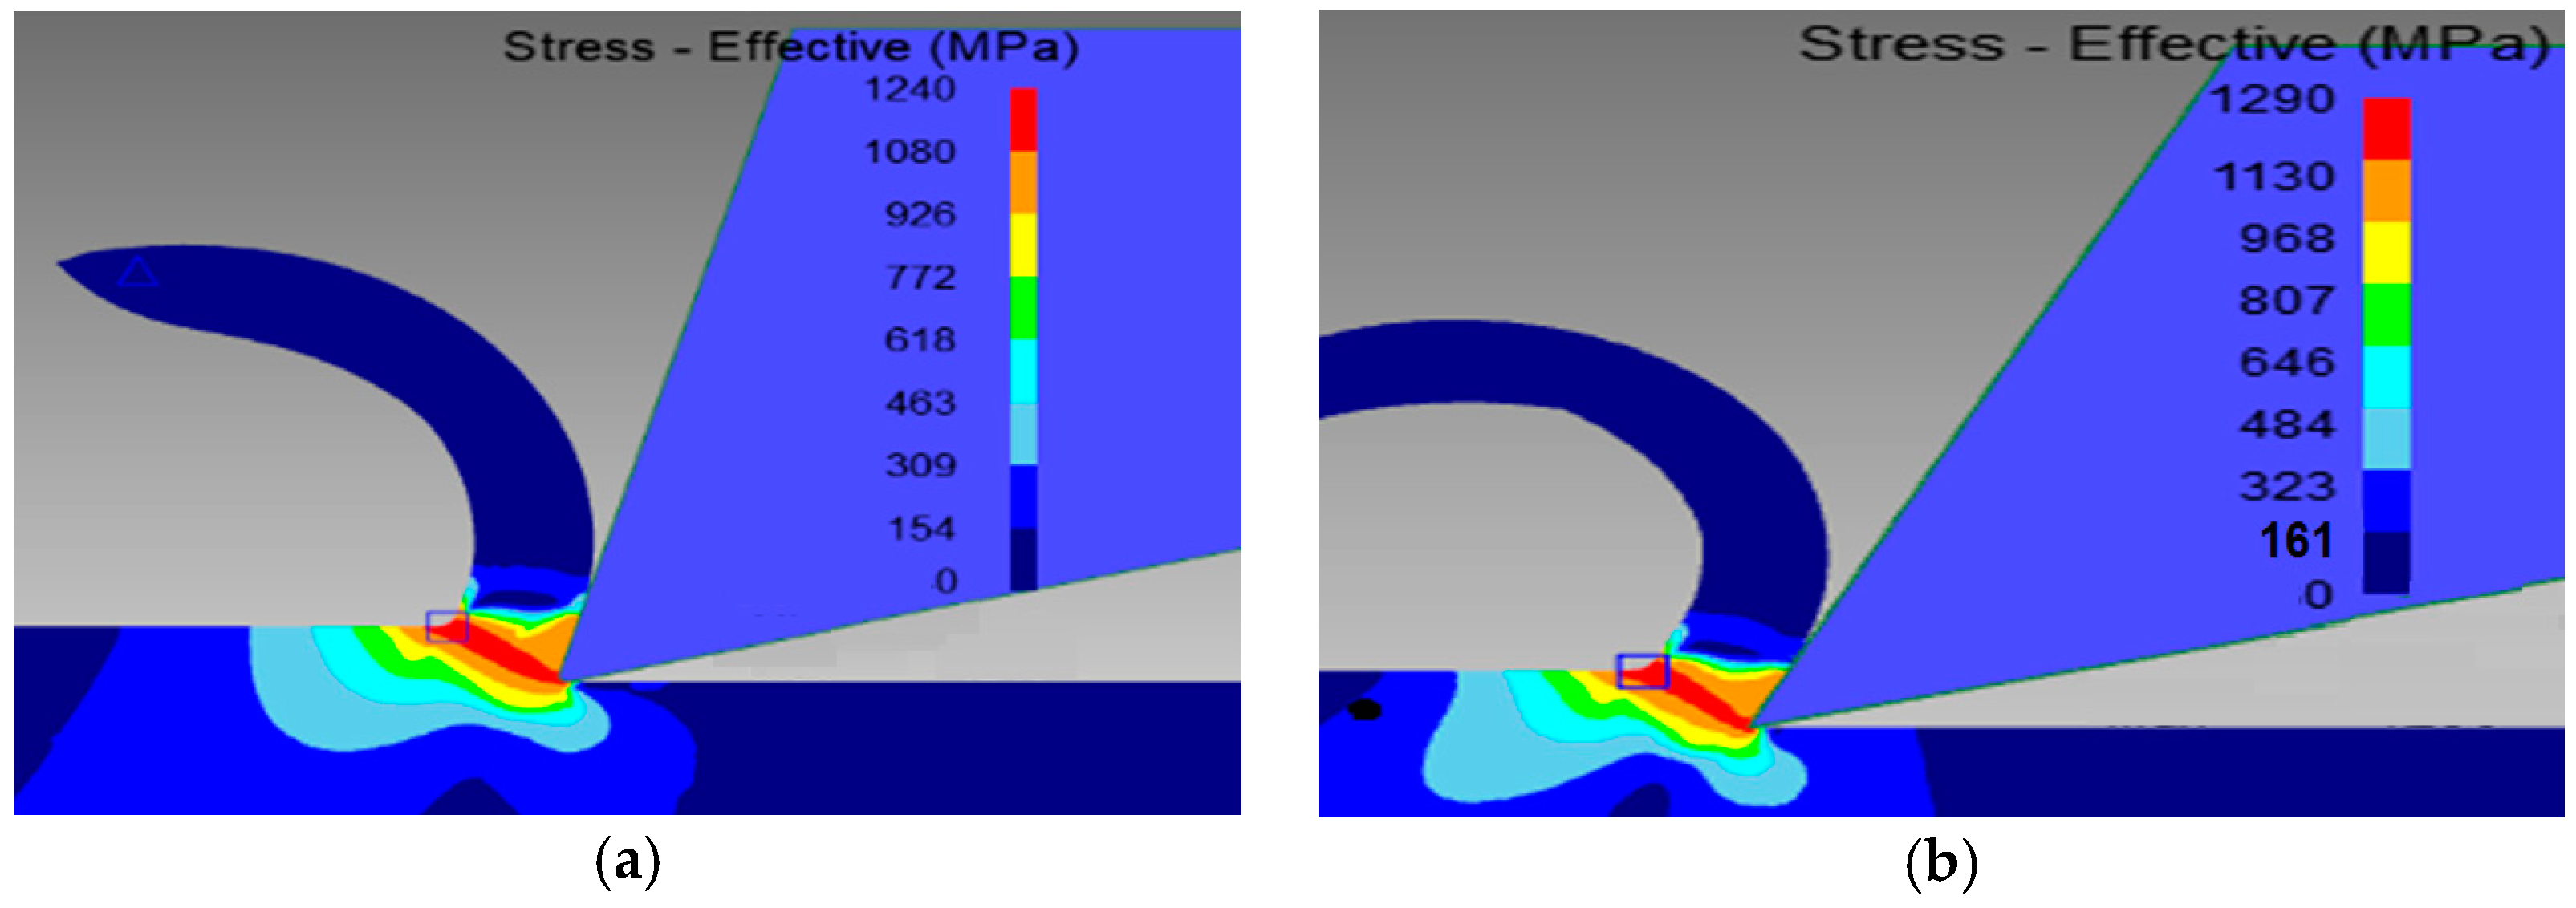
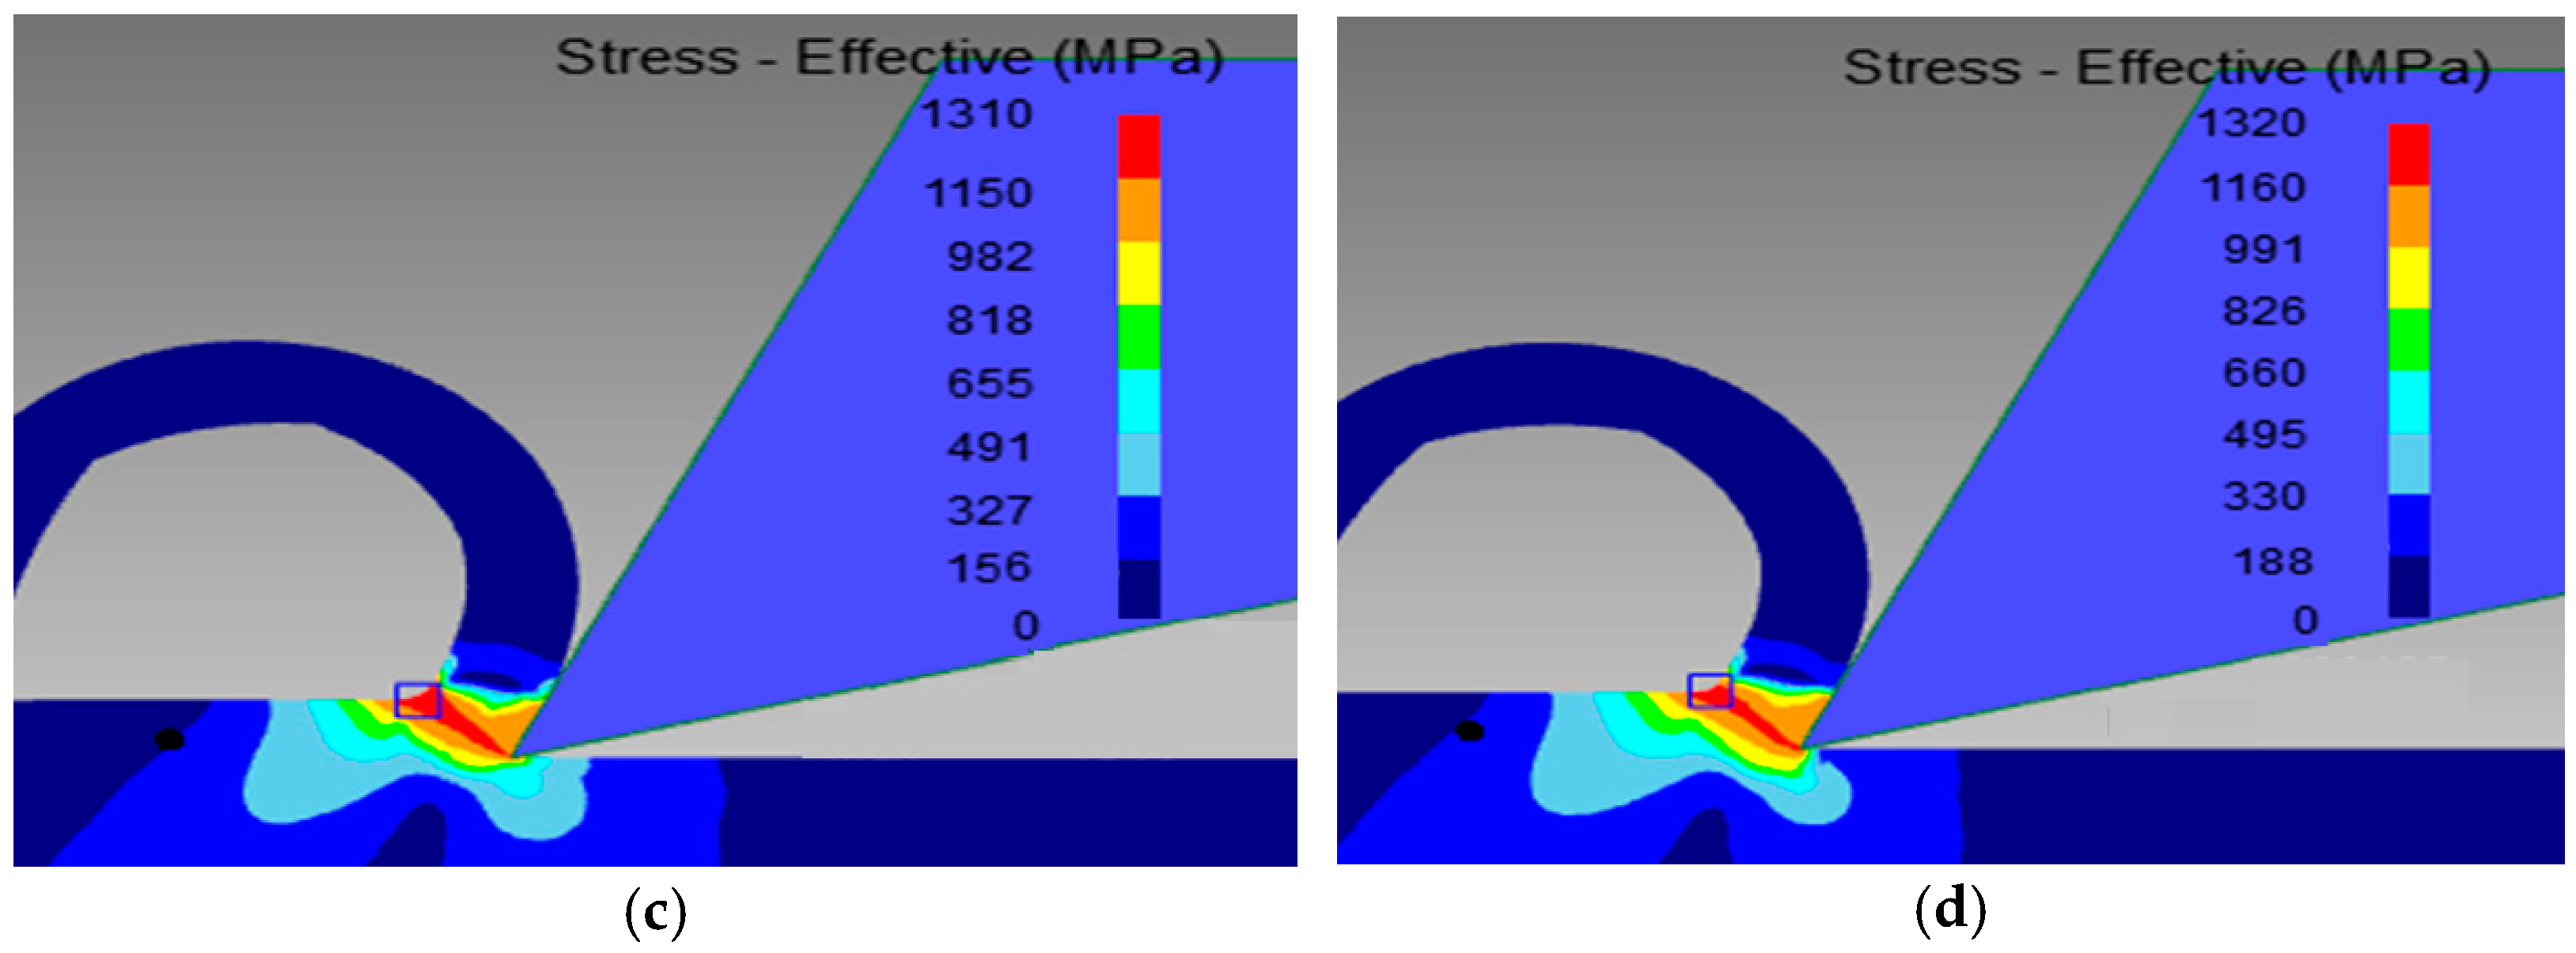
Figure 9 shows the distribution of effective stress in the model at V = 150 m/min, f = 0.2 mm/rev and γn =10° for different chamfer widths. It may be seen from the figure that the effective stress increases when the chamfer width increases. This result shows that a higher chamfer width produces a larger contact stress with the workpiece [22]. Changing the chamfer width from 0.1 mm to 0.75 mm produced a small increase in cutting stress of about 3%. The cutting stresses were maximum in the shear plane. Tagiuri et al. [15] also observed this result previously.
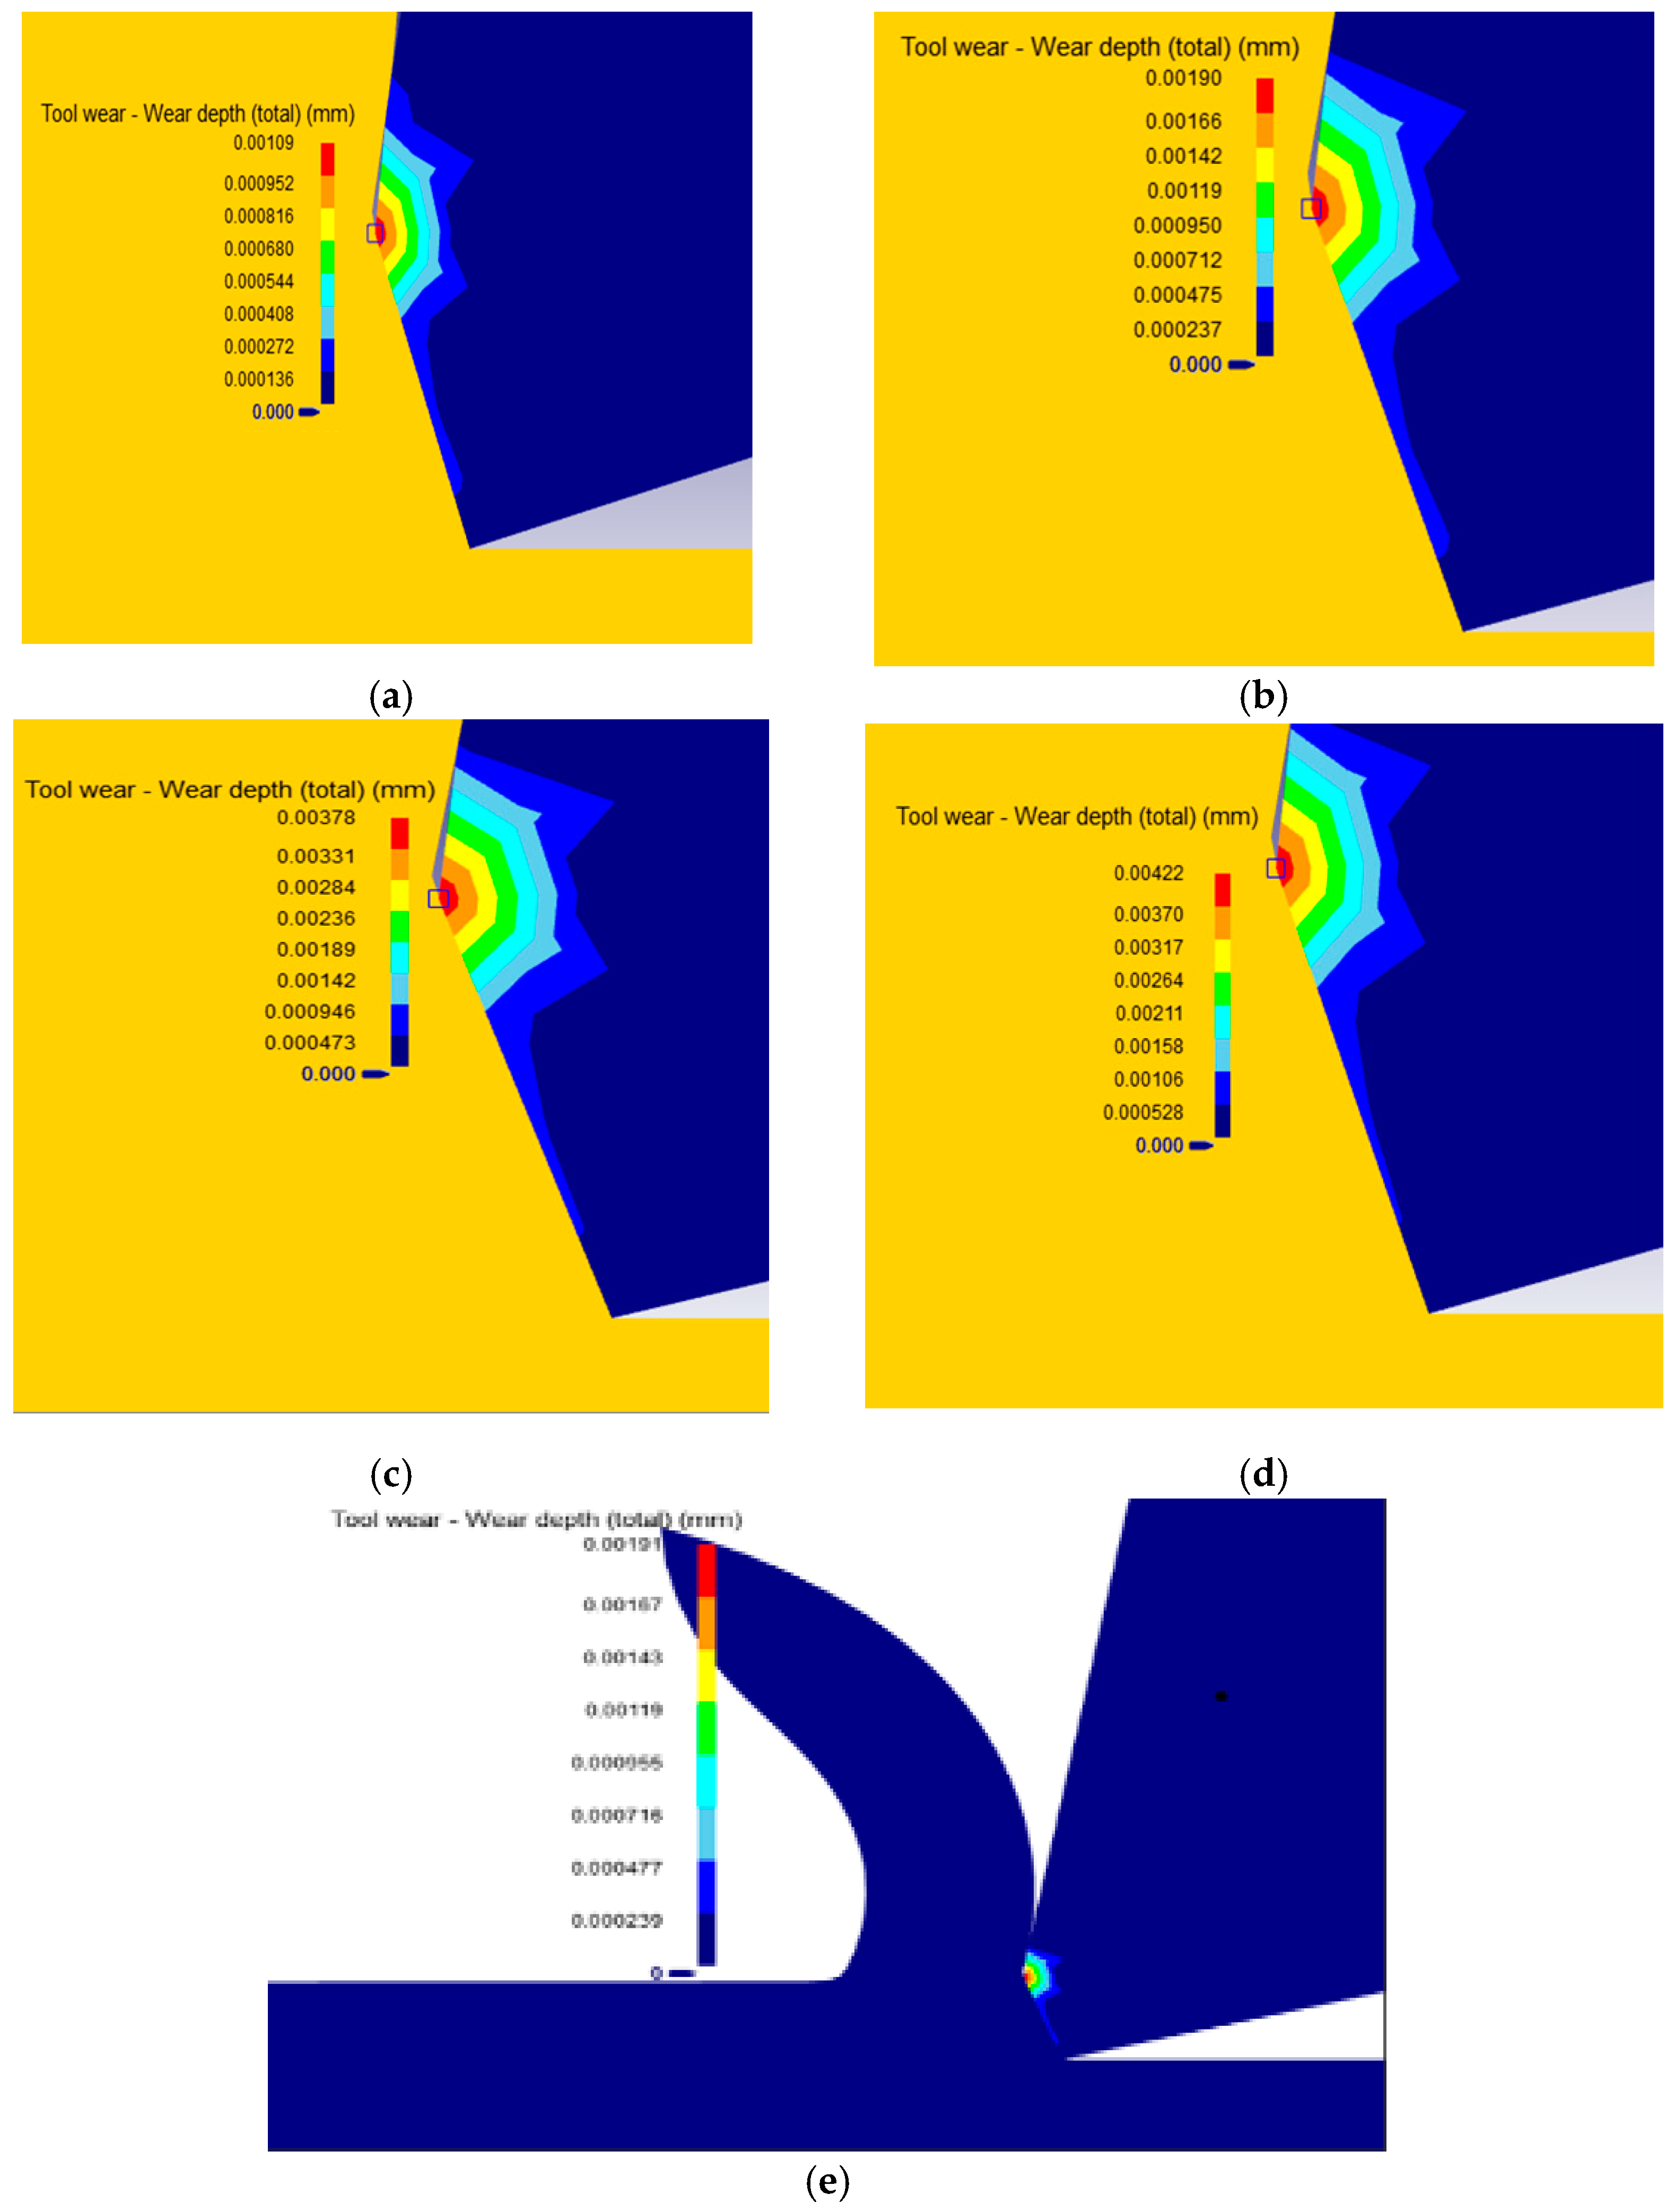
Figure 10 shows the distribution of wear depth for different chamfer widths during the cutting simulation at V = 150 m/min, f = 0.2 mm/rev and γn =10 °. Due to the microscale nature of the obtained total wear, the images were zoomed in on the chamfer width area in order to show clearly the wear depth zone. From Figure 10, it is observed that the tool wear depth increases with increasing chamfer width. Increasing from a chamfer width of 0.1 mm to 0.4, 0.6 and 0.75 mm, the increases in tool wear depth were 74%, 98% and 11%, respectively. While there was a large increase from 0.1 mm to 0.6 mm, the increase noted was small from 0.6 mm to 0.75 mm. The tool wear is higher on the chamfer width of the tool at the tool–chip contact area. These variations are due to the pressure balance applied in this area, caused by the opposing effects [4]. Otherwise, while chamfer width increases from 0.1 to 0.6 mm, the increase in pressure increases the wear depth. From 0.6 to 0.75 mm, the pressure decreases and consequently the wear depth is reduced.
Figure 11 shows the distribution of cutting temperature for different chamfer angles during the cutting simulation at V = 150 m/min, f = 0.3 mm/rev and wn = 0.1 mm. From Figure 11, it can be noted that the cutting temperature increases with increasing chamfer angle. The increase is approximately 3% in the range of 517 ± 13 °C for the maximum temperature. From chamfer angle 25 to 35°, the cutting temperature remains nearly constant. Additionally, the more the chamfer angle increases, more the rake angle decreases. This creates longer contact between the chip and cutting tool, which produces much heat in these locations [4,17].
Figure 12 shows the distribution of effective stress for different chamfer angles during the cutting simulation at V = 150 m/min, f = 0.3 mm/rev and wn = 0.1 mm. An examination of the figure shows that the effective stress increases when the chamfer angle increases from 15 to 25° and from 35 to 45° but it decreases from 25 to 35° as more thrust forces are applied than cutting force in these cases [17]. The variation in cutting stress is around 2%. Thus, it is reasonable to conclude that the chamfer angle does not have a significant effect on the cutting stress.
Figure 13 illustrates the distribution of cutting temperature in the model at V = 150 m/min, f = 0.3 mm/rev for different sharp angles. As may be seen, the cutting temperature increases with increasing sharp angle. The rate of increase is approximately 2 to 5% in the range of 426 ± 15 °C for the maximum temperature. It is also observed that the more the sharp angle increases, the more the rake angle decreases, which creates greater contact between the chip and the cutting tool; this results in much heat in this area. The maximum temperatures are located on the contact area between the chip and rake face. The more the sharp angle increases, the more the maximum temperature is pronounced in this zone, extending to the chip as well.
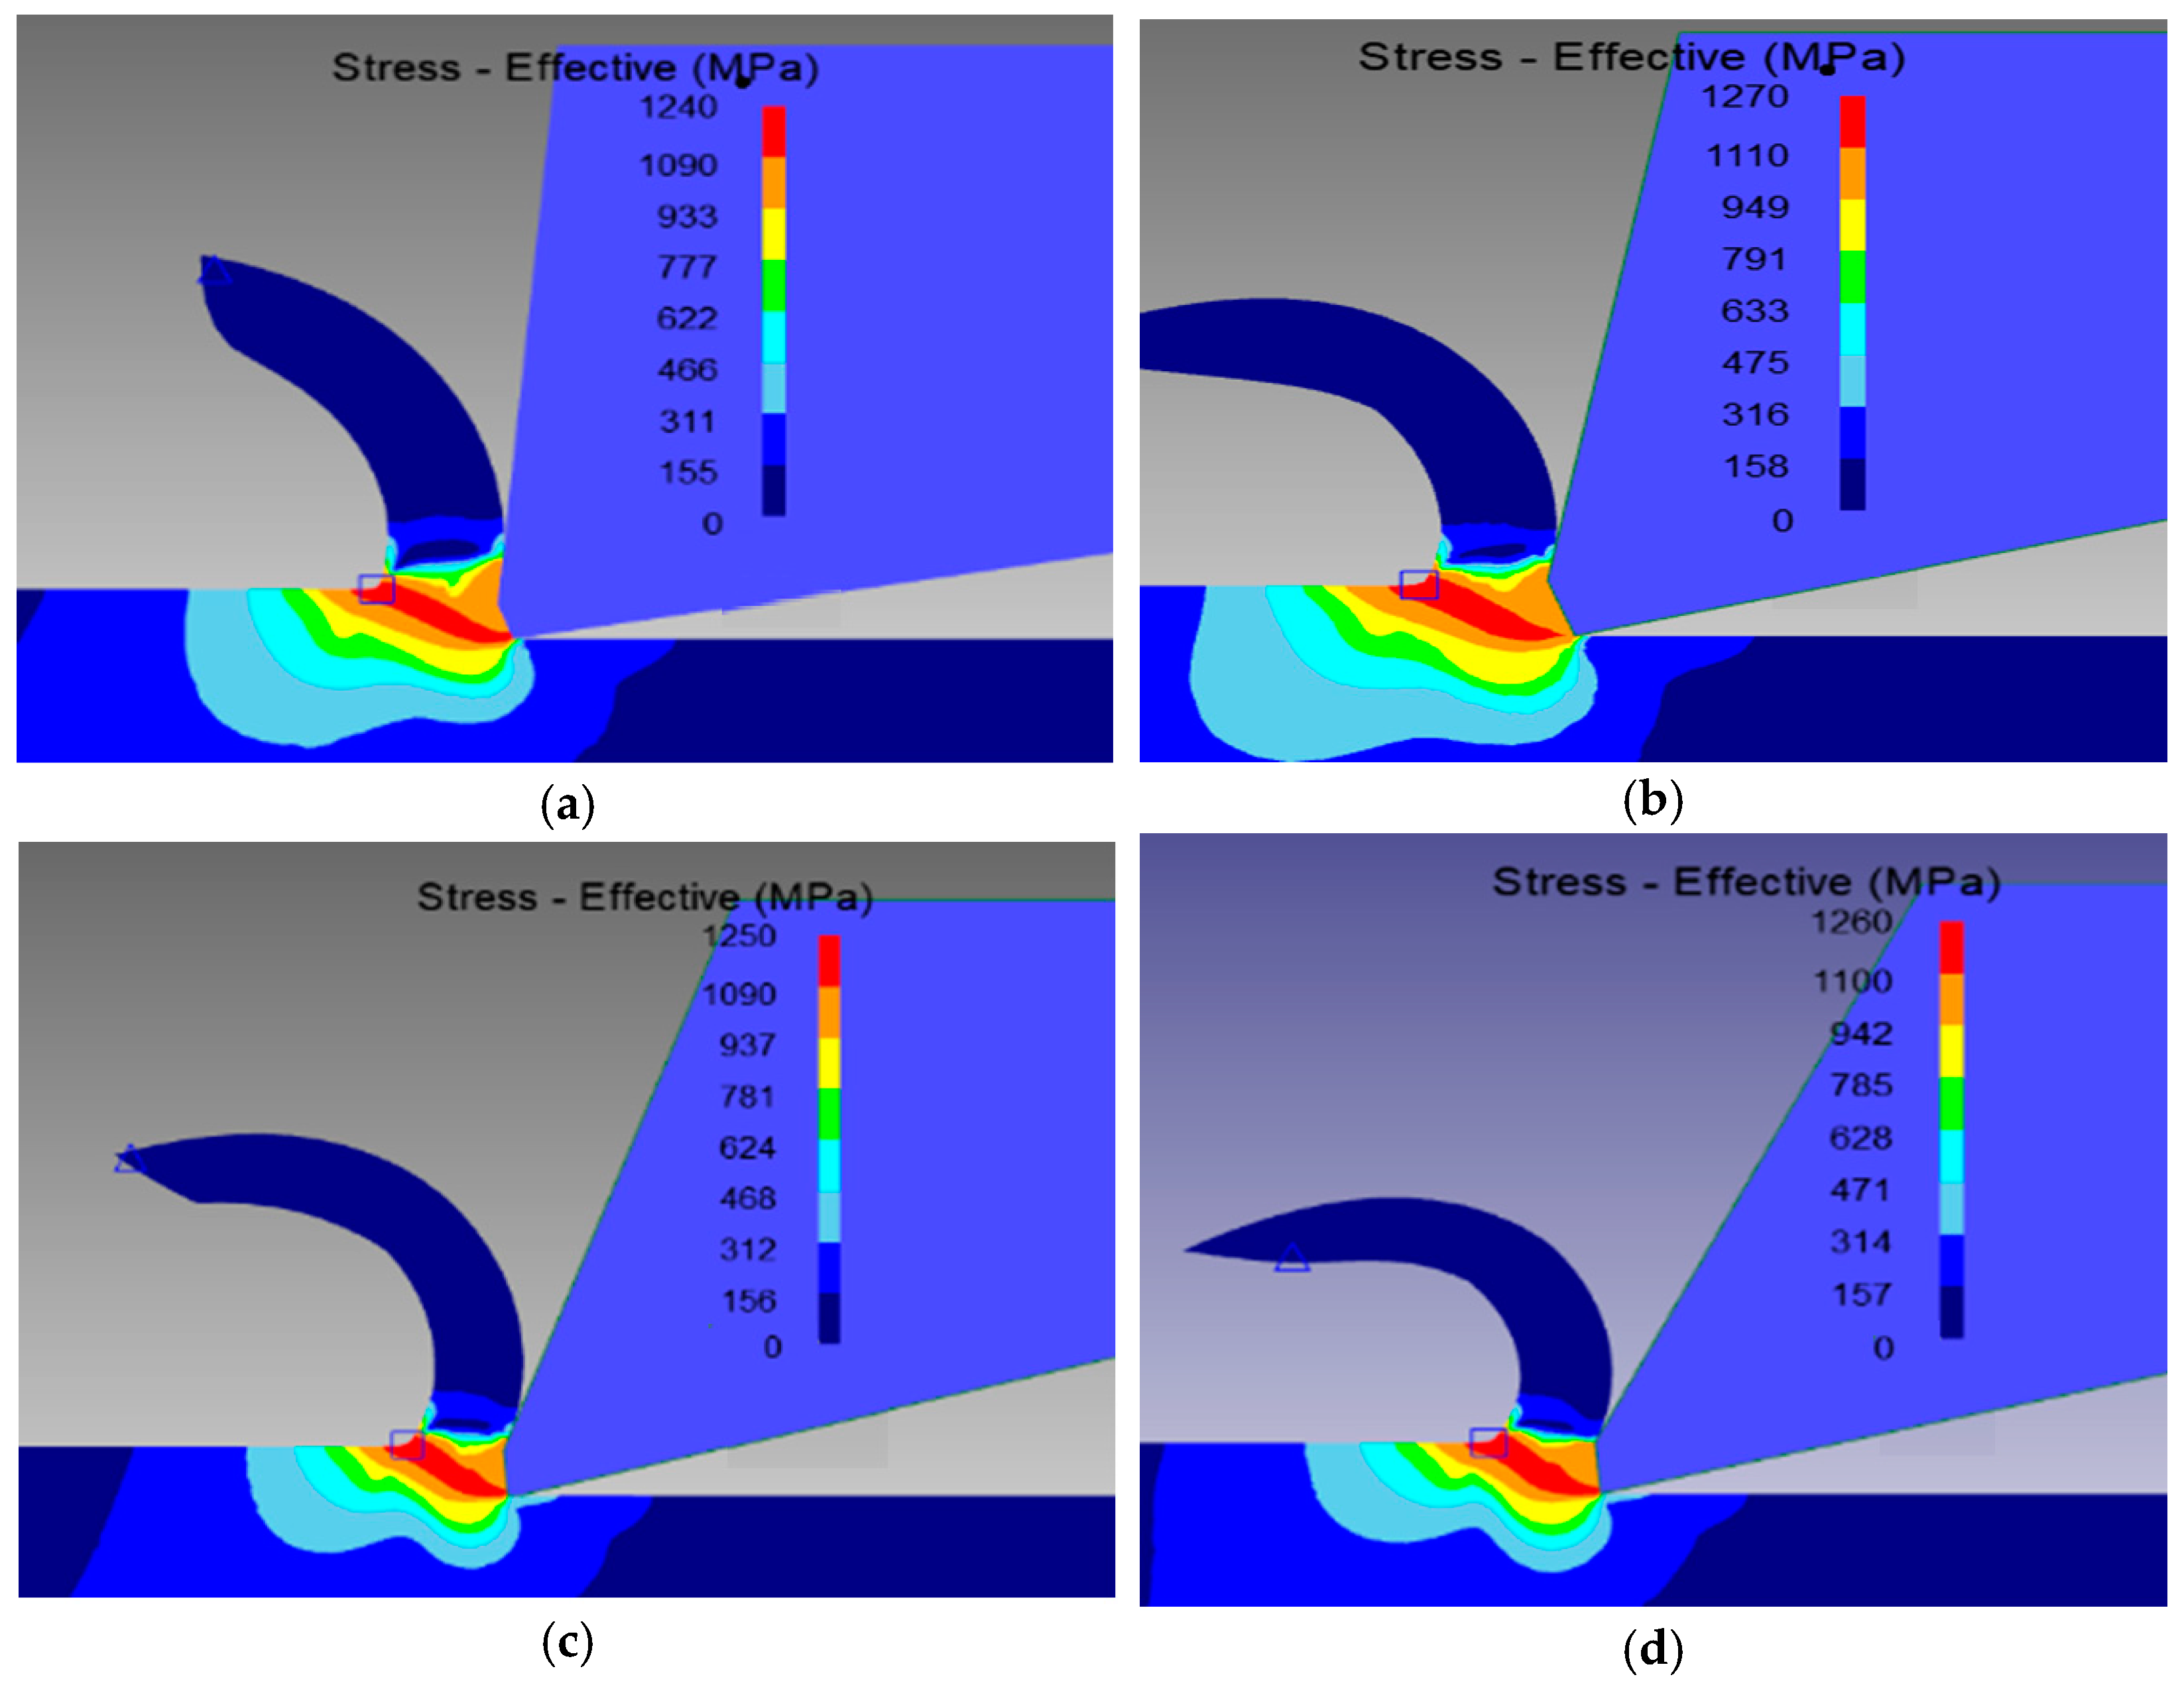
Figure 14 shows the distribution of effective stress for different sharp tool angles during the cutting simulation at V = 150 m/min and f = 0.3 mm/rev. From Figure 13, it is noted that there is a slight increase in cutting stress when moving from a sharp angle of 45° to 65°. The increase is around 1% for maximum stress. For the values from 35° to 45°, however, the cutting stress variation is about 4%.
Figure 15 illustrates the distribution of tool wear depth for different tool sharp angles during the cutting simulation at V = 150 m/min and f = 0.3 mm/rev. From Figure 15 it is observed that wear depth increases with increasing sharp angle and chamfer angle. For the sharp tool, the tool wear occurred on the rake face, whereas it occurs on the chamfer width for the chamfer tool. As discussed earlier, the more the tool angle (sharp or chamfer angle) increases, the more the rake angle decreases, which creates longer contact between chip and cutting tool which presses the chips against the cutting tool in the contact area [12]. Hence, both the rake face of the sharp tool and the corner at the chamfer width become more stressed, which causes significant wear at these respective locations. Furthermore, tool wear depths for the sharp tool were observed to be higher than those for the chamfer tool, due to the lower rake angles created.

3.2. Analysis of Variance (ANOVA)

In order to identify the main parameters that influence the different machining performance characteristics, such as temperature, effective stress, chip thickness and tool wear, it is necessary to study statistically the above-investigated interactive effects. This statistical study consists of performing an analysis of variance (ANOVA) test based on the Taguchi design method, using the Statgraphics Centurion software in our case. The design of experiments (DOE) developed consisted in selecting four factors with different levels. Two types of DOEs were designed for the chamfer tool geometry and the sharp tool geometry, respectively. Table 6 and Table 7 present the two designs of experiments for the two tool-type geometries, respectively.
Accordingly, two ANOVA analyses were carried out, one for the chamfer tool and the other for the sharp tool to obtain the response parameters of temperature and stress. The significant parameters were identified using the condition that the p-values must be less than 0.05 at the 95.0% confidence level. Several models were analyzed and only those statistically valid at the 95% confidence level were retained.

3.2.1. ANOVA for Chamfer Tool

The obtained results showed that the feed rate, the cutting speed and their interactions were the most significant parameters affecting temperature, stress and wear depth. In addition, it can be noted that the interactions between the cutting speed and chamfer width and that between the cutting speed and chamfer angle are also most significant for temperature.
A first general linear model was analyzed and the non-statistically significant terms or interactions were removed for the analysis. Table 8 summarizes the final ANOVA parameters retained for the temperature when using a chamfered tool. The cutting speed was the most influential factor (F-value = 80.74), followed by the chamfer width (F-value = 42.03). The cutting speed × feed rate interaction exhibits the most important term with an F-value of 18.81.
Table 9 summarizes the ANOVA results of the stress on the tool when machining with a chamfered tool. The tool chamfer angle did not show a statistically significant influence on the result (for the 95% confidence interval considered). This was also the case for the interactions between the chamfer angle and the other factors: cutting speed, feed rate and tool chamfer width. Therefore, this factor and its interactions were removed from the analysis. It can thus be seen from Table 9 that the stress on the cutting tool is influenced mainly by the cutting speed, the chamfer width and feed rate, plus their interactions.

3.2.2. ANOVA for Sharp Tool

The performance of the sharp tool was analyzed as a function of the cutting parameters (cutting speed and feed rate) and tool angle (θt). Table 10 summarizes the results of analysis of variance obtained for the temperature, considering a general linear model and before removing non-statistically significant factors and terms. The tool angle and its interactions with cutting and feed rate were not statistically significant at the 95% confidence interval, and hence these terms were removed from the final model.
The cutting speed, the feed rate and the cutting speed x feed rate interaction were the most significant terms. This was confirmed by Qasim et al. [23] during the turning of AISI 1045 steel using carbide cutting sharp tools. They reported that the cutting speed and the feed rate are the most significant factors for cutting temperature and cutting force, respectively.
For the stress on the cutting tool, the results of the analysis of variance are presented in Table 11. Once again, the tool angle and its interactions with cutting speed and feed rates were found to be not statistically significant when using a general linear model with a constant. Some effects were found, however, when considering a general linear model without a constant, as will be seen in the equations and response surface analysis presented in the next section.
In order to show the most influencing parameters that affect the cutting temperature and the effective stress during orthogonal cutting, the above results can be explicitly given in terms of the effect order. Table 12 summarizes the influential parameters in terms of importance—with 1 being most influential and 4 being the least. It may be seen that the cutting speed and feed rate are the most influential parameters affecting the different machining characteristics studied.

3.3. Response Surface Analysis

The results obtained from the ANOVA tests may be expressed through mathematical and statistical equations using regression models to establish response functions fitting the available data. The following empirical models were obtained from statistical analysis:
For the chamfer cutting tool, the regression equations for temperature and stress are presented in Equations (7) and (8):
Temperature = 1.467 V + 1172 f + 719.78 wn + 16.463 γn − 3.490 V f − 0.0208 V γn − 23.635 wnγn  R2 = 99%
Stress = 2.21154 V + 3565.15 f +2713.88 wn − 4.53194 V f − 3.84915 V wn − 4596.42 f wn  R2 = 99.5%
For the sharp cutting tool, the regression equations of temperature and stress predicted from statistical analysis are given in Equations (9) and (10). The analysis of the wear did not show statistical significance at the 95% confidence interval.
Temperature = 229 + 0.650 V + 1867 f − 1.25 V f  R2 = 88%
Stress = 1.902 V + 2993.72 f + 17.763 θt − 2.5146 V f  R2 = 99%
− 0.02486 Vθt − 30.06 f θt
The general linear model for the estimation of the stress for the sharp tool gave a coefficient of correlation that was not acceptable (68%). For this reason, a model with no constant was preferred. The predicted results shown in Equations (7)–(10) fitted well with the results obtained by simulation as displayed in Figure 16 and Figure 17.
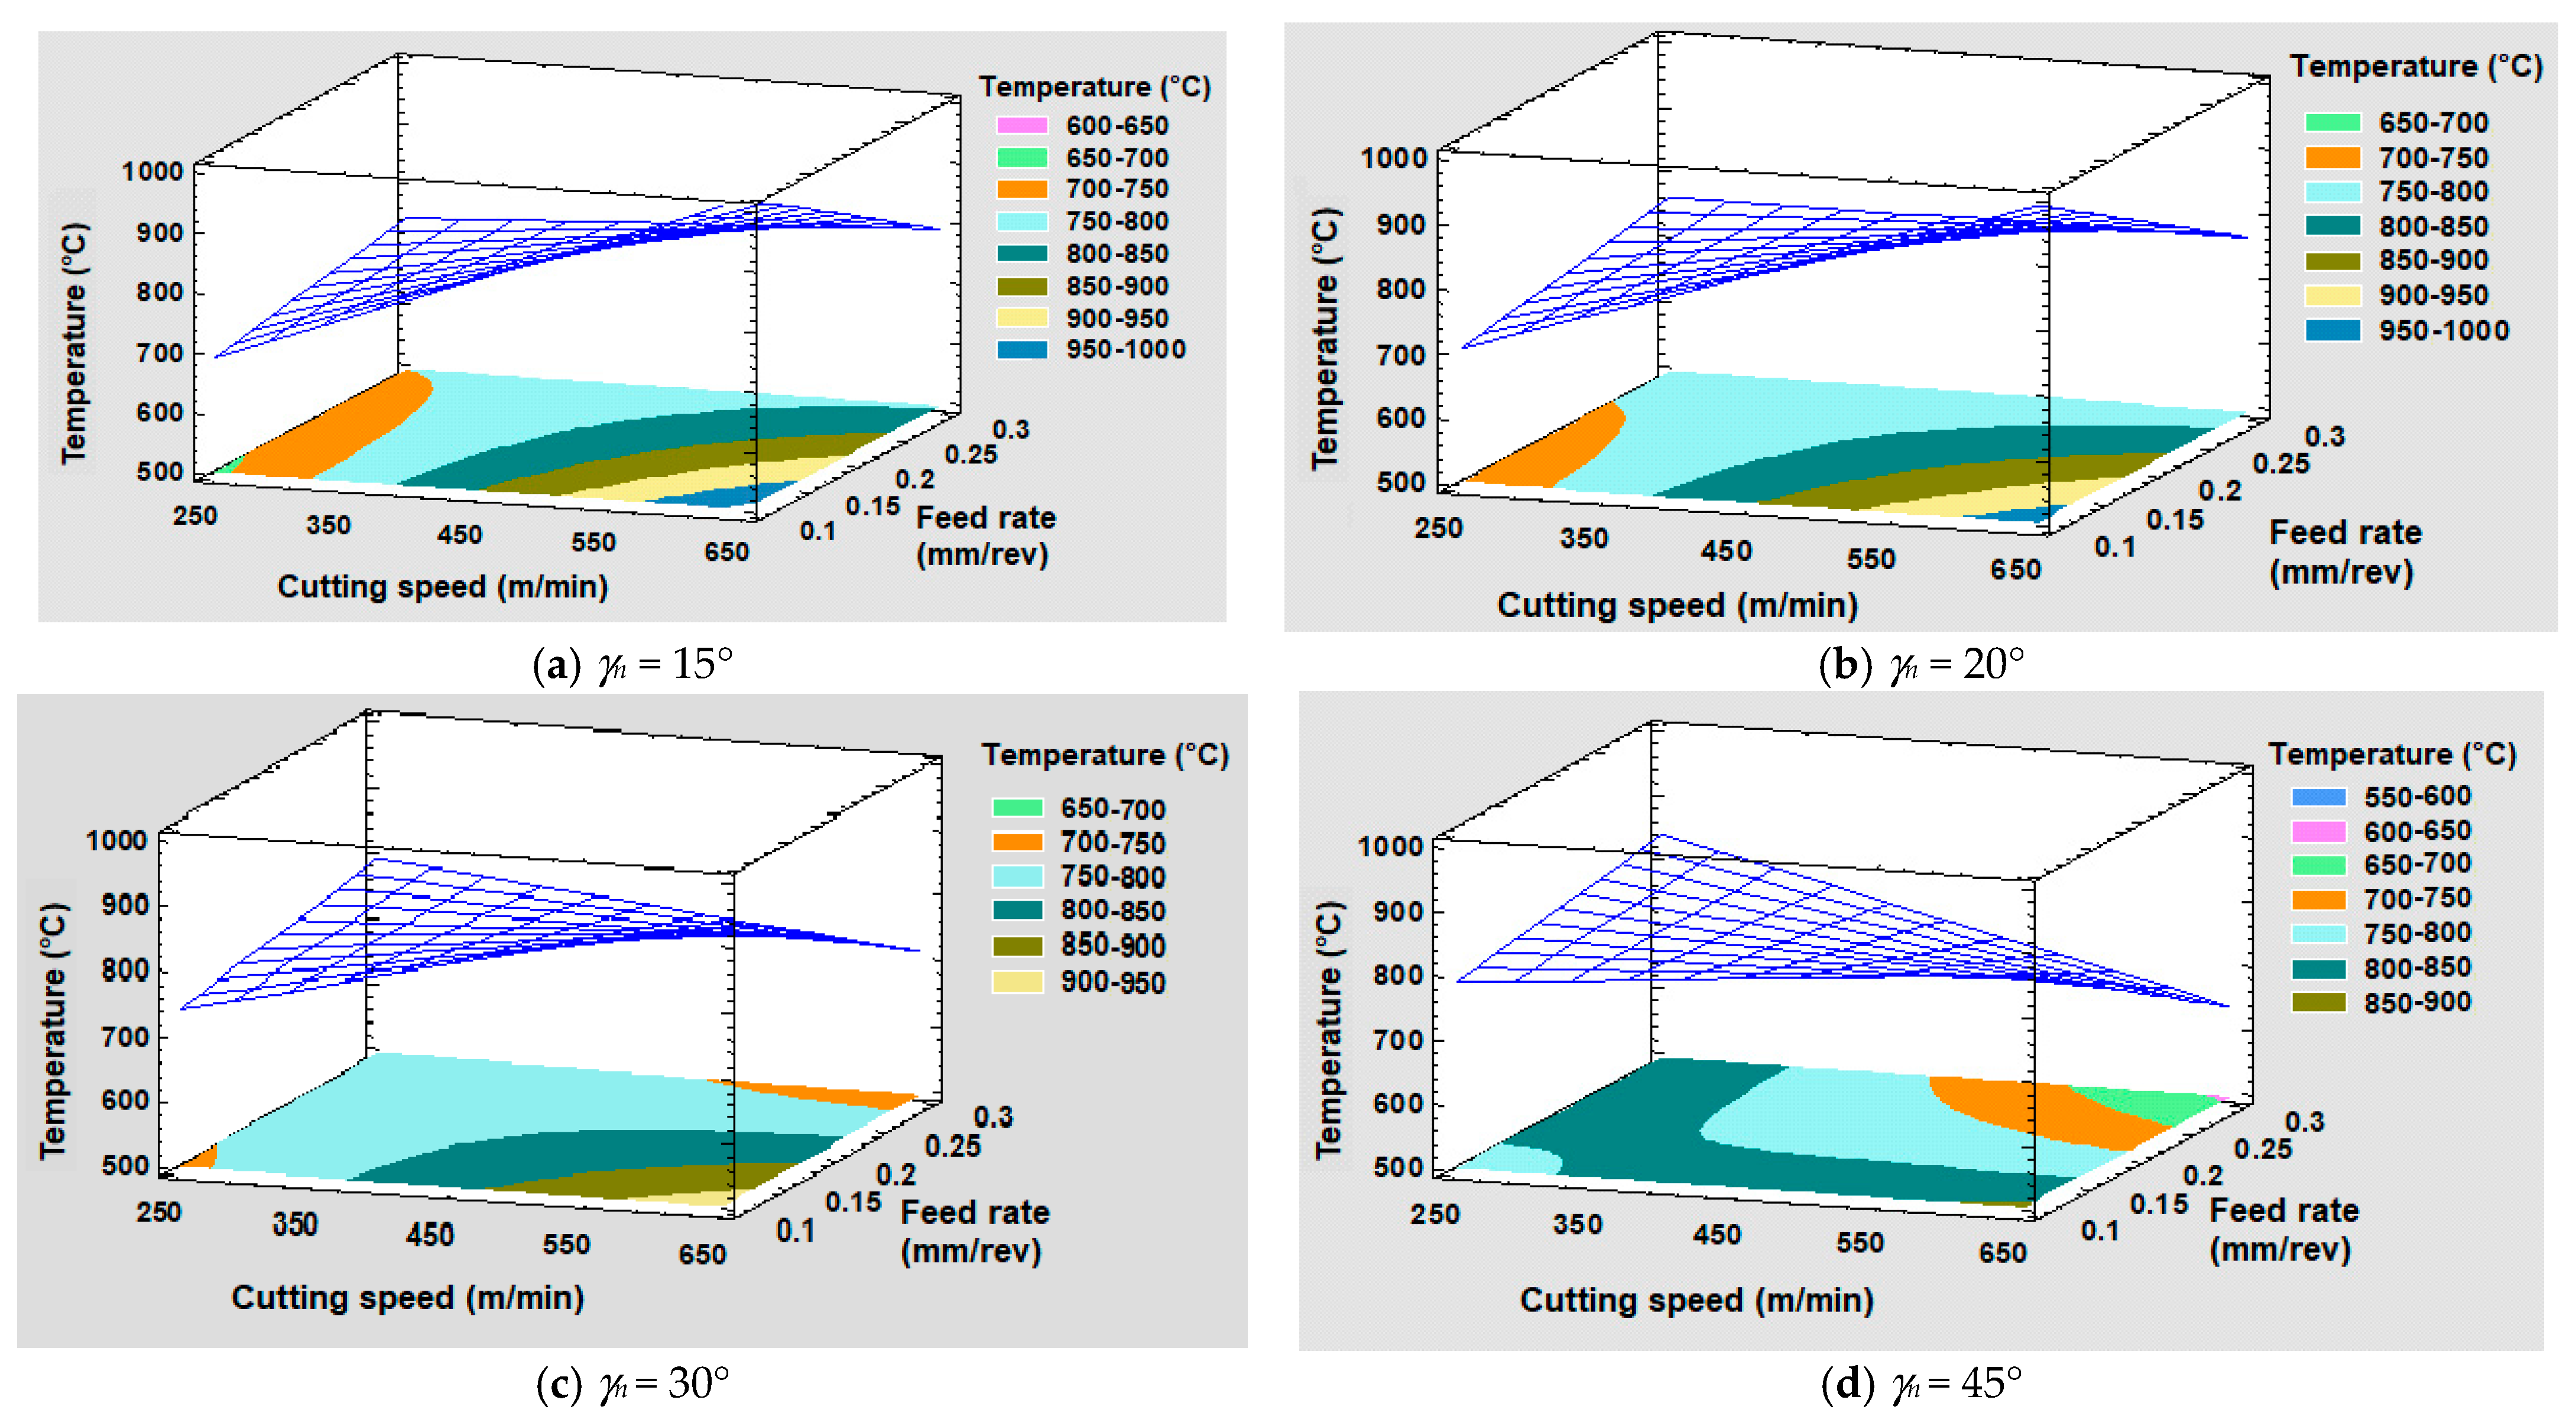
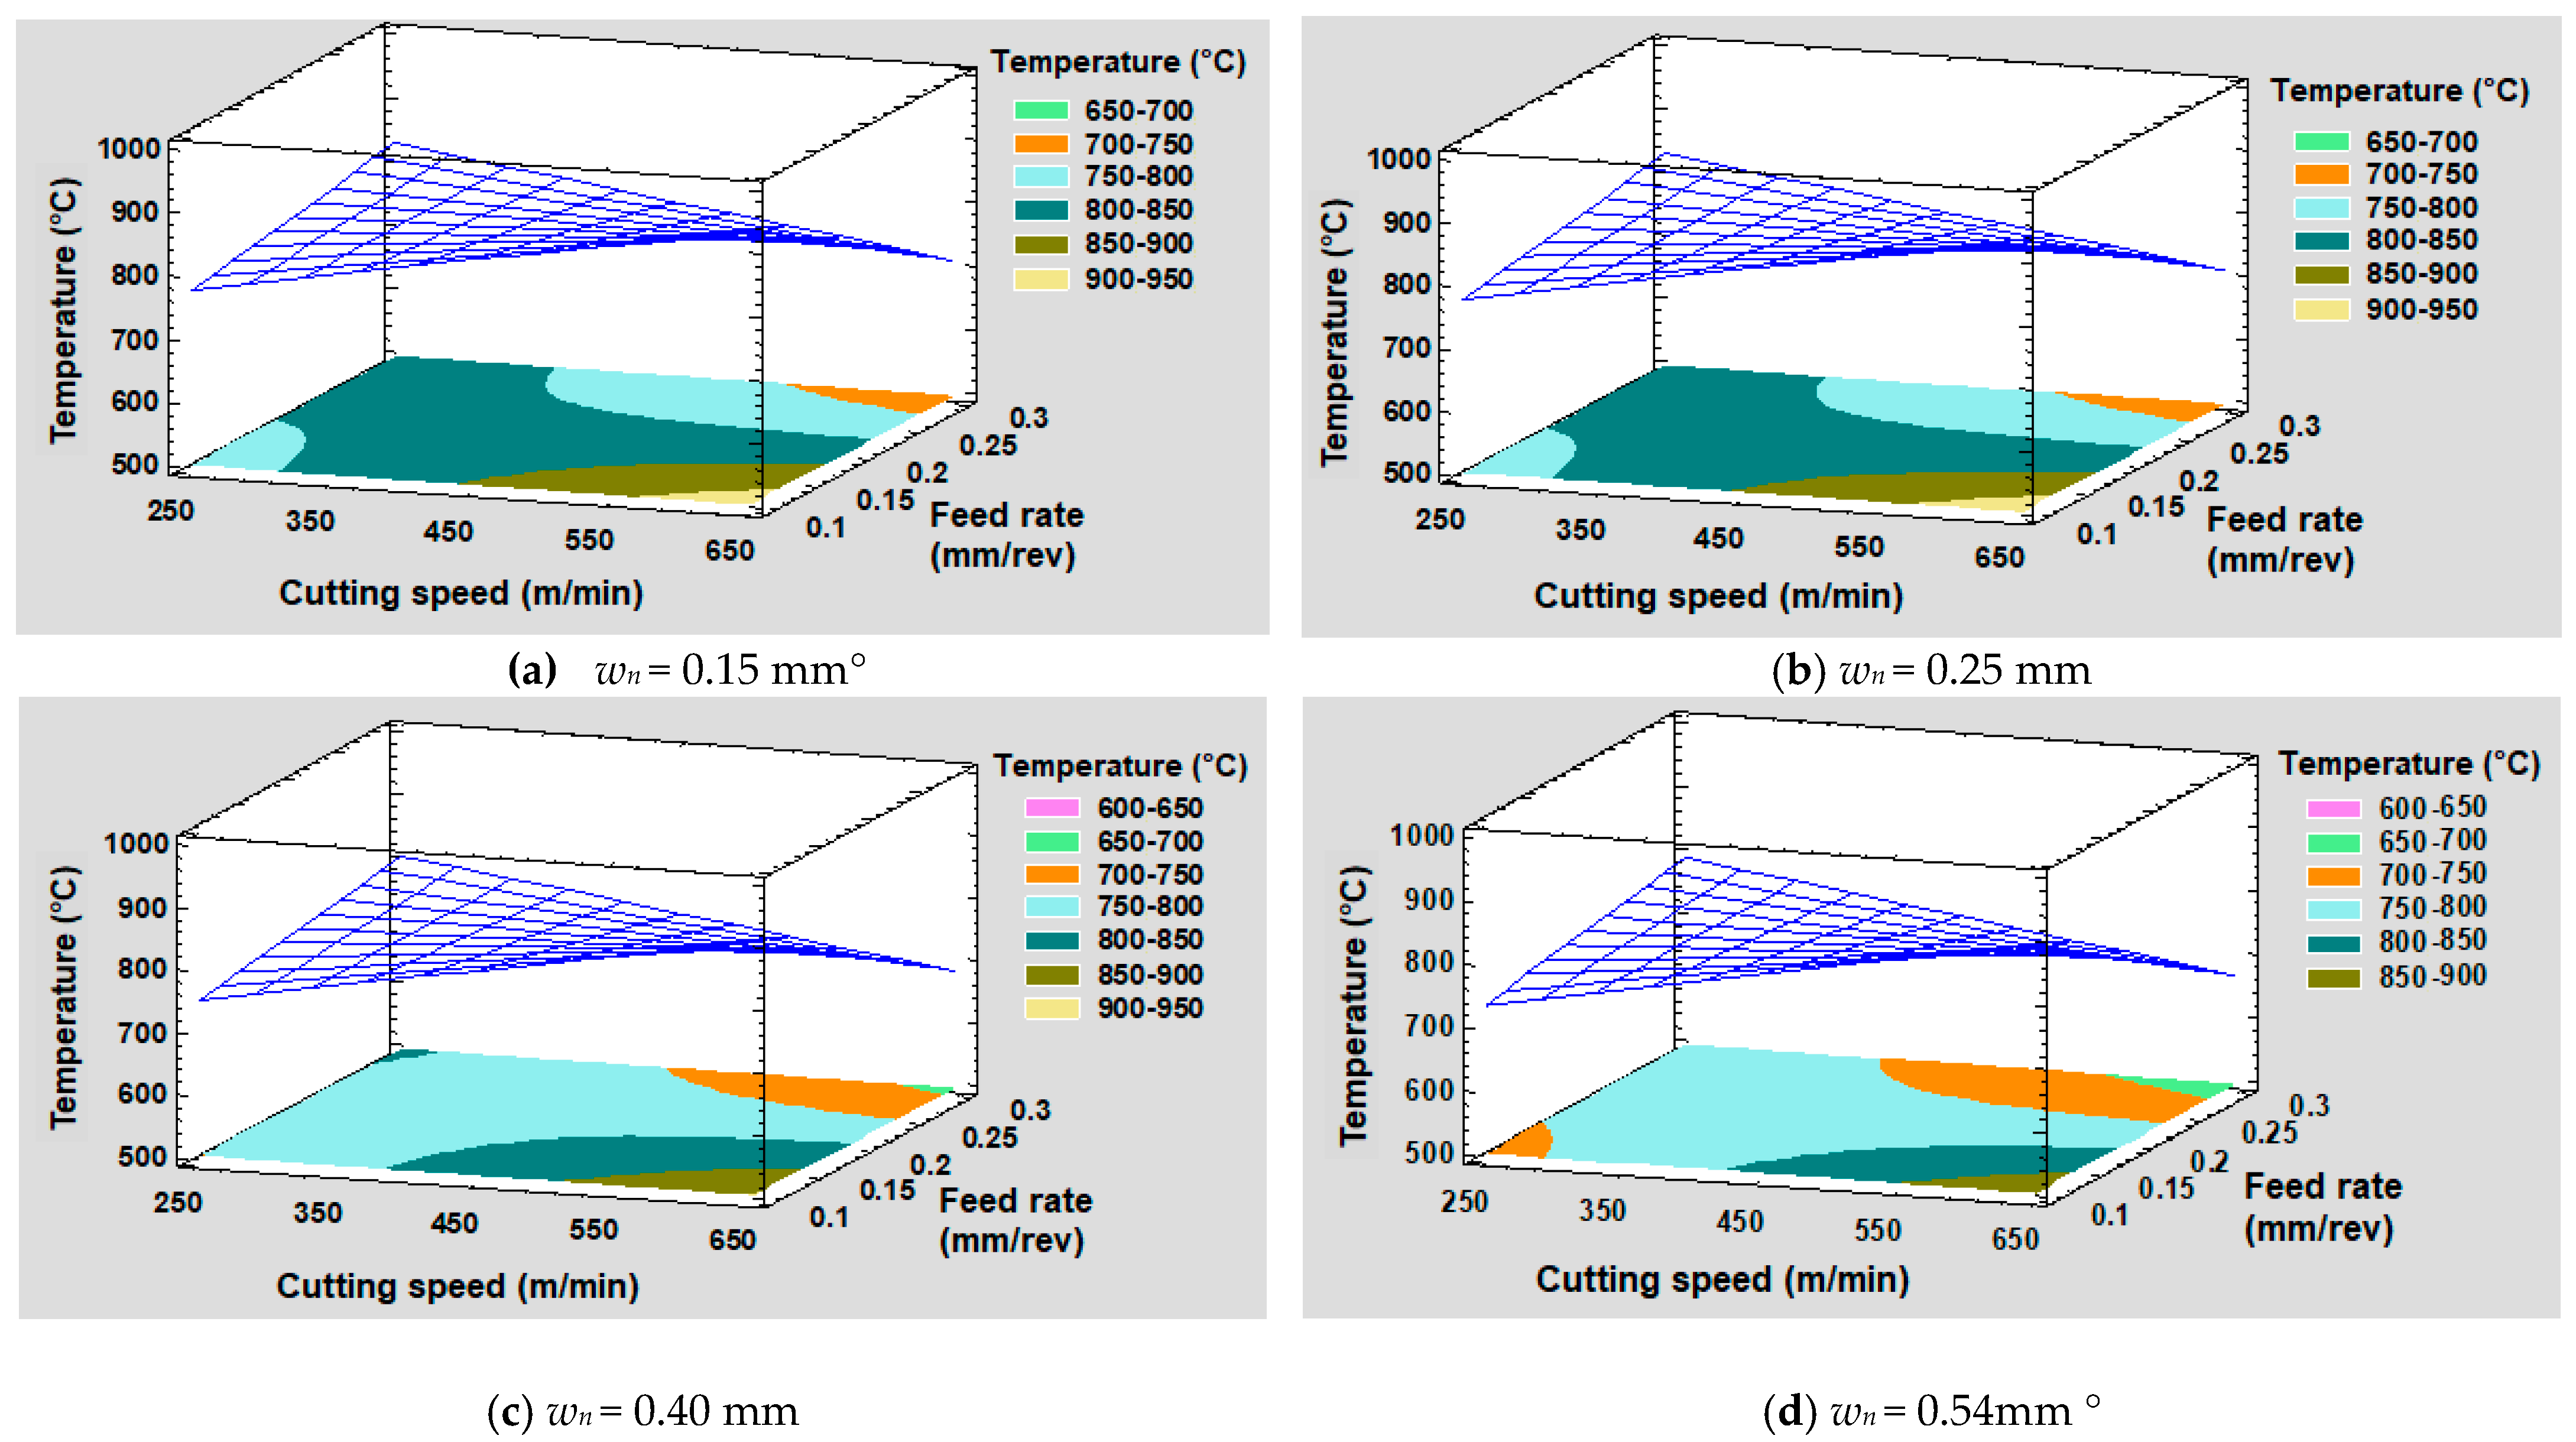
In order to predict the unknown response values and the corresponding cutting conditions, 3D statistical graphs or 3D surface plots were produced to interpret the effects of the continuous parameters on the response values based on the fitted model. Figure 18 shows the surface plots of the parametric effects on temperature for the chamfered cutting tool. This figure shows the interaction between the chamfered tool geometry and the machining parameters (cutting speed and feed rate) on the cutting temperature. For low chamfer angles (15° and 20°; Figure 18a,b), the maximum temperature occurs at a higher cutting speed and low feed rate setting (at speed about 650 m/min and a feed rate of about 0.1 mm/rev). At a higher value of chamfer angle (40°; Figure 18d), the maximum values of cutting temperatures occurred in irregular settings of cutting speed and feed rates as depicted in Figure 18d. This is due to the interactive effects between the tool edge preparation and the cutting parameters, as also noted in Equation (8). As both the chamfered tool width (wn) and the chamfered angle (γn) influenced the temperature (Equation (8)), a 3D effect of cutting speed, feed rate and chamfer width (wn) on the cutting temperature was also analyzed and is presented in Figure 19. It is seen from Figure 19 that the effect of chamfer width (wn) on temperature is moderate, as compared to those of the cutting speed and feed rate.
A 3D surface plot of cutting speed and feed rate on the cutting stress on chamfered tool is presented in Figure 20. This stress is mostly influenced by the cutting speed and the feed rate and, in second order, by the chamfer width and its interactions with cutting speed and feed rate (see Equation (9)). For chamfer width below 0.25 mm, the maximum stress takes place at high cutting and low feed rate (Figure 20a,b), while for higher values of chamfer width (0.35 mm and 0.50 mm), the maximum stress occurs at high feed rate and low cutting speed but also at high cutting speed and low feed rate settings. The stresses are higher for the large feed rate, as the chip section is thicker and the forces high.
For a sharp tool, the maximum temperature occurred when using a high feed rate and a high cutting speed (Figure 21a,b) independently of the sharp tool angle used. At this setting, the stress on the cutting tool is high (Figure 22a,b).

4. Validation of Results

The obtained numerical results for chamfered tools were validated using the experimental data obtained (see Table 13) by Khalili and Safaei [17] who conducted a study on the effect of tool edge preparation on 1045 steel for a feed rate of 0.20 mm/rev and using chamfered carbide tools with different chamfer widths. The results of effective stress are very comparable (errors of about 4.7 to 6.9 %), while those of the temperature are slightly more different (errors varying from 10–15%).
The obtained numerical and statistical analysis results obtained with chamfered tools are also in good agreement with the study by Ucun et al. [23], who conducted a similar numerical study on AISI 1045 steel with similar properties using ceramic tools and cutting speeds ranging from 100 m/min to 400 m/min and feed rates from 0.1–0.5 mm/rev and with a depth cut of 1 mm. The numerical results of [23] were validated by experimental data from the literature [4]. The experimental conditions have been described in this study [4]. Ucun et al. [23] obtained a cutting temperature of about 800 °C and they found that the tool chamfer lengths (0.1 mm–0.3 mm) and chamfer angle (5 °C–20 °C) do not have a significant effect on the cutting temperature but may increase the machining forces. Although a straight comparison cannot be made since ceramic tool has different heat transfer properties, it remains that the effect of the tool geometry (chamfer parameters) in similar machining conditions can be compared, as it follows the same trend and leads to the same conclusion as in the present study.
For orthogonal cutting of AISI 1045 with sharp carbide tool, the closest comparison we found was that of the work by Qasim et al. [24]. They compared the process performance for a large range of cutting speeds (200–630 m/min) and cutting feed rates (0.1 to 0.2 mm/rev). The results obtained in the present study are close those of Qasim et al. [24], as shown in Table 14, in which the tool angle is ignored as it did not affect our results. The differences observed could be explained by the small variations in the materials data used in the two cases.

5. Conclusions

In the present research study, the interactive effects between chamfer width, chamfer angle, sharp angle, and cutting speed and feed rate on cutting temperature and effective stress were investigated during the milling of AISI 1045 steel using the finite element method and employing DEFORM-2D software. The statistical analysis of numerical simulation results using ANOVA was carried out in order to determine significant parameters. From the results obtained, the following points may be summarized:
  • Statistical analysis showed that the effective stress and cutting temperature are mainly influenced by the cutting speed, the feed rate and their interaction for the chamfer tool and by the feed rate for the sharp tool. For the chamfer tool, the interactions between cutting speed and chamfer width and between cutting speed and chamfer angle have a significant influence on the cutting temperature. Whereas for the sharp tool, the cutting speed and the interaction between the sharp tool angle and feed rate are important. Therefore, for a given tool edge geometry, the cutting speed and the feed rate should be chosen wisely.
  • The main effects of the tool edge preparation parameters tested did not show significant influence on the tested machining process performance (temperature, stress), especially for chamfered tools. The performance of these tools is mainly influenced by the cutting speed, the feed rate and their interactions. In contrast, the tool with chamfer edge led to high temperature and high effective stress as compared to the sharp edge tool.
  • For the chamfer tool, the cutting speed and the tool chamfer width were found to be the most influential factors, followed by the interaction between the cutting speed and the feed rate and then by the interaction between the cutting speed and the tool chamfer width. The maximum temperature obtained on chamfered tools ranged from 700 °C to 900 °C, while the minimum was about 550 °C, depending on the feed rates and speeds used. The effective stress varied less and was about 1320 MPa.
  • For the sharp tool, the tool angle has a slight influence on temperature and stress. The values of tool angle affected the 3D surface responses of maximum temperature and effective stress when both the cutting speed and the feed rates were varied. The maximum temperature reached was 970 °C while the minimum was about 550 °C, depending on the feed rate and speeds used. The effective stress varied less and was about 1250 MPa.

Author Contributions

Conceptualization and methodology, Z.A.M.T. and V.S.; simulation, formal analysis, writing—original draft, Z.A.M.T.; resources, V.S.; supervision, writing—review and editing, V.S. and T.-M.D.; and final revision and editing, A.M.S. All authors have read and agreed to the published version of the manuscript.

Funding

This research received no external funding. The APC was funded by Victor Songmene’s research funds. The authors wish to thank the Ministry of Higher Education and Scientific Research in Libya in collaboration with the Canadian Bureau for International Education (CBIE) for providing the Ph.D. scholarship for the first author (Z.A.M.T.).

Data Availability Statement

Data available on request due to privacy or ethical restrictions.

Conflicts of Interest

The authors declare no conflict of interest.

Nomenclature

SymbolUnit Meaning
wnmmChamfer width
γndegChamfer angle
θtdegSharp angle
Vm/minCutting speed
fmm/revFeed rate
αdegClearance angle
γ, γcdegRake angle
R2% Correlation coefficient

References

  1. Rodriguez, C.J.C. Cutting Edge Preparation of Precision Cutting Tools by Applying Micro-Abrasive Jet Machining and Brushing. Ph.D. Thesis, Kassel University, Kassel, Germany, 2009. [Google Scholar]
  2. Shnfir, M.; Olufayo, O.A.; Jomaa, W.; Songmene, V. Machinability Study of Hardened 1045 Steel When Milling with Ceramic Cutting Inserts. Materials 2019, 12, 3974. [Google Scholar] [CrossRef] [PubMed] [Green Version]
  3. Denkena, B.; Biermann, D. Cutting edge geometries. CIRP Ann. 2014, 63, 631–653. [Google Scholar] [CrossRef]
  4. Yen, Y.C.; Jain, A.; Altan, T. A finite element analysis of orthogonal machining using different tool edge geometries. J. Mater. Process. Technol. 2004, 146, 72–81. [Google Scholar] [CrossRef]
  5. Cheng, X.; Zha, X.; Jiang, F. Optimizing the geometric parameters of cutting edge for rough machining Fe-Cr-Ni stainless steel. Int. J. Adv. Manuf. Technol. 2016, 85, 683–693. [Google Scholar] [CrossRef]
  6. Emamian, A. The Effect of Tool Edge Radius on Cutting Conditions Based on Updated Lagrangian Formulation in Finite Element Method. Master’s Thesis, McMaster University, Hamilton, ON, Canada, 2018. [Google Scholar]
  7. Daoud, M.; Chatelain, J.F.; Bouzid, A. Effect of rake angle on Johnson-Cook material constants and their impact on cutting process parameters of Al2024-T3 alloy machining simulation. Adv. Manuf. Technol. 2015, 81, 1987–1997. [Google Scholar] [CrossRef]
  8. Davoudinejad, A.; Noordin, M.Y. Effect of cutting-edge preparation on tool performance in hard-turning of DF-3. tool steel with ceramic tools. J. Mech. Sci. Technol. 2014, 28, 4727–4736. [Google Scholar] [CrossRef]
  9. Gao, P.; Liang, Z.; Wang, X.; Li, S.; Zhou, T. Effects of different chamfered cutting edges of micro end mill on cutting performance. Int. J. Adv. Manuf. Technol. 2018, 96, 1215–1224. [Google Scholar] [CrossRef]
  10. Wan, L.; Wang, D.; Gao, Y. Investigations on the Effects of Different Tool Edge Geometries in the Finite Element Simulation of Machining. J. Mech. Eng. 2015, 61, 157–166. [Google Scholar] [CrossRef]
  11. Gregório, A.V.L.; Silva, T.E.F.; Reis, A.P.; de Jesus, A.M.P.; Rosa, P.A.R. A Methodology for Tribo-Mechanical Characterization of Metallic Alloys under Extreme Loading and Temperature Conditions Typical of Metal Cutting Processes. J. Manuf. Mater. Process. 2022, 6, 46. [Google Scholar] [CrossRef]
  12. Javidikia, M.; Sadeghifar, M.; Songmene, V.; Jahazi, M. On the impacts of tool geometry and cutting conditions in straight turning of aluminum alloys 6061-T6: An experimentally validated numerical study. Int. J. Adv. Manuf. Technol. 2020, 106, 4547–4565. [Google Scholar] [CrossRef]
  13. Zhuang, K.; Weng, J.; Zhu, D.; Ding, H. Analytical modeling and experimental validation of cutting forces considering edge effects and size effects with round chamfered ceramic tools. J. Manuf. Sci. Eng. 2018, 140, 081012. [Google Scholar] [CrossRef]
  14. Altintas, Y.; Ren, H. Mechanics of machining with chamfered tools. J. Manuf. Sci. Eng. 2000, 122, 650–659. [Google Scholar]
  15. Tagiuri, Z.A.M.; Dao, T.-M.; Samuel, A.M.; Songmene, V. A Numerical Model for Predicting the Effect of Tool Nose Radius on Machining Process Performance during Orthogonal Cutting of AISI 1045 Steel. Materials 2022, 15, 3369. [Google Scholar] [CrossRef] [PubMed]
  16. Chowdhury, M.A.; Khalil, M.K.; Nuruzzaman, D.M.; Rahaman, M.L. The effect of sliding speed and normal load on friction and wear property of aluminum. IJMME Int. J. Eng. Sci. 2011, 11, 45–49. [Google Scholar]
  17. Khalili, K.; Safaei, M. FEM analysis of edge preparation for chamfered tools. Int. J. Mater. Form. 2009, 2, 217–224. [Google Scholar] [CrossRef]
  18. Engineering ToolBox. Convective Heat Transfer. 2003. Available online: https://www.engineeringtoolbox.com/convective-heat-transfer-d_430.html (accessed on 14 August 2022).
  19. Jaspers, S.P.F.C.; Dautzenberg, J.H.; Taminiau, D.A. Temperature Measurement in Orthogonal Metal Cutting, International Journal of Adv. Manuf. Technol. 1998, 14, 7–12. [Google Scholar] [CrossRef]
  20. Afrasiabi, M.; Saelzer, J.; Berger, S.; Iovkov, I.; Klippel, H.; Röthlin, M.; Zabel, A.; Biermann, D.; Wegener, K. A Numerical-Experimental Study on Orthogonal Cutting of AISI 1045 Steel and Ti6Al4V Alloy: SPH and FEM Modeling with Newly Identified Friction Coefficients. Metals 2021, 11, 1683. [Google Scholar] [CrossRef]
  21. Marinov, V. ME 364 Manufacturing Technology Lecture Notes. indd. Available online: https://www.yumpu.com/en/document/view/17440102/me-364-manufacturing-technology-lecture-notes-department-of- (accessed on 14 August 2022).
  22. Liu, C.; Wang, Z.; Zhang, G.; Liu, L. The effect of cutting speed on residual stresses when orthogonal cutting TC4. EPJ Web Conf. 2015, 94, 1035. [Google Scholar] [CrossRef] [Green Version]
  23. Ucun, I.; Aslantas, K.; Ucun, I. Finite Element Modeling of Machining of AISI 1045 with Ceramic Cutting Tool. Available online: https://www.academia.edu/27298543/Finite_Element_Modeling_of_Machining_of_Aisi_1045_with_Ceramic_Cutting_Tool (accessed on 14 August 2022).
  24. Qasim, A.; Nisar, S.; Shah, A.; Khalid, M.S.; Sheikh, M.A. Optimization of process parameters for machining of AISI-1045 steel using Taguchi design and ANOVA. Simul. Model. Pract. Theory 2015, 59, 36–51. [Google Scholar] [CrossRef]
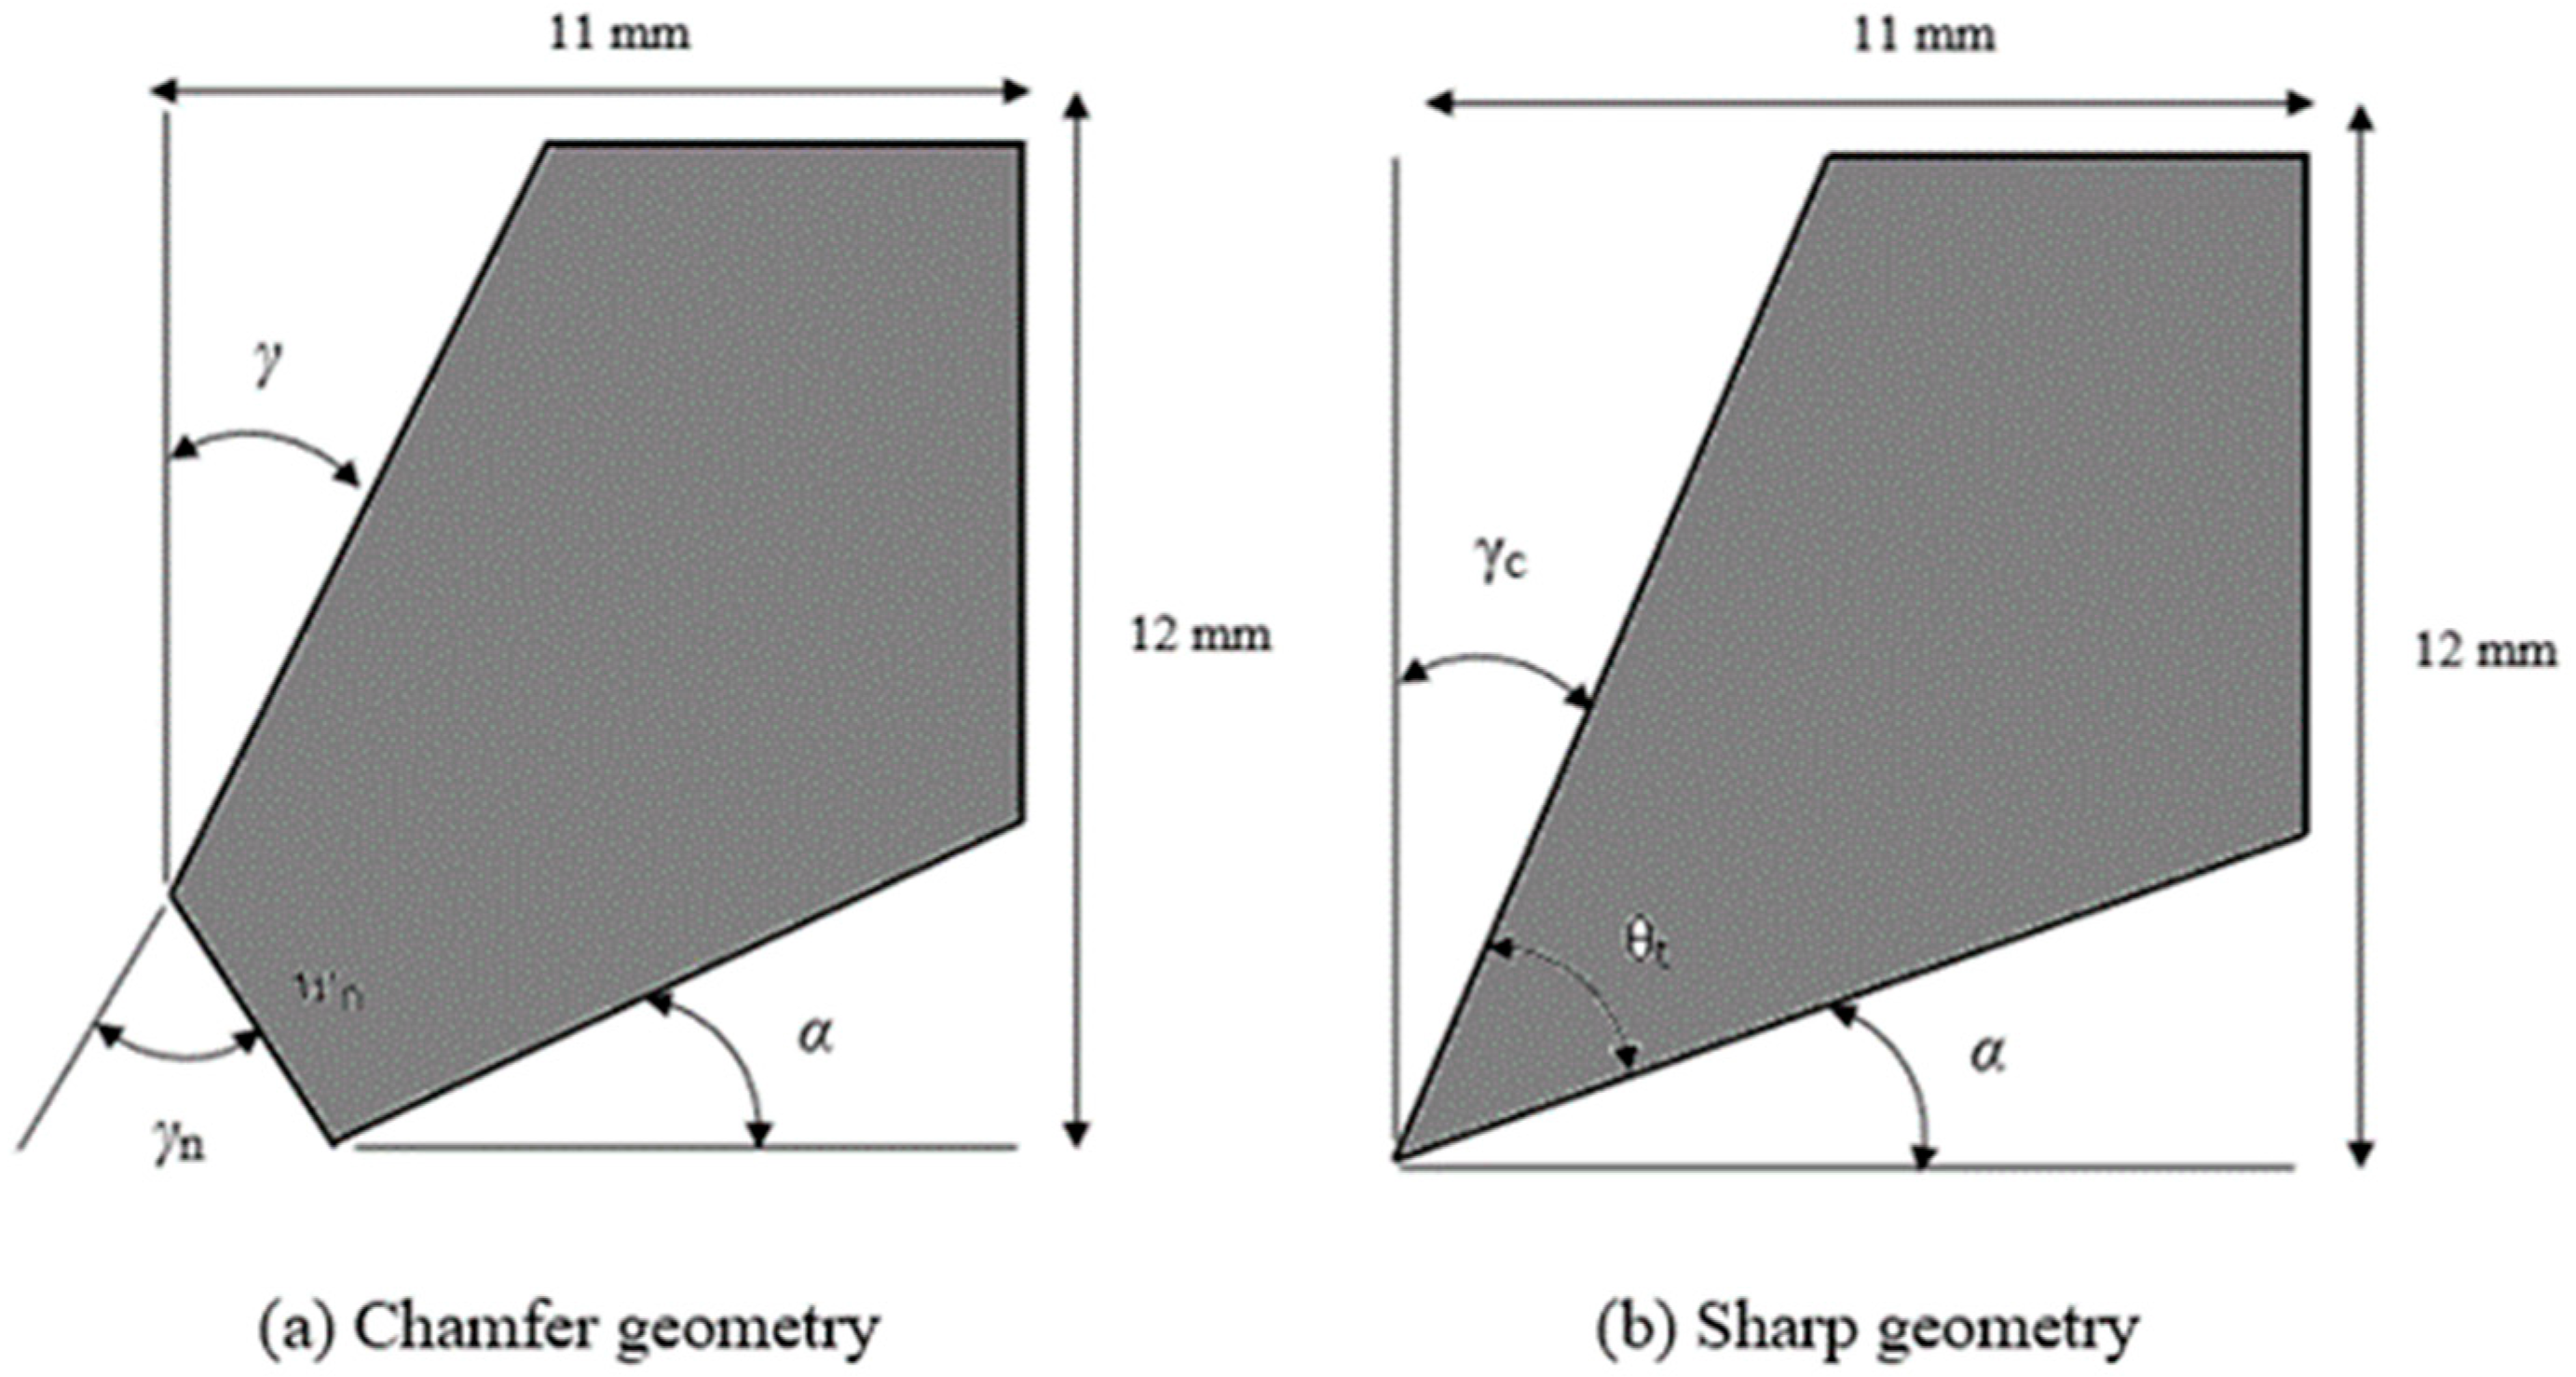
Figure 1. Two-dimensional (2D) models of the cutting tools studied: (a) Chamfer tool; (b) Sharp tool.
Processes 10 02171 g001
Figure 2. The workpiece model geometry.
Processes 10 02171 g002
Figure 3. Chamfer cutting tool geometries with different chamfer widths wn: (a) 0.1 mm, (b) 0.4 mm, (c) 0.6 mm, (d) 0.75 mm.
Processes 10 02171 g003aProcesses 10 02171 g003b
Figure 4. Chamfer cutting tool geometries with different chamfer angles γn: (a) 15°, (b) 25°, (c) 35°, (d) 45°.
Processes 10 02171 g004
Figure 5. Sharp cutting tool geometries with different sharp angles θt: (a) 35°, (b) 45°, (c) 55°, (d) 65°.
Processes 10 02171 g005
Figure 6. Variation in force versus time during cutting process for chamfer tool geometry at V = 150 m/min, wn = 0.1 mm, f = 0.2 mm/rev, γn = 10 ° and sharp tool geometry θt = 45°.
Processes 10 02171 g006
Figure 7. Variation in maximum temperature versus time during cutting process for chamfer tool geometry at V = 150 m/min, wn = 0.1 mm, f = 0.2 mm/rev, γn = 10 ° and sharp tool geometry with θt = 45°.
Processes 10 02171 g007
Figure 8. Distribution of cutting temperature in the model at V = 150 m/min, f = 0.2 mm/rev, γn = 10° for the chamfer widths wn: (a) 0.1 mm, (b) 0.4 mm, (c) 0.6 mm, (d) 0.75 mm.
Processes 10 02171 g008aProcesses 10 02171 g008b
Figure 9. Distribution of effective stress in the model at V = 150 m/min, f = 0.2 mm/rev and γn = 10° for the chamfer widths wn: (a) 0.1 mm, (b) 0.4 mm, (c) 0.6 mm, (d) 0.75 mm.
Processes 10 02171 g009
Figure 10. Distribution of tool wear in the model at V = 150 m/min, f = 0.2 mm/rev and γn =10° for the chamfer widths wn: (a) 0.1 mm, (b) 0.4 mm, (c) 0.6 mm, (d) 0.75 mm, (e) zoomed of (b).
Processes 10 02171 g010
Figure 11. Distribution of cutting temperature in the model at V = 150 m/min, f = 0.3 mm/rev and wn = 0.1 mm for the chamfer angles γn: (a) 15°, (b) 25°, (c) 35°, (d) 45°.
Processes 10 02171 g011
Figure 12. Distribution of effective stress in the model at V = 150 m/min, f = 0.3 mm/rev and wn = 0.1 mm for the chamfer angles γn: (a) 15°, (b) 25°, (c) 35°, (d) 45°.
Processes 10 02171 g012
Figure 13. Distribution of cutting temperature at V = 150 m/min and f = 0.3 mm/rev for the sharp angles θt: (a) 35°, (b) 45°, (c) 55°, (d) 65°.
Processes 10 02171 g013
Figure 14. Distribution of effective stress in the model at V = 150 m/min and f = 0.3 mm/rev for the sharp angles θt: (a) 35°, (b) 45°, (c) 55°, (d) 65°.
Processes 10 02171 g014aProcesses 10 02171 g014b
Figure 15. Distribution of tool wear depth in the model at V = 150 m/min and f = 0.3 mm/rev, for the cutting tool angles: (a) sharp edge; θt = 45°, (b) sharp edge; θt = 55°, (c) chamfered edge; γn = 25°, (d) chamfered edge; γn = 35°.
Processes 10 02171 g015
Figure 16. Comparison of predicted and simulated temperatures: (a) chambered tool and (b) sharp tool.
Processes 10 02171 g016
Figure 17. Comparison of predicted and simulated stress: (a) chambered tool and (b) sharp tool.
Processes 10 02171 g017
Figure 18. 3D Surface plots of parametric effects of cutting speed, feed rate and chamfered tool angle (γn) on temperature (°C) when using a chamfered tool (wn = 0.34 mm).
Processes 10 02171 g018
Figure 19. 3D Surface plots of parametric effects of cutting speed, feed rate and chamfered tool length (wn) on temperature (°C) when using a chamfered tool (γn = 35°).
Processes 10 02171 g019
Figure 20. 3D Surface plots of parametric effects of cutting speed, feed rate and chamfered tool length (wn) on the stress when using a chamfered tool (γn = 35°).
Processes 10 02171 g020aProcesses 10 02171 g020b
Figure 21. 3D Surface plots of parametric effects of cutting speed, feed rate and sharp tool angle (θt) on the temperature (°C) when using a sharp tool (γn = 35°).
Processes 10 02171 g021
Figure 22. 3D Surface plots of parametric effects of cutting speed, feed rate and sharp tool angle (θt) on the stress (MPa) when using a sharp tool (γn = 35°).
Processes 10 02171 g022
Table 1. Thermal properties of workpiece and tool materials.
PropertiesTool: Uncoated CarbideWorkpiece: AISI 1045
MaterialUsedDeform Software (Default)UsedDeform Software
(Default)
Density (kg/m3)11,90010,85078707850
Thermal conductivity (W/m °C)50594555
Specific heat (J/kg °C)375364590570
Table 2. Mechanical properties of workpiece and tool materials.
PropertiesTool: Uncoated CarbideWorkpiece: AISI 1045
MaterialUsedDeform Software (Default)UsedDeform Software (Default)
Young’s modulus 620 GPa-200 GPa-
Poisson ratio0.260.220.290.30
Hardness93 HRB93 HRB163 HB-
Table 3. The constants of Johnson–Cook material model for AISI 1045 steel [19]: (Jaspers et al., 1998).
MaterialA (MPa)B (MPa)nCmTm (°C)
AISI 1045553.1600.80.2340.01311733
Table 4. Parametric design plan for the chamfer tool geometry numerical simulations.
Test IDChamfer Angle γn (°)Cutting Speed
(m/min)
Feed Rate
(mm/rev)
Chamfer Width
wn (mm)
1101500.20.1–0.75
2103500.20.1–0.75
3105000.20.1–0.75
4106000.20.1–0.75
5101500.10.1–0.75
6101500.20.1–0.75
7101500.30.1–0.75
815–451500.10.1
915–451500.20.1
1015–451500.30.1
1115–451500.20.1
1215–453500.20.1
1315–455000.20.1
1415–456000.20.1
Table 5. Parametric design plan for the sharp tool geometry numerical simulations.
Test IDSharp Tool Angle
θt (°)
Cutting Speed
(m/min)
Feed Rate
(mm/rev)
135–652500.2
235–655000.2
335–657500.2
435–6510000.2
535–651500.1
635–651500.2
735–651500.3
Table 6. Design of experiments for the chamfer tool.
FactorsLevel 1Level 2Level 3Level 4
V: Cutting speed (m/min)250350500600
f: Feed rate (mm/rev)0.10.20.3-
wn: Chamfer width (mm)0.150.250.350.45
γn: Chamfer angle (°)15253545
Table 7. Design of experiments for the sharp tool.
FactorsLevel 1Level 2Level 3Level 4
V: Cutting speed (m/min)250350500600
f: Feed rate (mm/rev)0.10.20.3-
θt: Sharp angle (°)35455565
Table 8. Analysis of variance for temperature as a function of cutting speed (V), feed rate (f) and tool geometry (γn and wn) when using a chamfered tool.
SourceDfSum of SquareMean SquareF-Valuep-Value
Model72.974248 × 1074.24891 × 106833.850.0000
V: Cutting speed1411,429411,42980.740.0000
f: Feed rate 157,900.157,900.111.360.0016
wn: Chamfer width 150,961.450,961.410.000.0029
γn: Chamfer angle1214,141214,14142.030.0000
V × f195,862.495,862.418.810.0001
V × γn174,028.074,028.014.530.0005
wn × γn156,705.856,705.811.130.0018
Residual Error41208,918.05095.56
Total 482.99513 × 10⁷
Table 9. Analysis of variance for stress as a function of cutting speed (V), feed rate (f) and tool edge chamfer with (wn).
SourceDfSum of SquareMean SquareF-Valuep-Value
Model68.34658 × 1071.3911 × 1071401.190.0000
V: Cutting speed11.0384 × 1061.0384 × 106104.590.0000
f: Feed rate 1495,304495,30449.890.0000
wn: Chamfer width 1674,986674,98667.990.0000
V × f1170,323170,32317.160.0002
V × wn1252,041252,04125.390.0000
f × wn1107,954107,95410.870.0020
Residual Error42416,9749927.94
Total 488.38828 × 10⁷
Table 10. Analysis of variance for temperature as a function of cutting speed (V), feed rate (f) and sharp tool angle (θt)—Original model before suppression of factors.
SourceDfSum of SquareMean SquareF-Valuep-Value
Model6722,164120,361.052.940.0000
V: Cutting speed322,731.022731100.0029
f: Feed rate 236,024.636,024.615.840.0003
θt: Sharp tool angle31331.571331.570.590.4485
V × f69055.139055.133.980.0526
V × θt91564.351564.350.690.4116
f × θt60.001100.0011000.9994
Residual Error4193,221.52273.7
Total 47815,385.0-
Table 11. Analysis of variance for stress as a function of cutting speed (V), feed rate (f) and sharp tool angle (θt).
SourceDfSum of SquareMean SquareF-Valuep-Value
Model67.55473 × 1071.2591 × 1073392.620.0000
V: Cutting speed1329,927329,92788.90.0001
f: Feed rate 1167,344167,34445.090.0001
θt: Sharp tool angle1604,873604,873162.980.00001
V × f142,829.742,829.711.540.0015
V × θt1129,005129,00534.760.00001
f × θt150,784.150,784.113.680.0006
Residual Error42155,8772273.7
Total 487.57 × 10⁷-
Table 12. Summary of most influential parameters in terms of importance (1 = most, 4 = least).
ParametersChamfer ToolSharp Tool
TemperatureStressTemperatureStress
V: Cutting speed1122
f: Feed rate-313
T*: Tool geometry22-1
V × f: Interaction Speed × Feed rate3334
V × T: Interaction speed × Tool geometry44-
f × T: Interaction feed × Tool geometry -
T*: Tool geometry: Chamfer width (wn) or chamfer angle (γn); sharp tool angle for sharp tool (θt).
Table 13. Comparison of numerical and experimental results for chamfer tool.
Numerical Results
(V = 250 m/min)
Experimental Data [17]
(V = 100–200 m/min)
Errors
ParameterChamfer width wn (mm)
Characteristics0.10.20.30.10.20.3 0.10.20.3
Temperature (°C)741.23750.32799.3563767568014.1%10.0%14.9%
Cutting stress (MPa)1320.871325.481290.751230122512306.9%7.6%4.7%
Table 14. Comparison of numerical and experimental results for sharp tool.
TemperatureTemperature [24]Error
Variable feed rates (cutting speeds ranging from 200 m/min to 630 m/min)
0.1 mm /rev62970010%
0.2 mm /rev793765−4%
Variable cutting speeds (feed rates ranging from 0.1to 0.2 m/rev)
200 m/min677.5600−13%
600 m/min830800−4%
Publisher’s Note: MDPI stays neutral with regard to jurisdictional claims in published maps and institutional affiliations.