Article

A Frequency Domain PID Control Strategy for an In-House Friction and Wear Test Rig

1
School of Mechanical Engineering, Shanghai Jiao Tong University, Shanghai 200240, China
2
AECC Commercial Aircraft Engine Co., Ltd., Shanghai 200241, China
3
School of Energy and Power Engineering, Beihang University, Beijing 100191, China
*
Authors to whom correspondence should be addressed.
Aerospace 2024, 11(8), 623; https://doi.org/10.3390/aerospace11080623
Submission received: 17 June 2024 / Revised: 24 July 2024 / Accepted: 25 July 2024 / Published: 30 July 2024

Abstract

:
The contact behavior greatly influences the damping performance of frictional interfaces. Numerous experimental studies on friction and fretting wear have investigated the evolution of contact parameters. An in-house friction and wear test rig has been developed to obtain hysteresis loops at certain normal forces. However, the test rig lacks load control and is thus unable to ensure precise stabilization at a preset normal force, which affected the hysteresis behavior. In this paper, we developed a frequency-domain PID controller to ensure the stable application of a target normal force with constant (0–300 N) and harmonic (0–50 N) components. Compared to the commonly used time-domain strategy, the control signal error is reduced from 6.30% to 0.54% at 50 Hz. With a 3% error as the standard, the controller enables stabilized control of signals with frequencies up to 300 Hz. Friction experiments on various typical materials are conducted using this improved test rig. The results indicate a general tendency for contact stiffness to increase with a rising normal force, while the relationship between the friction coefficient and the normal force does not exhibit a clear pattern. The contact stiffness is not sensitive to the relative displacement or vibration frequency.

1. Introduction

Blades serve as the main energy conversion components in aeroengines and are exposed to a complex flow field loading environment. Mitigating and controlling the dynamic response is essential to avoid the high cycle fatigue of the blades [1,2,3]. Dry friction damping stands out as one of the primary vibration damping methods for the blades in turbomachinery. Its principal mechanism involves dissipating vibration energy by performing work through dry friction generated by the relative motion between contact surfaces. In high-speed and high-load operating conditions, prolonged reciprocating motion between friction interfaces will result in wear. The mechanical properties of the contact interfaces, particularly the contact parameters, within various dry friction damping structures evolve as wear increases [4,5]. The friction and wear outlined above may reduce the frictional damping effect and significantly heighten the probability of structure intensifying vibration and failure [6,7]. Consequently, it is a top priority to explore the damping performance and evolution of contact parameters in dry friction dampers.
Numerous studies have been carried out on friction and wear tests. Typically, hysteresis loops serve as a crucial tool for determining contact parameters [8,9,10]. These loops depict the correlation between tangential force and relative displacement during frictional contact between the blade and the damping block. Chen et al. [11] designed a dedicated test apparatus to measure the hysteresis phenomenon arising from small-amplitude tangential motions between contacting surfaces. Yu et al. [12] developed a test rig to investigate the friction characteristics of articulating bearings in large aircraft hoisting devices while considering various working conditions and materials. Furthermore, commercially available friction and wear testers with relevant functionalities (e.g., HRT-A02C) are widely used. With the assistance of self-developed or commercially available test devices, some studies have investigated that contact parameters (typically the coefficient of friction and contact stiffness) rapidly increase as oscillation cycles increase and then reach a steady state [4,5,13].
The normal force is one of the key loading factors that impact friction and wear behaviors [14,15,16,17,18]. It is important to maintain the normal force at the target value in friction and wear tests. Apart from the elastic frames, which are typically employed to mitigate normal force fluctuations owing to their low stiffness in the normal direction, certain commercial tribometers adopt a closed-loop control methodology to stabilize the normal force. However, despite these measures, inevitable fluctuations in the normal force persist, particularly during high-frequency wear testing. The conventional time-domain PID control of the normal force encounters limitations stemming from the bandwidth constraints of both the controller and the digital processing system. Consequently, it becomes challenging to eliminate fluctuations within a single vibrational cycle at higher frequencies, ultimately adversely impacting the shape of the hysteresis loop. In addition, during the testing process, the vibration environment and wear may cause the normal force to deviate from the design value. On the other hand, the normal force on the contact surface may contain a time-varying term when the friction pair has elastic deformation induced by vibration, e.g., shrouded blades [19]. Therefore, controlling the normal force of the friction and wear test rigs necessitates two essential requirements: firstly, maintaining it at the preset value without any degradation, and secondly, reproducing the harmonic time-varying term. The effectiveness of friction and wear tests is contingent upon whether the normal force accurately reproduces the service conditions. For instance, the evolution of interface morphology and contact parameters probably exhibits a distinct pattern under time-varying normal force [20,21,22,23,24]. Therefore, it is important to integrate an appropriate control strategy for mechanical loads into the friction and wear test rig.
In this work, we have improved the in-house friction and wear test rig capable of capturing the hysteresis loop on the contact surface under well-controlled normal force. A highlight of this work is the design and implementation of a normal force control module capable of generating different types of stable normal forces, including constant form and harmonic form. The control signal is smoother and has less error than the generally used time-domain PID control strategy. Moreover, a significant increase in control frequency is realized, meeting the needs of engineering tests. Finally, the test rig is employed to investigate the influential factors of the contact parameters.
The paper is organized as follows: In Section 2, we present the in-house friction and wear test rig comprehensively, emphasizing the design principles and software development of the closed-loop control module for normal force based on frequency-domain PID. The control module enables precise adjustments of the amplitude of normal force, vibration frequency, and phase lag. In Section 3, we demonstrate the performance of the test rig by configuring the parameters and assessing the control effectiveness of the normal force. Additionally, the control outcomes of this test rig employing the frequency-domain PID control strategy are contrasted with those of the time-domain strategy to underscore its superiority. In Section 4, friction tests are carried out, and then the influence of the normal force and other factors on the contact parameters is analyzed.

2. Improvement of the In-House Friction and Wear Test Rig

The in-house friction and wear test rig is developed to investigate the hysteresis mechanical behavior of interfaces and the evolution of contact mechanical parameters for dry friction damping structures. To reproduce the mechanical load state in service conditions, the pivotal design of the test rig must prioritize not only specimen movement and constraints but also the precise and consistent application of normal force, including both constant and harmonic forms. Accordingly, the entire test rig is structured into two modules: the mechanical operations module and the closed-loop control module. The former utilizes mechanical components to conduct the friction and wear experiments, while the latter processes the collected data and achieves accurate closed-loop control of the normal force. The entire configuration of the test rig is illustrated in Figure 1.

2.1. Mechanical Operations Module

As shown in Figure 2, the mechanical operations module comprises test specimens, a support system, a loading system, and a measurement system. These components are interconnected by a cubic iron frame structure with dimensions of 300 mm in length and width and 390 mm in height, which provides support for the specimens and fixtures while facilitating load transfer.
The fixed and moving specimens are in longitudinal contact. Both are cylindrical, with diameters ranging from 10 to 15 mm. The fixed specimen is mounted on a customized fixed fixture, which is fully constrained by three-claw stabilizers and remains stationary throughout the test. The three-jaw stabilizer transmits only the normal force at the contact interface without generating any tangential force, which ensures the stability of force transmission and measurement. The moving specimen with its fixture is installed on the guide rail and is subjected to reciprocating micro-movements during the test.
The moving fixture is connected to the ejector rod of the shaker, which is powered by a signal generator and amplifier to establish uniform and stable tangential loading conditions for the specimen.
The normal force is provided by the screw and the piezoelectric actuator. The screw can apply the constant pre-normal force by turning the knob. The piezoelectric actuator (PSt150/14/80VS20, Coremorrow Inc., Harbin, China) can provide two types of normal force: constant and harmonic. The damping performance of dry friction dampers can be altered when the normal load is harmonically varying. The piezoelectric actuator, with its amplifier, adjusts the output force by the input voltage based on the inverse piezoelectric effect. After integrating the piezoelectric actuator into the closed-loop control module, it compensates for the constant component of the normal force and ensures consistency even as interfacial wear increases.
The measurement system mainly comprises a laser displacement sensor and three force sensors. A single laser Doppler vibrometer (LV-S01, Van-Hensin Technology Corp., Beijing, China) was employed to directly measure the displacement between the fixed and moving specimens. The strain force sensor (208B005, KingSci Inst., Beijing, China) is positioned between the fixed fixture and the piezoelectric actuator to record the normal force signal. Two dynamic force sensors (VLF-S-500N, Jinnuo Sensor Co., Bengbu, China) are installed on each side of the static fixture to calculate the tangential friction force.

2.2. Closed-Loop Control Module

The closed-loop control module is established based on the mechanical operations module to continuously monitor and sustain the normal force unchanged (no matter in constant form or harmonic form) throughout the wear test. To achieve this goal, a normal force control program must be devised. The communication between the program and the test rig is facilitated by the DAQ-USB board (USB-6001, National Instruments Inc., Austin, TX, USA), as illustrated in Figure 3.
The fundamental principle of the control program algorithm is the PID controller, which calculates the deviation between the target normal force and the acquired value. This deviation is linearly synthesized using proportional, integral, and derivative terms to generate a control voltage signal utilized for adjusting the controlled object. In the case of harmonic normal force, the target value exhibits dynamic variations, posing a challenge for the PID controller to achieve consistent regulation due to its inherent regulation time. Hence, a control algorithm in the frequency domain is suggested, dividing the normal force into three components: the constant component (C), the amplitude of the harmonic component (A), and the phase of the harmonic component (φ), as shown by the green frame line in Figure 3. In other words, the normal force is given as:
f ( t ) = C + A sin ( 2 π f req t + φ )
in which f req denotes the frequency of the normal force, expressed in Hertz (Hz). Each variable is handled by a separate PID controller. The acquired normal force value f M ( t ) from the test rig is analyzed using the Fast Fourier Transform (FFT) to determine three parameters: C M , A M and φ M . The error between these parameters and their respective target values ( C T , A T and φ T ) is used as input for the PID controller. It is worth noting that the displacement signal x ( t ) does not participate in control, but provides the phase reference. The PID controllers calculate the control variables by utilizing proportional, integral, and derivative terms with inputs e C , e A and e φ . Subsequently, it generates a voltage control signal u ( t ) through a virtual signal generator.
The control program is developed using the LabVIEW platform, and the logic block diagram is depicted in Figure 4a. The acquisition and output processes employ the while-loop structure to ensure continuous operation, establishing the cornerstone for software and hardware interaction. The output process data is structured as an array, circumventing the issue of low output frequency and the inability to meet high-frequency control demands caused by the limitations of single-point output due to memory refresh rates. These data rely on the acquisition process for their provision and are transmitted between nodes via data streams. Establishing a direct connection between them could result in a loop blockage, hindering the flow of data to the output process. Therefore, a commonly employed multi-threaded programming model called the “producer-consumer” structure is implemented to address data synchronization issues. Within each loop, the output process (consumer) is executed after the acquisition process (producer), utilizing a queue for data transfer between the two processes. This setup prevents issues where the initial output cycle lacks data and enables the relatively autonomous development of program functions.
Figure 4b displays the operation panel of the computer control program. The upper half represents the parameter configuration area. Within this area, the channel setting must be identical to the wiring of the DAQ board. The sample rate setting is primarily limited by both the performance of the board and the signal frequency. The section for setting the PID parameters is linked to the characteristics of the tester and requires adjustments based on engineering experience. All these parameters can be established during the construction and pretest of the test rig, eliminating the need for repetitive adjustments during actual friction and wear tests. The final section pertains to the setting of normal force target values, which can be adjusted both before and during program operation, considering the actual working conditions. The lower half represents the data display area, encompassing the measured normal force signal, the relative displacement signal, and the output control voltage signal. Additionally, a comparison chart displaying the acquired normal force value and the target value is provided to visually evaluate the control effectiveness during program operation.

3. Control Performance of the Test Rig

This section has determined the suitable parameters of the PID controllers and investigated the functionality of the closed-loop control module through localized test experiments. These results demonstrate the validity of the test rig design and methodology for future experiments and results.

3.1. Parameter Configuration of the PID Controller

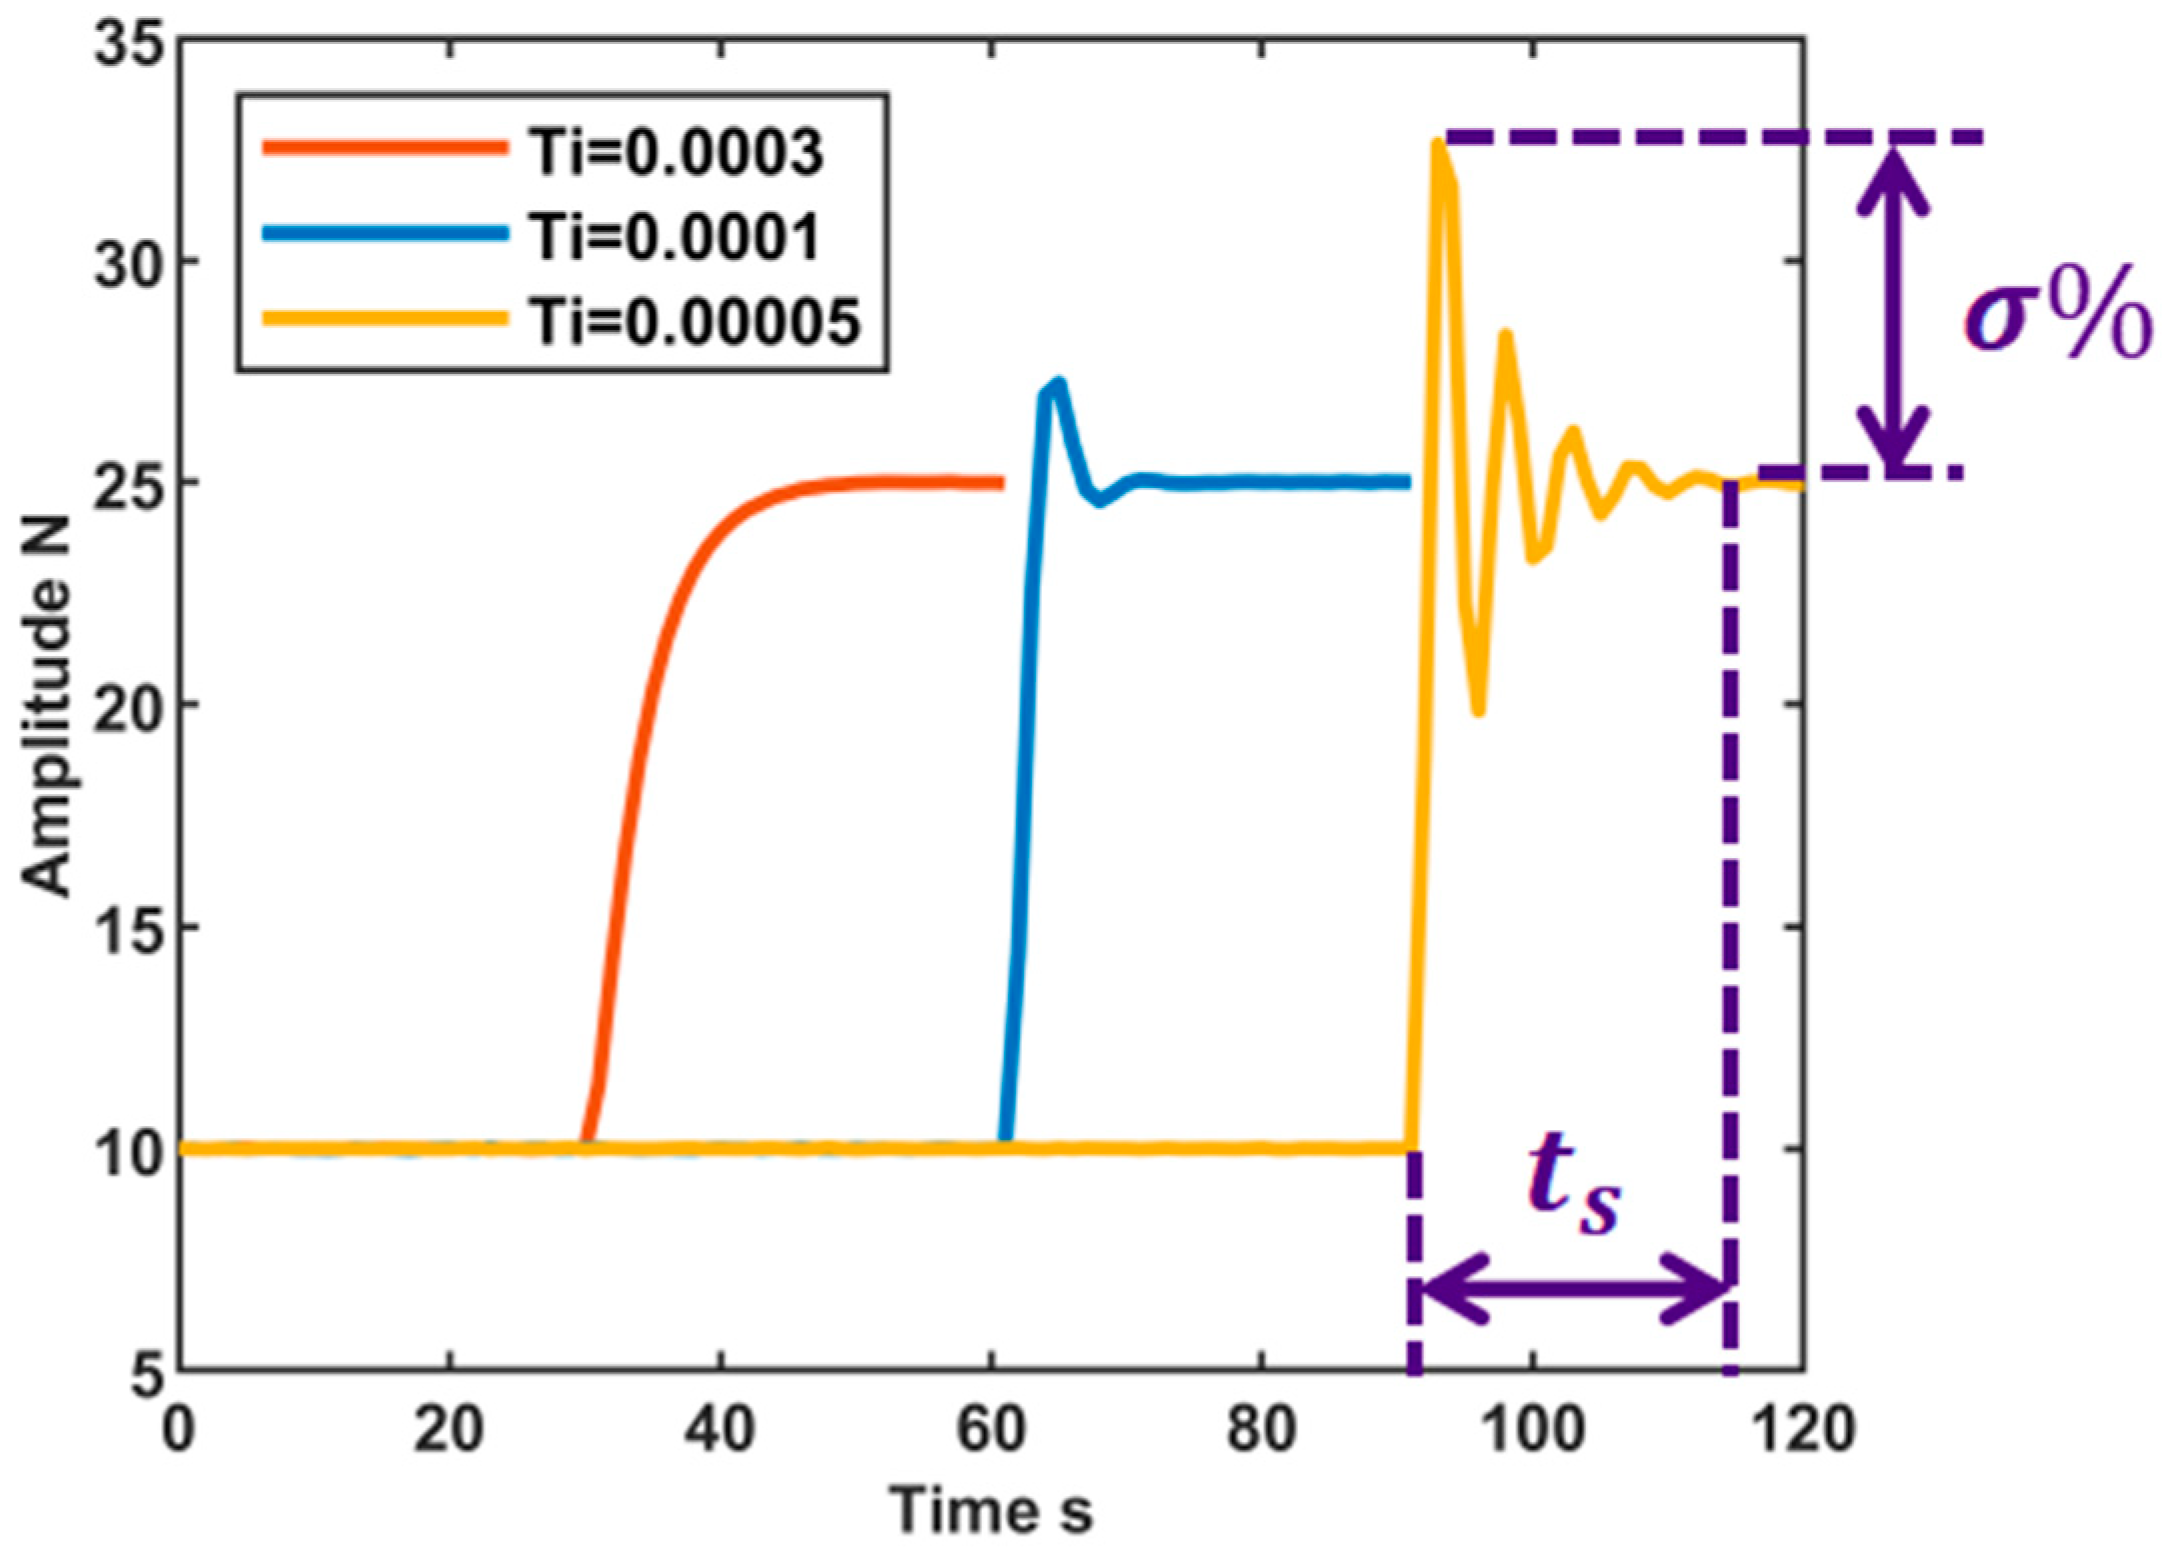
Control of the normal force in this test rig is accomplished using three independent PID controllers for variables C, A, and φ . Each PID controller consists of a proportional term, an integral term, and a derivative term, with each term regulated by its corresponding parameter K c , T i , and T d . The selection of appropriate parameters can enhance the effectiveness of system control, which can be evaluated by assessing the settling time t s and overshoot σ % (refer to Figure 5). Settling time denotes the minimum duration needed for the system to reach a new equilibrium state after a disturbance. Overshoot is the ratio between the instantaneous maximum deviation and the steady-state value, typically expressed as a percentage.
Figure 5 depicts the adjustment scenario of the integral term parameter Ti for the controller associated with variable A. The relevant evaluation metrics, namely overshoot and regulation time, are documented in Table 1. When the selected value for the parameter Ti is relatively large, as indicated by the red line, the adjustment process exhibits highly stable behavior with no overshooting, albeit at the cost of a relatively prolonged time to reach the target. And when a relatively small value is selected, as indicated by the yellow line, it induces system oscillations, resulting in a notable prolongation of the settling time. In ideal adjustment scenarios, as denoted by the blue line, there might be a slight overshoot but a quicker achievement of the target and subsequent stabilization. Consequently, a finalized suitable value of Ti at 0.0001 was determined, allowing for a minor overshoot in the normal force to diminish settling time. In this work, the PID parameters were found by trial and error. It is worth noting that one can also use online tuning methods to correct the PID controller. For more details, one can refer to [25,26]. However, this is beyond the scope of this paper.
Likewise, appropriate values can be selected for the remaining parameters of variable A, as well as for the parameters of variables C and φ . Finally, the identified parameters, along with the respective average setting times and average overshoots, are documented in Table 2. While controlling the normal force, the average setting time amounts to approximately 10 s, with an average overshoot below 10%, better meeting the test rig requirements.

3.2. Performance of the Closed-Loop Control Module

The primary function of the control module is to consistently maintain the normal force at the target value, regardless of whether it is in harmonic or constant form, throughout the entire friction and wear test.
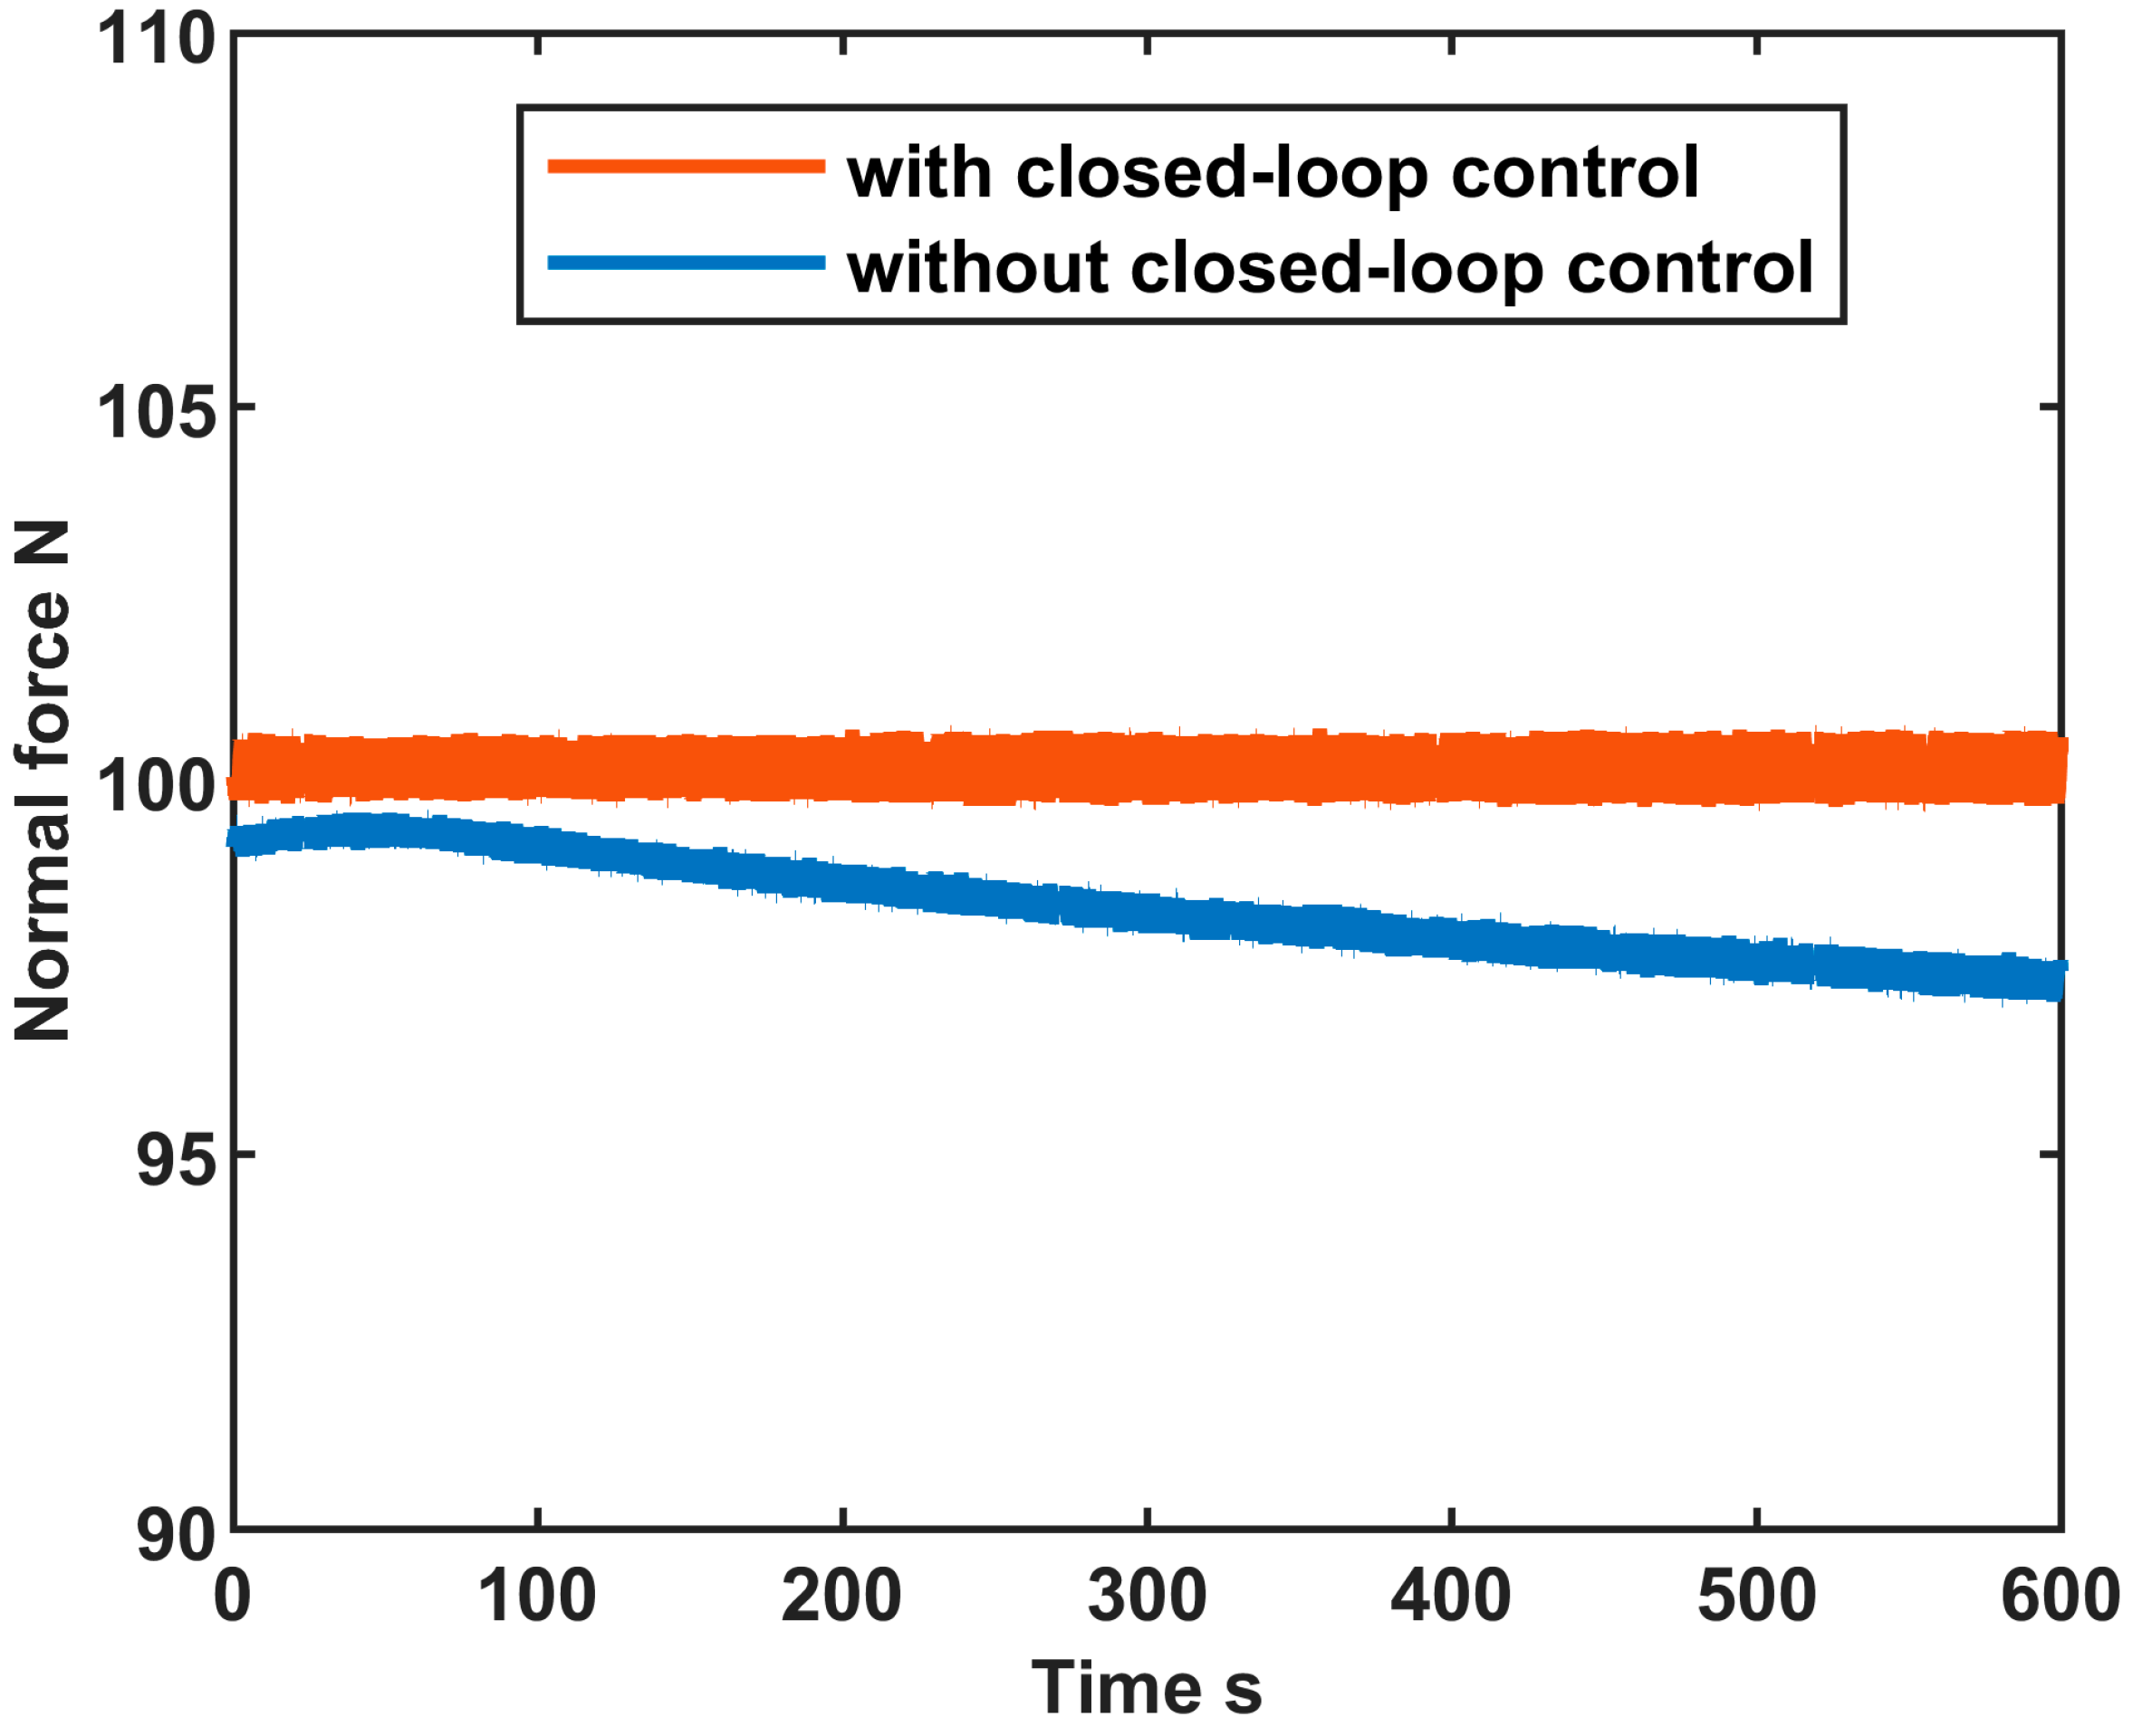
During the experiments, a predetermined normal force can be applied using a knob. However, achieving a precise target force solely through this method proves to be challenging. As depicted in Figure 6, the target normal force applied is 100 N. Without the closed-loop control, the manually adjusted normal force slightly undershot the target value. Throughout the wear test, the normal force initially increased slightly and then decreased steadily. Within a mere 10-min interval, the normal force dropped by 2.6%. This decline may primarily result from the wear of the friction interface. Conversely, under closed-loop control, the normal force remained stable at 100 N for an extended period during a considerably lengthy test period.
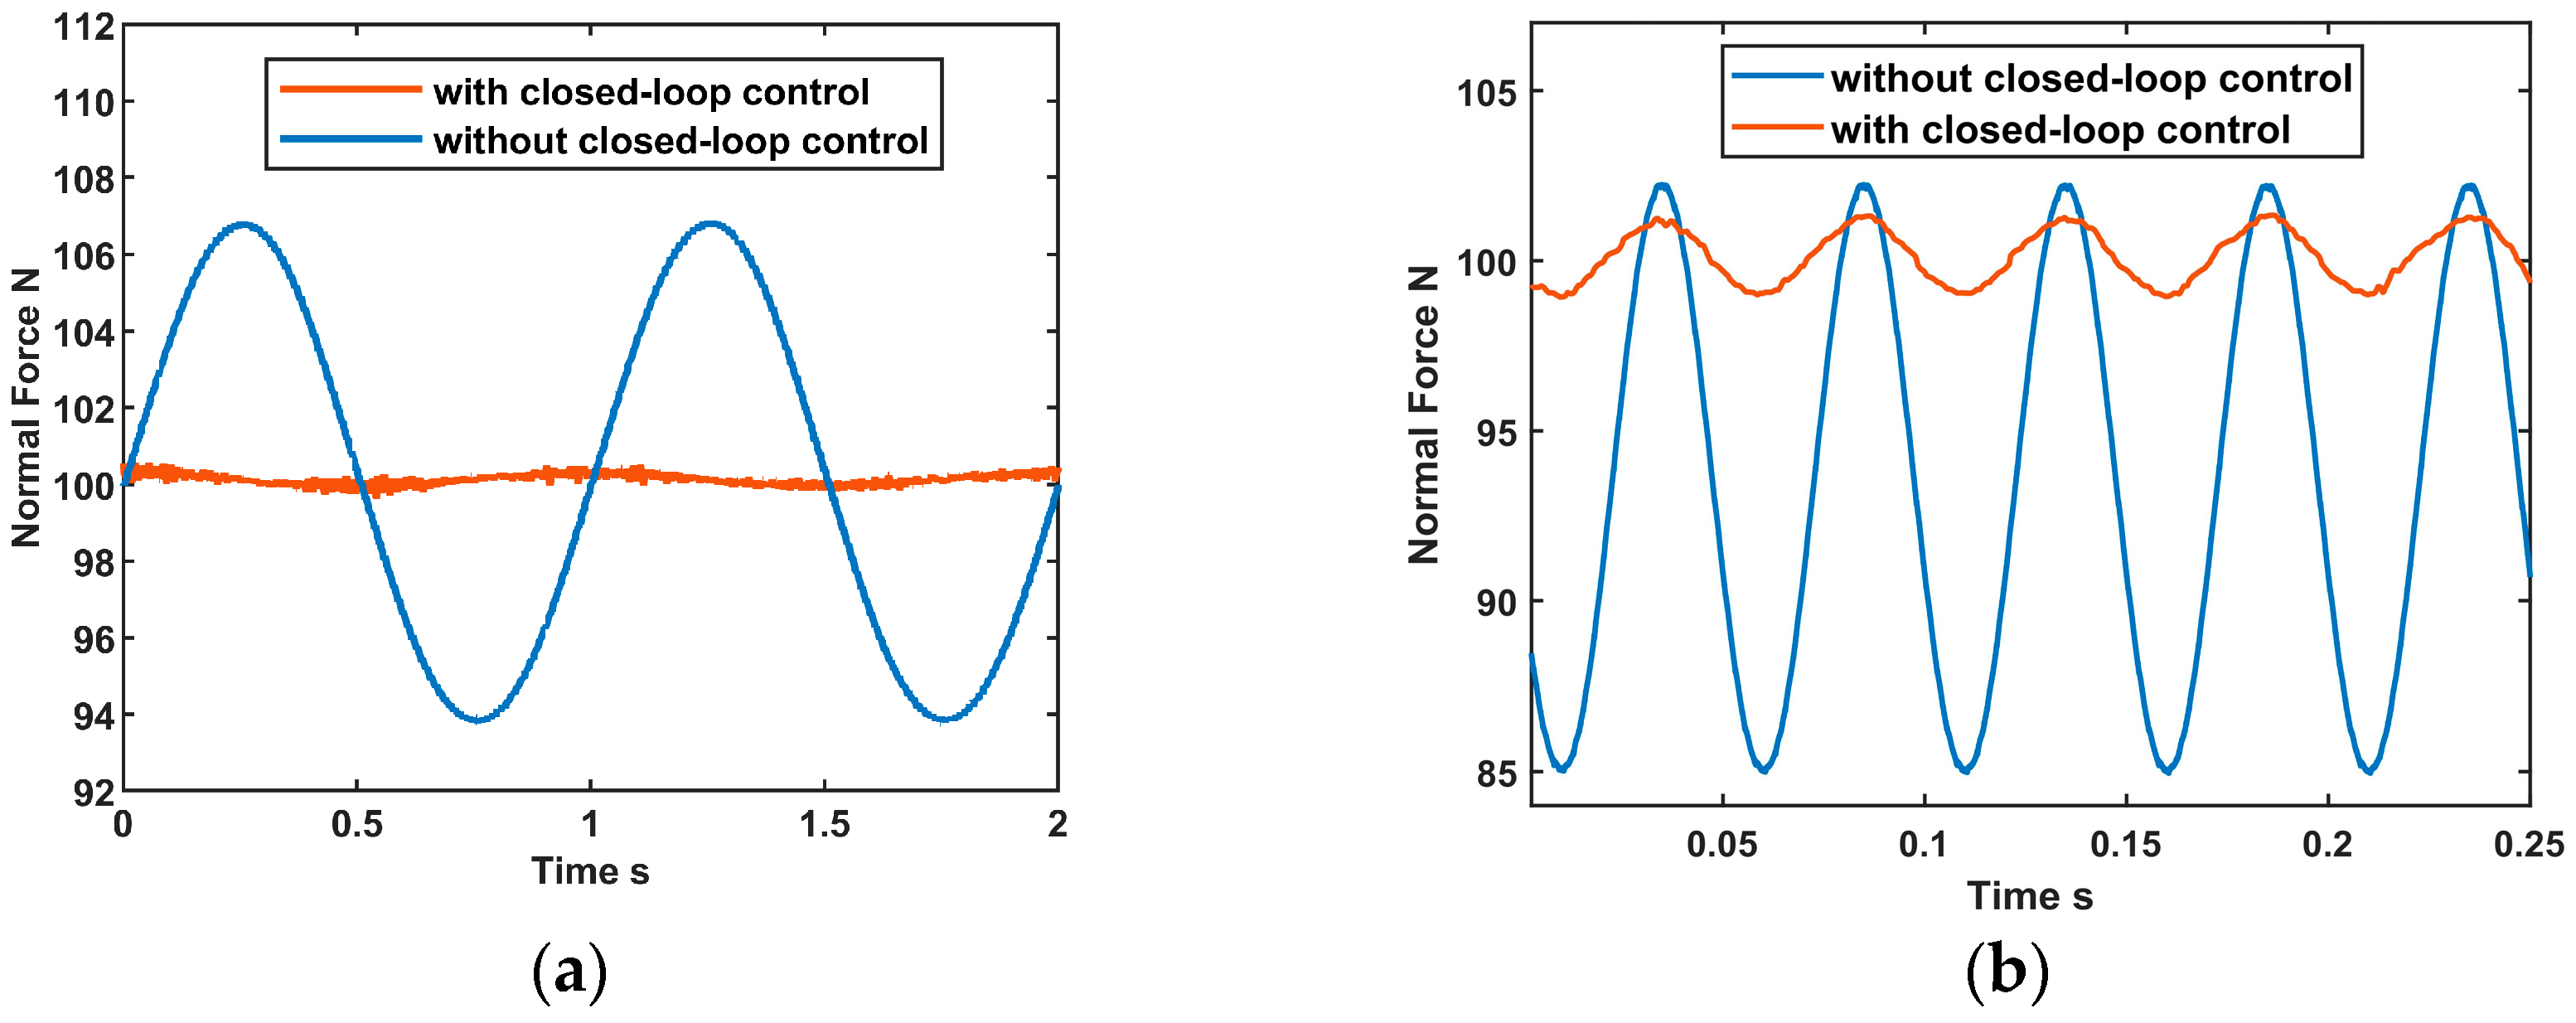
Moreover, a coupling between tangential and normal vibration exists. Fixed fixtures in the test rig are secured by three-jaw stabilizers for clamping. Each stabilizer is equipped with three stainless steel universal balls that exert solely normal forces, theoretically excluding tangential forces. This configuration ensures the internal torque balance of the fixed fixture and prevents rotational movement of the fixed specimen. However, this design does not achieve complete decoupling of tangential and normal forces during the actual testing procedure. The sinusoidal tangential excitation induces fluctuations in the normal force. These fluctuations become notably pronounced under certain conditions, such as when specific specimen materials are utilized, high tangential excitation amplitudes are exerted, or assembling is inadequate. Figure 7a illustrates significant fluctuations of approximately ±7.5 N in the normal force without closed-loop control when the excitation is 1 Hz. When the control module is activated, the normal force maintains a notably stable and constant value, and the fluctuation decreases to ±0.2 N. Although the fluctuation increases slightly in Figure 7b at 20 Hz, it still remains within ±2 N. The control system can compensate for at least 50% of the normal force fluctuations under various working conditions.
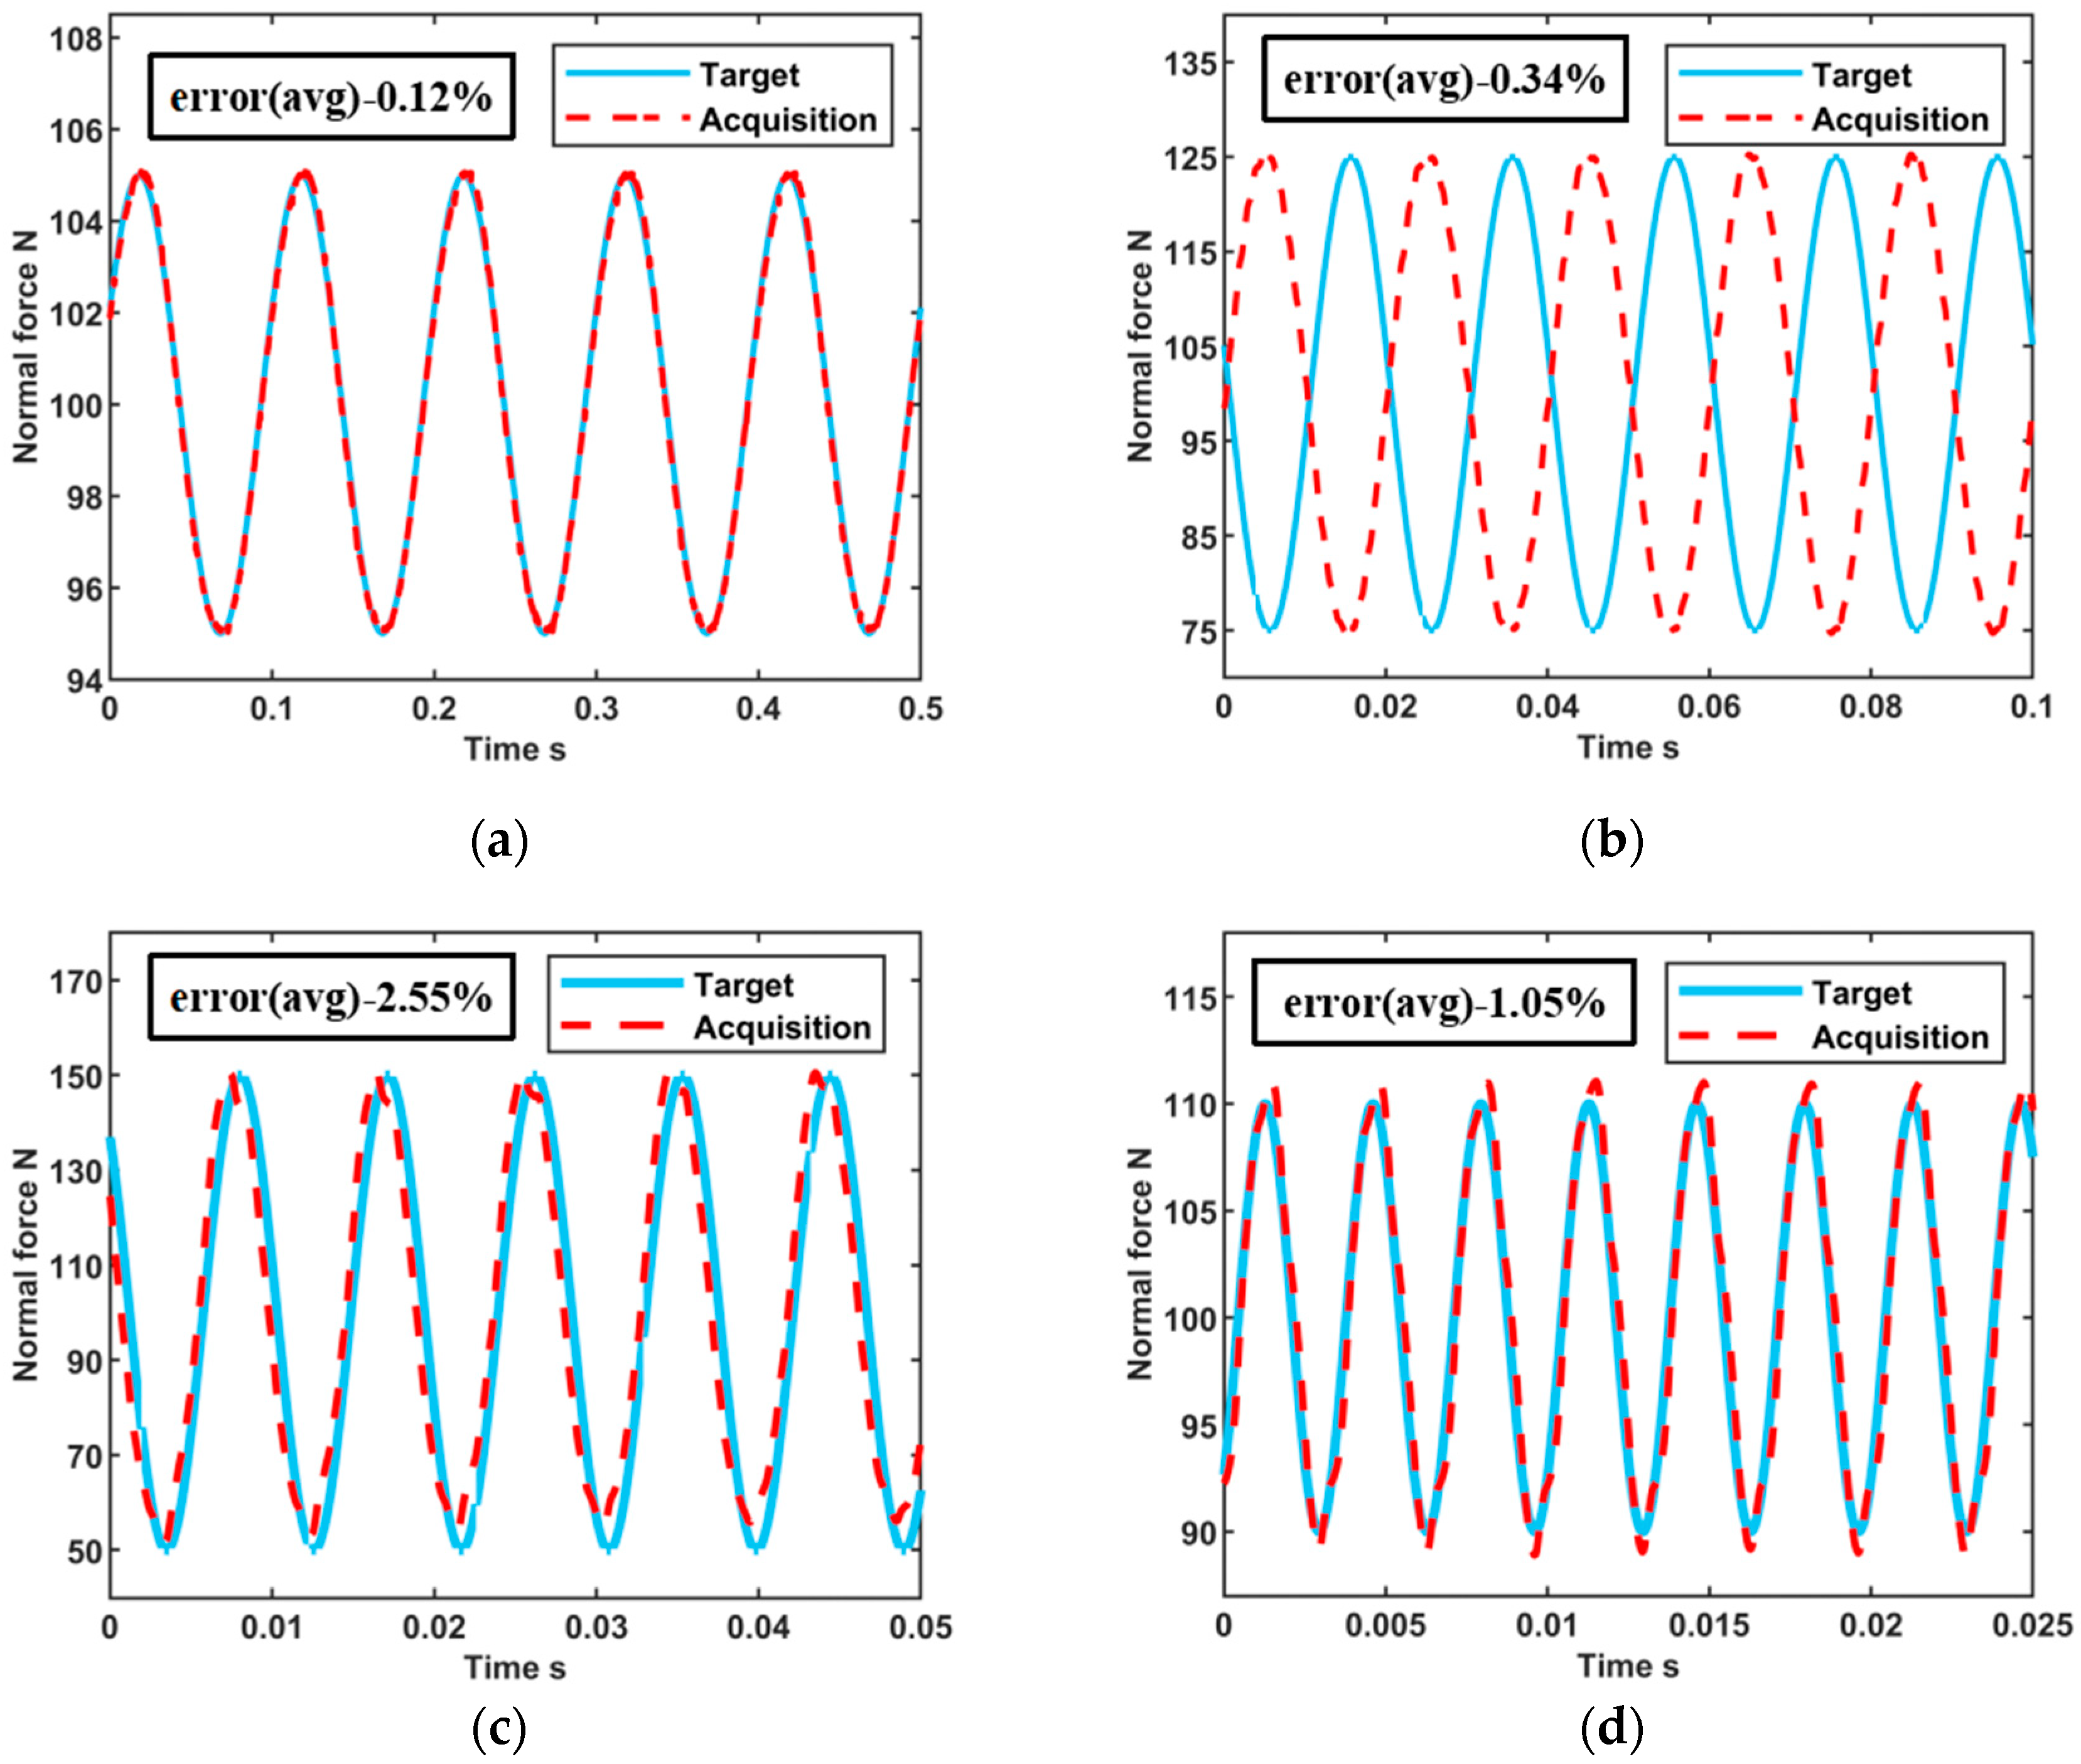
When the target normal force is time-varying, the control module also shows very good performance. The target normal force can be pre-set for various frequencies ( f req = 10   Hz / 50   Hz / 110   Hz   /   300   Hz ), amplitudes ( A = 5   N / 10   N / 25   N / 50   N ), and initial phases ( φ = 0 / 180 ). The acquired value (red dashed line in Figure 8) of normal force implemented by the control system exhibits a high degree of similarity to the target value (blue solid line in Figure 8). The average error, which quantifies the disparity between the acquired and target values, is adopted as the evaluation metric. Upon comparison, it is evident that the average error over five signal cycles typically remains below 1%. Even under extremely high-frequency demands, the error stays under 3%. The above test results affirm the effective realization of the normal force by the closed-loop control system.
Additionally, relative displacement can be controlled using the same frequency-domain PID strategy. Relative displacement primarily depends on the tangential excitation level, with its actual magnitude impacted by factors such as normal force and assembly. Figure 9a illustrates that under constant tangential excitation power conditions, relative displacement varies a bit across multiple tests, which complicates manual adjustment processes. The implementation of the closed-loop control system addresses this challenge by enhancing test repeatability. Figure 9b shows the result of displacement control at 0.3 mm with a tangential excitation frequency of 10 Hz and a normal force of 30 N. The target displacement is also depicted as a reference. It can be seen that the average error is relatively low (4.12%), and the resulting hysteresis loop is smooth (Figure 9c). Relative displacement can be precisely stabilized within a 2 mm amplitude at frequencies below 150 Hz. These parameters are primarily constrained by the maximum power output of the shaker.
In summary, the friction and wear test rig can achieve the loading, measurement, and control functions. To facilitate an understanding of the capabilities of the test rig, its specifications are provided in Table 3. The specification data is limited by the hardware capabilities and the PID control program. In this test rig, the error in force amplitude can be controlled within 3% of the target value, and the phase error is less than 5°, which meets the test requirements. The minimum values of the technical parameters are 0 if they are not given.

3.3. Performance Comparison of Frequency-Domain and Time-Domain PID Control Strategies

As delineated in Section 2.2, the closed-loop control module within this test rig employs a frequency-domain PID control strategy. In this context, the term “frequency domain” primarily refers to the magnitude and phase obtained through Fourier transformation, which serve as descriptive parameters for the normal force. Correspondingly, the “time domain” signifies the immediate magnitude of the normal force as a descriptive metric.
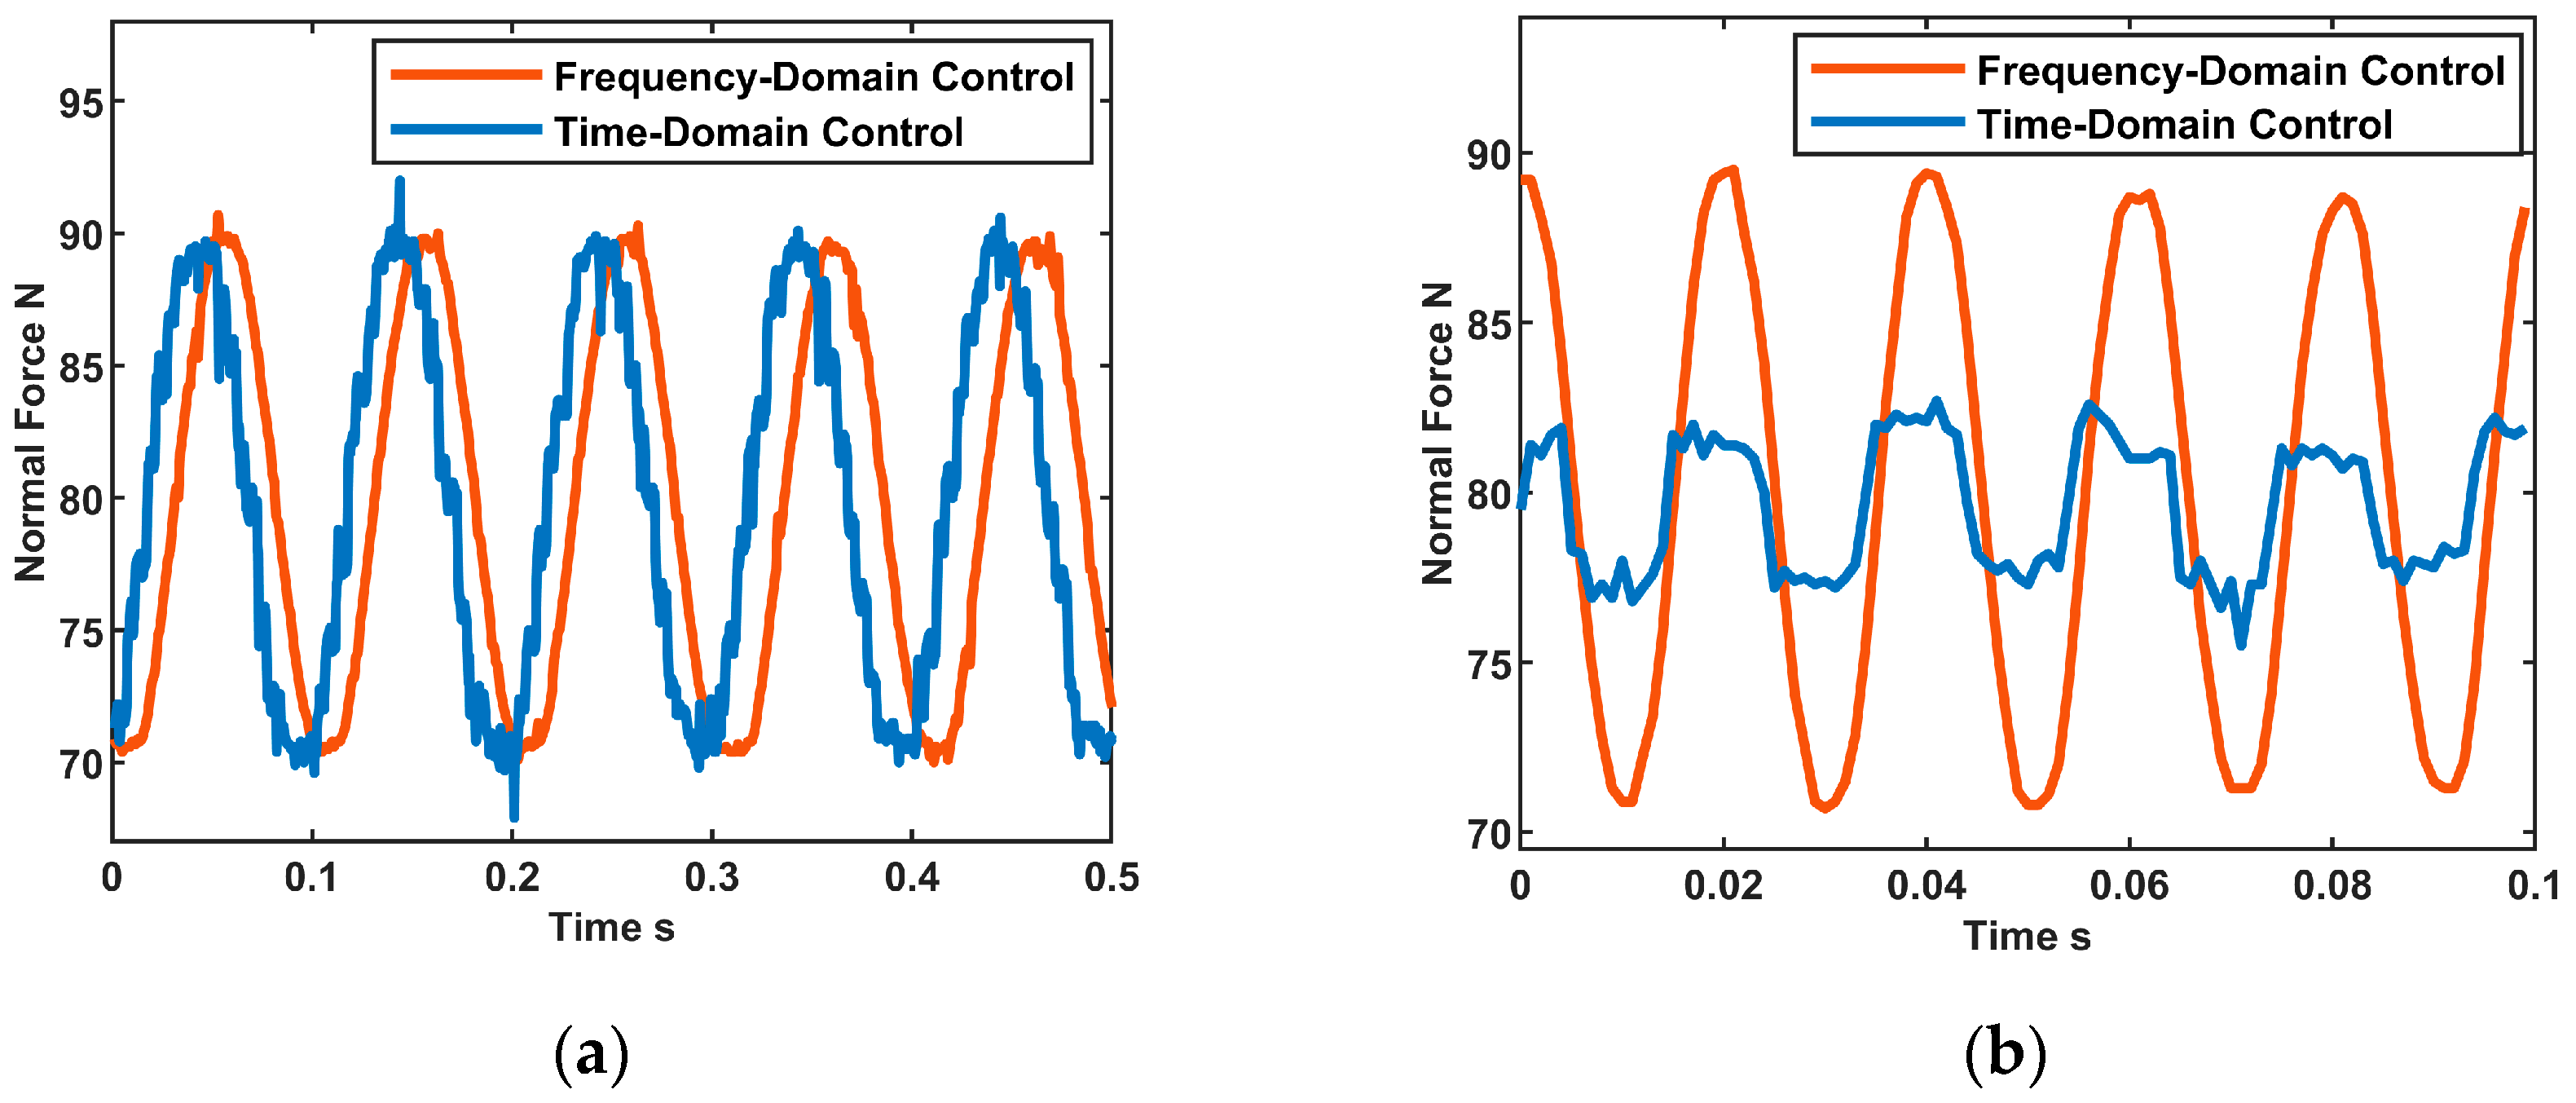
The target value of the normal force is set as f ( t ) = 80 + 10 sin ( 2 π f req t ) N . The two control strategies are tested, and the results are presented in Figure 10. The red lines represent outcomes obtained from the frequency domain control strategy (abbreviated as F.C. strategy), while the blue lines depict those from the time domain control strategy (abbreviated as T.C. strategy). In the low-frequency scenario, exemplified by Figure 10a ( f req = 10 Hz), both control strategies effectively attain the control objective. The average error within the F.C. strategy, measuring the deviation between the controlled and target values, registers at 0.44% across five signal cycles, compared to 0.97% within the T.C. strategy. The former is slightly superior to the latter. More notably, it is evident from the figure that the resultant curve within the F.C. strategy exhibits a smoother profile. This is due to the fact that the target harmonic normal force, inherent to the DC control strategy, perpetually alters over time. Consequently, the PID control undergoes frequent reinitializations, hindering stabilization. The control curve exhibits a myriad of minute undulations. This phenomenon intensifies notably at higher frequencies, as depicted in Figure 10b ( f req = 50 Hz). Despite the PID control not converging to the preset target normal force, the target undergoes significant fluctuations, directly influencing the trend of normal force changes. As a result, the average error peaks at 6.30% within the T.C. strategy, whereas it remains at a mere 0.54% within the F.C. strategy.

4. Friction Tests Results

In tribology, hysteresis loops are curves that depict the correlation between friction and relative displacement among interfaces. This section employs the friction and wear test rig for mechanical characterization tests to plot the hysteresis loops of different friction materials under varying target loading conditions. This process aims to acquire data on interfacial mechanical parameters like contact stiffness k t and friction coefficient μ .

4.1. Experimental Preparation

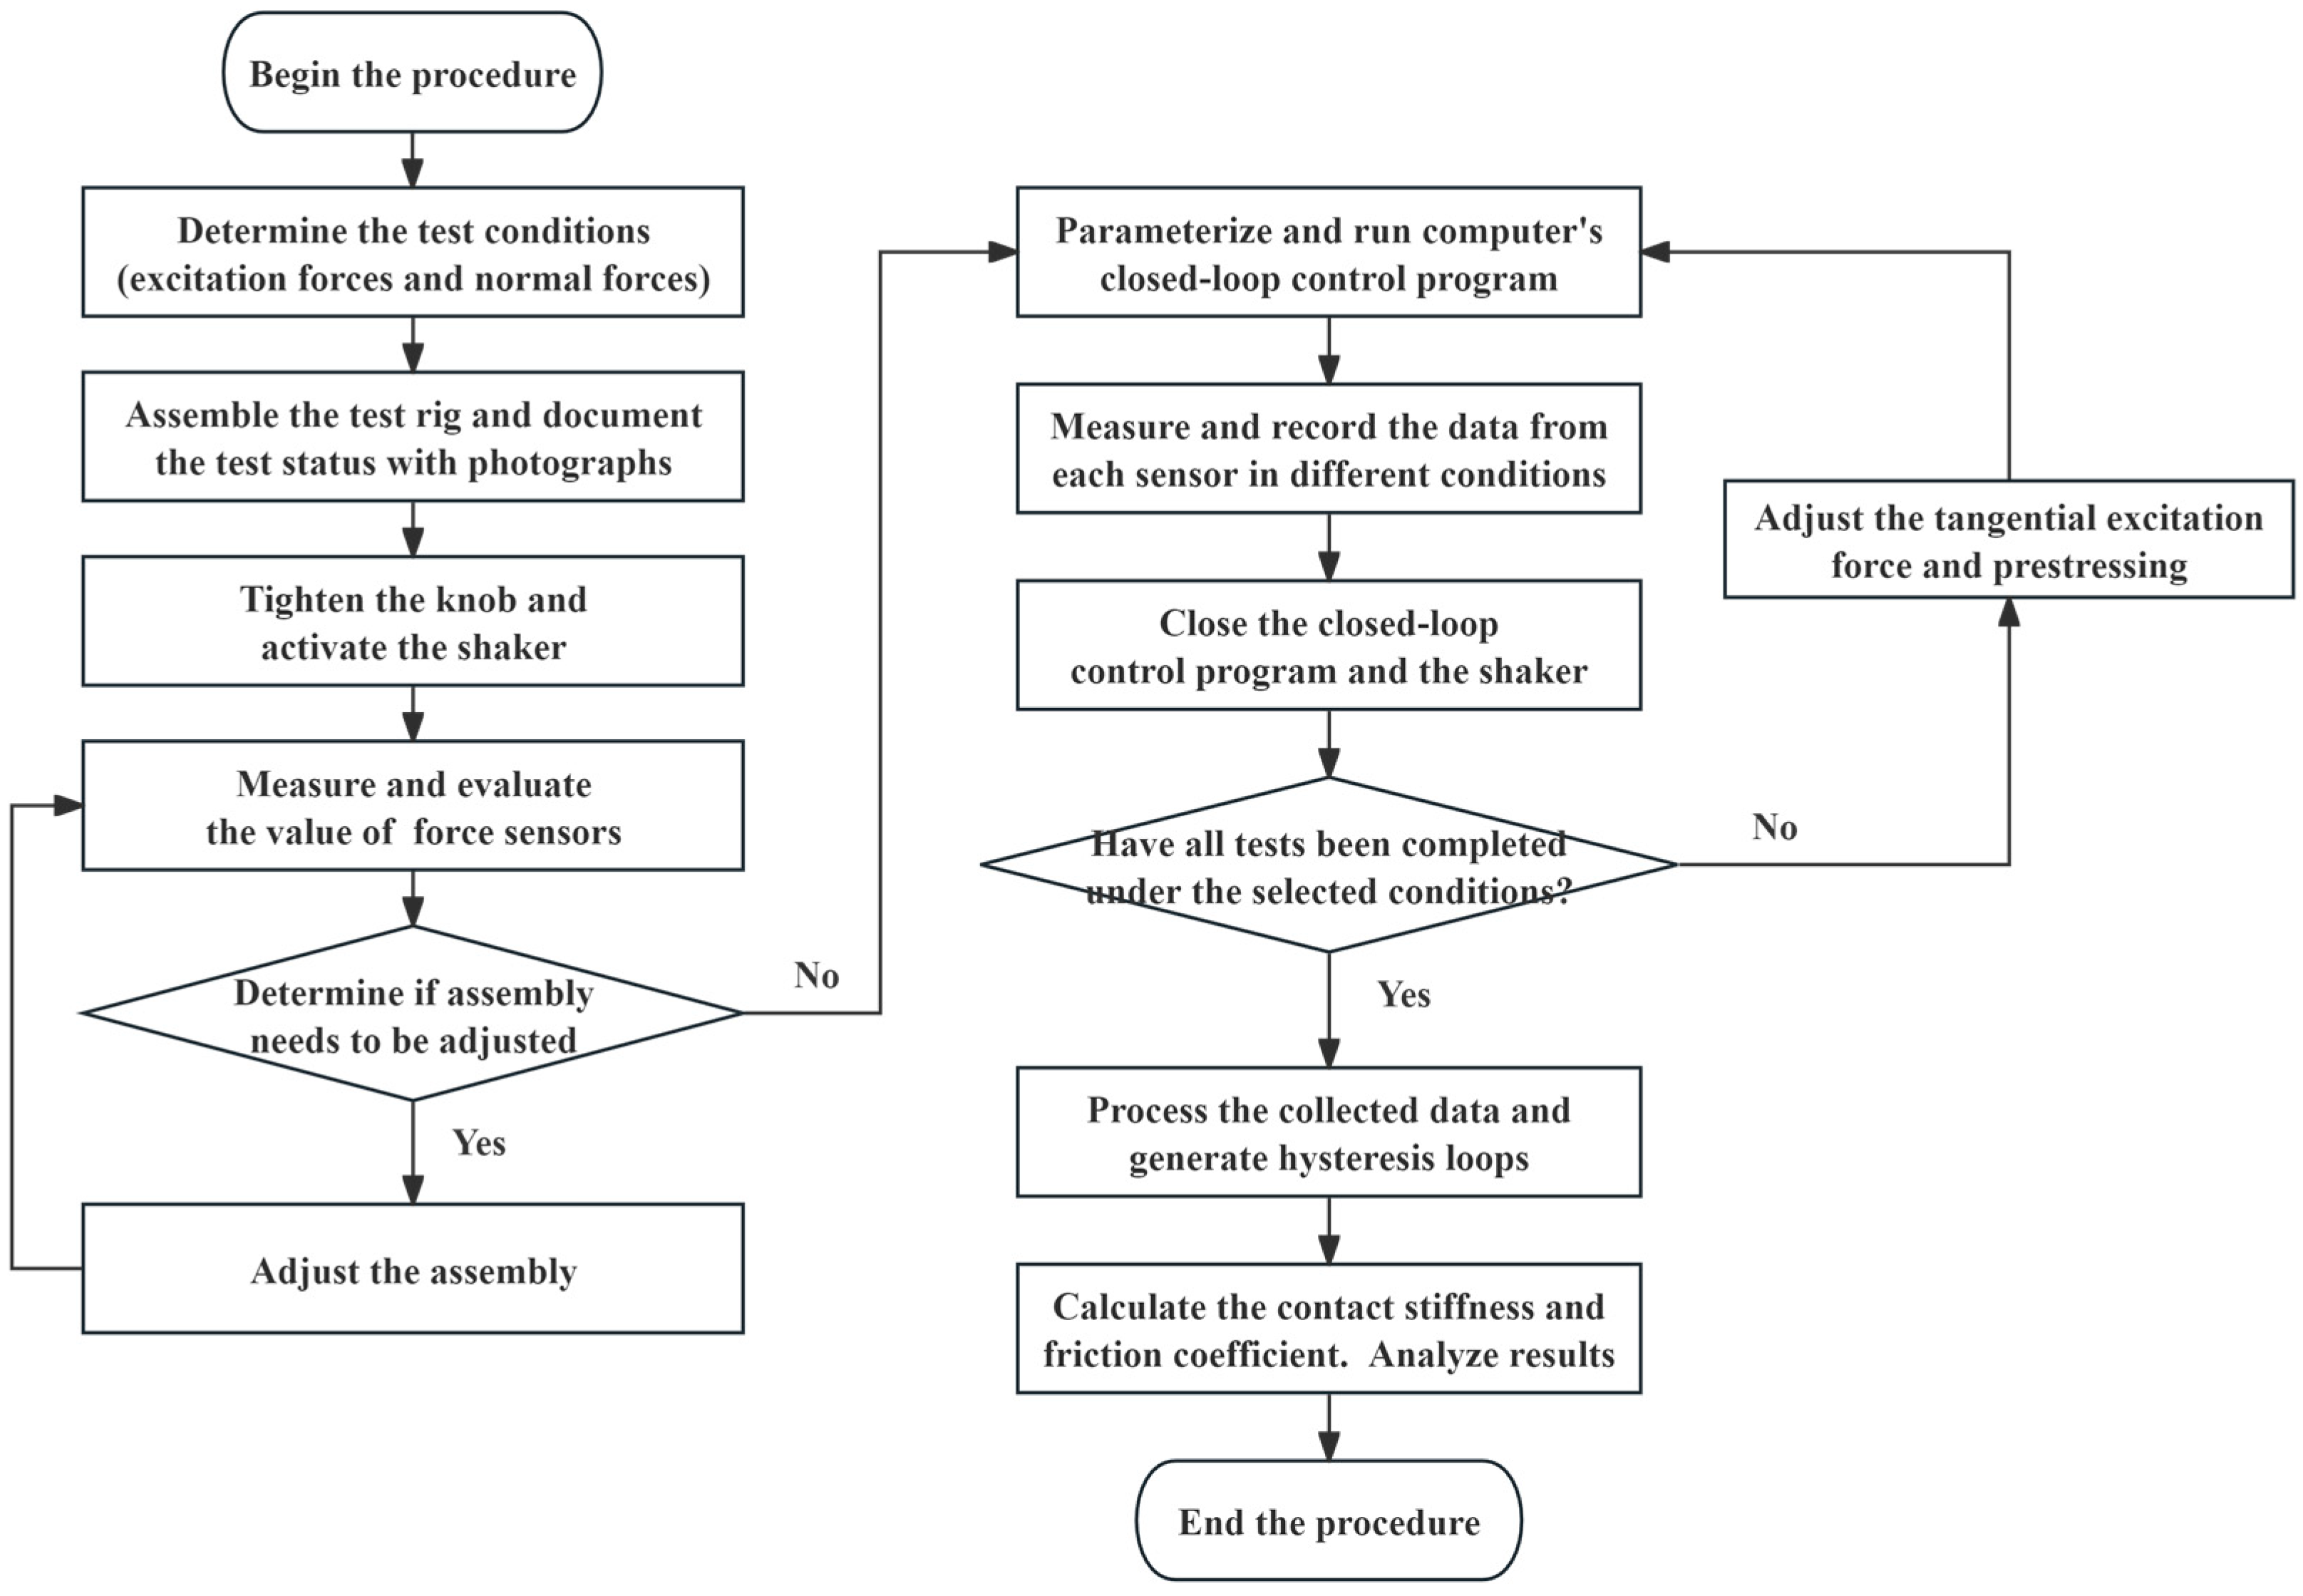
The specific experimental procedures for the friction test are illustrated in Figure 11 and are primarily divided into three stages: assembly, testing, and data processing. Firstly, the fixed specimen and its fixture are installed and secured using three-claw stabilizers. Subsequently, the moving test specimen and its fixture are assembled and mounted on the guide rail. The knob is then tightened to establish contact between the stationary and moving specimens. During this assembly phase, adjustments are made based on the force sensor readings. Ideally, both tangential force sensors should register identical values, while the normal force sensor should approximate the target value. Following this, a computerized closed-loop control program is executed to ensure adherence to the specified conditions. Data from each sensor is measured and recorded across various testing conditions. Finally, the collected data is processed to generate hysteresis loops. From this, the contact stiffness and friction coefficient are calculated. The experimental results are then analyzed to investigate the influence of different factors on the contact parameters.
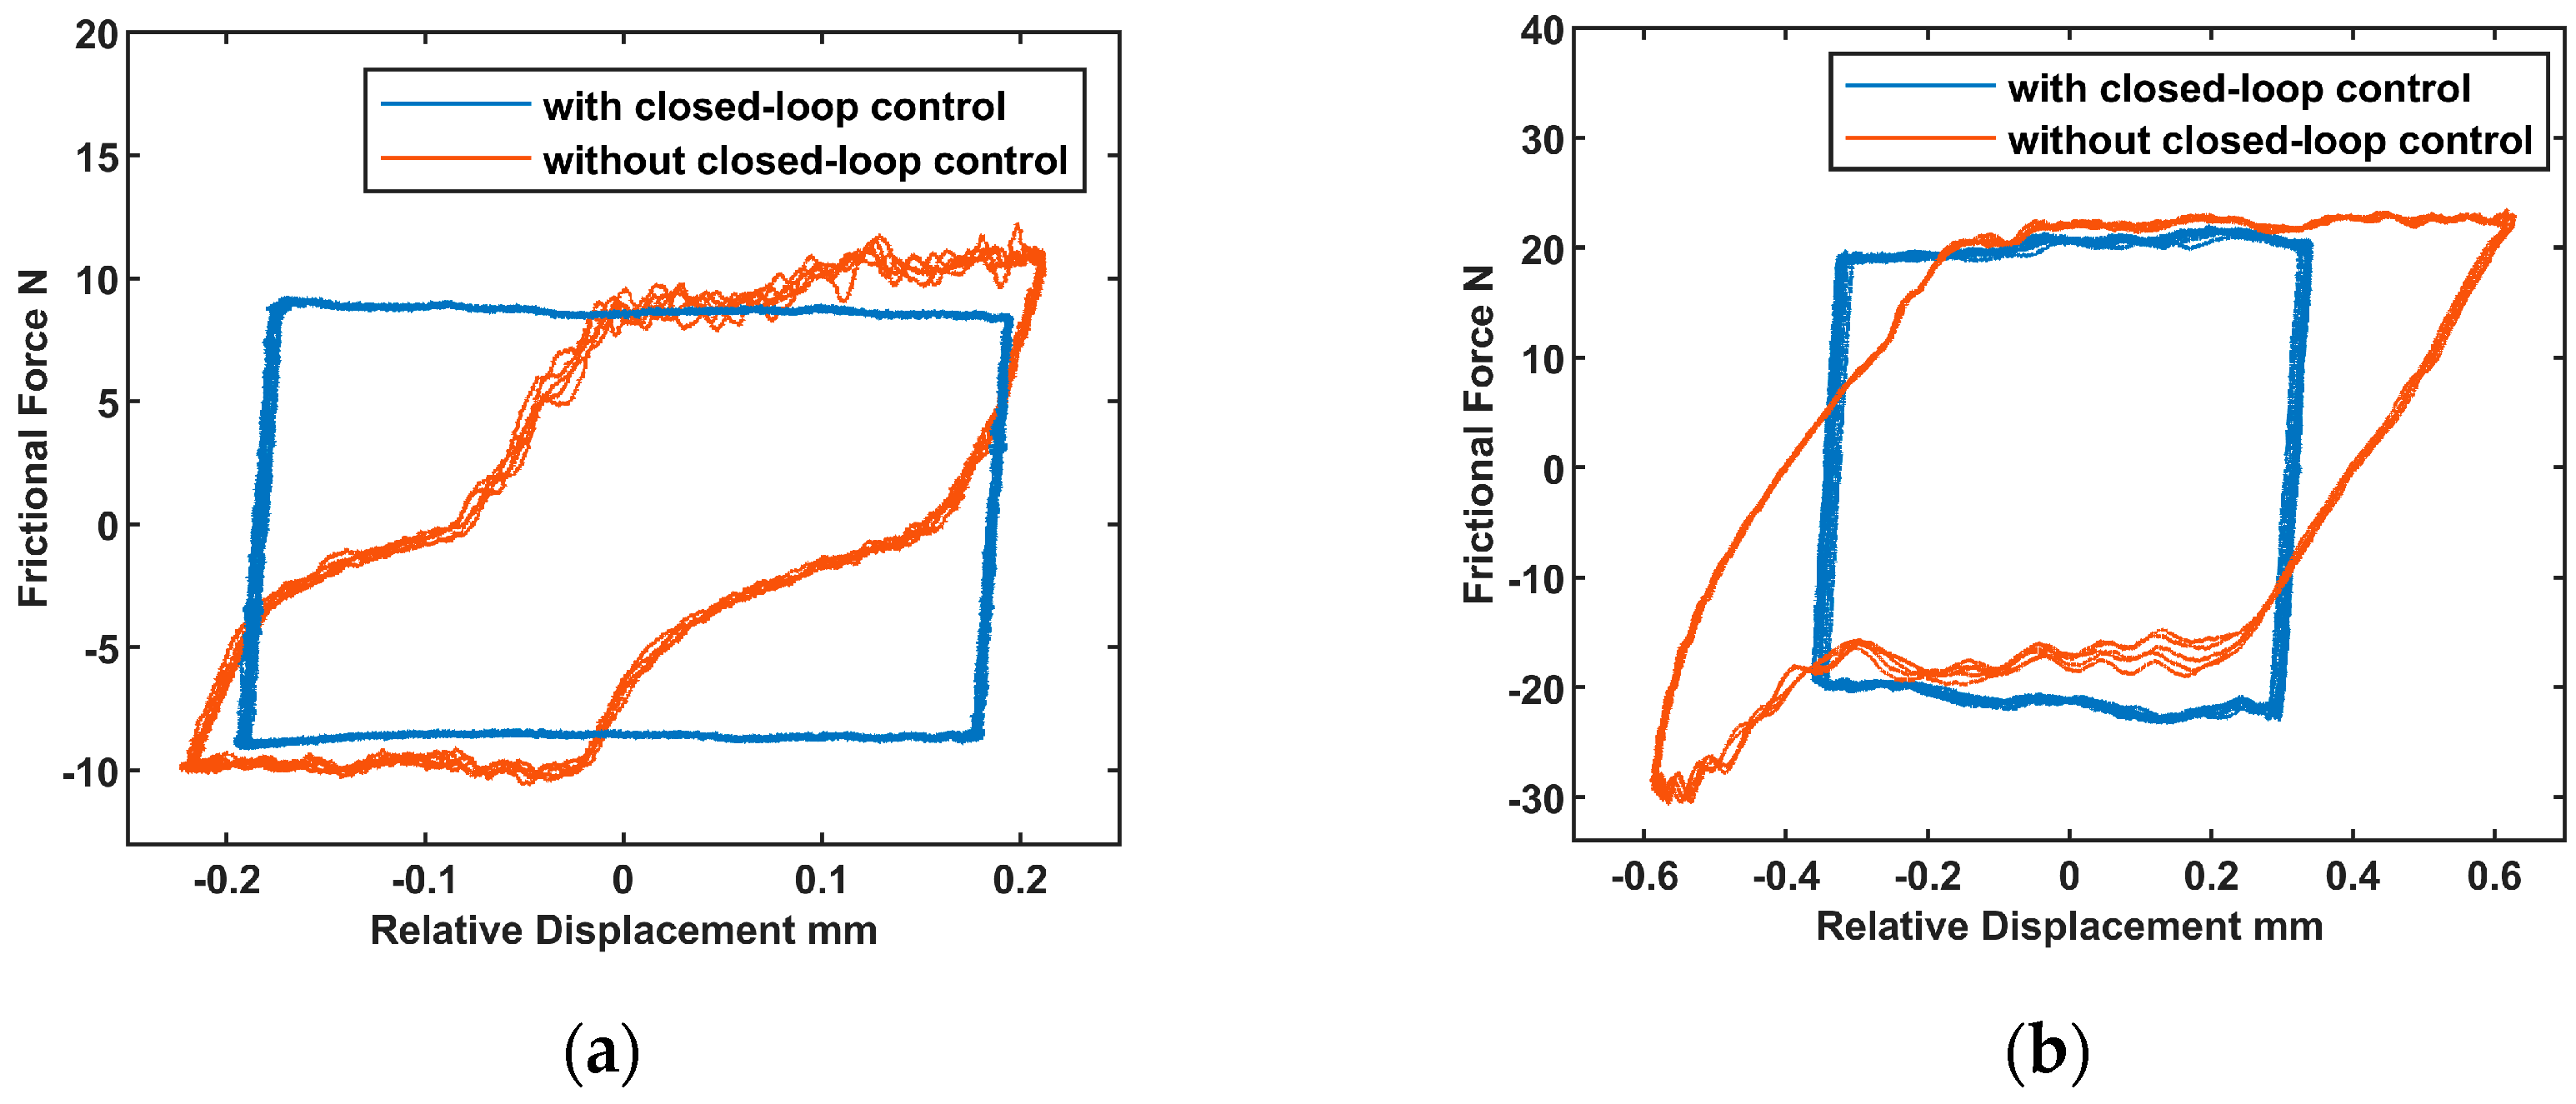
Before commencing formal testing, multiple pre-tests were conducted with and without activation of the closed-loop control module to validate the control performance. Hysteresis loops were recorded, as depicted in Figure 12. The smoothness and stability of the hysteresis loops markedly increased in the presence of the control compared to their absence. These results provide strong evidence of the validity and accuracy of the developed test method in comparison to commonly employed experimental methods.

4.2. Hysteresis Loops of Different Friction Materials

The specimens used in this paper involve more than ten types of materials, which are mainly divided into two categories: friction materials (copper-iron-based powder metallurgy materials, ceramic matrix composites, etc.) and high-temperature alloy materials (DD6, GH605, GH4090, Mar-M247CC, etc.). The selection of test materials is based on specific engineering requirements, and the materials used for the fixed and moving specimens can be the same or different in each test.
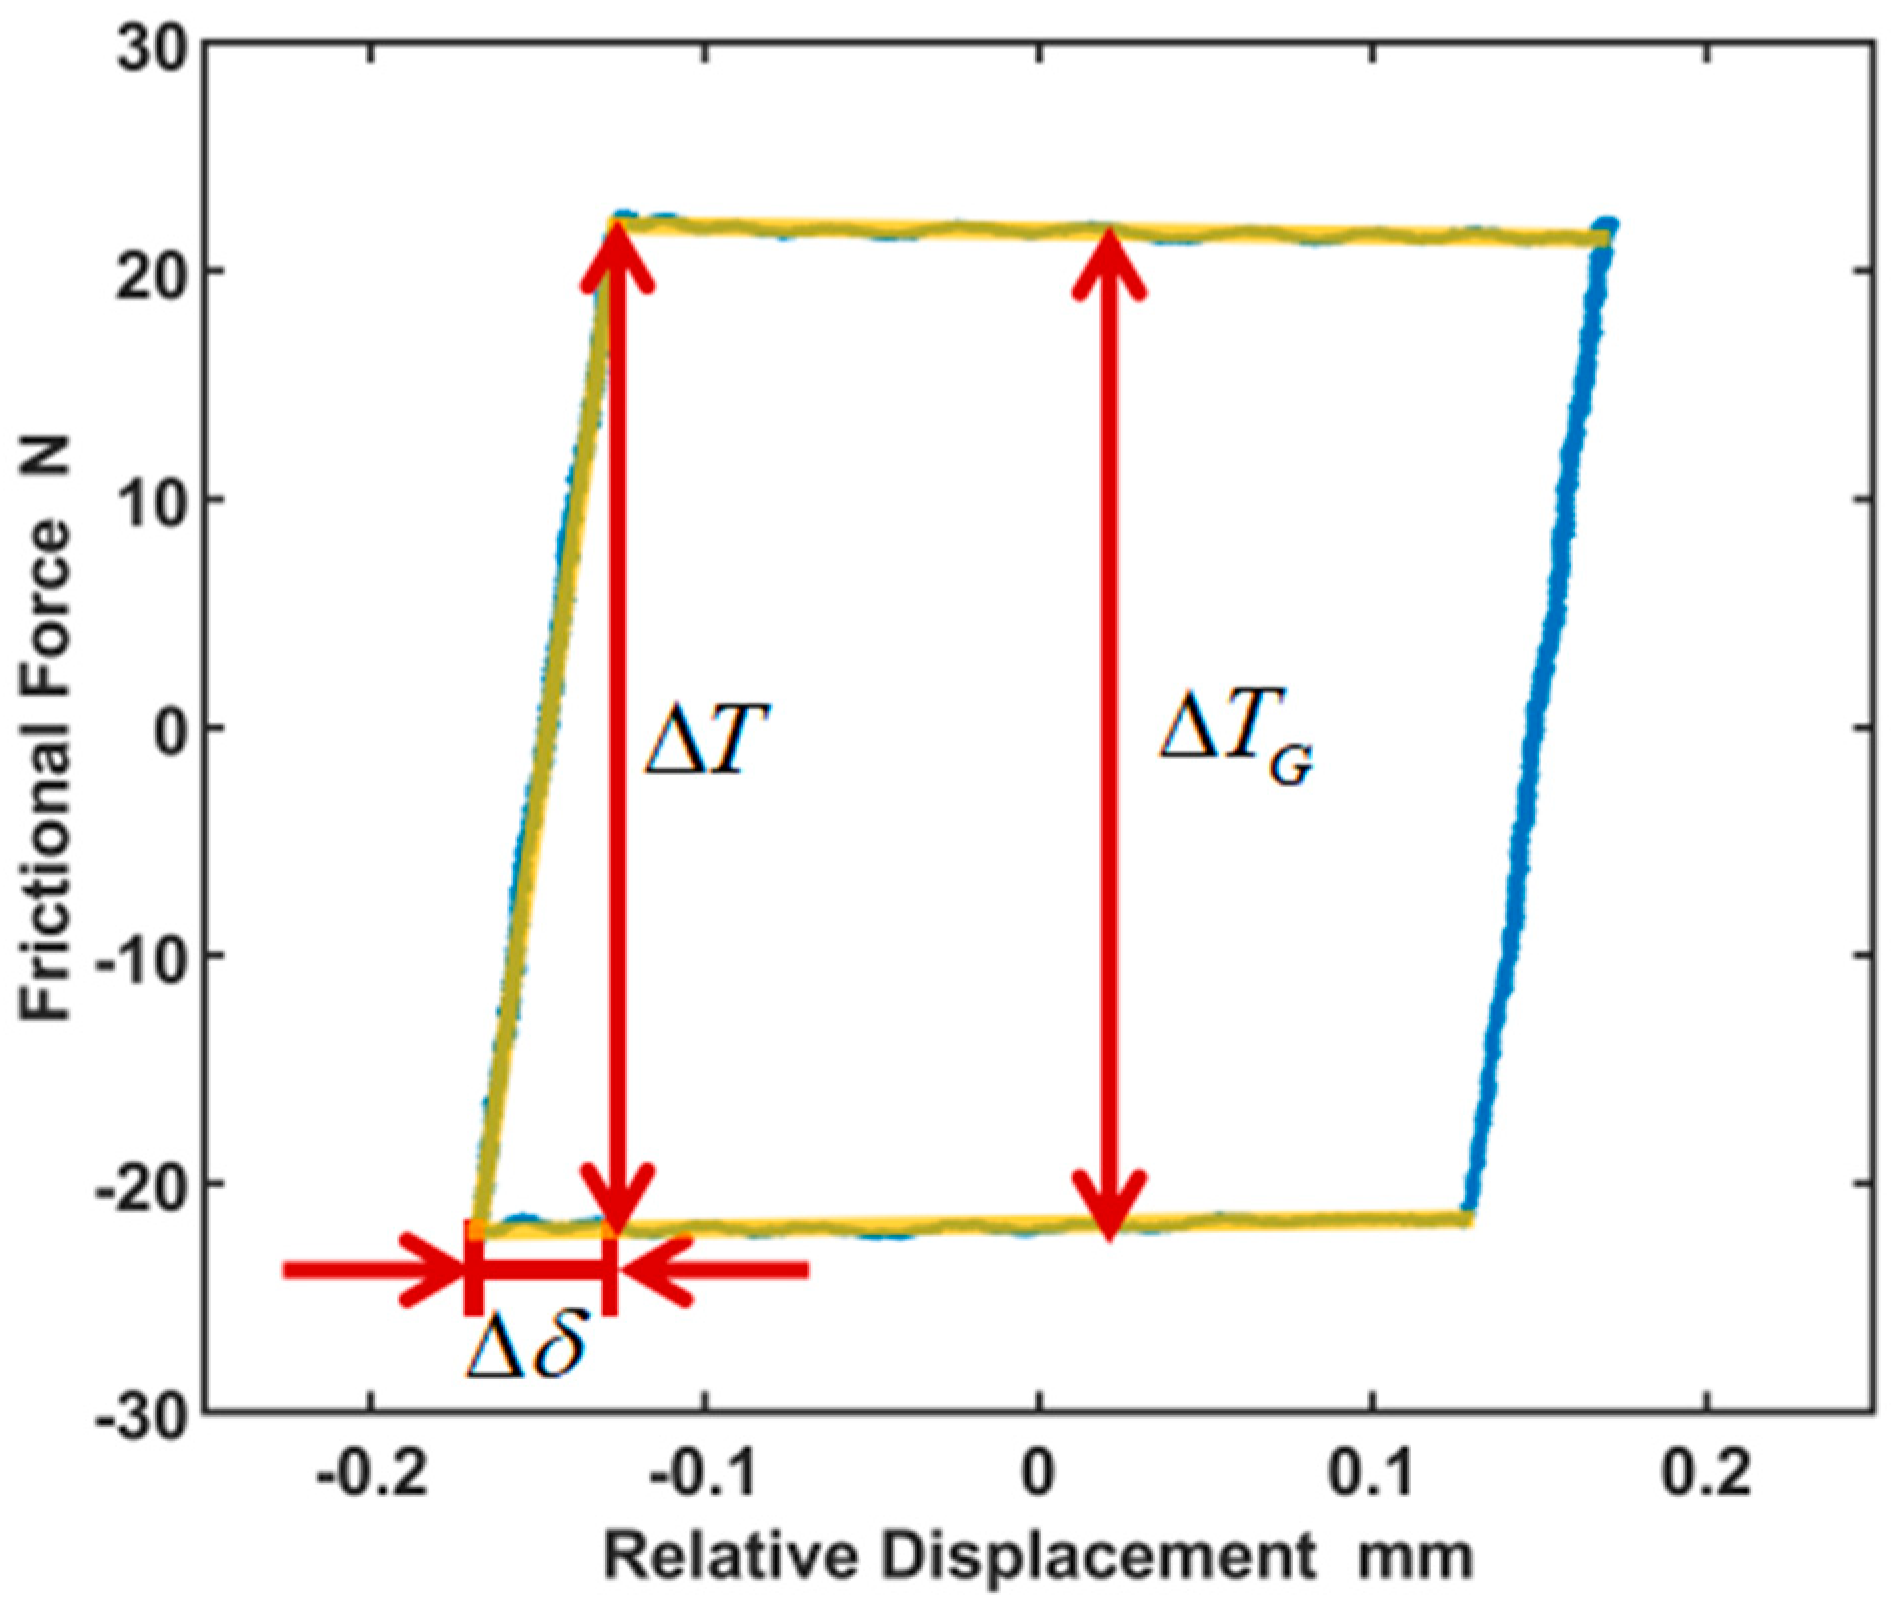
In friction behavior tests, the typical hysteresis loops observed resemble parallelograms. Figure 13 illustrates an experiment conducted on specimens composed of copper-iron-based powder metallurgy material and the high-temperature alloy GH605.
Each cycle of the hysteresis loop consists of two phases: the left and right sides of the hysteresis loops represent the stick phase, while the upper and lower sides are the slip phase. By analyzing the hysteresis loops, the tangential contact stiffness k t and friction coefficient μ can be extracted as follows:
k t = Δ T Δ δ
μ = Δ T G 2 F n
The tangential contact stiffness is defined as the average slope of the hysteresis loop in the stick phase. The increment Δ δ is the relative displacement in the stick phase and Δ T is the corresponding friction force. The friction coefficient is defined as the ratio of the friction force over the normal force in the slip phase. It can be obtained by calculating the average ratio in the two slip phases, in which Δ T G is the difference between the two friction forces. It is worth noting that the friction coefficient can only be determined in hysteresis loops with a slip phase. In cases of pure stick states, only the tangential contact stiffness can be determined.
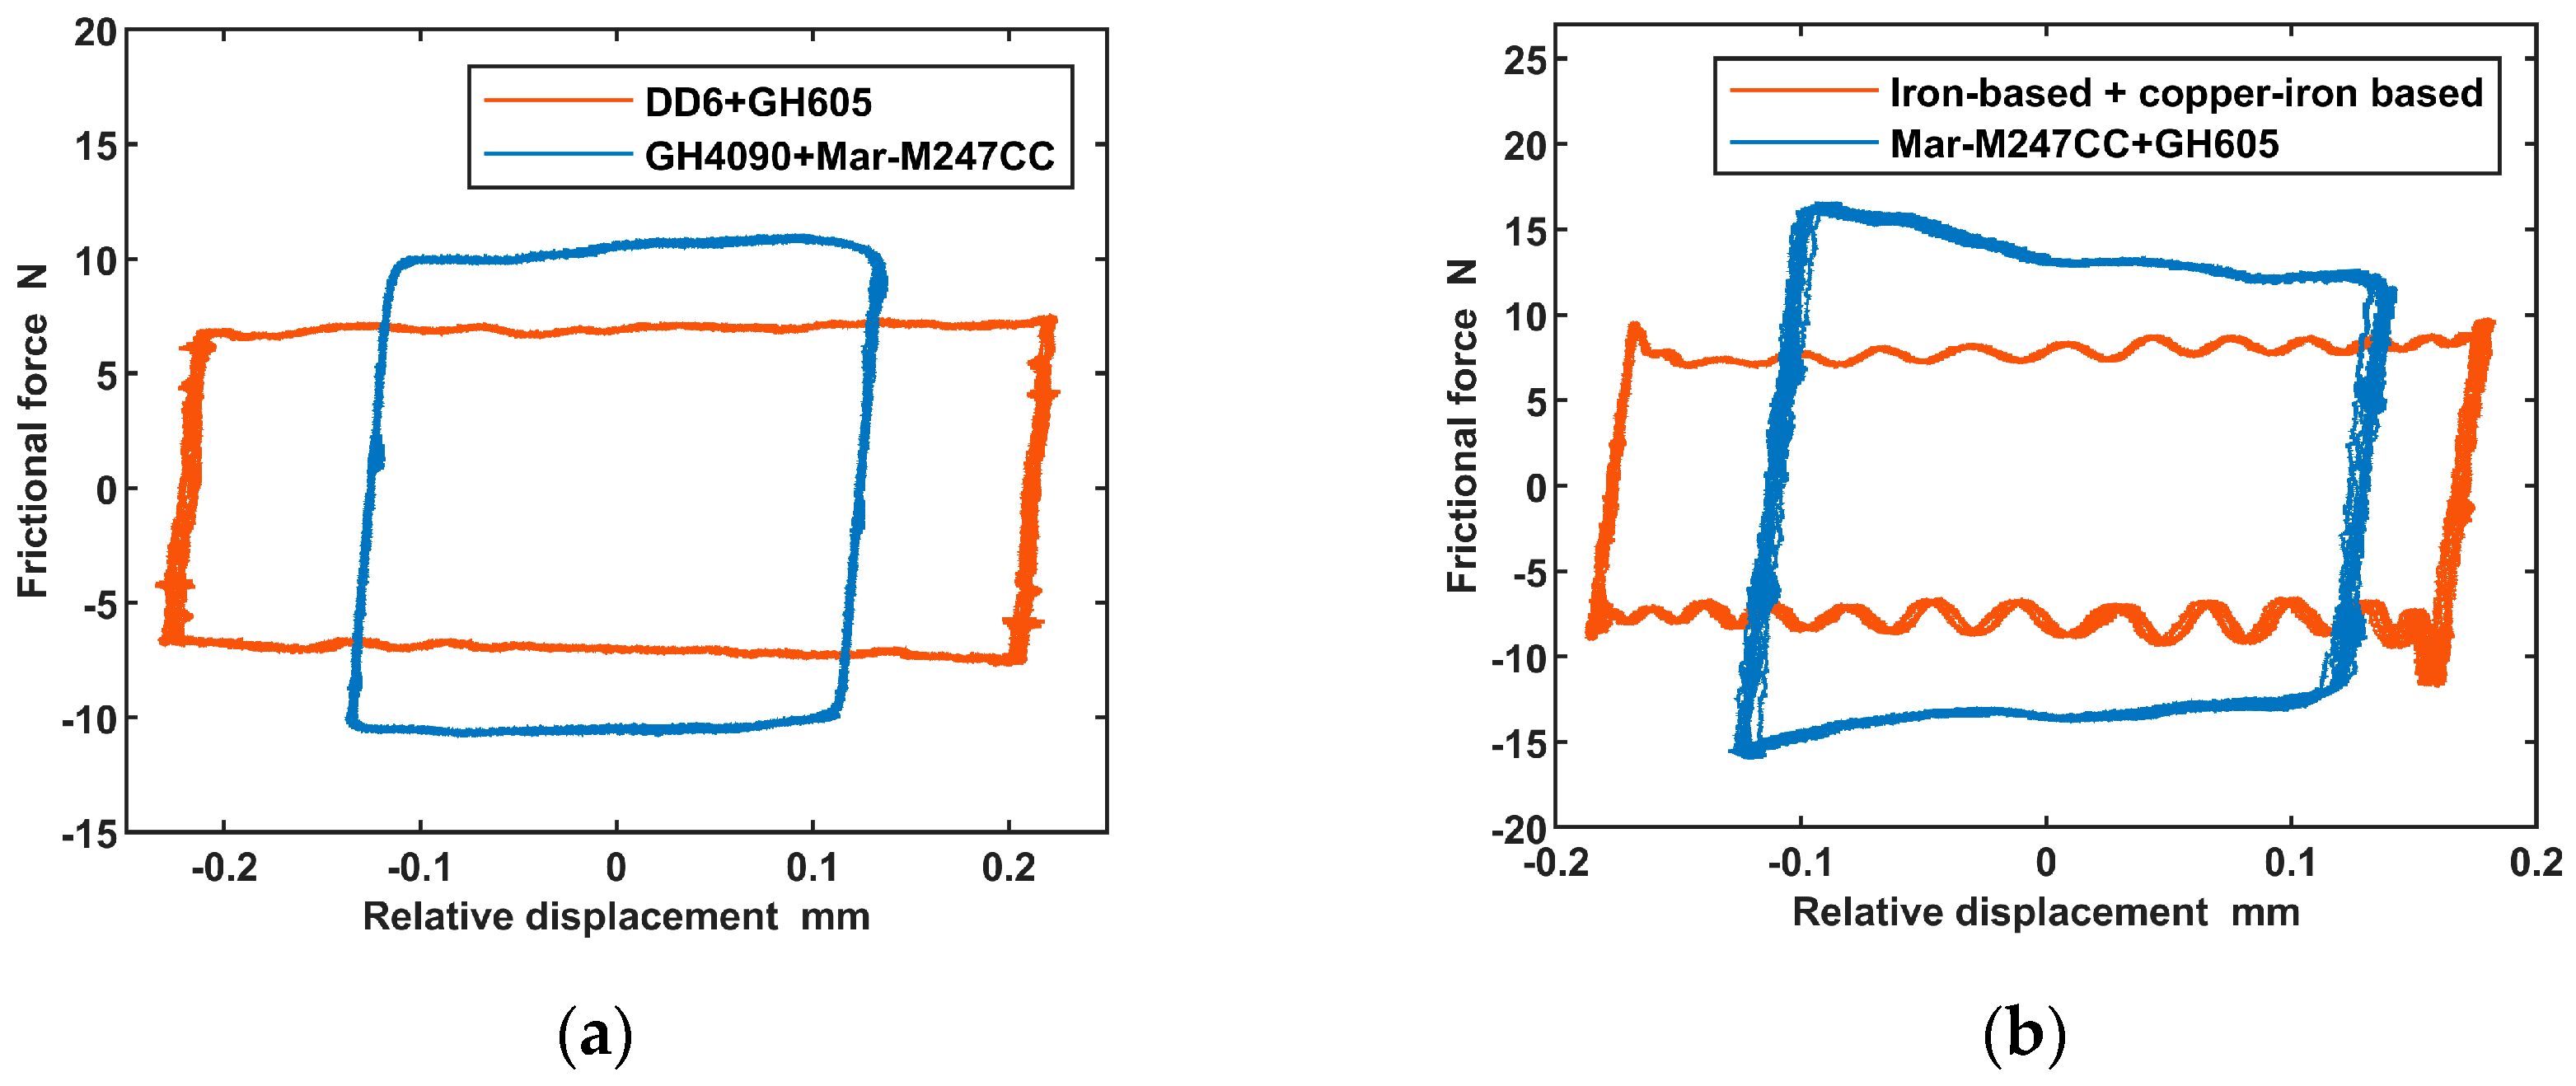
The majority of hysteresis loops for the friction materials, specifically DD6 + GH605 and GH4090 + Mar-M247CC, closely resemble parallelograms, as illustrated in Figure 14a. The experiments are conducted with the constant excitation power of the shaker in a tangential direction, which has been adopted by many researchers [5,27]. The variation in friction during the slip phase is not pronounced. However, for a portion of the friction materials (iron-based + copper-iron-based powder metallurgy materials), the hysteresis loops are not perfectly parallelogram-shaped, as shown by the red line in Figure 14b. The friction exhibits fluctuations during the slip state, which could be attributed to the influence of microscopic grooves at the friction interface. A small number of friction materials (Mar-M247CC + GH605) exhibit hysteresis loops closer to a trapezoidal shape, indicating unequal lengths in the stick state of the friction reciprocation process, as depicted by the blue line in Figure 14b. In these cases, the trend of friction in the slip state is relatively apparent. The specific shape of the hysteresis loops does not significantly impact the identification of contact parameters. When analyzing non-standard shaped hysteresis loops, they are typically fitted toward standard parallelogram shapes to facilitate parameter identification. Specifically, during stick states, a linear function approximates the relationship between data points, whereas in slip states, the mean normal force serves as the test result.

4.3. Effect of Tangential Excitation Level on Contact Parameters

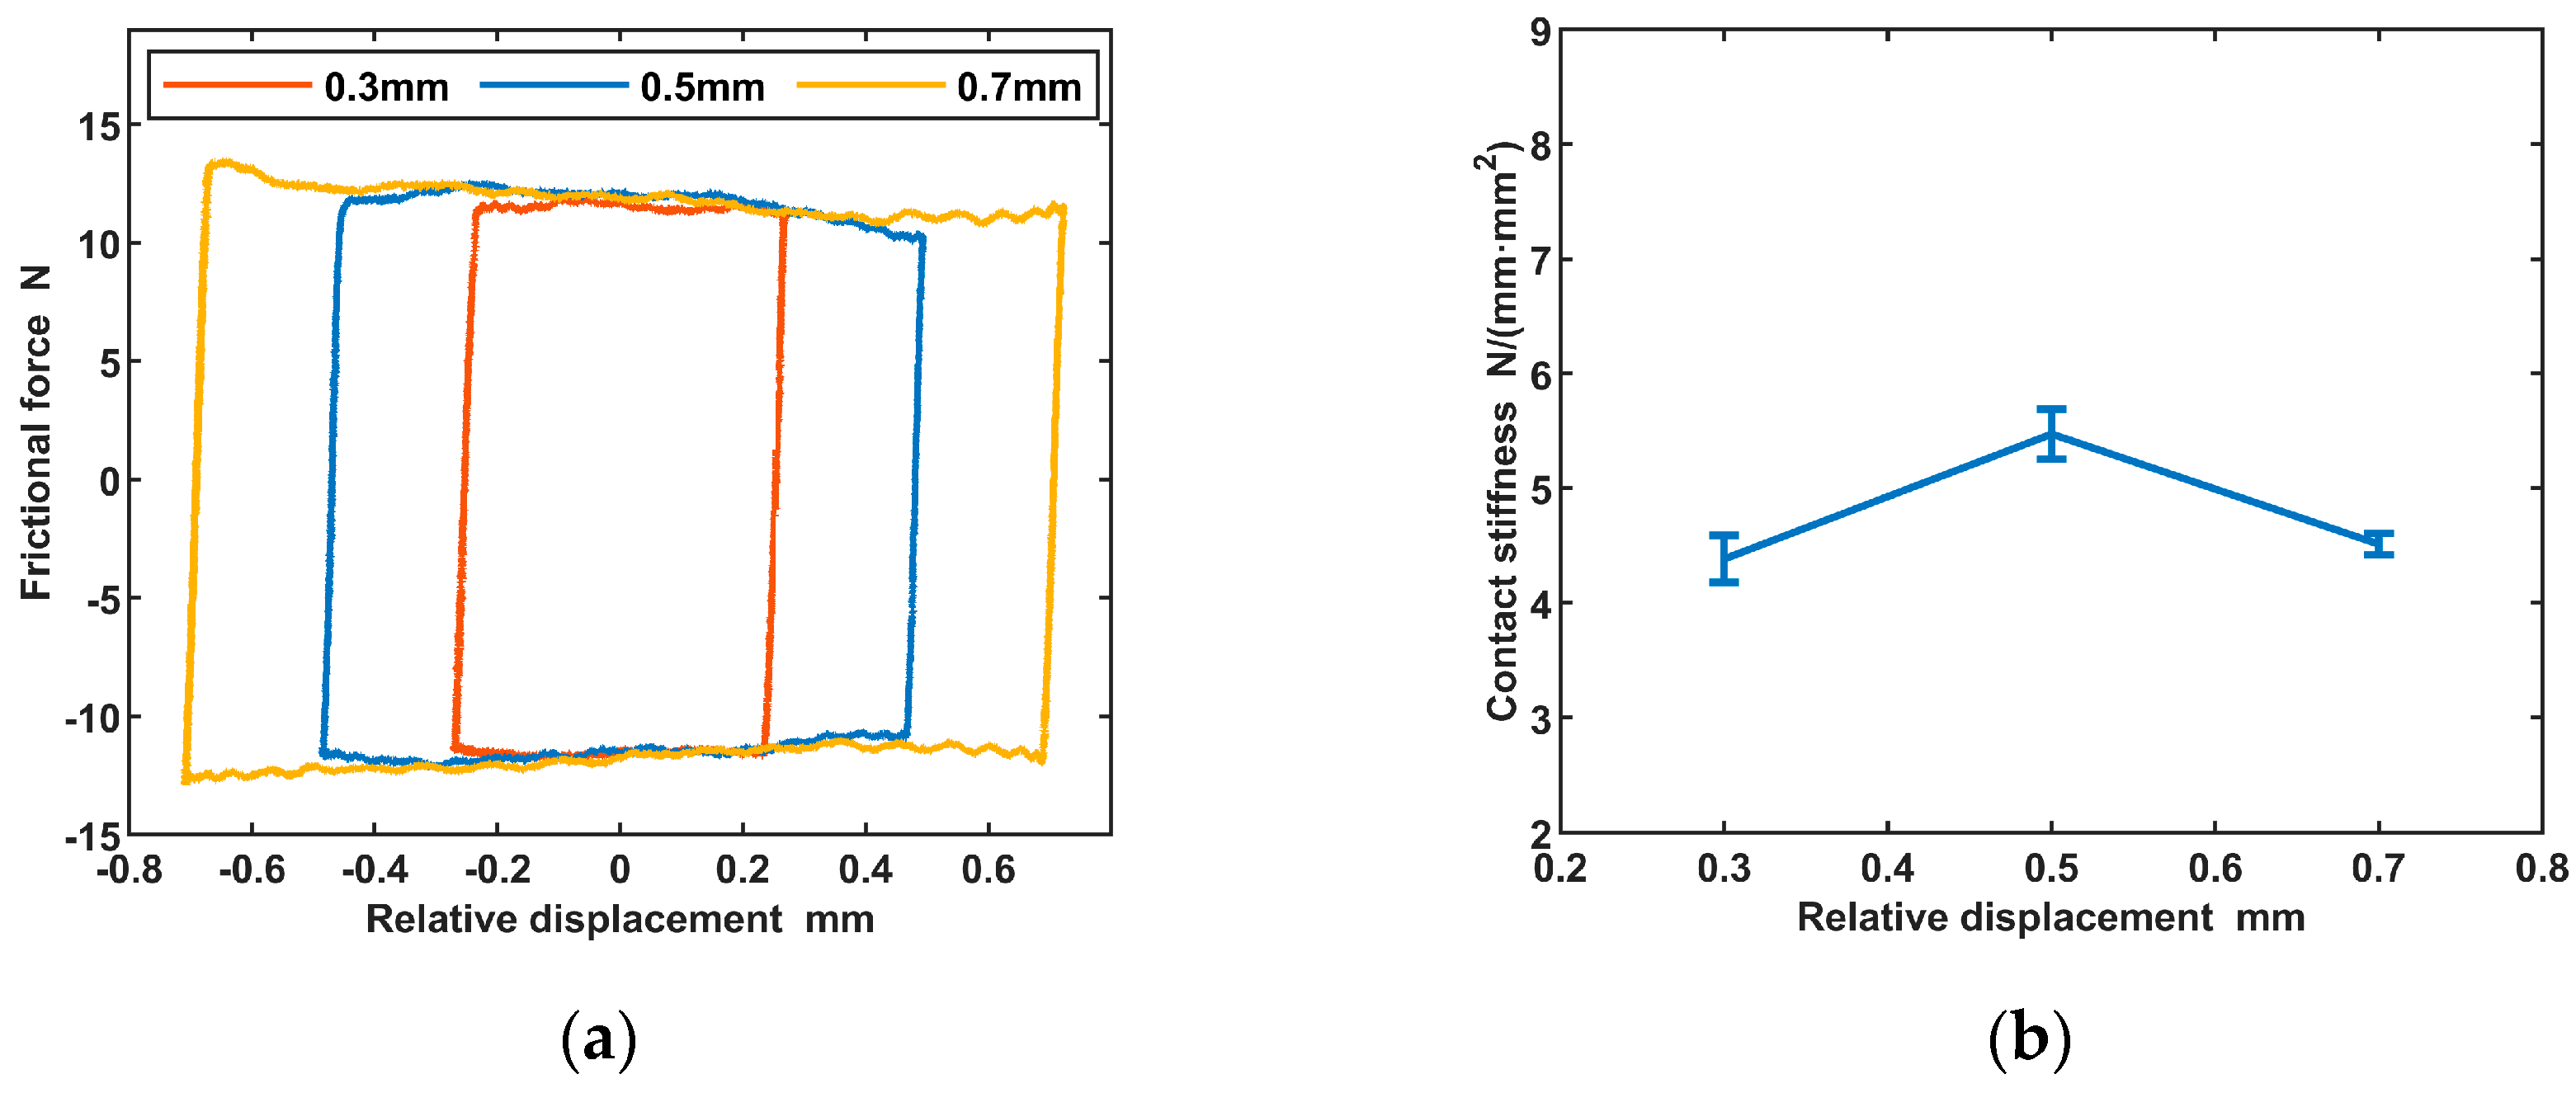
The amplitude of the tangential excitation level directly influences the relative displacement (RD). The tangential excitation level can be controlled in a similar manner as the time-varying normal force. With a constant tangential excitation frequency, the hysteresis loops of the specimens are measured and recorded at different relative displacements (RD = 0.3 mm, 0.5 mm, and 0.7 mm), as depicted in Figure 15a. Each measurement typically lasted for 3 to 5 s. Throughout the test, the control module remained active to maintain a constant, normal force. Ten data cycles are used for curve plotting to demonstrate the stability of the test results.
With an increase in relative displacement, the hysteresis loops proportionally expand along the relative displacement direction while maintaining almost no change in the direction of the friction. The contact stiffness can be determined through the analysis of the hysteresis loops, with its corresponding error bar graph presented in Figure 15b. It reveals that the contact stiffness does not exhibit a notable trend as the relative displacement varies. And the fluctuation in the contact stiffness value is minimal. Table 4 presents the computed results of the friction coefficient, indicating that the influence of relative displacement on the friction coefficient is insignificant.
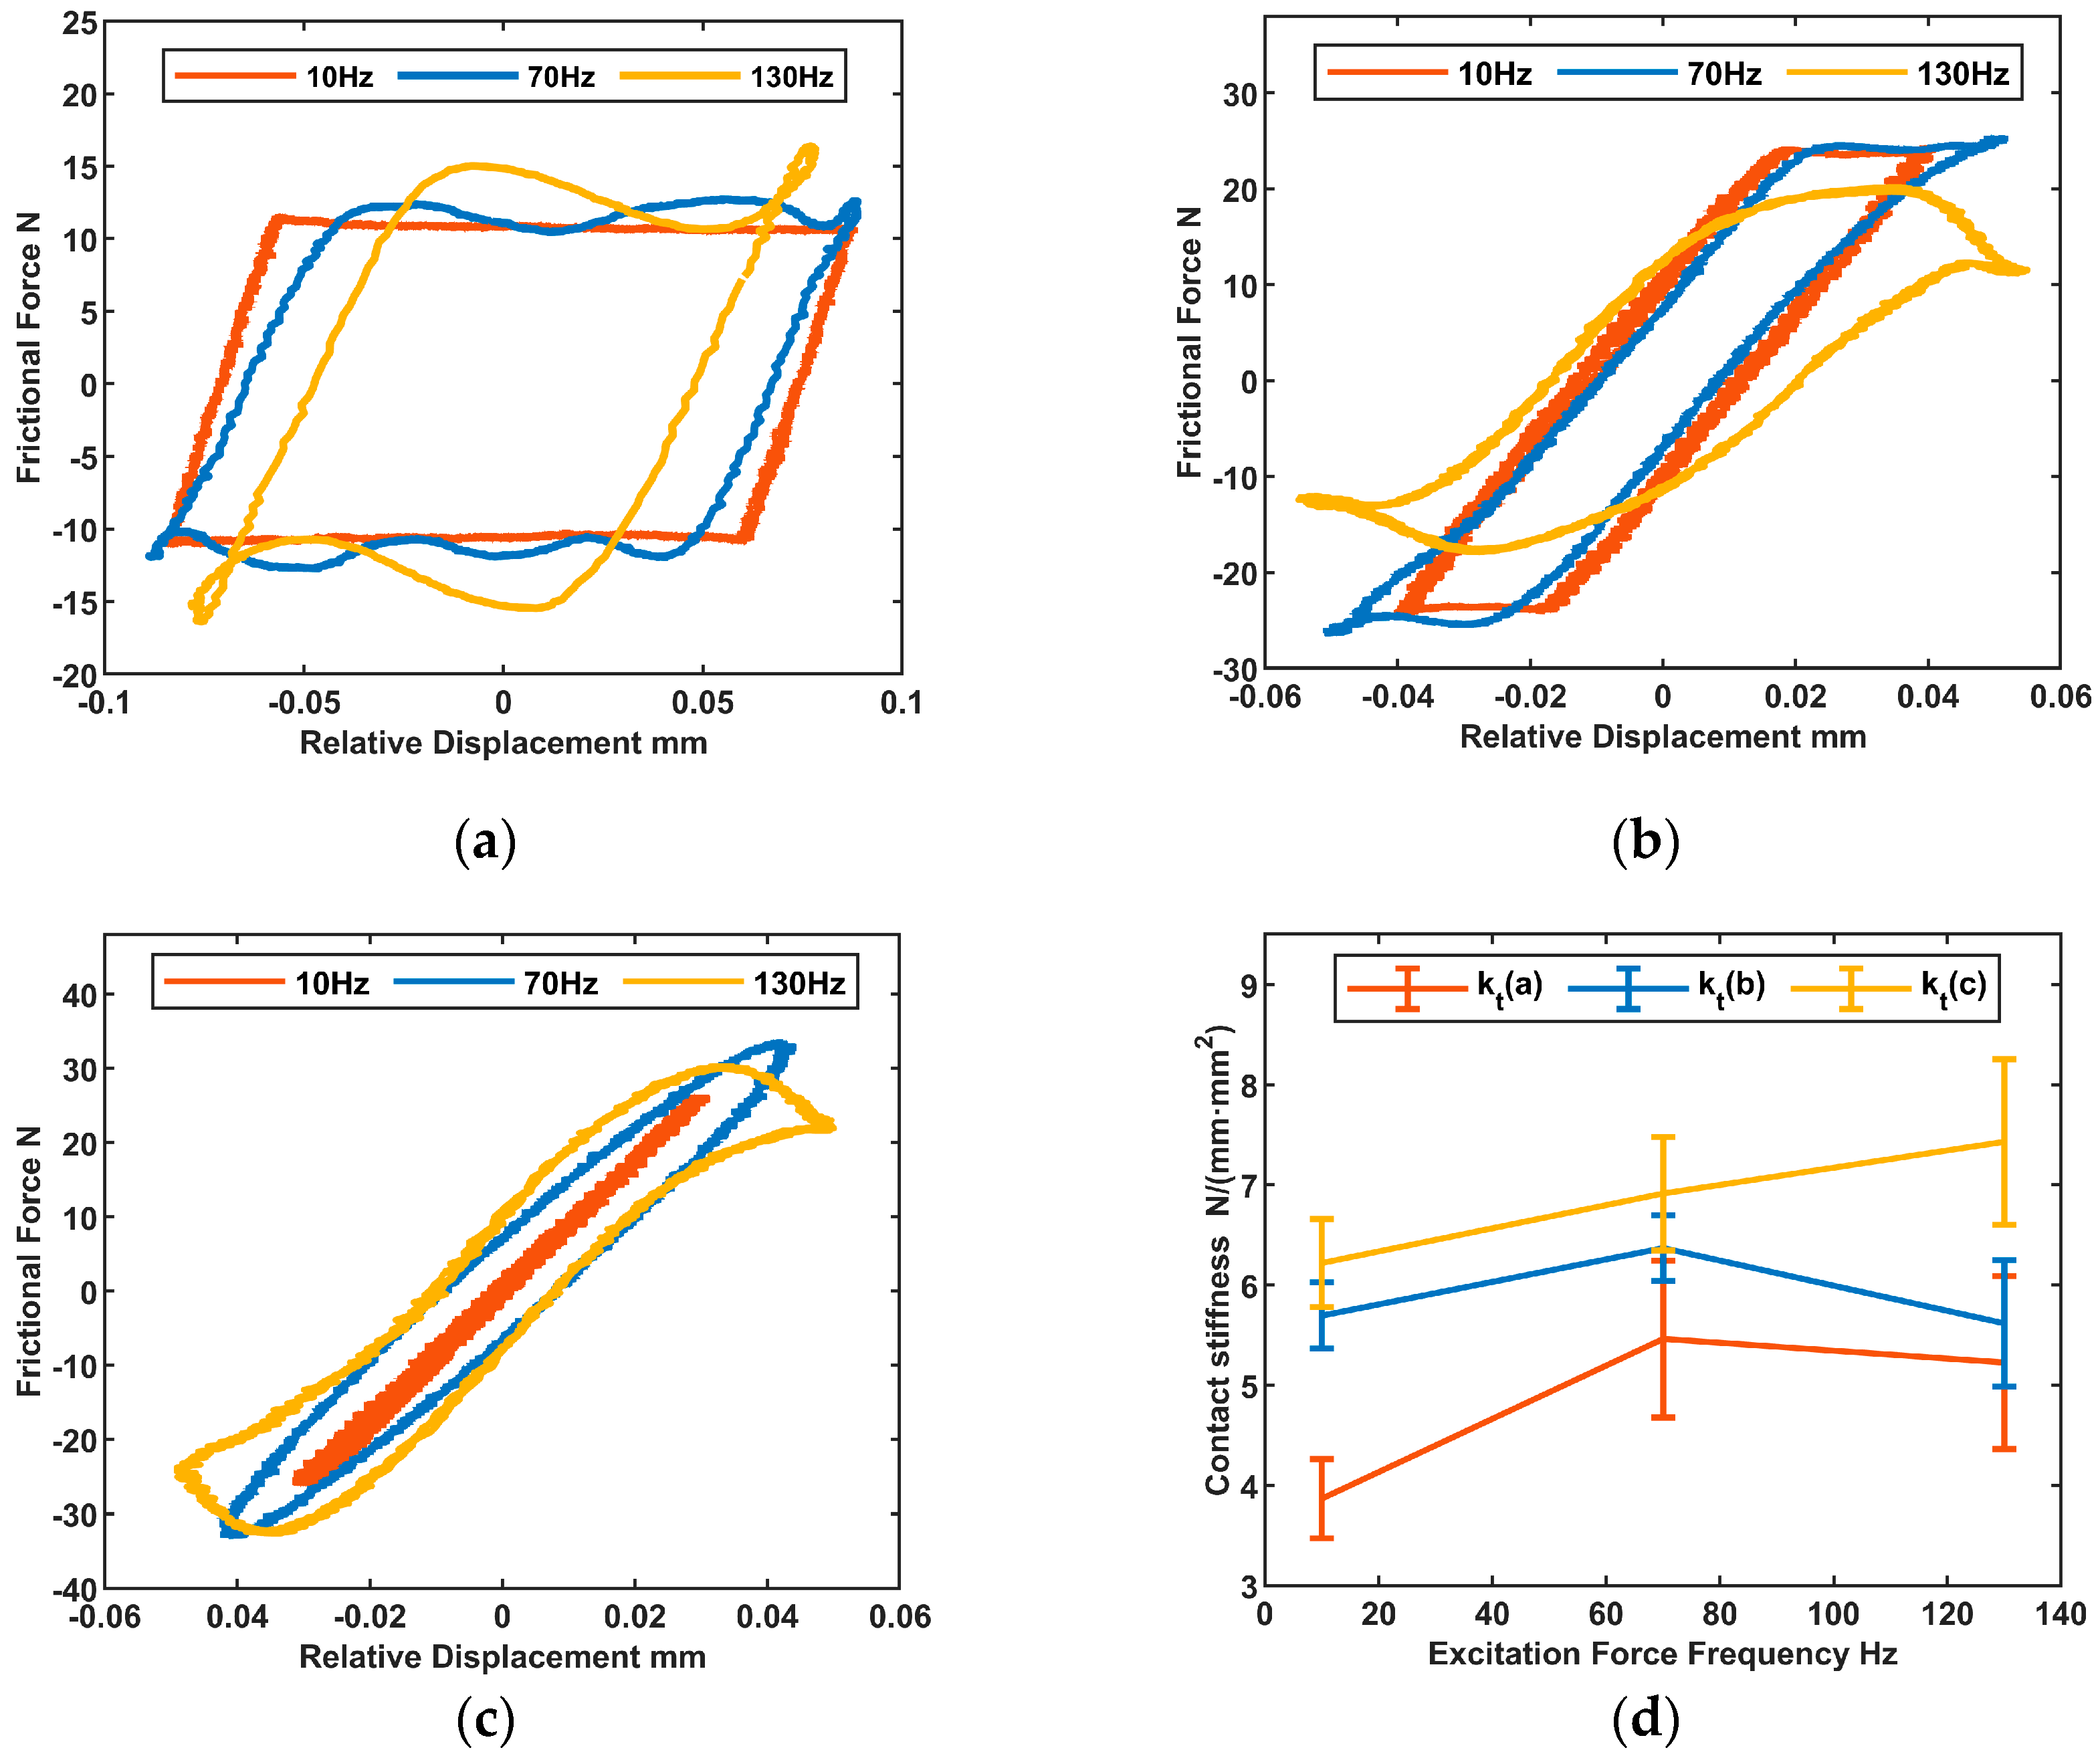
The shape of the hysteresis loop is significantly influenced by variations in the tangential excitation force frequency. The hysteresis loops are measured and recorded at different tangential excitation force frequencies (f = 10 Hz, 70 Hz, and 130 Hz) while maintaining a constant tangential excitation force amplitude, as illustrated in Figure 16a–c. The error bar graph of contact stiffness in Figure 16d and the calculated results of the friction coefficient in Table 5 demonstrate that increasing the tangential excitation force frequency does not lead to a clear pattern in the changes of contact stiffness and friction coefficient, and the magnitude of change is minimal. Elevated tangential excitation frequencies may cause substantial deviations from the parallelogram shape in the hysteresis loop, which could introduce inaccuracies during the determination of the coefficient of friction.
Finally, it can be concluded that both the contact stiffness and friction coefficient are not substantially influenced by the amplitude or frequency of the tangential excitation force. Subsequent tests to explore the effect of the normal force can be based on the findings derived from low-frequency and low-tangential excitation force conditions.

4.4. Effect of Normal Force on Contact Parameters

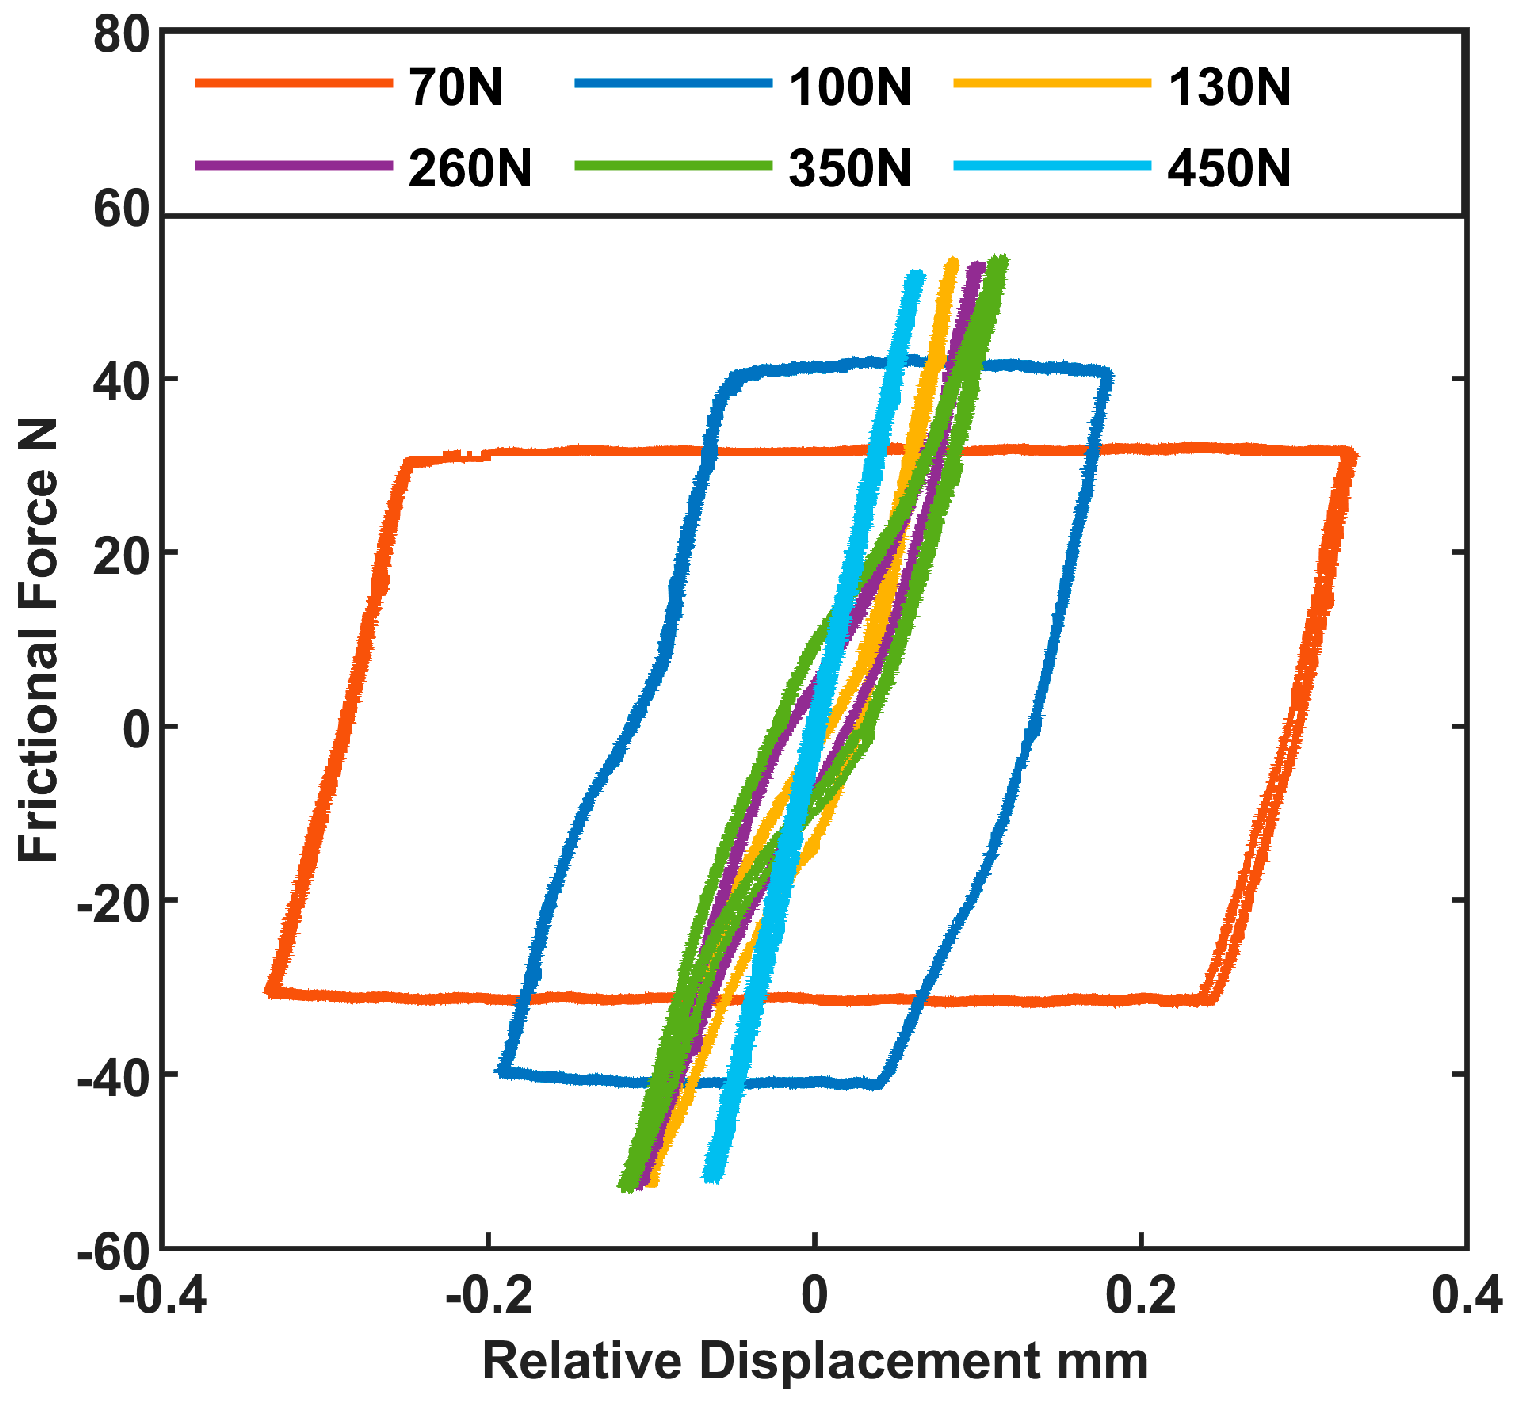
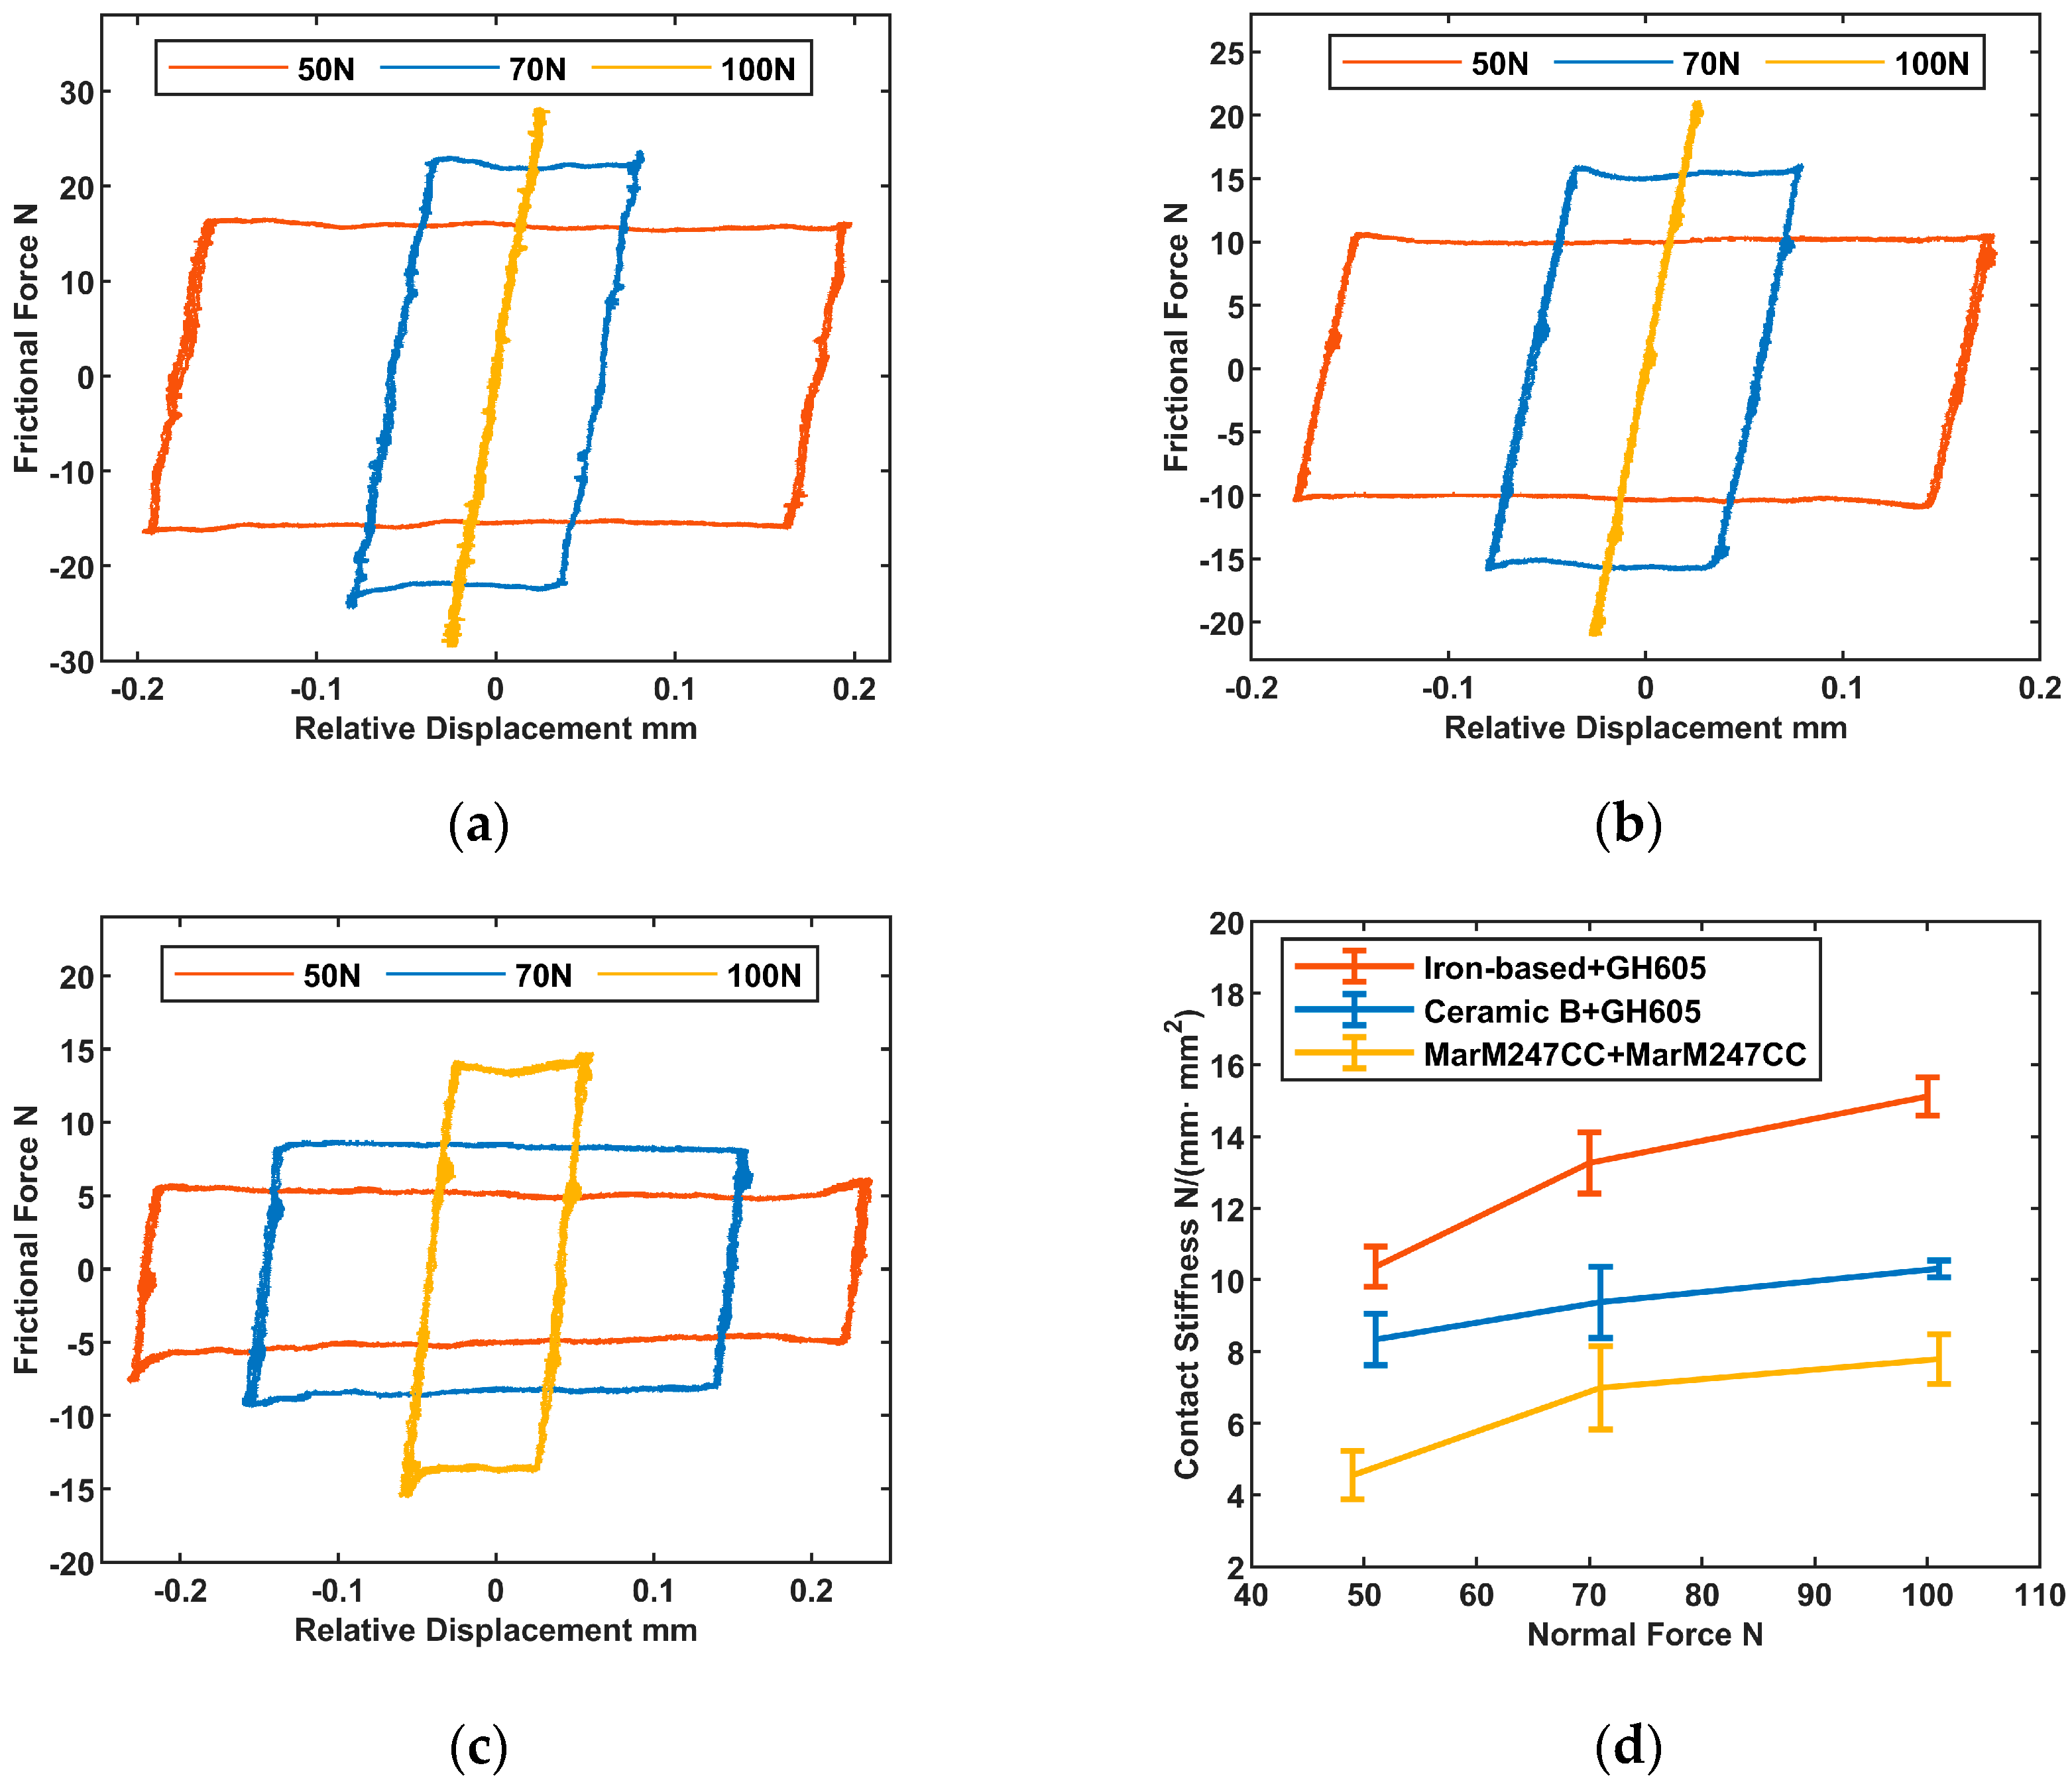
The value of the normal force also influences the shape of the hysteresis loop. Under constant excitation power, the area of the hysteresis loop steadily diminishes with increasing normal force. This transformation is depicted in Figure 17. When the normal force exceeds a certain threshold (e.g., 130 N), the specimens reach a state of full stick, and the hysteresis return lines shift to a configuration featuring only two side stick states. Subsequent tests with higher normal force do not contribute meaningfully to the study of contact parameter laws. Thus, Figure 18 records the hysteresis loops of three distinct specimens under specific normal forces (50 N, 70 N, and 100 N).
The contact stiffness is determined by analyzing the hysteresis loops, and its corresponding error bar graph is presented in Figure 18d. As the normal force increases, there is a clear upward trend in the contact stiffness. The same trend is observed across multiple sets of results with varying tangential excitation force amplitudes. Table 6 documents the calculation results for the friction coefficient, derived from the analysis of hysteresis loops. The data indicates that the friction coefficient shows an unpredictable pattern as the normal force increases, with some specimens exhibiting an initial tendency to rise followed by a subsequent decline.
Note that the value of normal force can be specified because the normal force (in the normal direction) and the friction (in the tangential direction) are measured separately and individually: the normal force is applied jointly by the knob and the piezoelectric actuator and then measured by the normal force transducer; the friction is measured by the tangential force transducer. Therefore, the status in the tangential direction does not affect the measurement of the normal force.
In this experiment, the majority of specimens (including Ceramic B + Copper-based powder metallurgy material, GH4090 + MarM247CC, etc.) confirm the conclusion that the contact stiffness tends to rise with an increase in normal force. A common explanation suggests that interfacial mechanical parameters are primarily influenced by material and surface conditions. The normal force is believed to enhance the mutual occlusion of surface micro-convex bodies, resulting in an elevation of contact stiffness.

5. Conclusions

In this study, we have improved the in-house friction and wear test rig to investigate the impact of interface load parameters on the frictional behavior of typical friction-pair materials. The test rig features a normal force closed-loop control module that utilizes a frequency-domain PID controller, enabling a consistent and precise imposition of the target normal force, regardless of whether it comprises constant or harmonic components. The reliability and functionality of all these capabilities of the test rig have been validated. The main conclusions are as follows:
(1)
The test rig can output normal force with stable constant (0–300 N) and harmonic (0–50 N) components with given amplitude and phase lag in the friction tests. The frequency-domain PID controller avoids the frequent control of the traditional PID controller in the time-domain, which tracks the reference signal step-by-step. The control error is significantly reduced (from 0.97% to 0.44% at 10 Hz and from 6.30% to 0.54% at 50 Hz). With a standard error threshold of 3%, the controller’s operating frequency is increased from 20 Hz to 300 Hz.
(2)
Through conducting friction tests on typical materials, it was found that, in general, contact stiffness tends to rise with an increase in normal force. However, the relationship between the friction coefficient and the normal force does not demonstrate a clear pattern.
(3)
Variations in tangential excitation amplitude and frequency significantly impact the shape of the hysteresis loop while having minimal influence on the contact parameters. Consequently, contact parameters obtained under low-frequency, low-amplitude tangential excitation can be extrapolated to high-frequency, high-amplitude conditions. The friction and wear test rig demonstrates high reliability under low tangential excitation, which holds considerable implications for engineering applications.
The development of the in-house friction and wear test rig with the ad-hoc closed loop control strategy in the frequency domain can provide the necessary conditions for precisely obtaining the contact constitutive relationship of friction pairs. The hysteresis loops of various friction materials provide an essential database for friction contact models and dynamic characteristic analysis, improving the accuracy of damping performance assessments for aeroengines.

Author Contributions

Conceptualization, D.L.; methodology, J.W.; software, J.W.; validation, D.L. and H.L.; formal analysis, J.W.; investigation, D.L.; resources, D.L. and H.L.; writing—original draft preparation, D.L. and J.W.; writing—review and editing, D.L. and A.L.; visualization, J.W. and A.L.; supervision, H.L. and G.M.; project administration, H.L. and G.M.; funding measurement, D.L. and G.M. All authors have read and agreed to the published version of the manuscript.

Funding

This work was supported by the National Natural Science Foundation of China [Grant No. U23B6001].

Data Availability Statement

All the data will be accessible upon request, ensuring its availability to interested parties.

Conflicts of Interest

Author Di Li was employed by the company AECC Commercial Aircraft Engine Co., Ltd. The remaining authors declare that the research was conducted in the absence of any commercial or financial relationships that could be construed as a potential conflict of interest.

References

  1. Gao, Q.; Fan, Y.; Wu, Y.; Li, L. A harmonic balance-based method to predict nonlinear forced response and temperature rise of dry friction systems including frictional heat transfer. Nonlinear Dyn. 2023, 111, 14263–14291. [Google Scholar] [CrossRef]
  2. Gola, M.M. A general geometrical theory of turbine blade underplatform asymmetric dampers. Mech. Syst. Signal Process. 2023, 191, 1–23. [Google Scholar]
  3. Fantetti, A.; Setchfield, R.; Schwingshackl, C. Nonlinear dynamics of turbine bladed disk with friction dampers: Experiment and simulation. Int. J. Mech. Sci. 2023, 257, 1–20. [Google Scholar] [CrossRef]
  4. Li, D.W.; Botto, D.; Xu, C.; Gola, M. Fretting wear of bolted joint interfaces. Wear 2020, 458–459, 1–11. [Google Scholar] [CrossRef]
  5. Fantetti, A.; Tamatam, L.R.; Volvert, M.; Lawal, I.; Liu, L.; Salles, L.; Brake, M.R.W.; Schwingshackl, C.W.; Nowell, D. The impact of fretting wear on structural dynamics: Experiment and Simulation. Tribol. Int. 2019, 138, 111–124. [Google Scholar] [CrossRef]
  6. Sun, J.Y.; Yang, H.Y.; Li, D.W.; Xu, C. Experimental investigation on acoustic emission in fretting friction and wear of bolted joints. J. Sound Vib. 2023, 558, 1–18. [Google Scholar] [CrossRef]
  7. Ranjan, P.; Pandey, A.K. Experimental characterization and parameter identification of bolted joints under vibratory loading. Tribol. Int. 2023, 186, 1–11. [Google Scholar]
  8. Vingsbo, O.; Söderberg, S. On fretting maps. Wear 1988, 126, 131–147. [Google Scholar] [CrossRef]
  9. Schwingshackl, C.W.; Petrov, E.P.; Ewins, D.J. Measured and estimated friction interface parameters in a nonlinear dynamic analysis. Mech. Syst. Signal Process. 2012, 28, 574–584. [Google Scholar] [CrossRef]
  10. Wang, K.; Wu, J.W.; Zhao, G.Y.; Li, Z.K. Study on Friction Contact Characteristics of Turbine Shroud Damper. Aero-engine 2018, 44, 70–74. [Google Scholar]
  11. Chen, L.L.; Ma, Y.H.; Li, D.; Hong, J. Measurement of Contact Stiffness during Microslio. J. Aerosp. Power 2010, 25, 936–942. [Google Scholar]
  12. Yu, S.J.; Zhu, E.; Yao, X.F. Experiment Study on Friction Characteristics of Spherical Plain Bearings for Large Civil Aircraft Lifiting Devices. Civ. Aircr. Des. Res. 2023, 1, 38–43. [Google Scholar]
  13. Zhang, D.W.; Yang, Y.C.; Lv, S.C.; Tian, C.; Li, Z.J. Fretting behavior of static metal seal and test rig for fretting friction with low/high temperature. Tribol. Int. 2023, 187, 1–13. [Google Scholar] [CrossRef]
  14. Wu, Y.; Li, L.; Fan, Y.; Ma, H.Y.; Wang, W.J.; Christen, J.L.; Ichchou, M. Design of semi-active dry friction dampers for steady-state vibration: Sensitivity analysis and experimental studies. J. Sound Vib. 2019, 459, 114850. [Google Scholar] [CrossRef]
  15. Cui, X.; Gao, Y.; Muggleton, J.; Liu, Y. Superimposed imaging of acoustic wave reflections for the detection of underground nonmetallic pipelines. Mech. Syst. Signal Process. 2024, 209, 111127. [Google Scholar] [CrossRef]
  16. Wu, Y.; Chen, J.; Fan, Y.; Li, L.; Jiang, Z. An MFC-based friction damper with adjustable normal force: Conception, modelling, and experiment. Mech. Syst. Signal Process. 2024, 215, 111450. [Google Scholar] [CrossRef]
  17. Gao, Q.; Fan, Y.; Wu, Y.G.; Li, L.; Zhang, D.Y. Insight into the influence of frictional heat on the modal characteristics and interface temperature of frictionally damped turbine blades. J. Sound Vib. 2024, 581, 118410. [Google Scholar] [CrossRef]
  18. Ma, H.; Li, L.; Wu, Y.G.; Fan, Y.; Gao, Q. Design of dry friction dampers for thin-walled structures by an accelerated dynamic Lagrange method. J. Sound Vib. 2020, 489, 115550. [Google Scholar] [CrossRef]
  19. Sun, H.; Zhang, D.; Wu, Y.; Shen, Q.; Hu, D. A semi-analytical multi-harmonic balance method on full-3D contact model for dynamic analysis of dry friction systems. Chin. J. Aeronaut. 2024, 37, 309–329. [Google Scholar] [CrossRef]
  20. Firrone, C.M.; Zucca, S.; Gola, M.M. The effect of underplatform dampers on the forced response of bladed disks by a coupled static/dynamic harmonic balance method. Int. J. Non-Linear Mech. 2011, 46, 363–375. [Google Scholar] [CrossRef]
  21. Zucca, S.; Firrone, C.M. Nonlinear dynamics of mechanical systems with friction contacts: Coupled static and dynamic Multi-Harmonic Balance Method and multiple solutions. J. Sound Vib. 2014, 333, 916–926. [Google Scholar] [CrossRef]
  22. Lakshminarayana, R.T.; Botto, D.; Zucca, Z. A novel test rig to study the effect of fretting wear on the forced response dynamics with a friction contact. Nonlinear Dyn. 2021, 105, 1405–1426. [Google Scholar]
  23. Tamatam, L.R.; Botto, D.; Zucca, Z. A coupled approach to model wear effect on shrouded bladed disk dynamics. Int. J. Mech. Sci. 2023, 237, 1–17. [Google Scholar] [CrossRef]
  24. Gao, Q.; Fan, Y.; Wu, Y.G.; Liu, J.L.; Wang, J.; Li, L. A novel test apparatus to study the mechanism of harmonic normal force on fretting wear. Tribol. Int. 2024, 191, 109091. [Google Scholar] [CrossRef]
  25. Moura, J.P.; Neto, J.V.D.F.; Rêgo, P.H.M. A neuro-fuzzy model for online optimal tuning of PID controllers in industrial system applications to the mining sector. IEEE Trans. Fuzzy Syst. 2020, 288, 1864–1877. [Google Scholar] [CrossRef]
  26. Liu, J.; Li, T.; Zhang, Z.; Chen, J. NARX prediction-based parameters online tuning method of intelligent PID system. IEEE Access 2020, 8, 130922–130936. [Google Scholar] [CrossRef]
  27. Lavella, M.; Botto, D.; Gola, M.M. Design of a high-precision, flat-on-flat fretting test apparatus with high temperature capability. Wear 2013, 302, 1073–1081. [Google Scholar] [CrossRef]
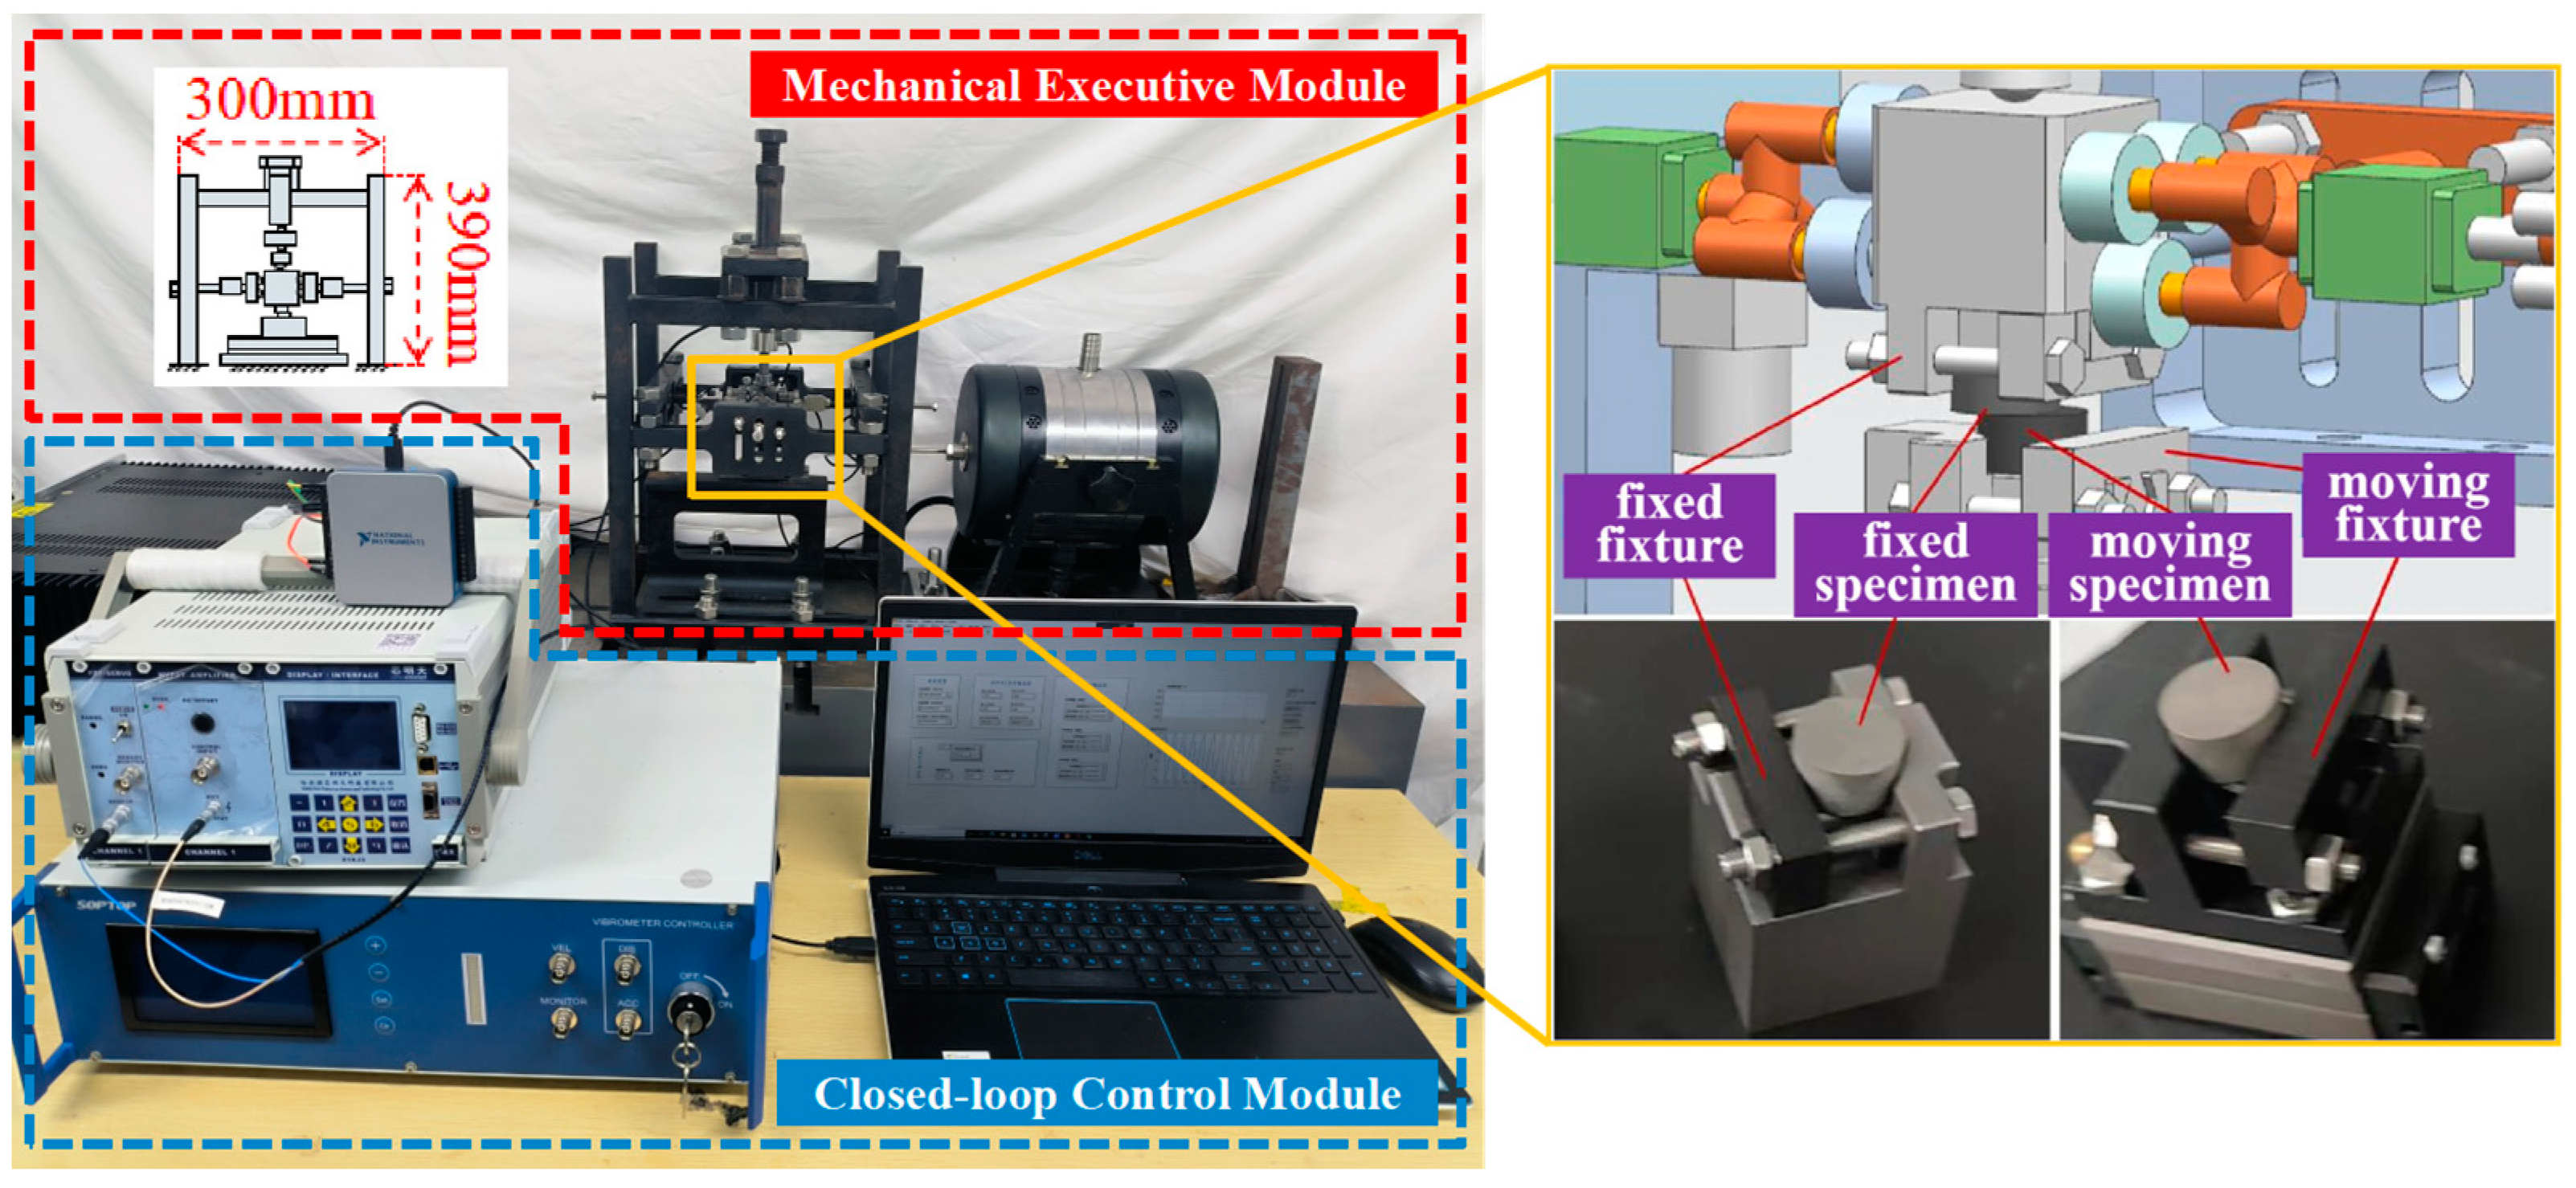
Figure 1. Overview of friction and wear test rig.
Aerospace 11 00623 g001
Figure 2. Schematic diagram of mechanical operations module and functional subsystems.
Aerospace 11 00623 g002
Figure 3. Components and algorithmic principles of the closed-loop control module.
Aerospace 11 00623 g003
Figure 4. Development of a closed-loop control program for normal forces based on the LabVIEW platform: (a) logic block diagram; (b) user interface.
Aerospace 11 00623 g004
Figure 5. Controller adjustment scenarios for amplitude under different integral term parameters Ti (including extraction of evaluation metrics: settling time t s and overshoot σ % ).
Aerospace 11 00623 g005
Figure 6. Evolution of constant normal force overtime with and without control.
Aerospace 11 00623 g006
Figure 7. Fluctuation of normal forces with and without control. (a) Tangential excitation frequency f = 1 Hz; (b) Tangential excitation frequency f = 20 Hz.
Aerospace 11 00623 g007
Figure 8. Control results of harmonic normal force with various target values: (a) f req = 10 Hz, A = 5 N, φ = 0°; (b) f req = 50 Hz, A = 25 N, φ = 180°; (c) f req = 110 Hz, A = 50 N, φ = 0°; (d) f req = 300 Hz, A = 10 N, φ = 0°.
Aerospace 11 00623 g008
Figure 9. Control results of relative displacement: (a) fluctuation of the relative displacement under constant tangential excitation power of the shaker; (b) displacement control at 0.3 mm; (c) hysteresis loop.
Aerospace 11 00623 g009
Figure 10. Control results for both control strategies with the same target normal forces: (a) f req = 10 Hz; (b) f req = 50 Hz.
Aerospace 11 00623 g010
Figure 11. Flow chart of experimental procedure for friction test.
Aerospace 11 00623 g011
Figure 12. Hysteresis loops with and without closed-loop control under different normal forces (a) 50 N, (b) 90 N.
Aerospace 11 00623 g012
Figure 13. Typical hysteresis loops under the constant normal force and the extraction of contact parameters. The blue line is the original data and the yellow line is the fitted data.
Aerospace 11 00623 g013
Figure 14. Hysteresis loops of various friction materials: (a) DD6 + GH605 and GH4090 + Mar-M247CC; (b) iron-based + copper-iron based powder metallurgy material and Mar-M247CC + GH605.
Aerospace 11 00623 g014
Figure 15. Test results at different relative displacements: (a) hysteresis loops; (b) contact stiffness error bar.
Aerospace 11 00623 g015
Figure 16. Test results at different tangential excitation frequencies: (ac) Hysteresis loops for three tests; (d) Contact stiffness error bar.
Aerospace 11 00623 g016
Figure 17. Hysteresis loops under various constant normal force.
Aerospace 11 00623 g017
Figure 18. Test results of several friction materials under various specified normal forces: (a) Hysteresis loops of iron-based metallurgy material + GH605; (b) Hysteresis loops of Ceramic B + GH605; (c) Hysteresis loops of Mar-M247C + Mar-M247CC; (d) Contact stiffness error bar.
Aerospace 11 00623 g018
Table 1. Settling time and overshoot of the controller for amplitude under different Ti.
T i t s σ %
0.000319 s0
0.000111 s8.9%
0.0000525 s30.5%
Table 2. Selected controller parameters and control performance.
AC φ
parameter K c 0.00050.00050.003
T i 0.00010.00010.0001
T d 0.00010.00010.0001
t s ( a v g ) 10 s9 s7 s
σ % ( a v g ) 7.4%6.0%3.5%
Table 3. Performance indicators of in-house friction and wear test rig.
Technical ParameterSpecification
Range of Applied Normal ForceConstant (C)15 N ≤ C ≤ 300 N
Time-varying Amplitude (A)≤50 N
Frequency   ( f req )≤300 Hz
Range of Relative DisplacementAmplitude≤2 mm
Frequency≤150 Hz
Measurement AccuracyForce0.01 N
Displacement0.1 μm
Control AccuracyForce Amplitude≤3%
Force Phase≤5°
Table 4. Calculation of the friction coefficient at different relative displacements.
RD/mm0.30.50.7
μ0.3850.3810.394
Table 5. Friction coefficient at different tangential excitation frequencies.
f req / H z 1070130
μ(a)0.2720.2970.219
μ(b)0.3400.3520.226
μ(c)-0.3310.272
Table 6. Calculation of the friction coefficient of several friction materials under the various specified normal forces.
F n 50 N70 N100 N
μIron-based + GH6050.30950.31510.2566
Ceramic B + GH6050.19050.21040.1891
Mar-M247C + Mar-M247CC0.12260.10880.1307
Disclaimer/Publisher’s Note: The statements, opinions and data contained in all publications are solely those of the individual author(s) and contributor(s) and not of MDPI and/or the editor(s). MDPI and/or the editor(s) disclaim responsibility for any injury to people or property resulting from any ideas, methods, instructions or products referred to in the content.