Article

An Electromechanical Impedance-Based Application of Realtime Monitoring for the Load-Induced Flexural Stress and Damage in Fiber-Reinforced Concrete

by
Maria C. Naoum
1,
George M. Sapidis
1,
Nikos A. Papadopoulos
1 and
Maristella E. Voutetaki
2,*
1
Laboratory of Reinforced Concrete and Seismic Design of Structures, Civil Engineering Department, School of Engineering, Democritus University of Thrace, 67100 Xanthi, Greece
2
Structural Science and Technology Division, Architectural Engineering Department, School of Engineering, Democritus University of Thrace, 67100 Xanthi, Greece
*
Author to whom correspondence should be addressed.
Fibers 2023, 11(4), 34; https://doi.org/10.3390/fib11040034
Submission received: 13 February 2023 / Revised: 16 March 2023 / Accepted: 6 April 2023 / Published: 11 April 2023

Abstract

:
Effective real-time structural health monitoring in concrete structures is paramount to evaluating safety conditions and the timely maintenance of concrete structures. Especially, the presence of discrete fibers in fiber-reinforced concrete restrains crack propagation into small and thin cracks, which increases the difficulty in detecting damage. In this study, an array of piezoelectric lead zirconate titanate (PZT) transducers was applied to study the effects of external load-induced flexural stress and damage in fiber-reinforced concrete beams using the electromechanical impedance (EMI) or electromechanical admittance (EMA) methods. Beams were subjected to a four-point bending test under repeatable loading, while PZTs evaluated corresponding flexural stress and induced damage simultaneously. Due to the influence of the medium’s stress fields in the different types of wave propagation in structural elements, PZT transducers measurements are accordingly affected under variable stress fields, in addition to the effect of the higher level of damage that occurred in the medium. According to the results of the tests, variation in EMA signatures, following flexural stress and gradual damage changes, provided convincing evidence for predicting stress and damage development.

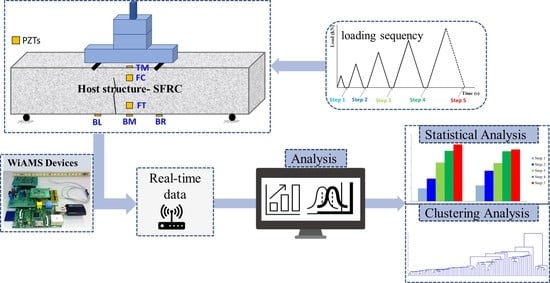
Graphical Abstract

1. Introduction

The construction industry relies heavily upon cementitious materials, especially concrete, to meet the ever-increasing demand for sustainable and long-lifespan infrastructures, such as bridges, dams, and buildings. A challenging task arising from this need is deploying materials with advanced and resilient properties. In the last decades, concrete technology endeavored to meet the emerging requirements with the achieved evolution, developing high and ultra-high-performance matrixes. However, despite their well known merits, such as durability, mechanical properties, formability, and modifiability, the poor tensile strength performance and the low strain capacity are still the main unresolved downsides of conducting brittleness behavior [1,2].
Some decades before, a novel and efficient approach had been introduced with the fibers’ inclusion into cement matrixes, which enhanced the effort to improve plain concrete’s mechanical properties, ductility, toughness, and fracture resistance [3]. Furthermore, synthetic fibers provide elevated durability thanks to their high corrosion resistance. The beneficial bridging mechanism provided by fibrous reinforcement also ameliorates the resistance to crack formation and propagation. As a result, it improves the shrinkage cracking performance by capturing the openings and confining the widening of the microcracks [4,5,6]. Further, fibers’ inclusion in shear-critical reinforced concrete specimens can affect the final type of failure (from a brittle shear to a flexural one) [7].
Thanks to the rapid growth of materials and civil engineering science, several kinds of fibers materialized to address the demands of the construction industry. The most popular are made of glass, steel, polymeric, and synthetic materials. The latter, especially plastic fibers (PET, PE, PP), attract the interest of the construction and scientific community, combining the inexpensive cost, efficient improvement of bending capacity, enhanced durability by refraining from corrosion, and excellent thermal properties. Furthermore, their recyclability, versatility, and large-scale availability meet the demands of circular economies for materials with a reduced environmental footprint. Additionally, synthetic fibers constitute a promising and sufficient material in alignment with the aim for sustainable and resilient constructions [8,9].
Additionally, orientated to the abovementioned aim, the structural health monitoring (SHM) method could be a helpful tool for assessing and evaluating the performance of concrete structures during their lifespan under insufficient durability, operational loading, and earthquake sequences. Under these circumstances, stresses fluctuate dramatically in the structural members, which may induce damage in the form of micro or macro-cracks to concrete, predominantly from tensile strain [10]. Furthermore, by the time visible surface cracking occurs, the bearing capacity of the structural element may have been significantly impaired due to the brittleness nature of plain concrete. Therefore, efficient SHM methods must distinguish the impact between reversible stress variations and permanent damage.
Many traditional visual or localized experimental non-destructive testing (NDT) and damage detection methods have been proposed in the extant literature and used in a variety of concrete structures, such as ultrasonic C-scan detection, X-rays, and radar techniques. In addition, infrared thermography, acoustic emission (AE), ultrasonic C-scan detection, and resistance strain gauges are commonly used to check structural integrity. However, the latter is predominantly destined for static measurements and achieves low transverse sensitivity [11].
Most of the abovementioned methods are not suitable for large and complicated structures due to structural constraints and the requirement for prior knowledge of the damage location. In addition, NDT techniques are expensive, require access in situ, and cannot provide continuous and real-time monitoring. Further, all these experimental techniques require bulky equipment, which is incredibly time-consuming, and most importantly, request that the damage’s vicinity be known a priori. At the same time, the portion of the structure to be inspected is readily accessible. Moreover, as concrete structures become more complex, these techniques become non-feasible and unsuitable for in-service infrastructures. Thus, NDT methods are typically performed at specific intervals or when a defect is suspected.
On the other hand, the SHM methods applying active sensing techniques refer to a procedure that utilizes emitting and sensing signals transducers to continuously ascertain the inspected structure’s structural condition in real-time.
One of the most commonly used SHM techniques, which utilize piezoelectric transducers as actuators/sensors, is the EMI or EMA technique. The EMI sensing method has been proven as a promising technique for the continuous inspection and damage assessment of existing in-service infrastructures. The EMI technique’s main advantage is its ability to detect local damages, even in complex structures [12,13,14].
Among other non-destructive and real-time SHM methods, EMI arises as a promising and reliable one, mainly when accompanied by piezoelectric sensors’ implementation. Piezoelectric sensors are electronic components that are able to convert a mechanical or thermal input into an electrical signal, operating by the principle of the piezoelectric effect, which is defined as the property of some crystalline materials to polarize when subjected to mechanical deformation (direct piezoelectric effect), generating a potential difference, as well as, at the same time, to elastically deform when traversed by electrical current (inverse piezoelectric effect) [15,16].
In aeronautical and civil engineering fields, piezoelectric lead zirconate titanate sensors (PZT) are frequently used for SHM applications thanks to their powerful piezoelectric effects, advantages of high transient response, high sensitivity, wide bandwidth, dual sensing and actuating functions, and low-cost value. Further, the merit of the high-frequency response is beneficial to avoid or reduce the influence of other electrical equipment implemented in the vicinity of the sensors [13].
As the PZT’s operation is established to the piezoelectric phenomenon, the EMI PZT-enabled technique relatively exploits all the merits of this fundamental condition. Thus, a PZT patch serves, simultaneously, as a sensor and actuator by being embedded or mounted on the host structure [17].
The employment of PZT transducers for the EMI-based SHM method for cementitious materials has been researched, such as multiple mass loss in concrete cubes [18], cracking caused by steel corrosion in RC members [19], and the influence of the heating-time effect [20]. Furthermore, a considerable body of the literature exists on implementing the EMI-based SHM method in real-scale members, such as shear-critical RC beams [21,22,23], RC frames [24], and RC joints [25] under monotonically and cyclic loading, respectively.
According to recent research, using a grid of PZT patches in areas that are at risk of damage can enhance the accuracy and efficiency of SHM techniques for identifying damage in reinforced concrete structures [11]. Additionally, studies have shown that PZT materials are superior to strain gauges in similar conditions, as they offer higher signal-to-noise ratios and better transverse sensitivity [11,14].
Although PZT patches and typical electrical resistance strain gauges can be used to measure strain, they rely on different physical mechanisms. PZT patches are typically used in applications where high sensitivity, wide frequency bandwidth, and dynamic response are required. At the same time, electrical resistance strain gauges are more commonly used in static or low-frequency applications. Additionally, the PZT patch operates as a sensor and actuator simultaneously and has a compact size. Additionally, using strain gauges suffers from some limitations due to the a priori hypothesis of the uniform strain field, which practically recant when cracking occurred. In addition, strain gauges are locally limited, while PZT transducers can act in a wider spatial region. However, combining both methods could exhibit additional data for verifying the attained data [11].
Moreover, the evolution of material damage from distributed microcracks to localized cracking in concrete structures related to the change in the material’s compliance level has also been studied [10,26,27,28]. Additionally, to analyze several measurements obtained from PZT transducers and to diagnose damage to reinforced concrete elements, Perera et al. [29] and Sevillano et al. [30] developed a novel approach based on clustering, a common unsupervised machine learning with promising results.
Additionally, the effect of the imposed loading on external bonded and embedded PZT’s SHM performance in standard dimension specimens under compression and tension loads has been examined [31]. Several studies have investigated load-induced damages under flexural loading and compression, conducting EMI measurements under unloaded conditions without applied stress. Furthermore, Zhang et al. investigated the feasibility of the PZT-based EMI method to monitor stiffness degradation under monotonically uniaxial compression through conducted EMI measurements, simultaneously, with the loading increment [32]. Narayanan et al. demonstrated experimental results from uniaxial repeatable compression loading with EMI measurements carried out under the maximum stress of each loading step and released conditions to distinguish the combined influence of stress field and material damage [10]. Due to the influence of the developed stress fields of the medium in the different types of wave propagation in structural elements, PZT transducers’ measurements are, correspondingly, affected in experimental tests under variable stress fields, in addition to the effect of the higher level of occurred damage in the medium.
In real-life structures, there is no feasible way to unload them and determine the effect of applied stresses and the actual level of damage separately [10]. Thus, distinguishing the impact on the response of a PZT, either surficial bonded or embedded to a concrete element, between the substrate stresses and the damage level is essential before establishing an actual case application of the impedance-based technique to detect incipient damage in concrete structures. Therefore, this study attempts to distinguish the effect of applied stress and damage.
Providakis et al. introduced a wireless impedance or admittance monitoring system, for concrete integrity monitoring, denoted as WiAMS [33]. This paper investigates the efficiency of a wireless low-cost advanced SHM system for damage detection of synthetic fiber-reinforced concrete (SFRC) beams. The specimens were subjected to a four-point bending test under a repeated loading sequence. Gradually, incremental loading steps were used to develop concrete stress and damage in a controlled manner, while EMI measurements have been applied in the release condition of the beam. The commonly used scalar indices of RMSD and MAPD were used to quantify changes in the EMI spectra at several positions in the loading sequence. Furthermore, a novel technique was introduced based on the HCA, capable of distinguishing variations in EMI caused by stress from those caused by damage.

2. Materials and Methods

2.1. Materials and Properties

Special attention should be paid when adding fibers to the concrete. One of the main requirements is to retain the workability and the flowability to the designed level during casting. For this purpose, well designed fiber-reinforced concrete should be produced based on a medium size coarse aggregate plain concrete [34,35,36].
In this experimental work, crushed limestone with a nominal particle size of up to 16 mm was used as coarse aggregate, as well as a mix of crushed limestone sand with natural silica sand as fine aggregate. Determining the absorption and the specific gravity for the coarse and fine aggregate was implemented in agreement with ASTM C127 [37] and ASTM C128 [38]. In the development of the mixture, a Type II-42.5 N Portland cement, complying with the requirements of EN 197-1 [39], was used. A high-range superplasticizer, utilizing Sika’s ‘ViscoCrete® Ultra350’, conforming to the requirements for EN 934.02: 2009 + A1: 2012, was also added to the mixture to enhance the workability to 0.7% of cementitious materials. The macro-synthetic fibers, made of polyolefin, sorted into plastic materials, were produced by Sika Hellas, with the mark designation SikaFiber Force 50. Fibers were added to the mixture in a dosage of 5 kg/m3. Macro-synthetic fibers formed in cylindrical shapes with a surface morphology characterized by alternate spherical segments across the transverse cross-section. Owing to their corrugated relief, they show enhanced bonding performance acting as anchorages into the concrete mass. Figure 1 shows the formation of macro-synthetic fibers used in the mixture, and Table 1 and Table 2 show the material properties.

2.2. Specimens Manufacturing

The raw materials were prepared and added to the rotary mixer, following the principles of ASTM C192 [36]. The aggregates (coarse and fine) were added first and mixed for 30 s. Then, the quantity of the cement was added, mixing for 30 s more; the insertion of 60% of the designed water was followed by subsequent mixing for a further 30 s. After that, the remaining 40% of the designed quantity of water was poured over the pan concomitantly with the admixture, mixing for another 60 s. An important notice is that the total water mix-designed quantity was reduced, according to the absorption test due to the wet condition of the aggregates. Finally, the macro-synthetic fibers were added at four different times in equal quantities each (25%) during stirring to achieve homogeneity and flowability of the fresh SFRC mixture and prevent fibers’ clumping. The properties of the fresh SFRC mixture were tested to ensure that the designed workability was achieved by performing the slump test [40] and evaluating concrete unit weight differences within each mix by performing fresh density measurements [41].
The molds of the specimens were filled slightly into their brims with the SFRC mixture and adequately vibrated with an automated vibrating table, having a 20 × 20 in (508 × 508 mm) large platform with a load capacity of up to 300 lb (136 kg) and a rheostat knob to adjust the amplitude of 3600 vibrations per minute. All the specimens were cured at a standard temperature of 20 ± 2 °C and a relative humidity RH > 95% at 28 days.
The SFRC mixture casts six 150 × 300 mm concrete cylinders, six 150 × 150 × 150 mm standard concrete cubes, and two concrete beams 1000 × 200 × 150 mm. The cylindrical and cubic specimens (three per case) were used to evaluate concrete’s mean compressive and tensile strength at 28 days and on the day of the experimental test of the two prismatic beams.

2.3. Set Up and Tested Specimens

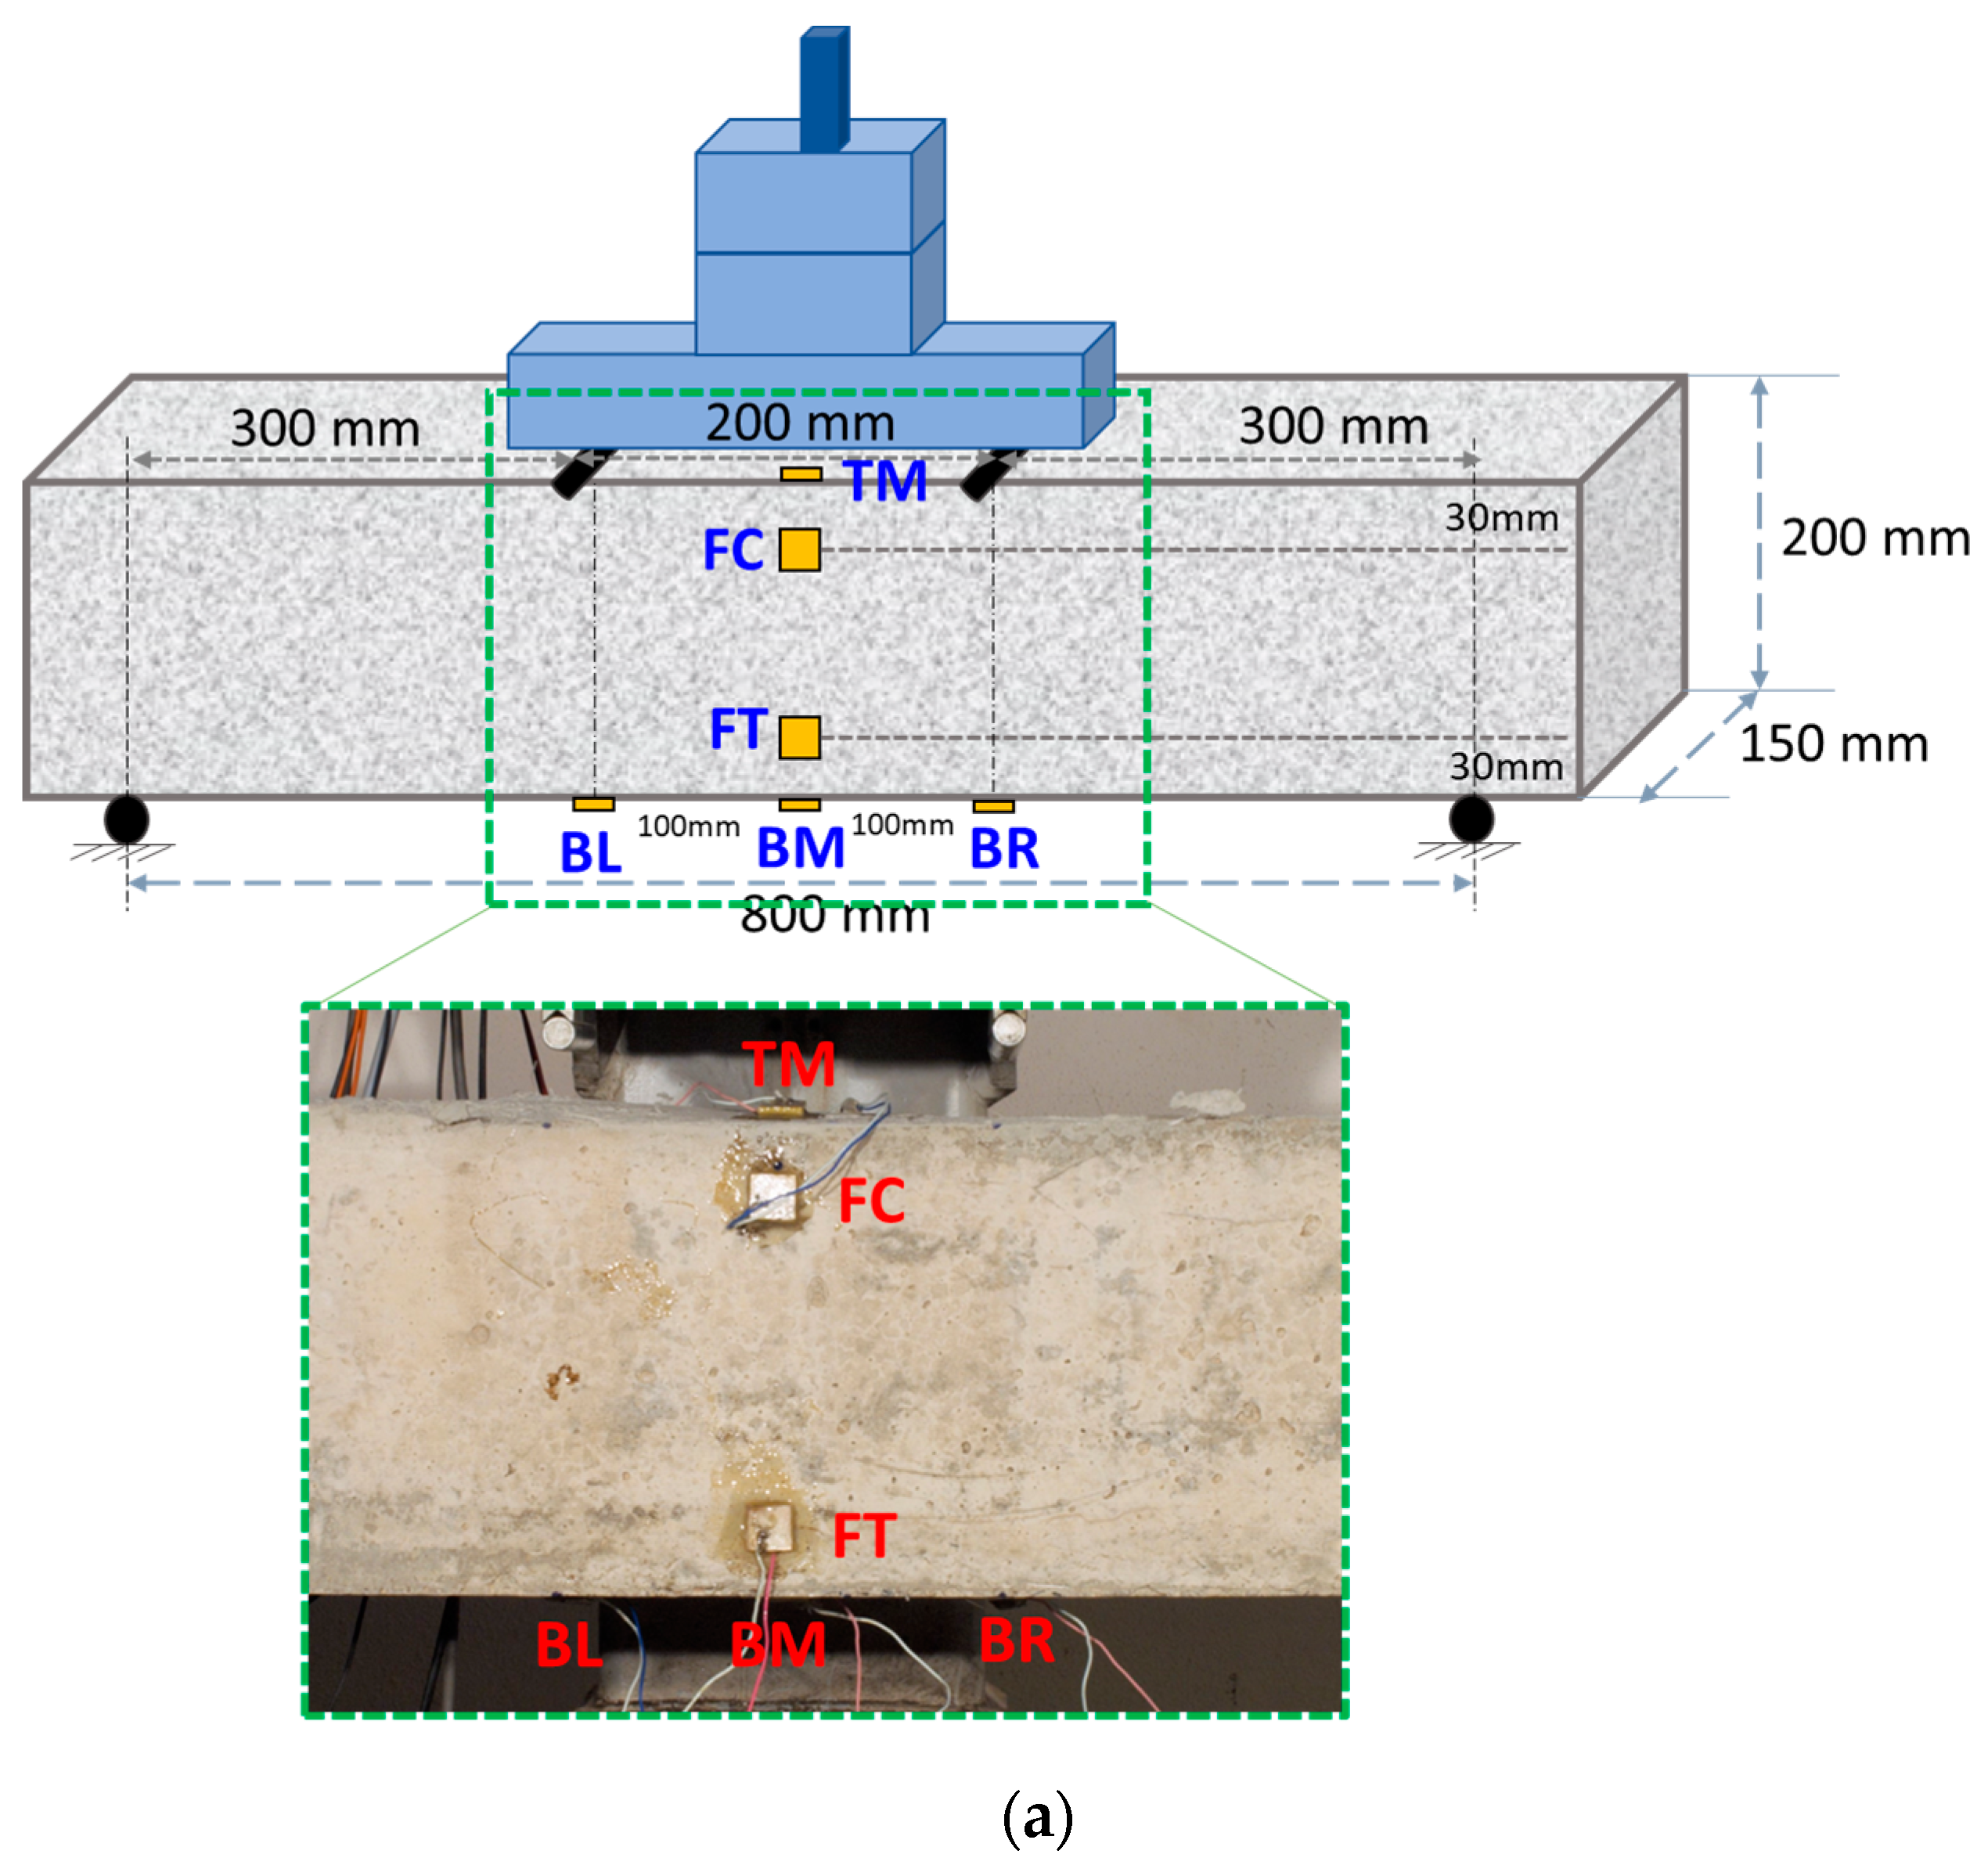
The experimental program consisted of two flexural SFRC prismatic beams with dimensions 1000 mm (length) × 200 mm (height) × 150 mm (width), respectively. The SFRC beams were tested in a four-point bending configuration, as shown in RMSD. The SFRC beams were supported on two hardened steel rollers on the left and right edges. The total span length was 800 mm (L), separated into three sections of 300—200—300 mm (left—mid—right). Two-line loads were applied at an equal distance of 100 mm from the middle point of the top surface of the beam with two hardened steel rollers. The testing was performed using a servo-controlled hydraulic machine. The test fixture conformed to the requirements of ASTM C78 [42] for obtaining the fracture response of the SFRC.
SFRC beams were subjected to consecutive repeated loading conditions (loading, unloading, reloading, unloading, etc.) using different load levels based on the estimated maximum flexural strength of the beam. The loading sequence is illustrated schematically in Figure 2. In the last step, beams are loaded until final failure since the developed flexural stress reached the maximum load-carrying bending capacity, fractured from pure flexure in the mid-span. In addition, Table 3 depicts the examined loading level – step, the flexural strength at each load level, and the ratio of maximum flexural strength.
Continuous measurements of load and deflection were taken during the tests using a load cell with an accuracy of 0.05 kN. Laser extensometers with an accuracy of 0.001 mm were used to obtain full-field surface displacements and net midspan deformations of the beams.
Equation (1) defines the values of the flexural stress.
σf = 3 F a/(b d2)
where σf: stress in outer fibers at the midpoint, (MPa), F: applied load, (N), a: shear span (mm), b: width of test beam (mm), and d: depth or height of tested beam (mm).

2.4. Development of Monitoring

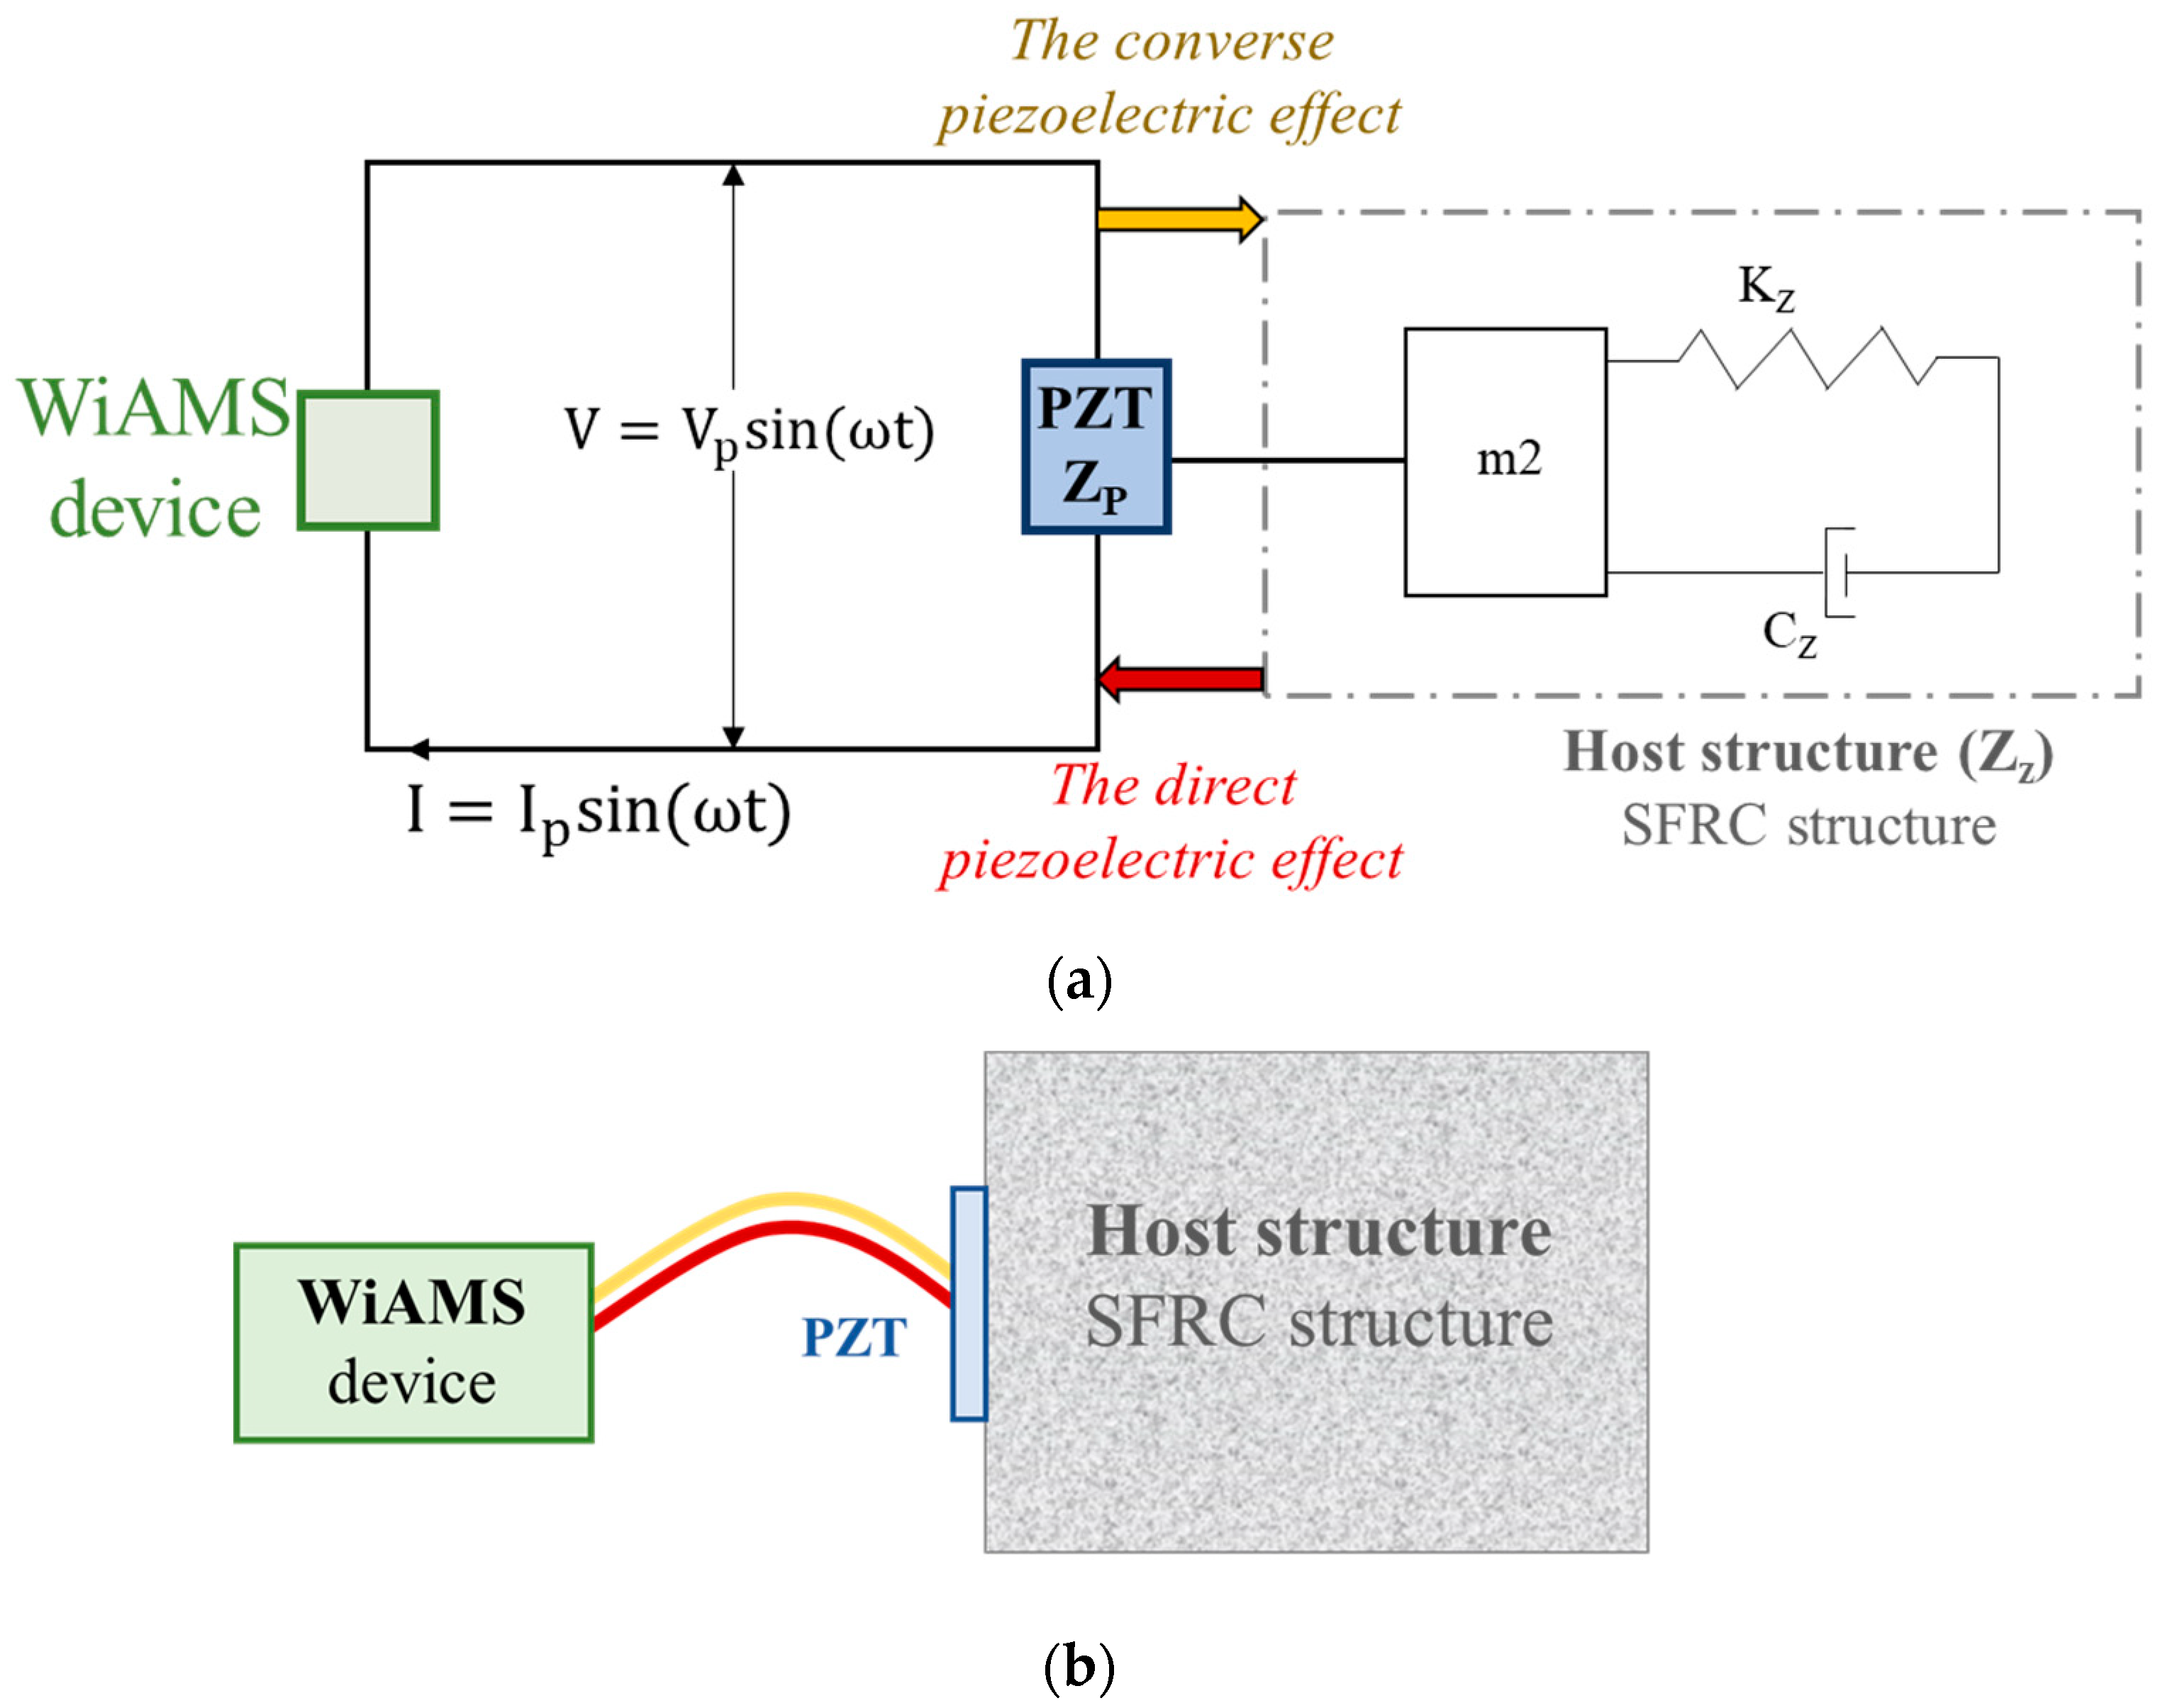
In this experimental work, a wireless SHM and damage evaluation system based on the EMI method was applied. PZT patches were adopted to implement the EMI measurements in real-time through a wired connection with the advanced custom-made device WiAMS. The WiAMS device could be held remotely, and the measurements could be acquired wirelessly through a Wi-Fi connection via email notification or a server database. The connection between the WiAMS device, the PZT patches, and the host structure is illustrated schematically in Figure 3.
Before the experimental testing commenced, the WiAMS devices performed twenty consecutive measurements for each PZT patch in the pristine condition without the subjection of the imposed loading. Similarly, three consecutive measurements were performed for every release condition loading state. Thus, the applied technique’s repeatability, fidelity, and reliability are ensured.
The influence between PZT and the RC element is captured as an admittance signature, consisting of the real part (conductance) and the imaginary part (susceptance). As a result of these interactions, structural features are reflected in the signature, as depicted in the following, Equation (2), for complex admittance, Y ¯ , of the mounted PZT patch:
Y ¯ = I ¯ V ¯ = G + B j = 4 ω j L 2 h ε 33 T ¯ 2 d 31 2 Y E ¯ 1 ν + 2 d 31 2 Y E ¯ 1 ν Z a , e f f Z s , e f f + Z a , e f f tan k L k L
where: I ¯ is the current passing through PZT, V ¯ is the harmonic alternating voltage supplied to the circuit, G is the conductance (the real part of admittance), B is the susceptance (the imaginary part of admittance), j is the imaginary unit, v is the angular frequency, L is the half-length of the patch, h is the thickness of the patch, d 31 is the piezoelectric strain coefficient of the PZT, Z a , e f f is the short-circuited effective mechanical impedance, Z s , e f f is the effective structural impedance, n is Poisson’s ratio, k is the wave number related to the angular frequency, Y E ¯ is the complex Young’s modulus of elasticity under constant electric field, and ε 33 T is the complex electric permittivity of PZT patch at constant stress [11].
The benefits of the piezoelectric phenomenon are derived from the ability of PZT patches to function as both transducers and sensors. This occurs when they are exposed to an amplified harmonic excitation voltage signal and are able to receive reflected waves and detect changes in electrical impedance across a range of frequencies.
The peak frequency in the piezoelectric admittance signature is influenced by the structure’s stiffness, to which the piezoelectric patch is attached. If a crack occurs and propagates in the structure, the local stiffness of that area will decrease, resulting in a decrease in the peak frequency in the piezoelectric admittance signature. [43,44]. The piezoelectric patch attached near the crack can sense this change in stiffness and translate it into changes in peak frequency in the admittance signature. Analyzing these frequency changes makes it possible to detect the presence of a structural crack, thus providing a theoretical basis for using piezoelectric impedance to monitor the status of a crack in a structure.
This study addressed two different ways of PZTs’ configuration. First, the externally epoxy-bonded PZTs were mounted to the surfaces of the tested beams. Further, the notched epoxy-embedded sensors (NeeS) were inserted slightly into the beam’s mass. To the author’s knowledge, this has not been presented in the literature. PZT transducers, with dimensions of 20 × 20 mm, were used in both cases. The PZTs were carefully bonded on different positions relative to the expected location of the potentially fatal failure. The positions of the installed PZT transducers were picked up in such a way as to accomplish a multi-purpose attempt:
(A)
damage evaluation caused on SFRC beams subjected to a four-point bending test
(B)
the influence of the induced load on the acquired EMI measurements
(C)
the impact of the angle created between the direction of the formed crack and the direction of the PZT’s polarization
Six PZT patches for each beam were epoxy-bonded at particular surface areas, as shown in Figure 4. The notation of each PZT patch for Beam 1 and Beam 2, according to its position, is as follows (Figure 4):
-
FT—Facade Tension: The PZT patch was bonded in the middle of the façade surface at around 30 mm from the lower extreme fiber of the beam.
-
FC—Facade Compression: The PZT patch was bonded in the middle of the façade surface at around 30 mm from the extreme upper fiber of the beam.
-
TM—Top Mid: The PZT patch was bonded in the middle of the top surface at an equal distance of 100 mm apart from the loading points.
-
BM—Bottom Mid: The PZT patch was bonded in the middle of the bottom surface directly opposite to the TM patch.
-
BL—Bottom Left: The PZT patch was bonded 100 mm to the left direction from the middle of the lower extreme fiber surface directly opposite to the left loading point.
-
BR—Bottom Right: The PZT patch was bonded 100 mm to the right direction from the middle of the lower extreme fiber surface directly opposite to the right loading point.
-
BLE—Bottom Left External: The NeeS PZT patch was vertically epoxy-embedded to a grooved notch with a depth of 22 mm and at a distance of 200 mm to the left direction from the middle of the lower extreme fiber surface.
-
BRE—Bottom Right External: The NeeS PZT patch was vertically epoxy-embedded to a grooved notch with a depth of 22 mm and at a distance of 200 mm to the right direction from the middle of the lower extreme fiber surface.
PZT BLE, and BRE have been artificially placed outside of the mid-span. They were intended to avoid impacting the nature of the experimental testing by grooving the insertion area, influencing the fracture response, and they have been inserted with a vertical to the expected failure direction of polarization, which was shown to increase the efficiency in damage detection in previous studies.
In this study, two different sets of measures have been used. The first set implemented in a short frequency range (35–45 values) near the resonant frequency of each PZT patch during the application of the subjected load at each loading step, noted as “continuous” due to the continuous repetition of measurements. The set of measures commences with the subjection of loading at each repeatable step and finishes some seconds later after the completion of the unloading phase. This type of measurement has been applied to three PZT patches in the selected narrow frequency range to acquire multiple voltage responses near the resonant frequency.
The second set of measurements includes applying a broader frequency range of 10 to 250 kHz in the beam’s unload-released condition, and it has been used for all the employed PZT patches of the specimens.

2.5. Damage Quantification Process

The process of damage quantification could not be restricted to identifying the existence of the damage, but, rather, it is related to estimating properties, such as location, width, and depth, of the developed cracking formation. Moreover, the evaluation and quantification of the damage should be the major orientations of the process, using all the appropriate available and accessible data analysis tools.
Plenty of proposed indices could be met to the extent of literature, with the most commonly used being the below:
  • RMSD: Root Mean Square Deviation
  • MAPD: Mean Absolute Percentage Deviation
  • CC: Coefficient of Correlation
Every acquired measurement through the EMI method constitutes an electromechanical signature of the particular PZT patch. Therefore, elaborating the EMI signatures through statistical analysis could be a useful tool in converting the variations of the EMI signatures between the healthy state and any successive state to damage index metrics. In this study, the commonly used damage indices RMSD and MAPD have been primarily applied to analyze the EMI signatures for both sets of measurements. The expressions of RMSD and MAPD indices are presented in Equations (3) and (4), respectively:
R M S D = r = 1 n V p ( f r ) D V p ( f r ) 0 2 r = 1 M V p ( f r ) 0 2
M A P D = 1 n r = 1 n V p f r D V p f r 0 V p f r 0
where:
V p ( f r ) 0 : absolute value of the voltage output signal as extracted from the PZT at the healthy pristine state of the specimen,
V p ( f r ) D : absolute value of the corresponding voltage output signal as measured from the same PZT at damage level D ,
Additionally, n is the discrete number of measurements in the examined frequency band.
Although the commonly used statistical indices show satisfying performance and good efficiency in identifying damage’s existence, there are still some points for improvement. These deficiencies have not been overcome in concrete applications due to the complicated features of the material and the impact of different phenomena acting individually, together, or consecutively. Due to that condition, statistical indices’ efficacy reliability decreased for different cracking severity. Furthermore, the damage indices could have the same value, and vice versa, due to their scalar nature. Therefore, an efficient approach to solving the above deficiency is the combination of different damage indices or, even better, combining different data analysis methods.
For this purpose, the HCA has been implemented in this study. In general, clustering is an unsupervised learning algorithm that can group observations, concerning the degree of their similarity [45,46]. The basic conception of the clustering approach for EMI-based applications is that the acquired voltage responses in terms of the frequency range of a single PZT patch are anticipated to exhibit similar performance at different loading steps, unless an occurred abnormality exists in its monitoring range [29].
In HCA, each measurement is considered and inserted as a single group. After that, employing a reiterative process, the measurements with similar observations are merged into a new cluster. Thus, an agglomerative methodology is structured, and finally, a dendrogram is used for better visualization of different stages of clustering, which gives a classification of the dissimilarity among the formed groups. Additionally, the number of the total initial clusters is always between 1 and n, where n is the number of the inserted measurements. The decision about the final number of clusters depends on the data analyst’s desire, experience, and training to set and combine the efficient number of clusters.
The main principles of the hierarchical algorithm are summarized in the below steps:
  • insertion of all the desired measurements into the system
  • allocation of the measurements to a cluster. The algorithm starts with all the measurements, initially consisting of a cluster.
  • creating the first clusters by merging some single measurements with best-fit similarity
  • recomputation of the metric distances between the newly formed clusters and the initial ones
  • The algorithm stops whenever all the measurements are assigned to a cluster or until the formation of the clusters’ designed number occurs.
Except for the above steps, two more coefficients, such as distance metric and linkage criterion, must be defined. The linkage criterion verifies, or does not verify, the fidelity of the represented clustering and is a measure of how faithfully a dendrogram preserves the pairwise distances or distance matrix between the original unmodeled data points [24].
This study selects the Euclidean distance metrics (Equation (5)) and the cophenetic correlation coefficient (Equation (6)) with moderate performance.
d s t = i = 1 n x s x t 2
where d s t is the Euclidean distance between each pair of observations, s and t, and x s and x t denote the vectors (1-by-n) of impedance signature of PZT in different conditions.
C C C = s < t d s t d ¯ d s t c o p h d ¯ c o p h s < t d s t d ¯ 2 s < t d s t c o p h d ¯ c o p h 2
where CCC denote the cophenetic correlation coefficient, while d s t c o p h corresponds to cophenetic distances, which represent the dissimilarity of the cluster, where s and t merged firstly.

3. Results

3.1. Flexural Behavior of Beams

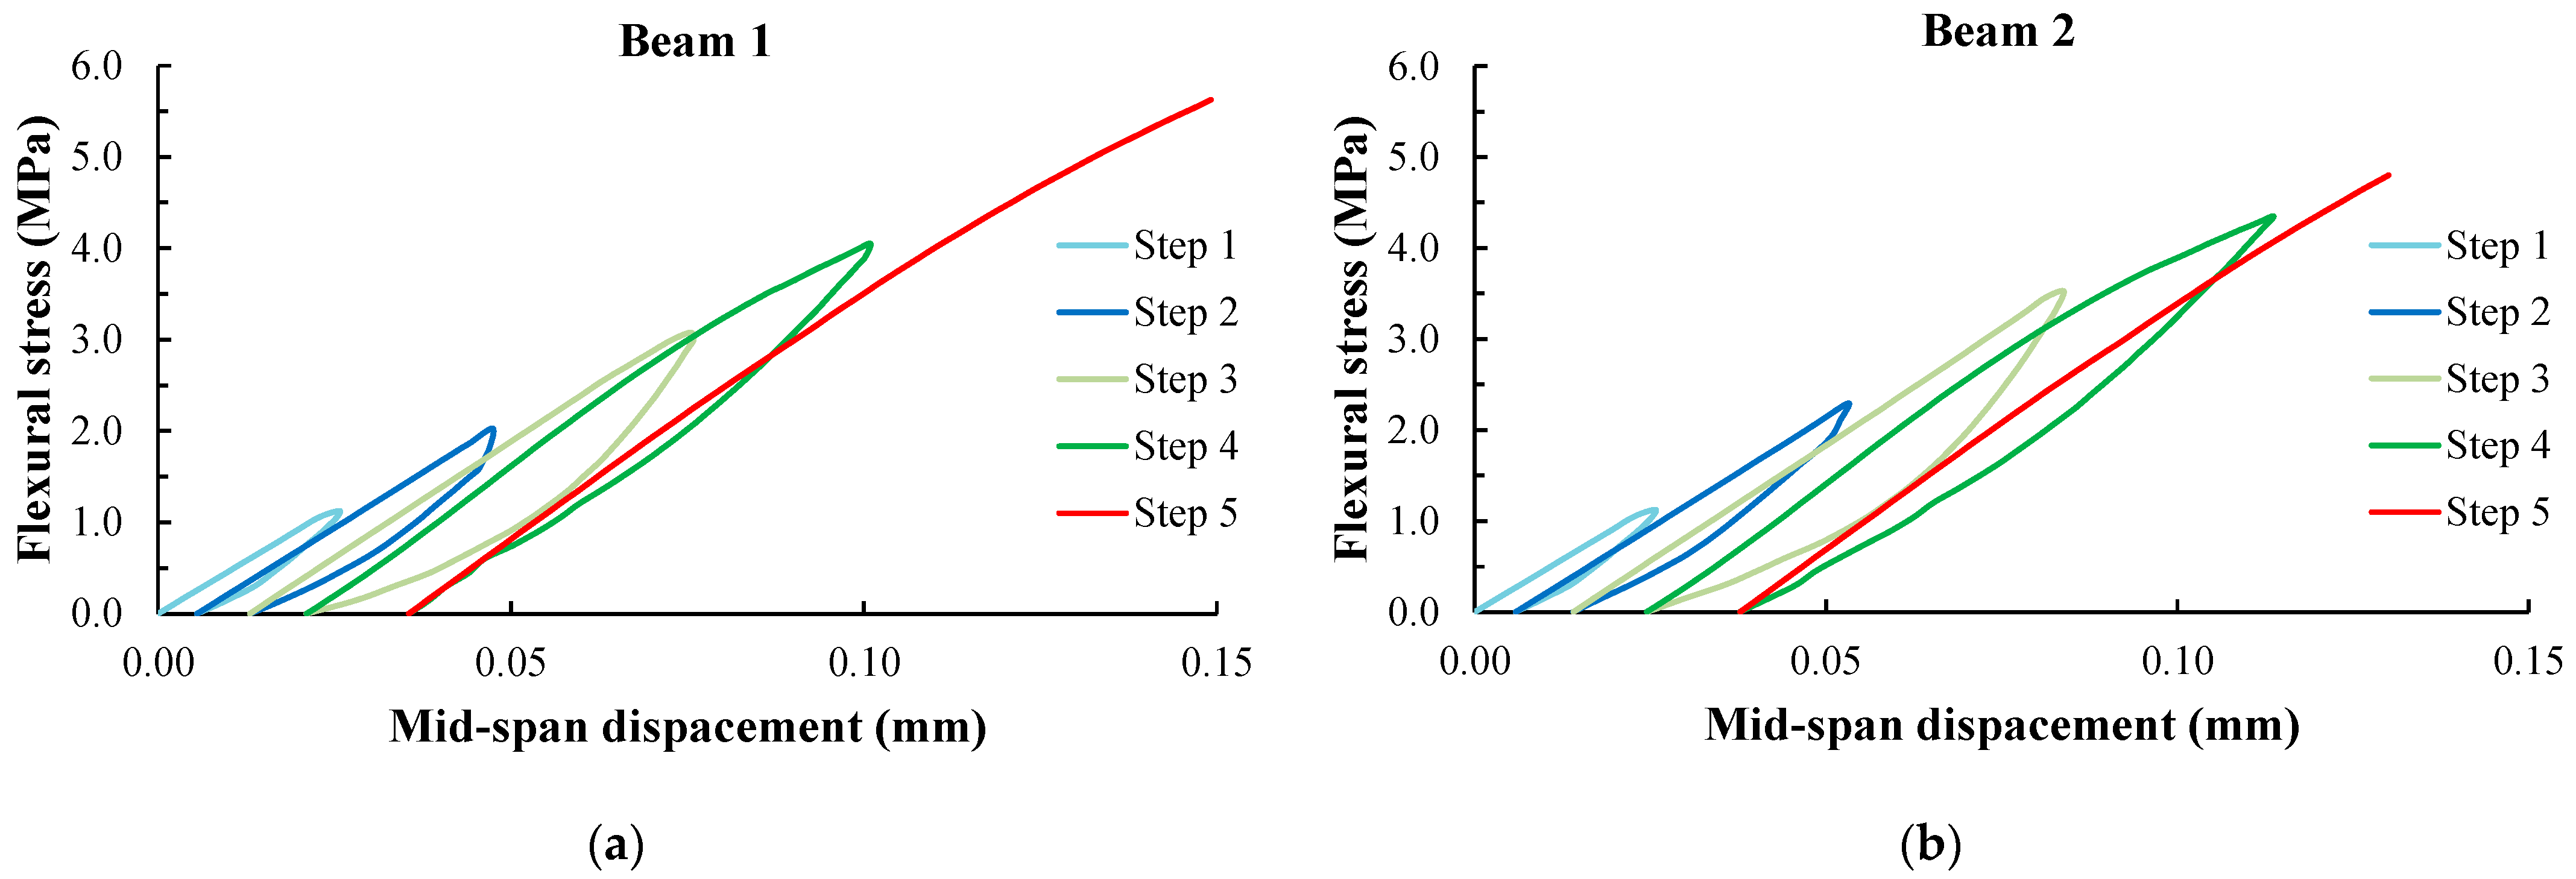
The tested beams 1 and 2 exhibited typical flexural response and brittle failure, as they were designed and expected to be in alignment with the applied and slightly modified four-point bending test method. The fatal failure formed cracks that were developed in the mid-span at a distance around 50 mm left and right from the middle section of beams 1 and 2, respectively, and they were perpendicular to the beam’s longitudinal axis.
Figure 5 demonstrates the experimental behavior of the SFRC beams in terms of flexural stress versus mid-span deflection. Both beams were subjected to repeated loading using different load steps based on the estimated maximum flexural strength of the beam, with the sequence of loading, unloading, reloading, and loading until the final fracture, as shown in Figure 2.

3.2. Structural Health Monitoring Results

3.2.1. Analysis through Statistic Metrics in the Beams’ Released Condition

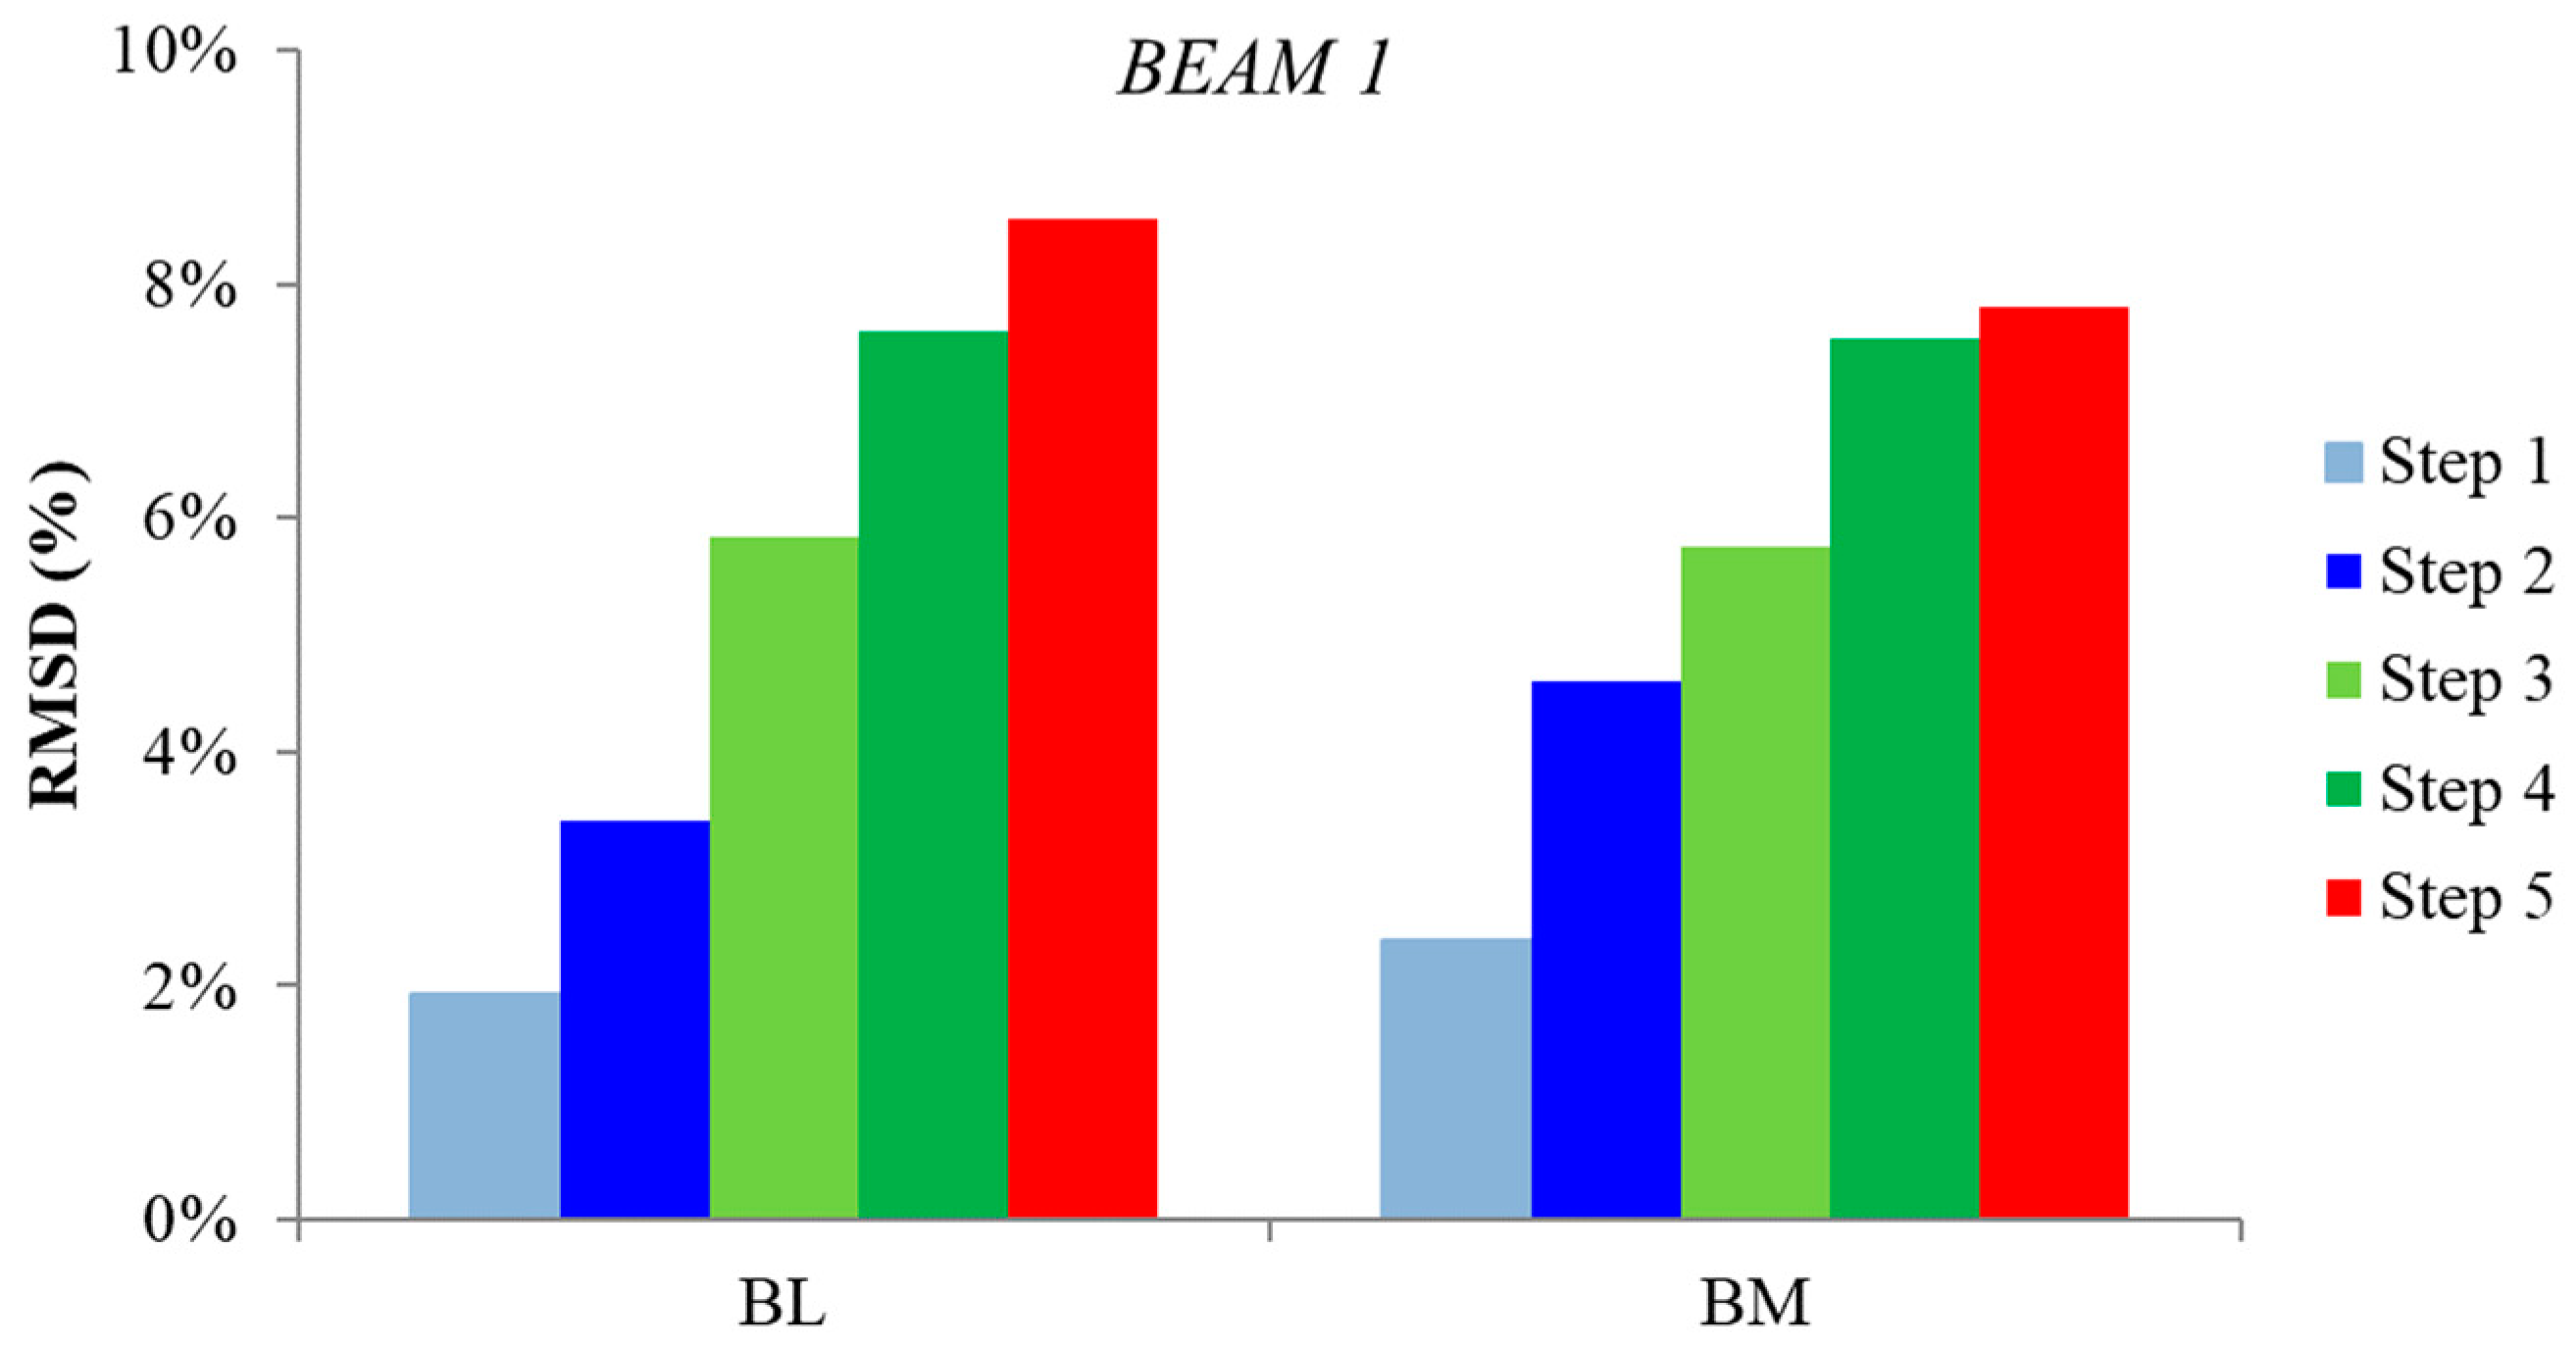
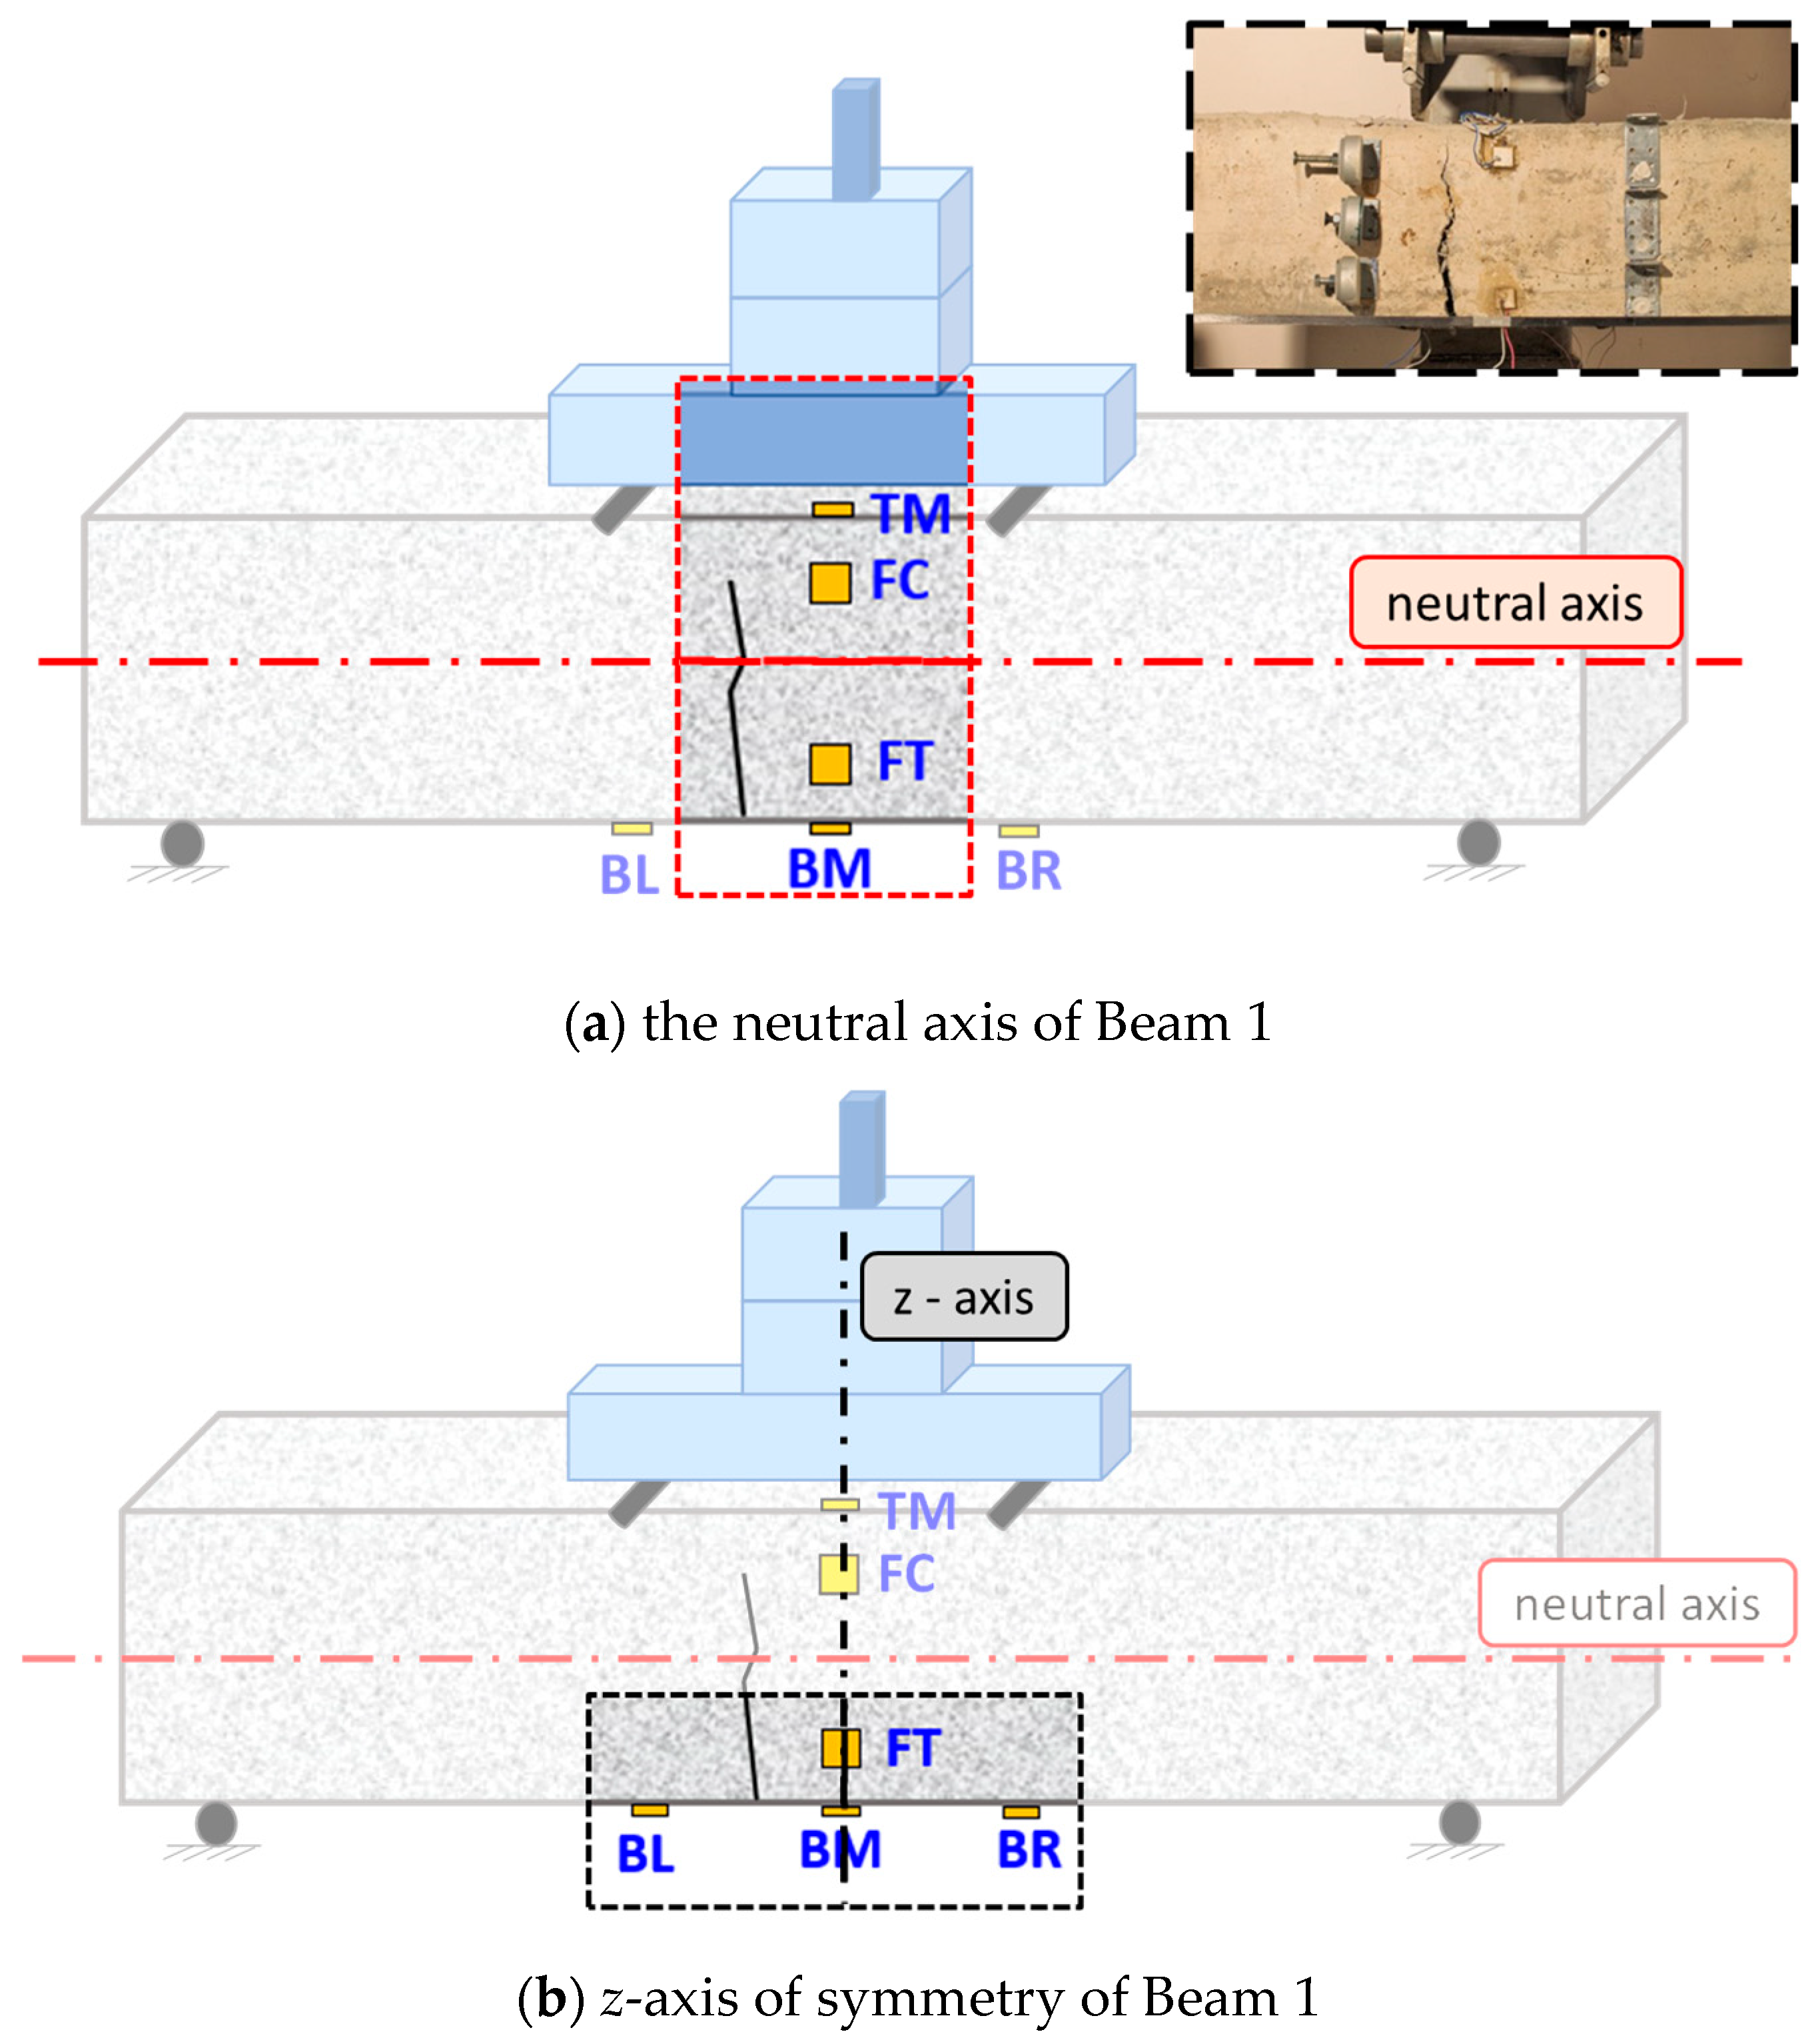
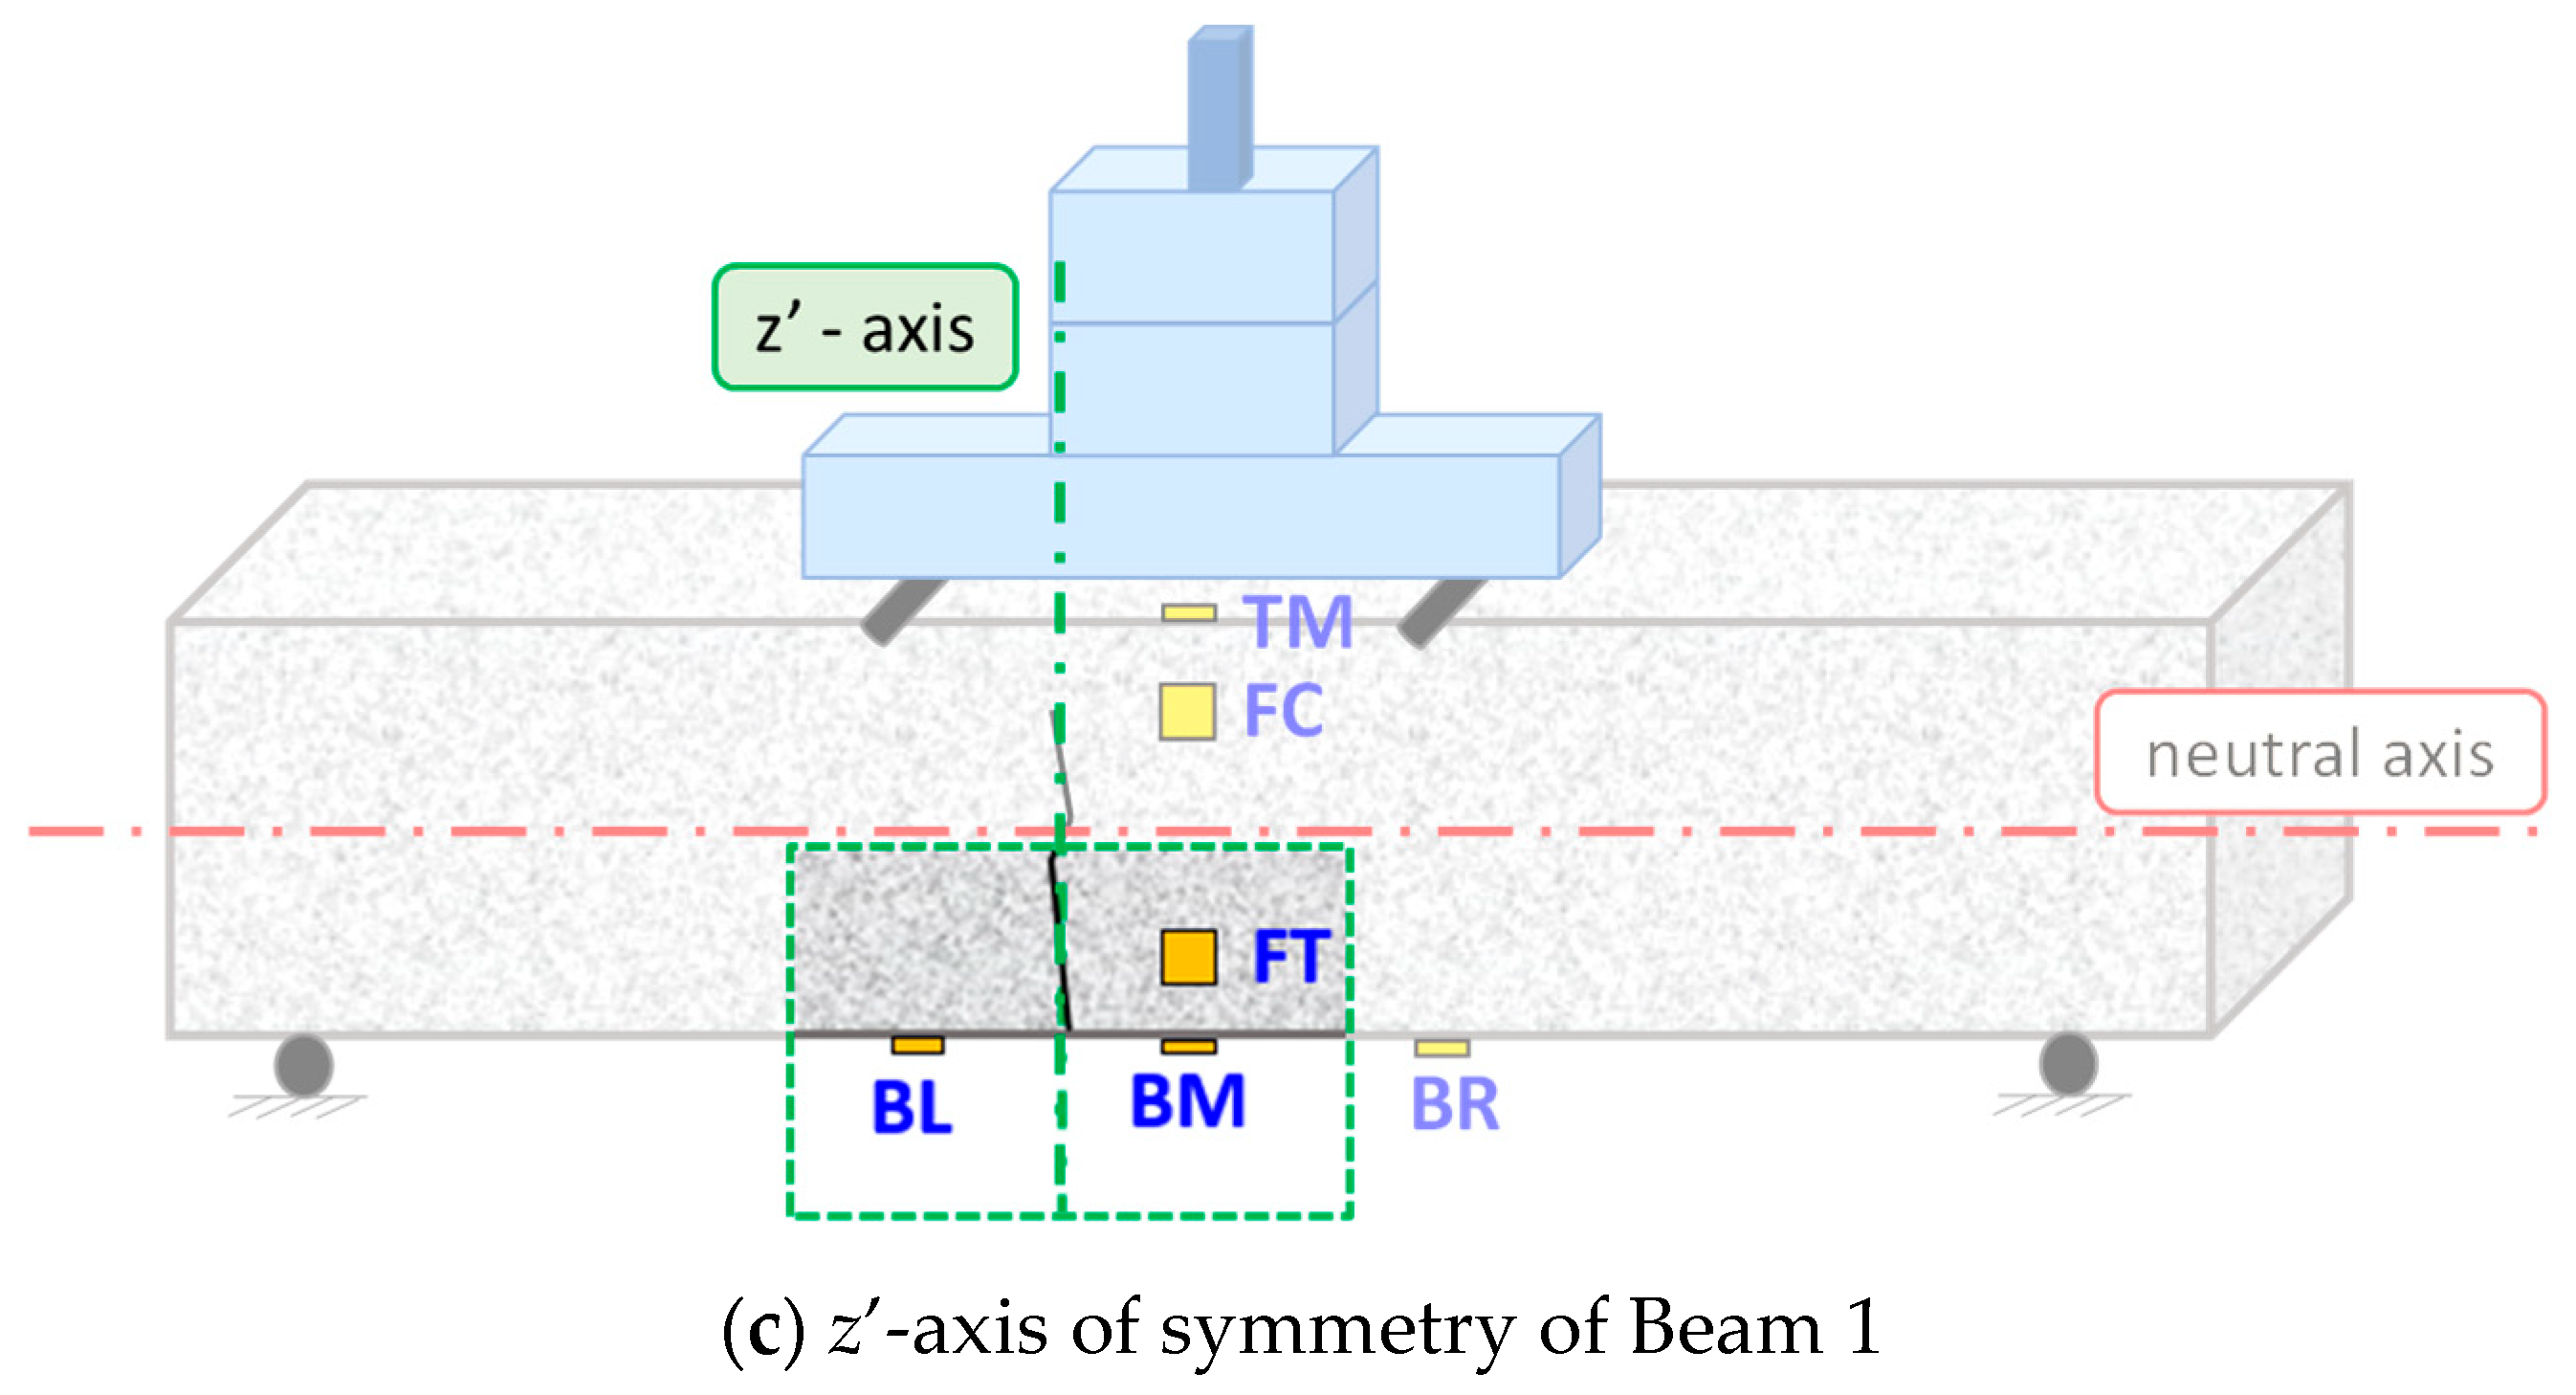
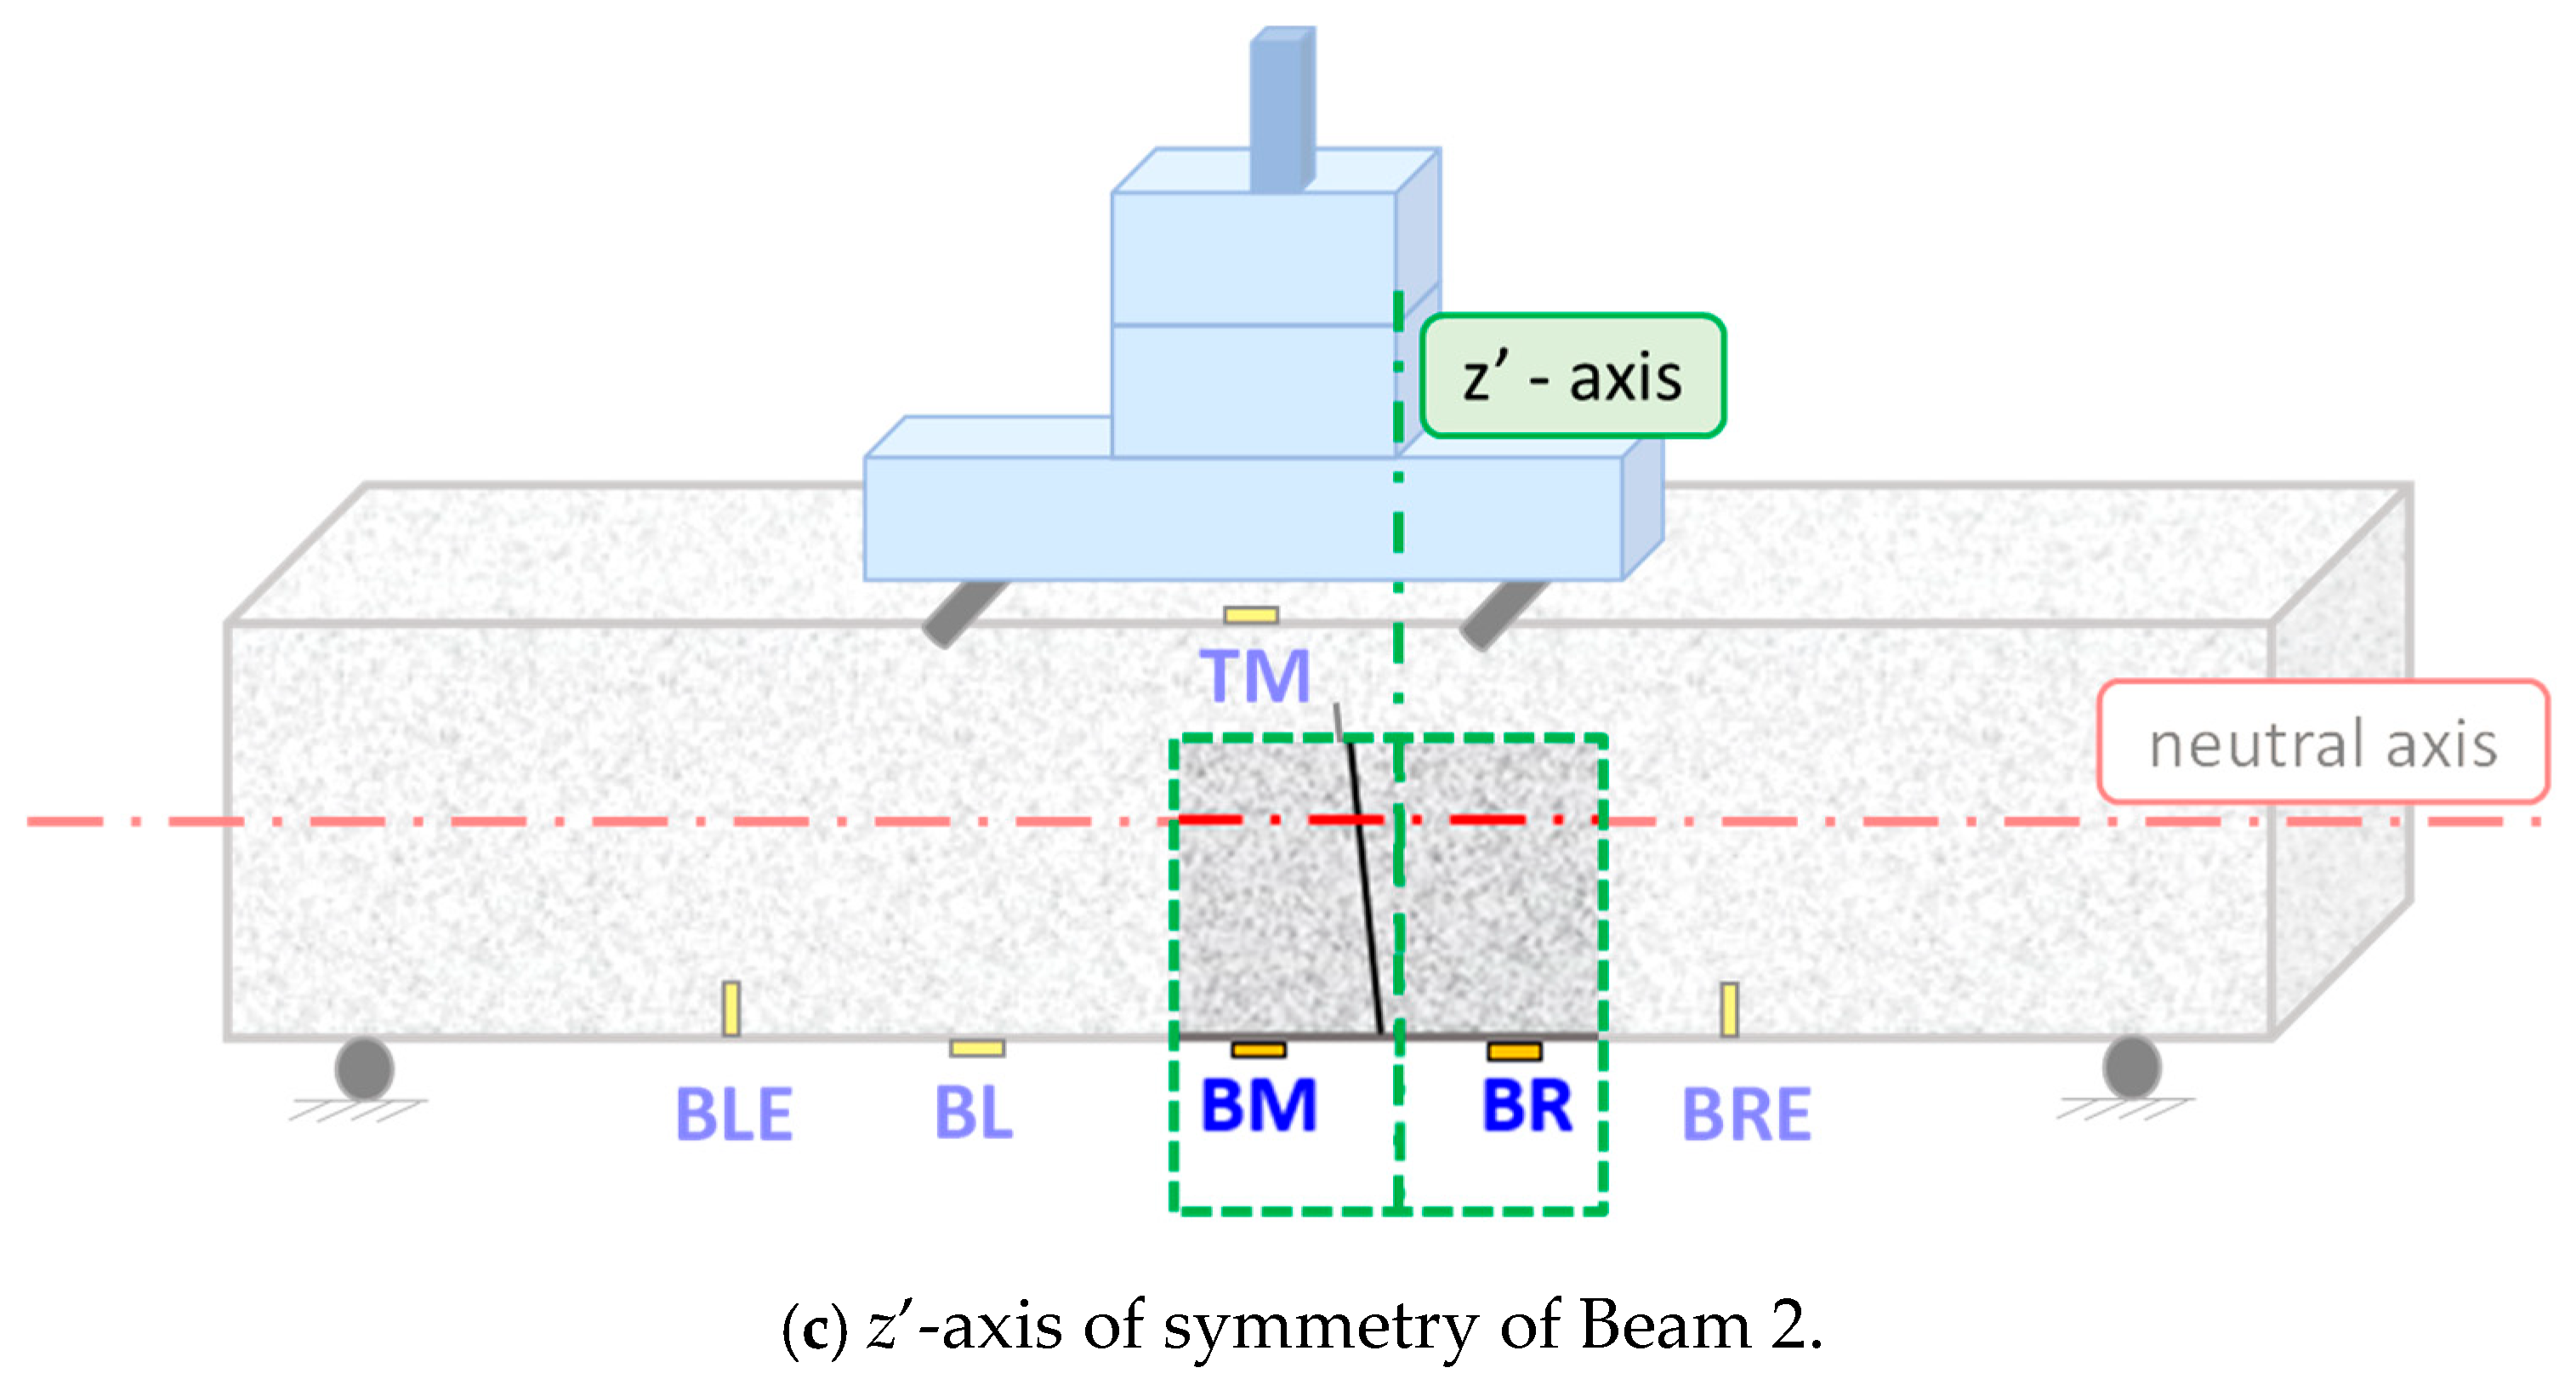
The RMSD volume ratios of all the epoxy-bonded PZT patches, measured in the released condition of beam 1, are depicted in Figure 6, Figure 7 and Figure 8. The PZT transducers have been divided into four pairs, correlated to an axis of symmetry. Thus, the groups consisted of (a) TM-BM (neutral axis of the beam), (b) FT-FC (neutral axis of the beam), (c) BL-BR (z-axis of symmetry), and (d) BL-BM (fatal failure, z’-axis), as displayed in Figure 9. The evaluation of damage detection has been applied through comparisons between the co-grouped PZT transducers.
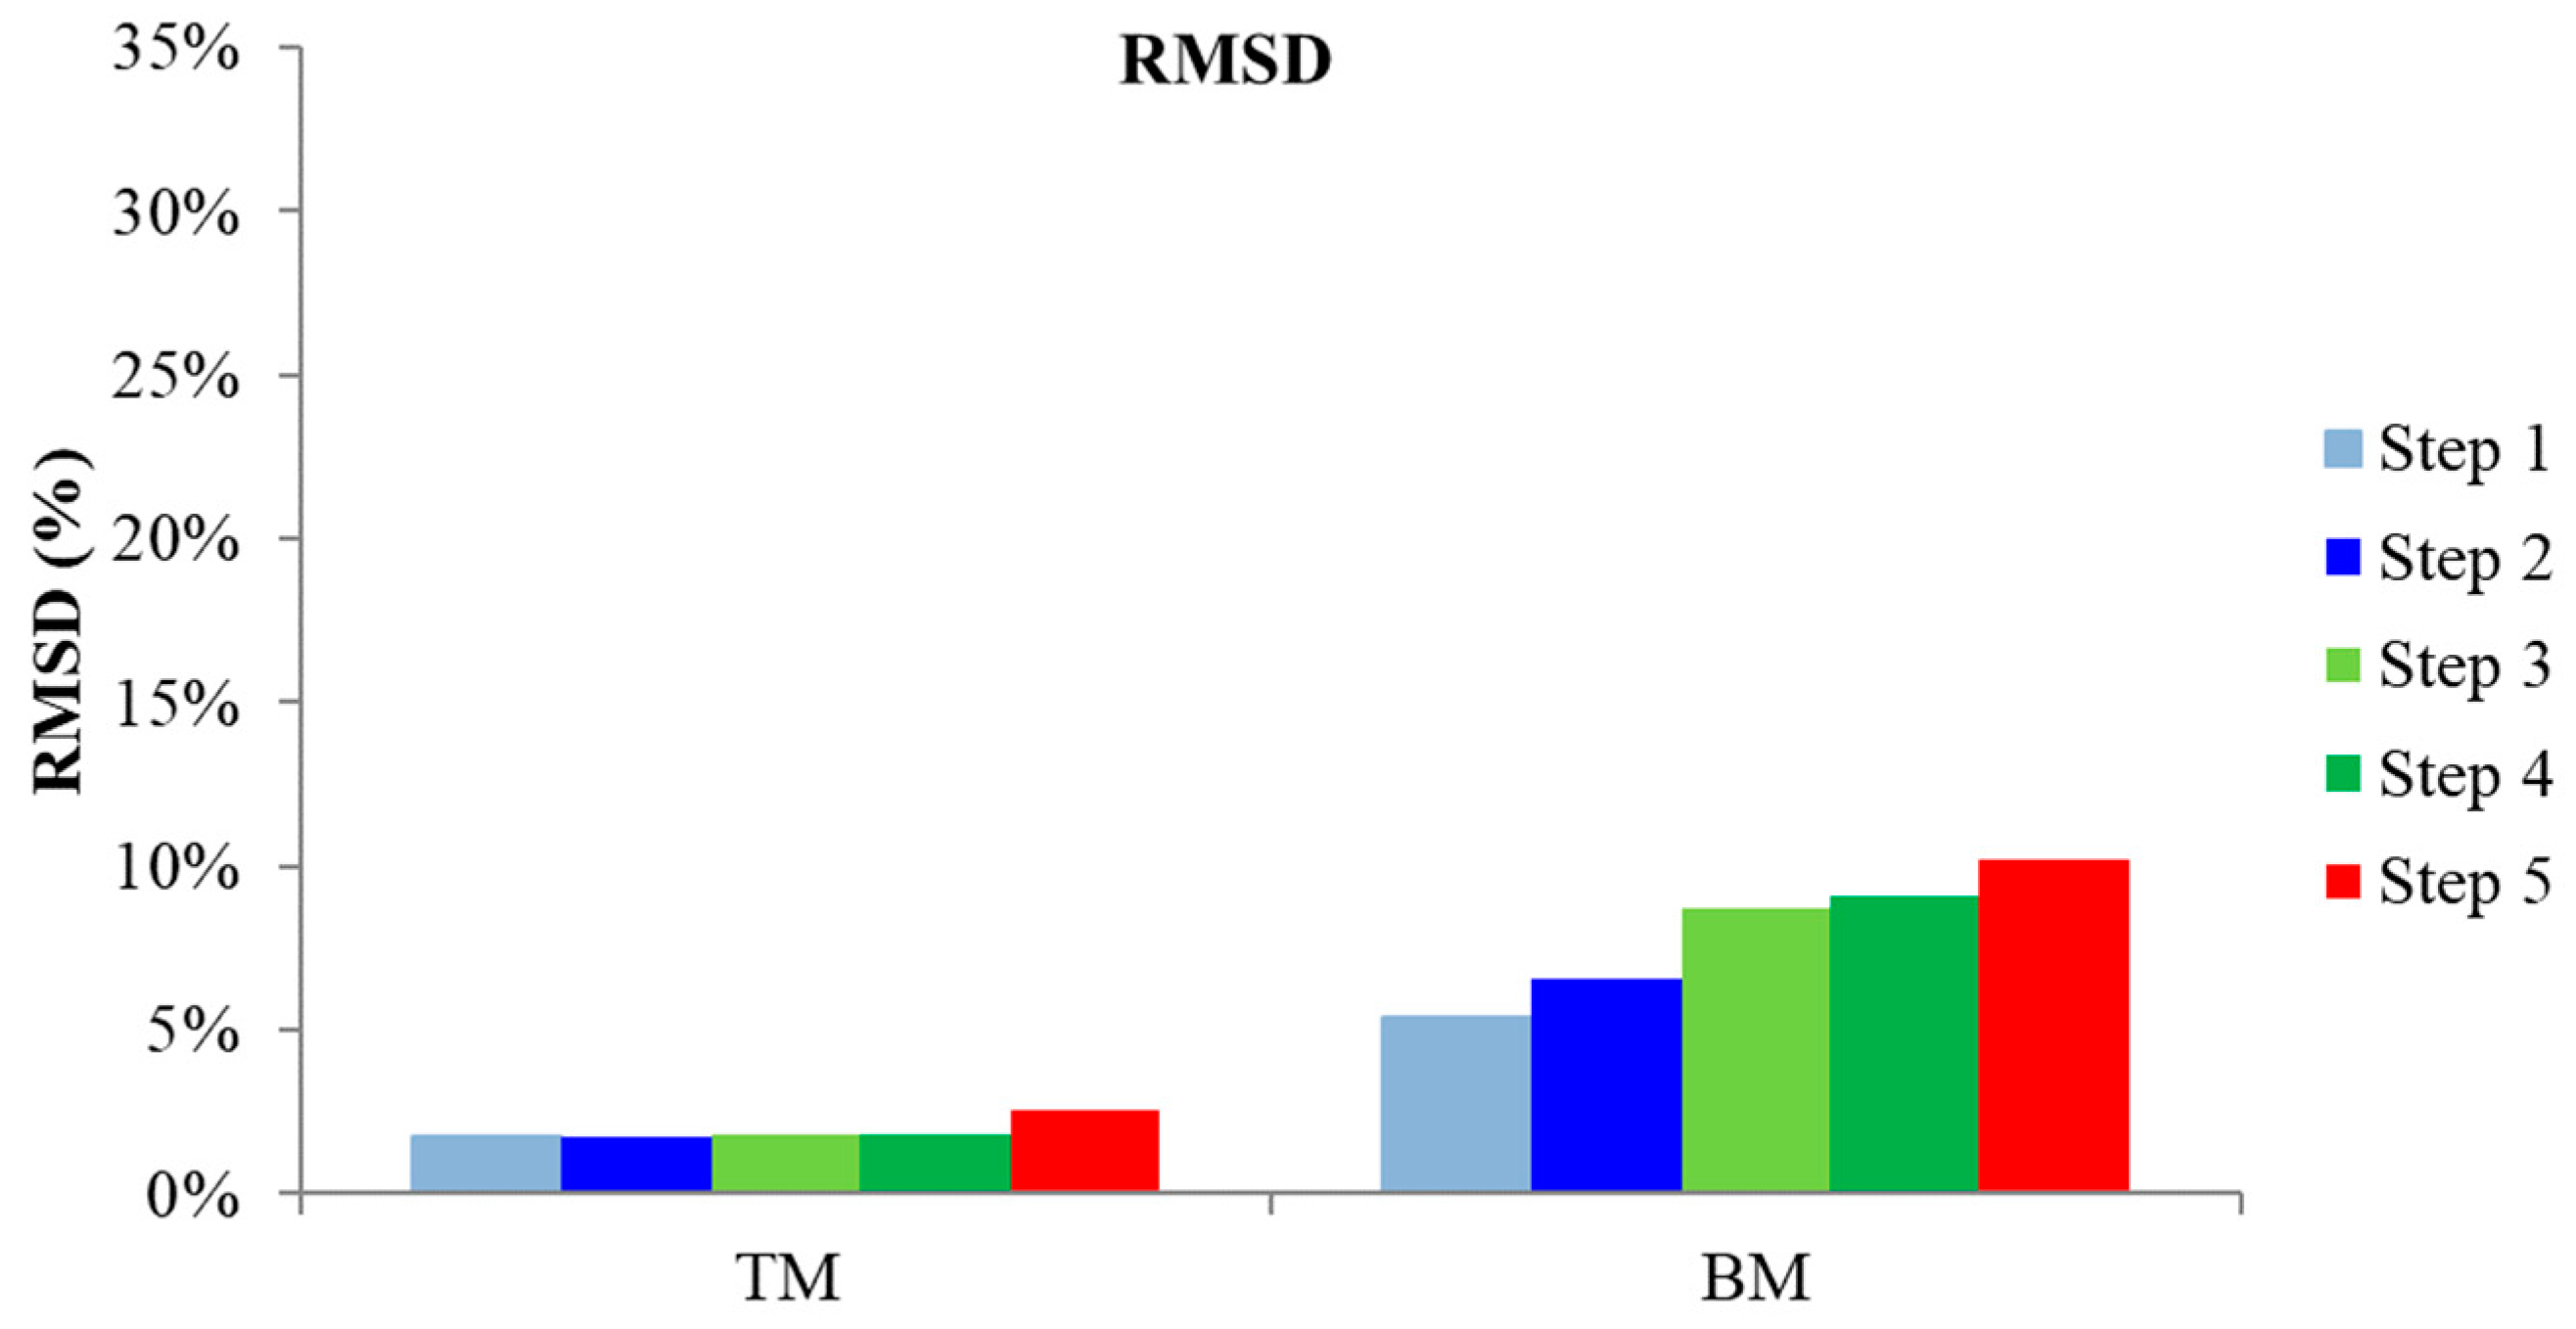
Hence, for the first pair, PZT BM showed a high value (7.8%) of damage index at the failure loading state in comparison to PZT TM, which is owned to the fact that the width of the crack near the lower extreme fiber of the beam is wider opened comparatively to its formation to the relative upper section. Furthermore, the values of the RMSD indices for the second pair, PZT transducers FT and FC, seemed to be similarly affected by the formation of the crack, leading to vague compared results with indistinct conclusions.
Moreover, regarding the third pair, PZT BL showed consistently increased values of damage indexes at all the loading steps, performed higher values (8.6%) among all the PZT transducers, and seemed to detect the formation of the failure near the area of monitoring, even at earlier loading stages, giving a promising indication for the verification of the applied instrumentation and methods. Further, PZT BR showed slightly gradual ascending RMSD values up to the fourth loading step and an abrupt increasing performance at the final loading step, probably due to another relative near-crack formation to the right part of the mid-span, which did not manage to become surficially apparent due to the predeveloped left mid-span fatal failure.
Additionally, for the fourth pair, the failure was formed in the area between PZT transducers BL and BM, which both showed extremely high values of RMSD indices (BL 8.6% vs. BM 7.8%); the difference in the performance has been probably owned to the fact that a wide section height wise of the fatal crack has been formed 10 mm closer to BL.
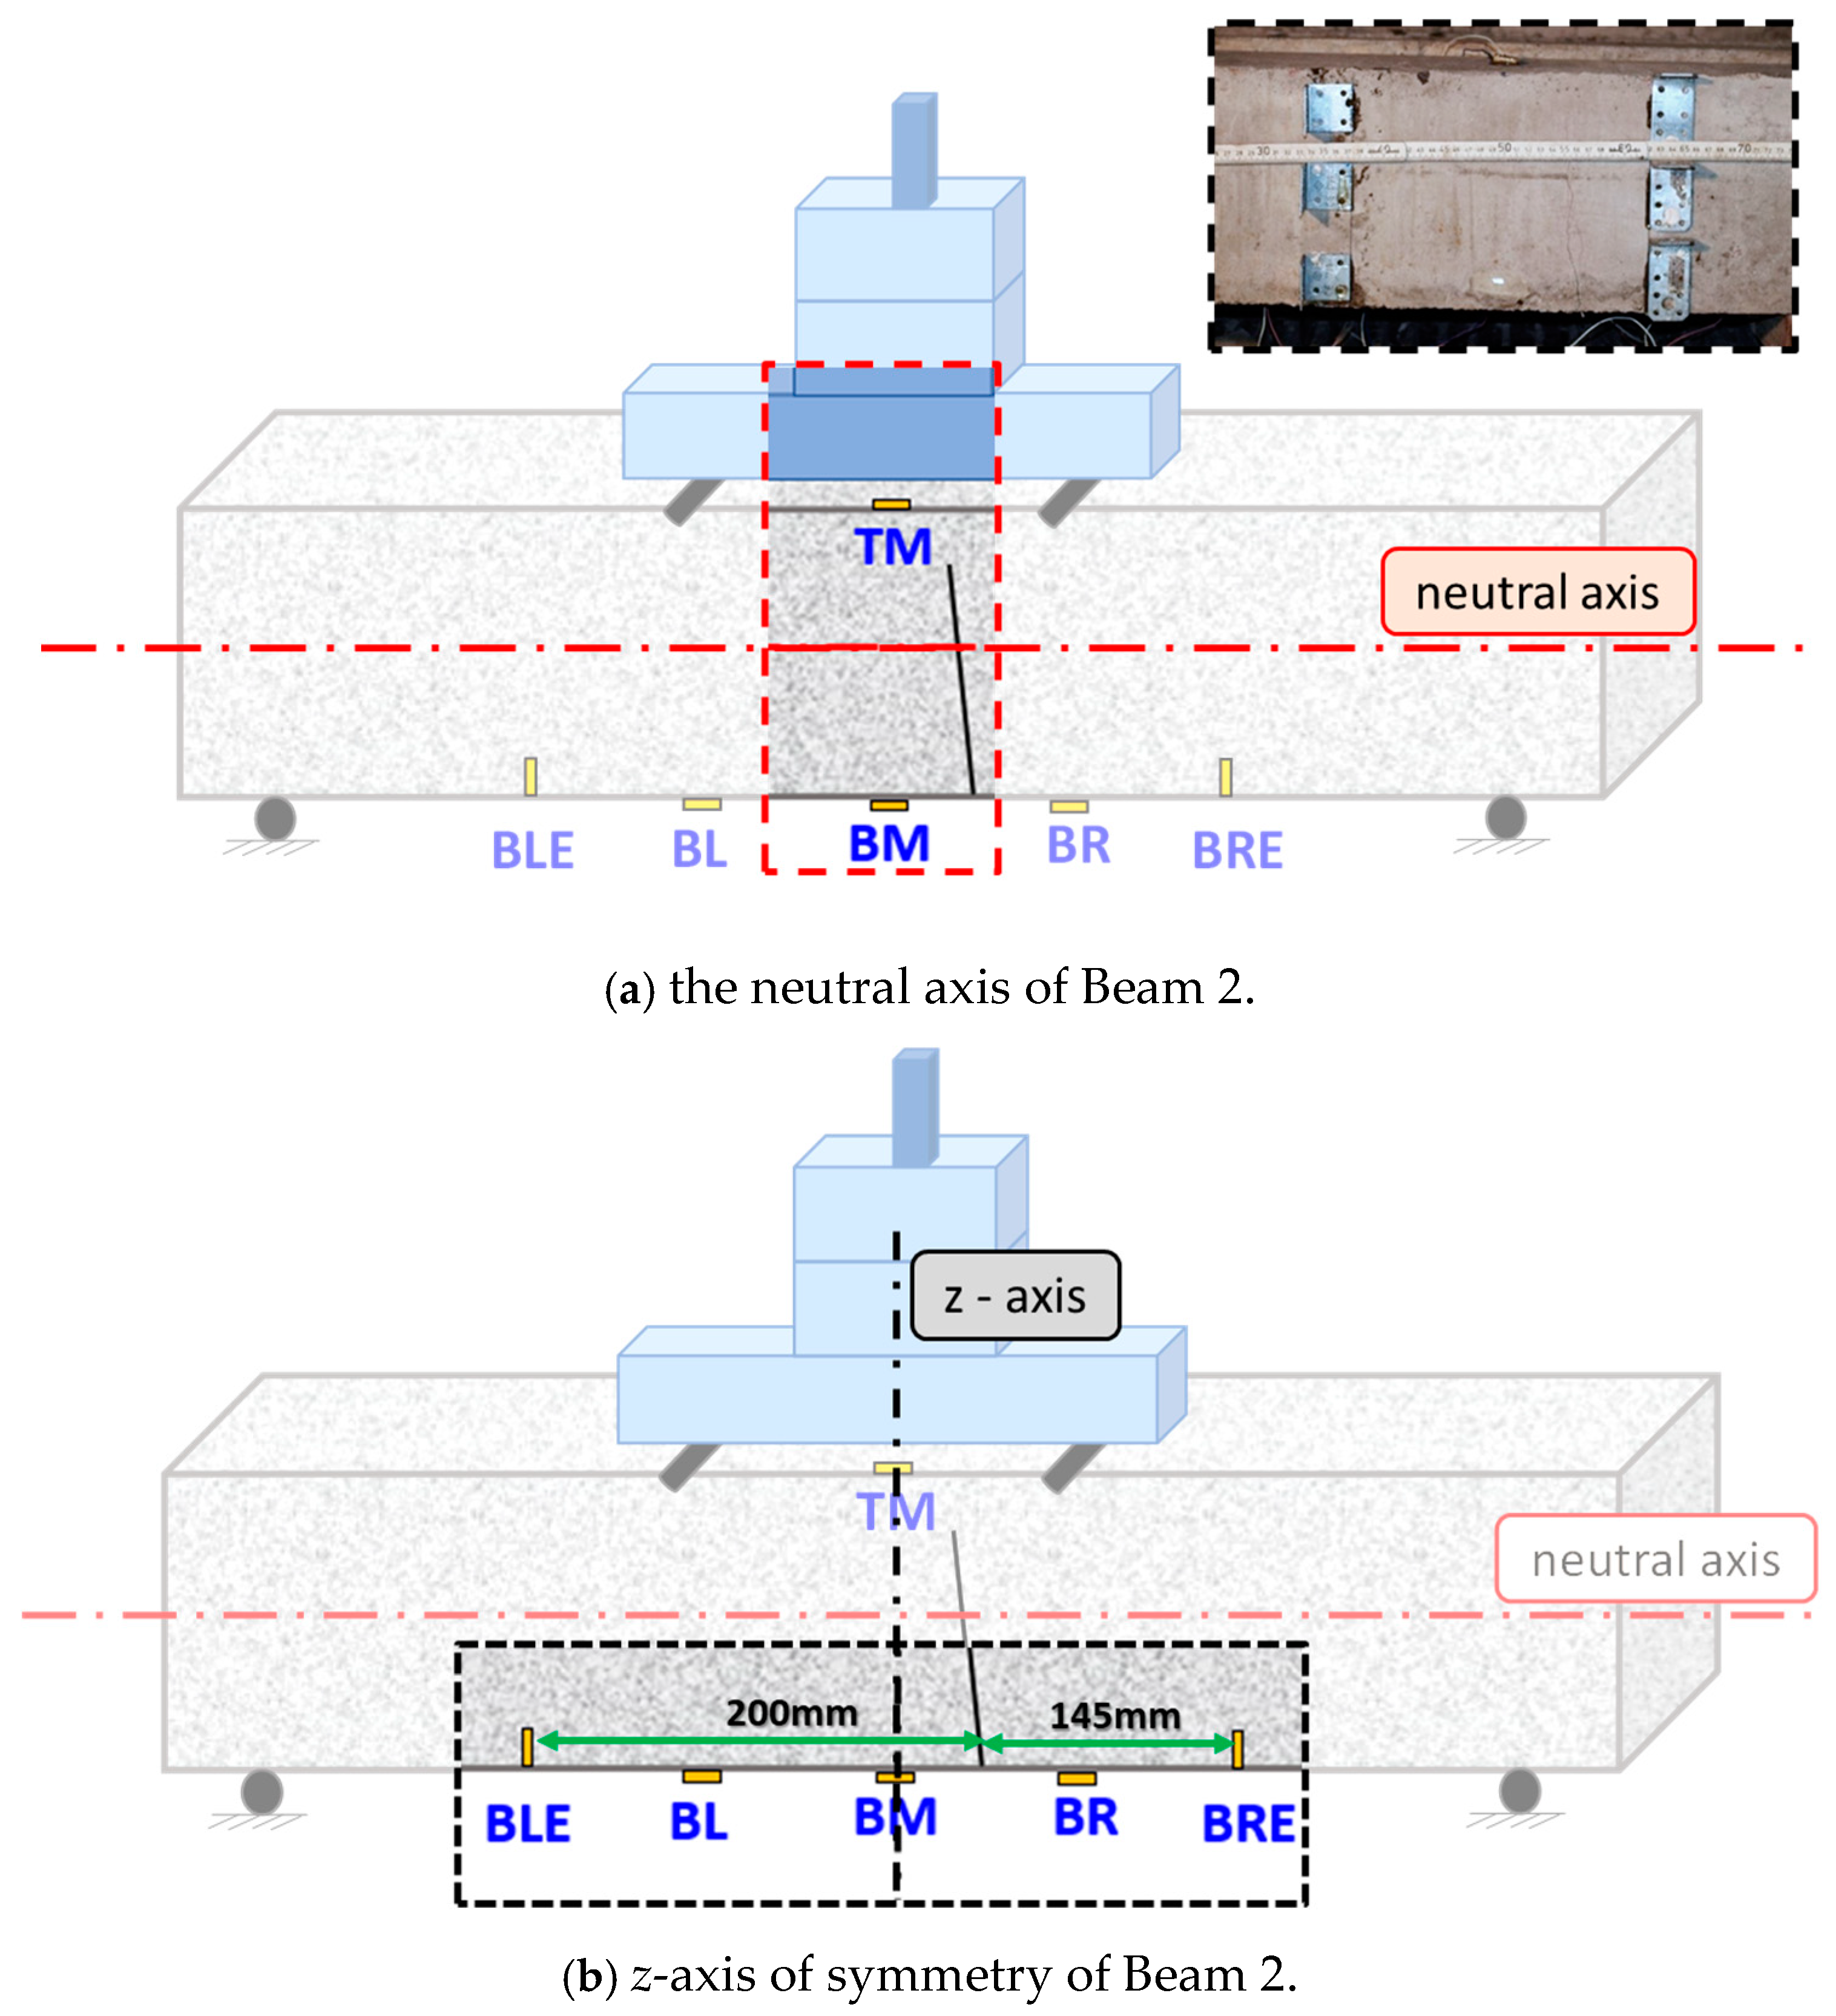
Moreover, the RMSD volume ratios of all the epoxy-bonded PZT patches, measured in the released condition of beam 2, are depicted in Figure 10, Figure 11 and Figure 12. The PZT transducers were, as in beam 1, divided into four pairs correlated to an axis of symmetry. Thus, the pairs consisted of (a) TM-BM (neutral axis of the beam), (b) BL-BR (z-axis of symmetry), (c) BLE-BRE (z-axis of symmetry), and (d) BR-BM (fatal failure, z’-axis). The evaluation of damage detection has been applied through comparisons between the co-grouped PZT transducers.
Thus, for the first pair, PZT BM showed higher values at all loading steps than PZT TM, indicating the detection of the forthcoming failure. Moreover, regarding the second pair, PZT BR showed consistently increased RMSD values at all the loading states and seemed to strongly indicate the detection of the failure formation near its monitoring area even at earlier loading stages. On the other hand, PZT transducer BL showed slightly gradual ascending RMSD values up to the third loading step and subsequently slightly decreased up to the final loading steps, probably due to the predominant development of the failure to the right part of the mid-span.
Moreover, regarding the third pair, BRE showed consistently increased RMSD values at all the loading states and performed the highest value (28.9%) among all the PZT transducers, being a harbinger of the detection of the forthcoming damage even at earlier loading stages, albeit it was positioned 145 mm far from the final failure formation. However, the vertical direction of polarization of the PZT has probably enhanced the performance of the transducer to detect the failure, even from the primary loading steps, resulting in an auspicious fidelity of the instrumented applied methods. Secondly, the PZT transducer BLE showed an expected performance as the distance between the fatal failure, and its embedded position was around 245 mm, too far for effective damage detection.
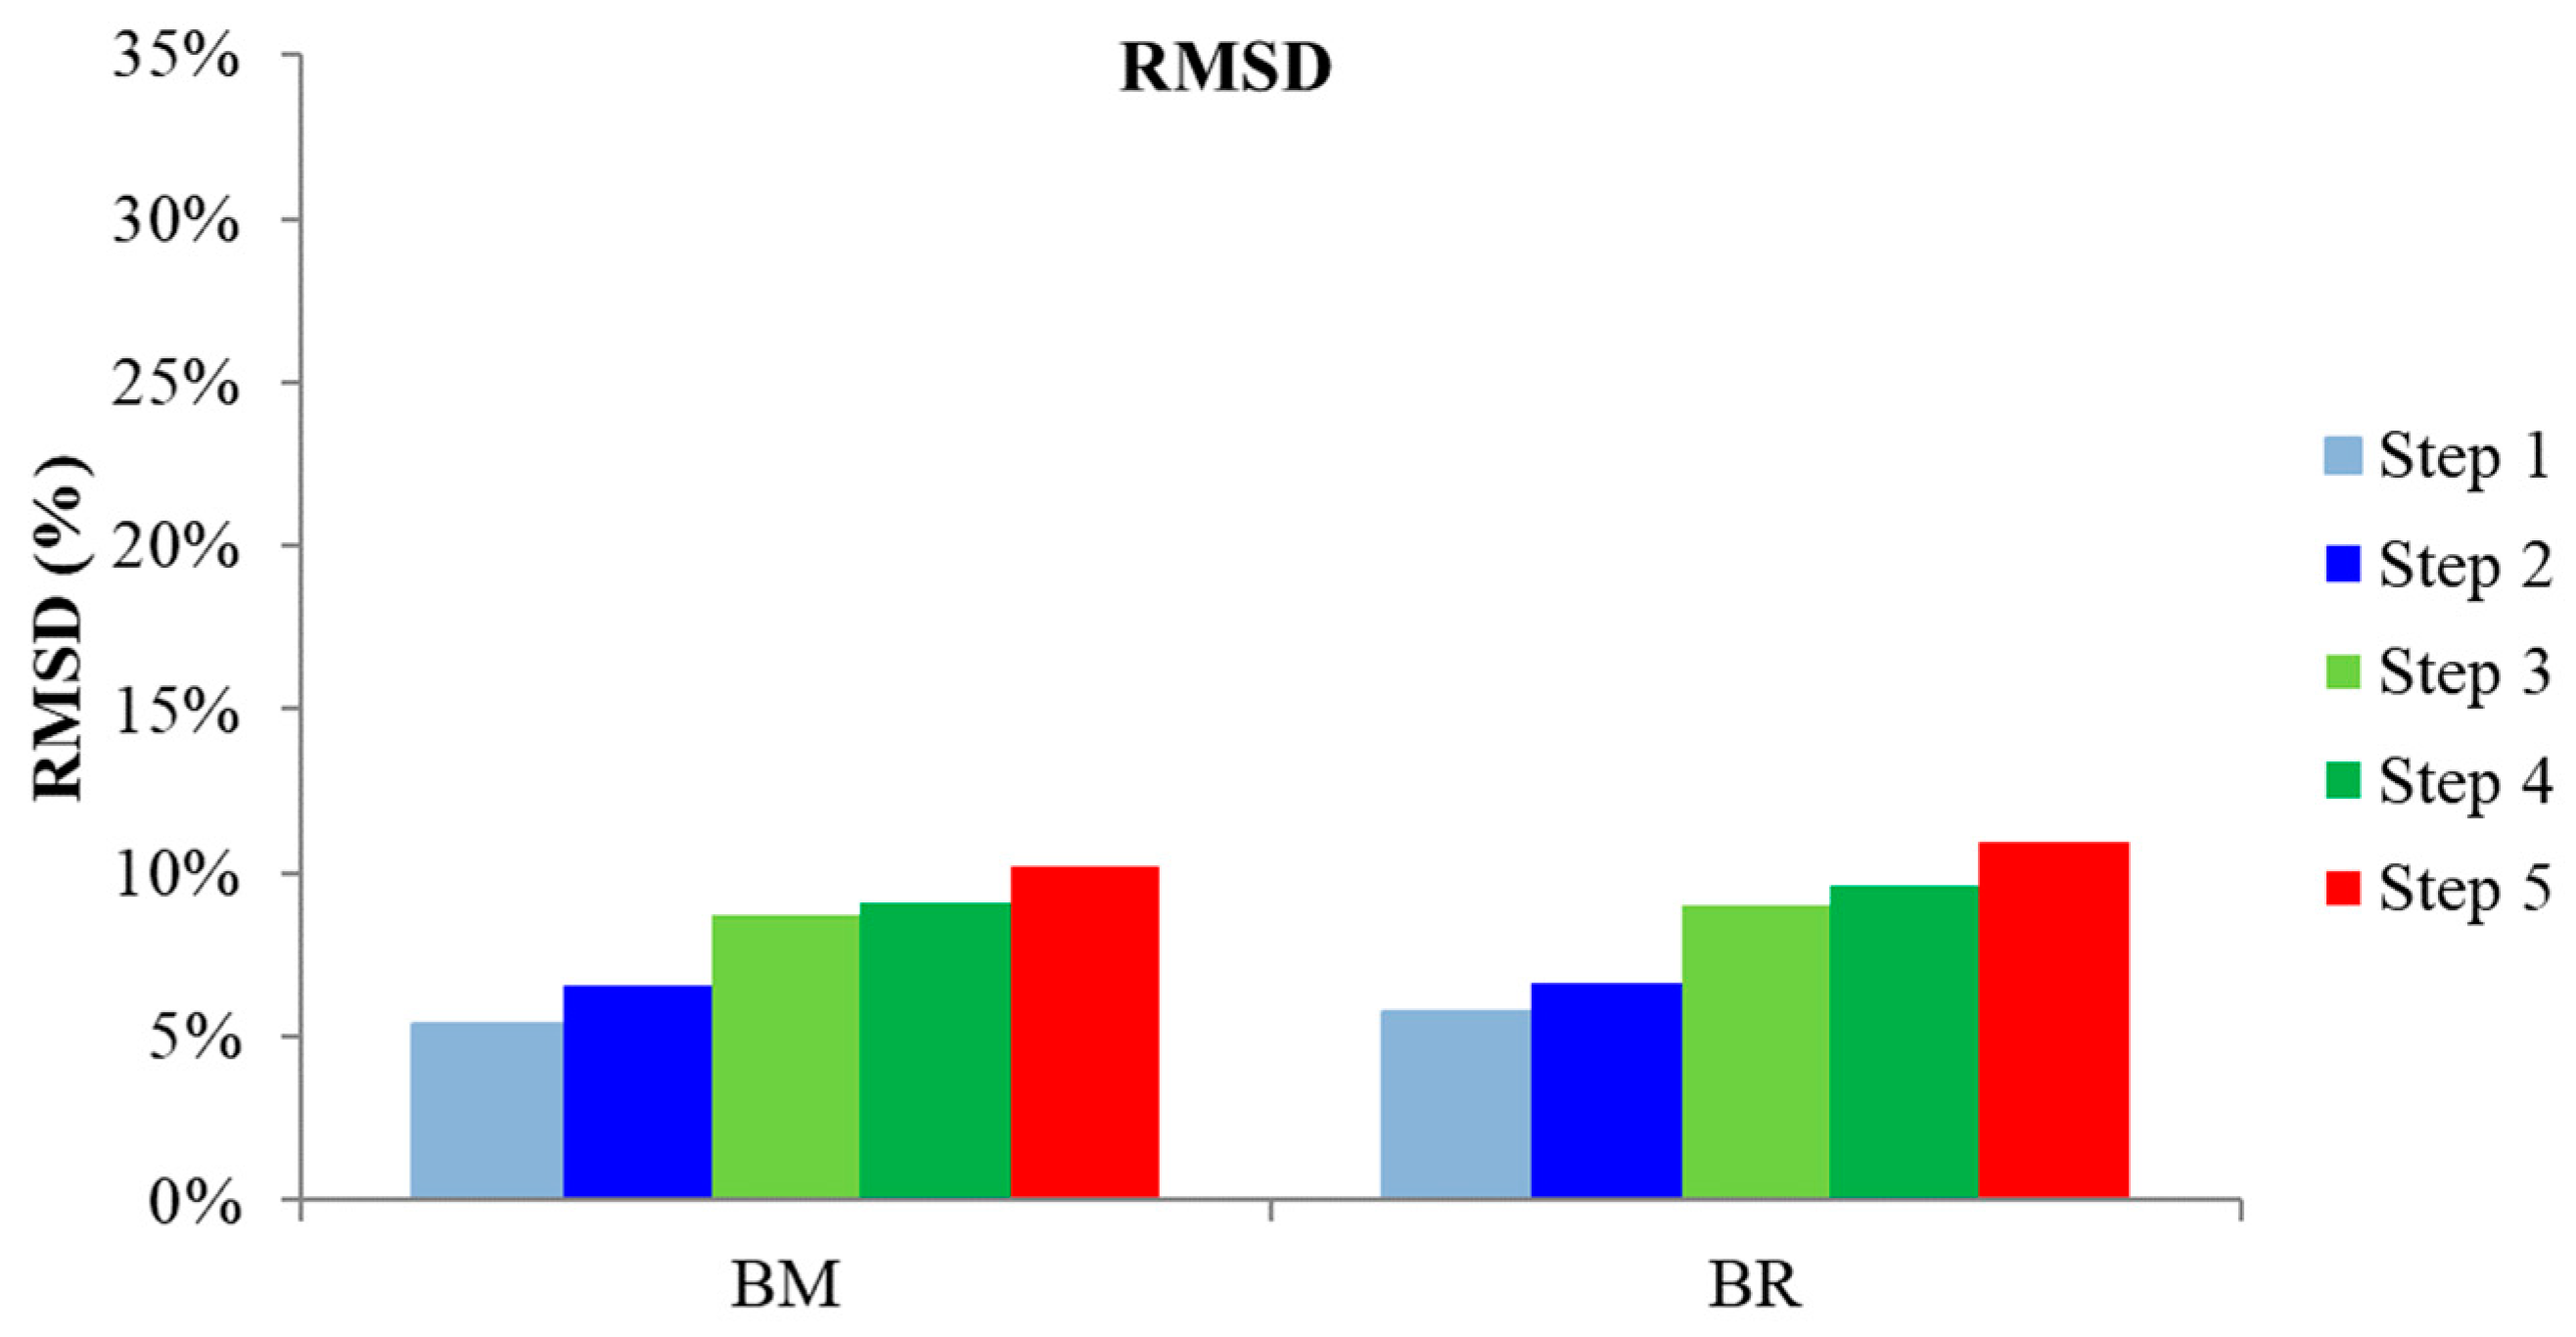
Additionally, for the fourth compared pair, the failure was formed in a section between PZT transducers BR and BM, which both showed extremely high values of RMSD indices (BR ~11% vs. BM 10.2%); the different developed values of RMSD have been probably owned to the fact that the fatal crack was formed 10 mm closer to BR, as shown in cracking pattern Figure 13.

3.2.2. Analysis through Statistic Metrics during the Loading Sequence

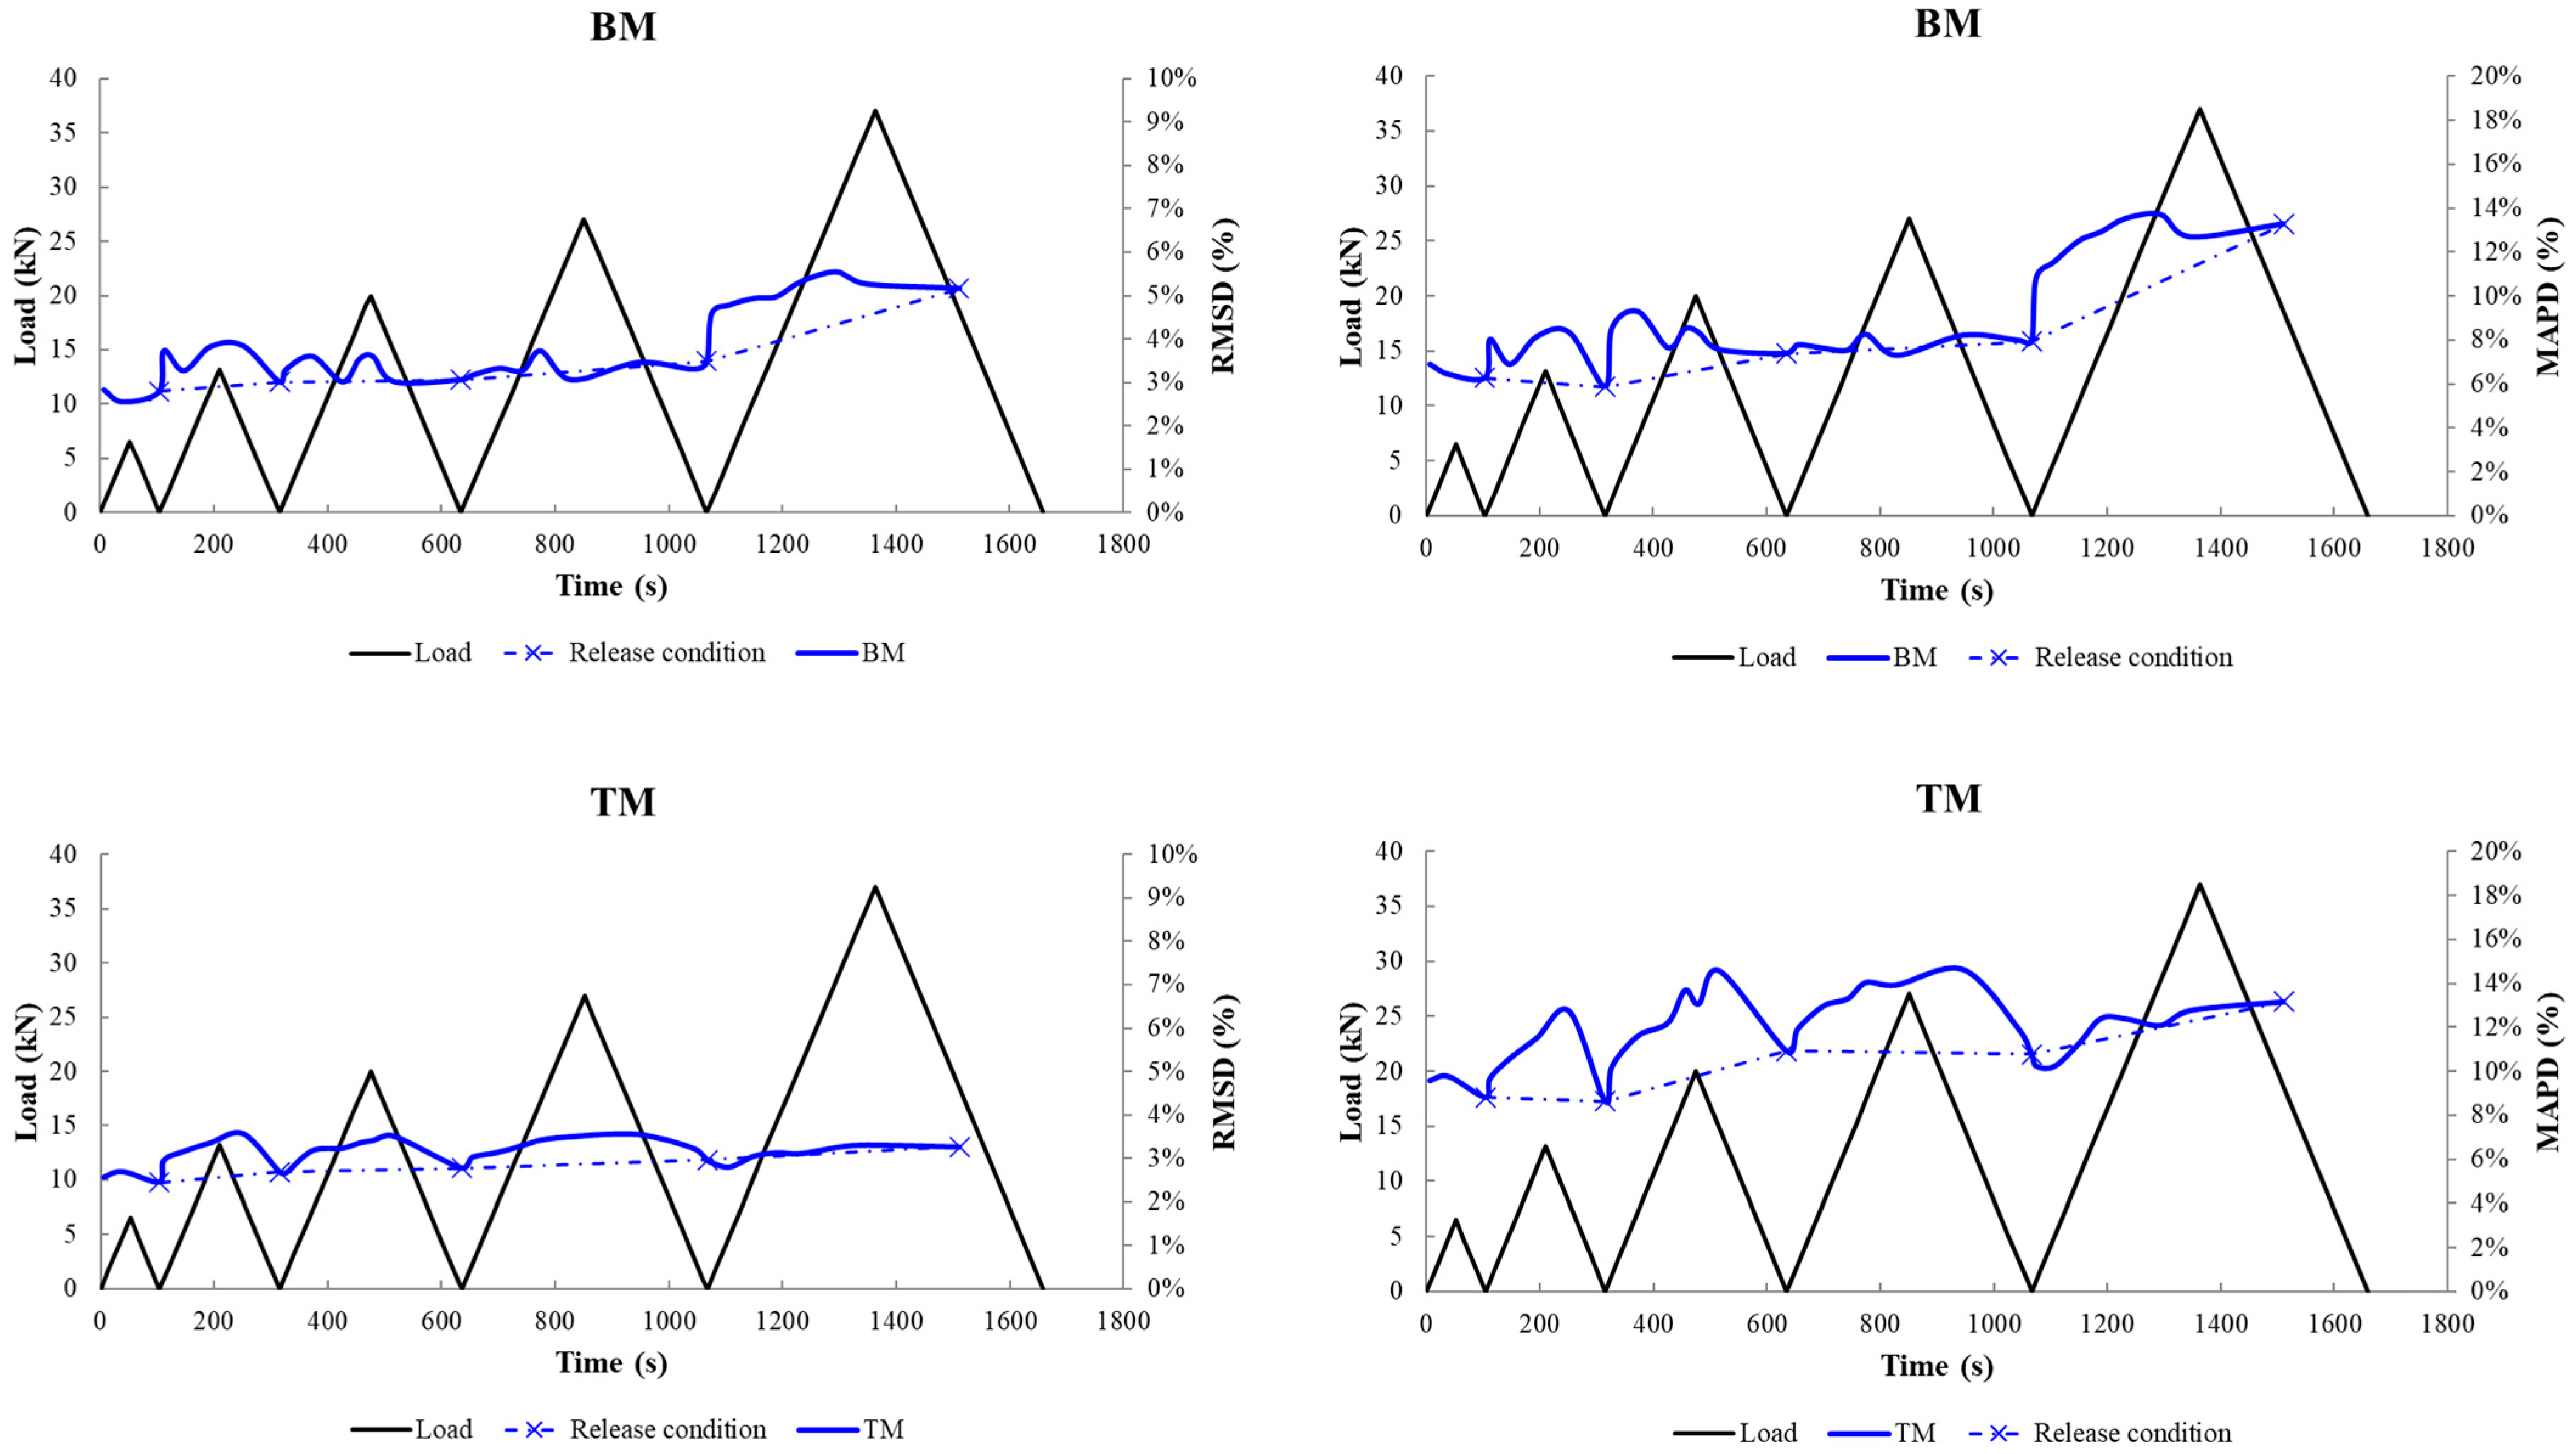
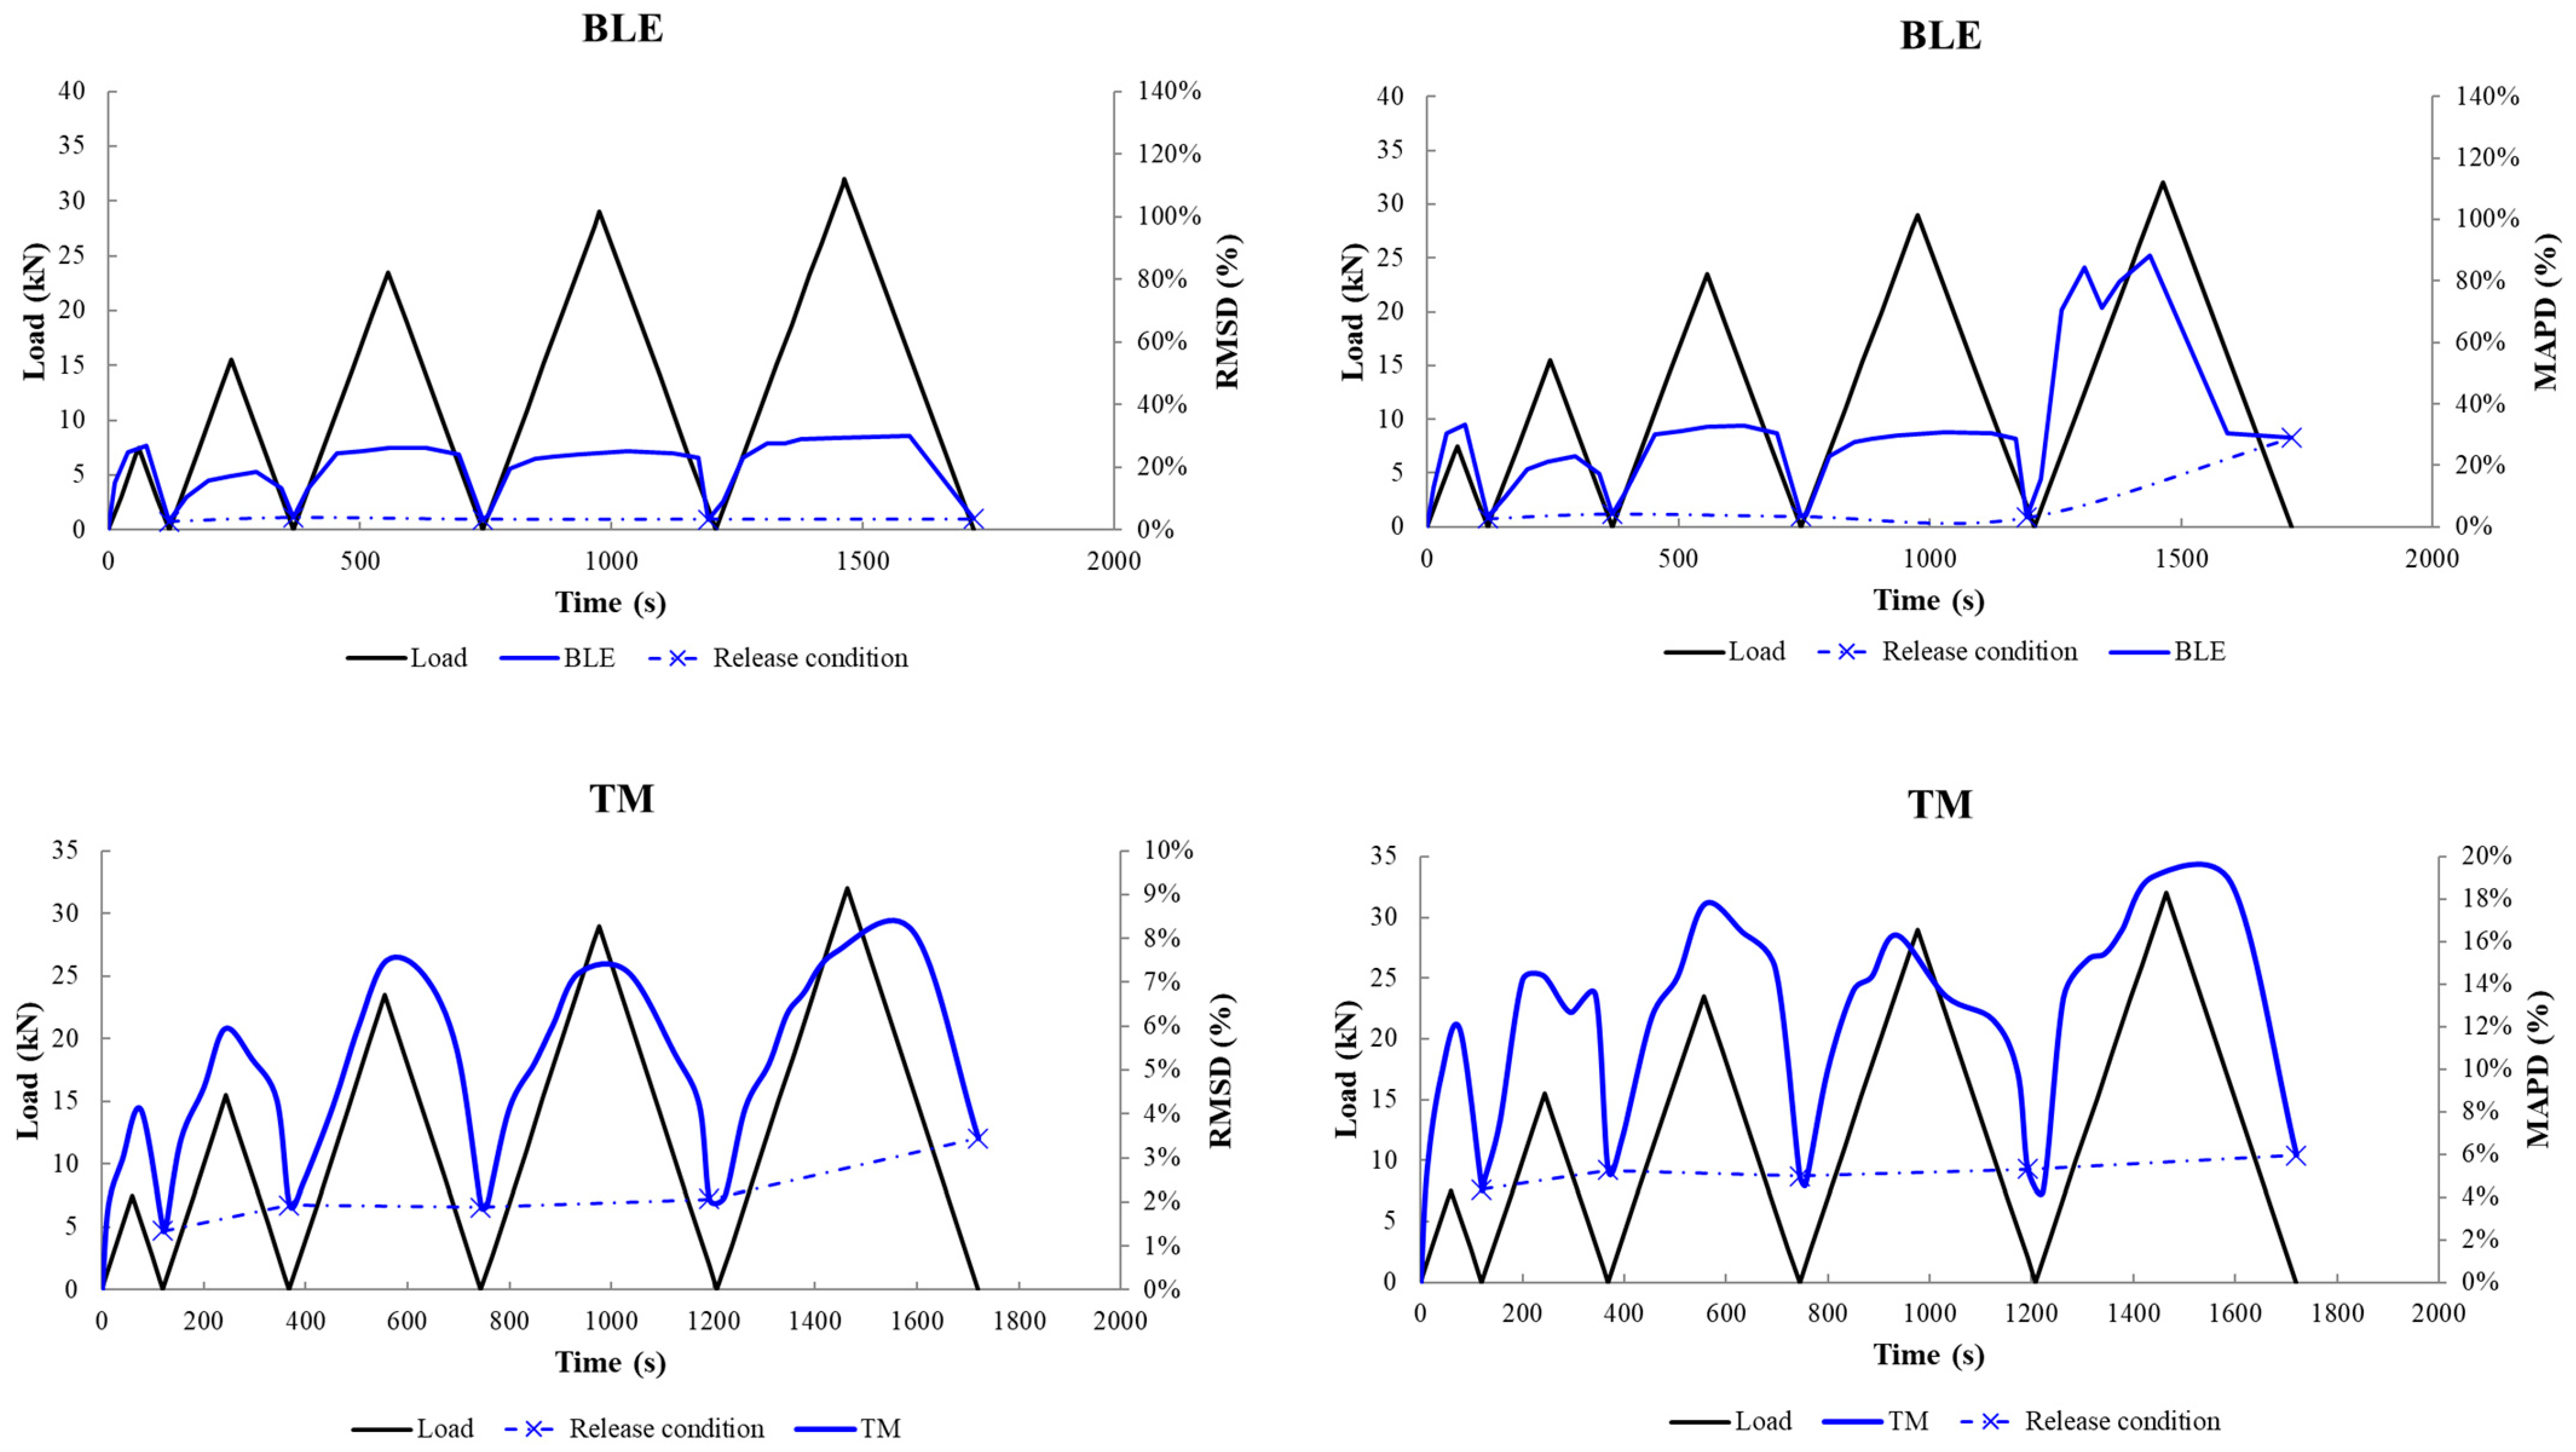
Figure 14 and Figure 15 present the diagrams of RMSD (left column) and MAPD (right column) of beams 1 and 2, respectively, in terms of the loading history. As aforementioned, a set of EMI measurements have been implemented in a narrow range of frequencies during the induced loading process. Therefore, the continuous blue line depicts the RMSD and MAPD indices diagrams, exported from the above continuous EMI measurements. The dashed blue line depicts the RMSD and MAPD indices calculated from measurements of voltage response precisely after the completion of an entire loading cycle (black line) when the beam returned to the release condition. In both cases, it is apparent that the induced load and the developed stresses near the monitoring area of the PZT heavily influence the response of the PZT transducer. It could also be demonstrated that the MAPD index seems more statistically sensitive to the elaboration of Voltage responses.
In Beam 1, PZT transducers TM and BM seem to be affected more by the stress subjection, which is actually estimated, as the maximum tensional and flexural stress developed precisely at their epoxy-bonded locations, correspondingly.
In Beam 2, PZT transducers BRE and BLE show a severe impact by the subjected loading. Furthermore, due to their epoxy embedding formation, the latter is owed to the better coherence between transducers and the beam. Theoretically, excluding the influence of the epoxy resin quantity inside the embedding notch for each PZT transducer and the negligible deviation to their distance from the middle of the beam, both PZTs should be influenced similarly by the induced load.
Additionally, although their location is symmetric from the loading points, the PZT transducer BRE shows a highly increased value of indices compared to BLE on the on-load and in the release condition. Therefore, the fusion of the abovementioned rationales assumes that the forthcoming failure would be formed closer to the PZT transducer’s BRE location, as the indices’ values increment is partially apportioned due to the impact of the induced load and the existence of an abnormality. The final failure of the beam finally confirmed the above assumption.

3.2.3. Analysis through Hierarchical Clustering Approach

The HCA could be performed either as a tool for a primary sorting of the acquired data and then proceeding with the statistical analysis using common indices or as a final assisting tool to re- or co-evaluate the extracted indices.
The main reason for implementing HCA in this work was the realization that common indices numerically evaluate the damage level. However, it is often observed that the same damage index values could correspond to different structural integrity conditions, which could easily lead to false alerts, i.e., stress developed by the loading impact.
The HCA was adopted to be supplementally applied with the quantitative data analysis process, enhancing the attempt to identify more specific properties of the forthcoming or developed damage and clearly distinguish the false alerts inserted by the induced load.
The fundamental hypothesis in the clustering approach for PZT applications is that the acquired measurements for the same PZT transducer at different loading steps are expected to demonstrate a similar behavior, except if deformation occurs, which should be correlated with the damage’s existence. In this study, an extension of the clustering approach was proposed. Furthermore, the present work investigated that not solely mechanical damages affect the similarity of the PZT’s measurements. Additionally, the induced load could be a potential parameter for the development of dissimilarities that needs further investigation to determine the actual impact ratio of each variable.
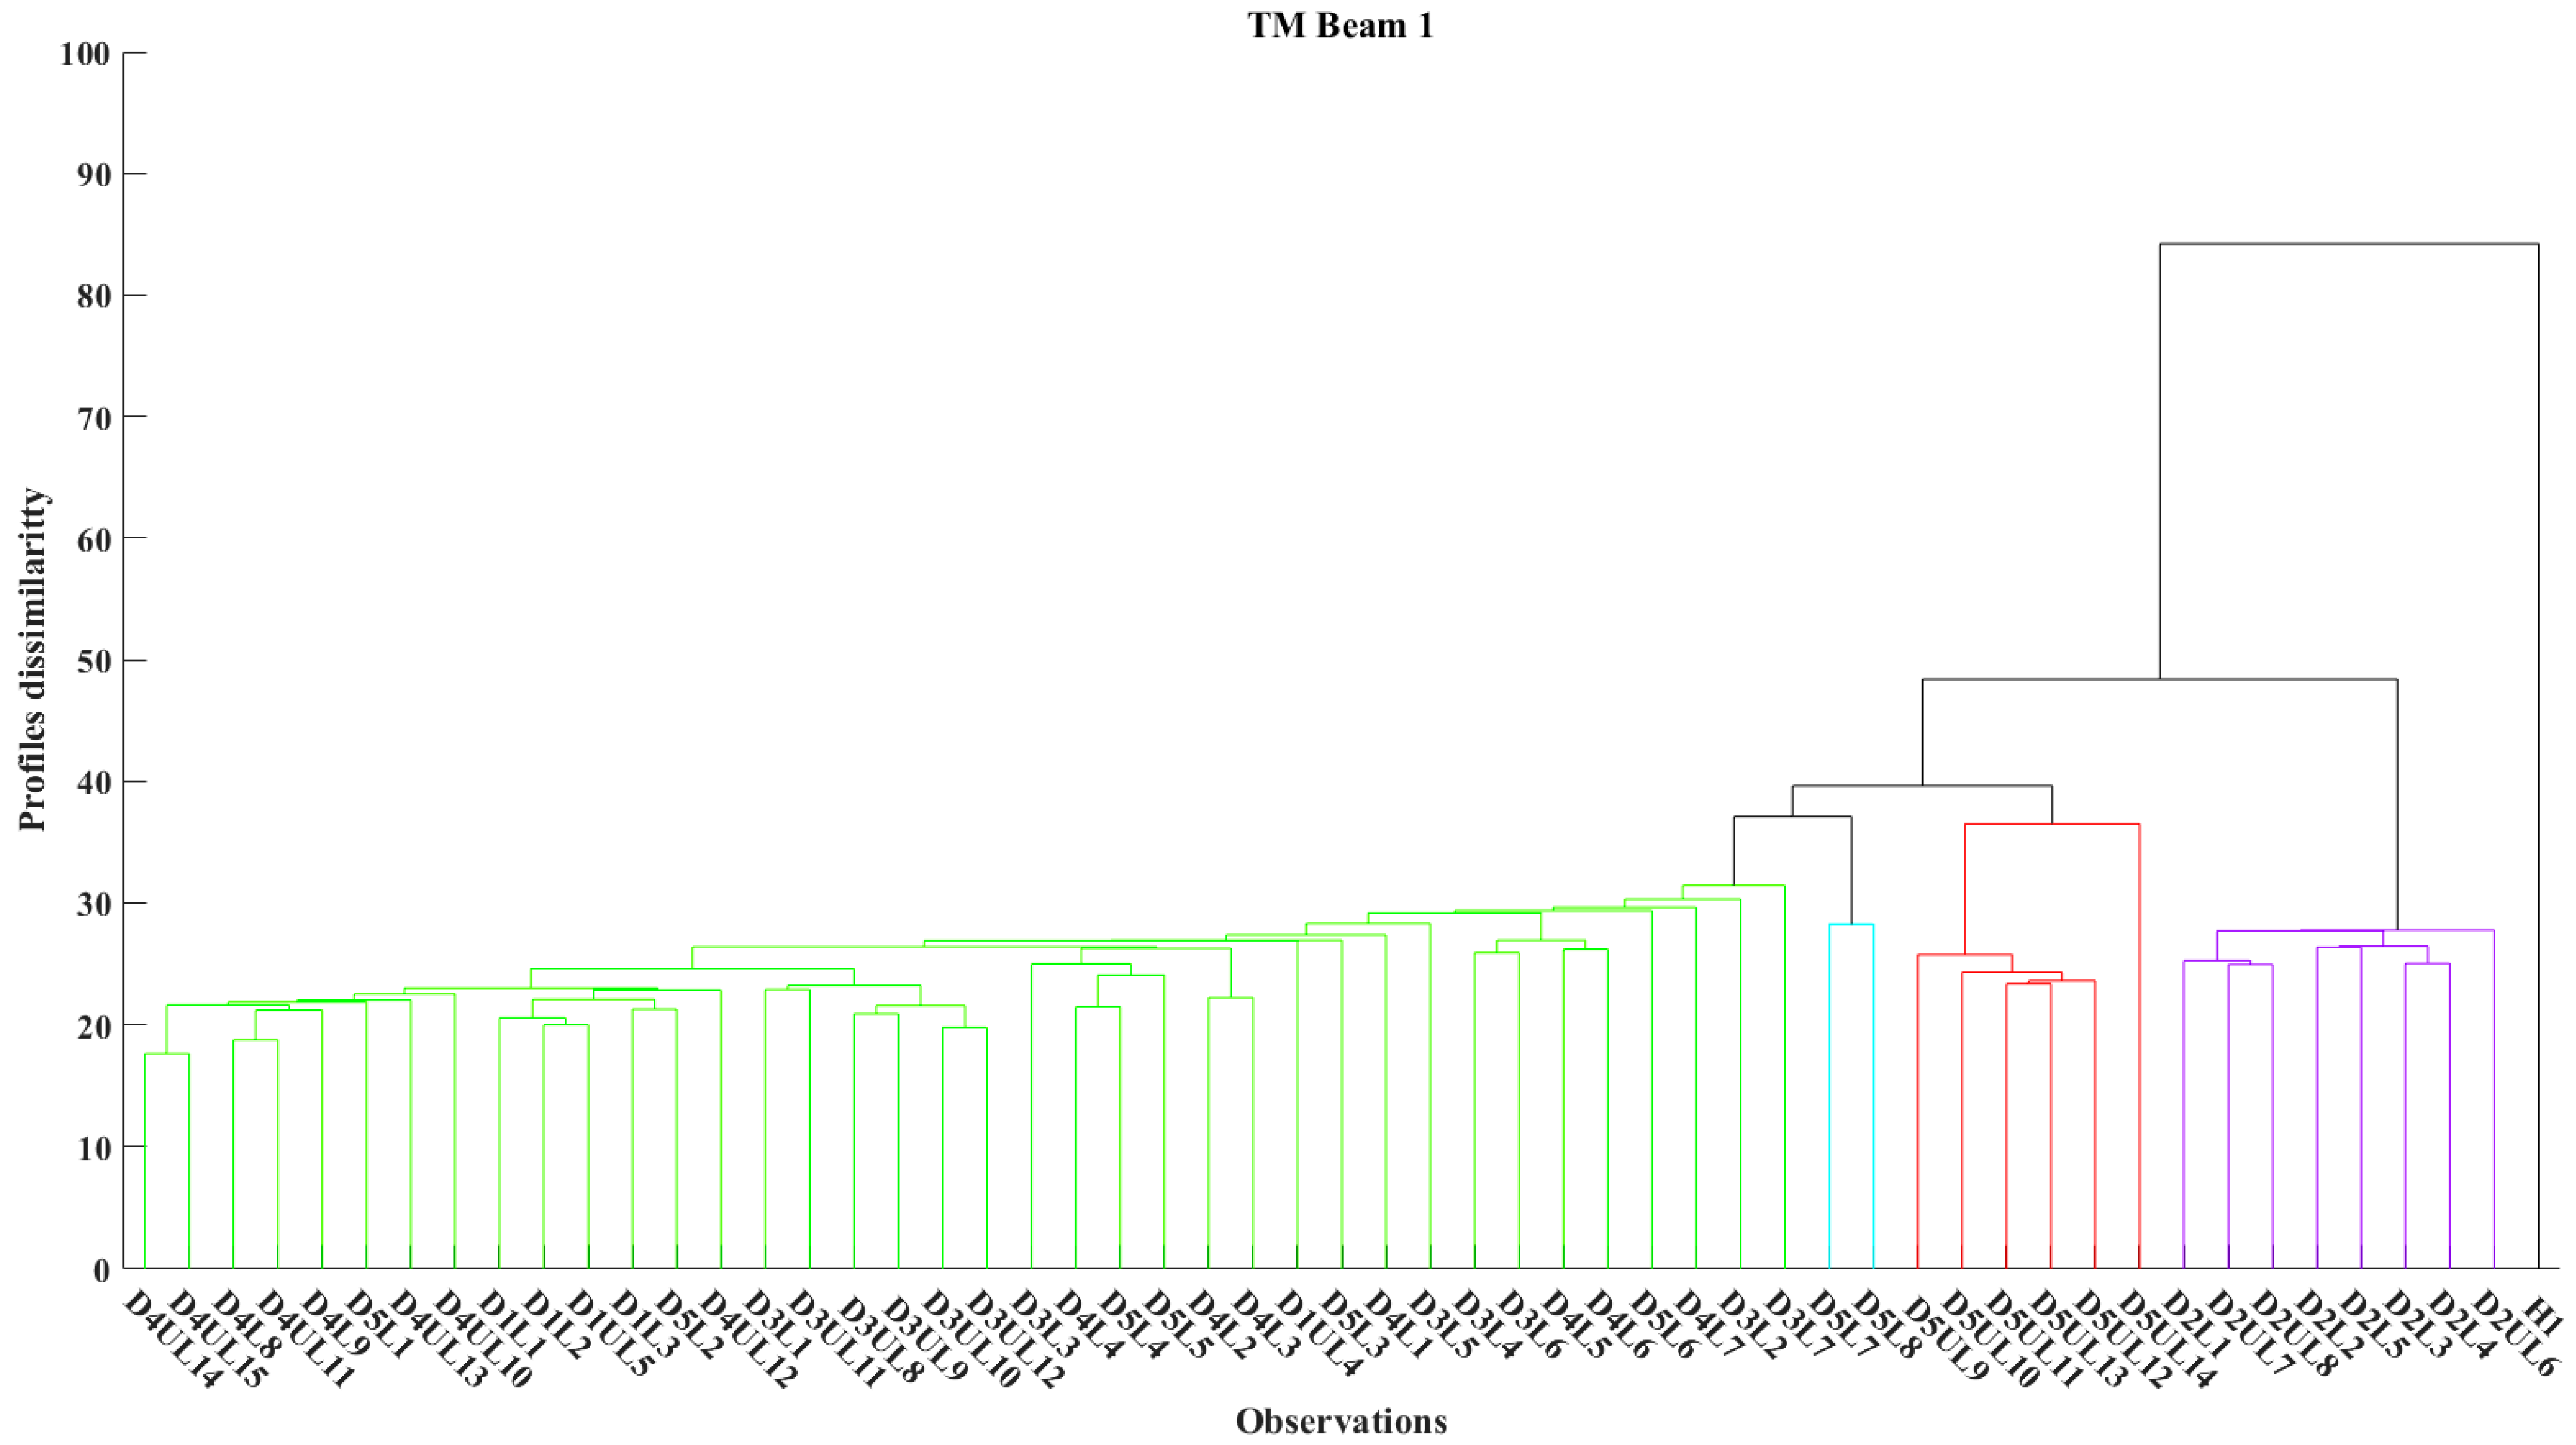
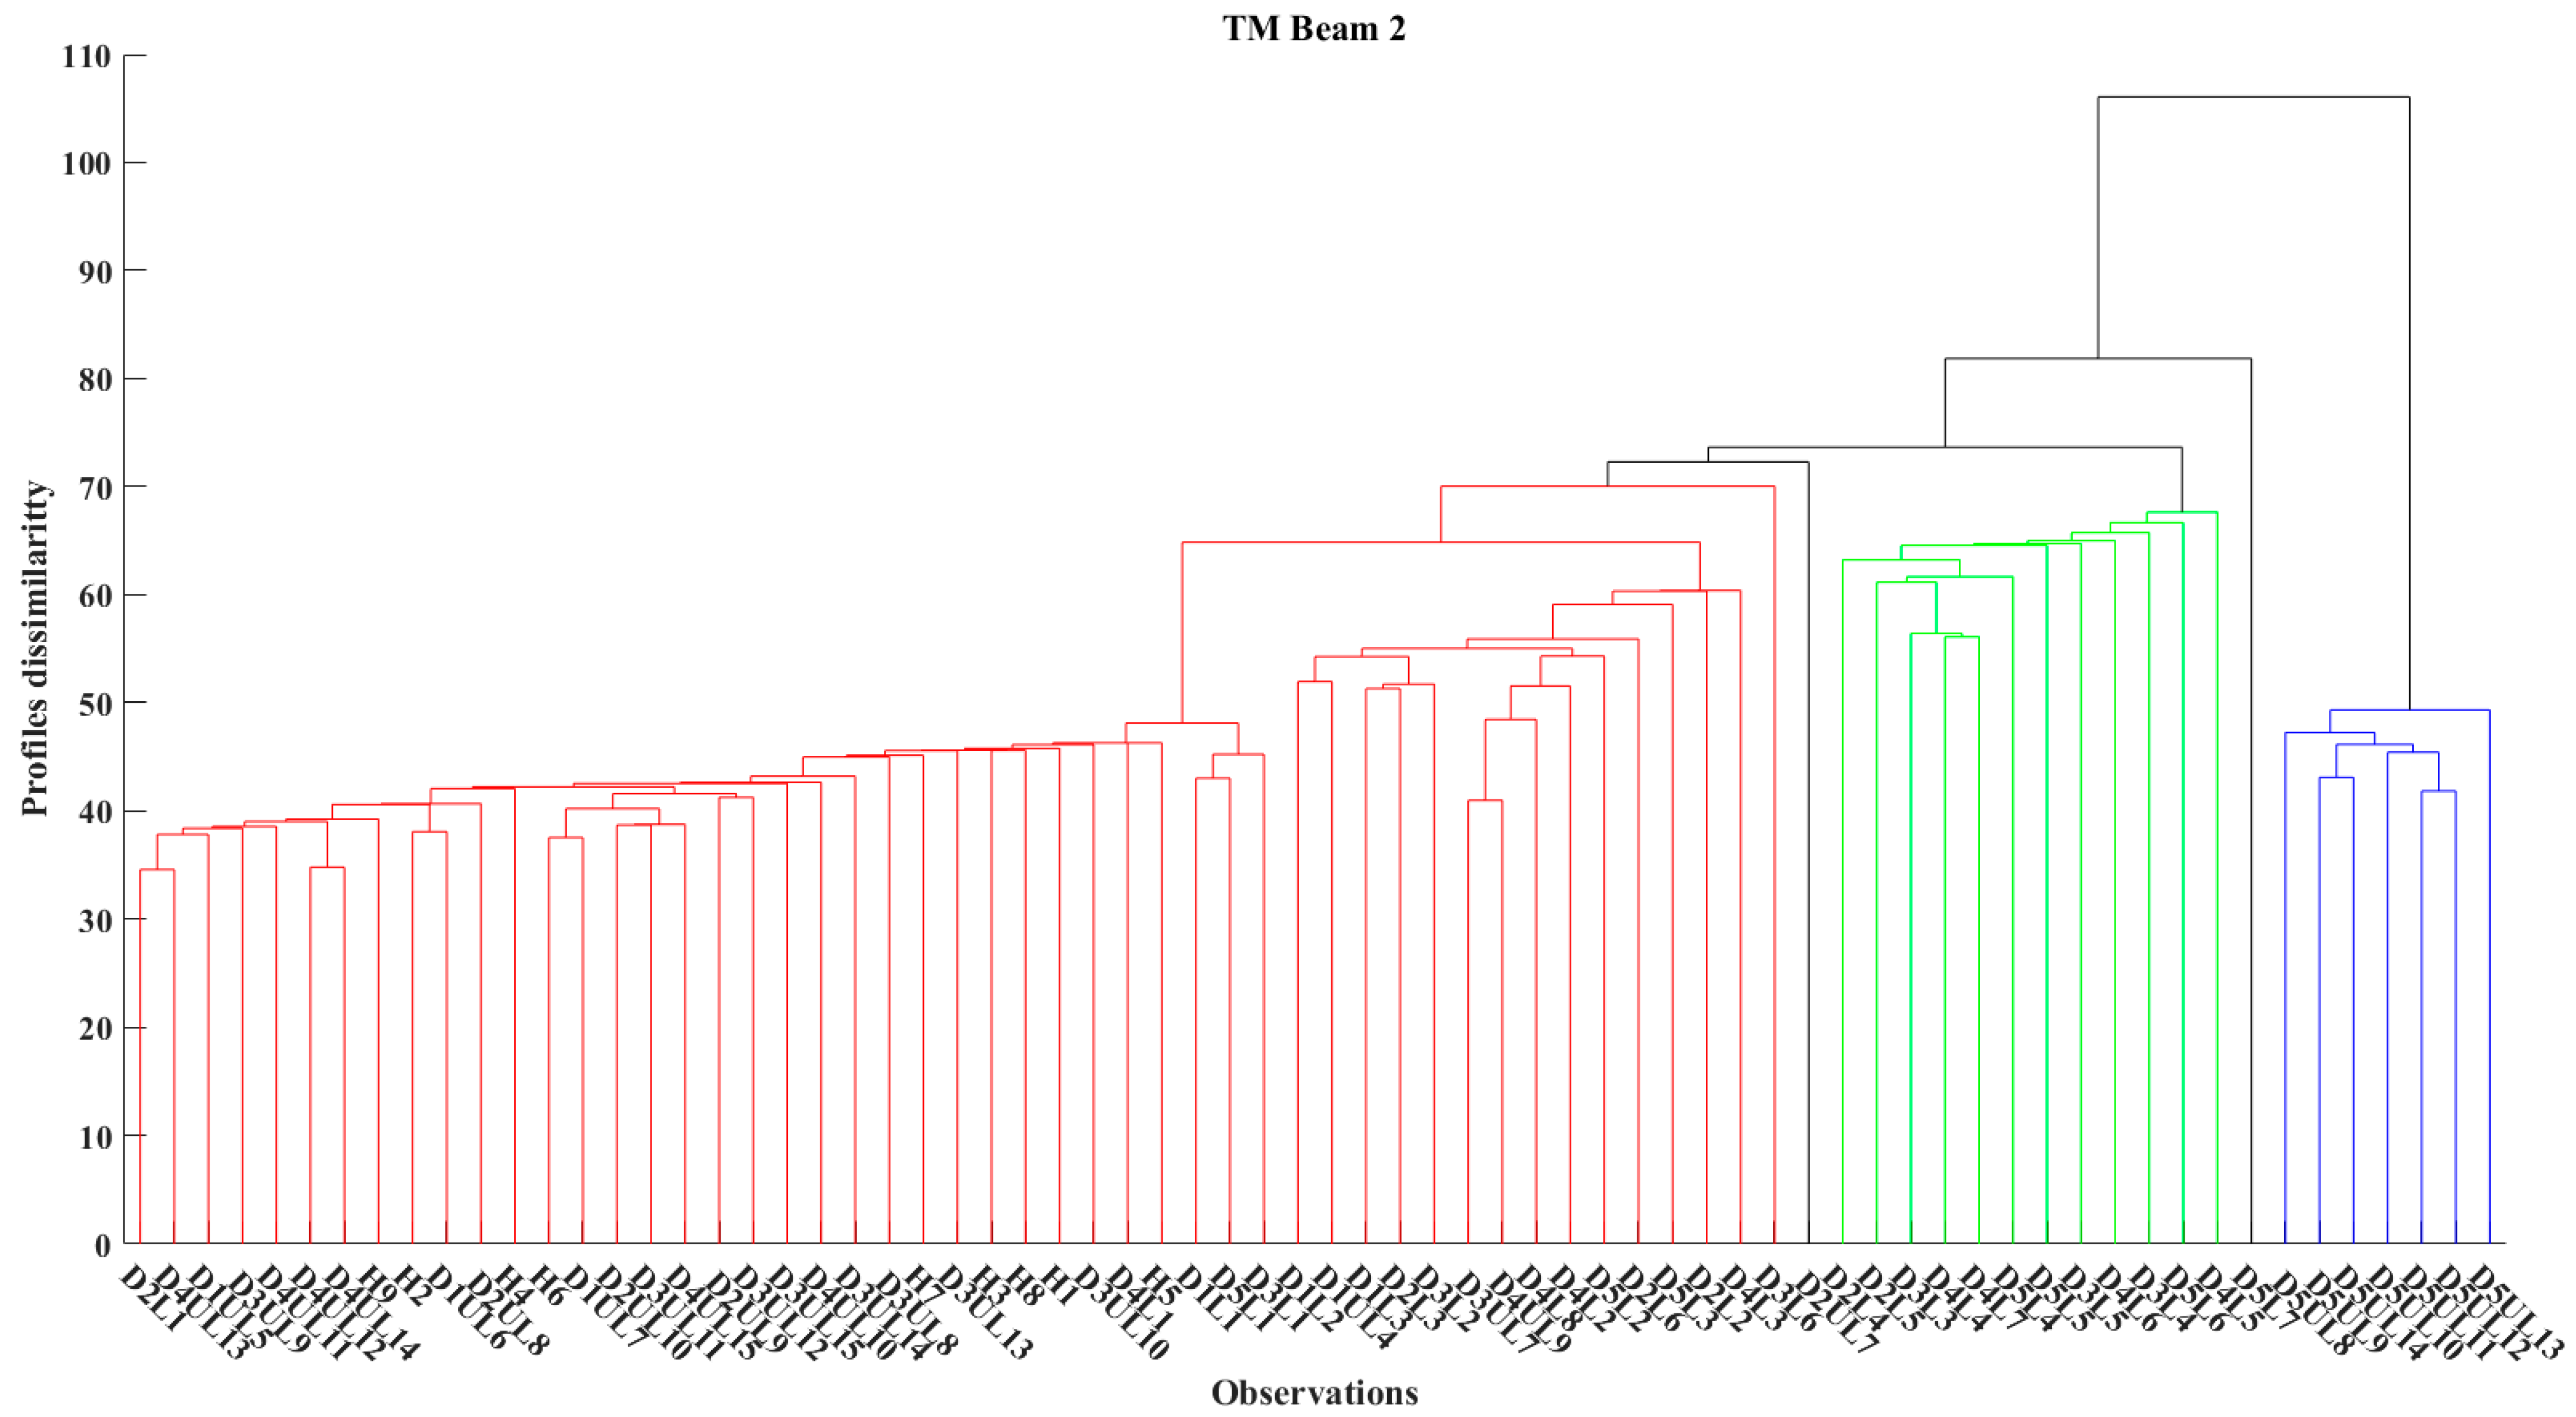
In this study, all loading steps’ measurements of three PZT transducers per beam were individually examined with the HCA. Figure 16 and Figure 17 display the results of a typical HCA for beams 1 and 2 in a dendrogram formation for PZT patch TM. The label of each measurement is presented in the x-axis in terms of the dissimilarity profile among the examined measurements. In this way, in the x-axis, each measurement is sorted closer to its most similar one, according to the calculated metric distance, which is depicted as profile dissimilarity. The plot is further analyzed in diagrams separately for each PZT transducer in Figure 18. Finally, the number of clusters is presented on the x-axis in terms of each transducer’s surficial developed stress. In this experimental work, five clusters were selected to represent the distance matrix of the acquired measurements, and the Euclidean distance metrics were adopted as the best-fit clustering approach. The HCA could enhance its utility and efficacy after addressing a set of repeatable data processing, excluding all the transition values (outliers) at each time and re-evaluating the desirable number of clusters. The outliers are caused when a single measurement is alternately implemented and acquired during a transition case, i.e., from the release condition to the loading and vice versa.
For PZT TM of beam 1, the data are distributed in five clustering groups. The 1st cluster consists only of measurements of the healthy voltage responses; the 2nd cluster contains all the voltage responses of loading steps 1, 3, and 4. In addition, the inceptive measurements of the 5th loading step are also included in the 2nd cluster. Further, the 3rd cluster encloses all the voltage responses of the 2nd loading step. Moreover, the 4th cluster consists of the two EMI measurements, acquired exactly before and during the moment of the failure. Finally, in the 5th cluster, all the post-failure measurements (five in total) are enclosed.
The data are also split into five clusters for PZT BM of beam 1. The 1st cluster consists exclusively of the healthy voltage responses; the 2nd cluster contains all the voltage responses of loading steps from 1 to 4. Furthermore, the 3rd cluster encloses all the pre-failure measurements of the 5th loading step, excluding two acquired measurements. The first before, as well as the second at the time of the failure, are grouped in the 4th cluster. Finally, all the post-failure measurements are grouped in the 5th cluster (four in total).
In addition, the same number of clustering groups were formed for the PZT FT of beam 1. The 1st cluster encloses the healthy voltage responses solely. Further, the 3rd and the 4th clusters contain two outlier measurements of loading steps 1 and 3, respectively. Moreover, the 5th cluster contains the post-failure voltage responses of the 5th loading step. Finally, the 2nd cluster encloses all the rest acquired measurements from loading steps 1 to 5, indicating a low damage detection sensitivity of the PZT transducer.
Similarly, for all the PZT transducers of beam 2, the clustering formation process of beam 1 has been followed. For PZT TM, the 1st cluster consists exclusively of one outlier measurement of the 2nd loading step. The 2nd cluster contains voltage responses of all the loading steps in the release condition or with low loading impact. Furthermore, the 3rd cluster contains voltage responses of all the loading steps with high loading impact, while the 4th cluster encloses only one measurement direct on the moment of the failure, and the 5th cluster all the post-failure measurements (seven in total). For PZT BLE, the 1st cluster encloses all the healthy voltage responses and the unload measurements for all loading steps, except for one outlier transition measurement, which was separately sorted in the 5th cluster. In addition, the 3rd and 4th clusters contain only outlier measurements of loading steps 1, 2, 3, and 5. Finally, the 2nd cluster encloses all the rest acquired on-load measurements from loading steps 1 to 5. An observed point, originating from the 2nd clustering, is the co-groupage of the acquired measurements near the moment of the formation of the failure with the measurements of loading steps 1, 2, 3, and 4, indicating the low sensitivity of the PZT transducer to the identification of the failure.
For PZT BRE, the 1st cluster encloses the healthy voltage responses and the unload measurements for all the loading steps. The 2nd cluster contains voltage responses of all the loading steps from 1 to step 5 of all the on-load measurements. The separation of these two clusters, combined with the relevance of PZT BLE, demonstrates that the embedded PZTs are strongly affected by the subjection of loading and the development of the stresses near their monitoring area, as commented above in the commonly used indices section. Finally, the 5th cluster contains only failure measurements, while the 3rd and 4th clusters contain outlier transit measurements.
Summarizing, the application of the HCA for beam 1 isolated the failure in two out of three PZT transducers and the post-failure measurements in three out of three, while, for beam 2, the applied clustering segregated in two out of three, the failure, and one out of three the post-failure measurements. However, in beam 2, there was an apparent distinction between the on-load and the unload measurements of the embedded PZT transducers. Therefore, the latter was the initial target of implementing the method.

4. Conclusions

In this experimental study, the efficiency of the EMI-based PZT-enabled SHM method for real-time monitoring of the damage development and the load-induced flexural stress of two SFRC beams subjected to a four-point bending test under repeated loading was examined. Furthermore, the PZT-enabled SHM system’s efficacy in detecting changes in the health condition of the specimens is being examined using the EMI-based method. Especially, the proposed method determines the impact and significance of the load-induced stress and damage development in the abovementioned changes. The acquired voltage responses were statistically elaborated by applying commonly used indices (RMSD and MAPD) in two conditions (release, on-load). Furthermore, the impact of the load-induced flexural stress was further examined by implementing the HCA.
The experimental results based on EMI and the statistical analysis using various damage indices and methods have shown that:
  • In both beams, proximate to the failure, external epoxy-bonded PZT transducers have effectively detected the damage development by applying the RMSD scalar index in the released condition.
  • Furthermore, the values of the indices are slightly higher for the proximate to the failure PZT compared to its symmetric one (BL, BR).
  • The introduction of NeeS configuration applied for the EMI measurements.
  • The NeeS BRE showed remarkable performance, even if it was positioned 145 mm far from the final failure formation; it detected the forthcoming failure even at earlier loading steps, owing to the vertical polarization placement into the concrete mass.
  • In beam 1, PZT transducers BM and BL, and, in Beam 2, PZTs BM, BR, and BRE, seemed to detect the forthcoming failure at earlier damage states.
  • In beam 1, PZT transducers FT, BM, and TM, according to their indices (RMSD, MAPD), and in beam 2, PZT transducers TM, BRE, and BLE, according to their indices (RMSD, MAPD) values, seemed to be affected by the subjection of the loading.
  • The MAPD statistical index seems more sensitive to the elaboration of the acquired data, performing higher volume ratios.
  • The HCA (a) could distinguish, with excellent accuracy, the measurements affected by the induced load and those in the release condition, (b) could efficiently distinguish and sort the acquired transitional measurements, and (c) could achieve three out of four to distinguish the failure measurement in the external epoxy-bonded PZT transducers; two out of four were used to distinguish an earlier detection of the failure in the external epoxy-bonded PZT transducers; and further, four out of four distinguished the post-failure measurements and (d) achieved the distinguishment of the failure measurement related to the NeeS BRE. While, for NeeS BLE, there was no indication concerning which factor was evaluated as correct due to the remote position of the PZT.
  • A further experimental investigation is required to enhance the determination of the localization of the crack and to evaluate the efficiency of the HCA; Moreover, the efficiency of the applied HCA by applying multiple distance metrics and increasing the correlation of the representation should be further extended.

Author Contributions

Conceptualization, M.E.V., M.C.N. and N.A.P.; methodology, G.M.S. and N.A.P.; formal analysis, G.M.S. and N.A.P.; investigation, M.C.N., G.M.S. and N.A.P.; data curation, M.C.N., G.M.S. and N.A.P.; writing—original draft preparation, M.C.N. and N.A.P.; writing—review and editing, G.M.S. and M.E.V.; visualization, M.C.N.; supervision, M.E.V.; project administration, M.E.V. All authors have read and agreed to the published version of the manuscript.

Funding

The authors also acknowledge support of this work by the project “Risk and Resilience Assessment Center—Prefecture of East Macedonia and Thrace—Greece” (MIS 5047293), which is implemented under the Action “Reinforcement of the Research and Innovation Infrastructure“, funded by the Operational Programme “Competitiveness, Entrepreneurship and Innovation” (NSRF 2014–2020), and co-financed by Greece and the European Union (European Regional Development Fund).

Data Availability Statement

The data presented in this study are available upon request from the corresponding author.

Conflicts of Interest

The authors declare no conflict of interest.

References

  1. Lessly, S.H.; Kumar, S.L.; Jawahar, R.R.; Prabhu, L. Durability Properties of Modified Ultra-High Performance Concrete with Varying Cement Content and Curing Regime. Mater. Today Proc. 2020, 45, 6426–6432. [Google Scholar] [CrossRef]
  2. Sideris, K.K.; Anagnostopoulos, N.S. Durability of Normal Strength Self-Compacting Concretes and Their Impact on Service Life of Reinforced Concrete Structures. Constr. Build. Mater. 2013, 41, 491–497. [Google Scholar] [CrossRef]
  3. Torres, J.A.; Lantsoght, E.O.L. Influence of Fiber Content on Shear Capacity of Steel Fiber-Reinforced Concrete Beams. Fibers 2019, 7, 102. [Google Scholar] [CrossRef] [Green Version]
  4. Nili, M.; Afroughsabet, V. The Effects of Silica Fume and Polypropylene Fibers on the Impact Resistance and Mechanical Properties of Concrete. Constr. Build. Mater. 2010, 24, 927–933. [Google Scholar] [CrossRef]
  5. Signorini, C.; Volpini, V. Mechanical Performance of Fiber-reinforced Cement Composites Including Fully-Recycled Plastic Fibers. Fibers 2021, 9, 16. [Google Scholar] [CrossRef]
  6. Nobili, A.L.; Tarantino, A.M. Performance Evaluation of a Polypropylene-Based Draw-Wired Fibre for Concrete Structures. Constr. Build. Mater. 2012, 28, 798–806. [Google Scholar] [CrossRef]
  7. Khaloo, A.R.; Kim, N. Influence of Concrete and Fiber Characteristics on Behavior of Steel Fiber-reinforced Concrete under Direct Shear. ACI Mater. J. 1997, 94, 592–601. [Google Scholar]
  8. Abbas, A.M.; Hussain, H.K.; Ojaimi, M.F. Shear and Flexural Behavior of Flat Slabs Casted with Polyolefin Fiber-Reinforced Concrete. Fibers 2022, 10, 34. [Google Scholar] [CrossRef]
  9. Kytinou, V.K.; Chalioris, C.E.; Karayannis, C.G. Analysis of Residual Flexural Stiffness of Steel Fiber-Reinforced Concrete Beams with Steel Reinforcement. Materials 2020, 13, 2698. [Google Scholar] [CrossRef]
  10. Narayanan, A.; Subramaniam, K.V.L. Sensing of Damage and Substrate Stress in Concrete Using Electromechanical Impedance Measurements of Bonded PZT Patches. Smart Mater. Struct. 2016, 25, 095011. [Google Scholar] [CrossRef]
  11. Papadopoulos, N.A.; Naoum, M.C.; Sapidis, G.M.; Chalioris, C.E. Cracking and Fiber Debonding Identification of Concrete Deep Beams Reinforced with C-FRP Ropes against Shear Using a Real-Time Monitoring System. Polymers 2023, 15, 473. [Google Scholar] [CrossRef]
  12. Na, W.S.; Baek, J. A Review of the Piezoelectric Electromechanical Impedance Based Structural Health Monitoring Technique for Engineering Structures. Sensors 2018, 18, 1307. [Google Scholar] [CrossRef] [PubMed] [Green Version]
  13. Sam-Daliri, O.; Faller, L.M.; Farahani, M.; Roshanghias, A.; Araee, A.; Baniassadi, M.; Oberlercher, H.; Zangl, H. Impedance analysis for condition monitoring of single lap CNT-epoxy adhesive joint. Int. J. Adhes. Adhes. 2019, 88, 59–65. [Google Scholar] [CrossRef]
  14. Sam-Daliri, O.; Faller, L.M.; Farahani, M.; Zangl, H. Structural health monitoring of adhesive joints under pure mode I loading using the electrical impedance measurement. Eng. Fract. Mech. 2021, 245, 107585. [Google Scholar] [CrossRef]
  15. Casini, M. Smart Buildings, Advanced Materials and Nanotechnology to Improve Energy-Efficiency and Environmental Performance; Woodhead Publishing: Sawston, CA, USA, 2016; pp. 55–104. [Google Scholar]
  16. Providakis, C.P.; Stefanaki, S.D.; Voutetaki, M.E.; Tsompanakis, Y.; Stavroulaki, M. Damage detection in concrete structures using a simultaneously activated multi-mode PZT active sensing system: Numerical modelling. Struct. Infrastruct. Eng. 2014, 10, 1451–1468. [Google Scholar] [CrossRef]
  17. Ai, D.; Luo, H.; Wang, C.; Zhu, H. Monitoring of the Load-Induced RC Beam Structural Tension/Compression Stress and Damage Using Piezoelectric Transducers. Eng. Struct. 2018, 154, 38–51. [Google Scholar] [CrossRef]
  18. Ai, D.; Cheng, J. A Deep Learning Approach for Electromechanical Impedance Based Concrete Structural Damage Quantification Using Two-Dimensional Convolutional Neural Network. Mech. Syst. Signal Process. 2023, 183, 109634. [Google Scholar] [CrossRef]
  19. Ai, D.; Du, L.; Li, H.; Zhu, H. Corrosion Damage Identification for Reinforced Concrete Beam Using Embedded Piezoelectric Transducer: Numerical Simulation. Meas. J. Int. Meas. Confed. 2022, 192, 110925. [Google Scholar] [CrossRef]
  20. Ai, D.; Yang, Z.; Li, H.; Zhu, H. Heating-Time Effect on Electromechanical Admittance of Surface-Bonded PZT Sensor for Concrete Structural Monitoring. Meas. J. Int. Meas. Confed. 2021, 184, 109992. [Google Scholar] [CrossRef]
  21. Chalioris, C.E.; Karayannis, C.G.; Angeli, G.M.; Papadopoulos, N.A.; Favvata, M.J.; Providakis, C.P. Applications of Smart Piezoelectric Materials in a Wireless Admittance Monitoring System (WiAMS) to Structures-Tests in RC Elements. Case Stud. Constr. Mater. 2016, 5, 1–18. [Google Scholar] [CrossRef] [Green Version]
  22. Chalioris, C.E.; Papadopoulos, N.A.; Angeli, G.M.; Karayannis, C.G.; Liolios, A.A.; Providakis, C.P. Damage Evaluation in Shear-Critical Reinforced Concrete Beam Using Piezoelectric Transducers as Smart Aggregates. Open Eng. 2015, 5, 373–384. [Google Scholar] [CrossRef]
  23. Voutetaki, M.E.; Papadopoulos, N.A.; Angeli, G.M.; Providakis, C.P. Investigation of a New Experimental Method for Damage Assessment of RC Beams Failing in Shear Using Piezoelectric Transducers. Eng. Struct. 2016, 114, 226–240. [Google Scholar] [CrossRef]
  24. Chalioris, C.E.; Voutetaki, M.E.; Liolios, A.A. Structural health monitoring of seismically vulnerable RC frames under lateral cyclic loading. Earthq. Struct. 2020, 19, 29–44. [Google Scholar]
  25. Karayannis, C.G.; Golias, E.; Naoum, M.C.; Chalioris, C.E. Efficacy and Damage Diagnosis of Reinforced Concrete Columns and Joints Strengthened with FRP Ropes Using Piezoelectric Transducers. Sensors 2022, 22, 8294. [Google Scholar] [CrossRef] [PubMed]
  26. Voutetaki, M.E.; Naoum, M.C.; Papadopoulos, N.A.; Chalioris, C.E. Cracking Diagnosis in Fiber-Reinforced Concrete with Synthetic Fibers Using Piezoelectric Transducers. Fibers 2022, 10, 5. [Google Scholar] [CrossRef]
  27. Kocherla, A.; Subramaniam, K.V.L. Embedded Smart PZT-Based Sensor for Internal Damage Detection in Concrete under Applied Compression. Meas. J. Int. Meas. Confed. 2020, 163, 108018. [Google Scholar] [CrossRef]
  28. Narayanan, A.; Subramaniam, K.V.L. Experimental Evaluation of Load-Induced Damage in Concrete from Distributed Microcracks to Localized Cracking on Electromechanical Impedance Response of Bonded PZT. Constr. Build. Mater. 2016, 105, 536–544. [Google Scholar] [CrossRef]
  29. Perera, R.; Torres, L.; Ruiz, A.; Barris, C.; Baena, M. An EMI-based clustering for structural health monitoring of NSM FRP strengthening systems. Sensors 2019, 19, 3775. [Google Scholar] [CrossRef] [Green Version]
  30. Sevillano, E.; Sun, R.; Gil, A.; Perera, R. Interfacial crack-induced debonding identification in FRP-strengthened RC beams from PZT signatures using hierarchical clustering analysis. Compos. Part B Eng. 2016, 87, 322–335. [Google Scholar] [CrossRef]
  31. Voutetaki, M.E.; Naoum, M.C.; Papadopoulos, N.A.; Sapidis, G.; Chalioris, C.E. Cracking Diagnosis in Fibre Reinforced Concrete Cubes and Cylinders with Synthetic Fibres Using a PZT-Based Health Monitoring System. Sch. J. Eng. Technol. 2021, 9, 140–151. [Google Scholar] [CrossRef]
  32. Zhang, C.; Yan, Q.; Panda, G.P.; Wu, W.; Song, G.; Vipulanandan, C. Real-Time Monitoring Stiffness Degradation of Hardened Cement Paste under Uniaxial Compression Loading through Piezoceramic-Based Electromechanical Impedance Method. Constr. Build. Mater. 2020, 256, 119395. [Google Scholar] [CrossRef]
  33. Providakis, C.P.; Tsistrakis, S.; Voutetaki, M.E.; Tsompanakis, J.; Stavroulaki, M.; Agadakos, J.; Kampianakis, E.; Pentes, G.; Liarakos, E. An Innovative Active Sensing Platform for Wireless Damage Monitoring of Concrete Structures. Curr. Smart Mater. 2016, 1, 49–62. [Google Scholar] [CrossRef]
  34. Cleven, S.; Raupach, M.; Matschei, T. A New Method to Determine the Steel Fibre Content of Existing Structures-Test Setup and Numerical Simulation. Appl. Sci. 2022, 12, 561. [Google Scholar] [CrossRef]
  35. Naoum, M.C.; Voutetaki, M.E.; Papadopoulos, N.A.; Chalioris, C.E. Detection of damage in fiber-reinforced concrete using piezoceramic transducers and electromechanical impedance (EMI) method. In Proceedings of the 11th International Conference on Advanced Materials Research (ICAMR 2021), Association for Computing Machinery (ACM), Singapore, 21–24 January 2021. [Google Scholar]
  36. ASTM C192; Practice for Making and Curing Concrete Test Specimens in the Laboratory. ASTM: West Conshohocken, PA, USA, 2004.
  37. ASTM 127; Test Method for Specific Gravity and Absorption of Coarse Aggregate. ASTM: West Conshohocken, PA, USA, 2015.
  38. ASTM 128; Test Method for Specific Gravity and Absorption of Fine Aggregate. ASTM: West Conshohocken, PA, USA, 2015.
  39. EN 197-1; Cement-Part 1: Composition, Specifications and Conformity Criteria for Common Cements. CEN: Brussels, Belgium, 2000.
  40. ASTM C143/C143M-12; Standard Test Method for Slump of Hydraulic-Cement Concrete. ASTM: West Conshohocken, PA, USA, 2020.
  41. ASTM C138; Standard Test Method for Unit Weight, Yield, and Air Content (Gravimetric) of Concrete. ASTM: West Conshohocken, PA, USA, 2017.
  42. ASTM C 78–94; Standard Test Method for Flexural Strength of Concrete (Using Simple Beam with Third-Point Loading). ASTM: West Conshohocken, PA, USA, 2002.
  43. Liang, C.; Sun, F.P.; Rogers, C.A. Coupled Electro-Mechanical Analysis of Adaptive Material Systems-Determination of the Actuator Power Consumption and System Energy Transfer. J. Intell. Mater. Syst. Struct. 1997, 8, 335–343. [Google Scholar] [CrossRef]
  44. Wang, T.; Tan, B.; Lu, M.; Zhang, Z.; Lu, G. Piezoelectric Electro-Mechanical Impedance (EMI) Based Structural Crack Monitoring. Appl. Sci. 2020, 10, 4648. [Google Scholar] [CrossRef]
  45. Tsintotas, K.A.; Bampis, L.; Gasteratos, A. Assigning Visual Words to Places for Loop Closure Detection. In Proceedings of the 2018 IEEE International Conference on Robotics and Automation, Brisbane, Australia, 21–25 May 2018. [Google Scholar] [CrossRef]
  46. Tsintotas, K.A.; Sevetlidis, V.; Papapetros, I.T.; Balaska, V.; Psomoulis, A.; Gasteratos, A. BK Tree Indexing for Active Vision-Based Loop-Closure Detection in Autonomous Navigation, 30th ed.; Institute of Electrical and Electronics Engineers: Manhattan, NY, USA, 2022. [Google Scholar]
Figure 1. (a) Test set up. (b) PZT transducer properties. (c) PZT patch bonded in the surface of the beam. (d) NeeS PZT patch vertically epoxy-embedded to a grooved notch in a depth of 22 mm. (e) Macro synthetic fibers (SikaFiber Force 50).
Fibers 11 00034 g001
Figure 2. Applied loading history.
Fibers 11 00034 g002
Figure 3. (a) Schematic of the electrical circuit in the one-dimensional electromechanical impedance PZT—structure coupling system and (b) connection between the WiAMS device, the PZT patch, and the host structure circuit.
Fibers 11 00034 g003
Figure 4. Notation of PZT patches for (a) Beam 1 and (b) Beam 2, according to their position.
Fibers 11 00034 g004aFibers 11 00034 g004b
Figure 5. Experimental flexural behavior of (a) Βeam 1 and (b) Βeam 2 under repeatable loading.
Fibers 11 00034 g005
Figure 6. RMSD index values of (a) the first group of PZTs “TM”—“BM” and (b) the second group of PZTs “FT”—“FC” of Beam 1.
Fibers 11 00034 g006
Figure 7. RMSD index values of the third group of PZTs “BR”—“BL” of Beam 1.
Fibers 11 00034 g007
Figure 8. RMSD index values of the fourth group of PZTs “BL”—“BM” of Beam 1.
Fibers 11 00034 g008
Figure 9. Schematic representation of four pairs of the PZTS transducer of Beam 1 correlated to (a) the neutral axis of Beam 1, (b) z-axis of symmetry of Beam 1, and (c) z’-axis of symmetry of Beam 1.
Fibers 11 00034 g009aFibers 11 00034 g009b
Figure 10. RMSD index values of the first group of PZTs “TM”—“BM” of Beam 2.
Fibers 11 00034 g010
Figure 11. RMSD index values of (a) the second group of PZTs “TM”—“BM” and (b) the third group of PZTs “FT”—“FC” of Beam 2.
Fibers 11 00034 g011
Figure 12. RMSD index values of the first group of PZTs “BM”—“BR” of Beam 2.
Fibers 11 00034 g012
Figure 13. Schematic representation of four pairs of the PZTS transducer of Beam 2 correlated to (a) the neutral axis of Beam 2, (b) z-axis of symmetry of Beam 2, and (c) z’-axis of symmetry of Beam 2.
Fibers 11 00034 g013aFibers 11 00034 g013b
Figure 14. Diagrams of RMSD and MAPD indices of Beam 1 in a narrow range of frequencies during the induced loading process.
Fibers 11 00034 g014aFibers 11 00034 g014b
Figure 15. Diagrams of RMSD and MAPD indices of Beam 2 in a narrow range of frequencies during the induced loading process.
Fibers 11 00034 g015aFibers 11 00034 g015b
Figure 16. Hierarchical tree for PZT “TM” of Beam 1.
Fibers 11 00034 g016
Figure 17. Hierarchical tree for PZT “TM” of Beam 2.
Fibers 11 00034 g017
Figure 18. Surficial stress versus clusters of PZTs transducers for beams 1 and 2.
Fibers 11 00034 g018
Table 1. Properties of concrete.
Mix Proportion (Cement: Water: Fine Aggregate: Coarse Aggregate)Proportion of Fiber/m3 Concrete (kg)Density (kg/m3)Compressive Strength (MPa)Young’s Modulus (GPa)Modulus of Rupture (MPa)
1:2:2.4:0.525235038.532.83.9
Table 2. Properties of macro synthetic fibers (SikaFiber Force 50).
Equivalent Diameter (mm)Length (mm)Tensile Strength (MPa)Young’s Modulus (GPa)
0.715504306.0
Table 3. The examined load levels and the relevant ratio of maximum flexural strength of the beam.
Load LevelFlexural Strength (MPa)Ratio of the Maximum Flexural Strength
Beam 1Step 11.0 MPa17.9%
Step 22.0 MPa35.7%
Step 33.0 MPa53.6%
Step 44.0 MPa71.4%
Step 55.6 MPaFailure
Beam 2Step 11.0 MPa22.2%
Step 22.0 MPa41.7%
Step 33.0 MPa62.5%
Step 44.0 MPa83.8%
Step 54.8 MPaFailure
Disclaimer/Publisher’s Note: The statements, opinions and data contained in all publications are solely those of the individual author(s) and contributor(s) and not of MDPI and/or the editor(s). MDPI and/or the editor(s) disclaim responsibility for any injury to people or property resulting from any ideas, methods, instructions or products referred to in the content.