Article

Effect of Anodizing and Welding Parameters on Microstructure and Mechanical Properties of Laser-Welded A356 Alloy

1
School of Mechanical Engineering and Rail Transit, Changzhou University, Changzhou 213164, China
2
Changzhou Water Conservancy Bureau, Changzhou 213000, China
*
Author to whom correspondence should be addressed.
Coatings 2025, 15(12), 1461; https://doi.org/10.3390/coatings15121461
Submission received: 16 November 2025 / Revised: 5 December 2025 / Accepted: 6 December 2025 / Published: 10 December 2025
(This article belongs to the Special Issue Cutting Performance of Coated Tools)

Abstract

This study investigates the effects of anodizing and welding parameters on the microstructure and mechanical properties of laser-welded die-cast A356 aluminum alloy. The influence of different surface oxidation conditions, namely, no anodized film (NAF), single-sheet anodized film (SSAF), and double-sheet anodized films (DSAF), was assessed. The porosity, elemental distribution, and mechanical behavior was systematically analyzed. The results indicate that anodizing reduces the fusion zone (FZ) size by approximately 5%–15% and increases porosity, primarily due to the thermal-barrier effect, energy consumption during film decomposition, and hydrogen release. Welding speed and defocusing amount have a significant impact on heat input and melt-pool dynamics. Quantitative analysis revealed that lower welding speeds and positive defocusing amount increased the FZ size by 15% and porosity by 2%–5%. In contrast, optimized conditions (welding speed of 4 m/min and 0 mm defocus) enhanced gas evacuation and minimized pore formation. Elemental analysis showed that anodizing promoted Si enrichment and increased oxygen incorporation, with oxygen content rising by 10%–15%, from 0.78 wt% (NAF) to 1.31 wt% (DSAF). Microhardness testing revealed a reduction in heat-affected zone (HAZ) hardness due to thermal softening induced by anodizing, while FZ hardness peaked under optimized welding conditions, reaching a maximum value of 95.66 HV. Tensile testing indicated that anodized films enhance the yield strength (YS) of the fusion zone (FZ) but may reduce ductility. Under optimized welding conditions (4 m/min, 0 mm), the joints exhibited the best overall performance, achieving the YS of 125.28 ± 10.57 MPa, an ultimate tensile strength (UTS) of 193.18 ± 3.66 MPa, and an elongation of 3.46 ± 0.25%. These findings provide valuable insights for optimizing both anodizing and welding parameters to improve the mechanical properties of A356 joints.

1. Introduction

A356 die-cast aluminum alloy, a typical Al-Si-Mg alloy, is extensively used in the automotive industry for manufacturing structural components due to its excellent mechanical properties and ability to reduce weight [1,2]. In industrial manufacturing, traditional welding methods, such as gas metal arc welding (GMAW), often lead to excessive heat input, resulting in the formation of a coarse heat-affected zone (HAZ) that negatively impacts the mechanical properties of the welded joint [3,4]. In contrast, laser beam welding (LBW), with its high productivity, large aspect ratio, and minimal distortion, has gained widespread use in processing thick aluminum alloy plates [5,6].
Recent studies on die-cast A356 aluminum alloys have predominantly focused on traditional welding methods, with limited research on laser beam welding (LBW) for cast aluminum alloys. Li et al. [7] utilized the Taguchi method to identify the optimal welding parameters by analyzing the signal-to-noise ratio (S/N ratio). Akhter et al. [8] applied post-weld T6 heat treatment to laser-welded SSM cast A356 aluminum alloy joints, significantly enhancing both the strength and plasticity of the welded joints. Rehbein et al. [9] showed that controlling the casting process can reduce porosity in laser-welded die-cast aluminum to levels similar to wrought alloys, though LBW of high-pressure die castings remains challenging. Karami et al. [10] focused on AA6061, systematically studying the effects of welding parameter on weld quality, microstructure, and mechanical properties. Their findings offer valuable guidance for optimizing parameters in aluminum alloy laser welding. Alfieri et al. [11] examined how heat input and weld geometry influence pore formation during the laser welding of aluminum alloys, deepening the understanding of defect-generation mechanisms. Most laser beam welding (LBW) research has focused on wrought aluminum alloys, with limited studies on die-cast aluminum alloys like A356. This is due to several challenges. Die-cast alloys typically exhibit higher porosity, microstructural defects, and more complex compositions than wrought alloys, making them more difficult to weld effectively. Additionally, oxide films on the surface of die-cast aluminum absorb laser energy, decompose to release hydrogen, and increase porosity in the weld. As a result, LBW research has primarily targeted wrought alloys, which are more predictable and involve fewer welding-related complications. Ray et al. [12] further investigated the constitutive behavior and temperature–strain-rate dependence of as-cast A356, providing fundamental material data highly relevant to the deformation behavior during LBW thermal cycles; their subsequent thermomechanical modeling work [13] offered additional insight into how casting microstructure and thermal history influence weld response. Trometer et al. [14] observing a significant increase in hydrogen porosity during the laser welding of anodized aluminum alloys. They developed a Cellular Automaton (CA) model to predict the nucleation and growth of gas pores during welding. Tao et al. [15] also noted a considerable increase in hydrogen pores when welding anodized aluminum alloys. Abioye et al. [16] focused on laser welding of AA5052-H32 aluminum alloy thin plates, revealing that process parameters are crucial in determining weld geometry and the microstructural properties of the joint. Gao et al. [17] analyzed the effects of laser power and defocus distance, highlighting that insufficient power or improper defocus results in inadequate heat input, while excessive heat input can cause defects like spatter and alloy element burnout. Subbaiah et al. [18] investigated the impact of welding speed on the mechanical properties and microstructure of AA5083 aluminum alloy, finding that higher welding speeds improve tensile strength and promote the dissolution of intermetallic compounds, while hardness decreases. Xu et al. [19] demonstrated that oscillation laser welding can significantly reduce porosity and improve weld morphology in cast aluminum alloys, indicating the potential of parameter modulation to mitigate these issues. Theron et al. [20] optimized LBW parameters for rheo-cast F357, achieving low porosity and favorable mechanical properties, demonstrating that careful control of casting and welding conditions can yield high-quality welds. Gilbert et al. [21] investigated the impact of laser power and welding speed on weld quality and geometry in the LBW of semi-solid rheocast 2139 aluminum alloy. A356 die cast components also need to exhibit good corrosion and wear resistance, which is typically achieved through surface treatments like anodizing [22,23,24,25]. Li et al. [26] reported that aluminum’s high inherent thermal conductivity, the elevated hydrogen solubility in liquid aluminum, and the presence of passive oxide layers all significantly impede welding quality. Nunes et al. [27] provided a comprehensive review of the weldability of aluminum alloys in both fusion and solid-state welding, emphasizing the roles of laser absorptivity, thermal conductivity, porosity, and oxide layers in determining weld quality. Consequently, the presence of oxide layers on the surface often poses a challenge prior to LBW. Despite the widespread use of LBW in aluminum alloys, there is limited research on the effects of oxide films and welding parameters on the welded joints of die-cast A356 aluminum alloys.
This study makes several novel contributions to the field of laser welding of die-cast A356 aluminum alloys. It systematically investigates the combined effects of anodizing and welding parameters (welding speed and defocusing amount) on the microstructure and mechanical properties of welded joints. The research focuses on three surface oxidation conditions: no anodized film (NAF), single-sheet anodized film (SSAF), and double-sheet anodized film (DSAF), which have been insufficiently studied in laser-welded A356 alloys. A key contribution of this study is the comprehensive analysis of these oxidation conditions on weld morphology, porosity, elemental distribution, and mechanical behavior, providing detailed numerical results on fusion zone size, porosity, and microhardness. Furthermore, the study incorporates quantitative data on elemental redistribution, highlighting the effects of anodized films on Si enrichment and O incorporation. These findings offer crucial insights into optimizing welding parameters to reduce porosity and enhance mechanical properties, particularly yield strength and hardness. Additionally, the study deepens the understanding of anodizing’s role in influencing weld pool dynamics and weld quality, offering practical recommendations for optimizing laser welding processes in aluminum alloys.

2. Materials and Methods

2.1. Base Materials

A356 aluminum alloy plates fabricated via low-pressure die casting (LPDC) were selected as the experimental material in this study, and the chemical composition is shown in Table 1. The LPDC process was conducted under the following parameters: mold temperature of 250 °C, filling pressure ranging from 0.03 to 0.04 MPa, injection speed of 0.2 m/s, and vacuum level maintained between −0.03 and −0.04 MPa. Prior to welding, the cast plates were machined into standard specimens with dimensions of 60 mm × 25 mm × 2.5 mm (length × width × thickness). To eliminate surface oxide layers and oil contaminants, the base metal surface was sequentially sanded with 200 #, 800 #, and 1200 # sandpapers to remove a 0.5 mm-thick surface layer, followed by ultrasonic cleaning.

2.2. Anodic Oxidation of Aluminum Alloy Surfaces

To produce anodized films on die-cast A356 aluminum alloy specimens, the sulfuric acid anodic oxidation method was employed, with specific process steps as follows: the specimens for preliminary cleaning were ultrasonically cleaned using 70 vol% ethanol to remove surface oil stains and dust. The specimens for pickling were immersed in a 5 vol% nitric acid solution at 25 ± 2 °C for 5 min to eliminate surface oxides and obtain a clean substrate for subsequent anodic oxidation. The treated specimens during anodic oxidation were clamped as anodes and placed in a 10 wt% sulfuric acid electrolyte at 23 ± 2 °C, a conductive oxide was used as the cathode, with the anode specimens maintained parallel to the cathode, and a constant voltage of 15 V was applied. After 15 min of oxidation, a black anodic oxide film formed on the specimen surface. The specimens after anodic oxidation were ultrasonically cleaned to remove residual electrolyte, then dried in an oven at 50 °C for 30 min to eliminate residual moisture, and the experimentally measured thickness of the anodic oxide film was approximately 11.97 µm.

2.3. Laser Beam Welding

The welding experiments of die-cast A356 aluminum alloy were performed using an IPG YLS-3000 fiber laser system with a beam delivery fiber diameter of 200 µm. The laser system provided a maximum output power of 3 kW and operated at a wavelength of 1.08 μm. To investigate the effect of anodized films on welding performance, the study designed three anodized film conditions: no anodized film (NAF), where no anodized film is applied to the surface; single-sheet with anodized films (SSAF), where anodized film is applied to only one side of the plate; double-sheet with anodized films (DSAF), where anodized films are applied to two sides of the plate. Meanwhile, the DASF-U is employed to examine the influence of anodized films on the lower surface on the welding process. The term U is used when the anodized film is applied to the top surface, and U/L is used when anodized films are applied to both the top and bottom surfaces. In addition, to analyze the effect of welding parameters on the quality of the welded joint, two levels of welding speed and two levels of defocusing amounts were selected based on preliminary orthogonal experiments. These optimized parameter combinations were subsequently examined using a single-variable approach, as summarized in Table 2. In this study, pure argon was used as the shielding gas for laser beam welding, with a gas flow rate of 20 L/min. The shielding nozzle was inclined at 30° and kept 20 mm away from the workpiece surface. The output laser power was maintained at 3 kW for all experiments. The schematic diagram of laser beam welding is shown in Figure 1.

2.4. Characterization and Properties Testing

After welding, the metallographic samples and the tensile specimens were intercepted via wire cutting discharge machining (WEDM). The cross-sectional metallographic samples were subjected to mechanical polishing with diamond pastes followed by water grinding. The samples were dried for further analysis. The porosity of weld seams was quantitatively characterized using the grid method, a classical point-counting-based image analysis technique. This method involves superimposing a regular grid over a microstructural image and estimating the area fraction of pores, by calculating the ratio of grid points lying within pores to the total number of grid points in the analyzed region.
The microstructure and elemental composition of laser-welded joints were characterized using an ultra-depth-of-field optical microscope (OM, VHX-700F, Osaka, Osaka, Japan) and a scanning electron microscope (SEM, Quanta250FEG, Hillsboro, OR, USA).
The hardness of the welded joints was measured using a digital microhardness tester with a Vickers indenter. The hardness measurements were performed from the base metal to the fusion zone, applying a load of 0.01 N for a dwell time of 15 s. To avoid the impact of hardening effect caused by the hardness test, the distance between two adjacent indentation was set at 150 µm.
The tensile properties of die-cast A356 aluminum alloy were evaluated at room temperature using flat dog-bone tensile specimens with a 10 mm gauge length (Figure 2). Tensile tests were performed on a universal testing machine at an engineering strain rate of 1 mm/min under ambient conditions. A full-range extensometer was employed for strain measurement, with five nominally identical specimens tested for each configuration.

3. Results and Discussion

3.1. Welding Morphology and Microstructure

3.1.1. Cross-Section Macrostructure and Porosity

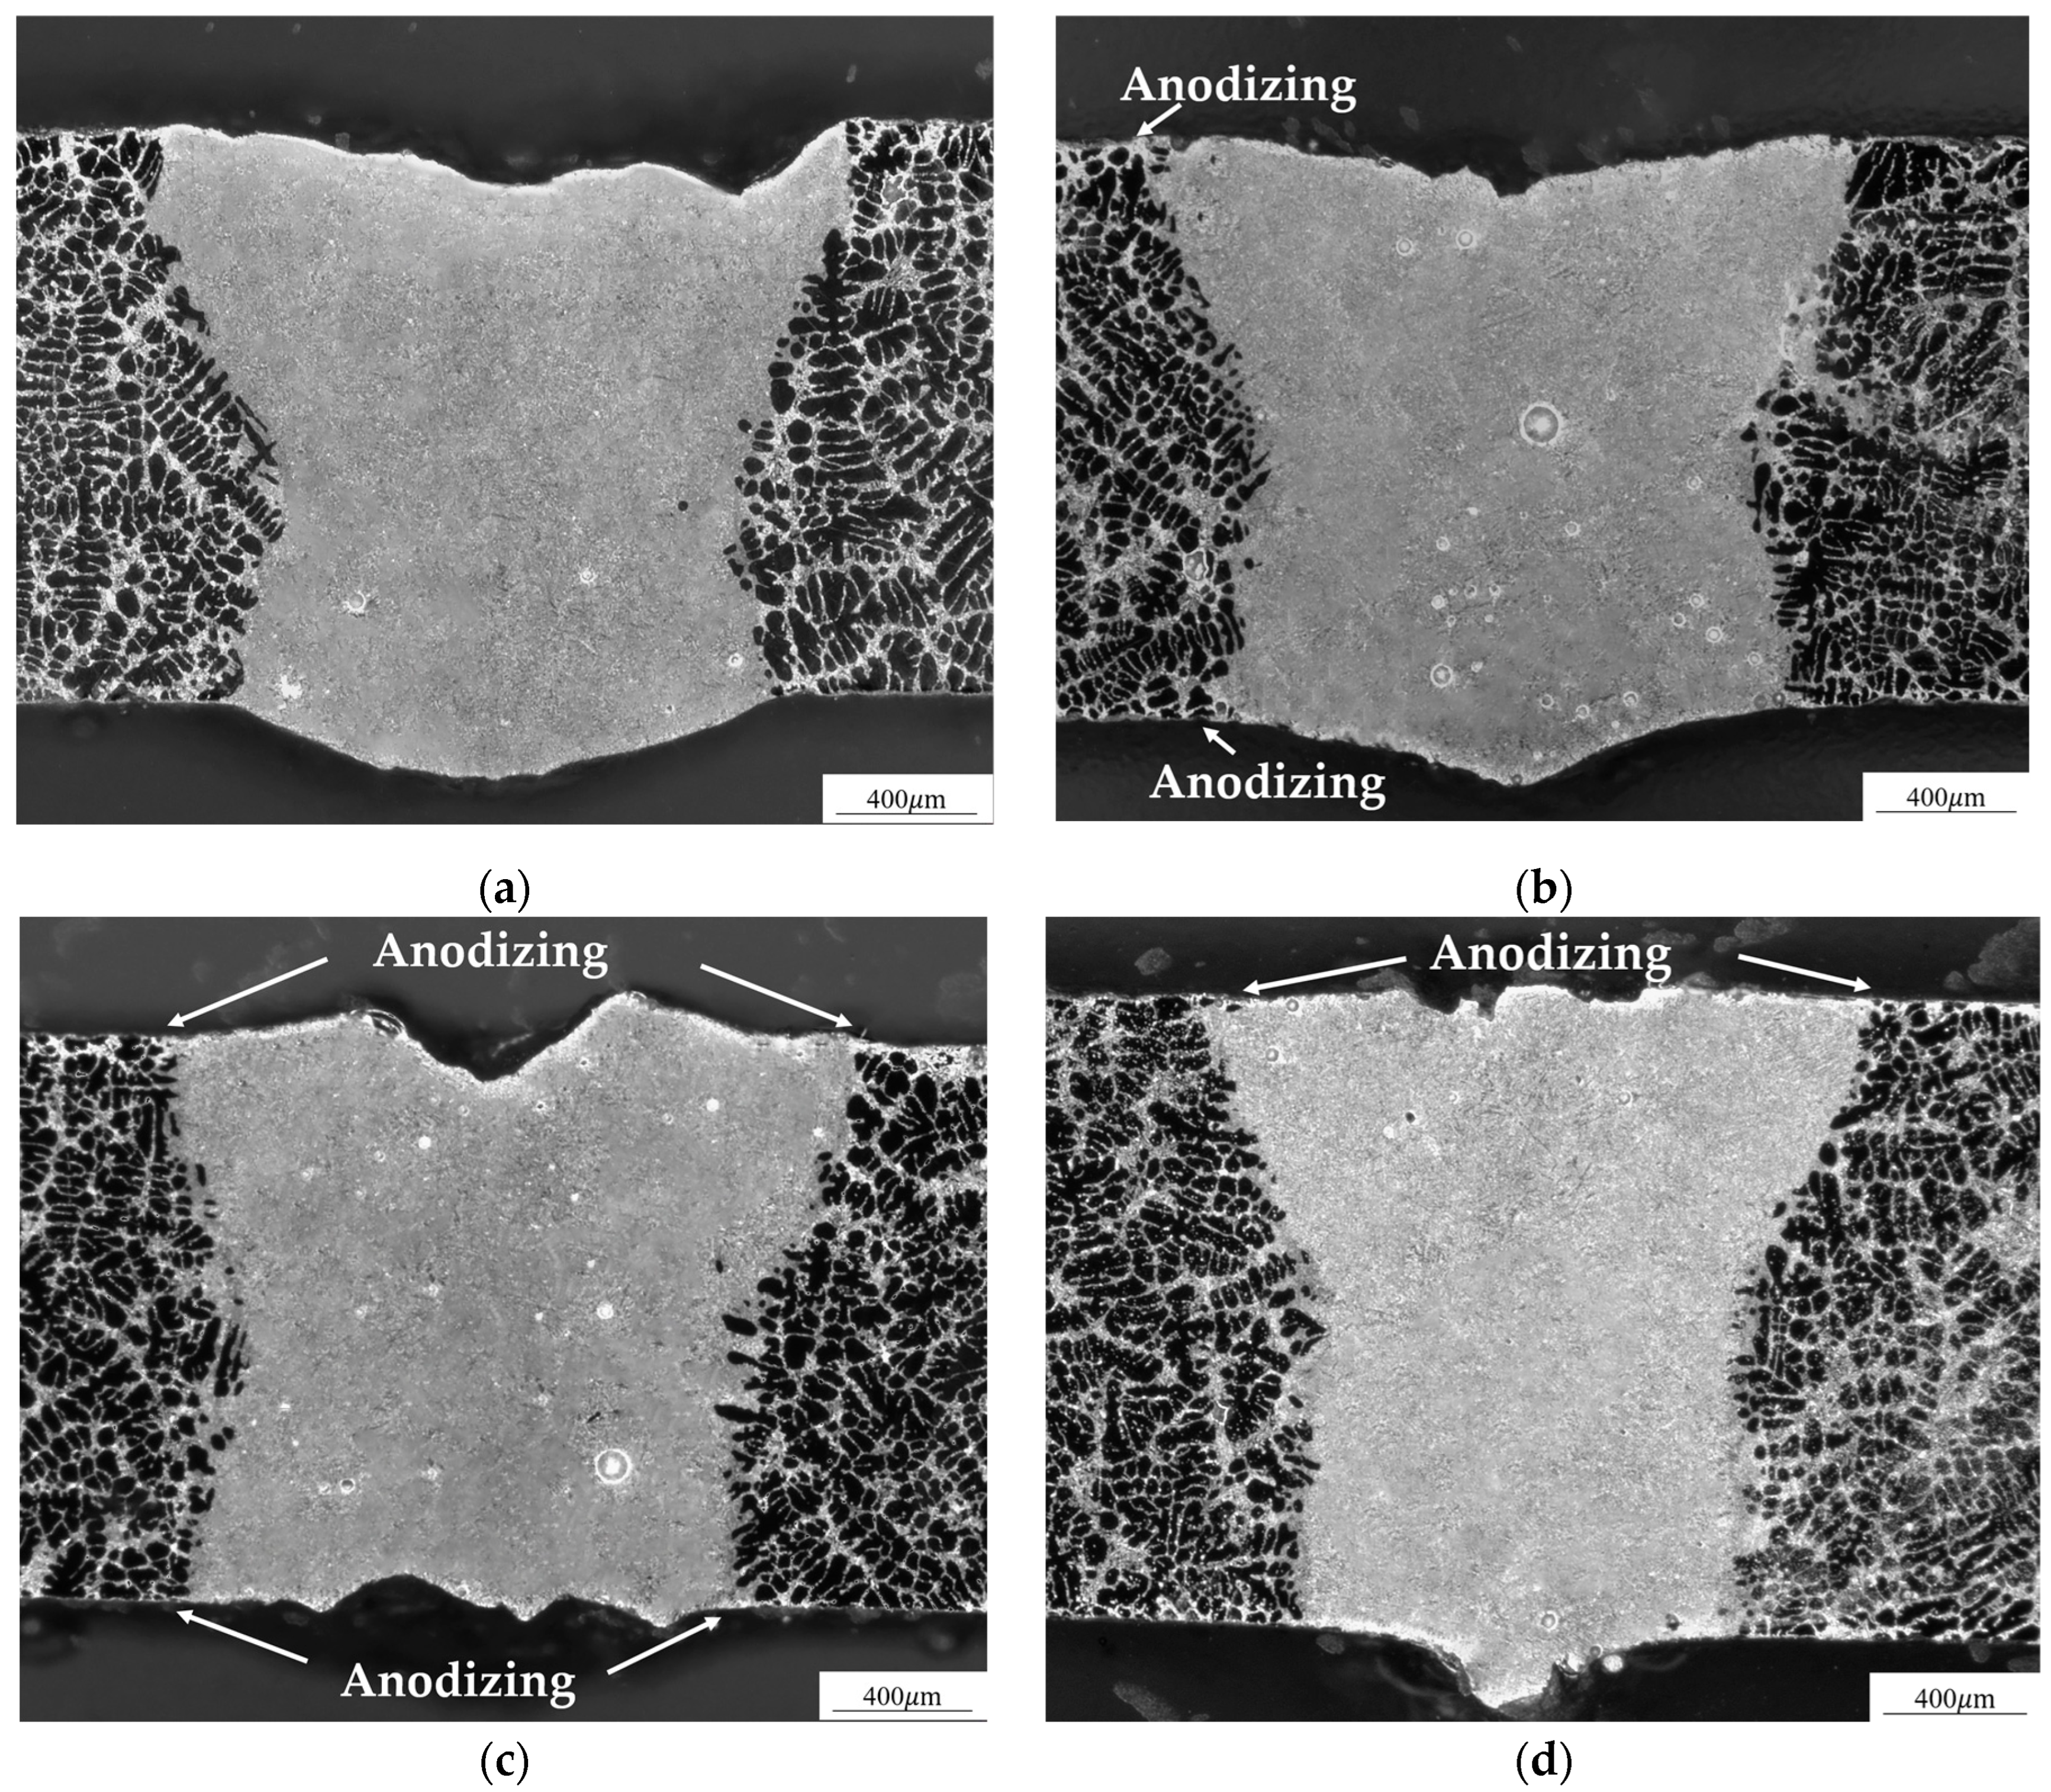
Figure 3 presents the cross-sectional macrostructure of welded joints prepared under three surface oxidation conditions: no anodized film (NAF), single-sheet with anodized films (SSAF) and double-sheet with anodized films (DSAF). The molten pool morphologies obtained at welding speeds of 3 m/min and 4 m/min and defocusing amounts of 0 mm and +1 mm are compared. It can be seen that the welds exhibit the upper surfaces depression and lower surfaces reinforcement, which are characterized by a visible indentation on the upper surface and an accumulation of material at the root of the weld. These features are typical of the laser welding process, where the heat input and laser–material interaction cause the molten pool to behave in a way that results in these characteristics. The upper surface depression arises from the rapid solidification of the molten pool, which may not completely fill the upper part of the joint, creating a slight indentation. In contrast, lower surfaces reinforcement occurs when the molten material accumulates at the root of the weld, forming an excess of material that results in a reinforcement bead along the bottom of the joint. Moreover, the observations revealed that different surface oxidation conditions exert a significant influence on the morphology of the welded joints. To quantify this effect, statistical analyses were conducted on key geometric and defect-related indicators, statistical analyses of weld width, root width, fusion zone (FZ) area, and porosity were conducted, with the results summarized in Table 3.
As demonstrated in Figure 3 and Table 3, the surface oxidation condition substantially altered the weld macrostructure under identical process parameters. Welded joints with SSAF exhibited a smaller FZ area than those with NAF, accompanied by more pronounced sagging on the non-anodized side and an increase in porosity. Joints with DSAF displayed an even narrower weld width and a smaller FZ area compared with NAF and SSAF. Although overall sagging was alleviated, porosity increased markedly. Notably, the DSAF-U joints exhibited the smallest FZ area, while their porosity decreased. These trends can be explained by the dual role of anodized films in the laser welding process. Although anodized films enhance laser energy absorption, their low thermal conductivity and acts as a thermal barrier to limit thermal conduction to the base material. Moreover, anodized films tend to melt or decompose under laser irradiation, consuming part of the laser energy. This additional energy loss reduces the heat available for melting the base metal and ultimately leads to a smaller FZ area [28].
The experimental results also indicate that welding speed and defocusing amount exert significant influences on the morphology of welded joints. Under identical surface oxidation conditions, a decrease in welding speed leads to a marked increase in both FZ area and porosity. This trend suggests that lower welding speeds promote more extensive melting due to prolonged interaction between the laser beam and the workpiece. At reduced speeds, the laser beam remains in contact with the material for a longer duration, allowing greater heat accumulation and deeper thermal penetration, which substantially enlarges the FZ. Meanwhile, despite the use of protective gas, the molten pool retains a high temperature for an extended period at lower speeds. This elevates the probability of reactions between the molten pool and the surrounding environment, facilitates gas entrainment, and ultimately increases pore formation. Under the same surface oxidation conditions, increasing the defocusing amount from 0 mm to +1 mm results in a smaller FZ area and higher porosity. As the defocusing amount increases, the laser beam diverges, reducing energy density and effective heat transfer. Consequently, the weld becomes narrower and shallower due to limited thermal input and diminished lateral heat conduction. At the same time, the weakened metal flow in the molten pool restricts gas escape, further promoting pore formation [29,30].
Cross-sectional examinations further confirm that anodized films play a critical role in pore formation within the FZ. Comparative analyses show that samples with DSAF exhibit markedly higher cross-sectional porosity, which is attributed to the intrinsic porous structure of anodized films. This structure enables films to readily adsorb environmental moisture. During laser welding, the absorbed moisture decomposes and releases quantities of hydrogen [14]. As the aluminum melt cools, the solubility of hydrogen decreases sharply, promoting hydrogen precipitation and pore nucleation. Additionally, anodized films significantly influence pore size. As shown in Table 4, NAF samples primarily show pores ranging from 0 to 10 µm in diameter, while SSAF and DSAF samples exhibit a larger proportion of pores, typically greater than 20 µm, with DSAF showing the higher number and larger size of pores. Furthermore, this can be attributed to the increased hydrogen absorption capability of the anodized films. The porous nature of the films, combined with the presence of moisture within the oxide layers, facilitates gas release, resulting in a higher number and larger size of pores. Furthermore, anodized films suppress Marangoni convection and thermocapillary convection, weakening bubble migration and thereby limiting their escape from the FZ [31]. In contrast, the strong turbulence induced by laser irradiation in NAF samples enhances the driving force for gas escape, significantly reducing pore formation. Further analysis shows that increasing welding speed and reducing the defocusing amount from +1 mm to 0 mm both contribute to lower porosity, demonstrating that well-designed process parameters can optimize FZ flow behavior and facilitate gas evacuation [32].
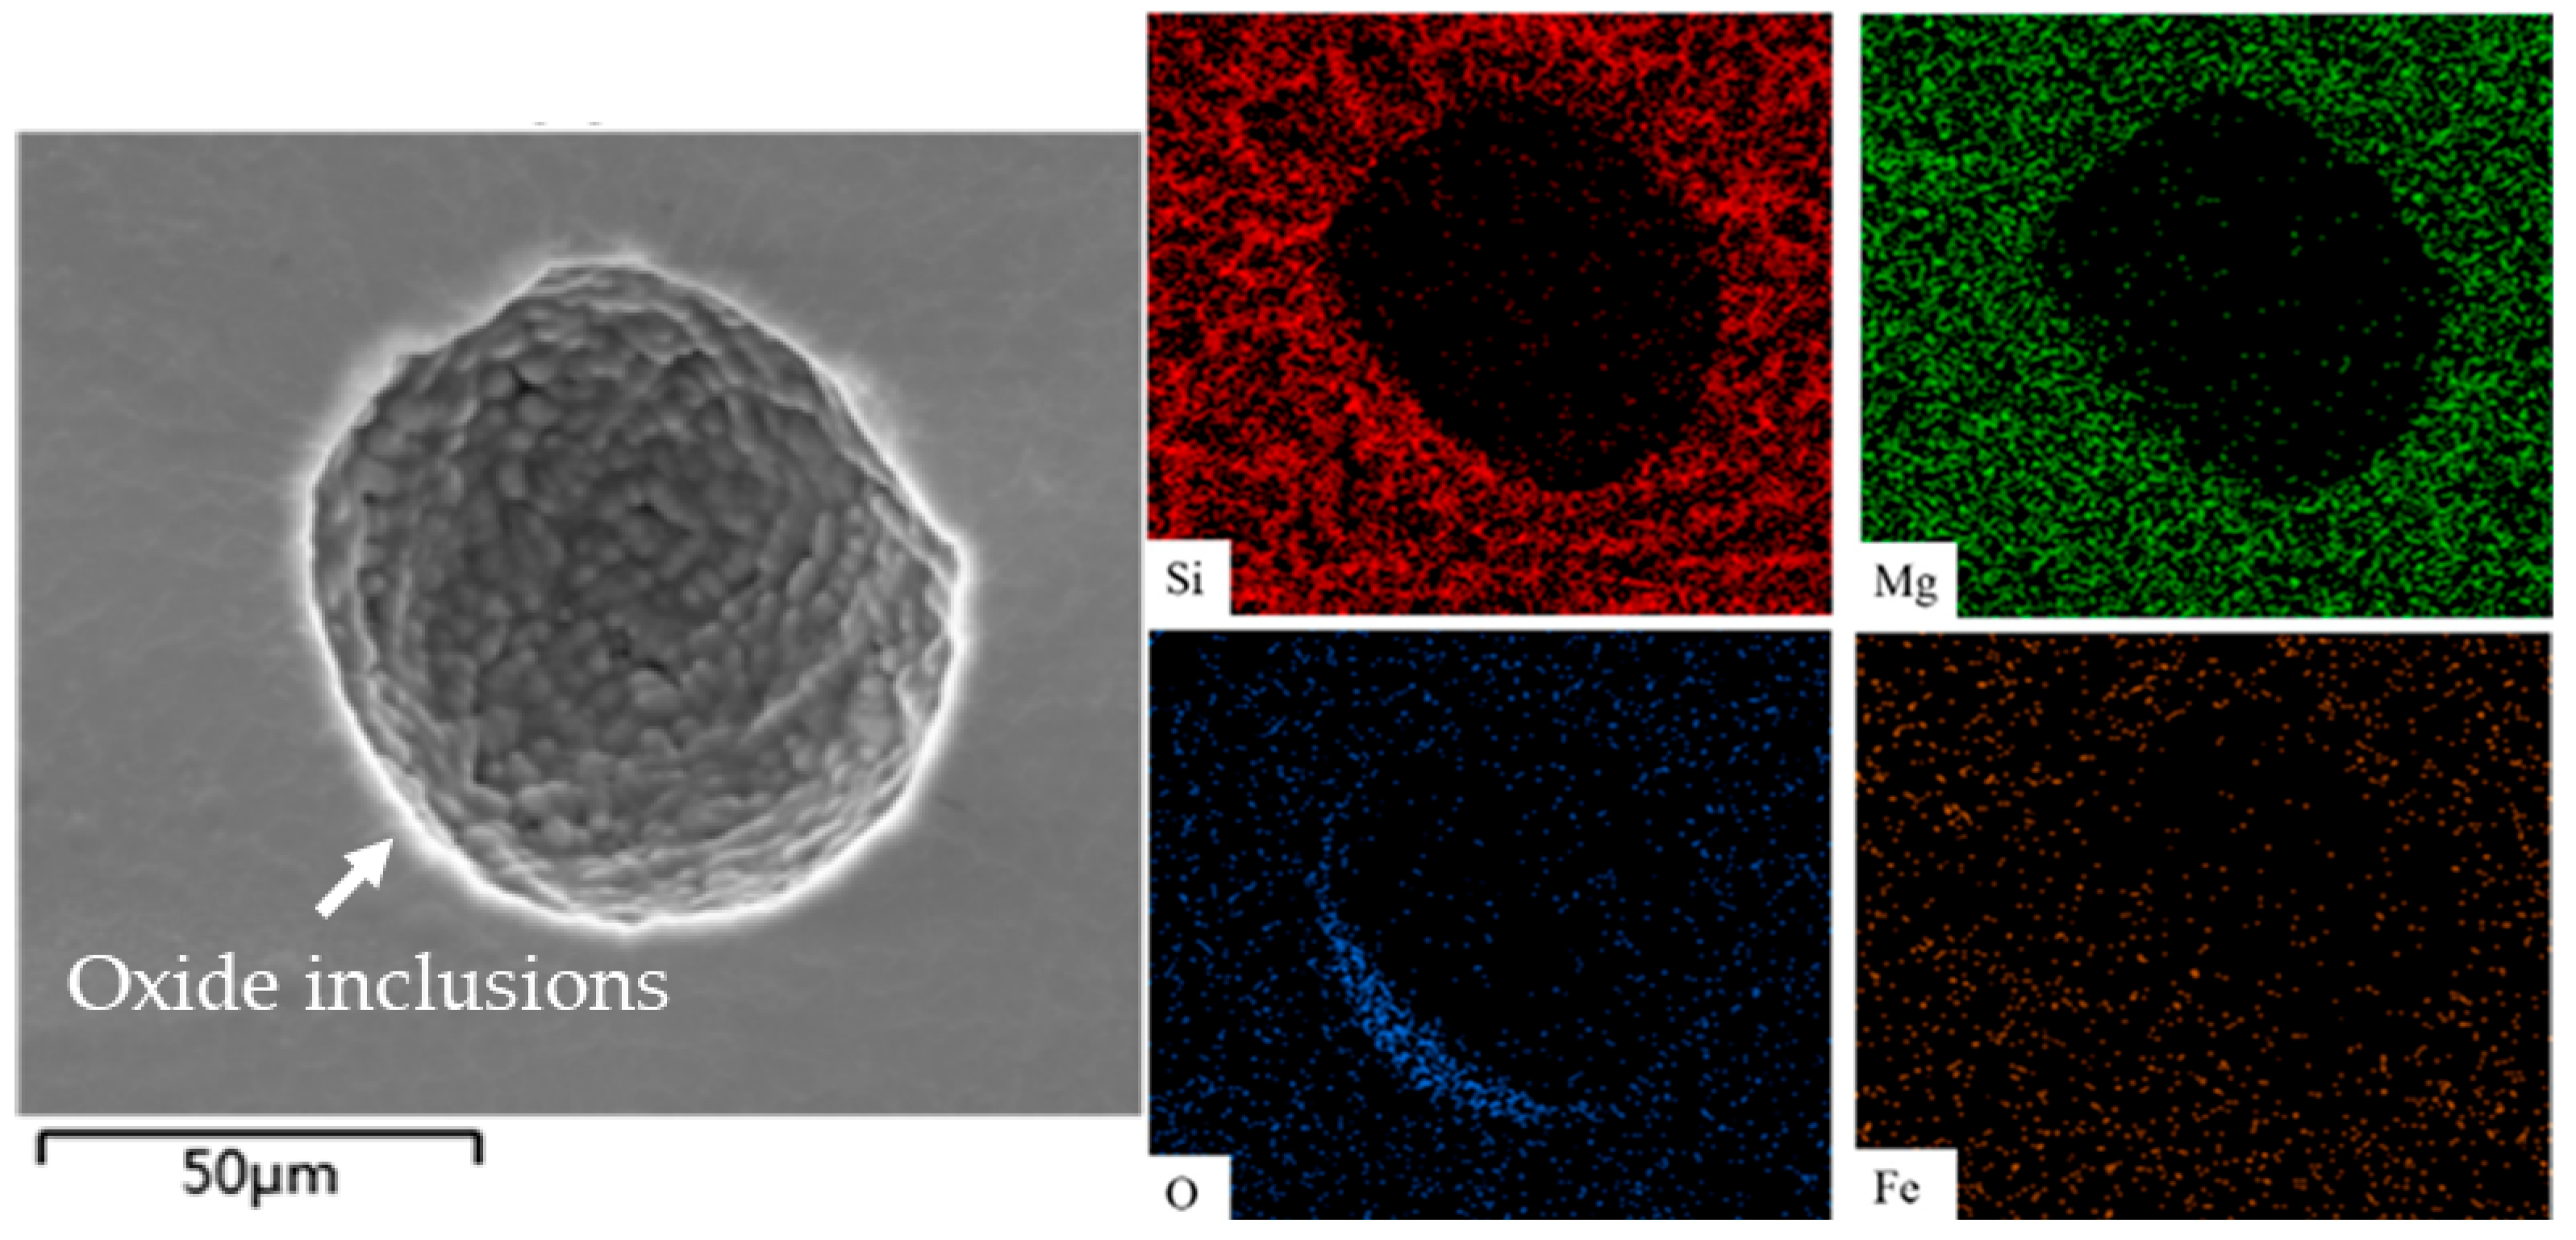
Figure 4 presents the SEM morphology and elemental scanning analysis of pore defects within the fusion zone (FZ), highlighting the presence of oxide inclusions. These inclusions result from the interaction between the molten pool and the surface anodized films on the base material. During welding, the anodized films decompose, releasing gases such as hydrogen, which become trapped in the porous structure of the film. As a result, these gases are unable to escape quickly from the molten pool, leading to the formation of gas pores and oxide inclusions. The porous nature of anodized surfaces exacerbates this gas entrapment, further increasing porosity and promoting the formation of oxide inclusions within the weld. These defects compromise the integrity of the weld by reducing ductility and creating potential sites for crack initiation.

3.1.2. Element Distribution and Phase Composition in the Weld Seam

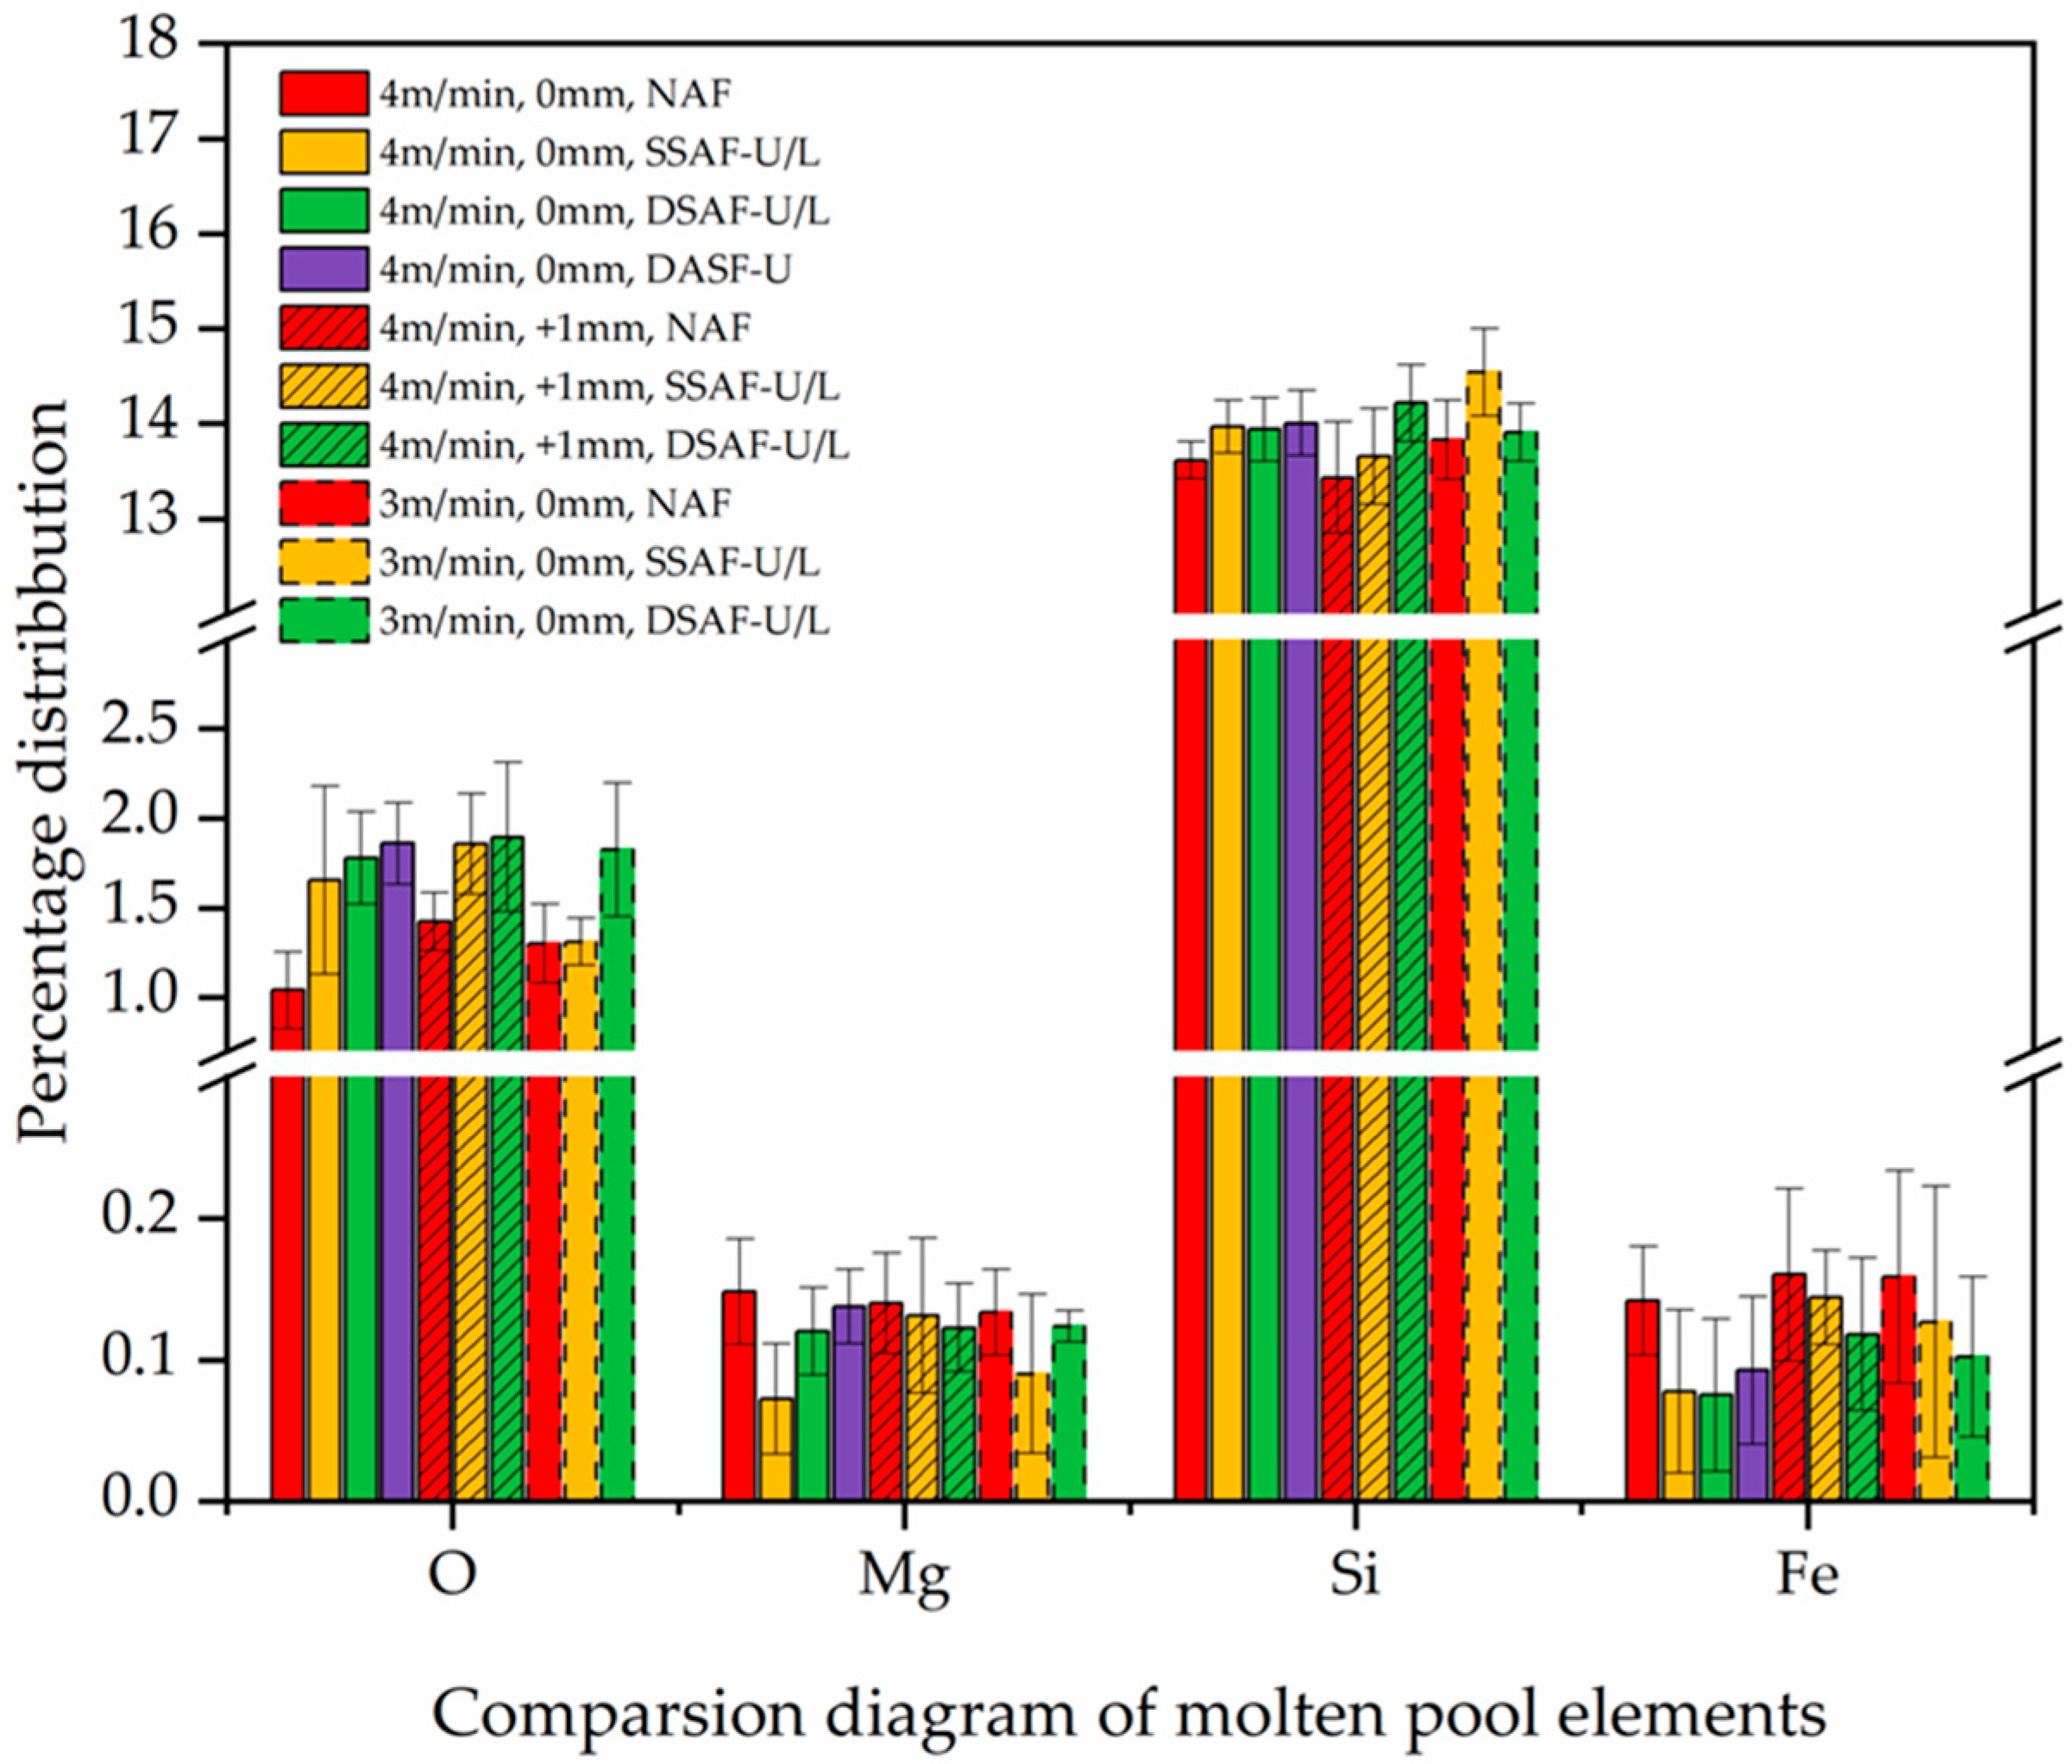
Figure 5 presents the elemental variations in the FZ under different surface oxidation conditions and welding parameters. Compared with the alloy composition of the BM (Table 1), the FZ exhibits a noticeably higher Si content and reduced Mg contents, while the Fe content remains relatively unchanged. Surface oxidation conditions further modulate these elemental changes. Samples with SSAF and DSAF exhibit higher average Si content but lower average Mg and Fe contents than those with NAF, while no significant differences in the distribution of major elements (Si, Mg, Fe) are observed between SSAF and DSAF. This enrichment of Si and depletion of Mg and Fe in the FZ is consistent with the findings reported by Zhu et al. [33]. The underlying mechanism is attributed to the enhanced laser-energy absorption induced by anodized films. Elevated absorption promotes high-temperature vaporization of volatile elements, particularly Mg and Fe, thereby reducing their concentrations in the FZ. Although DSAF provides higher laser absorption than SSAF, this enhancement is insufficient to induce substantial changes in elemental concentrations within the FZ. Furthermore, the welding parameters examined in this study show no significant influence on the distributions of Si, Mg, or Fe.
In addition to the aforementioned elements, the O content in the FZ also showed a pronounced dependence on the surface oxidation conditions. Samples with anodized films exhibited higher O content than those with NAF, with the DSAF condition producing the highest O level. This can be attributed to the high temperatures generated during laser welding, which melt the surface anodized films and incorporate them into the FZ. A greater amount of anodized film consequently leads to increased O retention within the FZ [34,35].
The effect of welding speed on the O content in the FZ varies with the surface oxidation condition. At higher welding speeds, the FZ exhibited a progressively lower O proportion under both NAF and DSAF conditions. This reduction is attributed to the shorter interaction time between the FZ and the surrounding atmosphere at higher speeds, which suppresses oxidation reactions. In contrast, the O content increased with rising welding speed for SSAF. This trend can be explained by the asymmetric distribution of heat input and flow fields induced by the anodized film on one side, which reduces the stability of the FZ. As welding speed increases, transient fluctuations within the FZ intensify, enhancing interactions between the molten pool surface and the ambient environment and thereby promoting the entrainment and retention of atmospheric oxygen [36,37].
The defocus amount also affects the O content in the FZ. As the defocus increased from 0 mm to +1 mm, the O content in the FZ shows a decreasing trend. This behavior is attributed to the highly concentrated laser energy at a defocus of 0 mm, which generates a high energy density and induces vigorous stirring within the FZ. Such stirring enhances metal fluidity and facilitates the effective escape of dissolved oxygen. In contrast, when the defocus amount increases, the reduced laser energy density weakens FZ agitation, thereby lowering the efficiency of oxygen escape and ultimately increasing the O content in the FZ [38,39].

3.1.3. Microstructure of Welded Joints

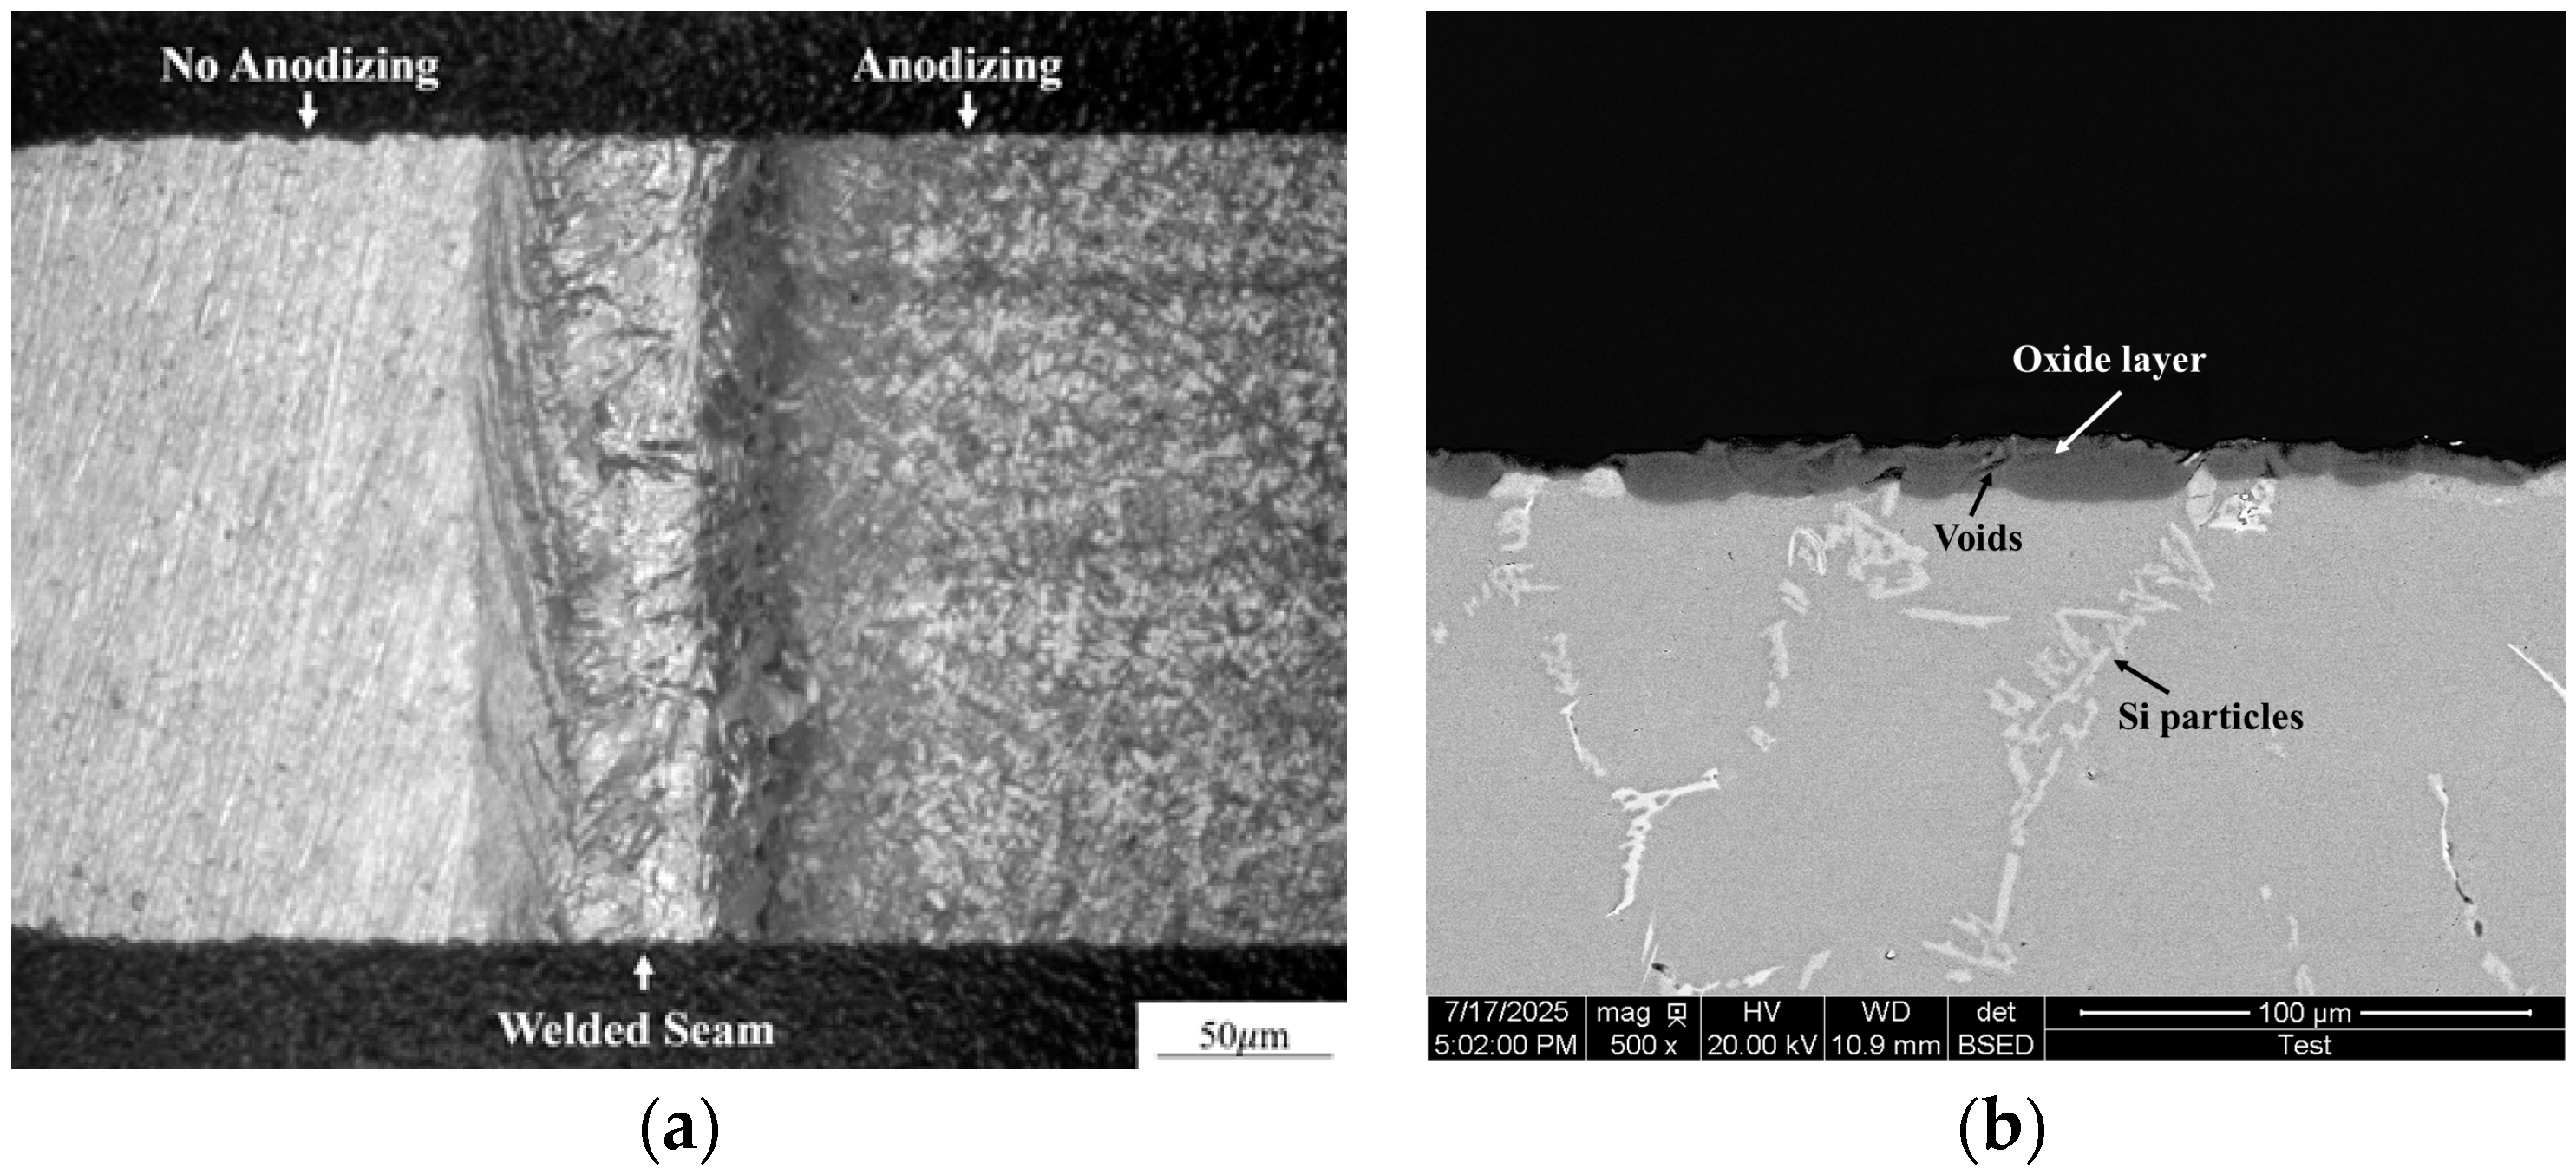
Figure 6 presents a comparison of the aluminum alloy material before and after anodization, along with the cross-section morphology of the specimens following anodization. The results clearly show that the surface of the aluminum alloy becomes black, primarily because the Si particles undergo partial oxidation, remain undissolved, and consequently remain embedded within the anodized film [40,41].
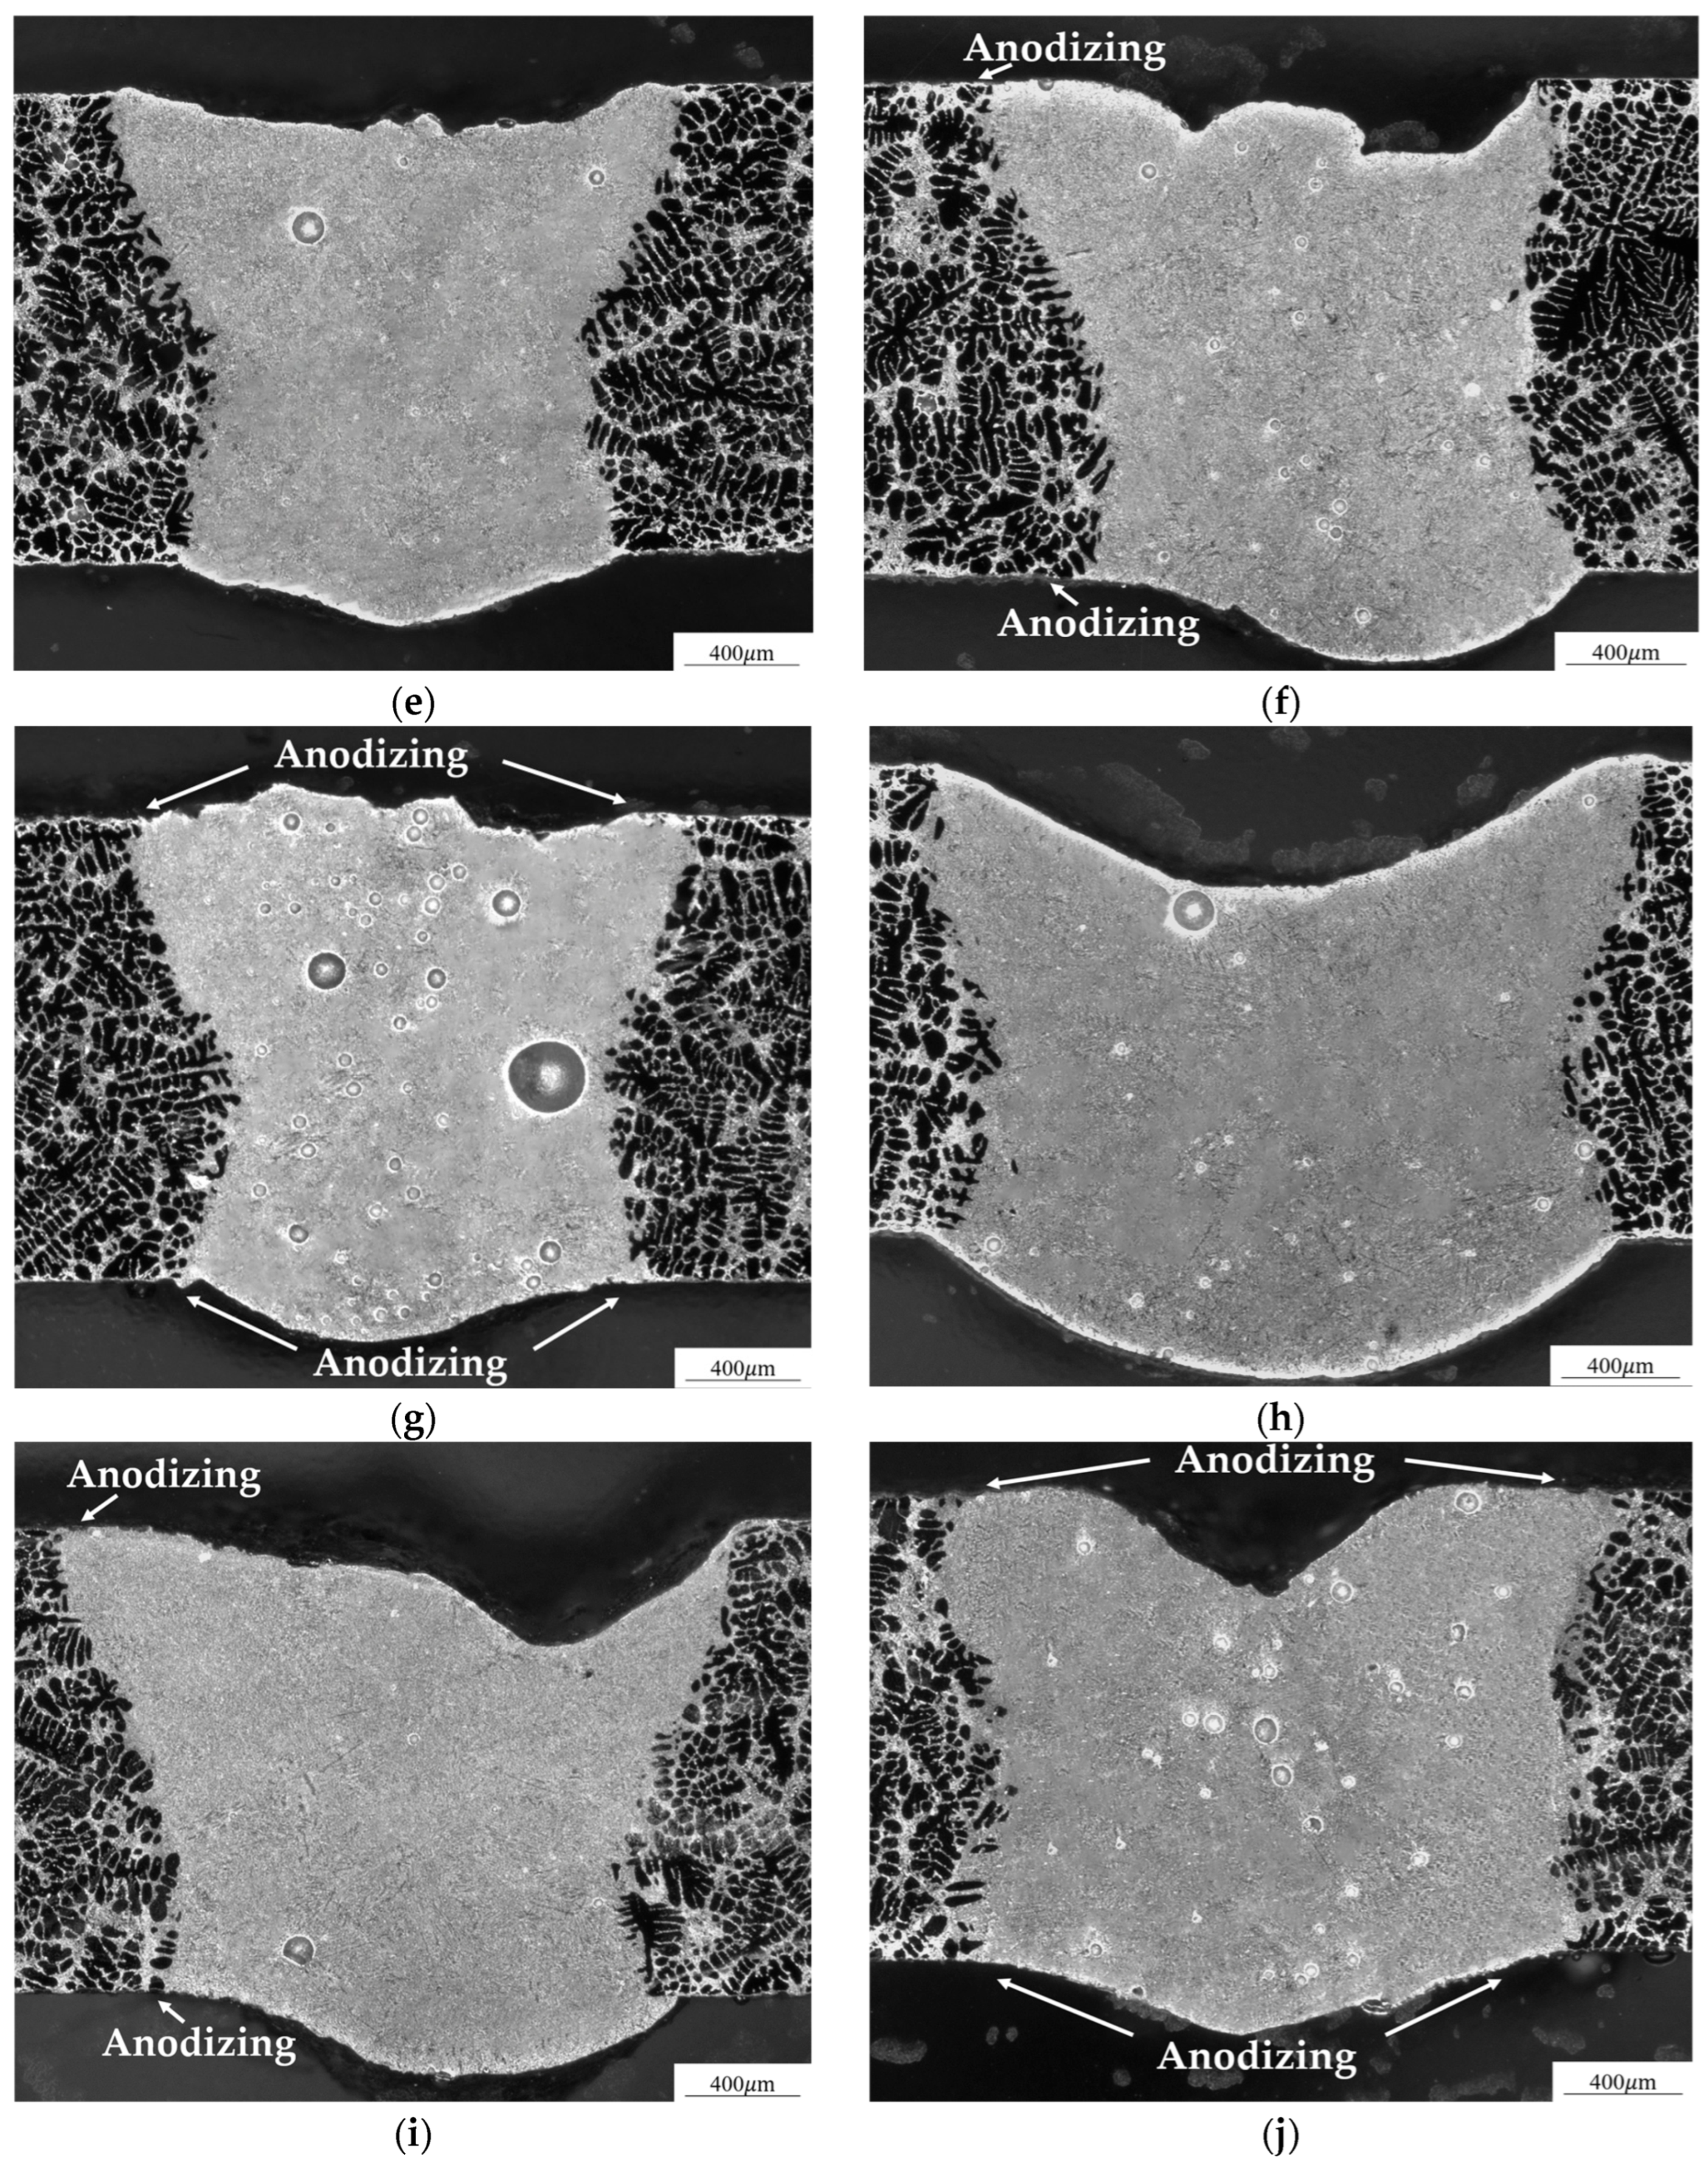
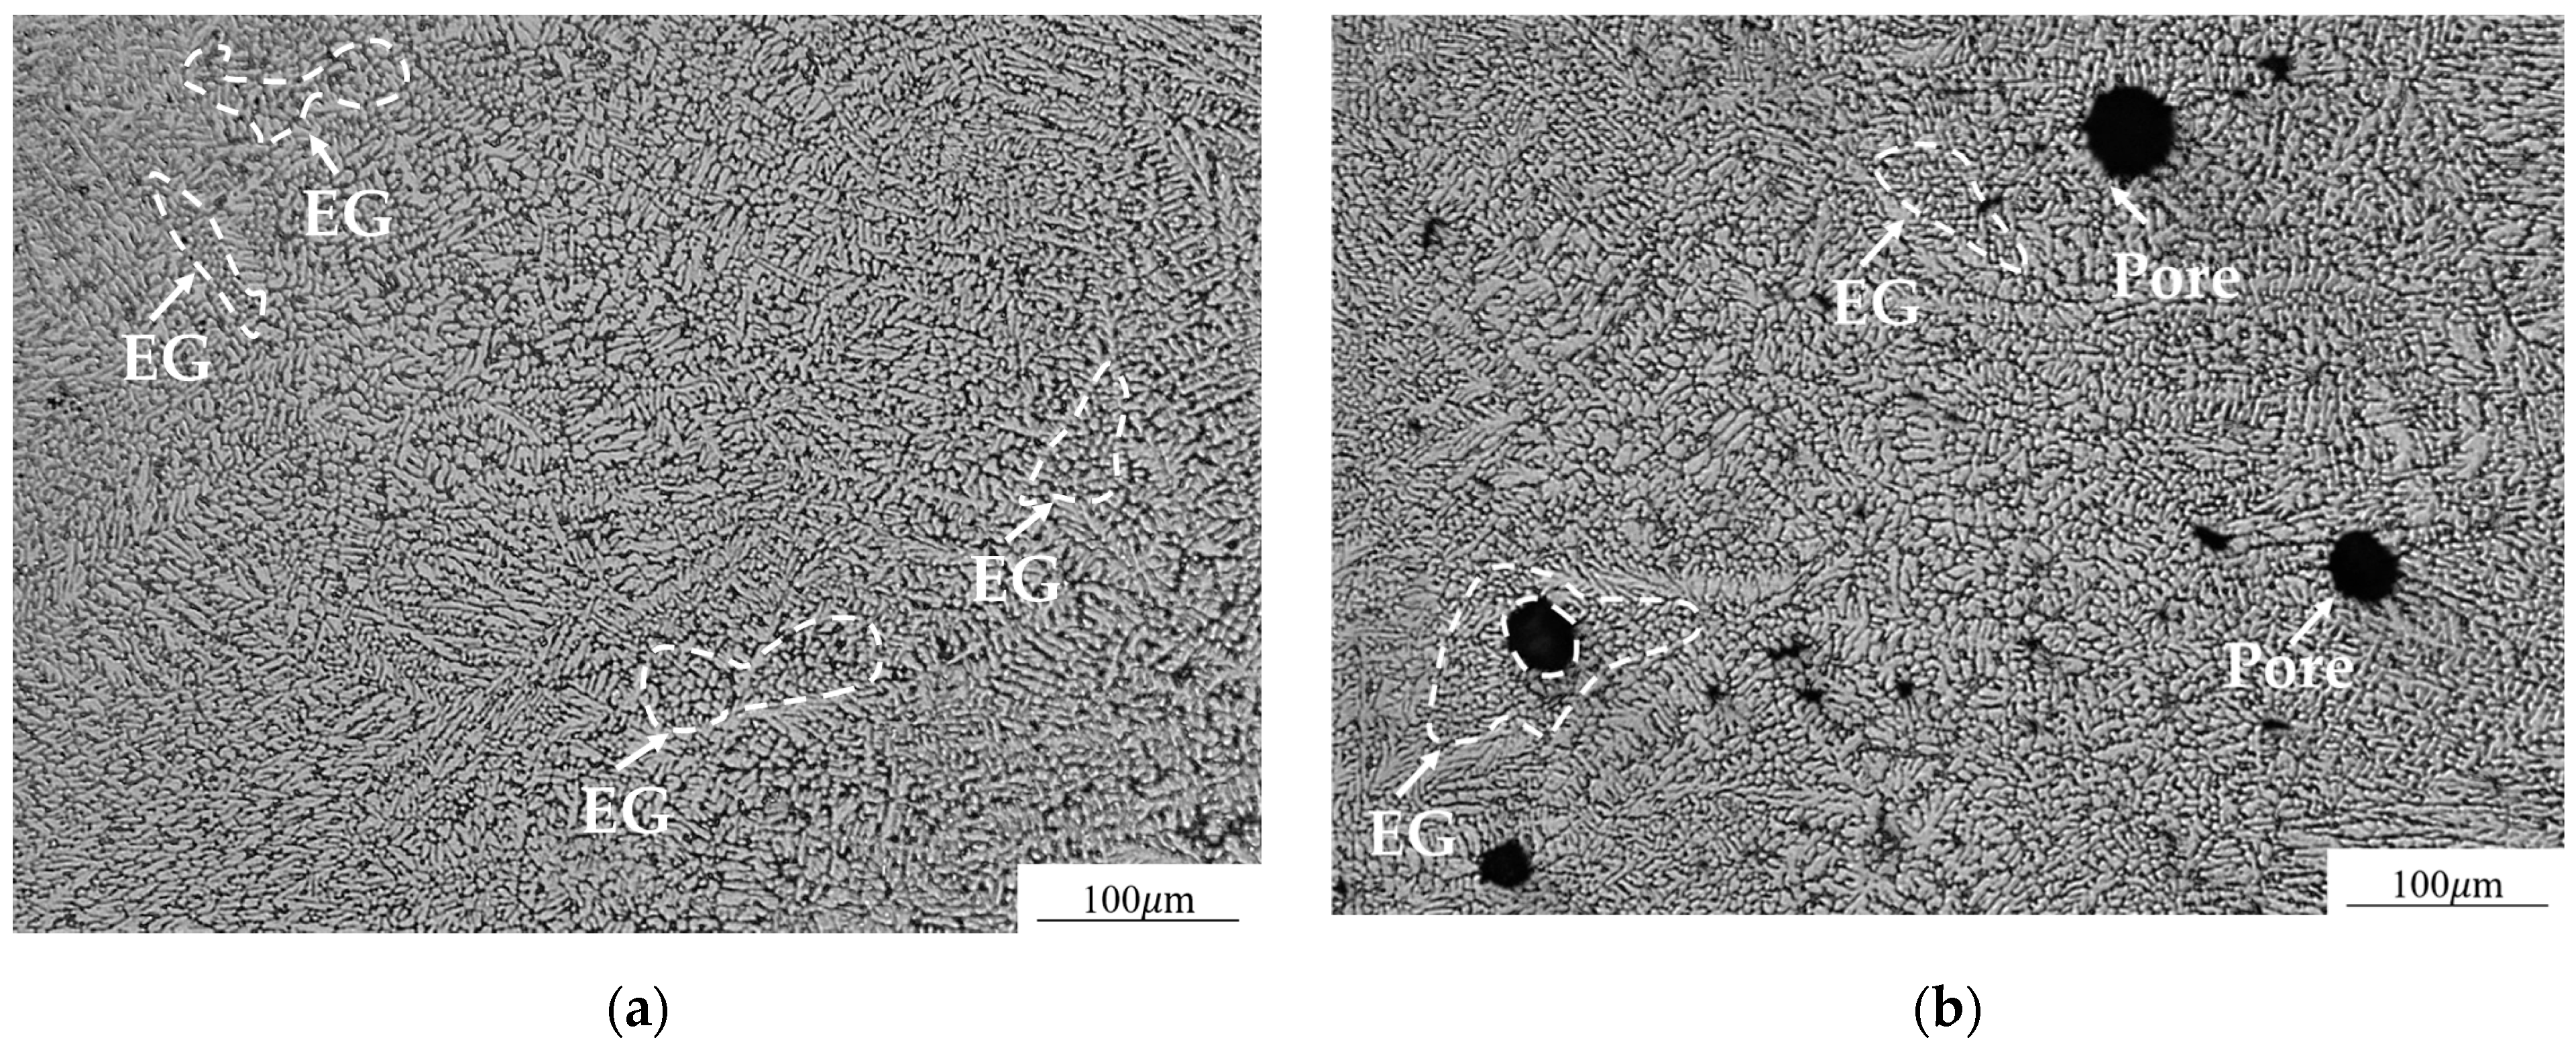
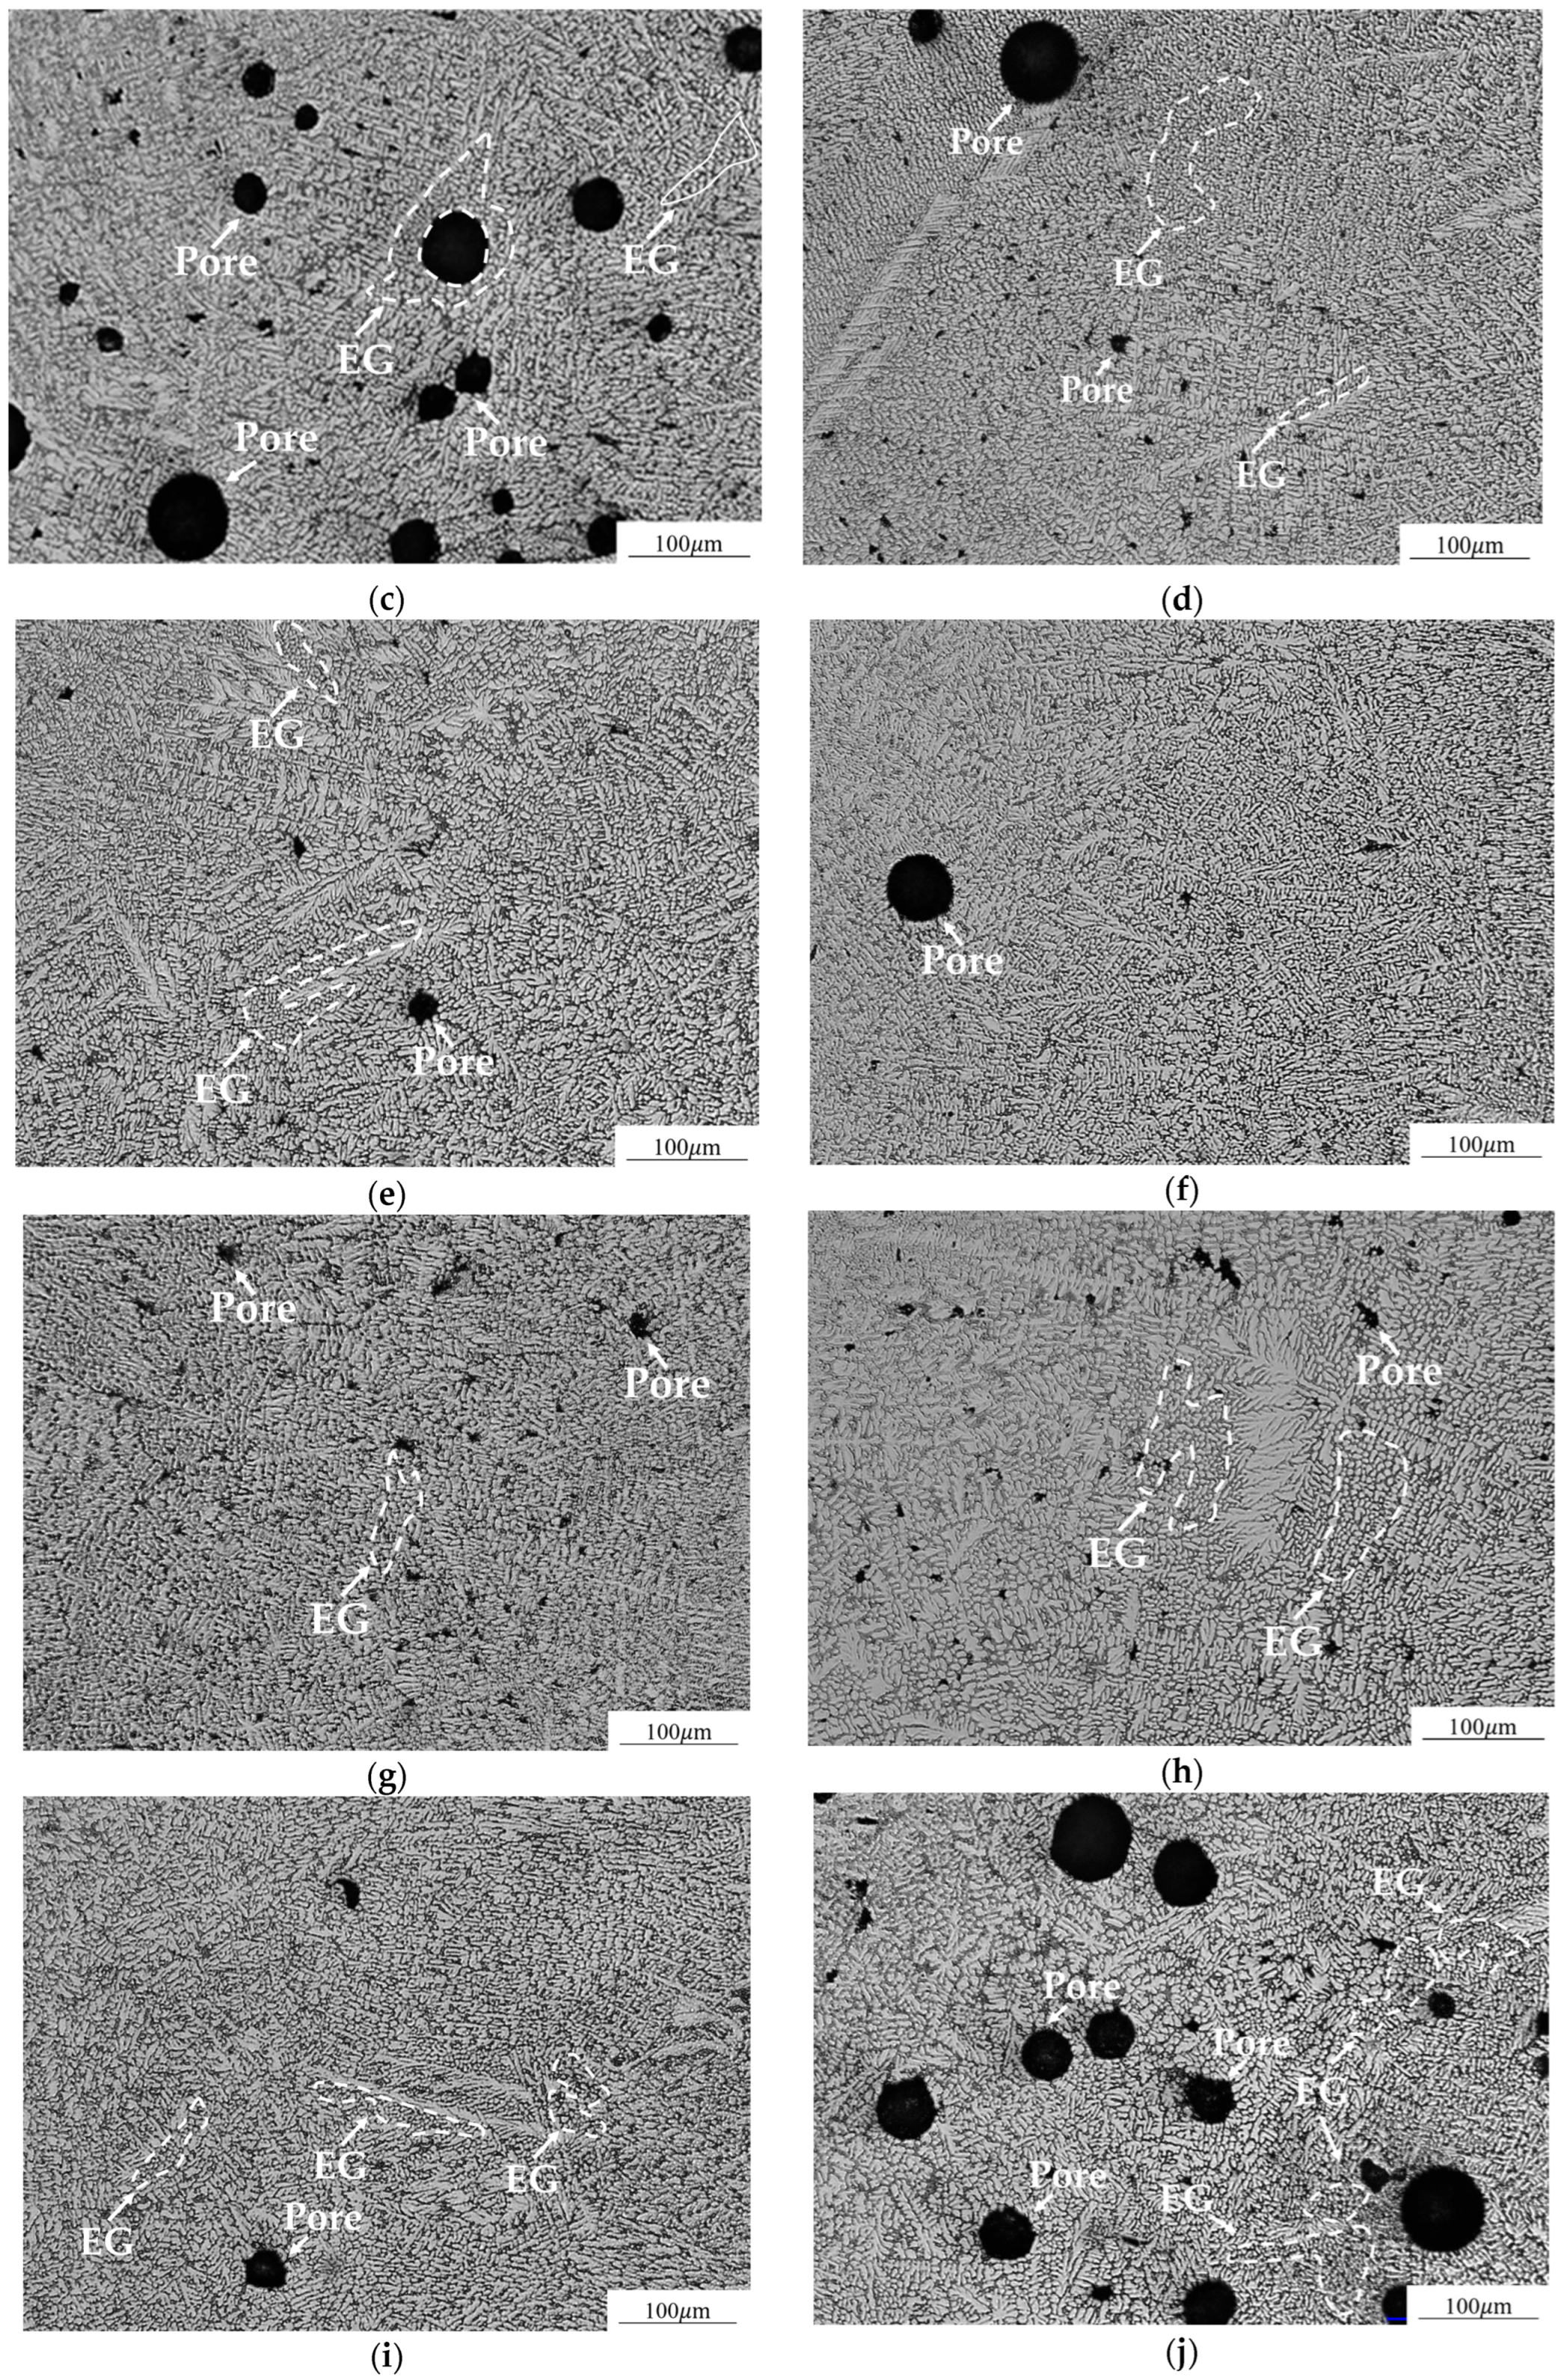
Figure 7 shows the microstructural morphology at the center of the FZ in laser-welded A356 aluminum alloy joints under ten combinations of welding parameters (welding speed and defocus amount) and surface oxidation conditions. The comparative analysis demonstrates that the surface oxidation conditions markedly influence the grain morphology, grain distribution, and microstructural compactness of the FZ. Under NAF, the FZ consisted of a mixture of equiaxed grains (EGs) and columnar grains (CGs), accompanied by a small number of fine pores and shrinkage cavities. In contrast, the FZ in samples with SSAF and DSAF was predominantly composed of CGs. Moreover, the DSAF samples exhibited both higher pore density and larger pore sizes than those with SSAF. The FZ microstructure of the DSAF-U/L samples showed no substantial differences from that of DSAF-U, except for a relatively lower pore density. The predominance of CGs in SSAF and DSAF samples is attributed to the anodized films altering the heat-transfer characteristics of the FZ, thereby producing a higher temperature gradient. According to the classical G/R (temperature gradient/solidification rate) solidification theory, an elevated temperature gradient promotes directional grain growth, suppresses EG nucleation, and ultimately results in the prevalence of CGs [42,43]. Furthermore, because DSAF samples contain a larger total amount of anodized film, their inherent porous structure readily provides heterogeneous nucleation sites that adsorb hydrogen and trap gases [44,45]. Combined with the low thermal conductivity of the anodized film, which slows FZ cooling and prolongs bubble residence time, these effects facilitate bubble growth and lead to the formation of larger pores. This mechanism directly explains why DSAF samples develop both more numerous and larger pores [46,47]. In comparison, SSAF samples introduce less anodized film into the molten pool, thereby reducing the cumulative impact of these adverse mechanisms and consequently exhibiting a lower pore density. These observations are consistent with the porosity and pore-size data for different surface oxidation conditions presented in Table 3, further corroborating the reliability of the microstructural findings.
Figure 8 provides an overall schematic of how surface oxidation conditions influence weld-pool behavior and the resulting microstructure. The presence of the oxide film slightly stabilizes the molten pool and helps reduce upper-surface collapse; however, it also acts as a thermal barrier and decomposes during welding, which increases porosity and promotes the formation of oxide inclusions in the FZ.
Furthermore, the grain morphology in the FZ underwent significant changes under different welding parameters. As the welding speed decreased, the heat input to the molten pool increased while the cooling rate slowed, resulting in larger regions of constitutional supercooling. This condition promotes the nucleation and growth of EGs, leading to a mixed microstructure of EGs and CGs at low welding speeds. In contrast, higher welding speeds reduce heat input and accelerate cooling, causing the temperature gradient within the molten pool to dominate directional solidification and yielding an FZ microstructure primarily composed of CGs [48]. The defocus amount also influenced the grain morphology. At a defocus of 0 mm, the highly concentrated laser energy density generated vigorous molten-pool turbulence, readily forming solute-driven compositional supercooling zones and thereby promoting EG nucleation. As the defocus amount increased to +1 mm, the laser energy became more diffuse and the molten-pool flow stabilized. This stabilization enhanced the conditions for directional solidification, facilitating the steady growth of CGs and driving the gradual evolution of the microstructure toward CG dominance.

3.2. Microhardness of Welded Joints

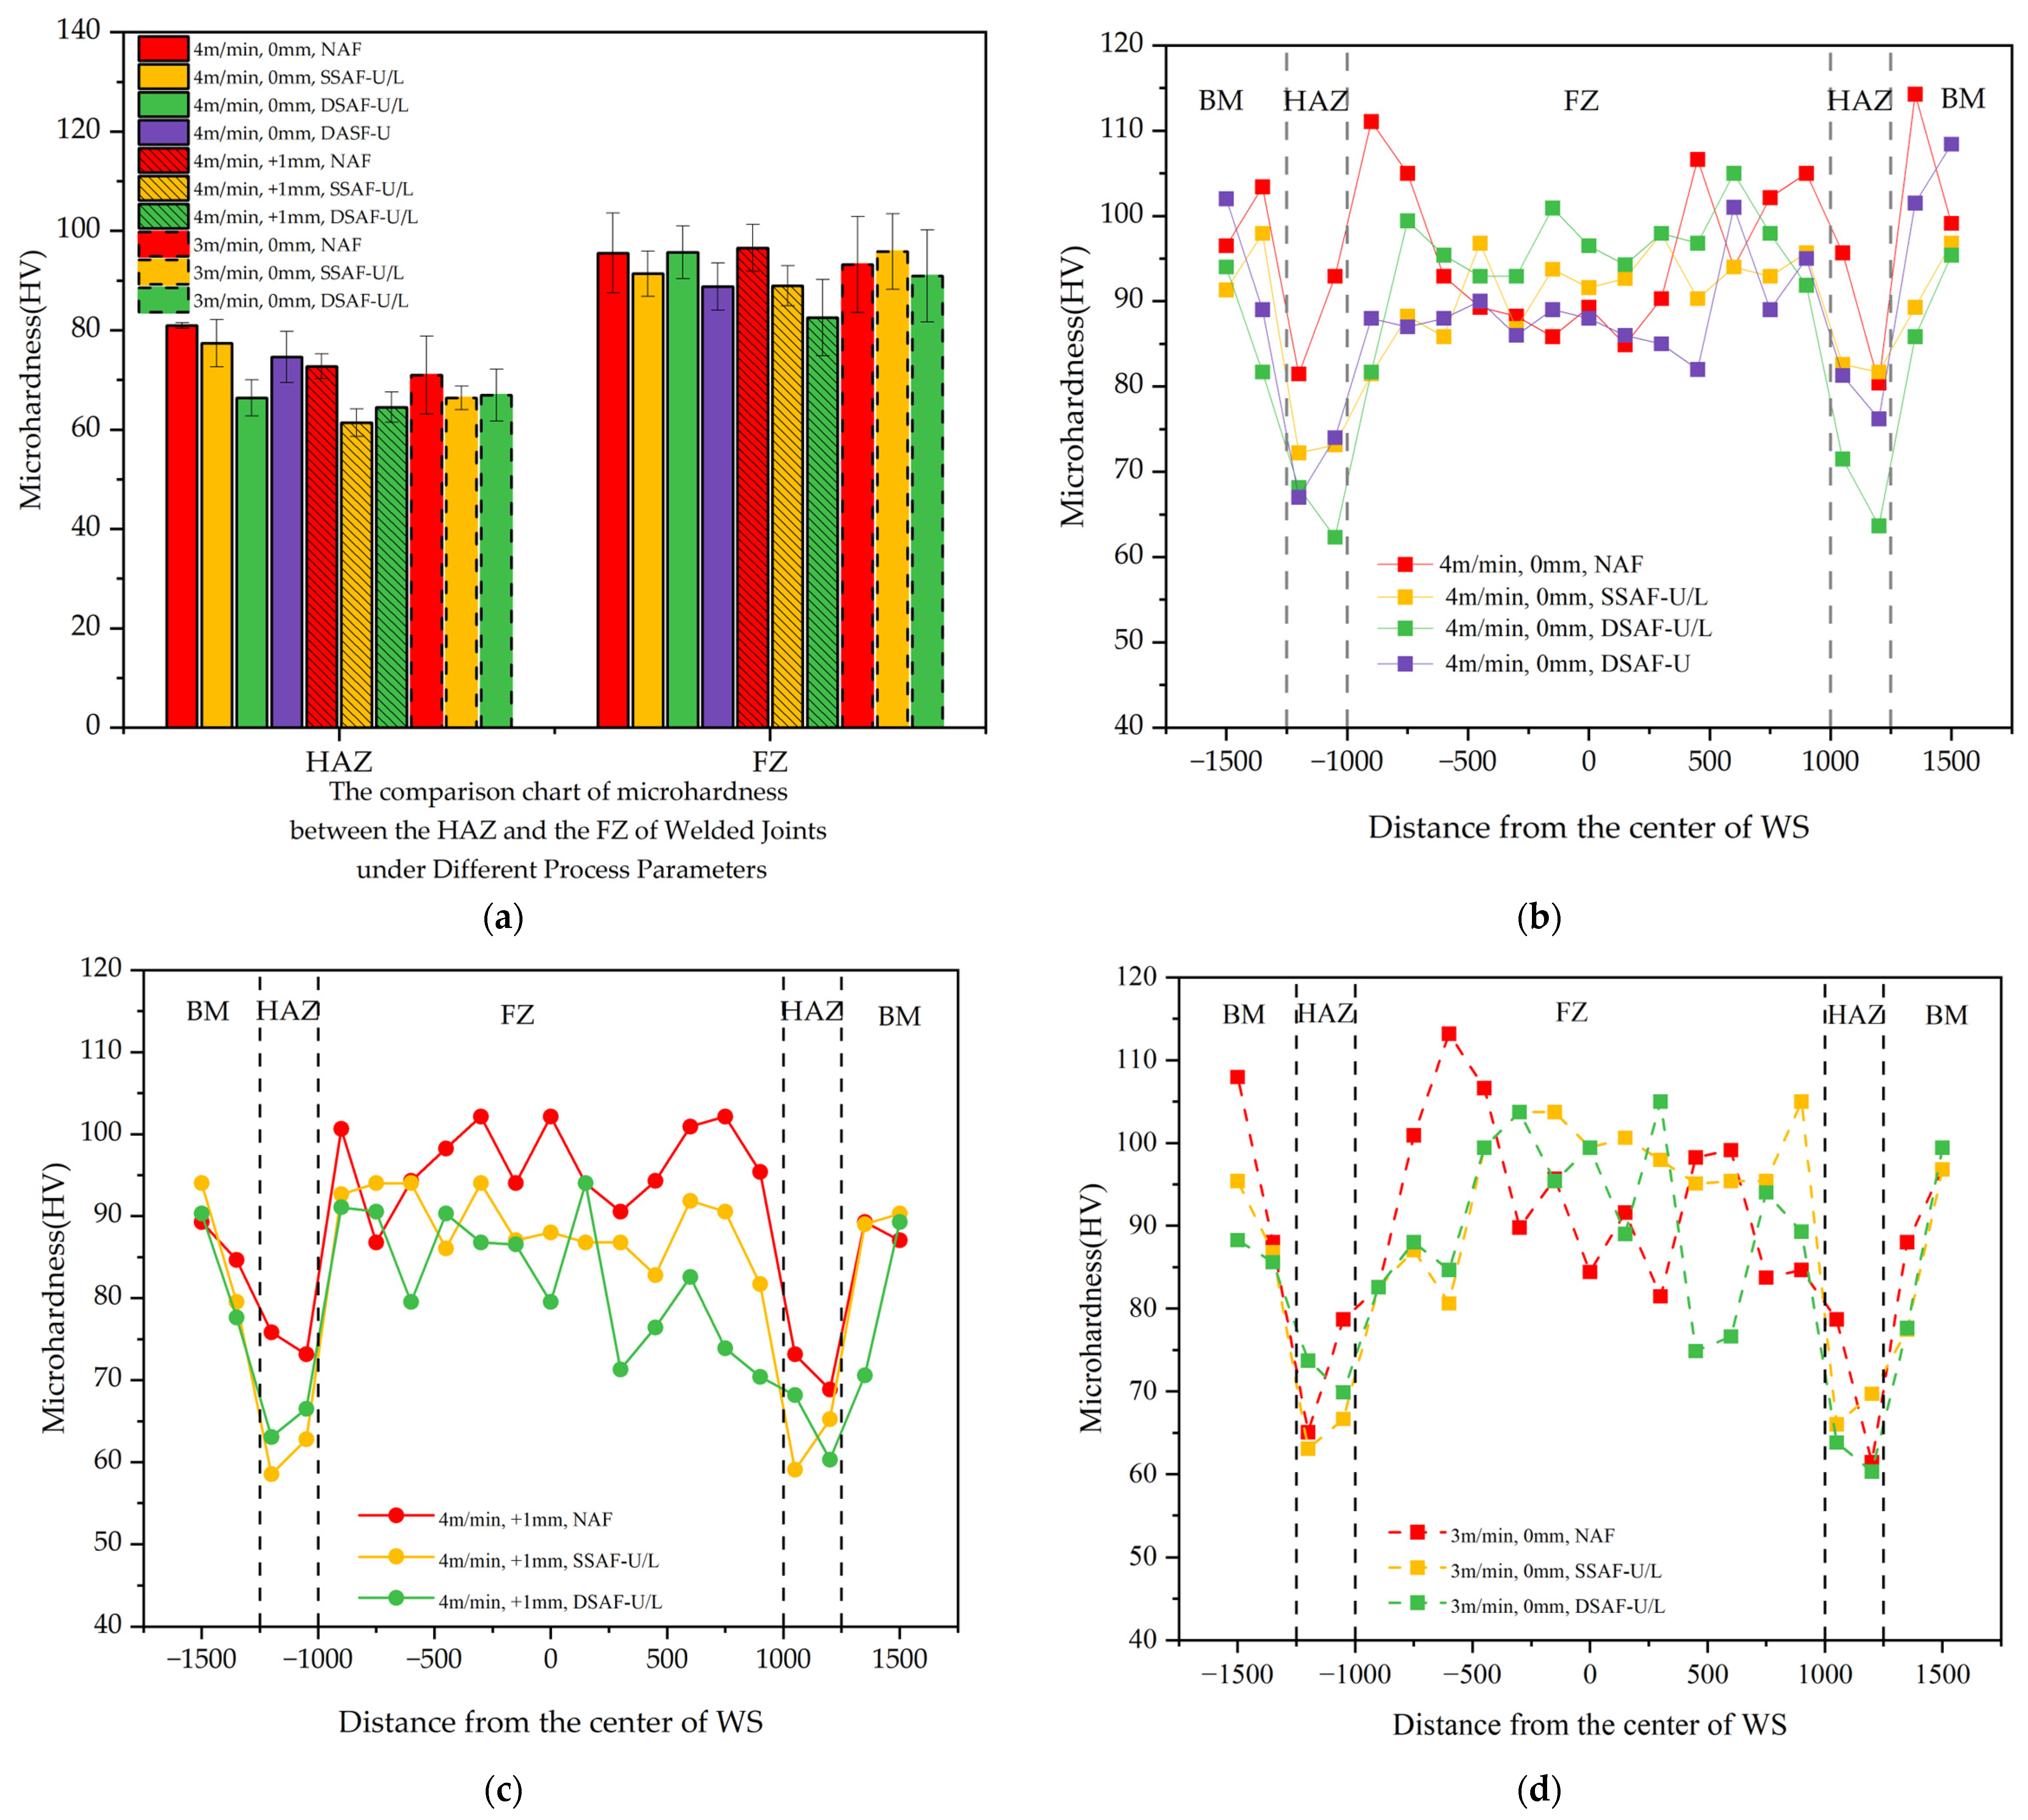
Figure 9 shows the microhardness distribution of the welded seam (WS) in die-cast A356 aluminum alloy under different surface oxidation conditions and welding parameters. The microhardness of the heat-affected zone (HAZ) is significantly lower than that of the fusion zone (FZ). This reduction is due to the fact that although the HAZ does not melt, thermal exposure leads to coarsening of the eutectic Si phase and partial over-aging of the α-Al matrix, decreasing its hardness. In contrast, the molten pool undergoes rapid solidification, producing a refined microstructure that contributes to the higher hardness of the FZ. This observation is in line with studies by Mahmoud et al. [23], who reported a decrease in HAZ hardness due to the over-aging of the α-Al matrix and the dissolution of strengthening phases. Furthermore, as shown in Figure 8a, the welded joint with NAF exhibited relatively high microhardness. The FZ hardness increased with welding speed and reached its maximum when the defocus amount was 0 mm.
When comparing the samples with SSAF and DSAF, the latter absorbed more laser energy, leading to a more intense thermal cycle, which facilitates grain refinement and encourages the formation of equiaxed grains. At the same time, elemental burnout becomes more pronounced. These effects contribute to the observed reduction in HAZ microhardness, and the findings are consistent with those reported by Abioye et al. [49]. However, at a defocus amount of +1 mm, the lower energy density reduced the difference in absorbed energy between SSAF and DSAF. As a result, the effective heat input and the degree of Mg burnout became comparable, leading to similar HAZ hardness for both sample types. A similar trend was observed at a welding speed of 3 m/min. The extended laser–material interaction time increased the total heat input; however, despite the inherently higher energy absorption of DSAF, the effective heat input and extent of Mg burnout were nearly equivalent to those of SSAF. Consequently, the difference in HAZ microhardness between the two conditions became negligible, as further supported by the results of Akhter et al. [16], who observed a similar trend in the HAZ hardness of laser-welded aluminum alloys under varied surface oxidation conditions.

3.3. Tensile Property

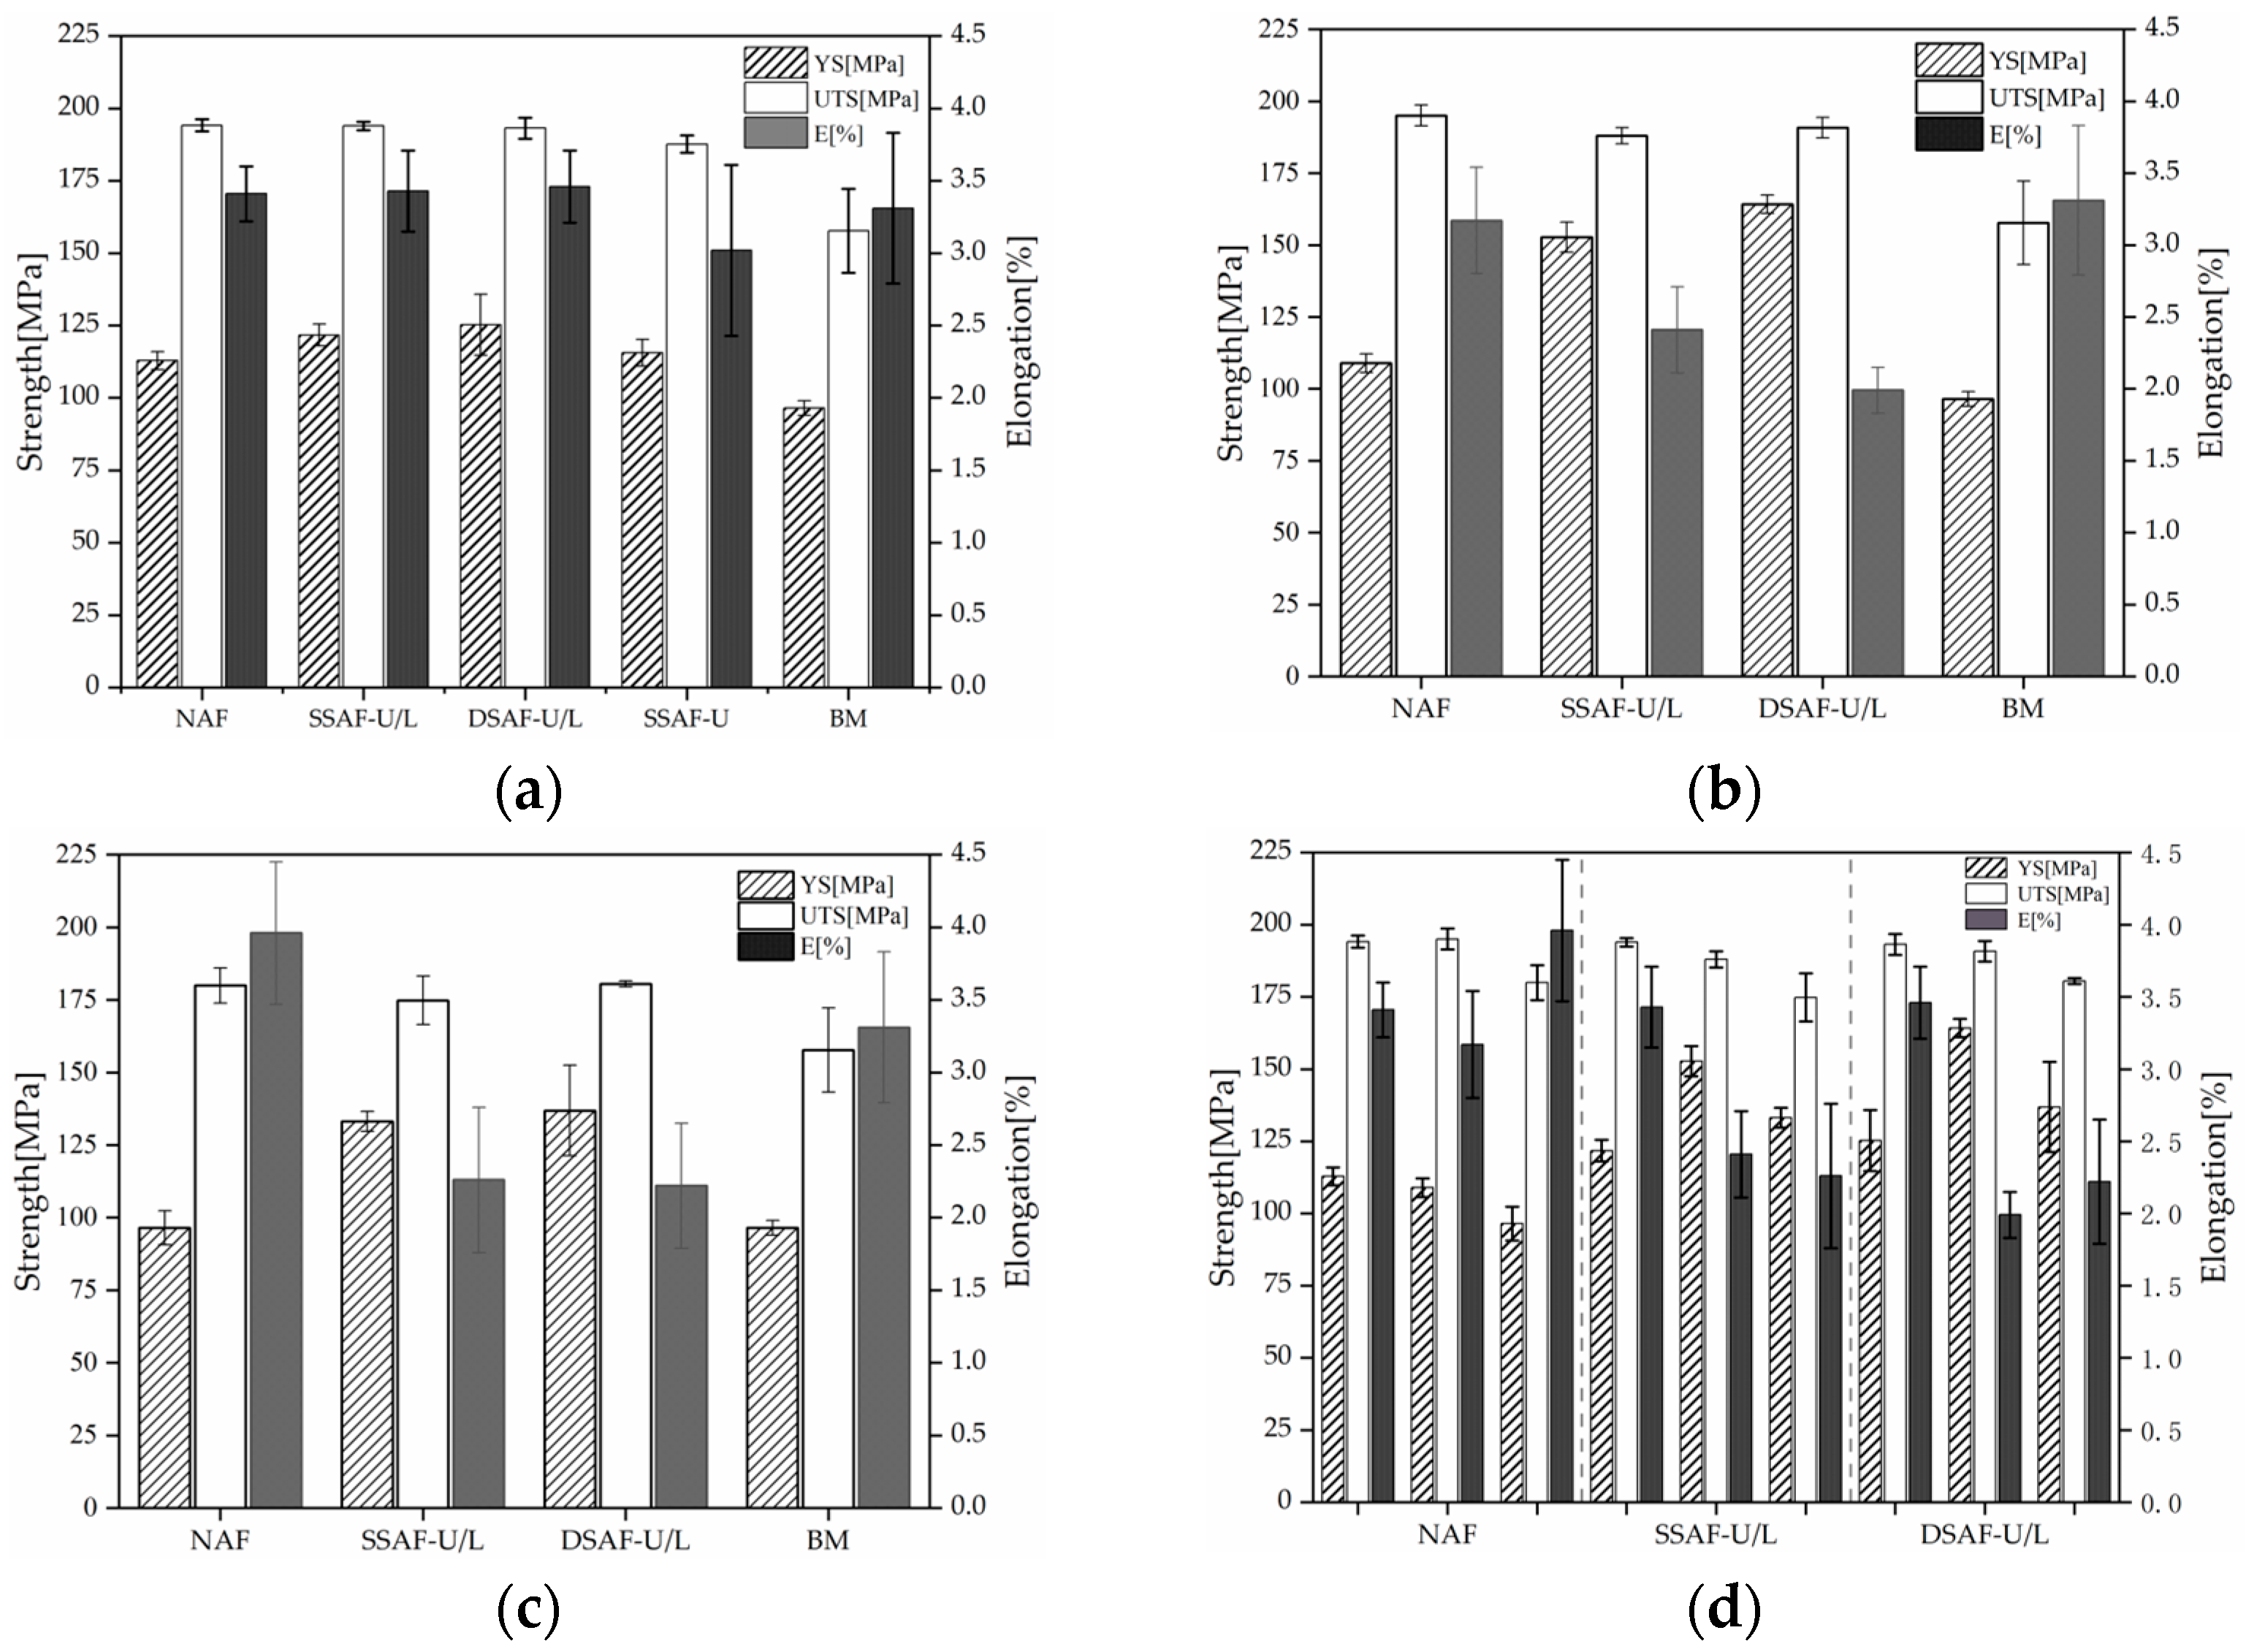
Tensile testing was conducted to evaluate the effects of anodized films and welding parameters on the mechanical performance of laser-welded joints. Figure 10 presents the yield strength (YS), ultimate tensile strength (UTS), and elongation (E) of joints produced under various welding conditions, while Table 5 summarizes the fracture locations for all tensile specimens as a function of surface oxidation state and welding parameters. The results show that both YS and UTS of the welded joints exceed those of the BM, whereas the elongation is markedly reduced. Fracture consistently occurs in either the BM or the heat-affected zone (HAZ).
The tensile results demonstrated that both the surface oxidation condition and welding parameters significant influence joint performance. For joints containing anodized films (SSAF and DSAF), the YS was noticeably higher than that of NAF, with DSAF producing the most pronounced strengthening effect. In contrast, the UTS showed no substantial variation among the different surface oxidation conditions. As discussed earlier, the anodized films do not fully melt during welding but instead remain as rigid second-phase particles within the molten pool. These particles impede dislocation motion, thereby increasing the YS. Because DSAF introduces a larger quantity of such strengthening phases, its YS enhancement is more significant. This localized strengthening shifts plastic deformation toward the softer BM, ultimately leading to BM-dominated fracture behavior [50,51]. Since fracture is governed by the BM rather than the FZ, the UTS exhibits limited sensitivity to surface oxidation conditions.
The influence of the anodized films on elongation (E) was strongly dependent on the welding parameters. At a welding speed of 4 m/min with a defocus amount of +1 mm, or at 3 m/min with a defocus amount of 0 mm, the presence of anodized films led to a reduction in E, with specimens containing DSAF exhibiting lower elongation than those with SSAF. However, at a welding speed of 4 m/min and a defocus amount of 0 mm, the anodized films exerted minimal influence on E. As shown in Table 3, the anodized films substantially increased porosity in the molten pool, promoting gas entrapment and pore formation, which in turn reduced elongation. At higher welding speeds with a defocus amount of 0 mm, the increase in porosity was limited; consequently, the differences in E among NAF, SSAF, and DSAF became negligible.
As shown in Figure 10, both welding speed and defocus amount exert a pronounced influence on the mechanical properties of the joints. For specimens with NAF, a decrease in welding speed or an increase in defocus amount led to reductions in YS, UTS, and E, primarily because slower cooling rates and increased porosity in the molten pool degrade mechanical performance. This is consistent with the findings of Wan et al. [4], who observed similar trends in TIG-welded 2219-T8 aluminum alloy joints, where slower welding speeds resulted in greater porosity and lower mechanical properties due to prolonged heat exposure. In contrast, for specimens with SSAF and DSAF, the same variations in welding parameters resulted in notable increases in YS, whereas UTS and E continued to decline. This behavior is attributed to the enhanced dispersion of the anodized films within the molten pool, which strengthens the localized microstructure and increases YS. However, the associated rise in porosity adversely affects UTS and E, leading to their reduction.
Table 5 summarizes the fracture locations of all tensile specimens under various welding parameters and surface oxidation conditions. The results show that fractures predominantly occurred in BM or HAZ, with clear differences in fracture behavior under different surface oxidation conditions. Compared with NAF, specimens with DSAF were more likely to fracture in the BM, whereas fractures in specimens with SSAF tended to shift toward the FZ. This behavior occurs because the anodized film does not completely dissolve during welding; instead, it remains as rigid reinforcing particles within the FZ, thereby increasing its strength and causing fracture to initiate in the relatively weaker BM, a trend that is more pronounced in DSAF specimens. In contrast, SSAF introduces asymmetric effects, whereby the NAF side develops noticeable depression and oxide particles preferentially accumulate on one side of the FZ, as evidenced by the higher O content on the anodized film side (1.31 ± 0.11 wt%) compared with the NAF side (0.78 ± 0.18 wt%). Such asymmetry produces local variations in weld microstructure and mechanical properties, creating stress concentration zones in the weaker NAF side or in porous regions of the FZ. Consequently, fractures in SSAF specimens typically occur in FZ or HAZ.
Additionally, welding speed and defocus amount significantly influenced on fracture locations. At lower welding speeds, fractures were more likely to occur in the FZ, while at higher speeds, they shifted toward the BM in both NAF and SSAF specimens. This trend is attributed to the increased deformation and depression of the molten pool at lower speeds, which makes the FZ more prone to failure. In contrast, higher welding speeds reduce deformation and improve FZ strength, resulting in fractures occurring more frequently in the relatively weaker BM. In comparison, the defocus amount had minimal impact on fracture location.
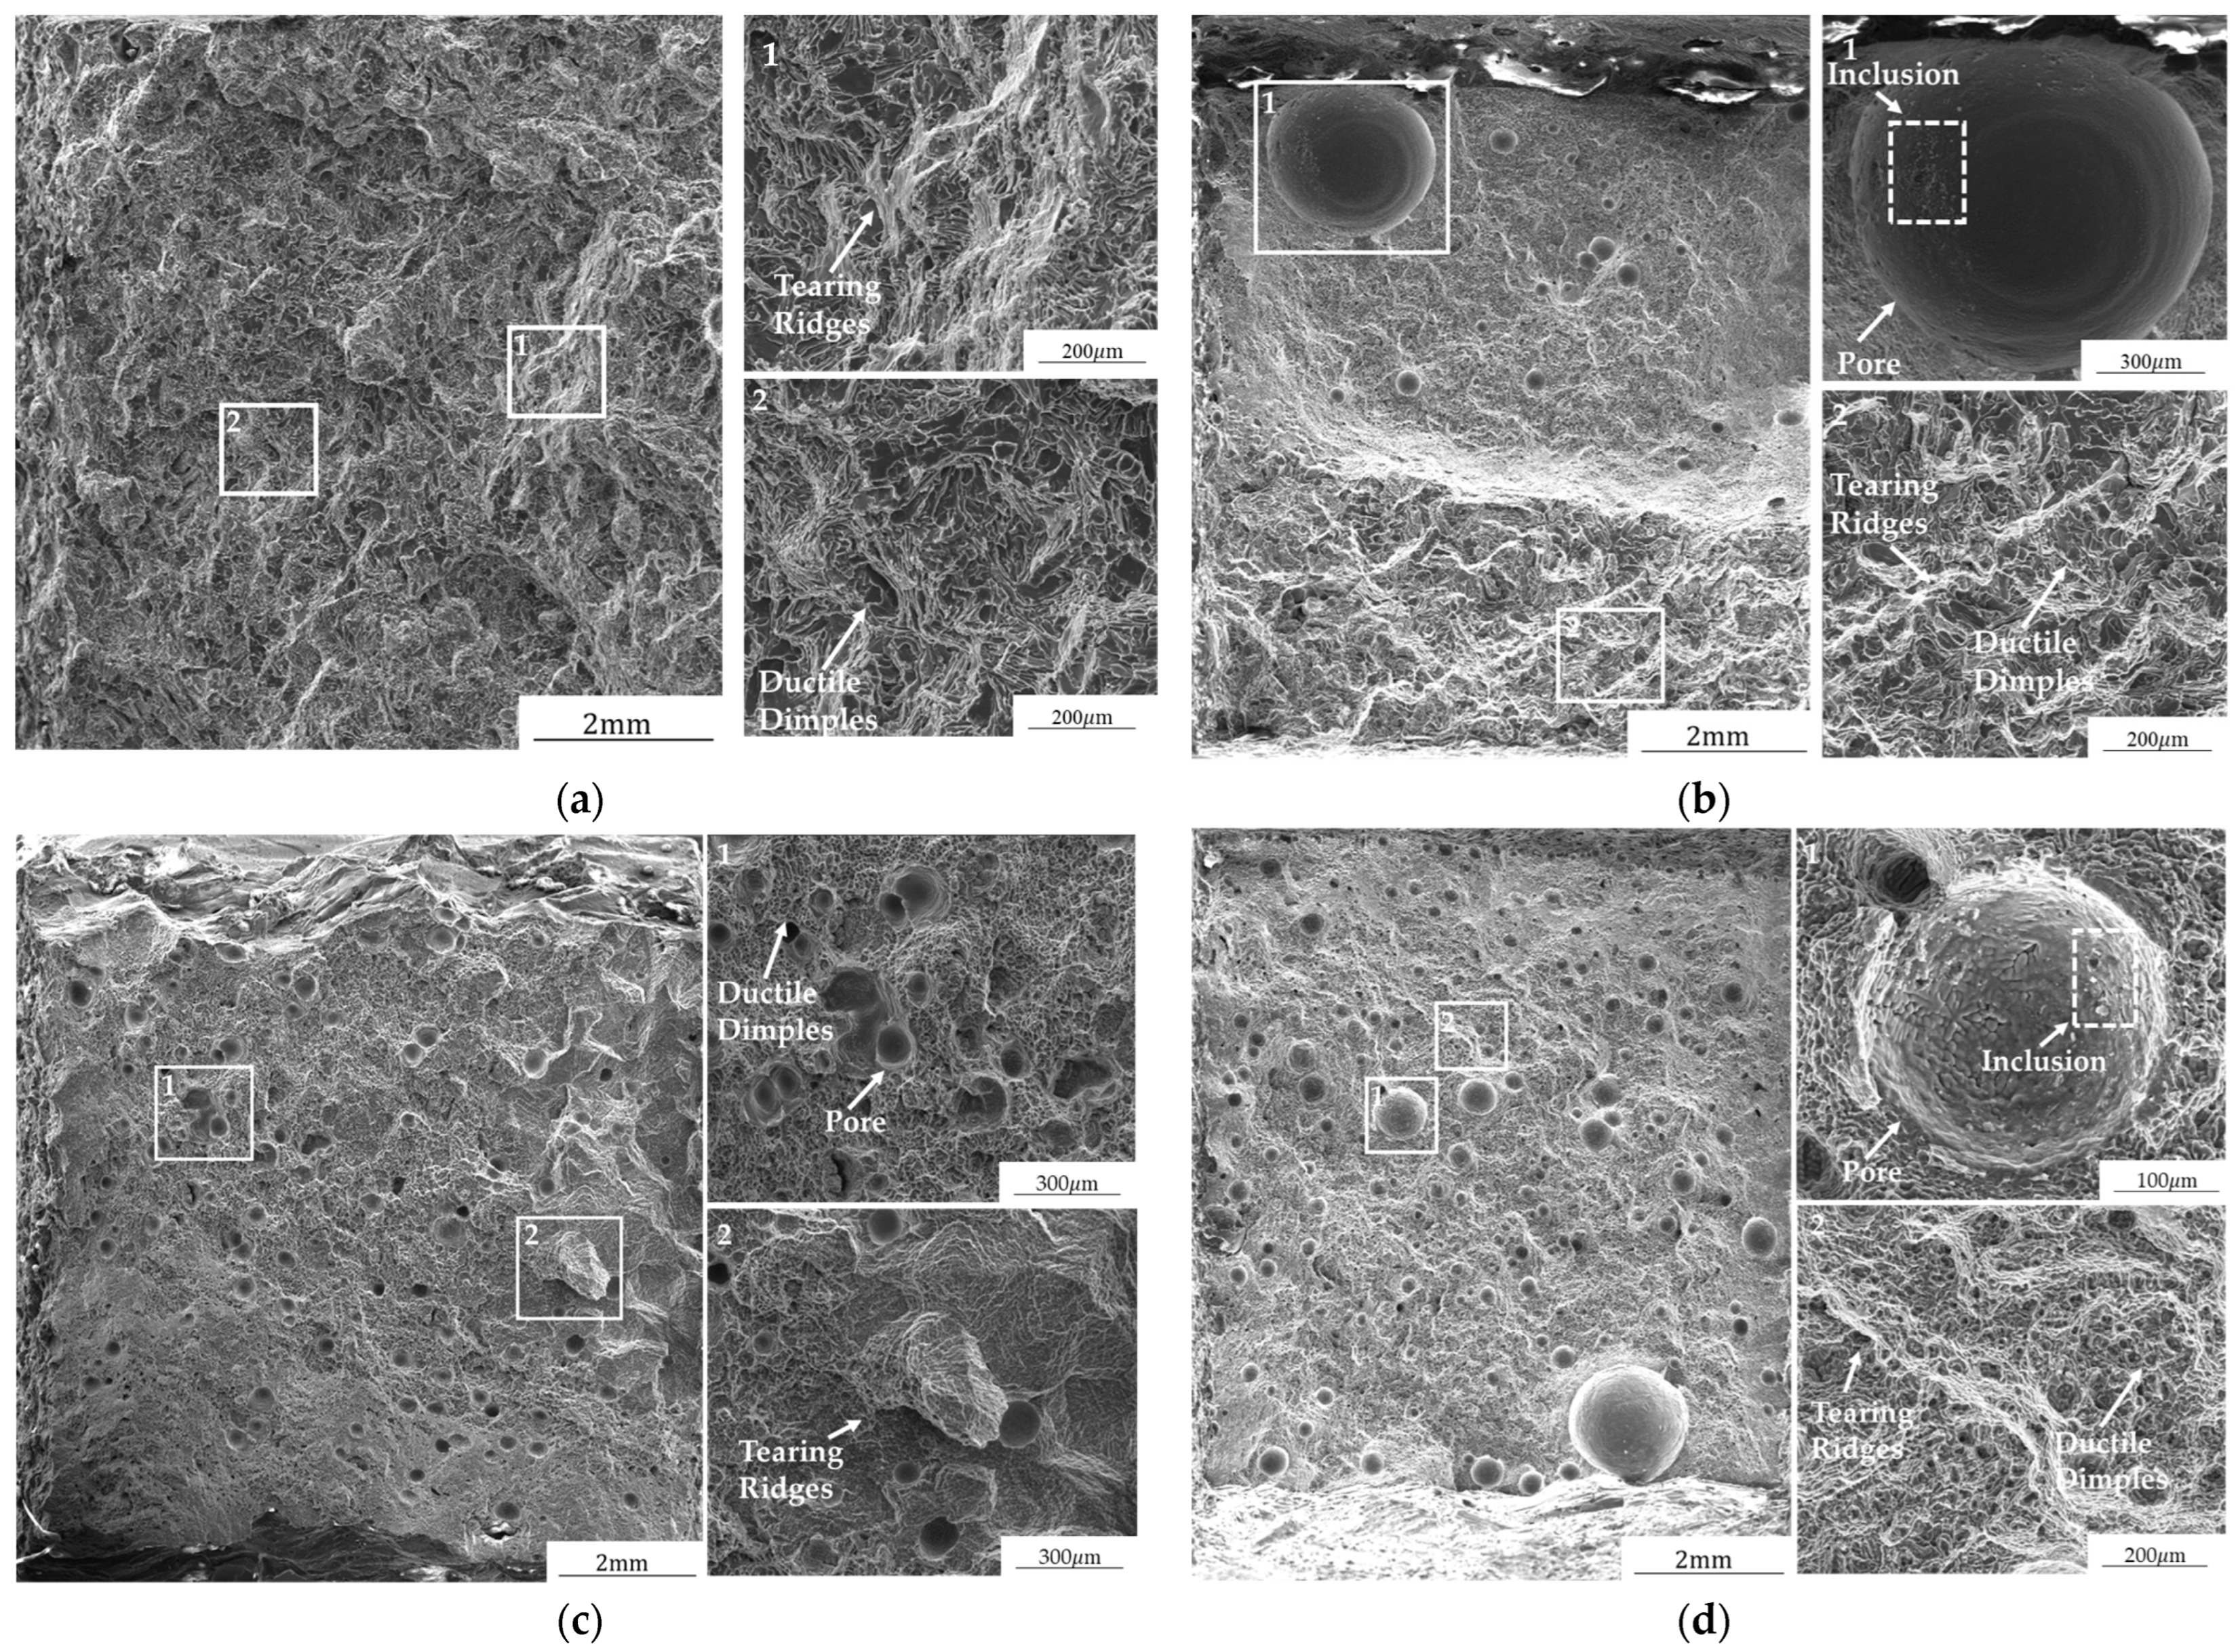
Figure 11 presents representative fracture surface morphologies of aluminum alloy welded joints from the BM, HAZ, and FZ. As shown in Figure 11a, the BM exhibits a mixed fracture mode characterized by ductile dimples and brittle cleavage facets. The dimples are unevenly distributed, displaying distinct tearing ridges. Figure 11b shows the fracture morphology of specimens with anodized films, where the fracture path traverses both the HAZ and FZ. The fracture surface is highly irregular, featuring pronounced bends and step-like features. Numerous gas pores are observed, some of which are relatively large and contain oxide inclusions. In Figure 11c, the FZ fracture morphology of specimens with NAF is dominated by densely distributed dimples that cover most of the fracture surface. Small gas pores are also present, but their edges are smooth, with no evidence of oxide inclusions. In contrast, Figure 11d illustrates the FZ fracture morphology of specimens with anodized films, characterized by numerous large and unevenly distributed gas pores. Many of these pores contain oxide inclusions, and “river-like” features associated with cleavage fracture are visible in certain regions.

4. Conclusions

This study investigates the effect of anodizing and welding parameters on the microstructure and mechanical properties of laser-welded A356 aluminum alloy. The key findings are summarized as follows:
(1)
Anodizing fundamentally alters weld formation, reducing the FZ size by approximately 5%–15% and significantly increasing porosity from 3.09% (NAF) to 9.25% (DSAF), owing to its thermal-barrier effect, energy consumption during film decomposition, and hydrogen generation.
(2)
Welding parameters regulate heat input and melt-pool flow, with lower welding speeds (3 m/min) leading to a 15% increase in fusion zone (FZ) area and a 2%–5% increase in porosity. The larger positive defocusing amount further amplifies these effects, whereas optimized conditions (welding speed of 4 m/mins and defocusing amount of 0 mm) enhance gas evacuation and effectively suppress pore formation, reduce porosity by 1%–2%, with values of 4.01% for NAF, 4.94% for SSAF, and 4.62% for DSAF.
(3)
Anodizing fundamentally governs elemental redistribution and oxygen incorporation in the weld seam. Anodized films increase oxygen content by 10%–15%, with DSAF samples exhibiting the highest oxygen content at 1.31 wt%, compared to 0.78 wt% in NAF samples, as shown in Figure 11. While welding parameters exert limited influence on major alloying elements but strongly regulate oxygen behavior through their effects on melt-pool dynamics and atmospheric interaction.
(4)
Anodizing reduces HAZ hardness by amplifying thermal softening and Mg burnout, while welding parameters primarily modulate FZ hardness through energy density and melt-pool agitation, with the highest hardness achieved at the welding speed of 4 m/mins and defocusing amount of 0 mm, with a maximum average hardness value of 95.66 ± 5.32 HV.
(5)
Anodizing enhances FZ yield strength (10%–15% higher than NAF) through retained oxide particles but reduces ductility via increased porosity. Optimized welding parameters (welding speed of 4 m/mins and defocusing amount of 0 mm) enhance strength and delay fracture toward the BM, whereas lower speeds or positive defocus increase porosity, reduce ductility, and promote FZ/HAZ failure.
This study investigated two welding speeds (3 m/min and 4 m/min) and two defocus settings (0 mm and +1 mm) under different surface oxidation conditions (NAF, SSAF, DASF). The results indicate that the best welding performance was achieved under the DSAF at 4 m/min welding speed and 0 mm defocusing amount, highlighting the synergistic effect of anodized film and optimized welding parameters. Nevertheless, the study has limitations, as exploring additional parameter combinations could provide further insights. Additionally, only sulfuric acid anodizing was investigated; future research should include other anodizing techniques, such as chromic acid anodizing, to assess their influence on welding performance. Further studies should also examine the impact of anodized film thickness on welding performance and durability. Long-term studies are also necessary to assess the corrosion resistance and mechanical behavior of welded joints with anodized films under cyclic loading and elevated temperatures.

Author Contributions

Conceptualization, B.Z. and E.L.; methodology, B.Z.; software, H.Y., J.L., T.F. and G.C.; validation, B.Z.; formal analysis, H.Y. and J.L.; investigation, H.Y., T.F. and G.C.; resources, B.Z. and E.L.; data curation, H.Y. and T.F.; writing—original draft preparation, B.Z. and H.Y.; writing—review and editing, E.L.; visualization, H.Y. and G.C.; supervision, B.Z.; project administration, E.L.; funding acquisition, B.Z. and E.L. All authors have read and agreed to the published version of the manuscript.

Funding

This research was funded by the Natural Science Foundation of Jiangsu Province, grant number BK20230632, the Natural Science Foundation for Colleges and University in Jiangsu Province, grant number 20KJB40009 and the National Natural Science Foundation of China, grant number 52505466.

Institutional Review Board Statement

Not applicable.

Informed Consent Statement

Not applicable.

Data Availability Statement

Data is contained within this article.

Conflicts of Interest

The authors declared no potential conflict of interest with respect to the research, authorship, and/or publication of this article.

References

  1. Wu, D.Y.; Li, S.; Ma, S.D.; Wang, L.S.; Kang, J.; Dong, H.C.; Wang, Q.; Wang, Y.D.; Su, R. Multi-scale investigation of A356 alloy with trace Ce addition processed by laser surface remelting. Mater. Charact. 2022, 188, 111895. [Google Scholar] [CrossRef]
  2. Wang, J.N.; Chen, X.; Yang, L.F.; Zhang, G.C. Effect of preheat & post-weld heat treatment on the microstructure and mechanical properties of 6061-T6 aluminum alloy welded sheets. Mater. Sci. Eng. A 2022, 841, 143081. [Google Scholar] [CrossRef]
  3. Chen, C.; Sun, G.R.; Du, W.B.; Li, Y.; Fan, C.L.; Zhang, H.J. Influence of heat input on the appearance, microstructure and microhardness of pulsed gas metal arc welded Al alloy weldment. J. Mater. Res. Technol. 2022, 21, 121–130. [Google Scholar] [CrossRef]
  4. Wan, Z.; Meng, D.; Zhao, Y.; Zhang, D.K.; Wang, Q.; Shan, J.G.; Song, J.L.; Wang, G.Q.; Wu, A.P. Improvement on the tensile properties of 2219-T8 aluminum alloy TIG welding joint with weld geometry optimization. J. Manuf. Process. 2021, 67, 275–285. [Google Scholar] [CrossRef]
  5. Jiang, N.; Chen, K.; Jiang, M.; Chen, X.; Wang, Z.; Su, X.; Wang, Z.B.; He, P.; Peng, G.C.; Chen, Y.B. Complete-joint-penetration vacuum laser beam welding of 20 mm thick aluminum alloy with beam oscillation. Opt. Laser Technol. 2025, 192, 113476. [Google Scholar] [CrossRef]
  6. Hu, Y.Y.; Xiong, Z.; Yan, F.; Liu, Z.H.; Zhao, Z.S.; Wang, C.M. Investigation of collapse defect suppression in 20 mm-thick plate laser penetration welding via beam energy spatial control. J. Manuf. Process. 2025, 151, 408–425. [Google Scholar] [CrossRef]
  7. Li, T.; Li, F.; Gu, Y.; Cai, Y. Study on Optimization of Welding Process Parameters for Cast Aluminum A356 Based on Taguchi Method. Hot Work. Technol. 2016, 45, 43–47. [Google Scholar]
  8. Akhter, R.; Ivanchev, L.; Burger, H.P. Effect of pre/post T6 heat treatment on the mechanical properties of laser welded SSM cast A356 aluminium alloy. Mater. Sci. Eng. A 2016, 447, 192–194. [Google Scholar] [CrossRef]
  9. Rehbein, D.H.; Decker, I.; Wohlfahrt, H. Laser Beam Welding of Aluminum Die Casting with Reduced Pore Formation; U.S. Department of Energy, Office of Scientific and Technical Information: Oak Ridge, TN, USA, 1994.
  10. Karami, S.; Yousefieh, M.; Naffakh-Moosavy, H. The effect of laser welding parameters on mechanical properties and microstructure evolution of multi-layered 6061 aluminum alloy. J. Adv. Join. Process. 2025, 11, 100275. [Google Scholar]
  11. Alfieri, V.; Cardaropoli, F.; Caiazzo, F.; Sergi, V. Investigation on porosity content in 2024 aluminum alloy welding by Yb:YAG disk laser. Adv. Mater. Res. 2011, 383–390, 6265–6269. [Google Scholar] [CrossRef]
  12. Ray, M.J.; Maijer, D.M.; Dancoine, L. Constitutive behavior of as-cast A356. Mater. Sci. Eng. A 2012, 548, 195–205. [Google Scholar] [CrossRef]
  13. Ray, M.J.; Maijer, D.M. Analysis and modelling of a rotary forming process for cast aluminium alloy A356. J. Mater. Process. Technol. 2015, 226, 188–204. [Google Scholar] [CrossRef]
  14. Trometer, N.; Chen, B.W.; Moodispow, M.; Cai, W.; Rinker, T.; Kamat, S.; Velasco, Z.; Luo, A.A. Modeling and validation of hydrogen porosity formation in aluminum laser welding. J. Manuf. Process. 2024, 124, 877–890. [Google Scholar] [CrossRef]
  15. Tao, W.; Yang, S.L. Weld zone porosity elimination process in remote laser welding of AA5182-O aluminum alloy lap-joints. J. Mater. Process. Technol. 2020, 286, 116826. [Google Scholar] [CrossRef]
  16. Abioye, T.E.; Zuhailawati, H.; Aizad, S.; Anasyida, A. Geometrical, microstructural and mechanical characterization of pulse laser welded thin sheet 5052-H32 aluminium alloy for aerospace applications. Trans. Nonferrous Met. Soc. China 2019, 29, 667–679. [Google Scholar] [CrossRef]
  17. Cao, X.L.; Wang, G.; Xing, C.; Tan, C.W.; Jiang, J. Effect of process parameters on microstructure and properties of laser welded joints of aluminum/steel with Ni/Cu interlayer. Trans. Nonferrous Met. Soc. China 2021, 31, 2277–2286. [Google Scholar] [CrossRef]
  18. Subbaiah, K.; Geetha, M.; Shanmugarajan, B.; Rao, S. Effect of welding speed on CO2 laser beam welded aluminum-magnesium alloy 5083 in H321 condition. Adv. Mater. Res. 2013, 685, 259–263. [Google Scholar] [CrossRef]
  19. Xu, H.; Shao, J.; Han, L.; Wang, R.; Jiang, Z.; Miao, G.; Zhang, Z.; Cheng, X.; Bai, M. Investigation of the Microstructure and Mechanical Properties of Heat-Treatment-Free Die-Casting Aluminum Alloys Through the Control of Laser Oscillation Amplitude. Materials 2025, 18, 1194. [Google Scholar] [CrossRef]
  20. Theron, M.; Burger, H.; Ivanchev, L.; Rooyen, C.V. Property and Quality Optimization of Laser Welded Rheo-Cast F357 Aluminum Alloy. Solid State Phenom. 2012, 192–193, 167–172. [Google Scholar] [CrossRef]
  21. Gilbert, C.R. Laser Beam Welding of Semi-Solid Rheocast Aluminium Alloy 2139. Adv. Mater. Res. 2014, 1019, 81–89. [Google Scholar] [CrossRef]
  22. Zhang, S.D.; Chen, Y.X.; Huang, H.; Gao, Z.Q.; Wang, Q.; Hou, L.F.; Wei, Y.H. Dual enhancement of wear and corrosion resistance in aluminum alloy anodic oxide films through glycerol addition. Appl. Surf. Sci. 2025, 711, 164071. [Google Scholar] [CrossRef]
  23. Mahmoud, Z.A.; Safaei, B.; Asmael, M.; Kenevisi, M.S.; Sahmanl, S.; Karimzadeh, S.; Jen, T.C.; Hui, D. Impact of process parameters on mechanical and microstructure properties of aluminum alloys and aluminum matrix composites processed by powder-based additive manufacturing. J. Manuf. Process. 2025, 146, 79–158. [Google Scholar] [CrossRef]
  24. Xu, J.N.; Song, Y.W.; He, K.Z.; Zhang, H.; Dang, K.H.; Cai, Y.; Han, E.H. Role of oxidants in the anodic oxidation of 2024 aluminum alloy by dominating anodic and cathodic processes. Colloids Surf. A Physicochem. Eng. Asp. 2024, 703, 135229. [Google Scholar] [CrossRef]
  25. Zhang, F.; Ornek, C.; Nilsson, J.O.; Pan, J.S. Anodisation of aluminium alloy AA7075—Influence of intermetallic particles on anodic oxide growth. Corros. Sci. 2020, 164, 108319. [Google Scholar] [CrossRef]
  26. Li, D.; Slater, C.; Cai, H.; Hou, X.; Li, Y.; Wang, Q. Joining Technologies for Aluminium Castings—A Review. Coatings 2023, 13, 958. [Google Scholar] [CrossRef]
  27. Nunes, R.; Faes, K.; De Waele, W.; Simar, A.; Verlinde, W.; Lezaack, M.; Sneyers, W.; Arnhold, J. A Review on the Weldability of Additively Manufactured Aluminium Parts by Fusion and Solid-State Welding Processes. Metals 2023, 13, 1724. [Google Scholar] [CrossRef]
  28. Liu, H.; Zhao, H.X.; Zhao, Y.F.; Peng, Y.J.; Xu, M.J.; Chen, X.H. Interfacial bonding mechanisms in laser welding of 2024 Al alloy and continuous CFR-PEEK via adjustable ring-mode laser beam. J. Manuf. Process. 2025, 153, 757–773. [Google Scholar] [CrossRef]
  29. Sun, T.Z.; Franciosa, P.; Ceglarek, D. Effect of focal position offset on joint integrity of AA1050 battery busbar assembly during remote laser welding. J. Mater. Res. Technol. 2021, 14, 2715–2726. [Google Scholar] [CrossRef]
  30. Jiang, J.W.; Oliveira, J.P.; Yang, J.; Zheng, M.; Li, H.Y.; Xu, W.H.; Wu, L.Q.; Dou, T.Y.; Wang, R.J.; Tan, C.W.; et al. Effect of defocusing distance on interfacial reaction and mechanical properties of dissimilar laser Al/steel joints with a porous high entropy alloy coating. Mater. Charact. 2024, 210, 113751. [Google Scholar] [CrossRef]
  31. Jiang, Y.C.; Cheng, Y.H.; Zhang, X.C.; Yang, J.Y.; Yang, X.Y.; Cheng, Z.H. Simulation and experimental investigations on the effect of Marangoni convection on thermal field during laser cladding process. Optik 2020, 203, 164044. [Google Scholar] [CrossRef]
  32. Bunaziv, I.; Akselsen, O.M.; Ren, X.B.; Nyhus, B.; Eriksson, M. Laser Beam and Laser-Arc Hybrid Welding of Aluminium Alloys. Metals 2021, 11, 1150. [Google Scholar] [CrossRef]
  33. Zhu, B.W.; Zhu, T.Y.; Liu, J.; Zhuang, B.L.; Yuan, H.W.; Zhang, H.Y.; Pan, H.J.; Liu, E.L. Microstructure and Hardness Analysis of Laser Welded A357 Semisolid Rheocasting Alloy. J. Mater. Eng. Perform. 2025. [Google Scholar] [CrossRef]
  34. Olabode, M.; Kah, P.; Hiltunen, E.; Martikainen, J. Effect of Al2O3 film on the mechanical properties of a welded high-strength (AW 7020) aluminium alloy. Proc. Inst. Mech. Eng. Part B J. Eng. Manuf. 2015, 230, 2092–2102. [Google Scholar] [CrossRef]
  35. Liu, B.W.; Wang, C.M.; Mi, G.Y.; Wang, J.; Zhang, W.; Zhang, X. Oxygen content and morphology of laser cleaned 5083 aluminum alloy and its influences on weld porosity. Opt. Laser Technol. 2021, 140, 107031. [Google Scholar] [CrossRef]
  36. Chen, C.; Zheng, K.Y.; Zhang, Y.; Gao, M. Effect of kerf characteristics on microstructures and properties of laser cutting–welding of AA2219 aluminum alloy. J. Mater. Res. Technol. 2021, 15, 4147–4160. [Google Scholar] [CrossRef]
  37. Wang, W.; Jiang, Q.Y.; Liu, W.J.; Ji, X.C.; Xing, F.; Zhang, K.; Wang, J. Effect of laser cleaning the anodized surface of 5083 aluminum alloy on weld quality. Weld. World 2024, 68, 1281–1295. [Google Scholar] [CrossRef]
  38. Takahashi, K.; Sato, S. Porosity reduction in CO2 laser welding of aluminium alloys-Influence of penetration, joint, oxygen gas and oxide films. Weld. Int. 2000, 14, 439–446. [Google Scholar] [CrossRef]
  39. Zhao, C.X.; Kwakernaok, C.; Pan, Y.; Richardson, I.M.; Saldl, Z.; Kenjeres, S.; Kleijn, C. The effect of oxygen on transitional Marangoni flow in laser welding. Acta Mater. 2010, 58, 3154–3162. [Google Scholar] [CrossRef]
  40. Zhu, B.W.; Zanella, C. Hardness and corrosion behaviour of anodised Al-Si produced by rheocasting. Mater. Des. 2019, 173, 107764. [Google Scholar] [CrossRef]
  41. Zhu, B.W.; Fedel, M.; Andersson, N.; Leiosner, P.; Deflorian, F.; Zanella, C. Effect of Si Content and Morphology on Corrosion Resistance of Anodized Cast Al-Si Alloys. J. Electrochem. Soc. 2017, 164, 435–441. [Google Scholar] [CrossRef]
  42. Gu, C.; Lu, Y.; Miao, J.S.; Klarner, A.; Yan, X.Y.; Luo, A.A. Predicting grain structure in high pressure die casting of aluminum alloys: A coupled cellular automaton and process model. Comput. Mater. Sci. 2019, 161, 64–75. [Google Scholar] [CrossRef]
  43. Tourret, D.; Karma, A. Growth competition of columnar dendritic grains: A phase-field study. Acta Mater. 2017, 122, 220–235. [Google Scholar] [CrossRef]
  44. Wu, X.; Guan, Z.P.; Yang, H.Y.; Dang, B.X.; Zhang, L.C.; Meng, J.; Luo, C.J.; Wang, C.G.; Cao, K.; Qiao, J.; et al. Sub-rapid solidification microstructure characteristics and control mechanisms of twin-roll cast aluminum alloys: A review. J. Mater. Res. Technol. 2024, 32, 874–914. [Google Scholar] [CrossRef]
  45. Liang, G.F.; Ali, Y.; You, G.Q.; Zhang, M.X. Effect of cooling rate on grain refinement of cast aluminium alloys. Materialia 2018, 3, 113–121. [Google Scholar] [CrossRef]
  46. Nwema, F.M.; Akinlabi, E.T.; Oladijo, O.P.; Krishna, S.; Majumdar, J.D. Microstructure and mechanical properties of sputtered Aluminum thin films. Procedia Manuf. 2019, 35, 929–934. [Google Scholar] [CrossRef]
  47. Han, J.; Shi, Y.; Guo, J.C.; Volodymyr, K.; Le, W.Y.; Dai, F.X. Porosity inhibition of aluminum alloy by power-modulated laser welding and mechanism analysis. J. Manuf. Process. 2023, 102, 827–838. [Google Scholar] [CrossRef]
  48. Jin, Z.Q.; Guo, S.; Zhang, Z.Y.; Li, Z.X.; Yi, H.L.; Xie, G.M. Microstructural evolution and mechanical properties of laser-welded novel Al-Si coated 2 GPa press-hardened steel by weld alloying. Mater. Charact. 2025, 228, 115444. [Google Scholar] [CrossRef]
  49. Lai, W.J.; Ganguly, W.; Suder, W. Study on effect of laser keyhole weld termination regimes and material composition on weld overlap start-stop defects. J. Manuf. Process. 2020, 57, 416–428. [Google Scholar] [CrossRef]
  50. Shehryar Khan, M.; Shahabad, S.I.; Yavuz, M.; Duley, W.W.; Biro, E.; Zhou, Y. Numerical modelling and experimental validation of the effect of laser beam defocusing on process optimization during fiber laser welding of automotive press-hardened steels. J. Manuf. Process. 2021, 67, 535–544. [Google Scholar] [CrossRef]
  51. Indhu, R.; Manish, T.; Vijayaraghavan, L.; Soundarapandian, S. Microstructural evolution and its effect on joint strength during laser welding of dual phase steel to aluminium alloy. J. Manuf. Process. 2020, 58, 236–248. [Google Scholar] [CrossRef]
Figure 1. The schematic diagram of laser beam welding.
Coatings 15 01461 g001
Figure 2. The tensile test specimen.
Coatings 15 01461 g002
Figure 3. The macro morphology of welded joints under different surface oxidation conditions and welding parameters. (a) 4 m/min, 0 mm, NAF; (b) 4 m/min, 0 mm, SSAF-U/L; (c) 4 m/min, 0 mm, DSAF-U/L; (d) 4 m/min, 0 mm, DASF-U; (e) 4 m/min, +1 mm, NAF; (f) 4 m/min, +1 mm, SSAF-U/L; (g) 4 m/min, +1 mm, DSAF-U/L; (h) 3 m/min, 0 mm, NAF; (i) 3 m/min, 0 mm, SSAF-U/L; (j) 3 m/min, 0 mm, DSAF-U/L.
Coatings 15 01461 g003aCoatings 15 01461 g003b
Figure 4. The SEM morphology and element scanning analysis of pore defects.
Coatings 15 01461 g004
Figure 5. The comparison chart of alloying elements in the FZ under surface oxidation conditions and welding parameters.
Coatings 15 01461 g005
Figure 6. The morphology and SEM micrographs of the oxide layer. (a) The comparison of aluminum alloy materials before and after anodization; (b) The cross-section of the samples after anodization.
Coatings 15 01461 g006
Figure 7. The comparison of microstructures at the center of the FZ under different surface oxidation conditions and welding parameters. (a) 4 m/min, 0 mm, NAF; (b) 4 m/min, 0 mm, SSAF-U/L; (c) 4 m/min, 0 mm, DSAF-U/L; (d) 4 m/min, 0 mm, DASF-U; (e) 4 m/min, +1 mm, NAF; (f) 4 m/min, +1 mm, SSAF-U/L; (g) 4 m/min, +1 mm, DSAF-U/L; (h) 3 m/min, 0 mm, NAF; (i) 3 m/min, 0 mm, SSAF-U/L; (j) 3 m/min, 0 mm, DSAF-U/L.
Coatings 15 01461 g007aCoatings 15 01461 g007b
Figure 8. The schematic diagram clearly shows the mechanisms that produced the experimental results. (a) NAF; (b) SSAF; (c) DSAF.
Coatings 15 01461 g008
Figure 9. The bar chart and curves of microhardness for welded joints. (a) The microhardness of different zones; (b) The compare of the microhardness in the 4 m/min and 0 mm under different surface oxidation conditions; (c) The compare of the microhardness in the 4 m/min and +1 mm under different surface oxidation conditions; (d) The compare of the microhardness in the 3 m/min and 0 mm under different surface oxidation conditions.
Coatings 15 01461 g009
Figure 10. Tensile properties of welded joints under different surface oxidation conditions and welding parameters. (a) The compare of the tensile properties in the 4 m/min and 0 mm under different surface oxidation conditions; (b) The compare of the tensile properties in the 4 m/min and +1 mm under different surface oxidation conditions; (c) The compare of the tensile properties in the 3 m/min and 0 mm under different surface oxidation conditions; (d) The compare of the tensile properties under different surface oxidation conditions and welding parameters.
Coatings 15 01461 g010
Figure 11. The comparison of tensile properties of welded joints under different anodizing conditions. (a) BM; (b) HAZ/FZ, anodized films; (c) FZ, no anodized films; (d) FZ, anodized films.
Coatings 15 01461 g011
Table 1. Chemical composition of die-cast A356 aluminum alloy (wt%).
SiMgFeCuMnZnTiAl
6.840.360.12 0.20 0.10 0.10 0.20Balance
Table 2. The detailed surface oxidation conditions and welding parameters.
Welding Speed (m/min)Defocusing Amount (mm)Surface Oxidation Conditions
140No anodized film (NAF)
240Single-sheet with anodized films on both upper and lower surfaces (SSAF-U/L)
340Double-sheet with anodized films on both upper and lower surfaces (DSAF-U/L)
440Double-sheet with anodized films on the upper surface only (DASF-U)
54+!No anodized film (NAF)
64+1Single-sheet with anodized films on both upper and lower surfaces (SSAF-U/L)
74+1Double-sheet with anodized films on both upper and lower surfaces (DSAF-U/L)
830No anodized film (NAF)
930Single-sheet with anodized films on both upper and lower surfaces (SSAF-U/L)
1030Double-sheet with anodized films on both upper and lower surfaces (DSAF-U/L)
Table 3. The macro morphology values welded joints under surface oxidation conditions and welding parameters.
Group NumberUpper Weld Seam Width (mm)Lower Weld Seam Width (mm)FZ AreaPorosity (%)
1 (4 m/min, 0 mm, NAF) 4015.163172.557.593.09
2 (4 m/min, 0 mm, SSAF-U/L)4138.533446.937.194.62
3 (4 m/min, 0 mm, DSAF-U/L)3762.953379.877.146.71
4 (4 m/min, 0 mm, DASF-U)3858.133249.137.115.25
5 (4 m/min, +1 mm, NAF)4027.313168.387.204.01
6 (4 m/min, +1 mm, SSAF-U/L)3649.583414.937.064.94
7 (4 m/min, +1 mm, DSAF-U/L)3802.472439.606.248.64
8 (3 m/min, 0 mm, NAF)4867.544689.569.564.62
9 (3 m/min, 0 mm, SSAF-U/L)4787.983589.928.385.56
10 (3 m/min, 0 mm, DSAF-U/L)4793.203463.468.269.25
1 Upper weld seam width refers to the width dimension of the top of the weld seam (on the side close to the welding operation surface) in the cross-section of a welded joint. 2 Lower weld seam width refers to the width dimension of the root area of the butt weld’s cross-section (the non-operating side). Along with the upper weld seam width, it forms the core geometric parameters of the weld cross-section. 3 The fusion zone area refers to the two-dimensional area of the fusion zone, which is the semi-molten transition zone between the weld and the base metal, in the transverse cross-section of a welded joint.
Table 4. The proportion of table for pore size distribution.
0–10 µm (%)10–20 μm (%)20 μm or More (%)
NAF57.1714.2628.57
SSAF10.0030.0060.00
DSAF033.3366.67
Table 5. The fracture position of the tensile specimens.
Number12345
Group
1BMBMBMBMBM
2FZHAZFZHAZHAZ
3BMBMBMBMBM
4BMBMBMBMBM
5BMBMBMBMHAZ
6HAZBMBMBMFZ
7BMBMBMBMBM
8FZHAZFZFZBM
9BMBMBMHAZHAZ
10BMBMBMBMBM
Disclaimer/Publisher’s Note: The statements, opinions and data contained in all publications are solely those of the individual author(s) and contributor(s) and not of MDPI and/or the editor(s). MDPI and/or the editor(s) disclaim responsibility for any injury to people or property resulting from any ideas, methods, instructions or products referred to in the content.