Review

In Situ Neutron and Synchrotron X-Ray Analysis of Structural Evolution on Plastically Deformed Metals During Annealing

1
Institute of Aeronautical Equipment Intelligent Manufacturing, Chengdu Aeronautic Polytechnic University, Chengdu 610031, China
2
High-End Equipment Advanced Materials and Manufacturing Technology Laboratory, Chengdu 610031, China
3
Department of Materials Science and Engineering, Technion—Israel Institute of Technology, Haifa 32000, Israel
4
Department of Materials Science, Chengdu Aeronautic Polytechnic University, Chengdu 610031, China
*
Authors to whom correspondence should be addressed.
Coatings 2025, 15(12), 1438; https://doi.org/10.3390/coatings15121438
Submission received: 8 October 2025 / Revised: 8 November 2025 / Accepted: 2 December 2025 / Published: 7 December 2025
(This article belongs to the Special Issue Surface Treatment and Mechanical Properties of Metallic Materials)

Abstract

This review highlights the significance of modern quantum-beam techniques, particularly neutron and synchrotron radiation sources, for advanced microstructural characterization of metallic systems. Following a brief introduction to neutron and synchrotron diffraction, selected studies demonstrate their application in probing thermally induced structural evolution in plastically deformed metals. Additively manufactured CoCrFeNi alloys and 316L stainless steels subjected to high-pressure torsion (HPT) were investigated by in situ neutron diffraction during heating, revealing the sequential regimes of recovery, recrystallization, and grain growth. Coupled with mechanical measurements, the results show that HPT followed by controlled thermal treatment improves the mechanical performance, offering strategies for designing engineering materials with enhanced properties. The thermal anisotropy behavior of Ti-45Al-7.5Nb alloys under in situ neutron diffraction is defined as anisotropic ordering upon heating, while the HPT-processed alloy displayed isotropic recovery of order at earlier temperatures. Complementary in situ synchrotron studies in rolled-sheet magnesium alloys unveiled microstructural rearrangement, grain rotation, recovery, and precipitate dissolution during annealing. And phase transformation, recovery, and recrystallization processes were detected in steel using HEXRD. This work emphasizes the complementary strengths of the neutron and synchrotron methods and recommends their broader application as powerful tools to unravel microstructure–property relationships in plastically deformed metals.

1. Introduction

The “art” of the thermo-mechanical forming of metals has evolved from ancient blacksmith blade-forging to modern process-controlled approaches for tailoring microstructures and macroscopic mechanical properties. During thermo-mechanical processing, complex intra- and inter-granular changes take place, including phase transformation, texture evolution, grain rotation, grain recovery, recrystallization, grain growth, dislocation accumulation and annihilation, twinning, and strain relaxation. These processes are strongly governed by external conditions, such as temperature, time, load, and torque, which ultimately determine the balance between microstructure evolution and the resulting mechanical performance.
Conventionally, microstructural studies on thermo-mechanical processing relied on examining quenched specimens after exposure to specific temperatures and/or mechanical loads. For instance, the complex microstructures generated by high-pressure torsion processing, such as phase transformation in stainless steels [1] and high-entropy alloys [2], as well as texture evolution in various metals [3], have been widely investigated using conventional post-processing characterization techniques. However, these approaches are primarily sensitive to near-surface structural features and generally provide only limited insight into the bulk material. Moreover, these ex situ methods fail to capture instantaneous microstructure evolution arising under real-time heating and/or applied pressure, leaving a critical gap in understanding dynamic processes during thermo-mechanical treatment.
In situ neutron and synchrotron diffraction techniques, available at large-scale facilities, overcome these limitations by enabling non-destructive, real-time probing of structural and microstructural changes within the bulk, thereby providing important information on time- and spatially resolved microstructure evolution upon thermo-mechanical processing. For synchrotron radiation, a wide range of microstructure phenomena can be investigated, including grain rotation, recovery and recrystallization, phase transformations, orientation relationships, dynamic recovery, dynamic recrystallization, twinning and detwinning processes, and texture evolution [4,5,6,7,8,9,10,11,12,13,14,15,16,17,18,19,20,21,22,23,24]. For instance, γ-to-α phase transformations have been characterized upon heating in TiAl alloys [4,5,16], while recovery and recrystallization processes in various metals were identified through diffraction line-broadening analysis [7,9]. The coefficient of thermal expansion (CTE) of Ti-Al-Cr-Nb alloys has been determined using in situ synchrotron X-ray diffraction during heating [14]. Furthermore, deformation-mediated azimuthal intensity evolution, revealing grain refinement and texture development, has been observed during the compression of a coarse-grained copper under in situ synchrotron measurement [22]. Dynamic recovery, recrystallization, and grain rotation during thermo-mechanical processing of different metal alloys have also been extensively reported in the literature [15,23].
On the other hand, neutrons possess a much higher penetration depth, allowing the investigation of structural information throughout the entire bulk volume. This makes neutron diffraction particularly advantageous for studying phenomena such as phase evolution [9,25,26,27,28], texture development [29], residual stress [9,29,30,31], lattice parameter changes [26,32,,33,34,35,36], and defect evolution [37,38,39,40]. For neutron diffraction, along with X-ray radiation, they are particularly powerful in probing order/disorder transition in TiAl alloys [28,32,41]. Performing in situ heating neutron experiments on NiTi, Qiu et al. observed the evolution of the lattice strain and phase composition during annealing [27]. The dislocation evolution of nanocrystalline materials upon heating has also been revealed clearly using neutron diffraction [37,38]. An in situ loading study on HEAs was conducted using neutron diffraction, and the related lattice strain evolution has been observed with respect to true stress [26]. The strain evolution and load partitioning during the elevated temperature tensile test of Ti-6Al-4V have been successfully captured [33]. More recently, a downsized laser powder bed fusion (PBF) device has been integrated into a neutron beamline, enabling real-time observation of microstructure evolution in steel during additive manufacturing [34].
As shown above, in situ neutron and synchrotron diffraction approaches have become indispensable for revealing the real-time structural evolution under various experimental conditions. These techniques exhibit complementary strengths. Neutron diffraction probes larger effective volumes, ensuring reliable texture and stress measurements even in coarse-grained materials, while synchrotron radiation enables localized investigations at the grain or sub-grain scale, revealing gradient features and related mechanisms. Neutron diffraction provides slightly higher lattice strain accuracy, whereas synchrotron X-rays, with photon fluxes several orders of magnitude greater, allow much faster data acquisition—typically within seconds or even milliseconds. In contrast, neutron measurements usually require minutes or longer.
In addition, both neutron and synchrotron techniques face several inherent limitations that constrain their applications. First, the data acquisition rate of diffraction is often limited by instrument configuration and detector efficiency, restricting time resolution in in situ or operando experiments involving rapid physical and chemical transformations. Second, due to the limited space and diffraction geometry at beamlines, current setups can only accommodate limited sample environments with precise control of parameters such as high/low temperature, mechanical loading (tension, compression, torsion, fatigue), high pressure, magnetic and electric fields, and reactive gas or liquid atmosphere. Third, access to large-scale neutron and synchrotron facilities remains highly competitive, with limited beamtime availability and strict proposal-based allocation systems, which often hinder systematic or long-term experimental studies. These constraints collectively highlight the need for continued technical development and methodological innovation to enhance the efficiency, accessibility, and versatility of these advanced characterization tools.
In this work, several representative case studies of typical structural materials are presented to illustrate the application of neutron and synchrotron X-ray techniques in plastic deformation research. The focus is placed on metallurgical materials that have undergone various plastic deformations and are subsequently subjected to in situ heat treatment while performing diffraction measurements. By providing valuable information on the structure transitions as a function of temperature and time, these studies offer a deeper understanding of the relationship between microstructure and mechanical behavior.

2. Comparison Between Neutron and Synchrotron X-Ray Diffraction

While both neutrons and synchrotron X-rays are powerful probes of materials, their interaction mechanisms differ fundamentally, making them highly complementary. Synchrotron X-rays provide extremely intense, tunable, and highly focused beams, enabling rapid data acquisition, fine spatial resolution, and element-specific spectroscopic analysis. These features make them particularly suitable for investigating small samples, surface and interface phenomena, and dynamic processes with high temporal resolution. Neutrons, on the other hand, interact with atomic nuclei rather than electron clouds, giving them exceptional sensitivity to light elements such as hydrogen and lithium, as well as a unique capability for probing magnetic structures. By combining the strengths of both techniques, researchers can achieve a comprehensive understanding of materials, from atomic scale to bulk microstructure and functional performance.
It is worth emphasizing that synchrotron X-rays interact with inter-atomic electrons, while neutrons in non-magnetic materials are scattered by atomic nuclei. This fundamental difference leads to distinct contrast mechanisms and atomic form factors F. For X-rays, the atomic form factor F is expressed as the following equation:
F = j f j Q r e e x p   i Q r j
At zero momentum transfer, the scattering amplitude fj (Q) from an individual atom with atomic number j equals the classical radius of the electron, re = 2.818 × 10⁻¹⁵ m, multiplied by j, i.e., f (Q) = re j. With increasing scattering angle θ—that is, with increasing magnitude of the scattering vector Q = 2ksin(θ)—the form factor f (Q) decreases rapidly (see, e.g., ref. [42]). The functions fj (Q), commonly referred to as the atomic scattering factors or atomic form factors, are tabulated for every individual element. And rj are radius vectors indicating the positions of different atoms within a unit cell (ref. [42]). Note that in the literature, there are various conventions for scaling Q.
Because atomic nuclei are extremely small compared to electron shells, in the case of neutron scattering, the form factor is equal to unity, 1 [43]. And the atomic scattering amplitude fj (Q) is replaced by the coherent scattering amplitude, referred to as the bound scattering length, bc. bc is constant in the entire range of scattering vectors Q, relevant for diffraction.
In comparison with facilities based on synchrotron X-ray sources, neutron sources exhibit lower brilliance, which results in larger beam cross-sections and longer data acquisition times to achieve diffraction patterns with satisfactory signal-to-noise ratios [44]. Nevertheless, neutrons possess a larger penetration length, typically ranging from centimeters to meters, whereas for X-rays the penetration length is limited to micrometers to centimeters, depending on photon energy and material density. Examples of penetration lengths are listed in Table 1. Meanwhile, neutron beamlines typically provide fluxes on the order of 105–108 n cm−2 s−1, with spatial resolutions of tens of micrometers for imaging and millimeter-scale gauge volumes for diffraction. In contrast, synchrotron facilities deliver much higher photon fluxes (1011–1015 photons s−1) and achieve micrometer to sub-micrometer spatial resolutions.
The detailed comparison of neutron and synchrotron measurements on different features is listed in Table 2.

3. In Situ Neutron Studies on Plastically Deformed Bulk Metals upon Heating

3.1. CoCrFeNi High-Entropy Alloys
A composition of 24Co–26Cr–25Fe–25Ni (at%) high-entropy alloy (HEA) powders was produced via the spraying method, followed by the powder bed fusion process to manufacture the bulk material. Detailed information can be found in an earlier work [38]. The obtained bulk material was further subjected to high-pressure torsion processing at room temperature with a compressive pressure of 6.0 GPa and a rotation speed of 1 rpm for 15 turns, resulting in an ultrafine-grained structure with average grain sizes of 50~60 nm. The additively manufactured billets after HPT processing are referred to as AM-HPT HEAs. The specimens were then sliced to ~0.8 mm thickness and 10 mm diameter for the neutron experiment, performed at the iMATERIA beamline (BL20) at the J-PARC spallation source employing the time-of-light method [45]. An in situ heating ramp of 4 K·min−1 from room temperature to 1273 K was chosen in a vacuum condition, followed by furnace cooling. Three detector banks oriented in different directions were applied to collect data. Instrument details are referred to the literature [46].
Figure 1 presents the in situ annealing diffraction results of the additively manufactured high-entropy alloys after high-pressure torsion, obtained from three detector banks. The peak intensity increases progressively from blue through white to red, allowing different reflections to be clearly distinguished, as indexed at the top. The corresponding temperature–time cycles are displayed as red curves on the right. The peak profiles at t = 0 min of heating represent the texture of the alloy immediately after high-pressure torsion processing, revealing a strong γ-<111> fiber texture of the HPT-processed HEA. Furthermore, the AM-HPT HEA exhibits a single fcc crystal structure and shows no evidence of phase transformation during the entire heating–cooling cycle. Nevertheless, apparent peak shifts, as well as noticeable evolution in peak intensity and peak width, are clearly observed.
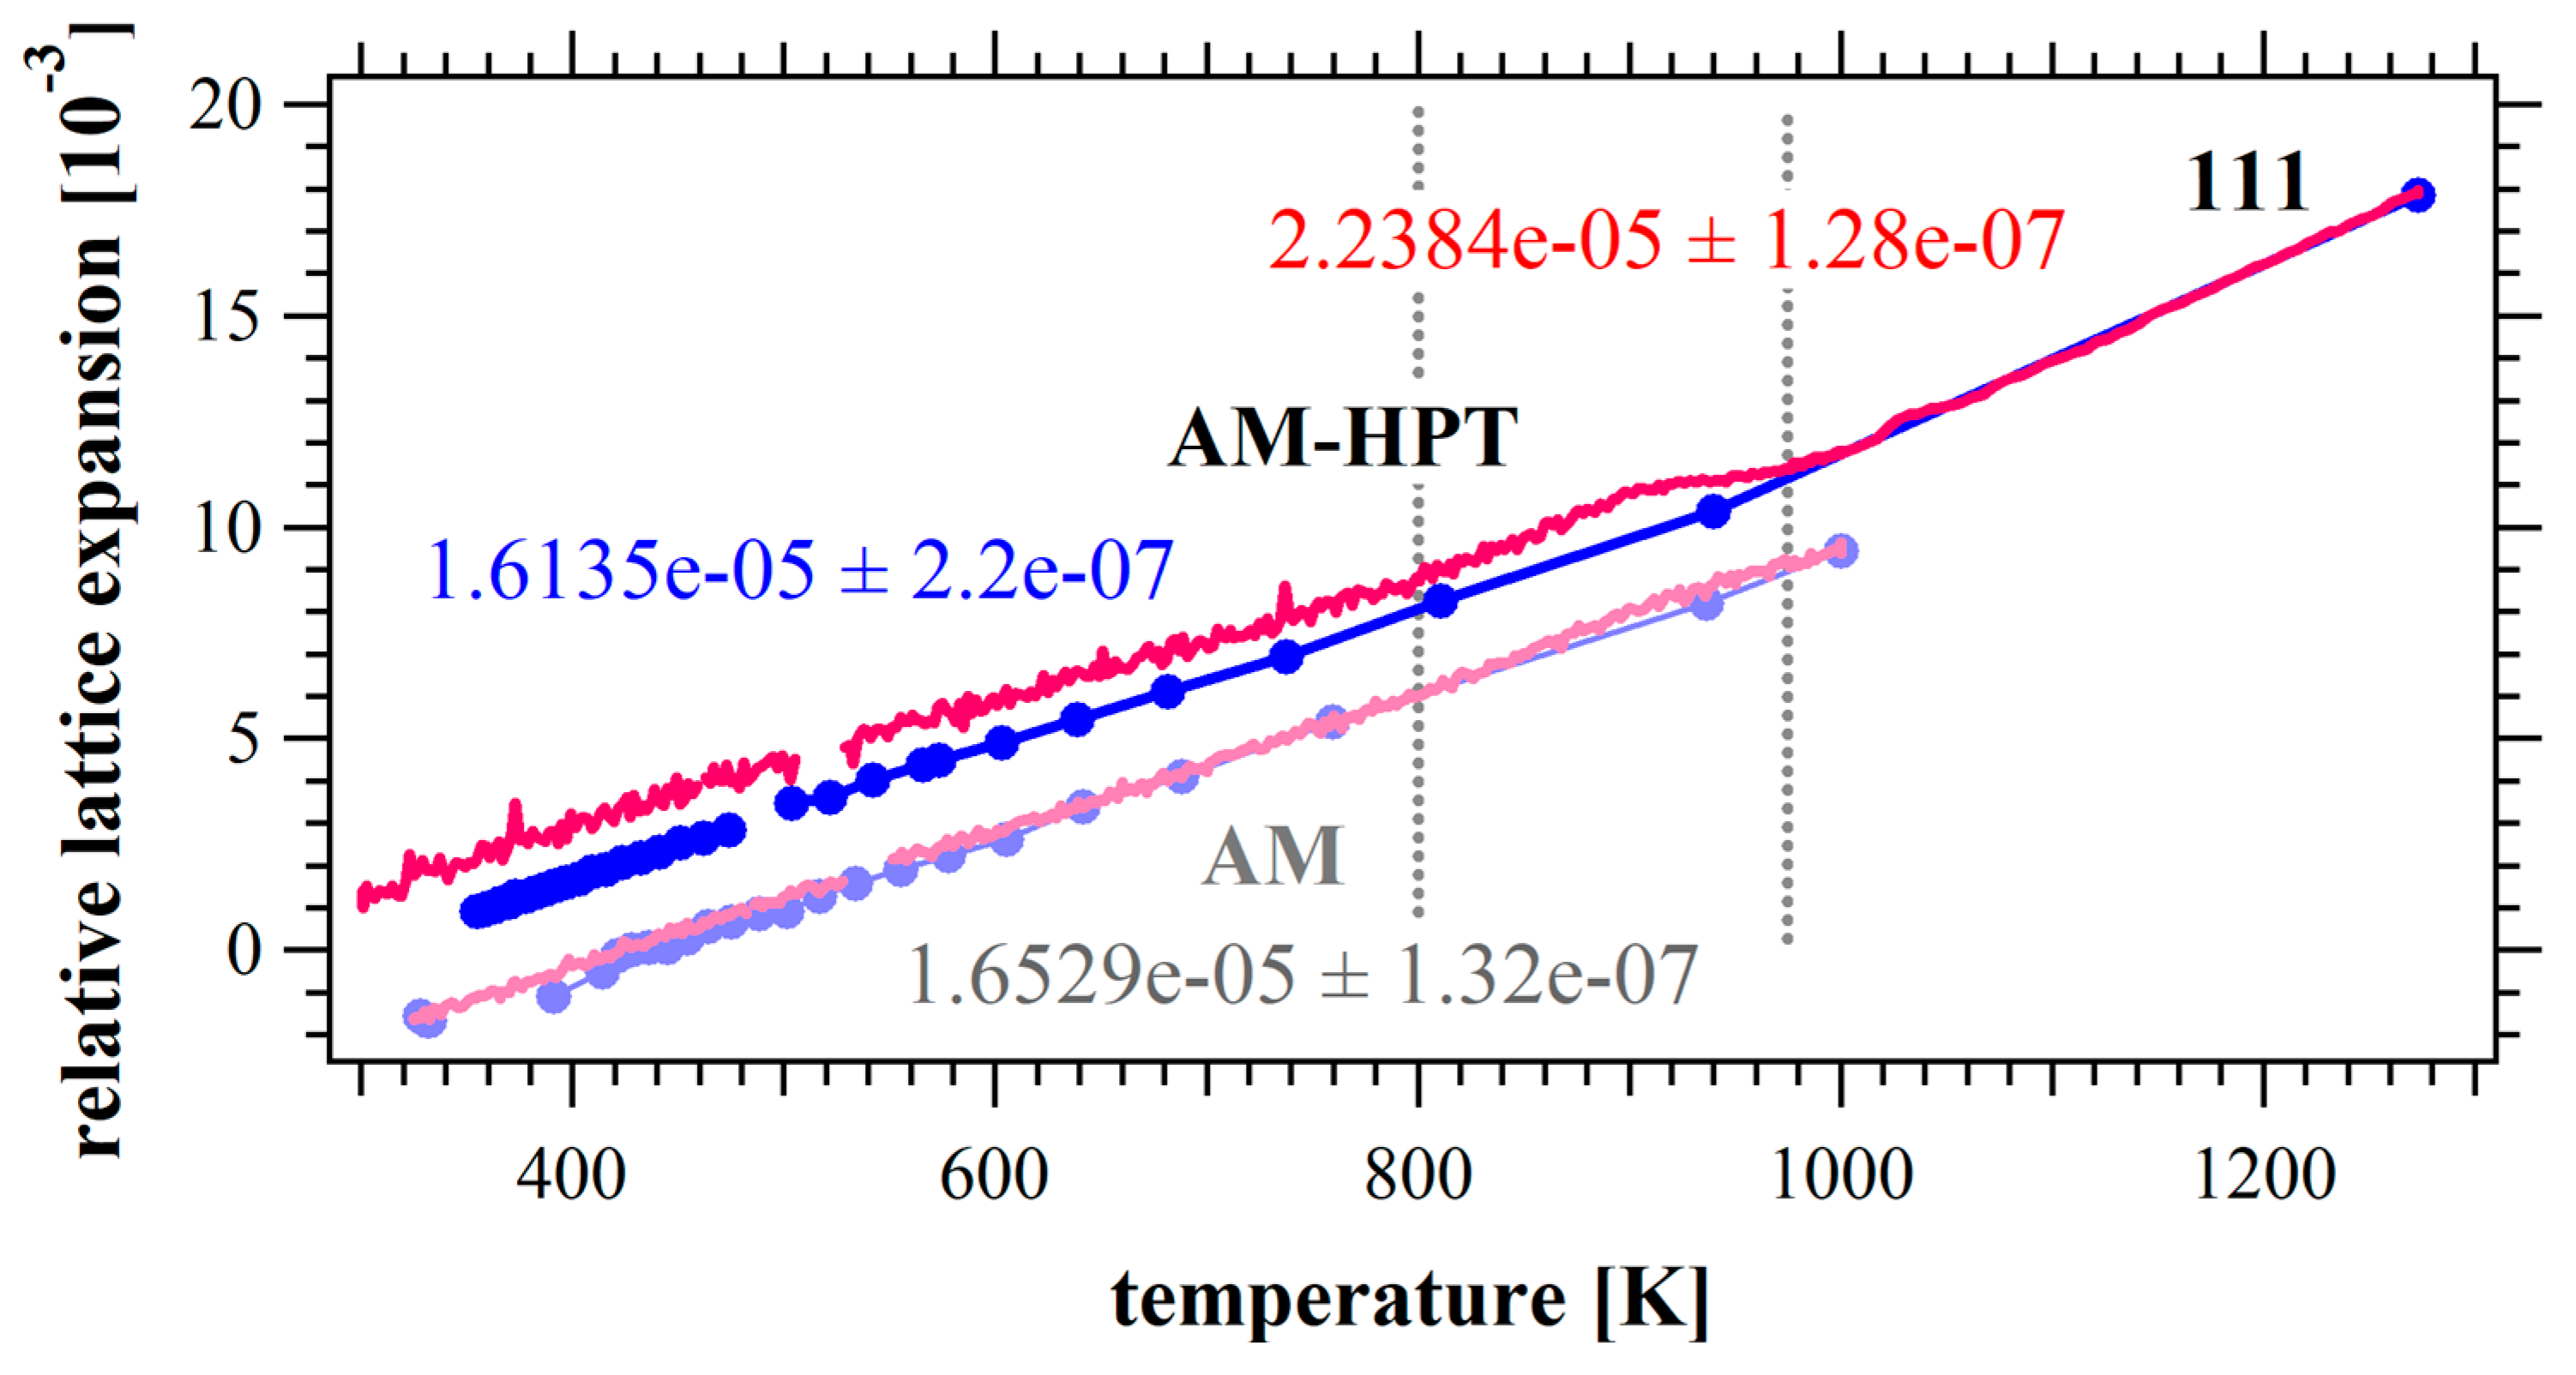
Through Gaussian fitting of each peak, the lattice strain induced by expansion and contraction through the heating and cooling procedure can be quantified, respectively. Using the scattering vector Q111 = 3.05 Å−1 under the minimum-strain condition after the complete heating–cooling cycle, the original lattice parameter of the fcc unit cell was determined to be a0 = 3.57 Å at room temperature. Figure 2 plots the results of the 111 plane, where the heating and cooling processes are denoted in red and blue, respectively [38]. At temperatures below 900 K, both heating and cooling can be well described by linear fits, yielding a thermal expansion coefficient of η300K = 16 × 10−6 K−1. A distinct deviation (“bump”) occurs at about 900 K. Above this temperature, the lattice expansion accelerates, providing η1200K = 22 × 10−6 K−1. Upon cooling, a similar kink in relative lattice strain is observed again near 900 K.
An interpretation of these results can be summarized as follows: (i) the relatively low thermal expansion coefficient observed during heating at lower temperatures is attributed to the reduced vacancy concentration. Calculated in the literature [38], the change in vacancy-induced lattice strain is evaluated to be ΔεV = 1 × 10⁻³ K−1, which is consistent with the kink observed in Figure 2 at around 900 K; (ii) at ~ 900 K, atomic diffusion becomes increasingly active, enabling excess vacancies to recombine toward equilibrium; (iii) above 900 K, thermally activated generation of new vacancies dominates, resulting in an enhanced lattice expansion coefficient.
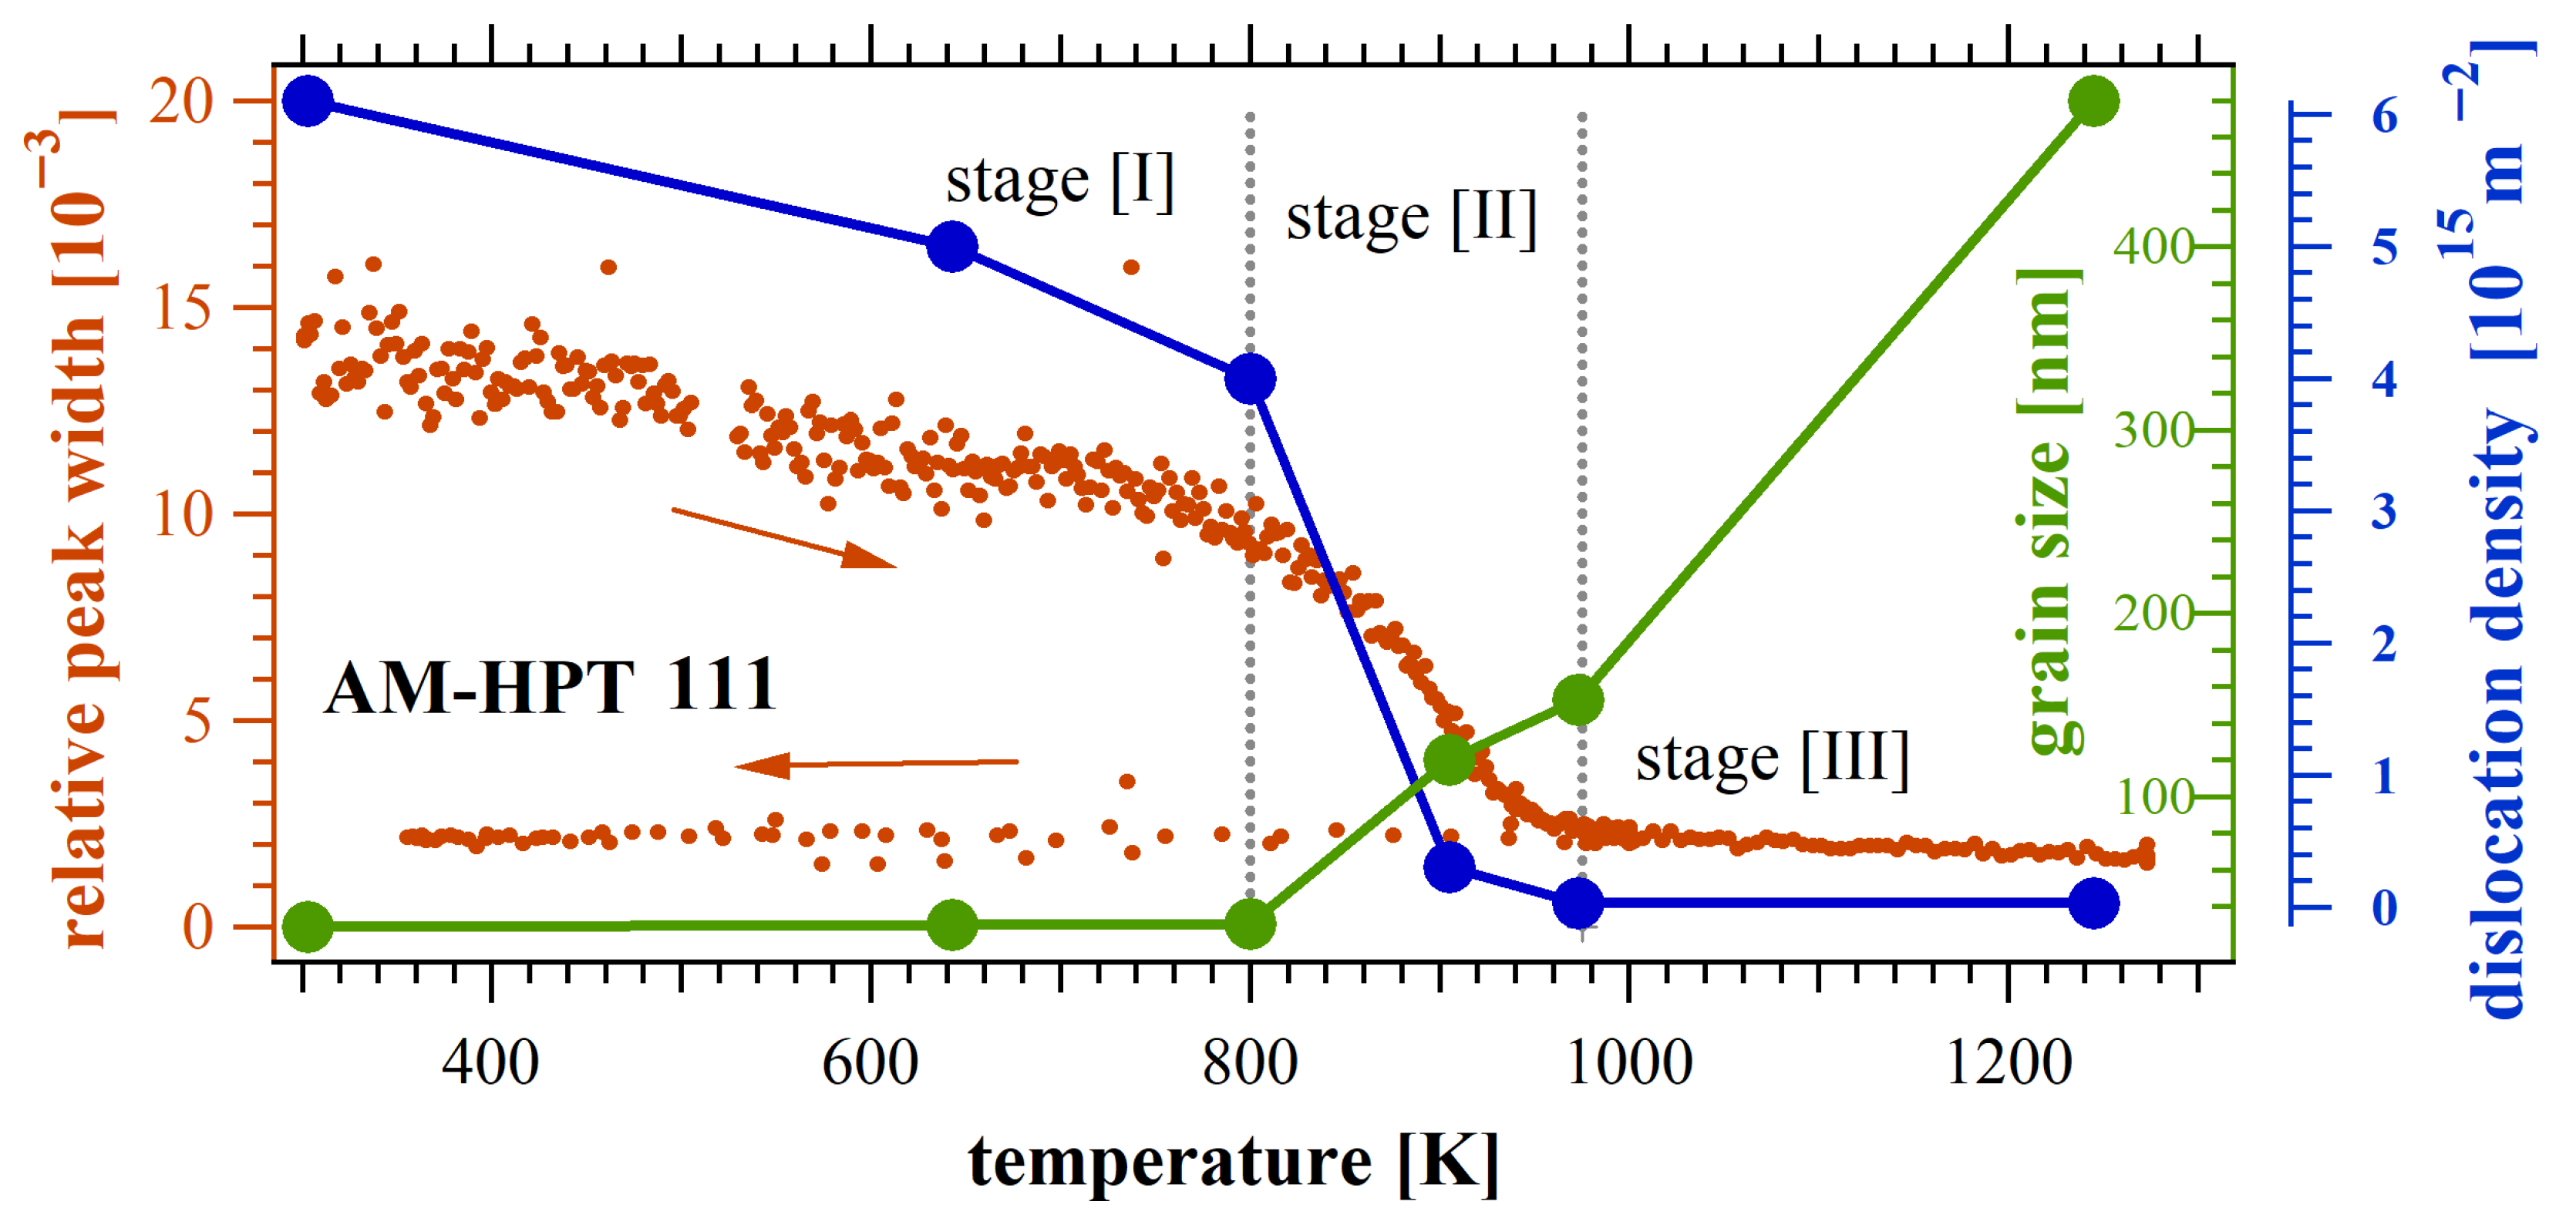
Similarly, by fitting the diffraction peaks, the relative evolution of peak width during the heating–cooling cycle of the AM-HPT HEA at the 111 reflection is presented in Figure 3. Severe plastic deformation introduces a large density of lattice distortions, nanograins, and internal stresses [47,48,49,50,51,52], which account for the broadest peaks observed in the high-pressure torsion-processed high-entropy alloy at room temperature. Upon heating, three temperature regimes can be distinguished: stage (I) from room temperature to 800 K, where the peak width decreases slightly, indicating the onset of lattice strain relaxation; stage (II) between 800 K and 970 K, where a sharp reduction in peak width occurs, reflecting the significant release of micro-strain. And at 970 K, the peak width reaches its minimum and remains nearly thermally stable toward stage (III), that is, above 970 K.
The diffraction peak width is mainly affected by two factors, namely, finite grain size D and total micro-strain broadening, denoted Δε. The latter includes the inter- and intra-granular type II and type III components, which may originate from vacancies, chemical strain gradients, precipitates, dislocations, and misfits, among others [53]. To qualitatively evaluate microstructure thermal behavior, the modified Williamson–Hall method was applied to estimate dislocation density ρ and coherent grain domain D, with calculation details provided elsewhere [38]. And the thermal evolution of ρ and D are plotted in Figure 3 with blue and green lines, respectively.
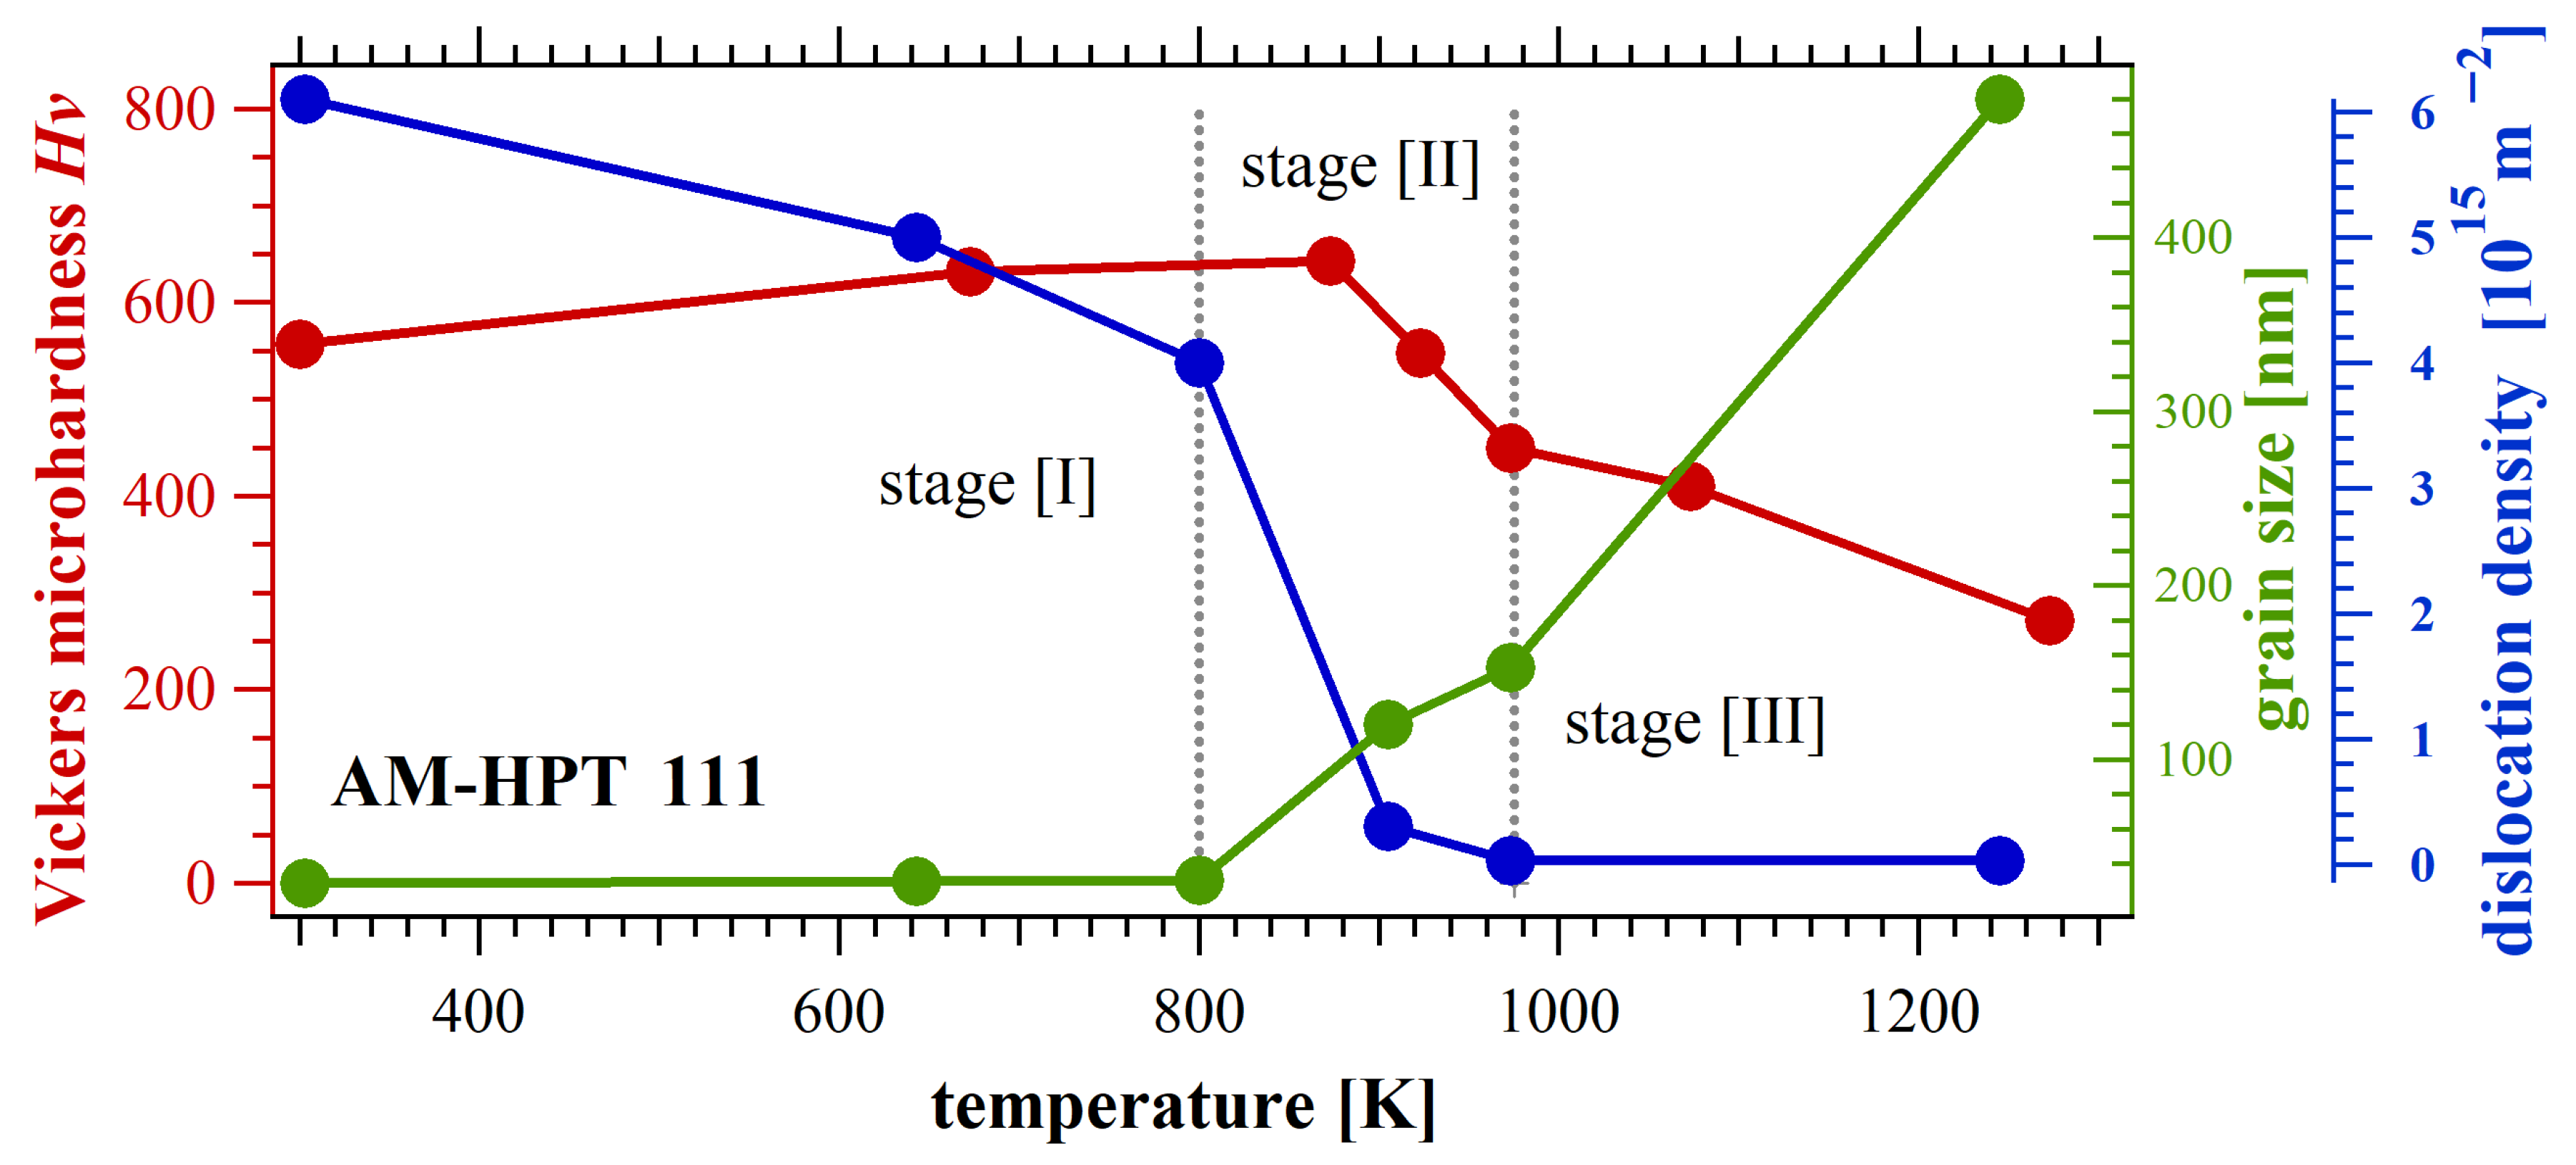
The data for dislocation density and grain size at 303 K, 643 K, 905 K, 1000 K, and 1273 K were derived from Figure 5b in ref. [38] using the modified Williamson–Hall equation, which is given as Equation (2) in ref. [38]. In Figure 3, we also included data at 800 K and 970 K to make the curve more consistent. The corresponding data are listed in Table 3. It can be seen that dislocation density ρ decreases slightly but continuously during stage (I), followed by a sharp drop in stage (II). Upon further heating into stage (III), dislocation density shows little variation. In contrast, grain size remains almost constant during stage (I), undergoes a slight decrease in stage (II), and then increases markedly in stage (III).
Here, three distinct temperature regimes can be interpreted as: (i) during stage (I), grain recovered up to 800 K, with limited but continuous dislocation removal; followed by (ii) grain recrystallization during stage (II), from 800 K to 970 K, accompanied by extensive dislocation annihilation [54], which is consistent with the typical recrystallization temperatures range of CoCrFeNi HEA (approximately 773–1000 K [55]); and finally (iii) grain growth at stage (III), leading to an almost stress-free structure, upon which further heating exerts only a limited effect on peak width evolution. The present in situ neutron experiment upon heating offers a methodology for investigating the microstructure relaxation of severely deformed bulk materials in both quantitative and qualitative terms.
To better illustrate the correlation between microstructural evolution and mechanical properties, Vickers microhardness values Hv—estimated in a manner consistent with the neutron experiment but determined on quenched specimens—are superimposed on the evolution of dislocation density ρ and grain domain D in Figure 4. The Vickers microhardness exhibits an unconventional increase, rather than softening, from Hv = 556 at room temperature to Hv = 642 at about 870 K. A similar hardening phenomenon during short-term annealing has also been reported in HPT-processed CoCrNi alloys [56].
The unusual hardening behavior of nanostructured metals during low-temperature annealing has been widely discussed over the past two decades [57,58]. As shown in Figure 1, no phase transformation or precipitation is detected. Furthermore, Figure 4 indicates no significant grain growth, while dislocation density only shows a mild reduction. Therefore, three main mechanisms may contribute to the aforementioned abnormal hardening behavior: (i) as demonstrated by MD simulation in a former report [59], thermal annealing can induce relaxation of non-equilibrium grain boundaries (primarily HAGB), which then become less capable of emitting dislocations or undergoing grain boundary sliding; (ii) as modeled in earlier reports [60], intra-grain dislocations may be annihilated during short-term annealing, leading to fewer mobile dislocations; (iii) vacancy concentration is reduced during heat treatment [9,61], thereby impeding dislocation motion. A substantial decrease in Vickers microhardness appears upon further heating up to 1273 K. This softening corresponds to the grain recrystallization stage, during which dislocation-free grains emerge and grow, consistent with the Hall–Petch grain size relationship.
Here, in situ neutron diffraction provides an innovative methodology to investigate sequential thermal evolution of microstructure, while also helping explain the mild-temperature hardening observed in nanocrystalline materials. These findings highlight a potential pathway for tailoring the properties of nanomaterials through the combined effects of severe plastic deformation and subsequent heat treatment.
Figure 4. Vickers microhardness Hv evolution, along with the grain size and dislocation density evolution upon thermal treatment for HPT-processed CoCrFeNi. Reproduced from the literature [38].
Coatings 15 01438 g004

3.2. 316L Stainless Steels

The thermal microstructural evolution of single fcc-structured 316L stainless steel (316L SS) was also investigated using this innovative in situ neutron diffraction methodology. The as-received 316L SSs were additively manufactured via an L-PBD printer from powders with particle sizes ranging from 20 to 53 μm. Specimens were subsequently subjected to HPT under the same conditions as those applied to the CoCrFeNi alloys described earlier. The in situ neutron experiments were conducted on the severely deformed HPT-processed 316L SS following the same procedure as outlined in the previous chapter. Detailed information on the specimen preparation, processing history, and in situ neutron experimental procedure can be found elsewhere [37].
Figure 5 displays the contour map of diffractograms for the HPT-processed 316L SS during heat treatment, as collected in Bank 1. Similarly to the observations for CoCrFeNi alloys, several distinct features can be extracted: (i) the HPT-processed 316L SS at room temperature exhibits a single fcc crystal structure with a pronounced 111 texture, which remains essentially unchanged during subsequent heating; (ii) all diffraction peaks shift to lower scattering vectors during heating, corresponding to lattice expansion, and return to higher scattering vectors upon cooling, reflecting lattice contraction; (iii) the peak intensity and peak width exhibit obvious development throughout the heating–cooling cycle.
Figure 5. Evolution of neutron diffractograms derived from Bank 1 upon heating for the AM 316L stainless steel after HPT for 15 turns [37].
Coatings 15 01438 g005
The diffractograms at all heating–cooling stages were analyzed using GauRelative peak width evolution of 111 reflection and ssian fitting to extract peak position, peak intensity, and peak width. The peak position at room temperature in Figure 5 provides lattice parameter a0 = 3.60 Å for the HPT-processed 316L SS. From the calculated peak shifts, lattice temperature distortions—comprising expansion during heating and contraction during cooling—were obtained, yielding ηh = 18.530 × 10⁻⁶ K−1 and ηc = 17.641 × 10⁻⁶ K−1, respectively. The detailed values can be found in Figure 6b of an earlier report [37].
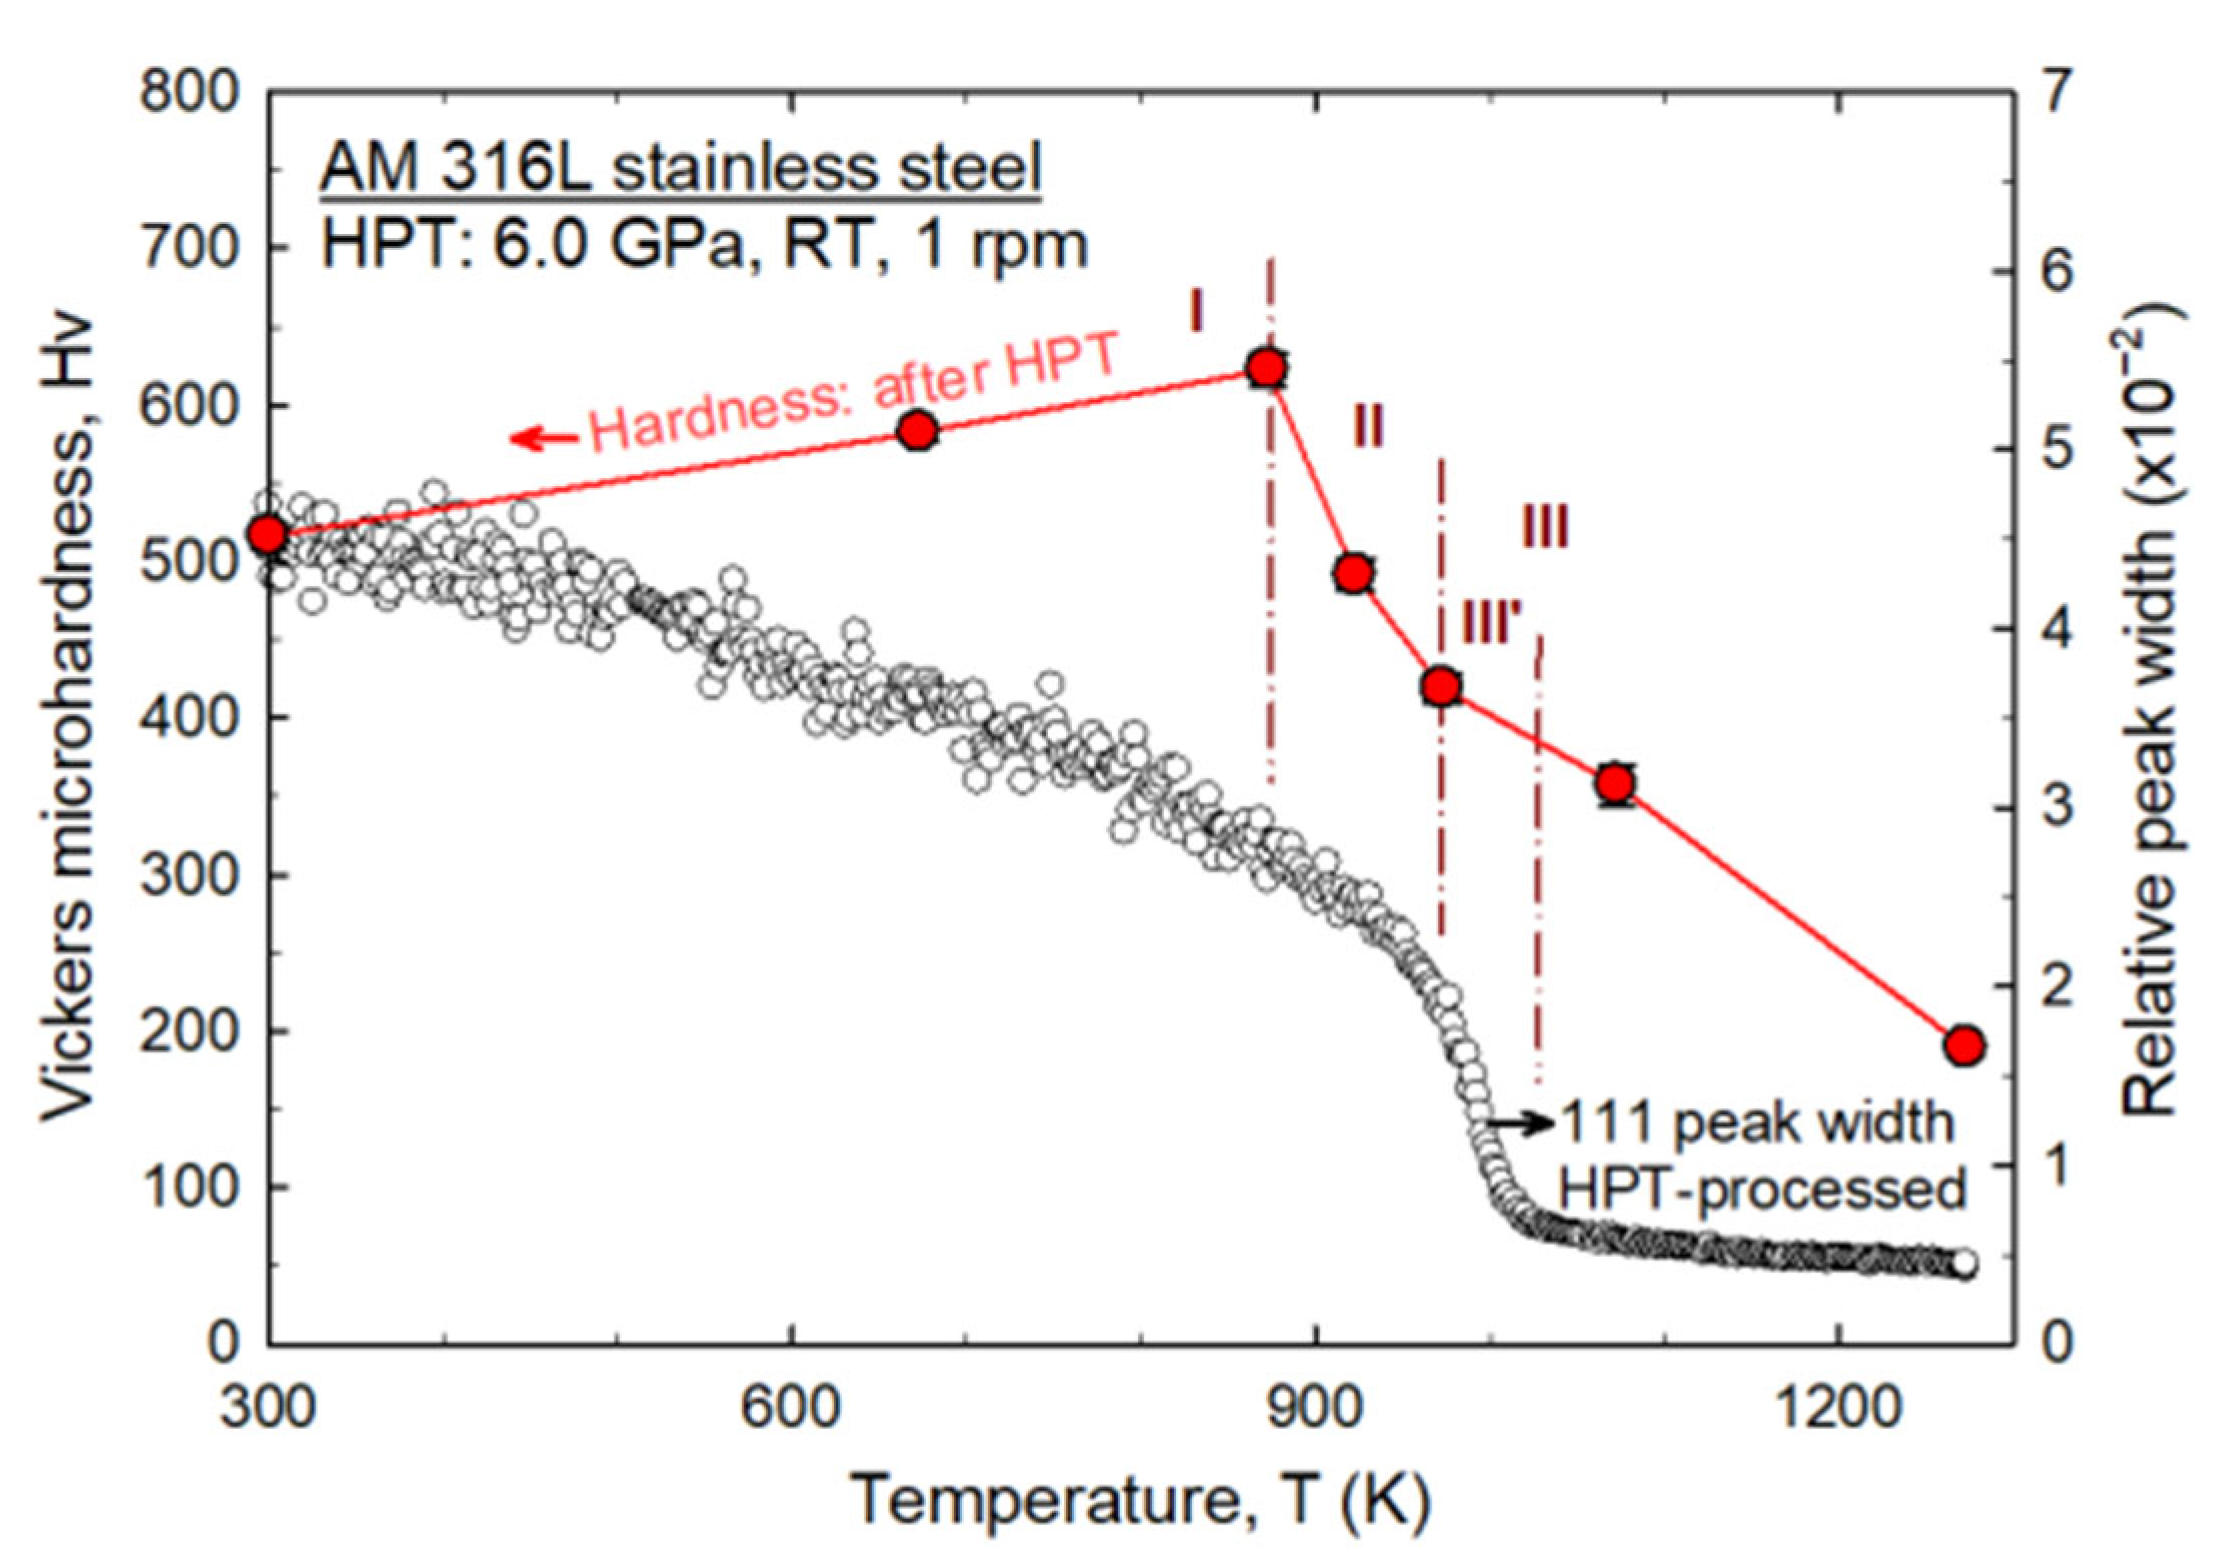
The relative peak width development of the 111 peak upon heating is illustrated in Figure 6, together with the Vickers microhardness evolution measured at selected temperatures on the quenched HPT-processed 316L SS. Similarly to the phenomenon in the abovementioned CoCrFeNi alloy, the peak width first exhibits a mild decrease at low temperatures below 920 K, followed by a pronounced reduction between 920 K and ~ 1020 K, and finally shows little variation up to 1273 K. The equiaxed nanocrystalline microstructure with a grain size of approximately 60 nm was introduced into 316L SS through HPT. Consequently, the unusual mild-temperature-induced hardening also appears in HPT-processed 316L SS, as depicted in Figure 6, likely for the same reasons discussed in the previous chapter. This abnormal hardening behavior has likewise been reported for nanostructured 316L SS upon annealing in earlier studies [62,63,64]. Beyond ~873 K, the subsequent decrease in microhardness implies extensive grain growth and significant strain relaxation.
Figure 6. Relative peak width evolution of 111 reflection and Vickers microhardness Hv evolution for HPT-processed 316L stainless steel upon heating. Reproduced from the literature [65].
Coatings 15 01438 g006
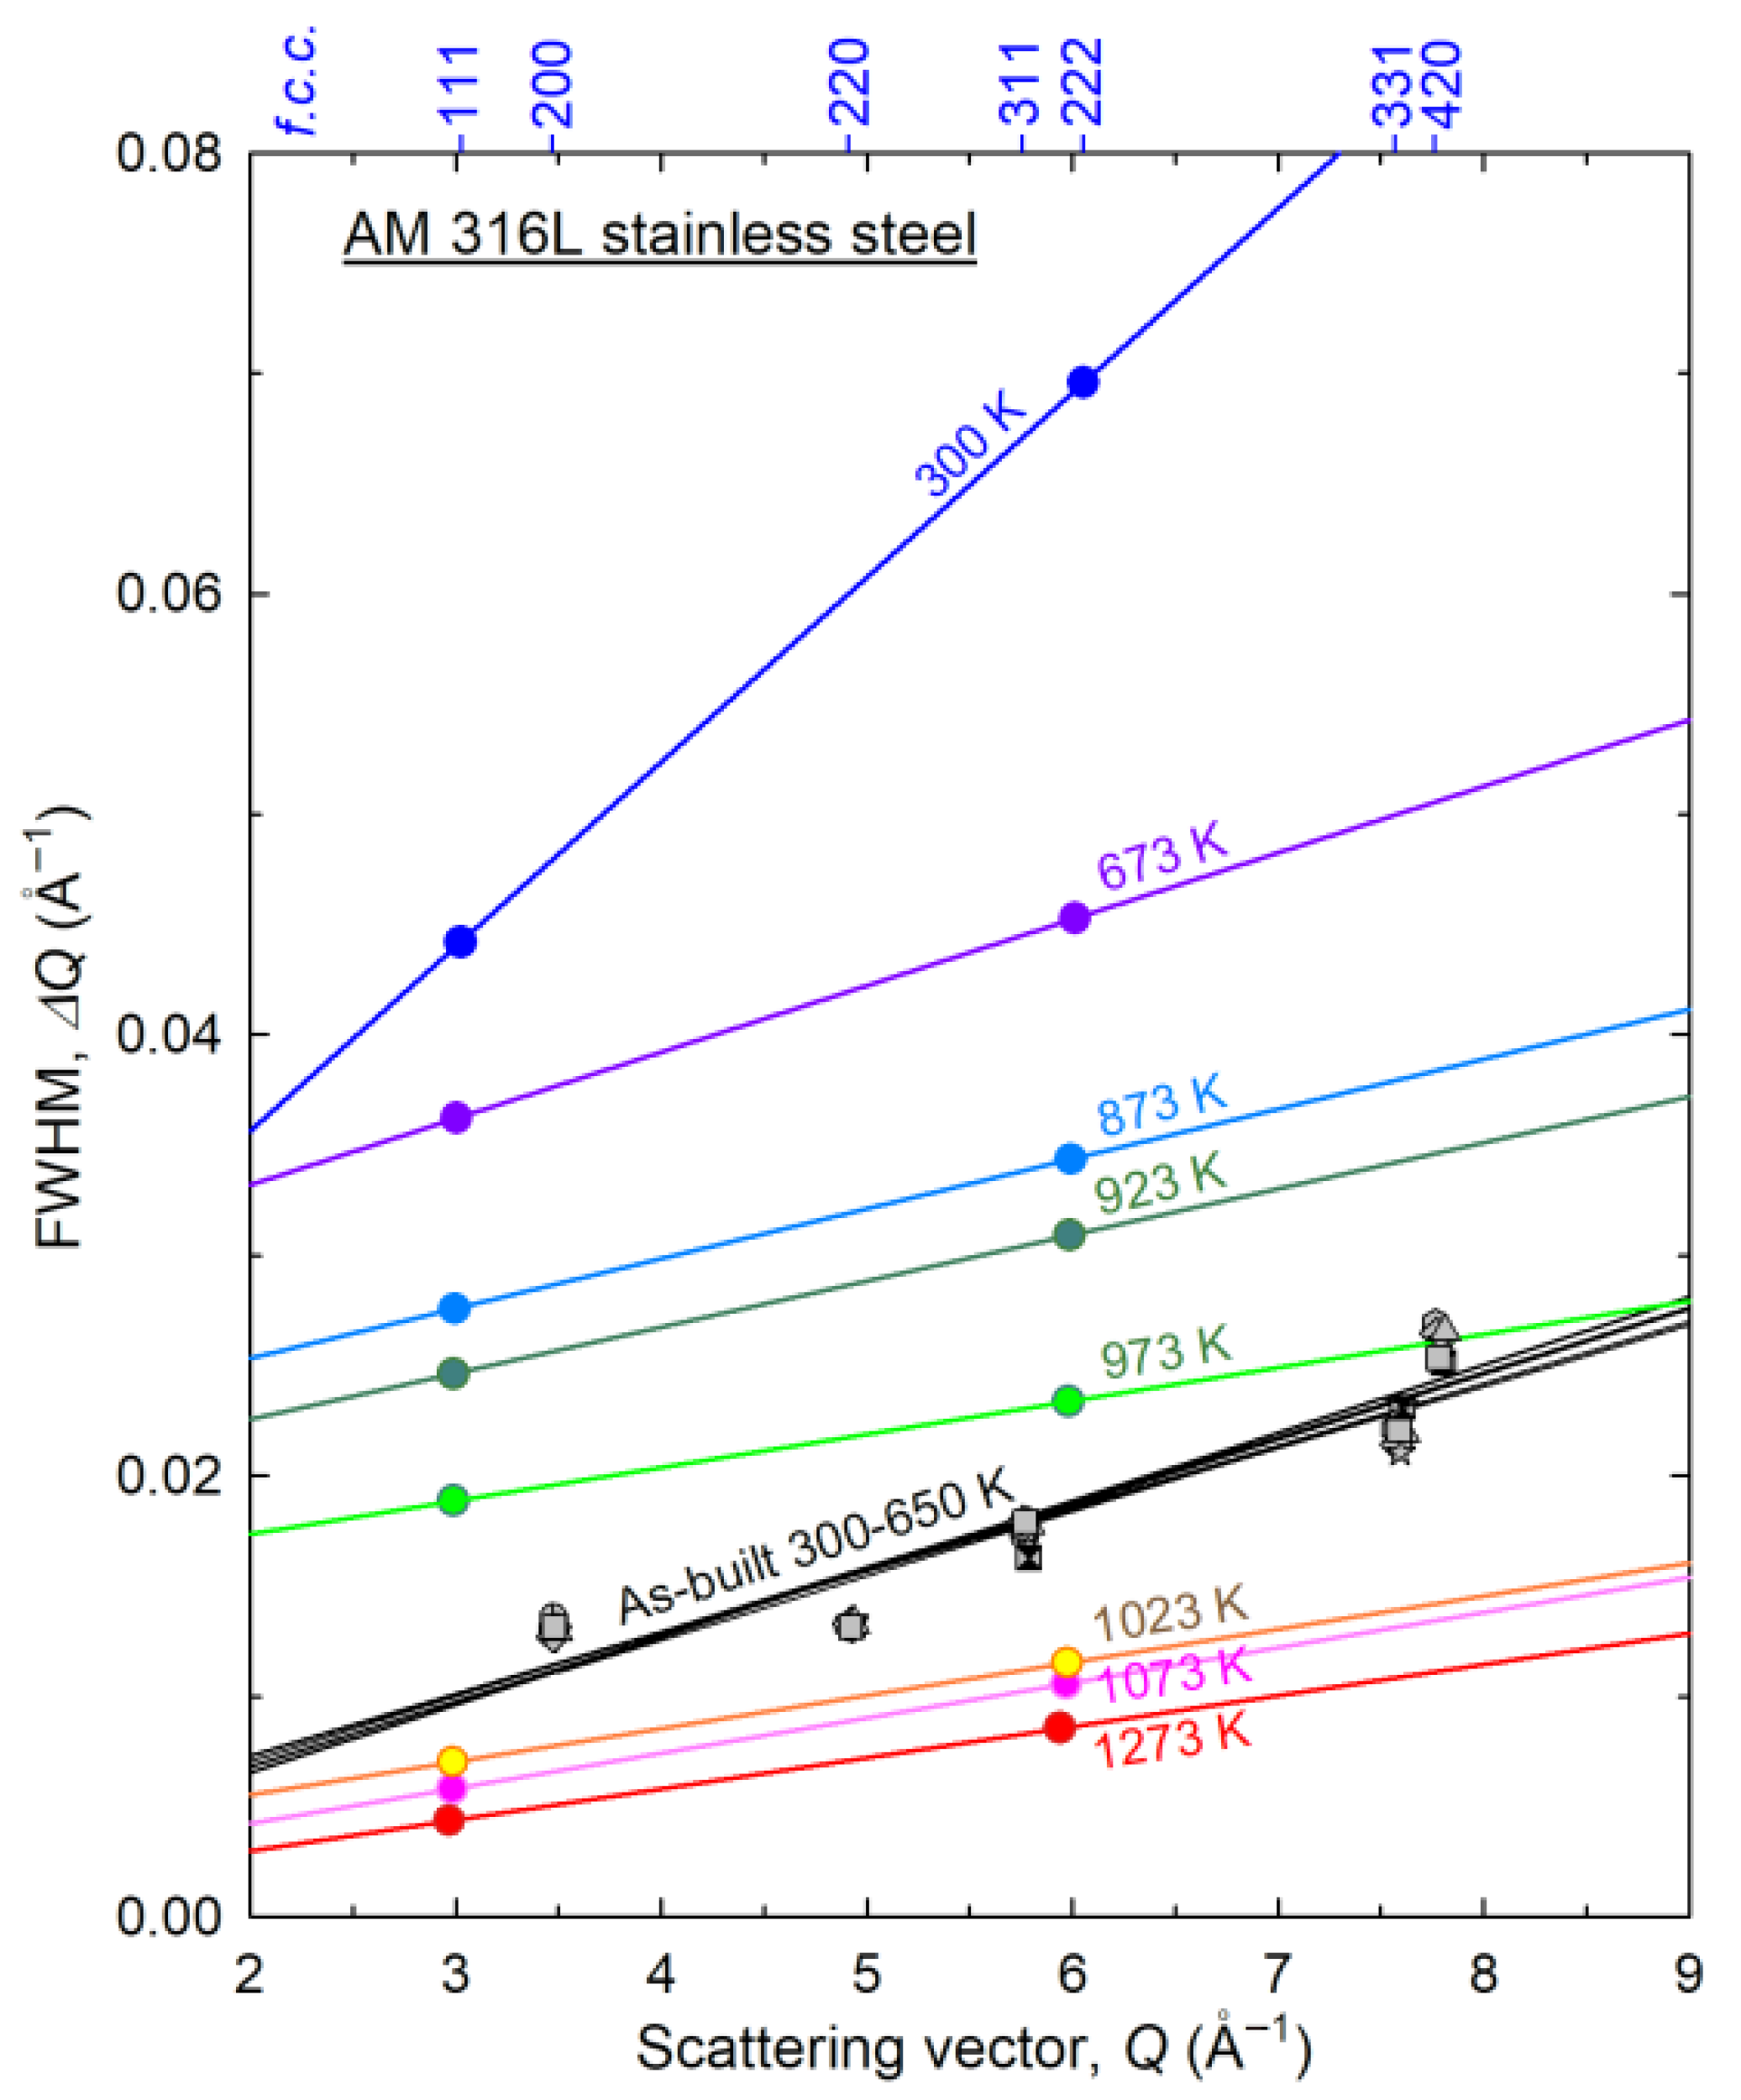
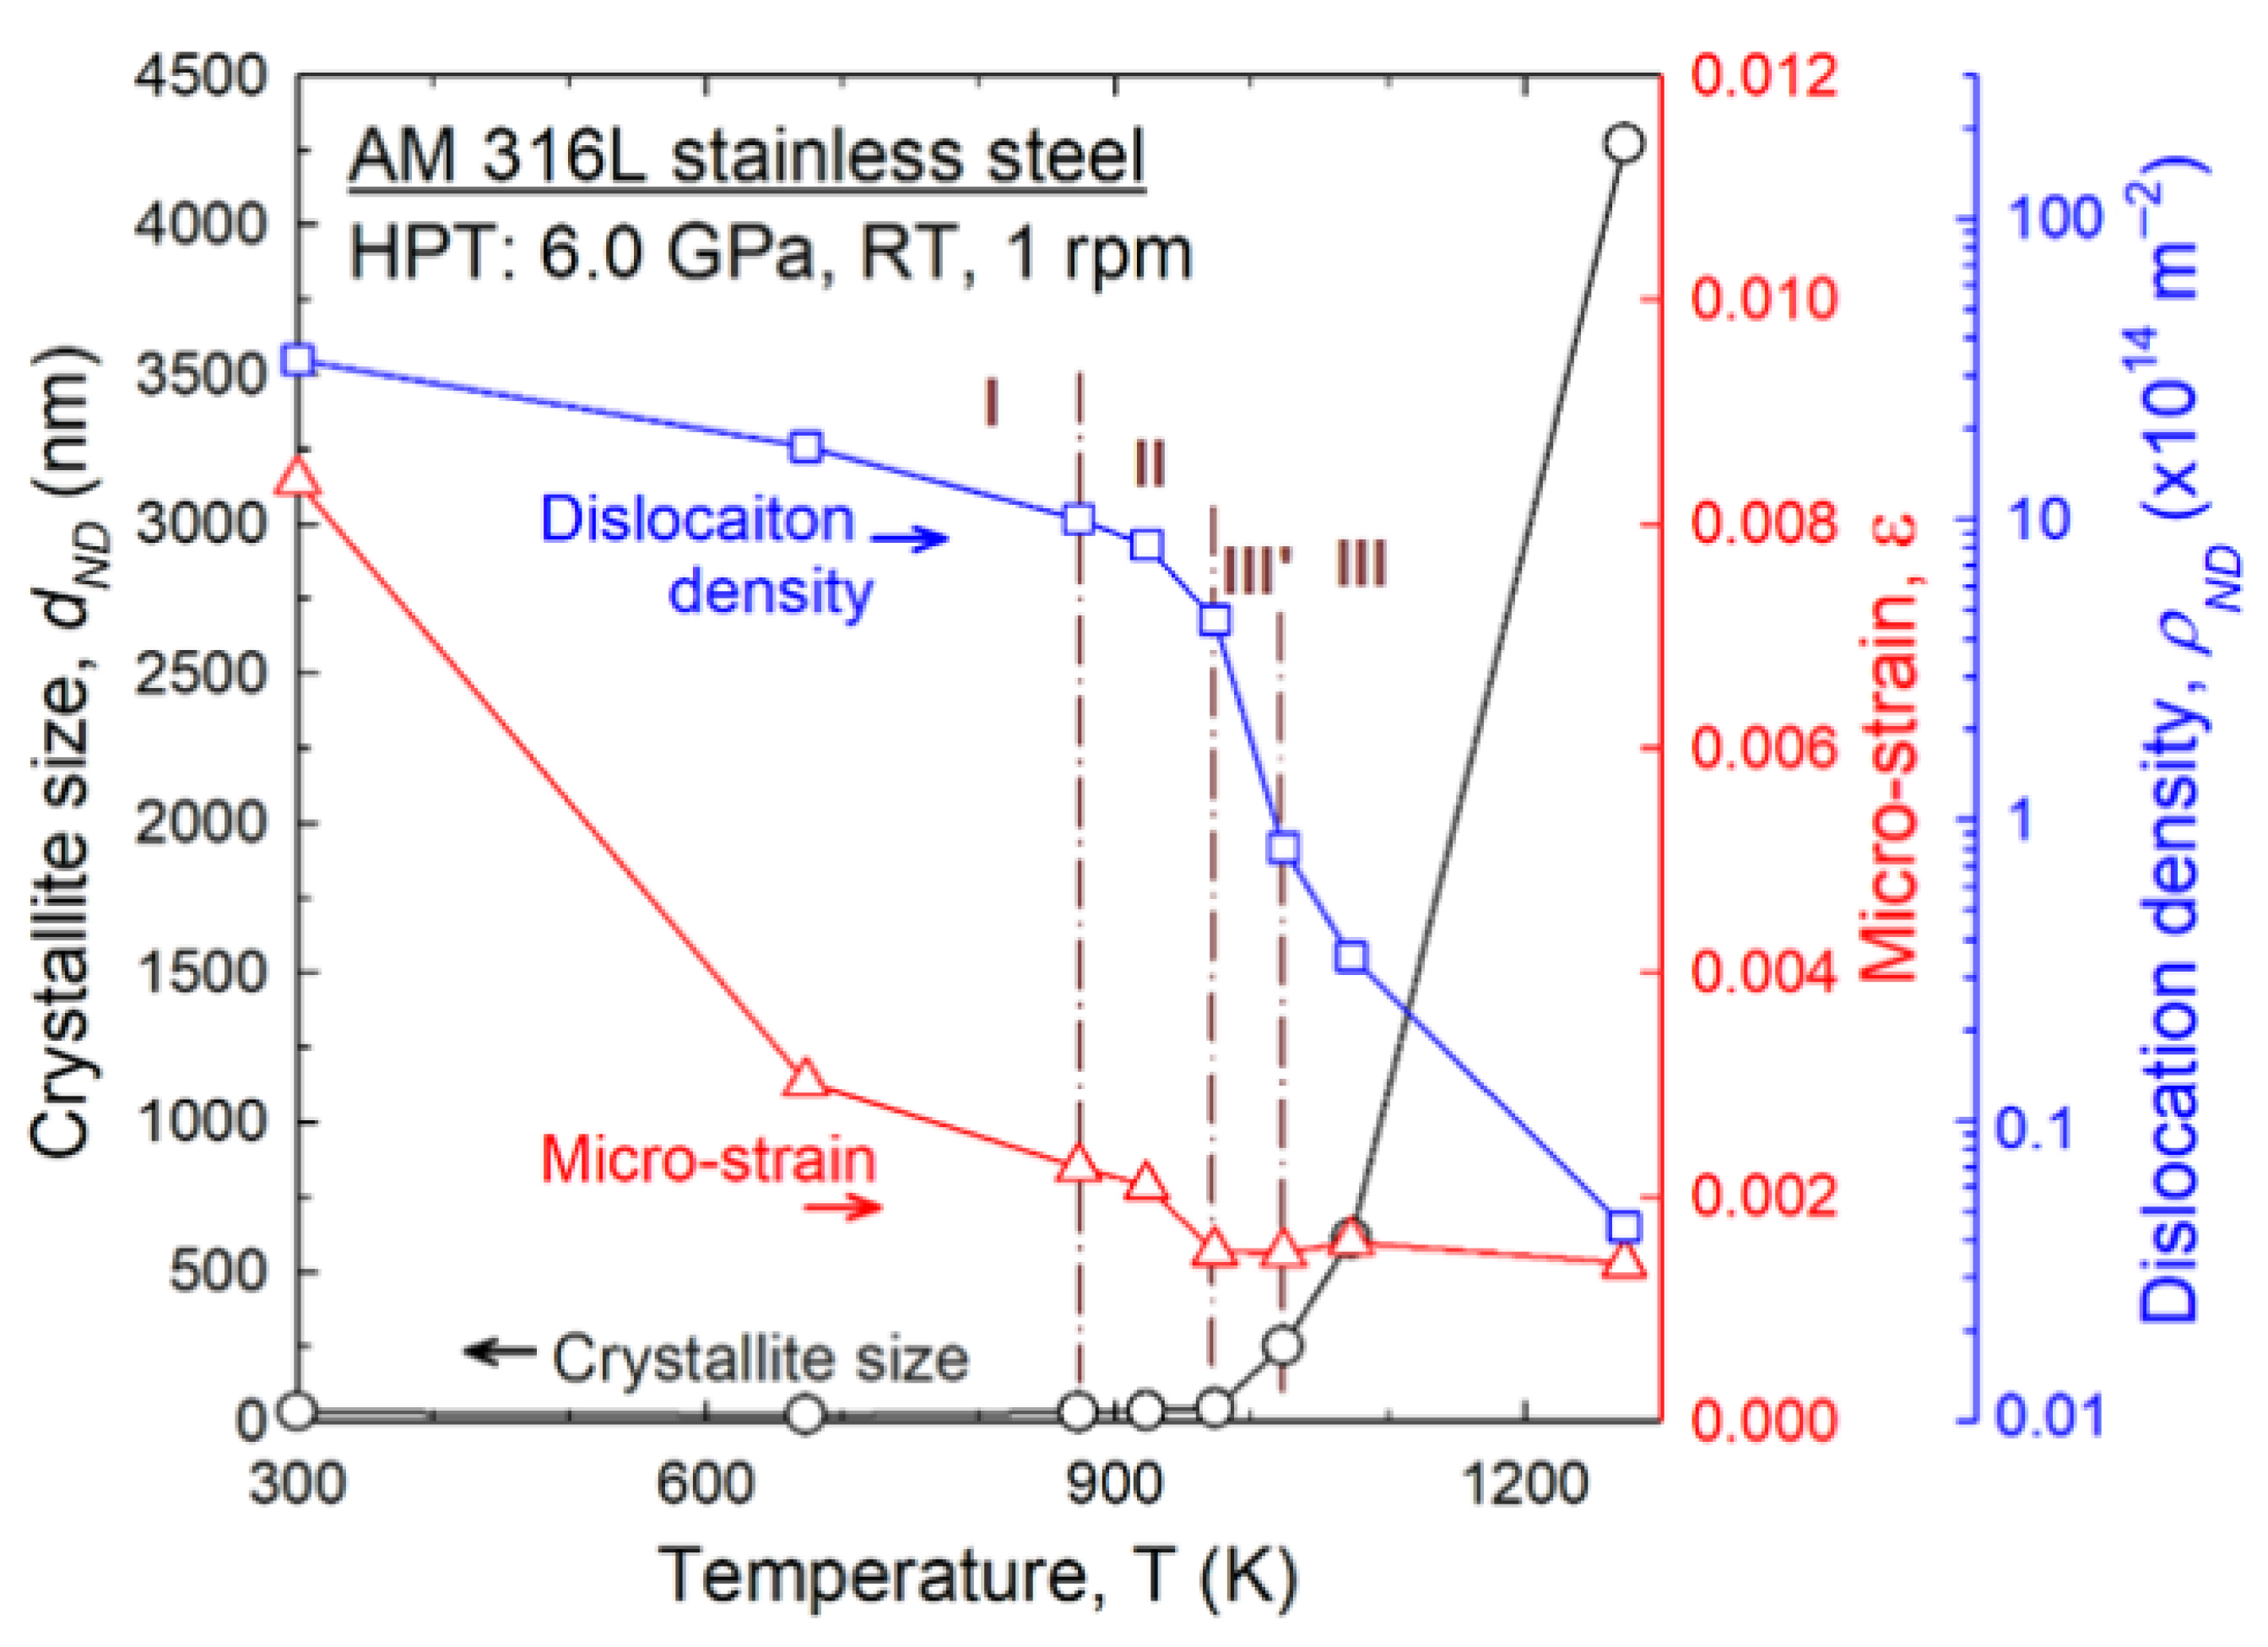
To further determine the exact temperature regimes for microstructure thermal changes in HPT-processed 316L SS, the Williamson–Hall equation: Δ Q = K · 2 π D + Δ ε Q   was employed to evaluate the coherent grain size D and dislocation density ρ. The results at selected temperatures are shown in Figure 7. Detailed information can be found in reference [37]. For comparison, Williamson–Hall plots of as-built 316L SS specimens under different temperatures are also presented in Figure 7. For the HPT-processed 316L SS, the coherent grain size increases with temperature, while the dislocation density decreases, as summarized in Figure 8. By contrast, the as-built specimens reveal almost no change in either the intercept (grain size) or slope (dislocation density) during heating. A similar trend was also observed for the as-printed CoCrFeNi alloy, which exhibited only limited grain recovery between 800 K and 1000 K, as shown in Figure 8 of a former literature [38]. It can be explained that the printing process provides insufficient driving force for grain recrystallization upon heating. Meanwhile, the slope of the Williamson–Hall plot for HPT-processed 316L SS after heating to 1023 K is lower than that of the as-built ones, indicating that HPT, combined with subsequent heat treatment, can greatly reduce the micro-strain in printed materials. Similar conclusions can also be found in earlier studies [38]. This can be explained by the fact that severe plastic deformation through HPT introduces a large number of dislocations and other defects into the nanostructure [66], thereby storing significant deformation energy. During heat treatment, this stored energy provides the driving force for grain recovery, recrystallization, and subsequent grain growth, ultimately leading to an almost stress-free microstructure.
The sequential thermal evolution of microstructure can be further analyzed based on the evolution of dislocation density and grain size, as well as micro-strain upon heating, and the results for HPT-processed 316L SS are presented in Figure 8, where three main stages, I–III, namely, recovery, recrystallization, and grain growth, are identified. In stage I (300–873 K), the crystallite size remains nearly constant, and dislocation density exerts a minor decrease, whereas micro-strain displays a significant reduction, indicating the recovery regime when the removal of point defects overwhelms. Through stage II (873–973 K), dislocation density shows a continuous decrease without major changes in grain size, whereas the micro-strain reaches a minimum, confirming the recrystallization process. Starting from stage III (973–1273 K), grain size increases markedly, accompanied by a slight increase in micro-strain, which may be attributed to the development of thermal-strain.
Here, the innovative in situ neutron diffraction technique successfully captured the thermal microstructure evolution of HPT-processed 316L stainless steel and provides valuable insights for improving mechanical properties and reducing strain in printing components through plastic deformation followed by controlled thermal treatments.

3.3. TiAl Alloys

In situ neutron diffraction approach is particularly powerful for investigating order/disorder transitions in TiAl alloys [28]. In this example, the Ti-45Al-7.5Nb alloys were prepared via a powder metallurgical route, as described elsewhere [67]. The powders were produced by gas atomization, followed by hot isostatic pressing at 200 MPa and 1553 K for 2h. The consolidated specimens were chipped into disks with a diameter of 10 mm and a thickness of ~0.83 mm, and subsequently subjected to high-pressure torsion under a pressure of 6.0 GPa for 5 turns at a rotation speed of 1 rpm. The processed specimens were designated as HPT-6-5-b. Both HPT-6-5-b and as-received samples were then investigated by in situ neutron diffraction during heating and cooling cycles using the WOMBAT diffractometer at the Australian Nuclear Science and Technology Organization (ANSTO) [68].
An earlier neutron report [41] on the same batch of samples revealed that the as-received sample exhibits both the ordered γ phase and the α2 phase at room temperature, while the disordered α phase appears in the HPT-6-5-b specimen. This observation demonstrates first that phase transformations are heterogeneous within HPT samples, and largely dependent on the sampling position. At the surface, the sequential phase transformation of HPT-6-5-b follows the pathway (α2 + γ) → (α + γ) → α, whereas in the mid-section, these transitions are incomplete, with the residual γ phase still detectable.
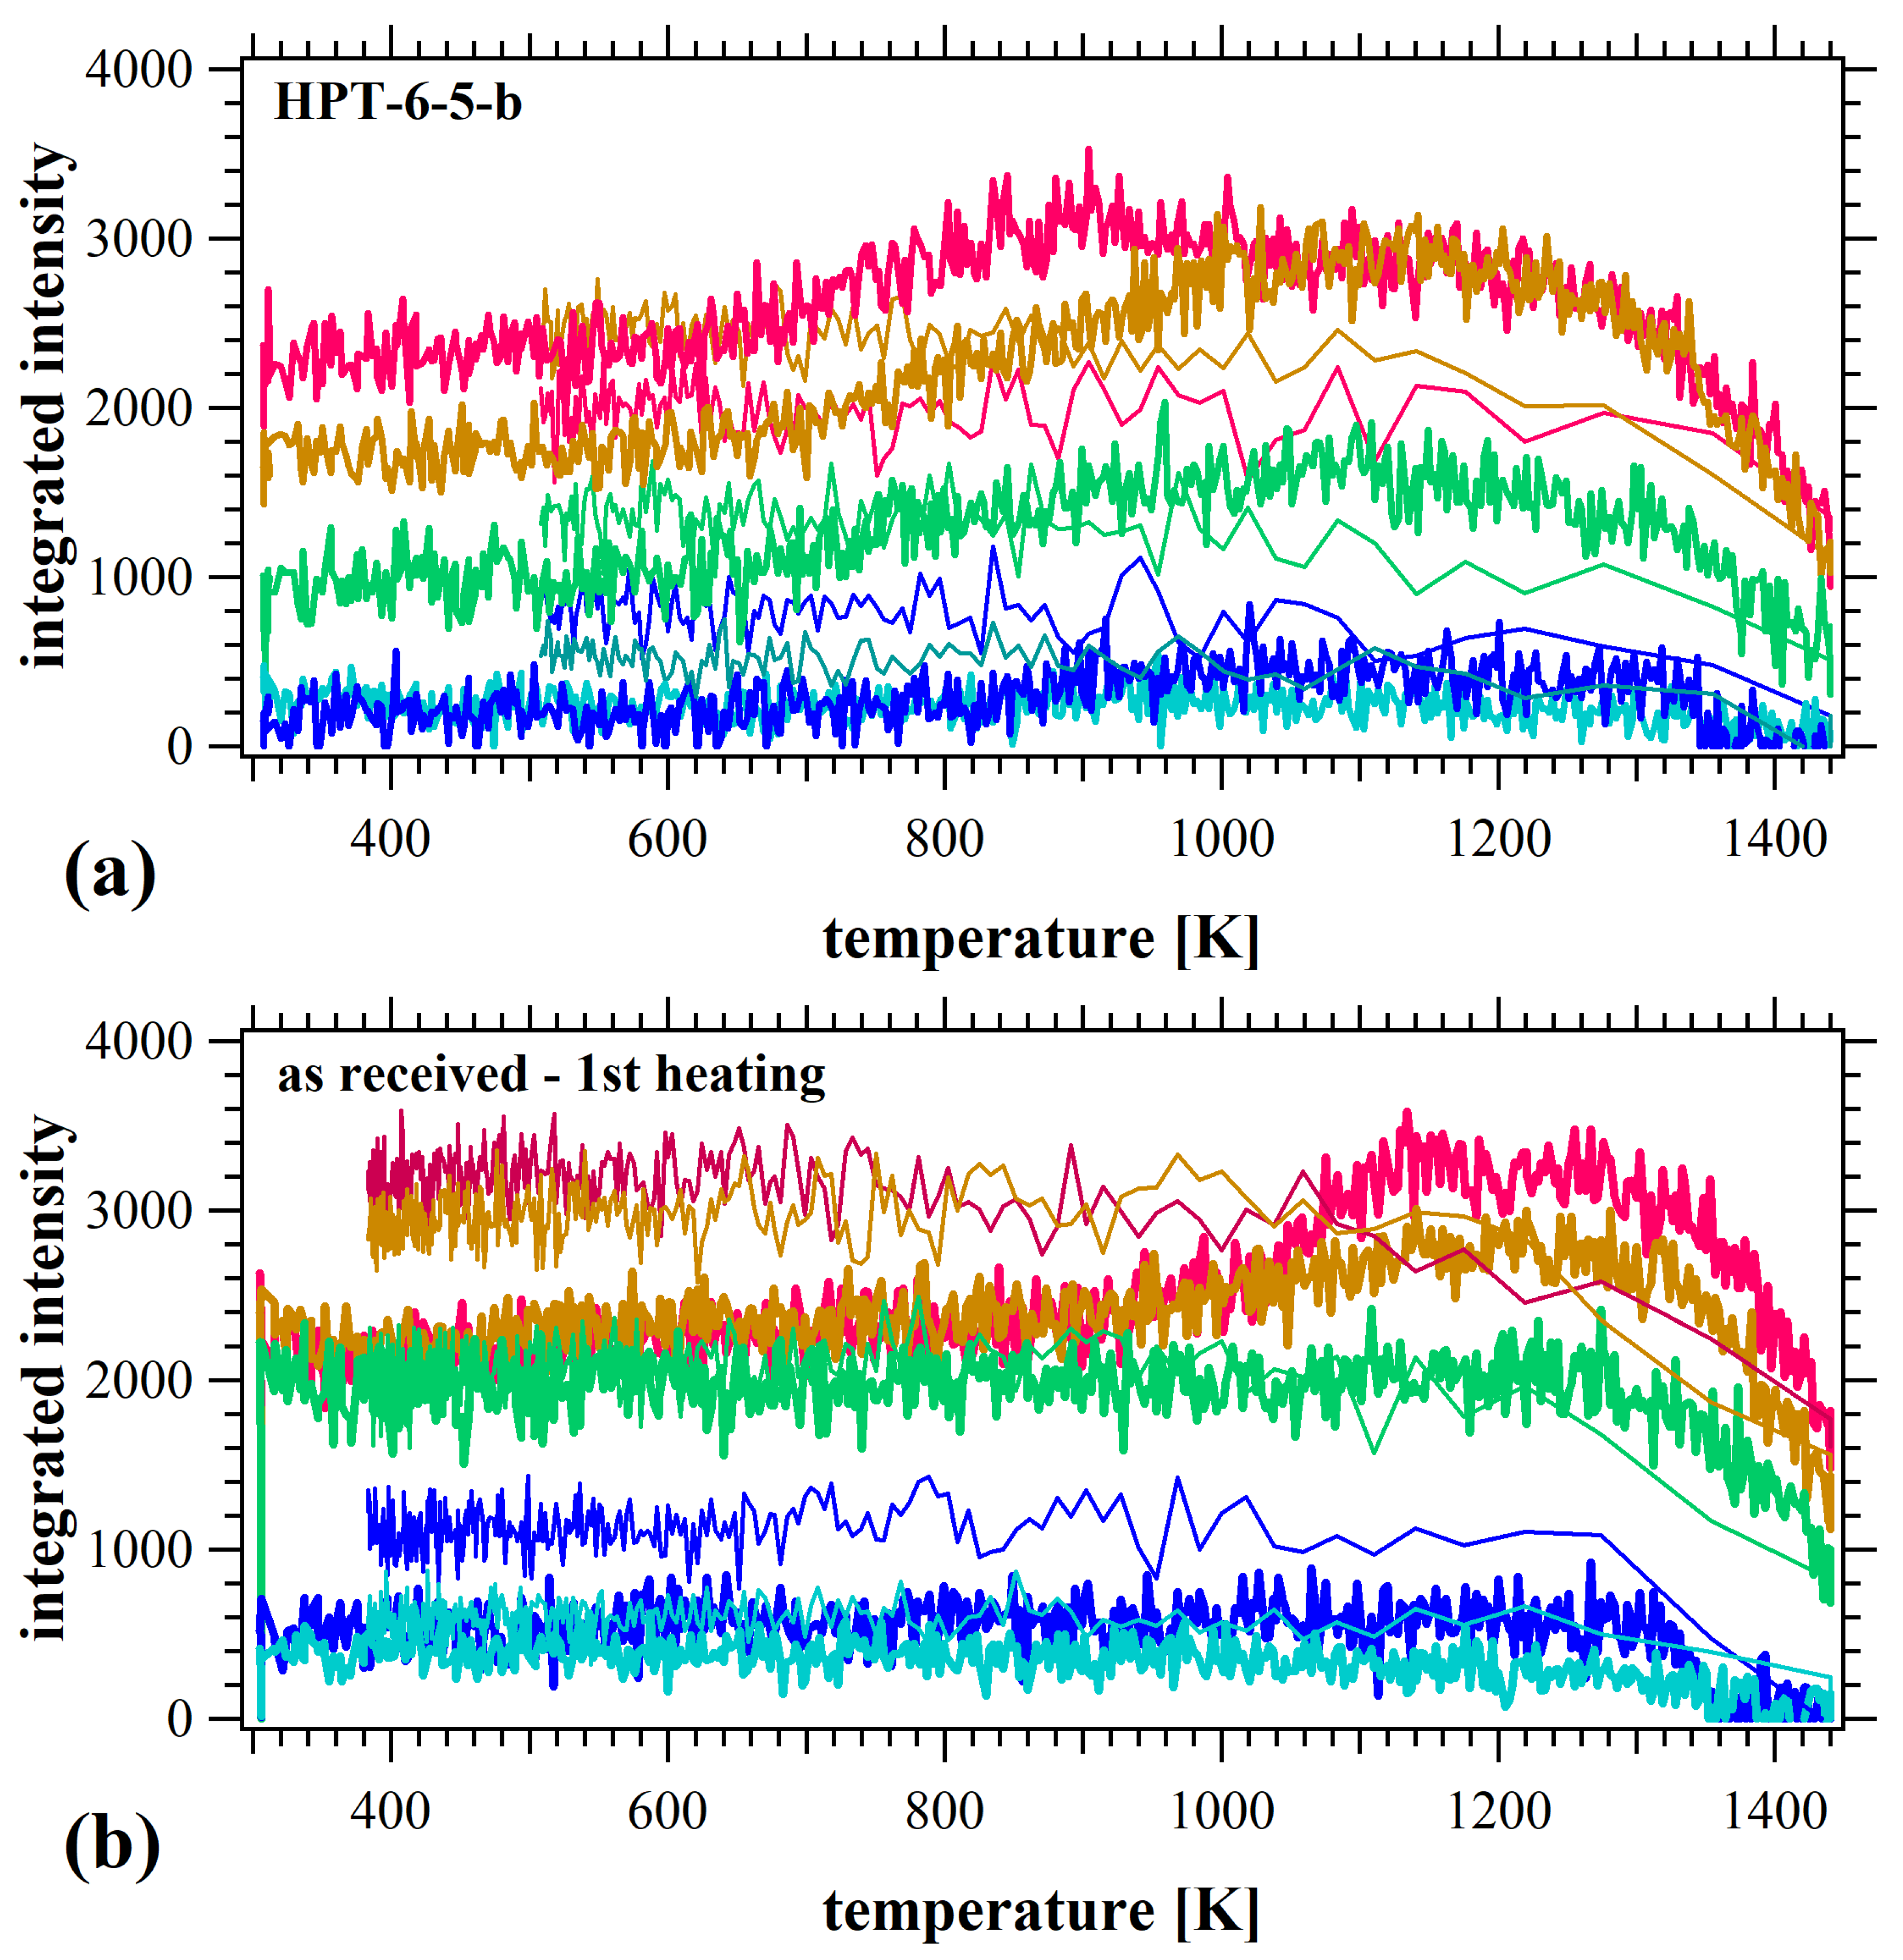
By single-peak fitting with a Gaussian function, the evolutions of diffraction peak intensities with respect to temperature of as-received and HPT-6-5-b specimens are extracted and plotted in Figure 9. For both alloys, the α2 reflections vanish above 1360 K, implying a eutectoid disorder transition to the α phase. Meanwhile, the peak intensities of all γ reflections in the HPT-6-5-b specimen increase from 660 K to 1000 K, which is attributed to the enhanced ordering of the γ phase. This temperature-enhanced crystallographic ordering of the γ phase is consistent with earlier observations [69]. Meanwhile, subtle changes in γ-021 reflection were observed in the as-received specimen, suggesting that temperature has a negligible effect on the high order of the alternating Ti and Al layers on the γ-(021) planes. Moreover, the γ phase reflections in the HPT-6-5-b specimen exhibit relatively lower intensities compared with the as-received ones. This reduction is attributed to the severe crystallographic disorder introduced by HPT, which isotropically mixes atoms across all crystallographic planes, including the γ-(021) planes. Furthermore, the recovery of crystallographic order in the HPT-6-5-b specimen at much lower temperatures than in the as-received alloy is due to the substantial crystallographic distortion by high-pressure torsion.
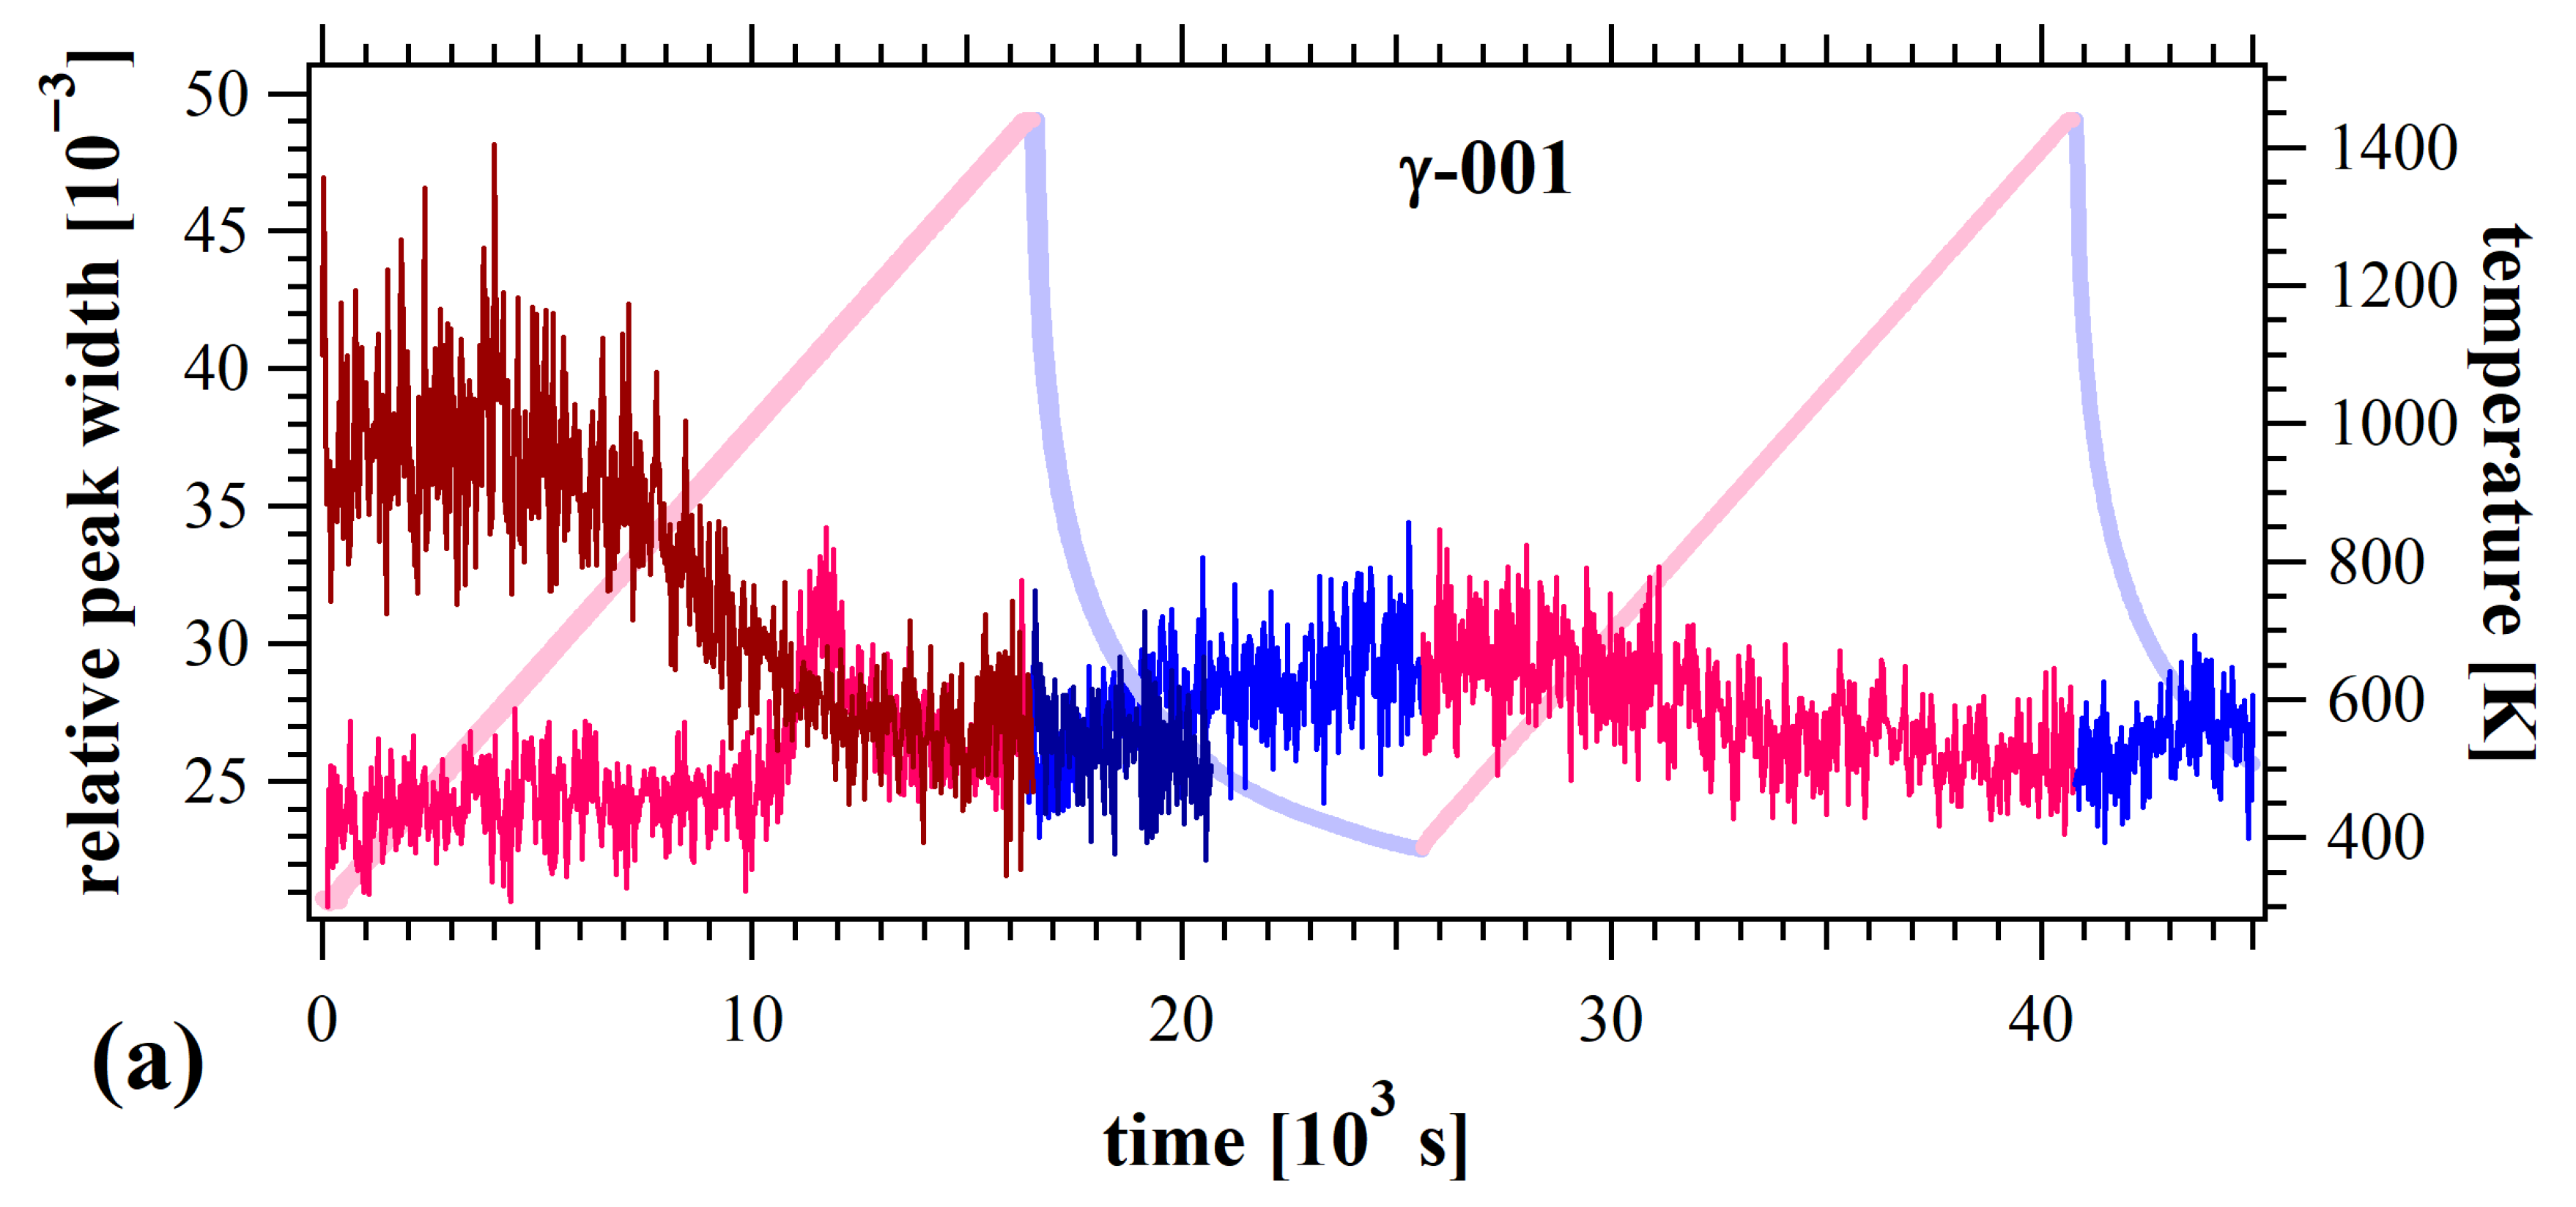
The crystallographic thermal anisotropy in the as-received sample is also observed in the peak width evolution, as illustrated in Figure 10. The peak width of the γ-001 reflection in as-received ones shows only a slight reduction, while the γ-110 reflection exhibits a remarkable decrease during the second heating cycle. Since peak width is correlated with the dislocations, this anisotropic phenomenon is explained by the activation of energetically favorable Burgers vectors of γ-TiAl, namely, the low-energy <110> and the higher-energy <011> dislocations [70]. This study highlights the capability of in situ neutron diffraction in probing order/disorder transitions, as well as capturing the anisotropic thermal crystallographic evolutions in TiAl alloys.

4. In Situ Synchrotron X-Ray Analysis on Plastically Deformed Bulk Metals upon Heating

4.1. Mg-Al Alloys

Synchrotron X-rays are billions of times brighter than conventional laboratory X-rays and also much more intense than neutron sources, enabling faster and better data acquisition. Moreover, synchrotron beams can be focused down to sub-micrometer dimensions, offering fine spatial resolution. These advantages allow detailed in situ investigations of materials, where crystal structures, lattice strain, phase transitions, grain rotations, etc., can be tracked with high spatial and temporal resolution. An example of this capability is illustrated by an in situ synchrotron radiation experiment conducted on deformed magnesium alloys during heat treatment.
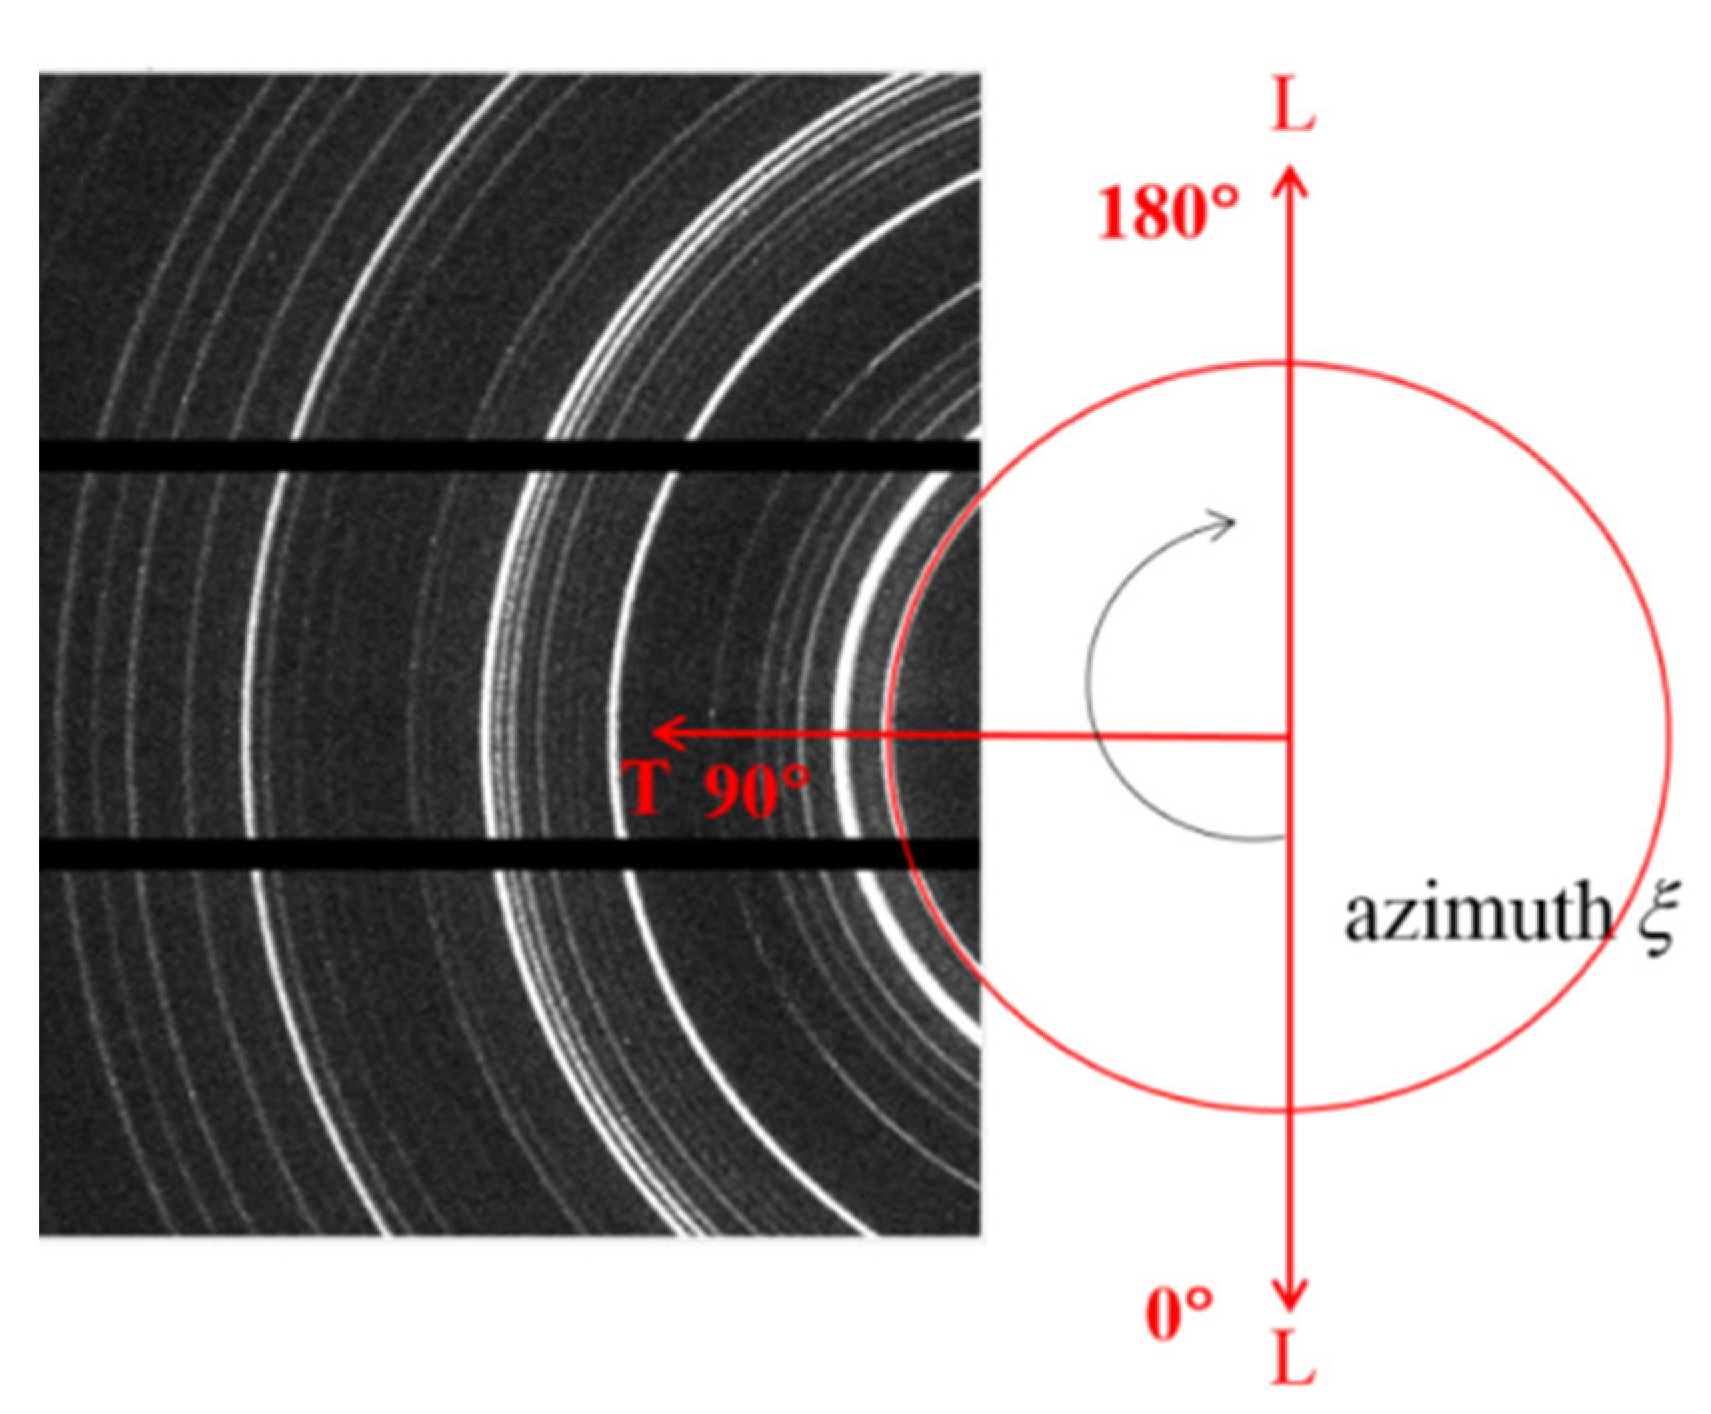
In this example, in situ synchrotron radiation diffraction experiments were carried out on as-received rolled sheets of AZ91 and AZ31 magnesium alloys, each exhibiting an average equiaxed grain size of approximately 4 μm. For synchrotron measurements, the as-received sheets were cut into platelets with dimensions of 10 × 5 × 2 mm3. The experiments were performed in the Laue transmission scattering geometry at the beamline BL22XU [71] in SPring-8 (Japan), where the incident beam energy of 69.908 keV (wavelength λ = 0.1775 Å) is provided. A 2D-area detector was employed with an image capture time of 1 s−1. Representative sections of the Debye–Scherrer diffraction rings were recorded during sample heating at a rate of 7.5 K/min up to 773 K, followed by a holding period of 300 s and subsequent spontaneous cooling. Further details of the experimental procedure can be found in the literature [13]. Figure 11 represents the recorded detector image, showing sections of the Debye–Scherrer rings obtained for the AZ91 alloy at room temperature.
Contour maps of peak intensity evolution during the heating–cooling cycle were extracted through azimuthal integration along the Debye–Scherrer rings from Figure 12, and the results for AZ91 and AZ31 specimens are plotted in Figure 12. The intensity continuously increases with color changes from blue through white to red, with temperature ramps to the right. And different peaks can be distinguished as indexed to the top and bottom of contour maps. Several key features are observed: (i) apart from the Mg matrix, the AZ91 alloy predominantly contains a single intermetallic phase, Al12Mg17, whereas AZ31 comprises two minor phases, i.e., Al8Mn5 and AlMn; (ii) diffraction peaks of Al12Mg17 disappear at a certain high temperature and reappear during cooling, while precipitation peaks in AZ31 remain thermally stable; (iii) both alloys display negligible 0002 reflections from the Mg matrix at room temperature, considering the specimens were mounted with sheet normals aligned to the synchrotron beam during the experiment, indicating that 0002 planes are mostly parallel to the rolled sheet’s surface—a basal texture typical for rolled metals [72,73]; (iv) all diffraction peaks shift to the left upon heating and shift back during cooling, which can be attributed to lattice thermal expansion and contraction, respectively; and (v) the peak width of the Mg matrix in AZ91 exhibits some development upon heating. Details will be discussed in the following paragraphs.
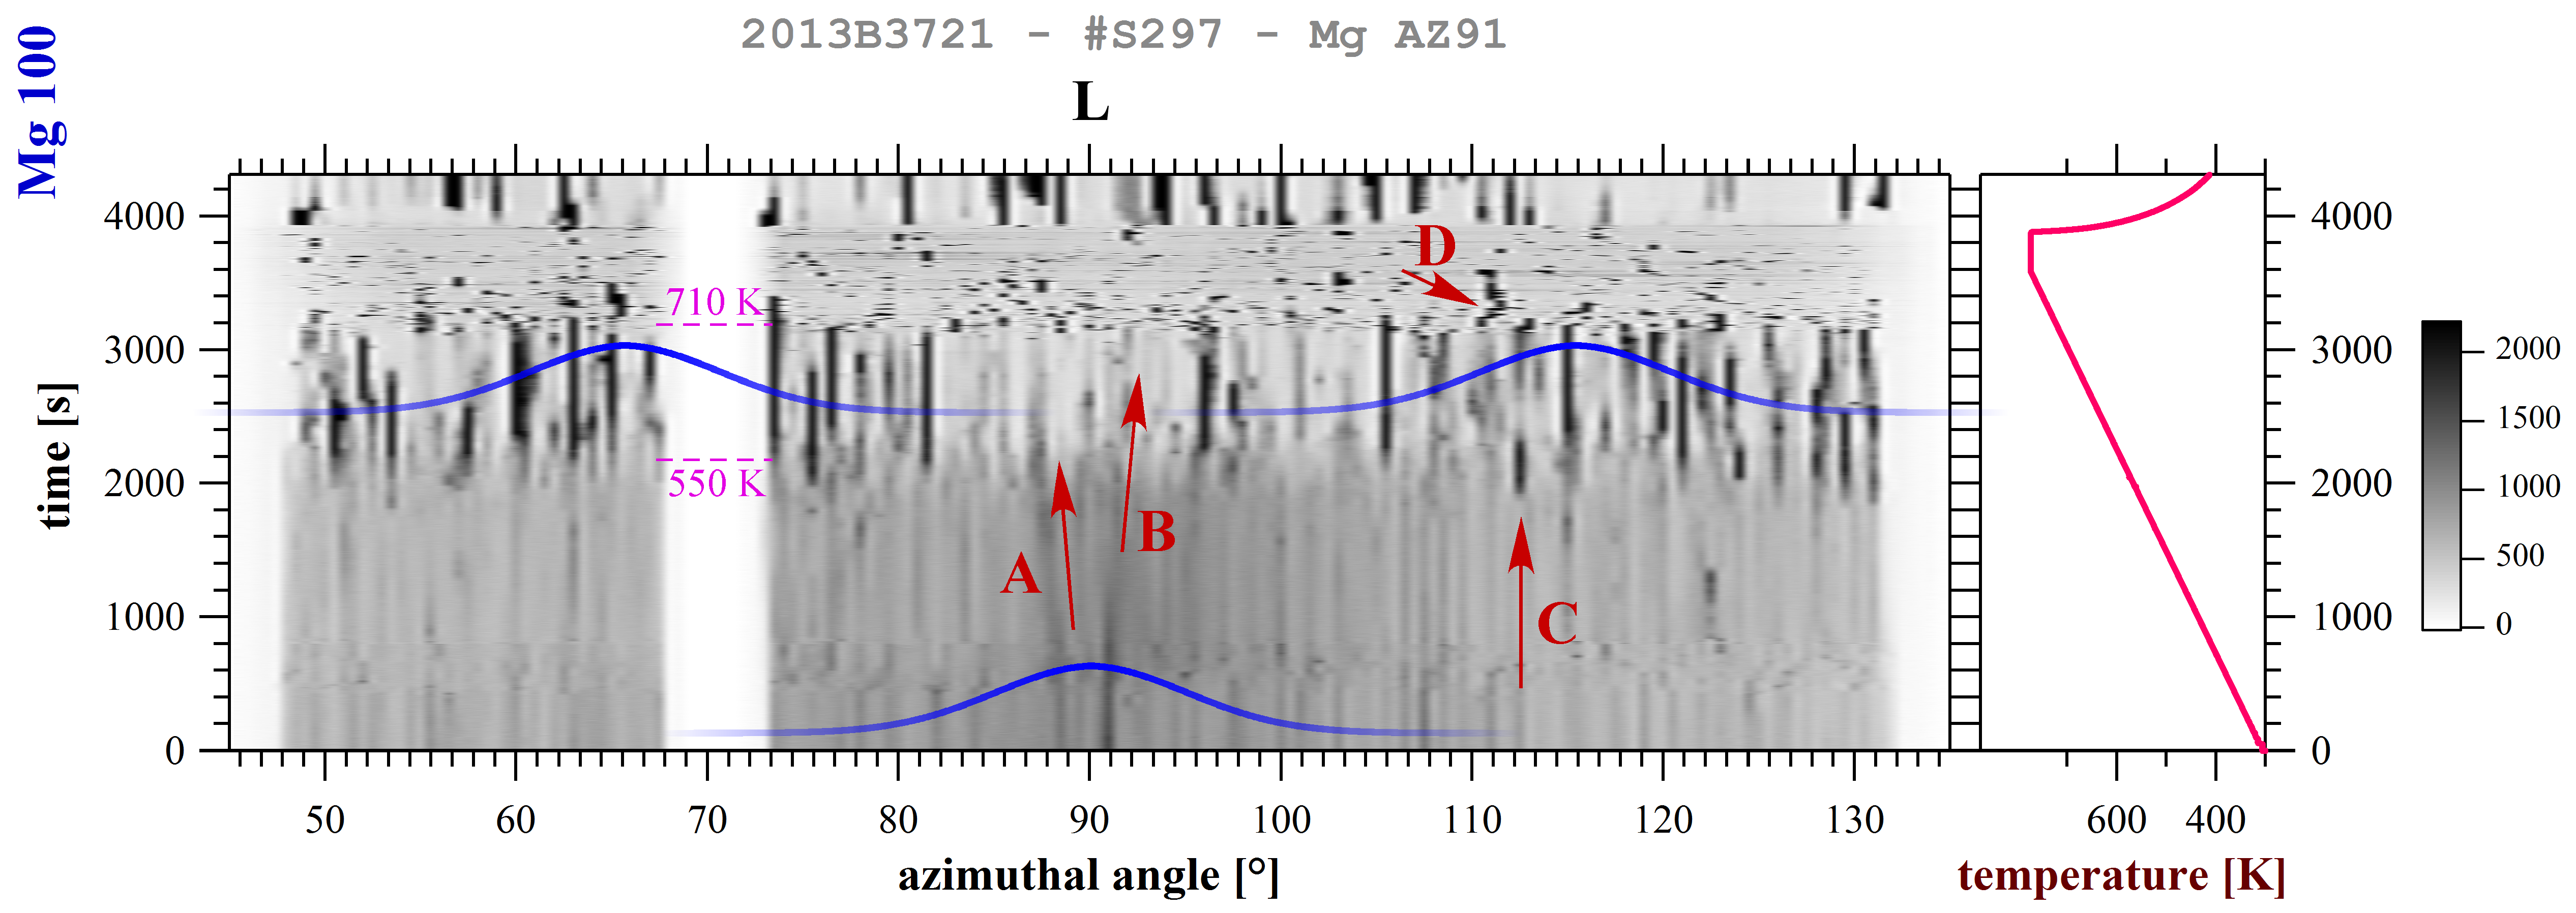
By sectioning the Debye–Scherrer ring of a selected reflection into 360 segments along the azimuthal direction, the peak intensity distribution along diffraction rings was obtained [74]. Results for the Mg-100 reflection of the AZ91 alloy are displayed in Figure 13, where the color change from light to dark corresponds to increasing intensity.
Several findings can be summarized: (1) At room temperature, the 100 reflection exhibits peak intensity concentrated near an azimuthal angle of 90°, corresponding to the rolling direction, which demonstrates the strong basal texture of the as-received AZ91 alloy. (2) Starting from approximately 550 K, certain vertical intensity lines sharpen while others diminish, until the eutectic temperature is reached at about 710 K, in agreement with reported value [75]. This microstructure rearrangement is expressed as recovery and subsequent recrystallization. (3) Grain rotations are evidenced by several examples: (i) the highest 100 peak intensity deviates from the rolling direction upon heating to 550 K, as pointed out by Arrows A and B, which is attributed to grain rotation around the beam axis; (ii) Arrow C highlights the sudden appearance of a line, signifying that a grain reflection crossed the Ewald sphere due to fluctuation; (iii) the continuous trajectory marked as Arrow D above 710 K indicates repeated grain reflection crossing through the Ewald sphere. (4) The appearance of randomly dispersed intensity spots at the holding temperature of 710 K is ascribed to partial melting, resulting in pronounced orientation fluctuations. For the AZ31 alloy, similar texture evolution, grain rotation, and microstructural rearrangements were also observed [13].
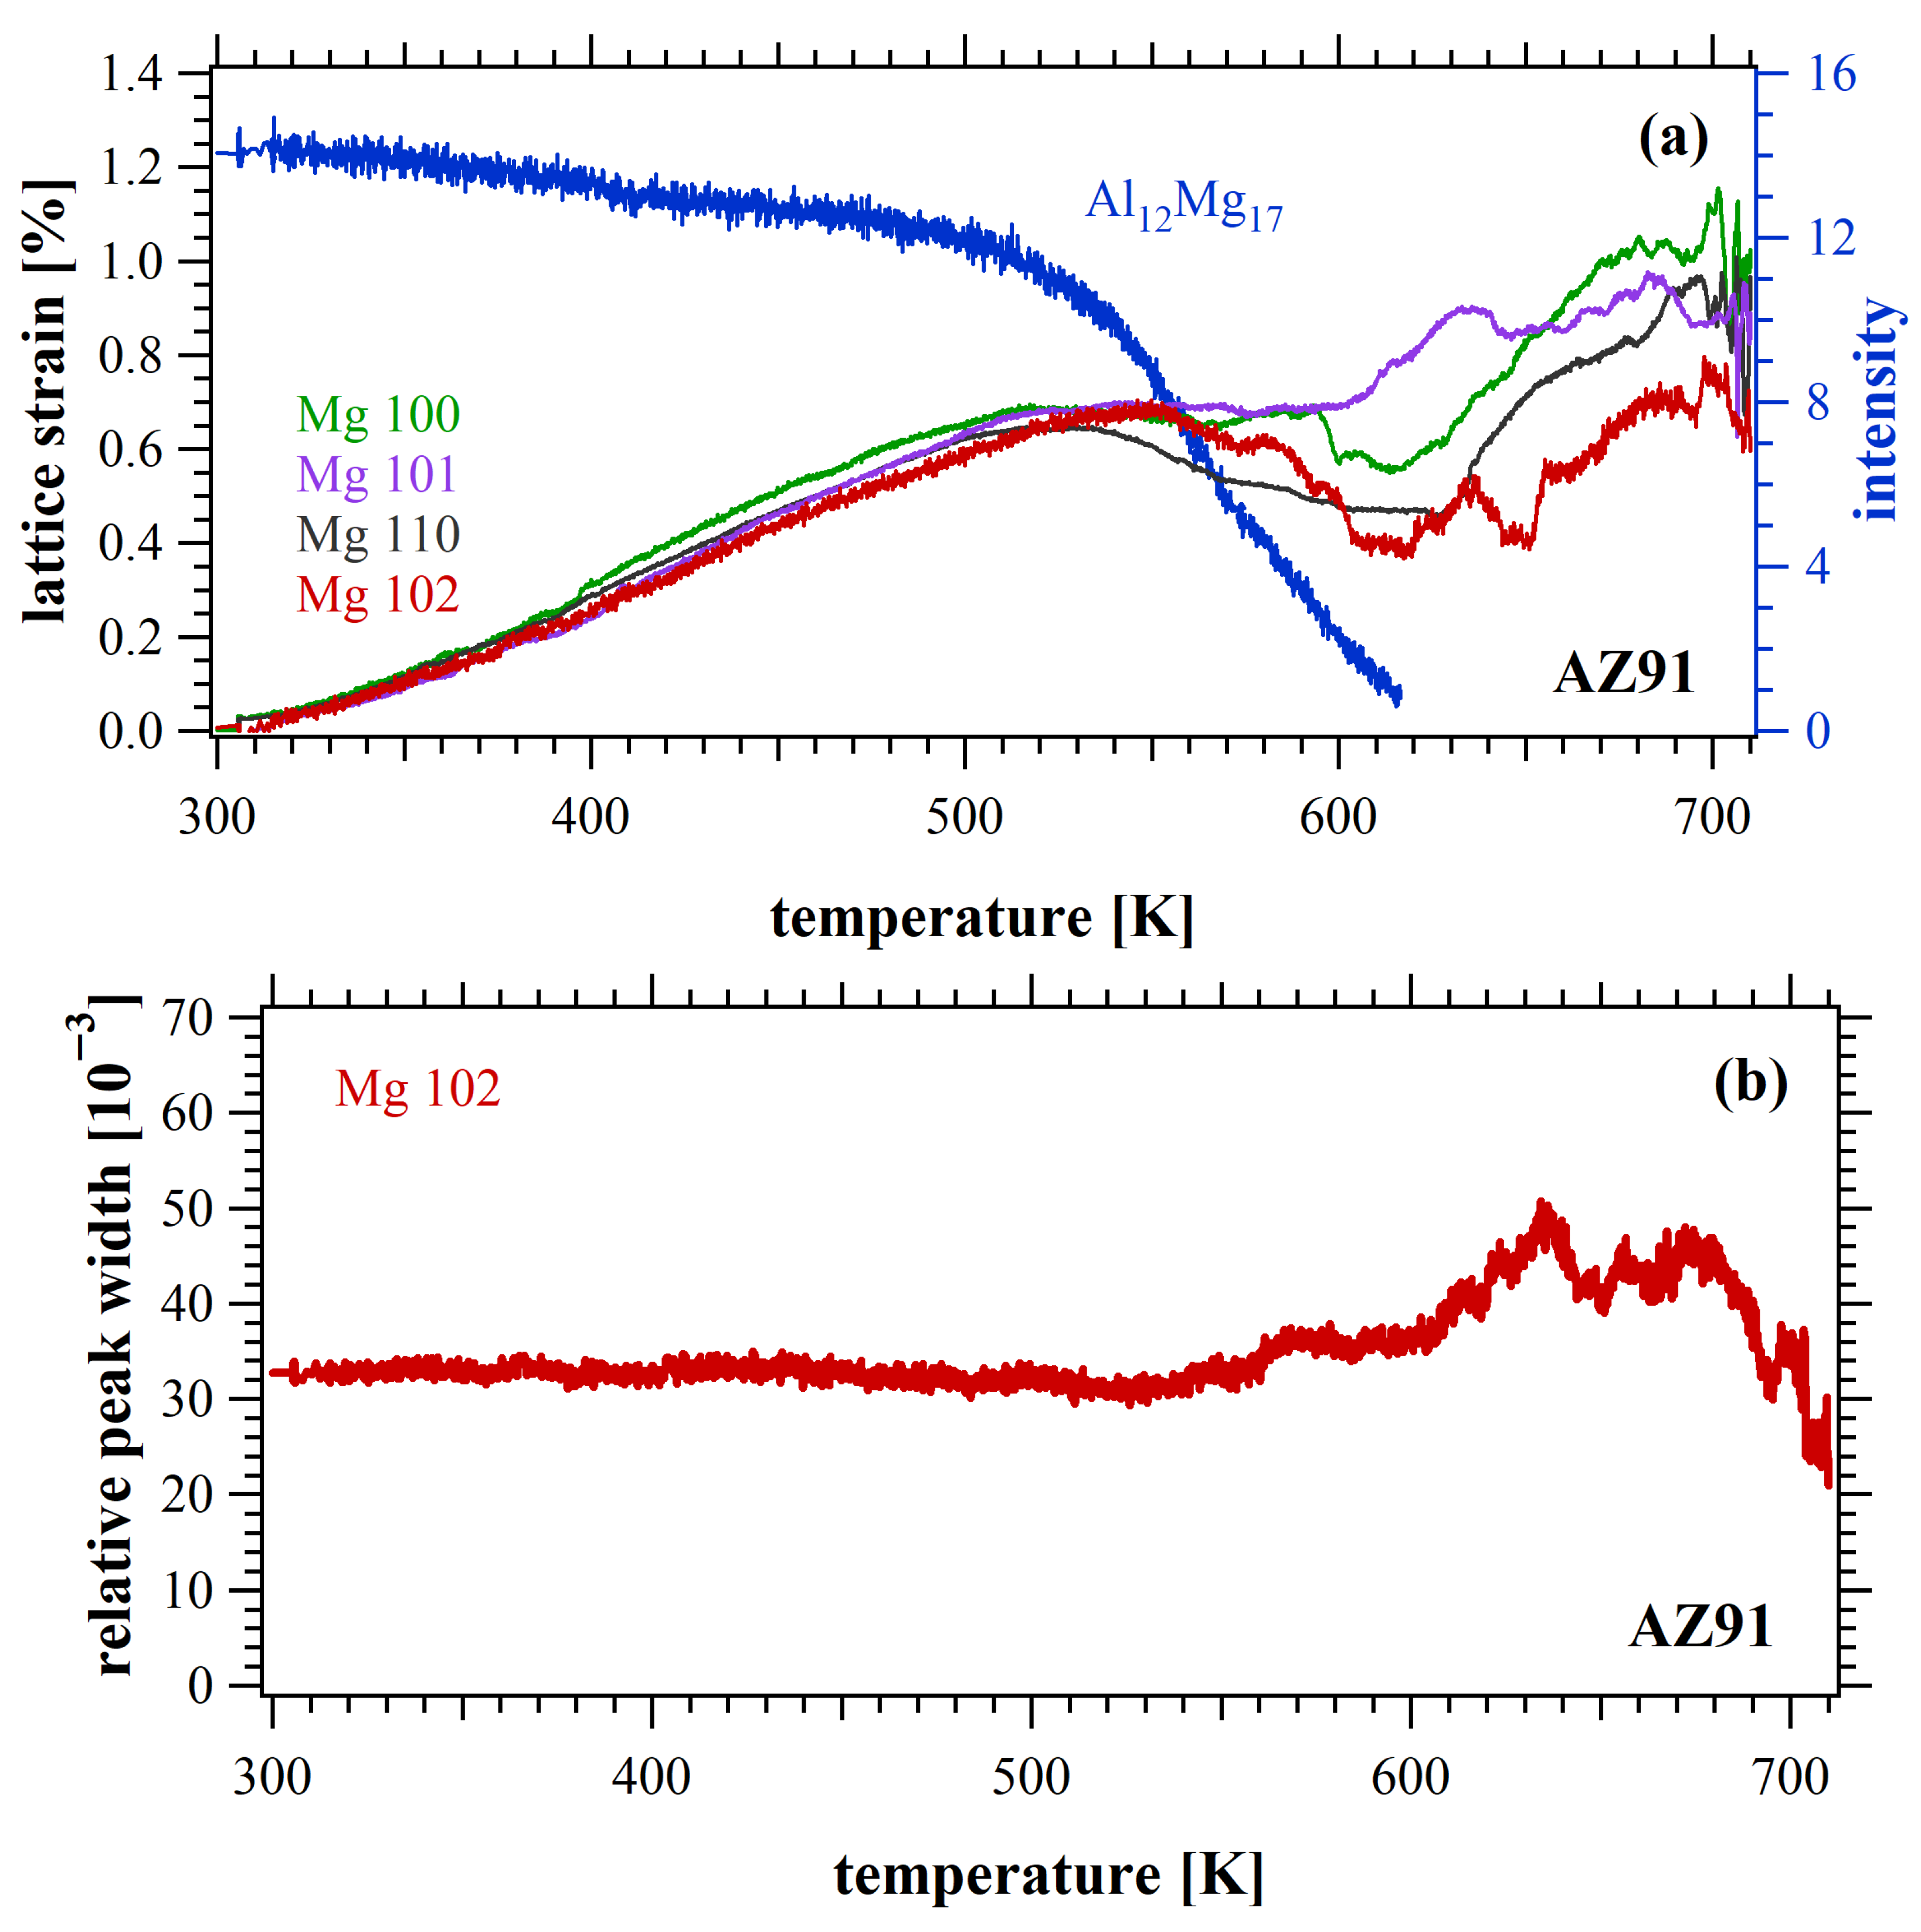
Lattice strain thermal evolutions of 100, 101, 110, and 102 reflections for the Mg matrix in the AZ91 alloy are extracted through peak fitting as well as relevant calculations. The results are illustrated in Figure 14a together with the 332 peak intensity evolution of the sole intermetallic, Al12Mg17 (blue curve). At the beginning of heating, the lattice strains in the Mg matrix increase as expected from thermal expansion, yielding an evaluated thermal expansion coefficient of η = 28 × 10−6 K−1, which is in good agreement with the previously reported values of η = 29 × 10−6 K−1 [76,77]. Whereas, between 540 K and 650 K, an anisotropic and non-uniform decrease in lattice strains is observed, which correlates well with the pronounced reduction in Al12Mg17 peak intensity. Since peak intensities are proportional to the irradiated volume fraction of the investigated material [42], the precipitation dissolution of Al12Mg17 was manifested by the intensity reduction. This process arises from the increased solubility of Al into Mg with temperature [78]. The incorporation of additional Al atoms into the Mg lattice results in a “compressed” lattice response, which explains well the unusual drop of lattice strains for the Mg matrix.
Furthermore, Figure 14b also plots the 102 peak width evolution of the Mg matrix. The peak width remains constant up to ~540 K, after which it increases sharply as Al begins diffusing from the intermetallic phase into the matrix. And the subsequent increase in peak width is attributed to the inhomogeneous distribution of Al concentration in the matrix during the dissipation of Al12Mg17. Accelerated diffusion at higher temperatures leads to a homogeneous concentration; thus, the peak width of the matrix gradually shrinks. This study demonstrates that in situ synchrotron measurements provide a comprehensive understanding of lattice expansion, precipitate dissolution, recovery, recrystallization, and grain rotation phenomena in plastically deformed magnesium alloys [79].

4.2. Steel

Cold-rolled steel with a composition of Fe-0.1C-1.9Mn-0.2Cr-0.2Si (wt.%) is subjected to synchrotron experiment at DESY on the PETRA III P07 beamline under powder diffraction setup. A monochromatic X-ray beam with an energy of 100 keV was used. The diffracted X-rays were recorded using a PerkinElmer 2D-area detector operating at a frame rate of 10 Hz, which resulted in the collection of more than 2700 diffraction images during a typical heating sequence of about four minutes. The cold-rolled steel specimens were heated at a constant rate of 180 K/min up to a peak temperature of 1073 K. Detailed experiment information can be found in the literature [80].
Following the in situ HERXD measurement, the diffraction data were analyzed using a combination of Rietveld refinement, Williamson–Hall analysis, and a newly developed diffraction-spot counting method to quantify phase transformation, recovery, and recrystallization, respectively.
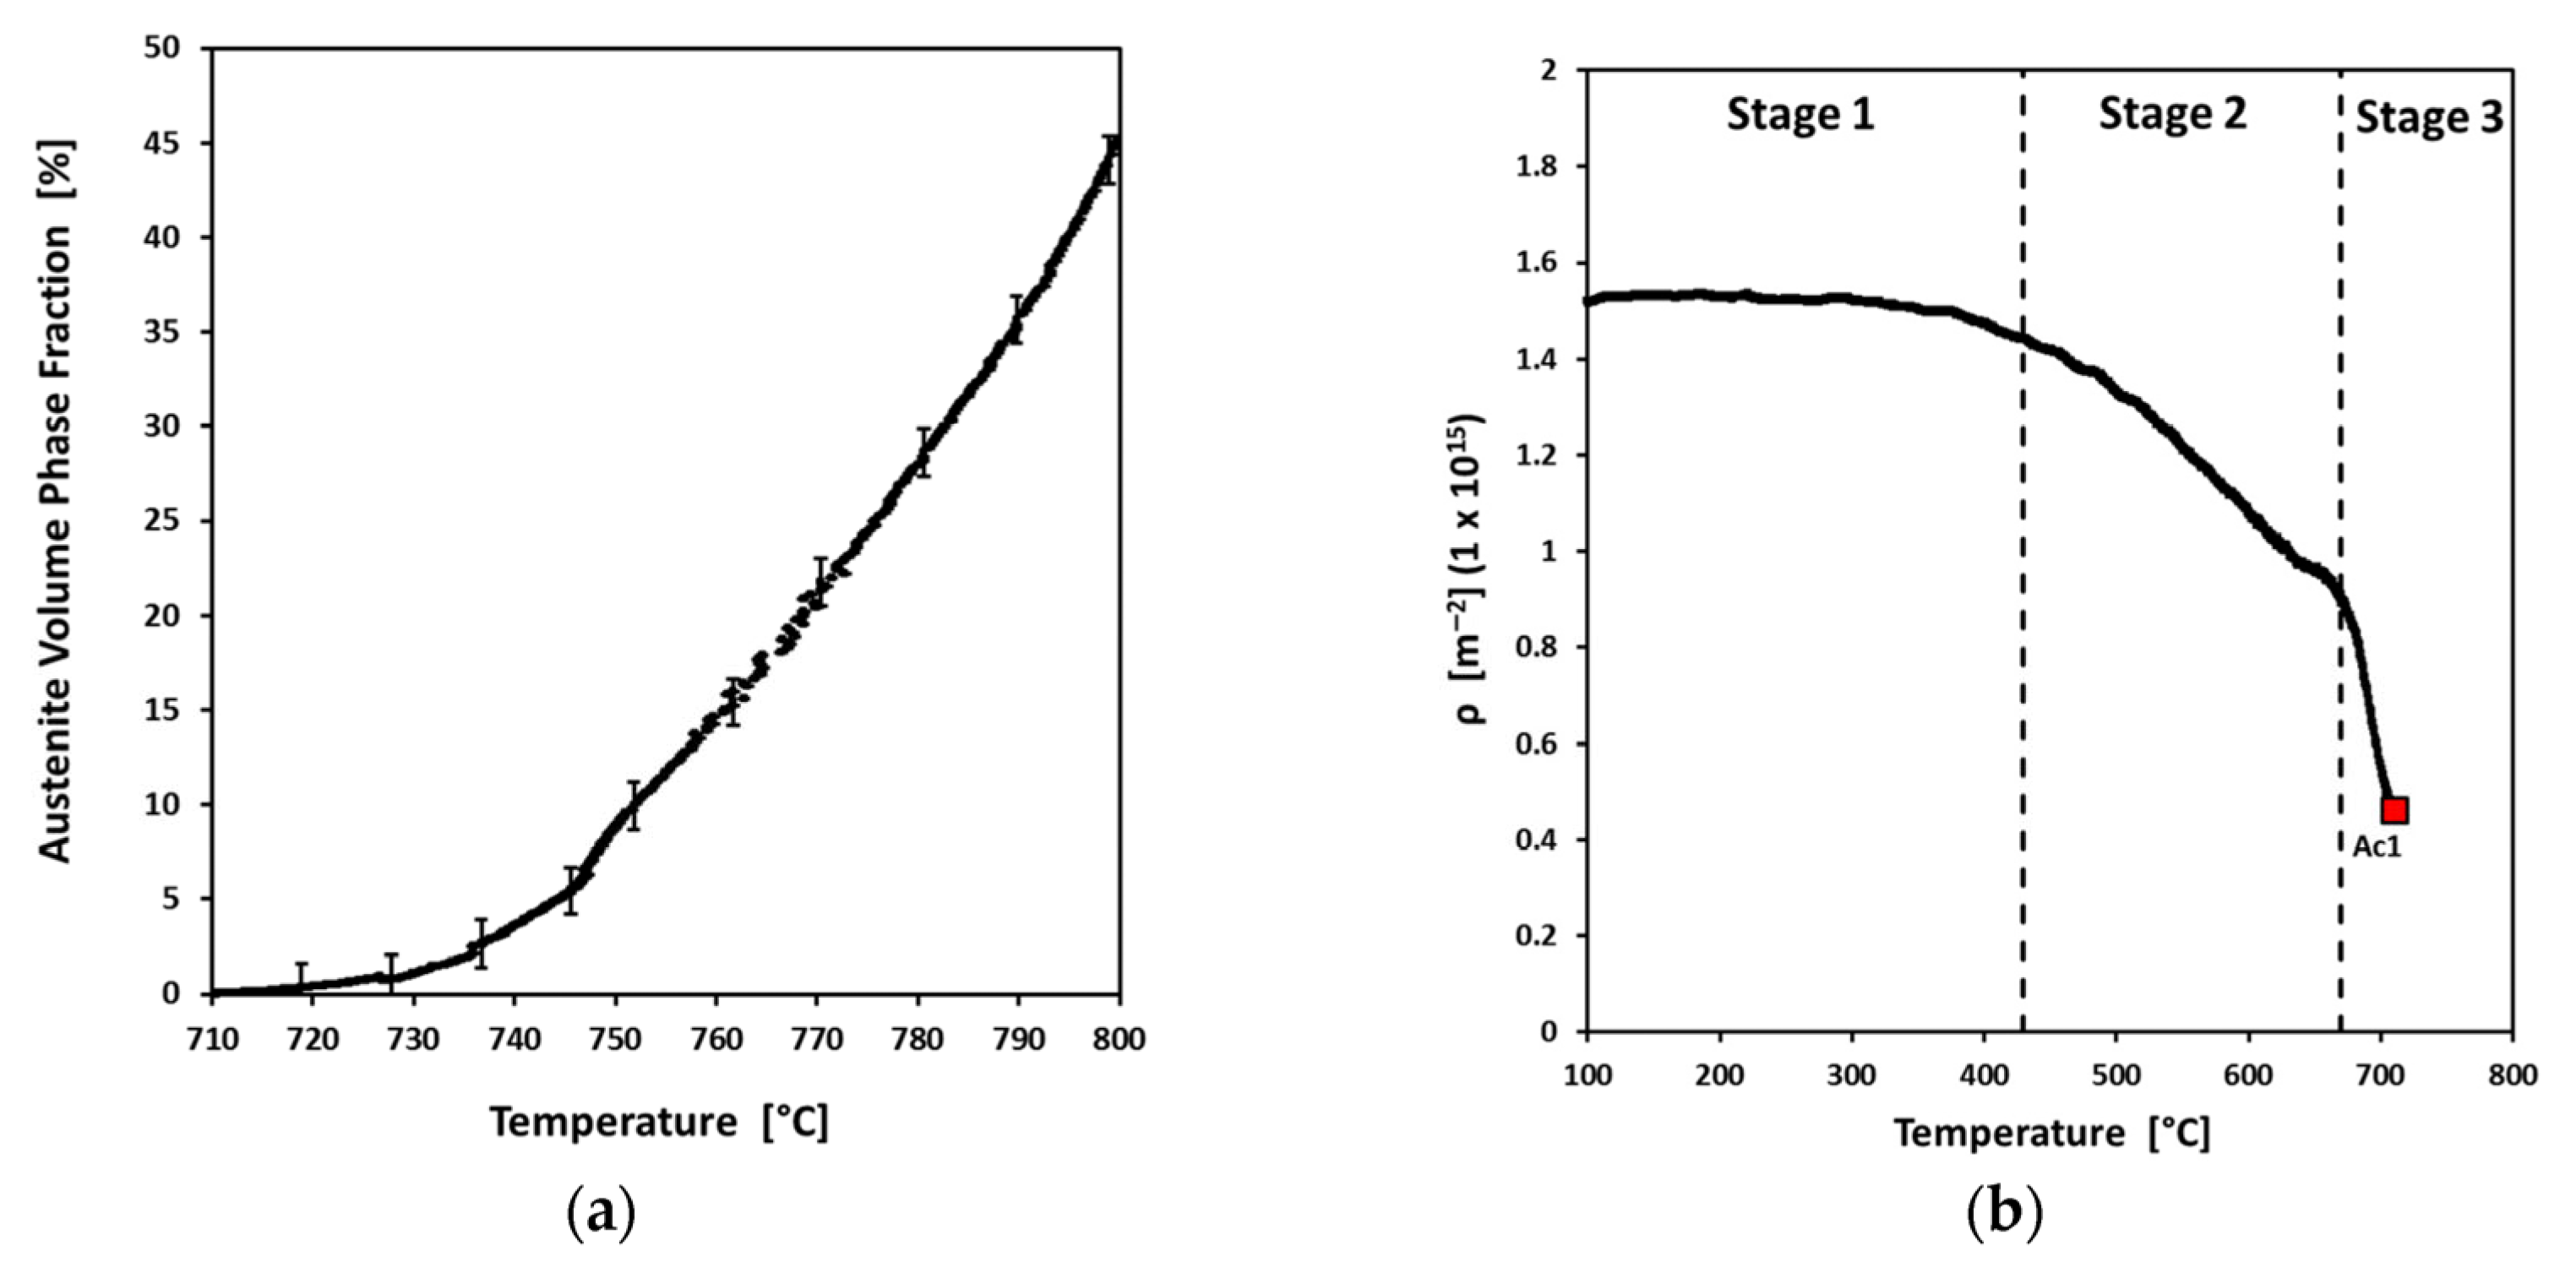
Figure 15a presents the evolution of the austenite volume fraction during heat treatment, from which the transformation begins at 983 K and the austenite phase fraction gradually increases to a maximum value of about 47% at 1073 K. At lower temperatures, the increase is relatively slow, followed by a pronounced acceleration at higher temperatures, which is attributed to the rapid dissolution of pearlite. Figure 15b illustrates the evolution of the dislocation density in ferrite as a function of temperature. Three distinct stages can be identified. In the first stage, below approximately 650 K, the dislocation density remains nearly constant, indicating negligible recovery. In the second stage, between 650 K and 920 K, a gradual decrease of about one-third in dislocation density is observed, corresponding to the recovery process, during which dislocations rearrange and annihilate. In the third stage, from 920 K up to the Ac1 temperature, a sharper reduction in dislocation density occurs, which is associated with the onset of recrystallization. This sequential evolution clearly demonstrates that recovery precedes recrystallization during continuous heating.
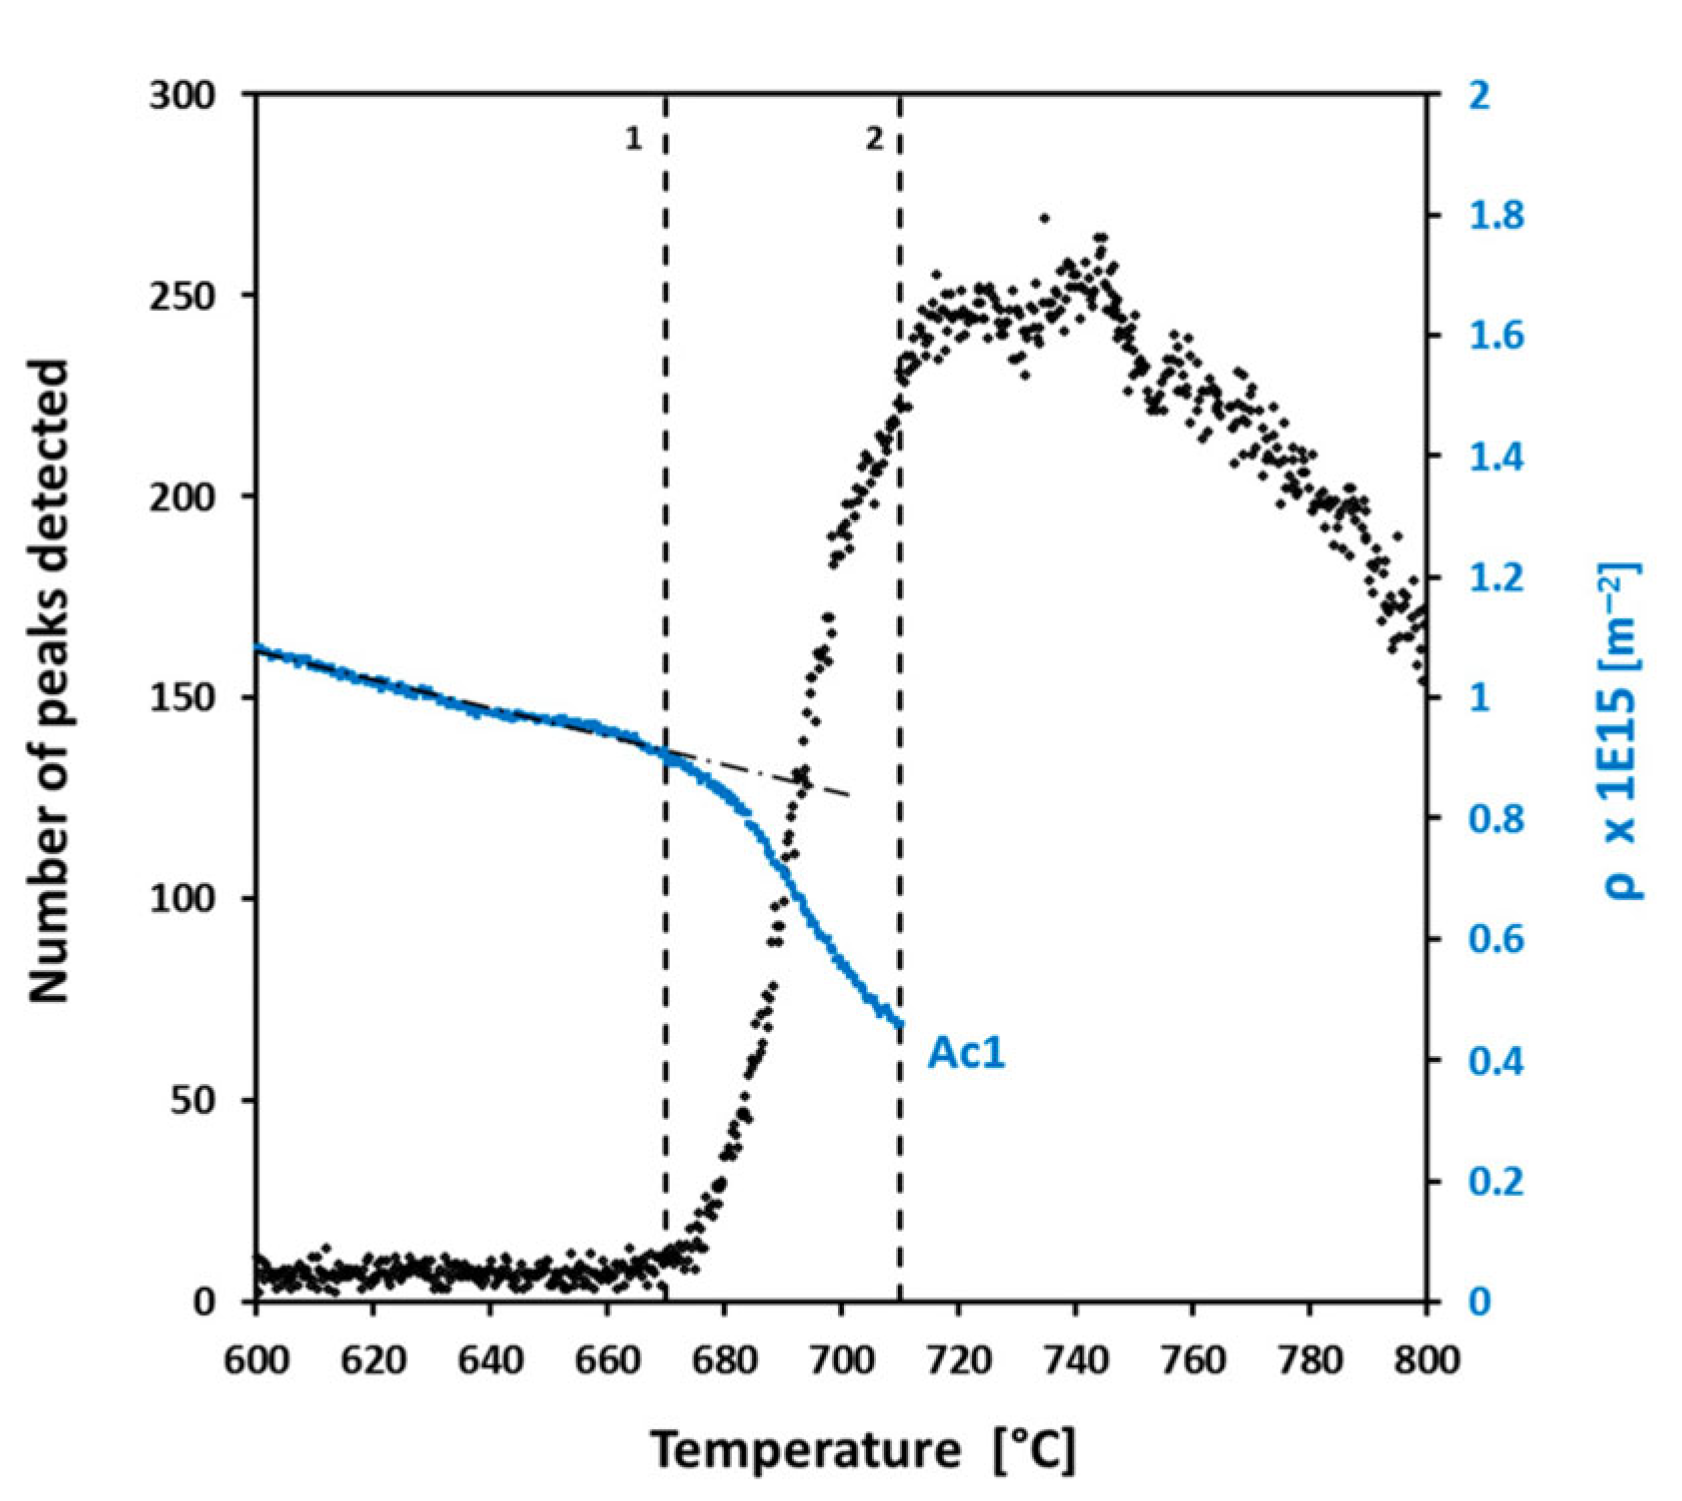
Figure 16 shows the evolution of the number of detected recrystallization peaks as a function of temperature, as determined from the azimuthal intensity fluctuations of the (200) Debye–Scherrer ring. The number of peaks remains nearly constant up to approximately 940 K, indicating the absence of recrystallized grains at lower temperatures. Above this point, the number of detected peaks increases sharply, reaching a maximum around 990–1010 K. This sigmoidal evolution reflects the nucleation and growth of new, strain-free ferrite grains during the recrystallization process. Beyond 1010 K, the number of peaks decreases slightly due to the onset of the austenite transformation, which broadens the ferrite diffraction features and reduces the detectability of individual spots. The black dashed lines labeled 1 and 2 indicate the start of recrystallization and of austenite transformation, respectively. The close correspondence between the onset of recrystallization and the sharp drop in dislocation density confirms the reliability of this in situ quantification method.
For comparison, Table 4 summarizes the key information of the above examples.

5. Conclusions

Plastically deformed metals possess highly strained, defect-rich microstructures that undergo pronounced transformations during annealing. The modern quantum-beam techniques of in situ neutron and synchrotron X-ray diffraction provide unique, non-destructive tools to probe these structural evolutions in real time. Four recent studies are reviewed in this paper, and their main findings, together with the corresponding conclusions, are summarized as follows:
(1)
The application of an in situ neutron technique to HPT-processed CoCrFeNi alloy and 316L stainless steel probes sequential thermal microstructural evolution, as revealed through the evolution of diffraction peak profiles during heat treatment. This innovative methodology opens new pathways for effectively reducing residual strain/stress in as-printed metals through plastic deformation and subsequent thermal treatments. Furthermore, mechanical examinations revealed that short-term annealing of nanograins can induce unexpected hardening, providing ways to tailor the mechanical properties of nanostructured materials.
(2)
Ti-45Al-7.5Nb alloys under different conditions were investigated by in situ neutron diffraction during heating–cooling cycles. For the powder-metallurgical alloy, lattice thermal anisotropy was observed: (1) the ordering of Ti and Al layers on the γ-021 planes remained constant, while ordering on other planes was enhanced; (2) the activation of energetically favorable Burgers vectors in the γ-phase was detected. Whereas, HPT induced isotropic atomic disorder, resulting in an earlier disorder recovery temperature in the HPT-processed TiAl alloys during heating.
(3)
A high-energy synchrotron X-ray diffraction approach was employed to investigate plastically deformed magnesium alloys during annealing, with time- and space-resolved measurements to track phases and microstructure in real time. Quantitative evaluations of lattice parameters and thermal expansion coefficients for both matrix and intermetallic were obtained. Upon heating, precipitate dissolution, recovery, recrystallization, and grain rotation phenomena were clearly identified.
(4)
Cold-rolled steel was subjected to in situ high-energy synchrotron X-ray diffraction to monitor recovery, recrystallization, and austenite transformation during annealing. Recovery began at 653 K, recrystallization at 943 K, and austenite transformation at 983 K. A new diffraction-spot counting method quantified recrystallization kinetics, enabling simultaneous, real-time characterization of coupled metallurgical processes in steel.
Although significant progress has been achieved in the combined use of neutron and synchrotron techniques, many scientific challenges remain to be addressed. For instance, both methods generally provide averaged structure information, which limits their applicability to heterogeneous nanostructures. The development and application of microbeam techniques may therefore become an important future direction. In addition, the effective use of these probes—particularly X-rays—for materials with large grain sizes still requires further methodological improvement. Moreover, it is difficult to continuously monitor and investigate materials across various stages, including novel synthesis routes, processing conditions, and diverse service environments. In addition, for materials subjected to large or complex strain histories, data processing and physical modeling pose considerable challenges that demand more sophisticated analytical approaches.
Future attention may focus on following aspects:
(1)
Multidimensional micro-beam diffraction for heterogenous nanostructures. Applying microbeam-based neutron and synchrotron diffraction techniques to heterogeneous nanostructured materials could enable detailed crystallographic information to be obtained, such as phase determination, residual stress evolution, and grain rotation behavior.
(2)
Integration of multiscale characterization techniques. The rapid development of neutron and synchrotron techniques, together with advanced complementary tools including transmission electron microscopy and three-dimensional atom probe tomography, is bridging multiple length scales from the nanometer to the millimeter. These integrated approaches aim to elucidate the spatial distribution and evolution of chemical and crystallographic short- and long-range order, thereby providing critical insights to guide the design and fabrication of advanced structural and functional materials.
(3)
Coupling experimental data with deformation modeling. By constructing databases of stress, strain and microstructure derived from neutron and synchrotron measurements, and integrating them with various plastic deformation models, it may become possible to reveal the evolution of microstructural units across multiple length scales under realistic temperature and stress conditions, particularly regarding the redistribution of stress and strain, as well as the behavior of dislocation and twinning.
(4)
Incorporation of artificial intelligence and machine learning. Artificial intelligence (AI) and machine learning (ML) have demonstrated remarkable success in processing and analyzing electron microscopy data. Their application to the analysis of synchrotron and neutron scattering data, especially for systems with complex lattice dynamics, may offer powerful new solutions to existing challenges in measurement, data interpretation, and characterization.

Author Contributions

Conceptualization, X.L., Z.L., and Z.M.; data curation, X.L.; writing—original draft preparation, X.L.; writing—review and editing, X.L., Z.L., and Z.M.; visualization, X.L.; supervision, X.L.; project administration, Z.L.; funding acquisition, X.L. All authors have read and agreed to the published version of the manuscript.

Funding

This research was funded by the High-level Talent Research Start-up of Chengdu Aeronautic Polytechnic University, grant number ZZX0625029 (X.L.).

Institutional Review Board Statement

The study does not require ethical approval.

Informed Consent Statement

Not applicable.

Data Availability Statement

The data presented in this study are available upon request from the corresponding authors.

Acknowledgments

The authors gratefully acknowledge financial support from the High-level Talent Research Start-up of Chengdu Aeronautic Polytechnic University [grant No. ZZX0625029 (X.L.)].

Conflicts of Interest

The authors declare that they have no known competing financial interests or personal relationships that could have appeared to influence the work reported in this paper.

References

  1. Gubicza, J.; El-Tahawy, M.; Huang, Y.; Choi, H.; Choe, H.; Lábár, J.L.; Langdon, T.G. Microstructure, Phase Composition and Hardness Evolution in 316L Stainless Steel Processed by High-Pressure Torsion. Mater. Sci. Eng. A 2016, 657, 215–223. [Google Scholar] [CrossRef]
  2. Wang, F.; Ding, C.; Yang, Z.; Zhang, H.; Ding, Z.; Li, H.; Xu, J.; Shan, D.; Guo, B. Microstructure Evolution and Mechanical Properties of AlCoCrFeNi2.1 Eutectic High-Entropy Alloys Processed by High-Pressure Torsion. Materials 2024, 17, 2954. [Google Scholar] [CrossRef]
  3. Azzeddine, H.; Bradai, D.; Baudin, T.; Langdon, T.G. Texture Evolution in High-Pressure Torsion Processing. Prog. Mater. Sci. 2022, 125, 100886. [Google Scholar] [CrossRef]
  4. Liss, K.-D.; Whitfield, R.E.; Xu, W.; Buslaps, T.; Yeoh, L.A.; Wu, X.; Zhang, D.; Xia, K. In Situ Synchrotron High-Energy X-Ray Diffraction Analysis on Phase Transformations in Ti–Al Alloys Processed by Equal-Channel Angular Pressing. J. Synchrotron Radiat. 2009, 16, 825–834. [Google Scholar] [CrossRef]
  5. Stark, A.; Rackel, M.W.; Pyczak, F. How Rapid Heating and Quenching Cycles Affect Phase Evolution in Advanced γ-TiAl Alloys: An in Situ Synchrotron Radiation Study. MRS Commun. 2025, 15, 790–795. [Google Scholar] [CrossRef]
  6. Zhang, M.; Li, L.; Ding, J.; Wu, Q.; Wang, Y.; Almer, J.; Guo, F.; Ren, Y. Temperature-Dependent Micromechanical Behavior of Medium-Mn Transformation-Induced-Plasticity Steel Studied by in Situ Synchrotron X-Ray Diffraction. Acta Mater. 2017, 141, 294–303. [Google Scholar] [CrossRef]
  7. Liss, K.-D.; Takata, N.; Wang, W.; Kawasaki, M. Recrystallization-Accelerated Precipitation, Structural Evolution, and Residual Stress Relaxation in Nanostructured Al–Cu–Li Alloy: An in Situ Microbeam Synchrotron High-Energy X-Ray Diffraction Study. J. Mater. Sci. 2025, 60, 18307–18331. [Google Scholar] [CrossRef]
  8. Liss, K.-D.; Xu, P.; Shiro, A.; Zhang, S.; Yukutake, E.; Shobu, T.; Akita, K. Abnormal Grain Growth: A Spontaneous Activation of Competing Grain Rotation. Adv. Eng. Mater. 2024, 26, 2300470. [Google Scholar] [CrossRef]
  9. Liss, K.-D.; Han, J.-K.; Blankenburg, M.; Lienert, U.; Harjo, S.; Kawasaki, T.; Xu, P.; Yukutake, E.; Kawasaki, M. Recrystallization of Bulk Nanostructured Magnesium Alloy AZ31 after Severe Plastic Deformation: An in Situ Diffraction Study. J. Mater. Sci. 2024, 59, 5831–5853. [Google Scholar] [CrossRef]
  10. Garces, G.; Medina, J.; Chávez, B.; Perez, P.; Barea, R.; Stark, A.; Schell, N.; Adeva, P. Load Partitioning Between Mg17Al12 Precipitates and Mg Phase in the AZ91 Alloy Using In-Situ Synchrotron Radiation Diffraction Experiments. Metall. Mater. Trans. A 2021, 52, 2732–2745. [Google Scholar] [CrossRef]
  11. Sonkusare, R. A Critical Evaluation of Microstructure-Texture-Mechanical Behavior Heterogeneity in High Pressure Torsion Processed CoCuFeMnNi High Entropy Alloy. Mater. Sci. 2020, 782, 139187. [Google Scholar] [CrossRef]
  12. Ivanisenko, Y.; Skrotzki, W.; Chulist, R.; Lippmann, T.; Kurmanaeva, L. Texture Development in a Nanocrystalline Pd–Au Alloy Studied by Synchrotron Radiation. Scr. Mater. 2012, 66, 131–134. [Google Scholar] [CrossRef]
  13. Liu, X.; Xu, P.; Shiro, A.; Zhang, S.; Shobu, T.; Yukutake, E.; Akita, K.; Zolotoyabko, E.; Liss, K.-D. Heat-Induced Structural Changes in Magnesium Alloys AZ91 and AZ31 Investigated by in Situ Synchrotron High-Energy X-Ray Diffraction. J. Mater. Sci. 2022, 57, 21446–21459. [Google Scholar] [CrossRef]
  14. Novoselova, T.; Malinov, S.; Sha, W.; Zhecheva, A. High-Temperature Synchrotron X-Ray Diffraction Study of Phases in a Gamma TiAl Alloy. Mater. Sci. Eng. A 2004, 371, 103–112. [Google Scholar] [CrossRef]
  15. Schmoelzer, T.; Liss, K.-D.; Kirchlechner, C.; Mayer, S.; Stark, A.; Peel, M.; Clemens, H. An In-Situ High-Energy X-Ray Diffraction Study on the Hot-Deformation Behavior of a β-Phase Containing TiAl Alloy. Intermetallics 2013, 39, 25–33. [Google Scholar] [CrossRef]
  16. Liss, K.-D.; Stark, A.; Bartels, A.; Clemens, H.; Buslaps, T.; Phelan, D.; Yeoh, L.A. Directional Atomic Rearrangements During Transformations Between the A- and γ-Phases in Titanium Aluminides. Adv. Eng. Mater. 2008, 10, 389–392. [Google Scholar] [CrossRef]
  17. Reimers, W.; Broda, M.; Brusch, G.; Dantz, D.; Liss, K.-D.; Pyzalla, A.; Schmackers, T.; Tschentscher, T. Evaluation of Residual Stresses in the Bulk of Materials by High Energy Synchrotron Diffraction. J. Nondestruct. Eval. 1998, 17, 129–140. [Google Scholar] [CrossRef]
  18. Bunge, H.J.; Wcislak, L.; Klein, H.; Garbe, U.; Schneider, J.R. Texture and Microstructure Analysis with High-Energy Synchrotron Radiation. Mater. Sci. Forum 2002, 408–412, 137–142. [Google Scholar] [CrossRef]
  19. Yan, K.; Callaghan, M.D.; Liss, K.-D. Deformation Mechanisms of Twinning-Induced Plasticity Steel under Shock-Load: Investigated by Synchrotron X-Ray Diffraction. Quantum Beam Sci. 2019, 3, 15. [Google Scholar] [CrossRef]
  20. Yan, K.; Carr, D.G.; Callaghan, M.D.; Liss, K.-D.; Li, H. Deformation Mechanisms of Twinning-Induced Plasticity Steels: In Situ Synchrotron Characterization and Modeling. Scr. Mater. 2010, 62, 246–249. [Google Scholar] [CrossRef]
  21. Liss, K.-D.; Bartels, A.; Schreyer, A.; Clemens, H. High-Energy X-Rays: A Tool for Advanced Bulk Investigations in Materials Science and Physics. Texture Stress Microstruct. 2003, 35, 219–252. [Google Scholar] [CrossRef]
  22. Yan, K.; Liss, K.; Garbe, U.; Daniels, J.; Kirstein, O.; Li, H.; Dippenaar, R. From Single Grains to Texture. Adv. Eng. Mater. 2009, 11, 771–773. [Google Scholar] [CrossRef]
  23. Liss, K.-D.; Yan, K. Thermo-Mechanical Processing in a Synchrotron Beam. Mater. Sci. Eng. A 2010, 528, 11–27. [Google Scholar] [CrossRef]
  24. Shi, H.; Gan, W.; Esling, C.; Wang, X.; Zhang, Y.; Maawad, E.; Stark, A.; Li, X.; Wang, L. Elastic Strain Induced Abnormal Grain Growth in Graphene Nanosheets (GNSs) Reinforced Copper (Cu) Matrix Composites. Acta Mater. 2020, 200, 338350. [Google Scholar] [CrossRef]
  25. He, H.; Naeem, M.; Zhang, F.; Zhao, Y.; Harjo, S.; Kawasaki, T.; Wang, B.; Wu, X.; Lan, S.; Wu, Z.; et al. Stacking Fault Driven Phase Transformation in CrCoNi Medium Entropy Alloy. Nano Lett. 2021, 21, 1419–1426. [Google Scholar] [CrossRef]
  26. Wu, Y.; Liu, W.H.; Wang, X.L.; Ma, D.; Stoica, A.D.; Nieh, T.G.; He, Z.B.; Lu, Z.P. In-Situ Neutron Diffraction Study of Deformation Behavior of a Multi-Component High-Entropy Alloy. Appl. Phys. Lett. 2014, 104, 051910. [Google Scholar] [CrossRef]
  27. Qiu, S.; Krishnan, V.B.; Padula, S.A.; Noebe, R.D.; Brown, D.W.; Clausen, B.; Vaidyanathan, R. Measurement of the Lattice Plane Strain and Phase Fraction Evolution during Heating and Cooling in Shape Memory NiTi. Appl. Phys. Lett. 2009, 95, 141906. [Google Scholar] [CrossRef]
  28. Kabra, S.; Yan, K.; Mayer, S.; Schmoelzer, T.; Reid, M.; Dippenaar, R.; Clemens, H.; Liss, K.-D. Phase Transition and Ordering Behavior of Ternary Ti–Al–Mo Alloys Using in-Situ Neutron Diffraction. Int. J. Mater. Res. 2011, 102, 697–702. [Google Scholar] [CrossRef]
  29. Pyzalla, A.; Reimers, W.; Liss, K.D. A Comparison of Neutron and High Energy Synchrotron Radiation as Tools for Texture and Stress Analysis. Mater. Sci. Forum 2000, 347–349, 34–41. [Google Scholar] [CrossRef]
  30. Daymond, M.R.; Johnson, M.W.; Sivia, D.S. Analysis of Neutron Diffraction Strain Measurement Data from a Round Robin Sample. J. Strain Anal. Eng. Des. 2002, 37, 73–85. [Google Scholar] [CrossRef]
  31. Suzuki, H.; Harjo, S.; Abe, J.; Xu, P.; Aizawa, K.; Akita, K. Effects of Gauge Volume on Pseudo-Strain Induced in Strain Measurement Using Time-of-Flight Neutron Diffraction. Nucl. Instrum. Methods Phys. Res. Sect. Accel. Spectrometers Detect. Assoc. Equip. 2013, 715, 28–38. [Google Scholar] [CrossRef]
  32. Liss, K.-D.; Liu, X.; Li, X.; Han, J.-K.; Dippenaar, R.J.; Kawasaki, M. On the Thermal Evolution of High-Pressure Torsion Processed Titanium Aluminide. Mater. Lett. 2021, 304, 130650. [Google Scholar] [CrossRef]
  33. Pandian, K.; Neikter, M.; Ekh, M.; Harjo, S.; Kawasaki, T.; Woracek, R.; Hansson, T.; Pederson, R. In Situ Neutron Diffraction Study of Strain Evolution and Load Partitioning During Elevated Temperature Tensile Test in HIP-Treated Electron Beam Powder Bed Fusion Manufactured Ti-6Al-4V. JOM 2025, 77, 1803–1815. [Google Scholar] [CrossRef]
  34. Navarre, C.; Sumarli, S.; Malamud, F.; Polatidis, E.; Strobl, M.; Logé, R.E. In-Situ Neutron Diffraction Revealing Microstructure Changes during Laser Powder Bed Fusion and in-Situ Laser Heat Treatments of 316L and 316L-Al1. Mater. Des. 2025, 251, 113727. [Google Scholar] [CrossRef]
  35. Woo, W.; Huang, E.-W.; Yeh, J.-W.; Choo, H.; Lee, C.; Tu, S.-Y. In-Situ Neutron Diffraction Studies on High-Temperature Deformation Behavior in a CoCrFeMnNi High Entropy Alloy. Intermetallics 2015, 62, 1–6. [Google Scholar] [CrossRef]
  36. Lucas, M.S.; Wilks, G.B.; Mauger, L.; Muñoz, J.A.; Senkov, O.N.; Michel, E.; Horwath, J.; Semiatin, S.L.; Stone, M.B.; Abernathy, D.L.; et al. Absence of Long-Range Chemical Ordering in Equimolar FeCoCrNi. Appl. Phys. Lett. 2012, 100, 251907. [Google Scholar] [CrossRef]
  37. Kawasaki, M.; Han, J.-K.; Liu, X.; Onuki, Y.; Kuzminova, Y.O.; Evlashin, S.A.; Pesin, A.M.; Zhilyaev, A.P.; Liss, K.-D. In Situ Heating Neutron and X-Ray Diffraction Analyses for Revealing Structural Evolution during Postprinting Treatments of Additive-Manufactured 316L Stainless Steel. Adv. Eng. Mater. 2022, 24, 2100968. [Google Scholar] [CrossRef]
  38. Liu, X.; Han, J.-K.; Onuki, Y.; Kuzminova, Y.O.; Evlashin, S.A.; Kawasaki, M.; Liss, K.-D. In Situ Neutron Diffraction Investigating Microstructure and Texture Evolution upon Heating of Nanostructured CoCrFeNi High-Entropy Alloy. Adv. Eng. Mater. 2023, 25, 2201256. [Google Scholar] [CrossRef]
  39. Kabra, S.; Yan, K.; Carr, D.G.; Harrison, R.P.; Dippenaar, R.J.; Reid, M.; Liss, K.-D. Defect Dynamics in Polycrystalline Zirconium Alloy Probed in Situ by Primary Extinction of Neutron Diffraction. J. Appl. Phys. 2013, 113, 063513. [Google Scholar] [CrossRef]
  40. Naeem, M.; He, H.; Harjo, S.; Kawasaki, T.; Zhang, F.; Wang, B.; Lan, S.; Wu, Z.; Wu, Y.; Lu, Z.; et al. Extremely High Dislocation Density and Deformation Pathway of CrMnFeCoNi High Entropy Alloy at Ultralow Temperature. Scr. Mater. 2020, 188, 21–25. [Google Scholar] [CrossRef]
  41. Li, X.; Dippenaar, R.J.; Han, J.-K.; Kawasaki, M.; Liss, K.-D. Phase Transformation and Structure Evolution of a Ti-45Al-7.5Nb Alloy Processed by High-Pressure Torsion. J. Alloys Compd. 2019, 787, 1149–1157. [Google Scholar] [CrossRef]
  42. Zolotoyabko, E. Basic Concepts of X-Ray Diffraction; John Wiley & Sons: Hoboken, NJ, USA, 2014. [Google Scholar]
  43. Reimers, W.; Pyzalla, A.; Schreyer, A.; Clemens, H. Diffraction Methods in Engineering Materials Science; Wiley-VCH: Weinheim, Germany, 2008. [Google Scholar]
  44. Schmoelzer, T.; Liss, K.-D.; Staron, P.; Mayer, S.; Clemens, H. The Contribution of High-Energy X-Rays and Neutrons to Characterization and Development of Intermetallic Titanium Aluminides. Adv. Eng. Mater. 2011, 13, 685–699. [Google Scholar] [CrossRef]
  45. Takada, H.; Haga, K.; Teshigawara, M.; Aso, T.; Meigo, S.-I.; Kogawa, H.; Naoe, T.; Wakui, T.; Ooi, M.; Harada, M.; et al. Materials and Life Science Experimental Facility at the Japan Proton Accelerator Research Complex I: Pulsed Spallation Neutron Source. Quantum Beam Sci. 2017, 1, 8. [Google Scholar] [CrossRef]
  46. Nakajima, K.; Kawakita, Y.; Itoh, S.; Abe, J.; Aizawa, K.; Aoki, H.; Endo, H.; Fujita, M.; Funakoshi, K.; Gong, W.; et al. Materials and Life Science Experimental Facility (MLF) at the Japan Proton Accelerator Research Complex II: Neutron Scattering Instruments. Quantum Beam Sci. 2017, 1, 9. [Google Scholar] [CrossRef]
  47. Ovid’ko, I.A.; Valiev, R.Z.; Zhu, Y.T. Review on Superior Strength and Enhanced Ductility of Metallic Nanomaterials. Prog. Mater. Sci. 2018, 94, 462–540. [Google Scholar] [CrossRef]
  48. Valiev, R.Z.; Langdon, T.G. Principles of Equal-Channel Angular Pressing as a Processing Tool for Grain Refinement. Prog. Mater. Sci. 2006, 51, 881–981. [Google Scholar] [CrossRef]
  49. Valiev, R. Nanostructuring of Metals by Severe Plastic Deformation for Advanced Properties. Nat. Mater. 2004, 3, 511–516. [Google Scholar] [CrossRef]
  50. Valiev, R.Z.; Estrin, Y.; Horita, Z.; Langdon, T.G.; Zehetbauer, M.J.; Zhu, Y.T. Fundamentals of Superior Properties in Bulk NanoSPD Materials. Mater. Res. Lett. 2016, 4, 1–21. [Google Scholar] [CrossRef]
  51. Valiev, R.Z.; Islamgaliev, R.K.; Alexandrov, I.V. Bulk Nanostructured Materials from Severe Plastic Deformation. Prog. Mater. Sci. 2000, 45, 103–189. [Google Scholar] [CrossRef]
  52. Zhilyaev, A.P.; Langdon, T.G. Using High-Pressure Torsion for Metal Processing: Fundamentals and Applications. Prog. Mater. Sci. 2008, 53, 893–979. [Google Scholar] [CrossRef]
  53. Withers, P.J.; Bhadeshia, H.K.D.H. Residual Stress Part 1—Measurement Techniques. Mater. Sci. Technol. 2001, 17, 355. [Google Scholar] [CrossRef]
  54. Doherty, R.D.; Hughes, D.A.; Humphreys, F.J.; Jonas, J.J.; Jensen, D.J.; Kassner, M.E.; King, W.E.; McNelley, T.R.; McQueen, H.J.; Rollett, A.D. Current Issues in Recrystallization: A Review. Mater. Sci. Eng. A 1997, 238, 219–274. [Google Scholar] [CrossRef]
  55. Wu, Z.; Bei, H.; Otto, F.; Pharr, G.M.; George, E.P. Recovery, Recrystallization, Grain Growth and Phase Stability of a Family of FCC-Structured Multi-Component Equiatomic Solid Solution Alloys. Intermetallics 2013, 46, 131–140. [Google Scholar] [CrossRef]
  56. Praveen, S.; Bae, J.W.; Asghari-Rad, P.; Park, J.M.; Kim, H.S. Annealing-Induced Hardening in High-Pressure Torsion Processed CoCrNi Medium Entropy Alloy. Mater. Sci. Eng. A 2018, 734, 338–340. [Google Scholar] [CrossRef]
  57. Gubicza, J. Annealing-Induced Hardening in Ultrafine-Grained and Nanocrystalline Materials. Adv. Eng. Mater. 2020, 22, 1900507. [Google Scholar] [CrossRef]
  58. Huang, X.; Hansen, N.; Tsuji, N. Hardening by Annealing and Softening by Deformation in Nanostructured Metals. Science 2006, 312, 249–251. [Google Scholar] [CrossRef]
  59. Hasnaoui, A.; Van Swygenhoven, H.; Derlet, P.M. On Non-Equilibrium Grain Boundaries and Their Effect on Thermal and Mechanical Behaviour: A Molecular Dynamics Computer Simulation. Acta Mater. 2002, 50, 3927–3939. [Google Scholar] [CrossRef]
  60. Orlova, T.S.; Skiba, N.V.; Mavlyutov, A.M.; Murashkin, M.Y.; Valiev, R.Z.; Gutkin, M.Y. Hardening by Annealing and Implementation of High Ductility of Ultra-Fine Grained Aluminum: Experiment and Theory. Rev. Adv. Mater. Sci. 2018, 57, 224–240. [Google Scholar] [CrossRef]
  61. Sanders, P.; Weertman, J.; Barker, J.; Siegel, R. Small Angle Neutron Scattering from Nanocrystalline Pd and Cu Compacted at Elevated Temperatures. MRS Online Proc. Libr. 2011, 351, 319. [Google Scholar] [CrossRef]
  62. Scheriau, S.; Zhang, Z.; Kleber, S.; Pippan, R. Deformation Mechanisms of a Modified 316L Austenitic Steel Subjected to High Pressure Torsion. Mater. Sci. Eng. A 2011, 528, 2776–2786. [Google Scholar] [CrossRef]
  63. El-Tahawy, M.; Huang, Y.; Choi, H.; Choe, H.; Lábár, J.L.; Langdon, T.G.; Gubicza, J. High Temperature Thermal Stability of Nanocrystalline 316L Stainless Steel Processed by High-Pressure Torsion. Mater. Sci. Eng. A 2017, 682, 323–331. [Google Scholar] [CrossRef]
  64. Wang, H.; Shuro, I.; Umemoto, M.; Ho-Hung, K.; Todaka, Y. Annealing Behavior of Nano-Crystalline Austenitic SUS316L Produced by HPT. Mater. Sci. Eng. A 2012, 556, 906–910. [Google Scholar] [CrossRef]
  65. Kawasaki, M.; Han, J.-K.; Liu, X.; Moon, S.-C.; Liss, K.-D. Synchrotron High-Energy X-Ray & Neutron Diffraction, and Laser-Scanning Confocal Microscopy: In-Situ Characterization Techniques for Bulk Nanocrystalline Metals. Mater. Trans. 2023, 64, 1683–1694. [Google Scholar] [CrossRef]
  66. El-Tahawy, M.; Huang, Y.; Um, T.; Choe, H.; Lábár, J.L.; Langdon, T.G.; Gubicza, J. Stored Energy in Ultrafine-Grained 316L Stainless Steel Processed by High-Pressure Torsion. J. Mater. Res. Technol. 2017, 6, 339–347. [Google Scholar] [CrossRef]
  67. Chladil, H.F.; Clemens, H.; Leitner, H.; Bartels, A.; Gerling, R.; Schimansky, F.-P.; Kremmer, S. Phase Transformations in High Niobium and Carbon Containing γ-TiAl Based Alloys. Intermetallics 2006, 14, 1194–1198. [Google Scholar] [CrossRef]
  68. Studer, A.J.; Hagen, M.E.; Noakes, T.J. Wombat: The High-Intensity Powder Diffractometer at the OPAL Reactor. Phys. B Condens. Matter 2006, 385–386, 1013–1015. [Google Scholar] [CrossRef]
  69. Yeoh, L.A.; Liss, K.-D.; Bartels, A.; Chladil, H.; Avdeev, M.; Clemens, H.; Gerling, R.; Buslaps, T. In Situ High-Energy X-Ray Diffraction Study and Quantitative Phase Analysis in the A+γ Phase Field of Titanium Aluminides. Scr. Mater. 2007, 57, 1145–1148. [Google Scholar] [CrossRef]
  70. Shechtman, D.; Blackburn, M.J.; Lipsitt, H.A. The Plastic Deformation of TiAl. Metall. Trans. 1974, 5, 1373–1381. [Google Scholar] [CrossRef]
  71. Shobu, T.; Tozawa, K.; Shiwaku, H.; Konishi, H.; Inami, T.; Harami, T.; Mizuki, J. Wide Band Energy Beamline Using Si (111) Crystal Monochromators at BL22XU in SPring-8. AIP Conf. Proc. 2007, 879, 902–906. [Google Scholar] [CrossRef]
  72. Liss, K.-D.; Yan, K.; Reid, M. Physical Thermo-Mechanical Simulation of Magnesium: An in-Situ Diffraction Study. Mater. Sci. Eng. A 2014, 601, 78–85. [Google Scholar] [CrossRef]
  73. Pérez-Prado, M.T.; Del Valle, J.A.; Contreras, J.M.; Ruano, O.A. Microstructural Evolution during Large Strain Hot Rolling of an AM60 Mg Alloy. Scr. Mater. 2004, 50, 661–665. [Google Scholar] [CrossRef]
  74. Liss, K.-D.; Schmoelzer, T.; Yan, K.; Reid, M.; Peel, M.; Dippenaar, R.; Clemens, H. In Situ Study of Dynamic Recrystallization and Hot Deformation Behavior of a Multiphase Titanium Aluminide Alloy. J. Appl. Phys. 2009, 106, 113526. [Google Scholar] [CrossRef]
  75. Murray, J.L. The AI-Mg(Aluminum-Magnesium)System. J. Phase Equilibria 1982, 3, 60–74. [Google Scholar] [CrossRef]
  76. Raynor, G.; Hume-Rothery, W. A Technique for the X-Ray Powder Photography of Reactive Metals and Alloys with Special Reference to the Lattice Spacing of Magnesium at High Temperatures Locality. J. Inst. Met. 1939, 65, 477–485. [Google Scholar]
  77. Childs, B.G. The Thermal Expansion of Anisotropic Metals. Rev. Mod. Phys. 1953, 25, 665–670. [Google Scholar] [CrossRef]
  78. Xu, X.-Y.; Wang, Y.-F.; Wang, H.-Y.; Wang, T.; Zha, M.; Hua, Z.-M.; Wang, C.; Jiang, Q.-C. Influences of Pre-Existing Mg17Al12 Particles on Static Recrystallization Behavior of Mg-Al-Zn Alloys at Different Annealing Temperatures. J. Alloys Compd. 2019, 787, 1104–1109. [Google Scholar] [CrossRef]
  79. Busk, R.S. Lattice Parameters of Magnesium Alloys. JOM 1950, 2, 1460–1464. [Google Scholar] [CrossRef]
  80. Moreno, M.; Teixeira, J.; Geandier, G.; Hell, J.-C.; Bonnet, F.; Salib, M.; Allain, S.Y.P. Real-Time Investigation of Recovery, Recrystallization and Austenite Transformation during Annealing of a Cold-Rolled Steel Using High Energy X-Ray Diffraction (HEXRD). Metals 2018, 9, 8. [Google Scholar] [CrossRef]
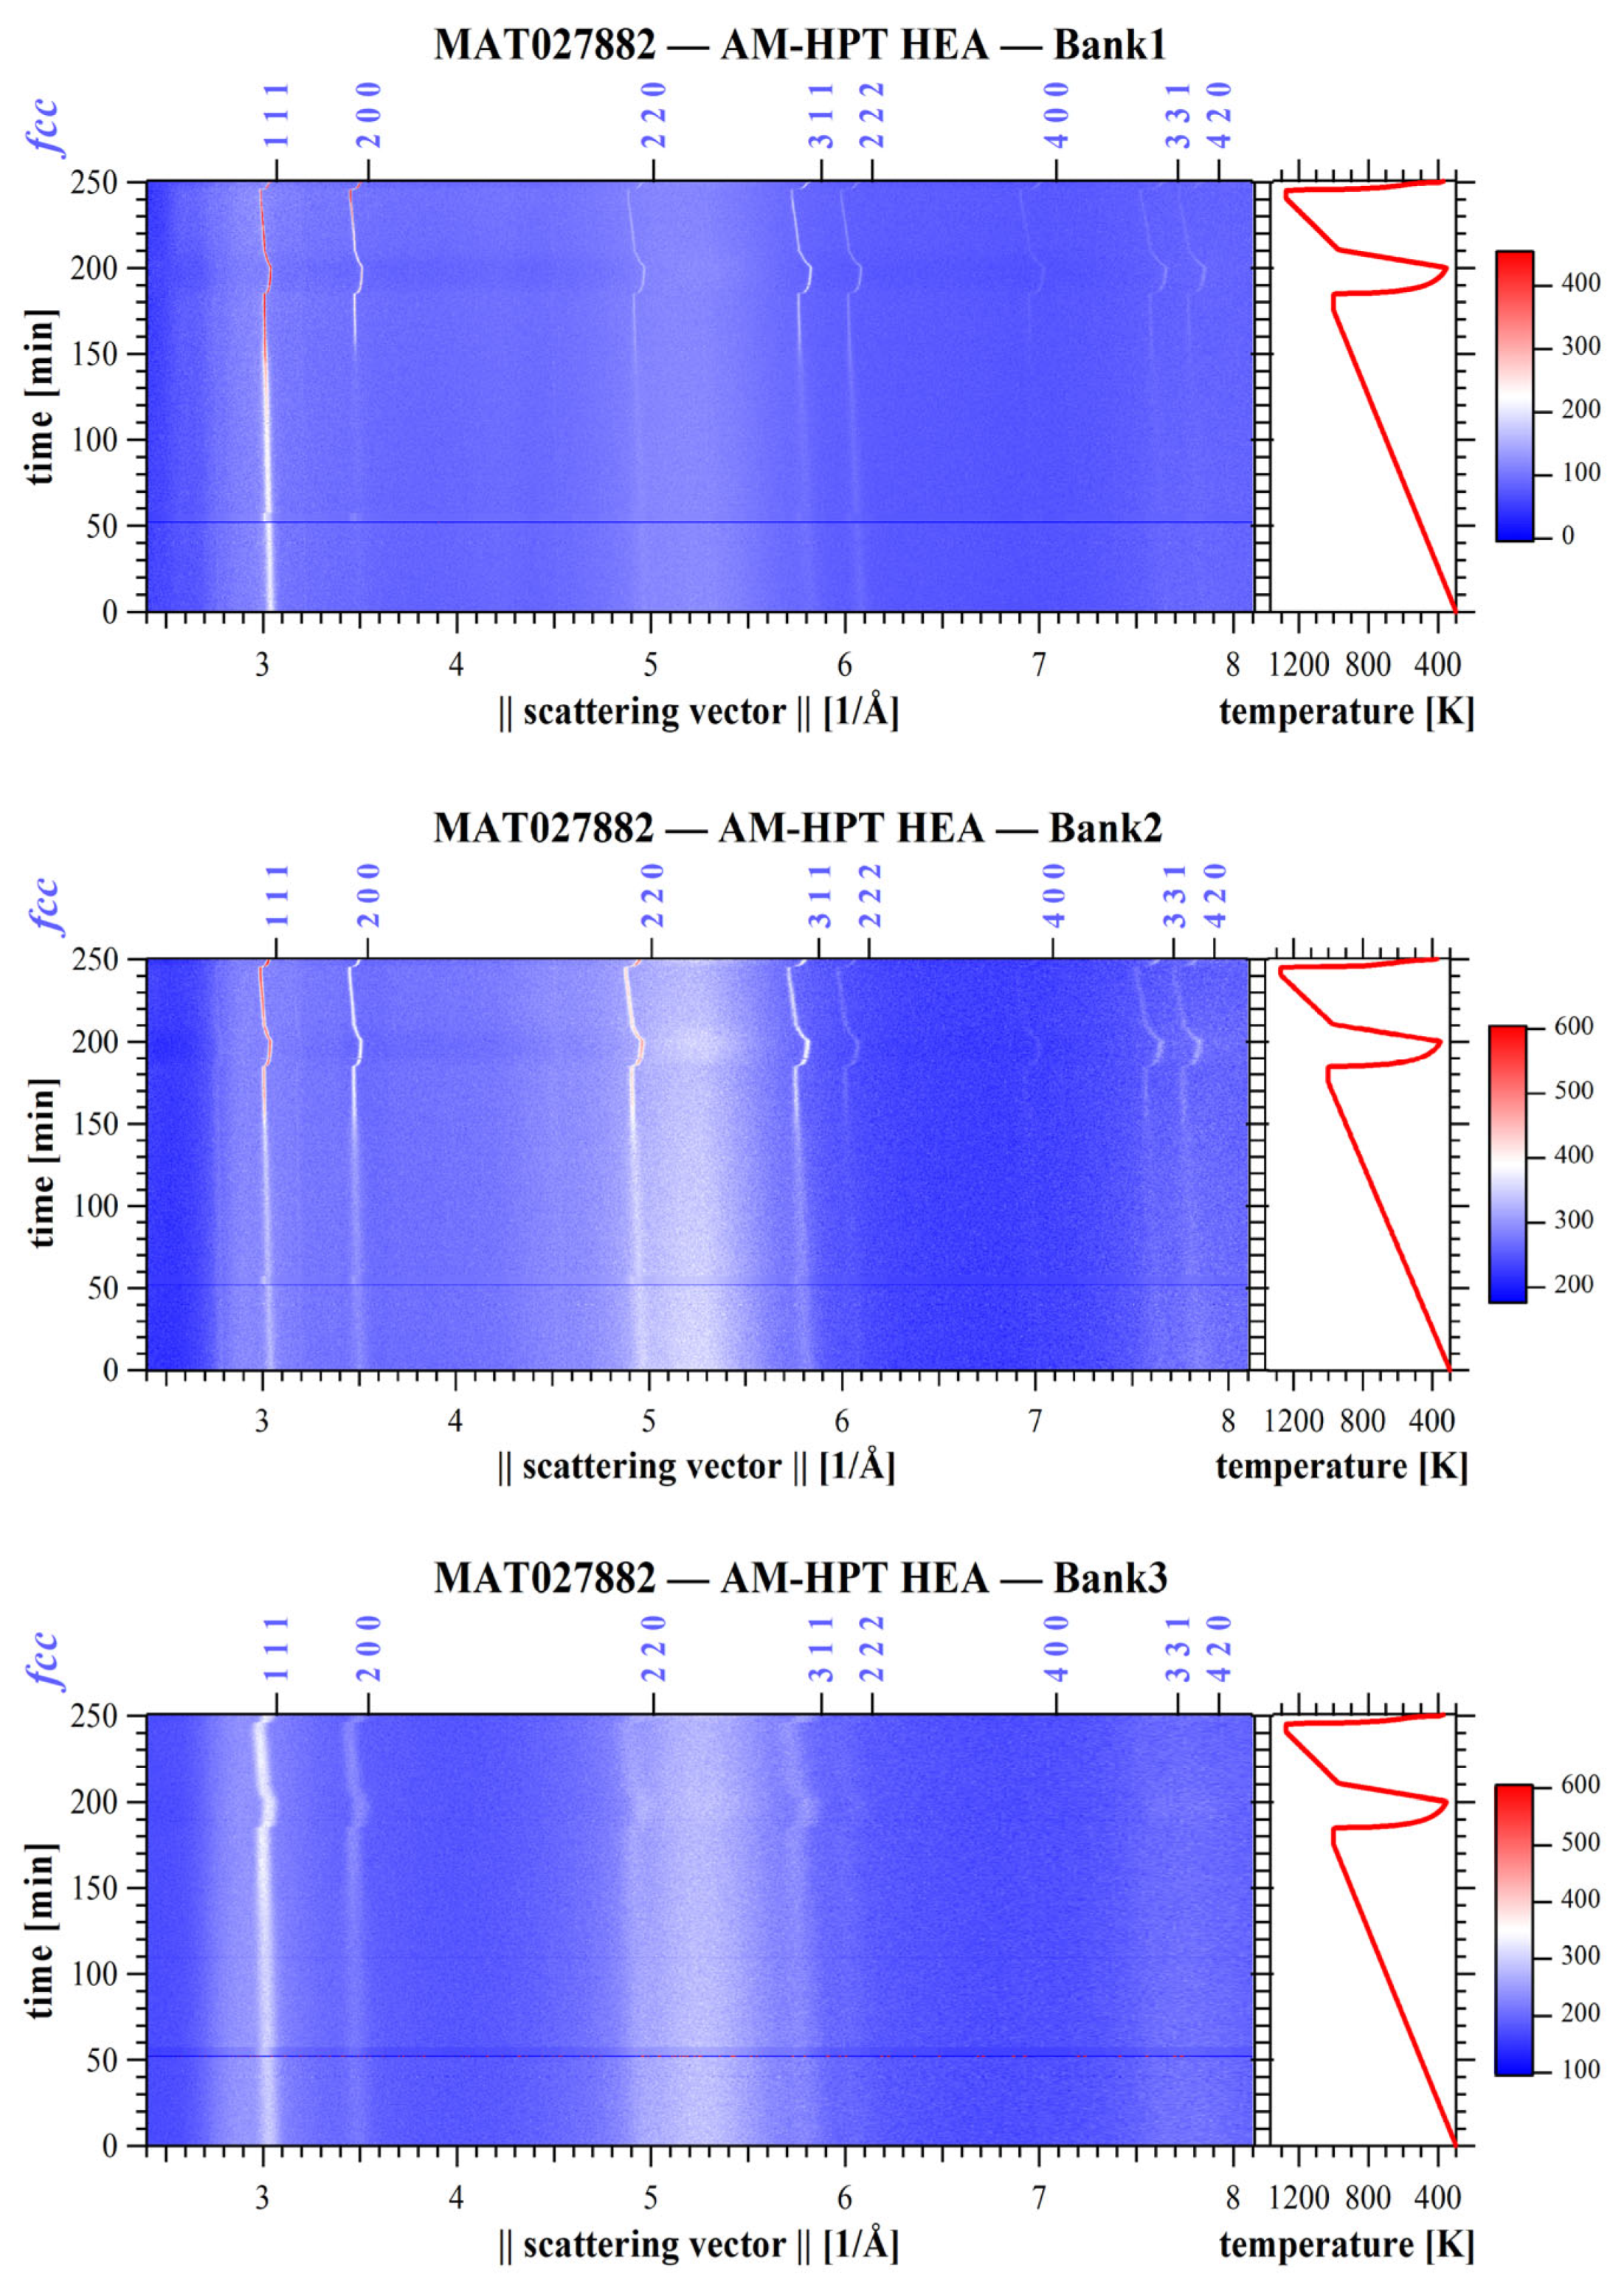
Figure 1. Evolution of neutron diffractograms derived from Banks 1–3 upon heating for the CoCrFeNi high-entropy alloys after HPT for 15 turns [38].
Coatings 15 01438 g001
Figure 2. Relative lattice expansion of 111 reflections upon the heating (reddish) and cooling (bluish) cycles for as-printed (AM) and HPT-processed materials (AM-HPT) [38].
Coatings 15 01438 g002
Figure 3. Relative peak width evolution of the 111 reflection, together with the grain size and dislocation density evolution upon thermal treatment for HPT-processed CoCrFeNi. Reproduced from the literature [38].
Coatings 15 01438 g003
Figure 7. A Williamson–Hall plot for the HPT-processed 316L stainless steel upon heating [37].
Coatings 15 01438 g007
Figure 8. Structure evolution of HPT-processed 316L stainless steel upon heating [37].
Coatings 15 01438 g008
Figure 9. Integrated intensity evolution of γ and α2 phases as a function of temperature for the (a) HPT-6-5-b sample and (b) during the first heating–cooling cycle for the as-received specimen [32]. γ-001 (red), γ-110 (orange), γ-021 (green), α2-011 (dark blue), and α2-121 (light blue). Thick and thin lines mark directions of heating and cooling, respectively.
Coatings 15 01438 g009
Figure 10. Relative peak width evolution of (a) γ-001 and (b) γ-110 reflections as a function of time during heating and cooling cycles for both HPT-6-5-b and as-received specimens [32]. Reddish for heating, bluish for cooling, dark tones for HPT-6-5-b, and bright colors for as-received HPT-0-0.
Coatings 15 01438 g010aCoatings 15 01438 g010b
Figure 11. Debye–Scherrer rings obtained for the AZ91 alloy at room temperature [13].
Coatings 15 01438 g011
Figure 12. Contour maps of synchrotron diffraction patterns for (a) AZ91 and (b) AZ31 alloys with respect to temperature and time [13].
Coatings 15 01438 g012aCoatings 15 01438 g012b
Figure 13. Azimuthal temperature plot of 100 magnesium reflection for AZ91 alloy [13].
Coatings 15 01438 g013
Figure 14. (a) Temperature-dependent evolution of lattice strain in 100, 101, 110, and 102 reflections for AZ91 alloy and peak intensity in 332 reflection for Al12Mg17; (b) Relative peak width evolution of 102 magnesium reflection during heating [13].
Coatings 15 01438 g014
Figure 15. (a) Evolution of the austenite volume fraction upon heating; (b) Evolution of the dislocation density upon heating [80].
Coatings 15 01438 g015
Figure 16. Evolution of the number of recrystallization peaks (black dots) and of the dislocation density (blue curve) as a function of the temperature [80].
Coatings 15 01438 g016
Table 1. Different attenuation lengths of neutron, synchrotron, and laboratory X-rays.
TechniquesEnergy (keV)Wavenumber (Å−1)Attenuation Length (Iμ) (mm)
MgAlFeCuAu
Neutrons330004.0517008004537.22
Synchrotron10050.737223.80.0370.249
Laboratory (Cu )84.050.1440.0740.00420.0210.00259
Table 2. Comparison of neutron and synchrotron on different aspects.
AspectNeutronsSynchrotron (High-Energy X-Rays)
Source intensity/fluxlowhigh
Beam sizecmnm–mm
Sample sizelarge volumes (cm3)very small (mm3)
Penetration depth in metalscm–mmm–cm
Sensitivity to light/heavy elementsexcellentpoor
Magnetism sensitivitystrongweak
Detector technologyslow and less efficientadvanced, fast 
Experiment speedminutes to hoursseconds to minutes
Table 3. Calculated data at different temperatures.
TemperatureDislocation Density, ρ [1015 m−2]Grain Size, D [nm]
303 K6.129
643 K530.2
800 K430.5
905 K0.3120
1000 K0.033153
1273 K0.030479.5
Table 4. In situ application examples of neutron and synchrotron techniques.
TechniqueMaterialsProcessing MethodsIn Situ Temperature ConditionsMain Diffraction FeaturesMechanical Correlations
NeutronCoCrFeNi 3D printing and HPT (15 turns, 6 GPa, RT, 1 rpm)300–1000 K at 4 K·min−1, furnace cooling, 1000–1273 K at 9 K·min−1Dislocation density, grain size, lattice expansionHardness increases during short-term annealing
Neutron316L stainless steel3D printing and HPT (15 turns, 6 GPa, RT, 1 rpm)300–1240 K at 4 K·min−1, furnace cooling,Dislocation density, grain size, lattice expansionHardness increases during short-term annealing
NeutronTi-AlHPT (5 turns, 6 GPa, RT, 1 rpm)300–1440 K at 4.2 K·min−1, furnace cooling,Order/disorder transition, thermal anisotropy-
SynchrotronAZ91/AZ31Rolling300–773 K at 7.5 K·min−1, furnace cooling,Phase transformation, Lattice strain, grain rotation-
SynchrotronSteel Cold rolling300–1073 K at 180 K·min−1Phase transformation, recovery, recrystallization-
Disclaimer/Publisher’s Note: The statements, opinions and data contained in all publications are solely those of the individual author(s) and contributor(s) and not of MDPI and/or the editor(s). MDPI and/or the editor(s) disclaim responsibility for any injury to people or property resulting from any ideas, methods, instructions or products referred to in the content.