1. Introduction
In order to improve the endurance and load capacity of aircraft in a complex environment such as atmosphere and space, lightweight and functionalization are the primary goals of structural design in the aerospace field, which has led to numerous studies on carbon fiber reinforced polymer (CFRP) composites [
1,
2,
3]. In terms of material composition, carbon fibers serve as a reinforcement to bear the load, and epoxy resin serves as a matrix to transmit stress. This combination makes its density less than 1/4 of that of steel [
4,
5]. In terms of material performance, thanks to the extraordinary properties of carbon fiber, such as high strength, high modulus, heat resistance and corrosion resistance, CFRP composites can overcome challenges from high temperature, complex impact and radiation [
6,
7]. However, suffering from the non-homogenous and anisotropic properties of composites structure and high abrasion resistance of carbon fibers and high abrasiveness of carbon fibers, the machining of CFRP composites is much harder than that of traditional metal materials, which can easily induce tool wear [
8,
9].
Tool wear alters the geometry of the tool, thereby affecting the final surface quality of the workpiece [
10,
11]. However, unlike conventional metals, CFRP composites face more unique surface defects caused by tool wear [
12]. Owning to the anisotropic material mechanics of CFRP composites, the bonding strength between different fiber layers is much smaller than the fracture strength along the fiber tensile direction. Therefore, the change in the geometric structure caused by tool wear brings an increase in the axial cutting force and a decrease in the critical thrust force, which tends to cause delamination [
13]. In addition, tool wear enlarges the radius of the cutting edge, which enhances the bending effect on fibers. Consequently, fibers are harder to cut off, and the machined surface becomes rough and exhibits many uncut fibers. Then, burrs, tearing, burning, fiber pull out, cracking and severer processing damage occur [
14]. The rapid wear of the cutting tool triggers unqualified surface quality, and frequent tool replacement or secondary treatment of surface damage reduce processing efficiency and add to the cost [
15]. Therefore, it is of great importance to learn the mechanism of tool wear to guide the processing parameters and prevent surface defects.
Over the years, numerous reports have focused on the study of tool wear as well as the surface integrity of CFRP composites, and diverse theories concerning the tool wear mechanism of CFRP composites cutting have been proposed. Several researchers have devoted attention to exploring the tool wear mechanism by experiment method. By tribological investigations, Ramirez et al. [
16] confirmed abrasion is the main wear mechanism during CFRP drilling, and the uncut fiber area ratio has a strong connection with the surface roughness of the hole. Buse et al. [
17] experimentally found that the wear mechanism of hard metal tools when cutting CFRP composites is mainly characterized by the cobalt phase removal, and lowering the cobalt content can lower the tool wear. By drilling tests, Xu et al. [
18] confirmed that progressive abrasion is the dominant wear mechanism controlling the flank wear of candlestick drills and step drills. They also found that candlestick drills exhibit a higher resistance to wear. Compared to the experiment method, FEM appears more convenient and cost-effective. Xu et al. [
19] established a FE model to analyze the main tool wear mechanism in both the traditional and EVA cutting of FRP composites. They confirmed that the wear mechanism in both cuttings is friction-caused flank wear, and EVA cutting can notably slow down the tool wear rate with a better-machined surface. By FEM simulation, Wu et al. [
20] found that the wear mechanisms under different fiber orientations when cutting CFRP composites are strongly dependent on the cutting stress distributions and keeping the fiber orientation at 135° can delay tool wear to the greatest extent. Nevertheless, FEM is hard to restore the actual situation of machining, and empirical models based on the data fitting method could be more reliable in predicting the tool wear. Using Central Composite Design (CCD), Khairusshima et al. [
21] found tool wear increased as the cutting speed, feed rate, and depth of cut increased under both dry machining and chilled air machining. Bi et al. [
22] concluded that feed per tooth is an influential factor in the wear of multi-tooth milling cutters, and burr damages on the top and bottom ply increase with tool wear aggravation. Such studies shed light on the tool wear mechanisms of CFRP composite cutting and offer effective solutions to delay wear.
However, current studies are mostly based on extreme processing parameters, and information on progressive wear as well as surface integrity under mild processing parameters is relatively vague. As shown in
Table 1, most researchers preferred to use a large feed rate (f ≥ 540 mm/min) to conduct tool wear experiments because it could improve efficiency [
16,
17,
18,
19,
20,
21,
22]. In practical production, however, machinists prefer to apply mild processing parameters for processing [
23,
24]. In conventional milling, Researchers tended to use a mild feed rate (f ≤ 400 mm/min) to prevent surface defects such as burrs, tears, and burns [
25,
26]. Therefore, the mechanism of tool wear under mild parameters is also a meaningful research field. On the one hand, some research was dedicated to exploring the mechanism of tool wear under mild processing parameters. Wang et al. [
27] found that the tool wear morphology on the rake face of the cutting tool when turning hardened 40Cr steel at mild cutting speeds is characterized by microchipping and that, at extreme cutting speeds, is characterized by crater wear. Hao et al. [
28] apply the molecular dynamics method to study the tool wear of the nt-cBN tool during the nano-cutting of Nickel-based superalloys. They found that the main wear mechanism of the tool in the mild-parameter-cutting process is diffusion wear. On the other hand, some studies are focused on the influence of extreme parameters and mild parameters on tool wear resistance. By hardened EN8 alloy steel drilling tests, Roopa et al. [
29] found that tool-work interface temperature is lower under mild cutting speed and a maximum chip removal rate appears, which helps in dissipating the maximum temperature produced during operation, under mild feed rate. They assumed that applying those mild parameters could lead to the delay of tool wear by lowering the processing temperature. Kumer et al. [
30] found hybrid AA7075- B4C composites exhibit a worse wearresistance under mild rotationalspeed and AA7075 base material exhibits a better wearresistance under mild rotationalspeed. By using Multiple linear regression (MLR) and Genetic Expression Programming (GEP) methods, Celik et al. [
31] found tool wear rate of processing Ti-6Al-4V alloy was much lower under mild cutting speed and feed rate. However, the tool wear mechanism of CFRP milling under mild machining parameters has not been studied yet.
To fill this gap, the tool wear mechanism of CFRP milling under mild machining parameters was investigated as well as surface integrity, to reveal aggravation of the tool wear during conventional machining. A tool wear experiment using conventional milling parameters (f = 60 mm/min) for CFRP composites was conducted. And then, the cutting length of mild milling parameters affects cutting forces and cutting temperature; and the corresponding quality of the machined surface and subsurface and morphologies of worn tools was examined. Empirical modeling of cutting forces in association with cutting length was presented. The interplay between cutting forces, cutting temperature and surface integrity of the machined surface and tool surface was analyzed and discussed. The wear mechanisms underlying mild milling parameters were evaluated and reported. In addition, the effect of cutting temperature on tool wear and CFRPs surface integrity before and after the glass transition temperature, Tg, was analyzed and discussed in detail.
2. Experimental Method
To investigate deeply the effect of tool cutting length and surface integrity, a tool wear experiment was conducted. As shown in
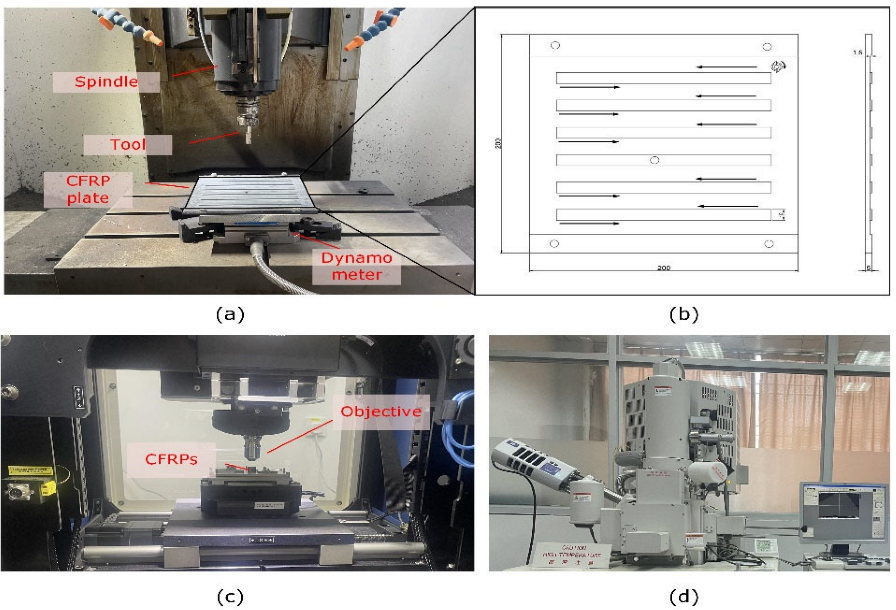
Figure 1a, the experiments were conducted on a TC-S2Cz/-O high-speed four-axis machining center (maximum spindle speed 15,000 r/min) manufactured by Brother, Japan. The specimen was manufactured with T700 carbon fiber from Toray company, with a size of 200 mm × 200 m × 5 mm. The tool is selected from 300R C12-12-130 single-edge shank (diameter 12 mm) with APKT1135-0.4 PCD tool. In this article, we used the cutting parameters of conventional CFRP milling experiments, including the feed rate and the speed of the spindle [
32]. The depth of cut and the width we applied are recommended parameters given by the tool manufacturer based on tool stiffness. The cutter geometric and cutting parameters are shown in
Table 2. As shown in
Figure 1b, the tool wear experiment was performed by side edge reverse milling of 200 × 200 mm carbon fiber plate. The cutting area is five tabs (160 mm × 10 mm × 1.5 mm). The carbon fiber plate was fixed to a 220 × 220 × 25 aluminum plate via five screw holes, and the aluminum plate was fixed to the dynamometer (see
Figure 1b). For the milling test, the specimen was mounted on a dynamometer (Kistler 9257B, Kistler, Winterthur, Switzerland) equipped with a data acquisition board and an electrical charge amplifier, as shown in
Figure 1a. In-situ temperature monitoring of the cutting area during the test using an Infrared thermal imager (Fluke Ti 400+, Fluke, Avery, WA, USA). After the test, the tool was ultrasonically cleaned with anhydrous ethanol.
Finally, the tool wear state was photographed and analyzed using a scanning electron microscope (SEM, Toshiba S-4800, Tokyo, Japan, see
Figure 1d), and the machined surface morphology was analyzed using a white light interferometer (see
Figure 1c).
3. Results and Discussion
3.1. Cutting Force
The low-pass filter method with a cutoff frequency of 10 Hz was used to process the original cutting force data in the X and Y directions [
33,
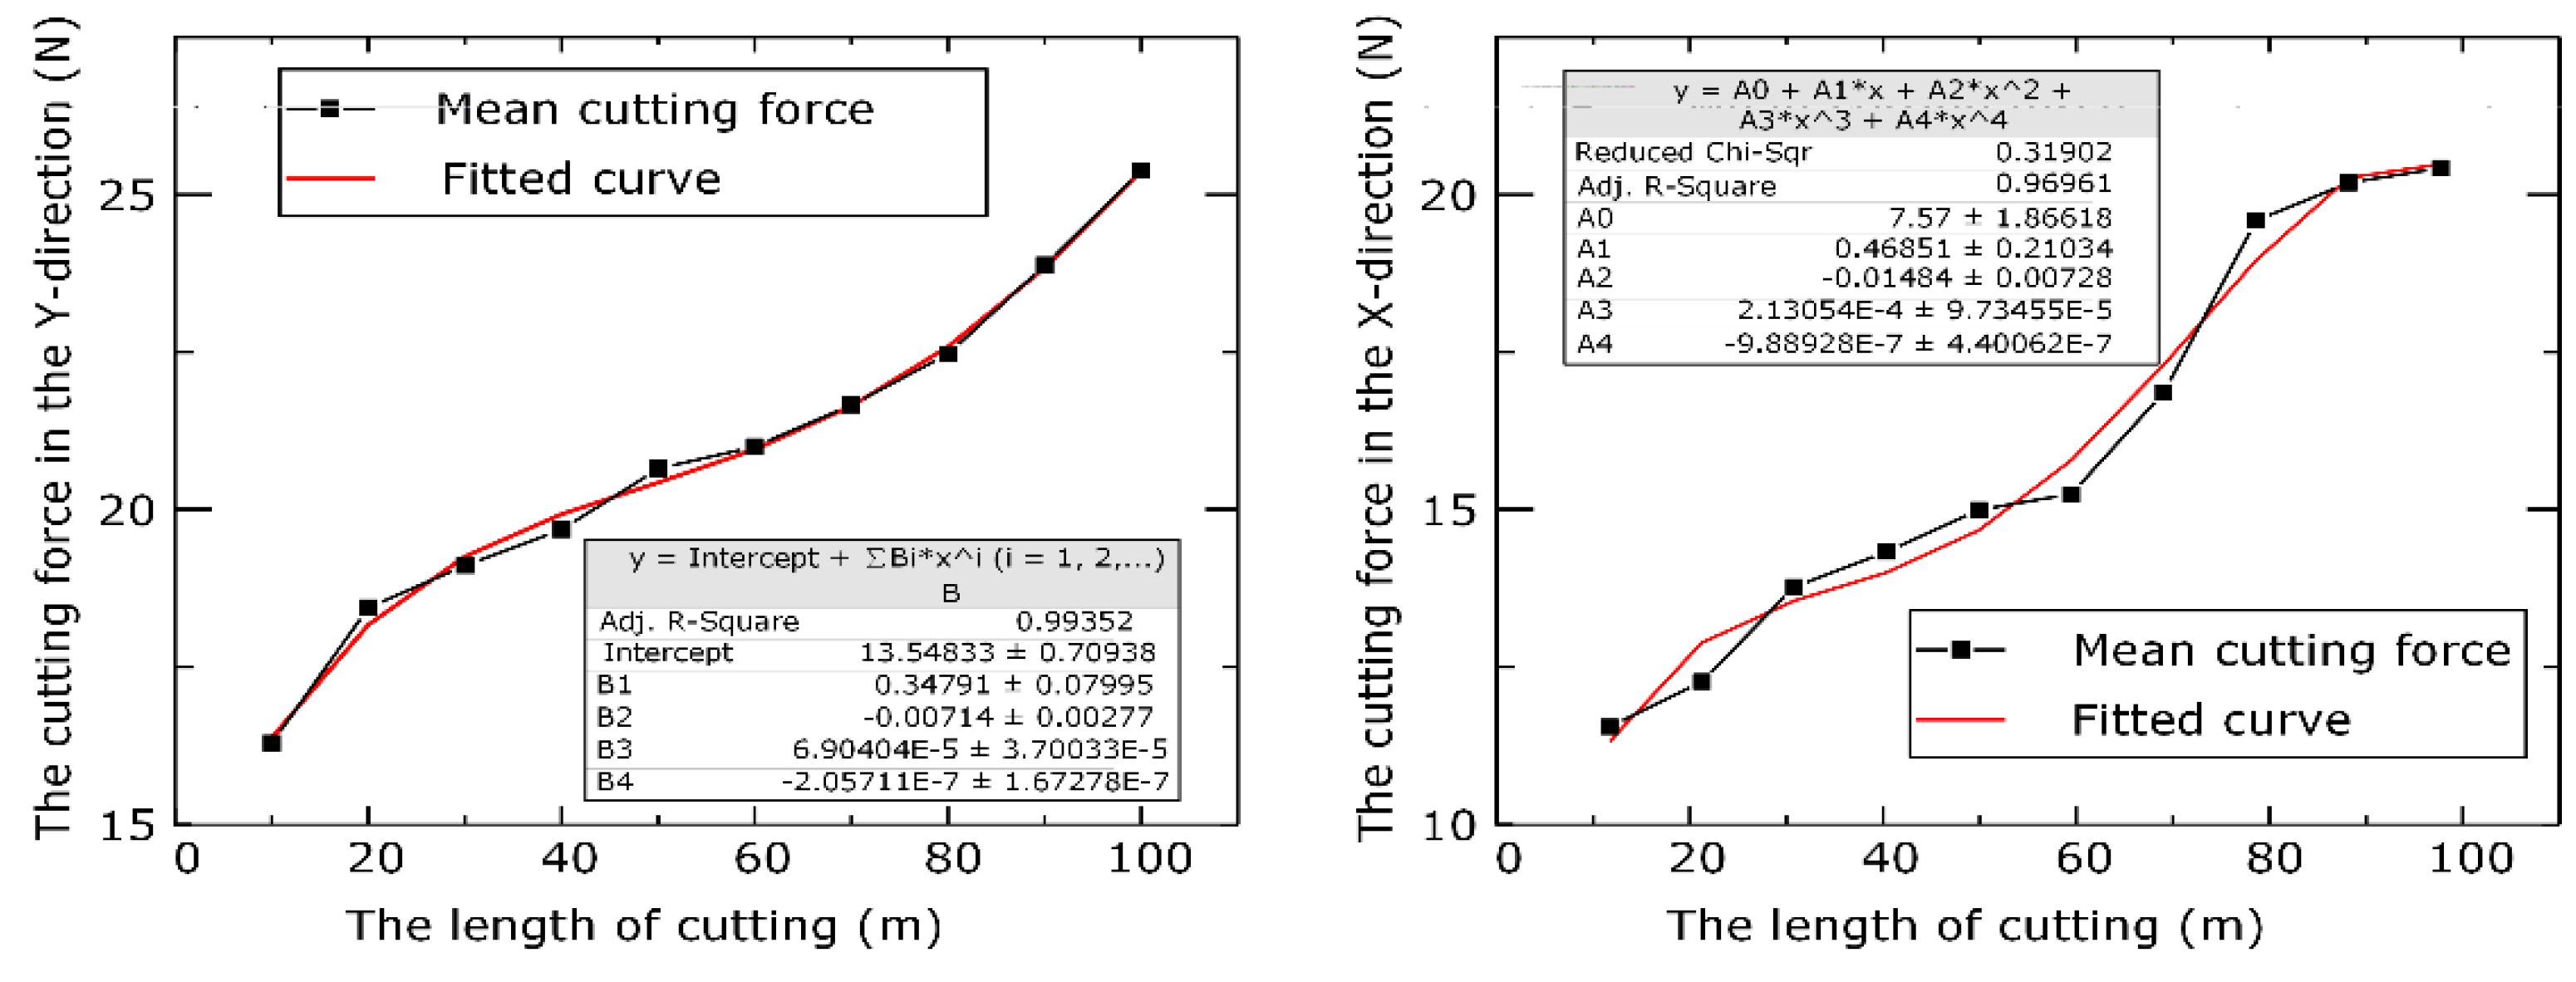
34], and the curve of the average cutting force of the tool with the cutting distance was extracted, as shown in
Figure 2a,b. It could be clearly seen that the mean cutting force in both the X-direction and Y-direction increased sharply with the cutting length increasing and the cutting force in the Y-direction was always larger than that in the X-direction. To be more specific, the cutting force in the Y direction increased from 11.21 N to 20.12 N with an increase of 79.5%, and the cutting force in the X direction increased from 17.29 N to 26.38 N with an increase of 52.6%. The growth rate of the cutting force in X and Y directions was different because the measured force in the X-direction included not only the X-direction component cutting force but also the friction force in the opposite direction of the feed rate caused by the push force.
To describe the change in cutting force quantitatively, the following empirical formula is used to fit the cutting force data:
where
is the cutting length,
is the fitting parameters,
(
represents the order of the polynomials,
represents cutting force in the X and Y directions. The fitting parameters and fitting curves are illustrated in
Figure 2a,b.
According to the slip line field theory, the rising forces result from tool wear. Due to flank wear, the press force
and the friction force
can be expressed as [
35]:
where
,
,
,
,
donate the thickness of the tool tooth, the bandwidth of the flank wear, the normal stress, the shear stress and the length of the tool-workpiece contact band on the flank face.
While
,
can be considered to follow the quadratic distribution in the contact band [
36],
and
can be written as:
As increases with the increasing cutting length, the cutting force also rise based on Equations (4) and (5). The rising trend agrees with the empirical formula proposed.
The tool wear rate of the whole processing life can be divided into three stages initial wear stage, stable wear stage and sharp wear stage. The cutting force in X and Y directions remarkably increased for the first 20 m cutting length due to the similar initial tool wear process. And then, the increasing trend of the cutting force in X and Y directions became relatively slight for the next 60 m cutting length due to the similar stable tool wear process. Lastly, the cutting force in X and Y directions came back to significantly increasing for the last 20 m cutting length due to the similar sharp tool wear process. The stable wear stage occupied most of the tool’s life, while the initial wear stage and sharp wear stage share the rest. What was worth mentioning, although the time of the sharp wear stage seemed to be equal to that of the initial wear stage, the real period of the sharp wear stage ought to be longer since the tool had not been scrapped until the end of the experiment.
3.2. Cutting Temperature
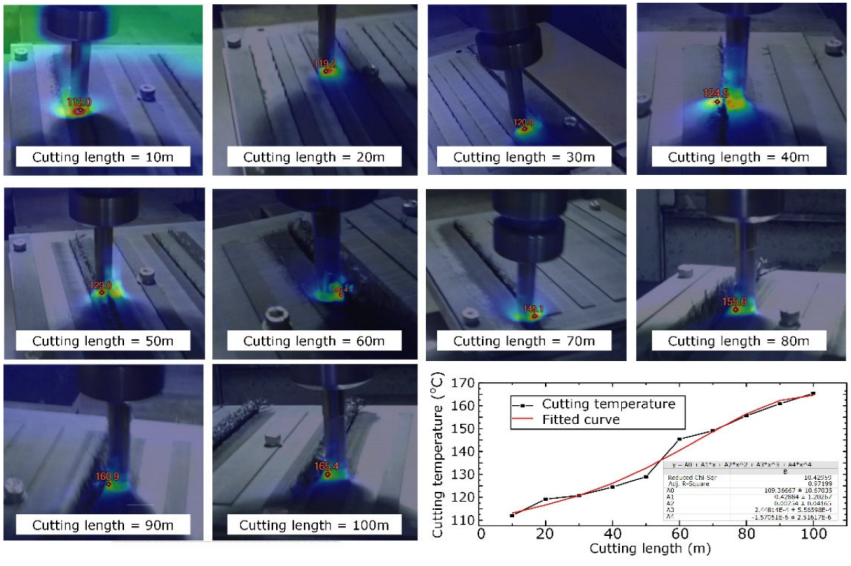
Collected from an infrared thermograph camera, every 10-m-cutting-length, measured cutting temperatures were visualized in images from the inserted illustration (see
Figure 3), respectively. During end milling, it was clear that heat accumulated in the tool-workpiece contact zone of the tool surface, and the local temperature of the tool end could be over 100 °C. Therefore, the peak cutting temperature was chosen for the evaluation of the cutting temperature since it occurred exactly where the tool and workpiece came into contact. As the cutting length increased from 0 m to 100 m with all other processing parameters fixed, the maximum tool temperatures were 112.0 °C, 119.2 °C, 120.8 °C, 124.5 °C, 129.0 °C, 145.4 °C, 149.1 °C, 155.6 °C, 160.9 °C, and 165.4 °C, respectively, indicating a raising tendency.
During milling, cutting heat is mainly generated by plastic deformation and frictional work. Therefore, given a nominal cutting plane (
) the cutting heat per cutting width unit Q(
) can be calculated as:
where
and
are defined as the heat rate generated by plastic deformation and frictional work per cutting width unit respectively.
Since carbon fibers exhibit brittle fracture and the elongation of carbon fibers is minor, the plastic deformation of CFRP during cutting is insignificant. Therefore, heat generated by plastic deformation
(
) in CFRP cutting is smaller than in the case of conventional metal cutting and can be neglected (
(
) = 0). That is why the cutting temperature is relatively lower than that when machining conventional metals (i.e., higher than 400 °C for cutting steel). Moreover, the heat generated by frictional work is computed in the following form:
where
and
donate shear stress, cutting width, instantaneous shearing angle, rake angle friction speed and feed rate. What was noteworthy, some of the cutting heat was possibly consumed to melt or sublime the matrix resin of CFRP at the cutting point.
The increase in cutting temperature came from the increase in frictional work at the tool rake face and the clearance face. As the cutting length increases, the wear of the tool becomes more serious, leading to severer abrasion wear on the flank face as well as the rake face and rounding of the cutting edge. And then, these changes in the edge geometry led to an increase in rake angle and bandwidth of the flank wear VB for both the bottom edge and side edge. According to Equation (7), it generated more heat to induce the rising of cutting temperature. The rising cutting temperature in turn aggravated the wear of the tool, thus causing the cutting temperature to keep rising, forming a vicious circle.
In addition, when the cutting length increased from 40 m to 50 m, the temperature rose by 4.5 °C, and when it increased from 50 m to 60 m, the temperature rose by 16.4 °C and the increment reached 264%. The temperature step point was 145.4 °C, which was around the glass transition temperature (Tg = 145 °C) of epoxy resin, indicating that the cutting temperature had a sudden increment during the state transition of the resin.
3.3. Machined Surface
Table 3 presents root mean square deviation (Rq), skewness (Rsk), kurtosis (Rku), the maximum height of profile (Rz), and arithmetic mean deviation (Ra) of machined surfaces with the completion of cutting length of 100 m. Rq changed from 4.242 μm to 6.209 μm with increasing cutting length, showing an overall upward trend with a 46.37% increment rate, indicating that the amplitude fluctuation of the processed surface is increasing.
The above surface topography parameters are calculated as follows:
where
n refers to the number of equally spaced intervals between adjacent points of sampling length,
donates the height sequence along the sampling length,
represents the average height of
and
represents Rz values in 5 consecutive sampling lengths respectively.
As cutting length increased, the moving trend of Rsk was not obvious. The overall value was negative, which meant that the distribution had a negative deviation. The data smaller than the mean value were less than those bigger than the mean value, indicating that the matrix of CFRP composites might have deep damage. In addition, Rsk was generally negative when the cutting length was more than 40 m, and the degree of negative deviation was getting severer, which meant that the damage to the matrix was getting deeper. Rku was generally around 3, indicating that it followed the normal distribution. However, after the cutting length exceeded 60 m, there was a downward trend, which meant higher burrs and deeper matrix damage occurred. Rz remained at about 20 μm before the cutting length reached 60 m. When the cutting length reached 60 m, there was a sudden increase and remained at about 28 with a 40% increment rate since, which meant that serious burr residues and matrix damage began to appear at the cutting length of 60 m, resulting in further expanded the peaks and valleys of the surface in the machined surface. Ra changed from 3.453 μm to 4.989 μm with increasing cutting length, showing a rather stable upward trend with a 44.48% increment rate, indicating that the average amplitude of the processed surface was increasing.
Based on the above analysis and former relative studies [
32], it can be concluded that Ra has a steady increase with increasing cutting length, which could be used to represent the cutting length of the tool, and Rz had a sudden increase with increasing cutting length, which could be used to represent the sharp increase in matrix damage and burr.
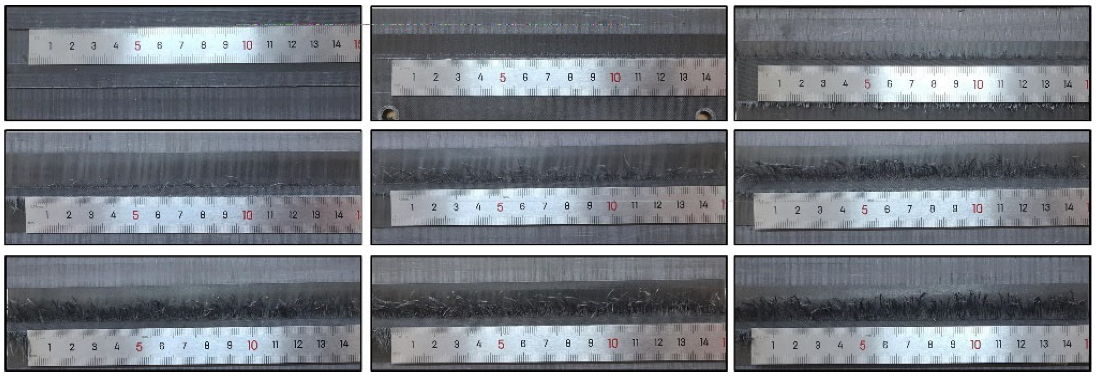
The height and distribution of burrs appearing on the edges of the milled grooves are shown in
Figure 4. When the cutting distance was within 20 m, the edge of the groove was relatively smooth without obvious burrs, since during this phase the tool was in the initial wear stage, and the cutting edge was sharp enough to cut off any burrs. When the cutting length was between 20 m and 60 m, burrs appear on the edge of the groove, and they were longer and denser with the increasing cutting length. This was because the tool moved to the stable wear stage, and the larger cutting edge radius caused the removal mechanism of the fiber to change from crushing-dominated to bending--dominated, making it more difficult for the fiber to fracture. When the cutting length was within 60 m to 100 m, long and dense burrs appeared on the edge of the groove. This was because epoxy resin became softer, and its deformation turned to be ductile when the cutting temperature exceeded the glass transition point of the matrix material, T
g. And then, it brought about severe deformation of the matrix, which could not give support to the fibers, leading to failure cutting and more burrs. It suggested that it is better to keep cutting temperature below the T
g of the matrix material to prevent burr formation.
3.4. Subsurface
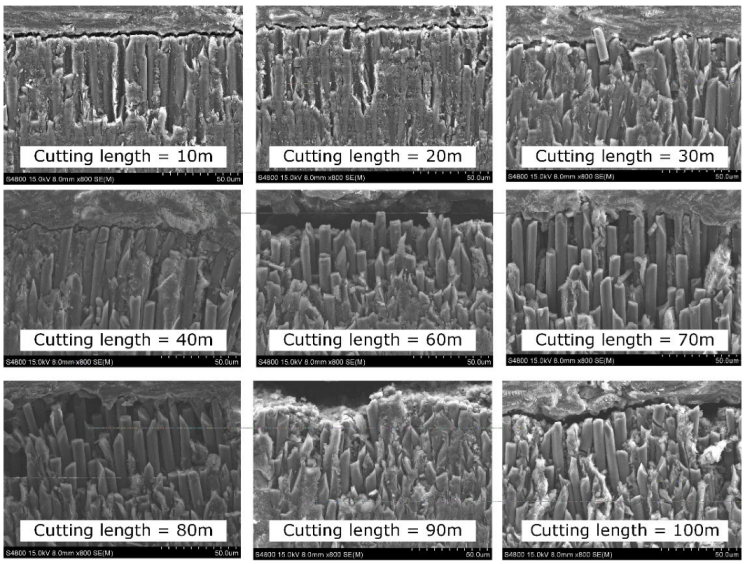
To visually see the topography of the groove bottom, subsurface cross-sections of the machined surface from the milling experiments were examined with cutting lengths under 10 m to 100 m, as shown in
Figure 5. Under tool wear, the subsurface quality of a machined workpiece had a great change with the increasing cutting length and followed a gradual deterioration pattern obviously.
When the cutting length was less than 20 m, thanks to the small cutting edge radius, the machined plane was very neat, and it showed a direct crushing-dominated fracture for fibers. In addition to the plane of the machined surface, there also existed a sub-plane of fiber fracture under the machined surface, which was mainly composed of inclined fiber fracture bands along the fibers caused by the shearing action of the cutting tool. The damage depth of the machined surface is relatively shallow, and the fracture points of fibers in the subsurface are relatively consistent.
When the cutting length was within 20 m to 60 m, the machined plane fluctuated slightly, in agreement with the trend of Ra measured. For fiber would not be cut off immediately but would fracture after a certain deflection deformation due to the larger cutting edge radius, the fracture point is rather uncertain. In addition, the fracture of fibers under the machined surface is irregular. This is because, with the further feeding of the cutting tool, both tensile stress and compressive stress began to concentrate on the subsurface downwardly on unbroken fibers and also propagated downwards along the fiber direction, leading to random fiber deflection as well as random fiber fracture. Eventually, it presented deeper subsurface damage.
When the cutting length was within 60 m to 80 m, the machined plane fluctuated greatly, still in accordance with the trend of Ra measured. As the friction-induced fiber bending was dominated, the fibers around the tool-workpiece interaction zone deflected from their initial locations furtherly due to the larger cutting edge radius, resulting in larger cavities in the finished surface and poorer machined surface. What is more, there existed many fiber fractures of varying depths and a large number of cavities in the subsurface. As the cutting temperature exceeded the glass transition temperature, T
g, of epoxy resin, the matrix became softening, and fibers became less supported mechanically, which made fibers deflect furtherly in the subsurface and, in turn, led to massive subsurface damage [
37].
When the cutting length was more than 80 m, the machined plane presented an irregular curved profile, indicating that there existed obvious milling marks on the surface. On the one hand, the bottom flank of the tool had undergone serious wear, resulting in the unevenness of the machined surface. On the other hand, the increasing cutting force would increase the phenomenon of cutter relieving, causing the appearance of milling marks. In addition, the syntheses of matrix cracking, fiber fracture, and interfacial debonding became more complex in the subsurface. As the tool enters the stage of rapid wear, severe wear occurs on the flank face of the tool, which significantly increases the cutting force and further deepens the debonding of the matrix-fiber interface.
3.5. Tool Wear
The SEM morphologies of the surfaces for the tool rake face under 10 m to 100 m cutting length were shown in
Figure 6, respectively. With increasing cutting length, the surface quality of the rake face had an obvious change and wear width followed a deterioration trend from 20.48 μm to 101.4 μm. When the cutting length was less than 20 m, slight wear occurred at the rake face around the bottom edge, while no significant wear occurred at the rake face around the side edge since the material was primarily removed by the side edge and the tool was in the initial wear stage during milling. When the cutting length was between 20 m to 80 m, the wear of the rake face began to increase sharply from 21.08 μm to 67.42 μm with a growth rate of 219.83%, and the wear extended to the junction of the side edge and the bottom edge, since the tool moved to stable wear stage, and the effecting of shearing and friction began to intensify caused by increasing cutting force. What was noteworthy is when the cutting distance was 60 m, a certain degree of pits appeared on the flank face of the side edge because the matrix became ductile at the glass transition temperature and increased the effects of friction.
When the cutting length was more than 80 m, abrasion marks on the flank face were visually increasing from 67.42 μm to 101.40 μm with a growth rate of 50.40% due to the sharply increasing cutting force, which resulted from chipping failure, such as coating peeling and cutting edge fracture [
38]. In addition, more severe abrasion wear was noted at the tool corner zone indicating that the bottom edge was wearing simultaneously.
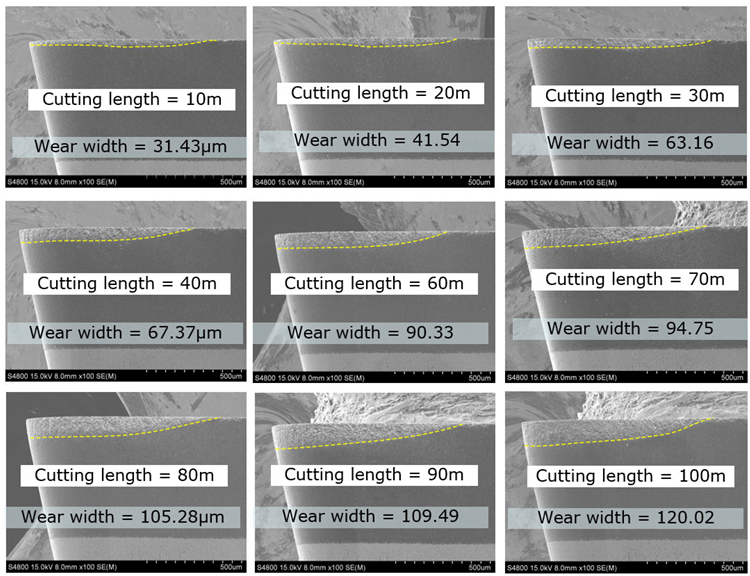
The SEM morphologies of the surfaces for the tool flank face under 10 m to 100 m cutting length were shown in
Figure 7, respectively. Concerning the wear surface, zones of abrasion marks onto the flank face are broadly shown along its edges due to coating peeling effects resulting from the brittleness of PCD material and cyclic impacts at the tool-CFRP interfaces caused by the inhomogeneity of CFRP composites [
39]. As a whole, it was safe to say flank tool wear was the primary tool wear mechanism when milling CFRP composites with PCD tools [
15]. When cutting length increases from 10 m to 100 m, an expansion of mill flank wear width was observed from 31.43 μm to 120.02 μm with a growth rate of 281.86%. Note that two sudden increments of flank wear land occurred at cutting lengths of 20 m and 80 m, which was due to the stage of tool wear changing from initial wear to stable wear and from stable wear to rapid wear, respectively. Additionally, in the flank wear land of the side edge, the wear was more serious closer to the bottom edge, which was caused by the higher cutting speed and the larger actual cutting length along the side edge.
It was worth mentioning that when the cutting length reached 60 m, granular wear appeared on the flank wear land. Based on the images of the subsurface (see
Figure 7), it is believed that this was caused by irregular fiber fractures. Since the matrix changed from elasticity to ductility, there was randomness in the fracture depth of fibers, and the wear caused by fibers on the flank surface was also dispersed. This dispersibility further led to randomness in the fracture of fibers, which further deepened the dispersibility of flank wear, forming a vicious circle. In addition, the ductility of the matrix accentuated the high abrasiveness of the carbon fibers and also caused granular wear that varied with the distribution of fiber fracture points.
4. Conclusions
In this study, the tool wear mechanism and CFRPs surface integrity of CFRP milling under mild machining parameters are elucidated, focusing on the evolution of cutting force, cutting temperature, surface and subsurface of machined CFRP workpiece and topography of tool surface. The following major conclusions can be drawn from this work.
When the cutting length increased from 0 m to 100 m, the cutting force in the Y direction increased from 11.21 N to 20.12 N, and the cutting force in the X direction increased from 17.29 N to 26.38 N. An empirical formula is proposed to describe the change of the above cutting force.
When the cutting length exceeded 20 m, the tool entered the stable wear stage from the initial wear stage. Moreover, when the cutting length exceeded 80 m, the tool entered the rapid wear stage from the wear stage.
When the cutting length increased from 0 m to 100 m, the cutting temperature increased from 112.0 °C to 165.4 °C. In addition, when the cutting length exceeded 60 m, the cutting temperature had a sharp increment and reached the glass transition temperature, .
Ra had a steady increase with increasing cutting length, which can be used to represent the cutting length of the tool, and Rz had a sudden increase with increasing cutting length, which can be used to represent the sharp increase in matrix damage and burr.
Long and dense burrs appeared on the edge of the groove once the cutting temperature exceeded . Therefore, it is better to keep the cutting temperature below the of the matrix material to acquire a finely machined surface.
When the cutting length exceeded 60 m, many fiber fractures of varying depths and a large number of cavities occurred in the subsurface due to the transformation of the matrix. When the cutting length exceeded 80 m, the machined plane presented an irregular curved profile caused by serious tool wear.
When the cutting length increased from 0 m to 100 m, the wear width of the rake face increased from 20.48 μm to 101.4 μm, and the wear width of the flank face increased from 31.43 μm to 120.02 μm. And then, both wear widths had two sudden increments at cutting lengths of 20 m and 80 m, respectively, due to the transformation of tool wear stages. In addition, when the cutting length exceeded 60 m, granular wear appeared on the flank wear land due to the change in resin properties.
Considering the limitations of this work, more in-depth work can be carried out in the future on (i) the effect of different cutting angles (e.g., 0°, 45°, 90°, and 135°) on tool wear, (ii) the comparison of mild and aggressive machining parameters, and (iii) theoretical modeling of PCD tool wear.
