Article

Synchronous Shot Peening Applied on HVOF for Improvement on Wear Resistance of Fe-based Amorphous Coating

1
Institute of Massive Amorphous Metal Science, School of Chemistry and Chemical Engineering, China University of Mining and Technology, Xuzhou 221116, China
2
Academy of Military Science PLA China, National Innovation Institute of Defense Technology, Beijing 100071, China
3
Jiangsu Key Laboratory for Advanced Metallic Materials, School of Materials Science and Engineering, Southeast University, Nanjing 211189, China
*
Authors to whom correspondence should be addressed.
Coatings 2020, 10(2), 187; https://doi.org/10.3390/coatings10020187
Submission received: 6 February 2020 / Revised: 17 February 2020 / Accepted: 18 February 2020 / Published: 20 February 2020
(This article belongs to the Section Corrosion, Wear and Erosion)

Abstract

:
Shot peening was used synchronously to improve Fe-based amorphous coating performance by delivering ZrO2 ceramic particles into a low-temperature region of a flame during the high velocity oxygen flame (HVOF) spray process. The coating became denser, and its hardness became higher via the new process. Moreover, the compressive residual stress was induced by shot peening. The results from the dry friction test indicated that the coating’s wear resistance was enhanced obviously. The wear mechanism of coatings with and without shot peening is an abrasive wear combined with an oxidation wear at wear test conditions of a low load and a low frequency. The coating with the best wear resistance did not have the strongest microhardness but had the highest compressive residual stress. The compressive residual stress had a significant positive influence on the wear resistance at a low frequency, while its effect is weakened at a high frequency.

1. Introduction

Fe-based amorphous alloys have been studied extensively due to high hardness, good wear and corrosion resistance, and relatively low cost. Meanwhile, with the development of thermal spray technology, Fe-based amorphous materials are quickly introduced into the field of surface engineering [1,2]. For improvement on Fe-based amorphous coatings performance, different kinds of methods were developed such as technology improvement [3], parameter optimization [4], hard phase reinforcement [5], and pre/post-treatment [6,7]. Most methods pay attention to the microstructures of Fe-based amorphous coatings such as density and hard phase composition. Takeshi et al. [8] studied an Fe-based amorphous composite coating with the addition of WC-12Co. When the added WC-12Co was 8%, the coating hardness increased from 660 to 870 HV0.1, while the wear rate decreased from 0.8 × 10⁻⁴ to 0.1 × 10⁻⁴ mm3·N−1·m−1, exhibiting significant enhancement in the hardness and wear resistance. Yugeswaran et al. [9] added TiN ceramic powder to strengthen an Fe-based amorphous coating and found that the strengthening phase decreased both the oxide content of the composite coating and the friction coefficient. However, significant attention has to be paid to the added content of the second phase, particle size, and mismatch between particles associated with Fe-based amorphous coatings in order to avoid deterioration [10].
The coating performance is related to the residual stress, which plays an important role in factories [11,12,13,14]. During the spraying technology, high velocity oxygen flame (HVOF) spraying is beneficial for preparing coatings with high density and low porosity due to the flame of supersonic speed and low temperature. For powders with a high melting point, they cannot be melted thoroughly during the HVOF spray process. Therefore, unmelted or semimelted powders impacting on the substrate or a previous lay can lead to great shot stress to induce the compressive residual stress in a coating [11,15]. Generally, the compressive residual stress is rewarding to service life, fatigue resistance, and wear resistance [16,17]. However, shot stress created by Fe-based powders is limited due to their relatively low melting points. Some literature focused on the effects of residual stress in coatings [14,16,18,19], but it is difficult to find an effective way to improve it.
Hard particle peening technology (sandblasting, shot peening, etc.) has been applied on surface engineering, where shot peening is used widely in pre- or post-treatment processes [20,21,22,23]. The purpose of pre-treatment is to increase the roughness of a substrate, so that a coating adheres to a substrate strongly [20]. Junior et al. [22] carried out shot peening on a WC-10Ni coating sprayed by HVOF and found that the fatigue strength of the coating enhanced from 750 to 850 MPa owing to the compressive residual stress caused by shot peening. Shot peening in the post-treatment is in favor of wear resistance and compressive residual stress, but the sphere of influence is limited [22,24]. Therefore, some literature turned to utilize shot peening during spraying. The earliest study on simultaneous peening during spraying was implemented by Singer [25] in 1984. In the study, they introduced an extra independent shot peening equipment into a spraying system. The result showed that the residual stress and hardness were improved and low porosity was deserved. However, independent shot peening cannot make sure all deposition areas were covered. Moreover, Oxidation was introduced by high-pressure air, and high cost was caused by an inert gas. Another method for synchronization of spraying and peening is to mix hard particles into sprayed particles, where hard particles have effects on shot peening. Liang et al. [5] mixed Al2O3 particles into Fe-based amorphous powders and prepared an amorphous coating by HVOF. In the research, Al2O3 particles were used as shot peening to induce compressive residual stress. However, the velocity and temperature of Al2O3 particles cannot be adjusted independently, and the excessive speed and temperature can damage the coating microstructure.
In this study, hard particles ZrO2 and sprayed powders were fed into a spraying system from different positions. The hard particles were delivered into a flame flow out of a nozzle to reduce acceleration and heating. The tribological behavior and properties of coatings were studied, and the formation mechanism was also discussed. This study provides an effective method to improve the wear resistances of Fe-based amorphous coatings.

2. Experimental Procedures

2.1. Preparation of Coatings

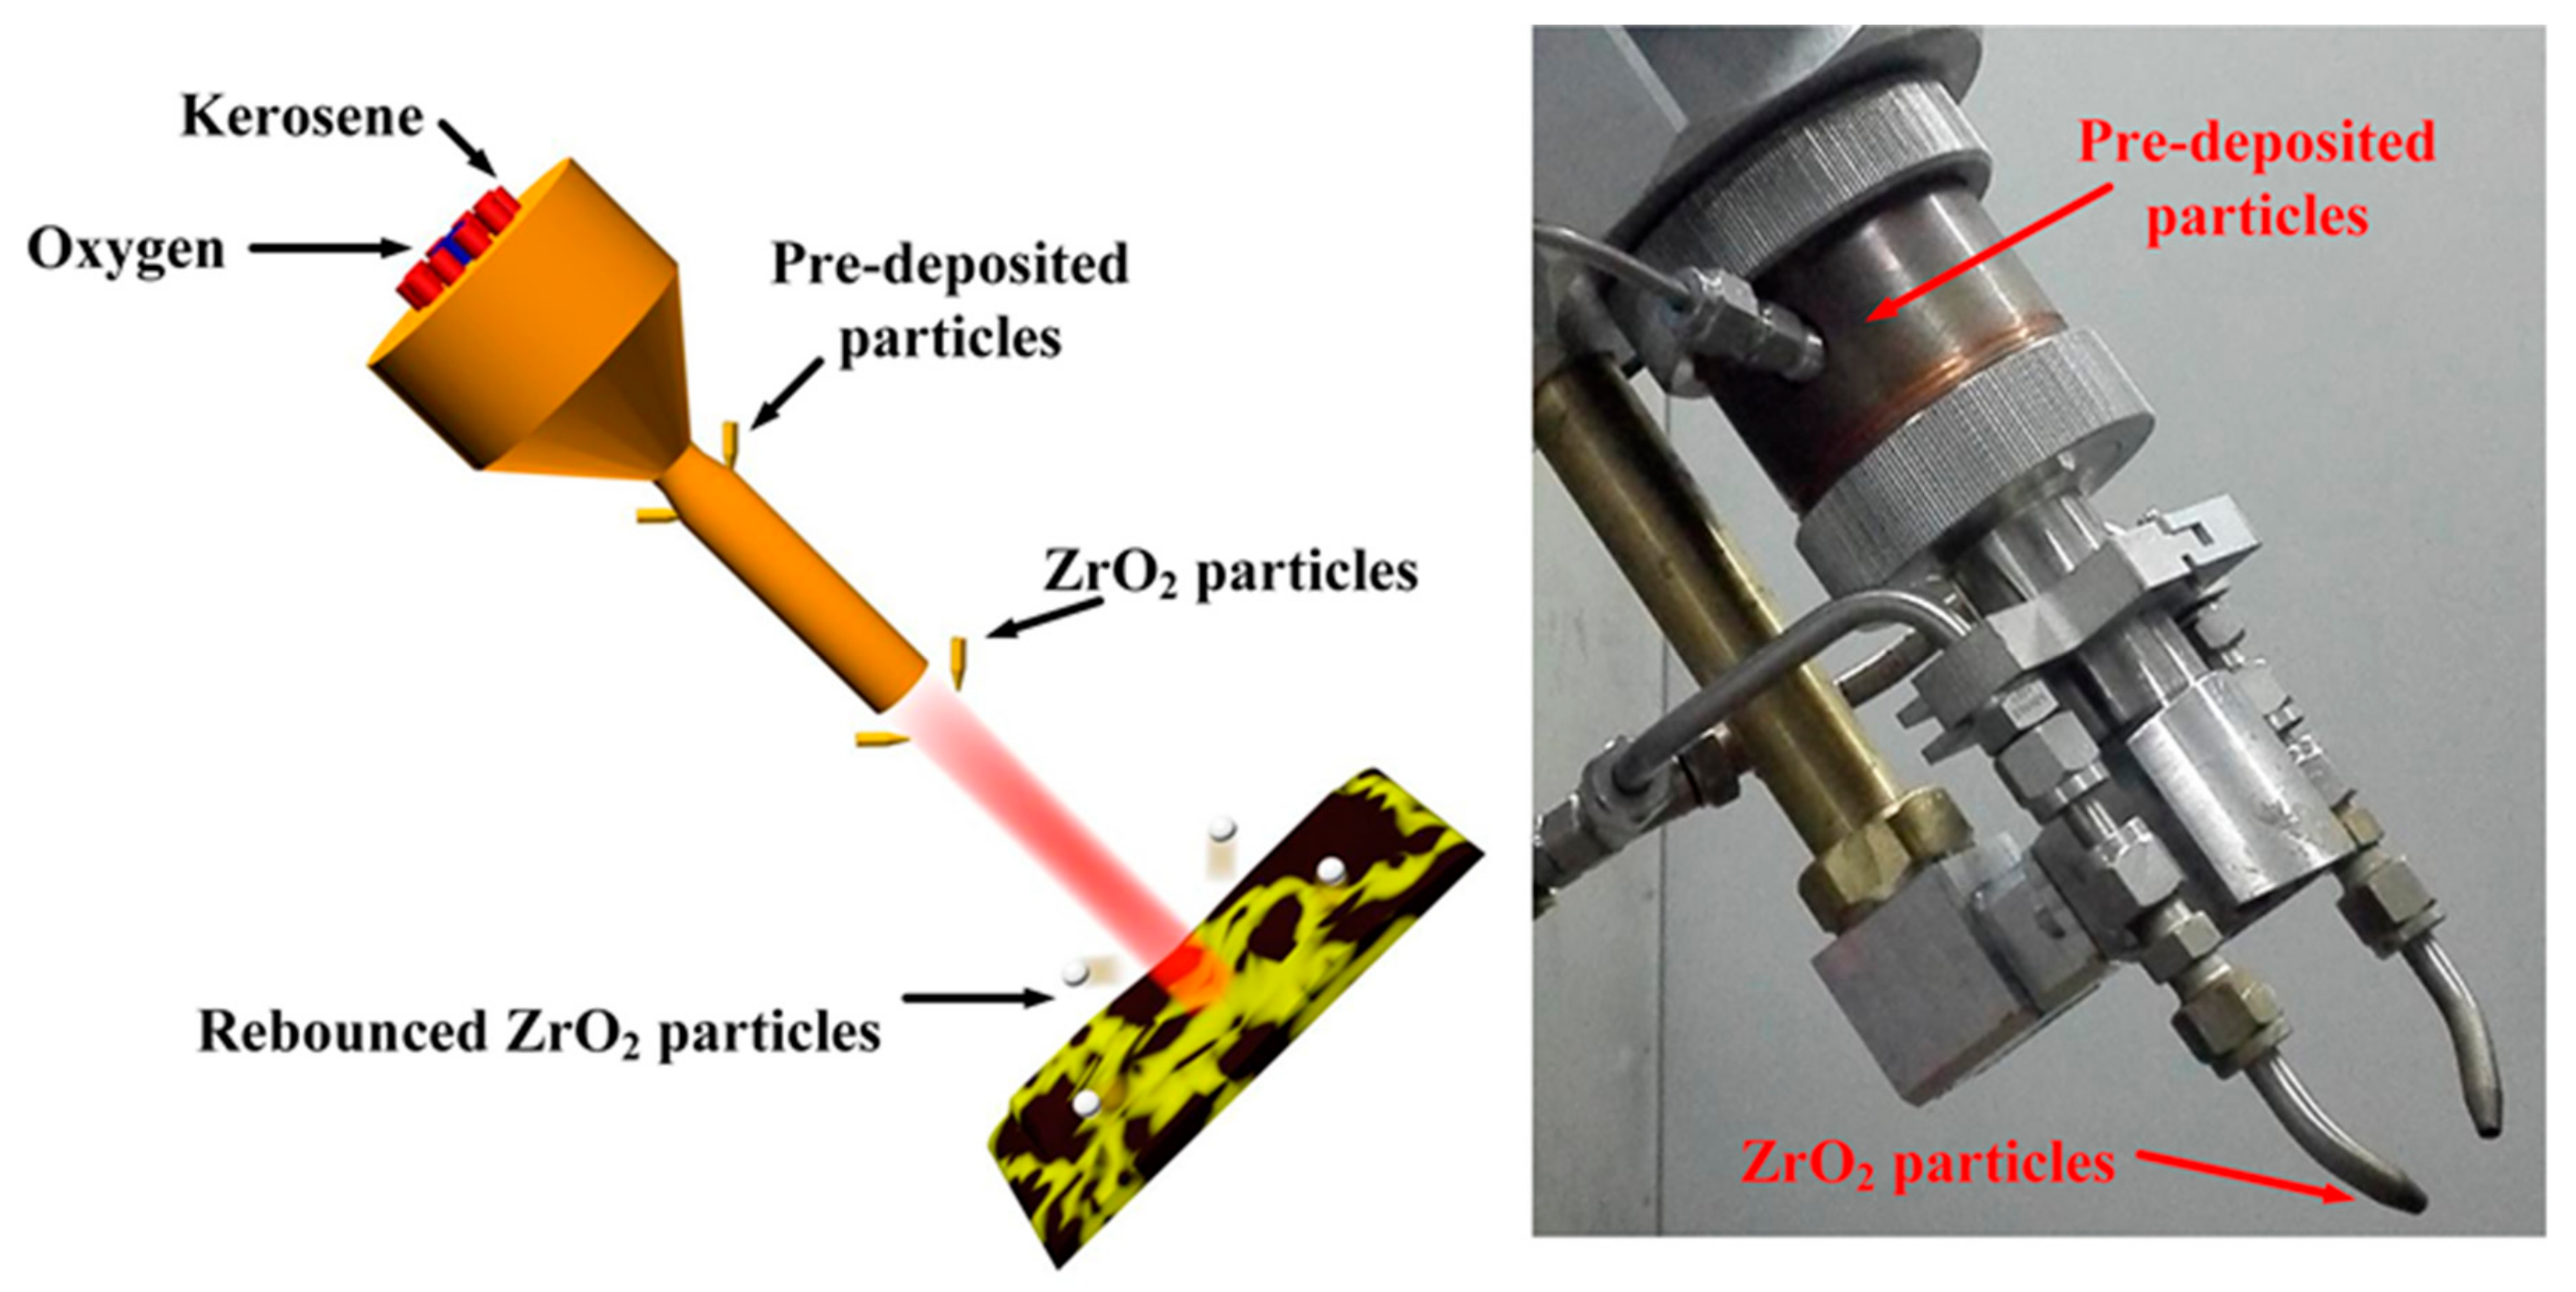
The sprayed powder was a self-made Fe69B22Si5Nb4 (at.%) Fe-based amorphous powder, prepared by vacuum gas atomization. Then, powders with a diameter less than 45 μm were sieved. The micromorphology is shown in Figure 1a. The typical satellite structure was found from the enlarged picture in the upper left corner of Figure 1a, due to the fact that small melts adhered to the surface of large droplets easily during the faster cooling process. The diameters of hard particles ZrO2 were in a range of 150-180 μm, as shown in Figure 1b. Figure 2 shows the schematic diagram of the HVOF process assisted with shot peening. The sprayed powder was delivered near a combustion chamber, while ZrO2 particles were delivered out of a gun. The incident position of ZrO2 particles can be adjusted to control shot peening levels. Lower thermal conductivity and larger size can keep ZrO2 particles with a low temperature, high elastic energy, and large collision kinetic energy, which is in favor of shot peening. The substrate was composed of 1045 steel and was pretreated through oil removal, rust removal, and sandblasting. For comparative analysis, three kinds of coatings were sprayed, and the related parameters are listed in Table 1, where the coatings are C0, C1, and C2 for short, respectively.

2.2. Measurement and Analysis Method

The phase structures of powders and the coating were analyzed using D8 XRD (karlsruhe, Germany), equipped with a Kα ray with Cu target (λ = 0.154060 nm). The diffraction angle range, diffraction speed, and step length were 30–90°, 2°/min, and 0.02°, respectively. The microstructures of powders (Fe-based amorphous powders and ZrO2 powders) and coatings were observed using a Nova Nano 650 SEM field emission scanning electron microscope (Nova Nano 650, Hillsboro, OR, USA), equipped with an energy-dispersive spectrometer. The microhardness in coatings was measured by a Vicker hardness tester (Micromet-6030, Buehler, Lake bluff, IL, USA). The applied load was 100 g for 10 s. The tribological performance was measured using a wear tester (UMT-3, CETR, Campbell, CA, USA), and the dry friction model was the reciprocating ball-to-surface contact. The friction ball pair consisted of Si3N4 balls with the diameter Φ = 4.0 mm, and the coating surface was polished with 1000-mesh sandpaper before the test. The test conditions were as follows: load, 5 and 10 N; frequency, 5 and 10 Hz; time, 30 min; and slide distance, 4.0 mm. A three-dimensional interference surface profiler (phase shift MicroXAM-3D, ADE Corporation, Westwood, MA, USA) was used to measure worn volume and observe the morphology of the shot peening trace. The worn surface was also respected by SEM mentioned above. The residual stress on the coating surface was monitored by an XRD stress tester (X-350A, Handan, China). Usually, the tester cannot be used to obtain the residual stress value of pure amorphous materials due to no crystal phase [19]. However, there was an α-Fe phase in the coating by the result of XRD. The residual stress can be evaluated qualitatively by characterizing the lattice constant of the α-Fe phase in the coating [26,27]. Therefore, the stress can be measured by the Cr-based Kα radiation in a diffraction crystal plane of (211) at 2θ = 158°, where the scanning rate of the tester was 0.1°/min, and three measurements were performed at 2Ψ of 0°, 30°, and 45°, respectively. Here, the residual stress value was used for vertical comparison.

3. Results and Discussion

3.1. Phase Structure and Residual Stress

Figure 3 shows similar XRD patterns in powders and coatings, indicating the existence of the dominant amorphous phase and a small amount of the α-Fe phase. There were no characteristic peaks of ZrO2 in C1 and C2 compared with that in C0, showing that ZrO2 particles neither reacted with spray-coated powders chemically nor were embedded into coatings during the spraying and coating processes. The diffraction peak intensities of the α-Fe crystal phase of C1 and C2 grew higher, which may result from impact-induced damage of peening particles on the rather brittle material [28].
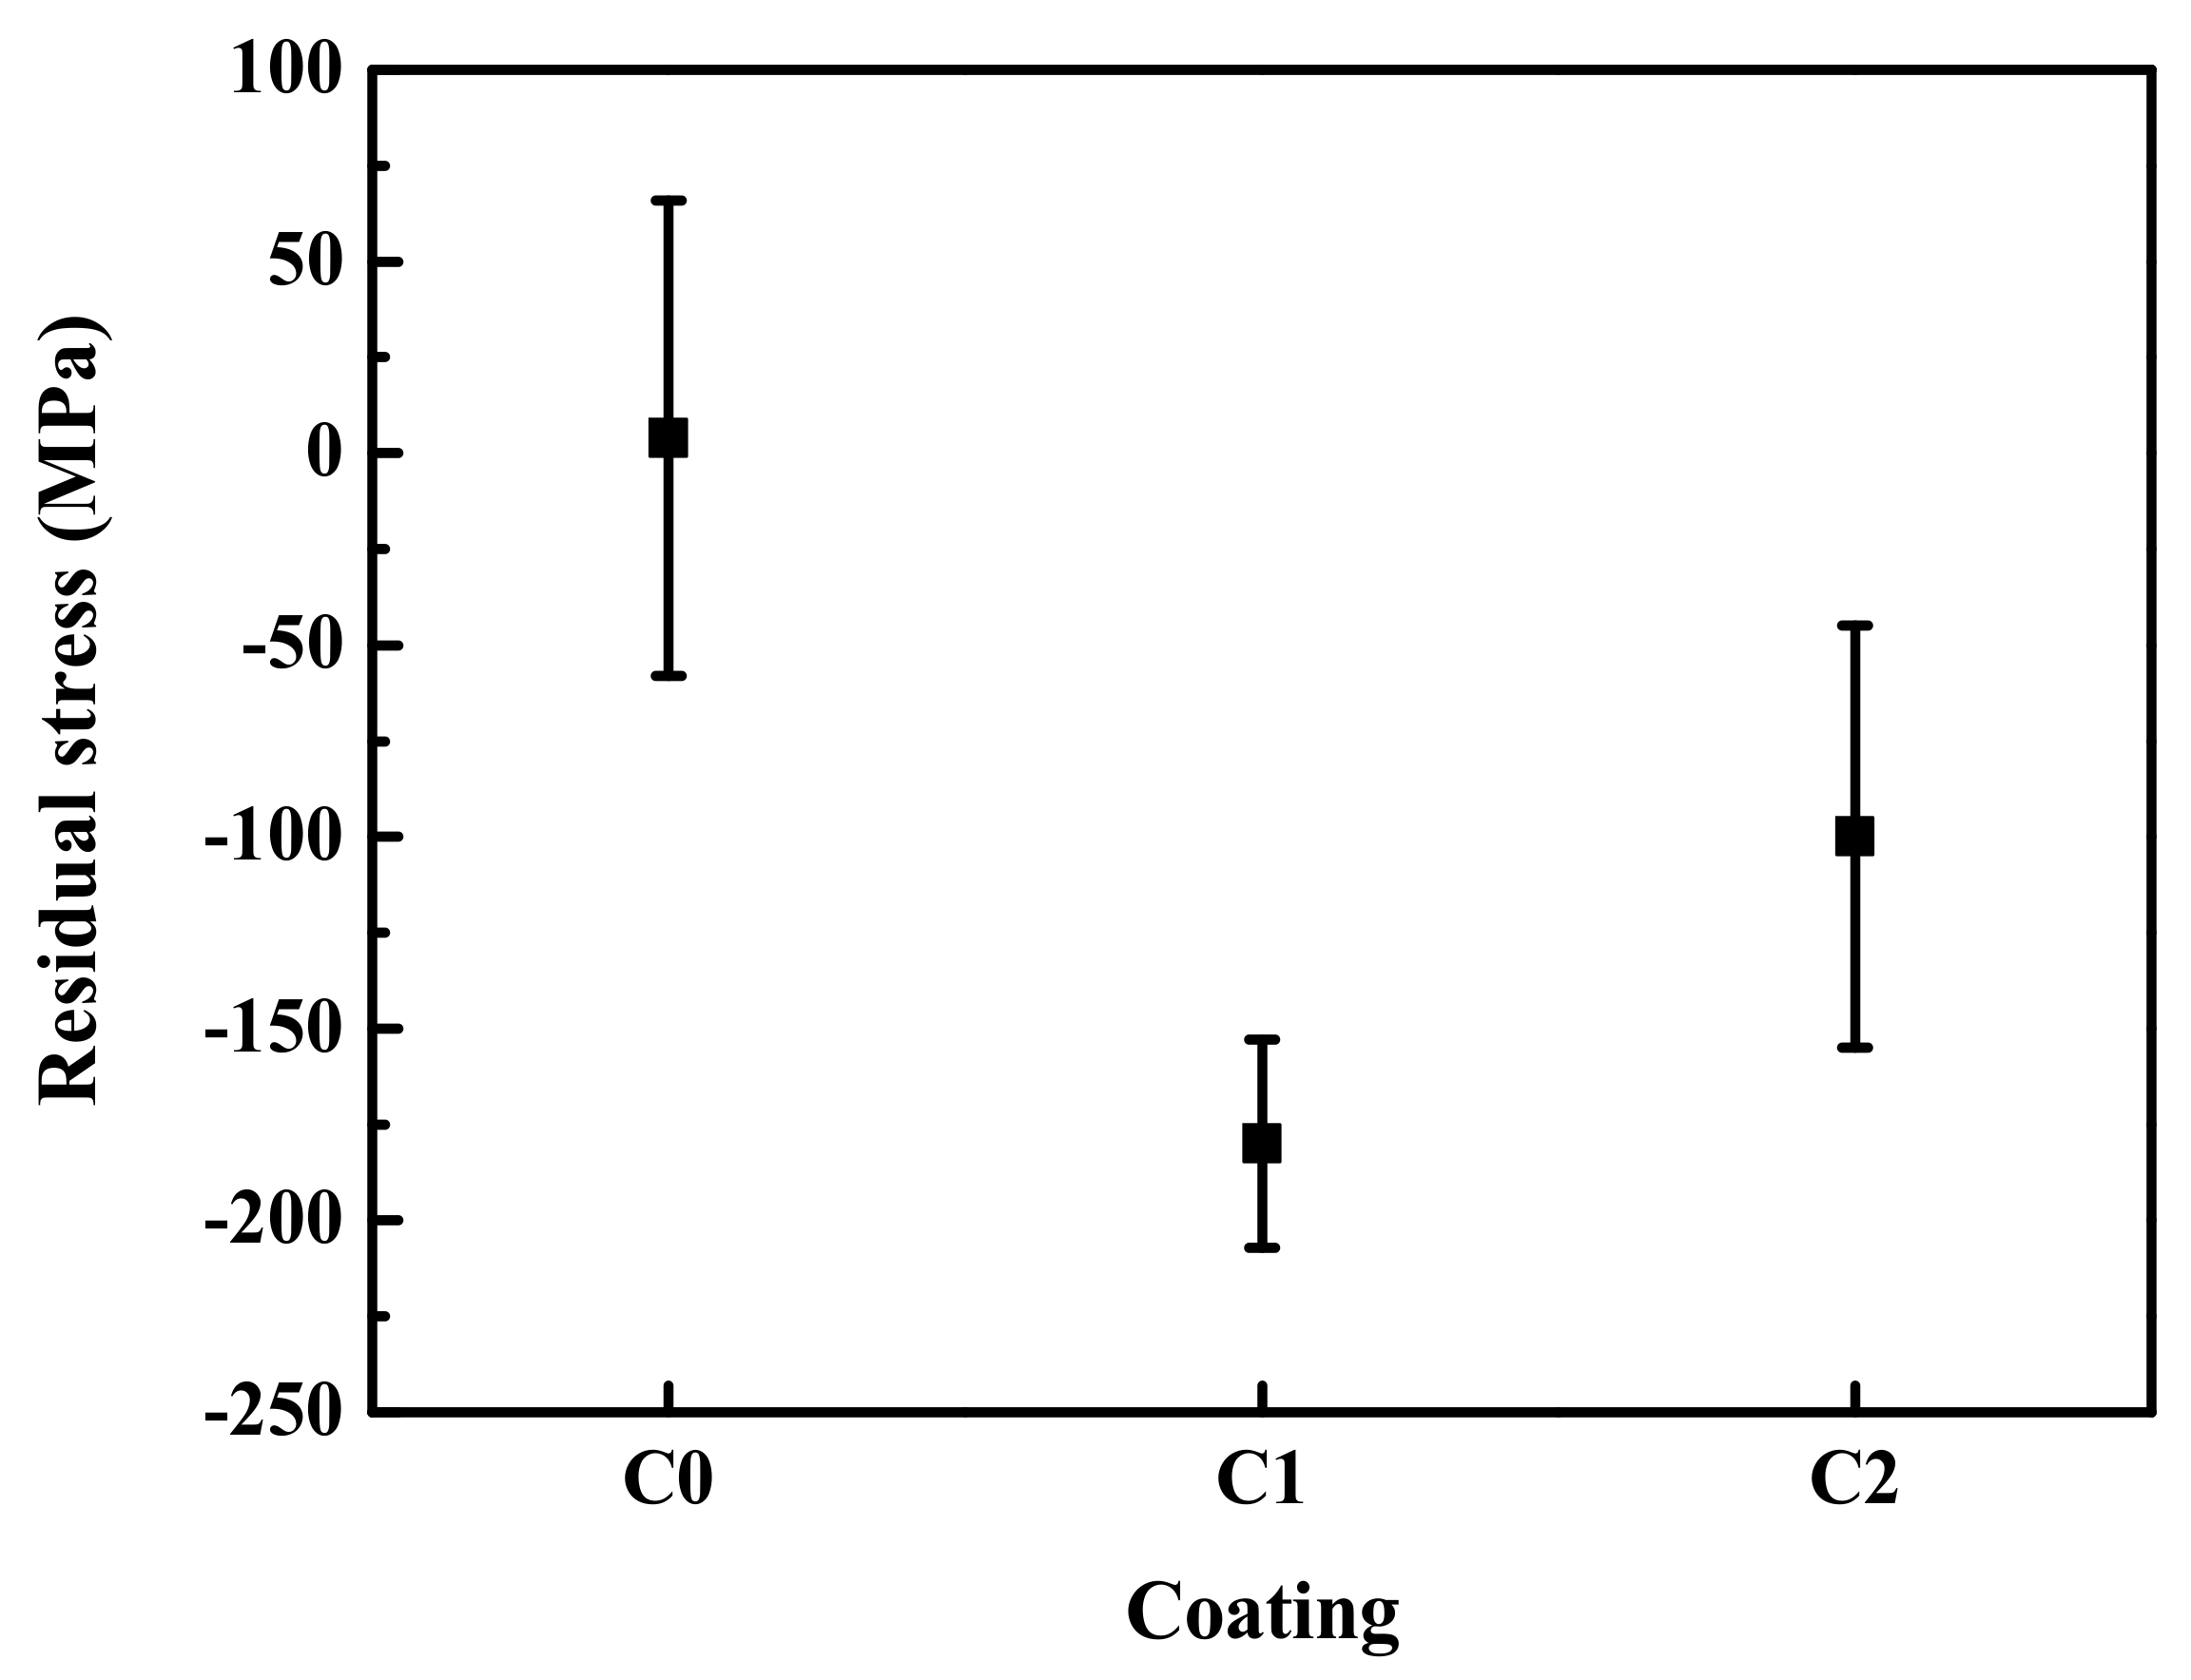
Figure 4 shows the residual stress values in C0, C1, and C2. It can be seen that the residual stress changed from the residual tensile stress (4 MPa) to the compressive residual stress (−180 and −100 MPa) after auxiliary of ZrO2 particles. The largest compressive residual stress was induced when the peening particle rate was 50 g/min, showing that the exceeding ZrO2 rate was harmful to the compressive residual stress. Heavier shot peening could lead to coating damage like microcracks, which relaxed the compressive residual stress [29].

3.2. Shot Peening Traces

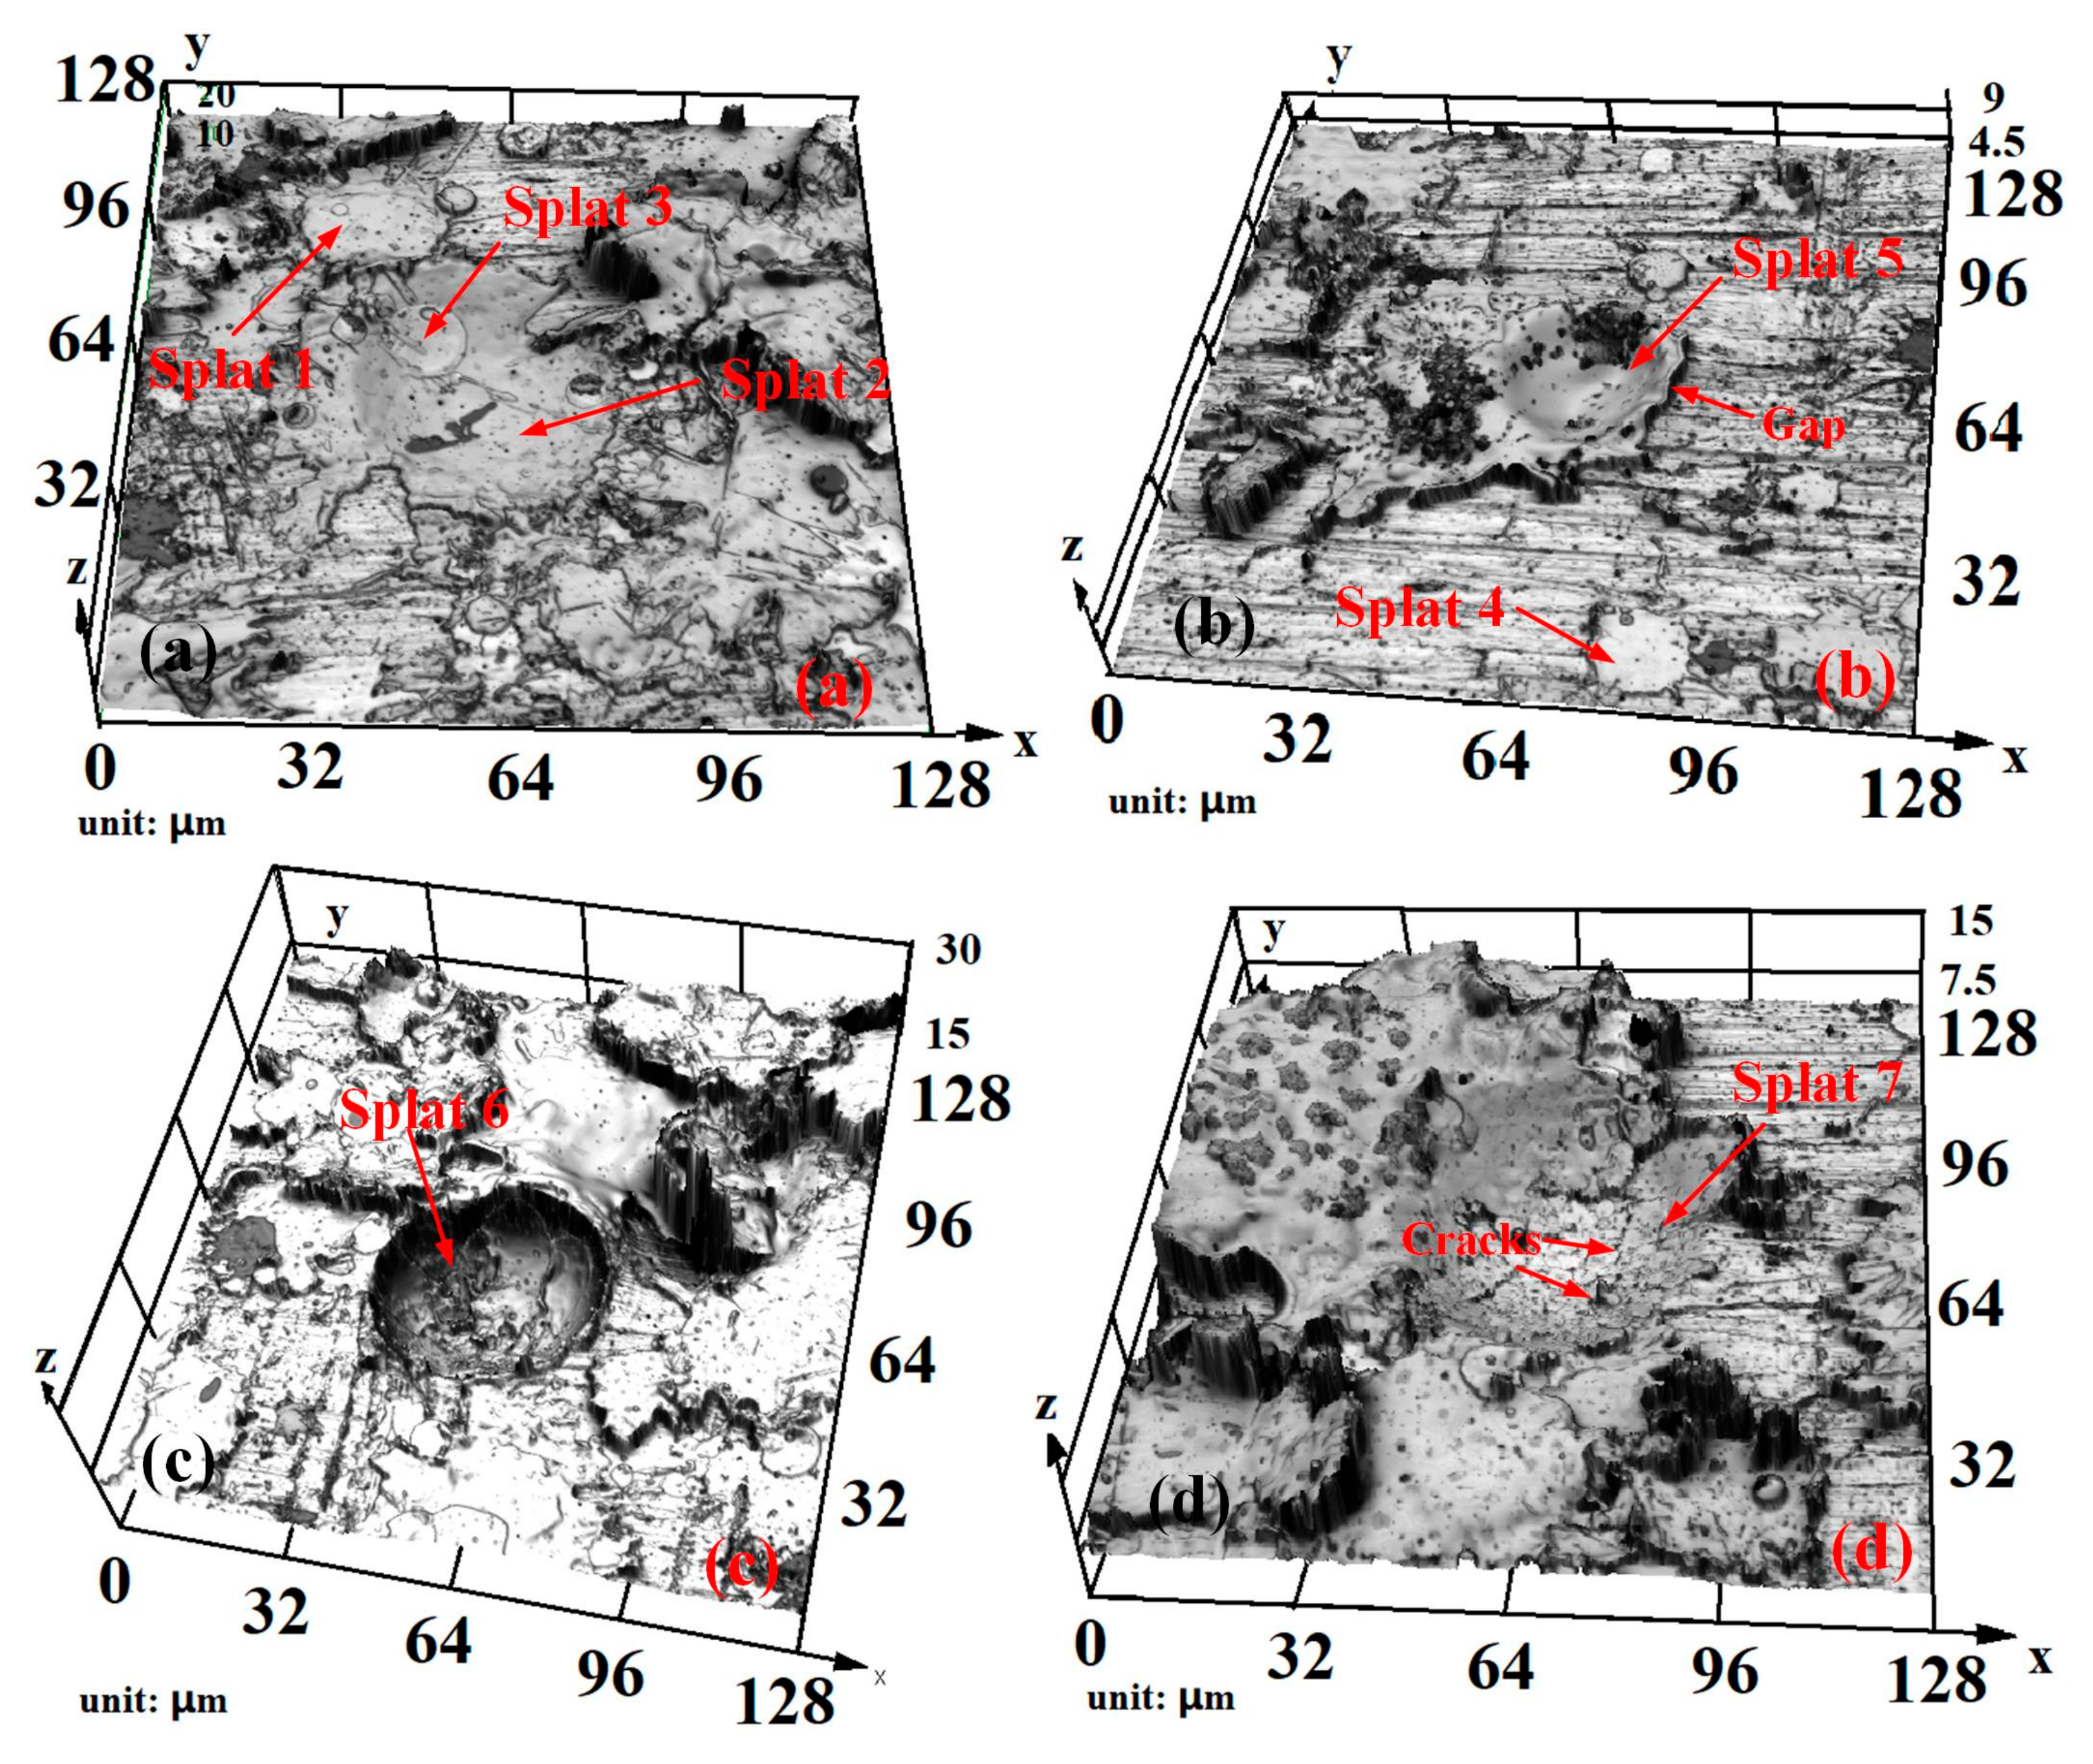
For a clear observation of shot peening, ZrO2-assisted spraying was operated only once at a very high traveling velocity. The micromorphologies of traces are shown in Figure 5. Hard particles impact and amorphous particles deposition are random during the spray process. Splats 1 and 4 were not influenced by shot peening, as shown in Figure 5a,b, respectively, presenting a typical “fried-egg” shape [30]. However, there was not a clear thin disk in the center of the splat, which illustrated that amorphous powders were melted completely and flattened well. During the deposition process, the droplet edge flattened along with the previous layer surface at a high speed in the tangential direction [31,32]. Therefore, compared with the center of the splat, the adhesion of the edge to the other layer was weak. It is obvious the edge of splat 2 (Figure 5a) adhered to the substrate firmly while there was a gap between the edge of splat 5 and the substrate. It was due to the different sequences of shot peening and deposition. For splat 2, deposition was first, and then shot peening made the splat edge pressed into the substrate. Interestingly, close adhesion between splats 2 and 3 proved further that shot peening can compact the coating structure. For splat 5, shot peening caused a crater firstly. When a droplet impacted onto a crater, its edge escaped from the crater along with the crater surface. The edge hanged in the air after the droplet solidification, and a big gap was formed, as shown in Figure 5b. The effect of shot peening was negative in this kind of situation, but the following shot peening or deposition still had the chance to counteract the adverse effect. Figure 5c shows another situation that hard particles impacted on the flattening droplet. The droplet was still very soft even in the liquid state. As a result, a deep and coarse crater remained after shot peening. In Figure 5d, there was an evident crater on the splat 7 surface, where cracks were observed. This suggested that exceeding shot peening can damage deposited splats.

3.3. Micromorphologies and Mechanical Properties

As shown in Figure 6, all coatings were typical thermal-sprayed layered structures. An inter-splat interface formed as the deposited splat’s boundary, where pores existed. After shot peening, obvious saucer-shaped lines were seen in Figure 6b,c. Compared to the unpeened coating in Figure 6a, the shot peening-assisted coating in Figure 6b was of lower porosity, and the inter-splat interface became narrow. It suggested that shot peening was beneficial for the coating density. However, as shown in Figure 6c, more pores and inclusions appeared due to serious impact-induced damage caused by exceeding shot peening.
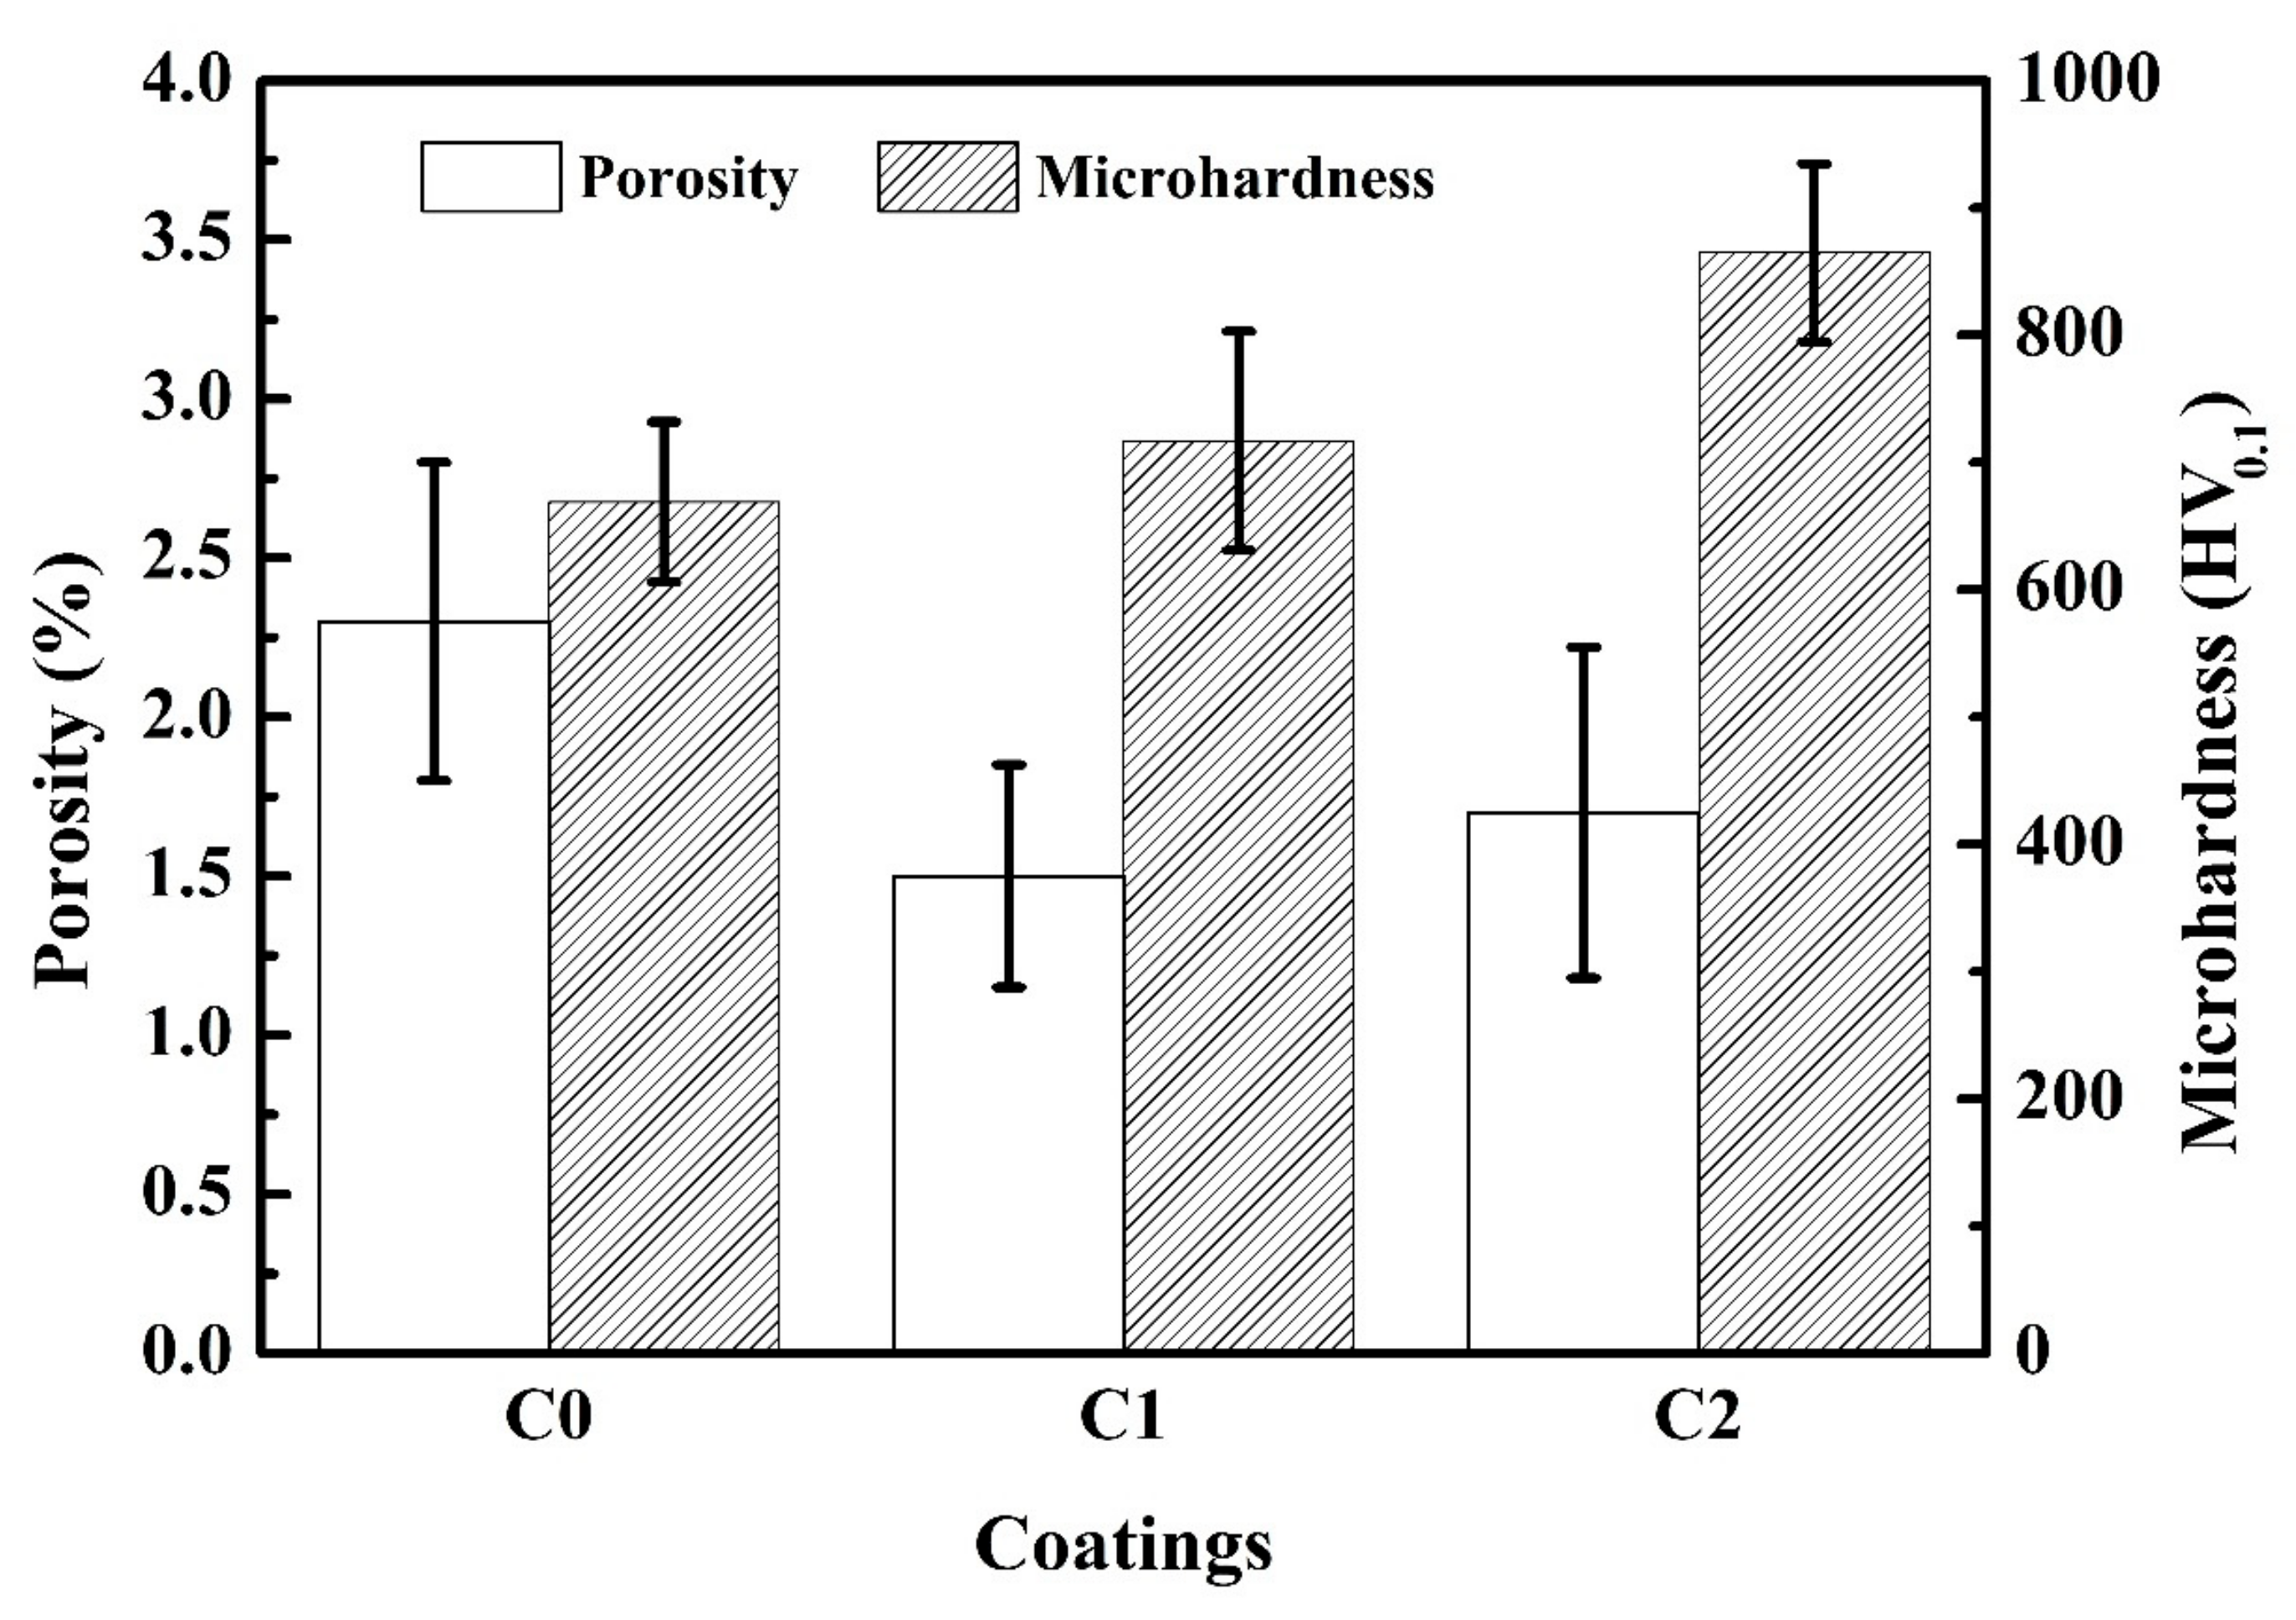
In Figure 7, by increasing the mass rate of ZrO2 particles, the porosity decreased first from 2.3% to 1.5% and then increased to 1.7%, while the microhardness went up progressively (C0: 669 HV0.1, C1: 717HV0.1, and C2: 865HV0.1). Porosity and microhardness of both C1 and C2 were improved compared with those of C0. More interestingly, C2 with a higher mass rate of ZrO2 particles possessed higher microhardness but worse porosity than C1, which proved that exceeding shot peening damaged the microstructure of C2. The speed of ZrO2 particles depended on many factors such as injection velocity, diameter, and mass rate [33]. Particles with higher speeds and smaller diameters probably led to more serious plastic deformation, which broke deposited particles easily as shown in Figure 5d. It is generally known that plastic deformation caused by peening is in favor of coatings performance, but it cannot increase infinitely via the peening method [34]. Excessive shot peening caused splat damage, inclusion generation, and more pores existence around the boundary, as shown in Figure 6c. These defects can play a role in defect hardening, so that the microhardness was increased further [35].

3.4. Wear Behavior

3.4.1. Friction Coefficient and Wear Rate

Figure 8a–c shows the coefficient of friction (COF) curves of C0, C1, and C2 at different test conditions. The profiles of COF curves in Figure 8a,c looked similar. In Figure 8b, the bread peak existed in the curves of C1 and C2 marked as arrows. It illustrated that the stable oxide layer formed in the initial period of wear tests. Figure 8d shows the COF curves of C0, C1, and C2 under all test conditions. It can be seen that the COF decreased slightly with the increasing mass rate of ZrO2 particles. It should be attributed to the good deformation resistance for coatings with high microhardness. However, the COF did not change significantly with a fluctuation between 0.62 and 0.68 at a frequency of 5 Hz. When the frequency was increased, more energy was generated between the friction pair and the coating surface. The amorphous areas in the coatings were softened easily due to their higher temperature sensitivity. Strong adhesion between the asperity of these areas and the friction pair formed by “spot” welding, which dramatically increased the COF.
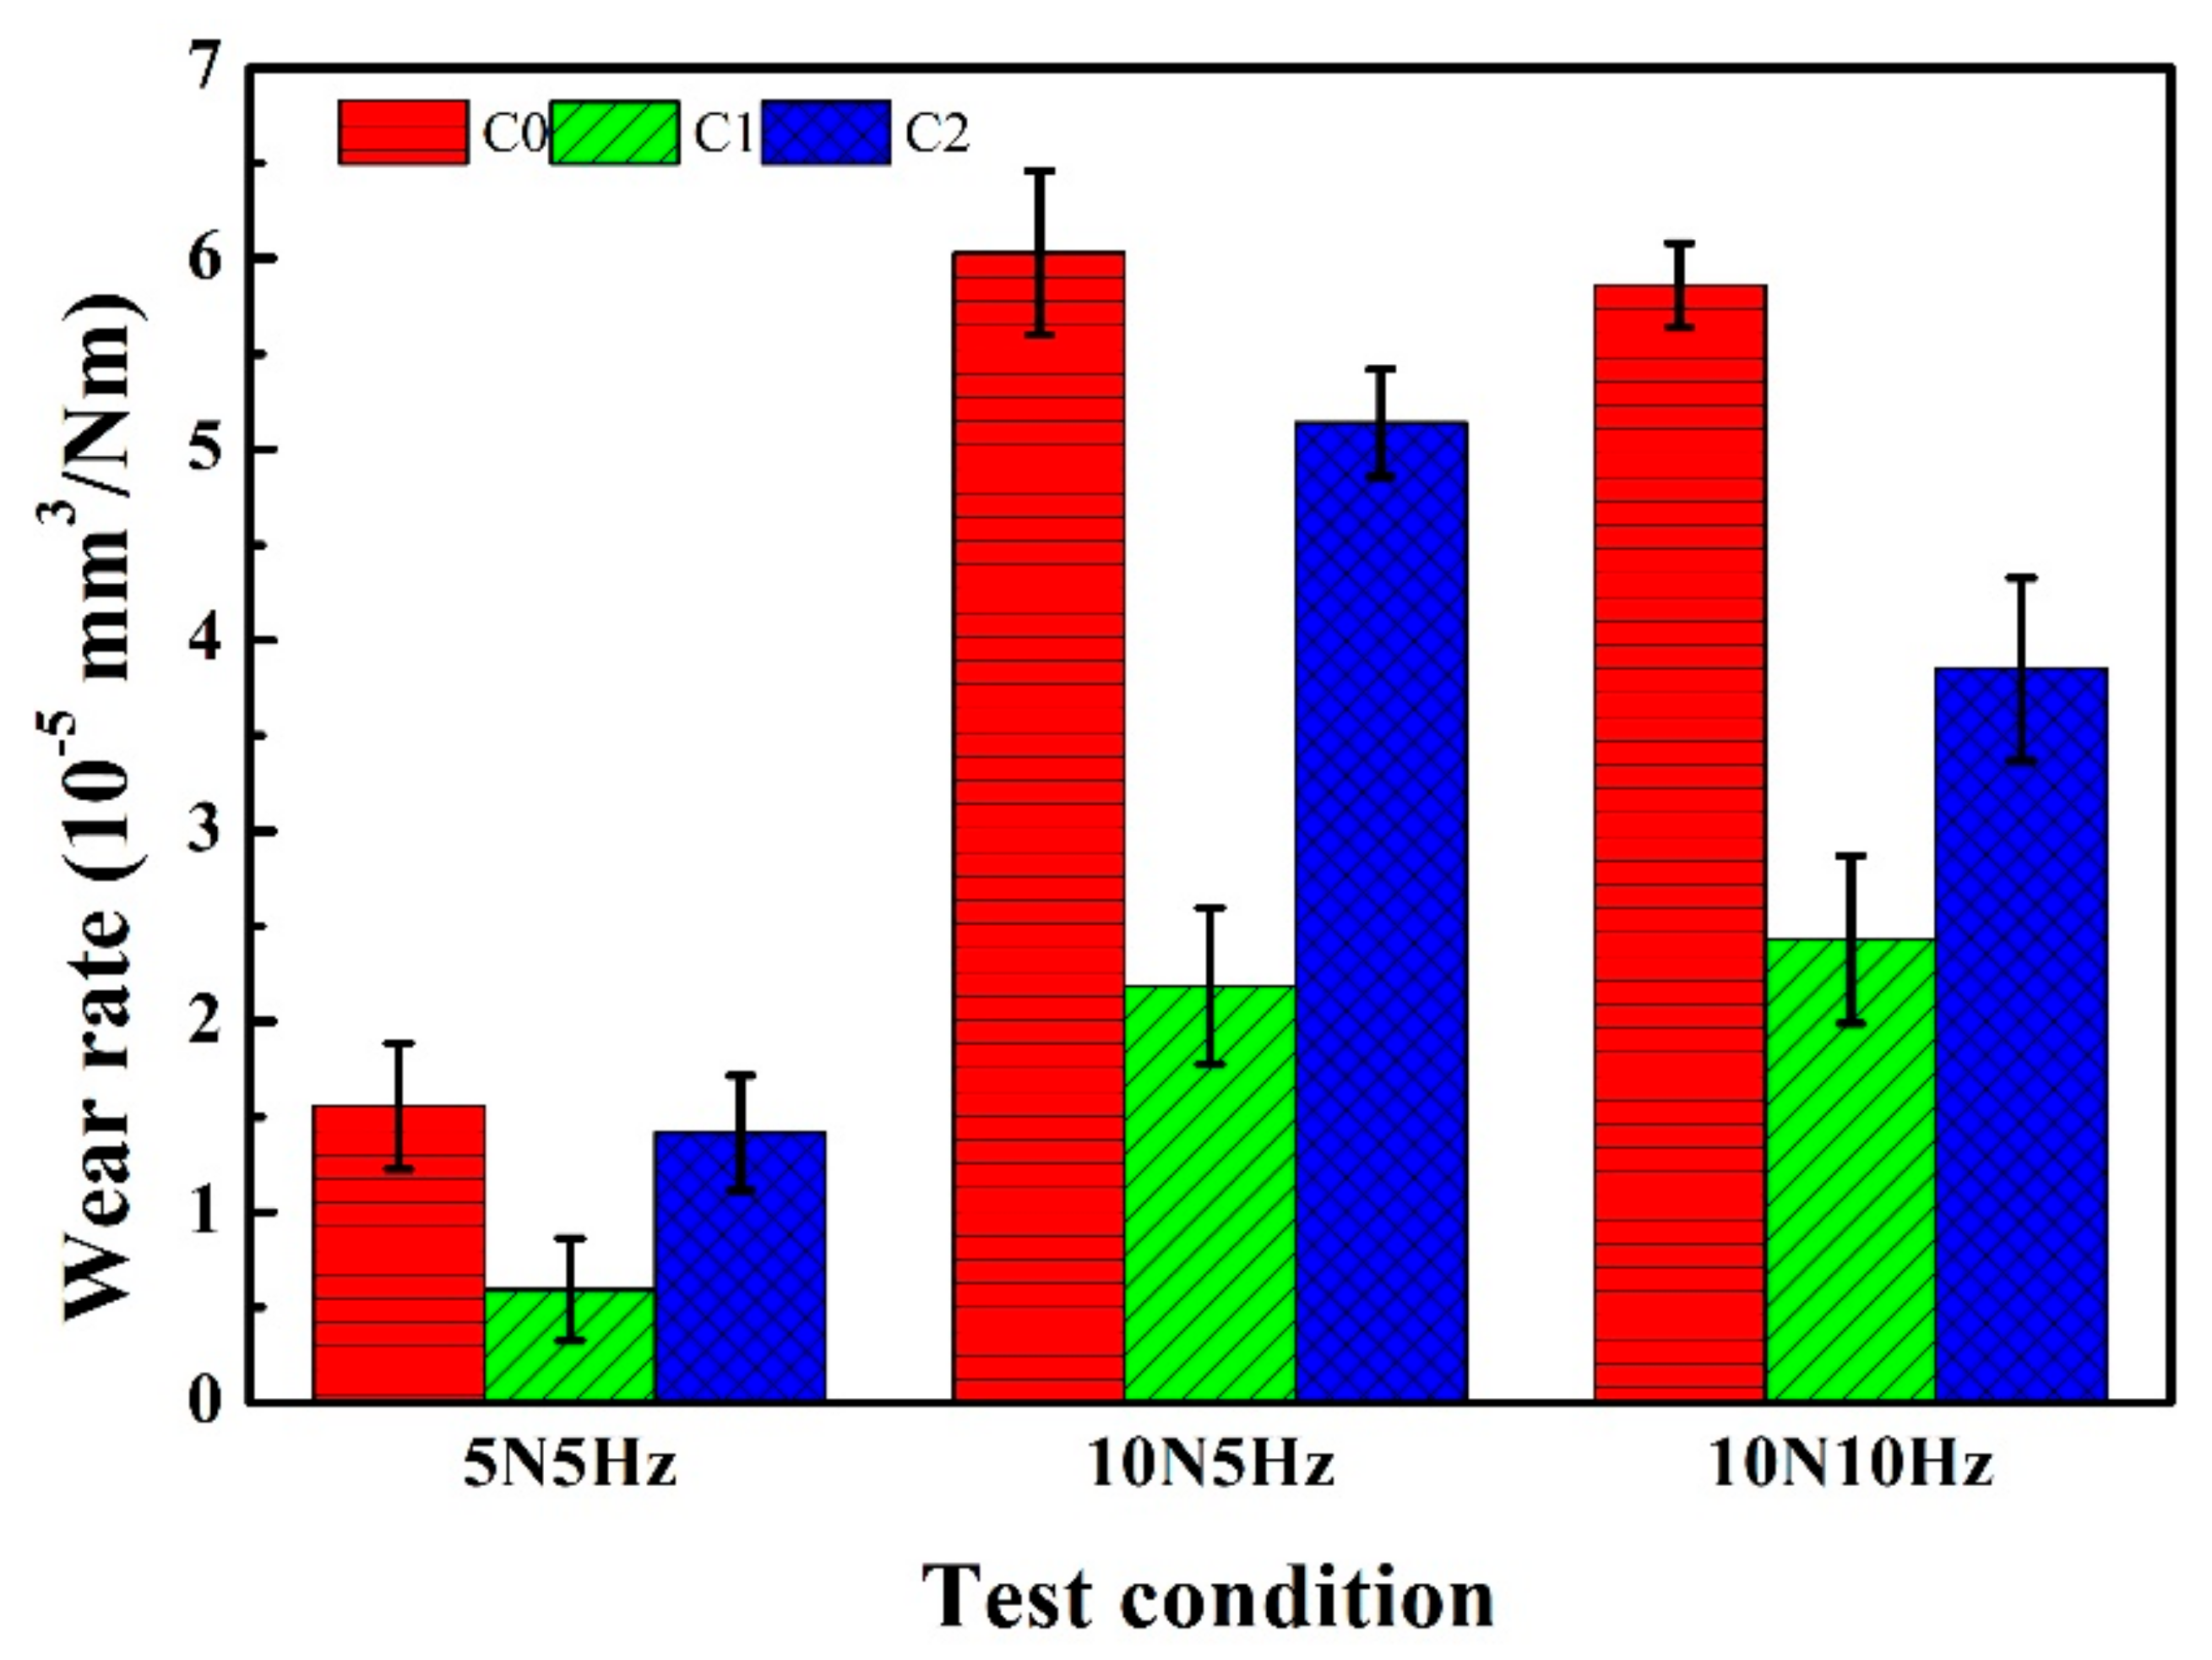
Figure 9 shows the wear rates of coatings under different test conditions. The wear rate was calculated by the equation [36]: W = Vm / (N × S), where W is the wear rate (mm3·N−1·m−1), Vm is the wear volume (mm3), N is the load (N), and S is the sliding distance (m). The wear rates of both C1 and C2 were lower than that of C0 at any test condition, showing that wear resistance was improved via the process of simultaneous shot peening. The wear rate of C1 with a load of 10 N and a frequency of 5 Hz (2.19 × 10⁻⁵ mm3·N−1·m−1) was almost a third of that of C0 (6.03 × 10⁻⁵ mm3·N−1·m−1). Generally, high microhardness is in favor of improvement in wear resistance. Interestingly enough, C1 had the best wear performance, although its microhardness was lower than that of C2, illustrating that microhardness was not the only factor in improving wear resistance. It is well-known that wear rates are directly influenced by residual stresses [37]. Compared with the wear rates obtained with a load of 10 N and a frequency of 5 Hz, the wear rates for C0 and C2 decreased, while the wear rate for C1 actually increased slightly, when the test conditions were a load of 10 N and a frequency of 10 Hz. The reason will be discussed in detail later.

3.4.2. Wear Mechanics

Figure 10 shows the worn surface profiles of coatings. More black chipping, spalling holes, and shallow grooves were observed on the C0 surface, presenting the occurrence of abrasive wear. The black chippings were identified as oxides through energy-dispersive spectroscopy (EDS) analysis of area A, as shown in Table 2, illustrating that an oxide layer was formed. The layered structure of the sprayed coating inevitably led to a rough and uneven convex–concave surface. When a friction ball pair contacted with the convex–concave area, higher shear stress was generated at the edge of the asperity, resulting in larger plastic deformation. When the plastic deformation increased to a certain extent, cracks occurred and expanded along a sliding line. After a certain cycle, the pieces were separated along the propagation trajectory of cracks, forming wear debris. Under the repeated grinding and the frictional heat, the wear debris underwent the dynamic oxidation and microzone hot pressing and then formed an oxide layer covering the worn surface [38]. However, the oxide layer cannot exist on a surface with low microhardness, and it was broken into debris again and embedded into the surface [39,40]. The oxide layer could exist steadily, only when its forming rate was higher than the breaking rate. The oxide layer also existed on the C1 surface in Figure 10b, by the result of EDS of area B, as shown in Table 2, which protected the coating from the wear. Therefore, the wear mechanics for all coatings is an abrasive wear combined with an oxidation wear. Compared with those on the C1 surface in Figure 10b, more chipping and holes existed on the C2 surface in Figure 10c. It suggested delamination occurred easily on the C2 surface.
As the load was increased to 10 N, more spalling holes appeared on the worn surface, as shown in Figure 10d–f. The morphology of C0 obtained with a load of 10 N and a frequency of 5 Hz was similar to that obtained with a load of 5 N and a frequency of 5 Hz, which suggested the same wear mechanics. Evident plastic deformation is presented in Figure 10e. The plastic deformation denoted the adhesive wear appearance [41]. In this situation, the ball pair surface contacted with the friction surface steadily. Therefore, its COF curve displayed the minimum fluctuation as shown in Figure 8b. In Figure 10f, many spalling holes were observed, illustrating severe brittle fracture occurred [42]. The bottom of the spalling holes was actually the fracture surface, where cracks were generated and propagated. Stress concentrated on the inter-splat interface and defects like pores during the wear test. When the stress exceeded the bonding strength, cracks were generated from the region of stress concentration and propagated along the inter-splat interface. Defects such as pores found in the bottom of spalling holes were usually the source of cracks as shown in Figure 10f.
As the load and frequency were up to 10 N and 10 Hz, respectively, the amount of chippings decreased dramatically, and a lot of spalling holes existed on the C0 worn surface, as shown in Figure 10g. No evident black chipping illustrated that the wear mechanics was just an abrasive wear. Apparent grooves appeared in the center of the C1 worn surface as shown in Figure 10h, and only a few spalling holes were seen. In Figure 10i, some traces of plastic deformation were observed besides delamination on the C2 surface, showing the wear mechanics is an abrasive wear combined with an adhesive wear. As shown in Figure 10f, the spalling holes became small. High heat inside the contact surface softened the surface and then reduced the brittle fracture, which promoted the opportunity of an adhesive wear and improved the wear resistance at some level. Therefore, the wear rate of C2 decreased, when the frequency increased from 5 to 10 Hz, as shown in Figure 9.

3.4.3. Effect of the Compressive Residual Stress

Crystallization for amorphous materials during friction should be considered first. The flash temperature during a wear test can be presented by Archard’s equation [43]:
T F = 0.125 μ V ( π F P σ s ) 1 / 2 / K
where TF is the flash temperature (°C); μ is the COF; V is the velocity (m·s); FN is the load force (N); σs is yield strength of coating (Pa), and K is the thermal conductivity of coating (W·m−1·C−1). σs can be obtained from microhardness [44], and K values (5 W·m−1·C−1) were assumed the same for all coatings to compute the flash temperature. The highest calculated flash temperature was 375.81 °C, lower than the coating’s glass transition temperature [45]. It illustrated that no crystallization occurred during the wear test. C2 with the highest microhardness did not have the lowest wear rate, showing that hardness was not the only factor in improving wear resistance in the present work. Compared with C2, C1 is of the lowest porosity and highest compressive residual stress. Low porosity meant high density and few defects, which restricted cracks generation and propagation. Meanwhile, precious literature has also given the point that the high compressive residue stress is beneficial for wear resistance whereas the tensile residual stress induced negative effects on wear resistance [19,46].
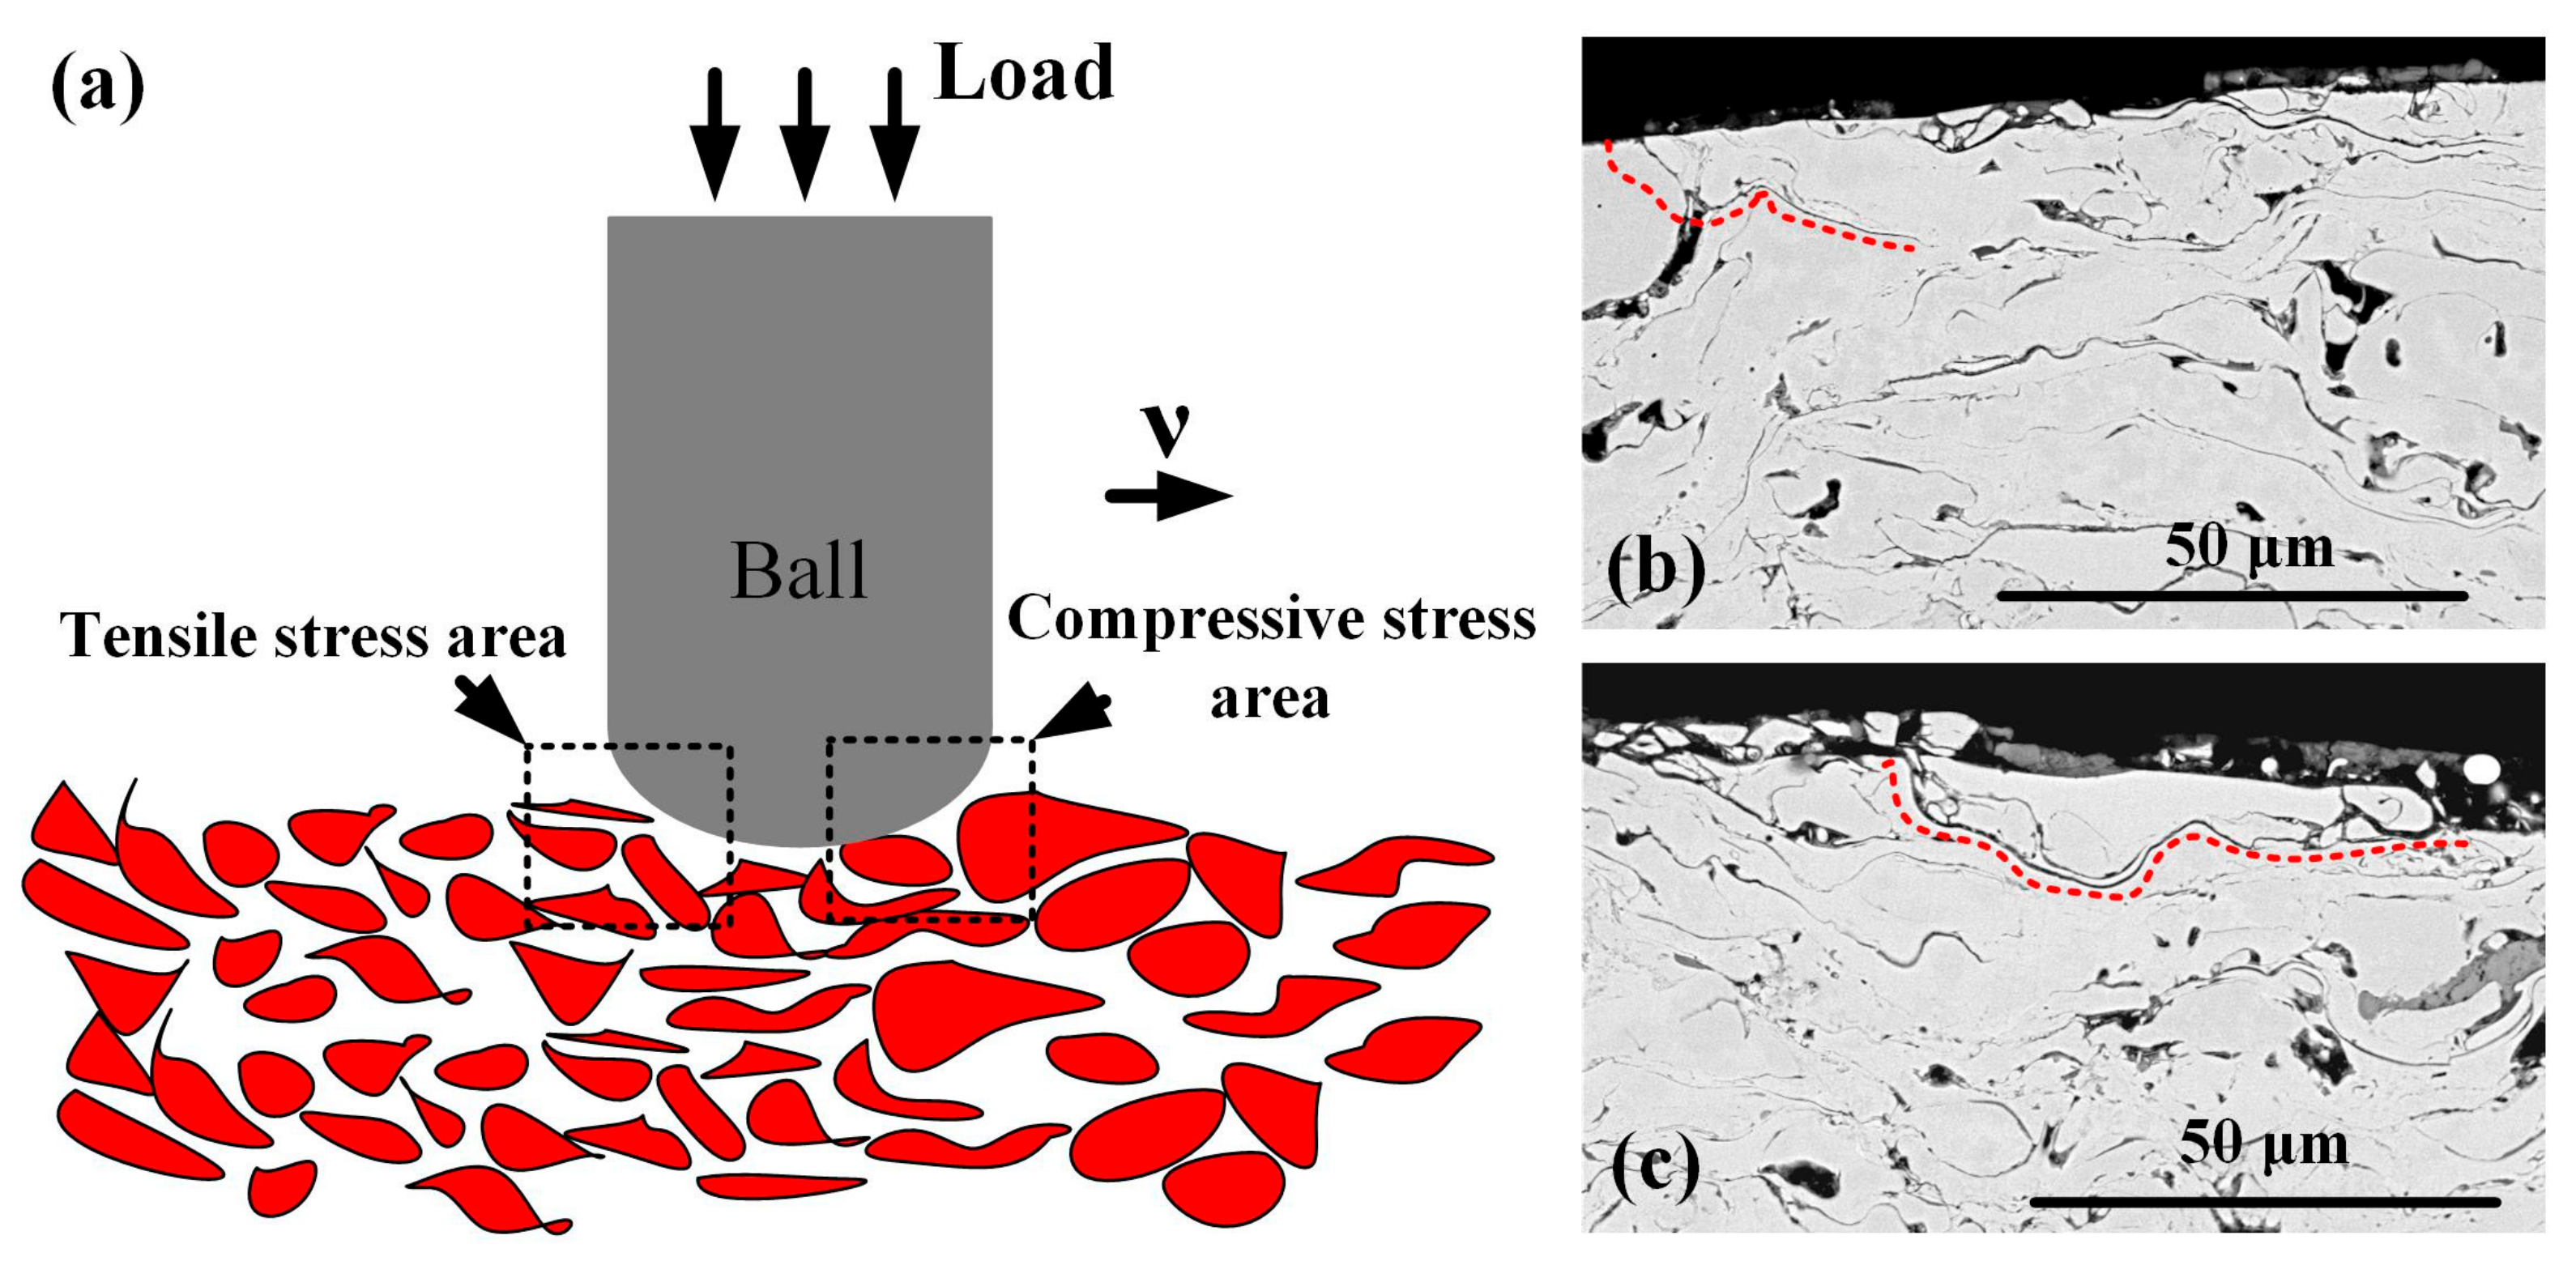
As shown in Figure 11a, the area from the ball was compressed andthe area behind the ball was tensed during the sliding process. Fracture was always in the tensile stress area. When the tensile stress exceeded the inter-splat bonding strength, cracks occurred. The intrinsic compressive residual stress could neutralize parts of the tensile stress, which delayed the formation and propagation of microcracks [47]. As shown in Figure 11b,c, the crack growth was prevented in C1, while the crack propagated fully in C2 and more chipping was on the C2 surface.
As the frequency was increased to 10 Hz at A load of 10 N, the wear rate of C2 decreased significantly although it was still higher than that of C1, while the wear rate of C1 increased slightly. The different variation tendencies of wear rates for C1 and C2 further illustrated that porosity and hardness were not the only influencing factors. The compressive residual stress should be an important factor that restricted crack generation and propagation and protected splats from delamination at a low frequency. At a high frequency, the quick relative motion during the wear test resulted in higher heat and larger deformation in the contact surface [48,49]. The deformation relaxed the residual compressive residual stress further [50,51]. It led to an increase in the wear rate of C1. More deformation usually occurred on the center of the sliding surface, where the influence of the compressive residual stress on the wear decreased dramatically [52]. Therefore, lots of grooves concentrated on the center of the C1 worn surface, as shown in Figure 10h.

4. Conclusions

Hard particles were delivered into a flame flow to achieve synchronous shot peening during the HVOF spraying process. The result showed that the porosity was reduced, the coating became denser, and its microhardness was increased significantly. Moreover, the compressive residual stress was induced by shot peening, and it played an important role in wear resistance. Shot peening of hard particles ZrO2 was random in the spraying process. In individual cases, the peeing went against splats spreading or broke the deposited particles. Exceeding shot peening led to coating damage and relaxed the compressive residual stress.
It can be seen from the results of the wear test that the COF did not change obviously for coatings with and without shot peening. Compared with the unpeened coating, the wear resistance of the coating under proper shot peening increased three-fold at a low frequency. It was mainly attributed to the induced compressive residual stress. As the frequency of the wear test was increased, high heat generated during the sliding process relaxed some of the compressive residual stresses. However, the wear resistance of coatings obtained by the shot peening-assisted process was improved under all test conditions. Hopefully, the new process can be applied in other coating preparation.

Author Contributions

Manuscript writing, data analysis, Z.Z. (Zhidan Zhou); Carry out experiments; data collection, J.S.; Study design, data analysis, Y.C.; Study design, experiment guidance, X.L.; Study design, experiment guidance, B.S.; Experiment guidance; literature search, Z.Z. (Zhibin Zhang). All authors have read and agreed to the published version of the manuscript.

Funding

This research was funded by Outstanding Innovation Scholarship for Doctoral Candidate of CUMT (2019YCBS021).

Conflicts of Interest

The authors declare no conflict of interest.

References

  1. Muthu, S.M. Investigations of hot corrosion resistance of hvof coated fe based superalloy a-286 in simulated gas turbine environment. Eng. Fail. Anal. 2020, 107, 104224. [Google Scholar] [CrossRef]
  2. Zhang, C.; Zhang, Z.-W.; Chen, Q.; Liu, L. Effect of hydrostatic pressure on the corrosion behavior of hvof-sprayed fe-based amorphous coating. J. Alloys Compd. 2018, 758, 108–115. [Google Scholar] [CrossRef]
  3. Guo, R.Q.; Zhang, C.; Chen, Q.; Yang, Y.; Li, N.; Liu, L. Study of structure and corrosion resistance of fe-based amorphous coatings prepared by hvaf and hvof. Corros. Sci. 2011, 53, 2351–2356. [Google Scholar] [CrossRef]
  4. Qiao, L.; Wu, Y.; Hong, S.; Zhang, J.; Shi, W.; Zheng, Y. Relationships between spray parameters, microstructures and ultrasonic cavitation erosion behavior of hvof sprayed fe-based amorphous/nanocrystalline coatings. Ultrason. Sonochem. 2017, 39, 39–46. [Google Scholar] [CrossRef]
  5. Liang, X.B.; Shang, J.C.; Chen, Y.X.; Zhou, Z.D.; Zhang, Z.B.; Xu, B.S. Influence of ceramic particles and process parameters on residual stress of flame-sprayed fe-based coatings. Surf. Coat. Technol. 2018, 354, 10–17. [Google Scholar] [CrossRef]
  6. Peng, Y.; Zhang, C.; Zhou, H.; Liu, L. On the bonding strength in thermally sprayed fe-based amorphous coatings. Surf. Coat. Technol. 2013, 218, 17–22. [Google Scholar] [CrossRef]
  7. Zheng, Z.B.; Zheng, Y.G.; Sun, W.H.; Wang, J.Q. Effect of heat treatment on the structure, cavitation erosion and erosion–corrosion behavior of fe-based amorphous coatings. Tribol. Int. 2015, 90, 393–403. [Google Scholar] [CrossRef]
  8. Terajima, T.; Takeuchi, F.; Nakata, K.; Adachi, S.; Nakashima, K.; Igarashi, T. Composite coating containing wc/12co cermet and fe-based metallic glass deposited by high-velocity oxygen fuel spraying. J. Alloys Compd. 2010, 504, S288–S291. [Google Scholar] [CrossRef]
  9. Yugeswaran, S.; Kobayashi, A.; Suresh, K.; Subramanian, B. Characterization of gas tunnel type plasma sprayed tin reinforced fe-based metallic glass coatings. J. Alloys Compd. 2013, 551, 168–175. [Google Scholar] [CrossRef]
  10. Zhang, C.; Zhou, H.; Liu, L. Laminar fe-based amorphous composite coatings with enhanced bonding strength and impact resistance. Acta Mater. 2014, 72, 239–251. [Google Scholar] [CrossRef]
  11. Bansal, P.; Shipway, P.H.; Leen, S.B. Residual stresses in high-velocity oxy-fuel thermally sprayed coatings—Modelling the effect of particle velocity and temperature during the spraying process. Acta Mater. 2007, 55, 5089–5101. [Google Scholar] [CrossRef]
  12. Suhonen, T.; Varis, T.; Dosta, S.; Torrell, M.; Guilemany, J.M. Residual stress development in cold sprayed al, cu and ti coatings. Acta Mater. 2013, 61, 6329–6337. [Google Scholar] [CrossRef]
  13. Zhang, X.; Watanabe, M.; Kuroda, S. Effects of processing conditions on the mechanical properties and deformation behaviors of plasma-sprayed thermal barrier coatings: Evaluation of residual stresses and mechanical properties of thermal barrier coatings on the basis of in situ curvature measurement under a wide range of spray parameters. Acta Mater. 2013, 61, 1037–1047. [Google Scholar]
  14. Ghelichi, R.; Bagherifard, S.; MacDonald, D.; Fernandez-Pariente, I.; Jodoin, B.; Guagliano, M. Experimental and numerical study of residual stress evolution in cold spray coating. Appl. Surf. Sci. 2014, 288, 26–33. [Google Scholar] [CrossRef]
  15. Kuroda, S.; Tashiro, Y.; Yumoto, H.; Taira, S.; Fukanuma, H.; Tobe, S. Peening action and residual stresses in high-velocity oxygen fuel thermal spraying of 316l stainless steel. J. Therm. Spray Technol. 2001, 10, 367–374. [Google Scholar] [CrossRef]
  16. Wang, Y.; Li, K.Y.; Scenini, F.; Jiao, J.; Qu, S.J.; Luo, Q.; Shen, J. The effect of residual stress on the electrochemical corrosion behavior of fe-based amorphous coatings in chloride-containing solutions. Surf. Coat. Technol. 2016, 302, 27–38. [Google Scholar] [CrossRef] [Green Version]
  17. Zoei, M.S.; Sadeghi, M.H.; Salehi, M. Effect of grinding parameters on the wear resistance and residual stress of hvof-deposited wc–10co–4cr coating. Surf. Coat. Technol. 2016, 307, 886–891. [Google Scholar] [CrossRef]
  18. Abubakar, A.A.; Arif, A.F.M.; Al-Athel, K.S.; Akhtar, S.S.; Mostaghimi, J. Modeling residual stress development in thermal spray coatings: Current status and way forward. J. Spray Technol. 2017, 26, 1115–1145. [Google Scholar] [CrossRef]
  19. Luo, W.; Selvadurai, U.; Tillmann, W. Effect of residual stress on the wear resistance of thermal spray coatings. J. Spray Technol. 2015, 25, 321–330. [Google Scholar] [CrossRef]
  20. Staia, M.H.; Ramos, E.; Carrasquero, A.; Roman, A.; Lesage, J.; Chicot, D.; Mesmacque, G. Effect of substrate roughness induced by grit blasting upon adhesion of wc-17% co thermal sprayed coatings. Thin Solid Film 2000, 377–378, 657–664. [Google Scholar] [CrossRef]
  21. Wang, Y.Y.; Li, C.J.; Ohmori, A. Influence of substrate roughness on the bonding mechanisms of high velocity oxy-fuel sprayed coatings. Thin Solid Film. 2005, 485, 141–147. [Google Scholar] [CrossRef]
  22. Junior, G.S.; Voorwald, H.J.C.; Vieira, L.F.S.; Cioffi, M.O.H.; Bonora, R.G. Evaluation of wc-10ni thermal spray coating with shot peening on the fatigue strength of aisi 4340 steel. Procedia Eng. 2010, 2, 649–656. [Google Scholar] [CrossRef] [Green Version]
  23. Moridi, A.; Hassani-Gangaraj, S.M.; Vezzú, S.; Trško, L.; Guagliano, M. Fatigue behavior of cold spray coatings: The effect of conventional and severe shot peening as pre-/post-treatment. Surf. Coat. Technol. 2015, 283, 247–254. [Google Scholar] [CrossRef]
  24. Unal, O.; Varol, R. Surface severe plastic deformation of aisi 304 via conventional shot peening, severe shot peening and repeening. Appl. Surf. Sci. 2015, 351, 289–295. [Google Scholar] [CrossRef]
  25. Singer, A.R.E. Simultaneous spray deposition and peening of metals (ssp). Met. Technol. 1984, 11, 99–104. [Google Scholar] [CrossRef]
  26. Chen, Y.; Liang, X.; Liu, Y.; Xu, B. Elastoplastic analysis of process induced residual stresses in thermally sprayed coatings. J. Appl. Phys. 2010, 108, 49. [Google Scholar]
  27. Chen, Y.; Shang, J.; Liang, X.; Wang, H.; Zhou, Z. Warm-particle peening assisted hvof spraying: A new process to improve the coating performances. Surf. Coat. Technol. 2019, 367, 135–147. [Google Scholar] [CrossRef]
  28. Zhang, P.; Lindemann, J. Influence of shot peening on high cycle fatigue properties of the high-strength wrought magnesium alloy az80. Scr. Mater. 2005, 52, 485–490. [Google Scholar] [CrossRef]
  29. Wagner, L. Mechanical surface treatments on titanium, aluminum and magnesium alloys. Mater. Sci. Eng. A 1999, 263, 210–216. [Google Scholar] [CrossRef]
  30. Ivosevic, M.; Gupta, V.; Baldoni, J.A.; Cairncross, R.A.; Twardowski, T.E.; Knight, R. Effect of substrate roughness on splatting behavior of hvof sprayed polymer particles: Modeling and experiments. J. Spray Technol. 2006, 15, 725–730. [Google Scholar] [CrossRef]
  31. Li, C.-J.; Li, C.-X.; Yang, G.-J.; Wang, Y.-Y. Examination of substrate surface melting-induced splashing during splat formation in plasma spraying. J. Spray Technol. 2006, 15, 717–724. [Google Scholar] [CrossRef]
  32. Sun, T.; Liu, J.; Yan, H.; Morgan, G.; Chen, W. Super-resolution reconstruction based on incoherent optical aperture synthesis. Opt. Lett. 2013, 38, 3471–3474. [Google Scholar] [CrossRef] [PubMed]
  33. Pan, J.; Hu, S.; Yang, L.; Ding, K.; Ma, B. Numerical analysis of flame and particle behavior in an hvof thermal spray process. Mater. Desig. 2016, 96, 370–376. [Google Scholar] [CrossRef]
  34. Al-Obaid, Y.F. Shot peening mechanics: Experimental and theoretical analysis. Mech. Mater. 1995, 19, 251–260. [Google Scholar] [CrossRef]
  35. Choi, E.Y.; Kang, M.C.; Kwon, D.H.; Shin, D.W.; Kim, K.H. Comparative studies on microstructure and mechanical properties of crn, cr–c–n and cr–mo–n coatings. J. Mater. Process. Technol. 2007, 187–188, 566–570. [Google Scholar]
  36. Gao, M.; Lu, W.; Yang, B.; Zhang, S.; Wang, J. High corrosion and wear resistance of al-based amorphous metallic coating synthesized by hvaf spraying. J. Alloys Compd. 2018, 735, 1363–1373. [Google Scholar] [CrossRef]
  37. Pappacena, K.E.; Singh, D.; Ajayi, O.O.; Routbort, J.L.; Erilymaz, O.L.; Demas, N.G.; Chen, G. Residual stresses, interfacial adhesion and tribological properties of mon/cu composite coatings. WEAR 2012, 278–279, 62–70. [Google Scholar] [CrossRef]
  38. Gao, C.; Bhushan, B. Tribological performance of magnetic thin-film glass disks: Its relation to surface roughness and lubricant structure and its thickness. WEAR 1995, 190, 60–75. [Google Scholar] [CrossRef]
  39. Zhou, Z.; Liang, X.; Chen, Y.; Shen, B.; Shang, J.; Cai, Z. Effects of al addition on microstructure and wear resistance of high-velocity-oxygen-fuel-sprayed feconicrmn high entropy alloy coating. Sci. Adv. Mater. 2019, 11, 685–693. [Google Scholar] [CrossRef]
  40. Lin, N.; Xie, F.; Yang, H.; Tian, W.; Wang, H.; Tang, B. Assessments on friction and wear behaviors of p110 steel and chromizing coating sliding against two counterparts under dry and wet conditions. Appl. Surf. Sci. 2012, 258, 4960–4970. [Google Scholar] [CrossRef]
  41. Sharma, S.P.; Dwivedi, D.K.; Jain, P.K. Effect of la2o3 addition on the microstructure, hardness and abrasive wear behavior of flame sprayed ni based coatings. WEAR 2009, 267, 853–859. [Google Scholar] [CrossRef]
  42. Tao, Y.-F.; Li, J.; Lv, Y.-H.; Hu, L.-F. Effect of heat treatment on residual stress and wear behaviors of the tini/ti 2 ni based laser cladding composite coatings. Opt. Laser Technol. 2017, 97, 379–389. [Google Scholar] [CrossRef]
  43. Maupin, H.; Wilson, R.; Hawk, J. Wear deformation of ordered fe-al intermetallic alloys. WEAR 1993, 162, 432–440. [Google Scholar] [CrossRef]
  44. Pavlina, E.J.; Van Tyne, C.J. Correlation of yield strength and tensile strength with hardness for steels. J. Mater. Eng. Perform. 2008, 17, 888–893. [Google Scholar] [CrossRef]
  45. Cheng, J.B.; Liang, X.B.; Wang, Z.H.; Xu, B.S. Microstructure and mechanical properties of febsinb metallic glass coatings by twin wire arc spraying. J. Spray Technol. 2013, 22, 471–477. [Google Scholar] [CrossRef]
  46. Cao, Y.J.; Sun, J.Q.; Ma, F.; Chen, Y.Y.; Cheng, X.Z.; Gao, X.; Xie, K. Effect of the microstructure and residual stress on tribological behavior of induction hardened gcr15 steel. Tribol. Int. 2017, 115, 108–115. [Google Scholar] [CrossRef]
  47. Goto, H.; Amamoto, Y. Effect of varying load on wear resistance of carbon steel under unlubricated conditions. WEAR 2003, 254, 1256–1266. [Google Scholar] [CrossRef]
  48. Keshri, A.K.; Agarwal, A. Wear behavior of plasma-sprayed carbon nanotube-reinforced aluminum oxide coating in marine and high-temperature environments. J. Spray Technol. 2011, 20, 1217–1230. [Google Scholar] [CrossRef]
  49. Wang, Y.; Pan, Z.; Wang, Z.; Sun, X.; Wang, L. Sliding wear behavior of cr–mo–cu alloy cast irons with and without nano-additives. WEAR 2011, 271, 2953–2962. [Google Scholar] [CrossRef]
  50. Holmberg, K.; Ronkainen, H.; Laukkanen, A.; Wallin, K.; Hogmark, S.; Jacobson, S.; Wiklund, U.; Souza, R.M.; Ståhle, P. Residual stresses in tin, dlc and mos2 coated surfaces with regard to their tribological fracture behaviour. WEAR 2009, 267, 2142–2156. [Google Scholar] [CrossRef]
  51. Laukkanen, A.; Holmberg, K.; Koskinen, J.; Ronkainen, H.; Wallin, K.; Varjus, S. Tribological contact analysis of a rigid ball sliding on a hard coated surface, part iii: Fracture toughness calculation and influence of residual stresses. Surf. Coat. Technol. 2006, 200, 3824–3844. [Google Scholar] [CrossRef]
  52. Vierneusel, B.; Benker, L.; Tremmel, S.; Göken, M.; Merle, B. Isolating the effect of residual stresses on coating wear by a mechanical stress relaxation technique. Thin Solid Film. 2017, 638, 159–166. [Google Scholar] [CrossRef]
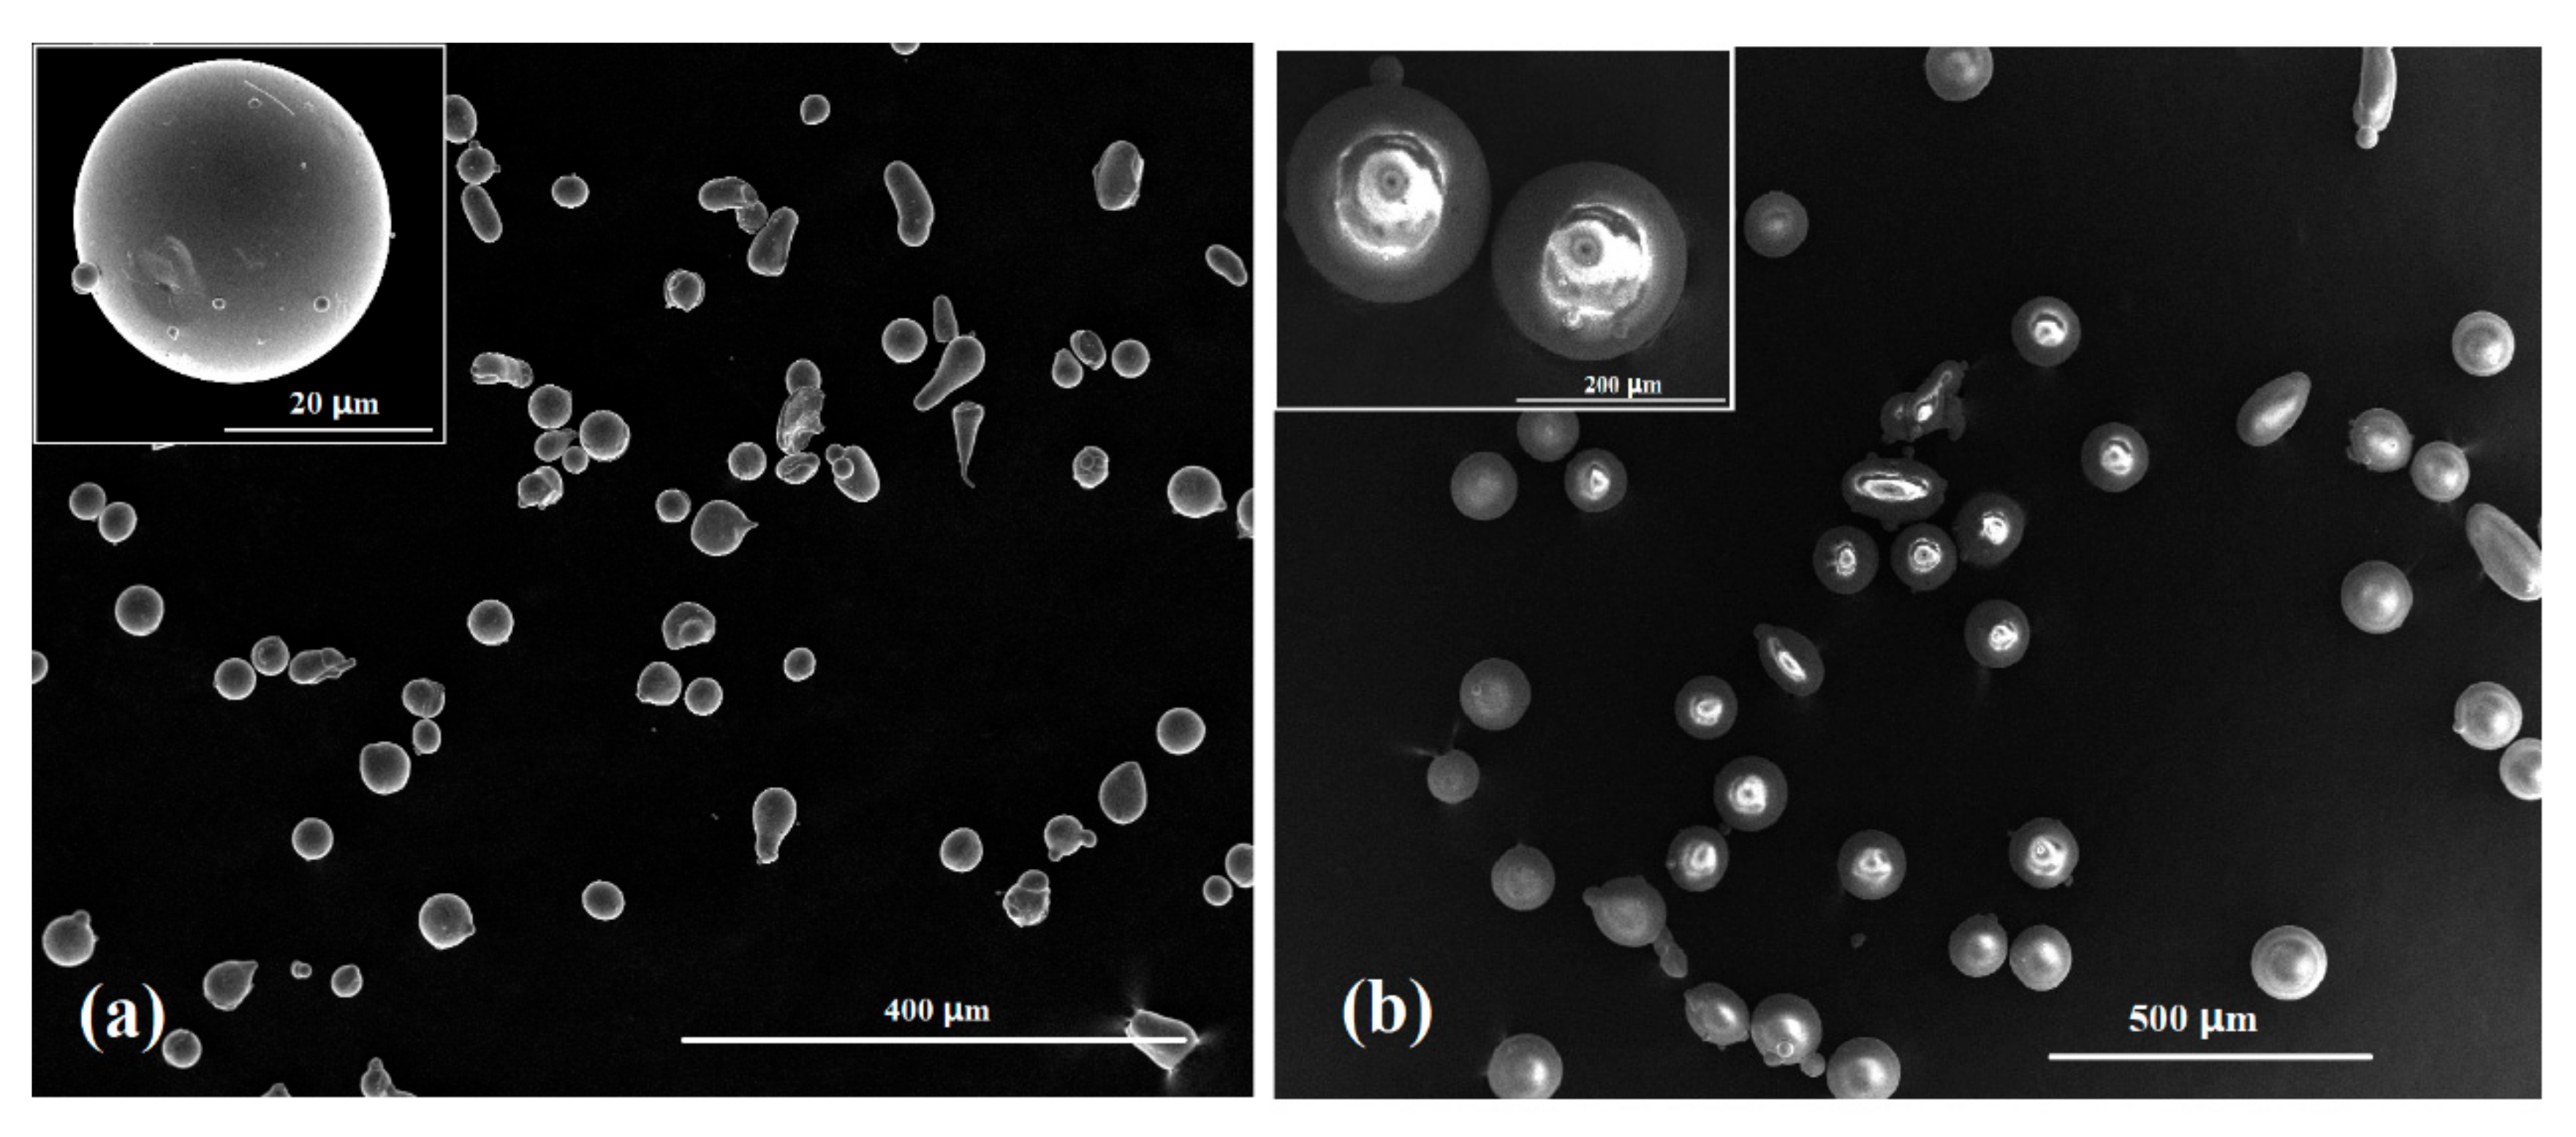
Figure 1. Micromorphologies of powders: (a) Fe-based amorphous powders; (b) ZrO2 powders.
Coatings 10 00187 g001
Figure 2. Diagrammatic drawing of a particle-assisted high velocity oxygen flame (HVOF) spray process.
Coatings 10 00187 g002
Figure 3. XRD patterns of powder and coatings.
Coatings 10 00187 g003
Figure 4. Residual stresses of coatings.
Coatings 10 00187 g004
Figure 5. Three-dimensionally (3D) microprofiles of different shot peening tracks.
Coatings 10 00187 g005
Figure 6. Micromorphologies of the cross-sections of C0 (a), C1 (b), and C2 (c).
Coatings 10 00187 g006
Figure 7. Porosity and microhardness of coatings.
Coatings 10 00187 g007
Figure 8. COF versus sliding time curves for C0 (a), C1 (b), and C2 (c). Test conditions: (a) a load of 5 N and a frequency of 5 Hz; (b) a load of 10 N and a frequency of 5 Hz; and (c) a load of 10 N and a frequency of 10 Hz. (d) Frequency coefficients under different conditions.
Coatings 10 00187 g008
Figure 9. Wear rates of coatings.
Coatings 10 00187 g009
Figure 10. Micromorphologies of a worn surface: C0 (a), C1 (b), and C2 (c) obtained with a load of 5 N and a frequency of 5 Hz; C0 (d), C1 (e), and C2 (f) obtained with a load of 10 N and a frequency of 5 Hz; C0 (g), C1 (h), and C2 (i) obtained with a load of 10 N and a frequency of 10 Hz.
Coatings 10 00187 g010
Figure 11. Schematic diagram of a wear test (a). The cross-sections of the worn surfaces of C1 (b) and C2 (c) obtained with a load of 10 N and a frequency of 10 Hz.
Coatings 10 00187 g011
Table 1. Process parameters of an HVOF spray coating.
ParametersValues
C0C1C2
Fuel(kerosene) flow (L·h−1)23.723.723.7
Oxygen gas flow (N·m3·h−1)505050
Oxygen/fuel (vol.%)2.12.12.1
Combustion chamber pressure (MPa)0.80.80.8
Powder feeding rate (g·min−1)858585
Spraying distance (mm)300300300
Peening particles rate (g·min−1)050150
Table 2. Energy-dispersive spectroscopy (EDS) analysis for coatings.
Element (wt %)NbOSiFeB
Area
A2.9947.918.9737.942.19
B6.7133.883.0153.333.07