Article

Crack Growth in Ni-Cr-Mo-V Steel Using ΔCTOD Elastic–Plastic Model

1
School of Naval Architecture, Ocean and Energy Power Engineering, Wuhan University of Technology, Wuhan 430070, China
2
Centre for Marine Technology and Ocean Engineering (CENTEC), Instituto Superior Técnico, Universidade de Lisboa, 1049-001 Lisbon, Portugal
3
Wind Power Research and Design Academy, Dongfang Electric Wind Power CO., Ltd., Chengdu 611731, China
*
Author to whom correspondence should be addressed.
J. Mar. Sci. Eng. 2022, 10(12), 1944; https://doi.org/10.3390/jmse10121944
Submission received: 14 November 2022 / Revised: 29 November 2022 / Accepted: 3 December 2022 / Published: 8 December 2022
(This article belongs to the Special Issue Ship Structures II)

Abstract

:
Many studies have shown that the linear elastic fracture mechanics (LEFM) method based on the stress intensity factor range (ΔK) has limitations that cannot be ignored. Due to neglecting the influence of plastic deformation near the crack tip, LEFM shows apparent deviations in evaluating the fracture behaviour. Therefore, in this study, the crack tip opening displacement range (ΔCTOD) is chosen as an alternative to ΔK and based on the elastic–plastic fracture mechanics (EPFM) to develop a new fracture behaviour assessment approach for marine structures. Firstly, a ΔCTOD model based on the HRR (Hutchinson, Rice, and Rosengren) solution is proposed considering the crack closure effect. Secondly, a series of compact tension (CT) specimen crack growth experiments under constant amplitude loading is carried out. According to the experimental results, the prediction accuracy of the HRR model and traditional Irwin and Dugdale models is compared and analysed. The rationality of ΔCTOD as an alternative to ΔK is verified. The results show that ΔCTOD can describe the crack propagation behaviour well. The proposed HRR model shows better accuracy and a more comprehensive application range than the traditional models, which has a guiding significance for studying fracture behaviour for marine structural applications.

1. Introduction

Fatigue failure is considered one of the most severe problems in marine structures during their service life [1]. The extensive use of high-strength steel has increased marine structures’ overall deformation and stress levels, resulting in more severe fatigue damage [2,3]. Therefore, it is essential to study the fracture behaviour of high-strength steel materials using the fracture mechanics method to design and reliability assessment of marine structures.
Marine structure design and residual fatigue strength assessment are mainly based on the linear elastic fracture mechanics (LEFM) method. Paris’ law [4] established the relationship between the crack propagation rate (da/dN) and stress intensity factor range ΔK, which significantly contributed to the advance in the understanding of the fracture of different materials and structural components [5]:
da/dN = CK)m
where C and m are material constants obtained from experiments. Ebler [6,7] observed experimentally that the crack closure occurs in the specimen even under tensile load. Since then, many scholars [8,9,10] have extensively studied the crack closure effect and concluded that the main driving force controlling the crack propagation should be the effective stress intensity factor amplitude ΔKeff, which is defined as:
Δ K e f f = K m a x   -   K p o = U Δ K
where Kmax and Keff are the maximum and the opening stress intensity factor, respectively, and U is the crack closure coefficient to character crack closure effect.
However, after decades of application, it has been found that there are apparent limitations of the LEFM. Although the effect of the crack tip plastic zone can be neglected for small-scale yielding, the use of fracture parameter ΔK leads to significant deviations in the predicted crack propagation rate when large-scale plastic deformation occurs at the crack tip. For this reason, two fracture parameters, J-integral and crack tip opening displacement (CTOD), were introduced to replace the stress intensity factor K.
Rice [11] and Cherepanov [12] proposed a concept of the path-independent J-integral, and Hutchinson [13], Rice, and Rosengren [14] established the HRR singular field theory. The HRR solution describes the elastic–plastic stress–strain distribution at the crack tip of the power-law hardening materials, and the J-integral characterizes the strength of the HRR singular field. Some studies focused on the HRR field characterized by J-integral. Shih et al. [15,16] calculated the angular distribution function of the HRR solution through the finite element method (FEM) and summarized it into a table, which greatly facilitated the use of the HRR solution. Homayoun et al. [17] calculated the stress–strain field at the mode I crack tip using the HRR solution, linear elastic FEM, and elastic–plastic FEM. The HRR solution results were closer to those of the elastic–plastic FEM solution, indicating that the HRR solution is suitable for solving the elastic–plastic fracture problem.
Zou et al. [18] analyzed the axial and radial stress distributions near the crack tip through FEM, which was in good agreement with the HRR solution, indicating that the HRR solution can reflect the stress–strain distribution at the crack tip accurately. However, since the J-integral is path-independent only when the assumption of total plastic deformation is satisfied, the HRR solution only applies to monotonic loading processes [19].
The concept of CTOD was proposed by Wells [20] based on the number of tests, which has clear physical significance and can be directly measured during the tests. One of the basic mechanisms for fatigue crack propagation is based on the crack-tip blunting under maximum load and the re-sharpening of the crack-tip under minimum load [21,22,23,24]. Antunes et al. [23] used numerical methods to calculate CTOD for two aluminium alloy middle tension (MT) specimens, Krzysztof [25] presented fatigue crack propagation rate and CTOD for high-strength steel under tensile loading, and Vasco-Olmo and James [26] proposed a method to measure and analyze CTOD from experimental data. These studies indicate that CTOD can be a viable alternative to ΔK for characterizing fatigue crack expansion.
There are two main numerical models commonly used to estimate CTOD. One is the Irwin model, which is derived based on the modified plastic zone size as proposed in [27] for the linear elastic fracture problem, and therefore it is only applicable to the case of small-scale yielding. The other is the Dugdale model [28], which treats the crack-tip plastic zone as a flat ribbon and uses the superposition principle to transform the complex elastic–plastic problem into two simple linear-elastic problems, thus achieving the solution of CTOD for the large-scale yielding condition.
However, the accuracy and applicability of the Dugdale model are questionable because it ignores the effect of material hardening and incorrectly assumes the shape of the plastic zone at the crack tip [29,30].
The HRR solution can accurately describe the elastic–plastic stress–strain field of the crack tip, but it is unsuitable for cyclic loading. CTOD can characterize the crack propagation behaviour under cyclic loading, but there is no accurate numerical solution. Therefore, the following work is carried out to characterize the crack propagation behaviour under cyclic loading. Firstly, the plastic zone size of the crack tip is deduced based on the HRR solution, which characterizes the crack tip’s elastic–plastic stress and strain field. The ΔCTOD numerical model (HRR model) is further proposed considering the crack closure effect. Section 3 introduces the CT specimen size, experimental device, and measurement method. According to the established loading conditions, a series of crack propagation experiments of CT specimens made of Ni-Cr-Mo-V high-strength steel used in naval ship construction are carried out. Section 4 compares the accuracy and applicability of the Irwin, Dugdale, and HRR models proposed in this study analyses them based on the experimental results. All the conclusions of this study are summarized lastly.

2. Numerical Methods

Fracture mechanics [31] defines the J-integral of the two-dimensional (2D) planar crack as follows:
J = Γ [ W d y   -   T i u i x d s ]
where Г is the integration contour pointing from the lower crack surface to the upper crack surface; W is the strain energy density; σij, εij, and ui are the stress, strain, and displacement fields near the crack tip, respectively; Ti is the tension vector on the crack body bounded by Г; and ds is the differential element along the contour Г:
W = σ j i ε j i
Since the above-defined equation is inconvenient to use in engineering, the J-integral was divided into the elastic component Je and plastic component Jp:
J = J e + J p
For the CT specimen, the relationship between Je and the stress intensity factor (SIF) is defined as:
J e = K 2 E
while the SIF can be determined by [32]:
K = P B W ( 2 + β ) ( 1   -   β ) 3 / 2 ( 0 . 886 + 4 . 64 β   -   13 . 32 β 2 + 14 . 72 β 3   -   5 . 6 β 4 )
where P is the far-field load, B and W are the thickness and width, respectively, of the CT specimen, and β = a/W is the shape factor of the CT specimen. a is the crack length of the CT specimen.
The J-integral plastic component JP of the CT specimen can be calculated employing engineering estimation as:
J p = α σ y s ε y s c h 1 ( a / W , n ) ( P / P 0 ) n + 1
where α and n are the hardening coefficient and index of the material, respectively, and σys and εys are the material’s yield stress and strain, respectively. c is the remaining ligament length of the CT specimen, h1(a/W, n) is a function related to a/W and n only, and the values can be found in reference [33]. P0 is the ultimate load per unit thickness of the specimen and is given by:
P 0 = 1 . 071 { [ ( 2 a c ) 2 + 2 ( 2 a c ) + 2 ] 1 / 2   -   [ ( 2 a c ) + 1 ] } c σ y s
A plastic zone’s presence leads to crack tip blunting [34]. To estimate the crack’s plastic zone size, a numerical model of CTOD is established.
In the LEFM, the longitudinal stress σy, which is perpendicular to the crack propagation direction, can be calculated as [35]:
σ y = K I 2 π r  
where KI is the SIF of the mode I crack and r is the distance along the extended line of the crack from the crack tip. To explain the phenomenon of small-scale yielding near the crack tip in LEFM, Irwin [27] proposed that the plastic zone size can be determined by assuming σy = σys. Therefore, the plastic zone size rp of mode I crack is as follows:
r p = σ 2 a 2 σ y s 2 = K I 2 2 π σ y s 2
Dugdale regarded the plastic zone size of the crack tip as a narrow strip and assumed that the upper and lower surfaces of the plastic zone carry the compressive stresses equal to yield stress σys uniformly.
According to the condition that there is no stress singularity near the crack tip (KI = 0), Kσ caused by the far-field stress σ should be offset by Kρ caused by the compressive stress σys acting on the crack surface:
K σ = K ρ
The equations of Kσ and Kρ can be taken into account to obtain the following:
σ π ( a + ρ ) = 2 σ y s   a + ρ π a r c c o s   a a + ρ
The plastic zone size of the crack tip can be deduced based on Dugdale’s method:
r p = π 2 σ 2 a 8 σ y s 2
Based on the HRR solution, the elastic–plastic stress field of the mode I crack can be calculated as follows:
σ i j ( r , θ ) = σ y s ( E J α σ y s 2 I n r ) 1 / n + 1 σ ˜ i j ( θ , n )
where r and θ are the polar coordinates at the crack tip. In is an integration constant related to hardening index n only, σ ˜ i j ( θ , n ) do n and θ determine the angular momentum function. The values of In and σ ˜ i j ( θ , n ) can be found in reference [15].
When θ = 0°, the σy can be estimated as:
σ y = σ θ θ = σ y s ( E J α σ y s 2 I n r ) 1 / n + 1 σ ˜ θ θ ( θ , n )
When σy = σys, the plastic zone size of the crack tip is defined as:
r p = E J [ σ ˜ θ θ ( θ , n ) ] n + 1 α σ y s 2 I n
For the crack body, the relationship between CTOD and rp is as follows [36]:
C T O D = 4 σ E 2 a r p + ( r p ) 2
Considering the crack closure effect, the crack tip opening displacement range ΔCTOD can be calculated as:
Δ C T O D = C T O D m a x - C T O D m i n = 4 Δ σ e f f E 2 a r p + ( r p ) 2
where ΔCTOD is the crack tip opening displacement range; CTODmax and CTODmin are the maximum and minimum opening displacement, respectively; and Δσeff is the effective far-field stress range, which is defined as:
Δ σ e f f = U Δ σ = U ( σ m a x - σ m i n )
where Δσ, σmax,, and σmin are the far-field stress range and maximum and minimum far-field stress, respectively; U is the coefficient reflecting the crack closure effect, which is defined as:
U = σ m a x - σ o p σ m a x - σ m i n = P m a x - P o p P m a x - P m i n
where Pmax and Pmin are the maximum and minimum far-field loading, respectively; σop and Pop represent the stress and loading associated with the crack opening.
Based on the formula of plastic zone sizes, three numerical models of ΔCTOD can be calculated as follows:
Δ C T O D = 4 U 2 Δ K 2 π E σ y s = 4 a U 2 Δ σ 2 E σ y s   ( Irwin   model )
Δ C T O D = 2 U 2 Δ K 2 E σ y s = 2 π a U 2 Δ σ 2 E σ y s   ( Dugdale   model )
Δ C T O D = 4 U Δ σ Δ J [ σ ˜ θ θ ( θ , n ) ] n + 1 α σ y s 2 I n 1 + 2 α α σ y s 2 I n E Δ J [ σ ˜ θ θ ( θ , n ) ] n + 1 ( HRR model )
It should be noted that both the Irwin and Dugdale models neglect ( r p ) 2 in the estimation of ΔCTOD due to the assumption that the plastic zone size rp is much smaller than the crack length a.

3. Experimental Analysis

3.1. Specimen Characteristics

CT specimens were prepared to verify the above CTOD numerical models, and a series of crack propagation experiments were performed according to ASTM E647 [32]. It should be noted that in the investigation, CT specimens are designed and manufactured according to the plane stress state to characterize the crack propagation behaviour of the hull deck and shell plates. The plane strain state has not been discussed. All specimens were machined from the same steel plate with an original plate thickness of 12 mm. The machining process of CT specimens was controlled in the L-T direction to ensure different specimens had similar fatigue performance. The machined notch of the CT specimen was made via electrical discharge machining (EDM), while the 4 mm pre-cracks were cut by 0.02 mm molybdenum wire. The degree of finish at the surface of the CT specimen was polished to 0.8 μm by an electric sander, which ensures that the surface texture was perpendicular to the crack propagation direction for crack observation easier. The configuration of the CT specimen is shown in Figure 1.
The material used for the CT specimen is Ni-Cr-Mo-V high-strength steel. To determine the parameters of the Ramberg–Osgood model is used in the HRR solution:
ε = σ E + α ε y s ( σ σ y s ) n
Uniaxial tensile tests of the Ni-Cr-Mo-V high-strength steel were carried out at room temperature to obtain the mechanical properties, as shown in Table 1.

3.2. Test Setup

All CT specimens were tested on the MTS322 fatigue test machine with a load capacity of 200 kN at room temperature. The fracture mechanics clevis grip was used for specimen clamping and fixing. The crack propagation experiments of CT specimens were carried out under sine wave load control conditions. A loading frequency that is too high may distort the applied load, so the loading frequency was set to 10 Hz in this experiment to achieve a loading accuracy of 0.01 kN.
Loading conditions under different load amplitudes and load ratios were set to verify the applicability of different numerical models, as shown in Table 2.
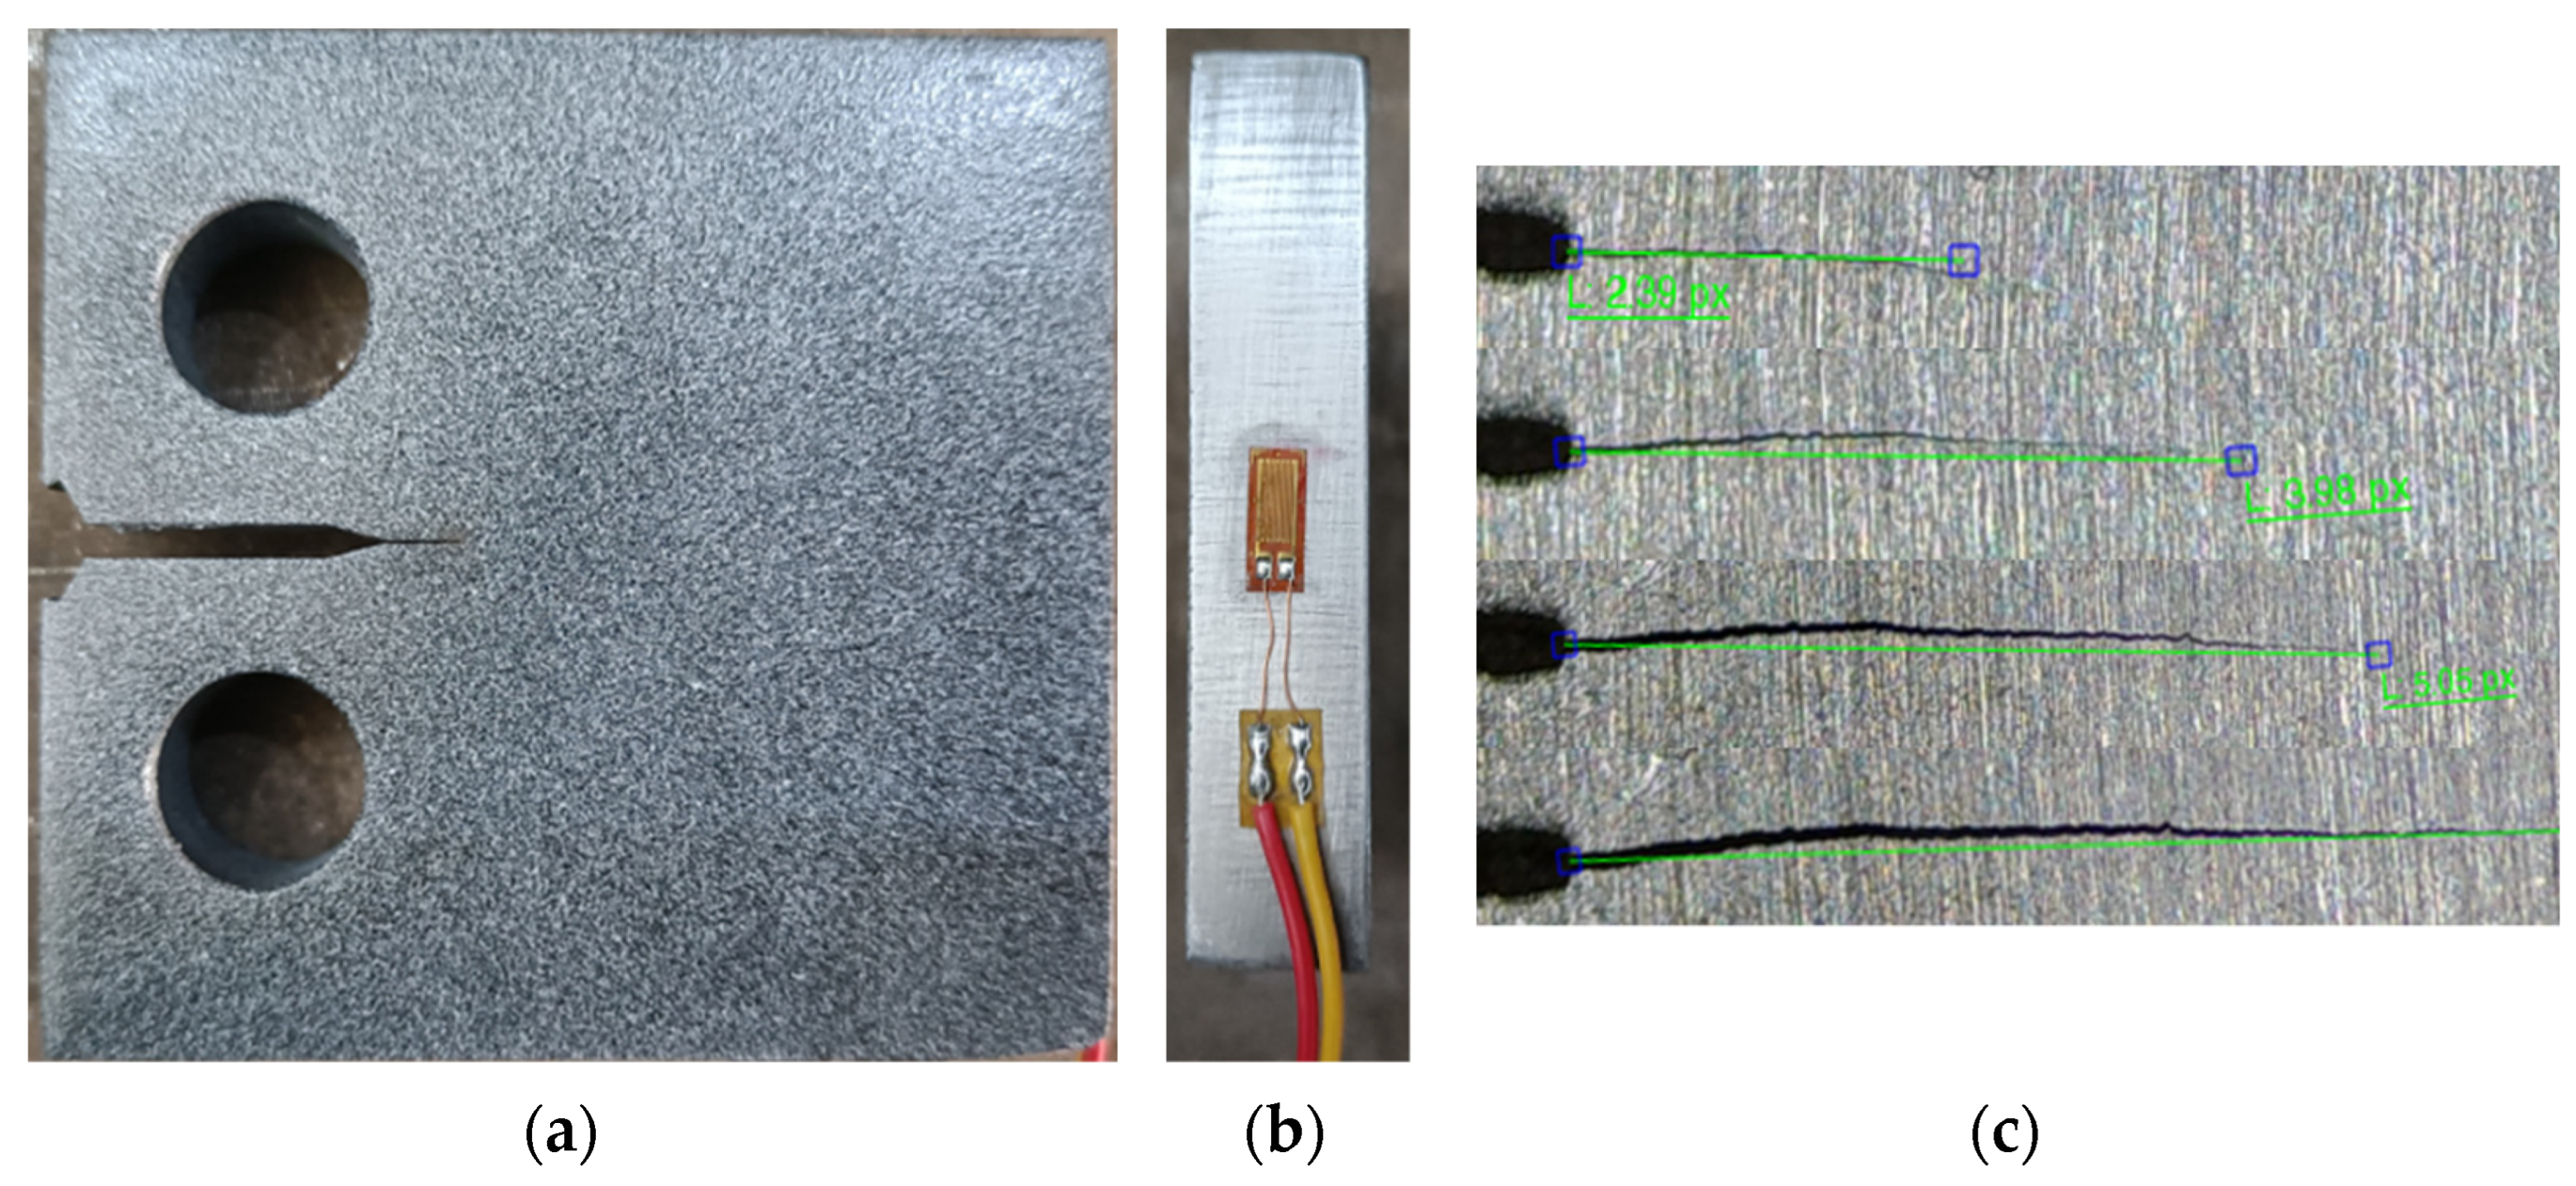
The CT specimens were observed for crack length and CTOD using a CCD microscope camera combined with the digital image correlation (DIC) analysis software VIC-2D. The CCD camera was positioned perpendicular to the surface of the CT specimen, and the magnification was adjusted to provide clear optical images of the crack propagation area in real time. Before the experiment, all CT specimens were sprayed with a speckle pattern and calibrated with a transparent scale to facilitate subsequent image processing. In addition, a high-sensitivity strain gauge was attached to the back of the CT specimen to measure back strain for estimating crack opening force Pop. The general arrangement of the test setup is shown in Figure 2, and the detail of the CT specimen is shown in Figure 3.
The experiment measured the CTOD and back strain in approximately 2 mm crack increments. To obtain sufficient images for DIC analysis, the loading frequency was decreased to 0.1 Hz, and the sampling frequency was set to 50 Hz, which enabled 500 images to be captured within one load cycle. The time history data of the loading force was recorded by the software system of the MTS test machine, and the sampling frequency was set to 500 Hz.

3.3. Digital Image Correlation

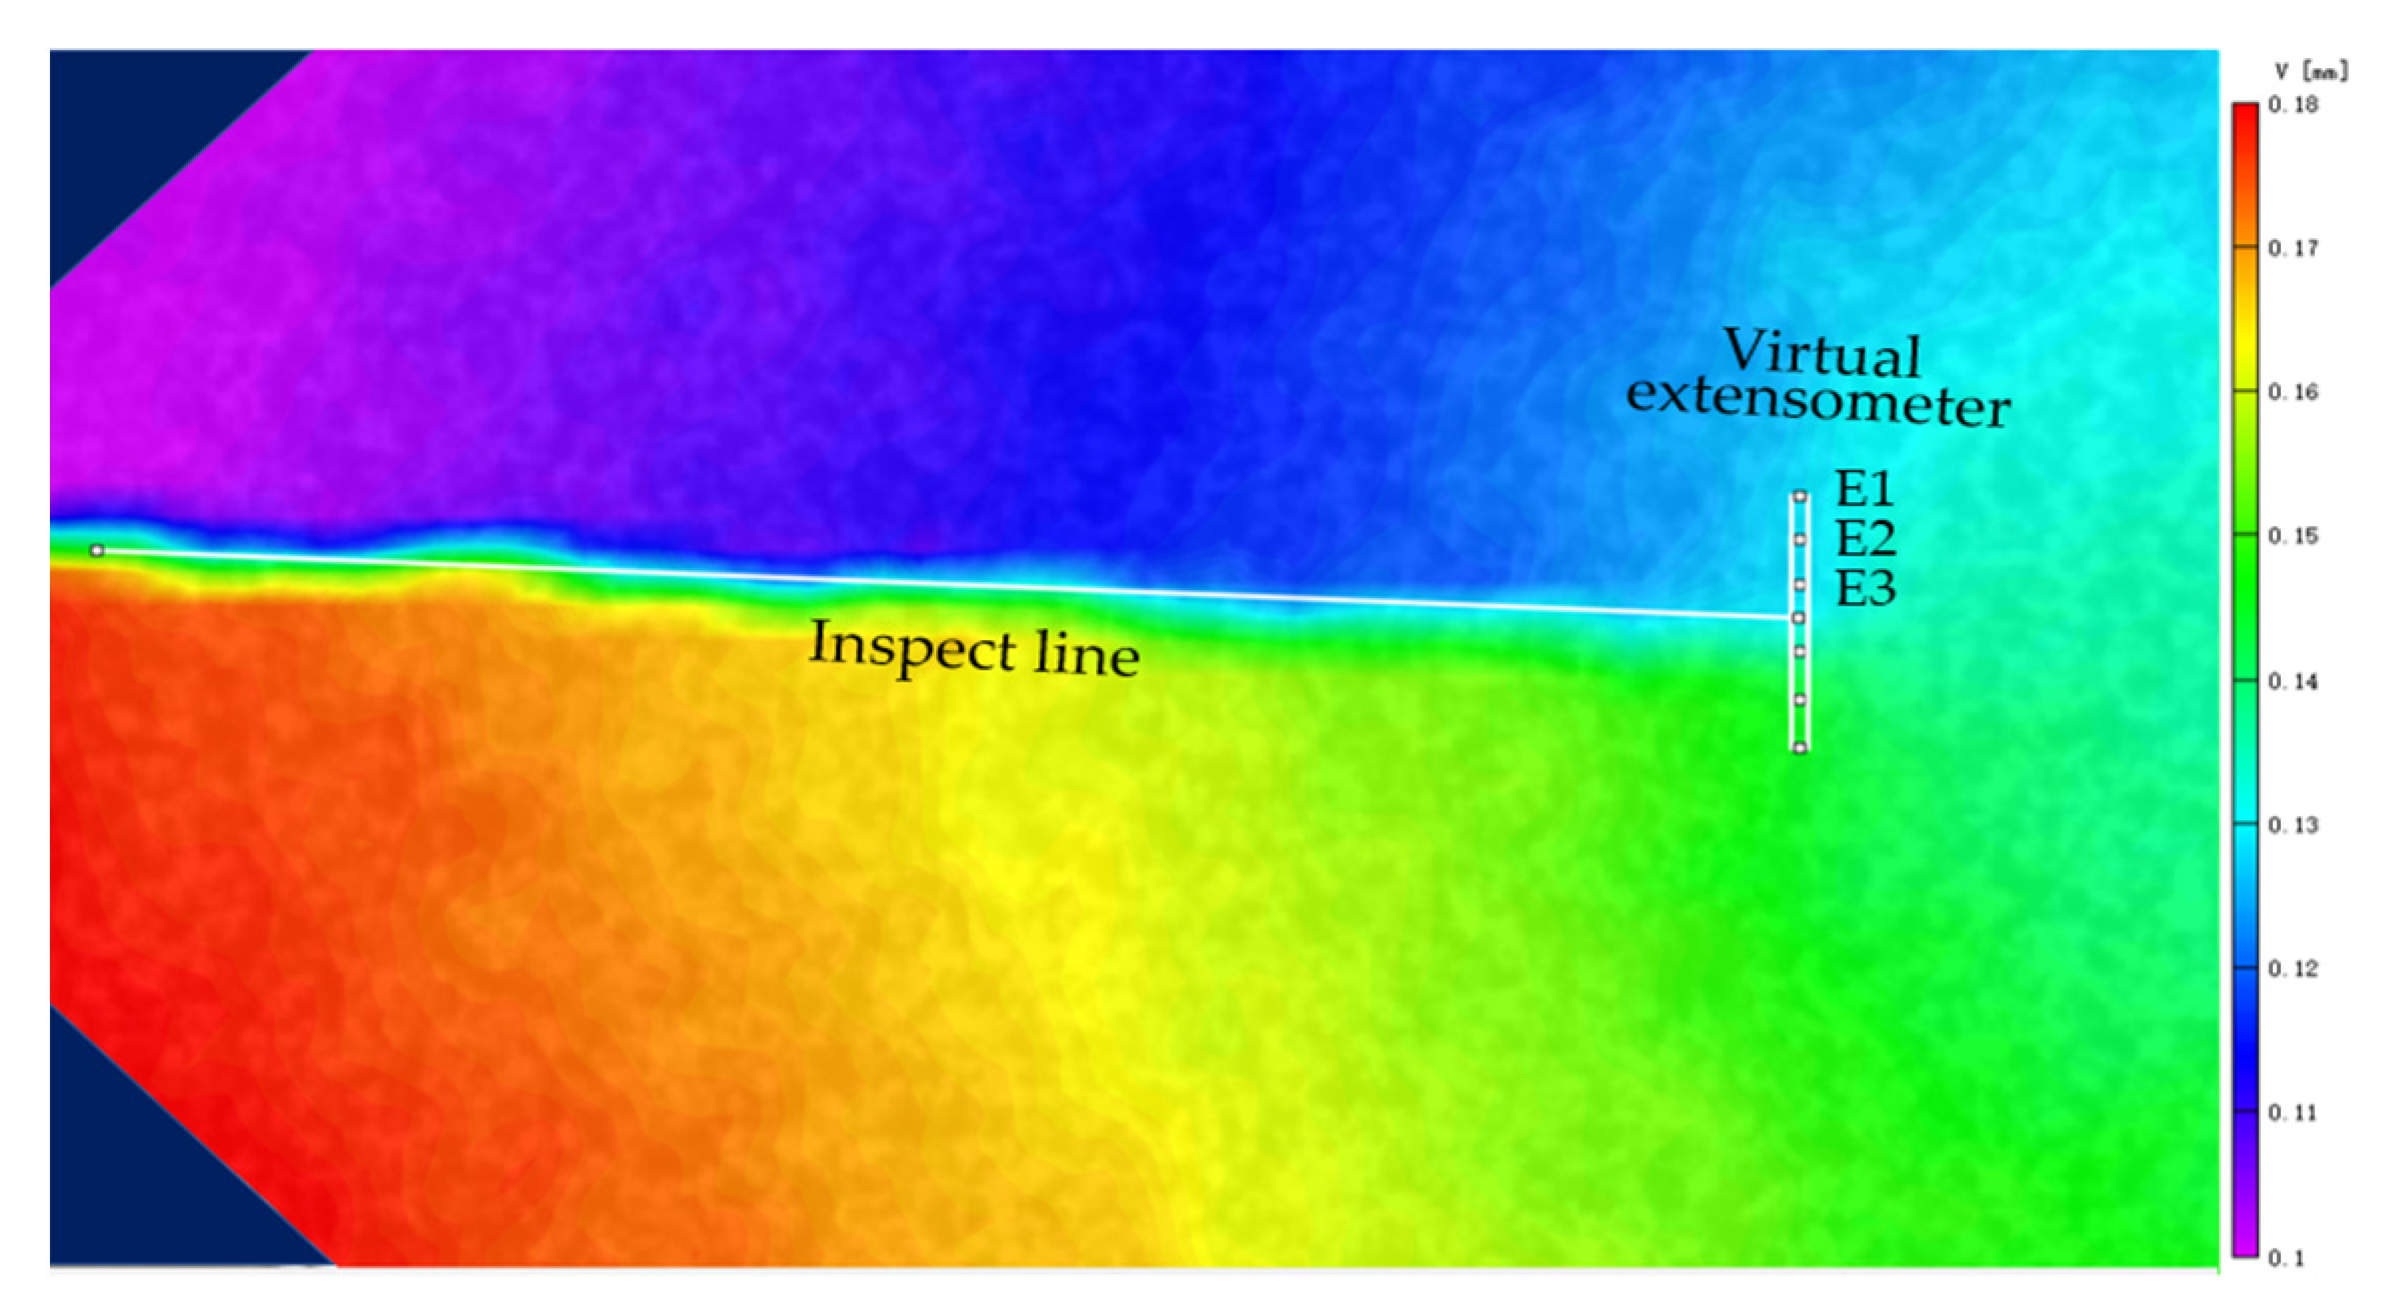
The principle of the DIC technique is to match the maximum correlation between a subset of sample images at different deformation stages and to obtain the displacement and strain fields of the specimen by estimating the correlation changes of the grayscale information of the specimen surface images [37,38]. DIC is a non-contact full-field measurement technique able to obtain the total (elastic plus plastic) strain on the surface of the specimen. Therefore, the elastic and plastic components can all be measured using DIC [23,39]. The DIC technique is applied to measure the crack length and ΔCTOD, as shown in Figure 4, where the “Inspect line” parallel to the crack propagation direction and the “Virtual extensometer” perpendicular to the crack propagation direction are added in the image analysis area.
The “Inspect line” length corresponds to the crack length of the specimen, and the displacement deformation of the “Virtual extensometer” corresponds to the CTOD of the specimen. Therefore, the ΔCTOD can be calculated as:
Δ C T O D = L m a x L m i n
where Lmax and Lmin are the maximum and minimum lengths of the “Virtual extensometer” in a loading cycle.
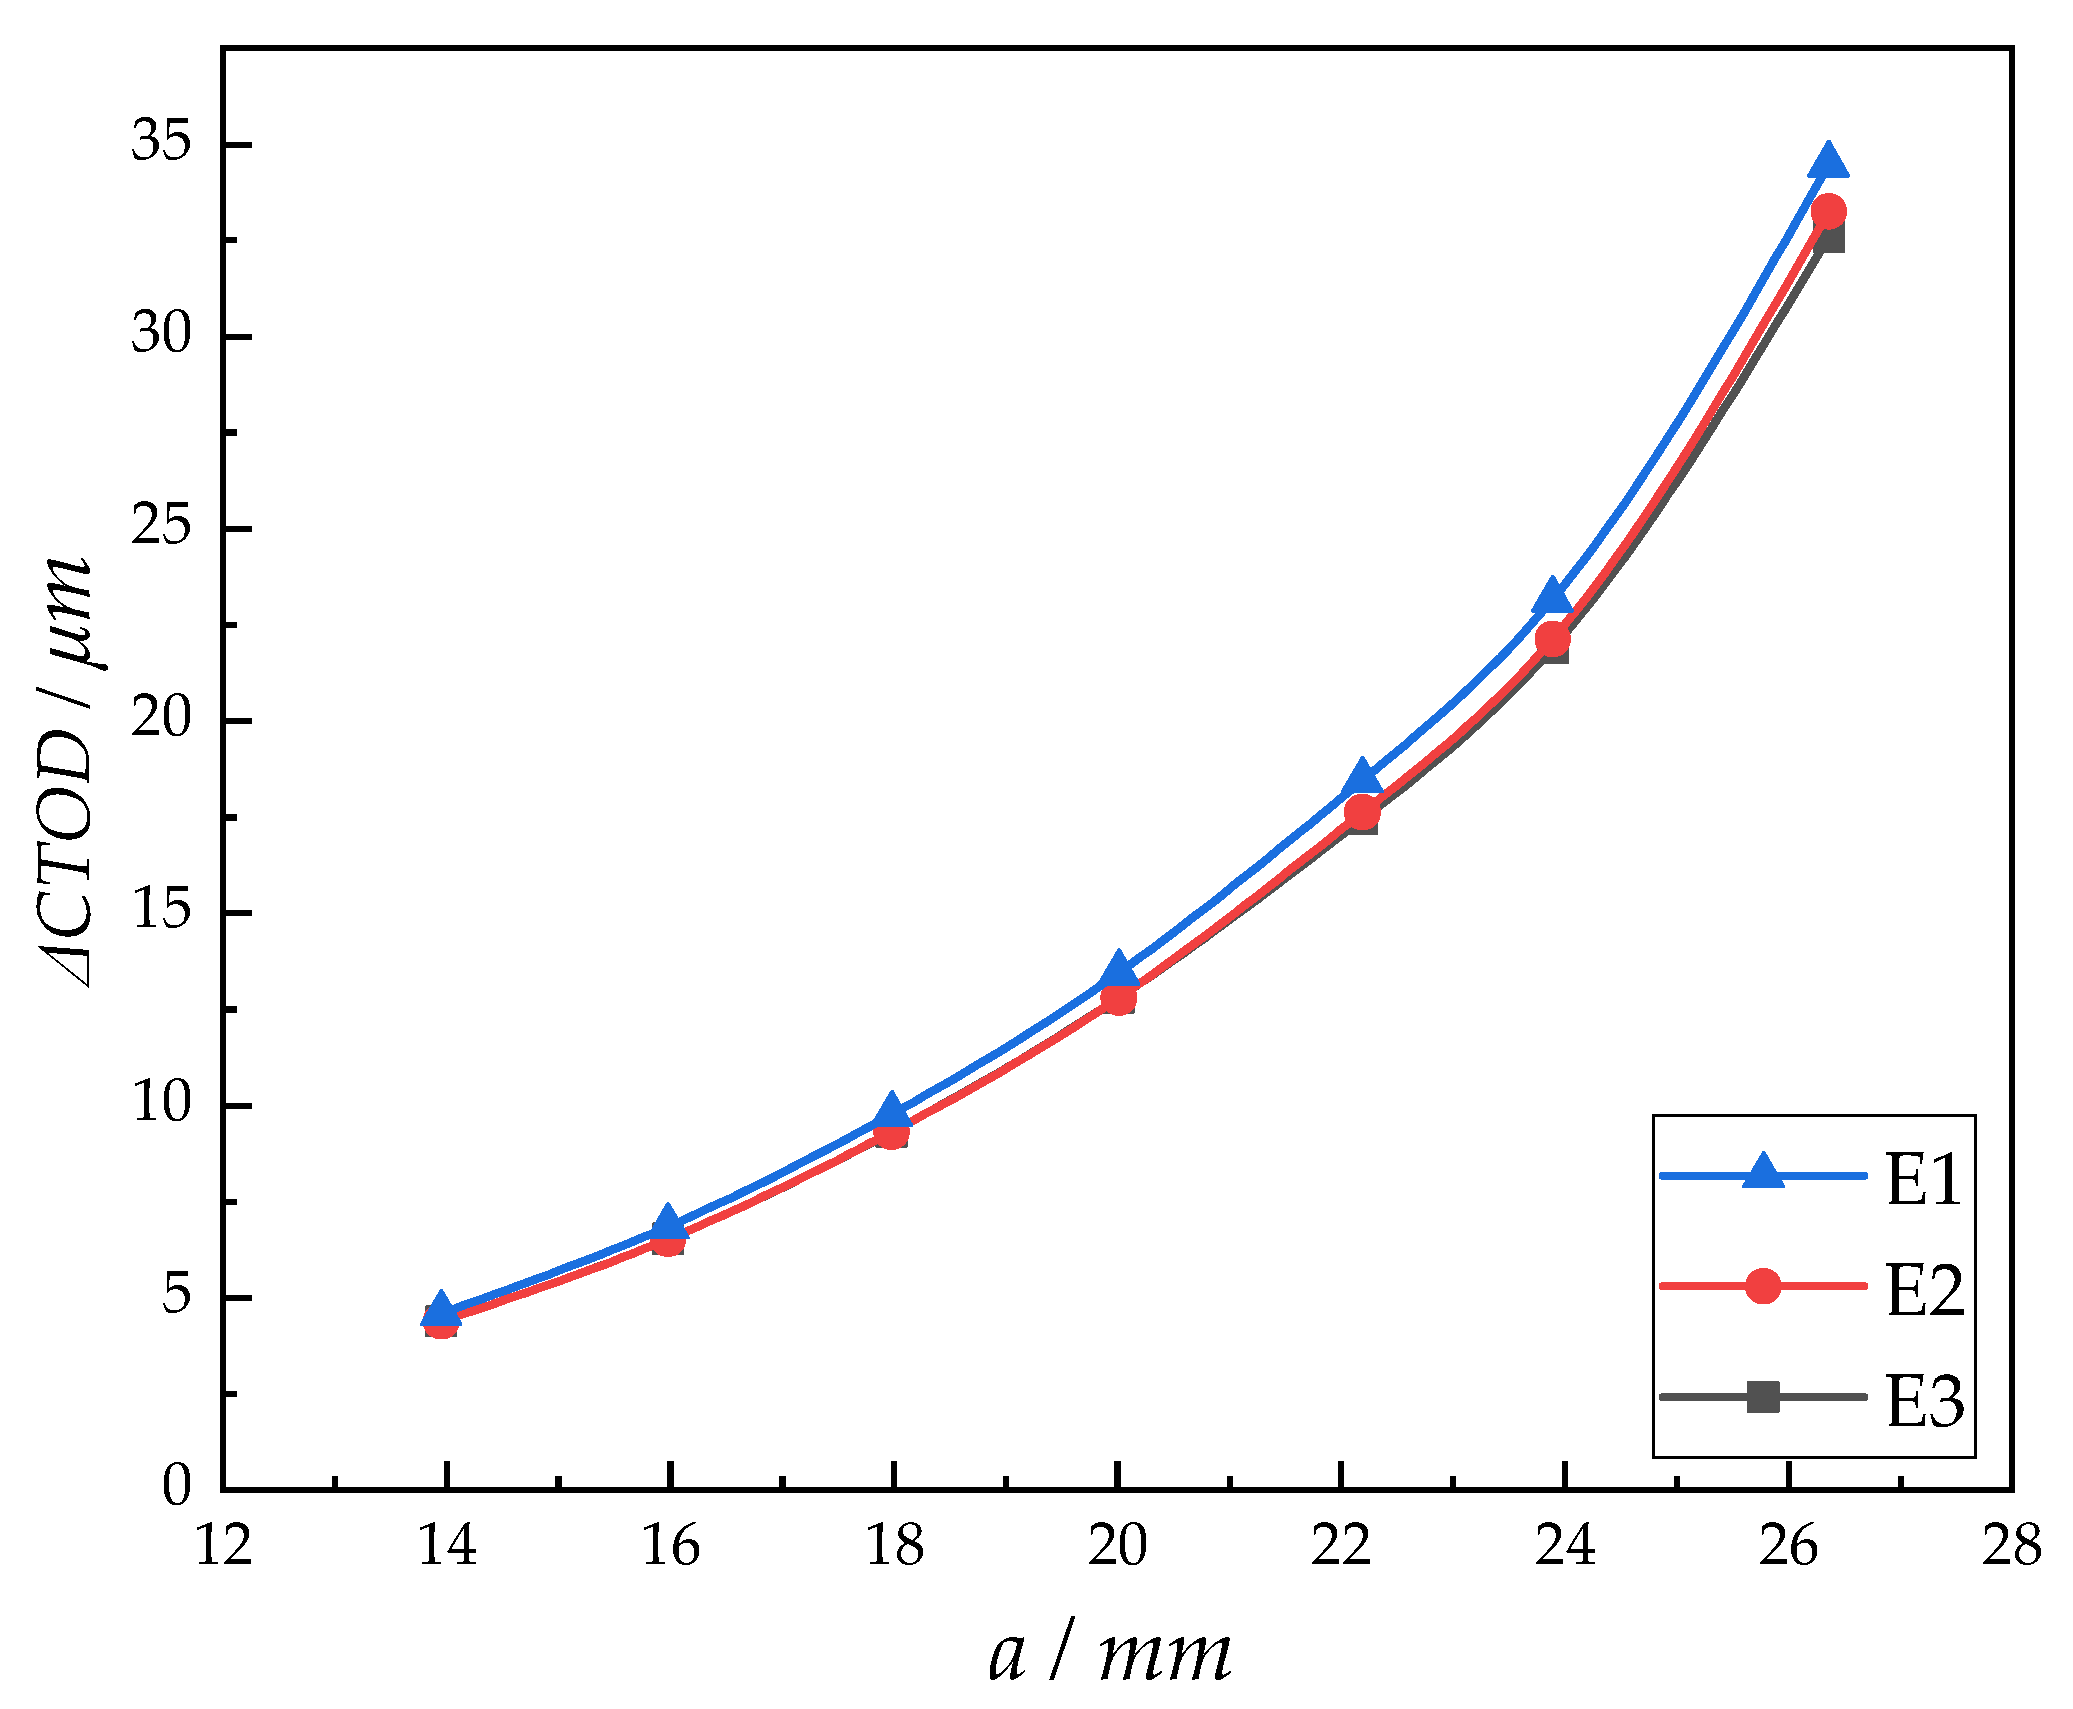
Additionally, to ensure the validity of measured results, three virtual extensometers (E1, E2, E3) with different ranges are added to investigate the effect of the extensometer range. As can be seen from Figure 5, there are slight differences in the measurement results of different extensometers, but such differences can be ignored when the extensometer range is small enough. In this study, measurement results of the E3 extensometer are taken as the final experimental data.

4. Results and Discussion

4.1. Crack Clouse Coefficient U

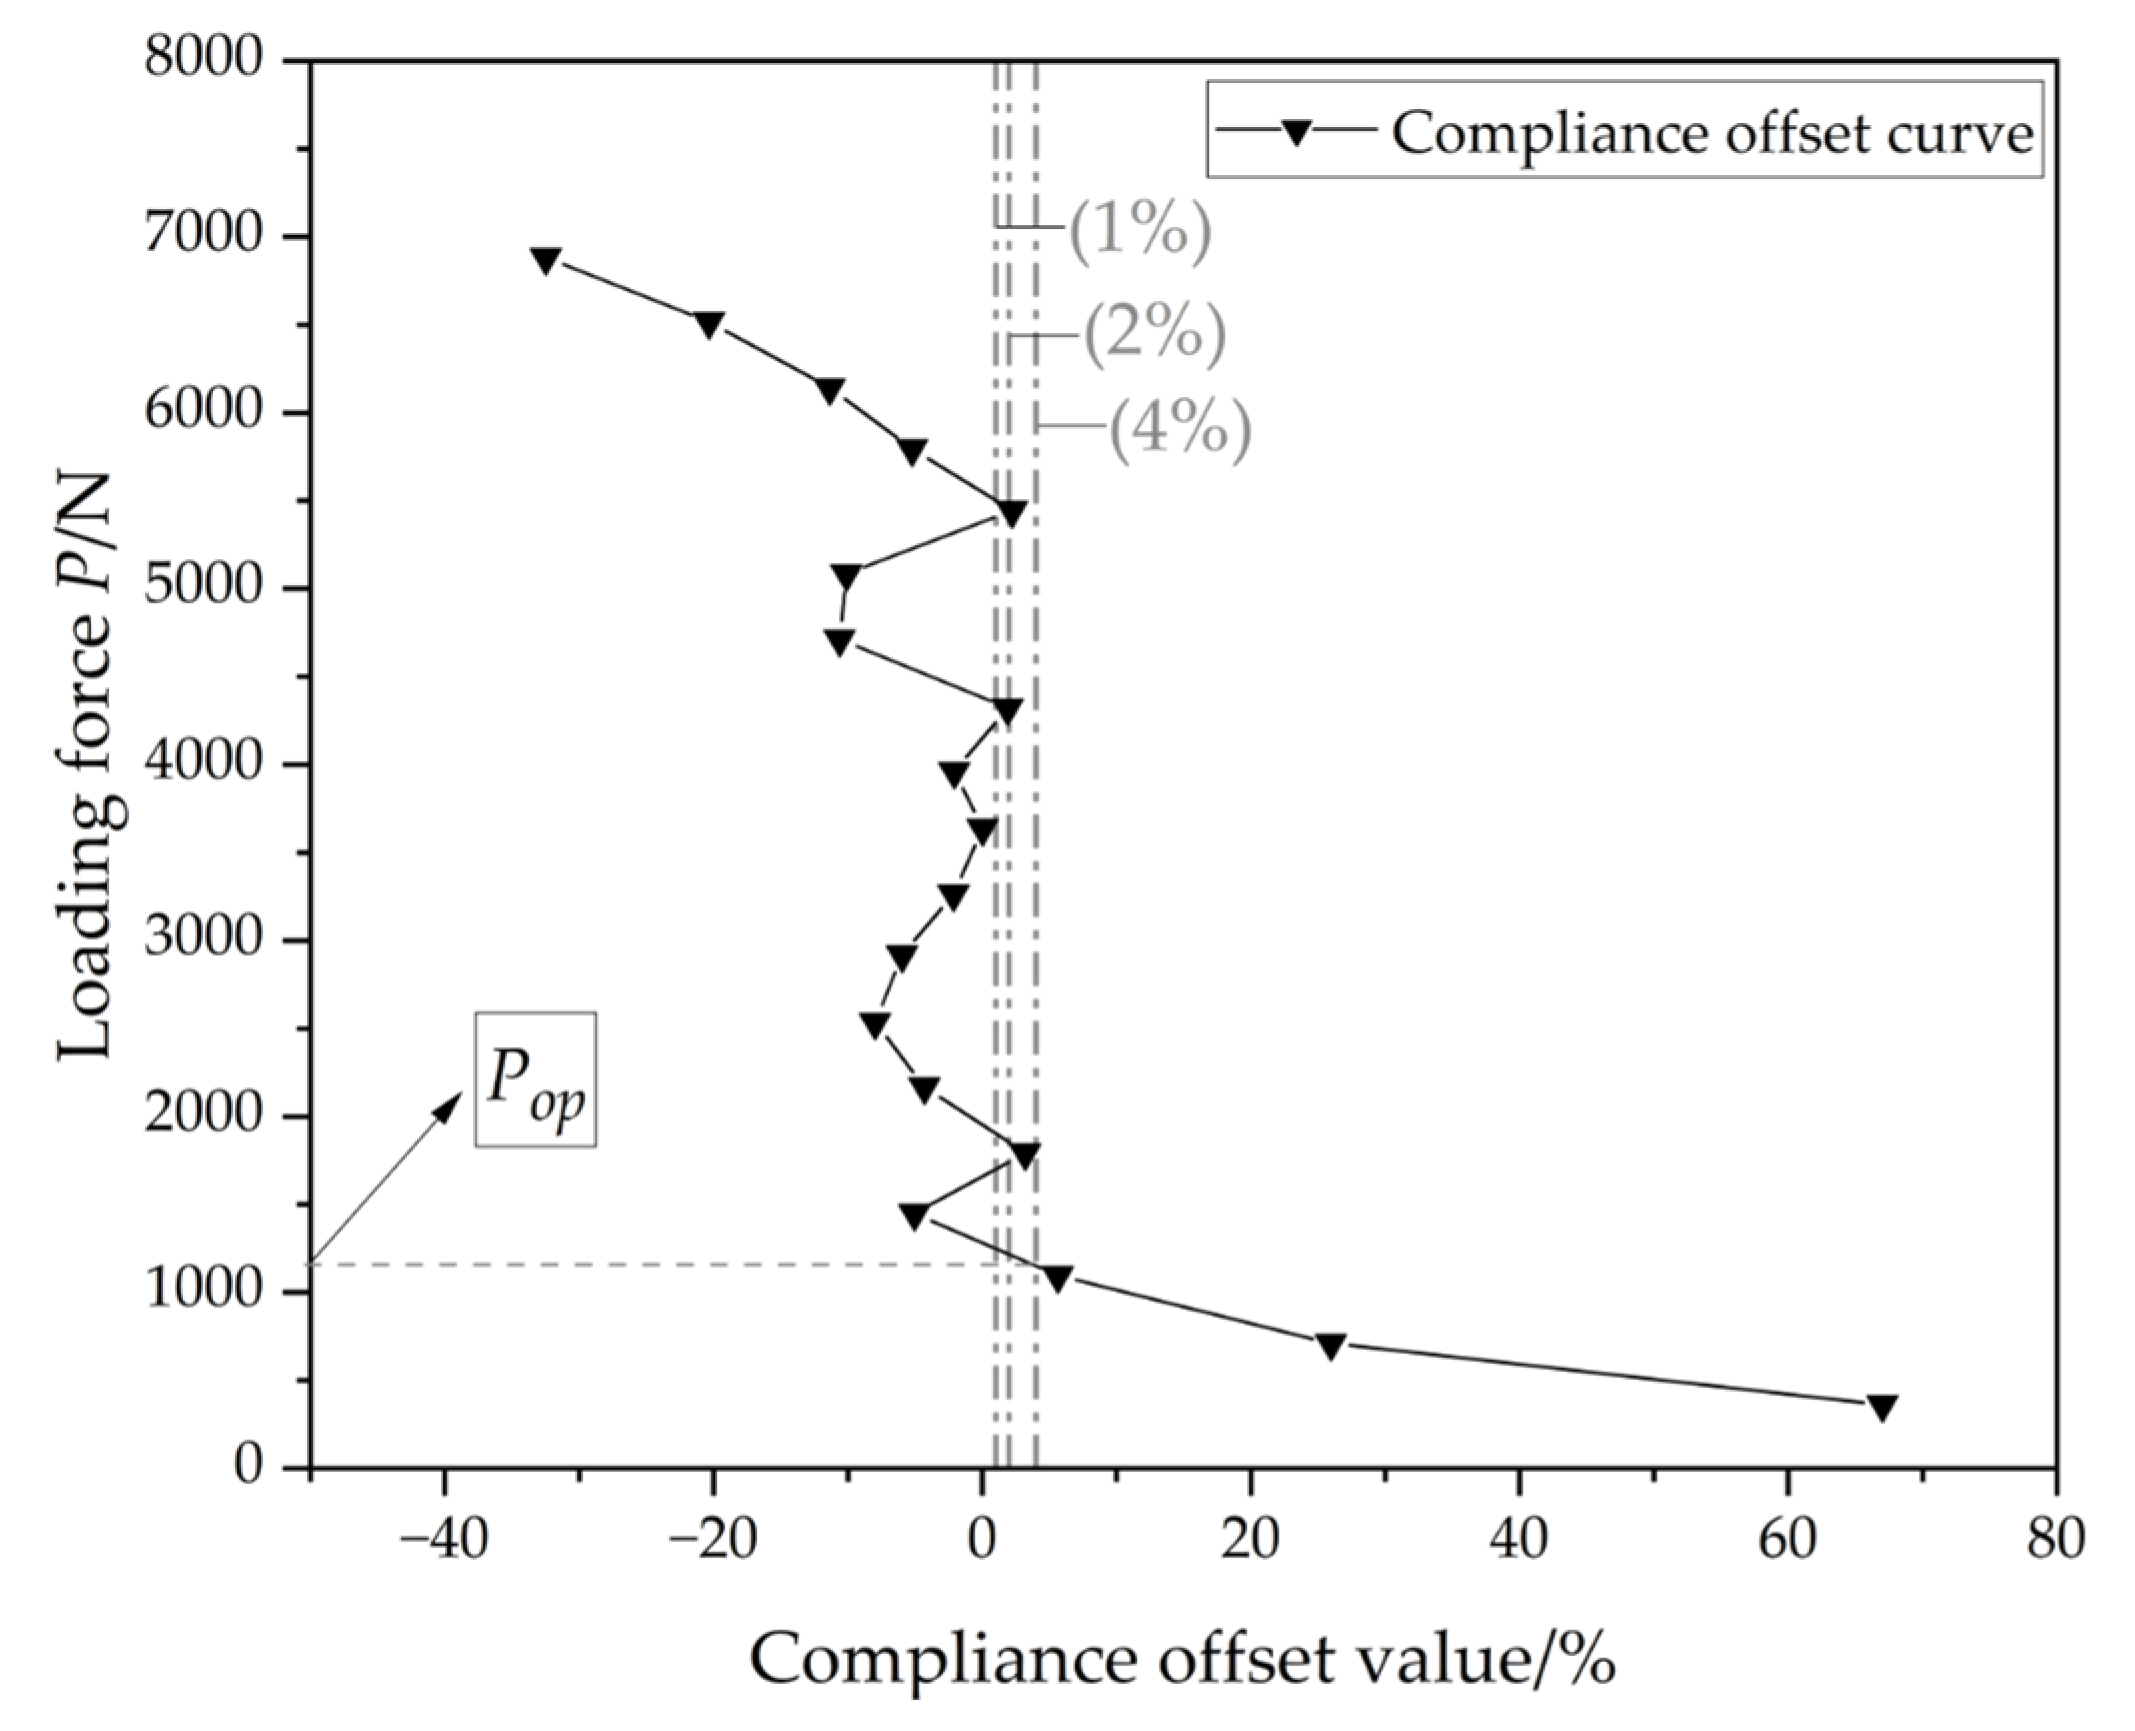
Based on the strain-loading force (ε-P) curve obtained from the experiment, the crack opening force Pop was determined using the compliance offset method in ASTM E647. The compliance offset value should be set at 1%, 2%, and 4%, and the specific value depends on the data dispersion of the compliance offset curve measured in the experiment.
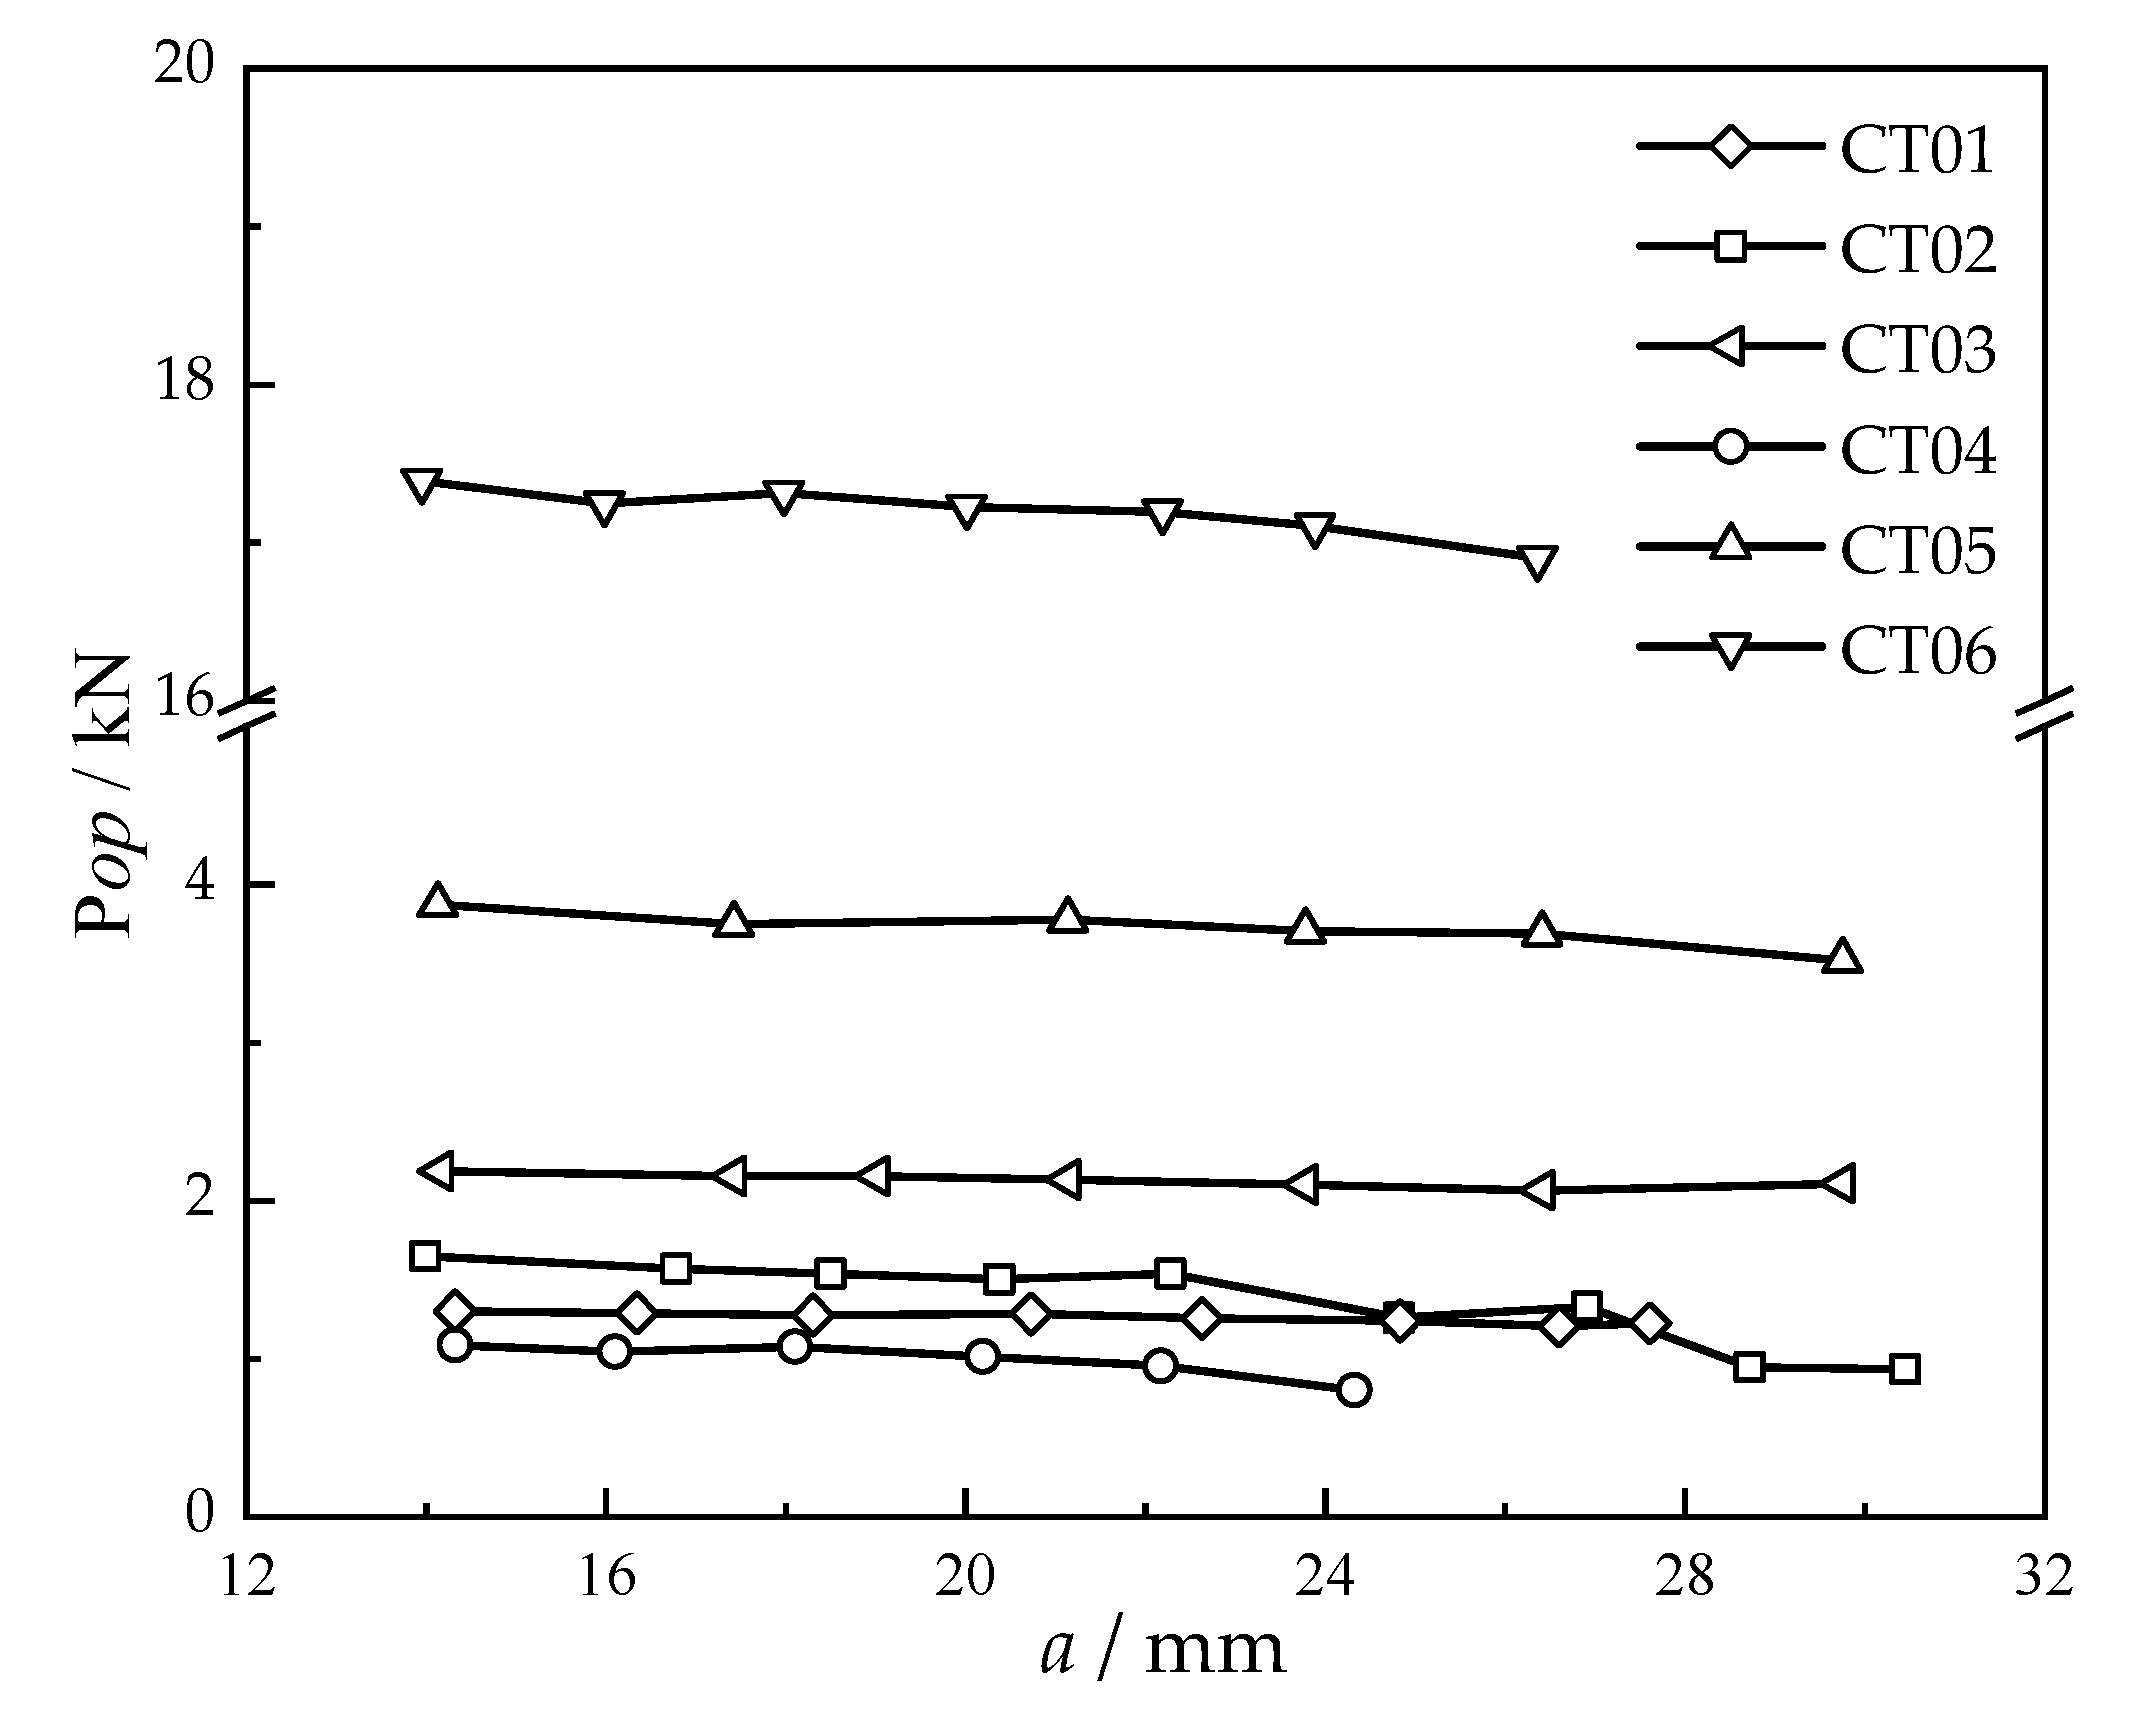
As shown in Figure 6, a unique corresponding crack opening force can be obtained by setting the compliance offset value as 4%. The calculated Pop for each loading condition is shown in Figure 7.
From Figure 7, Pop shows a decreasing trend as the crack length increases, indicating that the closure effect decreases with the crack length increase, but the degree of decrease is fragile. The study presented in [40] also points out that Pop generally decreases with increasing the crack length near the threshold, while in the sound propagation stage, the decreasing trend of Pop will slow down until stable.
In addition, the crack closure coefficient U for all loading conditions was calculated based on the crack opening force data obtained from the experiment and summarized in Table 3. From Table 3, the crack closure coefficient increases significantly with the increase in load ratio (CT02, CT04, CT05, CT06) but is hardly affected by the load amplitude (CT01, CT02, CT03), so it can be assumed that the crack closure coefficient U is only related to the load ratio R and the U-R fitted rule is obtained accordingly:
U = 0 . 57 R 3   -   0 . 93 R 2 + 0 . 53 R + 0 . 83   ( 0.1     R   0.7 )

4.2. da/dN-ΔCTOD Curve

The crack lengths and ΔCTOD of the CT specimens under all loading conditions were measured using the DIC technique, and the da/dN-ΔCTOD curves shown in Figure 8 were plotted in combination with loading cycles recorded by the fatigue test machine. As shown in Figure 8, the crack propagation rate shows a linear correlation with ΔCTOD similar to Paris’ law in the double logarithmic coordinate system, which indicates that ΔCTOD can be used to describe the crack propagation rate instead of ΔK. The fitted crack propagation rate model was obtained as follows:
d a / d N = 8 . 135   ×   10 3 ( Δ C T O D ) 0 . 839

4.3. Comparison

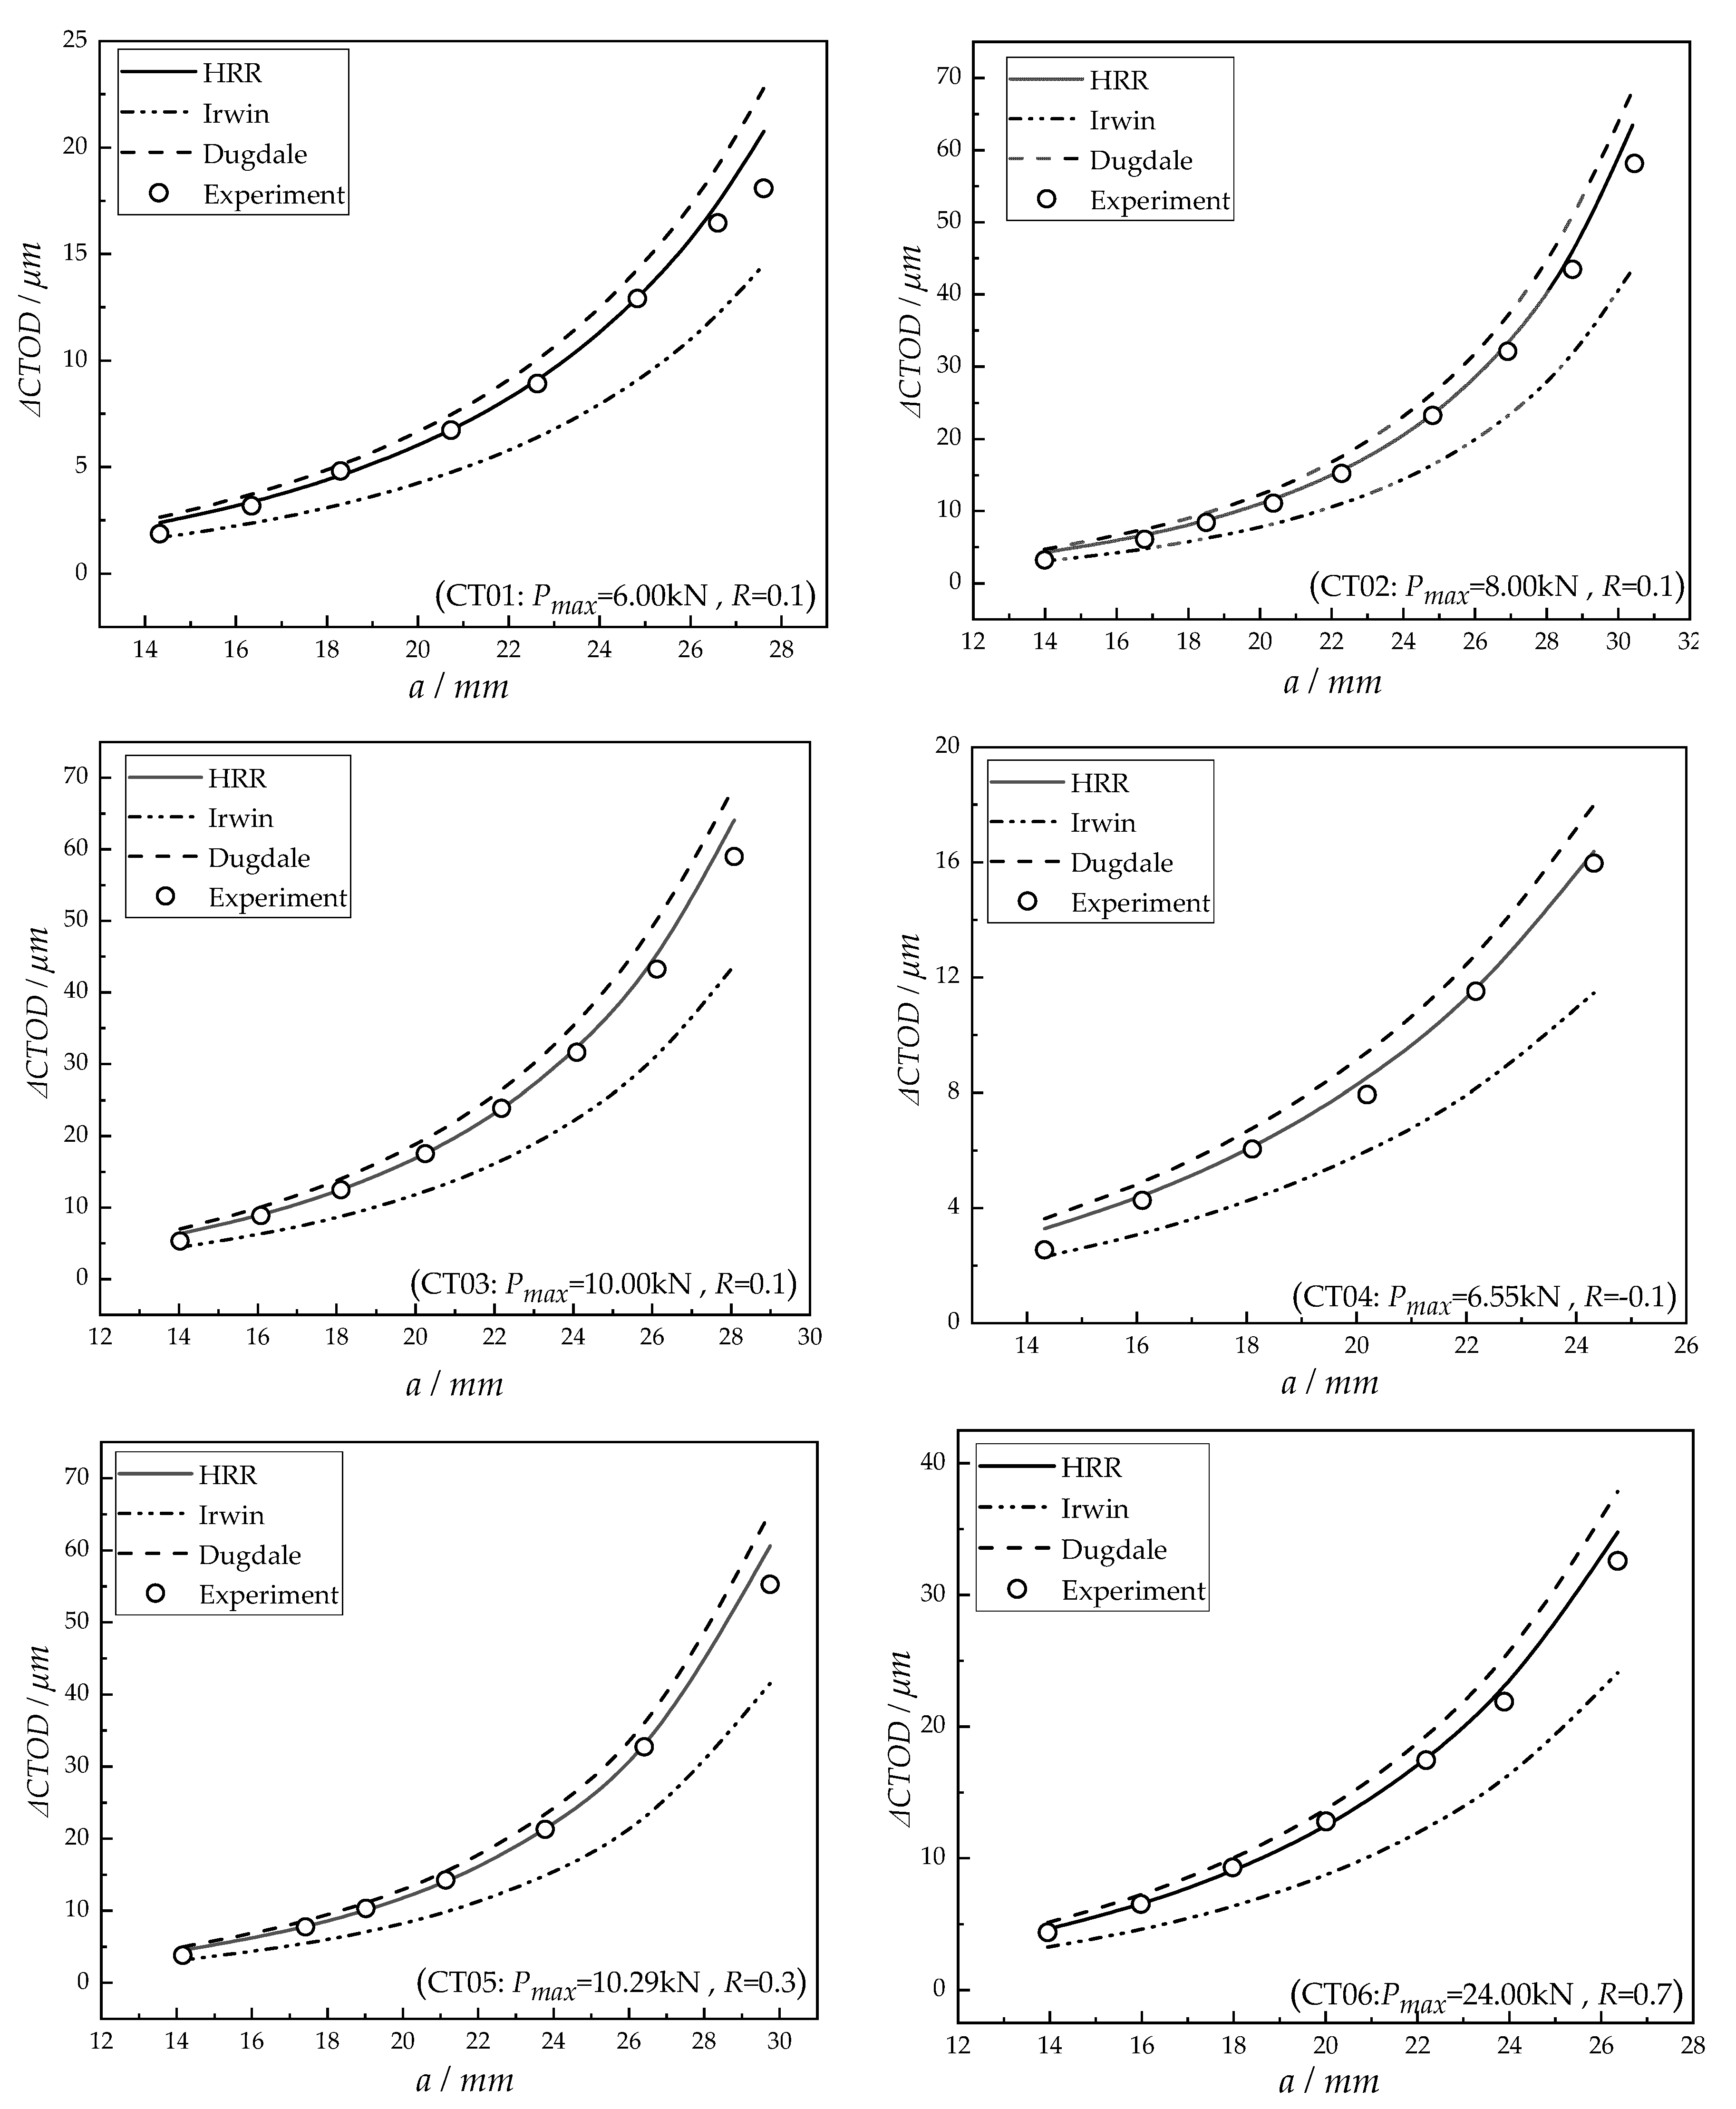
The a-ΔCTOD curves obtained from the numerical models and crack propagation experiments under all loading conditions are summarized in Figure 9. With the increase in crack length, the trend of ΔCTOD experimental value is almost the same as the numerical prediction curve. It only slows down at the early and late stages of crack propagation. There are two main reasons for this phenomenon. EDM machined the notch and pre-crack of the CT specimen, and residual compressive stresses inevitably affected the vicinity of the pre-crack. Therefore, in the early stage of the crack propagation, residual compressive stresses increase the difficulty of the crack opening, leading to minor ΔCTOD experimental results than numerically predicted results. This phenomenon disappears gradually with the increase in loading cycles. The higher the applied load, the faster it disappears, as verified by the experimental results of CT01, CT02, and CT03 specimens in Figure 9.
The CT specimen is loaded and fixed through the pin connection. With the continuous action of applied load, the contact position between the specimen and the pin will be deformed. The deformation will weaken the restraint effect of the pin on the CT specimen, resulting in more minor experimental results. This phenomenon occurs earlier when the applied load is higher, verified by the experimental results of CT02, CT05, and CT06 specimens in Figure 9.
For the above reasons, the first and last experimental data points for all loading conditions were excluded when comparing the prediction accuracy of the three numerical models. To evaluate the prediction ability of three numerical models, two error rating indicators, Ea and Emax, are calculated and summarized in Table 4. Ea and Emax are the mean and maximum absolute error of predicted results compared to experimental data, respectively, which are calculated as follows:
E a = 1 n i = 1 n | ( t m i t e i t e i ) × 100 % |
E m a x = m a x { | ( t m i - t e i t e i ) × 100 % | } ( i = 1 , 2 , , n )
where tmi is the prediction result of the model, and tei is the experimental result.
According to Figure 9 and Table 4, the a-ΔCTOD prediction curve of the Irwin model lies below the experimental data overall, the mean error of the Irwin model is more than 25%, and the maximum error reaches about 30%. On the contrary, the a-ΔCTOD prediction curve of the Dugdale model lies above the experimental data overall, the mean error of the Dugdale model stays within 15%, and the maximum error is less than 20%. In addition, it can be seen that the Dugdale model has good accuracy at the early stage of crack propagation. Still, the accuracy decreases gradually with increased crack length or applied load. While the a-ΔCTOD prediction curve of the HRR model agrees well with the experimental data, the mean error of the HRR model is kept within 4%, and the maximum error is around 6%.
The reasons for the above phenomenon can be explained by the fact that the Irwin model is based on small-scale yielding, which assumes that the plastic zone size is much smaller than the crack size. This assumption causes the prediction accuracy of the Irwin model to decrease as the crack length or applied load increases, as verified by the error data for CT02, CT04, CT05, and CT06 in Table 4.
The Dugdale model ignores the effect of material hardening parameters, and the hardening effect of material will lead to plastic energy dissipation during crack propagation [41,42]. The increase in the crack length or applied load leads to an increase in the plastic zone size of the crack tip, which intensifies the plastic energy dissipation and thus leads to a more significant prediction error of the Dugdale model.
The HRR model was established based on J-integral. It considers the material hardening effect, concluding that the HRR model can accurately describe the crack tip elastic–plastic stress–strain field. Its predictions are more accurate than the Irwin and Dugdale models at the significant loadings.

5. Conclusions

A newly developed model based on the HRR considering the elastic–plastic stress–strain field at the crack tip of mode I crack and crack closure effect applies to ΔCTOD under constant amplitude loading. A series of crack propagation experiments on CT specimens made of Ni-Cr-Mo-V high-strength steel was conducted to verify the applicability of ΔCTOD to describe the crack propagation behaviour. Additionally, the accuracy of the HRR model proposed in this study was compared to the traditional methods (Irwin and Dugdale models) based on the experimental results.
Several conclusions are drawn from the present study.
  • According to the crack opening force results from experiments, the crack closure coefficient U is almost independent of the load amplitude Pa and only related to the loading ratio R. Based on this phenomenon, the equation for U was provided.
  • In the double logarithmic coordinate system, there is a linear correlation between the crack propagation rate da/dN and ΔCTOD that is like Paris’ law, which indicates that ΔCTOD is a feasible alternative to ΔK.
  • The Irwin model assumes small-scale yielding, which considers the plastic zone size much smaller than the crack size, thus tends to underestimate the value of ΔCTOD with a significant error and is not recommended for the prediction of ΔCTOD in elastic–plastic fracture problems.
  • The Dugdale model has good predictability when the crack length or applied load is small. However, since the Dugdale model ignores the effect of material hardening, it tends to overestimate ΔCTOD and the error increases with the crack length or applied load. Therefore, the applicability range should be verified using the Dugdale model for ΔCTOD prediction.
  • Since the material hardening effect is considered, the HRR model is more accurate in describing the elastic–plastic stress–strain field at the crack tip of the CT specimen than the Irwin and Dugdale models. Thus, the ΔCTOD is better-predicted. Therefore, the HRR model proposed in the present study is recommended for predicting ΔCTOD in elastic–plastic fracture mechanics problems.

Author Contributions

Writing—original draft preparation, J.L., J.Y. and K.Y.; writing—review and editing, J.Y. and Y.G. All authors have read and agreed to the published version of the manuscript.

Funding

This research was funded by the National Natural Science Foundation of China (No. 52171320).

Institutional Review Board Statement

Not applicable.

Informed Consent Statement

Not applicable.

Data Availability Statement

The data presented in this study are available on request from the corresponding author.

Conflicts of Interest

The authors declare no conflict of interest.

References

  1. Yue, J.; Dang, Z.; Guedes Soares, C. Prediction of fatigue crack propagation in bulb stiffeners by experimental and numerical methods. Int. J. Fatigue 2017, 99, 101–110. [Google Scholar] [CrossRef]
  2. Lei, J.; Yue, J.; Xu, Z.; Fang, X.; Liu, H. Theoretical and Experimental Analysis on Low-Cycle Fatigue Crack Initiation for High Strength Steel Stiffened Plates. In Proceedings of the ASME 2022 41st International Conference on Ocean, Offshore and Arctic Engineering, Hamburg, Germany, 5–10 June 2022. [Google Scholar]
  3. Tu, W.; Yue, J.; Xie, H.; Tang, W. Fatigue Crack Propagation Behavior of High-strength Steel under Variable Amplitude Loading. Eng. Fract. Mech. 2021, 247, 107642. [Google Scholar] [CrossRef]
  4. Paris, P. A critical analysis of crack propagation laws. J. Basic Eng. 1963, 85, 528–533. [Google Scholar] [CrossRef]
  5. Hagihara, S.; Shishido, N.; Hayama, Y.; Miyazaki, N. Methodology for calculating J-integral range ΔJ under cyclic loading. Int. J. Press. Vessel. Pip. 2021, 191, 104343. [Google Scholar] [CrossRef]
  6. Elber, W. Fatigue crack closure under cyclic tension. Eng. Fract. Mech. 1970, 2, 37–45. [Google Scholar]
  7. Elber, W. The Significance of Fatigue Crack Closure. ASTM STP 1971, 486, 230–242. [Google Scholar]
  8. Codrington, J.; Kotousov, A. A crack closure model of fatigue crack growth in plates of finite thickness under small-scale yielding conditions. Mech. Mater. 2009, 41, 165–173. [Google Scholar] [CrossRef]
  9. Antunes, F.V.; Rodrigues, D.M.; Branco, R. An analytical model of plasticity-induced crack closure. Procedia Eng. 2010, 2, 1005–1014. [Google Scholar] [CrossRef] [Green Version]
  10. Ould Chikh, B.; Imad, A.; Meddah, H.M.; Bouchouicha, B.; Benguediab, M. An experimental study of loading parameters effect on fatigue crack closure in 12NC6 steel(Article). Mech. Mater. 2012, 46, 83–93. [Google Scholar] [CrossRef]
  11. Rice, J.R. A path independent integral and the approximate analysis of strain concentration by notches and cracks. J. Appl. Mech. 1968, 35, 379–386. [Google Scholar] [CrossRef] [Green Version]
  12. Cherepanov, G.P.; Becher, P.; Freiman, S. On crack propagation in solids. Int. J. Solids Struct 1969, 5, 863–871. [Google Scholar]
  13. Hutchinson, J.W. Singular behaviour at the end of a tensile crack in a hardening material. J. Mech. Phys. Solids 1968, 16, 13–31. [Google Scholar] [CrossRef]
  14. Rice, J.R.; Rosengren, G.F. Plane strain deformation near a crack tip in a power-law hardening material. J. Mech. Phys. Solids 1968, 16, 1–12. [Google Scholar] [CrossRef]
  15. Shih, C. Tables of HRR Singular Field Quantities; MRL E-147; Division of Engineering, Brown University: Providence, RI, USA, 1983. [Google Scholar]
  16. Shih, C.; German, M. Requirements for a one-parameter characterization of crack tip fields by the HRR singularity. Int. J. Fract. 1981, 17, 27–43. [Google Scholar] [CrossRef]
  17. Alizadeh, H.; Bedare, A.R.; Bhat, S. Finite Element Examination and Validation of Stress Field around Ductile Mode I Crack Tip in Elastic-Plastic Fracture. In Advanced Materials Research; Trans Tech Publications Ltd.: Wollerau, Switzerland, 2013; pp. 342–347. [Google Scholar]
  18. Zou, J.; Jing, H.; Xu, L. Surface crack fracture toughness and HRR fields of ultra-high strength steel. J. Mater. Sci. Eng. A 2007, 454, 467–471. [Google Scholar] [CrossRef]
  19. Xu, M.; Liu, Y.; Yuan, H. On ΔJ characterization of elastic-plastic crack-tip fields under fatigue loading conditions. Int. J. Fatigue 2022, 160, 106849. [Google Scholar] [CrossRef]
  20. Wells, A.A. Unstable crack propagation in metals: Cleavage and fast fracture. In Proceedings of the Crack Propagation Symposium, Cranfield, UK; 1961. [Google Scholar]
  21. Laird, C.; Smith, G.C. Crack propagation in high stress fatigue. Philos. Mag. 1962, 7, 847–857. [Google Scholar] [CrossRef]
  22. Hunnell, J.M.; Kujawski, D. Numerical simulation of fatigue crack growth behaviour by crack-tip blunting. Eng. Fract. Mech. 2009, 76, 2056–2064. [Google Scholar] [CrossRef]
  23. Antunes, F.V.; Rodrigues, S.M.; Branco, R.; Camas, D. A numerical analysis of CTOD in constant amplitude fatigue crack growth. Theor. Appl. Fract. Mech. 2016, 85, 45–55. [Google Scholar] [CrossRef]
  24. Dong, Q.; Yang, P.; Xu, G. Low cycle fatigue analysis of CTOD under variable amplitude loading for AH-32 steel. Mar. Struct. 2019, 63, 257–268. [Google Scholar] [CrossRef]
  25. Werner, K. The fatigue crack growth rate and crack opening displacement in 18G2A-steel under tension. Int. J. Fatigue 2012, 39, 25–31. [Google Scholar] [CrossRef]
  26. Vasco-Olmo, J.M.; Díaz, F.A.; Antunes, F.V.; James, M.N. Experimental evaluation of CTOD in constant amplitude fatigue crack growth from crack tip displacement fields. Frat. Integrità Strutt. 2017, 11, 157–165. [Google Scholar] [CrossRef]
  27. Irwin, G. Linear fracture mechanics, fracture transition, and fracture control. Eng. Fract. Mech. 1968, 1, 241–257. [Google Scholar] [CrossRef]
  28. Dugdale, D.S. Yielding of steel sheets containing slits. J. Mech. Phys. Solids 1960, 8, 100–104. [Google Scholar] [CrossRef]
  29. Chen, J.; Huang, Y.; Dong, L.; Li, Y. A new method for cyclic crack-tip plastic zone size determination under cyclic tensile load. Eng. Fract. Mech. 2014, 126, 141–154. [Google Scholar]
  30. Neimitz, A. Modification of Dugdale model to include the work hardening and in-and out-of-plane constraints. Eng. Fract. Mech. 2004, 71, 1585–1600. [Google Scholar] [CrossRef] [Green Version]
  31. Perez, N. Fatigue Crack Growth. In Fracture Mechanics; Springer International Publishing: Cham, Switzerland, 2017; pp. 327–372. [Google Scholar]
  32. ASTM. Standard Test Method for Measurement of Fatigue Crack Growth Rates; ASTM International: West Conshohocken, PA, USA, 2015. [Google Scholar]
  33. Kumar, V.; Shih, C. Fully Plastic Crack Solutions, Estimation Scheme, and Stability Analyses for the Compact Specimen; ASTM International: West Conshohocken, PA, USA, 1980. [Google Scholar]
  34. Robert, O.R.; Dong, L. Chapter 5—Crack-Tip Opening Displacement (CTOD); Elsevier: Oxford, UK, 2021; pp. 75–80. [Google Scholar]
  35. Huang, Y.; Guo, F. Effect of plastic deformation on the elastic stress field near a crack tip under small-scale yielding conditions: An extended Irwin’s model. Eng. Fract. Mech. 2021, 254, 107888. [Google Scholar] [CrossRef]
  36. Broek, D. Elementary Engineering Fracture Mechanics; Springer: Dordrecht, The Netherlands, 1982. [Google Scholar]
  37. Wang, Y.; Wang, W.; Zhang, B.; Li, C.-Q. A new method to determine fracture resistance curve of steel under various in-plane loading. Eng. Fract. Mech. 2021, 248, 107701. [Google Scholar] [CrossRef]
  38. Lei, Z.; Bai, R.; Deng, L.; Qiu, W. Noncontact optical measurement of CTOA and CTOD for interface crack in DCB test. Optics Lasers Eng. 2012, 50, 964–970. [Google Scholar]
  39. Vasco-Olmo, J.M.; Díaz, F.; Antunes, F.V.; James, M.N. Characterisation of fatigue crack growth using digital image correlation measurements of plastic CTOD. Theor. Appl. Fract. Mech. 2019, 101, 332–341. [Google Scholar] [CrossRef]
  40. McClung, R. The influence of applied stress, crack length, and stress intensity factor on crack closure. Metall. Trans. A 1991, 22, 1559–1571. [Google Scholar] [CrossRef]
  41. Xue, C.; He, A.; Yong, H.; Zhou, Y. Crack tip opening displacement in a linear strain hardening material. Mech. Mater. 2013, 66, 21–34. [Google Scholar] [CrossRef]
  42. Xue, C.; Yong, H.; Zhou, Y. Crack tip field in a linear elastic–plastic strain-hardening material. Int. J. Solids Struct. 2012, 49, 3447–3452. [Google Scholar] [CrossRef]
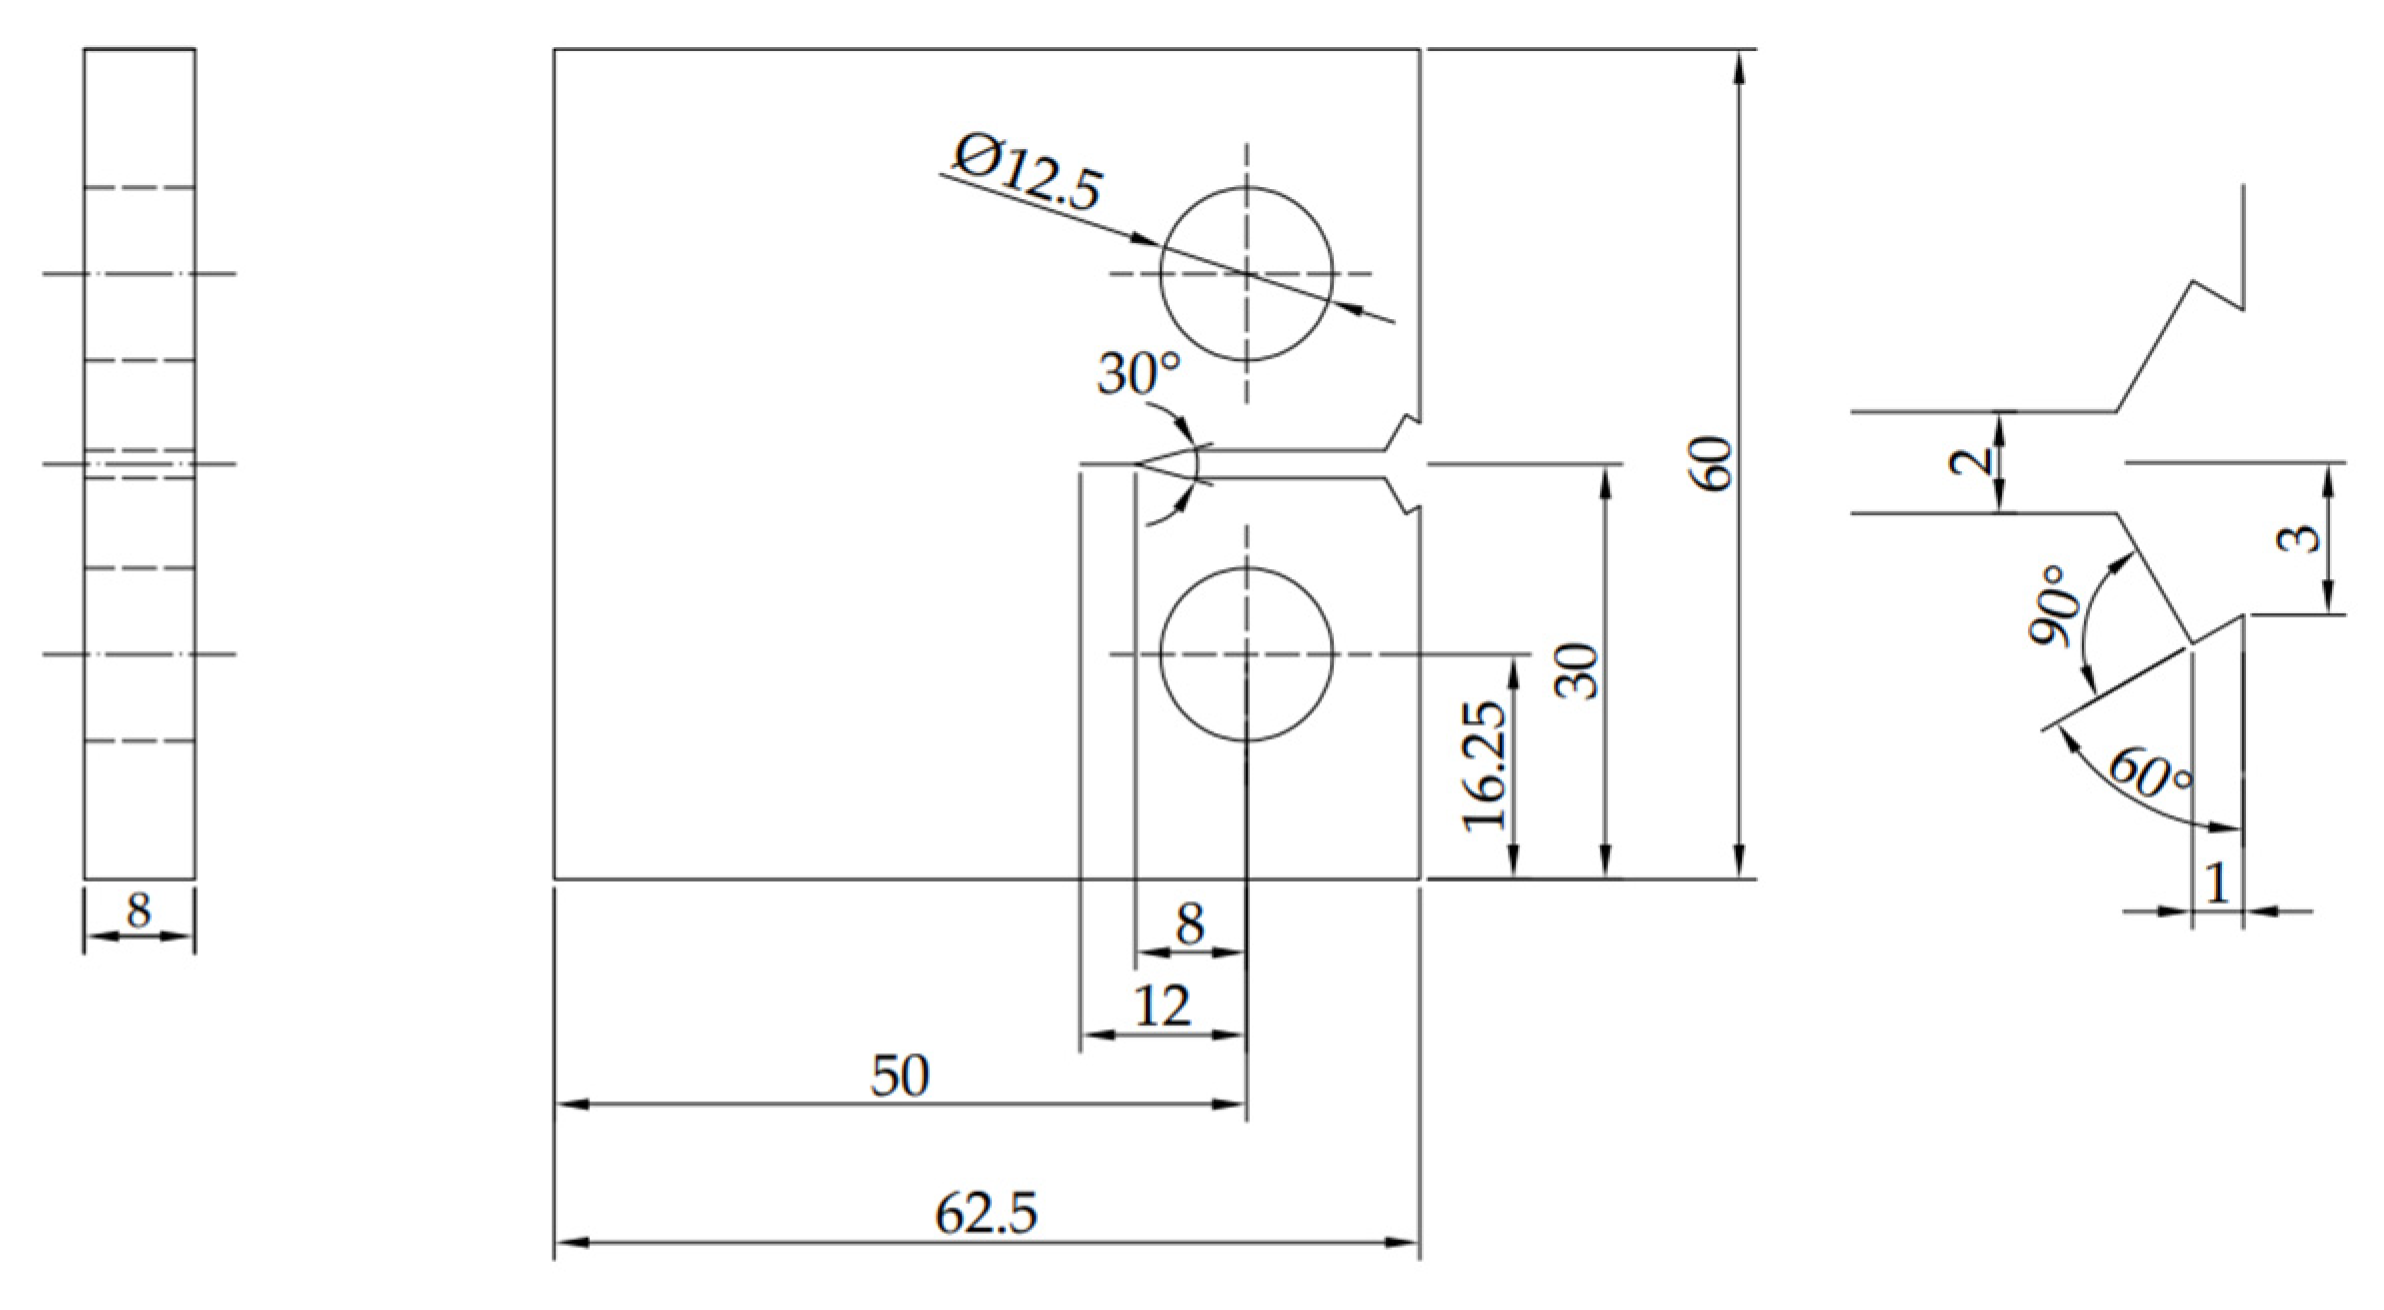
Figure 1. Configuration of CT specimen.
Jmse 10 01944 g001
Figure 2. Measurement system: (a) global; (b) local.
Jmse 10 01944 g002
Figure 3. CT specimen: (a) speckle pattern, (b) back strain gauge, (c) crack observation.
Jmse 10 01944 g003
Figure 4. Crack length and ΔCTOD measurement via the DIC technique.
Jmse 10 01944 g004
Figure 5. Measurement results with different ranges of extensometers (CT06).
Jmse 10 01944 g005
Figure 6. Loading force versus compliance offset value curve of CT01.
Jmse 10 01944 g006
Figure 7. Crack opening force of CT specimens under different loading conditions.
Jmse 10 01944 g007
Figure 8. Crack propagation rate da/dN versus ΔCTOD curve.
Jmse 10 01944 g008
Figure 9. Numerical and experimental a-da/dN curve under all loading conditions.
Jmse 10 01944 g009
Table 1. Material mechanical properties of Ni-Cr-Mo-V high-strength steel at room temperature.
Mechanical PropertyUnitValue
Density (ρ)kg/m37850
Modulus of elasticity (E)GPa219
Poisson’s ratio (ν)-0.35
Yield strength (σys)MPa635
Ultimate strength (σu)MPa680
Hardening coefficient (α)-0.11
Hardening index (n)-4.237
Table 2. Crack propagation experiment loading conditions of CT specimens.
SpecimenPa 1* (kN)R 2*Pm 3* (kN)
CT012.700.13.30
CT023.600.14.40
CT034.500.15.50
CT043.60−0.12.95
CT053.600.36.69
CT063.600.720.40
1* load amplitude, 2* load ratio, 3* mean load.
Table 3. The crack opening force and crack closure coefficient under different loading conditions.
SpecimenPa (kN)RPop (kN)U
CT012.700.11.260.878
CT023.600.11.650.882
CT034.500.12.130.874
CT043.60−0.11.050.764
CT053.600.33.710.914
CT063.600.717.200.945
Table 4. Error statistics of numerical model prediction results.
ModelError IndexCT01CT02CT03CT04CT05CT06
IrwinEa28.55%28.47%29.35%28.01%30.31%29.77%
Emax32.50%30.58%30.59%29.25%31.47%31.66%
DugdaleEa12.24%12.37%10.98%13.08%9.47%10.32%
Emax17.04%16.85%13.46%15.00%11.03%15.37%
HRREa3.05%2.58%1.59%2.42%1.14%2.34%
Emax5.77%5.82%4.85%3.98%2.31%5.40%
Publisher’s Note: MDPI stays neutral with regard to jurisdictional claims in published maps and institutional affiliations.