Article

Tooth Surface Contact Characteristics of Non-Circular Gear Based on Ease-off Modification

School of Mechanical Engineering and Automation, Beihang University, Beijing 100191, China
*
Author to whom correspondence should be addressed.
Appl. Sci. 2025, 15(23), 12707; https://doi.org/10.3390/app152312707
Submission received: 21 October 2025 / Revised: 7 November 2025 / Accepted: 18 November 2025 / Published: 1 December 2025
(This article belongs to the Special Issue Structural Mechanics in Materials and Construction—2nd Edition)

Abstract

To address edge contact in non-circular gears arising from installation errors, a modification strategy represented by elliptical gears and driven by an ease-off topological surface is proposed. A tooth surface model for non-circular gears was first derived from meshing theory. The modification magnitude was defined using a second-order ease-off differential surface, and the modified surface is represented through non-uniform rational B-spline (NURBS) fitting. A tooth contact analysis (TCA) model is then built to evaluate how installation errors and modification amount influence contact behavior. The results indicate that an increase in center distance error reduces the contact ratio. For equal perturbations of axial horizontal and axial vertical mounting angles, the horizontal error has the stronger impact on the size and location of the contact patch. As the longitudinal modification coefficient grows, the contact path and peak pressure position shift from the tooth edge toward the mid-width; the contact ellipse first enlarges and then shrinks, while the contact pressure shows the opposite trend. The elastic deformation of the tooth surface increases with the mounting angle. Transmission tests confirm that the proposed modification lowers the transmission error relative to the unmodified gear pair.

1. Introduction

Non-circular gears enable deliberately non-uniform transmission ratios and, thanks to their high efficiency and load capacity, are widely used in low-speed, high-torque applications such as differentials, variable-displacement pumps, ovality flow meters, and hydraulic motor [1,2,3,4].
Gears will inevitably appear during the installation process as a result of installation errors, resulting in tooth surface edge contact and other phenomena, resulting in meshing impact and accelerated tooth wear, which reduces the gear transmission performance and service life. Therefore, in addition to improving the stability and reliability of the gear use process, it is necessary to modify the tooth surface appropriately in terms of reducing the edge contact phenomenon caused by installation errors. Tooth longitudinal modification is an active means of reducing the sensitivity of gear installation error, which plays an essential role in improving vibration noise, optimizing tooth load distribution, and so forth [5]. Elliptic gears are a common and widely used type of non-circular gear, has and have high geometric symmetry and stable meshing performance. Since the tooth surface shape of elliptical gears is different from that of conventional circular gears, it is of great engineering value to study their optimization of modification and contact behavior. Therefore, this paper takes elliptical gears as the object for the study of the modification of non-circular gears.
Tooth profile modification, tooth longitudinal modification, and topology modification are widely used tooth surface modification methods, while the ease-off modification of topology modification can achieve both tooth profile modification and tooth longitudinal modification, and can also be modification of tooth profile and tooth longitudinal simultaneously. Gear tooth modification can improve the design process, dynamic performance, meshing stiffness, transmission error, and load sharing characteristics of gears [6,7,8,9]. Due to the intuition and computational convenience of ease-off difference tooth surface analysis, it has become a significant means of tooth surface modification precontrol and gear tooth meshing simulation, and has been utilized extensively in the design of the topological modification of spiral bevel gear tooth surfaces [10]. Sánchez et al. [11] studied the influence of tooth profile modification on the transmission error of spur cylindrical gears under surface wear, analyzed the evolution law of transmission error with the number of wear cycles, and explored the optimal tooth profile modification that minimizes the dynamic load caused by transmission error. Abruzzo et al. [12] have studied the tooth profile modification and manufacturing design of spur cylindrical gears with the goal of improving static transmission errors. José et al. [13,14] mathematically characterized gears with surface wear and studied their meshing stiffness and transmission error based on gear tooth modification theory. On this basis, they also investigated the effect of gear tooth modification on the load-sharing characteristics of internal meshing gears. Dias et al. [15] studied the effect of tooth profile modification on meshing vibration of spur cylindrical gears, and provided a new method for dynamic characteristic evaluation of gears in the design stage. Mahmoud et al. [16] studied a three-stage PGT model system and established a dynamic model using the lumped parameter method. They put into effect an in-depth analysis of the lateral vibration displacement characteristics of the PGT model system and showed that gear modification can significantly improve the dynamic performance of planetary gear transmission systems.
Supported by the aforementioned advantages of shaping, a large number of scholars have begun to study shaping strategies and methods. Chen [17] and Li et al. [18] provided the means to construct means of ease-off surface for curved bevel gear based on Ease-off theory and surface synthesis method, and verify the correctness and validity of the means, which serves as a reference for the topological design of complex tooth surfaces. Wang et al. [19] analyzed the meshing parameters of a shifted helical gear with different ease-off surface topological modifications, and the contact, kinematic, and mechanical parameters of the tooth surface were obtained. Zhang et al. [20] controlled the tooth contact characteristics by designing the tooth profiles of conjugate difference surfaces for spiral bevel gears. Nie et al. [21] suggested an ease-off topology modification method, which led to an improvement in the tooth surface contact stress distribution after modification. Yang et al. [22] used a discrete contact analysis algorithm to examine the outcomes of each parameter in the second-order ease-off tooth surface expression on contact characteristics such as the size and direction of the contract marks.
Like the meshing transmission of cylindrical gears, non-circular gears also suffer from meshing impact phenomenon caused by edge contact. For this reason, scholars have put into effect a series of studies on ordinary cylindrical gears. Litivin et al. [23] solved the edge contact problem caused by installation errors by modifying the tooth surface of straight and helical cylindrical gears. Wei et al. [24] examined how various installation errors influence geometric contact characteristics and sensitivity. Su et al. [25] proposed an optimal design method for applying linear triangular end relief to double-helical gears. Tang et al. [26] realized cylindrical gear longitudinal modification in accordance with the principle of drum gear modification. Liu [27] and Wang et al. [28] obtained a convenient non-circular gear profile modification design method through the modification of the gear shaper cutter; the flexural and contact stress of the gear was effectively improved. Li et al. [29] achieved longitudinal modification of non-circular gears by adjusting the center distance between two parts.
Tooth surface modification is a method that can effectively decrease the sensitivity of non-circular gears to installation errors and improve transmission performance. Most of the existing non-circular gear modification methods focus on geometric modification and contact surface optimization, and lack systematic analysis of performance indexes such as modification coefficient, contact stress, and transmission error. Most of methods fail to make a comprehensive performance comparison under actual working conditions, and do not consider the influence of actual factors such as assembly error on the effects of the method.
Despite substantial advances in gear-modification methods overall, studies focused specifically on non-circular gears remain limited, largely because accurate tooth surface models for such gears are difficult to obtain. In this work, we first derive the tooth surface equation of a non-circular gear and apply an ease-off-based longitudinal rectification; the modified surface is represented via NURBS fitting for high-accuracy reconstruction, after which tooth contact analysis is put into effect to map the relationships among installation errors, rectification coefficients and contact characteristics of non-circular gears.

2. Mathematical Modeling of Non-Circular Gear Tooth Surface

A standard shaper cutter is used to machine the non-circular gear according to the principle of gear meshing and the principle of Van Gogh forming.
Here the non-circular gear rotates around its own fixed axis (z-axis); the gear shaper cutter rotates on a fixed axis along the pitch curve of the non-circular gear and, on the other hand, makes up and down chip movements along its own rotary axis (z-axis), and their relationship is a pure rolling motion.
Based on its meshing relationship establish a coordinate system as shown in Figure 1, the S 0 ( x 0 , y 0 , z 0 ) is the fixed coordinate system of the tool, which is solidly connected to the coordinate system of the machine tool. S 1 ( x 1 , y 1 , z 1 ) is the coordinates of the tool movement, S 2 ( x 2 , y 2 , z 2 ) is the non-circular gear moving coordinate system, S p ( x p , y p , z p ) is the non-circular gear static coordinate system. r g is the radius of the indexing circle of the shaper cutter, φ i is the polar angle of the corresponding position, r i is the radial diameter of the non-circular gear at this node; ϕ i and θ i are the tool angle and gear angle, respectively.
The tooth surface equation and unit normal vector of the shaper cutter are denoted as r c and n c as follows:
r c = x c y c z c   t = r b [ cos ( β 0 + t c ) ] + t c sin ( β 0 + t c ) ± r b [ sin ( β 0 + t c ) ] t c cos ( β 0 + t c ) v c   1
n c = r b t c sin ( β 0 + t c )         r b cos ( β 0 + t c )         0 T
where r b is the radius of the base circle of the gear cutter, β 0 is the slot half-angle, t c is the involute parameter, v c is the axial parameter of the tooth surface, and ± indicates the left and right tooth surfaces.
By performing successive coordinate transformations, the shaper cutter geometry is formulated, from which the non-circular gear tooth surface equation and its unit normal are obtained. Accordingly, the tooth surface r 2 and unit normal n 2 are given as follows:
r 2 = M 2 p ( θ i ) M p 0 ( r i , t i ) M 01 ( ϕ i ) · r c ( t c , v c )
n 2 = L 2 p ( θ i ) L p 0 ( r i , t i ) L 01 ( ϕ i ) · n i 0 ( t c , v c )
where M 2 p , M p 0 , and M 01 are the coordinate transformation matrices from the gear blank static coordinate system S p to the dynamic coordinate system S 2 , from the machine coordinate system S 0 to the gear blank static coordinate system S p , and from the shaper cutter dynamic coordinate system S 1 to the machine coordinate system S 0 ; the expressions are as follows:
M 2 p = cos θ i sin θ i 0 0 sin θ i cos θ i 0 0 0 0 1 0 0 0 0 1
M p 0 = 1 0 0 r i sin ( t i ) + r g 0 1 0 r i cos ( t i ) 0 0 1 0 0 0 0 1
M 01 = cos ϕ i sin ϕ i 0 0 sin ϕ i cos ϕ i 0 0 0 0 1 0 0 0 0 1
Eliminate the last row and column of M 2 p , M p 0 , and M 01 to get the corresponding L 2 p , L p 0 , and L 01 .
The tooth surface meshing equation can be derived from reference [29] as follows:
r b t c cos δ 0 + t c + v c cos ( ϕ i ) ± r b t c sin δ 0 + t c + v c sin ( ϕ i ) = 1 r g y 1 r b t c sin δ 0 + t c + v c + x 1 r b t c cos δ 0 + t c + v c
Converting the meshing equation of the non-circular gear into a relation between the shaper cutter angle ϕ i and the involute parameter t c , i.e., Equation (8), can be simplified as
ϕ i = ± arccos r b r g ± δ 0 ± t c ± v c
Following the equal arc length principle and the angular relations in Figure 1, the mappings between the shaper cutter angle ϕ i and the pole angle ϕ i of the pitch curve, and between the non-circular gear angle θ i and the pole angle φ i of the pitch curve, can be derived as follows:
r g ϕ i = φ 0 φ i r φ i 2 + d r φ i d φ i 2 d φ i
θ i = φ i φ 0 μ 0 + μ i
The working tooth surface equation determined by two independent parameters t c and v c can be obtained by the coupling Formulas (1)–(11) as follows:
x 2 = r b cos ( δ 0 + t c + v c ± ϕ i ± θ i ) + r g cos θ i +                   r i sin ( μ i θ i ) + r b t c sin ( δ 0 + t c + v c ± ϕ i ± θ i ) y 2 = r b sin ( δ 0 + t c + v c ± ϕ i ± θ i ) r g sin θ i                   r i cos ( μ i θ i ) ± r b t c cos ( δ 0 + t c + v c ± ϕ i ± θ i ) z 2 = v c ϕ i = ± arccos r b r g ± δ 0 ± t c ± v c θ i = φ i φ 0 μ 0 + μ i r g ϕ i = φ 0 φ i r φ i 2 + d r φ i d φ i 2 d φ i
The symbol ‘+’ in the formula represents the left tooth surface and ‘−’ indicates the right tooth surface. The root transition curve is formed naturally by the top of the tooth of the generating gear.
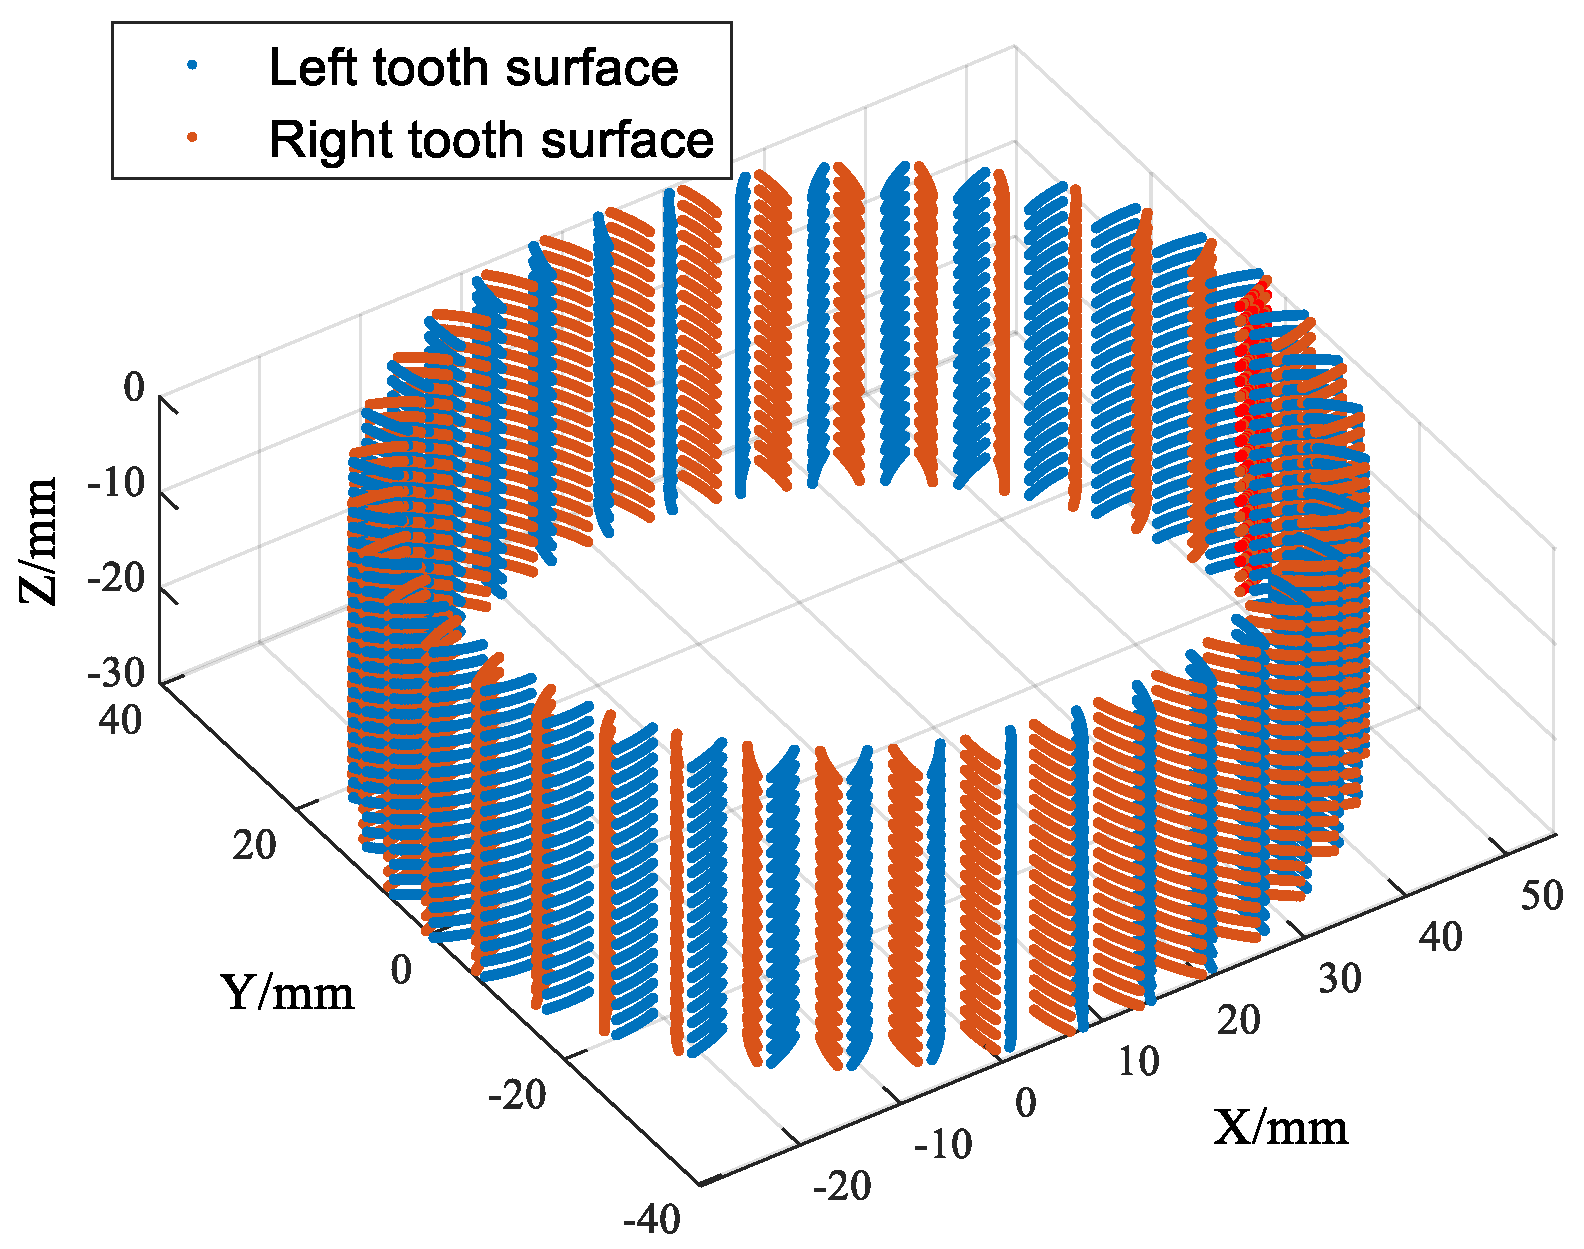
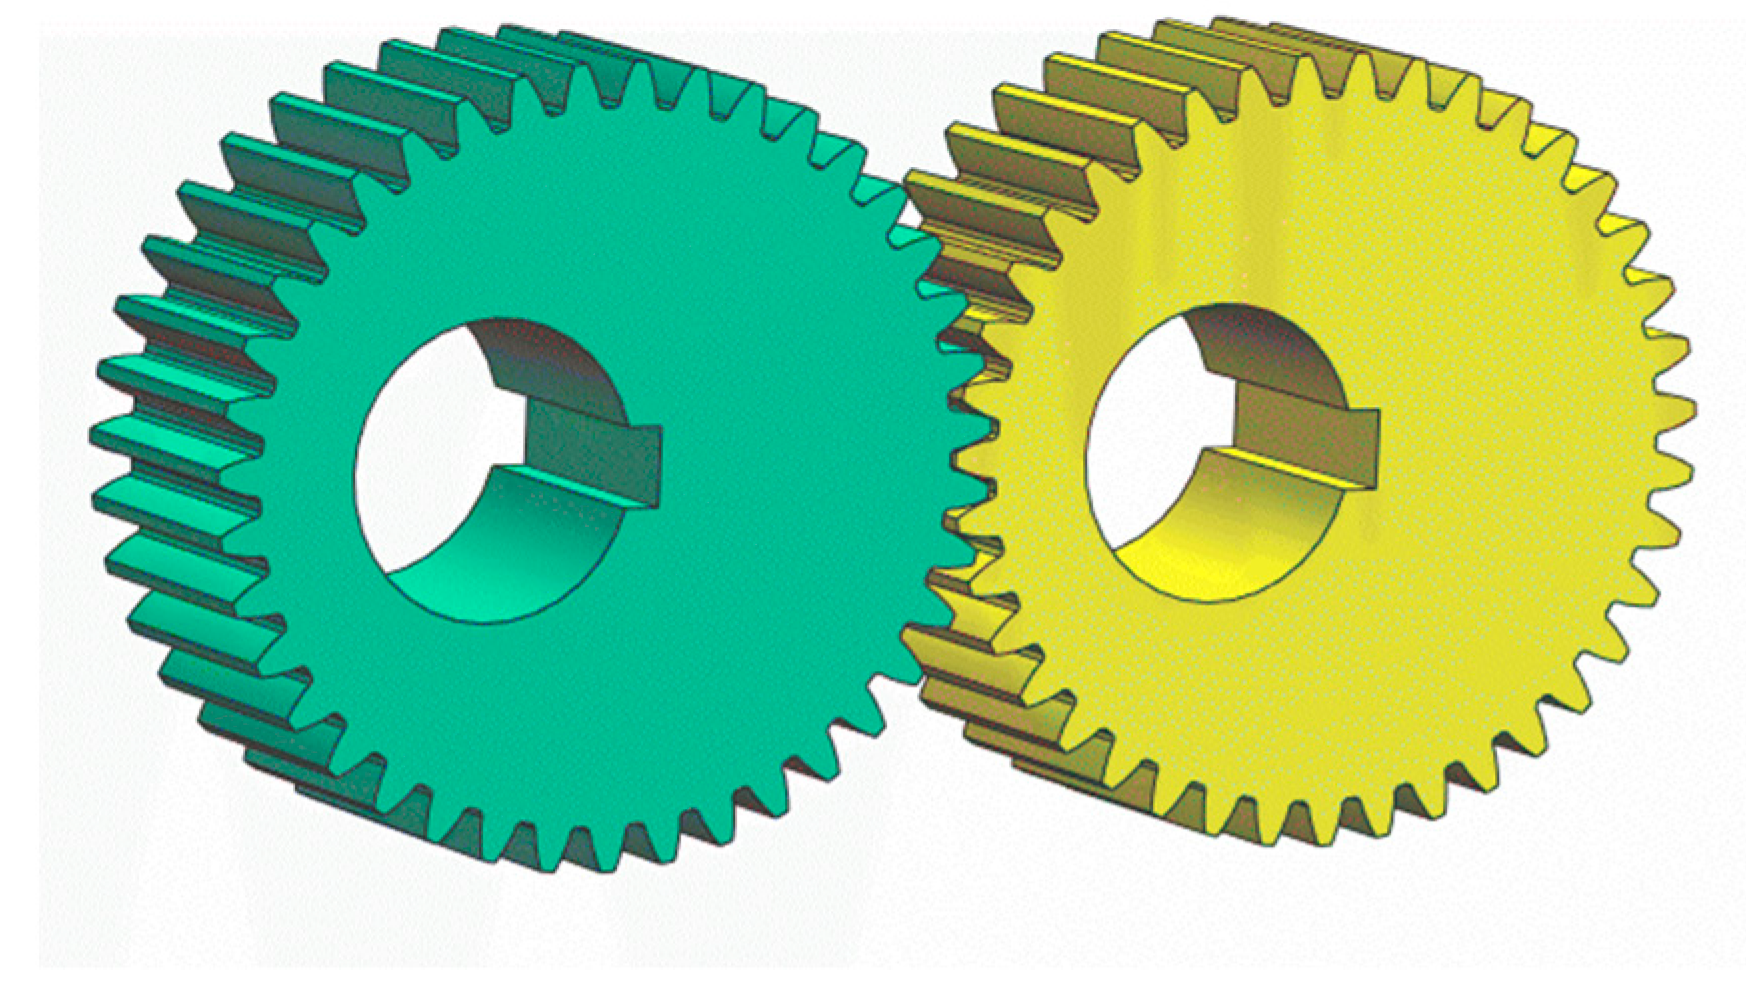
Taking the data in Table 1 as an example, substituting into the parametric tooth surface equation shown in Equation (12), and cyclically calculating with the tooth profile parameter t c and tooth direction parameter v c as independent variables, the accurate tooth surface point cloud data of the non-circular spur gear can be acquired, as illustrated in Figure 2. Using the obtained point cloud data, the gear pair can be modeled in three dimensions, as depicted in Figure 3.

3. Design Method for Ease-off Modification

The theoretical tooth surface Σ 2 is defined by the tooth surface obtained from the tooth surface equation in this paper; its vector equation is denoted by r 2 t c , v c and the unit vector by n 2 t c , v c .
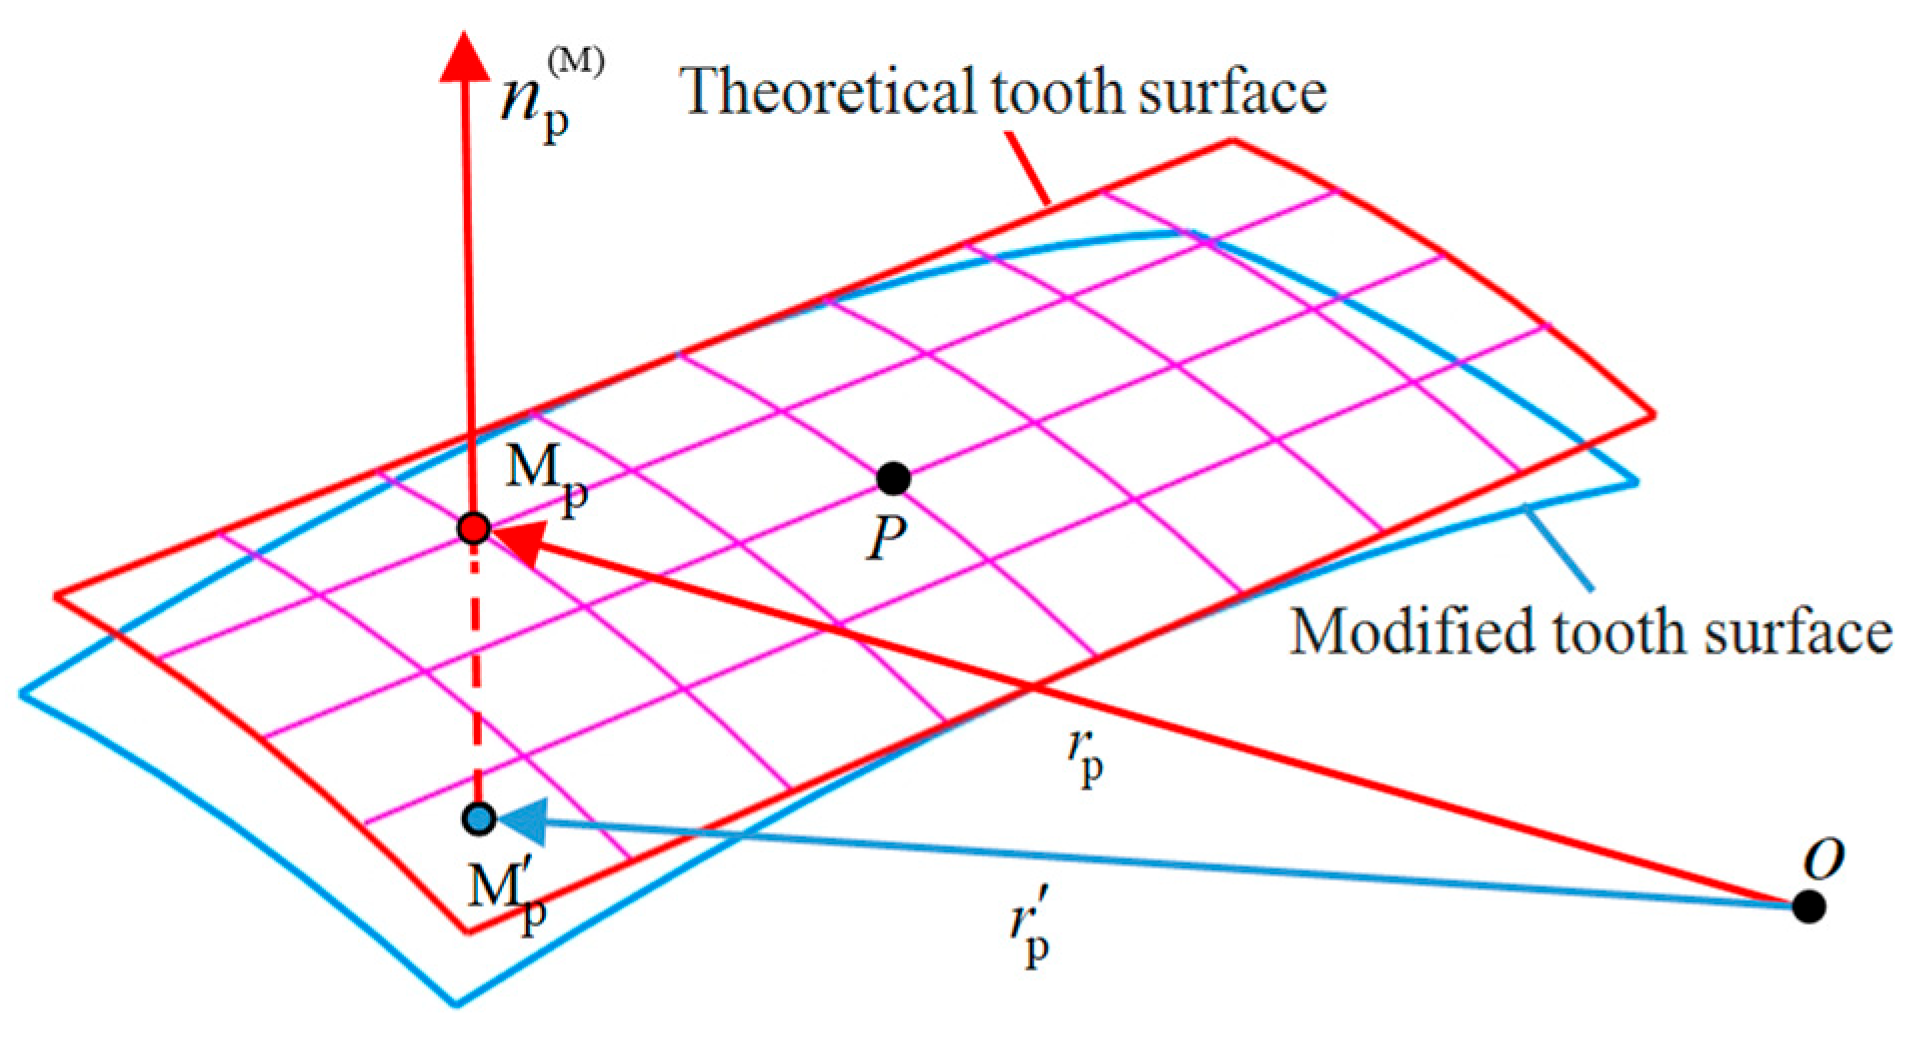
For the modified tooth surface defined as Σ m , the vector equation is denoted by r m t c , v c . The positional correspondence between the theoretical and modified surfaces is shown in Figure 4. Point P denotes the grid center of the tooth surface, while M p is a node on the theoretical surface. By numerically discretizing the surface, the coordinates are written as r p ( M ) = x p ( M ) , y p ( M ) , z p ( M ) . Through M p , construct the normal to the theoretical surface; its intersection defines M p , and the unit normal at M p is n p ( M ) . The tooth deviation at M p relative to the modified surface is Δ δ = M P M p [28]. The Δ δ is given by
Δ δ ( t c , v c ) = [ r m ( t c , v c ) r 2 ( t c , v c ) ] · n 2 ( t c , v c )
The coordinates of a point M p on the theoretical tooth surface can be expressed by Equation (12) as x 2 ( M ) ( t c , v c ) , y 2 ( M ) ( t c , v c ) , z 2 ( M ) ( t c , v c ) ; the unit normal vector is n 2 x ( M ) ( t c , v c ) , n 2 y ( M ) ( t c , v c ) , n 2 z ( M ) ( t c , v c ) , and it can be obtained from the vector relationship in Figure 4 as follows:
x 2 ( M ) ( t c , v c ) + Δ δ n 2 x ( M ) ( t c , v c ) = x 2 ( M ) y 2 ( M ) ( t c , v c ) + Δ δ n 2 y ( M ) ( t c , v c ) = y 2 ( M ) z 2 ( M ) ( t c , v c ) + Δ δ n 2 z ( M ) ( t c , v c ) = z 2 ( M )
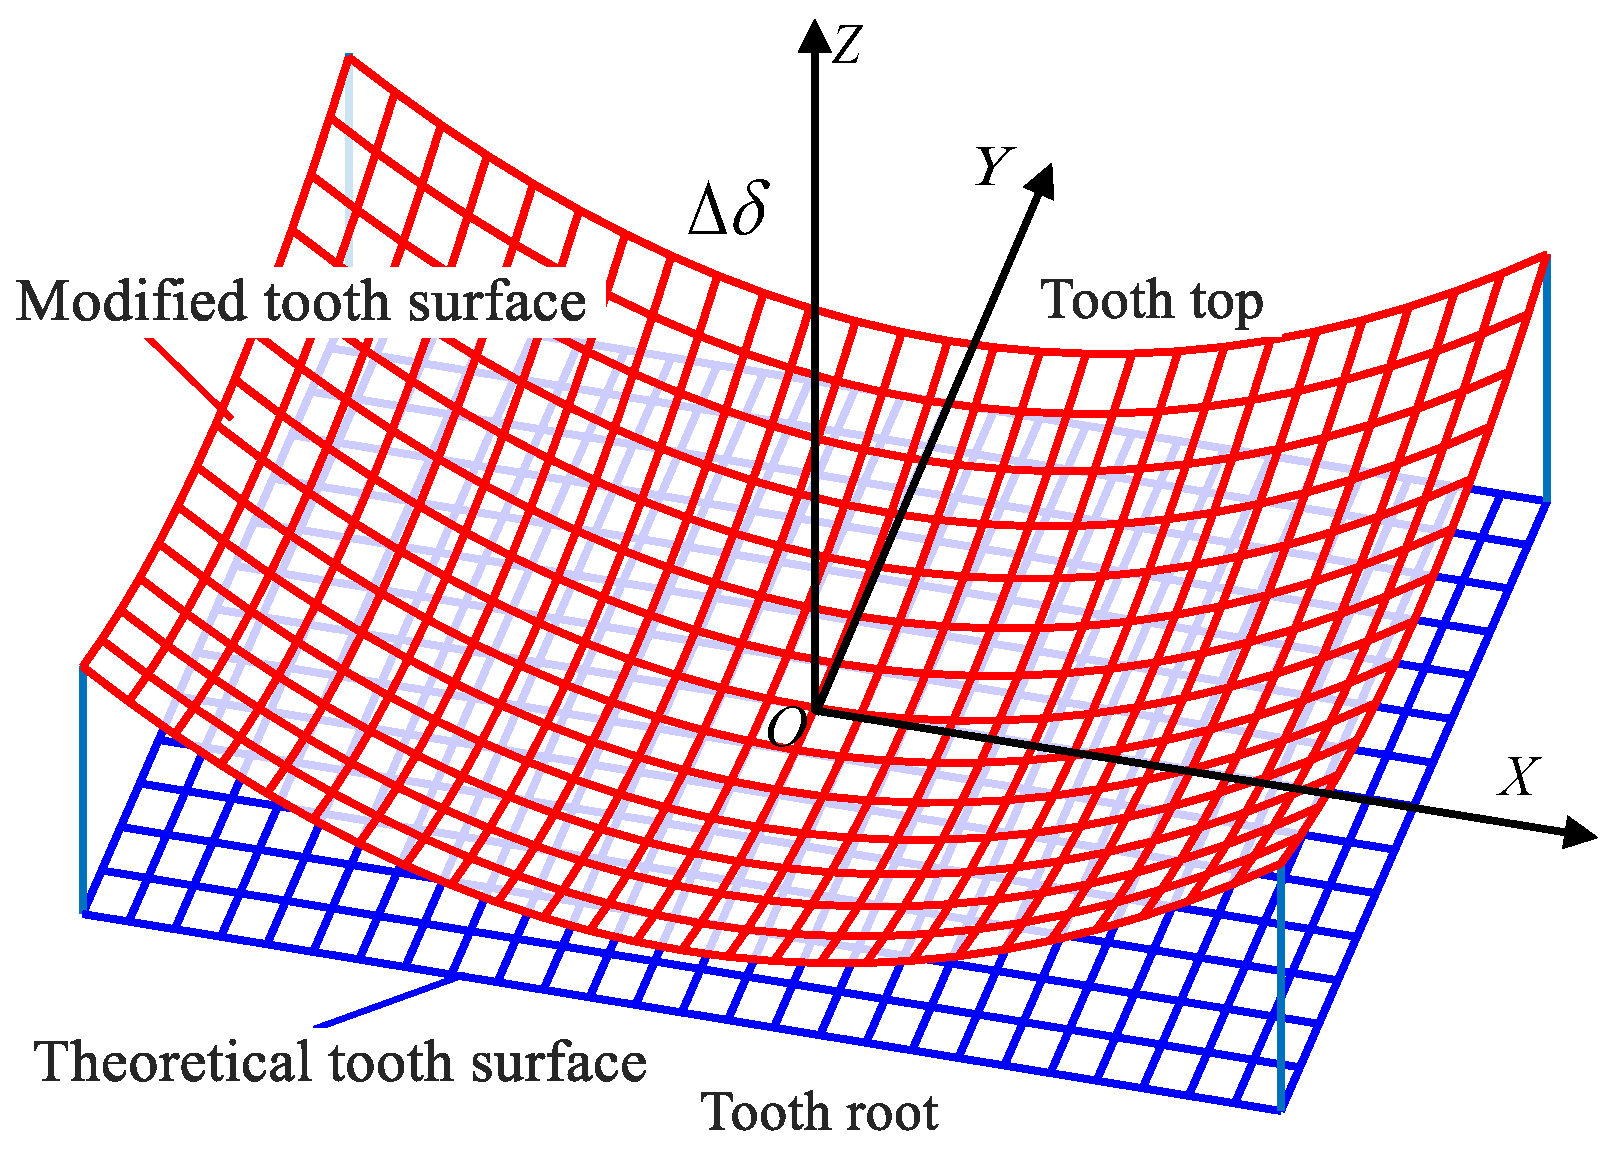
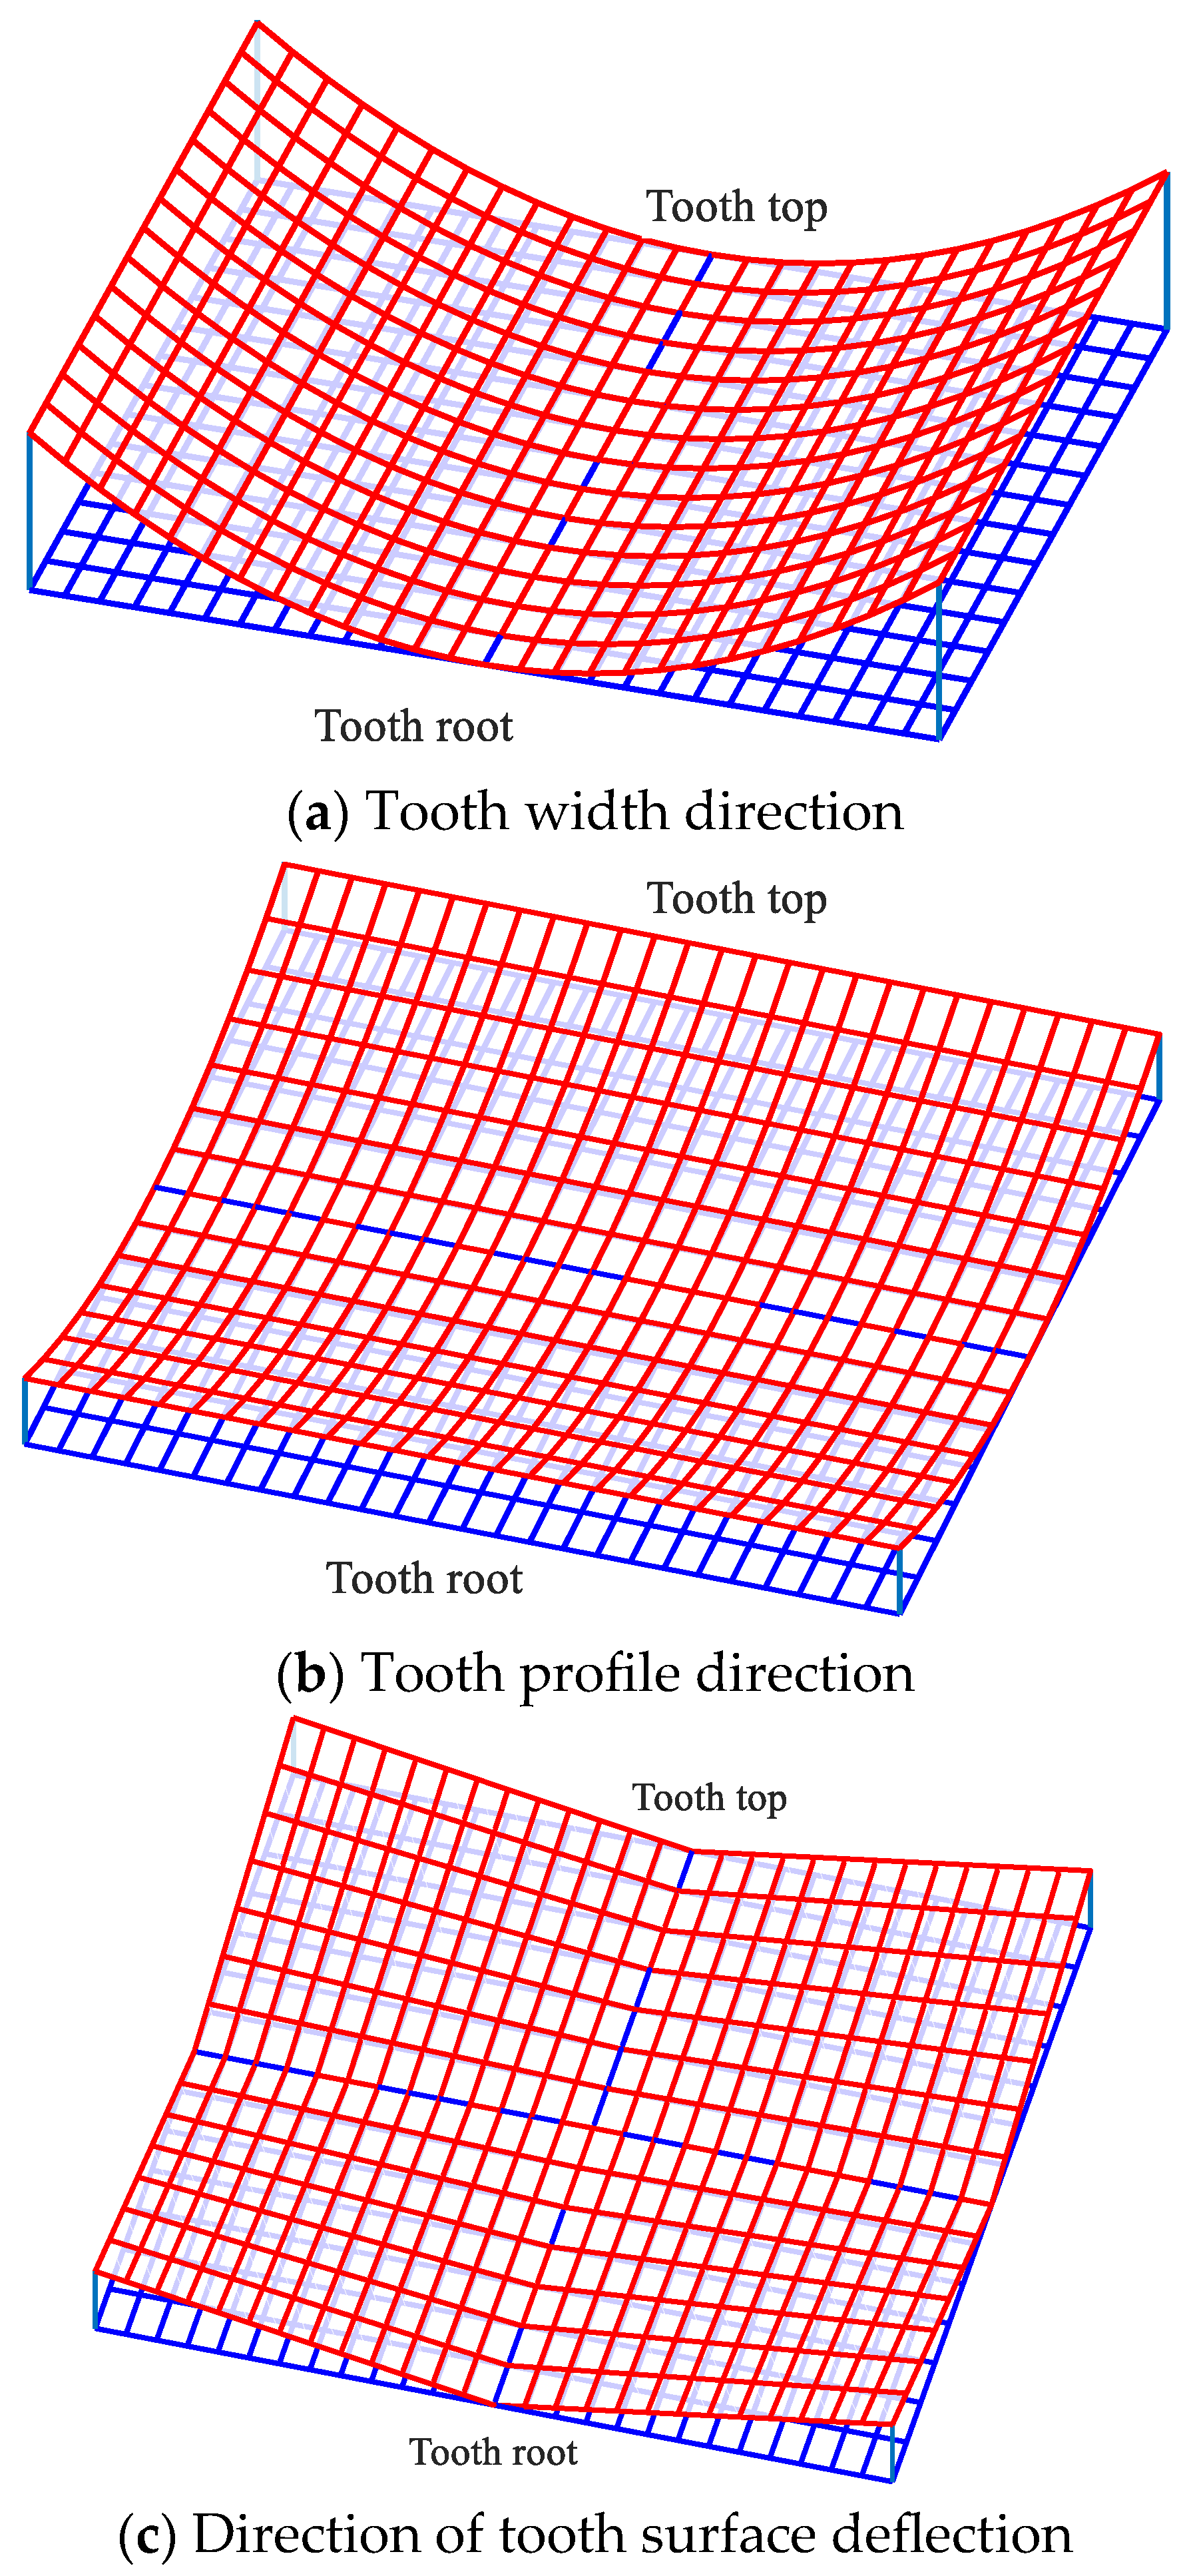
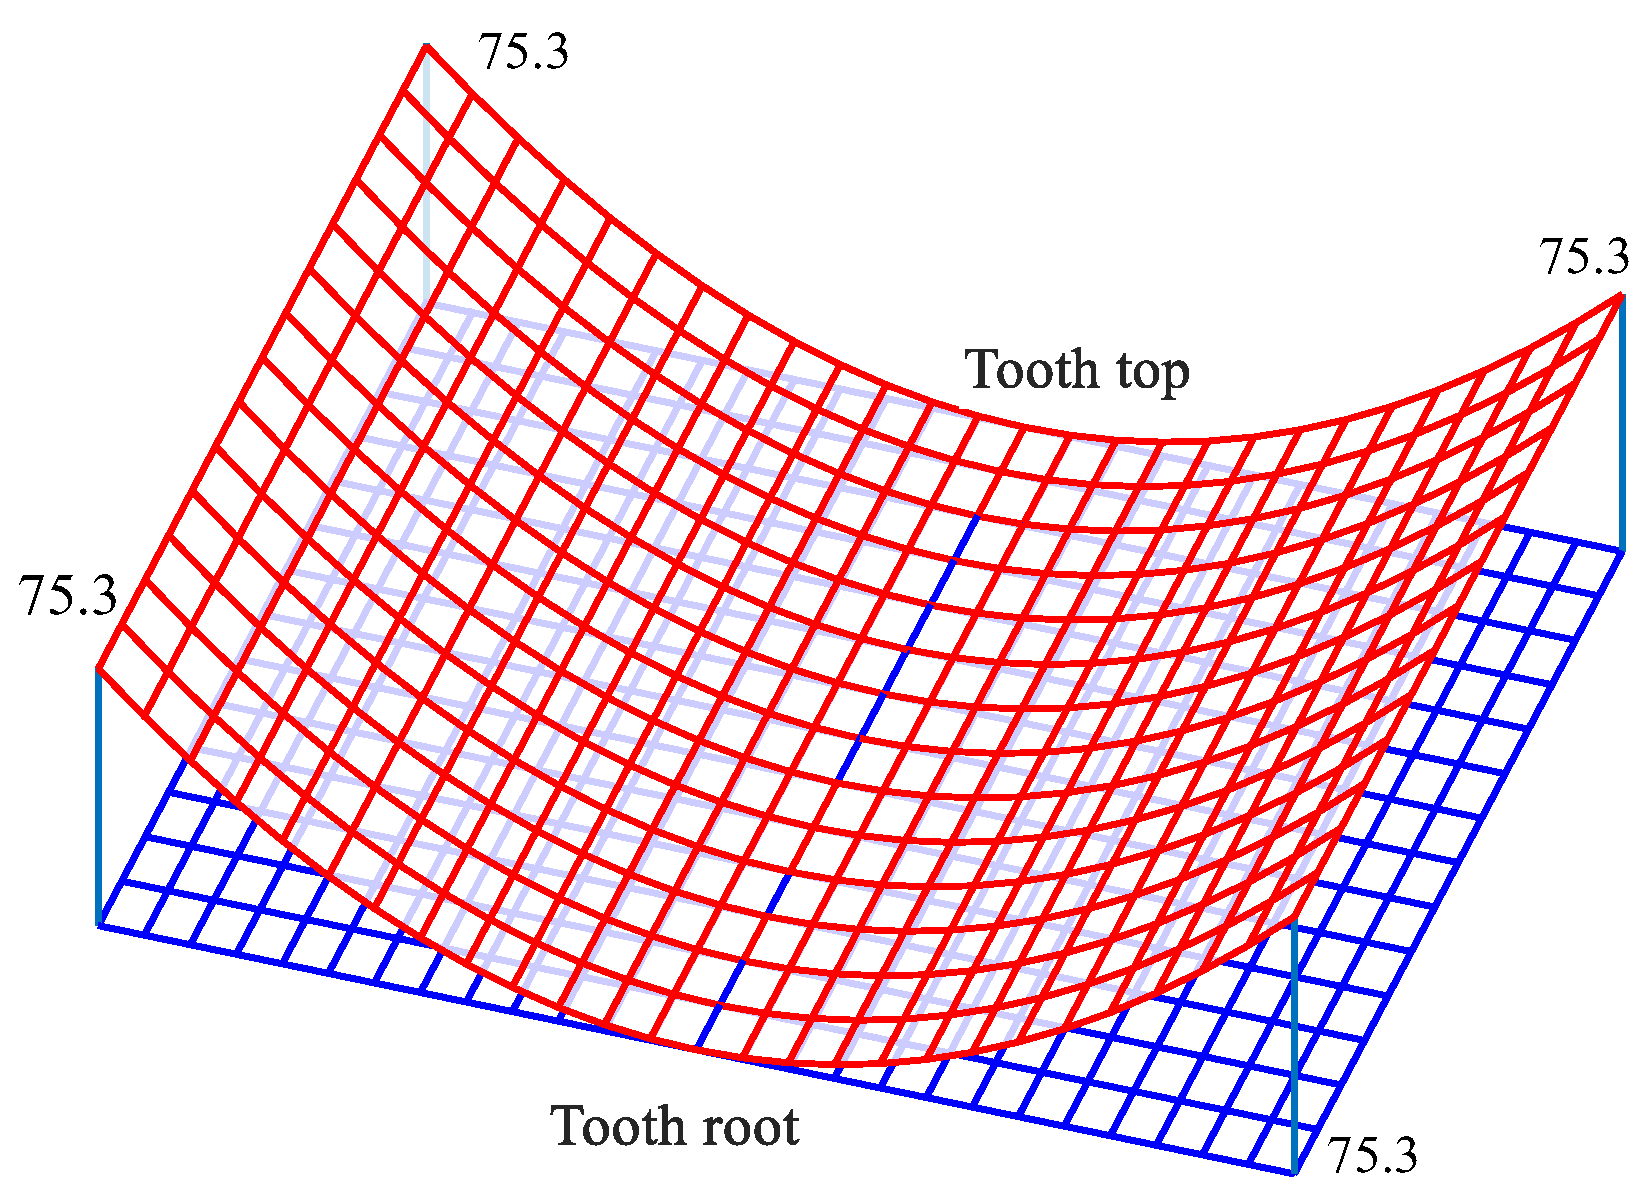
A second-order surface polynomial can be used to approximate the ease-off topology as demonstrated in Equation (15), which is essentially a tooth surface deviation, and the tooth surface modification topology is shown in Figure 5.
Δ δ = a 1 X + a 2 Y + a 3 X 2 + a 4 Y 2 + a 5 X Y
where ( X , Y ) is the grid node coordinates along the tooth width and tooth height using the grid center point as the origin of the revised coordinate system. a i ( i = 1 , 2 , 3 , 4 , 5 ) is the differential surface shape control coefficient, where a 1 is the helix angle error coefficient, a 2 is the pressure angle error coefficient, a 3 is the tooth width curvature coefficient, a 4 is the tooth profile curvature coefficient, and a 5 is the tooth surface deflection coefficient. When ( X , Y ) is a fixed value, changing the coefficient A can obtain different differential surface shapes. The most common typical second-order ease-off-modified difference surface is shown in Figure 6.
After obtaining the deviations from the theoretical tooth face points as well as from all grid nodes of the ease-off topology, Equation (15) is expanded to obtain the deviations from the ease-off topology expressed in matrix form [30] as follows:
Δ δ 1 Δ δ 2 Δ δ 3   Δ δ m × n = X 1 Y 1 X 1 2 Y 1 2 X 1 Y 1 X 2 Y 2 X 2 2 Y 2 2 X 2 Y 2 X 3 Y 3 X 3 2 Y 3 2 X 3 Y 3 X m × n Y m × n X m × n 2 Y m × n 2 X m × n Y m × n a 1 a 2 a 3 a 4 a 5
where m is the number of rows and n is the number of columns of the tooth surface grid.

4. Digital Fitting of the Tooth Surface of a Modified Non-Circular Gear

The modified tooth surface is a free-form surface that has been separated from the tooth surface equation before modification by ease-off longitudinal modification and before discrete point data is obtained. In this section, the explicit expression for the digitized tooth surface of a modified non-circular gear is acquired by fitting modified discrete point data using a double cubic NURBS surface, which facilitates the subsequent tooth contact analysis.

4.1. Definition of the NURBS Surface

The NURBS surface can be expressed as [31]
P ( u , v ) = i = 0 n j = 0 m N i , k ( u ) N j , l ( v ) W i , j ω i , j i = 0 n j = 0 m N i , k ( u ) N j , l ( v ) W i , j
where n is the number of control vertices in the direction u; m is the number of control vertices in the direction v; k, l is the power of the B-spline basis function; ω i , j is the weighting factor of the control vertices; W i , j is the control vertices of the surface; N i , k is the k-times B-spline basis function in the direction u; N j , l is the l-times B-spline basis function in the direction v; and the B-spline basis function satisfies the following recurrence relation:
N i , 0 ( t ) = 1 ,   t i t t i + 1 0 ,   others N i , k ( t ) = t t i t i + k t i N i , k 1 ( t ) + t i + k + 1 t t i + k + 1 t i + 1 N i + 1 , k 1 ( t ) ,   k 1
where t is the nodes of the surface and i is the ordinal number of the B-splines.
The node vectors U and V along the U direction and V direction can be represented as
U = 0 = u 0 = u 1 = = u k , , u r k 1 , u r k = u r k + 1 = = u r = 1
V = 0 = v 0 = v 1 = = v l , , v s l 1 , v r l = v s l + 1 = = v s = 1
where r and s are the number of nodes, r = n + k + 1 and s = m + l + 1 .

4.2. Double Cubic NURBS Surface Fitting

In this paper, we use the NURBS method to fit the tooth surfaces of non-circular gears. The accuracy of NURBS fitting is very important for the results of contact analysis, so in this part we describe the key parameters of the fitting process in detail.
The number of control points in NURBS fitting directly determines the flexibility and accuracy of the fitting surface. We selected 12 control points (in the U direction) and 15 control points (in the V direction) for fitting. The selection of control points is based on the complexity and accuracy requirements of tooth surface geometry to ensure that the fitting results can accurately reflect the tooth surface shape.
In NURBS fitting, the order of B-spline bases determines the smoothness and continuity of the fitting curve. In this paper, a third-order B-spline basis is used to ensure that the fitting curve has sufficient smoothness and can better fit the tooth surface shape.
In order to evaluate the accuracy of NURBS fitting, we use the maximum deviation (the maximum distance between the discrete points and the fitted surface) as the standard of fitting accuracy. The formula for calculating fitting accuracy is
Max _ Error = max P i Q i
where P i is a discrete point and Q i is the corresponding fitted surface point. By controlling the number of control points and the order of the B-spline bases, we ensure that the fitting accuracy is within 0.05 mm, so as to ensure that the fitting surface can accurately reflect the actual shape of the tooth surface.
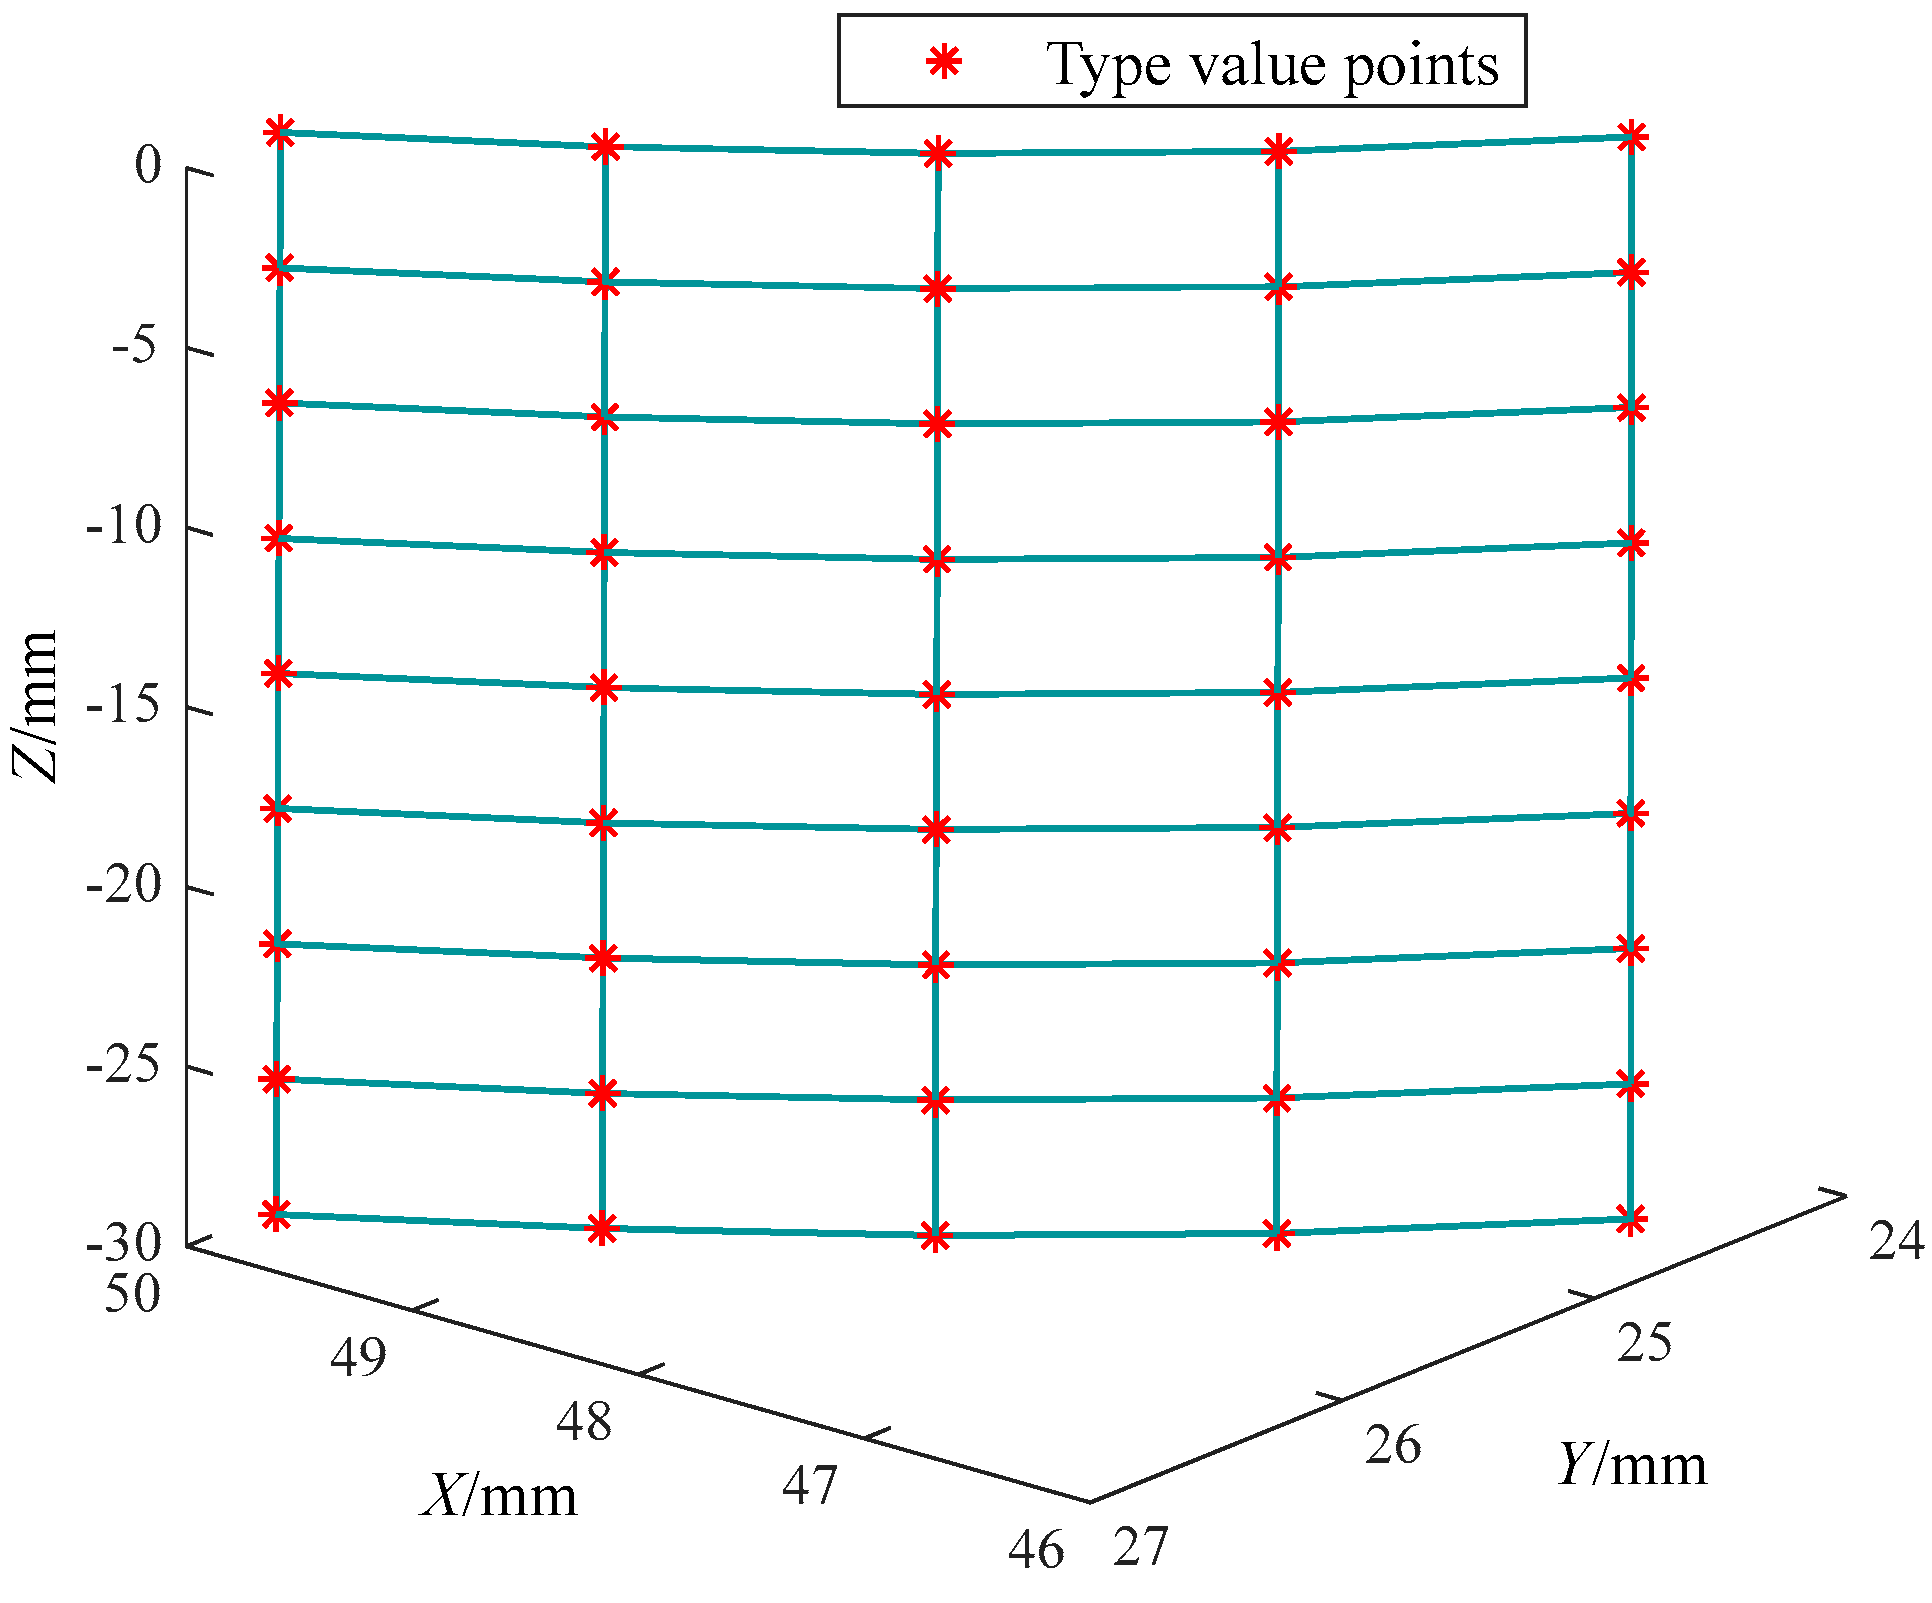
The double cubic NURBS surface fitting method is utilized to fit one of the tooth surfaces of the non-circular gear, using an example. Firstly, the design scheme for tooth surface modification in Section 2 is applied to modify the tooth surface of the non-circular gear by giving the corresponding modification coefficients, and the discrete point data of the modified tooth surface are obtained and used as the type value points, as shown in Figure 7.
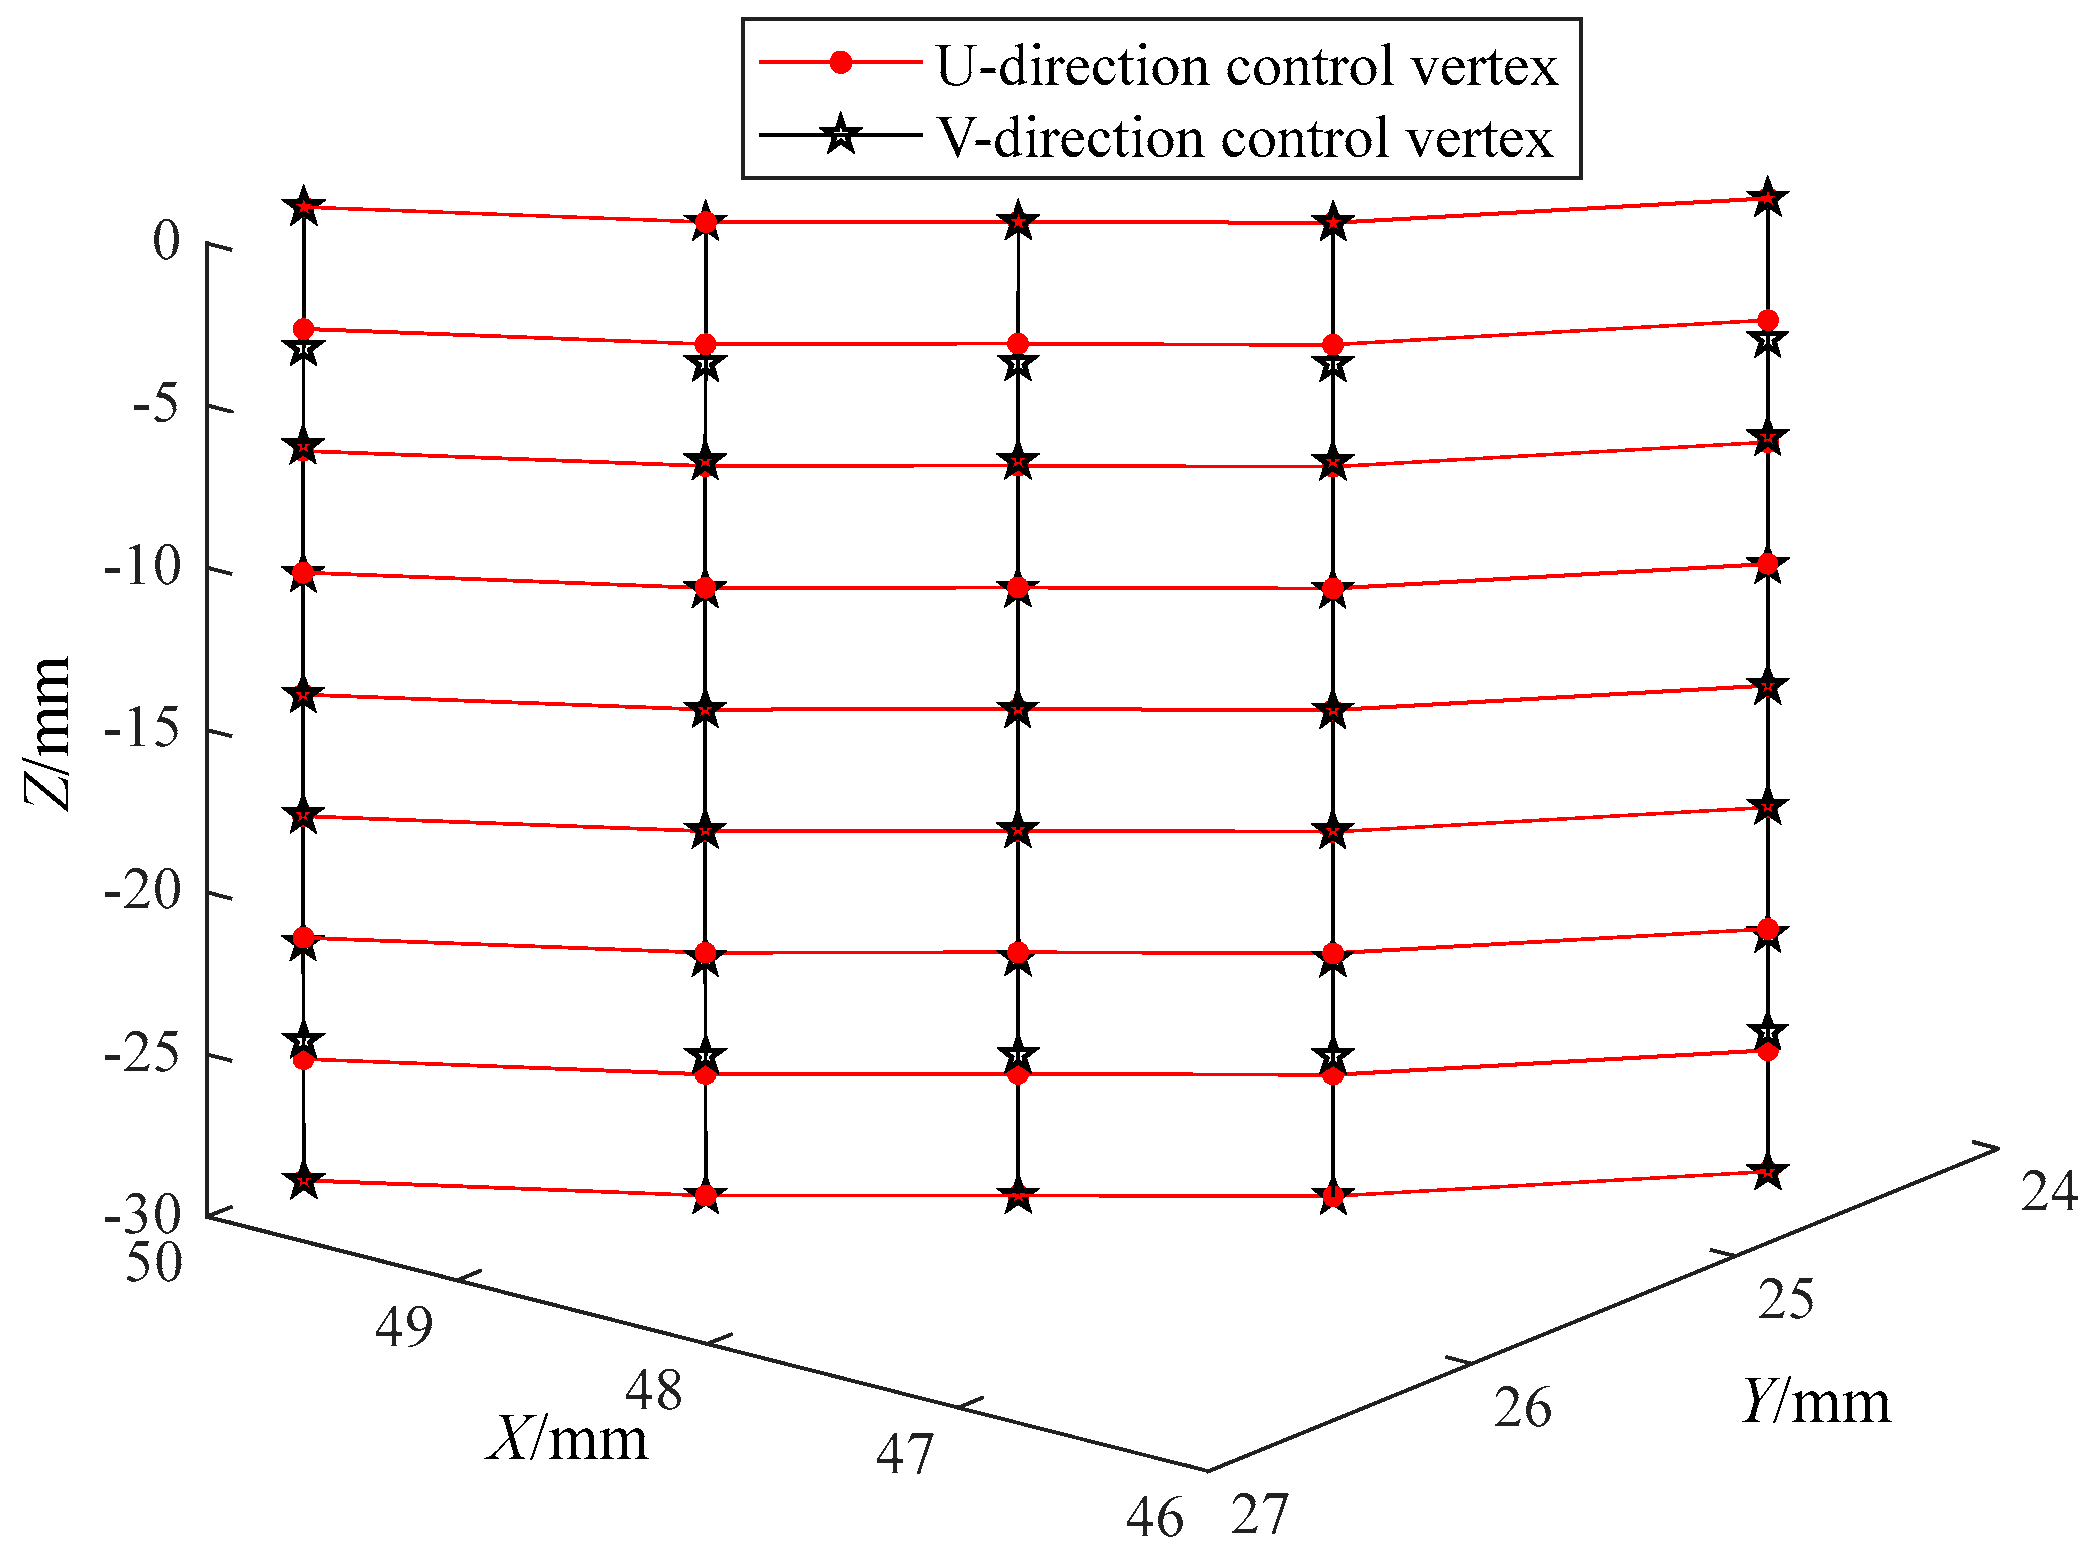
Secondly, the control vertices are calculated along the U direction according to the type value points, and the control vertices obtained are used as the type value points in the V direction to calculate the control vertices as depicted in Figure 8, and the digitized tooth surface is given by the expression
R = R u 0 , v 0
where R indicates the modified tooth surface, and u 0 and v 0 are the tooth surface parameters.
The authors of [32] pointed out that the digitized tooth face accuracy obtained by double cubic NURBS surface fitting can meet the requirements of gear use.

5. Tooth Contact Analysis of Modified Non-Circular Gear

5.1. Mathematical Modeling of TCA for Modified Non-Circular Gear with Installation Errors

Obtaining the digitized tooth surface of a modified non-circular gear can lead to the establishment of a TCA mathematical model of the modified non-circular gear with installation errors to investigate the impact of installation errors on the modified tooth surface of the gear.
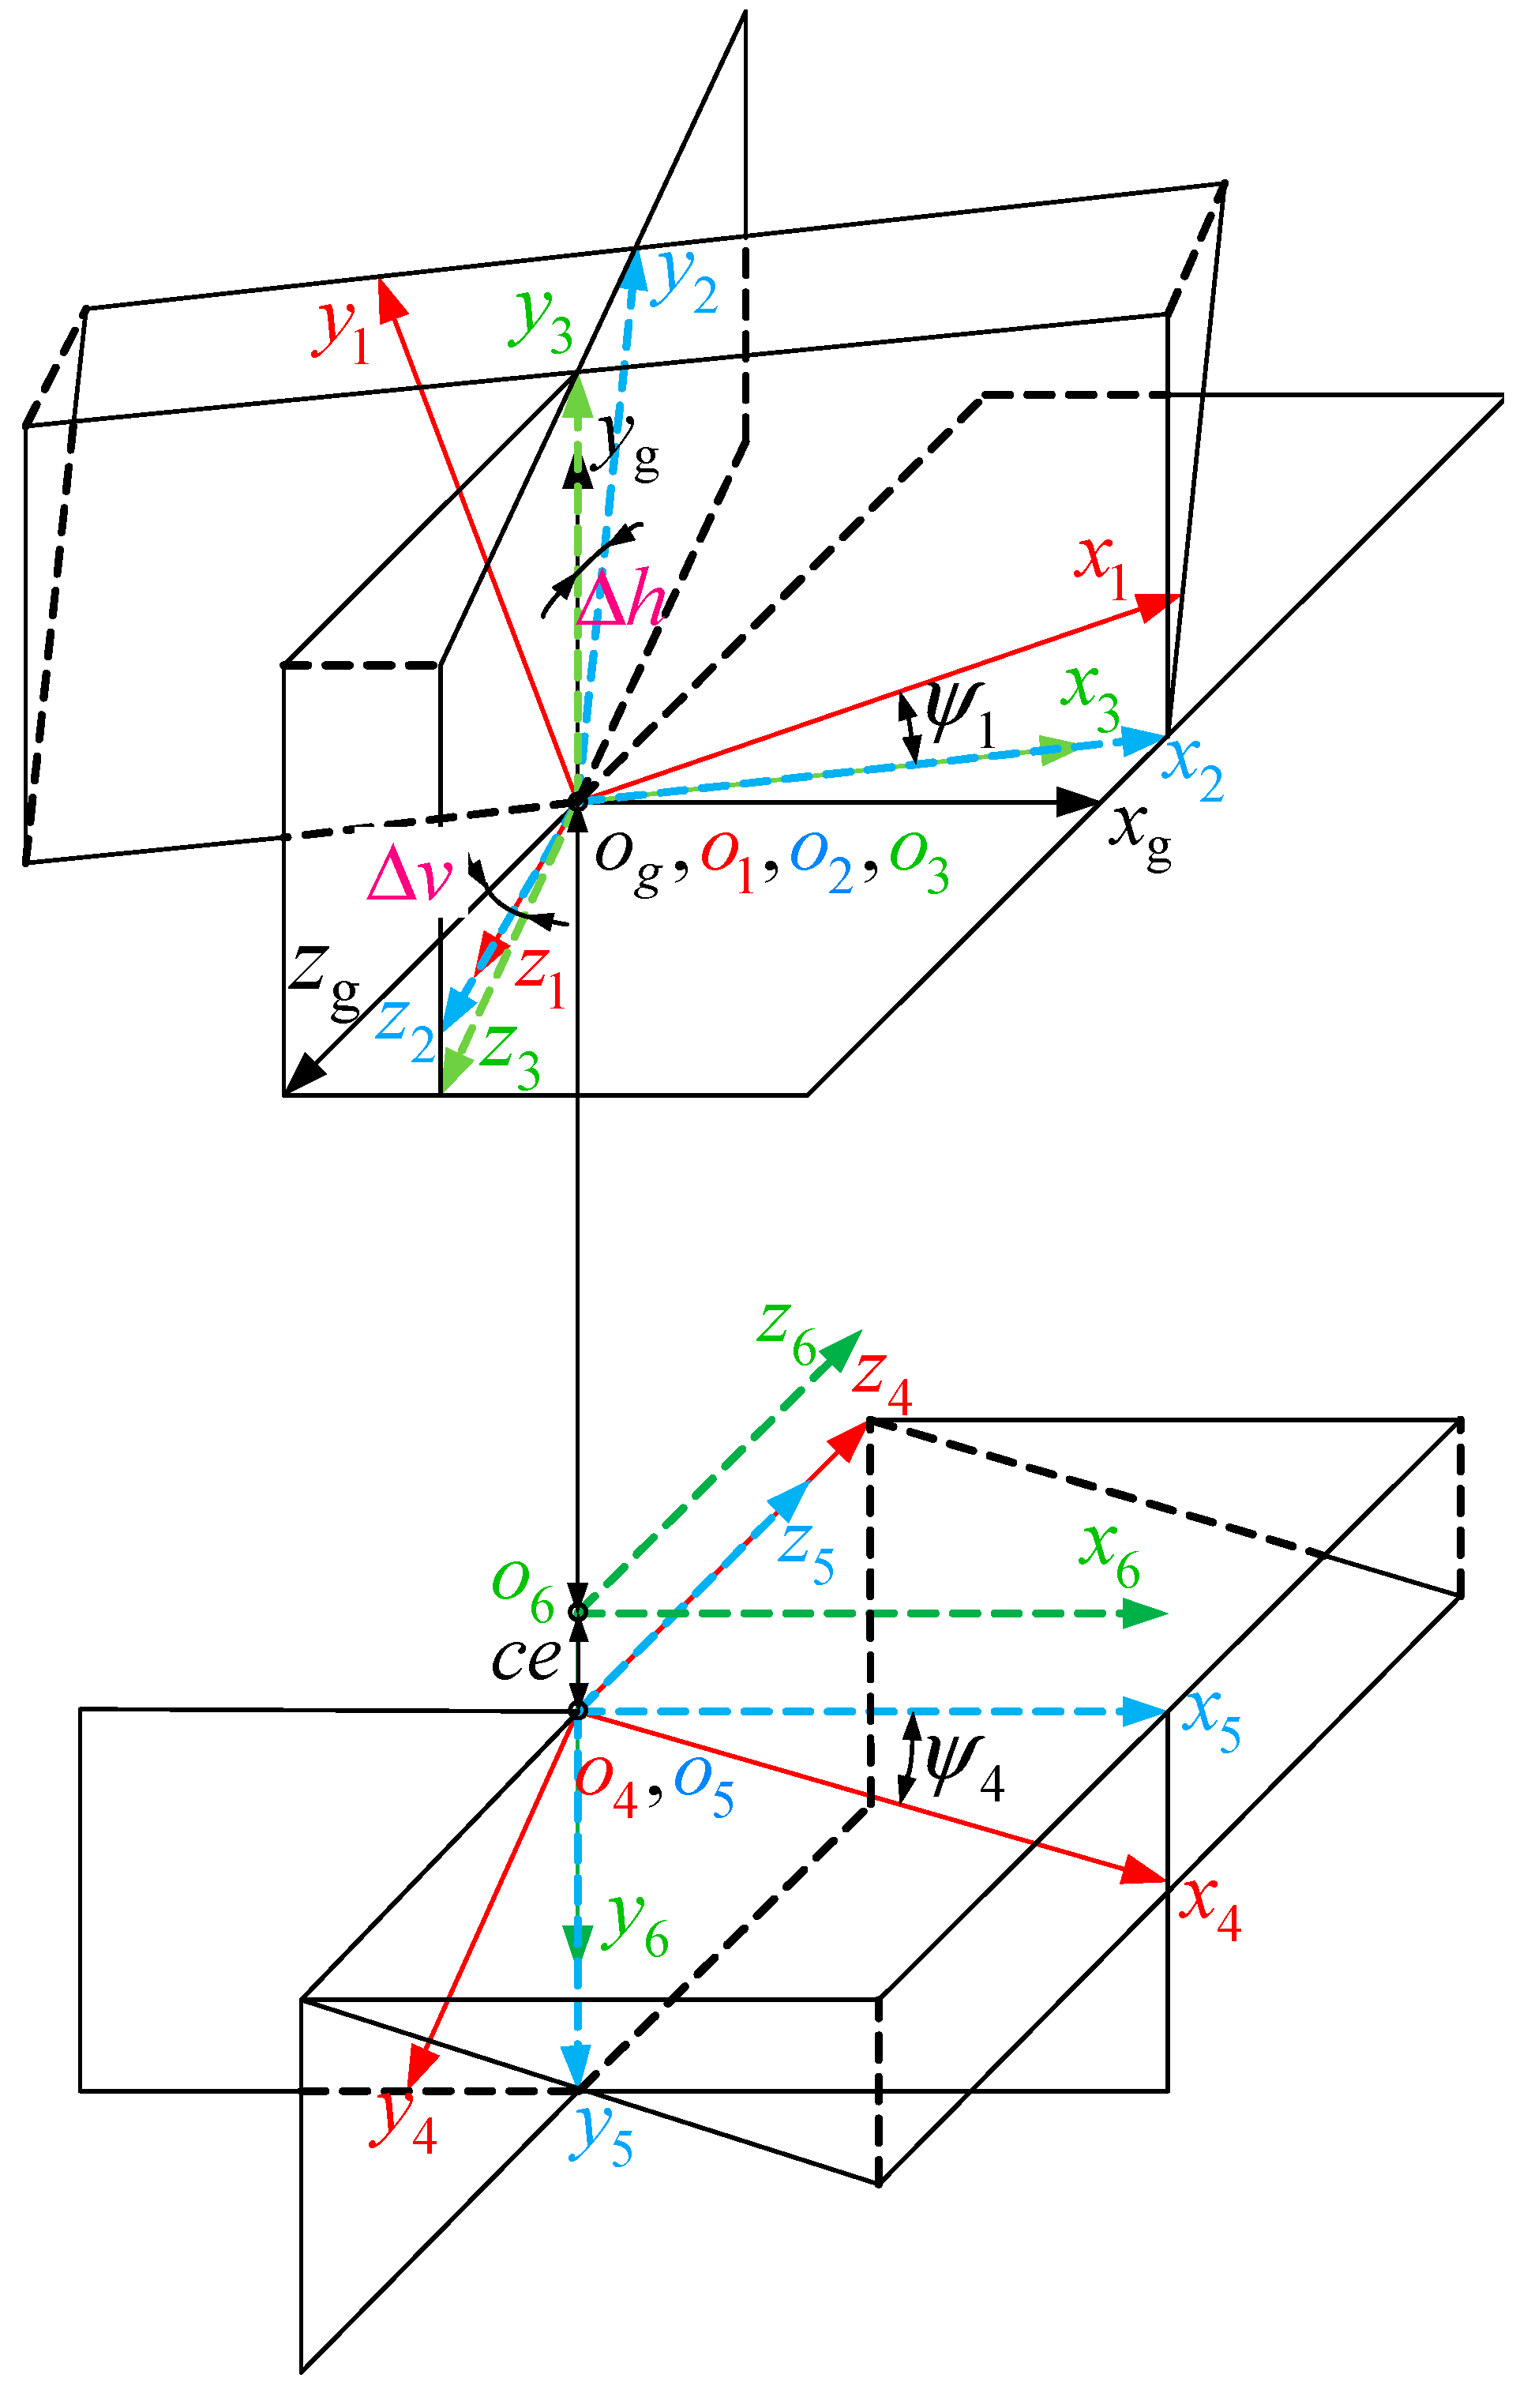
Establish the tooth contact analysis coordinate system shown in Figure 9. S g ( x g , y g , z g ) is the base coordinate system, S 1 ( x 1 , y 1 , z 1 ) is the angular coordinate system of the driving gear, and S 2 ( x 2 , y 2 , z 2 ) , S 3 ( x 3 , y 3 , z 3 ) is the coordinate system in which the driving gear introduces installation errors. S 4 ( x 4 , y 4 , z 4 ) is the angular coordinate system of the driven gear, and S 5 ( x 5 , y 5 , z 5 ) , S 6 ( x 6 , y 6 , z 6 ) is the coordinate system in which the driven gear introduces installation errors. Δ h denotes the axial horizontal angular error, ce indicates the center distance error, and Δ v indicates the axial vertical angular error. ψ 1 and ψ 4 denote the position angle of the driving gear and driven gear, respectively.
Engage the modified non-circular gear as the driving gear with the unmodified non-circular gear in the form of a point contact. The transformation matrix between the coordinate systems in Figure 9 can be determined by analyzing their rotational translation relationship, and the position vectors and normal vectors at the point of engagement of the two tooth surfaces are obtained as follows:
r 1 g ( t c , v c , ψ 1 ) = M g 3 M 32 M 21 ( ψ 1 ) r 1 1 ( t c , v c ) n 1 g ( t c , v c , ψ 1 ) = L g 3 L 32 L 21 ( ψ 1 ) n 1 1 ( t c , v c )
r 4 g ( t c , v c , ψ 4 ) = M g 6 M 65 M 54 ( ψ 4 ) r 4 4 ( t c , v c ) n 4 g ( t c , v c , ψ 4 ) = L g 6 L 65 L 54 ( ψ 4 ) n 4 4 ( t c , v c )
where t 1 and v 1 are the tooth surface parameters of the driving gear; t 4 and v 4 are the tooth surface parameters of the driven gear.
If there is continuous tangential contact between the meshing tooth surfaces of a gear pair, the position vector and normal vector at the meshing point should be the same [30]. The following equation describes a meshing condition:
r 1 g ( t c , v c , ψ 1 ) = r 4 g ( t c , v c , ψ 4 ) n 1 g ( t c , v c , ψ 1 ) = n 4 g ( t c , v c , ψ 4 )
For the pair of non-circular gears, the tooth contact analysis is formulated in Equation (25). The first- and second-order derivatives of the digitized tooth surface are obtained by differentiating Equation (21). Referring to the authors of [33], the principal curvatures and principal directions at every point on the digitized tooth surface are computed. Referring to the solution by the authors of [24], Equation (25) is solved to realize the tooth contact characteristics analysis.

5.2. Influence of Installation Errors on the Contact Characteristics of the Tooth Surface of a Modified Non-Circular Gear

With only slight modification, pronounced installation error leads to edge contact and prevents a precise evaluation of the effect of installation errors on the contact characteristics of the modified tooth surface. So when the longitudinal modification coefficient a 3 = 0.000335 , a non-circular gear tooth surface with larger installation error also did not appear in the edge contact phenomenon, which is conducive to exploring the rules of the change in tooth contact characteristics; its tooth surface ease-off modification of the topography is shown in Figure 10. The results are presented in Figure 11, Figure 12 and Figure 13, where the contact ellipse is calculated in reference [34].
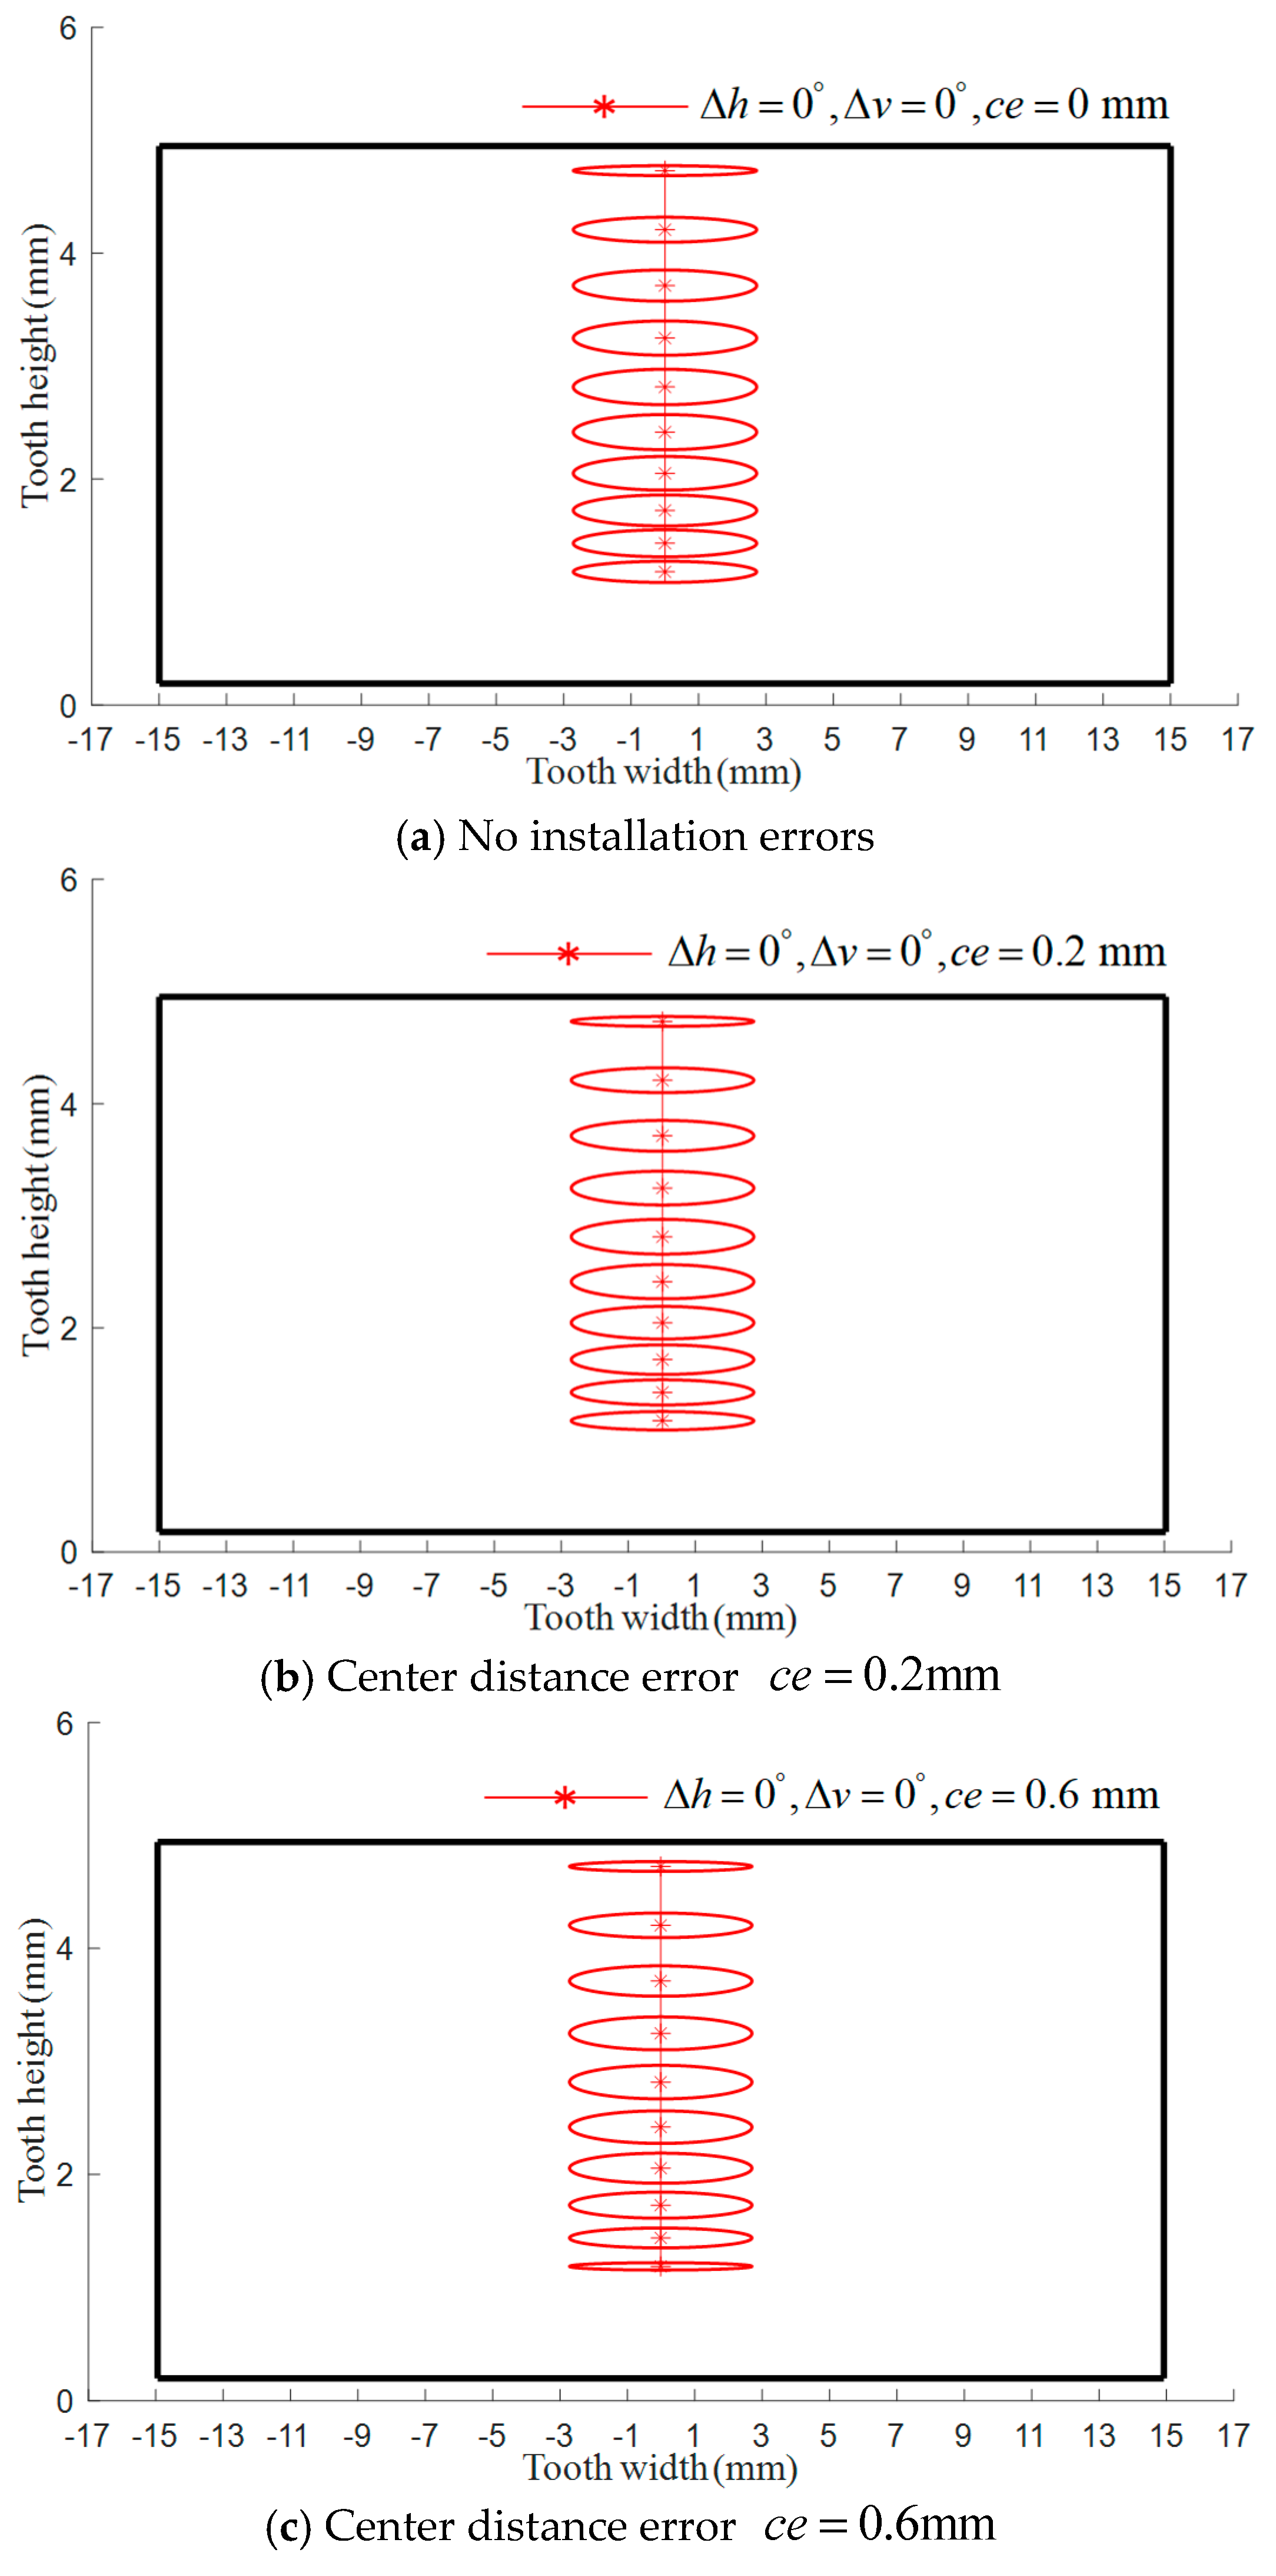
Figure 11 illustrates the influence of center distance error on the contact ellipse. Inspection of Figure 11a–c reveals that regardless of the existence of the center distance error, the position of the contact path on the tooth surface occurs in the middle of the tooth width, and the position of the contact path, as well as the magnitude of the long axis of the instantaneous contact ellipse, are not affected by the center distance. As the center distance error increases, the instantaneous contact ellipse located at the tooth root shifts toward the tooth top. The larger error shortens the contact path and shrinks the contact area, thereby lowering the gear’s contact ratio.
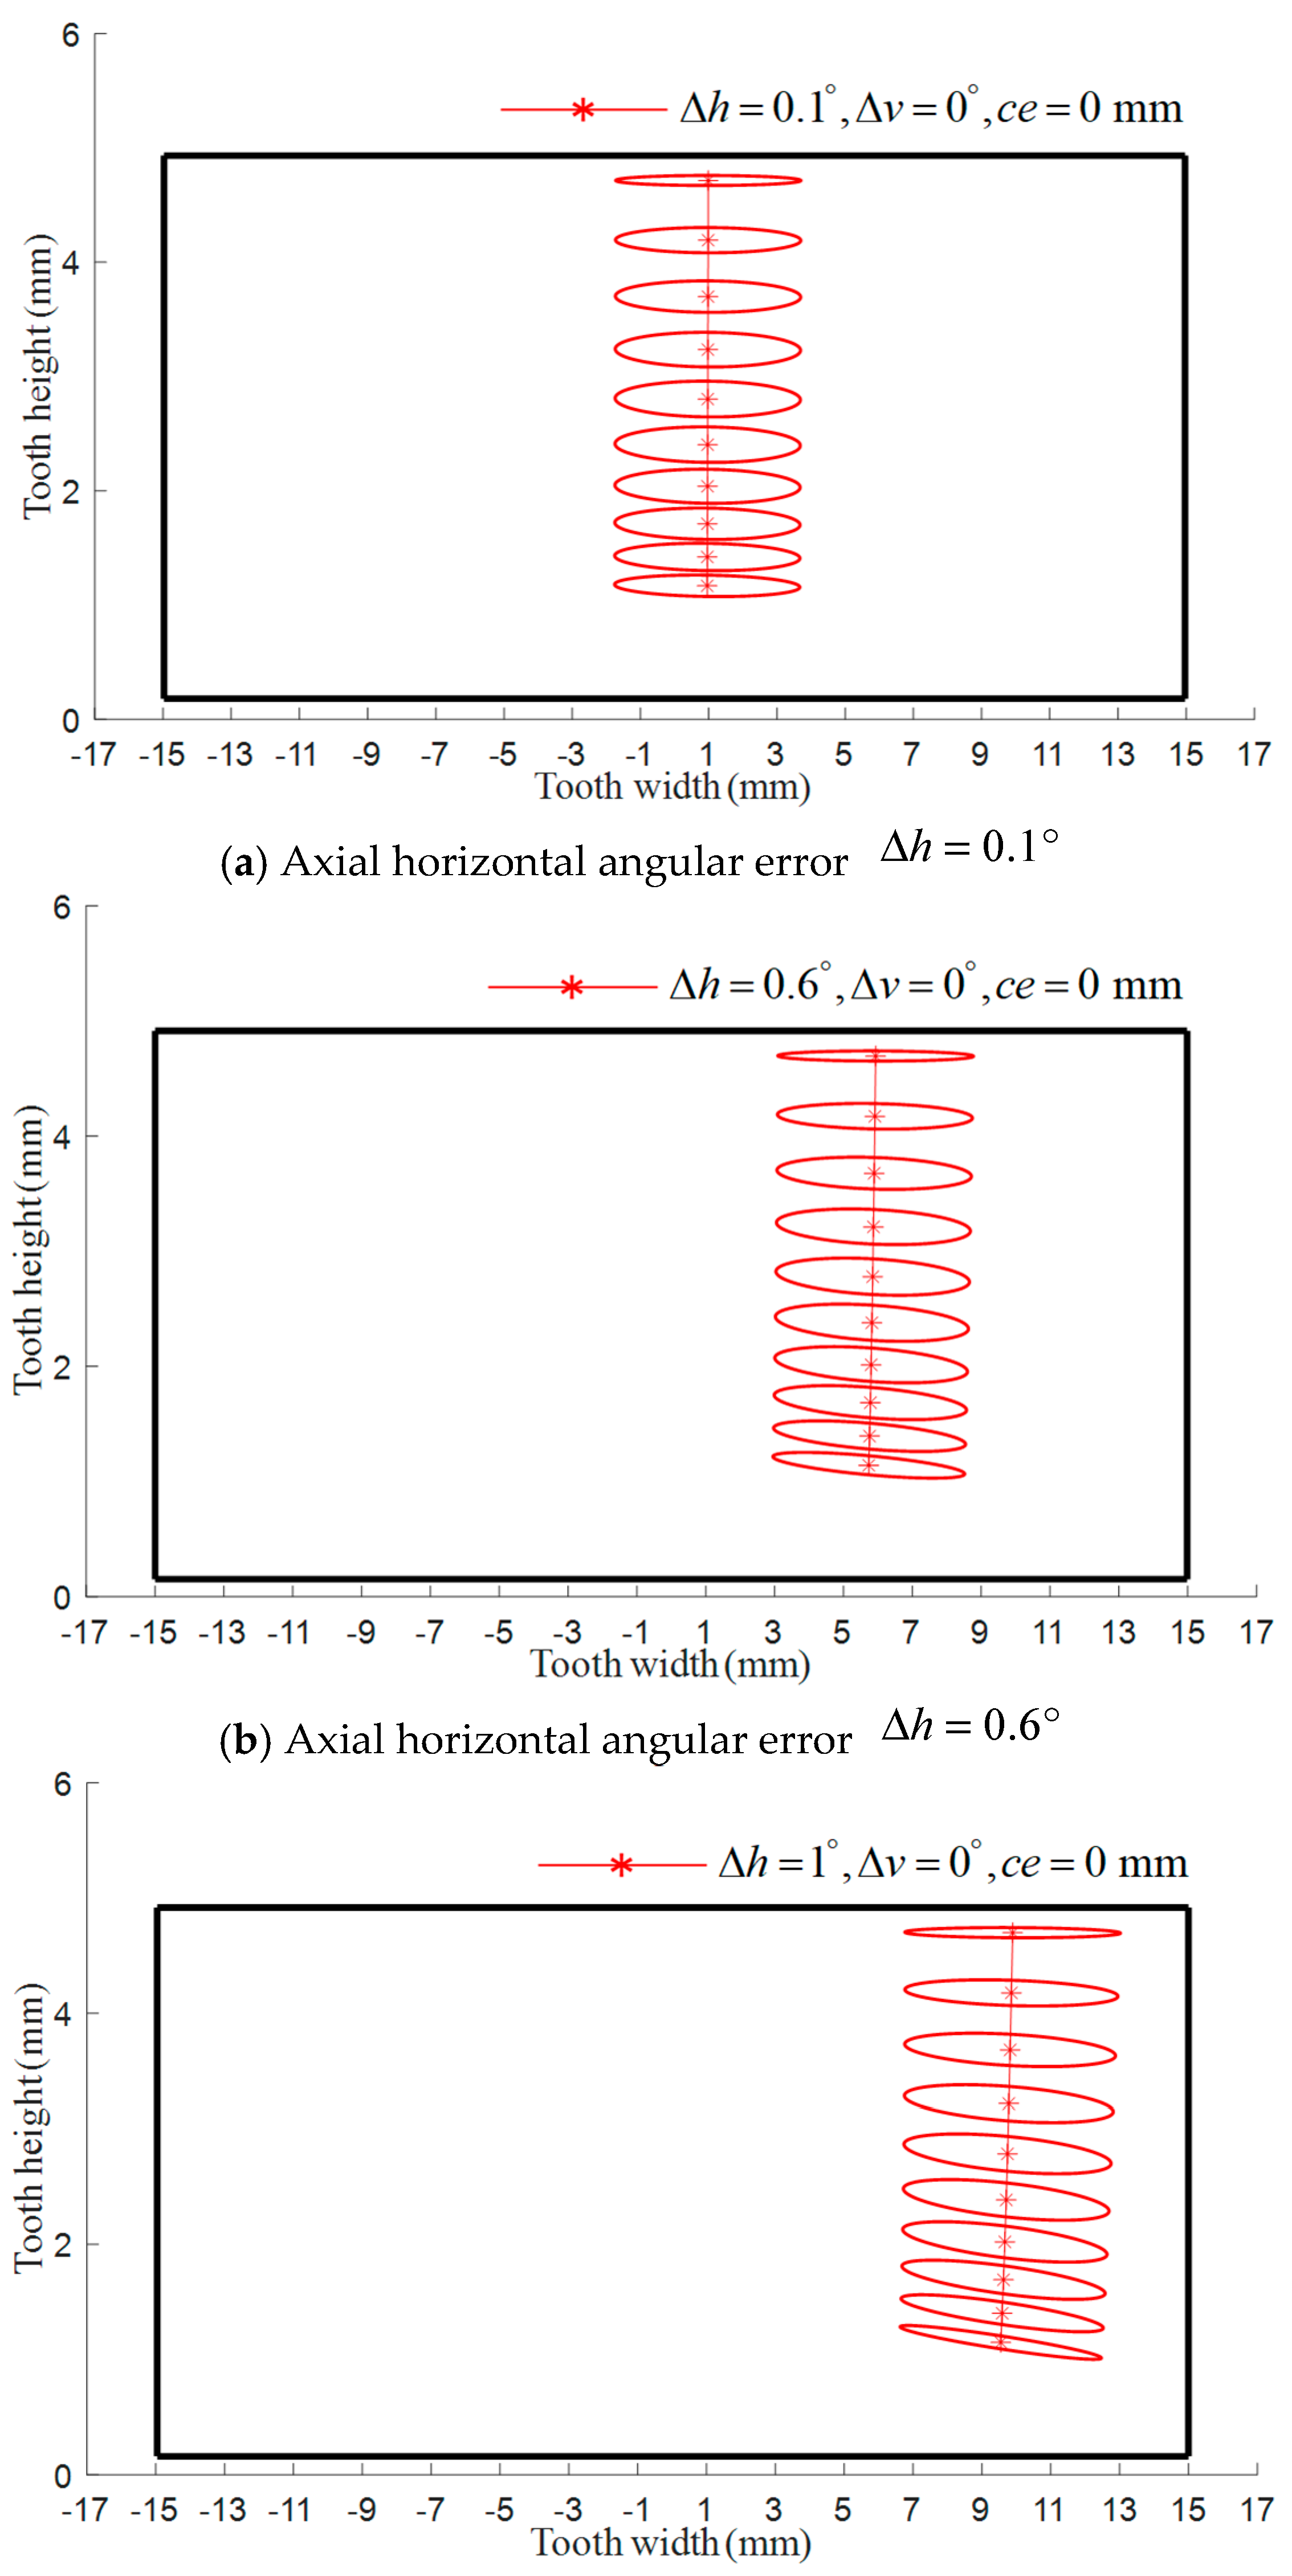
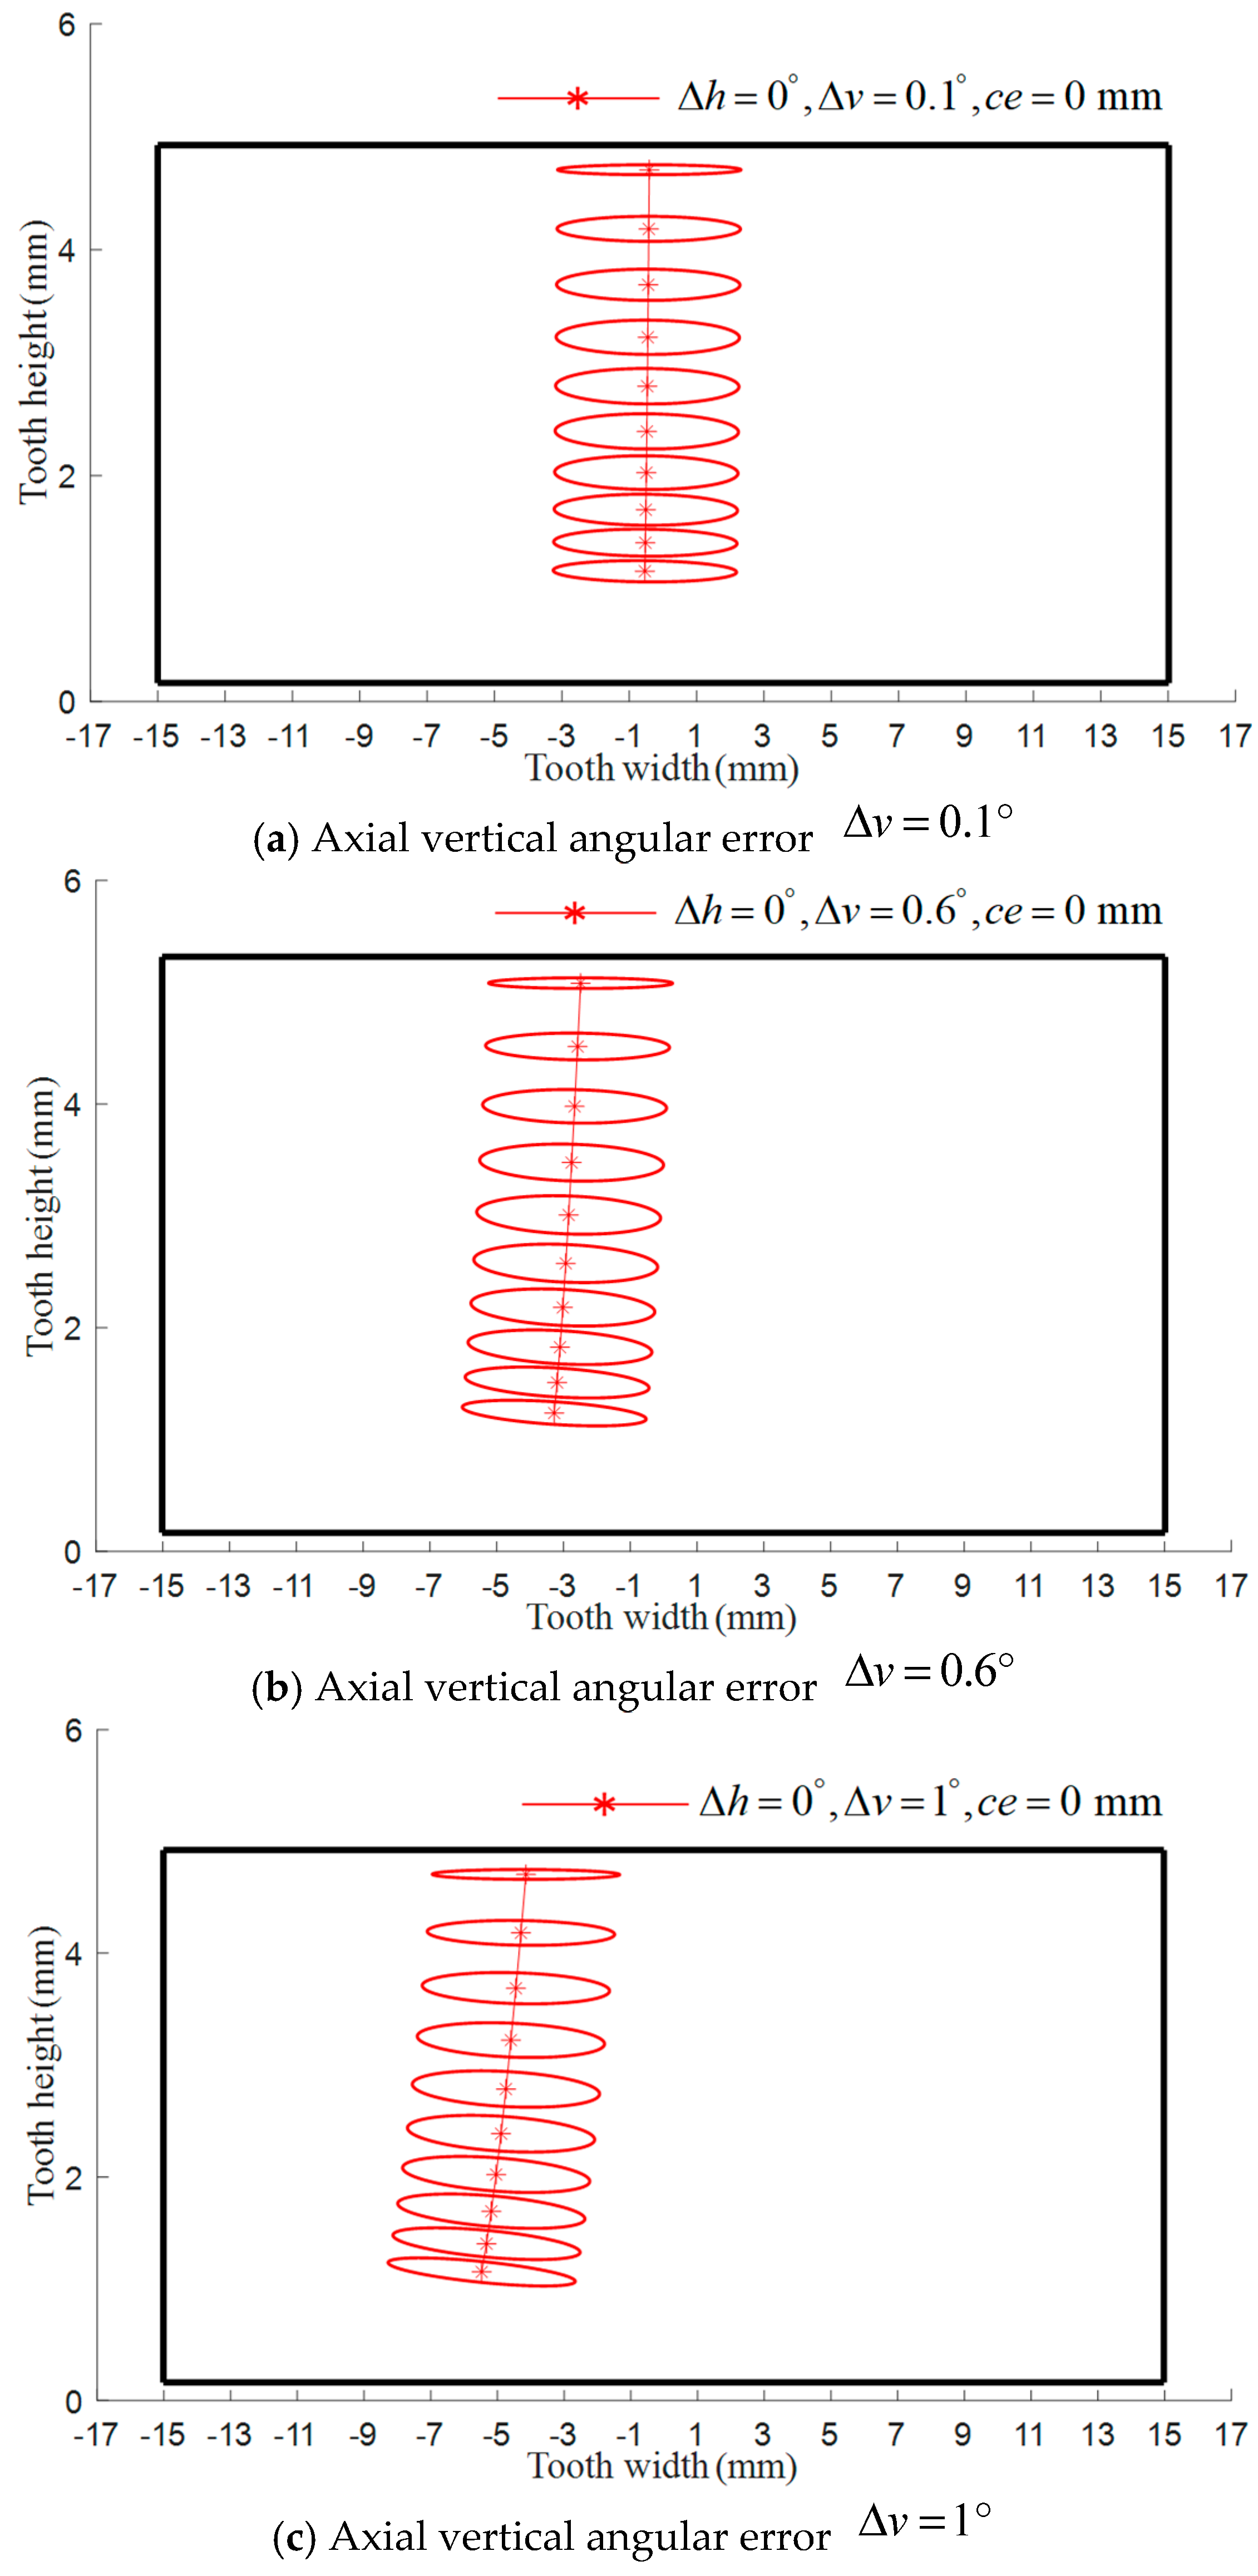
The results in Figure 12 and Figure 13 show that under the condition of determining the amount of modification, increasing the axial horizontal angle error Δ h together with the axial vertical angle error Δv, drives the contact path to shift from the mid-width of the tooth toward the edge, and the contact path will change from the original straight line to an inclined straight line or curve. The instantaneous contact ellipse’s size is not impacted, but its long axis makes an angle with the horizontal line, and the closer it approaches to the edge position, the greater the incline angle. Comparing Figure 12 and Figure 13, it can be seen that when the two installation errors are the same, the contact path position and instantaneous contact ellipse are more affected by the horizontal axial error.

5.3. Effect of the Longitudinal Modification Coefficient on Tooth Surface Contact Behavior

The results of the analyses in Section 5.2 show that, for the same amount of modification, the change in axial horizontal angle error Δ h has a greater effect on the contact path position, and is more prone to induced edge contact, so the influence of the modification coefficients on the tooth surface contact characteristics is explored under the condition of taking a random value for the axial horizontal angular error; e.g., Δ h = 0.6°.
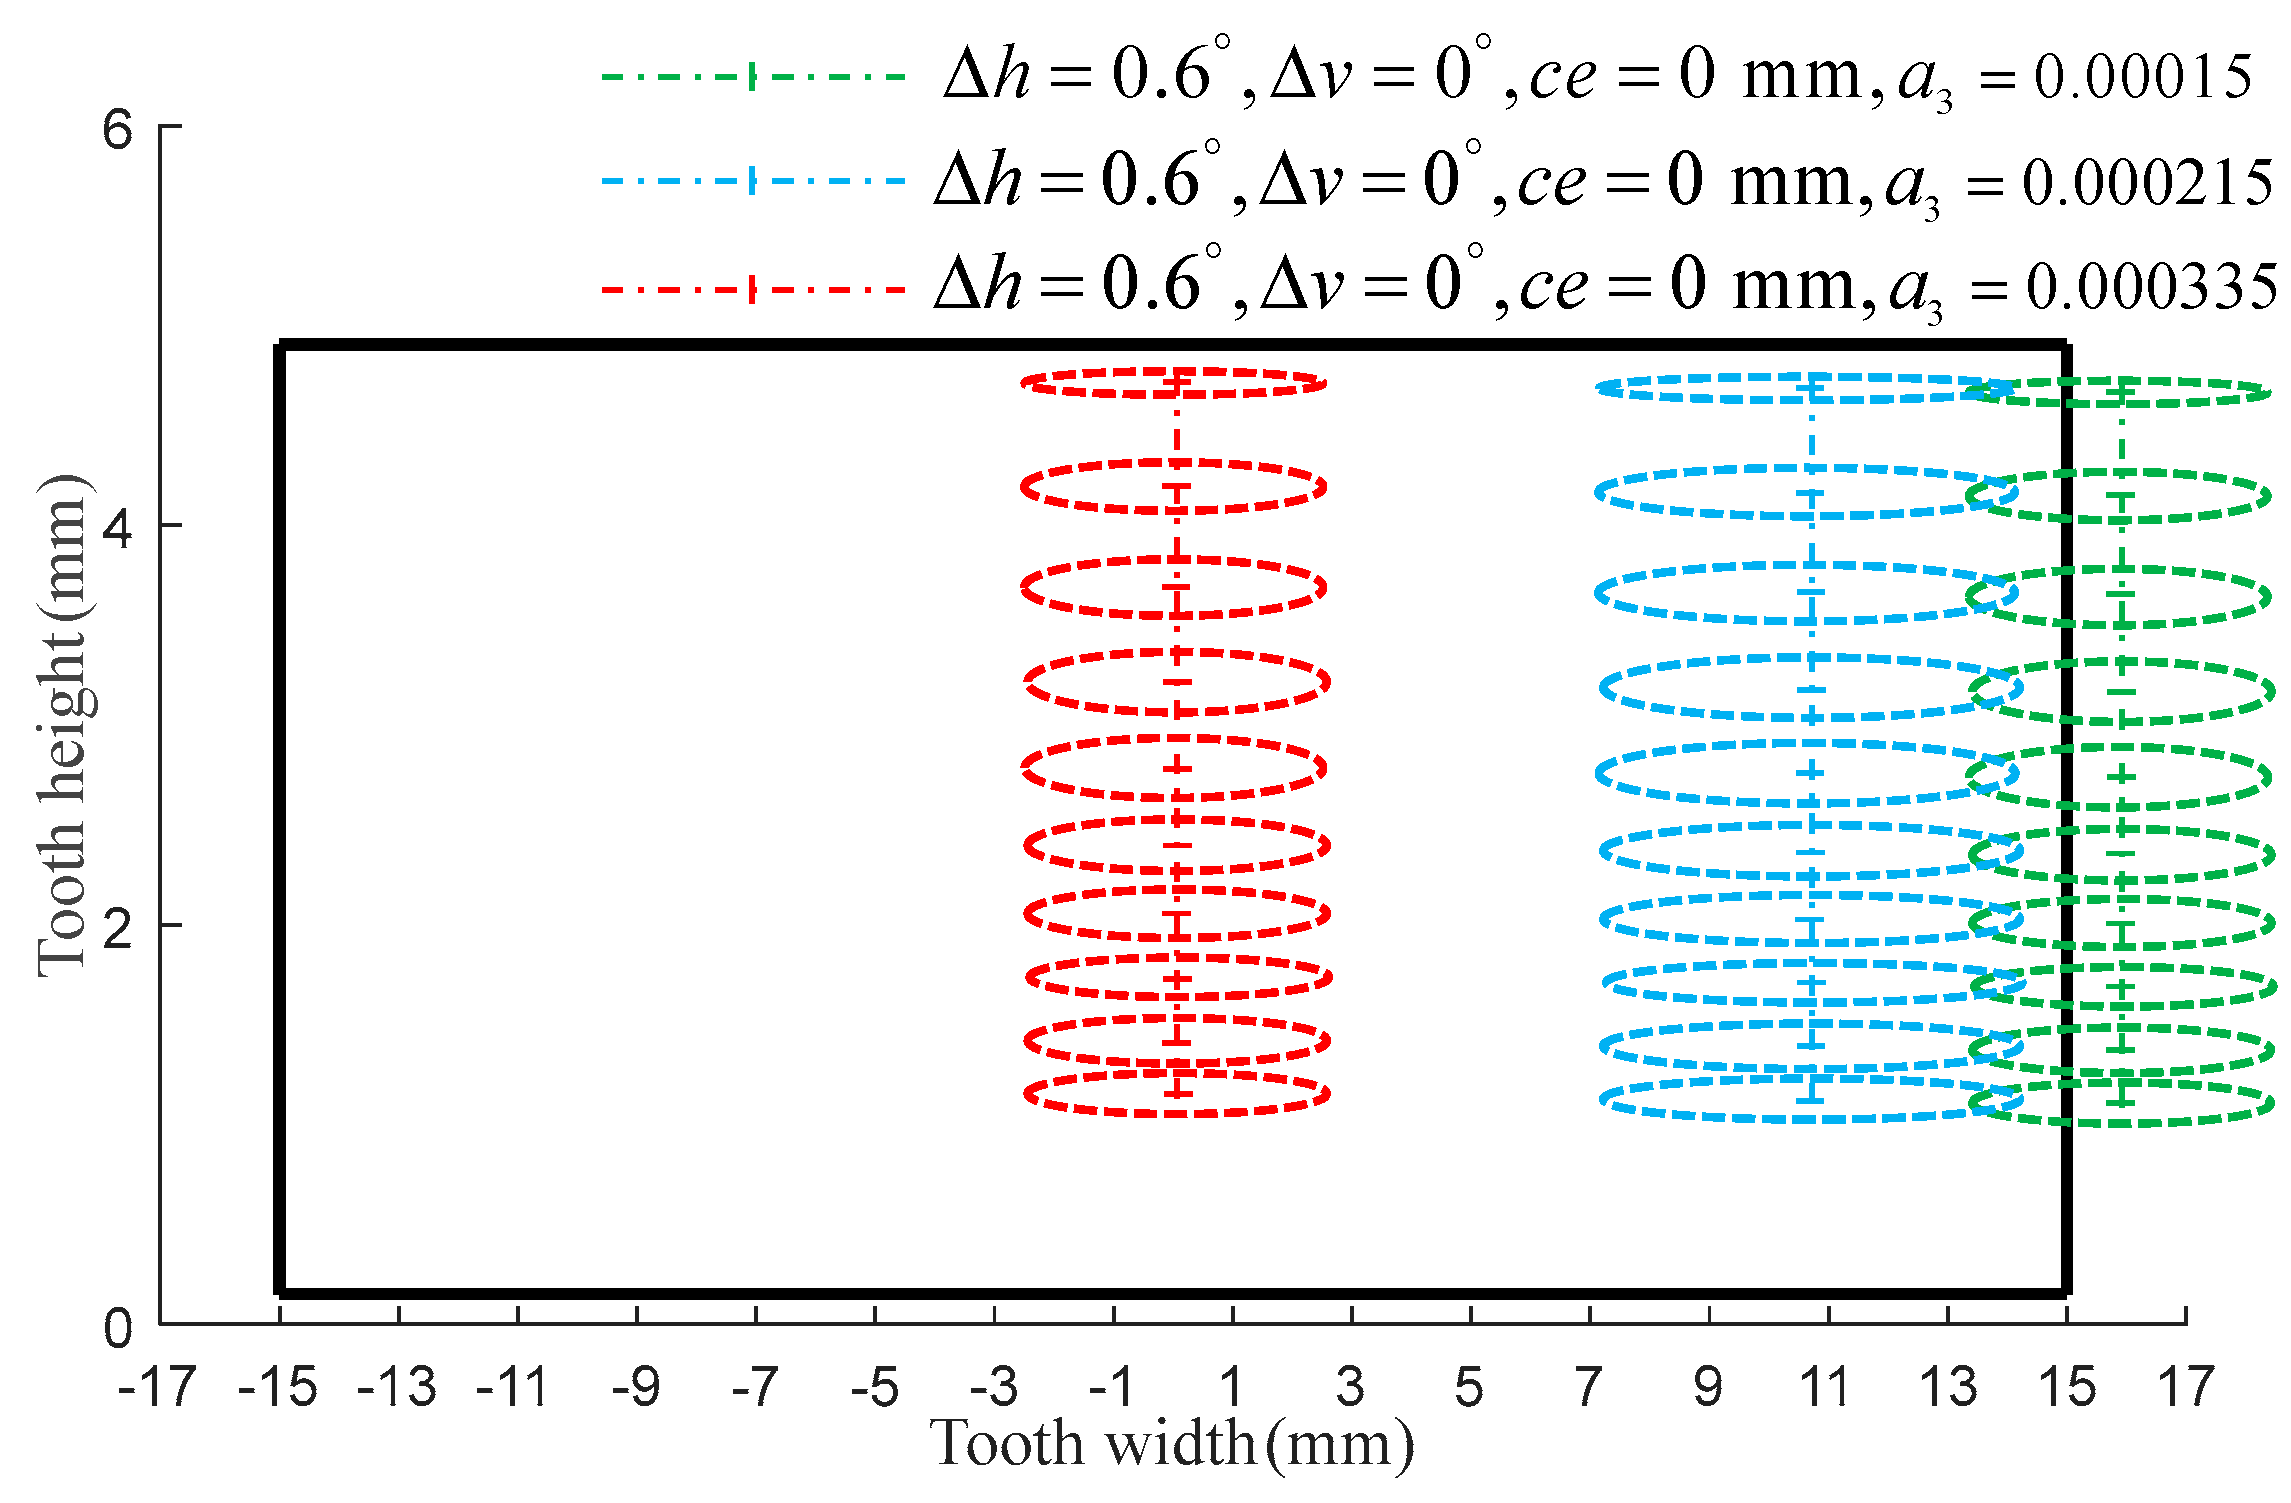
As shown in Figure 14, when the horizontal axial error Δ h = 0.6° and the longitudinal modification coefficient a 3 = 0.00015 , the contact path lies at the tooth surface edge, and clear edge contact appears. When the longitudinal modification coefficient a 3 = 0.000215 , the surface exhibits complete instantaneous contact ellipses that are near the edge but do not produce edge contact.
As the longitudinal modification coefficient increases, the contact path moves toward the tooth mid-width. When a 3 =   0.000335 , the path is at the middle of the tooth width; although this state effectively avoids edge contact, a larger tooth surface modification amount is required and the contact area becomes smaller, which adversely affects gear transmission efficiency.
Figure 15 shows the instantaneous contact condition for the tooth surface at a 3 = 0.00015 . The contact point lies at the tooth edge, producing a clear edge contact state, and the peak contact pressure reaches 1700.8 MPa.
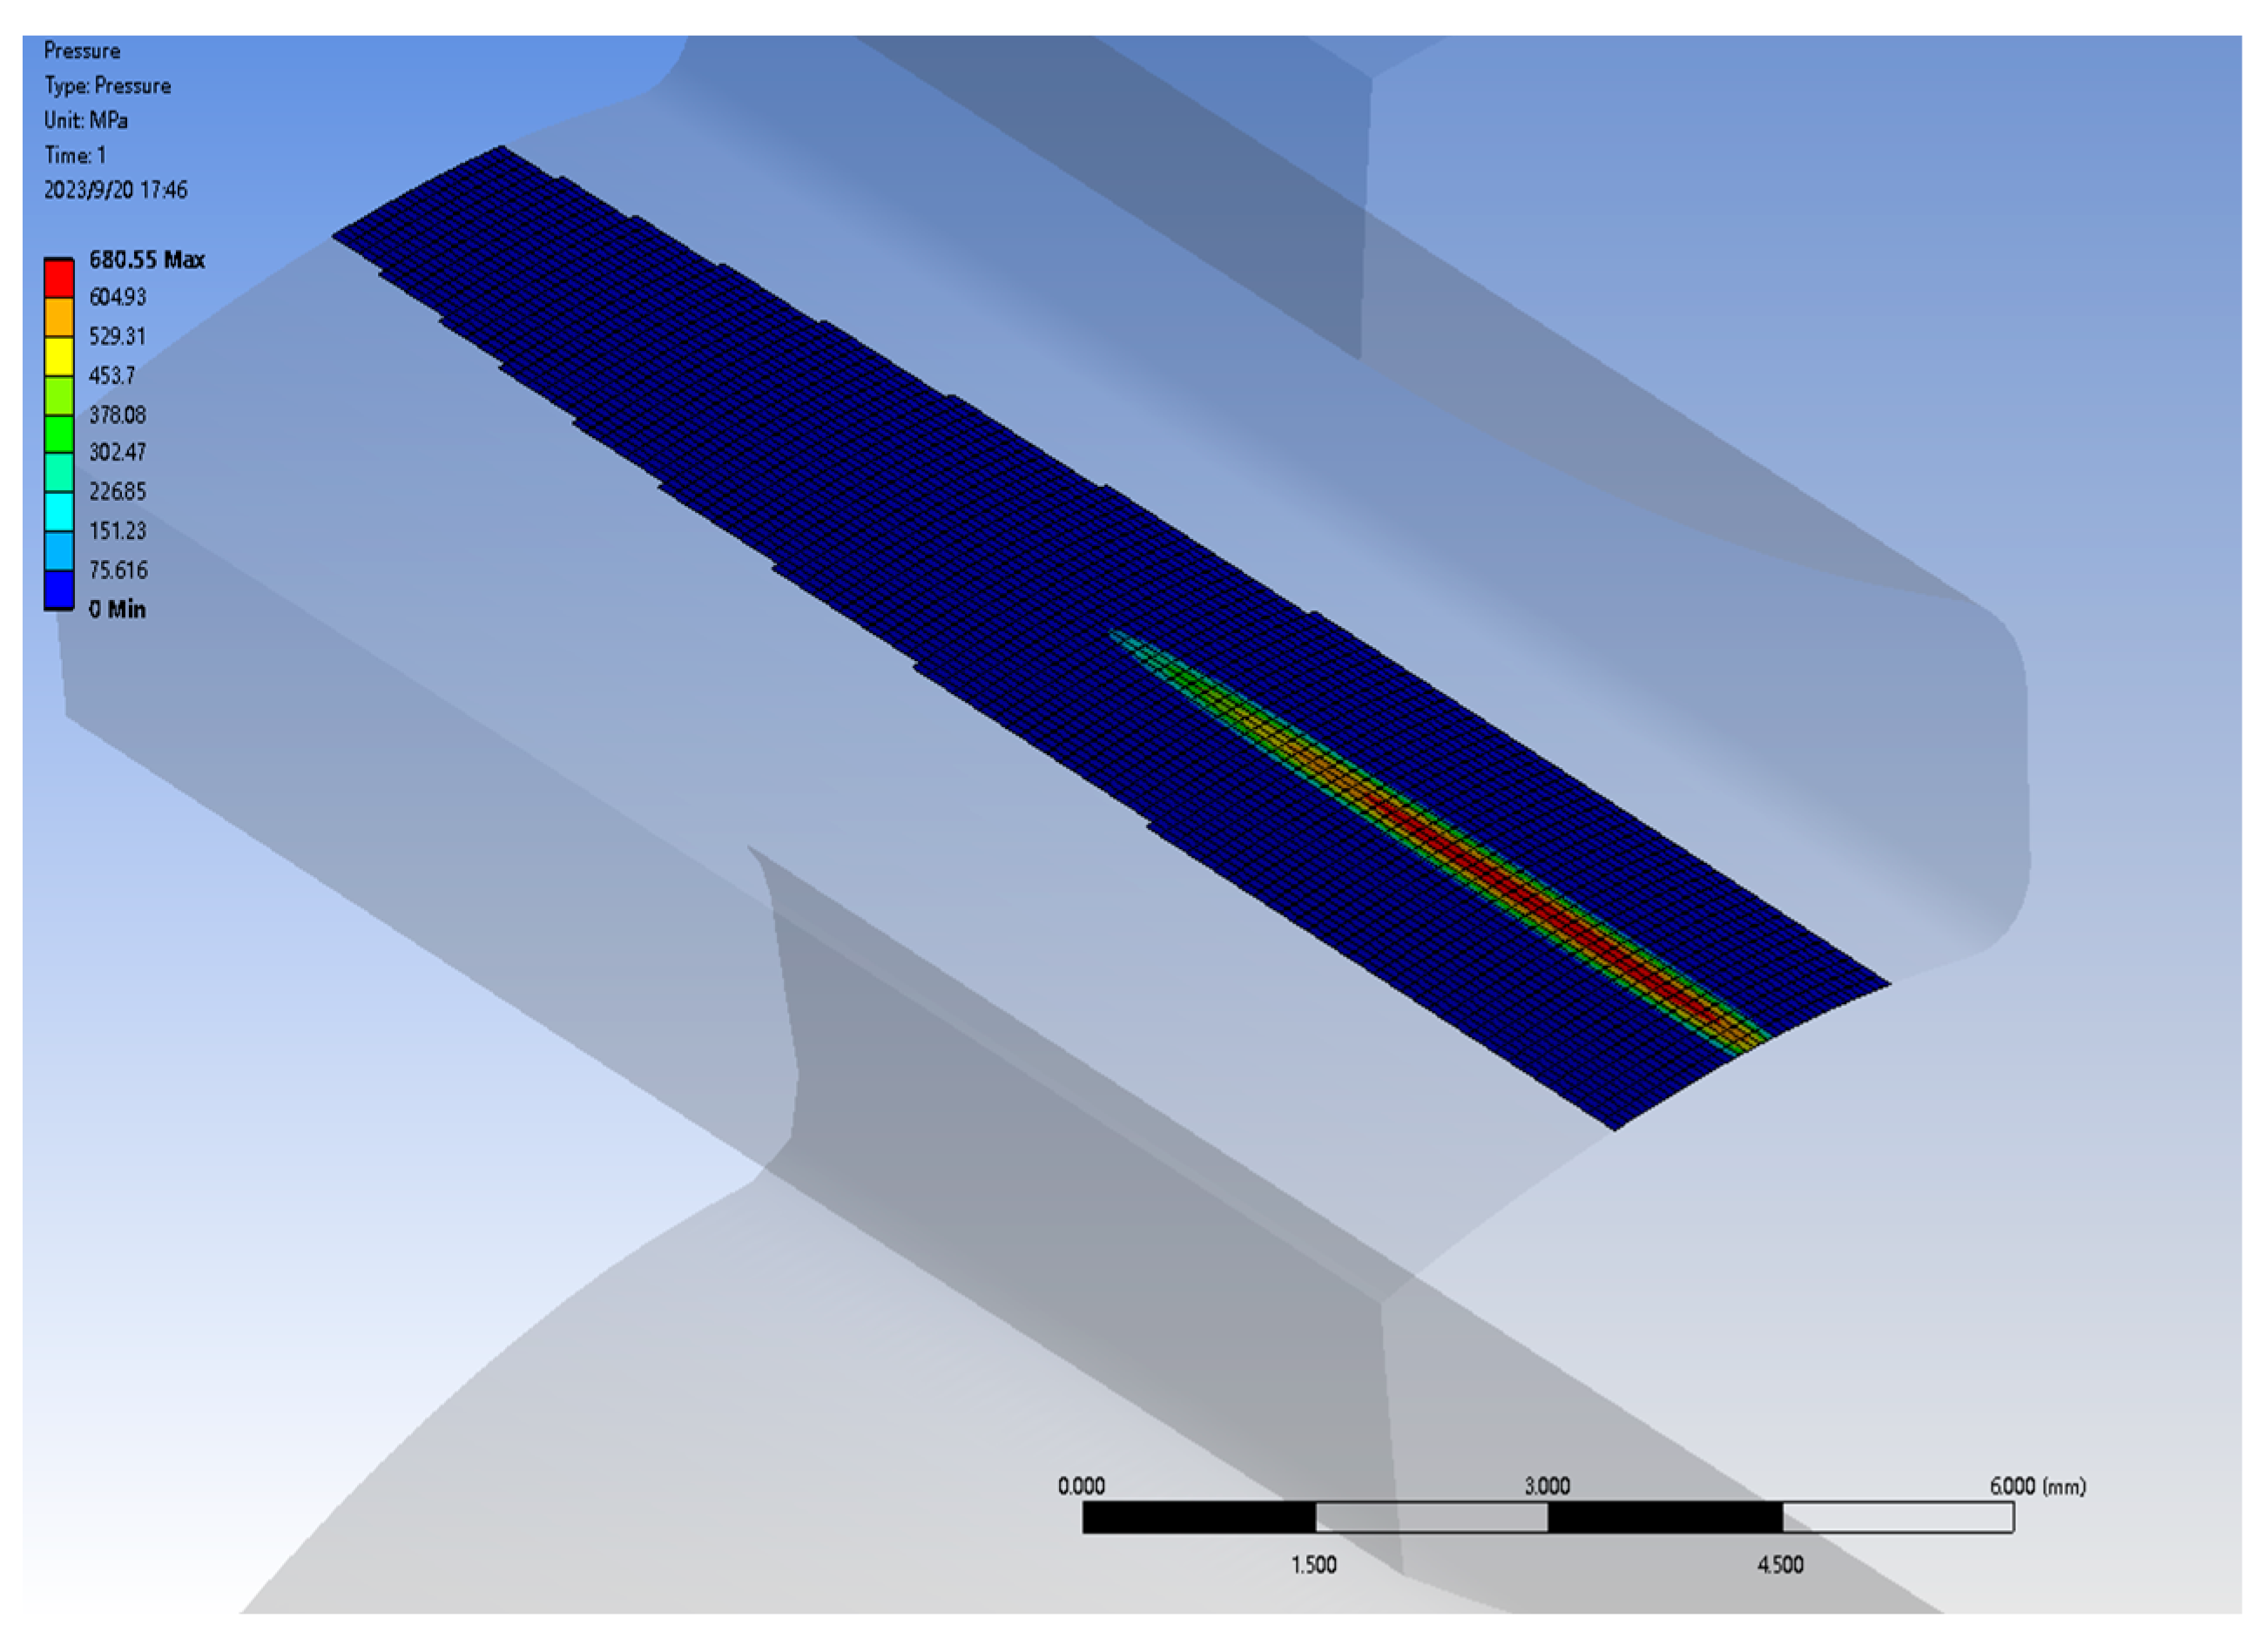
When a 3 = 0.000215 , the contact state is as in Figure 16; the formation of the instantaneous contact trace completes distribution onto the tooth surface and the location is close to the edge of the tooth surface, but there is no stress concentration, i.e., the maximum contact pressure on the tooth surface changes from 1700.8 MPa at the edge contact to 680.55 MPa.
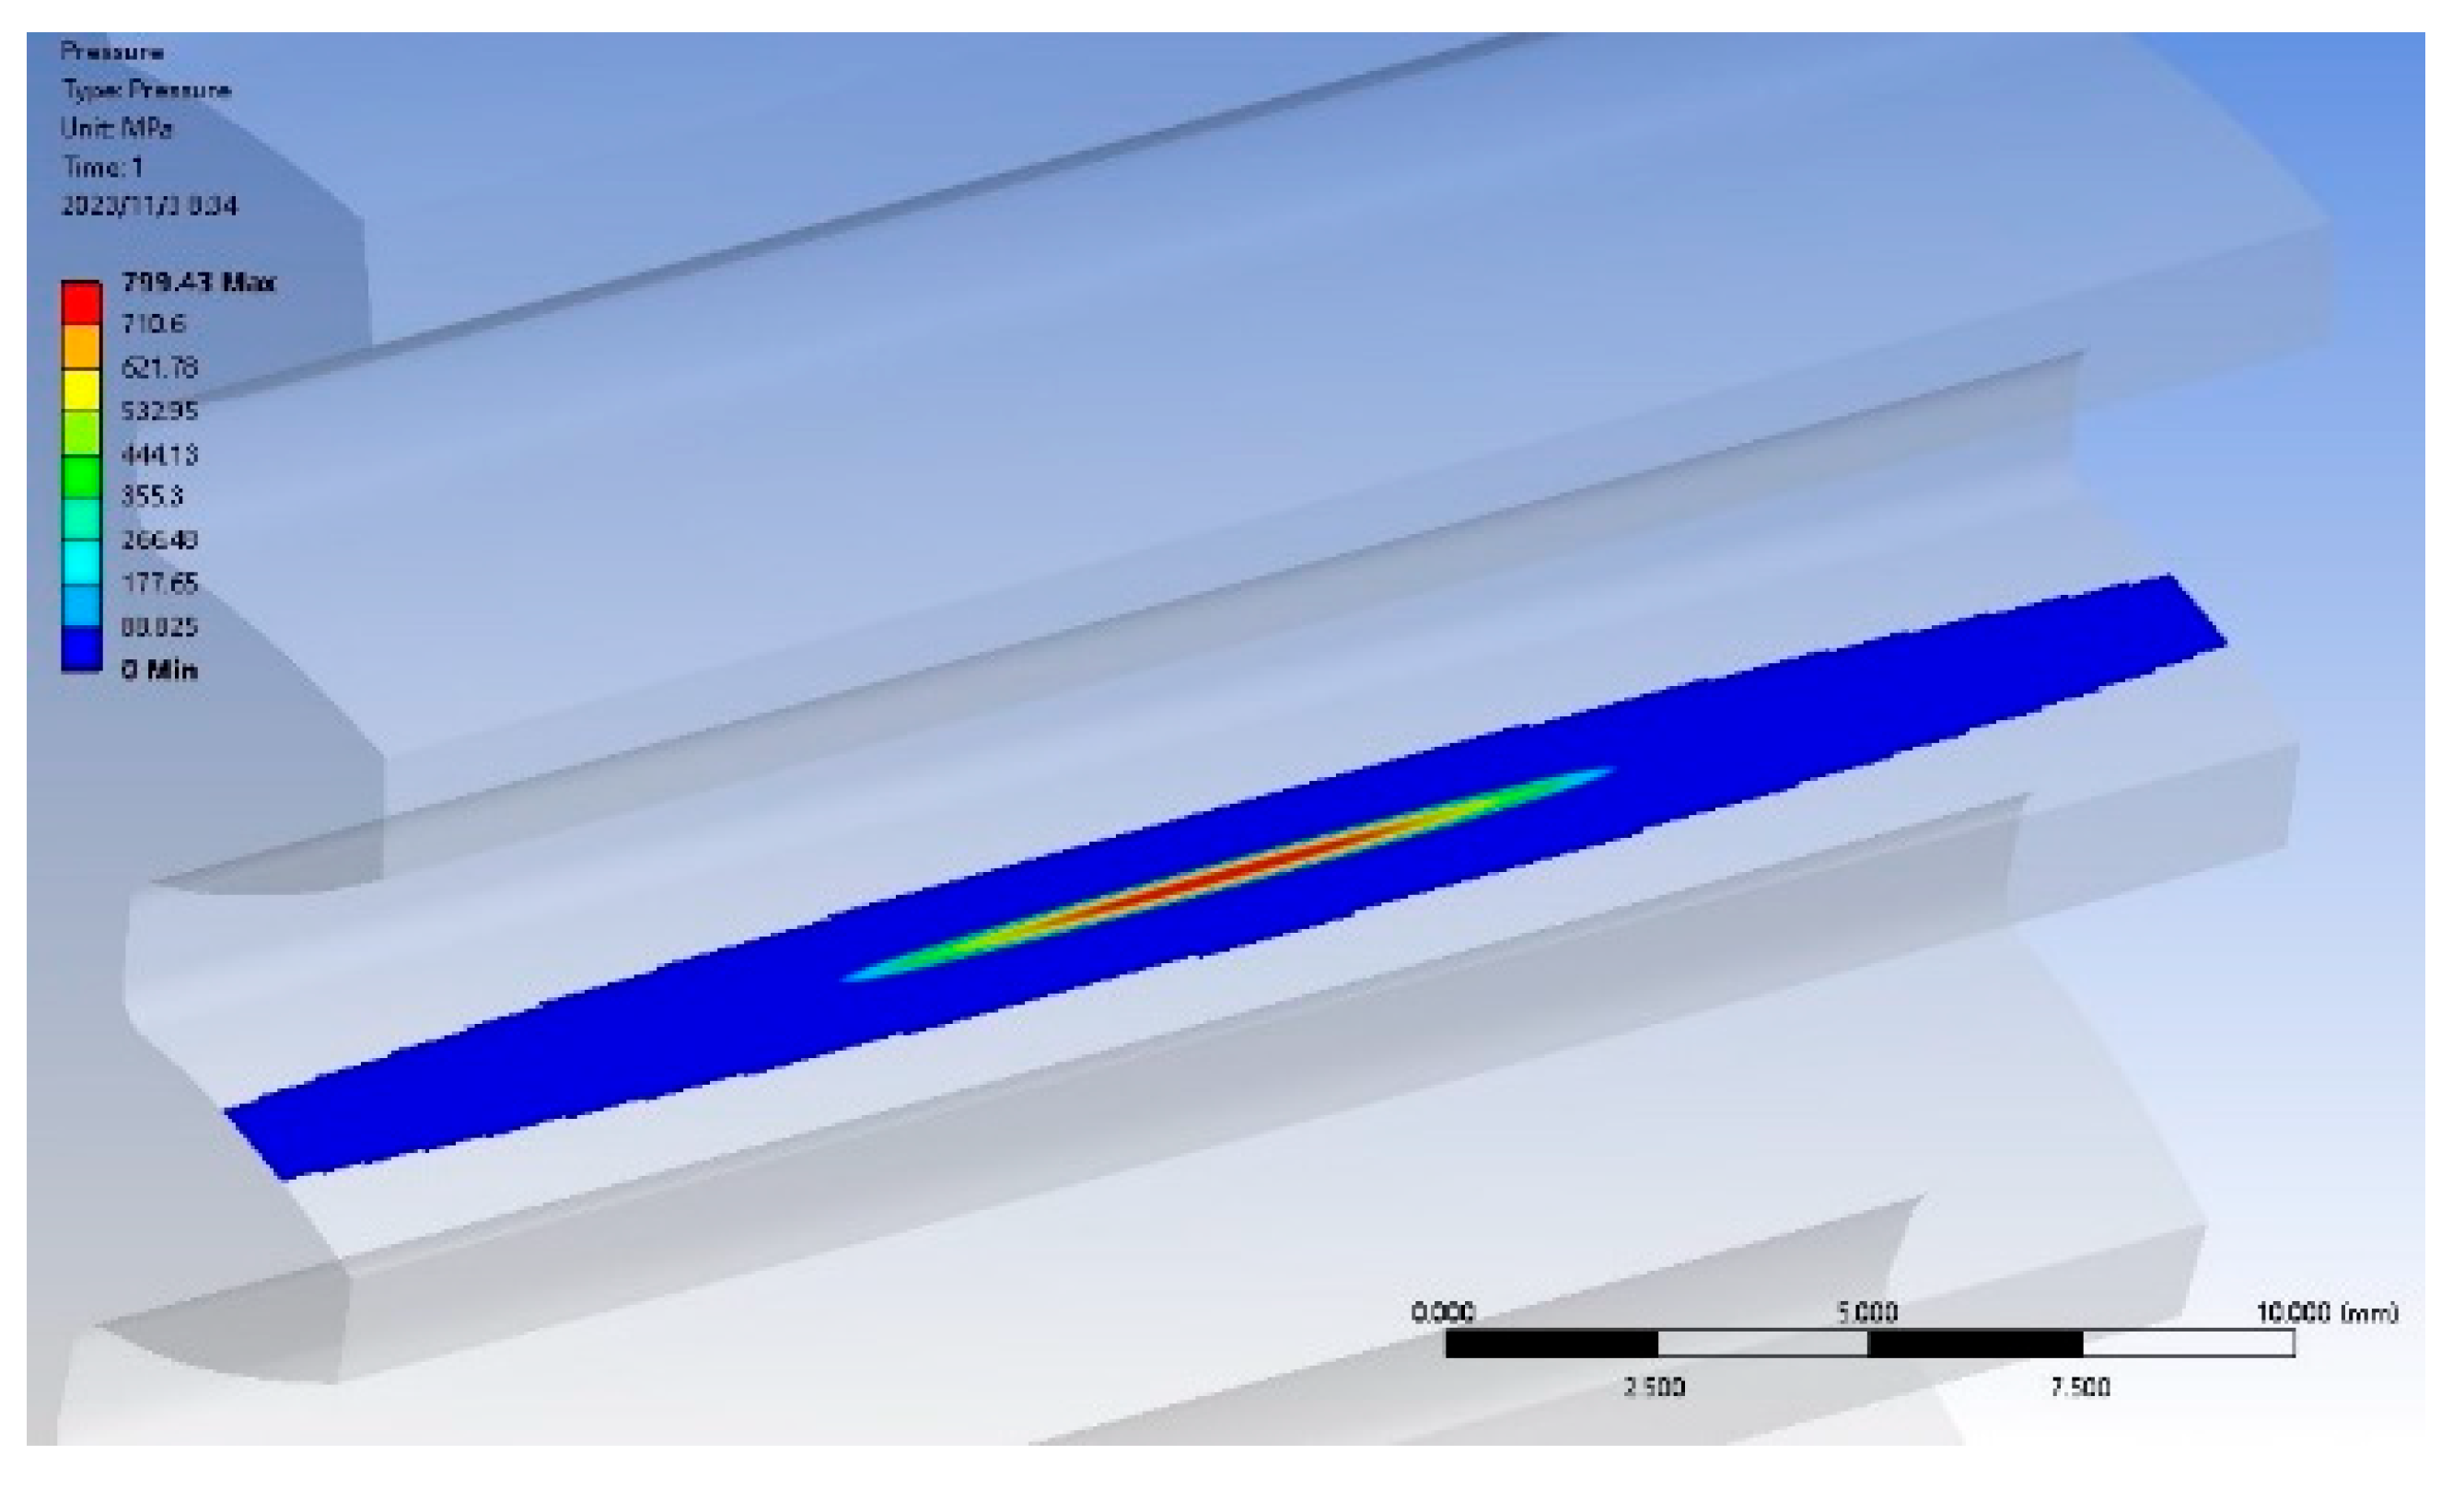
When a 3 =   0.000335 , as indicated in Figure 17, the instantaneous contact ellipse appears roughly at the tooth mid-width, with a peak surface contact pressure of 799.43 MPa. From Figure 15, Figure 16 and Figure 17, it can be seen that with an increasing modification coefficient, the maximum contact pressure will show a change rule from large to small and then increase. The simulated evolution of the instantaneous contact ellipse agrees well with the theoretical calculation, confirming the reliability and feasibility of the proposed longitudinal modification method for non-circular gears.

5.4. Influence of the Longitudinal Modification Coefficient on Contact Pressure and Tooth Surface Elastic Deformation

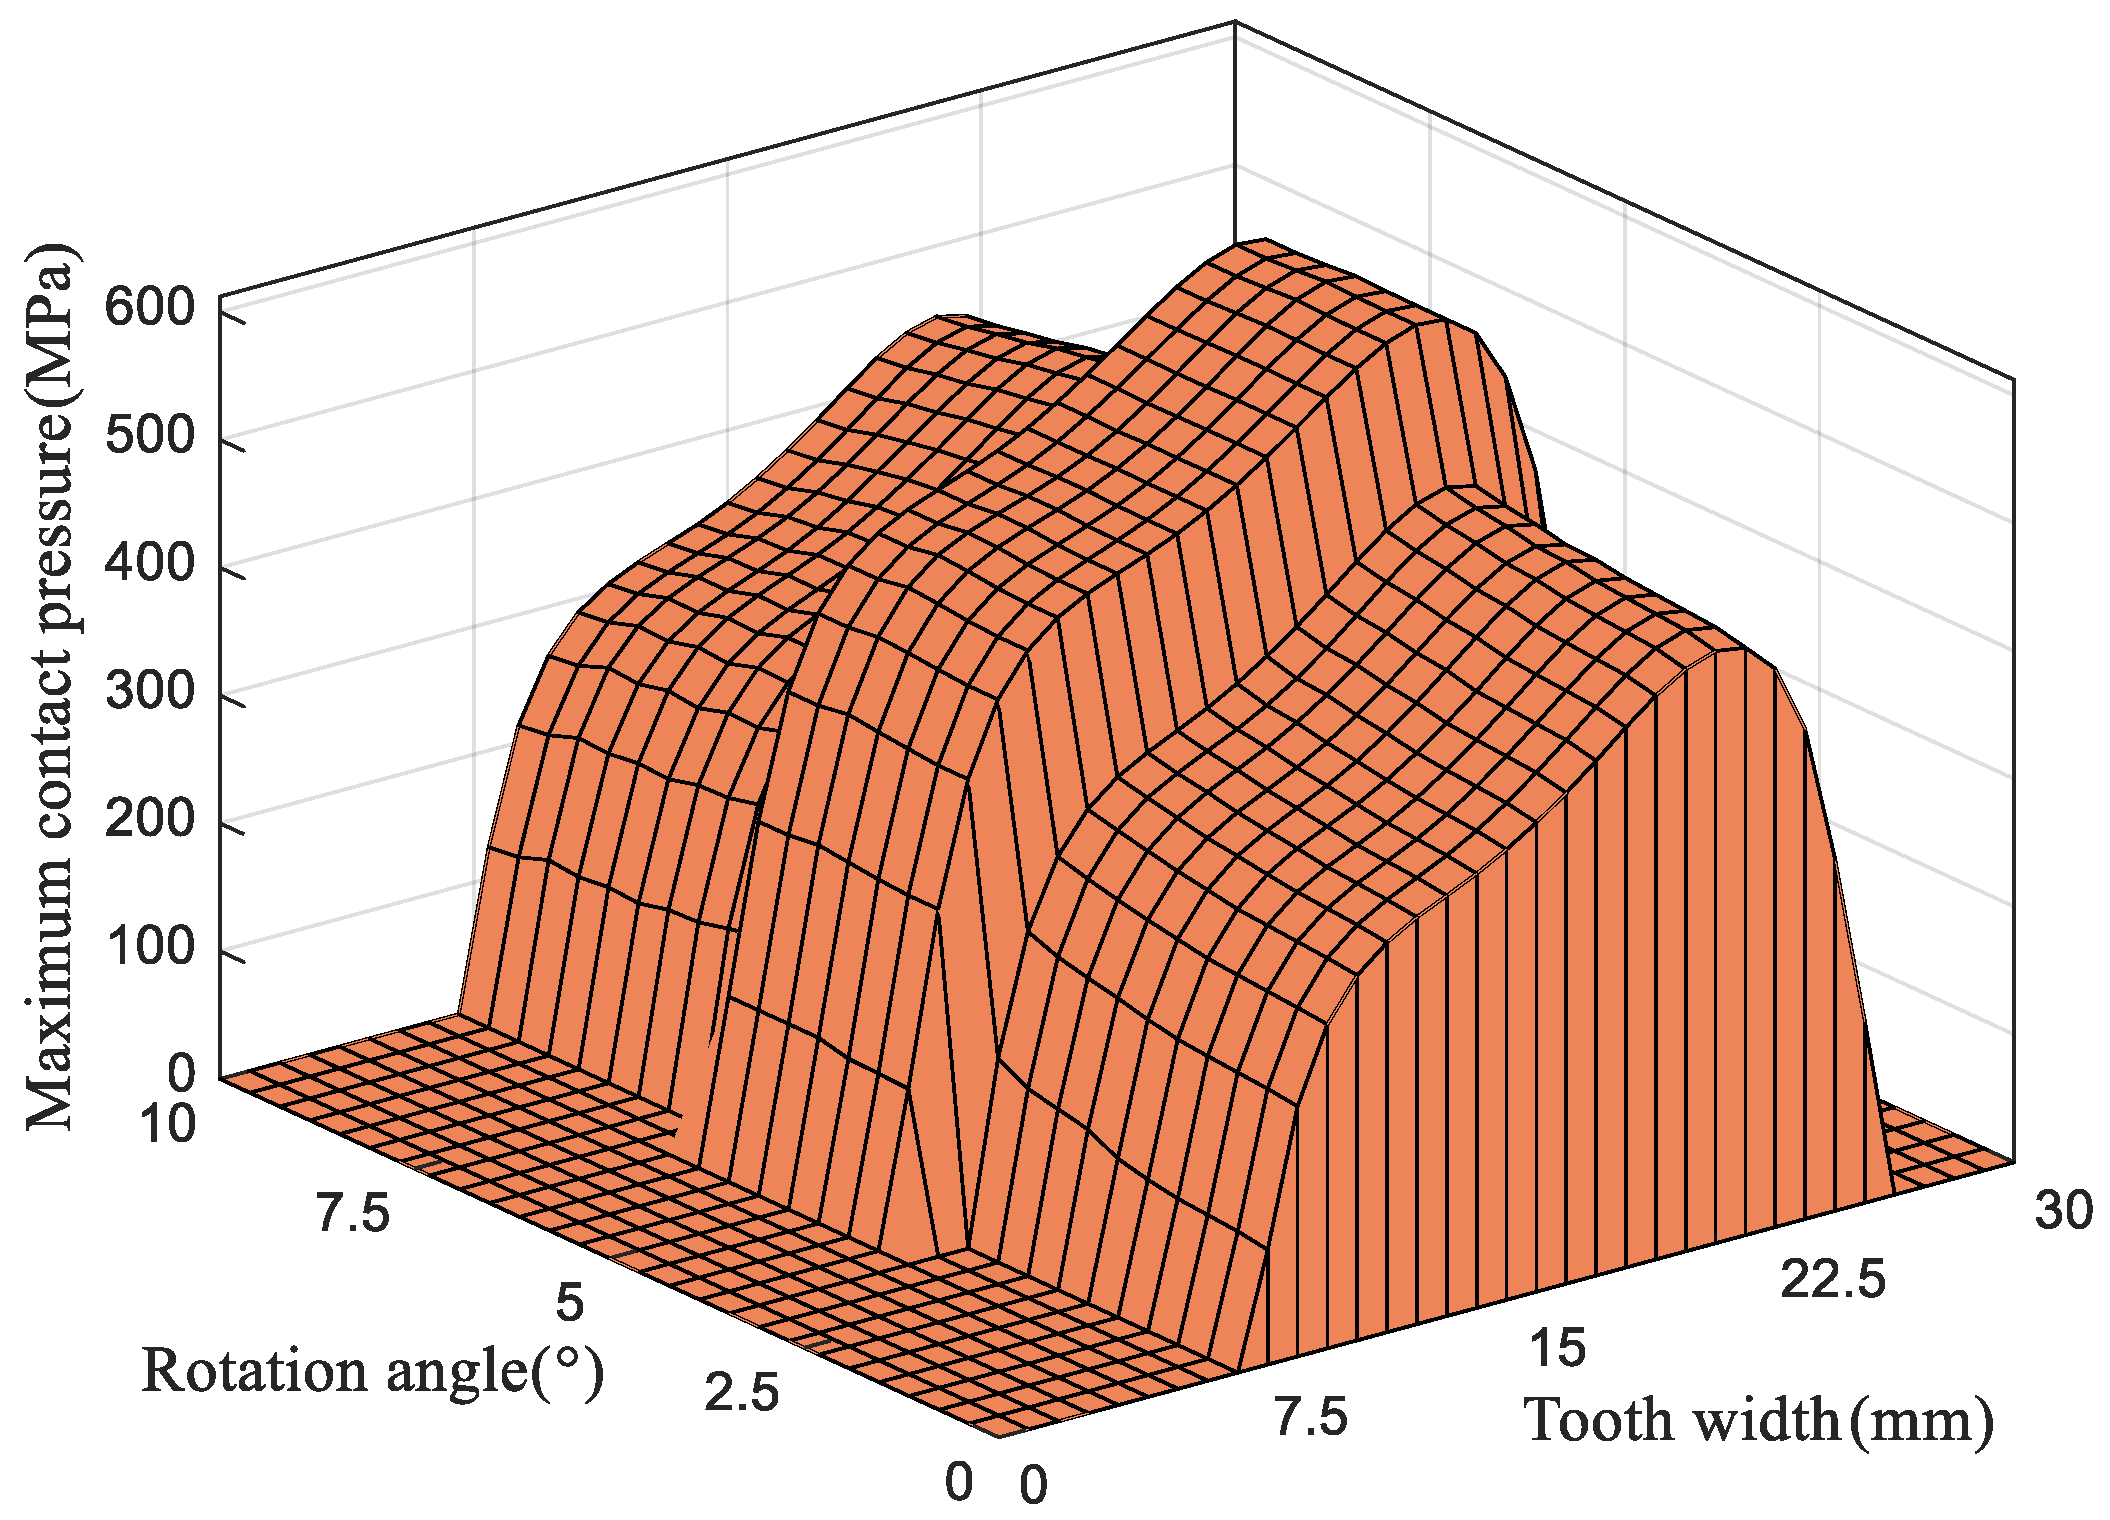
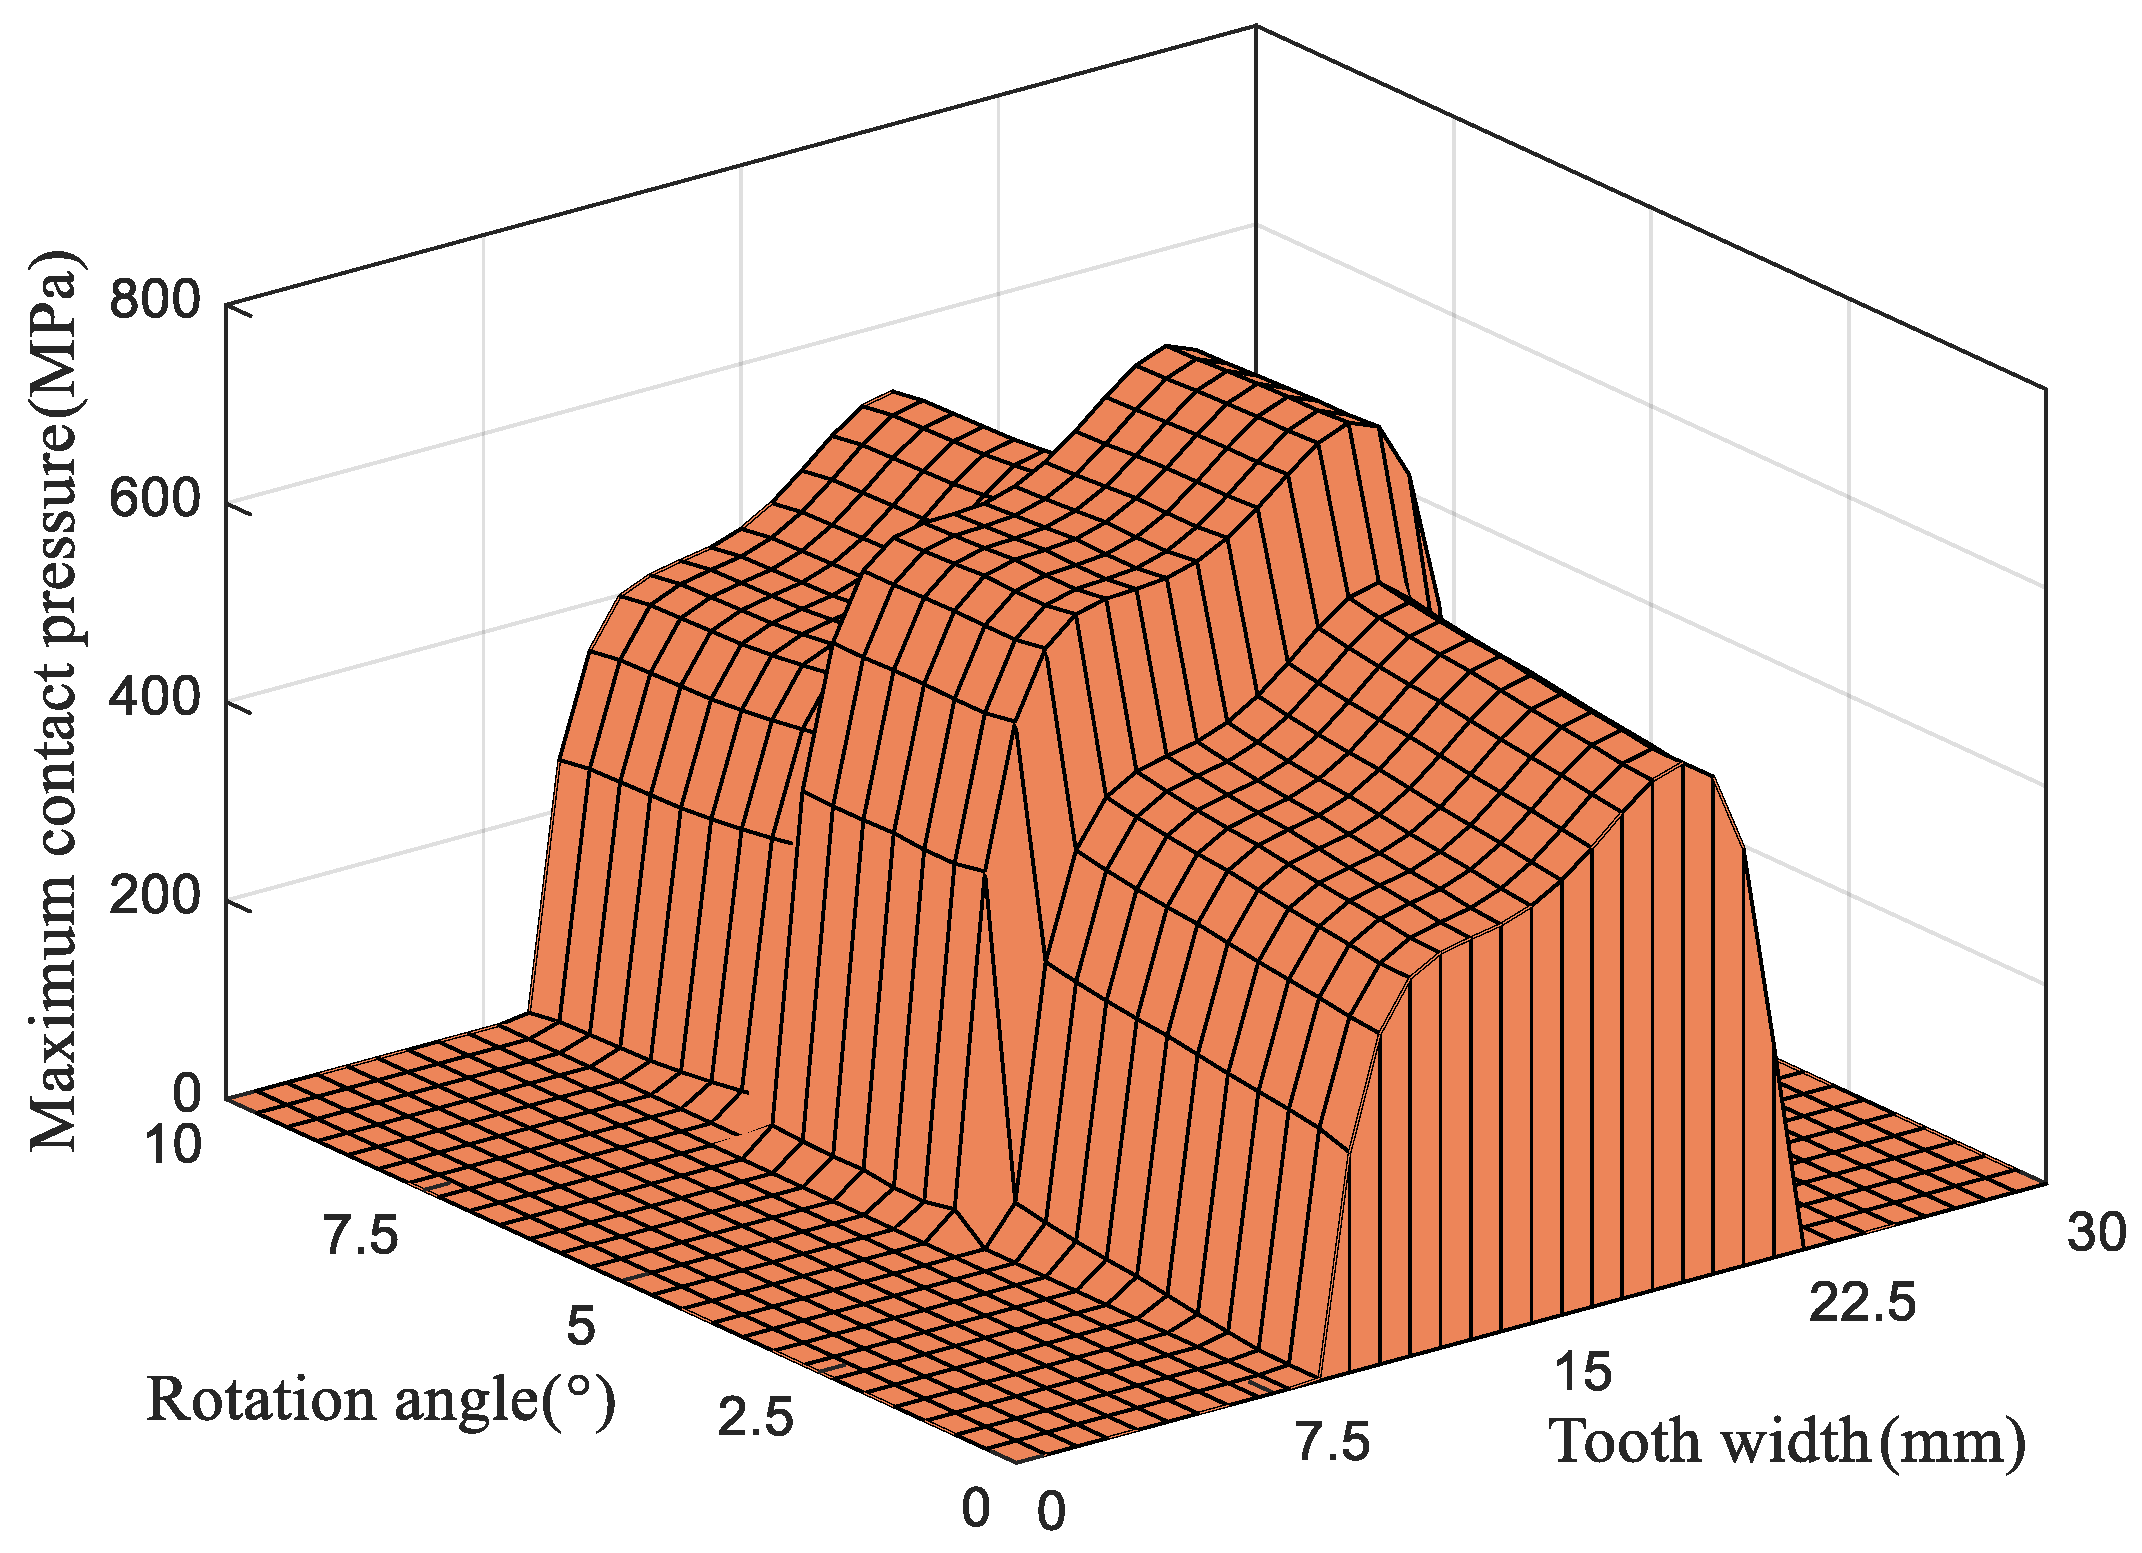
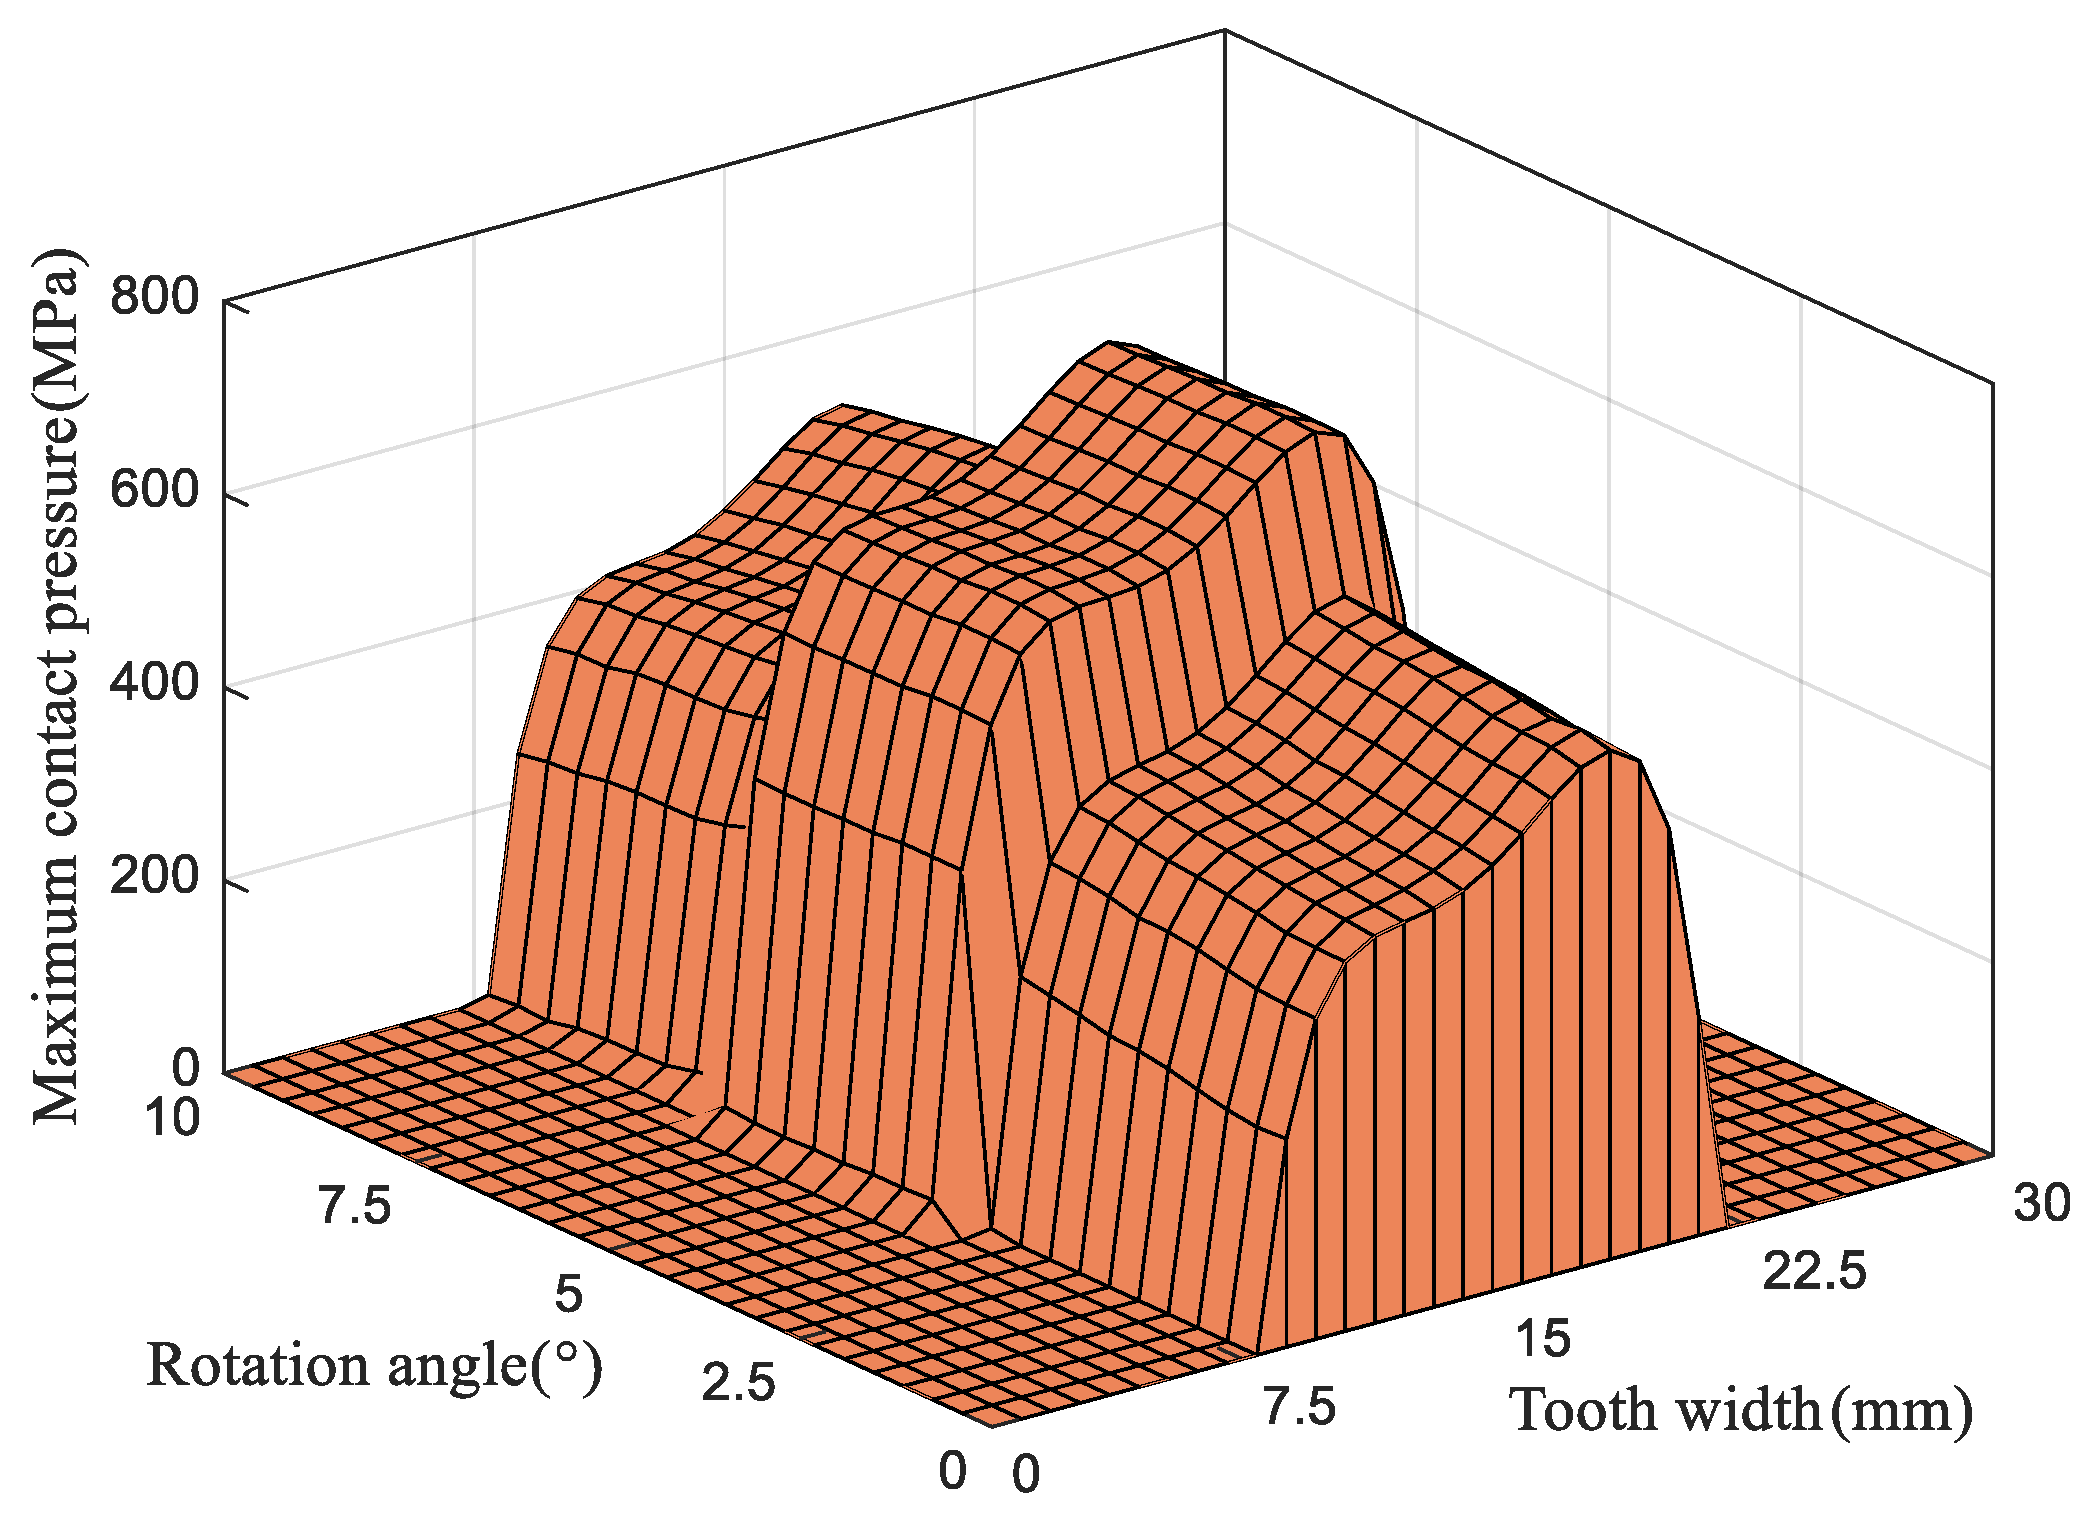
Under the condition of axial horizontal angular error Δ h = 0.6 , the results of contact pressure change on the same tooth surface when the driving gear is modified with different modification coefficients are shown in Figure 18, Figure 19, Figure 20 and Figure 21.
As shown in Figure 18, when the longitudinal modification coefficient a 3 = 0.000215 , due to the installation error, the pressure field is biased to the tooth side width, and the maximum contact pressure occurs in a position near the edge of the tooth surface, with a size of 680.55 MPa.
Figure 19 shows the tooth contact pressure distribution at a 3 = 0.000265 . The maximum contact pressure of 612.12 MPa began to move from the surface edge to the middle of the tooth width; the contact pressure is reduced and the tooth surface did not exhibit the edge contact phenomenon, which shows that this paper proposes the method of longitudinal modification, but can also play a role in avoiding the occurrence of edge contact.
As shown in Figure 20, for a 3 = 0.000305 the contact pressure field on the tooth surface reaches a maximum of 710.77 MPa, compared with the maximum contact pressure value at a 3 = 0.000265 this is an increase of 98.65 MPa. Due to the increase in the modification coefficient, the relative amount of modification of the tooth surface becomes larger, and the contact area becomes smaller, resulting in a larger contact pressure.
When a 3 = 0.000335 , the contact pressure is mainly distributed around the middle of the tooth width, and the maximum contact pressure becomes 799.43 MPa, as shown in Figure 21.
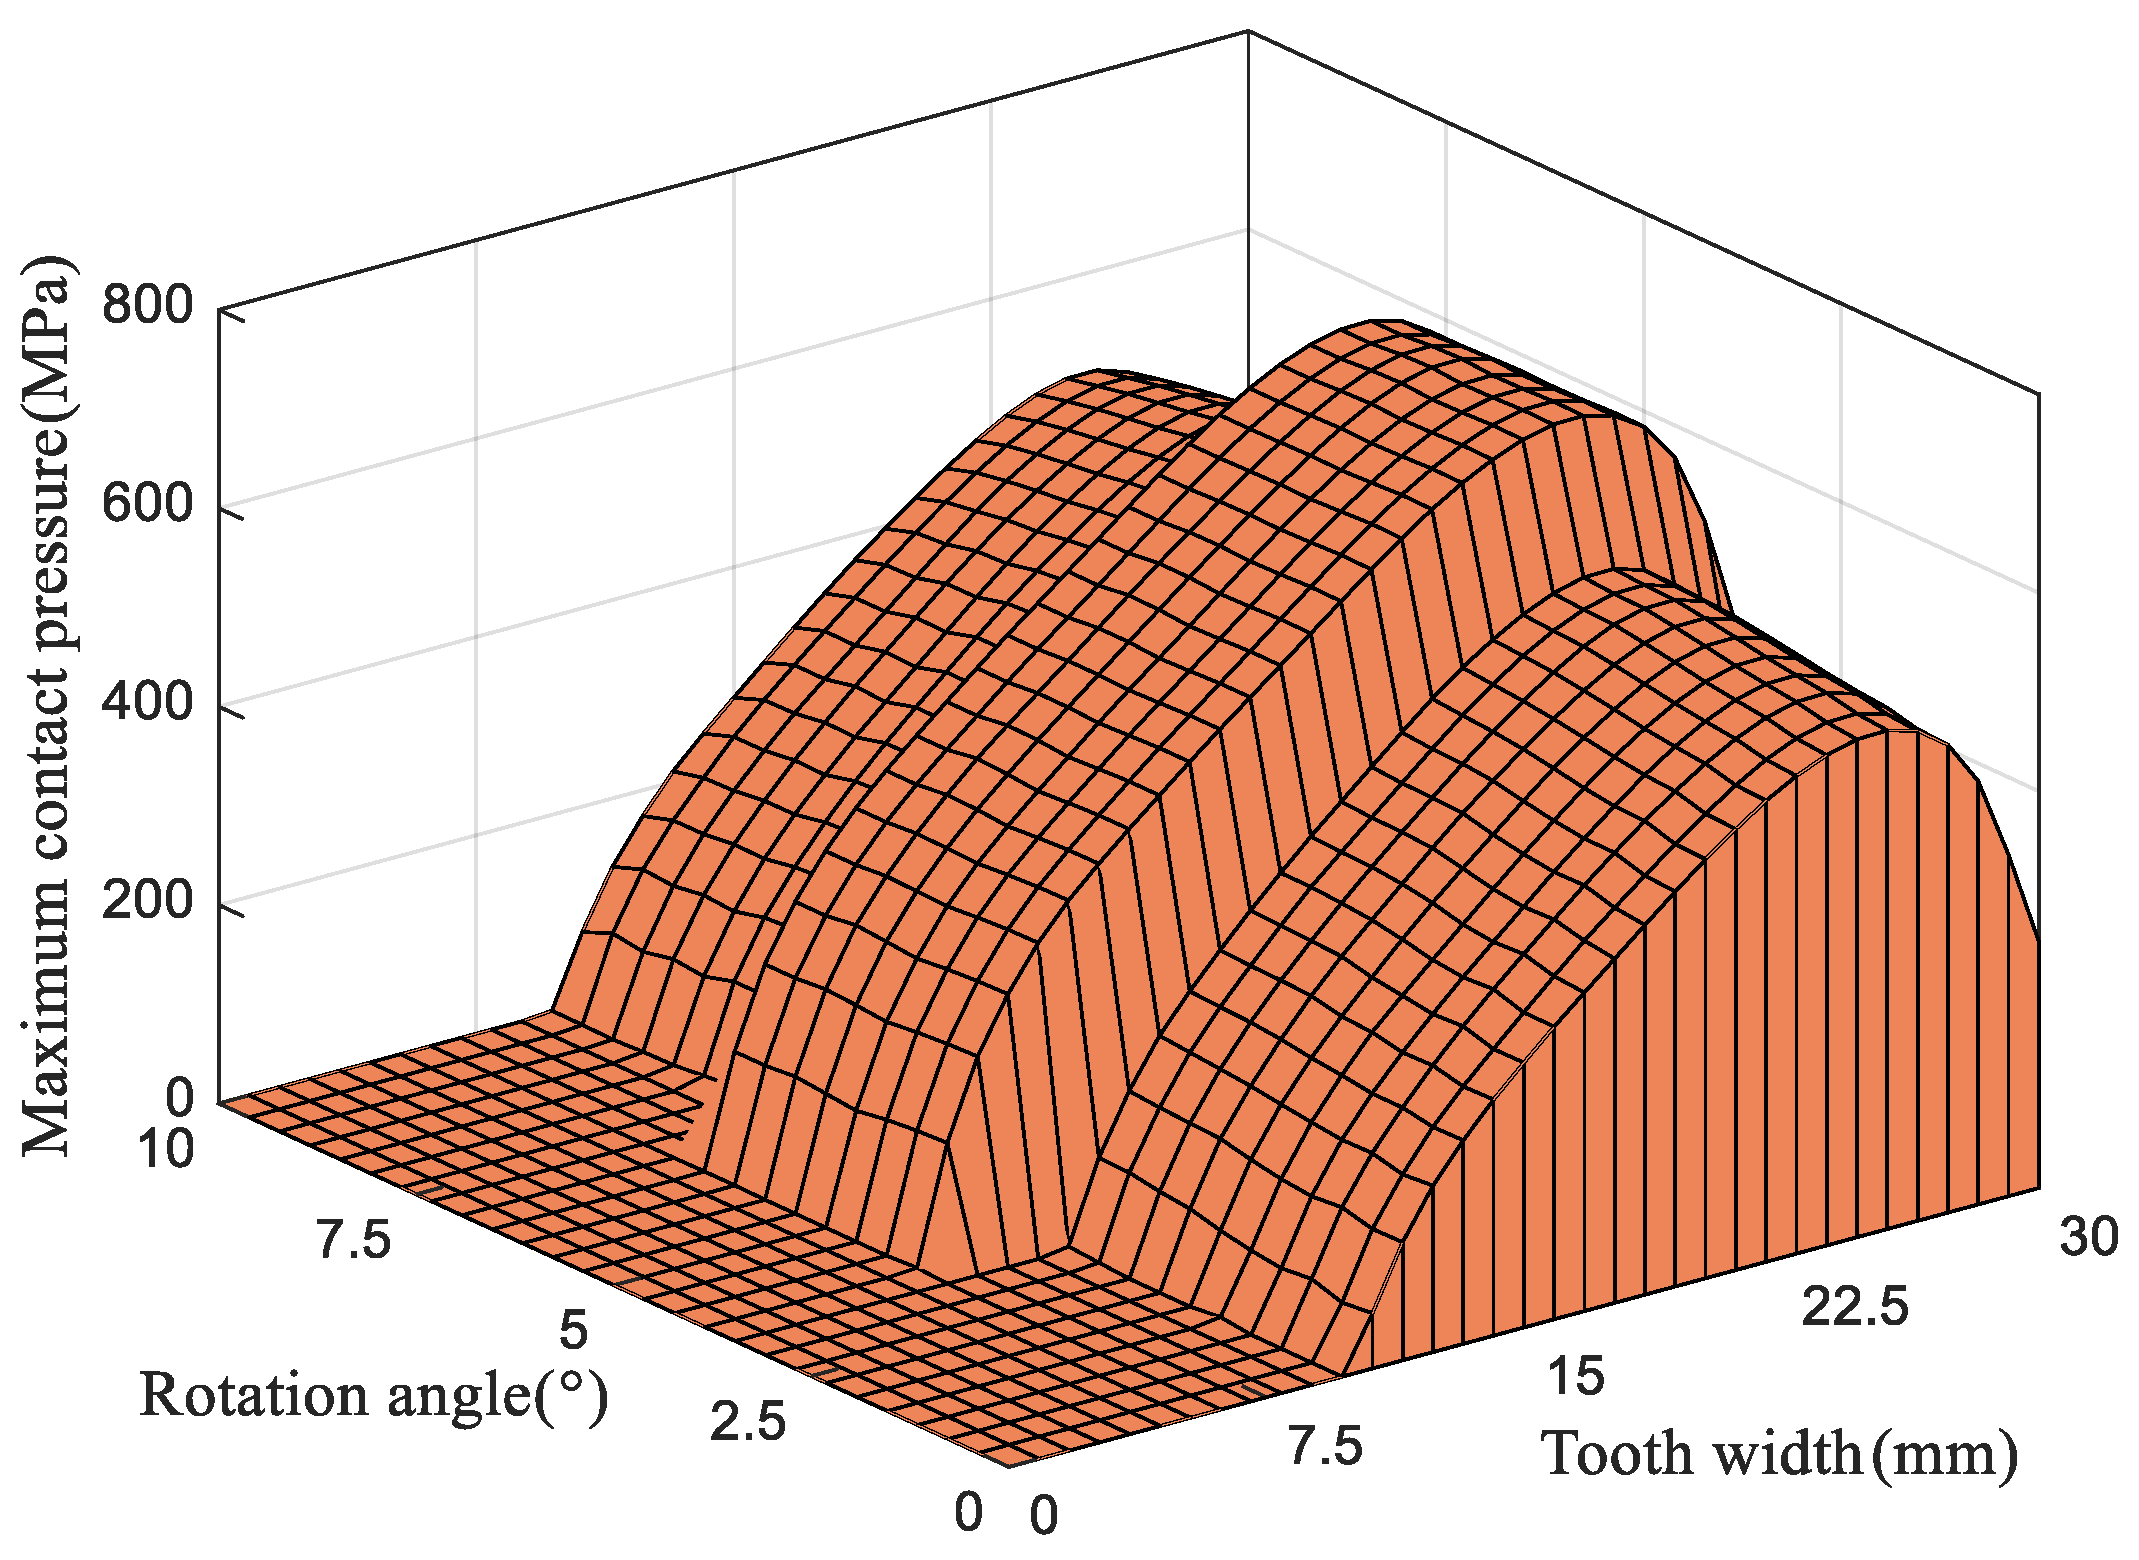
From Figure 18, Figure 19, Figure 20 and Figure 21, as the longitudinal modification coefficient increases, the contact pressure distribution over the tooth surface exhibits a decrease-then-increase trend, and the maximum contact pressure consistently occurs in the single-tooth meshing area. Selecting an appropriate modification coefficient enlarges the pressure-bearing area on the tooth surface, while lowering the peak pressure helps reduce the tooth surface failure rate and extends the gear’s service life.
During meshing, the elastic deformation reveals the gear’s contact condition, the contact area, its position, and its spread. The degree of elastic deformation can reflect the distribution of the load borne by the gear, and if the load is too large or uneven, this may cause excessive deformation or even lead to tooth breakage. Accordingly, elastic deformation of the tooth surface is a key metric for evaluating gear performance and health.
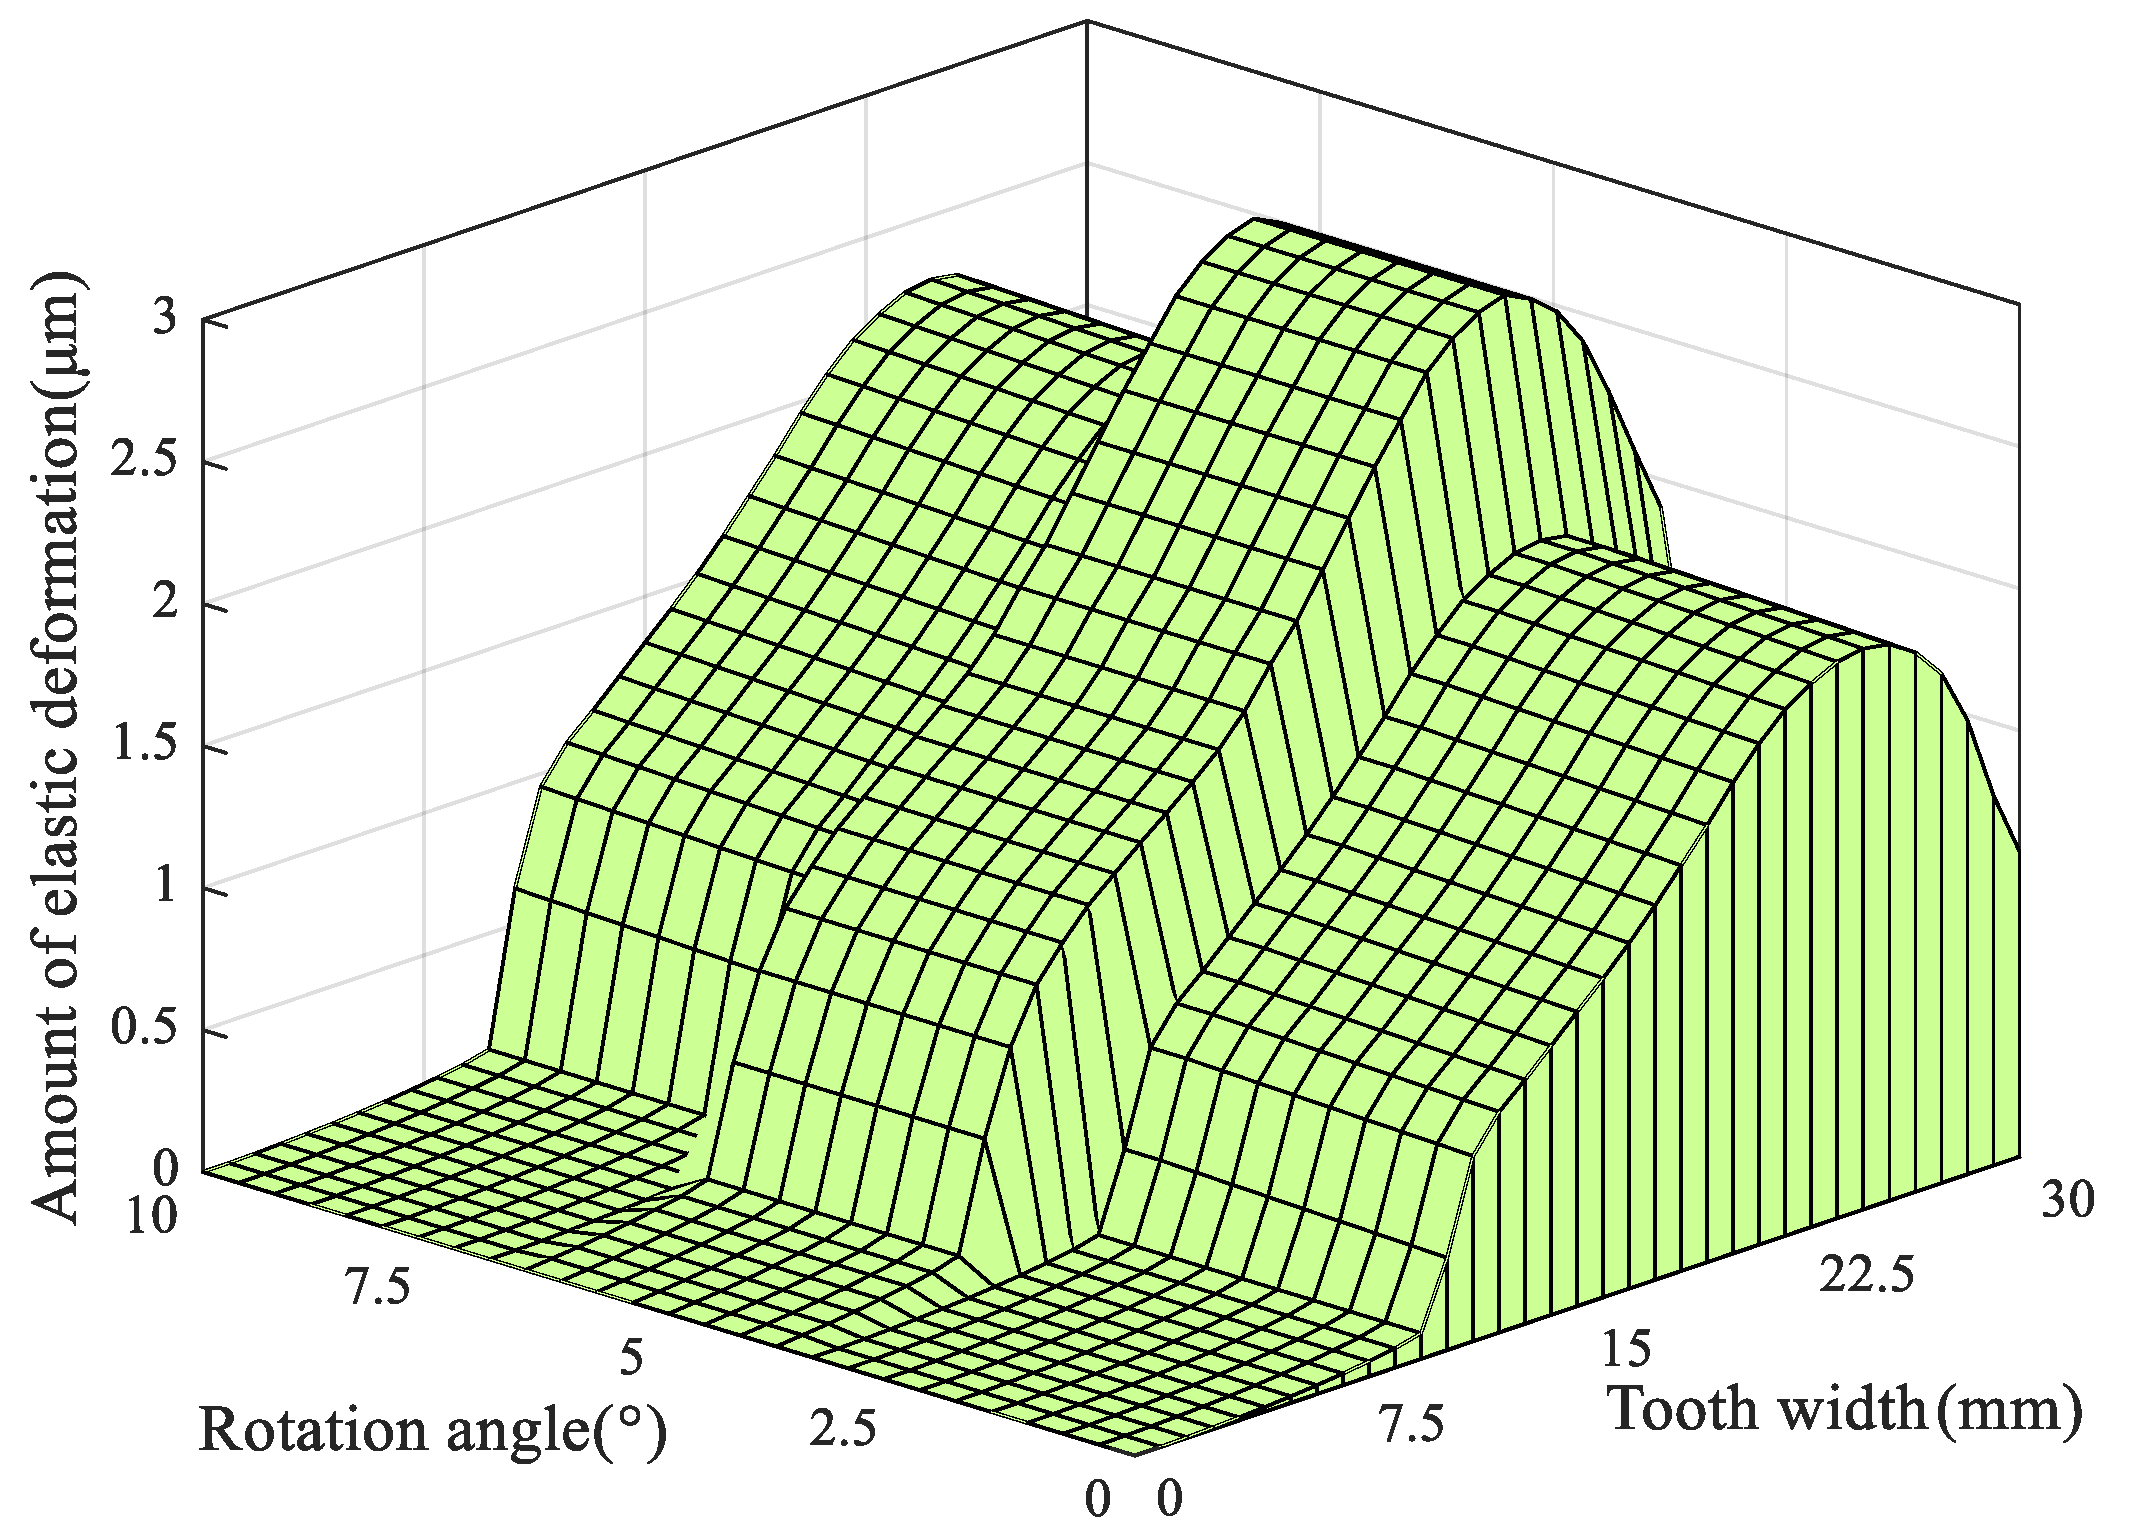
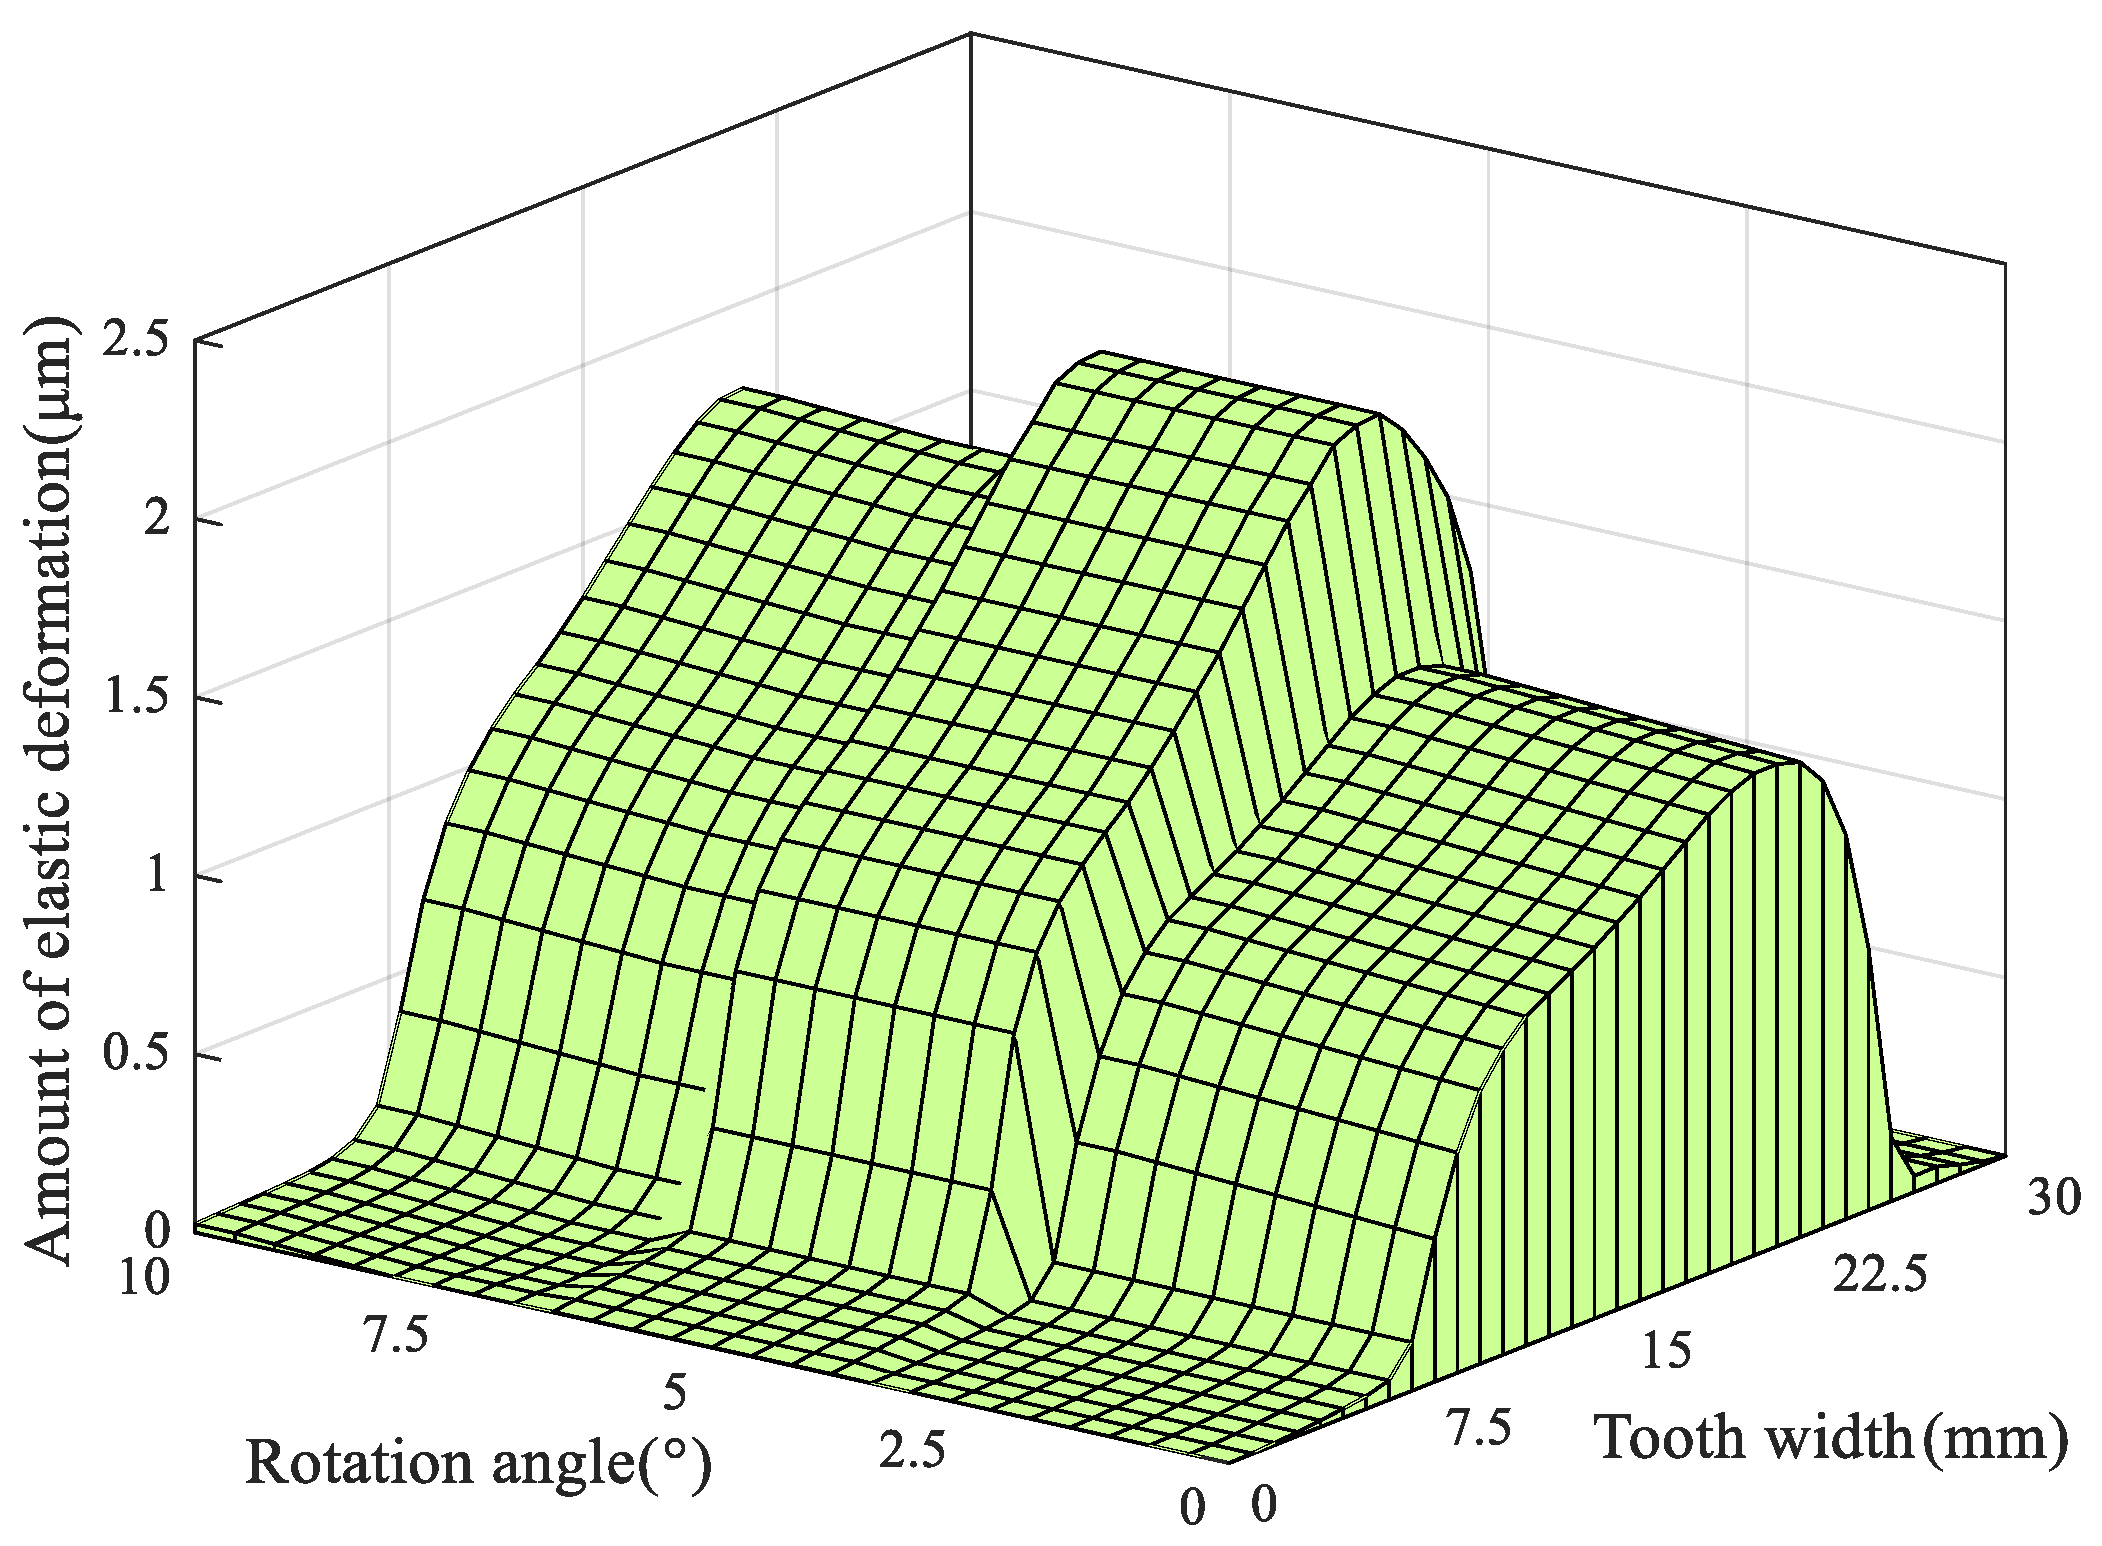
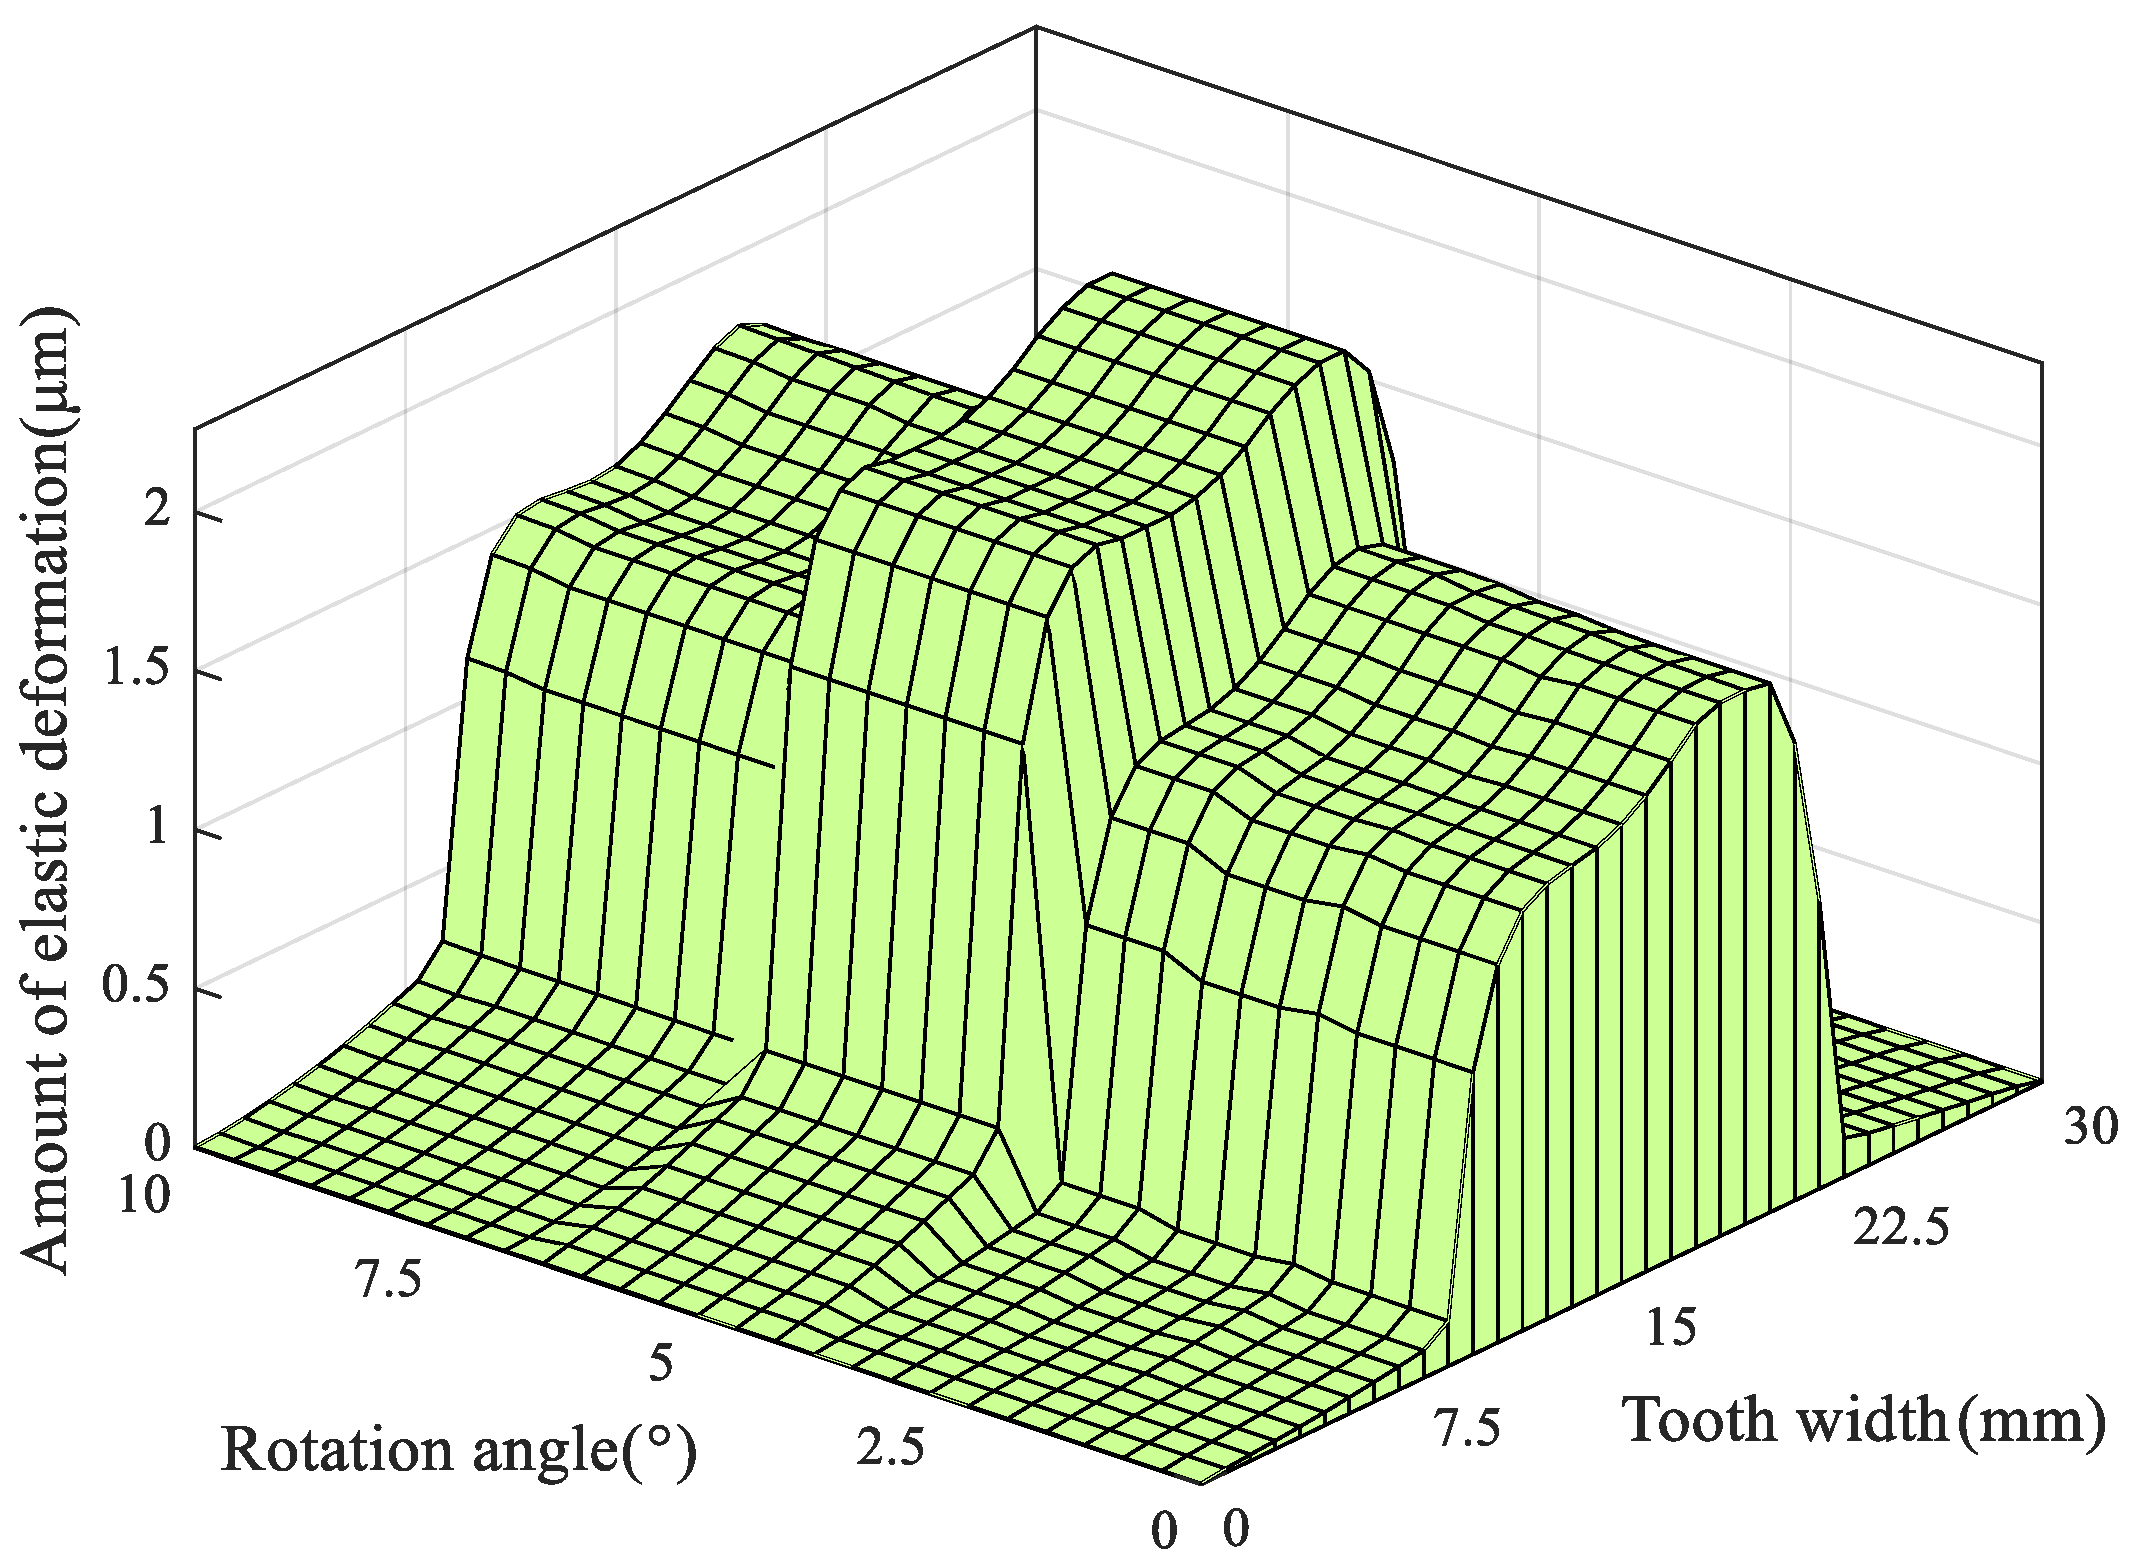
For different modification coefficients, the meshing-stage elastic deformation of the same tooth face of the driving gear is computed and reported, with schematic diagrams shown in Figure 22, Figure 23, Figure 24 and Figure 25.
From Figure 23, when a 3 = 0.000215 , the relative tooth surface modification is small and edge contact induced by installation error cannot be effectively eliminated. Consequently, a large tooth surface elastic deformation appears at the edge, with a maximum of 2.835 μm. Figure 23 shows the tooth surface elastic deformation for a 3 = 0.000265 , where the maximum elastic deformation is 2.085 μm. Along the tooth width, the elastic deformation rises slowly from 0 in the non-contact region and then increases sharply upon entering the contact region; overall, at this coefficient the elastic deformation of the tooth surface is lower than for the previous coefficient.
Figure 24 indicates that, at a 3 = 0.000305 , a maximum tooth surface elastic deformation of 2.261 μm. The higher modification coefficient reduces the contact patch, so the deformation grows from 2.085 μm to 2.261 μm.
Figure 25 shows that, when a 3 = 0.000335 , the maximum deformation occurs near the middle of the tooth width, with a peak value of 2.416 μm. The elastic deformation in the double teeth meshing area is smaller overall, but there is a large sudden change in the elastic deformation when single and double teeth mesh alternately, and this can even accelerate the wear of the tooth surface. Therefore, a larger amount of deformation can effectively avoid the occurrence of edge contact.
From Figure 22, Figure 23, Figure 24 and Figure 25, as the loading condition on the tooth surface varies along the tooth- -height, the elastic deformation changes accordingly. The elastic deformation near the tooth top is larger than that near the tooth root. The maximum elastic deformation of the gear tooth occurs within the single-tooth meshing interval. The maximum elastic deformation of the tooth surface increases with the rotation angle.

5.5. Experimental Verification

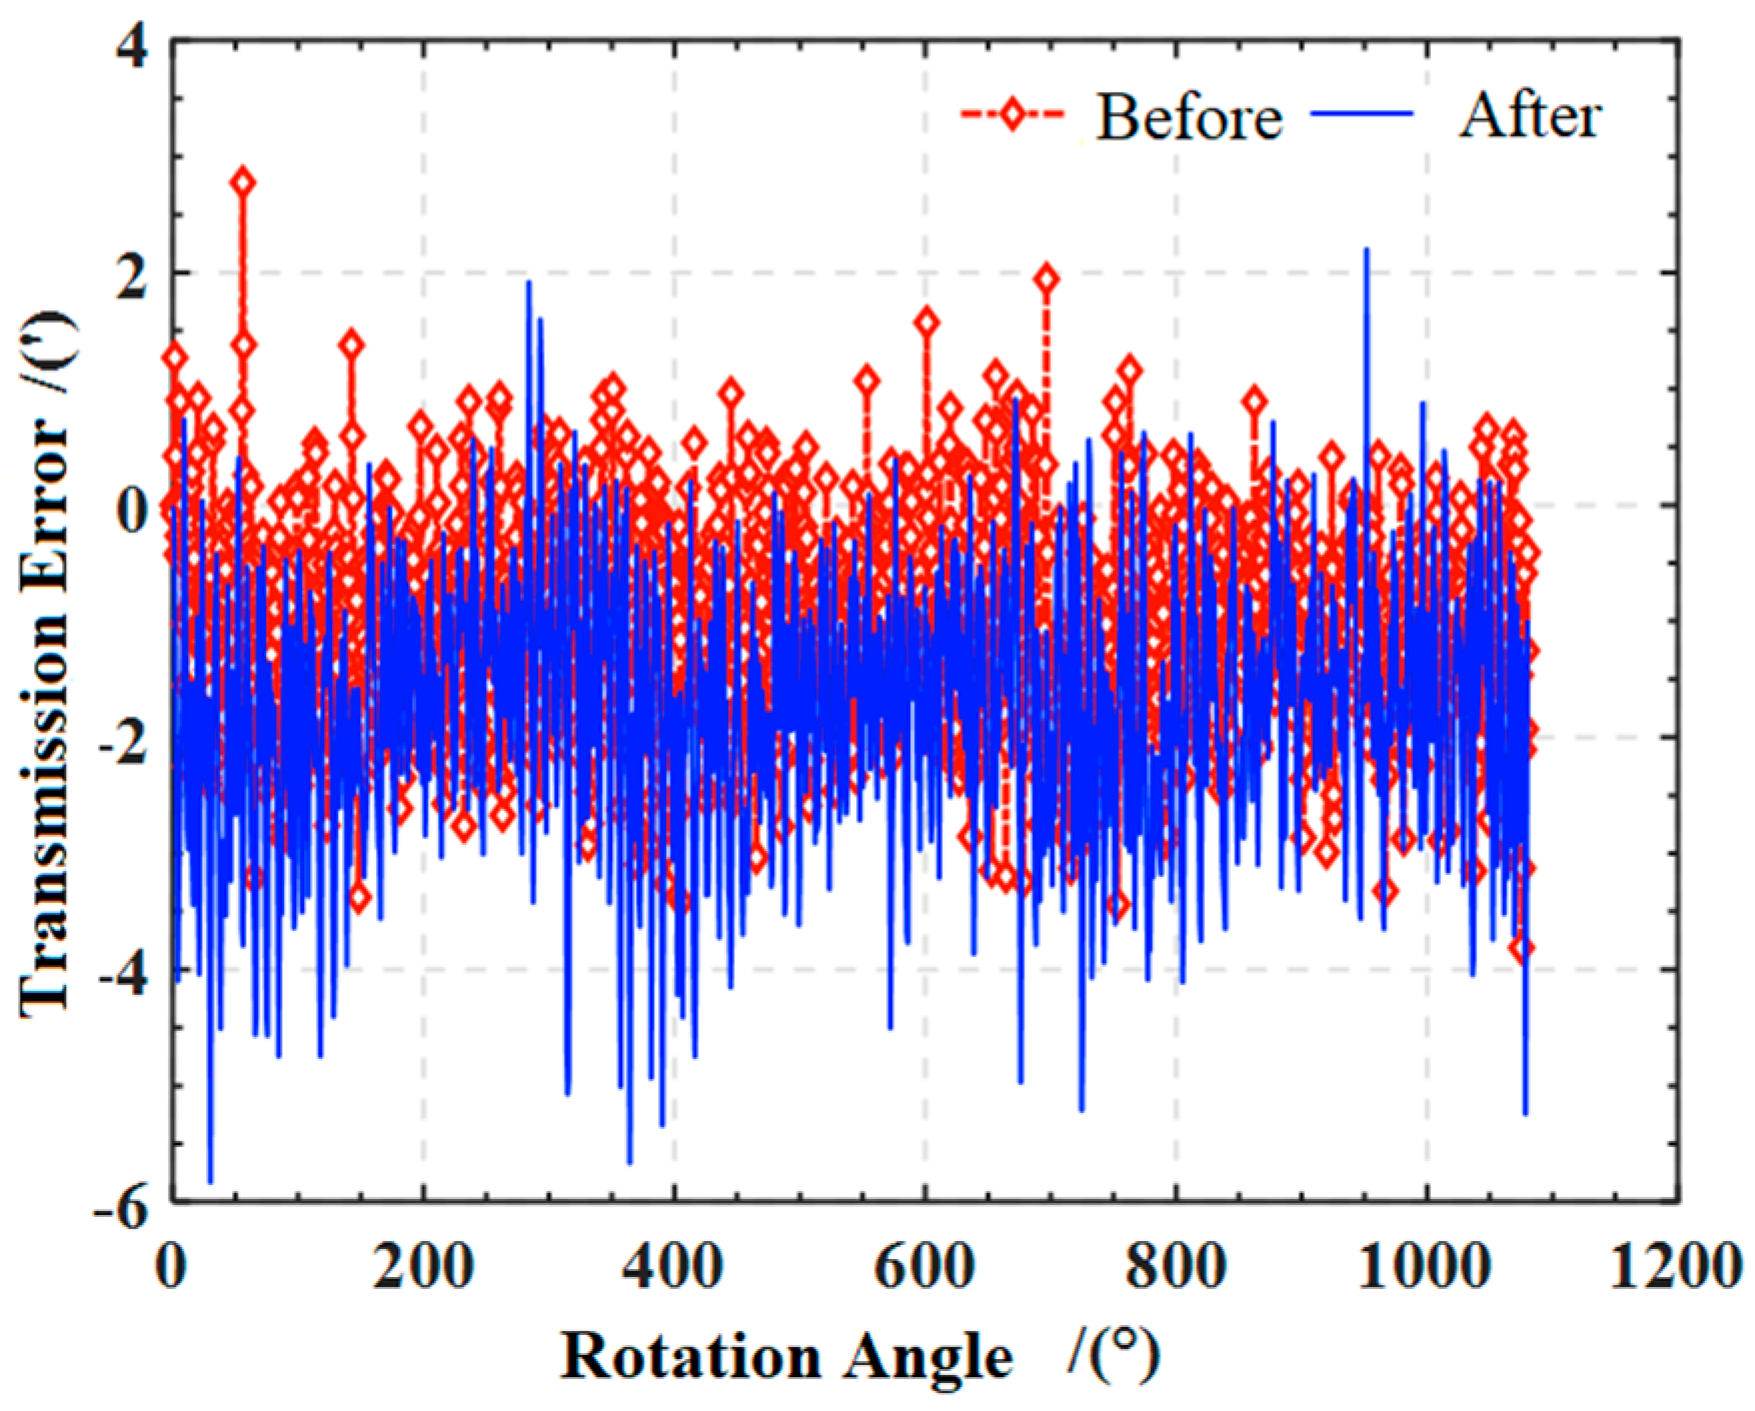
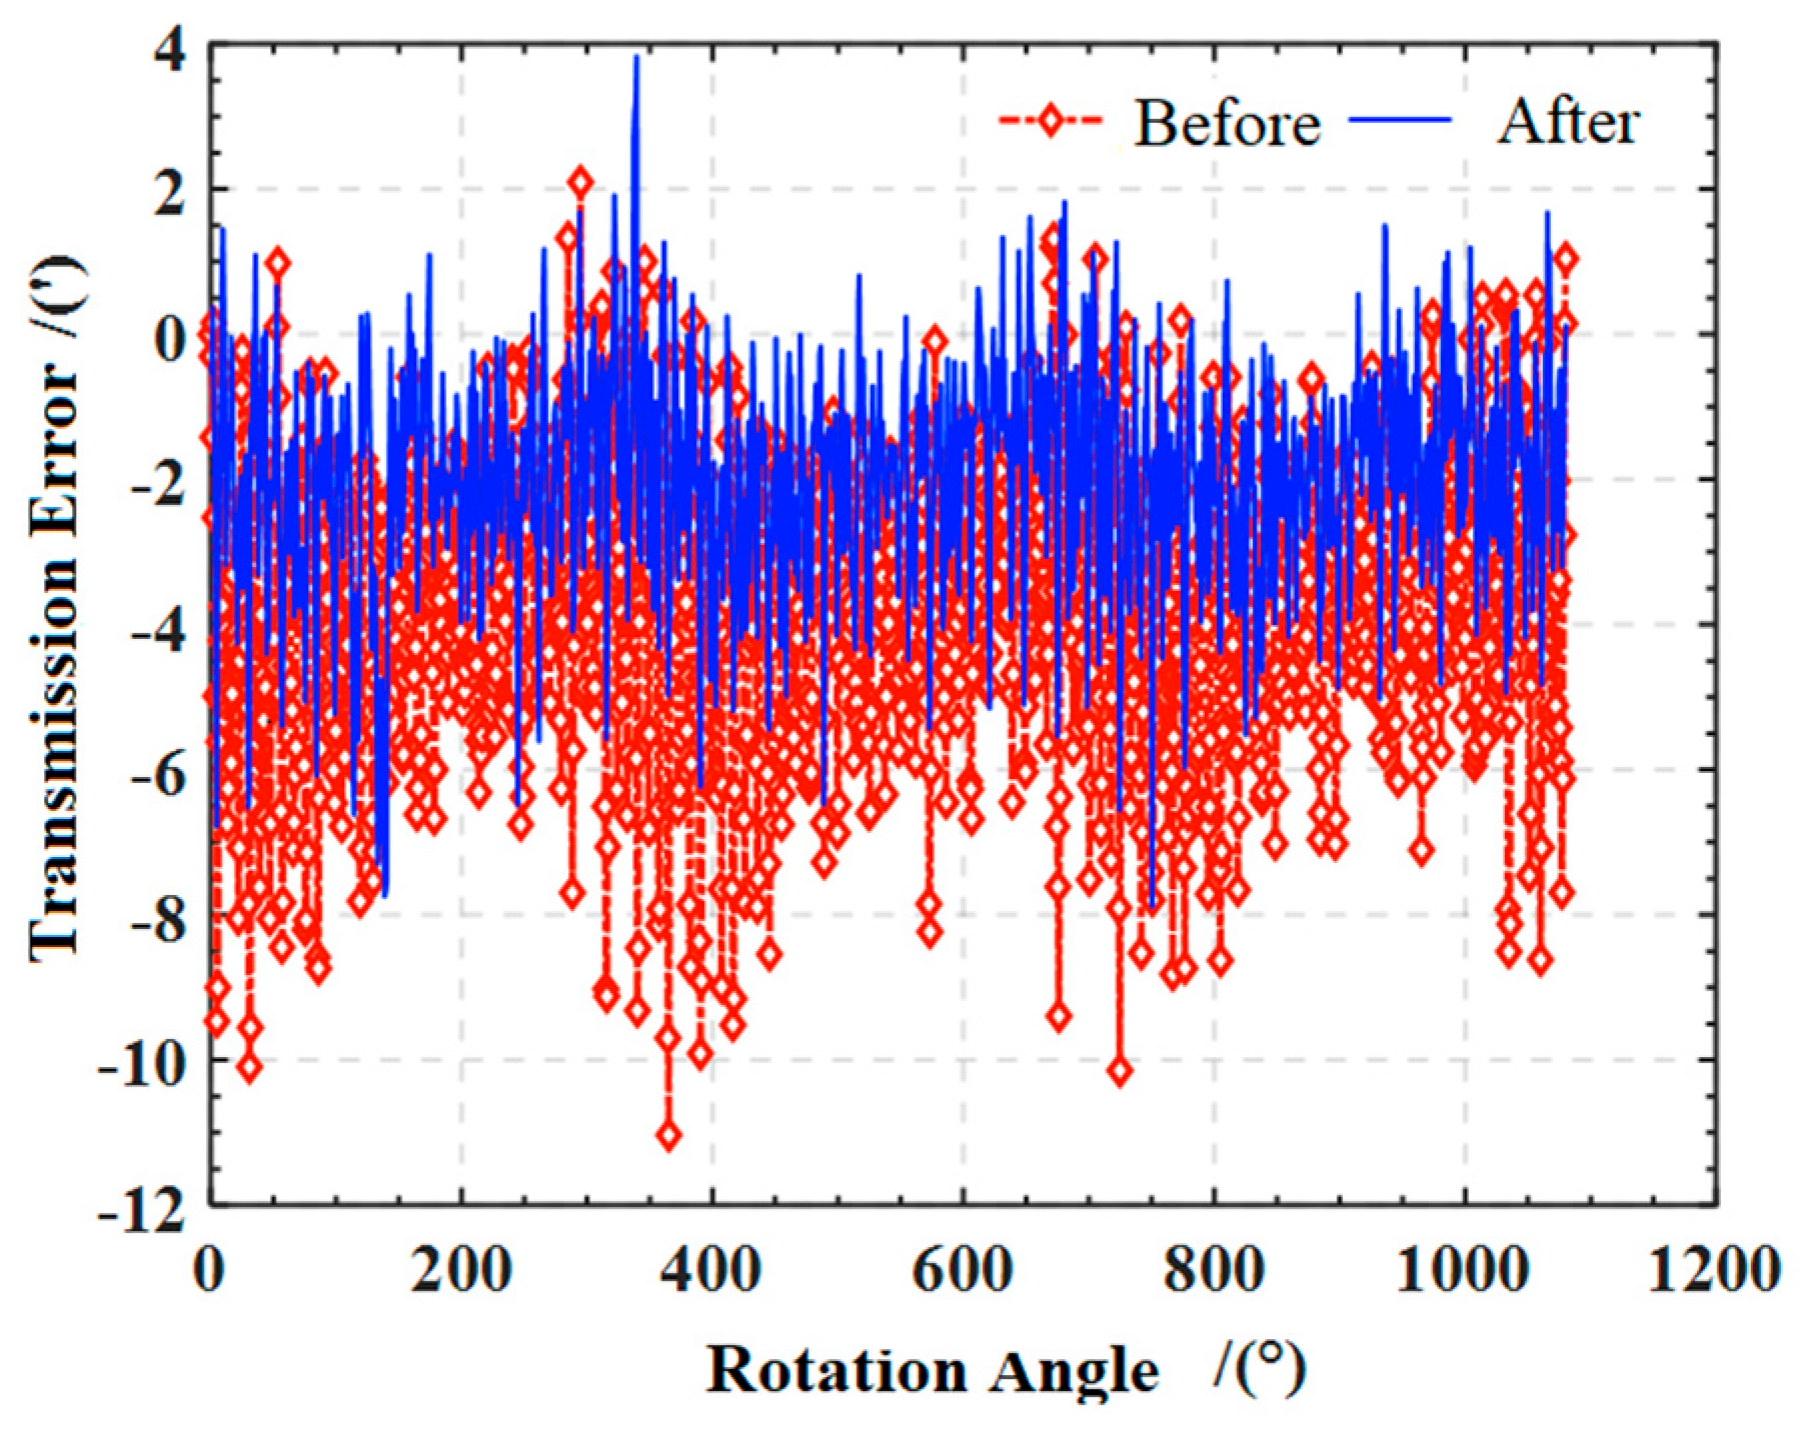
To validate the analysis method presented in this paper, a non-circular gear transmission test platform was constructed, as shown in Figure 26. It mainly includes servo motors, grating sensors, gearboxes, torque sensors, load motors, and data acquisition systems. The basic design parameters of the unmodified gear pair are the same as those of the modified gear pair. The unmodified and modified gear pairs share identical basic design parameters. Using data acquisition, the transmission error distribution of both the modified and unmodified gears was obtained. The detailed configuration information on transmission test rig is shown in Table 2.
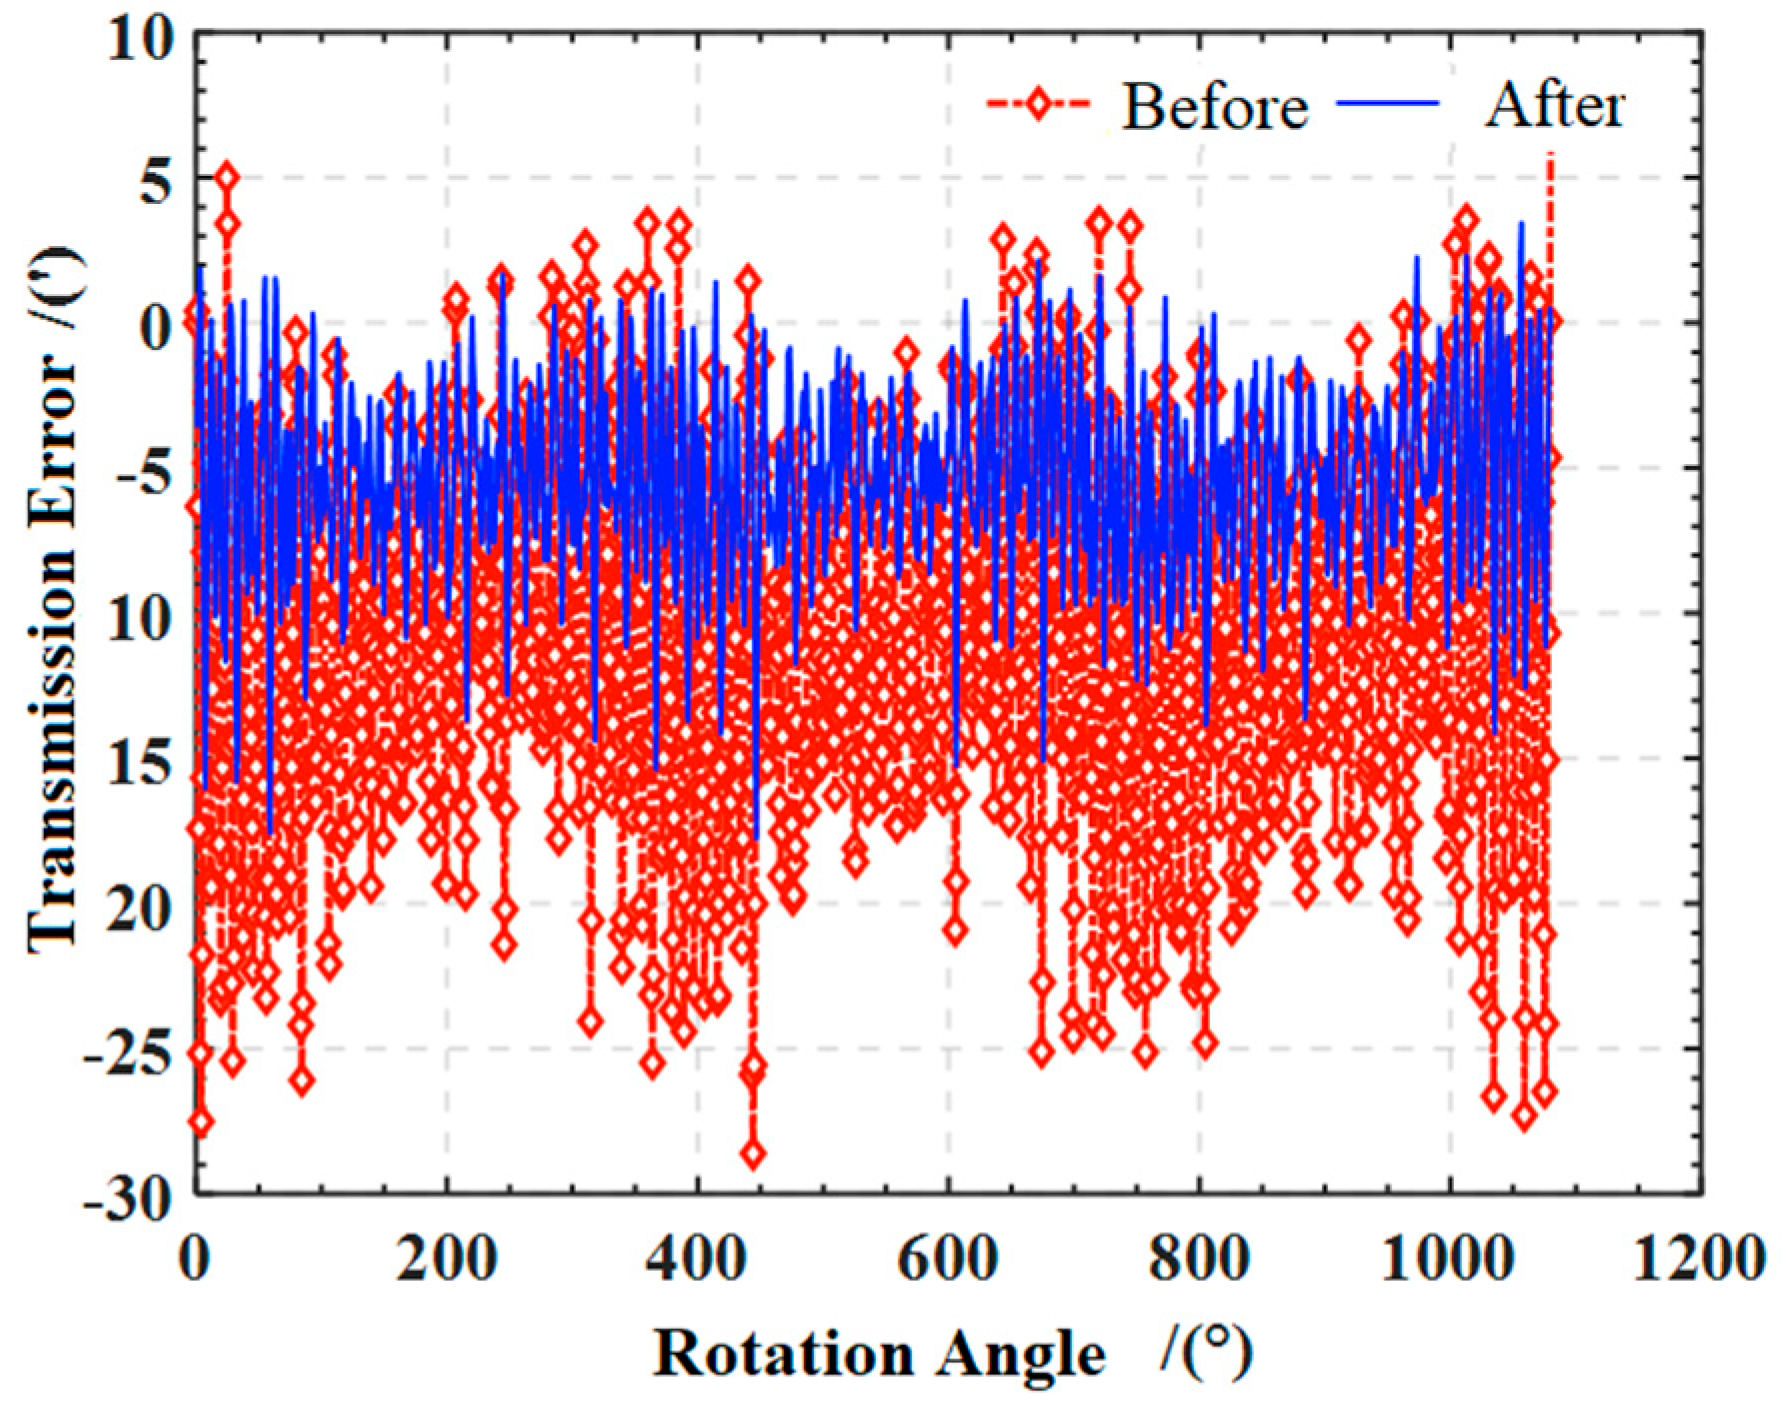
Transmission error is a key metric for evaluating gear transmission behavior and it directly influences the attainable transmission accuracy. In the test, the driving gear ran at 10 rpm and torques of 15 Nm, 30 Nm, and 60 Nm were applied to the driven gear to measure the transmission error of both the modified and unmodified pairs; the results are given in Figure 27, Figure 28 and Figure 29. The transmission errors exhibit periodic variations. At 15 Nm, the modified pair shows a slightly lower error amplitude than the unmodified pair, although the difference is minor. With increasing load, the error amplitude of both pairs rises; however, the modified pair grows slowly with load, whereas the unmodified pair increases rapidly. This indicates that the tooth surface of the modified gear pair has higher load-bearing capacity, smaller gear deformation, and reduced transmission error amplitude. Furthermore, the results verify the effectiveness of the proposed modification scheme and show that it mitigates, to a certain extent, the meshing impact of non-circular gears.

6. Conclusions

(1) The non-circular gear tooth surface model has been established, and its parametric equation has been formulated. This equation serves as the basis for tooth surface modification of and TCA for non-circular gears.
(2) From the tooth contact analysis of non-circular gears, the system is more sensitive to the axial horizontal angular error. Under the same installation error, with the increase in the longitudinal modification coefficient, the contact track gradually moves closer to the middle position of the gear tooth width, which proves that the longitudinal modification method proposed in this paper can effectively avoid the generation of the edge contact phenomenon and achieve the goal of improving the contact performance of the gear tooth.
(3) From the post-modification evolution of contact pressure and tooth surface elastic deformation, it is evident that an excessively large longitudinal modification coefficient reduces the contact area and causes a sudden jump in elastic deformation, showing that modification alone offers limited improvement of contact characteristics. After adopting the method in this paper, with the change in the modification coefficient, the peak contact pressure is in the range of 612.12–799.43 MPa, which is about 53–64% lower than that without modification, and the contact path is stable in the middle of the tooth width, and edge contact is eliminated.
(4) The transmission tests indicate that the transmission error amplitude of the modified gear decreases, and this reduction becomes more pronounced as the load increases. The experimental platform compares and tests loads of 15, 30 and 60 Nm at 10 rpm. The peak-to-peak value of the transmission error is reduced by about 7%, 16%, and 24%, respectively, compared with the unmodified one, which is consistent with the modification pressure relationship of ‘first drop and then rise‘, and the centralization trend of the contact area obtained by simulation. Therefore, the effectiveness and feasibility of the proposed method in terms of ‘avoiding edge contact and reducing peak pressure and improving transmission error‘ are verified through both numerical and physical experiments.
(5) In this paper, TCA and transmission error evaluation are carried out under the assumption of constant load, dry contact, and isotropic linear elasticity, aiming to highlight the relative effect of geometric and installation errors. The limitation is that the torsional vibration and load pulsation are not included, and the peak pressure and transmission error of the extreme transient may be different from the actual measurement. Under the above premise, the conclusion of this paper is mainly used for the relative comparison and trend judgment of modification parameters and installation errors, which can be used to guide parameter selection and engineering debugging.
(6) Experimental verification in this study is limited to the elliptical tooth profile, but the optimization method shown in the experimental results is also applicable to other types of non-circular gears. The experimental results of elliptical gears can provide general rules and guidance for the field of non-circular gear modification. In the future, the wide-ranging applicability of this method will be further verified by verifying other types of non-circular gears.

Author Contributions

Conceptualization, S.L.; methodology, S.L.; software, S.L.; validation, S.L.; formal analysis, S.L.; investigation, Y.W.; resources, Y.W.; writing—original draft preparation, S.L.; writing—review and editing, Y.W. All authors have read and agreed to the published version of the manuscript.

Funding

This research received no external funding.

Institutional Review Board Statement

Not applicable.

Informed Consent Statement

Not applicable.

Data Availability Statement

The original contributions presented in this study are included in the article. Further inquiries can be directed to the corresponding author(s).

Conflicts of Interest

The authors declare no conflict of interest.

References

  1. Zhao, H.; Xu, G.; Li, Z. Advanced design strategies and applications for enhanced higher-order multisegment denatured Pascal curve gears. Sci. Rep. 2020, 14, 27137. [Google Scholar]
  2. Dong, C.B.; Liu, Y.P.; Wei, Y.Q. Dynamic contact characteristics analysis of elliptic cylinder gear under different load conditions. J. Huazhong Univ. Sci. Technol. (Nat. Sci. Ed.) 2019, 47, 103–107. [Google Scholar]
  3. Li, B.T.; Chen, D.F. Design, manufacture, inspection and application of non-circular gears. J. Mech. Eng. 2020, 56, 55–72. [Google Scholar]
  4. Dong, C.B.; Liu, Y.P.; Wei, Y.Q.; Deng, H.Q.; Xu, J. Analysis of nonlinear dynamic characteristic of elliptic gear transmission system. J. Jilin Univ. (Eng. Technol. Ed.) 2020, 50, 483–493. [Google Scholar]
  5. Pedrero, J.I.; Pleguezuelos, M.; Sánchez, M.B. Analysis of the tip interference in low gear ratio internal spur gears with profile modification. Forsch. Ingenieurwesen 2023, 87, 891–900. [Google Scholar] [CrossRef]
  6. Pedrero, J.I.; Sánchez, M.B.; Pleguezuelos, M. Analytical model of meshing stiffness, load sharing, and transmission error for internal spur gears with profile modification. Mech. Mach. Theory 2024, 197, 105650. [Google Scholar] [CrossRef]
  7. Pleguezuelos, M.; Sánchez, M.B.; Pedrero, J.I. Analytical model for meshing stiffness, load sharing, and transmission error for helical gears with profile modification. Mech. Mach. Theory 2023, 185, 105340. [Google Scholar] [CrossRef]
  8. Pleguezuelos, M.; Sánchez, M.B.; Pedrero, J.I. Analytical model for meshing stiffness, load sharing, and transmission error for spur gears with profile modification under non-nominal load conditions. Appl. Math. Model. 2021, 97, 344–365. [Google Scholar] [CrossRef]
  9. Pedrero, J.I.; Sánchez-Espiga, J.; Sánchez, M.B.; Pleguezuelos, M.; Fernández-del-Rincón, A.; Viadero, F. Simulation and validation of the transmission error, meshing stiffness, and load sharing of planetary spur gear transmissions. Mech. Mach. Theory 2024, 203, 105800. [Google Scholar] [CrossRef]
  10. Pedrero, J.I.; Pleguezuelos, M.; Sánchez, M.B. Influence of surface wear on the meshing stiffness and transmission error of internal spur gears with profile modification. Forsch. Ingenieurwesen 2025, 89, 154. [Google Scholar] [CrossRef]
  11. Li, J.Q.; Song, C.C.; Wei, B.Y. Multi-objective orthogonal test simulation and modification parameter design based on ease-off topology. J. Mech. Transm. 2022, 46, 42–47. [Google Scholar]
  12. Stadtfeld, H.J. What “ease-off” shows about bevel and hypoid gears. Gear Technol. 2001, 18, 8–23. [Google Scholar]
  13. Sánchez, M.B.; Pleguezuelos, M.; Pedrero, J.I. Influence of profile modification on the transmission error of spur gears under surface wear. Mech. Mach. Theory 2024, 191, 105473. [Google Scholar] [CrossRef]
  14. Abruzzo, M.; Beghini, M.; Romoli, L.; Santus, C. Design for manufacturing of a spur gears profile modification based on the static transmission error for improving the dynamic behavior. Int. J. Adv. Manuf. Technol. 2023, 129, 1999–2010. [Google Scholar] [CrossRef]
  15. Dias, F.H.; Silva, G.C.; Chui, D.S. Vibration attenuation on spur gears through optimal profile modification based on an alternative dynamic model. J. Braz. Soc. Mech. Sci. Eng. 2024, 46, 10. [Google Scholar] [CrossRef]
  16. Mabrouk, M.; Liu, H.; Pengfei, Y.; Pu, G. Dynamic characteristics analysis of gear tooth modification in a three-stage gear system. Proc. Inst. Mech. Eng. Part D J. Automob. Eng. 2025, 239, 1083–1107. [Google Scholar] [CrossRef]
  17. Chen, P.; Wang, S.M.; Li, F. High-order contact analysis method of spiral bevel gear tooth surface based on ease-off. J. Aerosp. Power 2023, 39, 243–252. [Google Scholar]
  18. Li, J.Q.; Guo, Y.L.; Wei, B.Y.; Cao, X.M. Research on meshing simulation analysis method for complex flanks based on surface synthesis method. J. Mech. Transm. 2022, 46, 16–20. [Google Scholar]
  19. Wang, Y.Q.; Wei, B.Y.; Xie, X.K.; Li, J.Q. Ease-off surface topological modification of helical gear tooth surface calculation method of adhesive wear. J. Aerosp. Power 2023, 38, 2982–2990. [Google Scholar]
  20. Zhang, W.Q.; Ma, P.P.; Guo, X.D. Contact characteristics control method of spiral bevel gears based on Ease-off. J. Beijing Univ. Technol. 2018, 44, 1024–1031. [Google Scholar]
  21. Nie, S.W.; Jiang, C.; Deng, X.Z.; Su, J.X.; Yang, J.J.; Wang, J.H. Flank modification method of hypoid gears with Ease-off topology correction. China Mech. Eng. 2019, 30, 2709–2715. [Google Scholar]
  22. Yang, J.J.; Gong, F.; Zhang, H. Tooth profile modification and tooth contact analysis of precision forging spiral bevel gear. J. Jiangsu Univ. (Nat. Sci. Ed.) 2018, 39, 168–173. [Google Scholar] [CrossRef]
  23. Litvin, F.L.; Fuentes, A.; Gonzalez-perez, I.; Carvenalie, L.; Kawasaki, K.; Handschuh, R.F. Modified involute helical gears: Computerized design, simulation of meshing and stress analysis. Comput. Methods Appl. Mech. Eng. 2003, 192, 3619–3655. [Google Scholar] [CrossRef]
  24. Wei, Y.Q.; Li, Z.Y.; Liu, Y.P.; Guo, R.; Yang, D.; Luo, L.; Chen, Z.M. Geometric contact characteristics and sensitivity analysis of variable hyperbolic circular-arc-tooth-trace cylindrical gear with error theory considered. J. Northwestern Polytech. Univ. 2022, 40, 679–689. [Google Scholar] [CrossRef]
  25. Su, J.Z.; Li, X.D.; Yin, X.M.; Jia, H.T.; Guo, F. Design and form grinding principle of linear triangular end relief for double helical gears. J. Mech. Eng. 2023, 59, 121–129. [Google Scholar]
  26. Tang, J.Y.; Chen, X.M.; Luo, C.W. Contact analysis of spur gears based on longitudinal modification and alignment errors. J. Cent. South Univ. Sci. Technol. 2012, 43, 1703–1709. [Google Scholar]
  27. Liu, Y.P.; Yun, B.B.; Wei, Y.Q.; Dong, C.B.; Ren, Z.T. Research on digital design and tooth shape optimization of non-circular gears based on envelope features. J. Mech. Transm. 2022, 46, 55–60. [Google Scholar]
  28. Wang, X.; Zheng, F.Y. Profile modification method for non-cylindrical gear based on shaper cutter. Hoisting Conveying Mach. 2018, 46, 144–149. [Google Scholar] [CrossRef]
  29. Li, D.W.; Liu, Y.P.; Gong, J.; Wei, Y.Q.; Zhao, G. A novel method for longitudinal modification and tooth contact analysis of non-circular cylindrical gears. J. Mech. Sci. Technol. 2022, 36, 6157–6170. [Google Scholar] [CrossRef]
  30. Nie, S.W.; Deng, J.; Deng, X.Z.; Yang, J.J.; Li, J.B. Tooth surface error equivalent correction method of spiral bevel gears based on Ease off topology. China Mech. Eng. 2017, 28, 2434–2440. [Google Scholar]
  31. Zhu, X.X. Free Curves and Surfaces Modeling Technology; Science Press: Beijing, China, 2001; pp. 88–168. [Google Scholar]
  32. Wang, L.; Cao, X.M.; Deng, X.Z.; Lei, B.Z. Research of spiral bevel gear tooth surface modification technique based on machining center. J. Mech. Transm. 2016, 40, 1–5. [Google Scholar]
  33. Zhang, J.H.; Fang, Z.D.; Wang, C. Digital simulation of spiral bevel gears real tooth surfaces based on non-uniform rational B-spline. J. Aerosp. Power 2009, 24, 1672–1676. [Google Scholar]
  34. Litvin, F.L.; Fuentes, A. Gear Geometry and Applied Theory, 2nd ed.; Cambridge University Press: Cambridge, UK, 2004; pp. 12–20. [Google Scholar]
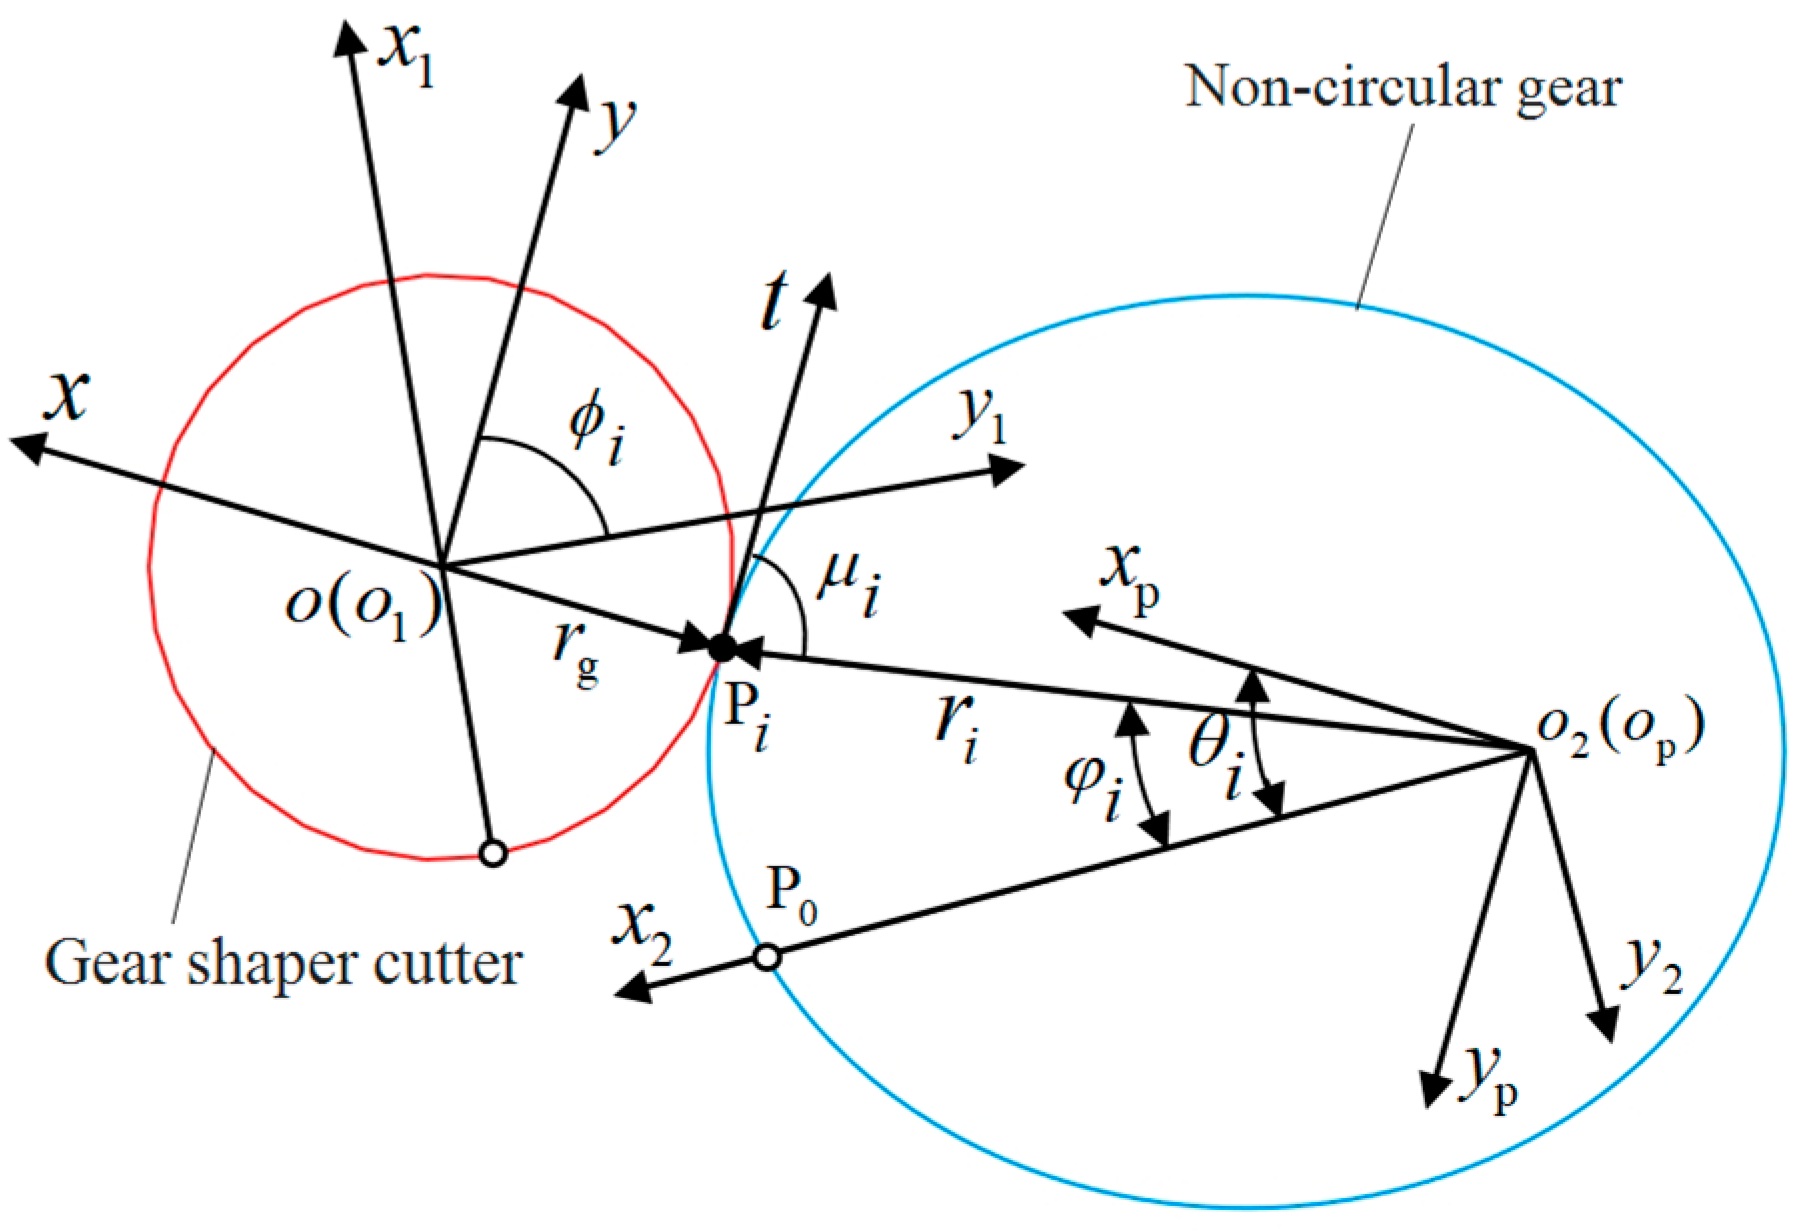
Figure 1. Coordinate system for non-circular gear forming.
Applsci 15 12707 g001
Figure 2. The digital image of the tooth surface of the non-circular gear.
Applsci 15 12707 g002
Figure 3. Three-dimensional model of non-circular gear.
Applsci 15 12707 g003
Figure 4. The relationship between the theoretical tooth surface and the position of the modified tooth surface of the non-circular gear.
Applsci 15 12707 g004
Figure 5. Topology of tooth surface modification.
Applsci 15 12707 g005
Figure 6. Second-order ease-off-modified topology of tooth surface.
Applsci 15 12707 g006
Figure 7. Schematic diagram of type value points.
Applsci 15 12707 g007
Figure 8. NURBS surface control vertices.
Applsci 15 12707 g008
Figure 9. Coordinate system for contact analysis of gear pair.
Applsci 15 12707 g009
Figure 10. Topology of ease-off modification ( μ m ) .
Applsci 15 12707 g010
Figure 11. Influence of center distance error on contact ellipse.
Applsci 15 12707 g011
Figure 12. Effect of axial horizontal angular error on contact ellipse.
Applsci 15 12707 g012
Figure 13. Effect of axial vertical angular error on contact ellipse.
Applsci 15 12707 g013
Figure 14. Contact ellipses under different modification coefficients.
Applsci 15 12707 g014
Figure 15. Contact state of the modified tooth surface under the condition in which a 3 = 0.00015 .
Applsci 15 12707 g015
Figure 16. Contact state of the modified tooth surface under the condition in which a 3 = 0.000215 .
Applsci 15 12707 g016
Figure 17. Contact state of the modified tooth surface under the condition in which a 3 = 0.000335 .
Applsci 15 12707 g017
Figure 18. Contact pressure distribution characteristics at a 3 = 0.000215 .
Applsci 15 12707 g018
Figure 19. Contact pressure distribution characteristics at a 3 = 0.000265 .
Applsci 15 12707 g019
Figure 20. Contact pressure distribution characteristics at a 3 = 0.000305 .
Applsci 15 12707 g020
Figure 21. Contact pressure distribution characteristics at a 3 = 0.000335 .
Applsci 15 12707 g021
Figure 22. Elastic deformation results of modified tooth surface with a 3 = 0.000215 .
Applsci 15 12707 g022
Figure 23. Elastic deformation results of modified tooth surface with a 3 = 0.000265 .
Applsci 15 12707 g023
Figure 24. Elastic deformation results of modified tooth surface with a 3 = 0.000305 .
Applsci 15 12707 g024
Figure 25. Elastic deformation results of modified tooth surface with a 3 = 0.000335 .
Applsci 15 12707 g025
Figure 26. Non-circular gear transmission test platform.
Applsci 15 12707 g026
Figure 27. Distribution law of transmission error under 15 Nm.
Applsci 15 12707 g027
Figure 28. Distribution law of transmission error under 30 Nm.
Applsci 15 12707 g028
Figure 29. Distribution law of transmission error under 60 Nm.
Applsci 15 12707 g029
Table 1. Parameters of non-circular gear pair.
ParametersValue
Number of teeth39
Modulus (mm)2
Addendum coefficient1
Tip clearance coefficient0.25
Tooth width (mm)30
Pitch curve equation r φ 36 . 0812 / ( 1 - 0 . 313 × cos φ 1 )
Pressure angle at the pitch curve (°)20
Material38CrMoAI
Gear accuracy6
Table 2. Detailed configuration information on transmission test rig.
Part NameModelSpecifications
Torque sensorYH-502The measuring ranges are 20 N·m and 2000 N·m, respectively. Measurement accuracy: ±0.1%. Power supply voltage: 24 VDC. Output signal: 10 ± 5 kHz. Torque accuracy: < ± 0.1   % F S . Frequency response: 100   μ s
Noise sensorRS-ZS-V05-2Range: 30–120 dB. Frequency range: 20 Hz–12.5 kHz. Measurement error: ±1.5 dB
Infrared temperature sensorCK-01ATemperature range: −20~300 °C. Spectral range: 8–14 μm. Measurement accuracy: ±1%. Response time: 50–300 ms optional
Vibration sensorCA-YD-107Frequency response: 0.5–6000 Hz. Maximum lateral sensitivity: ≤5%. Axial sensitivity: 50   PC / g . Magnetic sensitivity: 2 g/T. Base strain:   0.2   mg / μ g
Circular gratingK-100Power supply voltage: 24 VDC. Resolution: 48000 P/R. Protection grade: IP50
AC servo motorMSME504GRated speed: 3000 rpm. Rated voltage: 400 VAC (three-phase). Torque: 15.9 N·m. Protection grade: IP67
Servo motor driverMFDTA464Rated voltage: 400 VAC (three-phase)
PLCS7-200SMARTPower supply voltage: 220 VAC. I/O point: 30. AO channel: 4
Data acquisition cardNI-6351Sampling rate:1.25 MS/s. AI channel: 16. A/D accuracy: 16 bits. AO channel: 2.
DIO channel: 24. Counting channel: 4
Disclaimer/Publisher’s Note: The statements, opinions and data contained in all publications are solely those of the individual author(s) and contributor(s) and not of MDPI and/or the editor(s). MDPI and/or the editor(s) disclaim responsibility for any injury to people or property resulting from any ideas, methods, instructions or products referred to in the content.