1. Introduction
In recent years, advancements in newly developed materials have further led to increased demands for their mechanical and physical properties. Hard and brittle materials such as superalloys, ceramics, quartz glass, and sapphires are thus produced. Due to the significant differences in their physical and mechanical properties as compared with metallic materials, traditional machining methods struggle to enhance machining efficiency and cost reduction simultaneously. As a result, the development of ultrasonic-assisted machining methods has emerged. This assisted machining approach can reduce the cutting force and friction resistance between the cutting tool and workpiece, thereby improving the machining quality. Furthermore, with the evolution of machining technologies, achieving high rigidity and a lightweight design have become crucial research topics in machine tool structural development. When designing a machine tool structure, it is essential to consider its rigidity and avoid the resonant frequencies that the machine tool may encounter during the machining process. As a result, the possibility of a machine tool’s vibrating system causing environmental resonances may be minimized. Therefore, research into machining characteristics during cutting processes to investigate the interconnected relationship between machine tool structural rigidity and process dynamics is increasingly important. This interconnection could serve as a reference for machine tool structural design and manufacturing improvements. The ultimate goal of machining performance and efficiency promotions can be achieved accordingly.
Through the use of the finite element method for the design and analysis of milling tools, the principle of ultrasonic lateral vibration conversion for the transformation of vertical vibration power at the vibration node (the maximum pressure point) into lateral vibration is applied (2009). The necessary horizontal cutting force may thus be generated to optimize the removal efficiency of hard and brittle materials during abrasive grain milling. This also enables the design of more suitable cutting tools for milling processes. The milling tool shape, when expanded and scaled down during the machining stage, is fully incorporated after power conversion and can effectively enhance the cutting performance. Furthermore, under the same conditions of piezoelectric ceramics, changes in the existing vibration system can be made to achieve optimal performance. The results show that the conversion of vertical vibration power into lateral vibration effectively enhances the horizontal cutting force and the material removal is facilitated. To increase the swing of the vibration system, in addition to increasing the input pressure, a swing amplification shaft can be used to amplify the required swing. Therefore, modeling and designing the amplification shaft in finite element software for simulation analysis is necessary and the amplified value demonstrates a linear relationship with the theoretical values. The simulation of a vibration response in an ultrasonic vibration system with software could be coupled with appropriate elements such as common metal materials and quartz piezoelectric ceramics, and high accuracy could be achieved. The design time and manufacturing costs in practical manufacturing processes may thus be effectively reduced [
1].
Wu et al. (2023) investigated the impact of ultrasonic vibration on the machining performance of titanium alloy experimentally in the hybrid-assisted grinding of ultrasonic vibration/plasma oxidation. In this experiment, a three-axis CNC machining center with an ultrasonic spindle at a frequency of 25 kHz attached to a conductive grinding wheel was utilized to perform ultrasonic vibration. It was connected to a plasma oxidation power supply and hybrid-assisted grinding of a titanium alloy was thus achieved. These results indicate that applying ultrasonic vibration and increasing the vibration amplitude can reduce the grinding forces. The reduction in grinding forces is more pronounced when plasma oxidation is employed. Since the ultrasonic cavitation effect can enhance the plasma intensity, the microhardness of the surface oxidized layer is further decreased. Simultaneously, there is a trend of reducing the surface roughness of the machined surface with an increase in vibration amplitude. The application of ultrasonic vibration assistance improves material removal rates, especially with a more significant effect under plasma oxidation conditions. The increase in material removal rates is attributed to a reduction in grinding forces during the vibration-assisted process, which subsequently diminishes deformations in the machining system. In the context of hybrid-assisted grinding of plasma/vibration, it was observed that the chip size became smaller and more granular. The efficient removal of chips from the grinding zone and the reduction of chip adhesion to the grinding wheel can be assisted by this improvement. With the increase in the vibration amplitude, there is a further promotion of chip adhesion reduction [
2].
Gao et al. (2009) presented a novel ultrasonic grinding vibration device and established a theoretical model of surface roughness for ultrasonic vibration-assisted grinding. The impact of grinding parameters on the surface roughness was tested, and the micro-surface characteristics and critical ductile cutting depth with and without ultrasonic assistance were analyzed based on the experimental data and atomic force microscopy images. The experimental results indicate that in ultrasonic grinding, the effects of wheel velocity and grinding depth on surface roughness are similar to conventional grinding. A critical ductile cutting depth greater than that of conventional grinding and traditional ZrO
2 engineering ceramics was observed. These findings suggested that the use of nano-class scale ultrasonic assistance is feasible for the machining of nano-ZrO
2 ceramics [
3].
Yang et al. (2019) employed ultrasonic vibration-assisted grinding as a non-traditional machining method for ceramic materials processing. A theoretical analysis of the trajectories during ultrasonic vibration-assisted machining was conducted. On this basis, the removal mechanism of zirconia in ultrasonic vibration-assisted grinding was investigated. Initially, nano-scratching tests with a single abrasive grain were conducted on ZrO
2 ceramic material. Experimental analysis revealed that the removal mode (plastic or brittle) of zirconia ceramic changed with increasing loads. Subsequently, based on the scratching tests and kinematic analysis of the ultrasonic vibration-assisted grinding (UVAG), a grinding force prediction model was established and the effectiveness of the model was validated through design experiments. It was observed that the grinding force decreased as the spindle speed and amplitude increased, while the grinding force increased as the feed rate and grinding depth increased. Furthermore, the grinding force significantly decreased in UVAG as compared to conventional grinding (CG). Experimental analysis also indicated an improvement in the surface quality of the workpiece and wear reduction of the grinding head in UVAG as compared to CG [
4].
Huo et al. (2010) proposed a comprehensive approach for integrating dynamic modeling and numerical simulation to support the analysis and optimization of the overall machine dynamics and cutting performance during the early design phase. Based on this approach, the process of designing and modeling an innovative five-axis bench-top ultra-precision micro-milling machine was presented. This modeling and simulation encompass the machine structure, moving components, control system, and the dynamics of the cutting process. It was used to predict the overall machine tool dynamic performance for two typical machine configurations, open-frame and closed-frame. Through static analysis, modal analysis, and harmonic analysis of the machine tool structures for both open-frame and closed-frame bench-top machines, the static and dynamic loop stiffness of the machine structure was predicted and the effectiveness and feasibility of the proposed approach were validated. Preliminary cutting experiments also confirmed that this approach can ensure the right operation of the machine tool during its initial setup [
5].
Zulaika et al. (2011) proposed an approach to ensure the minimization of the mass of the moving structural components of a large milling machine tool while maximizing material removal (targeted productivity). This design method involved an iterative design process that translated the productivity target requirements of the milling process into design optimization criteria, which guided the conceptualization of a large milling machine tool with the minimum possible mass of moving structural components while ensuring a stable cutting productive performance. A modeling approach was employed that used a stability model of the milling process in modal coordinates to model the interaction between the milling process and the machine tool structure. This model allowed for the identification of mechanical design parameters that limited the productivity and the threshold values required to meet the targeted productivity. These critical values were reached through an iterative procedure aimed at minimizing the mass of critical structural components in the machine tool. This methodology was applied to redesign an actual milling machine tool and machining tests were conducted. It resulted in a productivity increase of over 100% and a reduction in energy consumption by more than 20% due to the mass reduction of the moving structural components [
6].
Li et al. (2012) developed a simple and practical method for the optimal design of a machine tool bed structure. First, establish a simplified fiber model composed of a shell and matrix elements to handle the numerical simulations of the complex mechanical structures and boundary conditions. Next, identify the load bearing path topology of the bed structure to represent the optimal layout of the internal stiffener ribs. Subsequently, utilize innovative optimization criteria that describe the best weight distribution for both the external support panels and internal stiffener ribs to produce a detailed sizing optimization design. The results demonstrated the effectiveness of the proposed method when using the example of a grinding machine tool bed as a design case [
7].
Gupta et al. (2021) focused on the structural analysis of the hollow square column of three-sided and four-sided CNC machine tools. Various parameters were considered, such as a bionic design, total number of ribs and apertures, type of aperture, and tapering angles. The analysis concentrated on the stability, static structural analysis, and load effects of the CNC machine tool. The results of finite element analysis were compared with those in the literature. An optimization method using the derivative parameter approach was employed to determine the optimized ranking of the tested columns. With the assistance of software, successful static structural analysis was conducted. These research findings will contribute to the development of CNC machine tool structures. Based on the literature and finite element analysis results, the following conclusions can be drawn: based on the optimization criterion, which is the minimum value of the derivative parameter, a four-sided column with four horizontal plate ribs featuring rotated square-shaped apertures provides the best choice and is the optimal option among 14 competing cases. For the most rigid structure, i.e., the one with the minimum displacement, the best choice among the 14 competing cases was a four-sided column with an optimized wall thickness and four horizontal plate ribs without any apertures. To design a lightweight structure, it was recommended to use a three-sided column with a tapered back and a wall thickness of 25 mm, with a refined taper angle of 12.99, no back side, and no ribs. This structure was the lightest among the 14 competing cases and had less material volume [
8].
Kroll et al. (2011) investigated the impact of lightweight design measures on the energy efficiency of machine tools. After a comprehensive elaboration and categorization of the primary lightweight design measures for machine tool energy efficiency, different strategies for achieving a maximum reduction of the mass of machine tool structural components through lightweight design were considered. Subsequently, the direct and indirect effects of lightweight design measures were discussed in more detail, which accounted for their quantitative impact on energy efficiency. Through sensitivity analysis, the potential for a direct reduction of electrical energy consumption in feed drives and the potential for an indirect reduction in base load through improved performance to decrease energy losses in machine tool auxiliary systems were explored. Finally, based on static stiffness, the actual components of an existing medium-sized machine tool were redesigned and the optimized components were integrated into the finite element model of the entire machine tool. Their dynamic behavior and their impact on electrical energy consumption were studied through mechatronic simulations. The results showed that a structural lightweight design could achieve up to a 30% reduction in the mass of the structural components, while a material lightweight design could lead to a reduction in the mass of the structural components by up to 50% of the structural component itself. Considering the steel deposits required for functional purposes and the several devices that must be moved with the structural components such as servo drives, auxiliary systems, energy chains, etc., the overall potential for mass reduction in the moving part of the feed drive is typically less than 30% [
9].
Ji et al. (2020) proposed a structural design optimization method for energy-efficient CNC machine tool moving components. Firstly, an energy consumption characteristic model for the machine tool moving components was explicitly established, and a structural optimization design model for the moving components was developed with energy consumption and static and dynamic performance as objectives. Secondly, a comprehensive approach was employed, incorporating a uniform design method, sensitivity analysis, response surface methodology, and principal component analysis to comprehensively construct a structural optimization model for the moving components. This enabled a better understanding of the interaction mechanisms of structural parameters on energy consumption and structural performance. Finally, a hybrid algorithm combining particle swarm optimization (PSO) and simulated annealing (SA) was proposed to solve the optimization model, and the convergence speed and global search capability were significantly improved and ensured, respectively. Through the analysis and simulation of the optimization results, it was concluded that the proposed optimization method for moving components can achieve the same energy-saving effect as the lightest structure while enhancing the static and dynamic performance of the moving components [
10].
Huang et al. (2011) conducted a parametric design for a gantry milling machine tool column by using the APDL language in ANSYS. Subsequently, a finite element model of the column was created for static analysis. Based on this analysis, a topology optimization method for the column structure was proposed, which led to the development of an optimal design approach for weight minimization. A subsequent finite element analysis was performed to analyze the reconfigured column structure. Through structural topology optimization, the stress distribution in various parts of the column became more homogeneous and reasonable. Without altering the stress and rigidity, the weight of the column was reduced by approximately 10% [
11].
Gao et al. (2011) focused on a high-speed machining center’s worktable study. To meet the overall performance requirements of the high-speed machining center, a 3D model of the worktable was created in SolidWorks (version 2017). Subsequently, static analysis and modal analysis were conducted in ANSYS Workbench. The worktable was optimized by using the topology optimization module in ANSYS Workbench. The results indicated an improvement in the worktable’s structure. The optimized worktable maintained its original static rigidity performance while enhancing its dynamic performance. Additionally, the original structure weight was reduced to achieve a better worktable design [
12].
Ding et al. (2010) proposed an optimal design approach for a machine tool bed structure, which consisted of three stages: first, a reasonable and simplified model called the “fiber model” was applied to optimize the layout of stiffener plates within the bed structure. Second, detailed sizing optimization was performed on the stiffener plates and support blocks under the bed. Third, a topology design optimization for the distribution of the manufacturing hole in bed structure was executed. A typical cylindrical grinding machine tool bed was chosen as an example to validate the proposed method. The results demonstrated the effectiveness of this approach, and it led to an improvement in the structural eco-efficiency [
13].
Zhao et al. (2008) used a structural bionic approach based on the configuration principles of biological skeletons and plant stems to redesign the stiffener ribs of a machine tool column to improve its static and dynamic performance. After verifying the lightening effects through finite element simulations, scaled-down models of both the conventional column and the bionic column were manufactured and tested. The results showed that both the maximum static displacement and mass could be reduced, and a better dynamic performance with an increase in the first two natural frequencies was exhibited for the bionic column. Structural bionic design proved to be effective in enhancing the static and dynamic structural performance of high-speed machine tools [
14].
Kovalov et al. (2016) proposed a method for arranging the frame of a heavy-duty lathe to distribute forces along the coordinate axes loads that act on the machine tool during operation. A three-dimensional mathematical model of the large bearing system for the heavy-duty lathe was developed, which accounts for typical and boundary loads. On-site tests were conducted to analyze the frame’s movement along the coordinate axes under high loads. Physical modeling and study of the support structure for the heavy-duty lathe were carried out using simulation software. A method for studying the composite bed accuracy through mathematical modeling was developed. By using the preliminary calculation results as boundary conditions of contact deformation for designing individual load-bearing structures, a support structure technique for heavy machinery was designed. The design geometry of the cross section with the lowest possible weight while meeting specified performance and precision machining standards was achieved and allowed. The results showed the design of a high-precision heavy-duty lathe frame with a load capacity of 100 tons, capable of machining up to 12.5 m in length and 2.5 m in diameter, with a maximum cutting force of 200 kN. Recommendations for designing CNC high-precision heavy-duty machine tool bearing systems were provided [
15].
Sharma et al. (2023) conducted a study to examine structural optimization of machine tools using finite element analysis. The stability of the structure under the influence of cutting forces is crucial for achieving machining precision. To initiate the investigation, a machine tool structure was created, and cutting forces were estimated for different wood and aluminum samples using an energy method. Initially, static and dynamic analyses were performed on the initial structure, and maximum displacement values and modal frequencies were recorded. Subsequently, structural optimization was carried out by using stiffener plates with a fixed mass constraint rate of the initial volume. The optimized structure was reanalyzed and reductions of the maximum static and dynamic displacements were achieved. Furthermore, the modal frequencies of the optimized structure increased as compared to the original structure, which increased the gap with excitation frequencies and thereby avoided resonance occurrence. That study aimed to analyze the placement of the stiffener plates using finite element analysis techniques to reduce the overall weight and enhance the stability of the machine tool structure, providing insights into the optimization of machine tool structures [
16].
Kiyono et al. (2023) introduced a new approach to address stress-based topology optimization problems by utilizing a binary structural topology optimization method. Design updates were performed using binary values (0 or 1), and a boundary identification scheme was employed to smooth the structural contours, avoiding artificial stress concentrations caused by the rugged nature of the topology optimization process. Due to boundary identification, re-meshing was required at each iteration. To minimize discontinuities in the moving domain during the iterative process, a two-domain technique, as presented by Picelli et al.’s TOBS (topology optimization of binary structures)—GT (geometric trimming) methodology was followed. Two distinct domains were defined: the first was an extension domain (referred to as the topology domain) that remains fixed and is meshed only at the beginning of the optimization process. The second was the trimmed domain with identified structure boundaries (referred to as the analysis domain), which needs to be meshed at each iteration for displacement and stress calculations using finite element methods. Within this mesh, a variable called pseudo-density is defined for each element, even though there are no void elements in the analysis domain. Spatial filtering techniques were applied to prevent numerical instability and extrapolate the void region. Numerical examples were provided to demonstrate the efficiency of this approach. The results indicated that the proposed trimming and remeshing domain method successfully addresses optimization problems where considering strength criteria can become troublesome, mitigating the rugged boundary transition between void and phase materials [
17].
Amaral et al. (2022) employed first-order reliability method-based displacement and stress limit state functions for reliability analysis to quantify uncertainties in material properties, applied load and geometric parameters, and determined new optimized topologies through the proportional topology optimization (PTO) method. The innovation lies in incorporating the framework of reliability-based design optimization into topology optimization within a dual-loop scheme. Reliability analysis serves as the inner loop within the topology optimization outer loop. The PTO method was applied to analyze beams based on bidirectional evolutionary structural optimization. Moreover, a sensitivity analysis was conducted to assist in revealing the relative importance of uncertain variables in the final reliability within the design decisions of the topology optimized structures. Failure probabilities and corresponding reliability indices of the optimized geometries were obtained in numerical examples of a simply supported beam and a double-clamped beam. The results demonstrated the importance of considering reliability constraints in the final topology to ensure a safe and cost-effective design [
18].
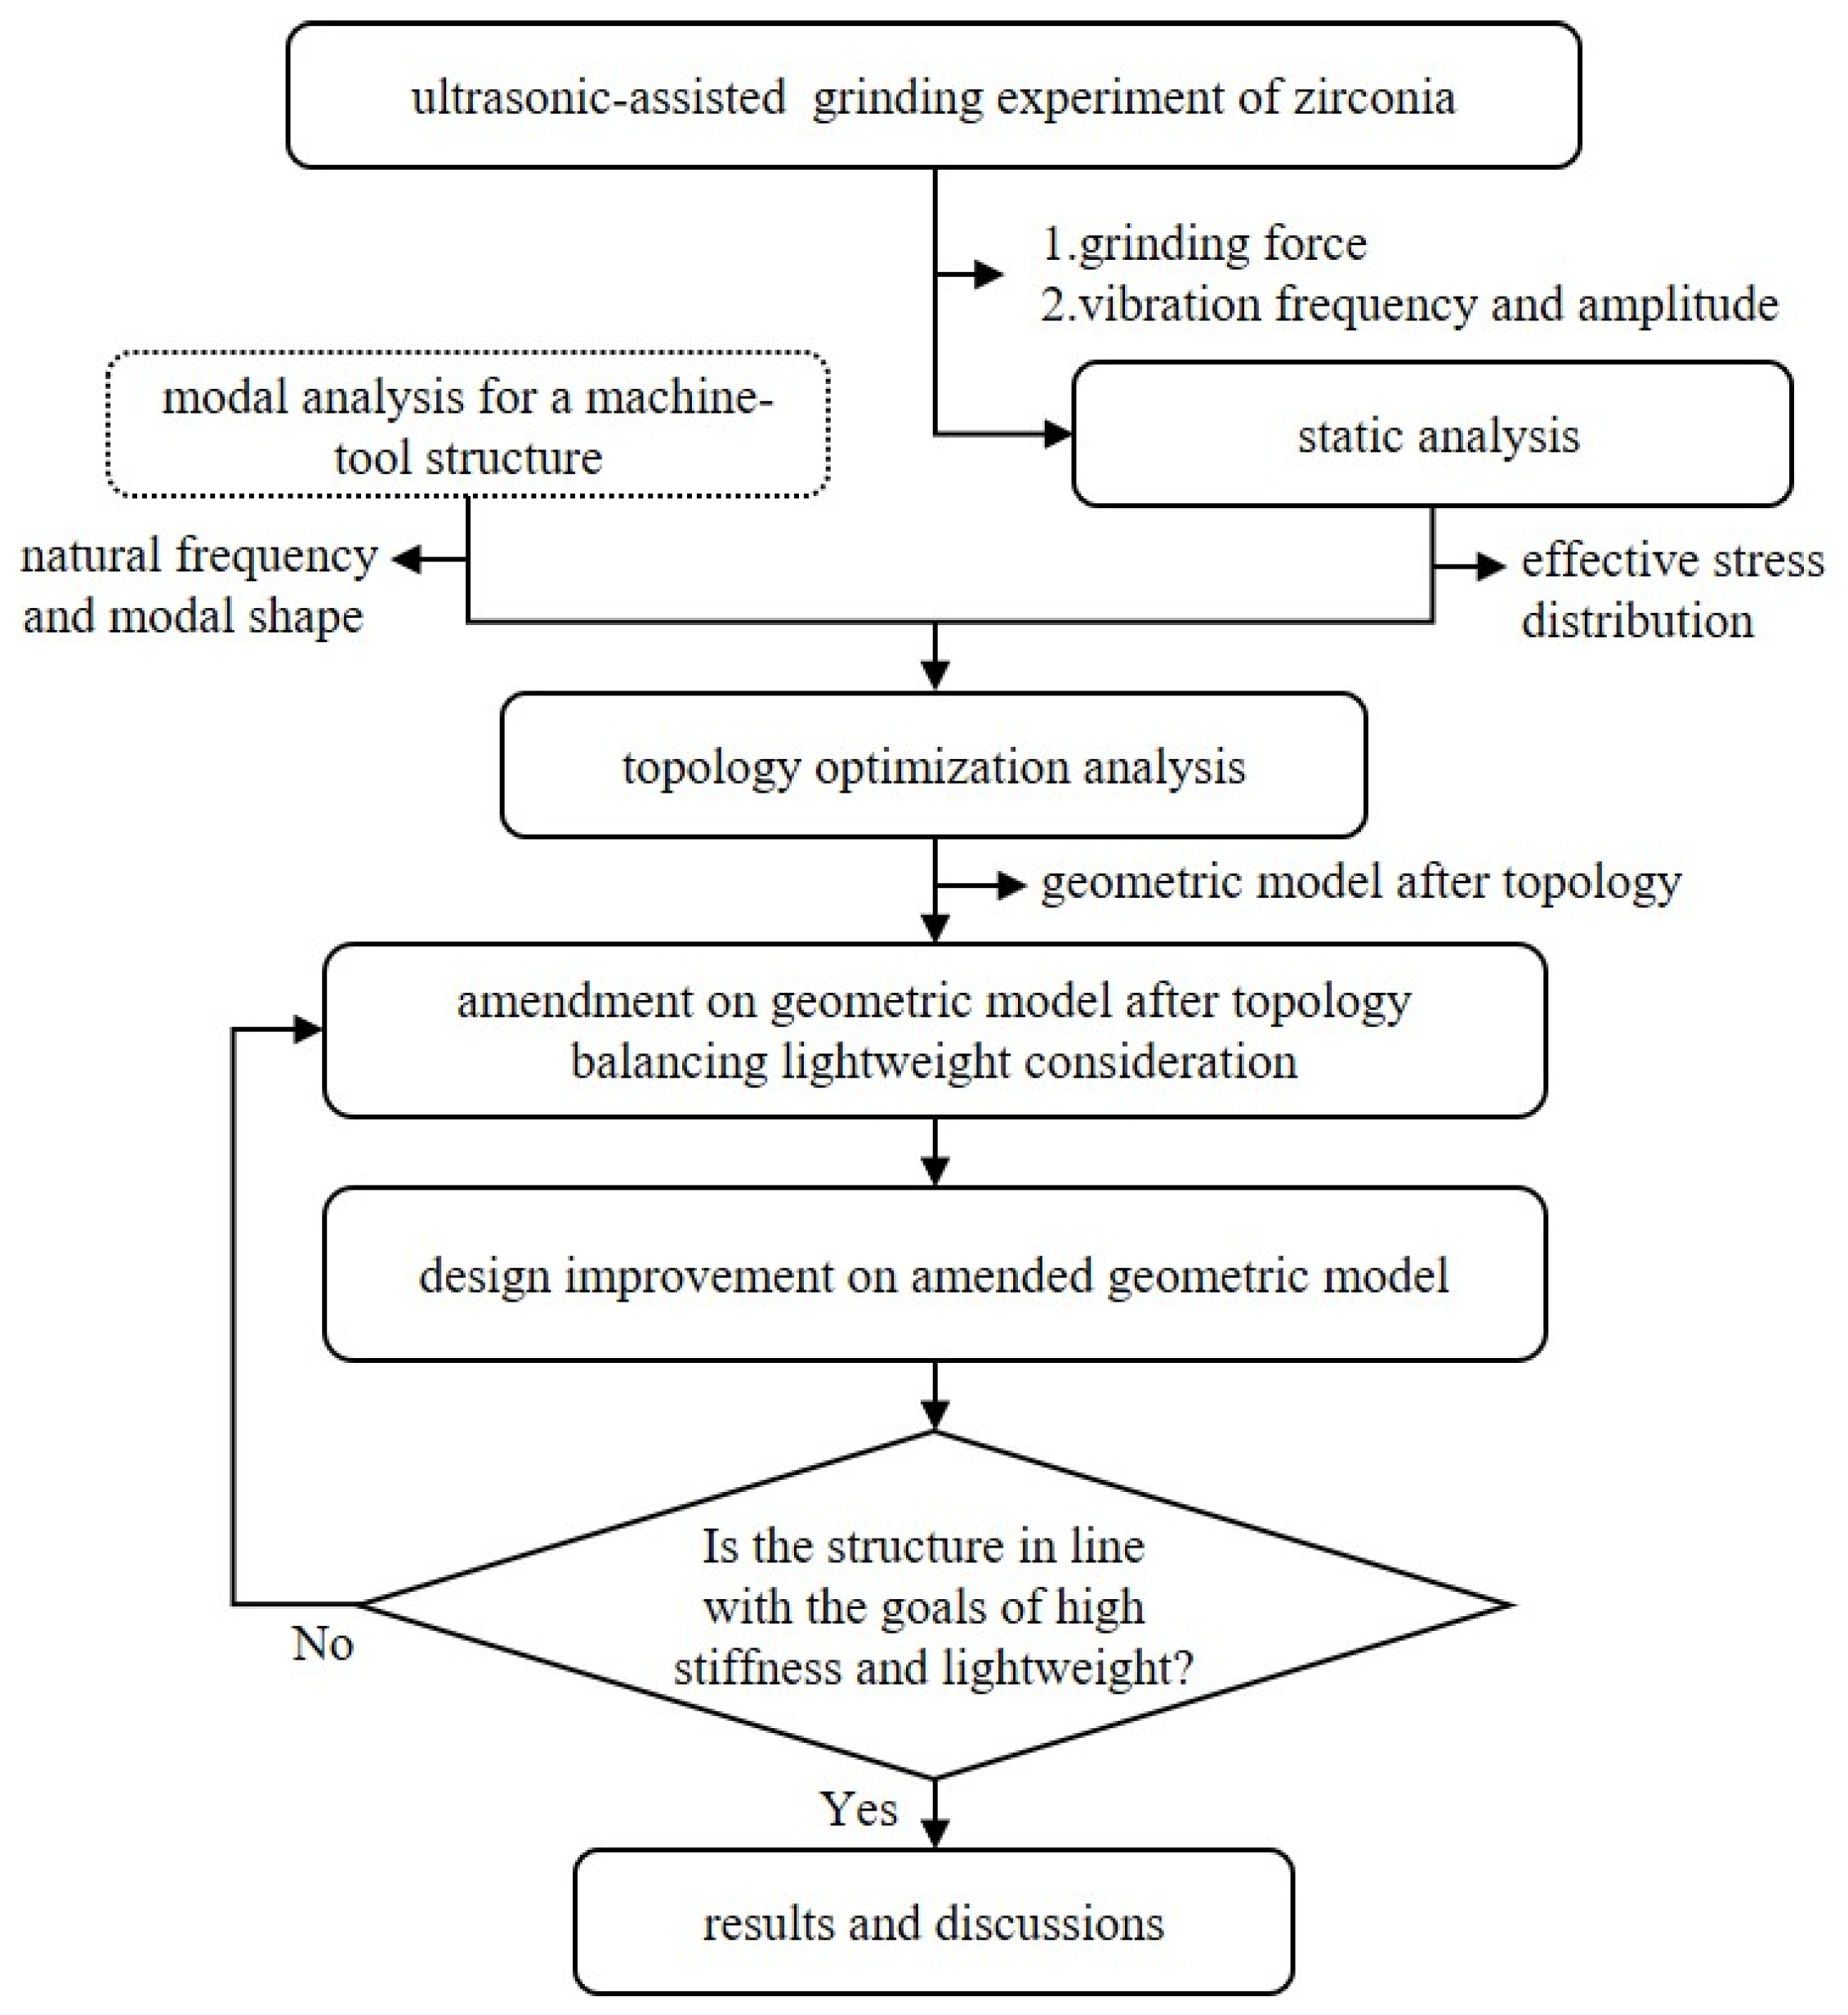
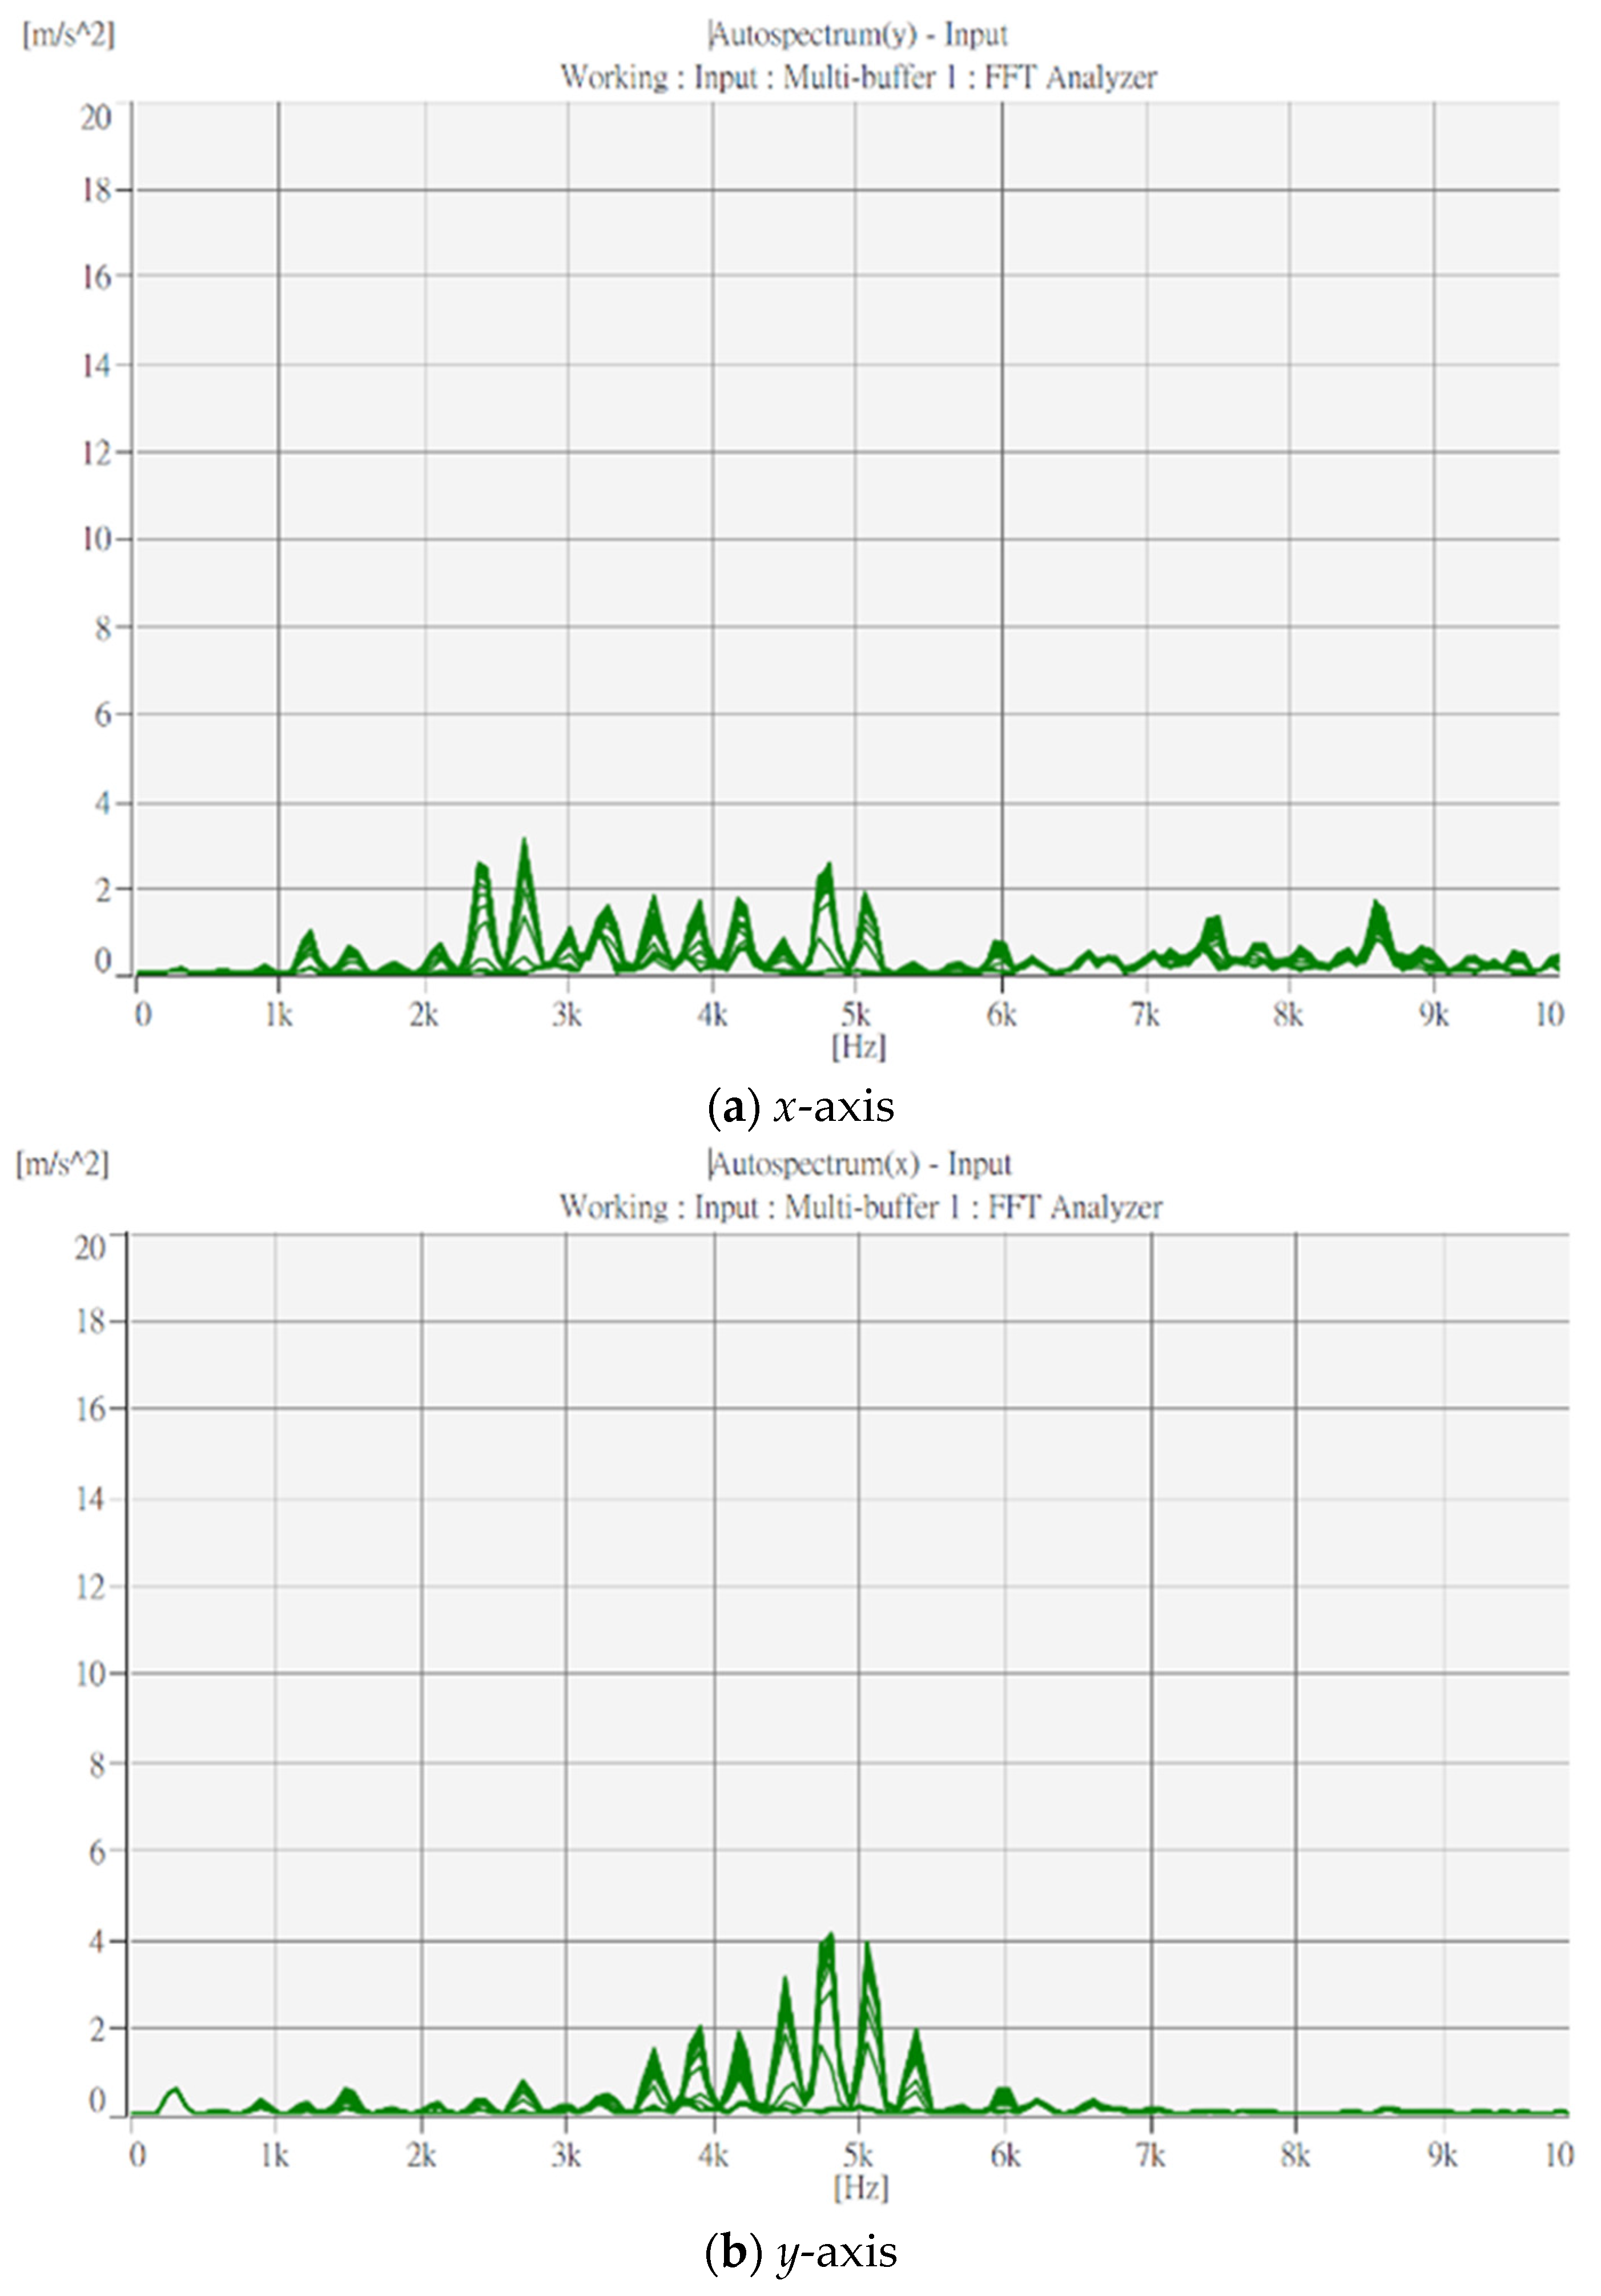
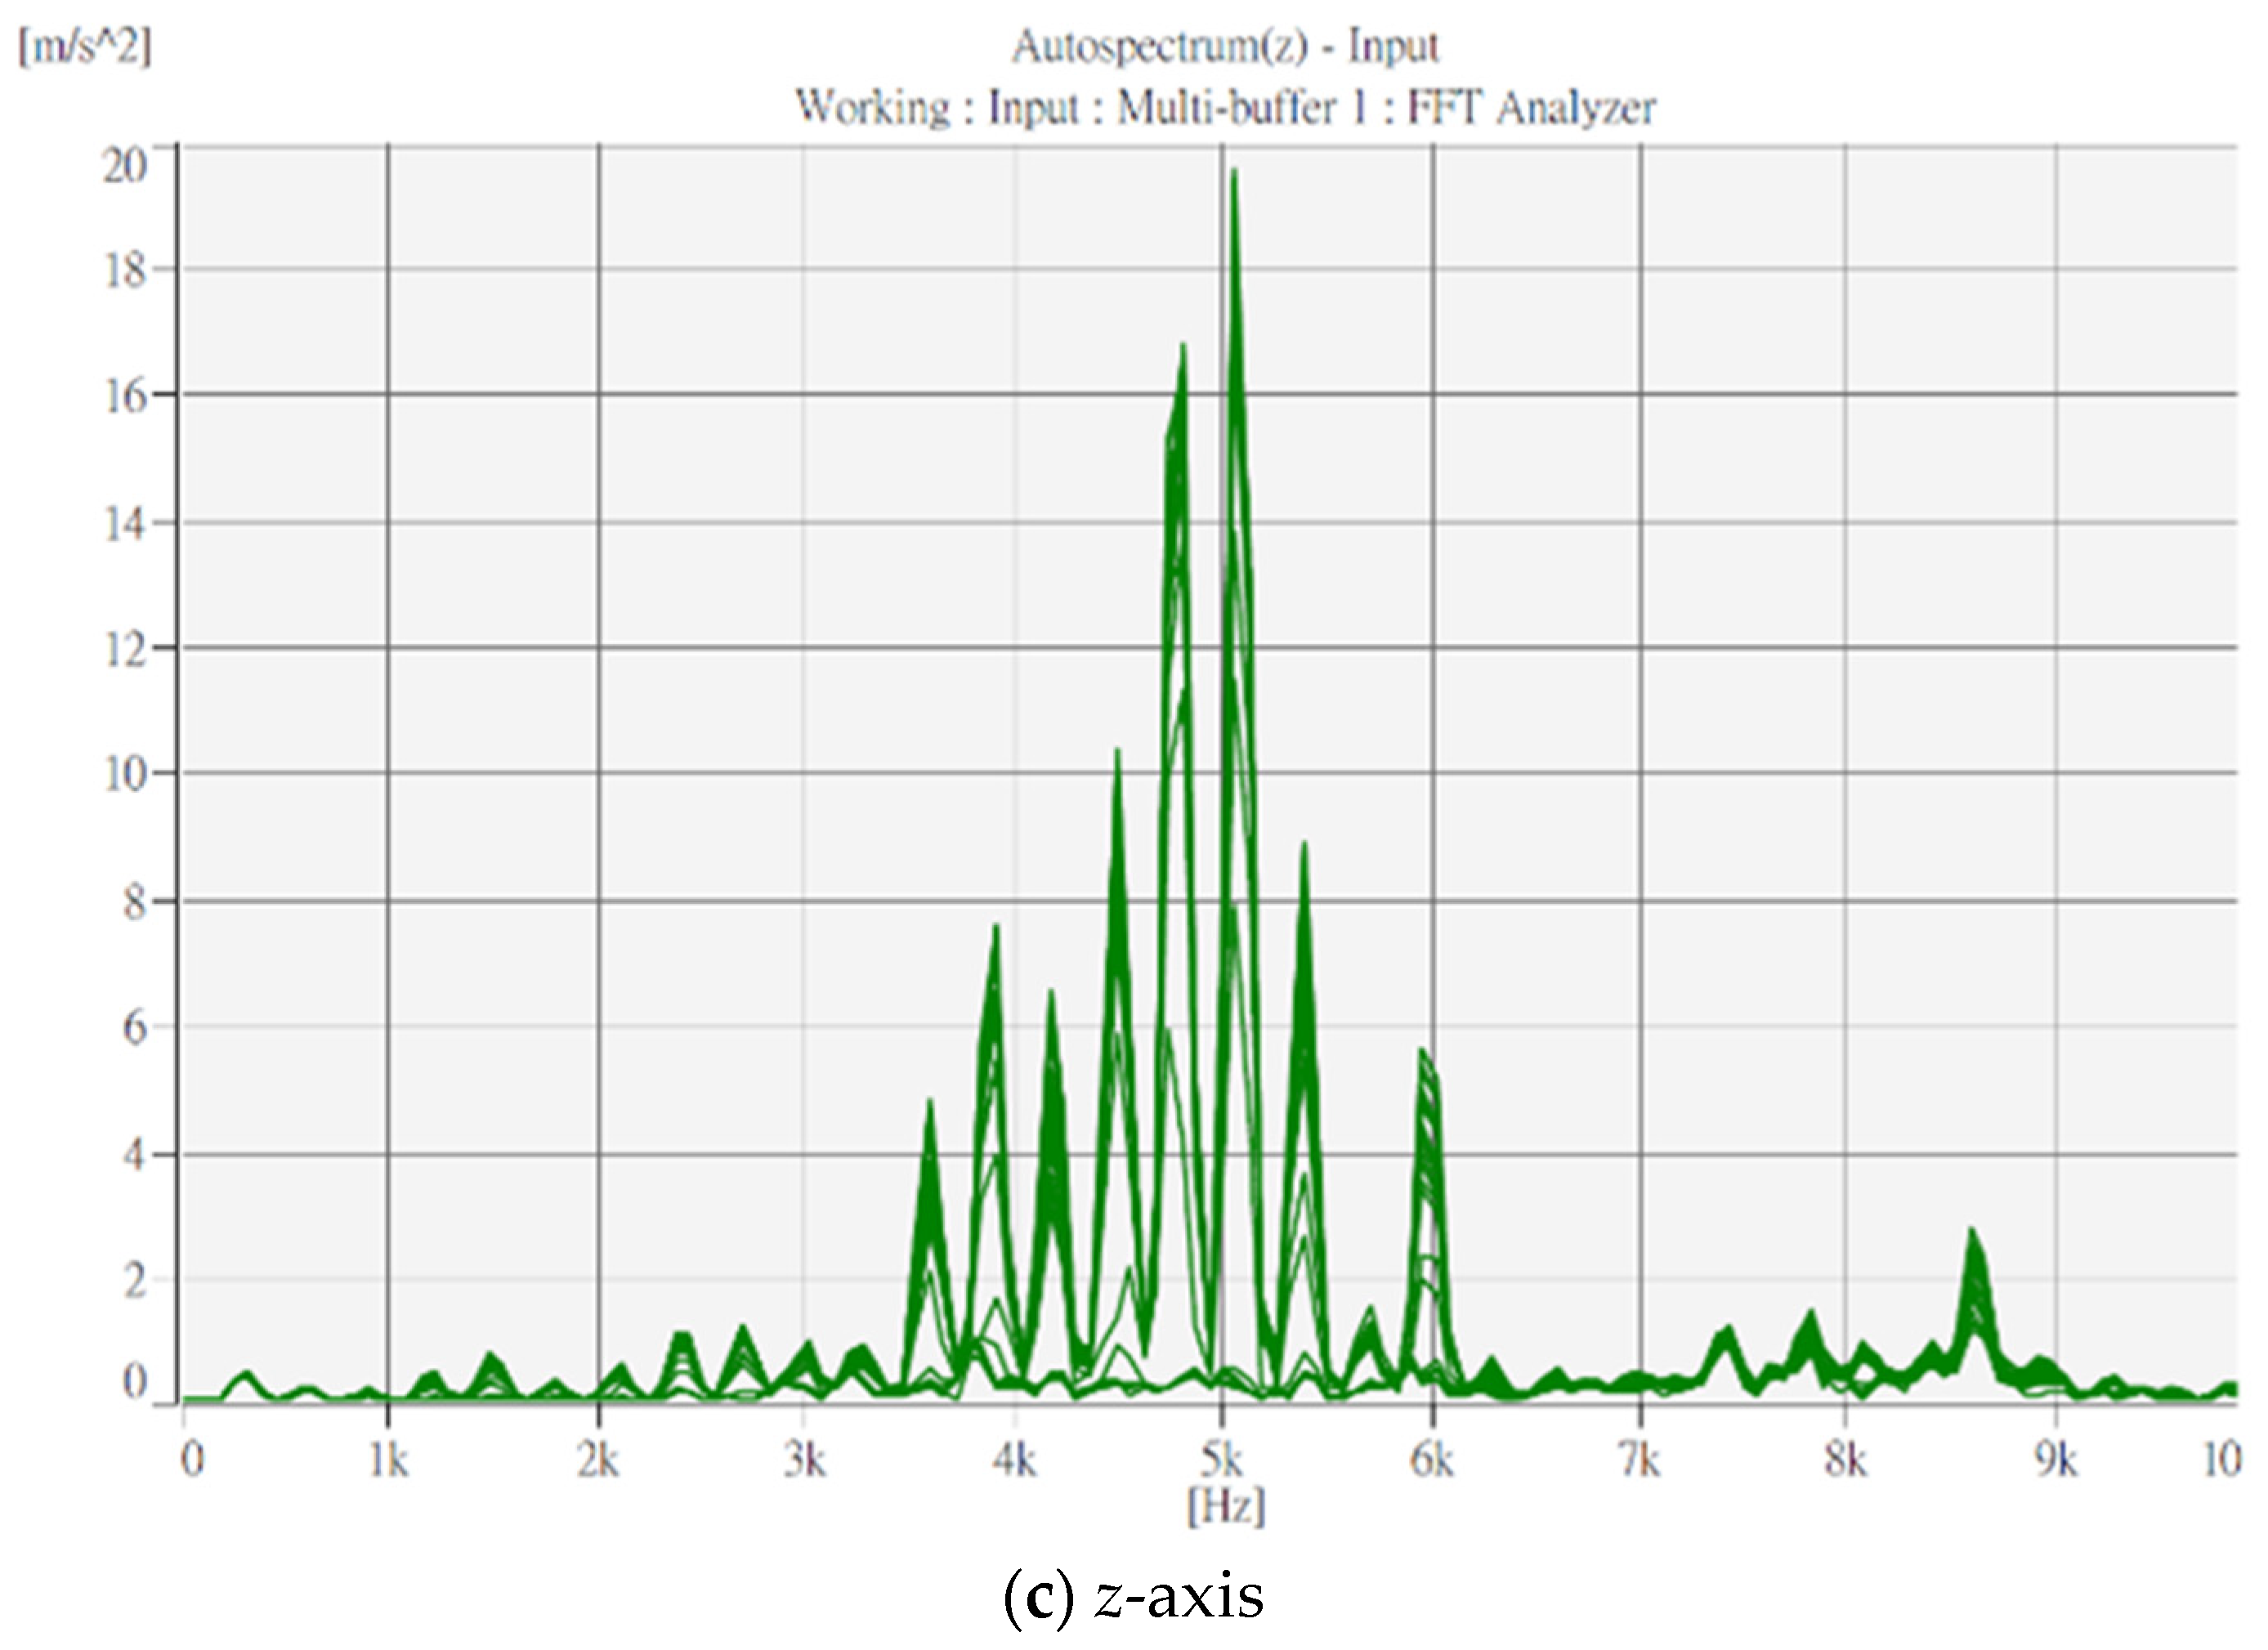
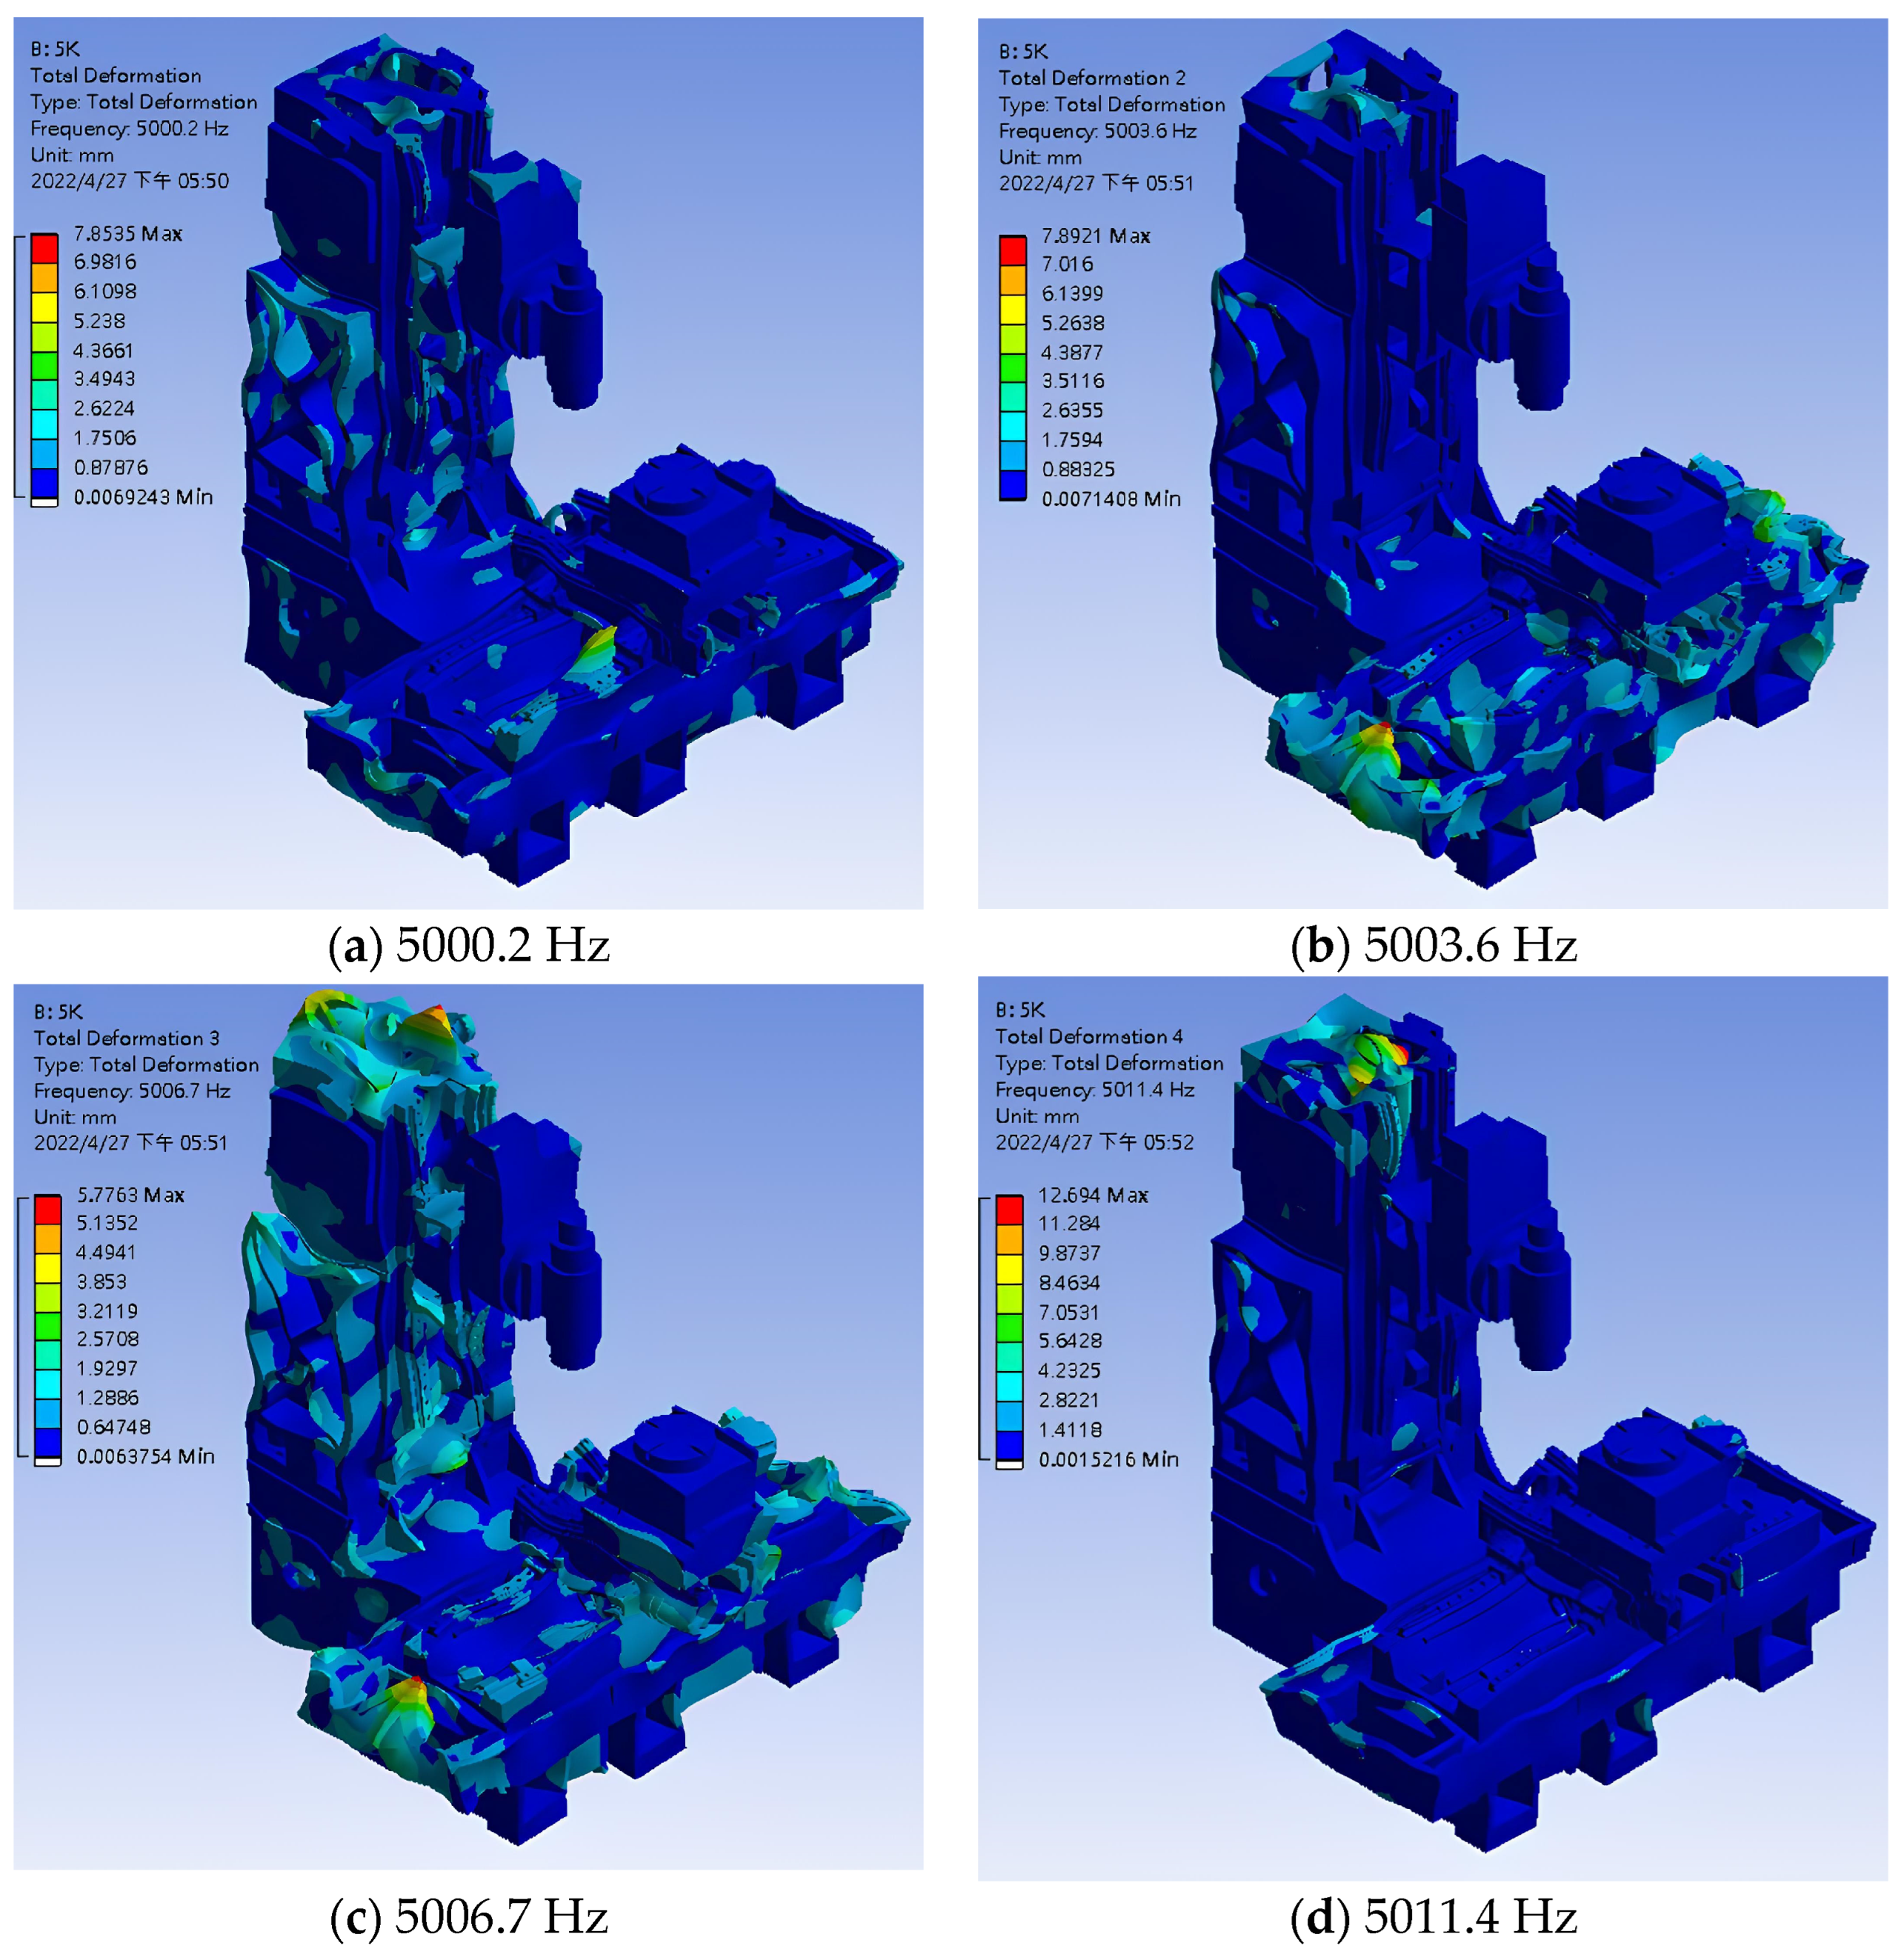
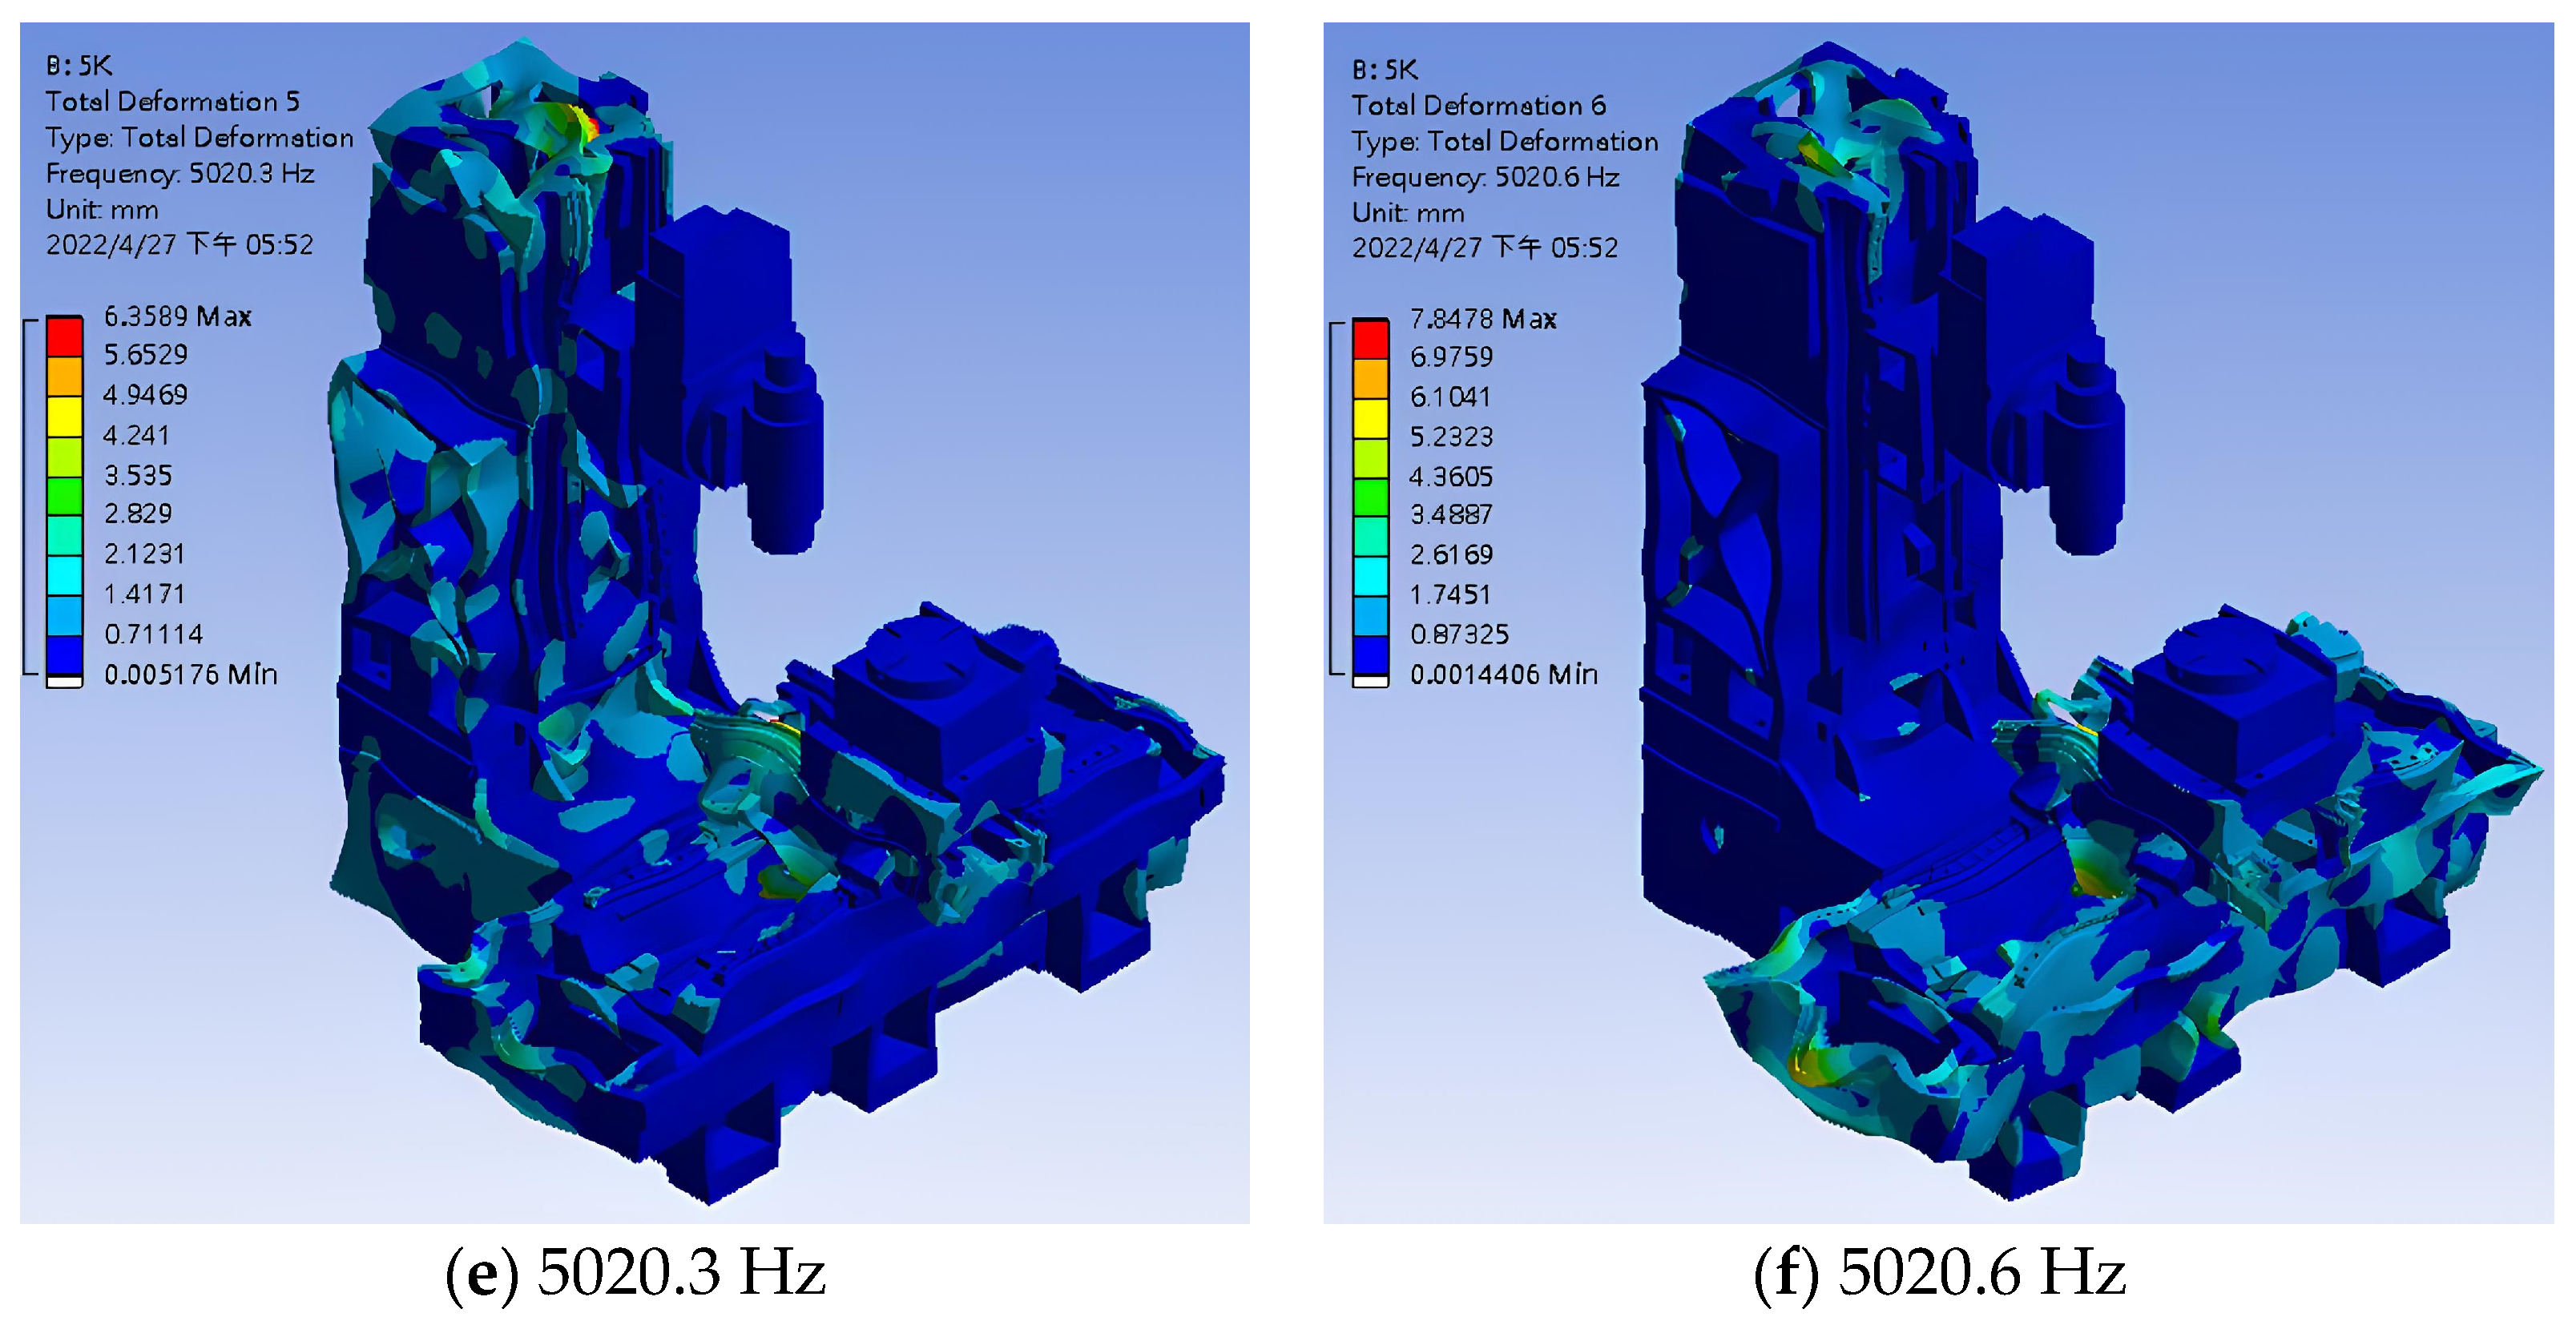
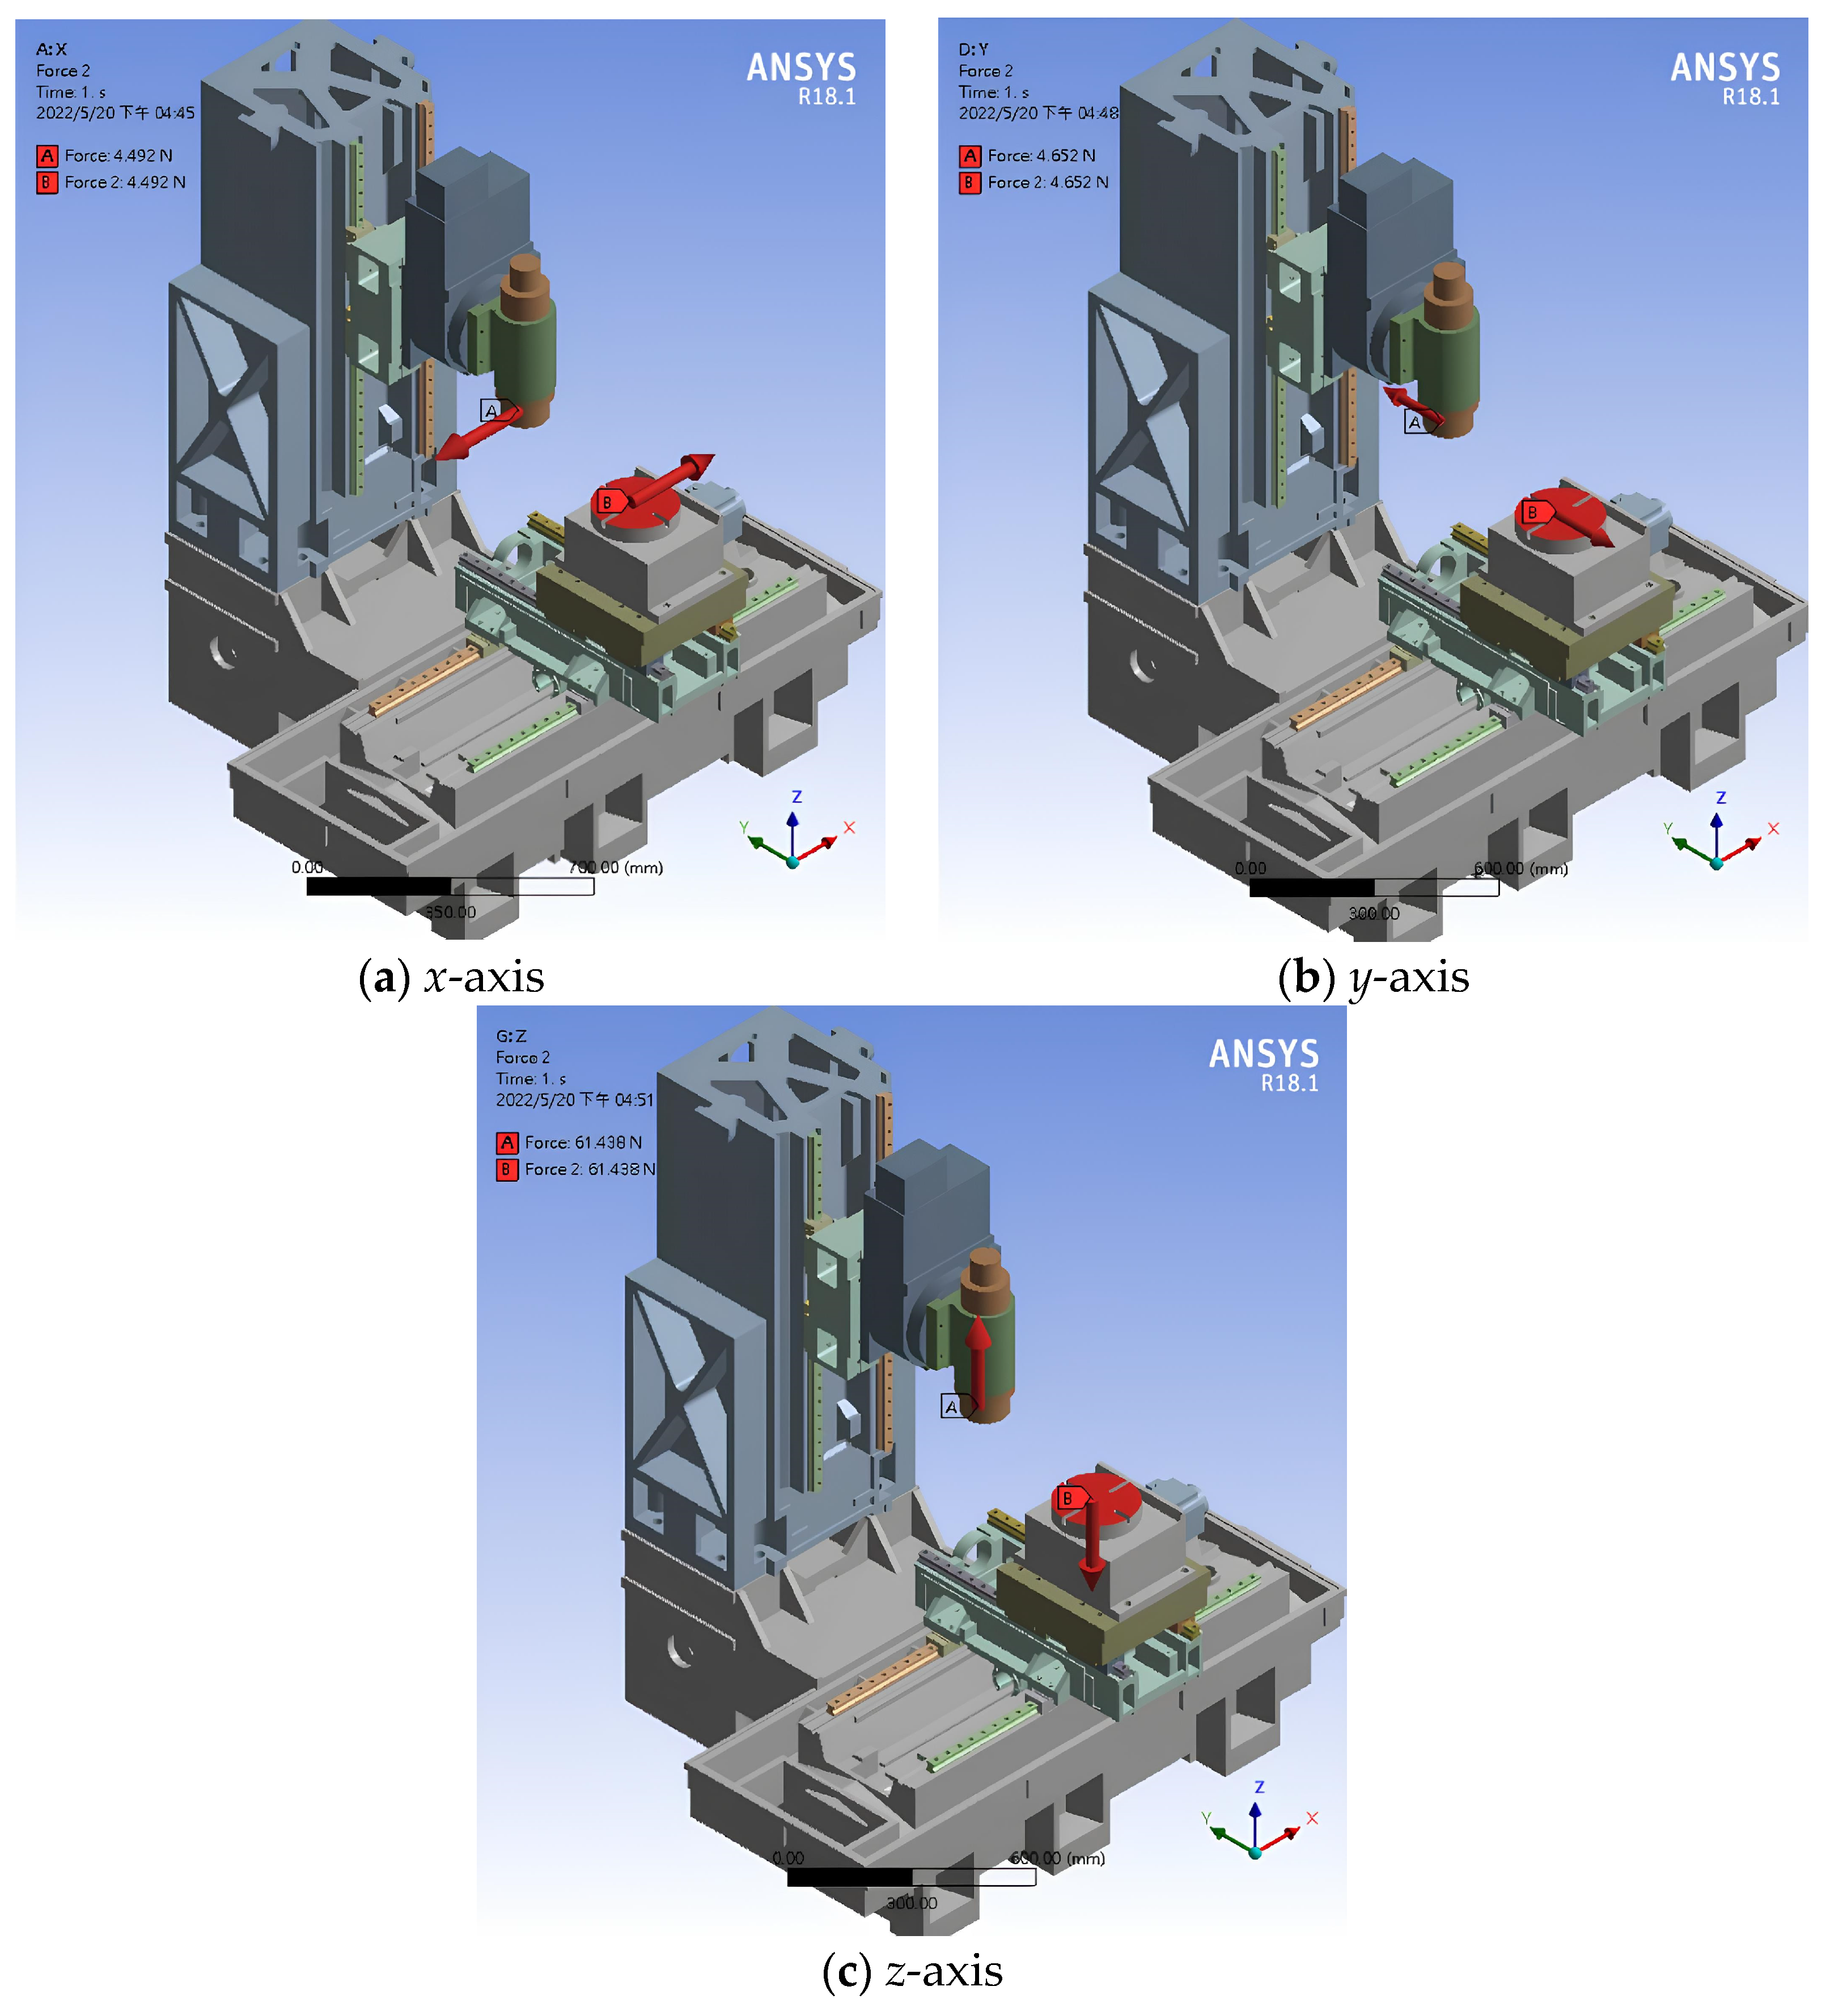
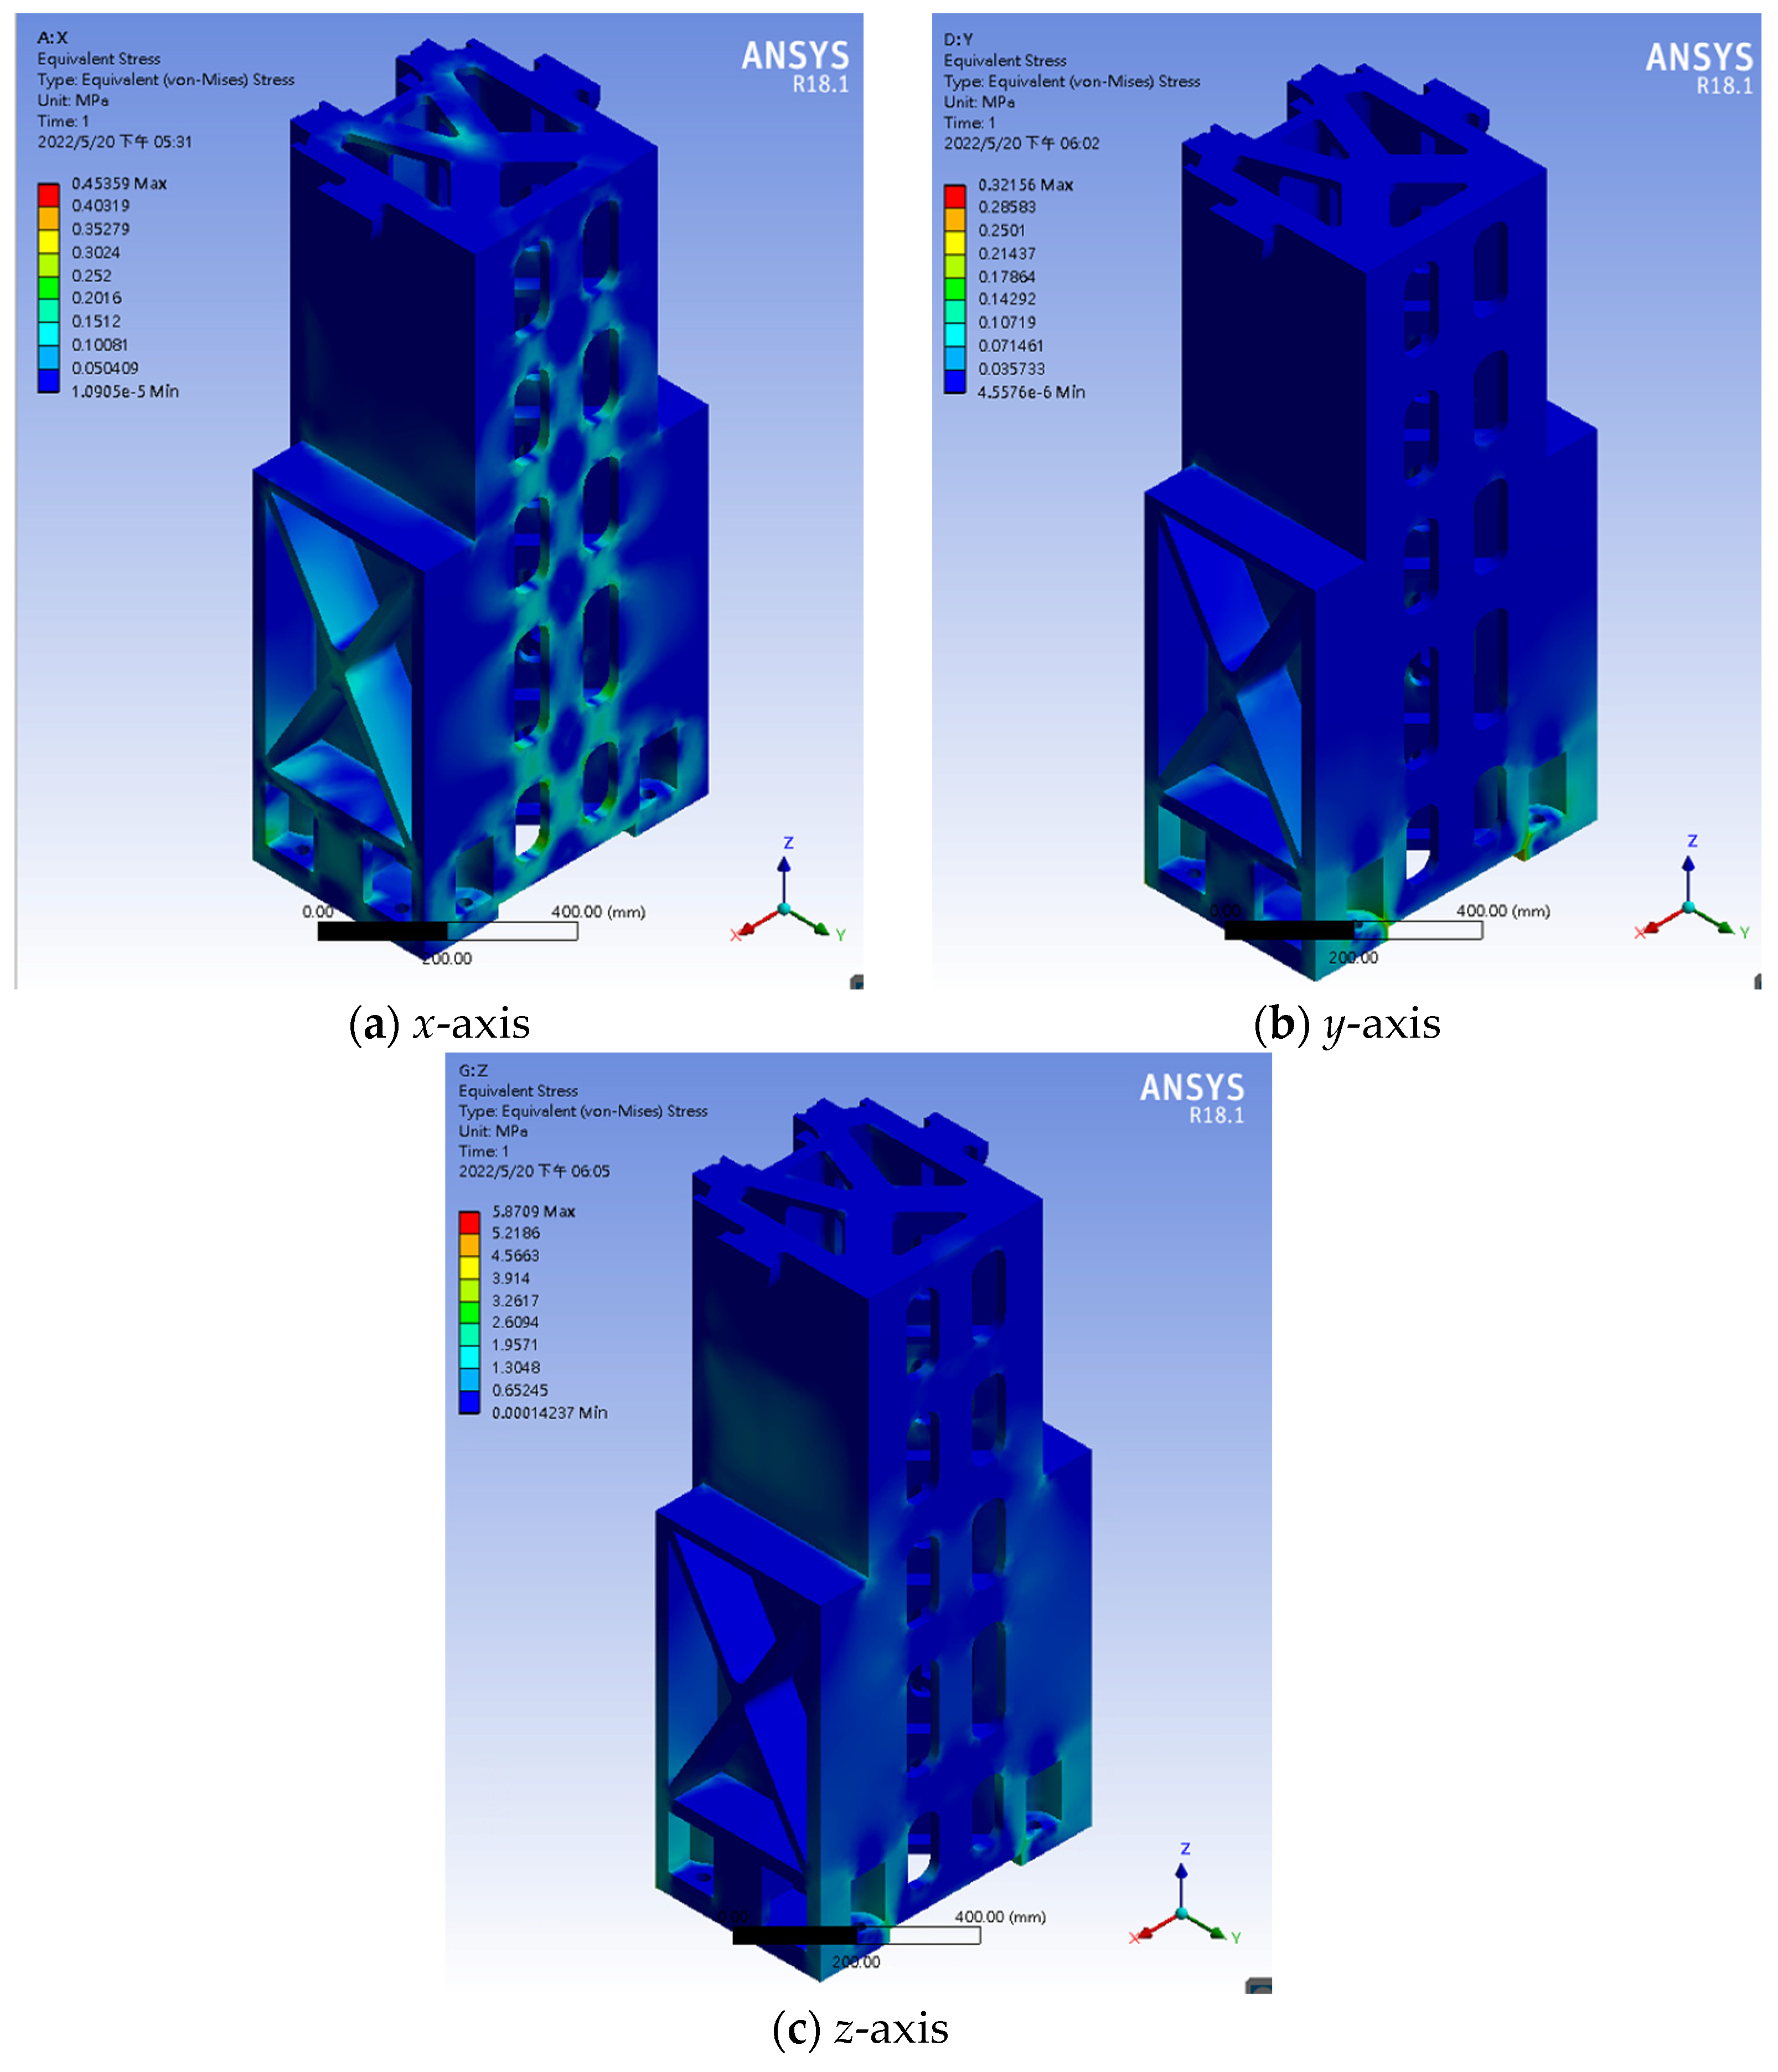
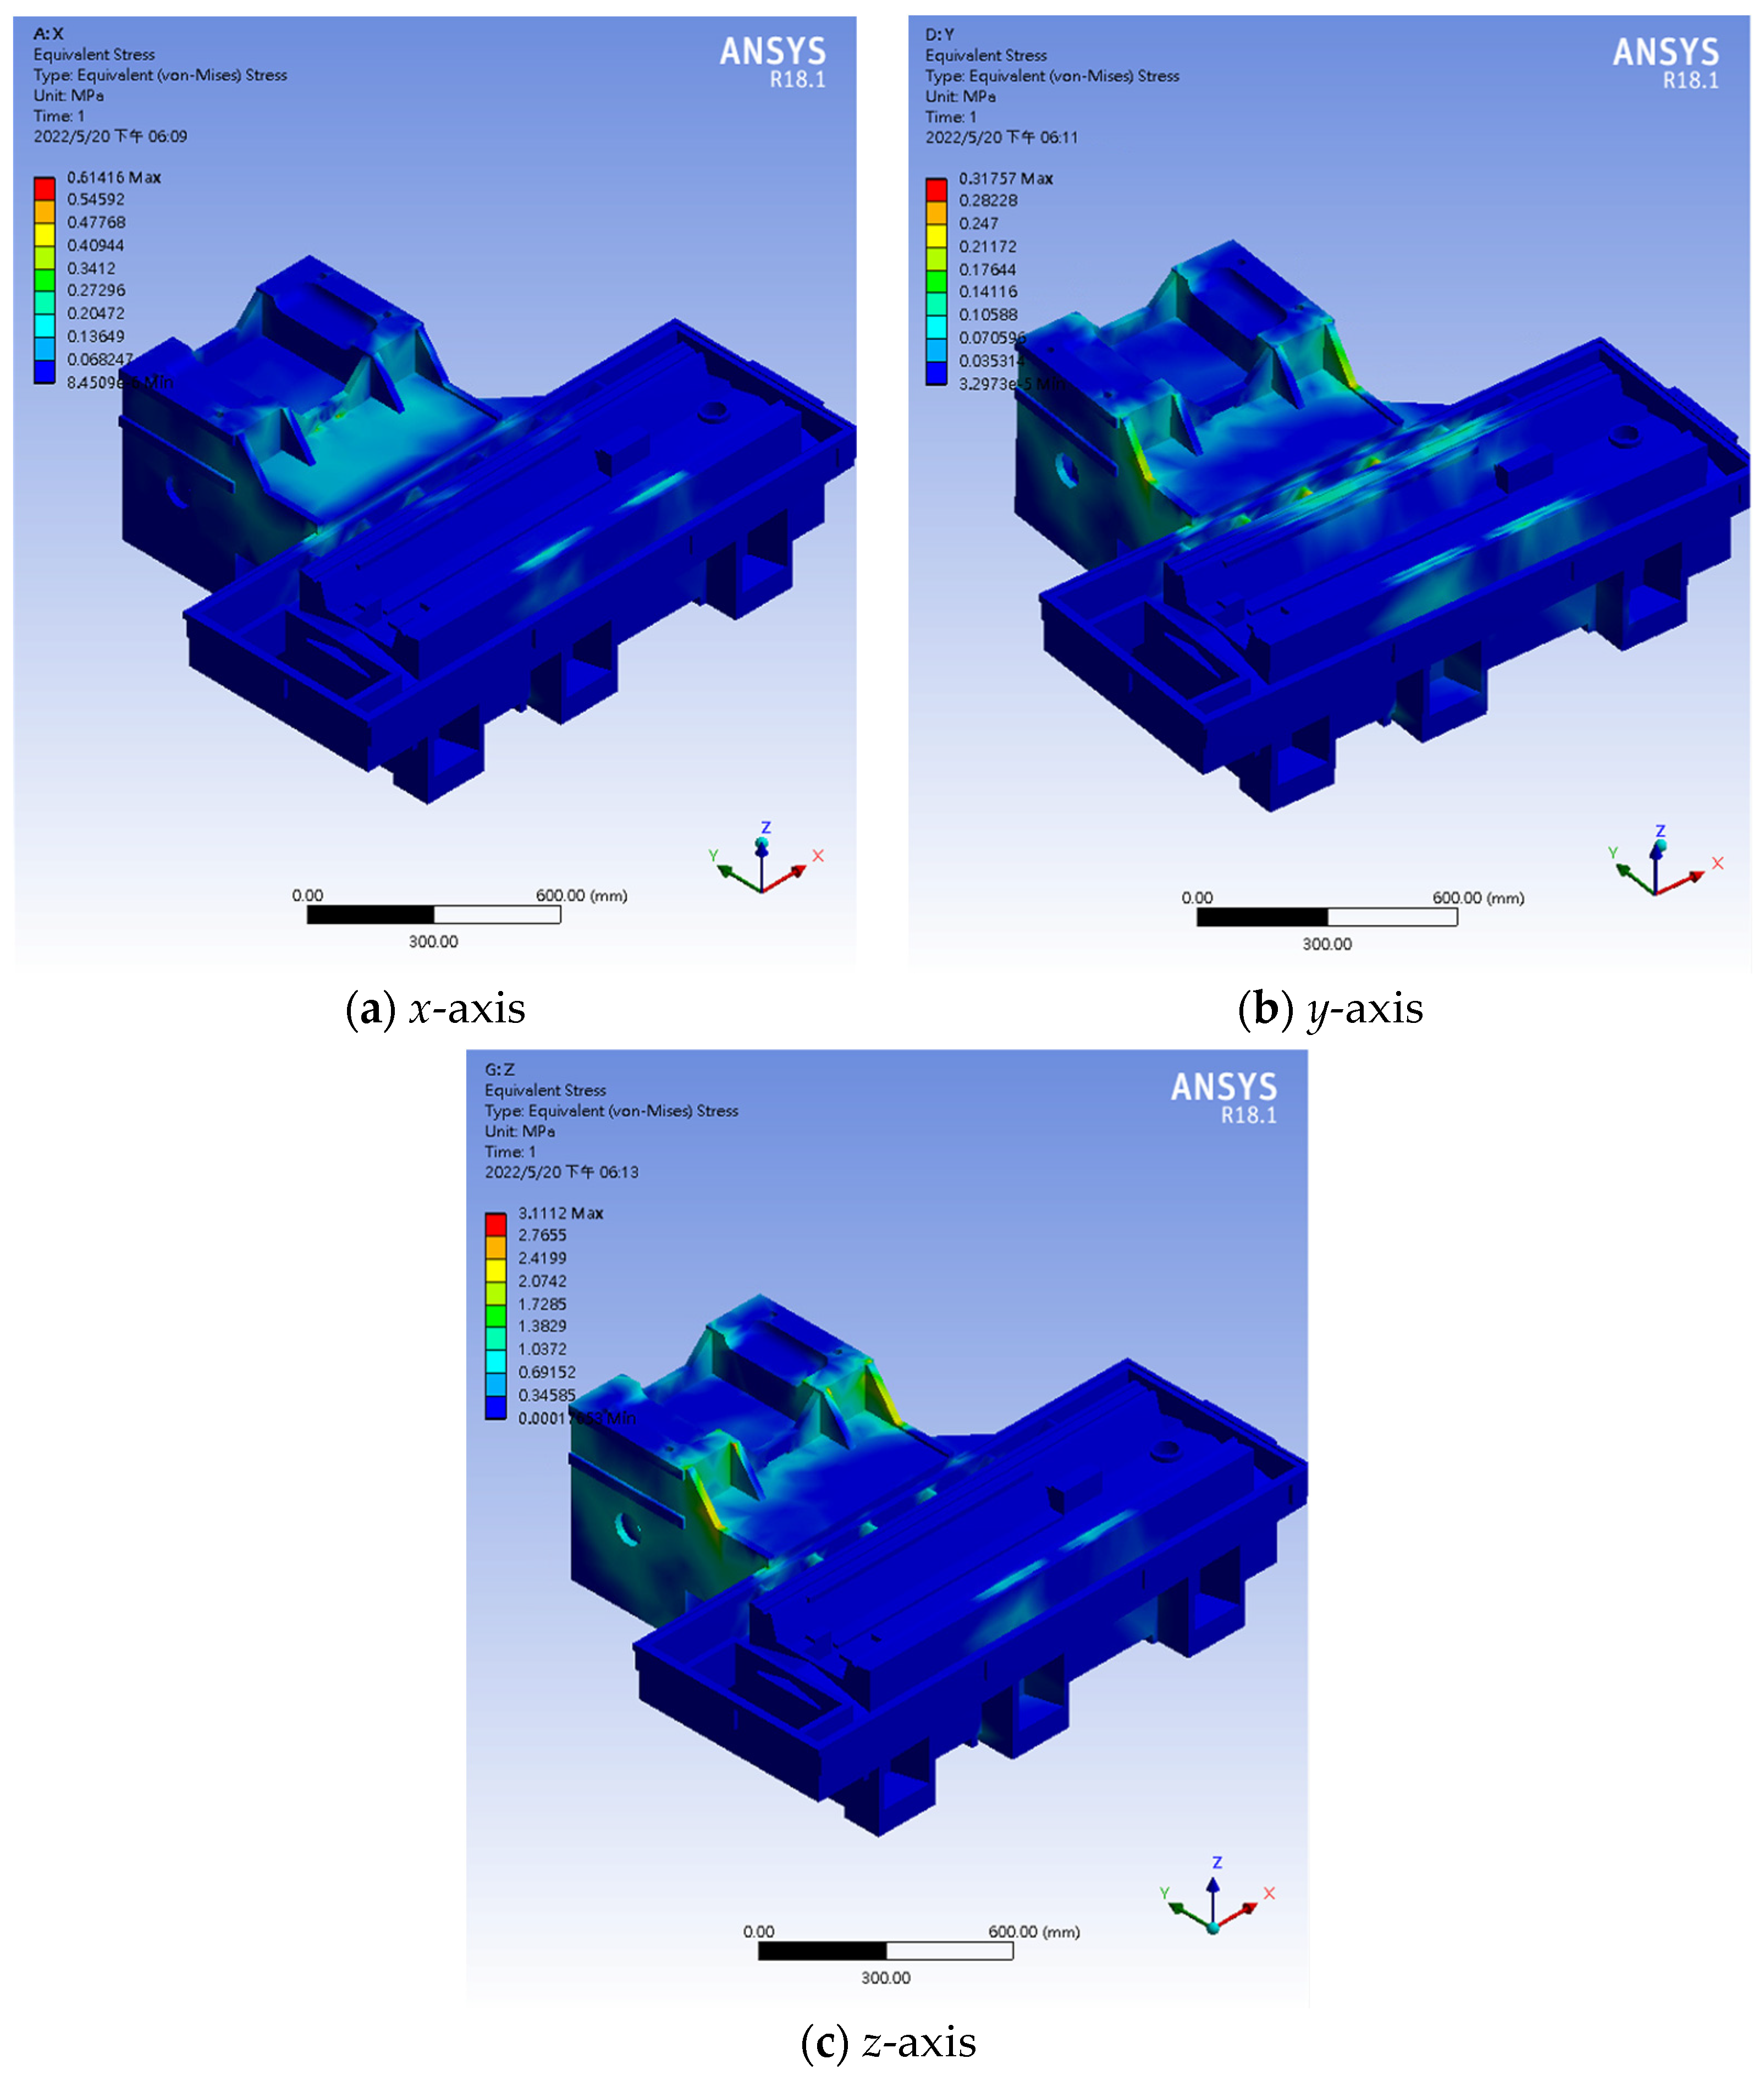
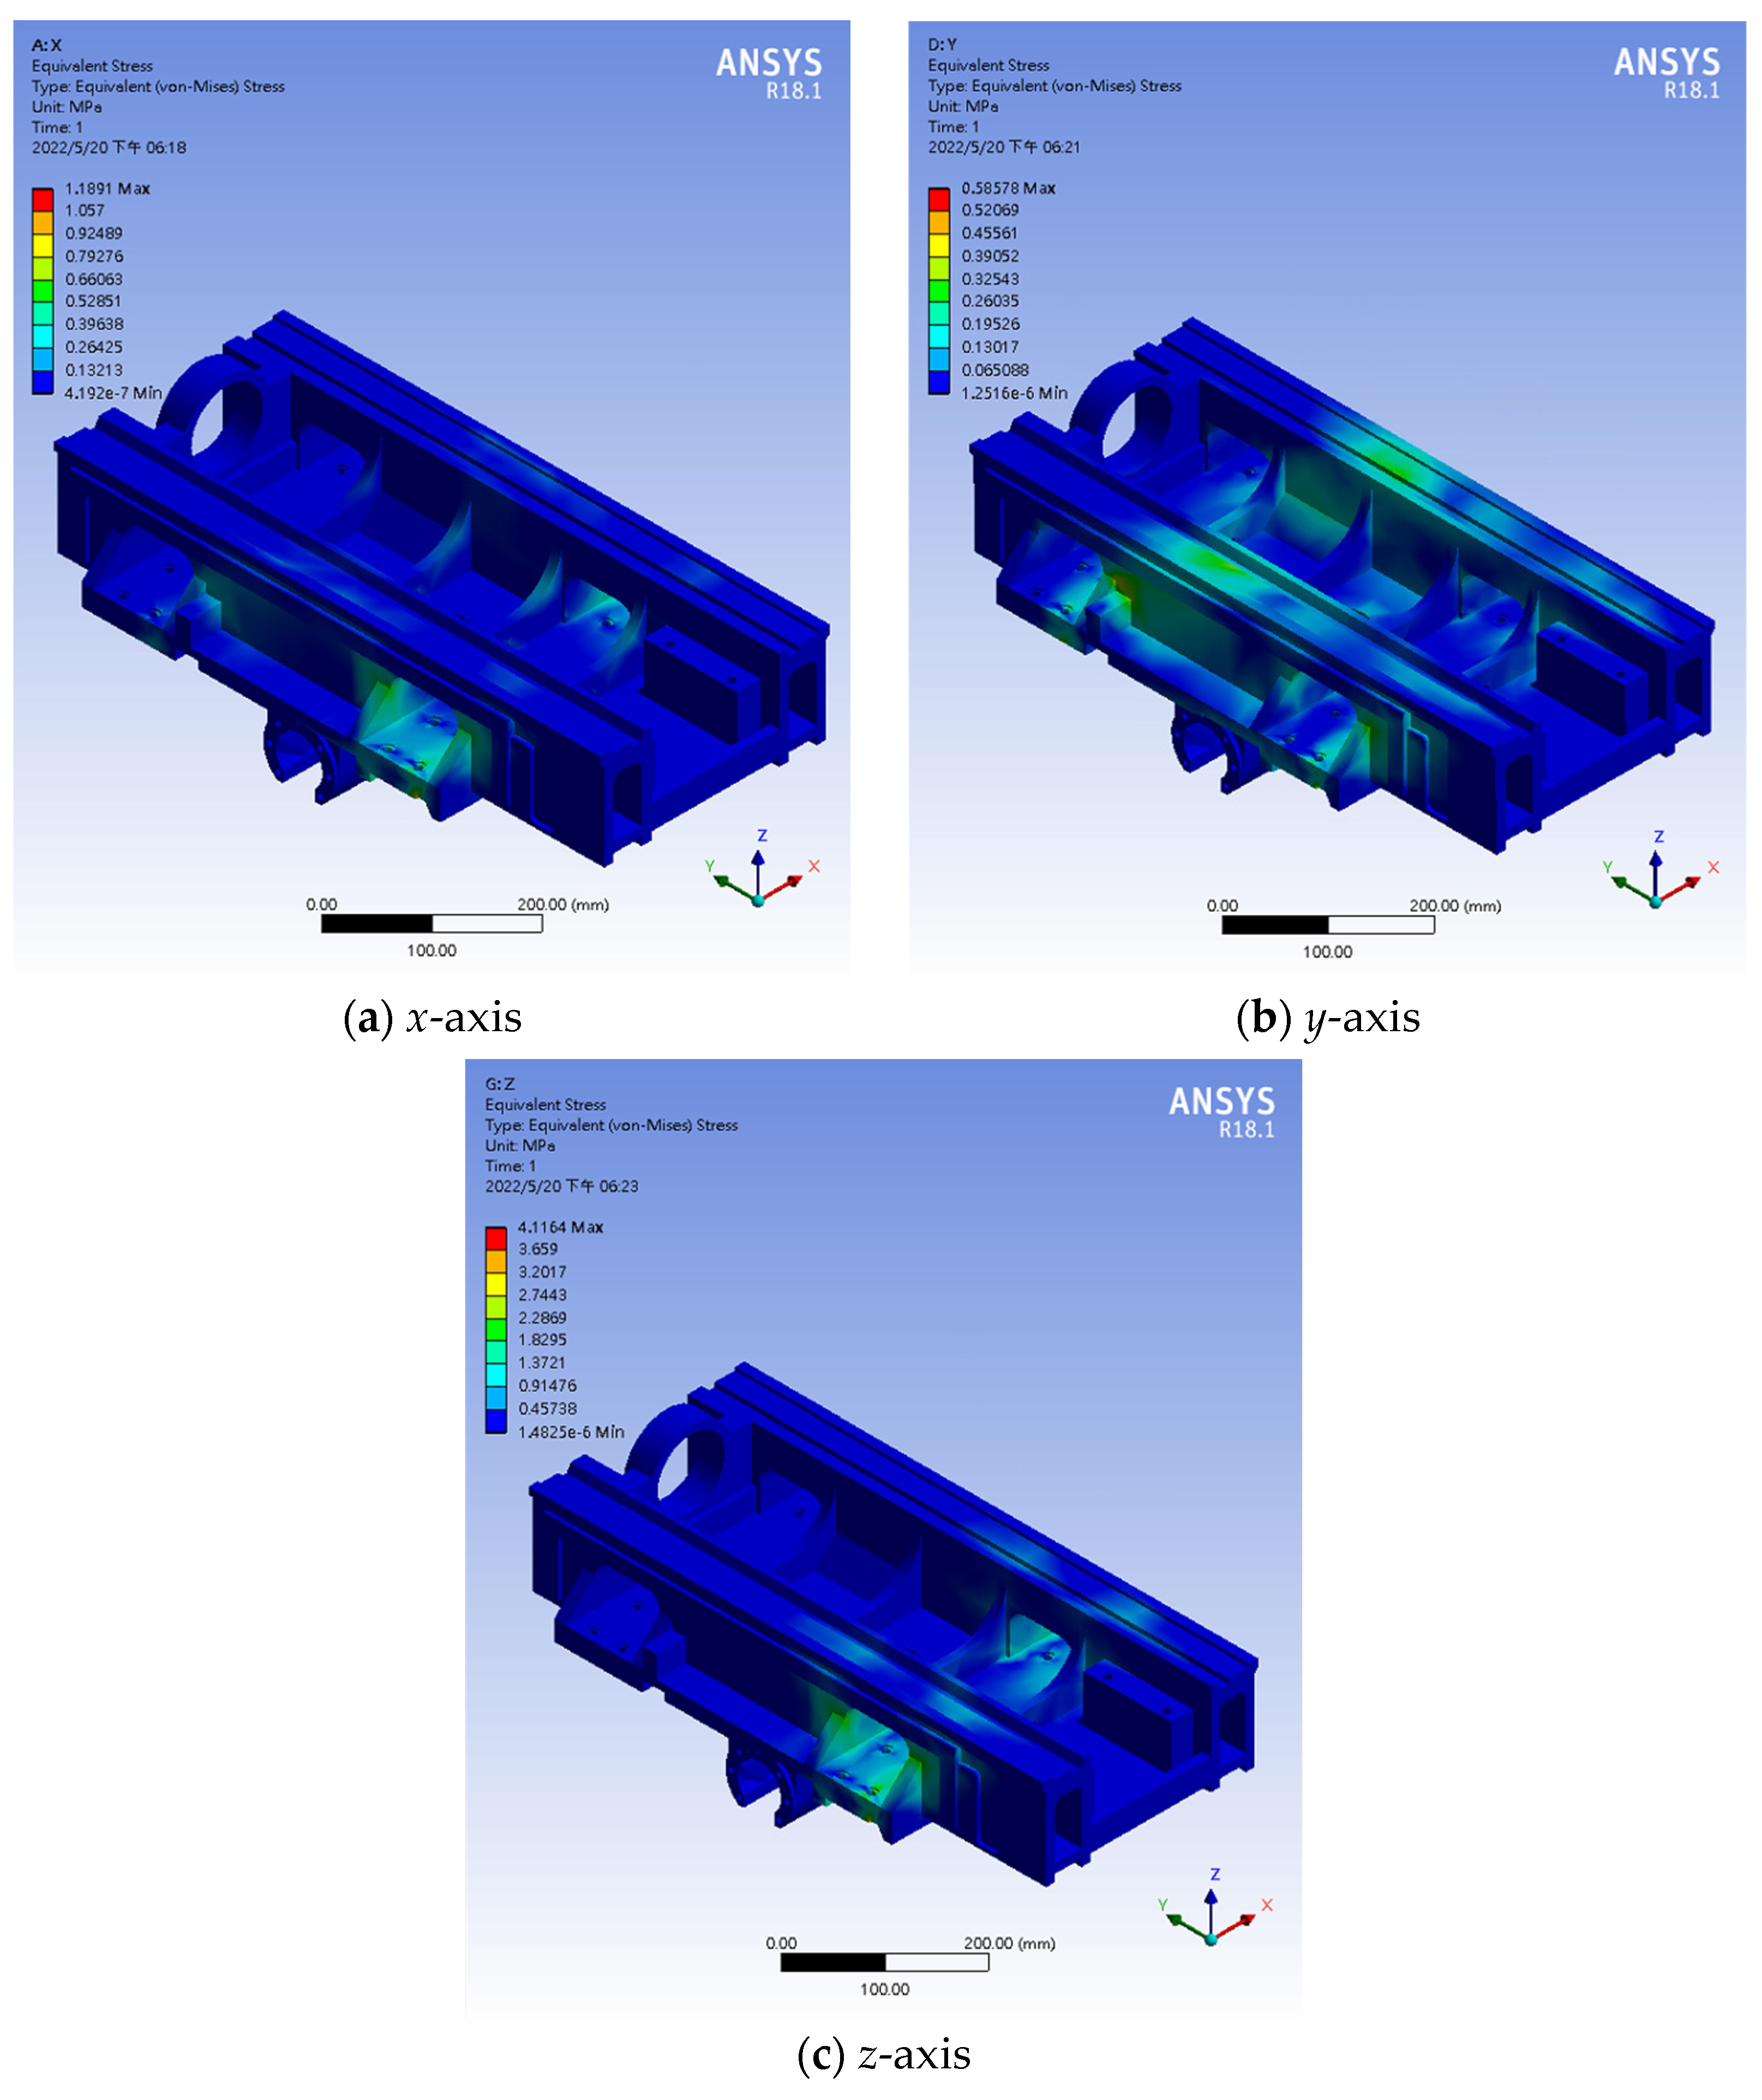
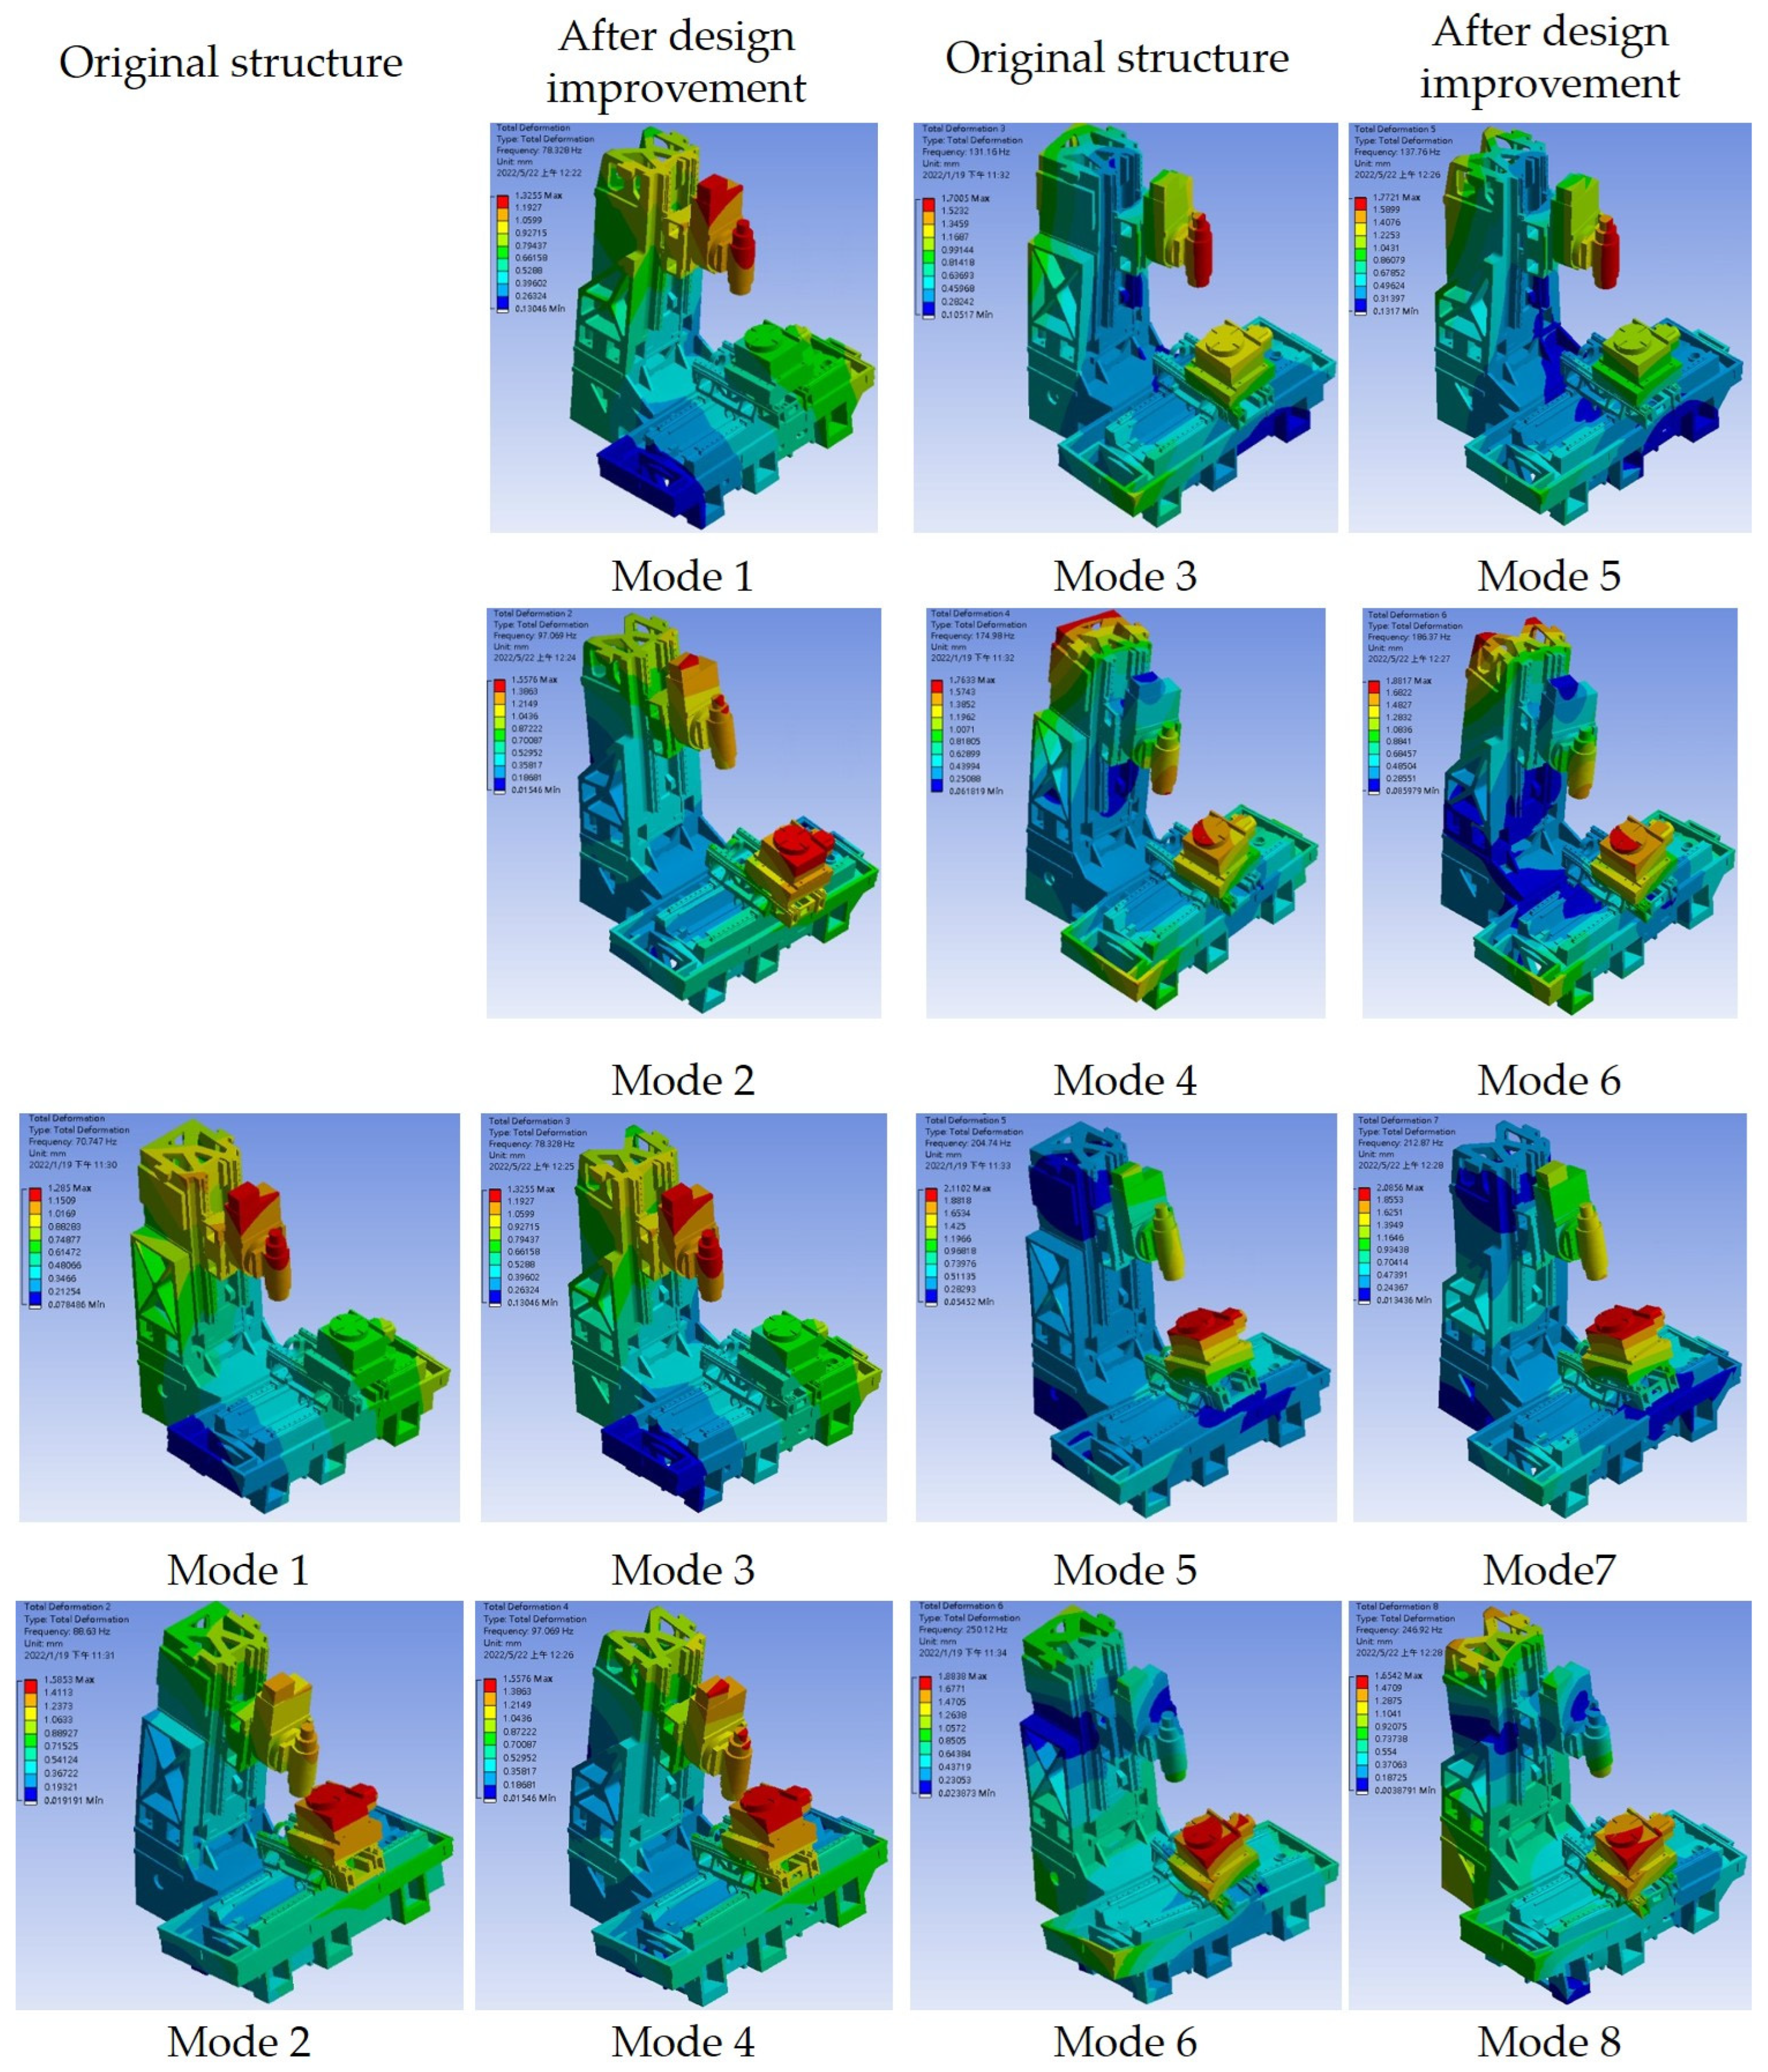
Many researchers have proposed various methods for structural design and numerical refinement analysis, which are highly beneficial and worth referencing for structural design improvement. However, this study adopted a practical approach based on machining characteristics, systematically conducting topology optimization analysis and structural stiffness enhancement design step-by-step. In this study, topology optimization based on machining characteristics was applied for structural design improvement of a machine tool. The machining characteristics, such as grinding vibrations, grinding forces, and surface roughness obtained from the ultrasonic-assisted grinding experiments of zirconia were utilized as the boundary conditions in static analysis. Both equivalent stress distributions obtained from static analysis and the geometric shape (model) after topological analysis were utilized as the key references for further structural design improvement of the column, base, and saddle subsystems. The differences of the effective stress, natural frequency, corresponding modal shape, weight and stiffness of a machine tool between the original structure and after design improvement may thus be compared completely.
The method proposed in this study may closely align with the dual requirements of structural stiffness enhancement and the pursuit of a lightweight design for machine tools. The proposed procedures also may serve as a practical reference to direct the industry manufacturer in enhancing the design of existing machine tools or contribute to the development of the next generation of machine tools.
2. Theoretical Foundation
This section introduces the principles of grinding, ultrasonic-assisted machining, and topology optimization, and the relevant procedures.
2.1. Grinding
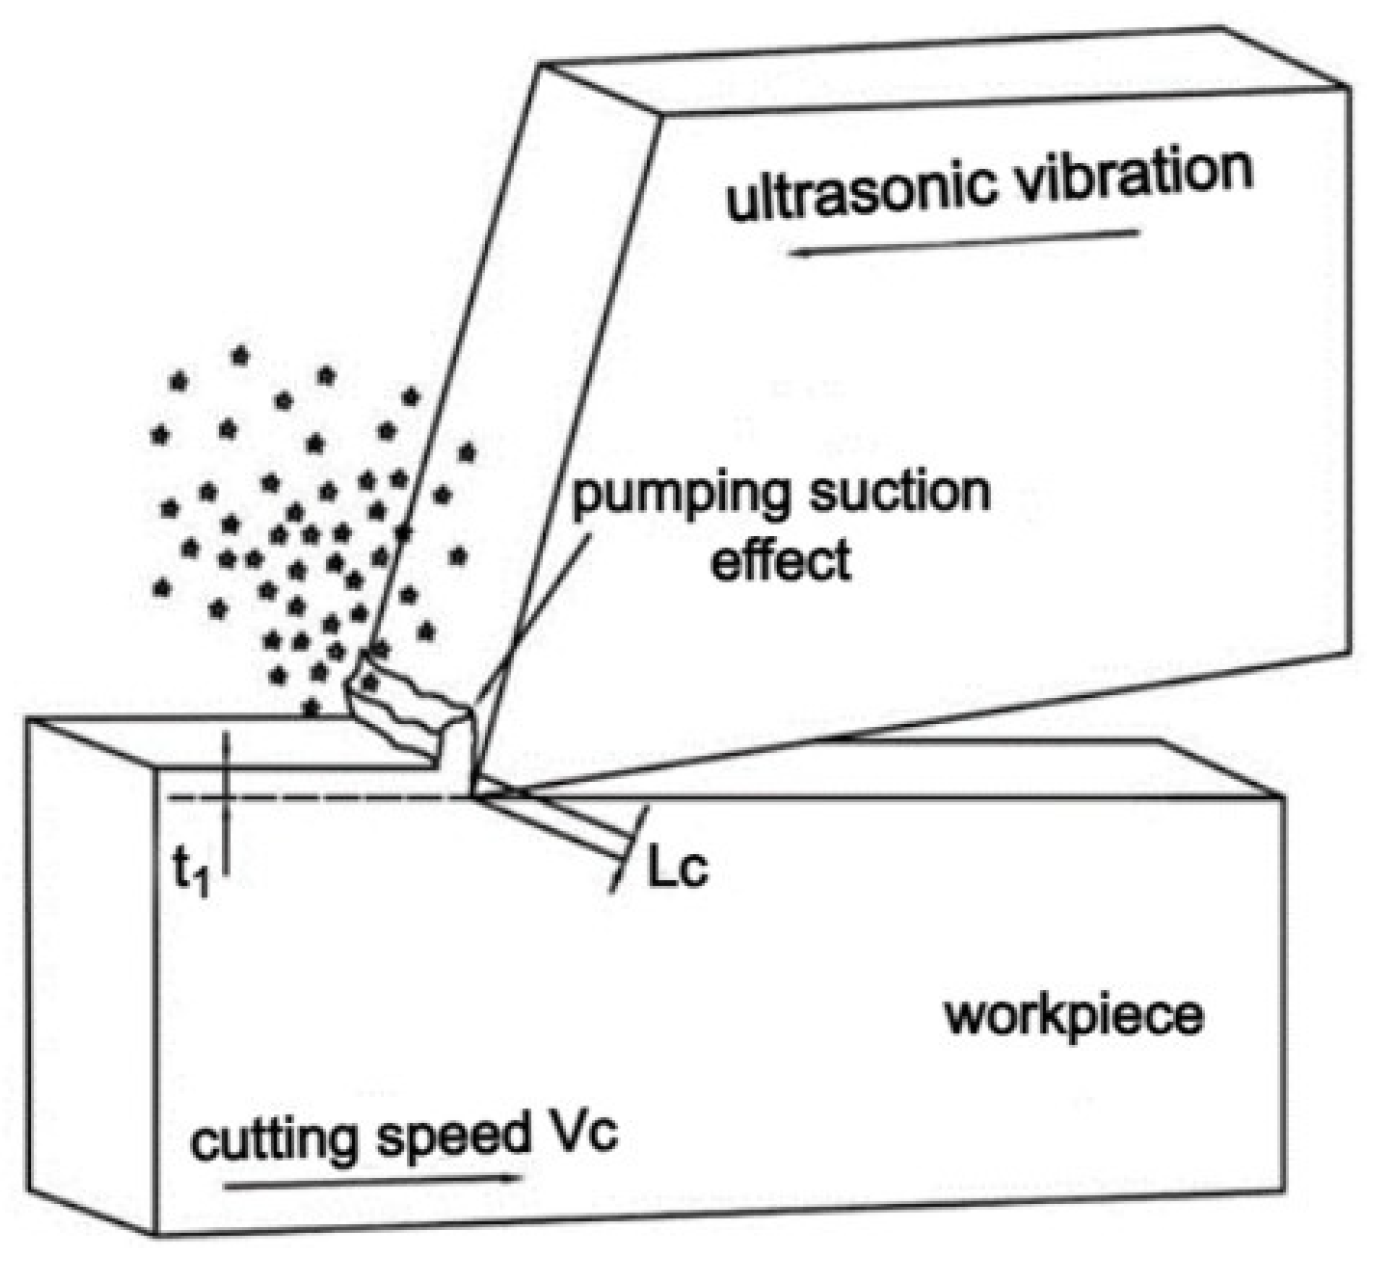
Grinding is a machining process that utilizes abrasive grits with significantly higher hardness than the workpiece material to grind the workpiece. Grinding can achieve better machining accuracy, surface roughness, and a high level of machining allowance for precision machining requirements. In the grinding processes of hard and brittle materials, abrasive grits come into contact with the workpiece and then rubbing, ploughing, and cutting actions are generated sequentially to remove the materials, as shown in
Figure 1. Additionally, diamond tools are commonly used for grinding of hard and brittle materials due to their high hardness and wear resistance. Grinding processes generally can be divided into the following three stages:
Rubbing stage: due to the internal stress within the workpiece material not reaching the fracture threshold, elastic and plastic deformation is caused by the rubbing of diamond abrasive grits and the workpiece material is not removed at this stage.
Ploughing stage: workpiece material is extruded outwardly toward both sides and the front end of the diamond abrasive grit when the cutting force induces plastic deformation in the workpiece. As a result, cracks and a small amount of material are removed.
Cutting stage: cracks in the workpiece continue to propagate, which causes lateral cracking on the workpiece material surface to be generated. These lateral cracks are subsequently detached and chips are thus formed that are removed at this stage.
During the grinding processes, electroplated diamond coating burs can exhibit different grinding patterns due to influential factors such as grain size, structure (texture), bond strength, and the type of abrasive material used. Clogging and blunting are more likely to occur when conditions involve a finer grain size, higher structure, and harder bond strength. Diamond abrasive grits in the grinding processes can generally be categorized into the following types:
Detachment: due to excessive grinding forces, the bonding agent is damaged and the detachment of abrasive grits thus occurs.
Partial grit damage: some abrasive cutting edges are damaged due to grinding forces. The grinding performance deteriorates as the size of this damage exceeds the amount of wear.
Significant damage and wear: a substantial loss of abrasive grits causes the abrasive region to become cutting edges, and the cutting-edge area is thus reduced.
Flattening: wear and abrasion occurs due to the high-temperature friction between the grinding edge and the workpiece and a flattened appearance is gradually formed.
Newly emerged: the wear of the bonding agent leads to the exposure of the abrasive grit during the grinding process and a new cutting edge emerges.
2.2. Ultrasonic-Assisted Machining
Ultrasonic-assisted machining, as a new technology distinct from traditional machining, can be regarded as an advanced and complex cutting process primarily applied to hard and brittle materials. Its characteristics not only include lower cutting temperatures and reduced cutting forces but also high-frequency vibrations that facilitate self-cleaning of the cutting tool, preventing chip build-up and enhancing machining precision.
In machining processes, simply adding cutting fluid may have limited actual improvement in machining performance. However, introducing ultrasonic-assisted cutting can significantly enhance both machining performance and cutting-tool life. This is because, in vibrational machining, a vacuum region is formed between the cutting tool and the workpiece and a pumping suction effect is thus formed in this region, as shown in
Figure 2. Hence, the cutting fluid is likely to reach the primary cutting zone by this pumping suction effect.
2.3. Topology Optimization
This study employed a topology optimization method using the density function approach, wherein material density is treated as a design variable in structural design. A relationship between the material density and Young’s modulus is established for each finite element. The density function approach, based on material interpolation, involves penalty factors and can be further categorized as solid isotropic material with penalization (SIMP) and rational approximation of material properties (RAMP). Therefore, this method is also referred to as the penalty function-based density function approach. The ANSYS Workbench R18.1 software can automatically determine which interpolation method to use, with SIMP as shown in Equation (1) and RAMP as shown in Equation (2).
where
ρ is the specific density value of the element ranges from 0 to 1, and 0 indicates the absence of the element while 1 indicates its presence.
is the real Young’s modulus for the materials.
E is used to determine the Young’s modulus during the topology optimization process.
P as a penalty factor, it typically ranges from 2 to 4, with a default value of 3 in the software.
Based on the above information, it can be observed that when the penalty coefficient is greater than one, elements with lower specific density undergo an exponential operation, causing their E-values to decrease, facilitating their removal from the system. Ultimately, this allows for the optimization of the topological shape (model) based on different density distributions.
SIMP and RAMP methods primarily involve the steps of setting design variables and defining objective functions in the context of topology optimization. Specifically: 1. design variable setting: in the SIMP method, design variables are typically associated with the material density of each element. The material density of each element serves as a design variable that can be adjusted during the optimization process. Similar to the SIMP method, in the RAMP method, design variables are also related to the material density of each element. The material density of each element is used to describe the topological distribution. 2. Objective function definition: in the SIMP method, the objective function usually involves minimizing the deformation or volume of the structure. This is achieved by adjusting the material density of each element. The definition of the objective function often includes a relationship between the density and material properties, introducing a penalization factor to control the material distribution. The objective function is related to the relationship between the density and material properties. However, as compared to the SIMP method, the RAMP method introduces rational approximation to more accurately describe the material properties. The objective function involves minimizing the deformation or volume of the structure and utilizes rational approximation of the material properties. Therefore, both methods play a crucial role in the design variable and objective function definition stages of topology optimization. The choice between these methods often depends on the specific engineering requirements and the need for accurate representation of the material properties.
Structural optimization is a process of iteratively solving finite element models by continuously updating design variables and modifying the finite element model to meet the design requirements based on the constraint conditions. Topology optimization, during the analysis process, continuously modifies the material density within the optimization domain, effectively removing elements from the analysis model to achieve the optimization objectives.
Optimization analysis must be conducted with well-defined objective function and constraints in place, requiring a standardized procedure for the smooth execution of the optimization analysis. There are mainly four parameters involved:
Optimization region: seek the optimal material distribution within a given design area by applying the following three parameters.
Objective function: the objective function is the optimization target. It is defined as the quantity to be minimized or maximized based on the parameters in the design response. The objective function can also be expressed using multiple design responses, and in the case of multiple objective functions, weighting factors can be used to define the influence of each objective function on the system.
Response constraints: constraints imposed on the design response to fulfill the analysis or practical requirements, such as volume or weight reduction by a certain percentage.
Geometric constraints: also known as manufacturing constraints, they refer to the limitations imposed directly on design variables. These constraints are primarily imposed to ensure that the analyzed structure aligns with real-world requirements. They encompass factors such as member size, pull-out direction, extrusion limits, and symmetry limits.
Applying the SIMP and RAMP methods in ANSYS Workbench involves specific configurations for design variables and objective functions. Below are the general steps for utilizing the SIMP and RAMP methods in Workbench: 1. Design variable setting: open ANSYS Workbench and import or create the structural model in SIMP, access the topology optimization module, and select the structural domain for optimization. Designate the material density of each element as a design variable and specify the upper and lower limits for density, which can be adjusted during optimization. The RAMP method is similar to SIMP: treat the material density of each element as a design variable, and set upper and lower limits for density. 2. Objective function definition: choose the performance index for optimization in SIMP, such as minimizing structural deformation or volume. The objective function typically involves density distribution and material properties. By using a penalization factor to adjust the relationship between density and material, apply Young’s modulus for optimization. Unlike SIMP, when using the RAMP method, introduce a rational approximation of the material properties and configure the objective function to minimize structural deformation or volume while considering the influence of rational approximation. 3. Constraint setting: set constraints based on specific requirements, such as maximum stress, degree of freedom limitations, etc. The constraints setting may ensure that the optimization results comply with the design requirements. 4. Select the optimization algorithm: in Workbench, choose an appropriate optimization algorithm, such as sequential quadratic programming (SQP), genetic algorithm (GA), etc.
2.4. Relevant Procedures
A flowchart demonstrating the overall relevant procedures performed in this study is depicted in
Figure 3.

