1. Introduction
Fatigue cracks are often detected in structures, and their propagation due to cyclic loading have led to cases of damage (in nuclear reactor components, pipelines, and transport systems, among others) [
1,
2]. Due to the high maintenance costs and the need for robust structures or for damage tolerant design, it is of high importance that the fatigue strength of materials is also taken into account in the development and manufacturing process [
3,
4,
5]. In addition to this, simulation of fatigue crack growth in structures provides an estimation of the propagation of cracks within the structure and of the residual lifetime of structures, thereby enabling structural replacement before the ultimate failure. For these estimations, crack growth simulation programs such as Adapcrack3D are utilized [
6,
7]. The models that are used for these crack growth simulations have to incorporate all kinds of loadings acting on the component in order to predict the crack growth as accurately as possible. Currently, Adapcrack3D simulates models that are defined with mechanical loads such as pressure and concentrated loads [
8,
9]. The program can also simulate cracks in FE models with static thermal loads [
10]. Another important loading condition that is very common in the engineering field is contact loading, which generally occurs in rails, wheels, gears, bearings, etc. There are numerous works in the literature that simulate crack growth under contact loads in which contact definitions are defined between structures or between crack surfaces. One of the most common examples found in the literature is crack growth due to rolling contact fatigue [
11,
12,
13]. This can be extensively found on rails [
14,
15,
16,
17]. There are also crack growth simulations carried out under contact loading in other mechanical components such as gears, bearings, etc. [
18,
19]. Numerical methods such as the boundary element method, the finite element method and the extended finite element method are all adopted for simulations with contact loads [
20,
21,
22,
23].
Contact loading can also be found in components that are joined together with processes such as clinching. This joining process enables the joining of different and coated materials without additional joining parts or heat input. In addition, the process is carried out in a single step, resulting in a cost-effective and simple joining process [
24]. In the joining process, two sheets are arranged one above the other and pressed against the die with the aid of a punch, forming an undercut and, thus, a form-fit and force-fit connection. The joining process creates a large contact area between the die and the punch-sided metal sheet, which influences crack growth [
25]. In order to extend the scope of application to other components, Adapcrack3D has to be extended to also consider contact loading. Crack growth simulation programs such as Beasy [
26], Franc3D [
22], and Zencrack [
27] can simulate models with contact loading. Furthermore, the programs Beasy and Zencrack can also simulate crack face interactions [
28,
29].
This paper focuses on the newly implemented features of contact interactions in the three-dimensional crack growth simulation program Adapcrack3D. The paper addresses contact interactions between components as well as contact interactions between crack faces. The next section therefore gives a short overview of the functionality of the program. It provides details of how Adapcrack3D is designed to simulate crack growth in an FE model. With the help of a practical example of a clinched joint, the
Section 3 provides the details of crack growth simulation in structures with contact definitions. There, the clinching process is also briefly described. In addition to the contact interactions between structures, there are also cases in which contact interactions appear between the crack surfaces. The architecture of the submodel generated by Adapcrack3D is also updated to accommodate models that have contact interactions between the crack surfaces. This is explained in detail in
Section 4. Models of 3D structures are considered in
Section 3 and
Section 4 to demonstrate the simulation processes.
2. 3D Crack Growth Simulation Program—Adapcrack3D
Adapcrack3D is a crack growth simulation program based on the Finite Element Method (FEM) to predict crack growth in structures and to estimate the residual service lifetime [
3]. The architecture of the program is displayed in
Figure 1. It is divided into three modules: (i) Netadapt3D, (ii) FE solver, and (iii) Netcrack3D. At first, the FE models of the structure and of the initial crack are submitted to the first module Netadapt3D. Thereby, the FE model of the structure contains the boundary conditions necessary to perform the crack growth simulation. The initial crack is modelled with a 2D mesh of the crack surface describing the shape and the position of the crack in the structure. Netadapt3D inserts the initial crack in the model and performs necessary mesh adaptations around the crack to generate an FE model of the structure with crack. The program uses the submodeling technique for the fracture mechanical analysis. Hence, the module Netadapt3D also generates a submodel along the crack front. The global model for the submodel is the previously generated model of the structure with crack. In the second module, both FE models generated by Netadapt3D are used for static stress analysis of the models, and the results obtained from the simulation are transferred to the third module Netcrack3D. This module performs the fracture mechanical evaluation, in which the strain energy release rates,
G, are first calculated using the modified virtual crack closure integral (MVCCI) [
7,
30]. The fracture mechanical evaluation is carried out exclusively with the submodel. The module then determines the stress intensity factors (
KI,
KII,
KIII, and
Kv,) for all the nodes along the crack front. The crack propagation is calculated with mixed mode crack propagation criteria such as the criterion from Richard [
31,
32] or the
criterion from Schöllmann et al. [
33]. In those concepts, values such as the equivalent stress intensity factors,
KV, and the crack kinking and twisting angles are calculated. If the crack is able to propagate, Netcrack3D calculates the coordinates of the new crack front nodes depending on the crack increment provided by the user. The load cycles for this amount of crack growth are computed thereafter. The newly calculated crack front coordinates are forwarded to the first module Netadapt3D, which inserts the extended crack front in the FE model and thereby generates FE models of the global model with crack and the submodel for the next step. This process will continue until a termination criterion defined in the program is reached, e.g., the equivalent stress intensity factor calculated at the crack front is equal or larger than the fracture toughness,
KIC, of the material. If the crack is not able to grow, i.e., if the cyclic equivalent stress intensity factor, Δ
KV, is less than the threshold, Δ
Kth, of the material, the program will end the simulation. In order to perform the fracture mechanical evaluation, the aforementioned fracture mechanical material parameters obtained from experiments have to be passed on to the module Netcrack3D. The crack growth rate curves obtained from the experiments are described mathematically with the help of equations such as Forman/Mettu [
34] or Erdogan/Ratwani [
35] to obtain fracture mechanical material parameters. This information, as well as the
R-Ratio of the applied load, is given to Adapcrack3D for the fracture mechanical evaluation, to thereby estimate the load cycles.
For FE models with temperature boundary conditions, the input model is simulated only with the thermal loading before inserting the crack in the model to obtain the temperature distribution in the model. This result will be used in all subsequent steps during the crack growth simulation. The temperature distribution in the model will be added as a ‘pre-defined field’ in the global model and submodel during the crack growth. In Netadapt3D re-meshing around the crack happens during crack insertion and crack propagation. Even though the input FE model and the FE models generated by Netadapt3D are slightly different, by applying interpolation the FE solver calculates the temperature distribution in the global model and the submodel. This procedure is described in detail in [
10].
3. Simulation of 3D Structures with Contact Loading
The problem of fatigue crack growth due to contact loading is common among mechanical components. Cracks due to fatigue are often detected in examples such as rail rolling contact [
36], brake systems [
37,
38], rotating machinery [
39], or bearings [
40]. Up until now, Adapcrack3D has only been able to simulate cracks in input models that consist of only one structure. Compared to such models, in FE models containing contact definitions, there will be definitions of multiple structures, contact interactions, coupling constraints, etc. Therefore, to incorporate contact loading in the program, Adapcrack3D has been updated to work with models containing such definitions. Because, in Adapcrack3D, the module Netadapt3D makes alterations to the FE mesh and generates FE models for the simulation, the further development of the program took place only in this module. As a result, this time the global model will be created with multiple structure definitions, etc., as in the input FE model. The process of crack insertion and submodel generation remains the same.
A 3D model of sheets with a thickness of 1.5 mm each, joined with the clinching process, is considered as an example to simulate crack growth in Adapcrack3D with contact loading. The process cycle consists of four different steps, which are presented in
Figure 2. In the first step, the two sheets to be clinched are positioned one above the other between the blankholder and the die assembly. The blankholder provides a preload force; thus, the joining parts cannot slip away during the joining process. The punch is subsequently moved downward and applies a force to the sheets. The metal sheets are enforced locally into the die assembly (Step 2). In the third step, the radial flow of material forms the clinch joint with its typical interlock as the punch moves further down and the die-sided sheet touches the bottom of the die assembly. In the last step, the punch is retracted [
25].
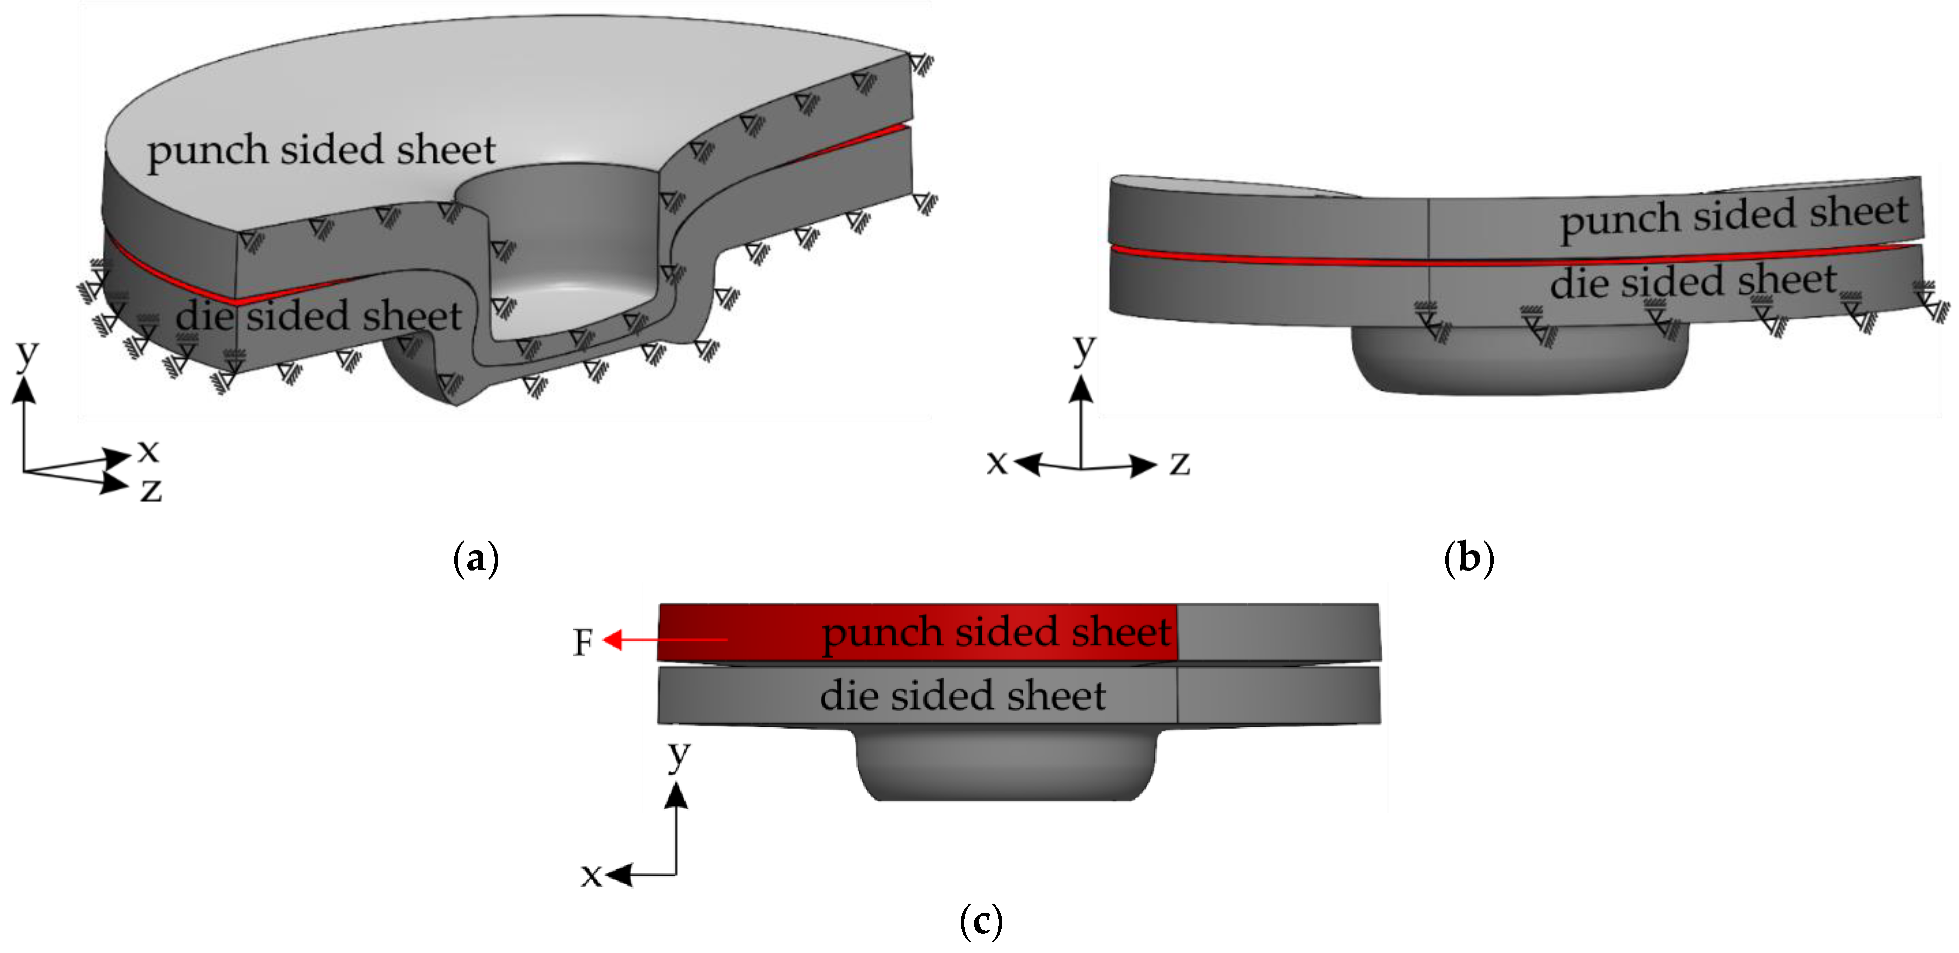
The 3D model of the clinched joint, the contact definition between the punch-sided and the die-sided sheets, and the boundary conditions are shown in
Figure 3. Because the clinched joints have rotational symmetry, only one half of the model is considered. The surfaces in the XY plane of the punch-sided sheet and the die-sided sheet have the symmetrical boundary condition in the z-direction, as shown in
Figure 3a. One half of the curved surface of the die-sided sheet is restrained in the x- and y-directions, as displayed in
Figure 3a,b. A distributed load of F = 350 N is applied on the punch-sided sheet as the loading condition (
Figure 3c).
A simulation of the model with the above specified boundary and loading conditions is performed. The location with the maximum value for principal normal stress is selected as the location for the initial crack, as shown in
Figure 4. The place to insert the initial crack is in the punch-sided sheet; see
Figure 4a. As shown in
Figure 4b, an initial semi-circular crack of radius 0.15 mm is inserted in the punch-sided sheet at the place where the maximum principal stress is at its highest value.
The model with the initial crack is loaded in Adapcrack3D for crack growth simulation. Then, the program successfully inserts the crack in the model and generates the global model consisting of both sheets with crack, contact definitions, etc., and the submodel along the crack front. The material parameters used for the crack growth simulation are shown in
Table 1 and characterize the base material of the sheets used. These are not for the stretched material in the vicinity of the clinched joints. The values used are taken from the experiments performed in [
41], in which the Forman/Mettu Equation (1) is applied to obtain the fracture mechanical parameters of the material. The important values of the Forman-Mettu equation are provided in
Table 1.
The results from the crack growth simulation are shown in
Figure 5. The global model generated by Adapcrack3D with multiple parts, contact definitions, and initial crack is displayed in
Figure 5a. The newly calculated crack fronts in the punch-sided sheet, including the initial crack, are shown in
Figure 5b. Hereby, in every step, the crack growth increment is selected as 0.025 mm. The crack growth in the model was more or less in the Mode I direction. Adapcrack3D was able to successfully create global models and simulate crack growth in the model with contact definitions. Therefore, it can be concluded that the newly implemented feature of contact definition is successfully implemented and simulated by the program. In this example, the contact definition between crack surfaces, which is explained in the next section, is not considered.
4. Submodel for Models with Contact Definition between Crack Surfaces
As described previously, Adapcrack3D adopts the submodel technique for fracture mechanical evaluation [
7]. The global model, which is actually the FE model of the structure to be analyzed, is meshed with tetrahedral elements and the submodel, which is only around the crack front, is meshed with hexahedral elements. This creates the possibility of creating meshes for any complex 3D models and a regularly shaped mesh along the crack front for analyzing the region around the crack. Moreover, a coarse mesh can be applied to the regions that are not in the proximity of the crack and a fine mesh in the vicinity of the crack. By using the submodel technique, the region around the crack can be meshed finer than the region around the crack in the global model [
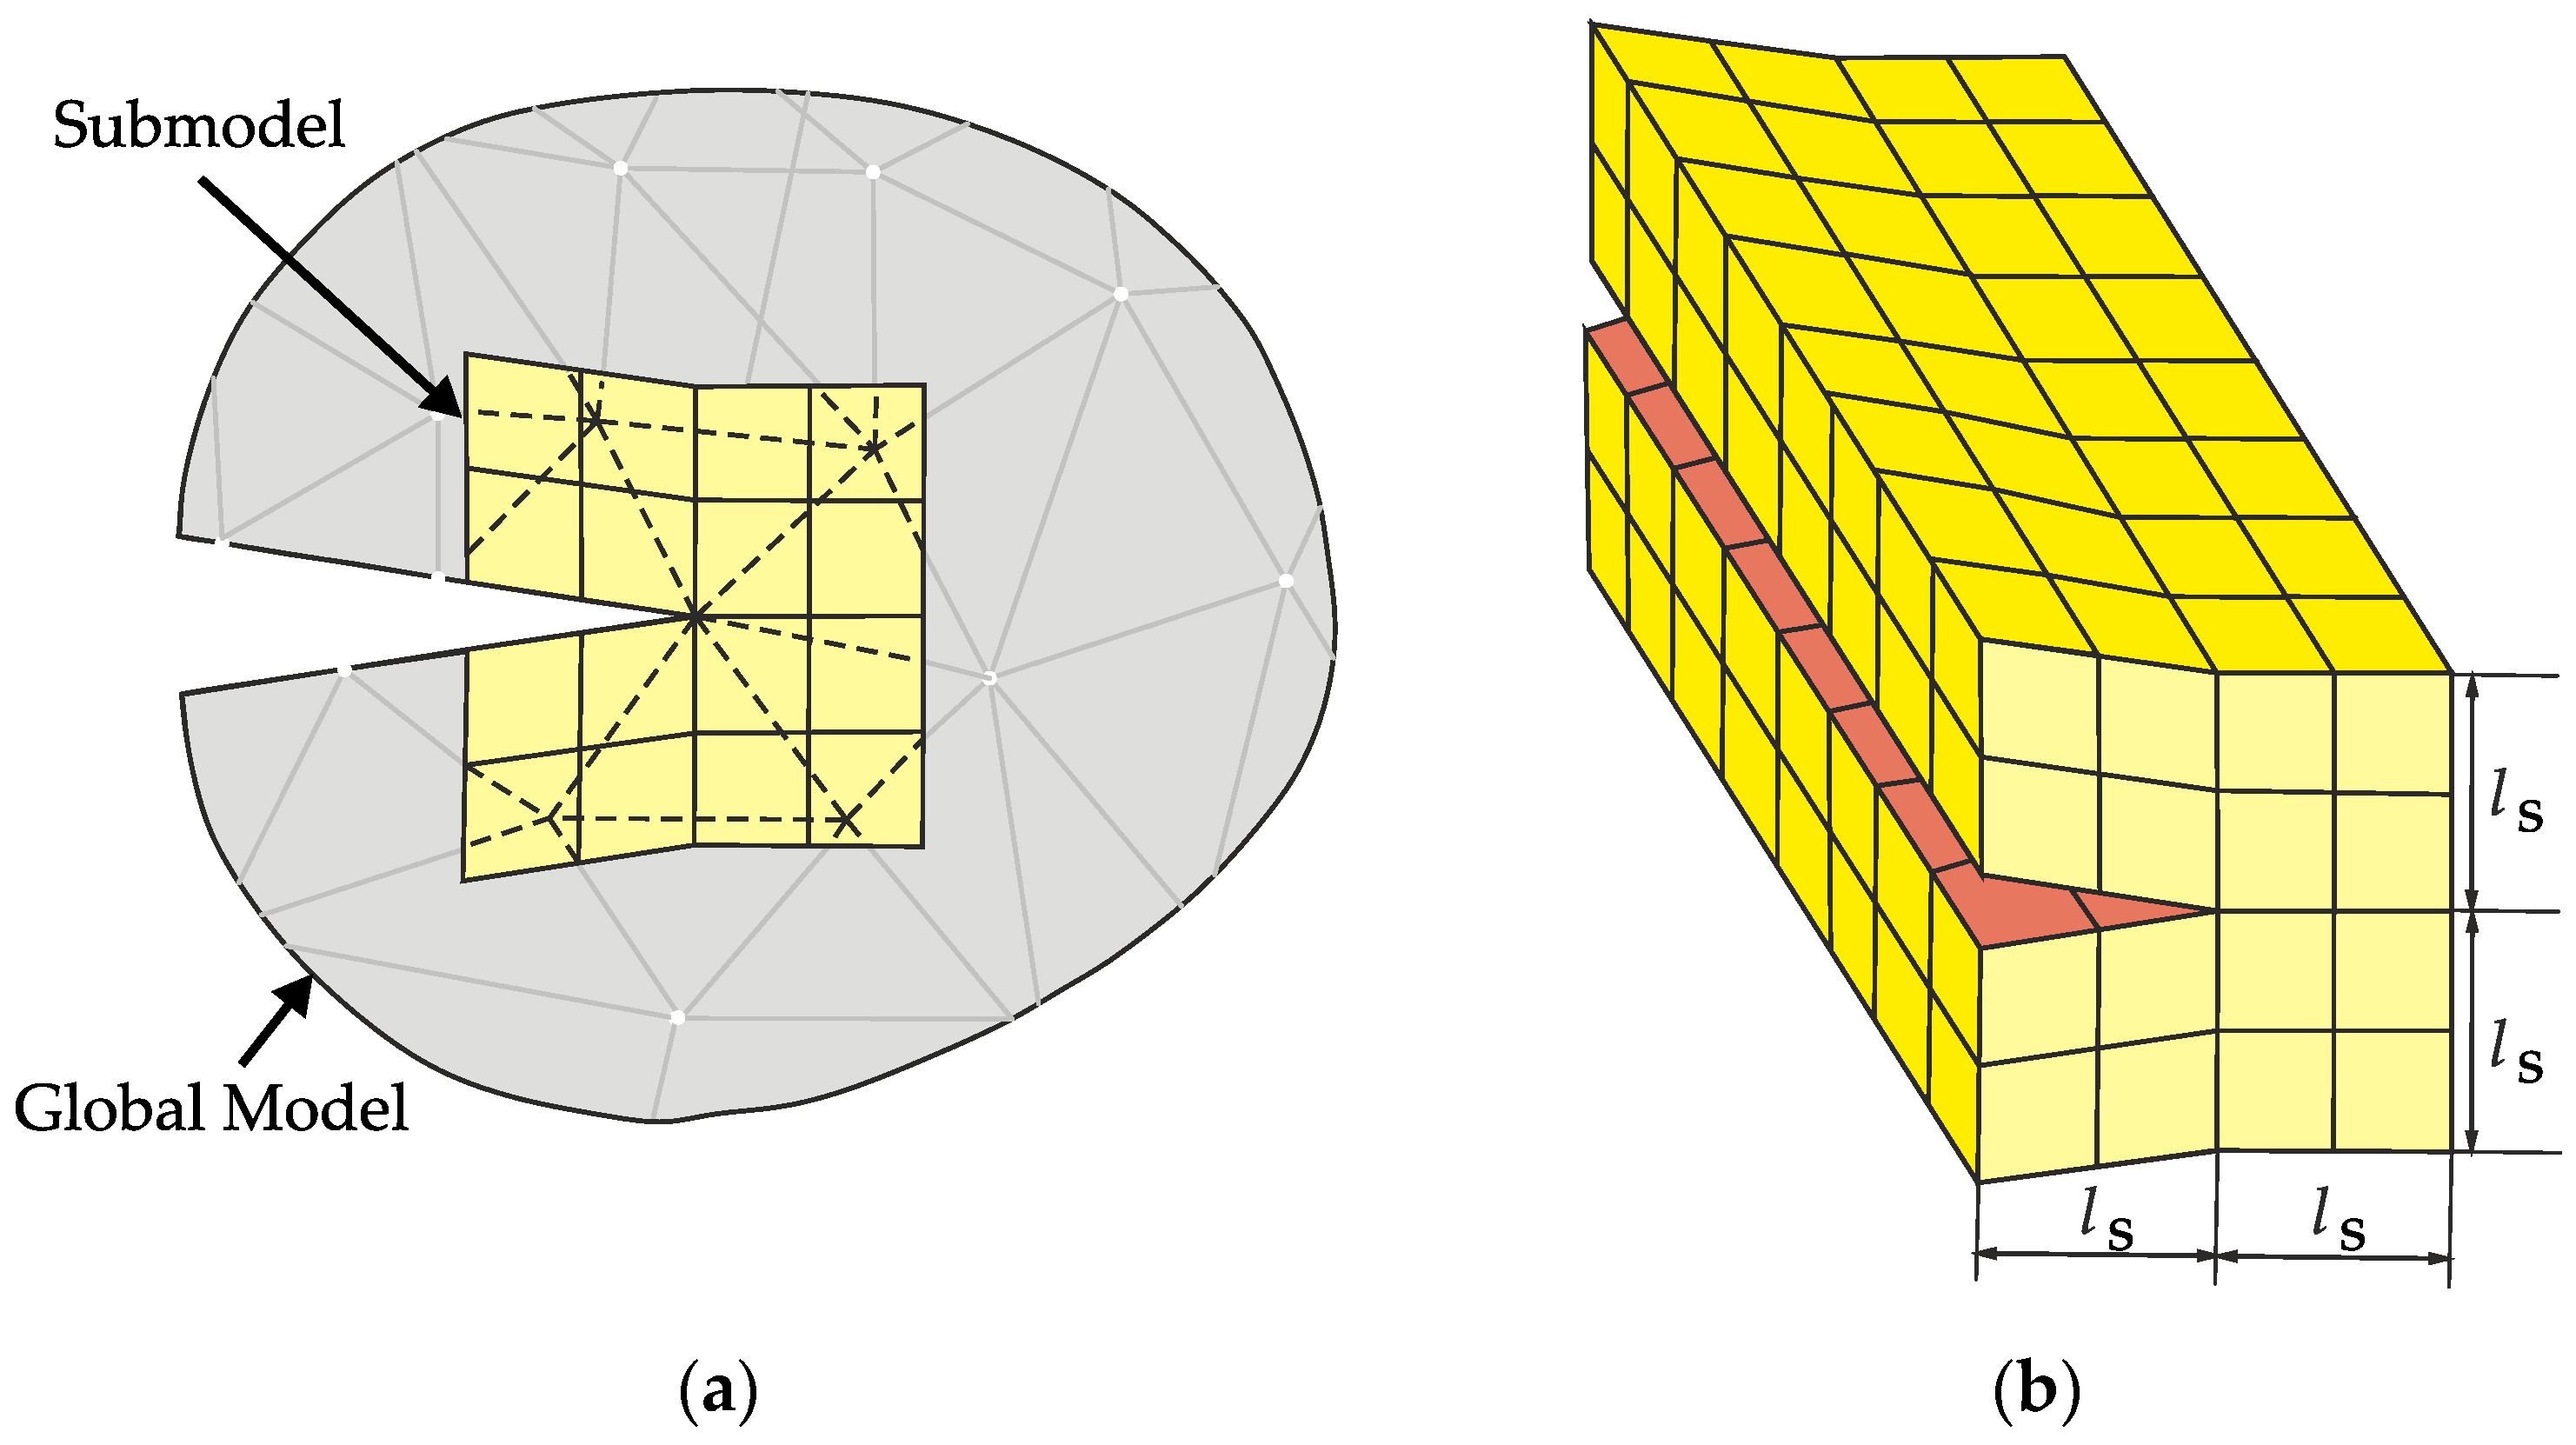
42]. The submodel and various aspects of it are shown in
Figure 6. In
Figure 6a, the global model with the crack and the position of the submodel with respect to the global model is displayed. The hexahedral meshed geometry of the submodel for a through crack is presented in
Figure 6b, in which the user-defined value,
ls, is the size of the submodel from the crack front in all four directions. The submodel with no stresses applied on it is depicted in
Figure 6b.
In the submodel technique, the displacements on the ‘driven nodes’ are calculated by the FE solver from the results of the simulation performed on the global model. The ‘driven nodes’ are nodes that are on the outer surfaces of the submodel, which intersects the global model. For the example in
Figure 6b, the ‘driven nodes’ are nodes that are on the yellow surfaces. Because the displacement of ‘driven nodes’ that are part of the crack surfaces need to be mapped from the correct side of the crack from the global model, Adapcrack3D creates a gap between the crack surfaces. However, in real world situations, e.g., rolling contact fatigue in the railway industry, there is friction defined between the crack surfaces [
28]. Due to the gap between the crack surfaces of the submodel created by Adapcrack3D, as in
Figure 6b, this submodel cannot be utilized for contact definitions between the crack surfaces. For such situations, the submodel has to be created without the gap between the crack surfaces. Nevertheless, during the submodel simulation, the displacements have to be mapped from the appropriate side of the crack.
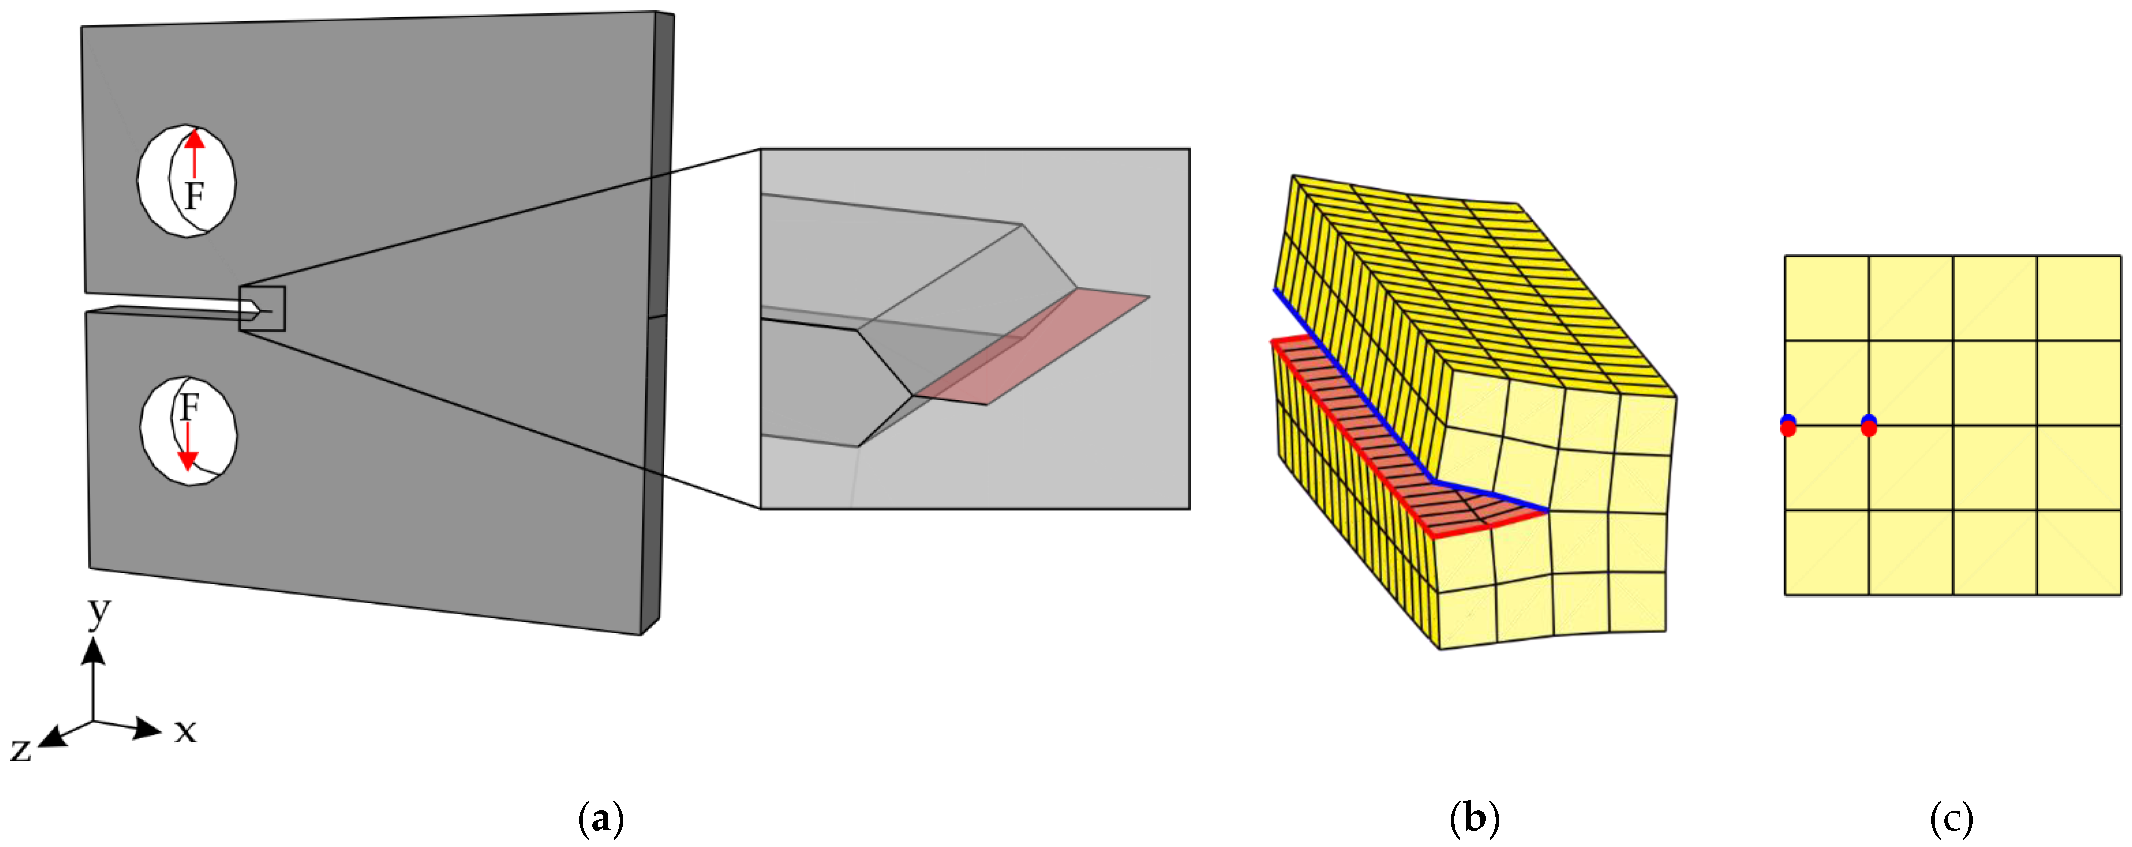
To explain the procedure of such simulations, a simple model of a CT specimen is utilized in this paper. The model of the CT specimen and the submodel for the initial crack are shown in
Figure 7. The CT specimen with the loading situation and the initial crack are displayed in
Figure 7a. In this case, the crack lies in the XZ plane, which is one of the three principal planes. The submodel along the crack front generated by Adapcrack3D for this structure is illustrated in
Figure 7b. The cross-section of the submodel without the gap between the crack faces is shown in
Figure 7c.
When the crack surfaces lie on top of each other, the nodes on crack surfaces, which appear above each other, also have the same coordinates. In
Figure 7b, the nodes on the crack surfaces, and especially the ‘driven nodes’ on the red and blue line, not only lie on top of each other but also have the same coordinates. In the cross-sectional view in
Figure 7c, the red and blue nodes have the same coordinates. As described above, if the nodes that appear in the yellow region are selected as ‘driven nodes’, then the adjacent red and blue nodes are mapped with the same displacement from the global model and the simulation of the submodel returns incorrect stress distribution. This is evident in
Figure 8, which shows the displacements in the model along the principal axes:
Figure 8a (displacement along x-axis),
Figure 8b (displacement along y-axis), and
Figure 8c (displacement along z-axis). Because the crack is loaded in the Mode I direction, the correct result should have been an opened crack.
In order to avoid this error during simulation, the displacements of the ‘driven nodes’ in the crack surfaces in the submodel have to be mapped appropriately from the correct side of the crack in the global model. To achieve this, a global model is created with two different ‘element sets’, each on either side of the crack. The submodel is generated with three different sets of ‘driven nodes’. The global model and the submodel are displayed in
Figure 9. The sections of the global model to define two ‘element sets’ on either side of the crack are shown in red and blue in
Figure 9a.
Figure 9b is the newly generated submodel with three sets of ‘driven nodes’: (i) nodes marked in red acquire the displacements mapped from the red ‘element set’ of the global model, (ii) nodes marked in blue acquire the displacement mapped from the blue ‘element set’ of the global model, and (iii) all other nodes that are on the outer surfaces intersecting the global model are marked in green. All three ‘driven nodes’ sets are defined in the FE model of the submodel, but in this case the mapping of the ‘driven nodes’ sets (i) and (ii) from the correct global model ‘element set’ have to be defined explicitly.
Figure 9c is the resulting displacement in the y-direction of the submodel. It is evident in the picture that by applying this method the displacements are correctly mapped, and now the crack is thereby in an opened state. Similarly, the simulations have also delivered correct results for the x- and z-directions.
As per the rule, in the FE model of the submodel, the directions (x, y, z) from which the displacements have to be mapped from the global model have to be specified. In the example above, the displacements have been mapped from all three directions. In the case of models with contact definitions between the crack surfaces, the edge nodes on the crack surfaces (marked in red and blue in
Figure 9b) are also assigned with contact definitions. The contact definitions in the FE solvers are defined with the master-slave method in which one of the crack surface is the master and the other is selected as the slave. This creates the problem of ‘over constraints’ in the FE solver, and the simulation will be aborted. For cracks that are created on one of the principal planes (XY, YZ, XZ), this error can be resolved by not mapping the displacements in the direction that is perpendicular to the plane in which the crack lies. For instance, in the above example, the displacements of nodes that are marked as red and blue should be mapped only from the x- and z-directions. The displacements in the y-direction of the ‘driven nodes’ that belong to the slave surface should be discarded in order to perform the simulation with contact definitions in the crack surfaces.
This procedure can be applied only in cases in which the crack is in any of the principal planes. If the crack is in a slanting position to the principal planes, then the omitting of displacements in one direction cannot be applied. Therefore, to create a more general solution, a new geometry of the submodel is introduced. Adapcrack3D already has the feature of extending element layers in all three directions [
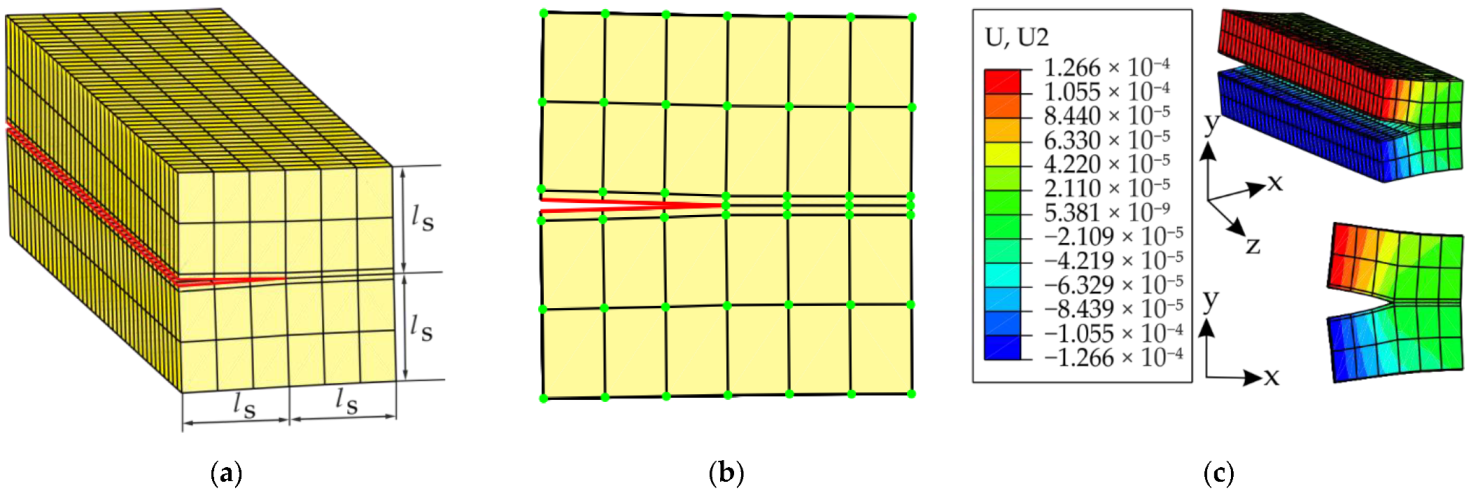
7]. By making use of this feature, a new geometry for the submodel is designed and is shown in
Figure 10. There are three elements created in all directions from the crack front. The height of the elements close to the crack surfaces are reduced in order to come as close to the crack as possible. This feature is newly implemented in Adapcrack3D, and the user can provide the height of the elements close to the crack surfaces. This can be selected as a percentage of the value,
ls, so that the size of the submodel remains the same as before (
Figure 10a). For instance, in the submodel presented in
Figure 10, the value of
ls is 1.0 mm and the height of the smallest element is 0.05 mm (5% of
ls). As shown in
Figure 10b, the nodes on the crack surfaces are not selected as ‘driven nodes’. All the nodes that appear on the intersecting surfaces other than the nodes from the crack surfaces are selected as ‘driven nodes’. One advantage of this method is that the arranging of ‘driven nodes’ in different sets is not necessary. Another advantage is the avoidance of ‘over constraints’ during contact between the crack surfaces. The resulting displacement on the model in the y-direction is displayed in
Figure 10c. The results are in good agreement with the reference result in
Figure 9c.
To validate the results for the newly proposed submodel in
Figure 10, the stress intensity factors along the crack front are evaluated. The values calculated with the previous geometry of the submodel, as in
Figure 9b, are taken as references. The stress intensity factors calculated by Adapcrack3D for both the submodels and the difference between the results are displayed in
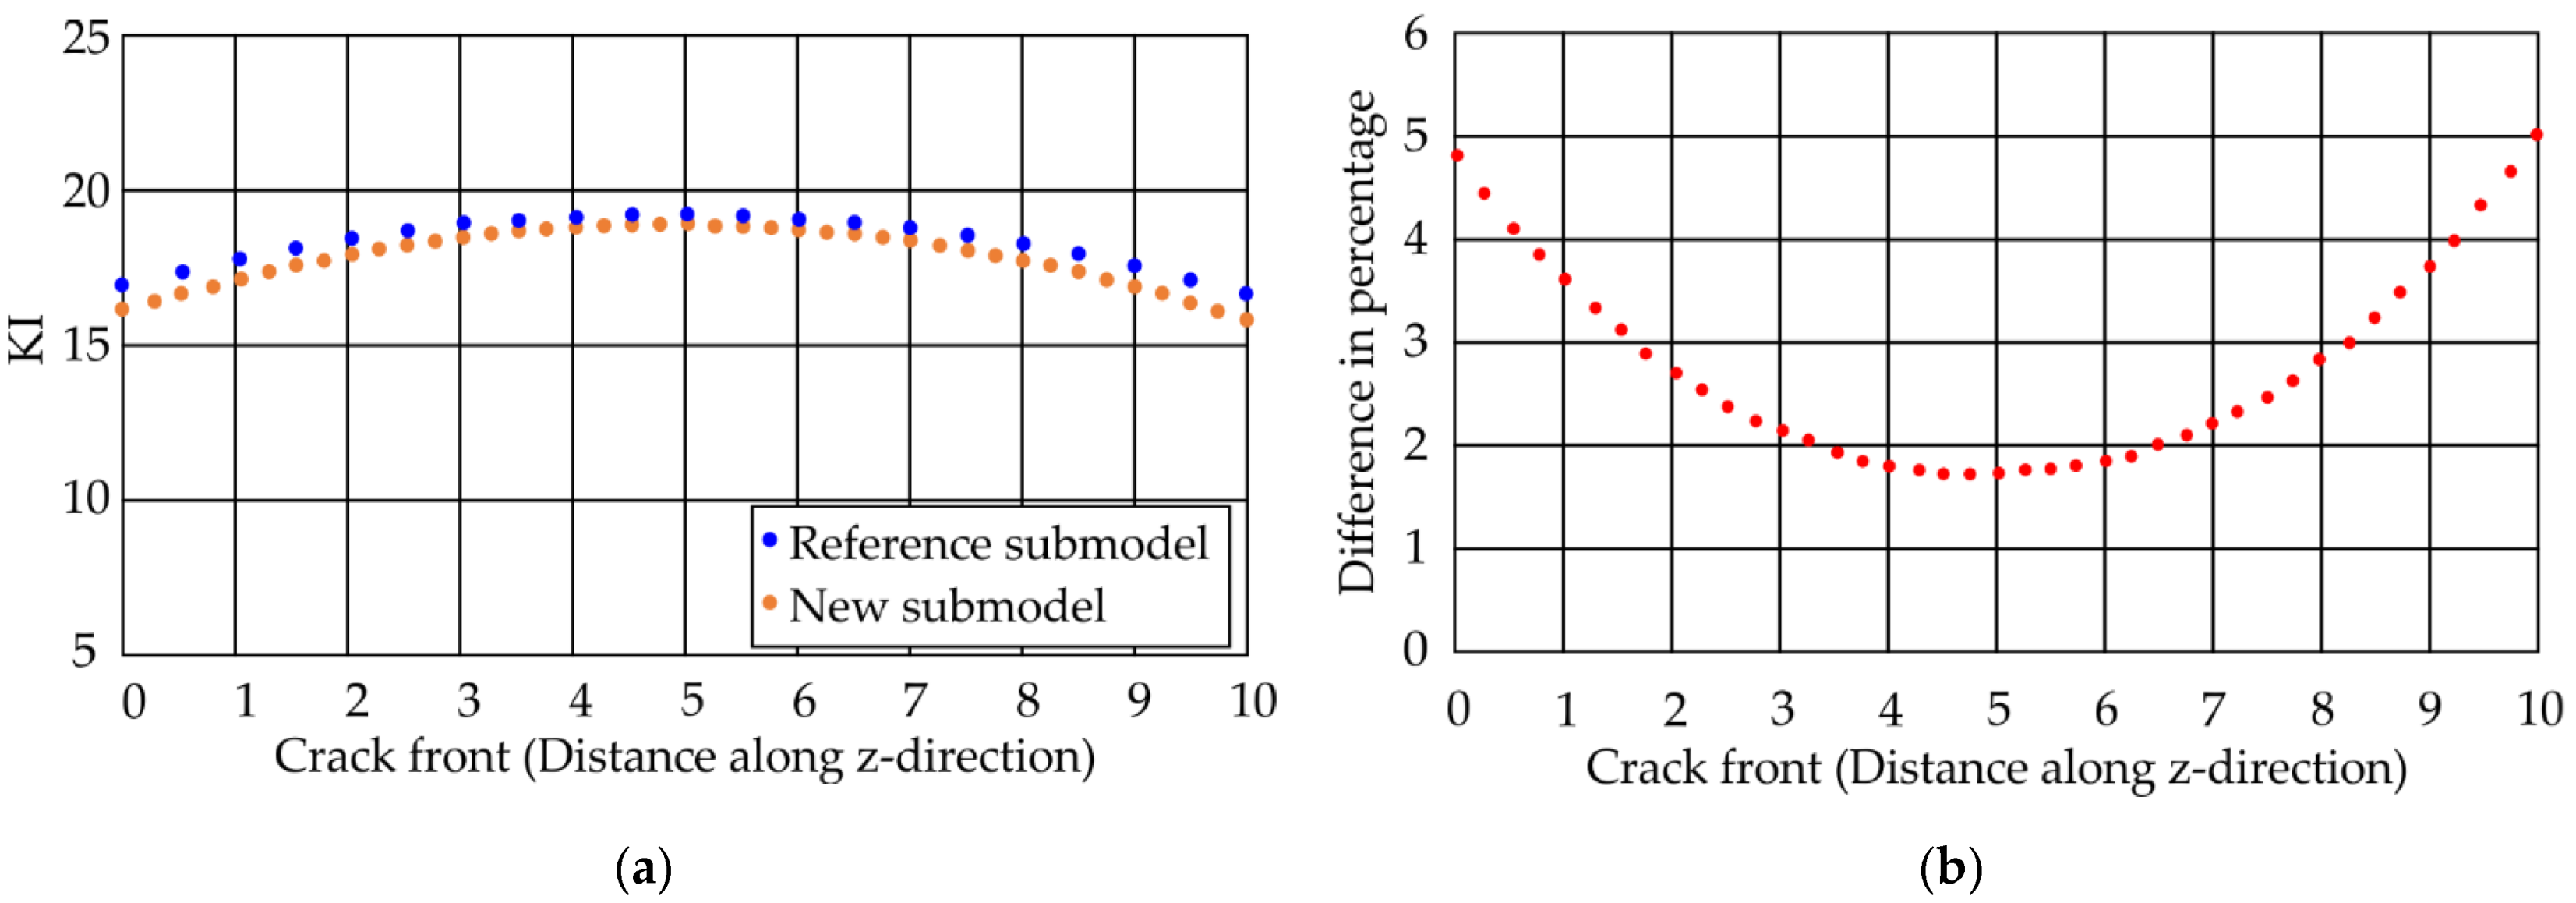
Figure 11. The simulation is performed for Mode I loading and in
Figure 11a, the values obtained for the reference model and for the new submodel are displayed in blue and orange, respectively. Because the new submodel has three elements in all directions, Adapcrack3D creates a finer mesh than the reference submodel. As a result, more nodes are present on the crack front for this model and thereby there are more points in orange than in blue. The difference between the results in percentage is shown in
Figure 11b, being approximately five percent at both ends of the crack front and below two percent in the middle. This shows that, by using the new submodel, the simulation will provide results that are very close to those with the previous submodel.
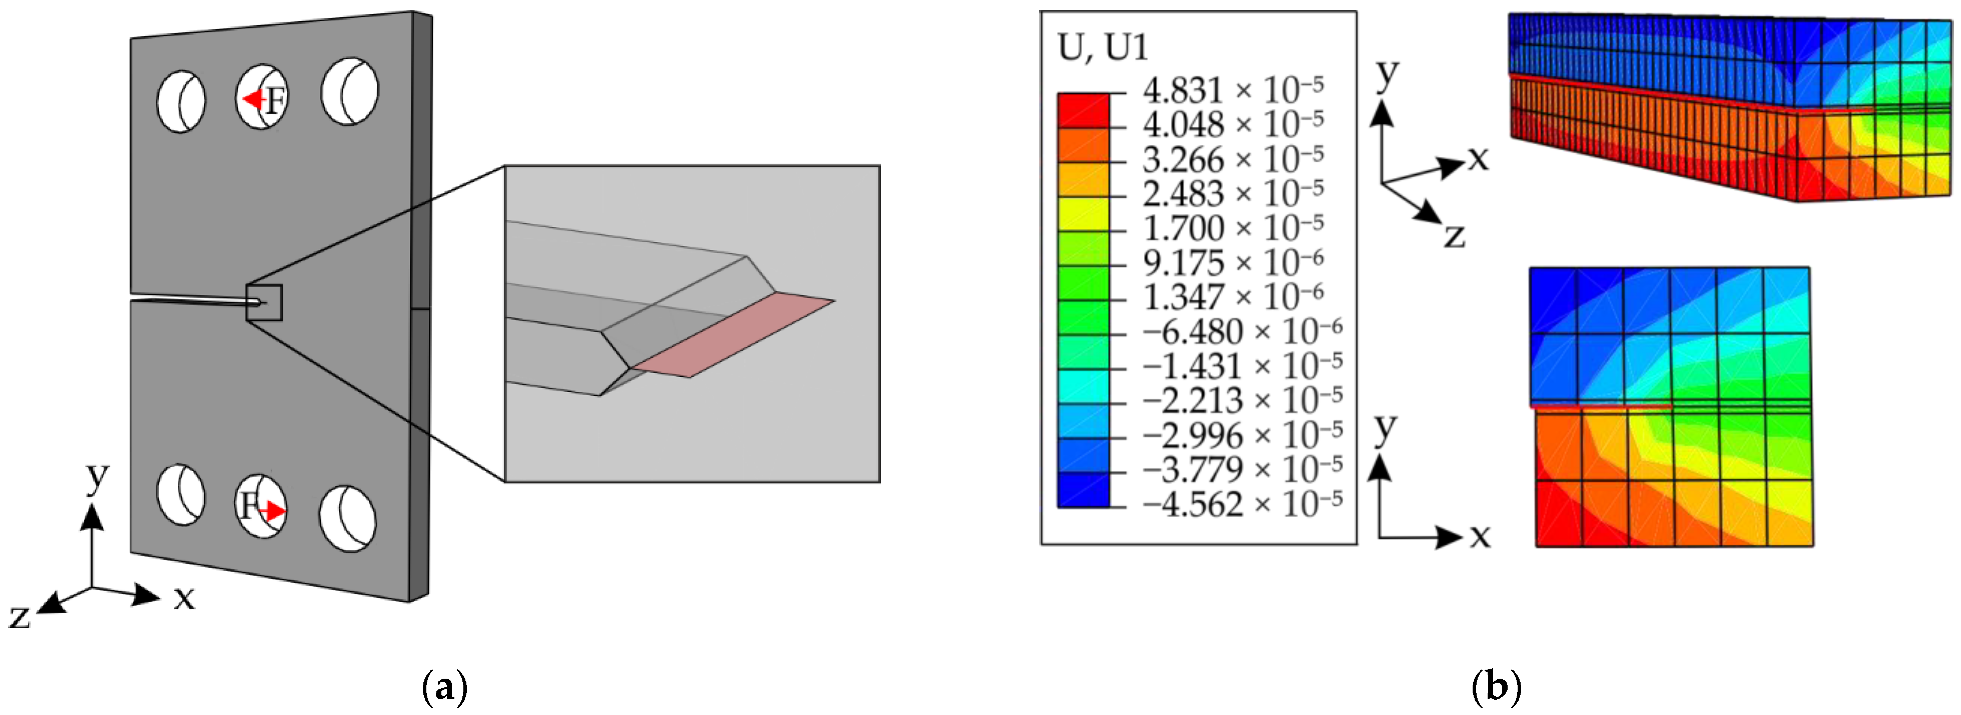
In order to test the new submodel geometry and to define the contact definition between crack surfaces, the model of a CTS specimen is also selected. The model of the CTS specimen and the submodel created are displayed in
Figure 12. The specimen is modelled with an initial crack, as shown in
Figure 12a, and the loads applied on it create a Mode II loading at the crack front. The contact definition (sliding formulation: small sliding, discretization method: surface to surface, friction coefficient: 0.15) is created between the crack surfaces. Adapcrack3D generates a submodel with smaller elements close to the crack surfaces and contact definition between the crack surfaces as in the global model. This model with contact definitions between the crack surfaces was simulated successfully, and the displacement in the x-direction from the submodel simulation is shown in
Figure 12b. The results show the Mode II loading at the crack front, which is evident in
Figure 12b in the XY plane.
In the case of alternating mixed mode loading situations, from a straight initial crack branching cracks can grow that do not affect each other during their growth. This happens only if the Mode II loading is large enough for the cracks to grow. In [
43], experiments were performed with the CTS specimen to create an alternating mixed-mode loading situation at an R-ratio of −1.6. The initial crack is spitted into two cracks: (i) the first crack grows at an angle of 60° upwards at maximum load and (ii) the second crack at 70° downwards when the load is minimum.
Models for performing simulations are created with the initial cracks and the deflected cracks, as shown in
Figure 13.
Figure 13a is the crack that deflected at 60° upwards and
Figure 13b is the crack that deflected downwards at 70°. Because the cracks do not have an influence on one another during crack growth, they can be modelled and simulated separately. The loading situations for both cracks are also shown in
Figure 13a,b, with the values as shown in
Table 2. For the crack that deflected downwards, the loads are −1.6 times larger than the loads that are defined for the crack that deflected upwards. Because both crack branches grew simultaneously, the assumption here is that the loads were chosen in such a way that the stress intensity factors calculated are almost the same for both cracks.
In both models, contact definitions along the crack surfaces are created. In order to calculate stress intensity factors, the newly proposed submodel in Adapcrack3D is created along the crack front for both cracks. The simulation results of the global models for both the models are shown in
Figure 14. It is evident in
Figure 14a that the crack opens up due to the load and a Mode I situation is almost evident at the crack front. Due to the compressive load, the crack that deflected downwards has almost a Mode I loading at the crack tip, whereas the initial crack undergoes a Mode II effect. This is visible in the global model displayed in
Figure 14b.
The stress intensity factors at the crack tip calculated from both models are shown in
Figure 15.
Figure 15a displays the stress intensity factors
KI along the crack front for both the cracks. For the crack that deflected upwards (
Figure 14a), the values are shown in blue and for the crack that deflected downwards, the values are shown in orange. As assumed, the stress intensity factors calculated for both crack branches lie very close to each other. The difference between the stress intensity factors for both crack branches is shown in
Figure 15b. The maximum difference between the values is 0.24, and the minimum difference is 0.13.
Another simulation carried out in Adapcrack3D considers rolling contact fatigue. In this simulation, the behavior of a crack in a rail is simulated when a wheel rolls over it. The rolling procedure and the finite element model are shown in
Figure 16. The wheel starts on the left side of the crack and rolls over it to create a normal force and a traction force. The rolling direction and the traction force are shown in
Figure 16a. The surface crack is oriented at an angle of 30°, and the models are created with contact definitions between the wheel and rail as well as between the crack surfaces. A detail from the meshed model prepared for the simulation is displayed in
Figure 16b.
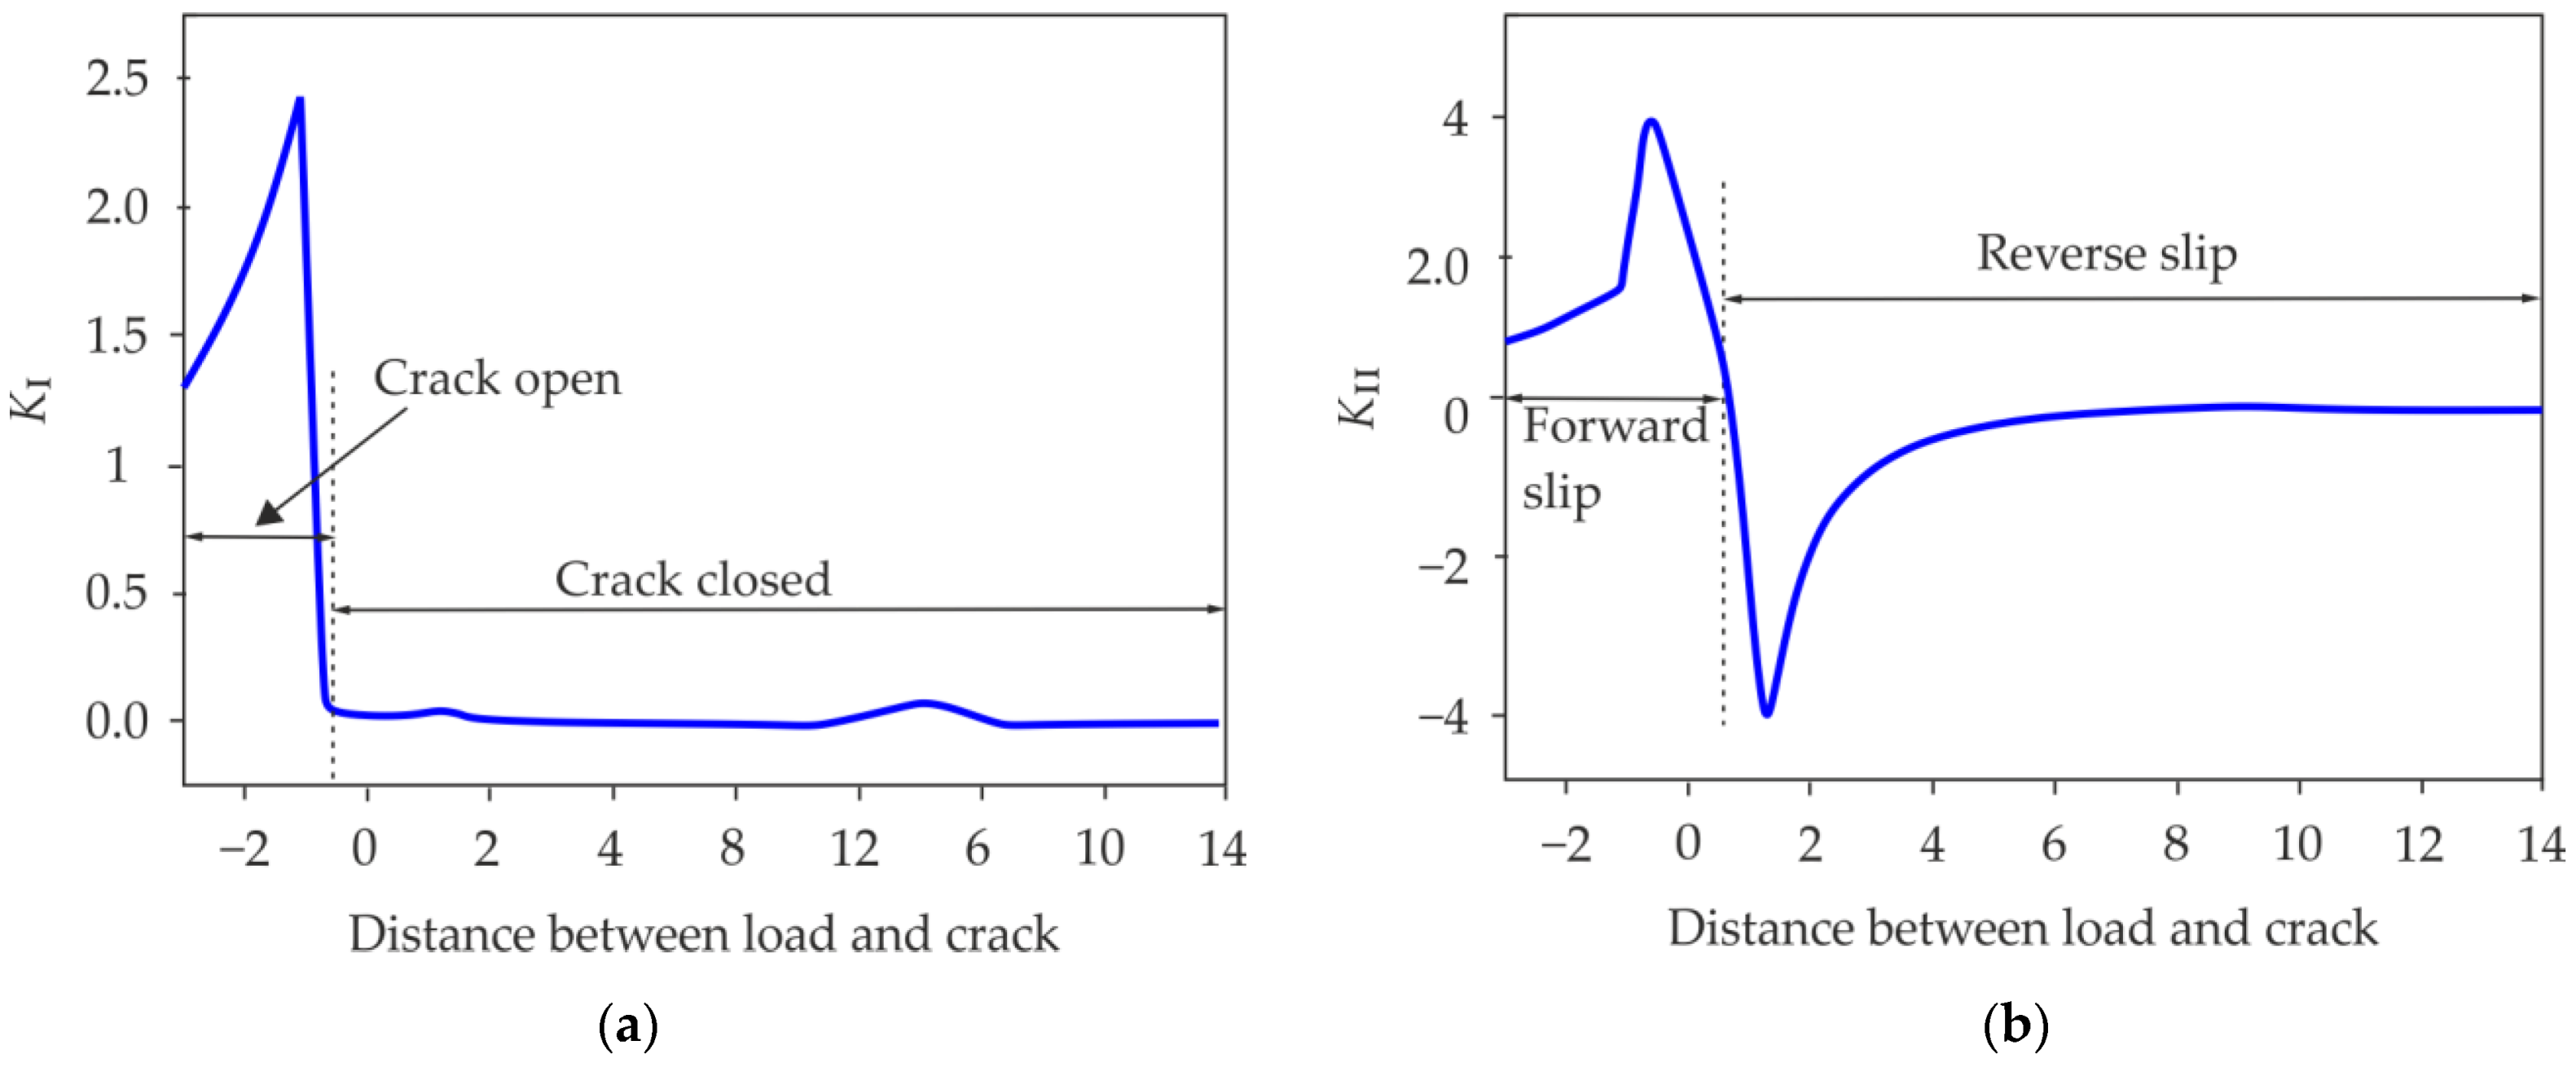
The stress intensity factors along the crack front are calculated in Adapcrack3D for plane strain state. The newly proposed submodel with the contact definition between the crack surfaces is also created for this simulation. In the simulation, the rolling of the wheel over the rail is performed for a distance of 3 mm, starting from the left side of the crack and then rolling over the crack to the right side. The course of the stress intensity factors is compared with the simulation results from [
44]. The stress intensity factors,
KI and
KII, from the literature and the same calculated in Adapcrack3D are displayed in
Figure 17. The principal course of the stress intensity factors calculated in Adapcrack3D agrees well with the course of the stress intensity factors from the literature. The tendency of
KI having a maximum value when the wheel approaches the crack and thereafter reducing to values close to zero is apparent in the results (
Figure 17a,c). Similarly, in the case of
KII, the values rise as the wheel approaches the crack, and then the values drop below zero. When the wheel rolls away from the crack, the values advance back to zero (
Figure 17b,d).


