Article

Shear Performance of Reinforced 3DPM-NM Specimens with Different Interface Locking Designs

1
School of Environment and Architecture, University of Shanghai for Science and Technology, Shanghai 200093, China
2
College of Civil Engineering, Tongji University, Shanghai 200092, China
3
School of Civil Engineering & Architecture, Changzhou Institute of Technology, Changzhou 213032, China
4
School of Engineering, Design and Built Environment, Western Sydney University, Sydney, NSW 2751, Australia
*
Author to whom correspondence should be addressed.
Buildings 2026, 16(3), 626; https://doi.org/10.3390/buildings16030626
Submission received: 29 December 2025 / Revised: 21 January 2026 / Accepted: 30 January 2026 / Published: 2 February 2026
(This article belongs to the Special Issue Low Carbon and Green Materials in Construction—3rd Edition)

Abstract

As 3D printing emerges as a transformative technology in construction, the structural performance of 3D-printed mortar (3DPM) has become a key research focus. This study conducted shear tests on reinforced specimens combining 3D-printed mortar (3DPM) and normal mortar (NM). Four different shapes of interfacial locking design (I-shaped, K-shaped, C-shaped, S-shaped) were examined, comparing reinforced (CR) and non-reinforced (NR) specimens. The investigation analyzed failure modes, crack propagation patterns, and shear transfer mechanisms at CR series specimens under direct shear loading. CR-S specimens exhibited a shear peak load value 14.0% higher than CR-K specimens, 33.2% higher than CR-C specimens, and 42.9% higher than CR-I specimens. CR-I specimens exhibited pure adhesive failure. CR-K, CR-C, and CR-S specimens showed composite failure patterns combining adhesive and shear failure mechanisms. Strain analysis revealed the maximum horizontal strain εxx across all specimen shapes. CR-C and CR-S specimens recorded strain values exceeding CR-I and CR-K specimens by over 50%. Reinforcement produced pronounced increases in ultimate bearing capacity for I-shaped and C-shaped specimens, achieving gains of 51.9% and 60.4%, respectively. Reinforcement substantially enhanced energy dissipation capacity. Compared with NR series specimens, the performance improvements ranked as follows: CR-C (+164.67%) > CR-S (+70.70%) > CR-I (+52.05%) > CR-K (+9.42%).

1. Introduction

3D printing represents a promising innovation in civil engineering and construction. The technology eliminates conventional formwork and vibration requirements during construction [1,2,3]. 3DPM accelerates construction efficiency, reduces labor costs, and expands design flexibility for complex structural fabrication. Despite being an emerging technology, 3DPM continues to attract global attention due to its operational advantages, including reduced material waste and the ability to fabricate complex geometries. These advantages promote more sustainable construction practices. Current research extensively explores 3DPM applications in green building and civil engineering, yielding notable progress [4,5,6,7]. However, future development faces challenges including immature printing material systems and compatibility issues between 3DPM and conventional construction methods [8,9,10,11].
3DPM holds substantial potential for widespread construction industry adoption. Before infrastructure applications reach full potential, mechanical behavior requires thorough investigation to ensure adequate load-bearing capacity and structural safety. As a typical brittle material, 3DPM exhibits high compressive strength but relatively low tensile and shear capacities [12]. These deficiencies significantly hinder broader structural engineering applications. Interface regions between printed layers particularly suffer from stress concentration, causing sudden brittle failure under shear loading and compromising structural integrity. Understanding the shear response of printed components under pure shear conditions, particularly interlayer interface behavior, remains essential. Advanced 3DPM research demonstrates that material properties cause weak tensile and shear performance at interlayer interfaces [13,14]. Current investigations focus primarily on understanding interlayer tensile and shear behavior. Multiple reinforcement strategies have been explored to enhance interlayer bonding and improve overall mechanical reliability of 3DPM components [15]. These include introducing viscous polymers for interface adhesion, employing fiber-reinforced cementitious materials, expanding interlayer contact areas, modifying mortar composition, and applying external reinforcement techniques [16,17,18,19,20,21].
Extensive research has been conducted to address these critical challenges. Rahul et al. [22] reported interlayer shear strength reductions of approximately 22–30% horizontally and 24–25% vertically compared to conventional cast-in-place concrete through comparative experiments. Ma et al. [10] quantified an 11.6% interlayer strength reduction using double-sided shear tests. Liu et al. [23] systematically investigated final setting time effects on interface performance. Shear strength decreased continuously with increasing printing intervals but showed recovery trends after exceeding the final setting time. Sun et al. [24] compared flexible and rigid reinforcement materials on interface shear behavior. Rigid reinforcement materials significantly enhanced interface shear strength, while flexible materials more effectively improved structural ductility. Reinforcement ratio emerged as a critical factor affecting shear capacity. Based on these findings, several models predicting interlayer shear behaviors were proposed. Wang et al. [25,26] designed four different types of interfacial locking design (I-shaped, V-shaped, π-shaped, and S-shaped-identifying V-shaped interfaces) as optimal for tensile and shear performance. Numerical simulations validated that interlocking mechanisms could suppress over 60% of shear slip and increase interface shear strength to approximately 85% of the base material [27]. Despite progress, persistent challenges, including insufficient interlayer bonding, material rheological limitations, and precise printing control difficulties, continue hindering practical engineering applications of interlocking interface designs [28,29]. Overall, research indicates that weak interface bonding remains a fundamental barrier restricting 3DPM technology’s structural reliability and large-scale deployment.
Previous studies on the shear behavior of 3DPM interfaces have mainly concentrated on the effects of printing parameters, layer orientation, interlayer bonding quality, and material composition. These investigations have provided valuable insights into interlayer adhesion and anisotropic mechanical behavior of 3D-printed cementitious materials. However, limited attention has been paid to the deliberate design of interfacial locking geometries and their interaction with reinforcement, particularly in the context of shear load transfer between 3DPM and NM.
In this study, 3DPM and NM were employed to represent joint interfaces commonly encountered in precast and additively manufactured concrete components. The primary objective is to systematically investigate the shear transfer behavior of interfaces with different geometric configurations, thereby improving the understanding of interface design strategies that are more applicable to engineering practice. Four representative interfacial locking geometries were designed, covering a wide range of shear transfer mechanisms and construction complexity. The I-shaped interface represents a basic configuration dominated by interfacial bonding and friction. The K- and C-shaped interfaces introduce moderate geometric interlocking and confinement effects, which are commonly adopted in engineering joints to enhance shear resistance while maintaining reasonable constructability. The S-shaped interface provides a higher degree of mechanical interlocking and is intended to explore the upper limit of shear performance achievable through interface geometry optimization. By comparatively analyzing the shear capacity, failure characteristics, and energy dissipation behavior of these four interface types, this study aims to clarify the role of interfacial geometry in shear load transfer and to provide practical guidance for the design of joint interfaces in 3D-printed and precast concrete structures. In addition, the effect of longitudinal reinforcement on post-peak behavior is examined to further enhance the engineering relevance of the proposed interface configurations.

2. Experimental Program

2.1. Materials and Specimen Design

The experimental 3DPM was prepared using P.O. 42.5 cement and tap water as the primary raw materials. Natural river sand with a fineness modulus of 2.41 was used as the fine aggregate. The mix also contained silica fume (SF), nanoclay (NC), hydroxypropyl methylcellulose (HPMC), a defoaming agent (Def), sodium gluconate (SG), and a superplasticizer (SP). Among them, nanoclay, hydroxypropyl methylcellulose, and sodium gluconate are thickeners. The specific mix proportions are presented in Table 1 (Sun et al., 2024 [30]). For the NM, to ensure that the compressive strength of the cured 3DPM is equivalent to that of the NM material, and that fracture consistently occurs at the interface or shear plane rather than within the intact matrix. P.O. 52.5 cement and tap water were used, with natural river sand (fineness modulus: 2.41) serving as the fine aggregate. The specific mix ratio is 761 kg/m3 of cement, 323 kg/m3 of water, and 961 kg/m3 of sand, with a water–cement ratio of 0.425. All materials used in the test were procured from Shanghai, China.

2.2. Printing Method and Reinforcement Process

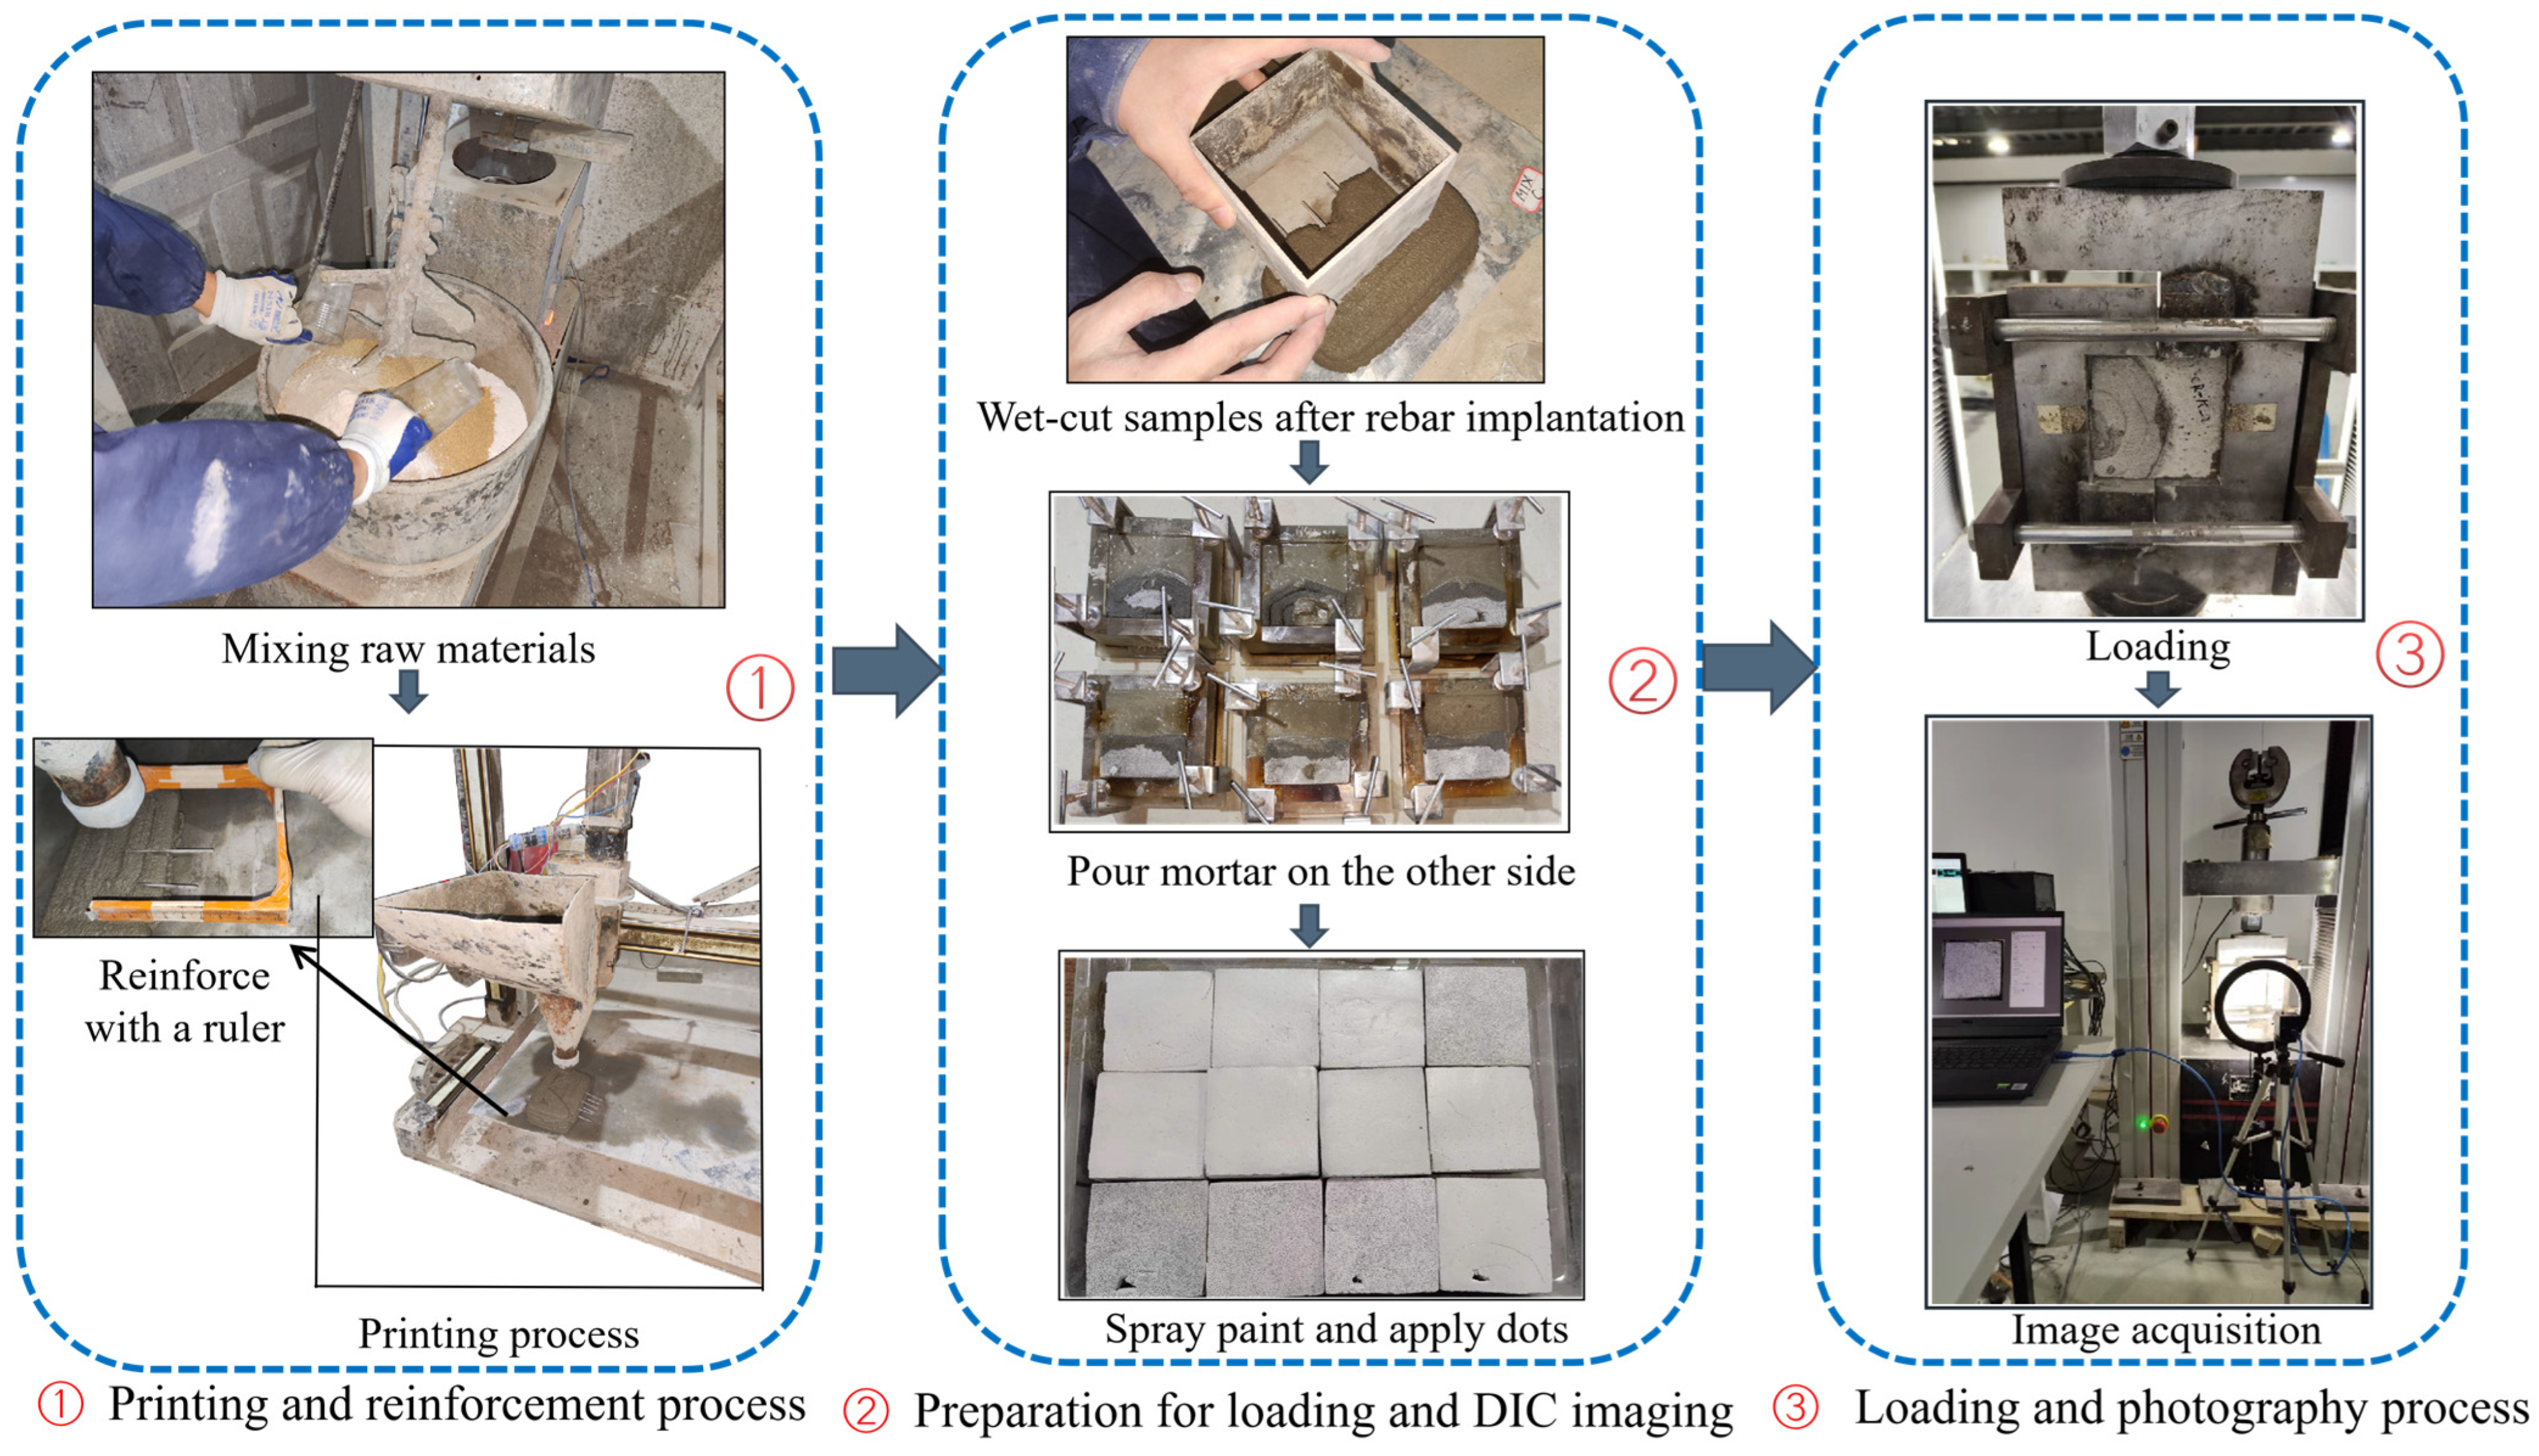
To prevent distortion of the extruded mortar strips and simplify machine control, a circular cross-section nozzle was adopted, with the printer’s print head shown in Figure 1. The specimen fabrication process involved first printing the 3DPM portion and completing the reinforcement placement, followed by wet-cutting using molds. After the specimen achieved the initial set, it was placed into a mold of specified dimensions for casting the NM portion. Figure 2 illustrates the detailed manufacturing process for 3DPM-NM specimens. Fresh mortar mixture was extruded continuously through the nozzle in a zigzag pattern during printing. Extrusion speed was set at 2.0 rad/s. Each layer height measured 6.67 mm, with the machine ascending at 6.67 mm intervals. Due to the absence of explicit national standards for the 3DPM reinforcement method, the anchor bolt installation technique and the type of steel wire used are determined in accordance with the “Code for Design of Reinforcement of Concrete Structures” (GB50367-2013) [31]. A specialized measuring ruler was designed to control steel wire positioning and ensure wet-cutting accuracy. This device enhanced experimental precision. Due to the small size of the test specimens, the steel wire used was determined to be a low-carbon steel Q195 material in accordance with the national standard GB/T 11253-2019 [32] as the rebar-anchoring material, with a wire diameter of 2 mm. Wire reinforcement technology offers multiple advantages that make it promising for application in large-scale or actual structural components. With its small diameter, high flexibility, and easy positioning characteristics, wire reinforcement material can be readily integrated into extrusion-based 3D printing processes or embedded into interface structures without significantly affecting print continuity. In practical applications, similar reinforcement concepts can be scaled up to meet structural demands by adjusting spacing, diameter, or layer density.
The printing sequence began with depositing two layers, followed by process interruption. Pre-cut steel wire segments (2 mm diameter) were rapidly positioned at designated locations on the printed specimen surface after quick measurement. Following one repetition of this procedure, the final two mortar layers were deposited to complete block printing. The printer produced blocks measuring 200 mm × 120 mm × 40 mm. These blocks were subsequently cut to 100 mm × 50 mm × 40 mm dimensions for casting operations. During cutting, interfaces were carefully aligned with pre-marked centerlines on specially designed cutting molds.
Cut specimens remained stationary for two days to achieve final setting. Specimens were then placed in acrylic molds for mortar casting at reserved positions. Two days after casting, specimens were demolded and transferred to water curing tanks for 28-day curing. Following specimen preparation, surface polishing was performed sequentially. Anti-penetration coating was applied, and uniformly sized black speckle markers were manually distributed across surfaces. The reinforcement material embedding-depth requirement was ≥15 D, where D represents the steel wire diameter. Actual embedding depth reached 30 D, positioned 30 mm from the centerline. Longitudinal spacing measured 30 mm, vertical spacing 13.3 mm, and edge distance 20 mm. Figure 3 provides a detailed schematic representation.

2.3. Test Procedure

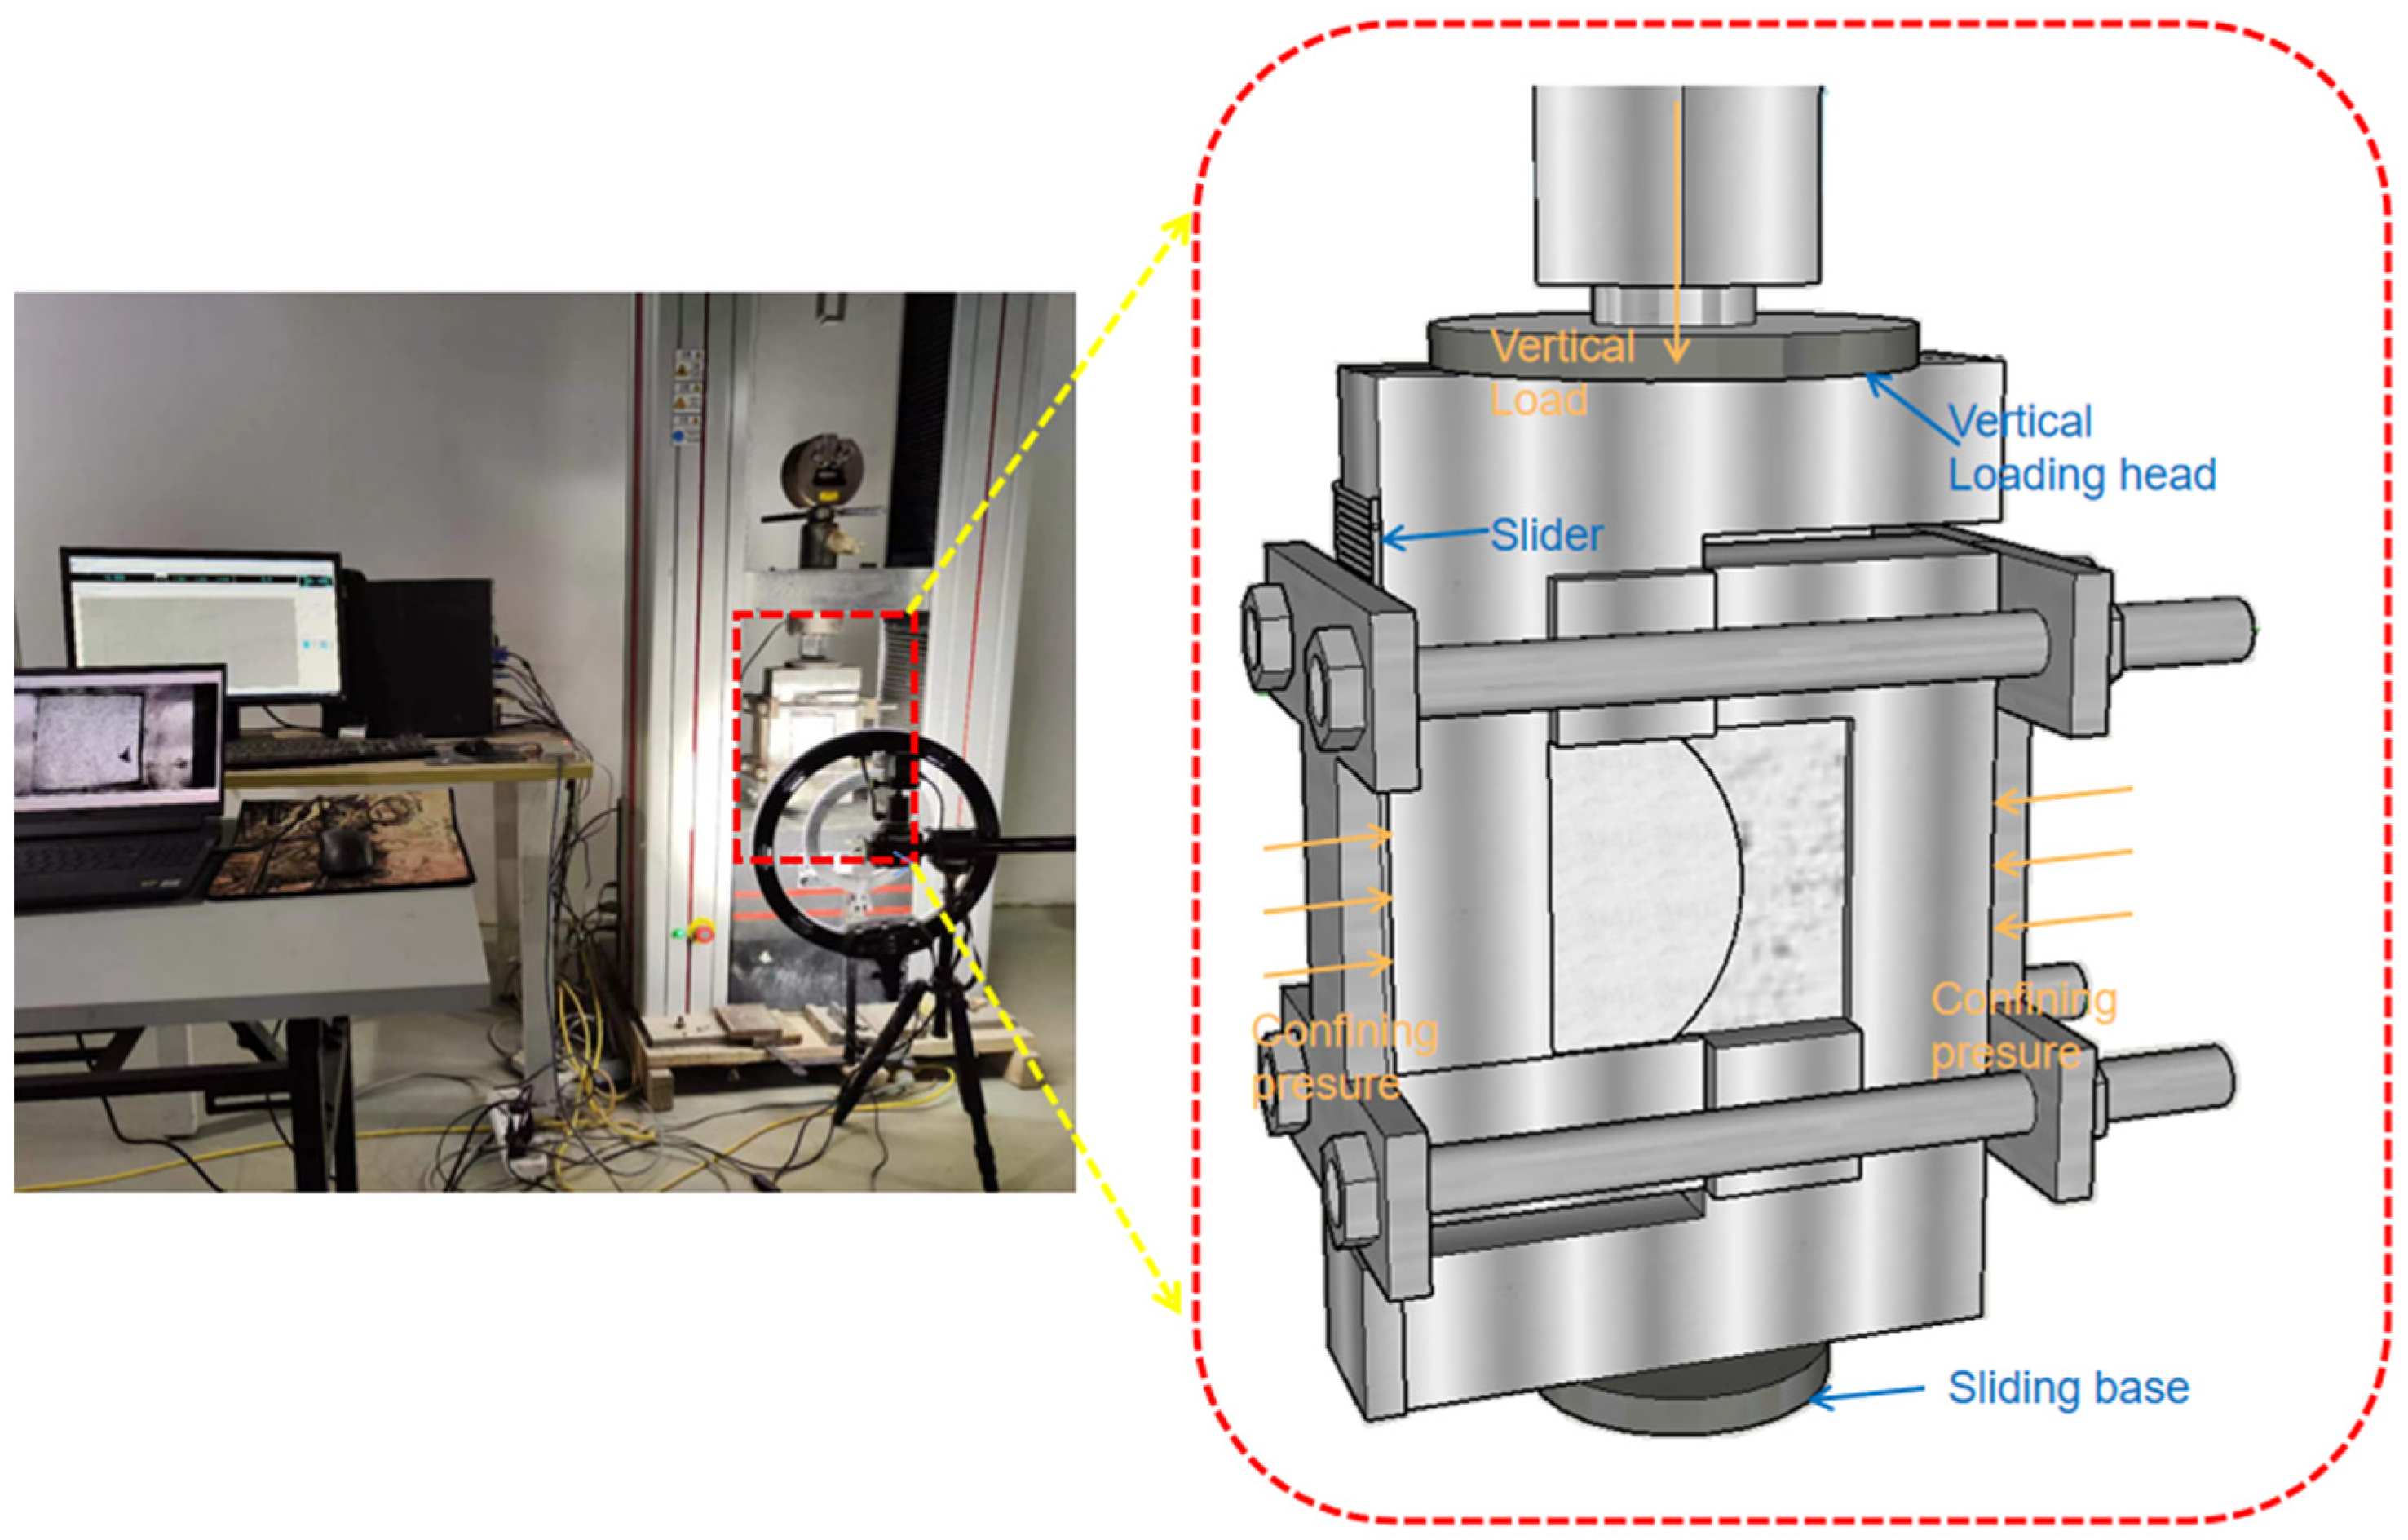
The configuration of the loading apparatus and the arrangement of fixtures are shown in Figure 4. A computer connected to the loading device was used to record the applied load, while a laptop linked to an industrial camera captured images for Digital Image Correlation (DIC) analysis. The loading head was positioned as centrally as possible and as close to the specimen surface as feasible. The fixture tightly clamped the specimen to minimize any potential gaps. Lateral confinement pressure was applied symmetrically on both sides of the fixture to provide necessary restraint without impeding vertical displacement. After the loading head made contact with the specimen, an initial preload of 0.2 kN was applied at a displacement rate of 3 mm/min. Subsequently, displacement-controlled loading was carried out at a constant rate of 0.3 mm/min. All loading and deformation data were automatically recorded using a data acquisition system [33].

3. Results and Analysis

3.1. Test Results

3.1.1. Peak Load and Corresponding Displacement at Peak Load

This section examines the shear behavior of different interface configurations by comparing the average peak load and the corresponding mean displacement at peak load of the reinforced specimens. The interfacial shear stress was calculated from the measured peak load using Equation (1).
τ μ = P μ A L
where Pμ represents the peak load of the specimen, and AL denotes the shear area. The shear area of the specimen was calculated as AL = 100 mm × 40 mm = 4000 mm2.
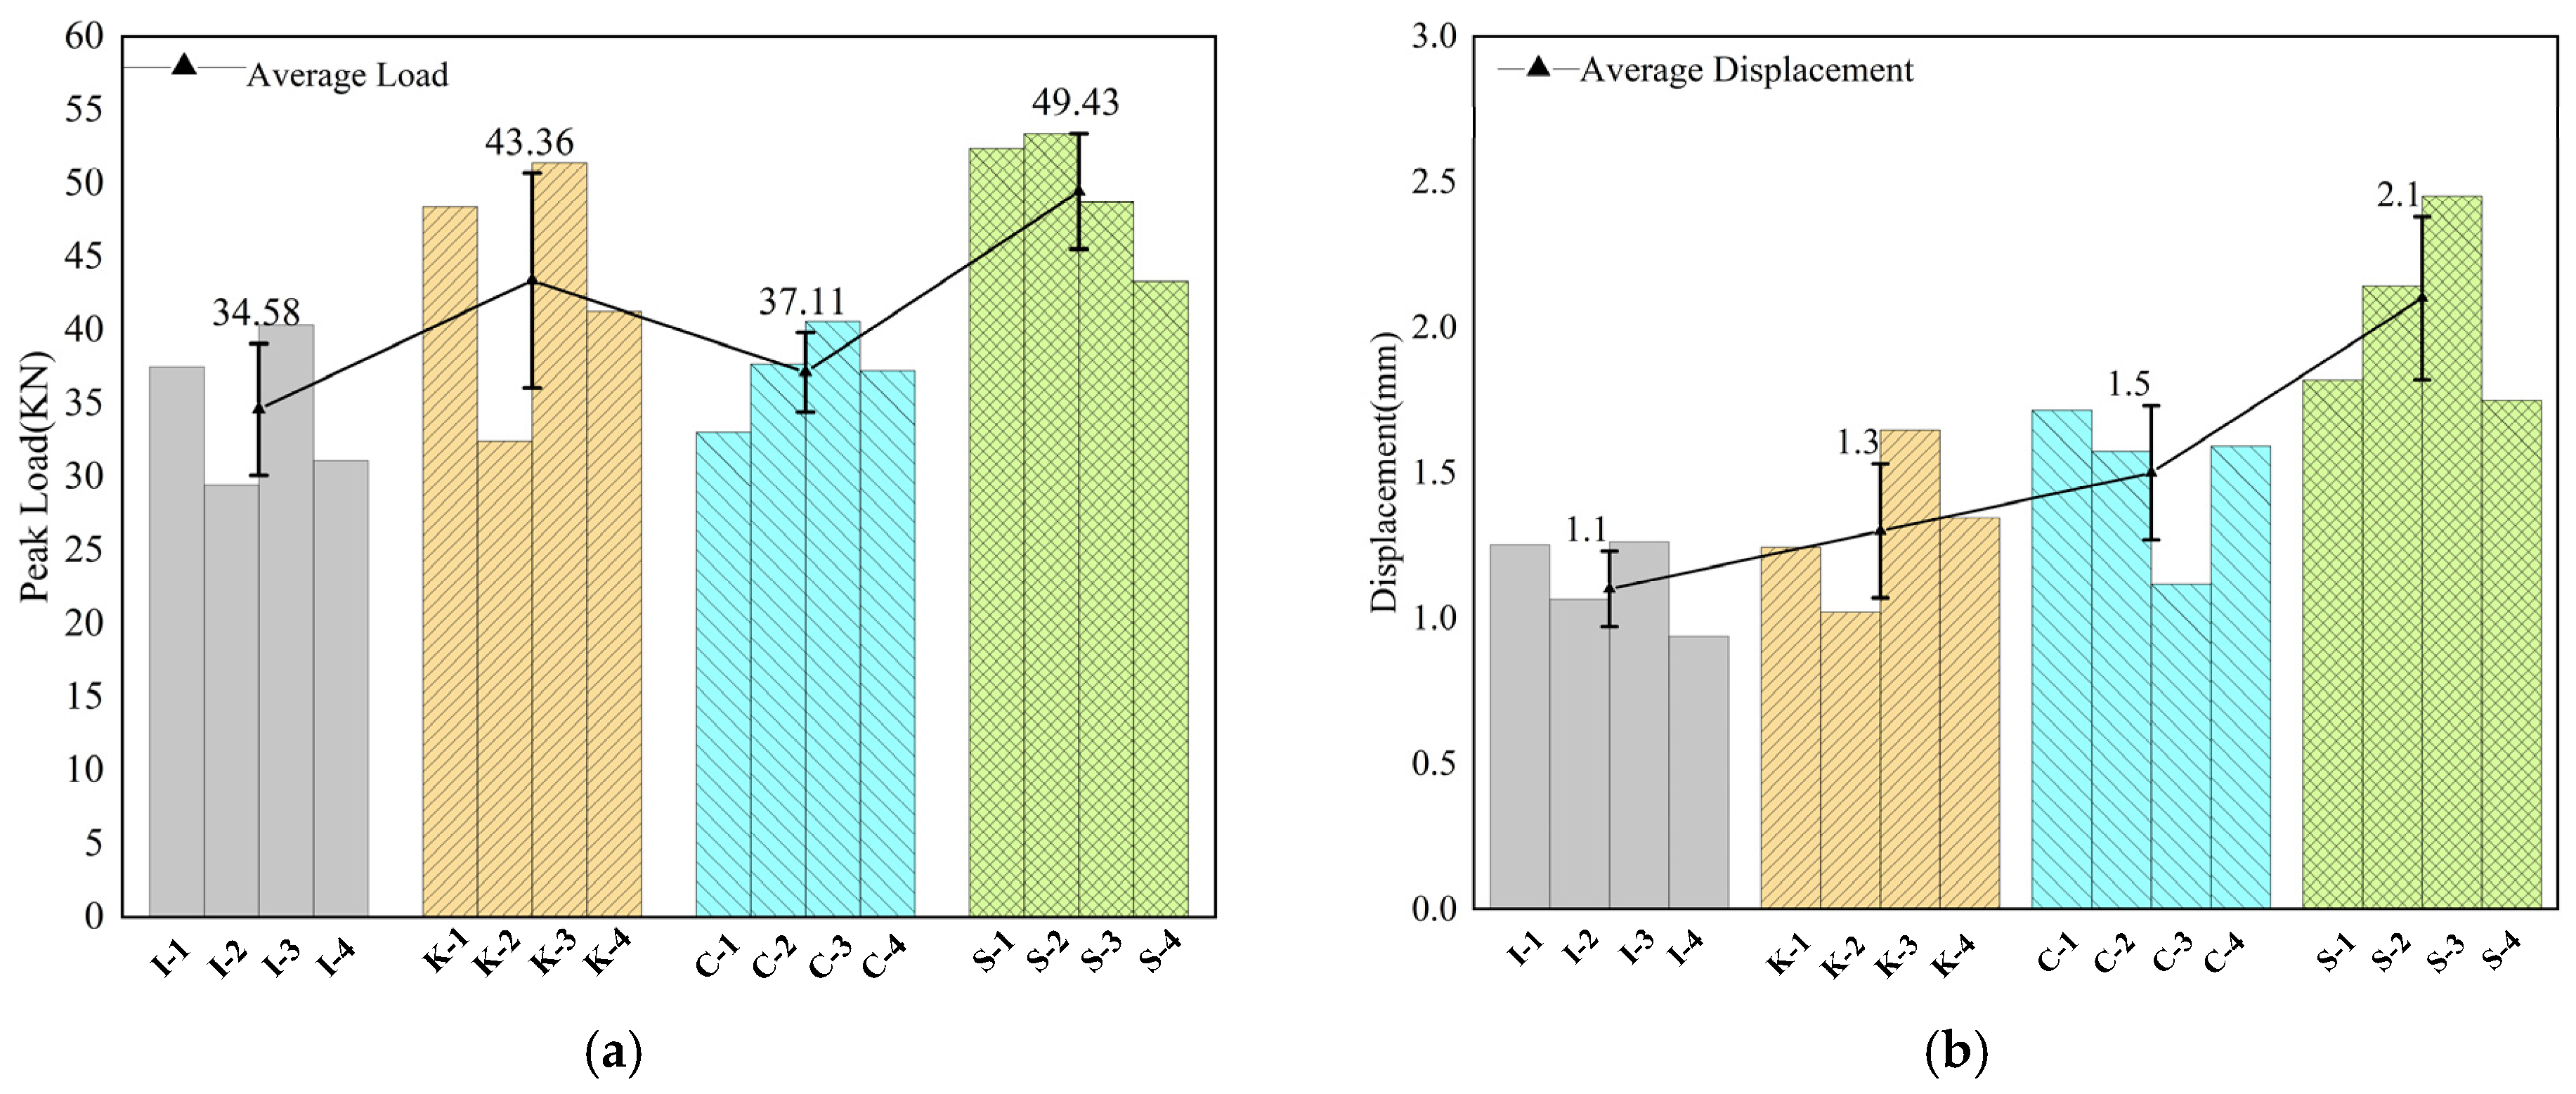
Figure 5 presents the ultimate loads of both the control group and the specially designed group, together with the mean values of each series. The average peak loads of the specimens follow the order: CR-S (49.43 kN) > CR-K (43.36 kN) > CR-C (37.11 kN) > CR-I (34.59 kN). The CR-S series exhibits the highest average peak load Pμ, exceeding CR-K by 14.0%, CR-C by 33.2%, and the control group CR-I by 42.9%. Figure 5b shows the corresponding displacements at significant load degradation for both the control and specially designed groups, as well as the mean displacement at load drop for each series. The average displacements are ranked as follows: CR-S (2.1 mm) > CR-C (1.5mm) > CR-K (1.3 mm) > CR-I (1.1 mm). The CR-S specimens exhibited the largest mean displacement, exceeding that of CR-K by 55.3%, CR-C by 36.1%, and CR-I by 80.5%. The experimental results demonstrate that both the peak load and the corresponding displacement of the CR-S series are significantly higher than those of the other configurations. This behavior is attributed to the larger interfacial contact area developed on both sides of the main crack in the CR-S specimens after cracking. The enhanced mechanical interlocking effect along the crack surfaces contributes more effectively to shear resistance, while the deformation associated with interlocking and compression leads to greater overall displacement.

3.1.2. Failure Modes

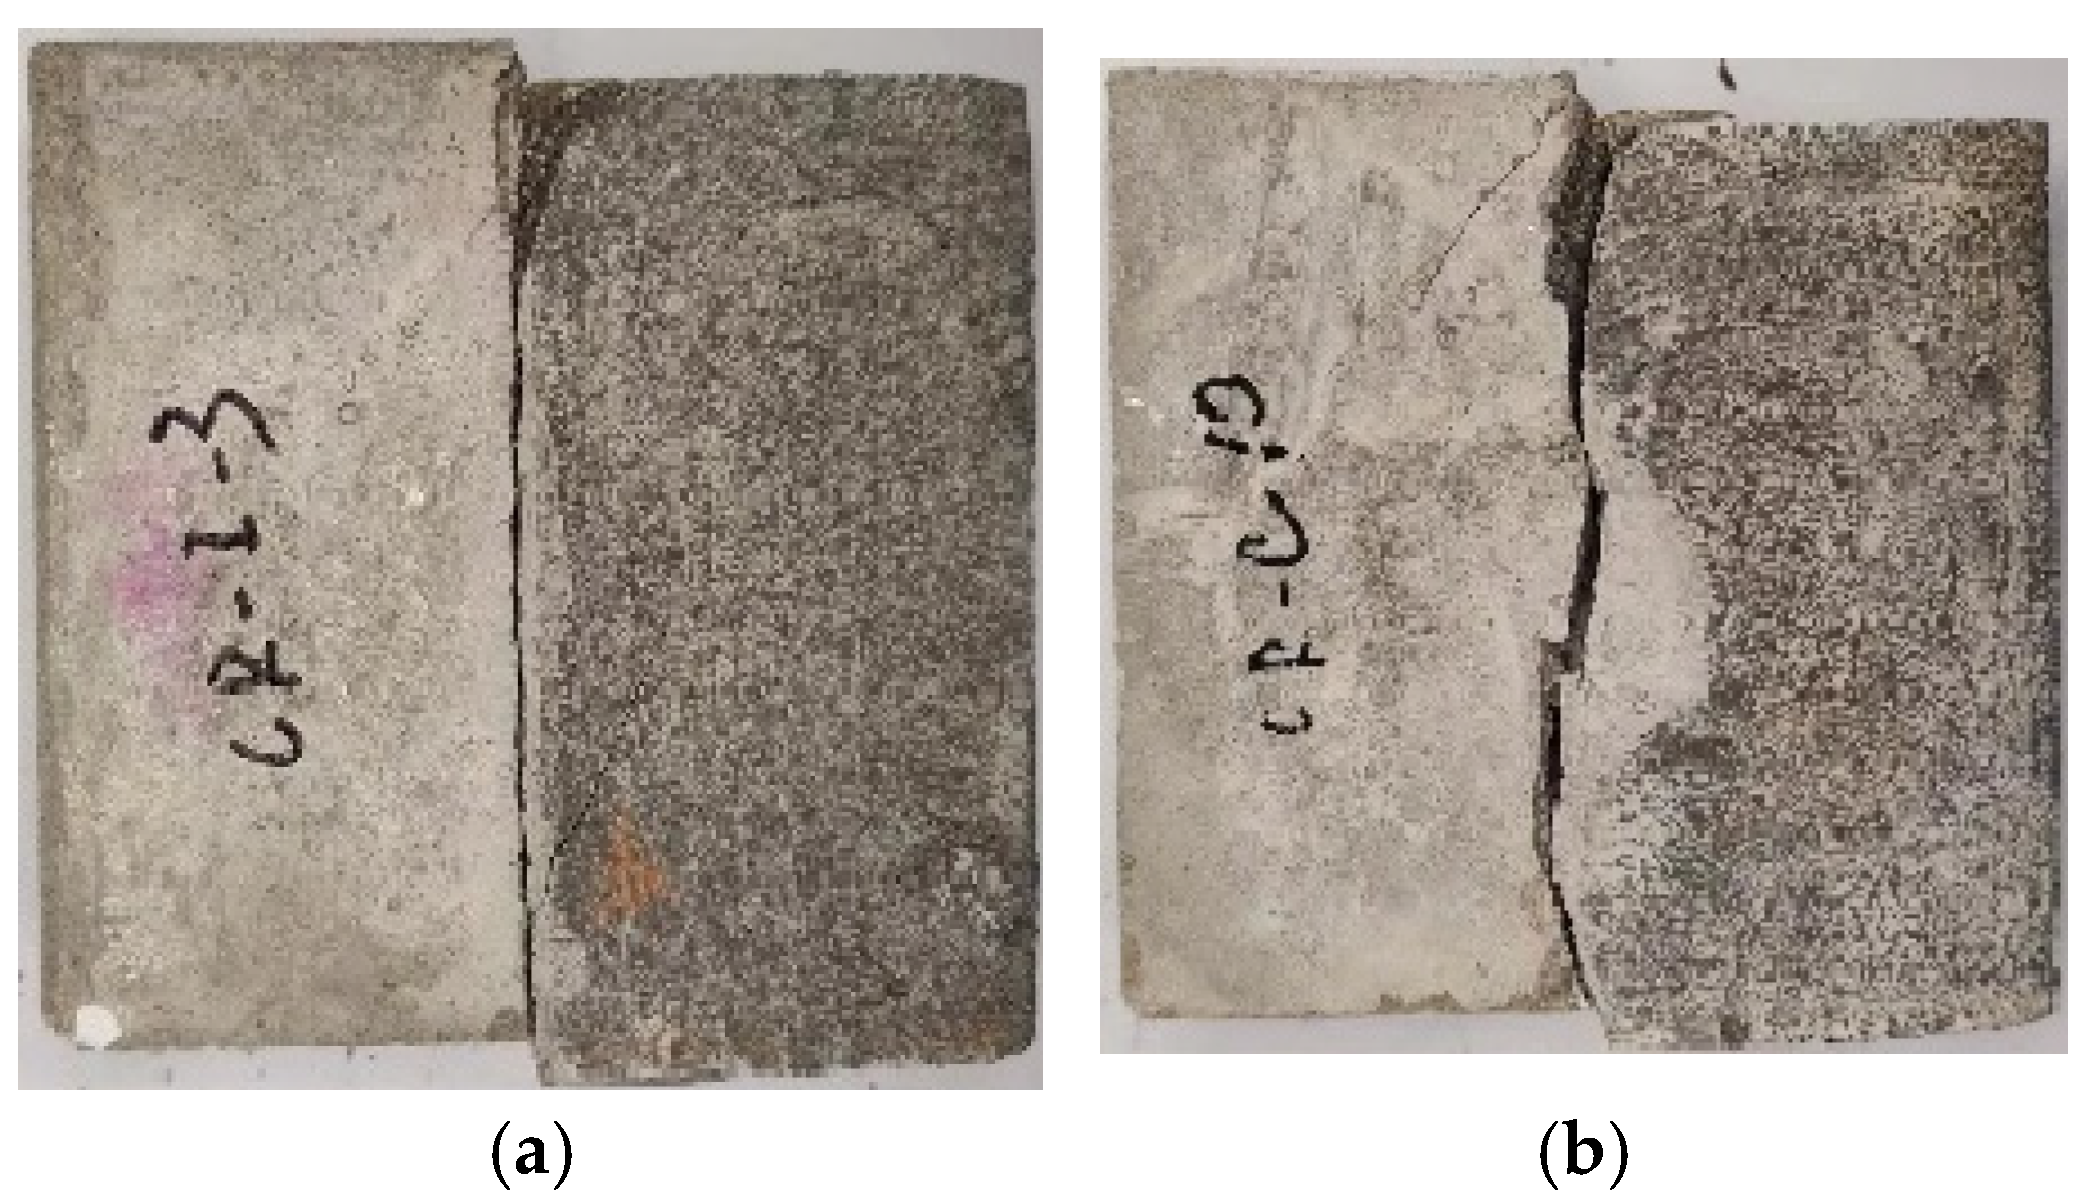
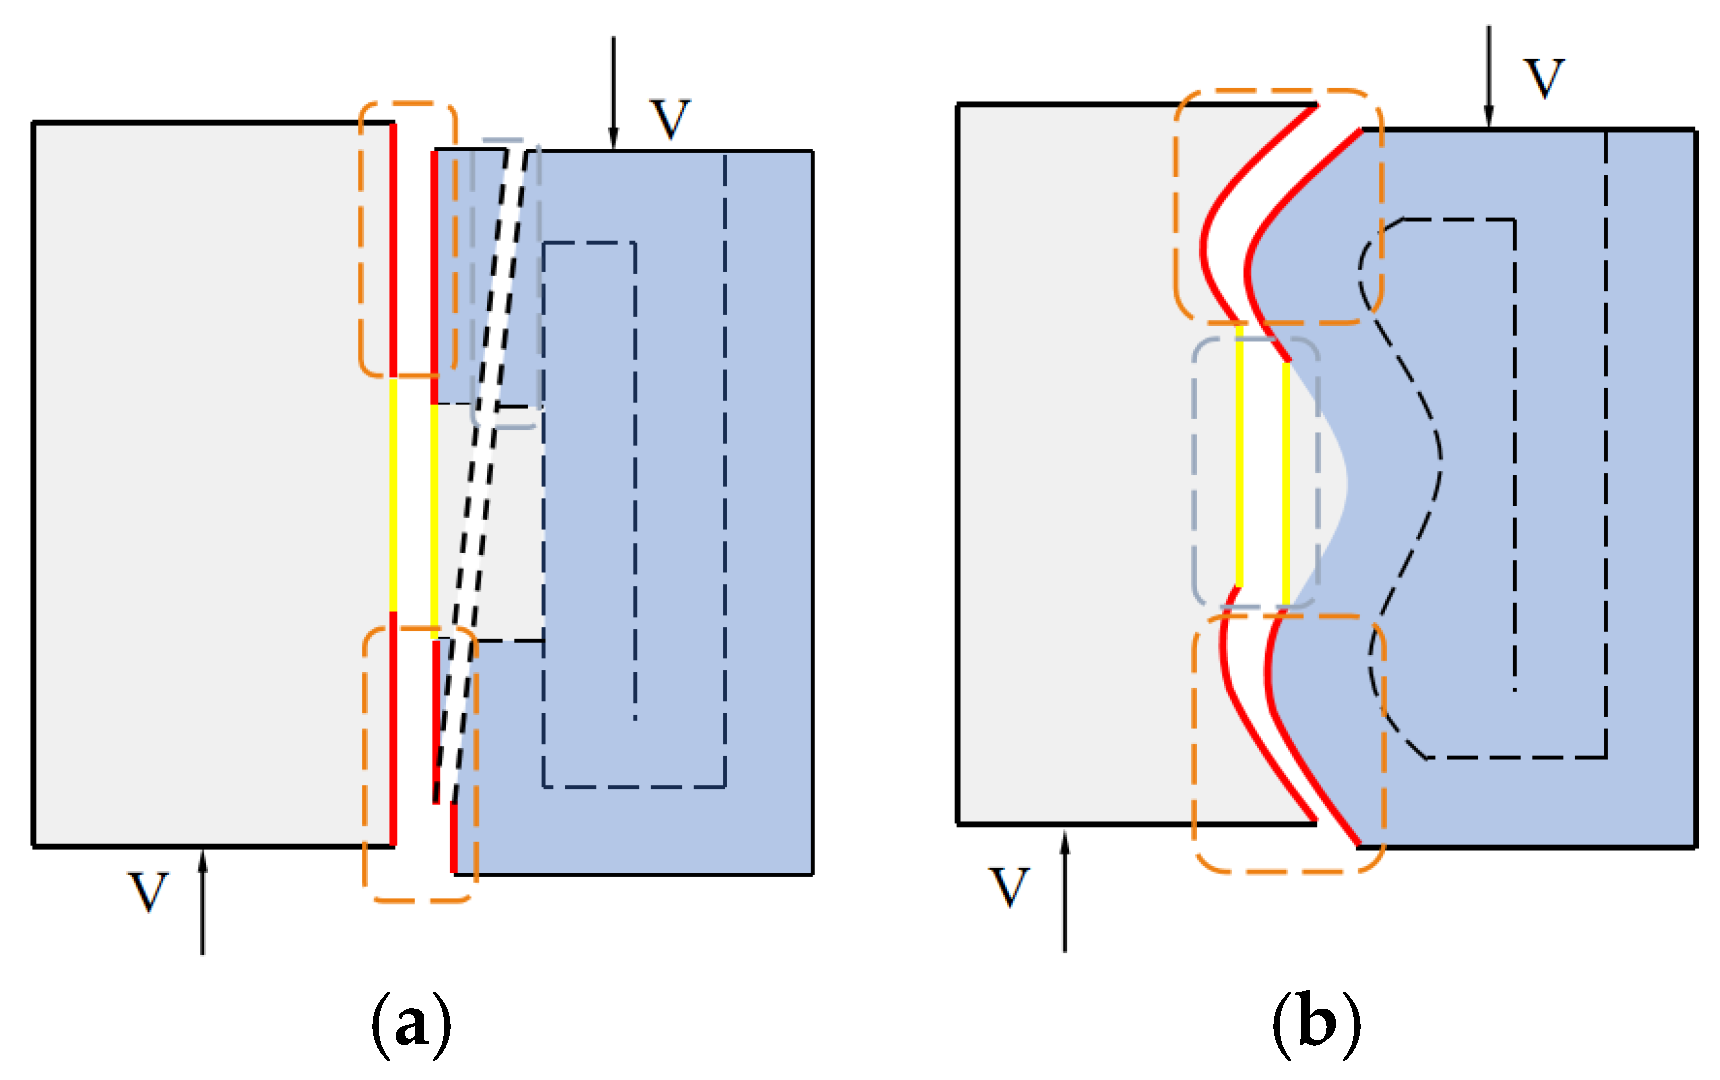
Figure 6 illustrates the typical failure characteristics of the 3DPM-NM specimens. In the initial loading stage, the bond strength at the 3DPM-NM interface provides the primary contribution to the overall load-bearing capacity. As the applied load increases, cracking initiates within the specimen, after which the mechanical interlocking between the opposing fracture surfaces, together with the dowel action of the embedded steel wires, becomes the dominant mechanism resisting shear. The degree of interlocking between the fracture surfaces is strongly influenced by the interfacial geometry.
The control group (CR-I) exhibited failure characteristics with crack propagation solely along interface connections. Fracture surfaces on both sides of the cracks remained relatively smooth, resulting in weak mechanical interlocking. Specimens retained certain residual load-bearing capacity after failure without displaying typical brittle fracture behavior. The other three groups (CR-K, CR-C, and CR-S) demonstrated mixed failure modes. Cracks alternately propagated along bonding interfaces and shear planes. Embedded steel wires intersected with shear planes in all specimens, significantly enhancing shear resistance. Experimental results revealed that the CR-S group achieved 30% higher average peak load than the control group CR-I, while average slip displacement increased by 44.6%. This improvement highlights the pronounced influence of enhanced interface contact area on shear capacity. During subsequent loading stages, the dowel action of the reinforcement maintained the specimen’s residual load-bearing capacity. Overall load response fluctuations remained limited during this phase. As displacement increased, dowel action and yielding of the steel reinforcement became the primary energy dissipation mechanisms.
Failure modes of 3DPM-NM specimens fall into two categories:
(1) Adhesive failure (Mode I): Main cracks propagate entirely along bonding interfaces during loading. Load-bearing capacity drops sharply due to interface bond failure.
(2) Combined adhesive and shear failure (Mode II): Cracks initiate and propagate alternately along bonding interfaces and shear planes until main cracks penetrate the full specimen height. This combined failure mechanism ultimately causes substantial load-bearing capacity reduction.

3.1.3. Simplified Formula and Shear Mechanism

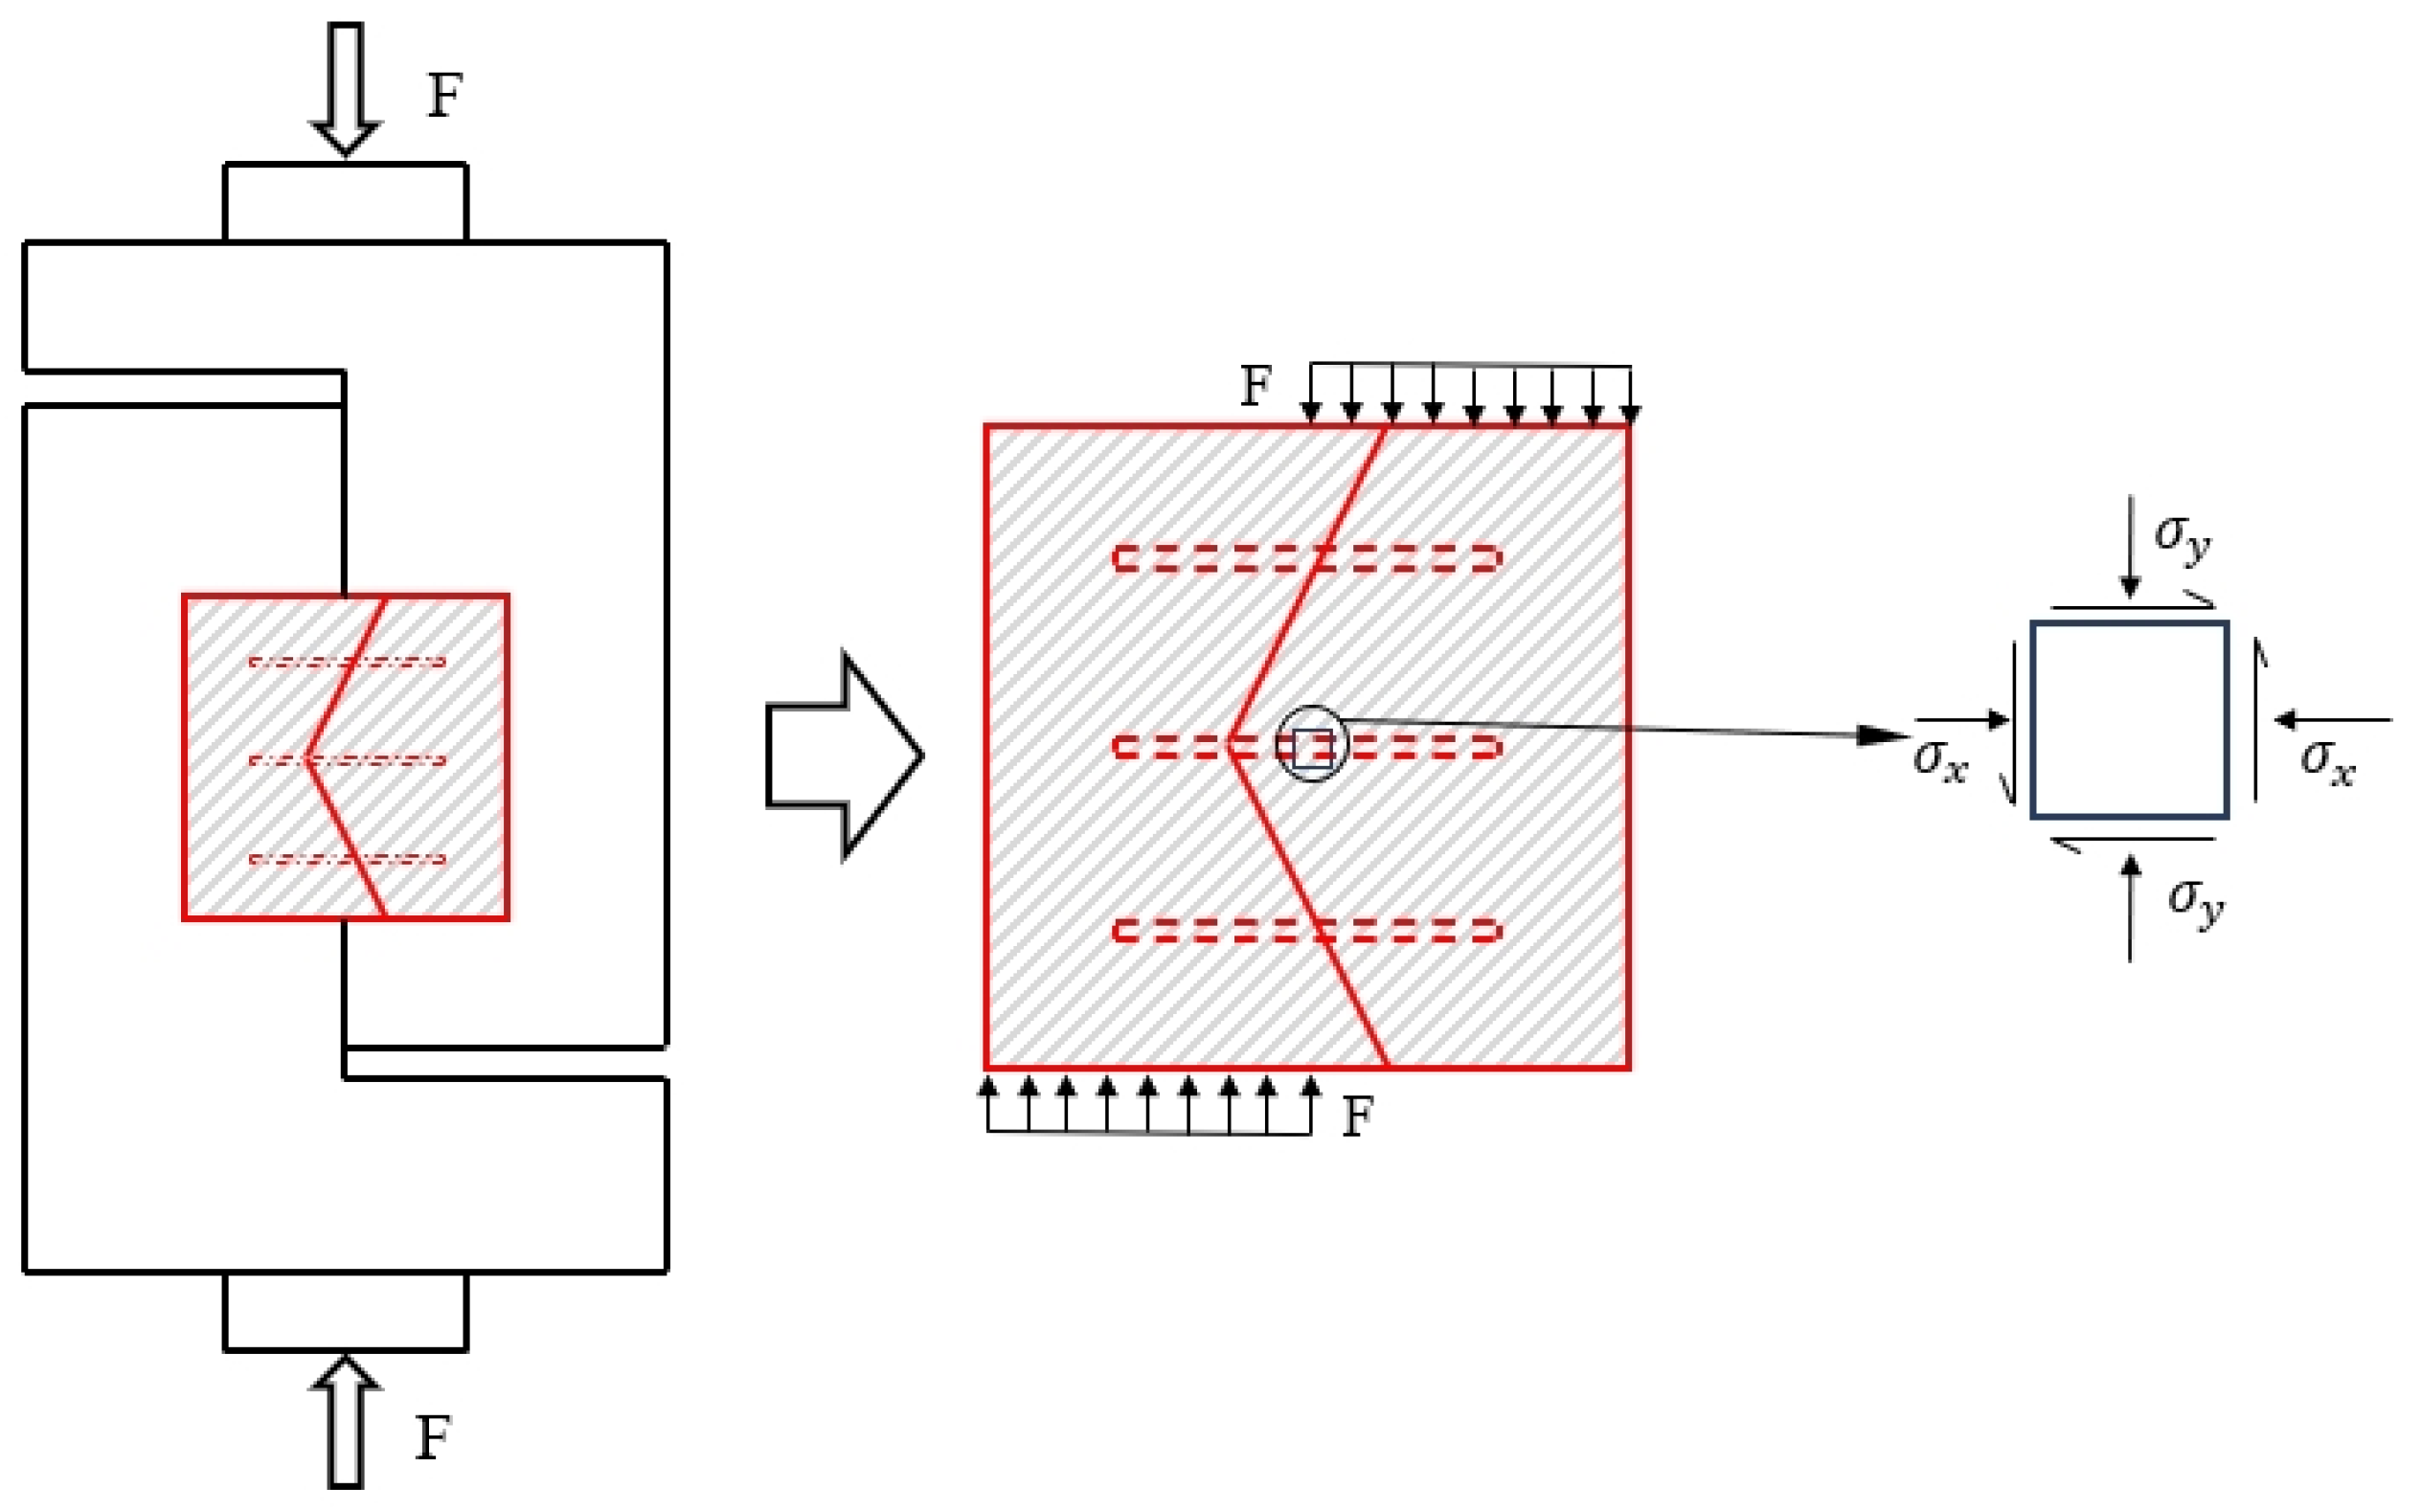
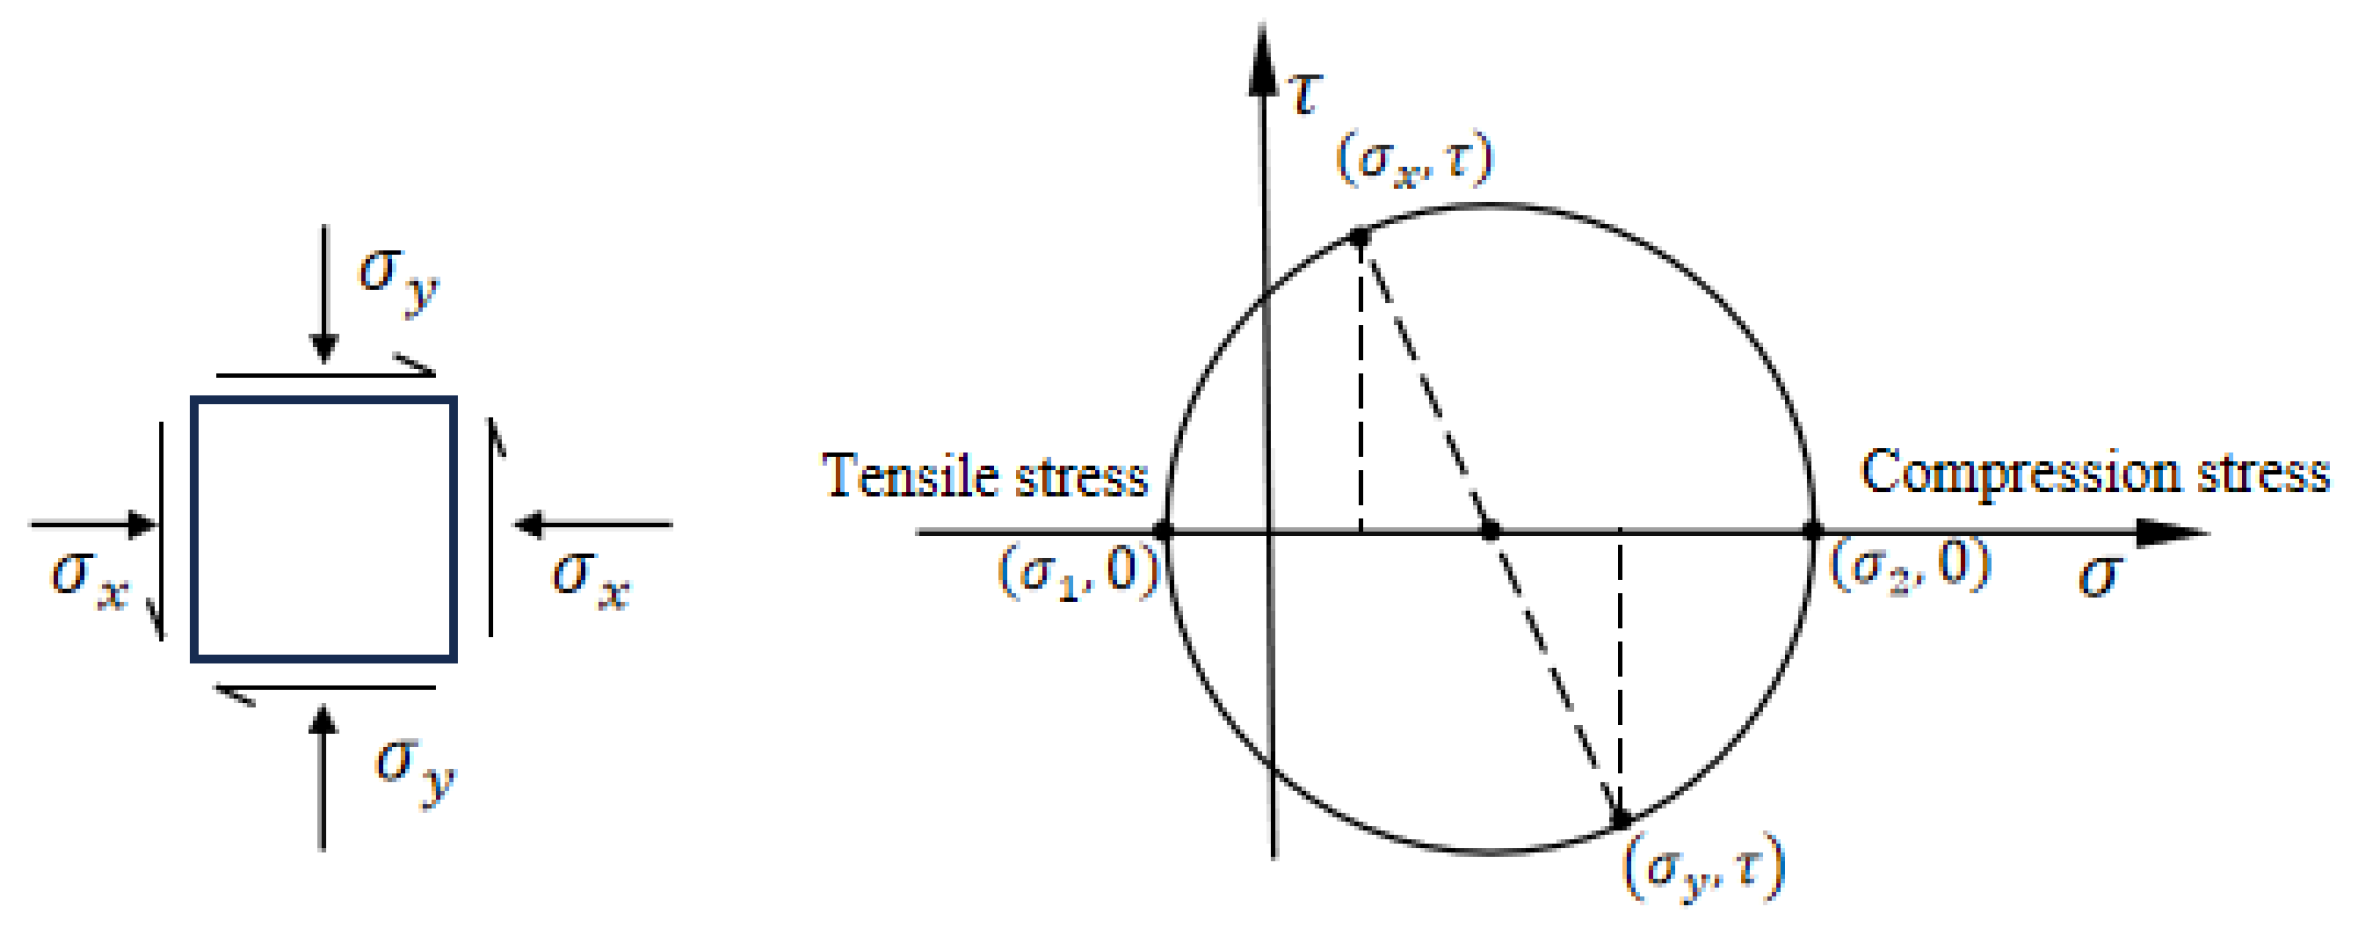
Based on the observed failure characteristics and peak load results of the 3DPM–NM specimens, a computational model was developed to predict their shear capacity. Figure 7 illustrates the strut-and-tie model representing the joint behavior under direct shear loading. The specimens exhibited two predominant failure modes: bond failure and combined bond–shear failure. To characterize the evolution of principal and shear stresses within the shear plane, a theoretical model was established using Mohr’s stress circle [34]. Considering the concrete splitting tensile strength and the tensile capacity of the material, simplified expressions for the shear strength were derived, as presented in Equations (2) and (3). Shear failure was assumed to occur when the concrete reached its ultimate tensile strength. This theoretical assumption was validated through the experimental studies of Zhang et al. [34], which demonstrated good agreement between the proposed strength criterion and experimental observations. The derivation incorporates both the splitting tensile strength and the intrinsic tensile strength of concrete, as illustrated by Mohr’s stress circle in Figure 8. The proposed simplified shear strength model is based on several assumptions that should be interpreted within the scope of the current study. Its applicability is primarily limited to interfaces exhibiting similar loading conditions and failure modes.
Where σ1 denotes the maximum tensile stress, estimated based on the compressive strength using empirical relationships commonly applied to cementitious materials. For 3DPM, this value is 6.2 MPa, while for NM it is 4.5 MPa; σ y = F w · b represents the vertical compressive stress, τ = F h · b is the shear stress, w denotes the width of the specimen, h   denotes the height, b   denotes the thickness, and r is the radius of Mohr’s circle. By defining σ y = β · τ , σ y = F w · b = 1 w · F b = h · τ w = β · τ , it follows that β = h w = 1 .   Despite exhibiting layered and anisotropic characteristics, experimental observations indicate that specimen failure consistently occurs at the predetermined 3DPM-NM shear interface. No significant interlaminar delamination or filament breakage within printed layers was observed during testing. This failure behavior suggests that dominant stress transfer and damage evolution are governed by interfacial shear rather than interlaminar separation. The elastic modulus of the mortar was estimated based on its compressive strength using an empirical relationship ( E = 4700 f c ) . Elastic modulus of 3DPM and NM are 38 GPa and 35 GPa, respectively. The simplified expression can therefore be obtained as follows:
r = σ 1 + σ y 2
τ = 1 2 ( σ 1 · β + β 2 + 4 σ 1 2 )
Since the specimens in this study were reinforced with longitudinal steel bars but without stirrups or bent-up bars, the contribution of reinforcement to shear capacity was considered solely through the dowel action of the longitudinal bars. Referring to the Design and Construction Guidance for Segmental Concrete Bridges published by the American Association of State Highway and Transportation Officials (AASHTO) [35], the corresponding calculation formula is given as follows:
V = V 0 + V 1 + V 2 + V d
V 0 = 0.9961 A c v f c
V 1 = τ 1 · A 1
V 2 = τ 2 · A 2
V d = μ · A s · f y · sin θ
Here, V0 represents the shear capacity component contributed by interfacial bonding, calculated based on the shear failure area (Acv) and the strength parameter fc′ of the interfacial material, where fc′ denotes the compressive strength of the weaker material between 3DPM and NM. In this study, the cube compressive strengths of 3DPM and NM were measured as 65.5 MPa and 58.0 MPa, respectively. If shear failure occurs at the interlayer interface of 3DPM, the compressive strength of 3DPM is directly adopted. V1 denotes the shear capacity component provided by the mortar, determined as the product of the shear strength (τ1) of the material and its effective shear area (A1), where A1 represents the shear area of NM. V2 corresponds to the shear capacity component of 3DPM, with τ2 being the shear strength of 3DPM and A2 the shear area of 3DPM. μ is the friction coefficient, recommended as 0.6 by AASHTO; As is the cross-sectional area of the longitudinal reinforcement; fy denotes the yield strength of the longitudinal reinforcement bars; the yield strength of the Q195 steel wire used is 195 MPa.; and θ is the angle between the crack and the longitudinal reinforcement. In this test, the measured shear strength of NM was approximately 7 MPa, while that of 3DPM was about 9 MPa.
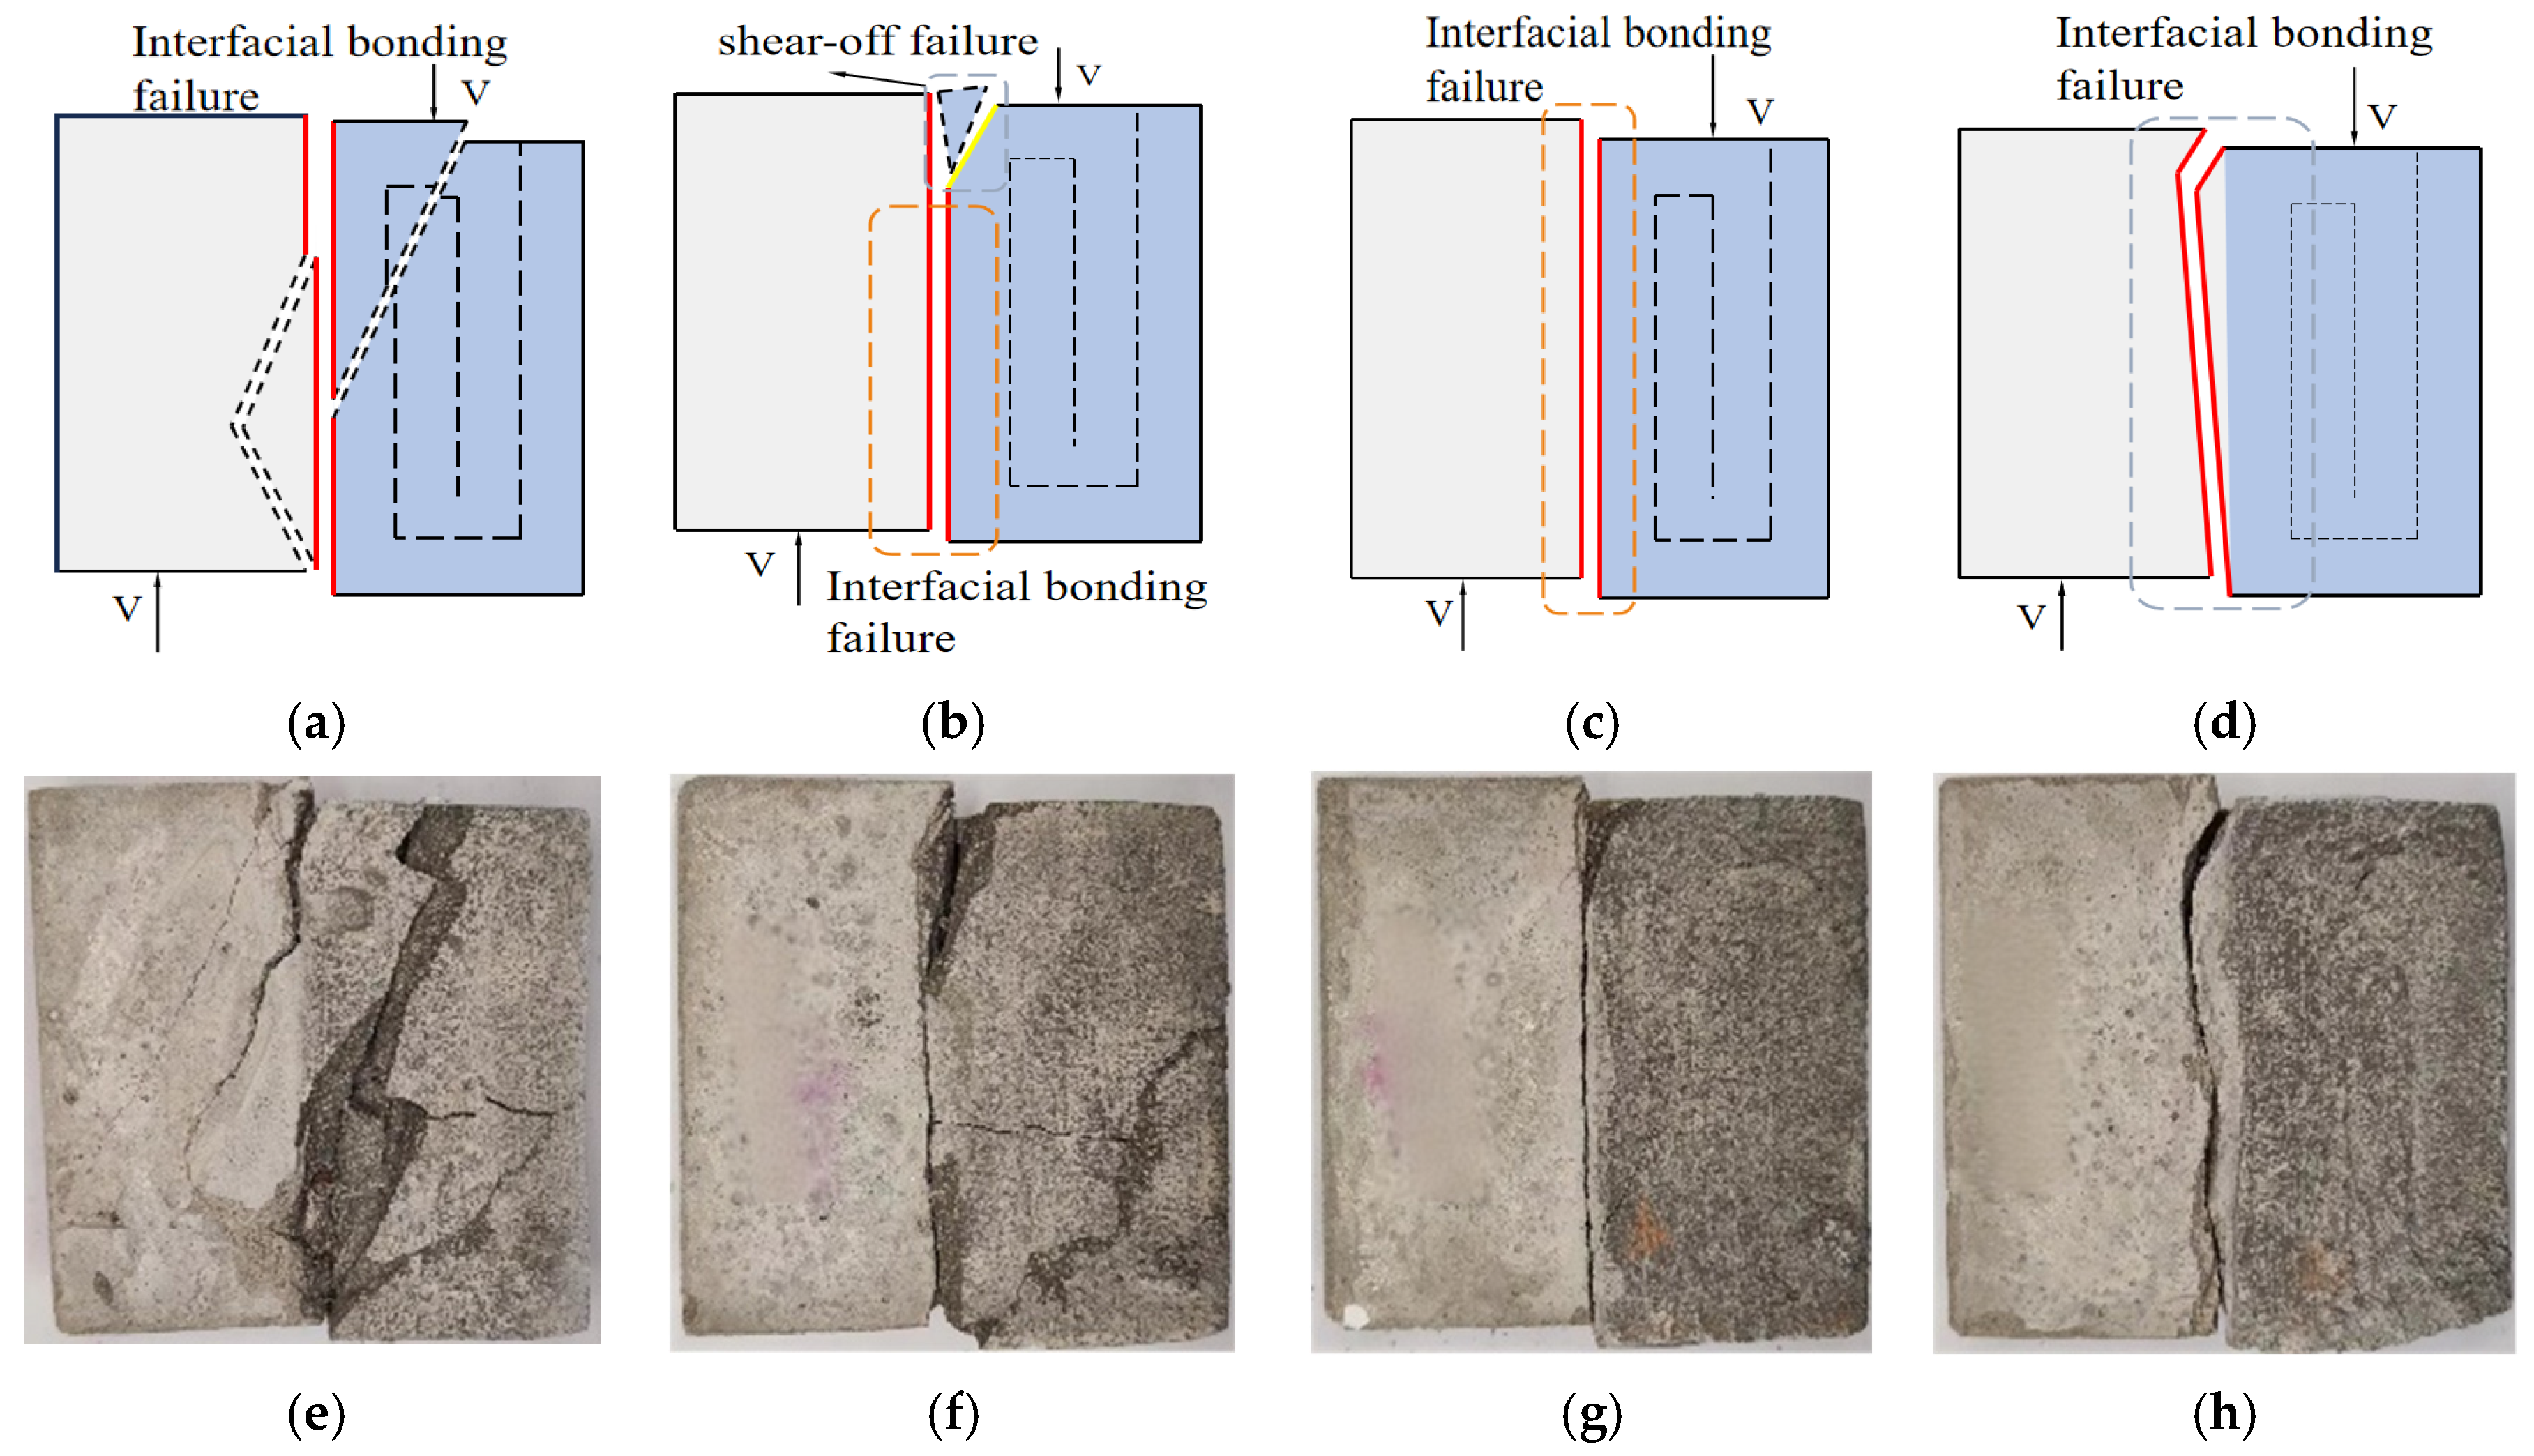
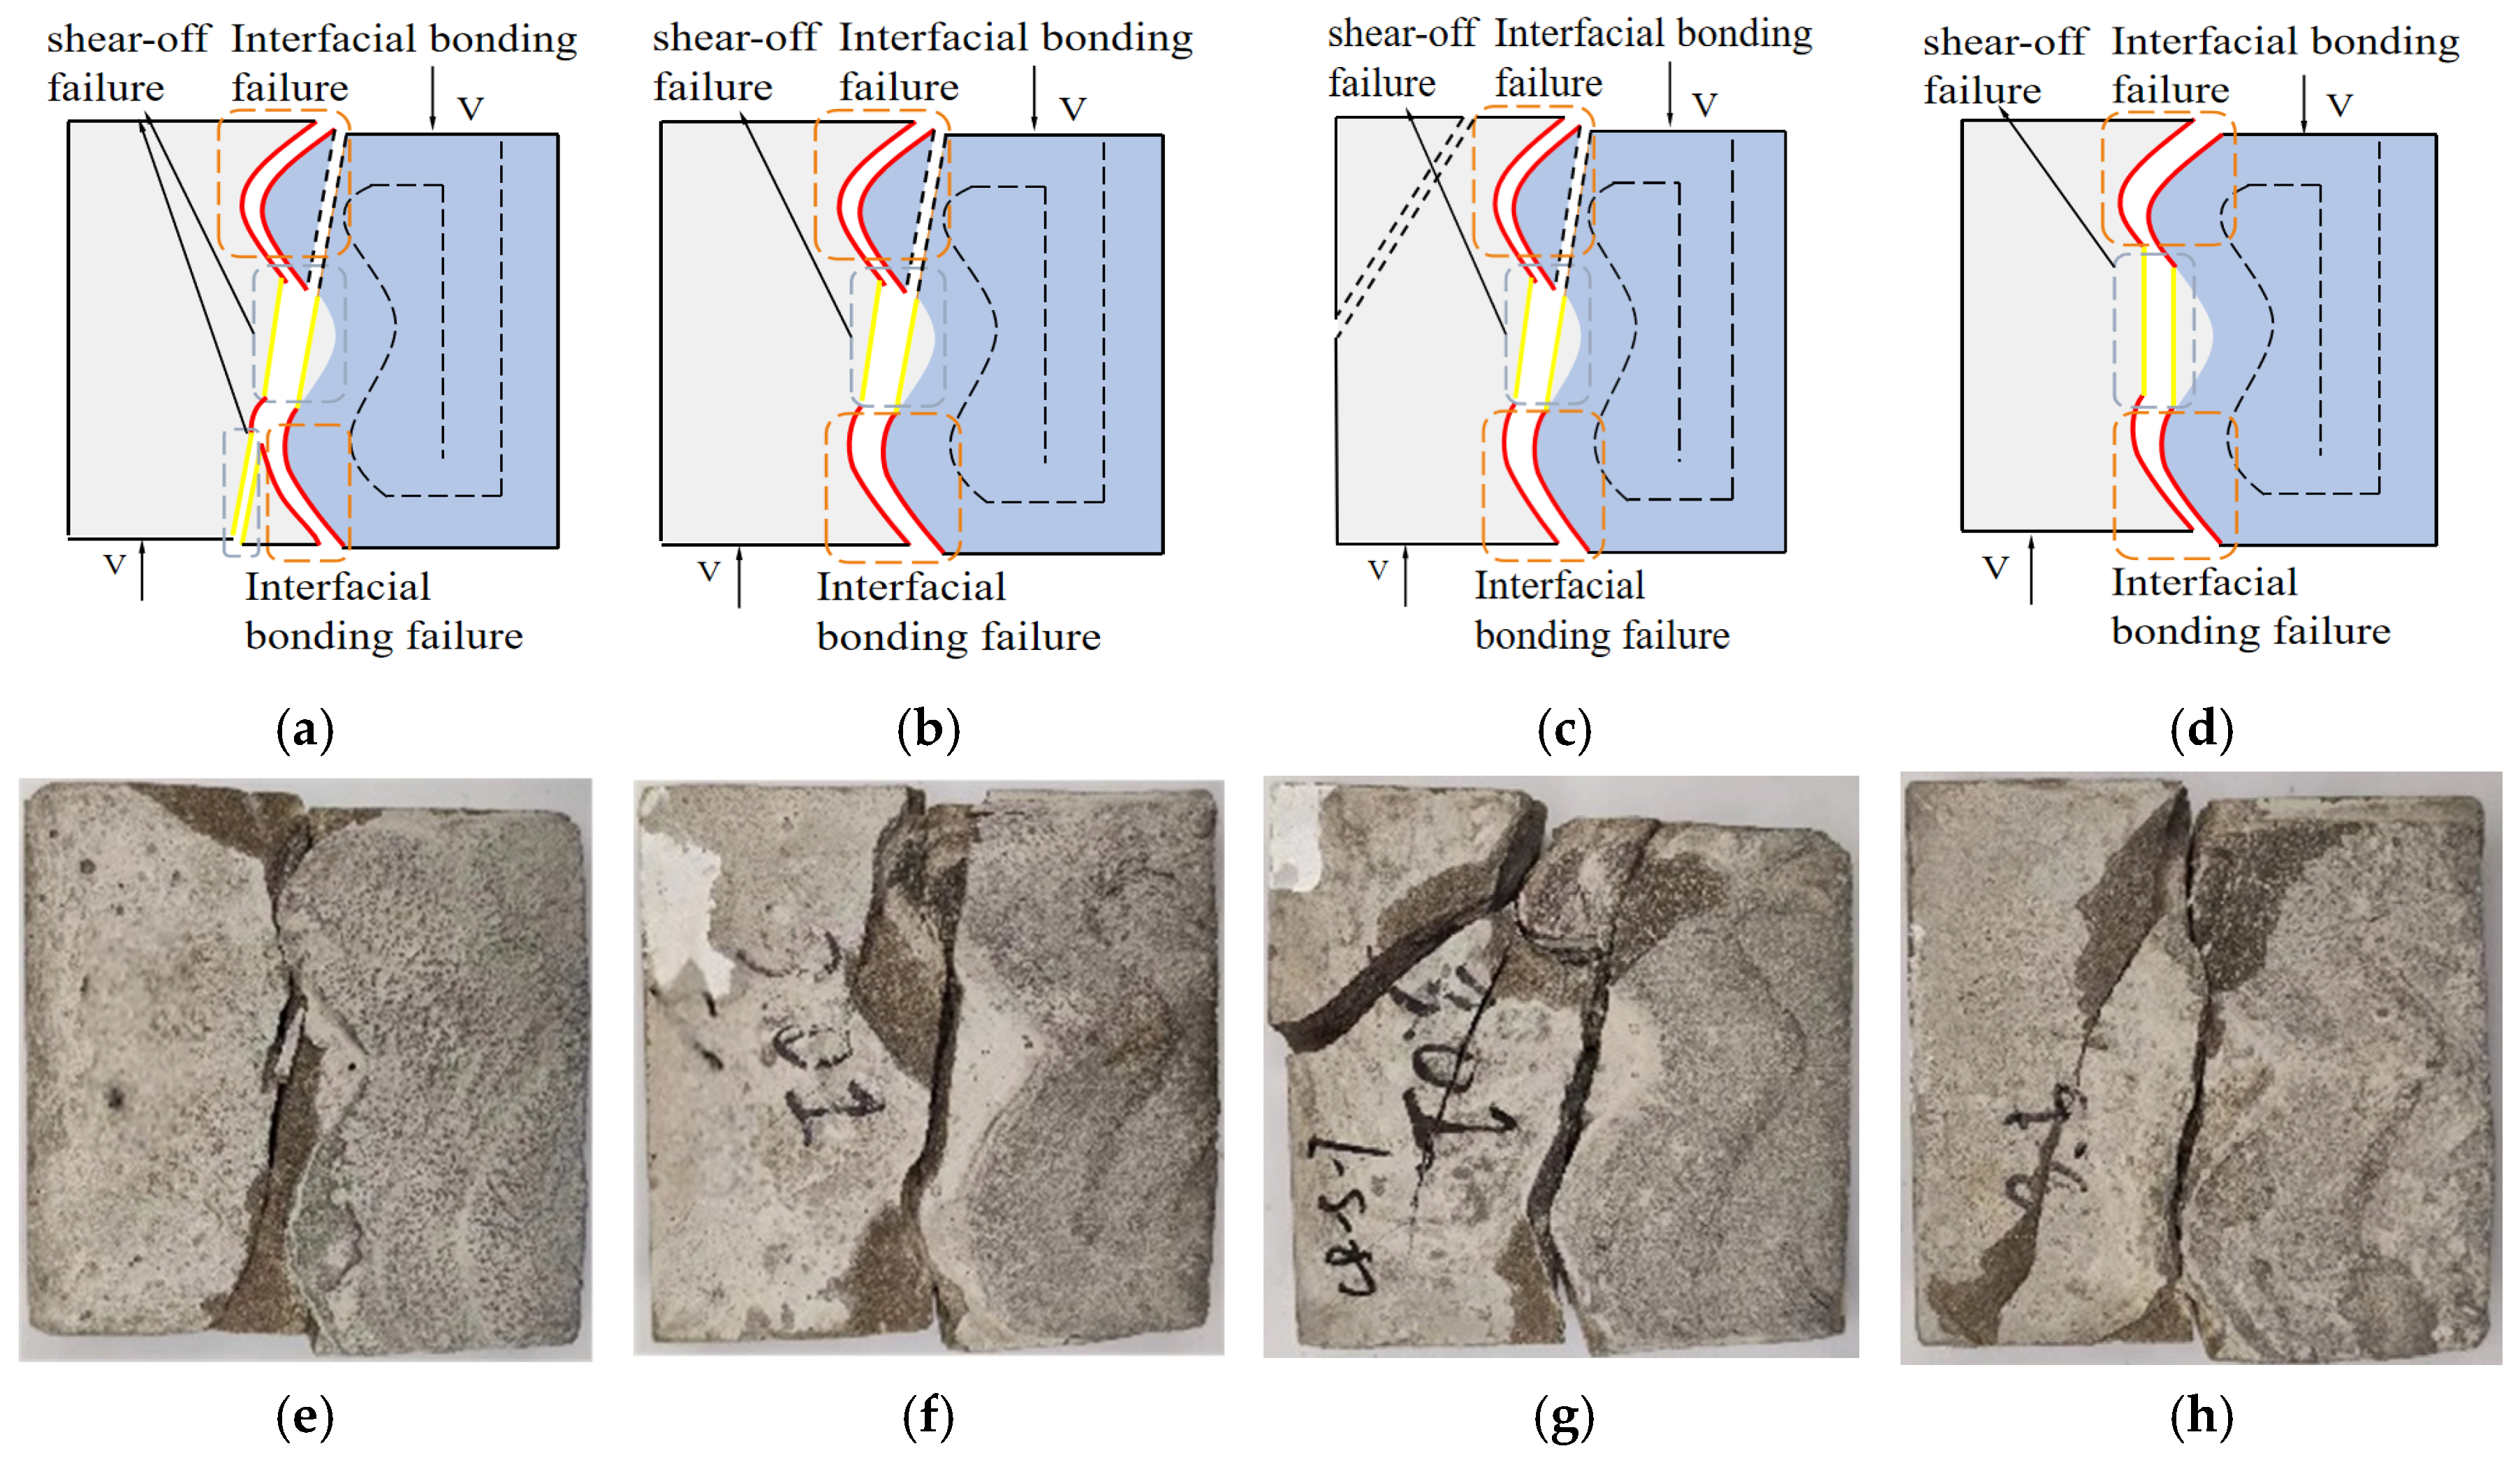
CR-I specimens exhibited adhesive failure mode, primarily characterized by interface debonding along bonding surfaces. Overall failure characteristics were broadly consistent across all specimens, as shown in Figure 9a–h. These figures present schematic diagrams and photographs of failure modes. CR-I-1 and CR-I-3 specifically displayed typical adhesive failure under shear loading. CR-I-1 experienced notable secondary crack propagation at the 3DPM-NM interface, accompanied by localized mortar matrix spalling. CR-I-3 maintained relatively intact macroscopic morphology. CR-I-2 failure process demonstrated two-stage behavior: initial crack propagation along bonding interfaces caused adhesive failure, followed by secondary crack formation within 3DPM matrix during subsequent loading, with minor mortar spalling. CR-I-4 displayed an anomalous failure mechanism. Crack paths deviated from bonding interfaces, presenting adhesive failure mode inconsistent with theoretical interface predictions. This deviation is attributed to uneven material distribution between layers during the 3D printing process. Layer-by-layer deposition causes interlayer misalignment, reducing stress transfer efficiency in interface regions. This ultimately leads to failure modes deviating from theoretically predicted interfaces.
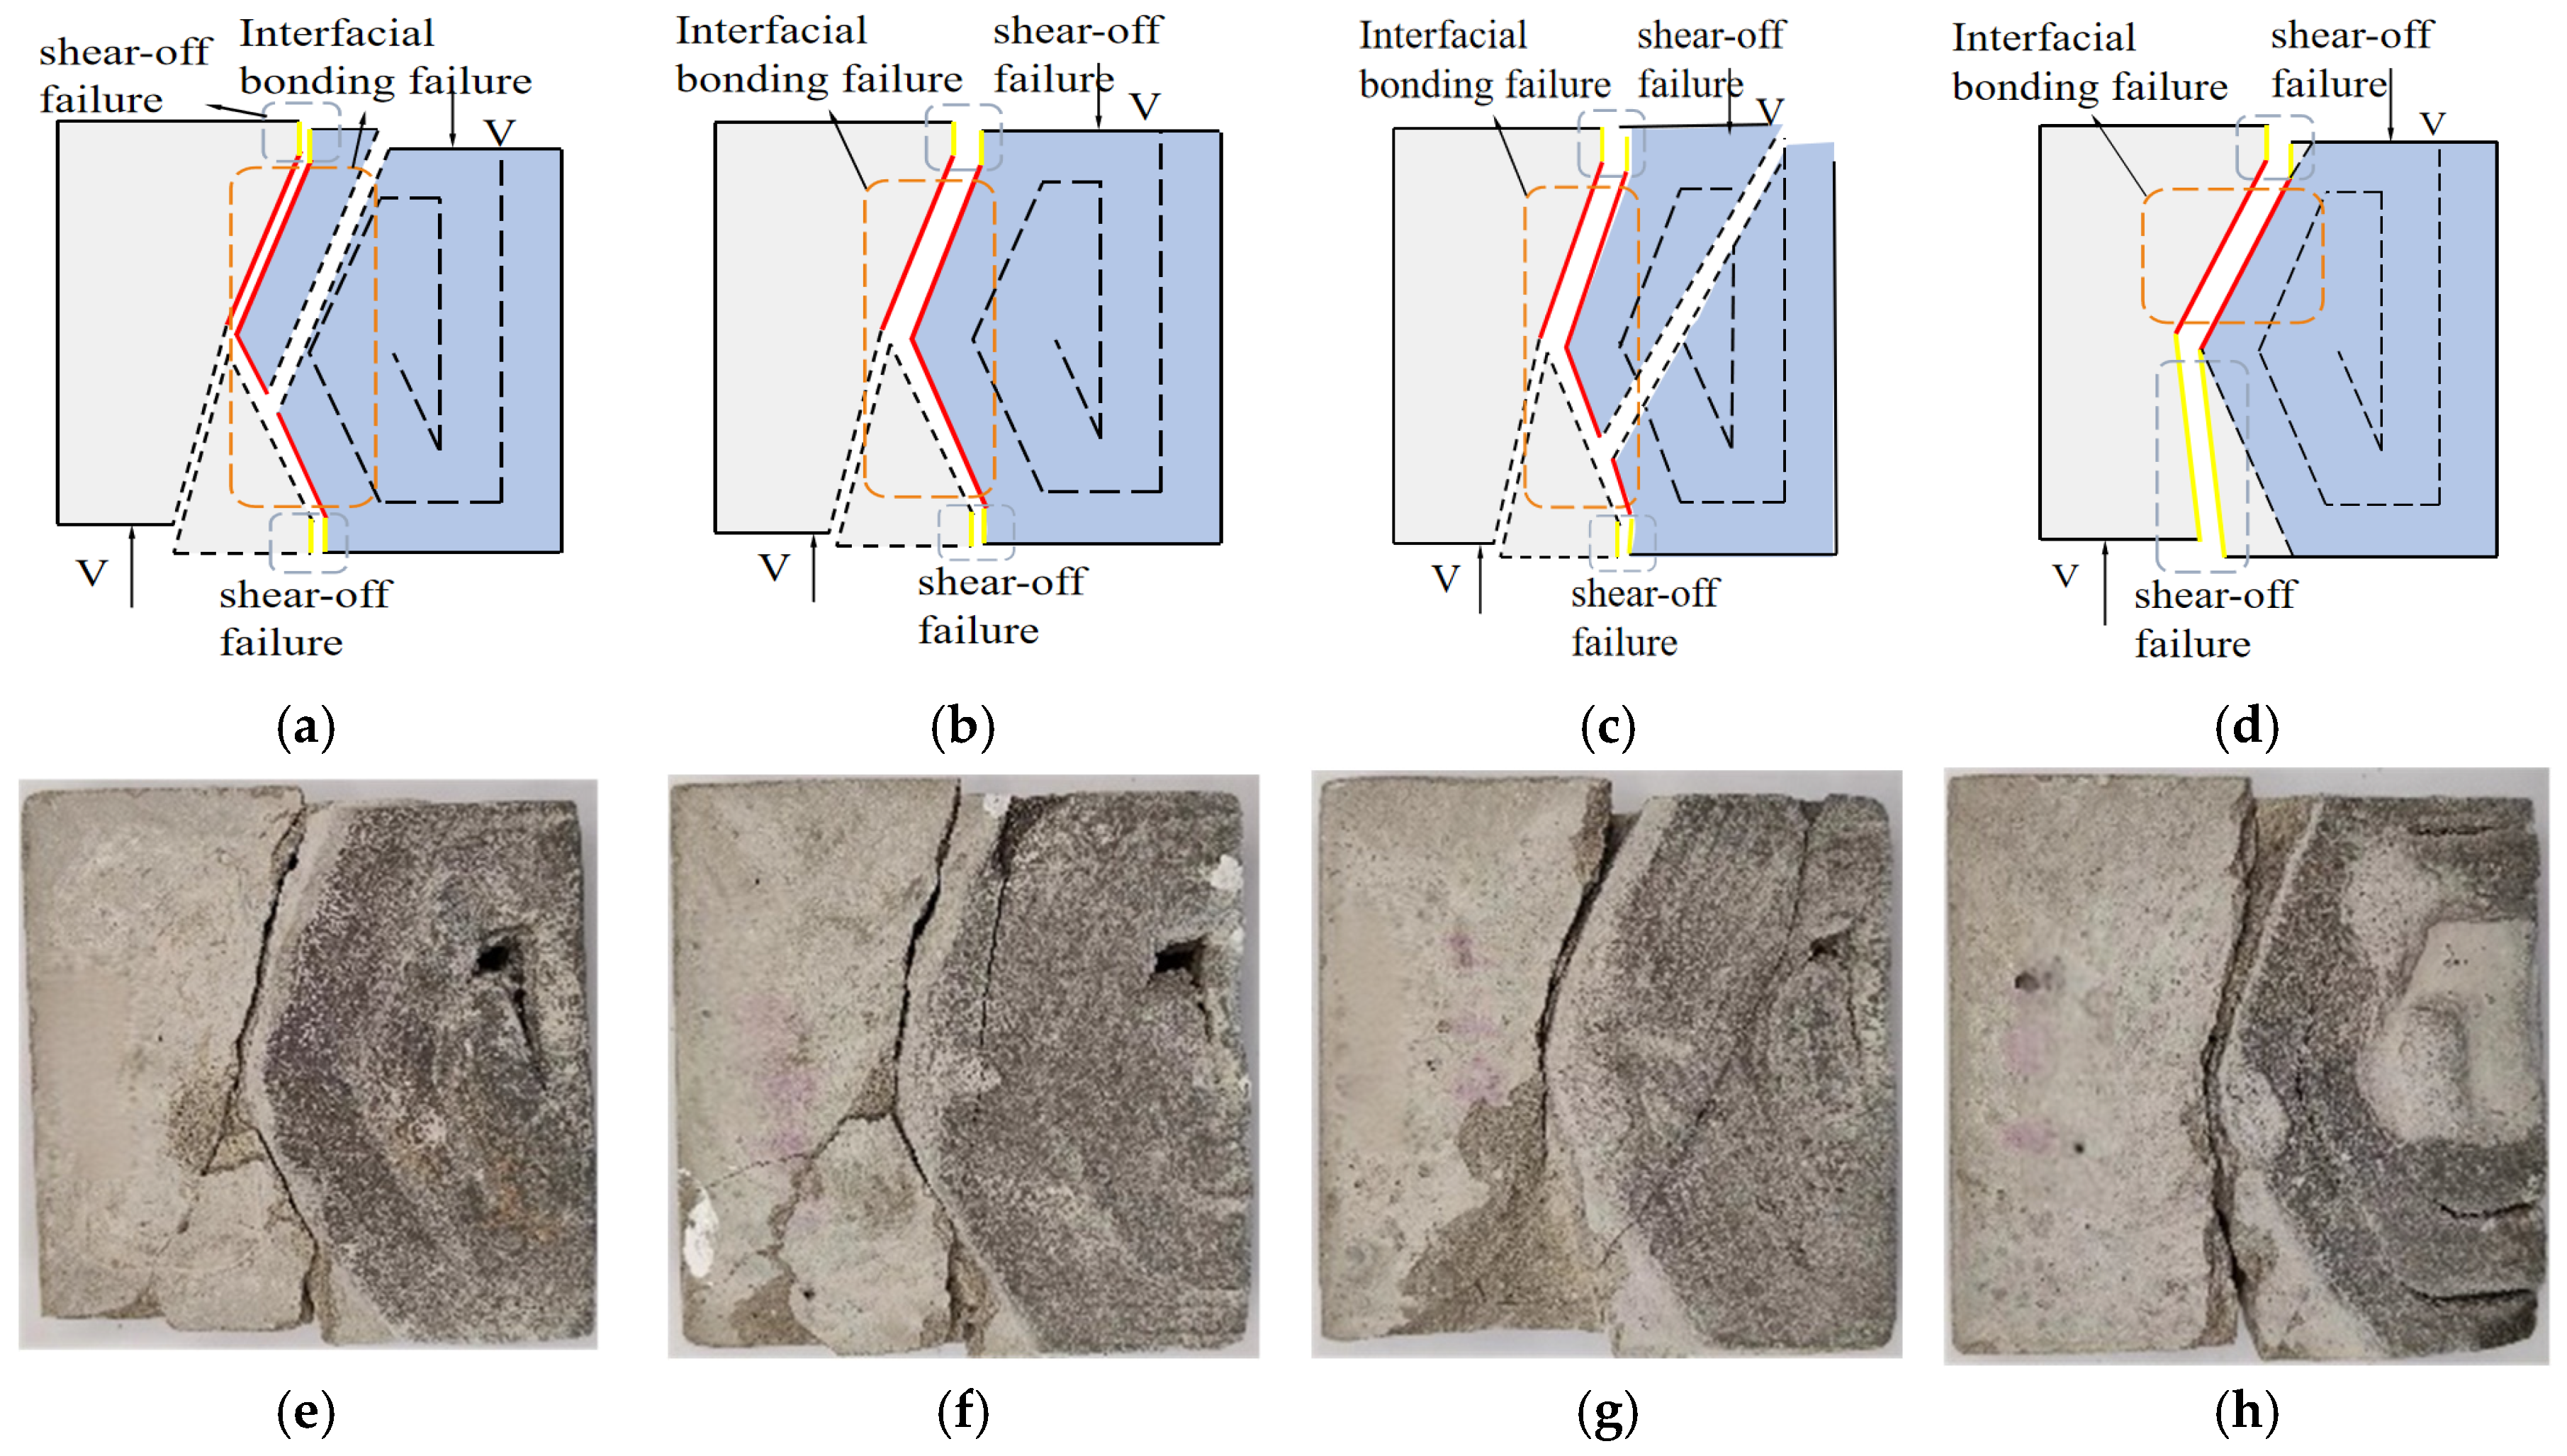
As shown in Figure 10, the primary failure mode of CR-K specimens is identified as combined bond–shear failure. During the shearing process, localized shear failure initially develops at the upper and lower ends of the specimen along the shear plane, followed by interfacial bond failure propagating along the bonded surface. Specimens CR-K-1 and CR-K-3 exhibit similar crack propagation patterns, representing a typical combined failure mode. In the later loading stages, as slip increases, spalling of the mortar matrix is observed in the lower region of the mortar. The overall failure behavior of CR-K-2 is consistent with that of CR-K-1 and CR-K-3; however, CR-K-2 develops splitting-like secondary cracks within the 3DPM section. These cracks aligned precisely with gaps between printed filaments, indicating shear failure occurs preferentially along inter-filament voids in the printing direction. CR-K-4 also displayed a combined failure mode, yet the crack propagation patterns differed from those of other specimens. Upon reaching the mid-height region, main cracks deviated from bonding interfaces and traversed mortar sections obliquely at approximately 15°. This path ultimately caused shear detachment in the specimen’s lower portions. Vertical cracks approximately 10 mm high formed at specimen ends, primarily due to misalignment between 3DPM-NM interfaces and fixture shear notches. Cracks therefore tend to propagate along weaker bonding regions when intersecting both shear planes and bonding interfaces. Overall, CR-K specimens experienced complex stress conditions, displaying diverse crack propagation patterns and notable mortar spalling. These factors led to considerable variation in shear resistance performance.
CR-C specimens demonstrated highly consistent failure modes, all exhibiting combined adhesive–shear failure mechanisms. Corresponding failure modes appear in Figure 11a–h. The failure process of CR-C specimens is divided into three distinct stages. During the first stage, cracks initiate and propagate at bonding interfaces in the specimen’s upper portions. In the second stage, cracks continue along shear planes after reaching intersection points between bonding interfaces and shear surfaces. During the final stage, cracks extend to intersection points of lower shear planes and bonding interfaces, ultimately penetrating specimens along bonding surfaces. The CR-C-3 specimen displayed atypical diagonal splitting failure during subsequent loading stages. Diagonal cracks formed at approximately 15° to the loading direction, extending beyond 80% of the specimen height. This phenomenon aligns with behavior observed in CR-I-2, primarily attributable to matrix spalling and secondary crack formation. These phenomena result from overall specimen misalignment under excessive slip. Extensive mortar matrix spalling commonly occurs in CR-C series specimens due to sustained residual-stress action.
As illustrated in Figure 12, CR-S specimens demonstrated a predominant adhesive–shear combined failure mechanism. Specimen CR-S-1 exhibited this combined failure behavior with a notable deviation: minor oblique shear failure developed along the shear plane at a small angle, accompanied by localized adhesive failure at the lower interface. Specimens CR-S-2, CR-S-3, and CR-S-4 displayed remarkably consistent crack propagation mechanisms and overall failure patterns. The failure process initiated with crack formation along the upper adhesive interface. Shear failure occurred when cracks propagated to weak load-bearing zones within the shear plane in the mid-to-upper mortar region. Upon reaching the intersection between the shear plane and adhesive interface, cracks extended along the adhesive surface, resulting in adhesive failure and ultimately penetrating through the entire specimen. Regarding substrate damage, CR-S-1 and CR-S-2 showed only minor surface spalling. CR-S-3 exhibited extensive block-type spalling within the mortar region, while CR-S-4 displayed large-scale delamination in the mortar portion.
The calculation results are summarized in Table 2. A comparison between the calculated shear capacities (Vc) and the experimental results (Vt) shows that the mean Vc/Vt ratios are 0.95 for CR-I, 1.00 for CR-K, 0.94 for CR-C, and 0.98 for CR-S specimens. The overall average Vc/Vt ratio across all specimen groups is 0.97, indicating generally good agreement between predicted and experimental values. However, it should be noted that the CR-K-3 specimen exhibited a relatively low Vc/Vt ratio (0.75). This may be attributed to the formation of multidirectional cracks during the early cracking stage, leading to a more complex crack propagation pattern and, thus, significant deviation from the idealized shear model.
The proposed simplified shear capacity model is based on several assumptions that should be interpreted within the scope of the present study. Confinement effects provided by surrounding concrete or transverse reinforcement are not explicitly considered, as the experimental configuration focuses on interface-scale shear behavior under controlled normal stress conditions. While confinement may influence the absolute shear capacity in real structural elements, its omission allows the dominant contributions of interface geometry and reinforcement dowel action to be isolated and interpreted more clearly. In addition, the model assumes an idealized stress state along the interface and does not explicitly capture local stress concentrations induced by complex interfacial geometries. Therefore, the model should be regarded as a simplified analytical framework for explaining observed trends rather than a detailed predictive model. Its applicability is primarily limited to interfaces with comparable loading conditions and failure modes.

3.1.4. Load–Displacement Curve Analysis

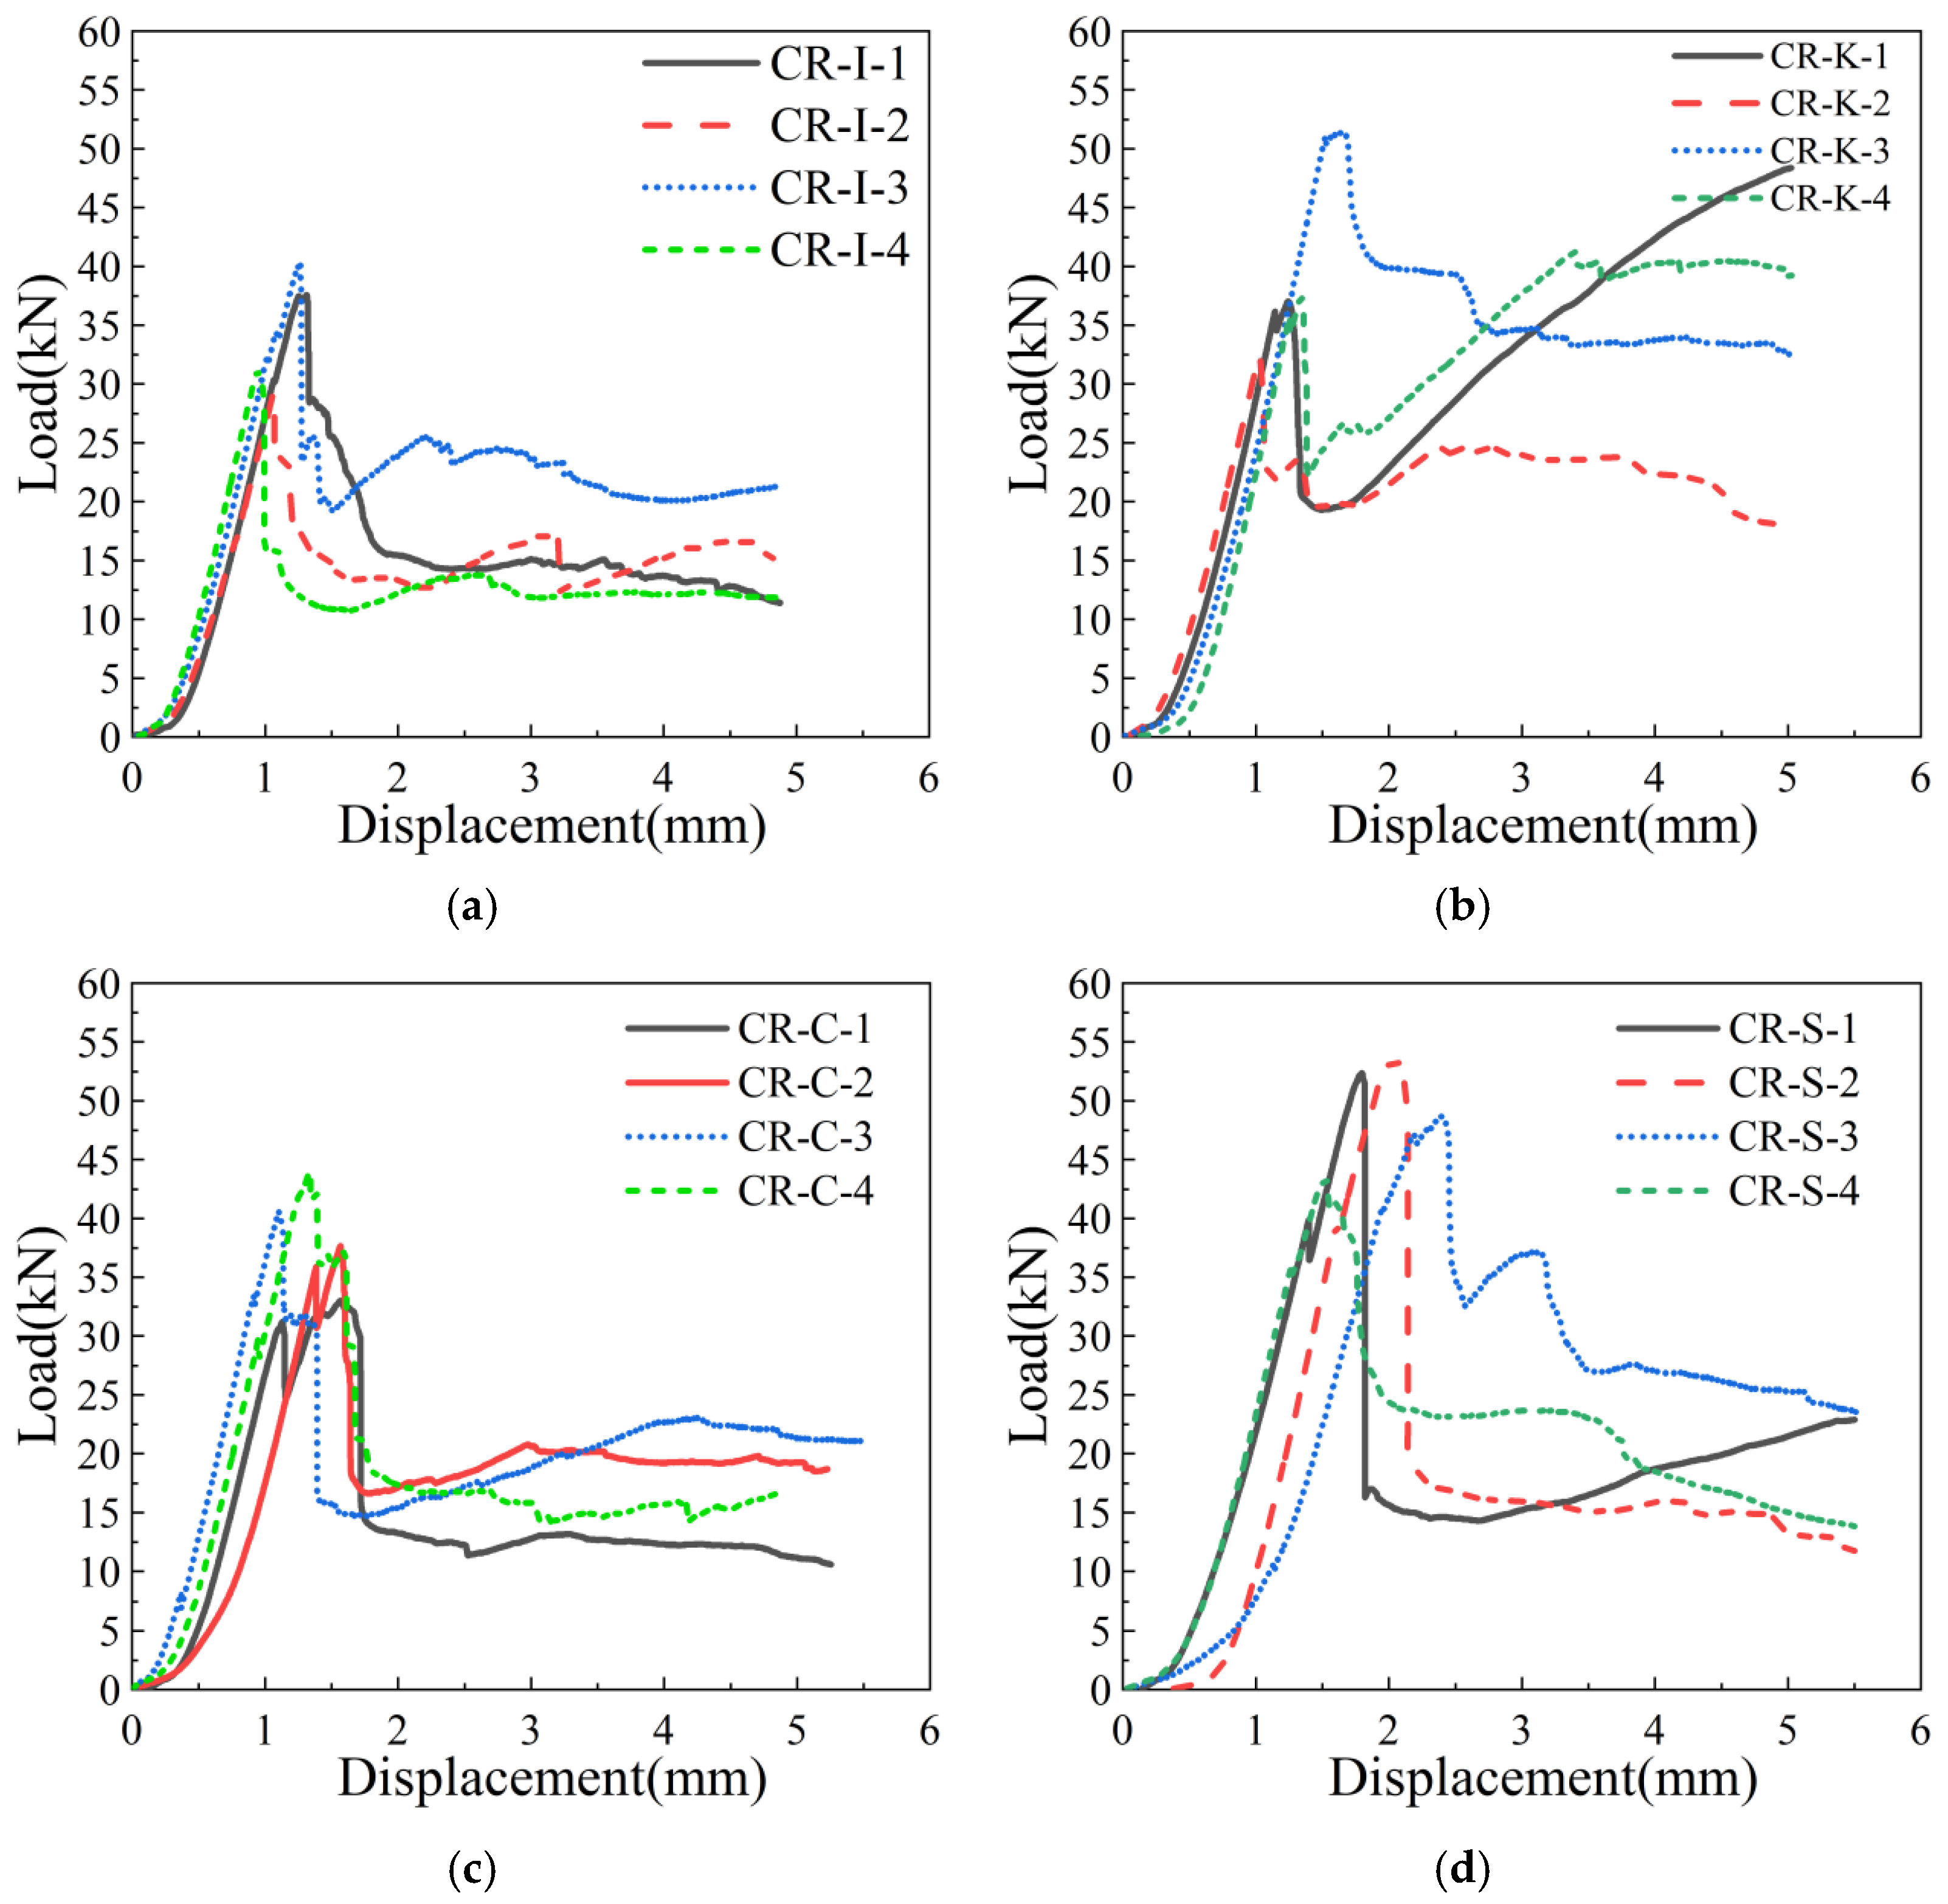
As shown in Figure 13a, the peak loads (Pμ) of CR-I specimens range from 30 kN to 40 kN, with a difference of 10.92 kN between the maximum value (CR-I-3) and the minimum value (CR-I-2). The corresponding displacements at peak load (Δμ) vary between 0.9 mm and 1.3 mm, with a difference of 0.3117 mm between the maximum (CR-I-1) and minimum (CR-I-4) values. It can also be observed that specimens with lower and similar peak loads (CR-I-2 and CR-I-4) exhibit smaller corresponding displacements, whereas CR-I-1 and CR-I-3 show comparable peak loads and displacement values. As the control group featuring the simplest interfacial geometry, CR-I specimens exhibit relatively lower load-bearing capacity compared with other interface configurations.
As illustrated in Figure 13b, the peak loads (Pμ) of CR-K specimens range from 30 kN to 52 kN, with a difference of 18.96 kN between the maximum (CR-K-3) and minimum (CR-K-2) values. The corresponding displacements at peak load (Δμ) vary between 1.0 mm and 1.65 mm, showing a difference of 0.6257 mm between the maximum (CR-K-3) and minimum (CR-K-2) values. The load–displacement curves of CR-K-1 and CR-K-4 display distinctive features: following initial failure, both specimens enter a strain-hardening phase, ultimately achieving bearing capacities that surpass their initial peak loads. Specimen CR-K-3 achieved a considerably higher peak load and exhibited a distinctive dual-plateau response during the post-peak phase. CR-K-2 recorded a lower peak load but maintained stable load–displacement behavior throughout the plateau stage. Although the CR-K series demonstrated substantially enhanced load-bearing capacity compared to the control group (CR-I), differences in Δμ values remained marginal. All specimens retained substantial strength at 4.5 mm displacement. Further analysis suggests the observed variability in this series stems from interfacial geometric effects.
Figure 13c shows CR-C specimens achieved peak loads (Pμ) ranging from 33 kN to 40 kN, with a 7.58 kN difference between the maximum (CR-C-3) and minimum (CR-C-1) values. Corresponding peak load displacements (Δμ) varied from 1.1 mm to 1.72 mm, yielding a 0.5986 mm difference between the maximum (CR-C-1) and minimum (CR-C-3) values. CR-C-1 and CR-C-2 load–displacement curves displayed similar dual-peak patterns. Cracks began penetrating the specimens upon reaching the second peak, causing substantial load-bearing capacity reduction. CR-C-3 and CR-C-4 load–displacement curves showed pronounced post-peak decline; however, a plateau-like segment appeared within the 30–35 kN load interval. Load-bearing capacity recovered approximately 5% before undergoing a sharp decline, followed by stabilization as the curves flattened. CR-C specimens showed no substantial improvement in overall load-bearing performance compared to the control group (CR-I).
Figure 13d reveals that the CR-S-1, CR-S-2, CR-S-3, and CR-S-4 specimens experienced substantial load-bearing capacity reduction upon reaching ultimate load. Failure photographs indicate that CR-S-1 developed two cracks during loading, one along the shear plane and another within the mortar region. CR-S-2 experienced cracking at the 3DPM–mortar interface. CR-S-3 also formed cracks along this interface, with subsequent propagation through the interface. CR-S-4 exhibited two distinct cracks, one at the 3DPM interface and another within the 3DPM region. CR-S-1, CR-S-2, and CR-S-3 demonstrated markedly higher ultimate load-bearing capacities than CR-S-4. CR-S specimens achieved peak loads (Pμ) ranging from 43 kN to 54 kN, with a 10.07 kN difference between the maximum (CR-S-2) and minimum (CR-S-4) values. Corresponding peak load displacements (Δμ) ranged from 1.7 mm to 2.5 mm, yielding a 0.703 mm difference between the maximum (CR-S-3) and minimum (CR-S-4) values. CR-S specimen load–displacement curves generally followed a three-stage pattern: ascending, descending, and plateau stages. The load-bearing capacity dropped sharply after reaching peak load. Except for CR-S-3, the remaining specimens exhibited stable load–displacement responses with minimal fluctuations. This series demonstrated substantially enhanced load-bearing capacity compared to the control group (CR-I), along with notably increased displacement at peak load.
Analysis reveals all specimens followed a three-stage load–displacement behavior pattern. During the initial stage, curves showed approximately linear relationships before shear stress peaked, with minor fluctuations in certain specimens. The post-peak stage featured sharp load-bearing capacity reduction, followed by horizontal plateau formation during the residual load-bearing stage, indicating substantial stress redistribution. Comparison of different interface designs shows that the CR-S and CR-K series achieved markedly higher load-bearing capacities than the control group (CR-I). While the CR-K series demonstrated notable strength enhancement, results displayed considerable variability, with certain specimens exhibiting secondary strengthening behavior after initial load-bearing-capacity decline. CR-C series mechanical performance remained comparable to the control group, indicating limited shear resistance improvement.
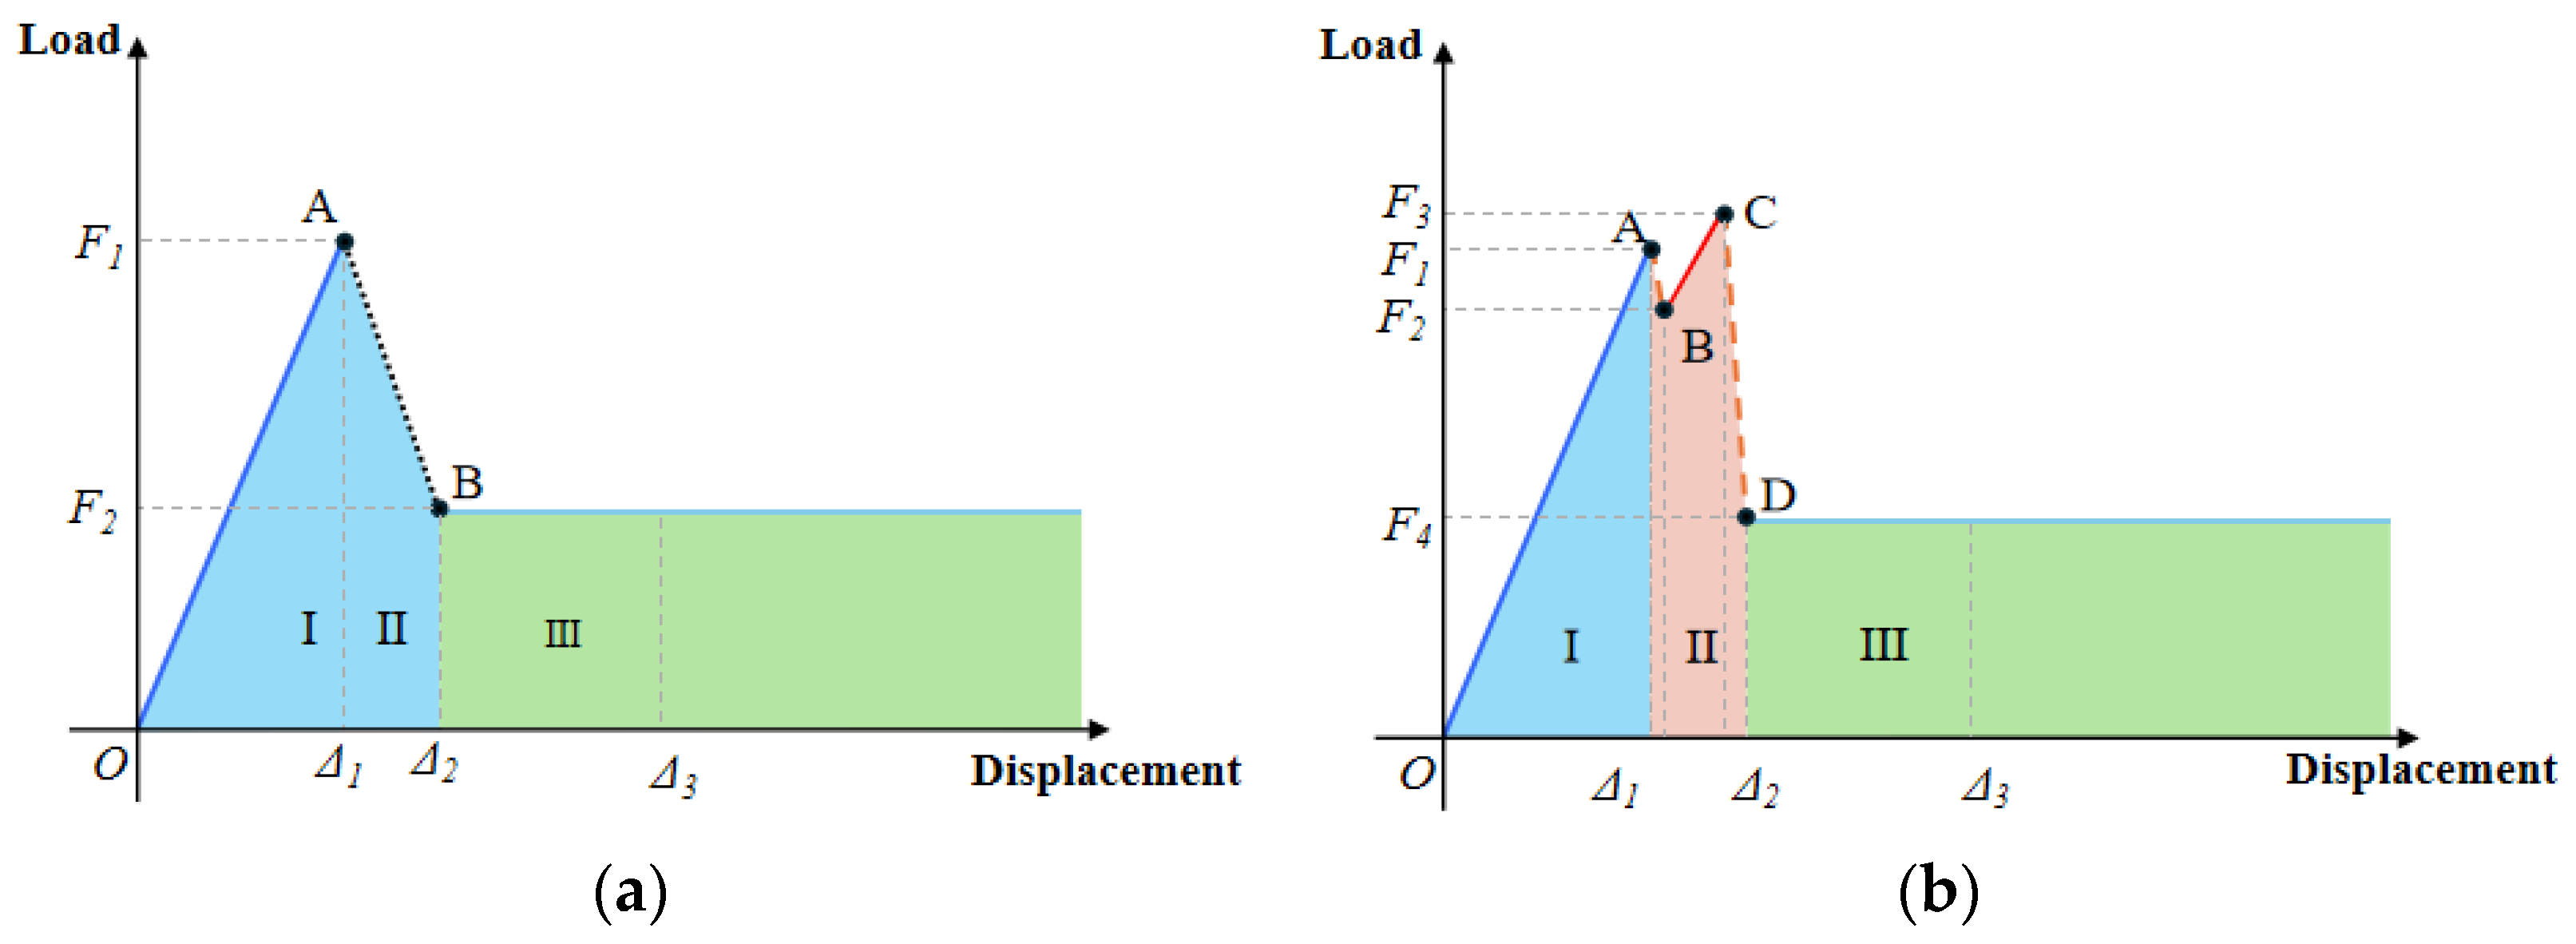
Figure 14 shows characteristic load–displacement curves fall into two distinct categories: fundamental type and fractured type. Over 50% of specimens displayed fundamental-type curves. These curves feature an initial linear ascending phase, followed by a sharp descent, then plateau formation. Such curves comprise a single ascending segment, a single descending segment, and a plateau segment, demonstrating typical shear response behavior. Fractured-type curves differ from fundamental-type curves by exhibiting a fracture point during the ascending phase. This characteristic indicates that localized failure occurred in specimens before reaching peak load. Although through-cracks had not yet formed, specimen stiffness decreased while load-bearing capacity continued increasing until peak load. After reaching peak value, through-cracks began developing, causing a sharp load-bearing capacity reduction before specimens entered the plateau phase.

3.2. Shear Cracking Characteristics Based on DIC Analysis

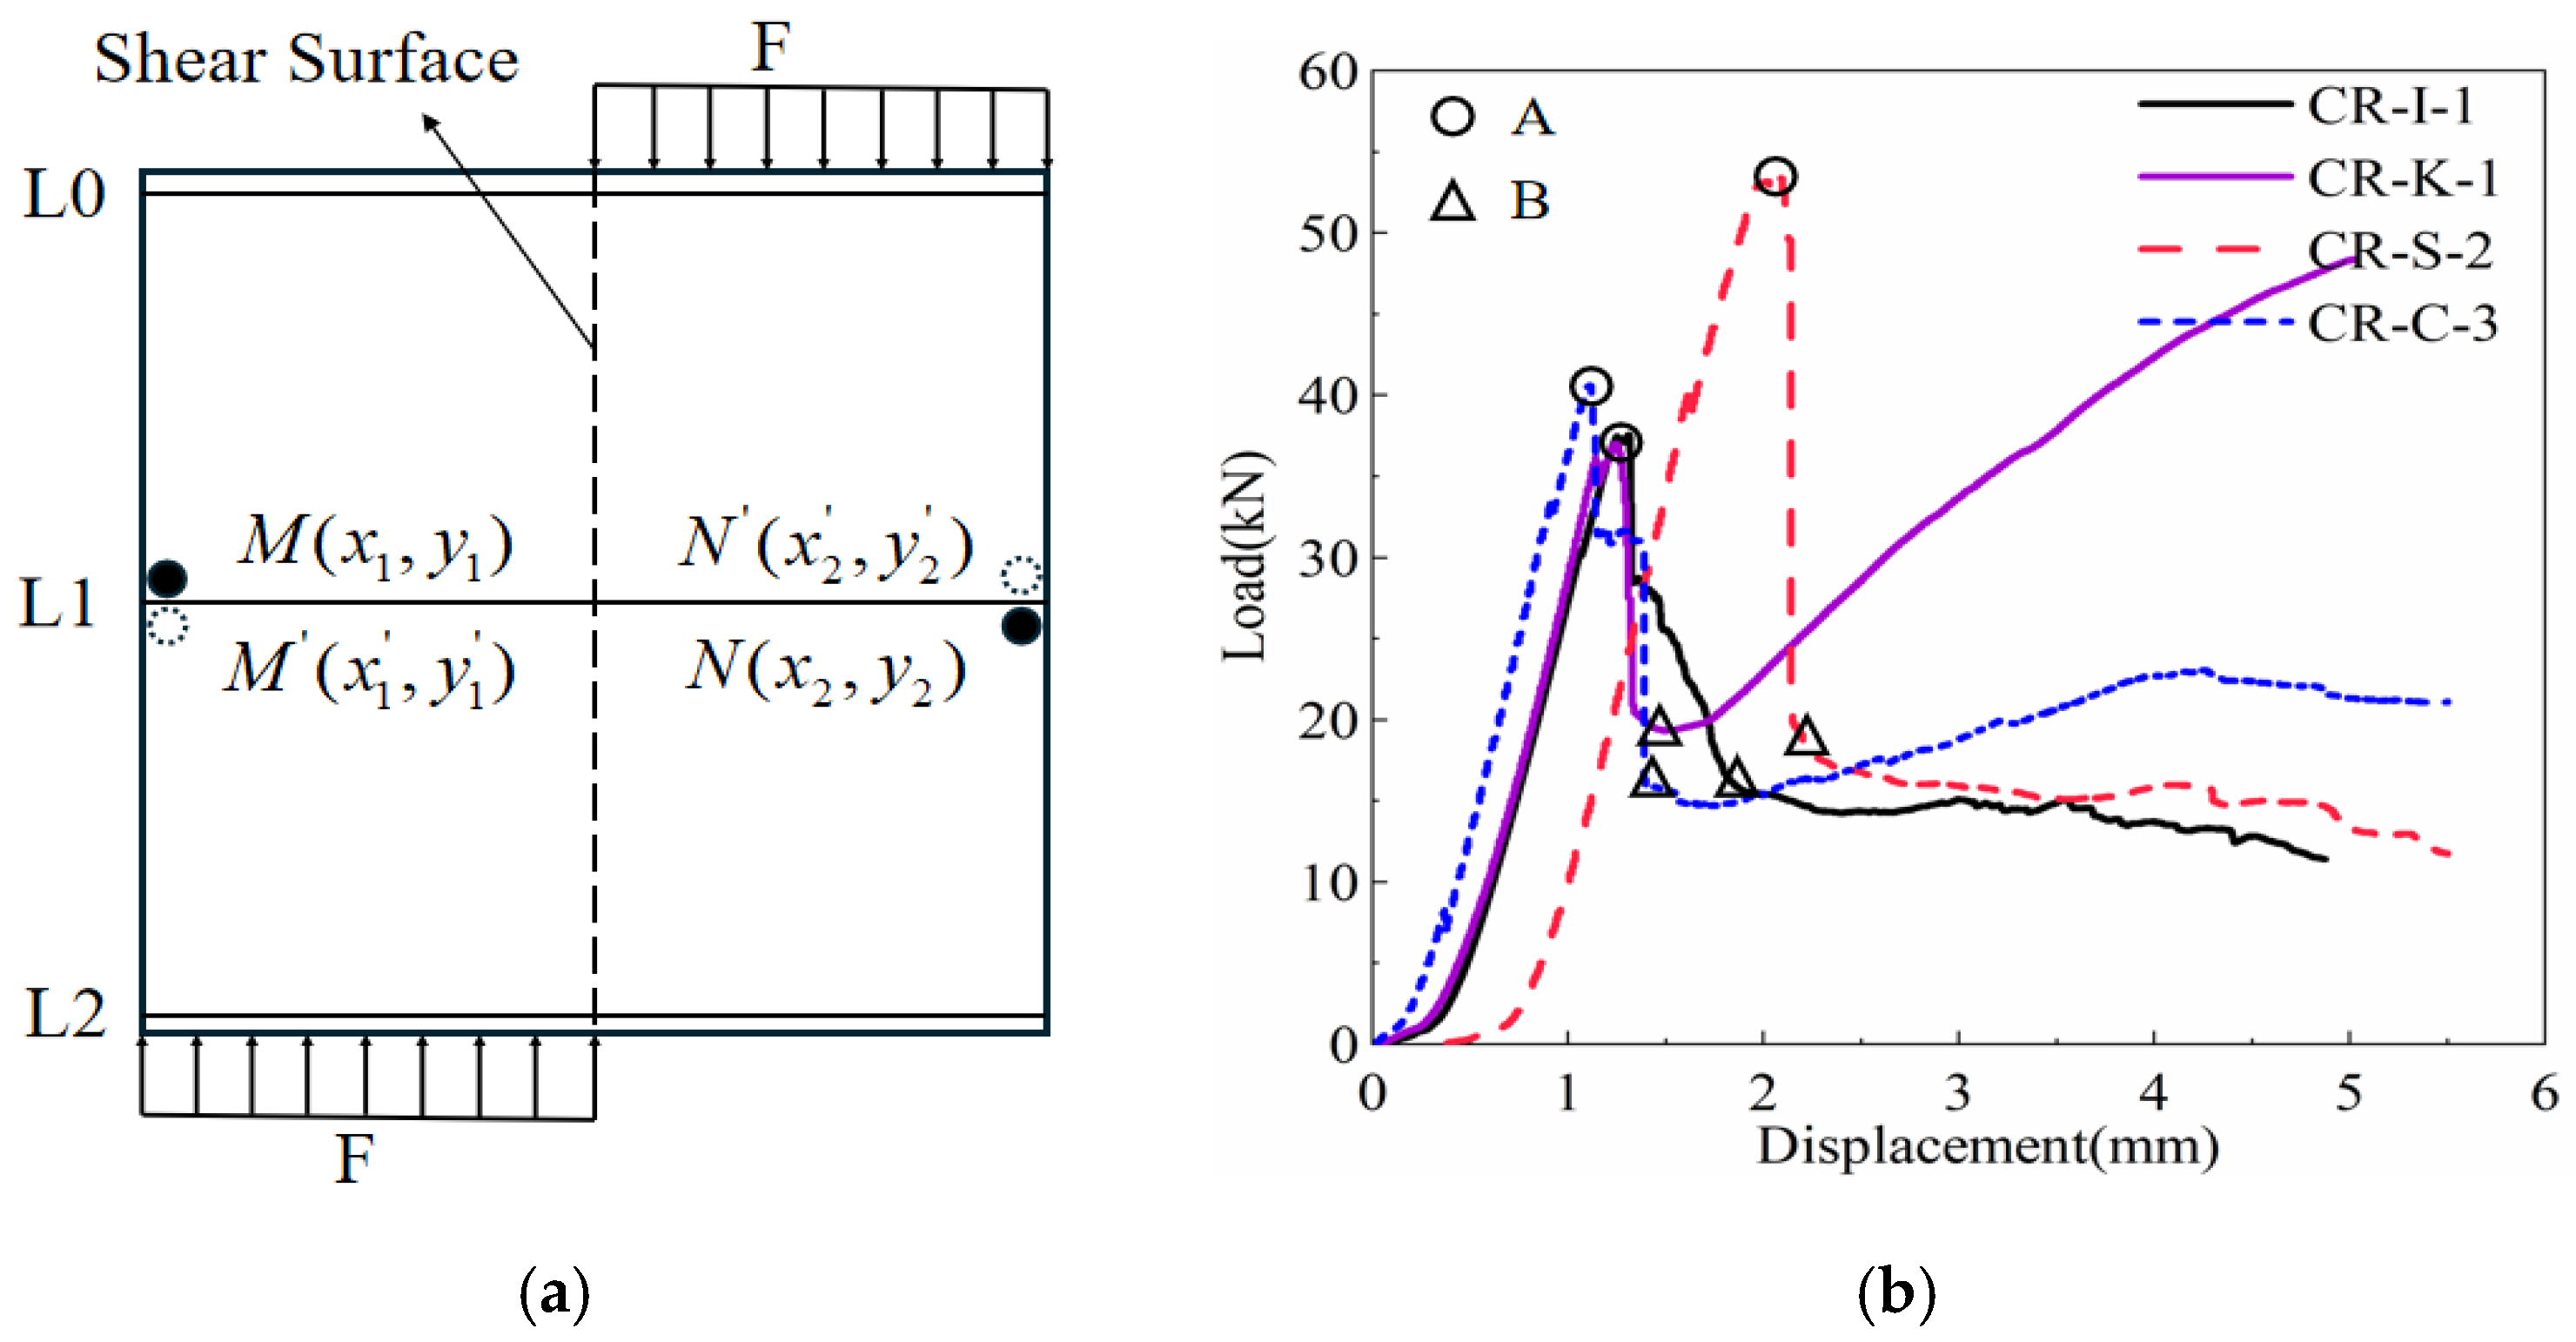
Corresponding observation images were systematically selected based on critical loading stages of specimens, with corresponding load values marked on load–displacement curves. Comparative analysis of crack evolution and strain distribution focused on characteristic images captured during crack initiation, propagation, and critical failure stages. DIC technique analysis revealed strain-field mutations correlate closely with surface microcrack emergence, while anomalous discontinuities in displacement data typically indicate crack formation. Three reference lines, L0, L1, and L2, were established for quantitative crack evolution description, uniformly distributed at horizontal intervals near the failure stage. Reference lines L0, L1, and L2 were positioned at approximately 25%, 50%, and 75% of specimen height, adjusted slightly for each interface geometry to intersect critical regions near the anticipated crack path. Analyzing displacement variations and strain concentration features along these reference lines effectively quantified crack width. Figure 15a illustrates DIC calculation principles and marks the L0, L1, and L2 positions. DIC technology tracks pixel offsets of black spots in consecutive images to calculate coordinate offsets, determining specimen surface strain using Equations (9) and (10). Through analyzing strain contour maps in three directions, specimen CR-I-1 was selected as the most representative for detailed analysis. Figure 15b marks two characteristic points: Point A corresponds to the peak load, and Point B represents the fracture point during the horizontal plateau stage.
U x = u p i x e l
E x x = U x x = ( x 2 x 1 ) ( x 2 x 1 ) ( x 2 x 1 )
where U x denotes the horizontal displacement, and Exx represents the horizontal strain.

3.2.1. CR-I

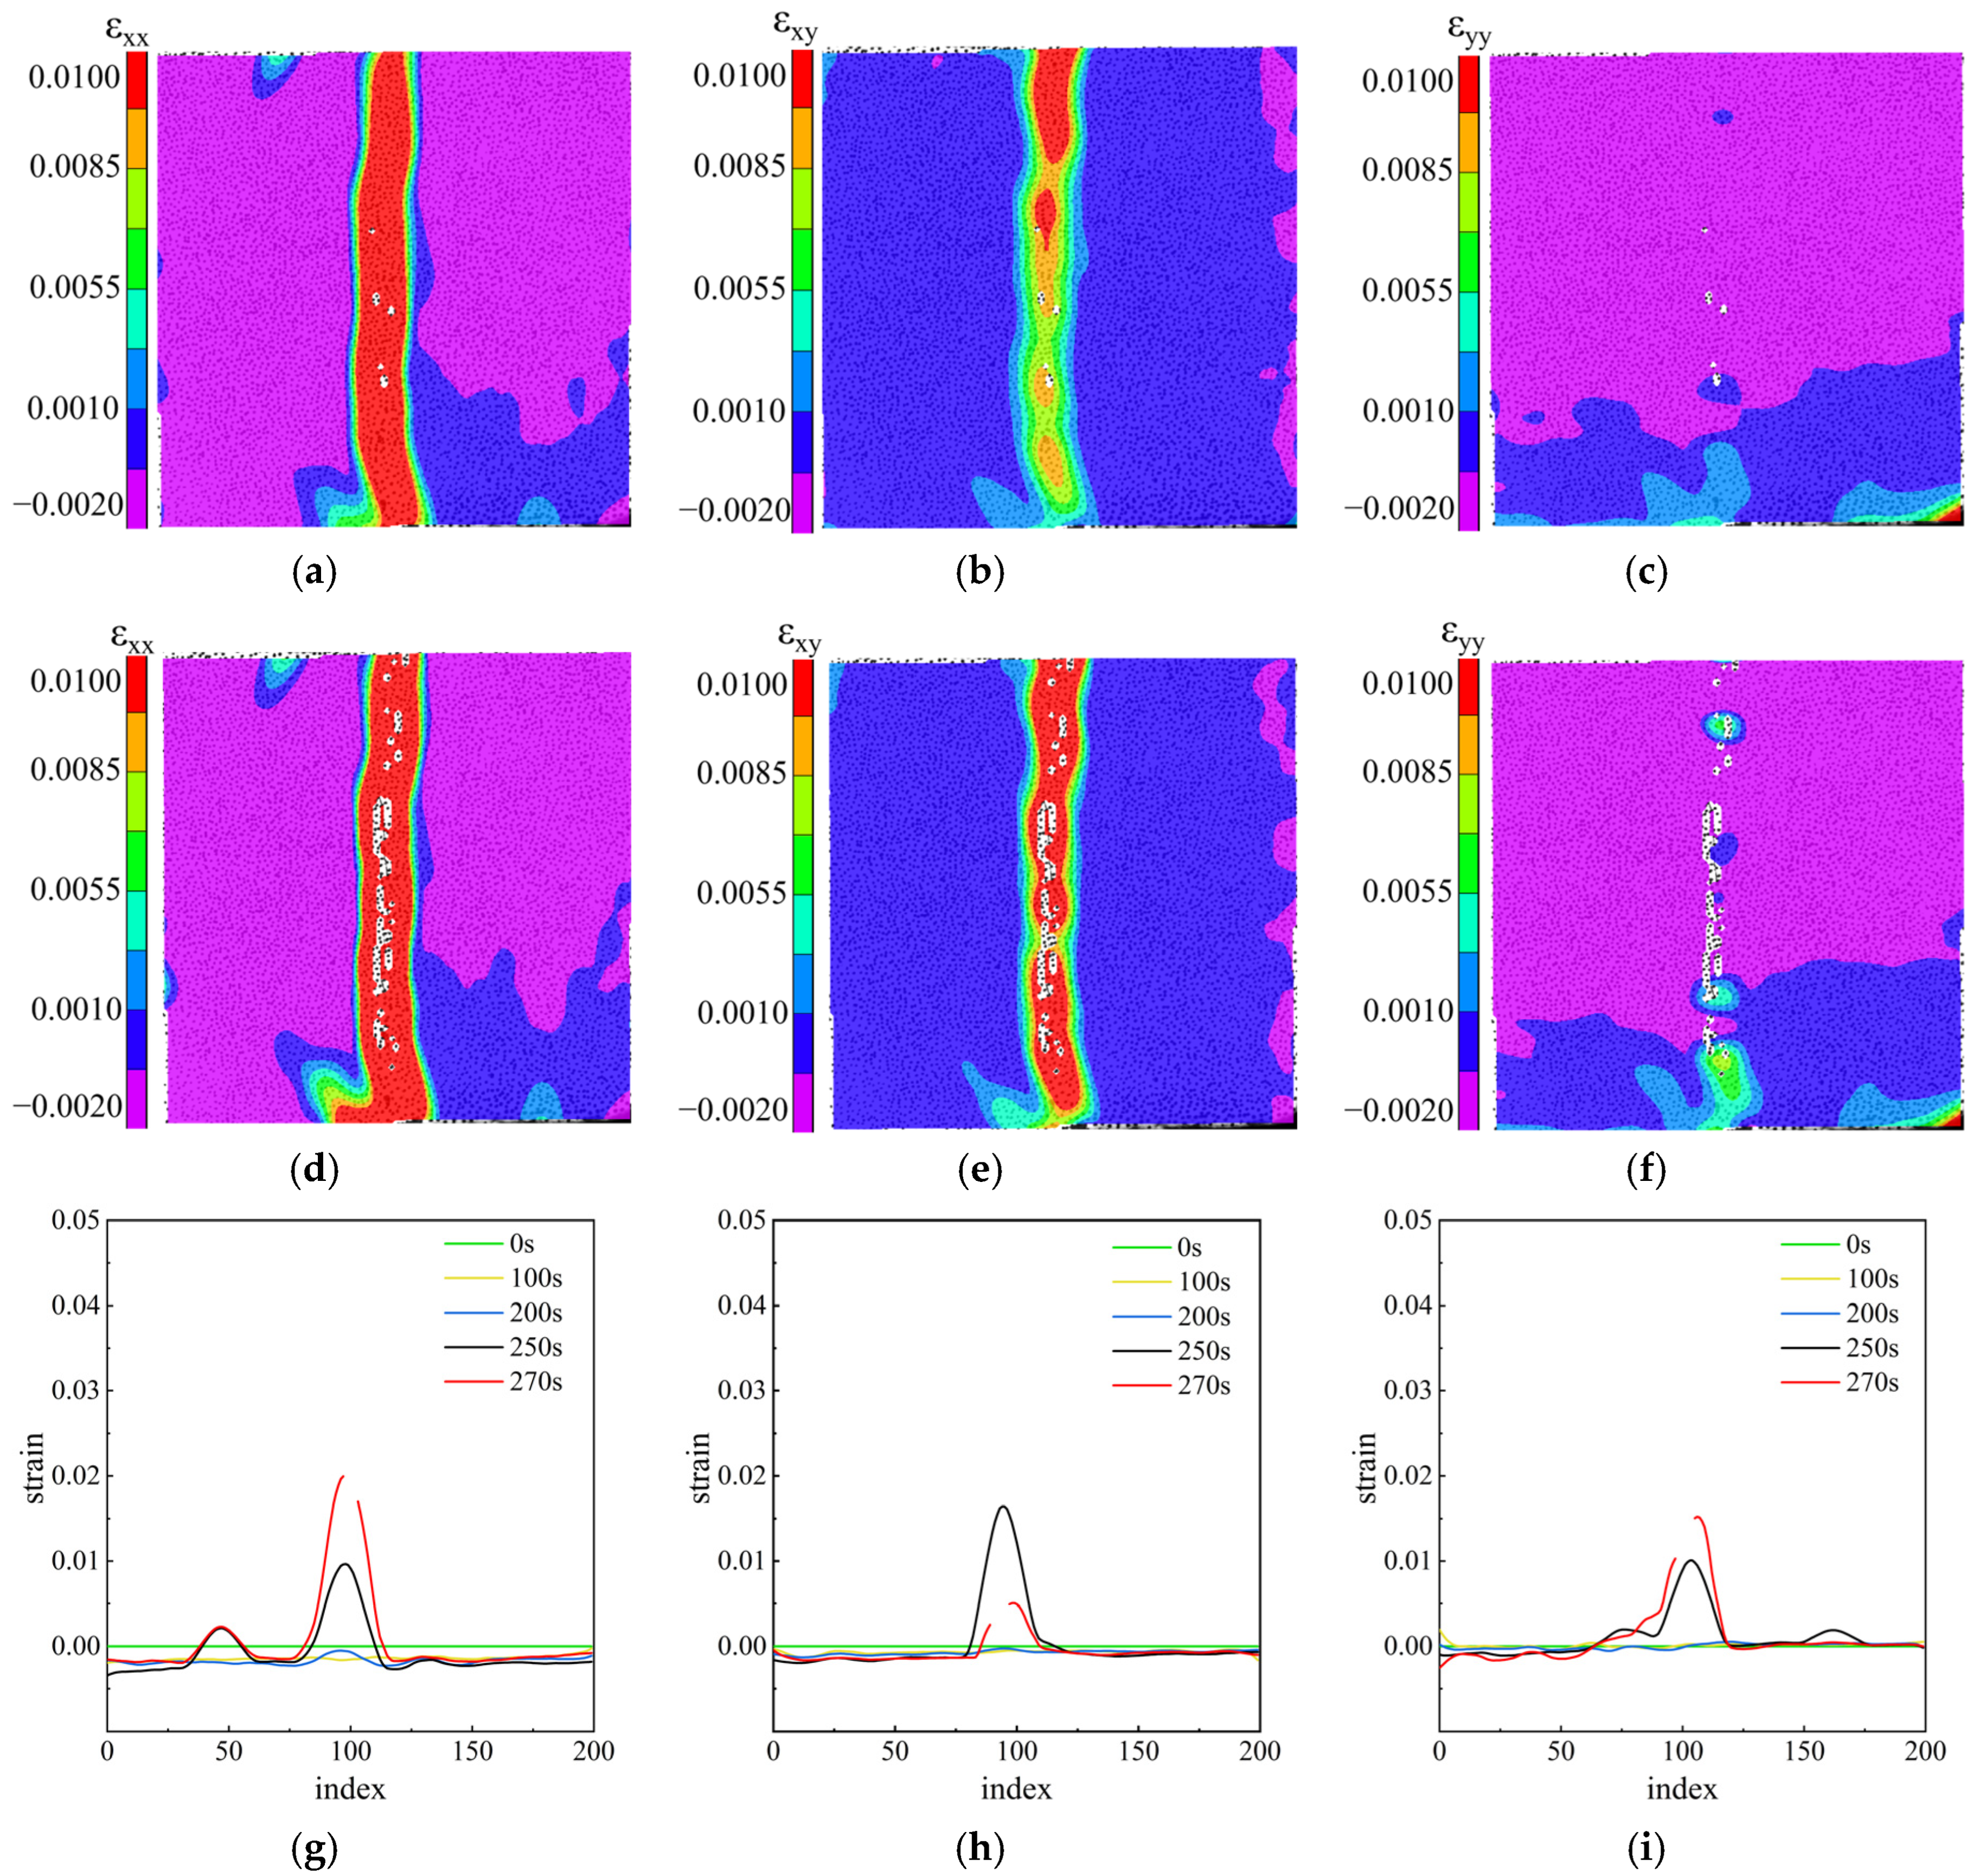
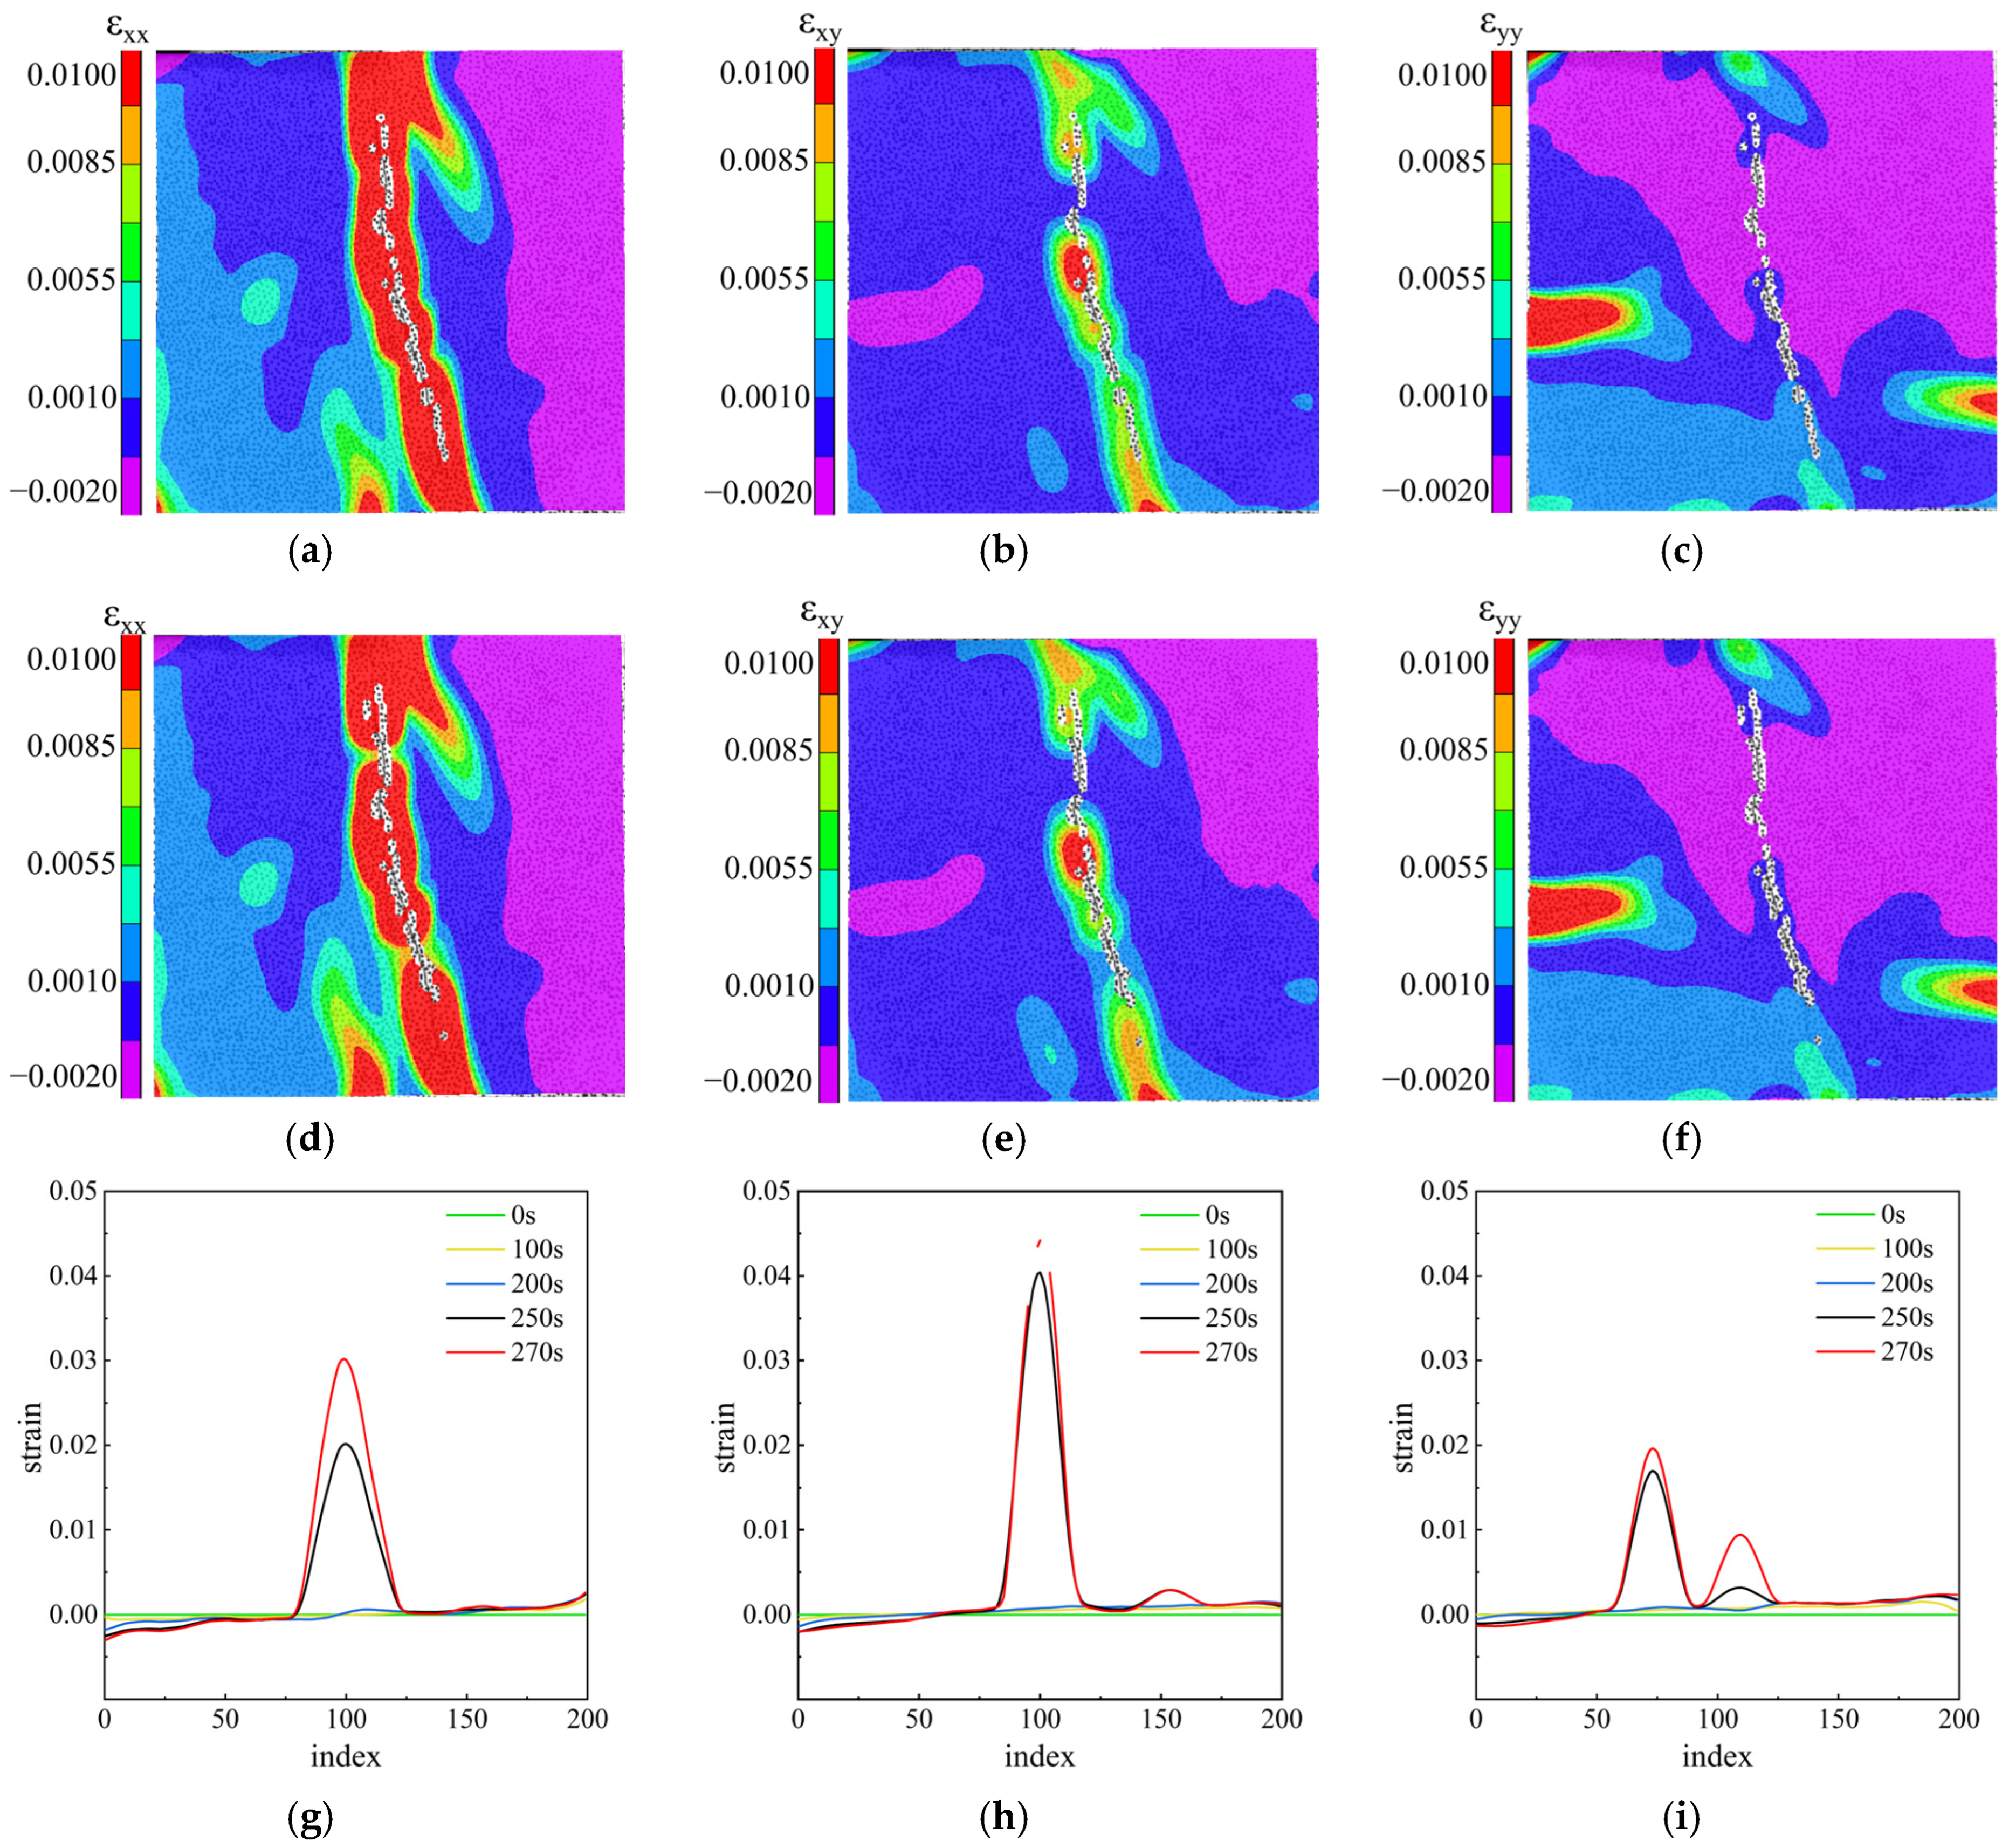
Figure 16a,d display horizontal-tensile-strain contour maps for specimen CR-I-1. Strain localization occurred along the adhesive interface when the applied load reached peak value. Concentrated strain zones gradually expanded during loading progression and exhibited oblique propagation tendencies. Figure 16b,e show shear strain contour maps for the same specimen. Strain primarily concentrated at the adhesive interface at peak load, with notable high-strain zones appearing in upper specimen regions. Significant strain localization persisted at the adhesive interface after peak load, with shear strain magnitude increasing substantially within this zone. Figure 16c,f present vertical-compression strain contour maps for specimen CR-I-1. No obvious strain concentration phenomena were observed at or after peak load. Combined strain distribution characteristic analysis suggests cracks initiated from the upper adhesive interface. Cracks progressively extended along the adhesive interface as load increased, ultimately penetrating the entire specimen.
Figure 16g–i display horizontal-strain distributions along the L0, L1, and L2 lines for specimen CR-I-1 at 0, 100, 200, 250, and 270 s. The L0 line strain distribution clearly shows a bimodal shape, with the primary peak at the adhesive interface and a secondary peak shifted leftward. The L1 and L2 line strain distributions exhibited single-peak characteristics, with peaks located at the adhesive interface, occurring between 250 and 270 s. Curve evolution analysis over time shows the distribution remained continuous at 250 s. However, distinct fracture points appeared in curves at 270 s. All curve regions showed fractures except the secondary peak in L0’s left-central portion, remaining continuous. This behavior suggests that a primary crack developed along the bonded interface between 250 s and 270 s, while the strain concentration zone in the upper portion of the specimen did not evolve into a visible crack.

3.2.2. CR-K

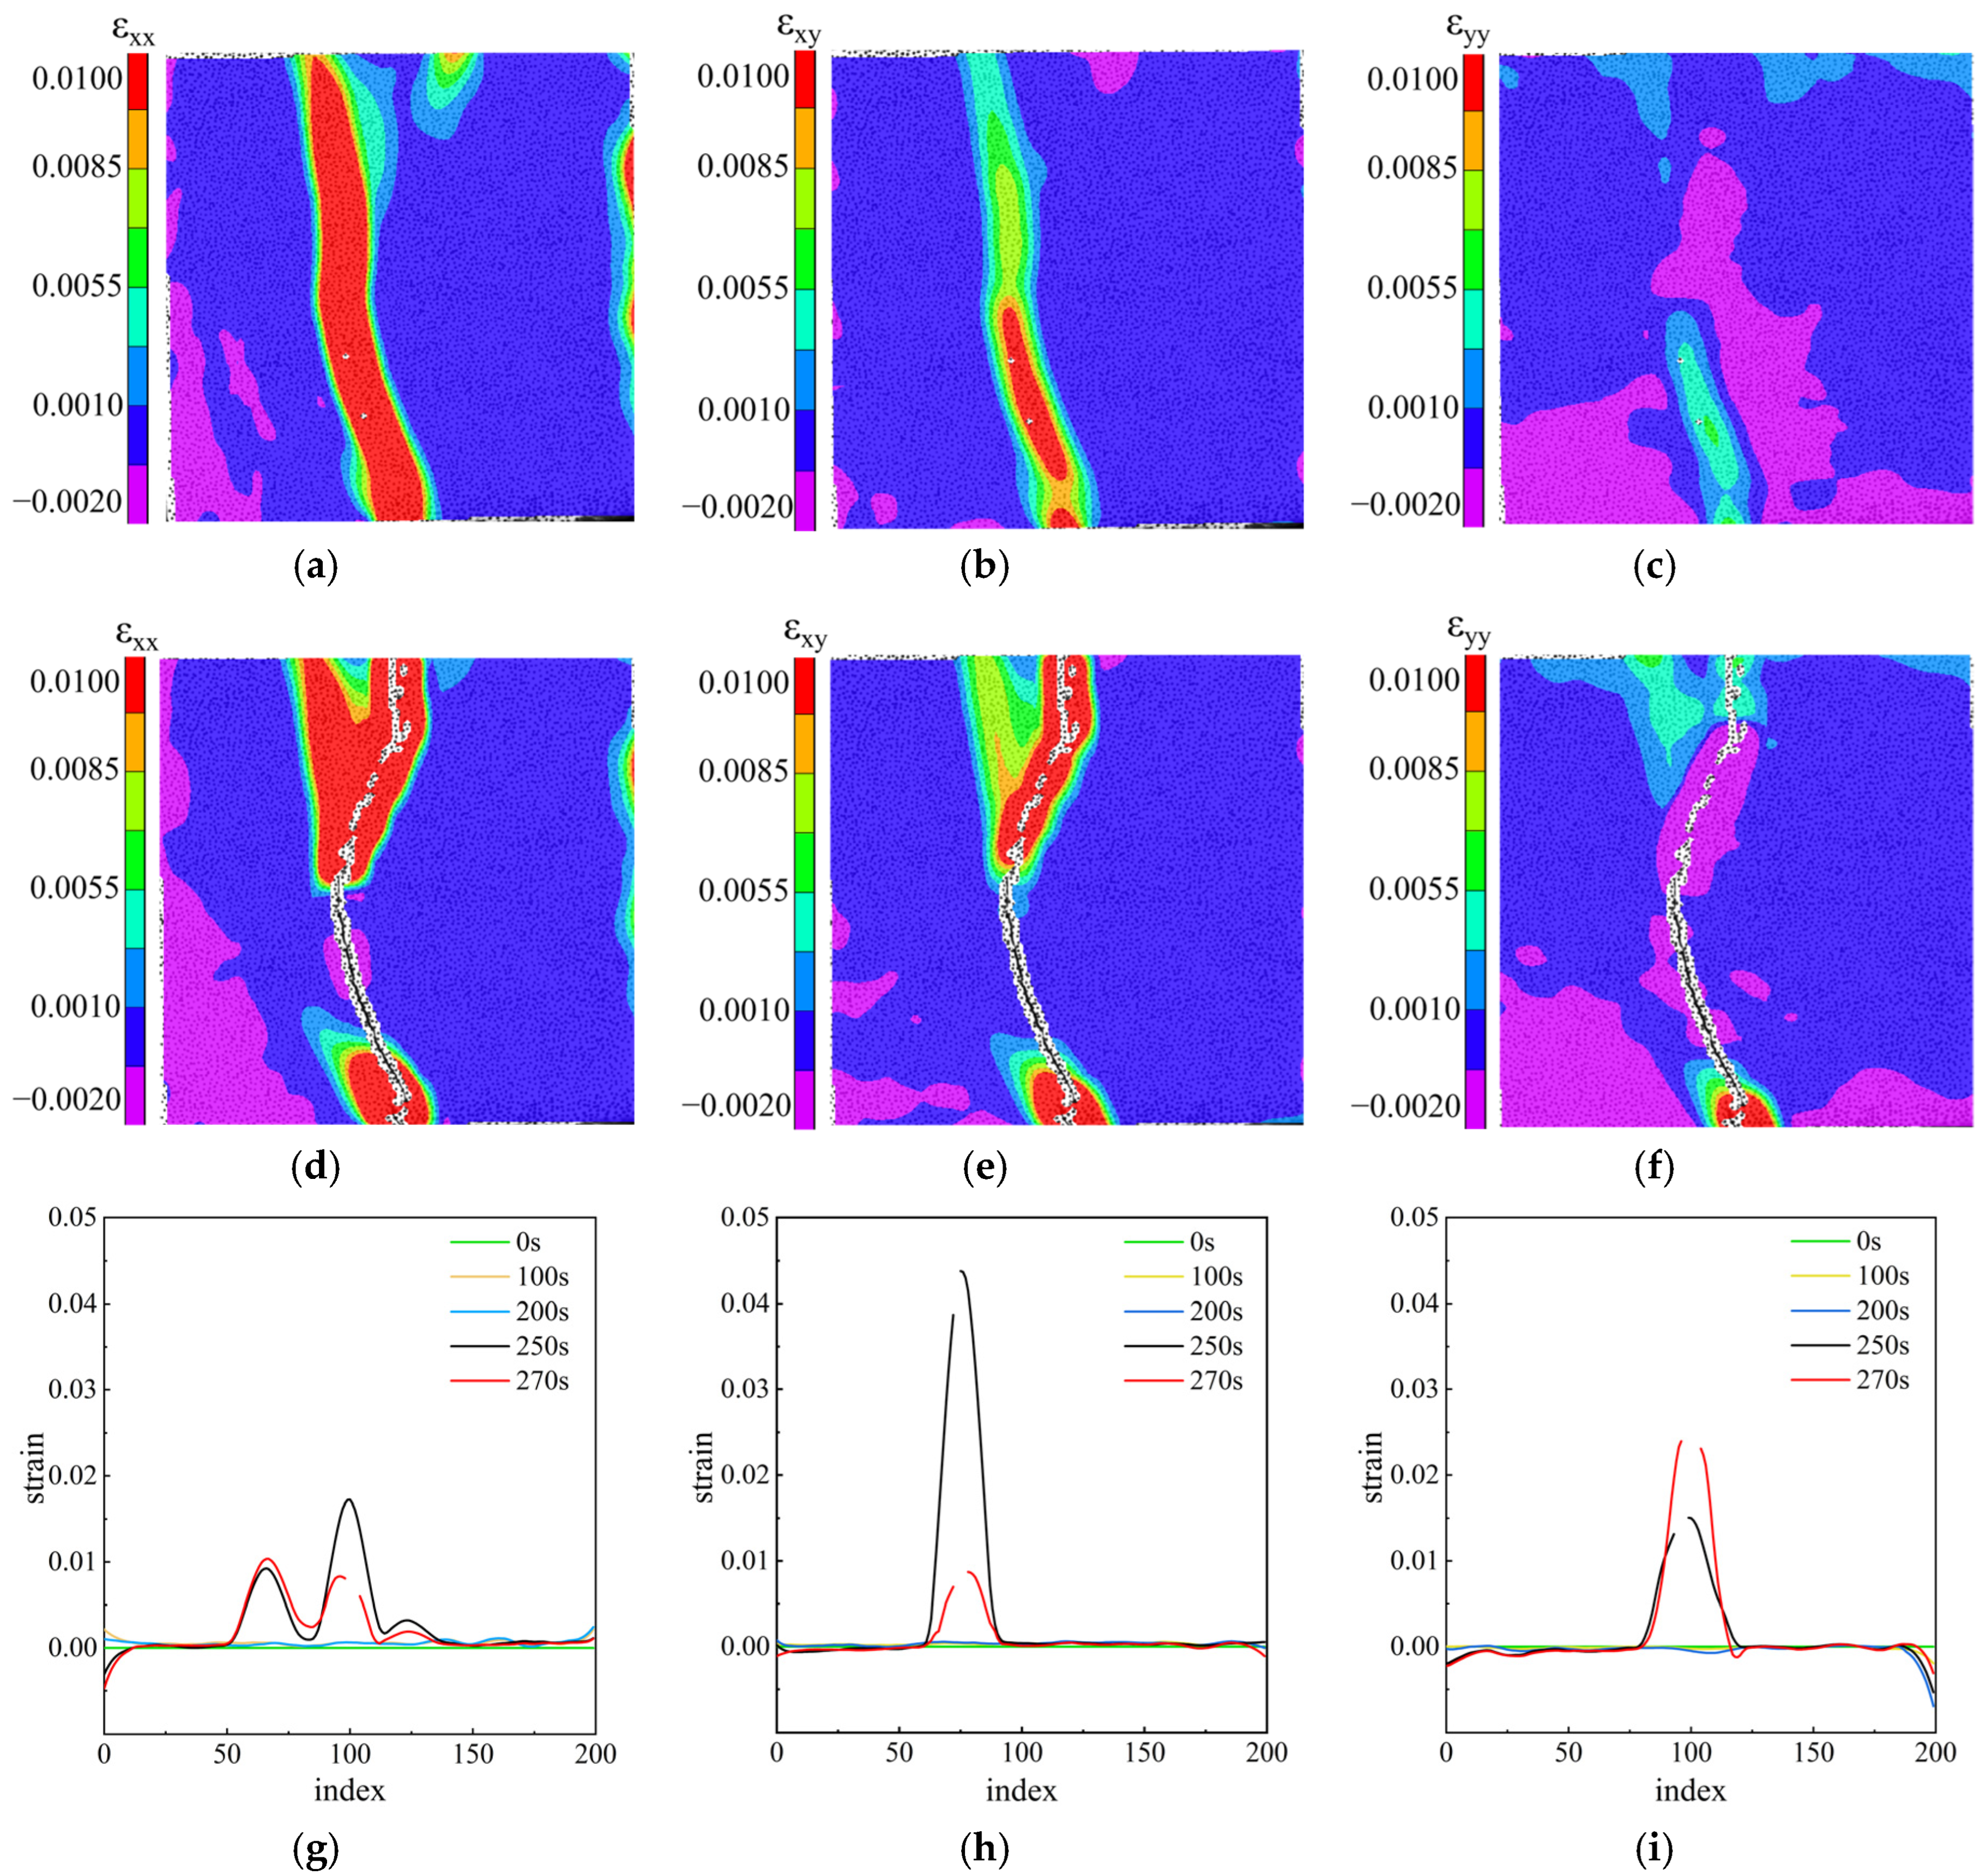
Figure 17a,d present the horizontal-tensile-strain contour maps of specimen CR-K-1. Strain localization is observed simultaneously along the shear plane, oblique shear plane, and bonded interface when the load reaches its peak value. As loading progresses, the strain concentration zones gradually expand, and the concentration in the upper portion of the specimen shifts from the oblique shear plane toward the main shear plane. Figure 17b,e show the shear strain contour maps of specimen CR-K-1. Strain concentrated at the adhesive interface and shear plane under peak load, with notable high-strain regions appearing in lower specimen portions. Overall shear strain intensified after peak load, with strain concentration zones expanding to the upper and lower shear planes plus the central adhesive interface. Figure 17c,f show vertical-compression strain contour maps for specimen CR-K-1. No obvious strain localization was observed during the peak load phase. However, localized strain concentration began forming on the lower shear plane as loading progressed. Integrating three-directional strain distribution results suggests cracks originated at the lower shear plane and adhesive interface. These cracks extended upward from the adhesive interface as the load increased, eventually penetrating the entire specimen to reach the upper shear plane.
Figure 17g–i display horizontal strain distributions along the L0, L1, and L2 lines for specimen CR-K-1 at different time points. The L0 line strain distribution clearly exhibits bimodal morphology, with the main peak at the shear plane and a secondary peak shifted leftward. The L1 and L2 strain distributions showed single-peak characteristics: L1 peak strain occurred at the adhesive interface, while L2 peak strain appeared at the shear plane. Analysis of curve evolution over time reveals L0 distribution remained continuous at 250 s, while L1 and L2 showed distinct fracture points. At 270 s, all three curves, L0, L1, and L2, exhibited distinct fracture points. All portions showed fractures except the secondary peak in L0’s left-central region, remaining continuous. This behavior indicates that the primary crack initiated along the failure interface in the lower portion of the specimen between 200 s and 250 s, leading to a combined failure mode. During this stage, the strain concentration zone in the upper portion of the specimen did not evolve into a crack, and the main crack had not yet fully penetrated the specimen. Between 250 s and 270 s, the primary crack propagated through the entire specimen, while no secondary cracks developed at the upper strain concentration region.

3.2.3. CR-C

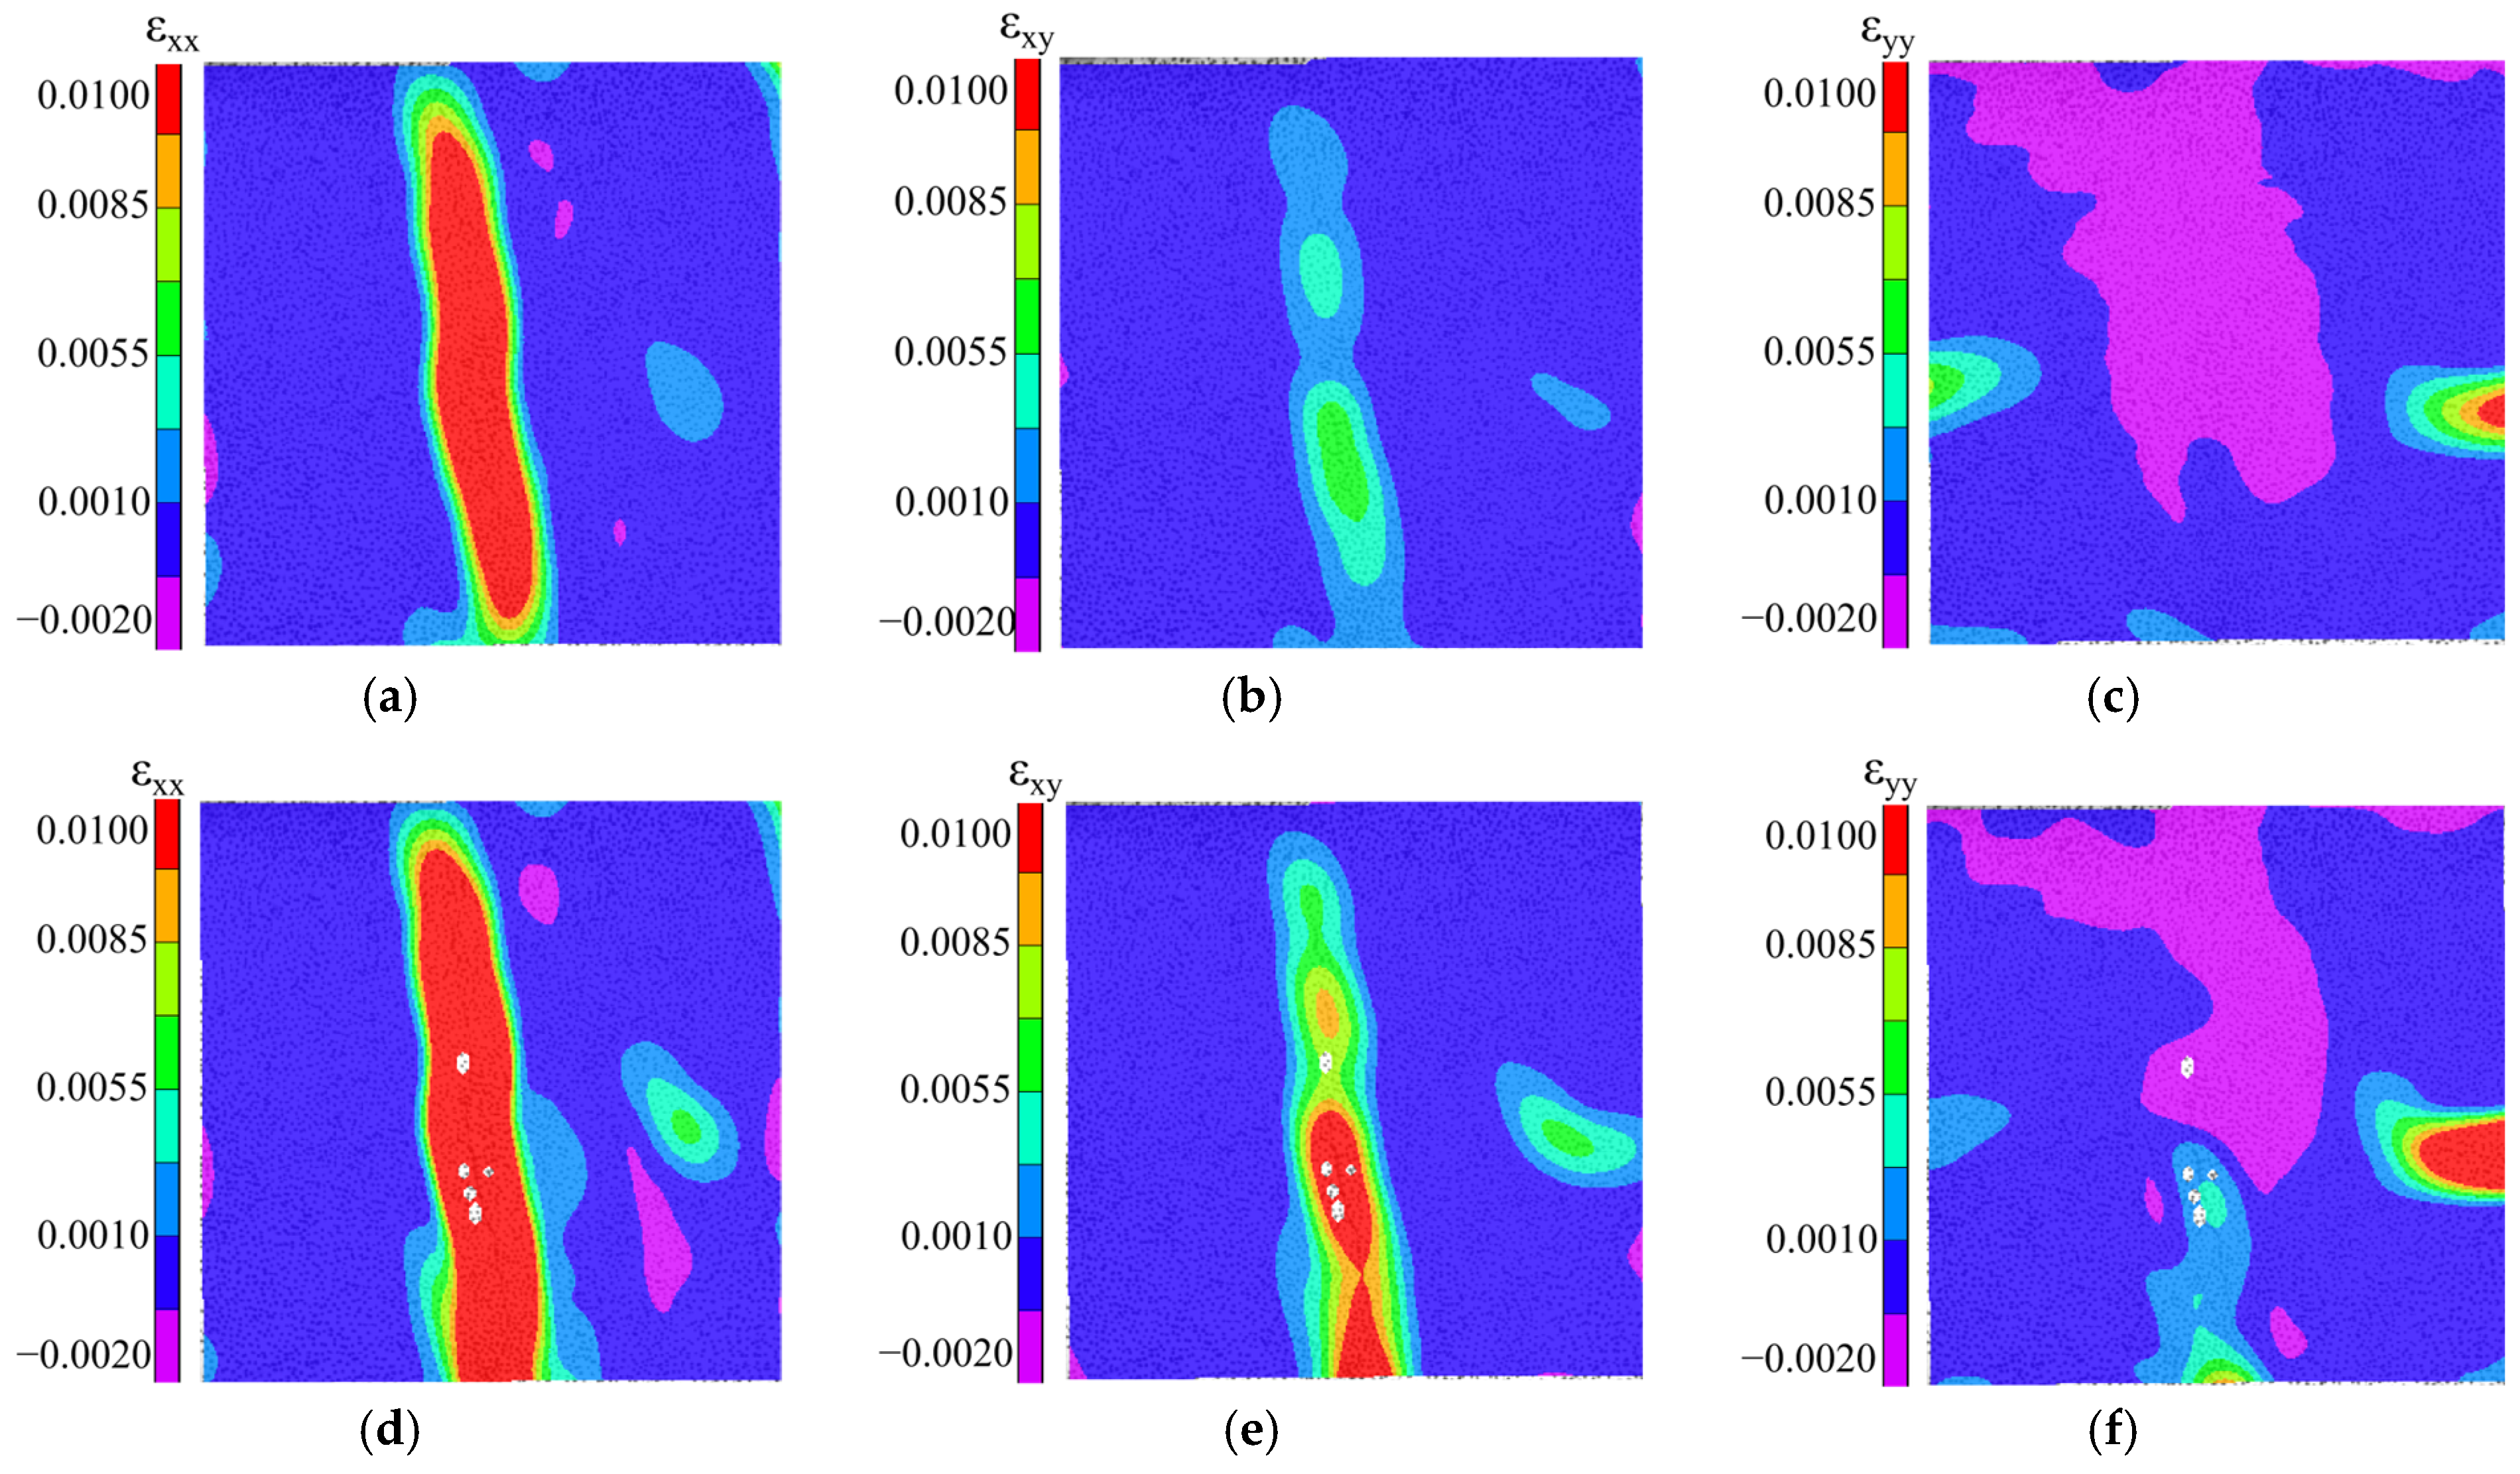
Figure 18a,d show the horizontal-tensile-strain contour maps of specimen CR-C-3. Strain localization is observed at both the bonded interface and the shear plane in the mid-height region when the applied load reaches its peak value. As loading progresses, these strain concentration zones expand, and additional localized strain develops near the lower end of the specimen. Figure 18b,e present the shear strain contour maps of specimen CR-C-3. At the peak load, strain concentrates along the bonded interface and the shear plane, with a pronounced high-strain region developing near line L1 in the central portion of the specimen. Shear strain continued intensifying after peak load, with localized strain zones extending toward lower specimen portions. Figure 18c,f show vertical-compression strain contour maps for specimen CR-C-3. No obvious strain concentration phenomena were observed at the failure interface during or after peak load; only minor localized strain appeared in lateral specimen regions. Comprehensive strain-field analysis suggests cracks initiated simultaneously at the adhesive interface and shear plane in mid-to-upper positions. These cracks extended toward upper and lower shear interfaces as the load increased, eventually converging and penetrating the entire specimen.
Figure 18g–i display horizontal strain distributions along the L0, L1, and L2 lines for specimen CR-C-3 at different time points. Strain distributions along all three lines clearly exhibited single-peak morphology. Peak strain on the L1 line occurred at the shear plane, while peak strains on the L0 and L2 lines were located at the adhesive interface. Analysis of strain distribution evolution over time indicates curves showed no fractures at 250 and 270 s, suggesting that crack initiation occurred after 270 s. This observation aligns with previous findings: specimen CR-C-3 reached peak load at a larger displacement, distinguishing itself from other specimens.

3.2.4. CR-S

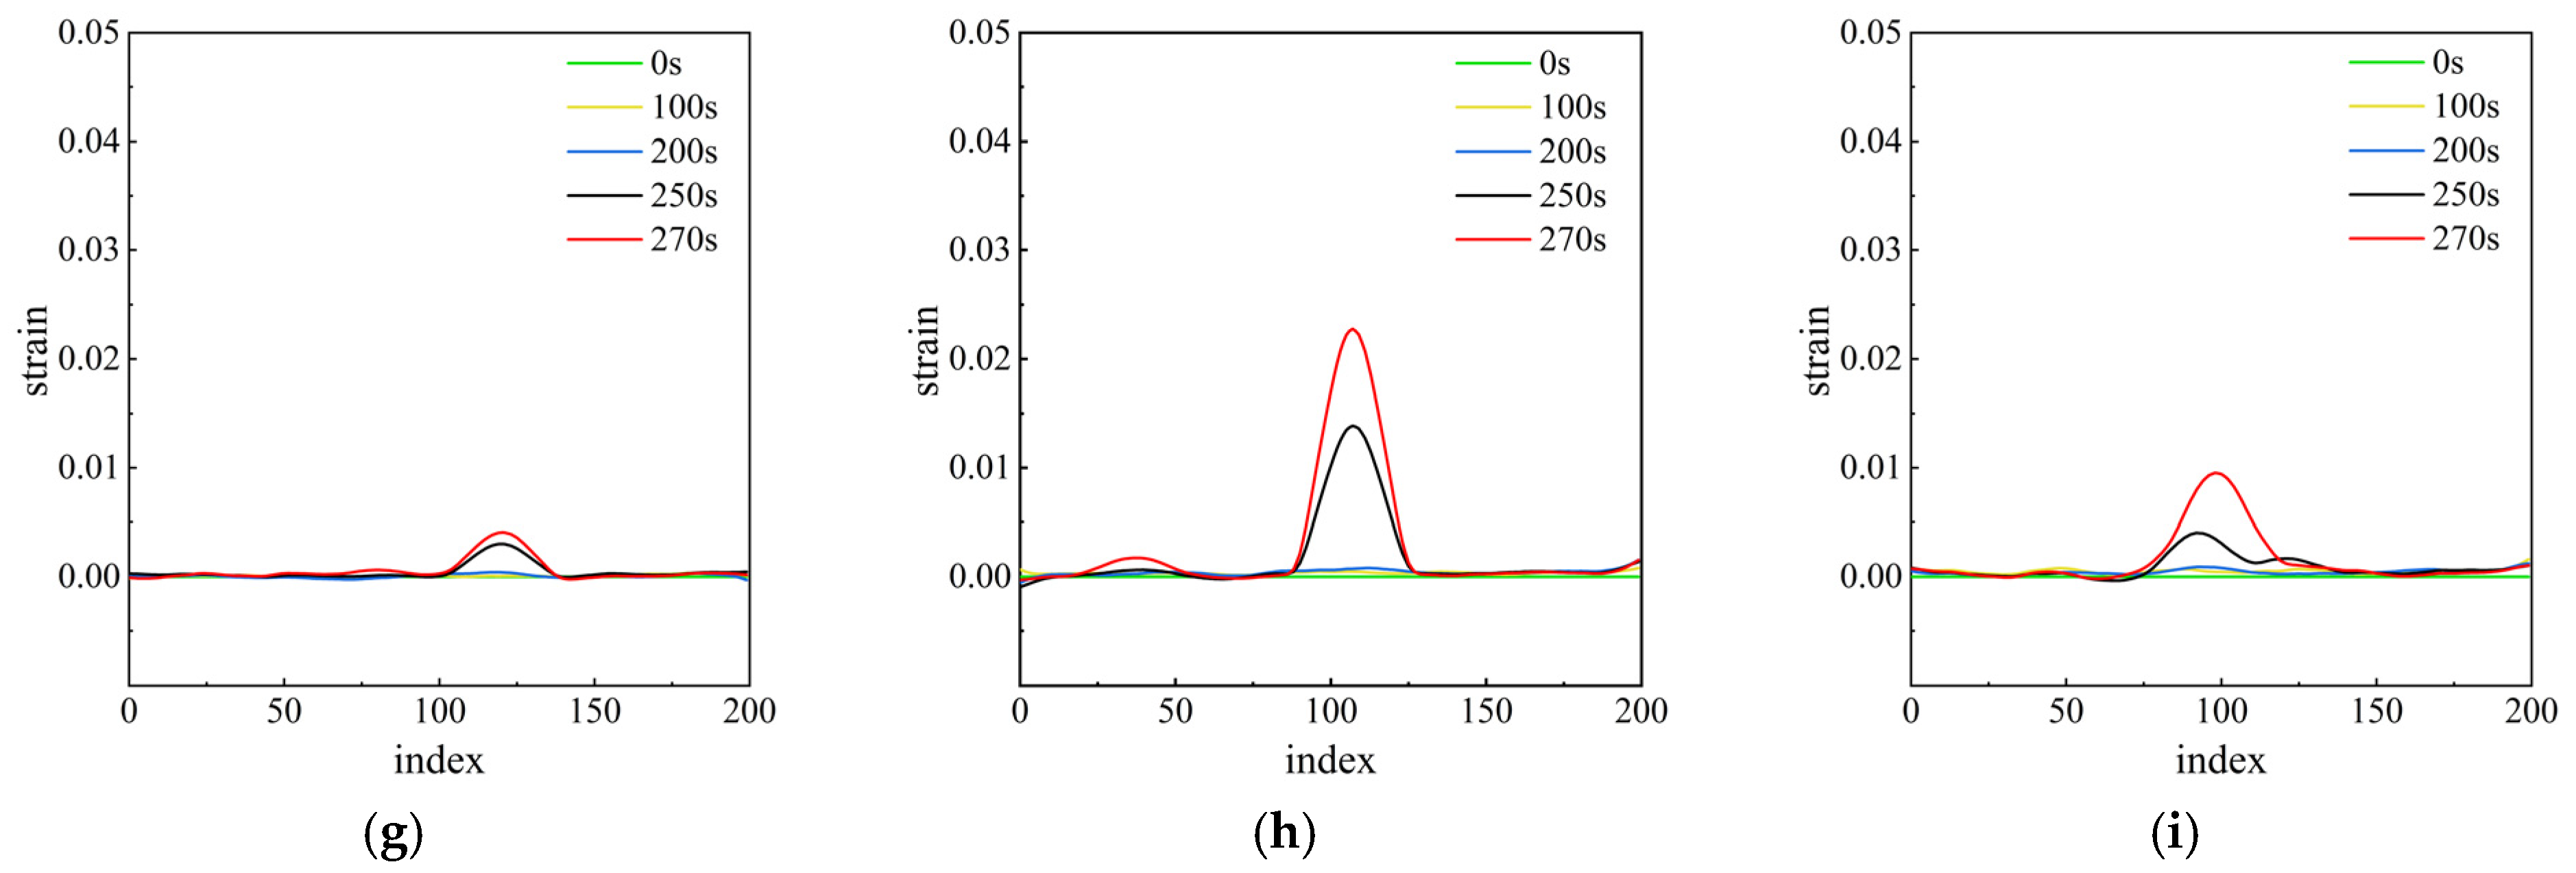
Figure 19a,d present the horizontal-tensile-strain contour maps of specimen CR-S-2. Strain localization is observed along the upper shear plane, as well as at both the bonded interface and the oblique shear plane in the lower region when the applied load reaches its peak value. As loading progresses, these strain concentration zones further expand. Figure 19b,e show the shear strain contour maps of specimen CR-S-2. At the peak load, pronounced strain concentration occurs along the bonded interface and shear plane, with a distinct high-strain region developing near line L1 in the central part of the specimen, where visible cracking can be observed.
Shear strain magnitude and distribution showed no significant changes after peak load. Figure 19c,f present vertical-compression strain contour maps for specimen CR-S-2. No obvious strain localization along the failure interface was detected under peak load, with no significant changes occurring during subsequent loading. Comprehensive strain-field analysis suggests cracks initiated simultaneously in the central region of both the shear plane and adhesive interface. Large crack openings appeared instantly upon crack formation. Cracks extended upward along the adhesive interface while propagating downward along the shear plane as loading continued, eventually penetrating the entire specimen.
Figure 19g–i show horizontal-strain distributions along the L0, L1, and L2 lines for specimen CR-S-2 at different time points. The L2 line strain distribution clearly displayed bimodal morphology, with the primary peak at the oblique shear plane and a secondary peak in the central region. The L0 and L1 line strain distributions exhibited single-peak characteristics: peak strain on the L1 line occurred at the shear plane, while peak strain on the L0 line was located at the adhesive interface. Analysis of strain distribution evolution over time reveals that all distributions remained continuous before 250 s, without fracture phenomena. However, distinct fracture points appeared in the L1 line strain distribution between 250 and 270 s. This behavior indicates that cracks initially formed at the shear plane in the specimen center, subsequently extending toward the upper and lower regions.
Through DIC analysis and quantitative calculations, the average maximum strains in different directions for each specimen were determined. The results are summarized in Table 3. For the CR-I specimens, the average triaxial strains are ranked as follows: εxx (0.0169) > εxy (0.00503) > εyy (0.0018). Both the transverse tensile strain (εxx) and in-plane shear strain (εxy) are substantially greater than the vertical compressive strain (εyy), indicating that the CR-I specimens primarily undergo tensile–shear failure along the bonded interface. For the CR-K specimens, the average triaxial strains follow the order εxx (0.0131) > εxy (0.0063) > εyy (0.0028). Once again, εxx and εxy are considerably larger than εyy, suggesting that the CR-K specimens experience tensile–shear failure predominantly along the characteristic failure interface. In the case of CR-C specimens, the average triaxial strains are ranked as εxx (0.0281) > εxy (0.0094) > εyy (0.0062). Here too, the transverse tensile strain (εxx) and in-plane shear strain (εxy) are markedly higher than the vertical compressive strain (εyy), confirming that the CR-C specimens exhibit tensile–shear failure along the characteristic failure interface as well. For CR-S specimens, the average triaxial strains exhibit the following decreasing order: εxx (0.0232) > εyy (0.0115) > εxy (0.0063). Although εyy is greater than εxy, the strain contour plots reveal that εyy is more diffusely distributed along the specimen height rather than concentrated at the failure interface. This indicates that vertical compressive strain likely originates from overall bending under shear loading and friction confinement effects, rather than being directly associated with the tensile–shear failure path. Concurrently, εxx remains the dominant strain component, clearly localized along the bond interface and shear plane. Therefore, the failure mechanism of CR-S specimens is still primarily governed by tensile action along the shear direction at the characteristic interface, but accompanied by significant vertical compressive deformation.
According to the summary results of maximum strain values under peak load, the highest average maximum strain value across all specimen shapes consistently corresponds to the transverse tensile strain εxx. Among these, CR-C specimens exhibited the largest εxx value, averaging 0.0281. The average maximum strain values for CR-C and CR-S specimens were comparable, both exceeding those of CR-I and CR-K specimens by more than 50%. Although the CR-S specimen exhibited relatively high εyy values, its distribution did not localize along the failure interface. This indicates that the vertical strain likely originated from overall specimen compression and boundary constraints rather than the tensile–shear failure mechanism. Therefore, the failure behavior across all specimen series remained fundamentally dominated by tensile shear, with εxx serving as the primary indicator of interface delamination and shear slip.
Although the CR-S specimen exhibited a relatively high average εyy value, DIC strain cloud mapping revealed that it did not concentrate along the failure interface but instead distributed diffusely along the specimen height. This phenomenon may be attributed to vertical compressive deformation induced by overall specimen compression during shear loading, fixture constraints, and friction effects. Additionally, the notably higher εyy in CR-S specimens compared to other configurations (0.0115 vs. 0.0062 in CR-C) may reflect the combined effects of interface geometry on load distribution and measurement artifacts from the undulating S-shaped profile during DIC analysis. In contrast, εxx and εxy exhibited clear concentration near the bond interface and shear plane, indicating that the tensile–shear mechanism remains the dominant mode governing interfacial failure. Thus, the strain patterns in CR-S specimens reflect a composite loading state: tensile–shear failure occurs at the interface while the specimen as a whole undergoes non-uniform vertical compression. This phenomenon also indicates that when evaluating the failure mechanism of the 3DPM-NM interface, a comprehensive assessment should be made based on both the location of strain concentration and the failure path, rather than relying solely on the magnitude of strain values.
Compared with the CR-S specimens, the CR-C specimens exhibited relatively higher strain levels, while the improvement in peak shear capacity was not as pronounced. For the CR-C specimens, this response can be attributed to the combined effects of stress concentration, crack path development, and interlocking efficiency. The C-shaped interface increases the effective contact area and allows for greater deformation; however, the geometric discontinuities at the curved corners induce localized stress concentrations, which promote early crack initiation. DIC observations indicate that cracks tend to propagate along preferred paths around the C-shaped features, leading to pronounced strain localization without fully mobilizing global shear resistance. Consequently, although the CR-C specimens exhibit enhanced deformation capacity, the efficiency of mechanical interlocking is limited compared with the more continuous engagement provided by the S-shaped interface, resulting in a less significant improvement in shear capacity.

3.3. Comparative Analysis of Reinforced and Non-Reinforced Specimens

A comparative analysis of the peak load and energy dissipation capacity between the CR and NR specimen series was performed to comprehensively assess the influence of reinforcement on the mechanical performance of 3DPM-NM specimens. The experimental data for the non-reinforced specimens were obtained from Reference [30]. For consistency and ease of comparison, the non-reinforced specimens were re-labeled following a unified nomenclature convention: NR/CR–interface shape-specimen number. For instance, NR-S-1 refers to specimen No. 1 with an S-shaped interface in the non-reinforced series. To ensure that the load–displacement curve accurately reflects the specimens shear properties, particularly in the elastic and rising phases, thereby providing a precise basis for subsequent analysis of peak stress, peak strain, and other parameters, the load–displacement curves for CR and NR specimens underwent correction processing.

3.3.1. Peak Load

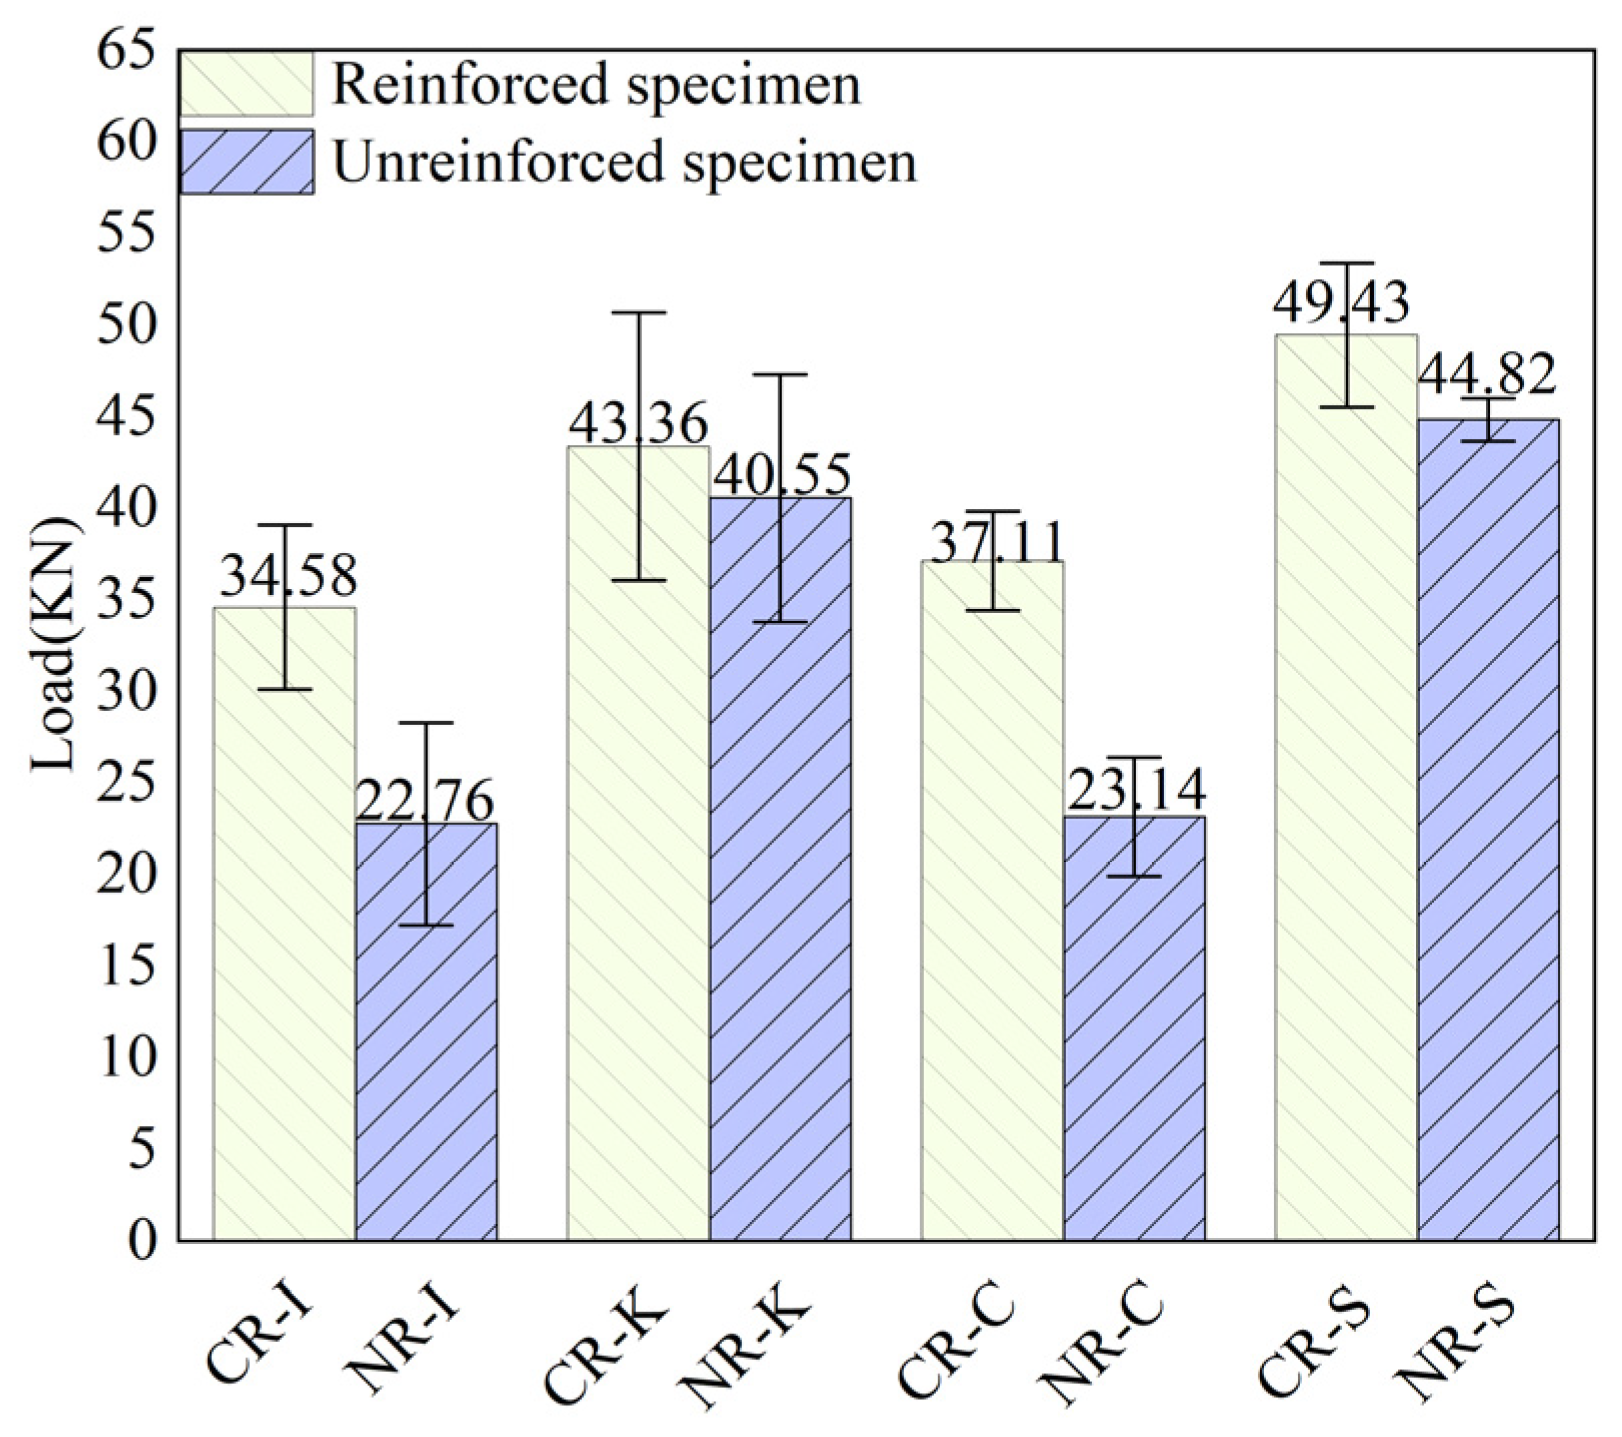
As shown in Figure 20, experimental results reveal that the average peak loads of the CR-I and CR-C specimens show a difference of approximately 7.3%, and reinforcement markedly enhanced their load-bearing performance relative to their unreinforced counterparts. The CR-I specimens showed a 51.9% increase over NR-I, and CR-C achieved a 60.4% increase over NR-C. In contrast, the improvement for CR-K and CR-S was more modest (7% and 10.3%, respectively), as their corresponding unreinforced specimens (NR-K and NR-S) already possessed higher baseline strength due to superior interlocking geometry.
Therefore, even with the relatively small percentage gain from reinforcement, CR-S specimens consistently exhibited the highest absolute shear performance among all reinforced specimens, a direct result of the S-shaped interface providing the strongest inherent mechanical interlocking. This underscores that interfacial design is the primary factor governing peak load, while reinforcement is most effective at boosting the capacity of geometrically simpler, weaker interfaces. Comparative analysis indicates that reinforcement provides pronounced benefits for specimens with relatively simple interfacial locking design, such as the I-shaped and C-shaped configurations. However, despite the substantial improvement, the peak loads of the reinforced CR-I and CR-C specimens remain lower than those of the non-reinforced NR-S and NR-K specimens. This observation underscores the critical role of interfacial geometry in governing the mechanical behavior of 3DPM-NM specimens. Complex interface designs can inherently promote efficient load transfer and stress redistribution, thereby diminishing the relative enhancement gained from additional reinforcement.
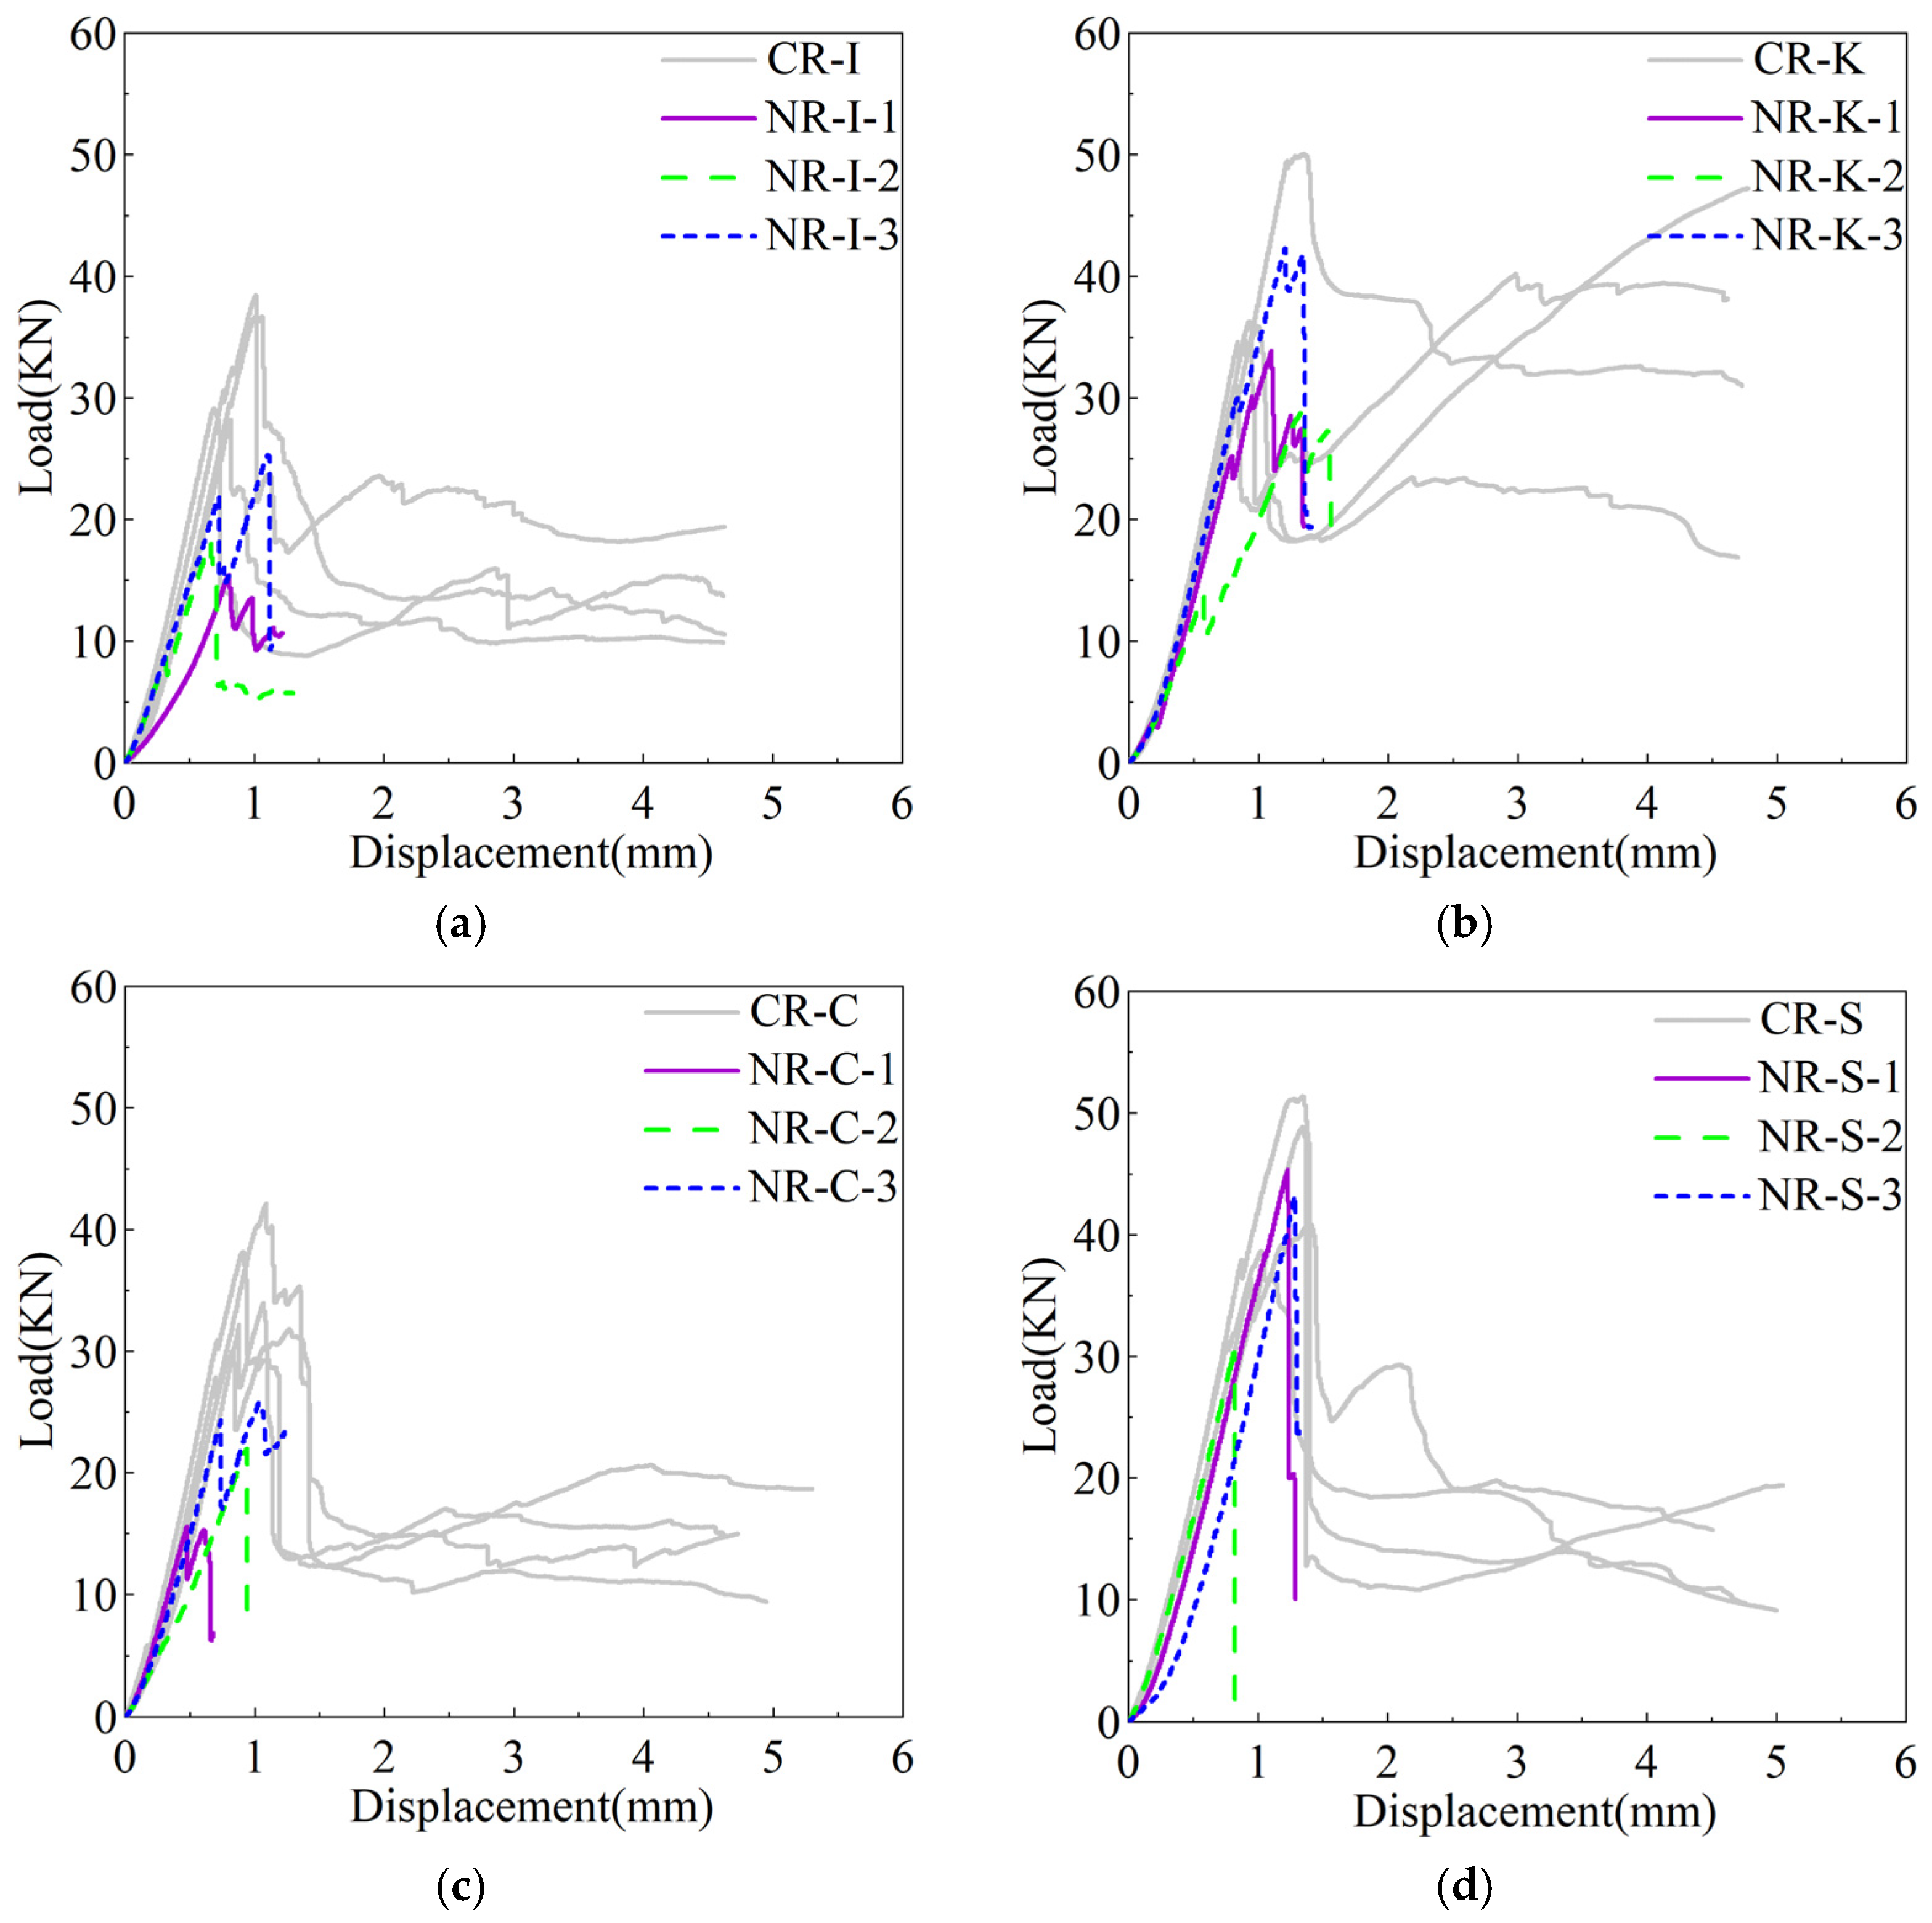
Figure 21a presents load–displacement curves for the CR-I and NR-I specimens. The results show considerable scatter in test data for I-shaped interface specimens. The maximum difference between peak loads for the CR-I and NR-I series approached twice the minimum value. Displacement differences at peak load were also significant, exceeding 1.1 mm. Curve slope comparison shows steel-reinforced CR-I specimens exhibited approximately 10–15% higher stiffness than unreinforced NR-I specimens. Regarding curve morphology, CR-I specimens demonstrated typical single-plateau curves divisible into three distinct stages: ascending stage, descending stage, and fluctuating plateau stage. NR-I specimens experienced immediate brittle failure after reaching peak load, with curves presenting only ascending and descending stages. During late loading stages, CR-I specimens maintained stable deformation with displacement exceeding 4 mm. Peak load for CR-I specimens exceeded that of NR-I specimens by more than 35%. Overall, reinforced I-shaped specimens demonstrated superior structural stability, higher load-bearing capacity, and greater stiffness compared to unreinforced specimens.
Figure 21b shows load–displacement curves for K-shaped interface specimens (CR-K and NR-K) displaying considerable data scatter. The difference between the highest and lowest peak loads exceeded 1.5 times. NR-K specimens also showed large displacement differences at peak load, exceeding 1.5 times. Reinforcement had a limited impact on load-bearing capacity enhancement for K-shaped interface specimens. CR-K and NR-K specimens showed similar stiffness and peak load values. However, reinforcement significantly improved energy dissipation capacity. This improvement resulted from dual enhancement mechanisms introduced by reinforcement: (1) steel bars delayed substrate damage accumulation through interface anchoring, causing partial stiffness recovery in load–displacement curves after sharp load-bearing capacity decline; (2) stress redistribution promoted by reinforcement substantially enhanced energy dissipation capacity, manifested as markedly increased area under the descending portion of load–displacement curves compared to unreinforced specimens. This phenomenon indicates that energy dissipation performance improvement far exceeds peak load-bearing capacity enhancement for reinforced 3DPM-NM specimens with complex interface geometry.
Figure 21c shows load–displacement curve analysis indicating that the difference between the highest and lowest peak loads for CR-C and NR-C specimens exceeded 2.5 times. NR-C specimens showed large peak load displacement differences. CR-C specimens also exhibited significant differences, with values exceeding 1 mm. CR-C and NR-C specimens showed similar initial stiffness. Steel-reinforced CR-C specimens achieved stiffness enhancement not exceeding 5%. Regarding curve characteristics, C-shaped interfaces with smaller notch depths typically showed failure modes and curve evolution consistent with I-shaped specimens. However, unlike I-shaped interface specimens, both CR-C and NR-C specimen load–displacement curves displayed obvious “fracture points” in the ascending segment. This feature represents typical fracture-type curves. During initial loading stages, stress concentration at the notch interface between 3DPM and mortar caused localized interface shear failure, leading to global specimen failure. No through-cracks formed along the adhesive interface during this stage. Specimens retained substantial load-bearing capacity. As interface sliding progressed, CR-C specimens achieved stress redistribution through synergistic action between steel bars and the surrounding substrate. NR-C specimens lacking lateral constraints experienced immediate brittle failure after reaching peak load. This difference highlights reinforcement’s positive role in altering stress transfer mechanisms for specimens with complex interfaces. Reinforcement effectively improved structural energy dissipation capacity and overall deformation ductility by delaying transition from localized damage to global instability.
Figure 21d shows load–displacement curves for reinforced and unreinforced S-shaped specimens, revealing several notable differences. Overall, CR-S and NR-S specimens showed highly consistent initial stiffness and peak load characteristics, with peak load differences controlled within 20%. However, displacement differences corresponding to peak loads were large, with an approximately 2 mm gap between maximum and minimum values. Similarly to in K-shaped specimens, mechanical performance improvements from steel reinforcement in S-shaped specimens primarily manifested as enhanced energy dissipation and ductility rather than increased peak load-bearing capacity.
Analysis indicates that the CR-S specimens’ load–displacement curve envelope area significantly exceeded that of NR-S specimens, demonstrating substantially improved energy dissipation capacity. This enhancement far surpassed improvements observed in K-shaped specimen groups. S-shaped specimens’ exceptional performance stemmed from synergistic effects between unique interface geometry and reinforcement mechanisms. Specifically, undulating S-shaped interfaces effectively delayed relative sliding through mechanical interlocking. Embedded steel bars further restricted microcrack propagation by providing stronger lateral constraints. Combined action promoted stable post-peak deformation and greater energy absorption. Therefore, extending the adhesive interface area more significantly enhances the mechanical performance of 3DPM-NM specimens compared to simply increasing transverse reinforcement.
As shown in Figure 22, a comparison between the C-shaped and S-shaped interfaces further clarifies the role of interface geometry in governing shear behavior. Although both configurations introduce geometric interlocking relative to the planar interface, their load transfer characteristics differ markedly. For the C-shaped interface, stress concentration tends to develop near the curvature transition zones, which promotes early crack initiation and limits the effective mobilization of interfacial friction and interlocking. As a result, relatively large deformation may occur without a proportional increase in shear capacity. In contrast, the S-shaped interface provides a more continuous and symmetric load transfer path along the interface. This geometry allows shear resistance to be mobilized more uniformly over the interfacial length, thereby delaying crack localization and promoting progressive crack development. Consequently, the S-shaped interface exhibits not only higher shear capacity but also a more stable post-peak response compared with the C-shaped interface. These observations indicate that, while both geometries enhance interfacial deformation capacity, the S-shaped configuration achieves higher interlocking efficiency and more effective stress redistribution under shear loading.
Similar trends have been reported in previous studies employing self-locking or curved interfacial geometries, where S-shaped or wave-like interfaces exhibited enhanced shear capacity and improved deformation performance compared with straight or angular interfaces [35]. These studies attributed the improved behavior primarily to geometric interlocking and redistributed stress paths, rather than changes in material properties. The present results are consistent with these findings, confirming that curved interfacial geometries can effectively enhance interface shear resistance.

3.3.2. Energy Dissipation Capacity

In this study, the energy dissipation capacity is defined as the energy absorbed during the shear process, which is quantified by the area under the shear stress–displacement curve up to the peak shear stress. This parameter reflects the ability of the interface to undergo deformation while maintaining load transfer and is used to compare the deformation and damage tolerance of different specimen series. The calculation example is shown in Figure 14. For data processing, absorbed energy W for CR was defined as the area enclosed by load–displacement curves, vertical axis (x = 0), horizontal axis (y = 0), and horizontal line at displacement x = 3 mm. For NR specimens, W was determined by the area enclosed by load-displacement curves, vertical axis (x = 0), horizontal axis (y = 0), and the point corresponding to peak load. Specifically, pre-peak absorbed energy (W0) was obtained through envelope curve integration at peak load. Post-peak absorbed energy (W1) was calculated through envelope curve integration from the peak load initiation point to 3 mm displacement. For NR specimens exhibiting brittle failure characteristics, post-peak absorbed energy (W1) remained consistently zero, as shown in Formulas (11) and (12).
W 0 = S I
W 1 = S I + S II + S III
Table 4 summarizes detailed energy absorption parameters for each specimen, including total absorbed energy (W), average absorbed energy ( W ¯ ), and component parts: pre-peak absorbed energy (W0) and post-peak absorbed energy (W1), along with corresponding average values ( W 0 ¯ and   W 1 ¯ ). From an energy absorption perspective, average absorbed energy ( W ¯ ) for four reinforced specimen types showed distinct differences, ranked in descending order: CR-K > CR-S > CR-C > CR-I. Specifically, W ¯ values for CR-K specimens exceeded CR-S, CR-C, and CR-I specimens by 21.21%, 47.66%, and 60.15%, respectively. Energy absorption distribution analysis indicates that the proportion of W1 in the CR-I, CR-K, CR-C, and CR-S specimens reached 68.65%, 64.86%, 46.36%, and 46.11%, respectively. Although CR-K specimens showed slightly lower peak load and stability than CR-S specimens, exceptional post-peak energy dissipation capacity yielded superior overall energy absorption performance. Conversely, CR-S specimens demonstrated lower total absorbed energy but concentrated energy primarily in the pre-peak stage. This concentration indicates more stable deformation processes and stronger structural integrity during loading.
NR specimens exhibited decreasing average absorbed energy ( W ¯ ) in the following order: NR-K > NR-S > NR-C > NR-I. Specifically, W ¯ values for NR-K specimens exceeded NR-S, NR-C, and NR-I specimens by 23.29%, 133.96%, and 149.42%, respectively. Reinforcement treatment substantially enhanced the energy absorption capacity of CR specimens relative to the NR series. The W 0 ¯ enhancement magnitude ranking is as follows: CR-C (+164.67%) > CR-S (+70.70%) > CR-I (+52.05%) > CR-K (+9.42%). Although CR-K specimens achieved the highest absolute energy dissipation values, relative improvement from reinforcement materials remained minimal. Further analysis revealed that reinforcement treatment most significantly improved energy absorption behavior for CR-S specimens during the load ascending stage. Combined with geometric advantages from undulating interfaces, CR-S specimens ultimately demonstrated optimal overall shear performance.

4. Conclusions

This study presents a systematic experimental investigation on the interfacial shear behavior of reinforced 3DPM–NM composite specimens, with particular emphasis on the role of interfacial locking geometry. Direct shear tests were conducted on reinforced specimens incorporating four representative interfacial locking designs (I-shaped, K-shaped, C-shaped, and S-shaped), which can be precisely fabricated using 3D printing technology. This integrated approach enables a direct evaluation of how interface geometry and reinforcement jointly govern shear resistance, failure mechanisms, and energy dissipation, representing a key technical contribution of this study.
(1) Average peak load ( P μ ¯ ) ranked in order: CR-S > CR-K > CR-C > CR-I. CR-S specimens demonstrated peak loads 42.9% higher than the control group (CR-I). Similarly, average displacement at peak load ( Δ μ ¯ ) followed the sequence CR-S > CR-C > CR-K > CR-I. CR-S specimens showed displacements 80.5% greater than CR-I. CR-S specimens exhibited superior performance overall, benefiting from undulating adhesive interface geometry. This configuration increased the adhesive area and improved load transfer efficiency, thereby enhancing the mechanical properties of 3DPM-NM specimens.
(2) Two distinct failure modes were observed: adhesive failure (CR-I) and combined adhesive–shear failure (CR-K, CR-C, CR-S). Based on the failure characteristics and peak load results of the 3DPM-NM specimens, a shear-bearing capacity calculation model for these specimens was derived, yielding a simplified formula. The calculated load-bearing capacities showed good agreement with the experimental results. The mean ratio of calculated values to test values ( V c / V t ¯ ) ranges from 0.94 to 1.00. The load-displacement curve indicates that the CR-S and CR-K series exhibited higher load-bearing capacity than the control group, CR-I.
(3) CR-S and CR-K series achieved substantially higher load-bearing capacities than the control group (CR-I). Strain analysis revealed stress concentration at adhesive interfaces in I-shaped specimens. K-shaped, C-shaped, and S-shaped specimens showed stress concentrations at both interfaces and shear planes. The maximum strain components εxx at peak load for the four series specimens were CR-C (0.0281) > CR-S (0.0232) > CR-I (0.0169) > CR-K (0.0131), indicating that CR-C and CR-S exhibit superior deformation capacity and more effective interfacial stress distribution.
(4) Comparison between CR specimens and unreinforced (NR) specimens revealed substantial performance improvements in the CR series. Peak load enhancement proved most pronounced in I-shaped and C-shaped specimens, increasing by 51.9% and 60.4%, respectively. The energy dissipation capacity of the CR series increased, with average absorbed energy improvements ranking as follows: CR-C (+164.67%) > CR-S (+70.70%) > CR-I (+52.05%) > CR-K (+9.42%).

Author Contributions

Conceptualization, C.S. and Y.L.; methodology, C.S.; formal analysis, C.S.; investigation, Z.C., Q.L., L.L. and A.S.; resources, C.S. and Y.L.; writing—original draft preparation, Z.C.; writing—review and editing, C.S. and Y.L.; visualization, Z.C.; supervision, C.S., Y.L., L.L. and Q.L.; project administration, C.S.; funding acquisition, C.S. All authors have read and agreed to the published version of the manuscript.

Funding

This research was funded by the National Natural Science Foundation of China, grant number 52478187.

Data Availability Statement

The original contributions presented in this study are included in the article. Further inquiries can be directed to the corresponding author.

Conflicts of Interest

The authors declare no conflicts of interest.

References

  1. Lim, S.; Buswell, R.A.; Le, T.T.; Austin, S.A.; Gibb, A.G.F.; Thorpe, T. Developments in construction-scale additive manufacturing processes. Autom. Constr. 2012, 21, 262–268. [Google Scholar] [CrossRef]
  2. Kharat, V.J.; Singh, P.; Raju, G.S.; Yadav, D.K.; Satyanarayana, M.; Arun, V.; Majeed, A.H.; Singh, N. Additive manufacturing (3D printing): A review of materials, methods, applications and challenges. Mater. Today Proc. 2023; in press. [Google Scholar] [CrossRef]
  3. De Schutter, G.; Lesage, K.; Mechtcherine, V.; Nerella, V.N.; Habert, G.; Agusti-Juan, I. Vision of 3D printing with concrete—Technical, economic and environmental potentials. Cem. Concr. Res. 2018, 112, 25–36. [Google Scholar] [CrossRef]
  4. Takva, Ç.; Top, S.M.; Gökgöz, B.İ.; Gebel, Ş.; İlerisoy, Z.Y.; İlcan, H.; Şahmaran, M. Applicability of 3D concrete printing technology in building construction with different architectural design decisions in housing. J. Build. Eng. 2024, 98, 111257. [Google Scholar] [CrossRef]
  5. Anton, A.; Reiter, L.; Wangler, T.; Frangez, V.; Flatt, R.J.; Dillenburger, B. A 3D concrete printing prefabrication platform for bespoke columns. Autom. Constr. 2021, 122, 103467. [Google Scholar] [CrossRef]
  6. Murad, Y.; Abu-AlHaj, T. Novel 3D printed bars for retrofitting heat damaged RC beams. Structures 2021, 34, 3427–3435. [Google Scholar] [CrossRef]
  7. Ahmed, G.H. A review of “3D concrete printing”: Materials and process characterization, economic considerations and environmental sustainability. J. Build. Eng. 2023, 66, 105863. [Google Scholar] [CrossRef]
  8. Ma, G.; Li, Z.; Wang, L. Printable properties of cementitious material containing copper tailings for extrusion based 3D printing. Constr. Build. Mater. 2018, 162, 613–627. [Google Scholar] [CrossRef]
  9. Sanjayan, J.G.; Nematollahi, B.; Xia, M.; Marchment, T. Effect of surface moisture on inter-layer strength of 3D printed concrete. Constr. Build. Mater. 2018, 172, 468–475. [Google Scholar] [CrossRef]
  10. Ma, G.; Li, Z.; Wang, L.; Wang, F.; Sanjayan, J. Mechanical anisotropy of aligned fiber reinforced composite for extrusion-based 3D printing. Constr. Build. Mater. 2019, 202, 770–783. [Google Scholar] [CrossRef]
  11. Mohamed, O.; Mishra, A.; Isam, F. An overview of 3D printed concrete for building structures: Material properties, sustainability, future opportunities, and challenges. Structures 2025, 78, 109284. [Google Scholar] [CrossRef]
  12. Khan, M.S.; Sanchez, F.; Zhou, H. 3-D printing of concrete: Beyond horizons. Cem. Concr. Res. 2020, 133, 106070. [Google Scholar] [CrossRef]
  13. Geng, Z.; She, W.; Zuo, W.; Lyu, K.; Pan, H.; Zhang, Y.; Miao, C. Layer-interface properties in 3D printed concrete: Dual hierarchical structure and micromechanical characterization. Cem. Concr. Res. 2020, 138, 106220. [Google Scholar] [CrossRef]
  14. Di Carlo, T.; Khoshnevis, B.; Carlson, A. Experimental and Numerical Techniques to Characterize Structural Properties of Fresh Concrete, ASME International Mechanical Engineering Congress and Exposition. In Proceedings of the ASME 2014 International Mechanical Engineering Congress and Exposition (IMECE2014); American Society of Mechanical Engineers: New York, NY, USA, 2014. [Google Scholar] [CrossRef]
  15. Singh, A.; Liu, Q.; Xiao, J.; Lyu, Q. Mechanical and macrostructural properties of 3D printed concrete dosed with steel fibers under different loading direction. Constr. Build. Mater. 2022, 323, 126616. [Google Scholar] [CrossRef]
  16. Moelich, G.M.; Kruger, J.; Combrinck, R. Modelling the interlayer bond strength of 3D printed concrete with surface moisture. Cem. Concr. Res. 2021, 150, 106559. [Google Scholar] [CrossRef]
  17. Thamboo, J.A.; Dhanasekar, M.; Yan, C. Flexural and shear bond characteristics of thin layer polymer cement mortared concrete masonry. Constr. Build. Mater. 2013, 46, 104–113. [Google Scholar] [CrossRef]
  18. Wang, H.; Jin, K.; Tao, J. Improving the interfacial shear strength of carbon fibre and epoxy via mechanical interlocking effect. Compos. Sci. Technol. 2020, 200, 108423. [Google Scholar] [CrossRef]
  19. Javan, A.R.; Seifi, H.; Lin, X.; Xie, Y.M. Mechanical behaviour of composite structures made of topologically interlocking concrete bricks with soft interfaces. Mater. Des. 2020, 186, 108347. [Google Scholar] [CrossRef]
  20. Hamilton, A.; Xu, Y.; Kartal, M.E.; Gadegaard, N.; Mulvihill, D.M. Enhancing strength and toughness of adhesive joints via micro-structured mechanical interlocking. Int. J. Adhes. Adhes. 2021, 105, 102775. [Google Scholar] [CrossRef]
  21. Singh, A.; Wang, Y.; Zhou, Y.; Sun, J.; Xu, X.; Li, Y.; Liu, Z.; Chen, J.; Wang, X. Utilization of antimony tailings in fiber-reinforced 3D printed concrete: A sustainable approach for construction materials. Constr. Build. Mater. 2023, 408, 133689. [Google Scholar] [CrossRef]
  22. Rahul, A.V.; Santhanam, M.; Meena, H.; Ghani, Z. Mechanical characterization of 3D printable concrete. Constr. Build. Mater. 2019, 227, 116710. [Google Scholar] [CrossRef]
  23. Liu, Z.; Wang, Z.; Wang, L.; Zhao, X. Interlayer Bond Strength of 3D Printing Cement Paste by Cross-Bonded Method. Kuei Suan Jen Hsueh Pao/J. Chin. Ceram. Soc. 2019, 47, 648–652. [Google Scholar] [CrossRef]
  24. Sun, X.; Ye, B.; Lin, K.; Wang, H. Shear performance of 3D printed concrete reinforced with flexible or rigid materials based on direct shear test. J. Build. Eng. 2022, 48, 103860. [Google Scholar] [CrossRef]
  25. Wang, H.; Shao, J.; Zhang, J.; Zou, D.; Sun, X. Bond shear performances and constitutive model of interfaces between vertical and horizontal filaments of 3D printed concrete. Constr. Build. Mater. 2022, 316, 125819. [Google Scholar] [CrossRef]
  26. Wang, L.; Liu, Y.; Yang, Y.; Li, Y.; Bai, M. Bonding performance of 3D printing concrete with self-locking interfaces exposed to compression–shear and compression–splitting stresses. Addit. Manuf. 2021, 42, 101992. [Google Scholar] [CrossRef]
  27. Yang, Q.; Yu, P.; Law, S.S. Load resisting mechanism of the mortise-tenon connection with gaps under in-plane forces and moments. Eng. Struct. 2020, 219, 110755. [Google Scholar] [CrossRef]
  28. Liu, C.; Zhang, Y.; Liu, H.; Wu, Y.; Yu, S.; He, C.; Liang, Z. Interlayer reinforced 3D printed concrete with recycled coarse aggregate: Shear properties and enhancement methods. Addit. Manuf. 2024, 94, 104507. [Google Scholar] [CrossRef]
  29. Shahzad, Q.; Li, F. Interfacial bond effects on the shear strength and damage in 3D-printed concrete structures: A combined experimental and numerical study. Eng. Fract. Mech. 2025, 315, 110840. [Google Scholar] [CrossRef]
  30. Sun, C.; Zhao, H.; Liu, Q.; Pan, F. Shear behavior of 3DPM-NM specimens with different interfacial locking designs. Constr. Build. Mater. 2024, 425, 136021. [Google Scholar] [CrossRef]
  31. GB 50367-2013; Code for Design of Reinforcement of Concrete Structures. The National Standards of the People’s Republic of China: Beijing, China, 2013.
  32. GB/T 11253-2019; Cold-Rolled Carbon Structural Steel Plates and Strips. The National Standards of the People’s Republic of China: Beijing, China, 2019.
  33. Tian, J.; Wu, X.; Zheng, Y.; Hu, S.; Du, Y.; Wang, W.; Sun, C.; Zhang, L. Investigation of interface shear properties and mechanical model between ECC and concrete. Constr. Build. Mater. 2019, 223, 12–27. [Google Scholar] [CrossRef]
  34. Zhang, X.; Hao, H.; Zheng, J.; Hernandez, F. The mechanical performance of concrete shear key for prefabricated structures. Adv. Struct. Eng. 2021, 24, 291–306. [Google Scholar] [CrossRef]
  35. AASHTO GSCB-2-M; Guide Specifications for Design and Construction of Segmental Concrete Bridges, 2nd Edition, and 2003 Interim. American Association of State Highway and Transportation Officials: Washington, DC, USA, 1999.
Figure 1. 3D Printing head.
Buildings 16 00626 g001
Figure 2. Experimental flowchart.
Buildings 16 00626 g002
Figure 3. The dimensions and reinforcements of specimens. (a) I-shaped; (b) K-shaped; (c) C-shaped; (d) S-shaped; (e) specimen dimensions and wire arrangement diagram.
Buildings 16 00626 g003
Figure 4. Schematic diagram of fixture.
Buildings 16 00626 g004
Figure 5. Comparison of ultimate loads and displacements of different specimens. (a) Ultimate loads of different specimens; (b) displacements of different specimens.
Buildings 16 00626 g005
Figure 6. Typical failure modes of 3DPM-NM specimens. (a) Mode I; (b) Mode II.
Buildings 16 00626 g006
Figure 7. Strut-and-tie model of the joint under direct shear loading.
Buildings 16 00626 g007
Figure 8. Mohr’s circle description of the stress state in the member near the shear plane.
Buildings 16 00626 g008
Figure 9. Failure mechanism of CR-I series specimens. (a) CR-I-1; (b) CR-I-2; (c) CR-I-3; (d) CR-I-4; (e) failure photograph of CR-I-1; (f) failure photograph of CR-I-2; (g) failure photograph of CR-I-3; (h) failure photograph of CR-I-4.
Buildings 16 00626 g009
Figure 10. Failure mechanism of CR-K series specimens. (a) CR-K-1; (b) CR-K-2; (c) CR-K-3; (d) CR-K-4; (e) failure photograph of CR-K-1; (f) failure photograph of CR-K-2; (g) failure photograph of CR-K-3; (h) failure photograph of CR-K-4.
Buildings 16 00626 g010
Figure 11. Failure mechanism of CR-C series specimens. (a) CR-C-1; (b) CR-C-2; (c) CR-C-3; (d) CR-C-4; (e) failure photograph of CR-C-1; (f) failure photograph of CR-C-2; (g) failure photograph of CR-C-3; (h) failure photograph of CR-C-4.
Buildings 16 00626 g011
Figure 12. Failure mechanism of CR-S series specimens. (a) CR-S-1; (b) CR-S-2; (c) CR-S-3; (d) CR-S-4; (e) failure photograph of CR-S-1; (f) failure photograph of CR-S-2; (g) failure photograph of CR-S-3; (h) failure photograph of CR-S-4.
Buildings 16 00626 g012
Figure 13. Load–displacement curve graphs of different specimens. (a) I-shaped; (b) K-shaped; (c) C-shaped; (d) S-shaped.
Buildings 16 00626 g013
Figure 14. Load–displacement characteristic curve graphs of different specimens. (a) Basic type; (b) fracture type.
Buildings 16 00626 g014
Figure 15. Analysis method for shear cracking characteristics using DIC. (a) Schematic diagram of DIC computational principle; (b) Load–displacement curve with characteristic points.
Buildings 16 00626 g015
Figure 16. Crack evolution characteristics of CR-I-1. (a) εxx direction at point A; (b) εxy direction at point A; (c) εyy direction at point A; (d) εxx direction at point B; (e) εxy direction at point B; (f) εyy direction at point B; (g) L0 in specimen CR-I-1; (h) L1 in specimen CR-I-1; (i) L2 in specimen CR-I-1.
Buildings 16 00626 g016
Figure 17. Crack evolution characteristics of CR-K-1. (a) εxx direction at point A; (b) εxy direction at point A; (c) εyy direction at point A; (d) εxx direction at point B; (e) εxy direction at point B; (f) εyy direction at point B; (g) L0 in specimen CR-K-1; (h) L1 in specimen CR-K-1; (i) L2 in specimen CR-K-1.
Buildings 16 00626 g017
Figure 18. Crack evolution characteristics of CR-C-3. (a) εxx direction at point A; (b) εxy direction at point A; (c) εyy direction at point A; (d) εxx direction at point B; (e) εxy direction at point B; (f) εyy direction at point B; (g) L0 in specimen CR-C-3; (h) L1 in specimen CR-C-3; (i) L2 in specimen CR-C-3.
Buildings 16 00626 g018aBuildings 16 00626 g018b
Figure 19. Crack evolution characteristics of CR-S-2. (a) εxx direction at point A; (b) εxy direction at point A; (c) εyy direction at point A; (d) εxx direction at point B; (e) εxy direction at point B; (f) εyy direction at point B; (g) L0 in specimen CR-S-2; (h) L1 in specimen CR-S-2; (i) L2 in specimen CR-S-2.
Buildings 16 00626 g019
Figure 20. Comparison of mean peak loads between CR and NR specimens.
Buildings 16 00626 g020
Figure 21. Load–displacement curves of CR and NR specimens with different interfaces. (a) I-shaped; (b) K-shaped; (c) C-shaped; (d) S-shaped.
Buildings 16 00626 g021
Figure 22. Comparison of S-Shaped and C-Shaped failure. (a) CR-C; (b) CR-S.
Buildings 16 00626 g022
Table 1. Mix proportions of 3DPM (unit: kg/m3).
CementSandSFWaterDefHPMCSPNCSG
3DPM1000100023026011151
Table 2. Comparison between calculated and experimental results.
Series A c v
(mm2)
A 1 (mm2) A 2 (mm2) V c (kN) V t (kN) V c / V t V c / V t ¯
CR-I-140000032.5637.550.870.95
CR-I-23200080033.6929.431.14
CR-I-340000032.5640.350.81
CR-I-440000032.5631.091.05
CR-K-10800341738.5637.021.041.00
CR-K-20800341738.5632.431.19
CR-K-30800341738.5651.390.75
CR-K-42480400170939.2137.021.06
CR-C-126681333031.7833.010.960.94
CR-C-226681333031.7837.650.84
CR-C-326681333031.7830.401.05
CR-C-426681333031.7837.100.86
CR-S-160000047.7352.340.910.98
CR-S-260000047.7353.370.89
CR-S-360000047.7348.700.98
CR-S-440002000046.5641.291.13
Table 3. Average maximum strains of four specimen series at peak load.
Seriesεxx εxy εyy
CR-I0.01690.00500.0018
CR-K0.01310.00630.0028
CR-C0.02810.00940.0062
CR-S0.02320.00630.0115
Table 4. Energy dissipation of all specimens.
Series W 0
(kN·mm)
W 0 ¯
(kN·mm)
W 1
(kN·mm)
W 1 ¯
(kN·mm)
W
(kN·mm)
W ¯
(kN·mm)
CR-I-1 18.7214.4942.2831.7361.0046.22
CR-I-2 9.7530.1939.94
CR-I-3 18.7730.9649.73
CR-I-4 10.7023.5134.21
NR-I-1 7.369.530.000.007.369.53
NR-I-2 6.250.006.25
NR-I-3 14.980.0014.98
CR-K-1 21.8526.0145.7248.0167.5774.02
CR-K-2 19.8758.8678.73
CR-K-3 44.2547.7291.97
CR-K-4 18.0639.7457.80
NR-K-1 23.8523.770.000.0023.8523.77
NR-K-2 23.960.0023.96
NR-K-3 23.500.0023.50
CR-C-1 24.7326.8925.9423.2450.6750.13
CR-C-2 18.8828.0046.88
CR-C-3 28.3618.0846.44
CR-C-4 35.5820.9356.51
NR-C-1 5.8410.160.000.005.8410.16
NR-C-2 9.430.009.43
NR-C-3 15.340.0015.34
CR-S-1 32.3332.9137.1828.1669.5161.07
CR-S-2 32.6619.4252.08
CR-S-3 38.3222.9761.29
CR-S-4 28.3333.0661.39
NR-S-1 25.3219.280.000.0025.3219.28
NR-S-2 10.890.0010.89
NR-S-3 21.640.0021.64
Disclaimer/Publisher’s Note: The statements, opinions and data contained in all publications are solely those of the individual author(s) and contributor(s) and not of MDPI and/or the editor(s). MDPI and/or the editor(s) disclaim responsibility for any injury to people or property resulting from any ideas, methods, instructions or products referred to in the content.