Article

Welding Residual Stress and Deformation of T-Joints in Large Steel Structural Modules

1
School of Civil Engineering, Qingdao University of Technology, Qingdao 266520, China
2
School of Ocean Engineering, Harbin Institute of Technology, Weihai 264209, China
3
School of Civil Engineering, Yantai University, Yantai 264005, China
4
Qingdao Guogong Industrial Advanced Materials Co., Ltd., Qingdao 266011, China
5
China Nuclear Industry 24 Construction Co., Ltd., Sanhe 065201, China
*
Author to whom correspondence should be addressed.
Buildings 2026, 16(1), 153; https://doi.org/10.3390/buildings16010153 (registering DOI)
Submission received: 25 November 2025 / Revised: 17 December 2025 / Accepted: 26 December 2025 / Published: 29 December 2025
(This article belongs to the Section Building Structures)

Abstract

To reduce the computational cost associated with traditional moving heat source methods, a segmented approach is proposed for simulating the welding process of T-joints in large-scale infrastructure steel modules. Firstly, the hole-drilling method was employed to measure the welding residual stresses in a 2400 mm T-joint. Subsequently, a three-dimensional finite element model was established in ABAQUS, and a user-defined subroutine for the segmented moving heat source was developed in Fortran to calculate the welding residual stresses. The numerical simulation results were compared with experimental data, showing high consistency and further validating the accuracy of the finite element model. Furthermore, the distribution patterns of residual stresses along the thickness direction and the effects of different welding sequences on temperature, stress, and deformation were investigated to optimize the welding sequence. The results indicated that the residual stresses along the weld seam exhibited a compressive–tensile–compressive distribution, with the maximum tensile stress reaching approximately 347 MPa. Additionally, the simulation results demonstrated that the double-ellipsoidal heat source method was computationally intensive and failed to provide accurate results for long weld seams, whereas the segmented moving heat source approach reduced the computation time to only 38 h. Moreover, different welding sequences had a significant impact on residual stresses and deformation. Through comprehensive analysis, it was found that Case 1 (sequential welding in the forward direction) achieved the best performance in minimizing welding residual stresses and deformation.

1. Introduction

Welding deformation and residual stress are critical factors influencing the successful fabrication of large-scale steel structural modules [1,2,3,4,5]. These stresses originate from non-uniform thermal distribution during welding, which may lead to structural fracture, material fatigue, and even catastrophic failure [6,7,8]. Therefore, investigating welding-induced residual stresses in T-joint connections in large infrastructure steel modules is imperative [9,10,11,12].
The growing adoption of numerical simulation techniques has enabled scholars to analyze the distribution and formation mechanisms of welding residual stress across diverse structures. Yan [13] conducted a study on residual welding stress in T-shaped corrugated steel web plates using an approach combining a drilling method and double-ellipsoidal heat source. Mehran G [14] found that the influence of boundary conditions on the deformation and residual stress of high-strength steel (S700) T-joints was more significant than that of the welding sequence. Ding’s [15] investigation into DH36 steel T-joints demonstrated that the welding sequence significantly affected both residual stress and deformation. Furthermore, restraint conditions were shown to have a more substantial influence, specifically on deformation. Zhang [16] systematically examined how weld bead distribution affects residual stress using ABAQUS simulations. Chen’s research [17] identified the governing relationship between heat input and residual stress through an analysis of 316 L stainless steel T-joints using a double-ellipsoidal heat source model. Rong’s research [18] revealed the correlation between welding sequences and residual stress in laser-arc hybrid welded T-joints, based on simulations with a heat source model whose accuracy was validated through experimental data. Perić M [19] investigated the thermal and mechanical response of thick-walled T-joints via a coupled experimental–numerical approach. The study confirmed the model’s accuracy based on the agreement between simulated and measured temperature, deflection, and residual stress. Ahmed H [20] employed both the double-ellipsoidal and Gaussian conical heat source models to calculate the residual stress in fully penetrated T-joints produced by laser–arc hybrid welding. The research further examined how different welding sequences affect deformation and residual stress.
The above studies all use the thermomechanical method combined with the moving heat source approach, which has low computational efficiency when dealing with large-scale, multi-weld complex structures. The inherent strain method, due to its ability to quickly predict welding deformation, is widely used for large-scale structures. Jaemin L [21] used unit plastic strain values in the HAZ region to extract thermal strain values layer by layer, considering the inherent strain effects between different weld passes. Li [22] proposed a non-uniform variant (IHISM) to calculate deformation in long welds, with its accuracy verified via TEP analysis. Shen [23] developed an approach by integrating the inherent strain method with an artificial immune algorithm to identify the optimal double-sided welding sequence for small ship components. Busari [24] comparatively studied S460 steel welding deformation using thermo-elastic–plastic and inherent strain methods. The latter approach offered significantly higher computational efficiency, requiring only 93.9% of the processing time of the former, at the expense of an approximate 8% discrepancy from experimental measurements.
Although the inherent strain method can quickly assess welding deformation, it has limitations in simulating the post-weld stress field. To address this, researchers have redeveloped heat source models and constructed more adaptable models to achieve faster and more accurate calculations. Vito [25] developed a moving equivalent volumetric heat source, which is a combination of two differently sized, hourglass-shaped heat sources, aiming to calculate the laser joining of tailor-welded blanks (TWBs) of varying thicknesses. Farias [26] proposed two variable cross-section heat source models to formulate the GMAW process for butt joints. The results showed that these new models provided better calculations compared to traditional models (such as the conical and double-ellipsoid heat sources). Jiao [27] derived a hyperbolic curvature cone heat source model, which not only can be applied to welds with different curvature sections but also improves simulation efficiency.
As reported in [28], the temperature field transitions to exhibit clear banded characteristics when the welding speed surpasses 2 mm/s. This observation suggests that, for large-scale structures, adopting a segmented moving heat source method can enhance the efficiency of numerical simulations. In practice, Wang [29] employed this segmented source approach to predict welding deformation in large pipeline structures. Similarly, the method has found application in additive manufacturing, as demonstrated by Wu [30] in simulating the laser powder bed fusion process.
Existing research has predominantly focused on analyzing residual stresses and deformation characteristics in small-scale T-joints using moving heat source methods. However, large-scale steel structural components are prevalent in actual engineering projects. This significant disparity between “specimen scale and reality” highlights engineering’s urgent need for research on welding residual stresses in full-scale steel structures. This study presents an integrated experimental–numerical analysis of residual stress and deformation in T-joints for a large infrastructure steel module. The methodology commenced with on-site residual stress quantification via the hole-drilling technique. In the numerical phase, a segmented moving heat source model, executed through a user subroutine (DFLUX) in ABAQUS, was employed for simulation, with its accuracy verified against experimental data. Subsequent numerical investigations focused on the through-thickness distribution of residual stress and the comparative effects of four welding sequences on the thermal and structural response. Case 1 (forward continuous welding) was identified as optimal, effectively minimizing residual stress and deformation for enhanced practicality in long-seam welding. Future work may address the application of the segmented heat source in simulations of geometrically complex components.

2. Hole-Drilling Test Process

2.1. Selection of Specimens

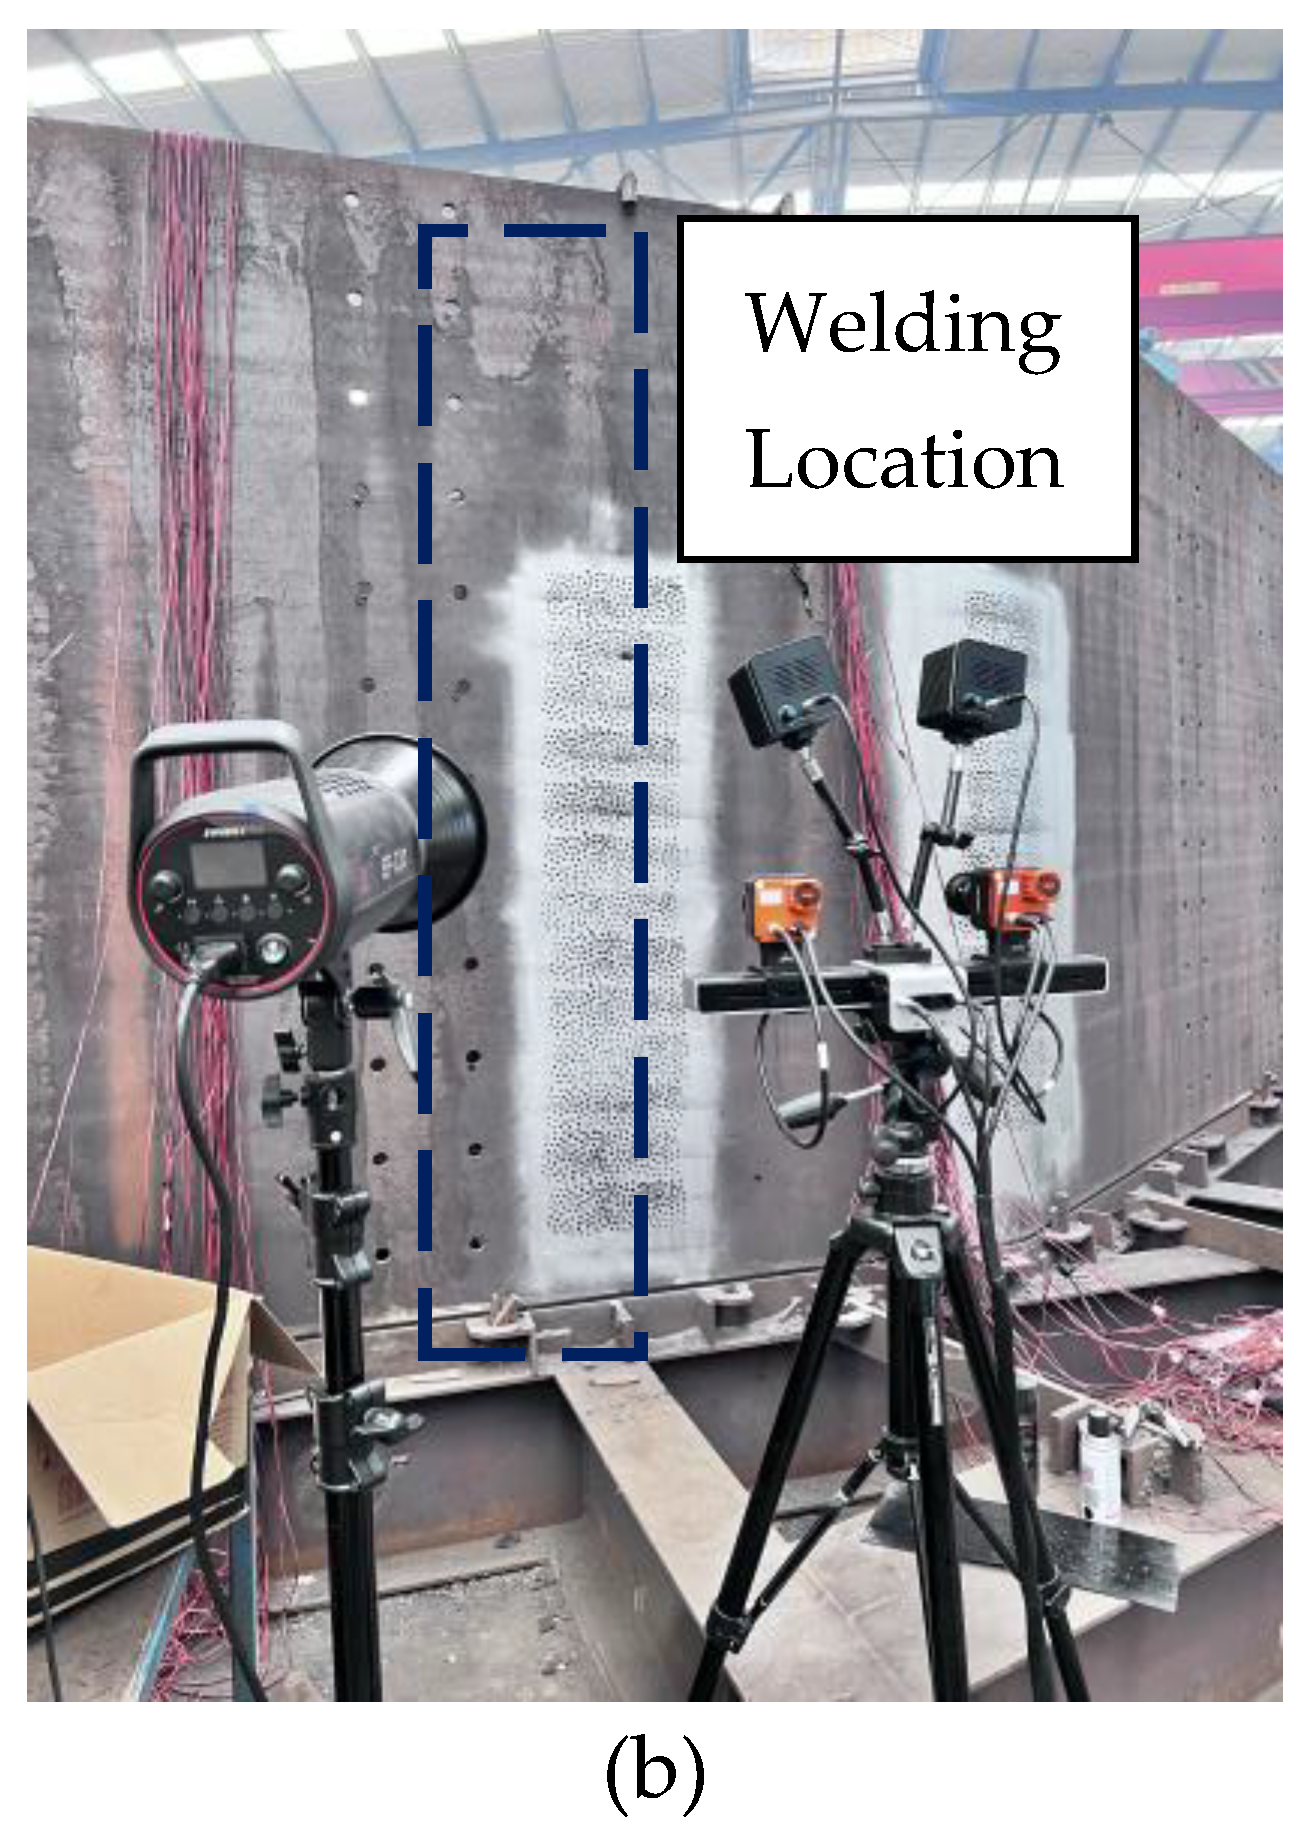
In this study, the welding residual stress of T-joints in a large-scale infrastructure steel structural module was experimentally analyzed, with a specific section extracted from the module employed as the test specimen. Figure 1 shows the field construction diagram of the overall structure, with steel components displayed in yellow and bolts marked in green. These bolts functioned as anchors for the subsequent concrete infilling. One of the filet welds (HJ-1) was chosen for residual stress measurement using the hole-drilling method. This experiment was intended to accurately measure the distribution of welding-induced residual stress, thereby supplying essential experimental data to validate following numerical simulations.

2.2. Materials and Welding Parameters

The base metal employed was Q390B steel, used in conjunction with GFR-81A1 filler wire; their chemical compositions are listed separately in Table 1 and Table 2. Welding was carried out using the semi-automatic FCAW-G (flux-cored arc welding with CO2) process. To prevent quality defects such as heat-affected zone grain coarsening and reduced mechanical performance, the interpass temperature was controlled strictly below 230 °C [31]. Detailed welding parameters for each pass are given in Table 3, where the parameters for weld seams 3, 4, and 5 correspond sequentially to those of seams 1, 2, and 3.

2.3. Measurement Process

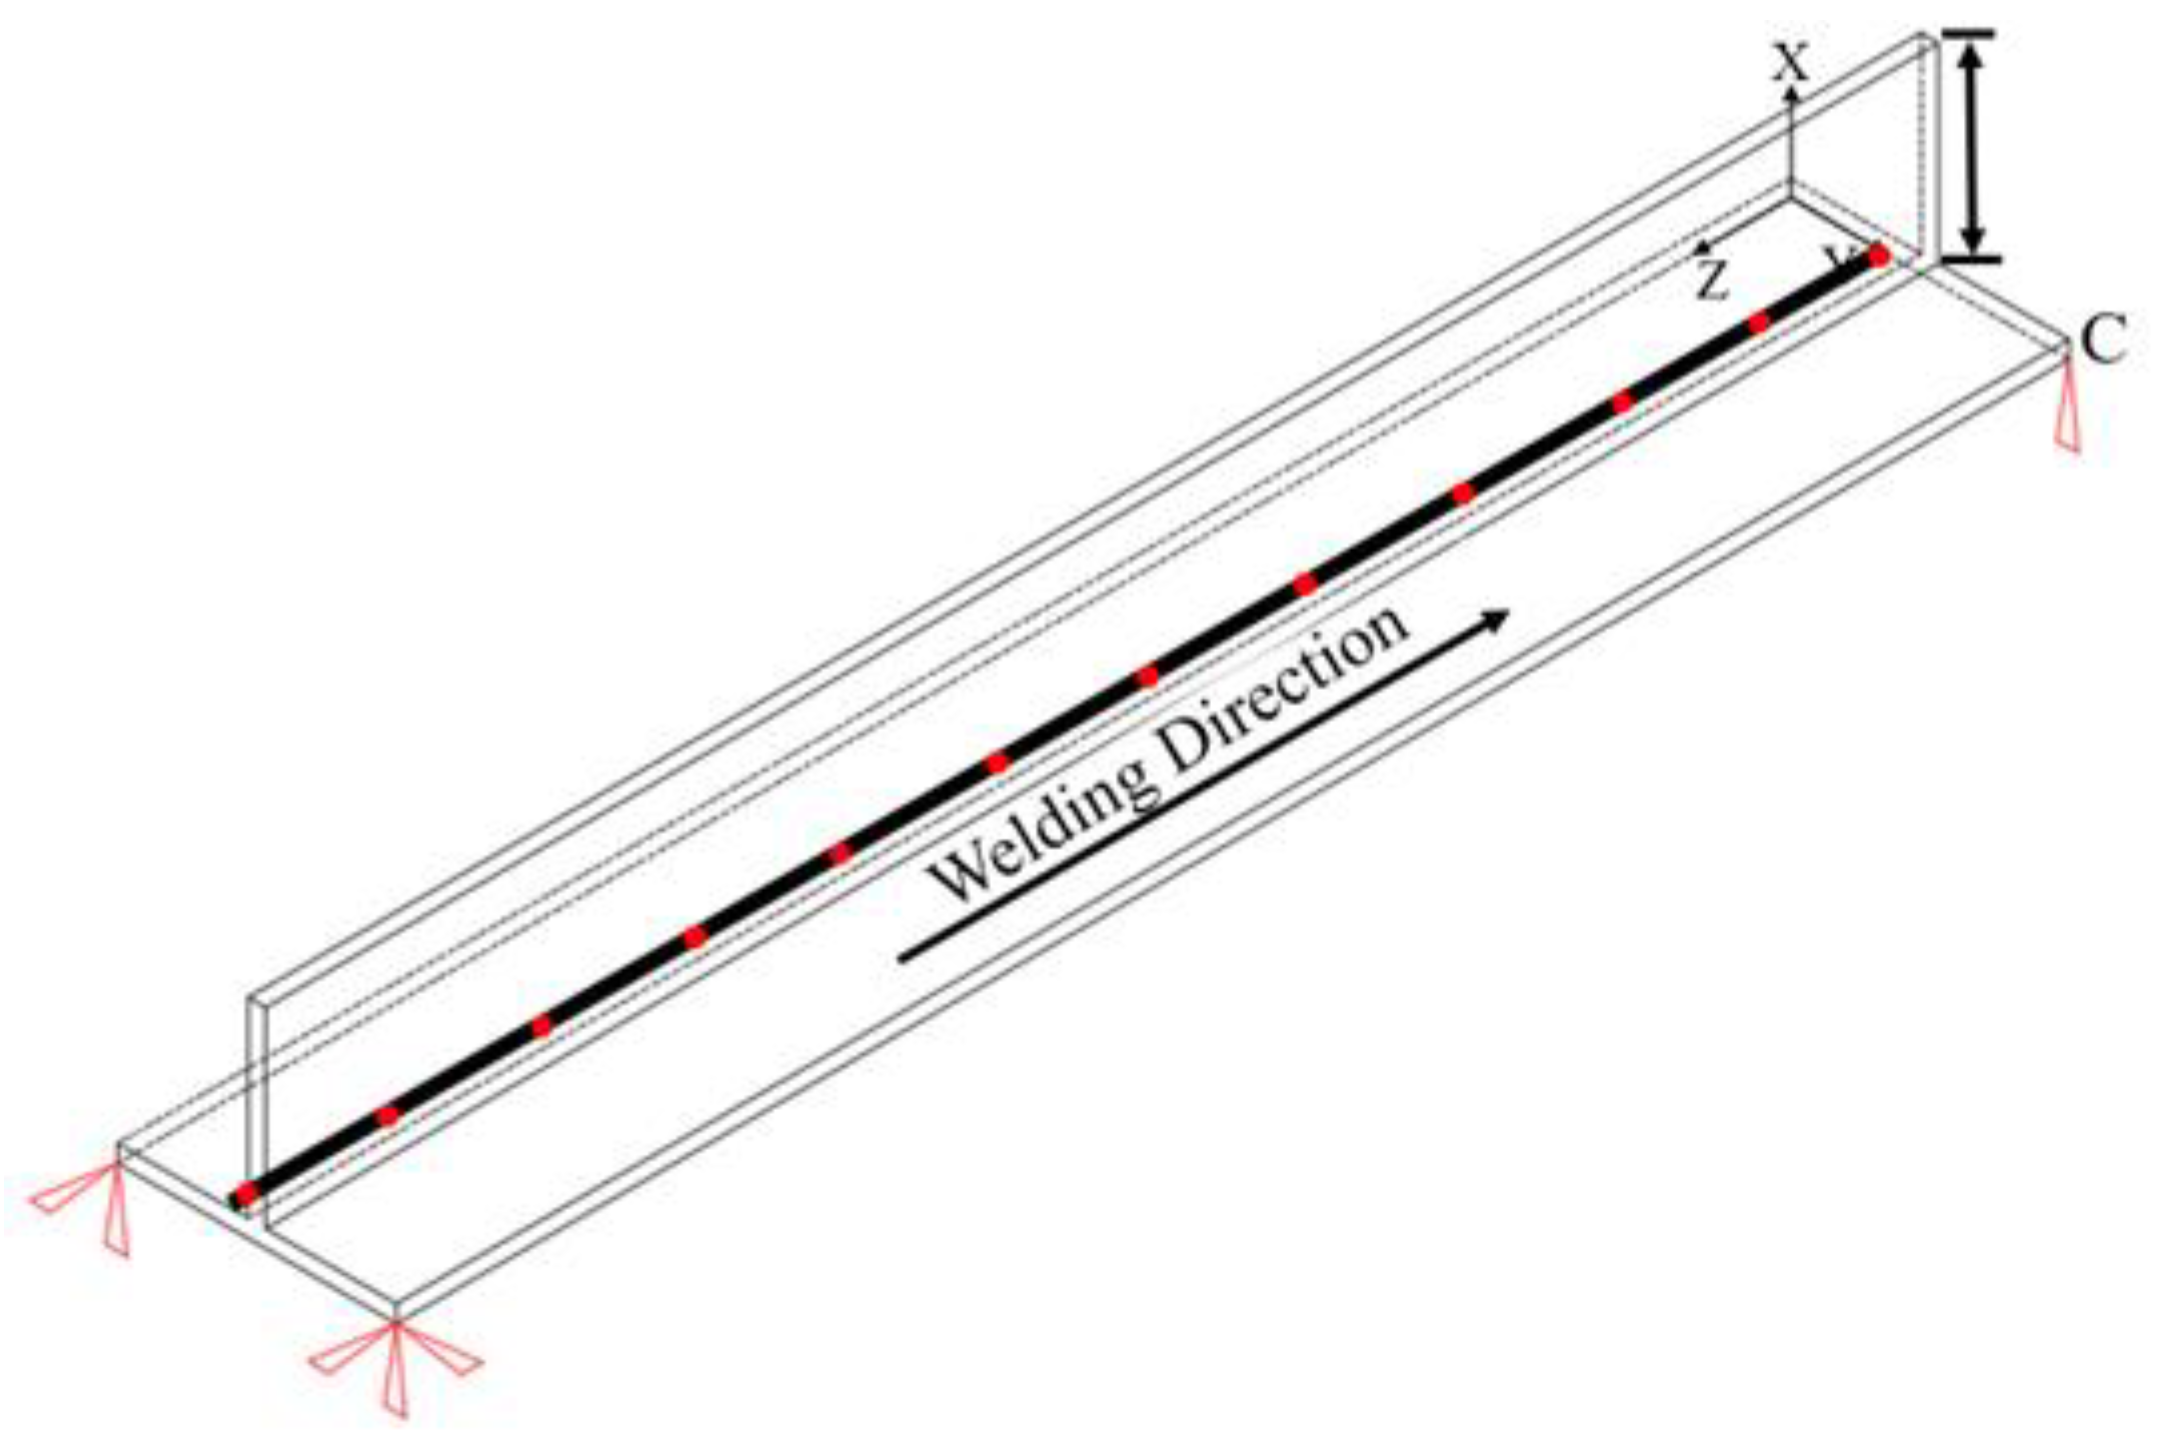
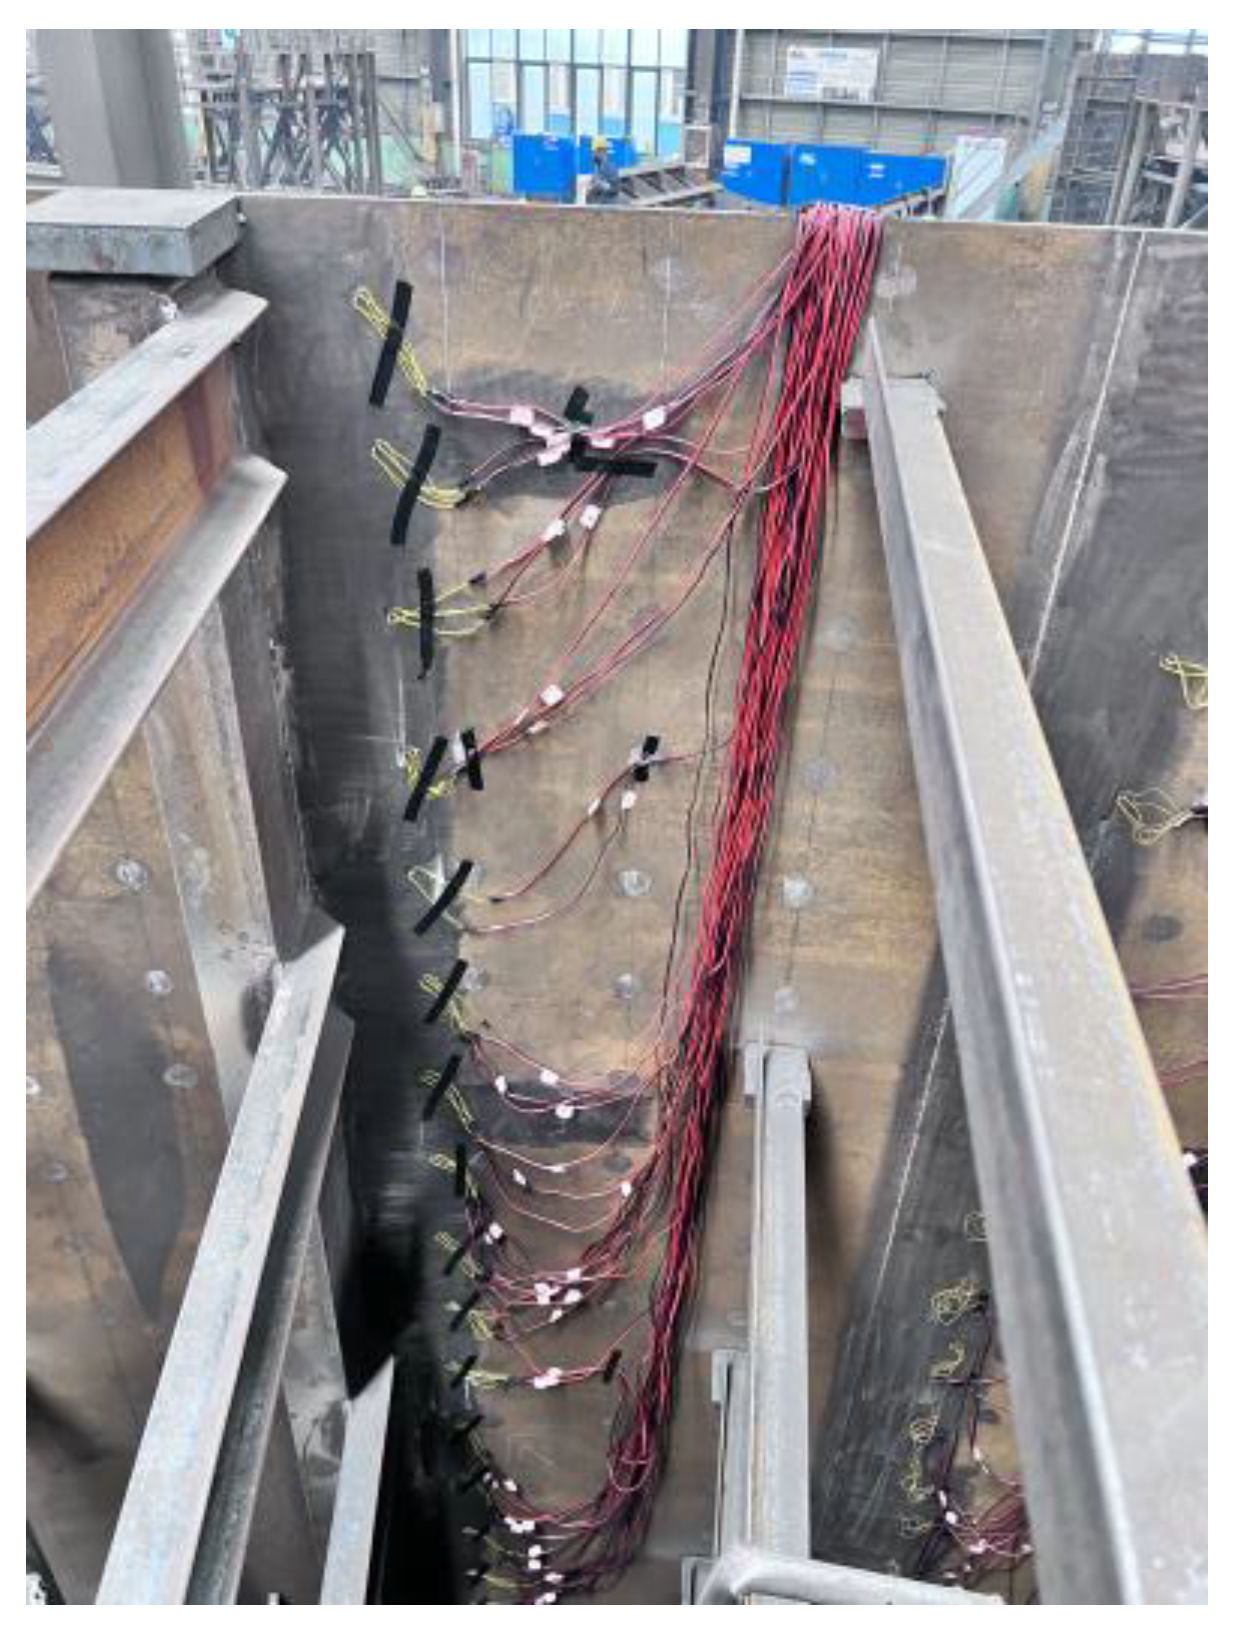
Under unrestrained conditions, the hole-drilling technique was applied to quantify the post-weld residual stress distribution in the T-joint. To prevent damage to the strain gauges in a high-temperature environment, the specimen was first fully cooled to room temperature. Subsequently, the area around the weld was polished, and strain gauges were attached near the weld, with spacing of 200 mm between them. The specific arrangement is shown in Figure 2, and Figure 3 illustrates the on-site layout. In the figure, the black lines represent the measurement paths, the red dots denote the measurement points, and the red triangles indicate the model constraints. Using a CML-1H-16 strain–stress acquisition instrument, the strains ε 1 , ε 2 , and ε 3 , released after drilling were measured. Then, the transverse and longitudinal residual stresses were calculated according to Equations (1) and (2), and the obtained results were corrected.
σ 1 , 2 = E 4 A ε 1 ε 3 E 4 B ε 1 ε 3 2 + 2 ε 2 ε 1 ε 3 2
σ x , y = σ 1 + σ 2 2 σ 1 σ 2 2 cos 2 θ

3. Numerical Simulation

3.1. Segmented Moving Heat Sources

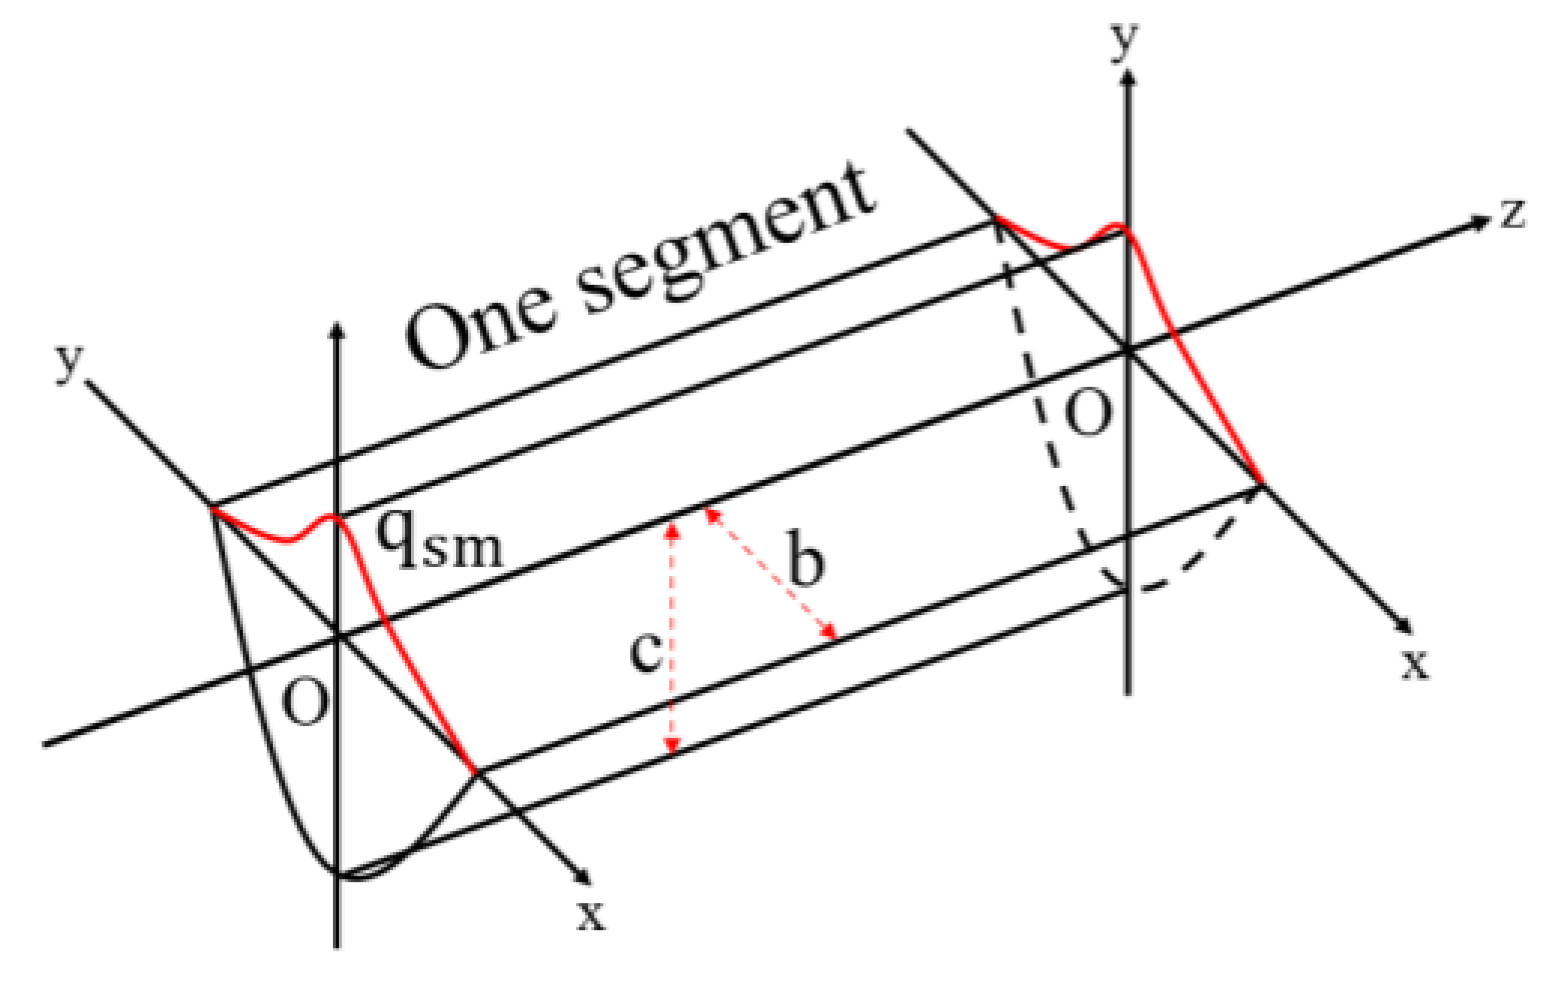
When using the moving heat source method to calculate structural features, a series of issues arise, such as excessively long computation times and non-convergence of the results. In light of this, we propose a segmented moving heat source method. This involves dividing the weld seam into several segments, with a double-ellipsoidal heat source applied at each point within each segment, ensuring that the heat flux at each point is equal to the maximum heat flux of the double-ellipsoidal heat source. Programmed to follow the prescribed welding sequence, the segmented moving heat source advances along the weld path (Figure 4). This heat source model was implemented via a user subroutine. For details, refer to Supplementary S1. Its mathematical formulation is provided in Equation (3) [32]:
q x , y , z = 6 3 U I η a b c exp 3 x 2 / b 2 + y 2 / c 2
U is the voltage; I is the current; a, b, and c are the melt pool parameters; and q s m is the maximum heat flow density of the double ellipsoid. From Equation (3), it can be seen that the shape of the melt pool is only dependent on two parameters, b and c. Therefore, when performing the temperature field analysis in subsequent stages, only b and c need to be adjusted. The action time of the segmented moving heat source on the weld is determined prior to simulation by equating its heat input to that of the double-ellipsoidal source, as derived in the following equation:
t f = b V s π 3
According to Reference [33], the segmented moving heat source exhibits low sensitivity to the number of segments. Therefore, to balance computational efficiency with result accuracy, we divide the 2400 mm weld seam into five segments, with equal heat input applied to each segment for calculation.

3.2. Finite Element Model

3.2.1. Model Construction

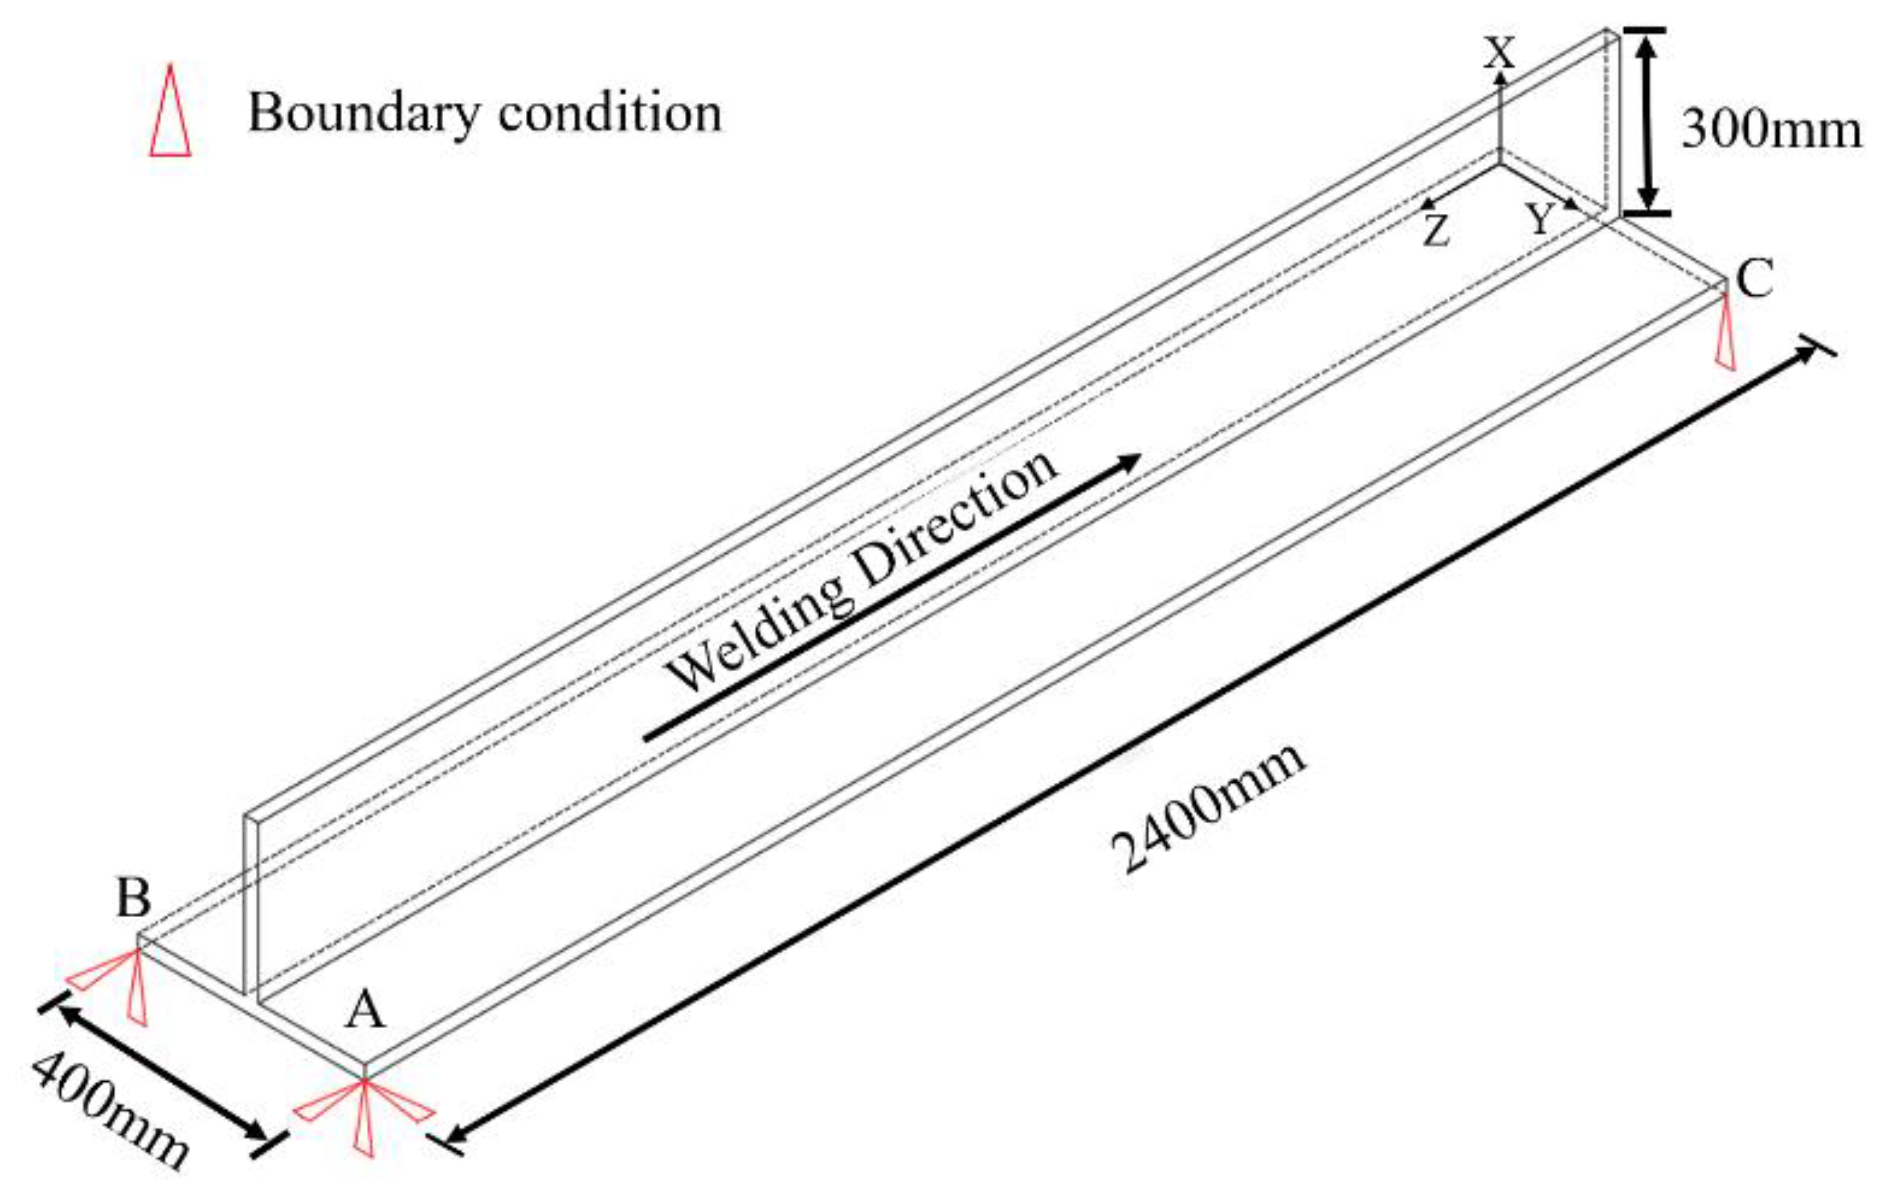
Since the thermal effect caused by strain during the welding process is usually small and the interaction between the temperature and stress fields is not significant, we used sequential coupling for simulation. Four T-joint models were established using ABAQUS to simulate different welding sequences. Following the definition of model geometry and constraints (Figure 5), a sequential coupled thermo-mechanical analysis was conducted. In the initial thermal step, the heat source was implemented via the DFLUX subroutine in ABAQUS to compute the temperature history. This thermal history was then applied as a load in the subsequent structural step to determine the resulting stress and deformation fields. CPU Specification: Intel(R) Core (TM) i9-14900HX, with 24 cores.

3.2.2. Meshing

All four finite element models constructed in this work share an identical mesh scheme. Each model comprises 406,800 elements, with the mesh topology displayed in Figure 6. For comparative analysis of thermal histories under various welding sequences, three points—designated A, B, and C—are utilized. Since the models use the sequential coupling calculation method, the DC3D8 and C3D8R mesh types are used when calculating the temperature and stress fields, respectively. All thermal and mechanical analyses employ the Newton–Raphson method for solving the associated nonlinear equations.

3.3. Thermal Analysis

The temperature field was numerically modeled utilizing ABAQUS6.14 finite element software. Its governing heat conduction equation is derived from the energy conservation equation and Fourier’s law, following the weighted residual method. This partial differential equation is given in Equation (5):
x λ x T x + y λ y T y + z λ z T z + Q = ρ T c T T t
where ρ T is the time-dependent density function; c T is the time-dependent specific heat capacity; λ x , λ y , and λ z are the conductivities in the x, y, and z directions, respectively; and Q is the heat-generating power per unit volume at any point.
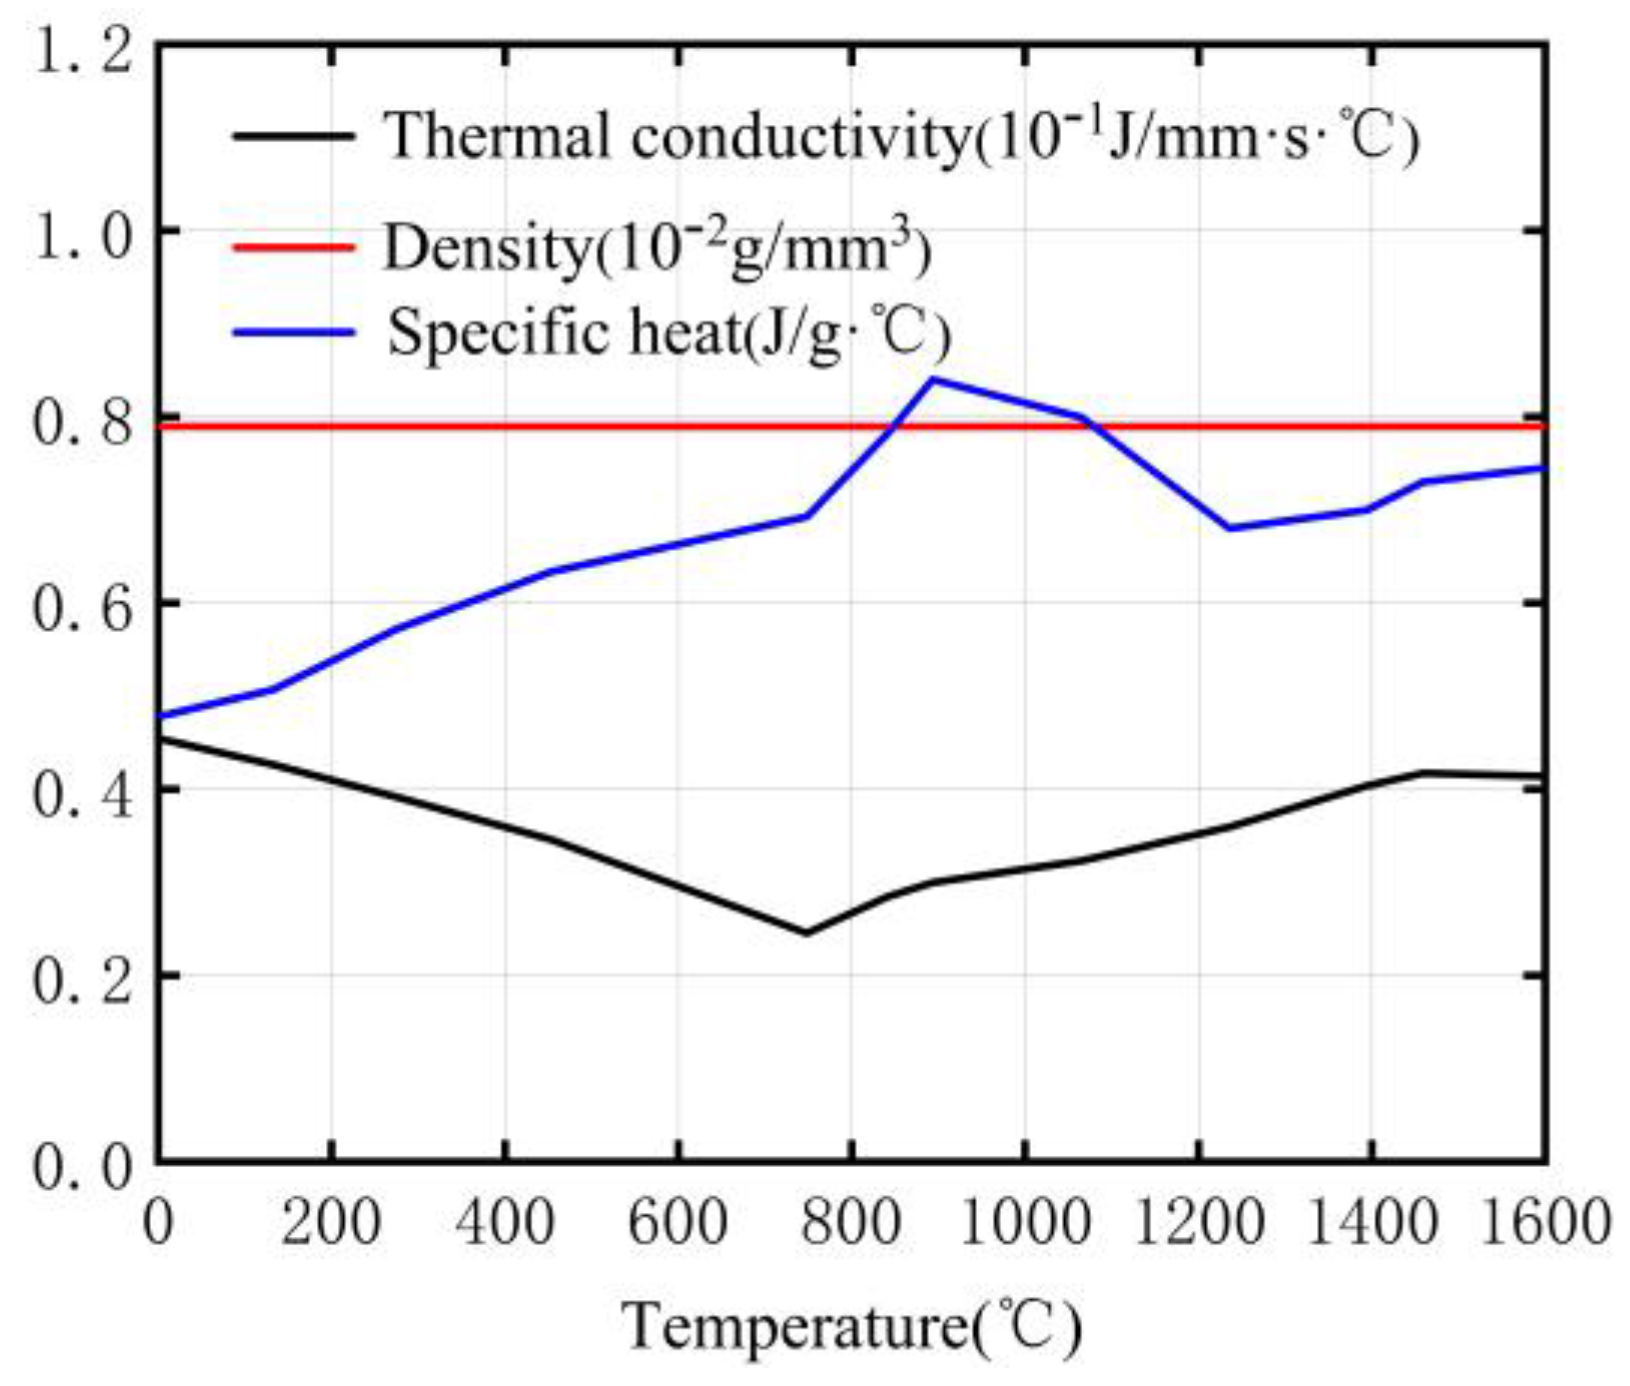
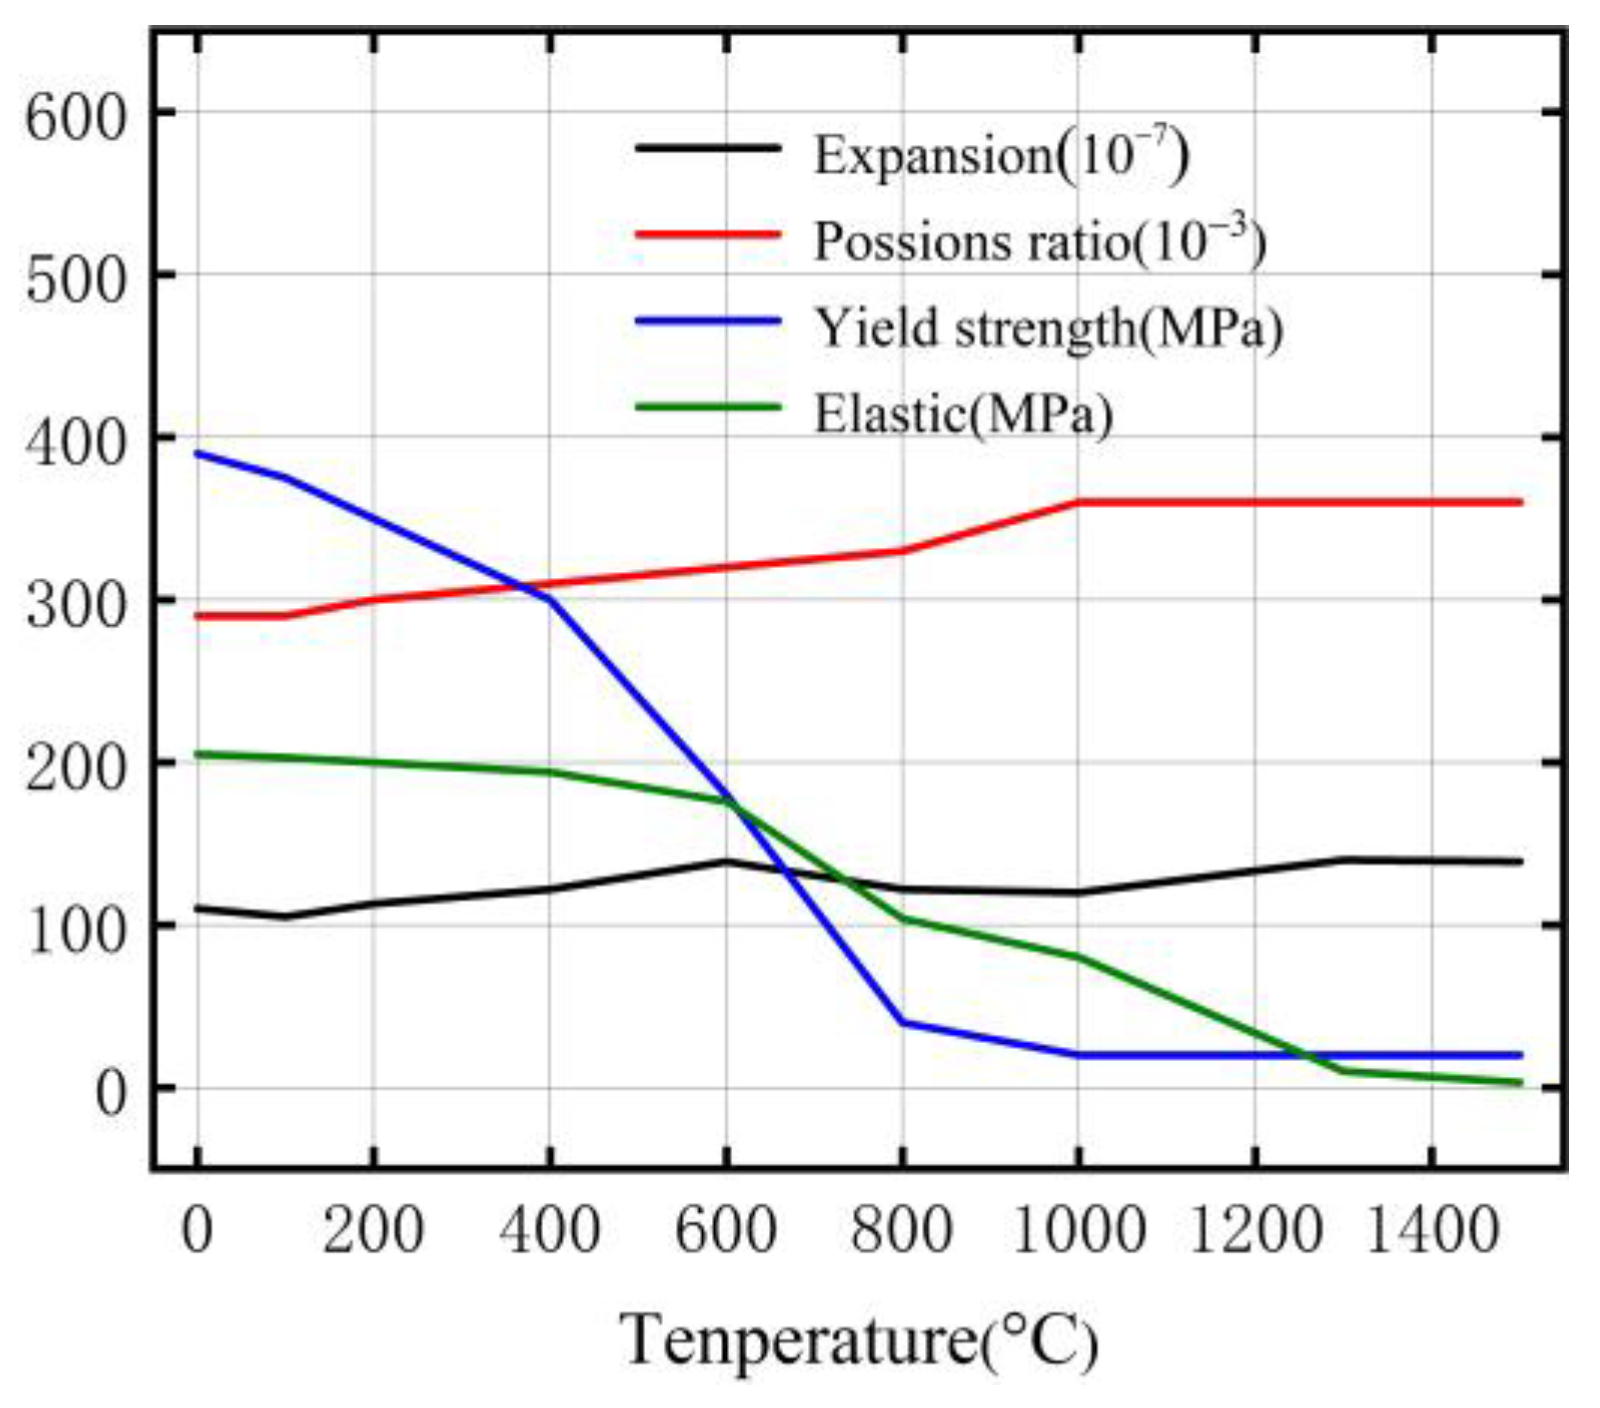
The experimental ambient temperature was maintained at 20 °C. Heat generated by the localized welding process dissipated via both convection and radiation to the surroundings. Convective dissipation was characterized by Newton’s law of cooling (Equation (6)), while radiative dissipation followed the Stefan–Boltzmann law (Equation (7)). The thermal properties of the Q390 steel employed are presented in Figure 7.
q k = α k T T 0
q r = ε C 0 T + 273.15 4 T 0 + 273.15 4
q k is the heat loss due to thermal convection, T is the surface temperature of the specimen, T 0 is the room temperature (20 °C), α k is the heat dissipation coefficient of thermal convection ( 0.015   W / m m 2 · ° C ), q r is the loss due to thermal radiation, ε is the emissivity (0.85), C 0 is the Stefan–Boltzmann constant ( 5.67 × 10 11 m W / m m 2 · k 4 , and absolute zero is −273.15 °C.
Figure 7. Thermal properties [31].
Buildings 16 00153 g007
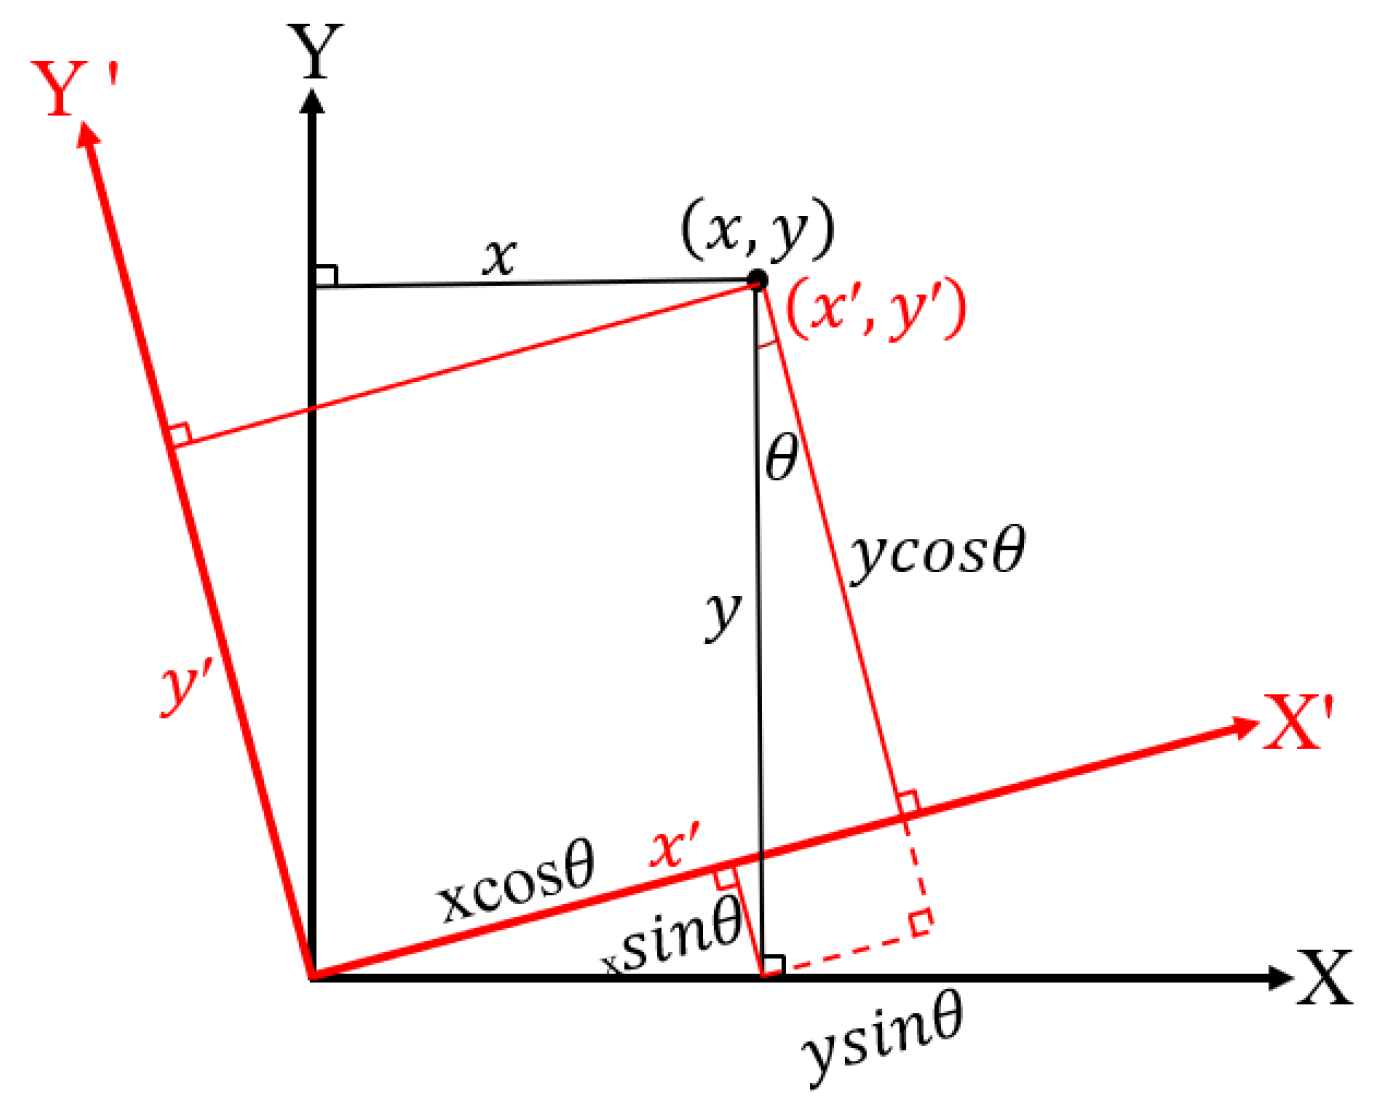
To ensure that the heat source energy is accurately applied along the three-dimensional weld path, a coordinate transformation must be performed in the Fortran subroutine. The core objective of this transformation is to establish a local coordinate system x y z aligned with the weld direction, where x is tangential and y and z are perpendicular to the weld. By applying a rotation matrix, the global coordinates X Y Z of an integration point are converted into this local coordinate system, ensuring that the heat flux distribution always aligns with the weld geometry. If this transformation is not performed, the heat source will not match the spatial orientation of the weld, leading to misplacement of the heat input and consequently affecting the accuracy of the temperature and stress field calculations. The geometric relationship of this coordinate transformation is illustrated in Figure 8.
The transformed x and y can be obtained from the above figure, as shown in the following equations:
x = x cos θ + y sin θ
y = y cos θ + x sin θ

3.4. Mechanical Analysis

The sequential coupling method for stress field calculation is implemented by first computing the temperature field, then applying the resulting temperature history as a predefined field to the structural model in each time increment, and finally performing the structural analysis within ABAQUS. This analysis relies on the classical equilibrium and constitutive equations that characterize how temperature variations influence the material’s stress field.
The equilibrium equation for a certain element of the structure is shown in Equation (10):
d F e + d R e = K e d δ e
where d F e is the increment in force at the unit node, d R e is the equivalent node force increment, K e is the unit stiffness matrix, and d R e is the unit displacement increment.
The principal constitutive equations:
In the stress analysis, material creep can be omitted, owing to the brief high-temperature exposure during welding. Additionally, given that Q390 is a low-carbon steel, phase transformation effects on residual stress are also negligible. Therefore, the total strain comprises the three components specified in Equation (11):
ε t o t a l = ε e + ε p + ε t h
where ε e is the elastic strain, ε p denotes the plastic strain, and ε t h denotes the thermal strain. The elastic behavior of the material follows the isotropic Hooke law, and the plastic strain increments are described by the Von Mises yield criterion in combination with the temperature-dependent mechanical properties as well as the linear isotropic hardening criterion. Thermal strains are then calculated by the coefficient of expansion, and the mechanical properties are shown in Figure 9.
The stress–strain relationship is shown in Equation (12):
d σ = D d ε C d T
where D is the elastic or elastoplastic matrix; C is the temperature-dependent vector; and d T is the temperature increment.
In welding simulation, weld seams are created progressively as the welding process advances using the “growing and dying cells” technique in ABAQUS, which simulates the “growth” of the weld by activating or deleting cells at specific time steps. When a cell is deleted, its stiffness is reduced to nearly zero using a very small reduction factor, which does not affect the loads. When a cell is activated, its stiffness matrix is re-assigned, and the normal loads are restored. Due to the large size of the model, having too many dead and active cells can significantly reduce computational efficiency. Therefore, this paper considers the entire weld as a single unit to be activated, thereby improving computational efficiency.

3.5. Welding Sequence Program

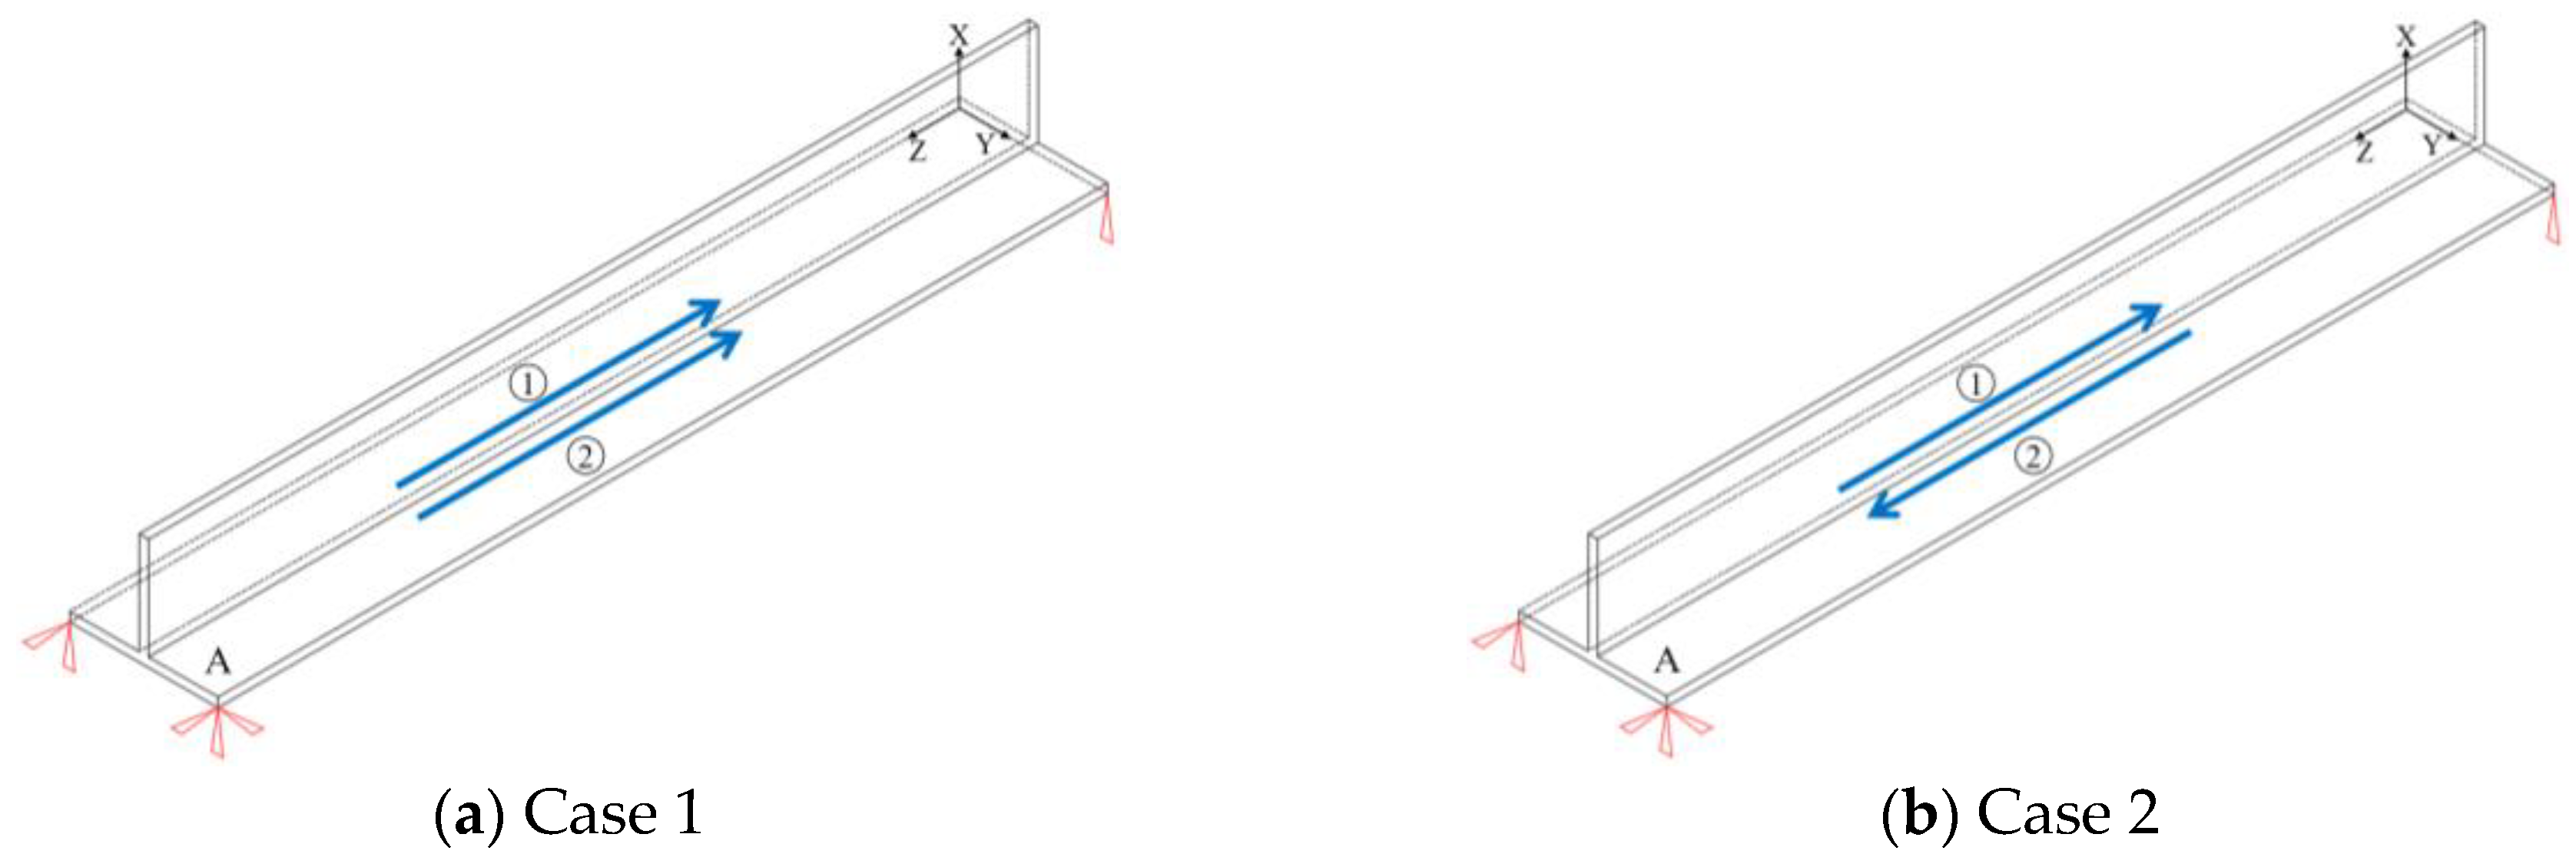
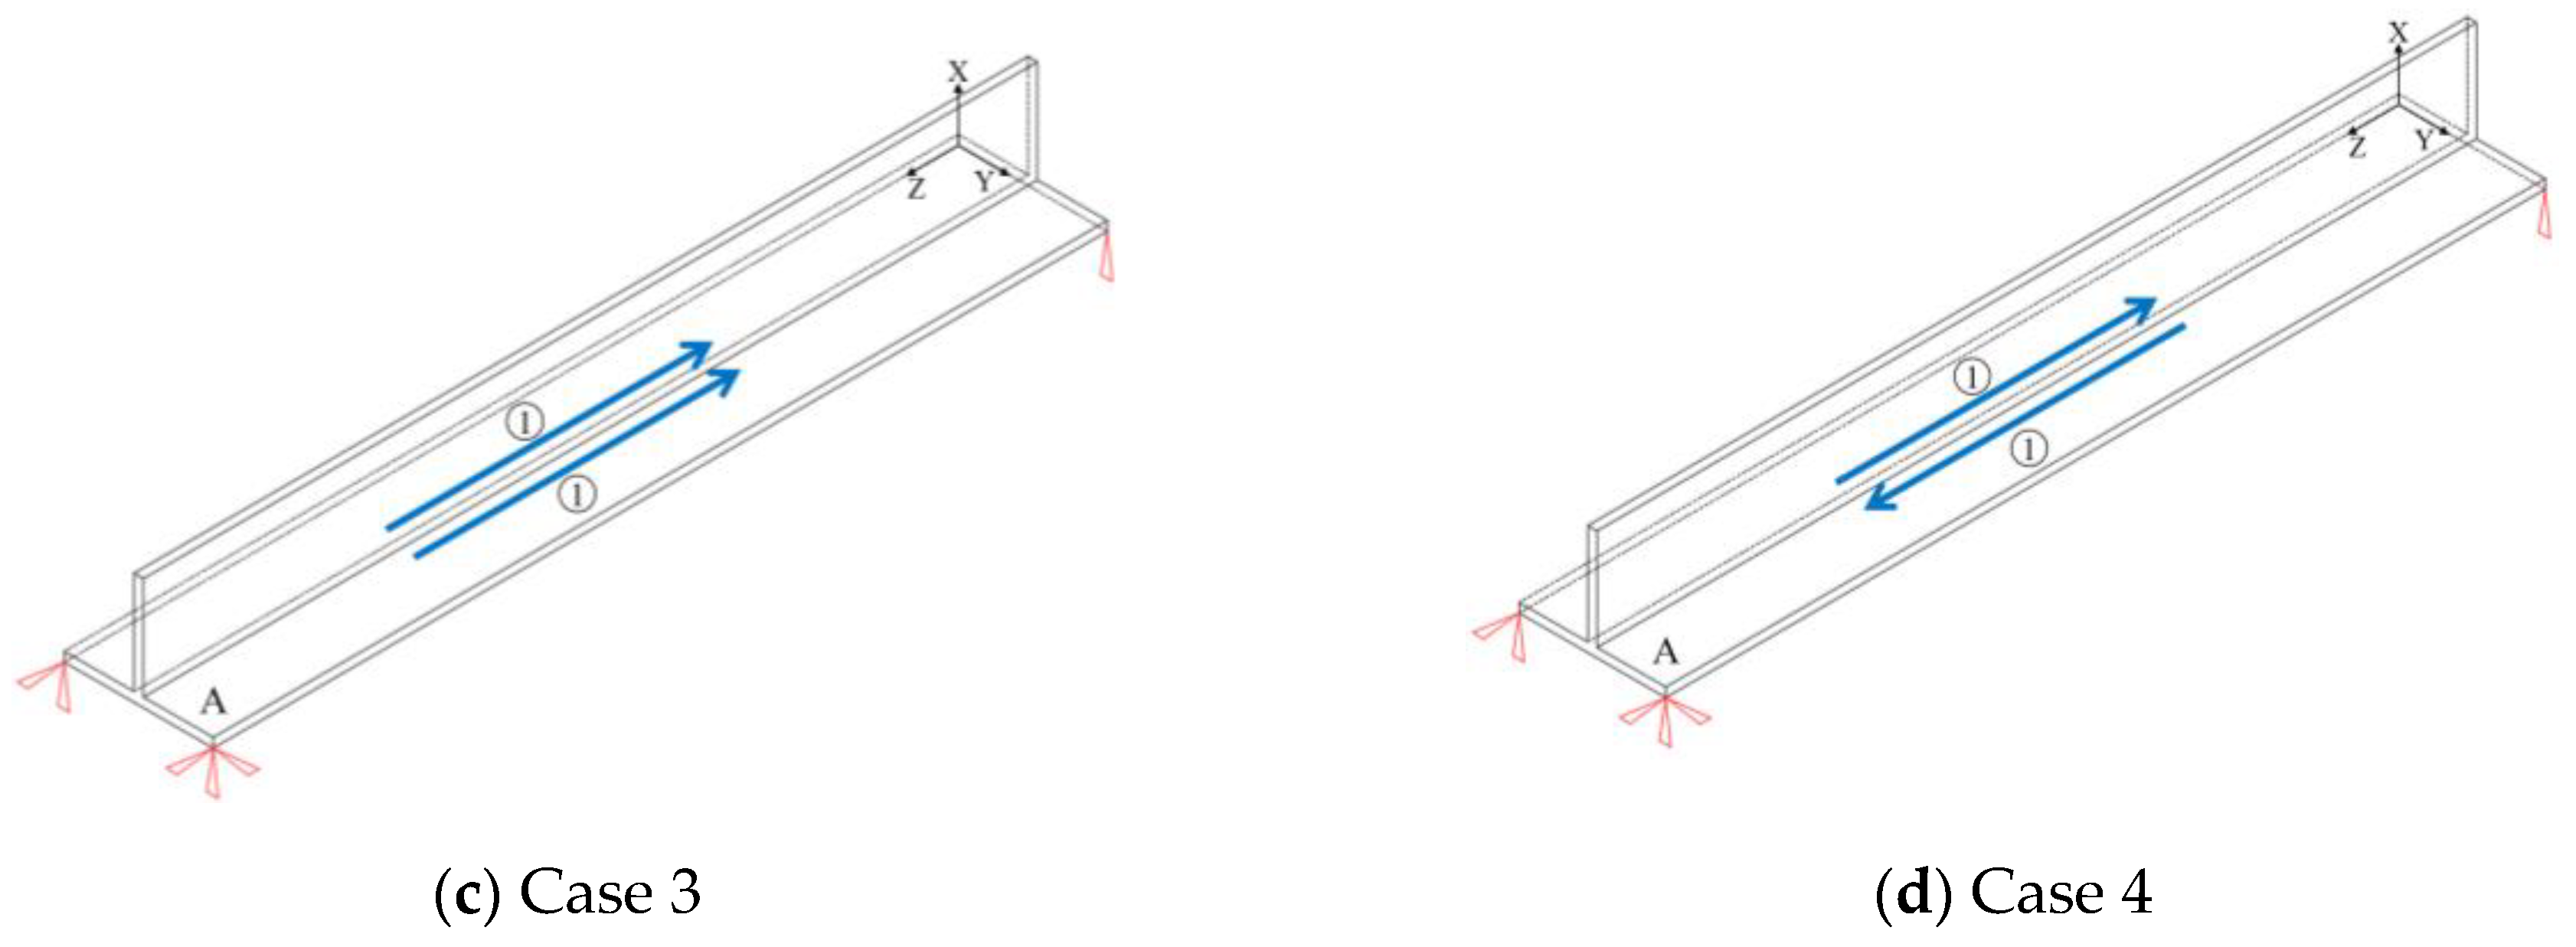
We employ numerical simulation to examine how different welding sequences affect residual stress and deformation in T-joints of steel structural modules, where both heat input and welding sequence play critical roles in determining the thermal and mechanical responses of the joint region. Therefore, four different welding sequence schemes (Case 1, Case 2, Case 3, and Case 4) were detailed in this section, and the calculation results are compared and analyzed in Section 4.4. The welding sequences for each scheme are illustrated in Figure 10.

4. Results and Discussion

4.1. Temperature Field

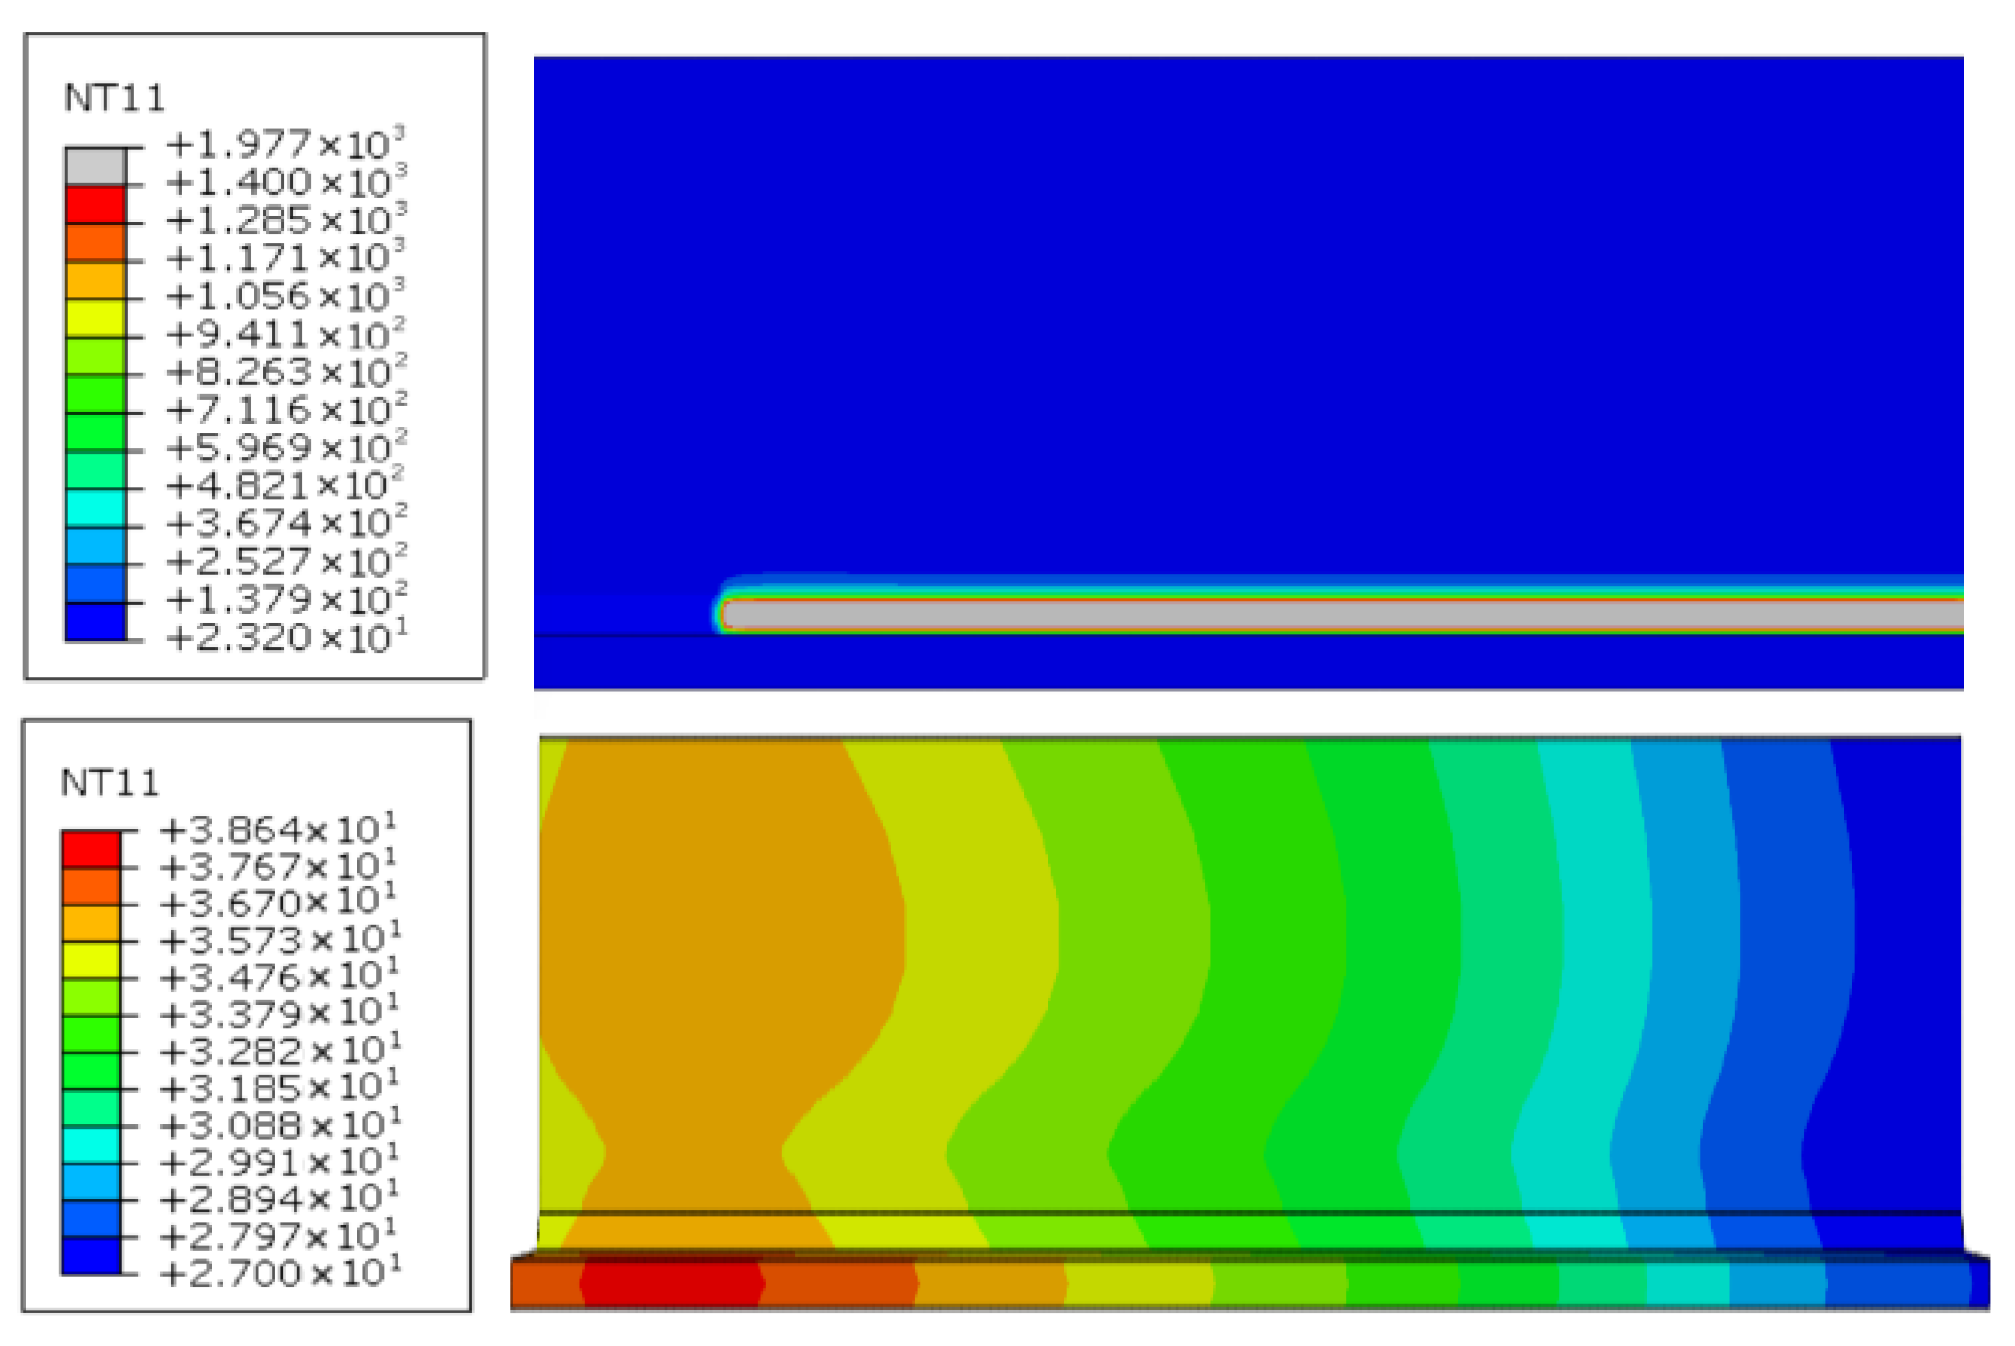
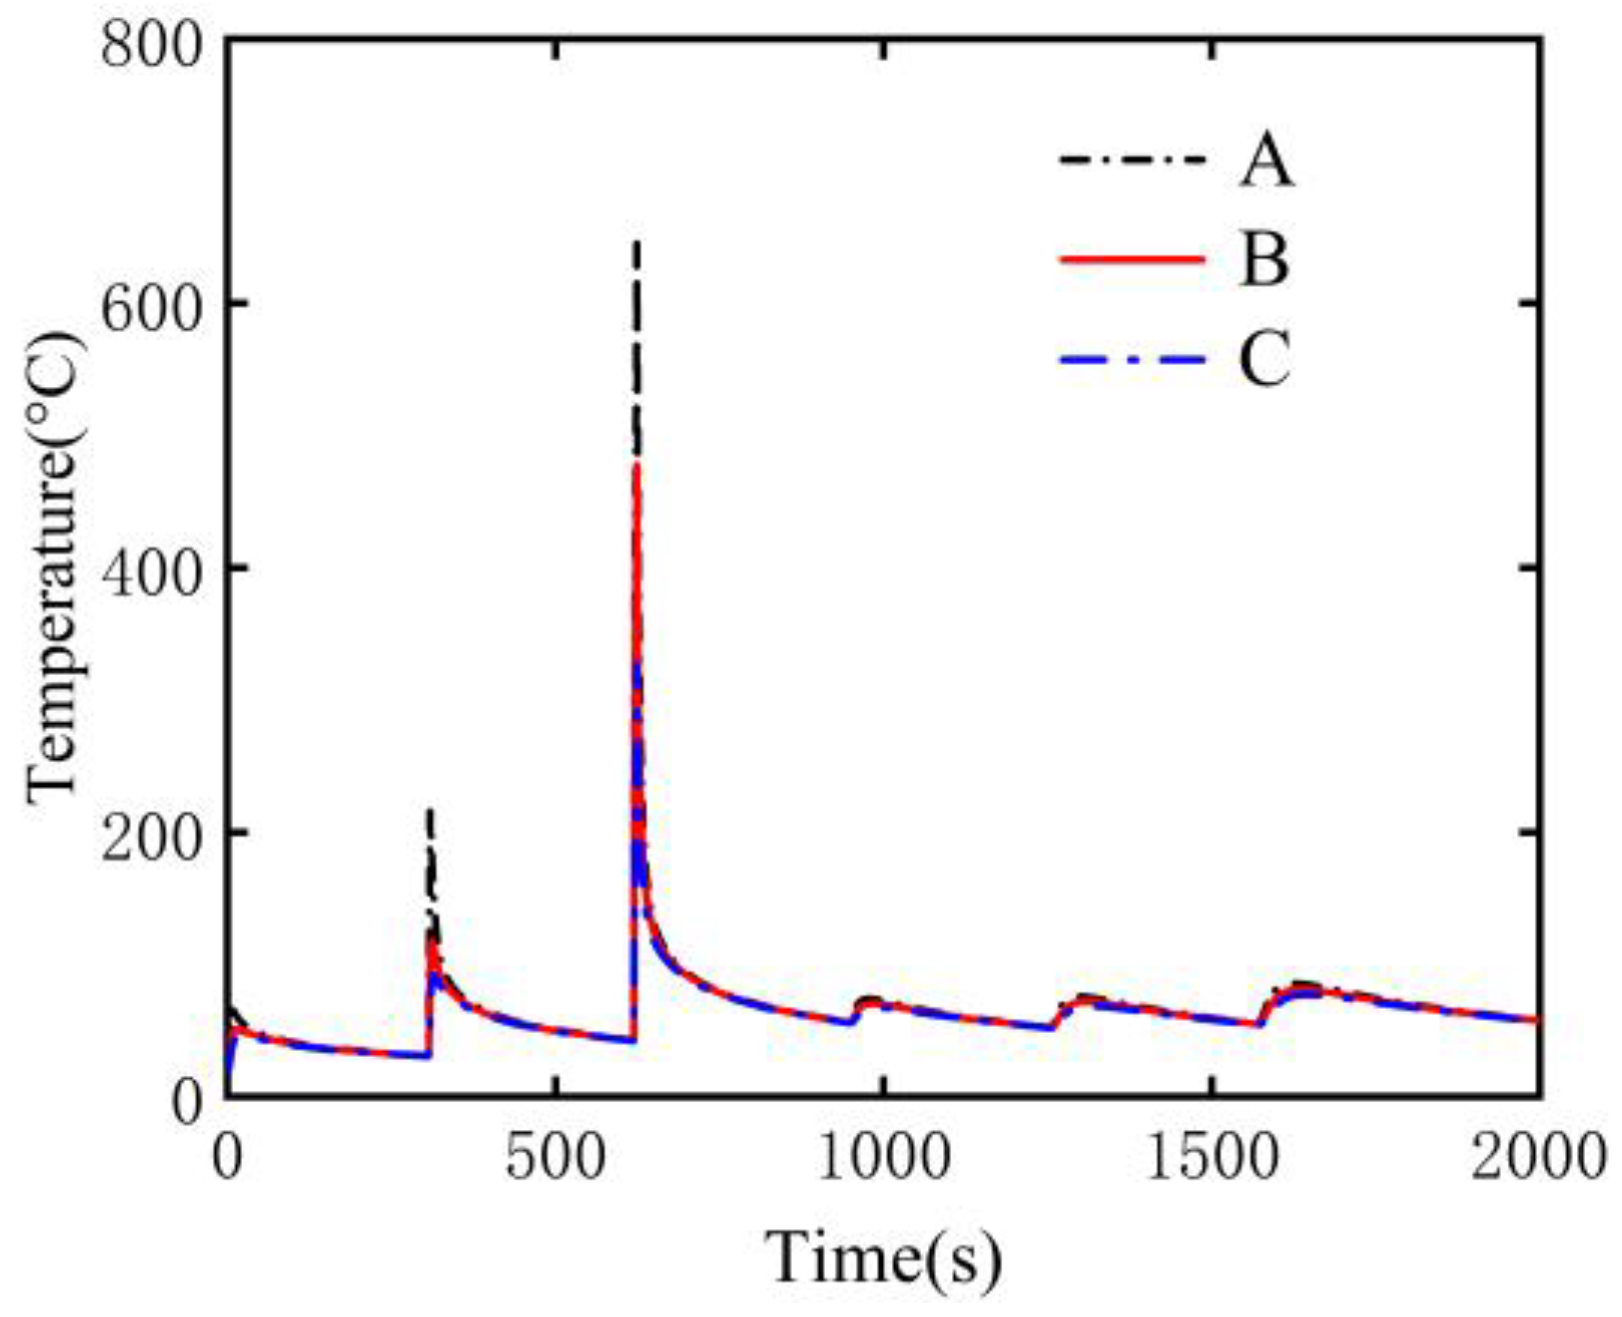
The temperature field of the second heat source and the completed third-pass weld is presented in Figure 11. The molten pool exhibits a segmented and uniform distribution along the entire weld length, with a peak temperature of 1977 °C, demonstrating consistency with the proposed segmented moving heat source model. Meanwhile, the simulated temperature–time histories at monitoring points A, B, and C (see Figure 6) are plotted in Figure 12. Six distinct thermal peaks are evident in these curves, each corresponding to the sequential passage of the segmented heat source across the six weld segments. Moreover, the magnitude of each peak progressively diminishes with the monitoring point’s increasing distance from the weld centerline.

4.2. Stress Field

Defined as internal stress induced by factors such as temperature gradients and differential cooling, residual stress is the focus of this section. To evaluate the accuracy of the finite element model, its predictions are first compared against experimental data along the predefined path shown in Figure 2. Within this context, stresses in the X and Z directions are termed transverse and longitudinal residual stresses, respectively. Building on this validated model, we further investigate the residual stress distribution through the thickness and evaluate how it is influenced by varying welding sequences.

4.2.1. Longitudinal Residual Stresses

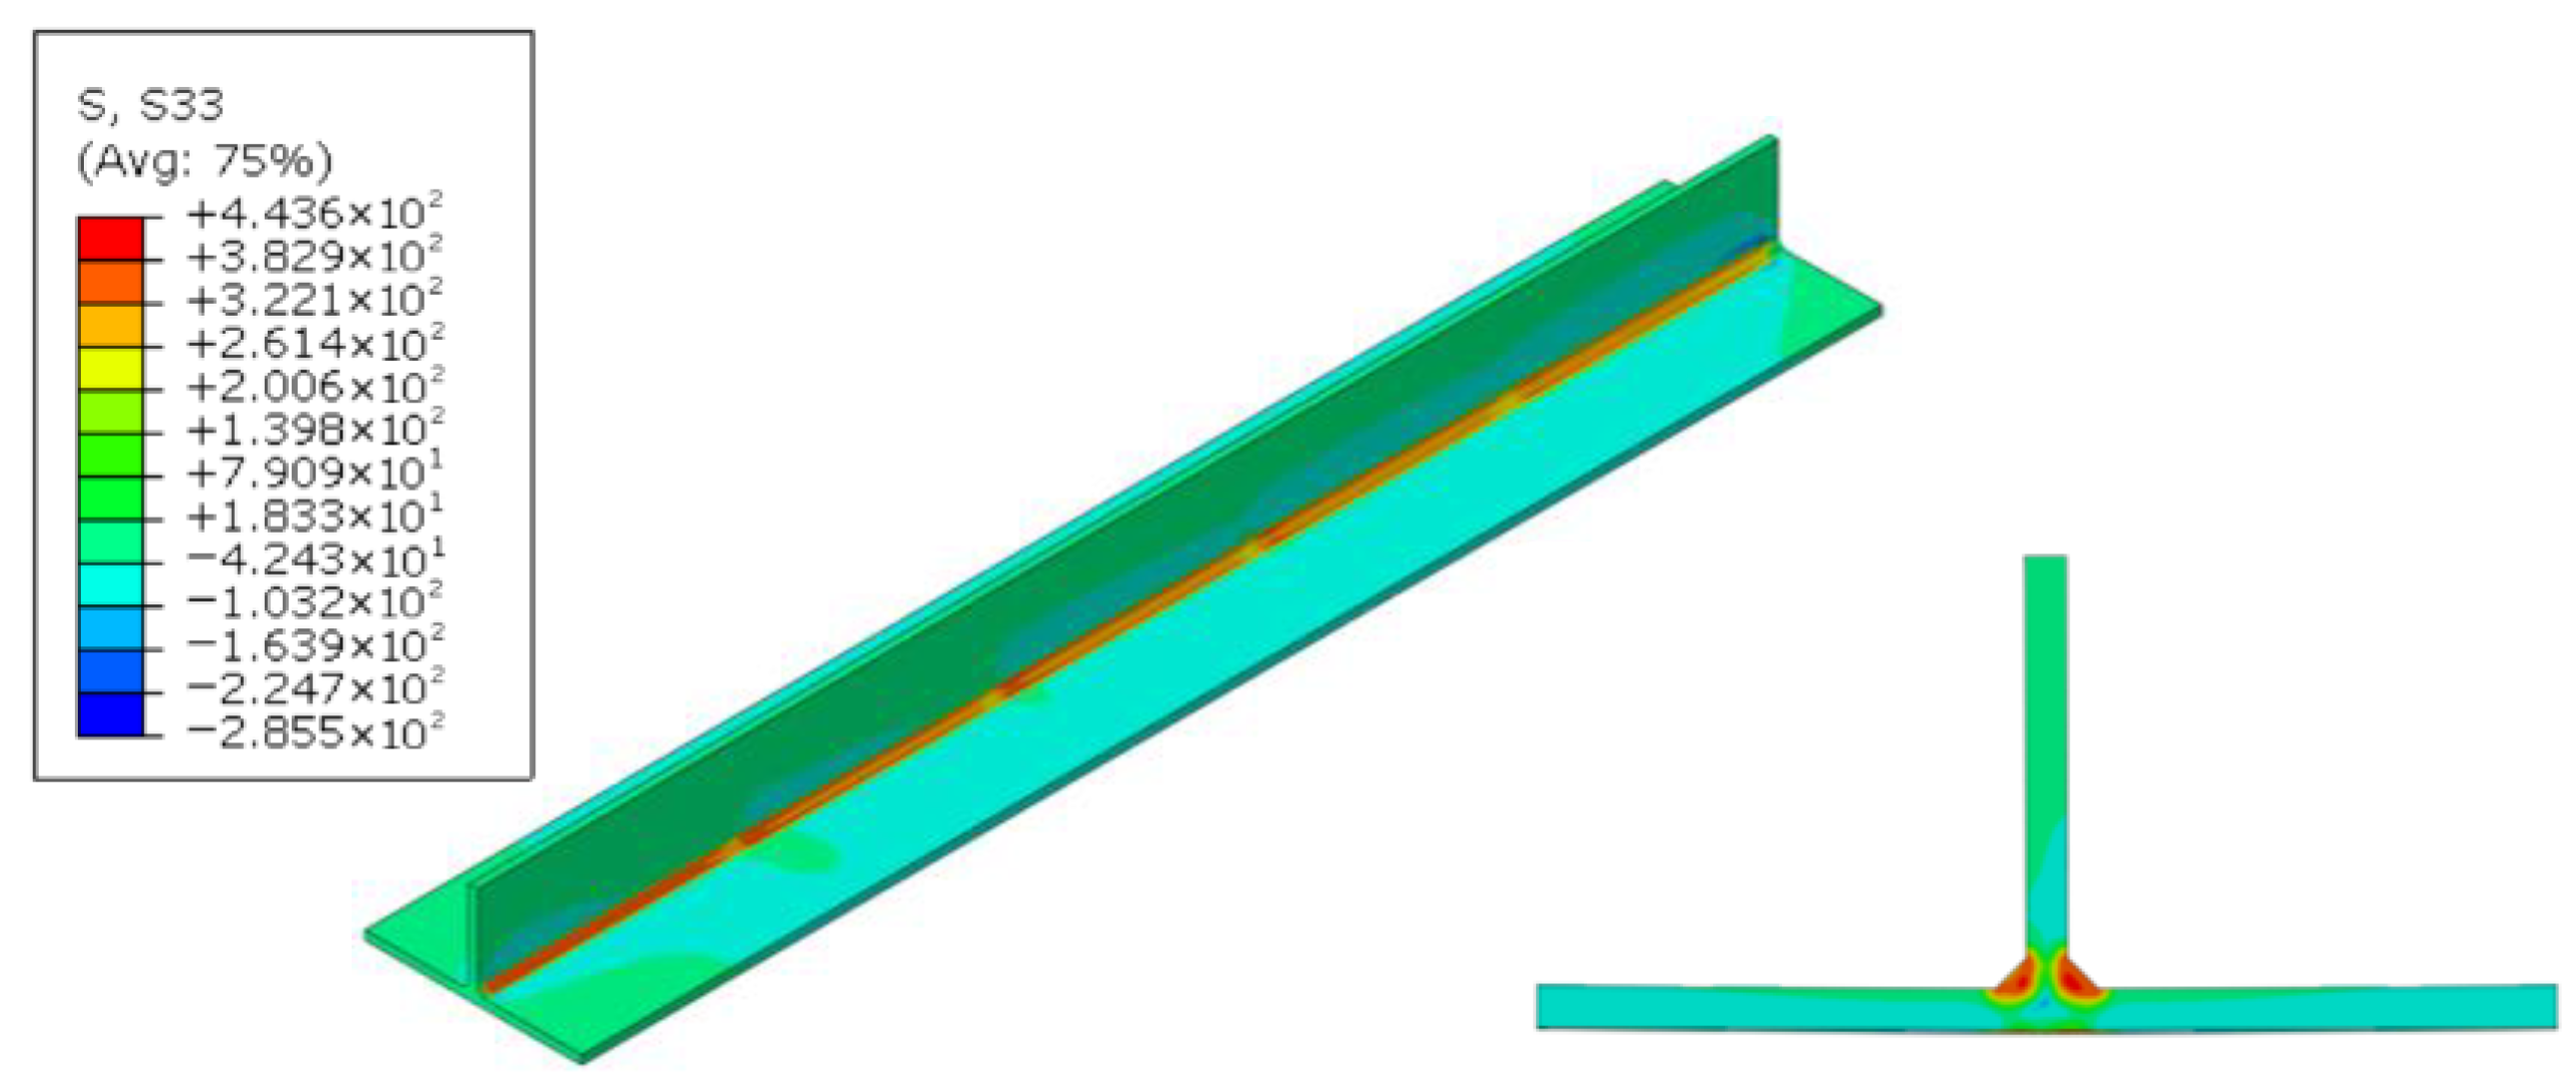
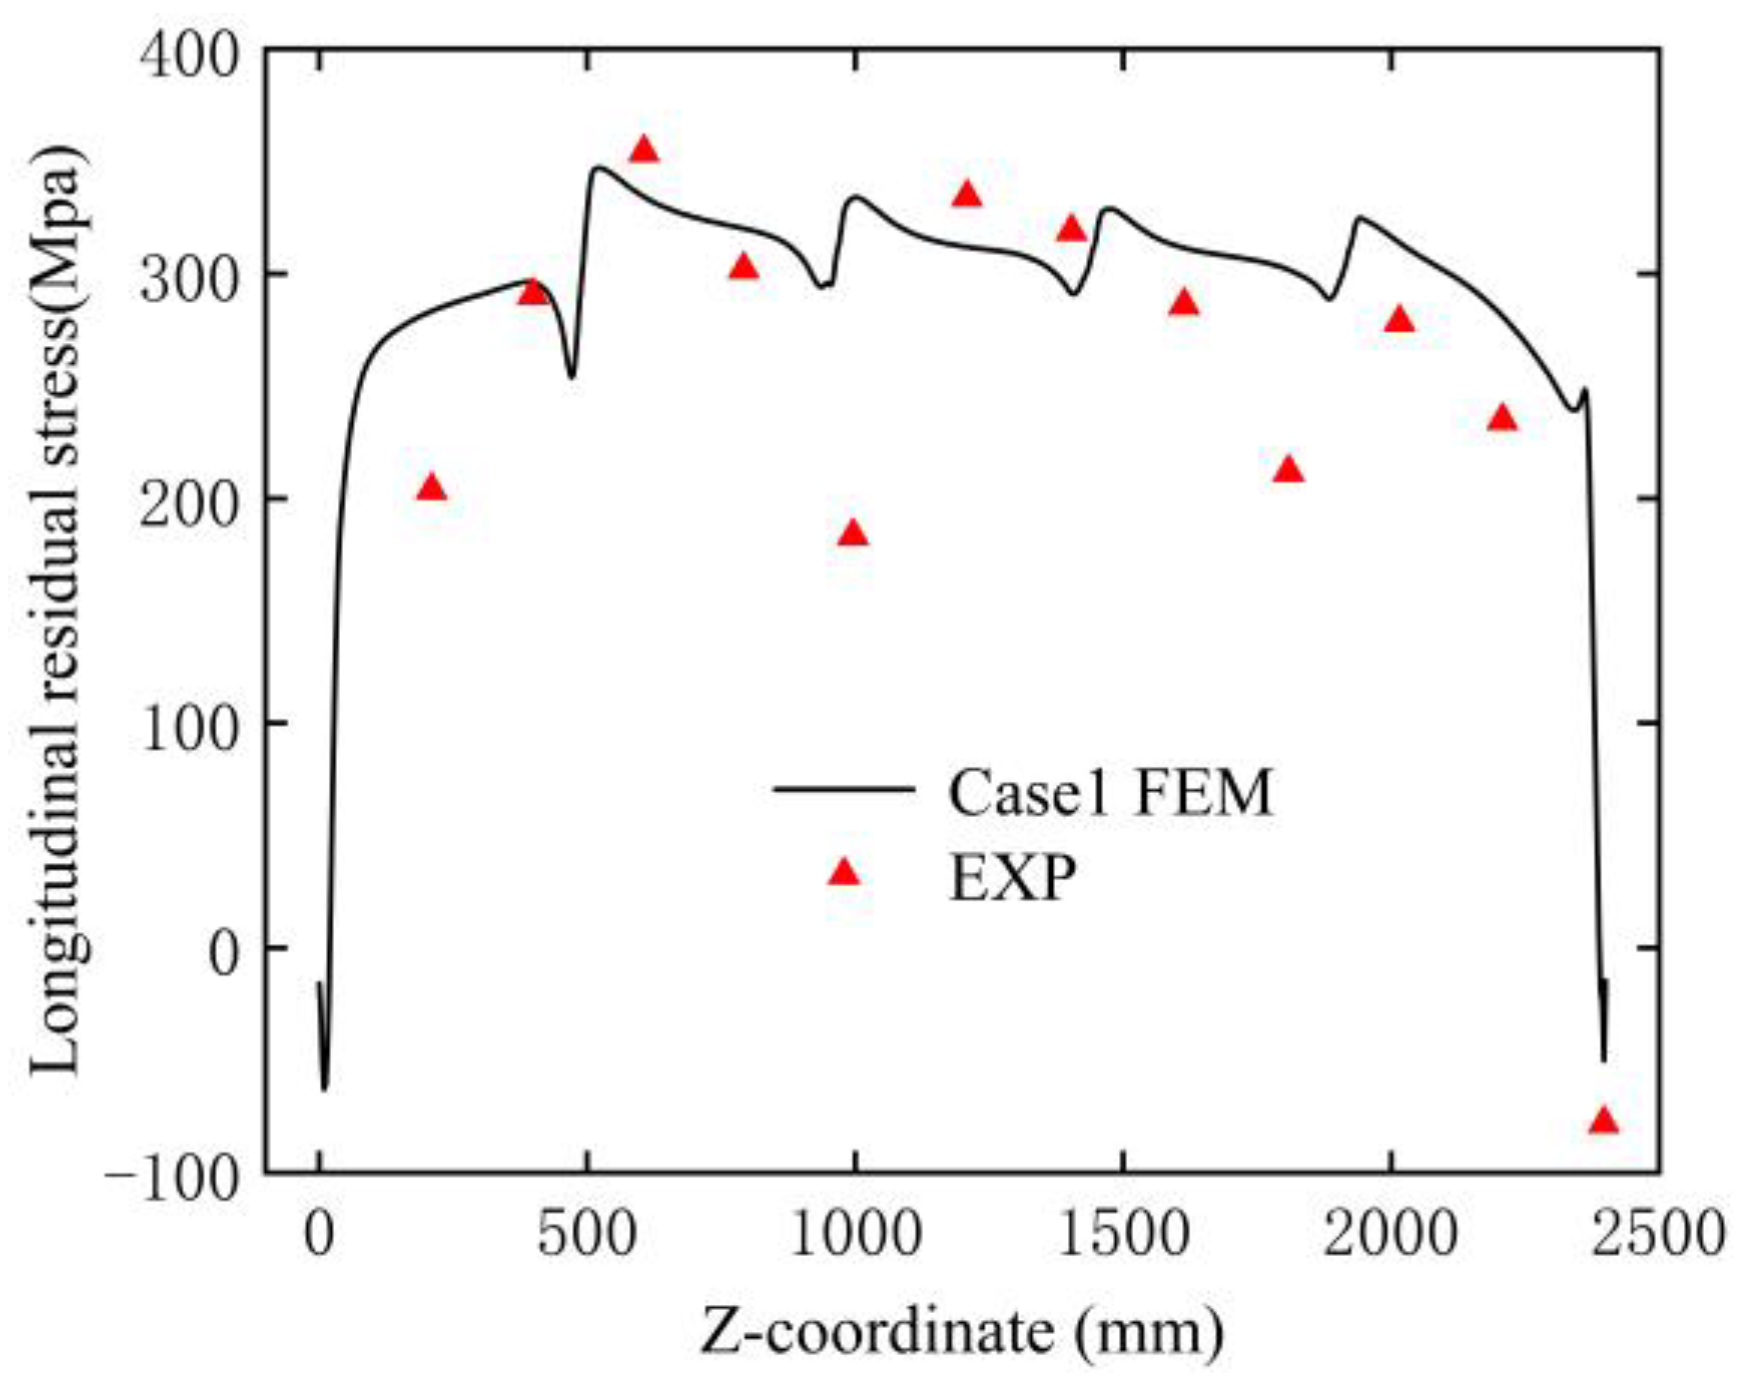
The distribution of longitudinal residual stress is displayed in the contour plot of Figure 13. The alternating pattern of tensile and compressive stresses along the weld creates a pronounced stress gradient. Notably, regions of high tensile stress are primarily located on both sides of the weld zone. Consequently, with increasing distance from the weld, the stress state transitions from tensile to compressive. This characteristic is further quantified along the defined path in Figure 14, which shows a clear “compression at the ends and tension in the middle” profile, with peak tensile and compressive stresses of approximately 347 MPa and 60.3 MPa, respectively. The analysis shows that, for the longitudinal residual stress, the correlation coefficient R2 between the simulated and experimental results is 0.663, and the prediction error for the maximum peak tensile stress is only 5.6%.
During the numerical simulation, since the heat source is applied in segments, this loading method generates different thermal effects on the welding regions in different stages. Specifically, after the first segment of the heat source is applied, when the second segment is loaded, the heat from the second segment induces a tempering effect on the region already affected by the first one. The effect works by locally raising the temperature to reduce the residual stress that has already been generated. It is noteworthy that the experimentally measured longitudinal residual stresses are in good agreement with the numerical simulation results, thus further validating the applicability of the segmented moving heat source model for analyzing large-scale steel structures.

4.2.2. Transverse Residual Stresses

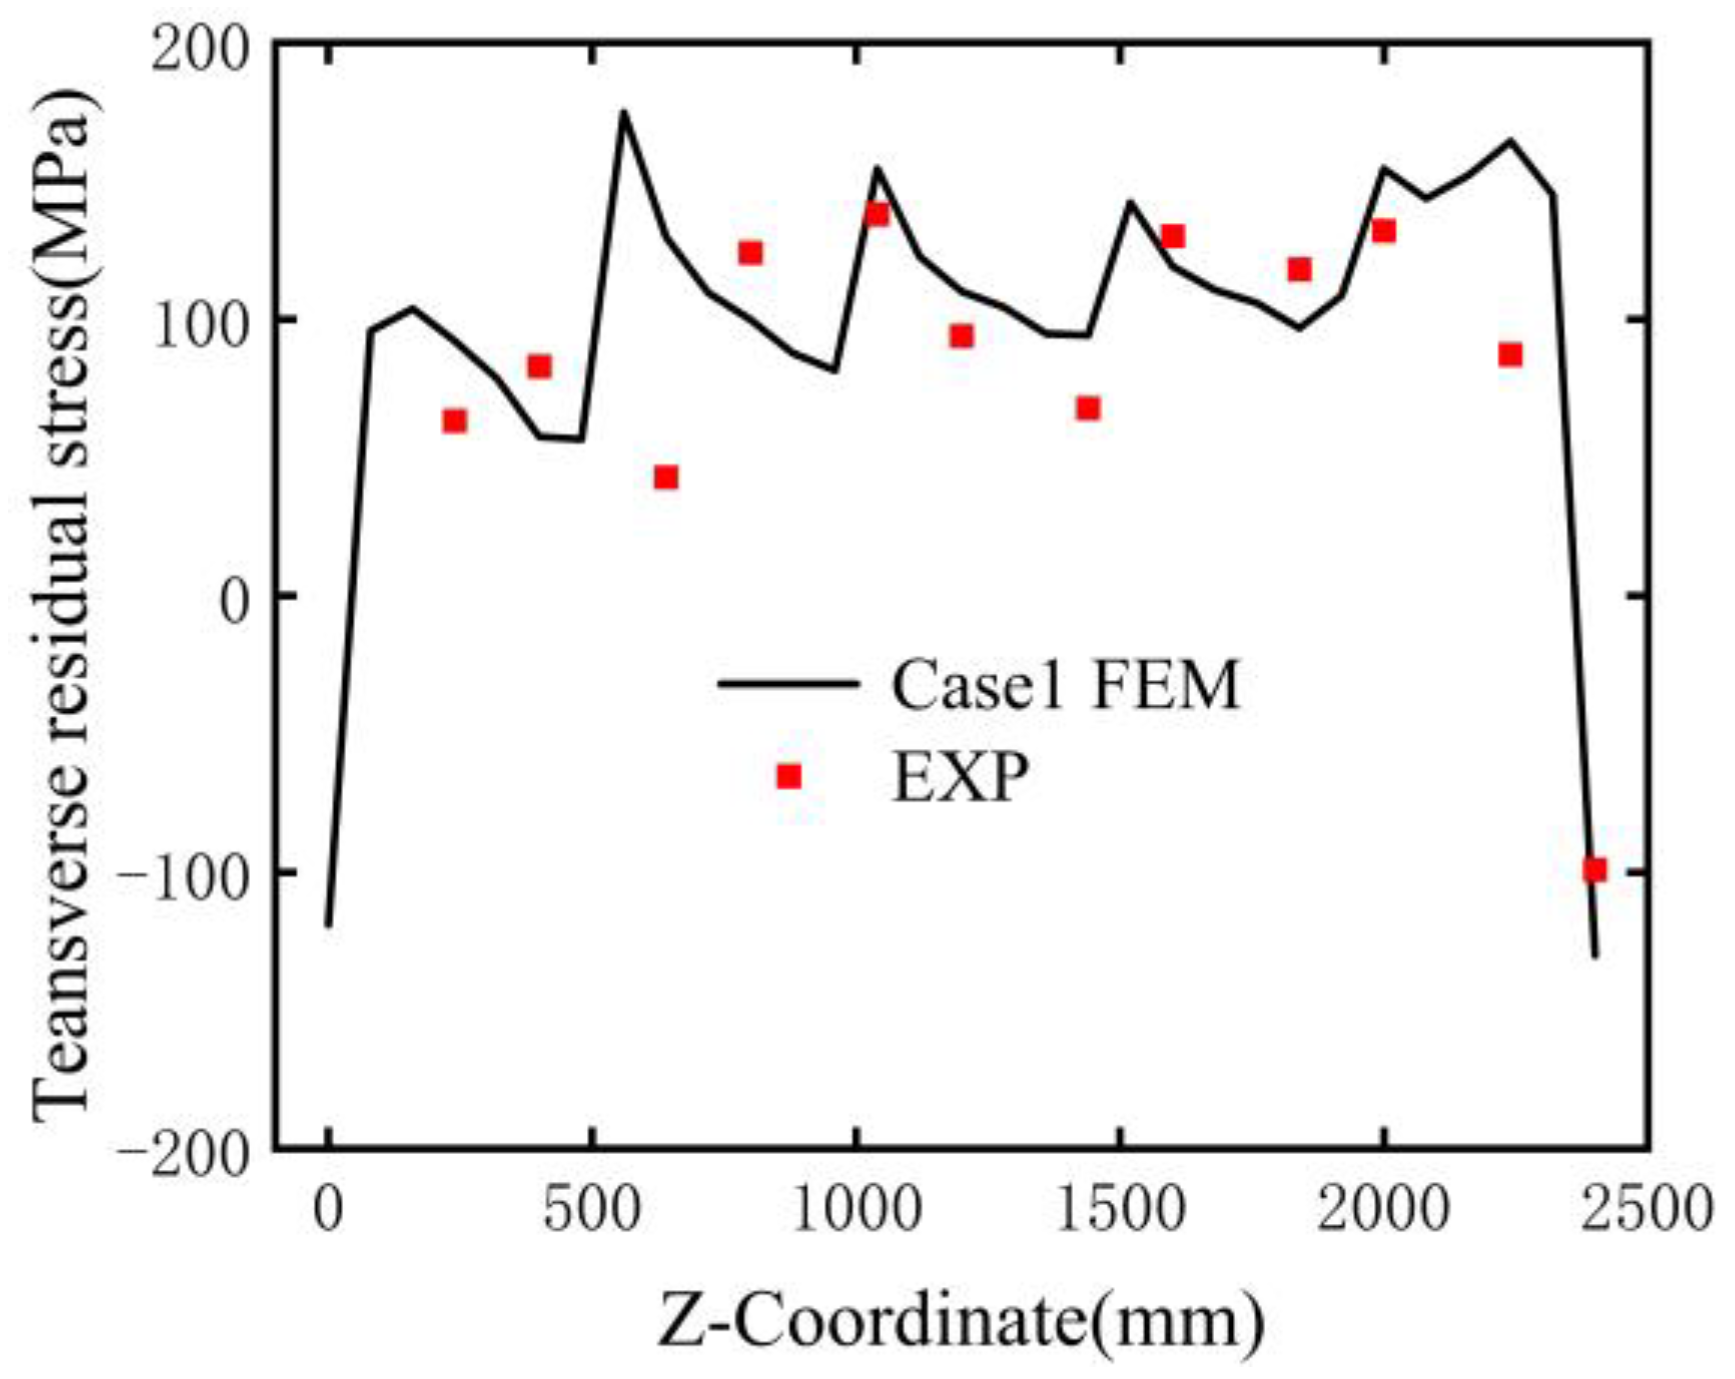
The transverse residual stress and PEEQ contour for Case 1 is displayed in Figure 15, revealing a distribution with distinct segmental fluctuations. The maximum tensile stress reaches 271.9 MPa. To balance this tensile stress, compressive residual stress is mainly concentrated at the weld initiation point and inside the base plate, attaining a peak value of 362.1 MPa. A comparison between simulated and experimentally measured transverse residual stress is provided in Figure 16; this shows that the fluctuations present in the simulation results—attributed to the use of the segmented moving heat source model—align well with the stress distribution characteristics observed in Figure 15a,b shows the PEEQ contour. For the transverse residual stress, the root mean square error (RMSE) between the simulated and experimental values is 29.5 MPa, and the correlation coefficient R2 is 0.517. These deviations primarily stem from two factors: first, the inherent uncertainty in the hole-drilling measurement method itself, and second, the errors introduced by reasonable simplifications in the model for Q390B steel, such as neglecting creep and phase transformation effects.
Currently, studies on full-scale welding residual stress in large steel structural modules remain relatively scarce. The residual stress distribution patterns obtained in this study are consistent with phenomena observed in smaller-scale T-joints [15,17]. Although their models are smaller in size, the fundamental thermo-mechanical mechanisms are similar. This validates the reliability of the numerical simulations presented in this work.

4.3. Distribution of Residual Stress Along the Thickness Direction

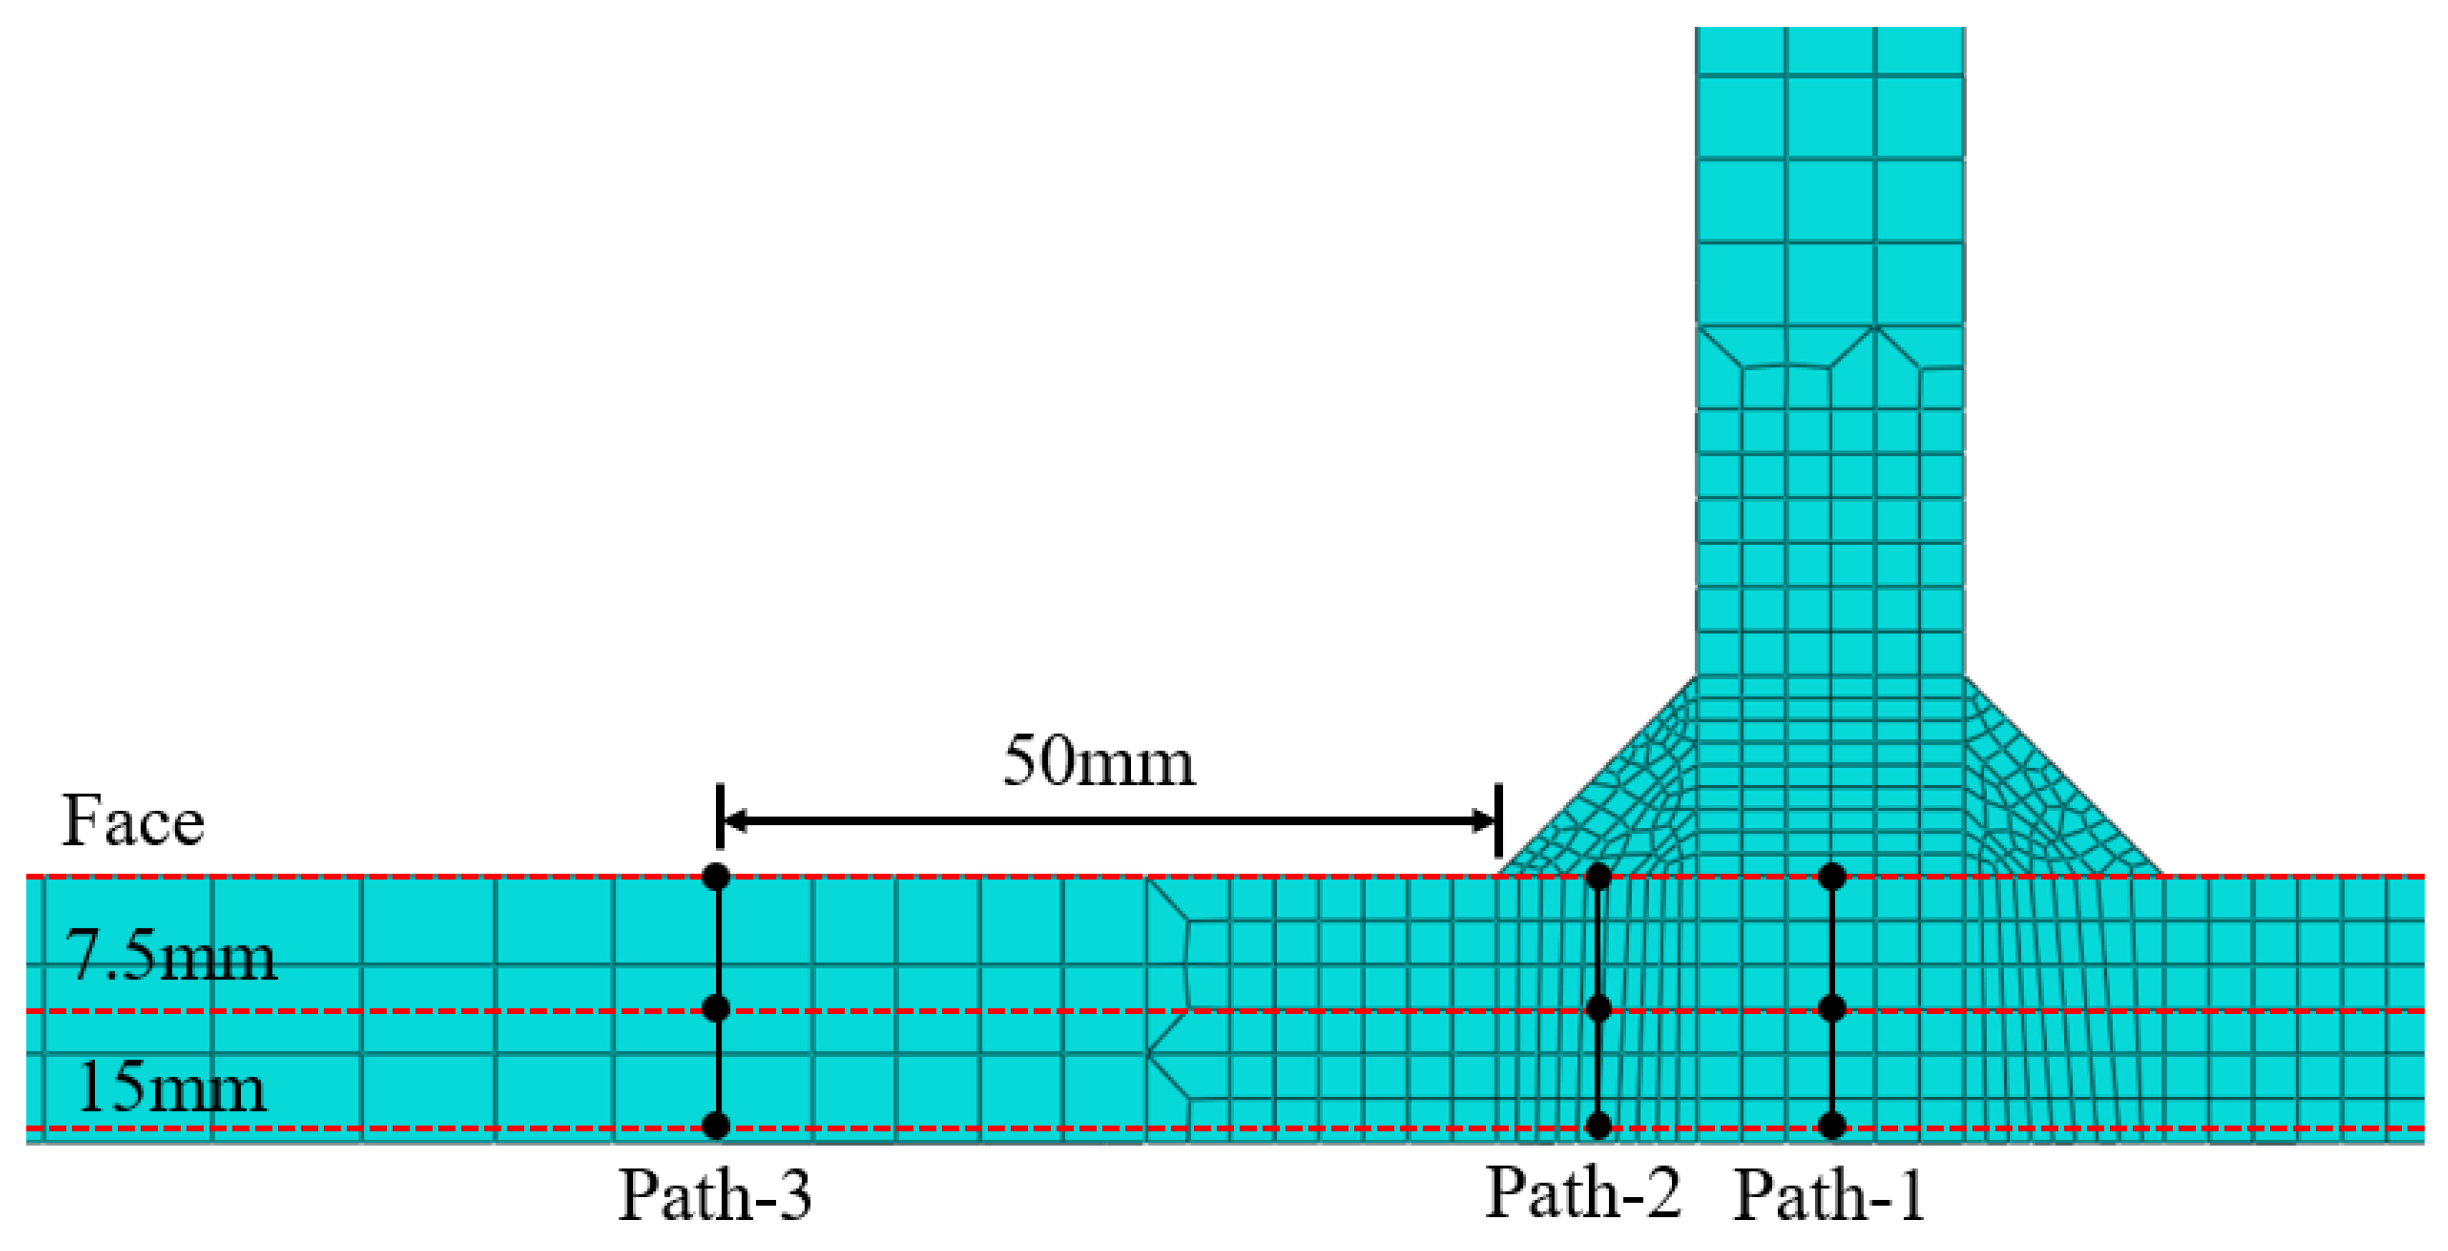
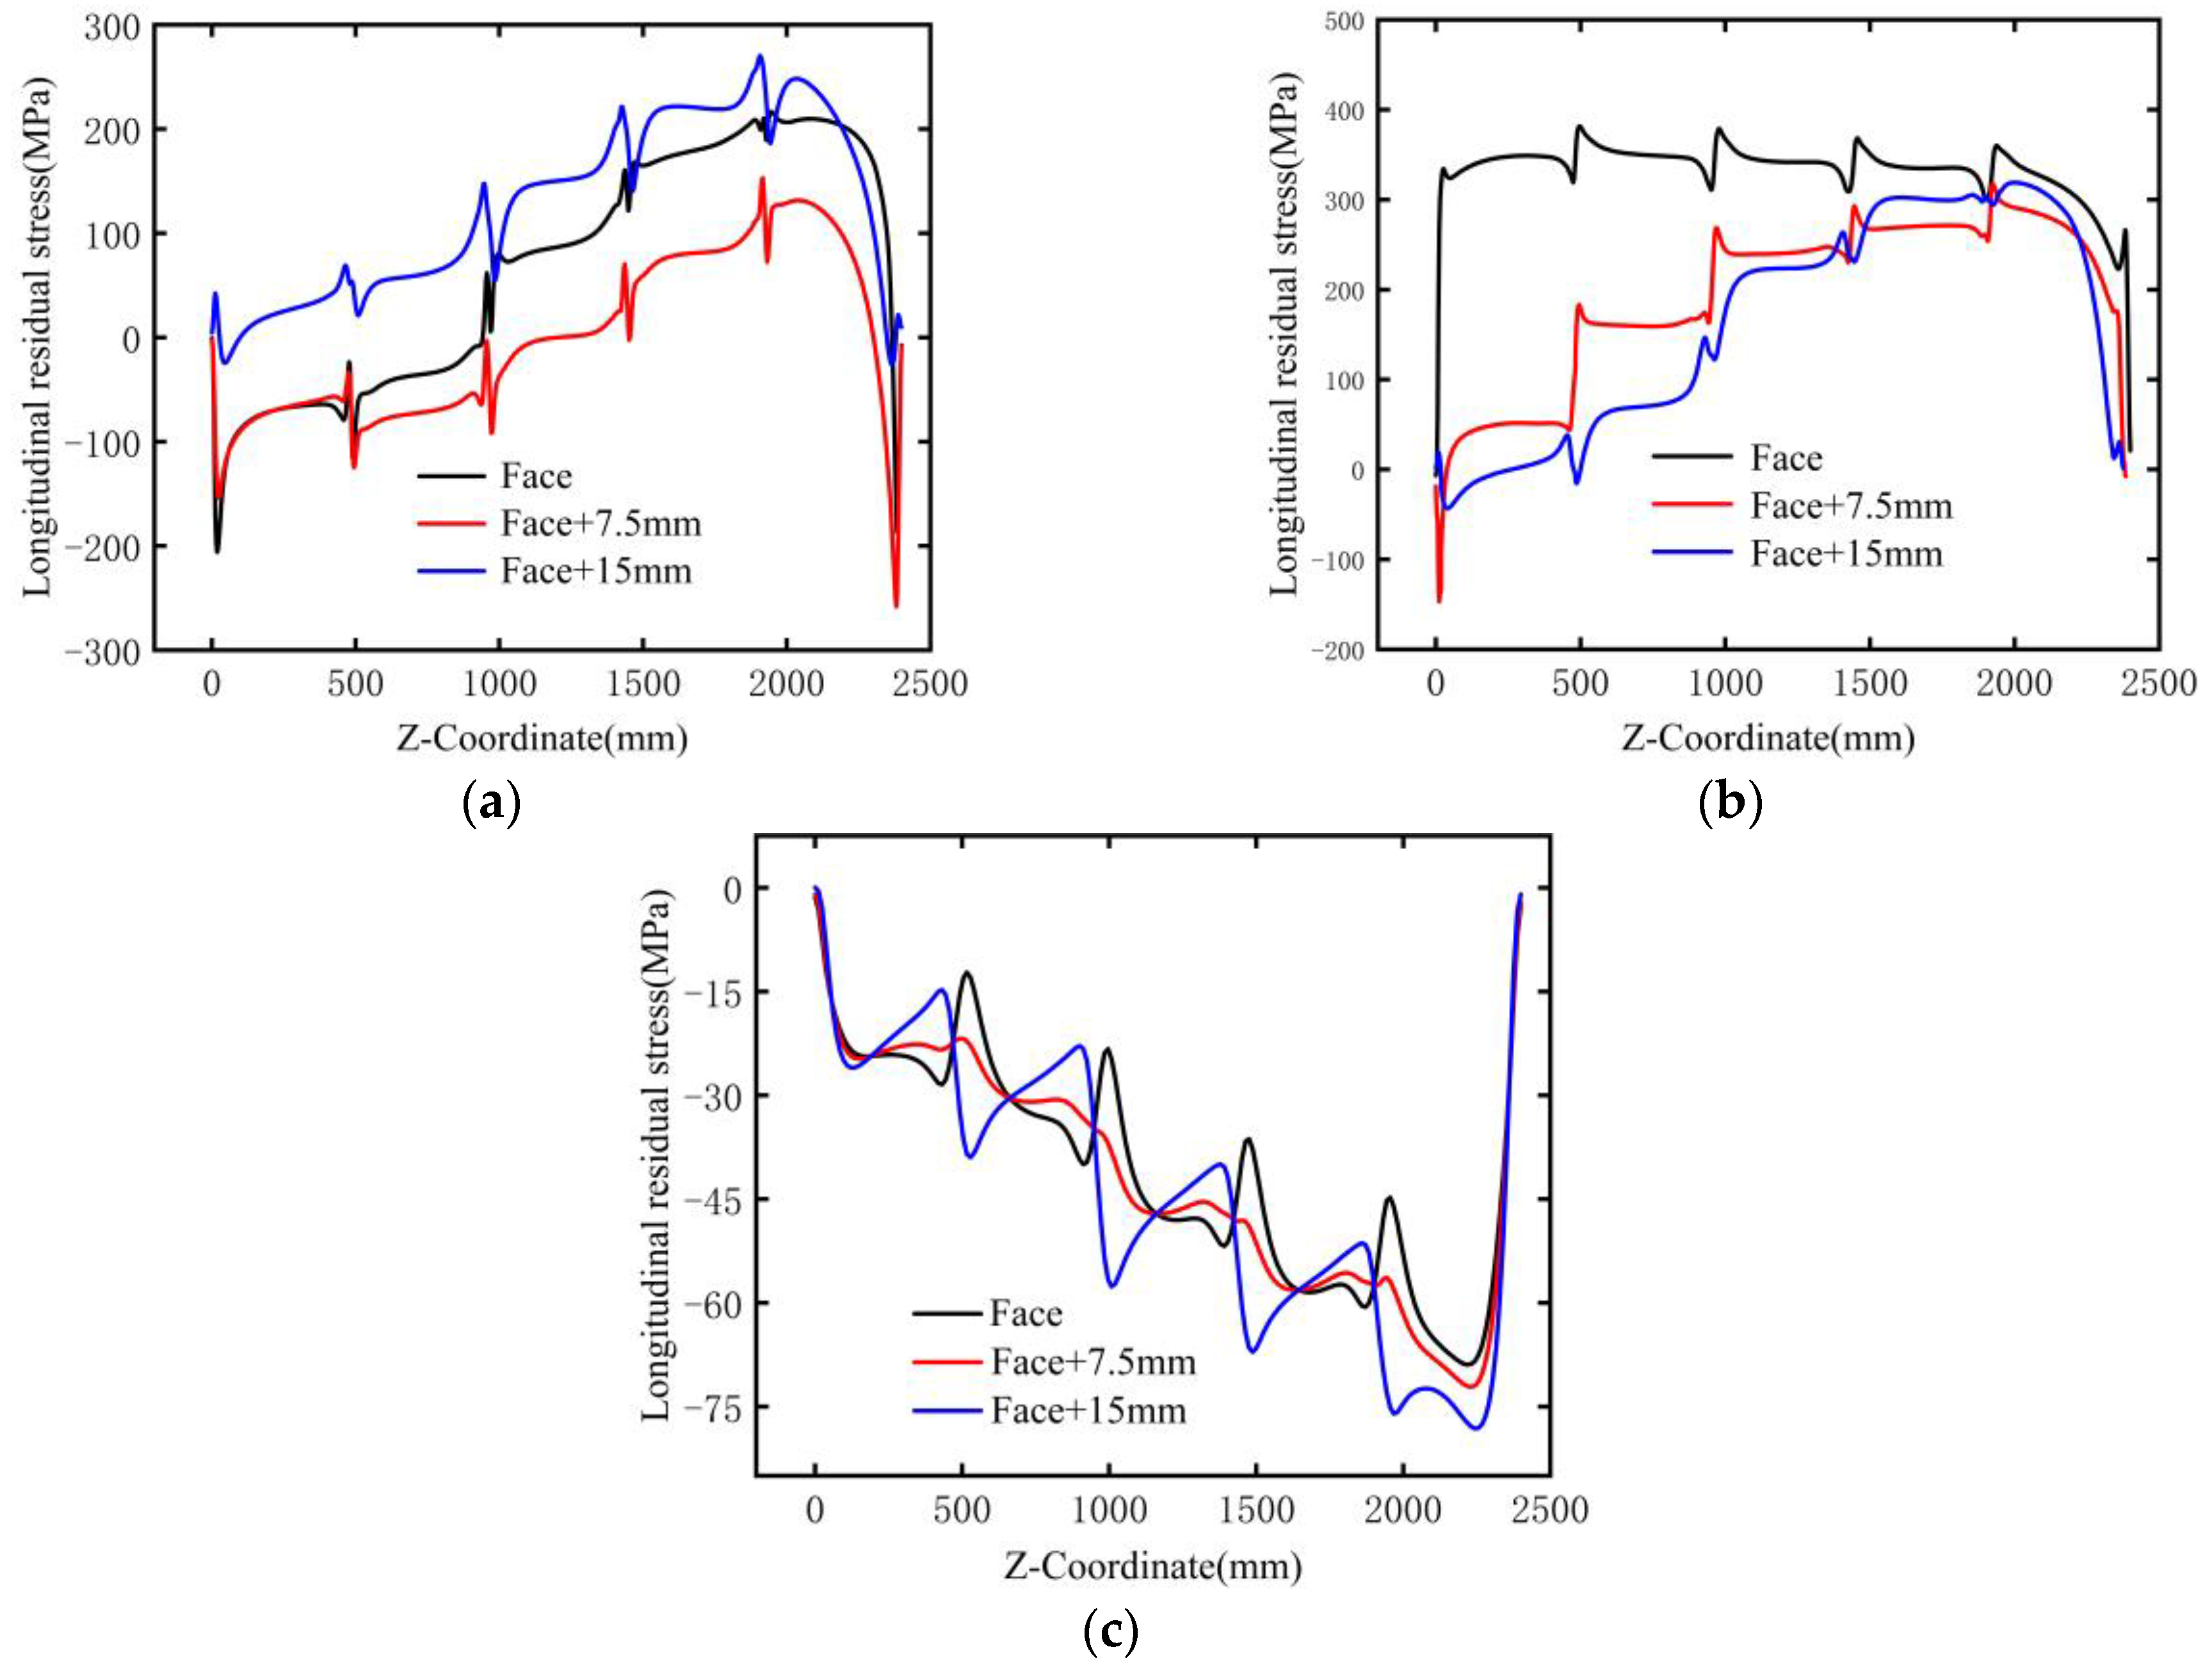
To investigate the distribution of residual stress along the thickness direction of the base material, we selected three representative locations: the connection between the web plate and the base plate (Path-1), the region directly below the weld (Path-2), and a point 5 cm away from the weld (Path-3). Residual stresses along the weld direction at three depths—0 mm (face), 7.5 mm (middle layer), and 15 mm (bottom layer)—were extracted and analyzed. The specific sampling locations are shown in Figure 17.
The residual stress distribution within the connection zone between the bottom plate and the base metal is presented in Figure 18a. The calculation results based on the segmented moving heat source indicate that due to the heat accumulation effect at the end of the weld, there is a significant increase in residual stress in this area. The stress distribution pattern in Figure 18a reveals that tensile stress primarily exists on the surface and bottom of the base metal, whereas the intermediate layer is subjected to compressive stress. This observed trend aligns well with the contour results presented earlier in Figure 13. Furthermore, Figure 18b indicates that the residual stress on the base metal surface approaches the material’s yield strength. Notably, a significant decay in residual stress is observed within the weld starting area as depth increases. This phenomenon indicates that, in practical engineering applications, it is necessary to adopt process methods such as shot peening or heat treatment to effectively reduce high residual stress on surfaces. Furthermore, Figure 18c illustrates the stress evolution in regions remote from the weld: a progressive transition from decaying tensile residual stress to low-magnitude compressive stress is observed with increasing distance. This observed trend aligns with and corroborates the simulation results presented in Figure 13.

4.4. Effect of Welding Sequence

4.4.1. Temperature

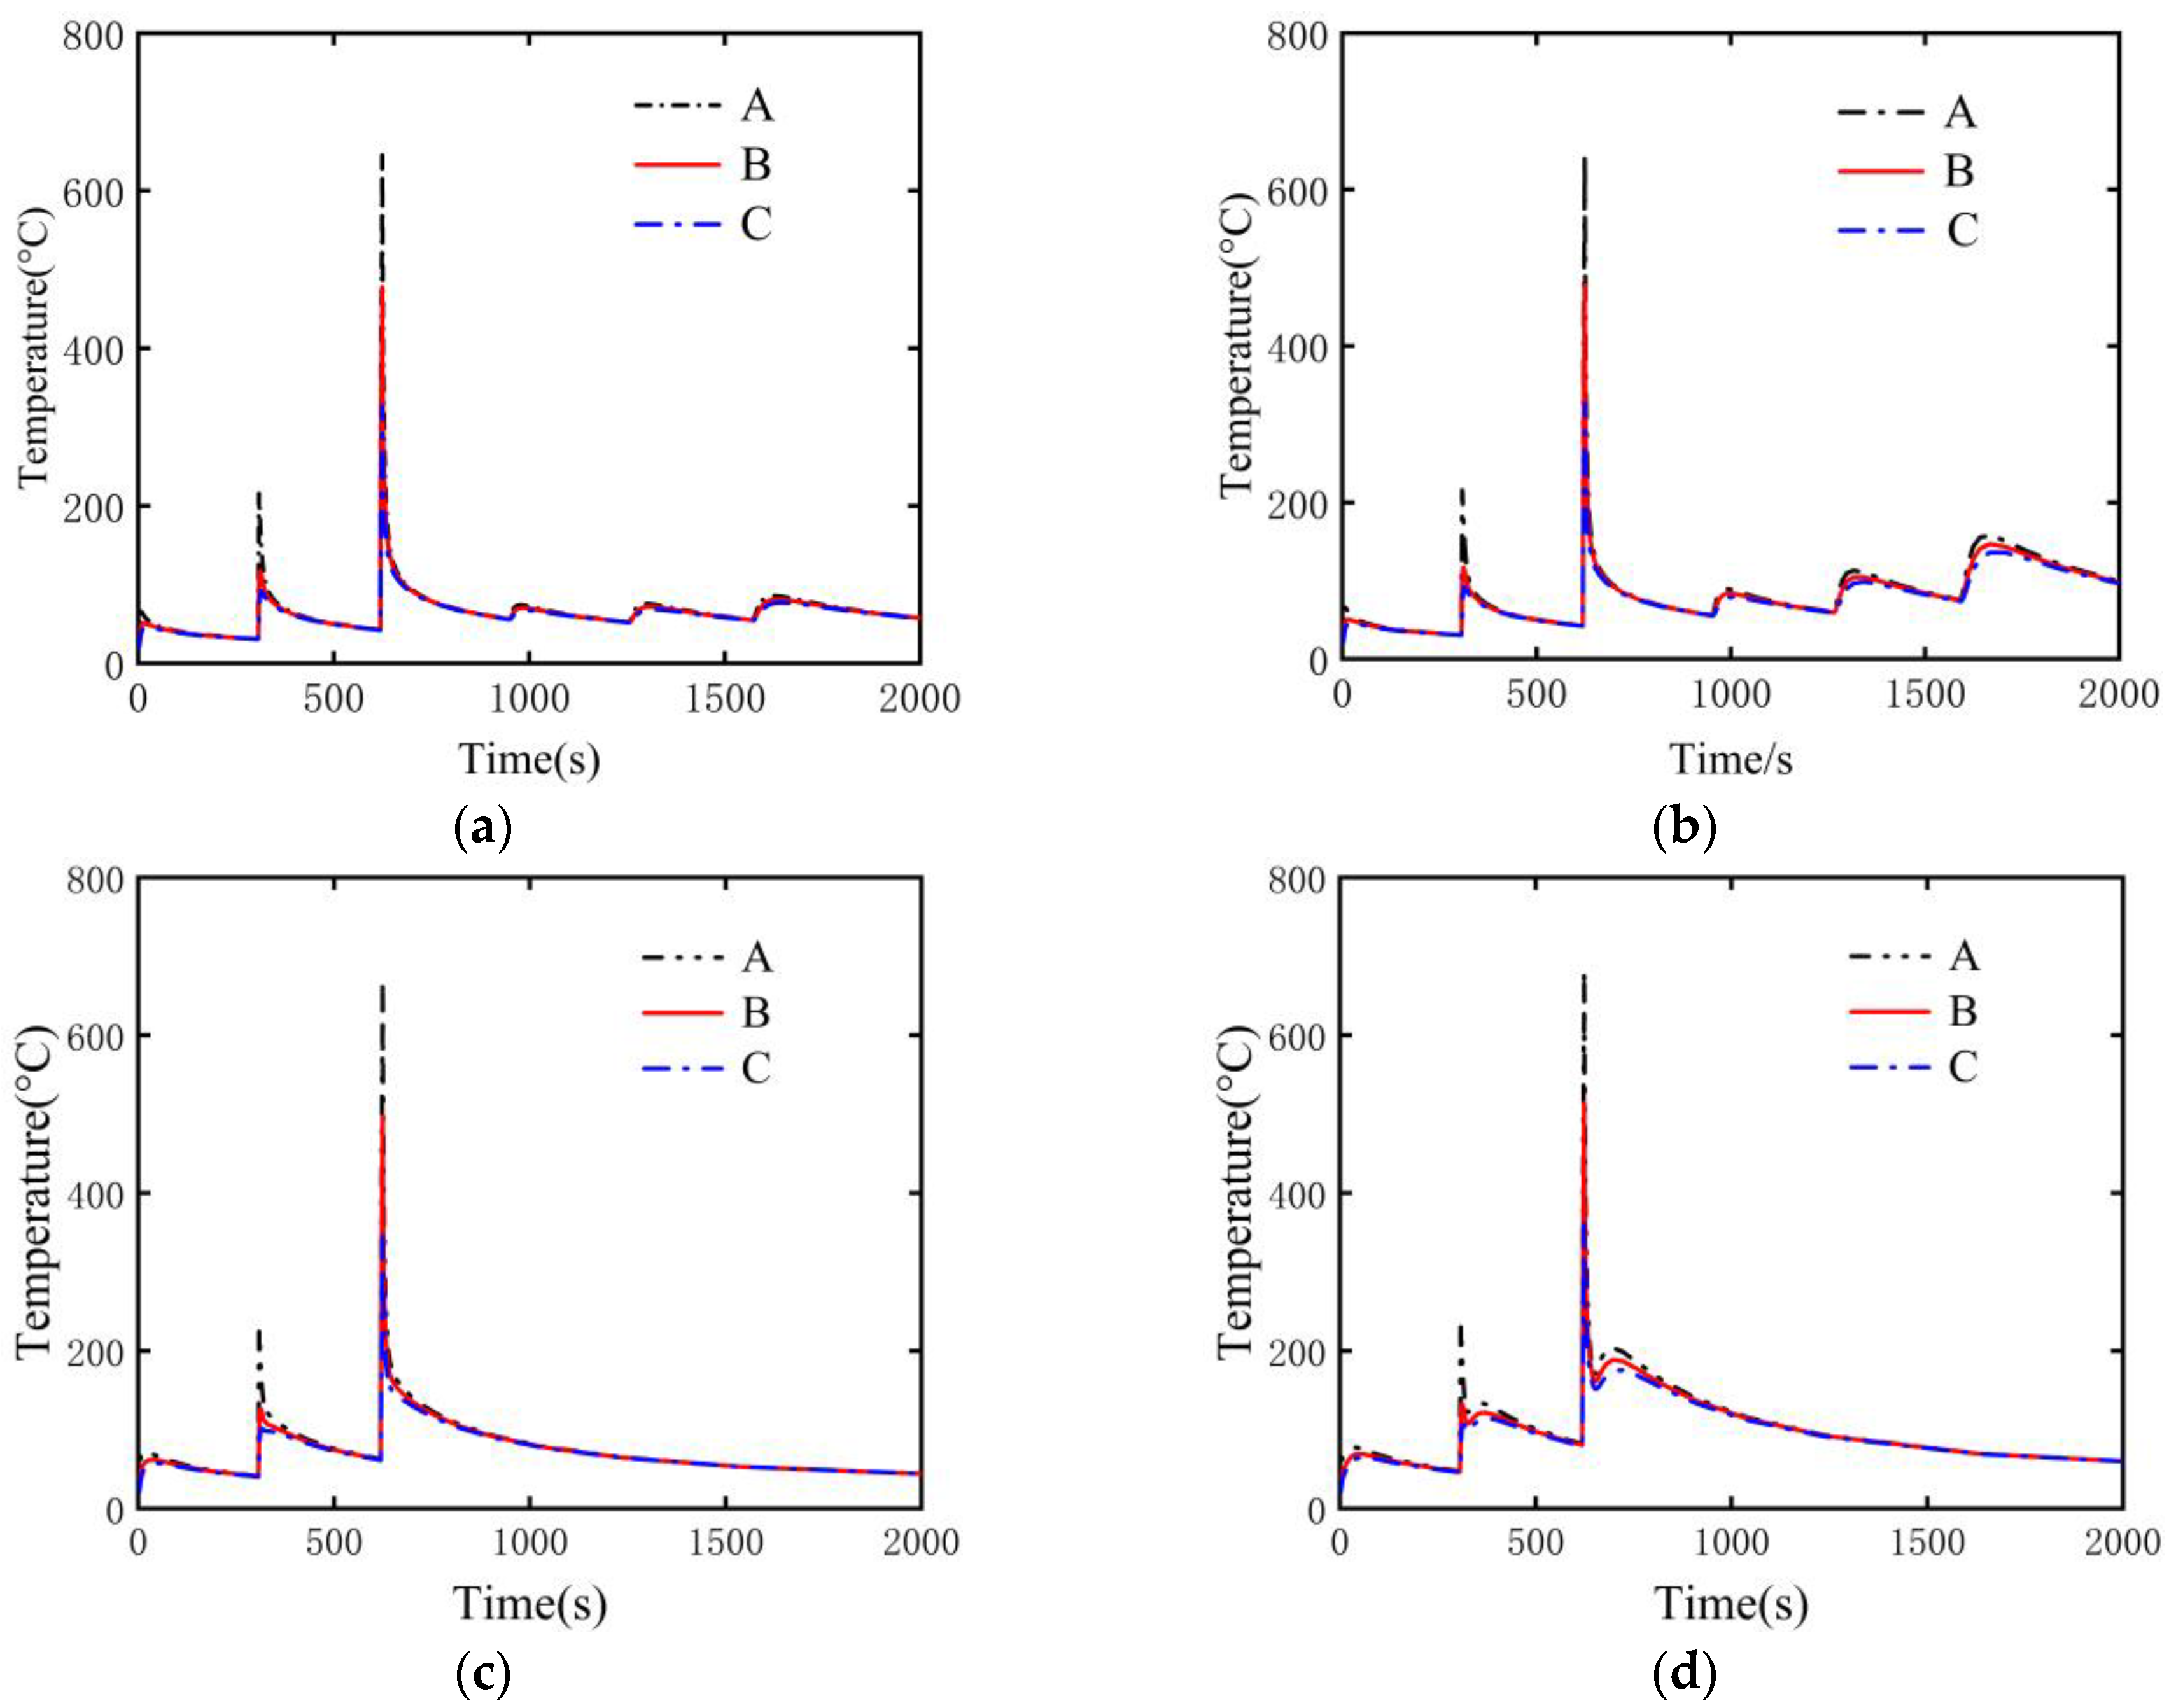
Figure 19 shows the temperature distribution results of points A, B, and C under different welding sequences obtained through finite element simulation. Since the results in Figure 19b were obtained using reverse-order welding, the temperature peaks at measurement points A, B, and C during the welding of welds 4, 5, and 6 are significantly higher than the corresponding values in the case of Figure 19a. Figure 19c,d show cases of simultaneous double-sided welding, so there are only three obvious temperature peaks. It is worth noting that, due to the reverse-order welding used to generate the results in Figure 19d, points A, B, and C experience a second heating, which leads to a small temperature fluctuation in the temperature curve. A comparative analysis of the thermal fields indicates that continuous double-sided welding (Figure 19a,b) exhibits a notable reduction in peak temperature—approximately 40 °C lower—compared to simultaneous double-sided welding (Figure 19c,d). This disparity stems from the differing heat inputs: the simultaneous method, by applying heat sources to both sides concurrently, achieves greater heat accumulation and thus a higher weld region temperature.

4.4.2. Stress

Longitudinal residual stress distributions along the welding direction under four distinct welding sequences are visualized in Figure 20. A comparative analysis reveals that the stress magnitudes and spatial patterns in Case 1 and Case 2 are markedly similar, exhibiting no substantial divergence in their overall configuration. In contrast, the distributions in Case 3 and Case 4 demonstrate significant differentiation. Specifically, these latter cases are characterized by more extensive propagation of high-compressive-stress zones. Concurrently, the tensile stress fields within the bottom plate region are more pronounced and widely distributed in Cases 3 and 4 compared to those in the former two sequences, suggesting a direct influence of the welding sequence on the localization and magnitude of both tensile and compressive stress regimes.
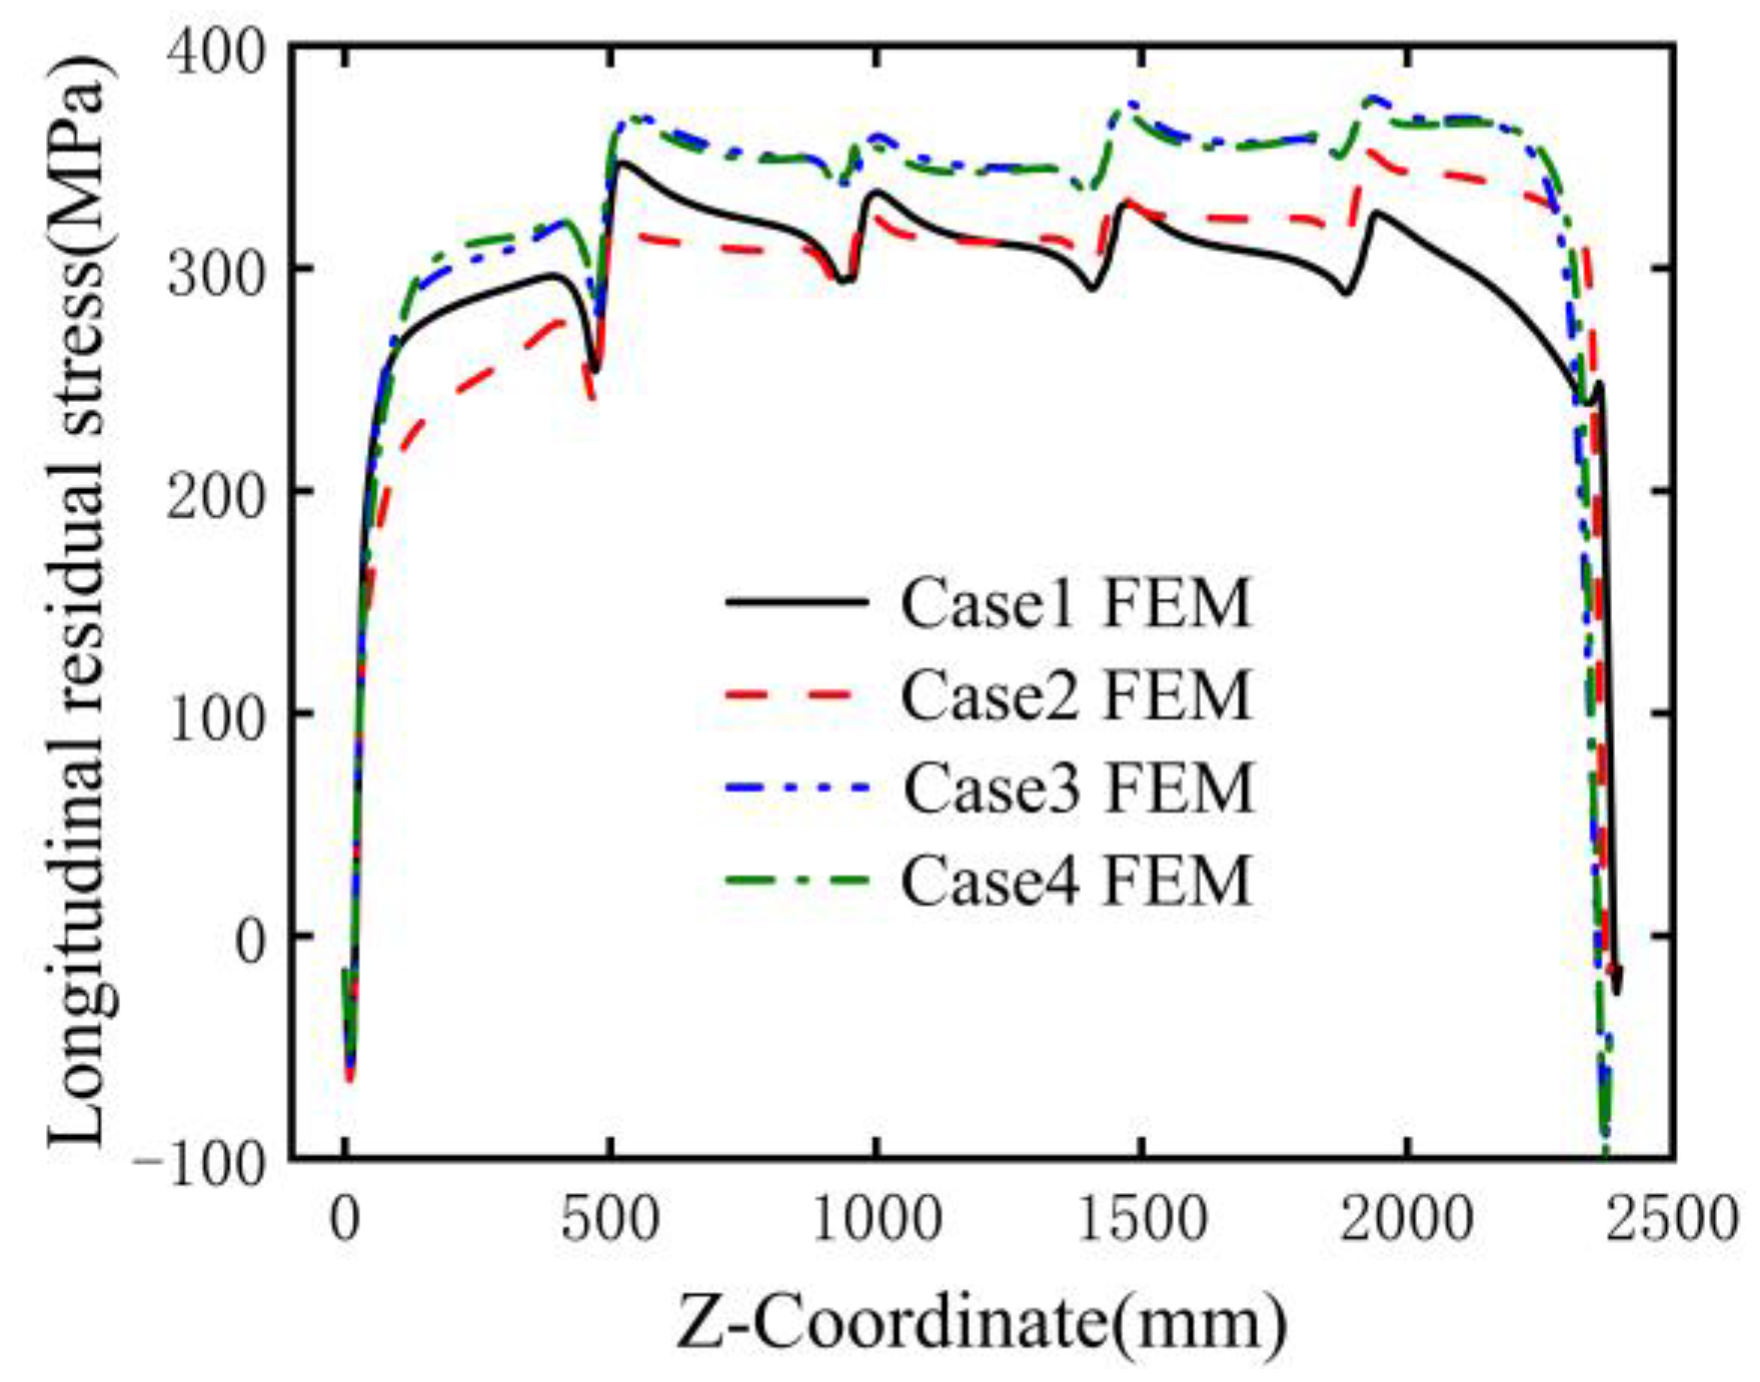
Figure 21 presents the longitudinal residual stress curves along the path defined in Figure 2 for different welding sequences. A comparison between Case 1 (forward continuous welding) and Case 2 (reverse continuous welding) reveals that the residual stress in the first half of the path is higher for Case 1 than it is for Case 2, whereas the trend reverses in the second half. This is attributable to the reverse welding order employed in Case 2. After welding one side, the temperature difference changes; in the first half, it is smaller for Case 2 than is it Case 1, and in the second half, it is larger. This alteration in temperature difference leads to different residual stress distributions, thus resulting in the above-mentioned results. Case 3 and Case 4 are simultaneous welding. It can be seen from the figure that the residual stress results of the two are not very different. However, overall, since the heat dissipation time during the two-side welding is shorter, the residual tensile stress is greater.
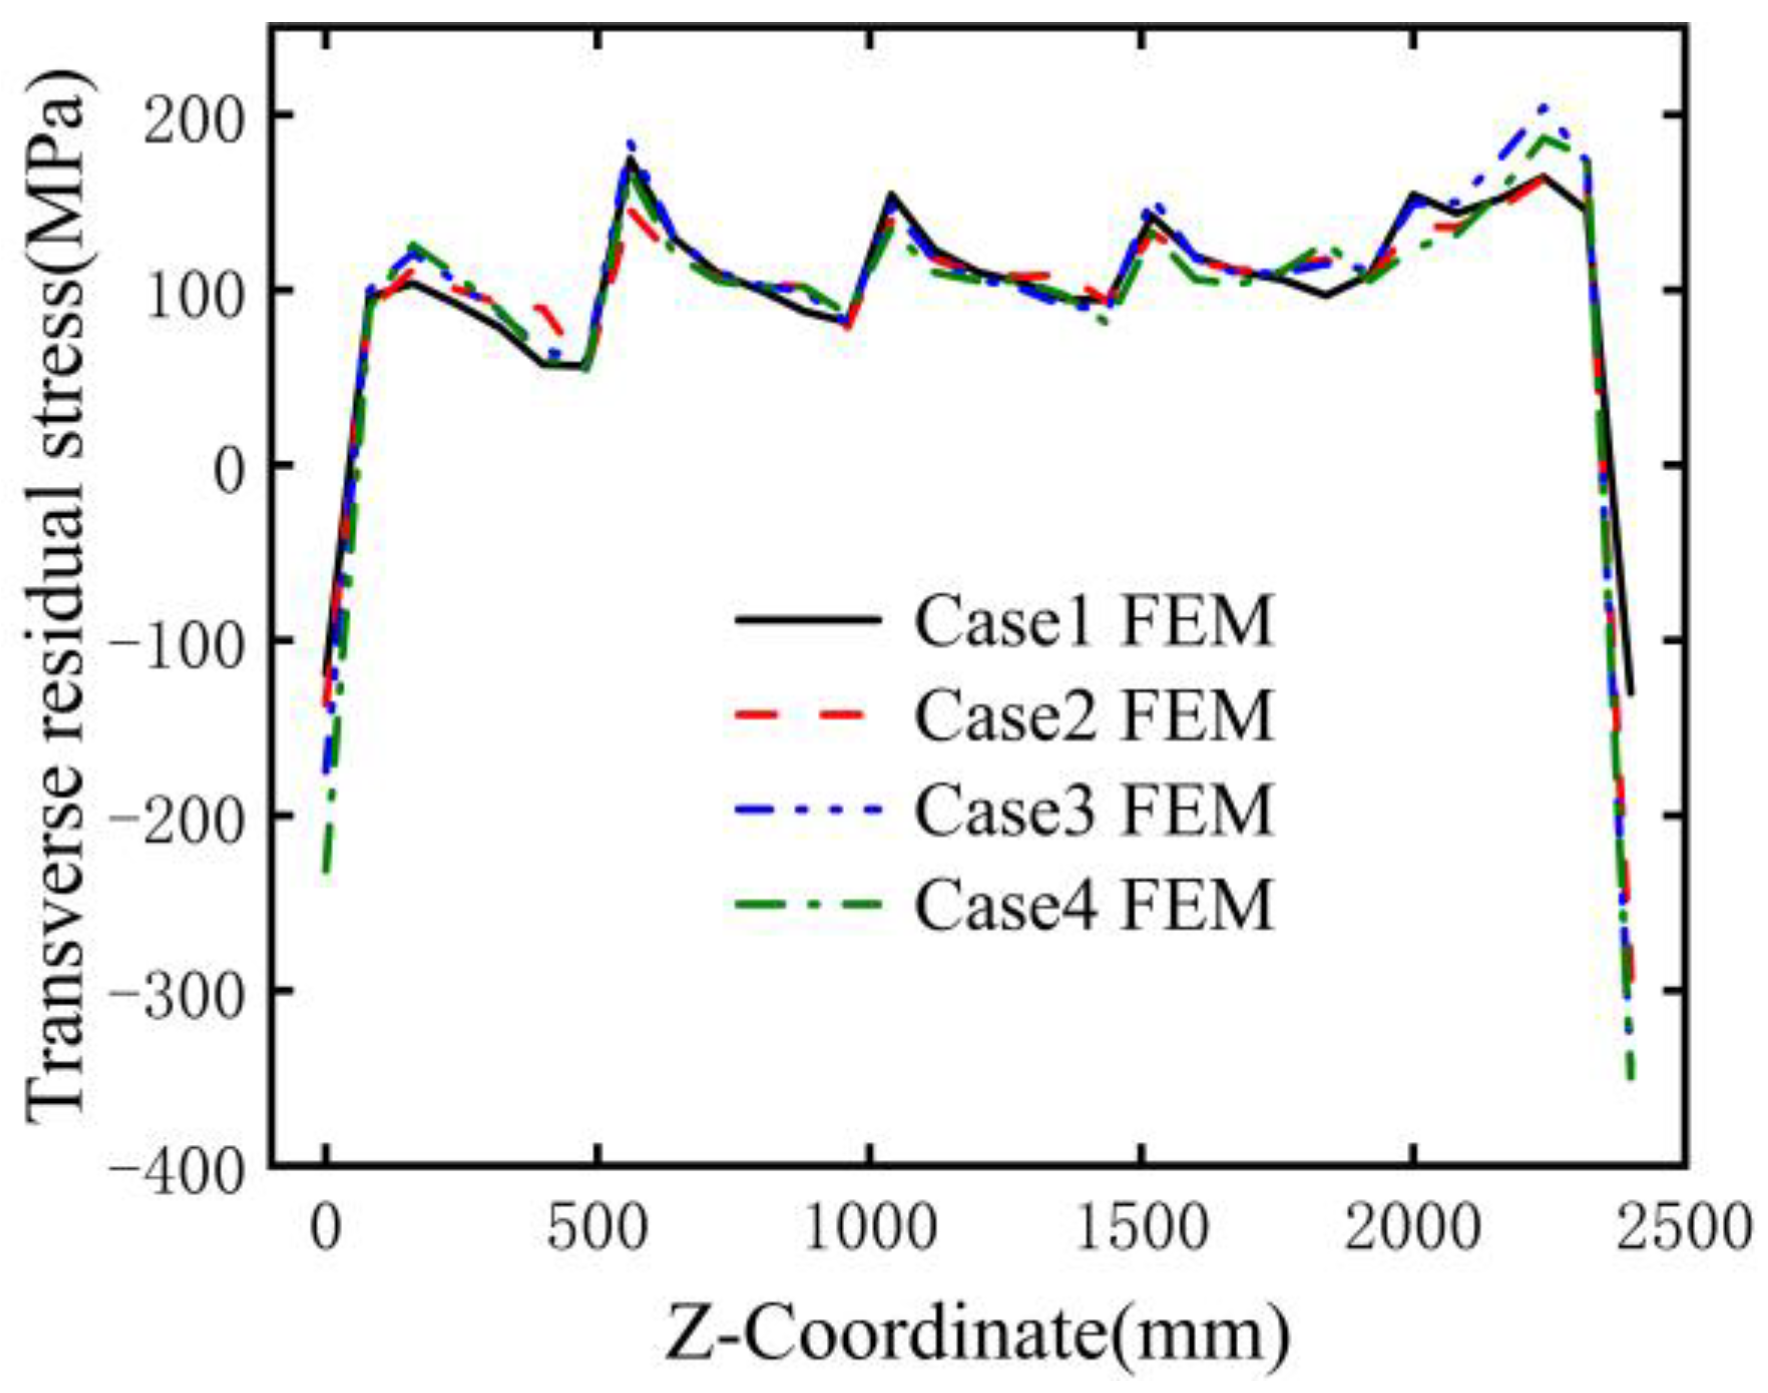
The variation in transverse residual stress with welding sequence is detailed in Figure 22. It is shown that the transverse tensile stress in the weld middle section exhibits only minor variations, whereas the transverse compressive stress near the start of the weld significantly fluctuates, considerably influenced by the welding sequence used.

4.4.3. Deformation

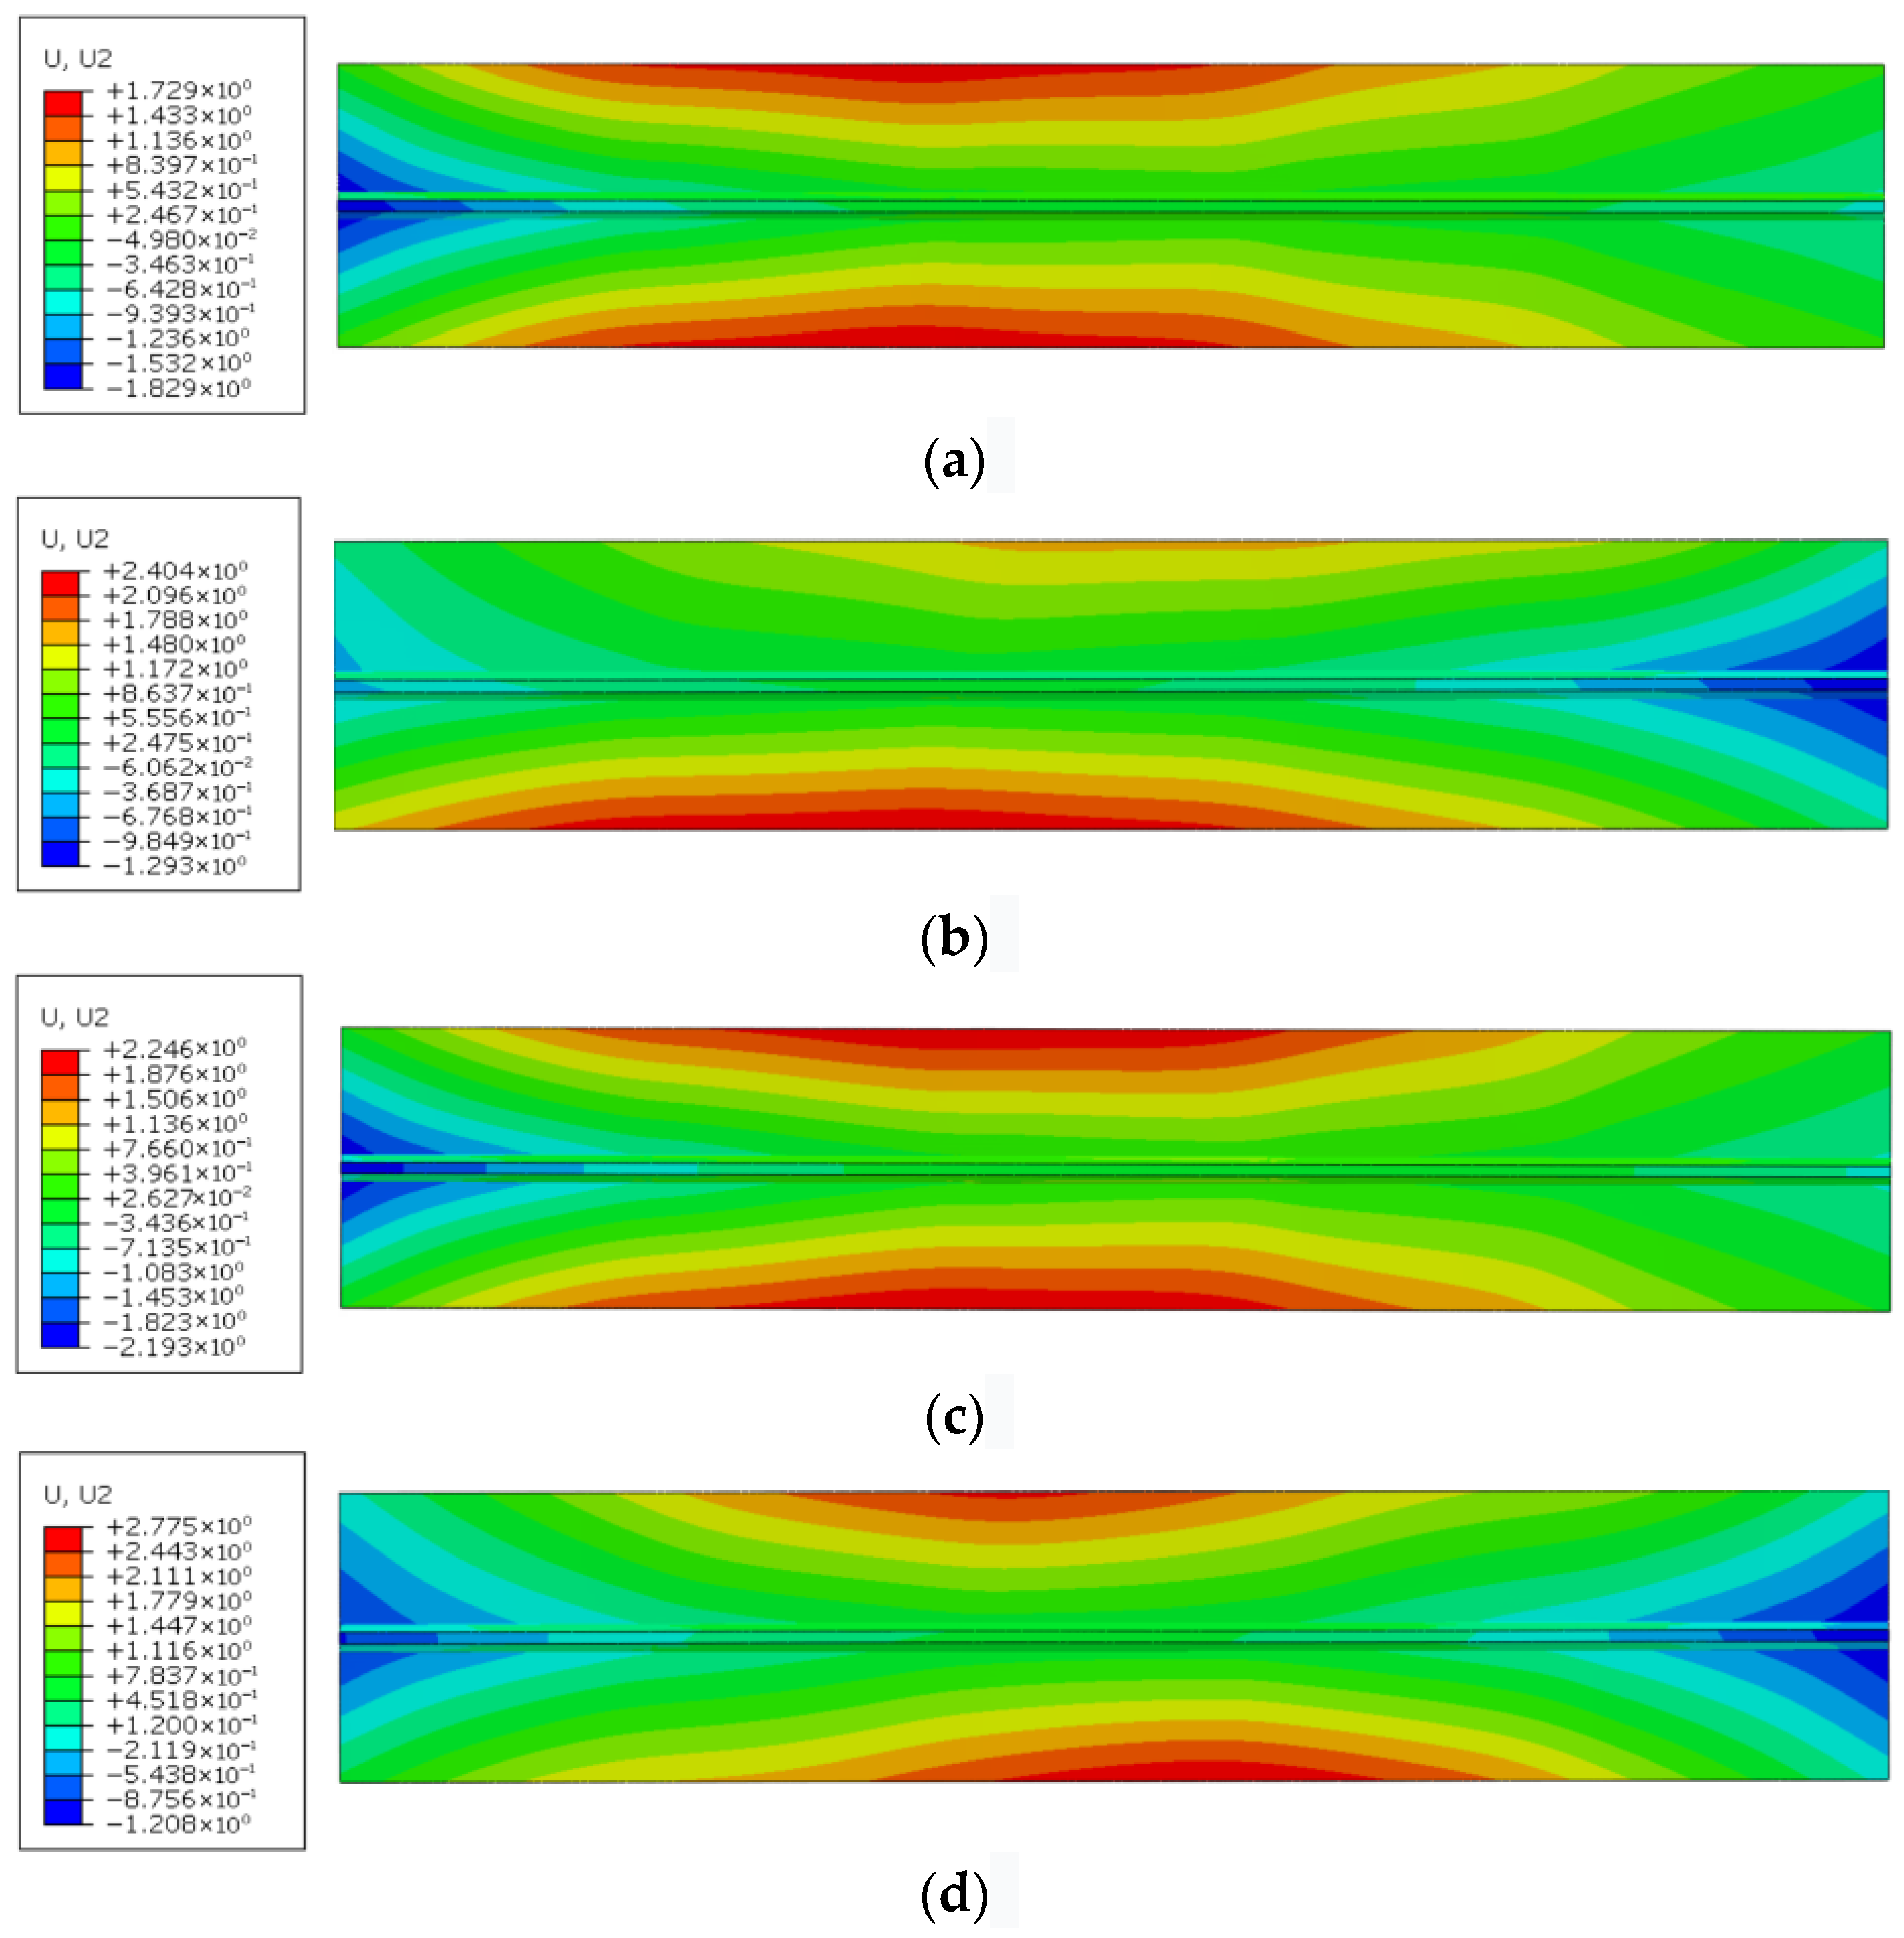
Figure 23 shows the welding deformation contours under different welding sequences, revealing that the maximum deformations consistently occur at the initial web section and edges, with Case 4 exhibiting the highest peak deformation of 2.775 mm and Case 1 showing the lowest at 1.729 mm.
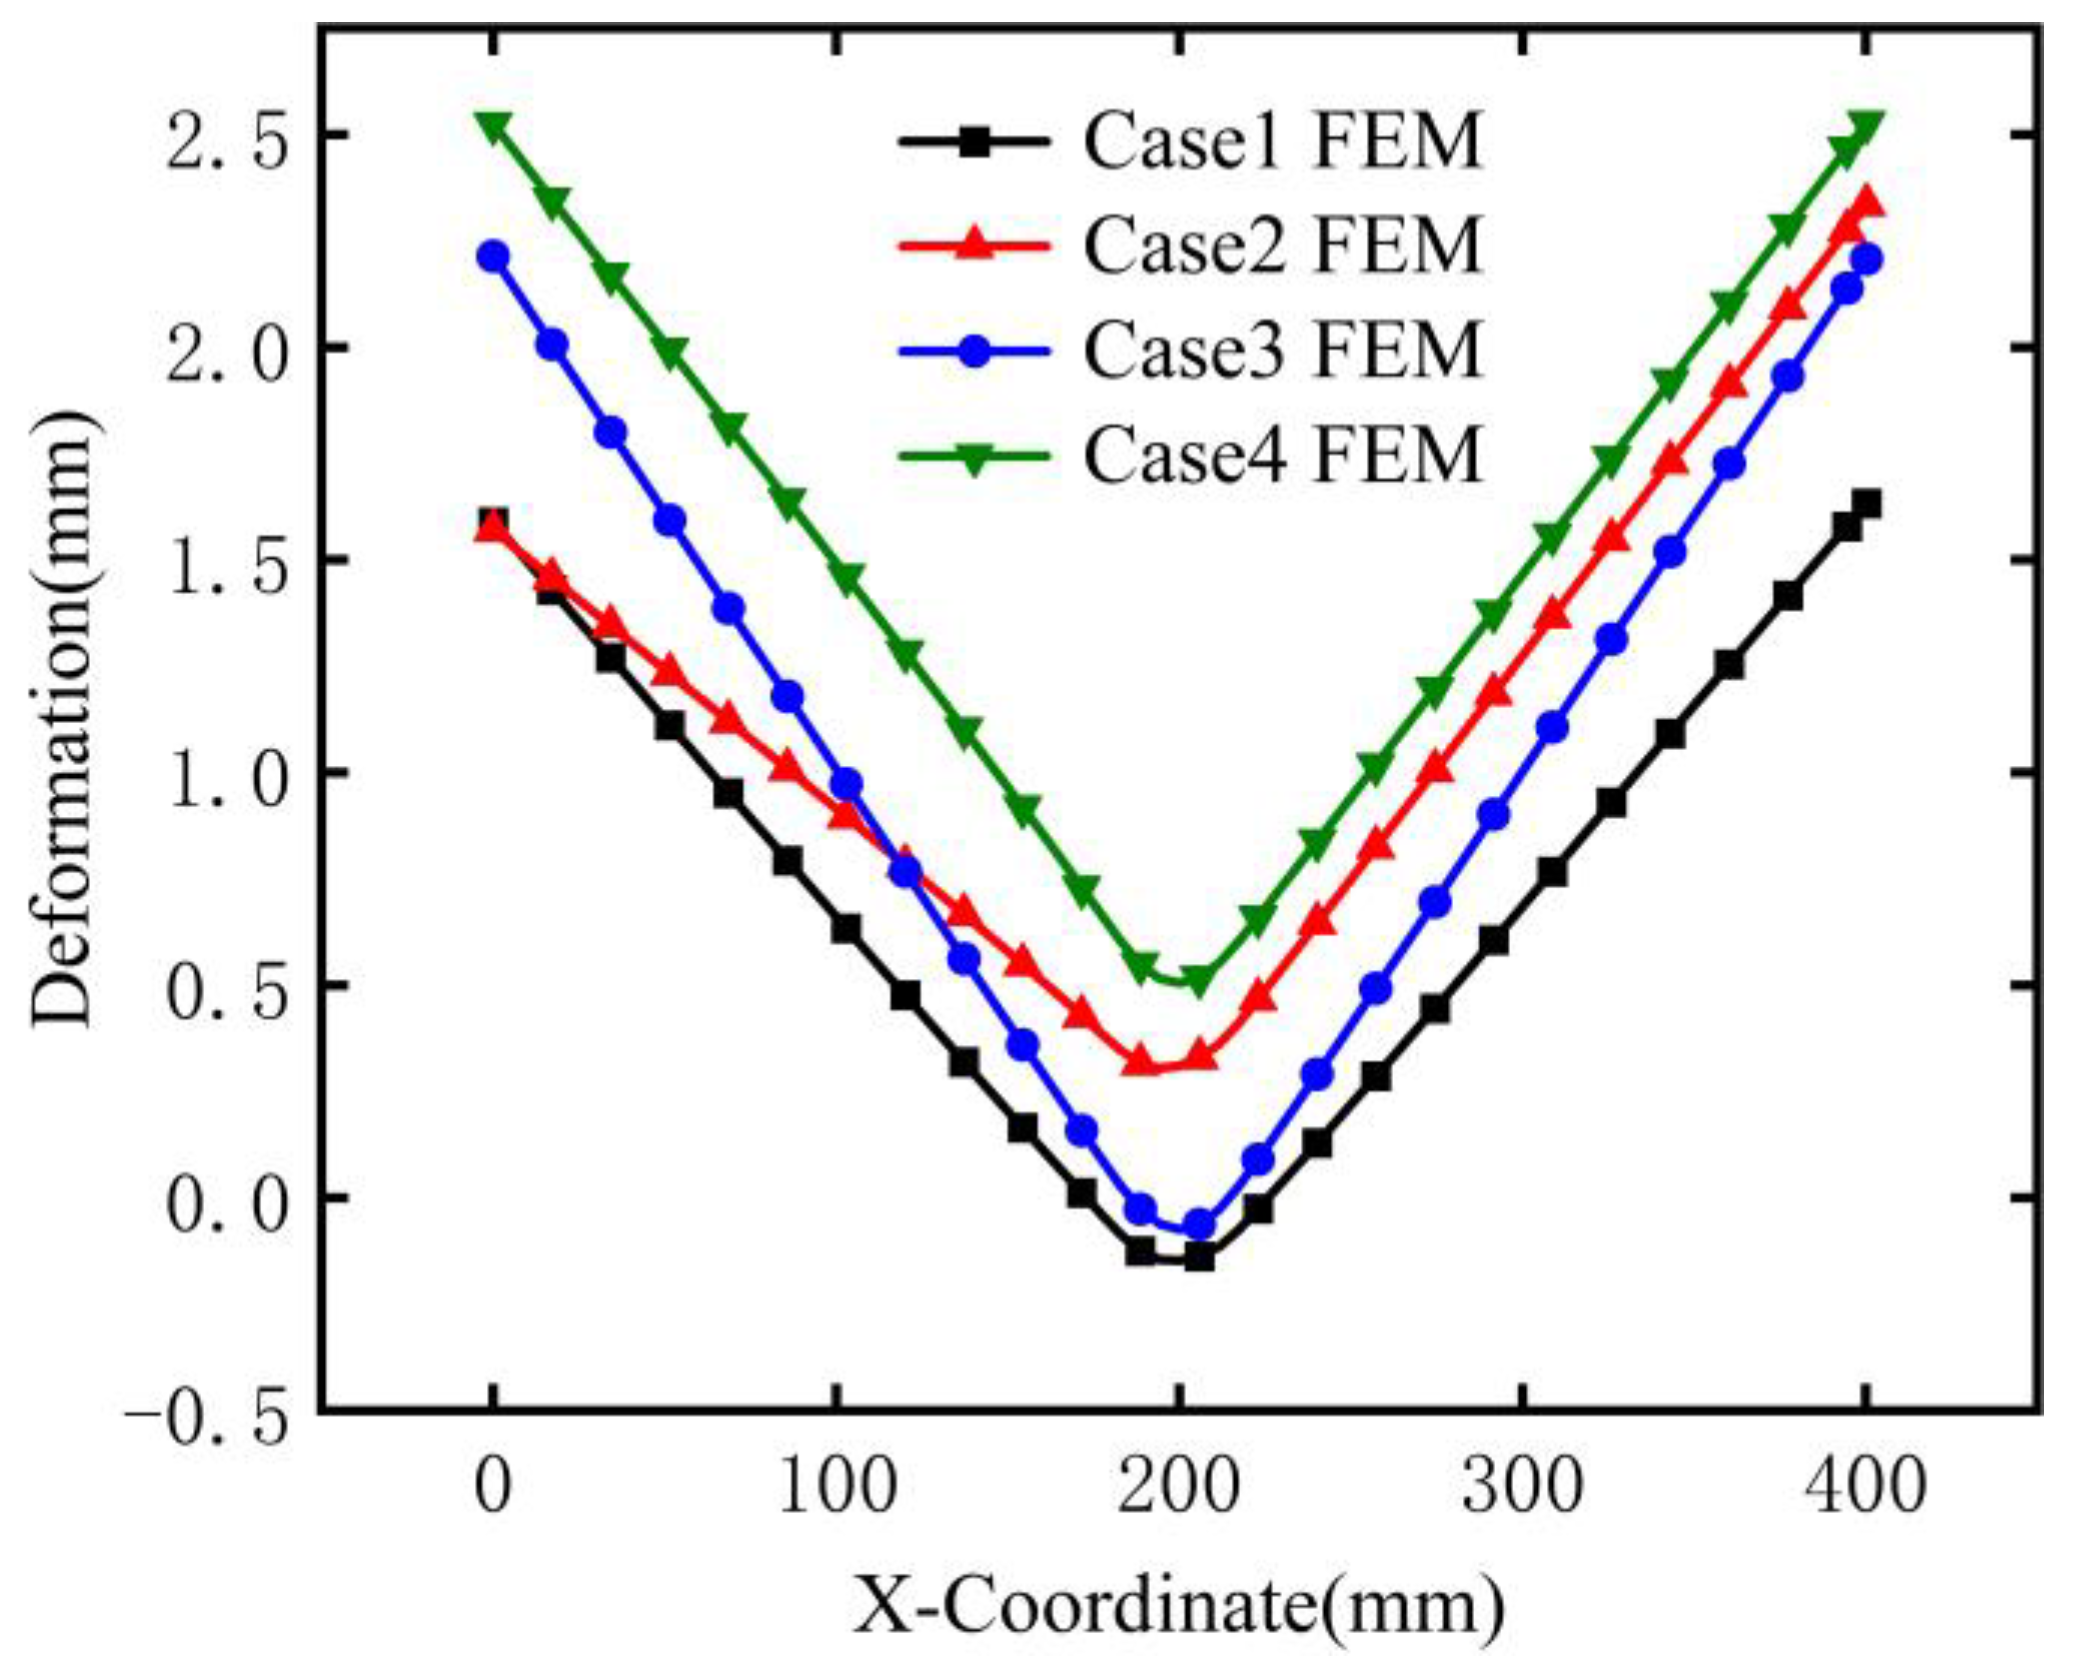
To elucidate the specific effects of welding sequence on the deformation of T-joint filet welds in large-scale steel structures, the out-of-plane distortion curves along the X direction for each sequence are compared, as presented in Figure 24.
It can be observed from the figure that the deformation of Case 1 (continuous welding in the forward sequence) at the bottom plate is basically symmetrically distributed and the smallest in value. Case 3 (simultaneous welding in the forward sequence) has slightly larger deformation compared with Case 1. In contrast, Case 2 and Case 4 adopt reverse-sequence welding, in the stress concentrates in local areas, which leads to greater deformation.

5. Conclusions

Combining experimentation and simulation based on a segmented moving heat source, in this study, we investigated this source’s use in large infrastructure modules and analyzed welding sequence effects on T-joint performance. The methodology commenced with hole-drilling measurements of filet weld residual stress, followed by finite element model validation using a DFLUX-based segmented heat source in ABAQUS, and culminated in an analysis of welding sequence impact, from which conclusions were derived.
  • The residual stress predictions obtained with the segmented moving heat source show good agreement with experimental measurements, confirming the method’s validity. Furthermore, the required computation time of 38 h is significantly reduced compared to that of the conventional moving heat source approach, demonstrating enhanced efficiency.
  • Based on the analysis of temperature–time curves at three fixed points, it was found that the temperature distribution is consistent with the heat source loading sequence. Compared to those during sequential welding, the temperature peaks at points A, B, and C are higher during simultaneous welding.
  • The residual stresses along the weld seam exhibit a distribution pattern of being “high in the middle and low on both sides,” with the maximum measured tensile residual stress of 347 MPa occurring at the center of the weld. Compared to simultaneous welding on both sides, continuous welding effectively reduces the temperature gradient, thereby significantly lowering the residual stresses.
  • The residual tensile stress on the base metal surface approaches the material’s yield strength, which significantly impairs the fatigue performance of the joint; this stress decays gradually along the thickness direction. Therefore, processes such as shot peening or heat treatment are required to reduce the surface stress and ensure long-term structural safety. Additionally, an alternating tensile–compressive–tensile distribution is observed at the connection between the base plate and the web plate, while regions away from the weld exhibit low-magnitude compressive stress.
  • The deformation analysis across welding sequences shows two key findings: the location of maximum deformation is consistently at the web end and unconstrained edge, while the magnitude peaks under reverse simultaneous welding and minimizes under forward continuous welding. Our comprehensive assessment therefore recommends Case 1 as the optimal choice for practical engineering.

Supplementary Materials

The following supporting information can be downloaded at: https://www.mdpi.com/article/10.3390/buildings16010153/s1, File S1: Segmented Heat Source Subroutine.

Author Contributions

Conceptualization, F.Y.; Methodology, Z.M. and Z.C.; Software, M.L.; Validation, Z.C. and W.L.; Formal analysis, J.Z.; Investigation, M.L. and Y.N.; Resources, Z.M.; Data curation, F.Y.; Writing—original draft, M.L.; Writing—review and editing, F.Y.; Visualization, W.L.; Supervision, Q.Y. and Y.Z.; Project administration, Q.Y., Y.Z. and Y.N.; Funding acquisition, J.Z. All authors have read and agreed to the published version of the manuscript.

Funding

This work was supported by the National Natural Science Foundation of China (52408340,52378304), the Shandong Natural Science Foundation (ZR2024QE024), and the Postdoctoral Innovation Project of Shandong Province (SDCX-ZG-202400226).

Data Availability Statement

The original contributions presented in this study are included in the article/Supplementary Material. Further inquiries can be directed to the corresponding author.

Conflicts of Interest

Author Yang Zhao was employed by the company Qingdao Guogong Industrial Advanced Materials Co., Ltd. Author Yun Niu was employed by the company China Nuclear Industry 24 Construction Co., Ltd. The remaining authors declare that the research was conducted in the absence of any commercial or financial relationships that could be construed as a potential conflict of interest.

References

  1. Gao, Z.; Guo, Y. Research progress on welding residual stress and deformation in large or complex steel structure. J. Archit. Civ. Eng. 2016, 33, 108–119. [Google Scholar]
  2. De, A.; DebRoy, T. Aperspective on residual stresses in welding. Sci. Technol. Weld. Join. 2011, 16, 204–208. [Google Scholar] [CrossRef]
  3. Ramy, G.; Hidekazu, M.; Masakazu, S. Investigation of thickness and welding residual stress effects on fatigue crack growth. J. Constr. Steel Res. 2023, 201, 107760. [Google Scholar] [CrossRef]
  4. Majid, F.; Thomas, P.N. Residual stress relaxation in welded large components. Mater. Test. 2015, 57, 750–754. [Google Scholar] [CrossRef]
  5. Wu, G.; Luo, J.; Li, L.; Long, Y.; Zhang, S.; Wang, Y.; Zhang, Y.; Xie, S. Control of Welding Residual Stress in Large Storage Tank by Finite Element Method. J. Met. 2022, 12, 1502. [Google Scholar] [CrossRef]
  6. Zhang, H.; Zhang, G.; Cai, C.; Gao, H.; Wu, L. Numerical simulation of three-dimension stress field in double-sided double arc multipass welding process. J. Mater. Sci. Eng. A 2007, 499, 309–314. [Google Scholar] [CrossRef]
  7. Nose, M.; Amano, H.; Okada, H.; Yusa, Y.; Maekawa, A.; Kamaya, M.; Kawai, H. Computational crack propagation analysis with consideration of weld residual stresses. J. Eng. Fract. Mech. 2017, 182, 708–731. [Google Scholar] [CrossRef]
  8. Jie, Z.; Wang, K.; Liang, S. Residual stress influence on fatigue crack propagation of CFRPstrengthened welded joints. J. Constr. Steel Res. 2022, 196, 107443. [Google Scholar] [CrossRef]
  9. Jiang, W.; Luo, Y.; Zeng, Q.; Wang, J.; Tu, S.-T. Residual stresses evolution during strip clad welding, post welding heat treatment and repair welding for a large pressure vessel. J. Int. J. Press. Vessel. Pip. 2021, 189, 104259. [Google Scholar] [CrossRef]
  10. Wang, Y.; Feng, G.; Pu, X.; Deng, D. Influence of welding sequence on residual stress distribution and deformation in Q345 steel H-section butt-welded joint. J. Mater. Res. Technol. 2021, 13, 144–153. [Google Scholar] [CrossRef]
  11. Pradhan, R.; Sunny, M.R.; Sarkar, A. Prediction of weld induced residual stress reduction by vibration of a T-joint using finite element method. Ships Offshore Struct. 2022, 17, 2722–2733. [Google Scholar] [CrossRef]
  12. Xin, H.; Correia, J.A.; Veljkovic, M.; Berto, F.; Manuel, L. Residual stress effects on fatigue life prediction using hardness measurements for butt-welded joints made of high strength steels. Int. J. Fatigue 2021, 147, 106175. [Google Scholar] [CrossRef]
  13. Yan, L.; Guan, Y.; Luo, K.; Wang, Q. Corrugated steel web I-girder welding deformation and residual stress research. J. Structures 2023, 58, 105602. [Google Scholar] [CrossRef]
  14. Ghafouri, M.; Ahola, A.; Ahn, J.; Björk, T. Welding-induced stresses and distortion in high-strength steel T-joints: Numerical and experimental study. J. Constr. Steel Res. 2022, 189, 107088. [Google Scholar] [CrossRef]
  15. Ding, H.; Zhang, W.; Zhang, Z.; Yin, D.; He, W.; Xie, D. Influence of welding sequences and boundary conditions on residual stress and residual deformation in DH36 steel T-joint fillet welds. J. Thin-Walled Struct. 2024, 204, 112337. [Google Scholar] [CrossRef]
  16. Zhang, C.; Li, S.; Hu, L.; Deng, D. Effects of pass arrangement on angular distortion, residual stresses and lamellar tearing tendency in thick-plate T-joints of low alloy steel. J. Mater. Process. Technol. 2019, 274, 116293. [Google Scholar] [CrossRef]
  17. Chen, Q.; Fei, F.; Yu, S.; Liu, C.; Tang, J.; Yang, X. Numerical simulation of temperature field and residual stresses in stainless steel T-Joint. Trans. Indian Inst. Met. 2020, 73, 751–761. [Google Scholar] [CrossRef]
  18. Rong, Y.; Chang, Y.; Xu, J.; Huang, Y.; Lei, T.; Wang, C. Numerical analysis of welding deformation and residual stress in marine propeller nozzle with hybrid laser-arc girth welds. Int. J. Press. Vessel. Pip. 2017, 158, 51–58. [Google Scholar] [CrossRef]
  19. Perić, M.; Nižetić, S.; Garašić, I.; Gubeljak, N.; Vuherer, T.; Tonković, Z. Numerical calculation and experimental measurement of temperatures and welding residual stresses in a thick-walled T-joint structure. J. Therm. Anal. Calorim. 2020, 141, 1–10. [Google Scholar] [CrossRef]
  20. Hammad, A.; Churiaque, C.; Sánchez-Amaya, J.M.; Abdel-Nasser, Y. Experimental and numerical investigation of hybrid laser arc welding process and the influence of welding sequence on the manufacture of stiffened flat panels. J. Manuf. Process. 2021, 61, 527–538. [Google Scholar] [CrossRef]
  21. Lee, J.; Perrera, D.; Chung, H. Multi-Pass Welding Distortion Analysis Using Layered Shell Elements Based on Inherent Strain. J. Mar. Sci. Eng. 2021, 9, 632. [Google Scholar] [CrossRef]
  22. Li, L.; Luo, C.; Shen, J.; Zhang, Y. Numerical prediction of welding deformation in ship block subassemblies via the inhomogeneous inherent strain method. J. Manuf. Process. 2022, 80, 860–873. [Google Scholar] [CrossRef]
  23. Shen, Y.; Liu, S.; Yuan, M.; Dai, X.; Lan, J. Immune optimization of double-sided welding sequence for medium-small assemblies in ships based on inherent strain method. J. Met. 2022, 12, 1091. [Google Scholar] [CrossRef]
  24. Busari, Y.O.; Manurung, Y.H.P.; Shuaib-Babata, Y.L.; Ahmad, S.N.; Taufek, T.; Leitner, M.; Dizon, J.R.C.; Muhammad, N.; Mohamed, M.A. Experimental validation on multi-pass weld distortion behavior of structural offshore steel HSLA S460 using FE-based inherent strain and thermo-mechanical method. J. MRS Commun. 2022, 12, 1–8. [Google Scholar] [CrossRef]
  25. Busto, V.; Coviello, D.; Lombardi, A.; De Vito, M.; Sorgente, D. Thermal finite element modeling of the laser beam welding of tailor welded blanks through an equivalent volumetric heat source. Int. J. Adv. Manuf. Technol. 2021, 119, 137–148. [Google Scholar] [CrossRef]
  26. Farias, R.M.; Teixeira, P.R.F.; Vilarinho, L.O. Variable profile heat source models for numerical simulations of arc welding processes. Int. J. Therm. Sci. 2022, 179, 107593. [Google Scholar] [CrossRef]
  27. Jiao, H.; Jin, H. An automated optimization procedure for geometry parameters calibration of two-curvature conical heat source model. Int. J. Therm. Sci. 2024, 197, 108788. [Google Scholar] [CrossRef]
  28. Zheng, Z.; Cao, W.; Xu, X.; Shan, P.; Bu, X. Combined distribution band segmented moving heat source model. J. Trans. China Weld. Inst. 2010, 31, 95–97+104+117–118. [Google Scholar]
  29. Wang, H.; Wang, Z.; Bai, P.; Hu, S.; Zhang, Y.; Wang, R. Optimized segmented heat source for the numerical simulation of welding-induced deformation in large structures. Adv. Eng. Softw. 2018, 117, 1–7. [Google Scholar] [CrossRef]
  30. Li, Y.; Li, Y.; Zhang, C.; Lei, M.; Luo, J.; Guo, X.; Deng, D. A segmented heat source for efficiently calculating the residual stresses in laser powder bed fusion process. J. Manuf. Process. 2022, 79, 206–218. [Google Scholar] [CrossRef]
  31. Li, Y.; Li, Y.; Zhang, C.; Lei, M.; Luo, J.; Guo, X.; Deng, D. Effect of structural restraint caused by the stiffener on welding residual stress and deformation in thick-plate T-joints. J. Mater. Res. Technol. 2022, 21, 3397–3411. [Google Scholar] [CrossRef]
  32. Wang, Y.; Zhao, H.; Wu, S.; Cai, Z.; Zhang, J. Establishment of segmented moving double ellipsoid heat source model in electron beam welding numerical simulation. J. Mech. Eng. 2004, 40, 165–169. [Google Scholar] [CrossRef]
  33. Shen, J.; Chen, Z.; Luo, Y. Welding Simulation of T-Shape Joint in Hull by Segmented Moving Heat Source. Shipbuild. China 2014, 55, 66–73. [Google Scholar] [CrossRef]
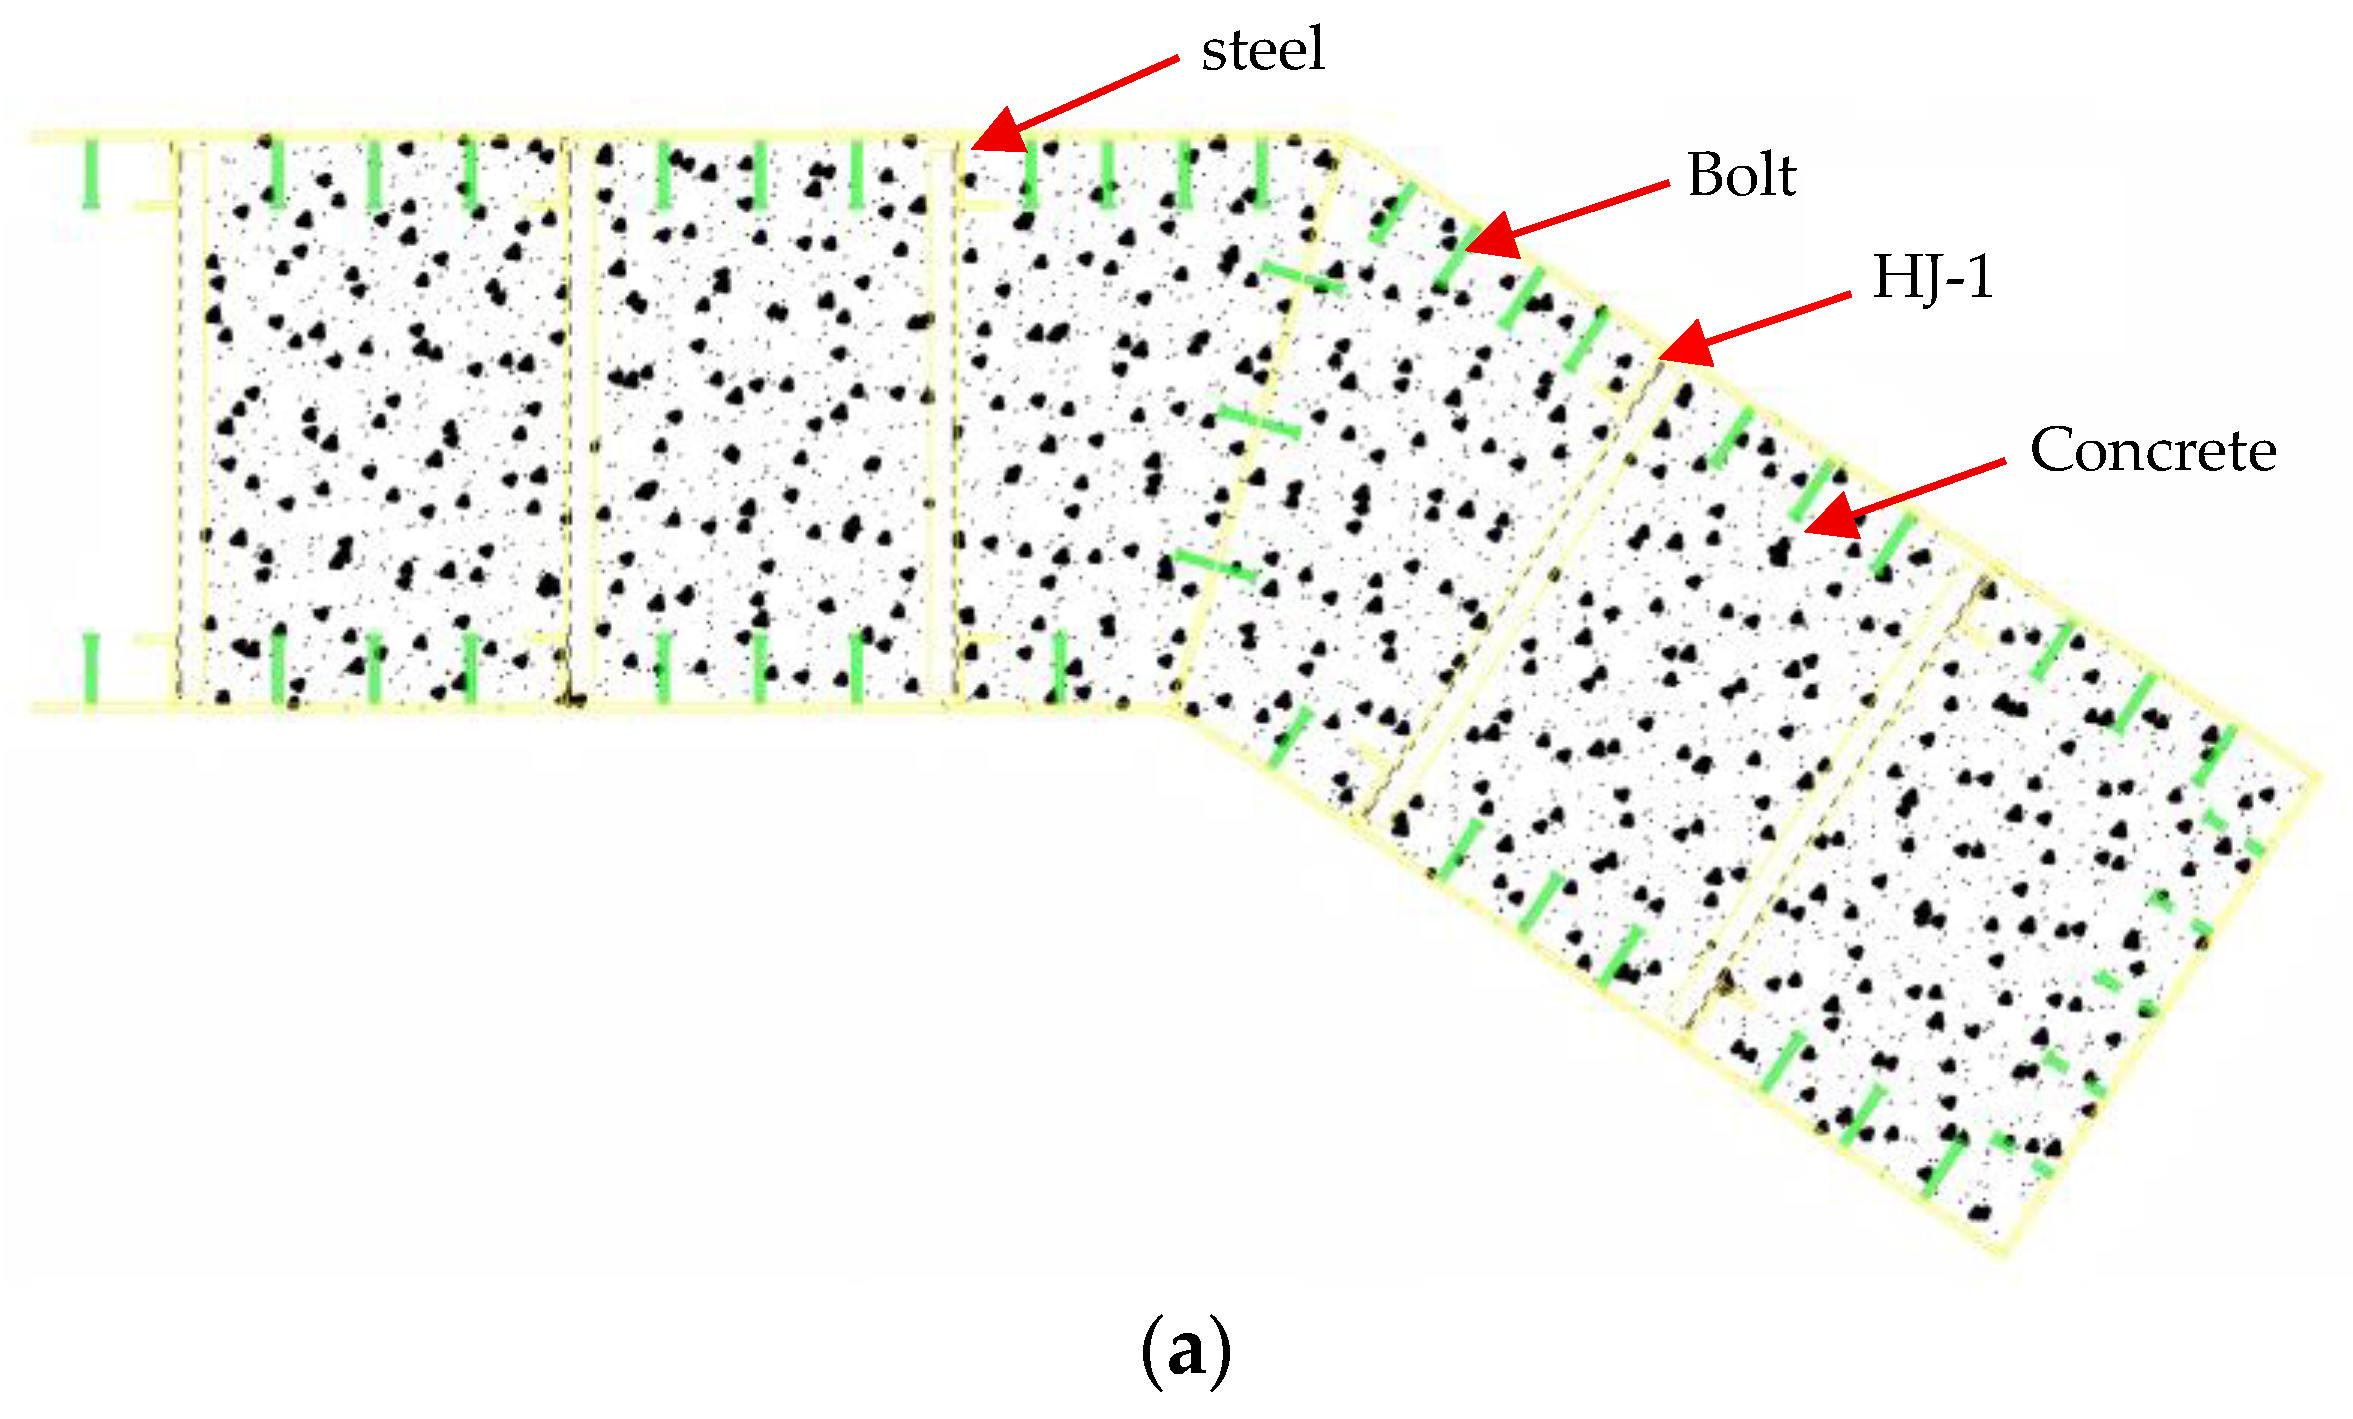
Figure 1. Structural diagram of steel module for large-scale infrastructure: (a) detailed structural drawing, (b) field diagram of weld location.
Buildings 16 00153 g001aBuildings 16 00153 g001b
Figure 2. Schematic of residual stress.
Buildings 16 00153 g002
Figure 3. Test point location layout diagram.
Buildings 16 00153 g003
Figure 4. Segmented moving heat source modeling.
Buildings 16 00153 g004
Figure 5. T-joint geometric model and boundary conditions.
Buildings 16 00153 g005
Figure 6. Mesh and weld bead distribution.
Buildings 16 00153 g006
Figure 8. Schematic diagram of coordinate transformation.
Buildings 16 00153 g008
Figure 9. Mechanical properties [31].
Buildings 16 00153 g009
Figure 10. Schematic diagram of welding sequences: (a) Case 1; (b) Case 2; (c) Case 3; (d) Case 4.
Buildings 16 00153 g010aBuildings 16 00153 g010b
Figure 11. The temperature field results during and after the welding process.
Buildings 16 00153 g011
Figure 12. The temperature curves at points A, B, and C.
Buildings 16 00153 g012
Figure 13. Contour of longitudinal residual stress.
Buildings 16 00153 g013
Figure 14. Distribution curve of longitudinal residual stress.
Buildings 16 00153 g014
Figure 15. Contours of transverse residual stress and PEEQ: (a) Transverse residual stress contour; (b) PEEQ contour.
Buildings 16 00153 g015
Figure 16. Distribution curve of transverse residual stress.
Buildings 16 00153 g016
Figure 17. Sampling points for residual stress along the thickness direction.
Buildings 16 00153 g017
Figure 18. Residual stress along the weld direction at different positions and thicknesses (a) Path-1; (b) Path-2; (c) Path-3.
Buildings 16 00153 g018
Figure 19. Temperature history curves under different welding sequences: (a) Case 1; (b) Case 2; (c) Case 3; (d) Case 4.
Buildings 16 00153 g019
Figure 20. Longitudinal residual stress contours under different welding sequences: (a) Case 1; (b) Case 2; (c) Case 3; (d) Case 4.
Buildings 16 00153 g020aBuildings 16 00153 g020b
Figure 21. Distribution of longitudinal residual stress under different welding sequences.
Buildings 16 00153 g021
Figure 22. Transverse residual stress distribution under different welding sequences.
Buildings 16 00153 g022
Figure 23. Welding deformation under different welding sequences: (a) Case 1; (b) Case 2; (c) Case 3; (d) Case 4.
Buildings 16 00153 g023
Figure 24. Welding deformation curves under different welding sequences.
Buildings 16 00153 g024
Table 1. Chemical composition of base material Q390B (%).
AlloyCMnSiSPCrMoVCuNi
Q390B0.161.480.250.0030.010.020.0040.0020.020.01
Table 2. Chemical composition of welding consumable GFR-81A1 (%).
Welding ConsumableCSiMnPSMo
GFR-81A10.0290.2730.950.0090.0050.428
Table 3. Welding process parameters.
Weld PassVoltage (V)Current (A)Welding Speed
(mm/s)
Gas Flow (L/min)
122.3–27.6146–195418–26
221.4–27.6130–1783.318–27
321.6–27.6135–1843.119–27
Disclaimer/Publisher’s Note: The statements, opinions and data contained in all publications are solely those of the individual author(s) and contributor(s) and not of MDPI and/or the editor(s). MDPI and/or the editor(s) disclaim responsibility for any injury to people or property resulting from any ideas, methods, instructions or products referred to in the content.