Article

Seismic Performance of T-Shaped Aluminum Alloy Beam–Column Bolted Connections: Parametric Analysis and Design Implications Based on a Mixed Hardening Model

1
School of Civil Engineering, Beijing Jiaotong University, Beijing 100044, China
2
Guangxi Academy of Sciences, Nanning 530007, China
3
Brunel Centre for Advanced Solidification Technology (BCAST), Brunel University London, Uxbridge, Middlesex UB8 3PH, UK
4
China State Construction Technical Center, Beijing 101300, China
5
China Construction Industrial Engineering and Technology Research Academy Co., Ltd., Beijing 101300, China
*
Authors to whom correspondence should be addressed.
Buildings 2025, 15(23), 4324; https://doi.org/10.3390/buildings15234324
Submission received: 15 October 2025 / Revised: 20 November 2025 / Accepted: 26 November 2025 / Published: 28 November 2025
(This article belongs to the Section Building Structures)

Abstract

The seismic design of aluminum alloy structures requires specific attention due to the material’s distinct mechanical properties compared to steel, which renders direct application of steel joint design methods inappropriate. This study investigates the seismic behavior of T-shaped aluminum alloy beam–column bolted connections, which consist of 6061-T6 aluminum alloy beams and columns connected by S304 stainless steel connectors via high-strength bolts. A finite element model, incorporating a mixed hardening constitutive model for accurate cyclic response, is established and validated against low-cycle cyclic loading tests. Parametric analyses evaluated the influence of L-shaped connector dimensions on hysteresis response, skeleton curves, stiffness degradation, energy dissipation, and ductility. Results demonstrate that increasing the thickness of the short leg of the L-shaped connector between the beam flange and column flange significantly enhances the ultimate bending moment, with an increase of up to 36.7% per 2 mm increment, alongside improved energy dissipation and ductility. Stiffness degradation follows a natural exponential decay, with residual stiffness between 23.85% and 32.57% at ultimate deformation. An efficiency analysis identifies the most cost-effective measures for seismic design. The primary novelty of this work lies in the successful application and validation of a mixed hardening model for simulating the complex cyclic behavior of T-shaped aluminum alloy connections, coupled with a systematic efficiency-oriented parametric study. The findings offer practical, quantitative guidelines for designing aluminum alloy bolted connections in seismic-prone regions.

1. Introduction

Aluminum alloys are widely used in the construction field due to their high specific strength, easy processing, and corrosion resistance. Compared with traditional steel structures, aluminum alloy structures require less maintenance, have a high recycling rate after decommissioning, and have low secondary processing costs, making them more in line with green and environmentally friendly building concepts [1,2]. Efforts have been made: some typical engineering applications include Japan’s Sakuragaoka House; the US’s Loblolly House and Cellophane; and China’s MacMetal Office Building, AAG Square Commercial Street, AAG Staff Dormitory, etc. [3,4,5,6,7]. However, the engineering application of aluminum alloy frame structures is still in its infancy, mostly adopting the design methods of steel structures. It must be pointed out, however, that the mechanical properties of aluminum alloys differ significantly from steel, especially in the design of connection joints and seismic performance. Existing steel structure design schemes should not be directly applied, and thus, further research is necessary.
Joints, as key components in frame structures for load transfer and seismic performance, are primarily connected via welding, bolting, or riveting [8,9]. Bolted connections are particularly widely used in beam–column joints due to their ease of construction. However, due to the unique properties of aluminum alloys, the seismic performance of their bolted connection joints differs significantly from steel structures. The Chinese standard, Code for design of aluminum structures (GB 50429-2007), referenced European, American, and British standards during its compilation; however, its provisions regarding bolted connections at joints remain incomplete, and key design parameters based on nodal experiments require further supplementation [10].
In recent years, numerous studies have been conducted on different structural forms of aluminum alloy bolted connection joints, mainly focusing on plate-type joints [11,12], angle-type joints [13,14,15], and special types of joints [16,17]. These studies typically utilize experiments and numerical simulations to elucidate the stress state, transmission mechanism, and bearing capacity of bolted connections in joints, continuously improving the design theory of aluminum alloy bolted connection joints and proposing innovative design methods [11,12,13,14,15,16,17,18,19,20,21,22,23,24]. However, research on T-shaped joints, which exhibit greater rigidity and seismic performance, remains relatively limited [21]. In parallel, the field of seismic design has seen innovative concepts in steel structures, such as connections equipped with replaceable fuses [25,26], which aim to dissipate energy and facilitate post-earthquake repair. While instructive, these strategies are not directly transferable to aluminum alloys due to the material’s characteristic nonlinear hardening, absence of a yield plateau, lower ductility, and more complex cyclic response. Furthermore, at a methodological level, while advanced constitutive models like the mixed hardening model have become well-established for material-level cyclic characterization of aluminum alloys [27,28], their application to the performance prediction of full-scale structural connections remains scarce, leading to uncertainties in accurately simulating their seismic behavior.
Consequently, a significant research gap exists in the following aspects: for the promising yet under-explored T-shaped aluminum alloy connection, there is a lack of (a) a high-fidelity simulation approach that incorporates a sophisticated material model, and (b) a systematic, efficiency-oriented parametric study to translate numerical findings into practical design guidance. Therefore, based on the experimental research in [21], this study establishes a finite element model incorporating a mixed hardening model to accurately capture the complex cyclic behavior of the 6061-T6 aluminum alloy. This validated model is then leveraged to conduct a comprehensive parametric analysis, with the explicit goal of identifying the most influential geometric parameters and evaluating their improvement efficiency for strength, stiffness, and ductility. The ultimate aim is to provide quantitative, cost-effective design implications for the seismic design of this connection type.

2. Methods

2.1. Selection of the Mixed Hardening Model

Common constitutive models for metals under cyclic loading include isotropic hardening models [29], kinematic hardening models [30], and mixed hardening models [31]. The isotropic hardening model is unsuitable for simulating cyclic behavior as it cannot capture the Bauschinger effect; the kinematic hardening model, while accounting for the Bauschinger effect, often exhibits an overly pronounced ratcheting effect under large-strain conditions [32,33]. The mixed hardening model, integrating features of both, allows for the simultaneous translation and expansion of the yield surface, thereby providing a more accurate representation of the cyclic plasticity of aluminum alloys. Consequently, the mixed hardening model is adopted in this study.

2.2. Framework of the Mixed Hardening Model

The yield function, based on the von Mises criterion, is defined as follows:
F = f σ α σ y
where σ is the stress tensor; α is the back stress tensor governing kinematic hardening; σy is the yield stress evolution governing isotropic hardening.
The equivalent stress f(σα) is calculated as follows:
f σ α = 3 2 S α dev : S α dev
where S is the deviatoric stress tensor; αdev is the deviatoric part of the back stress.
The plastic flow is assumed to follow the associated flow rule. The cumulative equivalent plastic strain, ε e p , a scalar measure of the total plastic deformation, is defined incrementally as follows:
ε e p = d ε e p = 2 3 d ε p : d ε p
where dεp is the incremental plastic strain tensor.
The model’s hardening rule combines isotropic hardening (Equation (4)) and nonlinear kinematic hardening (Equations (5) and (6)), as detailed in Section 2.3.

2.3. Hardening Rule of the Mixed Hardening Model

The post-yield stress evolution of the mixed hardening model for metals is considered as the superposition of two parts: the first part is kinematic hardening caused by back stress, resulting in yield surface movement; the second part is isotropic hardening of the material.

2.3.1. Isotropic Hardening Rule

The evolution pattern of the material yield surface σy is chosen as an exponential form related to the equivalent plastic strain ε e p :
σ y = σ 0 + Q 1 e b ε e p
where Q and b are fitting parameters for the material hardening stage: Q generally represents the maximum change in the size of the material yield surface, while b is the shape fitting parameter of the material hardening curve.

2.3.2. Kinematic Hardening Rule

Kinematic hardening utilizes Ziegler’s linear kinematic hardening rule [30], and Chaboche’s nonlinear kinematic hardening rule developed on this basis [31]. The Chaboche’s rule adds a recall term to the Ziegler’s rule, thereby introducing nonlinearity. For metals under low-cycle cyclic loading, in addition to the Bauschinger effect, there is also a ratchet effect, i.e., the phenomenon of creep in the average stress direction under asymmetric cycles. Under normal conditions, the ratchet effect under single back stress nonlinear hardening is overly significant and does not conform to the actual results. Therefore, the superposition of different back stress levels is defined to improve the overly obvious ratchet effect. The kinematic hardening rule for the kth back stress is as follows:
d α k = C k 1 σ 0 ( σ α ) d ε e p γ k α k d ε e p k = 1 , 2 , 3 , , n
α = α k
where Ck is the initial kinematic hardening modulus; σ0 is the initial yield stress; γk is the gradient of the kinematic hardening modulus decreasing with increasing plastic strain; n is the number of back stresses.
The two-dimensional representation of mixed hardening is shown in Figure 1, where αs is the limit back stress of the material under large plastic strain conditions, and σmax is the limit stress.

3. Numerical Model Setups

3.1. Experimental and Simulation Overview

3.1.1. Test Specimen

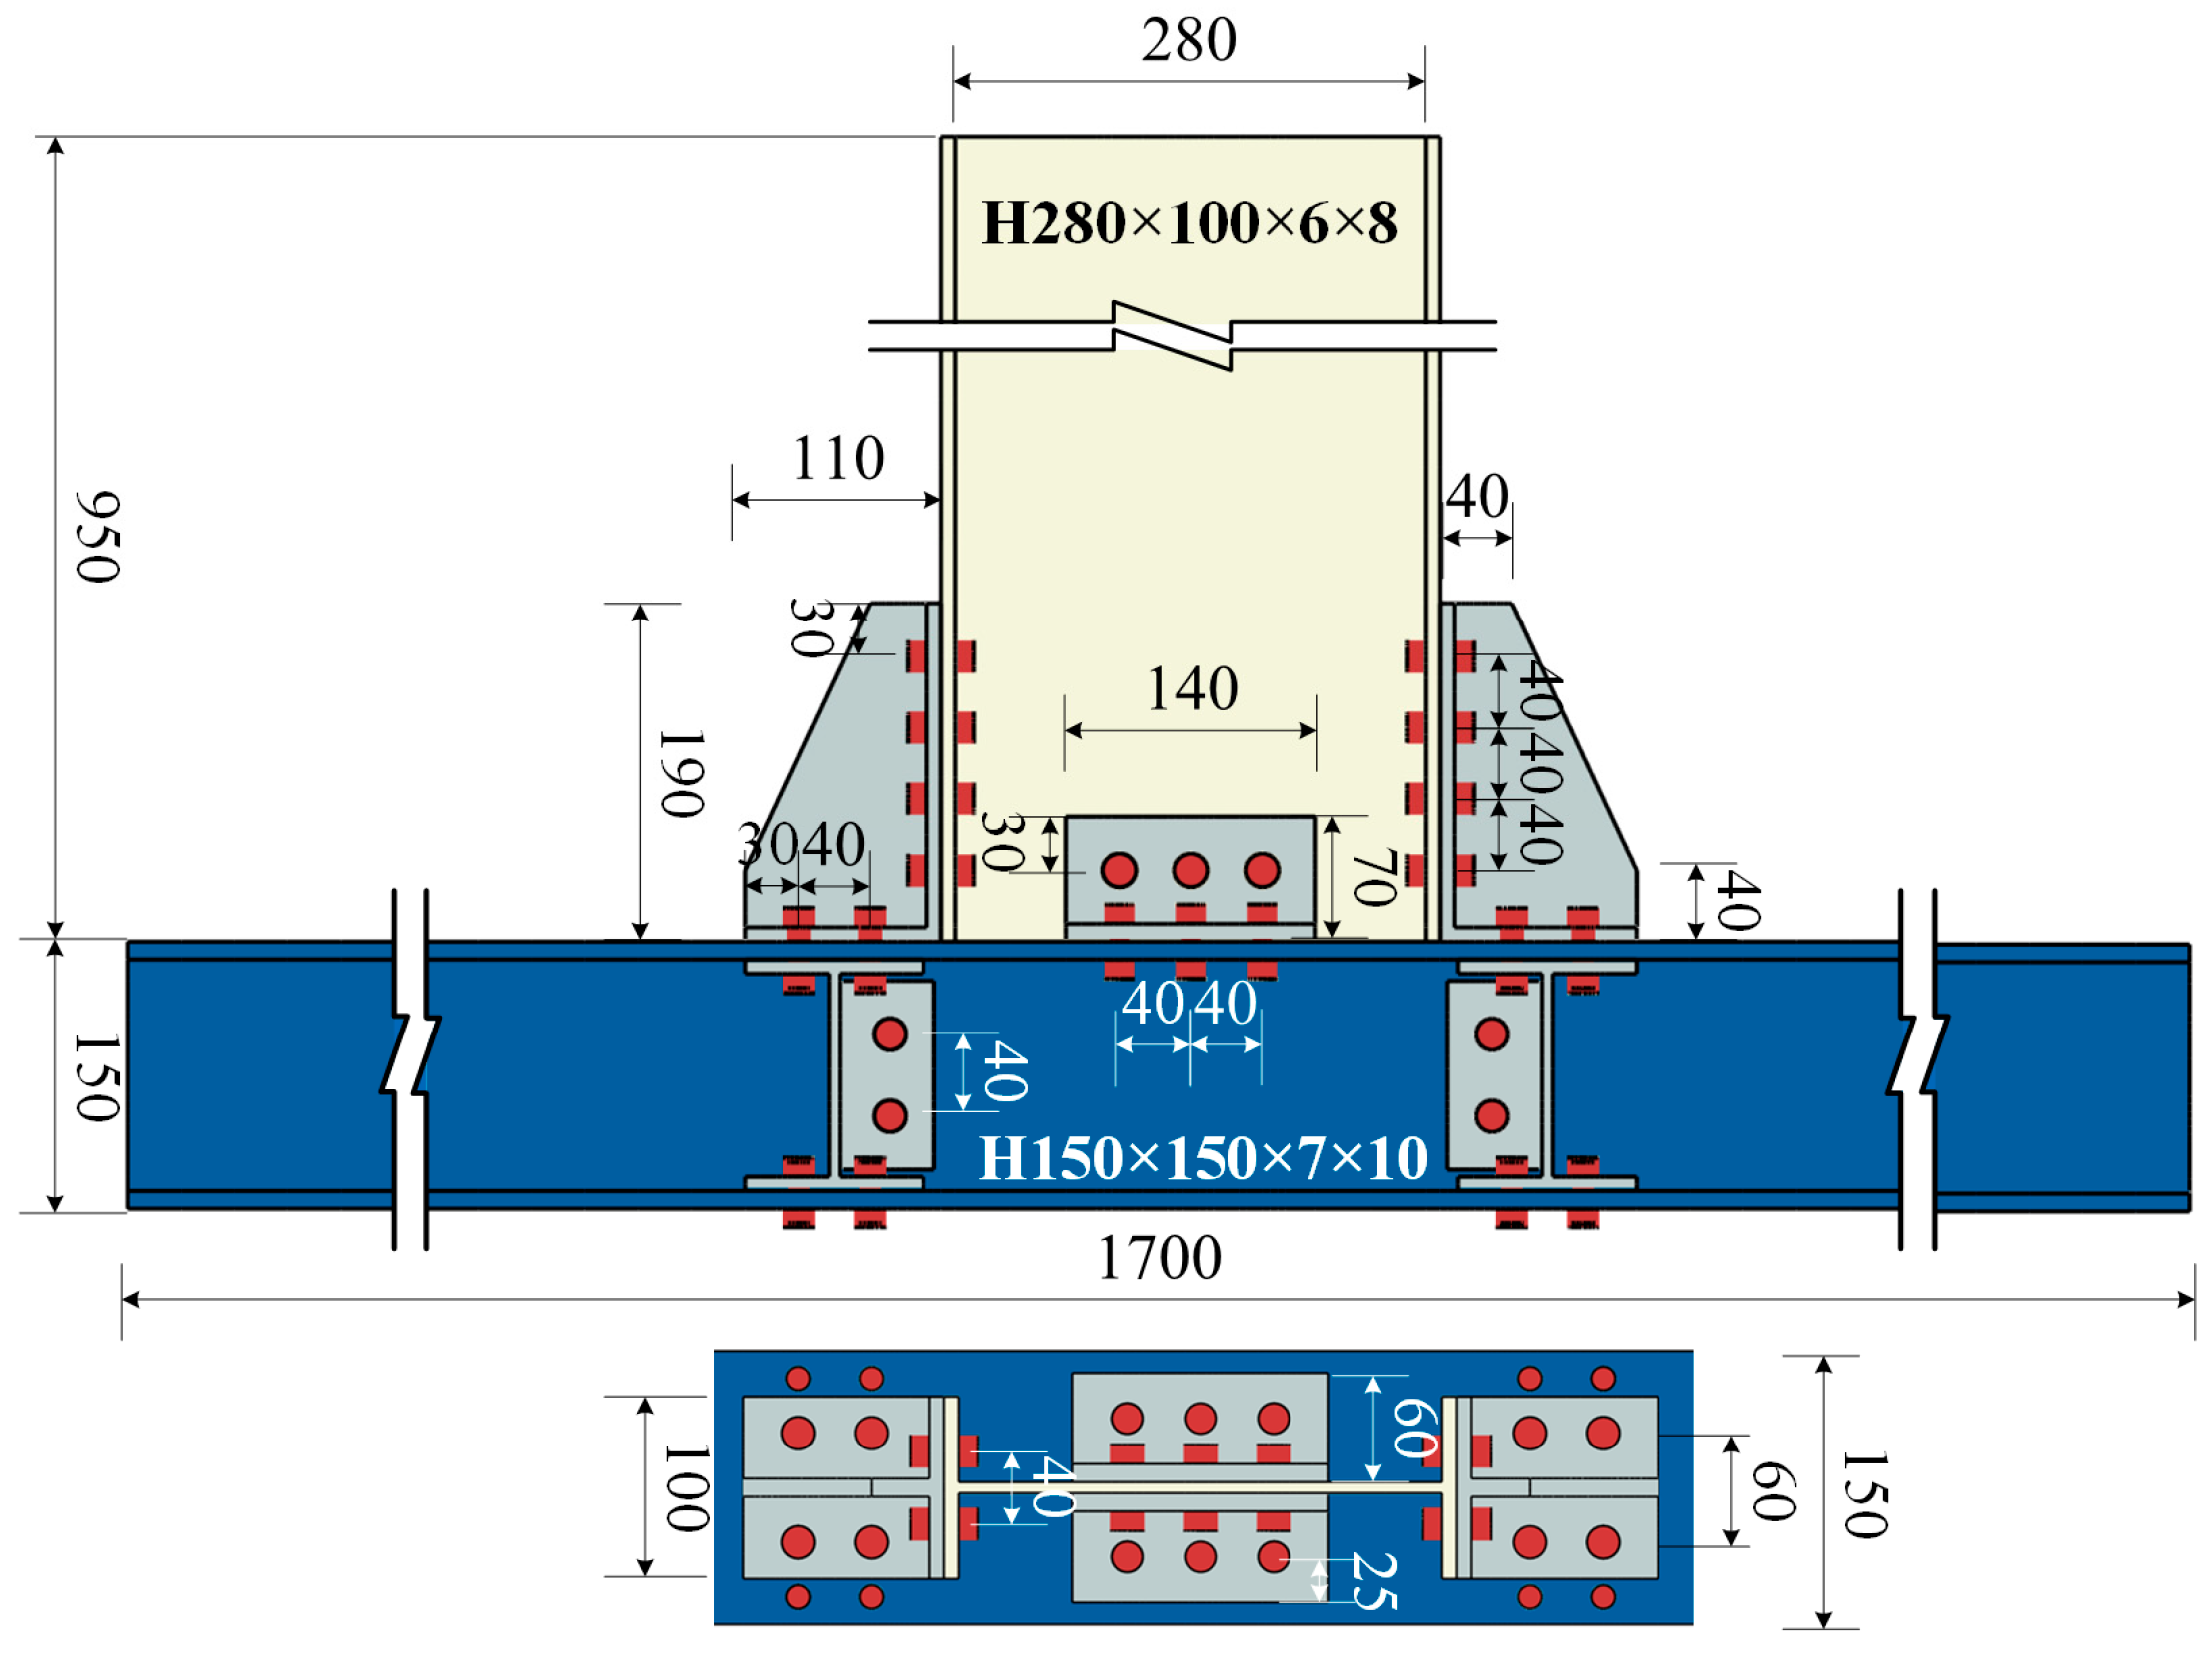
The test specimen was an aluminum alloy frame bolted connection joint, with the beam and column fully mechanically connected via high-strength bolts. The joint included an H-section beam and column, an L-shaped connector between the beam web and column flange, an L-shaped stiffening rib connector between the beam flange and column flange, and an inter-column stiffening rib. The beam and column material was 6061-T6 aluminum alloy, and the connectors and stiffening ribs were made of S304 stainless steel. The joint design dimensions are shown in Figure 2. The connection bolts were M12 and M8 grade 8.8 high-strength bolts; M8 bolts were only used in the connection position of the inter-column stiffening rib near the outer side of the column flange.
The key quasi-static mechanical properties of the base materials, obtained from standard specimen tests in accordance with the Chinese standard, Metallic materials—Tensile testing—Part 1: Method of test at room temperature (GB/T 228.1-2021), are summarized in Table 1.

3.1.2. Experimental Design

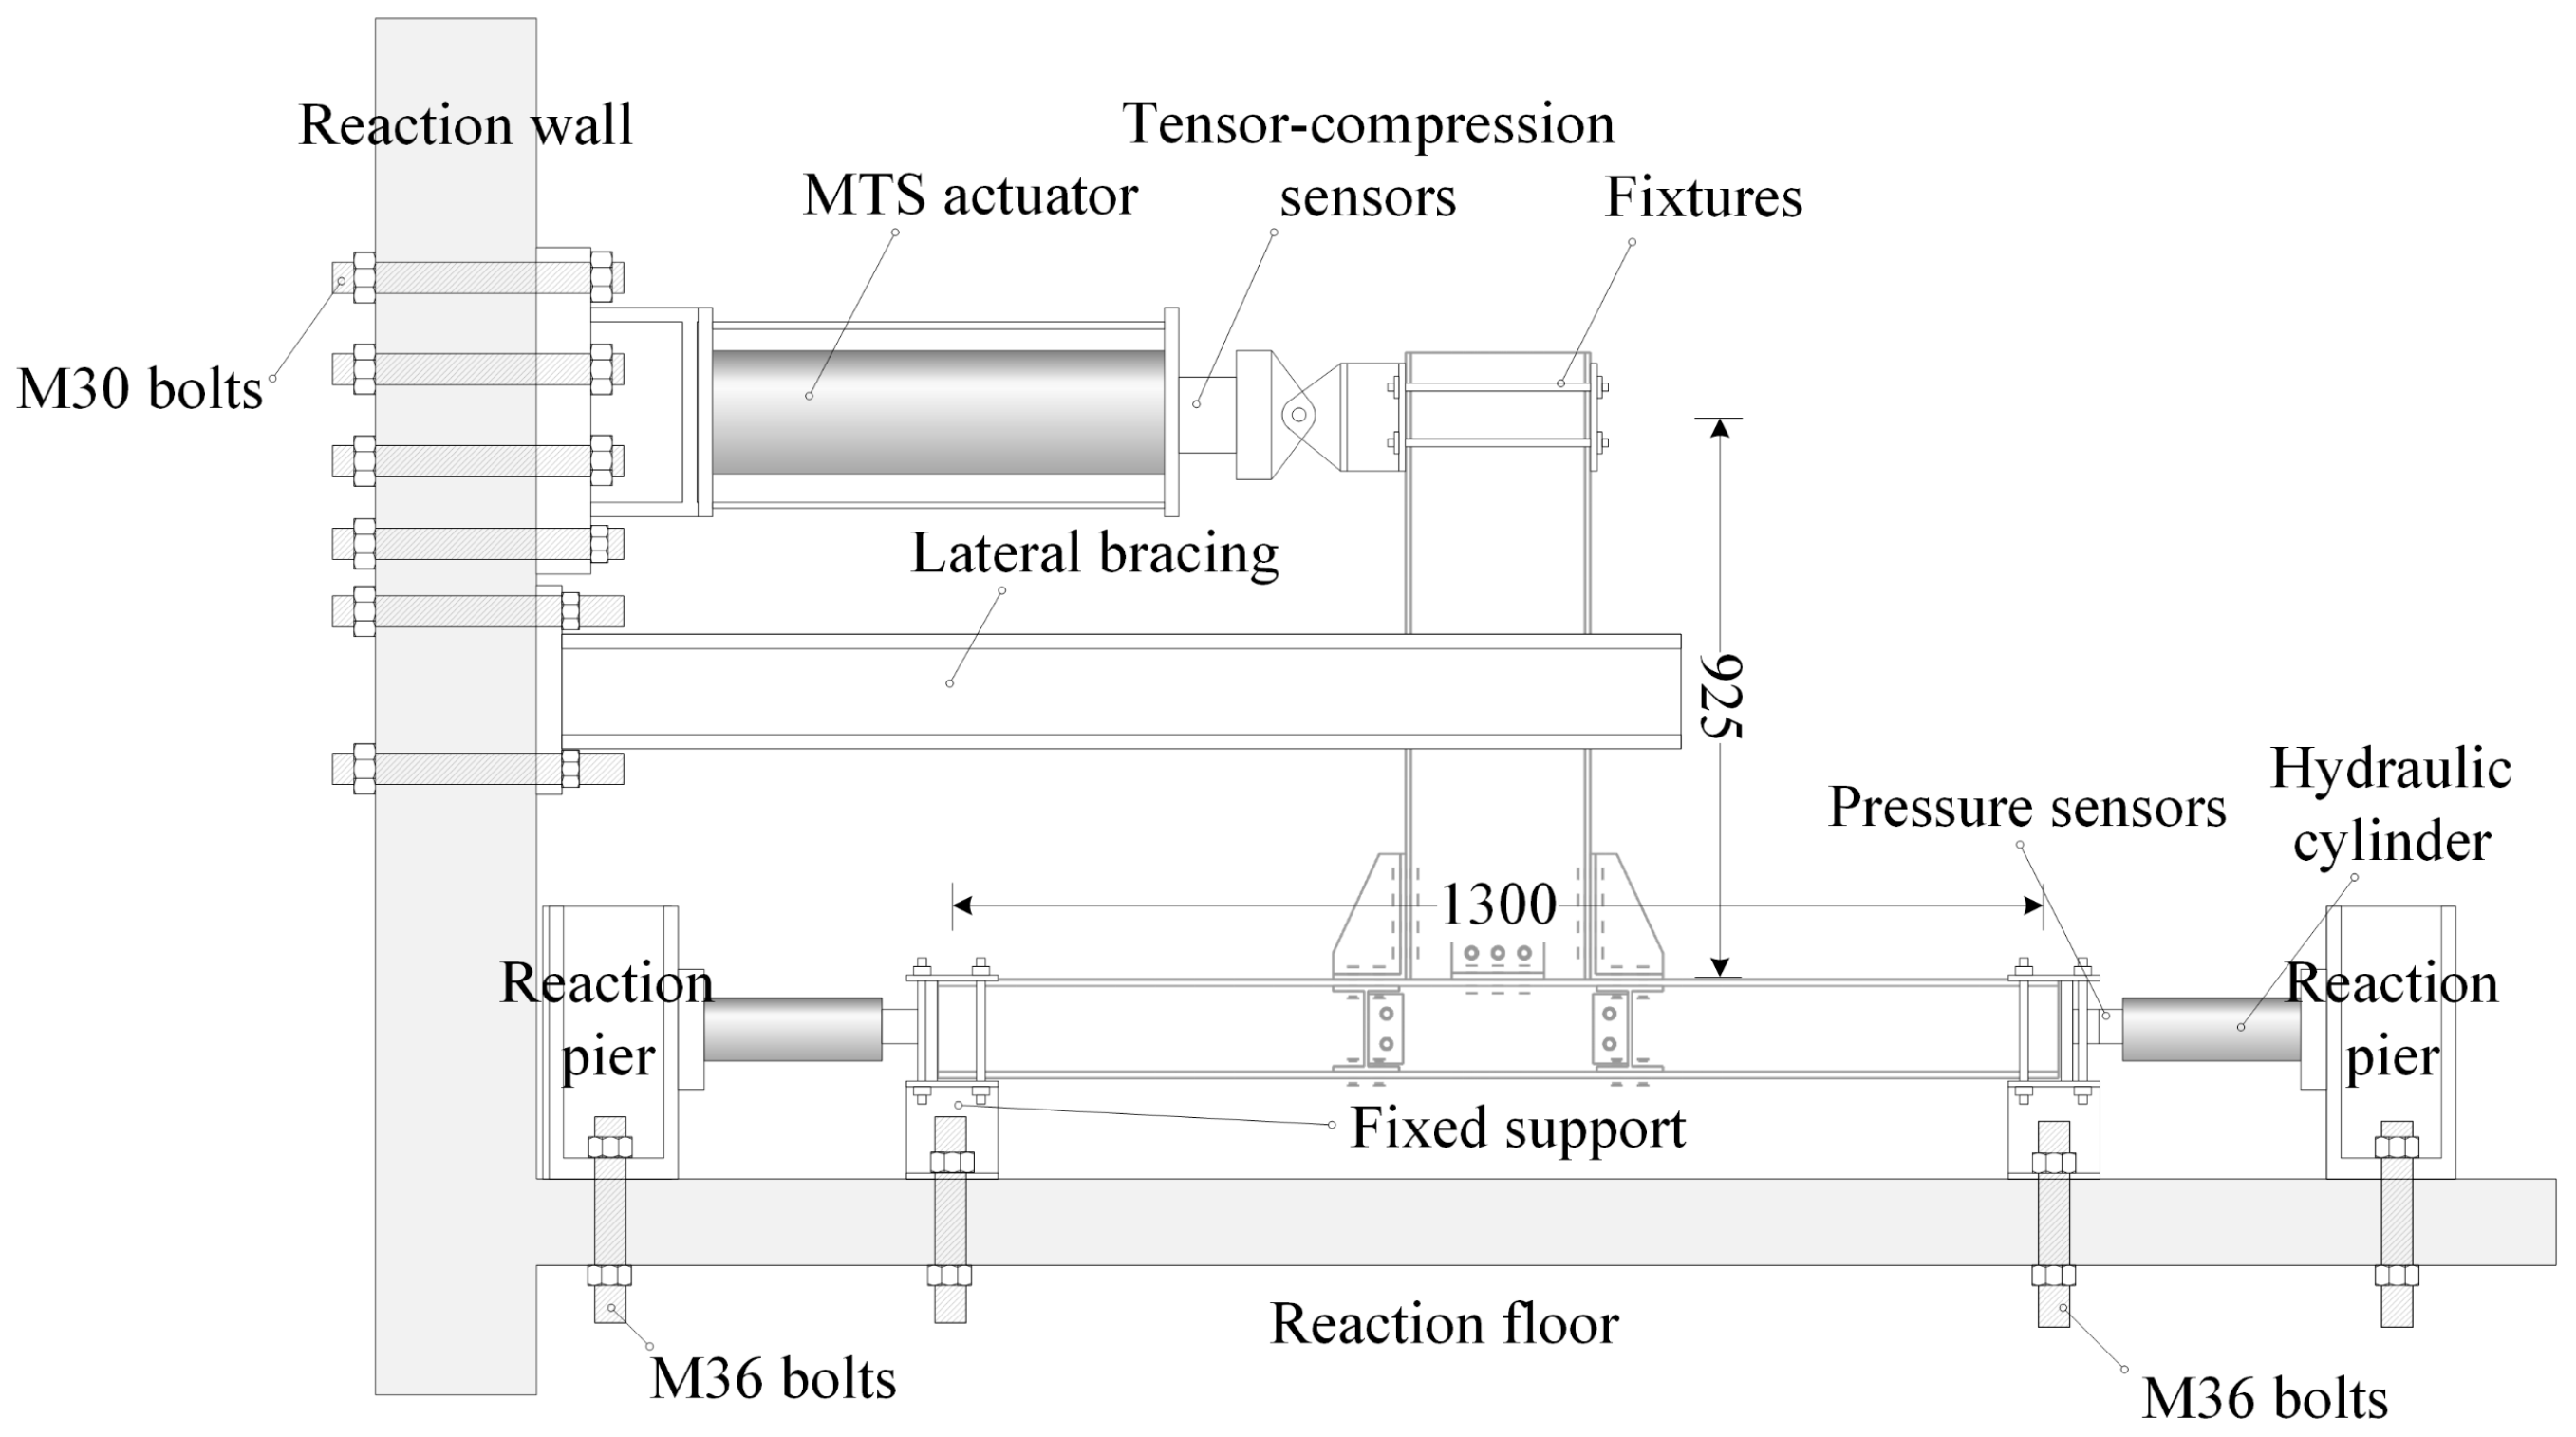
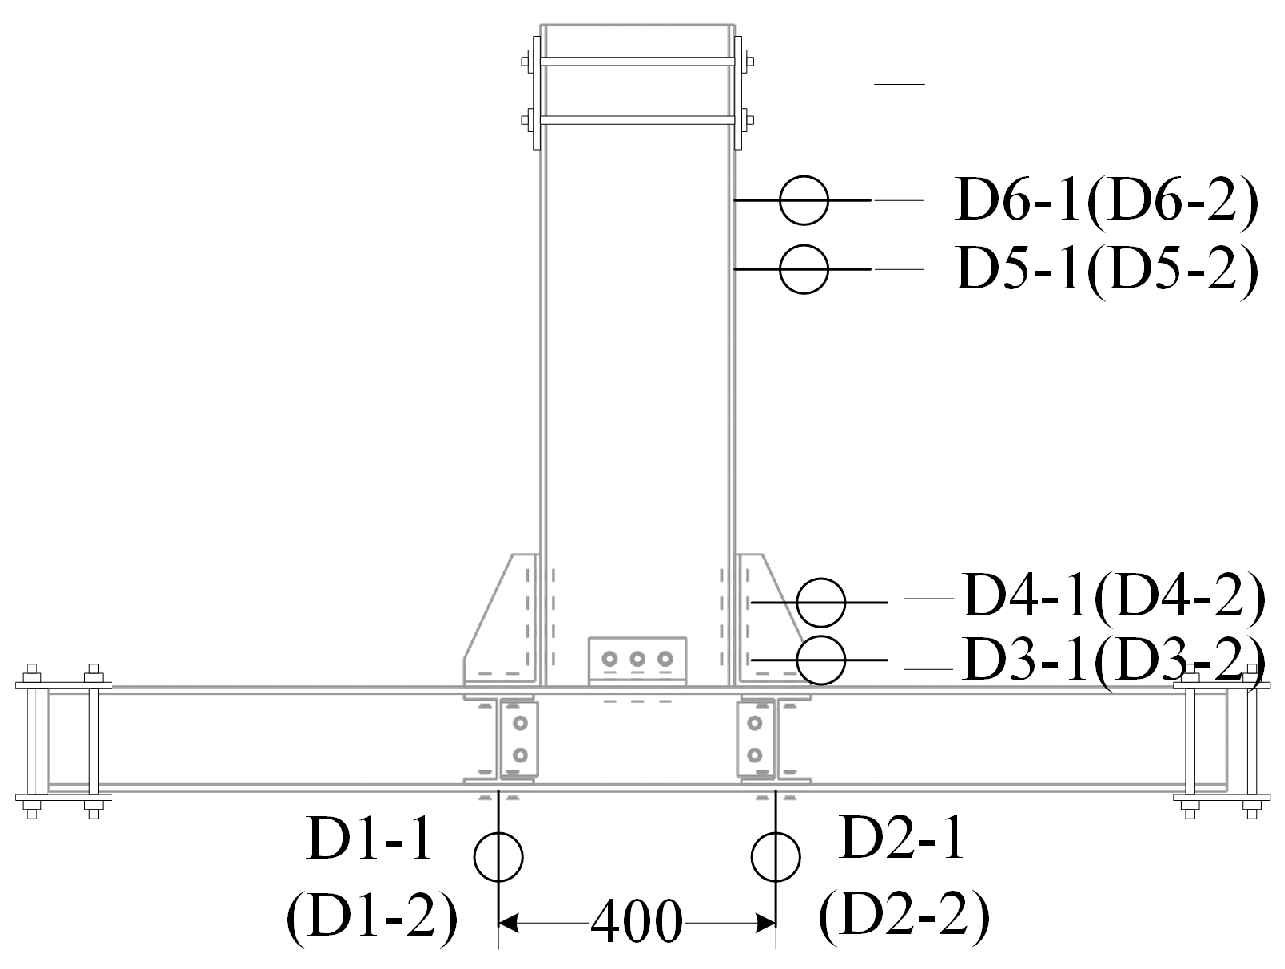
Referring to [21], the low-frequency cyclic loading experiment on the aluminum alloy frame bolted connection joint employed a horizontal experimental scheme with the column end fixed and a horizontal displacement load applied to the vertical beam end. The loading method is shown in Figure 3, and the arrangement of displacement sensors is shown in Figure 4 [34]. The effective experimental lengths of the beam and column, considering the fixture and load application center, were 0.925 m and 1.30 m, respectively. Displacement meters D6-1 and D5-1 (or D6-2 and D5-2) were placed at the beam end near the loading area to monitor the deformation of the beam end section; displacement meters D4-1 and D3-1 (or D4-2 and D3-2) were placed on the beam flange near the column to monitor the beam deformation; and displacement meters D1-1 and D2-1 (or D1-2 and D2-2) were placed on the column flange away from the beam to monitor the axial deformation of the column.
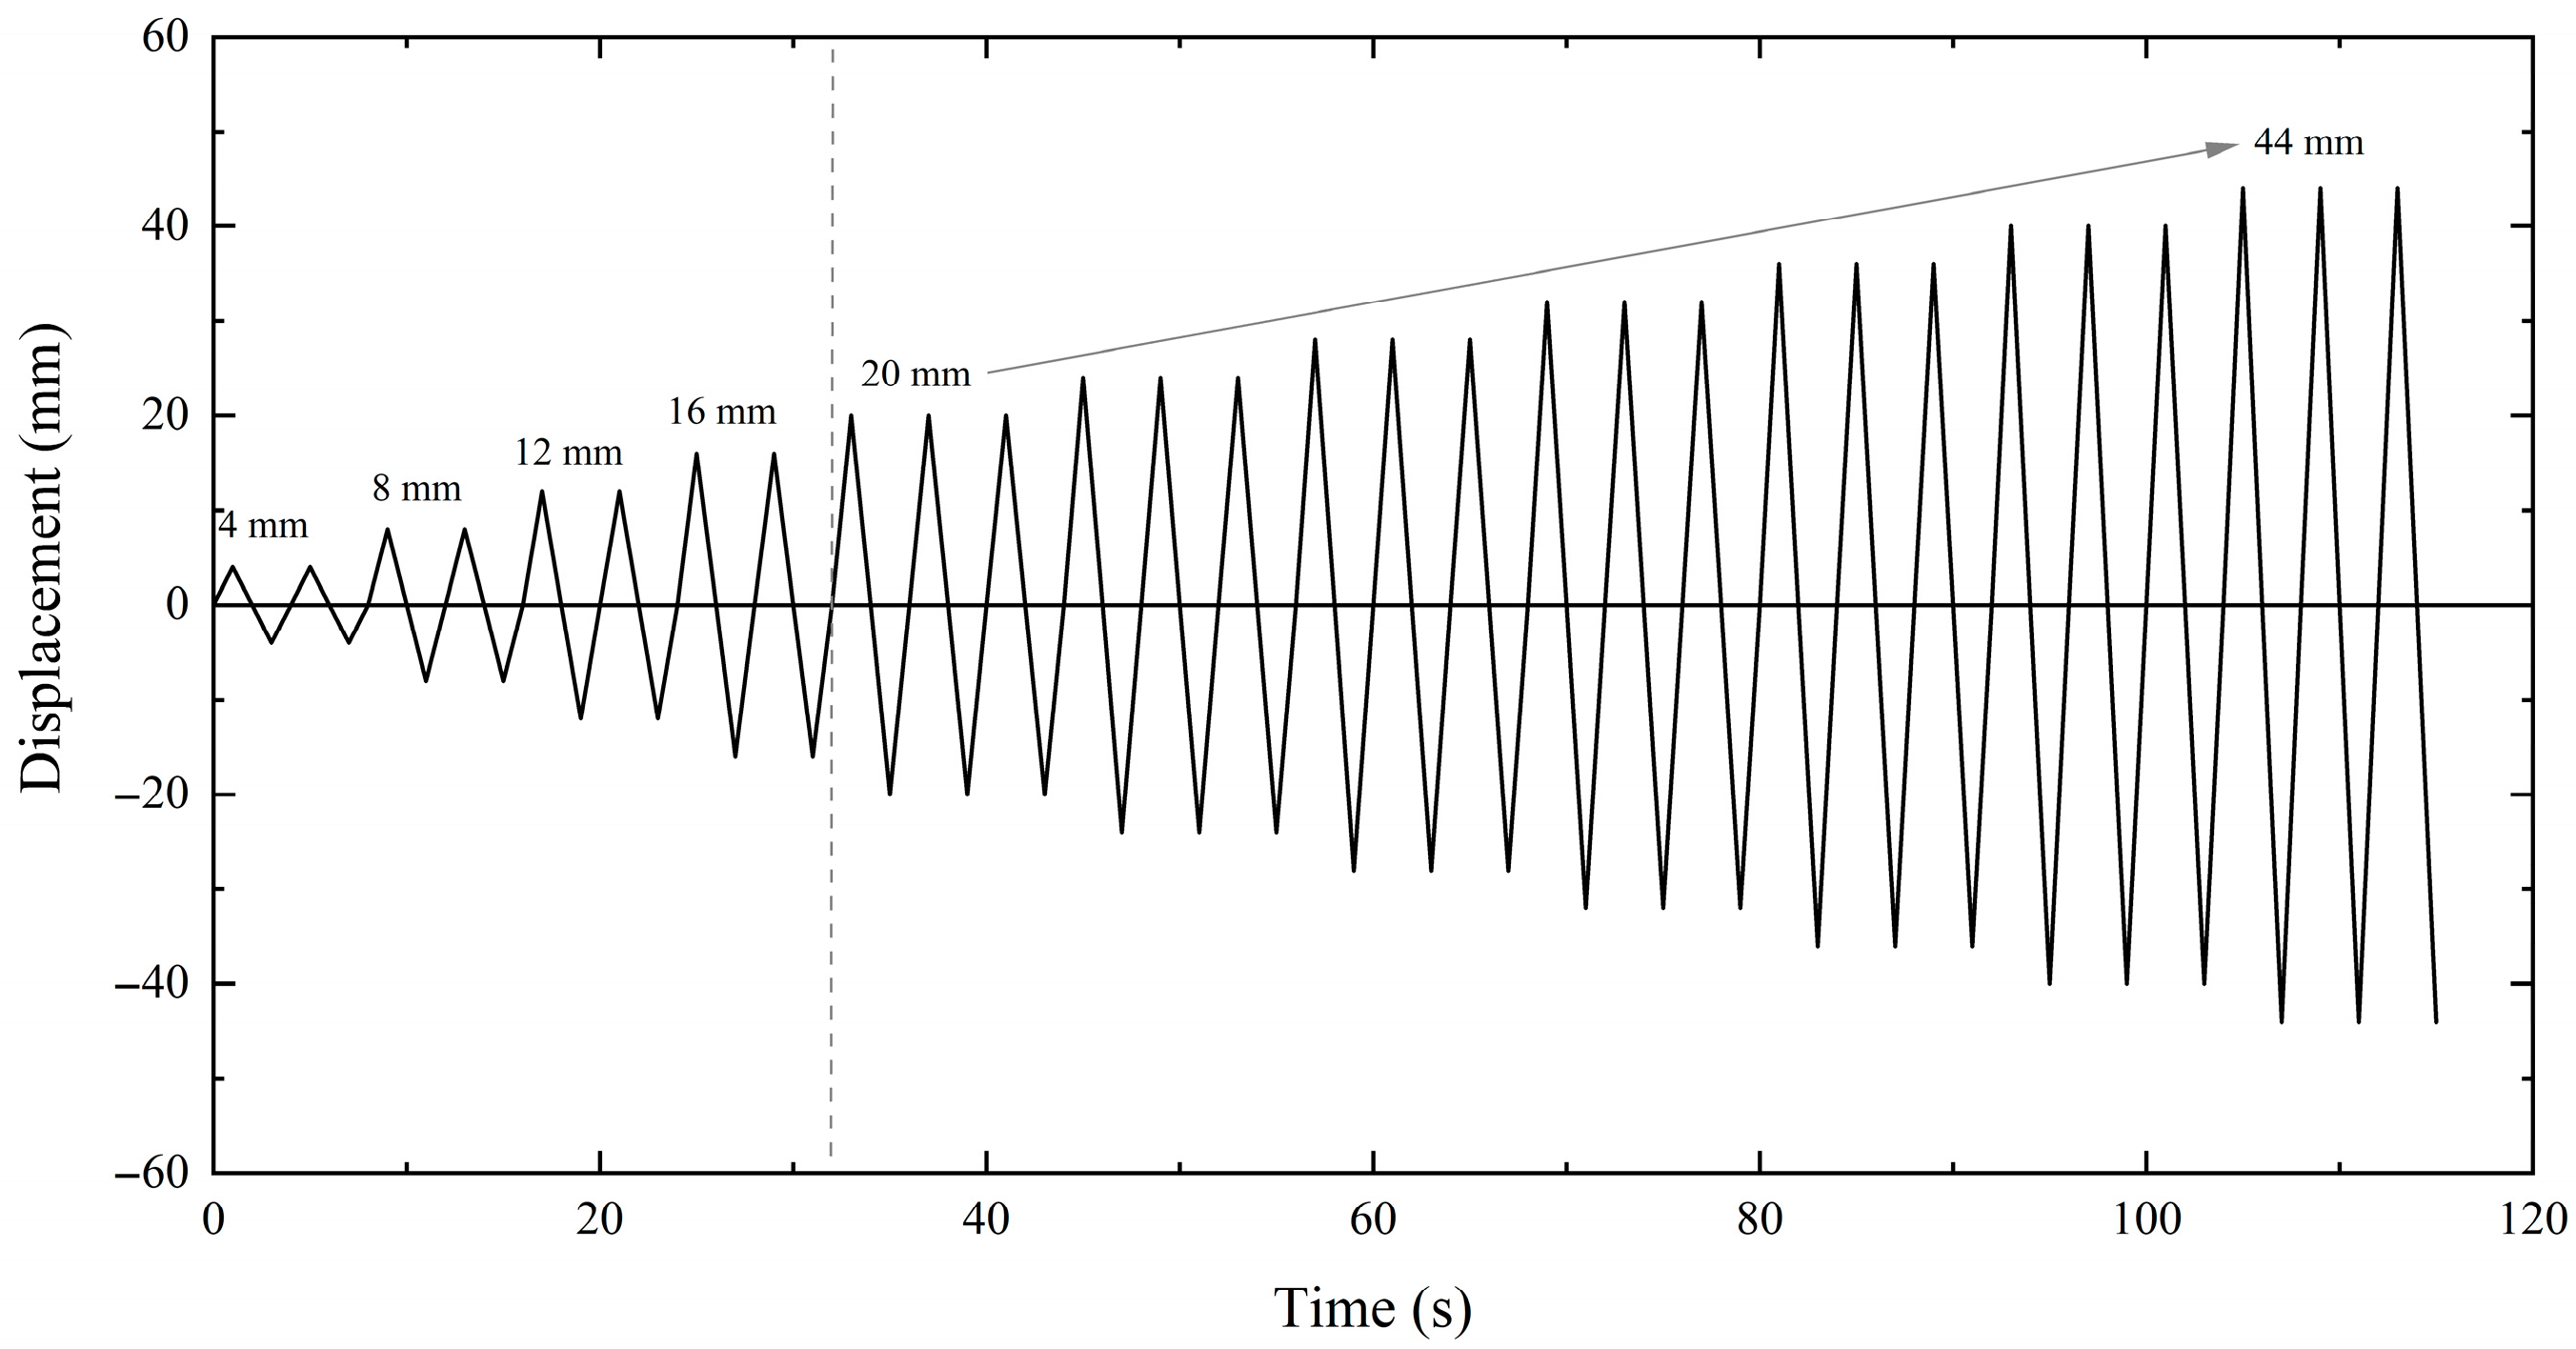
The loading method followed the provisions in the American Institute of Steel Construction’s standard, Seismic Provisions for Structural Steel Buildings (AISC 341-22) [35], controlling the change in the beam–column joint angle using a variable amplitude and low-cycle displacement loading. The loading path is shown in Figure 5. In the elastic stage, the displacement increased by 4 mm per step, with two cycles of gradient loading. After yielding, three cycles were applied per step.

3.1.3. Finite Element Model

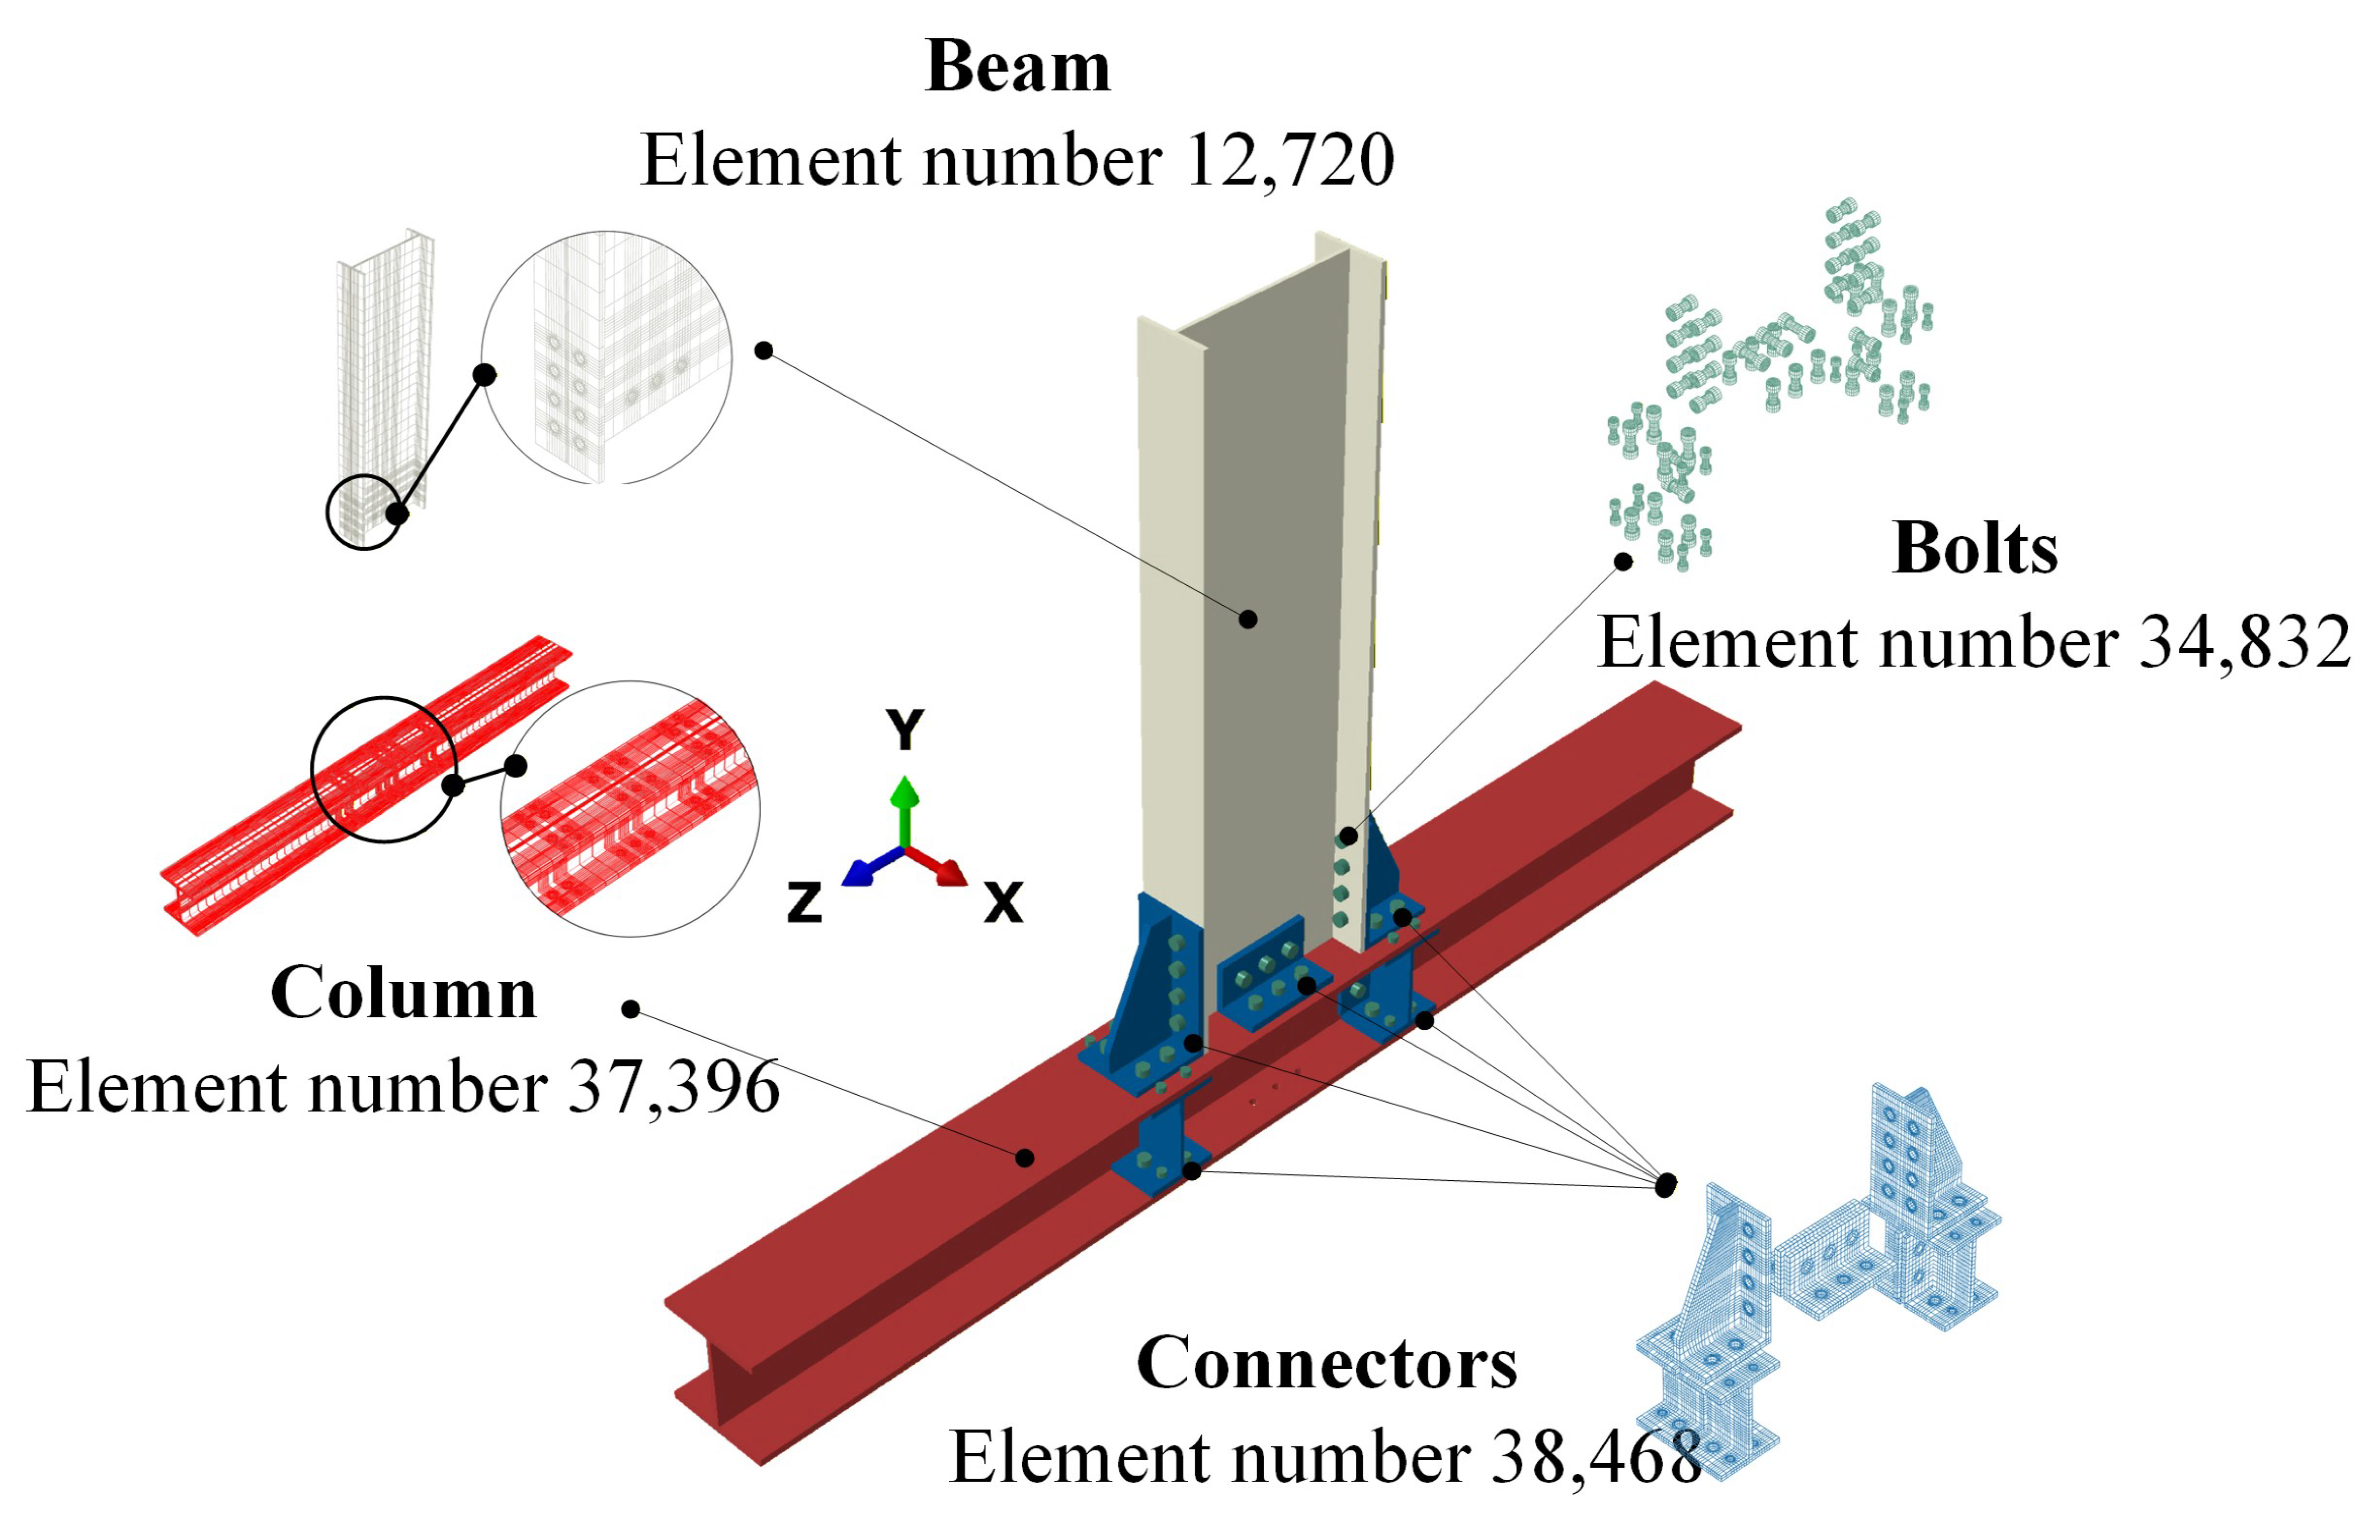
This section uses ABAQUS 2020 finite element simulation software to create a corresponding computational model for the aforementioned aluminum alloy mechanical connection joint experiment, aiming to calibrate the accuracy of the modeling and calculation methods using experimental results. The established solid model is shown in Figure 6, including aluminum alloy beams, columns, stainless steel connectors, and connecting bolts. The meshing of the model uses C3D8R solid elements, which are linear reduced integration elements. These elements offer advantages such as high mesh generation quality, effective reduction in shear locking, good material model compatibility, and easy handling of boundary conditions. However, C3D8R solid elements may reduce the accuracy of some calculation results while ensuring computational efficiency; for geometrically complex models, the number of meshes needs to be increased [36].
The total number of meshes in the aluminum alloy mechanical connection joint model is 123,416. To ensure the accuracy of the model, 16 mesh joints were arranged for the circular bolts and holes [37]. In the model, the components were set as surface-to-surface contact, with contact properties including hard contact in the normal direction and frictional contact in the tangential direction, with a friction coefficient of 0.2. A pre-tightening force of 48.5 kN was applied to the M12 high-strength bolts, and 21.4 kN to the M8 high-strength bolts. An axial pressure ratio of 0.2 was applied to the column in the axial direction.
The boundary conditions of the model used the same constraints as in the experiment. The left end of the column was fixed, with all six degrees of freedom constrained. The right end of the column was a unidirectional sliding hinge support in the z-direction, with the rightmost section being the location of axial pressure application. The top of the beam was a unidirectional sliding hinge support in the y-direction, and the displacement in the z-direction of the support was used to apply the displacement load shown in Figure 5.

3.1.4. Mixed Hardening Model Parameters

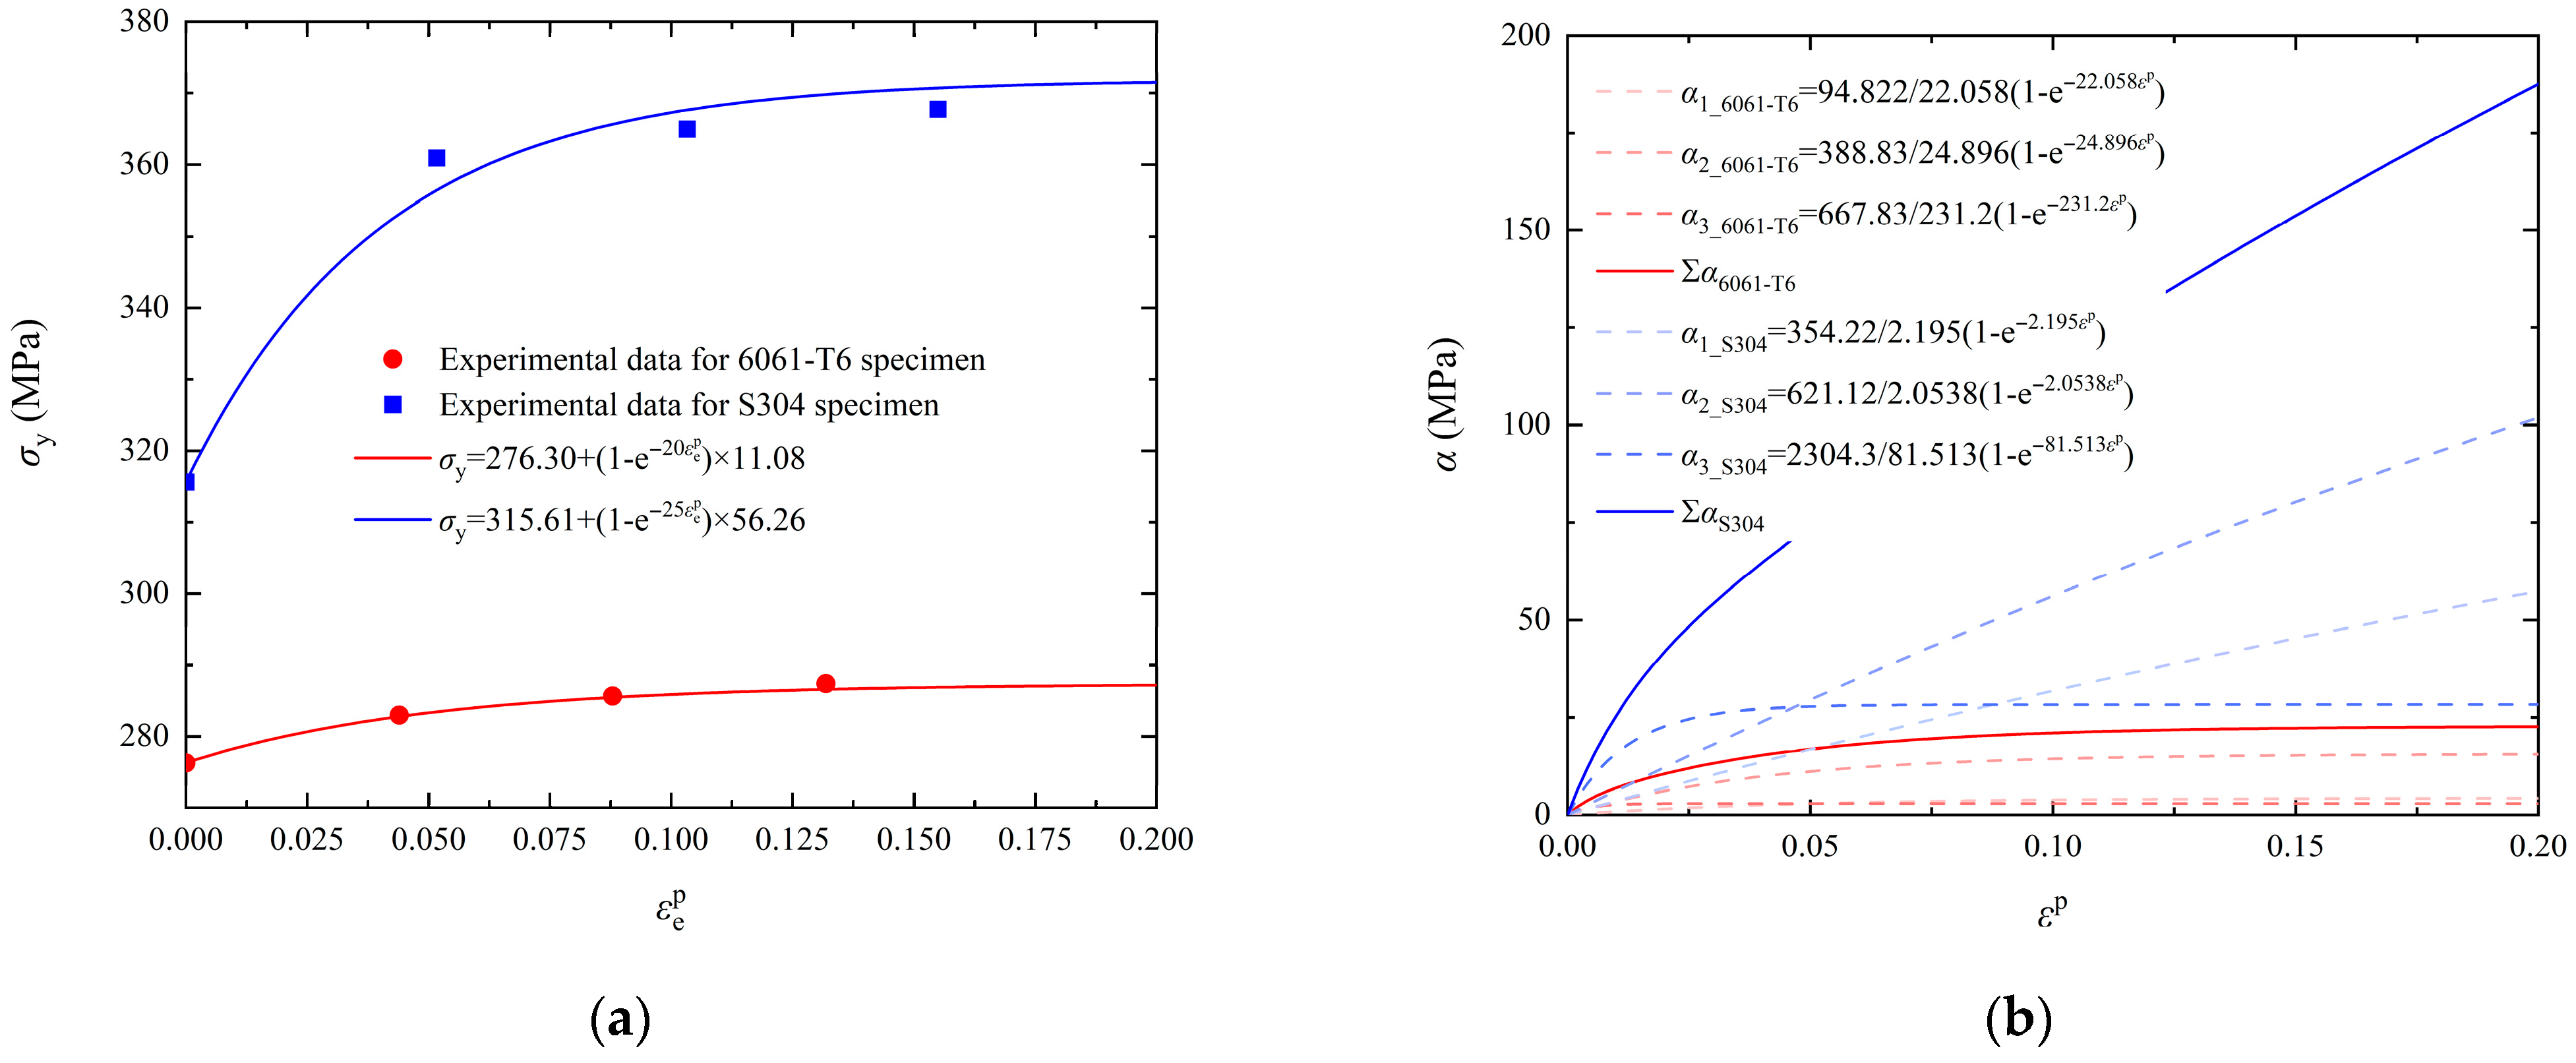
As mentioned above, a mixed hardening model was used as the constitutive relationship for the frame bolted connection joint. The parameters for the mixed hardening model were calibrated using standard specimens machined from the base material of the mechanical connection joint to ensure representativeness. The isotropic hardening parameters, Q and b, were determined by fitting Equation (4) to the stress amplitude data from a stable symmetric constant-amplitude cyclic test. The kinematic hardening parameters, n, Ck, and γk, were then calibrated by simulating a monotonic uniaxial tensile test and iteratively adjusting them to match the experimental hardening behavior. The final parameter set, which provides the best overall agreement with both experimental datasets, is presented in Figure 7.

3.1.5. Validation of Numerical Model

For the aluminum alloy frame bolted connection joint established using the modeling method and constitutive model referred to in previous sections, the rationality and accuracy of its calculation results need to be discussed to provide a basis for the analysis of joint design parameter optimization in the following sections. Therefore, this section compares and analyzes the hysteresis curves and extracted skeleton curves under cyclic loading experiments and numerical simulations, and discusses the degree of agreement between the joint deformation conditions of the two.
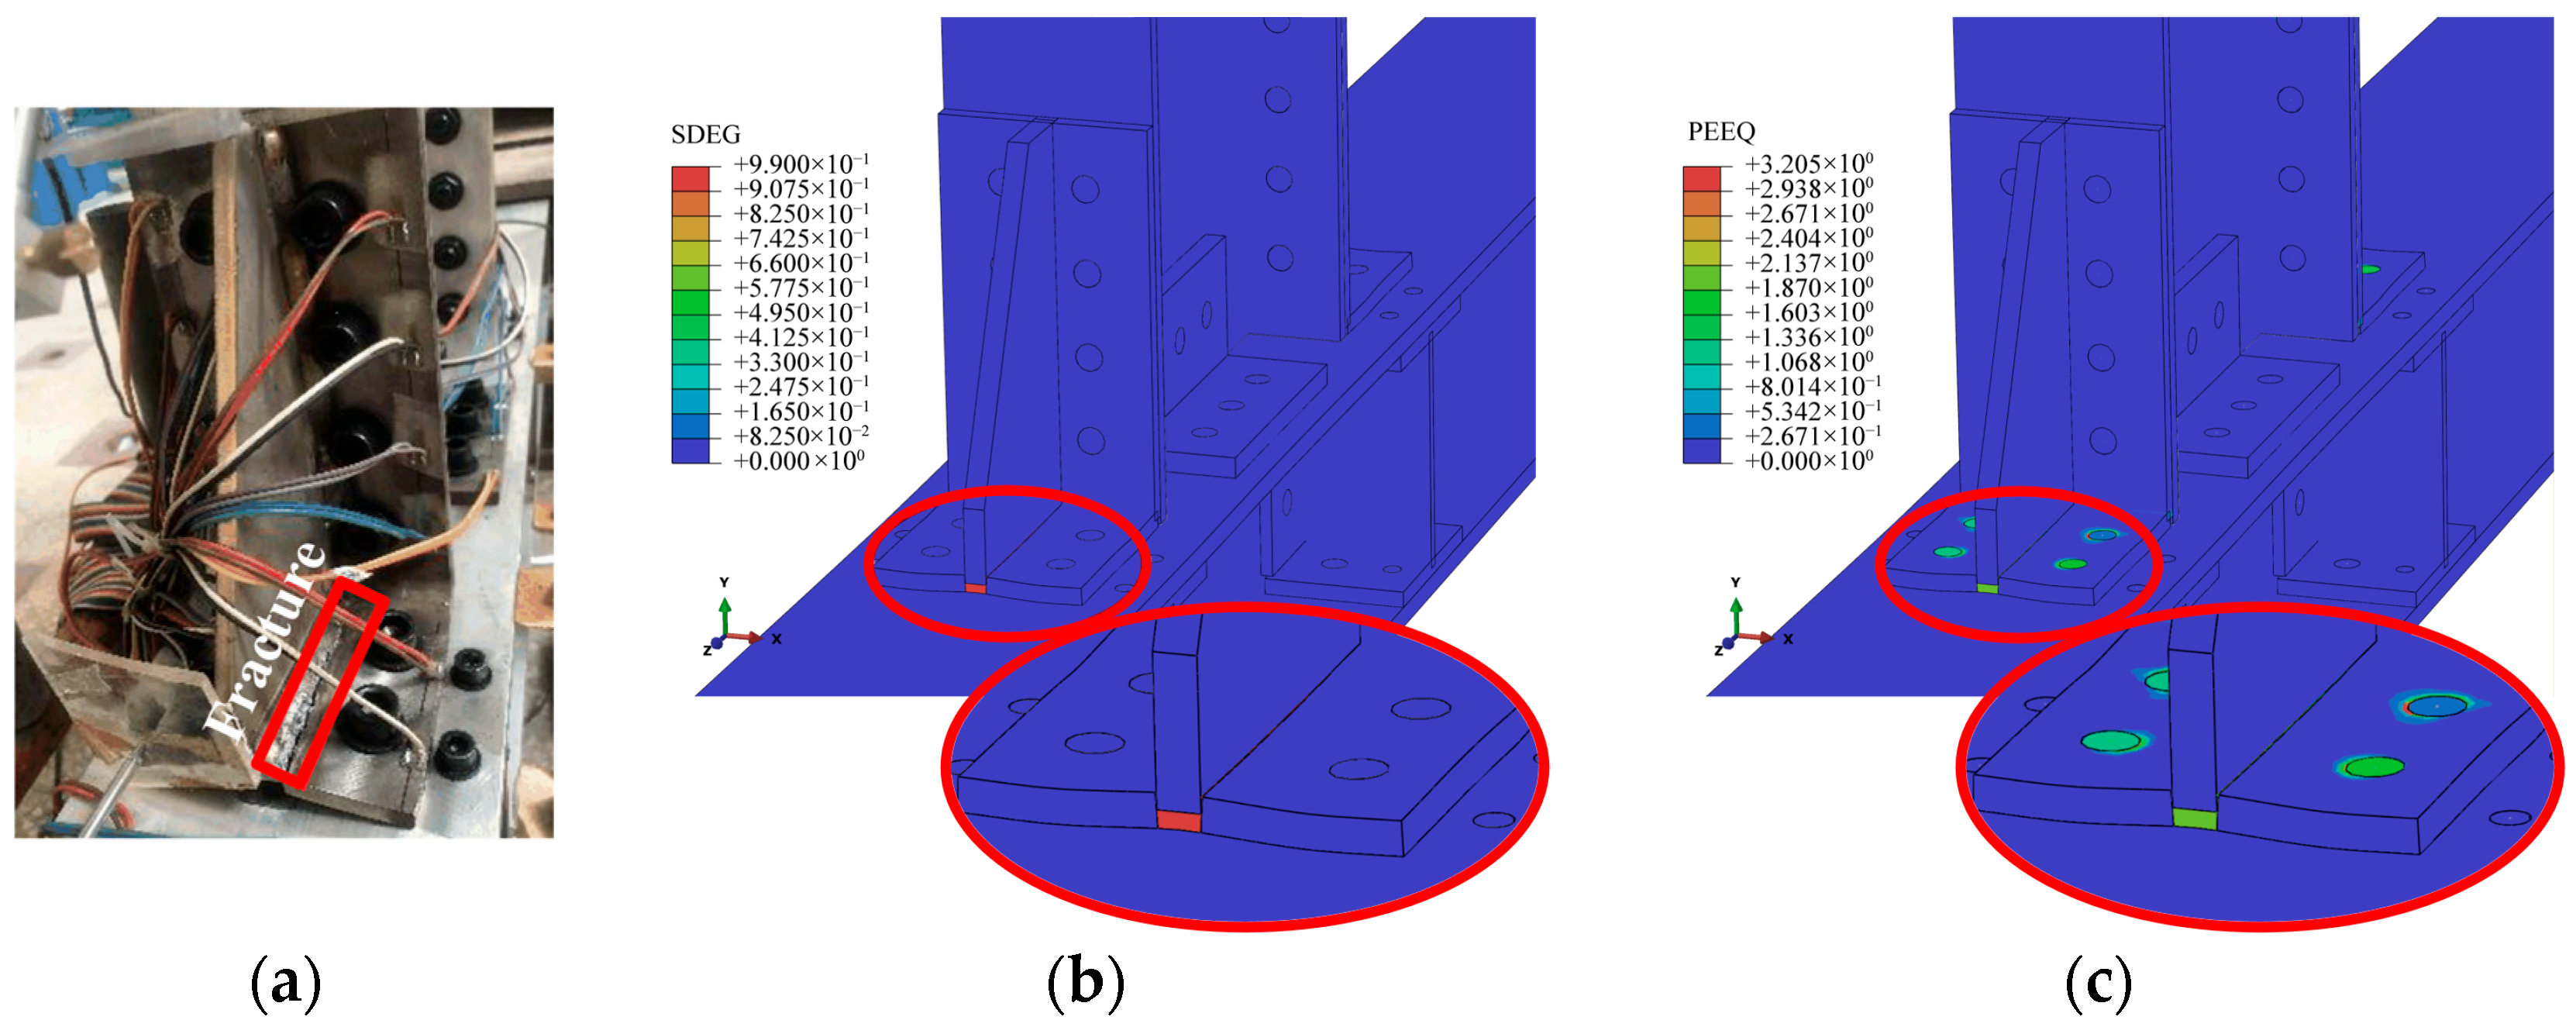
Figure 8 shows the fracture location after the low-cycle cyclic loading experiment and the coefficient and plastic strain under numerical simulation. The red box in Figure 8a indicates the fracture location. In the finite element analysis, the damage initiation and progression were comprehensively assessed using the stiffness degradation (SDEG) (Figure 8b), and the equivalent plastic strain (PEEQ) (Figure 8c), which quantifies the cumulative plastic deformation as defined in Equation (3). The SDEG variable, which ranges from 0 (undamaged) to 1 (fully damaged), indicates the local reduction in material stiffness. A region with an SDEG value approaching 1 was considered to have sustained severe damage, leading to a significant loss of load-bearing capacity. Concurrently, the PEEQ distribution reveals the extent of irreversible plastic deformation. In this study, the concentration of both SDEG and PEEQ in the same critical region, located at the weld root of the L-shaped stiffening rib connector between the beam flange and column flange, was identified as the numerical indicator of failure, which aligns well with the experimental observation of fracture.
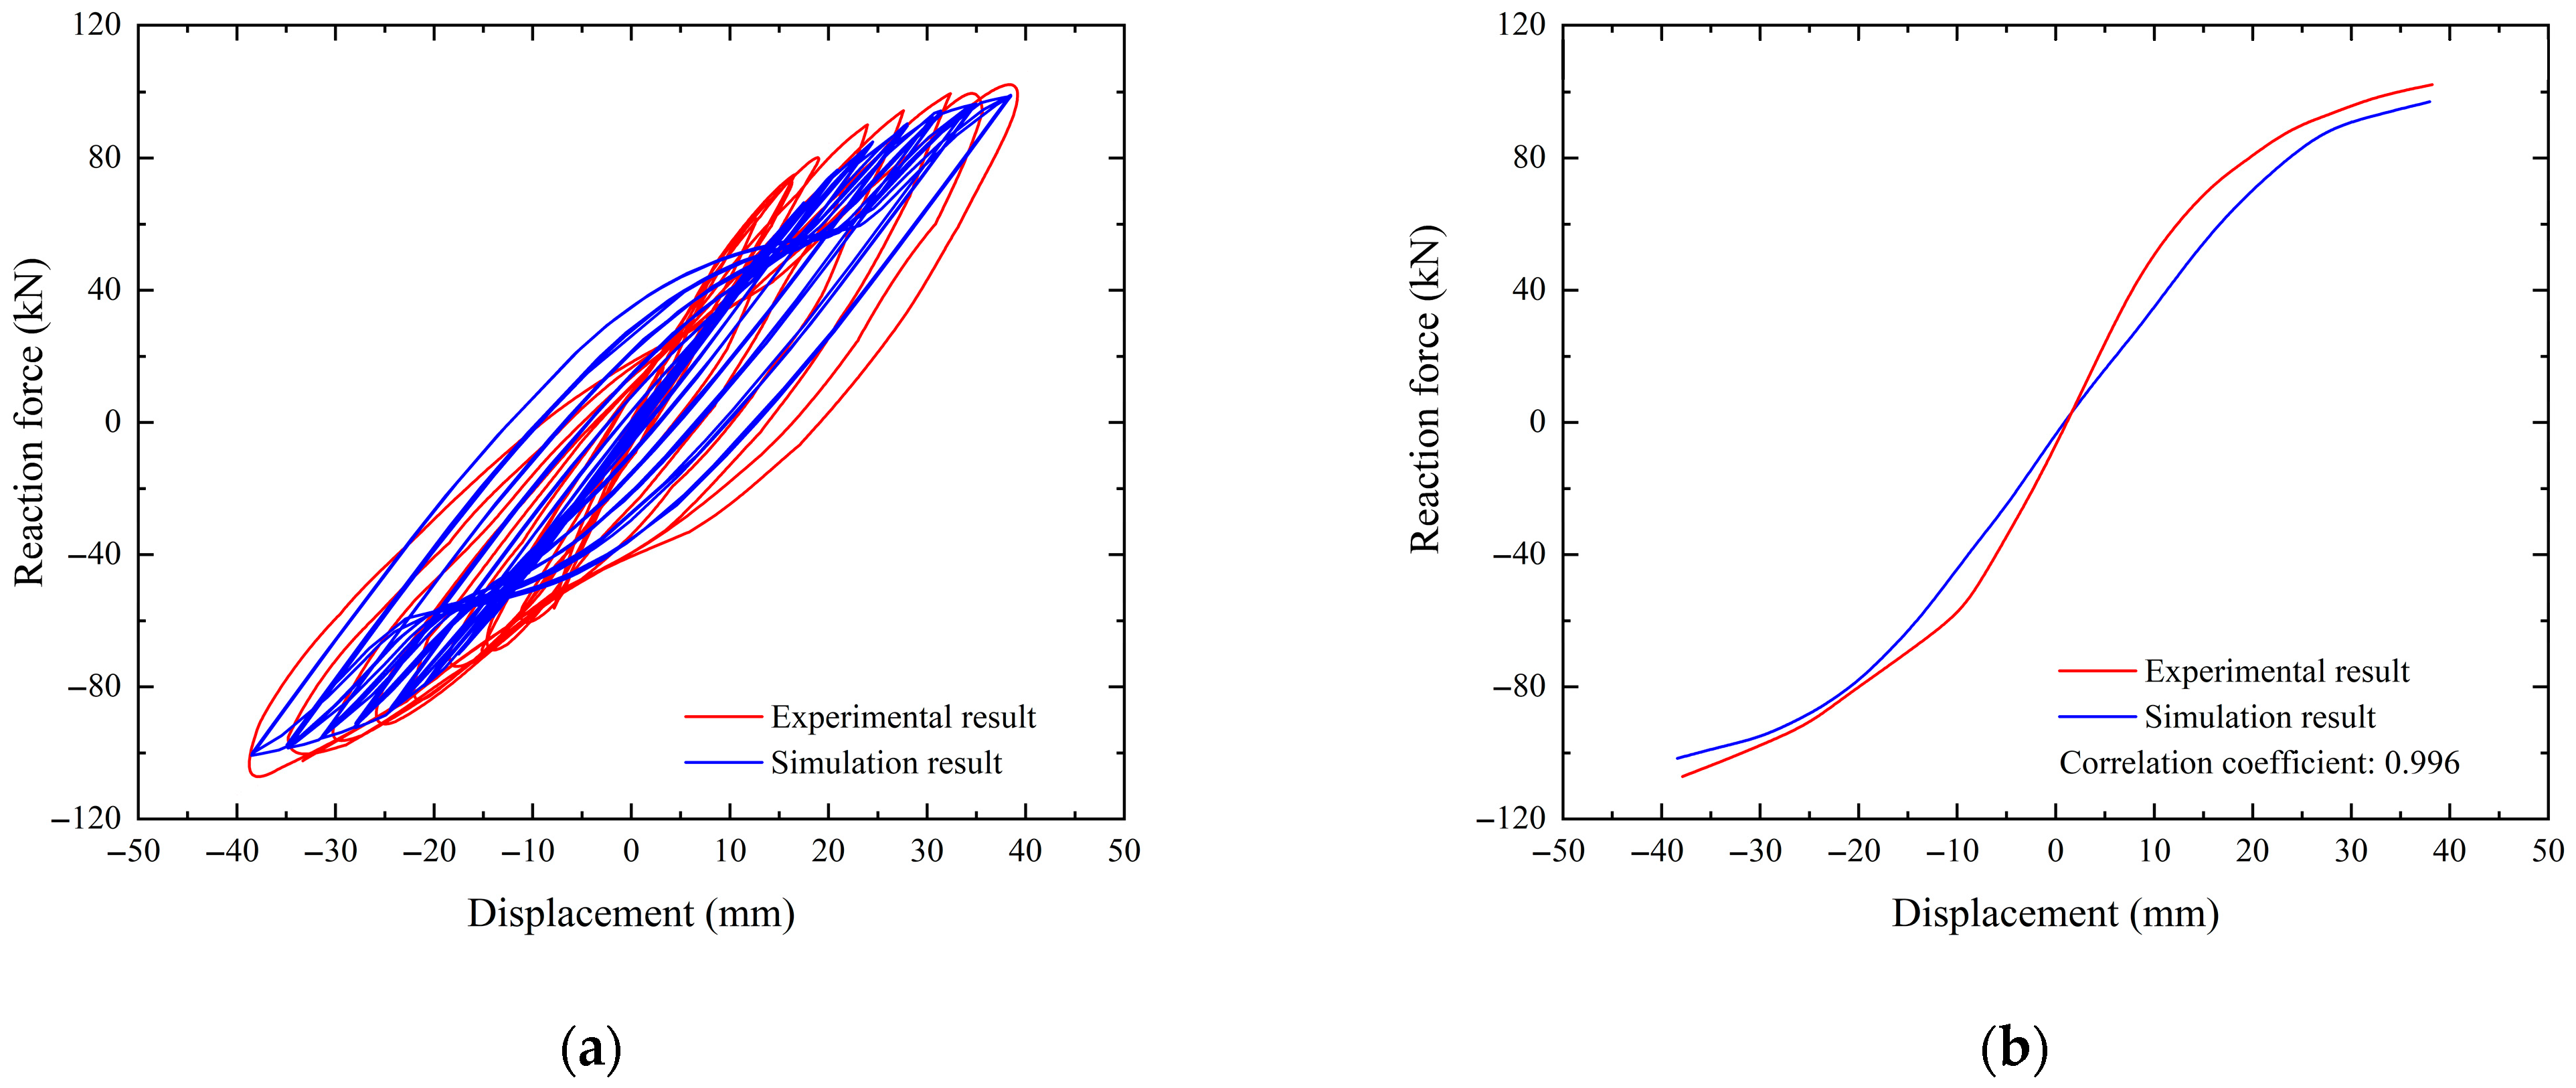
From the comparison results in Figure 9a, it can be seen that the hysteresis curves of the joint under numerical simulation and experimental conditions are similar in shape, exhibiting a bow shape. The experimental results show a fuller hysteresis curve than the numerical simulation results, and the positive and negative bidirectional loading and unloading are not symmetrical; the pinching effect is more pronounced in the experimental results. The numerical simulation conditions are more idealized compared to the experimental conditions and are not affected by material initial defects, assembly errors, and uneven stress during the experiment. Therefore, the calculation results are smoother and more uniform. However, the overall trends of the numerical simulation results and experimental results are the same. According to the skeleton curve error analysis, the numerical difference between the two is 5.09%, and the correlation coefficient between the numerical simulation results and experimental data is 0.996 (Figure 9b).
In summary, the numerical simulation using the modeling method and the mixed hardening constitutive model mentioned above can effectively reproduce the stress state and performance indicators of the aluminum alloy mechanical connection joint under real experimental conditions in [21].

3.2. Joint Parameter Working Conditions and Analysis Items

3.2.1. Joint Parameter Working Condition Settings

The combined components of the aluminum alloy frame bolted connection joint significantly affect the overall seismic performance. The characteristics of the hysteresis curves of the joint under low-cycle cyclic loading differ due to different component parameters. Therefore, based on the numerical model validated above, this section adjusts design parameters such as connector dimensions, in order to summarize the rules of joint stiffness, bearing capacity, and energy dissipation, and based on this, summarizes joint optimization design schemes.
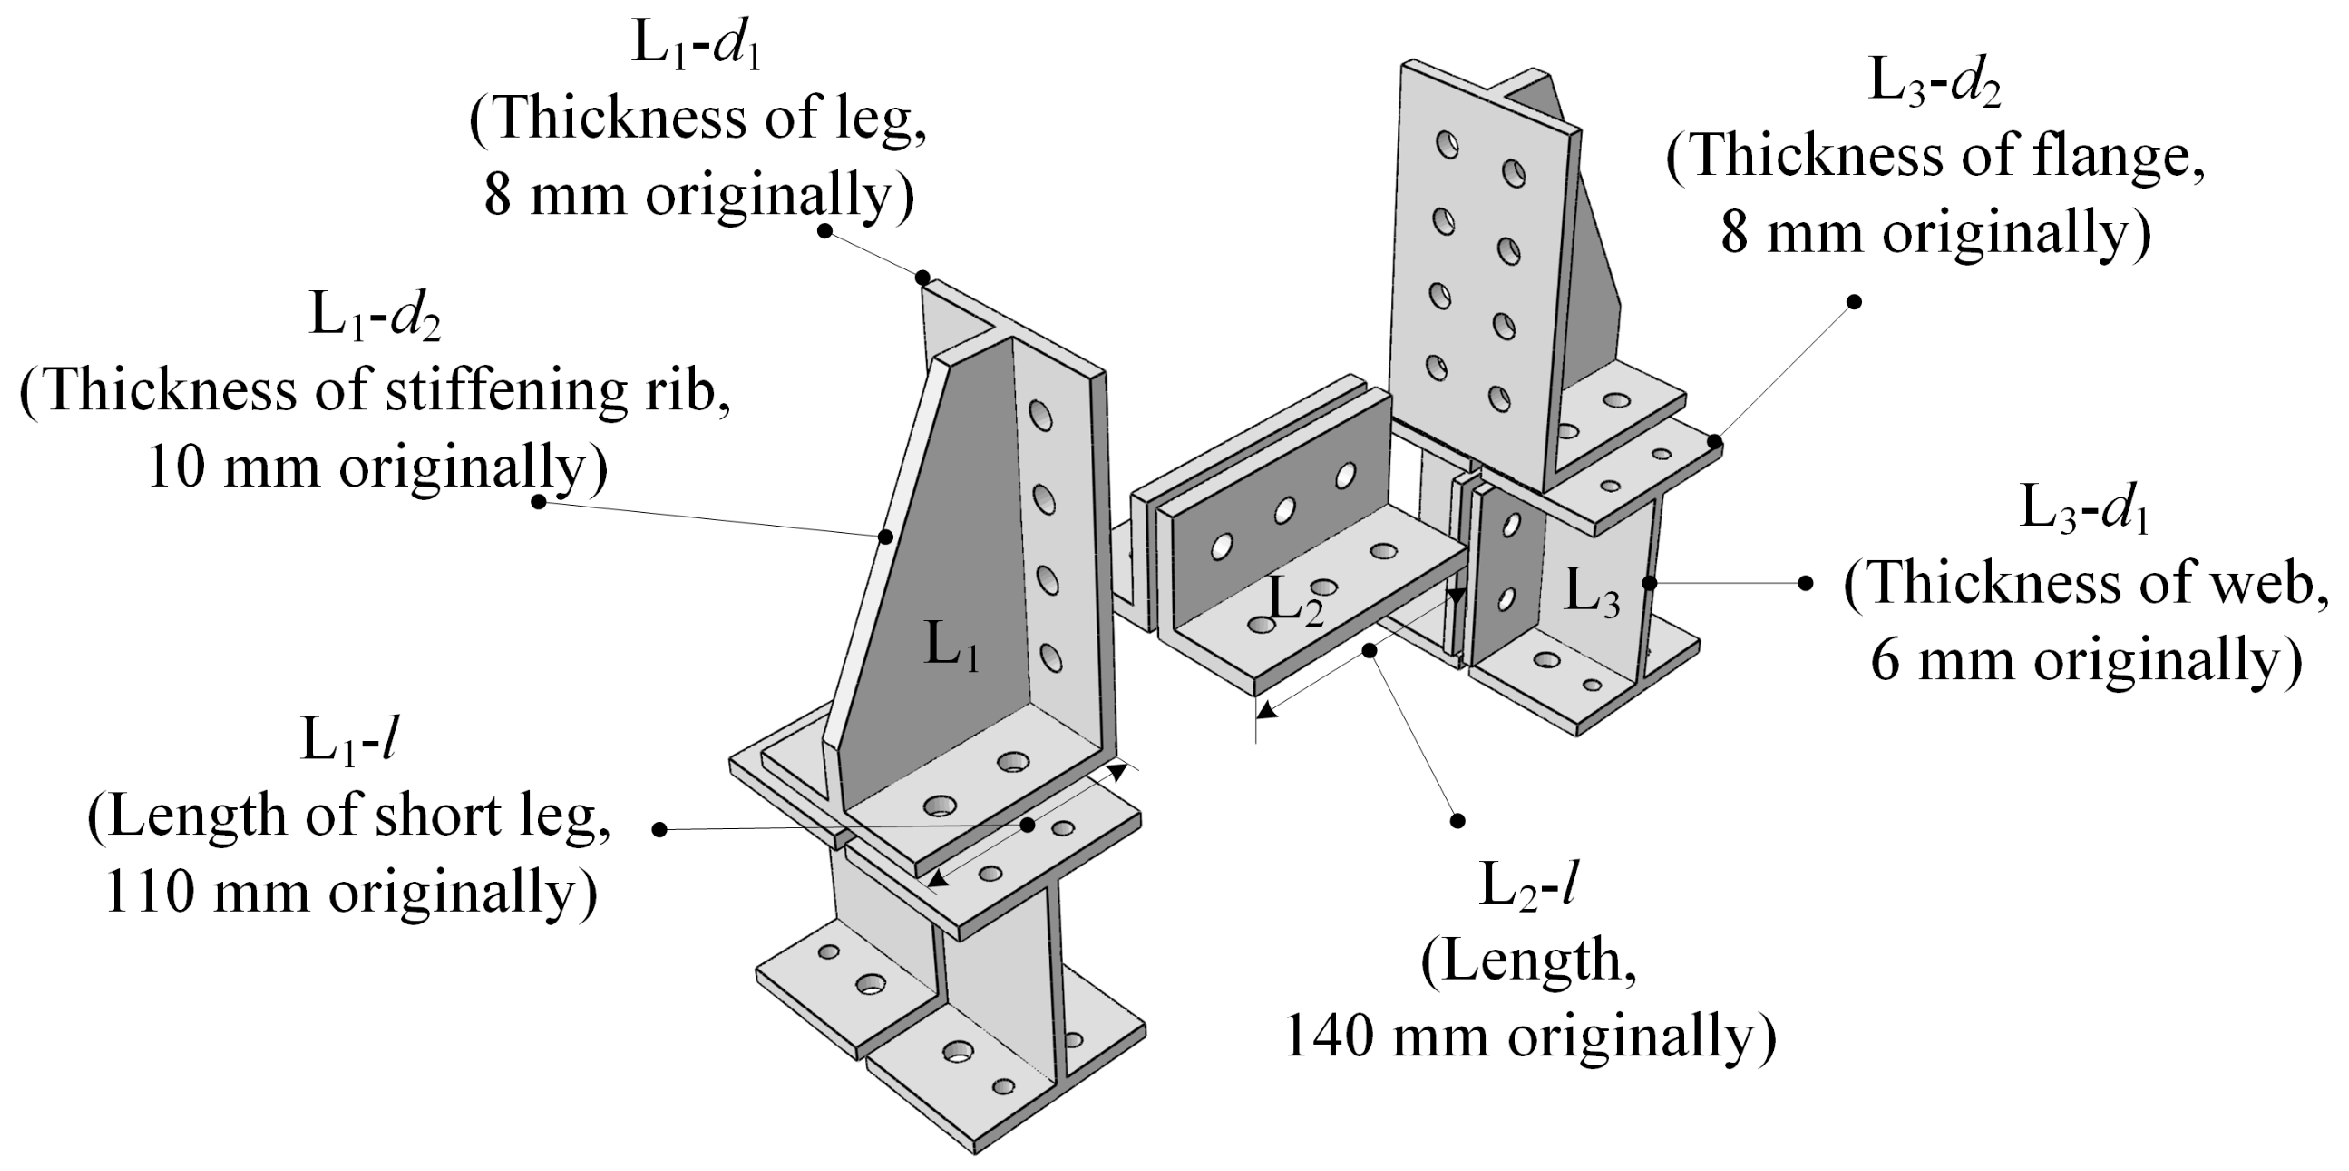
The L-shaped connector between the beam flange and column flange is denoted as “L1”; the L-shaped stiffening rib connector between the beam web and column flange is denoted as “L2”; and the inter-column stiffening rib is denoted as “L3” (see Figure 10). The joint working conditions calculated are shown in Table 2. The L2-l-140 working condition is designated as the control group, indicated in bold in the table. The values of the variables for each experimental group are also indicated in bold in Table 2.

3.2.2. Simulation Result Analysis Method

To quantitatively describe the seismic performance of the joint, the hysteresis curve data of the joint will be further extracted and calculated, decomposed into the joint’s skeleton curve, initial stiffness, stiffness degradation, viscous damping coefficient, displacement ductility coefficient, and energy dissipation performance. When processing the joint hysteresis data, to quantitatively analyze the influence of the beam and column on the joint bearing capacity performance, and to distinguish the contribution of the beam and column angles in the joint region to the total bearing capacity, the following variables are defined:
θ 1 = arctan d 1 - 1 d 2 - 1 b 1 - 2
θ 2 = arctan d 4 - 1 d 3 - 1 b 4 - 3
θ 3 = arctan d 6 - 1 d 5 - 1 b 6 - 5
where θ1 is the angle of the column in the joint region; d1-1 is the vertical displacement of monitoring point D1-1; d2-1 is the vertical displacement of monitoring point D2-1; b1-2 is the horizontal distance between monitoring points D1-1 and D2-1; θ2 is the angle of the beam in the joint region; d4-1 is the horizontal displacement of monitoring point D4-1; d3-1 is the horizontal displacement of monitoring point D3-1; b4-3 is the vertical distance between monitoring points D3-1 and D4-1; θ3 is the angle of the beam end near the loaded part; d6-1 is the horizontal displacement of monitoring point D6-1; d5-1 is the horizontal displacement of monitoring point D5-1; and b6-5 is the vertical distance between monitoring points D6-1 and D5-1.
The angle of the joint θ is defined as the absolute difference between θ1 and θ2. In the normalization processing of joint stiffness degradation data and the calculation of the displacement ductility coefficient, the ultimate angle θu when the joint bearing capacity decreases to 85% needs to be used.

4. Results and Discussion

4.1. Analysis of Bending Moment–Rotation Hysteresis Curves

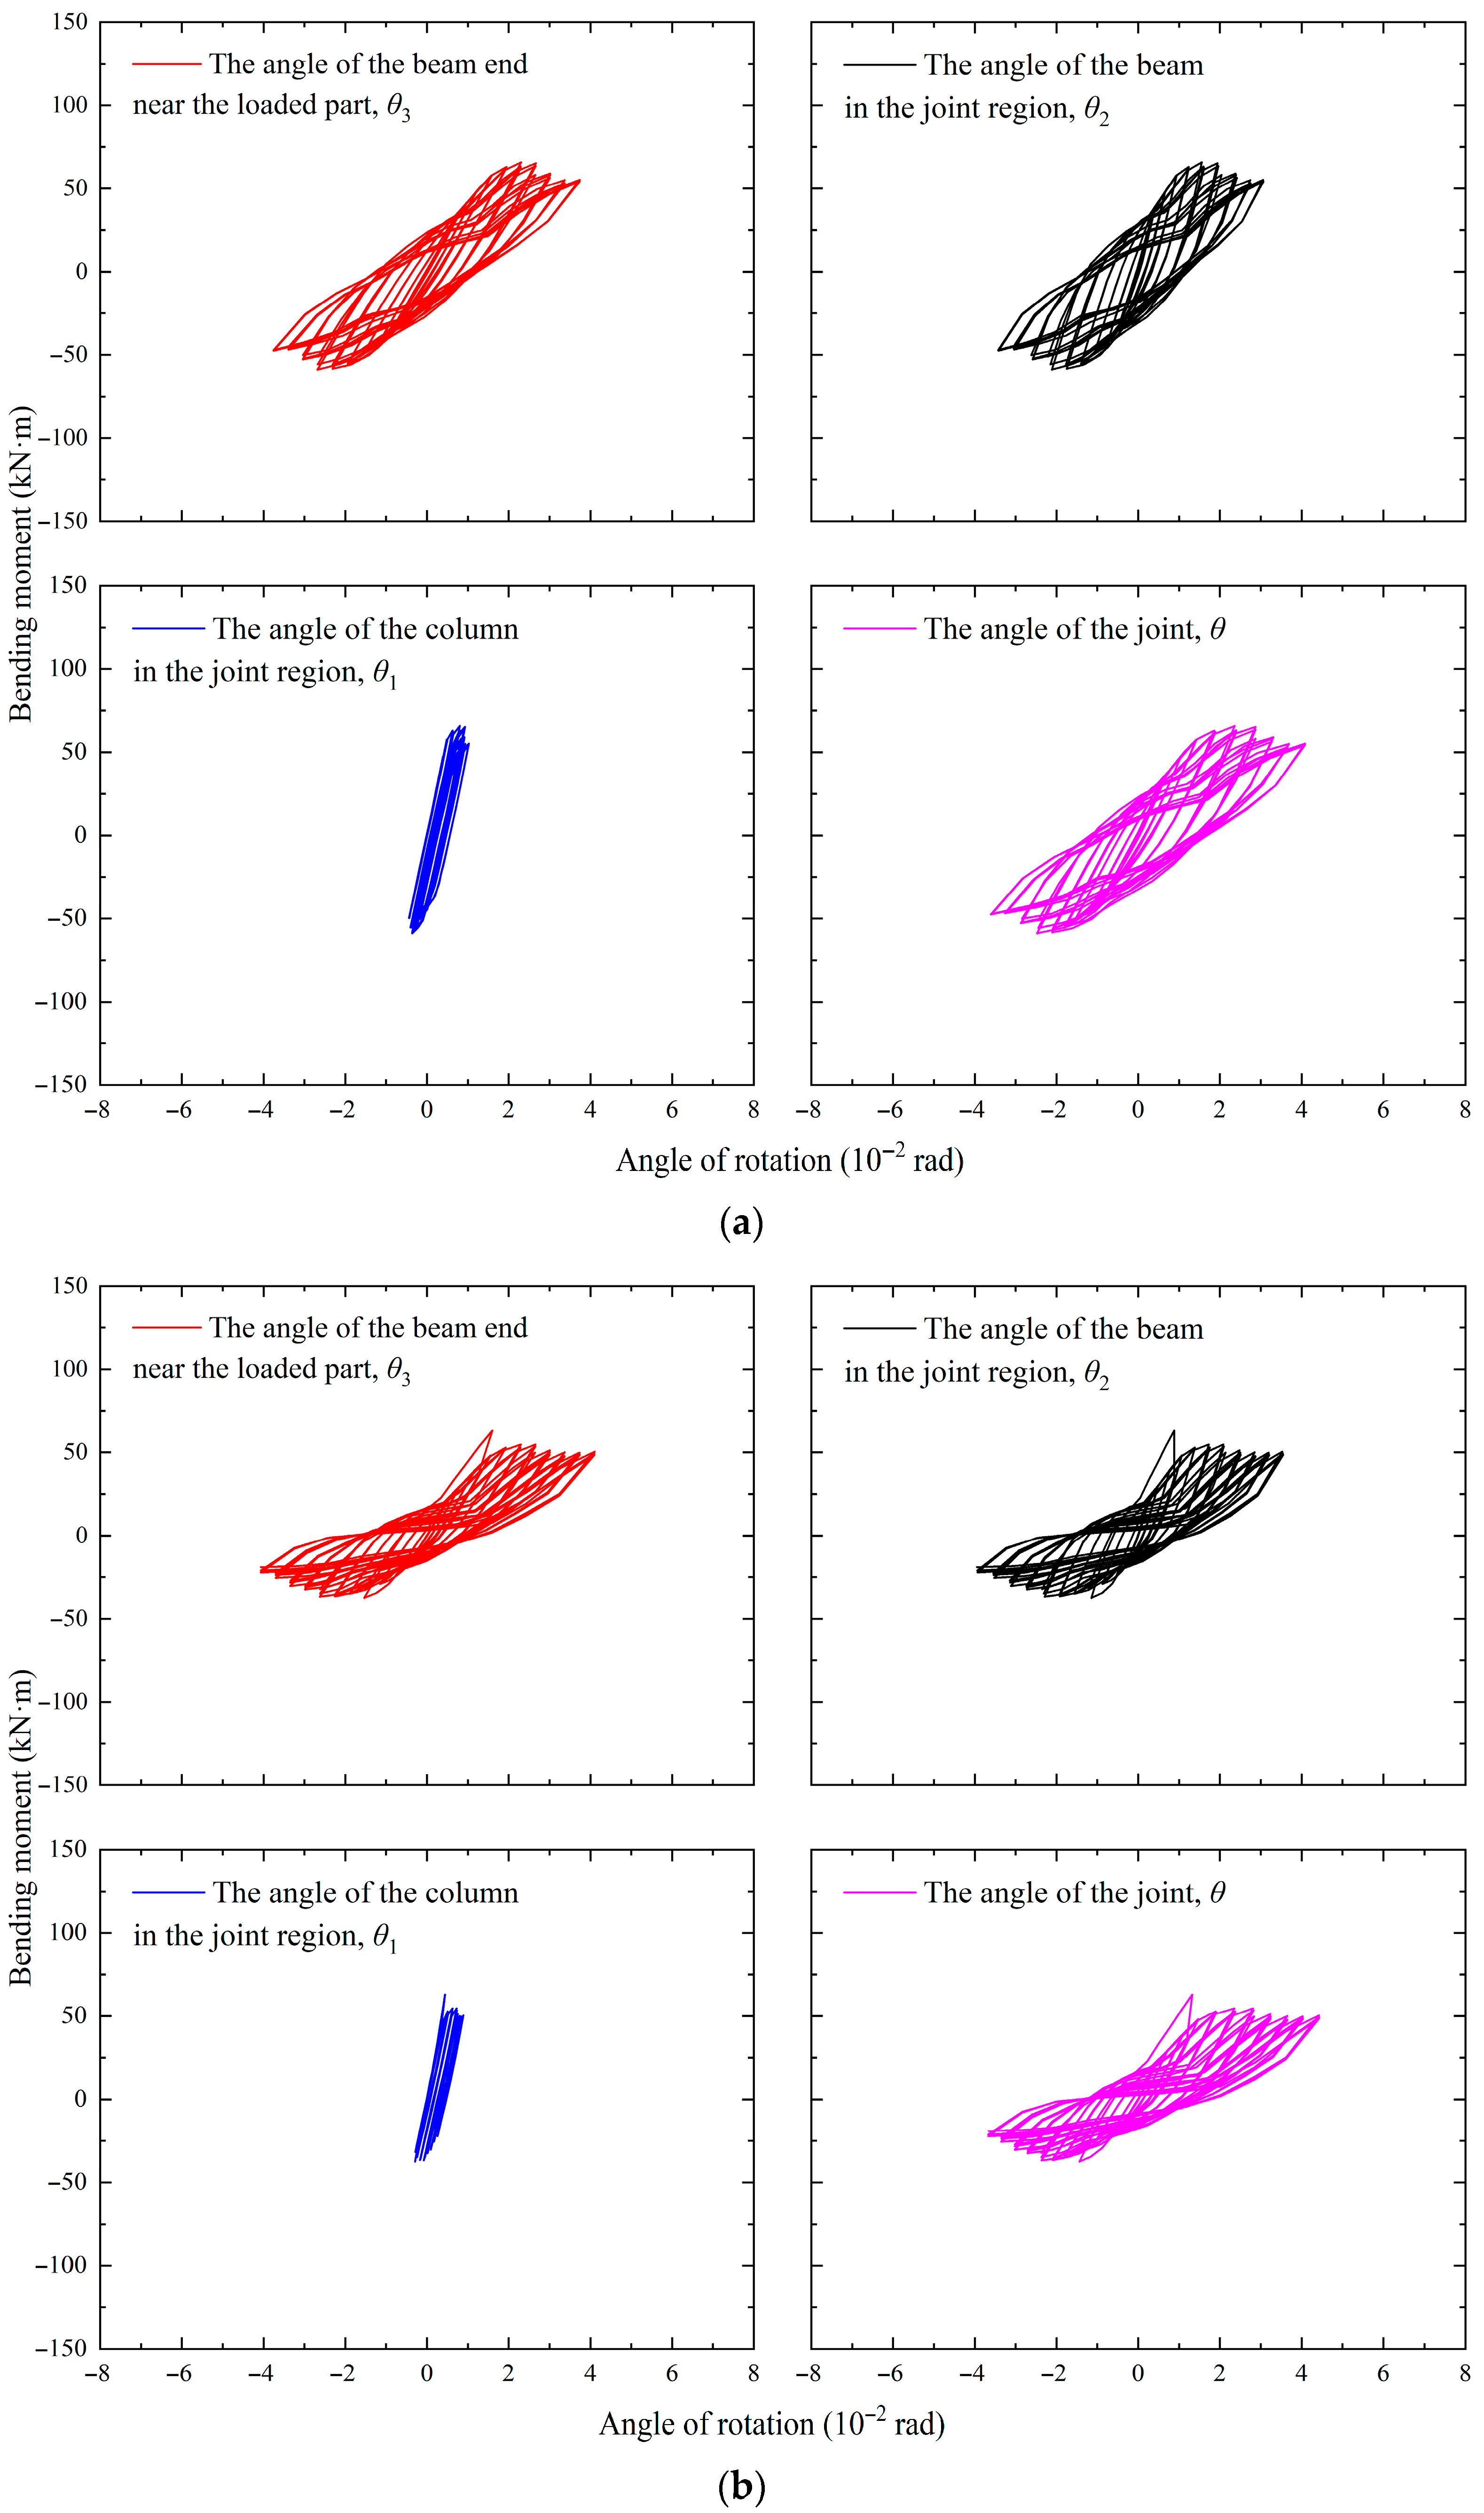
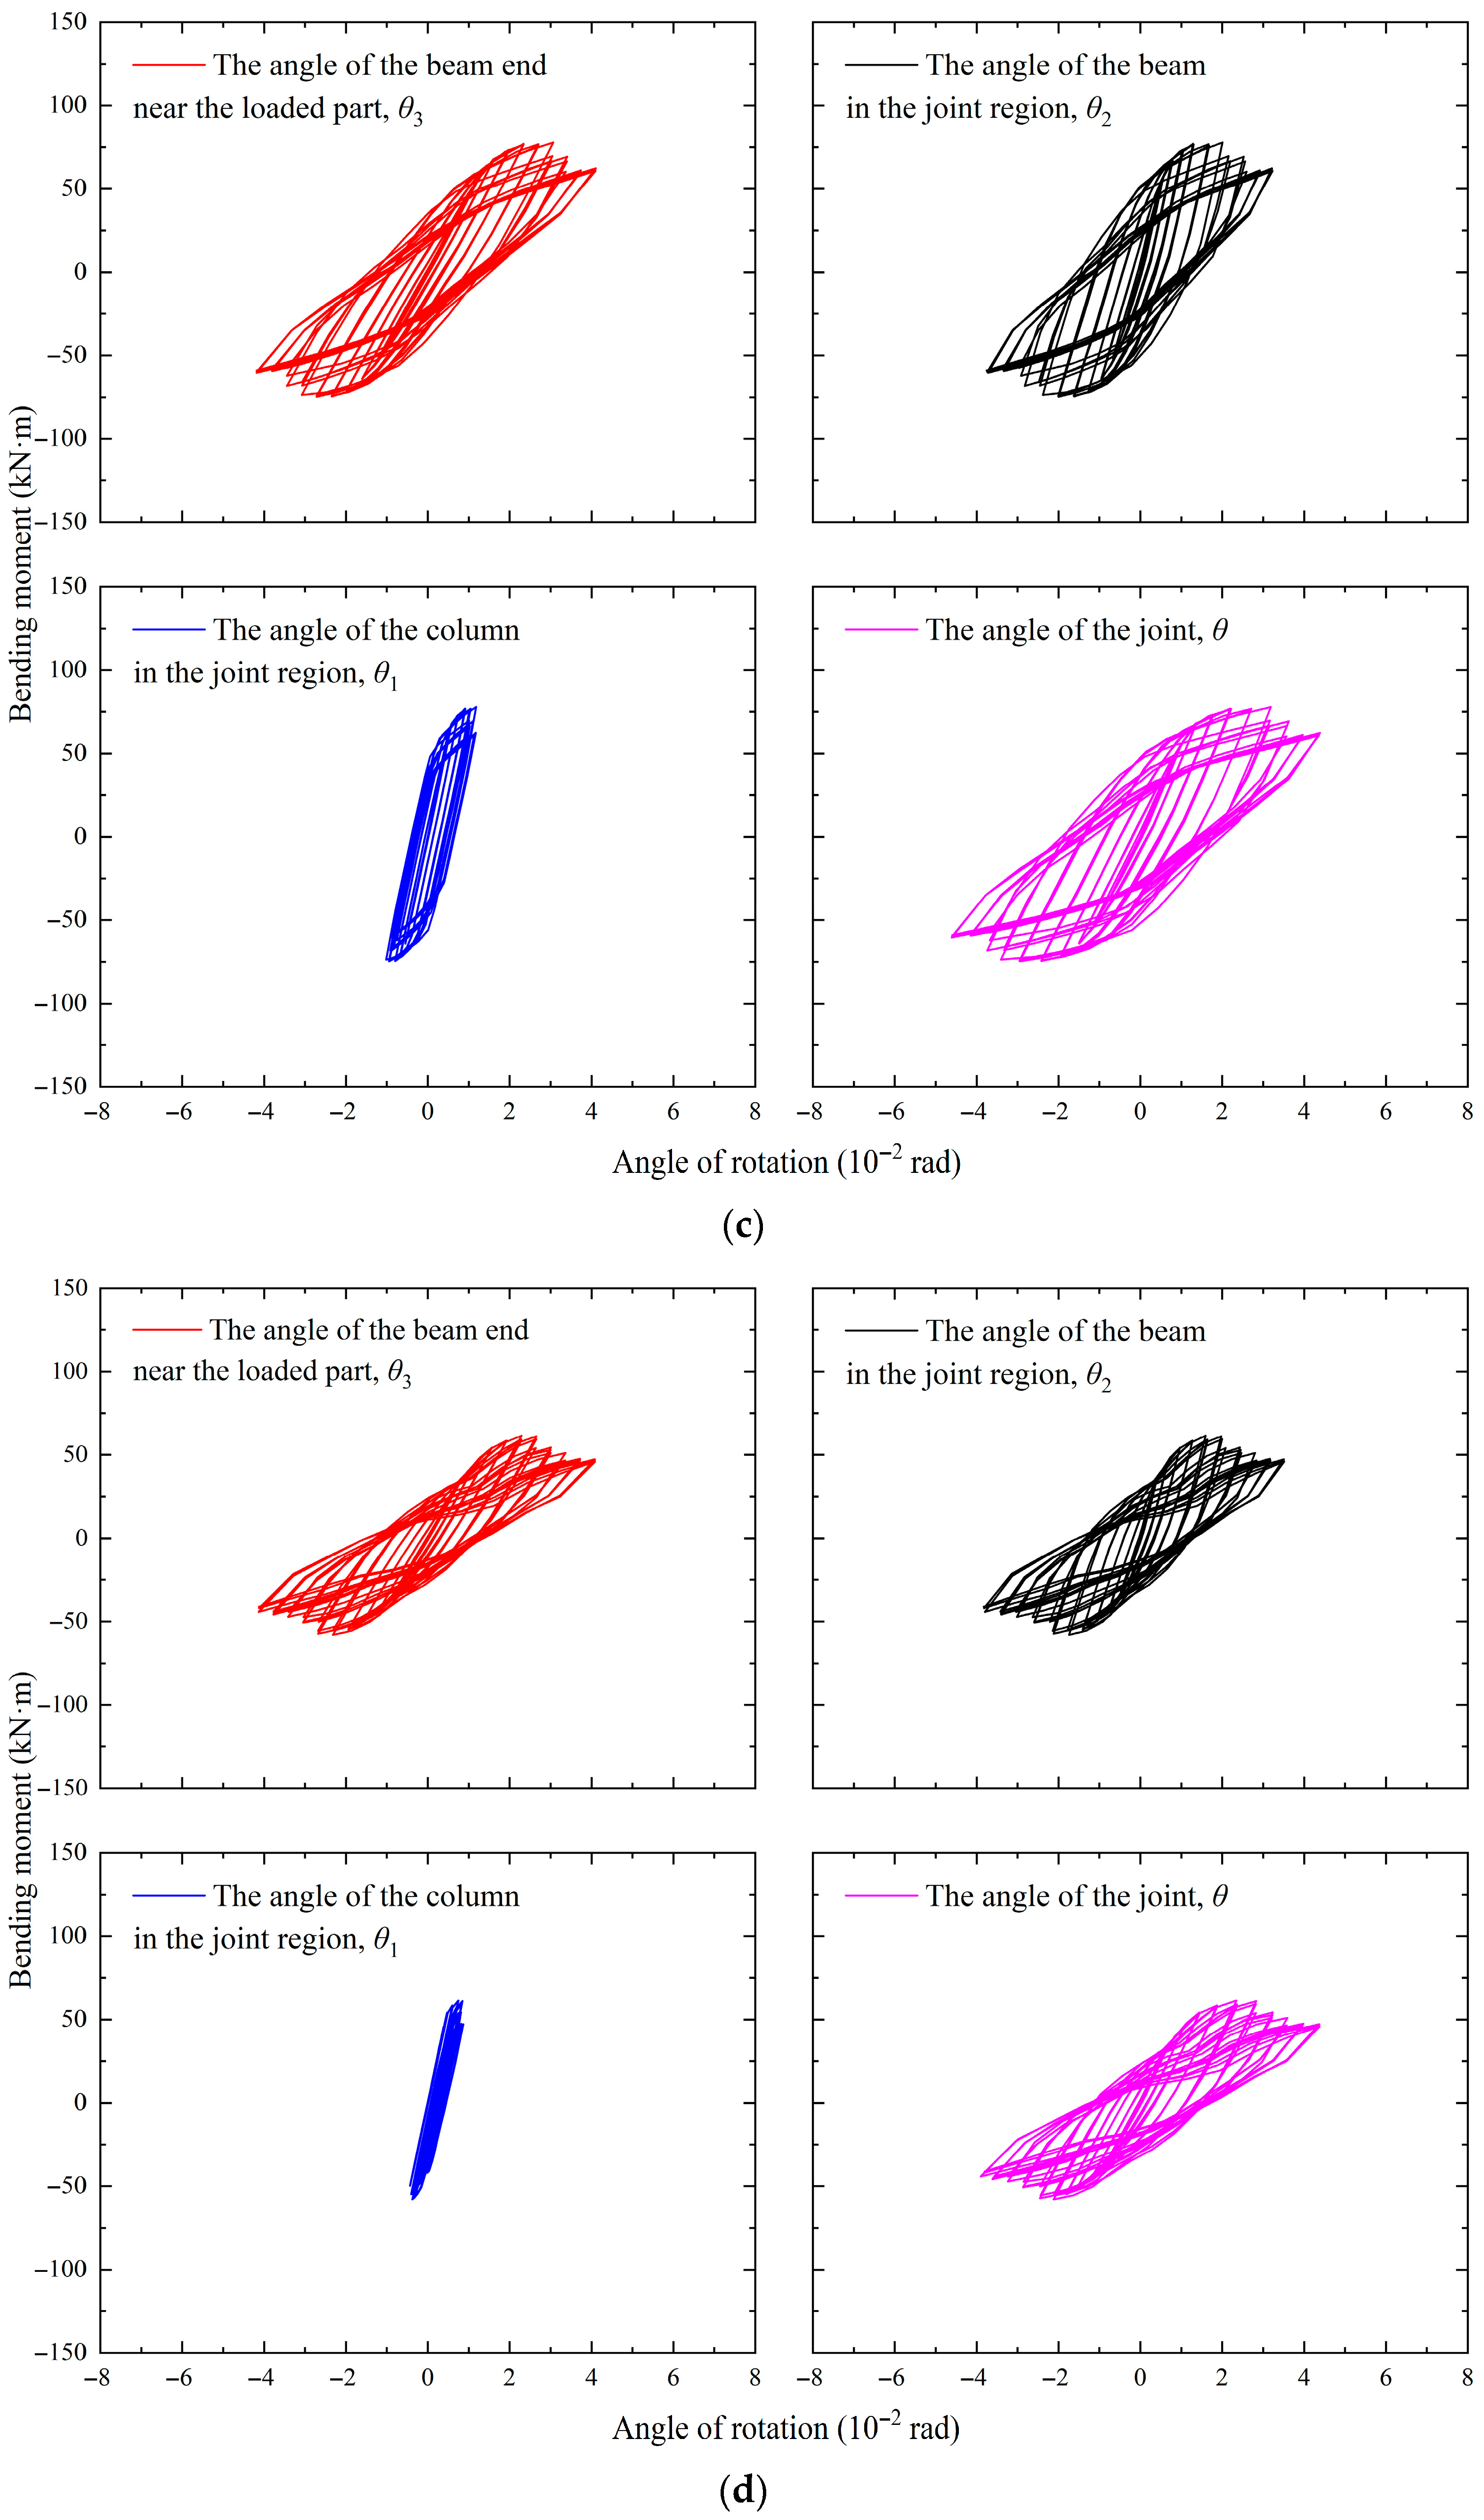
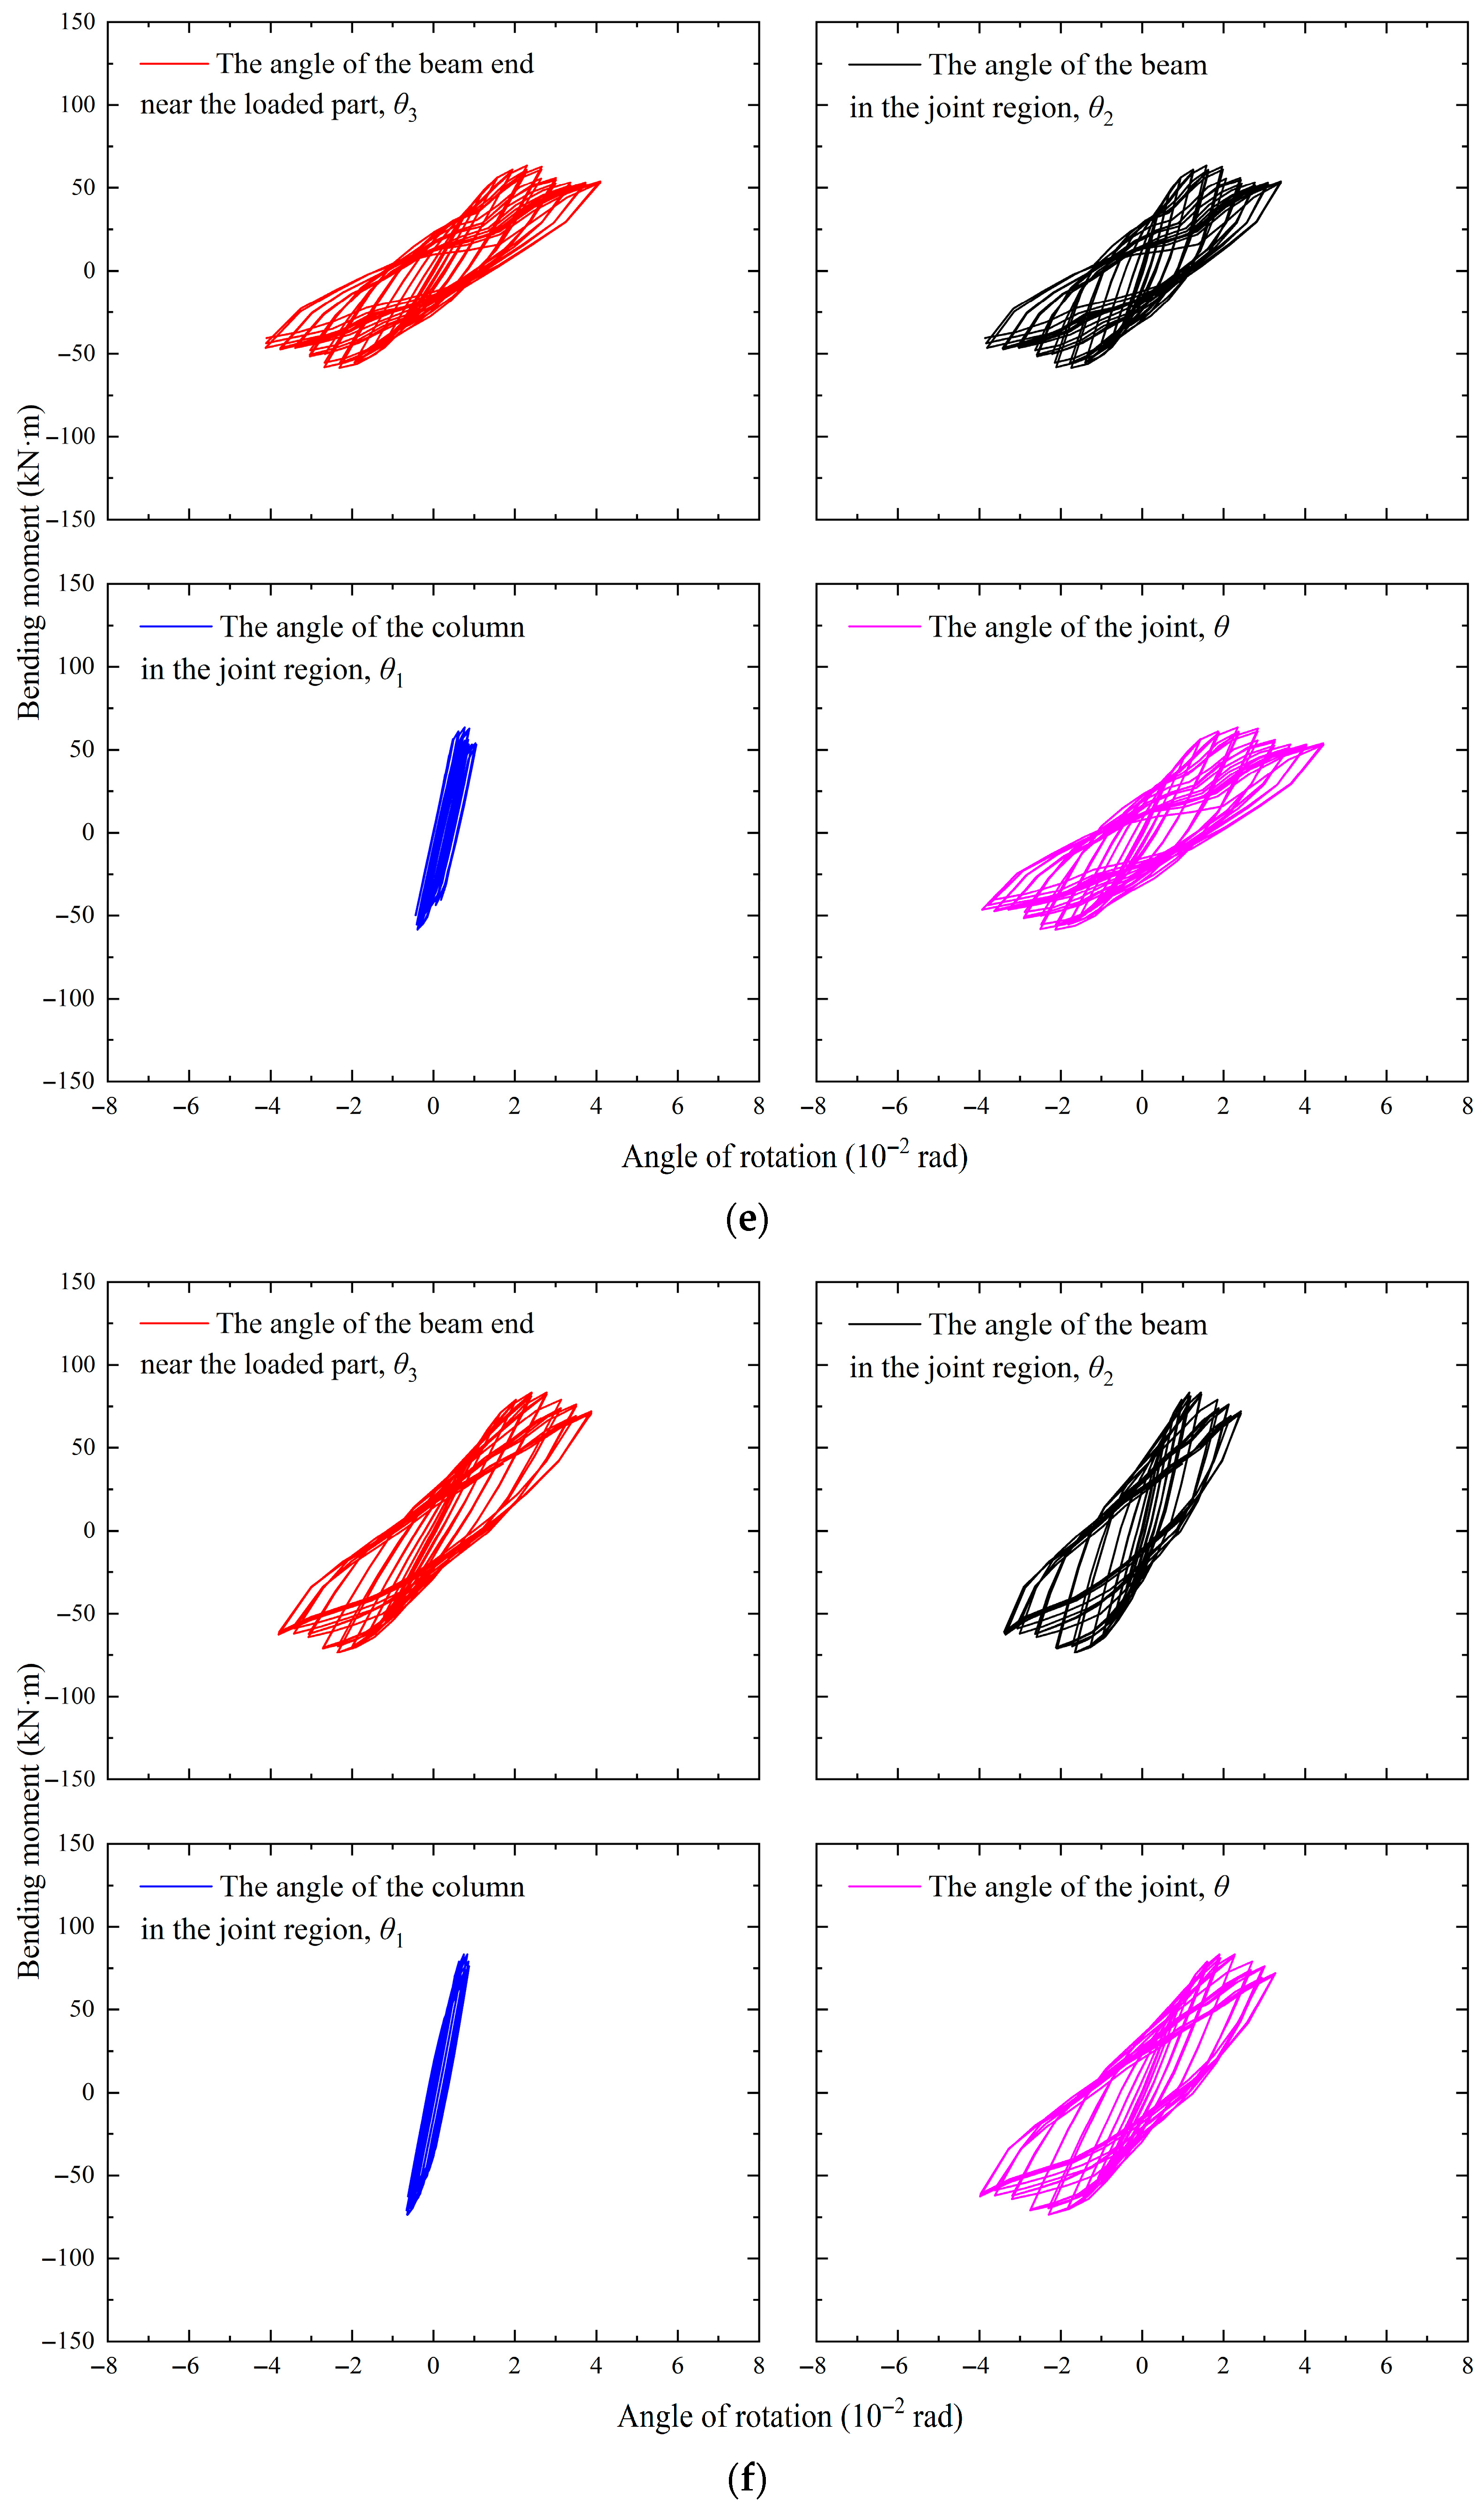
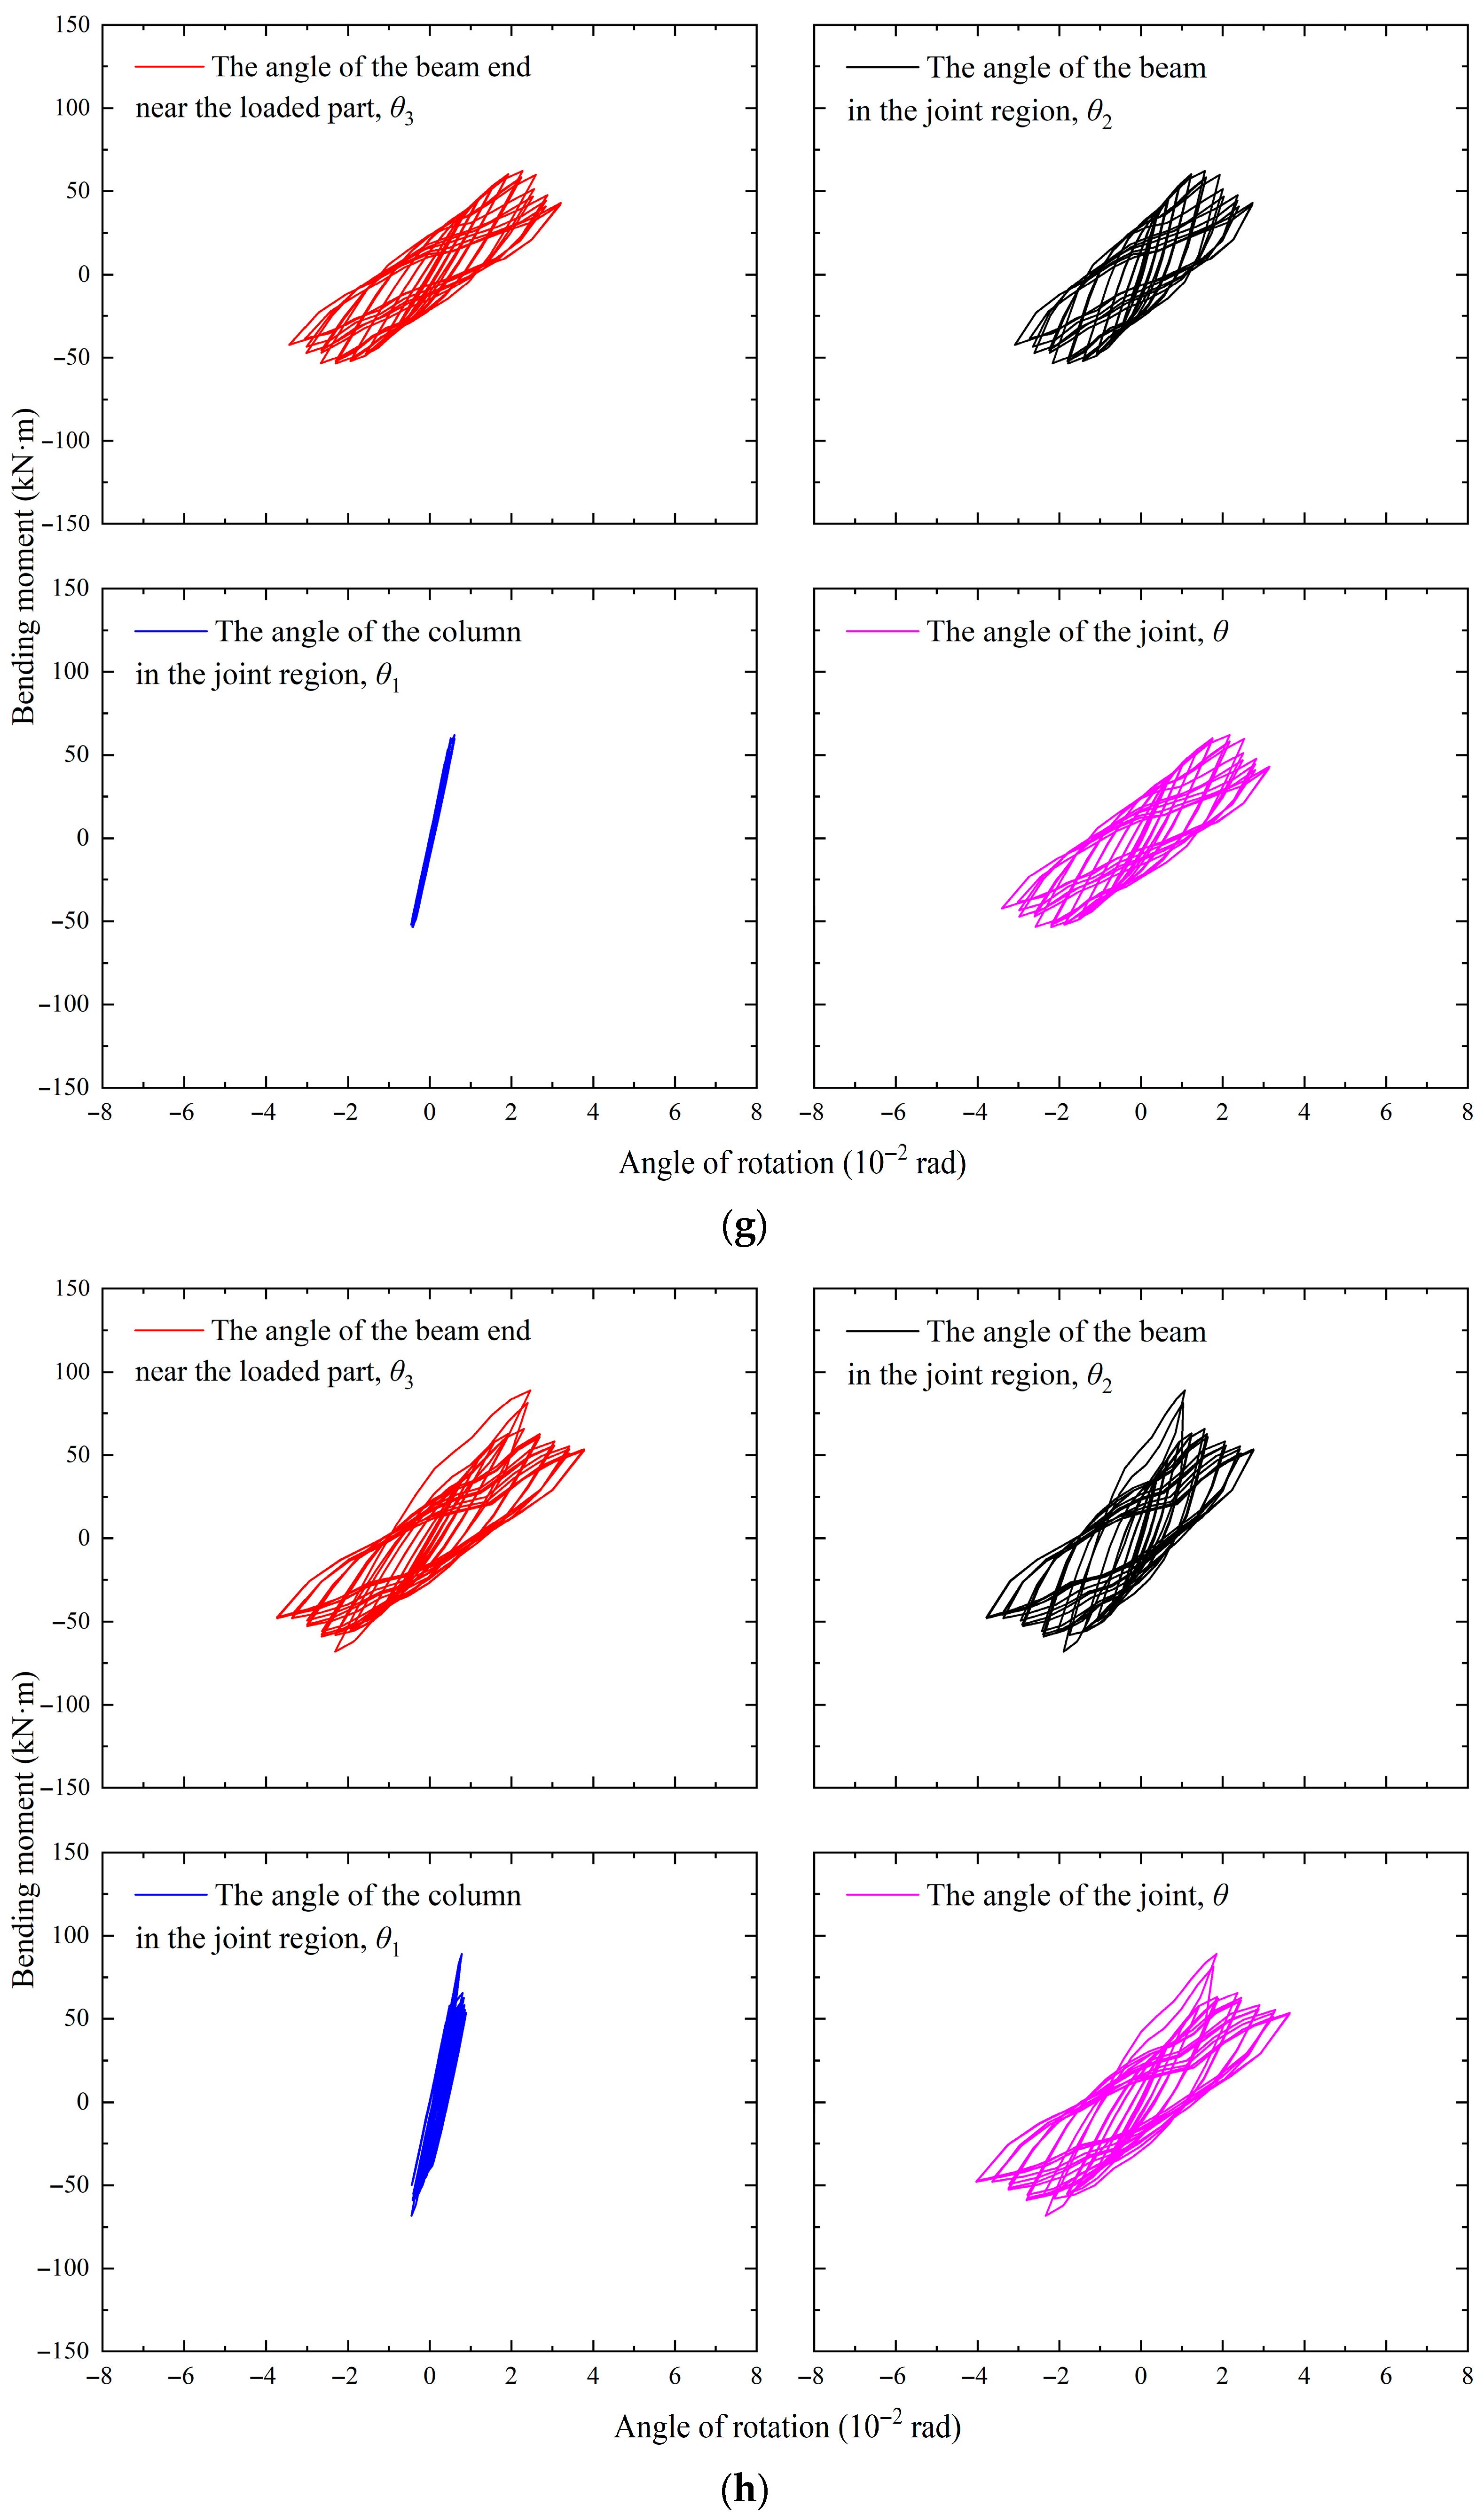
Figure 11 shows the bending moment–rotation hysteresis curves under various working conditions. It can be seen that, excluding the working conditions of joint L1-d1-10 and L1-l-150, the bending moment–rotation hysteresis curves of θ, θ1, and θ2 gradually transition from a bow shape to a reversed S-shape. This indicates that as the amplitude of the cyclic load gradually increases, the stainless steel connector gradually enters the plastic stage, accompanied by slip between the bolted connection components. The hysteresis curves of L1-d1-10 and L1-l-150 working conditions are relatively full, and the shape of the hysteresis curve after exceeding the ultimate bearing capacity is still approximately bow-shaped, indicating that the joint exhibits good resistance to plastic deformation and seismic performance. Among all working conditions, the bending moment–rotation hysteresis curve of the L1-d1-6 working condition shows a significant asymmetrical characteristic, indicating that the bolt slip effect in the joint is the largest.
Comparing the bending moment–rotation hysteresis curves based on θ, θ1, and θ2, it can be seen that the angle θ1 of the column in the joint region is the smallest, indicating that its contribution to the joint angle θ is relatively small. Comparing the bending moment–rotation hysteresis curves based on θ3, θ2, and θ, it can be seen that the three are very close, indicating that the cyclic load is completely transferred from the beam end to the joint, and the internal force near the beam in the joint region is the largest, which is consistent with the phenomenon of final degradation of the damage joint of the L-shaped stiffening rib connector between the beam flange and column flange (L1) in the experiment, as already shown in Figure 8. Therefore, for the following analysis items, the bending moment–rotation hysteresis data based on θ2 will be mainly used to illustrate the seismic performance of the joint.

4.2. Analysis of Skeleton Curves

The skeleton curve is the envelope of the peak values of the hysteresis curve and clearly reflects the bearing capacity and deformation capacity of the joint under cyclic loading [38] (pp. 36–48).
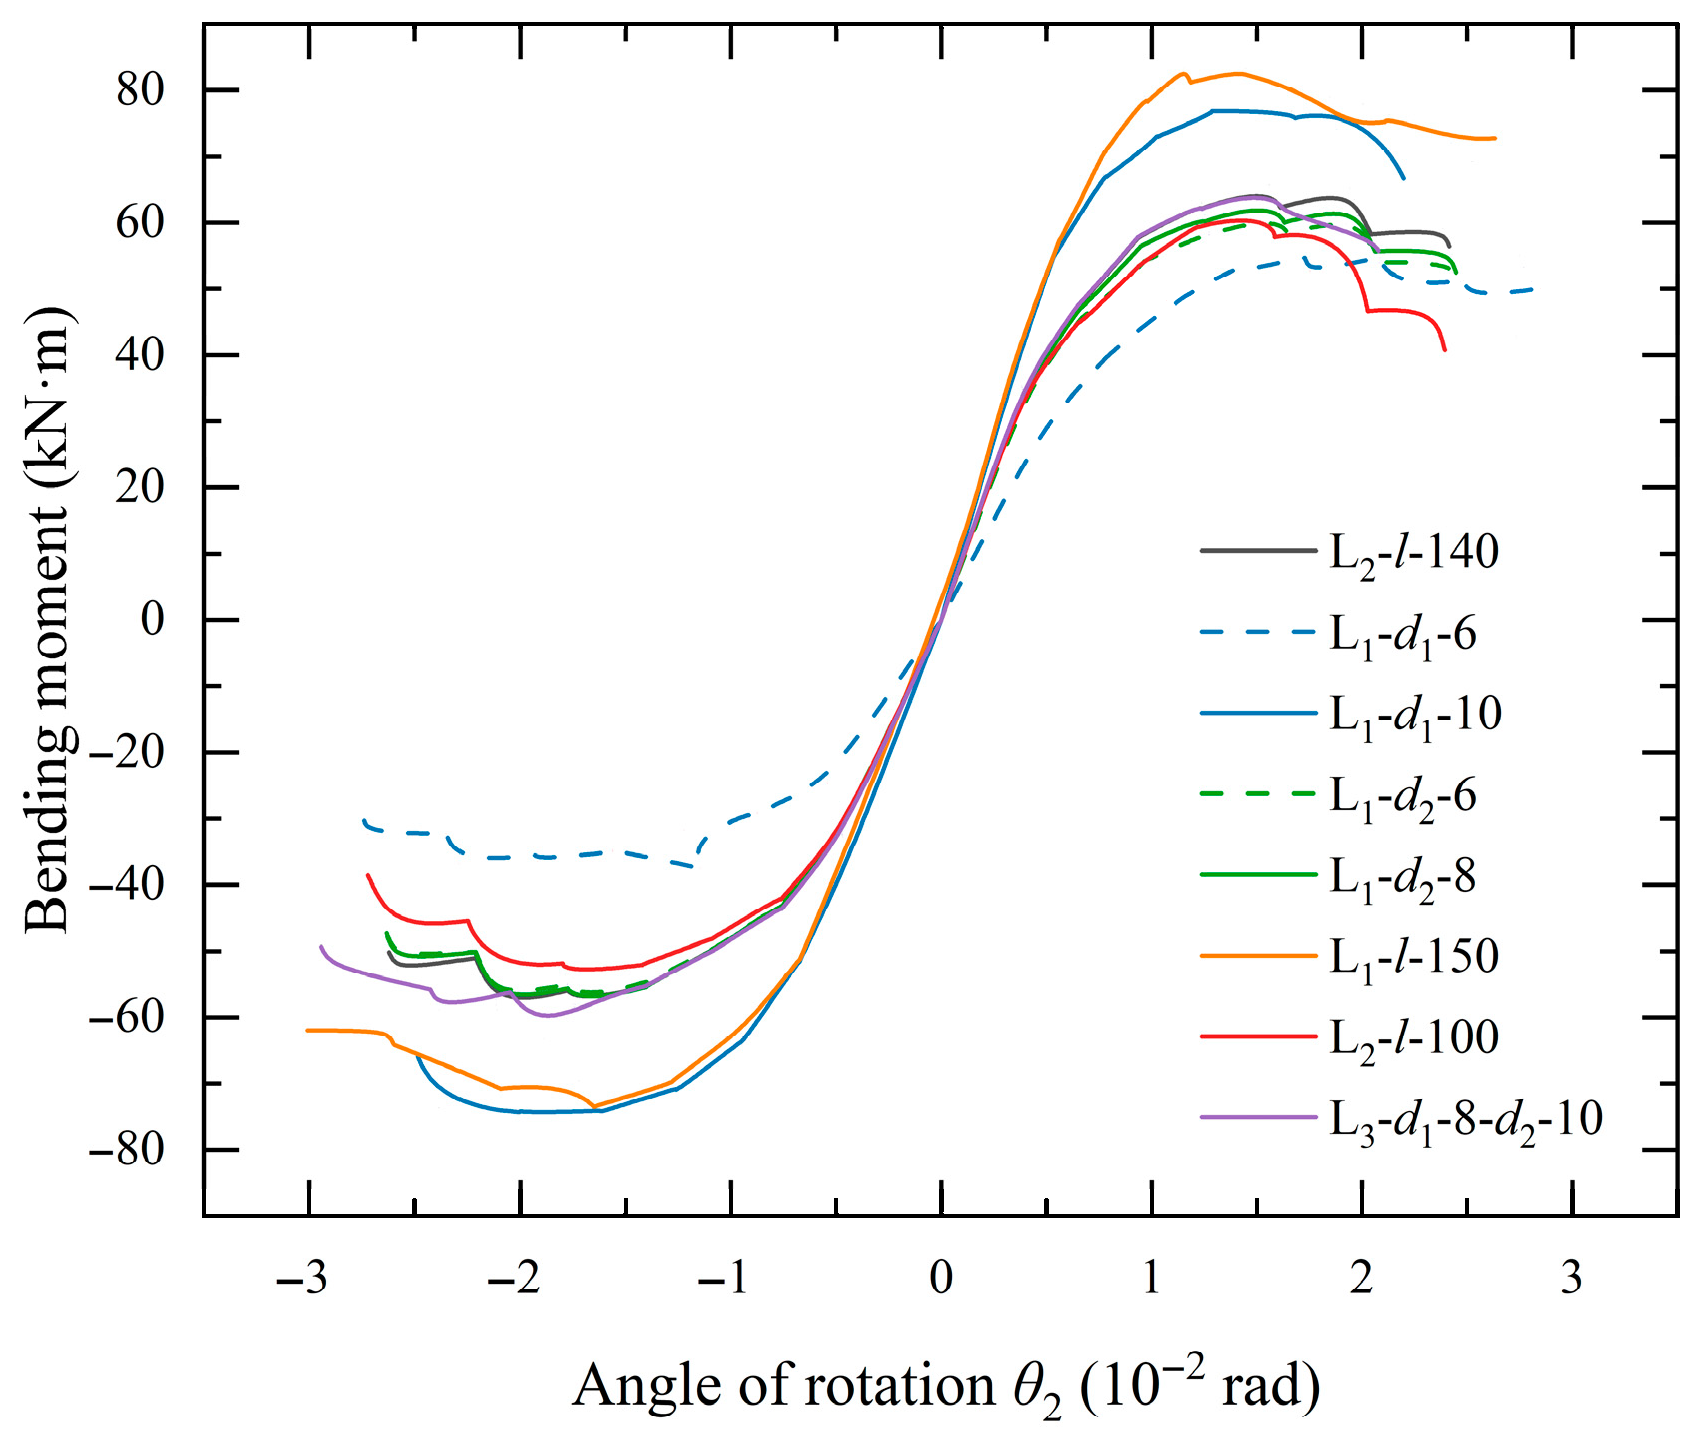
The black and the two blue lines in Figure 12 show the joint skeleton curves under different thicknesses of the leg of the L-shaped connector between the beam flange and column flange (L1-d1). It can be seen that as L1-d1 increases, the bending resistance of the joint gradually increases. Table 3 shows the statistics of the positive and negative ultimate bending moments and corresponding angles under cyclic loading. It can be seen that the positive and negative ultimate bending moments and corresponding angles are different, indicating that slip occurred during the loading process, but the difference in angles corresponding to the peak bending moments of different working conditions is not large. When the thickness L1-d1 increases from 6 mm to 8 mm, the average positive and negative ultimate bearing capacity increases by 36.70%; when the thickness increases from 8 mm to 10 mm, the average positive and negative ultimate bearing capacity increases by 22.35%.
The black and the two green lines in Figure 12 show the joint skeleton curves under different thicknesses of the stiffening rib of the L-shaped connector between the beam flange and column flange (L1-d2). Combined with the ultimate bending moment and corresponding angle statistics in Table 3, it can be seen that the effect of a 2 mm change in L1-d2 on the bearing capacity of the joint is at most 2.24%.
The black and orange lines in Figure 12 show the joint skeleton curves under different lengths of the short leg of the L-shaped connector between the beam flange and column flange (L1-l), and the black and red lines show the joint skeleton curves under different lengths of the L-shaped connector between the beam web and column flange (L2-l), respectively. It can be seen that increasing the length of both types of connectors can improve the bearing capacity of the joint, but the strengthening effect of L1-l is significantly better than L2-l. Referring to the ultimate bending moment and corresponding angle statistics in Table 3, it can be seen that increasing L2-l by 40 mm (distance between bolt groups) increases the average positive and negative ultimate bearing capacity by 7.95%, while increasing L1-l by 40 mm increases the average positive and negative ultimate bearing capacity by 25.92%.
The black and purple lines in Figure 12 show the joint skeleton curves under different thicknesses of the flange of the inter-column stiffening rib (L3-d1), and thicknesses of the web of the inter-column stiffening rib (L3-d2). It indicates that increasing L3-d1 and L3-d2 has almost no improvement on the joint bearing capacity. Combined with the ultimate bending moment and corresponding angle statistics in Table 3, the combined effect of a 2 mm change in both L3-d1 and L3-d2 on the bearing capacity of the joint is at most 3.40%.
Figure 12 shows that when the angular displacement reaches the structural elastic-plastic inter-story drift angle limit of 0.02 rad under major earthquake conditions, the bearing capacity curves of all working conditions reach near their peak values, accounting for 82.78–97.84% of the ultimate bearing capacity.
It is noteworthy that non-negligible differences exist between the positive and negative ultimate bending moments, despite the nominal geometric symmetry of the connection. This asymmetry in the structural response can be attributed to several factors: in the numerical simulation, even with a perfectly symmetric model, minute asymmetries can arise from finite precision in the solver’s calculations, the interaction of multiple contact surfaces undergoing sequential slip, and the accumulation of these effects under cyclic reversal. Even more importantly, in physical reality, these numerical factors are compounded by inherent imperfections such as manufacturing tolerances, assembly deviations, and inevitable scatter in bolt pre-tightening forces. Consequently, this asymmetry is not an anomaly but an inherent characteristic of bolted connections under cyclic loading. It is therefore recommended that in practical seismic design, the direction with the lower bending capacity be taken as the conservative design benchmark, with appropriate safety factors to cover uncertainties under bidirectional seismic input.

4.3. Analysis of Joint Stiffness Degradations

Table 4 shows the initial stiffness data of each joint working condition under cyclic loading. The table shows that the initial stiffness of L1-d1-10 and L1-l-150 is relatively large at the initial stage of loading, exceeding 9500 kN·m/rad; the initial stiffness of L1-d1-6 is the smallest, less than 5500 kN·m/rad; and the initial stiffness of the other working conditions generally falls in the range of 7500 kN·m/rad to 8500 kN·m/rad. Further analysis shows that increasing L1-d1 is the most effective way to improve the seismic performance of the joint; increasing L1-l is the second most effective; the effects of optimizing other design parameters are similar and not significant for performance improvement.
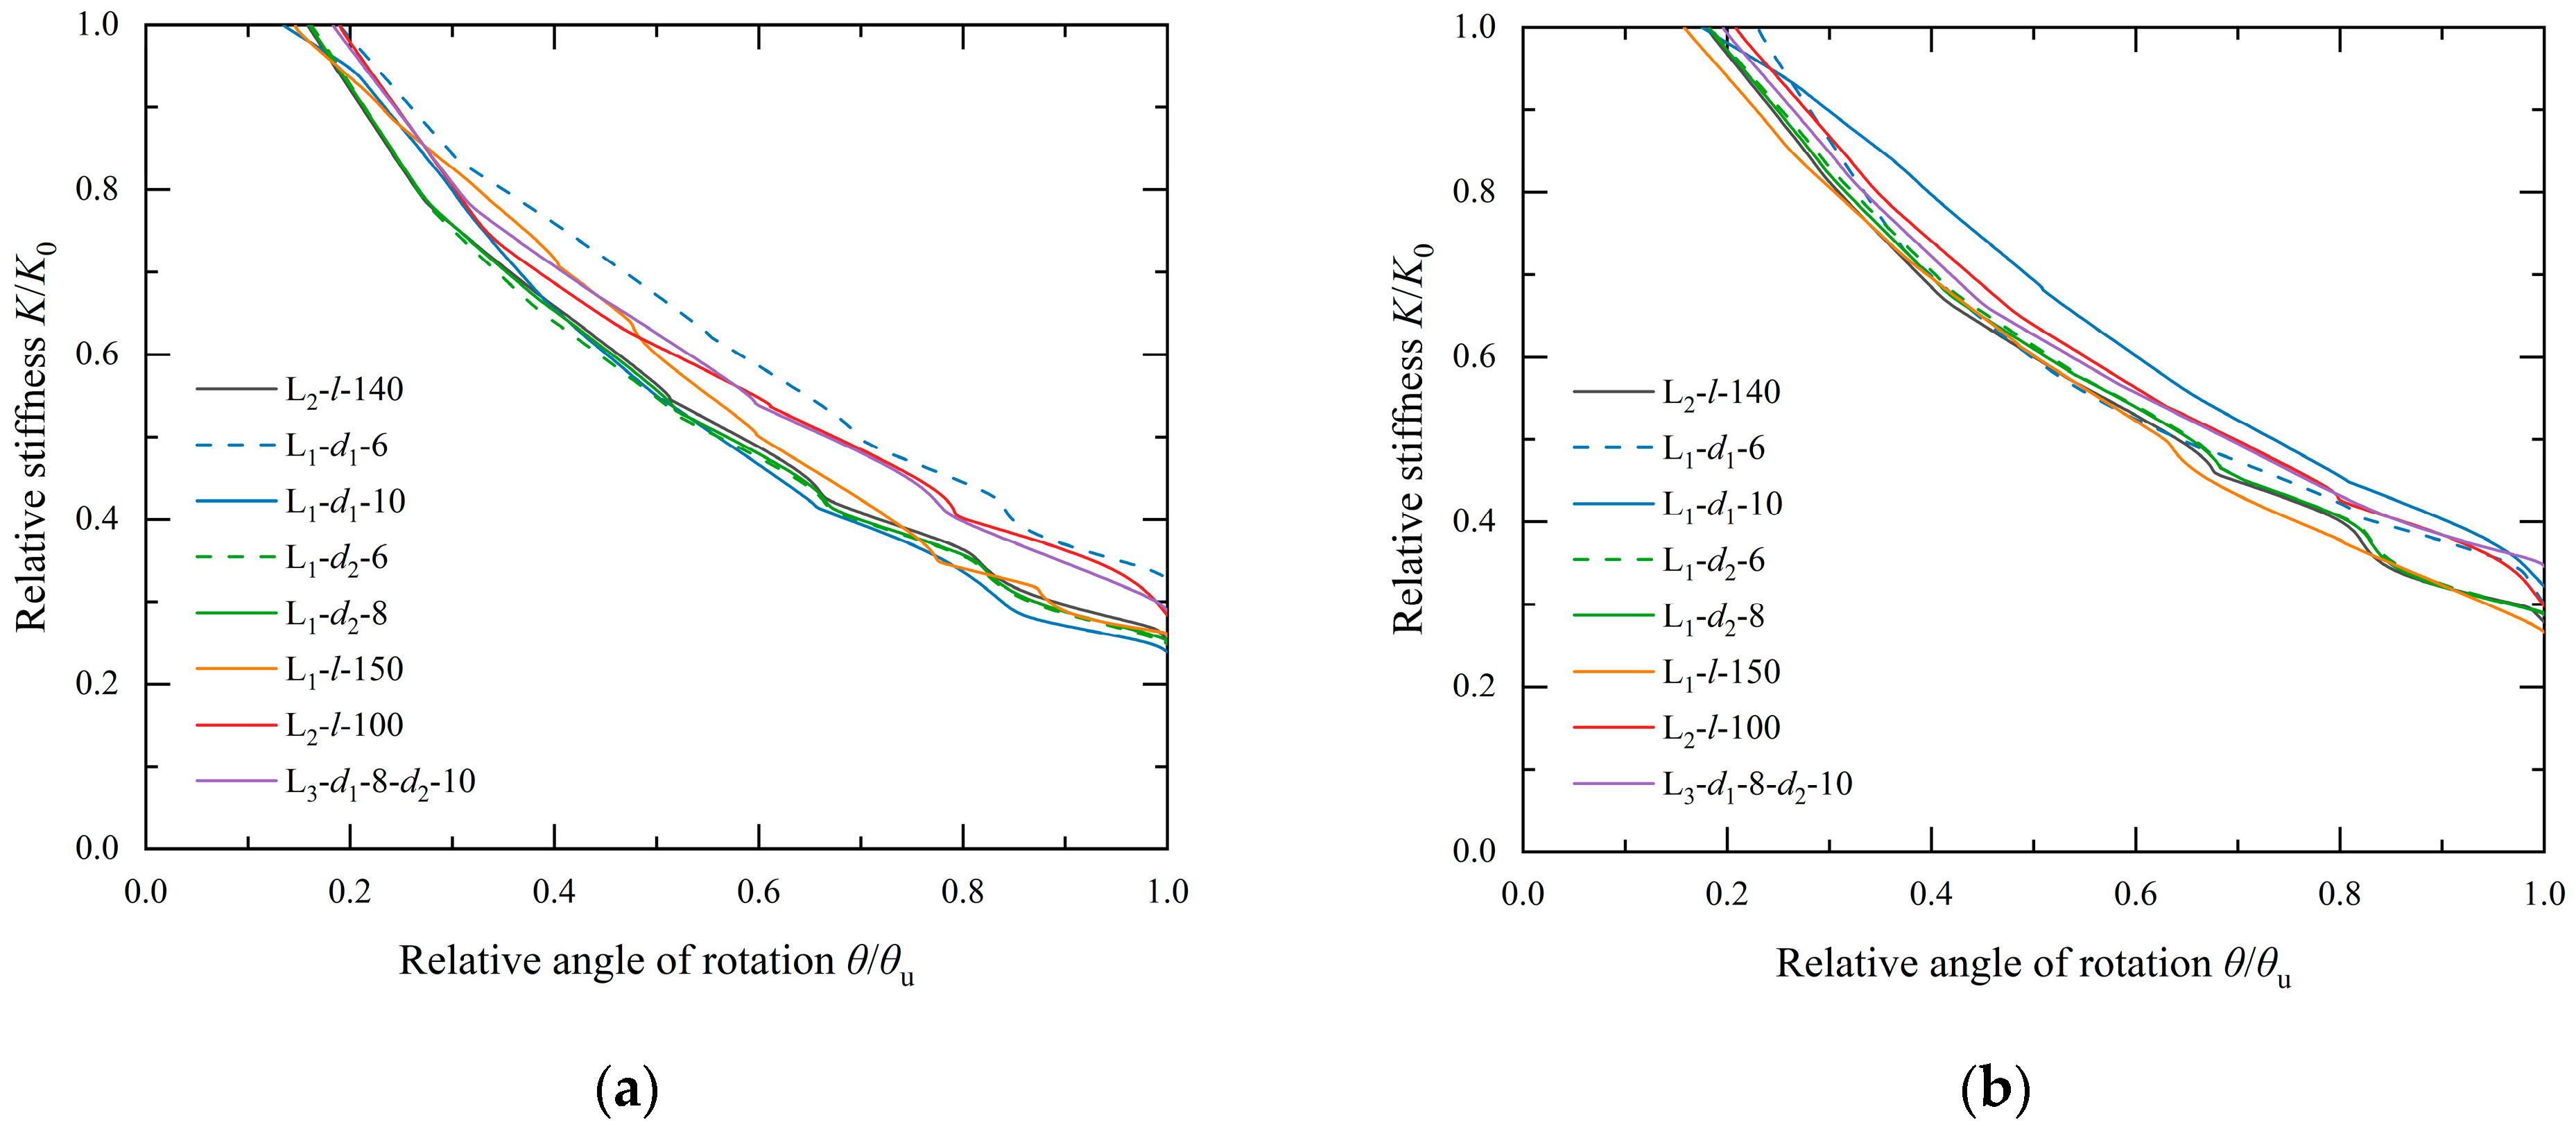
Figure 13 shows the normalized positive and negative bidirectional joint stiffness degradation curves. The figure shows that the joint stiffness degradation exhibits a natural exponential decay trend, and the decay characteristics and the magnitudes of various working conditions are relatively close. Under the condition where the joint bearing capacity decreases to 85% and the angle of rotation reaches an ultimate, θu, the joint stiffness degrades to the range of 23.85–32.57%.

4.4. Analysis of Equivalent Viscous Damping Coefficient

In the hysteresis curve, the difference between the energy absorbed during loading and the energy released during unloading represents the energy dissipated by the joint, manifested as the area of the hysteresis loop in the figure. The fuller the hysteresis curve and the larger the area of the hysteresis loop, the more energy the joint dissipates during an earthquake, and the safer the joint. The equivalent viscous damping is the ratio of the actual energy dissipated by the joint to the energy dissipated by an elastic body under the same level of force, and it is usually used with the energy dissipation curve to evaluate the seismic performance of the joint.
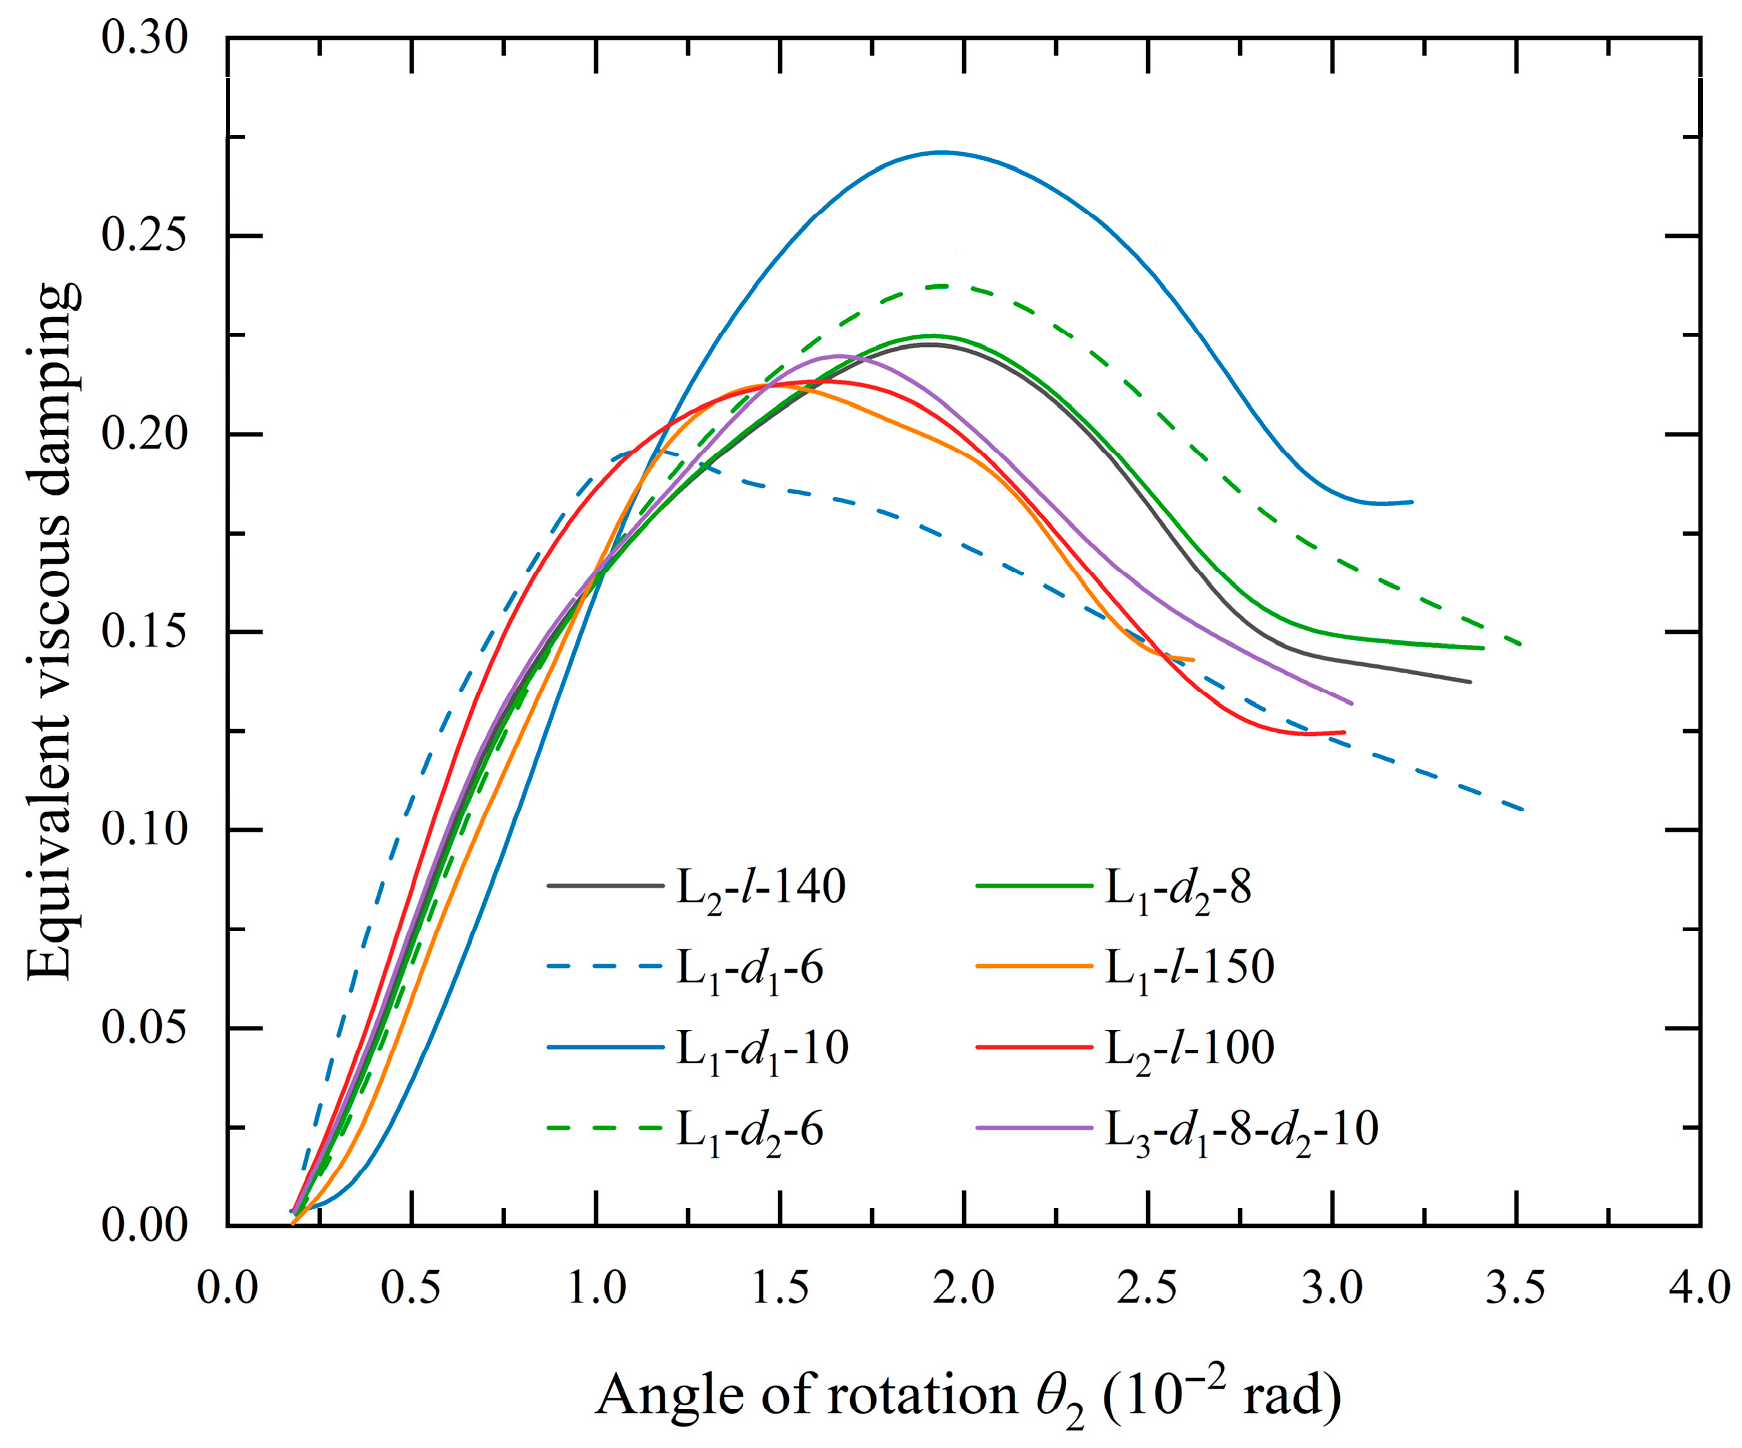
Figure 14 shows the equivalent viscous damping coefficient curves for all working conditions. The figure shows that the equivalent viscous damping coefficient curves under various working conditions exhibit a “convex upward” shape, and the extreme value positions coincide with the ultimate bearing capacity positions of the skeleton curves. This phenomenon indicates that in the rising stage from yielding to peak bearing capacity, the plastic deformation of L1 gradually accumulates, so the energy dissipation under cyclic loading increases, and the equivalent viscous damping coefficient increases. When entering the bearing capacity descending stage, the long and short leg connection parts of L1 fail. Under cyclic loading, the connection components deteriorate, plastic deformation occurs, and it gradually transitions to slip deformation between components. Therefore, the equivalent viscous damping coefficient decreases. Furthermore, Figure 14 shows that the equivalent viscous damping curve of working condition L1-d1-6 increases the fastest, but reaches its peak value early and has the smallest peak value. The equivalent viscous damping curve of working condition L1-d1-10 increases the slowest but reaches its peak value the latest and has the largest peak value, which is 20.25% higher than that of working condition L2-l-140. In summary, increasing the material thickness of the L-shaped connector between the beam flange and column flange is the most effective way to improve the equivalent viscous damping.
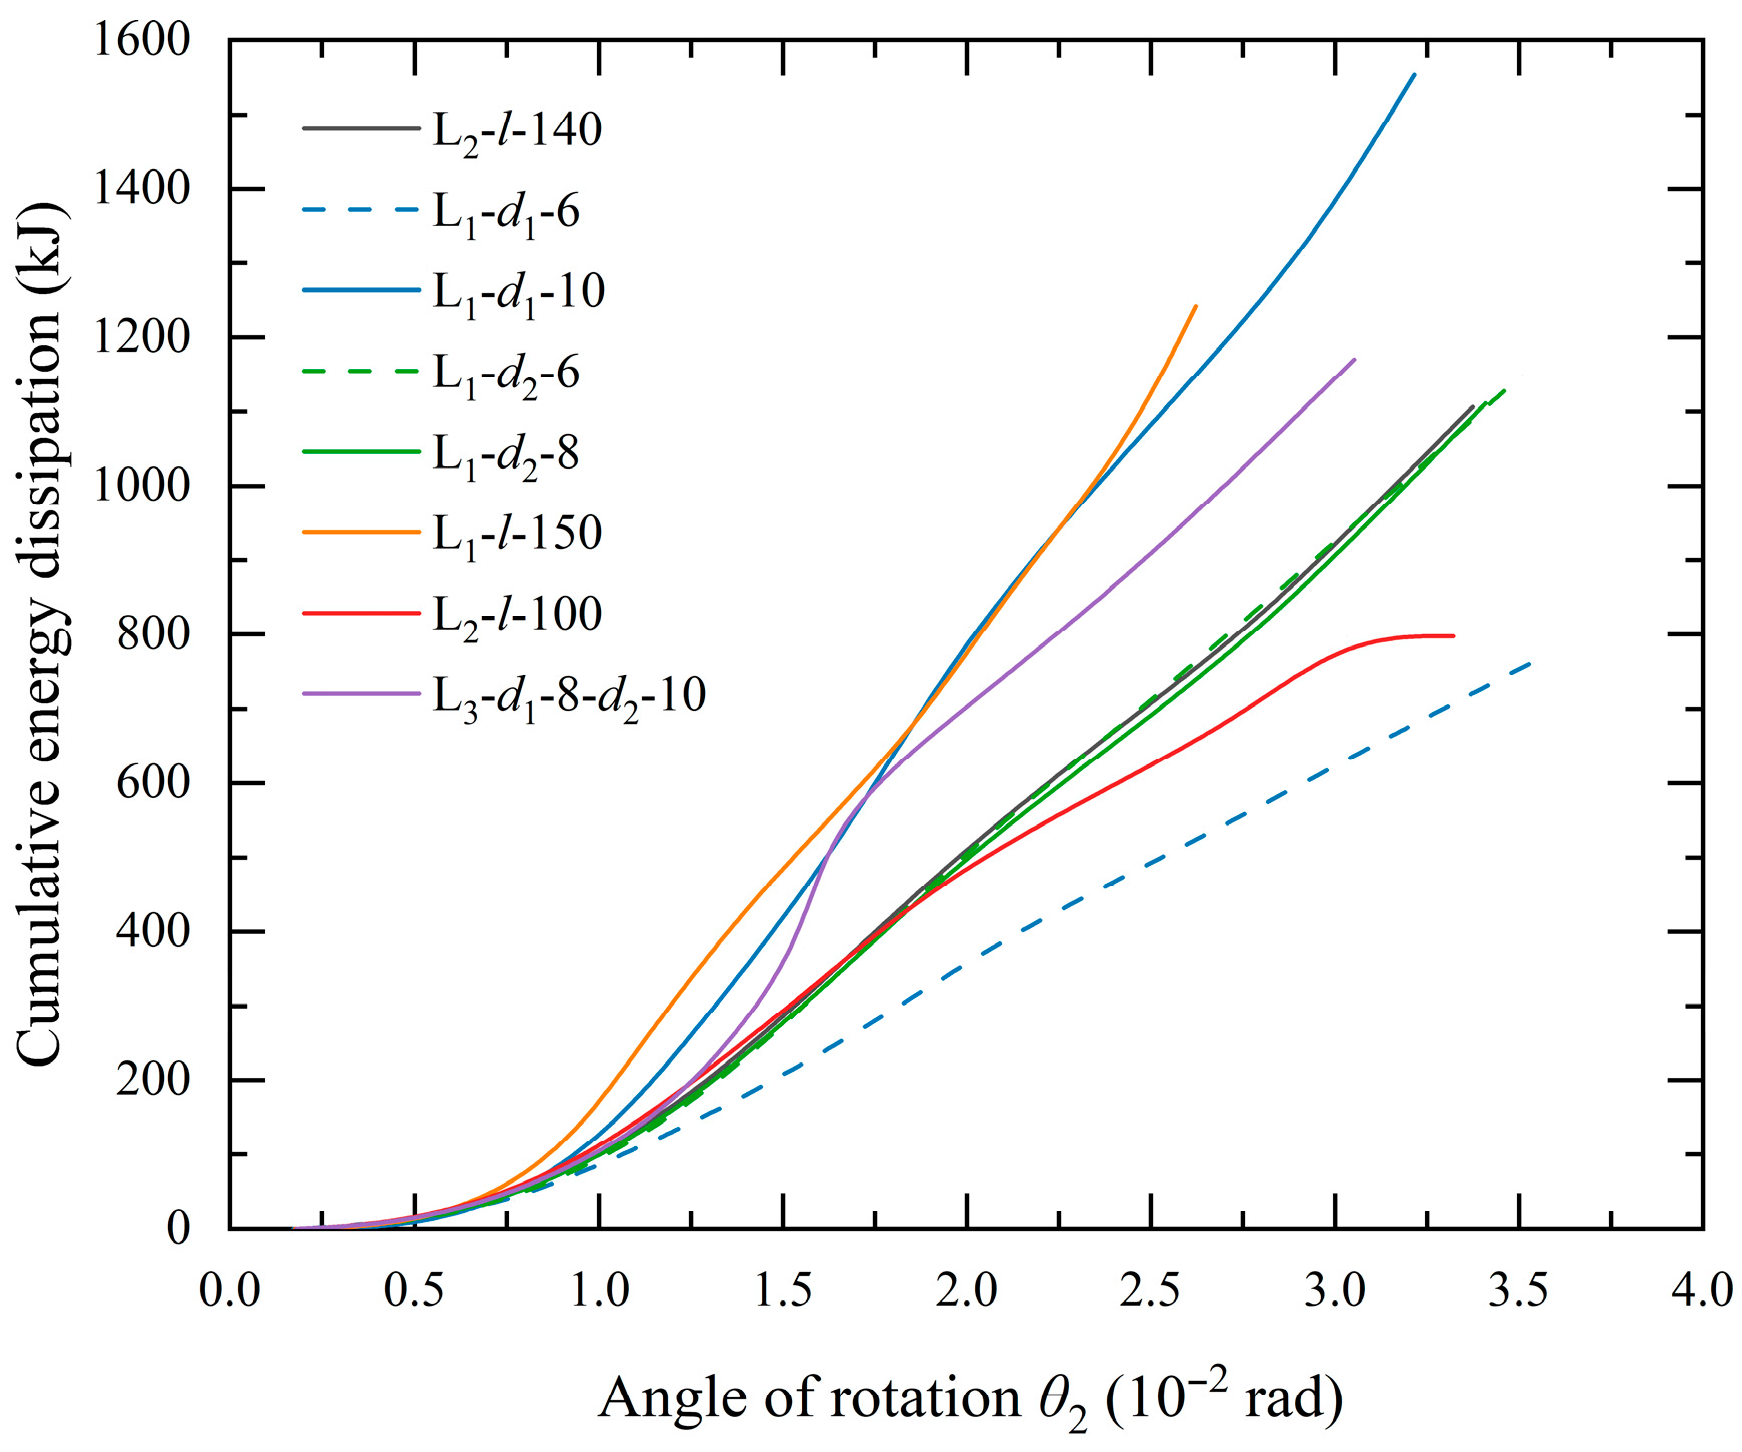
Figure 15 shows the cumulative energy dissipation curves for all working conditions. The figure shows that the cumulative energy dissipation of joint L1-d1-10 is the largest, and that of joint L1-d1-6 is the smallest, confirming the conclusions in the previous analysis of stiffness degradation and equivalent viscous damping.

4.5. Analysis of Ductility

Ductility refers to the inelastic deformation capacity of a joint from yielding to the ultimate bearing capacity state without a significant decrease in bearing capacity. It is an important seismic performance indicator for evaluating the ability of a joint to avoid brittle failure and have sufficient safety reserves. Since there is no obvious yield point in the skeleton curves in previous sections, the general yield bending moment method is used to calculate the yield angle, θy [39]; the calculation results are shown in Table 5.
Comparing the ductility coefficients under various working conditions, it can be seen that the ductility coefficient of working condition L1-d1-10 is the largest, indicating that increasing L1-d1 has the most significant effect on improving the safety of the joint. Comparing working conditions L1-d1-6 and L2-l-140, when L1-d1 increases from 6 mm to 8 mm, the ductility coefficient increases by 10.32%. Comparing working conditions L2-l-140 and L1-d1-10, when L1-d1 increases from 8 mm to 10 mm, the ductility coefficient increases by 12.60%. The average increase in the ductility coefficient of the joint by increasing L1-d1 twice is 11.46%. The ductility coefficients of working conditions L1-d2-6, L1-d2-8, L1-l-150, and L2-l-140 are relatively close, ranging from 2.46 to 2.48, indicating that increasing L1-d2 and L1-l has a limited effect on improving the ductility of the joint. The ductility coefficients of working conditions L1-d1-6, L2-l-100, and L3-d1-8-d2-10 are relatively low, ranging from 2.05 to 2.25, indicating that L2-l, L3-d1, and L3-d2 have almost no contribution to improving the ductility of the joint.

4.6. Analysis of Improvement Efficiency

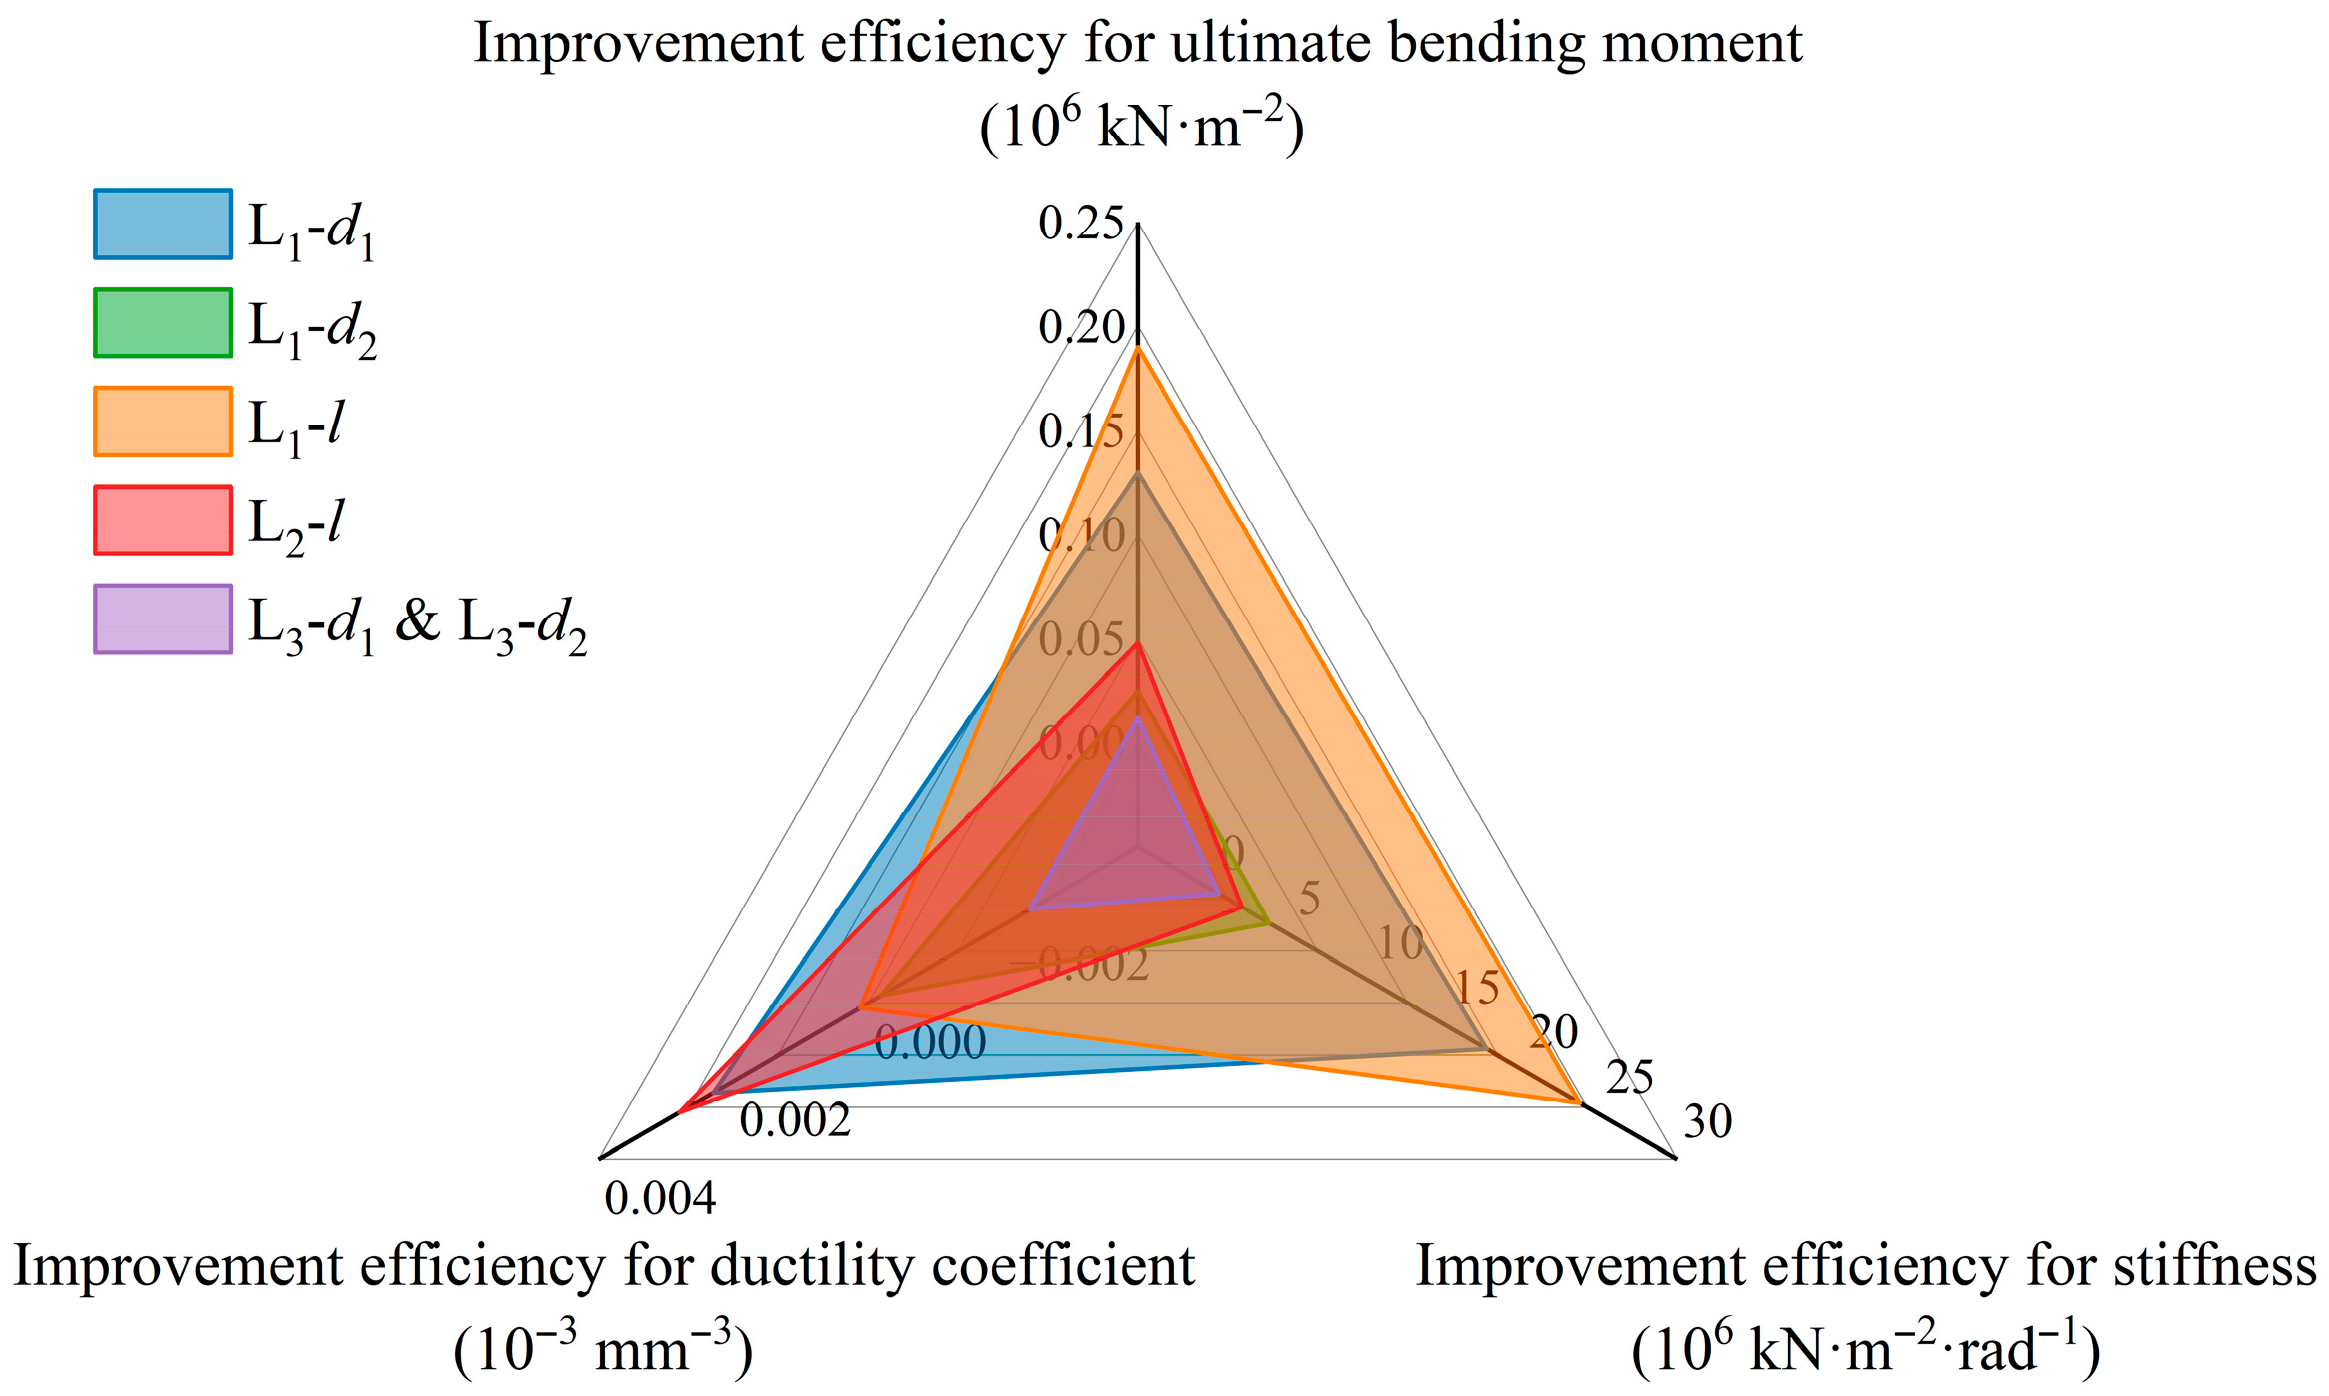
In the previous sections, mechanical indices of the joint, such as ultimate bending moment (representing bearing capacity), stiffness, and ductility of various working conditions, were compared, intuitively identifying the working condition with the optimal seismic performance. It is worth noting that changing the joint parameters will inevitably lead to a corresponding change in its total volume. Therefore, it is also necessary to compare and analyze, from an economic perspective, the improvement efficiency of each parameter on seismic performance. Still taking L2-l-140 as the baseline condition, the change in total volume of other working conditions compared to this condition is first calculated. Then, from Table 3, Table 4 and Table 5, the changes in three mechanical indices of each working condition compared to the baseline condition—average ultimate bending moment, average stiffness, and average ductility coefficient—are obtained. The ratio of the change in mechanical index to the change in total volume is defined as the improvement efficiency for the corresponding index. As can be seen from Table 6, for the improvement of bearing capacity, L1-l is the optimal single measure, followed by L1-d1, with a significant gap for the rest; for the improvement of stiffness, L1-l is the optimal single measure, followed by L1-d1, with a significant gap for the rest; for the improvement of ductility, L2-l is the optimal single measure, followed by L1-d1, with a significant gap for the rest, and even potentially negative optimization. In summary, by drawing a radar chart with bearing capacity, stiffness, and ductility as axes (Figure 16), it can be seen that L1-d1 is the comprehensive optimal solution for optimizing the seismic performance of the joint, but there may be a diminishing marginal effect, meaning that the benefit of increasing this parameter gradually decreases; L1-l is the second best, but its efficiency in improving ductility is not high.

5. Conclusions

This research studies an aluminum alloy frame bolted connection joint consisting of 6061-T6 aluminum alloy beams and columns, and S304 stainless steel connectors, with the components connected by high-strength bolts to form a T-shaped structure. To study the influence of the connector design parameters on the seismic performance of this type of joint, based on the numerical model validated by the low-cycle cyclic loading experiment, this paper analyzes the hysteresis curves of various combined working conditions with different connector dimensions from multiple perspectives, and obtains the following conclusions:
  • From the hysteresis curves of the beam end angle, the angle of the column in the joint region, the angle of the beam in the joint region, and the load bending moment, it can be seen that the contribution of the angle of the column in the joint region to the joint angle is very small and can be ignored. The hysteresis curves obtained from all working conditions initially exhibit a bow shape, but in the descending section after the peak bearing capacity, the shapes gradually transition to a reversed S-shape, except for the working conditions with a thickness of 10 mm for the long and short legs and a length of 150 mm for the short leg of the L-shaped connector between the beam flange and column flange.
  • The thickness of the long and short legs of the L-shaped connector between the beam flange and column flange significantly affects the ultimate bearing capacity of the skeleton curve. The average influence is that an increase of 2 mm in this thickness increases the ultimate bearing capacity by 22.35–36.70%. Increasing the length of the short leg of the L-shaped connector between the beam flange and column flange is also effective in increasing the ultimate bearing capacity, with an increase of 40 mm resulting in a 25.92% increase in the ultimate bearing capacity. Furthermore, there are non-negligible differences in the positive and negative ultimate bending moment of the joints, suggesting that the direction with the lower bearing capacity should be taken as the reference, incorporating appropriate safety factors.
  • The stiffness degradation curves of the aluminum alloy frame bolted connection joint exhibit a natural exponential decay trend. Under the condition where the joint bearing capacity decreases to 85%, the joint stiffness degrades to 23.85–32.57%. The initial stiffness of the two working conditions is the largest, with a thickness of 10 mm for the long and short legs and a length of 150 mm for the short leg of the L-shaped connector between the beam flange and column flange, exceeding 9500 kN·m/rad. Under major earthquake conditions with a structural elastic-plastic inter-story drift angle limit of 0.02 rad, the bearing capacity of all joint working conditions reaches near the peak value, accounting for 82.78–97.84% of the ultimate bearing capacity.
  • Considering the relevant conclusions of the equivalent viscous damping, cumulative energy dissipation, and ductility coefficient of the joints, increasing the thickness of the long and short legs of the L-shaped connector between the beam flange and column flange is the most effective way to improve the seismic performance of the joints. For every 2 mm increase in the thickness of the long and short legs, the equivalent viscous damping and ductility coefficient increase by 20.25% and 11.46%, respectively.
  • From an economic perspective, the improvement efficiency analysis establishes that increasing the length of the short leg of the L-shaped connector between the beam flange and column flange is the most efficient single measure for enhancing strength and stiffness, while increasing the thickness of the long and short legs of the L-shaped connector between the beam flange and column flange offers the best comprehensive improvement.
In summary, this study provides a novel framework for assessing and improving the seismic performance of T-shaped aluminum alloy beam–column bolted connections. The main novelty is the comprehensive approach combining a validated mixed hardening constitutive model with a parametric study that not only identifies key influential parameters but also evaluates their improvement efficiency. The practical implication is direct: structural designers can prioritize increasing the thickness of the long and short legs of the L-shaped connector between the beam flange and column flange to achieve the most cost-effective enhancement in joint strength, energy dissipation, and ductility for seismic applications.

Author Contributions

Conceptualization, W.R. and Z.Q.; methodology, B.R. and W.G.; software, B.R. and W.G.; validation, W.G.; formal analysis, B.R.; investigation, B.R. and J.W.; resources, Z.W., W.R., F.L. and J.W.; data curation, B.R. and W.G.; writing—original draft preparation, B.R.; writing—review and editing, W.R., Z.Q., F.L. and W.G.; supervision, Z.W., W.R. and Z.Q.; funding acquisition, Z.W., W.R., F.L. and J.W. All authors have read and agreed to the published version of the manuscript.

Funding

This research was funded by the Guangxi Key Research and Development Program: Research and Development of Key Technologies and Application Demonstration for CTC Integrated Scooter Frames Based on Aluminum Alloy Profiles (grant number Guike AB24010123); the Science and Technology Program Project of Housing and Urban–Rural Development Department of Henan Province: Key Technologies for Pile Foundation Construction and Bearing Performance Evaluation of Urban Viaducts in Complex Water-Rich Strata (grant number K-2303); the China State Construction Engineering Corporation (CSCEC) Technology R&D Project: Research on Complete Set of Technologies for Prefabricated Steel Deep Foundation Pit Support System (grant number CSCEC-2021-Z-22); and the Guangxi Enterprise Commissioned Science and Technology Project (Guangxi Wanyin Aluminum Building Materials Technology Co., Ltd.): Research on the Application of Aluminum Alloy Components in Green Building Seismic Engineering (grant number WYALKJ2023-001).

Data Availability Statement

The original contributions presented in this study are included in the article. Further inquiries can be directed to the corresponding author.

Conflicts of Interest

Authors Jin Wang and Wenyuan Gao were employed by the company China Construction Industrial Engineering and Technology Research Academy Co., Ltd. The remaining authors declare that the research was conducted in the absence of any commercial or financial relationships that could be construed as a potential conflict of interest. The authors declare that this study received funding from Guangxi Wanyin Aluminum Building Materials Technology Co., Ltd. The funder was not involved in the study design, collection, analysis, interpretation of data, the writing of this article or the decision to submit it for publication.

References

  1. Feng, R. Study on the Hysteretic Performance of High-Strength Bolted Beam-Column Joints with Aluminum Alloy Frames. Master’s Thesis, Fujian University of Technology, Fuzhou, China, 2022. [Google Scholar]
  2. Gao, Y. Study on Fatigue Performance of Aluminum Alloy Frame Structure Beam-Column Joints. Master’s Thesis, Xi’an Technological University, Xi’an, China, 2021. [Google Scholar]
  3. Buntrock, D. Toyo Ito and Masato Araya’s experiments in the structural use of aluminium. J. Archit. 2016, 21, 24–54. [Google Scholar] [CrossRef]
  4. Spyrakos, C.C.; Ermopoulos, J. Development of aluminum load-carrying space frame for building structures. Eng. Struct. 2005, 27, 1942–1950. [Google Scholar] [CrossRef]
  5. Zhi, X.; Wang, Y.; Zhang, Y.; Li, B.; Wang, Z.; Ouyang, Y. Engineering applications and research progress of low-rise aluminum alloy frames. Eng. Mech. 2023, 40, 46–55. [Google Scholar]
  6. AluHouse. Available online: https://www.aluhouse.com/en/ (accessed on 24 September 2025).
  7. Rao, B.; Huang, L.; Su, D.; Li, Z.; Li, L.; Geng, L.; Li, L.; Gao, W.; Li, F. Seismic performance of bolted connection in aluminum alloy frame. Henan Sci. 2025, 43, 469–481. [Google Scholar]
  8. Ma, J.; Xu, Y.; Zhang, C. Study on the hysteretic behavior of side plate reinforced beam-to-column connections in steel frame. J. Disaster Prev. Mitig. Eng. 2018, 38, 336–344. [Google Scholar]
  9. Zhang, Y.; Wang, Y.; Wang, Z.; Bu, Y.; Fan, S.; Zheng, B. Experimental investigation and numerical analysis of pin-ended extruded aluminium alloy unequal angle columns. Eng. Struct. 2020, 215, 110694. [Google Scholar] [CrossRef]
  10. Zhang, Q.; Ji, J.; Yang, L.; Wu, M. Some important concepts and research bases of code for design of aluminum structures. J. Build. Struct. 2009, 30, 1–12. [Google Scholar]
  11. Liu, H.; Ma, J.; Han, R.; Chen, K. Shearing low-cycle fatigue test and life prediction of the aluminum alloy bolted connection. J. Tianjin Univ. (Sci. Technol.) 2019, 52, 142–147. [Google Scholar]
  12. Jiang, S.; Ye, Z.; Guo, X. Experimental research on high strength bolted zigzag-plate connections of aluminum alloy members. J. Tianjin Univ. (Sci. Technol.) 2016, 44, 1333–1339+1355. [Google Scholar]
  13. Wu, Y.; Peng, L.; He, X.; Yang, J. Experimental and numerical analyses on mechanical properties of aluminum alloy L-shaped joints under cyclic load. Eng. Struct. 2021, 245, 112854. [Google Scholar] [CrossRef]
  14. Wu, Y. Experimental and Numerical Study on the Mechanical Properties of L-Shaped Aluminum Alloy Beam-Column Joints. Master’s Thesis, Guangxi University, Nanning, China, 2019. [Google Scholar]
  15. Xu, H.; Guo, X.; Luo, Y. Load-bearing capacity of aluminum alloy T-stub joints. J. Tongji Univ. (Nat. Sci.) 2012, 40, 1445–1451. [Google Scholar] [CrossRef]
  16. Aalberg, A. Design of aluminium beam ends with flange copes. Thin-Walled Struct. 2015, 94, 593–602. [Google Scholar] [CrossRef]
  17. Jiang, Y.; Ma, H.; Liew, J.Y.R.; Fan, F. Testing of aluminum alloyed bolted joints for connecting aluminum rectangular hollow sections in reticulated shells. Eng. Struct. 2020, 218, 110848. [Google Scholar] [CrossRef]
  18. Çam, G.; İpekoğlu, G. Recent developments in joining of aluminum alloys. Int. J. Adv. Manuf. Technol. 2017, 91, 1851–1866. [Google Scholar] [CrossRef]
  19. Zhang, Y.; Wang, Y.; Guo, X.; Zhi, X.; Wang, Z.; Liu, X. Numerical and parametric study on fracture behaviour and effect of friction on resistance of aluminium alloy shear connections. Thin-Walled Struct. 2023, 188, 110851. [Google Scholar] [CrossRef]
  20. Zhang, Y.; Wang, Y.; Li, B.; Wang, Z.; Liu, X.; Zhang, J.; Ouyang, Y. Structural behaviour of the aluminium alloy Temcor joints and Box-I section hybrid gusset joints under combined bending and shear. Eng. Struct. 2021, 249, 113380. [Google Scholar] [CrossRef]
  21. Zhang, Z.; Feng, R.; Shao, K.; Zhang, Q. Study on the seismic performance of T-type members connection of aluminum alloy frame beams and columns. Build. Sci. 2023, 39, 90–100. [Google Scholar]
  22. Wang, Z.; Wang, Y.; Zhang, G.; Shi, Y. Tests and parametric analysis of aluminum alloy bolted joints of different material types. Constr. Build. Mater. 2018, 185, 589–599. [Google Scholar] [CrossRef]
  23. Guo, X.; Qiu, L.; Luo, Y.; Zheng, B. Experimental study on flexural capacity of aluminum alloy plate joints. J. Hunan Univ. (Nat. Sci.) 2014, 41, 47–53. [Google Scholar]
  24. Rao, B.; Huang, L.; Su, D.; Li, L.; Gao, W.; Li, F. Analysis of the influence of constitutive parameters on the simulation accuracy of mechanically connected joints in aluminum alloy frame structures. Jiangxi Sci. 2025, 43, 532–540+546. [Google Scholar]
  25. He, X.; Yam, M.C.; Ke, K.; Zhou, X.; Zhang, H.; Gu, Z. Behaviour insights on damage-control composite beam-to-beam connections with replaceable elements. Steel Compos. Struct. 2023, 46, 773–791. [Google Scholar]
  26. He, X.; Chen, Y.; Ke, K.; Shao, T.; Yam, M.C. Development of a connection equipped with fuse angles for steel moment resisting frames. Eng. Struct. 2022, 265, 114503. [Google Scholar] [CrossRef]
  27. Li, B.; He, P.; Wang, J.; Pan, X.; Wang, Y.; Wang, Z.; Baniotopoulos, C.C. Mechanical characteristic and stress-strain modelling of friction stir welded 6061-T6 aluminium alloy butt joints. Thin-Walled Struct. 2024, 198, 111645. [Google Scholar] [CrossRef]
  28. Yan, J.; Kong, G.; Zhang, L. Low-temperature tensile behaviours of 6061-T6 aluminium alloy: Tests, analysis, and numerical simulation. Structures 2023, 56, 105054. [Google Scholar] [CrossRef]
  29. Budiansky, B. Discussion: “New method of analyzing stresses and strains in work-hardening plastic solids” (Prager, William, 1956, ASME 23, pp. 493–496). J. Appl. Mech. 1957, 24, 481–482. [Google Scholar] [CrossRef]
  30. Ziegler, H. A modification of Prager’s hardening rule. Q. Appl. Math. 1959, 17, 55–65. [Google Scholar] [CrossRef]
  31. Chaboche, J.L. Time-independent constitutive theories for cyclic plasticity. Int. J. Plast. 1986, 2, 149–188. [Google Scholar] [CrossRef]
  32. Paul, S.K.; Sivaprasad, S.; Dhar, S.; Tarafder, M.; Tarafder, S. Simulation of cyclic plastic deformation response in SA333 C–Mn steel by a kinematic hardening model. Comput. Mater. Sci. 2010, 48, 662–671. [Google Scholar] [CrossRef]
  33. Bai, J.; Jin, K.; Kou, Y. An improved kinematic hardening rule describing the effect of loading history on plastic modulus and ratcheting strain. Acta Mech. 2023, 234, 1757–1776. [Google Scholar] [CrossRef]
  34. Yin, L.; Niu, Y.; Quan, G.; Gao, H.; Ye, J. Development of new types of bolted joints for cold-formed steel moment frame buildings. J. Build. Eng. 2022, 50, 104171. [Google Scholar] [CrossRef]
  35. AISC 341-22; Seismic Provisions for Structural Steel Buildings. American Institute of Steel Construction: Chicago, IL, USA, 2022.
  36. Weiss, J.; Knezevic, M. Effects of element type on accuracy of microstructural mesh crystal plasticity finite element simulations and comparisons with elasto-viscoplastic fast Fourier transform predictions. Comput. Mater. Sci. 2024, 240, 113002. [Google Scholar] [CrossRef]
  37. Yu, H.; Burgess, I.W.; Davison, J.B.; Plank, R.J. Numerical simulation of bolted steel connections in fire using explicit dynamic analysis. J. Constr. Steel Res. 2008, 64, 515–525. [Google Scholar] [CrossRef]
  38. Zhu, B. Structural Seismic Test; Seismological Press: Beijing, China, 1989; pp. 36–48. [Google Scholar]
  39. Yang, R.; Zhou, X. Experimental study on the seismic behavior of concentrically braced steel frames with extended end-plate bolted connections. Sci. Prog. 2020, 103, 0036850420952289. [Google Scholar] [CrossRef] [PubMed]
Figure 1. Two-dimensional representation of the mixed hardening model.
Buildings 15 04324 g001
Figure 2. Design dimensions of joints (unit: mm).
Buildings 15 04324 g002
Figure 3. Schematic diagram of experimental loading (unit: mm).
Buildings 15 04324 g003
Figure 4. Arrangement of displacement sensors (unit: mm).
Buildings 15 04324 g004
Figure 5. Loading path.
Buildings 15 04324 g005
Figure 6. Model assembly and meshing.
Buildings 15 04324 g006
Figure 7. (a) Fitting results for isotropic hardening parameters; (b) fitting results for kinematic hardening parameters.
Buildings 15 04324 g007
Figure 8. Comparison of failure modes between experiment and numerical simulation: (a) experimental specimen with the fracture location highlighted by a red box; (b) contour of SDEG with a zoomed-in view of the critical damage zone; (c) contour of PEEQ with a zoomed-in view of the plastic strain concentration.
Buildings 15 04324 g008
Figure 9. (a) Experimental and simulation hysteresis curves; (b) experimental and simulation skeleton curves.
Buildings 15 04324 g009
Figure 10. Working condition code settings.
Buildings 15 04324 g010
Figure 11. Bending moment–rotation hysteresis curves under working conditions: (a) L2-l-140; (b) L1-d1-6; (c) L1-d1-10; (d) L1-d2-6; (e) L1-d2-8; (f) L1-l-150; (g) L2-l-100; (h) L3-d1-8-d2-10.
Buildings 15 04324 g011aBuildings 15 04324 g011bBuildings 15 04324 g011cBuildings 15 04324 g011d
Figure 12. Skeleton curves under different working conditions.
Buildings 15 04324 g012
Figure 13. (a) Normalized positive bidirectional joint stiffness degradation curves; (b) normalized negative bidirectional joint stiffness degradation curves.
Buildings 15 04324 g013
Figure 14. Equivalent viscous damping coefficient curves.
Buildings 15 04324 g014
Figure 15. Cumulative energy dissipation curves.
Buildings 15 04324 g015
Figure 16. Improvement efficiency radar chart under different joint parameters.
Buildings 15 04324 g016
Table 1. Measured quasi-static mechanical properties of the base materials.
MaterialYoung’s Modulus (GPa)Yield Strength (MPa)Ultimate Strength (MPa)Elongation at Break
6061-T6 aluminum alloy70.363291304.512
S304 stainless steel197.2631672160
Table 2. Combined working conditions (unit: mm).
Working ConditionVariableL1-d1L1-d2L1-lL2-lL3-d1L3-d2
L2-l-140/81011014068
L1-d1-6L1-d161011014068
L1-d1-10101011014068
L1-d2-6L1-d28611014068
L1-d2-88811014068
L1-l-150L1-l81015014068
L2-l-100L2-l81011010068
L3-d1-8-d2-10L3-d1 & L3-d2810110140810
Table 3. Statistics of ultimate bending moment and corresponding angle.
Working ConditionVariableCorresponding Value
(mm)
Positive Ultimate Bending Moment
(kN·m)
Positive Corresponding Angle
(10−2 rad)
Negative Ultimate Bending Moment
(kN·m)
Negative Corresponding Angle
(10−2 rad)
L2-l-140L1-d1865.811.56−58.90−2.11
L1-d1-6654.702.08−36.53−1.92
L1-d1-101077.912.01−74.67−2.00
L2-l-140L1-d21065.811.56−58.90−2.11
L1-d2-6661.441.59−58.05−1.74
L1-d2-8863.501.58−58.48−1.74
L2-l-140L1-l11065.811.56−58.90−2.11
L1-l-15015083.481.16−73.56−1.65
L2-l-140L2-l14065.811.56−58.90−2.11
L2-l-10010061.971.56−53.56−1.79
L2-l-140L3-d1 & L3-d26 & 865.811.56−58.90−2.11
L3-d1-8-d2-108 & 1065.711.56−63.24−1.89
Table 4. Statistics of initial stiffness.
Working ConditionPositive Initial Stiffness
(kN·m·rad−1)
Negative Initial Stiffness
(kN·m·rad−1)
Average Stiffness
(kN·m·rad−1)
Positive θu
(10−2 rad)
Negative θu
(10−2 rad)
L2-l-1409192688580832.42−2.62
L1-d1-66103450353342.50−2.35
L1-d1-1010,897824095692.56−2.83
L1-d2-68680673377072.45−2.59
L1-d2-88995683079132.42−2.59
L1-l-15011,313890810,1112.42−2.39
L2-l-1009034679579152.00−2.25
L3-d1-8-d2-109280697081252.08−2.63
Table 5. Statistics of ductility coefficients.
Working ConditionPositive θy
(10−2 rad)
Positive
Ductility
Coefficient
Negative θy
(10−2 rad)
Negative
Ductility
Coefficient
Average
Ductility
Coefficient
L2-l-1400.942.57−1.122.342.46
L1-d1-61.142.19−1.042.262.23
L1-d1-100.872.94−1.092.602.77
L1-d2-60.932.63−1.112.332.48
L1-d2-80.932.60−1.112.332.47
L1-l-1500.902.69−1.062.252.47
L2-l-1000.942.13−1.002.252.19
L3-d1-8-d2-100.942.21−1.401.882.05
Table 6. Statistics of improvement efficiency.
Working ConditionChange in Total Volume 1Change in Average Ultimate Bending Moment 2Change in Average Stiffness 3Change in Average Ductility Coefficient 4Joint ParameterImprovement Efficiency for Ultimate Bending MomentImprovement Efficiency for StiffnessImprovement Efficiency for Ductility Coefficient
L2-l-140////////
L1-d1-6−119.2−16.74−2749−0.23L1-d10.1317.650.0023
L1-d1-10+120.8+13.935+1486+0.31
L1-d2-6−106.512−2.61−376+0.02L1-d20.0253.53−0.00019
L1-d2-8−53.256−1.365−170+0.01
L1-l-150+85.6+16.165+2028+0.01L1-l0.1923.690.00012
L2-l-100−96−4.59−168−0.27L2-l0.0481.750.0028
L3-d1-8-d2-10+170.456+2.12+42−0.41L3-d1 & L3-d20.0120.25−0.0024
1 Unit: (103 mm3). 2 Unit: (kN·m). 3 Unit: (kN·m·rad−1). 4 Unit: 1.
Disclaimer/Publisher’s Note: The statements, opinions and data contained in all publications are solely those of the individual author(s) and contributor(s) and not of MDPI and/or the editor(s). MDPI and/or the editor(s) disclaim responsibility for any injury to people or property resulting from any ideas, methods, instructions or products referred to in the content.