Article

Accuracy and Surface Quality Improvements in the Manufacturing of Ti-6Al-4V Parts Using Hot Single Point Incremental Forming

by
Mikel Ortiz
1,*,
Mariluz Penalva
1,
Edurne Iriondo
2 and
Luis Norberto López de Lacalle
2
1
Advanced Manufacturing Area, Tecnalia Research & Innovation, Paseo Mikeletegi 7-Parque Tecnológico, E-20009 Donostia-San Sebastian, Spain
2
Department of Mechanical Engineering, University of the Basque Country, 48013 Bilbao, Spain
*
Author to whom correspondence should be addressed.
Metals 2019, 9(6), 697; https://doi.org/10.3390/met9060697
Submission received: 23 May 2019 / Revised: 12 June 2019 / Accepted: 18 June 2019 / Published: 20 June 2019
(This article belongs to the Special Issue New Processes and Machine Tools for Advanced Metal Alloys)

Abstract

:
The present work focuses on the manufacturing of Ti-6Al-4V parts using hot single point incremental forming (SPIF), a non-conventional forming technology mainly oriented toward the fabrication of prototypes, spare parts, or very low volume series. In the used procedure, the entire sheet is heated and kept at uniform temperature while the tool incrementally forms the part, with the limited accuracy of the obtained parts being the major drawback of the process. Thus, this work proposes two approaches to improve the geometric accuracy of Ti-6Al-4V SPIF parts: (i) correct the tool path by applying an intelligent process model (IPM) that counteracts deviations associated with the springback, and (ii) skip overforming deviations associated with the deflection of the sheet along the perimeter of the part based on a design improvement. For this purpose, a generic asymmetric design that incorporates features of a typical aerospace Ti-6Al-4V part is used. The results point out the potential of both solutions to significantly improve the accuracy of the parts. The application of the IPM model leads to an accuracy improvement up to 49%, whereas a 25.4% improvement can be attributed to the addendum introduction. The geometric accuracy study includes the two finishing operations needed to obtain the part, namely decontamination and trimming.

1. Introduction

Ti-6Al-4V is a titanium alloy that is widely used in the manufacturing of high strength lightweight parts in the aeronautical industry since it meets the requirements of low weight, keeping a high strength, and excellent corrosion and creep resistance [1]. Nevertheless, Ti-6Al-4V has a very poor formability at room temperature because of the Hexagonal Close Packed (HCP) structure of its alpha phase. Hence, hot technologies are indispensable for forming this titanium alloy.
Nowadays, hot stamping and superplastic forming are well-consolidated technologies in the production of large batches of Ti-6Al-4V parts. However, these technologies are not suitable to fabricate prototypes, spare parts, or very low volume series because of the long lead times and the expensive tooling they need. In this context, single point incremental forming (SPIF) appears as a technology with the potential for the competitive production of small batches since it allows transferring from the design to the production stage directly without any specific tooling [2]. SPIF is a non-conventional forming technology consisting of the localized and progressive plastic deformation of the blank under the action of a punch tool that follows a continuous and numerically controlled path.
The limited accuracy of the SPIF process has been identified as its major drawback. Sheet deflection and bending around the part perimeter, material springback after the passage of the tool, and stresses released when part unclamping or trimming affect the accuracy [3]. The use of a backing plate seems mandatory to limit deviations of the part perimeter area [4], and hot conditions can reduce the effect of springback [4,5,6,7] on parts made of Ti-6Al-4V. However, these aspects are not enough to produce accurate parts using hot SPIF and further progress is still needed in this field. Though not applied on hot formed parts yet, the most promising contributions toward increase part accuracy in SPIF refer to tool path correction or optimization solutions based on machine learning predictions [8,9,10,11,12,13]. Behera et al. [8,9] proposed a toolpath compensation strategy based on multivariate adaptive regression splines (MARS) for the prediction of the formed shape, which has been validated on different aluminum alloys. Fiorentino et al. [10] developed an artificial cognitive system based on iterative learning control for toolpath correction for the manufacturing of Al 1050A and DC04 parts. Lu et al. [11] developed a model predictive control (MPC) method consisting of an analytical control model built on the deformations mechanisms of SPIF and evaluated the proposed solution on an aluminium 7075-O part. Khan et al. [12] developed an intelligent process model (IPM) to predict springback and based on its prediction, generated a corrected Computer-Aided Design (CAD) model for toolpath programming. The model was successfully applied on two pyramidal geometries made of DC04 stamping steel, which showed improved accuracy. More recently, Zwierzycki et al. [13] studied two methods to compensate for springback, using localized in-process distance sensing to adapt tool-paths on the one hand, and using pre-process supervised machine learning to predict springback and generate corrected fabrication models on the other hand.
The present work focuses on improving the geometric accuracy of Ti-6Al-4V parts fabricated using hot SPIF by applying two different solutions. On the one hand, the application of the IPM proposed by Khan et al. [12] to counteract springback deviations is used. On the other hand, a solution to minimize deviations associated with the deflection of the sheet around the perimeter of the part is proposed. A heating system that controls the optimal temperature conditions during the forming operation was used. Furthermore, a finishing operation to eliminate the oxidation suffered by the parts due to high temperatures is defined and applied after the SPIF process. The influence of this operation, together with the stress release after trimming the perimeter of the part, over the geometric accuracy is also analyzed for the complete evaluation of the accuracy improvement.

2. Materials and Methods

2.1. Experimental Set up

For this study the geometry depicted in Figure 1 was designed. An asymmetric design was preferred to avoid compensation of the residual stresses induced during the deformation, which could mask the real geometric accuracy limits. The geometry shows three differentiated zones along its 70 mm depth:
  • Zone 1: 15 mm depth section with a transition zone with drastic a wall angle variation (from 9° to 35°).
  • Zone 2: 50 mm depth section with almost constant wall angle (35°–39°).
  • Zone 3: lower surface with slight curvature (5 mm between upper and lower zone).
All trials were made using Ti-6Al-4V sheets of 500 × 500 mm2 size and 1.6 mm thick.
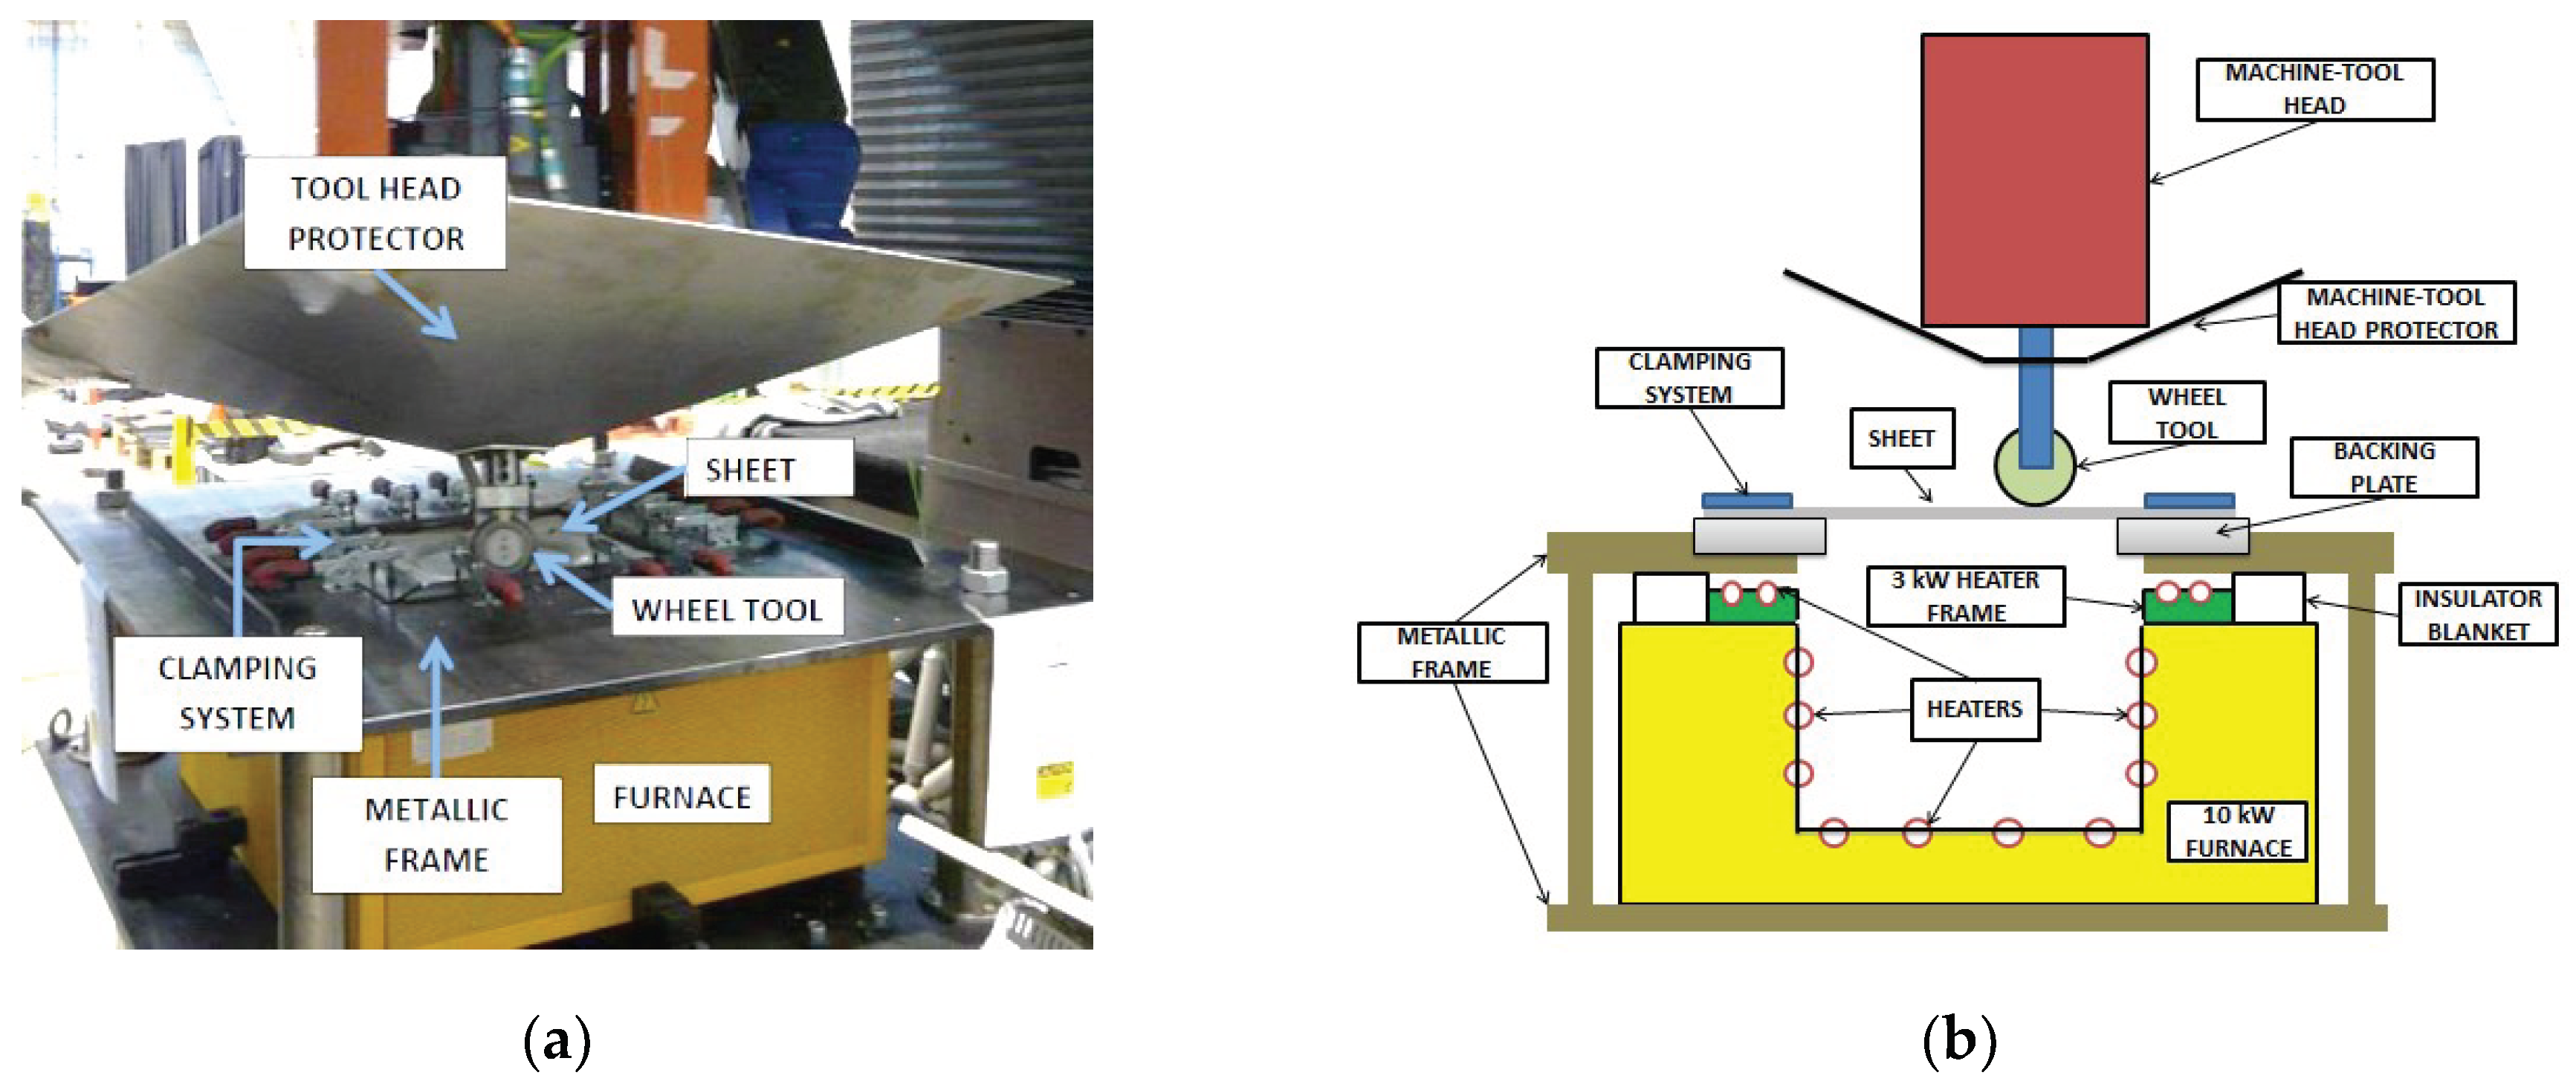
The trials were performed on an in-house 5-axis gantry machine equipped with a furnace, a sheet clamping device, and a housed head that protects it against temperature increase (Figure 2).
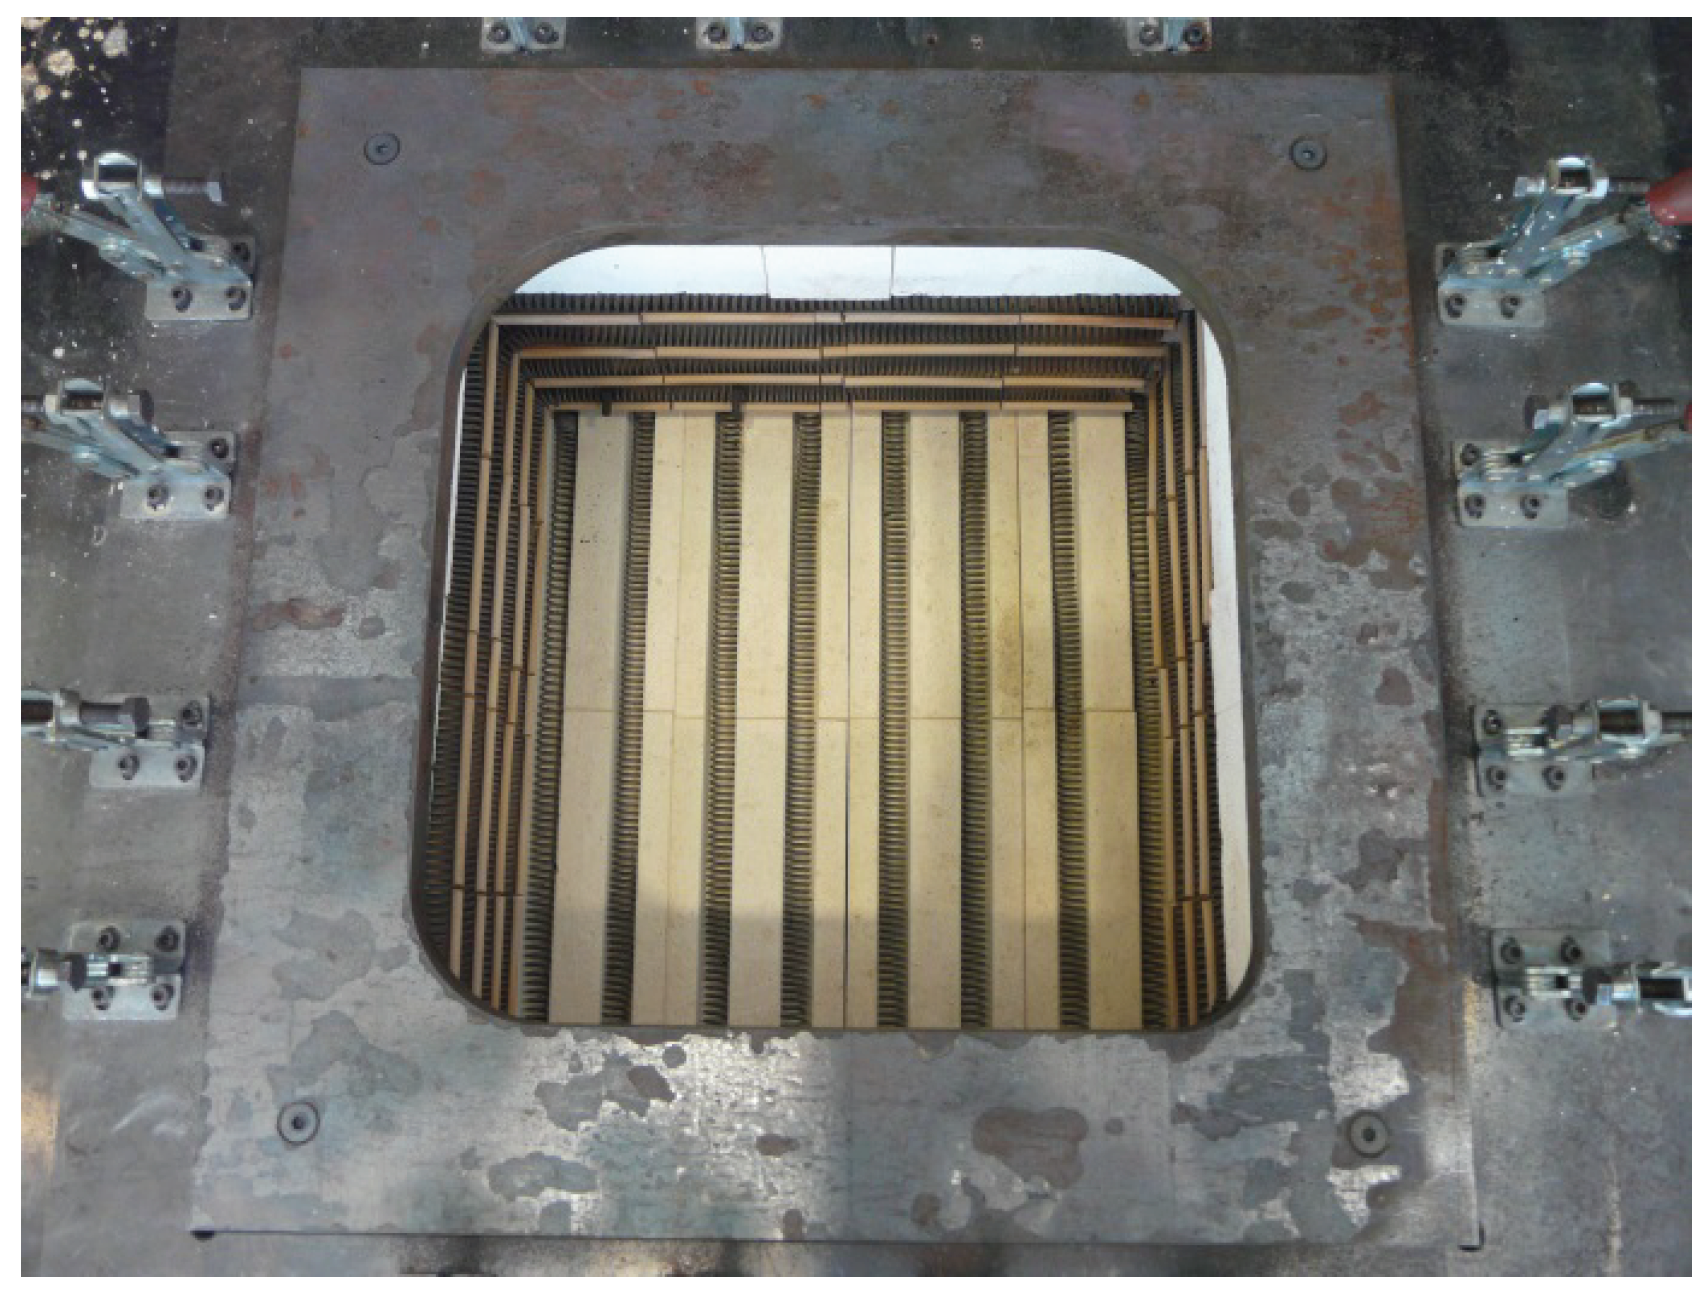
The furnace shows heaters, both on the walls and the bottom, and produces 10 kW of power. The metal sheet to deform is put, supported by the backing plate, on its top as a cover. Additionally, a cover with a ceramic fiber blanket insulator can be laid over the sheet when no forming is performed during the cooling stage for a tighter temperature control. The clamping unit is also equipped with a frame of heaters that can provide up to 3 kW of power to heat up the sheet perimeter covered by the clamping. Both heating devices, one in the oven cavity and the other one around the clamping, are governed by a Programmable Logic Controller (PLC) through two pyrometers (thermocouples for the fiber blanket cover) that continuously read the sheet temperature at the center and the area close to the clamping. A backing plate below the flange zone (Figure 3) was used to reduce the deflection observed in the area in previous experimentation [4].
For all the trials, a ceramic wheel tool with a 11 mm forming radius and boron nitride as lubricant were chosen to provide adequate contact conditions during forming.
All the fabricated parts in the study were measured using the optical 3D system Atos Compact Scan 5M (GOM, Braunschweig, Germany) and the obtained clouds of points were aligned for comparison with the original CAD by means of the Geomagic Control software (2013, 3D Systems, Rock Hill, SC, USA). For the visualization of deviations after the alignment, the GOM Inspect software (v7.5_SR2, GOM, Braunschweig, Germany) was employed.

2.2. Experimental Work

2.2.1. Working Variables

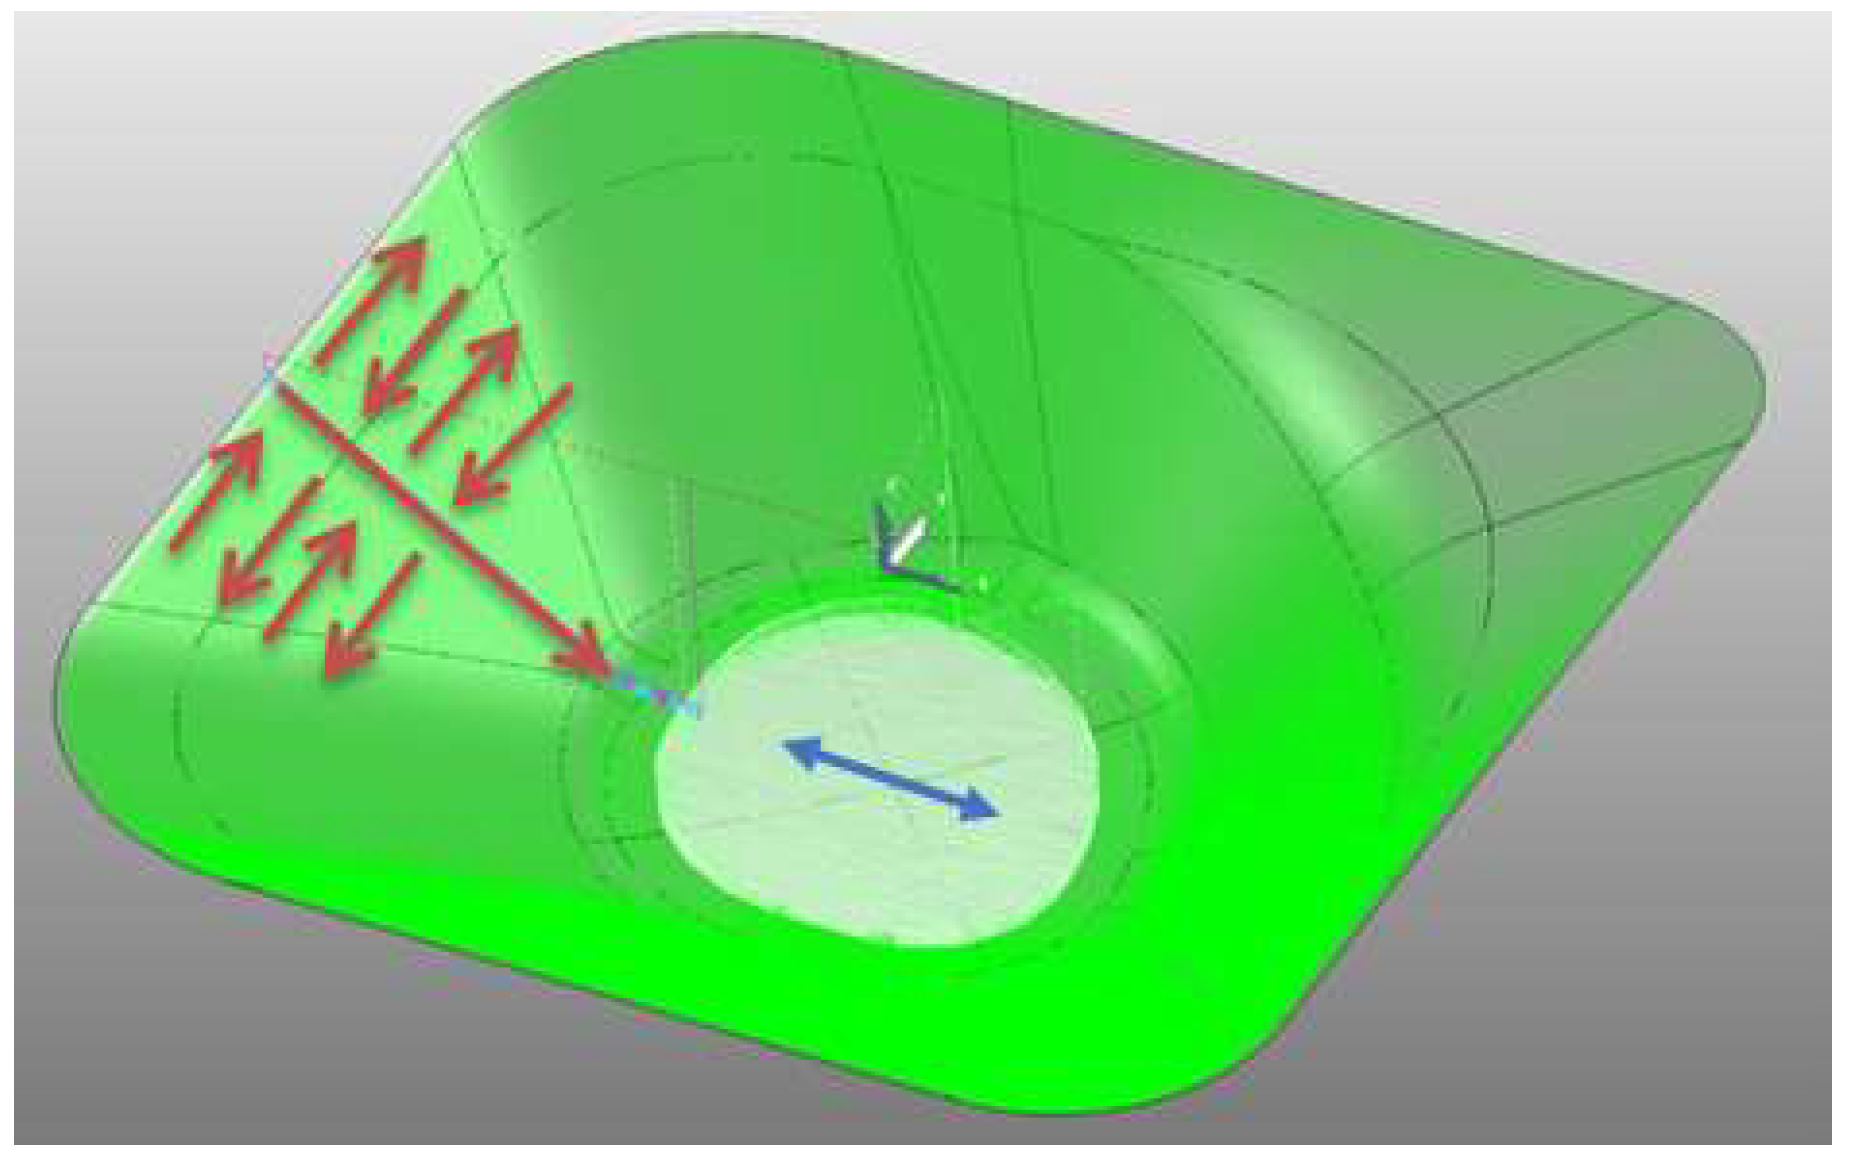
Figure 4 shows the scheme of the employed toolpath strategy. The tool deformed the sheet following the contour of the CAD part at constant Z levels and employed alternate directions from one slice to the other. Thus, the parts were produced at a 1000 mm/min feed rate and a 0.29 mm tool step down except at the bottom area where a 0.5 mm tool step over the part surface was used following a raster strategy. These process parameters were defined taking into account both the Ti-6Al-4V formability evaluation that previously had been carried out [14] and the part geometry.
A set of preliminary hot SPIF trials were performed to define the optimal working temperature for the study. The geometry depicted in Figure 1 was fabricated using three different temperatures (see Table 1) within a range identified in a previous study [4].
Based also on this study’s results [4], the complete forming operation was defined as a three-step operation:
  • Heating: heating ramp from room temperature up to the selected forming temperature (2 h).
  • Forming: hot SPIF to produce the part using the selected process parameters.
  • Cooling: controlled cooling down without unclamping the sheet and according to stress relief conditions recommended by Donachie [1]. To obtain optimal conditions regarding the stress relief, after the forming stage, the part was covered with the thermally insulated cover.

2.2.2. Tool Path Correction

The original tool path defined directly from the part design was corrected by applying an algorithm which made use of a springback predictive model. The considered algorithm, denominated as IPM, had been previously applied with success to the fabrication of a steel pyramid using cold SPIF, and its operation sequence was as follows [12]:
  • Input a CAD-generated coordinate cloud.
  • Pre-processed the coordinate cloud to produce an input data set.
  • After pre-processing, the data was passed to a classification module where a classifier was applied to each record (representing a grid square) in the data set to predict the associated springback error.
  • The predicted springback was then applied to the CAD cloud and a modified CAD shape was produced.
  • The predicted cloud was then used to generate a corrected cloud. The corrected cloud was generated by applying the predicted error at each point in the grid in the opposite direction to the predicted direction.
  • Smoothing was applied to the corrected cloud so as minimize gaps and bandings to produce a smooth corrected cloud that can used for tool path programming.
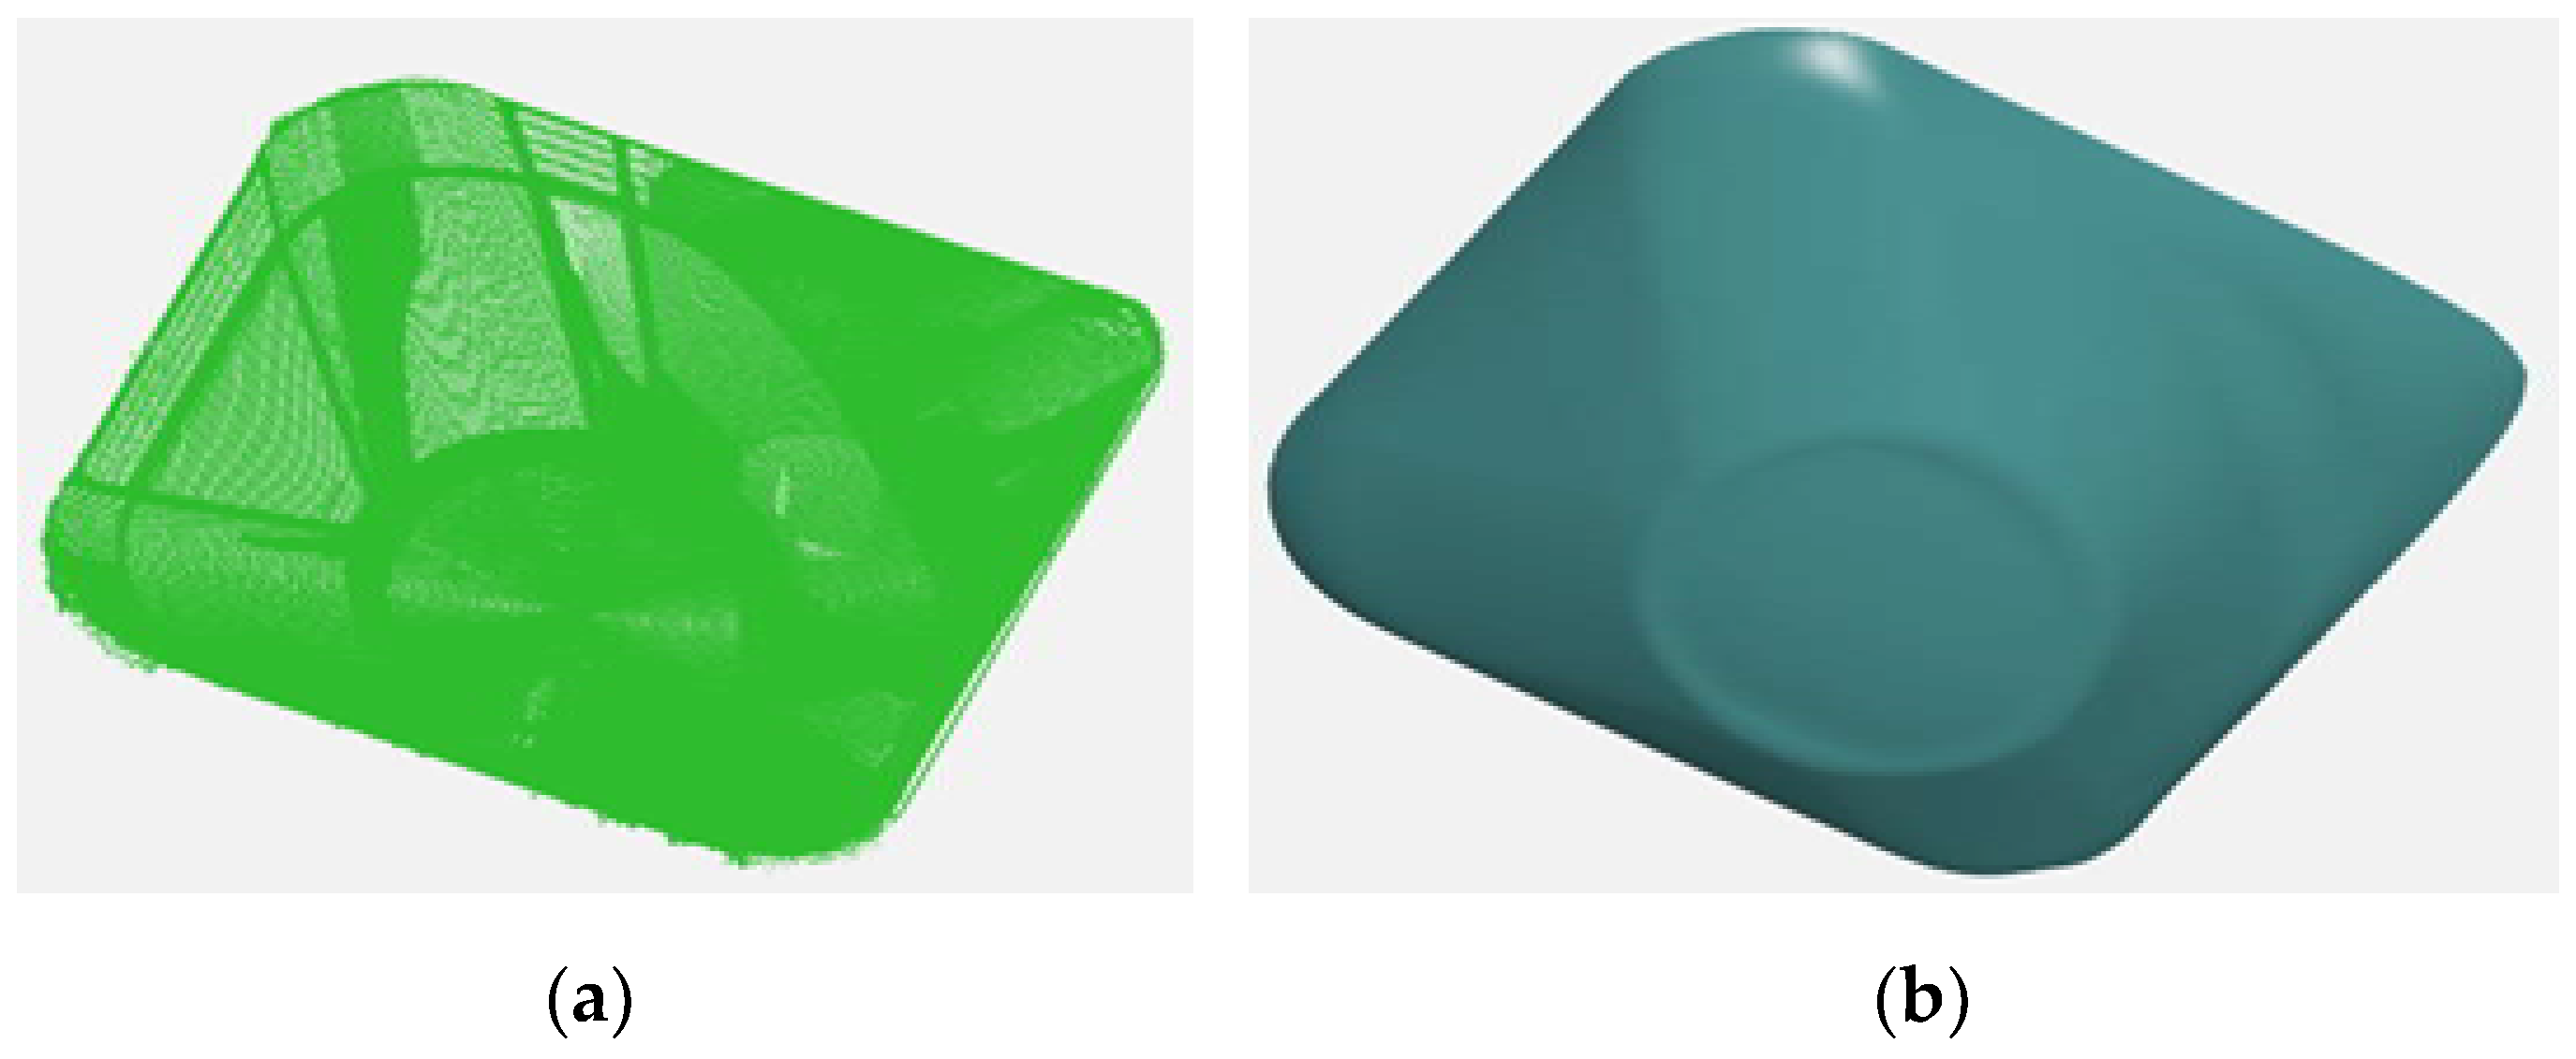
In the present work, the effectiveness of this algorithm was analyzed by using two different IPMs to correct the tool path of the geometry. The IPMs were generated from two parts produced under identical conditions, using each part to train and generate the classifier of each IPM. As Figure 5 shows, the output of each IPM was a corrected coordinate cloud. This cloud of points was used to generate an optimized mesh for the programming of the corrected toolpath using the same strategy shown in Figure 4.
For statistical analysis, three iterations were made (three parts manufactured) using each corrected toolpath.
A third correction consisted of just reversing the deviations from the design surface was also included in the analysis.

2.2.3. Introduction of an Addendum to the Target Geometry

The parts produced using SPIF frequently showed negative overforming deviations at their perimeter area. Such deviations were due to sheet deflection under the tool action. Though this effect could be considerably minimized with the presence of a backing plate, this was not enough to eliminate it completely. Unfortunately, the tool path seemed unfeasible at this area since before the forming tool passed, the sheet was still flat.
In order to diminish values of this type of deviation, a novel solution based on the modification of the part design was proposed. In this sense, a geometric improvement was proposed, which was based on including an addendum surface at the perimeter area so overforming errors lie within this addendum not belonging to the target geometry.
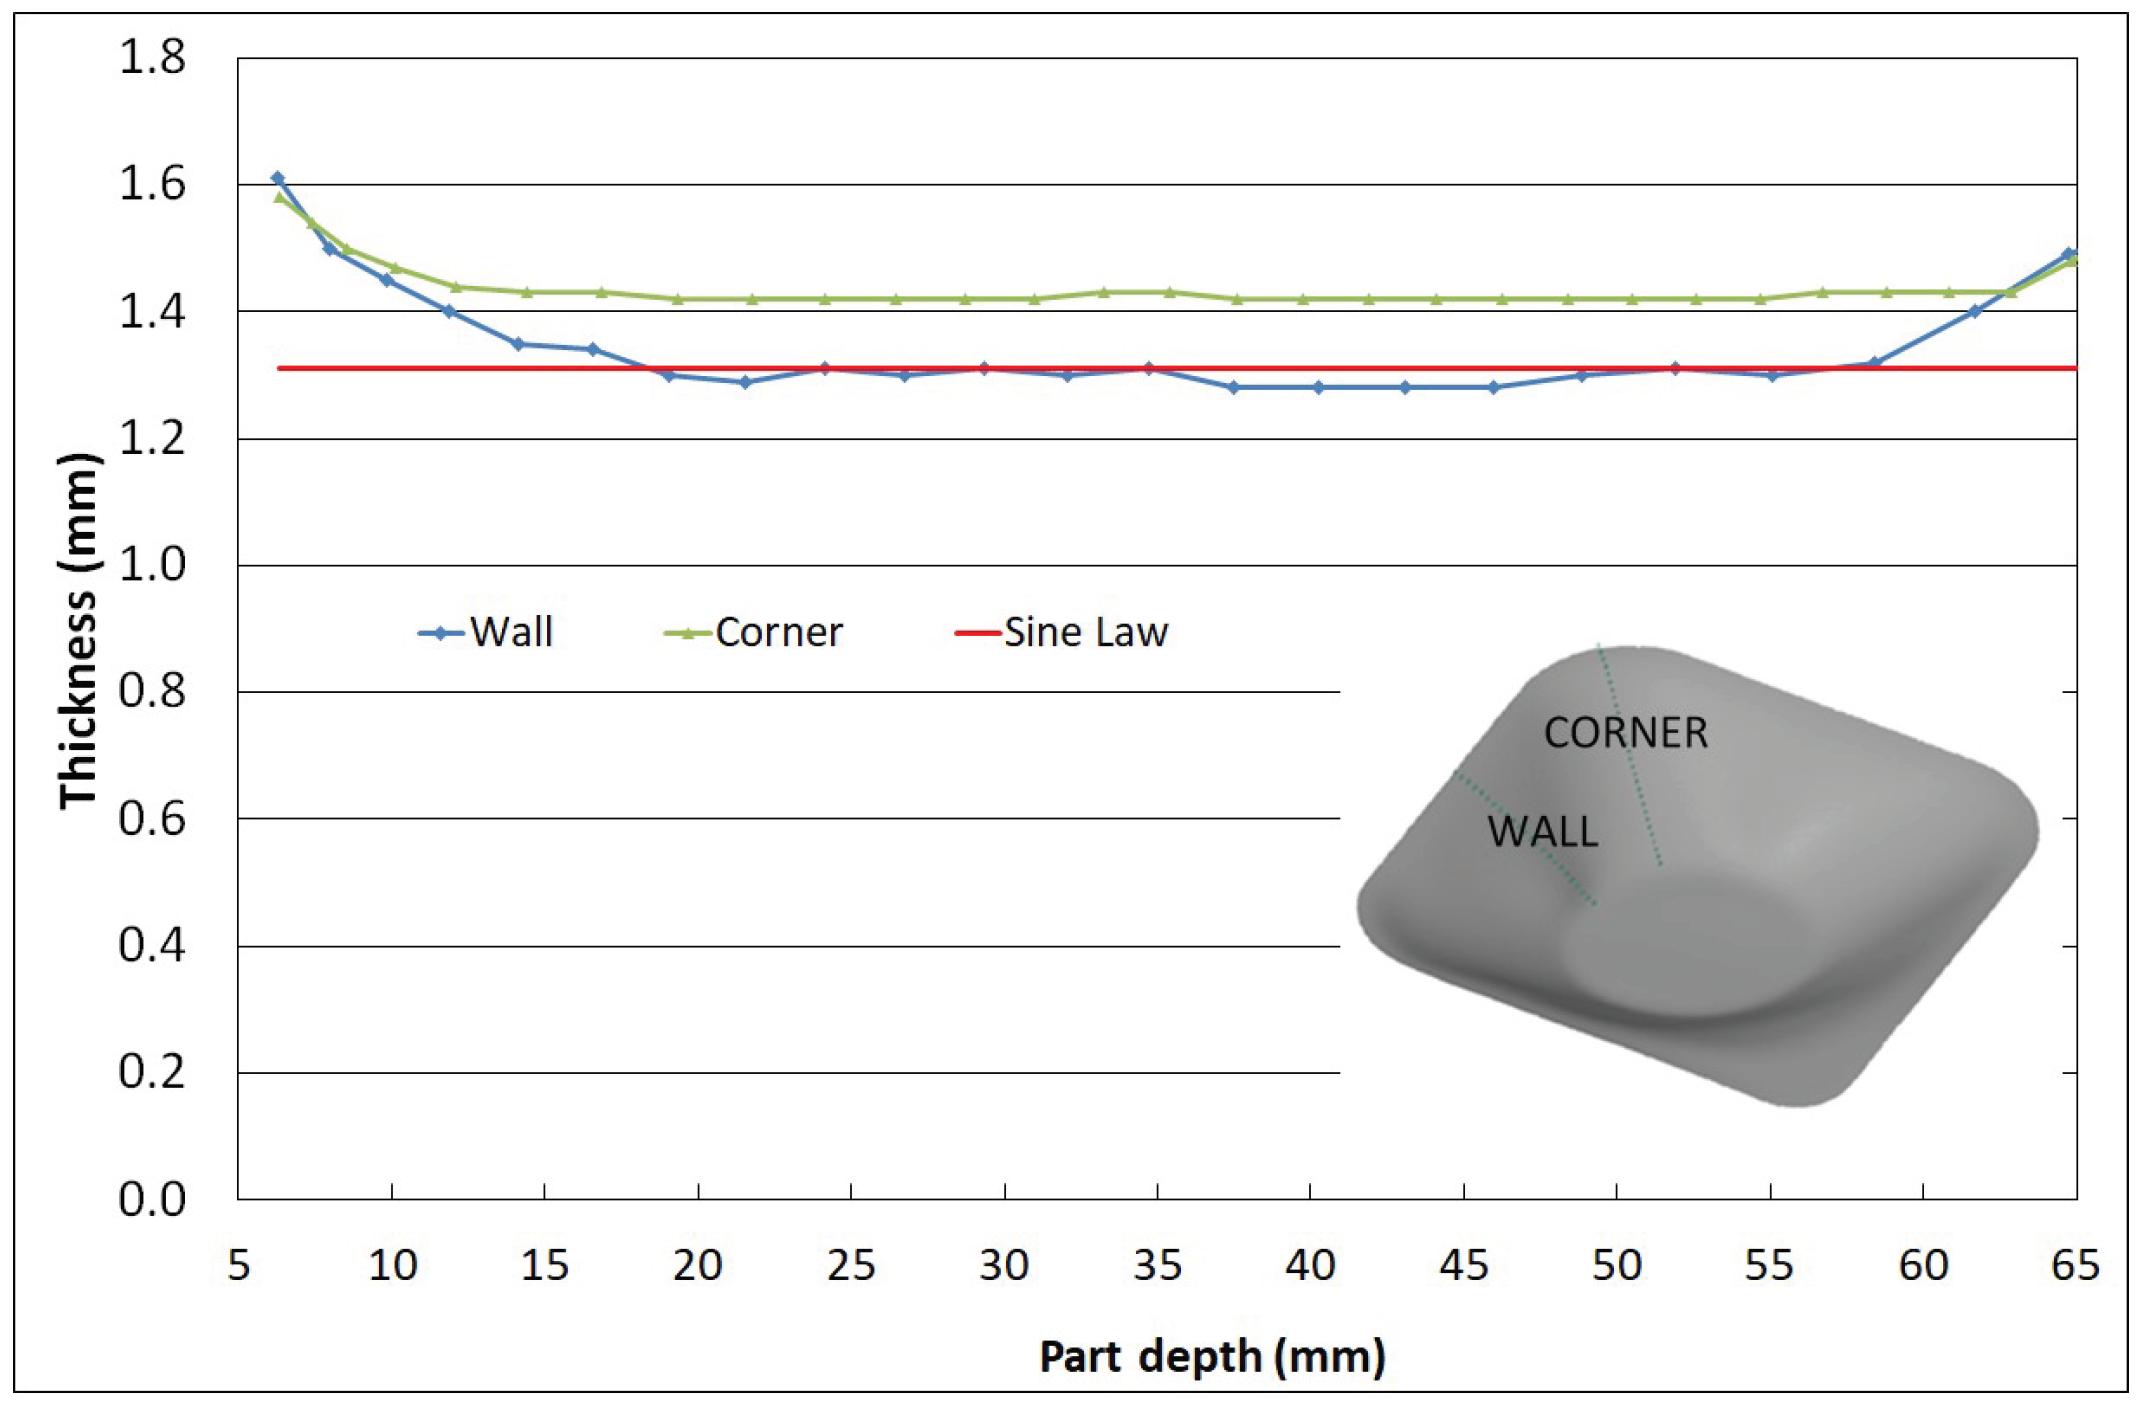
It is known that the thickness profile provides useful information about the part area affected by deflection [15]. Figure 6 shows, for the D2 trial of Table 1, the thickness profile of a wall and a corner along the part depth. Thus, based on these observations, that is, the point at which the thickness stabilizes, the depth of the addendum surface was estimated, and a modified design was produced (see Figure 7 in blue). The introduced addendum featured a constant wall angle of 35° and a 14 mm depth.
To evaluate the effectiveness of the proposed solution, three parts with the new design were fabricated at the best forming temperature identified from tests shown in Table 1.

2.3. Finishing Operations

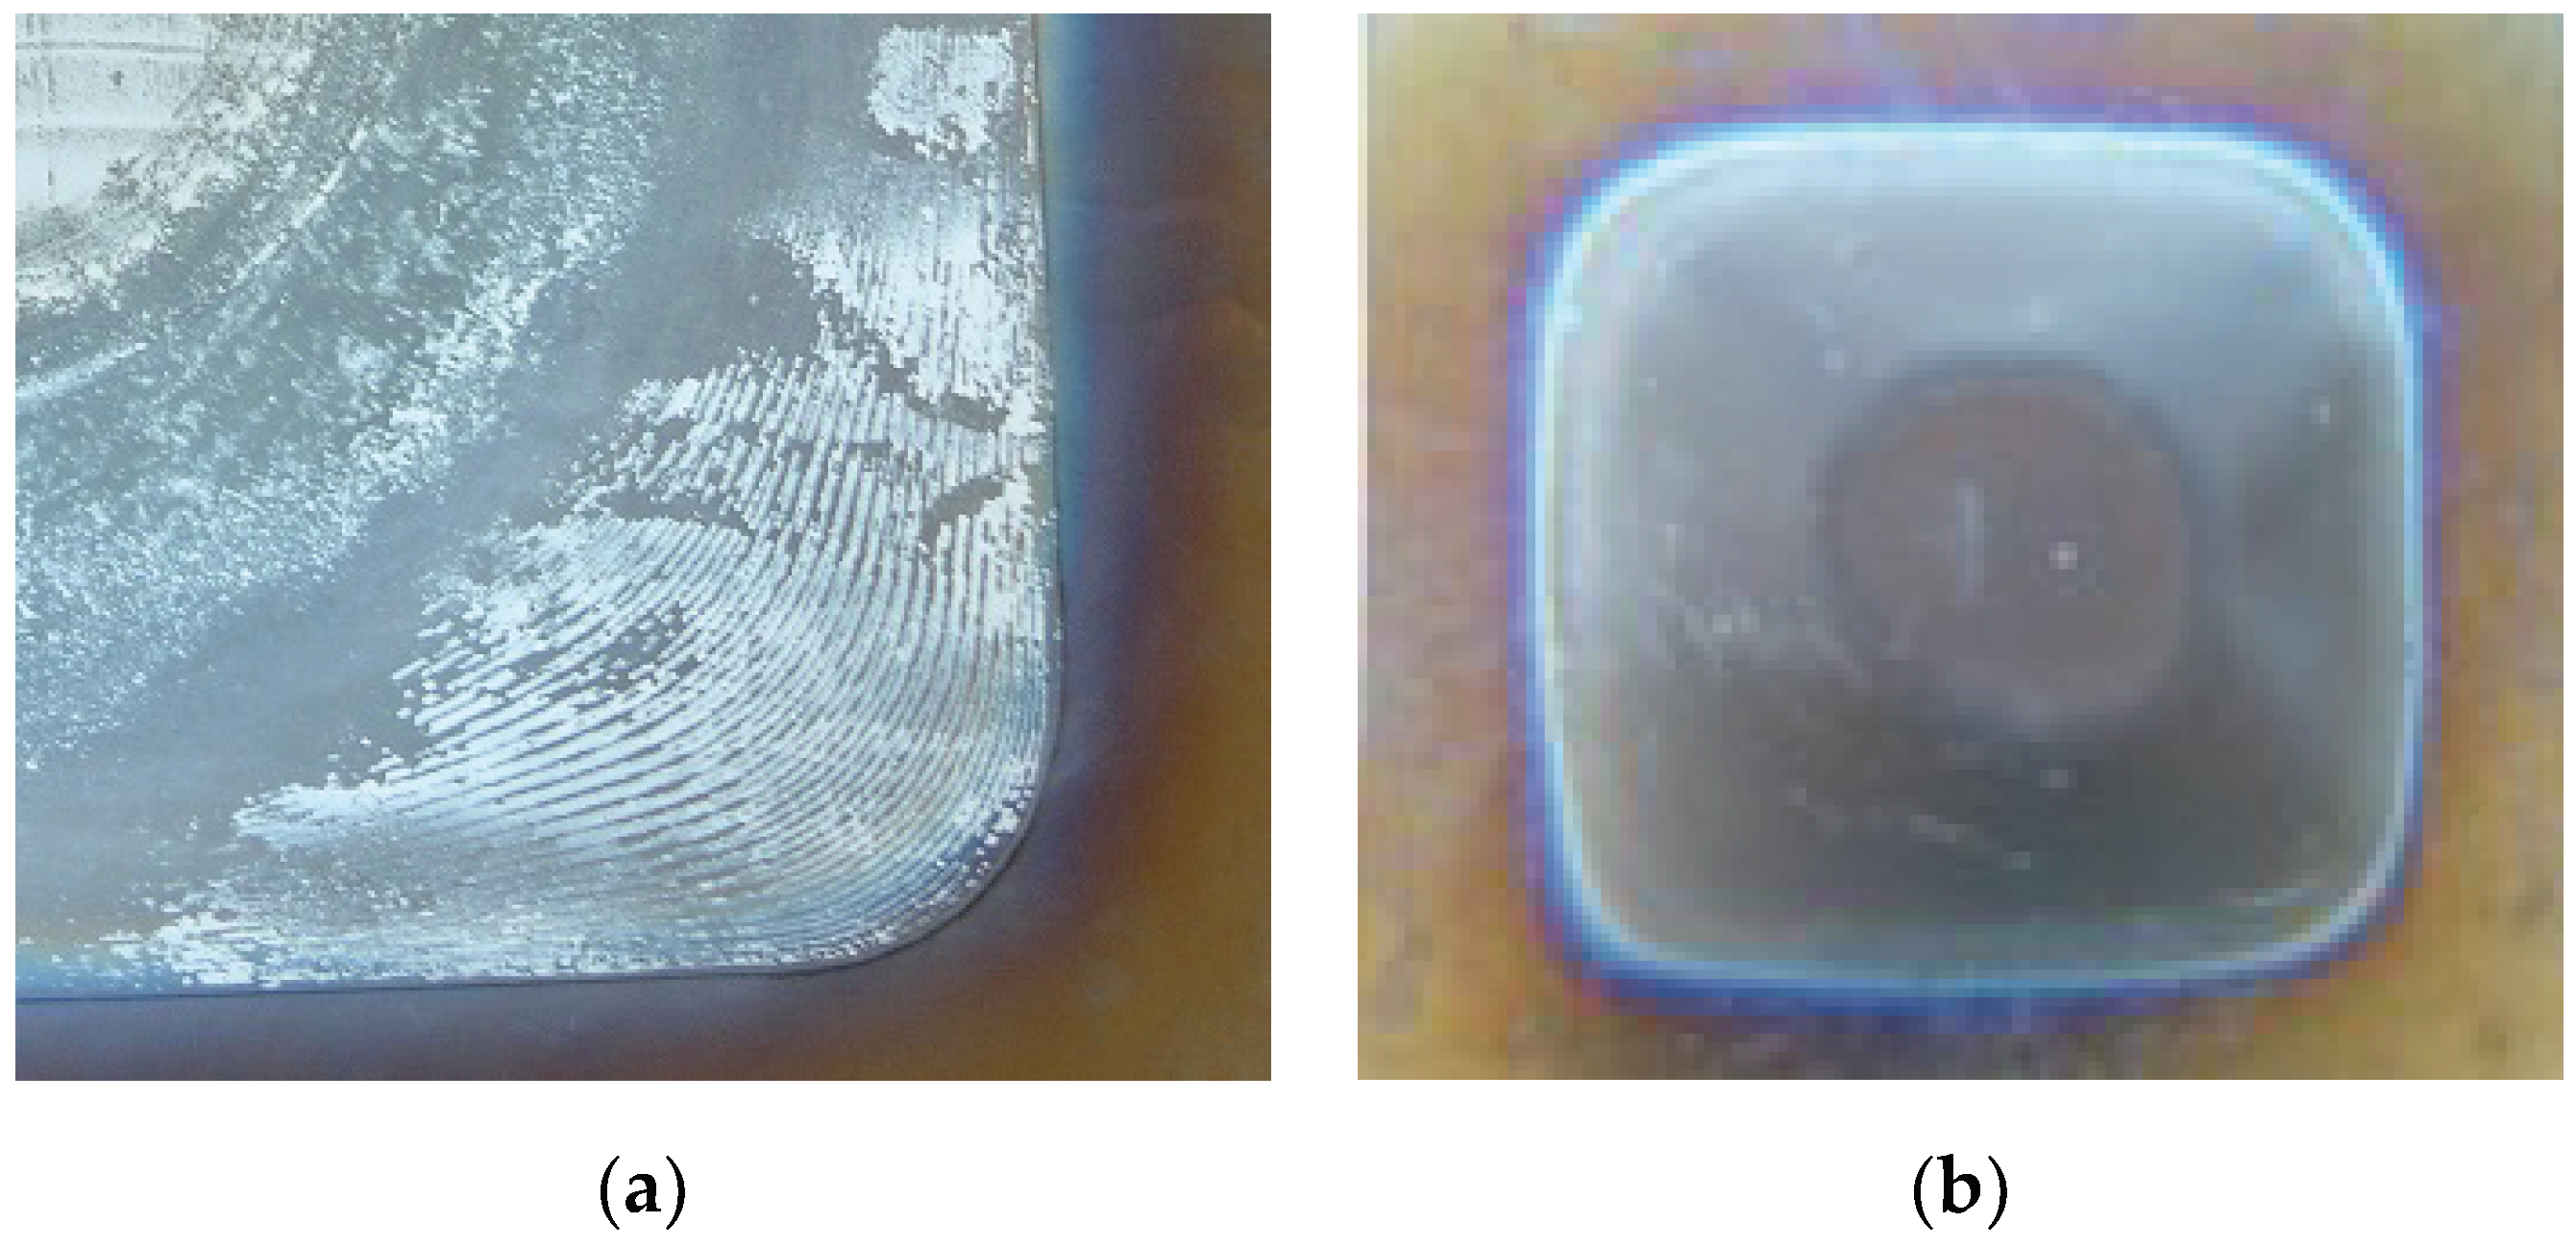
Decontamination of Ti-6Al-4V parts is necessary after the hot SPIF process since the sheets are excessively oxidized due to the high process temperatures and the lack of a protective atmosphere. Besides, lubricant remain embedded on the inner face of the parts because of the action of the tool (see Figure 8).
Prior to decontamination, the thickness of the alpha-case layer was estimated based on coupons extracted from one of the produced parts (see Figure 9). As it can be seen in Table 2, the averaged values ranged between about 6 and 14 µm with slightly higher values on the sheet outer face (not in contact with the tool). This can be explained by lower temperatures at the inner face (in contact with the tool) due to an air cooling effect.
Regarding decontamination, the following procedure was carried out: (1) manually cleaning with Methyl Ethyl Ketone (MEK), (2) sand blasted with 120 aluminium oxide, (3) fluor-nitric pickling, (4) deoxidized in acid nitric, and (5) final cleaning with MEK. The chemical attack parameters were adjusted based on the alpha-case layer thickness values obtained.
On the other hand, parts must be trimmed to obtain the desired geometry removing the edges of the sheets.
Therefore, the three parts fabricated showing the best geometric accuracy results were decontaminated following the procedure described above and trimmed using 2D cutting in an Abrasive Water Jet (AWJ) machine to analyze the influence of these finishing operations on the final accuracy.

3. Results

3.1. Influence of the Working Temperature on the Geometric Accuracy

Deviation maps associated to each of the selected temperatures are shown in Figure 10. Representative values extracted from these maps can also be found in Table 3.
From the obtained results, it can be said that all parts share the same deviation patterns, showing that:
  • By increasing the temperature, positive underforming deviations at the flat/low curvature areas decreased due to the reduction effect of temperature on material springback.
  • Higher temperature led to an increase of the negative overforming at the most severely affected area, that with an abrupt wall angle variation, because of the lower stiffness of the material with the temperature increased. However, overforming in the remaining perimeter area seemed to decrease with temperature. The difference in the behavior could be explained by the geometric effect. Because the bending radius around the perimeter is higher than in the other zone, the temperature increase could have a positive effect on the springback associated to bending.
  • Differences between values obtained at 675 °C and 700 °C seem small.
The percentage of deviations in the range of ±1 mm is an indicator of the obtained accuracy, and as Table 3 shows, the best results were obtained in the D2 trial, that is, with a 675 °C sheet. Thus, two additional parts were produced using the same conditions as in part D2 (forming at 675 °C) to evaluate the scatter of deviation in the process. As it can be seen in Table 4, the results show a small variability among parts produced under identical conditions, and hence, they display process robustness in terms of geometric accuracy. This can be attributed to the repetitiveness of the numerically controlled tool path.

3.2. Improvement of the Geometric Accuracy

3.2.1. Influence of the Toolpath Correction

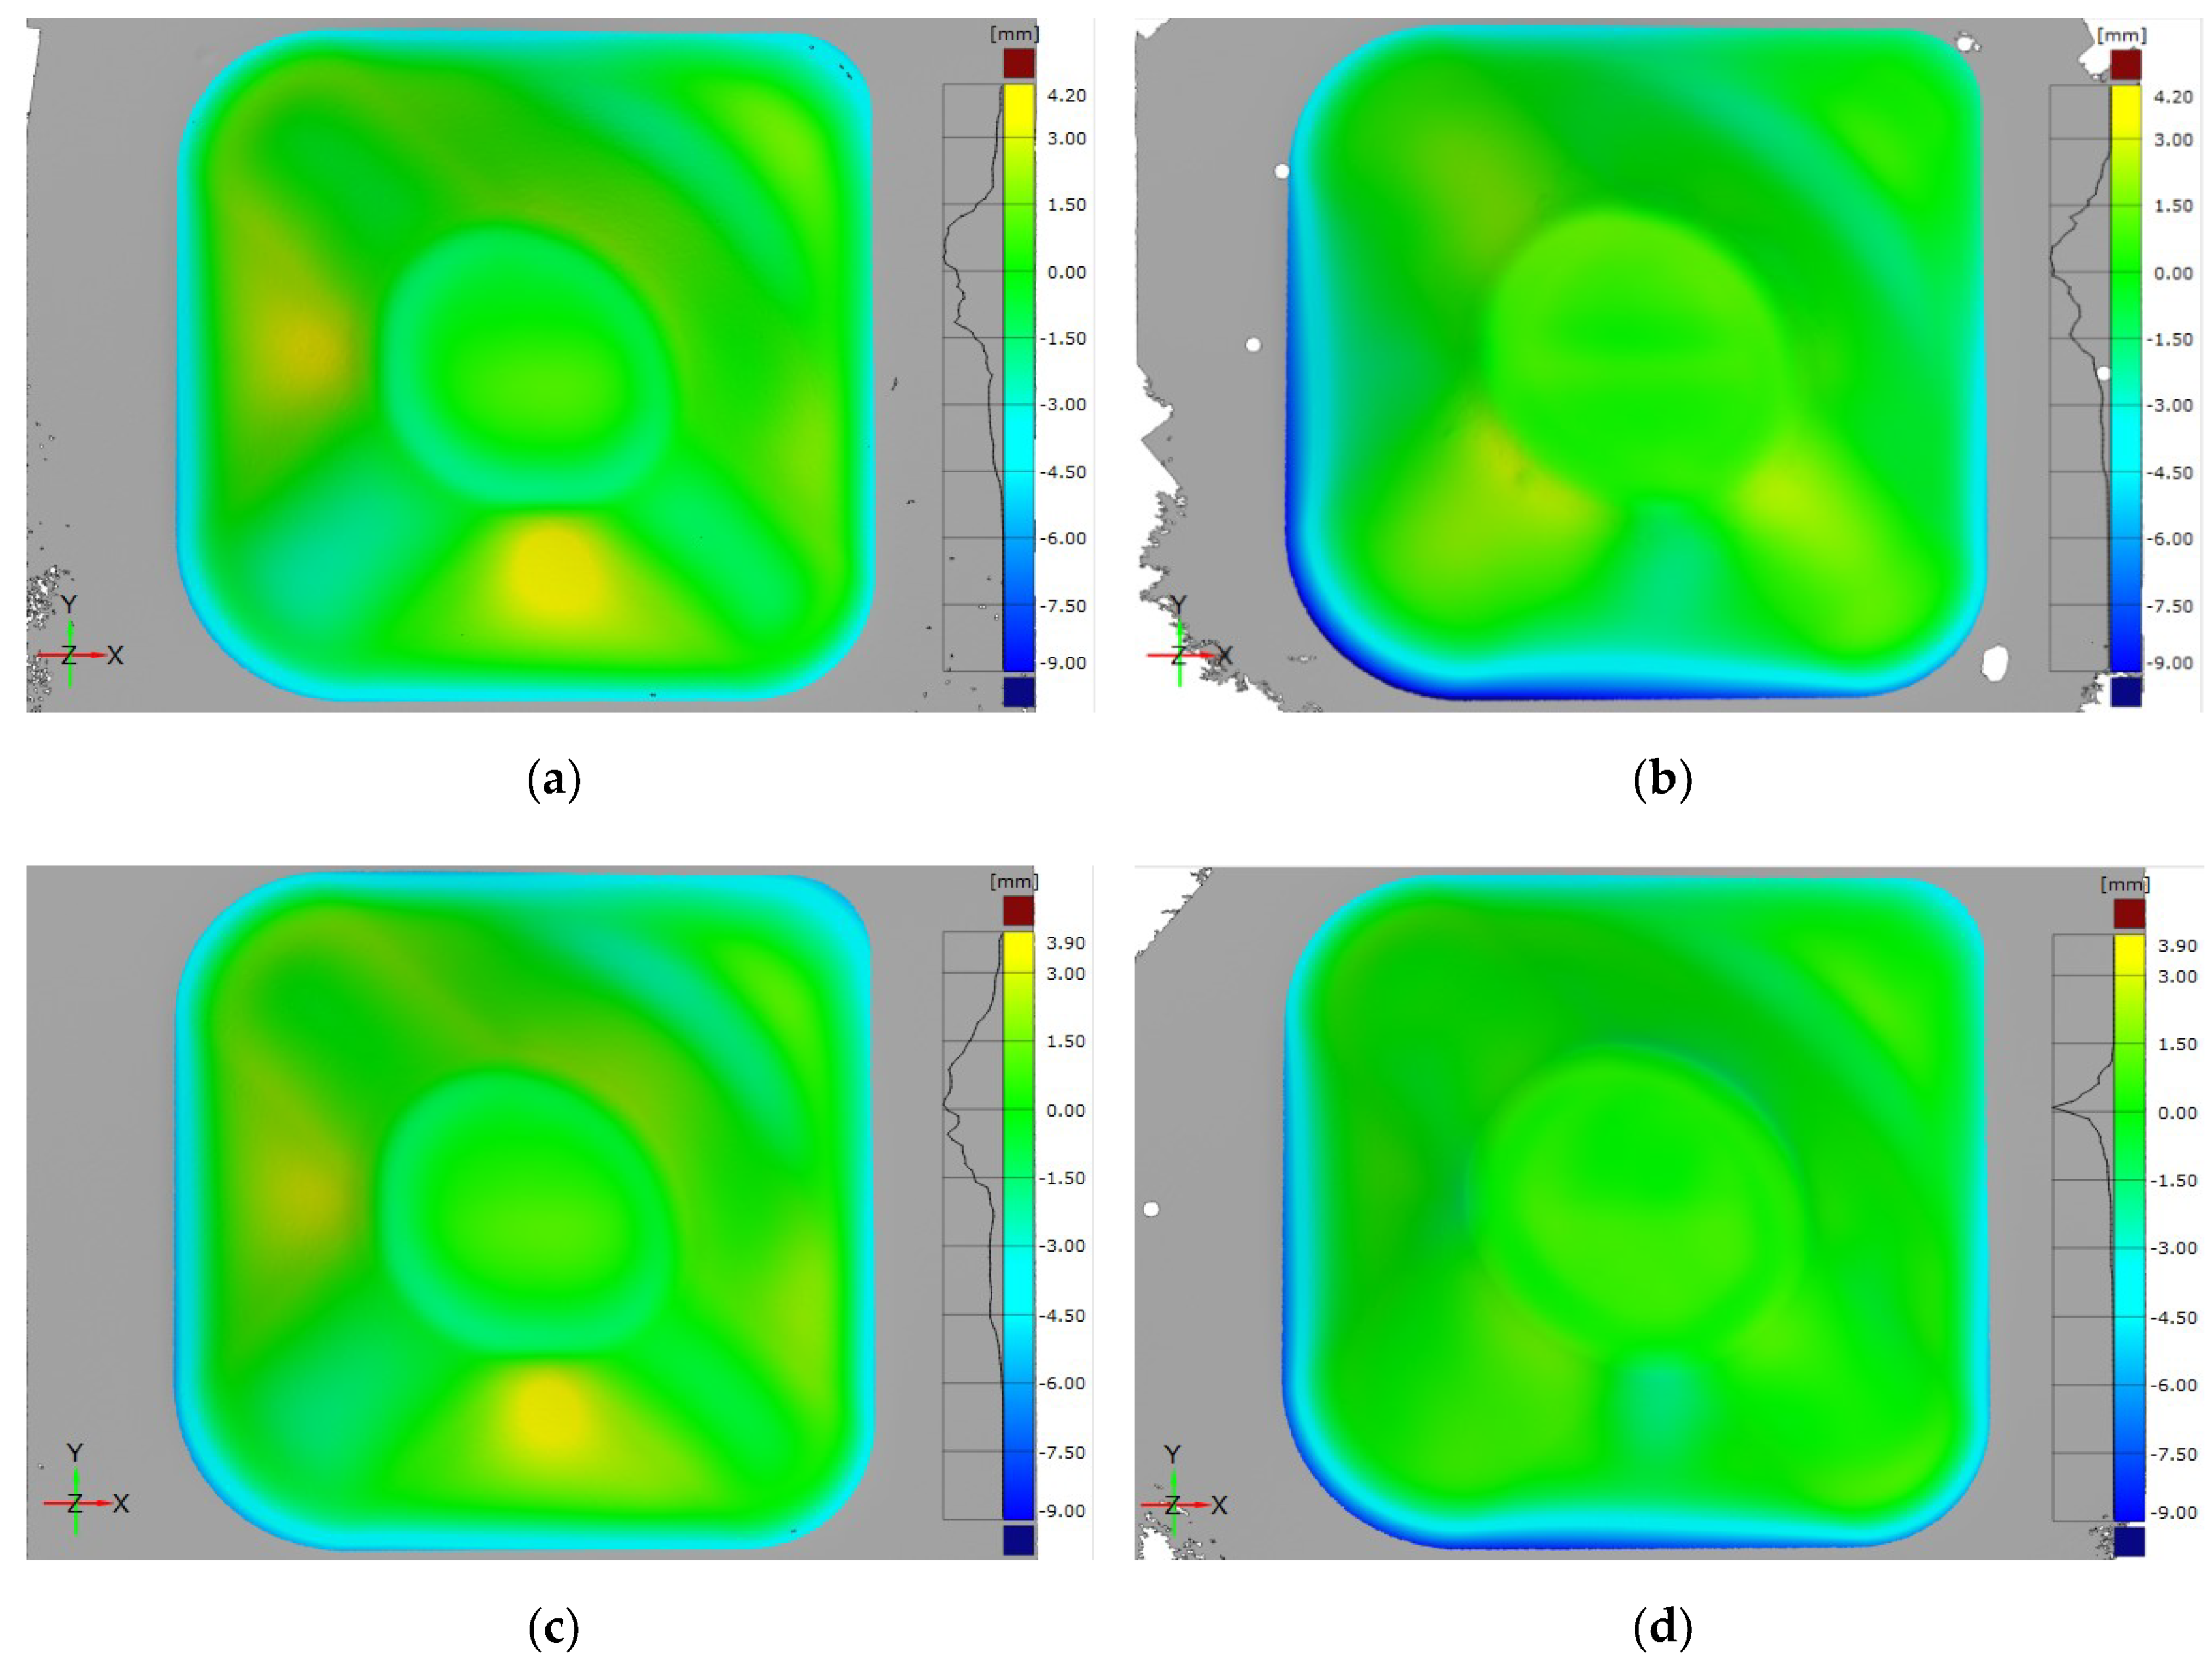
Figure 11 shows the deviation maps obtained without and with tool path correction provided by the IPMs. Representative values of these maps can be found in Table 5 where the results for the parts fabricated under the IPMs correction correspond to the average value of the three iterations.
From the obtained results, it can be said that:
  • Corrected parts showed identical deviation patterns:
    Slight negative overforming at the flat walls area.
    Positive underforming at the edges that intersect the part walls.
    Low deviation at the low curvature bottom area.
    Negative overforming region over both the perimeter and the abrupt wall angle variation areas.
  • A quantitative analysis of the deviation values points out that the tool path correction led to:
    Shifting of the deviation at flat walls from positive underforming to negative overforming and the absolute values decreased considerably (peak values varying from +4.00 to −2.00 mm approximately).
    Shifting of the deviation at the edges that intersect part walls from negative overforming to positive underforming without much variation in the deviation absolute values (peak values around ±2.00 mm).
    Shifting of the location of the maximum positive underforming deviations from flat walls to the edges that intersected these walls (underforming peak values 40–61% lower).
    Significant decrease of the deviation of the low curvature bottom and with lower variation (from −2.00/+1.50 mm to −0.50/+1.00 mm).
    Low variation in the magnitude of the deviations over the abrupt wall angle variation area.
    Significant increase of the deviations magnitude over the perimeter area (peak values 44–68% higher).
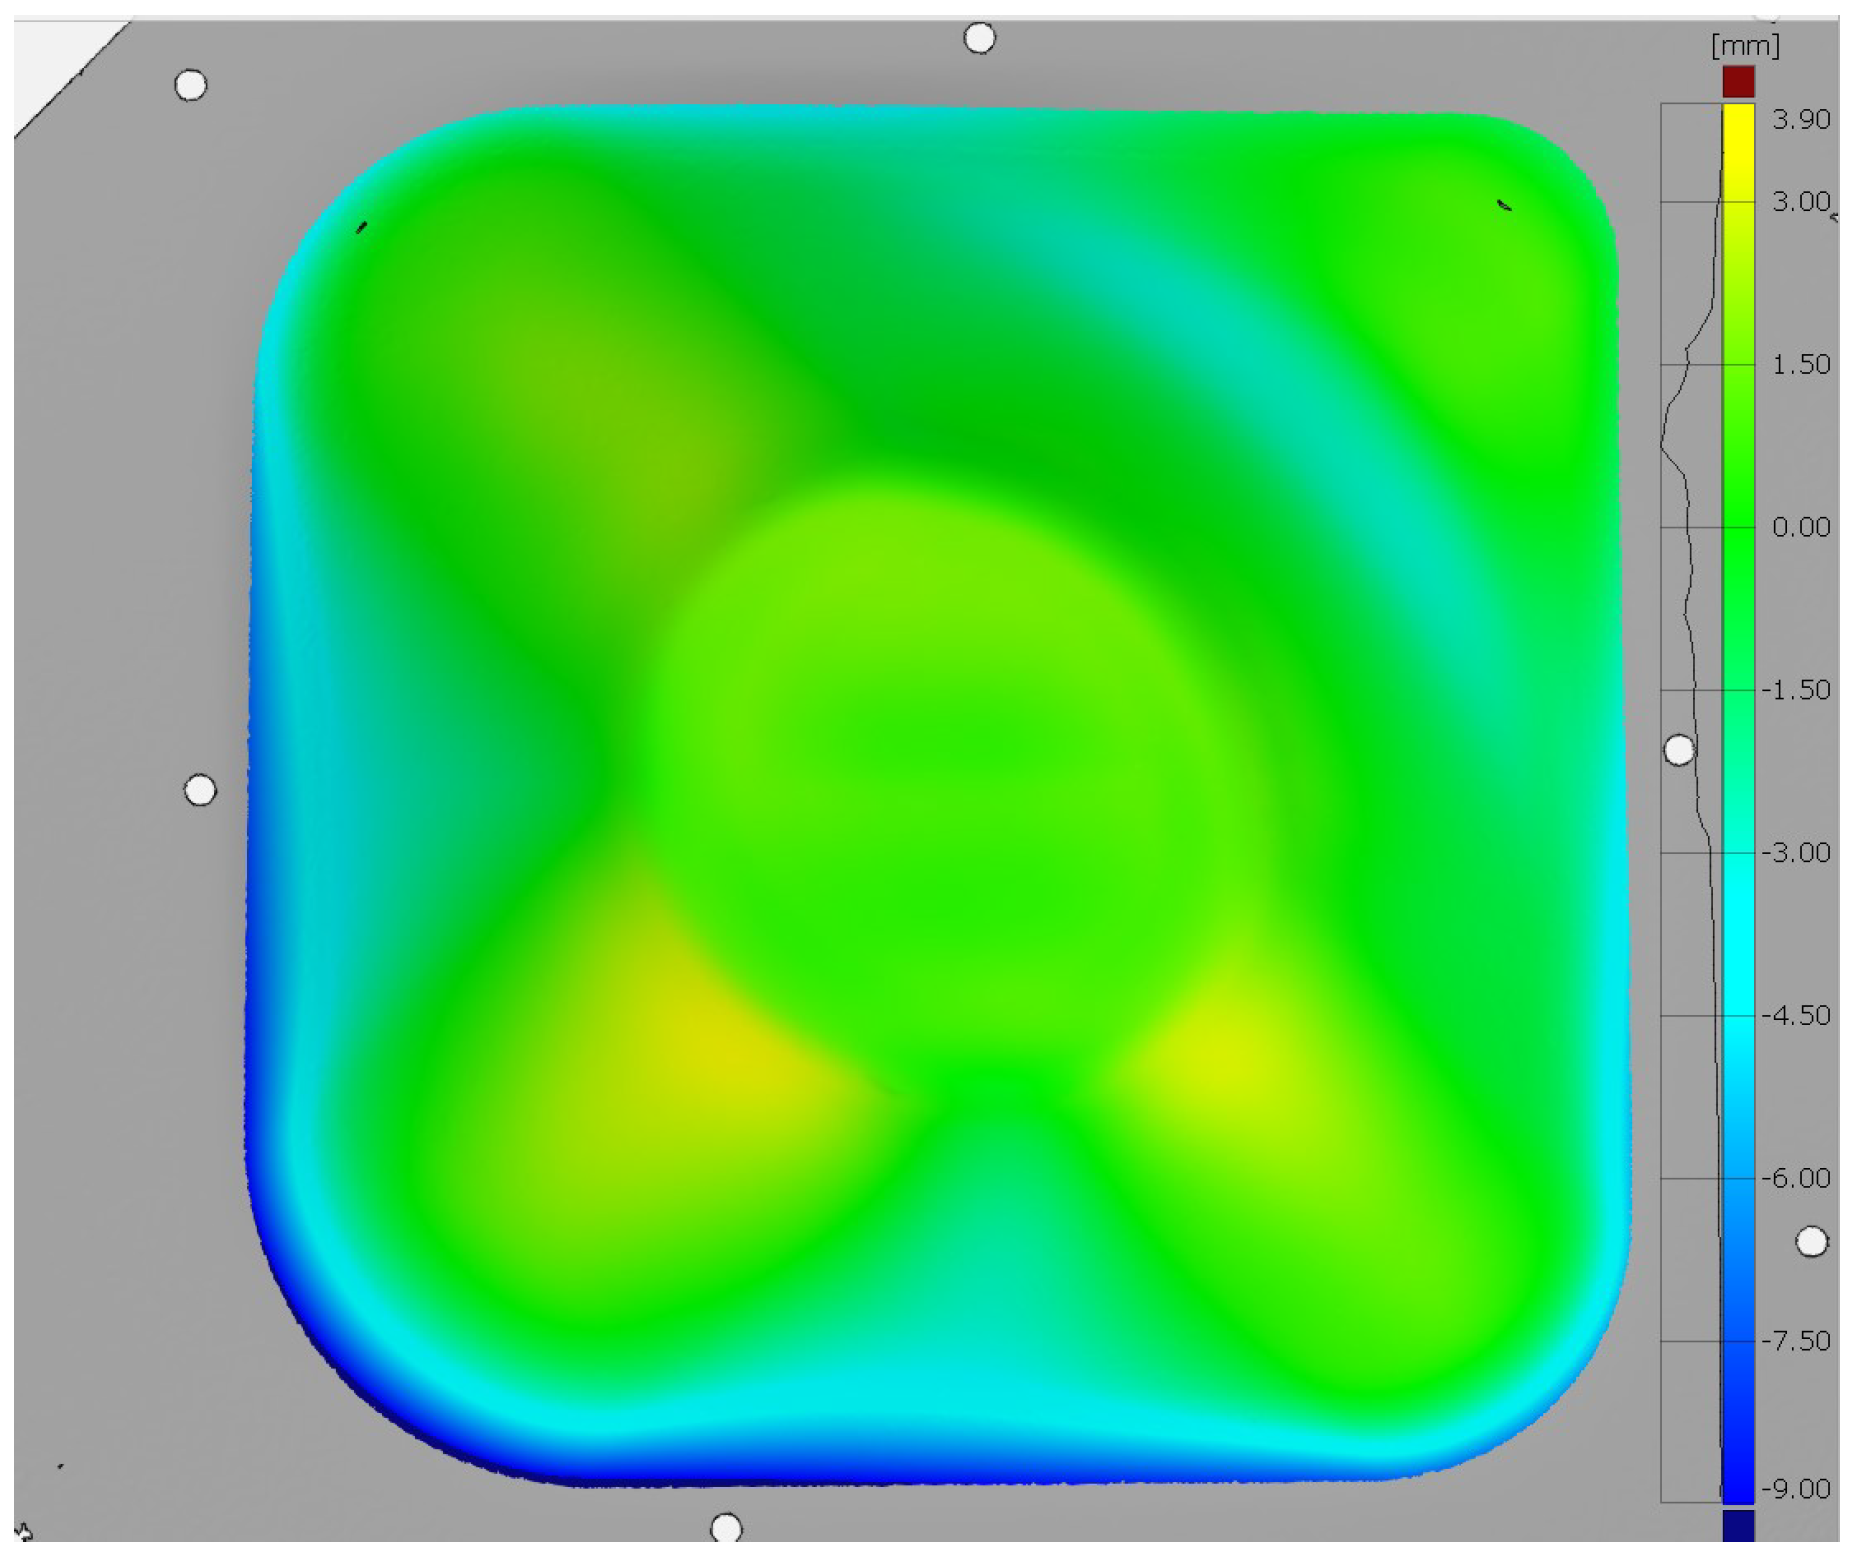
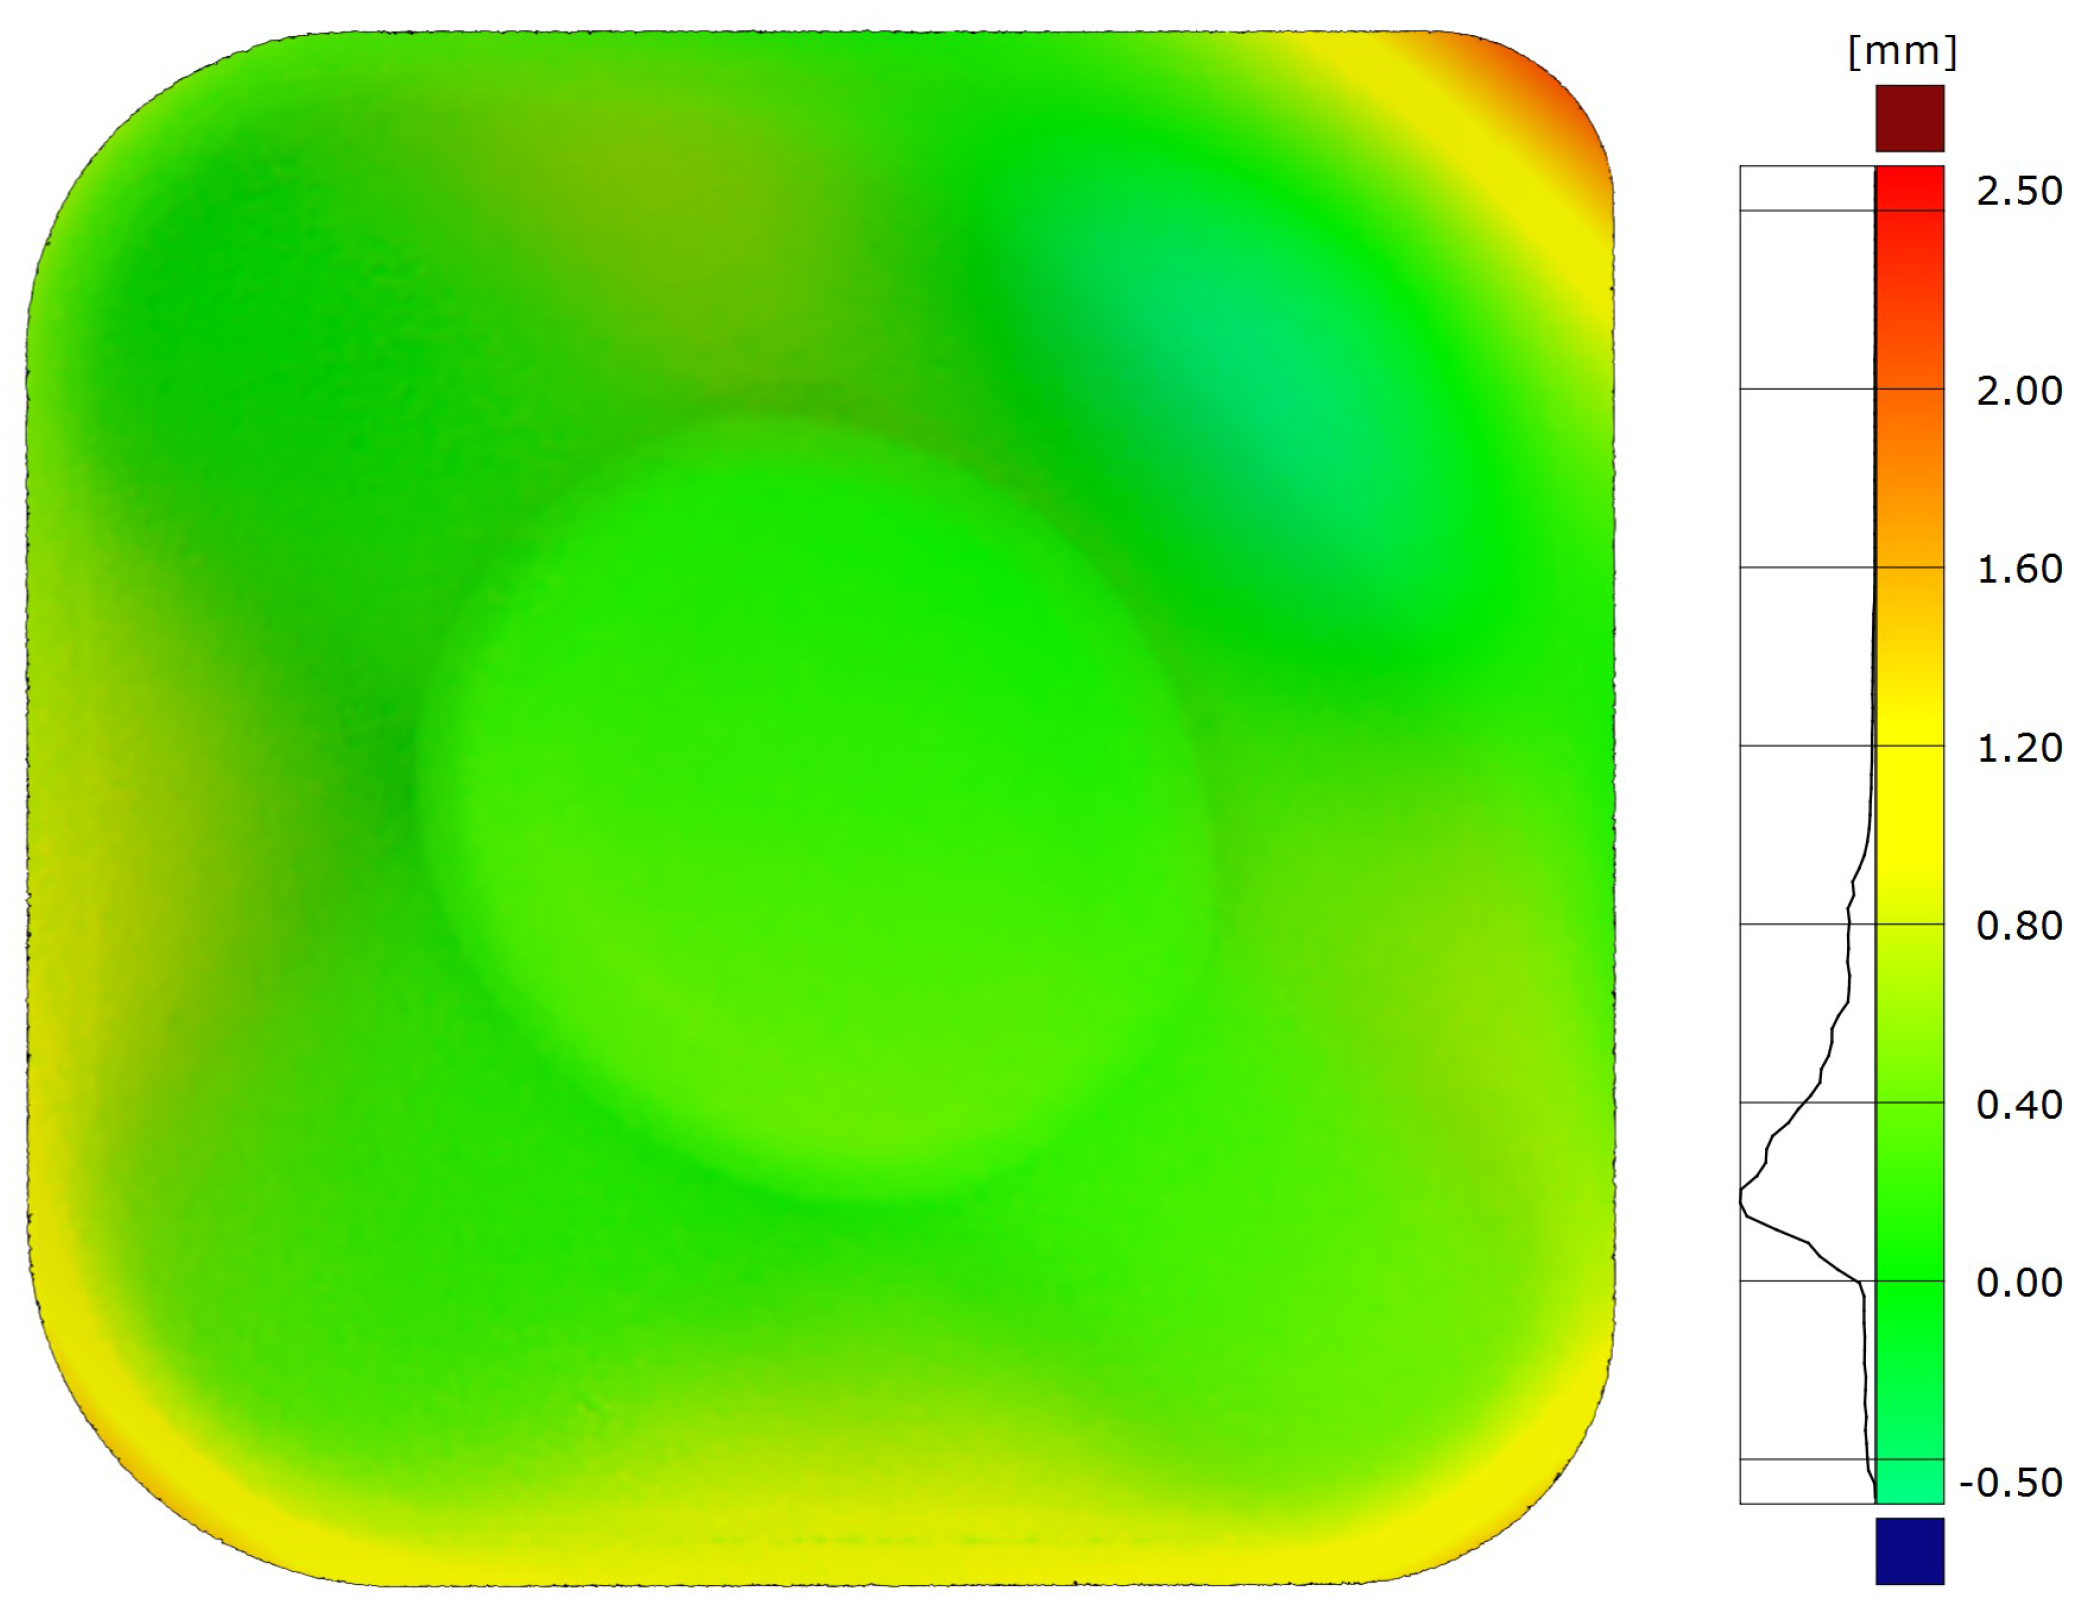
The produced part using the correction just by mirroring each deviated part point showed the same deviation patterns (see Figure 12) as parts corrected using the IPM. However, despite the fact that no iterations were produced, it can be said that the numerical values of deviations (see Table 6) were poor compared to those corresponding to the IPM correction and even to those obtained using no correction.

3.2.2. Influence of the Introduction of an Addendum

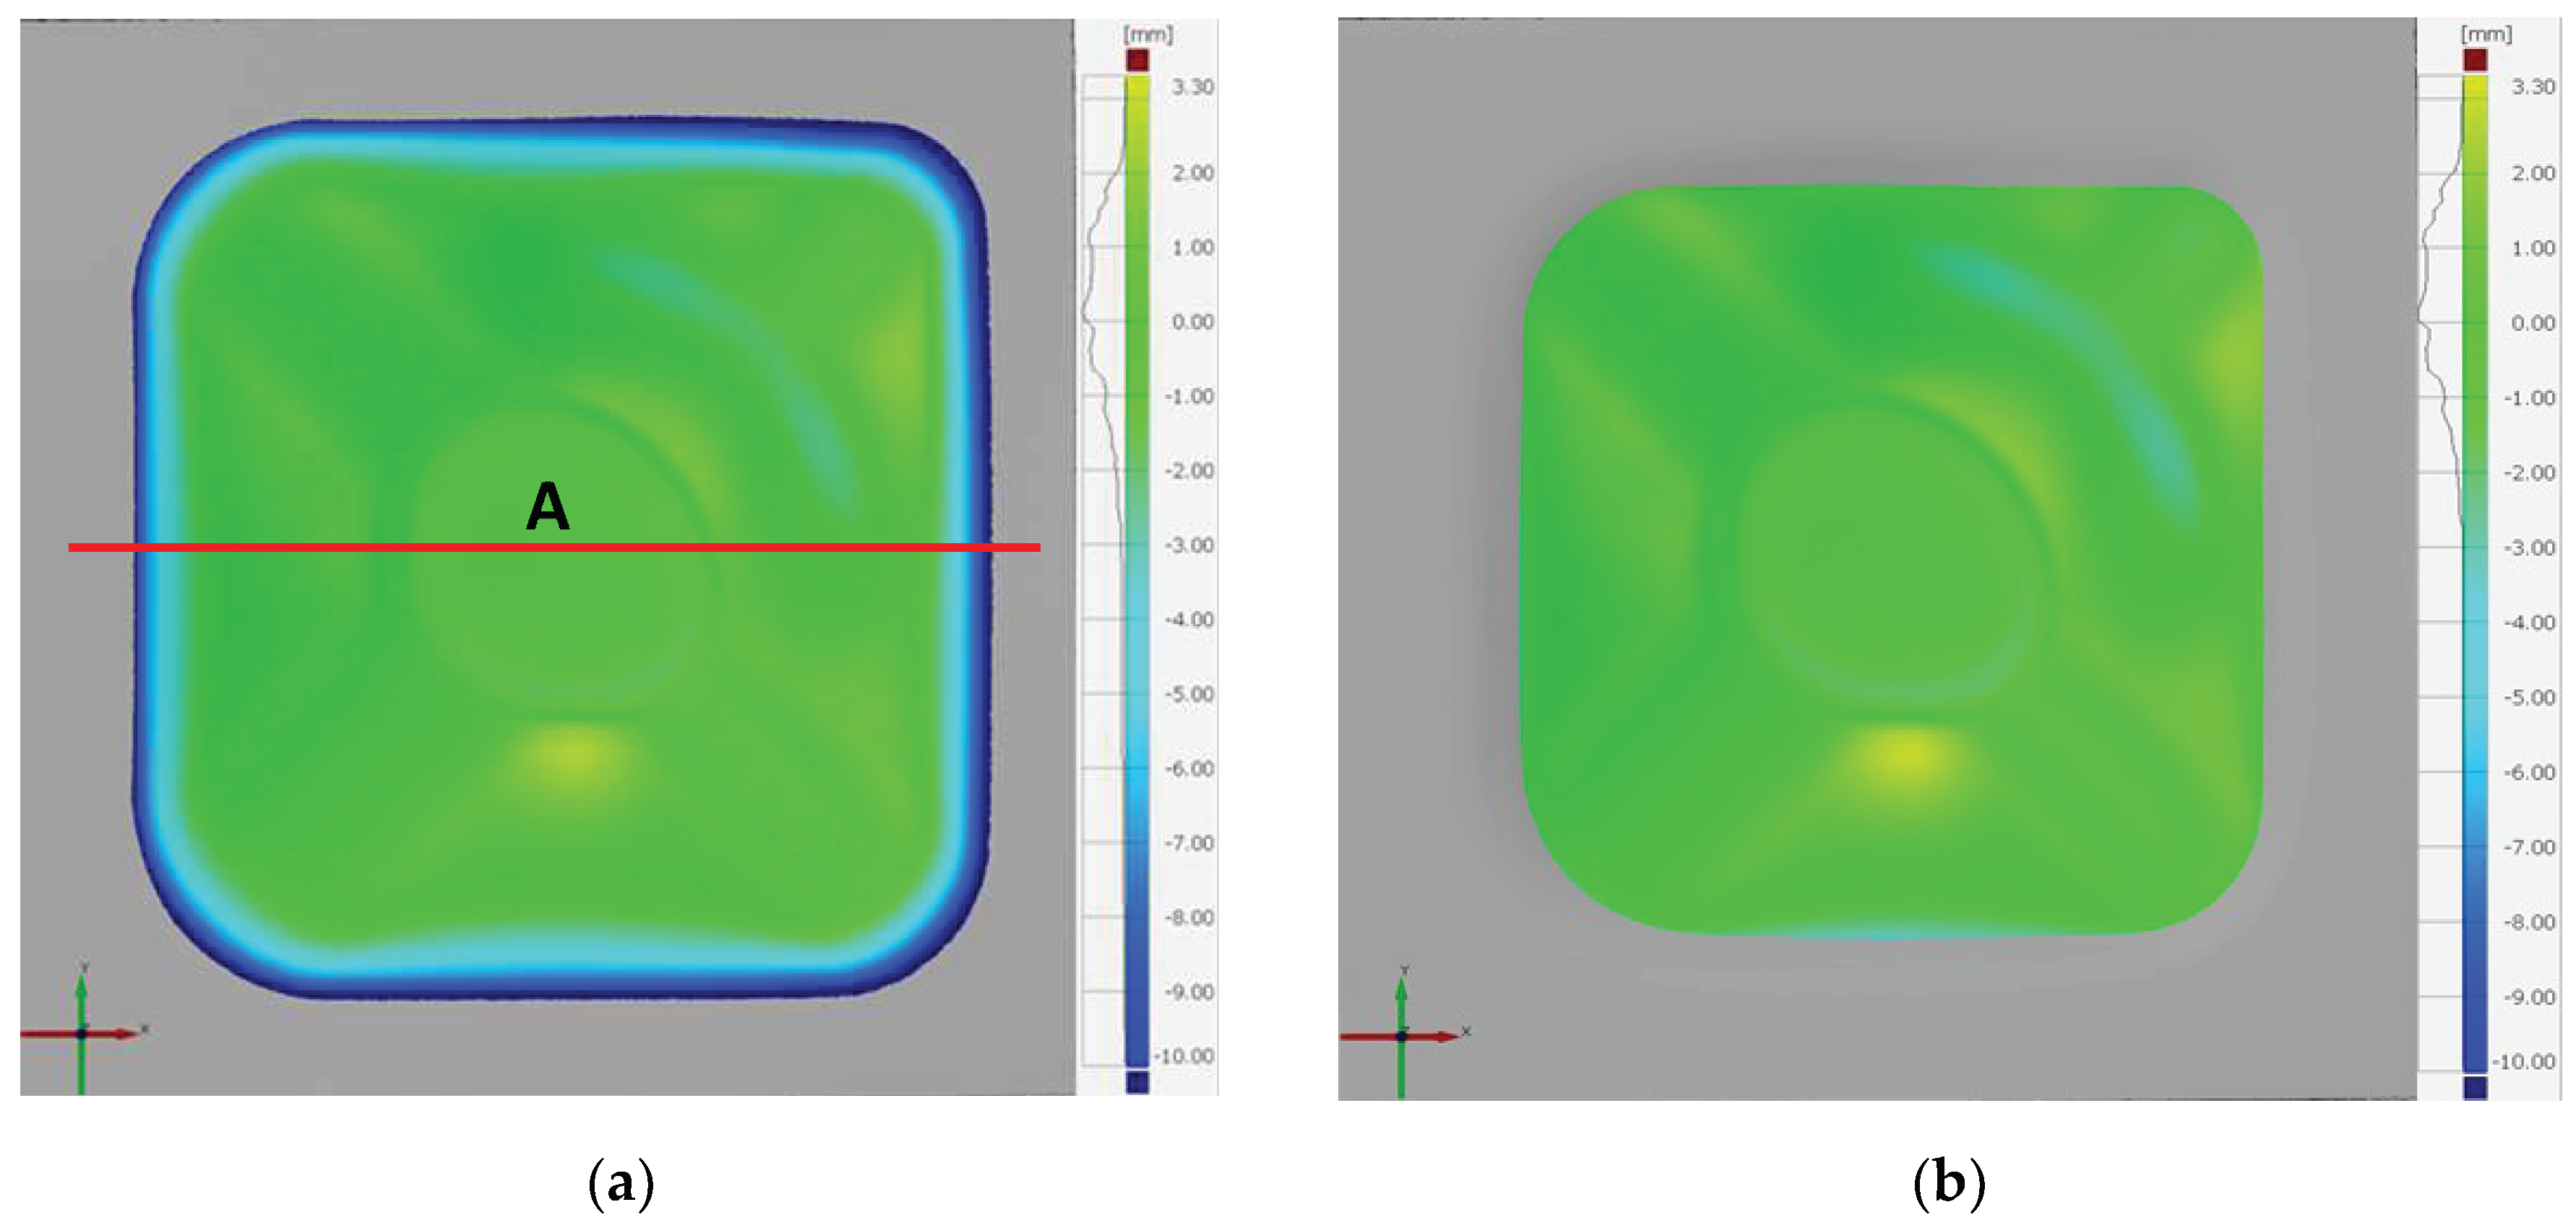
Figure 13 shows deviation maps of a part fabricated with an addendum. The image on the left shows the comparison of the part with the redesigned CAD geometry (D2A), whereas the image on the right shows the comparison with the original CAD (D2A*) target geometry. The representative deviation values of the three iterations performed can be found in Table 7.
The maps and the deviation values point out that:
  • All deviations lying in the addendum zone are negative overforming deviations. This is clearly shown in Figure 14, where the deviation profile of a section extracted from the deviation map of the part fabricated with addendum (Figure 13a) is depicted. That is, the entire addendum depth (14 mm) was affected by deflection. On the contrary, over the target geometry, the effect of the deflection was drastically reduced. In this sense, on the target geometry, the maximum negative overforming deviation was almost 70% lower than in the geometry containing the addendum.
  • The deviations over the addendum represented around 63% of the whole negative overforming deviations along the part.
  • On the target geometry, the percentage of deviations within the range ±1 mm was 21% higher than in the geometry containing the addendum. This value can be considered an indicator of the negative influence of the bending effect over the geometric accuracy of the part.

3.3. Analysis of the Finishing Operations

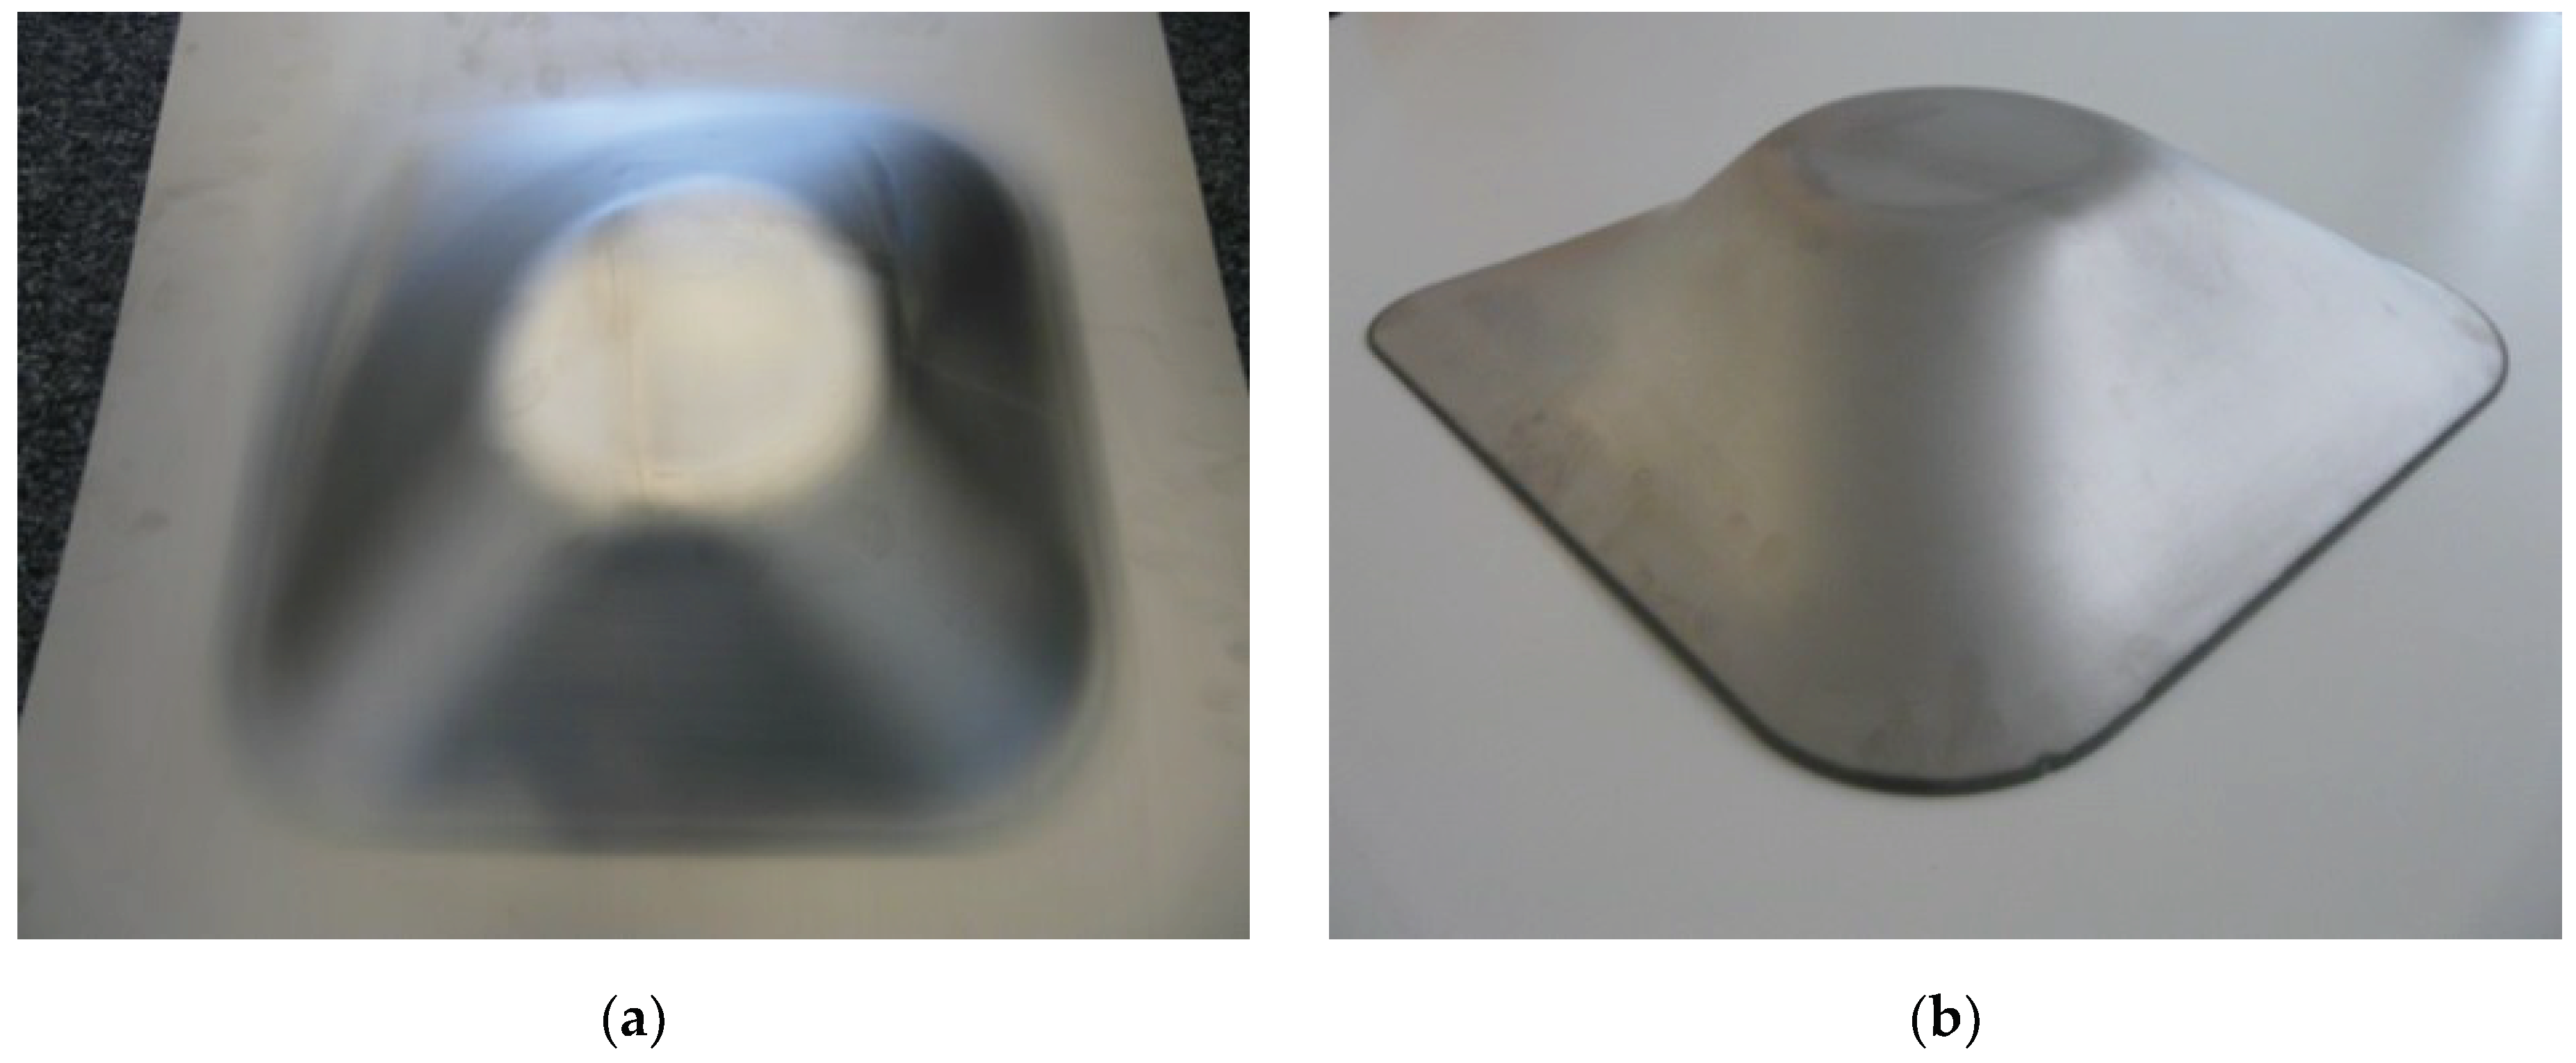
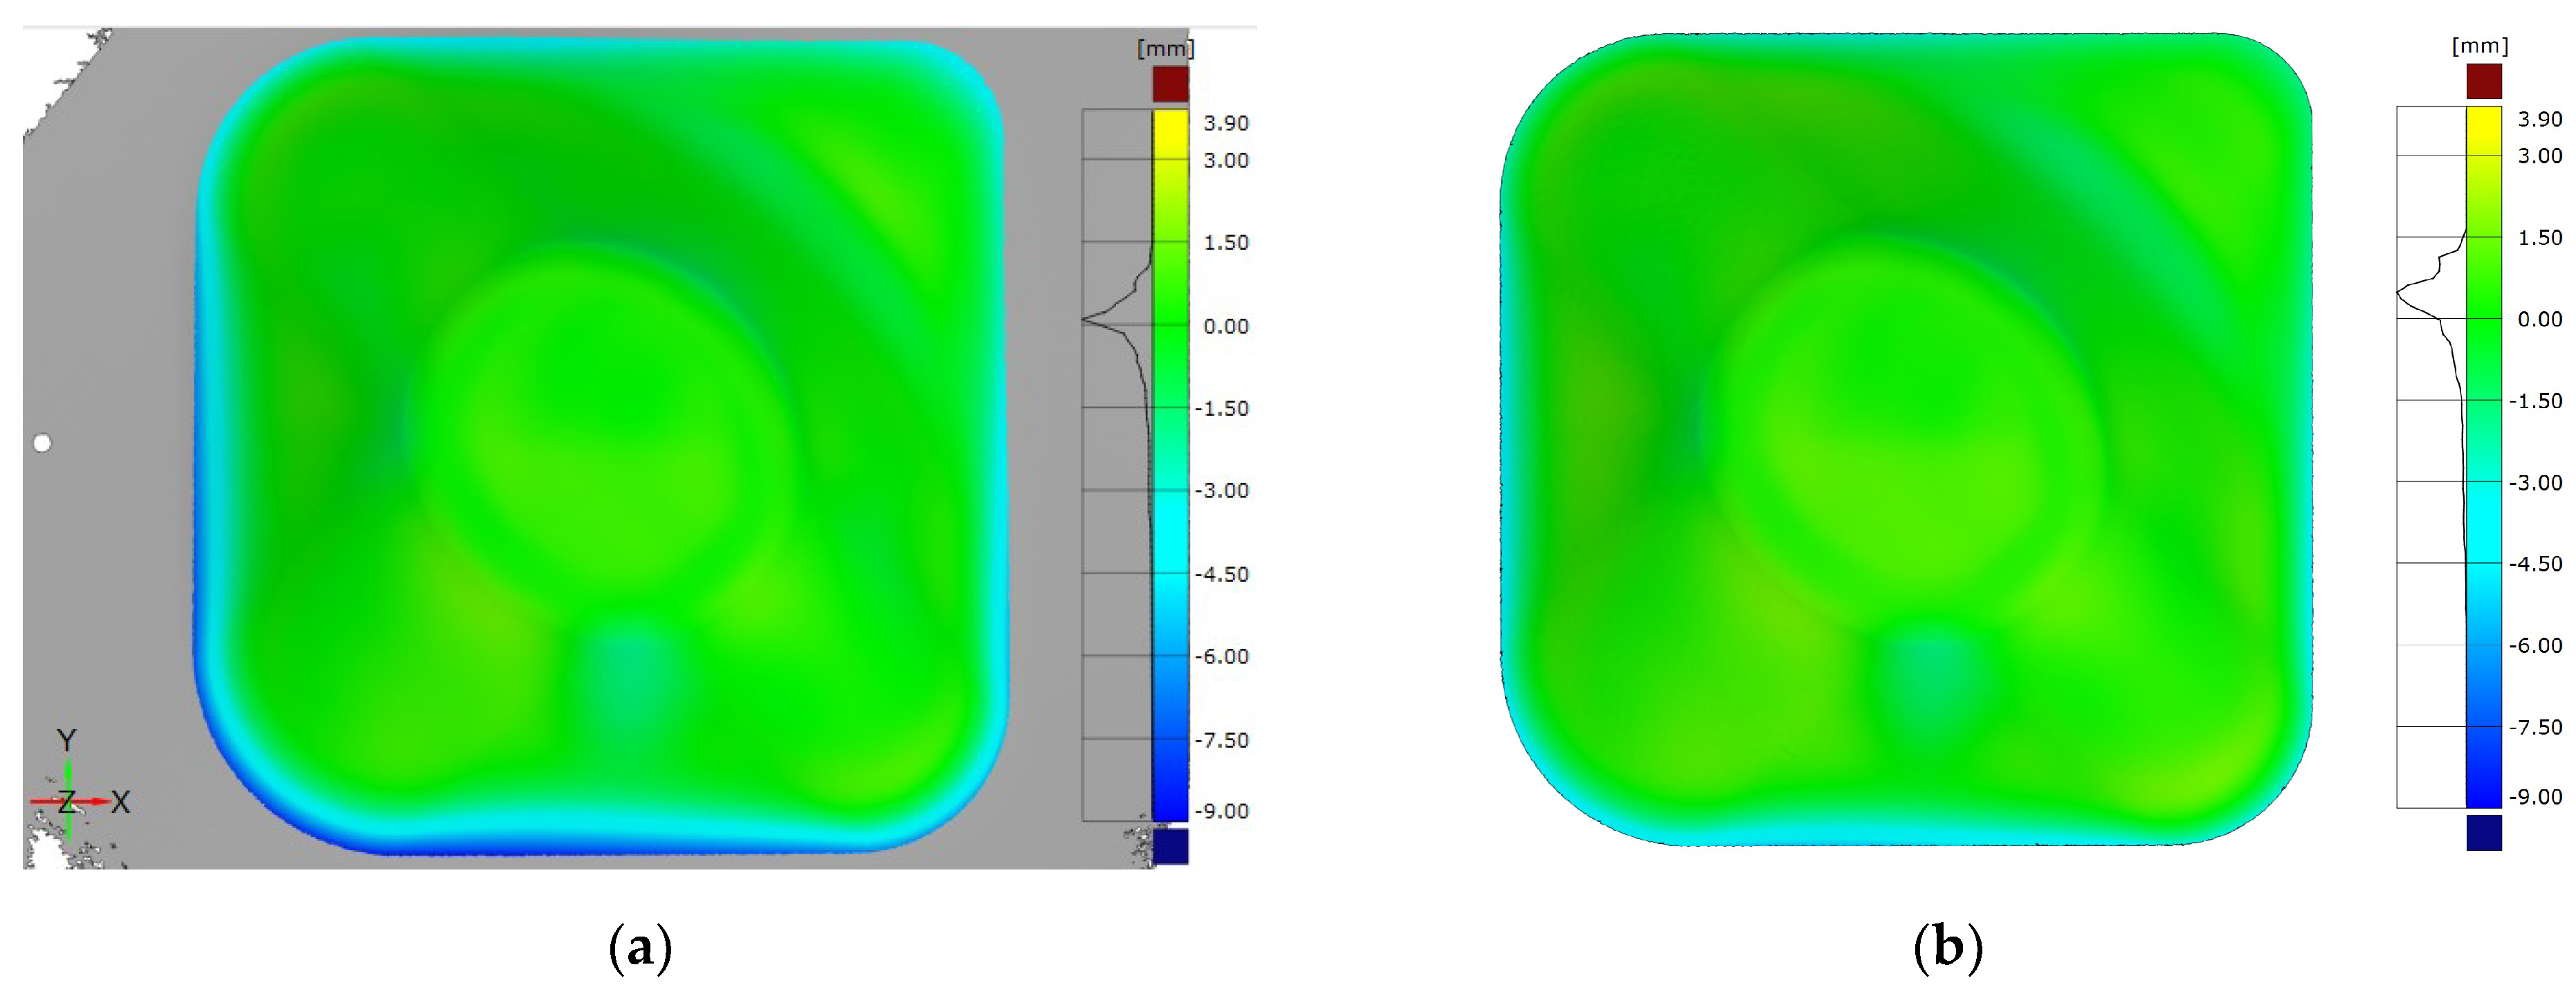
The finishing operations were applied to the three parts obtained with the application of the IPM model to the D2_3 part. A picture of a decontaminated part before and after trimming can be seen in Figure 15. Figure 16 shows deviation maps of one of the parts before and after finishing operations, whereas its representative deviations values (average of the three parts) can be found in Table 8.
The results point out that after the finishing operations:
  • The negative overforming deviations decreased (peak value 3.39 mm and average value 0.35 mm lower).
  • On the contrary, the positive underforming deviations increased (peak value 0.21 mm and average value 0.17 mm higher).
  • The percentage of deviations within ±1 mm remained almost constant since the decrease of the overforming deviations compensated for the increase of the underforming deviations.
A closer look at the deviation maps suggests that this occurred due to a localized stress relief after trimming operation. That is, when trimming along the perimeter, the part shrunk and consequently, negative overforming deviations decreased. At the same time, positive underforming deviations increased but to a lesser degree than overforming deviations. This variation is clearly observed in Figure 17 where the comparison of the 3D measurements for the first iteration of the D2_3_IPM part before and after the finishing operations is shown.

4. Discussion

The present work has been focused on the manufacturing of Ti-6Al-4V parts using hot SPIF, which involved heating the entire sheet by means of two heating devices governed by a PLC. In this context, the study has addressed the following aspects:
  • The analysis of the influence of the working temperature on the geometric accuracy by means of a preliminary set of SPIF trials.
  • The application of toolpath correction strategies to improve the geometric accuracy of Ti-6Al-4V parts.
  • The development of a novel solution to eliminate deviations associated with the bending of the sheet along the perimeter on the part.
  • The analysis of the influence of two finishing operations (decontamination and trimming) on the final geometric accuracy of the part.
First, the preliminary trials have served to define the optimal working temperature (675 °C) using the current set-up. In this sense, the results have shown that, in general, within the analyzed range, a temperature increase had an overall positive effect since the positive underforming deviations that were mainly related to the springback effect decreased, in agreement with other studies [4,5,6,7]. However, this fact was not enough to obtain sufficiently accurate Ti-6Al-4V parts. Furthermore, excessive negative overforming deviations, mainly related to the deflection of the sheet around the perimeter area, were unavoidable despite the increasing temperature and significantly minimized percentage of deviations in the range of ±1 mm, pointing out the necessity of a specific solution for this issue. However, taking previous results [4] as a reference, this effect was considerably minimized with the presence of the backing plate, but was not sufficient to eliminate it completely.
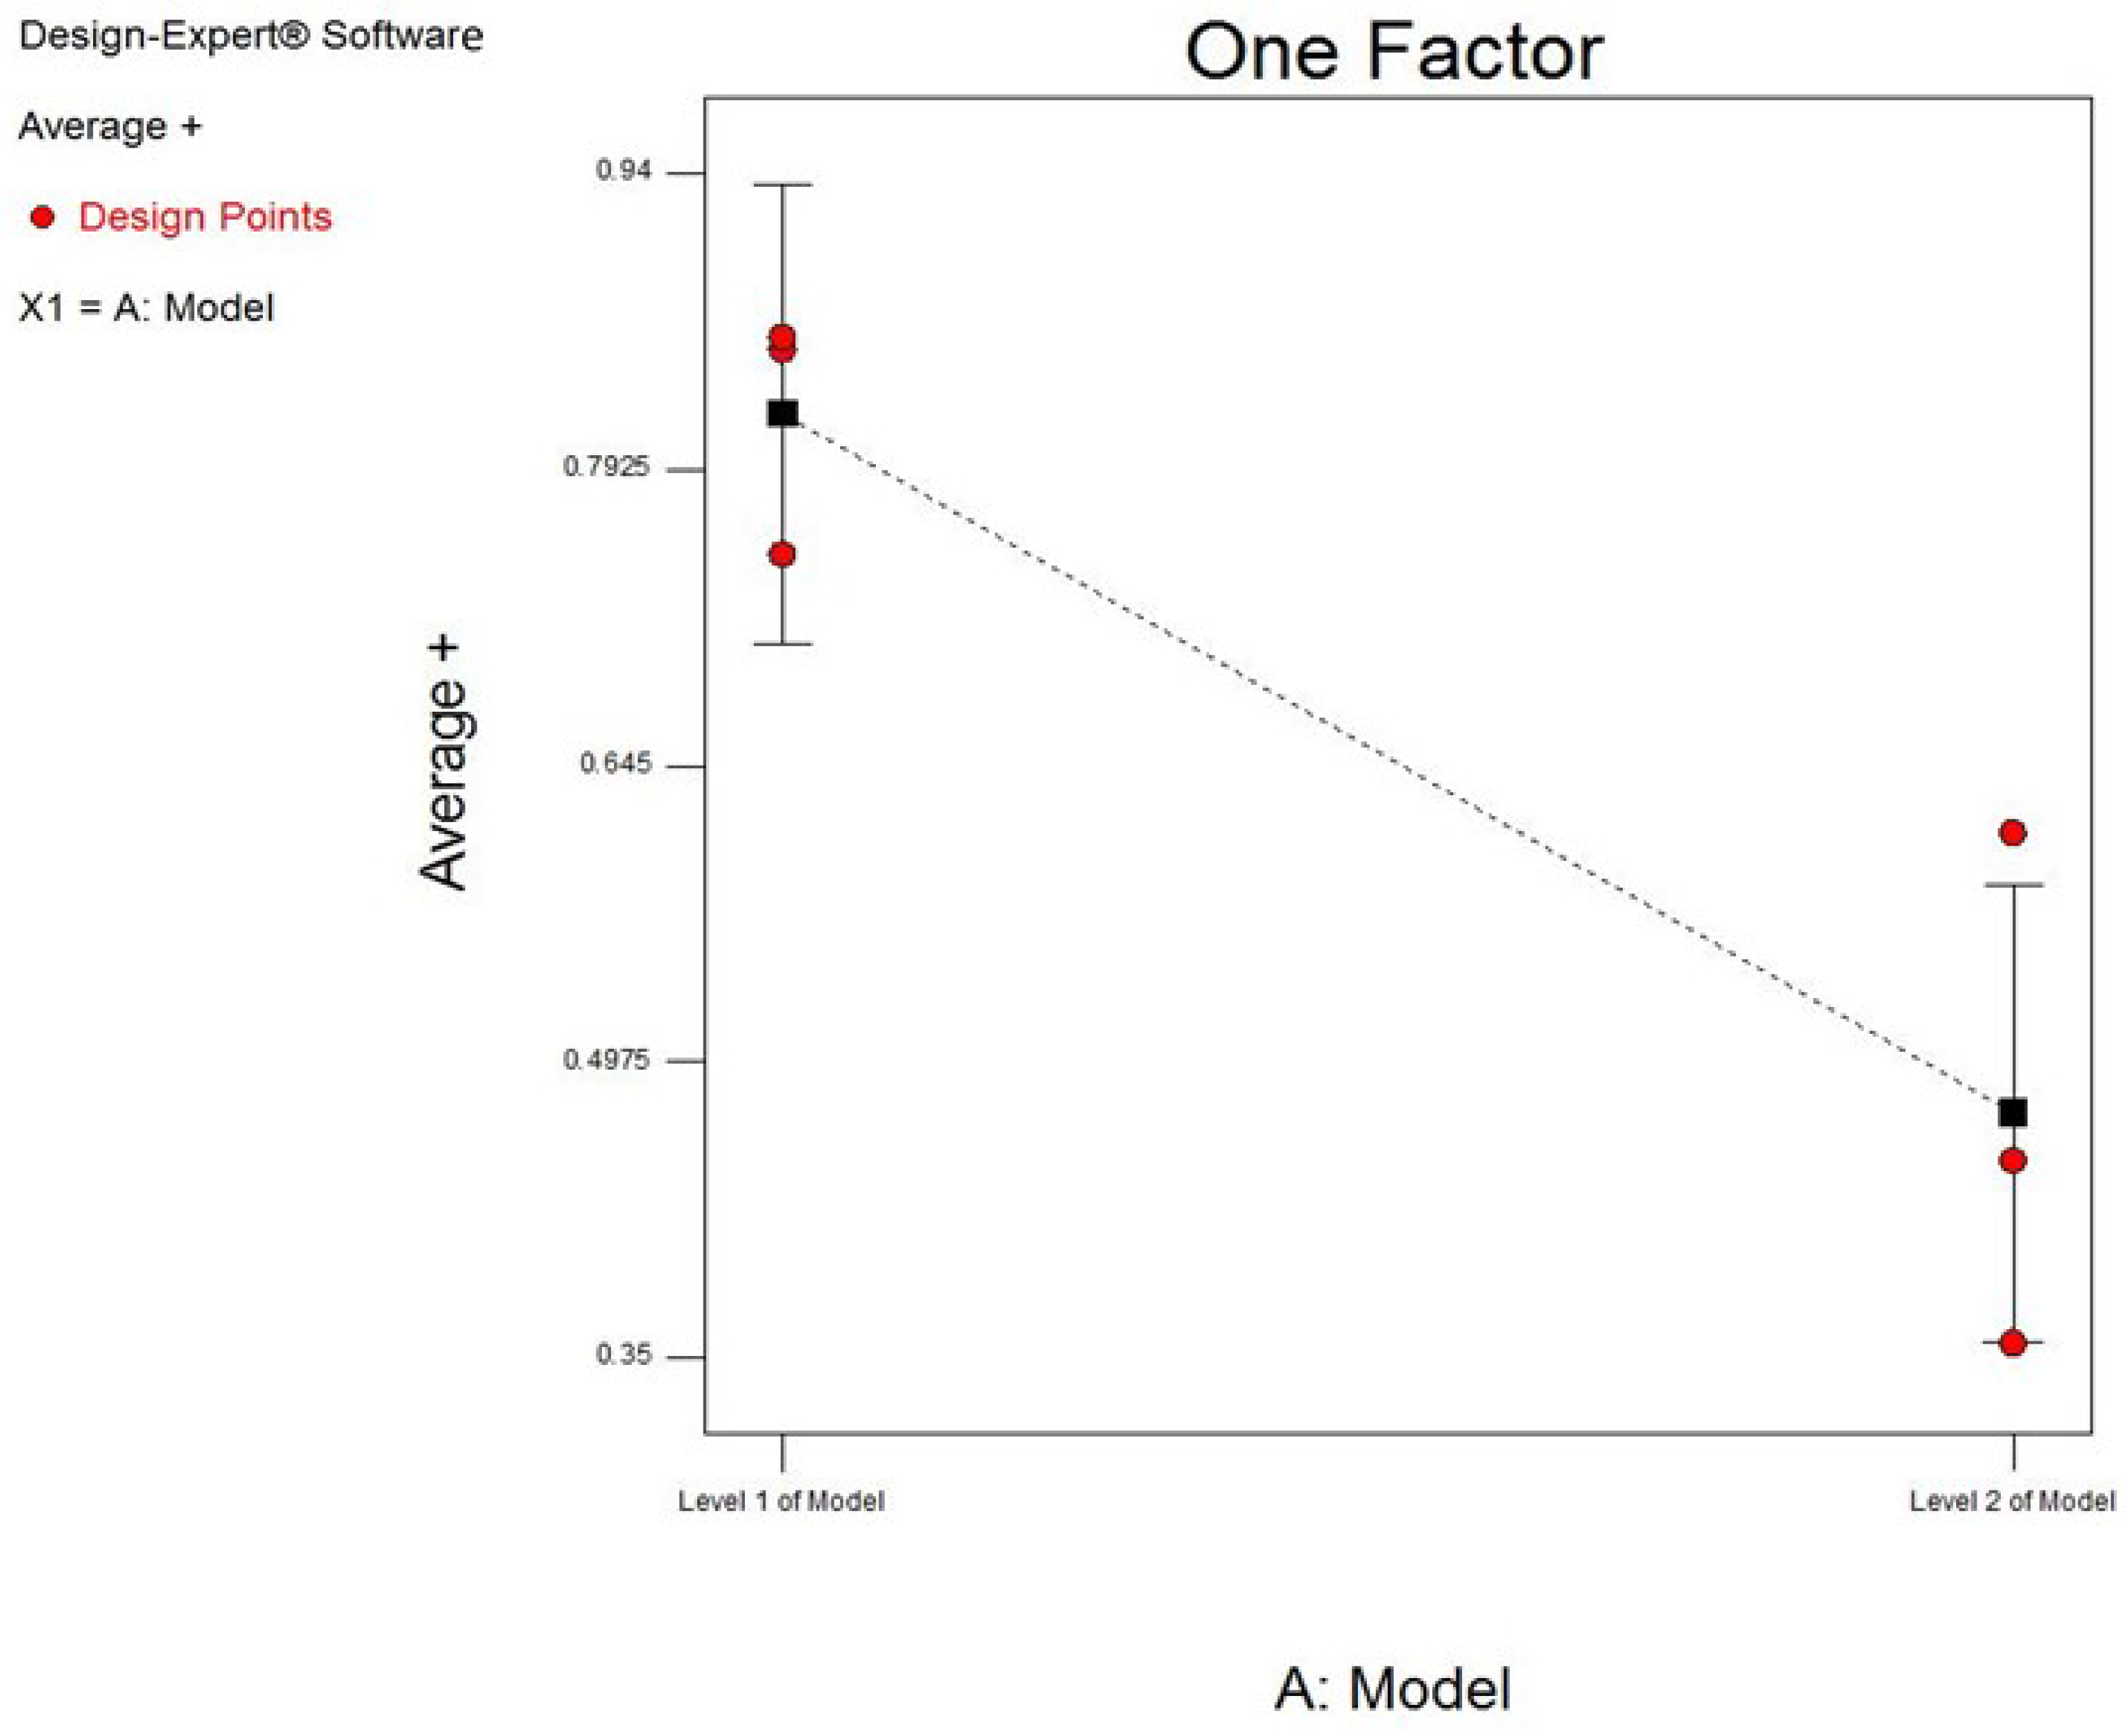
Second, the study has demonstrated the potential of the application of the IPM model developed by Khan et al. [12] for the manufacturing of Ti-6Al-4V parts, unlike the alternative strategy evaluated (mirroring each deviated part point relative to its design position). Thus, in general, the representative deviation values (see Table 5) of the maps have shown an overall positive effect of the IPM tool path correction as the deviations in the range ±1 mm show (up to 49% of improvement). In this sense, the model was effective to counteract deviations associated with the springback effect along the flat and low curvature walls, as the decrease of positive underforming deviations indicated. Specifically, underforming peak values were drastically minimized (40–61%) with the application of the IPM. The results also suggested remarkable differences depending on the tool path correction applied (obtained using parts D2_1 or D2_3 to generate the classifier of the IPM). For this reason, the results obtained with the three parts produced using each corrected tool path were used to make an ANOVA analysis of the effect of the corrected tool path on the deviation of the obtained part. As response factors, the representative deviation values were used (percent within the ±1.0 mm range, maximal/average positive deviations, maximal/average negative deviations) (Table 9). As it can be observed in Figure 18, the tool path used to correct the part (indicated as A-Model in the ANOVA analysis) had a significant effect on the resultant average positive deviation. According to the principles of the ANOVA analysis, values of “Prob > F” less than 0.050 indicate that model terms are significant and that means that, in this case, there is only a 1.33 % probability that the detected differences between levels (corrected tool paths) are due to noise. Analogue results have been obtained for the other deviation representative values. Considering the operating principle of the IPM algorithm (see Section 2.2.2), this means that the employed coordinate cloud to generate the classifier of the IPM significantly influenced the final accuracy of the part.
On the other hand, through all the produced parts, it was observed that the negative overforming deviations located at the perimeter area were excessive. Such deviations were due to sheet deflection under bending conditions, and tool path correction was not effective at correcting this type of deviation. In fact, these deviations increased with the tool path correction (see Table 5, peak values 44–68% higher). This issue further confirmed the necessity of a specific solution to counteract this kind of deviation. In this sense, the novel solution proposed based on the part redesign introducing an addendum seemed effective at drastically minimizing the influence of deviations associated with the bending effect along the perimeter of the part, and consequently, to significantly improving the geometric accuracy.
The parts fabricated with the addendum allowed for identifying the level of error the sheet deflection introduced. Deviations over the addendum, all affected by deflection, represent around 63% of the whole negative overforming deviations along the part. This negative factor made the geometric accuracy fall significantly since the percentage of deviations within the range ±1 mm decreased 21% and pointed out the positive effect of introducing an addendum to the target geometry. In fact, as Table 10 shows, comparing the results referred to the target geometry of the part fabricated with addendum, D2A*, with the reference part, D2 (part fabricated without addendum), the overforming negative deviations were 50% minimized and a 25.4% accuracy improvement was achieved (deviations within the range ±1 mm increased from 47.3% to 59.3%).
Finally, a procedure to decontaminate Ti-6Al-4V parts after the hot SPIF process was presented (the sheets were excessively oxidized due to the high process temperatures). Furthermore, the influence of this operation, combined with part trimming along the perimeter, was analyzed in terms of its geometric accuracy. Thus, it was demonstrated that, as a whole, these finishing operations did not significantly affect the final geometric accuracy of the part (deviations within the range ±1 mm were almost identical before and after finishing operations), though the results have also revealed that the part slightly shrunk after the trimming operation along the perimeter. This behavior is in concordance with the results obtained by Ortiz et al. [4] where a cross-shaped sample was trimmed from a Ti-6Al-4V part. This study showed that, in general, the deviations after trimming were very low since the maximum values were bounded to zones close to the trimming path.

5. Conclusions

The present study demonstrates the potential of two different approaches (Tool path correction by means of the application of an IPM and; Introduction of an addendum to the target geometry) to significantly improve the geometric accuracy of Ti-6Al-4V parts produced using hot SPIF.
On the one hand, regarding the solution related to the correction of the toolpath, the following can be stated:
  • The application of the IPM leads to an accuracy improvement up to 49%.
  • The IPM is effective to counteract deviations associated with the springback effect. However, it is not effective to correct deviations located at the perimeter area of the part associated to the sheet deflection.
  • The employed coordinate cloud to generate the classifier of the IPM significantly influences the final accuracy of the part after correction.
On the other hand, the solution based on including an addendum surface at the perimeter area of the target part to minimize the deviations associated to the deflection of the sheet seems effective. The results of the parts produced with addendum shows that:
  • Deviations over the addendum, all affected by deflection, represent around 63% of the whole negative overforming deviations along the part.
  • The negative effect of the deflection of the sheet over the geometric accuracy can be quantify in 21%.
  • On the target geometry, the overforming negative deviations are 50% minimized and a 25.4% accuracy improvement is achieved with the introduction of the addendum.
Furthermore, the present paper also shows that the two finishing operations needed to obtain the part, namely decontamination and trimming, do not significantly affect the final geometric accuracy of the part.

Author Contributions

M.O. is the main author of the paper. He has participated in the work planning, performing of the experimental tests, and analysis of the results. This work has been carried out in the frame of his PhD in Incremental Sheet Forming of Ti-6Al-4V. M.P. is the PhD director of M.O. in Tecnalia and has contributed to the definition of the work planning, analysis of results, and structure and supervision of the paper. E.I. has participated in the analysis of results and has provided academic support in the writing and supervision of the full paper. L.N.L.d.L. provided continuous academic support to the PhD of M.O. and has contributed to the present study with the supervision of the performed work and the writing of the paper.

Funding

Research leading to these results was done within the project INMA—Innovative manufacturing of complex titanium sheet components. This research was funded by the European Union´s Seventh Framework Programme for research, technological development, and demonstration under grant agreement number 266208.

Acknowledgments

The authors would like to acknowledge Muhamad S. Khan, Frans Coenen, and Clare Dixon from the University of Liverpool for their support regarding the generation of the corrected toolpaths using the IPM.

Conflicts of Interest

The authors declare no conflict of interest. The funders had no role in the design of the study; in the collection, analyses, or interpretation of data; in the writing of the manuscript, or in the decision to publish the results.

References

  1. Donachie, M.J. Titanium: A Technical Guide, 2nd ed.; ASM International, the Materials Information Society: Materials Park, OH, USA, 2004. [Google Scholar]
  2. Jeswiet, J.; Micari, F.; Hirt, G.; Bramley, A.; Duflou, J.; Allwood, J. Asymmetric single point incremental forming of sheet metal. CIRP Ann. 2005, 54, 88–114. [Google Scholar] [CrossRef]
  3. Lu, H.; Liu, H.; Wang, C. Review on strategies for geometric accuracy improvement in incremental sheet forming. Int. J. Adv. Manuf. Technol. 2019, 102, 3381–3417. [Google Scholar] [CrossRef]
  4. Ortiz, M.; Penalva, M.; Iriondo, E.; López de Lacalle, L.N. Investigation of thermal-related effects in hot SPIF of Ti–6Al–4V alloy. Int. J. Precis. Eng. Manuf. Green Technol. 2019. [Google Scholar] [CrossRef]
  5. Palumbo, G.; Brandizzi, M. Experimental investigations on the single point incremental forming of a titanium alloy component combining static heating with high tool rotation speed. Mater. Des. 2012, 40, 43–51. [Google Scholar] [CrossRef]
  6. Khazaali, H.; Fereshteh-Saniee, F. A comprehensive experimental investigation on the influences of the process variables on warm incremental forming of Ti-6Al-4V titanium alloy using a simple technique. Int. J. Adv. Manuf. Technol. 2016, 87, 2911–2923. [Google Scholar] [CrossRef]
  7. Naranjo, A.J.; Miguel, V.; Martínez, A.; Coello, J.; Manjabacas, C.M. Evaluation of the formability and dimensional accuracy improvement of Ti6Al4V in warm SPIF processes. Metals 2019, 9, 272. [Google Scholar] [CrossRef]
  8. Behera, A.K.; Verbert, J.; Lauwers, B.; Duflou, J.R. Tool path compensation strategies for single point incremental sheet forming using multivariate adaptive regression splines. Comput. Aided Des. 2013, 45, 575–590. [Google Scholar] [CrossRef]
  9. Behera, A.K.; Lauwers, B.; Duflou, J.R. Tool path generation framework for accurate manufacture of complex 3D sheet metal parts using single point incremental forming. Comput. Ind. 2014, 65, 563–584. [Google Scholar] [CrossRef]
  10. Fiorentino, A.; Giardini, C.; Ceretti, E. Application of artificial cognitive system to incremental sheet forming machine tools for part precision improvement. Precis. Eng. 2015, 39, 167–172. [Google Scholar] [CrossRef]
  11. Lu, H.; Kearney, M.; Liu, S.; Daniel, W.J.T.; Meehan, P.A. Two-directional toolpath correction in single-point incremental forming using model predictive control. Int. J. Adv. Manuf. Technol. 2017, 91, 91–106. [Google Scholar] [CrossRef]
  12. Khan, M.S.; Coenen, F.; Dixon, C.; El-Salhi, S.; Penalva, M.; Rivero, A. An intelligent process model: Predicting springback in single point incremental forming. Int. J. Adv. Manuf. Technol. 2015, 76, 2071–2082. [Google Scholar] [CrossRef]
  13. Zwierzycki, M.; Nicholas, P.; Thomsen, M.R. Localised and learnt applications of machine learning for robotic incremental sheet forming. In Humanizing Digital Reality: Design Modelling Symposium Paris 2017; De Rycke, K., Gengnagel, C., Baverel, O., Burry, J., Mueller, C., Nguyen, M.M., Rahm, P., Thomsen, M.R., Eds.; Springer: Singapore, 2018; pp. 373–382. [Google Scholar]
  14. Ortiz, M.; Penalva, M.L.; Puerto, M.J.; Homola, P.; Kafka, V. Hot single point incremental forming of Ti-6Al-4V alloy. Key Eng. Mater. 2014, 611, 1079–1087. [Google Scholar] [CrossRef]
  15. Young, D.; Jeswiet, J. Wall thickness variations in single-point incremental forming. Proc. Inst. Mech. Eng. Part B J. Eng. Manuf. 2004, 218, 1453–1459. [Google Scholar] [CrossRef]
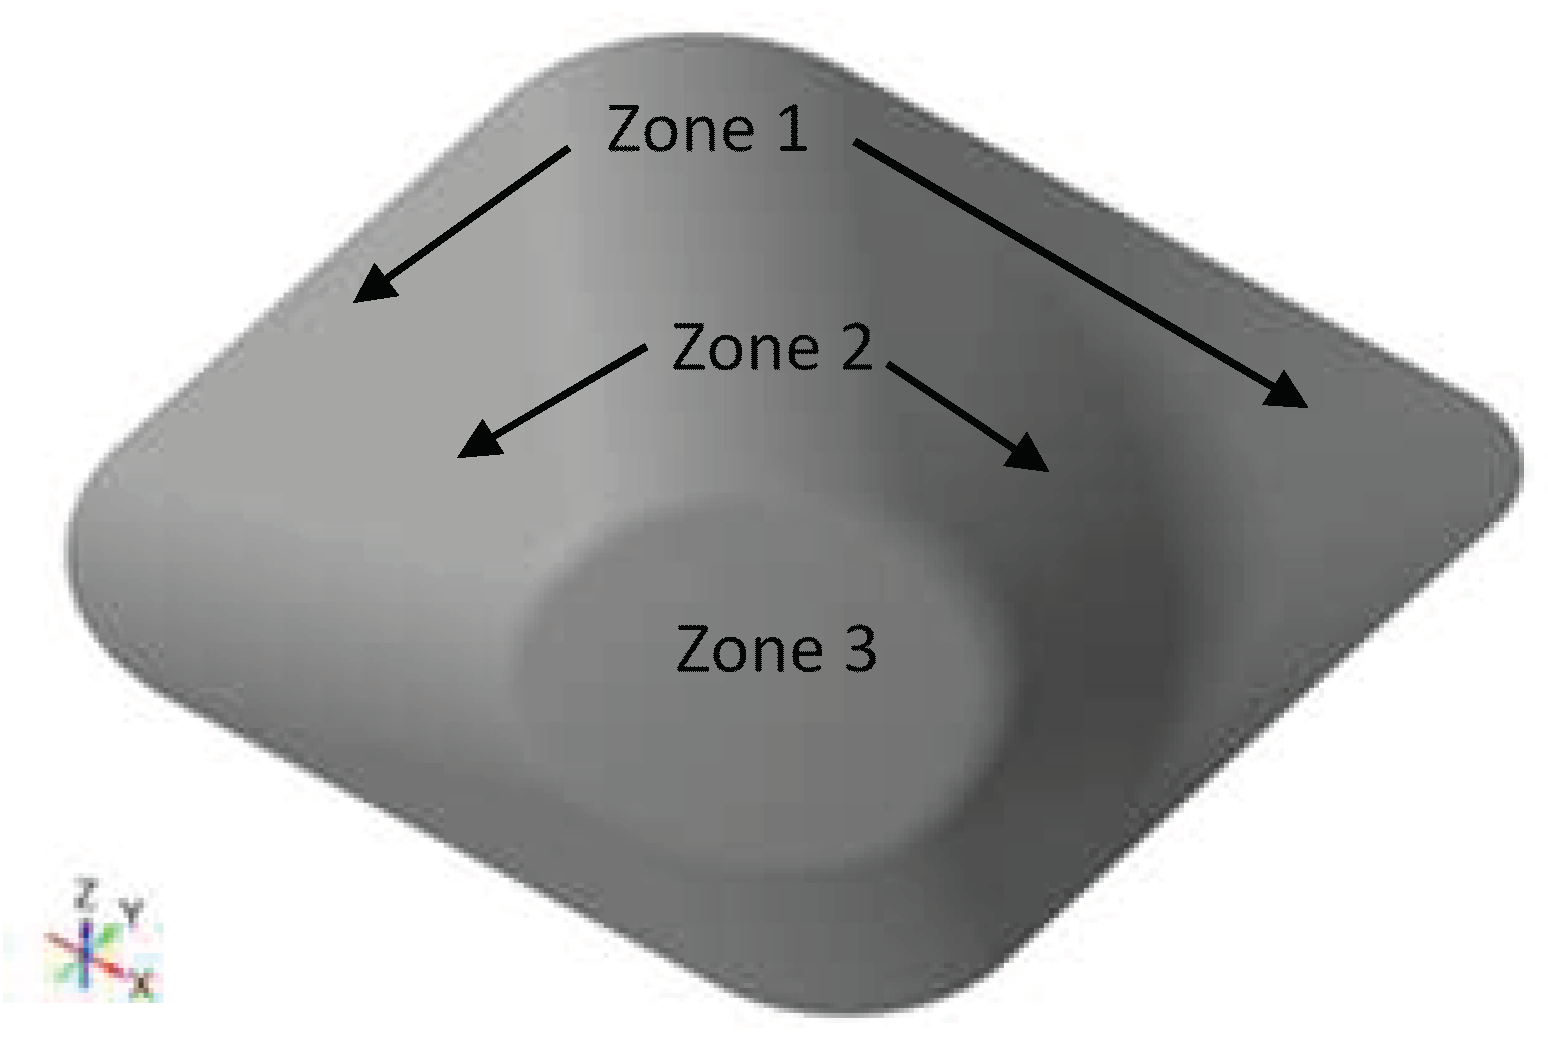
Figure 1. Asymmetric design used for the trials.
Metals 09 00697 g001
Figure 2. Hot SPIF equipment used for the trials.
Metals 09 00697 g002
Figure 3. Backing plate used for the trials.
Metals 09 00697 g003
Figure 4. Scheme of the toolpath strategy programmed with the PowerMill software (2014 R1, Delcam, Birmingham, UK).
Metals 09 00697 g004
Figure 5. Output of each IPM: corrected coordinate cloud (a), and mesh generated using the corrected cloud (b).
Metals 09 00697 g005
Figure 6. Identification of the sheet deflection area through the thickness profile.
Metals 09 00697 g006
Figure 7. Part redesign with the addendum.
Metals 09 00697 g007
Figure 8. Ti-6Al-4V part surface after the hot SPIF process: (a) inner face, and (b) outer face.
Metals 09 00697 g008
Figure 9. (a) Samples location extracted for the alpha-case thickness analysis, and (b) alpha-case on the outer face of zone 3.
Metals 09 00697 g009
Figure 10. Color map of deviations for (a) D1 (540 °C), (b) D2 (675 °C), and (c) D3 (700 °C) trials.
Metals 09 00697 g010
Figure 11. Effect of intelligent process models (IPMs) on geometric deviation: part D2_1 without correction (a), part corrected using D2_1 data (b), part D2_3 without correction (c), and part corrected using D2_3 data (d).
Metals 09 00697 g011
Figure 12. Color maps of deviations for a part produced with tool path correction (D2_1_C) just mirroring each deviated point of D2_1 part.
Metals 09 00697 g012
Figure 13. Color maps of deviations for a part manufactured with an addendum. (a) CAD reference: part with addendum. (b) CAD reference: target geometry.
Metals 09 00697 g013
Figure 14. Deviation profile of a section A extracted from the deviation map of Figure 13a.
Metals 09 00697 g014
Figure 15. Decontaminated part: (a) before trimming, and (b) after trimming.
Metals 09 00697 g015
Figure 16. Color maps of deviations for a part, D2_3_IPM, before (a) and after (b) finishing operations.
Metals 09 00697 g016
Figure 17. Comparison before and after the finishing operations (first iteration of D2_3_IPM part).
Metals 09 00697 g017
Figure 18. ANOVA of the effect of the tool path correction on the average positive deviations: a plot of the identified trend.
Metals 09 00697 g018
Table 1. Tests to analyze the influence of the working temperature on the geometric accuracy.
TestT Sheet (°C)T Sheet/Tm *Comment
D15400.33Recommended minimal temperature for hot forming Ti-6Al-4V [1]
D26750.41Temperature close to the limit of the heating equipment.
D37000.42Top working temperature of the heating equipment.
* Ti-6Al-4V melting temperature, Tm = 1650 °C.
Table 2. Alpha-case layer thickness measurements.
PointZone 1Zone 2Zone 3
Out (µm)Inn (µm)Out (µm)Inn (µm)Out (µm)Inn (µm)
15.83.67.87.613.29.2
26.07.08.85.612.810.6
36.86.414.29.414.612.8
46.65.410.212.815.66.8
56.86.89.08.213.68.6
Average6.46.1108.7149.6
Table 3. Deviation results of SPIF trials at different temperatures.
TrialMax + (mm)Max − (mm)Average + (mm)Average − (mm)±1 mm (%)
D14.71−6.891.35−2.2140.2
D24.18−5.961.08−1.6448.7
D34.18−6.141.18−1.6744.9
Table 4. Averaged representative deviation values of parts produced at 675 °C.
D2 Deviation Values (Three Iterations)Average Std Dev Var Coeff (%)
Part deviations within 1 mm range (%)47.31.53.2
Max positive deviation (mm)4.110.245.8
Average positive deviation (mm)1.110.065.4
Max negative deviation (mm)−6.260.264.2
Average negative deviation (mm)−1.700.074.1
Table 5. Representative deviation values of parts produced with and without tool path correction.
TrialMax + (mm)Max − (mm)Average + (mm)Average − (mm)±1 mm (%)
D2_14.18−5.961.08−1.6448.7
D2_1_IPM2.55 (−40%)−9.98 (+67.5%)0.82 (−24.1%)−1.81 (+10.4%)52.5 (+7.8%)
D2_33.84−6.351.05−1.7747.5
D2_3_IPM1.50 (−60.9%)−9.14 (+43.9%)0.47 (−55.2%)−1.63 (+7.9%)70.7 (+48.8%)
Table 6. Representative deviation values of part produced with tool path correction (D2_1_C) just mirroring each deviated point of D2_1 part.
TrialMax + (mm)Max − (mm)Average + (mm)Average − (mm)±1 mm (%)
D2_1_C3.32−10.281.09−2.3538.6
D2_1_C vs. D2_1_IPM (%)+30.2+3+32.9+29.8−26.5
D2_1_C vs. D2_1 (%)−20.6+72.5+0.9+43.3−20.7
Table 7. Representative deviation values of a part fabricated with addendum. Comparison with the redesigned geometry (D2A) and with the original geometry (D2A*).
TrialMax + (mm)Max − (mm)Average + (mm)Average − (mm)±1 mm (%)
D2A3.28−13.280.988−2.27149.0
D2A*3.28−4.050.991−0.84659.3
D2A* vs. D2A0−69.5%+0.3%−62.7%+21.0%
Table 8. Representative deviation values of D2_3_IPM before and after finishing operations.
TrialMax + (mm)Max − (mm)Average + (mm)Average − (mm)±1 mm (%)
D2_3_IPM *1.50−9.140.47−1.6370.7
D2_3_IPM *_FIN1.71−5.750.64−1.2871.3
DIF+0.21 (14%)−3.39 (37%)+0.17 (36.2%)−0.35 (21.5%)+0.6 (0.85%)
* Average of three iterations.
Table 9. ANOVA of the effect of the tool path correction on the average positive deviations: numerical results.
SourceSum of SquaresdfMean SquareF Valuep-Value Prob > F-
Model0.1810.1817.950.0133significant
A-Model0.1810.1817.950.0133-
Pure Error0.04040.010---
Cor Total0.225----
Table 10. Representative deviation values of parts fabricated without and with an addendum (with respect to the target geometry).
TrialMax + (mm)Max − (mm)Average + (mm)Average − (mm)±1 mm (%)
D24.11−6.261.11−1.747.3
D2A*3.28−4.050.991−0.84659.3
D2A* vs D2−20.2%−35.3%−10.7%−50.2%+25.4%