Article

Springback Prediction of a Hot Stamping Component Based on the Area Fractions of Phases

1
Key Laboratory of Automobile Materials, Ministry of Education and College of Materials Science and Engineering, Jilin University, Changchun 130025, China
2
Rolling Forging Research Institute, Jilin University, Changchun 130025, China
*
Author to whom correspondence should be addressed.
Metals 2019, 9(6), 694; https://doi.org/10.3390/met9060694
Submission received: 31 May 2019 / Revised: 13 June 2019 / Accepted: 14 June 2019 / Published: 20 June 2019

Abstract

:
Different from traditional hot stamping components with full martensite, the new tailored hot stamping (THS) components have different quenched microstructures, which results in their lower shape accuracy. To investigate the influence of different quenched phases on the springback of a component, a THS experiment of a U-shaped component was performed with segmented heating and a cooling tool. The area fractions of phases at different tool temperatures were obtained by a two-stage color tint etching procedure. Results showed that the quenched phase of the cold zone was almost full martensite. The area fraction of martensite in the hot zone was reduced to the lowest 13% at the tool temperature of 600 °C, while the bainite content reached the highest at 70%. The springback angles at different tool temperatures for quenching were measured by 3D scanning technology and the reverse modeling method. It was revealed that the springback angle increased with the increase of martensite and yet decreased with the increase of bainite. The relationship between the springback angle and the area fractions of the quenched phases was established by means of multiple linear regression analyses. The error analysis results of the predictions and measurements showed that the springback analysis model, based on the area fractions of quenched phases, could be used to predict the springback of hot stamping components with tailored properties.

1. Introduction

The demand for vehicle weight reduction and improved crash performance has led to the application of hot stamping of boron steel [1,2]. However, the components with high strength and low levels of ductility did not show a good performance in crash energy absorption [3,4]. To improve the energy absorption, tailored hot stamping (THS) components with tailored mechanical properties have been developed [5,6,7,8]. From continuous cooling transformation (CCT) curve, it can be seen that ferrite and bainite can be obtained at cooling rates lower than 30 °C/s [9,10]. Since the temperatures of two contact bodies will affect their cooling rates, THS with segmented heating and cooling tools can be used to obtain a multiphase quenched microstructure and achieve the components with tailored properties. There are some studies that analyze how the tool temperature affects the mechanical properties [11,12,13]. However, the temperature difference between the cooling tool and the heating tool is much larger when the tool is partitioned for cooling and heating, which makes the springback of the formed components more serious than conventional hot stamping. Some scholars have studied the influence of hot stamping process parameters on the springback of formed components [14,15,16]. They concluded that the springback of the formed component gradually decreased with the increase of blank temperature and holding time. However, for THS components with various quenching phases, the microstructure distribution has an important impact on the springback.
The springback measurement of components is a complicated process. In order to understand the effect of the quenching phase content on the component springback, a THS experiment was carried out in this paper, and the quenching phase was quantitatively measured by the color metallography and image recognition method. The springback angles of different phase contents were obtained by non-contact 3D measurement. The relationship between phase content and the springback angle was established, which can be used for the determination of the springback of THS components.

2. Experimental Study

2.1. THS Experiments

Usibor1500P boron steel with a thickness of 1 mm was used in the experiments, and the chemical composition is shown in Table 1. Figure 1 shows the THS experimental apparatus. The tool material used for this study was H13 steel and did not have any surface or hardening treatments. H13 steel has excellent comprehensive mechanical properties and high anti-tempering stability and is a common material for hot stamping tools. Cooling channels were machined inside the cooling tool to take away the heat of the blank by the water in the channels. Through installing the electric cartridge heaters controlled by the PID system, the hot tool temperatures could be varied from 25 °C and 600 °C. An air gap of 2 mm was left between the heating tool and the cooling tool to prevent heat transfer between them.
A furnace was used to heat the blank to the temperature of 930 °C for austenizing, and the heating time was about 5 min. After the blank was austenized, it was moved to the tool to be formed and quenched. It took about 10 s to move the hot blank from the furnace to the tools. The quenching time was 10 s with the press force of 400 kN.

2.2. Metallography

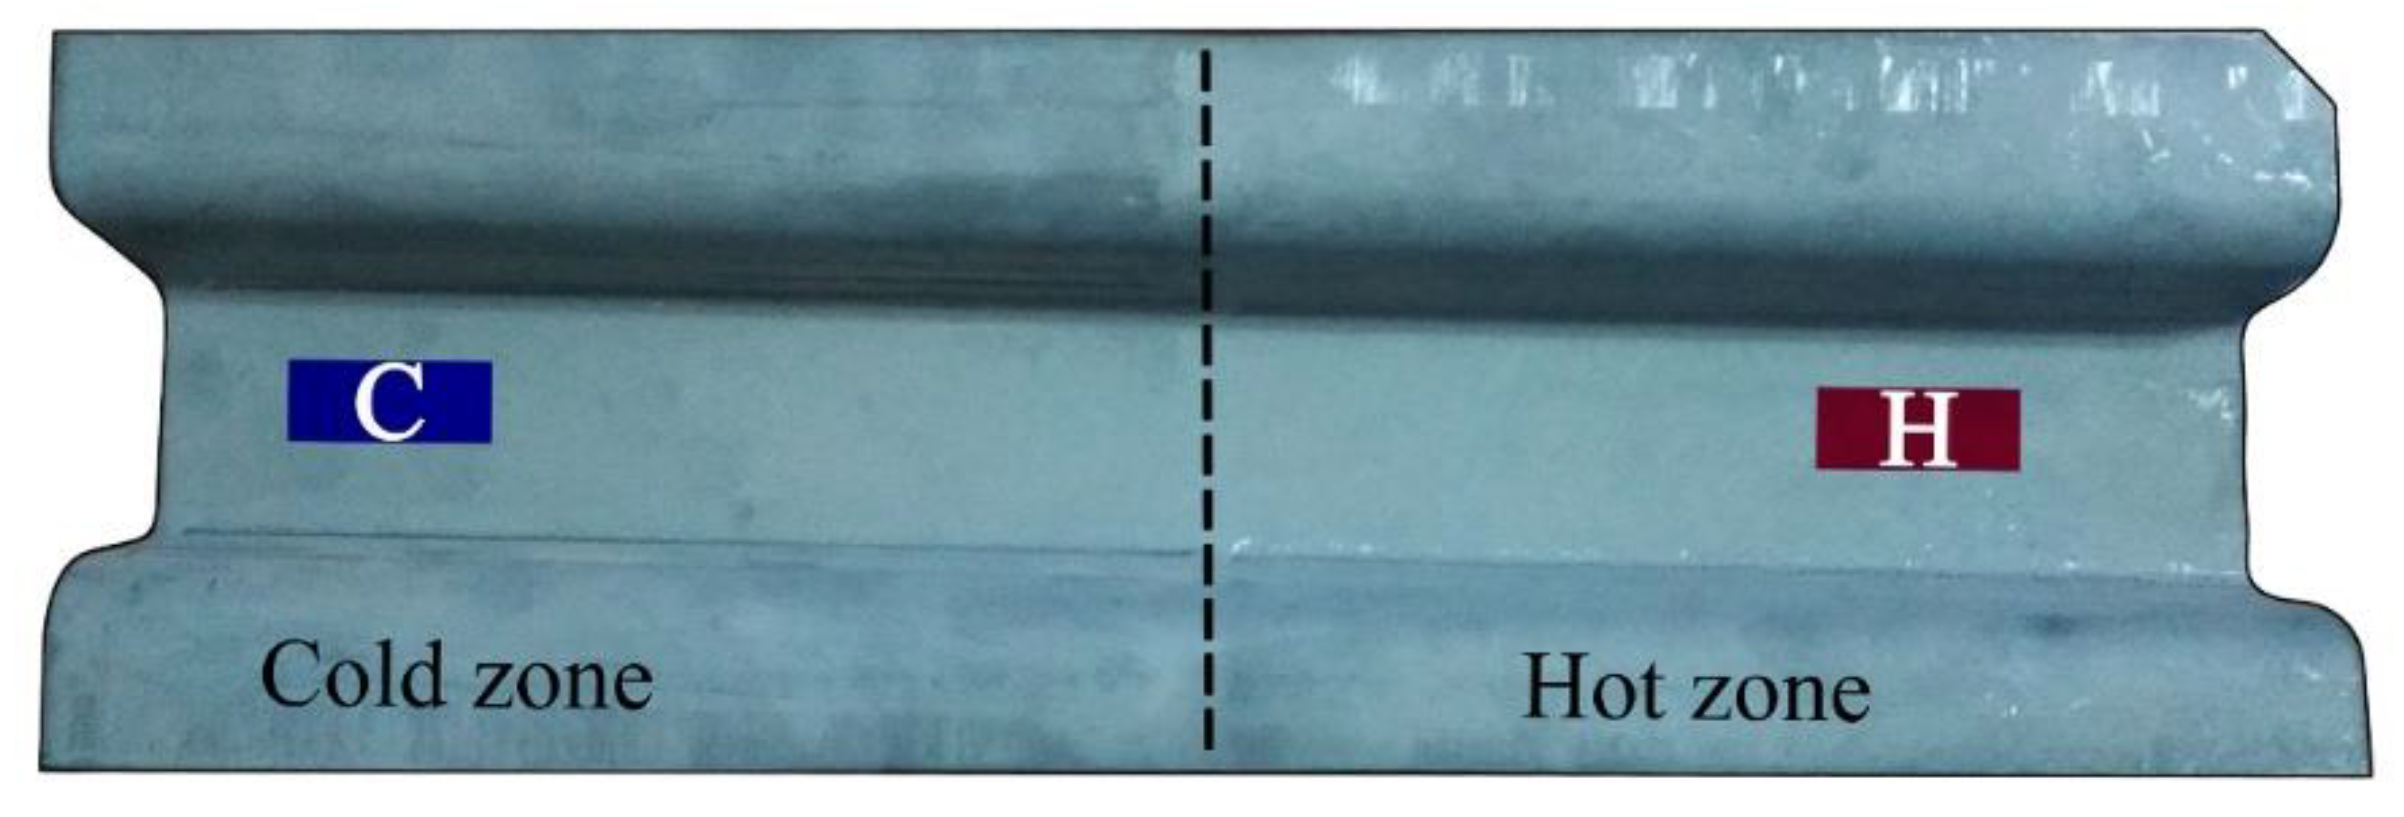
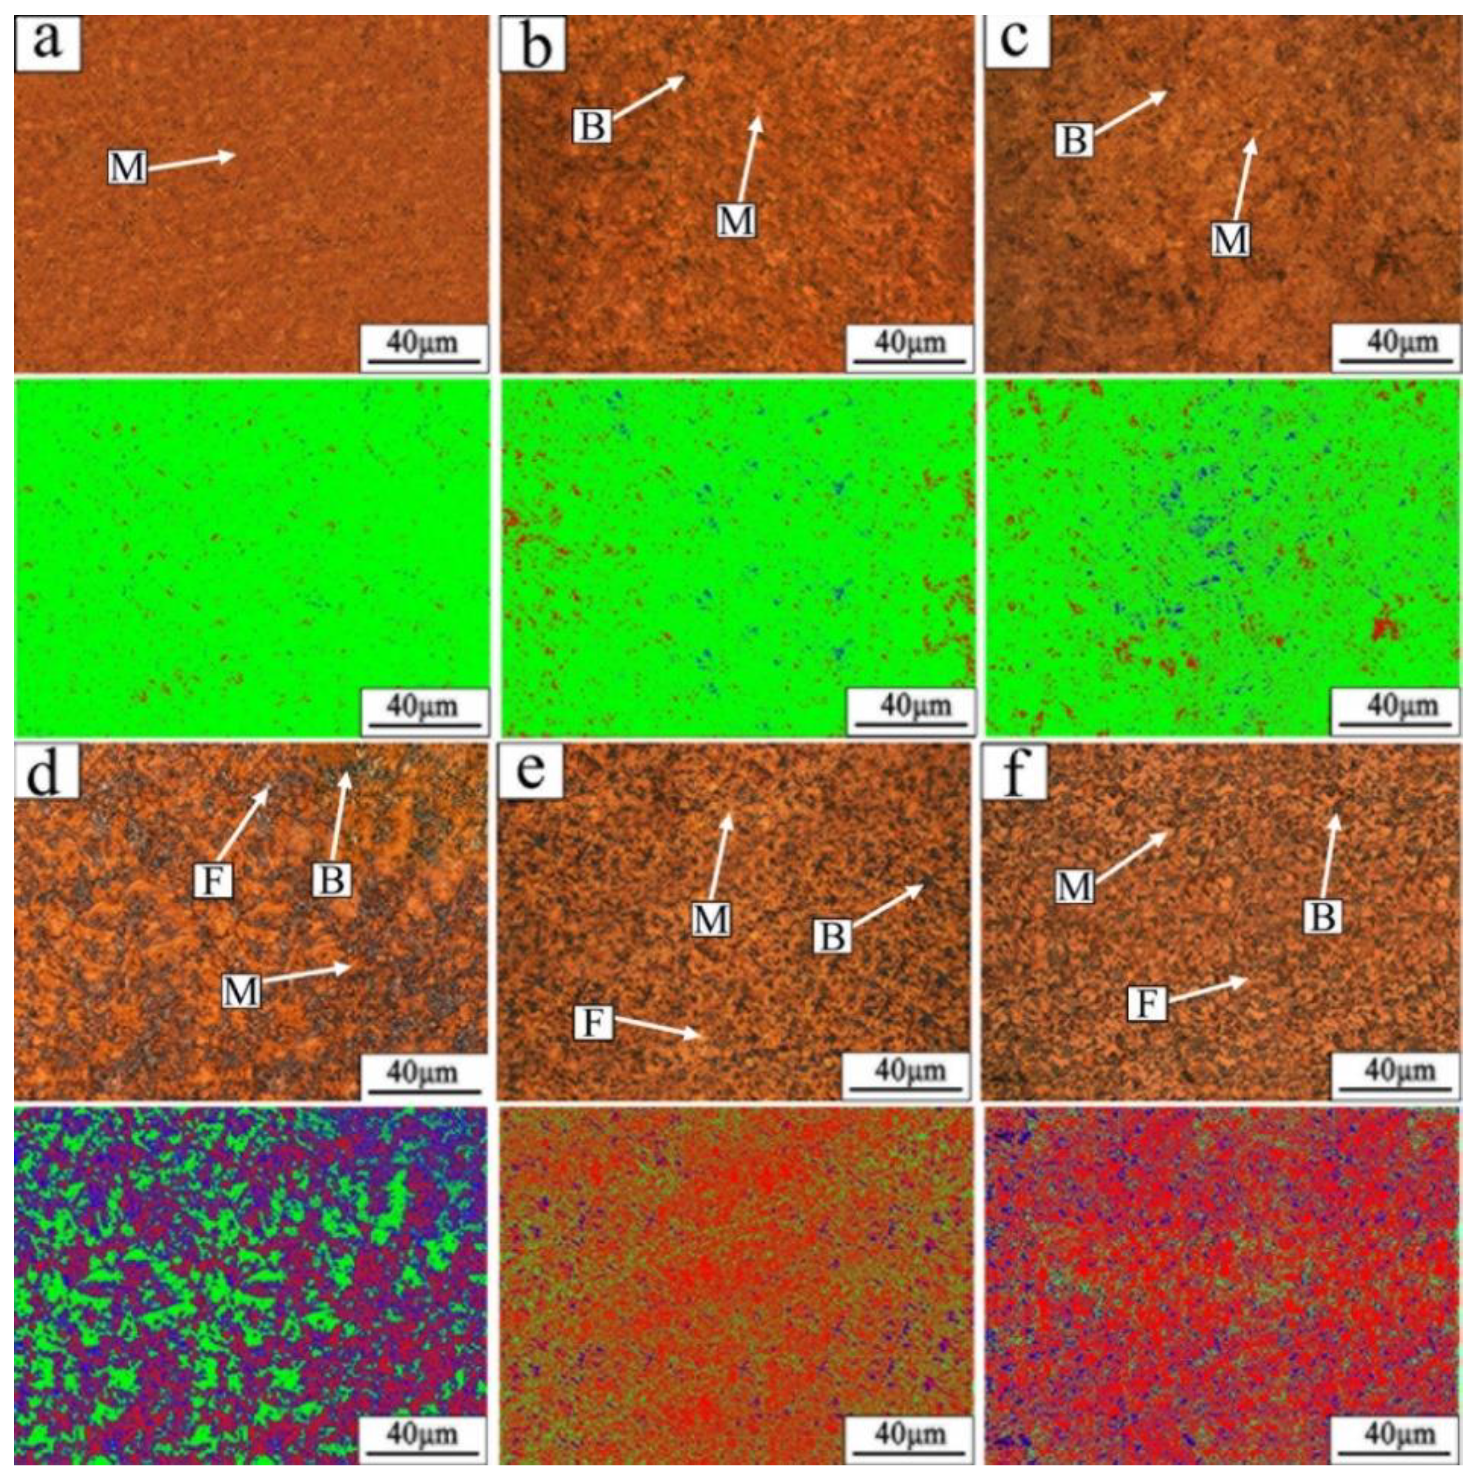
Figure 2 shows the locations of microstructure observation. C represents the cold zone and H is the hot zone. To identify and measure the content of the quenched phases, the specimens were mounted in epoxy resin, ground, and polished to a mirror finish, using 400, 1000, and 2000 grit SiC paper, followed by metallographic grinding paste. Two-stage color tint etching with 4% picral solution and 10% aqueous sodium metabisulfite solution was used to observe the quenched phases. After two-stage etching, the martensite was brown, the bainite was black, and the ferrite was white with an optical microscope. Martensite, bainite, and ferrite were manually set as green, red, and blue, respectively, by ImagePro Plus 7.0 software (Media Cybernetics, Inc., Rockville, MD, USA). The area fractions of quenched phases were quantified.

2.3. Springback Measurement

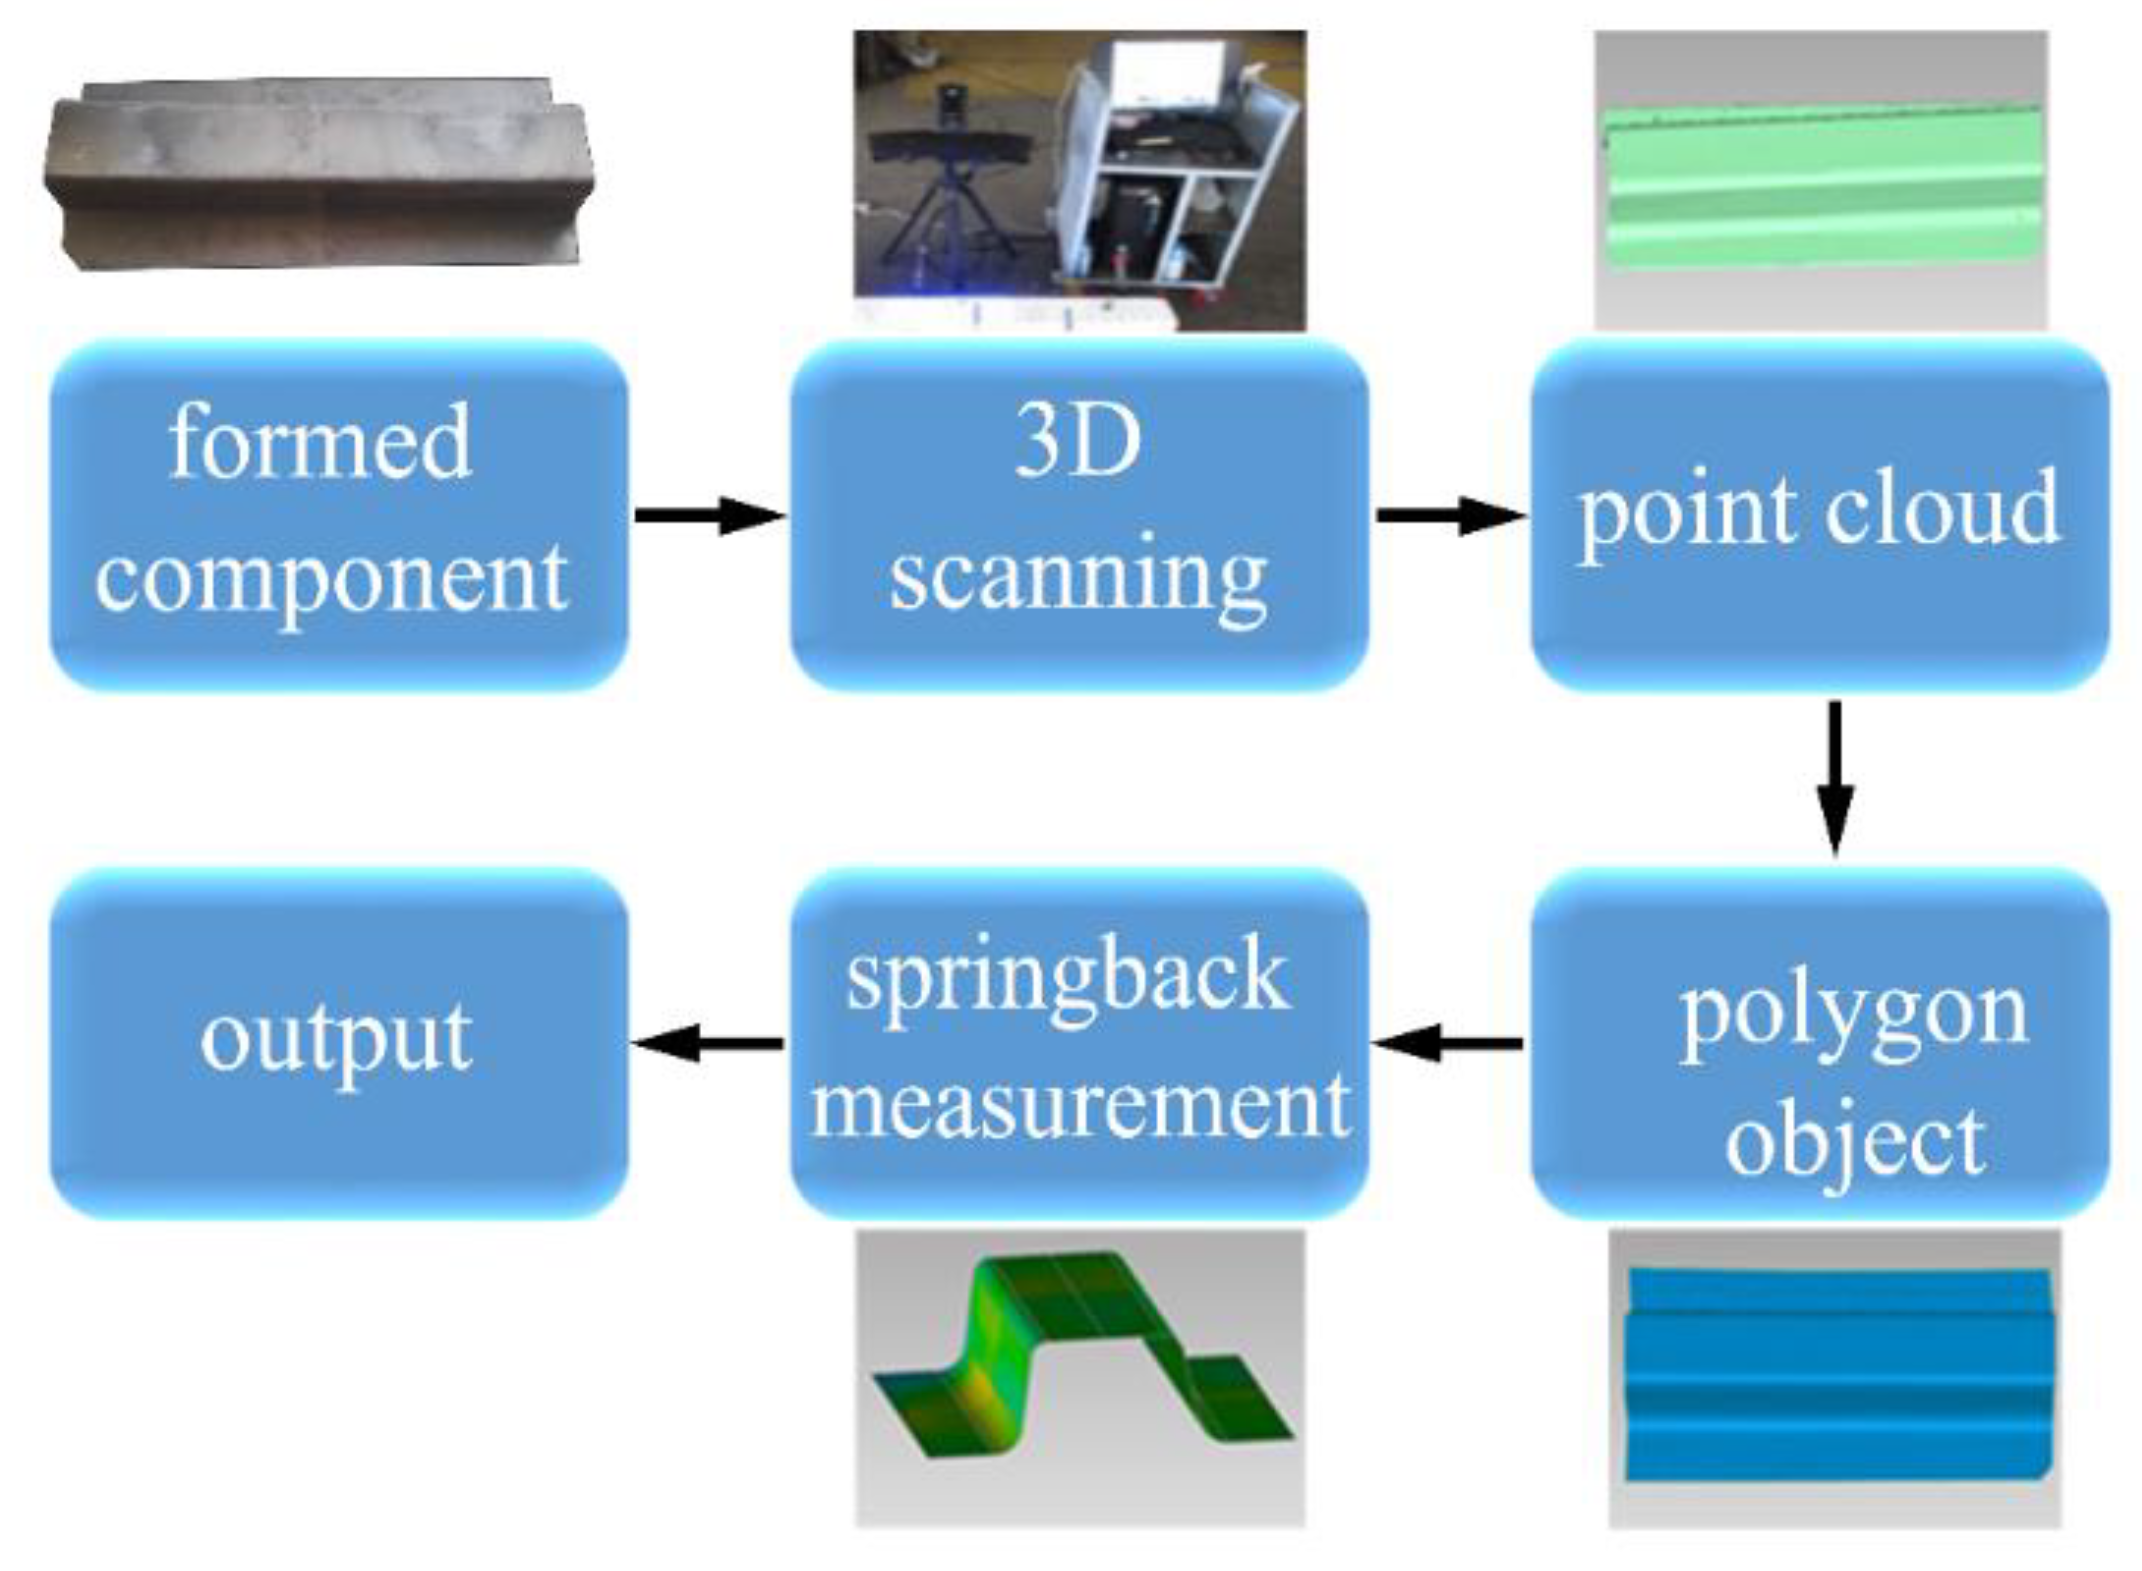
The springback measurement process is shown in Figure 3. The 3D scanning of the formed component was first conducted by a PRO CMM3500 optical coordinate measuring machine (NDI International, Waterloo, ON, Canada) and the point cloud data were obtained and processed by PolyWorks software (InnovMetric Software inc, Québec, Canada). By conducting calibration and alignment between polygon data and the original model of the component, the springback angle of the formed component could be accurately measured.
Figure 4 shows the scheme of springback angle measurement. The outer contour and the inner contour are the cross sections of the formed component and the original component, respectively. θ 2 is the sidewall angle of the formed component and θ 1 = 20° is the original angle. θ 2 θ 1 was defined as a springback angle.

3. Results and Discussion

3.1. Quenched Phases Analysis

Figure 5 displays color metallography of the formed component quenched at different tool temperatures and micrographs, calibrated by Image Pro Plus 7.0. It can be found that the quenched phases of the cold zone are almost full martensite at heating tool temperatures of 25 °C and 600 °C, which indicates that the heating tool temperature has little effect on the quenched phases of the cold zone. This may be because the cooling rate of the blank in the cold zone is greater than 100 °C/s, much higher than the critical speed of martensite transformation. However, the occurrence of a small amount of ferrite and bainite in the cold zone may be caused by the large plastic deformation of the U-shape component during the forming [17,18]. Martensite decreases, while ferrite and bainite increase in the hot zone with the increase of the tool temperature. When the tool temperature is higher than 200 °C, the area fraction of martensite drops dramatically and reaches 13% at the tool temperature of 600 °C. The reason may be that the start transformation temperature of martensite is 405 °C [19] and when the isothermal quenching temperature is higher than the start transformation temperature of martensite, bainite phase transition occurs during continuous cooling, resulting in the decrease of martensite. When quenched at the tool temperature from 300 °C to 600 °C, the area fraction of bainite increases with the increase of the tool temperature and is close to 70% at the tool temperature of 600 °C. The isothermal quenching for 10 s at this temperature range, which is the transition temperature range of bainite [19], results in the rapid formation and the increase of bainite. Shipway et al. [20] have also showed that bainite transition is more likely to occur than martensite transition during the isothermal quenching at this temperature range. With the increase of the tool temperature, ferrite increases slightly. George et al. [21] have demonstrated that the area fraction of ferrite is less than 10% at the tool temperature of 400 °C, which was close to the 9% ferrite in this paper. However, George et al. did not make research on the tool temperature higher than 400 °C. The studies in this paper showed that the area fraction of ferrite was 17% at the tool temperature of 600 °C.

3.2. Springback Results

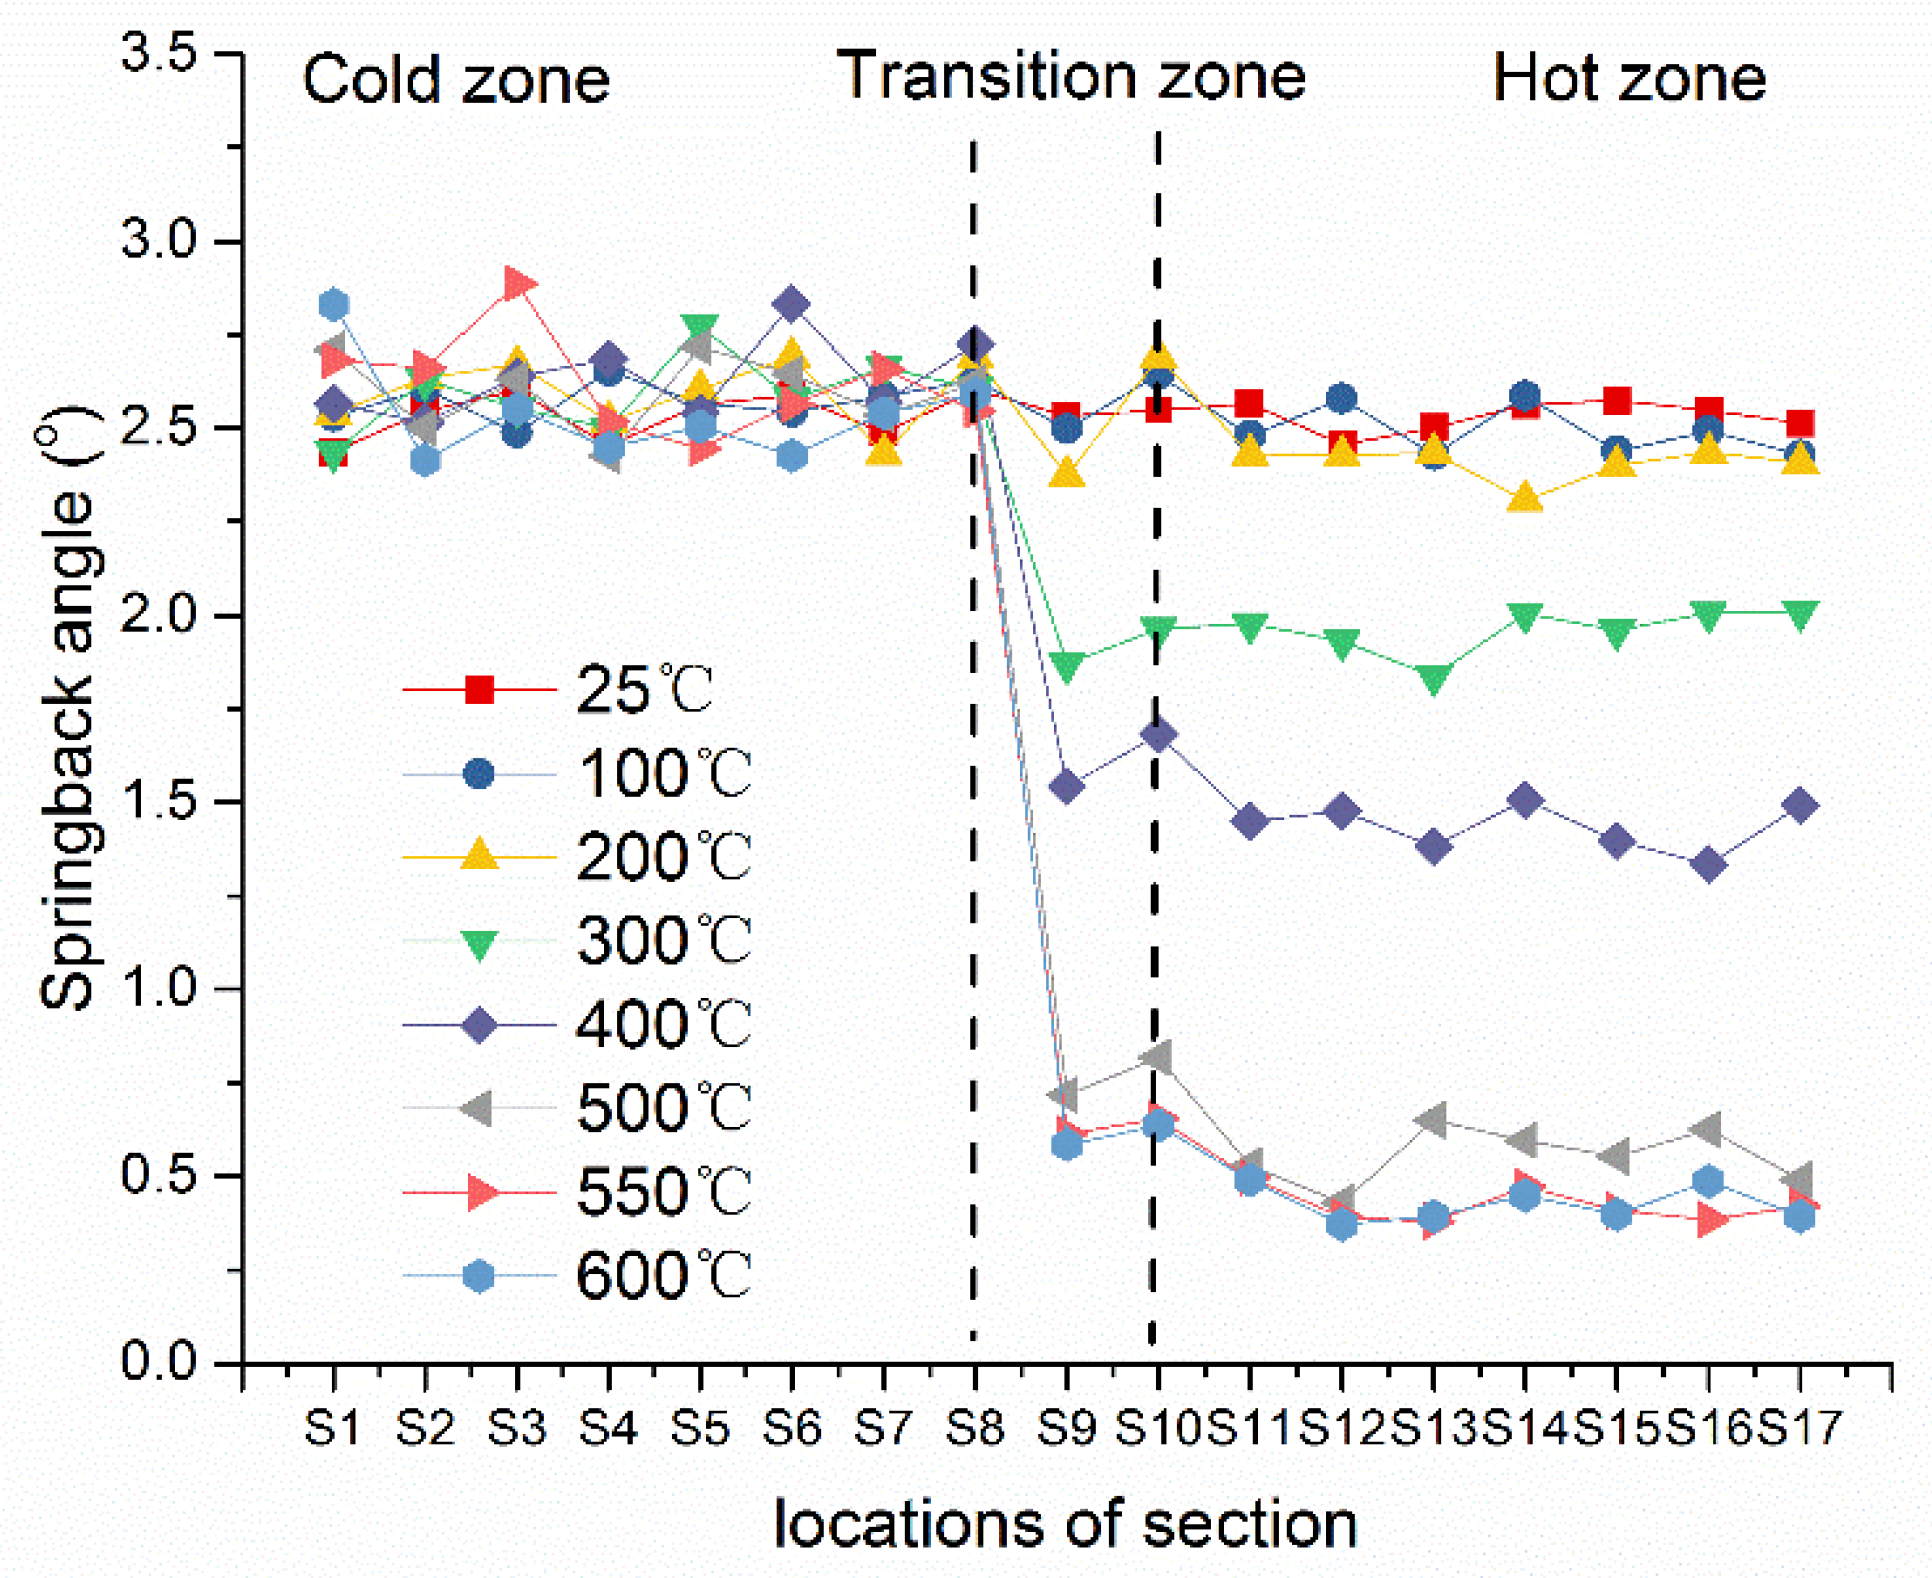
Springback angles under different heating tool temperatures are presented in Figure 6. No matter how the tool temperature changes in the hot zone, the spingback angles in the cold zone are almost unchanged. The reason is that the materials in the cold zone have almost the same temperature history and almost full martensite and, thus, the internal stress releases caused by phase transformation expansion and transformation plasticity are almost consistent [22]. The springback angle of the hot zone decreases with the increase of the tool temperature. When the tool temperature is higher than 300 °C, the springback angle decreases and becomes almost stable at the tool temperature higher than 550 °C. According to the relationship between the area fractions of phases and tool temperatures, it can be seen that martensite begins to decrease at the tool temperature higher than 300 °C and bainite increases dramatically. According to Åkerström and Oldenburg [23], the hardness of martensite and bainite is 510 HV and 402 HV, respectively. The decrease of the springback angle in the hot zone is due to the increase of softer bainite. When the tool temperature is higher than 550 °C, the area fractions of martensite and bainite are almost stable and, thus, there is no obvious change in the springback angle.
The relationship between the springback angle and the area fractions of martensite, bainite, and ferrite at different tool temperatures are shown in Figure 7. It can be seen that different quenched phases and their contents, caused by different tool temperatures, have great influence on the springback of the components. The springback angle shows a positive linear correlation with martensite and a negative linear correlation with bainite and ferrite. The correlation coefficient indicates that there is a noticeable linear correlation between them. With the springback angle as the dependent variable and the area fractions of martensite, bainite, and ferrite as the independent variable, a multiple linear regression analysis was carried out and the goodness of the fit, R-squared value is 0.985. The results show that there is a strong linear relationship between the springback angle and the area fractions of martensite, bainte, and ferrite. By the multi-step iterative optimization method, the relationship between the springback angle and the area fractions of quenched phases was established and is shown as Equation (1).
λ = 3.233 × ( 0.0469 f M + 0.0439 f B + 0.0005 f F ) 12.1286
where λ is the springback angle and f M , f B , and f F are the area fractions of martensite, bainite, and ferrite, respectively.
The springback angles calculated by Equation (1) at different heating tool temperatures are given in Table 2. It is found that the maximum relative error is 7.32% and the angle difference is 0.04°, which indicates that this equation can be used to accurately predict the springback of the formed component, based on the area fractions of the quenched phases. It is worth noting that Equation (1) is the relationship between the phase content and the springback angle, and the change of the tool geometry will lead to the change of the phase content, so after the tool geometry changes, Equation (1) is still applicable. In addition, Equation (1) is obtained in the range of ferrite content less than 20% and bainite content less than 80%, and if the phase content is beyond the range, it needs to be further verified.

4. Conclusions

The hot stamping experiment of the U-shaped component was performed with segmented heating and a cooling tool. The relationship between the springback angle and the area fractions of martensite, bainite, and ferrite at different tool temperatures was obtained. The conclusions are as follows:
(1)
The quenched microstructure of the cold zone was almost full martensite. The quenched microstructure of the hot zone changed greatly with increasing heating tool temperature. The area fraction of martensite dropped dramatically at heating tool temperatures higher than 200 °C. When the heating tool temperature was 600 °C, martensite dropped to 13% and bainite increased to 70%. Ferrite gradually increased at temperatures ranging from 25 °C to 600 °C and its maximum was close to 17%.
(2)
The springback angle of the cold zone was large and remained unchanged with the increase of the heating tool temperature. When the heating tool temperature was higher than 300 °C, the springback angle of the hot zone decreased significantly. The springback angle was minimum and the change of it tended to be stable with the heating tool temperature over 550 °C.
(3)
The relationship between the area fractions of quenched phases and the springback angle was established by the optimization method. A relative error analysis revealed that the relationship could be used to accurately predict the springback of a tailored formed hot stamped component.

Author Contributions

X.L. conceived and designed the experiments; X.Y. performed the experiments; Z.Z. polished the writing and grammar.

Funding

This work was supported by National Natural Science Foundation of China (51205162 and 51275203).

Conflicts of Interest

The authors declare no conflict of interest.

References

  1. Mori, K.; Bariani, P.F.; Behrens, B.A.; Brosius, A.; Bruschi, S.; Maeno, T.; Merklein, M.; Yanagimoto, J. Hot stamping of ultra-high strength steel parts. Cirp. Ann-Manuf. Technol. 2017, 66, 755–777. [Google Scholar] [CrossRef]
  2. Karbasian, H.; Tekkaya, A.E. A review on hot stamping. J. Mater. Process. Technol. 2010, 210, 2103–2118. [Google Scholar] [CrossRef]
  3. Ying, L.; Zhao, X.; Dai, M.H.; Zhang, S.Z.; Hu, P. Crashworthiness design of quenched boron steel thin-walled structures with functionally graded strength. Int. J. Impact Eng. 2016, 95, 72–88. [Google Scholar] [CrossRef]
  4. Merklein, M.; Wieland, M.; Lechner, M.; Bruschi, S.; Ghiotti, A. Hot stamping of boron steel sheets with tailored properties. J. Mater. Process Technol. 2016, 228, 11–24. [Google Scholar] [CrossRef]
  5. Omer, K.; George, R.; Bardelcik, A.; Worswick, M.; Malcolm, S.; Detwiler, D. Development of a hot stamped channel section with axially tailored properties–experiments and models. Int. J. Mater. 2018, 11, 149–164. [Google Scholar] [CrossRef]
  6. Vrolijk, M.; Lorenz, D.; Porzner, H.; Holecek, M. Supporting lightweight design: Virtual modeling of hot stamping with tailored properties and warm and hot formed aluminium. Procedia Eng. 2017, 183, 336–342. [Google Scholar] [CrossRef]
  7. Chokshi, P.; Dashwood, R.; Hughes, D.J. Artificial neural network (ANN) based microstructural prediction model for 22MnB5 boron steel during tailored hot stamping. Comput. Struct. 2017, 190, 162–172. [Google Scholar] [CrossRef]
  8. Mu, Y.; Wang, B.; Zhou, J.; Huang, X.; Li, X. Hot stamping of boron steel using partition heating for tailored properties: Experimental trials and numerical analysis. Metall. Mater. Trans. A 2017, 48, 5467–5479. [Google Scholar] [CrossRef]
  9. Bardelcik, A.; Worswick, M.J.; Winkler, S.; Wells, M.A. A strain rate sensitive constitutive model for quenched boron steel with tailored properties. Int. J. Impact Eng. 2012, 50, 49–62. [Google Scholar] [CrossRef]
  10. Li, F.F.; Fu, M.W.; Lin, J.P. Effect of cooling path on the phase transformation of boron steel 22mnb5 in hot stamping process. Int. J. Adv. Manuf. Technol. 2015, 81, 1391–1402. [Google Scholar] [CrossRef]
  11. Omer, K.; Kortenaar, L.; Butcher, C.; Worswick, M.; Malcolm, S.; Detwiler, D. Testing of a hot stamped axial crush member with tailored properties experiments and models. Int. J. Impact Eng. 2017, 103, 12–28. [Google Scholar] [CrossRef]
  12. Zhou, M.B.; Tang, J.L.; Yang, J.; Wang, C.Y. Tailored properties of a novelly designed press hardened 22MnMoB steel. J. Iron Steel Res. Int. 2017, 24, 508–512. [Google Scholar] [CrossRef]
  13. Mu, Y.H.; Wang, B.Y.; Zhou, J.; Kang, Y.; Li, X.T. Heating parameters optimization of hot stamping by partition heating for tailored properties. ISIJ. Int. 2017, 57, 1442–1450. [Google Scholar] [CrossRef]
  14. Nakagawa, Y.; Mori, K.I.; Maeno, T. Springback-free mechanism in hot stamping of ultra-high-strength steel parts and deformation behaviour and quenchability for thin sheet. Int. J. Adv. Manuf. Techol. 2018, 95, 459–467. [Google Scholar] [CrossRef]
  15. Krinninger, M.; Opritescu, D.; Golle, R.; Volk, W. Experimental investigation of the influence of punch velocity on the springback behavior and the flat length in free bending. Procedia CIRP 2016, 41, 1066–1071. [Google Scholar] [CrossRef]
  16. Bao, J.; Liu, H.; Xing, Z.; Song, B.; Yang, Y. Springback of hot stamping and die quenching with ultra-high-strength boron steel. Eng. Rev. 2013, 33, 151–156. [Google Scholar]
  17. Barcellona, A.; Palmeri, D.; Worswick, M. Hot forming of boron steels using heated and cooled tooling for tailored properties. Met. Mater. Trans. A 2009, 40, 1160–1174. [Google Scholar] [CrossRef]
  18. Merklein, M.; Svec, T. Effect of plastic hot deformation on the hardness and continuous cooling transformations of 22MnB5 microalloyed boron steel. In Proceedings of the 29th IDDRG International Conference, Graz, Austria, 31 May–2 June 2010. [Google Scholar]
  19. Nikravesh, M.; Naderi, M.; Akbari, G.H. Transformation kinetics of the hot stamping steel 22MnB5 in dependency of the applied deformation on the austenitic microstructure. Mater. Sci. Eng. A Struct. 2012, 540, 24–29. [Google Scholar] [CrossRef]
  20. Shipway, P.H.; Bhadeshia, H.K. The effect of small stresses on the kinetics of the bainite transformation. Mater. Sci. Eng. A Struct. 1995, 201, 143–149. [Google Scholar] [CrossRef]
  21. George, R.; Bardelcik, A.; Worswick, M.J. Hot forming of boron steels using heated and cooled tooling for tailored properties. J. Mater. Process Technol. 2012, 212, 2386–2399. [Google Scholar] [CrossRef]
  22. Bardelcik, A.; Salisbury, C.P.; Winkler, S.; Wells, M.A.; Worswick, M.J. Effect of cooling rate on the high strain rate properties of boron steel. Int. J. Impact Eng. 2010, 37, 694–702. [Google Scholar] [CrossRef]
  23. Åkerström, P.; Oldenburg, M. Austenite decomposition during press hardening of a boron steel-computer simulation and test. J. Mater. Process Technol. 2006, 174, 399–406. [Google Scholar] [CrossRef]
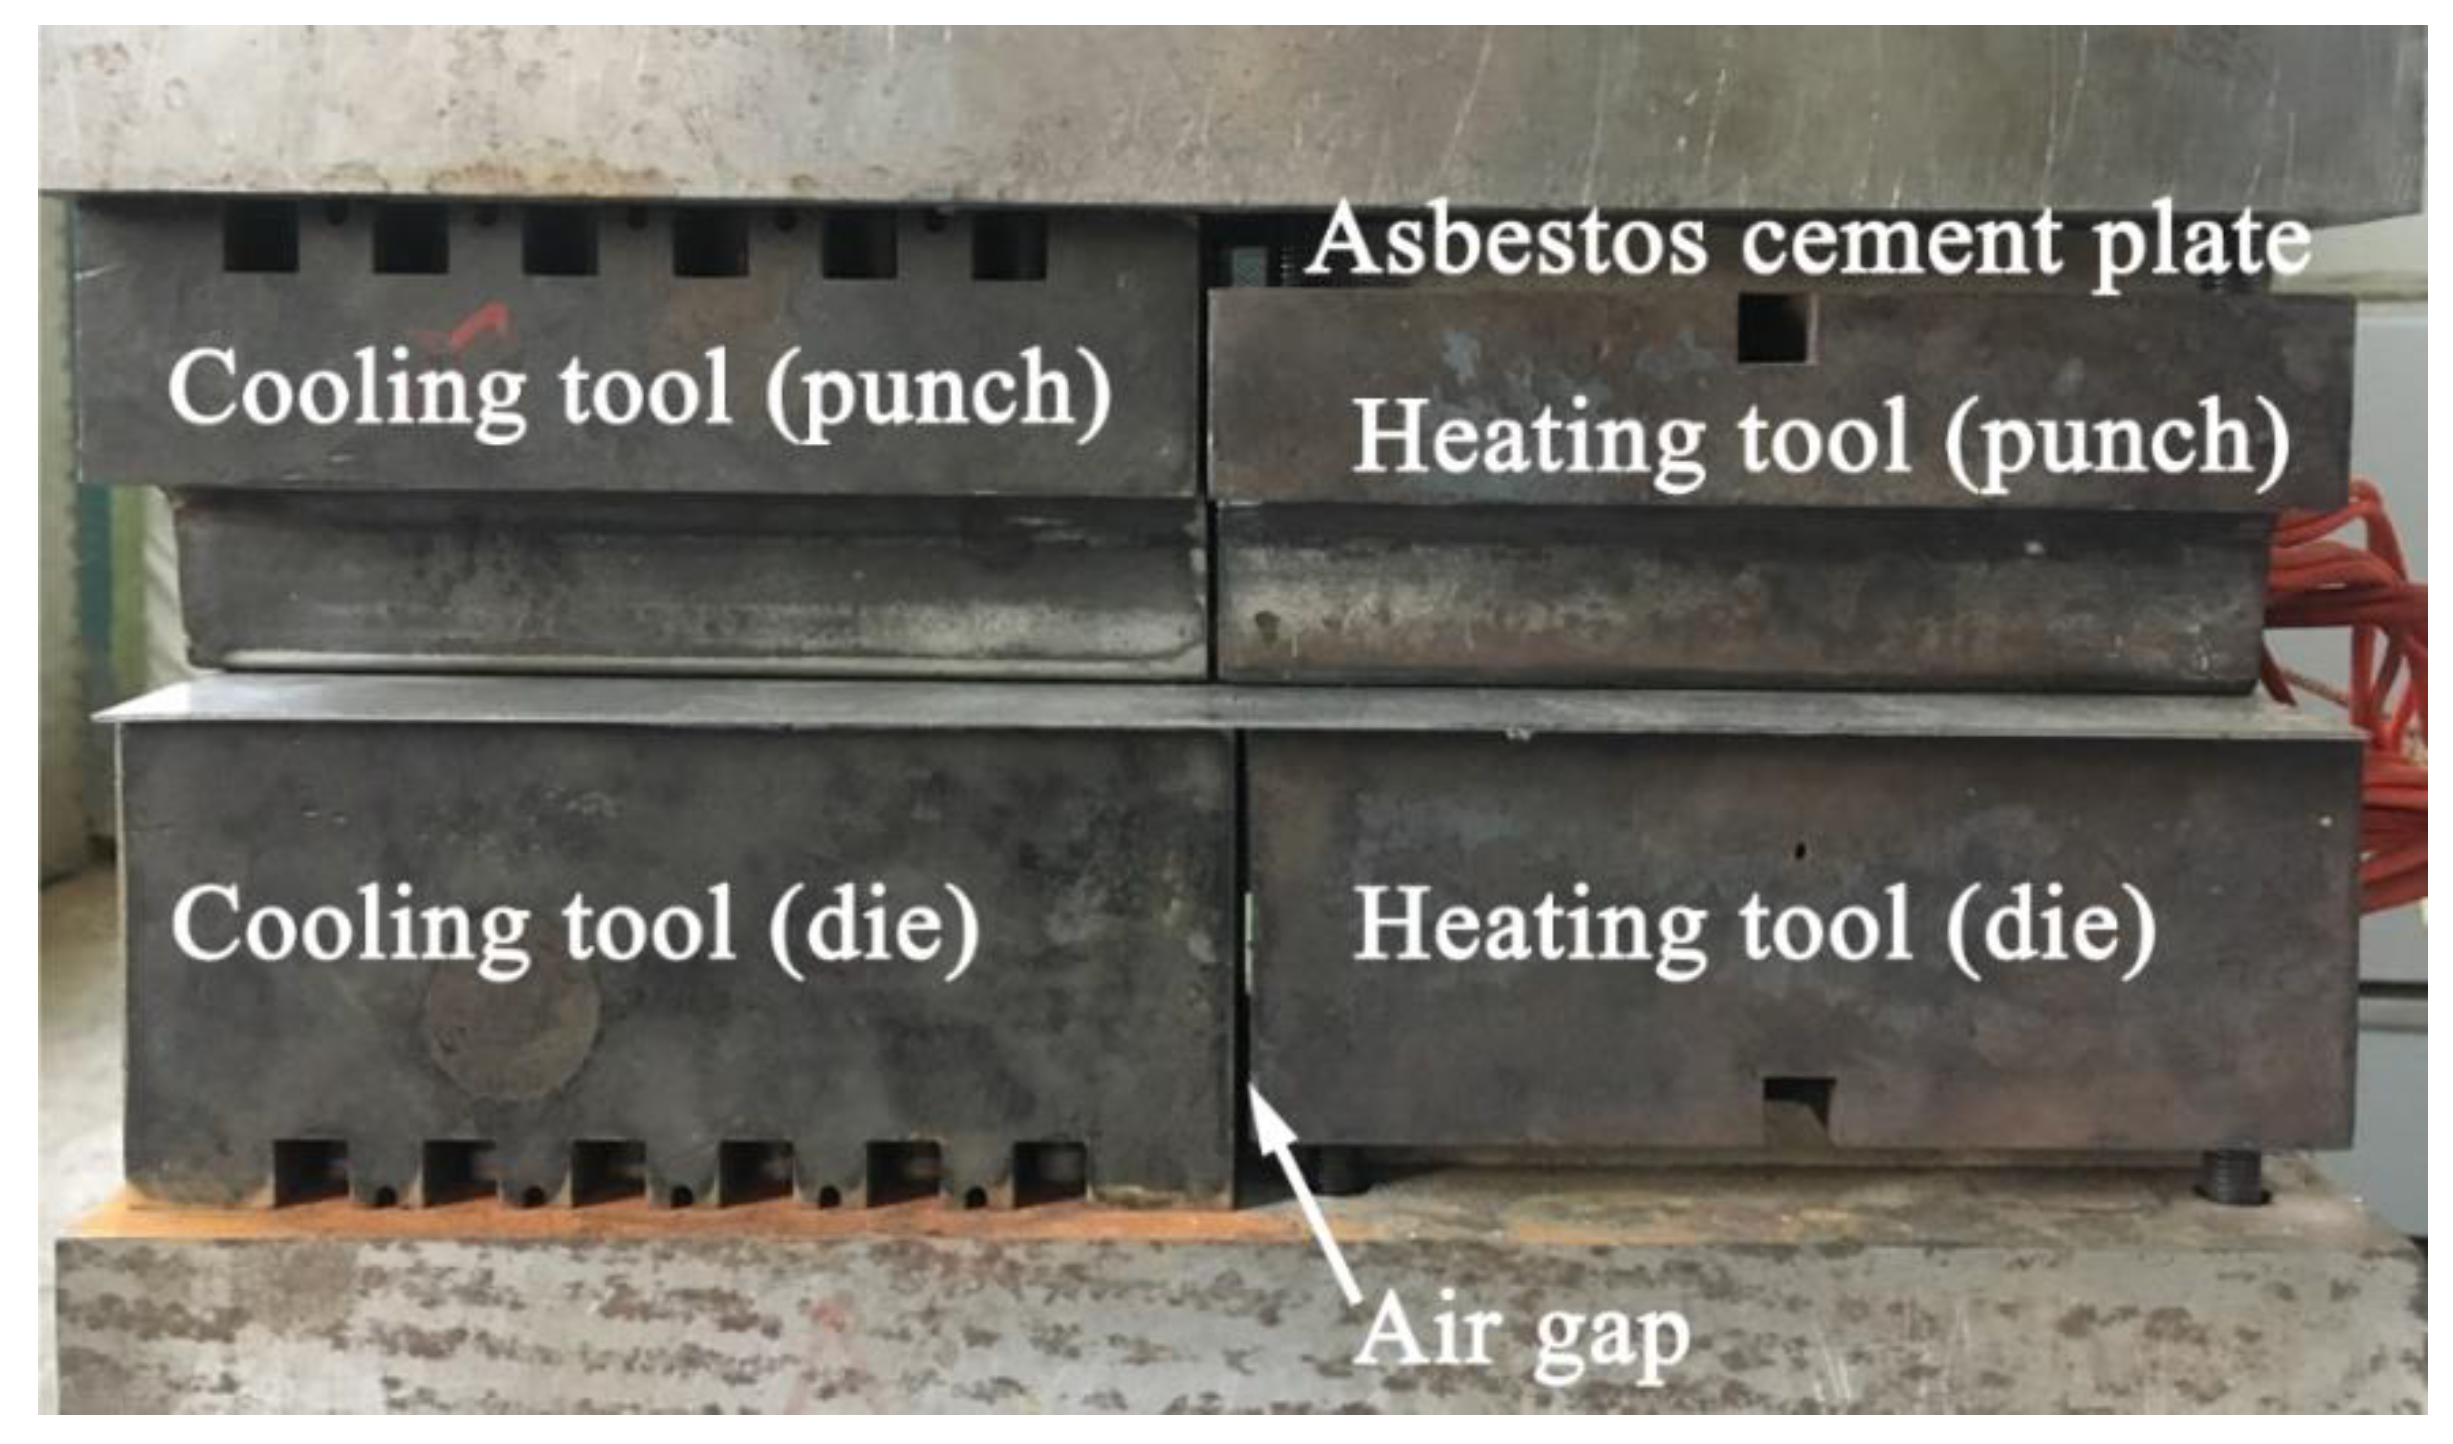
Figure 1. Schematic of the experimental apparatus.
Metals 09 00694 g001
Figure 2. The cutting locations of specimens.
Metals 09 00694 g002
Figure 3. Flowchart of the springback measurement process.
Metals 09 00694 g003
Figure 4. The schematic of the springback angle measurement.
Metals 09 00694 g004
Figure 5. Two-stage color tint etched optical micrographs and manually identified microstructure images (a) 25 C; (b) 600 C; (c) 200 H; (d) 400 H; (e) 500 H; (f) 600 H. C represents the cold zone and H is the hot zone.
Metals 09 00694 g005
Figure 6. Springback angles under different heating tool temperatures.
Metals 09 00694 g006
Figure 7. The relationship between the springback angle and area fractions of the quenched phases.
Metals 09 00694 g007
Table 1. Chemical composition of Usibor 1500P (wt.%).
CMnBSiPCuNiCrAlTiMo
0.221.230.0040.250.0080.030.020.200.030.037<0.02
Table 2. The average springback angle under different heating tool temperatures.
Heating Tool Temperature (°C)Measured Value (°)Calculated Value (°)
252.512.65
1002.492.49
2002.402.33
3001.961.86
4001.431.40
5000.550.59
5500.420.45
6000.410.41