Review

Review on Advances in Metal Micro-Tube Forming

Faculty of Automotive Systems Engineering and Production Engineering, TH Köln-University of Applied Sciences, Betzdorfer Str. 2, 50679 Köln, Germany
Metals 2019, 9(5), 542; https://doi.org/10.3390/met9050542
Submission received: 25 March 2019 / Revised: 3 May 2019 / Accepted: 6 May 2019 / Published: 10 May 2019
(This article belongs to the Special Issue Metal Micro-forming)

Abstract

:
Metallic tubular micro-components play an important role in a broad range of products, from industrial microsystem technology, such as medical engineering, electronics and optoelectronics, to sensor technology or microfluidics. The demand for such components is increasing, and forming processes can present a number of advantages for industrial manufacturing. These include, for example, a high productivity, enhanced shaping possibilities, applicability of a wide spectrum of materials and the possibility to produce parts with a high stiffness and strength. However, certain difficulties arise as a result of scaling down conventional tube forming processes to the microscale. These include not only the influence of the known size effects on material and friction behavior, but also constraints in the feasible miniaturization of forming tools. Extensive research work has been conducted over the past few years on micro-tube forming techniques, which deal with the development of novel and optimized processes, to counteract these restrictions. This paper reviews the relevant advances in micro-tube fabrication and shaping. A particular focus is enhancement in forming possibilities, accuracy and obtained component characteristics, presented in the reviewed research work. Furthermore, achievements in severe plastic deformation for micro-tube generation and in micro-tube testing methods are discussed.

1. Introduction

The application of micro-components in technical systems and devices today represents a crucial value-adding factor for numerous industrial sectors, such as medical engineering, healthcare, mobility or communication. Micro-manufacturing techniques for the fabrication of these components therefore play a key role in facilitating corresponding innovative and affordable products. The increasing trend in miniaturization over the past few years was a driver for the development of a broad range of novel manufacturing techniques and scaled-down conventional processes. In particular, this concerns cases where traditional methods, which are typically applied for silicon-based components of micro-electro-mechanical-systems (MEMS), reach their limits in terms of the materials to be processed or the aspect ratios, etc. [1,2].
Due to their numerous advantages, forming processes provide a promising approach for manufacturing relevant micro-parts from metal materials [3]. Micro-forming can enable near-net-shape characteristics, an enhanced shaping of complex geometries, the possibility to produce micro-parts with a comparatively high stiffness and strength [4], and the applicability of a wide spectrum of materials. Moreover, in general, forming processes provide a high-volume production for micro-components, which is required today [1,4].
These issues also apply for micro-tube forming techniques, as tubular micro-components play an important role in a broad range of industrial products for economically significant markets. Products based on micro-tubes and tubular micro-components can be found, for example, in the fields of medical engineering, electrics and electronic systems, optoelectronics, chemical systems, sensors, and thermal management, as summarized in Table 1 from [5,6].
As an example, for the market of medical engineering, where tubular micro-components are strongly represented, a global revenue of approximately USD 595 billion is expected in 2024, with a compound annual growth rate of about 5.4% between 2015 and 2024 [7].
Despite the importance and industrial presence of products with tubular micro-parts and the advantages forming processes can offer for their manufacture, a review of advances in micro-tube forming, in conjunction with the related technologies for tool design and consideration of size effects, is not available at present.
There exist comprehensive overviews of the latest achievements in micro-manufacturing technology in general [1,2,6,8,9,10,11], which represent the state of the art of various micro-manufacturing processes applied to metallic and non-metallic materials, including selected forming techniques. Reviews concentrated specifically on developments in micro-forming predominantly deal with bulk and sheet metal forming at the microscale [3,12], considering industrial applications in micro-sheet metal forming [13] and techniques for the micro-forming of bulk micro-parts from sheet metal material [14]. Additionally, surveys concerning research on size effect-affected deformation behavior [15,16] and friction in micro-forming [17] mainly focus on bulk and sheet metal forming.
However, there are no reviews available that consider the micro-tube forming technology and corresponding innovations as a whole, although the economic significance of micro-tubular products and the advantages of their manufacture with the forming technology is obvious, as described above. On this background, this review paper aims to provide an overview about the latest advances in micro-tube forming technologies and to complement existing reviews dealing with micro-forming.
Following the general definitions of micro-parts within the field of micro-forming, the term “micro-tubes” includes here tubular semi-finished products and components, with typical part-dimensions or part-features in the range of sub-millimeters up to a few millimeters [11]. This review surveys forming technologies for the fabrication of metallic micro-tubular products and considers the usual classification of forming processes as processes from the group of manufacturing processes in which plastic deformation is used to change the shape of metalwork pieces. However, for the sake of completeness, reference is made at this point to related methods, for which the efficient fabrication of micro-tubular components from metals was also demonstrated, but which are based on deposition techniques, such as electroforming [18,19] and sputtering [20].
The structure of this review is based on the core processes investigated and the forming results envisaged in the individual reviewed research work that is dealing with the plastic forming of micro-tubes. This leads to a subdivision into (a) drawing processes of semi-finished products, (b) forming processes with pressurized media of three-dimensional products, (c) the laser-assisted forming of three-dimensional products, (d) severe plastic deformation processes to achieve a defined material microstructure, and (e) expansion processes to obtain material data. Accordingly, this review provides summaries of new developments in the fabrication of micro-tubes as a semi-finished product (Section 2), research results in innovative micro-tube hydroforming processes (Section 3), published achievements in laser-assisted micro-tube forming (Section 4), new strategies in severe plastic deformation for the fabrication of micro-tubes (Section 5), and investigations into testing methods of micro-tubes (Section 6). Achievements in enhanced shaping possibilities, accuracies, component properties, process stability, and modeling techniques for the individual groups of forming techniques are considered and discussed, where corresponding results were available.

2. Micro-Tube Fabrication

Recent developments in the fabrication of micro-tubes aim in particular to provide improved semi-finished products, with more economic manufacturing processes, for use in microsystem-based applications of medical engineering and microfluidics for heat exchangers. When primarily considering the fabrication of seamless metallic tubes, the investigated technologies can be divided into (a) dieless drawing techniques [5,21,22,23,24,25,26,27,28,29,30,31,32,33,34,35], (b) process chains, applying scaled-down and partly modified tube drawing [36,37,38,39,40,41,42,43,44,45,46,47], and (c) manufacturing techniques of grooved micro-tubes for applications in heat exchange [43,48,49,50,51,52,53,54]. Apart from this research into tube manufacturing processes, notable progress was also achieved in the design of the process and tools for the profile extrusion of tubular micro-profiles with a number of channels [55,56,57,58,59]. Table 2, Table 3, Table 4 and Table 5 summarize the details of this research concerning the investigated technologies, micro-tube dimensions, with an outer diameter of do and tube wall thickness of t, materials, and designated applications in experimental and practical works.

2.1. Dieless Drawing

The dieless drawing of micro-tubes is an innovative technique to achieve comparatively larger reductions of the tube cross-section area within a single drawing step. Research results for the investigated micro-tube materials are available for zinc-aluminum-based superplastic alloys, titanium alloys, and stainless steel, as shown in Table 2. The forming principle, represented in Figure 1, together with fabricated micro-tube examples, consists in the local plasticization of the tube material by a heat source and the application of a tensile stress to the tube. Due to the decreased yield strength in the heated area and the superimposed tensile stress state, the dimensions of the tube cross-section start to be locally reduced. A controlled relative movement between the heat source, together with a cooling unit, and the tube then allows for the transfer of these reduced dimensions to the entire tubular workpiece. A distinction can be made between continuous and non-continuous dieless drawing, depending on how this relative movement is achieved [5].
Due to the fact that dieless drawing is conducted without rigid forming dies, difficulties in the fabrication and handling of scaled-down drawing dies and the influences of size effects in friction can be avoided [34]. As an advantage of size effects, it can be expected that the increase in heating and cooling rates at the microscale will lead to an increase in feasible drawing speeds for dieless micro-tube drawing [24,33].
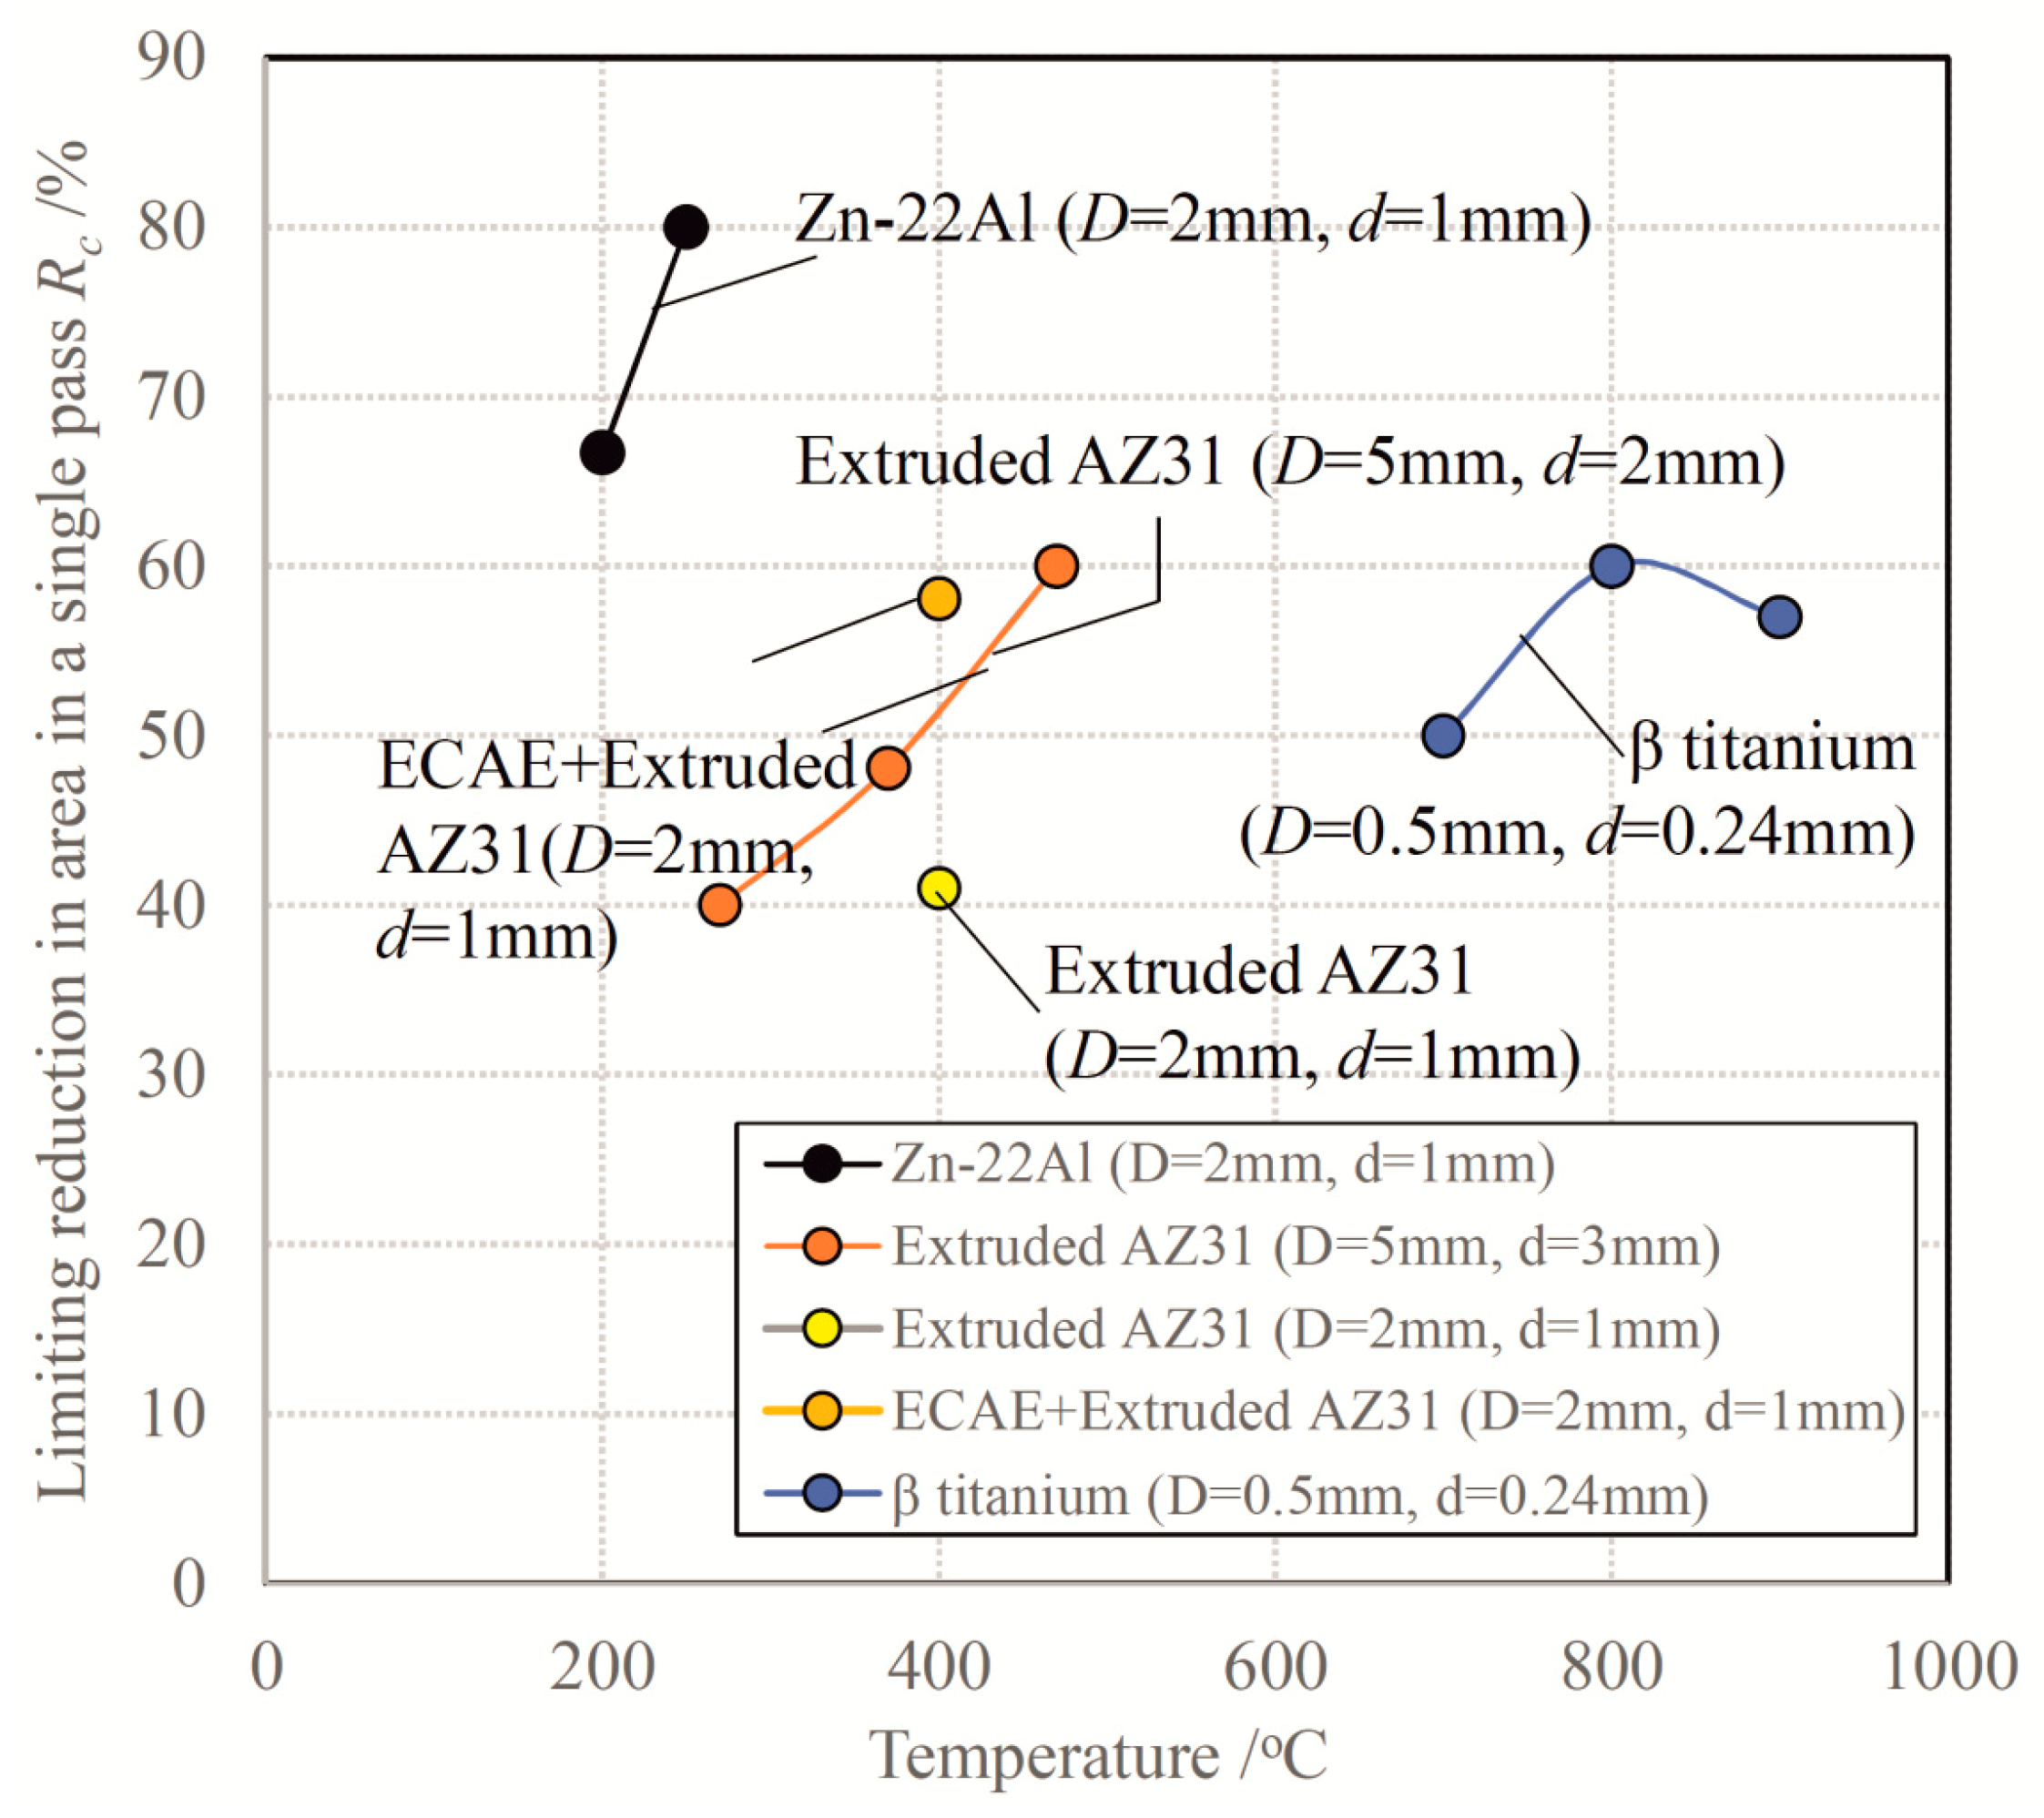
The forming temperature, distance between heating and cooling, tensile velocity, and the material characteristics of the formed tube are essential parameters determining a feasible reduction in the cross-section area [32]. Typical limits for the achievable cross-section reduction include an unequal plastic deformation of the produced micro-tube and its possible fracture [5]. As an example, Figure 2 shows the effect of the temperature on forming limits for different materials and micro-tube dimensions, indicating that reductions in cross-sections of up to 80% can be obtained in a single pass, considering the example of micro-tubes made from the material, Zn-22Al [23].
Research on heat sources for dieless micro-tube drawing and on the influencing parameters in the forming process predominantly concerns high-frequency induction heating systems, as shown, e.g., in [5,28,32], and laser heating, without [29,30] and with rotating relative movement between the micro-tube and the laser beam [25,27]. A rotating movement provides a more uniform temperature distribution and enhanced forming limits, compared to the use of laser irradiation, without rotation [25], but non-uniformity in the optical properties of the workpiece can lead to local overheating [22]. Independently from the type of heat source used, an effective temperature in the forming zone cannot be achieved when the drawing speed is faster than the thermal conductivity [33], whereby typical feeding velocities for dieless micro-tube drawing are in the range of about 0.06 to 0.5 mm/s [23]. It was found that increasing the length of the heating area at the formed tube led to a decrease of the mean strain rate within the formed material [60], and that, in turn, led to an enhancement of the limiting reduction in the cross-section area [60]. Further studies on the relationships between the drawing velocity, heating temperature, and forming limit were presented, for example, in [26] for the drawing of mini-tubes made of stainless steel.
The grain size of the dieless drawn micro-tubes increases slightly during forming. From the example of the drawing of tubes made from the alloy, AL78-ZN, an increase of the average grain size dg from 0.5 to 1.1 µm was determined for a dieless drawing with three passes and a reduction in the cross-section area of 66.7% per pass [32]. In this case, the surface roughness of the formed micro-tubes did not change significantly during forming [32]. For the drawing of stainless-steel micro-tubes in the temperature range of 950 to 1100 °C in argon atmosphere and atmospheric oxygen, respectively, it was found that the oxidation and surface roughening affected the drawing limit and varied widely, depending on the temperature [24].
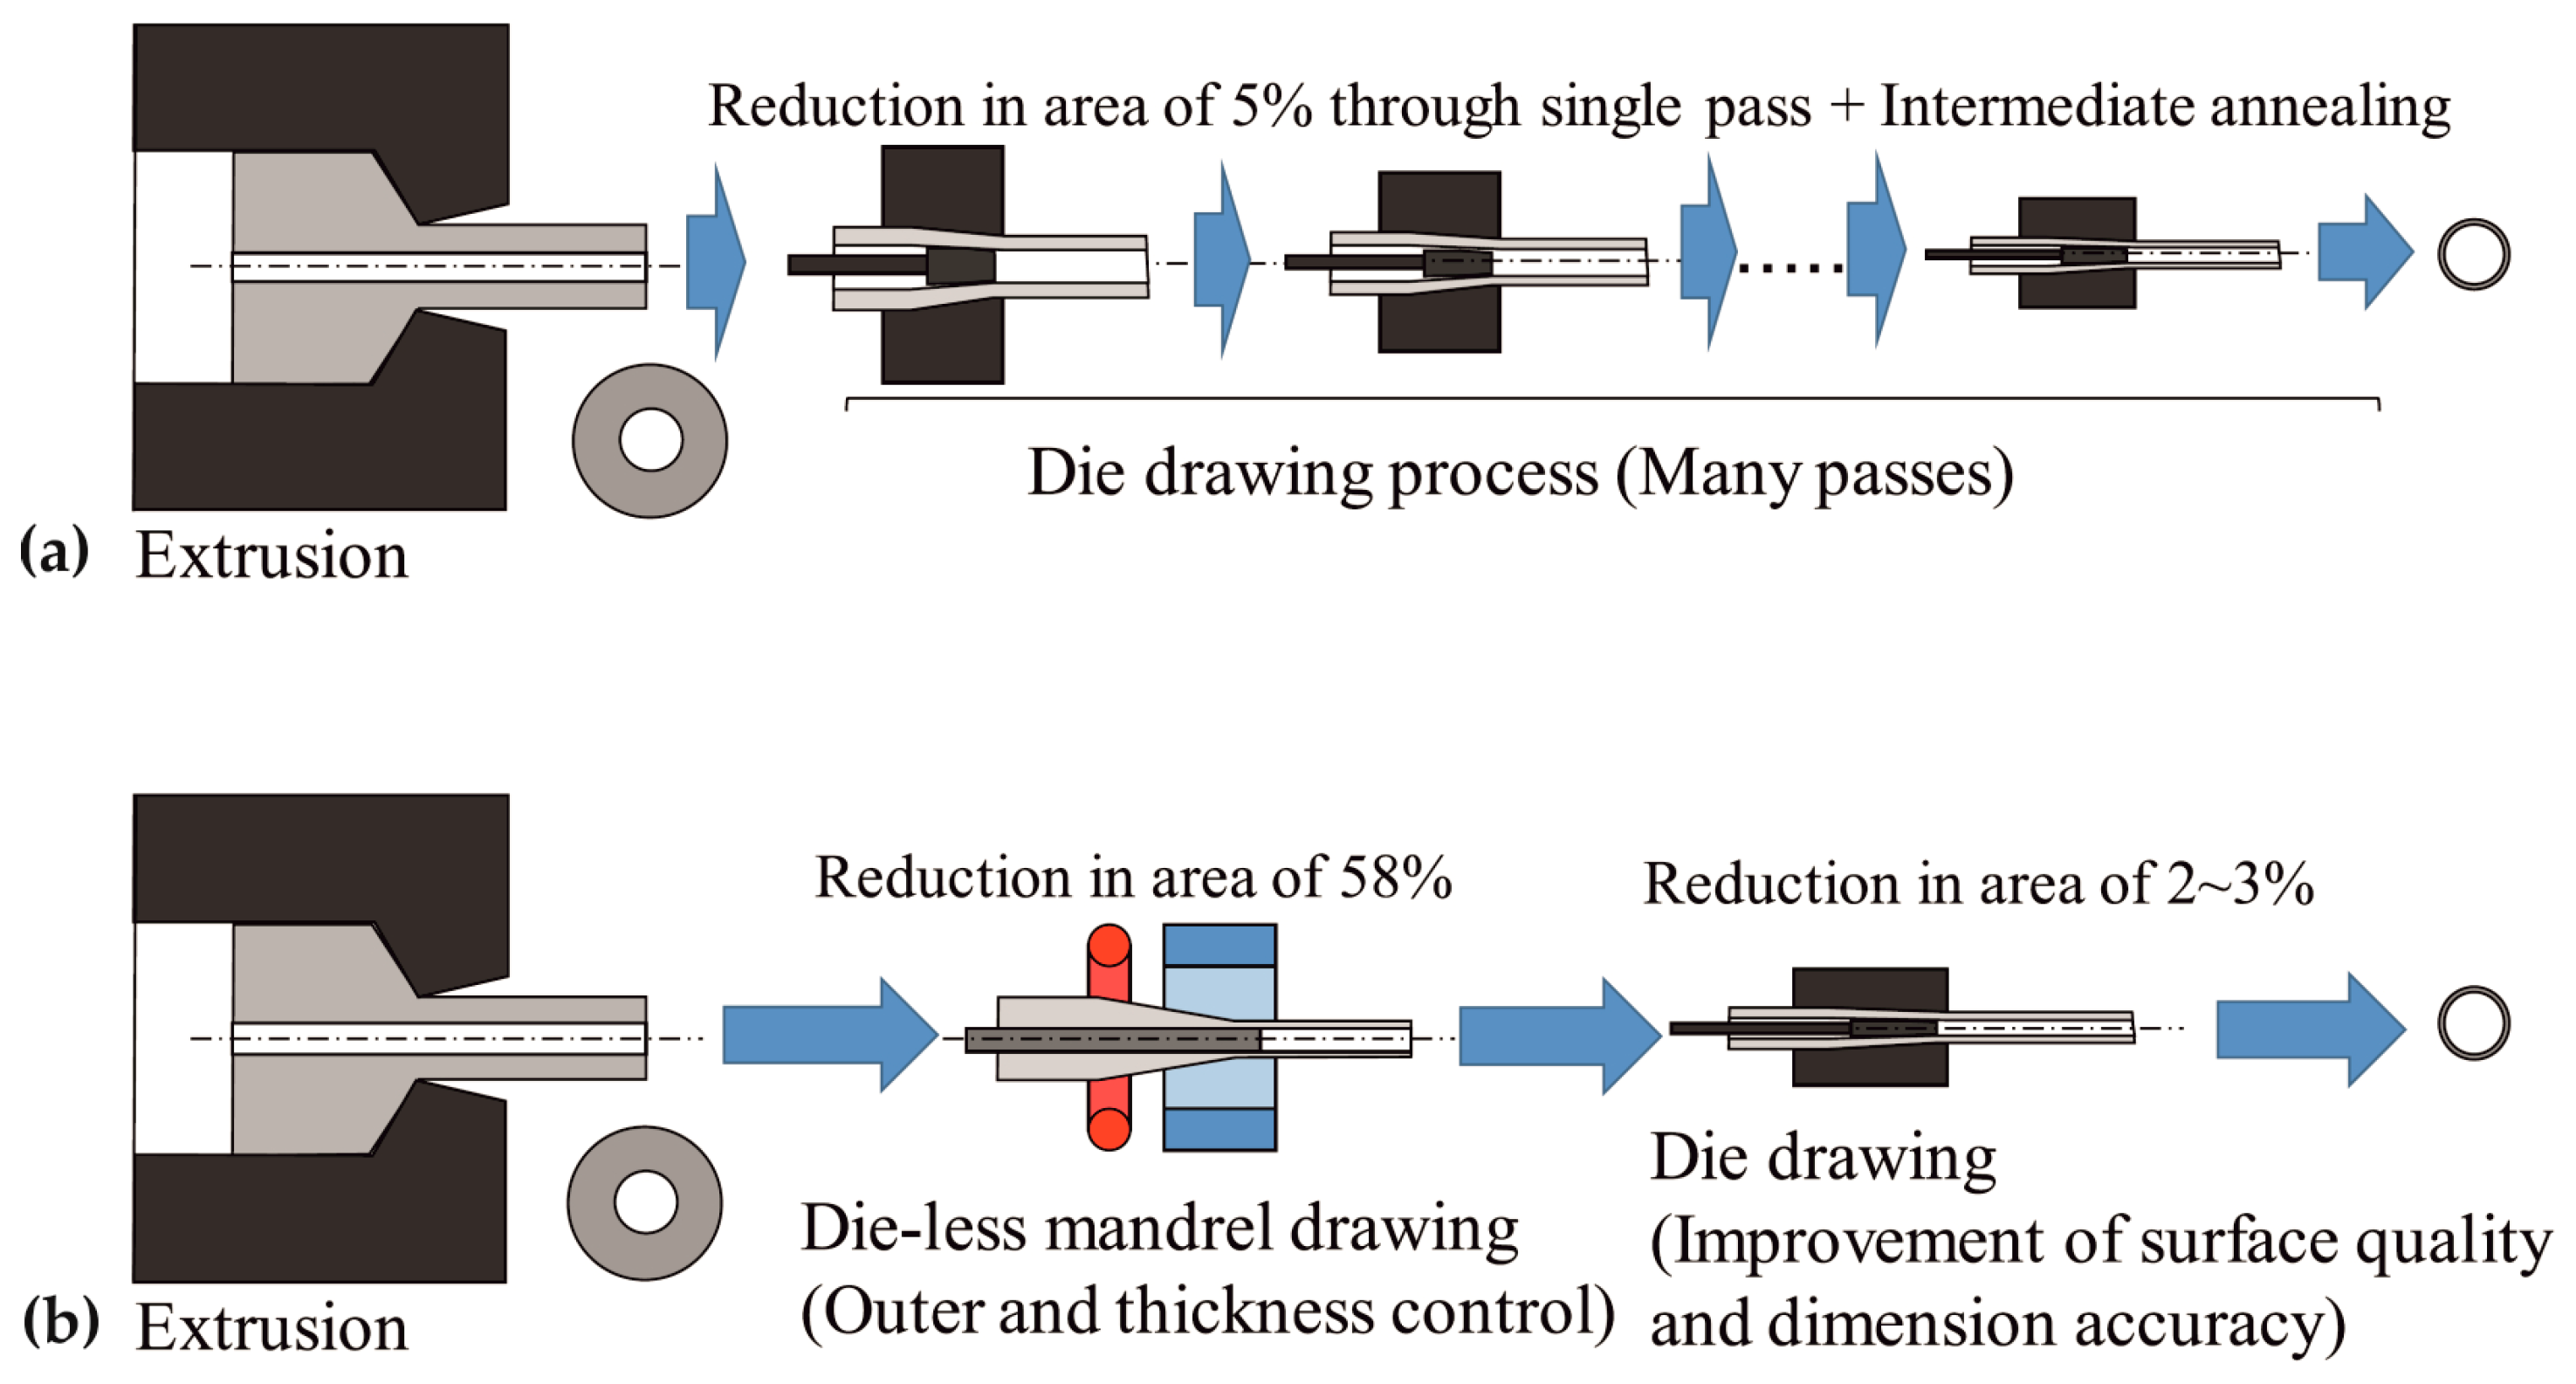
A specific peculiarity of dieless tube drawing processes is the fact that the ratio of the outer to the inner diameter of the drawn tube remains constant during forming, irrespective of the used tube material and tube dimension, even after a multi-pass dieless drawing [34,35], and this is also achievable for non-circular multicore tubes [28]. A theoretical explanation of this experimentally proven effect was provided in [34]. This similarity of cross-section change simplifies the process design. Additionally, the drawing process can also be conducted with the use of a wire mandrel, where the tube is drawn with this inserted mandrel to specify a selected inner tube diameter. This novel strategy was examined for the dieless drawing of magnesium micro-tubes, with obtained cross-section reductions of about 58,3% [21]. Based on this technique, a concept for the manufacture of bio-absorbable micro/mini-tubes, made from magnesium alloys for vascular anastomosis and for stents was suggested, with fabricated outer tube diameters do in the range of 0.4 up to 2 mm and 0.1 up to 1 mm, respectively, using the drawing with rigid dies as the final forming step [21]. Figure 3 represents this concept, together with a comparison with the fabrication of such products using solely rigid drawing dies [21]. These concepts can help to eliminate difficulties in dieless drawing associated with dimensional accuracy and surface roughness [21].
Developed models for the numerical analysis of dieless drawing processes were based on thermo-mechanical-coupled finite element simulations [5,22,33,34] and finite difference methods [60], and they have shown a good accuracy and reproducibility when material flow curves, which consider the dependencies between the flow stress and strain, and strain rate and temperature, were implemented.

2.2. Scaled-down Tube Drawing and Variants

Research into process chains using scaled-down tube drawing processes focused in large part on the processing of degradable biomedical metallic materials, such as alloys based on magnesium [36,39,40,41,44] or zinc [38], as shown in Table 3. These alloys have attracted extensive attention as materials for metallic stents for the treatment of cardiovascular disease, since there is no requirement for a secondary removal surgery. However, the hexagonal close-packed crystal structure of these materials significantly reduces cold formability. Furthermore, the application of the fabricated tubes for stents requires certain properties of these semi-finished products relating to, for example, strength, accuracy, and a metallic microstructure. The latter influences the biodegradability of the final component, as a sufficient degradability is related with a low density of crystallographic defects and a fine and homogenous microstructure [36].
For the manufacture of stents made from a magnesium alloy, a process chain was developed, starting with the hot extrusion of a tubular blank and subsequent multi-pass cold drawing operations, combined with heat treatment between the forming steps [36]. A dimensional error of less than 3.8% was achieved, and a mean grain size of 4.4 µm was determined for the final tubes, after annealing. It was shown that the mechanical properties and bio-corrosion improved due to the microstructure, after the achieved grain refinement [36]. The process chain described in [39] and applied to three different magnesium alloys was similar, but it had several cold-rolling steps between the hot extrusion of the blank and the multi-pass drawing operations with intermediate annealing. Dimensional errors below 2.8% were determined for the fabricated micro-tubes, and the influence of the obtained microstructure of the individual alloys on the mechanical properties and corrosion behavior was analyzed. The average grain size of the produced micro-tubes in this study were in the range of 10.9 and 15 µm [39]. Investigations into the effect of cold-rolling on the mechanical properties and evolution of the twinning of magnesium alloy tubes under varied processing parameters showed that different types of twinning dominated the mechanical behavior of the formed tube [41]. The type of twinning that appeared depended on the selected dimensional parameters for the cross-section-area changes in the rolling process [41].
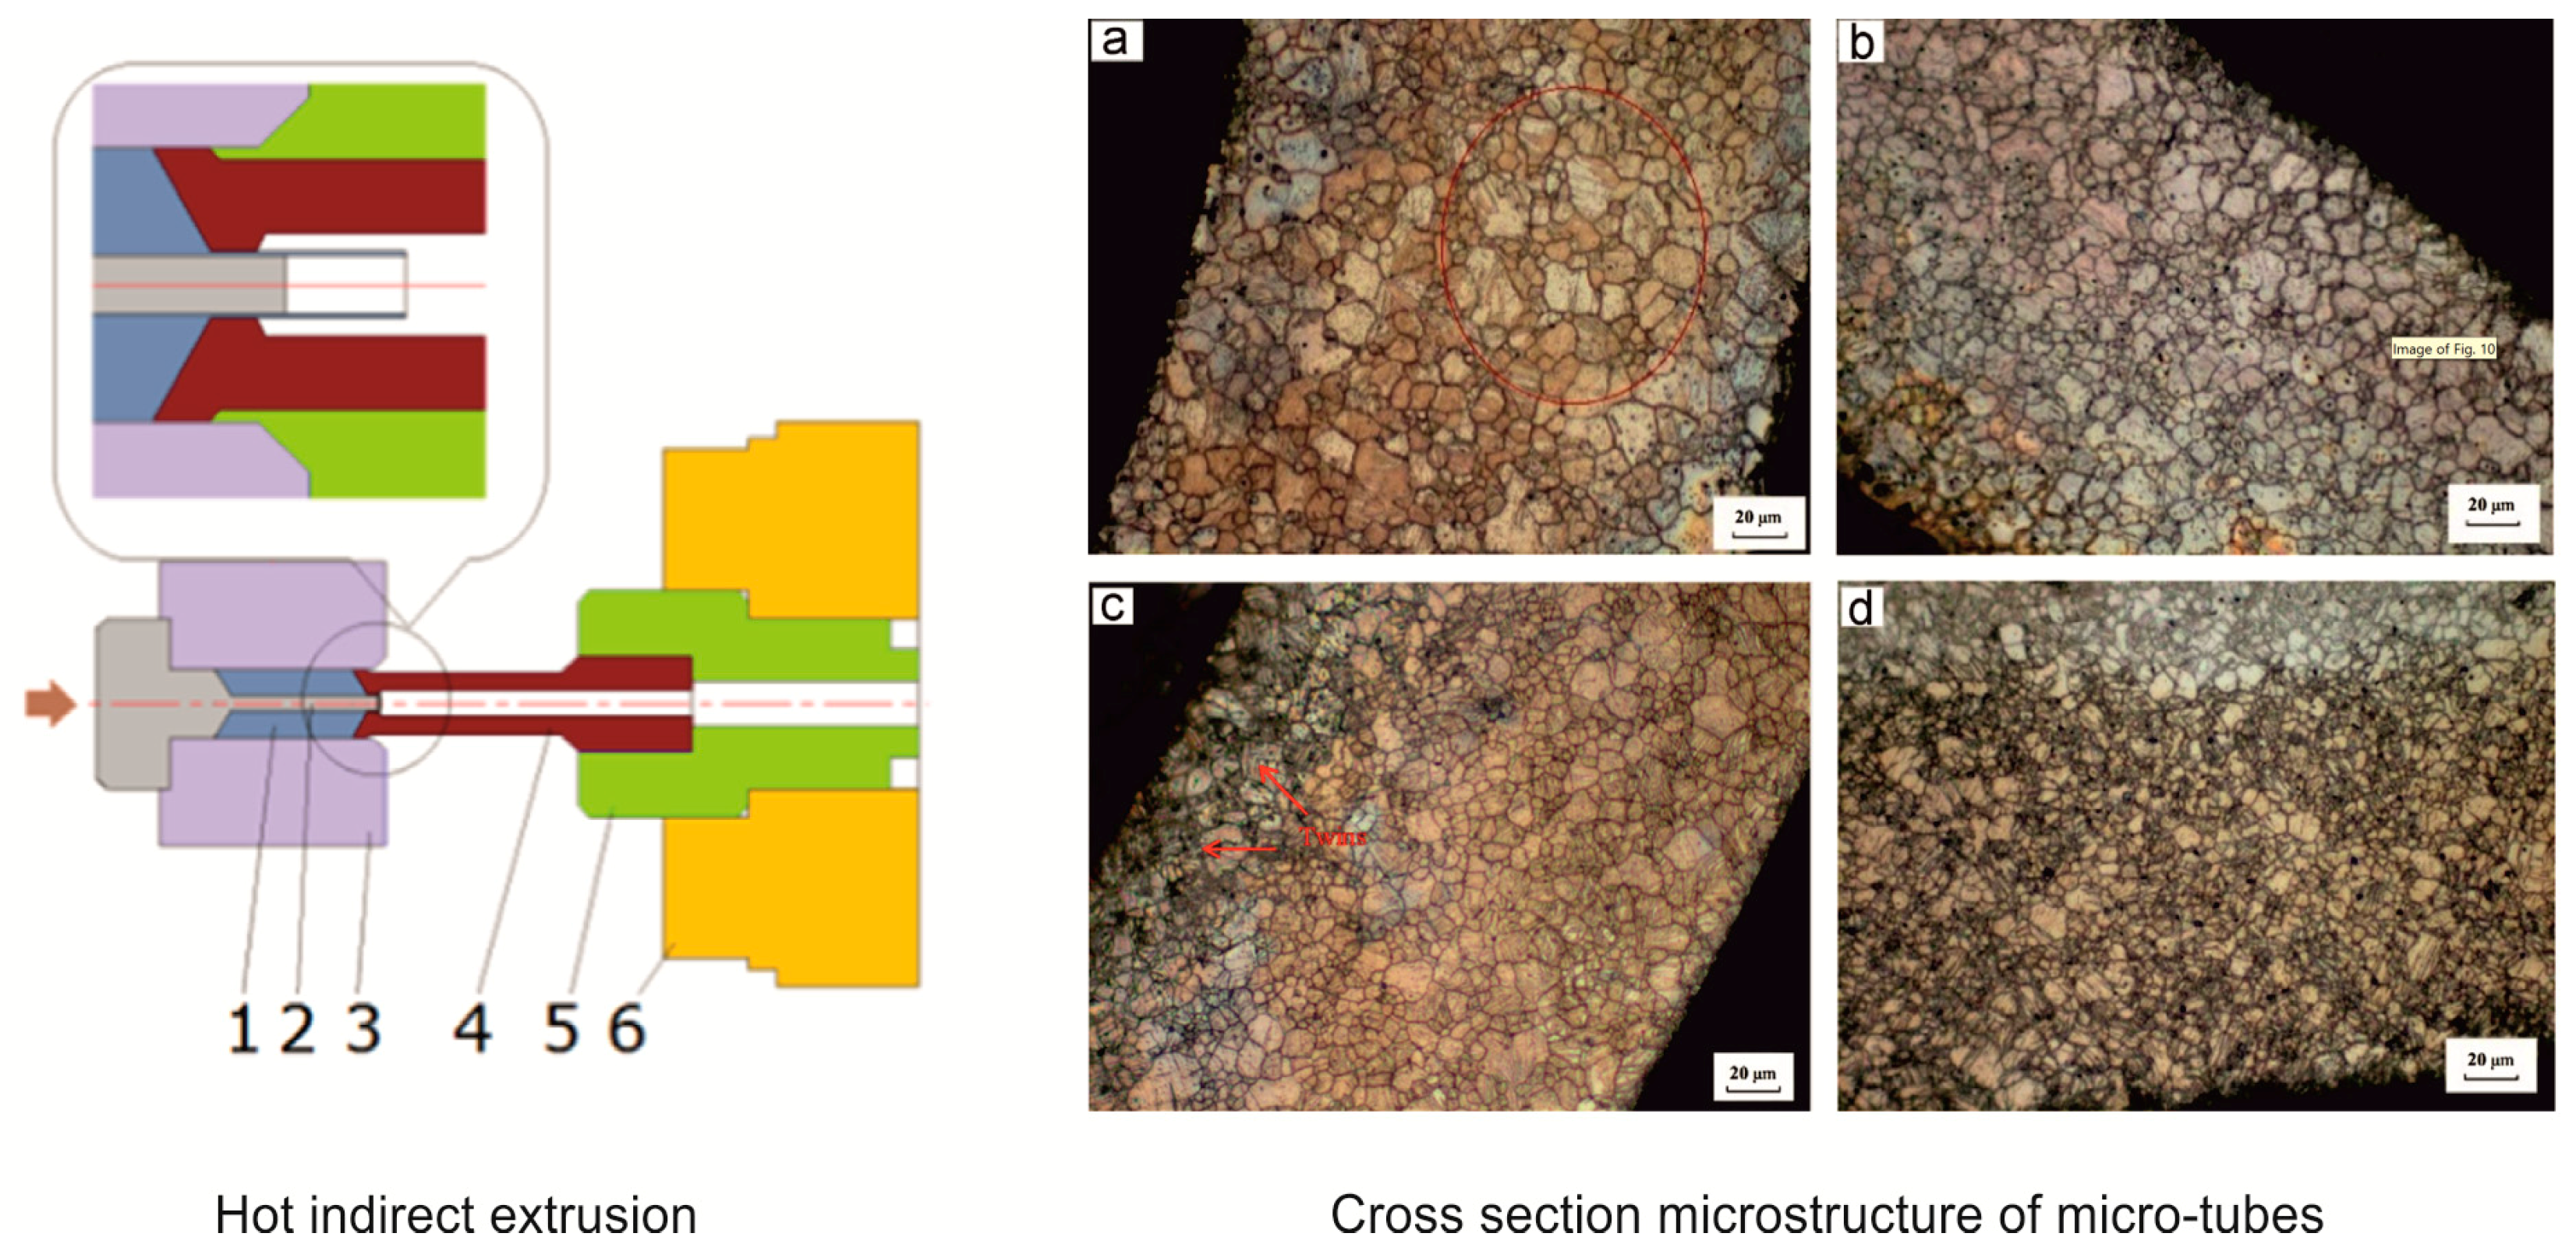
A comparatively short process chain for the fabrication of micro-tubes made from magnesium was developed and demonstrated [40,44]. Extrusion processes were applied to generate a solid billet that was first machined and then formed into a tube by a hot indirect extrusion process, followed by four cold drawing steps, without intermediate annealing. The indirect extrusion process could be considered to contribute to the refining of the grain structure, which showed an average grain size of 10 µm [40] and 15 µm [44], as shown in Figure 4. A dimensional error below 5.5% was achieved [44].
Investigations into the use of a novel biodegradable zinc alloy for stent fabrication were documented in [38]. The developed process chain consisted of drilling an extruded billet, several cold-rolling operations, and multi-pass drawing, without and with mandrel. Each forming operation was followed by a heat treatment process of the components, and an average grain size of 20 µm was attained, with a dimensional accuracy for the final tubes below 3.8% [38]. The mechanical properties and corrosion behavior were determined, and prototypes of the stents were tested mechanically.
Most of these studies report that mandrel drawing was used for the micro-tube drawing operations. In mandrel drawing, the tube is drawn over an inserted mandrel that passes through the die with the tube. For the fabrication of micro-tubes made from a Ni–Ti shape-memory alloy, mandrel drawing provided higher drawing limits, compared to drawing with a fixed plug or tube sinking without any plug [46]. The increase of surface roughness was found to be an additional limiting factor in producing micro-tubes through tube sinking processes [42,46]. The use of soft copper material for the mandrel could enable a maximum reduction in the cross-sectional area through mandrel drawing of about 27% for the drawing of Ni–Ti alloys [46]. The drawing of tubes from Ni–Ti alloys with fixed plugs turned out to be limited to outer diameters of the tubes above 4 mm due to difficulties in joining the plug to the supporting rod, and the forming with floating plugs led to unstable processes, caused by breaks of the drawn material [46]. Investigations based on numerical simulations using hyperelastic and the Mullins effect model, in conjunction with experiments, have shown that the dimensional accuracy of micro-tubes made from Ni–Ti alloys could be improved using brass, instead of copper, for the mandrel material, but that drawing stresses slightly increase [37]. However, the drawbacks of the mandrel drawing of micro-tubes consist in difficulties relating to the removal of the mandrel from the drawn tube and a lower surface quality, compared to that of drawing with fixed plugs [46].
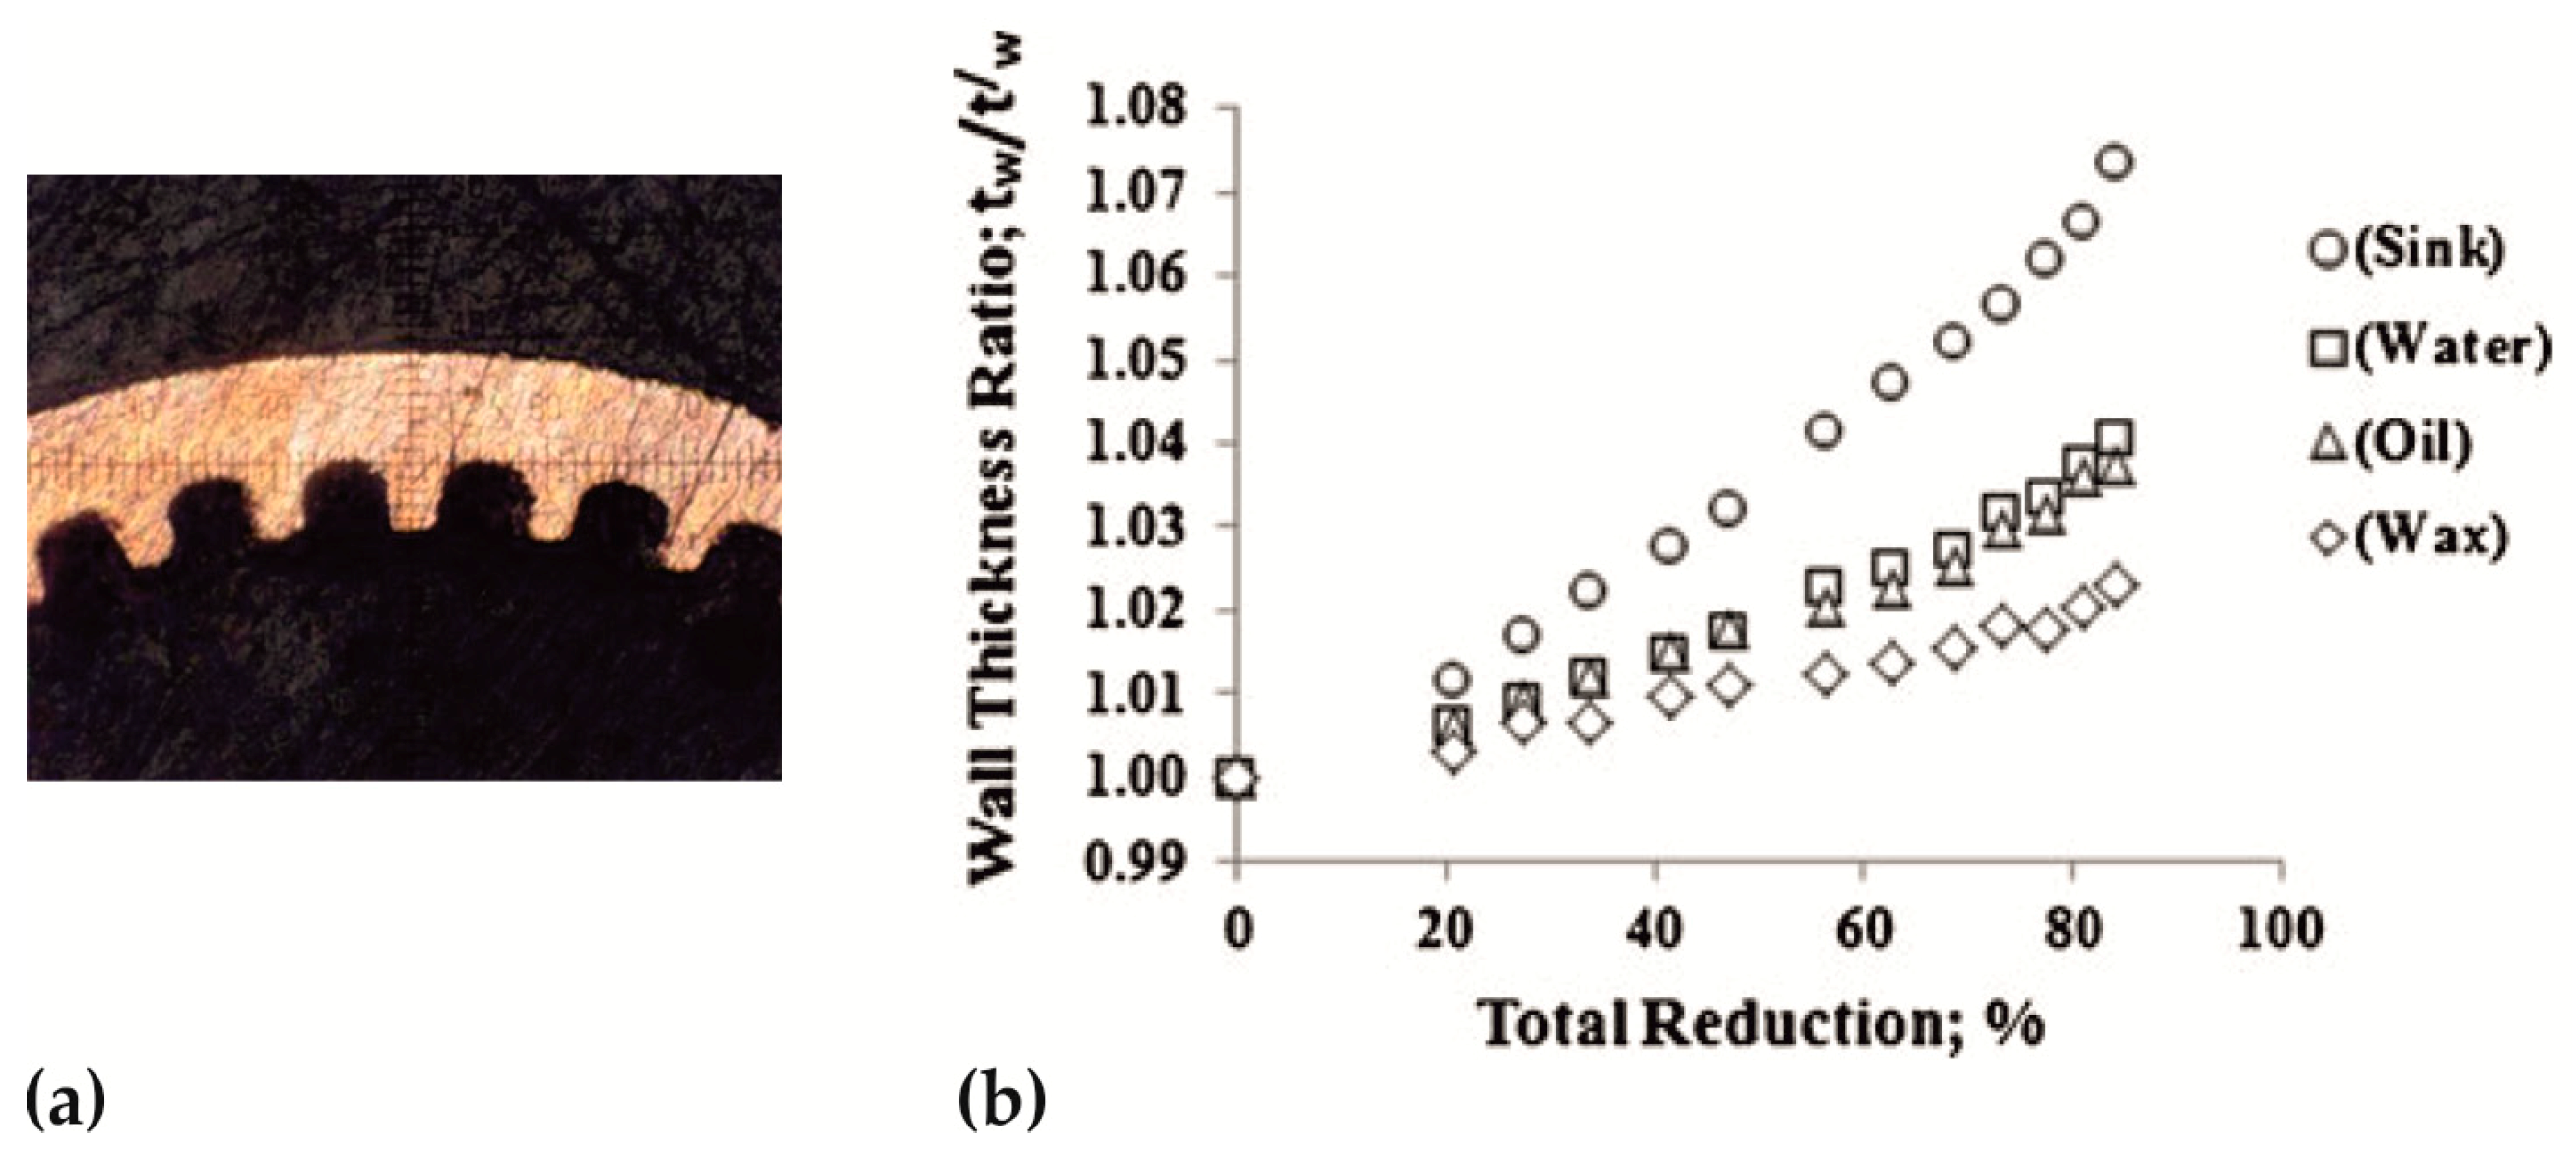
A possible way of avoiding complications in removing a rigid mandrel from the drawn micro-tube consists in the use of liquids, such as water or oil, within the sealed tube during the drawing process, instead of the mandrel [45]. For the fabrication of micro-tubes made from stainless steel, with do = 2.0 mm, by performing 21 passes, without intermediate annealing, the application of this fluid-mandrel drawing technique resulted in an increase of the wall thickness that was about 42% lower compared to that of the use of sinking [43], as shown in Figure 5.

2.3. Grooved Tubes and Non-Circular Tubular Products with Micro-Channels

Metallic tubular micro-products are gaining importance for applications in heat exchange technology [49]. Micro-tubes that are ribbed or grooved on the inside are of interest, for example, in relation to micro-heat pipes in electronic products [51], as shown in Table 4, and extruded profiles with micro-channels are suitable for improving the heat transfer efficiency in items, such as automobile air conditioners, radiators, or gas/fluid coolers [58], as shown in Table 5. For example, it was reported that a reduction of a heat exchanger channel, from diameters between 2 and 5 mm to less than 1 mm, can increase the heat transfer efficiency by more than 200% [61].
A conventional method—described in the corresponding literature as a spinning process—to manufacture grooved tubes, with outer diameters above 5 mm, consists in applying pressure using rotating steel balls on a tubular blank, which is supported inside with a ripped plug and drawn additionally in the axial direction [49,50]. However, similar to the plug drawing of smooth tubes, this method is limited to tube outer diameters above 4–6 mm due to difficulties in fabricating the plug and in its handling [53]. Specified dimensions of the grooves and of the intermediate ribs have to be obtained by the forming process to ensure the necessary properties of the final product in the heat transfer. Important parameters determining the quality and feasible dimensions of the formed inner grooves for this minimum producible diameter range are the number of spinning balls, the position of the plug, and the drawing speed [52,54].
Within certain limits, smaller diameters can be achieved by applying multi-pass tube sinking to a grooved tube, fabricated by the spinning process, described above [50,51,53]. However, this method is limited, because the ratio of the width of grooves to the width of the ribs reduces with each drawing pass, and after a certain number of passes, the grooves are closed by the deformed ribs [49,53]. Furthermore, an excessive increase in the wall thickness could be observed [49,53]. Investigations into drawing such grooved tubes with a liquid medium inside—according to fluid mandrel drawing [45]—have shown that these drawing limits of tube sinking could be extended considerably [43,49]. Figure 6 illustrates the change in wall thickness for the multi-pass drawing of a grooved micro-tube with different media, as an example. Finite element models were developed for the analysis and optimization of the multi-stage sinking of straight- [53] and spiral-ribbed micro-tubes [48], considering three-dimensional forming conditions.
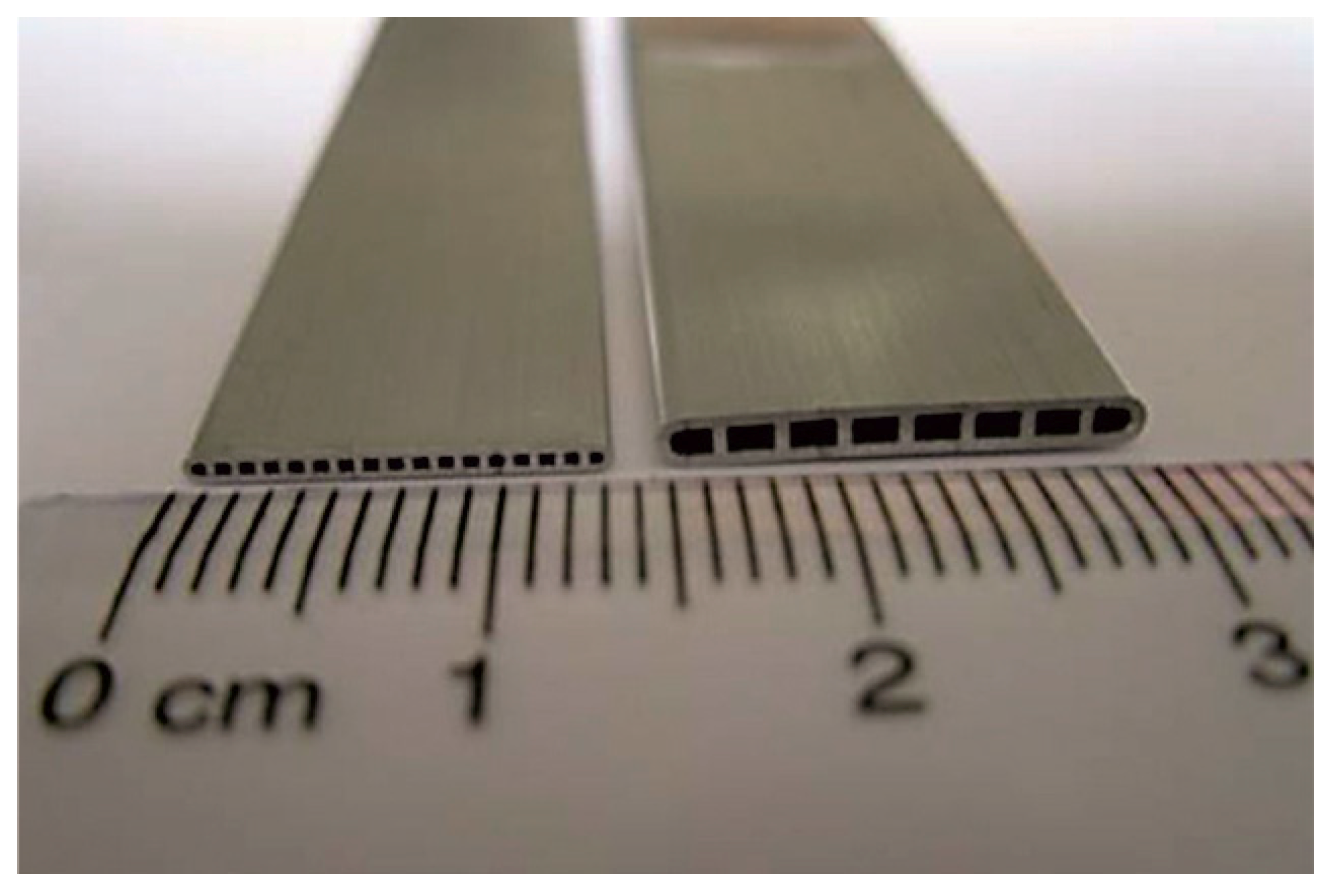
Achievements in the fabrication of extruded tubular profiles made from aluminum alloys with micro-channels (Figure 7) by hot extrusion processes involved investigations that led to a deeper understanding of the microstructure evolution during extrusion and of influences on weld seam strength.
In [55], a viscoplastic self-consistent model, considering crystal plasticity, together with finite element analysis and a flow line model, was employed to investigate the microstructure evolution during the extrusion process of a micro-channel tube, with ten square channels of a width of 1400 µm. It was found that the rotation of shear planes caused a texture change during the material flow, and relationships between the grain refinement and shear effects were determined [55].
A detailed study on the influence of the extrusion process and subsequent rolling and brazing operations on the microstructure and mechanical properties of this profile type was conducted [56]. Experimental comparisons of the extrusions of micro-channel tubes made from different aluminum alloys have shown that the alloy, A3003, provided a more reduced grain growth, due to the following brazing process, and a higher strength than the alloy, A1001 [59]. The effect of the extrusion die design on the quality of the weld seam strength of micro-channel tubes, with a channel size of 500 µm × 500 µm, was the subject of research in [57] and [58], supported by experiments, numerical simulations, and physical simulations.

2.4. Discussion

The reviewed research on dieless drawing for micro-tube fabrication shows that clear advantages of this technology consist in: (a) the possible large degree of cross-section reduction in a single drawing pass, which allows the number of manufacturing steps to be crucially reduced and, with this, production costs; (b) the feasibility to process materials that are difficult to form, but that are of great interest for important fields, such as medical technology; and (c) a comparatively large knowledge base concerning fundamentals, documented in numerous publications. The need for development is seen in measures for improving the manufacturing accuracy, where possible strategies were already pointed out, for example, the combination with conventional drawing processes.
Compared to dieless drawing, scaled-down drawing processes, summarized in Section 2.2, can provide a comparatively high and feasible manufacturing accuracy. However, for the processing of materials that are difficult to form, such as materials with a hexagonal lattice structure, manufacturing is typically accompanied by a greater number of manufacturing steps and annealing operations. This usually results in rising manufacturing costs and more difficulties in guaranteeing a consistent product quality. Therefore, it is useful to intensify research on strategies that also consider a reduction of process steps, as already demonstrated in isolated cases. The technique of fluid mandrel drawing has been shown to be able to provide advantages in facilitating micro-tube manufacturing, but there are still several outstanding issues, such as its capability in relation to high-volume production and correlations between the forming result and varying tube dimensions and tube materials.
The techniques discussed in Section 2.3 are of importance for industries that provide heat exchanger systems for a broad range of consumer goods and industrial installations. The miniaturization of extruded micro-channel tubes can be considered to be at a comparatively advanced stage, and existing research results deal with a holistic view of correlations between the manufacturing chain and product properties. A significant advantage of the extrusion process can be seen in its suitability for mass production, with a low number of manufacturing steps. For improvements in the miniaturization of grooved micro-tubes, approaches were developed and investigated based on the concept of fluid mandrel drawing. As in the case of the drawing of smooth micro-tubes, the need for investigations into the capability of high-volume production is also seen here as an outstanding issue.

3. Micro-Tube Hydroforming

In tube hydroforming, a tubular blank is plastically formed into a three-dimensional shape within a forming die cavity by applying pressurized liquid or gaseous media on the inside of the workpiece [62]. Additional mechanical loads on the formed component can be utilized to contribute to the plastic flow of the formed material or supporting areas of the component during expansion [62]. Applications of hydroforming at macro-scale predominantly concern the industrial production of thin-walled, complex-shaped components for numerous sectors, such as the automotive and aerospace industry or sanitary and piping manufacture [63,64,65,66,67]. Scaled-down hydroforming offers an economic potential for the micro-manufacturing industries, for example, for the production of metallic components for medical technology, elements of fuel cells, micro-fluidic devices, micro-heat exchangers, or hollow micro-shafts [6,68,69].
Research into scaling-down hydroforming for the manufacture of micro-tubes started about 10 years ago and has predominantly focused on the issues of (a) process development [69,70,71,72,73,74,75,76,77,78,79,80,81,82,83,84] and (b) appropriate tool and machine design [68,77,85,86,87,88,89,90,91]. In both cases, size effects due to miniaturization played an important role. This concerned not only size effects in the forming behavior of the micro-tubes that influence the forming process and the result [76,79,80,83,84], but also the effects on friction [86] as well as difficulties in scaling the conventional hydroforming tooling to the microscale [86]. A particularity of hydroforming consists in the comparatively large number of necessary forming loads [68]. This requires a tool design that ensures its sufficient high durability, with a minimum of elastic deflection and a reliable sealing of the formed components under the applied fluid pressure. Fluid pressures of the order of 50–120 MPa were applied within the context of published investigations into the hydroforming of micro-tubes [68,70,75].

3.1. Process Development

For the design and optimization of hydroforming processes and components, knowledge about forming limits is required to estimate the feasibility of the process and to determine the necessary process loads for the forming operation. Corresponding research on these limits and suitable load paths have been published for the micro-hydroforming of tubular blanks with outer diameters in the range of 500 to 2000 µm, summarized in Table 6, which contains corresponding information about the tube material, dimensions, process type, and envisaged workpiece shape.
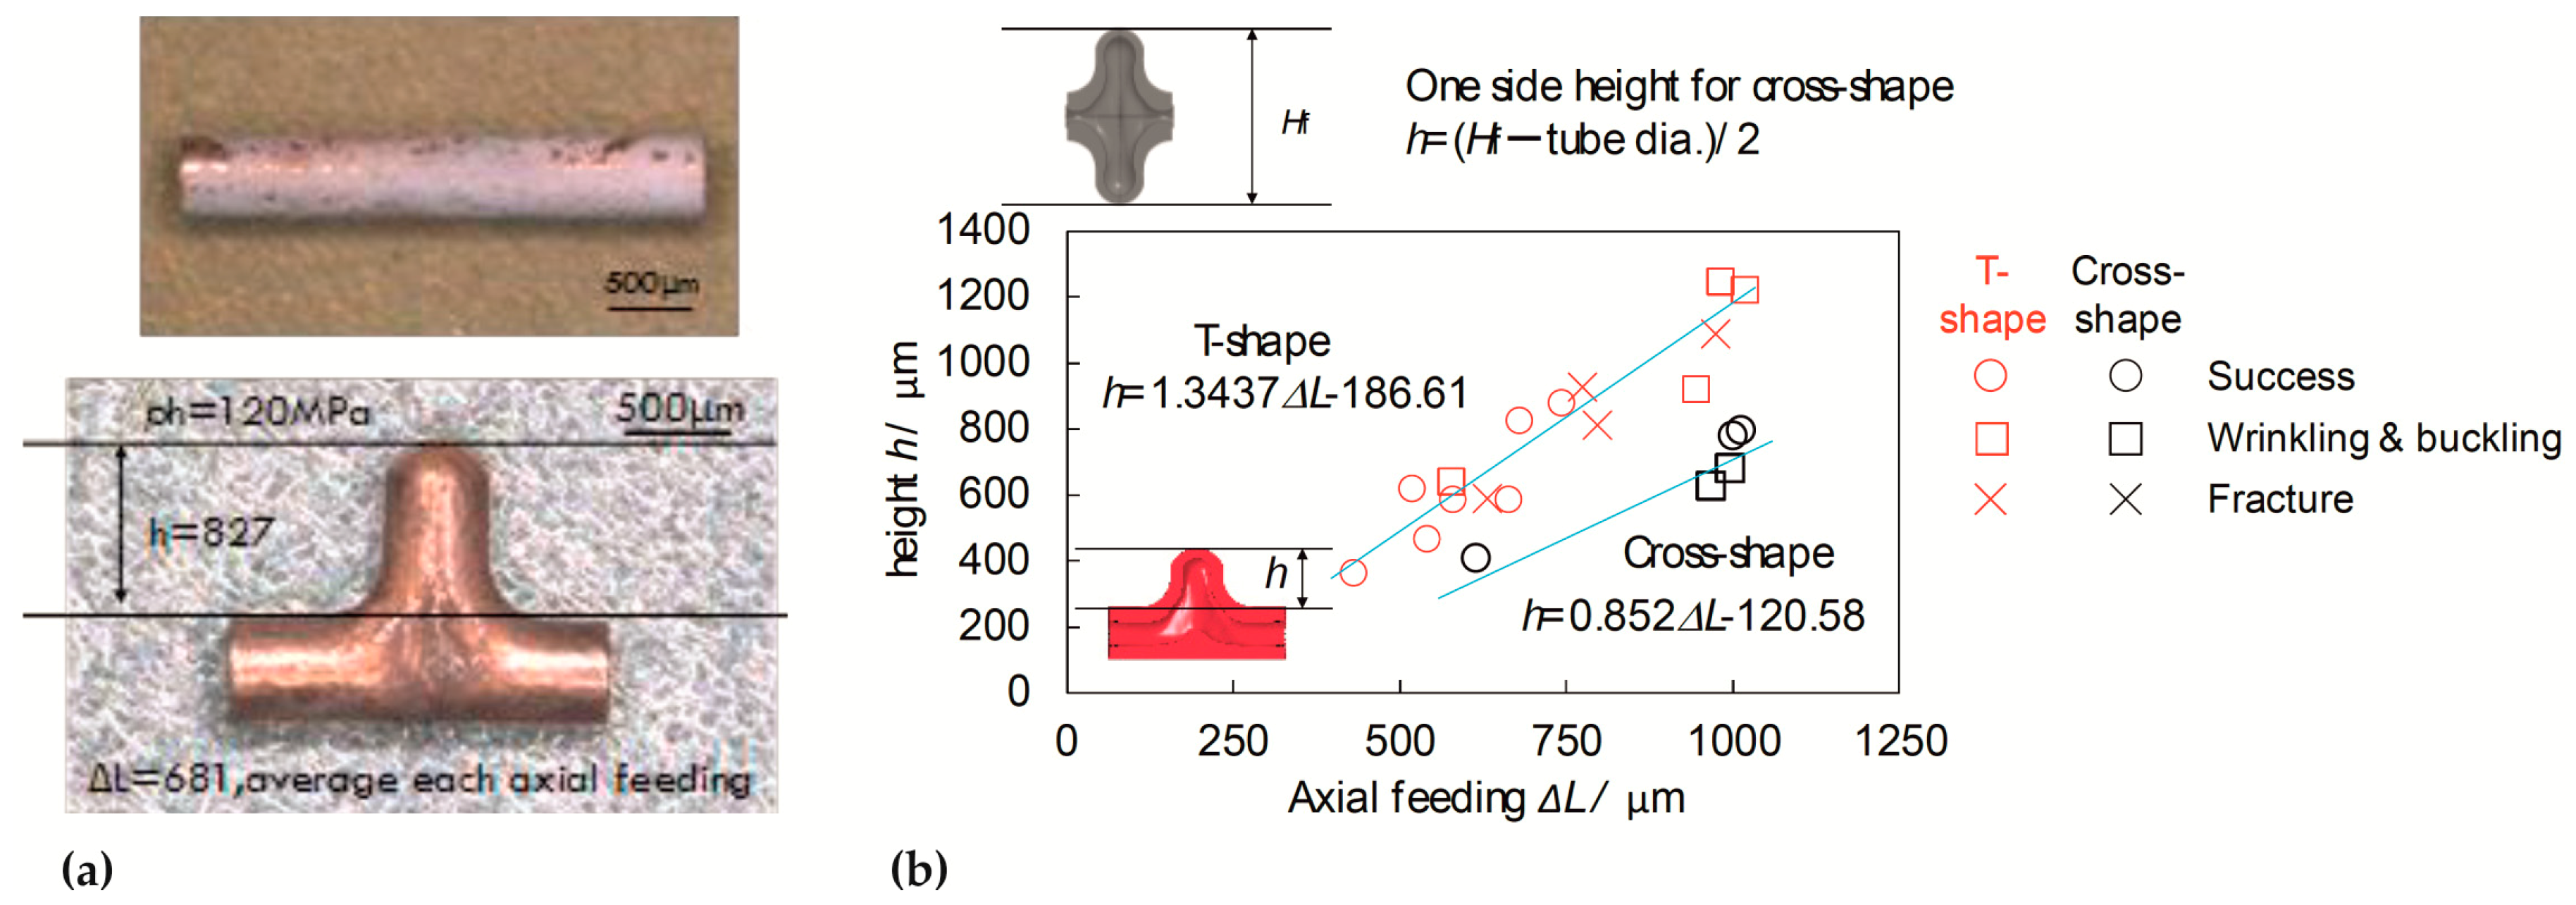
The results of the investigations into the micro-hydroforming of tubes, with an outer diameter of do = 500 µm and a wall thickness of t = 100 µm, into T-shaped (Figure 8a) and cross-shaped components were presented in [70,71,72,73]. The investigated load paths in these studies consisted of the controlled application of an axial movement of the tube ends, generating an axial compressive stress and an increase of the internal pressure. Different crack formations within the expanded component area and wrinkling and buckling in non-expanded zones were determined as the plastic instabilities that limited the range of applicable loads for the hydroforming of T-shaped and cross-shaped micro-parts [70,71,72,73], as shown in Figure 8b. For the expansion of T-shaped micro-components, an excessive local increase in the wall thickness, opposite to the expansion, also limited the process [72]. Within the frame of the research on a novel micro-hydroforming tool concept, described in Section 3.2, the micro-hydroforming of Y-shaped, T-shaped, axisymmetric, and rotationally symmetrical components, with do = 1.0 and 2.0 mm, was tested, based on load paths determined using finite element simulations [74,75].
Besides the selected amount of forming loads and their control during the forming operation, the grain size of the tube material can crucially influence the feasible expansion in micro-hydroforming and the scattering of the formability. For the micro-hydroforming of stainless-steel tubes, with do = 800 µm, t = 40 µm and an average grain size dg between 16 and 26 µm, it was found that the possible expansion of the micro-tubes, until the appearance of crack initiation, was lower than that for the forming of conventionally sized macro-tubes, made from the same material [83]. This could be attributed to size effects, resulting from the reduced ratio of the tube wall thickness to the average grain size t/dg of the tube material. In [80,84], it was predicted theoretically, using a crystal plasticity finite element-based modeling technique, that the localized necking of the micro-tube wall was related to the angle between the crystal slip systems and the hoop stress direction.
As a result of the small number of grains in the tube wall direction, necking and subsequent bursting progresses faster in the expansion of micro-tubes than in macro-tubes, which can be regarded as a homogeneous continuum due to their larger number of grains. Furthermore, with a decreasing ratio t/dg, an increase in the scattering of process parameters and forming results can be observed. This was found by [76,78] in comparative studies of micro-tubes made from stainless steel, with a ratio of t/dg = 3.3, and tubes made from a platinum alloy, with t/dg = 1.1. For the example of a rotationally symmetrical expansion, where merely the internal pressure and no axial compressive stress was applied, the scattering of the internal pressure at the occurrence of crack formation turned out to be 16 times higher for the tubes with the smaller ratio t/dg [76,78]. With the application of a superimposed axial stress, a reduction of this scattering by about 77% was achieved, combined with an increase in feasible expansion by about 114% [79]. For the micro-hydroforming of T-shaped and cross-shaped micro-components, it can be assumed that, when more than approximately 20 grains are located along the wall thickness of the formed micro-tube, grain-size-based size effects do not occur [70].
The application of heat energy to the micro-hydroforming process by direct electric resistance heating was tested by [69,81,82], with the objective of reducing the required deformation energy for micro-tube hydroforming and to increase the material formability. Experiments with stainless-steel tubes, with do = 2.1 mm and t = 150 µm, were conducted in a tool for free expansion, without axial forces, using water as a pressurizing medium and a current density of up to 26.7 A/mm2. As essential results of these investigations, it was shown that the necessary forming pressure could be reduced [82], that the microstructure influenced the achievable forming temperature [69], but that non-uniform deformations of the formed micro-tubes were to be observed [81].
The lubrication aspects of micro-hydroforming were part of the investigations into fabricating T-shaped and cross-shaped components [70]. In particular, galling between the forming die and the micro-tube, caused by a high amount of friction, limited the process [72]. According to the presented results, the coating of the tubular blanks with a fluorocarbon spray enabled a bulging height that was more than two times higher, compared to forming without any lubricant [72]. Teflon sheets were used in the micro-hydroforming experiments conducted in [75].

3.2. Tool and Machine Design

Currently, three different concepts of micro-hydroforming systems have been proposed, differing, in particular, in the way they achieve the pressure supply from the pressurizing medium to the workpiece, together with the sealing of the tube ends and the design of the axial movement of the sealing punches. One specific issue that had to be solved with the individual systems consisted in the design of reliably working sealing punches. The punch-tube-die junction has to fulfill several requirements: the material feed, the sealing, and the high-pressure supply, which present a huge challenge in scaling down the conventional hydroforming process to the micro level [85]. Furthermore, the micro-hydroforming process is also affected by the ability to manufacture small and accurate features on the punch [86].
The device described in [87] was based on a bolted setup for the forming dies, a pressure intensifier that was driven by a press, and sealing punches that were positioned and moved via screw threads. An internal pressure for the micro-tube forming of 400 MPa could be achieved using the system. To conduct the pressurizing media to the inside of the workpiece, the sealing punches were notched axially around their outer circumferences and radially at their end faces. In this way, the pressurizing medium could be transported along the outside of the punch to the inside of the micro-tube. A radius of 25 µm was selected for the notches [87].
A floating die assembly concept was presented in [74,75] that was based on decoupling the requirements at the die-tube-punch junction, as applied in conventional tube hydroforming systems. This tooling assembly was divided into two levels: a high-pressure housing and a floating micro-tube hydroforming die assembly. With this, difficulties in developing a reliable sealing system were eliminated, the system decoupled the interdependence of the material feed and the tube sealing, and punches of various geometric configurations could be designed [75]. To clamp the pressure housing chamber, the tool system was integrated into a 1500 kN press. It was equipped with feed actuators for the punch movement, a computer-controlled pressure intensifier for the pressurization of the formed tubes up to 140 MPa and feed actuators for the punch movement. Similar to the concept described before, notched sealing punches, fabricated by wire electro-discharge machining from A2 tool steel and heat treated to 60 HRC, were developed here as well. However, merely one notch was implemented on the individual punch, with a radius of 0.4 mm [75].
To investigate micro-hydroforming under production conditions, a system was developed with the method of scaling down, in large part, macro-scale hydroforming to the microscale, but considering issues concerning elastic tool deflection caused by comparatively high loads on miniaturized tool elements [68,77,90,91]. The system was equipped with a spindle-driven pressure intensifier, which allowed an internal pressure of up to 400 MPa to be applied. The closing force of the hydroforming dies was realized by a hydraulic press, with a maximum force of 20 kN, and the sealing punches were moved by linear actuators with spindle gears. For the control of all functions and recording of experimental data, the system was equipped with a computer-based control system. An important topic in tool design was avoiding the occurrence of relative deflection between the sealing punches and the die cavity in the vertical direction due to elastic deformations, generated by the tool closing force. Such deflections can cause unreliable sealing during hydroforming, an increasing wear of the sealing punches or even damage to the tool elements [68]. Against this background, a mounting of the sealing punches was designed, which ensured that the vertical position of these punches corresponds to the position of the die cavity, irrespective of elastic tool deflections [68]. Scaled-down traditional hollow tapered punches were used in the experiments with this system for micro-tubes with do > 1.0 mm and a conical punch design for smaller tubes [77].
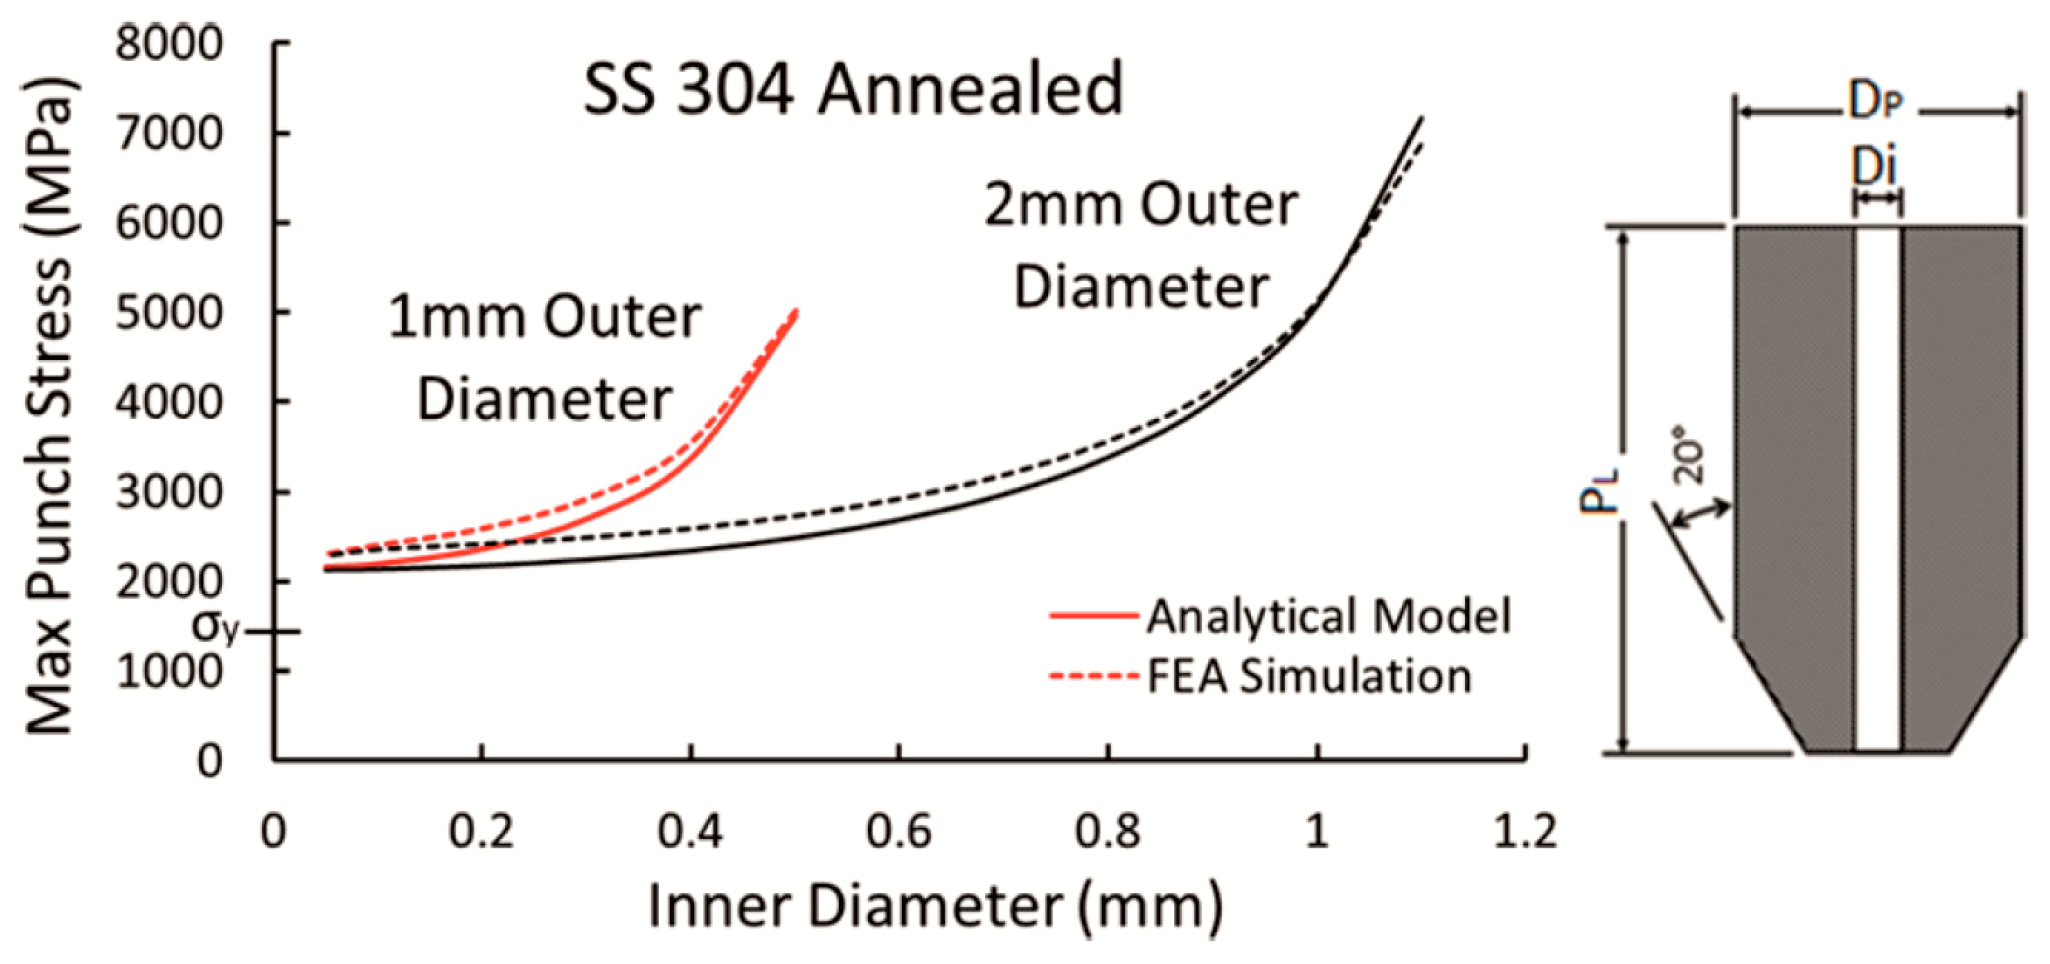
Several design variants for micro punches were proposed and analyzed with the aid of finite element simulations [85,86], analytical models [86], and experiments using a floating die assembly concept [85]. It was shown that partially and fully notched punches induced von Mises stresses below the yield stress of conventional tool steel and could withstand the material feed load required to form Y-, T-, and bulge shapes from SS304 steel micro-tubes, with outer diameters of 1 and 2 mm [85]. For the investigated micro-tubes and the die system, it was found that the effective punch length should not exceed 10 mm to avoid the buckling of these tool elements [85]. The feasibility of the scaling traditional macro-sized hydroforming tools to the microscale was investigated in [86], in which the effects of scaling the tooling are conceptually observed, and a mathematical model was developed to determine the stresses in tapered punches, as shown in Figure 9. One major conclusion was that current manufacturing techniques are not capable of accurately creating holes that are small enough for an acceptable stress level of the punch [86].
Measures to influence the accuracy of the produced micro-hydroforming components by reducing the elastic deflection of the forming dies under a load were investigated using finite element-based simulations [89]. The study recommended the implementation of a tool design that enables the superimposition of bending stresses, in conjunction with an adapted joint-face design and controllable closing forces, to control elastic distortions of the die cavity, caused by the internal pressurization of the workpiece [89].

3.3. Discussion

Various achievements of conducted research on process fundamentals and die design for micro-hydroforming contributed to the well-developed status of this technology. Applicable solutions are available for the sealing of the formed micro-tubes—as one of the most critical issues of this miniaturized process—that enable the axial feeding of the tube material and are manufacturable with conventional methods. Forming limits were determined for complex geometries, but further investigations are recommended to extend these investigations to a broader range of tube and part geometries and materials in order to provide a basis for industrial component and process design. Analogous to the hydroforming of conventional-sized macro-components, micro-hydroforming also offers a considerable potential for high-volume production. Furthermore, the demonstrated feasibility of manufacturing complex-shaped components is of interest for important industries, such as medical engineering or micro-fluid technology. Hence, further research work should concentrate on the application of micro-hydroforming in mass production.

4. Laser-Assisted Forming of Micro-Tubular Components

Besides laser application in micro-tube manufacturing using dieless drawing (see Section 2.1.), there exist only a few published results on the use of laser radiation that had the objective of modifying a micro-tubular component’s shape. However, strategies to assist or to conduct forming, processed by laser radiation [92], are known, since more than 20 years, and several research results on micro-sheet forming have been already presented, e.g., in [93]. Current investigations into the laser-assisted forming of micro-tubular parts were conducted (a) to generate shape elements on tubular components by applying superimposed external or internal loads to the effect of laser heating [94,95], and (b) for the bending of micro-tubes, solely due to the laser impact [96,97,98].
The feasibility of the laser-assisted and dieless fabrication of micro-bellows from stainless-steel tubes, with do = 500 µm and t = 50 µm, was successfully demonstrated [94]. Micro-bellows, commonly manufactured by electroforming, stereolithography or micro-roll forming, are used as hermetic seals, volume compensators, sensor elements, and connectors [94]. A laser, with a maximum power of 120 W and a wavelength of 808 nm, was used to heat the micro-tubes, which were set into rotation using a device that enabled a maximum rotational speed of 3000 rpm. An individual bulged shape was then generated by an upsetting deformation [94].
With the objective of providing a solution for the fabrication of grooved micro-tubes for micro-heat pipes, with diameters that are below conventionally feasible diameters, a dieless laser-assisted strategy with internal pressurization of the workpiece was investigated [95]. Inner grooves, with an average height of 209.5 µm, in a tube, with do = 2 mm and t = 200 µm, were fabricated using the simultaneous application of heat energy by a pulsed laser, with a power of 10 W and an air pressure of 0.01 MPa, on the inside of the tube [95].
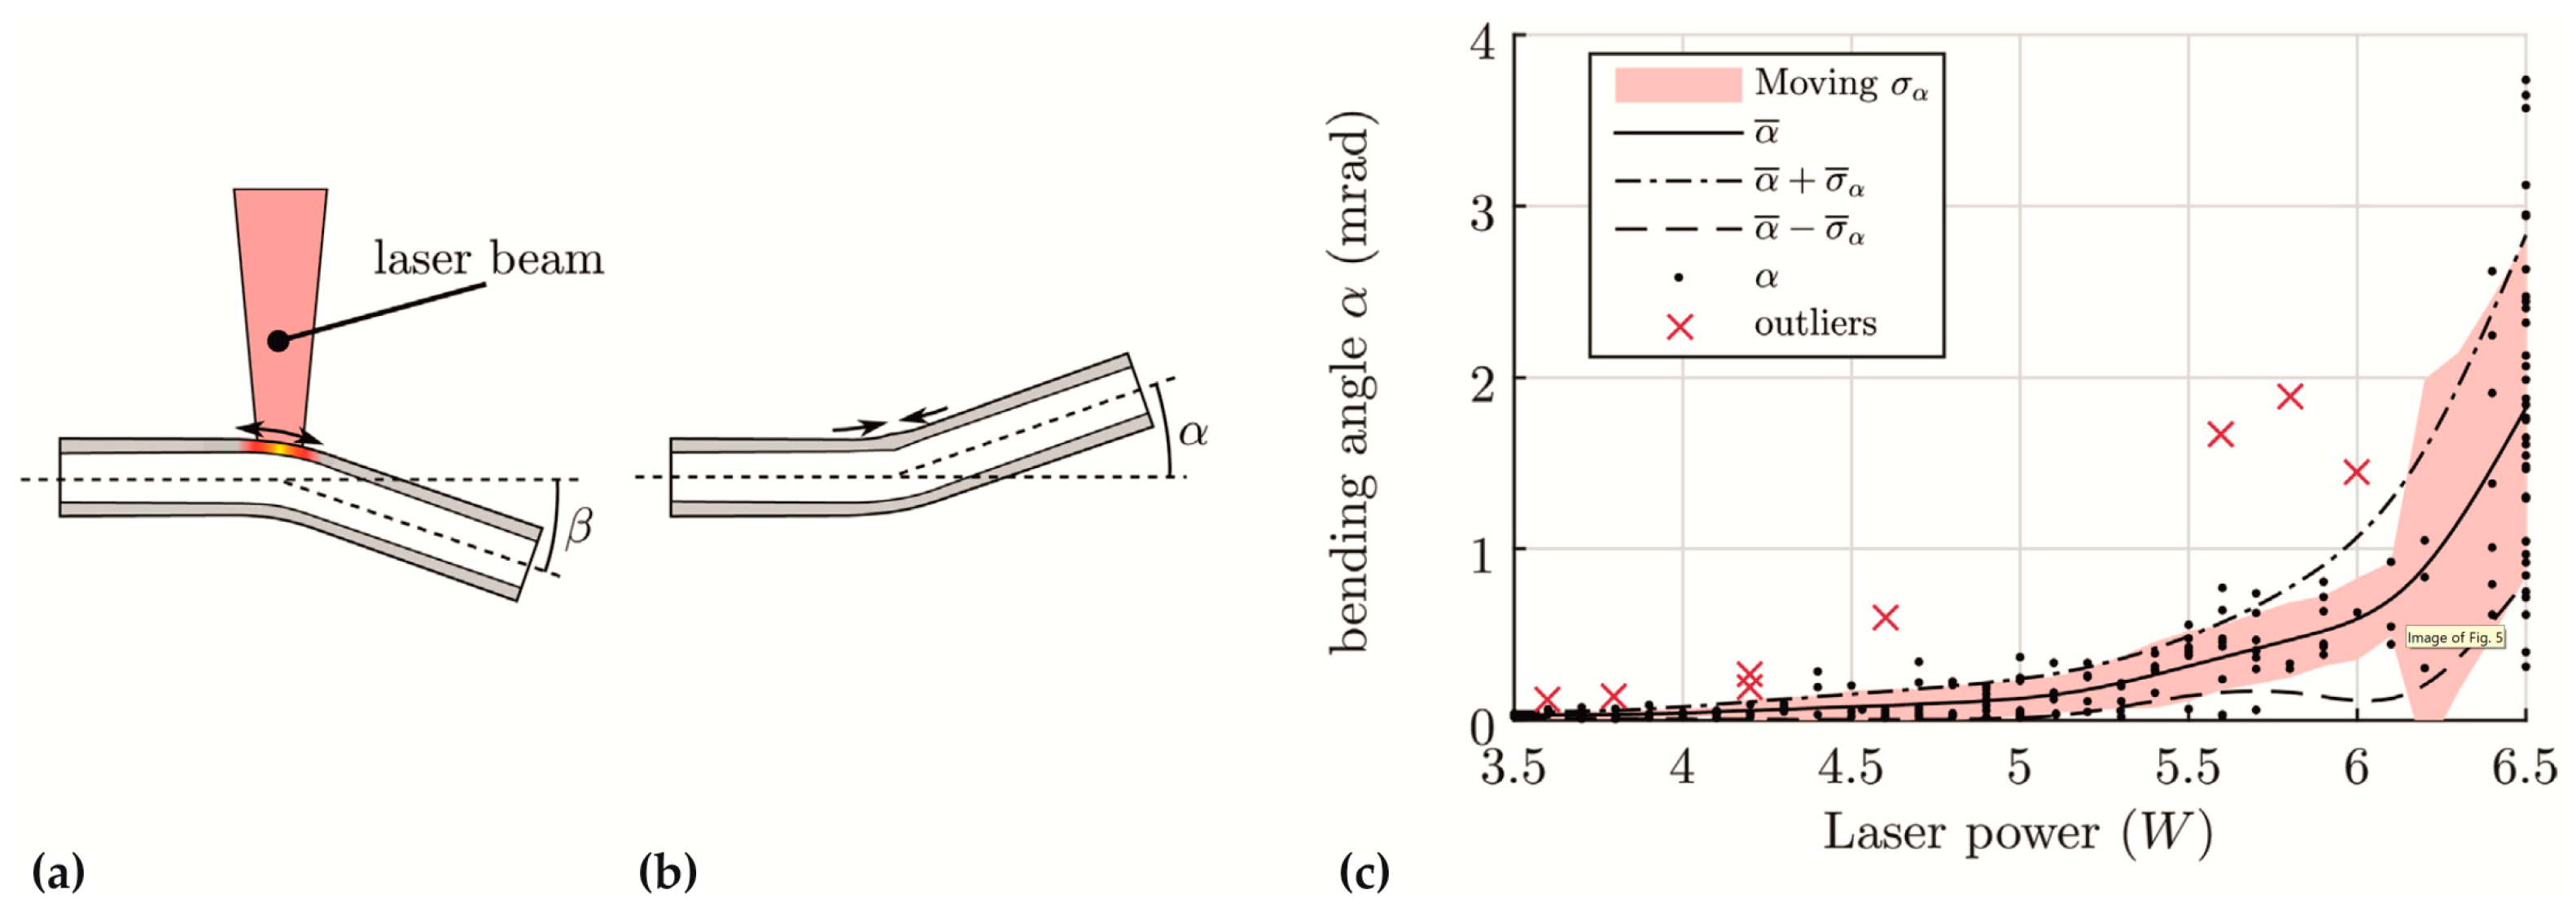
The laser-assisted bending of micro-tubes provides a potential, for example, for the positioning of optical fibers with respect to a waveguide chip, where a submicron alignment is required [96]. In this type of bending process, the tube is heated locally on one side by the laser radiation, which results in a local thermal strain in the tube wall. This strain introduces a compressive stress that exceeds the yield strength and, through this, generates a compressive plastic strain, as shown in Figure 10a. When the tube cools down, the heated area will effectively contract, and the result is a bending of the tube toward the laser, as shown in Figure 10b. In [96], an experimental setup was presented for the bending of stainless-steel tubes, with do = 635 µm and t = 153 µm, with a real time measurement of the tube deformation. A laser source, with a wave length of 1080 nm, was used in these experiments, with a focused spot size of the laser beam of 400 µm. The selected laser power was between 7 and 10 W. The bending of micro-tubes made from stainless steel, with outer diameters between 457 and 711 µm, was investigated [97], and it was shown that it was possible to align an optical fiber, with an accuracy of 0.1 µm, although the laser forming process caused a significant scattering in response to the bending angle and direction [97], as shown in Figure 10c. A self-learning algorithm was proposed and tested within the frame of this research, which determined for each bending step the most suitable values of the main parameters: the axial laser spot position on the tube and the laser power [97].
Studies in the laser-assisted bending of micro-tubes made from nickel, with an outer diameter of 960 µm and a wall thickness of 50 µm, were described in [98]. A particular result of this research was that the introduction of compressive pre-stresses by mechanical bending increased the final laser bending. Different laser sources were tested, and the influence of the laser power, pulse length, and pre-stress constraint on the bending deflection was investigated [98]. A high laser power and short pulse duration were found to be preferable due to the high thermal conductivity of the selected tube material [98].
It can be summarized that the laser-assisted micro-tube forming methods discussed here provide promising approaches and concern emerging industrial fields. The laser-assisted forming of micro-bellows and micro-heat pipes can open-up new opportunities for flexible manufacturing, but the research is still in an early stage. Further investigations into the influence of the forming parameters, tube dimensions, and materials on the forming result, as well as on the forming limits, appear necessary here. The published results concerning laser-assisted bending and strategies to cope with the scattering of bending results give the impression of a comparatively well-developed technique, with an obvious potential for industrial application.

5. Severe Plastic Deformation with a Focus on Micro-Tube Fabrication

Research into severe plastic deformation techniques (SPD) has attracted increasing interest over the past few years due to the potential of these methods to produce bulk nanostructured and ultra-fine-grained metals and metallic alloys [99,100,101,102]. Important objectives of corresponding investigations have been achievements in certain material properties that correlated with a reduced grain size, such as an enhanced material strength or superplasticity at lower temperatures [100,101]. The expected benefits of materials for micro-manufacturing, fabricated from SPD processes, are, aside from a reduction of grain size-related scaling effects, nearly homogeneous mechanical properties and a limited work hardening behavior [100]. Around 120 variants of SPD methods have been introduced up to now, providing metallic materials of different shapes, such as rods, bars, billets, tubes, or sheets [99]. Even though various SPD techniques were successfully applied to conventional tube dimensions [103], and these techniques can provide advantages for micro-components, only a few published results exist concerning research on micro-tube SPD processes.
On the background, an improvement of the mechanical properties and corrosion resistance of tubular materials for stent manufacture by grain refinement, a process sequence of equal-channel angular pressing (ECAP, or sometimes abbreviated as ECAE [99]), direct extrusion, machining, and micro-tube extrusion, was developed and presented by [104]. With this strategy, micro-tubes made from the magnesium alloy WE43, with do = 3.3 mm and t = 220 µm, were fabricated, showing an average grain size of dg = 3.5 µm. In this study, the tensile strength could be increased from 240 MPa of the initial workpiece to 340 MPa of the final micro-tube. An important achievement in this context was the determined increase in ductility, with an increase from 6% to 20% for the elongation of the fracture [104]. This is worth mentioning, as in many cases, SPD processing diminishes ductility [101]. According to the authors, the significant grain refinement within the equal-channel angular pressing step, initiated by recrystallization under the selected processing temperature, was assumed to be one of the main reasons for the increase in ductility [104].
A process chain consisting of ECAP operations, micro-tube extrusion, and machining processes, developed by [105], showed the feasibility of micro-tubes, with a sub-micrometer grain-size range for the magnesium alloy ZM21. This ultrafine grain size was achieved by a two-stage ECAP, with a processing temperature of 200 °C, in the first pressing step, and 150 °C in the second step. It was found that the large shear strain, imparted by ECAP on the coarse structure in the first pressing step, exceeded the fracture limit of the crystals when the billet was processed at 150 °C in this step as well. The average grain size of about 500 nm, achieved with this ECAP processing remained in the sub-micrometer range after the micro-tube extrusion process, with a processing temperature of 150 °C. The tensile strength could be increased, keeping a fairly high tensile ductility. The extruded tubes, with do = 4 mm and t = 1 mm, were machined to an outer diameter of 2.4 mm, a wall thickness of 0.4 mm and a stent net generated by laser cutting [105].
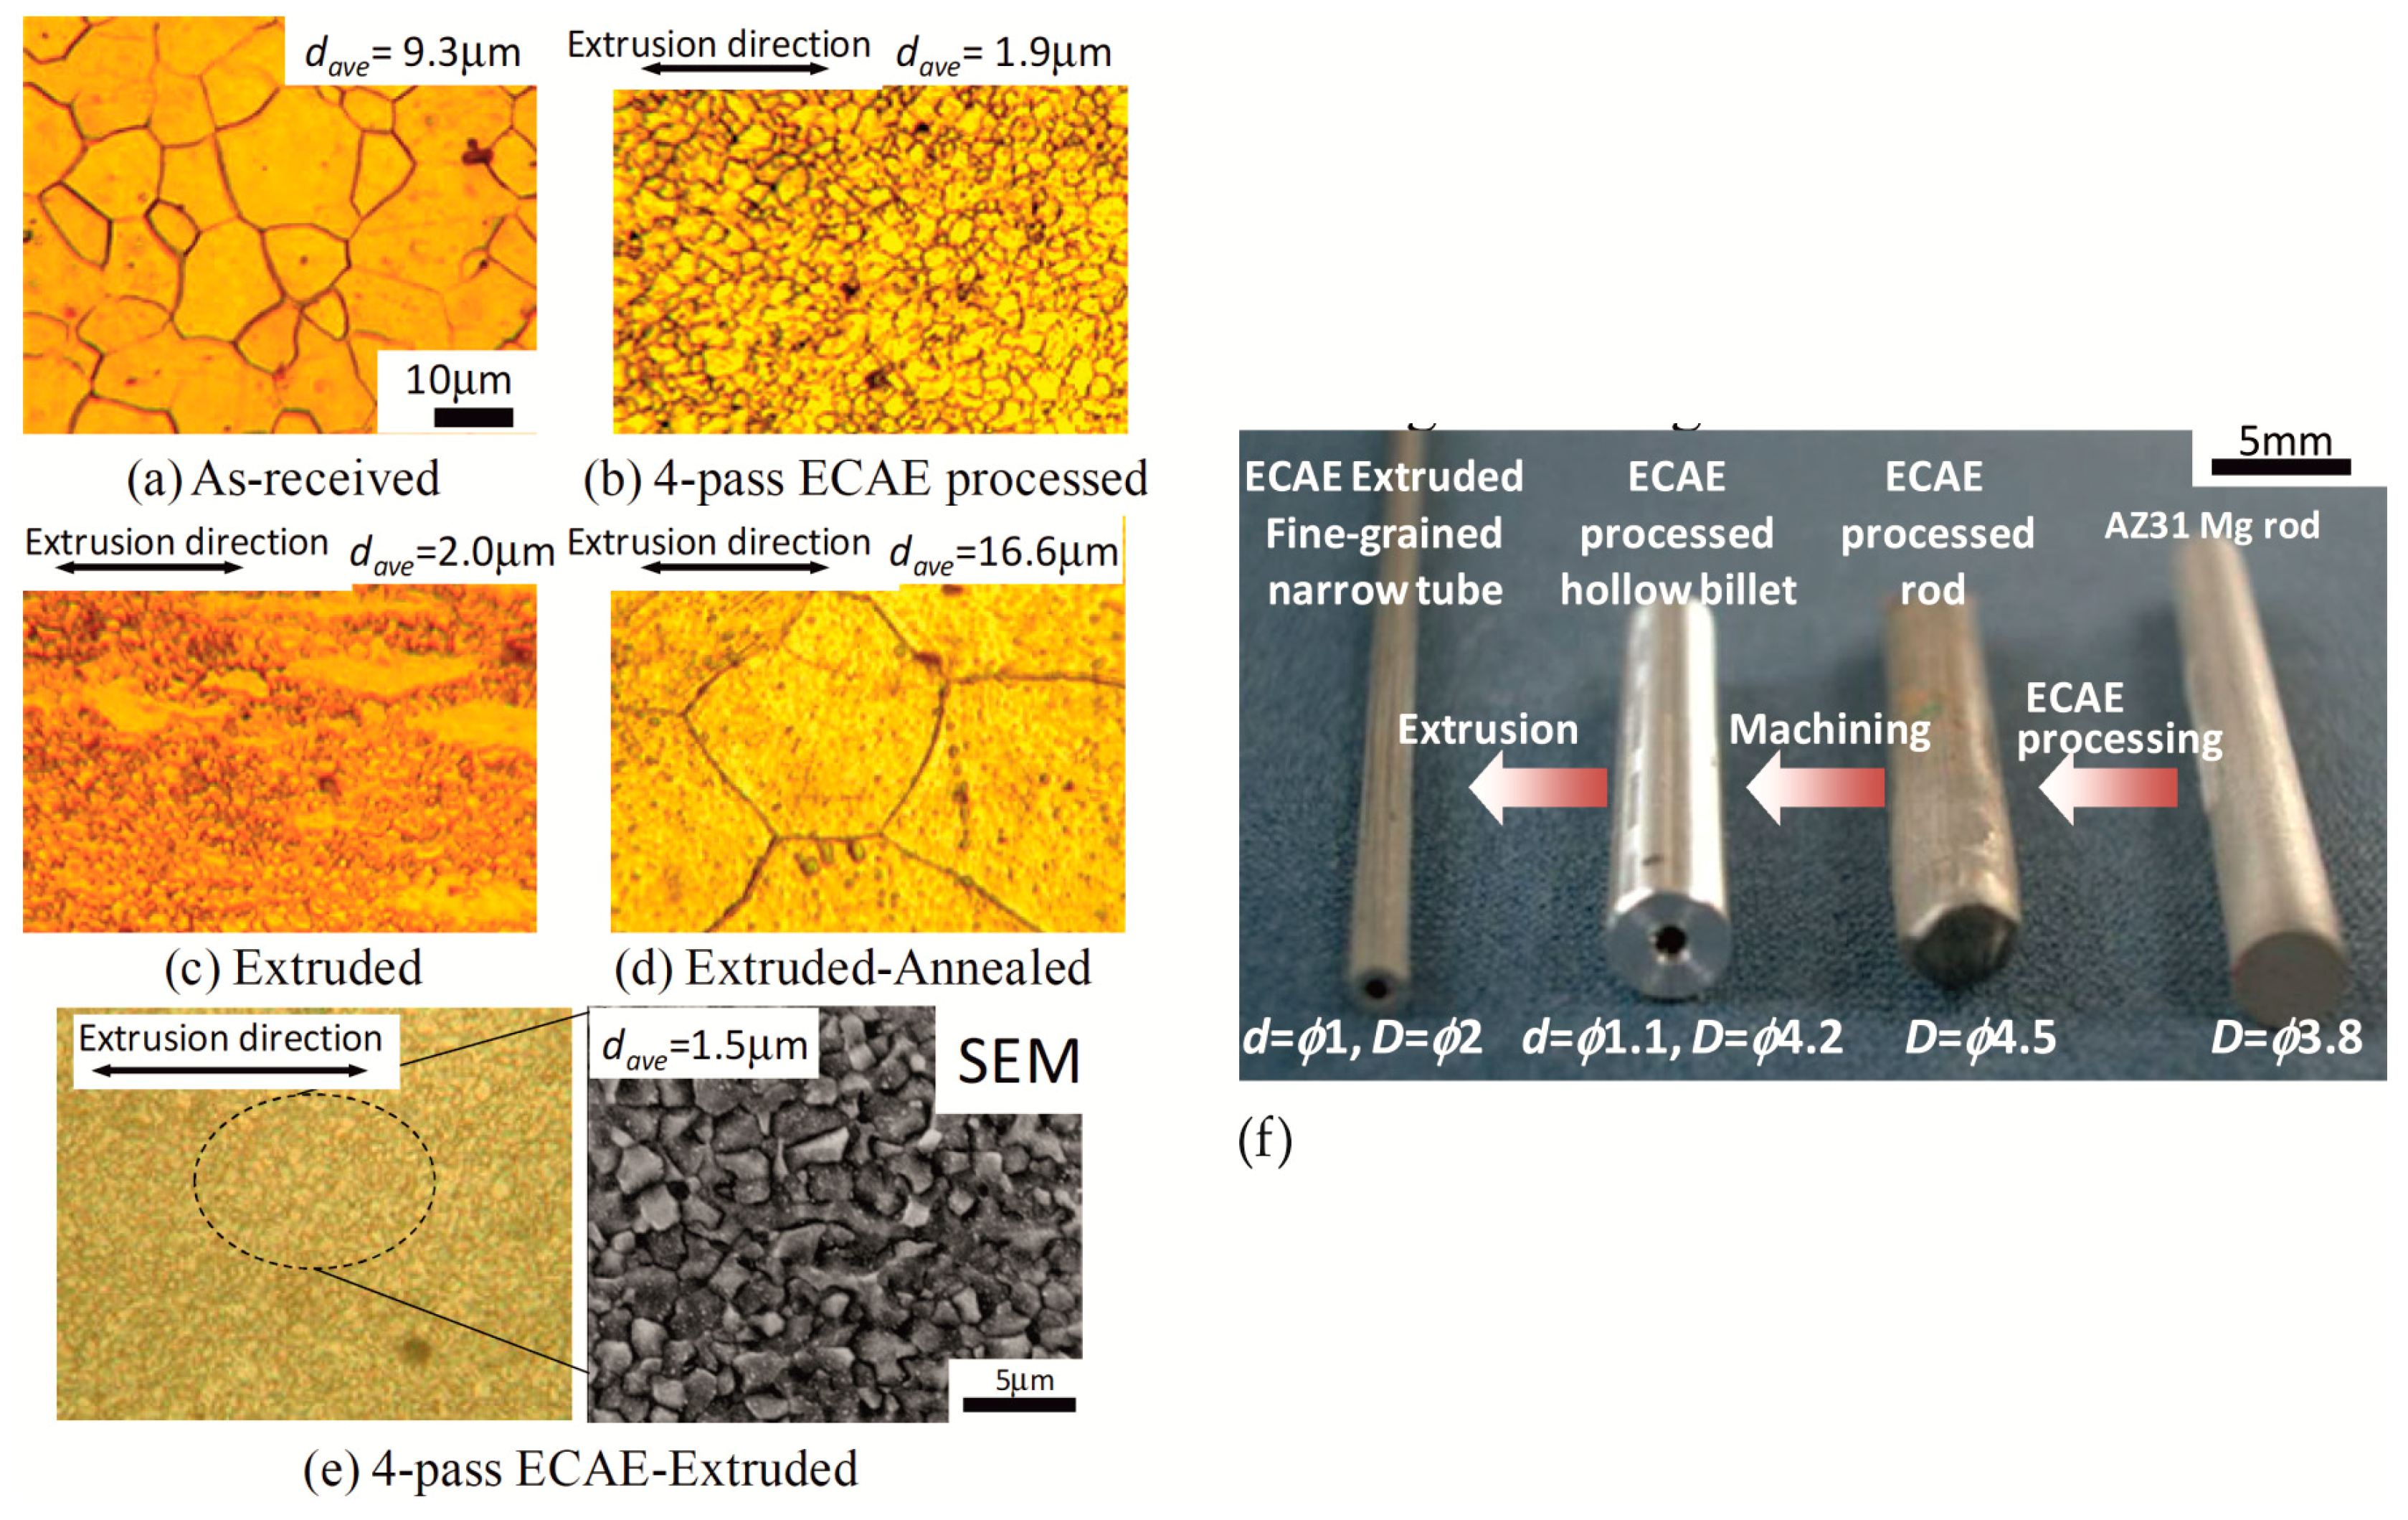
The fabrication of grain-refined micro-tubes and their application to superplastic forming by dieless tube drawing was the subject of the studies presented in [31]. Grain refinement by combined ECAP processing and tube extrusion was investigated for the fabrication of micro-tubes made from AZ31 magnesium alloy. ECAP processing, with four passes at 200 °C, was applied to a cylindrical billet, with a diameter of 3.8 mm, and extruded, with a fixed mandrel at 250 °C, to a tube, with do = 2 mm and t = 500 µm, attaining an average grain size of 1.5 µm. Figure 11 shows results of the individual forming steps and the evolution of the material’s microstructure. In particular, it was demonstrated that the application of ECAP processing improved the superplastic forming properties, compared to fabrications based merely on extrusion processes. Dieless tube drawing trials were successfully carried out, with a reduction in the cross-section area of 58.1% [31].
In summary, the few available results concerning severe plastic deformation for the fabrication of micro-tubes led to the conclusion that the use of this method provides opportunities to generate components with advantageous material microstructures and properties that meet the needs of important industries, such as medical engineering. However, the state of knowledge is limited to a few types of materials based on magnesium alloys and a reduced range of fabricated tube dimensions. Therefore, more investigations dealing with further materials, which are, for example, of interest for medical implants, such as titanium or platinum, are recommended.

6. Testing Micro-Tubes Characteristics

An extensive research was carried out on investigations into the influence of size effects on the forming behavior of metal materials by scaling down standard test methods, such as micro-cylindrical compression tests or tensile tests, e.g., in [106,107,108,109,110,111]. The transfer of these standard methods for bulk and sheet materials to determine the forming behavior of micro-tubes is difficult, because their dimensions do not readily enable the preparation of corresponding specimen shapes for conducting these tests. For this reason, testing methods for micro-tubes were derived from typical methods for the evaluation of the formability and of characteristics of macro-tubes, comprising (a) flaring tests with mechanical expansion [112,113,114,115,116] and (b) biaxial testing under internal pressurization [83,117].

6.1. Flaring Test

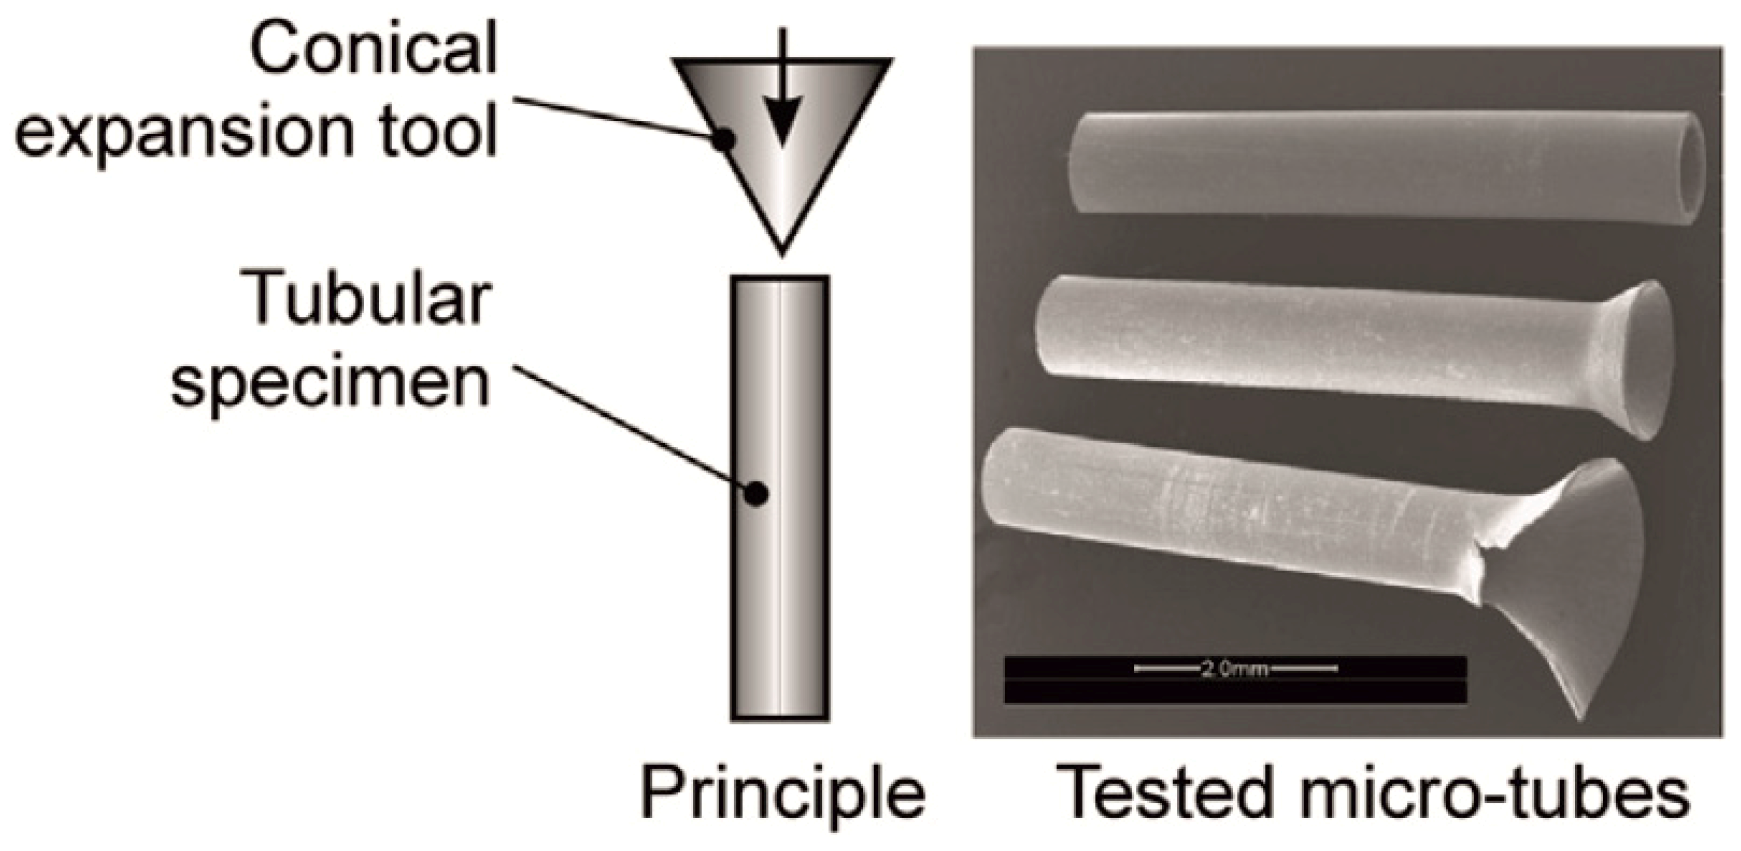
In tube flaring tests, the tube end is expanded with a conical punch that is moved axially to the longitudinal axis of the specimen, as shown in Figure 12. The application of this method to determine the specific material parameters, such as the flow curve parameters or forming limits of micro-tubes, requires consideration of the fact that the selected cone angle, the friction conditions, the ratio of the wall thickness to the tube diameter, and the microstructure of the formed tube crucially influence the forming result. Investigations into the flaring of micro-tubes, with do = 500 µm, made from stainless steel (t = 50 µm) and copper tubes (t = 25 µm), formed with cone angles of 20°, 40°, and 60°, demonstrated that the feasible expansion increased with the increasing angle [116]. For the flaring of stainless-steel micro-tubes, with do = 500 µm and t = 50 µm, using a cone angle of the punch of 40°, it was established that the punch load, as well as the forming limit, increased with an increasing punch surface roughness due to mechanical adhesion [113]. Compared with dry lubrication, these values decreased when fluorocarbon resin was used as a solid lubricant [113]. Additionally, these values did not significantly change in the case of lubrication with oil in combination with a rough surface, and they decreased in cases of a finer surface roughness, which may be explained by the constellation of closed and open lubrication pockets [113].
Based on detailed numerical and experimental investigations into the friction mechanisms between the forming punch and the inner tube surface for the conical flaring of stainless-steel micro-tubes, the surface roughness of the conical punch should be less than Ra = 0.025 µm to reduce the effects of the tool topography and to increase the test reliability [114]. Furthermore, the interaction between the punch and inner side of the micro-tube also depends on the tube wall thickness and influences the forming behavior and forming limits [115]. Research on the influence of the material grain size on the flaring test results was conducted by [112] for stainless-steel tubes, with do = 700 µm and t = 150 µm, with ratios of the tube wall thickness to the average grain size t/dg between 4.6 and 9.9, using a cone angle for the forming punch of 30.12°. According to these results, the forming limit decreased with a decreasing ratio t/dg [112].

6.2. Expansion Test

The internal pressurization of micro-tubes allows the forming behavior of micro-tubes to be investigated under biaxial loading conditions. The pressure at the occurrence of the crack initiation and maximum feasible expansion under these loading conditions were determined with a comparatively uncomplicated device by the internal pressurization of the tubular specimen, where the tube ends were clamped, without the possibility of an axial movement [83]. However, the generated stress state in such tube expansions is always pressure-dependent and cannot be modified. In contrast, the additional superimposition of loads axially to the tube axis provides opportunities for investigations in different stress and strain states [117]. The determination of the anisotropic properties of micro-tubes was demonstrated with expansion tests, under varying axial loads for stainless-steel micro-tubes, with do = 2.38 mm, t = 160 µm, and an average grain size dg between 10 and 12 µm [117].

6.3. Discussion

Among the reviewed techniques for the testing of micro-tubes, the flaring test is technically the easiest method to gather information about tube formability, but it has the drawback that numerous factors can influence the measured result. The presented research outcomes enable the consideration of the majority of these influences and the use of flaring tests for the evaluation of micro-tube formability. Expansion tests, with pressurized media and superimposed axial loads, provides more defined experimental conditions and more material data on, for instance, anisotropic behavior, but they require a higher technical effort. A challenge that needs to be addressed for both methods concerns investigations into the standardization of these tests.

7. Summary

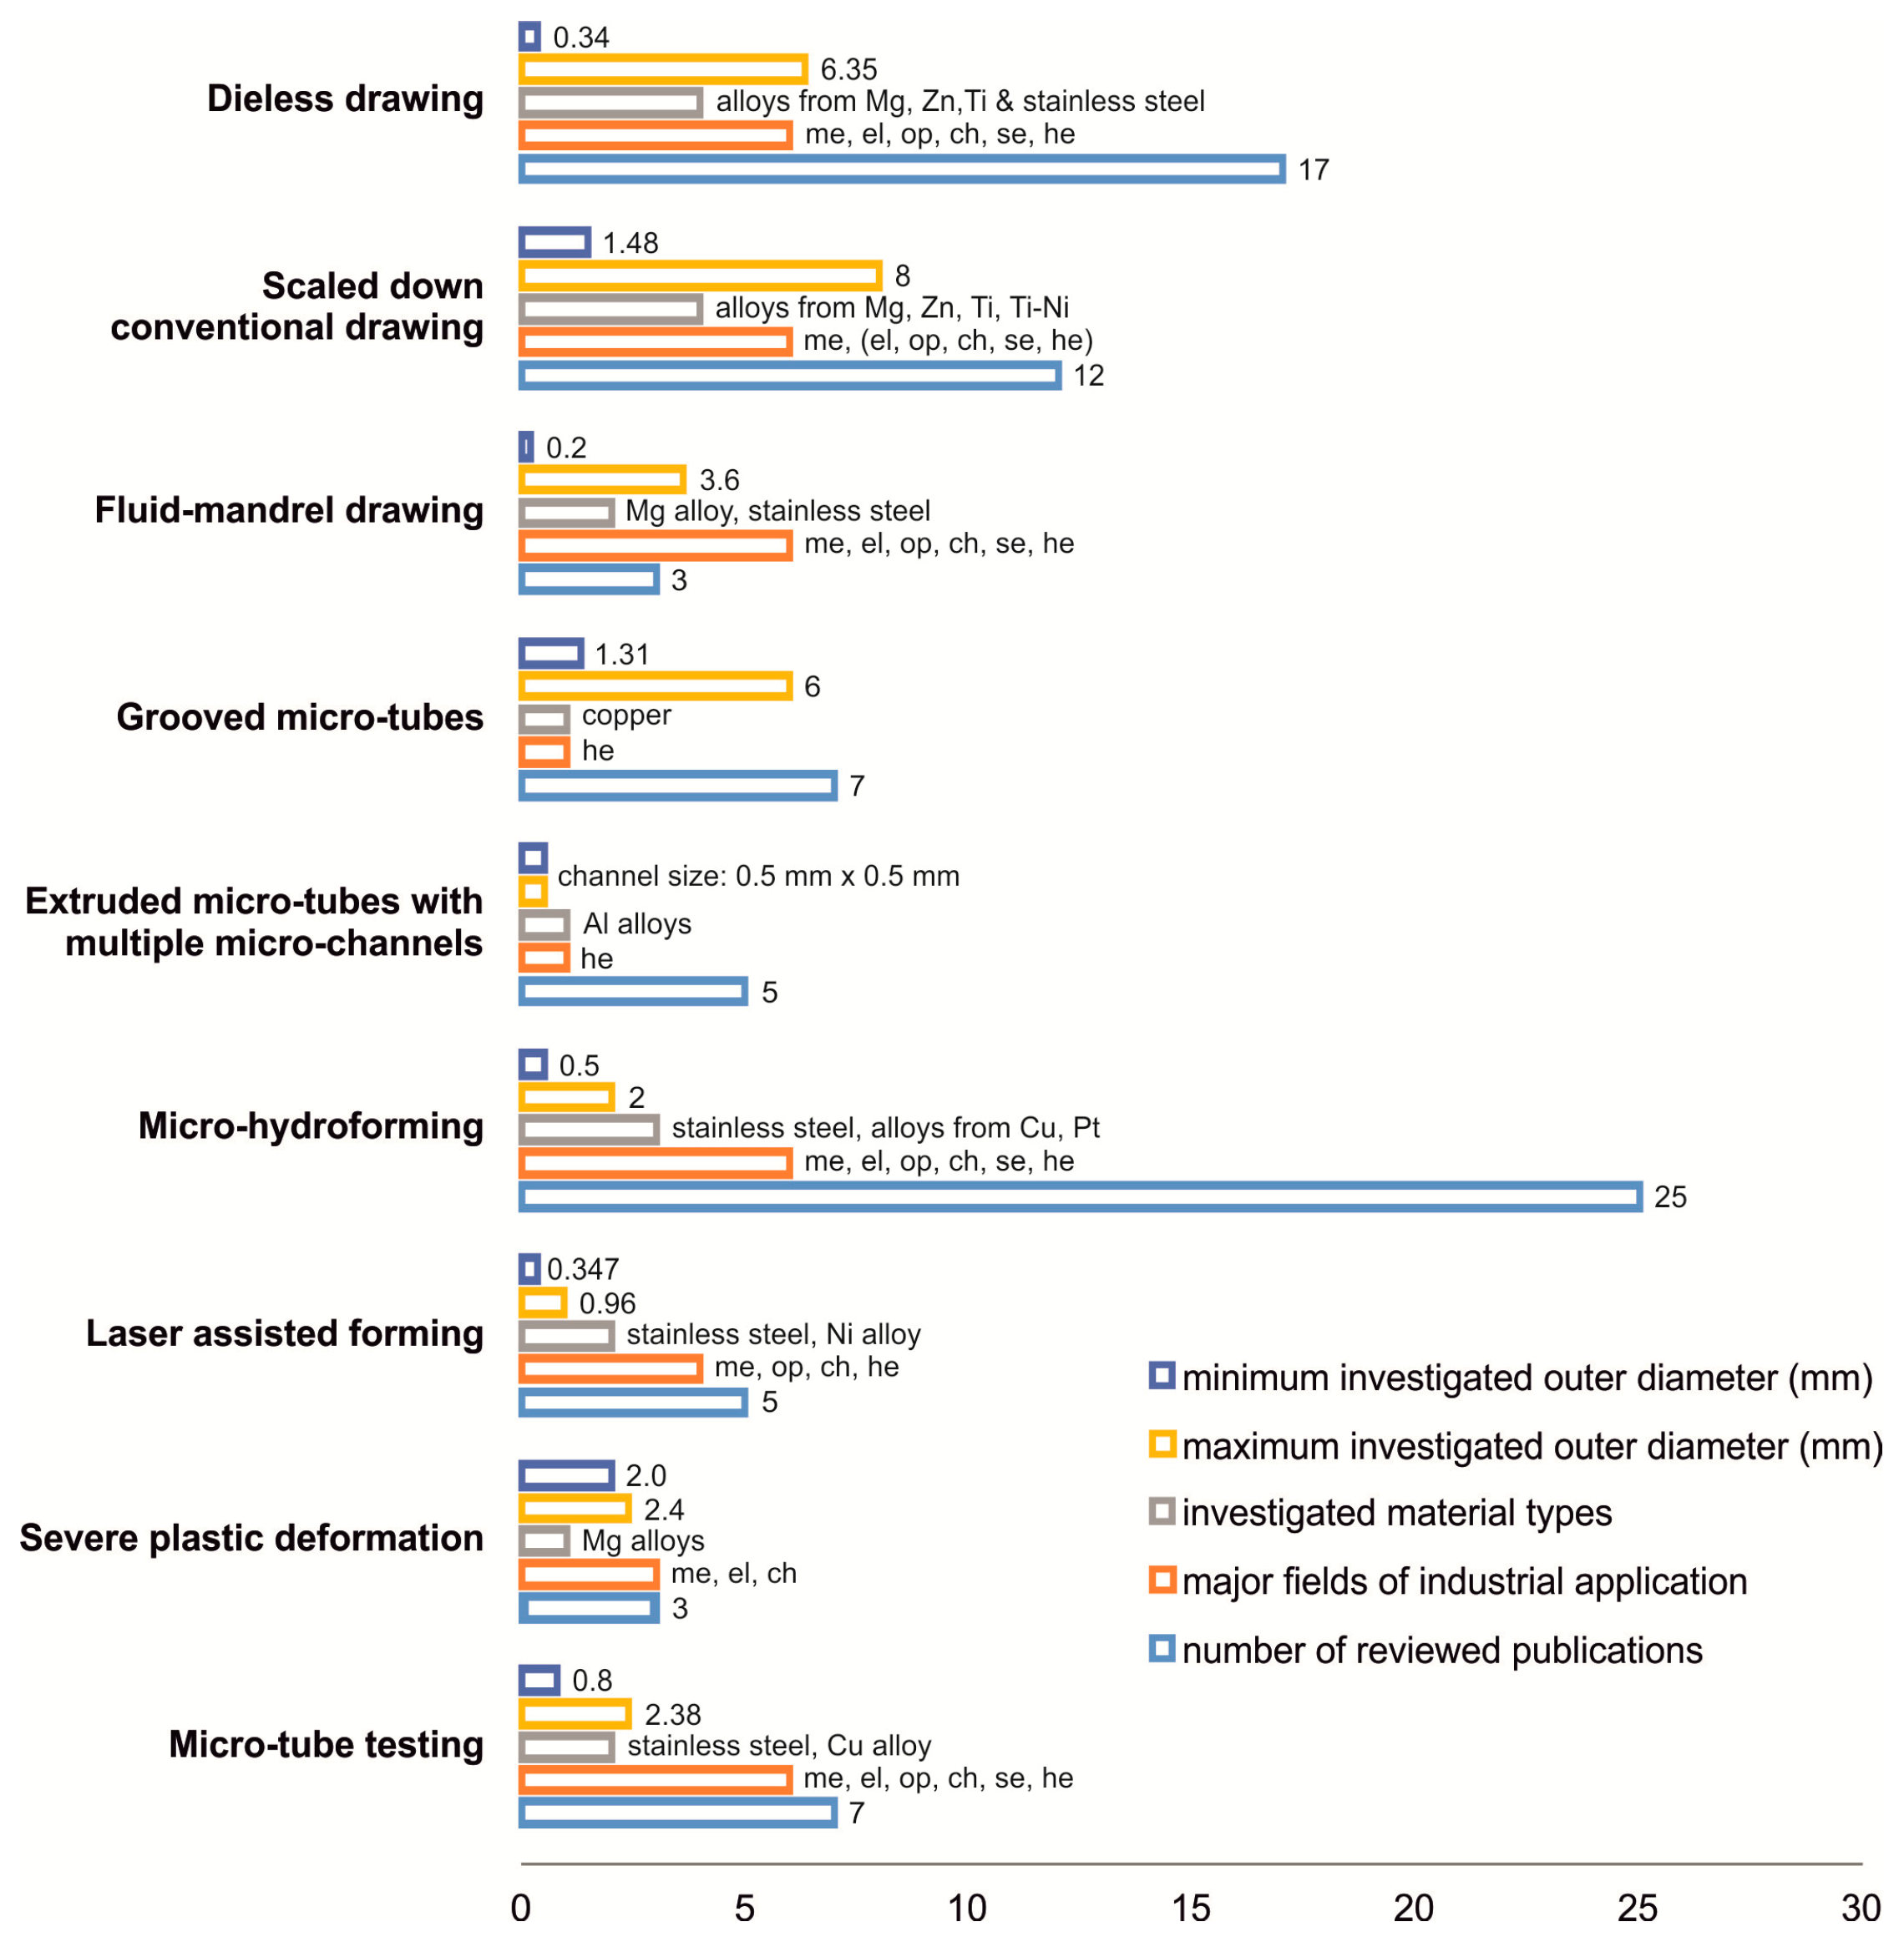
The objective of this review was to provide a thorough overview of the latest achievements in micro-forming processes and techniques for the fabrication and shaping of micro-tubes and micro-tubular components. The focus was on novel process types, techniques with enhanced shaping possibilities, and strategies to improve the efficiency or manufactured component properties with regard to restrictions due to size effects. Figure 13 gives a graphic summary of the groups of reviewed techniques, with a range of investigated significant workpiece dimensions and materials, major fields of industrial application from the author’s point of view, and the number of reviewed publications.
Research in micro-tube fabrication is concentrated to a great extent on semi-finished products for medical applications and for heat exchange technology. Dieless drawing processes have shown a considerable capability to reduce manufacturing steps and, through this, improve productivity in micro-tube manufacture. Investigations into the microstructure evolution supported the development of process chains, with scaled-down forming technologies, for the fabrication of micro-tubes with an improved manufacturing precision and product characteristics for the production of vascular stents made from materials with a reduced formability. Modifications of tube drawing processes, using liquid media as a drawing mandrel, and achievements in profile extrusion, based on studies in microstructure development of the formed material, allow semi-finished products to be manufactured efficiently, with reduced flow areas for progresses in miniaturization and thermal heat exchange.
Concerning technologies for shaping metallic tubular parts, important achievements were published for micro-hydroforming and laser-assisted micro-tube forming. For micro-hydroforming, the major issues of investigations focused on the size effects on the material behavior and appropriate design of miniaturized and highly stressed forming tool elements. New concepts in the design of these tool elements facilitated enhanced shaping possibilities for micro-tubes and the verification of forming limits in micro-hydroforming. Flexibility in the use of laser radiation was the basis for the development of a novel process to form tubular micro-bellows and micro-heat pipe-shape elements as well as to establish the applicability of laser energy for the positioning of micro-tubes by bending processes, in conjunction with computational algorithms.
Severe plastic deformation processes for grain refinement offer the potential to reduce the grain-size-related scaling effects of micro-components. A few results were published concerning research on the use of this technique for the fabrication of micro-tubes made from magnesium alloys, showing the feasibility of fine and ultrafine grain structures, with enhanced material properties and parameters for superplastic forming.
The testing methods for micro-tubes, working either with tube expansions by conical punches or by internal pressurization, were investigated, with the objective of evaluating the forming behavior. The cone angle, surface, and friction conditions, as well as tube dimensions, are the main factors influencing the measured values in tube flaring. Micro-tube expansion tests, with superimposed axial loads, have been found to be suitable for determining anisotropic characteristics.
The achievements in micro-tube forming, reviewed in this paper, can clearly contribute to enhanced manufacturing possibilities in the field of tubular micro-parts. However, the individual technologies differ in their level of development and acquired knowledge concerning the performance associated with varied tube geometries, tolerances, materials, integration into manufacturing lines, and productivity. Addressing these issues in further research work and efforts in standardization would assist in the industrial implementation of such processes and testing methods for mass production. It can be expected that a growing need for advanced micro-tubular products will come from emerging industries, such as medical technology and heat transfer technology.

Conflicts of Interest

The author declares no conflict of interest.

References

  1. Qin, Y.; Brockett, A.; Ma, Y.; Razali, A.; Zhao, J.; Harrison, C.; Pan, W.; Dai, X.; Loziak, D. Micro-manufacturing: Research, technology outcomes and development issues. Int. J. Adv. Manuf. Technol. 2010, 47, 821–837. [Google Scholar] [CrossRef]
  2. Fassi, I.; Shipley, D. Micro-Manufacturing and Their Applications, 1st ed.; Springer: Cham, Switzerland, 2017. [Google Scholar] [CrossRef]
  3. Fu, M.W.; Chan, W.L. A review on the state-of-the-art microforming technologies. Int. J. Adv. Manuf. Technol. 2013, 67, 2411–2437. [Google Scholar] [CrossRef]
  4. Engel, U.; Eckstein, R. Microforming-from basic research to its realization. J. Mater. Process. Technol. 2002, 125, 35–44. [Google Scholar] [CrossRef]
  5. Furushima, T.; Manabe, K. Superplastic micro-tubes fabricated by dieless drawing processes. In Superplastic Forming of Advanced Metallic Materials, 1st ed.; Giuliano, G., Ed.; Woodhead Publishing: Cambridge, UK, 2011; pp. 327–360. [Google Scholar] [CrossRef]
  6. Qin, Y. Micromanufacturing Engineering and Technology, 2nd ed.; Elsevier: Oxford, UK, 2015. [Google Scholar] [CrossRef]
  7. EvaluateMedTech—World Preview 2018, Outlook to 2024; Evaluate: London, UK, 2018; Available online: https://de.statista.com/statistik/daten/studie/313462/umfrage/umsatzentwicklung-der-weltweiten-medizintechnikindustrie/ (accessed on 1 May 2019).
  8. Koc, M.; Özel, T. Micro-Manufacturing: Design and Manufacturing of Micro-Products, 1st ed.; John Wiley & Sons: Hoboken, NJ, USA, 2011. [Google Scholar] [CrossRef]
  9. Jain, V.K.; Sidpara, A.; Balasubramaniam, R.; Lodha, G.S.; Dhamgaye, V.P.; Shukla, R. Micromanufacturing: A review—Part I. J. Eng. Manuf. 2014, 228, 973–994. [Google Scholar] [CrossRef]
  10. Jain, V.K.; Dixit, U.S.; Paul, C.P.; Kumar, A. Micromanufacturing: A review—Part II. J. Eng. Manuf. 2014, 228, 995–1014. [Google Scholar] [CrossRef]
  11. Razali, A.K.; Qin, Y. A review on micro-manufacturing, micro-forming and their key issues. Procedia Eng. 2013, 53, 665–672. [Google Scholar] [CrossRef]
  12. Vollertsen, F.; Schulze Niehoff, H.; Hu, Z. State of the art in micro forming. Int. J. Mach. Tools Manuf. 2006, 46, 1172–1179. [Google Scholar] [CrossRef]
  13. Lai, X.M.; Fu, M.W.; Peng, L.F. Sheet Metal Meso- and Microforming and Their Industrial Applications, 1st ed.; CRC Press: Boca Raton, FL, USA, 2018. [Google Scholar] [CrossRef]
  14. Fu, M.W.; Zheng, J.Y.; Meng, B. A Review of Progressive and Compound Forming of Bulk Microparts by Using Sheet Metals. MATEC Web Conf. 2018, 190, 1–10. [Google Scholar] [CrossRef]
  15. Vollertsen, F.; Biermann, D.; Hansen, H.N.; Jawahir, I.S.; Kuzman, K. Size effects in manufacturing of metallic components. CIRP Ann. Manuf. Technol. 2009, 58, 566–587. [Google Scholar] [CrossRef]
  16. Fu, M.W.; Wang, J.L.; Korsunsky, A.M. A review of geometrical and microstructural size effects in micro-scale deformation processing of metallic alloy components. Int. J. Mach. Tools Manuf. 2016, 109, 94–125. [Google Scholar] [CrossRef]
  17. Wang, C.; Guo, B.; Shan, D. Friction related size-effect in microforming—A review. Manuf. Rev. 2014, 1, 1–18. [Google Scholar] [CrossRef]
  18. Chatzipirpiridis, G.; Ergeneman, O.; Pokki, J.; Ullrich, F.; Fusco, S.; Ortega, J.A.; Sivaraman, K.M.; Nelson, B.J.; Pané, S. Electroforming of Implantable Tubular Magnetic Microrobots for Wireless Ophthalmologic Applications. Adv. Healthc. Mater. 2015, 4, 209–214. [Google Scholar] [CrossRef] [PubMed]
  19. Chatzipirpiridis, G.; Avilla, E.; Ergeneman, O.; Ullrich, F.; Nelson, B.J.; Pané, S. Electroforming of Magnetic Microtubes for Microrobotic Applications. IEEE Trans. Magn. 2014, 50, 1–3. [Google Scholar] [CrossRef]
  20. Tsuchiya, K.; Morishima, A.; Takamata, A.; Uetsuji, Y.; Nakamachi, E. Development of valve-less tube type micropump with PZT actuator. In Proceedings of the SPIE Conference Smart Materials Nano- and Micro Smart Systems, Melbourne, Australia, 9–12 December 2008. [Google Scholar] [CrossRef]
  21. Furushima, T.; Manabe, K. Large reduction die-less mandrel drawing of magnesium alloy micro-tubes. CIRP Ann. Manuf. Technol. 2018, 67, 309–312. [Google Scholar] [CrossRef]
  22. Milenina, A.; Kustra, P.; Byrska-Wójcik, D.; Furushima, T. Physical and numerical modelling of laser dieless drawing process of tubes from magnesium alloy. Procedia Eng. 2017, 207, 2352–2357. [Google Scholar] [CrossRef]
  23. Furushima, T.; Manabe, K. Heat assisted dieless drawing process of superplastic metal microtubes – from Zn22Al to β titanium alloys. Mater. Sci. Forum 2016, 838–839, 459–467. [Google Scholar] [CrossRef]
  24. Furushima, T.; Imagawa, Y.; Manabe, K.; Sakai, T. Effects of oxidation and surface roughening on drawing limit indieless drawing process of SUS304 stainless steel microtubes. J. Mater. Process. Technol. 2015, 223, 186–192. [Google Scholar] [CrossRef]
  25. Furushima, T.; Imagawa, Y.; Furusawa, S.; Manabe, K. Development of Rotary Laser Dieless Drawing Apparatus for Metal Microtubes. Key Eng. Mater. 2015, 626, 372–376. [Google Scholar] [CrossRef]
  26. Hwang, Y.-M.; Li, Z.-S.; Lin, T.-Y. Formability Discussion in Dieless Drawing of Stainless Steel Tubes. Key Eng. Mater. 2015, 626, 10–15. [Google Scholar] [CrossRef]
  27. Furushima, T.; Imagawa, Y.; Furusawa, S.; Manabe, K. Deformation profile in rotary laser dieless drawing process for metal microtubes. Procedia Eng. 2014, 81, 700–705. [Google Scholar] [CrossRef]
  28. Furushima, T.; Shirasaki, A.; Manabe, K. Fabrication of noncircular multicore microtubes by superplastic dieless drawing process. J. Mater. Process. Technol. 2014, 214, 29–35. [Google Scholar] [CrossRef]
  29. Furushima, T.; Noda, Y.; Manabe, K. Laser Dieless Drawing Process for Metal Micro-tubes. Key Eng. Mater. 2010, 443, 699–704. [Google Scholar] [CrossRef]
  30. Furushima, T.; Noda, Y.; Manabe, K. Laser Dieless Drawing Process for Metal Microtubes. In Proceedings of the International Conference on Materials Processing Technology 2010, Bangkok, Thailand, 5–6 January 2010; pp. 64–67. [Google Scholar]
  31. Furushima, T.; Shimizu, T.; Manabe, K. Grain Refinement by Combined ECAE/Extrusion and Dieless Drawing Processes for AZ31 Magnesium Alloy Tubes. Mater. Sci. Forum 2010, 654–656, 735–738. [Google Scholar] [CrossRef]
  32. Furushima, T.; Manabe, K.; Sakai, T. Fabrication of Superplastic Microtubes Using Dieless Drawing Process. Mater. Trans. 2008, 49, 1365–1371. [Google Scholar] [CrossRef] [Green Version]
  33. Furushima, T.; Manabe, K. FE analysis of size effect on deformation and heat transfer behavior in microtube dieless drawing. J. Mater. Process. Technol. 2008, 201, 123–127. [Google Scholar] [CrossRef]
  34. Furushima, T.; Manabe, K. Experimental and numerical study on deformation behavior in dieless drawing process of superplastic microtubes. J. Mater. Process. Technol. 2007, 191, 59–63. [Google Scholar] [CrossRef]
  35. Furushima, T.; Manabe, K. Experimental study on multi-pass dieless drawing process of superplastic Zn-22%Al alloy microtubes. J. Mater. Process. Technol. 2007, 187–188, 236–240. [Google Scholar] [CrossRef]
  36. Wang, J.; Zhou, Y.; Yang, Z.; Zhu, S.; Wang, L.; Guan, S. Processing and properties of magnesium alloy micro-tubes for biodegradable vascular stents. Mater. Sci. Eng. C 2018, 90, 504–513. [Google Scholar] [CrossRef]
  37. Kim, Y.N.; Hwang, S.K.; Joo, H.S.; Im, Y.T. Effect of heat treatment and mandrel material on precision tube drawing of Ni-Ti shape memory alloy. Procedia Eng. 2017, 207, 1517–1522. [Google Scholar] [CrossRef]
  38. Wang, C.; Yu, Z.; Cui, Y.; Zhang, Y.; Yu, S.; Qu, G.; Gong, H. Processing of a Novel Zn Alloy Micro-Tube for Biodegradable Vascular Stent Application. J. Mater. Sci. Technol. 2016, 32, 925–929. [Google Scholar] [CrossRef]
  39. Liu, F.; Chen, C.; Niu, J.; Pei, J.; Zhang, H.; Huang, H.; Yuan, G. The processing of Mg alloy micro-tubes for biodegradable vascular stents. Mater. Sci. Eng. C 2015, 48, 400–407. [Google Scholar] [CrossRef]
  40. Wang, L.; Fang, G.; Qian, L.; Leeflang, S.; Duszczyk, J.; Zhou, J. Forming of magnesium alloy microtubes in the fabrication of biodegradable stents. Prog. Nat. Sci. Mater. Int. 2014, 24, 500–506. [Google Scholar] [CrossRef] [Green Version]
  41. Zhang, Y.; Kent, D.; Wang, G.; StJohn, D.; Dargusch, M.S. The cold-rolling behaviour of AZ31 tubes for fabrication of biodegradable stents. J. Mech. Behav. Biomed. Mater. 2014, 39, 292–303. [Google Scholar] [CrossRef] [Green Version]
  42. Hong, S.-K.; Kang, J.J.; Kim, J.-D.; Kim, H.-K.; Lee, S.-Y.; Park, C.H. Finite Element Analysis for the Tube Sinking Process of the Micro Ti-0.2Pd Tube. Appl. Mech. Mater. 2014, 465–466, 693–698. [Google Scholar] [CrossRef]
  43. Yoshida, K.; Yokomizo, D.T.; Komatsu, T. Production of special tubes with a variety cross-sectional shapes by bunch drawing and fluid-mandrel drawing. Key Eng. Mater. 2014, 622–623, 731–738. [Google Scholar] [CrossRef]
  44. Fang, G.; Ai, W.; Leeflang, S.; Duszczyk, J.; Zhou, J. Multipass cold drawing of magnesium alloy minitubes for biodegradable vascular stents. Mater. Sci. Eng. C 2013, 33, 3481–3488. [Google Scholar] [CrossRef]
  45. Yoshida, K.; Koiwa, K. Cold Drawing of Magnesium Alloy Tubes for Medical. J. Solid Mech. Mater. Eng. 2011, 5, 1071–1078. [Google Scholar] [CrossRef] [Green Version]
  46. Yoshida, K.; Furuya, H. Mandrel drawing and plug drawing of shape-memory-alloy fine tubes used in catheters and stents. J. Mater. Process. Technol. 2004, 153–154, 145–150. [Google Scholar] [CrossRef]
  47. Yoshida, K.; Watanabe, M.; Ishikawa, H. Drawing of Ni-Ti shape-memory-alloy fine tubes used in medical tests. J. Mater. Proces. Technol. 2001, 118, 251–255. [Google Scholar] [CrossRef]
  48. Tangsri, T.; Norasethasopon, S. 3D FEM validation of ultra-small inner spiral ribbed copper tube using the tube sinking method. Int. J. Adv. Manuf. Technol. 2015, 81, 1949–1959. [Google Scholar] [CrossRef]
  49. Tangsri, T.; Norasethasopon, S.; Yoshida, K. Fabrication of small size inner spiral ribbed copper tube by fluid mandrel drawing. Int. J. Adv. Manuf. Technol. 2014, 70, 1923–1930. [Google Scholar] [CrossRef]
  50. Ou, D.S.; Tang, Y.; Wan, Z.P.; Lu, L.S.; Lian, B. Effect of drawing parameters on elongation of micro copper tube with straight grooves. Key Eng. Mater. 2012, 499, 62–67. [Google Scholar] [CrossRef]
  51. Tang, Y.; OU, D.S.; Wan, Z.P.; Lu, L.; Lian, B. Influence of drawing process parameters on forming of micro copper tube with straight grooves. Trans. Nonferrous Met. Soc. China 2011, 21, 2264–2269. [Google Scholar] [CrossRef]
  52. Wan, Z.P.; Li, Y.C. Forming Process and Mechanism of Microcapillary Grooves of Miniature Cylindrical Heat Pipe. Adv. Mater. Res. 2011, 328–330, 22–26. [Google Scholar] [CrossRef]
  53. Tang, Y.; Long-sheng Lu, L.; Yuan, D.; Wang, Q.; Zhaoa, X. Experimental and FEM study on sinking of miniature inner grooved copper tube. J. Mater. Process. Technol. 2009, 209, 5333–5340. [Google Scholar] [CrossRef]
  54. Li, Y.; Xiao, H.; Bin, L.; Tang, Y.; Zeng, Z. Forming method of axial micro grooves inside copper heat pipe. Trans. Nonferrous Met. Soc. China 2008, 18, 1229–1233. [Google Scholar] [CrossRef]
  55. Tang, D.; Fang, W.; Fan, X.; Zou, T.; Li, Z.; Wang, H.; Li, D.; Peng, Y.; Wu, P. Evolution of the Material Microstructures and Mechanical Properties of AA1100 Aluminum Alloy within a Complex Porthole Die during Extrusion. Materials 2019, 12, 16. [Google Scholar] [CrossRef]
  56. Tang, D.; Fan, X.; Fang, W.; Li, D.; Peng, Y.; Wang, H. Microstructure and mechanical properties development of micro channel tubes in extrusion, rolling and brazing. Mater. Charact. 2018, 142, 449–457. [Google Scholar] [CrossRef]
  57. Tang, D.; Fang, W.; Fan, X.; Li, D.; Peng, Y. Effect of die design in microchannel tube extrusion. Procedia Eng. 2014, 81, 628–633. [Google Scholar] [CrossRef]
  58. Tang, D.; Zhang, Q.; Li, D.; Peng, Y. A physical simulation of longitudinal seam welding in micro channel tube extrusion. J. Mater. Process. Technol. 2014, 214, 2777–2783. [Google Scholar] [CrossRef]
  59. Cho, H.; Hwang, D.-Y.; Lee, B.-S.; Jo, H.-H. Fabrication of micro condenser tube through direct extrusion. J. Mater. Process. Technol. 2007, 187–188, 645–648. [Google Scholar] [CrossRef]
  60. Furushima, T.; Ikeda, T.; Manabe, K. Deformation and Heat Transfer Analysis for High Speed Dieless Drawing of AZ31 Magnesium Alloy Tubes. Adv. Mater. Res. 2012, 418–420, 1036–1039. [Google Scholar] [CrossRef]
  61. Palm, B. Heat transfer in microchannels. Nanoscale Microscale Thermophys. Eng. 2001, 5, 155–175. [Google Scholar] [CrossRef]
  62. Hartl, C. Deformation mechanism and fundamentals of hydroforming. In Hydroforming for Advanced Manufacturing, 1st ed.; Koc, M., Ed.; Woodhead Publishing: Cambridge, UK, 2008; pp. 52–76. [Google Scholar] [CrossRef]
  63. Koc, M.; Cora, O.N. Introduction and state of the art of hydroforming. In Hydroforming for Advanced Manufacturing, 1st ed.; Koc, M., Ed.; Woodhead Publishing: Cambridge, UK, 2008; pp. 1–29. [Google Scholar] [CrossRef]
  64. Lee, M.-G.; Korkolis, Y.P.; Kim, J.H. Recent developments in hydroforming technology. J. Eng. Manuf. 2015, 229, 572–596. [Google Scholar] [CrossRef]
  65. Yuan, S.J.; Liu, G. Tube Hydroforming. In Comprehensive Materials Processing, 1st ed.; Hashmi, M.S.J., Ed.; Elsevier: Amsterdam, The Netherland, 2014; Volume 3, pp. 55–80. [Google Scholar]
  66. Lihui, L.; Kangning, L.; Cai, G.; Yang, X.; Guo, C.; Bu, G. A critical review on special forming processes and associated research for lightweight components based on sheet and tube materials. Manuf. Rev. 2014, 1, 1–20. [Google Scholar] [CrossRef]
  67. Hartl, C. Research and advances in fundamentals and industrial application of hydroforming. J. Mater. Process. Technol. 2005, 167, 383–392. [Google Scholar] [CrossRef]
  68. Hartl, C.; Anyasodor, G. Experimental and Numerical Investigations into Micro-Hydroforming Processes and Machine Design. In Proceedings of the 13th International Conference on Metal Forming, Toyohashi, Japan, 19–22 September 2010; pp. 1193–1196. [Google Scholar]
  69. Wagner, S.W.; Ng, K.; Emblom, W.J.; Camelio, J.A. Influence of continuous direct current on the microtube hydroforming process. J. Manuf. Sci. Eng. 2017, 139, 034502. [Google Scholar] [CrossRef]
  70. Manabe, K.; Sato, H.; Itai, K.; Vilotic, M.; Tada, K. Factors influencing the forming characteristics in micro tube hydroforming by ultra high-forming pressure. Procedia Eng. 2017, 207, 2334–2339. [Google Scholar] [CrossRef]
  71. Manabe, K.; Itai, K.; Sato, H.; Vilotic, M.; Takahashi, S. FE analysis of micro tube hydroforming process for cross- and T-shaped components. In Proceedings of the 7th International Conference on Tube Hydroforming (TUBEHYDRO 2017), Bangkok, Thailand, 14–17 November 2017; pp. 37–42. [Google Scholar]
  72. Manabe, K.; Itai, K.; Tada, K. Fabrication of micro T-shaped tubular components by hydroforming process. In Proceedings of the 20th International ESAFORM Conference on Material Forming, Dublin, Ireland, 26–28 April 2017; p. 050017. [Google Scholar]
  73. Manabe, K.; Vilotic, M.; Itai, K.; Tada, K. Failures in micro cross-shaped tube hydroforming process. In Proceedings of the 14th International Conference on Fracture (ICF 14), Rhodes, Greece, 18–23 June 2017; pp. 1–2. [Google Scholar]
  74. Ngaile, G.; Lowrie, J. Micro-Tube Hydroforming System Based on Floating Die Assembly. In 60 Excellent Inventions in Metal Forming, 1st ed.; Tekkaya, A.E., Homberg, W., Brosius, A., Eds.; Springer: Berlin/Heidelberg, Germany, 2015; pp. 427–432. [Google Scholar]
  75. Ngaile, G.; Lowrie, J. New Micro Tube Hydroforming System Based on Floating Die Assembly Concept. J. Micro Nano-Manuf. 2014, 2, 041004. [Google Scholar] [CrossRef]
  76. Hartl, C.; Chlynin, A.; Radetzky, M. Investigations into Forming Limits and Process Control of Micro-Hydroforming. In Proceedings of the 7th International Conference on Tube Hydroforming (TUBEHYDRO 2015), Xi’an, China, 9–11 September 2015; pp. 3–16. [Google Scholar]
  77. Hartl, C. Micro-hydroforming. In Micromanufacturing Engineering and Technology, 2nd ed.; Qin, Y., Ed.; Elsevier: Oxford, UK, 2015; pp. 323–345. [Google Scholar] [CrossRef]
  78. Hartl, C.; Chlynin, A.; Radetzky, M. The influence of axial compressive stresses on the formability and scattering of process parameters in micro-hydroforming processes of tubes. In Proceedings of the 4th International Conference on New Forming Technology (ICNFT 2015), Glasgow, UK, 6–9 August 2015; p. 06001. [Google Scholar] [CrossRef]
  79. Hartl, C.; Schiefer, H.; Chlynin, A. Evaluation of experimental and numerical investigations into micro-hydroforming of platinum tubes for industrial application. Manuf. Rev. 2014, 1, 1–7. [Google Scholar] [CrossRef]
  80. Zhuang, W.; Wang, S.; Lin, J.; Balint, D.; Hartl, C. Experimental and numerical investigation of localized thinning in hydroforming of micro-tubes. Eur. J. Mech. A/Solids 2012, 31, 67–76. [Google Scholar] [CrossRef]
  81. Wagner, S.W.; Ng, K.; Emblom, W.J.; Camelio, J.A. Effect of continuous direct current on the yield stress of stainless steel 304 micro tubes during hydroforming operations. In Proceedings of the ASME 2012 International Manufacturing Science and Engineering Conference (MSEC2012), Notre Dame, IN, USA, 4–8 June 2012; pp. 1–8. [Google Scholar]
  82. Wagner, S.W.; Ng, K.; Emblom, W.J.; Camelio, J.A. Influence of continuous direct current on the micro tube hydroforming process. In Proceedings of the ASME 2011 International Manufacturing Science and Engineering Conference (MSEC2011), Corvallis, OR, USA, 13–17 June 2011; pp. 1–6. [Google Scholar]
  83. Hartl, C.; Anyasodor, G.; Lungershausen, J. Formability of Micro-Tubes in Hydroforming. In Proceedings of the 14th International ESAFORM Conference on Metal Forming, Belfast, Ireland, 27–29 April 2011; pp. 529–534. [Google Scholar] [CrossRef]
  84. Zhuang, W.; Wang, S.; Cao, J.; Lin, J.; Hartl, C. Modelling of localised thinning features in hydroforming of micro-tubes using crystal plasticity FE method. Int. J. Adv. Manuf. Technol. 2010, 47, 859–865. [Google Scholar] [CrossRef]
  85. Ngaile, G.; Lowrie, J. Punch design for floating based micro-tube hydroforming die assembly. J. Mater. Process. Technol. 2018, 253, 168–177. [Google Scholar] [CrossRef]
  86. Lowrie, J.; Ngaile, G. Scalability of conventional tube hydroforming processes from macro to micro/meso. J. Eng. Manuf. 2018, 232, 2164–2177. [Google Scholar] [CrossRef]
  87. Sato, H.; Kobayashi, D.; Manabe, K. Numerical and experimental investigations of cross shaped micro tube forming. In Proceedings of the 7th International Conference on Tube Hydroforming (TUBEHYDRO 2015), Xi’an, China, 9–11 September 2015; pp. 64–69. [Google Scholar]
  88. Wagner, S.W.; Ng, K.; Emblom, W.J.; Camelio, J.A. Novel high pressure sealing system for tube hydroforming. In Proceedings of the ASME 2013 International Manufacturing Science and Engineering Conference (MSEC2013), Madison, WI, USA, 10–14 June 2013; pp. 1–10. [Google Scholar]
  89. Hartl, C.; Anyasodor, G.; Ptaschlik, T.; Lungershausen, J.; Lippert, S. Investigation into reduction of die-cavity deflection in micro-hydroforming processes using FEA. Int. J. Adv. Manuf. Technol. 2010, 47, 853–858. [Google Scholar] [CrossRef]
  90. Hartl, C.; Anyasodor, G. Design and development of a new machine system for the mass manufacture of complex shaped tubular components by micro-hydroforming. In Proceedings of the 9th International Conference on Exhibition on Laser Metrology, Machine Tool, CMM & Robotic Performance (Lamdamap 2009), London, UK, 29 June–2 July 2009; pp. 206–214. [Google Scholar]
  91. Hartl, C.; Lungershausen, J.; Anyasodor, G.; Ptaschlik, T. Development of tools and machines for micro-hydroforming with improved accuracy. Zeszyty Naukowe Instytutu Pojazdów 2008, 5, 157–164. [Google Scholar]
  92. Vollertsen, F. Laserstrahlumformen—Lasergestützte Formgebung: Verfahren Mechanismen, Modellierung; Meisenbach Verlag: Bamberg, Germany, 1996. [Google Scholar]
  93. Wielage, H.; Vollertsen, F. Increase of Acting Pressure by Adjusted Tool Geometry in Laser Shock Forming. In Proceedings of the International Conference on Advances in Materials and Processing Technologies (AMPT 2010), Paris, France, 24–27 October 2010; pp. 763–768. [Google Scholar]
  94. Furushima, T. Development of Rotary Laser Dieless Forming Apparatus for Micro Metal Bellows. In Proceedings of the 7th International Conference on Tube Hydroforming (TUBEHYDRO 2017), Bangkok, Thailand, 14–17 November 2017; pp. 48–51. [Google Scholar]
  95. Cheng, C.-M.; Tu, M.-Z.; Teng, T.-P.; Yu, S.-P.; Yu, C.-Y.; Chang, Y.-T. Development of inner-grooved tubes by dieless micro-forming with laser-assisted air pressure. MATEC Web Conf. 2017, 95, 1–4. [Google Scholar] [CrossRef]
  96. Folkersma, G.; Brouwer, D.; Römer, G.-W. Microtube Laser Forming for Precision Component Alignment. J. Manuf. Sci. Eng. 2016, 138, 081012. [Google Scholar] [CrossRef]
  97. Folkersma, K.G.P.; Brouwer, D.M.; Römer, G.R.B.E.; Herder, J.L. Robust precision alignment algorithm for micro tube laser forming. Precis. Eng. 2016, 46, 301–308. [Google Scholar] [CrossRef]
  98. Che Jamil, M.S.; Imam Fauzi, E.R.; Juinn, C.S.; Sheikh, M.A. Laser bending of pre-stressed thin-walled nickel micro-tubes. Opt. Laser Technol. 2015, 73, 105–117. [Google Scholar] [CrossRef]
  99. Bagherpour, E.; Pardis, N.; Reihanian, M.; Ebrahimi, R. An overview on severe plastic deformation: Research status, techniques classification, microstructure evolution, and applications. Int. J. Adv. Manuf. Technol. 2019, 100, 1647–1694. [Google Scholar] [CrossRef]
  100. Bruder, E. Formability of Ultrafine Grained Metals Produced by Severe Plastic Deformation – An Overview. Adv. Eng. Mater. 2019, 21, 1800316. [Google Scholar] [CrossRef]
  101. Cao, Y.; Ni, S.; Liao, X.; Song, M.; Zhu, Y. Structural evolutions of metallic materials processed by severe plastic deformation. Mater. Sci. Eng. R 2018, 133, 1–59. [Google Scholar] [CrossRef]
  102. Segal, V. Review: Modes and Processes of Severe Plastic Deformation (SPD). Materials 2018, 11, 1175. [Google Scholar] [CrossRef]
  103. Faraji, G.; Kim, H.S. Review of principles and methods of severe plastic deformation for producing ultrafine-grained tubes. Mater. Sci. Technol. 2016, 1–20. [Google Scholar] [CrossRef]
  104. Amani, S.; Faraji, G.; Mehrabadi, H.K.; Baghani, M. Manufacturing and mechanical characterization of Mg-4Y-2Nd-0.4Zr-0.25La magnesium microtubes by combined severe plastic deformation process for biodegradable vascular stents. J. Eng. Manuf. 2018, 233, 1–10. [Google Scholar] [CrossRef]
  105. Ge, Q.; Dellasega, D.; Demir, A.G.; Vedani, M. The processing of ultrafine-grained Mg tubes for biodegradable stents. Acta Biomat. 2013, 9, 8604–8610. [Google Scholar] [CrossRef]
  106. Chan, W.L.; Fu, M.W. Studies of the interactive effect of specimen and grain sizes on the plastic deformation behavior in microforming. Int. J. Adv. Manuf. Technol. 2012, 62, 989–1000. [Google Scholar] [CrossRef]
  107. Chan, W.L.; Fu, M.W.; Lu, J. The size effect on micro deformation behaviour in micro-scale plastic deformation. Mater. Des. 2011, 32, 198–206. [Google Scholar] [CrossRef]
  108. Barbier, C.; Thibaud, S.; Richard, F.; Picart, P. Size effects on material behavior in microforming. Int. J. Mater. Form. 2009, 2, 625–628. [Google Scholar] [CrossRef]
  109. Chen, F.-K.; Tsai, J.-W. A study of size effect in micro-forming with micro-hardness tests. J. Mater. Process Technol. 2006, 177, 146–149. [Google Scholar] [CrossRef]
  110. Raulea, L.V.; Goijaerts, A.M.; Govaert, L.E.; Baaijens, F.P.T. Size effects in the processing of thin metal sheets. J. Mater. Process. Technol. 2001, 115, 44–48. [Google Scholar] [CrossRef]
  111. Geiger, M.; Messner, A.; Engel, U. Production of micro parts—Size effects in bulk metal forming, similarity theory. Prod. Eng. 1997, 4, 55–58. [Google Scholar]
  112. Jiang, C.-P.; Chen, C.-C.; Wu, Y.-S.; Tsai, C.-H. Effect of annealing on grain size and flaring limit of seamless SUS 304 stainless microtubes. J. Chin. Inst. Eng. 2012, 35, 37–43. [Google Scholar] [CrossRef]
  113. Mirzai, M.A.; Manabe, K. Tribological behavior and surface characteristics of metal microtube in flaring test. J. Solid Mech. Mater. Eng. 2009, 3, 375–386. [Google Scholar] [CrossRef]
  114. Mirzai, M.A.; Manabe, K. Effect of tool surface topography on interfacial deformation behaviour of metal microtubes in flaring test. Int. J. Surf. Sci. Eng. 2009, 3, 391–406. [Google Scholar] [CrossRef]
  115. Mirzai, M.A.; Manabe, K. FE Analysis of Size Effect on Deformation Behavior of Metal Microtube Considering Surface Roughness in Flaring Test. Mater. Sci. Forum 2009, 623, 79–87. [Google Scholar] [CrossRef]
  116. Mirzai, M.A.; Manabe, K.; Mabuchi, T. Deformation characteristics of microtubes in flaring test. J. Mater. Process. Technol. 2008, 201, 214–219. [Google Scholar] [CrossRef]
  117. Korkolis, Y.P.; Ripley, P.W.; Knysh, P. Failure of an austenitic stainless steel under linear and non-linear loading paths. In Proceedings of the 24th International Congress of Theoretical and Applied Mechanics (ICTAM 2016), Montreal, QC, Canada, 22–26 August 2016; pp. 2102–2103. [Google Scholar]
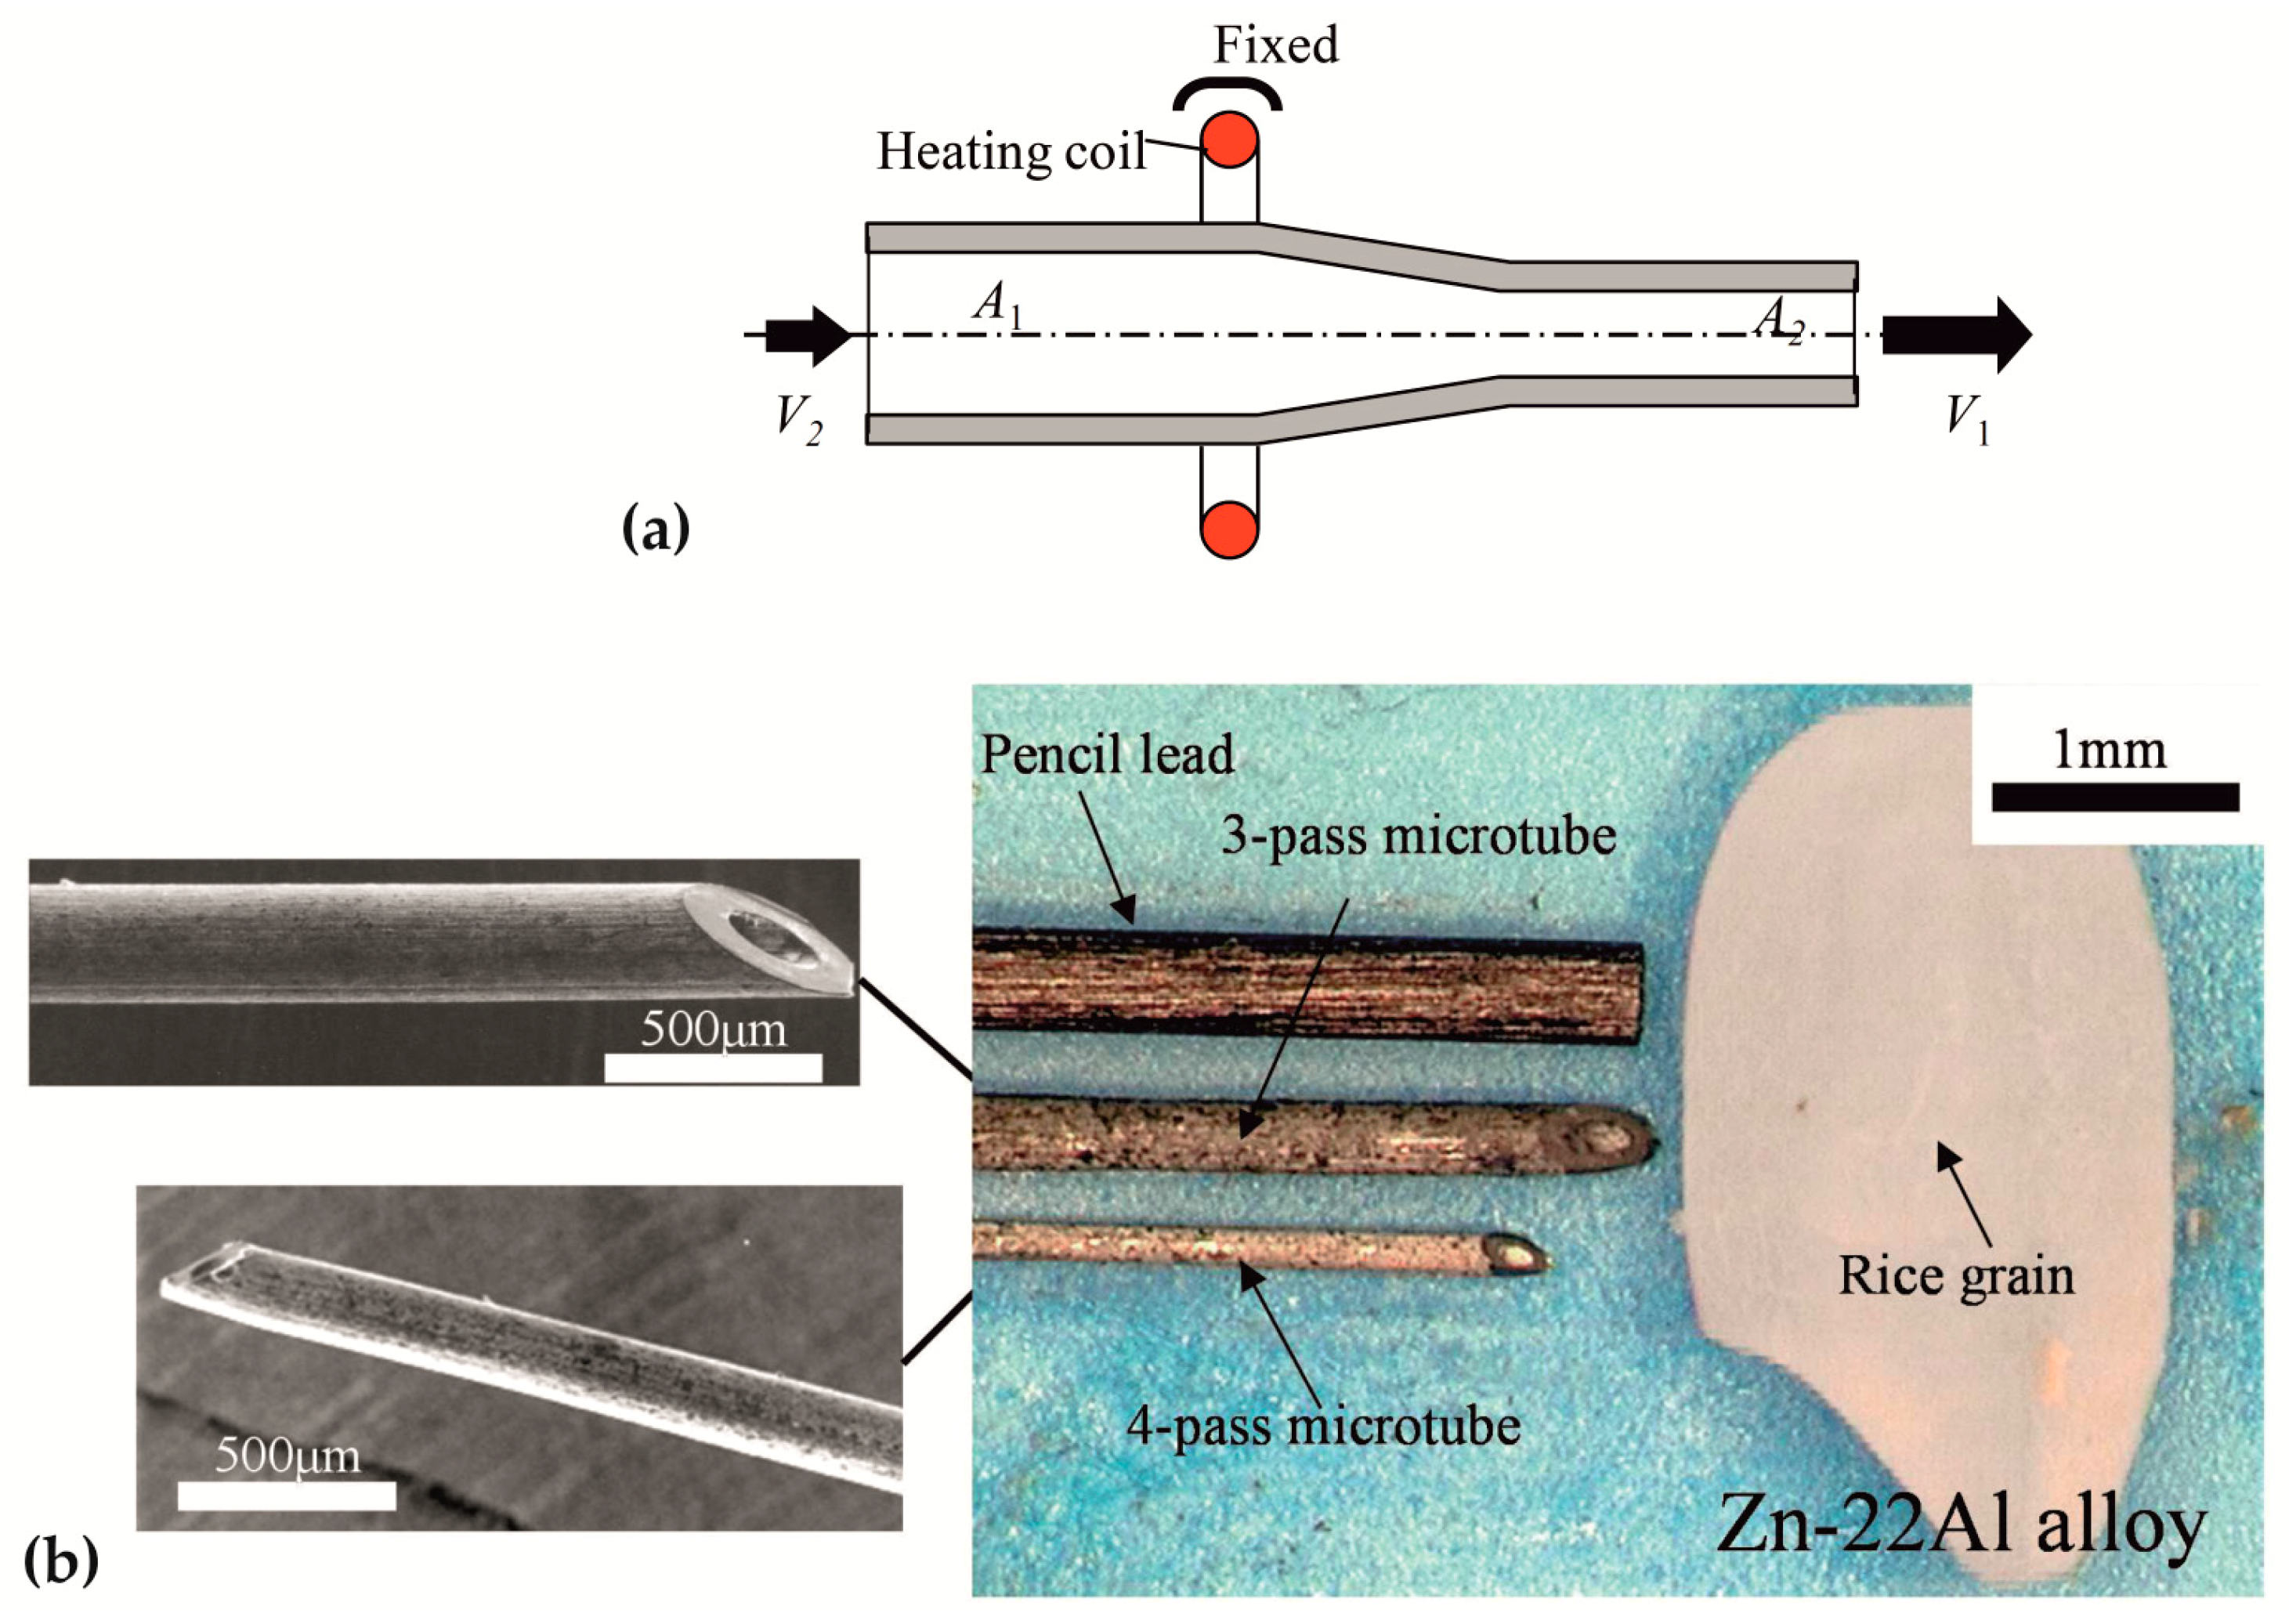
Figure 1. Dieless drawing of micro-tubes: (a) process principle (A1, A2: tube cross-section areas; V1, V2: drawing velocities) and (b) fabricated micro-tube examples. Republished with the permission of Trans Tech Publications, from reference [23], copyright 2016; permission conveyed through Copyright Clearance Center, Inc.
Metals 09 00542 g001
Figure 2. Effect of the heating temperature on the limiting reduction in the cross-section area (D, outer tube diameter; d, inner tube diameter; ECAE, equal channel angular extrusion). Republished with permission of Trans Tech Publications, from reference [23], copyright 2016; permission conveyed through Copyright Clearance Center, Inc.
Metals 09 00542 g002
Figure 3. Conceptual illustration for the mass production of magnesium alloy micro-tubes, with an improved accuracy and quality: (a) conventional manufacturing process die drawing and (b) proposed manufacturing process using dieless mandrel drawing. Reprinted from reference [21], copyright 2018, with permission from Elsevier.
Metals 09 00542 g003
Figure 4. Schematic illustration of hot indirect extrusion (1, hollow billet; 2, mandrel; 3, container; 4, die; 5, die set; 6, front plate) and cross-section microstructure of fabricated micro-tubes, after: (a) hot indirect extrusion; (b) two-pass drawing; (c) three-pass drawing; and (d) four-pass drawing. Reprinted from reference [40], copyright 2014, with permission from Elsevier.
Metals 09 00542 g004
Figure 5. Comparison of fluid-mandrel drawing and sinking: (a) development of the wall thickness ratio versus the ratio Rt of the reduction of the outer tube diameter and (b) the cross-section shapes of the initial tube (above) and the drawn micro-tubes (below). Republished with the permission of Trans Tech Publications, from reference [43], copyright 2014; permission conveyed through Copyright Clearance Center, Inc.
Metals 09 00542 g005
Figure 6. Fluid-mandrel drawing of grooved micro-tubes: (a) cross-section of the initial tube made from copper, with do = 5 mm and t = 364 µm, and (b) the development of the wall thickness ratio versus the total reduction area for different drawing media. Reprinted with permission from Springer Nature, reference [49], copyright 2014.
Metals 09 00542 g006
Figure 7. Examples of cross-sections of a micro-channel tube and a conventional tube. Reprinted from reference [58], copyright 2014, with permission from Elsevier.
Metals 09 00542 g007
Figure 8. Micro-hydroforming of tubes made from copper: (a) the forming result, using fluorocarbon spray as a lubricant, and (b) the relation between the protrusion height and the axial feeding. Reprinted from reference [70], copyright 2017, with permission from Elsevier.
Metals 09 00542 g008
Figure 9. Maximum punch stress as a function of the inner punch diameter Di for the micro-hydroforming of stainless-steel tubes with different tube outer diameters. Reprinted with the permission of SAGE Publications, Ltd., from reference [86], copyright 2018.
Metals 09 00542 g009
Figure 10. Laser-assisted bending of micro-tubes: (a) generation of local compressive plastic strains by laser radiation; (b) cooling and contracting of the heated area with the bending of the tube; and (c) measured bending angle as a function of the applied laser power for a micro-tube made from stainless steel, with do = 457 µm and t = 57 µm. Reprinted from reference [97], copyright 2016, with permission from Elsevier.
Metals 09 00542 g010
Figure 11. Micro-tubes, fabricated from ECAE-processed magnesium alloy AZ31: (ae) comparison of microstructure for different treatment steps (dave: average grain size) and (f) specimens of the individual processing steps (D, outer tube diameter; d, inner tube diameter). Republished with the permission of Trans Tech Publications, from reference [31], copyright 2010; permission conveyed through Copyright Clearance Center, Inc.
Metals 09 00542 g011
Figure 12. Principle of the flaring test for tubes and examples of micro-tubes made from stainless steel, with do = 800 µm and t = 40 µm, tested with a punch, with a cone angle of 60°. Reprinted from reference [77], copyright 2015, with permission from Elsevier.
Metals 09 00542 g012
Figure 13. Graphic summary of the review (me, medical engineering; el, electronic and electrical engineering; op, optoelectronics; ch, chemical technology; se, sensing technology; he, heat transfer technology).
Metals 09 00542 g013
Table 1. Examples of products based on micro-tubes and tubular micro-components.
IndustriesExamples of ProductsTypical Materials
Medical engineeringPainless injection needles
Catheters
Stents
Needles for cosmetic surgery Implants
Stainless steel
Titanium/titanium alloys
Magnesium/magnesium alloys
Electronic and electrical engineeringContact probes
Electrode tubes for EDM
Nickel/nickel alloys
Copper/copper alloys
OptoelectronicsOptical fibers
Laser accelerators
Nickel/nickel alloys
Kovar
Chemical technologyMicro-reactors
Micro-nozzles
Stainless steel
Titanium/titanium alloys
Sensing technologyDifferential gas pressure detector Micro-quantitative analysis devicePlatinum/platinum alloys
Tungsten/tungsten alloys
Heat transfer technologyMicro-heat exchangerTitanium/titanium alloys
Aluminum/aluminum alloys
Table 2. Reviewed experimental research on the dieless drawing of micro-tubes.
Tube Dimensions
Listed Shaping TechniquesMaterialdo
(mm)
t
(µm)
Designated ApplicationReference
Machining, hot extrusion, dieless drawing (IH)Superplastic alloy
(Zn-22Al)
0.1949.5-[35]
Machining, hot extrusion, multi-pass dieless drawing (IH)Superplastic alloy
(Zn-22Al)
0.34391MN, SP[32]
Rotary laser multi-pass dieless drawingβ Titanium alloy
(Ti-22V-4Al)
<0.5<130CA, ME, ST[23]
Rotary laser dieless drawingStainless steel
(SUS304)
<0.5<130-[25,27]
Dieless drawing (IH)Stainless steel
(SUS304)
<0.5<130-[24]
Laser dieless drawingStainless steel
(SUS304)
<0.52<100MN, IN, MH[29,30]
ECAP, hot extrusion, dieless drawing (IH)Magnesium alloy
(AZ31)
<2.0<500BI[31]
Extrusion, multi-pass dieless mandrel drawing (IH)Magnesium alloy
(AZ31)
3.35690ME, SA, CH[21]
Extrusion, rotary laser dieless drawingMagnesium alloy
(AZ31)
<5.0<500[22]
Dieless drawing (IH)Stainless steel
(SUS304)
<6.35<1000[26]
Hot extrusion, multi-pass dieless drawing (IH)Superplastic alloy
(Zn-22Al)
aMH, CO, FC, ET[28]
a, rectangular and multi-core rectangular tubes, with a channel size of 0.533 × 0.923, 0.58 × 0.58, and 0.75 × 1.3 (mm); BI, biodegradable implants; CA, catheters; CH, chemical industry; CO, commutators; ECAP, equal-channel angular pressing; ET, tubes for electro-discharge machining; FC, fuel cells; IH, inductive heating; IN, injection needles (painless, hypodermic); ME, medical technology; MH, micro-heat exchanger; MN, micro-nozzles; SA, sanitary; SP, stepped tubes; ST, stents.
Table 3. Reviewed experimental research on scaled-down micro-tube drawing and variants.
Tube Dimensions
Listed Shaping TechniquesMaterialdo
(mm)
t
(µm)
Designated ApplicationReference
Multi-pass fluid mandrel cold drawingStainless steel (SUS304)0.242ME, IN[43]
Multi-pass cold drawing (FP, MD)Shape memory alloy (Ti (51 at. %)-Ni)1.48210CA, ST[46]
Hot extrusion, multi-pass mandrel cold drawingMagnesium alloy (Mg-Zn-Y-Nd) 2.0150BS[36]
Multi-pass cold tube sinkingTitanium alloy (Ti-0.2Pd)2.4400ME[42]
Extrusion, drilling, cold-rolling, cold drawing (SI, MD)Zinc alloy (Zn-5Mg-1Fe) (wt. %)2.5130BS[38]
Extrusion, machining, hot indirect extrusion, mandrel cold drawingMagnesium alloy (ZM21)2.9
2.9
200
220
BS[40,44]
Hot extrusion, multi-pass cold-rolling, multi-pass mandrel cold drawingMagnesium alloys (Mg-Nd-Zn-Zr, AZ31, WE43)3.0180BS[39]
Multi-pass fluid mandrel cold drawingMagnesium alloy (AZ31)3.6610ME[45]
Single-pass mandrel cold drawingShape memory alloy (Ni(56 wt %)-Ti) 4.0400-[37]
Hot extrusion, cold-rollingMagnesium alloy (AZ31)<7.71<900BS[41]
Multi-pass cold drawing (SI, FP)Shape memory alloy (Ti (49.3%)-Ni)<8.0-ME[47]
BS, biodegradable stents; CA, catheters; FP, fixed plug; IN, injection needles (painless, hypodermic); MD, mandrel drawing; ME, medical technology; SI, sinking; ST, stents.
Table 4. Reviewed experimental research on the fabrication of grooved micro-tubes.
Tube Dimensions
Listed Shaping Techniques aMaterialdo
(mm)
t
(µm)
Number of GroovesReference
Tube spinning, multi-pass sinkingCopper3.0>22318[50,51]
Multi-pass fluid mandrel drawingCopper<5.0>36445[49]
Multi-pass fluid mandrel drawingCopper5.130055[43]
Tube spinning, multi-pass sinkingCopper<6.0<48012, 18[53]
Tube spinningCopper6.030060[54]
Tube spinningCopper6.0-60[52]
a all processes conduced at room temperature.
Table 5. Reviewed experimental research on the extrusion of profiles with multiple micro-channels.
Cross-Section Dimensions a
Materialw
(mm)
h
(mm)
t
(µm)
Number of ChannelsReference
Aluminum alloy (AA3003)16.01.825010[57]
Aluminum alloy (AA1100)16.02.030010[55,56]
Aluminum alloy (AA3003)25017[58]
Aluminum alloys (A1100, A3003)>20012[59]
a cross-section dimensions, w, width; h, height; t, wall thickness.
Table 6. Reviewed experimental research into the fabrication of micro-hydroforming parts.
Tube Dimensions
Hydroforming Process TypeMaterialdo
(mm)
t
(µm)
Designated ApplicationReference
T-shape forming (AF)Copper
(1220-H)
0.5100[71,72]
T-shape forming (AF)Stainless steel
(SUS304)
0.5100[70]
Cross-shape forming (AF)Copper
(1220-H)
0.5100[70,71]
Non-axisymmetric expansionStainless steel
(AISI 304)
0.840MF[68,89]
Rotationally symmetrical expansionStainless steel
(AISI 304)
0.840MS[89,91]
Rotationally symmetrical expansion. (AF)Stainless steel
(SS 304)
1.0100[75]
Rotationally symmetrical expansion (AF)Platinum
(PtIr10)
1.6576ME[78,79]
Rotationally symmetrical expansion (AF)
Axisymmetric expansion (AF)
T-shape forming (AF)
Y-shape forming (AF)
Stainless steel
(SS 304)
2.0160[75]
Rotationally symmetrical expansion (AF)
Axisymmetric expansion (AF)
T-shape forming (AF)
Y-shape forming (AF)
Stainless steel
(SS 304)
2.0200[85]
AF, with axial feeding; ME, medical technology; MF, micro-fluidic demonstrator; MS, micro-shaft demonstrator.