Article

Thermal Characterisation of Hybrid Laser Welds Made of Conventionally and Additively Soft Martensitic Steel 1.4313

1
Institute for Machine Tools and Manufacturing, Eidgenössische Technische Hochschule Zurich, 8092 Zurich, Switzerland
2
Inspire AG, 8005 Zurich, Switzerland
3
Institute of Mechanical Systems, School of Engineering, Zurich University of Applied Science, 8401 Winterthur, Switzerland
*
Author to whom correspondence should be addressed.
Metals 2025, 15(9), 950; https://doi.org/10.3390/met15090950 (registering DOI)
Submission received: 3 July 2025 / Revised: 22 August 2025 / Accepted: 23 August 2025 / Published: 27 August 2025
(This article belongs to the Section Additive Manufacturing)

Abstract

Part segmentation can be used to overcome limitations of additive manufacturing (AM) processes such as Direct Energy Deposition of Metals (DED). In this case subparts of soft martensitic steel 1.4313 produced by conventional manufacturing (CM) and AM are joined by laser welding. This paper reports the difference in thermal conductivity of conventional and additive manufactured parts. The thermal conductivity was calculated from the thermal diffusivity, the specific heat, and the bulk density. Furthermore, the temperature was measured during welding and the microstructure analyzed. The far field temperature was measured using eight K-type thermocouples and the microstructure was analyzed by metallography and light microscopy. The results showed that the thermal conductivity of AM material is 8% lower and therefore the heating rate 5% lower compared to CM material. The lower thermal conductivity is explained in the literature by its higher dislocation density, unfavorable alloying element distribution and a lower rest austenite content. AM introduces structural complexity that hampers electron and phonon transport, thereby reducing the thermal conductivity despite similar base chemical compositions. The heat-affected zone is only clearly visible on the CM side due to carbide formation. In DED parts, it comes to different phases in non-equilibrium states, which complicates the identification of carbides and the HAZ. The findings are important for the design of hybrid components to improve the the joint integrity and functionality of hybrid parts.

1. Introduction

Direct Energy Deposition of Metals (DED) is an additive manufacturing (AM) process that uses a laser as a heat source to melt and deposit powder or wire-shaped metal, as reviewed by [1,2,3,4,5]. Complex shapes can be produced without the conventional steps and expenses associated with tooling, dies, or casting molds like in conventional manufacturing (CM). However, the process faces limitations especially when it comes to building very large structures due to the limited deposition rate and geometrical limitations. Hybrid welding or part segmentation was used by Dey et al. [6] and Akbari et al. [7], who were welding conventional and additive subparts together to overcome the limitations of DED. It is becoming essential in modern manufacturing due to its ability to combine the strengths of additive and conventional technologies, enabling the production of complex, high-performance components. It offers greater design flexibility, improved material efficiency, and the ability to repair or enhance existing parts. As manufacturing demands grow more complex, hybrid approaches provide a scalable and cost-effective solution.
Laser welding conventional parts has been extensively researched during recent decades, but welding additive structures has been researched by fewer studies, such as [7,8,9,10,11,12]. They came to the conclusion that additive subparts can be welded successfully with good quality. The Heat-Affected Zone (HAZ) of the CM subpart appears similar to the AM subpart due to the comparable cooling rates. However, the thermal conductivity is changed by rapid solidification during DED due to segregation and the development of non-equilibrium phases according to Vrancken et al. [13]. In particular, the HAZ is characterized by the large local thermal gradients inherent after liquidation and solidification, but it is limited to a small area which is very sensitive to the differences in thermal conductivity.
Only Dey et al. [6], Tavlovich et al. [14], and Zapf et al. [15] have performed studies on hybrid part segmentation, consisting of CM and AM subparts, which have mainly been observational. Hybrid laser welds were investigated by Tavlovich et al. [14] using titanium alloy, Zapf et al. [15] and Casalino et al. [16] using austenitic stainless steel, and Dey et al. [6] using soft martensitic steel. Tavlovich et al. [14] state that the thermal conductivity of the AM material is about 2.5 times as high as that of the wrought material. Zapf et al. [15] outlined the importance of the porosity and the surface roughness on the energy coupling and their welding process parameters. Dey et al. [6] showed by Digital Image Correalation during tensile testing that the strain accumulation appears on the HAZ on the conventional HF (Hot Forged) side, especially after heat treatment. It is essential to understand the differences in thermal properties between AM and CM materials, as these lead to variations in thermal history, welding behavior, and HAZ characteristics in hybrid parts—preventing unexpected failures and weak points.
Thermal or heat conductivity λ refers to the intrinsic ability of a material to transfer or conduct heat. It is the most important material property in terms of thermal history since the heat transfer in solids is primarily governed by the process of conduction. Usually, measurements are performed on conventional manufactured material and the microstructure and mechanical properties are mainly determined by the cooling curves of the processes and the post-heat treatment. However, besides Tavlovich et al. [14], who claim that the thermal conductivity of AM Ti6Al4V is approximately 2.5 times higher than that of wrought material, the literature does not present any investigations on the thermal conductivity of additive manufactured samples of soft martensitic steel.
This study examines the thermal conductivity of subparts produced by additive and conventional manufacturing and records their temperature profiles during the welding process. The results are compared with a microstructural analysis of the hybrid laser weld to assess the thermal and structural behavior of the joint.

2. Materials and Methods

2.1. Raw Material

The raw material [17] for the conventional subpart was forged, hardened, and tempered. The material was hot forged (HF) after a 2 h heating phase and held at T = 1000 °C for two hours [18]. Following this, it was quenched in oil to achieve rapid cooling. Subsequently, the part underwent annealing at T = 605 °C and was cooled in air to relieve internal stresses.

2.2. Sample Manufacturing

The DED subparts were produced on a Trumpf TruLaser Cell 7020 (TRUMPF, Ditzingen, Germany). The continuous-wave disk laser Trumpf TruDisk 3001 (TRUMPF, Ditzingen, Germany) was employed for the DED and laser welding process and the DED subparts were produced according to the parameters presented in Table 1. The direction of the linear deposition was rotated by 90° in a clockwise direction for each layer, as illustrated in Figure 1a. The chemical composition of the powder used for DED is described in Table 2.
The DED block measured 115 × 40 × 35 mm, while the HF block measured 110 × 35 × 30 mm. To investigate the hybrid laser weld, four subparts were extracted from both the DED and HF blocks using a circular saw and electrical discharge machining (EDM), as illustrated in Figure 1b. The dimensions of these subparts were 42.5 × 1 × 19 mm. All surfaces were ground to ensure flatness and smoothness. A designated section, shown in Figure 1c, was used to prepare specimens for measuring thermal diffusivity (via laser flash analysis), specific heat capacity (via differential scanning calorimetry) and temperature-dependent density (via Archimedes’ principle and dilatometry).

2.3. Material Properties

To measure the thermal conductivity λ , different characteristics need to be measured. It can be calculated according to Bergmann [19]:
λ ( T ) = a ( T ) · c p ( T ) · ρ ( T )
where T is the temperature, a the thermal diffusivity, c p the specific heat, and ρ the density.
Thermal diffusivity measurements were performed from room temperature up to T = 1000 °C using a Netzsch LFA 467 HT HyperFlash (NETZSCH, Selb, Germany) laser flash analysis system. A xenon flash lamp and a standard indium antimonide infrared detector were employed. The heating rate was set at R h = 5 K/min, with an isothermal holding time of t h = 5 min at each measurement setpoint for the temperature. To maintain an inert atmosphere, argon was used as a shielding gas with a flow rate of Q s = 50 mL/min. A total of three samples each from the DED and HF blocks were measured, and the average thermal diffusivity was calculated separately for the three DED samples and the three HF samples.
The specific heat capacity c p and related energetic effects were measured using a NETZSCH DSC 404 F1 Pegasus® (NETZSCH, Selb, Germany) heat flow differential scanning calorimeter. The device was vacuum-tight and the measurements were conducted in inert atmospheres within a temperature range of T = 25 °C to T = 1650 °C. One DED and one HF sample were measured.
The initial density at room temperature was measured using the Archimedes principle. The temperature-dependent density, ρ ( T ) , was determined by dilatometry, based on the change in specimen length with temperature. Dilatometry measurements were performed from room temperature up to T = 1089 °C using a NETZSCH DIL 402 Expedis® (NETZSCH, Selb, Germany) Classic dilatometer. The heating rate was set to R h = 5 K/min. The temperature-dependent density was calculated by Kreith and Bohn [20]:
ρ ( T ) = m V 0 1 + Δ l l 0 3
where m is the constant mass, V 0 the initial volume, Δ l the change in specimen length and l 0 the initial specimen length at room temperature. Three DED and three HF samples were measured and the average was calculated.

2.4. Microstructure

During metallographic preparation, the specimens were cut, hot-mounted, ground, and polished. Grinding and polishing were carried out using a Saphir 520 (ATM Qness GmbH, Mammelzen, Germany) system. After grinding, the specimens were cleaned in an ultrasonic ethanol bath. The polishing was carried out using rotating polishing cloths and polycrystalline diamond suspensions with grain sizes of 6 μ m and 3 μ m , applying a constant force of 10 N at 200 rpm. A final surface roughness of approximately R a 0.1   μ m was achieved. Two cross-sectional images were captured using a Keyence VHX-500 (KEYENCE, Osaka, Japan) light microscope. The Adler (Wegberg, Germany) and Kalling II (Wegberg, Germany) etchants were applied to reveal the weld seam geometry and microstructure according to Oettel and Schumann [21].

2.5. Experimental Approaches

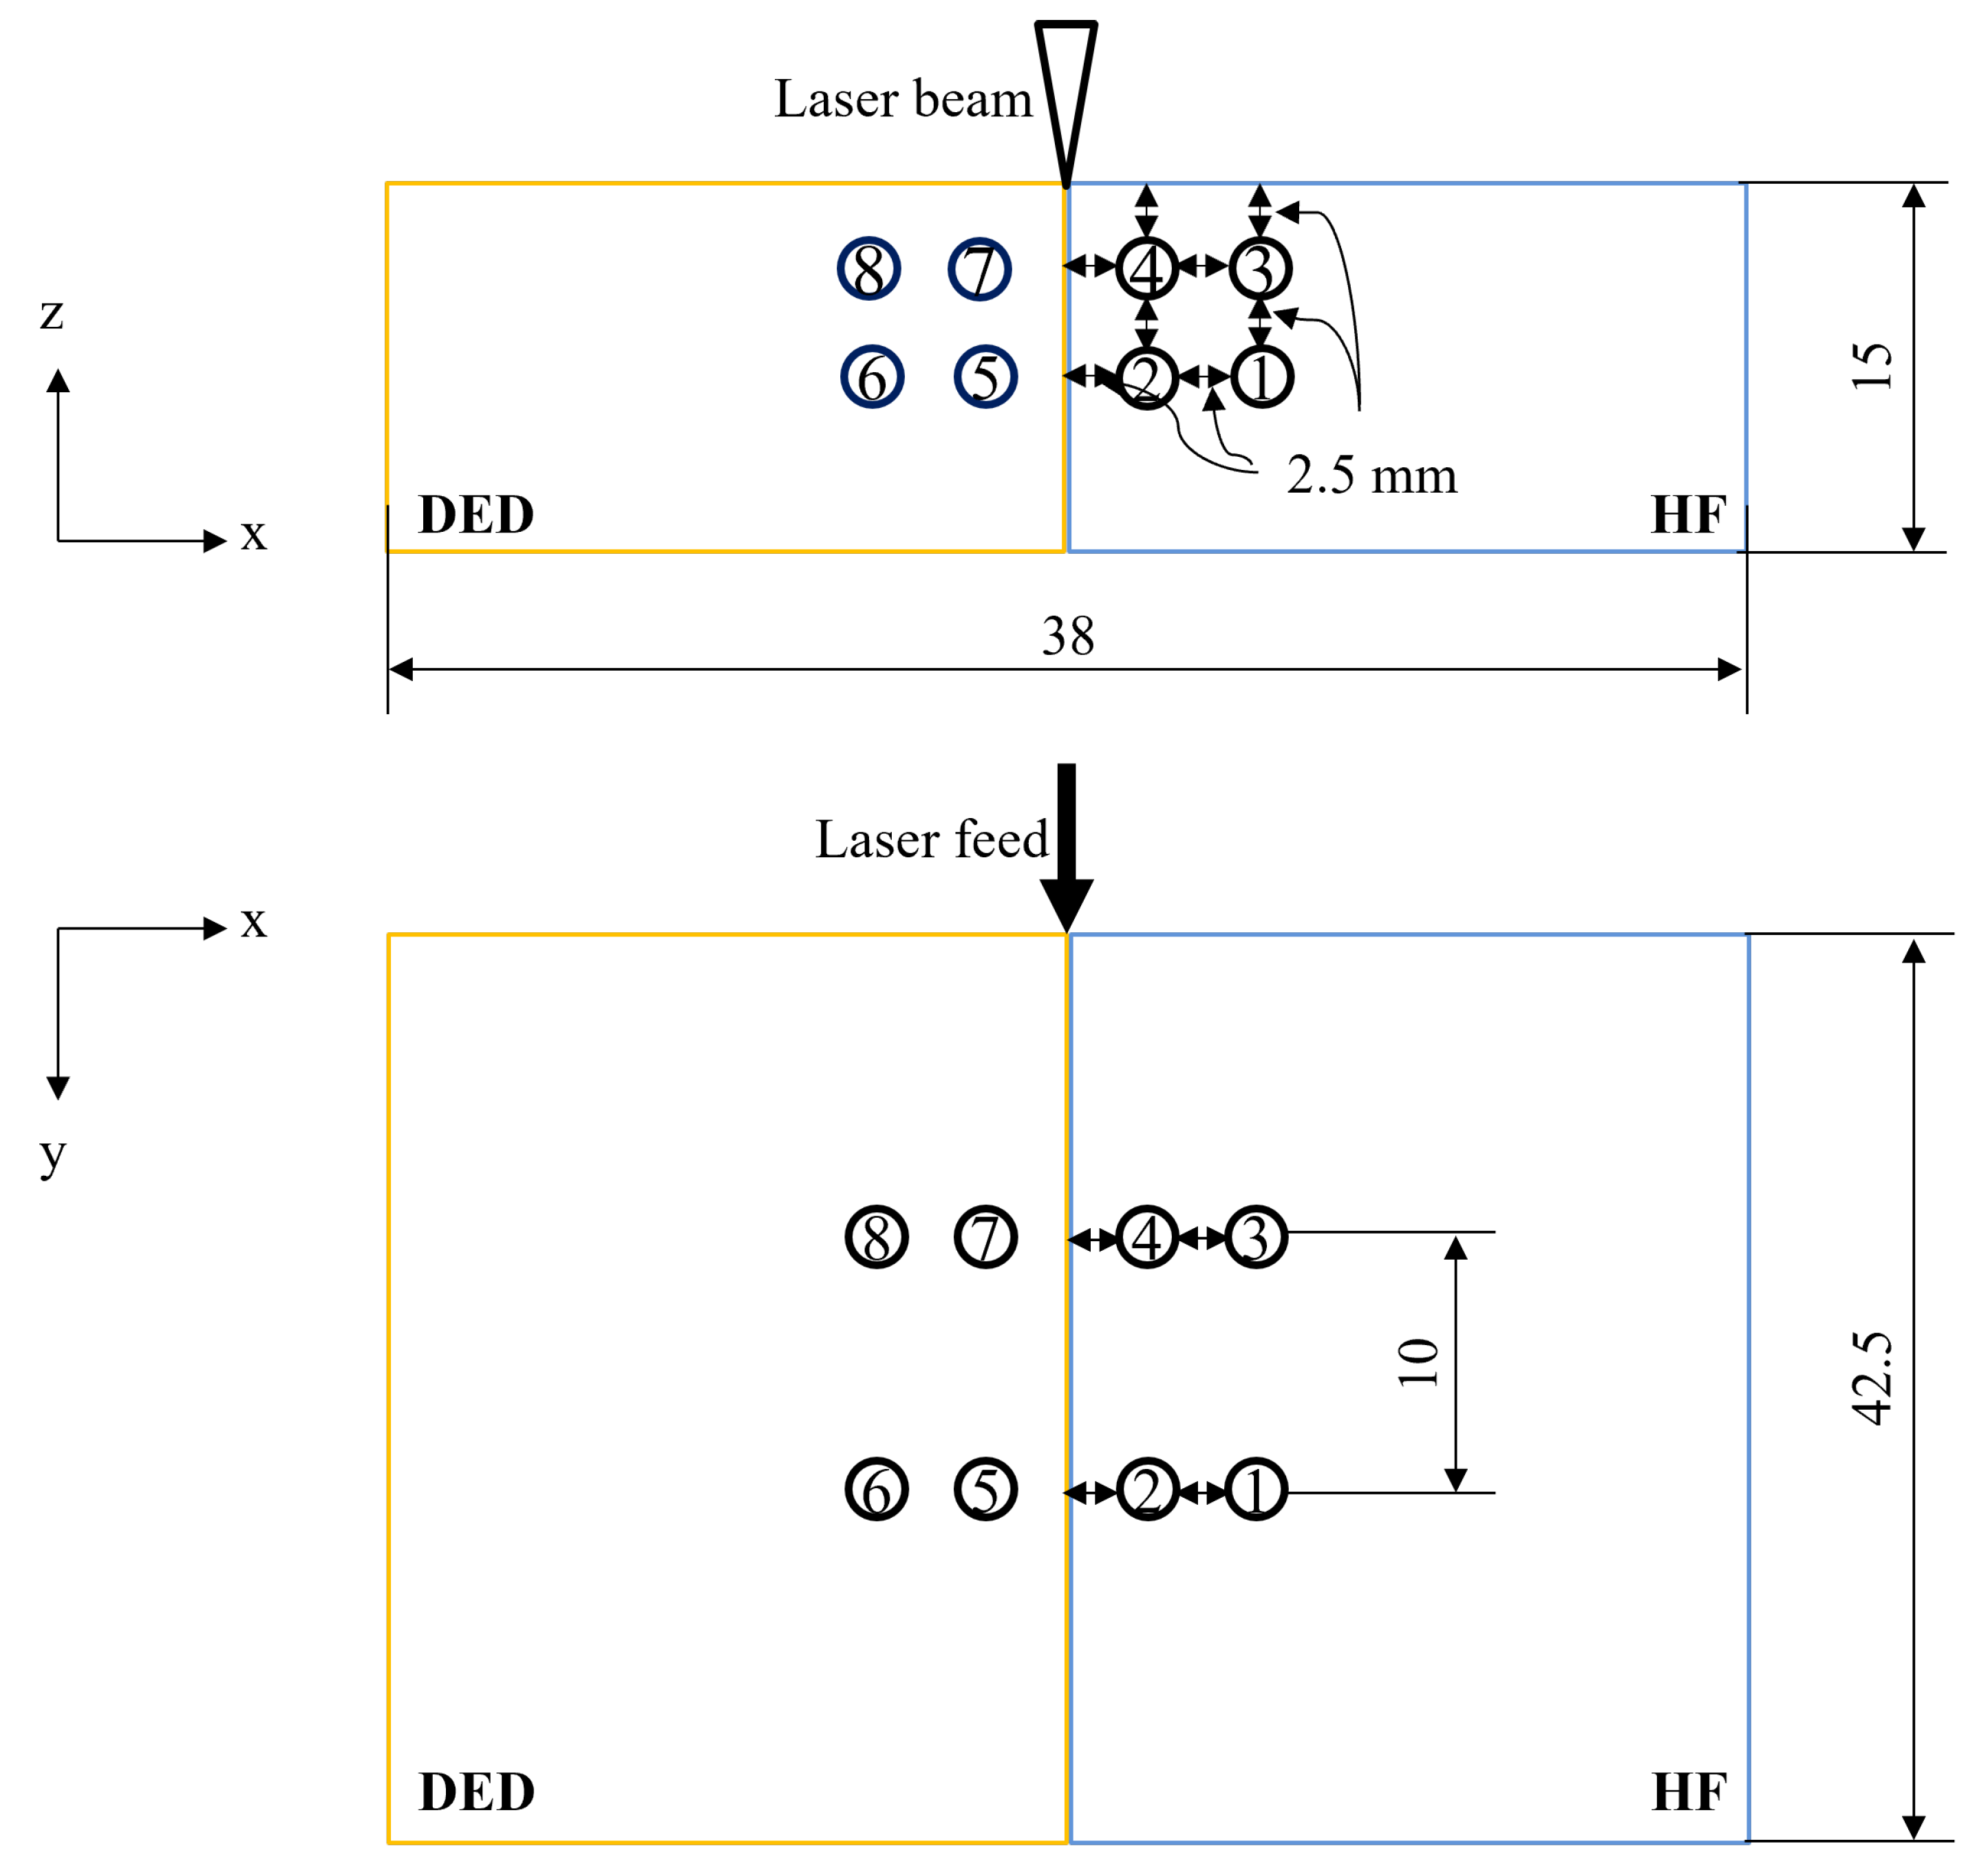
Eight K-type thermocouples were arranged in the hybrid specimen, as shown in Figure 2. These thermocouples are capable of measuring temperatures in the range of T = −200 °C to T = 1300 °C. Data acquisition was performed using a TC-08 data logger from Pico Technology (St Neots, UK), which supports simultaneous reading of up to eight thermocouples. To ensure accurate positioning, holes with a diameter of D = 2.5 mm were drilled and the thermocouples installed using silicone-based thermal conductivity paste with a thermal conductivity of λ = 1 W m K .
The measurement setup was designed to minimize material removal, as all eight holes were drilled in a single direction. This ensured that any positional error was limited to the z-axis. For temporal alignment, the temperature curves of TC1/7/4/3 were shifted to match the starting point of TC6/5/2/1 by t = 0.4 s. The laser welding process parameters used in this experiment are summarized in Table 3.

3. Results

3.1. Material Properties

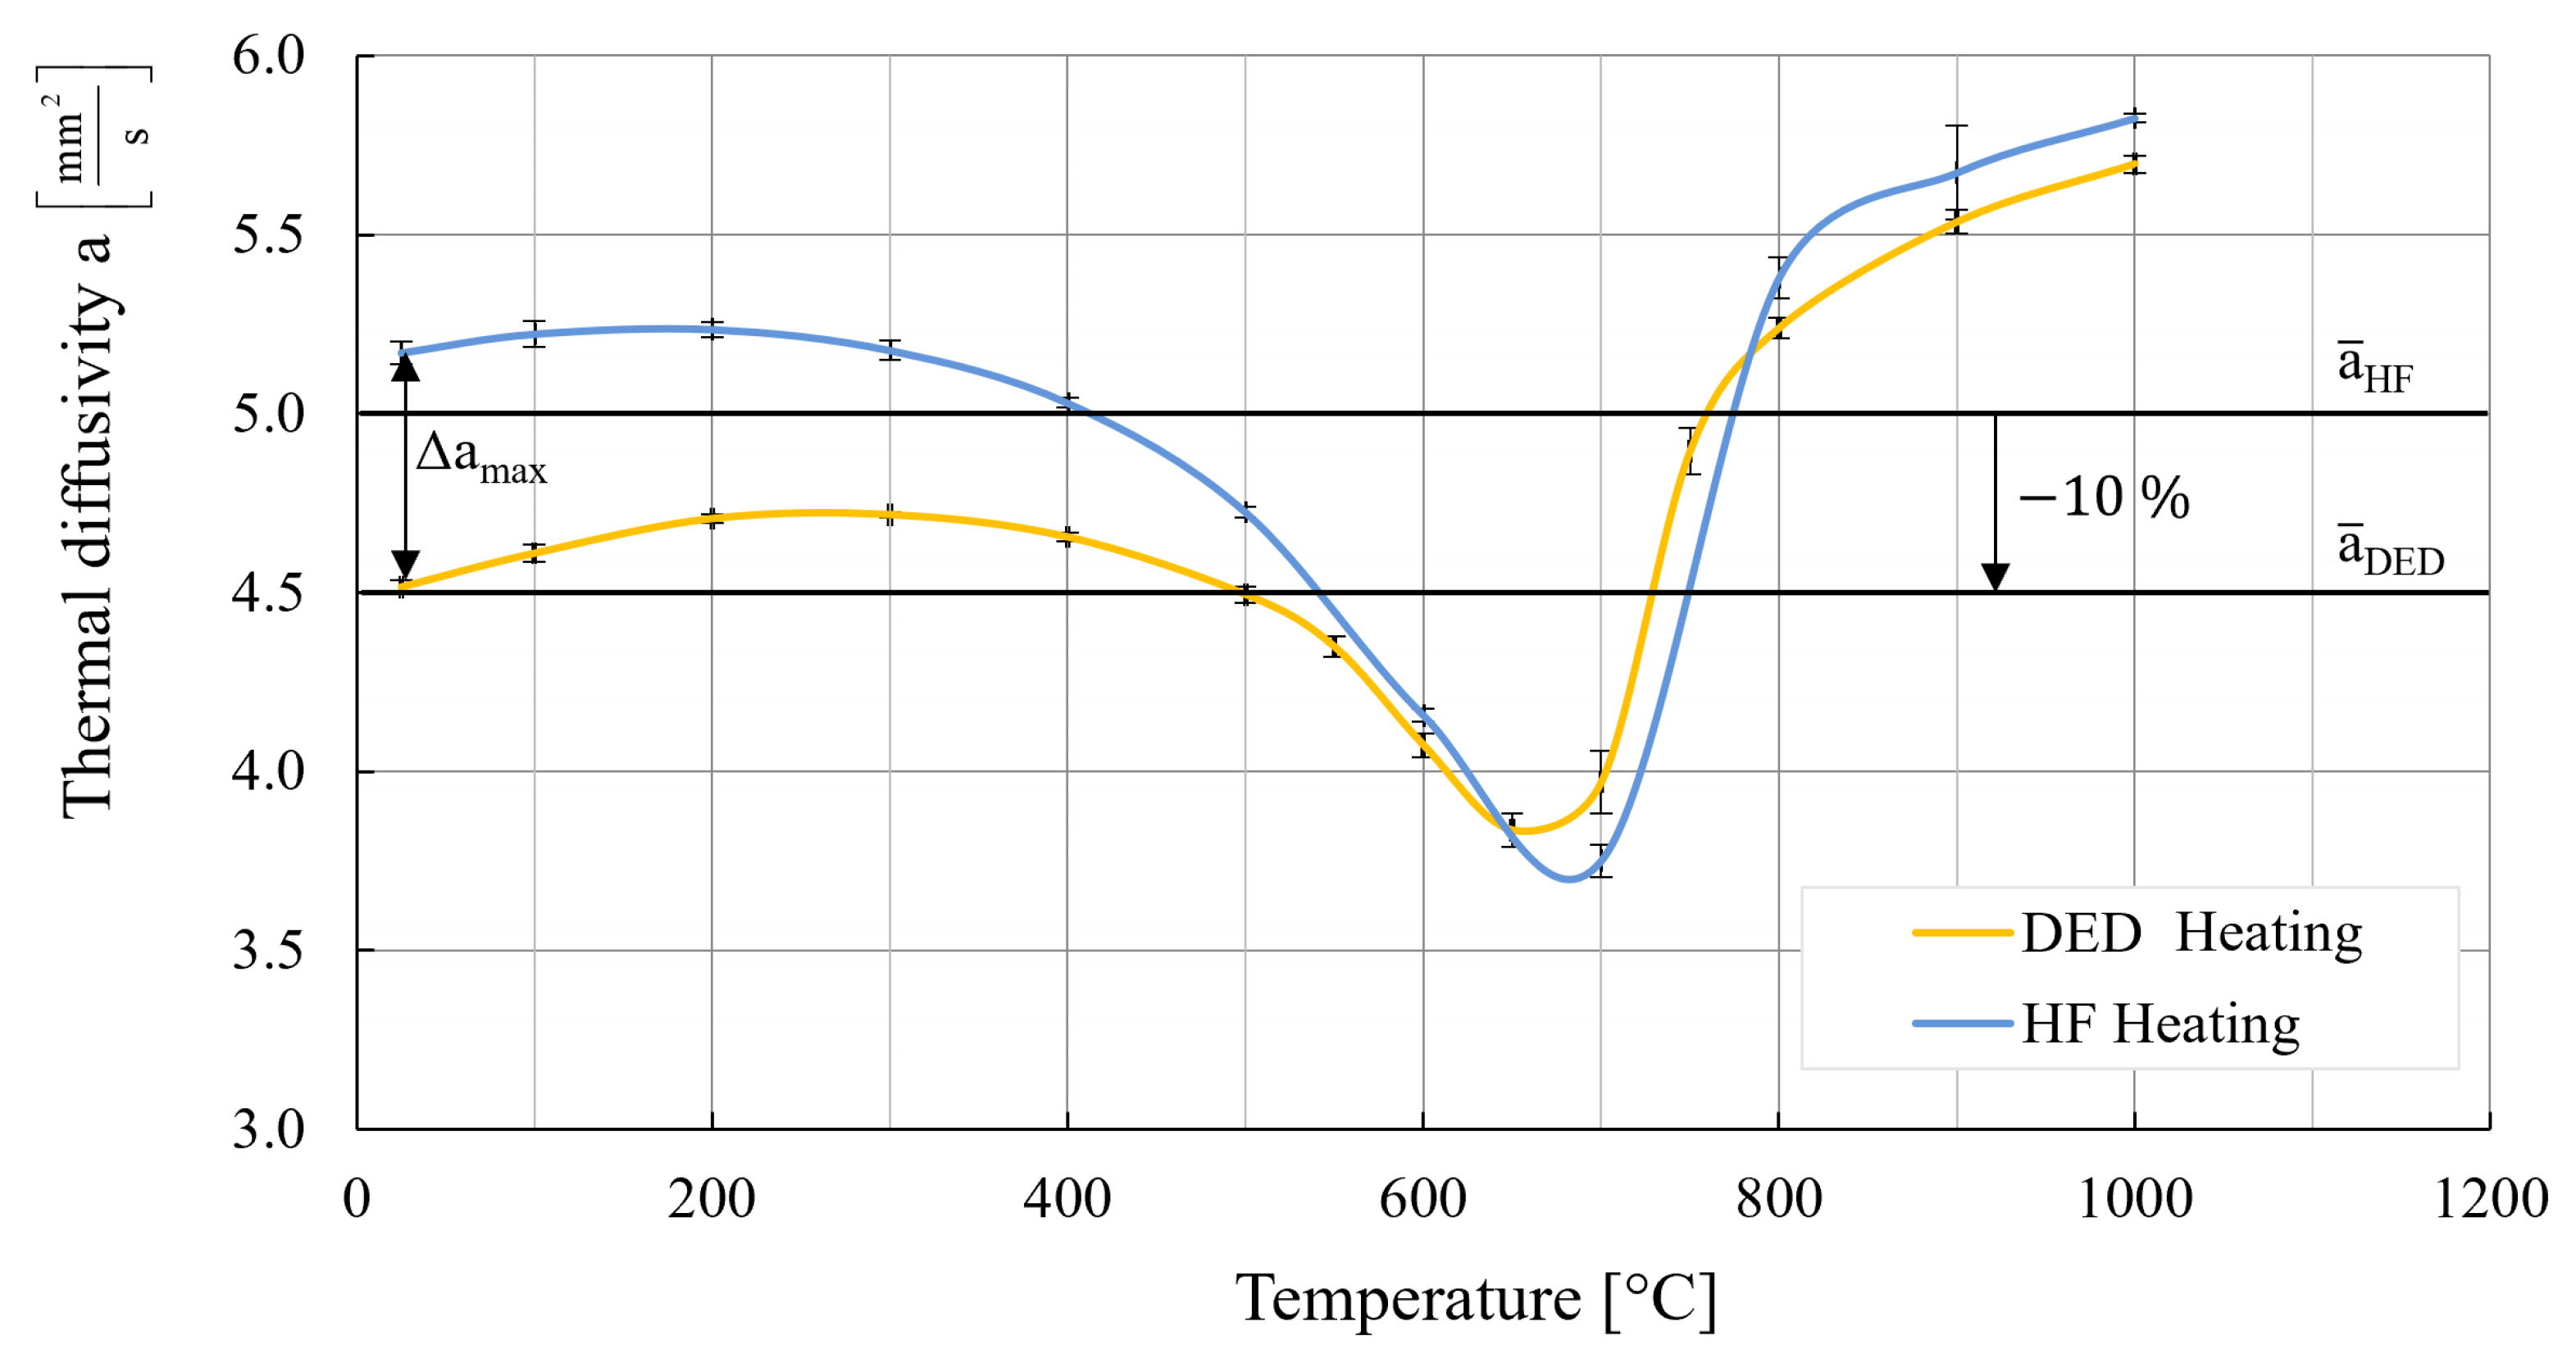
As presented in Figure 3, the measurements show a sharp decrease in thermal diffusivity during the α γ phase transformation around T = 700 °C which is described by Folkhard [22]. In general, HF specimens exhibited higher thermal diffusivity, except within the temperature range of the α γ transformation. The mean thermal diffusivity a ¯ DED in the temperature range of T = 0 °C to T = 1000 °C of the DED parts was 10% lower than a ¯ HF .
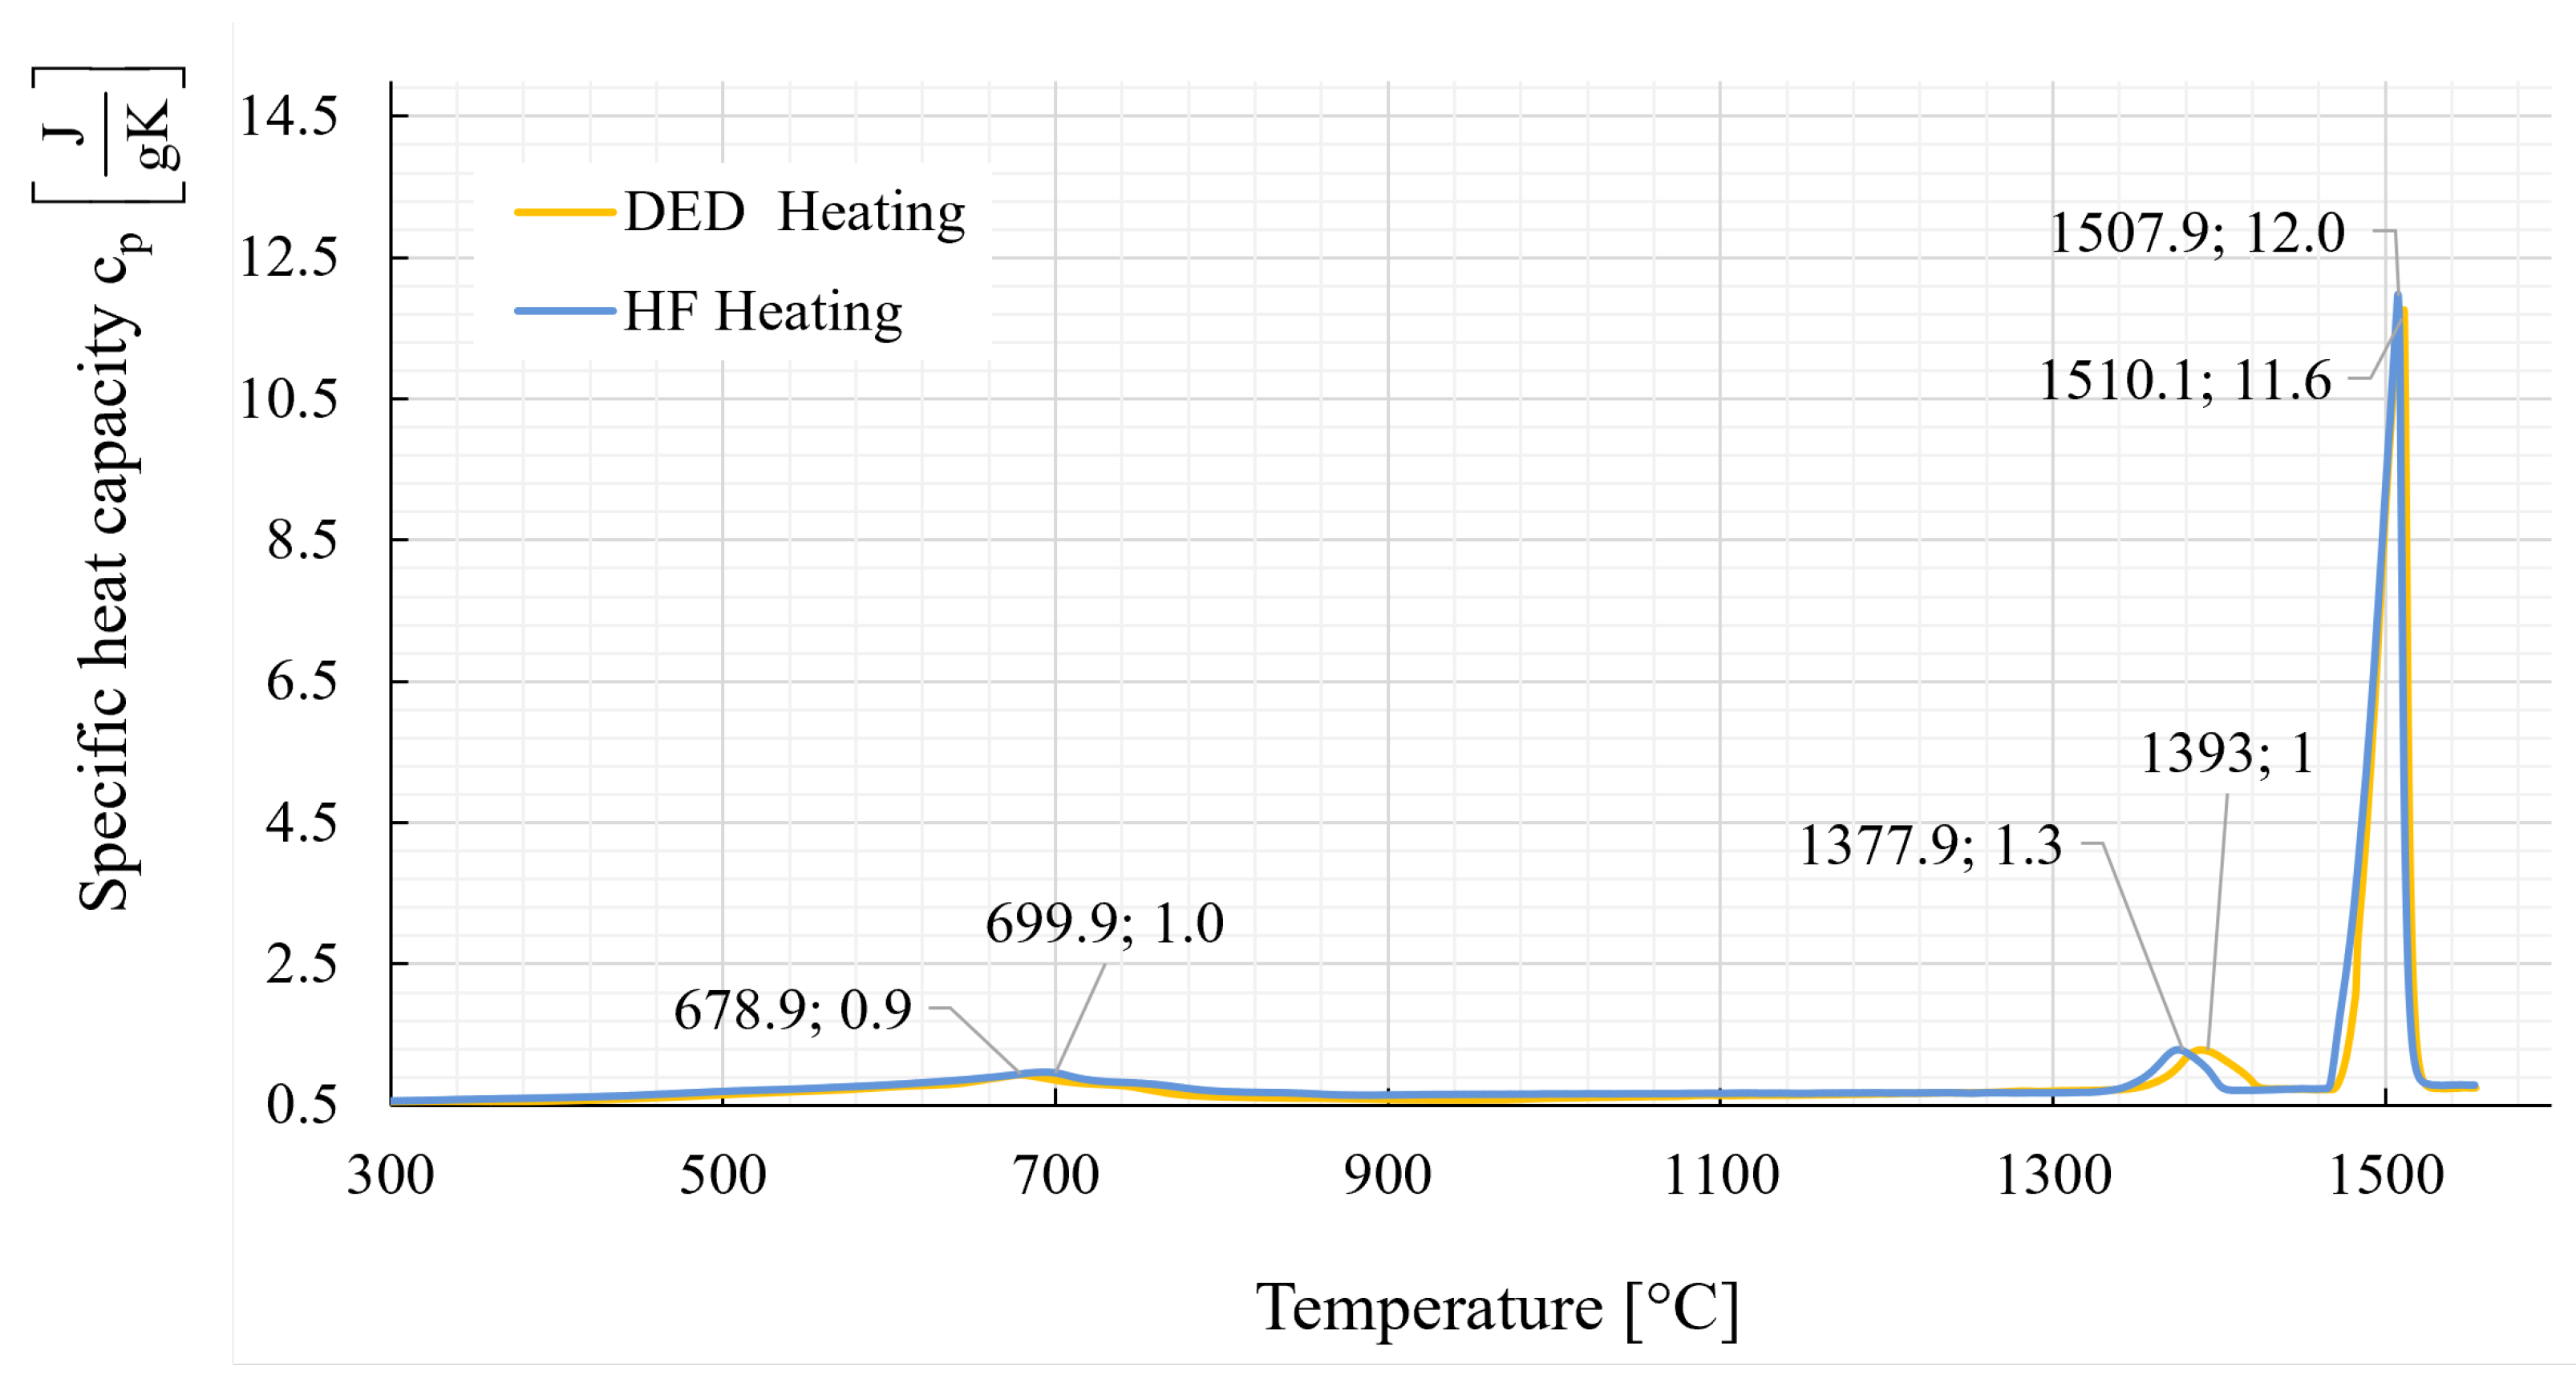
As presented in Figure 4, a peak was observed in the specific heat capacity c p around the α γ phase transformation at T = 678 °C, where the largest difference occurred, as well as at the beginning of liquefaction at T m = 1388 °C and at the end of melting at T m = 1510 °C. The measurement precision for c p lies within ±2.5% in the temperature range of T = −150 °C to T = 1500 °C.
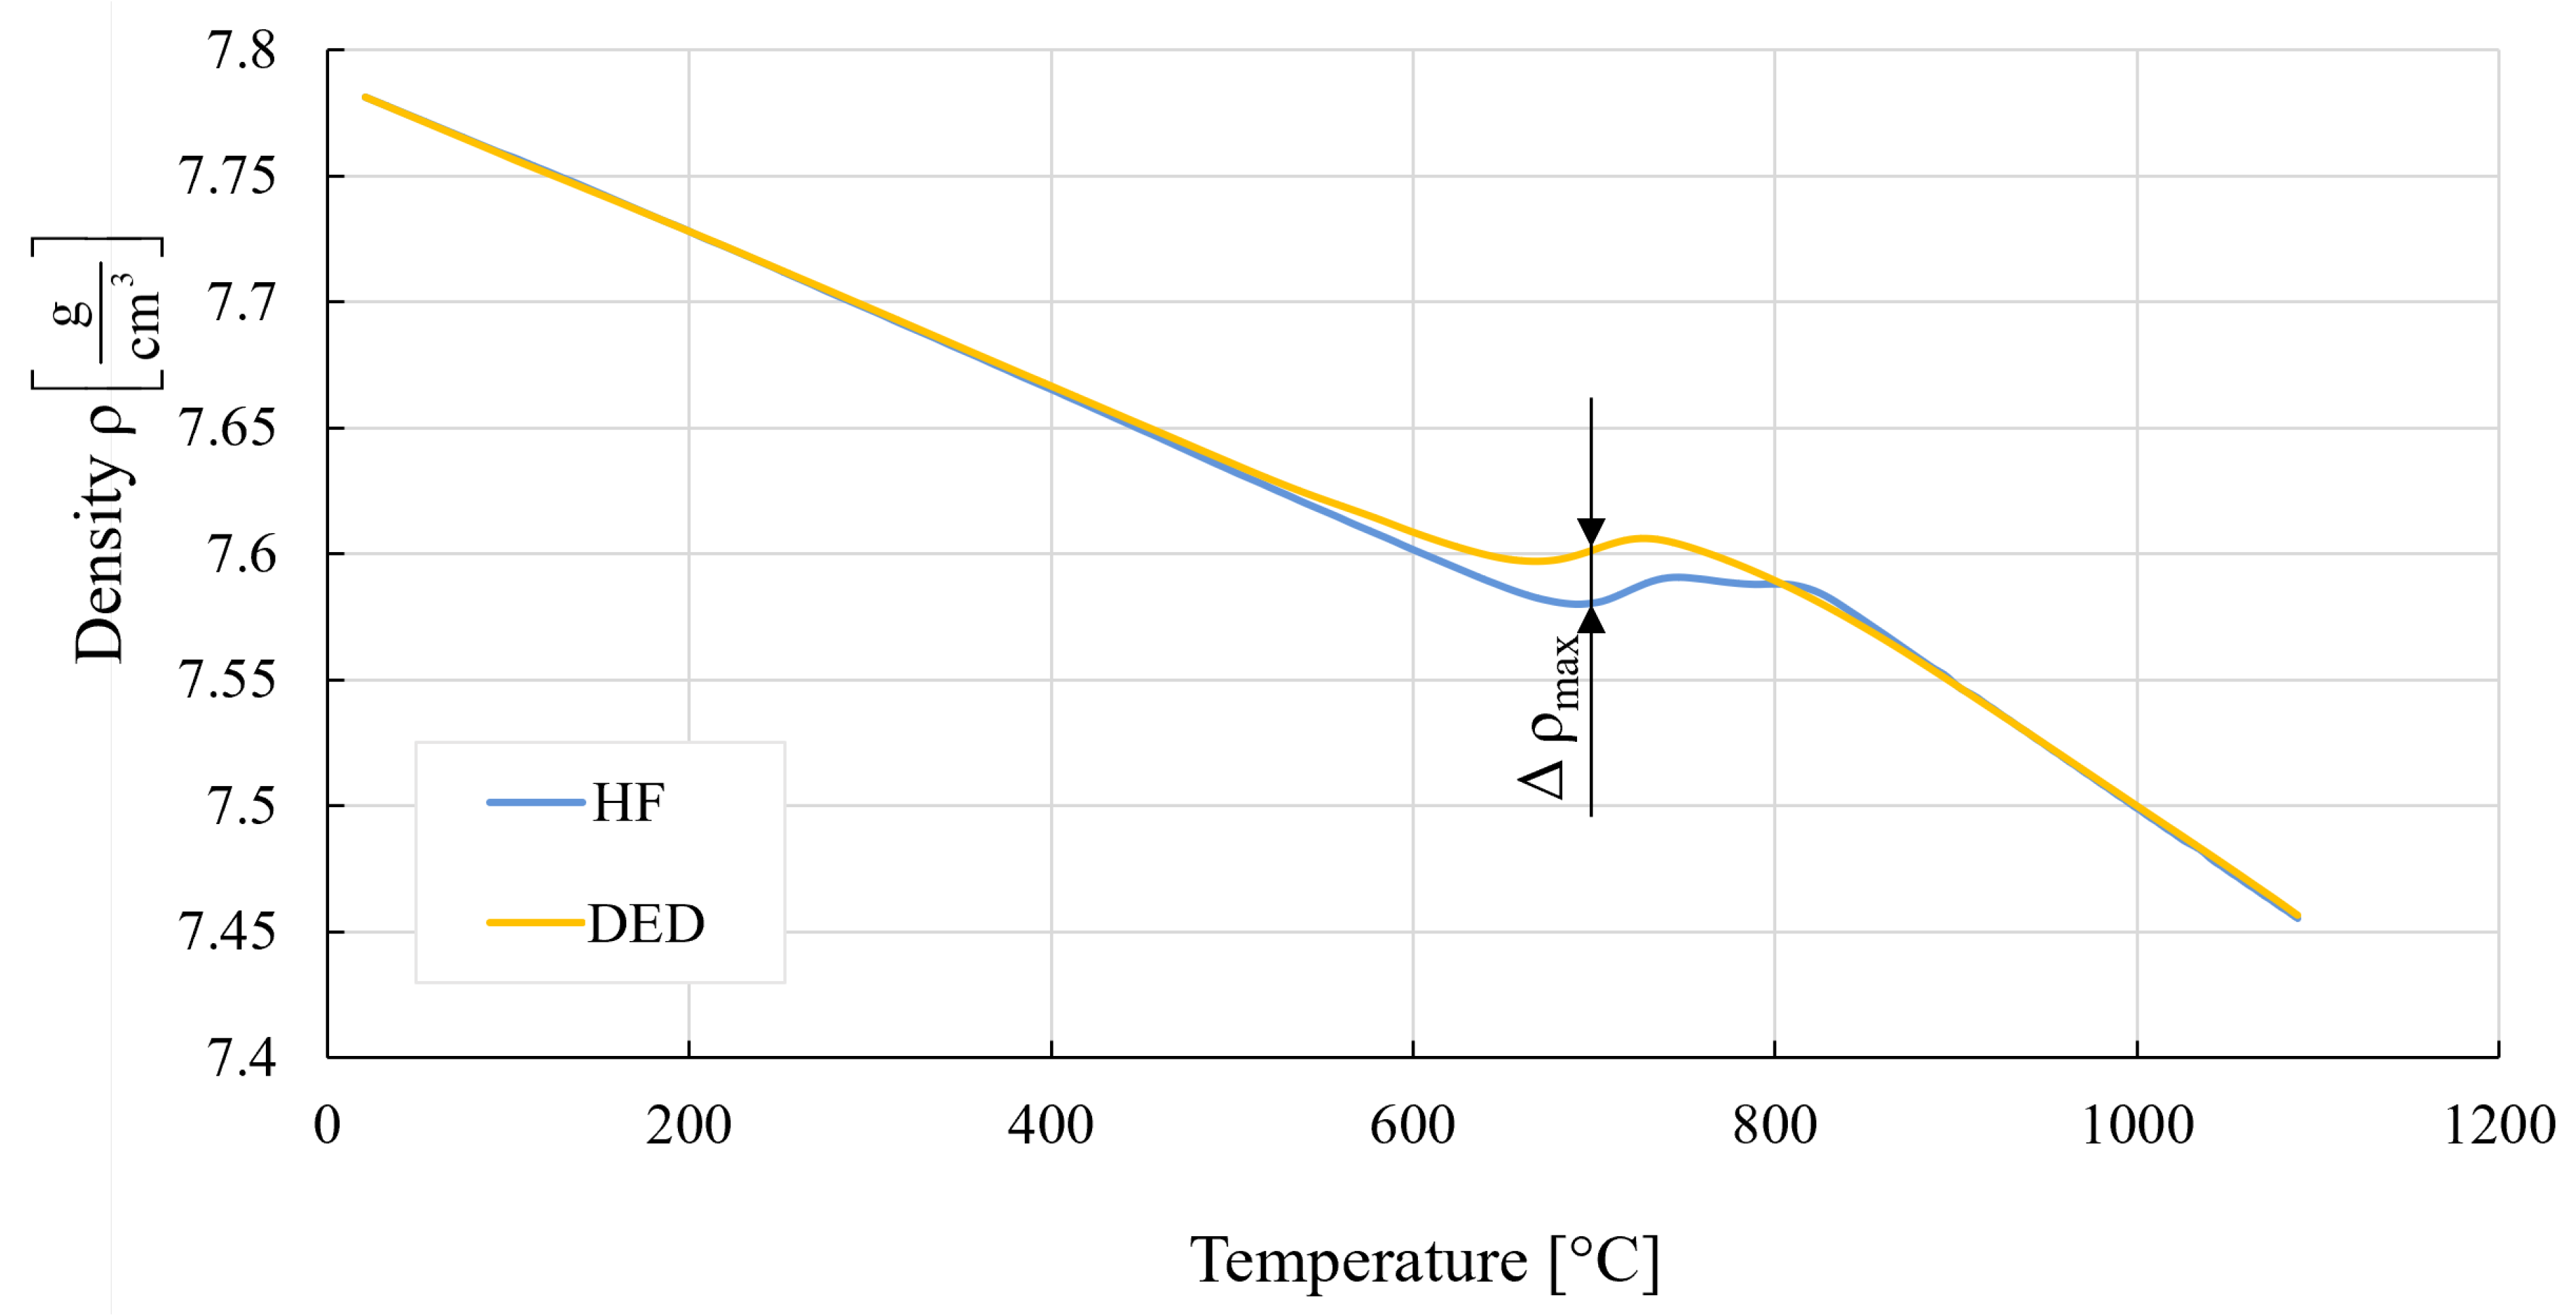
As presented in Figure 5, no significant differences in density ρ were observed between the DED and HF samples. The largest difference, Δ ρ max , occurred during the α γ phase transformation around T ≈ 700 °C.
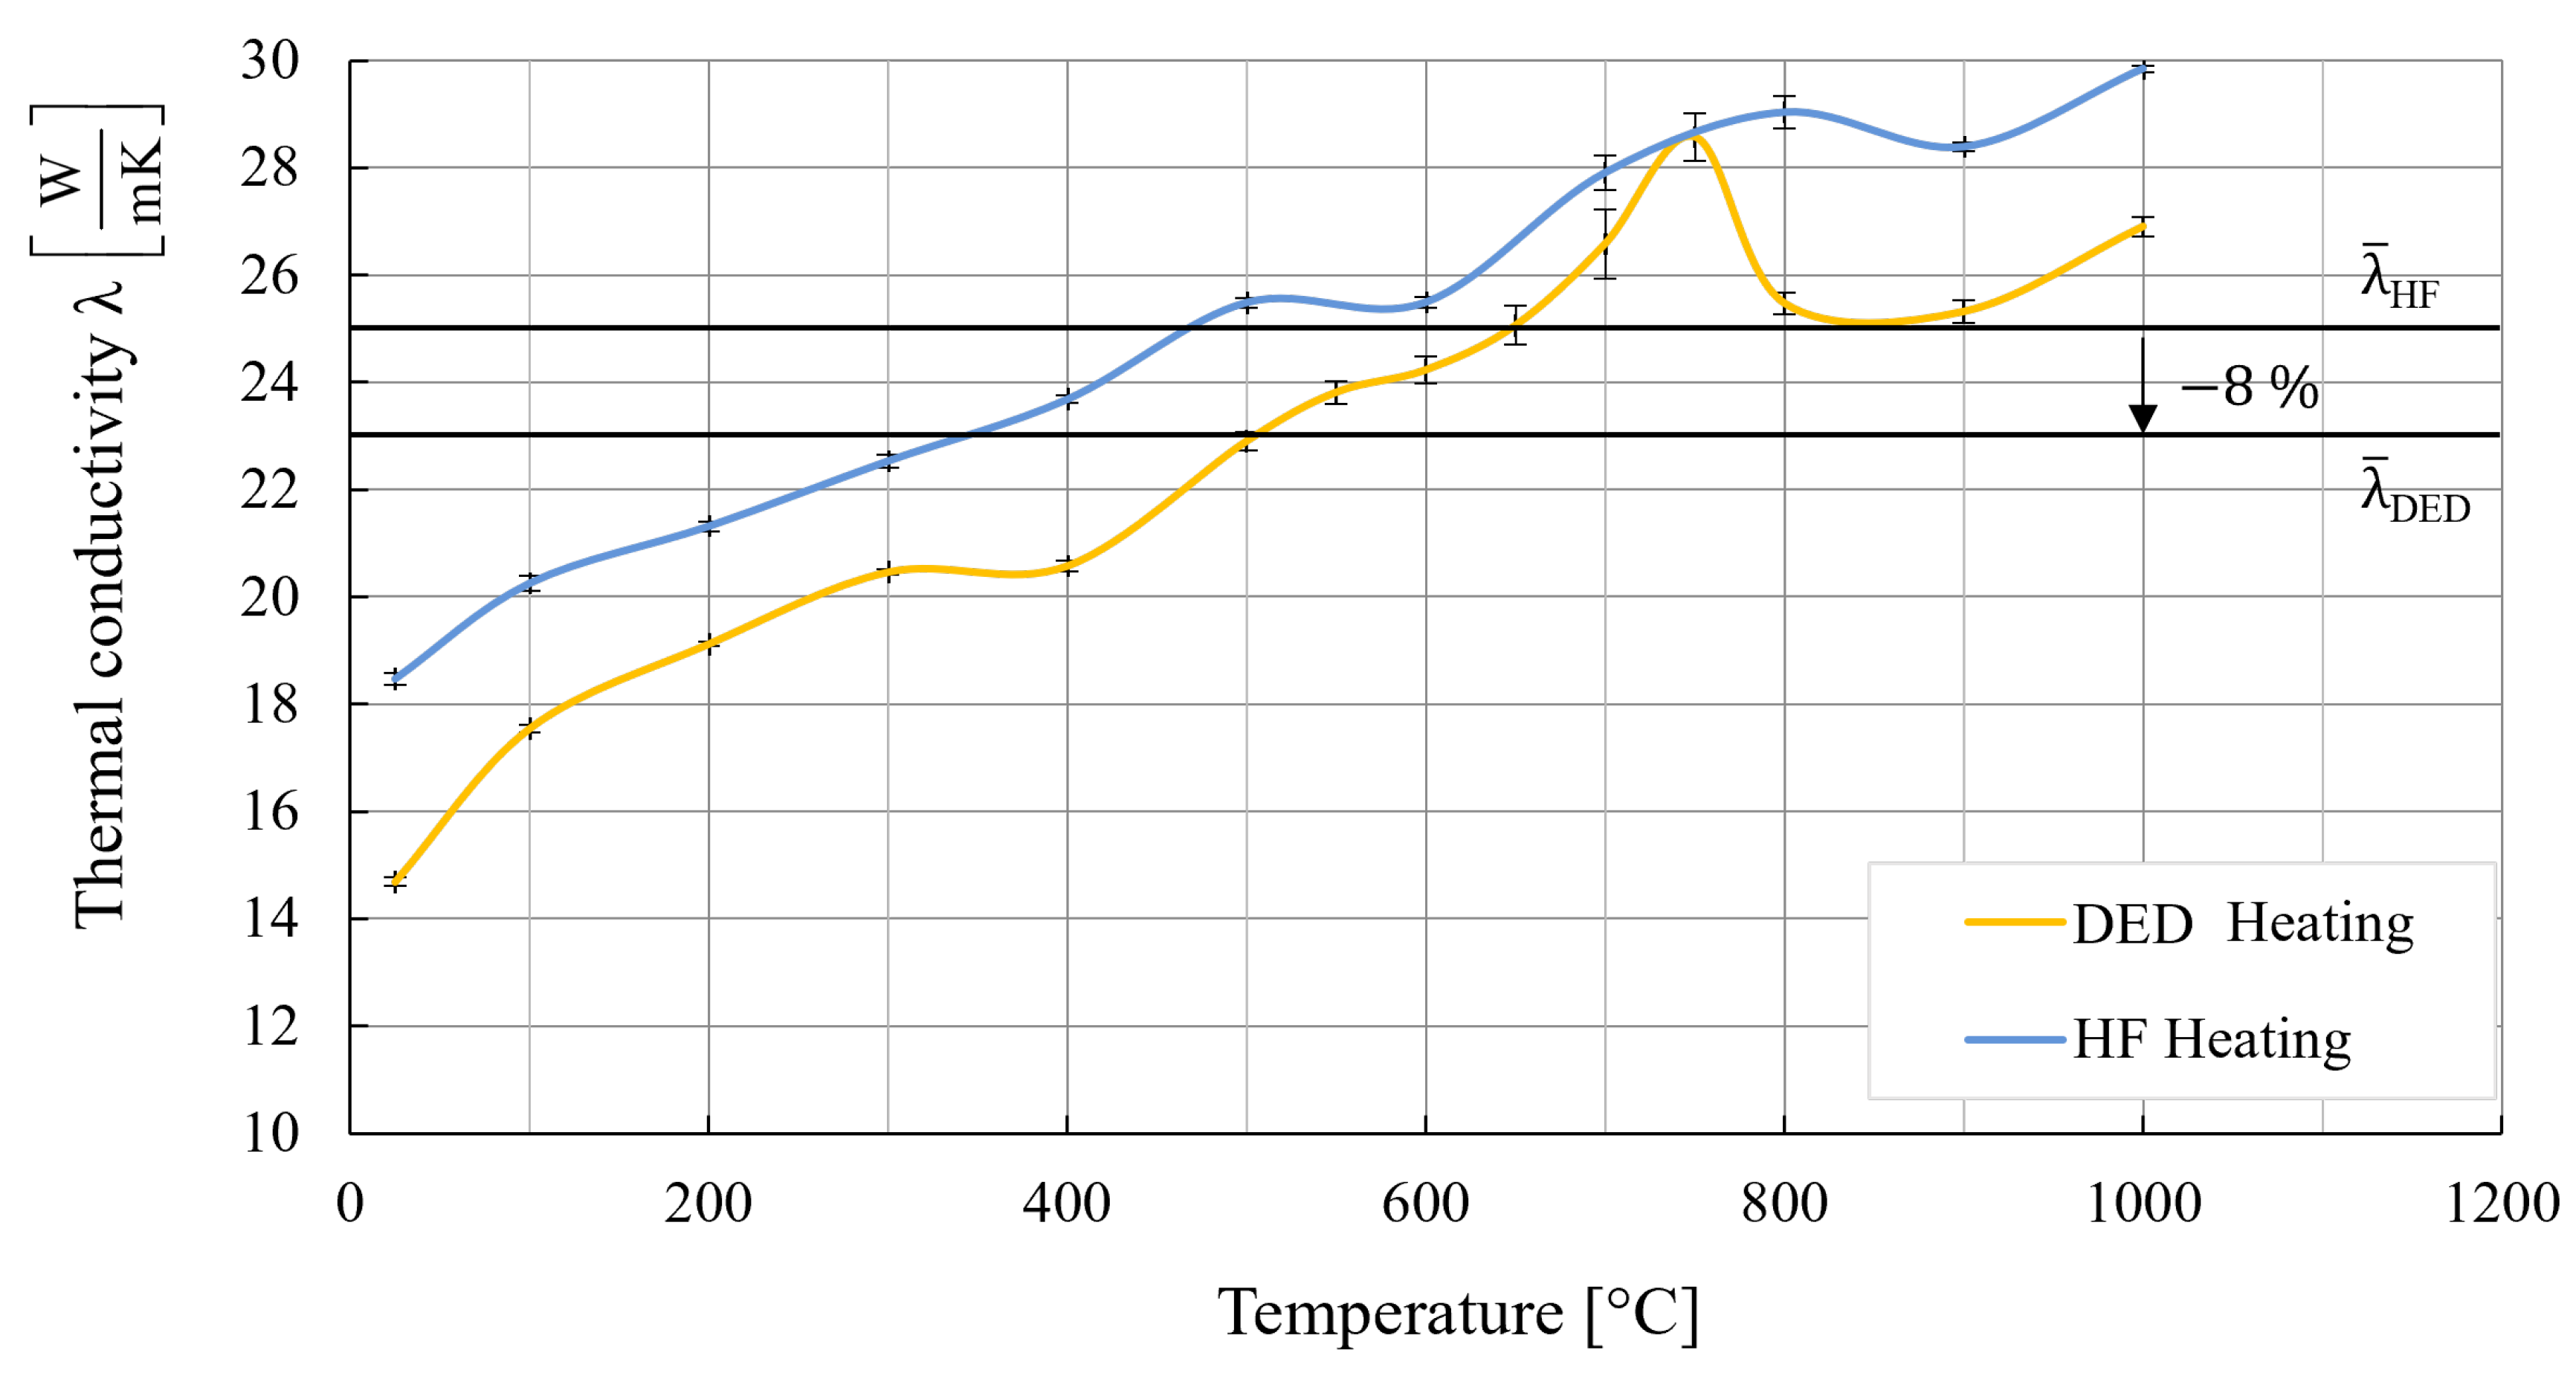
The calculated thermal conductivity, λ ( T ) , based on the experimentally measured specific heat capacity c p ( T ) and thermal diffusivity a ( T ) , is presented in Figure 6. The results show that the mean thermal conductivity λ ¯ DED of the DED parts was 8% lower than λ ¯ HF in the temperature range of T = 0 °C to T = 1000 °C. Similarly to the c p ( T ) results, a distinct peak is observed just below T = 700 °C, corresponding to the α γ phase transformation. A pairwise t-test with Bonferroni correction revealed a statistically significant difference in λ ( T ) between the DED and HF specimens.

3.2. Temperature Measurements

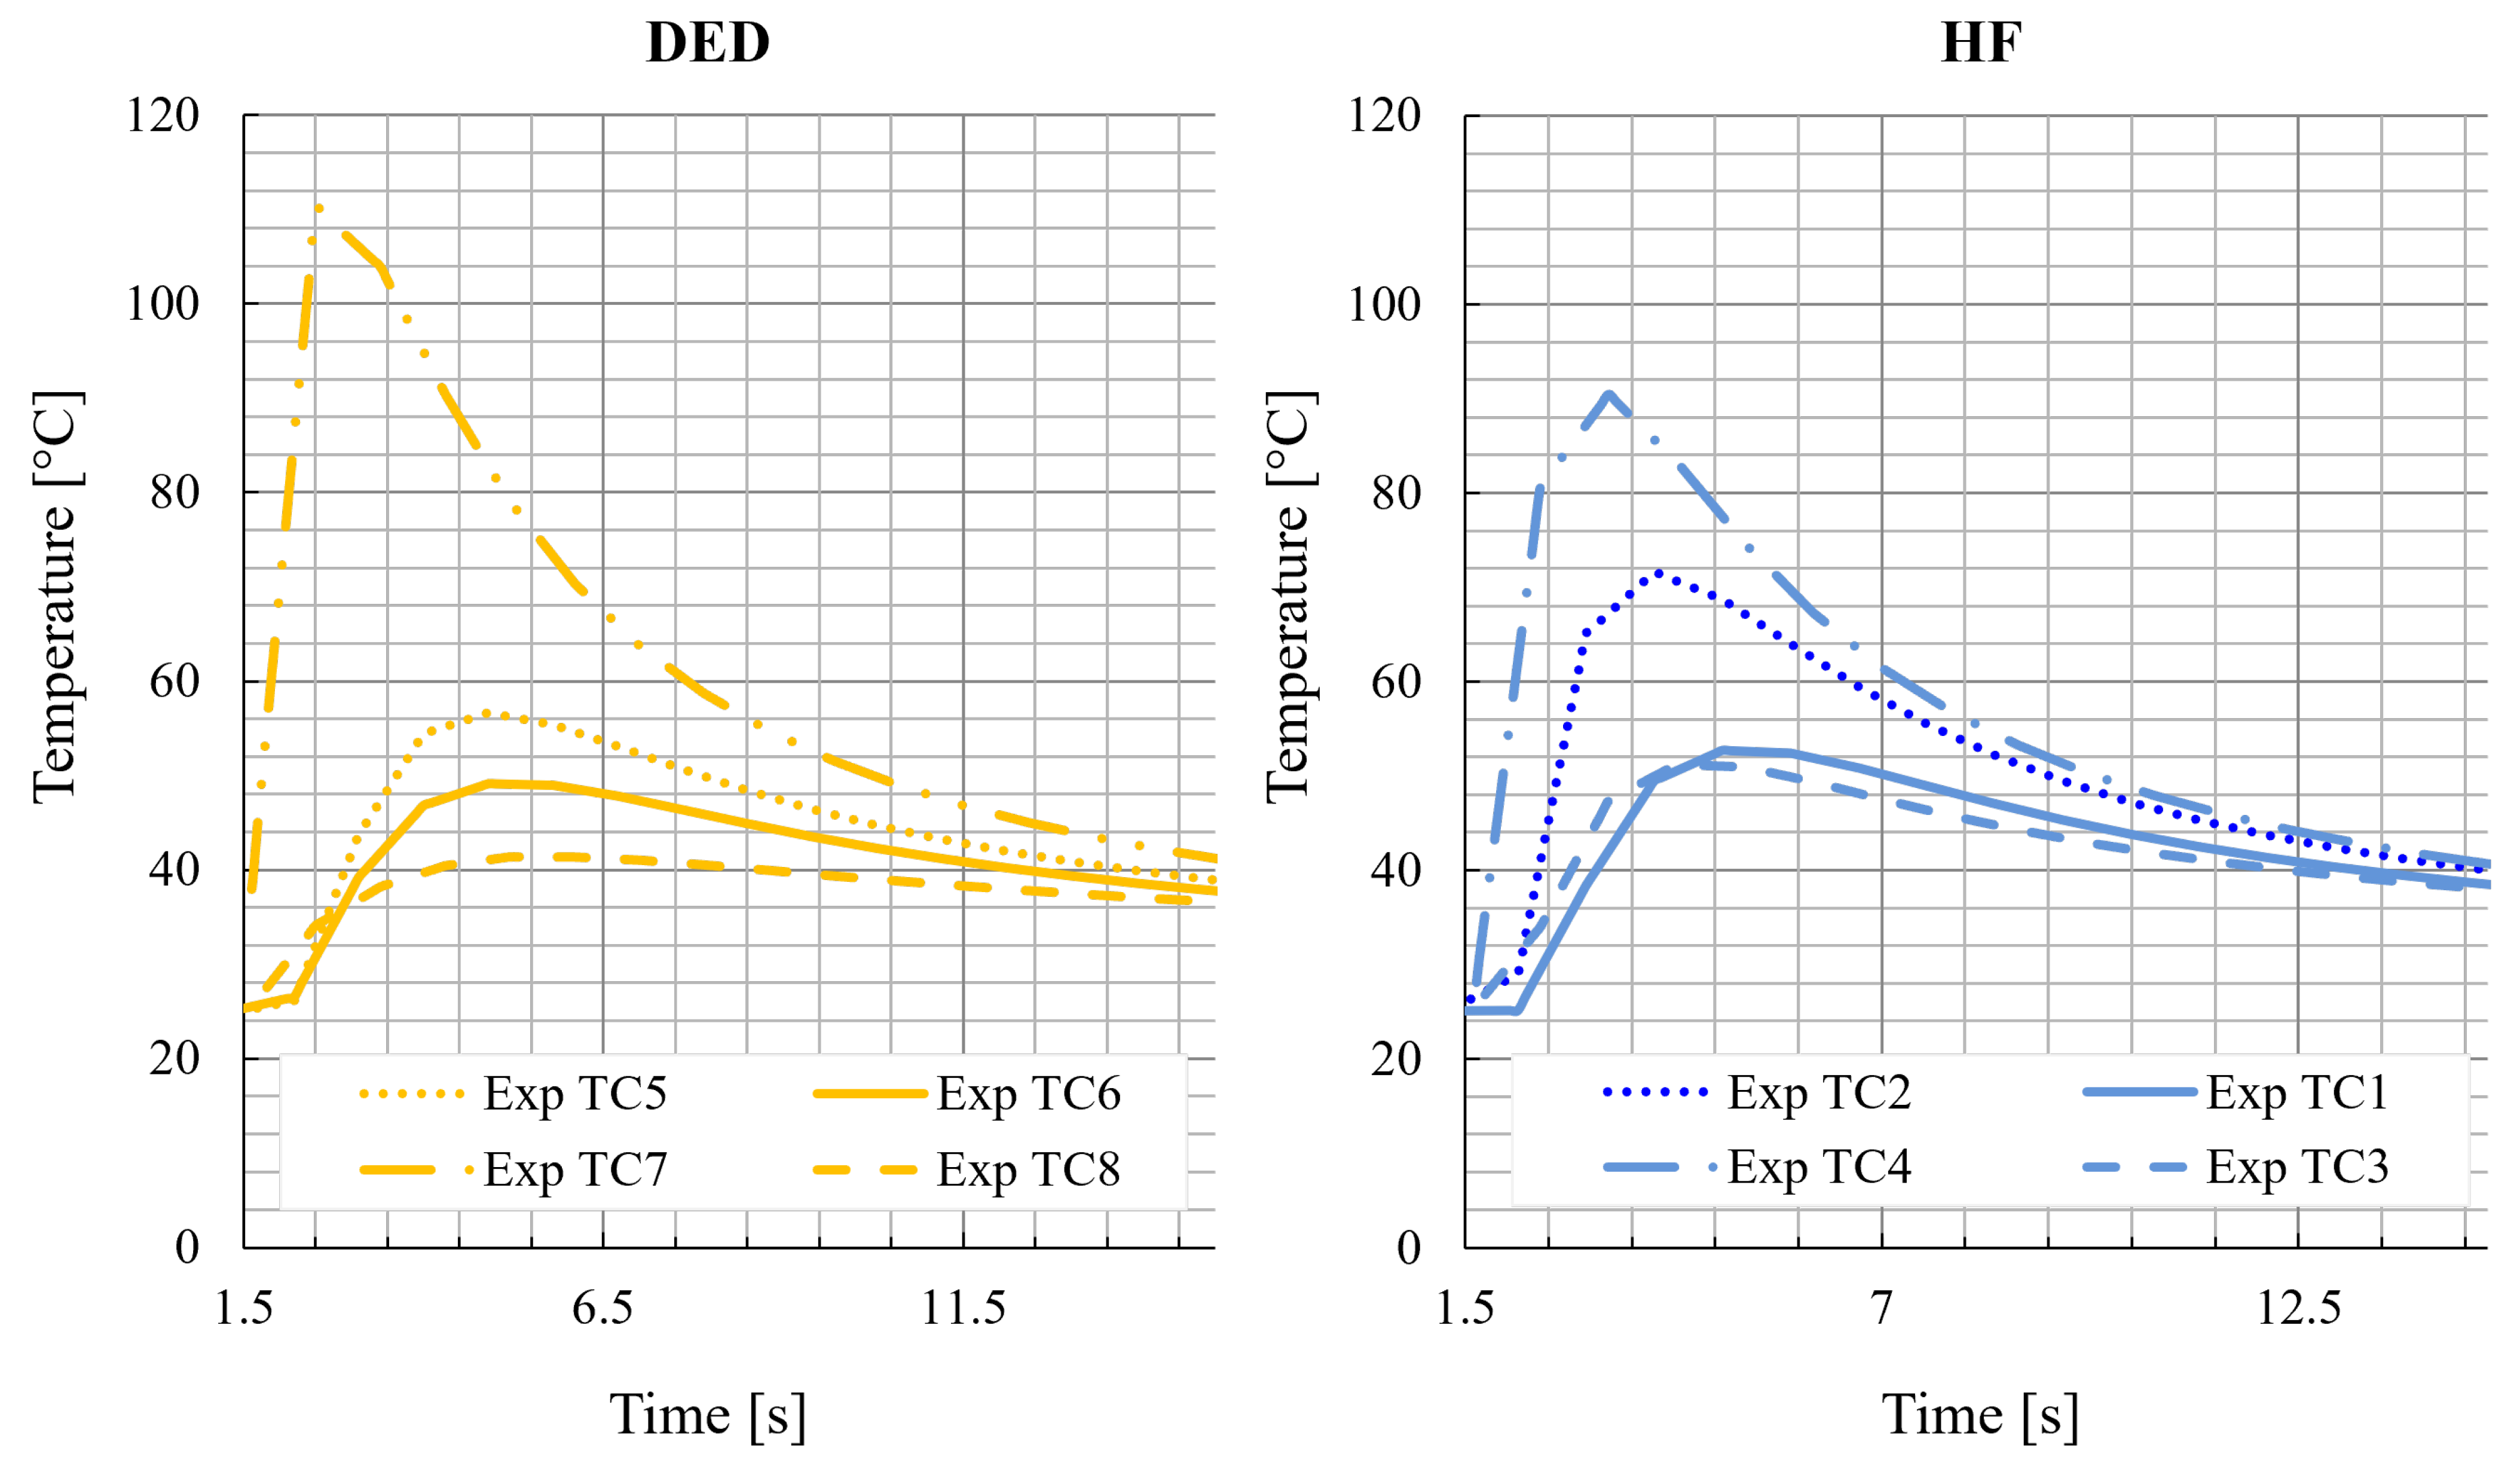
The measured temperature–time curves for the thermocouples TC1-TC8 are shown in Figure 7. TC4 (HF) and TC7 (DED), located closest to the laser contact point, recorded the highest temperatures. In the HF segment, TC2 and TC3 exhibited similar temperature profiles, while in the DED segment, TC6 and TC5 showed comparable behavior. The maximum (TC7) and minimum (TC8) temperatures were recorded in the DED subpart.
Table 4 presents the differences of the DED subpart compared to the HF subpart in maximum temperature T max and heating rate Δ R h . The heating rate Δ R h was calculated from the temperature T max divided by the time to reach T max .

3.3. Microstructural Evolution

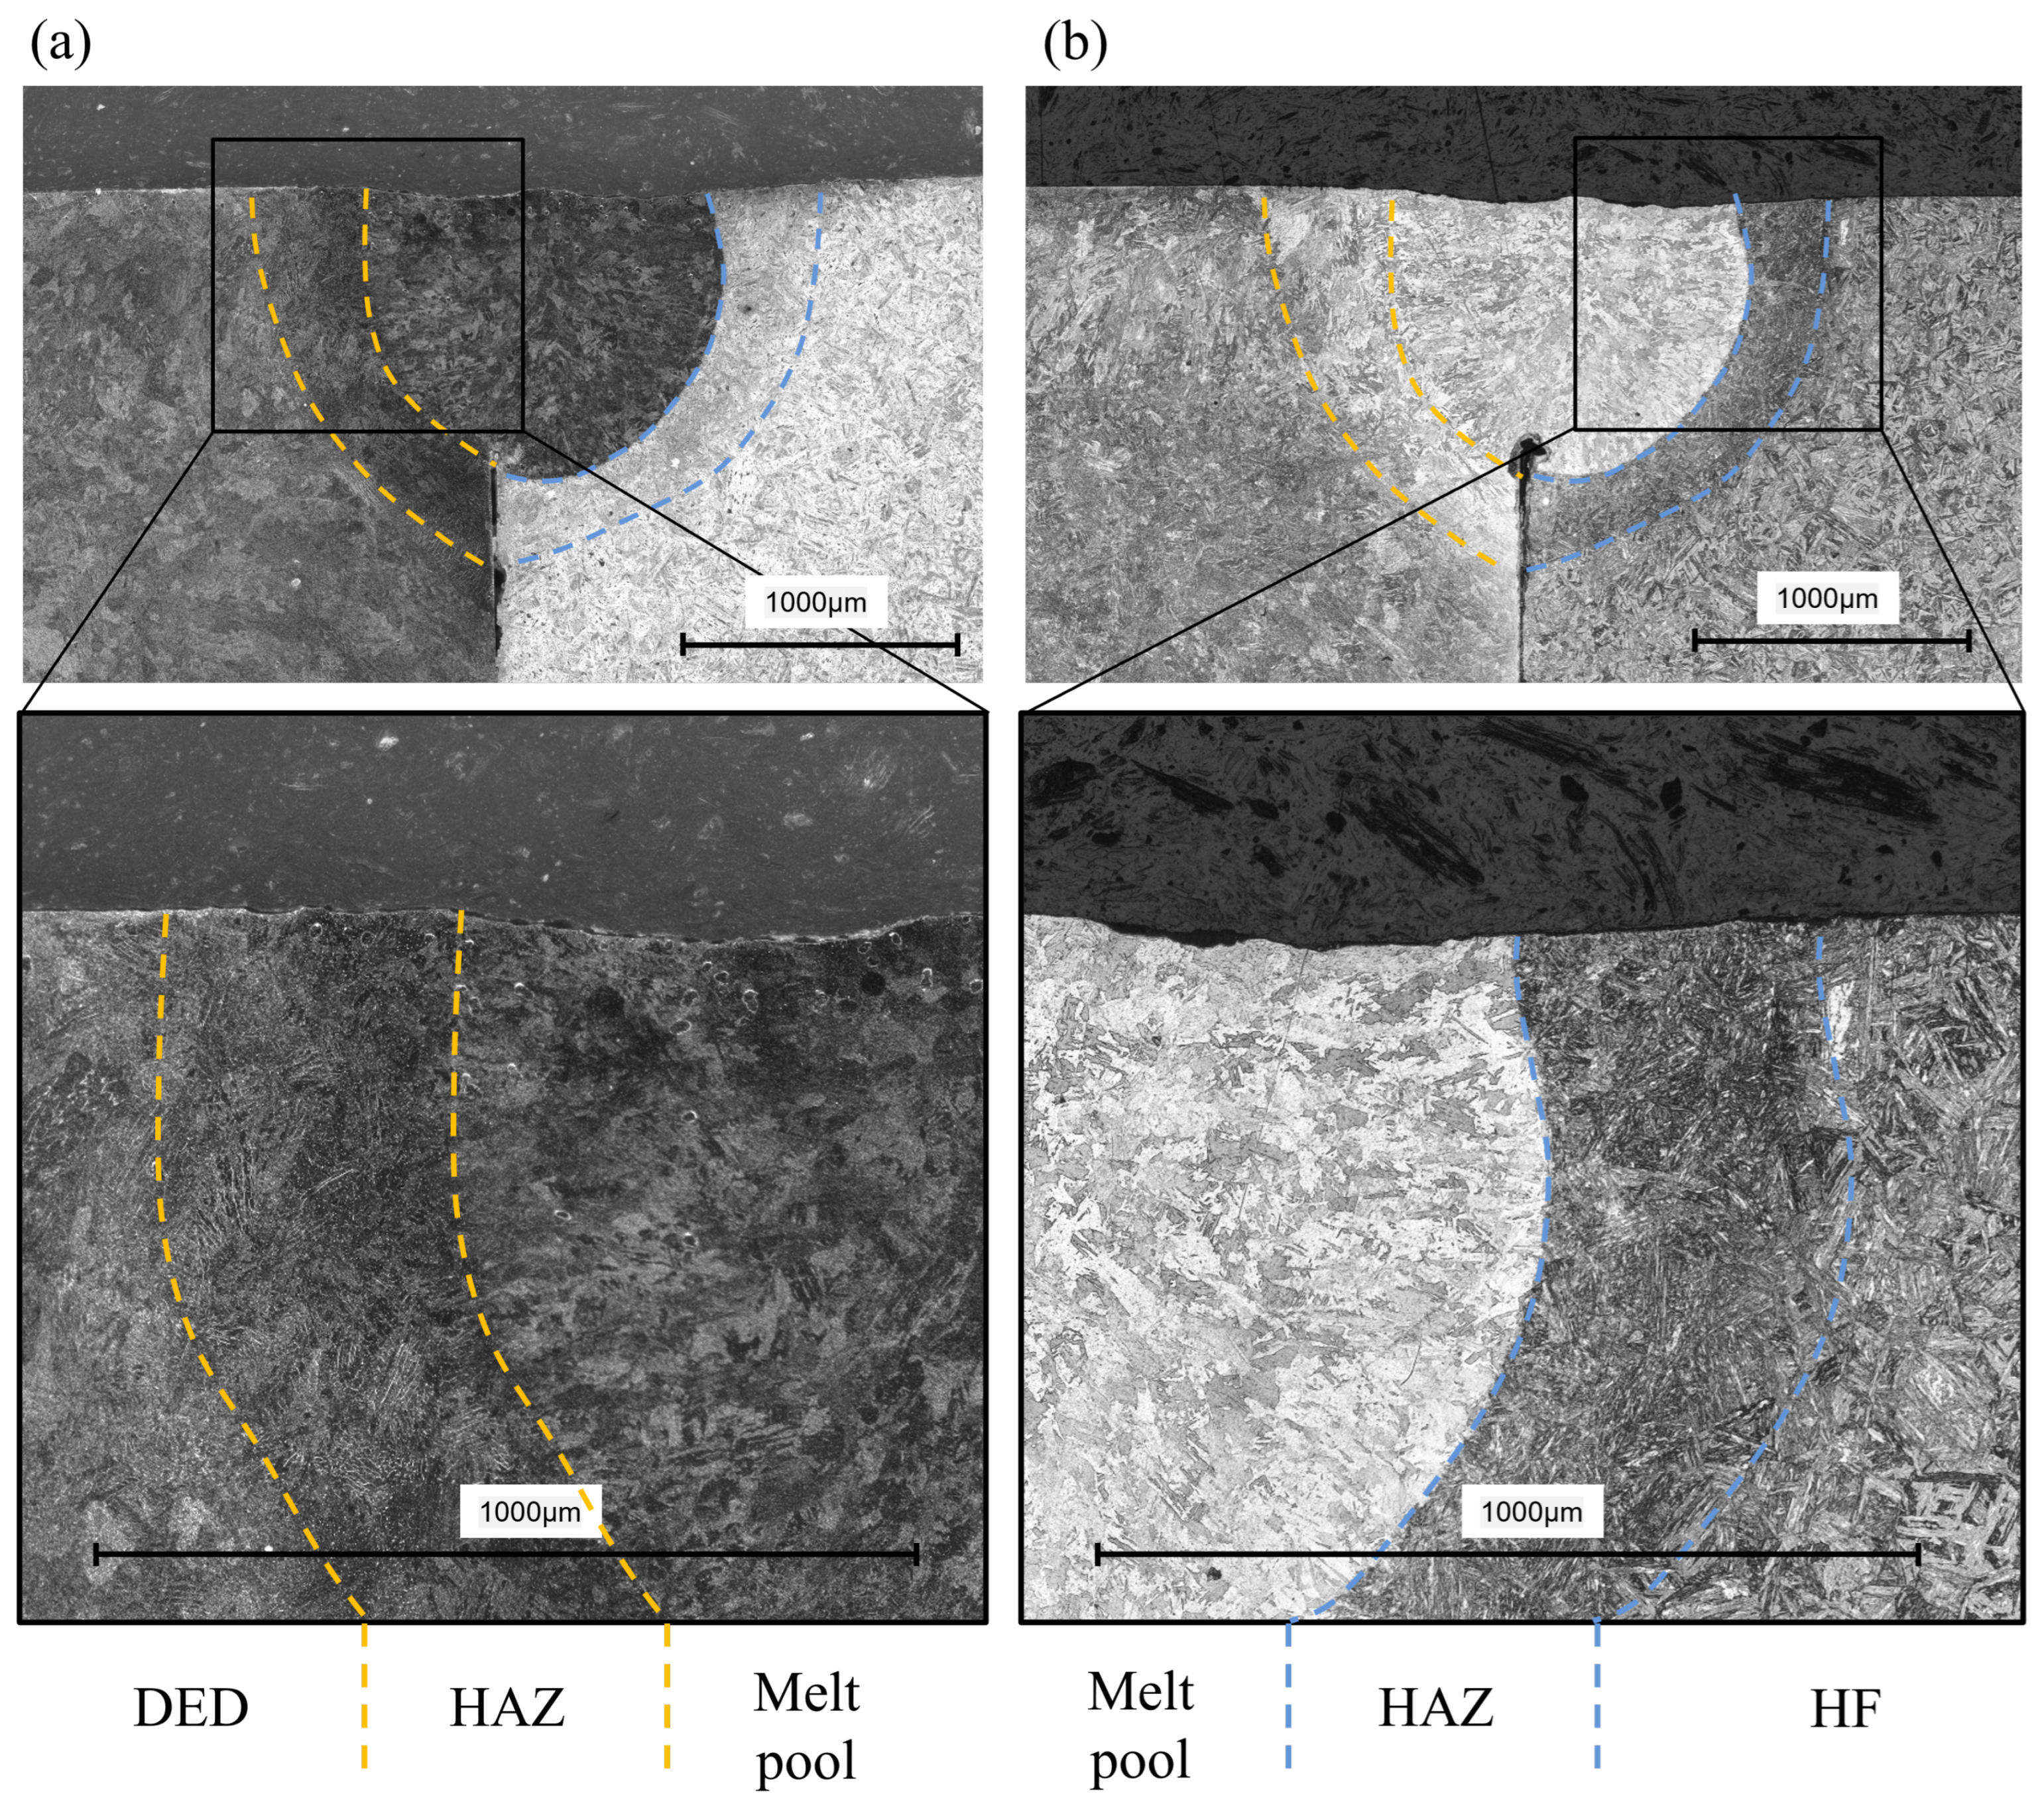
The pronounced HAZ of the hybrid laser weld is clearly distinguishable by its darker coloration and refined grain structure; however, it is only visible using Kallin II etchant in Figure 8a on the DED subpart and using Adler etchant in Figure 8b on the HF subpart. The HAZ in the DED subpart is similar in appearance to both the DED base materials, making it difficult to clearly identify the HAZ from the complex dual-phase microstructure described by Dey et al. [6]. The weld seam geometry appears symmetric. Furthermore, an offset of approximately d = 0.2   μ m was detected towards the HF subpart. This shift may be attributed to a positioning error of the laser spot or possibly to irregularities in the flatness of the contact surfaces prior to welding, also described by [15].

4. Discussion

The thermal conductivity of DED specimens is generally lower than that of HF specimens, but it is revealed that a peak is observed during the α γ phase transformation. The thermal diffusivity decreases, whereas the heat capacity increases during phase transformation generally for DED and HF. These findings support Wilzer et al. [23], who emphasized the importance of evaluating temperature-dependent heat capacity, which increases during phase transformation, when determining thermal conductivity at high temperatures, particularly in chromium-rich steels. The results show that λ DED increases with temperature and becomes comparable to λ HF around T = 700 ° C.
Further, tempering the as-quenched condition leads to an increase in thermal conductivity, which is consistent with the lower conductivity observed in the as-built DED material. This increase can be attributed to the precipitation of carbides, which trap alloying elements, leading to their depletion in solid solution. This promotes a higher electric and thermal conductivity. Furthermore, at high tempering temperatures, recovery and recrystallization reduce the dislocation density in α -martensite, enhancing the phononic contribution to thermal conductivity.
The lower thermal conductivity λ DED did not affect the maximal temperature T max and the heating rate R h significantly. The location and the bonding of the thermocouples might induce errors. More precise temperature measurements are required to correlate the findings.
The HAZ in the HF segment, as observed in Figure 8, is attributed to segregation and the formation of heterogeneous microstructural bands, as described by Dass and Moridi [1]. According to Folkhard [22], the HAZ in this region is characterized by γ -crystals, grain refinement, and carbide formation. The carbide formation process proceeds as follows. Carbides precipitate from δ -ferrite at the grain boundaries with austenite within a few seconds. These carbides then form a pearlite-like phase with austenite, known as the D-phase, which triggers the γ α transformation. During this transformation, austenite is converted to α -ferrite, leading to the formation of a mixture of ferrite and M 23 C 6 carbides, referred to as the G-phase due to its indistinguishability under optical or scanning electron microscopy described by Folkhard [22]. In welded metal, which is comparable to DED material, the fine martensitic grain structure makes these carbides nearly unidentifiable using conventional imaging methods. However, it should be mentioned that the detailed microstructural interpretation presented in this section is primarily based on findings from the literature, as the resolution of light microscopy used in this work does not allow for direct observation of grain boundaries or carbides in the HAZ. Other measurement and microscopy techniques are required to further support the theory.

5. Conclusions

The thermal conductivity λ , density ρ , specific heat capacity c p , and thermal diffusivity a were measured for both DED and HF subparts of soft martensitic stainless steel in the temperature range from 0 °C to 1000 °C. The effect of these thermal properties on the far-field temperature distribution was assessed using thermocouples. The following conclusions can be drawn:
  • AM and CM materials can be successfully joined by welding, resulting in a geometrically symmetric weld bead.
  • The mean thermal diffusivity a ¯ DED of the DED samples is approximately 10% lower, and the mean thermal conductivity λ ¯ DED is approximately 8% lower than those of the HF specimens.
  • The reason according to the literature for the lower thermal conductivity is a higher dislocation density, alloying elements that are not dissolved in a solid solution, and a lower rest austenite content that reduces the phononic contribution.
  • The transition between the weld seam and the HF base material is clearly visible on the DED supart when using Kalling II and on the HF subpart using Adler. However, the HAZ on the DED side is not distinguishable from the base material because its microstructure is similar to that of the weld zone.
Future research could involve correlating thermal parameters with dislocation densities and residual stresses, as these are known to influence thermal transport and stress development. This is essential for accurately analyzing and predicting the development of residual stresses in welding processes of AM parts.

Author Contributions

Conceptualization, I.D. and T.M.; methodology, I.D. and T.M.; software, I.D. and D.K.; validation, I.D. and D.K.; formal analysis, I.D. and D.K.; investigation, I.D. and D.K.; resources, T.M. and K.W.; data curation, B.E. and D.K.; writing—original draft preparation, I.D.; writing—review and editing, T.M. and K.W.; visualization, B.E. and D.K.; supervision, T.M. and K.W.; project administration, K.W.; funding acquisition, T.M. and K.W. All authors have read and agreed to the published version of the manuscript.

Funding

This research received no external funding.

Data Availability Statement

The original contributions presented in this study are included in the article. Further inquiries can be directed to the corresponding author.

Acknowledgments

I want to thank Timo Schudeleit (inspire AG) for the supervision of the laser group during the development of the results, Paolo Capozzi (ZHAW) for trying different simulation approaches, and Knut Krieger (inspire AG) for the metallographic preparation. During the preparation of this manuscript/study, the author used Chat GPT 4 for the purposes of coding and rephrasing. The authors have reviewed and edited the output and take full responsibility for the content of this publication.

Conflicts of Interest

The authors declare no conflicts of interest.

Abbreviations

The following abbreviations are used in this manuscript:
AMAdditive Manufacturing
CMConventional Manufacturing
DEDDirect Energy Deposition of Metals
EDMElectric Discharge Machining
HAZHeat-Affected Zone
HFHot Forged

References

  1. Dass, A.; Moridi, A. State of the art in directed energy deposition: From additive manufacturing to materials design. Coatings 2019, 9, 418. [Google Scholar] [CrossRef]
  2. Saboori, A.; Aversa, A.; Marchese, G.; Biamino, S.; Lombardi, M.; Fino, P. Microstructure and mechanical properties of AISI 316L produced by directed energy deposition-based additive manufacturing: A review. Appl. Sci. 2020, 10, 3310. [Google Scholar] [CrossRef]
  3. Liu, M.; Kumar, A.; Bukkapatnam, S.; Kuttolamadom, M. A review of the anomalies in directed energy deposition (DED) processes & potential solutions-Part quality & defects. Procedia Manuf. 2021, 53, 507–518. [Google Scholar]
  4. Thompson, S.M.; Bian, L.; Shamsaei, N.; Yadollahi, A. An overview of Direct Laser Deposition for additive manufacturing; Part I: Transport phenomena, modeling and diagnostics. Addit. Manuf. 2015, 8, 36–62. [Google Scholar] [CrossRef]
  5. Shamsaei, N.; Yadollahi, A.; Bian, L.; Thompson, S.M. An overview of Direct Laser Deposition for additive manufacturing; Part II: Mechanical behavior, process parameter optimization and control. Addit. Manuf. 2015, 8, 12–35. [Google Scholar] [CrossRef]
  6. Dey, I.; Floeder, R.; Kunze, K.; Roth, C.; Wegener, K. Mechanical properties and microstructure analysis of laser welded hybrid parts made of additively and conventionally manufactured 1.4313 soft martensitic steel. Mater. Des. 2025, 253, 113858. [Google Scholar] [CrossRef]
  7. Akbari, M.; Kovacevic, R. Joining of elements fabricated by a robotized laser/wire directed energy deposition process by using an autogenous laser welding. Int. J. Adv. Manuf. Technol. 2019, 100, 2971–2980. [Google Scholar] [CrossRef]
  8. Matilainen, V.P.; Pekkarinen, J.; Salminen, A. Weldability of additive manufactured stainless steel. Phys. Procedia 2016, 83, 808–817. [Google Scholar] [CrossRef]
  9. Wits, W.W.; Becker, J.J. Laser beam welding of titanium additive manufactured parts. Procedia CIRP 2015, 28, 70–75. [Google Scholar] [CrossRef]
  10. Yang, J.; Wang, Y.; Li, F.; Huang, W.; Jing, G.; Wang, Z.; Zeng, X. Weldability, microstructure and mechanical properties of laser-welded selective laser melted 304 stainless steel joints. J. Mater. Sci. Technol. 2019, 35, 1817–1824. [Google Scholar] [CrossRef]
  11. Parchegani, S.; Piili, H.; Ganvir, A.; Salminen, A. Laser welding of additively manufactured parts—A review. In IOP Conference Series: Materials Science and Engineering; IOP Publishing: Bristol, UK, 2023; Volume 1296, p. 012030. [Google Scholar]
  12. Brunner-Schwer, C.; Simón-Muzás, J.; Biegler, M.; Hilgenberg, K.; Rethmeier, M. Laser welding of L-PBF AM components out of Inconel 718. Procedia CIRP 2022, 111, 92–96. [Google Scholar] [CrossRef]
  13. Vrancken, B.; Thijs, L.; Kruth, J.P.; Van Humbeeck, J. Heat treatment of Ti6Al4V produced by Selective Laser Melting: Microstructure and mechanical properties. J. Alloys Compd. 2012, 541, 177–185. [Google Scholar] [CrossRef]
  14. Tavlovich, B.; Shirizly, A.; Katz, R. EBW and LBW of additive manufactured Ti6Al4V products. Weld J. 2018, 97, 179S–190S. [Google Scholar]
  15. Zapf, H.; Höfemann, M.; Emmelmann, C. Laser welding of additively manufactured medium manganese steel alloy with conventionally manufactured dual-phase steel. Procedia CIRP 2020, 94, 655–660. [Google Scholar] [CrossRef]
  16. Casalino, G.; Campanelli, S.L.; Ludovico, A.D. Laser-arc hybrid welding of wrought to selective laser molten stainless steel. Int. J. Adv. Manuf. Technol. 2013, 68, 209–216. [Google Scholar] [CrossRef]
  17. Oerlikon. Inspection Report of 1.4313 Powder; Technical Report; Oerlikon Metco (US) Inc.: Westbury, NY, USA, 2018. [Google Scholar]
  18. Freital. Inspection Report of 1.4313 Bar Steel Forged; Technical Report; BGH Edelstahl Freital GmbH: Freital, Germany, 1996. [Google Scholar]
  19. Bergman, T.L. Fundamentals of Heat and Mass Transfer; John Wiley & Sons: Hoboken, NJ, USA, 2011. [Google Scholar]
  20. Kreith, F.; Bohn, M. Principles of Heat Transfer; West Publishing Company: St. Paul, MN, USA, 1993. [Google Scholar]
  21. Oettel, H.; Schumann, H. Metallografie: Mit einer Einführung in die Keramografie; John Wiley & Sons: Hoboken, NJ, USA, 2011. [Google Scholar]
  22. Folkhard, E.; Folkhard, E. Welding Metallurgy of Austenitic Stainless Steels; Springer: Berlin/Heidelberg, Germany, 1988. [Google Scholar]
  23. Wilzer, J.; Küpferle, J.; Weber, S.; Theisen, W. Temperature-dependent thermal conductivities of non-alloyed and high-alloyed heat-treatable steels in the temperature range between 20 and 500 °C. J. Mater. Sci. 2014, 49, 4833–4843. [Google Scholar] [CrossRef]
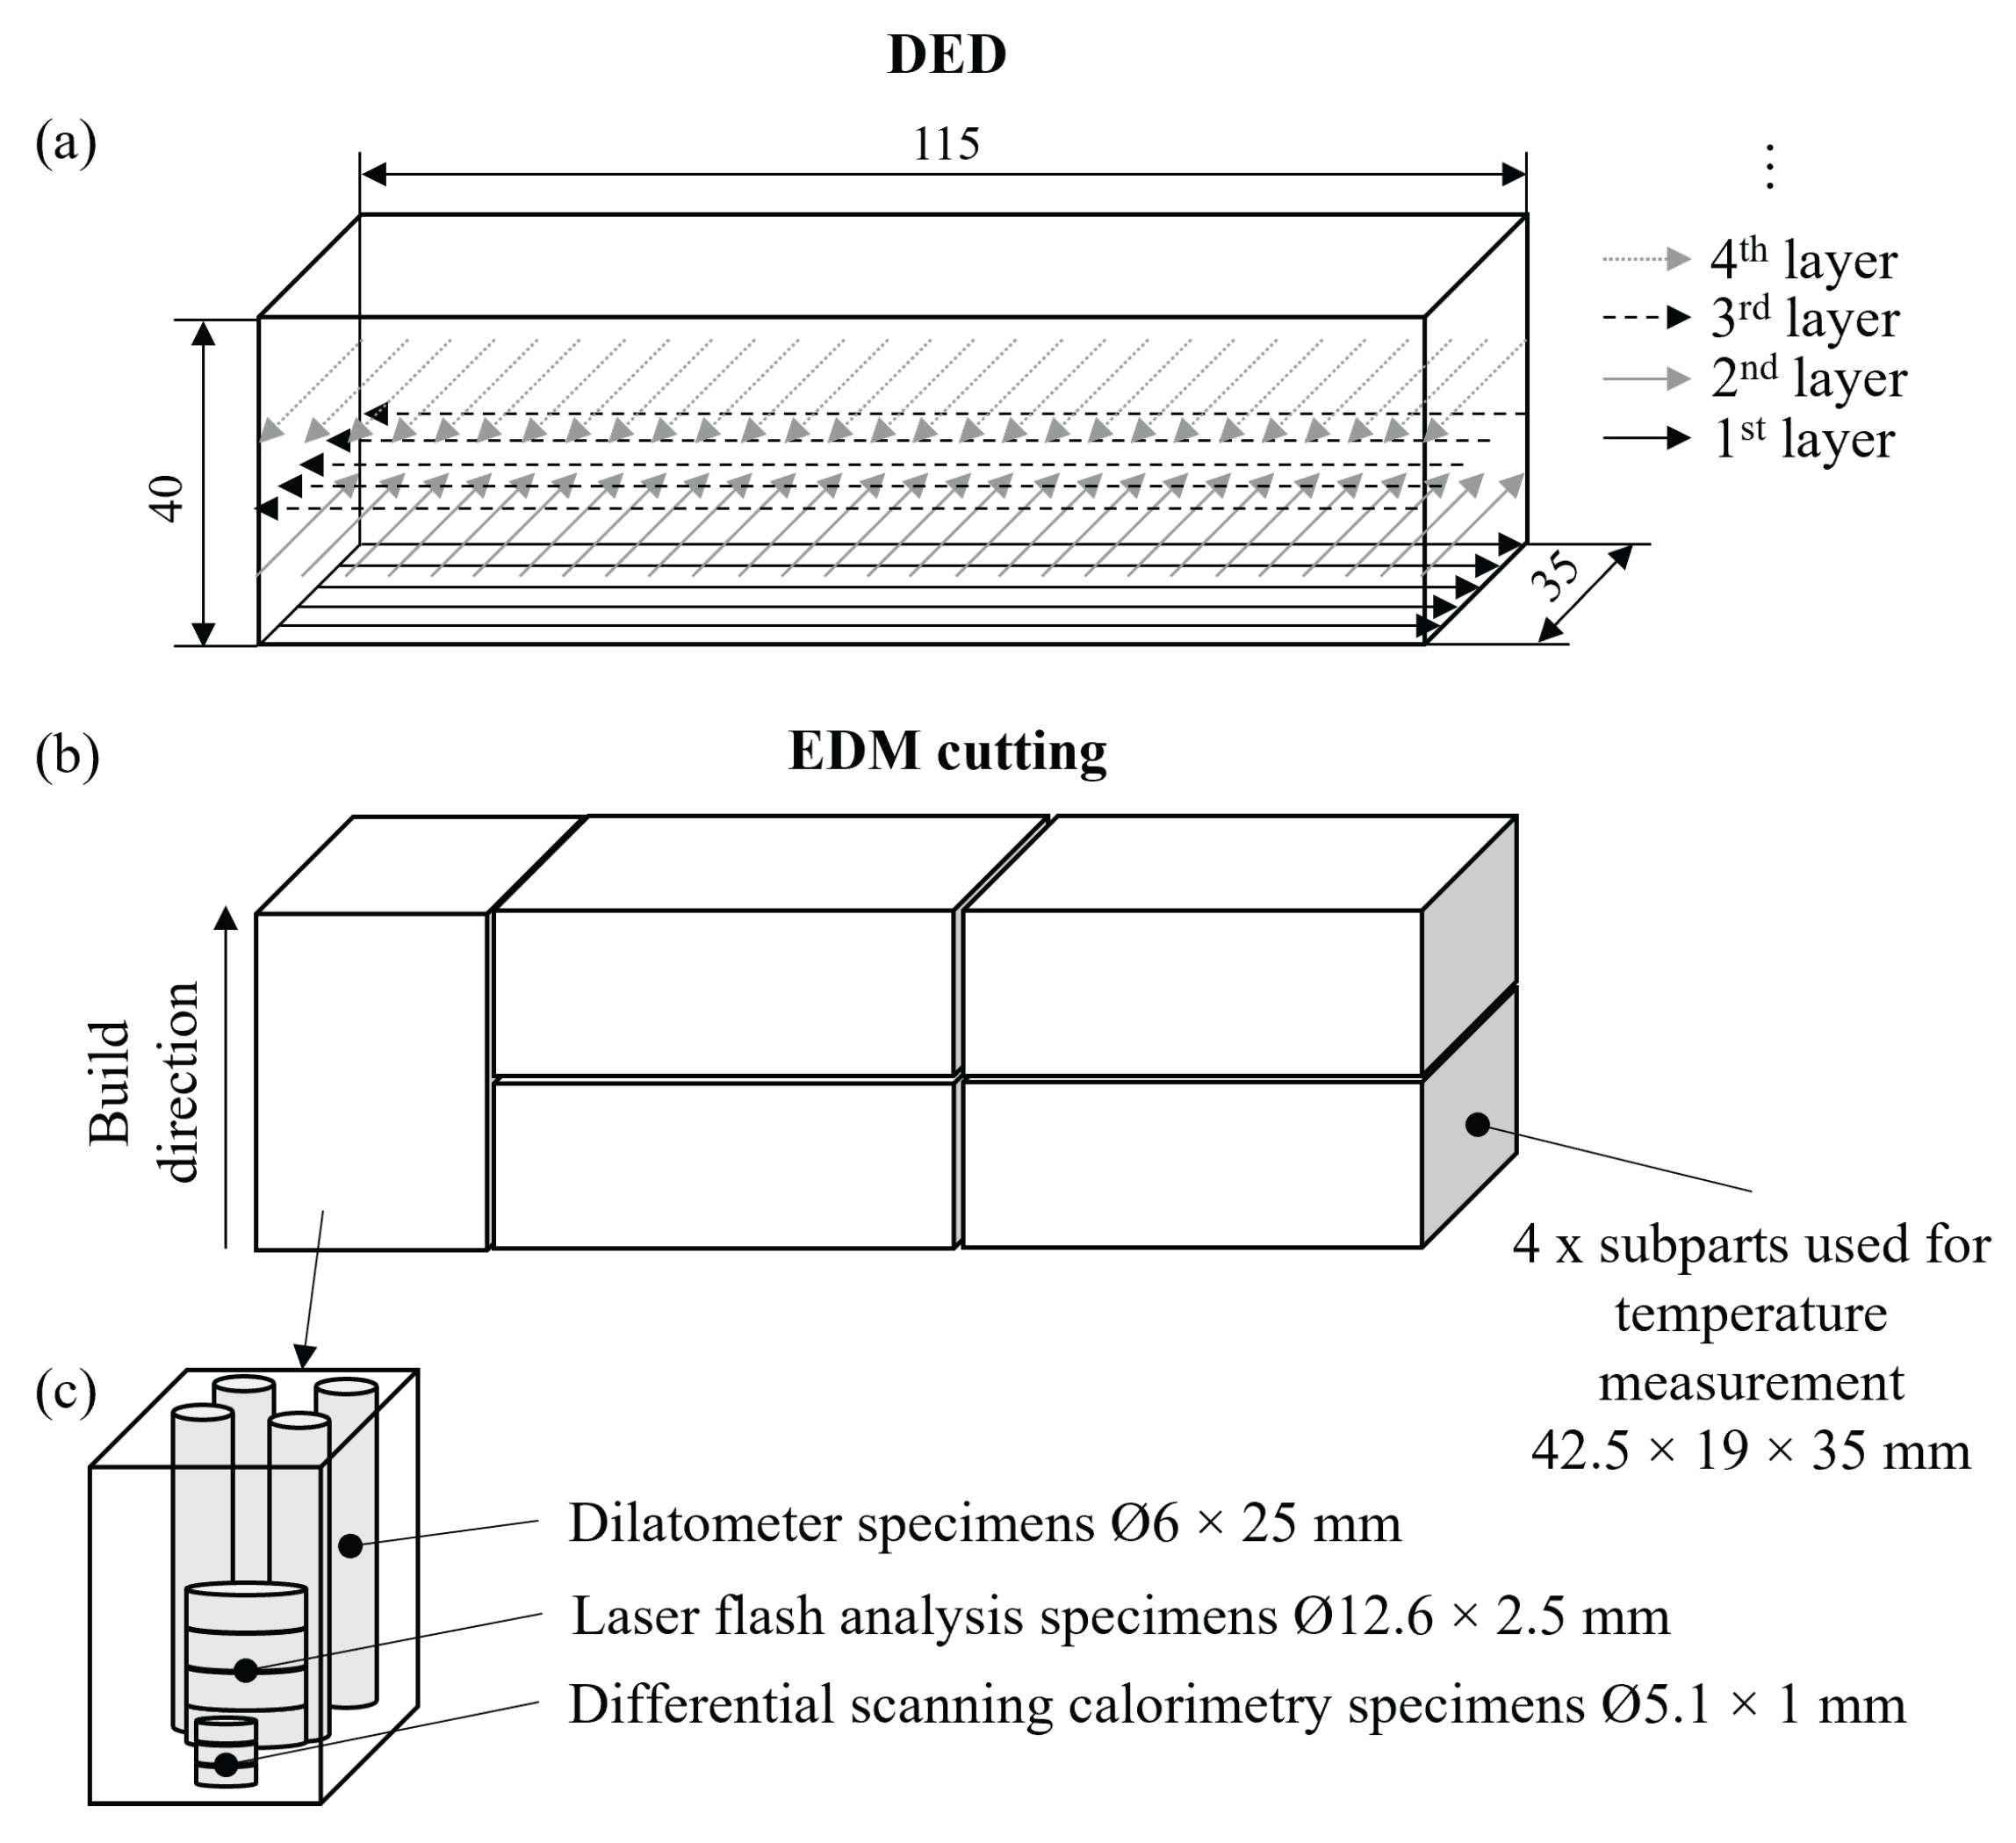
Figure 1. Orientation of subparts and specimens within the AM (DED) and CM (HF) blocks. (a) Separation of the DED block into subparts using a circular saw, (b) position of the specimens extracted by EDM for thermal property measurement and (c) subpart used for the measurement of thermal properties.
Metals 15 00950 g001
Figure 2. Position of the thermocouples within the hybrid specimens used in the experiment.
Metals 15 00950 g002
Figure 3. Laser flash analysis results showing the average thermal diffusivity of three DED and HF specimens.
Metals 15 00950 g003
Figure 4. Specific heat capacity c p of one DED and one HF sample up to the melting temperature of T m = 1450 °C.
Metals 15 00950 g004
Figure 5. Calculated density based on dilatometry measurements up to T = 1100 °C of three DED and HF samples.
Metals 15 00950 g005
Figure 6. Average of calculated thermal conductivity of DED and HF samples.
Metals 15 00950 g006
Figure 7. Measured temperature curves of the DED and HF segment.
Metals 15 00950 g007
Figure 8. Metallurgical cross-section etched with (a) Kalling II and (b) Adler of the hybrid conduction laser weld.
Metals 15 00950 g008
Table 1. Process parameters for the DED subpart.
ParameterValue
Wavelength1.064 μm
Laser Power1000 W
Feed320 mm/min
Hatch distance1.05 mm
Spot diameter2.1 mm
Layer height1.7 mm
Powder feed rate5 g/min
Shielding gas15 L/min
Carrier gas4 L/min
Line energy187.5 J/mm
Table 2. Chemical composition of the powder 1.4313 [wt%] and the hot forged raw material.
CrNiMnMoSiONCSPFe
Powder13.074.010.530.49<0.70.0280.020.310.0030.003Bal
Hot forged12.73.650.850.480.34--0.0240.0080.020Bal
Table 3. Laser welding parameters.
ParameterValue
Wavelength 1.064   μ m
Laser Power1000 W
Feed1500 mm/min
Spot diameter 2.1 mm
Table 4. Measured temperature including the Δ T max between the DED and HF segment.
DED T max [°C]R [°C/s]HF T max [°C]R [°C/s]
TC556.612TC271.618
TC649.210TC152.711
TC7110.244TC490.527
TC841.38TC351.312
x ¯ DED 64.33 (−3%)18.4 (+8%) x ¯ HF 66.5116.8
Disclaimer/Publisher’s Note: The statements, opinions and data contained in all publications are solely those of the individual author(s) and contributor(s) and not of MDPI and/or the editor(s). MDPI and/or the editor(s) disclaim responsibility for any injury to people or property resulting from any ideas, methods, instructions or products referred to in the content.