Article

Low-Temperature Tempering to Tailor Microstructure, Mechanical and Contact Fatigue Performance in the Carburized Layer of an Alloy Steel for Heavy-Duty Gears

1
School of Mechanical and Electrical Engineering, China University of Mining and Technology, Xuzhou 221116, China
2
Shanghai, TianDi Ming Equipment Technology Co., Ltd., Shanghai 200030, China
3
State Key Laboratory of Intelligent Mining Equipment Technology, China University of Mining and Technology, Xuzhou 221116, China
*
Authors to whom correspondence should be addressed.
Metals 2025, 15(9), 934; https://doi.org/10.3390/met15090934
Submission received: 14 July 2025 / Revised: 18 August 2025 / Accepted: 20 August 2025 / Published: 22 August 2025
(This article belongs to the Special Issue Recent Advances in Fatigue and Corrosion Properties of Steels)

Abstract

Taking a typical carburized alloy steel for heavy-duty gears as the research object, this work regulates carburizing–quenching and tempering processes to conduct a layer-by-layer analysis of gradient-distributed microstructures and mechanical properties in the carburized layer. The effects of tempering temperature on martensite evolution, mechanical properties, and wear resistance were specifically investigated. Results demonstrate that carburizing–quenching followed by cryogenic treatment generates high-carbon martensite at the surface, progressively transitioning to lath martensite towards the core. Low-temperature tempering promotes fine carbide precipitation, while elevated temperatures cause carbide coarsening. Specimens tempered at 175 °C achieve surface hardness of 800 HV and near-surface compressive yield strength of 2940 MPa. These samples exhibit 13% lower wear mass loss compared to 240 °C tempered counterparts, demonstrating superior wear resistance characterized by relatively flat wear surfaces, uniform contact stress distribution, and reduced cross-sectional plastic deformation zones. Key strengthening mechanisms at lower tempering temperatures involve solution strengthening, dislocation strengthening, and partial precipitation strengthening from carbides. Coherent carbides formed under these conditions impede fatigue dislocation motion via shearing mechanisms to suppress plastic deformation and fatigue crack initiation under contact fatigue stress, thereby enhancing wear performance.

1. Introduction

Heavy-duty gears, serving as critical components in mining machinery, engineering transportation, and deep-sea/space equipment, primarily undertake high-torque load transmission under complex and harsh service conditions [1]. Their meshing contact involves predominantly rolling with concurrent sliding–rolling contact, making surface contact fatigue wear under resistance torque the primary failure mode. To mitigate contact fatigue wear, comprehensive surface mechanical properties are enhanced through approaches including tooth profile design, high-alloy toughening, and carburizing/heat treatment optimization [2,3], with typical surface hardness requirements of 58–62 HRC. The fundamental subsurface microstructure of heavy-duty gears consists of high-carbon martensite obtained through carburizing–quenching. However, excessive solid-solution carbon content drastically increases lattice stresses in martensite, hindering dislocation slip and promoting stress-induced micro-crack initiation. Additionally, high carbon content stabilizes austenite, resulting in substantial retained austenite at room temperature after quenching, which reduces strength and dimensional stability [4]. This issue is primarily addressed through tempering—including high-temperature (HT) and low-temperature (LT) processes—which facilitates carbide precipitation while diluting matrix carbon concentration. HT tempering (typically >600 °C prior to quenching) promotes granular carbide formation, whereas LT tempering (post-quenching) yields transitional fine carbides within the martensitic matrix, effectively alleviating high-carbon martensite embrittlement [5].
The strength evolution during low-temperature tempering is governed by two primary factors: (1) carbon diffusion-induced coarsening of lath boundaries [6,7], and (2) carbide precipitation reduces solid-solution strengthening but boosts precipitation strengthening [8,9]. Wang et al. [10] theoretically calculated the yield strength of 20Cr2Ni2MoV gear steel after carburizing and 180 °C/2 h tempering, quantifying contributions from nano-precipitates and low-angle grain boundaries as 219 MPa (15.7%) and 428 MPa (30.6%), respectively. Their analysis further suggests that refined precipitates could be more beneficial for precipitation strengthening.
Additionally, low-temperature tempering induces decomposition of retained austenite alongside carbon partitioning processes [11]. Li et al. [12] demonstrated that 40SiMnNiCr steel subjected to optimized quenching and partitioning (Q&P) treatment achieves a tensile strength of 2400 MPa with elongation exceeding 10%. Post-Q&P steel strength initially increases but progressively decreases with extended partitioning time, attributable to enhanced carbon enrichment in retained austenite (strengthening phase) versus reduced solid-solution carbon in martensite that diminishes solid-solution strengthening. Complementarily, Zhirafar et al. [13] reported superior mechanical properties and fatigue life in 4340 steel tempered at 200 °C post-quenching, with cryogenic treatment further enhancing these characteristics. This improvement stems from intrinsic martensite strengthening, precipitation strengthening, and minimal retained austenite content (4–5%).
Beyond these studies, extensive research has been conducted on quenching–tempering strengthening–toughening mechanisms in high-carbon steels [4,14,15,16]. Michel Perez et al. [17] observed in 100Cr6 steel that ε-carbides initially precipitate from supersaturated martensite during tempering, followed by cementite formation. Carburized steel [18] subjected to quenching and 160 °C/2 h tempering exhibits a subsurface microstructure comprising a martensitic matrix, uniformly dispersed transitional carbides, and less than 15% retained austenite, achieving surface hardness of 61 HRC which gradually decreases with elevated tempering temperatures. Barrow et al. [19] demonstrated in low-temperature tempering of 100Cr6 that 160 °C/2 h treatment yields 1.7 GPa yield strength and 0.7–1.0% elongation, with the microstructure consisting of martensite and η-phase maintaining wavy-like ε-phase characteristics. Prolonged tempering progressively transforms precipitates from ε to η and finally θ-phase, where non-coherent θ-carbides strengthen the matrix via Orowan dislocation bypassing mechanisms. Optimizing tempering conditions to modify the interplay between tetragonal matrix distortion and precipitate/matrix interfaces enables tailored combinations of yield strength, tensile strength, and ductility.
Although tempering significantly modulates mechanical properties of high-carbon martensite [20], its impact on wear resistance evolution—particularly in carburized gear subsurface layers—has rarely been investigated in the recent literature. Our prior work [21] reported the effects of varied low-temperature tempering durations on microstructures and mechanical properties of carburized layers, revealing a carbide transition from ε to θ phases with extended tempering and optimal strength-ductility balance achieved during the early tempering stages. Concurrently, we examined wear resistance variations across different tempering times and analyzed corresponding fatigue wear mechanisms [22].
This study, however, focuses explicitly on the influence of distinct low-temperature tempering temperatures (170 °C vs. 240 °C) on mechanical properties and contact fatigue resistance of carburized layers. To mitigate quench-induced stress cracking, a preliminary 650 °C high-temperature tempering was applied before quenching to further dilute the matrix carbon content. Subsequent cryogenic treatment in liquid nitrogen eliminated the retained austenite, thereby enhancing surface hardness. Controlled low-temperature tempering at 170 °C and 240 °C then generated differential mechanical responses at the surface, enabling systematic analysis of strengthening mechanisms and wear failure modes in carburized layers.

2. Materials and Methods

The substrate material was low-carbon high-alloy steel (18Cr2Ni4W), with nominal composition Fe-0.18C-1.5Cr-4.25Ni-1.0W-0.45Mn-0.27Si (wt.%). Before carburization, samples were normalized at 950 °C for 2 h to achieve microstructural uniformity and permit surface machining. Then, the cylindrical specimens (Φ40 mm × L50 mm) were machined to surface roughness of Ra < 0.8 μm. Carburization was conducted at 950 °C for 24 h under nitrogen carrier gas with methanol-derived active carbon ions, comprising a 12 h boost stage at carbon potential 1.2 wt.%, followed by a 12 h diffusion stage at carbon potential 1.0 wt.%. Following carburization, specimens were furnace-cooled to room temperature in a nitrogen atmosphere. The heat treatment sequence (Figure 1a) initiated with high-temperature tempering at 650 °C for 3 h, proceeded by austenitization at 860 °C for 40 min with subsequent oil quenching to room temperature. Cryogenic treatment at −196 °C for 24 h was then performed to eliminate retained austenite, yielding QC-designated specimens. Finally, low-temperature tempering at either 175 °C or 240 °C for 12 h was applied to produce T175 and T240 specimens, respectively.
Gradient microstructural features were characterized using optical microscopy (SOPTOP, Yuyao, China) and scanning electron microscopy (TESCAN, Brno, Czech Republic). Specimens ground with abrasive papers and mechanically polished were etched with 4% nital solution. Hardness distribution from surface to core was measured by Vickers microhardness tester (Time Shijin Testing Machine, Jinan, China). The applied loading was 1 kgf. Five hardness measurements were taken for each specimen, and the average value was calculated. Tensile and compressive specimens sectioned layer-by-layer from surface to core were tested on the universal testing machine (MTS, Shenzhen, China) to determine gradient mechanical properties. The tensile specimen has a gauge length of 15 mm and a width of 2 mm. The miniature compression specimen is a cylinder with a diameter of 1.5 mm and a height of 4 mm. The applied strain rate was less than 1 × 10⁻³ s−1. Three specimens were tested for each group under both tensile and compressive conditions to minimize errors. The average values of strength and elongation were calculated. Based on consistent evolution trends observed across specimens, a representative stress–strain curve demonstrating minimal deviation from the average strength value was selected for comparative analysis. This approach enables rigorous examination of strengthening–toughening mechanisms. To directly quantify instantaneous hardening capacity within specific strain regimes, the tensile strain hardening rate is calculated as the integral of true stress with respect to true strain. Contact fatigue wear behavior was evaluated using the wear tester (Jingcheng, Jinan, China) with specimen geometry in Figure 1b, under 500 N normal load generating 603 MPa maximum Hertzian contact stress [4,23]. Test parameters included 180 rpm main ring rotation versus 200 rpm counterpart ring for 5 × 10⁴ cycles. Pre-/post-test specimens underwent ultrasonic cleaning in anhydrous ethanol followed by drying for mass loss quantification. Worn surface morphology, surface roughness and cross-sectional damage morphologies were characterized by SEM and depth-of-field microscopy (KEYENCE, Osaka, Japan).

3. Results and Discussion

3.1. Microstructure Evolution

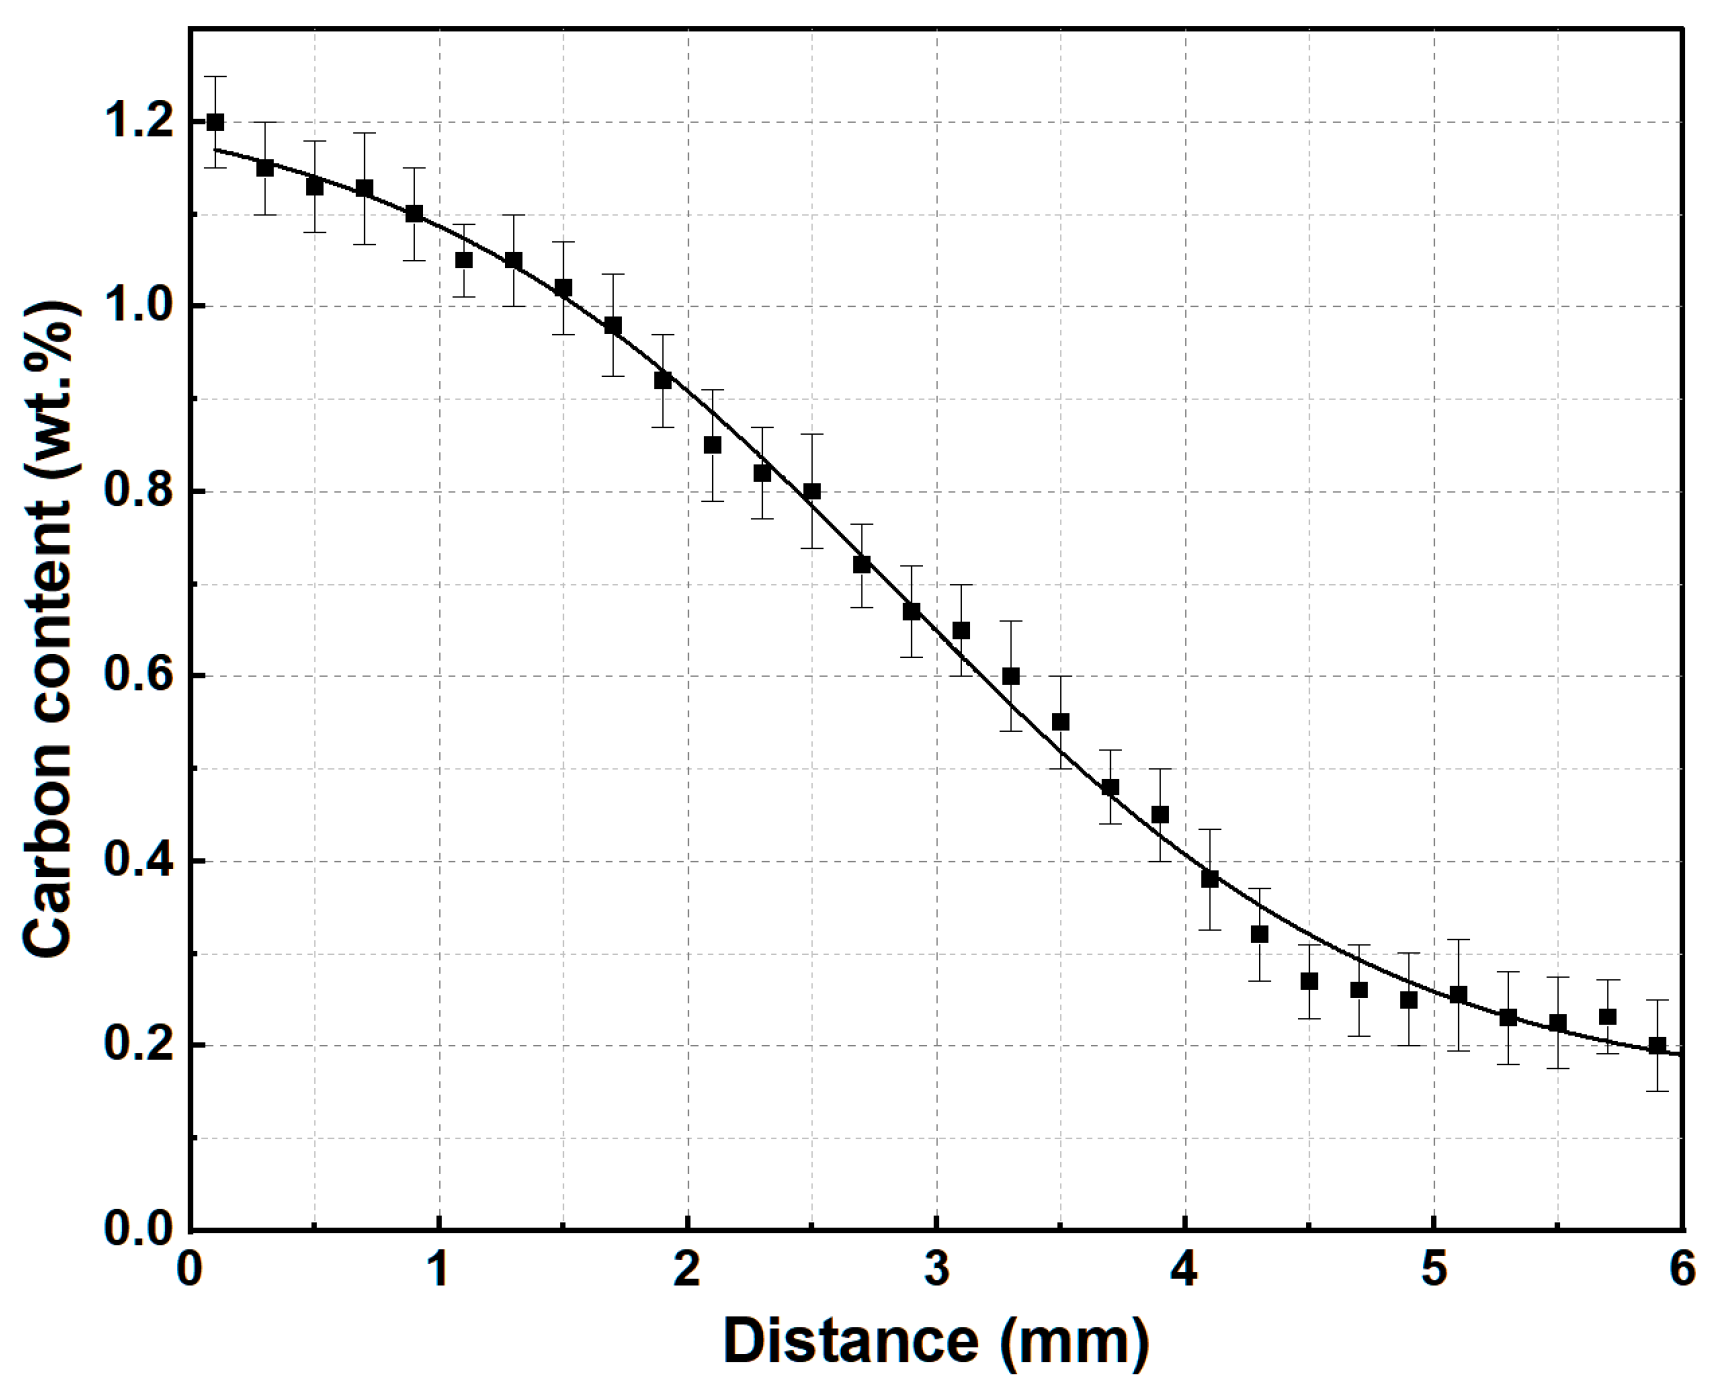
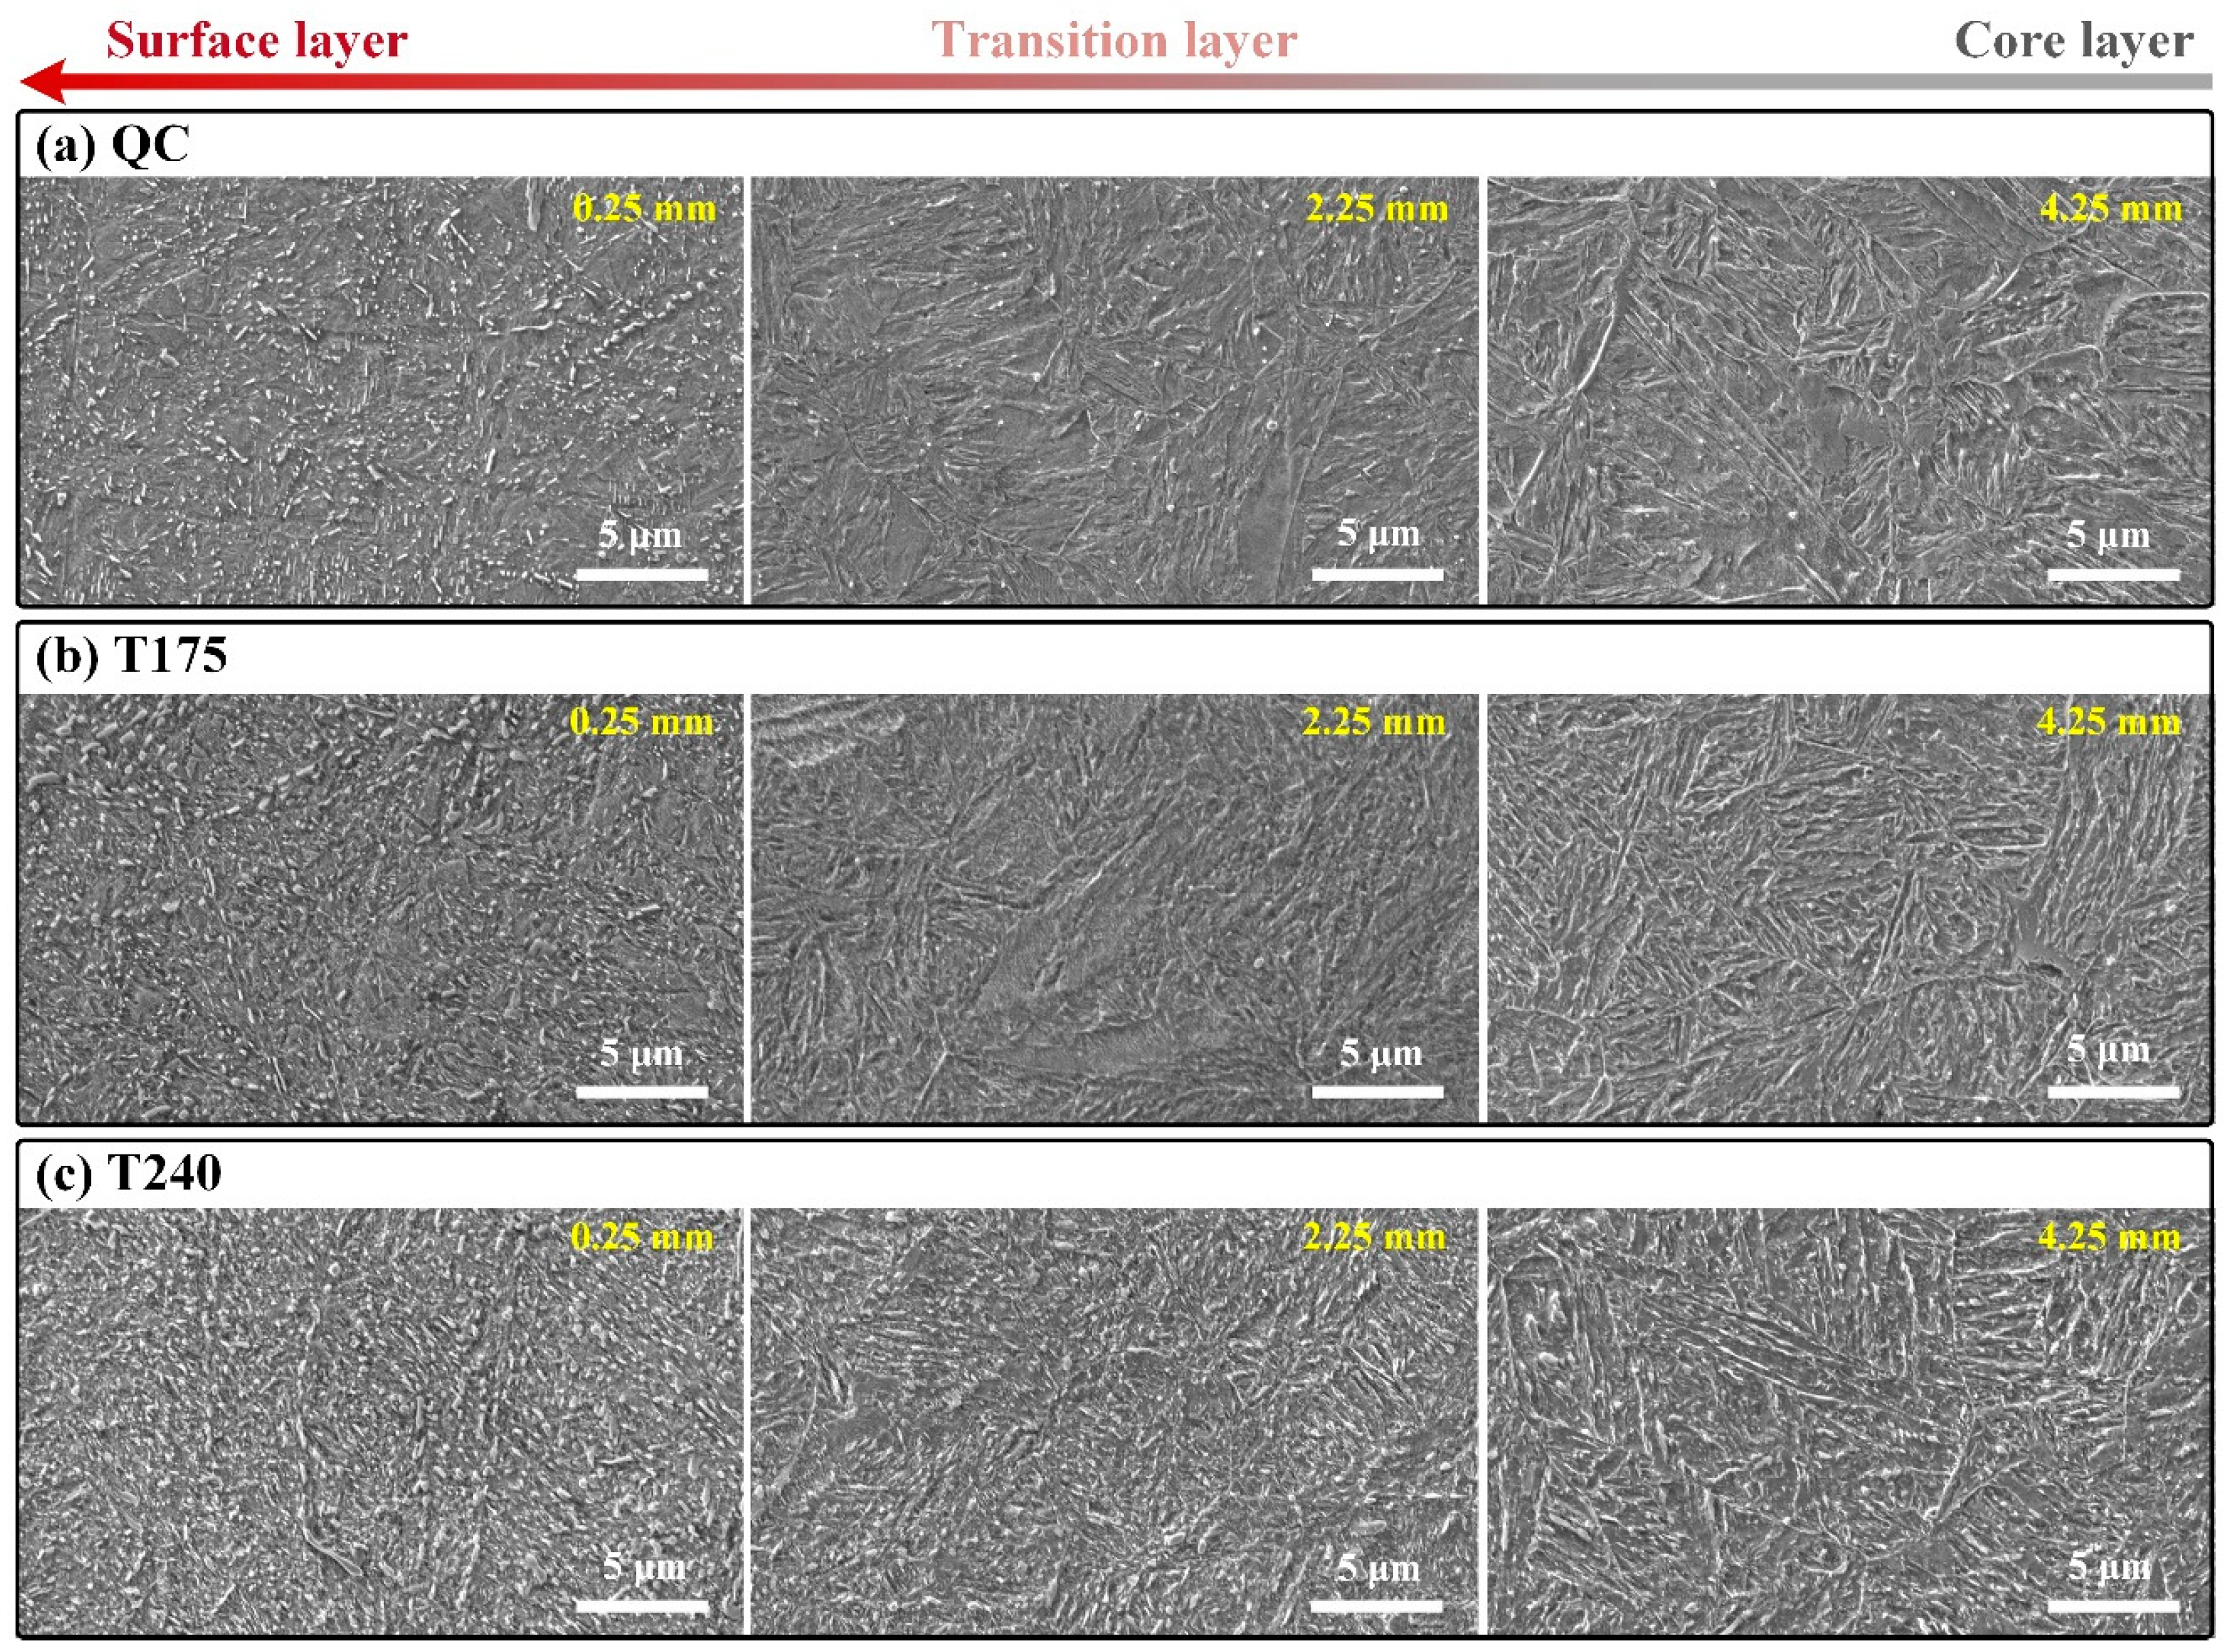
Following 24 h high-temperature carburizing, the surface carbon content reached 1.2 wt.%, as shown in Figure 2, exhibiting gradient attenuation toward the core per Fick’s diffusion laws [24,25,26]. Given that wear-induced failure dominates service life of heavy-duty gear carburized layers, microstructural and mechanical analyses focused on carburized zones and transition fronts [22]. Optical/SEM micrographs (Figure 3 and Figure 4) revealed fully martensitic structures in quenched specimens, with surface layers comprising high-carbon acicular martensite versus core regions showing low-carbon coarse lath martensite. High-temperature tempering promoted carbide precipitation, yielding embedded carbide particles within martensitic matrices, which are particularly coarse particles in high-carbon surface regions that diminished toward diffusion fronts. Notably, surface carbon enrichment inevitably resulted in retained austenite after oil quenching, causing insufficient hardness; this was mitigated by 2 h cryogenic treatment which facilitated complete transformation to high-carbon martensite, explaining the absence of detectable retained austenite in Figure 3a and Figure 4a.
As revealed in Figure 3b,c and Figure 4b,c, the carburized layers after 170 °C and 240 °C low-temperature tempering exhibit fine carbide precipitates within the martensitic matrix. Notably, tempering carbides appear more pronounced in high-carbon surface regions, whereas carbide precipitation remains less discernible in low-carbon lath martensite at the core. Furthermore, elevated tempering temperatures increase both the size and volume fraction of precipitated carbides. Consequently, reduced solid-solution carbon content in the matrix significantly enhances the plasticity and toughness of the martensitic matrix.

3.2. Mechanical Properties

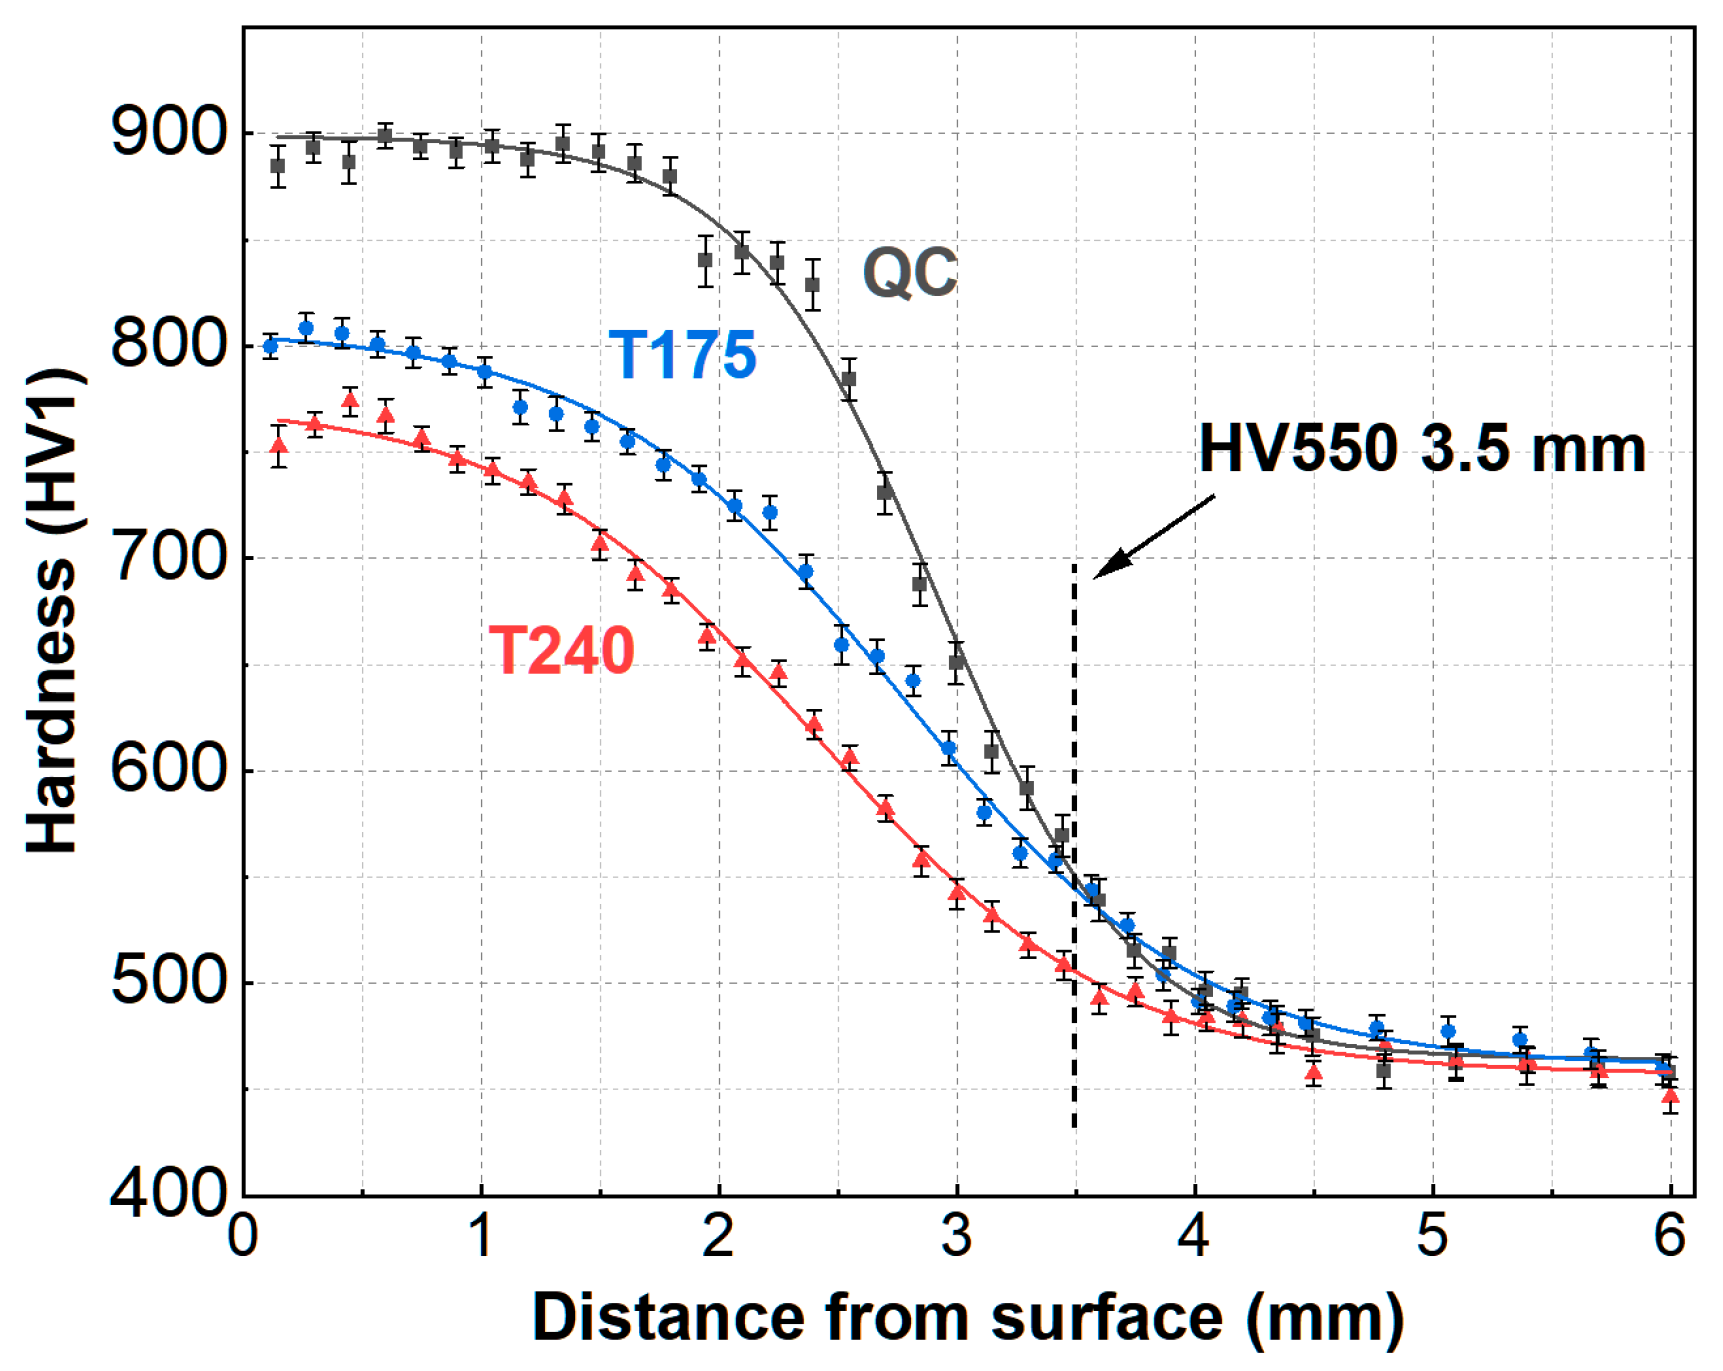
As depicted in Figure 5, gradient hardness profiles demonstrate that specimens after quenching–cryogenic treatment and subsequent low-temperature tempering exhibit an effective case depth of 3.5 mm defined by the 550 HV microhardness threshold. Within the 1 mm subsurface region, hardness remains near-constant at approximately 900 ± 10 HV due to carbon solid-solution diffusion characteristics. Following low-temperature tempering, surface hardness stabilizes similarly, while progressive reduction occurs beyond 2 mm depth. Notably, 240 °C tempering reduces the surface hardness to 750 ± 10 HV (equivalent to 62 HRC), coinciding with the upper design limit for heavy-duty gear surface hardness. This confirms that cryogenic treatment combined with lower tempering temperatures (<170 °C) can further increase surface hardness for enhanced wear resistance. Crucially, this integrated treatment maintains core hardness at ~460 ± 10 HV, meeting machinability requirements for non-carburized gear regions.
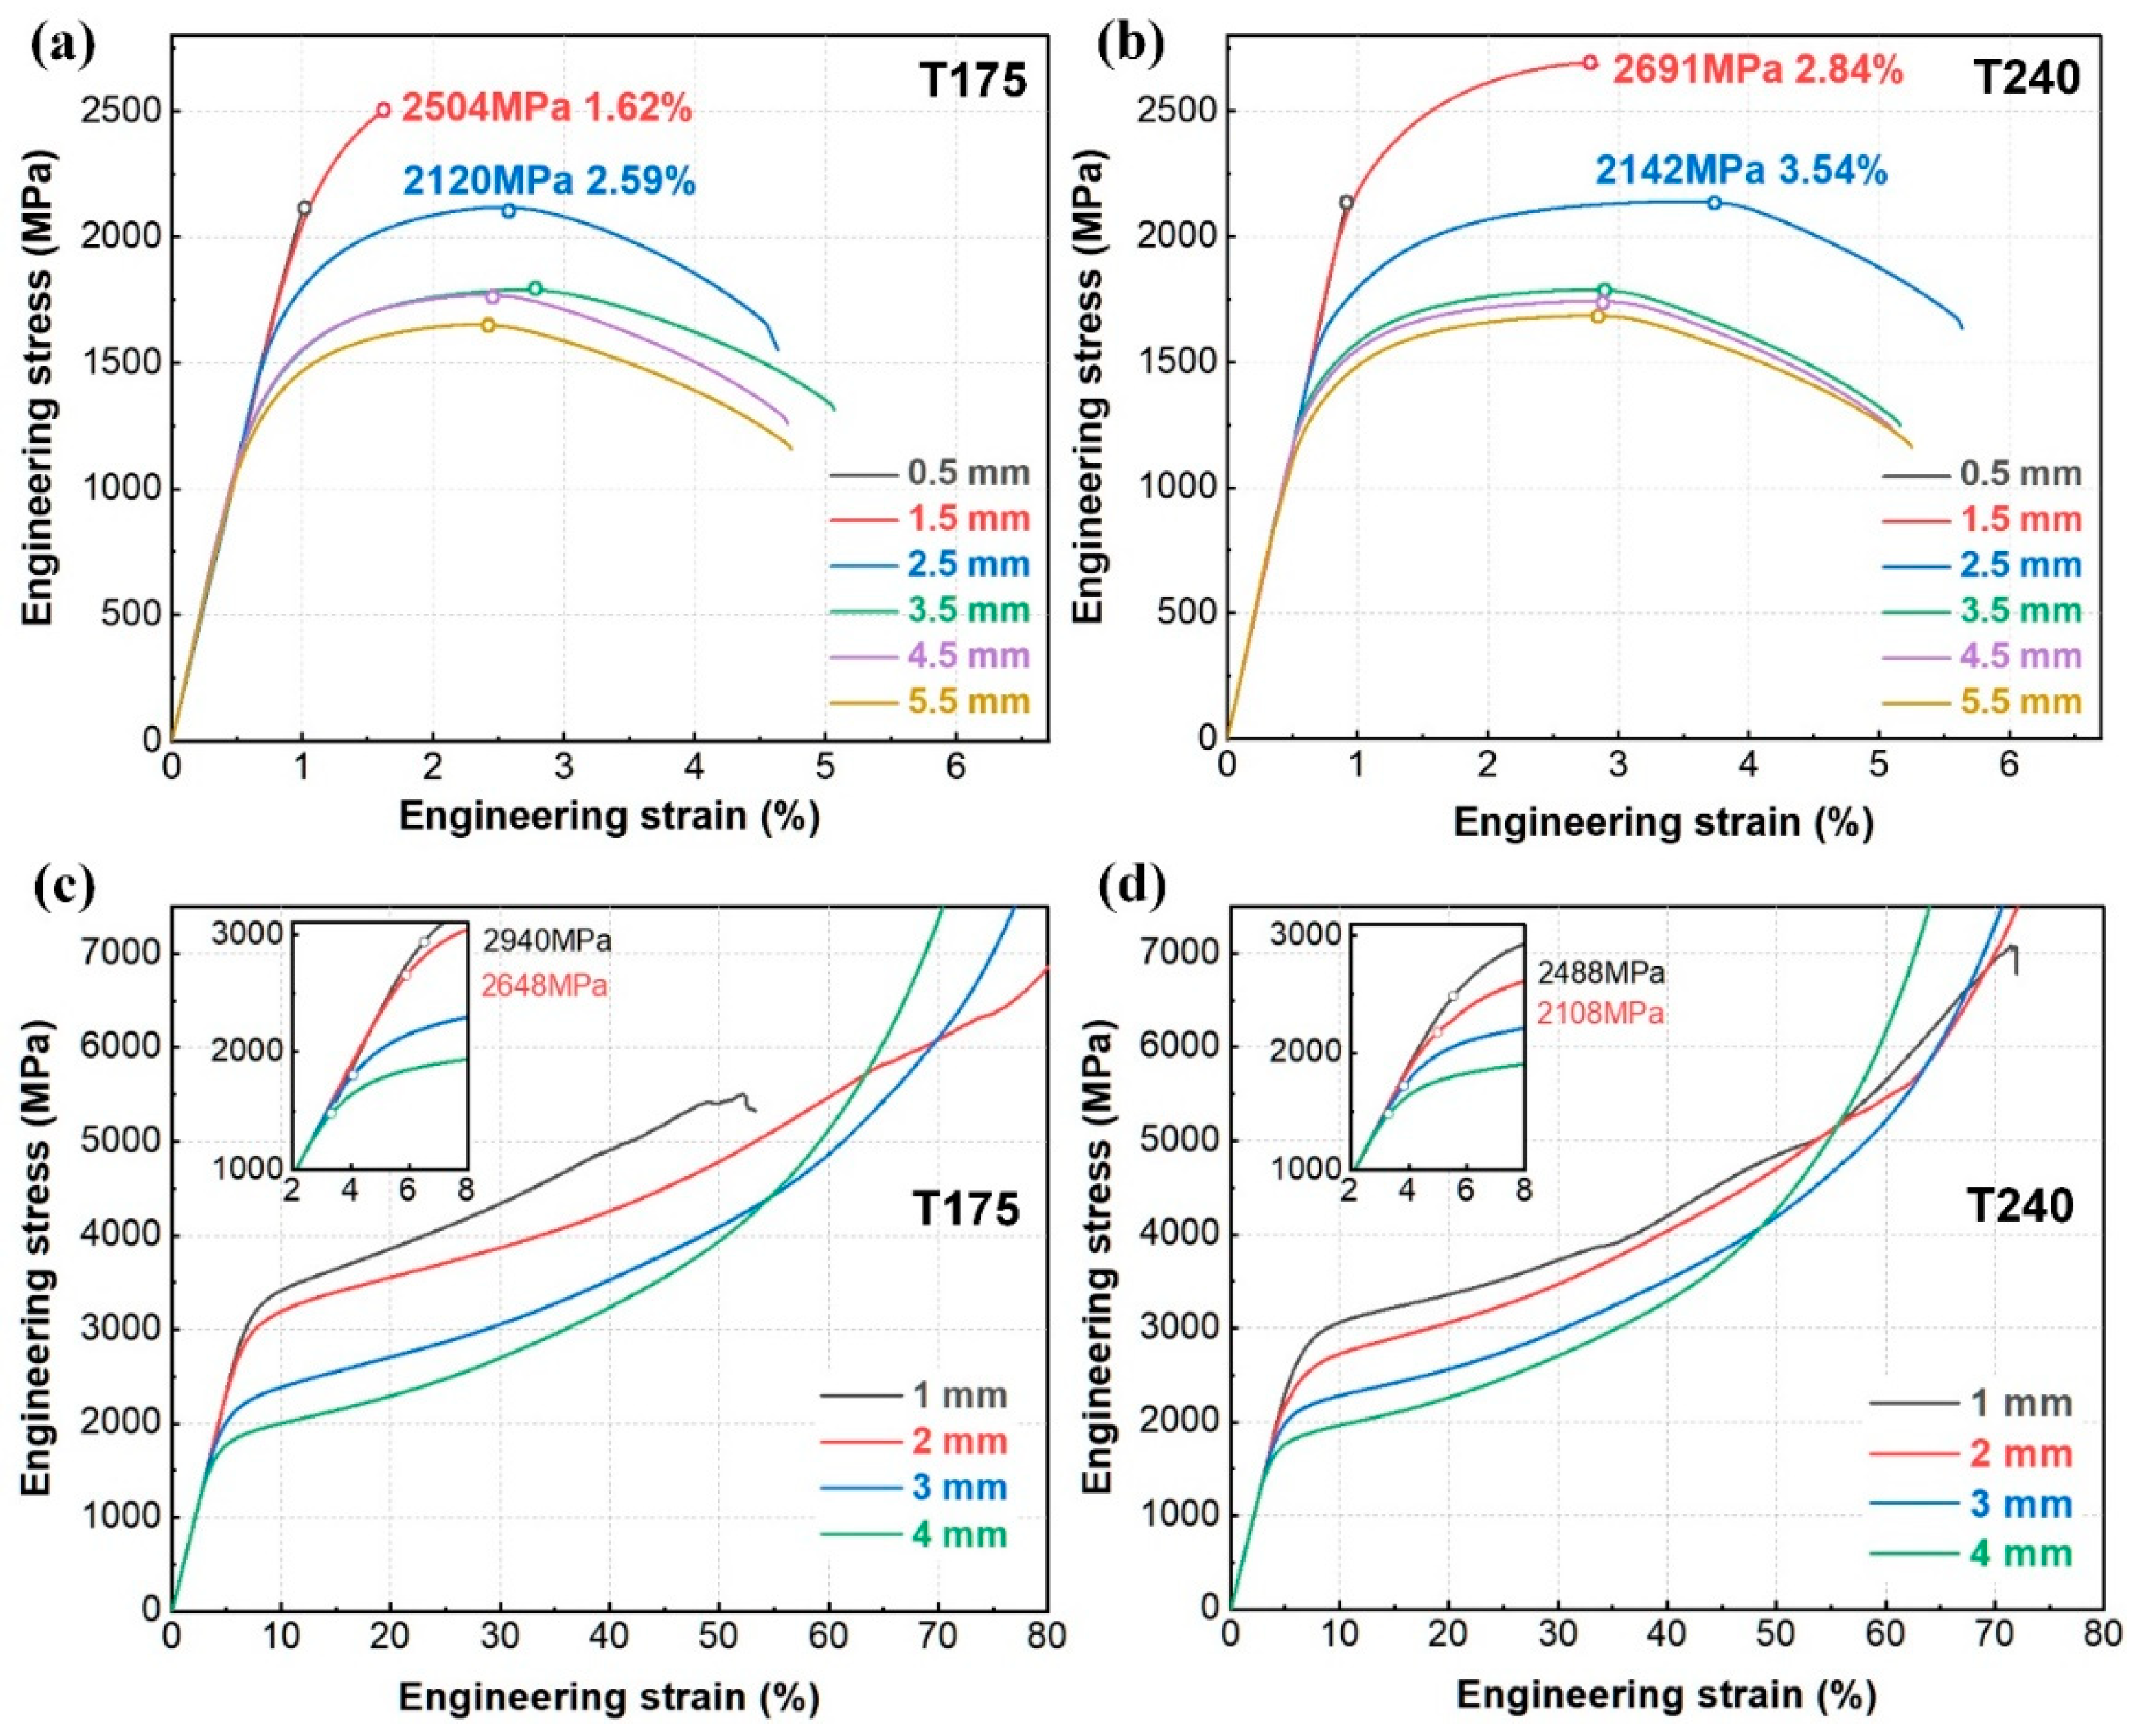
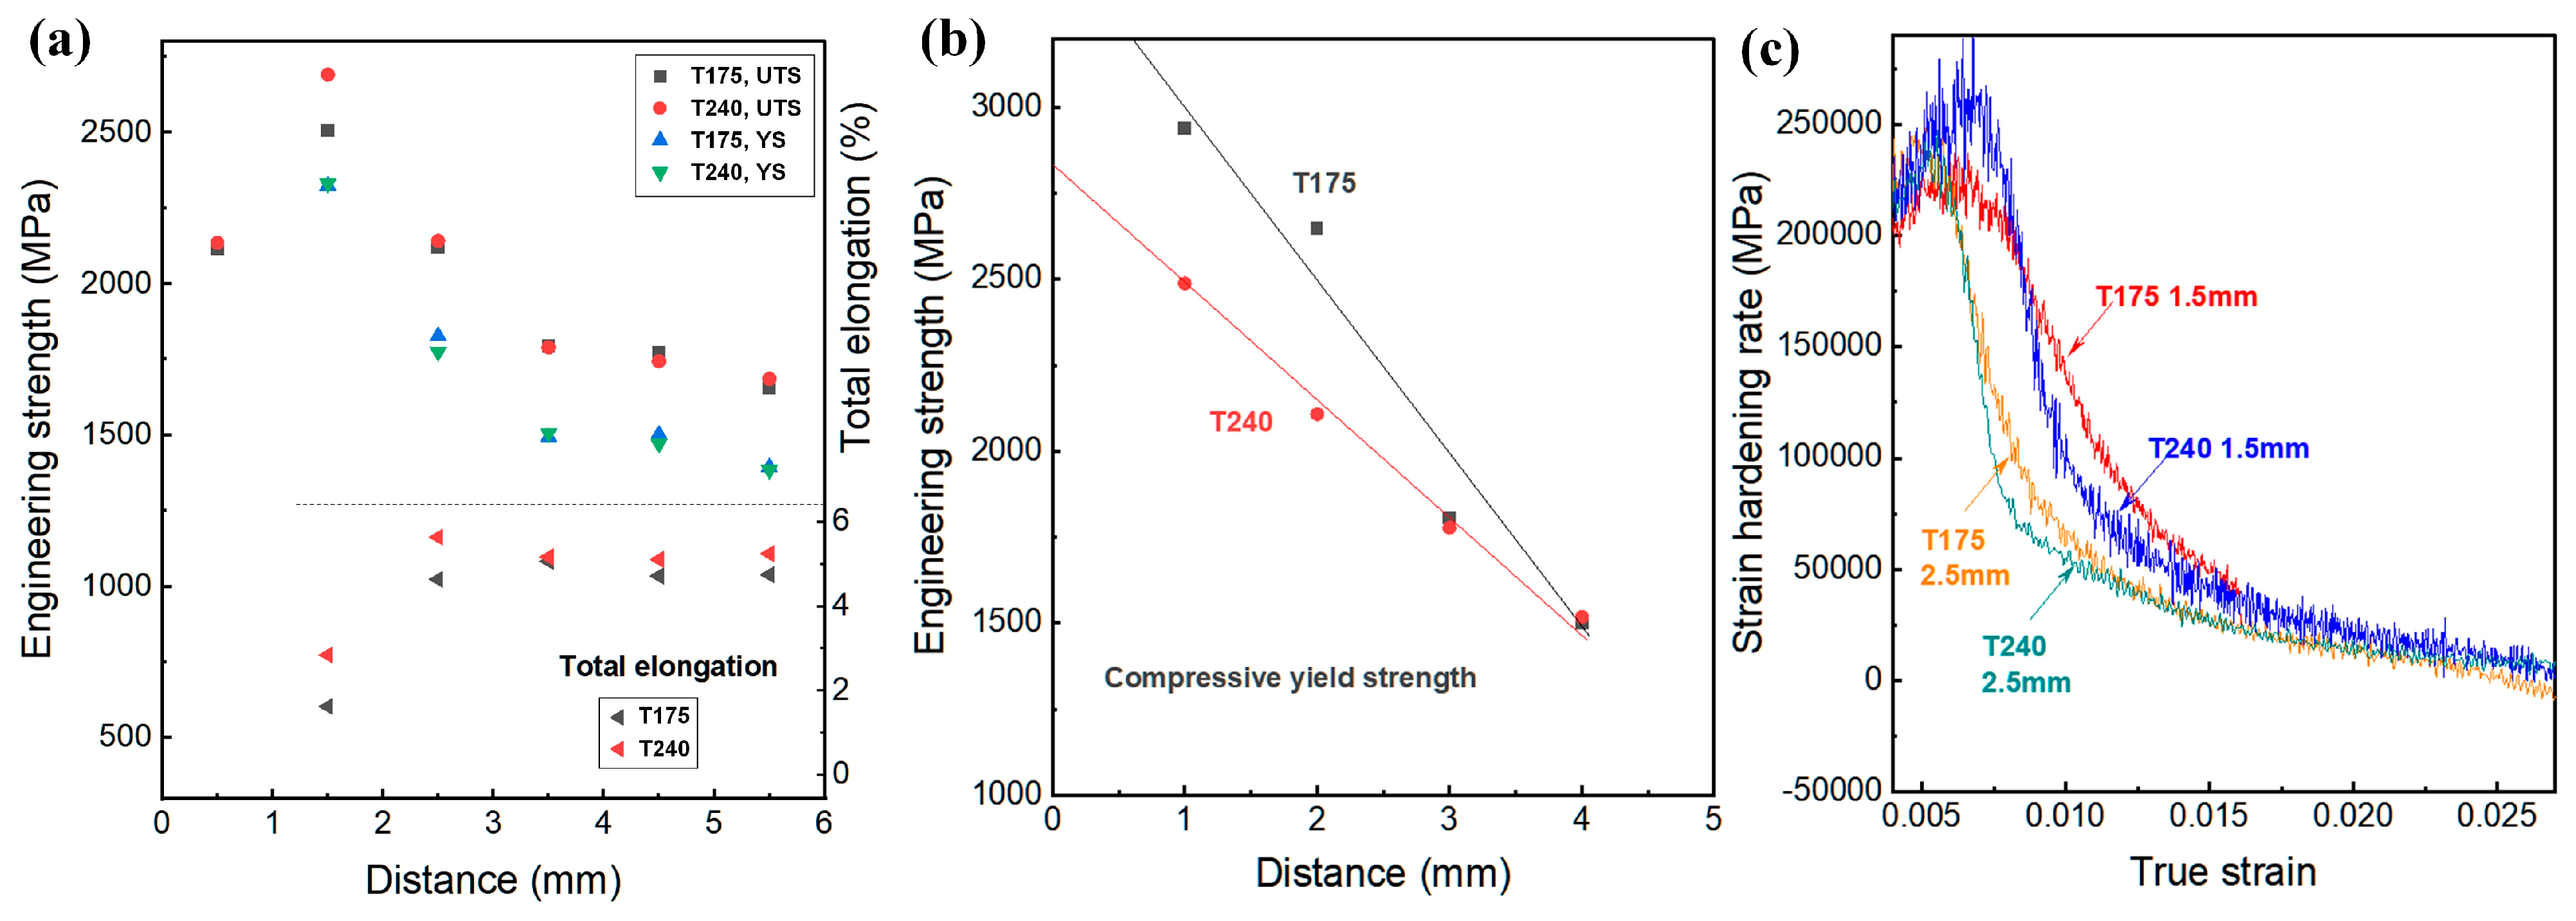
As presented in Figure 6, tensile and compressive stress–strain curves of 18Cr2Ni4W carburized layers after 12 h tempering at 175 °C and 240 °C reveal depth-dependent mechanical responses. Figure 6a demonstrates that the 175 °C tempered surface layer exhibits brittle fracture without yielding, while specimens at 1.5 mm depth achieve ultimate tensile strength (UTS) of 2504 MPa with 1.62% total elongation. This strengthening is attributable to combined effects of partial carbide precipitation and retained solid-solution carbon in the martensitic matrix. UTS progressively decreases from 2.5 mm to the core, whereas elongation peaks at 3.5 mm depth and stabilizes thereafter. Contrastingly, Figure 6b shows significantly enhanced ductility after 240 °C tempering: although surface fracture remains brittle, the 1.5 mm layer attains 2.84% total elongation with UTS of 2691 MPa.
As shown in Figure 6c, the 175 °C tempered surface layer exhibits compressive yield strength of 2940 MPa, decreasing to 2648 MPa at 2 mm depth. Conversely, increasing the tempering temperature to 240 °C reduces surface compressive yield strength to 2488 MPa, with the subsurface strength (at 2 mm) declining to 2108 MPa per Figure 6d. Beyond this depth, where microstructures approach the core state, carburizing–quenching strengthening effects diminish significantly, resulting in minimal variation in compressive yield strength.
Comparatively, tempering temperatures minimally affect yield strength at surface and core regions, but higher tempering enhances uniform elongation while reducing strain hardening rate as shown in Figure 7 (quantitative data in Table 1). Improved plasticity from elevated tempering increases tensile strength by approximately 190 MPa at the 1.5 mm subsurface layer. Nevertheless, since gear surfaces endure compressive stresses during meshing, compressive yield strength proves critical. Lower tempering temperatures substantially increase compressive yield strength, a trend consistent with hardness evolution. This implies distinct wear resistance between the two tempering conditions.

3.3. Fatigue Wear Behavior

During the meshing of heavy-duty gears, differential linear velocities between flank regions relative to the pitch circle generate sliding alongside rolling contact—particularly increased sliding farther from the pitch circle [27]. Consequently, gear surfaces simultaneously endure compressive normal stresses and tangential tensile stresses under cyclic contact loading. This complex stress state induces multifaceted microstructural transformations in contact zones, thereby accelerating fatigue wear failure at addendum and dedendum regions during service.
Aligned with heavy-duty gear meshing conditions, this study conducted rolling–sliding contact fatigue tests. Based on the adopted wear ring dimensions, Hertzian contact theory determined a maximum contact stress of 603 MPa between rings—significantly below the yield strength of tempered carburized layers and compliant with gear design specifications. Notably, localized stress concentrations in microscopic contact regions can exceed both yield and tensile strengths, triggering micro-scale material damage accompanied by fatigue spalling.
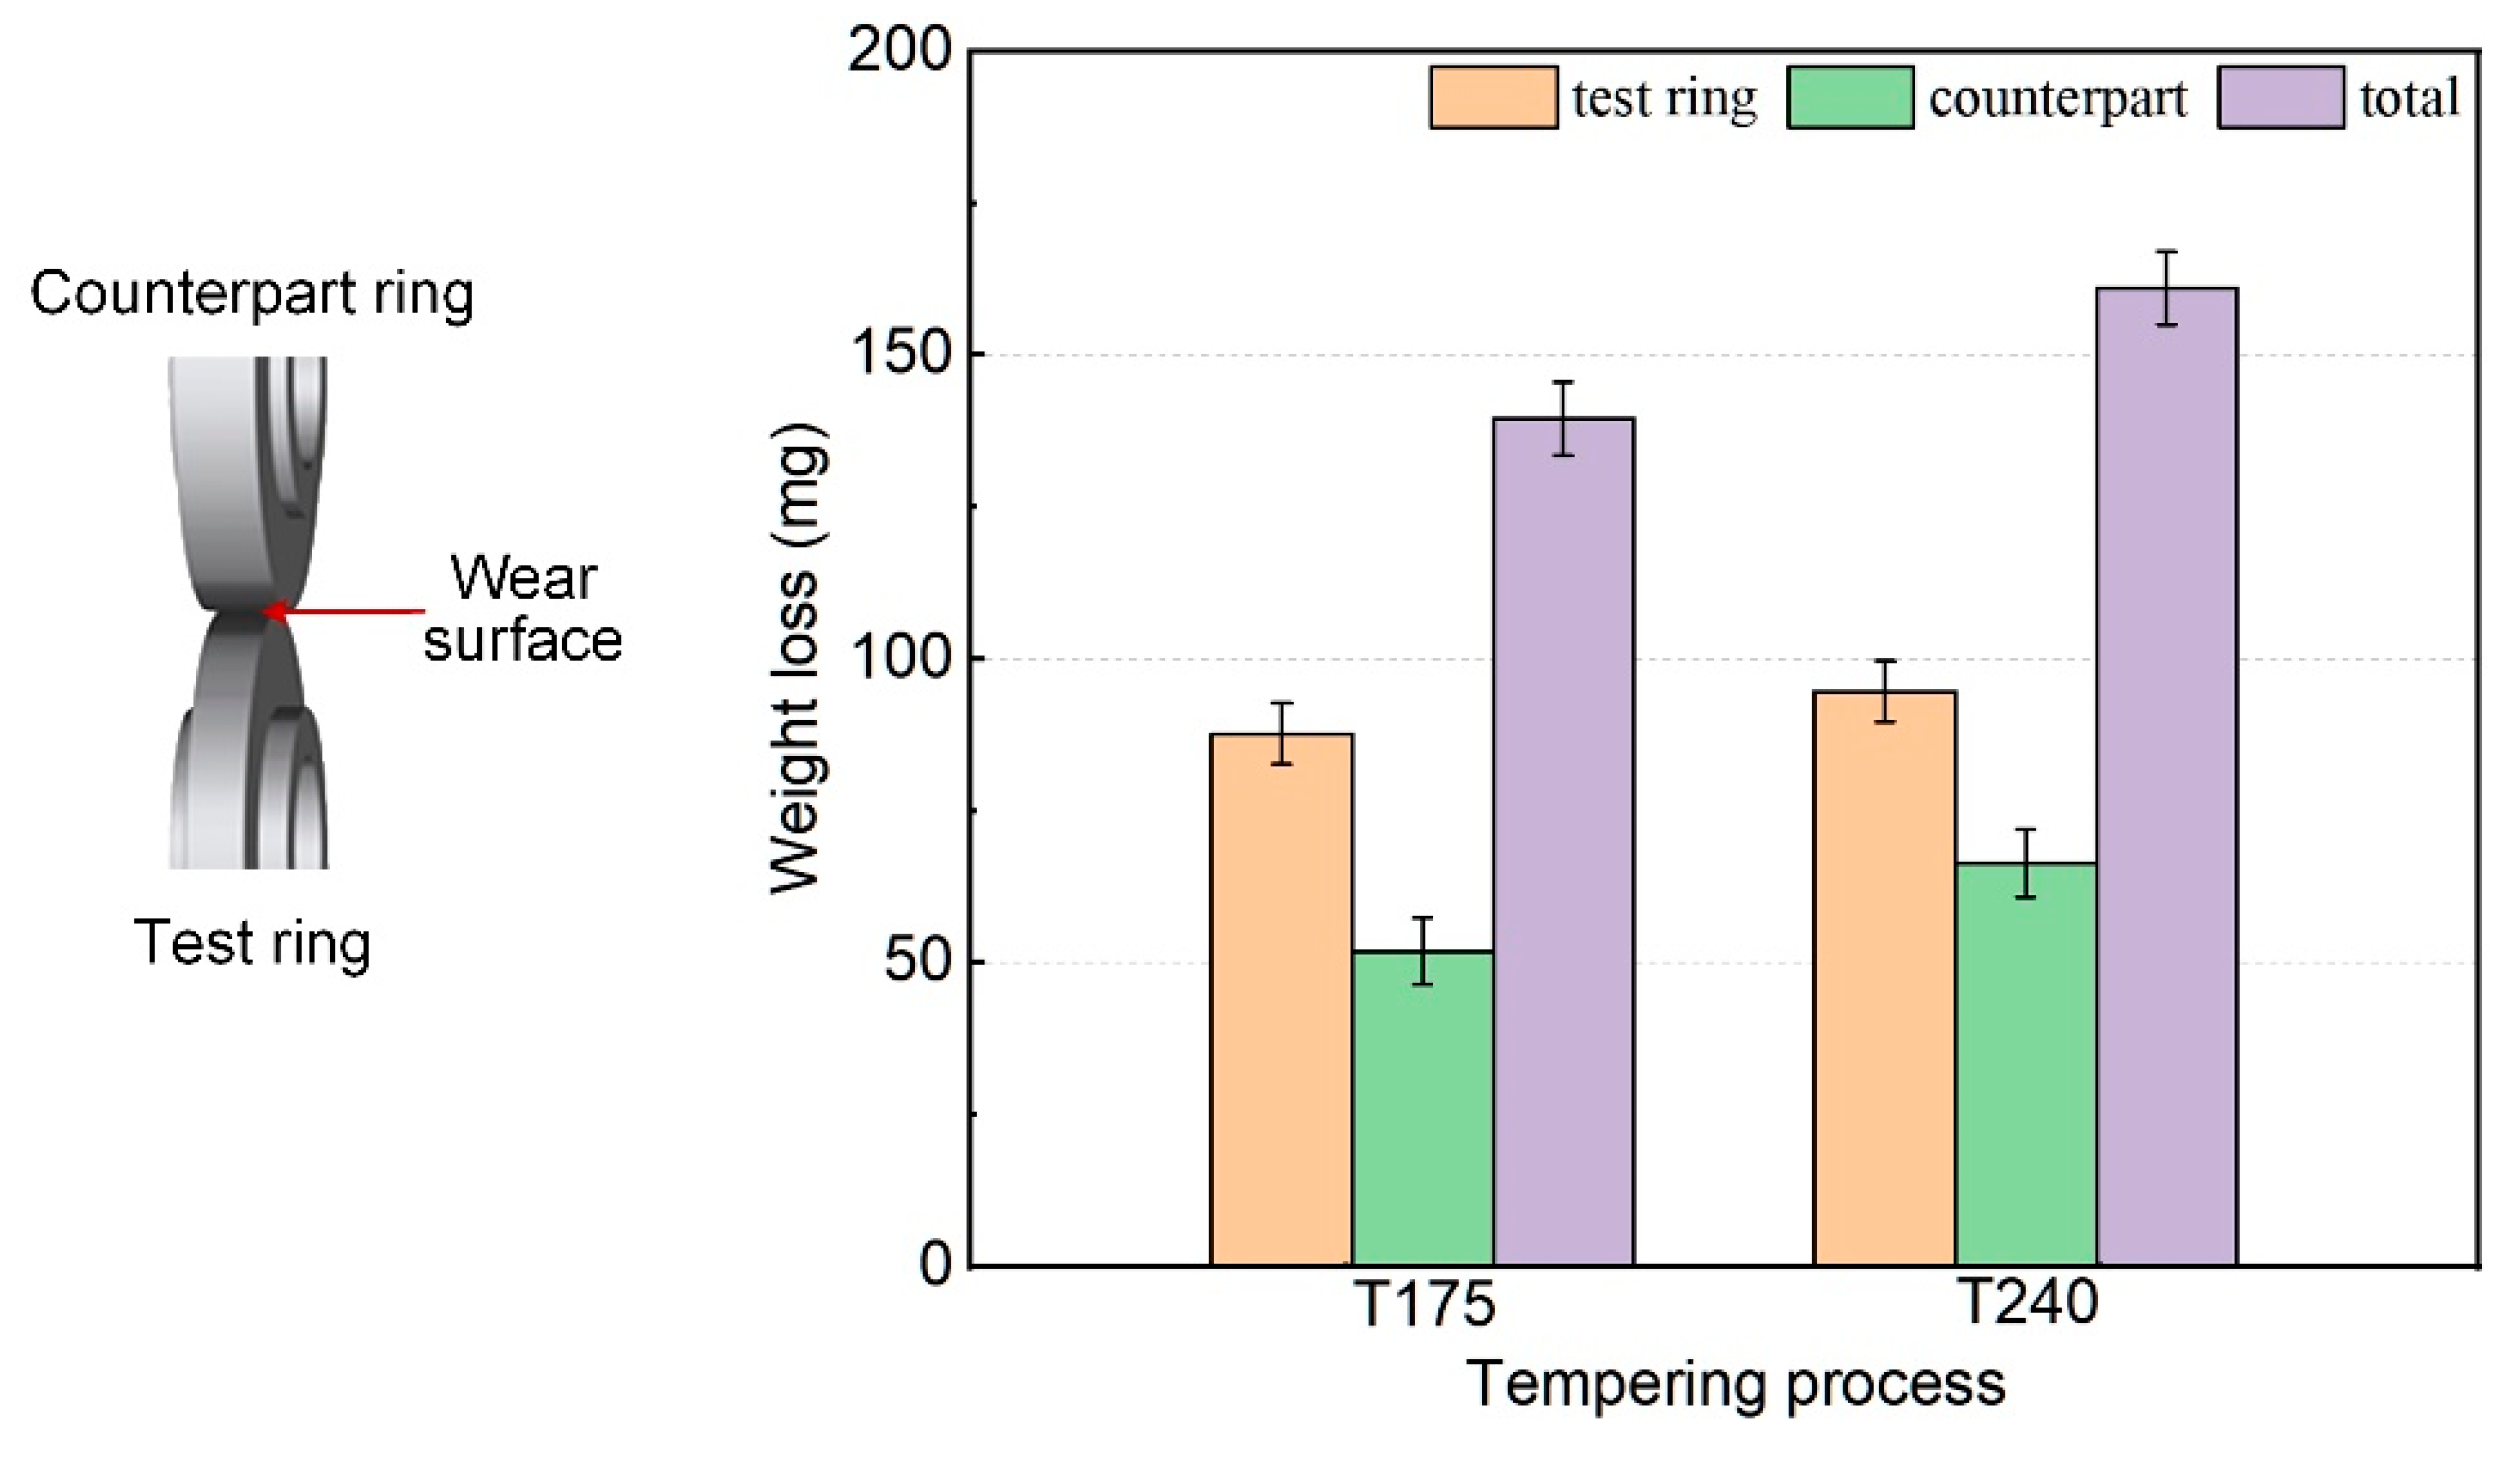
Figure 8 displays distinct mass loss differences in contact fatigue wear tests for differently heat-treated rings. After 175 °C tempering, the test ring exhibited 87.7 mg mass loss with a total wear loss of 139.6 mg, whereas 240 °C tempering resulted in 94.7 mg (test ring) and 161.1 mg (total). Crucially, 175 °C tempering reduced the total wear loss by 13% compared to 240 °C treated counterparts. In alignment with microhardness and compressive properties, carburized layers tempered at 175 °C for 12 h demonstrate superior contact fatigue wear resistance.
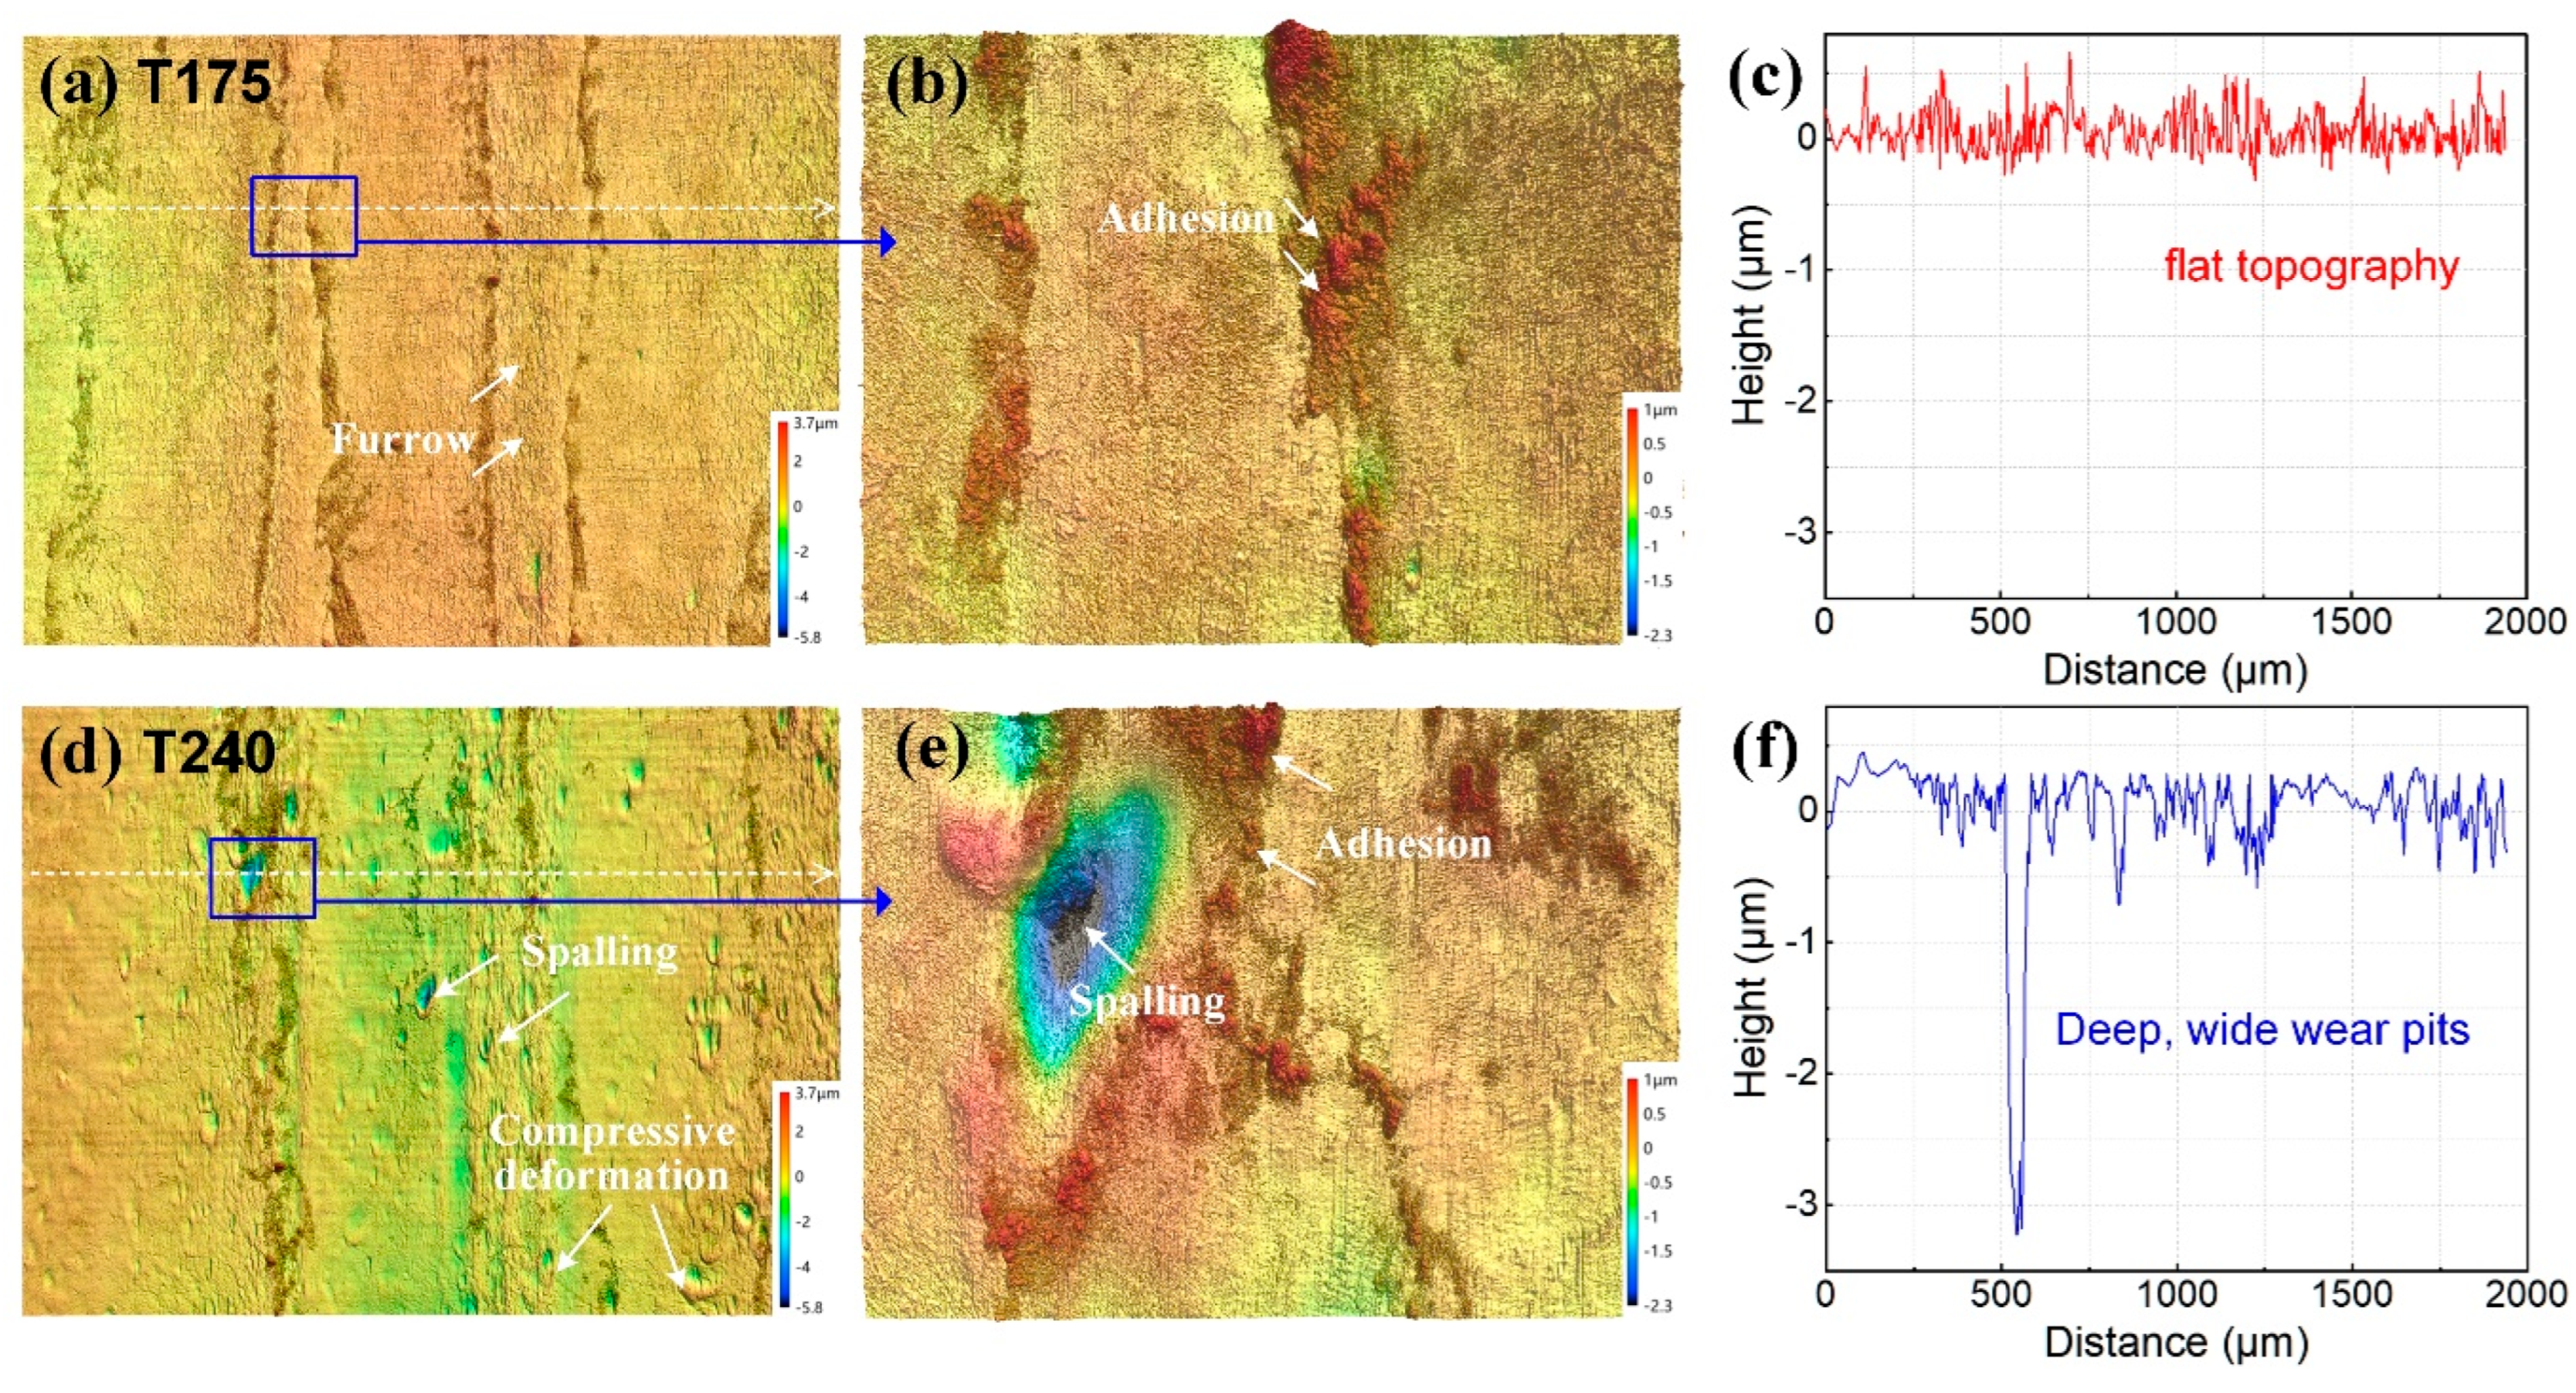
As shown in Figure 9, worn surfaces of 175 °C tempered test rings exhibit sparse wear grooves with relatively flat topography, ensuring uniform stress distribution in contact zones without significant stress concentrations. Due to enhanced surface hardness and compressive yield strength at this lower tempering temperature, plastic deformation remains minimal. Adhesive traces are scarcely distributed across contact areas, while wear grooves demonstrate high density with narrow widths and shallow depths.
Conversely, 240 °C tempering reduces carburized layer hardness and compressive yield strength while increasing plasticity, leading to pronounced plastic deformation on test ring surfaces manifested as dense wear grooves and adhesive abrasion. Deep, wide wear pits intensify localized stress concentrations, thereby accelerating groove-edge wear and initiating progressive deterioration cycles.
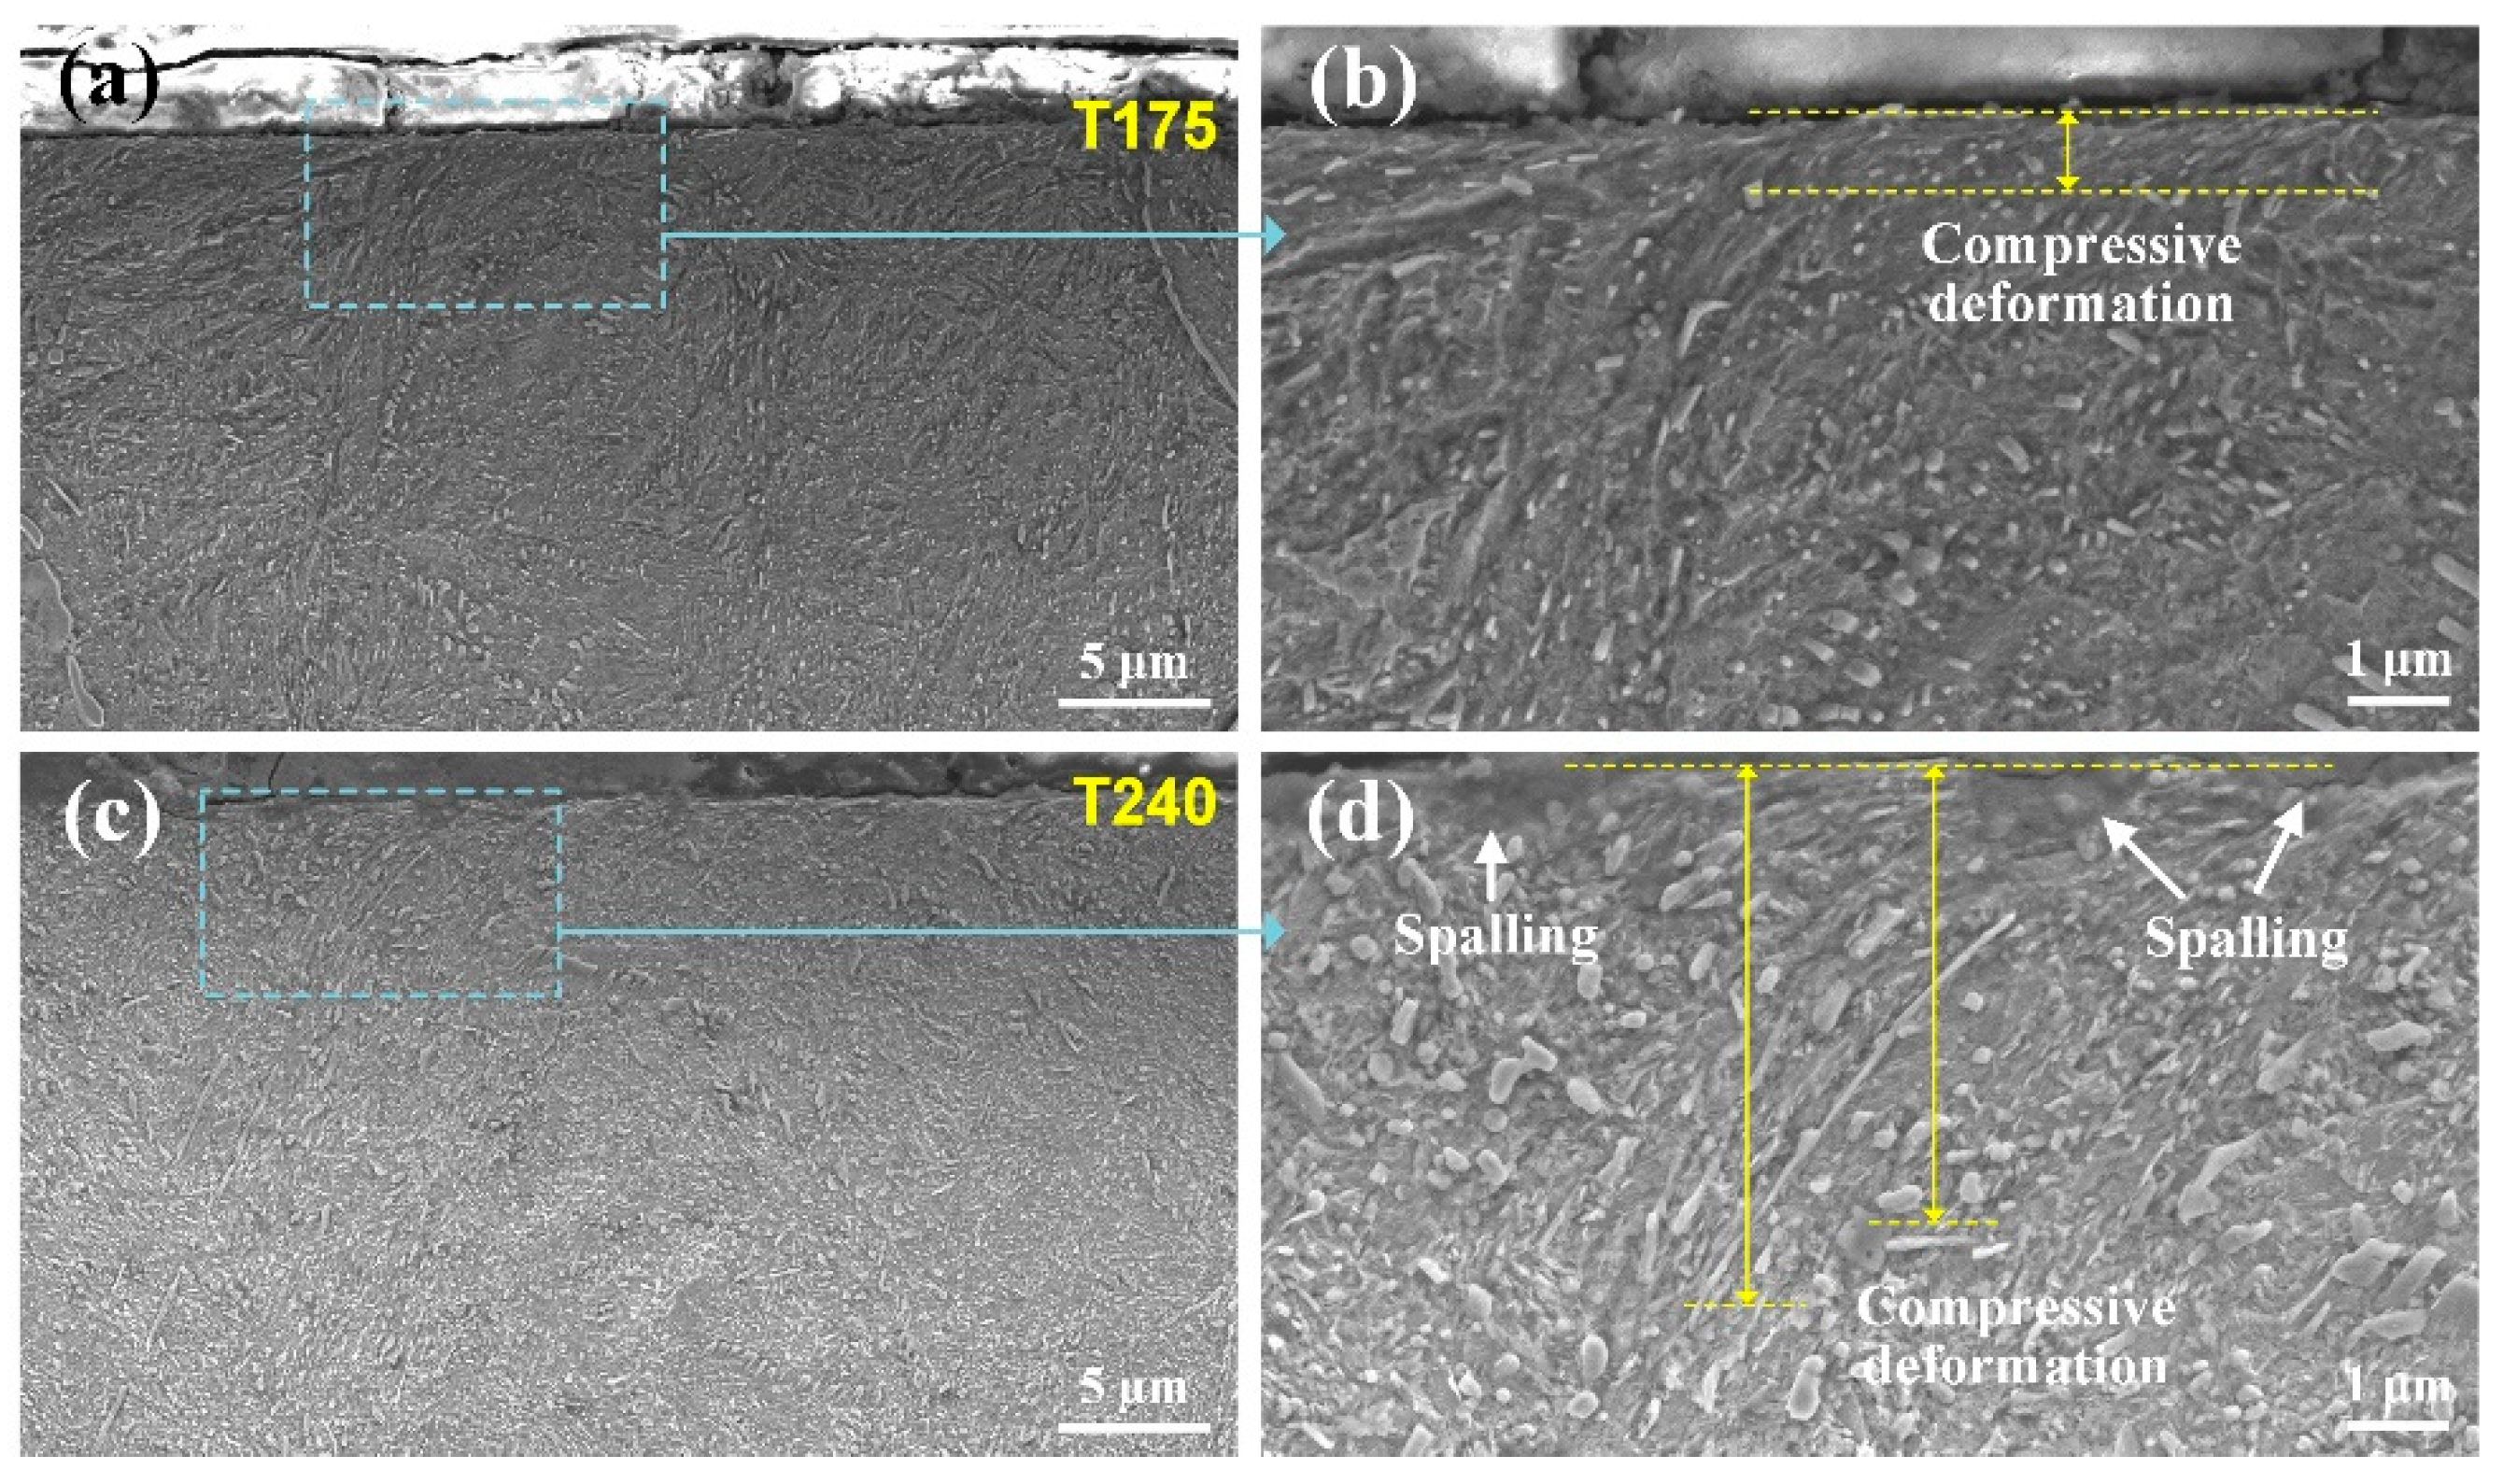
Figure 10 presents cross-sectional SEM morphologies of worn carburized layers. For 175 °C tempered specimens, subsurface regions reveal a submicron plastic deformation zone (<1 μm depth) with negligible microstructural distortion, whereas martensite morphology remains intact. Contrastingly, 240 °C tempering induces pronounced plastic deformation zones extending ~5 μm deep, further corroborated by spalling pits on the surface.

3.4. Mechanism of Strengthening and Anti-Wear

Carburized layers with elevated carbon content develop pronounced solid-solution strengthening, high-density dislocation accumulation, and substantial residual stresses from lattice distortion after quenching and cryogenic treatment [28,29]. Such quenched martensite becomes highly susceptible to micro-crack initiation and brittle fracture under external stresses [30,31]. Consequently, critical industrial components—including wear-resistant parts—are rarely utilized directly in this as-quenched state due to inherent embrittlement risks [4].
Microstructural evolution during low-temperature tempering governs the transformation of strengthening mechanisms in quenched martensite [19,32,33]. As shown in Figure 11, lower tempering temperatures retain partial solid-solution carbon in the martensitic matrix while reducing lattice distortion, simultaneously precipitating finely dispersed ε-carbides. This process involves three primary strengthening mechanisms: solid-solution strengthening, dislocation strengthening, and partial precipitation strengthening—predominantly through dislocation shearing of coherent carbides. When tempering temperature rises to 240 °C, solid-solution carbon content further decreases, promoting increased precipitation of transitional carbides alongside gradual ε→θ carbide transformation and coarsening. Consequently, solid-solution and dislocation strengthening weaken [8] while coarsened precipitates shift precipitation strengthening toward Orowan dislocation bypassing [34,35].
Under cyclic contact stresses, subsurface damage predominates due to maximum Hertzian stresses occurring beneath the surface, at depths proportional to applied loads [36,37]. Fundamentally, contact fatigue damage originates from microstructural plastic deformation and work hardening, which initiate fatigue micro-cracks [38]. In 240 °C tempered specimens, combined normal compressive and tangential shear stresses in contact zones [39] facilitate dislocation activation within martensitic matrices at stress maxima. Progressive cyclic loading accumulates dislocation slip, bypassing coarse carbides to form dislocation loops (Figure 11), generating extensive plastic deformation zones. Dislocation pile-ups near particles initiate micro-cracks that propagate into large spalling pits. Conversely, reducing tempering to 170 °C enhances coherency between ε-carbides and matrix [19,40], impeding localized dislocation slip under contact fatigue stresses. Solid-solution carbon atoms and clusters pin fatigue dislocations, increasing localized hardening resistance and inhibiting large-scale plastic deformation-manifesting superior fatigue wear resistance. Notably, an optimal low-temperature tempering regime (170–240 °C) may exist for balancing precipitation strengthening (via refined carbides) [8,41,42] with retained solid-solution/dislocation strengthening to maximize wear performance.

4. Conclusions

This work systematically investigates cryogenic treatment and low-temperature tempering effects on gradient microstructures, mechanical properties, and rolling–sliding wear performance of high-alloy carburized steel for heavy-duty gears, yielding the following key conclusions:
(1)
Carburizing–quenching with cryogenic treatment produces high-carbon martensite at the surface, gradually transitioning to lath martensite toward the core. Low-temperature tempering promotes fine carbide precipitation in martensite, while elevated temperatures cause carbide coarsening. Specimens tempered at 175 °C achieve 800 HV surface hardness and 2940 MPa near-surface compressive yield strength.
(2)
The 175 °C-tempered specimens exhibit 13% lower wear mass loss than 240 °C treated counterparts, demonstrating superior wear resistance characterized by flat surfaces with uniform stress distribution and submicron plastic deformation zones (<1 μm depth). Conversely, 240 °C tempering generates spalling pits and pronounced plastic deformation exceeding 5 μm depth.
(3)
Cryogenic treatment facilitates further transformation of retained austenite to martensite. Post-tempering strengthening mechanisms include solid-solution strengthening, dislocation strengthening, and partial precipitation strengthening. Under contact fatigue stresses, coherent carbides precipitated at lower tempering temperatures impede dislocation motion via shearing mechanisms, suppressing plastic deformation and fatigue crack initiation to enhance wear resistance.

Author Contributions

Conceptualization, J.W. and Q.T.; methodology, Q.L. and J.W.; software, J.W.; validation, J.W., Q.T. and G.C.; formal analysis, Q.T.; investigation, Q.L. and J.W.; resources, Q.L. and Q.T.; data curation, J.W. and Q.L.; writing—original draft preparation, J.W. and Q.L.; writing—review and editing, Q.T. and G.C.; visualization, J.W. and Q.L.; supervision, Q.T. and G.C. All authors have read and agreed to the published version of the manuscript.

Funding

This research was funded by the Special Project for Science and Technology Innovation of China Coal Technology and Engineering Group, grant number 2024-TD-ZD004-01 and the National Natural Science Foundation of China, grant number 51805533, 51641109.

Data Availability Statement

The original contributions presented in the study are included in the article material. Further inquiries can be directed to the corresponding authors.

Acknowledgments

The authors express sincere gratitude to Xiangkun Song for his valuable assistance during this research, including but not limited to project and financial support, as well as manuscript revision guidance.

Conflicts of Interest

Author Qingliang Li was employed by Shanghai, TianDi Ming Equipment Technology Co., Ltd. The remaining authors declare that the research was conducted in the absence of any commercial or financial relationships that could be construed as a potential conflict of interest. Besides, the authors declare that this study received funding from China Coal Technology and Engineering Group. The funder was not involved in the study design, collection, analysis, interpretation of data, the writing of this article or the decision to submit it for publication.

References

  1. Wu, J.; Wei, P.; Zhu, C.; Zhang, P.; Liu, H. Development and application of high strength gears. Int. J. Adv. Manuf. Technol. 2024, 132, 3123–3148. [Google Scholar] [CrossRef]
  2. Qin, S.; Zhang, C.; Zhang, B.; Ma, H.; Zhao, M. Effect of carburizing process on high cycle fatigue behavior of 18CrNiMo7-6 steel. J. Mater. Res. Technol. 2022, 16, 1136–1149. [Google Scholar] [CrossRef]
  3. Shi, L.; Cui, X.; Li, J.; Jin, G.; Liu, J.; Tian, H. Improving the wear resistance of heavy-duty gear steels by cyclic carburizing. Tribol. Int. 2022, 171, 107576. [Google Scholar] [CrossRef]
  4. Bhadeshia, H.K.D.H. Steels for bearings. Prog. Mater. Sci. 2012, 57, 268–435. [Google Scholar] [CrossRef]
  5. Krauss, G. Steels: Heat Treatment and Processing Principles; ASM International: Almere, The Netherlands, 1990. [Google Scholar]
  6. Caron, R.N.; Krauss, G. The tempering of Fe-C lath martensite. Metall. Trans. 1972, 3, 2381–2389. [Google Scholar] [CrossRef]
  7. Krauss, G. Tempering of Lath Martensite in Low and Medium Carbon Steels: Assessment and Challenges. Steel Res. Int. 2017, 88, 1700038. [Google Scholar] [CrossRef]
  8. Wang, J.; El-Fallah, G.M.A.M.; Chang, X.; Peng, Y.; Tao, Q. Achieving 2.7 GPa tensile strength in ultrastrong high-carbon steel through prolonged low-temperature tempering. Mater. Charact. 2024, 215, 114241. [Google Scholar] [CrossRef]
  9. Song, W.; von Appen, J.; Choi, P.; Dronskowski, R.; Raabe, D.; Bleck, W. Atomic-scale investigation of ε and θ precipitates in bainite in 100Cr6 bearing steel by atom probe tomography and ab initio calculations. Acta Mater. 2013, 61, 7582–7590. [Google Scholar] [CrossRef]
  10. Wang, Y.L.; Shen, Y.F.; Jia, N.; Wang, J.J.; Zhao, S.X. Acicular martensite induced superior strength-ductility combination in a 20Cr2Ni2MoV steel. Mater. Sci. Eng. A 2022, 848, 143400. [Google Scholar] [CrossRef]
  11. Zhang, J.; Dai, Z.; Zeng, L.; Zuo, X.; Wan, J.; Rong, Y.; Chen, N.; Lu, J.; Chen, H. Revealing carbide precipitation effects and their mechanisms during quenching-partitioning-tempering of a high carbon steel: Experiments and Modeling. Acta Mater. 2021, 217, 117176. [Google Scholar] [CrossRef]
  12. Li, H.Y.; Lu, X.W.; Li, W.J.; Jin, X.J. Microstructure and Mechanical Properties of an Ultrahigh-Strength 40SiMnNiCr Steel during the One-Step Quenching and Partitioning Process. Metall. Mater. Trans. A 2010, 41, 1284–1300. [Google Scholar] [CrossRef]
  13. Zhirafar, S.; Rezaeian, A.; Pugh, M. Effect of cryogenic treatment on the mechanical properties of 4340 steel. J. Mater. Process. Technol. 2007, 186, 298–303. [Google Scholar] [CrossRef]
  14. Sun, J.-J.; Liu, Y.-N.; Zhu, Y.-T.; Lian, F.-L.; Liu, H.-J.; Jiang, T.; Guo, S.-W.; Liu, W.-Q.; Ren, X.-B. Super-strong dislocation-structured high-carbon martensite steel. Sci. Rep. 2017, 7, 6596. [Google Scholar] [CrossRef] [PubMed]
  15. Sun, Y.; Quan, J.; Salvador, H.; Edwards, J.; Lin, J.; Kozmel, T.; Mathaudhu, S. Ausforming and tempering of a novel ultra-high strength steel. Mater. Sci. Eng. A 2022, 838, 142750. [Google Scholar] [CrossRef]
  16. Wang, Y.; Sun, J.; Jiang, T.; Sun, Y.; Guo, S.; Liu, Y. A low-alloy high-carbon martensite steel with 2.6 GPa tensile strength and good ductility. Acta Mater. 2018, 158, 247–256. [Google Scholar] [CrossRef]
  17. Perez, M.; Sidoroff, C.; Vincent, A.; Esnouf, C. Microstructural evolution of martensitic 100Cr6 bearing steel during tempering: From thermoelectric power measurements to the prediction of dimensional changes. Acta Mater. 2009, 57, 3170–3181. [Google Scholar] [CrossRef]
  18. Preciado, M.; Bravo, P.M.; Alegre, J.M. Effect of low temperature tempering prior cryogenic treatment on carburized steels. J. Mater. Process. Technol. 2006, 176, 41–44. [Google Scholar] [CrossRef]
  19. Barrow, A.T.W.; Kang, J.H.; Rivera-Díaz-del-Castillo, P.E.J. The ϵ→η→θ transition in 100Cr6 and its effect on mechanical properties. Acta Mater. 2012, 60, 2805–2815. [Google Scholar] [CrossRef]
  20. Hunkel, M.; Dong, J.; Epp, J.; Kaiser, D.; Dietrich, S.; Schulze, V.; Rajaei, A.; Hallstedt, B.; Broeckmann, C. Comparative Study of the Tempering Behavior of Different Martensitic Steels by Means of In-Situ Diffractometry and Dilatometry. Materials 2020, 13, 5058. [Google Scholar] [CrossRef]
  21. Tao, Q.; Wang, J.; Galindo-Nava, E.I. Effect of low-temperature tempering on confined precipitation and mechanical properties of carburised steels. Mater. Sci. Eng. A 2021, 822, 141688. [Google Scholar] [CrossRef]
  22. Zhang, T.; Wang, J.; Pan, Z.; Tao, Q. Effect of Carbon Partition and Precipitation on Wear Resistance of Carburized Layer in Heavy-Duty Gear. Materials 2021, 14, 6958. [Google Scholar] [CrossRef]
  23. Hertz, H. The Contact of Elastic Solids. J. Reine Angew. Math. 1881, 92, 156–171. [Google Scholar]
  24. Cavaliere, P.; Zavarise, G.; Perillo, M. Modeling of the carburizing and nitriding processes. Comput. Mater. Sci. 2009, 46, 26–35. [Google Scholar] [CrossRef]
  25. Goldstein, J.I.; Moren, A.E. Diffusion modeling of the carburization process. Metall. Trans. A 1978, 9, 1515–1525. [Google Scholar] [CrossRef]
  26. Nova, I.; Machuta, J. Monitoring of the Diffusion Processes during Carburizing Automotive Steel Parts. Manuf. Technol. J. 2016, 16, 225–230. [Google Scholar] [CrossRef]
  27. Oila, A.; Bull, S.J. Phase transformations associated with micropitting in rolling/sliding contacts. J. Mater. Sci. 2005, 40, 4767–4774. [Google Scholar] [CrossRef]
  28. Galindo-Nava, E.I.; Rivera-Díaz-del-Castillo, P.E.J. A model for the microstructure behaviour and strength evolution in lath martensite. Acta Mater. 2015, 98, 81–93. [Google Scholar] [CrossRef]
  29. Galindo-Nava, E.I.; Rivera-Díaz-del-Castillo, P.E.J. Understanding the factors controlling the hardness in martensitic steels. Scr. Mater. 2016, 110, 96–100. [Google Scholar] [CrossRef]
  30. Davies, R.G.; Magee, C.L. Microcracking in ferrous martensites. Metall. Trans. 1972, 3, 307–313. [Google Scholar] [CrossRef]
  31. Brobst, R.P.; Krauss, G. The effect of austenite grain size on microcracking in martensite of an Fe-1.22C alloy. Metall. Trans. 1974, 5, 457–462. [Google Scholar] [CrossRef]
  32. Badinier, G.; Sinclair, C.W.; Sauvage, X.; Wang, X.; Bylik, V.; Gouné, M.; Danoix, F. Microstructural heterogeneity and its relationship to the strength of martensite. Mater. Sci. Eng. A 2015, 638, 329–339. [Google Scholar] [CrossRef]
  33. Liang, J.; Lu, H.; Zhang, L.; Li, F.; Cao, R.; Liu, K.; Pan, H.; Teng, H.; Li, X.; Guo, A.; et al. A 2000 MPa grade Nb bearing hot stamping steel with ultra-high yield strength. Mater. Sci. Eng. A 2021, 801, 140419. [Google Scholar] [CrossRef]
  34. Gladman, T. Precipitation hardening in metals. Mater. Sci. Technol. 1999, 15, 30–36. [Google Scholar] [CrossRef]
  35. Wang, S.B.; Chang, X.F.; Key, J. New insight into high-temperature creep deformation and fracture of T92 steel involving precipitates, dislocations and nanovoids. Mater. Charact. 2017, 127, 1–11. [Google Scholar] [CrossRef]
  36. Suh, N.P. The delamination theory of wear. Wear 1973, 25, 111–124. [Google Scholar] [CrossRef]
  37. Farokhzadeh, K.; Edrisy, A. Fatigue improvement in low temperature plasma nitrided Ti–6Al–4V alloy. Mater. Sci. Eng. A 2015, 620, 435–444. [Google Scholar] [CrossRef]
  38. Rajinikanth, V.; Soni, M.K.; Mahato, B.; Rao, M.A. Microstructural investigation of rolling contact fatigue (RCF) on a failed planetary gear of a windmill gearbox. Eng. Fail. Anal. 2021, 121, 105167. [Google Scholar] [CrossRef]
  39. Takayasu, S.; Umezawa, O.; Yari, K.; Hashimoto, K.; Fuchigami, T. Spectroscopy analyses of tribofilm and surface microcracks in carburized SCM420 steel under high-pressure rolling contact fatigue. Wear 2021, 477, 203807. [Google Scholar] [CrossRef]
  40. Bhadeshia, H.K.D.H.; Chintha, A.R.; Lenka, S. Critical Assessment 34: Are χ (Hägg), η and ϵ carbides transition-phases relative to cementite in steels? Mater. Sci. Technol. 2019, 35, 1301–1305. [Google Scholar] [CrossRef]
  41. Gerold, V.; Haberkorn, H. On the Critical Resolved Shear Stress of Solid Solutions Containing Coherent Precipitates. Phys. Status Solidi B 1966, 16, 675–684. [Google Scholar] [CrossRef]
  42. Kamikawa, N.; Sato, K.; Miyamoto, G.; Murayama, M.; Sekido, N.; Tsuzaki, K.; Furuhara, T. Stress–strain behavior of ferrite and bainite with nano-precipitation in low carbon steels. Acta Mater. 2015, 83, 383–396. [Google Scholar] [CrossRef]
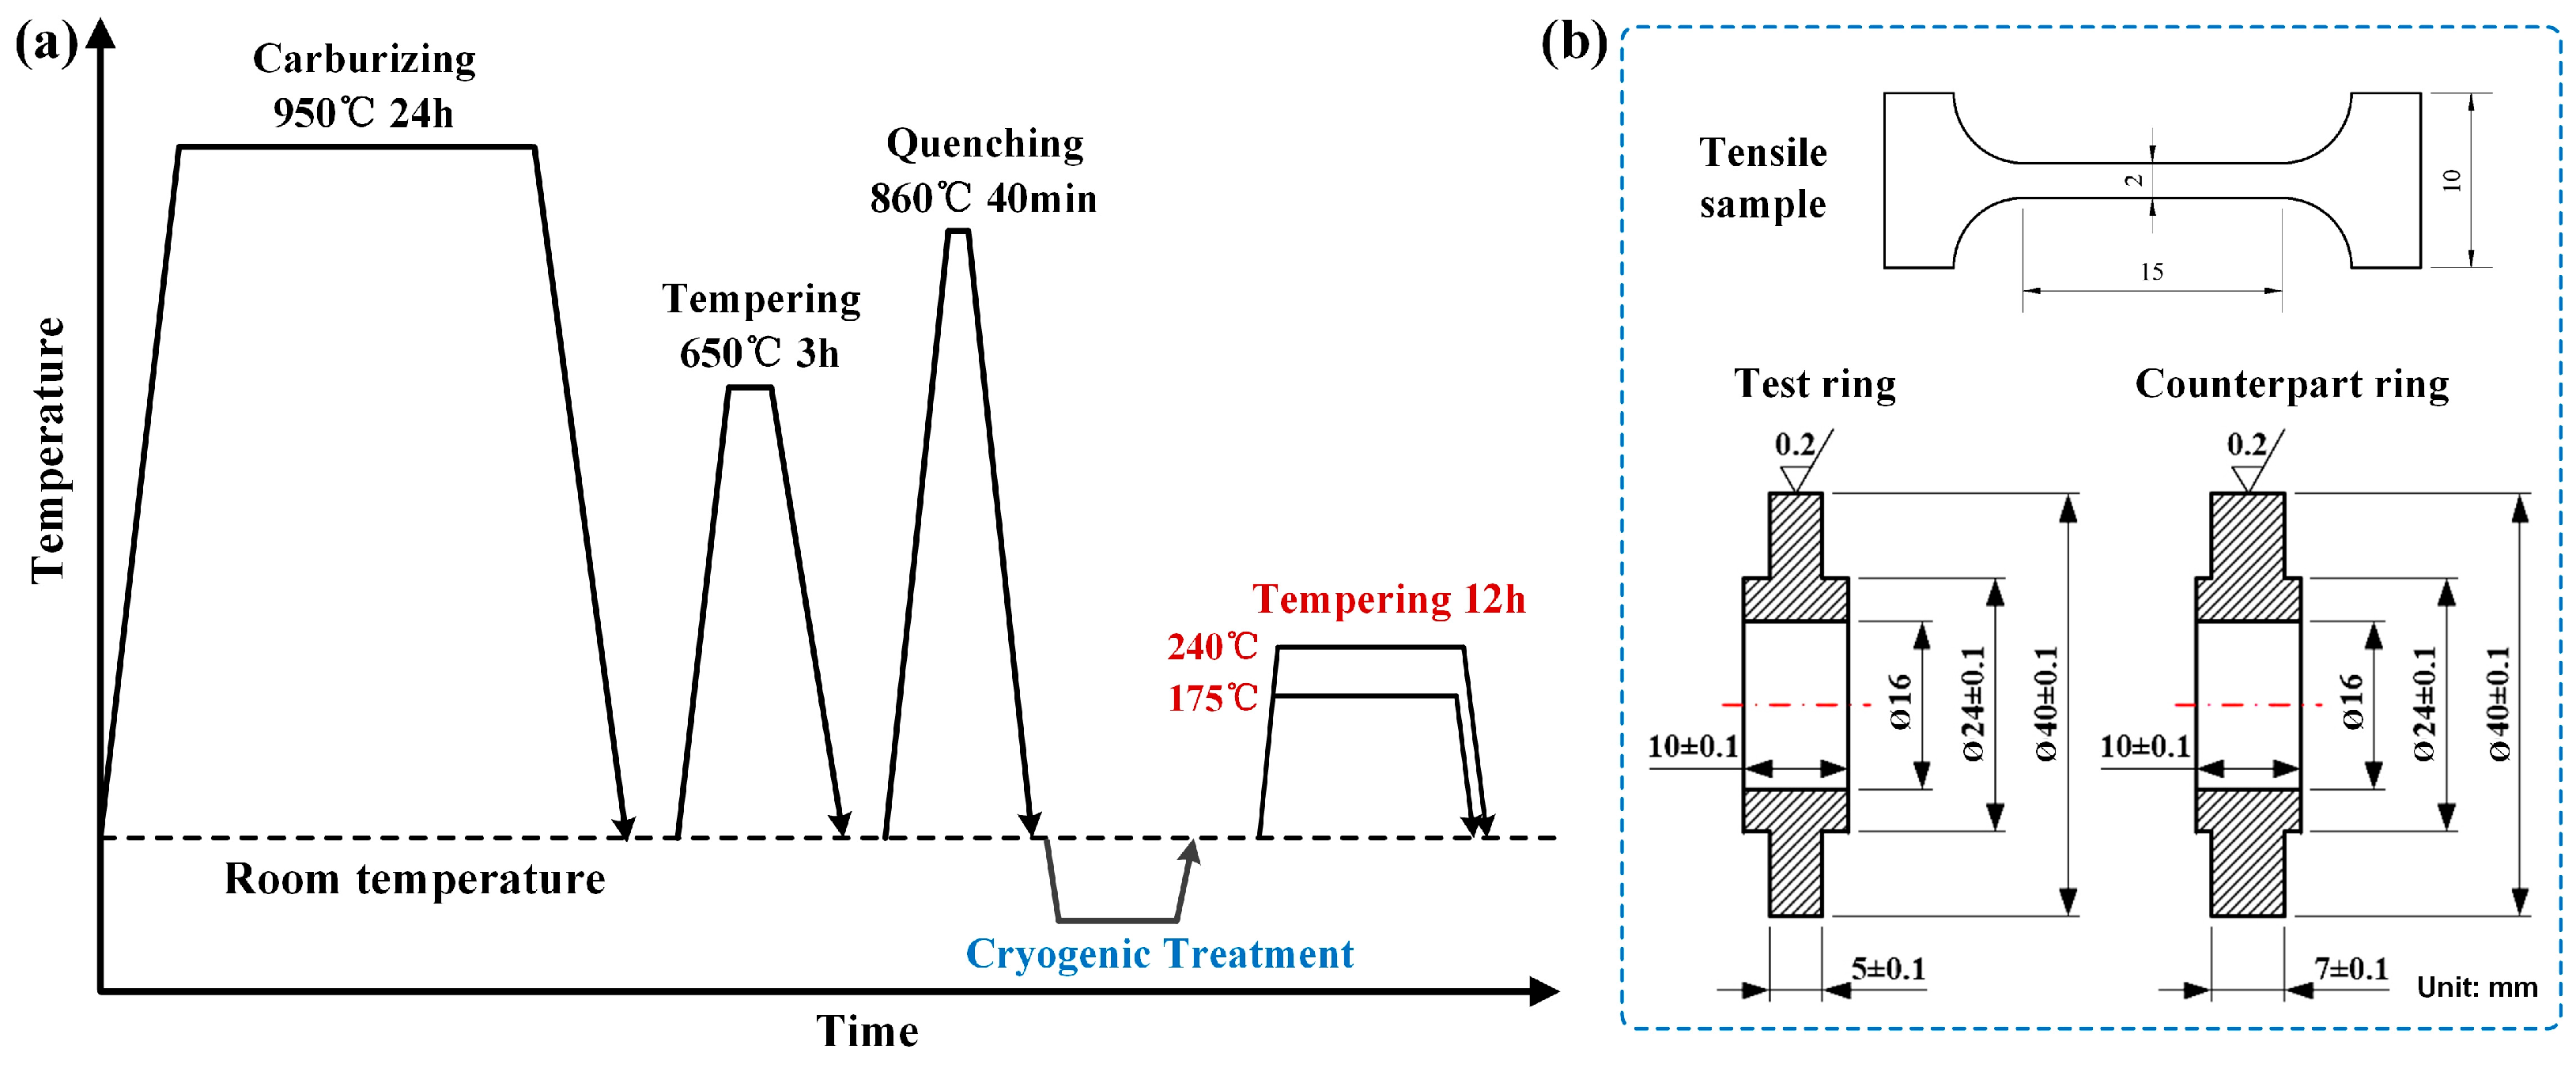
Figure 1. (a) Schematic diagram of the carburizing–quenching–tempering; (b) sample size for tensile test and fatigue wear resistance test.
Metals 15 00934 g001
Figure 2. Gradient distribution of carbon content in carburized sample measured layer-by-layer via combustion method.
Metals 15 00934 g002
Figure 3. Optical micrographs of carburized layer along depth gradient: (a) quenched and cryotreated; (b) tempered at 175 °C; (c) tempered at 240 °C. Sampled depths: 0.25 mm, 2.25 mm, and 4.25 mm.
Metals 15 00934 g003
Figure 4. SEM images of carburized layer along depth gradient: (a) quenched and cryotreated; (b) tempered at 175 °C; (c) tempered at 240 °C. Sampled depths: 0.25 mm, 2.25 mm, and 4.25 mm.
Metals 15 00934 g004
Figure 5. Hardness distribution curves from surface to core of the carburized layer after quenching and cryogenic treatment under different low-temperature tempering conditions.
Metals 15 00934 g005
Figure 6. Engineering stress–strain curves across depth layers (0.5–5.5 mm): tensile tests after tempering at (a) 175 °C, (b) 240 °C; compression tests after tempering at (c) 175 °C, (d) 240 °C.
Metals 15 00934 g006
Figure 7. Comparison of mechanical properties for the carburized layer: (a) ultimate tensile strength, yield strength, and uniform elongation; (b) compressive yield strength; (c) strain hardening rate.
Metals 15 00934 g007
Figure 8. Weight loss of the tempered samples after fatigue wear resistance test.
Metals 15 00934 g008
Figure 9. Depth-of-field images of sliding–rolling contact surface for carburized layer after quenching, cryogenic treatment, and tempering: (a,b) at 175 °C and (d,e) at 240 °C for 12 h. (c) and (f) show surface profiles of dashed-line positions in (a) and (d), respectively.
Metals 15 00934 g009
Figure 10. Cross-sectional SEM micrographs of carburized layer after sliding–rolling contact fatigue testing: (a,b) tempered at 175 °C, (c,d) tempered at 240 °C. Insets show magnified views of selected regions.
Metals 15 00934 g010
Figure 11. Schematic diagram of microstructure evolution mechanisms in carburized layer under sliding–rolling contact fatigue: (a) optimal tempering; (b) over-tempered condition.
Metals 15 00934 g011
Table 1. Depth-dependent mechanical properties of carburized layer after quenching and cryogenic treatment under low-temperature tempering conditions, including yield strength (YS), ultimate tensile strength (UTS), uniform elongation (UE), and total elongation (TE).
SamplesYS/MPaUTS/MPaUE/%TE/%
T175-0.5 mm-2116 ± 30--
T175-1.5 mm2324 ± 202505 ± 201.62 ± 0.11.62 ± 0.1
T175-2.5 mm1828 ± 202120 ± 202.59 ± 0.14.63 ± 0.1
T175-3.5 mm1494 ± 201793 ± 252.69 ± 0.15.06 ± 0.15
T175-4.5 mm1502 ± 201773 ± 252.40 ± 0.14.71 ± 0.15
T175-5.5 mm1394 ± 151655 ± 252.33 ± 0.14.74 ± 0.15
T240-0.5 mm-2136 ± 30--
T240-1.5 mm2331 ± 202691 ± 202.84 ± 0.12.84 ± 0.1
T240-2.5 mm1774 ± 202142 ± 203.54 ± 0.15.63 ± 0.15
T240-3.5 mm1506 ± 201790 ± 252.84 ± 0.15.16 ± 0.15
T240-4.5 mm1471 ± 201744 ± 252.82 ± 0.15.10 ± 0.15
T240-5.5 mm1385 ± 151686 ± 252.77 ± 0.15.24 ± 0.15
Disclaimer/Publisher’s Note: The statements, opinions and data contained in all publications are solely those of the individual author(s) and contributor(s) and not of MDPI and/or the editor(s). MDPI and/or the editor(s) disclaim responsibility for any injury to people or property resulting from any ideas, methods, instructions or products referred to in the content.