Article

Effect of Quenching and Partitioning on Microstructure, Impact Toughness and Wear Resistance of a Gray Cast Iron

by
Edson Luiz da Silva Junior
1,*,
Fábio Edson Mariani
1,
Selauco Vurobi Junior
2,
Camila Yuri Negrão Konno
3,
Adriano Corrêa Batista
3,
Tiago Manoel de Oliveira Santos
3,
Mariana Botelho Barbosa
3 and
Kahl Dick Zilnyk
1
1
Competence Center in Manufacturing, Instituto Tecnológico de Aeronáutica, São José dos Campos 12228-900, SP, Brazil
2
Departamento de Engenharia de Materiais, Universidade Estadual de Ponta Grossa, Campus Universitário de Uvaranas, Av. Carlos Cavalcanti, 4748, Ponta Grossa 84030-900, PR, Brazil
3
SENAI ISI Engenharia de Superfícies, Avenida José Cândido da Silveira, 2000, Horto, Belo Horizonte 31035-536, MG, Brazil
*
Author to whom correspondence should be addressed.
Metals 2025, 15(12), 1361; https://doi.org/10.3390/met15121361
Submission received: 1 November 2025 / Revised: 26 November 2025 / Accepted: 27 November 2025 / Published: 10 December 2025
(This article belongs to the Special Issue Mechanical and Structural Properties of Cast Irons)

Abstract

This study investigates the influence of quenching and partitioning (Q&P) on the microstructure, hardness, wear resistance, and impact toughness of GG25 gray cast iron, in comparison with as-cast, quenched, quenched-and-tempered, and austempered conditions. Q&P treatment promotes a significant fraction of retained austenite, with carbon enrichment stabilizing the austenite at room temperature. Microstructural analysis reveals a multiphase matrix composed of partitioned martensite, bainitic ferrite and carbon-enriched retained austenite, while the morphology and distribution of graphite flakes remain unchanged. Mechanical testing shows that Q&P enhances impact toughness without substantial loss of hardness, achieving a balance not observed in conventional quenching and tempering treatments. Tribological evaluation indicates that wear resistance is slightly lower than quenched and tempered samples but superior to as-cast iron, with deformation of retained austenite and tribofilm formation influencing wear behavior. These results demonstrate that Q&P represents a promising route for developing gray cast irons with enhanced toughness and maintained hardness, suitable for components subjected to impact and wear loading.

1. Introduction

Gray cast irons typically contain 2.5–4.0 wt.% carbon and 1.0–3.0 wt.% silicon. A portion of the carbon is present as graphite flakes, which significantly influence the mechanical behavior of the alloy by acting as stress concentrators that can initiate fracture within the metallic matrix. As a result, these materials exhibit limited ductility, with compressive strength up to four times higher than their tensile strength and elongation below 1%. The flake morphology of graphite also provides high thermal conductivity, excellent machinability, and self-lubricating properties, as well as superior vibration damping capacity [1].
The combination of favorable mechanical properties, ease of manufacture, and low production cost—about 20–40% lower than that of steels [2,3]—makes gray cast irons the most widely used type of cast iron. In 2019, the global production of gray cast iron components reached 49.53 million tons, accounting for approximately 47% of all castings produced worldwide [4]. These alloys are extensively used across several industrial sectors, including engine blocks, pump rotors, transmission housings, brake disks, machine bases, and stamping dies, among others [1,2,3,4,5,6,7,8,9].
The mechanical strength of gray cast irons depends mainly on the graphite morphology and the matrix microstructure [1]. Since the graphite phase cannot be modified after solidification [1,2,3], the properties of as-cast alloys can only be optimized by altering the microstructure of the metal matrix through post-casting heat treatments [1]. Among these treatments, austempering has already been investigated for gray cast irons [10,11,12], whereas quenching and partitioning (Q&P) has not yet been reported in the available literature [13,14,15].
The Q&P process is carried out in three main stages to obtain a microstructure composed of martensite and carbon-enriched retained austenite in steels, that remains stable at room temperature. In the first stage, the alloy is austenitized and then subjected to an initial quench between the martensite start (Ms) and martensite finish (Mf) temperatures, resulting in a controlled fraction of primary austenite and carbon-supersaturated martensite. After this partial quench, the second stage—known as partitioning—consists of reheating the alloy above Ms, allowing carbon to diffuse from the supersaturated martensite into the primary austenite. This process leads to carbon enrichment and stabilization of the austenite as carbon-saturated retained austenite. Finally, in the third stage, the material undergoes final quenching to room temperature [13,14,15].
Initial studies by Matlock et al. [16] introduced the concept of carbon partitioning in steels, developing a thermodynamic model to predict carbon redistribution and highlighting its dependence on composition and temperature. Speer et al. [17] confirmed the feasibility of the Q&P process for producing carbon-rich microstructures, noting that insufficient carbon enrichment promotes carbide precipitation. Later, Silva et al. [18] investigated the Q&P treatment in ductile cast irons, evaluating impact resistance, tensile strength, and carbon partitioning behavior. The results indicated that lower partitioning temperatures increase tensile strength, whereas higher partitioning temperatures improve elongation. Similarly, Melado [19] studied Q&P-treated ductile cast irons, reporting that higher partitioning temperatures enhance fatigue life, while lower partitioning temperatures and shorter partitioning times favor fresh martensite formation, which negatively affects mechanical performance.
Based on this background, the objective of the present study was to evaluate the feasibility of applying the quenching and partitioning (Q&P) treatment as an alternative route for developing multiphase gray cast irons. Particular emphasis was placed on investigating the effect of the Q&P process on wear resistance and impact toughness, two key properties that determine the applicability of gray cast irons in dynamic and tribological environments. In addition, the Q&P-treated samples were compared with as-cast gray iron specimens and with those subjected to austempering and quenching followed by tempering treatments.

2. Materials and Methods

The material used in this study is a GG25 gray cast iron, corresponding to the EN-GJL-250 grade. It was supplied in the form of rectangular bars measuring 35 × 35 × 200 mm for impact testing, hardness measurements, and microstructural characterization. For the wear tests, cylindrical samples with a diameter of 76.2 mm and a length of 100 mm were provided.
The casting process was carried out using the full-molding method. Melting was performed in a 500 kg induction furnace, with a pouring temperature between 1300 and 1350 °C. The chemical composition of the alloy is given in Table 1, and the measured values were provided by Itafunge, the supplier of the material.
Prior to heat treatment, all samples were coated with alumina-based protective paint to prevent surface decarburization. The austenitizing process was performed by heating from room temperature to 900 °C at a rate of 10 °C/min, followed by holding for 2 h in an electrical resistance furnace muffle. The quenching and partitioning (Q&P) treatment was carried out in molten salt baths, with quenching at 175 °C and partitioning at 375 °C under controlled heating and temperature regulation, as illustrated in Figure 1, following the partitioning step, the samples were subsequently cooled in air until room temperature. The partitioning time varied between 5 and 90 min to evaluate its influence on microstructure and properties.
As comparison, other heat treatments were carried out in samples of the GG25 gray cast iron. The quenched and tempered (Q&T) condition was obtained by quenching in canola oil at 80 °C and subsequently tempering at 375 °C for 30 min. For the austempered condition, samples were quenched and held at 375 °C in a molten salt bath for 30 min, followed by cooling in still air.

2.1. Microstructural Characterization

After heat treatment, part of the samples was sectioned for metallographic preparation, following a sequential procedure of grinding with silicon carbide papers and polishing with diamond pastes, followed by colloidal silica. Metallographic etching was performed using 2% nital for 5 s and 1% sodium metabisulfite for 30 s. Microstructural analyses were conducted using a Thermo Fisher Quattro ESEM [In Columbus, OH, USA] for electron backscatter diffraction (EBSD) and a Keyence VHX-7000 digital microscope [In Columbus, OH, USA] for optical microscopy.
X-ray diffraction (XRD) analyses were carried out on an Empyrean diffractometer (Malvern PANalytical) [in São José dos Campos, SP, Brazil] equipped with a Co-Kα radiation source (λ = 1.78901 Å). Rietveld refinement was performed using the HighScore Plus 4.0 software. Microstrain (ε), crystallite size (D), and dislocation character were estimated using the modified Williamson–Hall model, expressed as (Equation (1)):
K =   1 D + ε K C 1 2
where ΔK = 2cos (θ)*FWHM/λ, D is the crystallite size, ε is the microdeformation, K = 2sen (θ)/λ, FWHM is the full width at half measure of the diffraction peaks, λ is the wavelength of the incident X-ray (0.178901 nm for Co-Kα) and C is the contrast factor proposed by Úngar and Borbély [20], given by (Equation (2)):
C = C h 00 1 q h 2 × k 2 + h 2 × l 2 + k 2 × l 2 h 2 + k 2 + l 2 2
where Ch00 is the average contrast factor for h00 reflections (Ch00 = 0.285 for bcc iron and Ch00 = 0.332 for fcc iron) and q is a parameter that depends on the character of the dislocations (edge or screw) [21].

2.2. Mechanical Testing

The hardness tests were performed using the Brinell method on an Otto Wolpert Werke Dia Testor 2Rc tester [in Ponta Grossa, PR, Brazil], employing a 2.5 mm steel ball and a 1.8 KN load. Ten measurements were taken for each sample, and the results are presented as the average value ± standard deviation. The measurements were taken along the lateral surfaces, from one end of the sample to the other.
Impact toughness was determined using the Charpy impact test (Zwick/Roell RKP 450) [in Ponta Grossa, PR, Brazil] following ASTM E23-16 [22], with unnotched specimens.

2.3. Tribological Testing

The wear resistance of the samples was evaluated using a Bruker UMT-TriboLab tribometer (Belo Horizonte, MG, Brazil) in a dry pin-on-disk configuration, according to ASTM G99-2023 [23]. Tests were conducted under controlled conditions of 20 ± 2 °C and relative humidity of 55 ± 5%. disk specimens (70 mm in diameter and 6 mm thick) were tested against a tungsten carbide (WC) ball with a diameter of 4.762 mm. The applied normal load was 15 N, the sliding radius was 20 mm, the rotational speed was 150 rpm, and the total test duration was 1 h.
The specific wear rate was determined from the mass loss, obtained by precise weighing before and after testing using a Shimadzu AUW220D analytical balance [in Belo Horizonte, MG, Brazil]. Additionally, the wear track volume was measured using optical profilometry with a Bruker Contour GT-K profilometer [in Belo Horizonte, MG, Brazil] (vertical resolution: 1 nm), analyzed through Vision 64 software. Three-dimensional surface maps were generated to quantify wear depth, width, and removed volume.
The morphology of the wear tracks was examined by scanning electron microscopy (SEM, JEOL JSM-7100F) [in Belo Horizonte, MG, Brazil] to identify the dominant wear mechanisms. SEM images at various magnifications revealed features such as grooves, ridges, adhered particles, and microcracks. Additionally, EDS analysis was performed to determine the chemical composition of surface residues and adhered particles, aiding in the interpretation of the tribological behavior.

3. Results and Discussion Influence of Partitioning Time

3.1. Influence of the Partitioning Time

The microstructures of GG25 gray cast iron for partitioning times between 0 and 90 min are presented in Figure 2. In all samples, graphitic flakes are readily identified and can be classified as Type VII graphite, according to ASTM 247-19 [24].
For the 0 min sample, which was quenched to 175 °C and then air-cooled to room temperature, the matrix consists of martensite plates, visible as light-brown etched regions. In some areas, retained austenite can be identified as small non-etched white islands, whereas the larger unetched regions correspond to primary carbides formed during solidification.
After 5 min of partitioning, the matrix contains not only martensite but also bainitic ferrite, recognizable as dark-brown etched regions, and cementite near shrinkage regions. The bainitic ferrite sheaves are surrounded by larger fractions of non-etched retained austenite, a microconstituent sometimes referred to in the literature as ausferrite, owing to the coexistence of ferrite and austenite without cementite precipitation, as occurs in conventional bainite.
For longer partitioning times (15 to 90 min), the main difference is an increase in the area fraction of ausferrite accompanied by a reduction in the martensitic fraction. This trend suggests enhanced stability of the retained austenite, resulting in less fresh martensite formation during final cooling to room temperature.
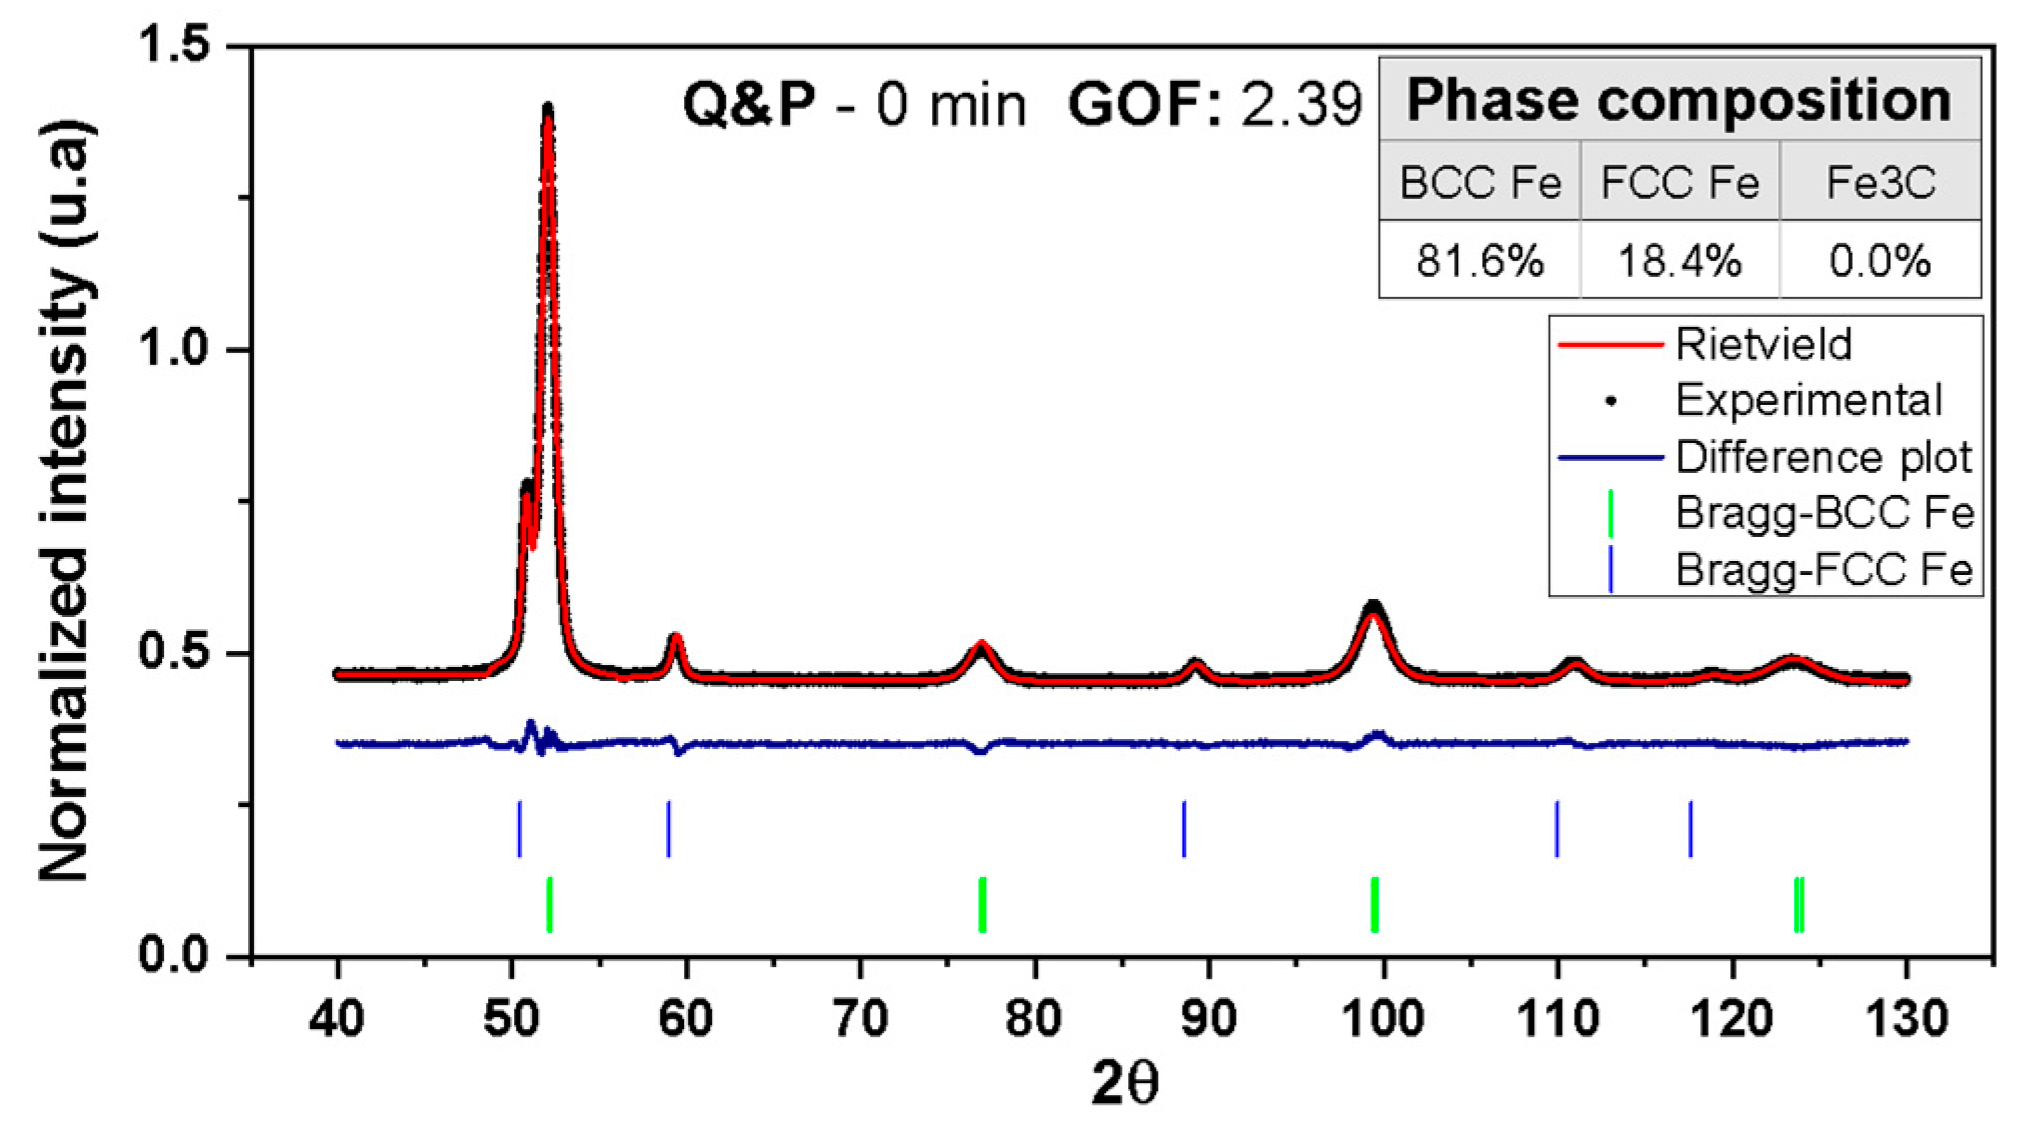
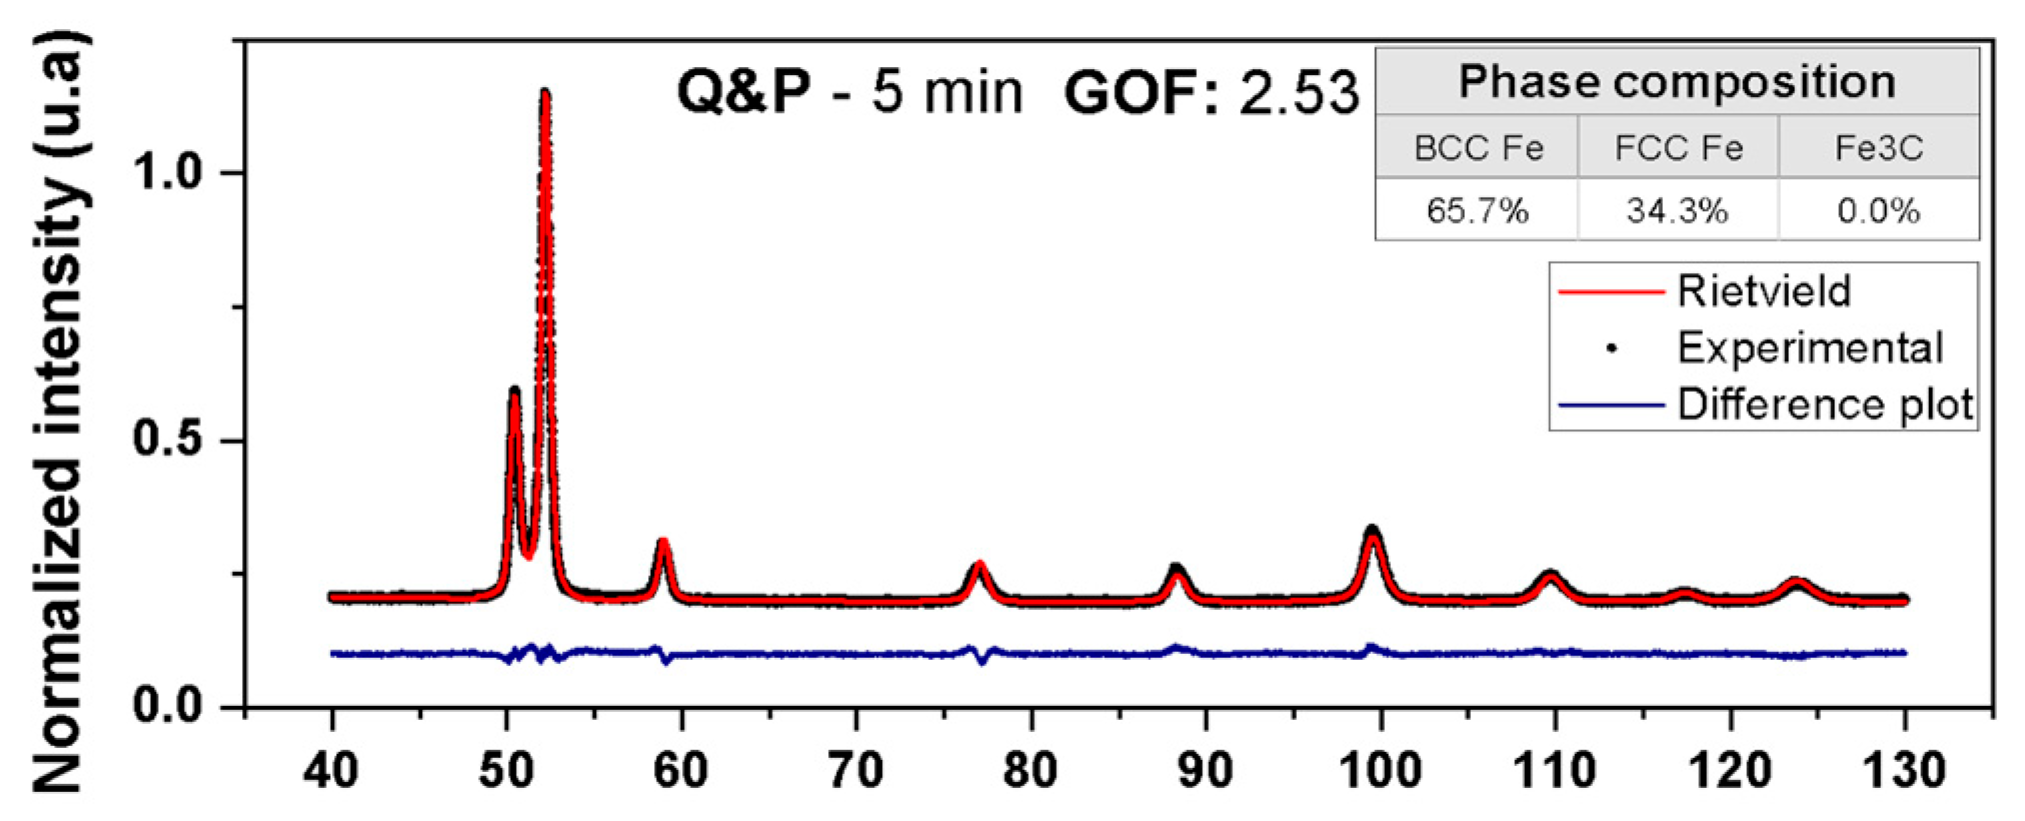
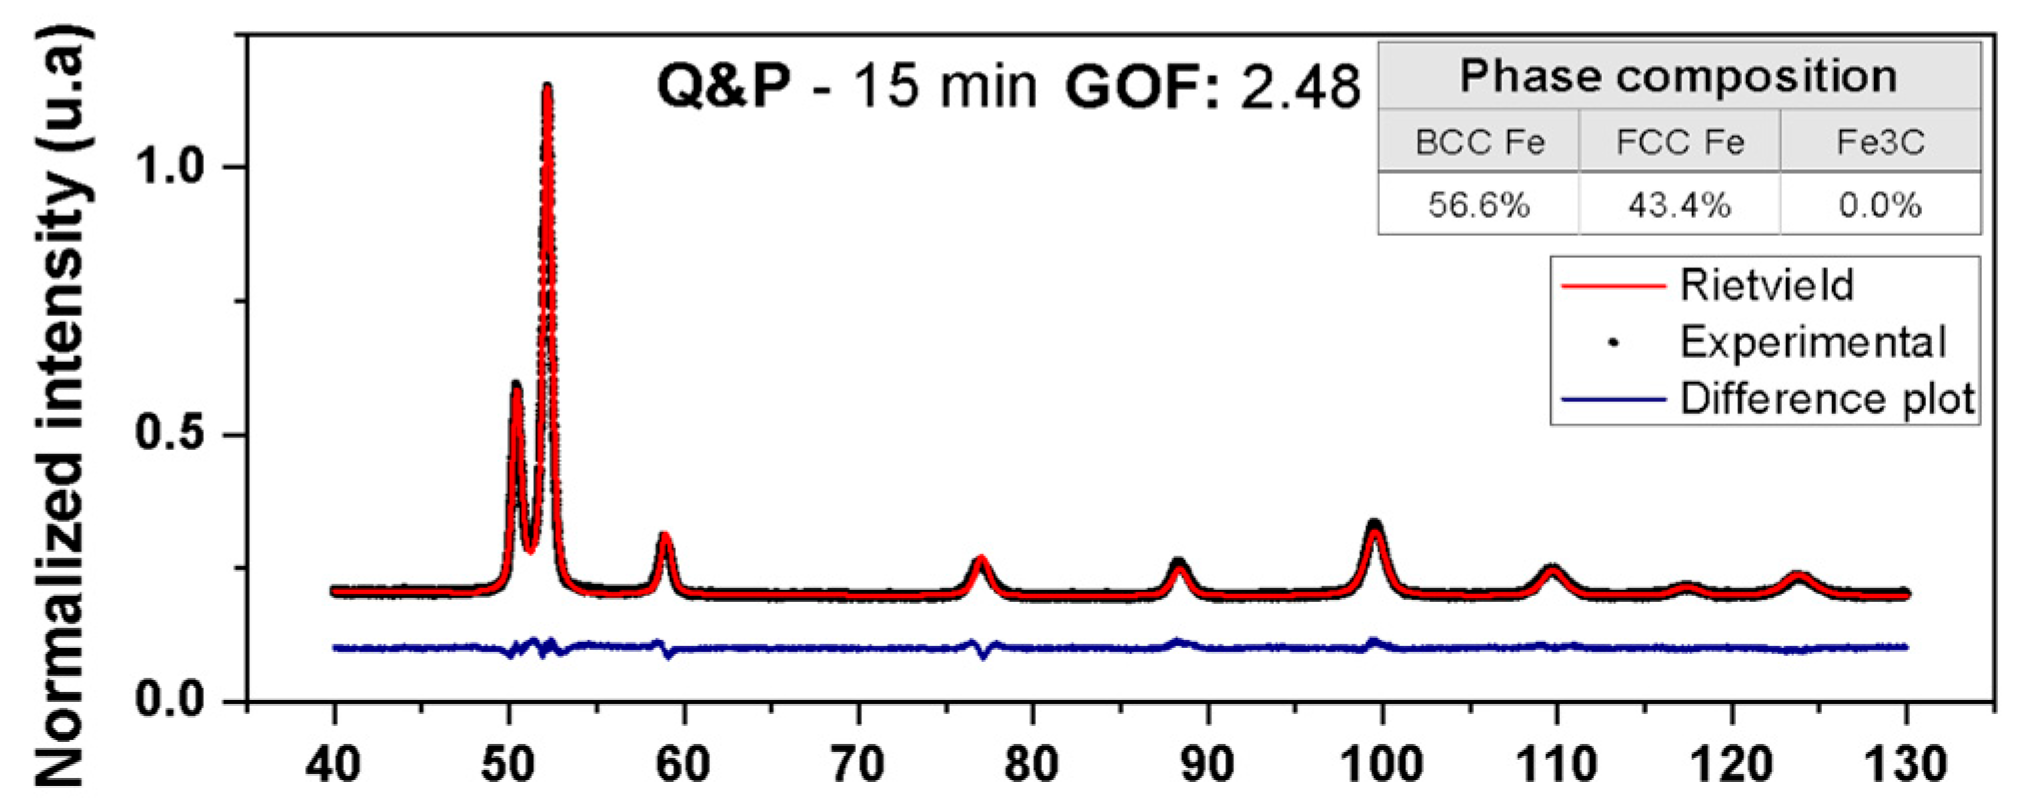
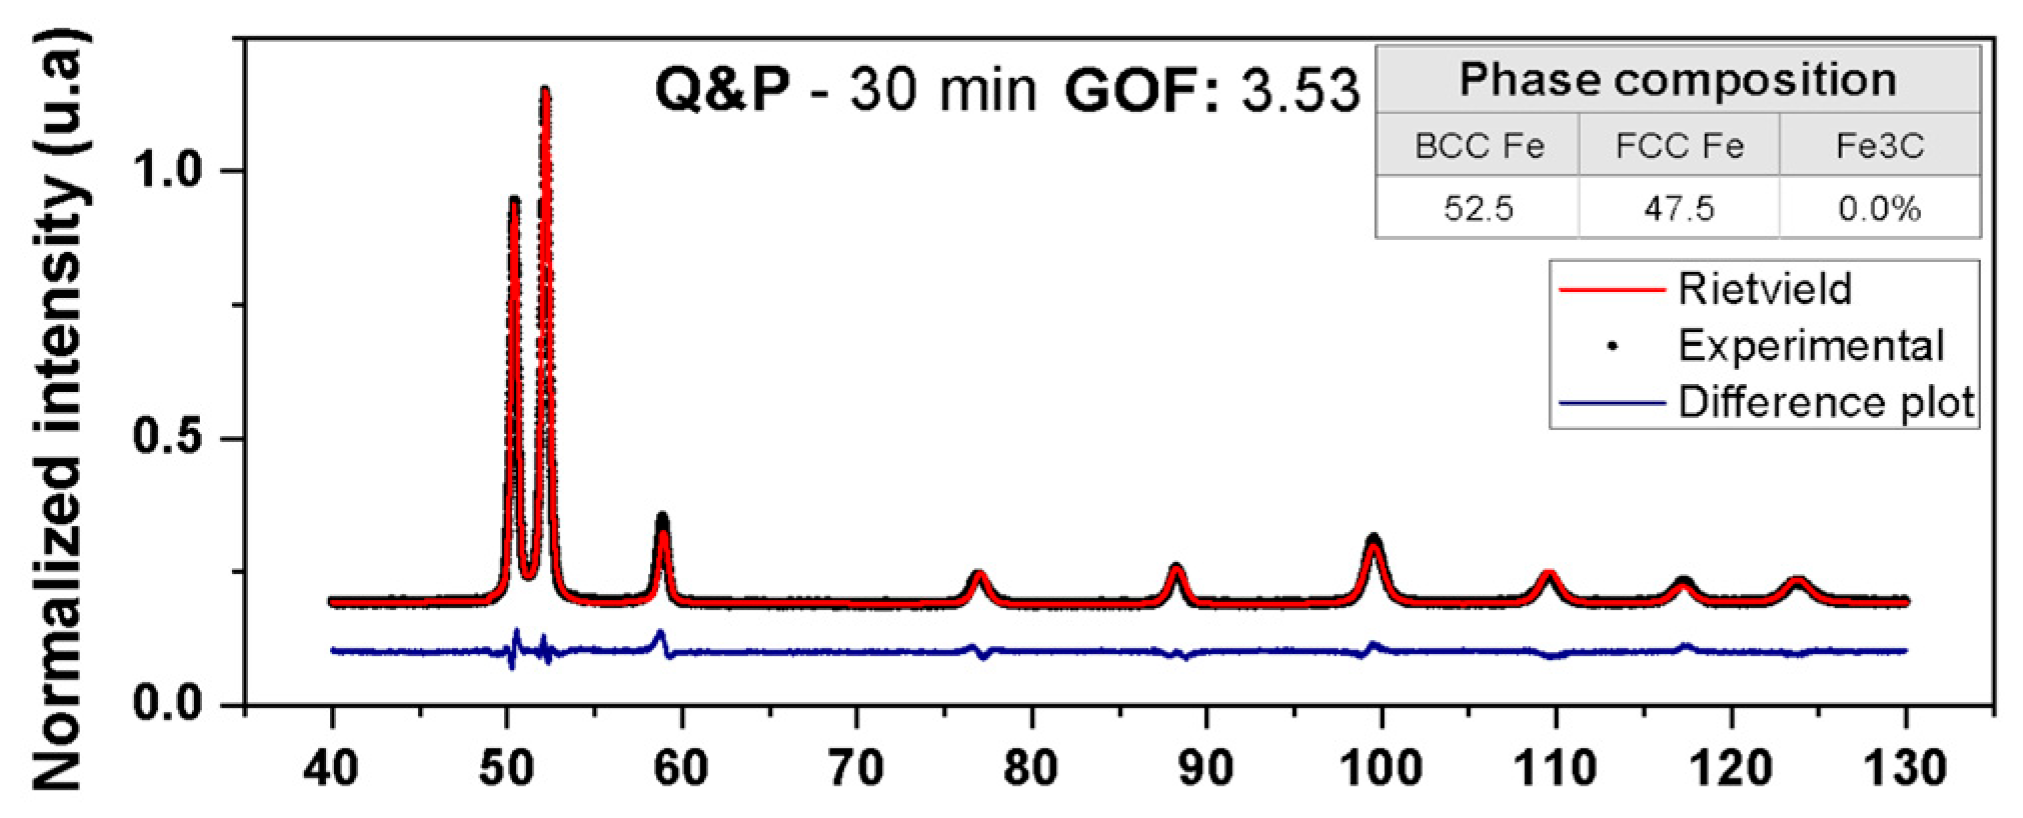
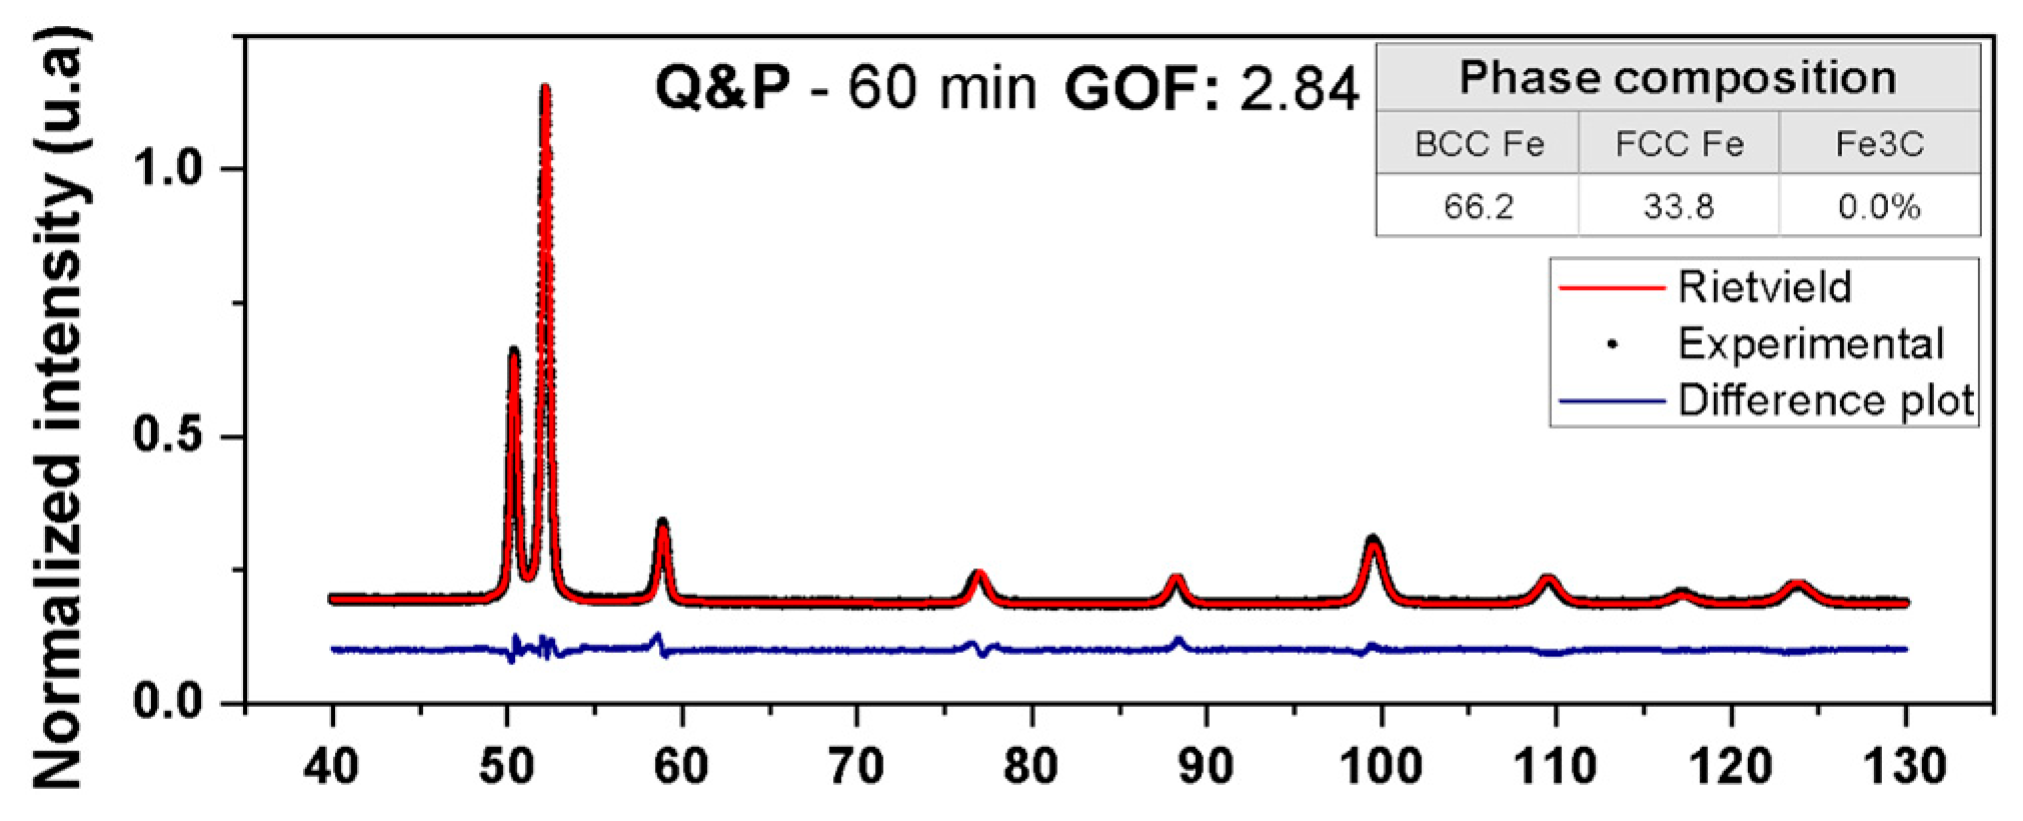
X-ray diffraction (XRD) patterns of the samples subjected to partitioning times ranging from 0 to 90 min are shown in Figure 3. The individual diffraction profiles for each partitioning time are provided in Appendix A (Figure A1, Figure A2, Figure A3, Figure A4, Figure A5, Figure A6 and Figure A7). Noticeable changes are observed in the intensity of the peaks associated with the austenite (γ) phase. Using Rietveld refinement, the fractions of FCC and BCC phases were quantified and are summarized in Figure 4.
For the Q&P samples, the BCC fraction includes tempered martensite, fresh martensite, and bainitic ferrite. The 0 min sample exhibits 18.4% retained austenite, which increases to 45.7% after 30 min. Beyond this time, a decrease in the retained austenite fraction is observed.
According to Silva et al. [18], in Q&P-treated nodular cast irons, this decrease is attributed to the decomposition of austenite into secondary transformation products, most likely carbides formed during the second stage of the bainitic reaction, some elements such as boron or copper slow the austenite-to-ferrite transformation [25]. Nevertheless, no diffraction peaks associated with carbides were detected in the present study.
According to the classical empirical equation by Dyson and Holmes [26] and XRD measurements reported by Lehnhoff et al. [27], the silicon content has minimal effect on the austenite lattice parameter, so any changes can be largely attributed to the carbon content or the effect of temperature (T). Accordingly, Onink et al. [28] proposed Equation (3) to estimate the carbon content (χC, in mole fraction) dissolved in austenite from the lattice parameters (aγ) obtained via Rietveld refinement. The 0 min sample shows a carbon content of 0.73 wt.%, consistent with estimates reported by Wenbang et al. [29] for tempered gray cast irons. After 5 min of partitioning, the carbon content in austenite increases rapidly to 1.51 wt.%, followed by a slower increase, reaching 1.61 wt.% after 90 min, values similar to the ones found by Silva et al. [18], in Q&P-treated nodular cast irons. The formation of bainitic ferrite increases the stability of retained austenite. The enrichment of carbon in austenite occurs initially through the partitioning of carbon rejected from martensite; however, the carbon content in martensite depletes after short partitioning times, meaning that the main mechanism for carbon enrichment in austenite is the simultaneous occurrence of the bainite reaction [30,31].
a γ = 0.36306 + 0.00078   X C [ 1 + ( 24.9 0.5   X C ) × 10 6 ( T 1000 ) ]
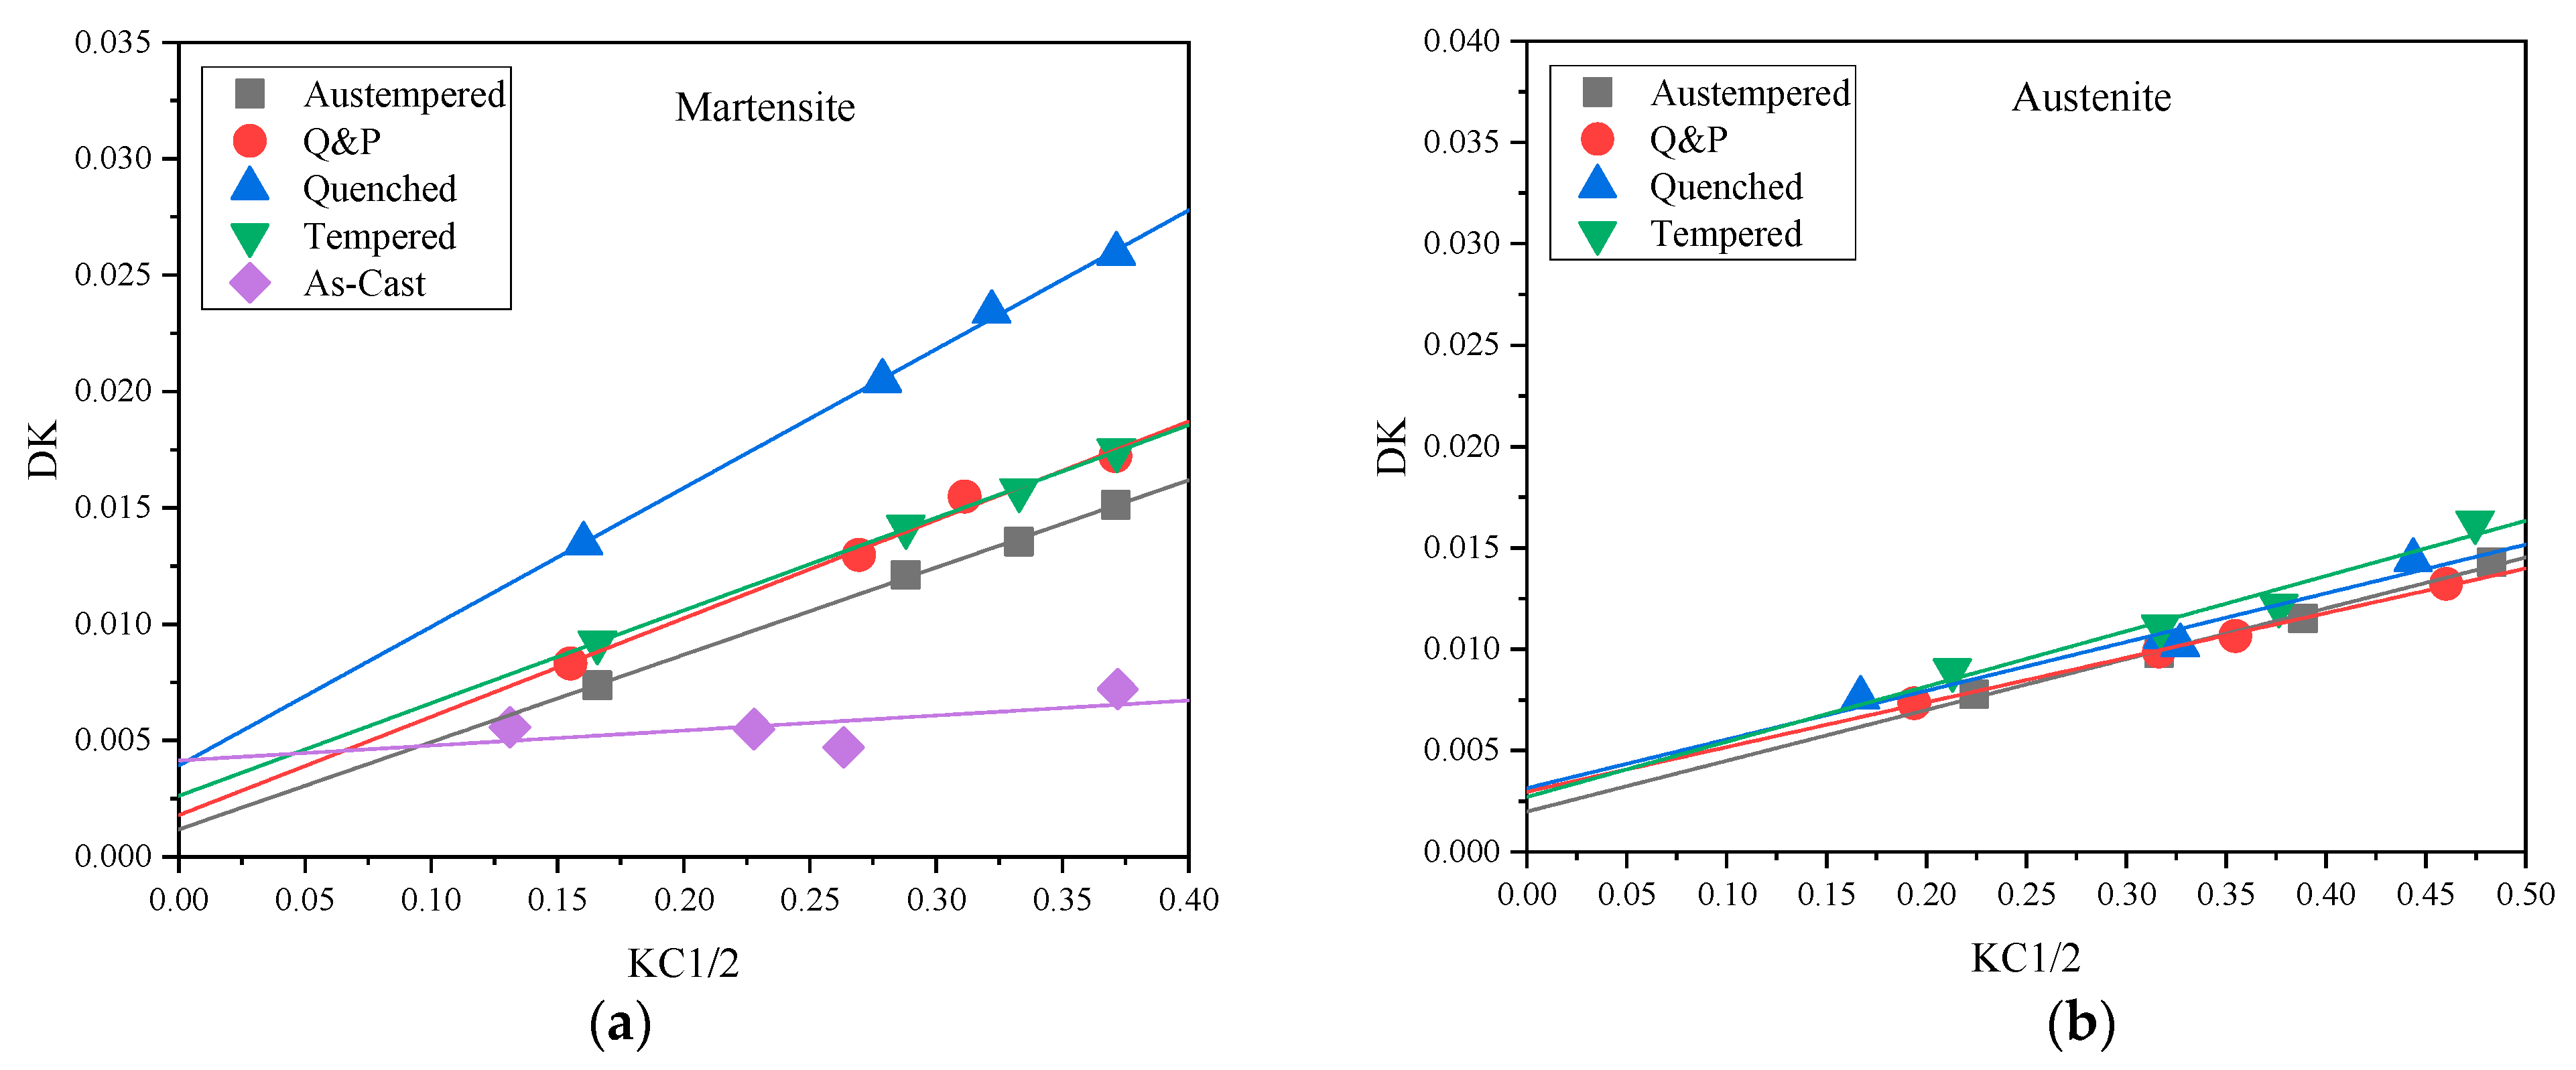
In addition to Rietveld refinement, a modified Williamson–Hall analysis was performed on the XRD patterns to estimate crystallite size and microstrain in each matrix phase based on peak broadening [32]. The modified Williamson–Hall plots are shown in Figure 5, and the main results are summarized in Table 2. The parameter q in Equation (2) represents the dislocation character: for bcc structures, it varies between 1.2 (pure edge) and 2.8 (pure screw), while for fcc structures, it ranges from 1.7 (pure edge) to 2.5 (pure screw) [21]. Martensite and bainitic ferrite in all samples exhibits predominantly screw-type dislocations, whereas austenite displays primarily edge-type dislocations. The microstrain of martensite and bainitic ferrite are higher than that of austenite, indicating a greater density of microstructural defects. The formation of bainitic ferrite generates semi-coherent ferrite/austenite interfaces, which are separated by crystalline defects. These defects relieve the elastic misfit strains between the lattices through a structure of dislocations and structural steps. A trend of microstrain reduction is observed with increasing partitioning time, particularly within the first 5 min. Interestingly, austenite shows a sudden increase in microstrain at this stage, likely due to non-uniform carbon distribution in retained austenite, causing peak broadening due to lattice parameter gradients. Except for the 0 min sample, which exhibits the smallest crystallite sizes for both phases, no clear trend in crystallite size is observed with partitioning time, with values ranging from 347 to 540 nm for martensite and 303 to 478 nm for austenite.
The Brinell hardness evolution of GG25 as a function of partitioning time is shown in Figure 6. An inverse correlation between hardness and retained austenite fraction is evident: as the austenite fraction increases up to 30 min, hardness decreases. Conversely, longer partitioning times lead to lower austenite fractions and higher hardness values.
To confirm the microstructural interpretation of the Q&P-treated material, EBSD mapping was performed on the 30 min sample, since it presented the highest fraction of retained austenite. The resulting map is shown in Figure 7a, where martensite and bainitic ferrite are colored red, austenite green, and graphite appears as non-indexed black areas. The austenite area fraction is 26.13% (or 28.06% excluding graphite), which is significantly lower than the value measured by XRD. This discrepancy may be due to the limited EBSD scan area (100 × 60 µm2) compared to the XRD-sampled area (10 × 10 mm2), or to the difficulty of detecting film-like retained austenite at grain boundaries [33]. Figure 7b,c shows the IPF orientation maps of martensite, bainitic ferrite and austenite, respectively, colored according to the reference in Figure 7d.

3.2. Microstructural Comparison with Other Heat Treatments

The as-cast material microstructure (Figure 8) without any post-casting heat treatment, exhibits a pearlitic matrix with graphite flakes, consistent with the expected microstructure following slow solidification [3]. The microstructure after heat treatment is shown in Figure 9.
After quenching (Figure 9a), the microstructure is predominantly martensitic, consisting of light-brown etched plates, with a small fraction of retained austenite appearing as bright, unetched regions between the martensite plates. Following tempering (Figure 9b), the appearance of the tempered martensite shows only minor changes, with a slight reduction in the retained austenite fraction. For the austempered condition (Figure 9c), differences in both morphology and etching contrast (darker brown coloration) indicate the formation of bainitic ferrite sheaves surrounded by unetched retained austenite [34].
The Q&P-treated sample with 30 min partitioning was chosen for comparison with other heat treatments since it presented the highest retained austenite fraction. In its microstrucutre (Figure 9d), martensite plates are similar to the quenched material, but with a substantial increase in regions rich in retained austenite and bainitic ferrite.
It is important to note that in all heat treatment conditions, the graphite flake morphology and distribution remain unchanged and are classified as Type VII (flake) according to ASTM 247-19 [24].
The hardness results are presented in Figure 10. As expected, the as-cast pearlitic microstructure exhibits the lowest hardness (184 HB). The austempered, quenched and tempered, and Q&P samples show statistically similar hardness values (223, 232, and 237 HB, respectively), while the quenched-only sample reaches 265 HB, consistent with the presence of untempered martensite [18,19].
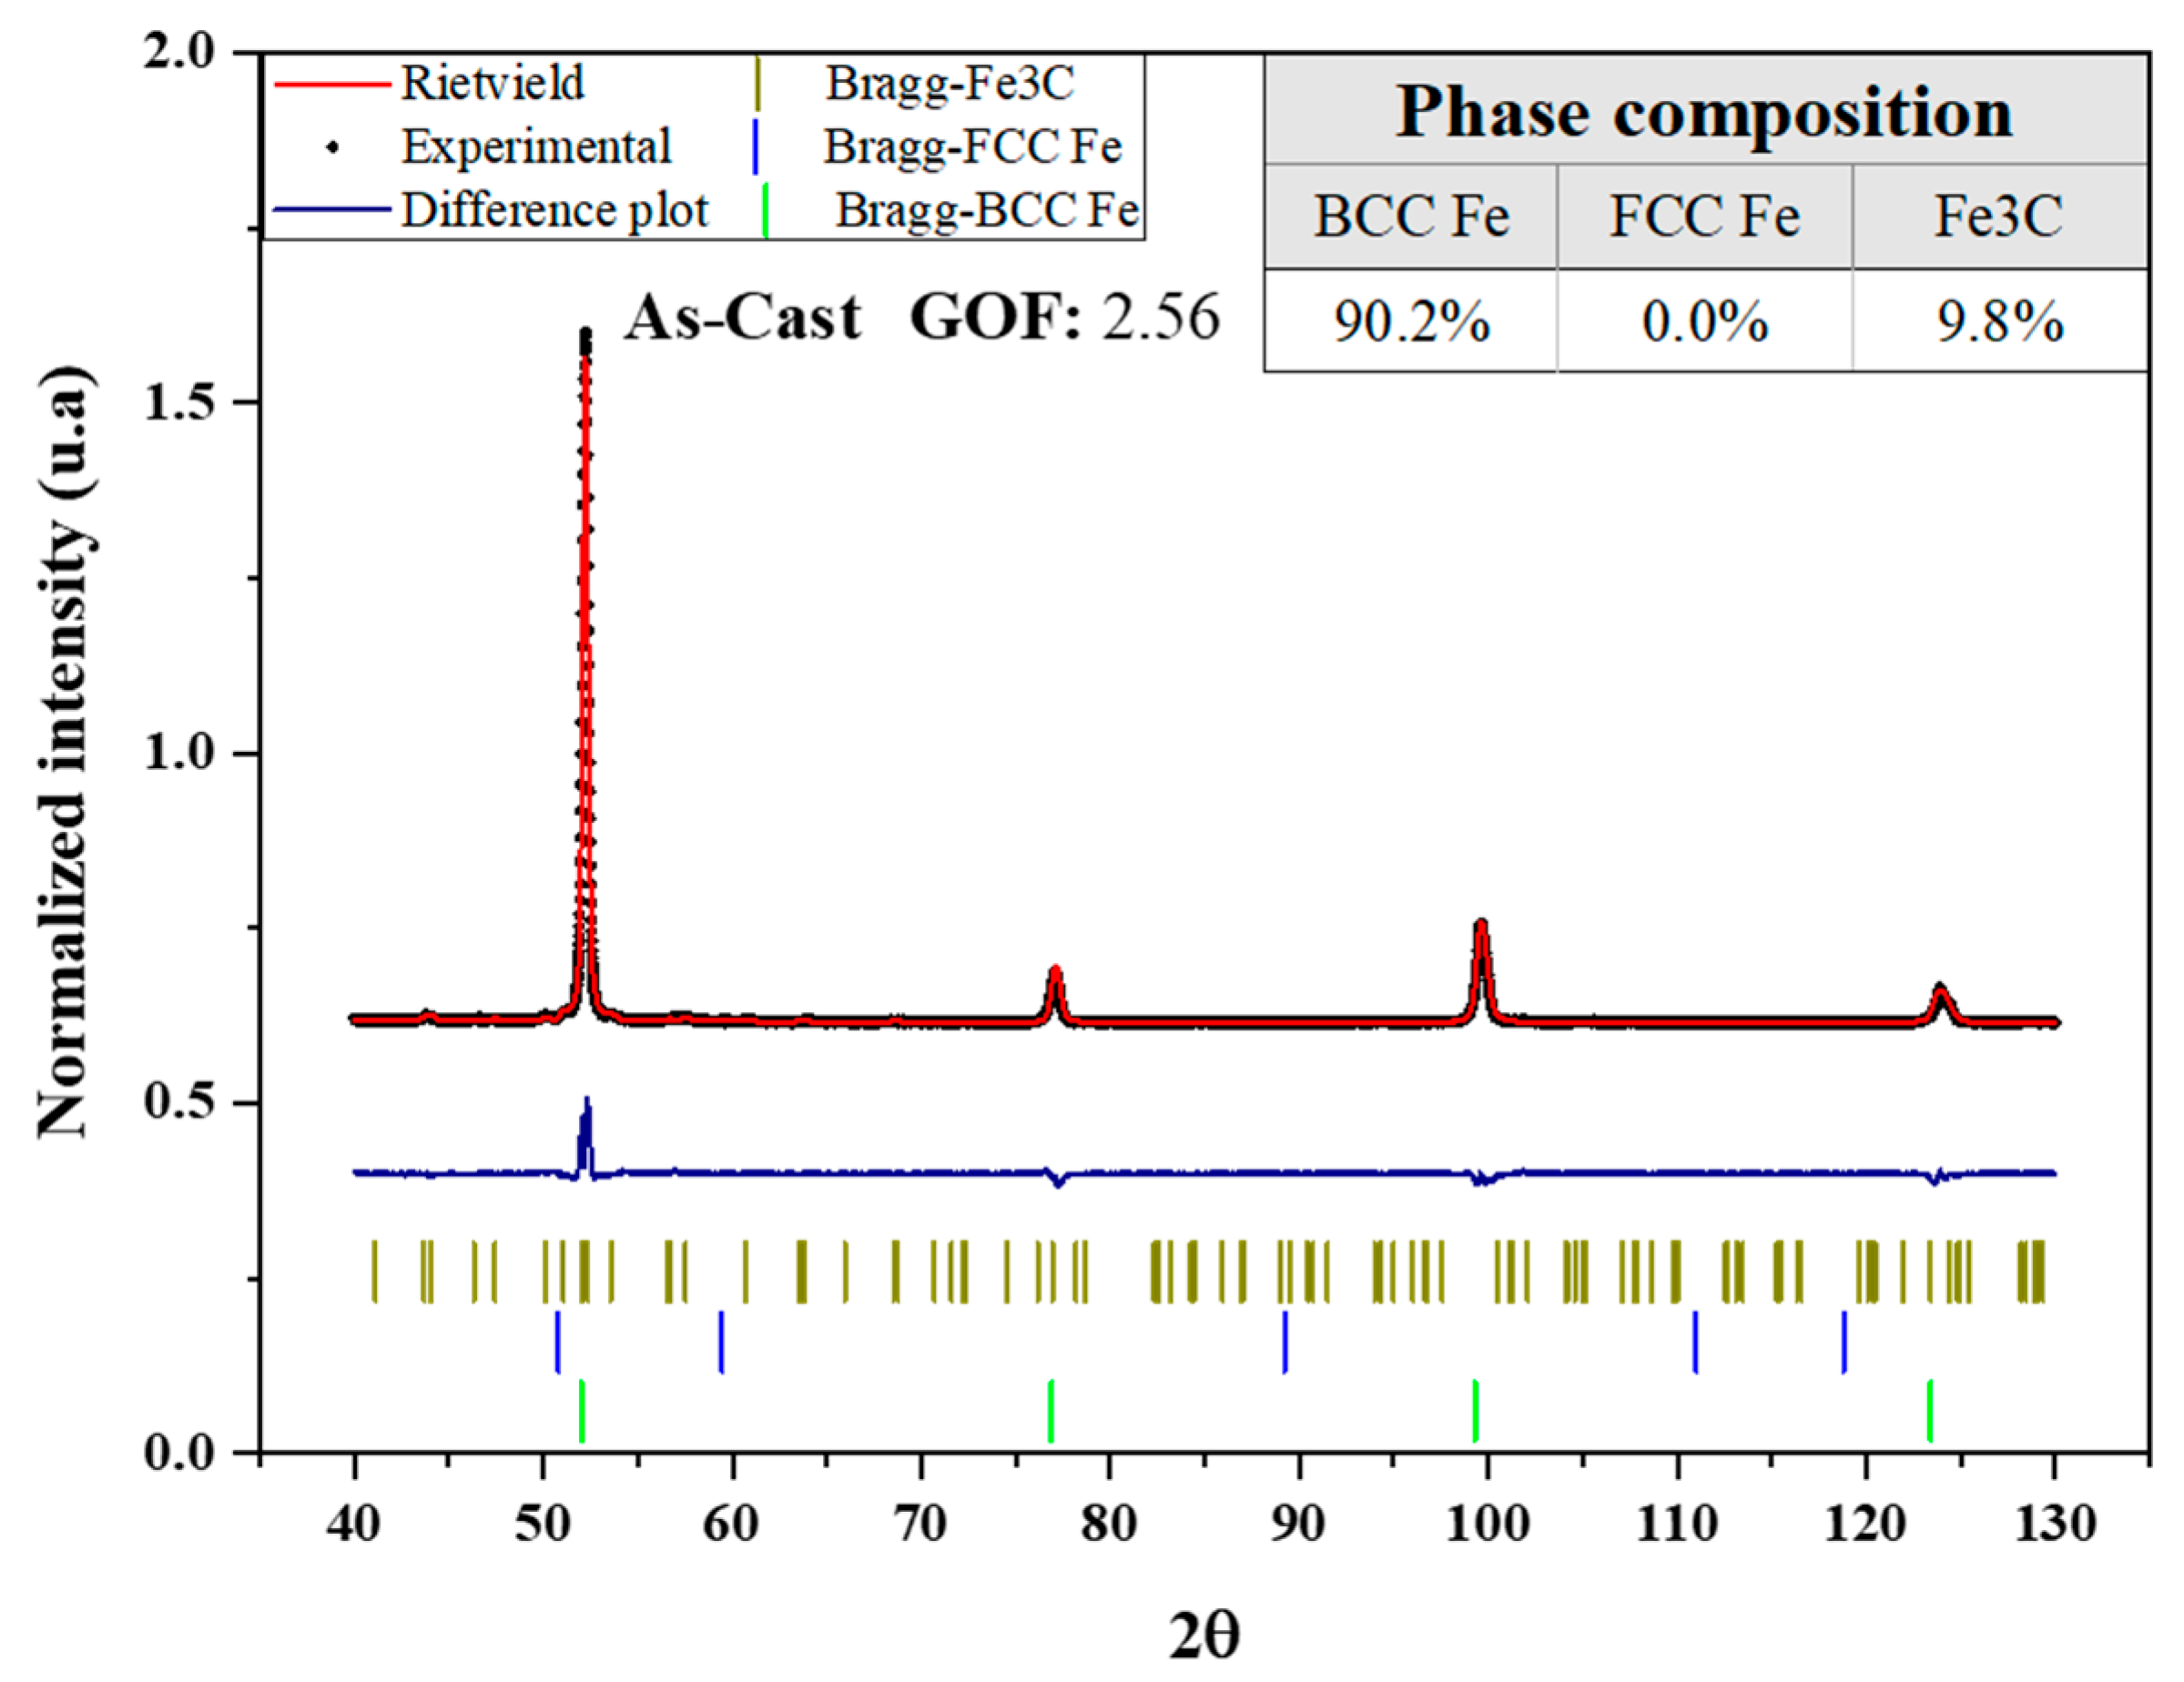
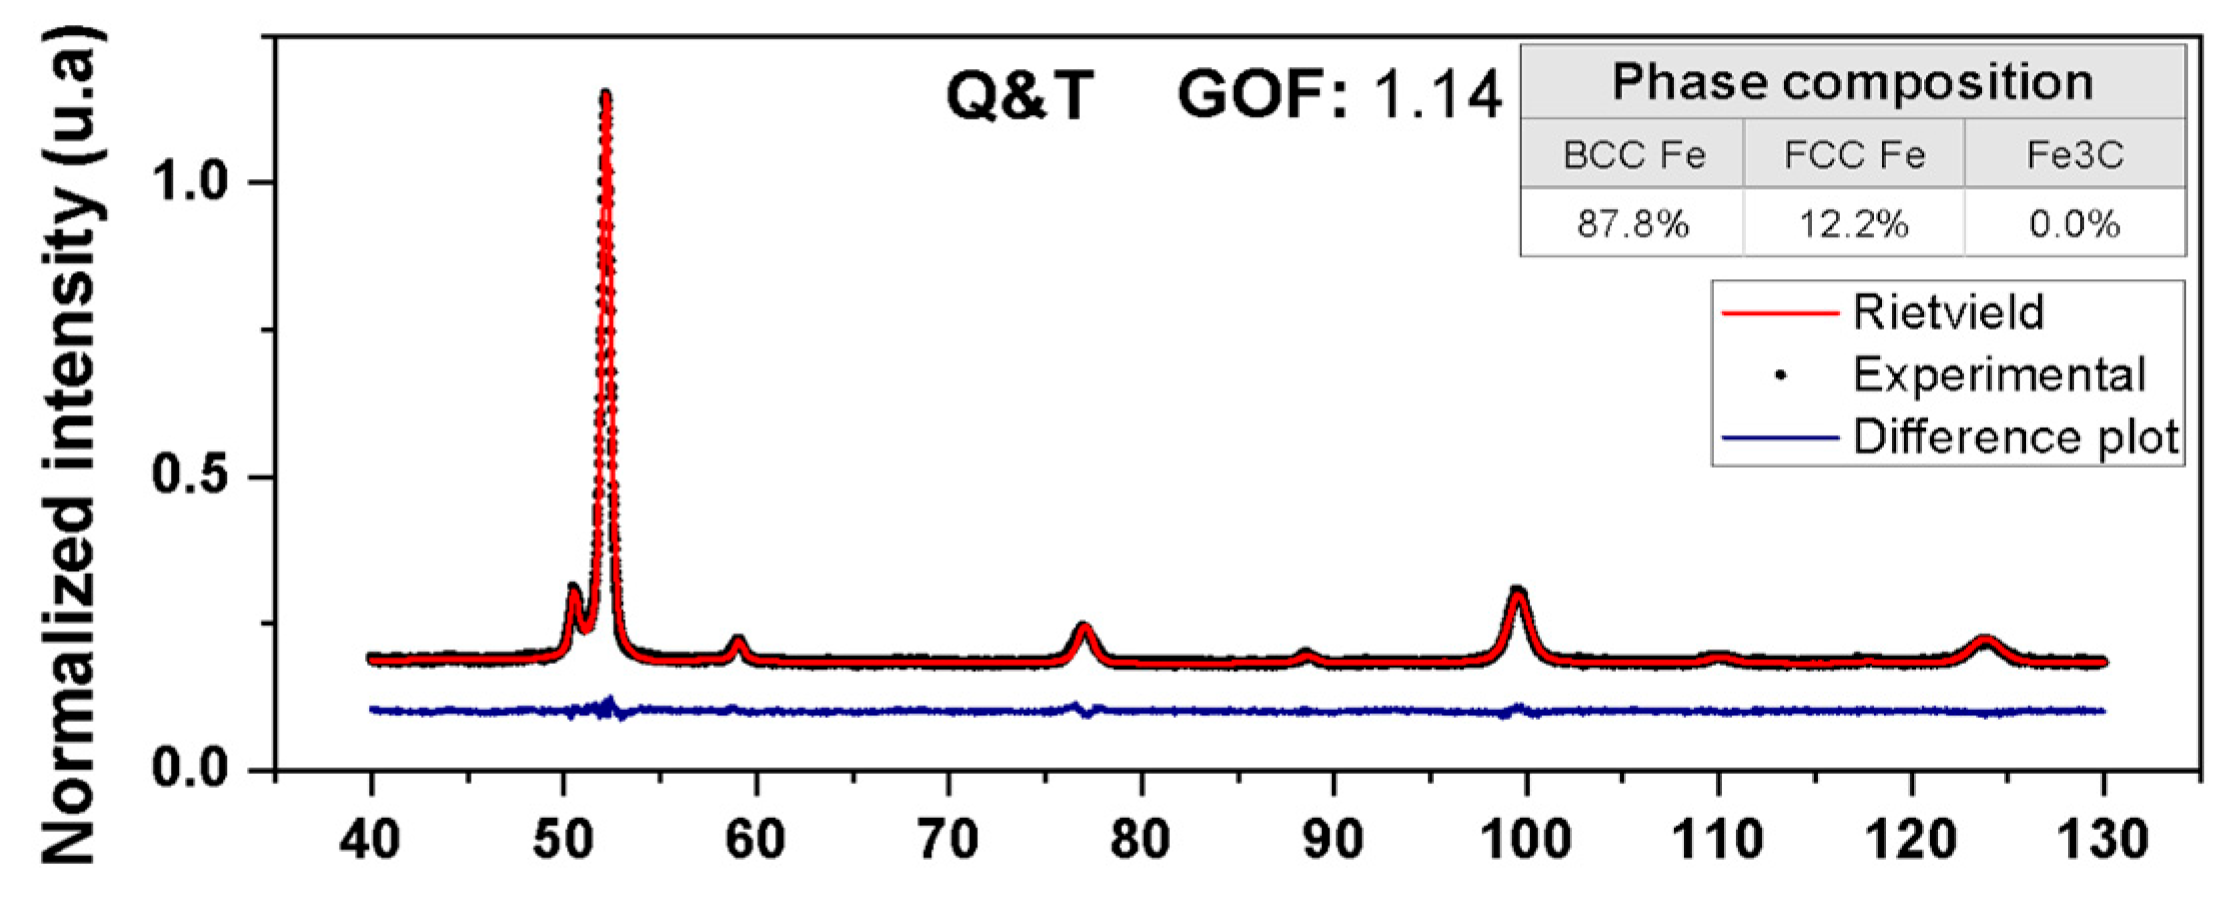
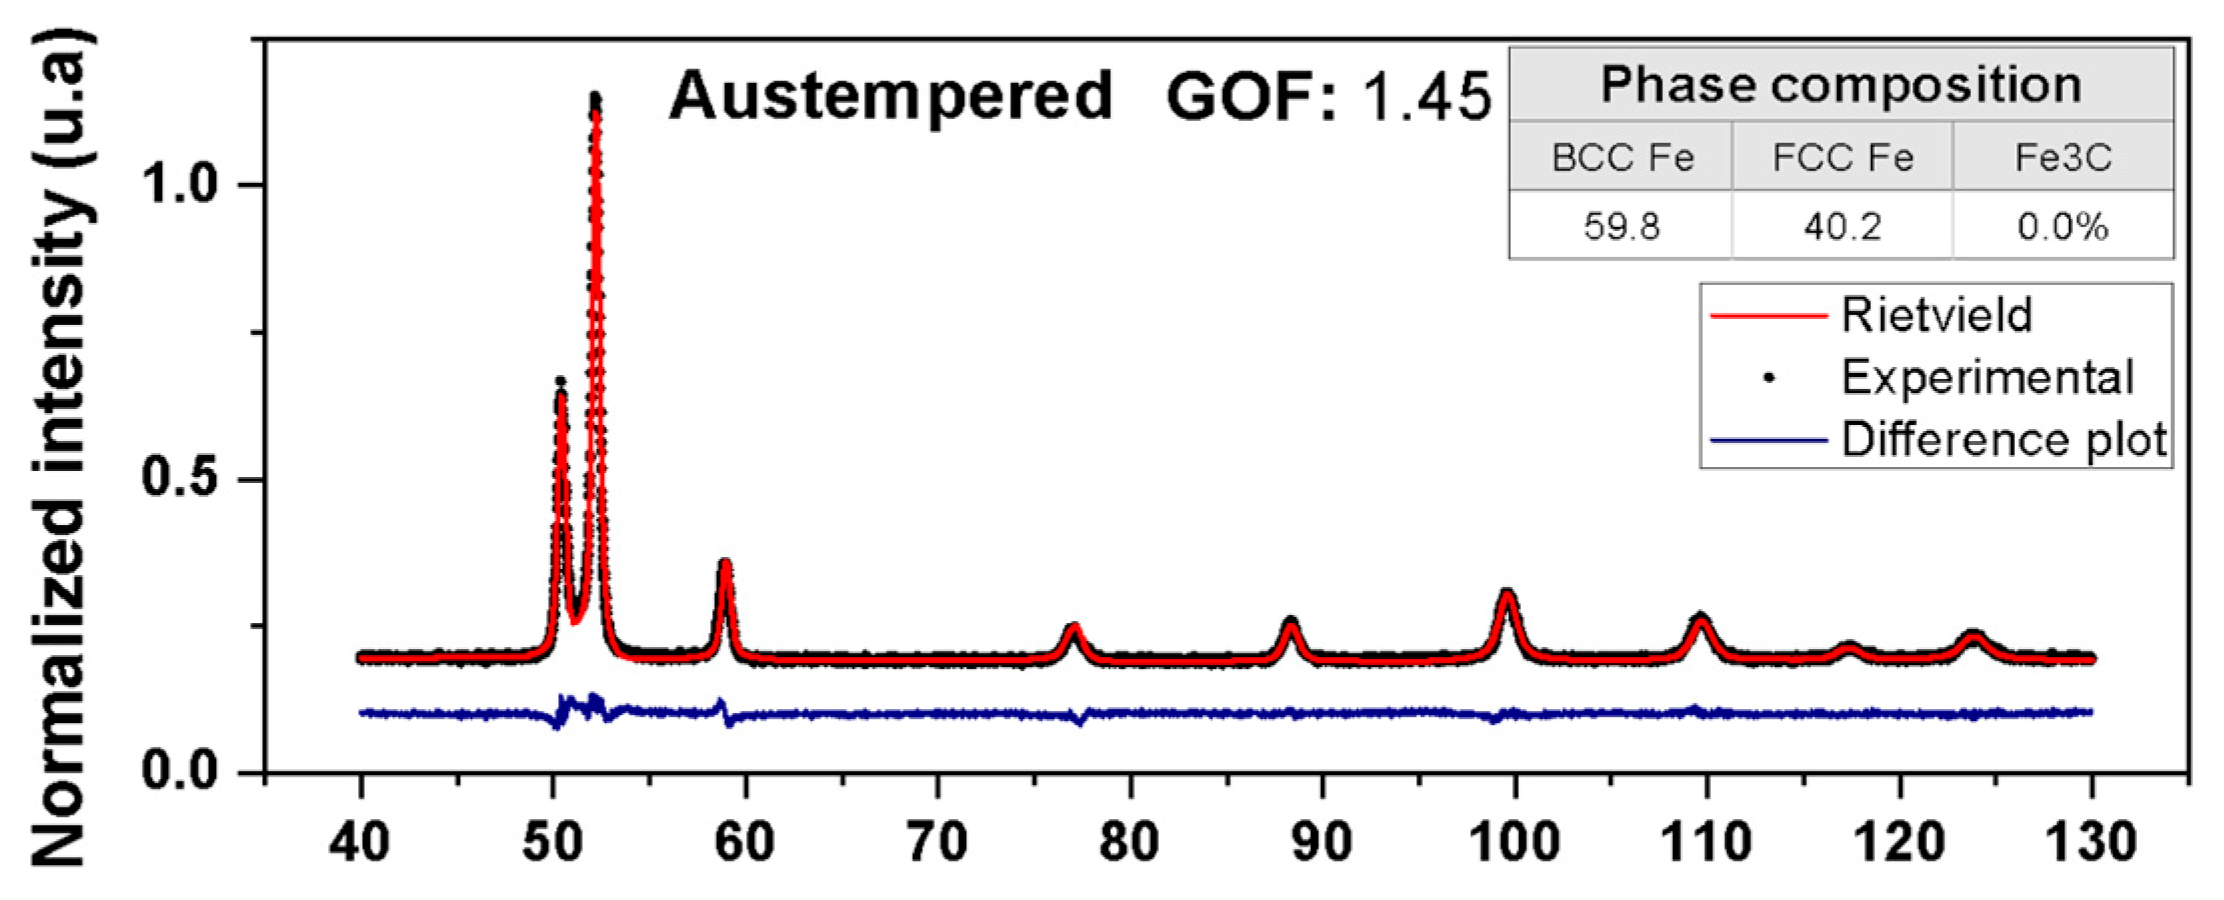
All samples were also analyzed by Co-Kα XRD to determine the matrix phase fractions and carbon content in retained austenite. The results for all heat treatments, including the 30 min Q&P sample, are shown in Figure 11, the individual graphs for each heat treatment are presented in Appendix A in Figure A8, Figure A9, Figure A10, Figure A11 and Figure A12. The as-cast material shows no retained austenite, as expected for a slowly cooled, near-equilibrium microstructure, but contains 9.8% cementite according to Rietveld refinement. The quenched sample contains 17.7% retained austenite with no cementite, while the quenched and tempered sample shows 12.2% retained austenite and approximately 0.5% carbide, indicating that austenite decomposed into ferrite and cementite during tempering. The austempered material exhibits a high retained austenite fraction (40.2%), similar to the 30 min Q&P sample (45.7%). However, the austempered material shows only bainitic ferrite, where Q&P shows martensite plus bainitic ferrite. Although some cementite precipitation may happen during austempering, it was not detected, likely due to its very low fraction.
Using the refined FCC lattice parameters and Equation (3), the carbon content in retained austenite was estimated for the different treatments and are shown in Figure 12. The austempered material shows a high carbon content (1.53 wt.%), comparable to Q&P samples. The quenched material exhibits the lowest carbon content (0.88 wt.%), slightly higher than the 0 min Q&P sample (Figure 4), consistent with expected values for high-silicon cast iron [29]. After tempering, the carbon content increases to 1.28 wt.%, indicating that austenite decomposition during tempering is accompanied by carbon enrichment.
Additionally, the modified Williamson–Hall method was applied to estimate microstrain and crystallite size from XRD peak broadening [32]. The plots are shown in Figure 13, and the main results are summarized in Table 3. The q parameter again indicates that martensite in all samples contains predominantly screw-type dislocations, whereas austenite has mainly edge-type dislocations. The austenite microstrain is similar across all samples, while for martensite, the as-quenched and as-cast samples exhibit significantly higher and lower microstrain, respectively, compared to the other treatments. Interestingly, a correlation between martensite microstrain and hardness is observed (Figure 9). Crystallite sizes are similar for both phases across samples, except for the austempered sample, which exhibits larger values, consistent with the larger bainitic sheaves compared to martensite plates, as observed in Figure 7 micrographs [34].

3.3. Effect of the Heat Treatments on Impact Toughness and Wear Resistance

The Charpy impact test results (Figure 14) indicate that the Q&P-treated material exhibits the highest absorbed energy (14.6 J), followed by the austempered sample (13.5 J). In both cases, the microstructures contain a higher fraction of retained austenite, which contributes to enhanced toughness. The quenched-only and quenched-and-tempered samples showed lower values (5.8 and 7.5 J, respectively), consistent with the higher martensite content in these microstructures. The as-cast material exhibits an intermediate value of 10.1 J.
Both the Q&P and austempered treatments were able to simultaneously increase hardness and energy absorption. However, despite the over 40% increase in absorbed energy, the impact toughness of GG25 gray cast iron remains significantly lower than that of structural steels or even ductile cast irons [18].
For a comparative analysis of the coefficient of friction (COF) profiles as a function of testing time, the results for all samples are plotted in Figure 15. All samples exhibit similar behavior, with COF values ranging from 0.25 to 0.5, indicating limited variation in average friction coefficients. Despite differences in duration and curvature of the profiles, all tests show a typical tribological sequence: initiation of the process, formation of a protective tribofilm, breakdown of the film with intermittent metal-to-metal contact, and finally, the establishment of sliding equilibrium, possibly reflecting tribofilm accommodation and/or cessation of track deformation.
The wear track volume obtained from tribological tests represents the material removed, worn, or plastically deformed due to friction during testing. In general, a lower wear volume indicates higher wear resistance, while a higher volume suggests increased susceptibility to wear. Figure 16 illustrates the influence of different heat treatments on wear resistance. Heat treatments significantly reduce the wear volume compared to the as-cast sample, which exhibits at least ten times greater wear volume. Among heat-treated samples, the largest wear volumes are observed in austempered samples, followed by Q&P, and quenched-only samples, which show the lowest wear and track volumes.
Mass loss measurements provide an additional evaluation of wear rates. Samples were weighed before and after the tribological tests. Results (Figure 17) show that quenched-only samples exhibit the lowest mass loss, followed by the as-cast and austempered samples. Interestingly, higher fractions of retained austempered and Q&P samples promote greater wear through material removal, consistent with the wear track volume analysis. Comparing mass loss and wear volume for the as-cast sample suggests that the wear mechanism is dominated by plastic deformation, rather than pure material removal. Quenched samples, despite slightly higher COF, show superior wear resistance due to their high surface hardness, resulting in minimal mass loss under frictional contact.
Wear track morphology after the pin-on-disk tests (Figure 18, Figure 19, Figure 20 and Figure 21) provides further insight into wear mechanisms. The as-cast samples (Figure 18) develop a carbon- and iron oxide-rich tribofilm, forming an initial protective layer that remains effective until ~2000 s, after which adhesive and abrasive wear occur, fragmenting the surface layer and exposing the base metal. The appearance of voids and cracks is attributed to graphite flake protrusion.
For austempered samples (Figure 19), larger track volumes were observed, but mass loss remained moderate, indicating significant plastic deformation of the wear track without extensive material removal. The low hardness of these samples contributes to reduced wear resistance, although the microstructure exhibits high resilience under friction. In studies of austempered ductile cast irons, Akinribide et al. [35] reported variations in wear mechanisms depending on heat treatment, observing tribofilms composed of graphite and iron oxides, similar to the results for austempered GG25 in this work. The tribofilm initially acts as a lubricating and protective layer but begins to deteriorate between 1500 and 2000 s due to abrasive mechanisms and delamination, exposing the base metal and promoting increased wear and mass loss.
Quenched and tempered samples (Figure 20) show superior tribological performance, with the formation of a continuous tribofilm of finely distributed carbides and iron oxides. This tribofilm remains stable for over 3000 s, significantly reducing abrasive and adhesive wear. Despite a slightly higher COF, mass loss is minimized, confirming the high wear resistance, with reduced track volume.
Finally, the Q&P-treated samples (Figure 21) exhibit favorable tribological behavior in terms of COF. A stable tribofilm composed of natural graphite flakes and iron oxides persists for over 3250 s, effectively acting as a lubricating layer, reducing abrasive and adhesive wear. While the COF remains relatively low and stable, wear resistance is slightly lower compared to quenched-only samples, likely due to the higher retained austenite content and lower hardness, which can favor material removal under sliding conditions.

4. Conclusions

This study evaluated the effects of quenching and partitioning (Q&P) on the microstructure, hardness, wear resistance, and impact toughness of GG25 gray cast iron, in comparison with as-cast, quenched, quenched-and-tempered conditions. The main conclusions are as follows:
  • Microstructure and Carbon Partitioning: Q&P treatment significantly increases the fraction of retained austenite, with 30 min of partitioning yielding the highest fraction (~45.7%). Carbon rapidly diffuses into the retained austenite, stabilizing it at room temperature and promoting a microstructure composed of partitioned martensite, bainite ferrite and carbon-enriched austenite.
  • Mechanical Properties: Q&P provides a good balance between hardness and toughness, with the highest Charpy impact energy (14.6 J) among all heat-treated samples. Austempered samples exhibit similar toughness, while quenched-only and quenched-and-tempered conditions show lower energy absorption.
  • Wear Resistance: Quenched and tempered samples exhibit the highest wear resistance due to their elevated hardness, while Q&P and austempered materials show slightly lower wear resistance, influenced by plastic deformation of retained austenite and tribofilm formation.
  • Implications: Q&P represents a promising approach for developing multiphase gray cast irons with enhanced impact toughness while retaining hardness. Optimization of partitioning parameters could further improve tribological performance, making Q&P-treated GG25 suitable for components subjected to impact and wear loading.

Author Contributions

Conceptualization: E.L.d.S.J., F.E.M., S.V.J., T.M.d.O.S. and K.D.Z.; Methodology: E.L.d.S.J., S.V.J., C.Y.N.K., A.C.B. and K.D.Z.; Validation: E.L.d.S.J., F.E.M., S.V.J., C.Y.N.K., A.C.B., T.M.d.O.S., M.B.B. and K.D.Z.; Formal analysis: E.L.d.S.J., S.V.J., C.Y.N.K., A.C.B. and K.D.Z.; Investigation: E.L.d.S.J., F.E.M., S.V.J., C.Y.N.K., A.C.B., T.M.d.O.S., M.B.B. and K.D.Z.; Resources: S.V.J., T.M.d.O.S., M.B.B. and K.D.Z.; Data curation: E.L.d.S.J., C.Y.N.K., A.C.B., M.B.B. and K.D.Z.; Writing—original draft preparation: E.L.d.S.J., F.E.M., C.Y.N.K., T.M.d.O.S., M.B.B. and K.D.Z.; Writing—review and editing: E.L.d.S.J., F.E.M., S.V.J., C.Y.N.K., A.C.B., T.M.d.O.S., M.B.B. and K.D.Z.; Visualization: E.L.d.S.J., F.E.M., T.M.d.O.S., M.B.B. and K.D.Z.; Supervision: E.L.d.S.J., A.C.B., T.M.d.O.S., M.B.B. and K.D.Z.; project administration: E.L.d.S.J., A.C.B., T.M.d.O.S., M.B.B. and K.D.Z.; funding acquisition: S.V.J., T.M.d.O.S., M.B.B. and K.D.Z. All authors have read and agreed to the published version of the manuscript.

Funding

This research was funded by FUNDAÇÃO DE DESENVOLVIMENTO DA PESQUISA—881 FUNDEP, grant number 27194.02.02/2021.01-00.

Institutional Review Board Statement

Not applicable.

Informed Consent Statement

Not applicable.

Data Availability Statement

The original contributions presented in this study are included in the article. Further inquiries can be directed to the corresponding author.

Acknowledgments

The authors acknowledge the Research Development Foundation (FUNDEP) for the research grants provided under the DESCAAL project.

Conflicts of Interest

The authors Camila Yuri Negrão Konno, Adriano Corrêa Batista, Tiago Manoel de Oliveira Santos, Mariana Botelho Barbosa were employed in the company SENAI ISI Engenharia de Superfícies. The remaining authors declare no conflicts of interest.

Appendix A

Figure A1. XRD of quenched and partitioned 0 min.
Metals 15 01361 g0a1
Figure A2. XRD of quenched and partitioned 5 min.
Metals 15 01361 g0a2
Figure A3. XRD of quenched and partitioned 15 min.
Metals 15 01361 g0a3
Figure A4. XRD of quenched and partitioned 30 min.
Metals 15 01361 g0a4
Figure A5. XRD of quenched and partitioned 45 min.
Metals 15 01361 g0a5
Figure A6. XRD of quenched and partitioned 60 min.
Metals 15 01361 g0a6
Figure A7. XRD of quenched and partitioned 90 min.
Metals 15 01361 g0a7
Figure A8. XRD from as-cast sample.
Metals 15 01361 g0a8
Figure A9. XRD from quenched sample.
Metals 15 01361 g0a9
Figure A10. XRD from quenched and tempered sample.
Metals 15 01361 g0a10
Figure A11. XRD from austempered sample.
Metals 15 01361 g0a11
Figure A12. XRD from quenched and partitioned sample.
Metals 15 01361 g0a12

References

  1. American Society for Metals. Metals Handbook, Volume 1: Properties and Selection—Irons, Steels, and High-Performance Alloys; ASM International: Materials Park, OH, USA, 1991. [Google Scholar]
  2. Moonesan, M.; Raouf, A.H.; Madah, F.; Zadeh, A.H. Effect of alloying elements on thermal shock resistance of gray cast iron. J. Alloys Compd. 2012, 520, 226–231. [Google Scholar] [CrossRef]
  3. Behnam, M.M.J.; Davami, P.; Varahram, N. Effect of cooling rate on microstructure and mechanical properties of gray cast iron. Mater. Sci. Eng. A 2010, 528, 583–588. [Google Scholar] [CrossRef]
  4. Wang, F.; Chen, T. The key role of applied university education in poverty alleviation by e-commerce: A case study of Rural Taobao in China. In Proceedings of the ICEIT 2019 8th International Conference on Educational and Information Technology, Cambridge, UK, 2–4 March 2019; pp. 22–26. [Google Scholar]
  5. Hamilton, J.D.; Sorondo, S.; Li, B.; Qin, H.; Rivero, I.V. Mechanical behavior of bimetallic stainless steel and gray cast iron repairs via directed energy deposition additive manufacturing. J. Manuf. Process. 2023, 85, 1197–1207. [Google Scholar] [CrossRef]
  6. Motta, M.; Zanocco, M.; Rondinella, A.; Iodice, V.; Sin, A.; Fedrizzi, L.; Andreatta, F. Inhibitive effect of 8-hydroxyquinoline on corrosion of gray cast iron in automotive braking systems. Electrochim. Acta 2023, 449, 142221. [Google Scholar] [CrossRef]
  7. Hamilton, J.D.; Sorondo, S.; Greeley, A.; Zhang, X.; Cormier, D.; Li, B.; Qin, H.; Rivero, I.V. Property-structure-process relationships in dissimilar material repair with directed energy deposition: Repairing gray cast iron using stainless steel 316L. J. Manuf. Process. 2023, 81, 27–34. [Google Scholar] [CrossRef]
  8. Chen, Y.; Xue, Z.; Song, S.; Cromarty, R.; Zhou, X. Evolution of microstructure and high temperature tensile strength of gray cast iron HT250: The role of molybdenum. Mater. Sci. Eng. A 2023, 863, 144511. [Google Scholar] [CrossRef]
  9. Lin, Y.; Ma, J.; Lai, D.; Zhanh, J.; Li, W.; Li, S.; He, S. Multi-response optimization of process parameters in nitrogen-containing gray cast iron milling process based on application of non-dominated ranking genetic algorithm. Heliyon 2022, 8, e11629. [Google Scholar] [CrossRef] [PubMed]
  10. Balachandran, G.; Vadiraj, A.; Kamaraj, M.; Kazuya, E. Mechanical and wear behavior of alloyed gray cast iron in the quenched and tempered and austempered conditions. Mater. Des. 2011, 32, 4042–4049. [Google Scholar] [CrossRef]
  11. Wang, B.; Pan, Y.; Liu, Y.; Barber, G.C.; Qiu, F.; Hu, M. Wear behavior of composite strengthened gray cast iron by austempering and laser hardening treatment. J. Mater. Res. Technol. 2020, 9, 2037–2043. [Google Scholar] [CrossRef]
  12. Navarro-Mesa, C.H.; Gómez-Botero, M.; Montoya-Mejía, M.; Ríos-Diez, O.; Aristizábal-Sierra, R. Wear resistance of austempered grey iron under dry and wet conditions. J. Mater. Res. Technol. 2022, 21, 4174–4183. [Google Scholar] [CrossRef]
  13. Kumar, S.; Singh, S.B. Microstructure–property relationship in the quenching and partitioning (Q&P) steel. Mater. Charact. 2023, 196, 112561. [Google Scholar]
  14. Li, Z.; Wu, R.; Song, S.-P.; Wang, Y.; Wu, T. Influence of changes in alloying elements distribution and retained austenite (RA) on mechanical properties of high boron alloy during quenching and partitioning (Q&P) process. J. Mater. Res. Technol. 2022, 18, 4748–4761. [Google Scholar]
  15. Mohtadi-Bonab, M.A.; Ariza, E.A.; Loureiro, R.C.; Centeno, D.; Carvalho, F.M.; Avila, J.A.; Masoumi, M. Improvement of tensile properties by controlling the microstructure and crystallographic data in commercial pearlitic carbon–silicon steel via quenching and partitioning (Q&P) process. J. Mater. Res. Technol. 2023, 23, 845–858. [Google Scholar]
  16. Speer, J.; Matlock, D.K.; De Cooman, B.C.; Schroth, J.G. Carbon partitioning into austenite after martensite transformation. Acta Mater. 2003, 51, 2611–2622. [Google Scholar] [CrossRef]
  17. Speer, J.G.; Assunção, F.C.R.; Matlock, D.K.; Edmonds, D.V. The “Quenching and Partitioning” process: Background and recent progress. Mater. Res. 2005, 8, 417–423. [Google Scholar] [CrossRef]
  18. da Silva, A.J.S.T.; Goldenstein, H.; Guesser, W.; de Campos, M.F. Quenching and partitioning heat treatment in ductile cast irons. Mater. Res. 2014, 17, 1115–1123. [Google Scholar] [CrossRef]
  19. Melado, A.C.; Nishikawa, A.S.; Goldenstein, H.; Giles, M.A.; Reed, P.A.S. Effect of microstructure on fatigue behaviour of advanced high strength ductile cast iron produced by quenching and partitioning process. Int. J. Fatigue 2017, 104, 397–407. [Google Scholar] [CrossRef]
  20. Ungár, T.; Borbély, A. The effect of dislocation contrast on X-ray line broadening: A new approach to line profile analysis. Appl. Phys. Lett. 1996, 69, 3173–3175. [Google Scholar] [CrossRef]
  21. Ungár, T.; Dragomir, I.; Révész, Á.; Borbély, A. The contrast factors of dislocations in cubic crystals: The dislocation model of strain anisotropy in practice. J. Appl. Crystallogr. 1999, 32, 992–1002. [Google Scholar] [CrossRef]
  22. ASTM E23-16; Standard Test Methods for Notched Bar Impact Testing of Metallic Materials. ASTM International: West Conshohocken, PA, USA, 2016.
  23. ASTM G99-23; Standard Test Method for Wear and Friction Testing with a Pin-on-Disk or Ball-on-Disk Apparatus. ASTM International: West Conshohocken, PA, USA, 2023.
  24. ASTM A247-19; Standard Test Method for Evaluating the Microstructure of Graphite in Iron Castings. ASTM International: West Conshohocken, PA, USA, 2019.
  25. Bugten, A.; Michels, L.; Mathiesen, R.; Bjørge, R.; Chernyshov, D.; McMonagle, C.; van Beek, W.; Pires, A.; Simões, S.; Ribeiro, C.; et al. Influence of B and Cu on microstructure and eutectoid transformation kinetics in spheroidal graphite cast iron. Materialia 2025, 43, 102511. [Google Scholar] [CrossRef]
  26. Dyson, D.J.; Holmes, J.B. Effect of alloying additions on lattice parameter of austenite. J. Iron Steel Inst. 1970, 208, 469–470. [Google Scholar]
  27. Lehnhoff, G.; Findley, K.; De Cooman, B. The influence of silicon and aluminum alloying on the lattice parameter and stacking fault energy of austenitic steel. Scr. Mater. 2014, 92, 19–22. [Google Scholar] [CrossRef]
  28. Onink, M.; Brakman, C.; Tichelaar, F.; Mittemeijer, E.; van der Zwaag, S.; Root, J.; Konyer, N. The lattice parameters of austenite and ferrite in Fe–C alloys as functions of carbon concentration and temperature. Scr. Metall. Mater. 1993, 29, 1011–1016. [Google Scholar] [CrossRef]
  29. Gong, W.; Chen, G.; Xiang, G. Calculation of carbon content of austenite during heat treatment of cast irons. China Foundry 2010, 7, 30–32. [Google Scholar]
  30. Nishikawa, A.S.; Miyamoto, G.; Furuhara, T.; Tschiptschin, A.P.; Goldenstein, H. Phase transformation mechanisms during quenching and partitioning of a ductile cast iron. Acta Mater. 2019, 179, 1–16. [Google Scholar] [CrossRef]
  31. Nishikawa, A.S.; Santofimia, M.J.; Sietsma, J.; Goldenstein, H. Influence of bainite reaction on the kinetics of carbon redistribution during the quenching and partitioning process. Acta Mater. 2018, 142, 142–151. [Google Scholar] [CrossRef]
  32. Zilnyk, K.; Suzuki, P.; Sandim, H. Subtle microstructural changes during prolonged annealing of ODS-Eurofer steel. Nucl. Mater. Energy 2023, 35, 101450. [Google Scholar] [CrossRef]
  33. Zhang, S.; Zhou, W.; Hu, F.; Yershov, S.; Wu, K. The role of Si in enhancing the stability of residual austenite and mechanical properties of a medium carbon bainitic steel. J. Mater. Res. Technol. 2024, 30, 1939–1949. [Google Scholar] [CrossRef]
  34. Pei, Z.; Song, R.; Feng, Y.; Xu, J. Influence of martensite and bainite microstructure on local mechanical properties of a bainitic and martensitic multiphase cast steel. Met. Mater. Int. 2021, 27, 4517–4526. [Google Scholar] [CrossRef]
  35. Akinribide, O.J.; Ogundare, O.D.; Oluwafemi, O.M.; Ebisike, K.; Nageri, A.K.; Akinwamide, S.O.; Gamaoun, F.; Olubambi, P.A. A review on heat treatment of cast iron: Phase evolution and mechanical characterization. Materials 2022, 15, 7109. [Google Scholar] [CrossRef]
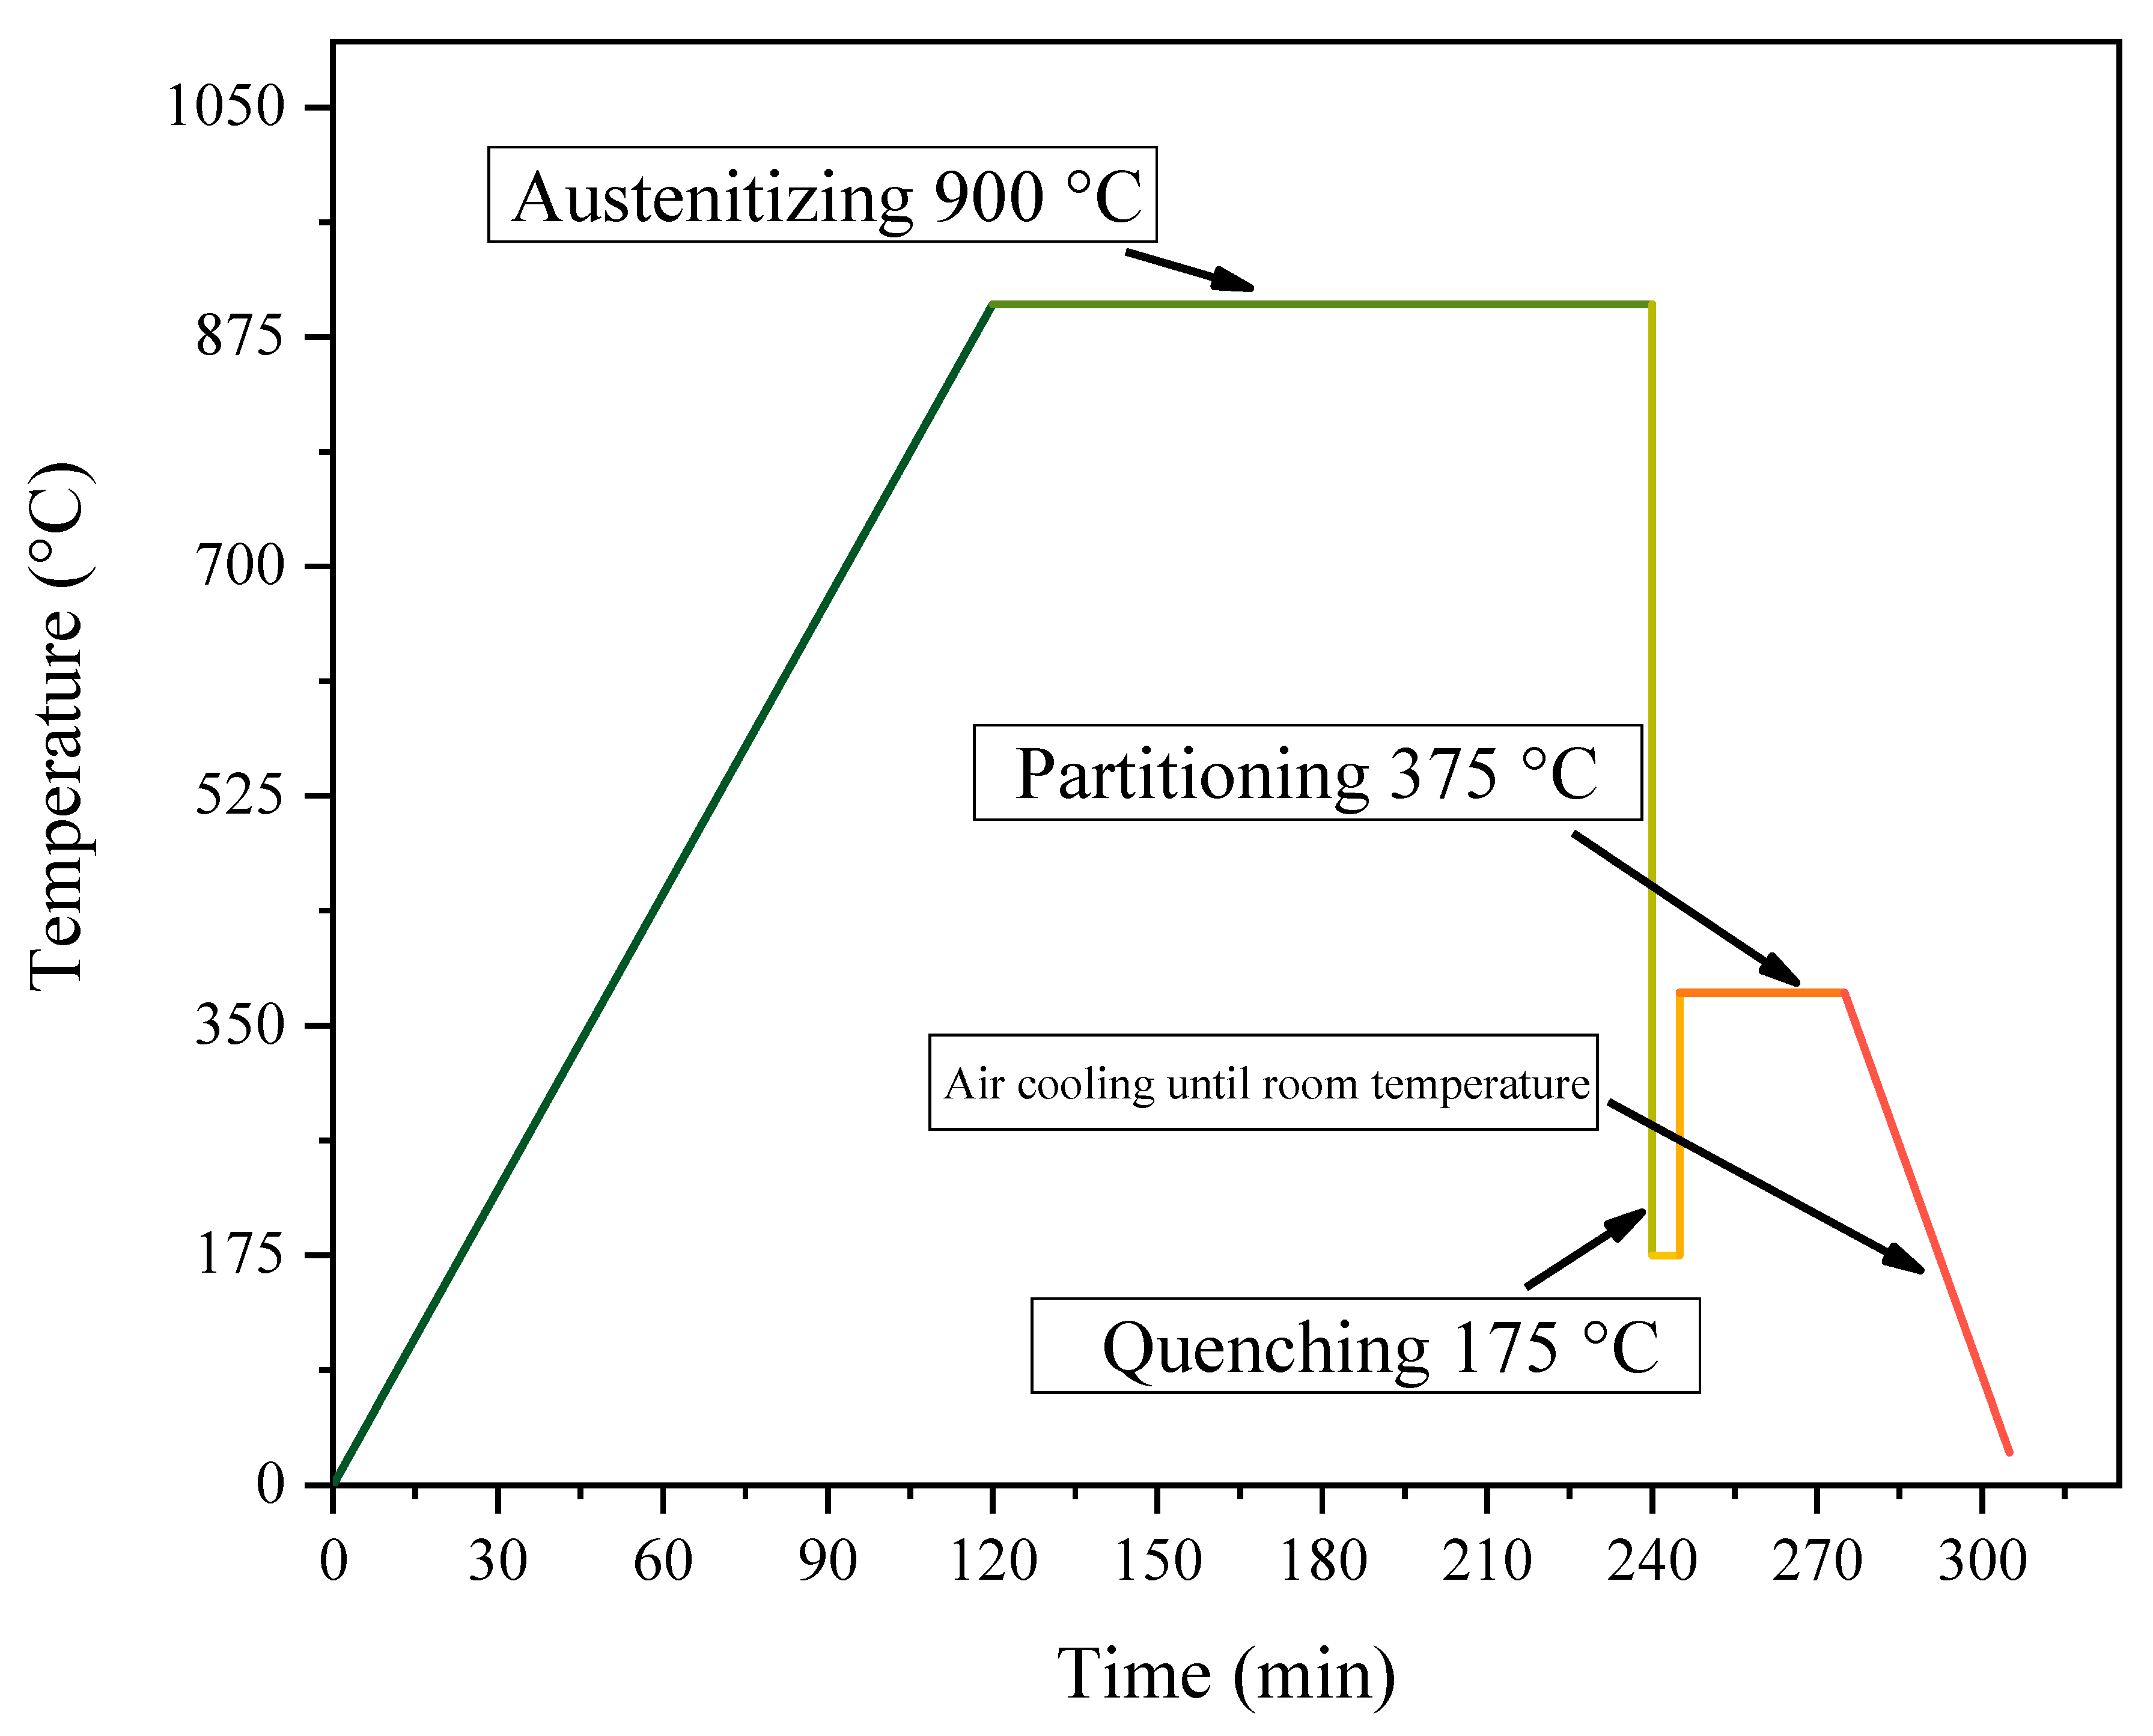
Figure 1. Temperature profile for the quenched and partitioned samples.
Metals 15 01361 g001
Figure 2. Optical micrographs of GG25 cast iron after different partitioning times, where B is bainite, M is martensite and A is austenite.
Metals 15 01361 g002
Figure 3. XRD profiles of the GG25 cast iron samples after different partitioning times.
Metals 15 01361 g003
Figure 4. Retained austenite volume fraction and carbon content in austenite, measured by Rietvelt refinement for different partitioning times.
Metals 15 01361 g004
Figure 5. Modified Williamson–Hall plot for martensite (a) and austenite (b) for different partitioning times.
Metals 15 01361 g005
Figure 6. Brinell hardness results for different partitioning times. The hardness of the as-cast sample is shown for comparison.
Metals 15 01361 g006
Figure 7. EBSD mappings for the 30 min Q&P sample. (a) Phase maps, (b) martensite and bainitic ferrite IPF orientation map, (c) austenite orientation map and (d) IPF coloring reference.
Metals 15 01361 g007
Figure 8. Microstructure of the as-cast material.
Metals 15 01361 g008
Figure 9. Optical micrographs of GG25 cast iron in the following conditions: (a) As-Quenched, (b) Quenched and tempered, (c) Austempered, (d) Quenched and partitioned, where A is austenite, B is bainite and M martensite.
Metals 15 01361 g009
Figure 10. Brinell hardness results for different heat treatments. The hardness of the as-cast sample is shown for comparison.
Metals 15 01361 g010
Figure 11. XRD profiles of the GG25 cast iron samples after different heat treatments.
Metals 15 01361 g011
Figure 12. Retained austenite volume fraction and carbon content in austenite, measured by Rietvelt refinement for different heat treatments.
Metals 15 01361 g012
Figure 13. Modified Williamson–Hall plot for martensite (a) and austenite (b) in all heat-treatment conditions.
Metals 15 01361 g013
Figure 14. Impact toughness of GG 255 cast iron after different heat treatments.
Metals 15 01361 g014
Figure 15. Coefficient of friction (COF) of GG 255 cast iron after different heat treatments (a) quenched and partitioned, (b) tempered, (c) austempered and (d) As-cast.
Metals 15 01361 g015
Figure 16. Wear volume of GG 25 cast iron after different heat treatments.
Metals 15 01361 g016
Figure 17. Wear rate of GG 25 cast iron after different heat treatments.
Metals 15 01361 g017
Figure 18. SEM of the Z wear track: (a) Overview of the wear track; (b) Detail for wear mechanism analysis; (c) Chemical spectrum and MapScan obtained by EDS.
Metals 15 01361 g018
Figure 19. SEM of the A wear track: (a) Overview of the wear track; (b) Detail for wear mechanism analysis; (c) Chemical spectrum and MapScan obtained by EDS.
Metals 15 01361 g019
Figure 20. SEM of the T wear track: (a) Overview of the wear track; (b) Detail for wear mechanism analysis; (c) Chemical spectrum and MapScan obtained by EDS.
Metals 15 01361 g020
Figure 21. SEM of the F wear track: (a) Overview of the wear track; (b) Detail for wear mechanism analysis; (c) Chemical spectrum and MapScan obtained by EDS.
Metals 15 01361 g021
Table 1. Gray cast iron composition.
GG 25 Gray Cast Iron—Composition
ElementAverage (wt.%)Deviation
FeBal.
C3.550.01
Mn0.640.03
Si2.090.06
P0.080.02
S0.0950.02
Cr0.160.04
Cu0.3250.045
Table 2. Results from the Modified Williamson–Hall model for partitioning times.
SampleqCrystallite Size (nm)Microdeformation
BCCFCCBCCFCCBCCFCC
0 min2.41.71871980.0670.026
5 min2.51.73474780.0440.035
15 min2.61.74374060.0430.027
30 min2.61.74773030.0410.022
45 min2.51.75403540.0420.022
60 min2.31.74313560.0370.023
90 min2.61.74554100.0390.022
Table 3. Results from the Modified Williamson–Hall model for different heat-treatments.
SampleqCrystallite Size (nm)Microdeformation
αγαγαγ
As-Cast2.8-218-0.006-
As-Quenched2.51.92252860.0590.024
Q&T2.41.73503320.0400.027
Austempered2.41.78004510.0380.025
30 min Q&P2.61.7477 3030.0410.022
Disclaimer/Publisher’s Note: The statements, opinions and data contained in all publications are solely those of the individual author(s) and contributor(s) and not of MDPI and/or the editor(s). MDPI and/or the editor(s) disclaim responsibility for any injury to people or property resulting from any ideas, methods, instructions or products referred to in the content.