Review

Literature Review on the Fatigue Properties of Materials Processed by Surface Mechanical Attrition Treatment (SMAT)

LASMIS, University of Technology of Troyes (UTT), 12 Rue Marie Curie, CS 42060, 10004 Troyes, France
*
Author to whom correspondence should be addressed.
Metals 2022, 12(5), 775; https://doi.org/10.3390/met12050775
Submission received: 31 March 2022 / Revised: 25 April 2022 / Accepted: 26 April 2022 / Published: 30 April 2022
(This article belongs to the Special Issue Fatigue Properties of Surface Modified Metallic Materials)

Abstract

:
As a promising surface treatment technique, the surface mechanical attrition treatment (SMAT) has been applied to enhance mechanical properties of various materials. Through multidirectional severe plastic deformation, SMAT is able to nanocrystallize the near surface region of materials. The nanostructured layer associated with high compressive residual stresses coupled with a work hardening layer can provide the treated materials with an improved fatigue resistance. The present work gives a comprehensive review on the fatigue strength of SMATed materials. First of all, a brief introduction is given on the basic elements of SMAT and surface modifications induced by this treatment. The fatigue strength of a large variety of SMATed materials with different loading conditions is reviewed, including low-cycle fatigue (LCF), high-cycle fatigue (HCF) and very-high-cycle fatigue (VHCF). Then, the mechanism of enhancement or reduction is explained through a detailed review on the effects of several factors, such as residual stress, surface quality and nanocrystalline grains. In addition, the combined effect of SMAT coupled with other processes is also reviewed. Trends and prospects of the current research are summarized at the end.

1. Introduction

The in-service resistance of mechanical components is of primary importance due to the increased demand on security and economic issues. To improve the performance and, consequently, the service life of mechanical components, one of the approaches is to strengthen their most top surface by means of a mechanical surface treatment. Mechanical surface treatments have been increasingly used to extend the life of engineering parts due to their simplicity for industrial applications. These techniques, including, for example, shot peening and deep rolling, are based on contact loadings, which can create significant plastic deformation in the near surface region [1,2,3,4,5]. As a result, a residual stress field along with a work-hardened region is generated after the treatments. It is well documented that compressive residual stress is beneficial for improving the durability of materials, especially their fatigue life by increasing the crack initiation resistance and reducing the crack propagation rate [6,7,8,9].
Approximately two decades ago, superficial nanocrystallization was discovered during severe plastic deformation induced by surface treatment, such as shot peening [10,11]. Since then, a great number of techniques, based on principles of shot peening and capable of nanocrystallizing the material surface, have been further developed and investigated. Such techniques include severe shot peening (SSP), ultrasonic shot peening (USSP) and ultrasonic impact peening/treatment (UIP/UIT), sometimes called ultrasonic nanocrystal surface modification (UNSM). Ultrasonic shot peening is based on the vibration of a sonotrode boosted by an ultrasonic generator, which works at a very high frequency. Among the different variants of ultrasonic shot peening techniques, the surface mechanical attrition treatment (SMAT) is one of the most widely studied. SMAT is based on the repetitive multidirectional impacts between the surface of a material and a spherical shot flying with high kinetic energy [12,13]. The near surface region of the material is repeatedly impacted by spherical shots with a high strain rate, which can lead to a progressive grain size refinement at the surface, whereas the bulk region of the material is not mechanically deformed, and the material’s features remain unchanged, including its properties. A gradient microstructure is, thus, generated by SMAT, from the top treated surface to the interior region of the material [14,15,16]. The particularity of SMAT with respect to conventional shot peening (CSP) lies in the fact that SMAT can transform the top surface layer of a material from coarse grains to nanosized grains [12,13]. This nanostructured layer, even if it is thin in general, could have a significant effect on the performance of a part by enhancing its mechanical functionality and modifying its interaction with the surrounding environment.
Fatigue resistance has always been one of the most important and noteworthy issues among all mechanical properties. To promote the industrial application of SMAT, it is of great importance to have a comprehensive understanding of the fatigue properties of various materials processed by SMAT. SMAT has been used to treat a great variety of pure metals and alloys such as Ti and its alloys, iron and steels, Al and its alloys, Mg and its alloys or Zr and its alloy. Due to the modification of material surfaces, including hardness, grain size and roughness, along with the introduction of compressive residual stress, the fatigue resistance of materials could be considerably improved, especially in high-cycle fatigue (HCF) and very-high-cycle fatigue (VHCF) regimes. Moreover, SMAT can play a synergic effect on fatigue properties when it is associated with other processes, such as heat treatment or other mechanical treatments.
The present work is focused on the summary of fatigue properties of various metals and alloys processed by SMAT in order to give an overview of the state-of-the-art in the application of this promising mechanical surface modification technique. On the basis of the present review, trends of some possible propositions for future research in this field are drawn and underlined. For convenience, this review also considers some other related surface nanocrystallization techniques, including SSP, UIT and UNSM. Although the specific mechanics and mechanisms of these techniques differ to some extent from SMAT, they share a common characteristic, which is that localized plastic deformation is especially used to induce a nanostructured layer at the surface of a component.

1.1. Basic Elements of SMAT

As a kind of ultrasonic shot peening, SMAT is a technique based on ultrasonic vibration generated by a piezoelectric transducer. Figure 1 shows a schematic description of the set-up of SMAT. Metallic or ceramic balls with a diameter generally ranging from 1 to 8 mm are first placed at the bottom of a cylindrical chamber. Then, the bottom of the chamber is put into vibration by an ultrasonic generator, which can project the balls towards a specimen at a speed of up to 20 m/s [17]. As the frequency is high (20 kHz), the specimen surface can be impacted by a large number of balls in a short time period. During each impact with a ball, the material is plastically deformed with a high strain rate, as shown in Figure 1b. Repetitive multidirectional impacts on the specimen surface can lead to the formation of a nanostructured layer in the near surface region.
A large variety of metallic materials have been treated by SMAT, including pure metals such as Ti [18,19,20,21], Al [22], Cu [23], Iron [12] and Zr [24], and alloys such as Cu alloys [25], Ti alloys [26], Al alloys [27,28,29,30], steels [31,32] or Mg alloys [33,34,35,36]. These materials can be classified, for example, according to their atomic structure or strengthening mechanism (precipitation and solid solution), which sometimes can be linked to their stacking fault energy (SFE). For most of the treated materials, a nanostructured layer can be generated by SMAT if the treatment intensity is high enough and other process parameters are properly set, such as the duration. In addition, the surface integrity obtained after SMAT can be different from one material to another, depending on their ductility.

1.2. Surface Modification Induced by SMAT

1.2.1. Microstructure and Nanocrystallization

With respect to CSP, one of the main features of SMAT is that it is able to transform the initial micrometer-sized grains into nanometer or ultrafine-sized grains. The grain refinement process during SMAT is based on multidirectional plastic deformation. Plastic strain generates high density dislocations, which can be arranged into different configurations, such as a geometrically necessary boundary, incidental dislocation boundary or dense dislocation wall [27,33,37]. Plastic deformation behavior and dislocation activities are mainly governed by two factors: the SFE and number of slip systems in the metal (which is linked to the atomic structure) [38]. For example, for face-centered cubic (FCC) and body-centered cubic (BCC) metals, dislocation walls and cells are formed to accumulate strains, and sub-boundaries are formed to subdivide coarse grains if the SFE of the metal is relatively high, while twinning plays an important role in the initial deformation stage if the SFE is medium or low [12,27,35]. For hexagonal close-packed (HCP) materials, twinning appears to prevail because of the limited slip systems [35], as illustrated in Figure 2. It is worth mentioning that mechanical twinning can be promoted by other processing factors such as low temperature [39,40,41,42,43] or a high strain rate [13,40,41,42].
In the case of some stainless steels (for example, 304L steel), where a phase transformation can occur during SMAT [44], the grain refinement is controlled by the formation of a nanometer-sized martensite phase during the ultrasonic frequency strikes. This is because the ultrasonic period (of about 50 μs) is short enough to limit the growth of the martensite and, consequently, to obtain nanometric grains at the top surface [45].
A summary of grain size values in the nanocrystalline layer of various SMATed materials is given in Table 1.

1.2.2. Residual Stress

Superficial compressive residual stress and a work hardening layer can be generated after SMAT. Qualitatively, the distribution of residual stress induced by SMAT is similar to that induced by CSP, due to the similarity of impacts and deformation. The value of compressive residual stress reaches its peak right beneath the top surface, and then decreases with an increasing depth, i.e., distance from the top surface. The residual stress changes from compressive in the near surface region to tensile in the region deeper from the surface. However, the peak value and the thickness of the residual stress layer after SMAT could be different compared to CSP, mainly due to the difference in angles and kinetic energy of impacts. The peak value also varies with different process parameters.
For example, for AA7075-T6 aluminum alloy [51] (yield strength of 462 MPa), SMAT using steel balls with a diameter of 2 mm and 3 mm would introduce compressive residual stresses with a peak value of −230 MPa and −330 MPa, respectively. For 316L ASTM F138 austenitic stainless steel [52] (yield stress of ~900 MPa), SMAT using 3 mm balls with a coverage of 125% and 3000% can generate compressive residual stress with a maximum value of approximately −500 MPa and −600 MPa, respectively.

1.2.3. Surface Hardness and Roughness

After SMAT, there is a significant increase in hardness at the surface. The hardness decreases gradually from the top surface to the bulk material. The peak value up to a few GPa can be reached in the nanocrystalline layer.
As illustrated in Figure 1b, severe plastic deformation could induce a treated surface with a higher roughness than its initial state. A significant increase in surface roughness has been reported for almost all materials. Nevertheless, after SMAT, the surface roughness is usually lower than that obtained after CSP [26,52,53].
A summary of surface hardness and roughness values of various materials processed by different mechanical surface treatments, among them being SMAT, is given in Table 2.

2. Fatigue Strength Affected by SMAT

The study of the fatigue properties of materials processed by SMAT concerns various materials under different fatigue loading conditions. According to load intensity, the work can be divided into LCF, HCF and VHCF studies. In terms of load nature, different types exist: uniaxial loading, rotating bending, flexural bending or multiaxial loading. In the following sections, the loading mode is specified, except for uniaxial tension/compression loading.

2.1. Low-Cycle Fatigue after SMAT

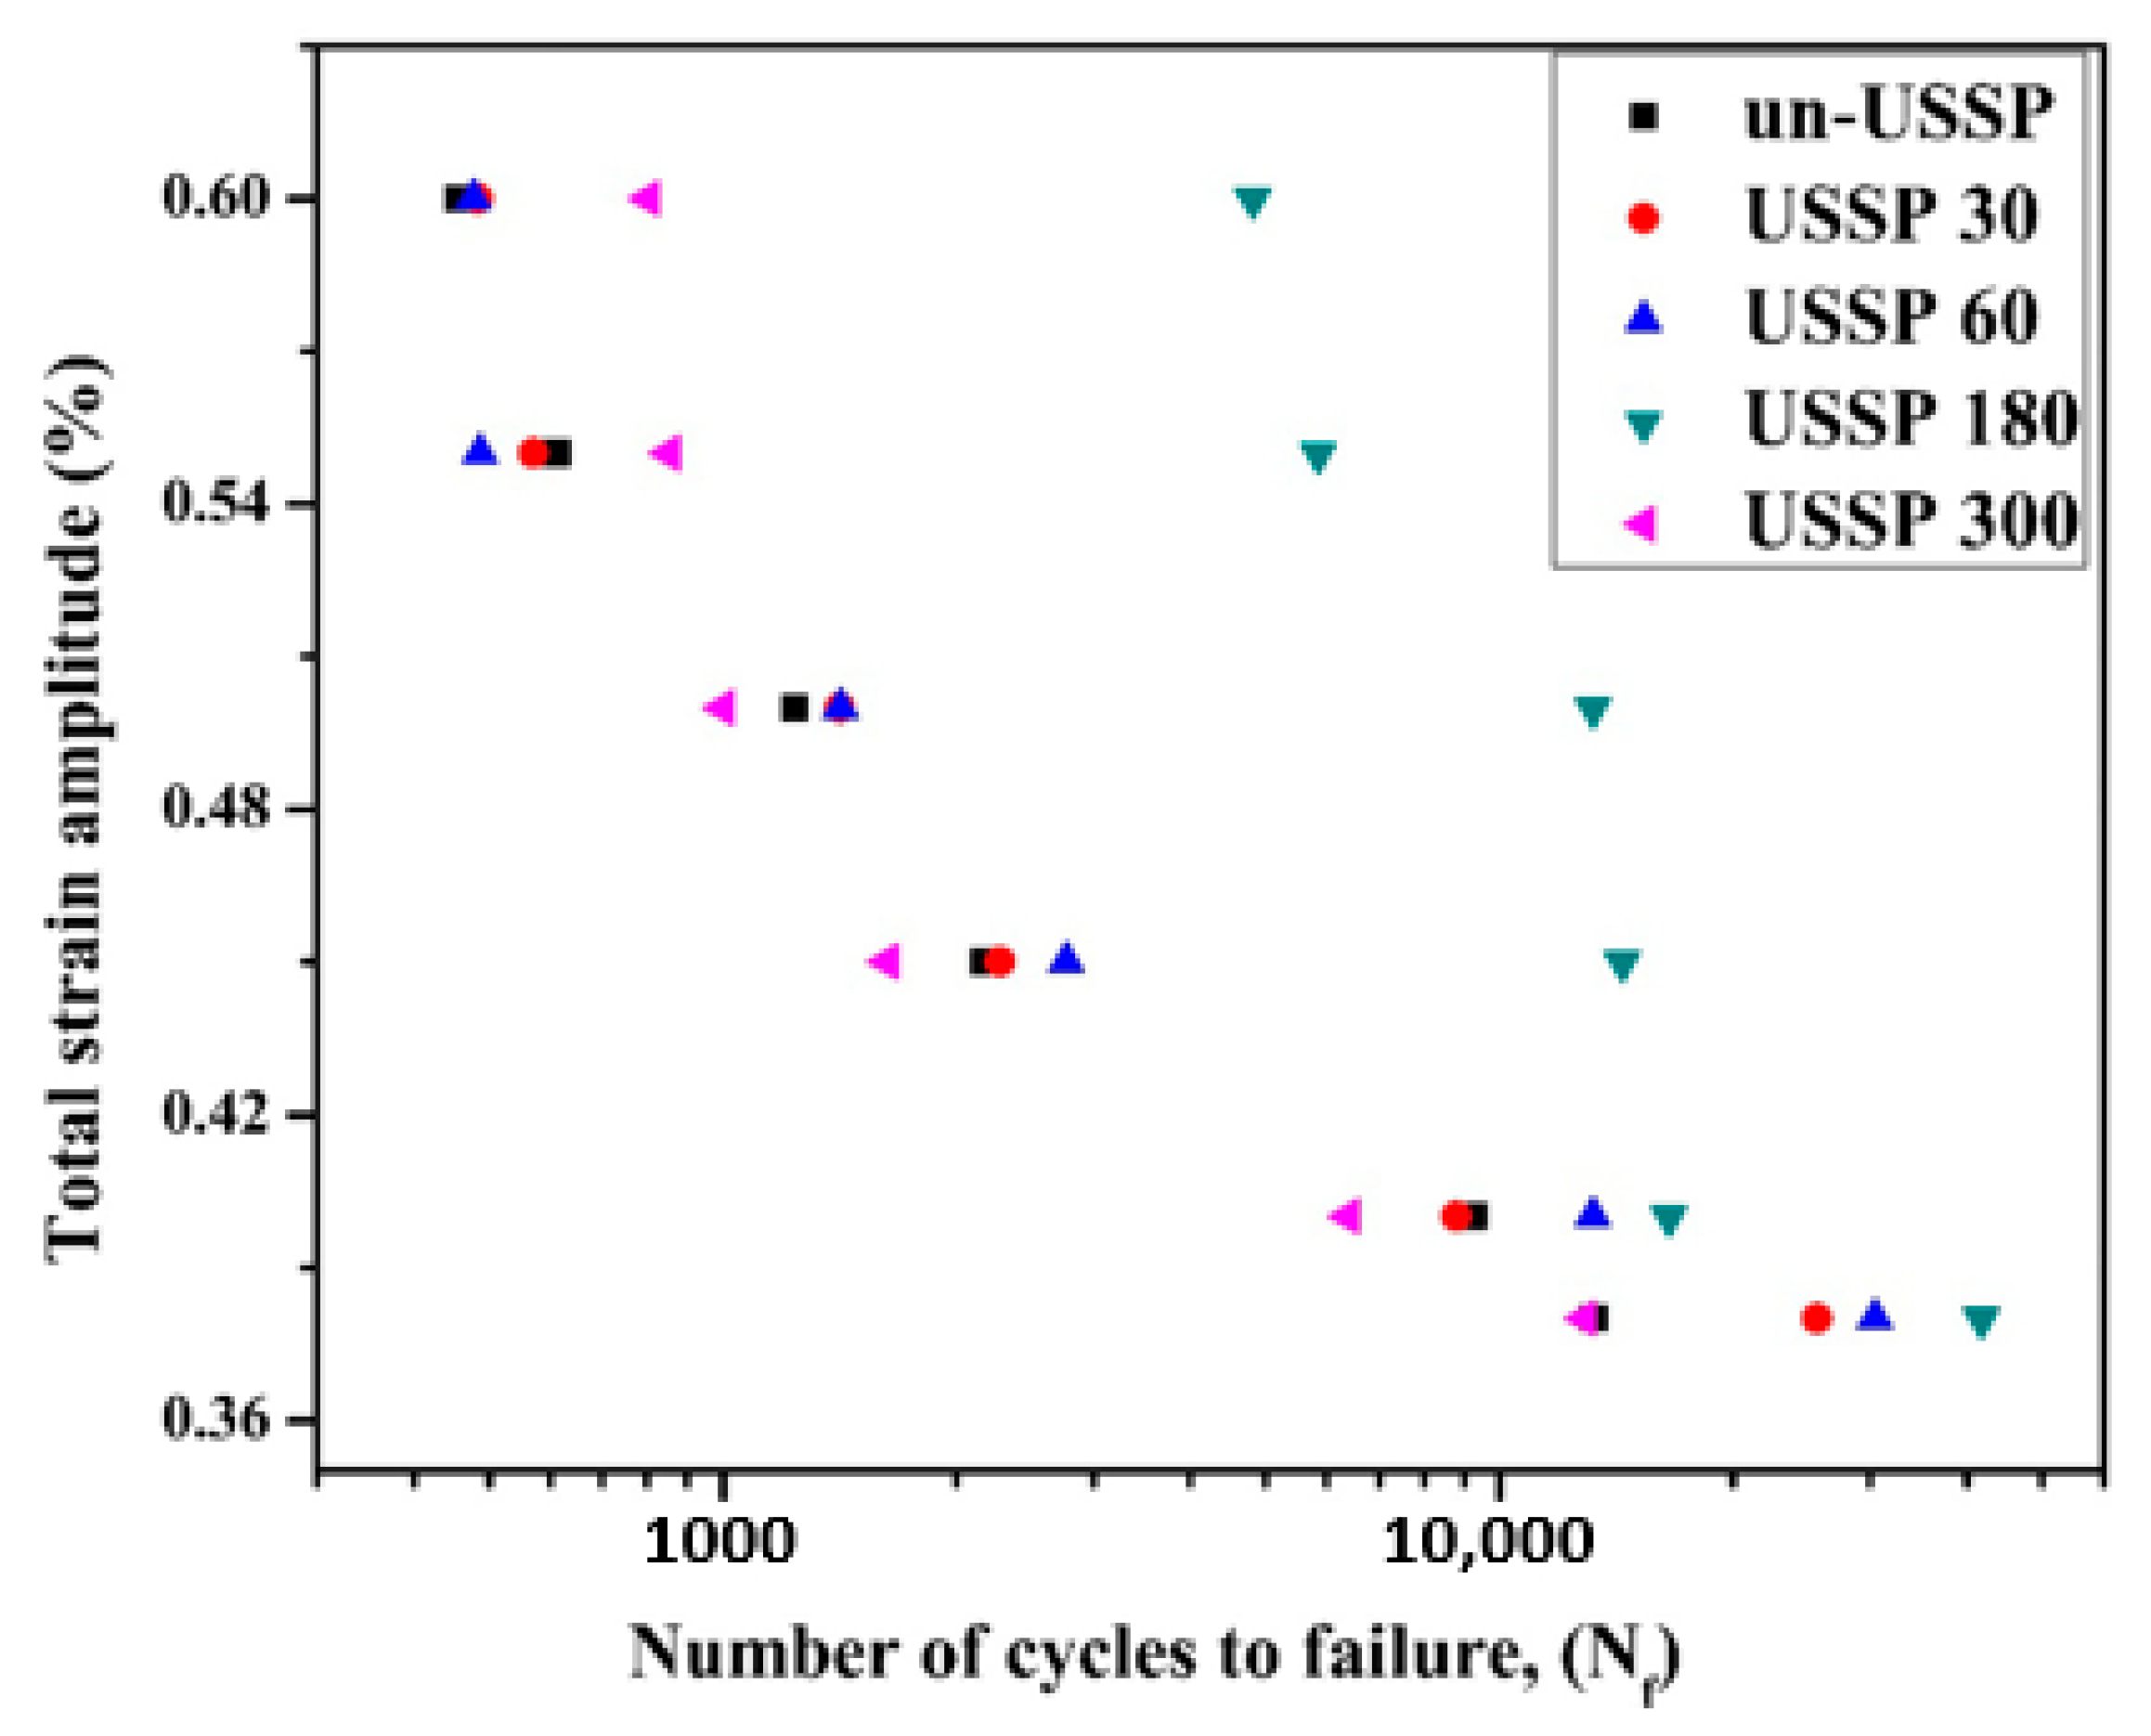
Under LCF, an enhancement in fatigue life was reported after SMAT for aluminum alloys. In the study focused on a 2014 aluminum alloy [46], a significant increase was found in the LCF life of specimens treated with ultrasonic shot peening, in particular at low strain amplitudes. After being treated with a duration of 10 min, the fatigue life increased by 79%, 115%, 280% and 480% for the samples tested at total strain amplitudes of 0.55%, 0.5%, 0.4% and 0.375%, respectively, compared to the untreated samples. Through the observation of interstriation spacings on the fracture surface, it was found that the rate of crack propagation was significantly reduced with both high and low strain amplitudes. The maximum reduction on interstriation spacing could be over 40% when the specimen was tested with the lowest strain amplitude. An enhancement was also reported on a 7075 aluminum alloy (AA7075) according to the investigation of Pandey et al. [28]. Compared with untreated samples, the fatigue life of samples treated by ultrasonic shot peening for 180 s increased, while the one of samples treated for 300 s reduced (Figure 3). It was concluded that the improvement was due to a combined effect of grain refinement and compressive residual stress, while the negative effect on fatigue life was attributed to the damage of the surface caused by an over-peening phenomenon. For AA7075-T651 treated with the surface mechanical rolling treatment (SMRT) [56], the fatigue strength in the LCF regime was enhanced by 6.5%. Moreover, the cyclic response during cyclic loadings with high strain amplitudes was also affected: the treated specimens showed a more significant ratcheting effect and more severe asymmetry when the applied strain was high.
The effect of SMAT was also investigated on other alloys, such as magnesium alloy [57], titanium alloy [58] and IN718 alloy [59,60]. Chen et al. [60] studied the fatigue strength of AZ31B magnesium alloy treated with SMAT. The results showed that the fatigue life of SMATed samples was significantly enhanced compared to the coarse-grained samples. In addition, samples treated with shots of 3 mm showed a higher fatigue strength than those treated with 2 mm shots, which was attributed to a thicker deformed layer and higher superficial compressive residual stress induced with shots of a bigger size. Different from aluminum alloys, a transition of the crack initiation site from the top surface to the interior could be observed for a SMATed AZ31B magnesium specimen. Such a transition was attributed to the crack initiations suppressed by the nanocrystalline layer. For a Ti-6Al-4V alloy, the fatigue life of specimens treated with ultrasonic shot peening was nearly comparable to that of the untreated specimens at the highest applied strain amplitude of 1.0%, while at the lowest applied strain amplitude of 0.60%, the fatigue life increased by a factor of four. For a selective laser melted Ti-6Al-4V alloy investigated by Yan et al. [61], fatigue resistance was enhanced by approximately 100% in comparison with the as-fabricated counterparts in both LCF (from 350 to 675 MPa) and HCF (from 290 to 580 MPa) regimes.
According to a study on the LCF behavior of a 316L stainless steel [16], the fatigue life of SMATed specimens decreased under a high strain amplitude (±1.25%), compared to untreated specimens. For both untreated and SMATed specimens, cracks occurred on the circumferential surface. Based on an analysis using the Coffin–Manson law and an energy dissipation-based model, Zhou et al. [16] concluded that the deterioration in fatigue life is due to a decrease in the ductility of the surface layer of the treated material. The results were consistent with those obtained in the study of Carneiro et al. [62], which revealed that the fatigue strength of 316L stainless steel samples after the surface mechanical rolling treatment (SMRT) was either similar or lower than that of coarse-grained counterparts. The effect of SMRT on fatigue life in strain-controlled tests turned positive and evident when the strain amplitude was lower.

2.2. High-Cycle Fatigue after SMAT

Under HCF, an improvement of fatigue life can generally be observed. SMAT was reported by Ramos et al. [63] to be able to improve the fatigue life of an AA7475-T7351 alloy. For SMATed specimens with a thickness of 4 mm and 8 mm, the fatigue strength to 106 cycles tested with a stress ratio, R = 0, was improved by 21.4% and 23.9%, respectively, while a higher fatigue life enhancement was attained with fully reversed tests (R = −1). The fatigue strength to 105 cycles was enhanced by approximately 35%, compared to that of untreated specimens. A significant enhancement in fatigue life was also reported in the study of Gao et al. on an AA7075-T6 alloy [51]. The fatigue strength at 1.20 × 10⁶ cycles for samples SMATed with 3 mm and 2 mm steel balls improved by approximately 11.6% and 51.6%, respectively, in comparison with electropolished counterparts.
Numerous investigations have been conducted on the fatigue life of various steels after the surface mechanical nanocrystallization treatment. The increase in fatigue life for a SMATed 316L steel is approximately 20% with respect to the non-SMATed counterparts, obtained from the work of Roland et al. [6]. In their study for 316L and 301LN steels, Uusitalo et al. [64] reported an increase in fatigue limit at 107 cycles of approximately 50% after SMAT. Dureau et al. [65] discovered that the fatigue limit increased by approximately 20% after the 304L austenitic stainless steel was treated with SMAT for 60 min at room temperature, compared to the non-SMATed specimens (polished to a mirror finish). SMAT was also able to improve the fatigue strength at 5 × 10⁶ cycles by as much as 13.1% for a SS400 carbon steel [66].
A noteworthy improvement of fatigue life was also observed for other metallic materials such as zirconium, C-2000 super alloy and titanium alloys. The fatigue limit of the industrial pure zirconium increased by approximately 28% after nanocrystallization induced by SMAT [67]. With the help of in situ observation equipment, SMAT was found to retard the initiation and propagation of cracks, especially with lower stress amplitudes. When tested with a 225 MPa amplitude, the fatigue crack initiation life and propagation life of specimens SMATed for 45 min increased by 210% and 48% compared to that of the original samples. Ti-6Al-4V samples SMATed for 30 min exhibited a superior life compared to untreated samples, while an inferior fatigue life could be observed for samples treated for 60 min.
Fatigue properties of welded joints are usually degraded by their inhomogeneities in microstructure and composition. Due to its operability with directional impacts on the surface of materials, UIT/UNSM is considered as a promising technique for strengthening parts with welded joints. The improvement in the fatigue strength of welded joints after UNSM has been generally observed and investigated in a large number of studies [68,69,70,71,72,73]. For instance, for a low-alloy steel, Strenx 700 MC, it was discovered by Lago et al. [72] that UIT was able to transform the tensile residual stresses in the welded material and heat-affected zone to compressive residual stresses. The fatigue limit at 108 cycles was enhanced from 370 MPa to 410 MPa.
Besides uniaxial tension–compression loading, an improvement in fatigue life after SMAT was also widely reported under other loading conditions, such as rotating bending [65,74,75] and torsional loading. For example, it was demonstrated by Dureau et al. [65] that, the application of SMAT can bring an enhancement of approximately 30% in fatigue life in rotating bending tests compared to the initial ground state, which was more significant than the enhancement in tension–compression tests. In the study of rotating bending on two 304 stainless steels [75], the specimens treated by ultrasonic shot peening exhibited a fatigue limit of 80 MPa higher than the untreated ones. The rotating bending fatigue (RBF) tests performed at room temperature showed that the fatigue strength of an annealed 718 Inconel alloy increased by approximately 42% using UNSM, as presented in Figure 4.
In terms of fatigue life with more complex loading conditions, such as multiaxial loading, research has been conducted on nanocrystallized materials treated by CSP [77,78] and SMRT [79]. Although an enhancement in the biaxial fatigue life was reported according to these investigations, few studies have been carried out on materials treated with SMAT or UNSM.

2.3. Very-High-Cycle Fatigue after SMAT

The VHCF strength of SMATed/UNSMed materials has been investigated in several studies [51,80,81]. Gao et al. [51] discovered that SMATed AA7075-T6 specimens had an inferior fatigue limit compared to electropolished specimens. The results revealed that the fatigue strengths at 1.82 × 10⁸ cycles decreased by 24.3% and 6.9% for samples treated by 3 mm steel shots and 2 mm steel shots, respectively. An interior crack initiation was observed in samples treated with 2 mm shots, while a surface–subsurface multi-initiation mode was observed in samples treated with 3 mm shots, as illustrated in Figure 5. For JIS SCM435 steel [80], the fatigue limit at 109 cycles increased approximately 10% for specimens UNSMed with a 40 N load, while for specimens UNSMed with 70 N and 100 N loads, the increase in fatigue limit was 20% and 30%, respectively.

2.4. SMAT-Affected Fatigue at Elevated Temperature

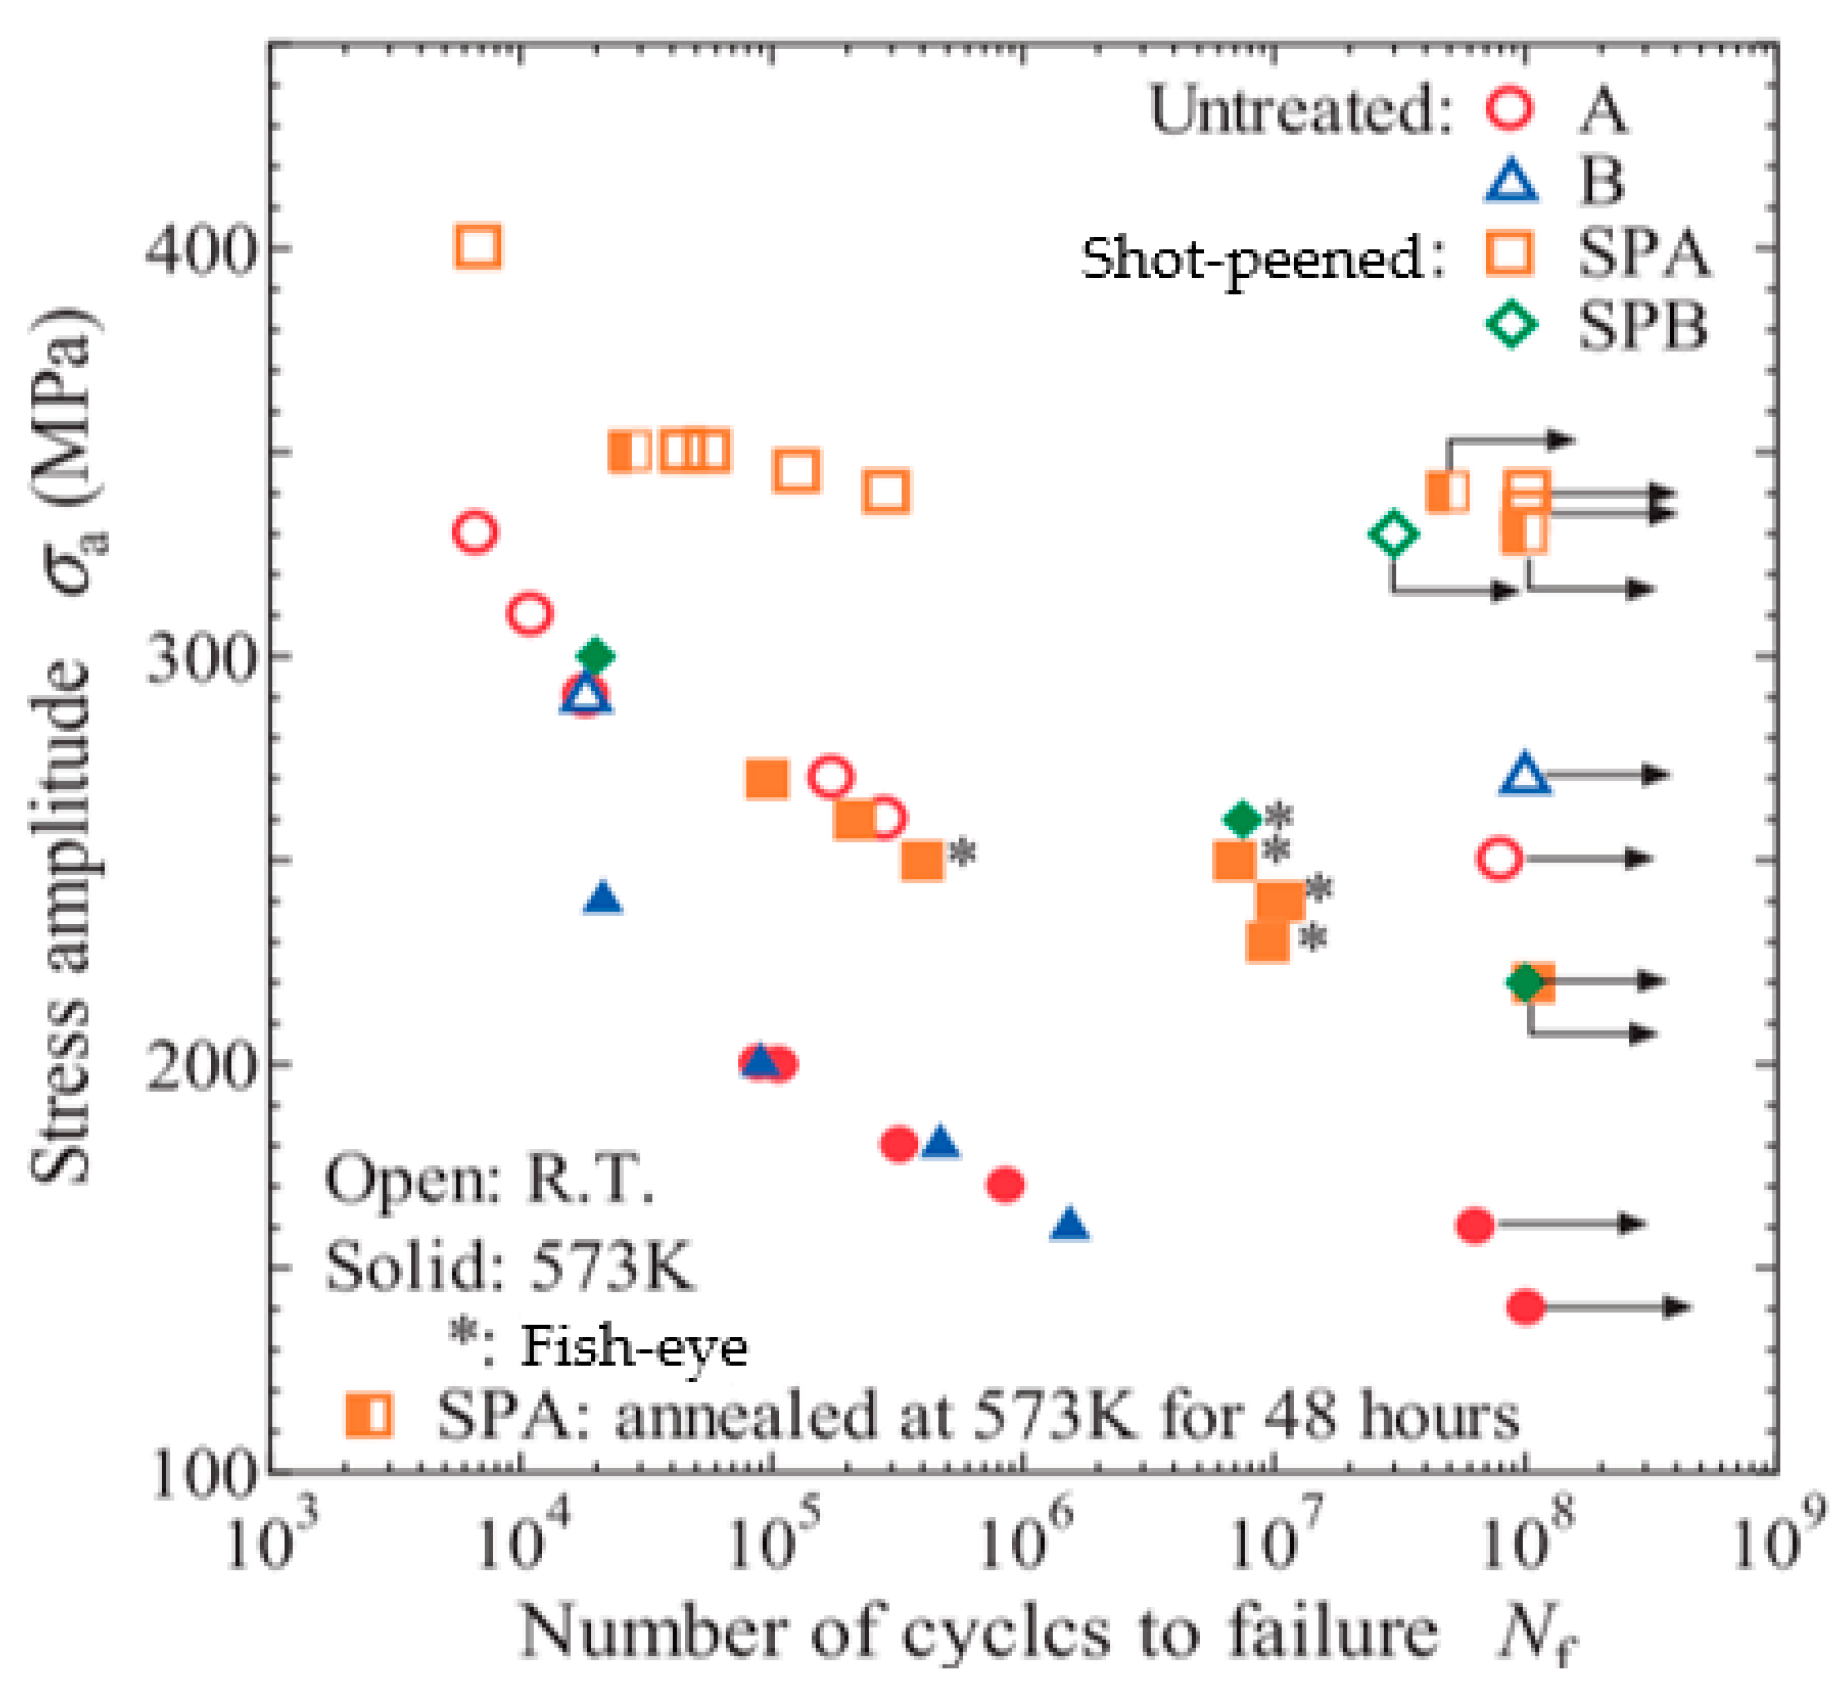
In terms of fatigue at elevated temperature, an investigation was conducted by Kakiuchi et al. [75]. The results demonstrated that the SMATed specimens in two 304 stainless steels exhibited higher fatigue strengths at both room temperature and 300 °C, as shown in Figure 6. The crack initiation site was found to shift from the surface at room temperature to the subsurface at elevated temperature. A steeper hardness gradient was observed at elevated temperature compared to room temperature, and it was considered as the main cause of the interior crack initiation phenomenon.

3. Factors Contributing to the Effect of SMAT on Fatigue Strength

3.1. Residual Stress and Its Relaxation
Conventionally, compressive residual stress is considered to hinder crack initiation and propagation, so that an enhancement in fatigue life can be achieved [66,82,83]. It was confirmed that compressive residual stress can improve both the crack initiation and propagation resistances by decreasing the external applied tensile stress [84].
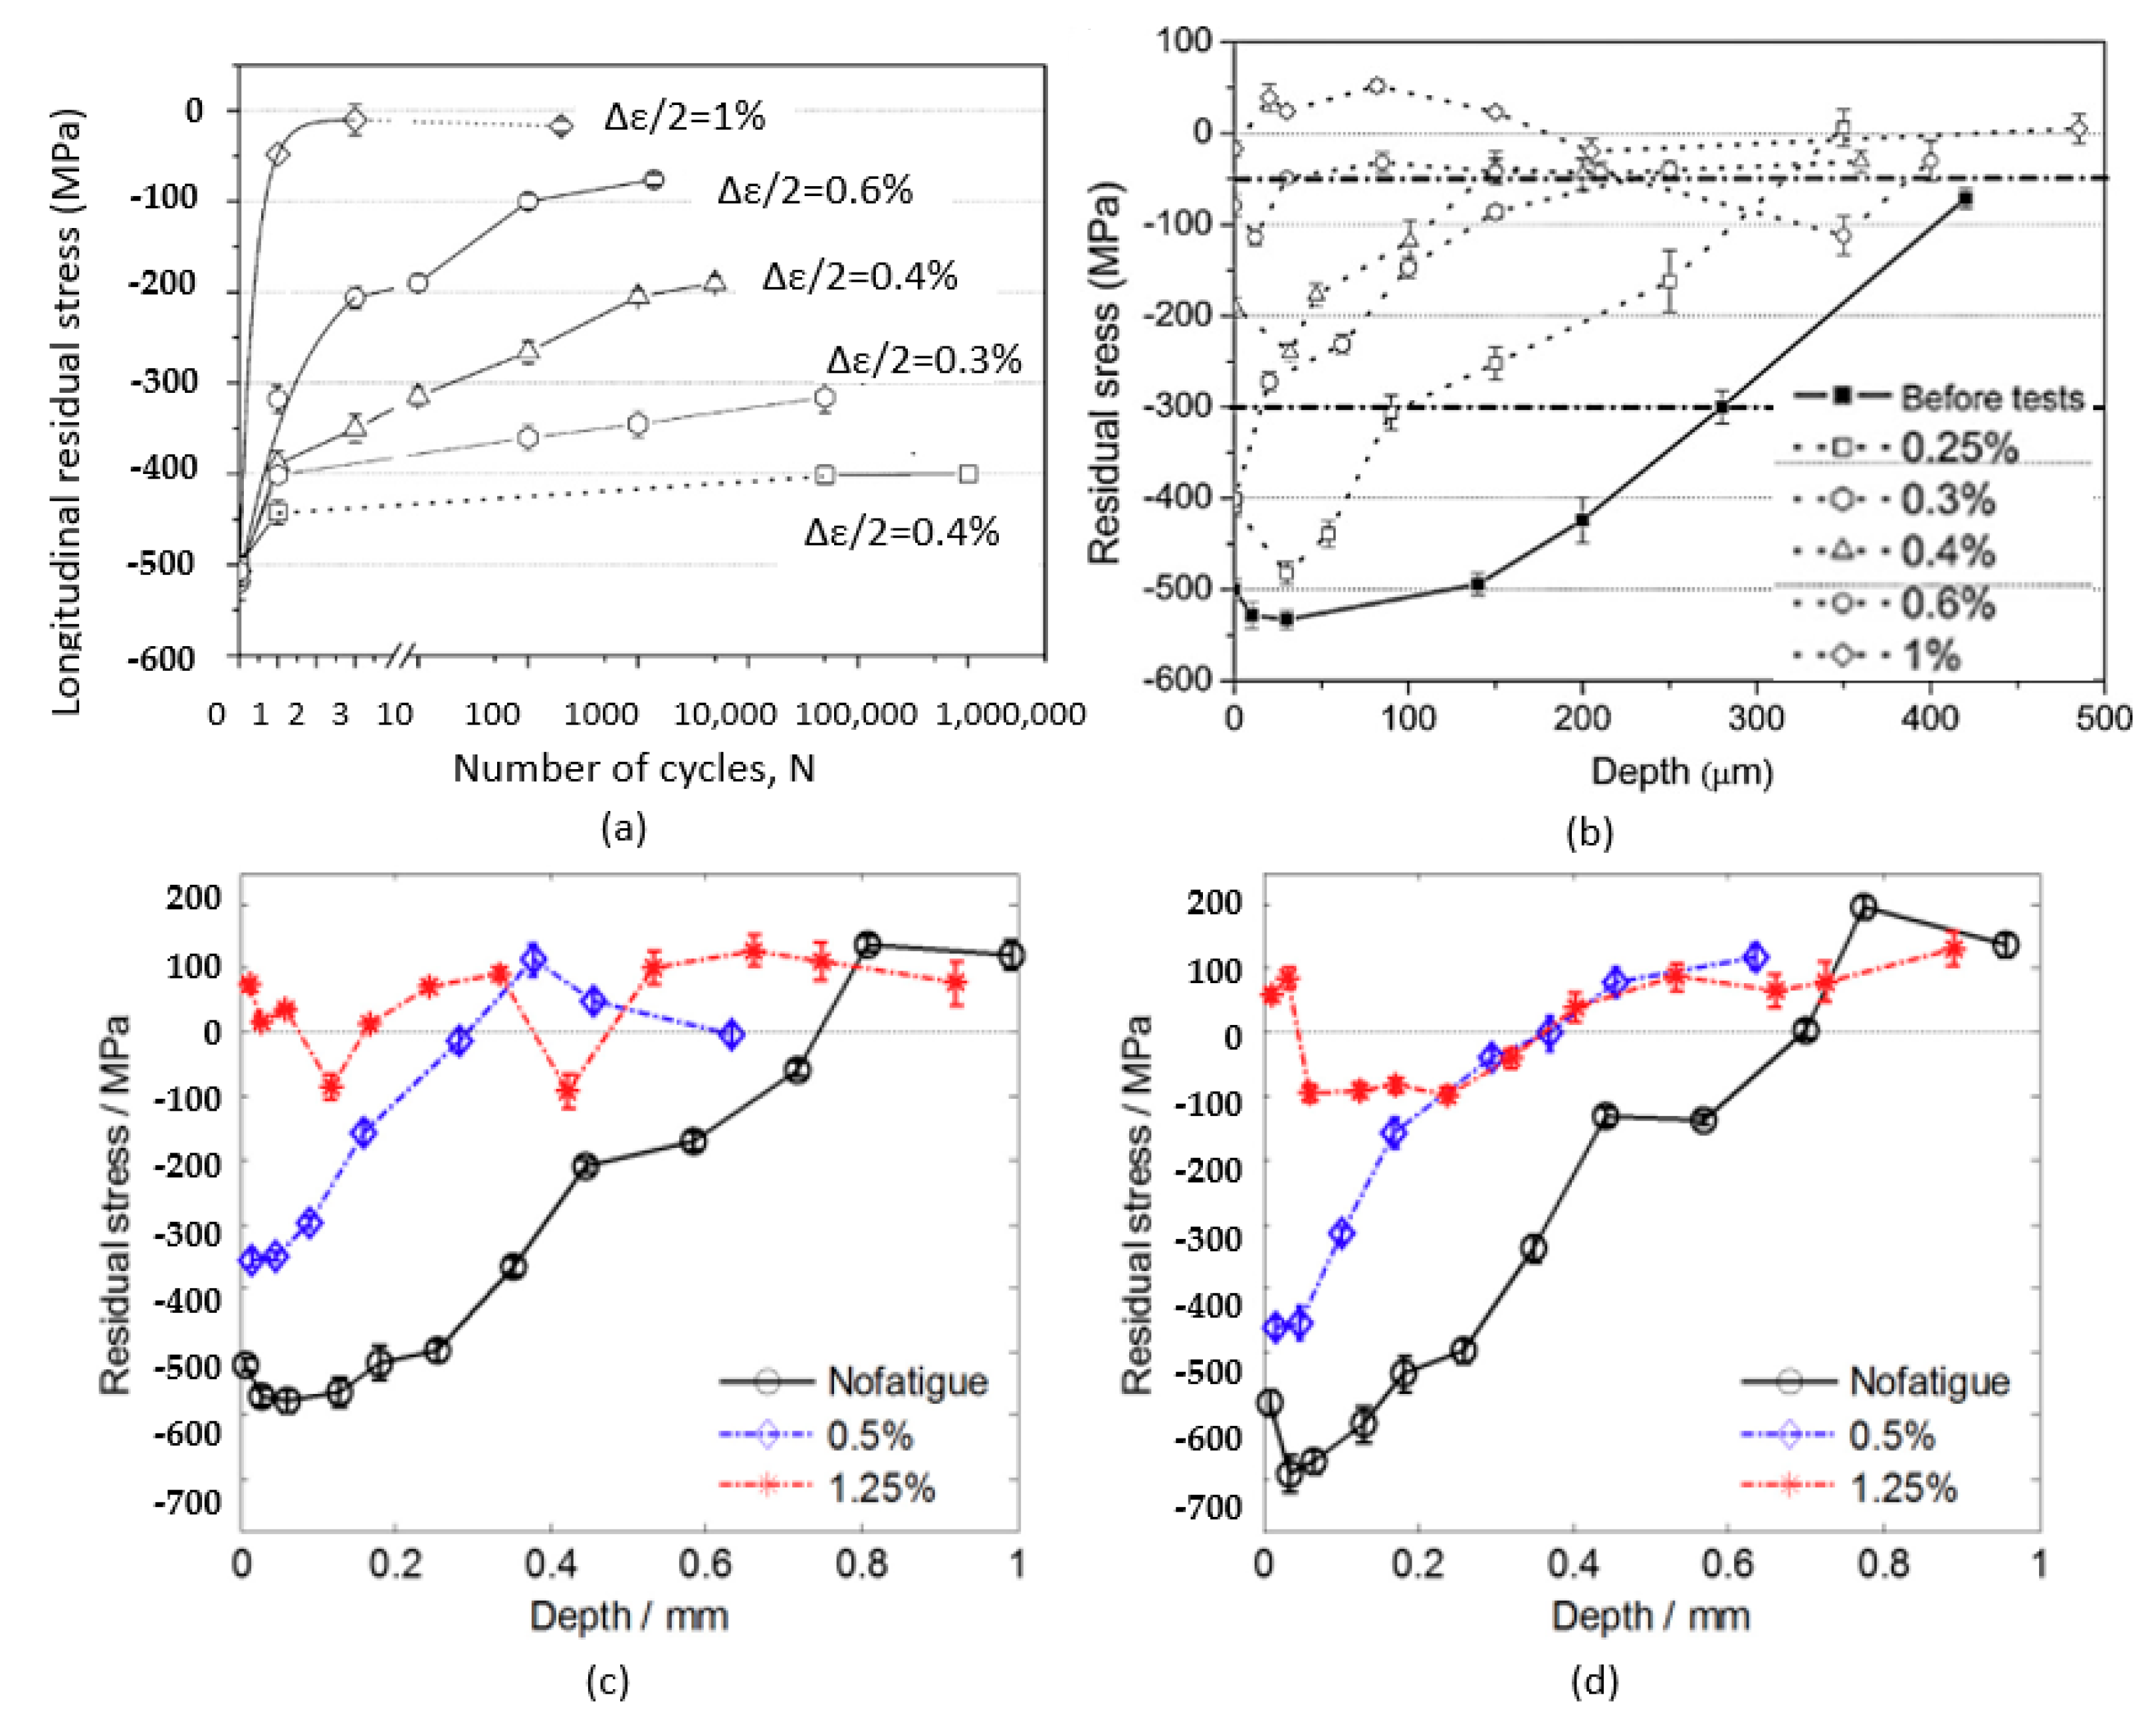
However, in the case of LCF, the role of compressive residual stress seems to not be crucial. As investigated in a study on a Ti-6Al-4V alloy [58], an enhancement in fatigue life was still observed on the specimens treated by USSP followed by a stress-relieving treatment (400 °C, 1 h), in which case the residual stress induced by USSP had already been reduced by 50%. A similar phenomenon was reported in a study on an AA2014 alloy treated by USSP [46]. The stress-relieved specimens exhibited a more enhanced fatigue life compared to USSPed ones and untreated ones, when the strain amplitude was high. Moreover, residual stress relaxation is a non-negligible issue when analyzing the individual effect of residual stress. The relaxation is mainly caused by cyclic plastic deformation imposed during fatigue loading and its kinetics is dependent on several factors, including the ductility of the studied material and the applied load level. Under LCF, when the load level is high, the relaxation mainly takes place in the first several cycles, and only a small proportion of residual stress can remain by the end of fatigue tests [16,66,85], as illustrated in Figure 7. These results regarding residual stress and its relaxation demonstrate that the effect of compressive residual stress on fatigue life improvement is significant only in the cases where the load level is low.
By contrast, under HCF, as the imposed stress level is low, plastic deformation in the macroscale can hardly be observed. Hence, the stress relaxation is relatively insignificant, and a large proportion of a compressive residual stress state can remain during cyclic loadings and even after the failure of the material [86]. However, under VHCF, the fatigue crack initiation site can shift from the top surface to the subsurface region or even the interior of materials. In such cases, the tensile residual stress layer beneath the compressive layer in the subsurface region can have a negative effect on the fatigue strength due to its role in promoting crack initiation, as concluded by Gao et al. [51].
Figure 7. (a) Evolution of residual stress at top surface as a function of number of cycles, with different load levels; (b) residual stress profiles with different load levels at N = Nf/2, for a micro alloyed steel (Reprinted with permission from [85]. Copyright 2011 Elsevier); (c) residual stress profiles of SMATed samples before and after fatigue; (d) residual stress profiles of CSPed samples before and after fatigue, for 316L stainless steel (Reprinted with permission from [87]. Copyright 2018 Elsevier).
Metals 12 00775 g007

3.2. Surface Quality

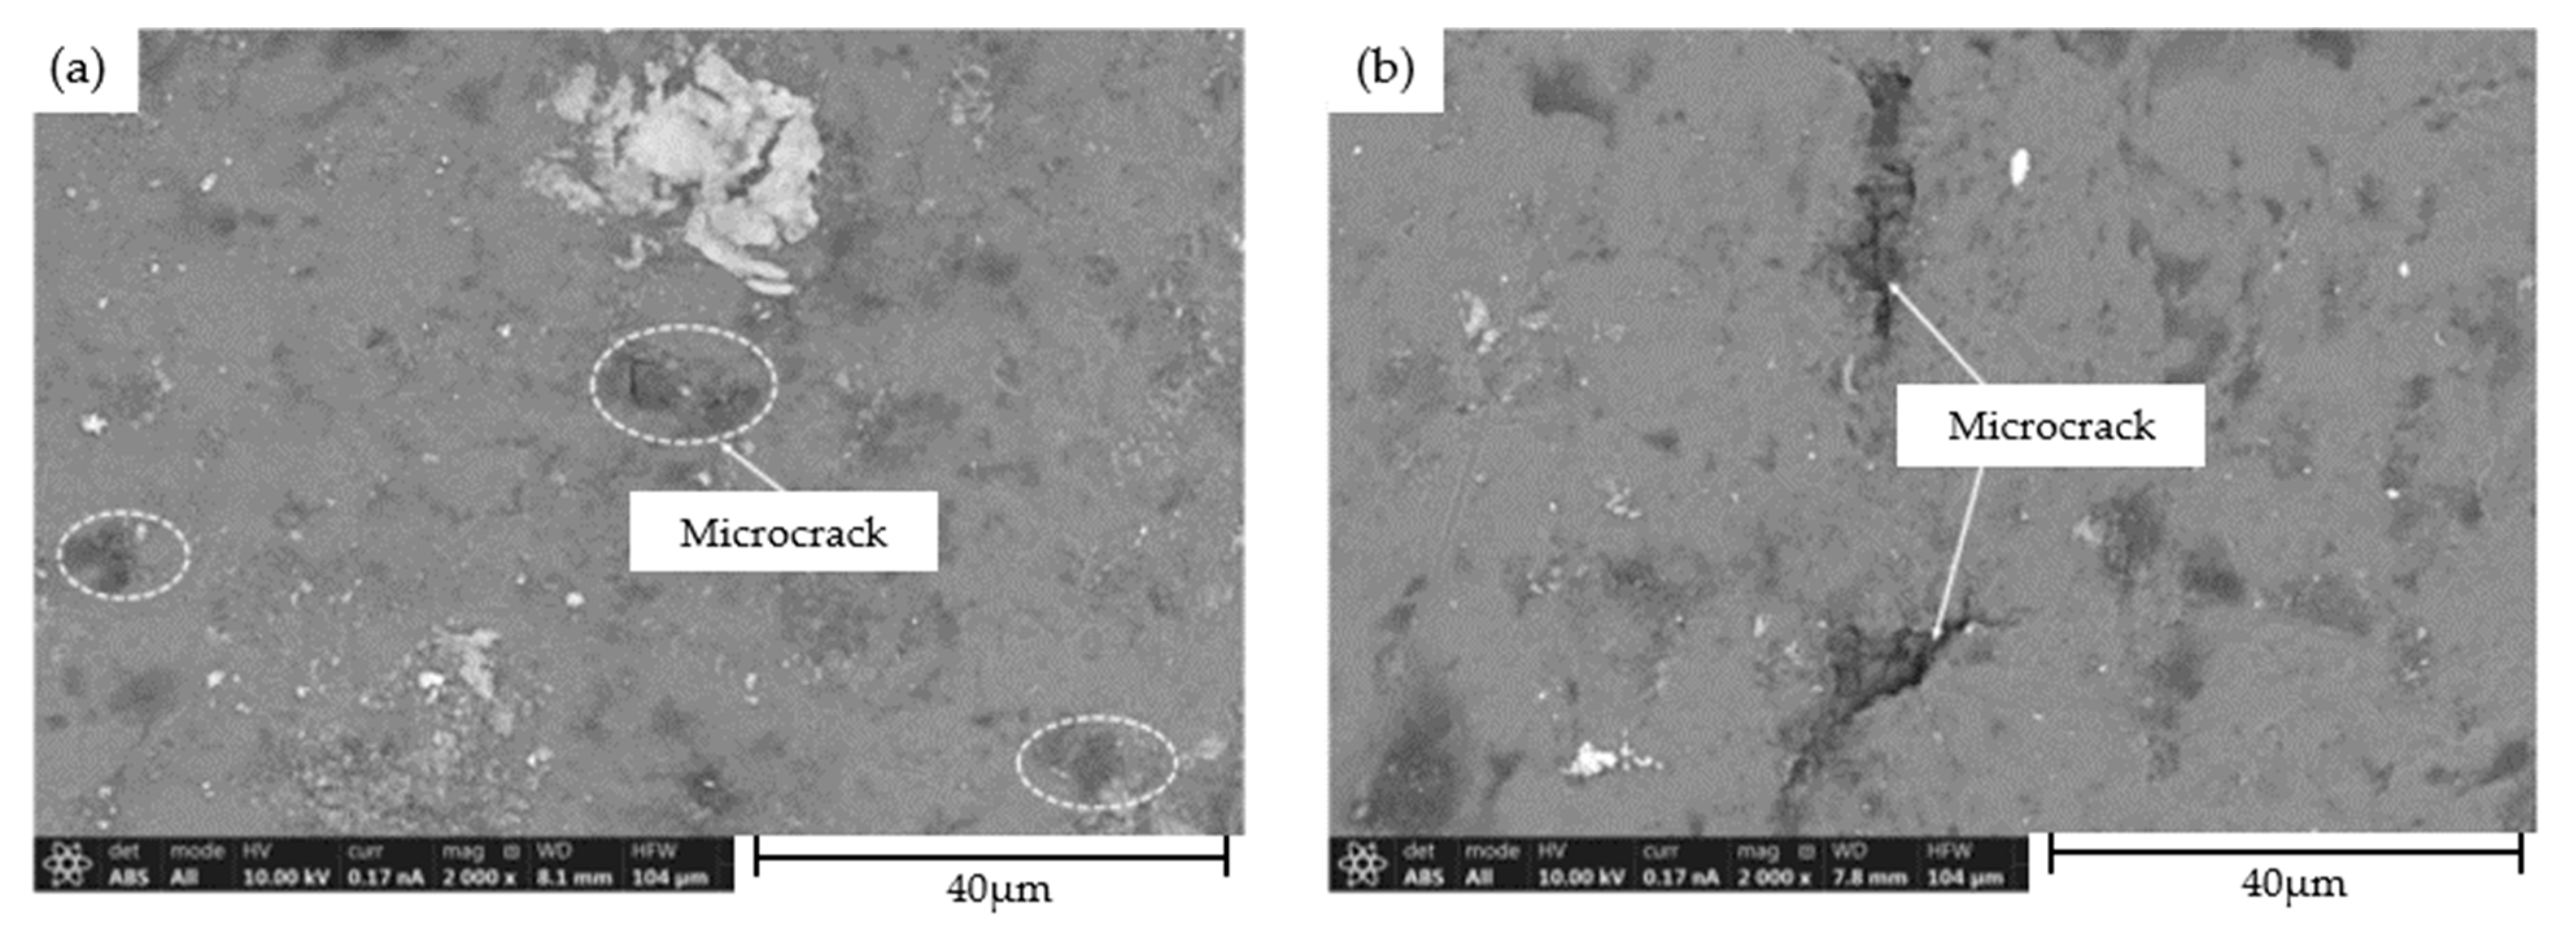
Surface integrity is generally a crucial factor, influencing the fatigue life. Microcracks induced by severe plastic deformation could somehow deteriorate the fatigue strength of materials by causing stress concentration and promoting crack initiation [28,74,88,89,90]. Regarding SMAT, it should be noted that an overpeening could induce microcracks at the surface. The negative effect of such microcracks could be non-negligible with different load levels, especially for materials with a high notch sensitivity. For example, the AA7075 alloy is generally considered as a notch-sensitive material. The results of Maurel et al. [91] revealed that SMAT-induced surface defects are extremely detrimental for the fatigue resistance of AA7075, compared to the counterparts of AA2024. Under VHCF, the SMATed AA7075 specimens exhibited an inferior fatigue limit compared to the untreated ones. The deterioration induced by SMAT was more significant on AA7075 specimens SMATed by 3 mm steel shots despite the higher superficial compressive residual stress. In fact, micro damage on the surface was observed and it caused a multicrack initiation phenomenon, as shown in Figure 8. Regarding UIT, since the impact angle is not randomly distributed but is instead directional, weaknesses are produced in the intersecting boundaries induced by UIT, and subsurface cracks can form between the surface nanocrystalline layer and the base metal [74].
Surface roughness is also generally considered as a factor influencing fatigue strength, especially when the load level is high. According to a fracture analysis on LCF behaviors of SMATed 316L stainless steel [52], for all the SMATed and untreated specimens, the basic fracture morphology was not different. After the crack initiation and slow propagation stage, cracks propagated inward in the transgranular mode, with the presence of fatigue striations. No intergranular facet was detected at crack initiation sites. Thus, crack initiation claims to be of a transgranular nature and occur from slip bands, which indicates that the surface roughness can have a significant influence.
Nevertheless, in some cases, the effect of surface roughness may not be reputed as a crucial factor contributing to the enhancement or deterioration of fatigue strength [92], as high residual stress can totally overwhelm the negative effect of roughness. In some other cases, the surface roughness can even be improved after UNSM when it is conducted on structure components, such as a ball screw composed of AISI 4150H steel [93].
In comparison with CSP and SSP, materials treated with SMAT exhibit a better surface quality [63]. Therefore, a more significant improvement in fatigue life can be obtained through the use of SMAT compared to CSP and SSP, if the size of shots and processing duration are well optimized [16,51,88].

3.3. Nanocrystalline Layer

Grain refinement is widely reputed to be the main factor for the enhancement in fatigue strength of surface-treated materials due to its ability to retard the fatigue crack initiation and propagation [90,94,95]. Such beneficial effects are also well documented in several studies on SMATed materials [45,67,74].
According to the investigation on the LCF behavior of AZ31B magnesium [60], the crack initiation sites of the SMATed samples switched from the top surface to the subsurface, which is not commonly observed in the LCF regime. The NC layer is considered as the main factor suppressing the formation of stress concentrators for crack initiation, since plastic deformation is more uniform and better accommodated, compared to the coarse-grain layer. The larger volume fraction of grain boundaries near the surface can impede the dislocation sliding effectively; thus, hindering the crack initiation.
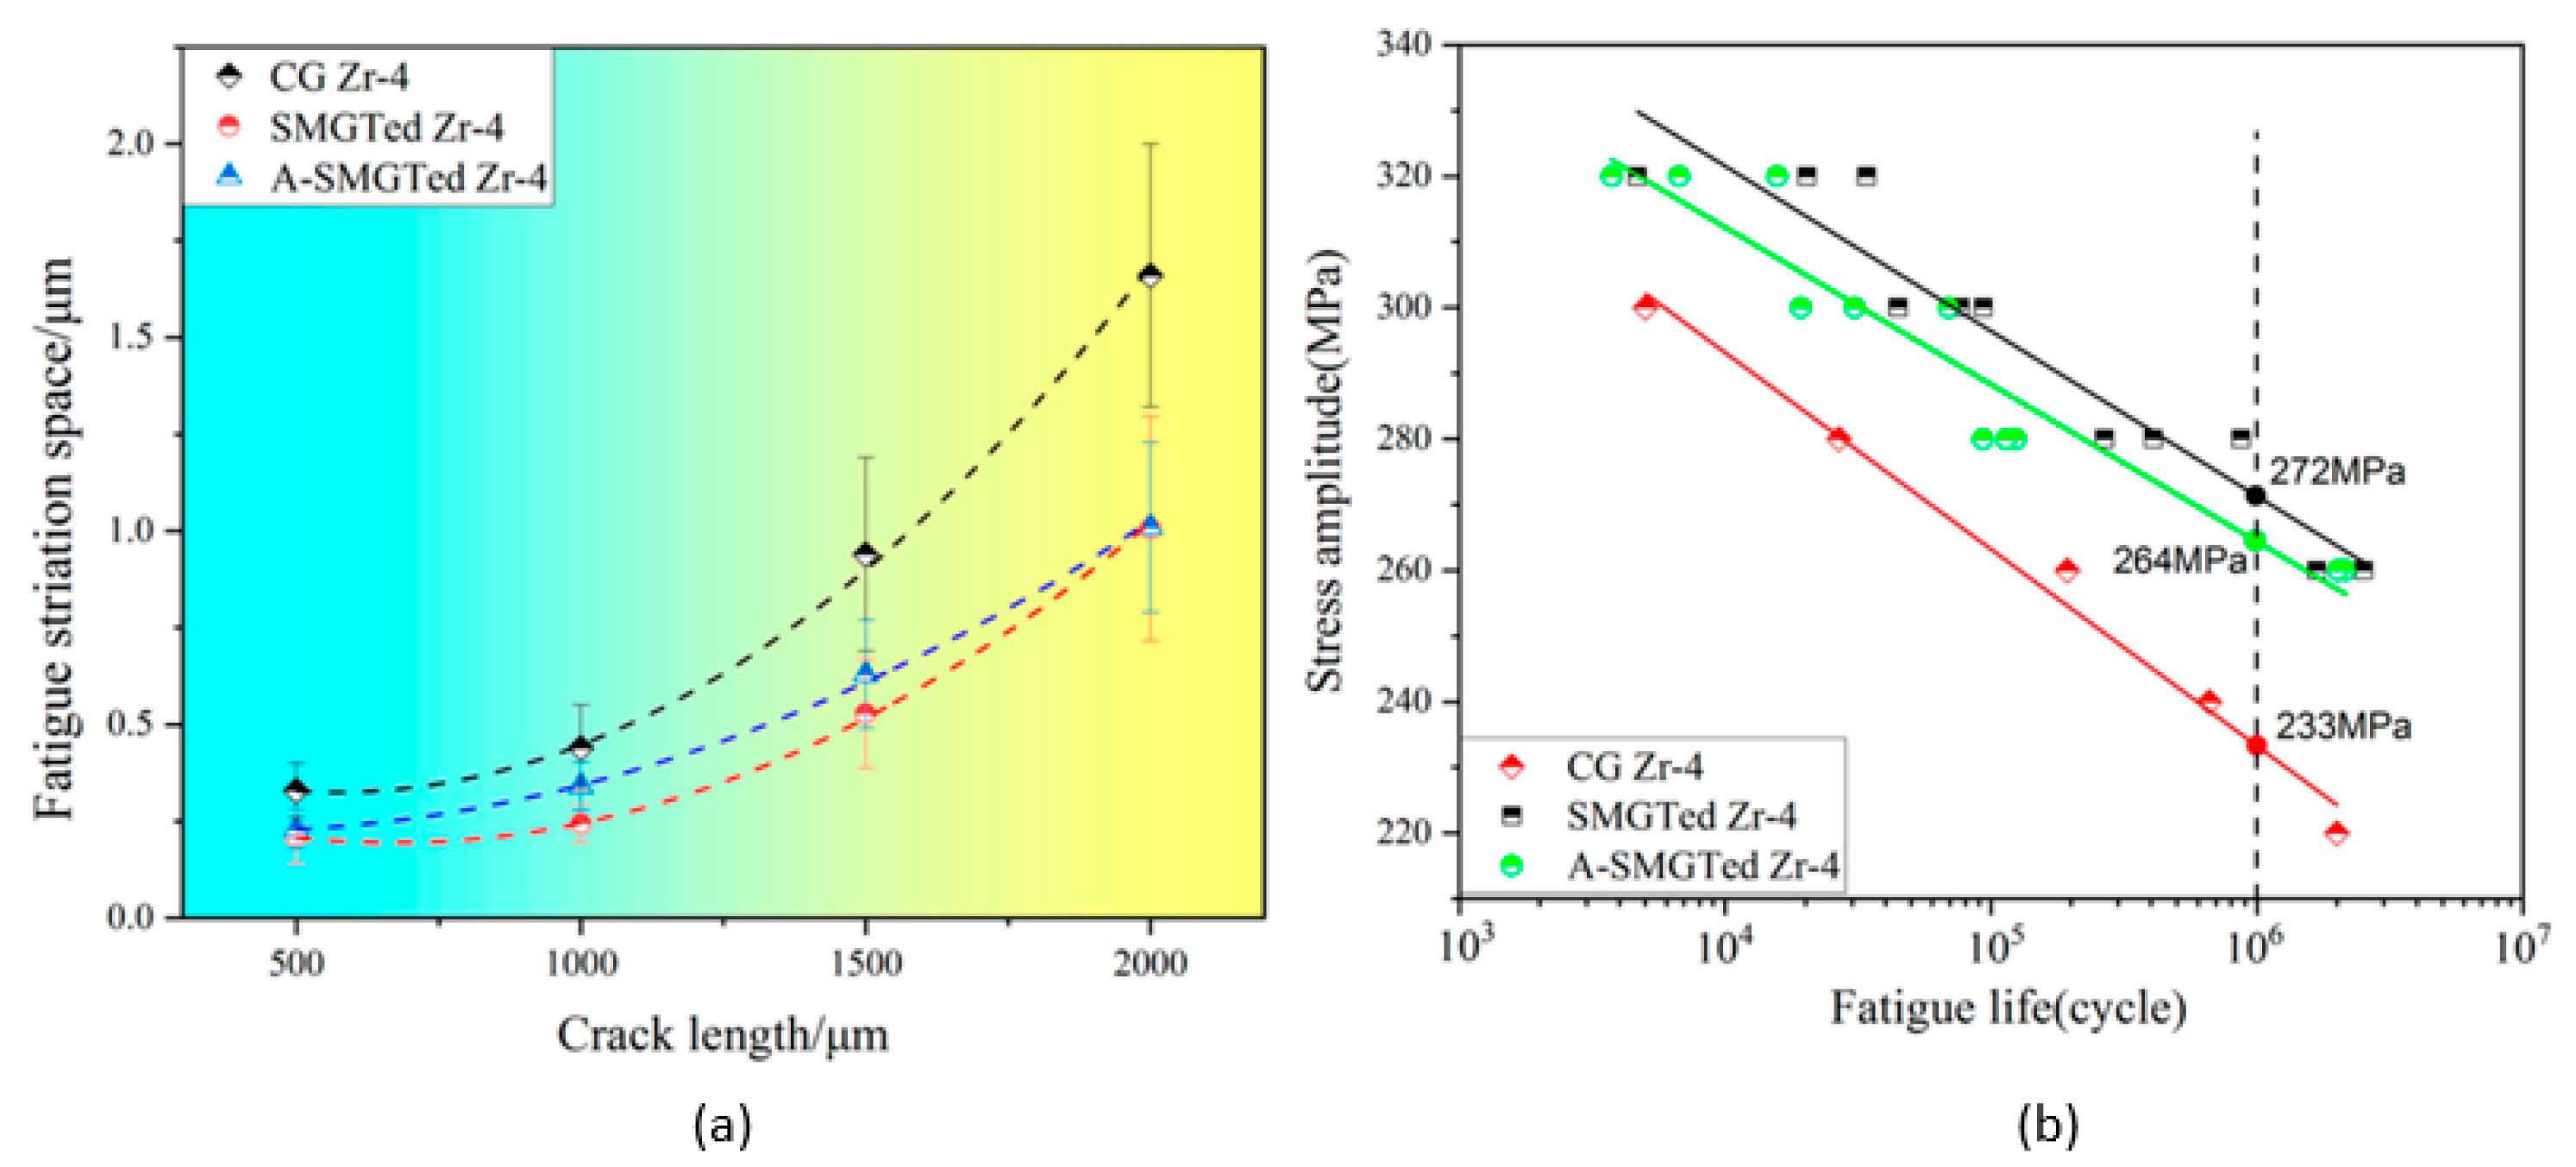
Since the nanocrystalline layer induced by surface treatment is generally associated with compressive residual stress and work hardening, post-treatment annealing has been applied as a method to relieve the residual stress after surface treatment, so that the individual influence of the nanostructure can be analyzed separately [49]. As illustrated in Figure 9a, once the residual stress is apparently relieved after annealing at 400 °C for 2 h, the annealed nanocrystallized Zr-4 samples exhibit a comparable fatigue striation space to the as-treated samples, and this striation space is significantly lower than that observed for the coarse-grain samples. This trend in fatigue striation space is consistent with fatigue results (Figure 9b). This difference seems to indicate that it is not the compressive residual stress, but the nanocrystalline layer itself that plays a principal role in enhancing the fatigue resistance.
Finite element method (FEM)-based numerical simulations can provide another potential method for analyzing the effect of nanostructures. As demonstrated by the results obtained in the numerical study of Li et al. [7,9], the nanocrystalline layer and work-hardened region at the surface and subsurface areas played a more significant role in improving the fatigue limit of nanocrystallized C-2000 superalloy samples than the compressive residual stress field. In these studies, finite element (FE) models of treated materials were built. Except for surface roughness, work hardening, compressive residual stress and a nanocrystal were set individually for each FE model, and a model with the combination of the three features was set as a counterpart. The plastic strain occurred in the surface of the FE models when a relatively high bending loading was applied. Different values of plastic strain demonstrated that the nanocrystalline layer was the most essential factor to enhance the fatigue crack resistance.
The stability of a nanostructure should be paid attention to while analyzing the individual effect on fatigue resistance, especially under LCF. Original work was conducted by Sun et al. [15] in order to study the eventual changes of the microstructure generated by SMAT under subsequent LCF loading. It was found that new plastic slips were activated in the plastically deformed region, which led to an increase in the grain orientation spread (GOS). However, in the nanostructured layer, no obvious microstructure changes were observed, which is considered to be related to the high dislocation slip resistance in nanocrystalline materials.

3.4. Phase Transformation

Apart from the role of the compressive residual stress and nanostructured layer generated by SMAT, other phenomena such as the deformation-induced phase transformation were also investigated for some steels such as, for example, SUS304 [2,45,96]. A fraction of the austenitic phase at the surface can actually be transformed into the martensitic phase under the effect of plastic deformation induced by impact loading [6,65]. As the mechanical strength of martensite is higher than that of austenite, the occurrence of a martensitic transformation induced by SMAT, coupled to the grain refinement, can also improve the fatigue strength of materials.
Based on the elements presented in this section, it can be concluded that the difference of fatigue strength between SMATed and untreated samples can be attributed to the combined effect of nanocrystal, surface quality and residual stress, while these factors may have different influences under different loading conditions. Residual stress can be a crucial factor only when the load level is relatively low. The nanocrystalline layer contributes to the enhancement in fatigue strength due to its capability of retarding crack initiation and propagation under both LCF and HCF. Surface roughness acts as a main detrimental factor of fatigue strength after SMAT. However, the deterioration after SMAT could be less remarkable compared to that of CSP or SSP. Microdamage such as dimples and cracks can be generated by SMAT, and they could be extremely harmful in any load level, when the processing parameters are not properly chosen, including the selection of shots, peening intensity and processing duration.

4. Effects of SMAT Coupled with Other Processes

4.1. Heat Treatment

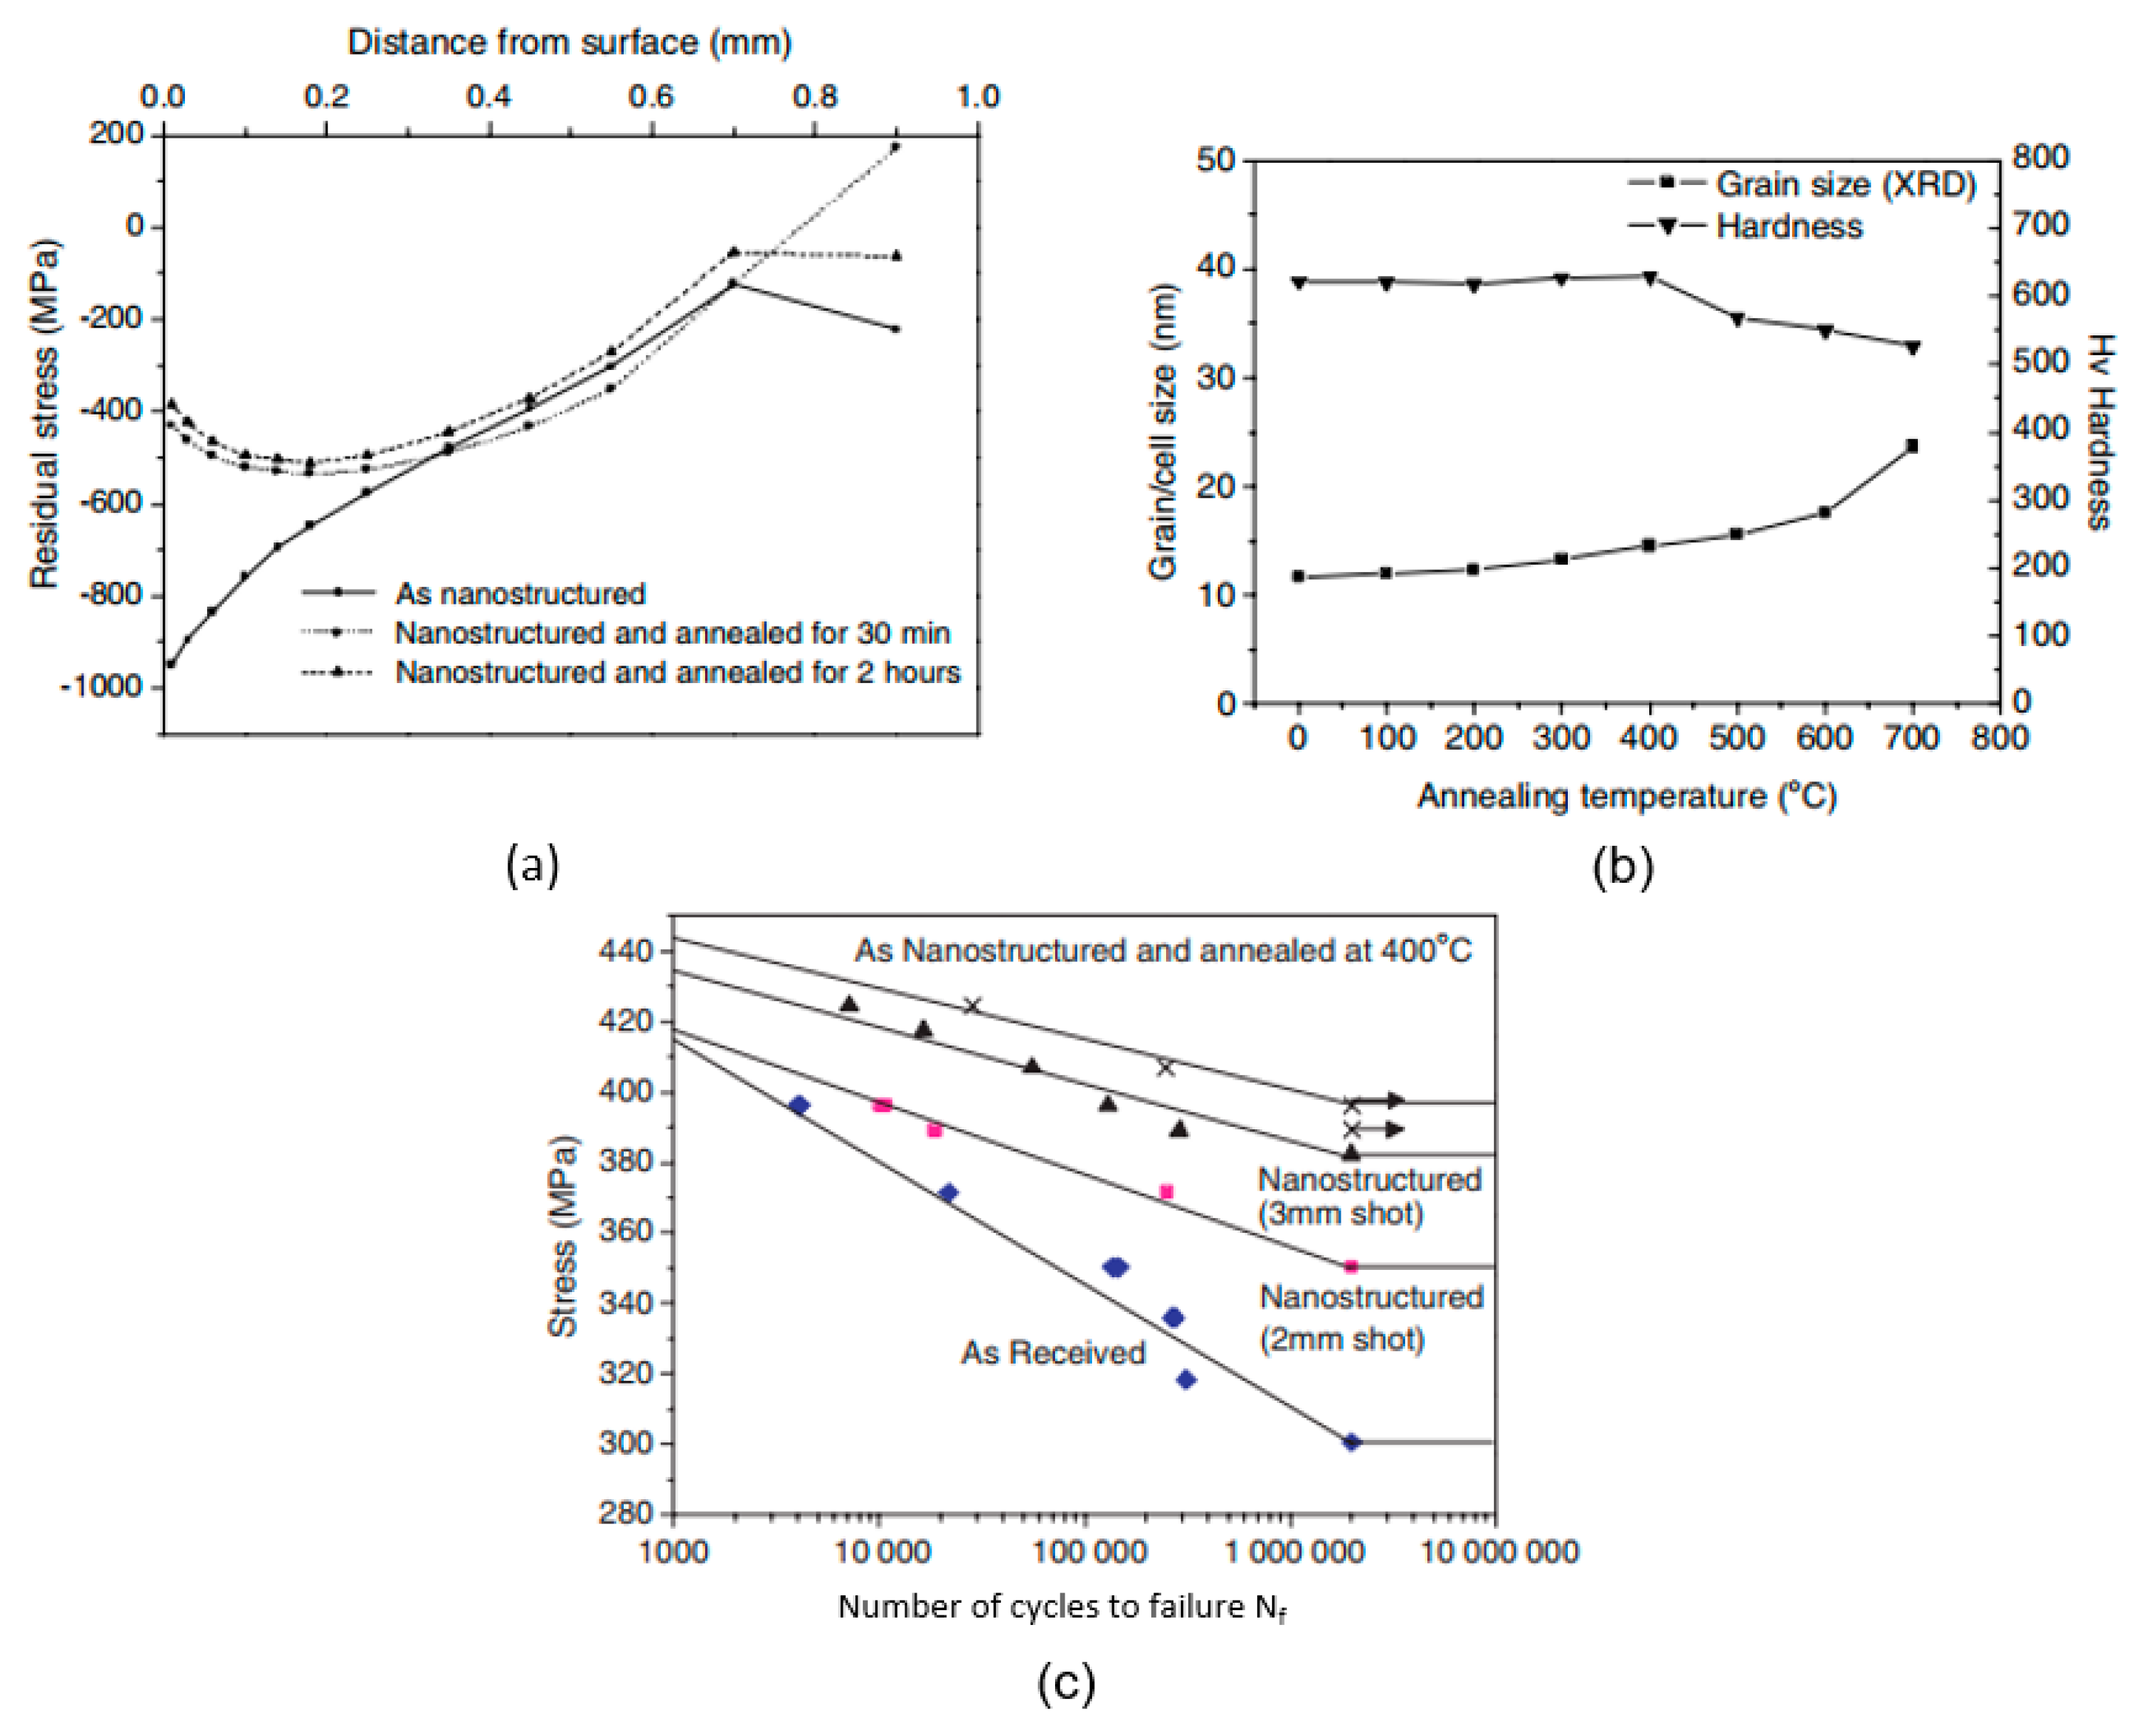
Annealing treatment at 400 °C after surface nanocrystallization was reported to greatly improve the fatigue properties of 316L stainless steel, as shown in Figure 10c. Although the superficial compressive residual stress starts to relax (Figure 10a), the occurrence of strain hardening, strain-induced martensitic transformation and the stable nanocrystalline layer contribute to the improvement of fatigue strength. As illustrated by Figure 10b, the nanostructure remains stable as long as the annealing temperature is controlled below 500 °C. The recovery of ductility caused by post-SMAT annealing was also reported by Kumar et al. [58]. However, in this study, no improvement in fatigue strength was found after annealing.
A duplex treatment consisting of precipitation aging and SMAT was proposed and investigated by Maurel et al. [91]. The aging was performed on AA2024 and AA7075 alloys, both before and after SMAT. Characterization revealed that the microstructure obtained by a precipitation aging after SMAT (S+A) displayed finer and denser precipitates compared to both the unaffected core microstructure and the microstructure processed by SMAT after precipitation aging (A+S). However, a comparatively shorter fatigue life was found for samples processed by S+A, compared to those processed by A+S. As concluded in the study, such a reduction is attributed to the fact that in S+A, SMAT is performed on a softer surface. Hence, a higher surface roughness and fold-like defects occur after S+A. Another detrimental factor is the relaxation of compressive residual stress caused by post-SMAT aging. For the AA2024 alloy, the fatigue resistance after A+S was 25% higher than that after S+A, while for AA7075, the value was 20%. It should be noted that the AA2024 samples processed by S+A exhibited a fatigue resistance comparable to the untreated ones.
The thermal stability of modifications induced by SMAT is essential for developing such duplex mechanical heat treatment processes. It was investigated through characterizing the evolution of microhardness and grain size during post-SMAT annealing treatments [22,24,97]. In [97], the thermal stability of a 316L steel nanocrystallized by SMAT was studied in the temperature range from 100 to 800 °C. It was shown that the grain size in the nanostructured layer remained unchanged for a temperature of up to 600 °C. This result was consistent with that obtained by Todaka et al. [31] for various steels. All these authors found that under annealing at 600 °C for 1 h, the nanostructured layer of the different studied steels showed a substantially slow grain growth without recrystallization. In the study performed by Han et al. [24] regarding Zr, they found that the nanograined pure Zr was stable during annealing treatments performed at temperatures of up to 650 °C for 10 h, above which significant grain growth occurred. A similar conclusion for Zr-4 alloy was drawn by Geng et al. [49]. Liu et al. [22] investigated the thermal stability of pure Al by carrying out isothermal and isochronal annealing treatments. It was revealed that the nanostructured layer of pure Al generated by SMAT exhibited a high thermal stability in up to 275 °C, which represents 59% of the melting temperature (0.59 Tm. According to the results obtained by Bagherifard et al. [98], the nanocrystalline layer of an SSPed low-alloy steel showed a good thermal stability in temperatures of up to 200 °C and 300 °C for a duration of 3 h.

4.2. Cryogenic Temperature

As mentioned in Section 3.4, a phase transformation can occur in some austenitic stainless steel during severe plastic deformation. A further investigation of Novelli et al. revealed that the volume fraction of martensite in the SMATed 304L austenitic stainless steel samples increased at lower temperatures [2,97]. Another potential benefit of cryogenic temperature lies in the fact that SMAT at a cryogenic temperature could induce a lower roughness on the treated surface [96], which may lead to a more significant enhancement in the fatigue strength of the treated material.
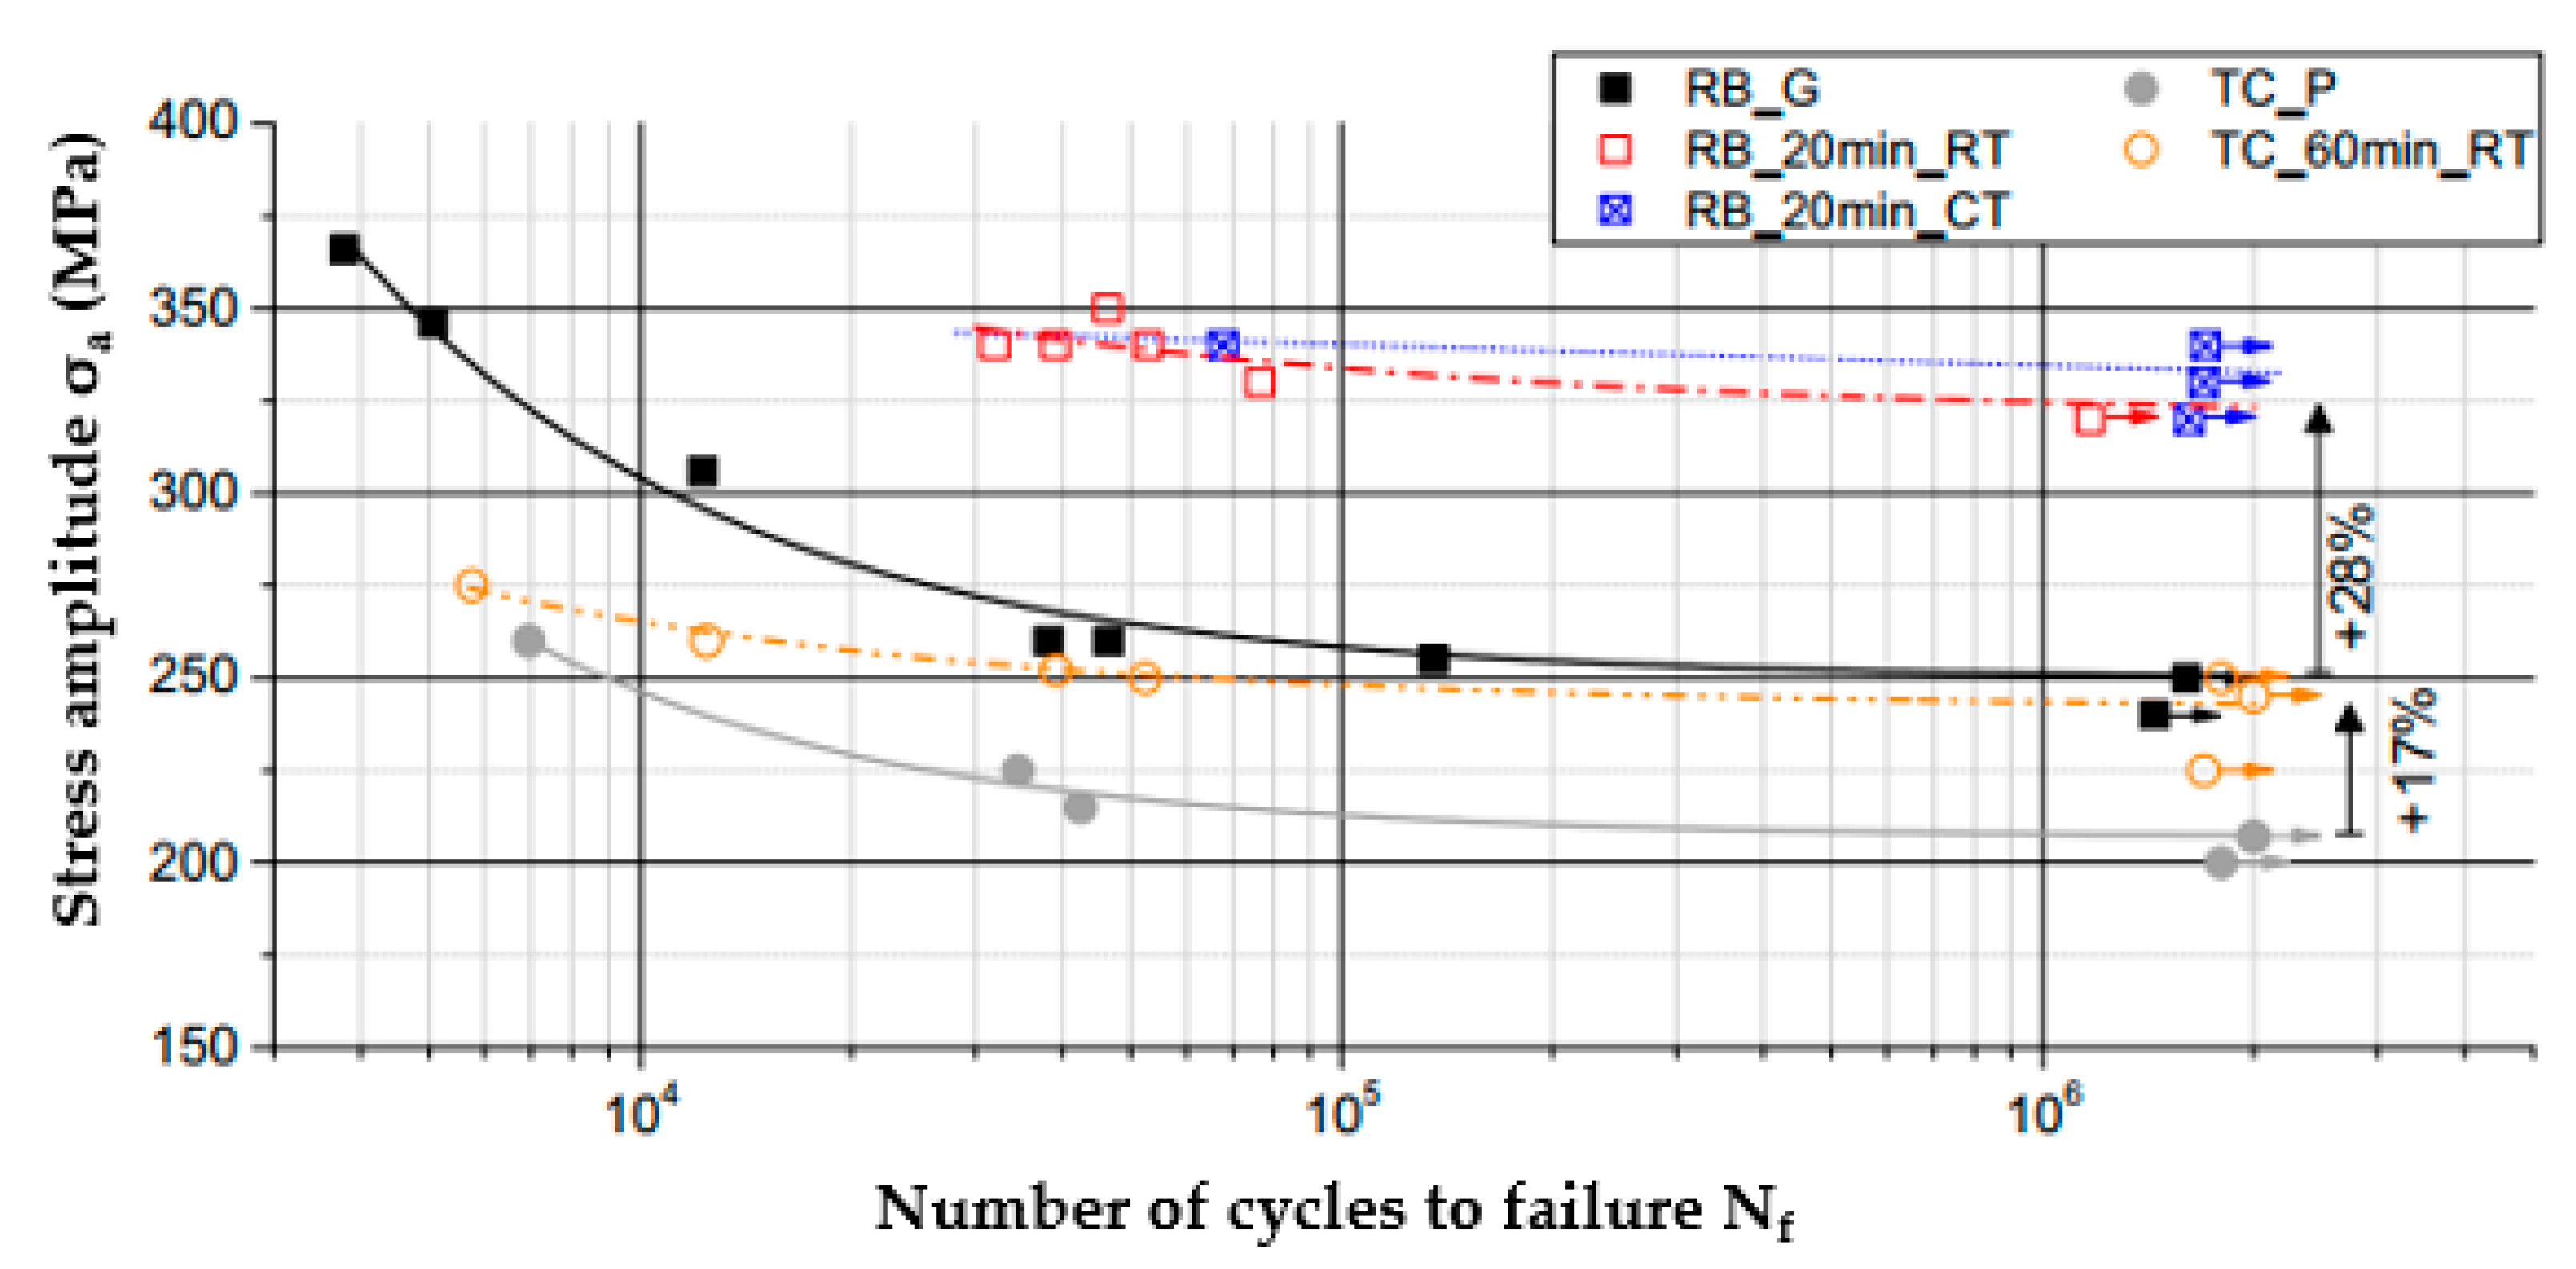
Based on the benefits above, research was carried out by Dureau et al. [65] to investigate the fatigue strength of a 304L austenitic stainless steel processed by SMAT at cryogenic temperature (CT). SMAT was performed on samples under cryogenic conditions at approximately −100 °C for 20 min. A lower roughness, a higher martensitic fraction, a higher surface hardness, and higher residual stresses in both phases (γ austenite and α’ martensite) were obtained. However, the results obtained from rotating bending tests revealed that the expected extra enhancement was not brought by CT-SMAT. The enhancement in fatigue life was nearly the same for samples processed by SMAT and CT-SMAT, compared to the initial ground state, as presented in Figure 11.
SMAT at a cryogenic temperature was also conducted by Maurel et al. [99] on a β-metastable 5553 titanium alloy. The results revealed that the formation of martensite was observed within the kink bands for specimens SMATed at both room temperature (RT) and cryogenic temperature, while the latter allowed the formation of a martensite deeper in the subsurface. The roughness of the CT-SMAT processed surface was reduced by a factor of four compared to the RT-SMAT processed one. Based on the two facts above, an enhancement of 8% was obtained in fatigue resistance after CT-SMAT compared to RT-SMAT.

4.3. Other Surface Mechanical Treatments

Bagherifard et al. [98] investigated different approaches to decrease the detrimental effect of a high surface roughness on fatigue strength after severe shot peening. Repeening and grinding were performed on SSPed specimens. Good results could be obtained through repeening by smaller and harder shots, although the surface roughness was not considerably reduced. The improvement was attributed to a much more homogeneous and regular surface morphology introduced by repeening.
Amanov et al. [93] conducted a duplex peening process on an AISI 304 stainless steel, in which case the CSP was performed prior to UNSM. The rotating bending fatigue life after all the three treatments (CSP, UNSM and CSP+UNSM) was prolonged compared to the untreated samples. However, the fatigue strength after CSP+UNSM was higher than that after CSP, but much lower than that after UNSM. The deterioration was attributed to the superficial damage induced by over-peening. The results indicated that such duplex peening could only be used to improve the effect of CSP.

4.4. Nitriding

Nitriding is a widely used thermochemical surface modification technology that has many advantages over other conventional surface engineering techniques. Nitriding can improve the surface hardness, wear resistance and corrosion resistance of ferrous materials through the formation of a unique composite structure with a hard compound layer and a diffusion zone with submicron-sized nitrides [100,101]. However, the nitrided layer formed due to the nitriding process is usually accompanied by a substantially low toughness [102].
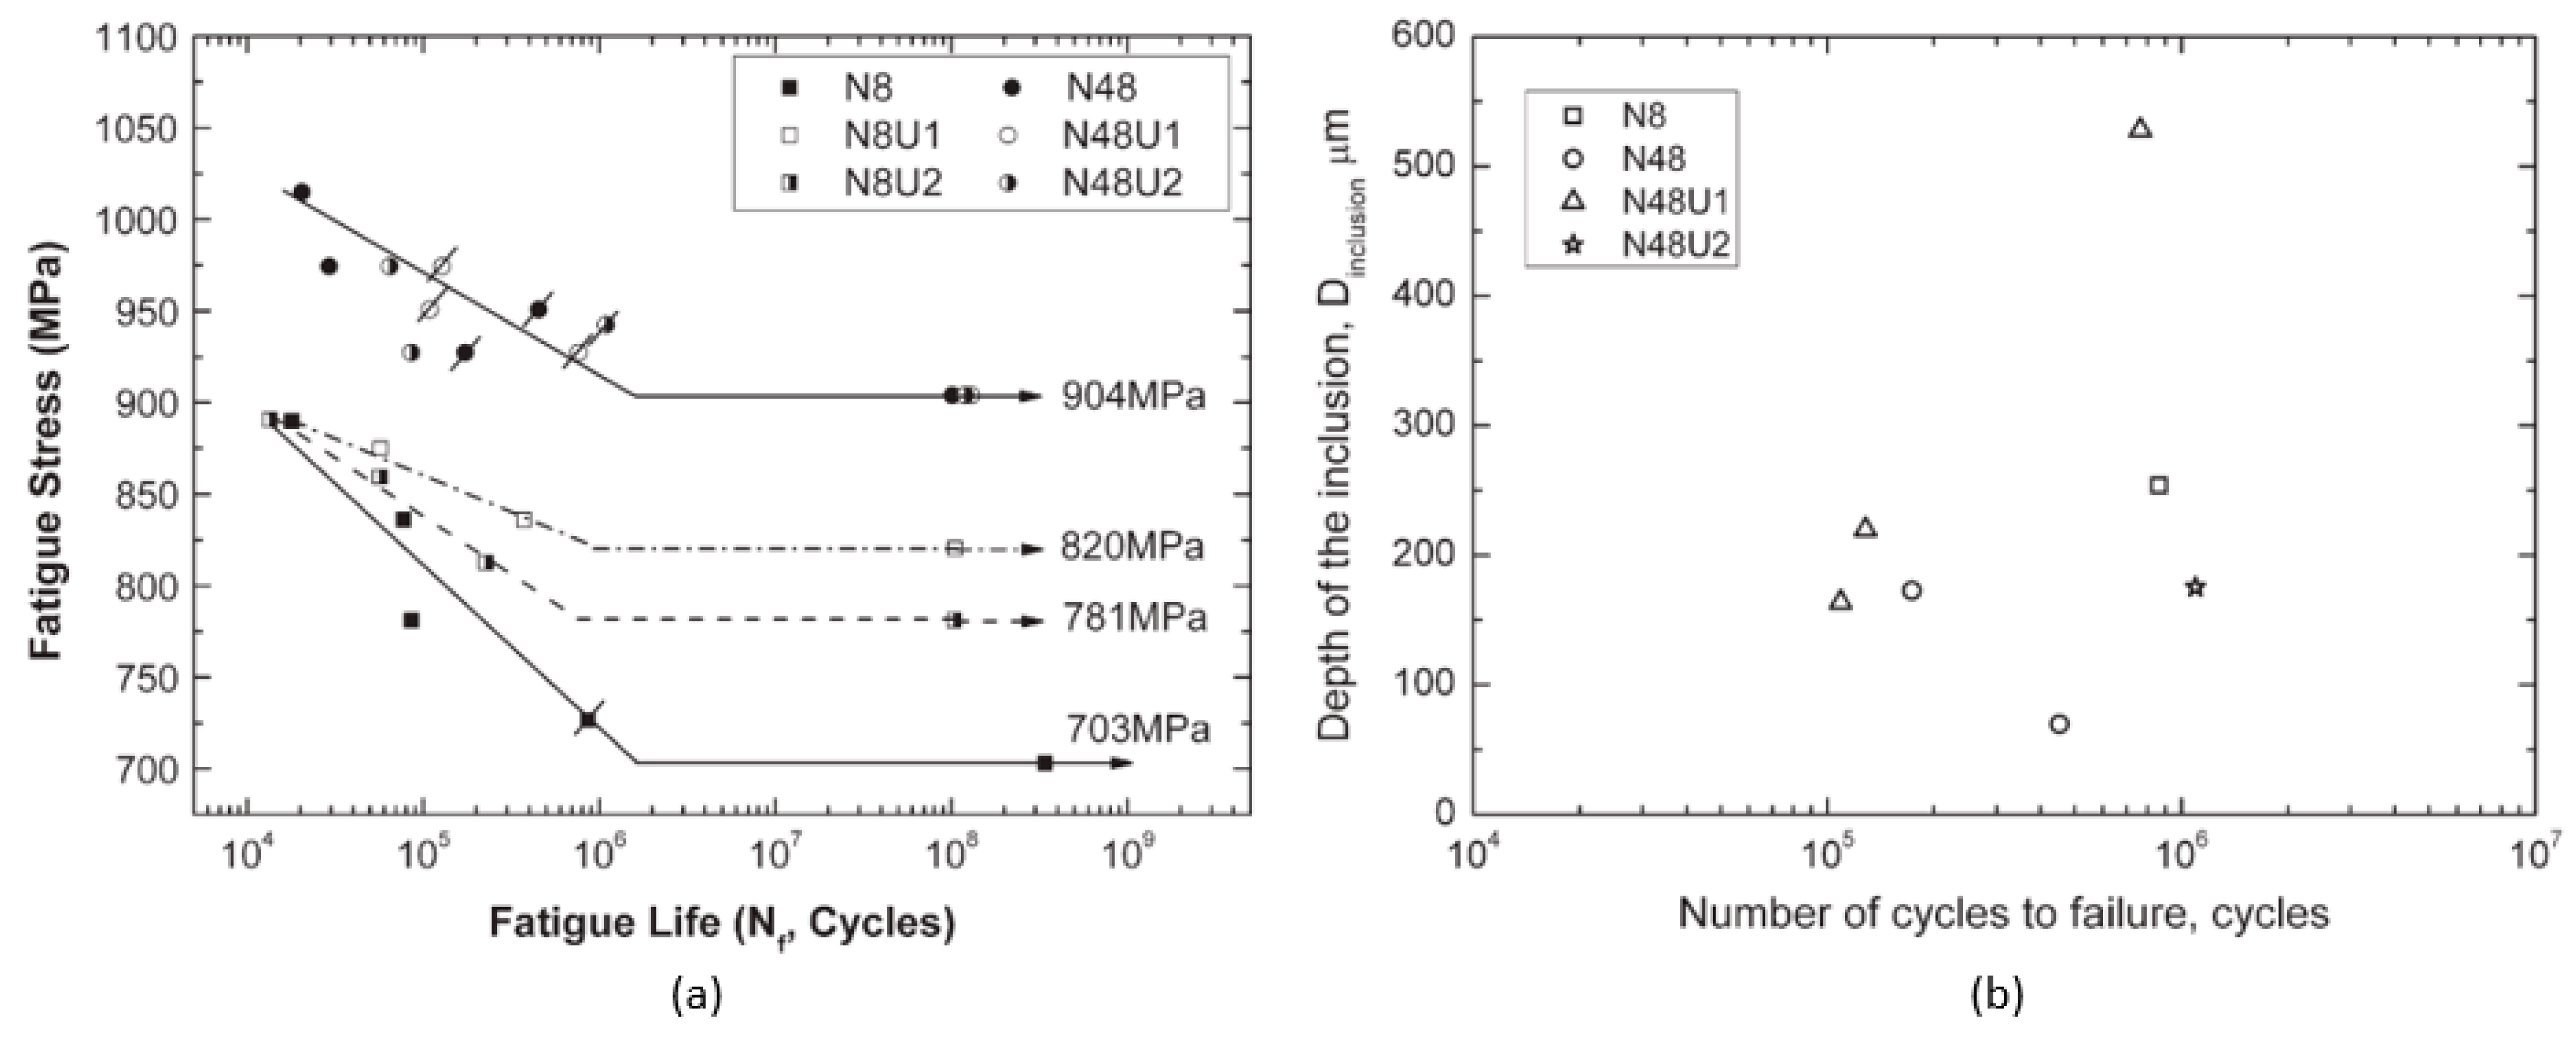
Wu et al. [82] performed UNSM on an S42C steel plasma nitrided for 8 h (N8) and 48 h (N48), respectively. The results obtained from material characterization and fatigue tests demonstrated that a plastically deformed layer with a lower roughness and considerably higher microhardness was generated at the surface of both N8-UNSM and N48-UNSM samples. Moreover, the layer was thicker when the nitriding duration was longer. A significant enhancement in fatigue strength was observed in N8-UNSM samples, while N48-UNSM samples exhibited no improvement. The plastic deformation layer was thicker in the N8-UNSM samples than in the N48-UNSM samples. Moreover, the positions of the inclusions inducing a fish-eye crack were found deeper in N48-UNSM samples compared to samples of other conditions (Figure 12b).

5. Conclusions and Prospects

Based on the elements reviewed in the present work, the following conclusions could be drawn:
  • SMAT has been widely applied to a large variety of metallic materials with different loading conditions, including LCF, HCF and VHCF. The loading conditions are not limited to uniaxial loading. In general, an enhancement in fatigue strength after SMAT can be observed compared to the untreated state if the SMAT conditions are optimized. However, the enhancement of SMAT can be more significant in the HCF regime than the LCF or VHCF regimes. Moreover, SMAT is also reported to have negative effects on fatigue strength for some materials in the LCF and VHCF regimes.
  • The enhancement or deterioration of the fatigue strength after SMAT can be attributed to the combined effect of a top surface nanocrystalline layer, superficial compressive residual stress and surface integrity. The nanocrystalline layer can play a crucial role of enhancing fatigue strength by retarding the initiation and propagation of cracks. Superficial compressive residual stress is also reputed to be a beneficial factor when the load level is not too high or too low. As for surface integrity, it is the main detrimental factor. Hence, to achieve an enhancement in fatigue strength, process parameters should be properly determined.
  • Combined with other processes such as heat treatment, cryogenic condition, other mechanical surface treatments and nitriding, the effect of SMAT on fatigue strength can be further reinforced or weakened, depending on whether the balanced effect of the nanocrystalline layer, residual stress and surface integrity is changed.
The majority of the studies presented in the literature corresponds to experimental work. The experimental results allowed highlighting the induced improvements due to SMAT and understanding the substantial mechanisms linked to the observed improvements. Hence, in future work, based on the obtained experimental results, it could be interesting to establish models in order to predict the fatigue properties/behaviors of the SMAT processed materials. Another research direction of interest could be SMAT-affected fatigue properties with even more complex loading conditions, such as the multiaxial fatigue strength of structural components.

Author Contributions

Writing—original draft preparation, P.G.; writing—review and editing, Z.S. and D.R.; supervision, Z.S. and D.R. All authors have read and agreed to the published version of the manuscript.

Funding

This research received no external funding.

Data Availability Statement

Not applicable.

Acknowledgments

Pengfei Gao acknowledges the Chinese Scholarship Council (CSC) for financial support of his PhD study in France.

Conflicts of Interest

The authors declare no conflict of interest.

References

  1. Zhang, H.W.; Wang, L.; Hei, Z.K.; Liu, G.; Lu, J.; Lu, K. Low-Temperature Plasma Nitriding of AISI 304 Stainless Steel with Nano-Structured Surface Layer. Z. Meter. Res. Adv. Tech. 2003, 94, 1143–1147. [Google Scholar] [CrossRef]
  2. Novelli, M.; Fundenberger, J.J.; Bocher, P.; Grosdidier, T. On the Effectiveness of Surface Severe Plastic Deformation by Shot Peening at Cryogenic Temperature. Appl. Surf. Sci. 2016, 389, 1169–1174. [Google Scholar] [CrossRef]
  3. Unal, O.; Varol, R. Surface Severe Plastic Deformation of AISI 304 via Conventional Shot Peening, Severe Shot Peening and Repeening. Appl. Surf. Sci. 2015, 351, 289–295. [Google Scholar] [CrossRef]
  4. Merwin, J.E.; Johnson, K.L. An Analysis of Plastic Deformation in Rolling Contact. Proc. Inst. Mech. Eng. 1963, 177, 676–690. [Google Scholar] [CrossRef]
  5. Wong, C.C.; Hartawan, A.; Teo, W.K. Deep Cold Rolling of Features on Aero-Engine Components. Procedia CIRP 2014, 13, 350–354. [Google Scholar] [CrossRef] [Green Version]
  6. Roland, T.; Retraint, D.; Lu, K.; Lu, J. Fatigue Life Improvement through Surface Nanostructuring of Stainless Steel by Means of Surface Mechanical Attrition Treatment. Scr. Mater. 2006, 54, 1949–1954. [Google Scholar] [CrossRef]
  7. Shaw, L.L.; Tian, J.W.; Ortiz, A.L.; Dai, K.; Villegas, J.C.; Liaw, P.K.; Ren, R.; Klarstrom, D.L. A Direct Comparison in the Fatigue Resistance Enhanced by Surface Severe Plastic Deformation and Shot Peening in a C-2000 Superalloy. Mater. Sci. Eng. A 2010, 527, 986–994. [Google Scholar] [CrossRef]
  8. Tian, J.W.; Villegas, J.C.; Yuan, W.; Fielden, D.; Shaw, L.; Liaw, P.K.; Klarstrom, D.L. A Study of the Effect of Nanostructured Surface Layers on the Fatigue Behaviors of a C-2000 Superalloy. Mater. Sci. Eng. A 2007, 468–470, 164–170. [Google Scholar] [CrossRef]
  9. Dai, K.; Shaw, L. Analysis of Fatigue Resistance Improvements via Surface Severe Plastic Deformation. Int. J. Fatigue 2008, 30, 1398–1408. [Google Scholar] [CrossRef]
  10. Umemoto, M.; Todaka, Y.; Tsuchiya, K. Formation of Nanocrystalline Structure in Steels by Air Blast Shot Peening. Mater. Trans. 2003, 44, 1488–1493. [Google Scholar] [CrossRef] [Green Version]
  11. Wang, T.; Yu, J.; Dong, B. Surface Nanocrystallization Induced by Shot Peening and Its Effect on Corrosion Resistance of 1Cr18Ni9Ti Stainless Steel. Surf. Coatings Technol. 2006, 200, 4777–4781. [Google Scholar] [CrossRef]
  12. Tao, N.R.; Wang, Z.B.; Tong, W.P.; Sui, M.L.; Lu, J.; Lu, K. An Investigation of Surface Nanocrystallization Mechanism in Fe Induced by Surface Mechanical Attrition Treatment. Acta Mater. 2002, 50, 4603–4616. [Google Scholar] [CrossRef]
  13. Lu, K.; Lu, J. Nanostructured Surface Layer on Metallic Materials Induced by Surface Mechanical Attrition Treatment. Mater. Sci. Eng. A 2004, 375–377, 38–45. [Google Scholar] [CrossRef] [Green Version]
  14. Samih, Y.; Beausir, B.; Bolle, B.; Grosdidier, T. In-Depth Quantitative Analysis of the Microstructures Produced by Surface Mechanical Attrition Treatment (SMAT). Mater. Charact. 2013, 83, 129–138. [Google Scholar] [CrossRef]
  15. Sun, Z.; Retraint, D.; Baudin, T.; Helbert, A.L.; Brisset, F.; Chemkhi, M.; Zhou, J.; Kanouté, P. Experimental Study of Microstructure Changes Due to Low Cycle Fatigue of a Steel Nanocrystallised by Surface Mechanical Attrition Treatment (SMAT). Mater. Charact. 2017, 124, 117–121. [Google Scholar] [CrossRef]
  16. Zhou, J.; Sun, Z.; Kanouté, P.; Retraint, D. Effect of Surface Mechanical Attrition Treatment on Low Cycle Fatigue Properties of an Austenitic Stainless Steel. Int. J. Fatigue 2017, 103, 309–317. [Google Scholar] [CrossRef]
  17. Lu, J.; Lu, K. 8.14—Surface Nanocrystallization (SNC) of Materials and Its Effect on Mechanical Behavior. Compr. Struct. Integr. 2007, 8, 495–528. [Google Scholar] [CrossRef]
  18. Wen, M.; Wen, C.; Peter, H.; Li, Y. Wear Behaviour of Pure Ti with a Nanocrystalline Surface Layer. Appl. Mech. Mater. 2011, 66–68, 1500–1504. [Google Scholar] [CrossRef]
  19. Yang, X.F.; Lu, J. A New Way to Synthesize Carbon Nanofiber Film on Bulk Titanium via Hybrid Surface Mechanical Attrition Treatment. Appl. Surf. Sci. 2013, 264, 191–196. [Google Scholar] [CrossRef]
  20. Zhang, S.; Chen, H.; Lin, Q. Surface Nanocrystallization of Commercial Pure Titanium Induced by SMAT and Its Properties. J. Mater. Sci. Technol. 2004, 20, 716–718. [Google Scholar]
  21. Sun, J.; Yao, Q.T.; Zhang, Y.H.; Du, X.D.; Wu, Y.C.; Tong, W.P. Simultaneously Improving Surface Mechanical Properties and in Vitro Biocompatibility of Pure Titanium via Surface Mechanical Attrition Treatment Combined with Low-Temperature Plasma Nitriding. Surf. Coatings Technol. 2017, 309, 382–389. [Google Scholar] [CrossRef]
  22. Liu, Y.; Jin, B.; Lu, J. Mechanical Properties and Thermal Stability of Nanocrystallized Pure Aluminum Produced by Surface Mechanical Attrition Treatment. Mater. Sci. Eng. A 2015, 636, 446–451. [Google Scholar] [CrossRef]
  23. Darling, K.A.; Tschopp, M.A.; Roberts, A.J.; Ligda, J.P.; Kecskes, L.J. Enhancing Grain Refinement in Polycrystalline Materials Using Surface Mechanical Attrition Treatment at Cryogenic Temperatures. Scr. Mater. 2013, 69, 461–464. [Google Scholar] [CrossRef]
  24. Han, Y.; Zhang, L.; Lu, J.; Zhang, W. Thermal Stability and Corrosion Resistance of Nanocrystallized Zirconium Formed by Surface Mechanical Attrition Treatment. J. Mater. Res. 2009, 24, 3136–3145. [Google Scholar] [CrossRef] [Green Version]
  25. Liu, X.; Nakatani, M.; Gao, H.; Sharma, B.; Pan, H.; Fu, Z.; Li, X.; Ameyama, K.; Zhu, X. Effect of Stacking Fault Energy on Deformation Mechanisms in Cu and Cu-30% Zn Alloy with Gradient Structure Obtained by SMAT. J. Alloys Compd. 2021, 865, 158863. [Google Scholar] [CrossRef]
  26. Gallitelli, D.; Retraint, D.; Rouhaud, E. Comparison between Conventional Shot Peening (SP) and Surface Mechanical Attrition Treatment (SMAT) on a Titanium Alloy. Adv. Mater. Res. 2014, 996, 964–968. [Google Scholar] [CrossRef] [Green Version]
  27. Wu, X.; Tao, N.; Hong, Y.; Xu, B.; Lu, J.; Lu, K. Microstructure and Evolution of Mechanically-Induced Ultrafine Grain in Surface Layer of AL-Alloy Subjected to USSP. Acta Mater. 2002, 50, 2075–2084. [Google Scholar] [CrossRef]
  28. Pandey, V.; Chattopadhyay, K.; Santhi Srinivas, N.C.; Singh, V. Role of Ultrasonic Shot Peening on Low Cycle Fatigue Behavior of 7075 Aluminium Alloy. Int. J. Fatigue 2017, 103, 426–435. [Google Scholar] [CrossRef]
  29. An, X.; Rodopoulos, C.A.; Statnikov, E.S.; Vitazev, V.N.; Komlkov, O.V. Study of the Surface Nanocrystallization Induced by the Esonix Ultrasonic Impact Treatment on the Near-Surface of 2024-T351 Aluminum Alloy. J. Mater. Eng. Perform. 2006, 15, 355–364. [Google Scholar] [CrossRef]
  30. Liao, M.; Chen, W.R.; Bellinger, N.C. Effects of Ultrasonic Impact Treatment on Fatigue Behavior of Naturally Exfoliated Aluminum Alloys. Int. J. Fatigue 2008, 30, 717–726. [Google Scholar] [CrossRef]
  31. Todaka, Y.; Umemoto, M.; Tsuchiya, K. Comparison of Nanocrystalline Surface Layer in Steels Formed by Air Blast and Ultrasonic Shot Peening. Mater. Trans. 2004, 45, 376–379. [Google Scholar] [CrossRef] [Green Version]
  32. Pour-Ali, S.; Kiani-Rashid, A.R.; Babakhani, A. Surface Nanocrystallization and Gradient Microstructural Evolutions in the Surface Layers of 321 Stainless Steel Alloy Treated via Severe Shot Peening. Vacuum 2017, 144, 152–159. [Google Scholar] [CrossRef]
  33. Li, Y.R.; Lin, W.M.; Wei, Y.H.; Hou, L.F.; Du, H.Y. Characteristic and Properties of Nanocrystalline Surface Layer in Cu-10wt%Ni Alloy Induced by Surface Mechanical Attrition Treatment. Gongneng Cailiao/J. Funct. Mater. 2011, 42, 766–769. [Google Scholar]
  34. Liu, Y.; Jin, B.; Li, D.J.; Zeng, X.Q.; Lu, J. Wear Behavior of Nanocrystalline Structured Magnesium Alloy Induced by Surface Mechanical Attrition Treatment. Surf. Coatings Technol. 2015, 261, 219–226. [Google Scholar] [CrossRef]
  35. Shi, X.Y.; Liu, Y.; Li, D.J.; Chen, B.; Zeng, X.Q.; Lu, J.; Ding, W.J. Microstructure Evolution and Mechanical Properties of an Mg-Gd Alloy Subjected to Surface Mechanical Attrition Treatment. Mater. Sci. Eng. A 2015, 630, 146–154. [Google Scholar] [CrossRef]
  36. Joshi, M.D.; Kumar, V.; Litoria, A.K.; Singh, D.; Hosmani, S.S. Effect of Surface Mechanical Attrition Treatment on Tribological Behavior of AISI 2205 Steel. Mater. Today Proc. 2020, 33, 4919–4926. [Google Scholar] [CrossRef]
  37. Huang, J.Y.; Zhu, Y.T.; Jiang, H.; Lowe, T.C. Microstructures and Dislocation Configurations in Nanostructured Cu Processed by Repetitive Corrugation and Straightening. Acta Mater. 2001, 49, 1497–1505. [Google Scholar] [CrossRef]
  38. Sun, H.Q.; Shi, Y.N.; Zhang, M.X.; Lu, K. Plastic Strain-Induced Grain Refinement in the Nanometer Scale in a Mg Alloy. Acta Mater. 2007, 55, 975–982. [Google Scholar] [CrossRef]
  39. Bay, B.; Hansen, N.; Hughes, D.A.; Kuhlmann-Wilsdorf, D. Overview No. 96 Evolution of f.c.c. Deformation Structures in Polyslip. Acta Metall. Mater. 1992, 40, 205–219. [Google Scholar] [CrossRef]
  40. Christian, J.W.; Mahajan, S. Deformation Twinning. Prog. Mater. Sci. 1995, 39, 1–157. [Google Scholar] [CrossRef]
  41. Zhu, Y.T.; Liao, X.Z.; Wu, X.L. Deformation Twinning in Nanocrystalline Materials. Prog. Mater. Sci. 2012, 57, 1–62. [Google Scholar] [CrossRef] [Green Version]
  42. Li, Y.S.; Tao, N.R.; Lu, K. Microstructural Evolution and Nanostructure Formation in Copper during Dynamic Plastic Deformation at Cryogenic Temperatures. Acta Mater. 2008, 56, 230–241. [Google Scholar] [CrossRef]
  43. Meyers, M.A.; Vöhringer, O.; Lubarda, V.A. The Onset of Twinning in Metals: A Constitutive Description. Acta Mater. 2001, 49, 4025–4039. [Google Scholar] [CrossRef]
  44. Gatey, A.M.; Hosmani, S.S.; Figueroa, C.A.; Arya, S.B.; Singh, R.P. Role of Surface Mechanical Attrition Treatment and Chemical Etching on Plasma Nitriding Behavior of AISI 304L Steel. Surf. Coatings Technol. 2016, 304, 413–424. [Google Scholar] [CrossRef]
  45. Yasuoka, M.; Wang, P.; Zhang, K.; Qiu, Z.; Kusaka, K.; Pyoun, Y.S.; Murakami, R. ichi Improvement of the Fatigue Strength of SUS304 Austenite Stainless Steel Using Ultrasonic Nanocrystal Surface Modification. Surf. Coatings Technol. 2013, 218, 93–98. [Google Scholar] [CrossRef]
  46. Pandey, V.; Rao, G.S.; Chattopadhyay, K.; Santhi Srinivas, N.C.; Singh, V. Effect of Surface Nanostructuring on LCF Behavior of Aluminum Alloy 2014. Mater. Sci. Eng. A 2015, 647, 201–211. [Google Scholar] [CrossRef]
  47. Anand Kumar, S.; Ganesh Sundara Raman, S.; Sankara Narayanan, T.S.N.; Gnanamoorthy, R. Influence of Surface Mechanical Attrition Treatment on Fretting Wear Behaviour of Ti-6Al-4V. Adv. Mater. Res. 2012, 463–464, 316–320. [Google Scholar] [CrossRef]
  48. Ortiz, A.L.; Tian, J.W.; Shaw, L.L.; Liaw, P.K. Experimental Study of the Microstructure and Stress State of Shot Peened and Surface Mechanical Attrition Treated Nickel Alloys. Scr. Mater. 2010, 62, 129–132. [Google Scholar] [CrossRef]
  49. Geng, D.; Sun, Q.; Xin, C.; Xiao, L. Contribution to Improvement of Fatigue Properties of Zr-4 Alloy: Gradient Nanostructured Surface Layer versus Compressive Residual Stress. Nanomaterials 2021, 11, 3125. [Google Scholar] [CrossRef]
  50. Ren, J.; Shan, A.; Zhang, J.; Song, H.; Liu, J. Surface Nanocrystallization of Ni3Al by Surface Mechanical Attrition Treatment. Mater. Lett. 2006, 60, 2076–2079. [Google Scholar] [CrossRef]
  51. Gao, T.; Sun, Z.; Xue, H.; Retraint, D. Effect of Surface Mechanical Attrition Treatment on High Cycle and Very High Cycle Fatigue of a 7075-T6 Aluminium Alloy. Int. J. Fatigue 2020, 139. [Google Scholar] [CrossRef]
  52. Zhou, J.; Retraint, D.; Sun, Z.; Kanouté, P. Comparative Study of the Effects of Surface Mechanical Attrition Treatment and Conventional Shot Peening on Low Cycle Fatigue of a 316L Stainless Steel. Surf. Coatings Technol. 2018, 349, 556–566. [Google Scholar] [CrossRef]
  53. Maawad, E.; Brokmeier, H.G.; Wagner, L.; Sano, Y.; Genzel, C. Investigation on the Surface and Near-Surface Characteristics of Ti-2.5Cu after Various Mechanical Surface Treatments. Surf. Coatings Technol. 2011, 205, 3644–3650. [Google Scholar] [CrossRef]
  54. Miková, K.; Bagherifard, S.; Bokuvka, O.; Guagliano, M.; Trško, L. Fatigue Behavior of X70 Microalloyed Steel after Severe Shot Peening. Int. J. Fatigue 2013, 55, 33–42. [Google Scholar] [CrossRef]
  55. Zhang, C.; Duan, X.; Zhou, L.; Lan, X. Surface Nanocrystallization of Zircaloy-4 by Surface Mechanical Attrition Treatment. Mater. Sci. Forum 2010, 658, 452–455. [Google Scholar] [CrossRef]
  56. Liu, Z.; Zhang, H.; Yan, Z.; Liaw, P.K.; Dong, P. Cyclic Deformation and Fatigue Behavior of 7075-T651 Al Alloy with a Gradient Structure. Mater. Sci. Eng. A 2021, 822. [Google Scholar] [CrossRef]
  57. Chen, Y.; Liu, F.; He, C.; Li, L.; Wang, C.; Liu, Y.; Wang, Q. Effect of Ultrasonic Peening Treatment on the Fatigue Behaviors of a Magnesium Alloy up to Very High Cycle Regime. J. Magnes. Alloy. 2022, 10, 614–626. [Google Scholar] [CrossRef]
  58. Kumar, S.; Chattopadhyay, K.; Singh, V. Effect of Ultrasonic Shot Peening on LCF Behavior of the Ti–6Al–4V Alloy. J. Alloys Compd. 2017, 724, 187–197. [Google Scholar] [CrossRef]
  59. Kumar, S.; Chattopadhyay, K.; Singh, V.; Satyanarayana, D.V.V.; Kumar, V. Low Cycle Fatigue Life of the Alloy IN718 Enhanced through Surface Nanostructuring. Mater. Charact. 2020, 159. [Google Scholar] [CrossRef]
  60. Chen, G.; Gao, J.; Cui, Y.; Gao, H.; Guo, X.; Wu, S. Effects of Strain Rate on the Low Cycle Fatigue Behavior of AZ31B Magnesium Alloy Processed by SMAT. J. Alloys Compd. 2018, 735, 536–546. [Google Scholar] [CrossRef]
  61. Yan, X.; Yin, S.; Chen, C.; Jenkins, R.; Lupoi, R.; Bolot, R.; Ma, W.; Kuang, M.; Liao, H.; Lu, J.; et al. Fatigue Strength Improvement of Selective Laser Melted Ti6al4v Using Ultrasonic Surface Mechanical Attrition. Mater. Res. Lett. 2019, 7, 327–333. [Google Scholar] [CrossRef]
  62. Carneiro, L.; Wang, X.; Jiang, Y. Cyclic Deformation and Fatigue Behavior of 316L Stainless Steel Processed by Surface Mechanical Rolling Treatment. Int. J. Fatigue 2020, 134. [Google Scholar] [CrossRef]
  63. Ramos, R.; Ferreira, N.; Ferreira, J.A.M.; Capela, C.; Batista, A.C. Improvement in Fatigue Life of Al 7475-T7351 Alloy Specimens by Applying Ultrasonic and Microshot Peening. Int. J. Fatigue 2016, 92, 87–95. [Google Scholar] [CrossRef]
  64. Uusitalo, J.; Karjalainen, L.P.; Retraint, D.; Palosaari, M. Fatigue Properties of Steels with Ultrasonic Attrition Treated Surface Layers. Mater. Sci. Forum 2009, 604–605, 239–248. [Google Scholar] [CrossRef]
  65. Dureau, C.; Novelli, M.; Arzaghi, M.; Massion, R.; Bocher, P.; Nadot, Y.; Grosdidier, T. On the Influence of Ultrasonic Surface Mechanical Attrition Treatment (SMAT) on the Fatigue Behavior of the 304L Austenitic Stainless Steel. Metals (Basel) 2020, 10, 100. [Google Scholar] [CrossRef] [Green Version]
  66. Li, D.; Chen, H.N.; Xu, H. The Effect of Nanostructured Surface Layer on the Fatigue Behaviors of a Carbon Steel. Appl. Surf. Sci. 2009, 255, 3811–3816. [Google Scholar] [CrossRef]
  67. Zhang, C.; Song, G.; Wang, Y.; Zheng, M.; Xiao, G.; Yang, J. Effect of Surface Nanocrystallization on Fatigue Crack Initiation and Propagation Behavior in Pure Zr. Mater. Sci. Eng. A 2020, 794. [Google Scholar] [CrossRef]
  68. Li, D.; Chen, H.N.; Xu, H. Comparative Responses of Welded Joints to Surface Mechanical Attrition Treatment and Shot Peening. Surf. Eng. 2009, 25, 15–20. [Google Scholar] [CrossRef]
  69. Yin, D.; Wang, D.; Jing, H.; Huo, L. The Effects of Ultrasonic Peening Treatment on the Ultra-Long Life Fatigue Behavior of Welded Joints. Mater. Des. 2010, 31, 3299–3307. [Google Scholar] [CrossRef]
  70. Wang, Y.; Huang, M.; Zhou, L.; Cong, Z.; Gao, H. Improved Fatigue Behavior of Pipeline Steel Welded Joint by Surface Mechanical Attrition Treatment (SMAT). J. Mater. Sci. Technol. 2009, 25, 513–515. [Google Scholar]
  71. Zhao, X.; Wang, D.; Huo, L. Analysis of the S-N Curves of Welded Joints Enhanced by Ultrasonic Peening Treatment. Mater. Des. 2011, 32, 88–96. [Google Scholar] [CrossRef]
  72. Lago, J.; Trško, L.; Jambor, M.; Nový, F.; Bokůvka, O.; Mičian, M.; Pastorek, F. Fatigue Life Improvement of the High Strength Steel Welded Joints by Ultrasonic Impact Peening. Metals (Basel) 2019, 9, 619. [Google Scholar] [CrossRef] [Green Version]
  73. An, L.; Sun, Y.T.; Lu, S.P.; Wang, Z.B. Enhanced Fatigue Property of Welded S355J2W Steel by Forming a Gradient Nanostructured Surface Layer. Acta Metall. Sin. (English Lett.) 2020, 33, 1252–1258. [Google Scholar] [CrossRef]
  74. Wu, B.; Zhang, J.; Zhang, L.; Pyoun, Y.S.; Murakami, R.I. Effect of Ultrasonic Nanocrystal Surface Modification on Surface and Fatigue Properties of Quenching and Tempering S45C Steel. Appl. Surf. Sci. 2014, 321, 318–330. [Google Scholar] [CrossRef]
  75. Kakiuchi, T.; Uematsu, Y.; Hasegawa, N.; Kondoh, E. Effect of Ultrasonic Shot Peening on High Cycle Fatigue Behavior in Type 304 Stainless Steel at Elevated Temperature. Zair. Soc. Mater. Sci. Japan 2016, 65, 325–330. [Google Scholar] [CrossRef] [Green Version]
  76. Amanov, A.; Pyun, Y.S.; Kim, J.H.; Suh, C.M.; Cho, I.S.; Kim, H.D.; Wang, Q.; Khan, M.K. Ultrasonic Fatigue Performance of High Temperature Structural Material Inconel 718 Alloys at High Temperature after UNSM Treatment. Fatigue Fract. Eng. Mater. Struct. 2015, 38, 1266–1273. [Google Scholar] [CrossRef]
  77. Benedetti, M.; Fontanari, V.; Bandini, M.; Taylor, D. Multiaxial Fatigue Resistance of Shot Peened High-Strength Aluminum Alloys. Int. J. Fatigue 2014, 61, 271–282. [Google Scholar] [CrossRef]
  78. Benedetti, M.; Fontanari, V.; Allahkarami, M.; Hanan, J.C.; Bandini, M. On the Combination of the Critical Distance Theory with a Multiaxial Fatigue Criterion for Predicting the Fatigue Strength of Notched and Plain Shot-Peened Parts. Int. J. Fatigue 2016, 93, 133–147. [Google Scholar] [CrossRef]
  79. Wang, Q.; Xin, C.; Sun, Q.; Xiao, L.; Sun, J. Biaxial Tension-Torsion Fatigue Behavior of Gradient Nano-Grained Pure Titanium Fabricated by Surface Nanocrystallization. Mater. Sci. Eng. A 2017, 702, 125–132. [Google Scholar] [CrossRef]
  80. Suh, M.S.; Suh, C.M.; Pyun, Y.S. Very High Cycle Fatigue Characteristics of a Chrome-Molybdenum Steel Treated by Ultrasonic Nanocrystal Surface Modification Technique. Fatigue Fract. Eng. Mater. Struct. 2013, 36, 769–778. [Google Scholar] [CrossRef]
  81. Khan, M.K.; Liu, Y.J.; Wang, Q.Y.; Pyun, Y.S.; Kayumov, R. Effect of Ultrasonic Nanocrystal Surface Modification on the Characteristics of AISI 310 Stainless Steel up to Very High Cycle Fatigue. Fatigue Fract. Eng. Mater. Struct. 2016, 39, 427–438. [Google Scholar] [CrossRef] [Green Version]
  82. Wu, B.; Wang, P.; Pyoun, Y.S.; Zhang, J.; Murakami, R. ichi Effect of Ultrasonic Nanocrystal Surface Modification on the Fatigue Behaviors of Plasma-Nitrided S45C Steel. Surf. Coatings Technol. 2012, 213, 271–277. [Google Scholar] [CrossRef]
  83. Ochi, Y.; Masaki, K.; Matsumura, T.; Sekino, T. Effect of Shot-Peening Treatment on High Cycle Fatigue Property of Ductile Cast Iron. Int. J. Fatigue 2001, 23, 441–448. [Google Scholar] [CrossRef]
  84. Arakawa, J.; Kakuta, M.; Hayashi, Y.; Tanegashima, R.; Akebono, H.; Kato, M.; Sugeta, A. Fatigue Strength of USP Treated ASTM CA6NM for Hydraulic Turbine Runner. Surf. Eng. 2014, 30, 662–669. [Google Scholar] [CrossRef]
  85. Dalaei, K.; Karlsson, B.; Svensson, L.E. Stability of Shot Peening Induced Residual Stresses and Their Influence on Fatigue Lifetime. Mater. Sci. Eng. A 2011, 528, 1008–1015. [Google Scholar] [CrossRef]
  86. Shimatani, Y.; Shiozawa, K.; Nakada, T.; Yoshimoto, T.; Lu, L. The Effect of the Residual Stresses Generated by Surface Finishing Methods on the Very High Cycle Fatigue Behavior of Matrix HSS. Int. J. Fatigue 2011, 33, 122–131. [Google Scholar] [CrossRef]
  87. Zhou, J.; Sun, Z.; Kanouté, P.; Retraint, D. Reconstruction of Residual Stress and Work Hardening and Their Effects on the Mechanical Behaviour of a Shot Peened Structure. Mech. Mater. 2018, 127, 100–111. [Google Scholar] [CrossRef]
  88. Kumar, S.A.; Raman, S.G.S.; Narayanan, T.S.N.S. Influence of Surface Mechanical Attrition Treatment Duration on Fatigue Lives of Ti-6Al-4V. Trans. Indian Inst. Met. 2014, 67, 137–141. [Google Scholar] [CrossRef]
  89. Huang, G.R.; Tsai, W.Y.; Huang, J.C.; Hu, C.K. Analytical Modelling for Ultrasonic Surface Mechanical Attrition Treatment. AIP Adv. 2015, 5. [Google Scholar] [CrossRef] [Green Version]
  90. Shamsaei, N.; Fatemi, A. Effect of Microstructure and Hardness on Non-Proportional Cyclic Hardening Coefficient and Predictions. Mater. Sci. Eng. A 2010, 527, 3015–3024. [Google Scholar] [CrossRef]
  91. Maurel, P.; Weiss, L.; Grosdidier, T.; Bocher, P. How Does Surface Integrity of Nanostructured Surfaces Induced by Severe Plastic Deformation Influence Fatigue Behaviors of Al Alloys with Enhanced Precipitation? Int. J. Fatigue 2020, 140. [Google Scholar] [CrossRef]
  92. Trško, L.; Guagliano, M.; Bokůvka, O.; Nový, F.; Jambor, M.; Florková, Z. Influence of Severe Shot Peening on the Surface State and Ultra-High-Cycle Fatigue Behavior of an AW 7075 Aluminum Alloy. J. Mater. Eng. Perform. 2017, 26, 2784–2797. [Google Scholar] [CrossRef]
  93. Amanov, A.; Karimbaev, R.; Maleki, E.; Unal, O.; Pyun, Y.S.; Amanov, T. Effect of Combined Shot Peening and Ultrasonic Nanocrystal Surface Modification Processes on the Fatigue Performance of AISI 304. Surf. Coatings Technol. 2019, 358, 695–705. [Google Scholar] [CrossRef]
  94. Hanlon, T.; Tabachnikova, E.D.; Suresh, S. Fatigue Behavior of Nanocrystalline Metals and Alloys. Int. J. Fatigue 2005, 27, 1147–1158. [Google Scholar] [CrossRef]
  95. Hanlon, T.; Kwon, Y.N.; Suresh, S. Grain Size Effects on the Fatigue Response of Nanocrystalline Metals. Scr. Mater. 2003, 49, 675–680. [Google Scholar] [CrossRef]
  96. Novelli, M.; Bocher, P.; Grosdidier, T. Effect of Cryogenic Temperatures and Processing Parameters on Gradient-Structure of a Stainless Steel Treated by Ultrasonic Surface Mechanical Attrition Treatment. Mater. Charact. 2018, 139, 197–207. [Google Scholar] [CrossRef]
  97. Roland, T.; Retraint, D.; Lu, K.; Lu, J. Enhanced Mechanical Behavior of a Nanocrystallised Stainless Steel and Its Thermal Stability. Mater. Sci. Eng. A 2007, 445–446, 281–288. [Google Scholar] [CrossRef]
  98. Bagherifard, S.; Guagliano, M. Fatigue Behavior of a Low-Alloy Steel with Nanostructured Surface Obtained by Severe Shot Peening. Eng. Fract. Mech. 2012, 81, 56–68. [Google Scholar] [CrossRef]
  99. Maurel, P.; Weiss, L.; Bocher, P.; Grosdidier, T. Effects of SMAT at Cryogenic and Room Temperatures on the Kink Band and Martensite Formations with Associated Fatigue Resistance in a β-Metastable Titanium Alloy. Mater. Sci. Eng. A 2021, 803. [Google Scholar] [CrossRef]
  100. Tong, W.P.; Han, Z.; Wang, L.M.; Lu, J.; Lu, K. Low-Temperature Nitriding of 38CrMoAl Steel with a Nanostructured Surface Layer Induced by Surface Mechanical Attrition Treatment. Surf. Coatings Technol. 2008, 202, 4957–4963. [Google Scholar] [CrossRef]
  101. Sun, J.; Tong, W.P.; Zhang, H.; Du, X.D.; Wu, Y.C. Enhanced Strength and Plasticity of Gas Nitrided Iron by Surface Mechanical Attrition Pretreatment. Surf. Coatings Technol. 2016, 286, 279–284. [Google Scholar] [CrossRef]
  102. Stinville, J.C.; Cormier, J.; Templier, C.; Villechaise, P. Monotonic Mechanical Properties of Plasma Nitrided 316L Polycrystalline Austenitic Stainless Steel: Mechanical Behaviour of the Nitrided Layer and Impact of Nitriding Residual Stresses. Mater. Sci. Eng. A 2014, 605, 51–58. [Google Scholar] [CrossRef]
Figure 1. (a) Schematic description of SMAT set-up and (b) a single impact between a ball and the material surface, which generates a local plastically deformed region. Reprinted with permission from [13]. Copyright 2004 Elsevier.
Metals 12 00775 g001
Figure 2. Schematic description of the grain refinement process during SMAT. Reprinted with permission from [35]. Copyright 2014 Elsevier.
Metals 12 00775 g002
Figure 3. Relation between total strain amplitude and fatigue life for untreated and USSPed 7075 aluminum alloy (AA7075) samples (the figures denote the duration of treatment in seconds). Reprinted with permission from [28]. Copyright 2017 Elsevier.
Metals 12 00775 g003
Figure 4. S–N curves for the untreated and UNSM-treated annealed Inconel 718 alloy obtained with rotating–bending fatigue (RBF) tests (UNSM with a load of 15 N and an amplitude of 60 µm). Reprinted with permission from [76]. Copyright 2015 John Wiley and Sons.
Metals 12 00775 g004
Figure 5. S–N plot for the fatigue data points obtained with electropolished (EP) AA7075-T6 samples and samples SMATed with different process conditions, namely, Steel-2 (SMAT using 2 mm steel shot), Steel-3 (SMAT using 3 mm steel shot) and Steel-3 + mechanical polishing (MP). Reprinted with permission from [51]. Copyright 2020 Elsevier.
Metals 12 00775 g005
Figure 6. S–N diagram (A: type A austenitic 304 stainless steel; B: type B austenitic 304 stainless steel). Reprinted from [75].
Metals 12 00775 g006
Figure 8. SEM observation of microcracks induced by SMAT on an AA7075-T6 alloy with (a) 2 mm steel shots; (b) 3 mm steel shots. Reprinted with permission from [51]. Copyright 2020 Elsevier.
Metals 12 00775 g008
Figure 9. (a) fatigue striations space versus crack length curves for Zr-4 with different conditions: CG: coarse grain; SMGTed: after SMGT; A-SMGTed: SMGT and annealed; (b) S–N curves of different Zr-4 SMGTed samples and SMGTed samples combined with annealing at 400 °C. Reprinted with permission from Ref. [49].
Metals 12 00775 g009
Figure 10. (a) Residual stress profiles obtained for different conditions on 316L steel samples; (b) variation of grain size and hardness with annealing temperatures for the top surface layer; (c) S–N curves of different SMATed samples and SMATed samples combined with annealing. Reprinted with permission from [6]. Copyright 2006 Elsevier.
Metals 12 00775 g010
Figure 11. S–N curves obtained at 10 Hz fatigue tests for a 304L austenitic stainless steel (RB: rotating bending; TC: tension–compression; G: ground state; P: polished state; RT: room temperature; CT: cryogenic temperature). Reprinted with permission from Ref. [65].
Metals 12 00775 g011
Figure 12. (a) S–N plot of samples in different conditions (N8: nitrided for 8 h; N48: nitrided for 48 h; U1: UNSM with a strike number of 34,000 mm−2; U2: UNSM with a strike number of 69,000 mm−2); (b) depth of inclusions inducing fish-eye initiations. Reprinted with permission from [82]. Copyright 2012 Elsevier.
Metals 12 00775 g012
Table 1. Grain size in nanocrystalline layer of several SMATed materials.
MaterialType of TreatmentGrain Size (nm)Reference
AA 2014SMAT—10 min31[46]
AA 7075SMAT—300 s16 ± 3[28]
SS 316LSMAT—15 min20[6]
SUS 304UNSM-90 N~10[45]
Ti-6Al-4VSMAT115[47]
C-2000 alloySMAT~12[48]
Zr-4 alloySMGT *161[49]
AZ91D alloySMAT30 ± 5[38]
Ni3AlSMAT45[50]
* SMGT—surface mechanical grinding treatment.
Table 2. Surface hardness and roughness values of several materials treated by SMAT and other processes.
MaterialType of TreatmentMicrohardnessSurface Roughness Ra (μm)
BulkSurfaceInitialTreated
AA 7075-T6 [51]SMAT157 HV0.025180 HV0.0250.351.11
AA 2014 [46]SMAT190 HV246 HV--
SUS 304 [45]UNSM250 HV540 HV0.350.95
SS 316L [52]SMAT200 HV0.025380 HV0.025~2~1.5
~3.3
CSP200 HV0.025430 HV0.025~2
Ti-6Al-4V [47]SMAT~3.2 GPa *~6.9 GPa *0.10.63
X70 micro alloyed steel [54]CSP~215 HV0.05~237 HV0.052.583.15
8.39
SSP~215 HV0.05~244 HV0.052.58
Ni3Al [50]SMAT~4 GPa *~12 GPa *--
Zircaloy-4 [55]SMAT165 HV215 HV--
*: nanohardness.
Publisher’s Note: MDPI stays neutral with regard to jurisdictional claims in published maps and institutional affiliations.