Article

Influence of Additive Manufactured Stainless Steel Tool Electrode on Machinability of Beta Titanium Alloy

by
Ragavanantham Shanmugam
1,*,
Monsuru Ramoni
2,*,
Geethapriyan Thangamani
3,* and
Muthuramalingam Thangaraj
4,*
1
Advanced Manufacturing Technology, School of Engineering, Math and Technology, Navajo Technical University, Crownpoint, NM 87313, USA
2
Industrial Engineering, School of Engineering, Math and Technology, Navajo Technical University, Crownpoint, NM 87313, USA
3
Department of Mechanical Engineering, SRM Institute of Science and Technology, SRM Nagar, Kattankulathur 603203, India
4
Department of Mechatronics Engineering, SRM Institute of Science and Technology, SRM Nagar, Kattankulathur 603203, India
*
Authors to whom correspondence should be addressed.
Metals 2021, 11(5), 778; https://doi.org/10.3390/met11050778
Submission received: 6 April 2021 / Revised: 5 May 2021 / Accepted: 7 May 2021 / Published: 10 May 2021

Abstract

:
Additive manufacturing technology provides a gateway to completely new horizons for producing a wide range of components, such as manufacturing, medicine, aerospace, automotive, and space explorations, especially in non-conventional manufacturing processes. The present study analyzes the influence of the additive manufactured tool in electrochemical micromachining (ECMM) on machining beta titanium alloy. The influence of different machining parameters, such as applied voltage, electrolytic concentration, and duty ratio on material removal rate (MRR), overcut, and circularity was also analyzed. It was inferred that the additive manufactured tool can produce better circularity and overcut than a bare tool due to its higher corrosion resistance and localization effect. The additive manufactured tool can remove more material owing to its strong atomic bond of metals and higher electrical conductivity.

1. Introduction

The conventional manufacturing technique has limitations for producing complex shapes, micro-holes, micro slots, as well as more tool wear and limited dimensional accuracy and precision [1,2]. Nontraditional manufacturing processes are used to overcome those problems [3,4]. The complex geometry ability of additive manufacturing offers an opportunity to produce complex geometrical tools for non-conventional manufacturing processes, especially electrochemical machining (ECM) processes. It is important to study the influence of the additive manufacturing (AM) tool in electrochemical micro-machining (ECMM) with related to titanium alloy. Such analysis has the potential to revolutionize the manufacturing processes of tools for non-conventional manufacturing applications. The various other non-conventional manufacturing techniques have a heat affected zone on the work piece. However ECM process does not produce any such heat affected zone (HAZ). It makes ECMM a great manufacturing process compared to other unconventional techniques. In this process, the workpiece acts as an anode to achieve the controlled removal of metal by anodic dissolution. The tool electrode acts as cathode while electrolyte flows through the inter-electrode gap. The shape of the tool is generally a replica of the shape to be machined on the workpiece [5]. Electrochemical machining is based on Faraday’s laws of electrolysis and Ohm’s law [6]. Two electrodes are arranged in an electrolytic solution. When DC power is supplied across these electrodes, the metal is eroded from the anode and deposited on the cathode. ECMM process is the replica of electrochemical plating technique. In the ECMM process, the material is removed at an atomic level through anodic dissolution, when high current is conducted at a relatively low potential difference through a specially shaped tool. As the ECMM process provides high surface finish, high accurate and stress-free products, it is widely used in manufacturing of turbine blades, high compression engines, artillery projectiles and parts for electronics and medical industries [7]. ECMM is performed for very small size products with a better controlled ECM process. It is used to produce micro-holes and micro-slots in the material with very high precision and quality [8]. Theoretically, in the micro machining process, the micro-holes generated within the dimension of 1µm to 999µm [9,10]. The ECMM has been referred for many of the micromachining because it removes the materials (conductive materials) regardless of their hardness and toughness [11]. Additive manufacturing (AM) is the process of generating a product layer by layer from a 3D model. It enables manufacturing of complex geometry with fewer processing step and minimum waste; it reduces time and cost for manufacturing products. It is now applied in the aerospace, medical implant, and electronics fields. Many research works have been done on the ECM process based on its process parameters, such as electrolytes, tool shape, materials, and workpiece. Some other studies on coated tools have also been performed with various tool electrodes [12]. This study is about machining of beta titanium alloy as a workpiece of ECMM process and the influence of additively manufactured tool over the process, which are yet to be studied. The machining performance on titanium alloy specimens using the ECM process was improved using an optimal combination of electrolytes and their concentration during the drilling process [13]. The nickel-based alloys can be precisely machined using ECM process by choosing optimal process parameters combination [14]. The influence of the tool coating was also analyzed on machining titanium alloy [15]. The surface morphology of the machined specimens should be improved as much as possible [16,17].
From the referenced literature, it has been understood that very little attention has been given to the analysis of the influence of the additively manufactured tool electrode on quality measures using the ECMM process. The objective of the study is to study the influence of process parameters and additively manufactured copper tool electrode on material removal rate (MRR), overcut (OC), and circularity (CY) while machining Titanium (Ti-6Al-4V) alloy in ECMM process. The micro structural analysis was also carried out to understand the variation of grains around the machined area of each specimen.

2. Materials and Methods

2.1. Electro. Chemical Micro Machining Arrangement

The ECMM setup has a machining unit, micro electrode feeding system (lead screw mechanism), electrolytic tank, and DC power supply system, as shown in Figure 1. The electrolyte bath is connected to a pump and a filter. The mechanical machining unit consists of a work holding device, micro-tool feeding system and machining chamber. The micro-tool feed movement has been achieved through the lead screw mechanism. The lead screw of the tool movement has been rotated with the help of a stepper motor, whereas the tool movement can be controlled manually. A DC power supply of 0 V–30 V and 0 A–2 A is inbuilt with the ability to control the voltage, current, and duty cycle. The experimental factors have been selected based on the influence of the process parameters, which affect the machining rate and shape accuracy of the material. The ECMM setup consists of a power input, control unit to set the process parameters, electrolyte supply system and a machining chamber which contains tool and the workpiece along with the electrolyte [18]. Titanium (Ti-6Al-4V) alloy with the size of (50 mm × 50 mm × 3 mm) was chosen as a workpiece, due to its importance in manufacturing industries.

2.2. Selection of Process Variables

This research work is focused on finding the machining performance of additively manufactured tool while machining beta titanium alloy by ECMM through calculating the selected output parameters, such as MRR and surface accuracy. The Stainless Steel 316L tool electrode in the shape of a sharp pencil hat is 30 mm long and 2 mm thick (0.4 mm thick from tip) has been used as a tool electrode in the ECMM process. The tool electrodes were manufactured using a conventional machining process (bare tool) and additive manufacturing (AM tool) process, as shown in Figure 1. The presence of a small volume of silicon and copper in the austenitic stainless steel containing molybdenum can improve the corrosion resistance by improving oxidation resistance. The additively manufactured stainless steel has almost the same properties compared to conventional available bare stainless steel. However, the AM tool electrode has better uniformity in composition and dimensional accuracy. The tool electrode was manufactured using Direct Metal Laser Sintering (DMLS) as the additive manufacturing technique. In this approach, the metal powders were utilized to build a platform continuously. The powder particles were sintered layer by layer using a laser beam. The shape of the job could be determined based on a CAM model. Then the specimens are formed into the required shape with the wire electrical discharge machining (WEDM) process [18]. Beta titanium alloy has been chosen as the work piece material of size of 40 mm × 20 mm × 1.7 mm. Table 1 shows the composition of the work piece and tool electrode. The importance of titanium material has been increasing in the field of biomedical because it fulfills the requirements over other materials with its properties, and also the titanium has wide applications in the area of aircraft, jet engines, racing cars, chemical, petrochemical, and marine components, and submarine hulls [19,20,21,22]. The 1 mol/L of Sodium Nitrate and 1 mol/L of Sodium Nitrate with 0.02 mol/L of Sodium Citrate were chosen as electrolyte, as shown in Table 2 [23,24,25]. In the present study, applied DC voltage, electrolytic concentration and duty cycle were selected as process parameters. The voltage was chosen as 15 V and 17 V with the Duty cycle of 50% and 66%. The manual Micro-tool feed rate of 1.6µm/min was chosen for this experiment [20,23]. During the machining process, the parameters were set to require based on a trial of an orthogonal array. The machining was done for making blind hole.

2.3. Selection of Performance Measures

Material removal rate (MRR) has been obtained by taking ratio between per machining time and weight difference of workpiece before and after machining. The values of the MRR were computed in terms of (g/h) using the following Equation (1).
M R R = W b   W a T
where, Wb = Pre-Weight of the piece (g); Wa = After-Weight of the piece (g); T = Machining time (hours).The circularity indicates the dimensional accuracy which provides the deviation from the required shape. The value should be less as much as possible and denoted in μm. It was measured based on the following Equation (2) [17].
Circularity = DMAJORDMINOR
where, DMAJOR = Major Diameter of Micro-hole (μm), DMINOR = Minor Diameter of Micro-hole (μm). The overcut indicates the deviation from the required width of the cut. The value should be less as much as possible and denoted in μm. The difference between the cross section of electrode tip and micro-hole is known as overcut. It has been calculated by finding the difference between the radius of the tool and micro-hole as mentioned Equation (3). The tool giving lower value for overcut is superior.
Overcut = D H D T 2
where, DH = Mean Diameter of Micro-hole (μm); DT = Diameter of Tool electrode Tip (μm). The profile projector was used to measure the dimension of tools. The shape accuracy and effect on the tool can be seen by optical microscope. The dimensions of the tool electrode were measured before and after machining using a profile projector. The Minitab package software was used for obtaining the optimal process parameters by analyzing the output characteristics data.

3. Results and Discussion

The blind hole machining operations were performed on titanium alloys specimens, as shown in Figure 1. All the experimental trials have been conducted with two times, and the average values were considered as final value to increase the measurement accuracy. The effects of AM tool and bare tool on performance measures while machining beta titanium alloy specimens under various process parameters like voltage, concentration and duty cycle using the ECMM process were compared and analyzed.

3.1. Influence of Additive Manufactured Tool Electrode on MRR

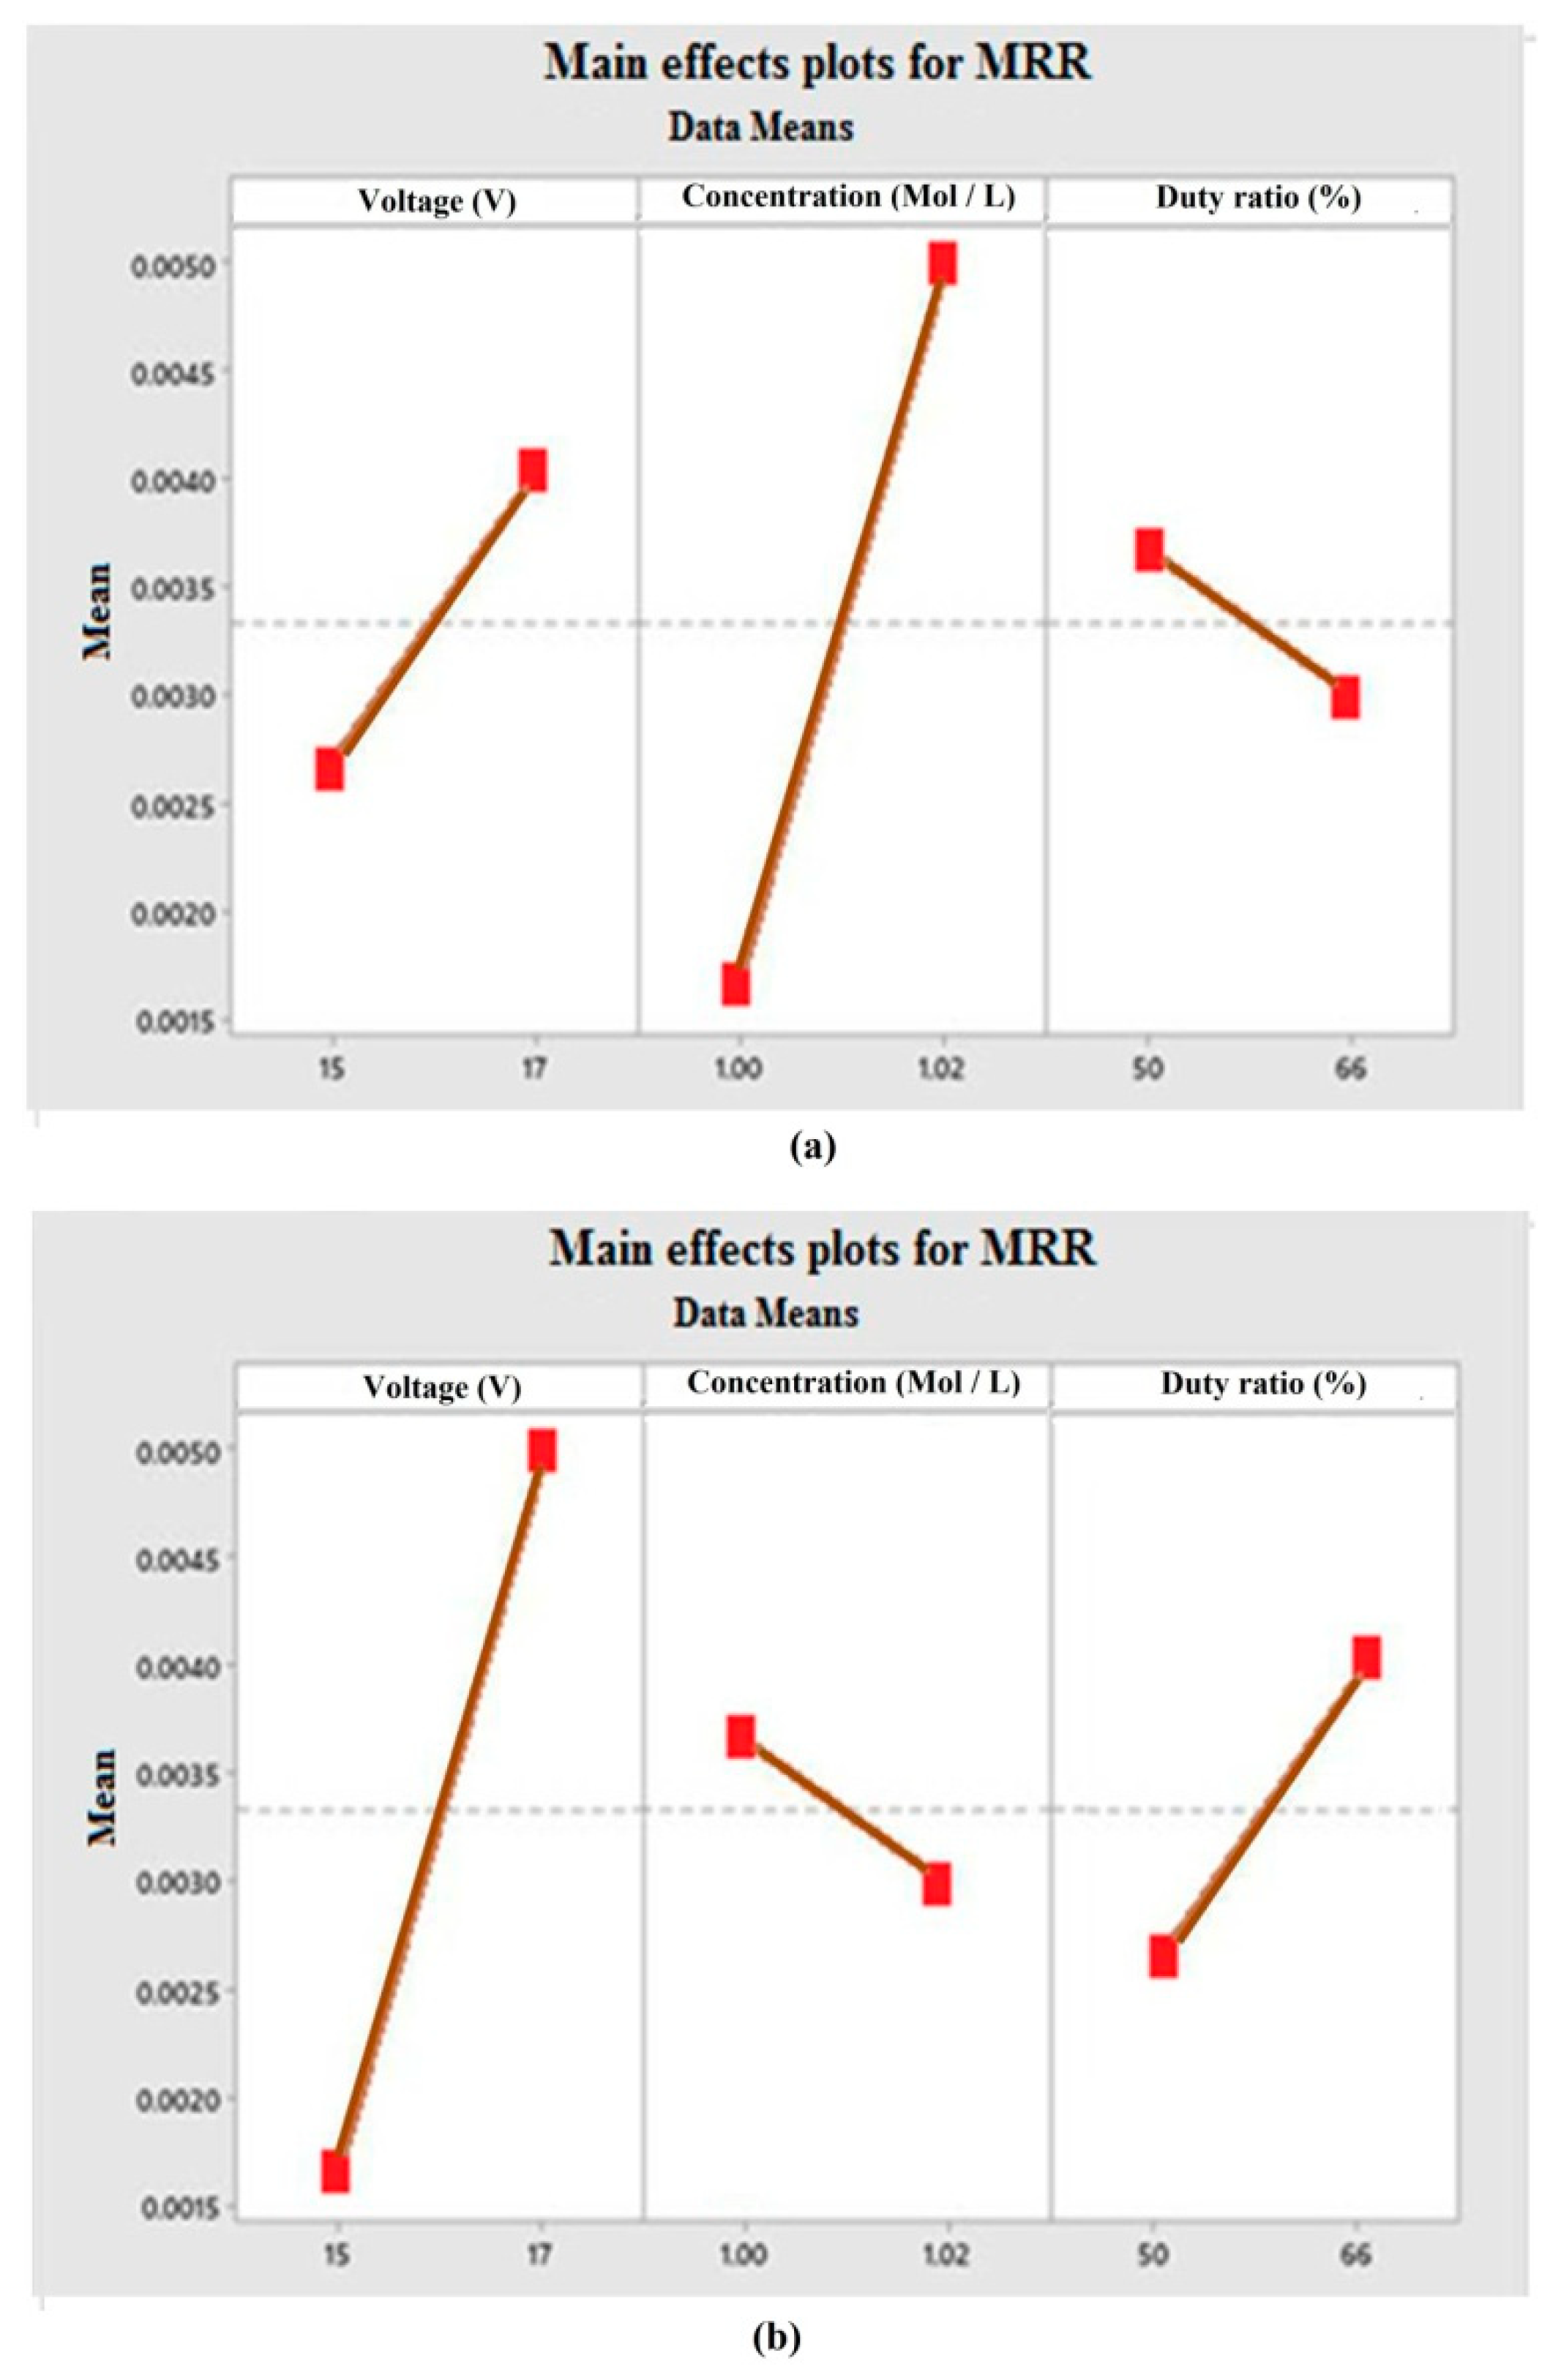
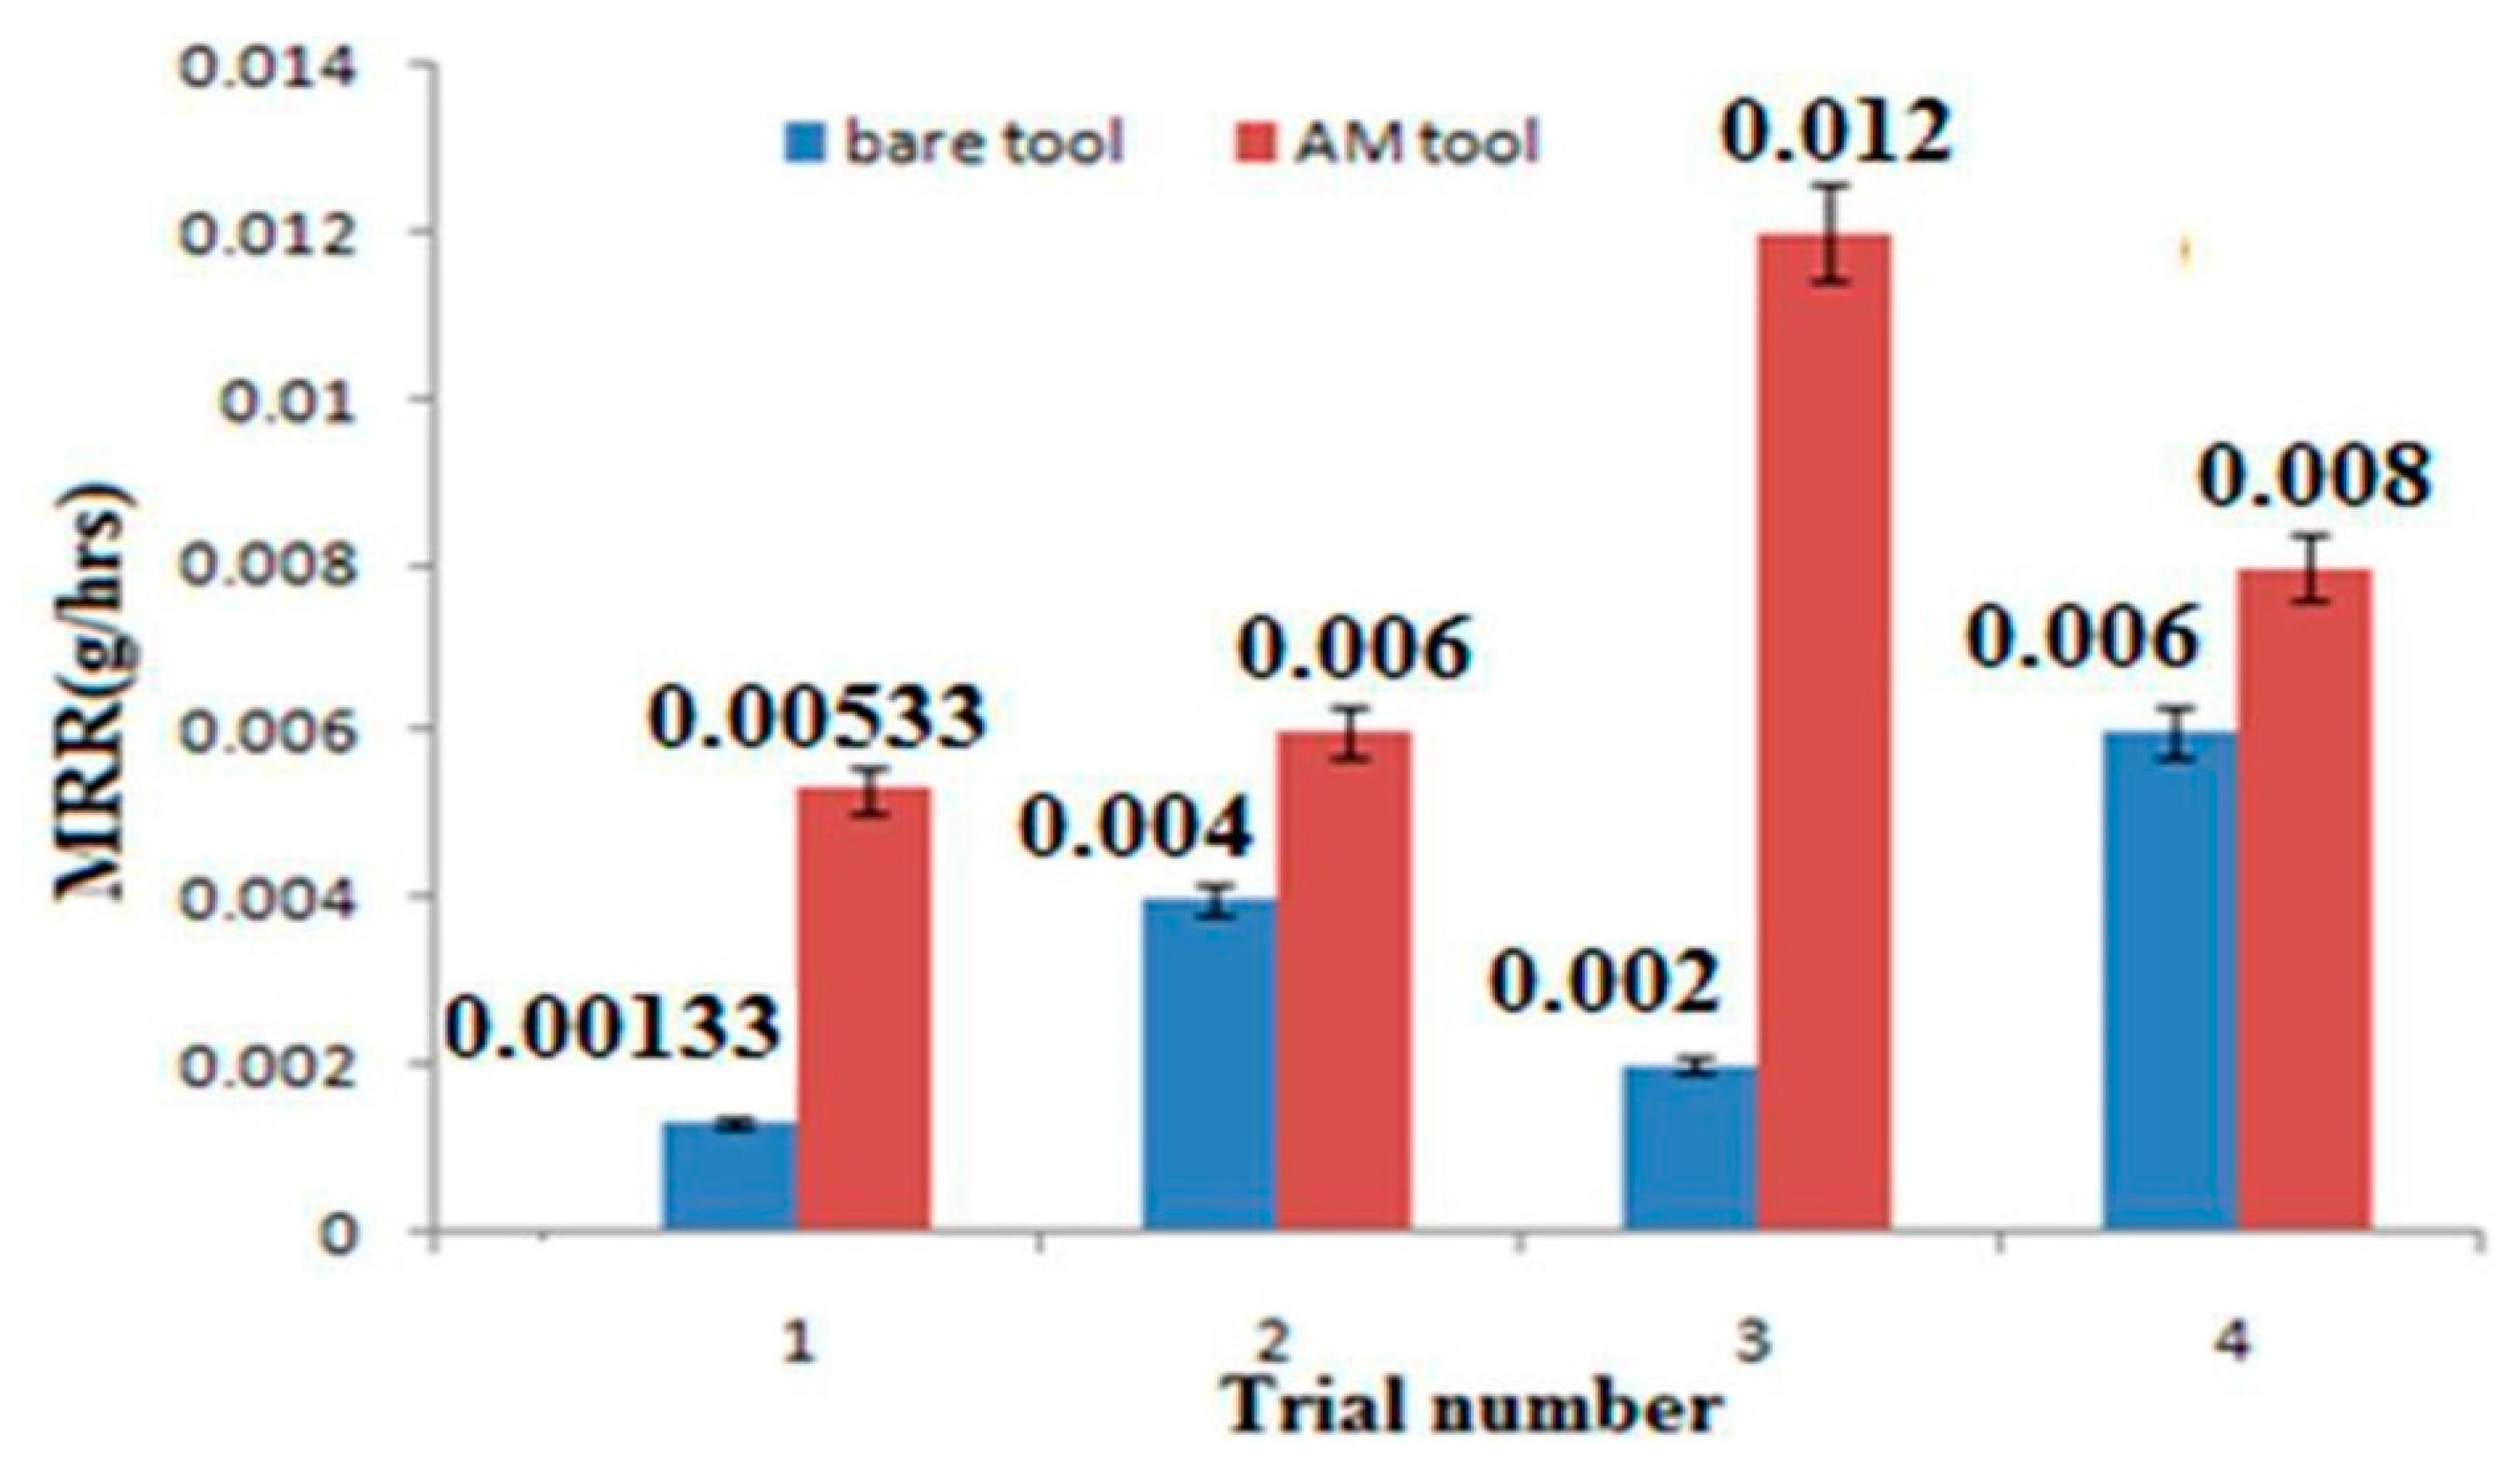
The significance of process parameters was investigated using Minitab 17 version software package. The most influencing ECMM variables can be indicated by the deviation from the mean line. It was inferred that the electrolyte concentration has the most dominating factor than others, such as applied voltage and duty cycle. The MRR was increased with a higher concentration of electrolytes due to this higher number of free ions and increasing current flow between the electrodes, as shown in Figure 2 [20,23]. MRR is directly proportional to voltage and duty cycle, but inversely proportional to electrolyte concentration. The additive tool has a more dominating effect on MRR because as by Ohm’s law, voltage and current are directly related to MRR, as shown in Figure 3. The error bar also indicated the lower repeatability error and standard deviation. The voltage can increase the current in the electrolytic cell of the process, which result in higher MRR in the ECMM process [26,27]. Hence, the optimum voltage should be kept as high as possible. From the Table 3, it was inferred that additive manufactured tool could provide better MRR than bare tool owing to the high uniformity of composition in additively manufactured tool as compared to conventionally manufactured bare tool. The study was also performed to find the optimal parameters and investigate the effects on the performance measures. It was found that higher voltage and duty cycle could provide higher material removal rate with better dimensional accuracy, owing to the ability of producing better anodic dissolution. It forms strong atomic bonds of metals, which increases electrical conductivity of the material to increase MRR during the machining process in ECMM [28].

3.2. Influence of Additive Manufactured Tool Electrode on Circularity and Overcut

The quality of the micro-hole produced by ECMM process on titanium specimens by AM tool and bare tool electrodes. It can be measured by capturing circularity and overcut of the workpiece under various process parameters combinations. The optical microscope (SVI107 manufactured by SIPCON, India) was used examine the quality of micro-hole by measure the value of circularity and overcut. The scanning electron microscope (SEM S-3400N manufactured by Hitachi, Japan) has been used to understand surface morphology in the present study.
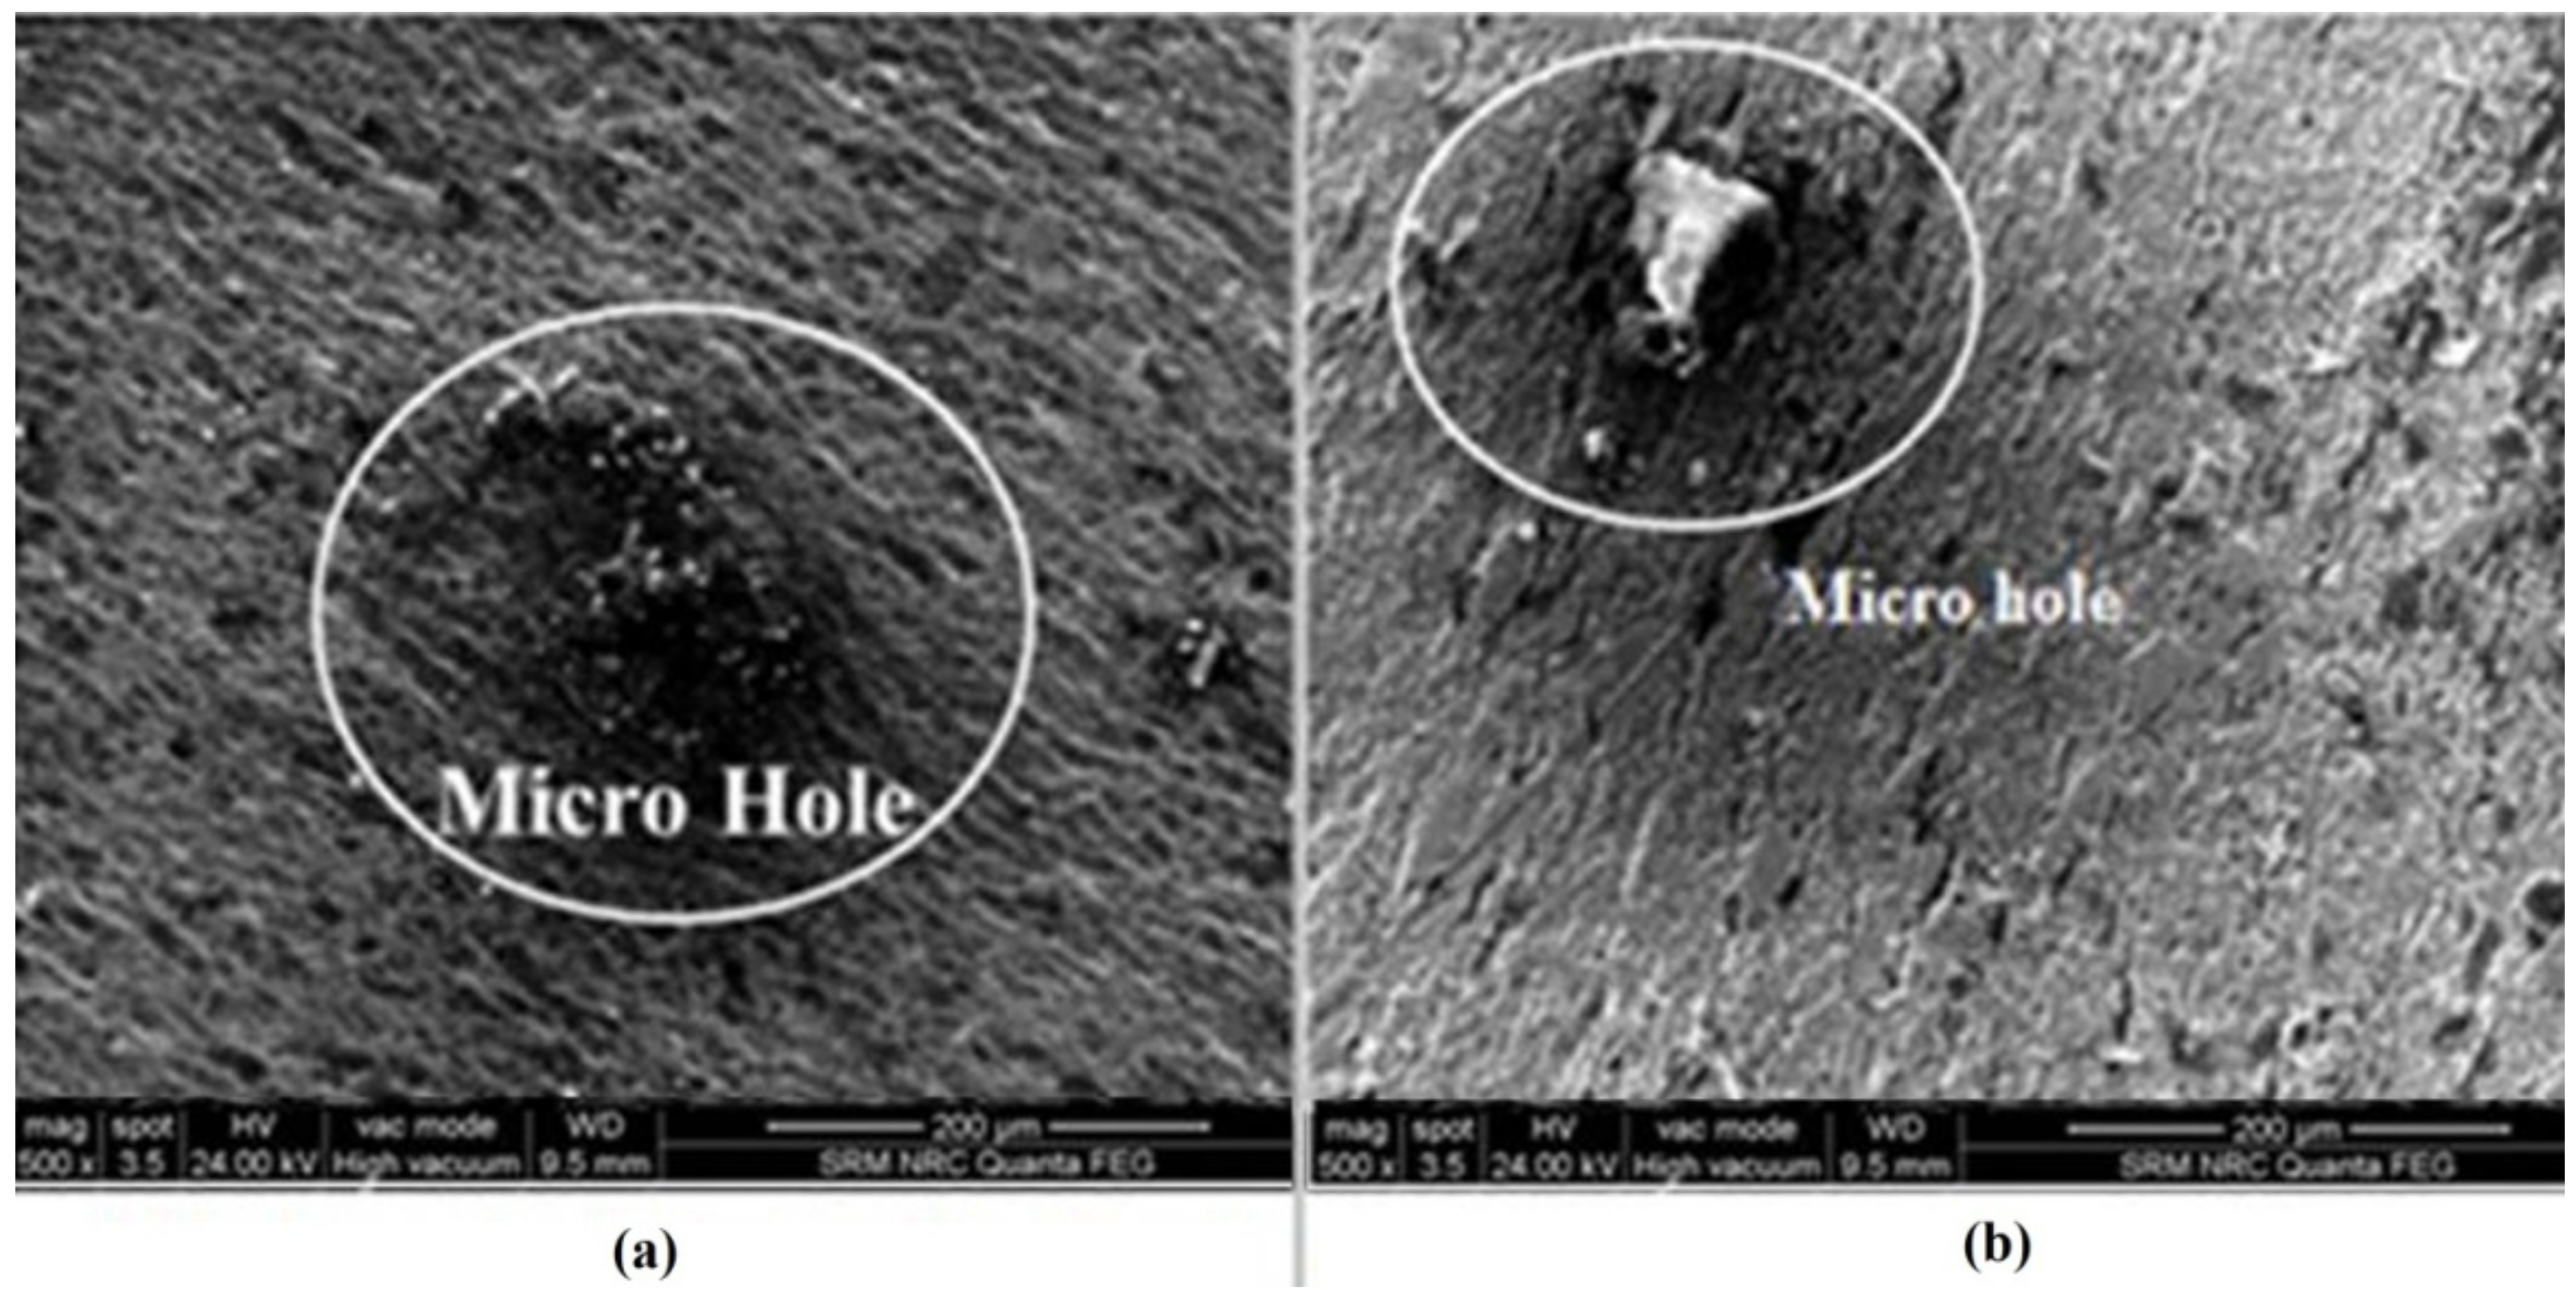
Figure 4 shows the SEM image of a micro-hole on a beta titanium alloy workpiece machined using a SS316L bare tool in ECMM. The circle in the figure shows the micro-holes in the machined region of the workpiece. The workpiece was machined by bare tool under (15 V voltage, 1 mol/L Sodium Nitrate, and 50% duty cycle) and (15 V voltage, 1 mol/L Sodium Nitrate with 0.002 mol/L Sodium Citrate, and 66% duty cycle) for SEM analysis. It was observed that higher duty cycle increases the number of free ions for the electrolyte. This could increase MRR by increasing the current in the process owing to a higher duty cycle. It could increase the quality of micro-holes by producing larger and concentrated craters in the bare tool [29,30].
Figure 5 shows the SEM image of micro-hole on beta titanium alloy workpiece machined using the additive tool of SS316L in the ECMM process. The circle in the figure shows the micro-holes in the machined region of the workpiece. The workpiece machined by bare tool under (15 V voltage, 1 mol/L Sodium Nitrate and 50% duty cycle) and (15 V voltage, 1 mol/L Sodium Nitrate with 0.002 mol/L Sodium Citrate and 66% duty cycle) for SEM analysis. The higher duty cycle could produce larger and more concentrated craters in the ECMM process. The surface accuracy was also observed in better form due to the higher particle uniformity and corrosion resistance, which could reduce the unwanted material removal on the machined surface in the ECMM process. It could result in compromising the quality of micro-holes on the machined specimens.
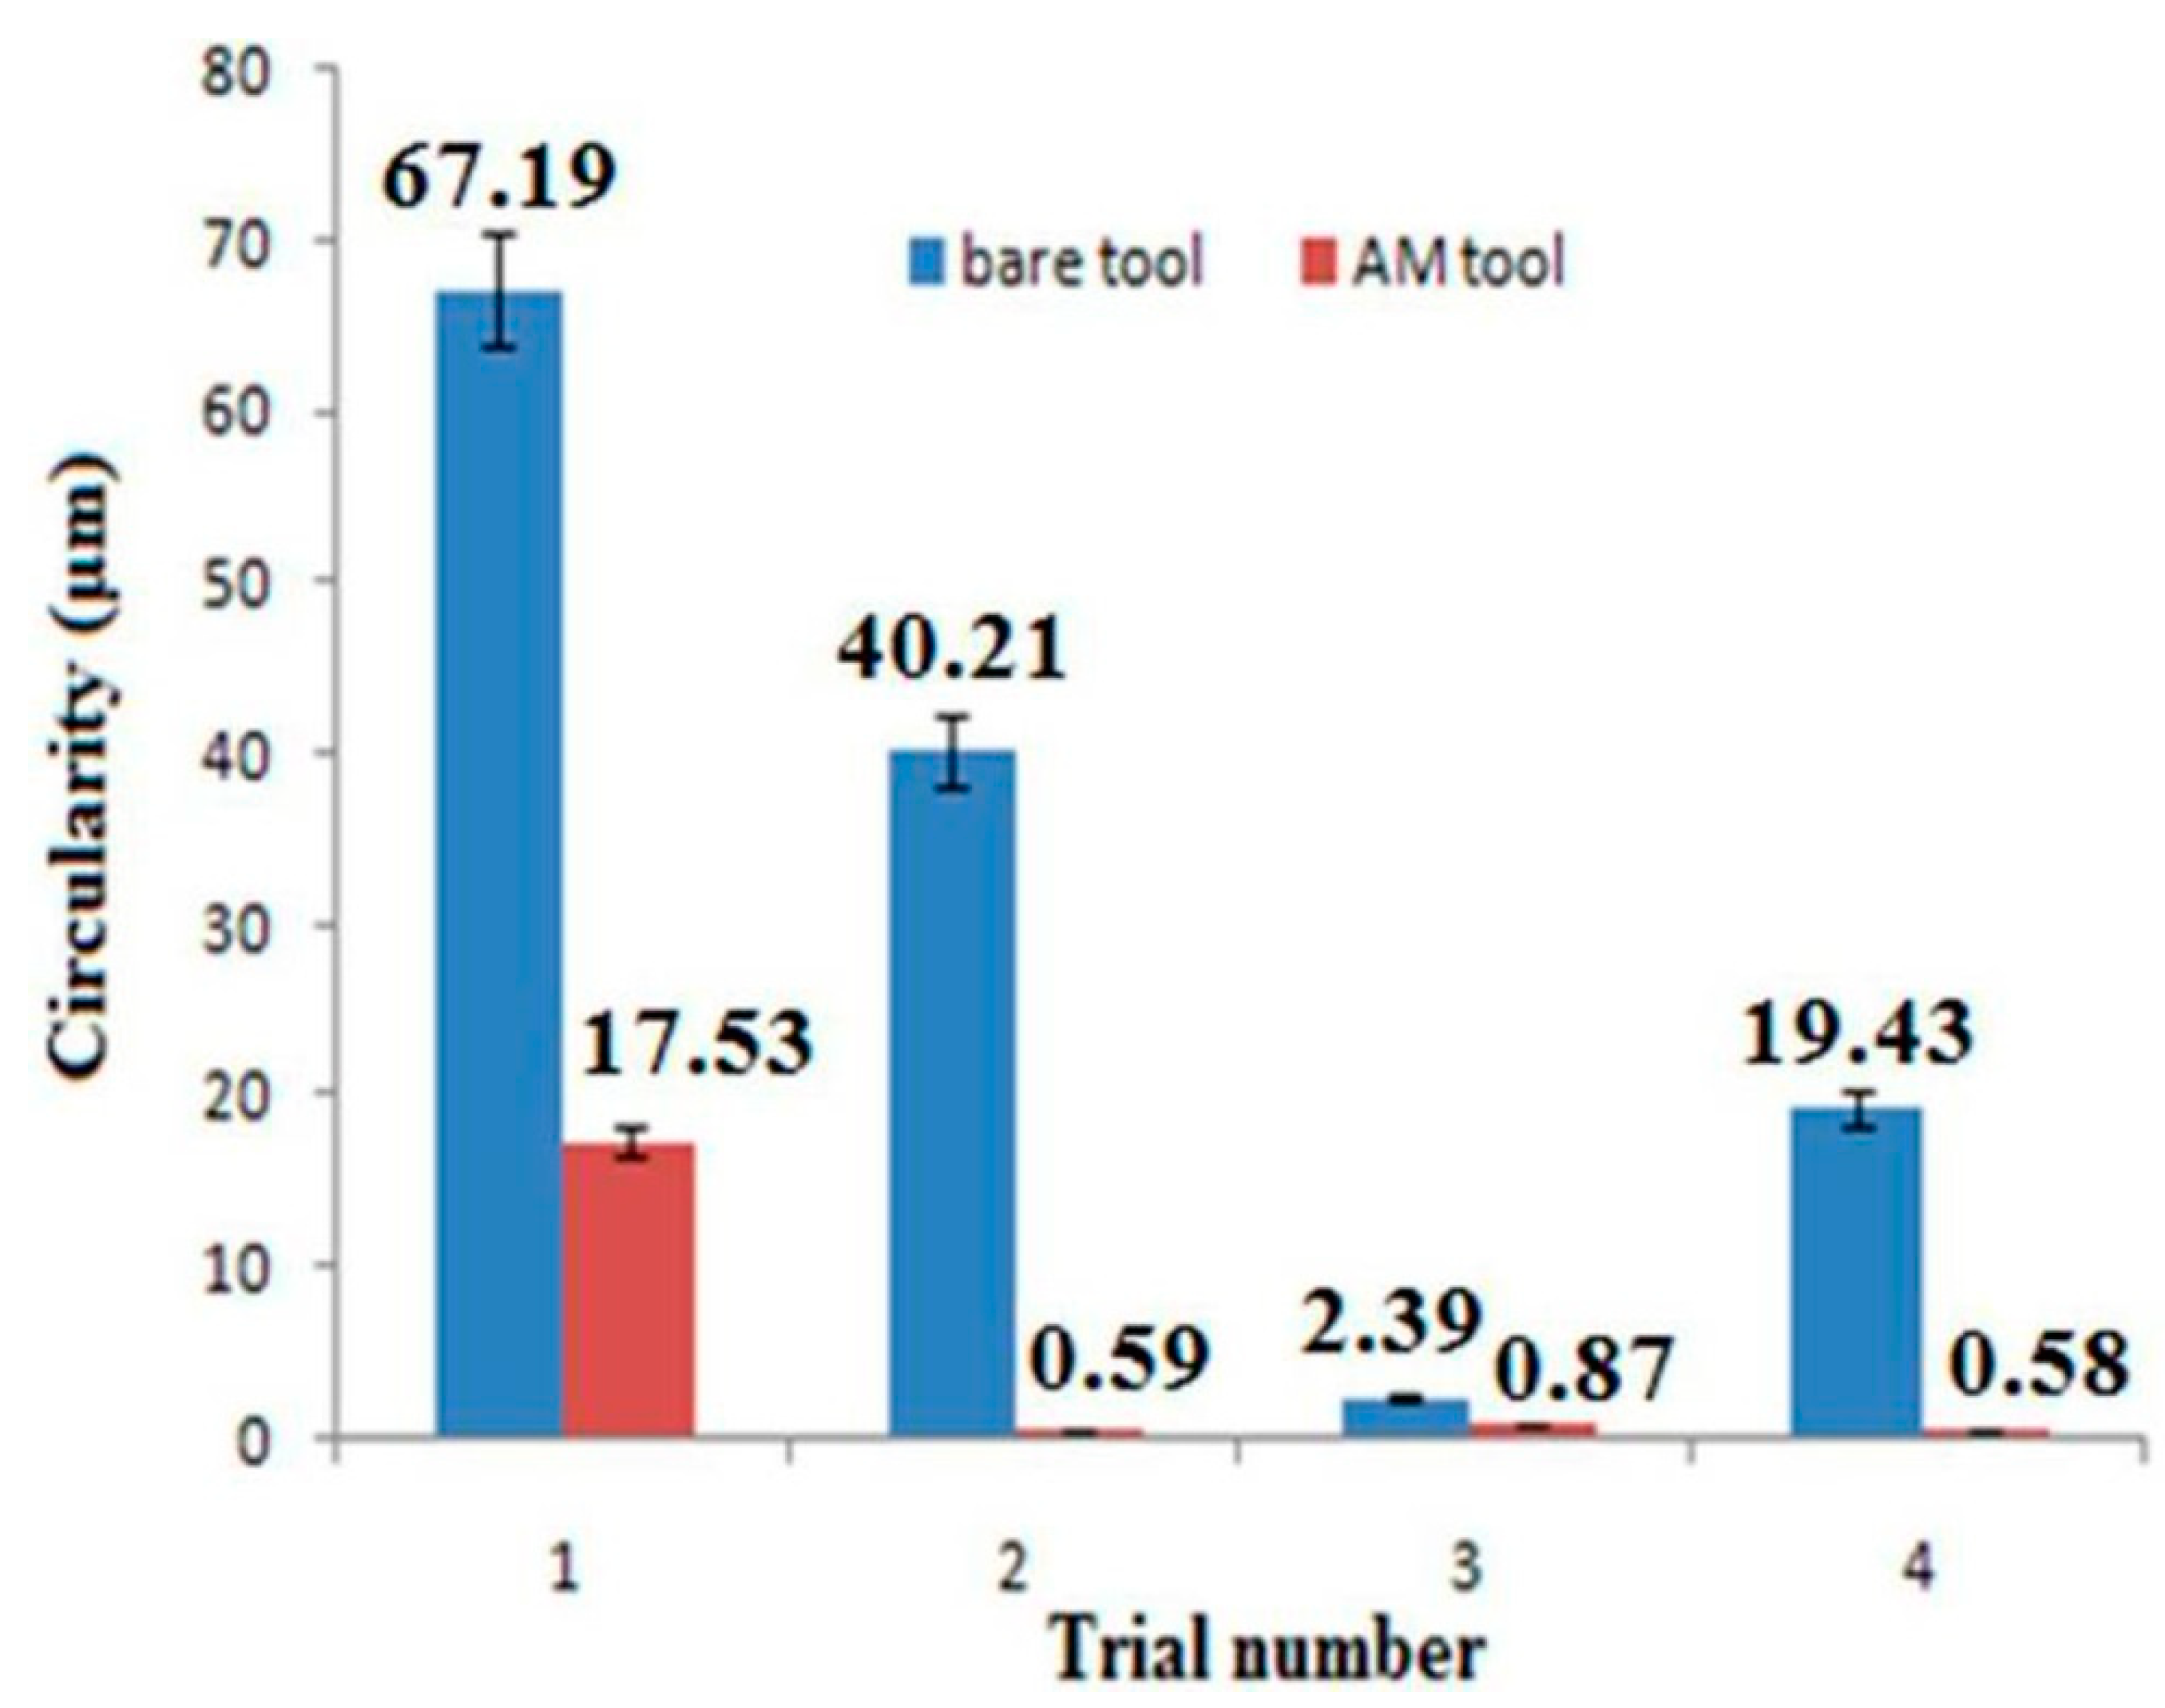
Table 4 shows that better circularity was observed with the additive tool than the bare tool. The dimensional exactness of the tool electrode demonstrates the dimensional accuracy over the machined specimens. Hence, the circularity of specimens was observed as better with the additive tool owing to the elemental exactness of the tool electrode, as shown in Figure 6. The reason behind the better dimensional accuracy of additive manufacturing could be due to the layer by layer manufacturing technique. It could avoid any shrinkage of metal during manufacturing.
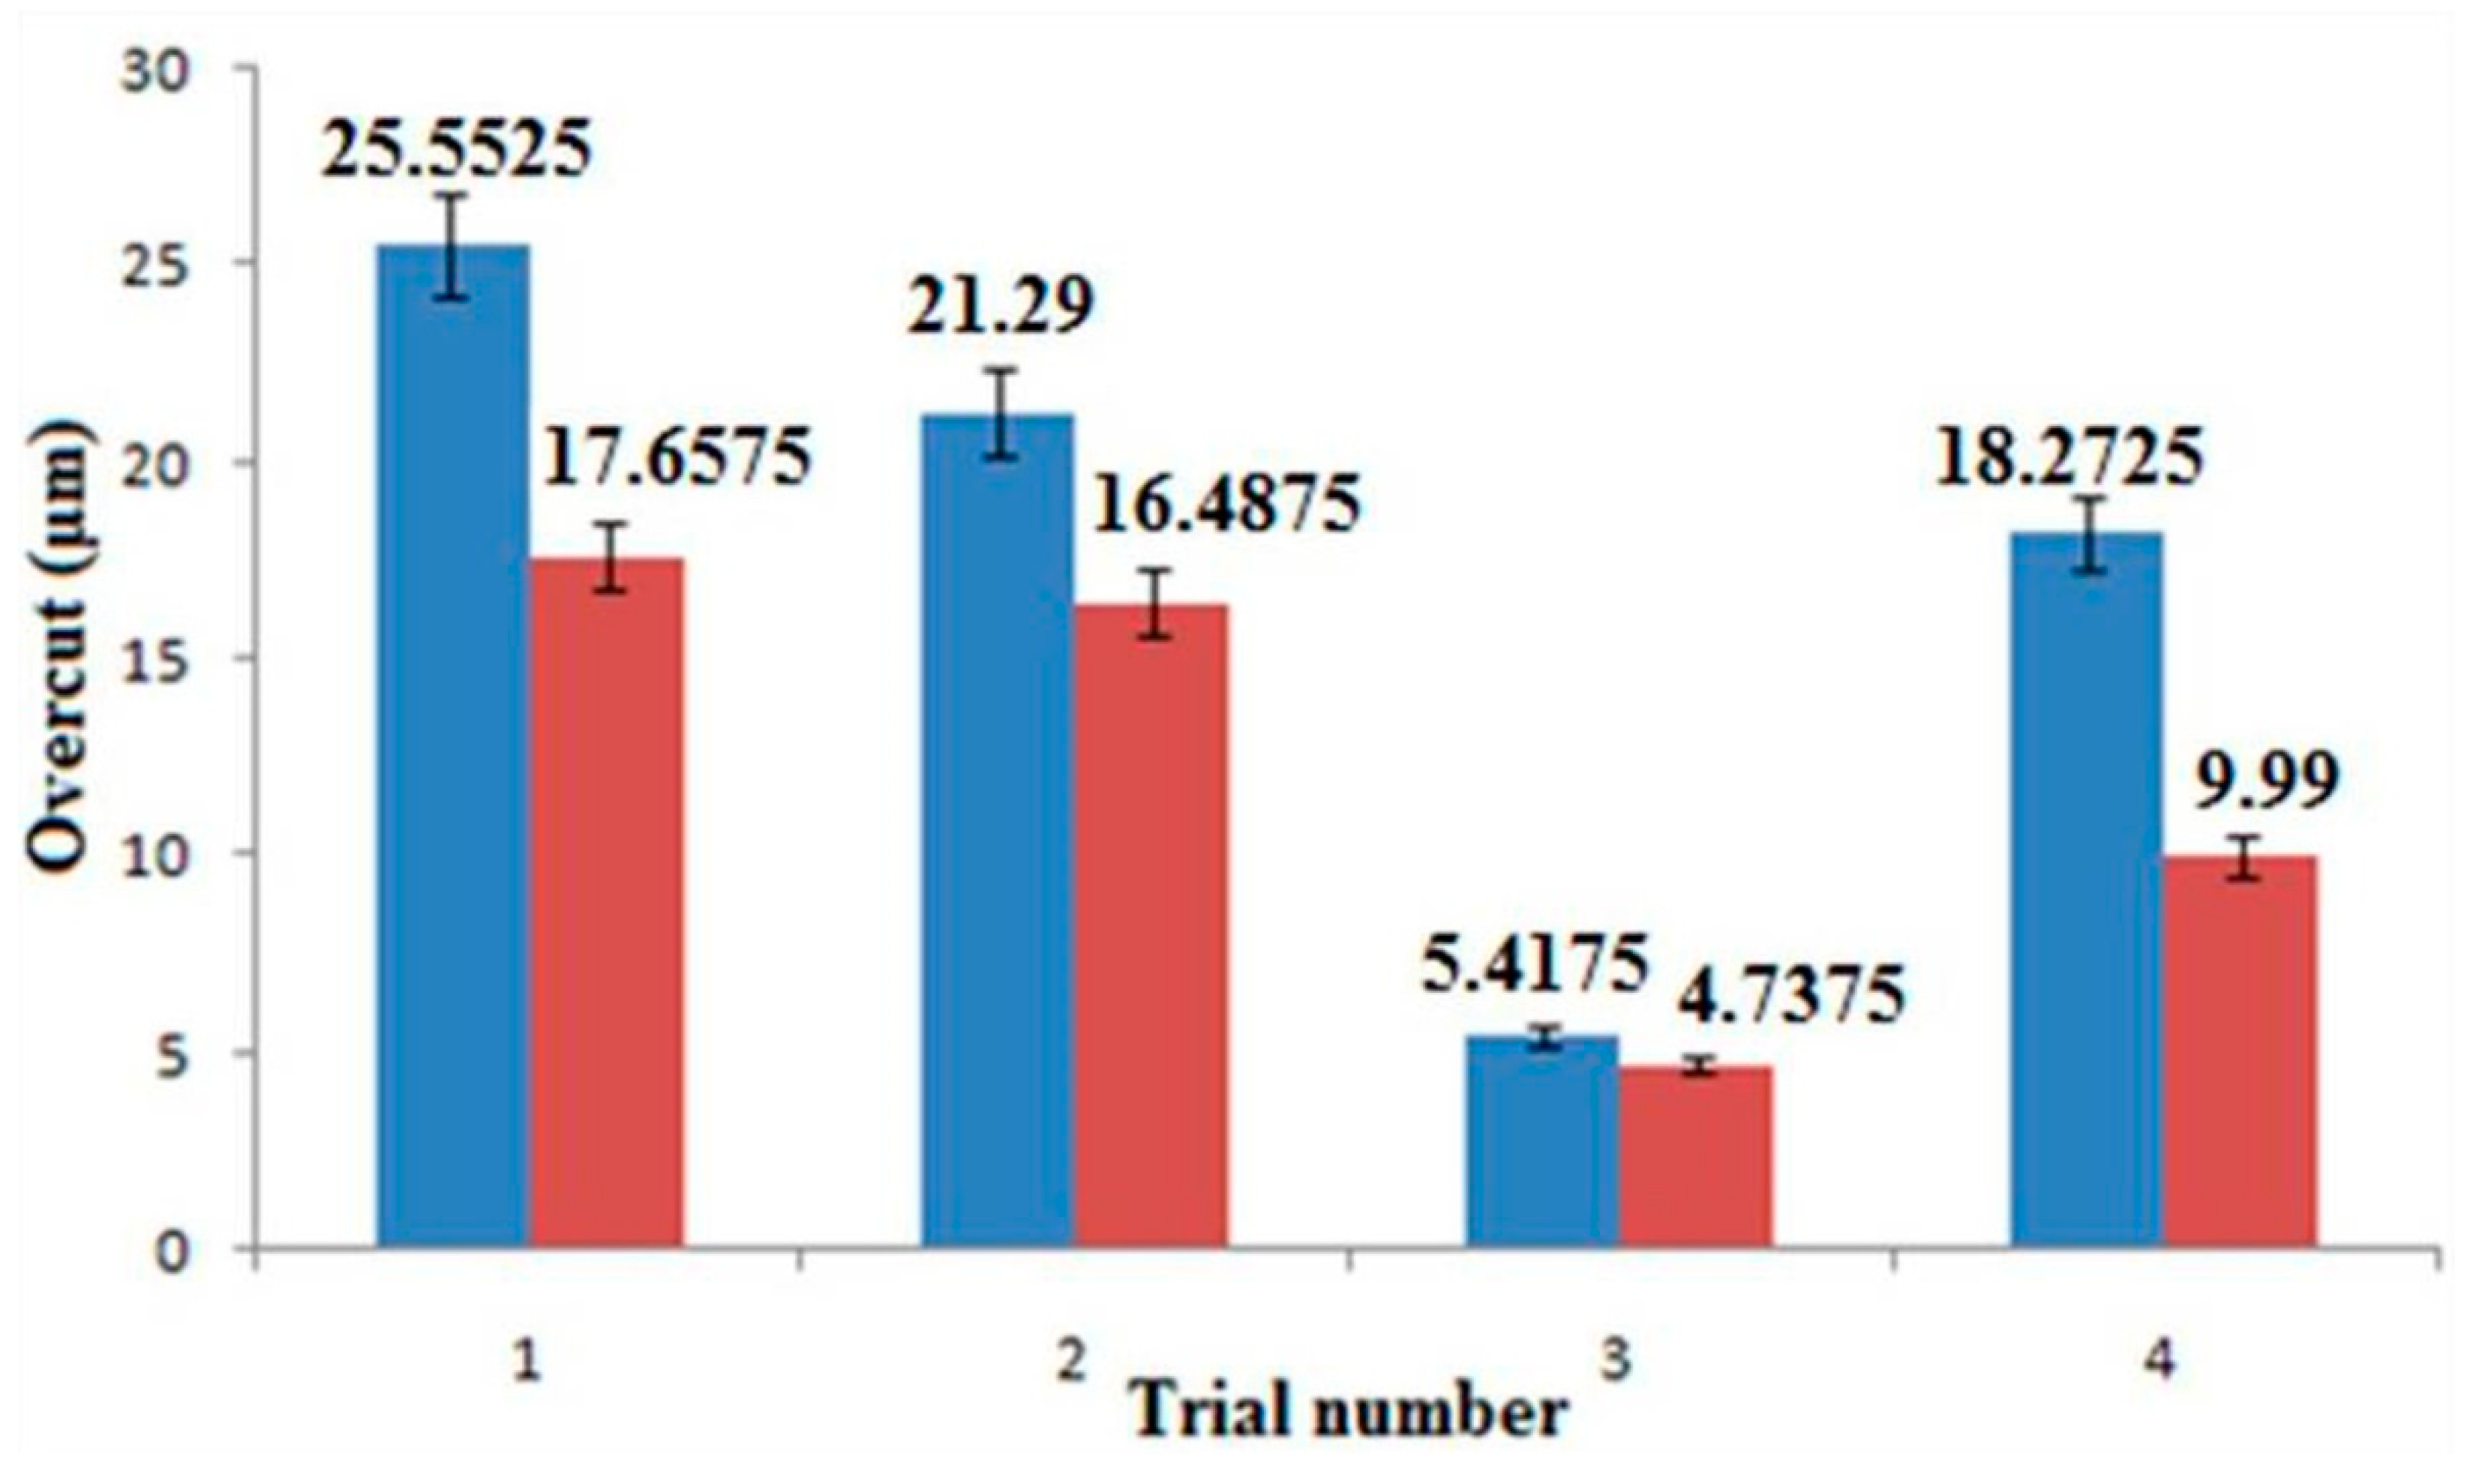
Table 5 shows that a lower overcut was observed with the additive tool than with the bare tool. The lower overcut of specimens was observed with additive tool due to the layer by layer additive manufacturing of the tool electrode, as shown in Figure 7. It could be due to the high localization effect and minimization of stray current provided by additive manufacturing tool in the ECMM process.

3.3. Surface Morphology Analysis with Additive Manufactured Tool Electrode

The corrosion can be seen in the tool at the tool tip and tool surface with a bare tool electrode as shown in Figure 8. The circle indicated the corrosion on the tool after the machining process. The corrosion in the tool is due to pitting corrosion, as the corrosion is not uniform throughout the tool and forming pits on the tool surface. Tool surface topology shows that the influence of the machining process over the tool electrode surface. After machining process, more craters were observed over the machined surface due to material removal in the ECMM process. It is due to defects that occurred during conventional manufacturing of the tool [31]. Figure 8 shows the corrosion at the tool tip and tool surface with the AM tool after machining process to represent the tool corrosion. The lower tool pitting corrosion in the AM tool was observed, since the AM tool could produce uniform corrosion and forming fewer pits on the tool surface [32]. Tool surface topology shows that the machining could minimally affect the AM tool the bare tool owing to its ability of lower and tiny craters in surface topology of additive tool [33]. It could be due to a smaller number of manufacturing defects occurred during manufacturing of the tool. The corrosion in bare tool was the pitting corrosion, since the corrosion was not uniform throughout the tool and forming pits on the tool surface. It was observed that the tool surface of the bare tool electrode after the machining process became rougher than the additive tool. The crater size in bare tool was higher than the additive tool. The tool surface and tool tip of additive manufactured was observed with lower corrosion compared to bare tool [34]. It was found that the bare tool could be corroded at a faster rate than that of the additive tool, since the manufacturing of the AM tool electrode could be involved with lower chemical reactance by oxidizing agent in the electrolyte environment to corrode the tool [35]. The corrosion was localized on the areas where machining defects were, which could lead to random distribution of the corrosion. It could lead to lower pitting corrosion with additively manufactured tool electrode in the ECMM process.

4. Conclusions

In the present study, an endeavor was performed to find the effects of an additive manufactured tool electrode and process parameters involved in the ECMM process on machining stainless steel for obtaining better performance measures. From the experimental results, the following conclusions were drawn.
  • The additive manufactured tool can produce higher MRR, since the composition of additive tool has more uniformity with strong atomic bond of metals and higher tool conductivity.
  • The additive manufacturing can give considerable dimensional accuracy in terms of circularity and overcut due to increased localization effect and less stray current.
  • The lower tool corrosion can be obtained in additively manufactured tool, since the additive tool has porous and less surface defects owing its fabrication of layer-by-layer addition of material.

Author Contributions

Conceptualization, M.T. and R.S.; methodology, M.R. and M.T.; software, M.T.; validation, R.S. and G.T.; formal analysis, M.R. and R.S.; investigation, G.T. and M.R.; re-sources, R.S.; writing—original draft preparation, M.T. and M.R.; project administration, M.T. and M.R.; funding acquisition, M.R.; All authors have read and agreed to the published version of the manuscript.

Funding

All authors thank to the National Aeronautics and Space Administration (NASA) MUREP Institutional Research Opportunity (MIRO) for providing funding to Navajo Tech Additive Manufacturing Education and Research (NAMER) under NASA Cooperative Agreement 80NSSC19M0227.

Data Availability Statement

Data sharing is not applicable to this article.

Acknowledgments

All authors thank to the National Aeronautics and Space Administration (NASA) MUREP Institutional Research Opportunity (MIRO) for providing funding to Navajo Tech Additive Manufacturing Education and Research (NAMER) under NASA Cooperative Agreement 80NSSC19M0227.

Conflicts of Interest

The authors declare no conflict of interest. The funders had no role in the design of the study; in the collection, analyses, or interpretation of data; in the writing of the manuscript, or in the decision to publish the results.

References

  1. Suresh, H.S.; Sudhir, G.B.; Dayanand, S.B. Analysis of electrochemical machining process parameters affecting material removal rate of hastelloy C-276. Int. J. Adv. Res. Sci. Eng. Technol. 2014, 5, 18–23. [Google Scholar]
  2. Haisch, T.; Mittemeijer, E.; Schultze, J.W. Electrochemical machining of the steel 100Cr6 in aqueous NaCl and NaNO3 solutions: microstructure of surface films formed by carbides. Electrochim. Acta 2001, 47, 235–241. [Google Scholar] [CrossRef]
  3. Rajurkar, K.P.; Sundaram, M.M.; Malshe, A.P. Review of electrochemical and electro discharge machining. Procedia CIRP 2013, 6, 13–26. [Google Scholar] [CrossRef] [Green Version]
  4. Sen, M.; Shan, H.S. A review of electrochemical macro- to microhole drilling processes. Int. J. Mach. Tool. Manuf. 2005, 45, 137–152. [Google Scholar] [CrossRef]
  5. Chiou, Y.C.; Lee, R.T.; Chen, T.J.; Chiou, J.M. Fabrication of high aspect ratio micro-rod using a novel electrochemical micromachining method. Precis. Eng. 2012, 36, 193–202. [Google Scholar] [CrossRef]
  6. Mileham, A.R.; Jones, R.M.; Harvey, S.J. Changes of valency state during Electrochemical Machining Production Points. Precis. Eng. 1982, 4, 168–170. [Google Scholar] [CrossRef]
  7. Thanigaivelan, R.; Arunachalam, R.M.; Karthikeyan, B.; Loganathan, P. Electrochemical micromachining of stainless steel with acidified sodium nitrate electrolyte. Procedia CIRP 2013, 6, 351–355. [Google Scholar] [CrossRef] [Green Version]
  8. De-Silva, A.K.M.; Altena, H.S.J.; McGeough, J.A. Influence of electrolyte concentration on copying accuracy of precision-ECM. CIRP Ann. Manuf. Technol. 2013, 52, 165–168. [Google Scholar] [CrossRef]
  9. Ayyappan, S.; Sivakumar, K. Experimental investigation on the performance improvement of electrochemical machining process using oxygen-enriched electrolyte. Int. J. Adv. Manuf. Technol. 2014, 75, 479–487. [Google Scholar] [CrossRef]
  10. Huaiqian, B.; Jiawen, X.; Ying, L. Aviation-oriented Micromachining Technology Micro-ECM in pure Water. Chin. J. Aeronaut. 2008, 218, 455–461. [Google Scholar] [CrossRef] [Green Version]
  11. Shibuya, N.; Ito, Y.; Natsu, W. Electrochemical Machining of Tungsten Carbide Alloy Micro-pin with NaNO3 Solution. Int. J. Precis. Eng. Manuf. 2012, 13, 2075–2078. [Google Scholar] [CrossRef]
  12. Tang, L.; Yang, S. Experimental investigation on the electrochemical machining of 00Cr12Ni9Mo4Cu2 material and multi-objective parameters optimization. Int. J. Adv. Manuf. Technol. 2013, 67, 2909–2916. [Google Scholar] [CrossRef]
  13. Geethapriyan, T.; Muthuramalingam, T.; Moiduddin, K.; Mian, S.M.; Alkhalefah, H.; Umer, U. Performance Analysis of Electrochemical Micro Machining of Titanium (Ti-6Al-4V) Alloy under Different Electrolytes Concentrations. Materials 2021, 11, 247. [Google Scholar]
  14. Geethapriyan, T.; Kalaichelvan, K.; Muthuramalingam, T. Multi Performance Optimization of Electrochemical Micro-Machining Process Surface Related Parameters on Machining Inconel 718 using Taguchi-grey relational analysis. Metall. Ital. 2016, 4, 13–19. [Google Scholar]
  15. Geethapriyan, T.; Kalaichelvan, K.; Muthuramalingam, T. Influence of coated tool electrode on drilling Inconel alloy 718 in Electrochemical micro machining. Procedia CIRP 2016, 46, 127–130. [Google Scholar] [CrossRef] [Green Version]
  16. Muthuramalingam, T.; Akash, R.; Krishnan, S.; Phan, N.H.; Pi, V.N.; Elsheikh, A.H. Surface quality measures analysis and optimization on machining titanium alloy using CO2 based Laser beam drilling process. J. Manuf. Process. 2021, 62, 1–6. [Google Scholar] [CrossRef]
  17. Muthuramalingam, T.; Moiduddin, K.; Akash, R.; Krishnan, S.; Mian, S.H.; Ameen, W.; Alkhalefah, H. Influence of process parameters on dimensional accuracy of machined Titanium (Ti-6Al-4V) alloy in Laser Beam Machining Process. Opt. Laser. Technol. 2020, 132, 106494. [Google Scholar] [CrossRef]
  18. Kirchner, V.; Cagnon, L.; Schuster, R.; Etrl, G. Electrochemical machining of stainless steel microelements with ultrashort voltage pulses. Appl. Phys. Lett. 2008, 79, 1721–1723. [Google Scholar] [CrossRef] [Green Version]
  19. Spieser, A.; Ivanov, A. Recent developments and research challenges in electrochemical micromachining (μECM). Int. J. Adv. Manuf. Technol. 2013, 69, 563–581. [Google Scholar] [CrossRef]
  20. Rajurkar, K.P.; Zhu, D.; McGeough, J.A.; Kozak, J.; Silva, A.D. New developments in electro-chemical machining. CIRP Ann. 1999, 48, 567–579. [Google Scholar] [CrossRef]
  21. Muthuramalingam, T.; Ramamurthy, A.; Sridharan, K.; Ashwin, S. Analysis of surface performance measures on WEDM processed titanium alloy with coated electrodes. Mater. Res. Express. 2018, 5, 126503. [Google Scholar] [CrossRef]
  22. Rajurkar, K.P.; Zhu, D.; Wei, B. Minimization of machining allowance in electrochemical machining. CIRP Ann. 1998, 47, 165–168. [Google Scholar] [CrossRef]
  23. Kozak, J.; Rajurkar, K.P.; Makkar, Y. Study of pulse electrochemical micromachining. J. Manuf. Proc. 2004, 6, 7–14. [Google Scholar] [CrossRef]
  24. Davydov, A.D.; Kabanova, T.B.; Volgin, V.M. Electrochemical machining of titanium. Review. Russ. J. Electrochem. 2017, 53, 941–965. [Google Scholar] [CrossRef]
  25. Geethapriyan, T.; Muthuramalingam, T.; Kalaichelvan, K. Influence of Process Parameters on Machinability of Inconel 718 by Electrochemical Micromachining Process using TOPSIS Technique. Arab. J. Sci. Eng. 2019, 44, 7945–7955. [Google Scholar] [CrossRef]
  26. Muthuramalingam, T.; Ramamurthy, A.; Moiduddin, K.; Alkindi, M.; Ramalingam, S.; Alghamdi, O. Enhancing the Surface Quality of Micro Titanium Alloy Specimen in WEDM Process by Adopting TGRA-Based Optimization. Materials 2020, 13, 1440. [Google Scholar]
  27. Senthilkumar, C.; Ganesan, G.; Karthikeyan, R. Study of electrochemical machining characteristics of Al/SiCp composites. Int. J. Adv. Manuf. Technol. 2009, 43, 256–263. [Google Scholar] [CrossRef]
  28. Geethapriyan, T.; Kalaichelvan, K.; Jothilingam, A. A Study on Investigating the Effect of various Electrolyte in Electrochemical Machining. Int. J. Appl. Eng. Res. 2015, 10, 15239–15243. [Google Scholar]
  29. Mingcheng, G.; Yongbin, Z.; Lingchao, M. Electrochemical Micromachining of Square Holes in Stainless Steel in H2SO4. Int. J. Electrochem. Sci. 2019, 14, 414–426. [Google Scholar] [CrossRef]
  30. Saxena, K.K.; Qian, J.; Reynaerts, D. A review on process capabilities of electrochemical micromachining and its hybrid variants. Int. J. Mach. Tool. Manuf. 2018, 127, 28–56. [Google Scholar] [CrossRef]
  31. Thakur, A.; Tak, M.; Mote, R.G. Electrochemical micromachining behavior on 17-4 PH stainless steel using different electrolytes. Procedia Manuf. 2019, 34, 355–361. [Google Scholar] [CrossRef]
  32. Leese, R.J.; Ivanov, A. Electrochemical micromachining: An introduction. Adv. Mech. Eng. 2016, 8, 1–13. [Google Scholar] [CrossRef] [Green Version]
  33. Geethapriyan, T.; Kalaichelvan, K.; Muthuramalingam, T.; Rajadurai, A. Performance Analysis of Process Parameters on Machining α-β Titanium Alloy in Electrochemical Micromachining Process. Proc. Inst. Mech. E. Part B J. Eng. Manuf. 2018, 232, 1577–1589. [Google Scholar] [CrossRef]
  34. Tang, L.; Li, B.; Yang, S.; Duan, Q.; Kang, B. The effect of electrolyte current density on the electrochemical machining S-03 material. Int. J. Adv. Manuf. Technol. 2014, 71, 1825–1833. [Google Scholar] [CrossRef]
  35. Chun, K.H.; Kim, S.H.; Lee, E.S. Analysis of the relationship between electrolyte characteristics and electrochemical machinability in PECM on invar (Fe-Ni) fine sheet. Int. J. Adv. Manuf. Technol. 2016, 87, 3009–3017. [Google Scholar] [CrossRef]
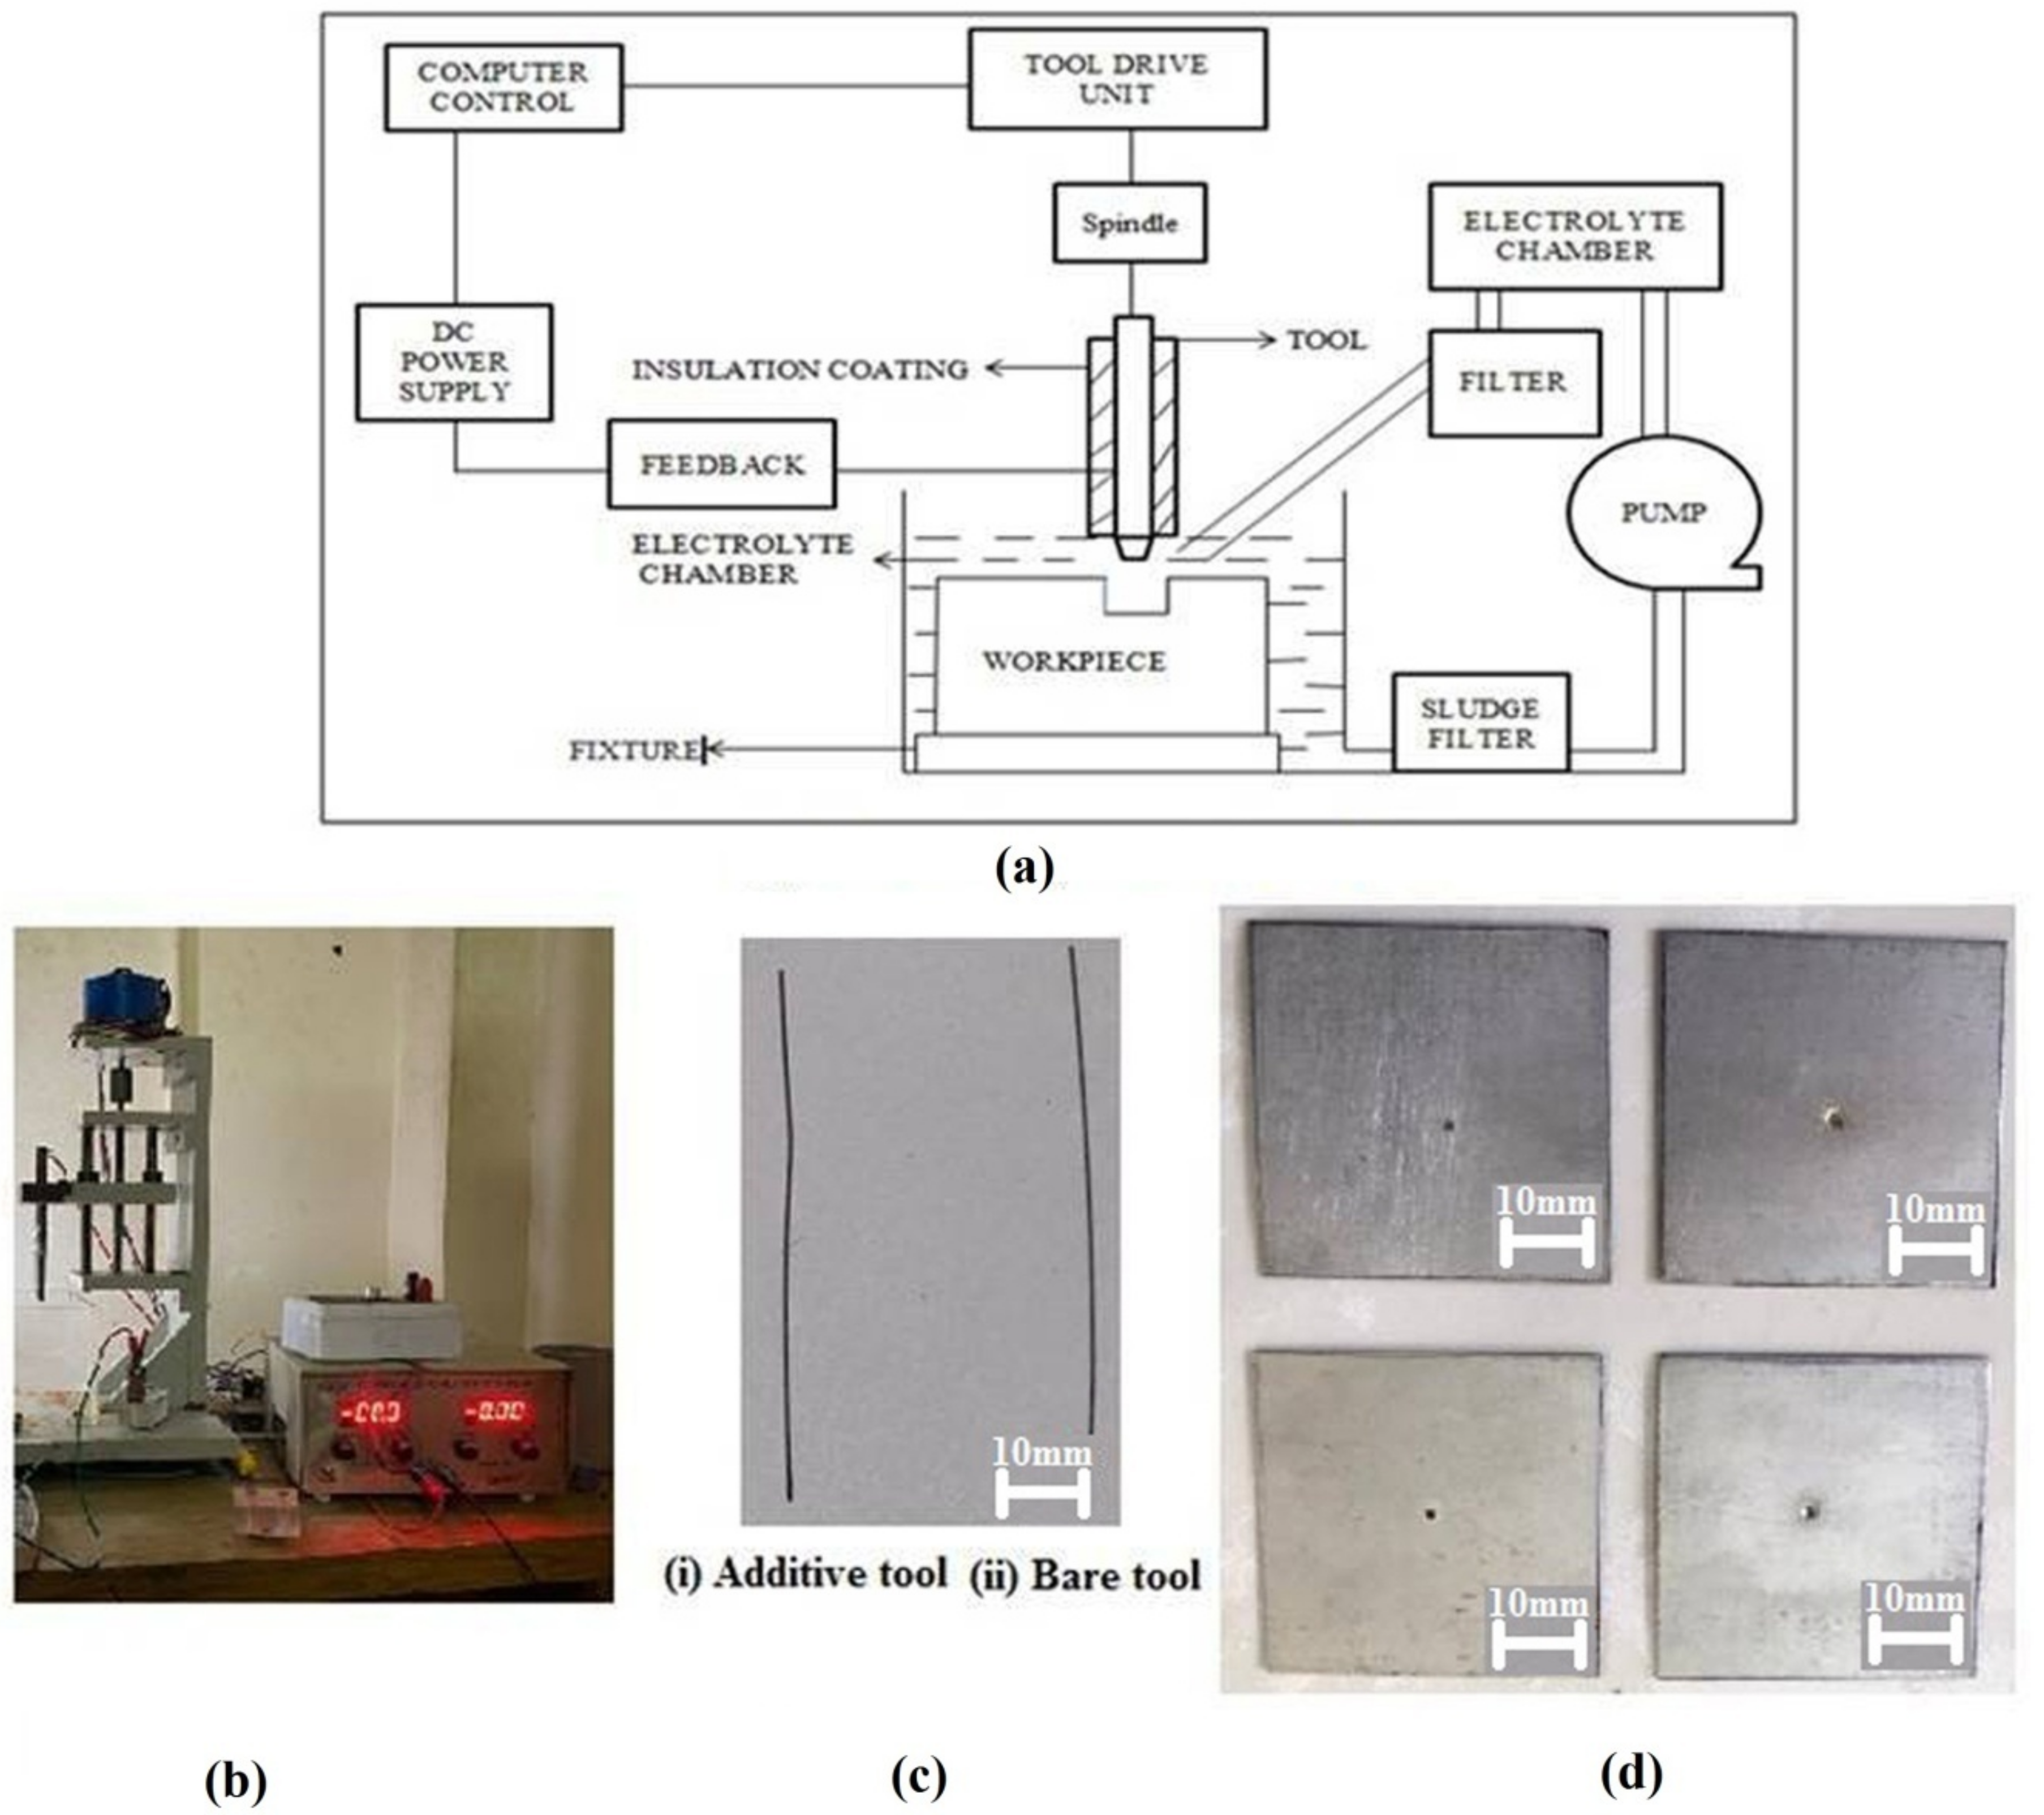
Figure 1. Experimental setup of ECMM with machined specimens and tool electrodes. (a) Schematic ECM, (b) ECM machine, (c) Tool electrodes, (d) Machined specimens.
Metals 11 00778 g001
Figure 2. Contribution of process parameter on MRR (a) bare tool (b) additive tool.
Metals 11 00778 g002
Figure 3. Comparison graph for bare tool and additive tool on MRR.
Metals 11 00778 g003
Figure 4. SEM image of machined workpiece surface by bare tool (a) 15 V, 1 mol/L Sodium Nitrate, 50% duty cycle (b) 15 V, 1 mol/L Sodium Nitrate, 66% duty cycle.
Metals 11 00778 g004
Figure 5. SEM image of machined workpiece surface by additive tool (a) 15 V, 1 mol/L Sodium Nitrate, 50% duty cycle (b) 15 V, 1 mol/L Sodium Nitrate, 66% duty cycle.
Metals 11 00778 g005
Figure 6. Comparison graph for bare tool and additive tool on circularity.
Metals 11 00778 g006
Figure 7. Comparison graph for bare tool and additive tool on overcut.
Metals 11 00778 g007
Figure 8. SEM analysis of machined specimens in ECMM (a) bare tool (b) AM tool.
Metals 11 00778 g008
Table 1. Chemical Composition of workpiece and tool electrode.
Beta Titanium Alloy Workpiece
ElementsComposition (%)
Iron (Fe)0.23
Aluminum (Al)3.01
Vanadium (V)2.19
Titanium (Ti)94.65
Stainless Steel 316l Tool electrode
Carbon0.03
Manganese2.00
Phosphorus0.045
Sulfur0.03
Silicon0.75
Chromium18.00
Nickel14.00
Molybdenum3.00
Nitrogen0.10
Iron62.045
Table 2. Selection of Process parameters and its levels.
Input ParametersLevel 1Level 2
Applied voltage (V)1517
Electrolytic concentration (mol/L)1—NaNO31—NaNO3
0—Sodium Citrate0.02—Sodium Citrate
Duty cycle (%)5066
Table 3. Comparison between Bare Tool and Additive Tool for MRR.
S.No.Voltage (V)Concentration (Mol/L)Duty Ratio (%)MRR (g/hrs)
Sodium NitrateSodium CitrateBare ToolAdditive Tool
11510500.001330.00533
21510.02660.0040.006
31710660.0020.012
41710.02500.0060.008
Table 4. Comparison table between Bare Tool and Additive Tool for Circularity.
TrialsCircularity by
Bare Tool (μm)
Circularity by
Additive Tool (μm)
167.1917.53
240.210.59
32.390.87
419.430.58
Table 5. Comparison table between Bare Tool and Additive Tool for Overcut.
TrialsOvercut by
Bare Tool (μm)
Overcut by
Additive Tool (μm)
125.552517.6575
221.2916.4875
35.41754.7375
418.27259.99
Publisher’s Note: MDPI stays neutral with regard to jurisdictional claims in published maps and institutional affiliations.