Article

Determining Forming Limit Diagrams Using Sub-Sized Specimen Geometry and Comparing FLD Evaluation Methods

1
Regional Technological Institute, University of West Bohemia, Univerzitní 8, 301 00 Pilsen, Czech Republic
2
COMTES FHT a.s., Průmyslová 995, 334 41 Dobřany, Czech Republic
*
Author to whom correspondence should be addressed.
Metals 2021, 11(3), 484; https://doi.org/10.3390/met11030484
Submission received: 10 February 2021 / Revised: 5 March 2021 / Accepted: 11 March 2021 / Published: 14 March 2021
(This article belongs to the Special Issue Recent Development in Advanced High Strength Steel)

Abstract

:
Sheet metal forming boundaries are established using the forming limit diagram (FLD). The Nakajima and Marciniak tests, which are based on stretching a material using a punch, are the most commonly used methods for determining the FLD or fracture forming limit diagram (FFLD). The results are usually evaluated by calculating local strain, strain rates, specimen thickness reduction or fracture strain. When the amount of experimental material is insufficient, miniaturization of the testing specimens may be a solution. However, the interchangeability of the results for standard and miniaturized specimens has not been proven yet. In this study, the Nakajima tests were performed using standard and sub-sized specimens made of manganese–boron steel 22MnB5, commonly used in the automotive industry. Afterwards, four FLD/FFLD evaluation methods were applied and compared. The miniaturized specimens yielded higher strain values, which was explained by the varied ratio of material thickness/punch diameter and different bending conditions. The highest compliance of the results was recorded for the standard and miniaturized FFLD.

1. Introduction

For almost all kinds of forming operations in which sheet metal is used as the input material, it is essential to know the conditions under which the material exhibits necking (material instability) or direct fracture. The aim is to exploit its material properties while ensuring the safe and long-lasting operation of a component. A typical example can be found in the automotive industry, specifically in the forming of critical body elements such as A, B and C pillars. Nowadays, the tendency on the global market is to reduce the material consumption for body in white (BIW) design by using innovative, lightweight materials and simultaneously maintaining the material strength characteristics required for operational safety. Knowledge of the borders of material processing is then crucial. Such limits can be presented as a forming limit curve/diagram (FLC/FLD), where the curve of the coordinates of major and minor strains is plotted.
Although in recent years, the methodology for the evaluation of FLDs has been highly developed and an international standard created [1,2], it is still possible to encounter a situation where the fracture of a real component occurs under strain conditions that differ from those predicted by an FLD. This phenomenon is observed due to the varied conditions of the process, such as the velocity and temperature of forming or testing. The components are often formed as a result of multiple operations, in which compressive and tensile deformations can change at a critical point. However, specimens used for evaluating FLDs are subjected only to deformation of a tensile character. Researchers are trying to simulate the actual forming conditions by using another approach called non-linear strain path testing, where cruciform specimens are employed.
FLCs or FLDs are some of the most popular thinning criteria in finite element analysis (F EA). The original idea was proposed by Gensamer [3] in 1946, and then, in the 1970s, was complemented by Keeler [4] and Goodwin [5] and evolved into the FLD criterion, which represents the necking phenomenon as we know it today. This approach was developed further for more than 40 years, and currently, there is a wide range of evaluation methods for measuring and evaluating critical strain under different load conditions [6,7,8,9,10,11,12] that are covered by international standards DIN ISO 12004 [1,2].
The main principle of the test is the extrusion of a sheet blank by a punch (usually a Marciniak or Nakajima tool) while the edges of the specimen are clamped. The maximum sheet thickness is defined as 4 mm for a Nakajima punch [7] and 1.5 mm for a Marciniak tool [6]. The critical aspect of the test is the lubrication system, since the friction has to be minimized. If the friction is negligibly small, the stress is concentrated in the central area of the specimen, where a final fracture can also be expected. The test results are considered as acceptable if the fracture occurs up to 15% from the middle of the specimen according to the standard [1,2].
The original evaluation methods were based on post-deformation measurements of the individual elements’ dimensions (circles) etched on the surface of the specimens. Nowadays, the tests are usually monitored by optical systems based on the digital image correlation (DIC) method, which allows, together with the random pattern applied to the specimen, online evaluation of the main deformations. The standard [1,2] specifies a minimum frame rate of 10 fps for a punch velocity of 1.5 ± 0.5 mm/s.
The standard evaluation process, the cross-section method, uses the last stage before failure from the optical records to avoid the edge effect when calculating the strain values on both sides of the necked area, using line sections. The major (ε1) and minor (ε2) strains at the onset of necking are then defined by a second-order inverse polynomial function (Figure 1). The cross-section method is easy to apply and is usually integrated with most of the optical systems in the evaluation scripts. On the other hand, problems in the evaluation process can occur when multiple necking zones arise. Another disadvantage is the tendency to underestimate the results, especially for high-strength steels; therefore, other evaluation methods were developed.
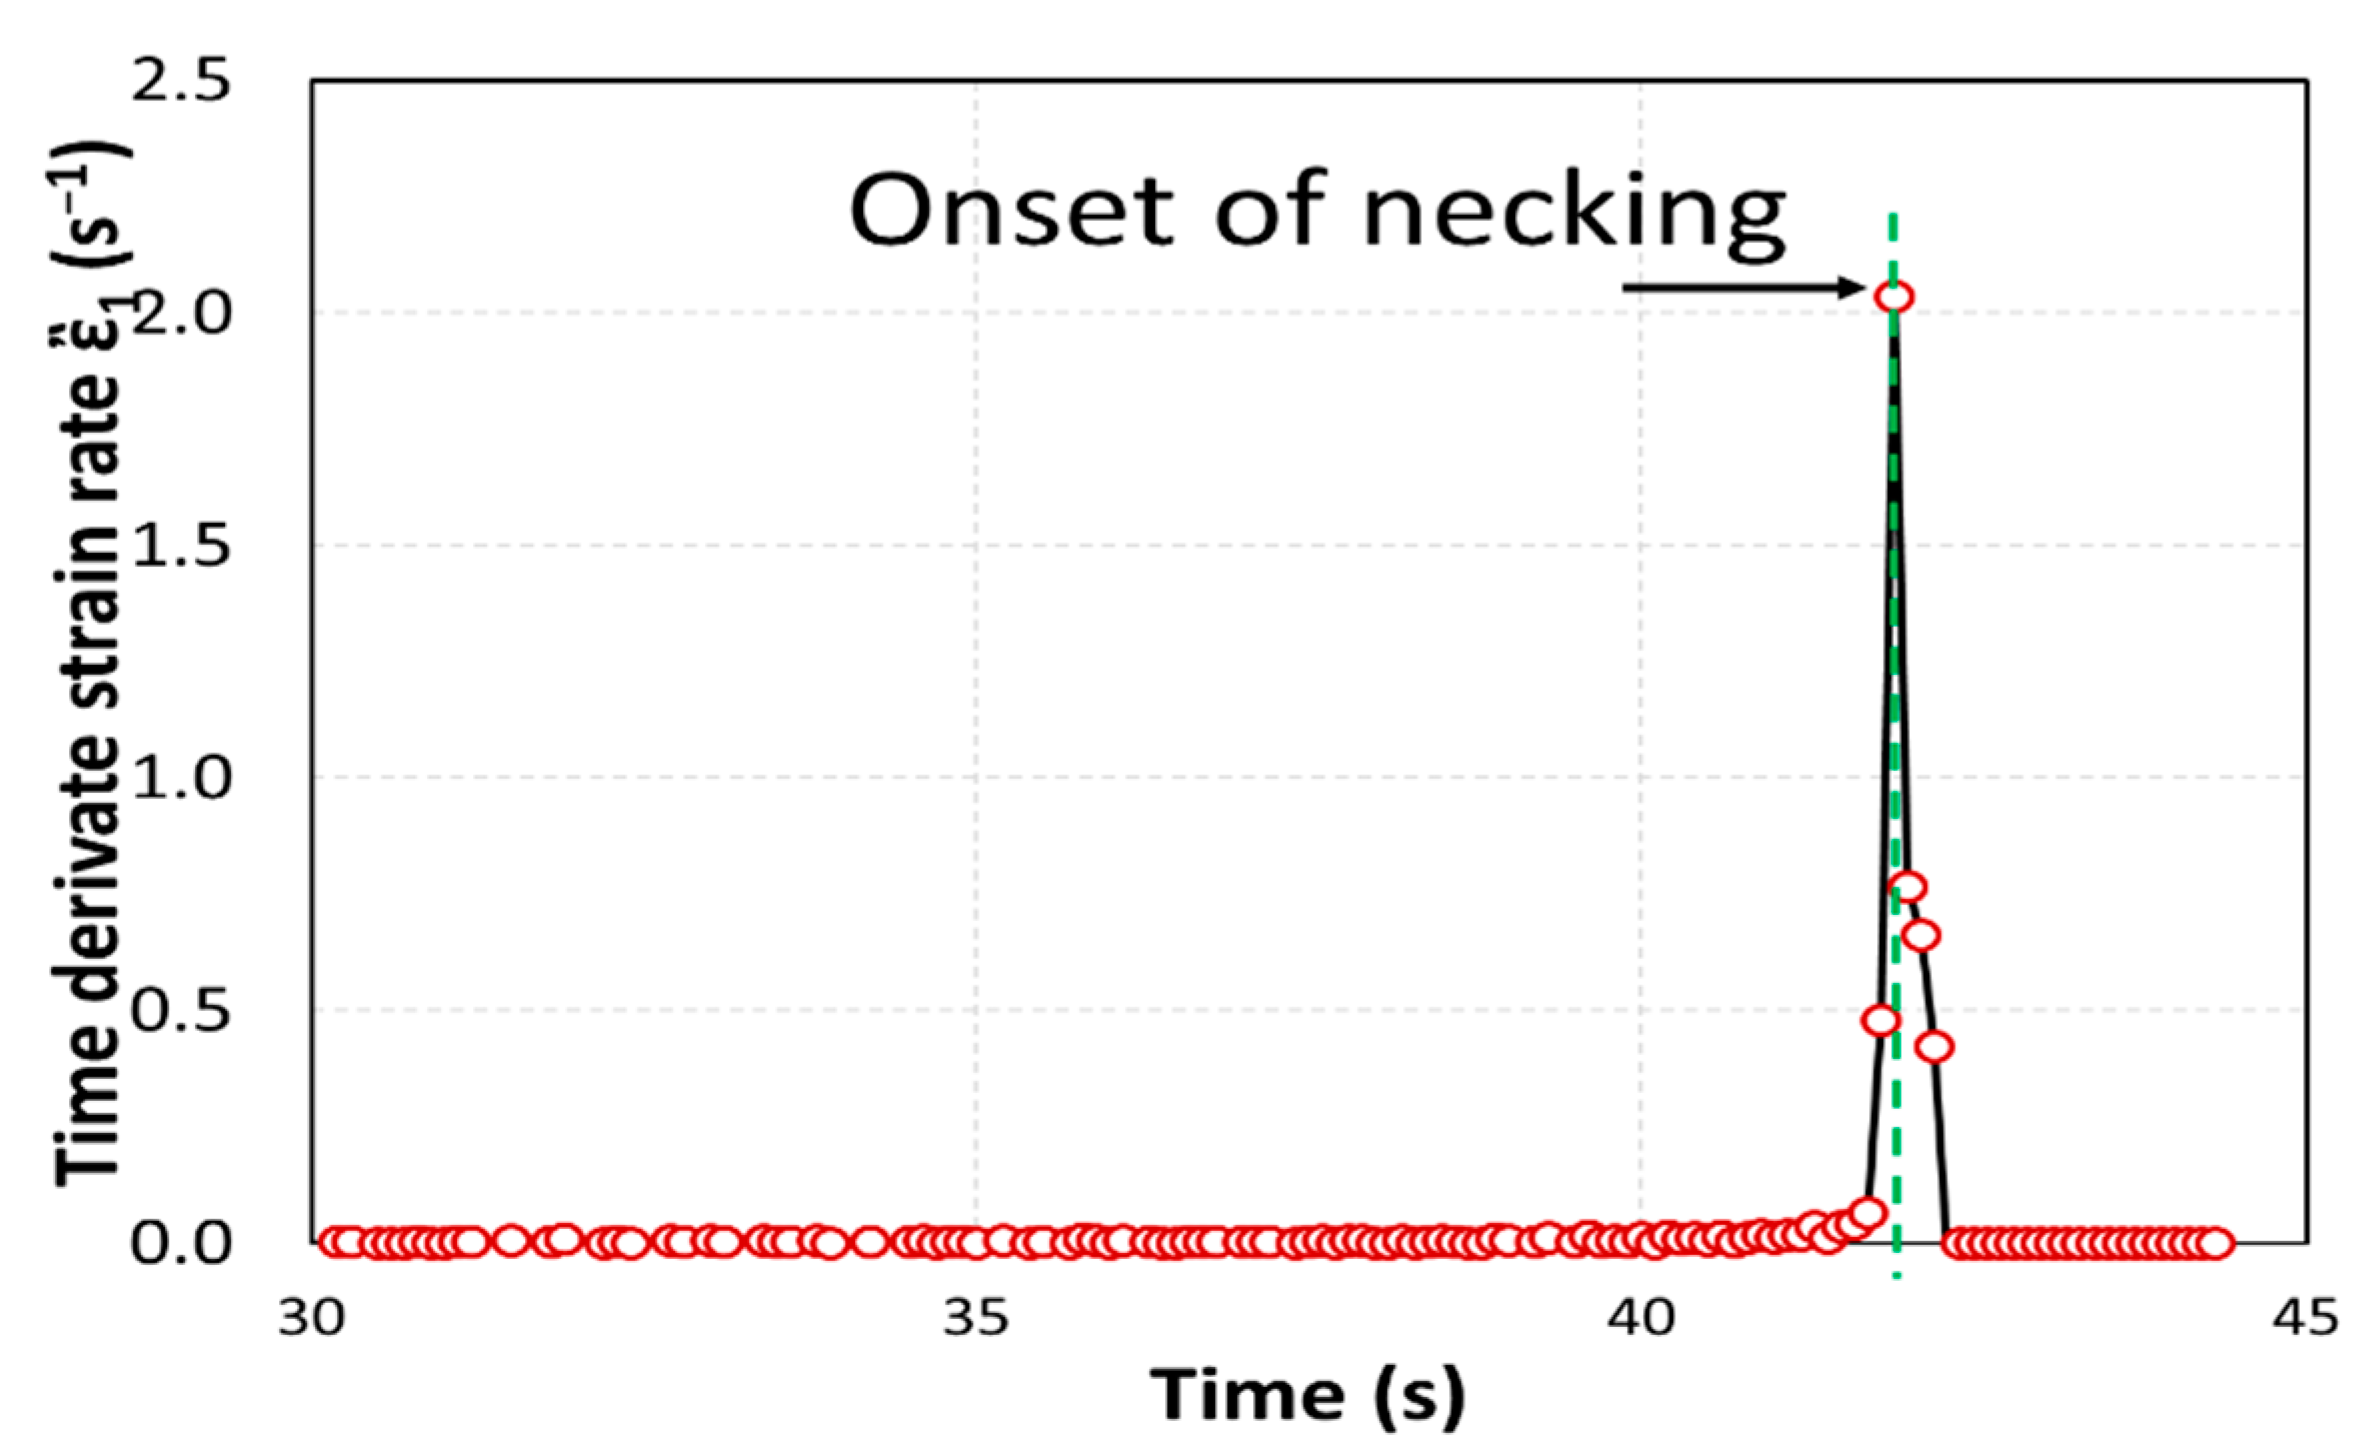
In 2008, Hora and Volk [13] proposed the time-continuous evaluation method, a novel method that is not based on local strain but examines the difference between the strain rates within one specimen. Material instability is manifested by increased strain rate, while the strain rate in the outer areas remains constant. In 2010, this method was modified by Merklein and Kuppert [9], who applied the basic idea but overcame the weakness of the histogram classification of the strain rates. Their approach is the (new) time-dependent method and it is also based on the comparison of the strain rates in the outer and inner regions. In this method, the local strain rates are calculated using a circle with a radius of 2 mm and the center is located where the highest deformation is concentrated. Consequently, the strain rate is derived and the onset of necking is set at the maximum of the regression curve (Figure 2).
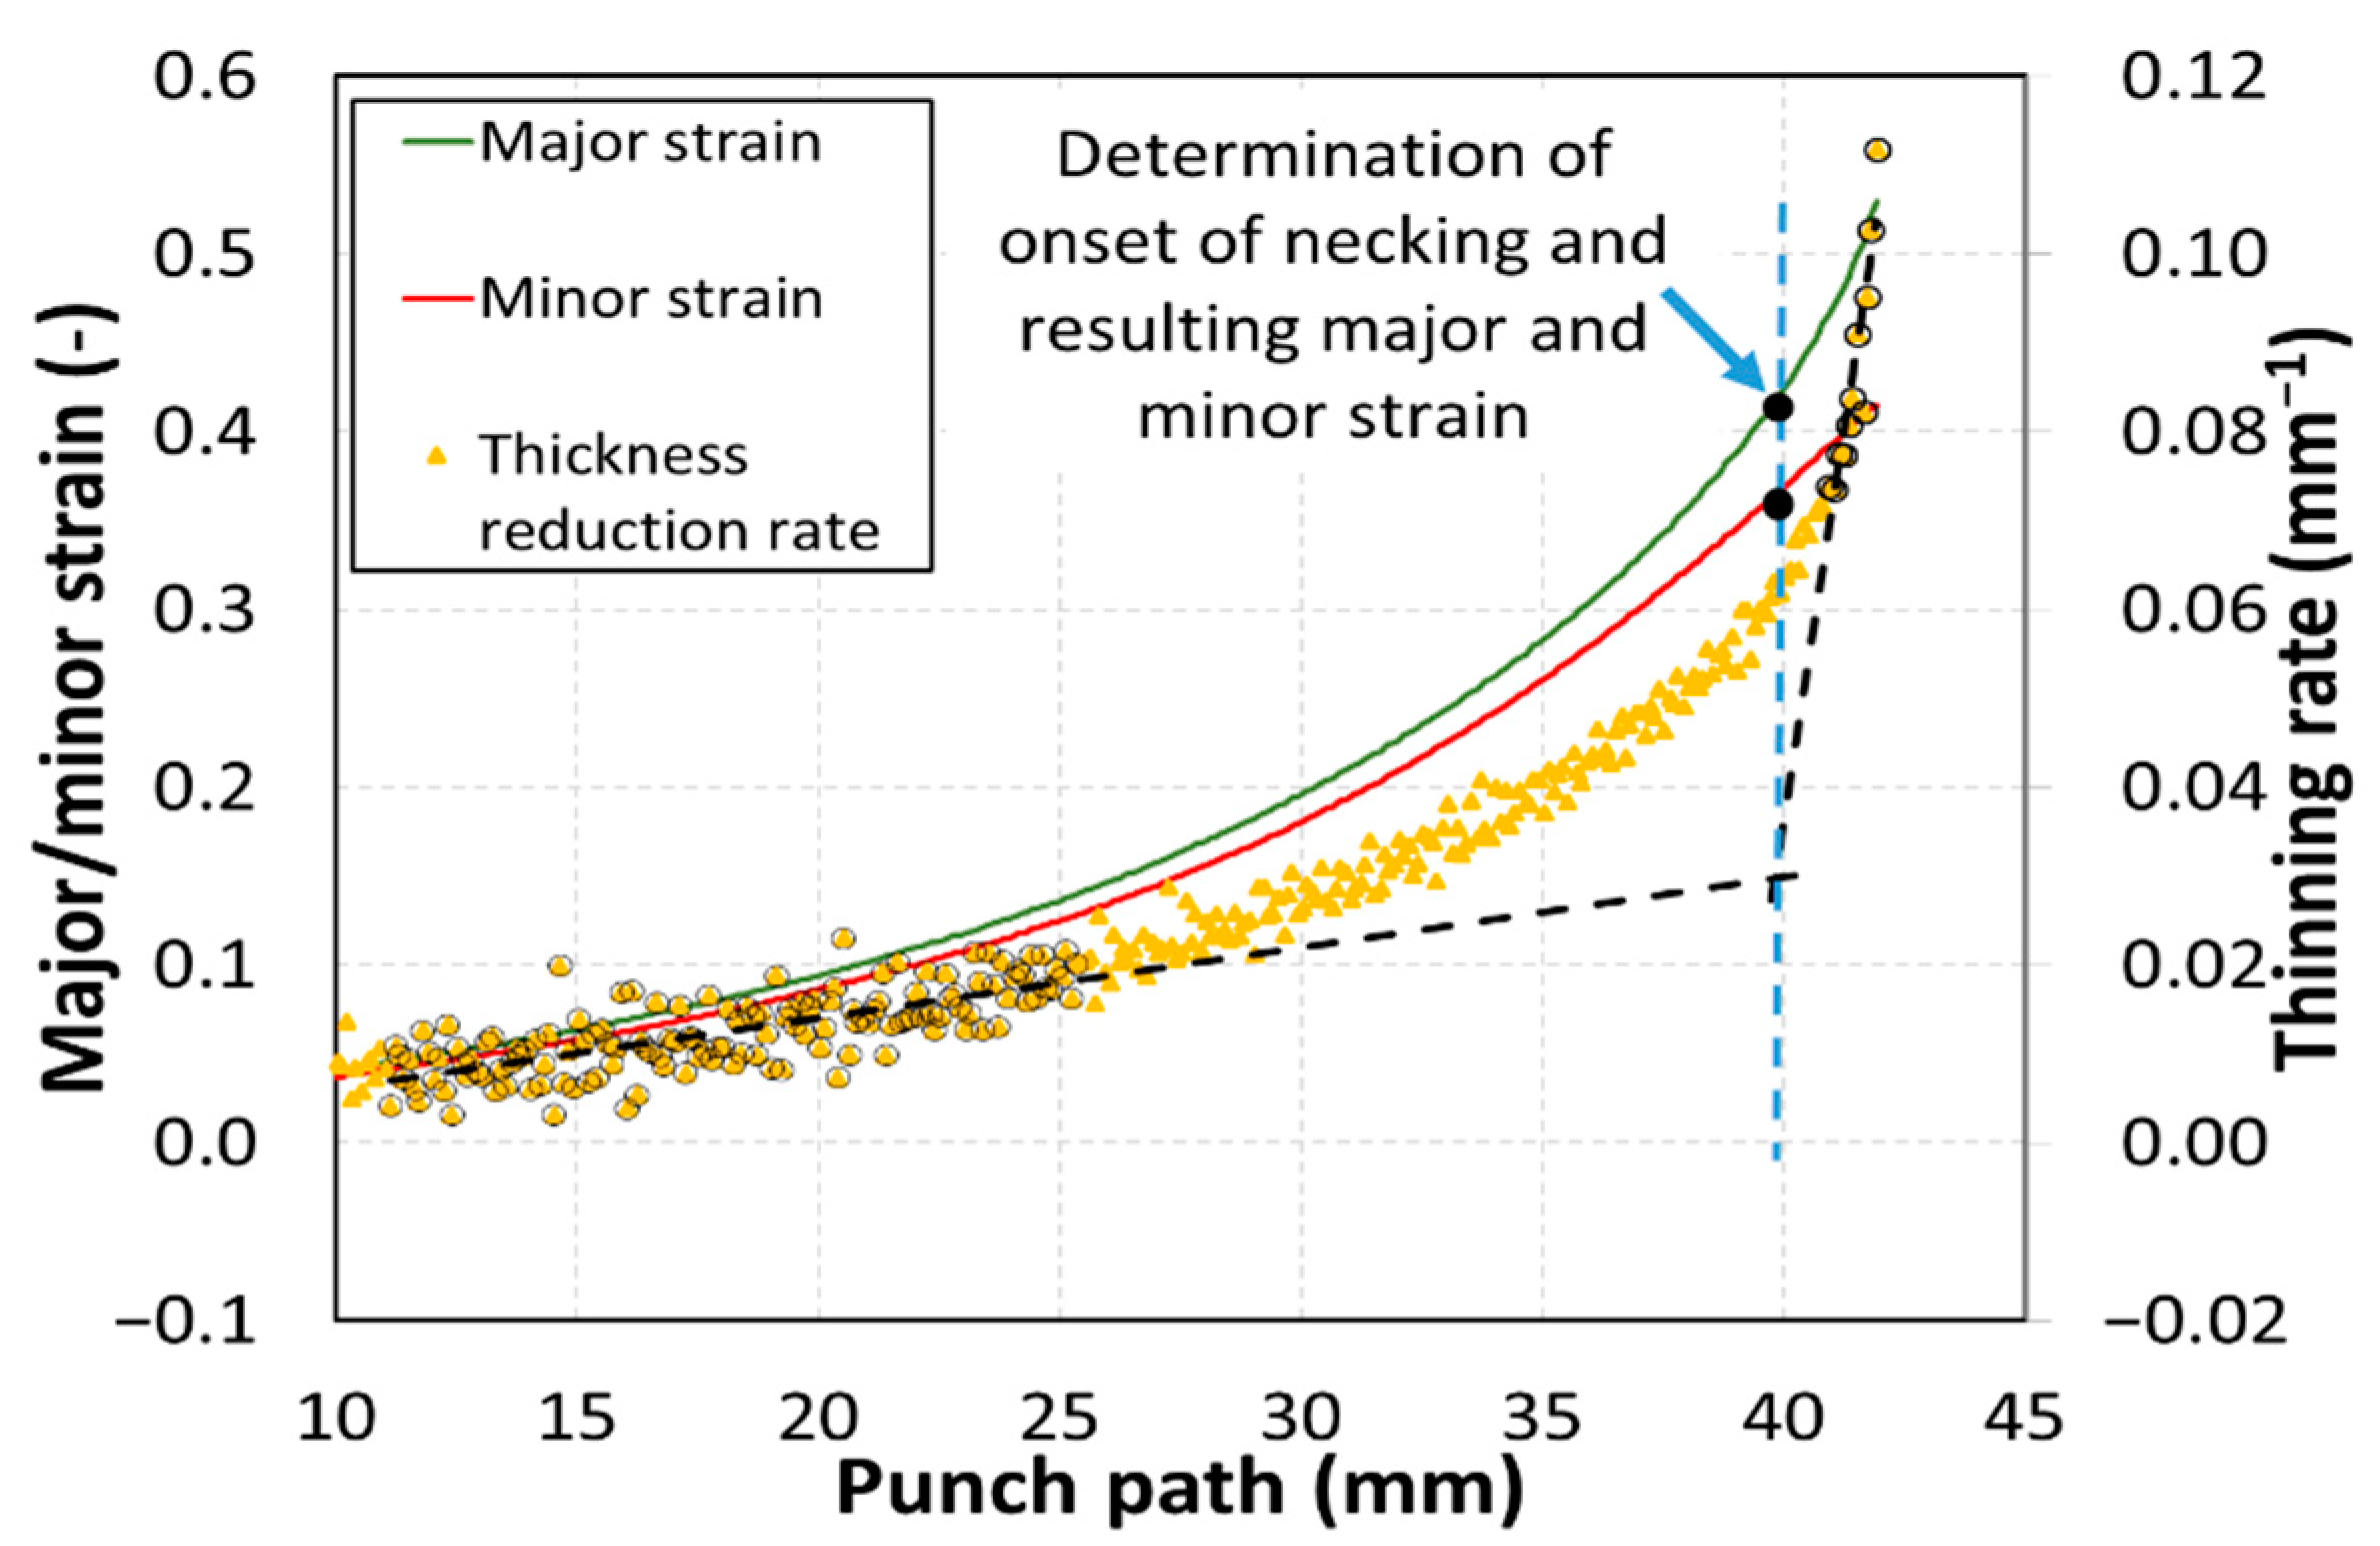
In 2012, a further modification based on a strain rate increase calculation was applied by Hotz and Merklein [14]. In contrast to the previous method, the thickness reduction rate versus the die path (instead of time) is plotted. In order to determine the die position before necking, two linear fits are created: first, in the area without necking (beginning of the curve), and second, in the necking area directly before the fracture. Their intersection provides the point of the beginning of necking (Figure 3). This methodology is widely accepted and included in the standard evaluation of Aramis DIC systems [15,16].
It is worth mentioning that when the results originate from any method evaluating the fracture strain, the final diagram is called a fracture forming limit diagram (FFLD or F-FLD). In another concept of FFLD evaluation, the critical fracture strain can be directly evaluated using DIC records, where the maximum data point of major and minor strain before fracture can be considered as fracture strain. This method is often called the section maximum method. The benefits include fast and easy evaluation, which is, however, dependent on the camera resolution and frequency of recording (defined by a standard), especially when the tested material exhibits sudden fracture without plastic deformation. Another approach for evaluating the fracture strain is the thinning method [17]. In this method, the thickness strain ε3 is evaluated using the resulting specimen thickness after the test; however, this value does not correlate with the ε3 evaluated from the DIC records, and the difference is indicated as Δε3. The principal strains are defined by ε1 > ε2 > ε3. The major and minor strains are evaluated using the DIC system, with a measurement precision of 0.001%. Conversely, a final fracture of the specimen occurs under a plane strain condition—in other words, ε2 (minor strain) is equal to zero. Applying the law of constant volume, it is possible to validate the fracture strain as the sum of the ε1 (major strain) from DIC records with the Δε3.
From the perspective of miniaturizing FLC testing specimens, in 2019, Grolleau et al. [18] used miniaturized FLC specimens together with plane strain tension and V-bend testing to investigate the material damage properties of 0.8-mm-thick aluminum alloy 2024-T351. The aim of their study was to calibrate a material model using different specimen geometries, where each specimen type provided different triaxiality. To apply various triaxiality conditions in the FLC specimens, two holes were drilled and a special V-punch with a radius of 1 mm was used.
This study aims to investigate the effect of the irregularity between the FLD and the final fracture of the specimens, namely the difference between the conditions created by the testing and forming tools, and the size of the formed material. The miniaturized specimens can also be used in situations where the available experimental material is insufficient and standard-sized specimens cannot be manufactured.
Miniaturized FLD/FFLDs have a wide range of applications due to their lower material requirements. In addition to testing non-original sheet thickness, it is also possible to use them for testing individual variants of heat treatment, which can significantly affect the mechanical properties. Another wide application is for testing newly developed, modern, high-strength steels such as medium manganese steels, micro-alloyed TRIP (Transformation-Induced Plasticity) steels and others. Due to the dynamic development in this area, only small amounts of material are available for initial testing. Reducing the sample size will allow these technological tests to be performed in the initial stages of the development of new materials.
A miniaturized FLD specimen test rig was developed so that sub-size Nakajima specimens were subjected to nearly the same strain rate as standard Nakajima specimens. Furthermore, a similar strain state was achieved by the miniaturized punch so that the results could be comparable with those obtained using standard FFLD specimens. The investigation was done with different FLD/FFLD evaluation methods. Press-hardened steel 22MnB5 was selected as the experimental material, and its microstructure was investigated by optical microscopy.

2. Materials and Methods

Martensitic steel 22MnB5 was chosen as the experimental material. This material is a typical representative of press-hardened steels, which combines good formability with high strength [19,20,21,22,23,24]. In the automotive industry, these unique material properties are used to reduce BIW while maintaining good crash resistance [25]. Therefore, this material is used as reinforcement in A and B pillars, in bumpers or as cross-members.
The material 22MnB5 is carbon/manganese steel with a small boron content. The chemical composition of the material and basic mechanical properties are shown in Table 1 and Table 2, respectively. The mechanical properties were determined on flat specimens with a cross-section of 1.6 × 3.3 mm2 and a length of the active part of 20 mm. The specimens were cut by waterjet considering the rolling direction.
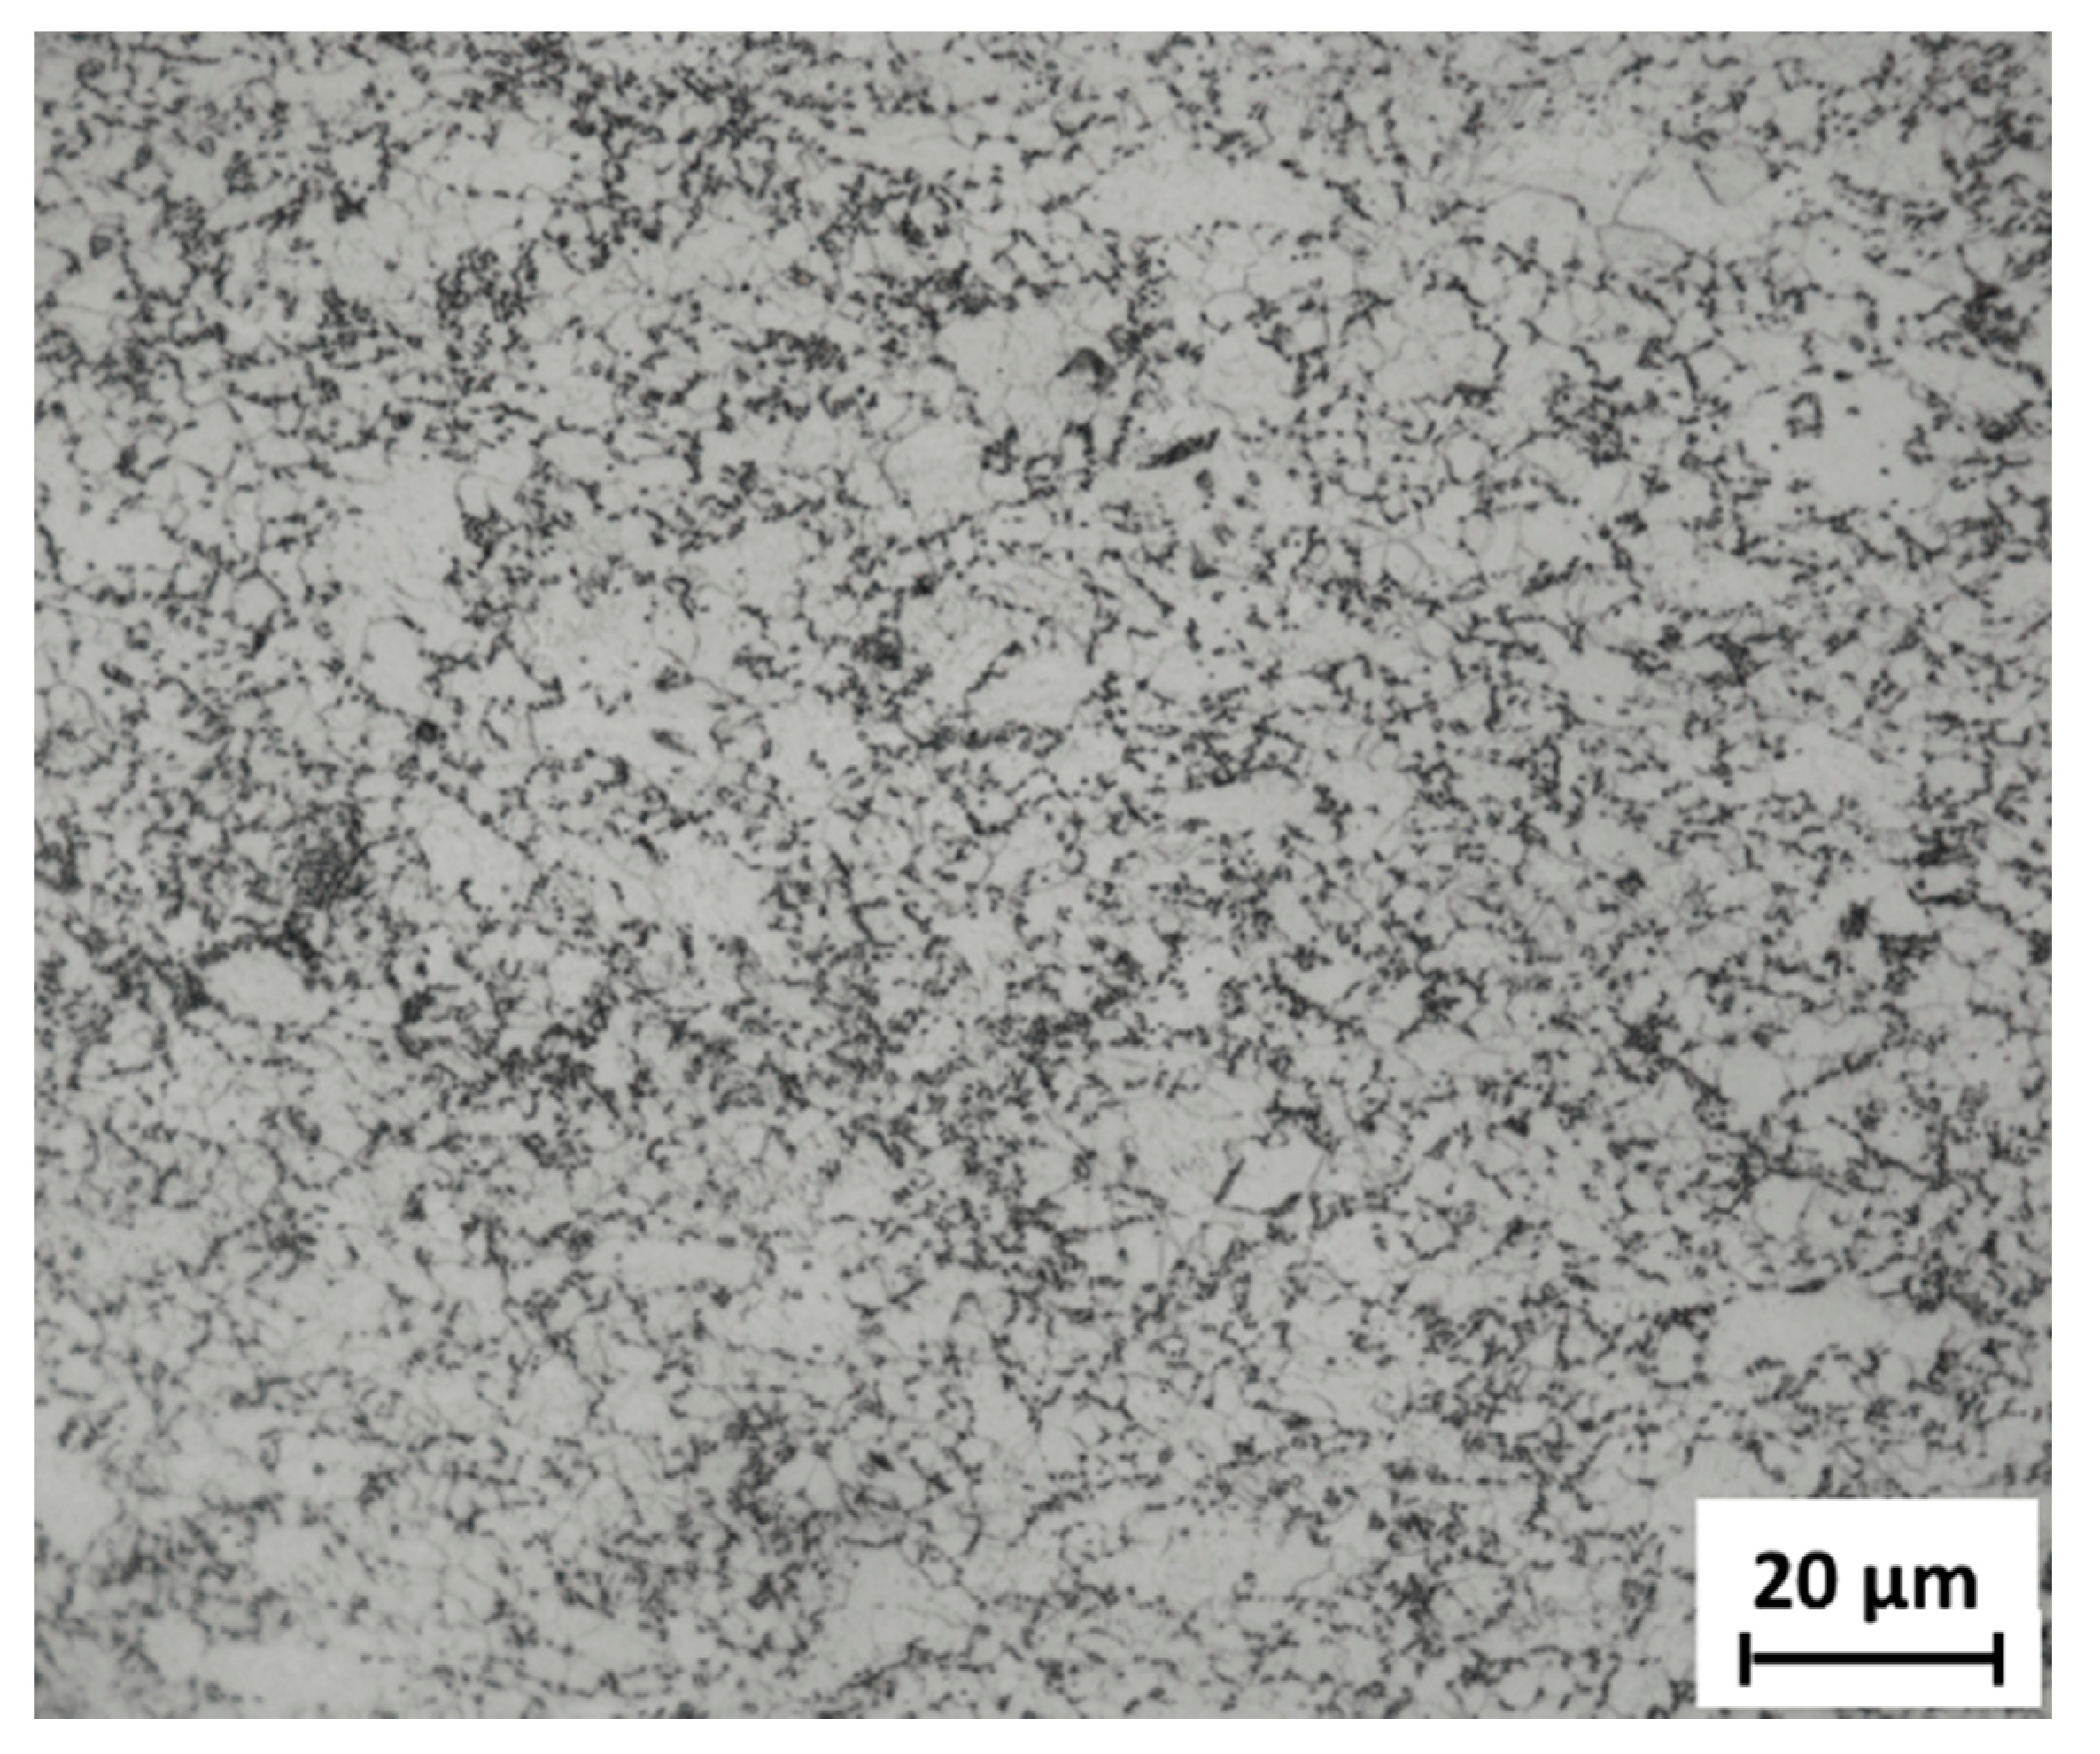
The microstructure was observed using an Olympus BX61 optical microscope (Olympus, Tokyo, Japan). The specimens were prepared by conventional mechanical grinding on SiC foils in several steps up to a grit size of 1200. This was followed by polishing on cloths with a diamond suspension in steps of 9, 3 and 1 µm. The structure was etched with 3% Nital. The material was in an as-received state after hot rolling and annealing; the microstructure is a combination of ferrite and globular pearlite and is shown in Figure 4.
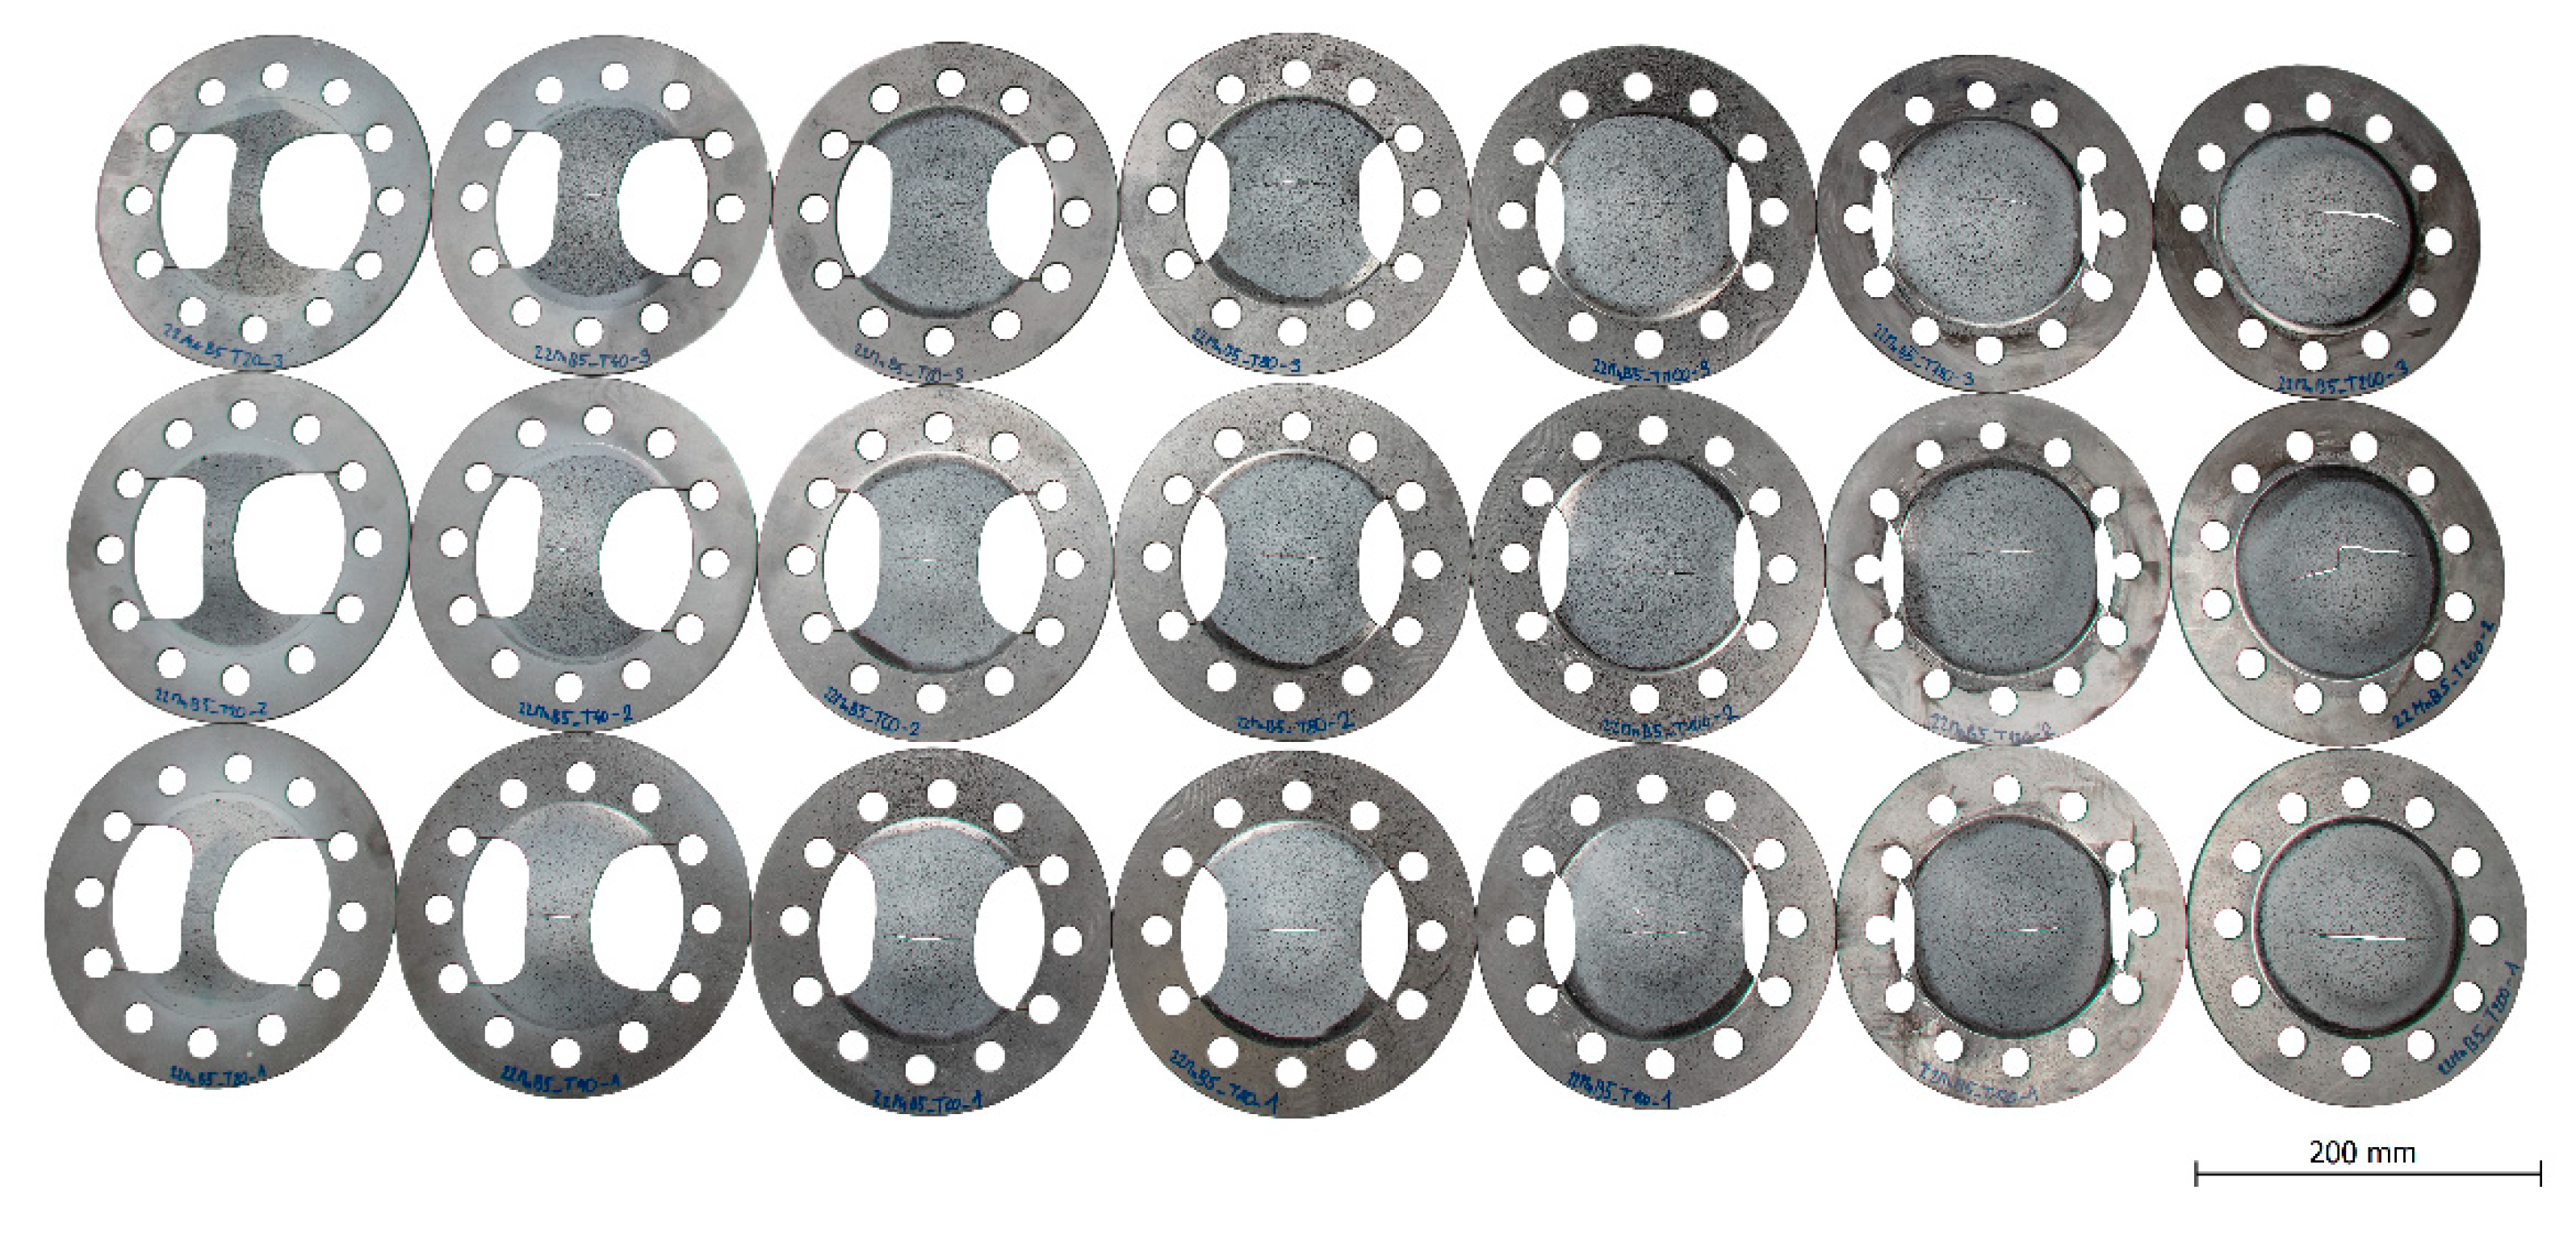
Seven different Nakajima specimen geometries of standard size were produced from 22MnB5 with a thickness of 1.6 mm for three test repetitions. Depending on the geometry, the testing specimen widths were 20, 40, 60, 80, 100, 120 and 200 mm as shown in Figure 5. The testing setup was designed according to the requirements of the standard ISO 12004 [2]. The tests were performed using an Inova servo-hydraulic testing machine (Inova GmbH, Bad Schwalbach, Germany) equipped with a load cell with a capacity of 200 kN. The punch velocity was set up as 1 mm/s for all the tests. The deformation of each specimen was tracked and evaluated using 4 MPx DIC Aramis software (GOM GmbH, Braunschweig, Germany). For this reason, a stochastic pattern was applied on the surface of each specimen. The lubrication system was several thin layers of polytetrafluoroethylene (PTFE) foil combined with lanolin covering the 100-mm punch diameter.
In the case of the miniaturized FLD specimens, four geometries were adapted using FEA simulation to reach approximately the same proportion of active parts as for standard specimens (4, 8, 16 and 40 mm) (Figure 6). The specimen thickness was not reduced. In this part of the experiment, a punch with a diameter of 10 mm was used. The aim was to obtain a similar strain state as in the standard specimens, i.e., bending stress (not shear stress). The lubrication system was applied to each specimen during the test. Precise measurement of the deformation was carried out using a 12 MPx DIC Aramis system (GOM GmbH, Braunschweig, Germany). The punch velocity was held at 0.2 mm/s to achieve a similar strain rate to a standard specimen.
The results of the evaluation according to the standard section method, time-dependent method, section maximum method and thinning method are discussed below.
The results obtained using standard 20-, 40-, 60-, 80-, 100-, 120- and 200-mm specimens and miniaturized FLD specimens are called “Standard” and “D40”, respectively.

3. Results

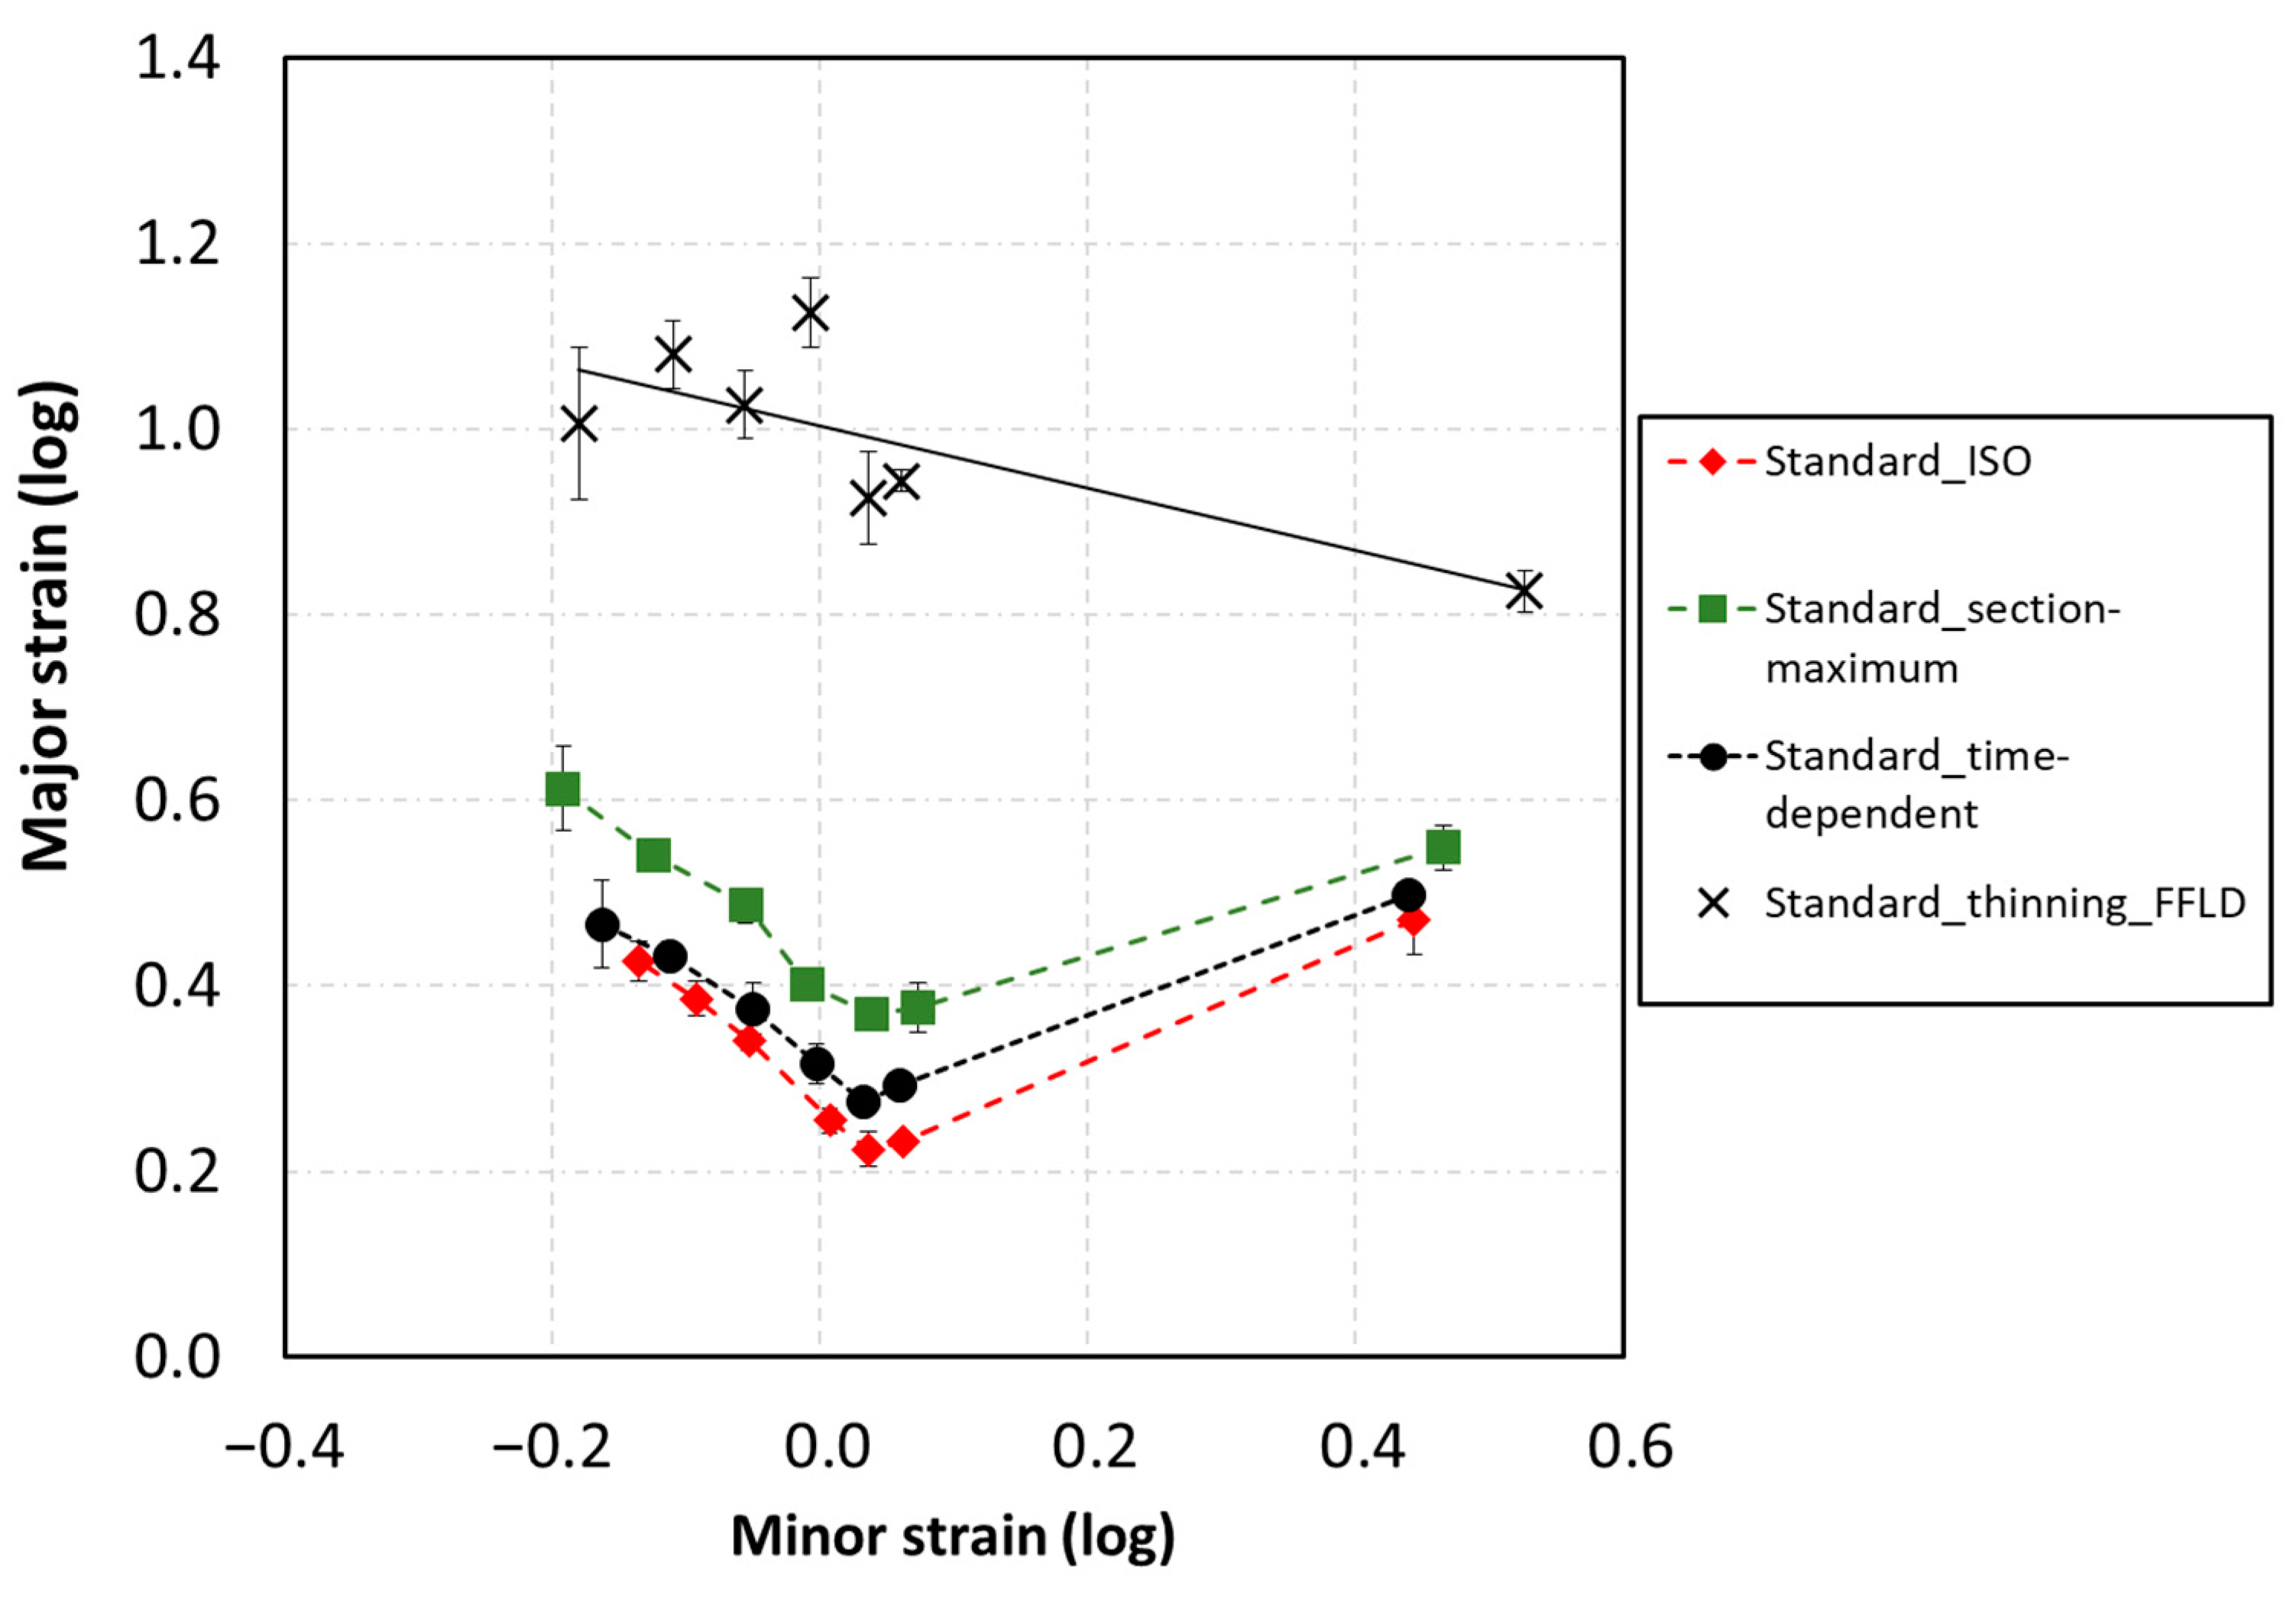
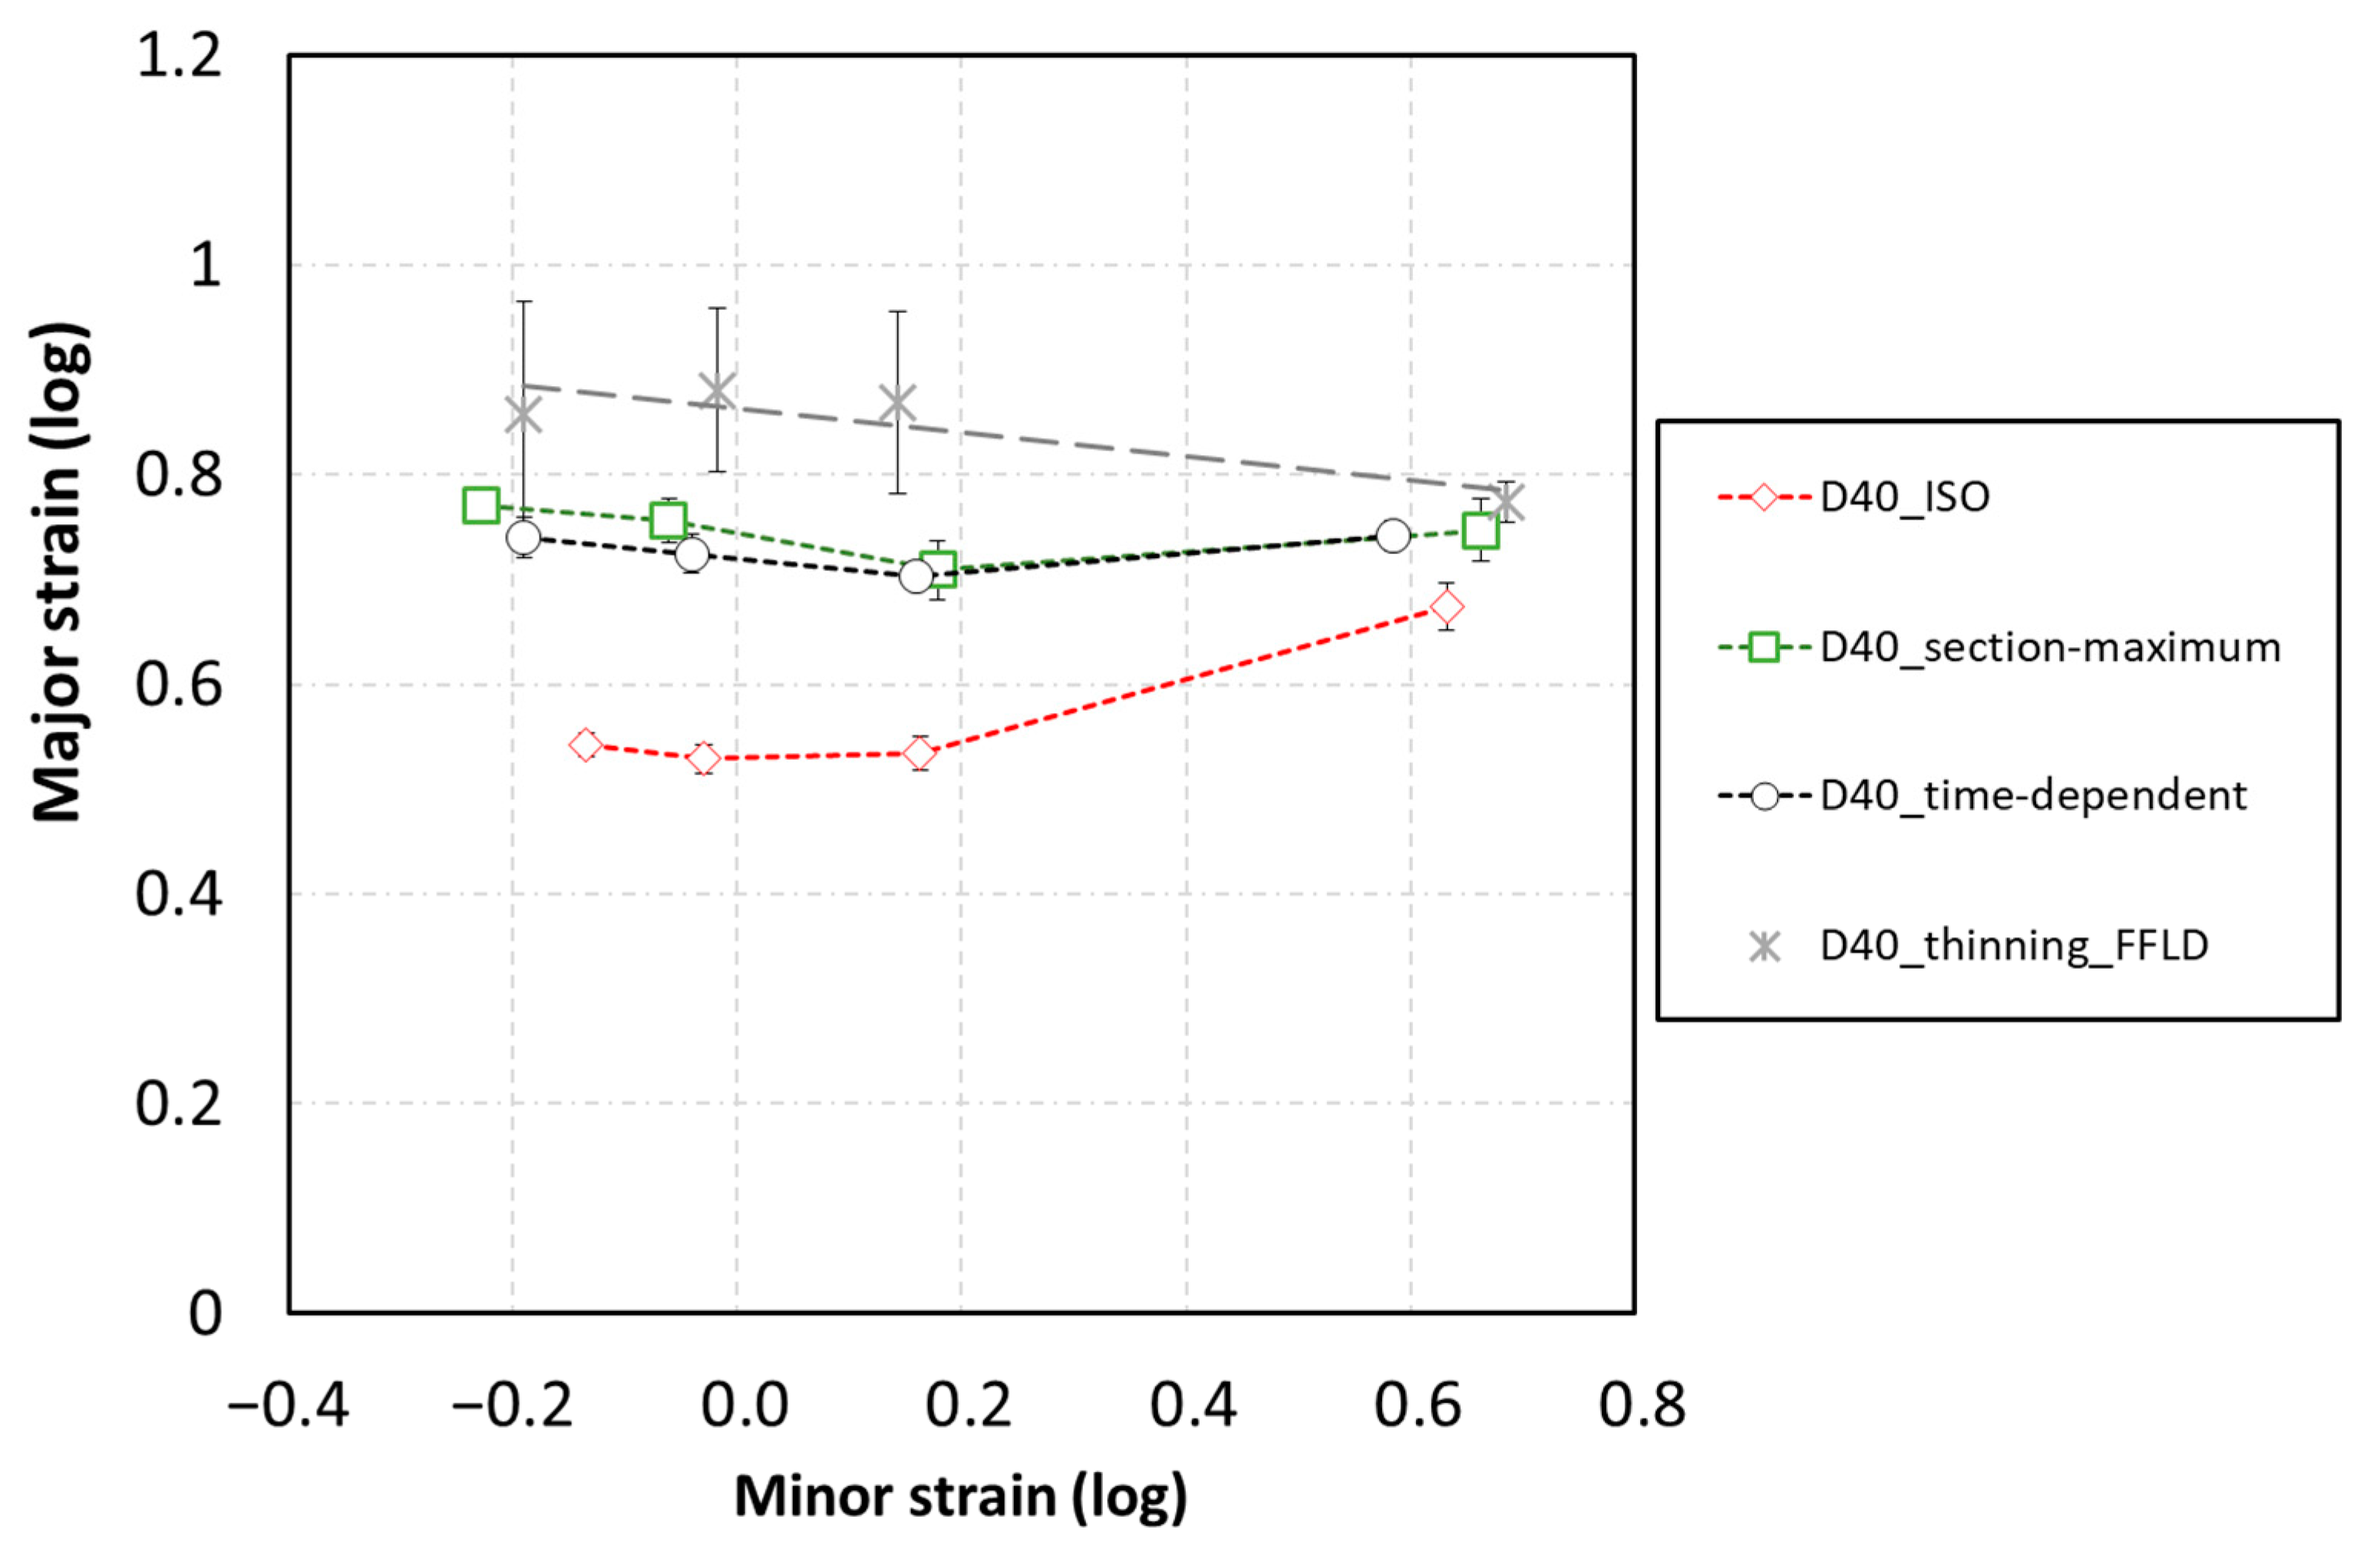
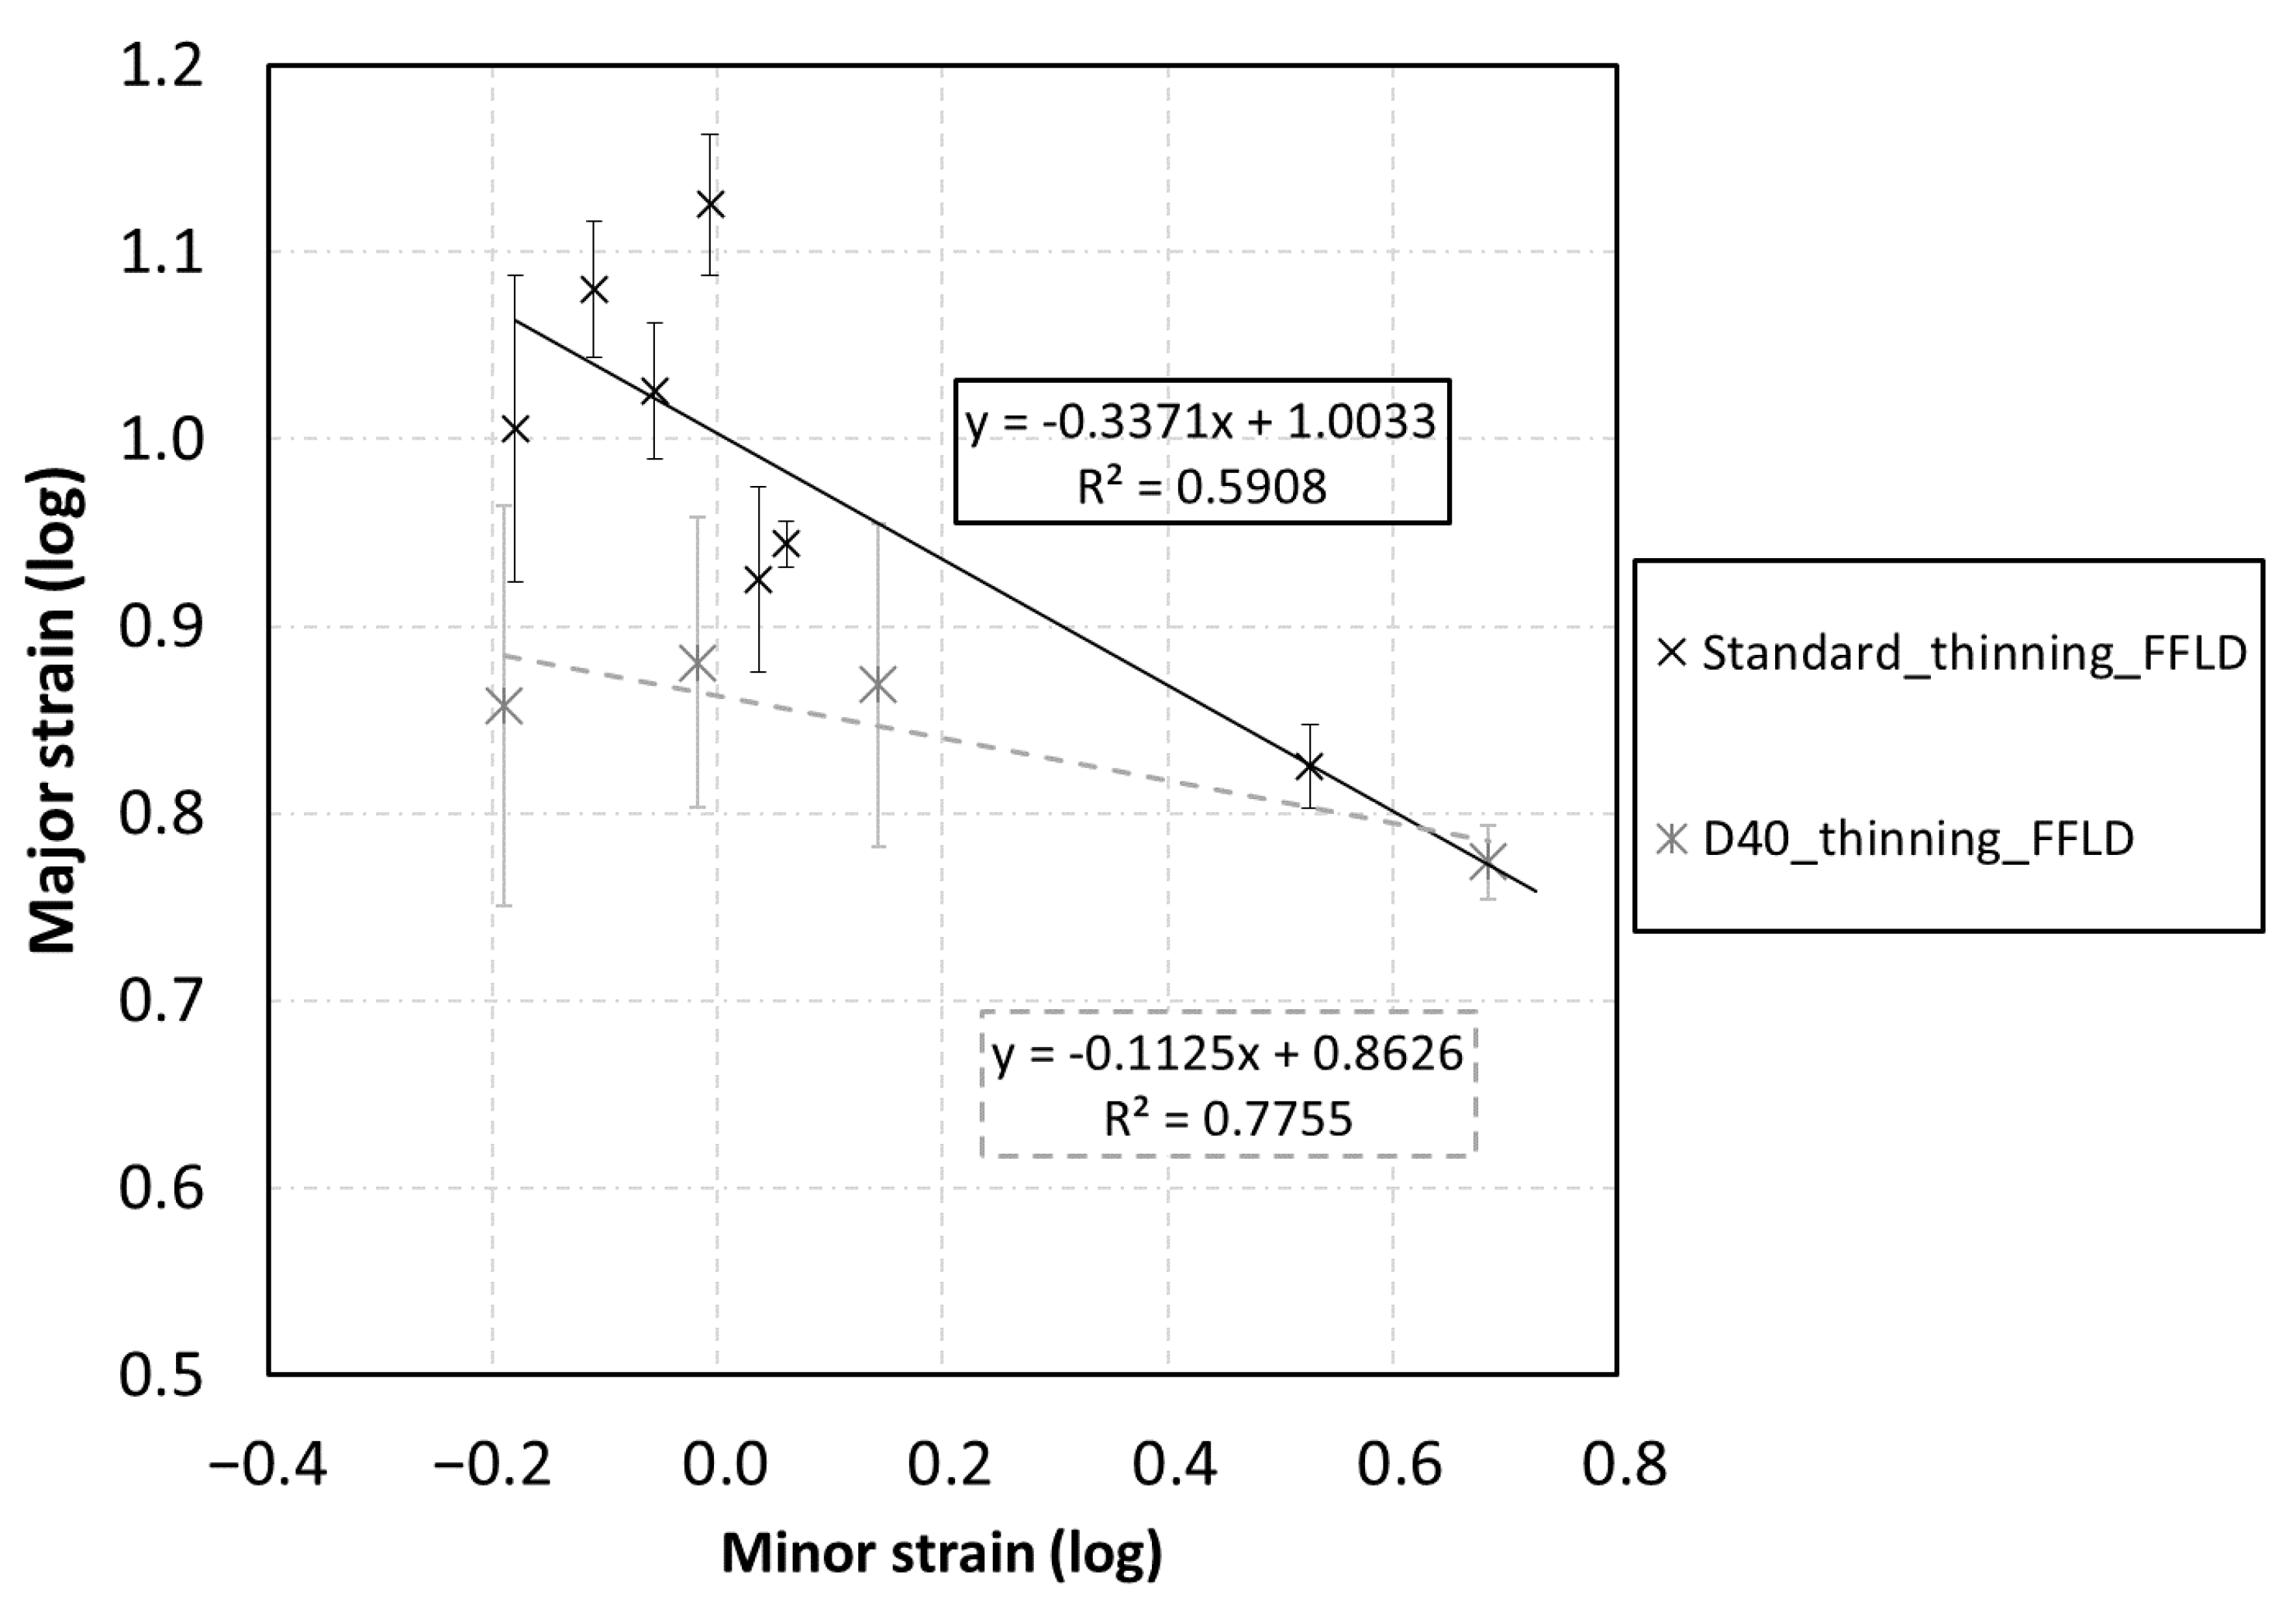
Figure 7 shows the test results evaluated according to the standard section method, time-dependent method, section maximum method and thinning method for standard Nakajima specimens. The FLD evaluation for the standard specimens provides graphs in the expected order, i.e., the ISO standard yields the most conservative results and the time-dependent method gives more progressive values. However, the highest strain values were recorded when using the section maximum and thinning methods, which fall into the category of FFLDs. Figure 8 is a summary of FLDs and FFLDs for miniaturized specimens. The comparison of the strain values obtained from standard and miniaturized specimens is shown in Figure 9.

4. Discussion

Nakajima tests were performed with two different punch diameters: 10 and 100 mm. The specimens for miniaturized testing were scaled proportionally in order to obtain material behavior and strain states comparable to standard test results. Furthermore, the specimen thickness was not reduced. Due to the various punch diameters employed in the experiment, the occurrence of different bending conditions could be expected during the test. The bending effect according to formula (1) is dependent on the punch diameter Dpunch and sheet thickness tsheet. This effect increases for higher thickness/punch diameter ratios. The ratio (1) was experimentally established by Affronti [26] and the resulting bending values are shown in Table 3. Due to the smaller punch diameter, the effect increases 10 times. The bending contribution is much lower than the achieved strain limit and is comparable to the standard deviations of test repetition for thicknesses up to 1 mm. This simple formula defines the strain state change between bending and shear stress. In the other words, the bending shifts the fracture strain to higher values. Therefore, the fracture thresholds are probably lower for smaller specimens than for the standard ones.
ε b e n d ~ t s h e e t 2   ·   D p u n c h
In general, higher values of FLD were expected for the miniaturized specimens where a smaller punch was used. A similar effect has been described by many authors such as [26,27]. The standard specimens, deformed using a large punch, yielded lower strain values, as demonstrated in Figure 7 and Figure 8. This phenomenon influences the thinning strain limit; however, it does not significantly affect the fracture strain, as demonstrated in Figure 9.
The miniaturized specimens tended to unify the individual evaluation methods. Namely, the results of evaluation using the time-dependent method (FLD) and the section maximum (FFLD) approach are almost identical. An explanation for this can be found in the punch geometry for the miniaturized testing setup, namely in the ratio between the thickness of the material and the radius of the punch. As demonstrated in many studies dealing with specimen miniaturization [27], the transferability of the results between standard and miniaturized results is possible up to a certain specimen size. In addition, the microstructure and the method of loading also affect the testing results. In tensile tests where uniaxial stress is applied, interchangeability of the results is possible [28,29]. However, in the case of a complex state of stress or even when considering the size of the crack, satisfactory results have not yet been achieved.
In the case of miniaturized FLD specimens, the results showed that the principle of using miniaturized samples is possible. The highest compliance of results can be found between the standard and miniaturized FFLDs, as documented in Figure 9. Other evaluation methods, ISO, time-dependent and section maximum, led to results that are not satisfactorily comparable with those evaluated from the standard geometry of the specimens. The original concept of FLD was created for the deep drawing of materials with significant thinning during the deformation process. However, nowadays, this idea is not applicable for advanced high-strength steel (AHSS) without significant thinning before cracking; therefore, FFLD is more relevant than FLD. According to this observation, miniaturized specimens can be applied in the investigation of material properties. In practice, when the results for standard and miniaturized specimens do not fully correspond, the difference can be covered by a safety coefficient, which is set up in the FEA software. The values obtained experimentally and corrected by the safety coefficient are applicable in the evaluation of the deep drawing process in numerical simulation.
However, it is necessary to realize that a miniaturized FFLD can provide more accurate results when a real part is formed with a punch that creates a comparable degree of deformation and stress in the material.

5. Conclusions

FLDs and FFLDs were evaluated based on the results of tests performed using miniaturized and standard Nakajima specimens with diameters of 40 and 200 mm, respectively. The investigated material was press-hardened steel 22MnB5, which is commonly used in the automotive industry. In total, four different evaluation methods were used in the study (standard section method, time-dependent method, section maximum method and thinning method), and the resulting FLDs or FFLDs were compared.
It was proven that the miniaturized FFLD can provide more advanced results than the standard FFLD. This can be explained by the bending effect due to the original material thickness and the ratio of the specimen thickness/punch diameter. However, the difference between the individual methods is not obvious in the miniaturized specimens. The resulting FFLDs for standard and miniaturized specimens can be considered as comparable.
Future research will be devoted to the validity and transferability of results from standard and miniaturized specimens made of different materials and thicknesses.

Author Contributions

Conceptualization, K.R., Š.J. and P.K.; methodology, M.R. and P.K.; software, M.R. and P.K.; validation, K.R., M.R., M.U. and H.J.; formal analysis, M.R. and S.R.; investigation, K.R., H.J. and M.R.; resources, Š.J. and L.K.; data curation, K.R., M.R.; writing—original draft preparation, K.R., H.J., M.R. and S.R.; writing—review and editing, S.R., M.R., M.U. and H.J.; visualization, M.R. and S.R.; supervision, P.K. and L.K.; project administration, H.J. and L.K.; funding acquisition, L.K. All authors have read and agreed to the published version of the manuscript.

Funding

This research was funded by the “Ministry of Education, Youth and Sports (MŠMT)”, student grant competition of University of West Bohemia, grant number” SGS 2019-019—Material-technological research of advanced high strength steels”. The APC was funded by CHF 1800.

Institutional Review Board Statement

Not applicable.

Informed Consent Statement

Not applicable.

Data Availability Statement

The data presented in this study are available on request from the corresponding author.

Acknowledgments

M.R., S.R., M.U. and P.K. thank the institutional support of the research organization (Decision no. 3/2018 of the Ministry of Industry and Trade of the Czech Republic).

Conflicts of Interest

The authors declare no conflict of interest.

References

  1. DIN ISO 12004-1:2008. Metallic Materials—Determination of Forming-Limit Curves for Sheet and Strip—Part 1: Measurement and Application of Forming-Limit Diagrams in the Press Shop; ISO: Geneva, Switzerland, 2008. [Google Scholar]
  2. DIN ISO 12004-2:2008. Metallic Materials—Sheet and Strip—Determination of Forming Limit Curves—Part 2: Determination of Forming Limit Curve in the Laboratory; ISO: Geneva, Switzerland, 2008. [Google Scholar]
  3. Gensamer, M. Strength and Ductility. Trans. ASM 1946, 36, 30–60. [Google Scholar] [CrossRef]
  4. Keeler, S.P.; Backofen, W.A. Plastic instability and fracture in sheets stretched over rigid punches. ASM Trans. Q. 1963, 56, 25–48. [Google Scholar]
  5. Goodwin, G.M. Applications of strain analysis to sheet metal forming in the press shop. Soc. Automot. Eng. 1968, 680093, 380–387. [Google Scholar]
  6. Marciniak, Z.; Kuczynski, K. Limit strains in the process of stretch—Forming sheets. Int. J. Mech. Sci. 1967, 9, 609–620. [Google Scholar] [CrossRef]
  7. Nakajima, K.; Kikuma, T.; Asaku, K. Study of the formability of steel sheet. Yawata Tech. Rep. 1968, 264, 8517–8530. [Google Scholar]
  8. Hašek, V. Untersuchung und theroretische Beschreibung wichtiger Einflussgrössen auf das Grenzformänderungschaubil. Blech Rohre Progile 1978, 25, 285–292. [Google Scholar]
  9. Geiger, M.; Merklein, M. Determination of forming limit diagrams—A new analysis method for characterization of material’s formability. CIRP Ann. 2003, 52, 213–216. [Google Scholar] [CrossRef]
  10. Ayachi, N.; Guermazi, N.; Pham, C.H.; Manach, P.-Y. Development of a Nakazima Test Suitable for Determining the Formability of Ultra-Thin Copper Sheets. Metals 2020, 10, 1163. [Google Scholar] [CrossRef]
  11. Gutierrez, J.E.; Noder, J.; Butcher, C. Experimental Characterization and Deterministic Prediction of In-Plane Formability of 3rd Generation Advanced High Strength Steels. Metals 2020, 10, 902. [Google Scholar] [CrossRef]
  12. Bayat, H.R.; Sarkar, S.; Anantharamaiah, B.; Italiano, F.; Bach, A.; Tharani, S.; Wulfinghoff, S.; Reese, S. Modeling of Forming Limit Bands for Strain-Based Failure-Analysis of Ultra-High-Strength Steels. Metals 2018, 8, 631. [Google Scholar] [CrossRef] [Green Version]
  13. Volk, W.; Hora, P. Evaluation of Experimental Forming Limit Curves and Investigation of Strain Rate Sensitivity for the Start of Local Necking. In Proceedings of the 8th International Conference and Workshop on Numerical Simulation of 3D Sheet Metal Forming Processes (NUMISHEET), Seoul, Korea, 21–26 August 2011; Chung, K., Han, H.N., Huh, H., Barlat, F., Lee, M.G., Eds.; AIP Conference Proceedings; Volume 1383, p. 99. [Google Scholar] [CrossRef]
  14. Hotz, W.; Merklein, M.; Kuppert, A.; Friebe, H.; Klein, M. Time dependent FLC determination—Comparison of different algorithms to detect the onset of unstable necking before fracture. Key Eng. Mater. 2012, 549, 397–404. [Google Scholar] [CrossRef]
  15. Farahnak, P.; Urbanek, M.; Konopik, P.; Dzugan, J. Influence of thickness reduction on forming limits of mild steel DC01. Int. J. Mater. Form. 2020, 13, 371–381. [Google Scholar] [CrossRef]
  16. Farahnak, P.; Prantl, A.; Dzugan, J.; Konopik, P.; Prochazka, R. Sheet necking prediction in forming limit diagrams with the anisotropy influence incorporation. In Proceedings of the 4th International Conference Recent Trends in Structural Materials, Pilsen, Czech Republic, 9–11 November 2016; IOP Conference Series-Materials Science and Engineering. Volume 179, p. 012023. [Google Scholar] [CrossRef]
  17. Gorji, M.; Berisha, B.; Hora, P.; Barlat, F. Modeling of localization and fracture phenomena in strain and stress space for sheet metal forming. Int. J. Mater. Form. 2016, 9, 573–584. [Google Scholar] [CrossRef]
  18. Grolleau, V.; Roth, C.C.; Lafilé, V.; Galpin, B.; Mohr, D. Loading of mini-Nakazima specimens with a dihedral punch: Determining the strain to fracture for plane strain tension through stretch-bending. Int. J. Mech. Sci. 2019, 152, 329–345. [Google Scholar] [CrossRef]
  19. Li, F.F.; Fu, M.W.; Lin, J.P.; Wang, X.N. Experimental and theoretical study on the hot forming limit of 22MnB5 steel. Int. J. Adv. Manuf. 2014, 71, 297–306. [Google Scholar] [CrossRef]
  20. Advanced High Strength Steel (AHSS). Application Guidelines, Volume 6, International Iron and Steel Institute, Committee on Automotive Applications; WorldAutoSteel: Middletown, OH, USA, 2006. [Google Scholar]
  21. Jiayue, L.; Junying, M.; Kaiyu, Q.; Jianping, L.; Fuqiang, L.; Leichao, L. Investigation on the effects of sheet thickness and deformation temperature on the forming limits of boron steel 22MnB5. Key Eng. Mater. 2011, 474–476, 993–997. [Google Scholar] [CrossRef]
  22. Turetta, A.; Bruschi, S.; Ghiotti, A. Investigation of 22MnB5 formability in hot stamping operations. J. Mater. Process. Technol. 2006, 177, 396–400. [Google Scholar] [CrossRef]
  23. Slota, J.; Jurčišin, M.; Spišák, E.; Šiser, M. Experimental flc determination of high strength steel sheet metal. AMS 2015, 21, 269–277. [Google Scholar] [CrossRef]
  24. Xu, Y.; Ji, Q.; Yang, G.; Bao, S.; Zhao, G.; Miao, X.; Mao, X. Effect of Cooling Path on Microstructures and Hardness of Hot-Stamped Steel. Metals 2020, 10, 1692. [Google Scholar] [CrossRef]
  25. GESTAMP, Hot Stamping. Available online: https://www.gestamp.com/What-we-do/Technologies (accessed on 26 January 2021).
  26. Affronti, E.; Merklein, M. Analysis of the bending effects and the biaxial pre-straining in sheet metal stretch forming processes for the determination of the forming limits. Int. J. Mech. Sci. 2018, 138–139, 295–309. [Google Scholar] [CrossRef]
  27. Konopik, P.; Dzugan, J.; Rund, M. Determination of fracture toughness in the upper shelf region using small sample test techniques. In Proceedings of the METAL 2015: 24th International Conference on Metallurgy and Materials, Brno, Czech Republic, 3–5 June 2015; pp. 710–715. [Google Scholar]
  28. Džugan, J.; Španiel, M.; Prantl, A.; Konopík, P.; Růžička, J.; Kuželka, J. Identification of ductile damage parameters for pressure vessel steel. Nucl. Eng. Des. 2018, 328, 372–380. [Google Scholar] [CrossRef]
  29. Jirková, H.; Rubešová, K.; Konopík, P.; Opatová, K. Effect of the Parameters of Semi-Solid Processing on the Elimination of Sharp-Edged Primary Chromium Carbides from Tool Steel. Metals 2018, 8, 713. [Google Scholar] [CrossRef] [Green Version]
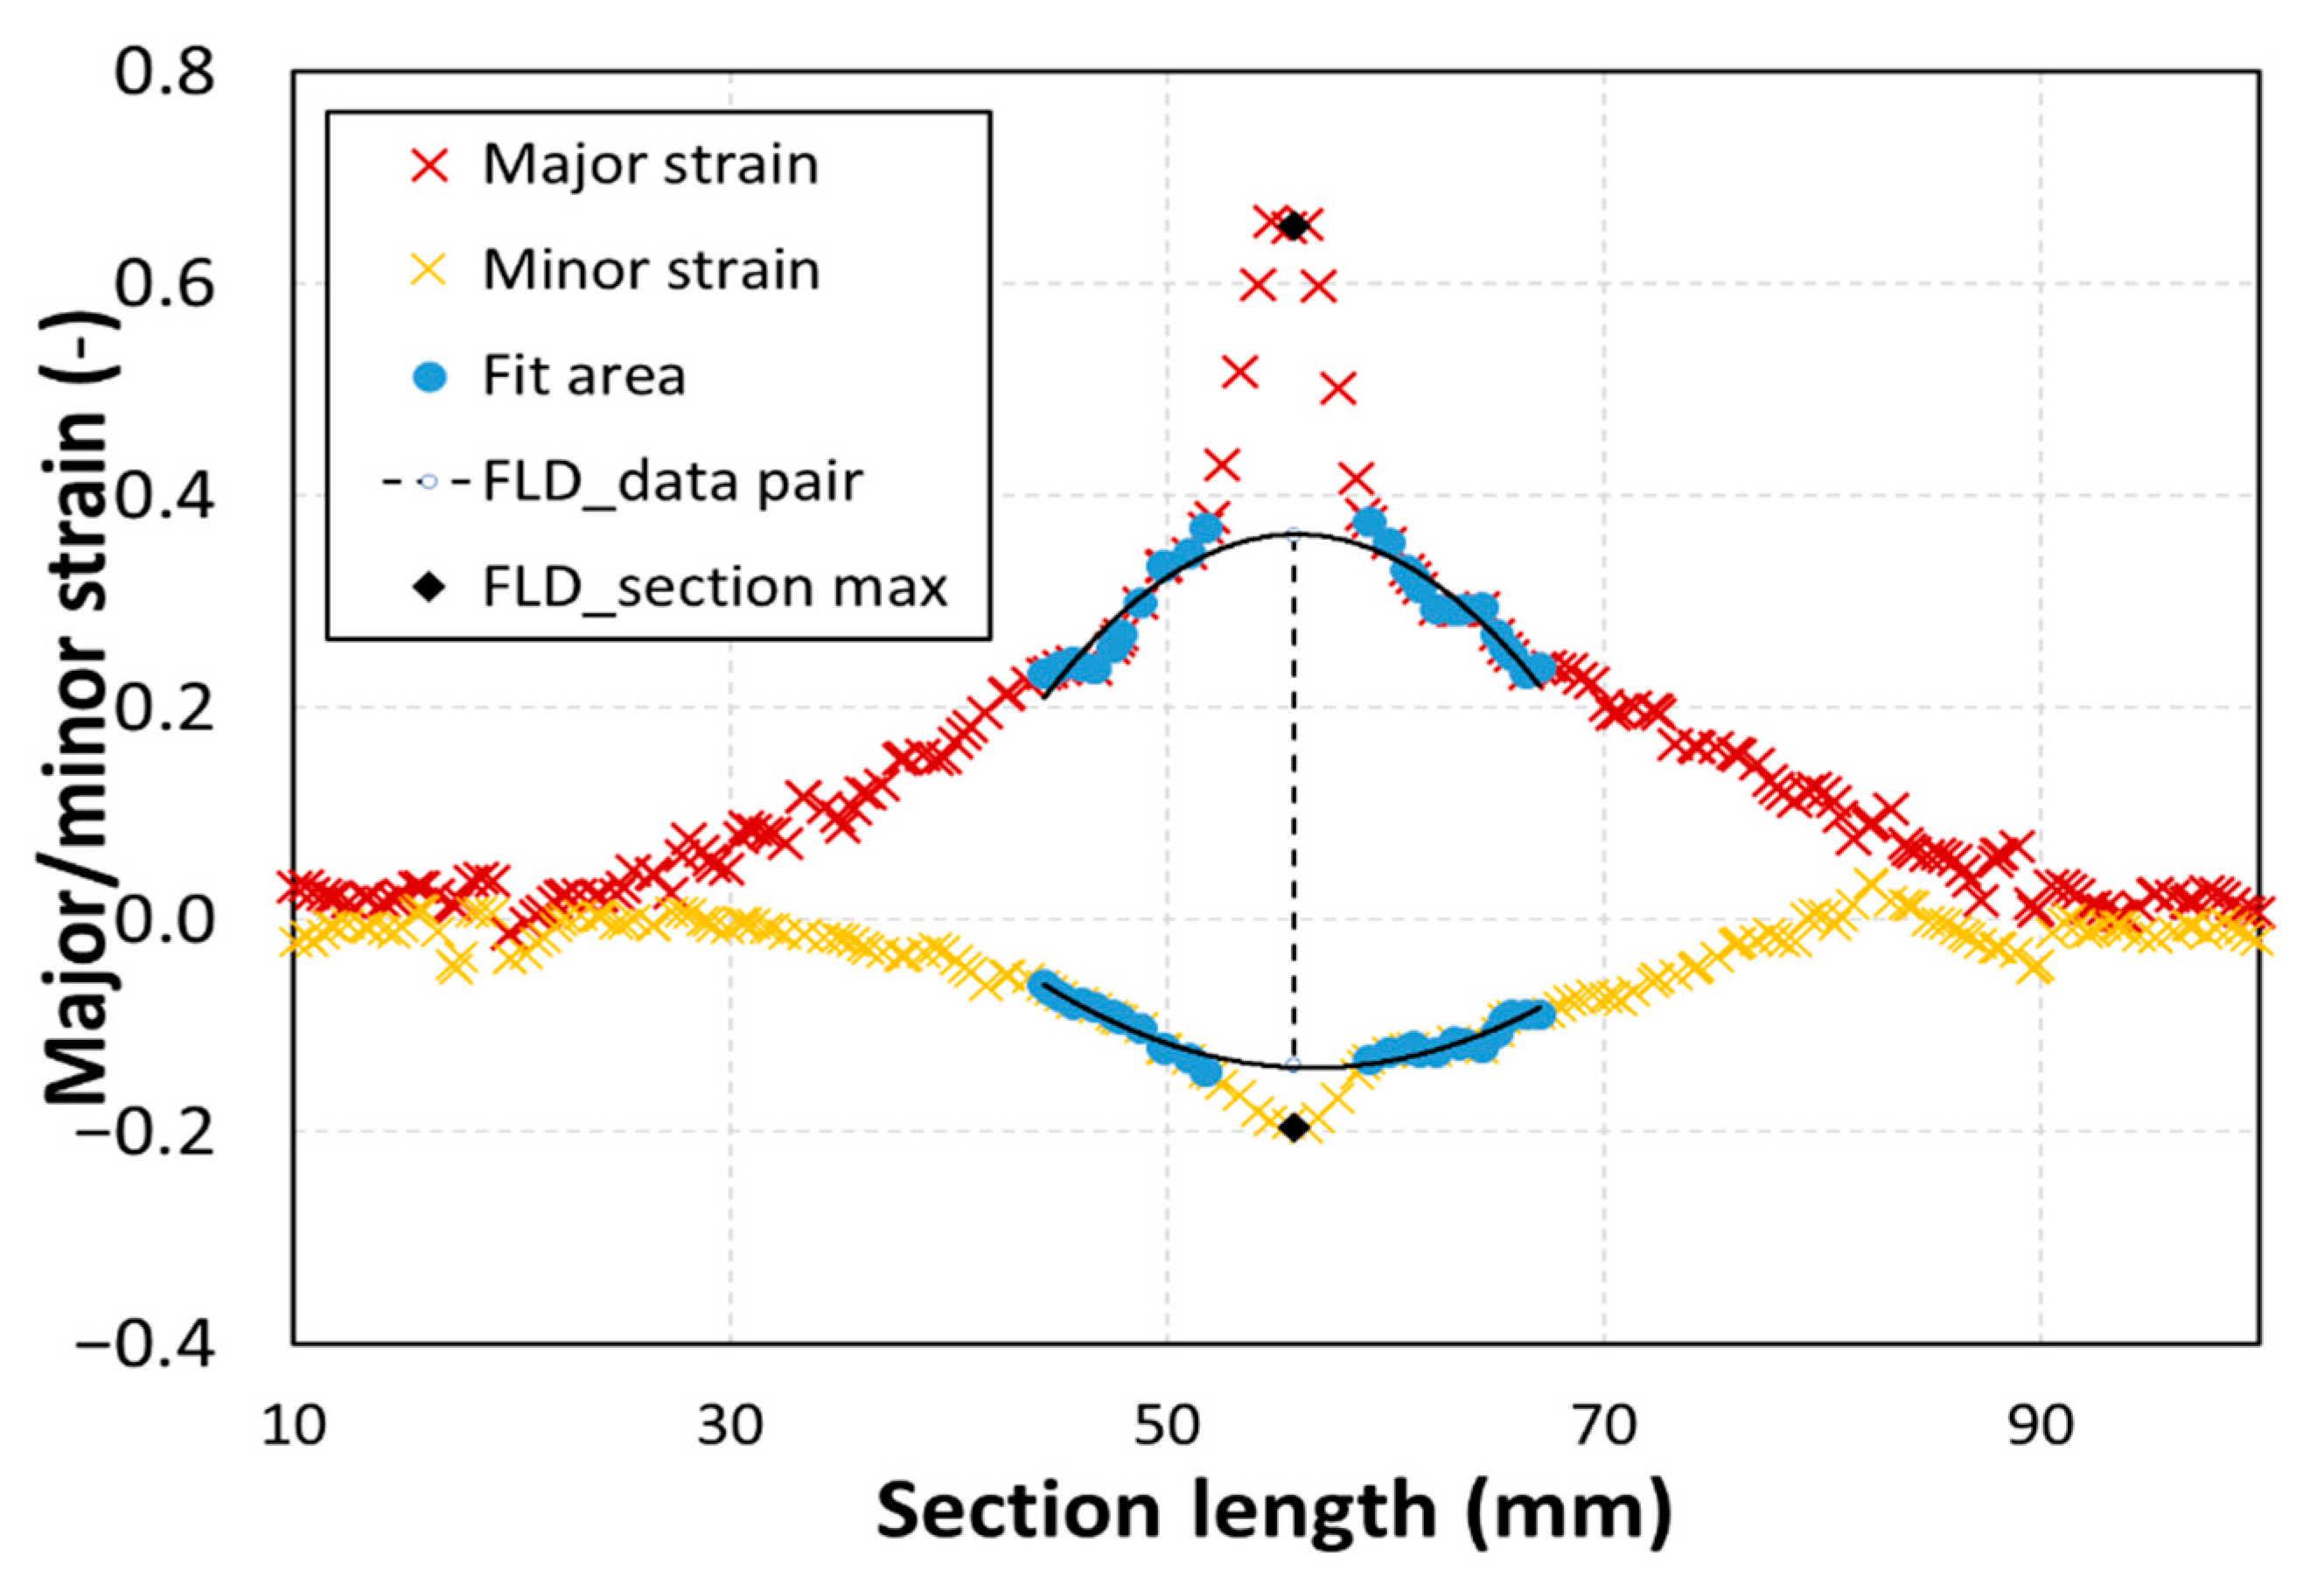
Figure 1. Determination of the forming limit diagram (FLD) values, cross-section method and section maximum method.
Metals 11 00484 g001
Figure 2. Determination of the FLD values, time-dependent method.
Metals 11 00484 g002
Figure 3. Determination of the FLD values, time-dependent method—2012 approach.
Metals 11 00484 g003
Figure 4. The microstructure of 22MnB5 consisting of ferrite and spheroidized pearlite.
Metals 11 00484 g004
Figure 5. The Nakajima specimen geometries manufactured according to standard ISO 12004 (from the left: 20-, 40-, 60-, 80-, 100-, 120- and 200-mm width) after testing.
Metals 11 00484 g005
Figure 6. The miniaturized specimen geometries for FLD evaluation which correspond to the Nakajima original theory (specimen widths from the left: 4, 8, 16 and 40 mm) after testing.
Metals 11 00484 g006
Figure 7. Forming limit diagram of 22MnB5 determined according to ISO standard, time-dependent, section maximum and thinning methods; standard specimens—comparison of the evaluation methods.
Metals 11 00484 g007
Figure 8. Forming limit diagram of 22MnB5 determined according to ISO standard, time-dependent, section maximum and thinning methods; miniaturized specimens—comparison of the evaluation methods.
Metals 11 00484 g008
Figure 9. Comparison of the FFLDs obtained from standard and miniaturized specimens.
Metals 11 00484 g009
Table 1. Chemical composition of 22MnB5 (wt.%).
Chemical Composition—22MnB5
CSiMnPSAlNCrB
0.250.41.350.0230.010.080.010.250.004
Table 2. Mechanical properties of 22MnB5.
Mechanical Properties—22MnB5
Yield strength Rp0.2382 ± 4 (MPa)
Ultimate tensile strength Rm549 ± 9 (MPa)
Uniform elongation Ag13 ± 0 (%)
Total elongation A2023 ± 1 (%)
Hardness HV10169 ± 2 (-)
Table 3. Results of bending effect calculation according to Affronti [26].
Punch Diameter (mm)10100
Bending Effect (–)0.080.008
Publisher’s Note: MDPI stays neutral with regard to jurisdictional claims in published maps and institutional affiliations.