1. Introduction
Vacuum conditions present several challenges to tribological contacts. The absence of gases like oxygen, nitrogen, and water prevents passivation of nascent surfaces. A low pressure promotes fast evaporation of conventional liquid lubricants and furthermore would contaminate technical vacua. Therefore, surfaces that need to endure friction in vacuum conditions must have self-lubricating and self-passivating properties.
Even more challenging are space conditions, which, in addition to low atmospheric pressure, require tribological performance during exposure to higher temperatures and atomic oxygen [
1]. Before being sent to space, most technical systems are assembled and rigorously tested within Earth’s atmosphere to ensure their reliable performance in both environments. Moreover, these systems must be designed to withstand the challenges of the space vacuum, where they experience significant changes in pressure and atmosphere.
Although coatings made from molybdenum disulfide (MoS
2), which belongs to the group of transition metal dichalcogenides (TMD), are the state of the art for space applications, they have several drawbacks, such as their soft nature resulting in high wear in air as well as their high sensitivity to moisture [
1,
2,
3]. However, in vacuum conditions, MoS
2 can achieve very low friction by sliding on crystalline atomic smooth layers, and it can even achieve superlubricity in appropriate conditions [
4].
Gradt and Schneider studied sputtered MoS
2 coatings in moist air at room temperature and a vacuum at 77 K. They found that the wear performance in low-pressure water vapor depends on the deposition conditions of the coating and can be improved by adding chromium or inducing internal stress [
2]. The influence of industrial deposition conditions, such as threefold rotation and a large target–substrate distance, was found to influence the porosity of the coatings, which also affected their tribological properties [
5].
In space applications, tribological systems are often susceptible to elevated temperatures due to the absence of convective cooling in a vacuum environment. In low Earth orbit, these systems experience substantial temperature cycling resulting from alternating exposure to direct sunlight and complete shadow periods. Any coatings therefore must be able to withstand a wide temperature range. Friction and wear of sputtered MoS
2 coatings improve up to approximately 100 °C by desorbing water from the surface but deteriorate for higher temperatures as oxidation is favored [
1].
Carbon-based amorphous coatings have been considered for vacuum conditions as well. Their tribological behavior strongly depends on whether they contain hydrogen or not and on the availability of water vapor in the atmosphere. In the absence of water vapor, hydrogen-containing a-C:H-coatings have remarkable tribological properties and may achieve superlubricity in a vacuum or hydrogen atmosphere [
6]. Similar behavior is found for CNx coatings in a vacuum and nitrogen [
7]. In contrast, hydrogen-free amorphous carbon coatings perform well in humid conditions but have high friction in dry air and vacuums [
8,
9,
10].
In addition to carbon-based coatings, titanium nitride (TiN) coatings have been studied in a vacuum. It was found that they exhibited moderate friction coefficients when operating in a vacuum, whereas their friction coefficient was higher in atmospheric conditions [
11,
12].
The idea of combining materials that can adapt to different environments has been investigated using various approaches. For instance, a multi-layer coating consisting of a thin film a-C:H/MoS
2/a-C structure was found to achieve superlubricity in 20% rF air via nanoscroll formation [
13]. Hybrid coatings, consisting of carbon alloyed TMDs such as MoS
2, WS, and MoSe
2, were studied and showed low friction conditions in several terrestrial and space conditions [
14,
15,
16]. The wear properties of pure MoS
2 coatings could be improved by adding a supramolecular gel [
17].
Laser-cladded nickel-based coatings with MoS
2 incorporation showed good high- temperature vacuum performance up to 300 °C [
18]. Silver-impregnated thermal-sprayed YSZ ceramic showed moderate friction in a vacuum and an improved wear life [
19]. Hot-pressed nickel-based alloys were found to perform well in a vacuum up to 800 °C [
20].
Although pure tetrahedral amorphous carbon (ta-C) coatings commonly have high friction and wear in a vacuum and cannot passivate as in air due to the absence of water, some notable exceptions have been reported. Härtwig et al. studied the influence of different counter body materials when sliding against ta-C in a vacuum and found that a brass counter body resulted in unexpectedly low friction and wear [
21]. A simple bilayer coating approach of MoS
2 on top of a ta-C coating deposited via vacuum arc deposition was found to improve the wear life in humid and vacuum conditions compared to a pure MoS
2 coating due to the underlaying hard ta-C coating [
22].
Patterning a surface with controlled microstructures is another strategy for improving the material’s tribological properties by reducing the contact area and promoting traps for wear debris to prevent third-body interactions [
23]. In this way, frictional and wear losses can be minimized [
24,
25]. Among the plethora of texturing methods, direct laser interference patterning (DLIP) is an industrial-scalable laser microfabrication method that is able to process large areas at throughputs already exceeding 1 m
2/min [
26]. The method is based on the overlap of multiple laser beams on the sample surface so that an interference pattern can be produced. At the maxima positions of the interference pattern, the material can be locally melted or ablated, whereas at the minima, the material remains unmodified, leading to a periodic surface texture. The spatial period of the texture can be easily controlled by adjusting the overlapping angle between the beams and can be as short as half of the used laser wavelength, yielding finer resolutions compared to other laser-based methods [
27]. This technique has already been used to optimize surfaces for tribology. For instance, in the works of Gachot and Rosenkranz [
28], the influence of the orientation of line-like textures produced using DLIP on friction (dry) and wear on different metals was investigated. In addition, they found a dependence of the coefficient of friction on the orientation of the tested line-like structure. Furthermore, DLIP has already been applied to ta-C layers, obtaining a reduction in the coefficient of friction by 30% under dry lubrication conditions [
29]. Also, DLIP was used to modify the topography of substrates prior to the deposition of carbon nanoparticle coatings, resulting in an enhanced coefficient of friction and wear resistance [
30,
31].
Motivated by the emergence of new industrial-scale processes for high-throughput surface structuring and advanced coating technologies capable of depositing ta-C and MoS2 films in one process, this study focuses on the tribological performance of ta-C/MoS2 bilayer coatings on structured steel surfaces. The friction and wear behavior of these coatings in a vacuum and atmosphere are investigated.
2. Materials and Methods
Steel disks (Rocholl GmbH, Eschelbronn, Germany) and steel balls (TIS Wälzkörpertechnologie, Gauting, Germany) were used as tribological test specimens. Both were made from 100Cr6/EN 1.3505 steel and hardened to 60 HRC. The disks had a diameter of 24 mm and were polished to a roughness of Ra < 0.03 µm. The steel balls had a diameter of 10 mm and had a polished surface as well.
Dot-like patterns were applied to the steel disks using a four-beam DLIP setup. The system was equipped with a 70 ps pulsed laser source (neoLASE GmbH, Hanover, Germany) with an output power of 2.7 W at a wavelength of 532 nm and a repetition rate of 10 kHz. Details on the method and used setup can be found elsewhere [
32]. In this study, the spatial period was targeted to 5 µm. The experiments were performed at a peak fluence (energy density) per pulse of 1.32 J/cm
2 with a laser spot size of 50 µm at the focal plane. The structuring strategy consisted of firing 6 pulses per position to reach the targeted structure depth of 500 nm. The sample was translated with an XY stage (travel distance 200 mm, max. speed 300 m/s, resolution 0.1 µm, Aerotech ABL-1500-E318187, Pittsburgh, PA, USA) and a hatch distance of 40 µm between adjacent laser-treated positions.
The coatings on the disks were deposited using a LaserArc™ (Fraunhofer IWS, Dresden, Germany) coating system, which is based on vacuum arc discharge. The general preparation of ta-C reference films has been described previously elsewhere [
33]. In this study, a pulse current of 1600 A at 300 Hz and a 100 V bias voltage with a pulse overlap of 175 µs was used.
Additionally, MoSx coatings were fabricated using an unfiltered LaserArc module as described by Krülle et al. [
34]. Similarly to graphite evaporation for ta-C coatings, a pure MoS
2 cathode was used. The discharge current was reduced to 250 A, and no bias voltage was applied. Furthermore, the process temperature was set to 150 °C via a radiation heater to avoid the formation of solid sulfur. These process conditions result in a sulfur to molybdenum ratio in the growing film similar to that in the cathode [
35]. However, since the element ratio is not perfectly stoichiometric and the coating is mostly amorphous and contains some impurities, the coating type is referred to as MoSx to distinguish it from crystalline MoS
2.
To ensure good adhesion of all the coatings, an approximately 100 nm thick chromium adhesion layer was applied to the substrate using magnetron sputtering. In the case of ta-C coating deposition, the sample surfaces were lapped after ta-C deposition to remove unwanted growth defects from the contacting surface which typically result from the arc process. In the case of ta-C/MoSx bi-layer films, the MoSx top layer was added onto the ta-C coating in an additional batch without another adhesion layer.
The properties of each single-layer coating were measured for reference samples placed in the corresponding coating batch. The coating thickness was obtained using the ball crater method. The coating hardness was measured using nanoindentation using a ZHN nanomechanical test system (Zwick/Roell, Ulm, Germany) with a Berkovich indenter (Synton-MDP Ltd, Nidau, Switzerland), and the quasi-continuous stiffness method (QCSM).
An overview of the substrate and coating materials with their respective properties is given in
Table 1.
DLIP structuring and deposition of ta-C and MoSx was applied to the disks in several combinations to obtain different surfaces that allowed for an assessment of single and combined processing steps. The corresponding process steps and their order used to specify each surface are given in
Table 2.
The steel balls remained unstructured and uncoated.
Tribological testing was performed using a UHVT universal vacuum tribometer (Tetra, Ilmenau, Germany) using a ball-on-disk geometry with a rotating motion. The pressure was kept between 1 and 5 × 10⁻⁷ mbar for ultrahigh vacuum conditions and at approximately 1013 mbar and 40 to 50% rH for atmospheric conditions. The ball was loaded with a normal force of 5 N. By rotating the disk, the sliding speed was kept constant at 3 mm/s for all experiments by varying the angular speed. The sliding duration for standard experiments was 60 to 100 min, resulting in 12 and 18 m sliding lengths, respectively.
The normal force and friction forces were recorded to calculate the friction coefficient over time. The steady-state friction coefficient was obtained by averaging over the last 2 m of the experiments.
Wear scars on balls and wear tracks on the disks were imaged using light microscopy. A differential interference contrast (DIC) filter was used to visualize the topographic features in the nanometer range.
Additionally, 3D white light interferometry (Keyence VK-X3000, Osaka, Japan) was used to measure the profile of the wear tracks and resulting wear area. Images of the disk wear tracks were always taken at four different locations with an equal 90° distribution. For visualization of the changes to the steel substrate caused by DLIP, the same microscope was used in laser confocal mode.
The wear rate on the disk was calculated based on the averaged cross-section area of the wear track. The wear rate on the counter body ball was based on the apparent contact area obtained using light microscopy, assuming that the volume of the corresponding spherical calotte had been removed. This approach is an easy estimate to overcome the obstacle of measuring the removed volume from the curved surface of the ball; however, as a drawback, it will show systematic failure when the worn surface is not flat or is not representative due to material transfer.
Raman spectra were recorded using an “inVia” Raman microscope from Renishaw plc., Wotton-under-Edge, UK (100× objective, wavelength 514 nm, laser power 8 mW, CCD line detector).
3. Results
3.1. Topography of Structured Steel Surface
Figure 1 shows the topography of the DLIP-treated steel surface taken using optical confocal microscopy. The surface shows a square pattern of ablated areas separated by a hatch distance of
H = 40 µm. Such ablated regions consist of square arrays of microcraters with a fixed periodicity
Λ = 5.2 ± 0.1 µm, as calculated via Fourier analysis. The shape of the ablated crater array resembles the interference pattern produced upon overlapping the four laser sub-beams. Furthermore, these ablated spots have a modulated depth given by the Gaussian intensity distribution of the laser pulses, as can be observed from the topographic profile shown in
Figure 1b. The craters feature relatively smooth sidewalls, and they are encircled by elevated rims produced by molten and redeposited material that flowed from the interference maxima positions (craters) to the minima (rims). This feature can be clearly seen in the profile of
Figure 1b, where the dashed line corresponds to the average height of the untreated surface. At the center of the Gaussian pulse, the DLIP craters have an average structure depth of 502 nm ± 36 nm.
3.2. Tribological Performance in a Vacuum
All the surfaces described in
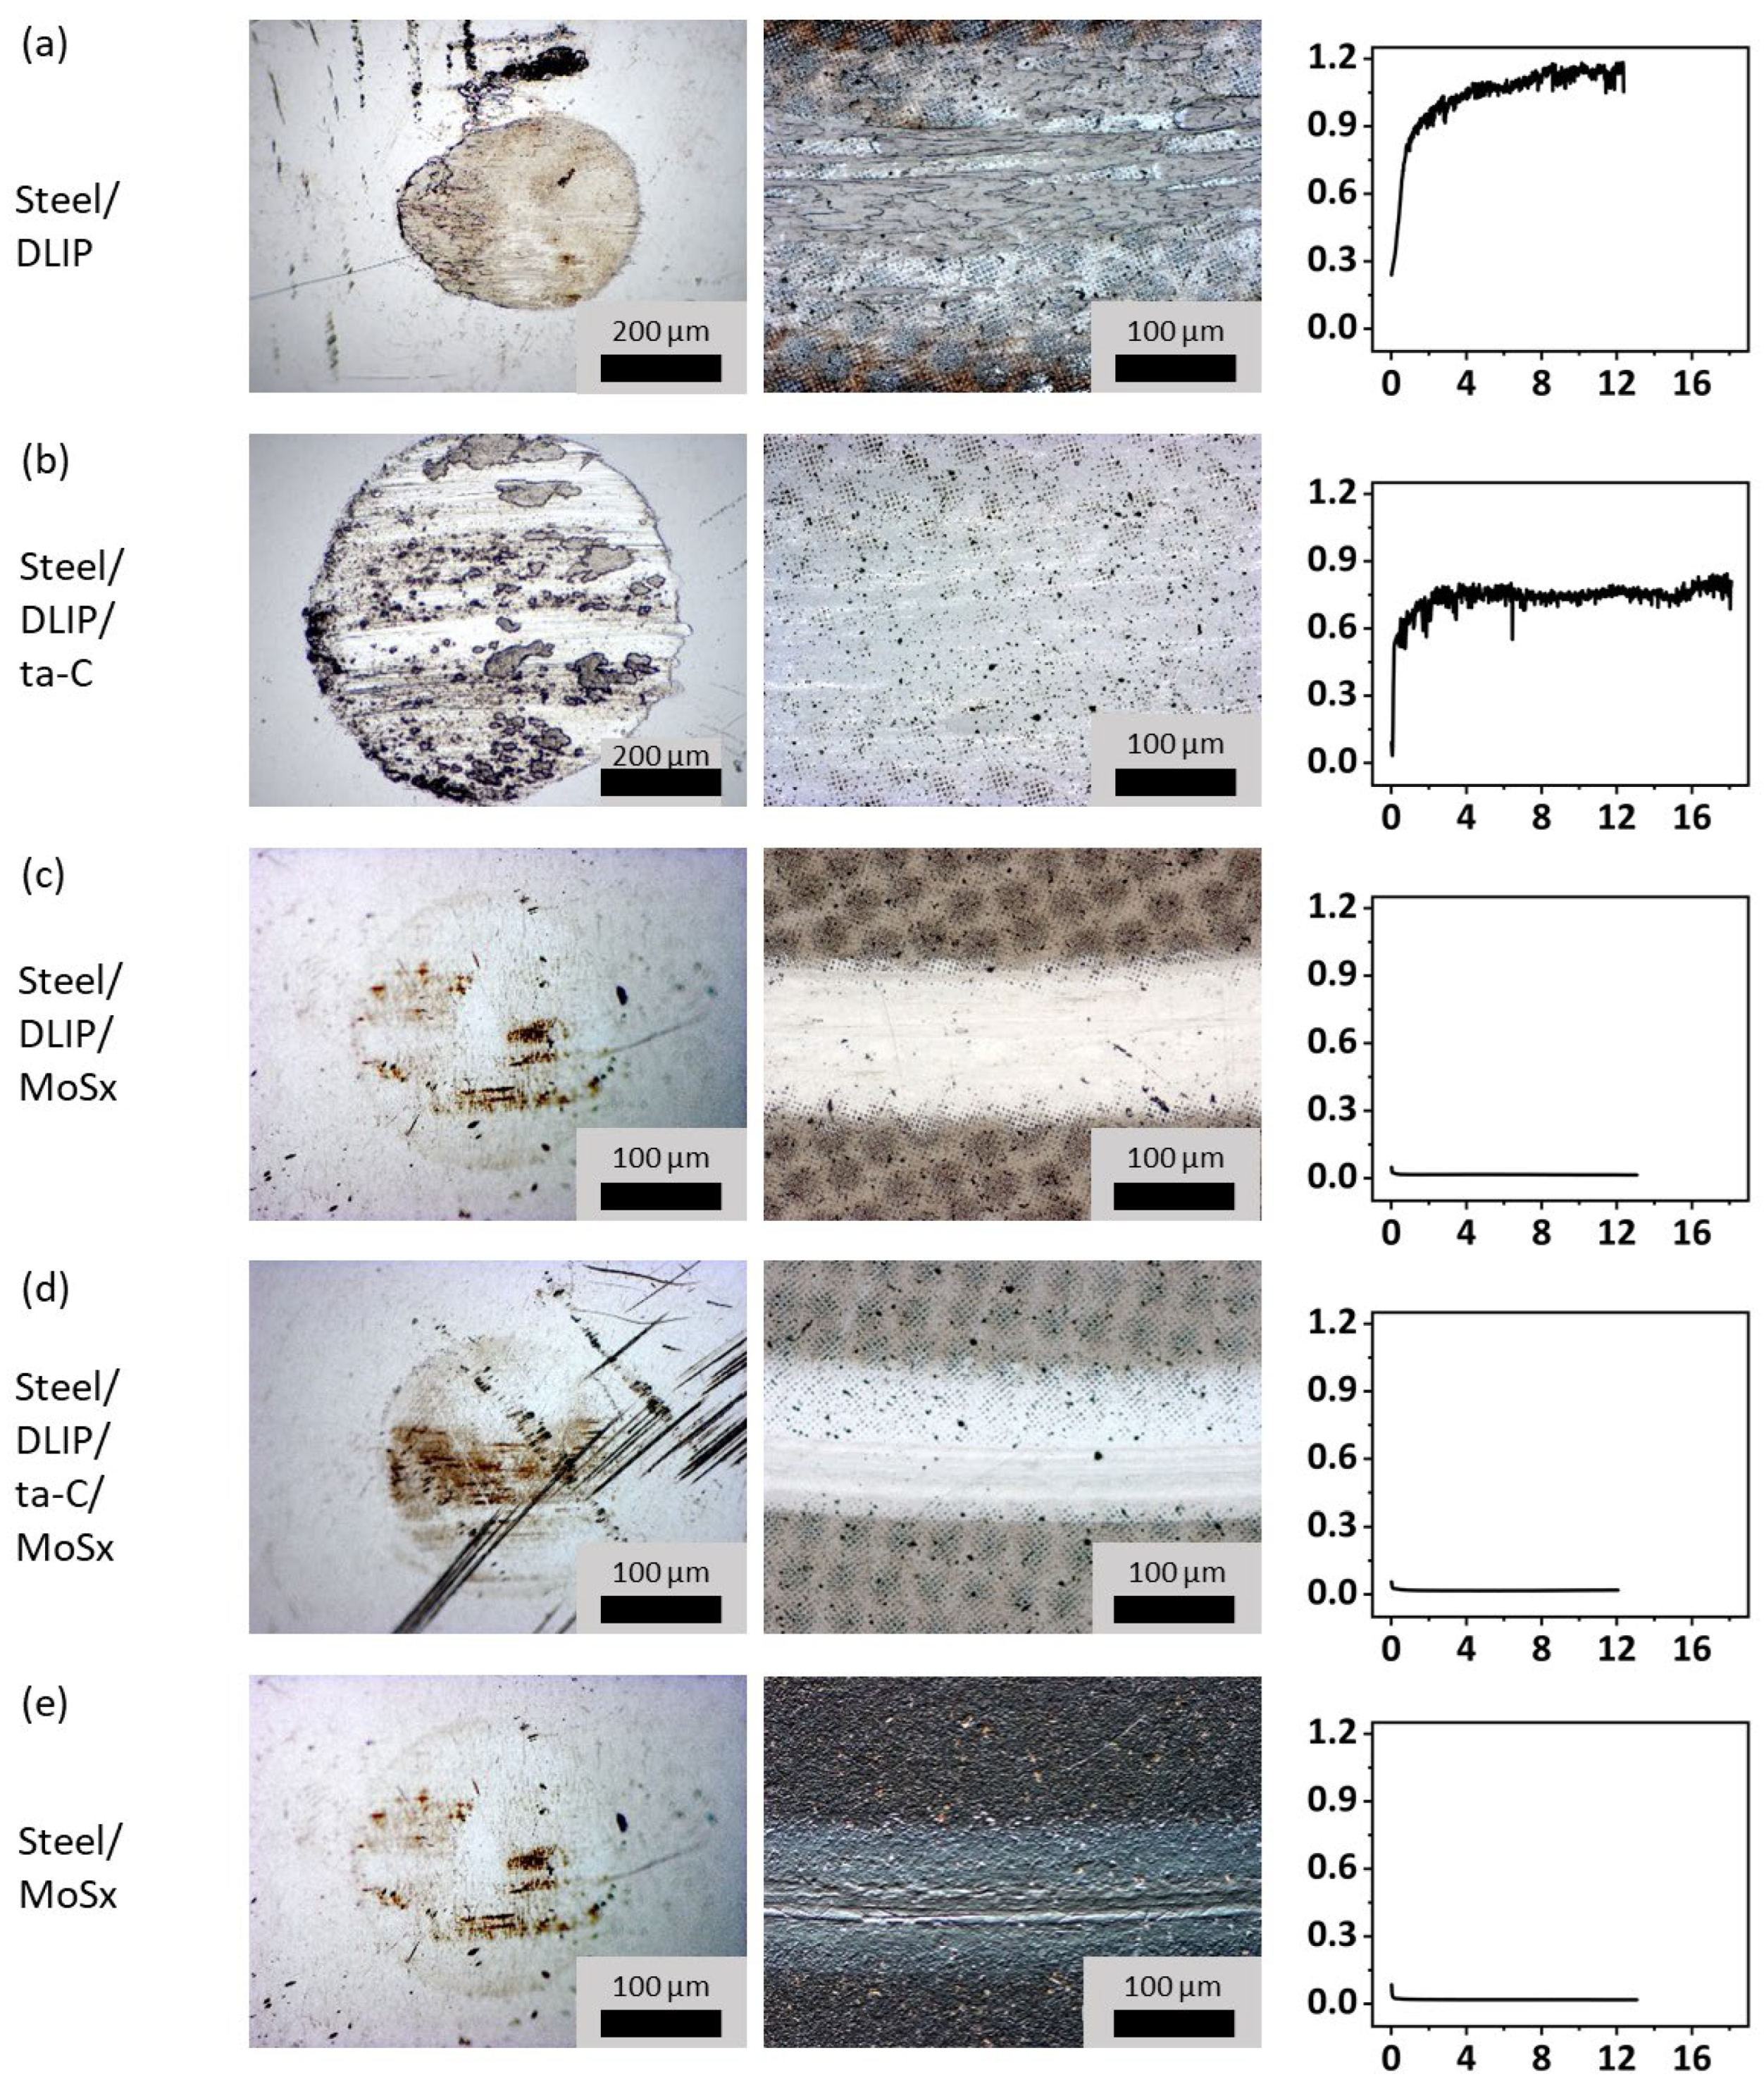
Table 2 were tested against steel balls in ultrahigh vacuum conditions and studied regarding their wear and friction. The wear scars and wear tracks are shown along the progression of the friction coefficient in
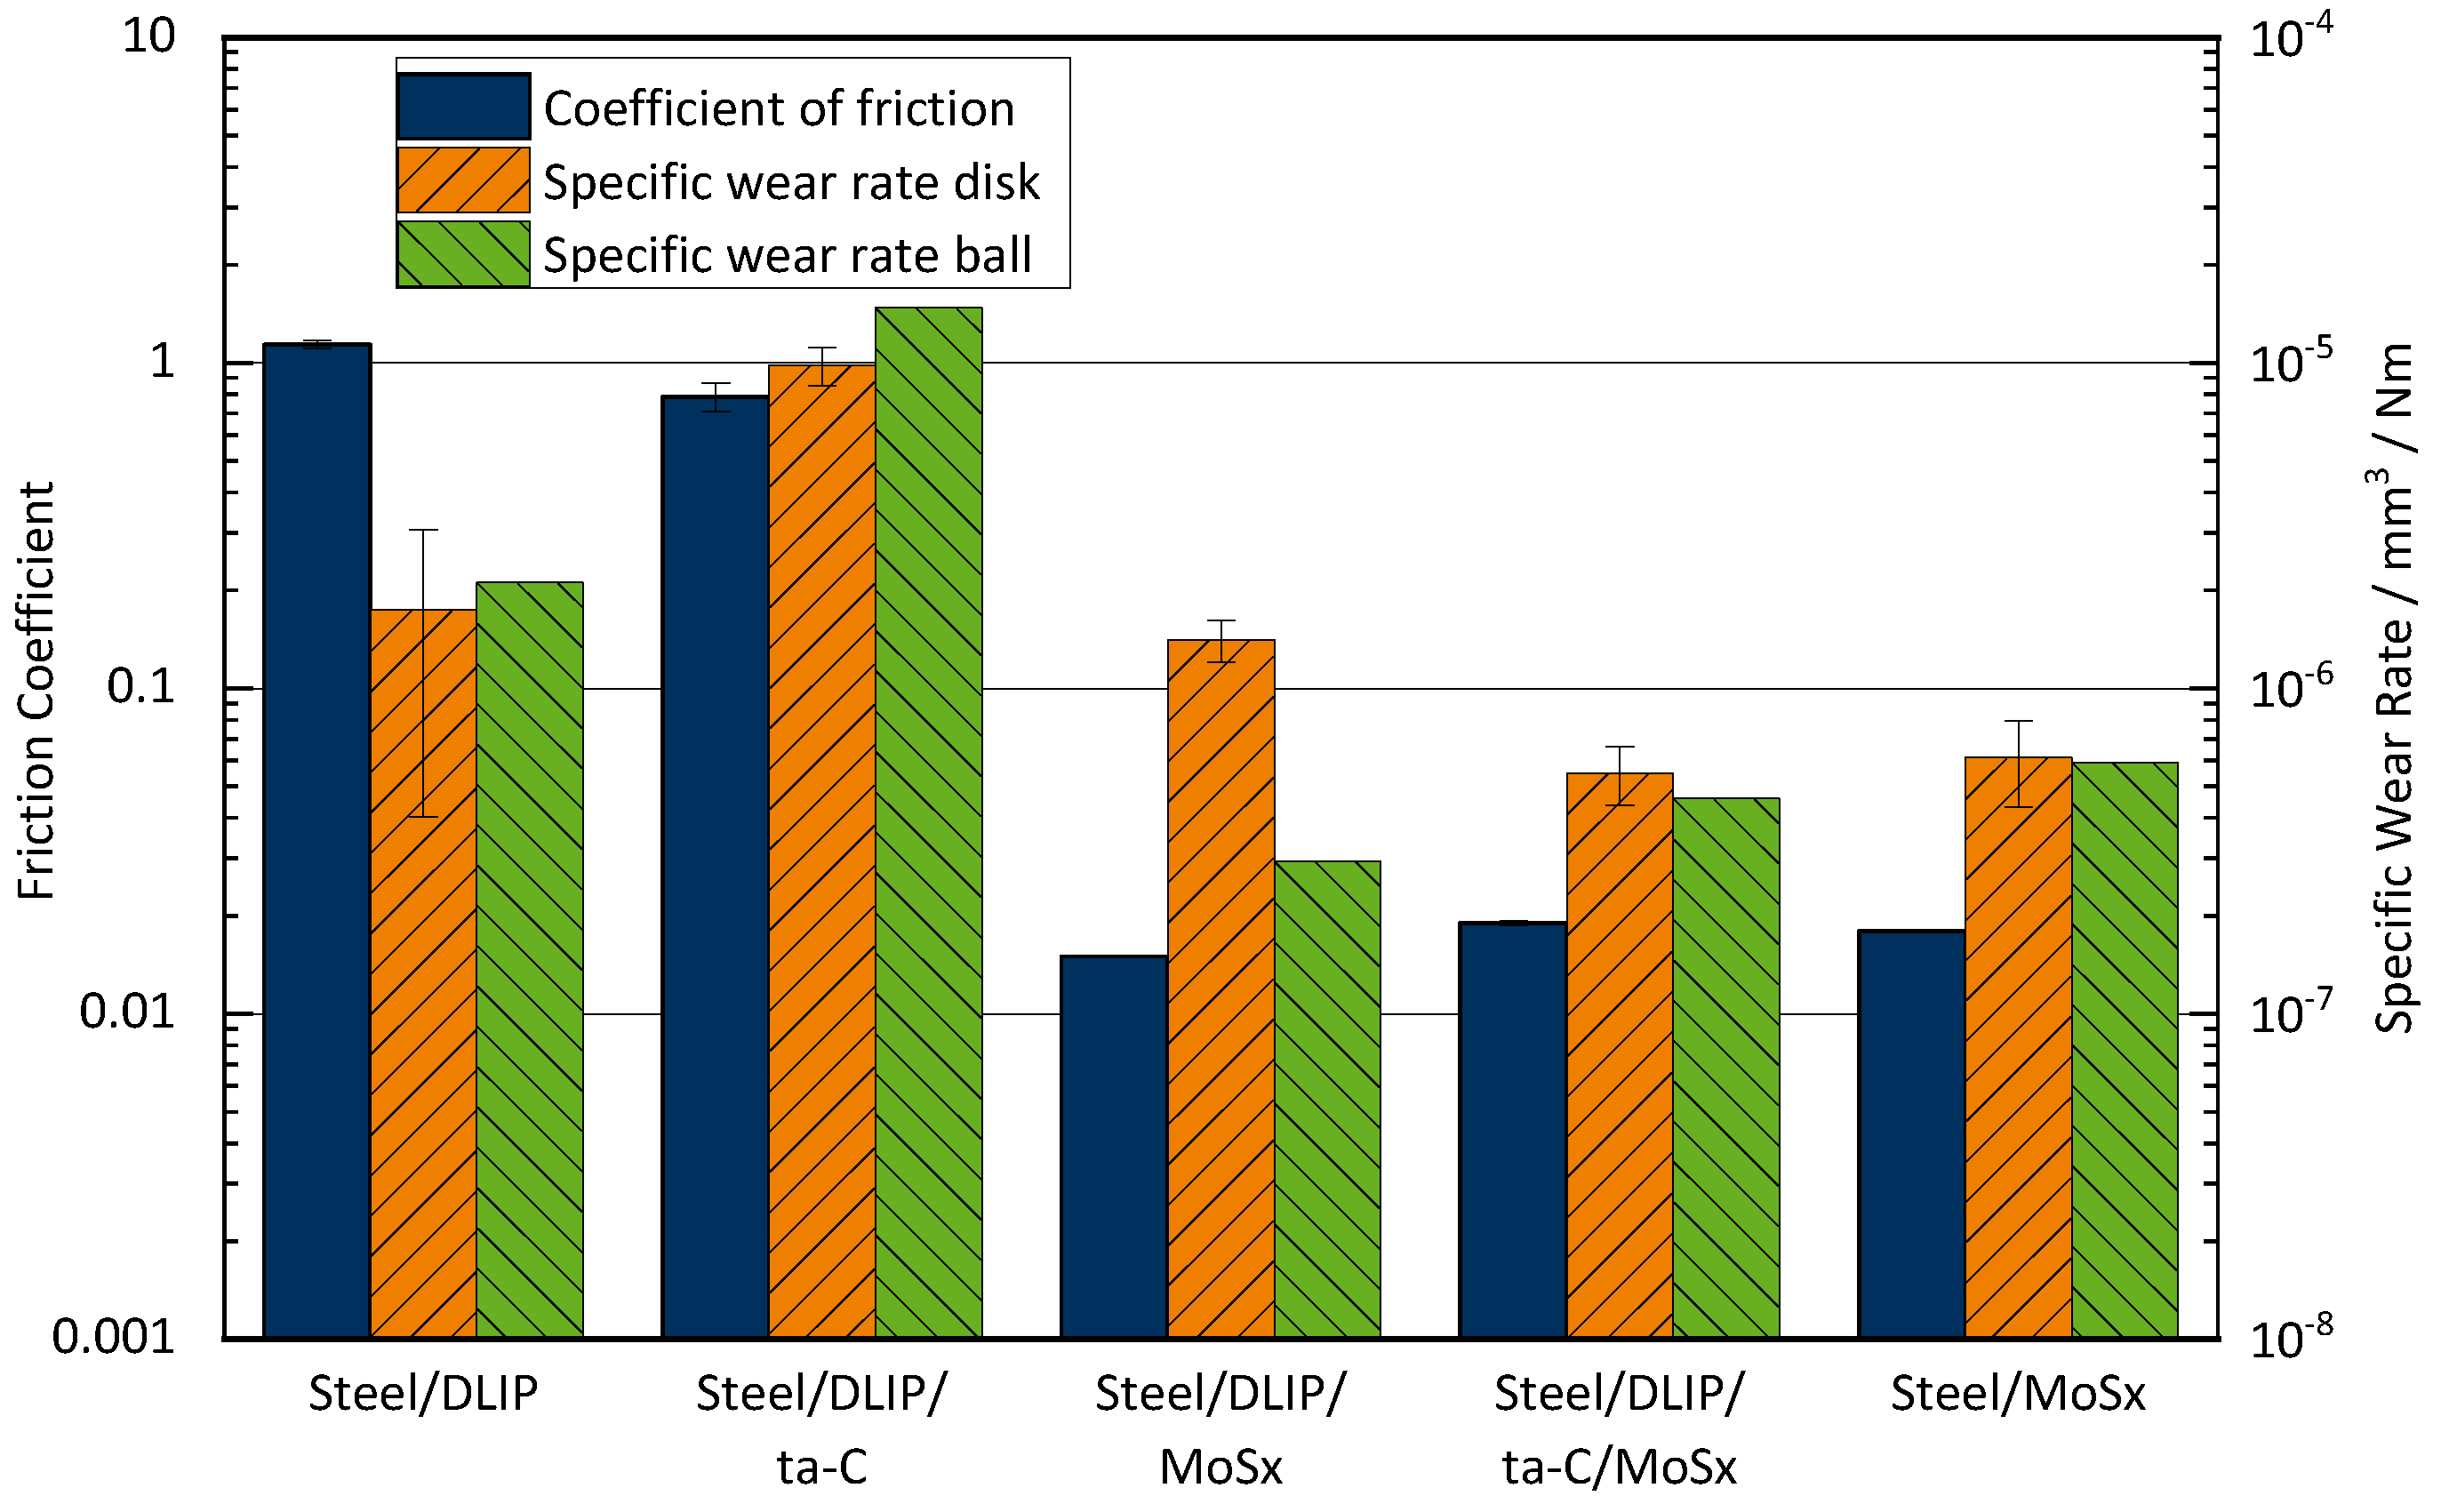
Figure 2. Quantitative evaluations of the wear coefficients and steady-state friction coefficient for the same experiments are given in
Figure 3.
The surface steel/DLIP (
Figure 2a) showed a running-in phenomenon, where COF increases from 0.3 to above 1.1. After the test, well-visible wear marks could be seen on both the ball and disk. The wear coefficient for both bodies was approximately 2 × 10
−6 mm
3/(Nm). On the disk, the initial DLIP structure was lost in many parts of the wear track, and signs of scuffing and heavy plastic deformation, including material deposit and removal both up to 0.5 µm, could be found instead.
Figure 2.
Wear and friction data for tribological short-term testing in an ultrahigh vacuum shown for all surfaces (a–e) with light microscope images of the wear scar on the counter body ball (left), light microscope images of the wear track on the disk (center), and friction (right, friction coefficient on Y axis and sliding length in meters on X axis). Please note the different scales for the ball wear scar images. Diagonal black scratches on the ball wear scar in (d) resulted from post-test handling and are not a tribological feature.
The surface steel/DLIP/ta-C (
Figure 2b) showed an even shorter running in, where the friction coefficient climbed from an initial value of 0.05 to 0.8 in steady state. The wear on the ball wear scar and disk wear track were by far the biggest among all the tested combinations (
k > 10
−5 mm
3/(N·m)). The wear track depth was up to 150 nm, at which point the DLIP structure was not visible anymore. However, in most areas with smaller wear depths, the DLIP structure was still visible. Some metallic scratches parallel to the sliding direction most likely resulted because of material deposition from the steel counter body.
Compared to the steel/DLIP surface, wear is mostly governed by abrasion. Only small patches of plastic behavior can be seen on the ball wear scar, and no plastic behavior can be seen on the disk wear track, which is smooth and even.
Figure 3.
Steady-state friction coefficient, specific wear rate of disk, and specific wear rate of counterbody for all surfaces after tribological testing in an ultrahigh vacuum (p < 5 × 10⁻⁷ mbar).
Figure 3.
Steady-state friction coefficient, specific wear rate of disk, and specific wear rate of counterbody for all surfaces after tribological testing in an ultrahigh vacuum (p < 5 × 10⁻⁷ mbar).
The surface of the steel/MoSx (
Figure 2e) had a much lower friction coefficient of 0.018, which remained very stable after nearly no running-in. The ball wear scar showed only mild signs of wear, had an almost circular shape, showed no signs of plasticity, and exhibited some colored patches most likely resulting from the tribo-induced transfer layer. The coated disk showed a wear track with some grooves and shallow voids along the sliding direction and signs of plastic deformation. The specific wear rates were rather low, at
k = 6.1 × 10
7 mm
3/(N·m) for the disk and
k = 5.9 × 10
7 mm
3/(N·m) for the ball.
Two more surfaces with MoSx top layers were studied: steel/DLIP/MoSx (
Figure 2c) and steel/DLIP/ta-C/MoSx (
Figure 2d). Despite their different designs below the MoSx top layer, their friction and wear behaviors were very similar to the steel/MoSx based on the qualitative assessment.
For the steel/DLIP/ta-C/MoSx, the friction coefficient was 0.019. The wear rates were k = 5.5 × 10⁻⁷ mm3/(N·m) for the disk and k = 4.6 × 10⁻⁷ mm3/(N·m) for the ball. In contrast to the steel/MoSx, the disk wear track was smooth and did not show signs of plasticity.
For the steel/DLIP/MoSx, the lowest friction of all the combinations was found with µ = 0.015. Furthermore, the ball wear rate was the lowest, with k = 2.9 × 10⁻⁷ mm3/(N·m). In return, the disk wear rate was increased to k = 1.4 × 10⁻⁶ mm3/(N·m). Again, the disk wear track was smooth and did not show plasticity, as was the case for the steel/MoSx.
In all cases, the material removal was low, in the range of just few hundred nanometers, and the coatings were not destroyed or removed. In most cases, the wear depths were smaller or similar to the DLIP structure depth. For the surfaces with MoSx top coatings, the DLIP structure often could not be seen in the microscopic images, but it can be assumed that the very soft material was smeared into the structure.
3.3. Tribological Performance in Air
Two surfaces from the vacuum tests were tested using the same settings, except in ambient air. Steel/MoSx was chosen to represent the state-of-the-art coating technology, with steel/DLIP/ta-C/MoSx providing an advanced coating structure below the MoSx top layer.
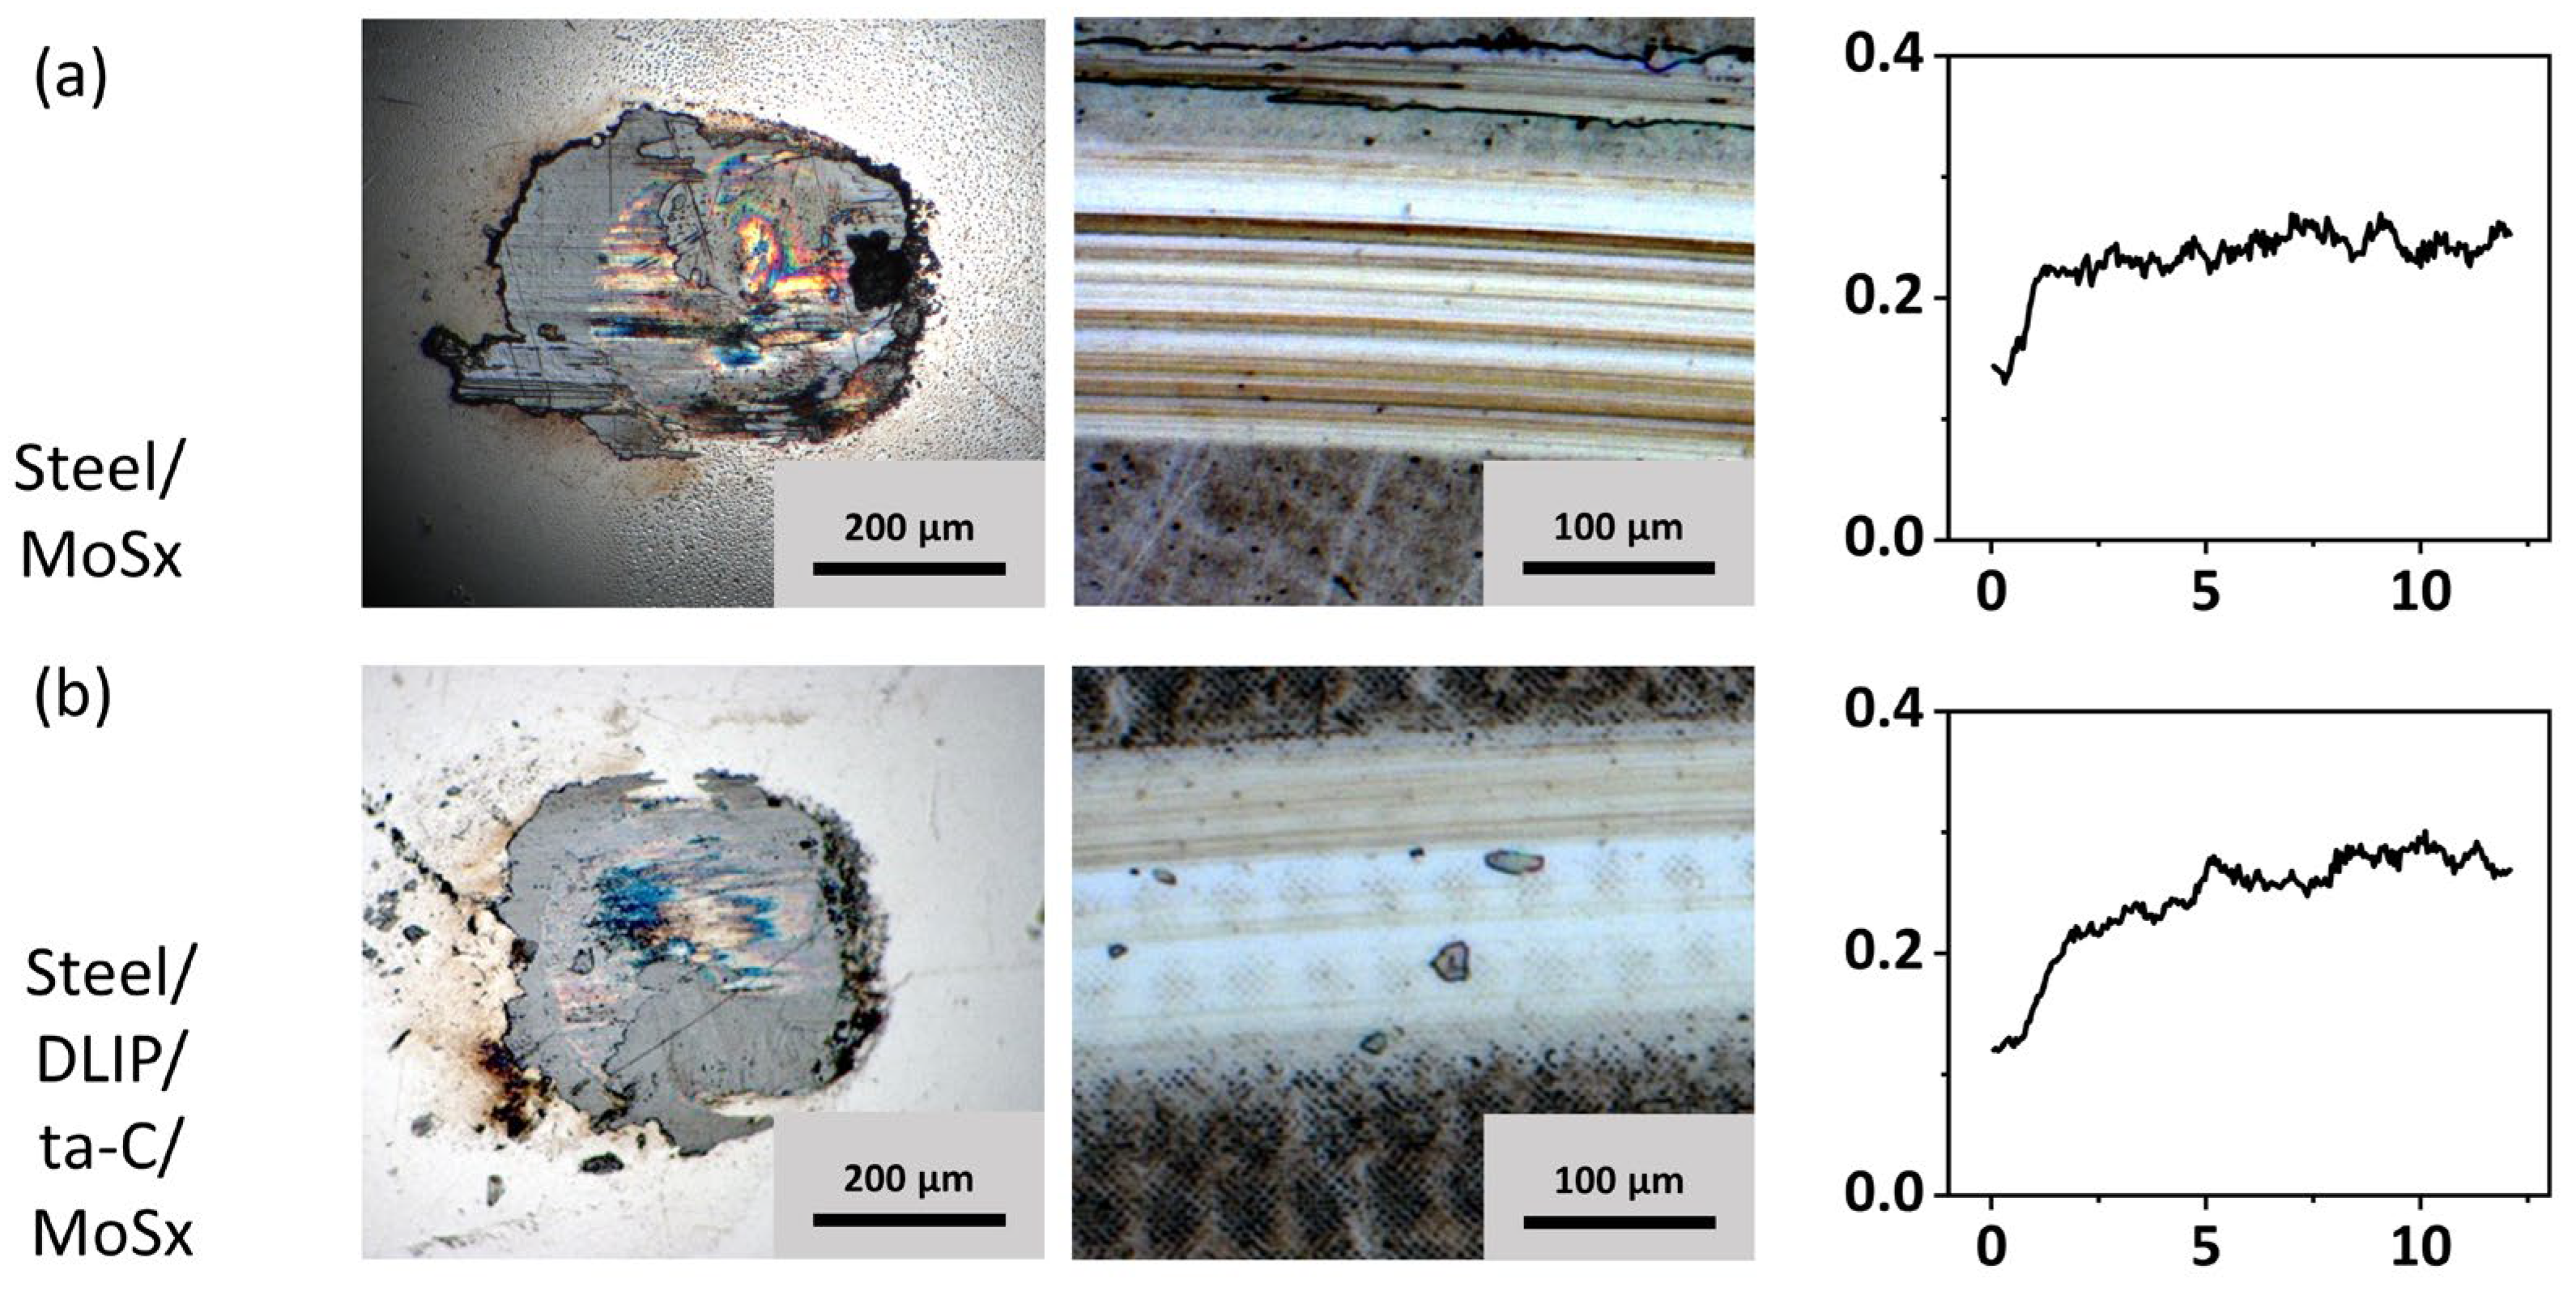
Images of the contact areas and the progression of the friction coefficient are given in
Figure 4.
The steel/MoSx surface (
Figure 4a) created a thick and grey-colored tribolayer on the ball. The friction coefficient started at 0.12 and climbed to a steady-state friction of 0.24. The width of the ball contact area was much wider than the visible wear track width on the disk, allowing the conclusion that transfer of the MoSx to the ball had occurred. In order to calculate the ball wear rate, the transferred material was ignored, and just the circular contact area on the ball, corresponding to the disk wear track width, was used. The ball wear rate was found to be
k = 1.9 × 10
−6 mm
3/(N·m).
The disk wear track was smooth, with apparent grooves in the sliding direction in the middle of the contact area. On the side of the contact area, there was partial delamination of the coating. Obviously, the higher friction forces led to higher shearing forces on the interface, resulting in delamination. This finding is unexpected, as the same interface technology was used as for the carbon coatings, which easily withstands such conditions without delamination. It might have been the high mechanical mismatch of the soft MoSx coating with the steel substrate that led to the critical loading conditions. The disk wear rate was calculated to be k = 1.6 × 10⁻⁵ mm3/(N·m), omitting the delaminated volume.
The surface steel/DLIP/ta-C/MoSx (
Figure 4b) showed a similar transfer layer on the ball. The ball wear rate was slightly lower, at
k = 1.6 × 10
−6 mm
3/(N·m), when compared to the steel/MoSx and only considering the inside contact area again. The disk wear track also showed some grooves in the sliding direction, but the DLIP pattern remained clearly visible. The disk wear rate was
k = 1.7 × 10
−5 mm
3/(N·m). The friction coefficient started at 0.12 and climbed to a steady-state friction coefficient of 0.28.
From a solely quantitative standpoint, the tribological behavior of both surfaces in the atmosphere was very similar, showing the same transfer layer and almost the same friction and wear rates on both the ball and disk. However, the steel/MoSx surface already started to delaminate, which was expected to result in rapid and complete failure of the system.
3.4. Conservation of DLIP Structure after Tribological Loading
To provide a tribological effect, the DLIP structure must withstand tribological loading. In the following, three different outcomes of DLIP structures after the end of the test are found, depending on the types of coatings used.
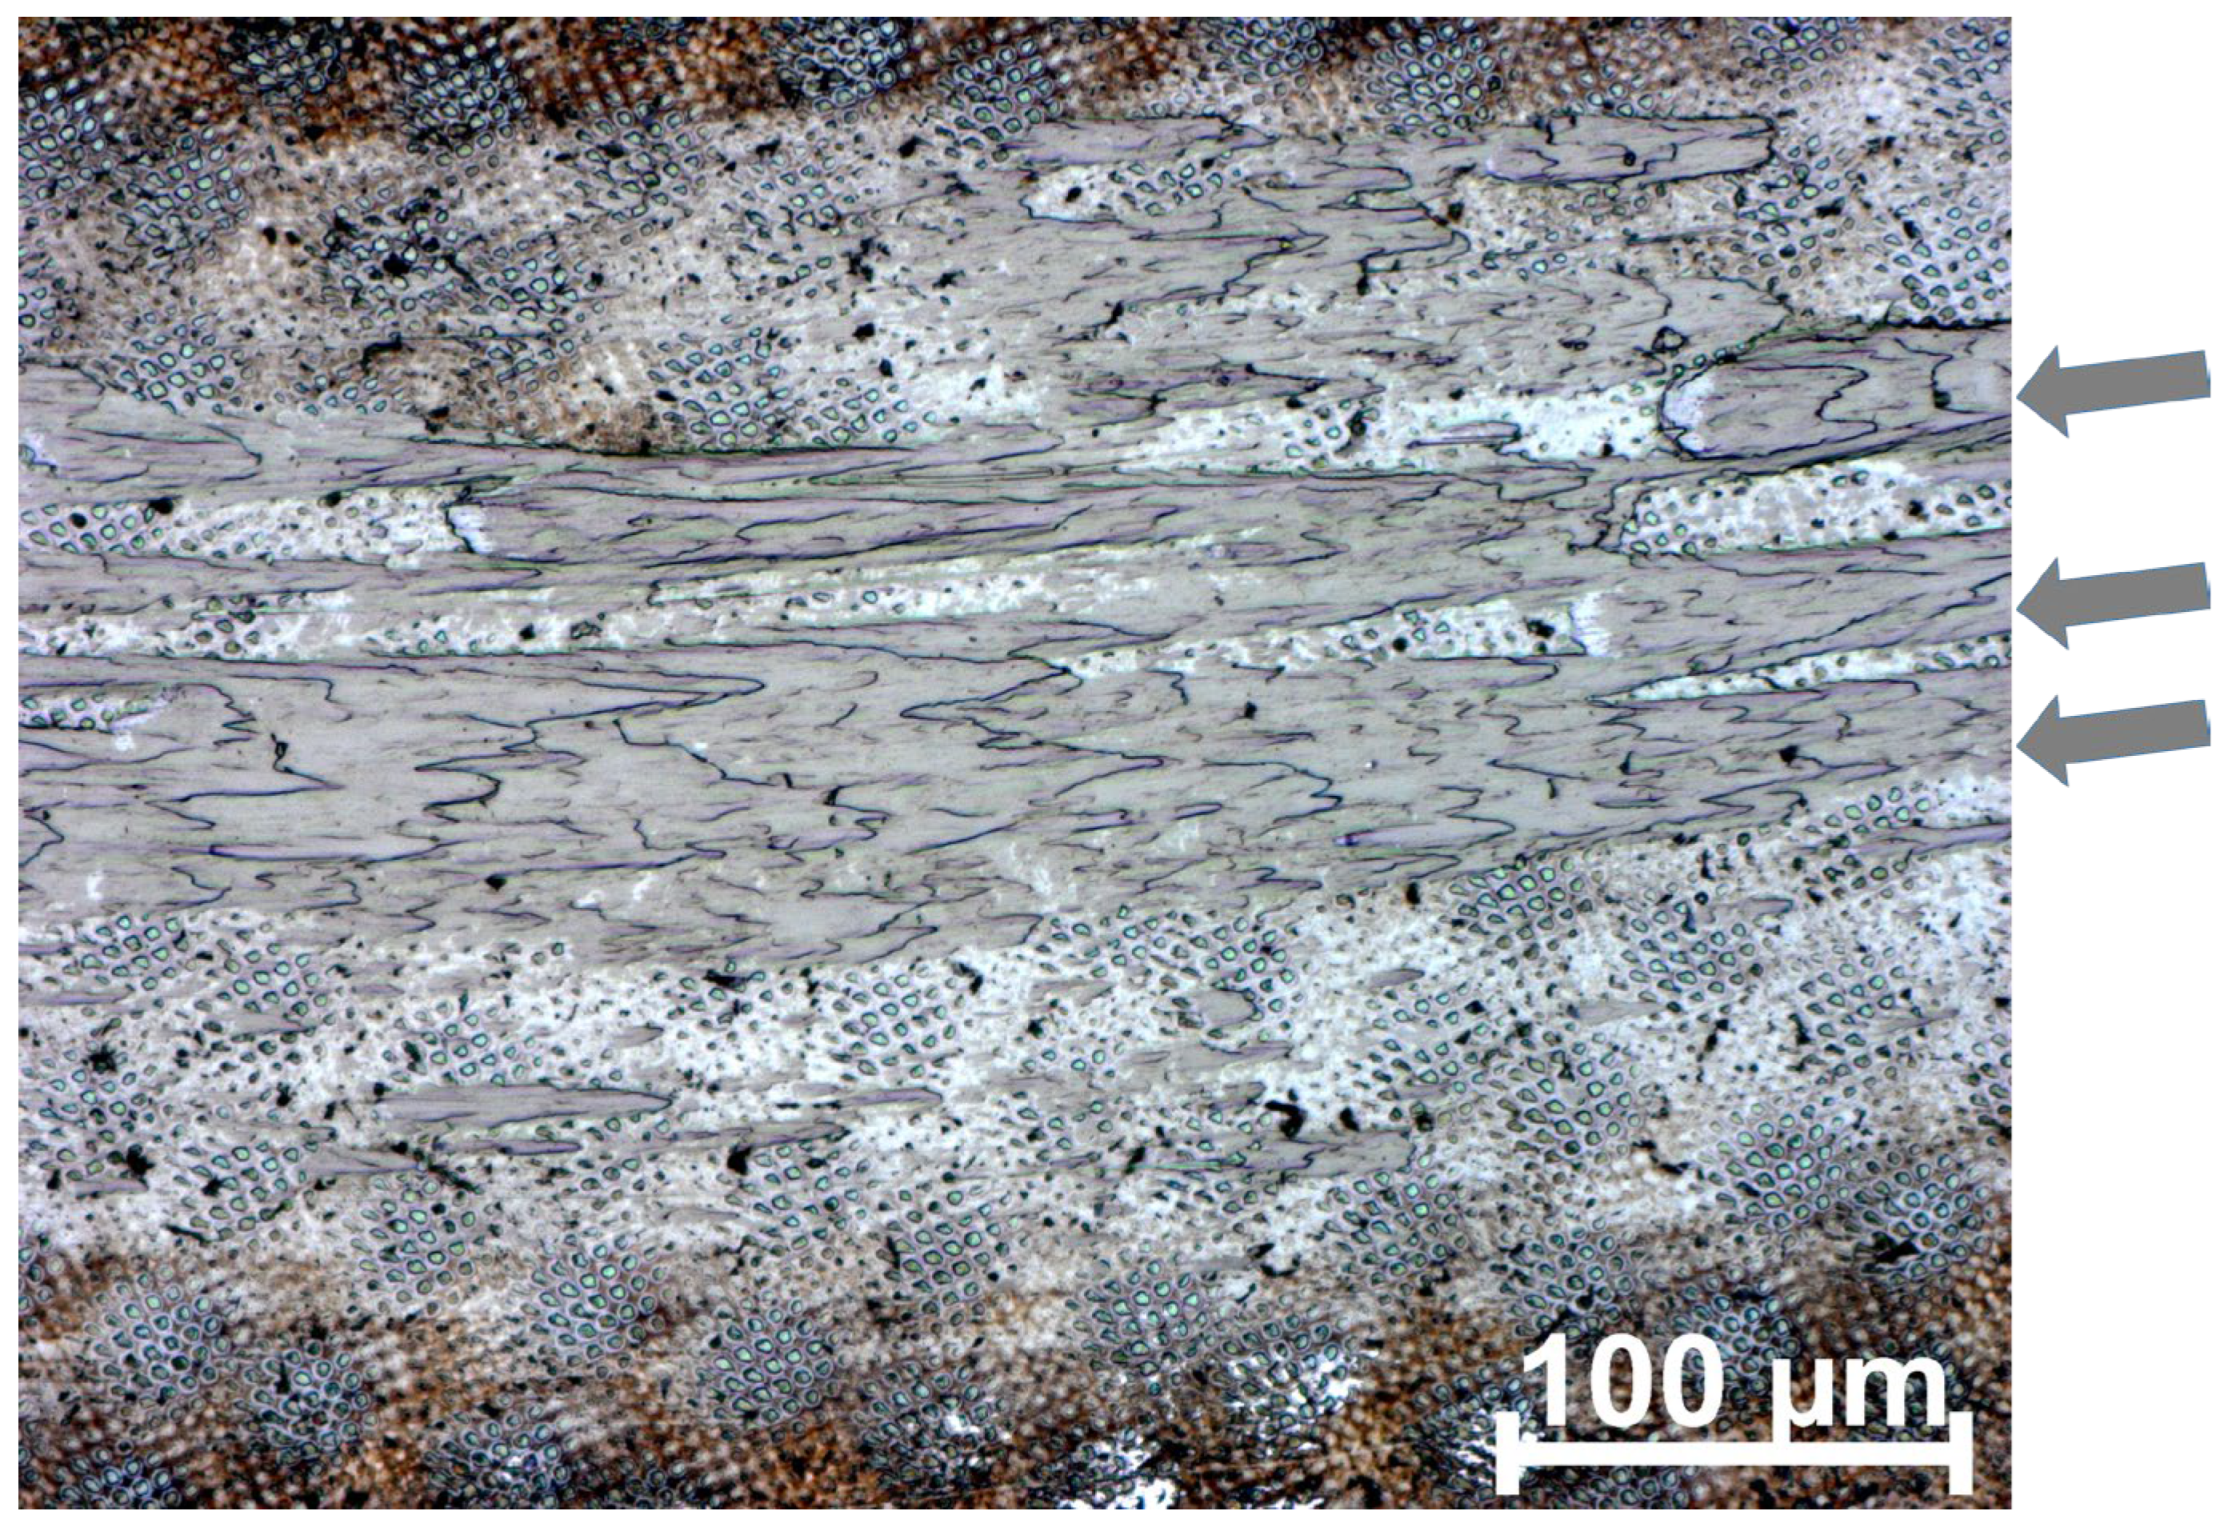
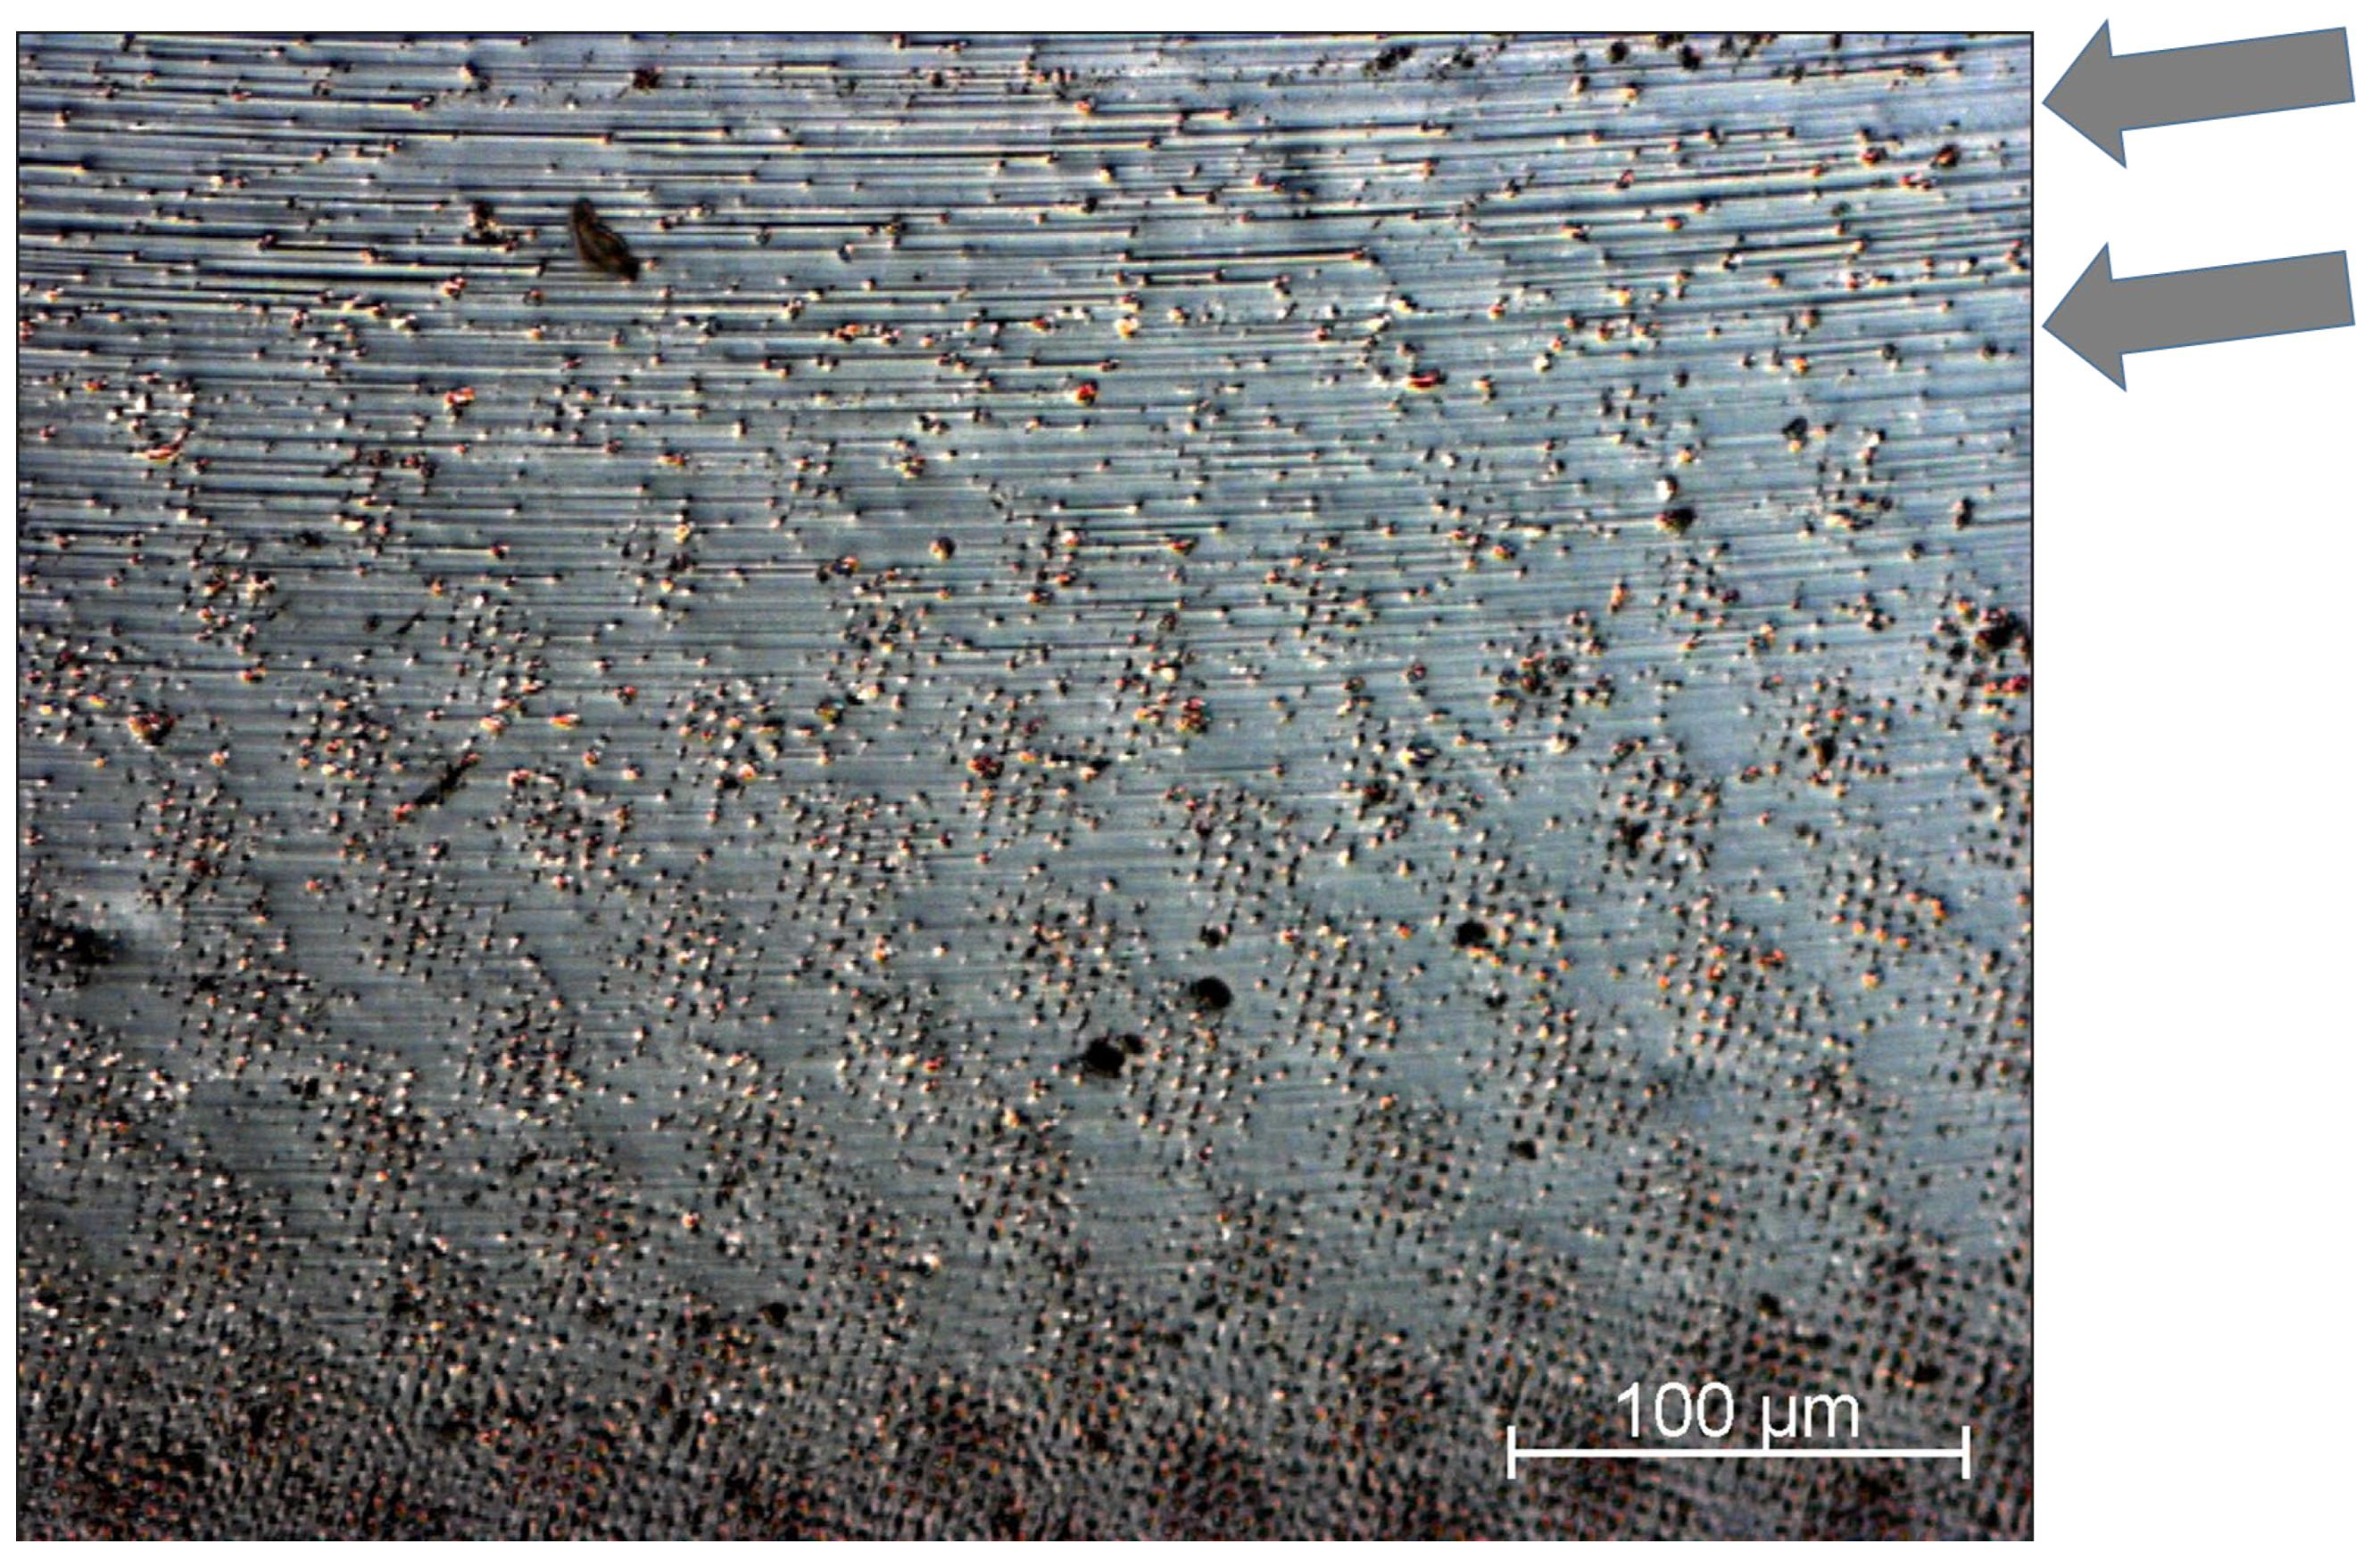
In the case of the steel/DLIP surface in a vacuum, the structure was lost due to heavy plastic deformation and material build-up where contact occurred on the microscopic scale. Only some areas that were not in contact kept their original structure, as visible in
Figure 5.
The surface of the steel/DLIP/ta-C in a vacuum did not show plastic deformation. It was very hard and only showed signs of mild abrasion in the form of polishing of the protruding areas (
Figure 6). In the center of the wear track, where the maximum contact pressure was observed, abrasive wear was found, which went deeper into the ta-C coating than the original DLIP structure.
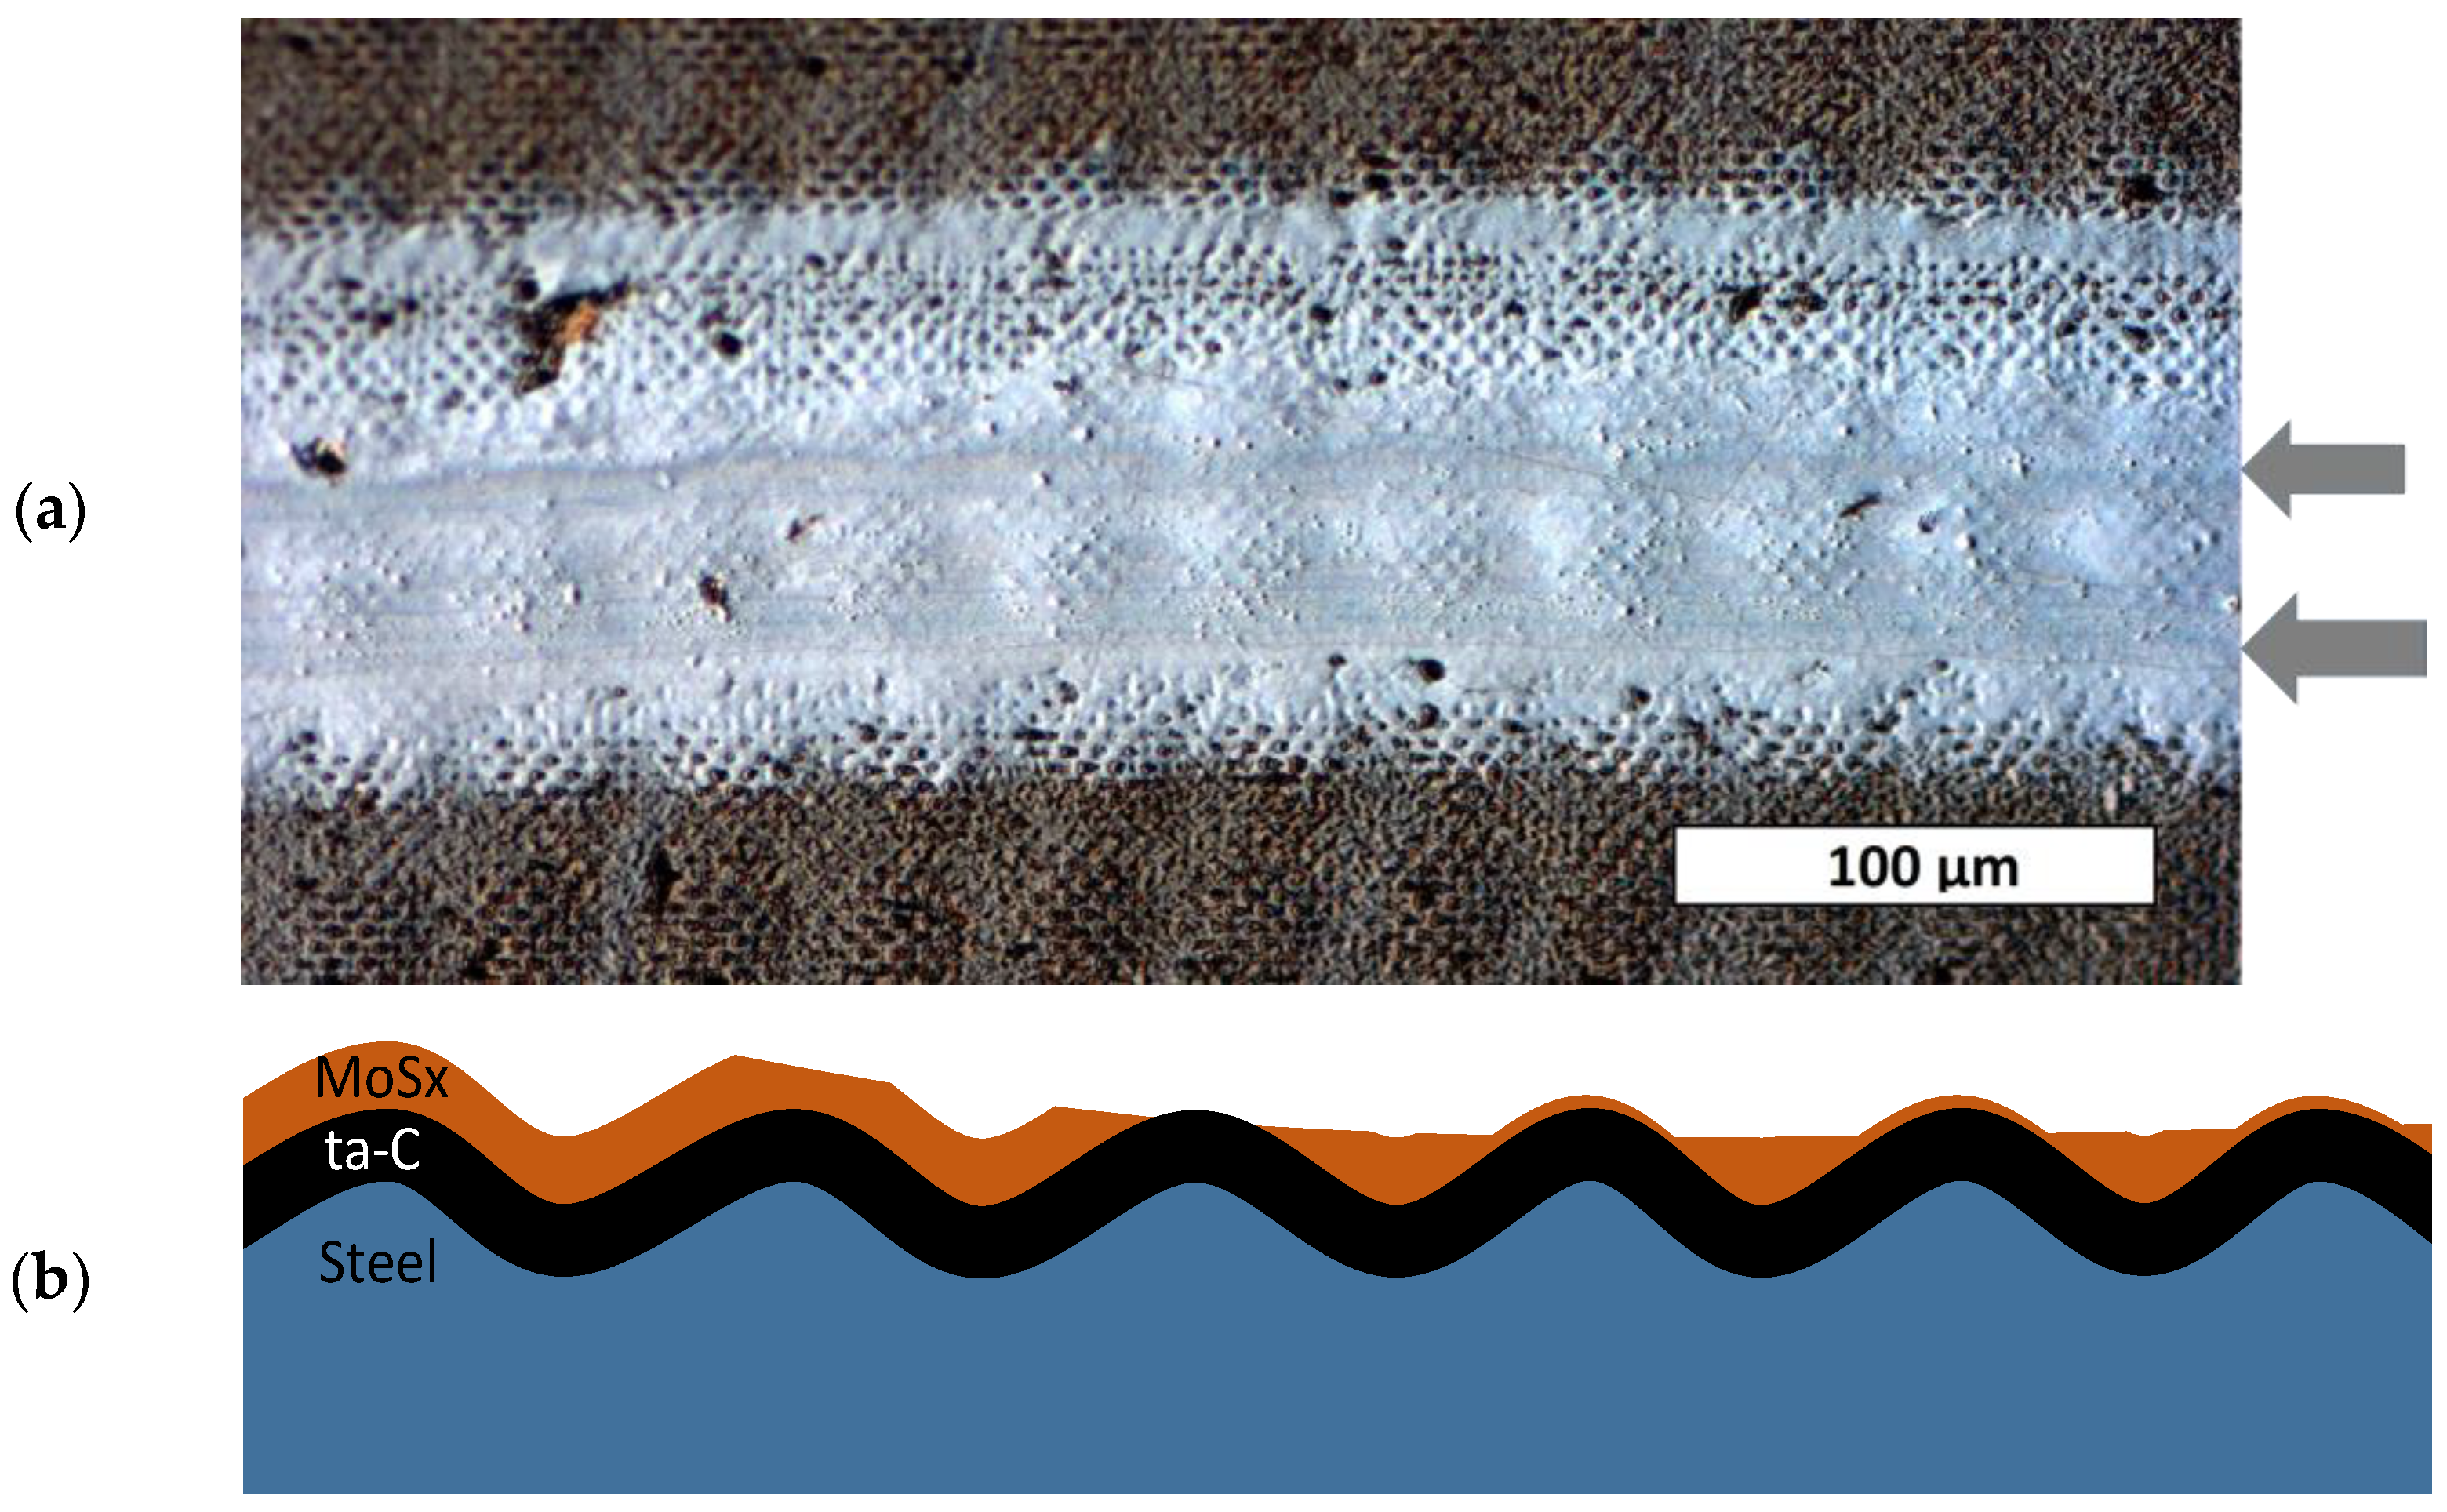
A very interesting case was found for the steel/DLIP/ta-C/MoSx surface (
Figure 7), where the very hard ta-C surface was covered with very soft MoSx. At the edge of the wear track, where only low contact pressure was found and only little material was removed, the MoSx coating had only the protruding peaks removed. Towards the middle of the wear track, where a higher contact pressure and higher wear occurred, most of the MoSx volume had been removed. Instead of the MoSx coating, the underlying peaks of the hard ta-C coating provided support and could withstand the locally concentrated contact pressure. No difference in the color or structure could be seen in the optical image, allowing the assumption that the whole area was still covered with MoSx.
4. Discussion
The tribological performance of the investigated surfaces in a vacuum can be categorized into two groups, whether the top layer was MoSx or not (
Figure 3).
Whenever MoSx was the top layer, friction was very low (µ < 0.02). Also, the wear rates were low for both the disk and ball. The DLIP structuring and ta-C sublayer did not change the outcome, except for the steel/DLIP/MoSx, where wear rate was somewhat lower on the ball but was increased for the disk. In general, the tribological properties were mostly governed by the MoSx, which was expected to perform well in a vacuum.
Contrarily, the friction and wear were high when ta-C or steel was the topmost surface. The friction coefficient was µ > 0.8, indicating adhesion of the materials. Both ta-C and steel lost passivation in a vacuum quickly due to the lack of oxygen or water, indicated by an initially low friction coefficient that increased sharply. The steel surfaces in contact reacted with cold welding and heavy plastic deformation. The surface with a ta-C coating was very hard and therefore did not deform plastically but showed heavy abrasion. Consequently, both the disk and ball wear were half a magnitude higher for steel/DLIP and more than one magnitude higher for steel/DLIP/ta-C. Again, no benefit from DLIP structuring was evident based on the analysis of the wear scar and wear track images.
With respect to their performance in air, two of the surfaces were studied in air to investigate whether the steel/DLIP/ta-C/MoSx had any benefit over the steel/MoSx. It was found that friction coefficient and disk and ball wear rates were very similar (
Figure 4). In both cases, the MoSx was removed from the disk surface, forming a thick transfer layer on and around the ball contact area.
The disk wear rate for both was more than one order of magnitude higher compared to the vacuum conditions for the same surfaces. Furthermore, the MoSx wear rate in atmosphere was in the same order as the ta-C surface in a vacuum, highlighting the adverse effects of the surrounding conditions on the coating.
Despite its high similarity when evaluated quantitatively, a detailed analysis of the wear mechanism revealed differences. In the case of the steel/MoSx surface, the soft MoSx coating was worn, leading to a large contact area. The grooves in the wear track indicated a localized and uneven wear. Delamination of the coating indicated that the strength of the interface was exceeded. In contrast, on the steel/DLIP/ta-C/MoSx, the soft top coating was removed down to the ta-C coating only. The study of the wear track indicated that the underlying ta-C provided support for the loaded contact, as the DLIP structure was revealed again after most of the MoSx was removed. The MoSx pockets remaining between the ta-C hills acted as a reservoir of solid lubricant.
Structuring also changed the load-bearing capacity of the surface. On the macroscopic scale, the contact pressure was about 1.6 times higher in the case of the steel/DLIP/ta-C/MoSx compared to the steel/MoSx (
Table 3).
On the microscopic scale, the contact pressure for the steel/DLIP/ta-C/MoSx was much higher, as the load was primarily supported by ta-C-structured surface and not by the soft MoSx. Such very high contact pressures also induced very high shear stresses, which were beneficial to forming shearing planes of MoS2 out of the amorphous MoSx material.
The presence of MoSx on the remaining structure was evidenced using Raman spectroscopy. A 100× objective, leading to a spot size of about 1 µm in diameter, was focused on the peak and valley areas of the remaining structure in the wear track after testing the steel/DLIP/ta-C/MoSx in air. The measurement positions are shown in
Figure 8a. For both locations, a single representative spectrum is shown in
Figure 8b.
In all locations, dominant spectra corresponding to MoS
2 were found (characteristic peaks at 382 cm
−1 and 408 cm
−1), indicating that MoSx was present in all cases. On the contrary, only a very weak G peak around 1580 cm
−1, characteristic of ta-C, was found. As ta-C coatings usually give a strong Raman signal, it is assumed that the amorphous MoSx on top of it became highly ordered due to shearing. Consequently, the reflectance increased to such a high level that the laser beam was barely able to penetrate and probe the underlying ta-C layer [
36].
Figure 8.
Analysis of the steel/DLIP/ta-C/MoSx surface tested in air showing: (a) light microscope image and magnified inset (DIC), exemplarily indicating depression and sliding surface positions for Raman analysis, and (b) one representative Raman spectrum for each of the locations.
Figure 8.
Analysis of the steel/DLIP/ta-C/MoSx surface tested in air showing: (a) light microscope image and magnified inset (DIC), exemplarily indicating depression and sliding surface positions for Raman analysis, and (b) one representative Raman spectrum for each of the locations.
From an application point of view, the combination of the DLIP structure with the ta-C support layer and MoSx sliding top layer opens up the possibility to create tribological contacts which can endure very high loads in both the atmosphere and vacuums without compromising friction and wear performance. While in this work, the two coatings were deposited in two different batches, it is possible in principle to deposit such bilayer coatings in a single batch using two separate arc sources.
Given the stable wear structure formed during tribological loading, both long-term testing as well as testing in changing atmospheres, for example in air and a vacuum, mimicking multi-use space applications, should be studied in the next step.
5. Conclusions
In this work, the combination of DLIP structured steel substrates and deposition of ta-C and MoSx mono- and bilayers using LaserArc™ technology was investigated, resulting in the following surfaces: steel/DLIP, steel/DLIP/ta-C, steel/DLIP/MoSx, steel/DLIP/ta-C/MoSx, and steel/MoSx. Their tribological properties were studied using a pin-on-disk-tribometer using a steel ball as the counter body and without any lubrication. All the surfaces were studied in a vacuum at a pressure of p < 5 × 10⁻⁷ mbar. Furthermore, the steel/DLIP/ta-C/MoSx and steel/MoSx were studied in ambient air with the same setup. The wear surfaces on both the disk and ball were examined to identify the wear mechanisms and topographic changes.
In vacuum conditions, all the coatings with a MoSx top layer had similar good performances with a very low friction (µ < 0.02) and low wear, regardless of the underlying structure or underlying coatings. In contrast, very high friction and wear was observed when steel or ta-C were the topmost materials of the disk, which was attributed to their loss of initial passivation and the resulting strong adhesion with the steel counter body.
In ambient air, the ball and disk wear rates as well as the friction coefficients were similar for both the steel/MoSx and steel/DLIP/ta-C/MoSx when compared quantitatively. However, while on the steel/MoSx surface, the coating started to delaminate along the wear tracks, the steel/DLIP/ta-C/MoSx surface was able to endure a much higher contact pressure without delamination. After the soft MoSx layer was partially worn on the steel/DLIP/ta-C/MoSx, the underlying ta-C coating with the DLIP structure was able to provide mechanical support to the top of the structure while providing a MoSx reservoir in between the structure. The load was confined to a small and well-defined contact area with a stable wear mechanism.
The combination of a structured substrate with a hard sub-layer and soft friction layer enables the design of high-load tribological surfaces, which might result in smaller and more durable dry-running bearings that can be used in both vacuums and in air, for example, in machines that temporarily operate in a technical vacuum or for multi-use space applications.
