Article

Effect of Wear on Alternating Bending Fatigue Life of 20CrNi2Mo Martensitic Steel

1
School of Electronic and Information Engineering, Anshun University, Anshun 561000, China
2
Guizhou Provincial University Integrated Key Tackling Platform, Anshun University, Anshun 561000, China
3
College of Mechanical Engineering, Guizhou University, Guiyang 550025, China
4
Guizhou Anji Aviation Precision Casting Co., Ltd., Anshun 561000, China
*
Author to whom correspondence should be addressed.
Lubricants 2024, 12(5), 157; https://doi.org/10.3390/lubricants12050157
Submission received: 25 March 2024 / Revised: 26 April 2024 / Accepted: 26 April 2024 / Published: 30 April 2024
(This article belongs to the Special Issue Friction and Wear of Alloys)

Abstract

:
Bending fatigue failures are commonly related to the wear behavior in an active system. The surface wear and plastic deformation of the tribolayer play crucial roles in the wear–bending fatigue behaviors of steels. In particular, the lamellar structure of martensitic steel leads to its unique wear–bending fatigue behavior. In this work, the wear–bending fatigue testing method and device were introduced to explore the wear–bending fatigue behavior of the martensitic steel. The effect of wear on the alternating bending fatigue life of 20CrNi2Mo martensitic steel was studied under low and high fatigue stress. The influence of wear debris on the fatigue life at two different sliding speeds was also analyzed. The results show that the fatigue life decreased with the wear load increased under high bending stress. Moreover, for systems with nanoscale wear debris on the steel surface, the wear–bending fatigue lifetimes are significantly enhanced compared with large wear debris.

1. Introduction

Multi-load service conditions involving two or more loads, such as fatigue, wear, and corrosion, are relatively common, and wear–fatigue multi-load engineering problems are prominent in the field of mechanical equipment [1,2,3,4]. Under dynamic service conditions with the friction and wear process, the bearing situations of main machinery parts are very complicated. Both the wear damage and fatigue damage have a significant effect on the service life of mechanical parts [5,6,7]. Generally, tribology experts employ various methods to reduce or even avoid wear, with a focus on surface damage, while fatigue researchers typically concentrate on volume damage or fractures. The interaction between wear and fatigue load, however, plays a crucial role in determining the failure mechanism of machinery parts. The current research on the wear–fatigue problem primarily focuses on mechanical components and assemblies, with some typical active systems including wheel/rail [8], steel wire [9], gearings [7,10], bearings [11], etc. The study conducted by Kapoor et al. [12] revealed that the service lives of mechanical parts were frequently not only influenced by a single load but also by the combined effects of wear and fatigue loads. For instance, the introduction of lubricating oil into surface cracks mitigate the wear process and consequently accelerate the crack propagation process. The fatigue cracks can be eliminated through the appropriate loss of surface material. A classical computational model of the Kapoor net was developed to analyze the crack propagation due to fatigue and contact friction wear under alternating loads. The relationship between the wear, fatigue, and the crack propagation under microdynamic conditions was investigated by Cantini [13,14] and Basseville et al. [15]. The propagation of rolling contact fatigue cracks may initially occur at a faster rate. However, once the crack reaches a certain depth or remains unchanged in length, it will either disappear due to material loss if the wear rate is high or continue to extend until failure occurs.
The conventional theory of damage accumulation is not applicable for addressing this nonlinear problem. The fatigue damage is typically mild under severe wear conditions, while the wear is relatively mild under severe fatigue damage [16]. The difference of surface plastic deformation, cold work hardening, and microstructure evolution resulting from wear are sufficient to significantly differentiate the wear–fatigue behavior from fatigue behavior alone. The presence of worn surfaces has a significant impact on both the initiation and propagation of cracks. On the one hand, the improvements in the strength and hardness of the tribolayer can directly impact the initiation of fatigue cracks. On the other hand, as shear strain is applied to the tribolayer, there is a change in the direction of crack propagation until it becomes parallel to the shear strain plane. Therefore, the service lives of the wheel and rail can be extended by effectively balancing the propagation rate of contact fatigue cracks and the rate of material wear. The current investigation of the wear–fatigue problem primarily focuses on the integration of fretting wear, tensile fatigue, and contact fatigue [8,17]. The fretting wear method and theory cannot be applied to investigate wear–bending fatigue behaviors under large displacement slip and the bending fatigue load, due to the microscale slip nature of fretting wear. Meanwhile, researchers have studied the relationship between wear and contact fatigue, which differs from the wear and bending fatigue behaviors in this study. The mechanism of crack initiation and propagation in contact fatigue differs from that in bending fatigue.
The aforementioned investigations, in addition, failed to simultaneously consider the inherent microstructure of materials and the evolution of microstructure in tribolayers when assessing wear–fatigue behaviors. The original microstructure, plastic flow, and the formation of a protective tribolayer are theoretically interrelated factors influencing wear–fatigue behavior [18,19,20,21]. Moreover, during the process of large sliding friction, the change in microstructure has a significant impact on the friction and wear characteristics. In particular, oxide nanoparticles in the system can be formed and attached to the surface, thereby reducing the stress concentration at the friction contact and providing self-lubricating protection [22].
The wear–fatigue behavior, taking into account the evolution of lamellar structures within the tribolayer and the formation of a self-lubricating surface layer, is investigated. The wear–fatigue behavior of 20CrNi2Mo martensitic steel with lamellar structures was investigated in this research, under conditions of large displacement sliding wear and rotary bending fatigue load, using self-developed equipment. This study aims to provide a stronger experimental and theoretical foundation for the investigation of the wear–fatigue system.

2. Methods

2.1. Wear–Fatigue Behavior Test Device

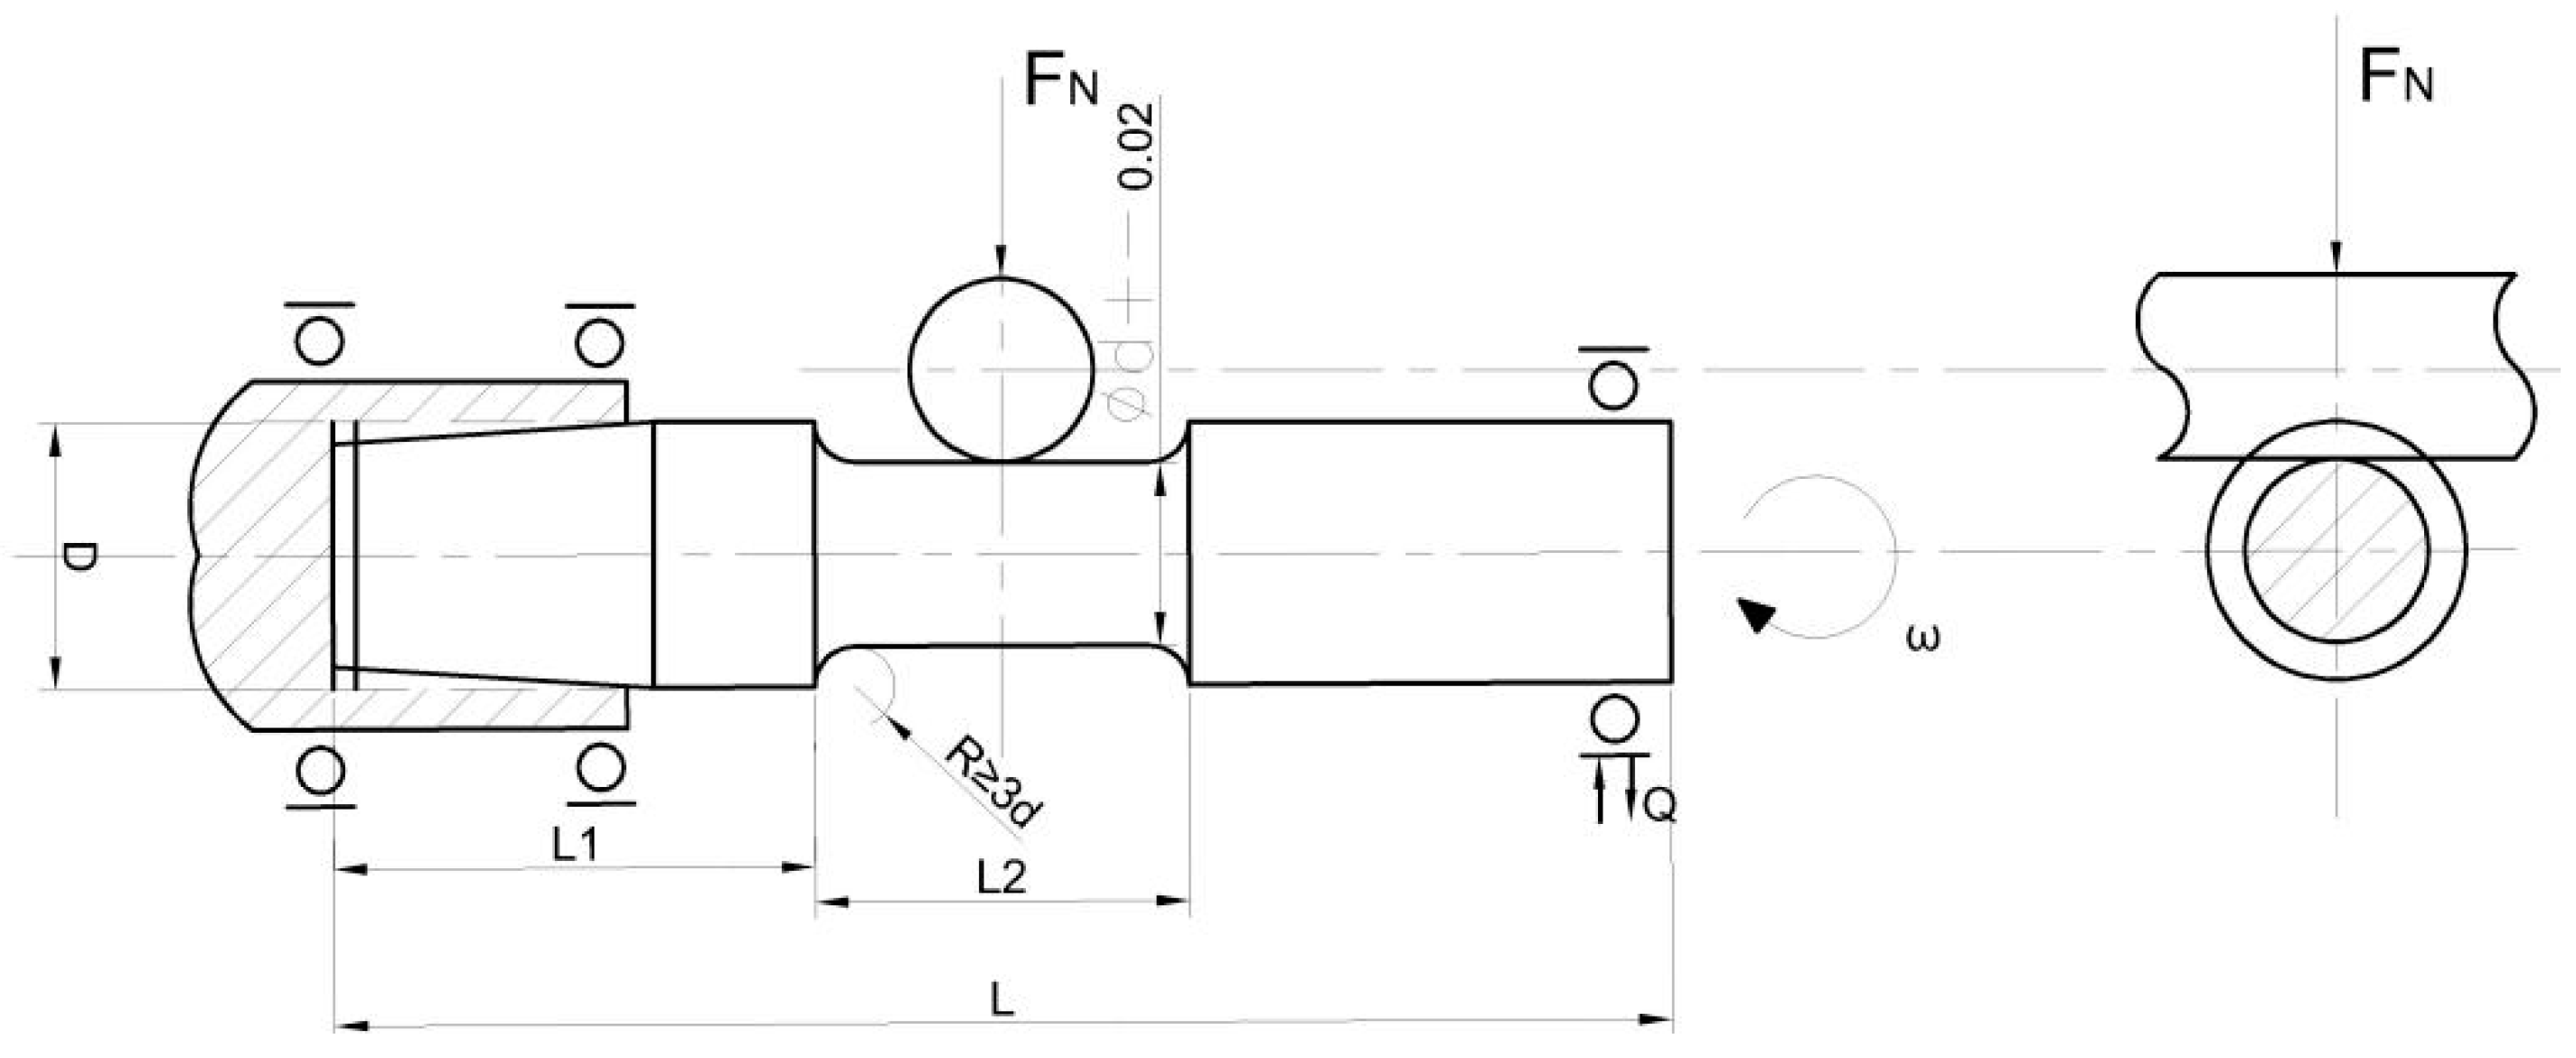
The device was equipped with a cantilever beam applying the primary bending stress as the main body, and wear loads were applied via a linear bearing. The key components of the device consisted of a fatigue load, a specimen, a wear load, a tungsten rod, and a rotary axis, as depicted in Figure 1. The function of the rotary axis was clamping the sample and driving it to rotate at high speed. The high-speed bearing was subjected to fatigue loads, and the specimens were installed within the bearing. A wear load was applied through a linear bearing to exert pressure on the tungsten rod, causing it to come into contact with the specimen. Sliding wear occurred as the specimen rotated. The aforementioned device enables the application of wear–fatigue multi-loads combined with sliding wear and bending stress to specimens.
The schematic diagram of the experimental method is illustrated in Figure 2. The roller/shaft system operates under the influence of contact FN (wear load) and non-contact Q (bending load) forces as the shaft rotates around its axis at a certain speed ω. The wear load is defined for the normal load and represents a typical roller/shaft tribo-fatigue system proposed in the existing literature [6]. The wear and bending stress can be regulated by adjusting the FN and Q, while the speed ω can be altered through the drive motor.

2.2. Wear–Fatigue Test Samples

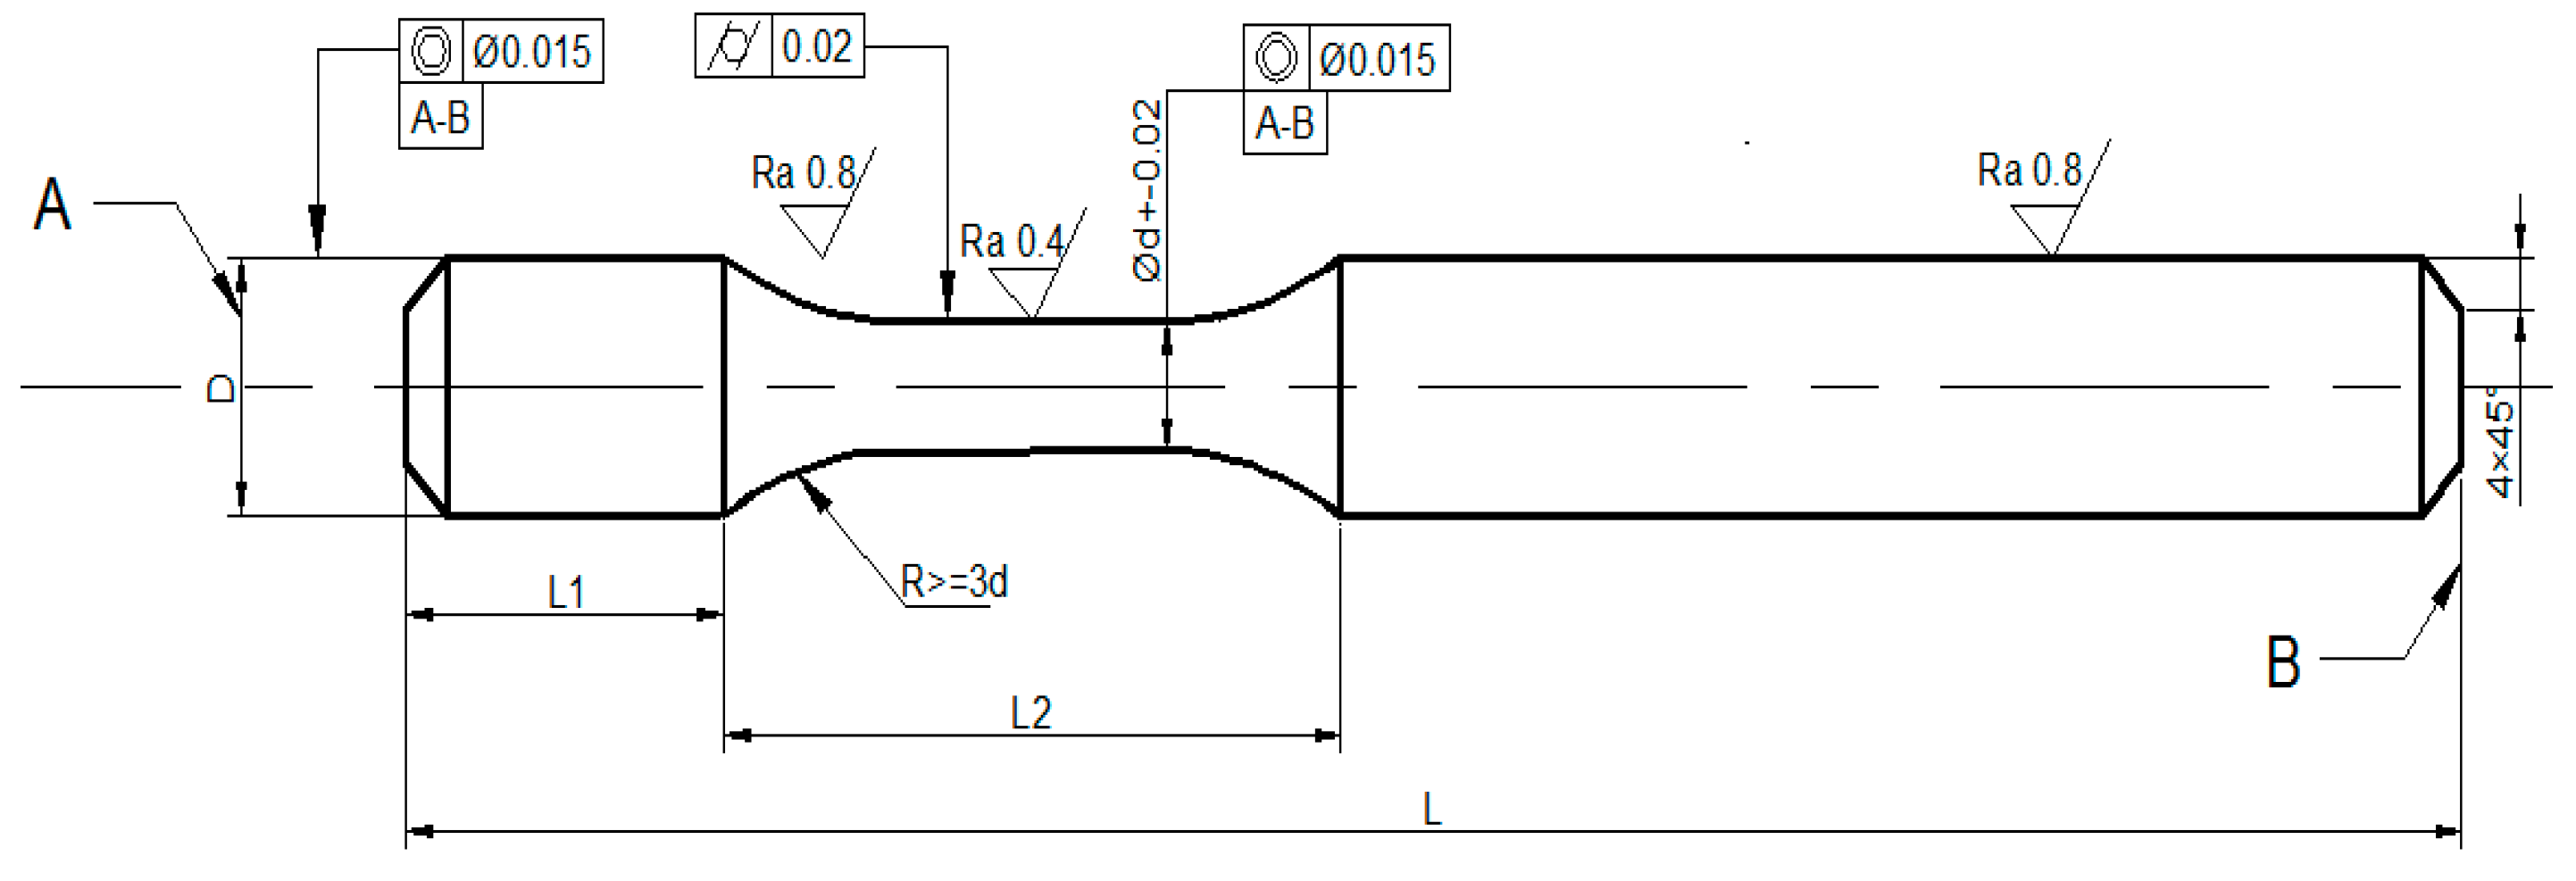
The 20CrNi2Mo steel bars were subjected to a heat treatment process, consisting of heating them at a temperature of 1000 °C for a duration of 50 min, followed by quenching in brine. Subsequently, the bars underwent tempering and were maintained at a temperature of 560 °C for a period of 1.5 h. After the heat treatment, the bars were sectioned into unconventional fatigue samples for wear–fatigue tests, as illustrated in Figure 3. The dimensions of the samples are as follows: the diameter d is 4.7 mm, diameter ‘D’ is 14.7 mm, and the lengths ‘L’, ‘L1′, and ‘L2′ are 260 mm, 55.5 mm, and 30.1 mm, respectively.

2.3. Characterization

To investigate the influencing factors of the wear–fatigue life, it was necessary to characterize the fracture surfaces, worn surfaces, wear debris (under various wear conditions) of a failed sample using a SUPER40 field-emission scanning electron microscope equipped with an EBSD analyzer (CNSI, Los Angles, CA, USA). The TEM specimen of the wear subsurface was prepared by utilizing a focused ion beam (FIB) “lift-out” technique in the FEI Helios NanoLab 600i (FEI, Tsukuba, Japan), with cutting performed precisely at the midpoint of the wear track. The failure sample fracture surface, worn surface, and wear debris were characterized by using an OLYMPUS OLS5000 laser scanning microscope (Cytek Industrial Scientific, Fremont, CA, USA). The characterization process involves the following three steps: 1. preparation of a cross-section sample through grinding and polishing of the fracture surface; 2. cutting a wear–fatigue cross-section sample along the radial direction; 3. cutting a wear–fatigue longitudinal profile sample along the axial direction.

3. Results and Discussion

3.1. Wear Effect on Wear–Fatigue Behavior under Low Bending Stress

After the wear–fatigue life exceeding 107 cycles under specific conditions, a relative balance state between wear and fatigue was achieved. In order to attain a state of relative equilibrium, the theoretically calculated fatigue limit value was considered as the actual bending stress loading value, specifically at a bending stress of 468 MPa. Table 1 summarizes wear fatigue test parameters and results under low bending stress. The wear–fatigue tests were conducted on at least two samples for each set of parameters, while maintaining the bending stress constant. The obtained data were averaged. Additionally, to ensure consistency, the rotation speed of the test samples was set to 1200 r/min. The samples, which exhibited no failures after 107 cycles, were assumed to possess infinite lifetimes (fatigue life could be defined as passing).
According to the data presented in Table 1, the tested samples exhibited no failure under a bending stress of 468 MPa and wear loads ranging from 5 to 30 N. It is noteworthy that, after undergoing 1 × 10⁷ cycles, the minimum diameter of the sample decreased by 38.3% from its initial value of 4.7 mm to 2.9 mm due to wear. Remarkably, despite being worn down to a final diameter of only 2.9 mm, no fracture occurred, and the corresponding bending stress was up to 1989 MPa.
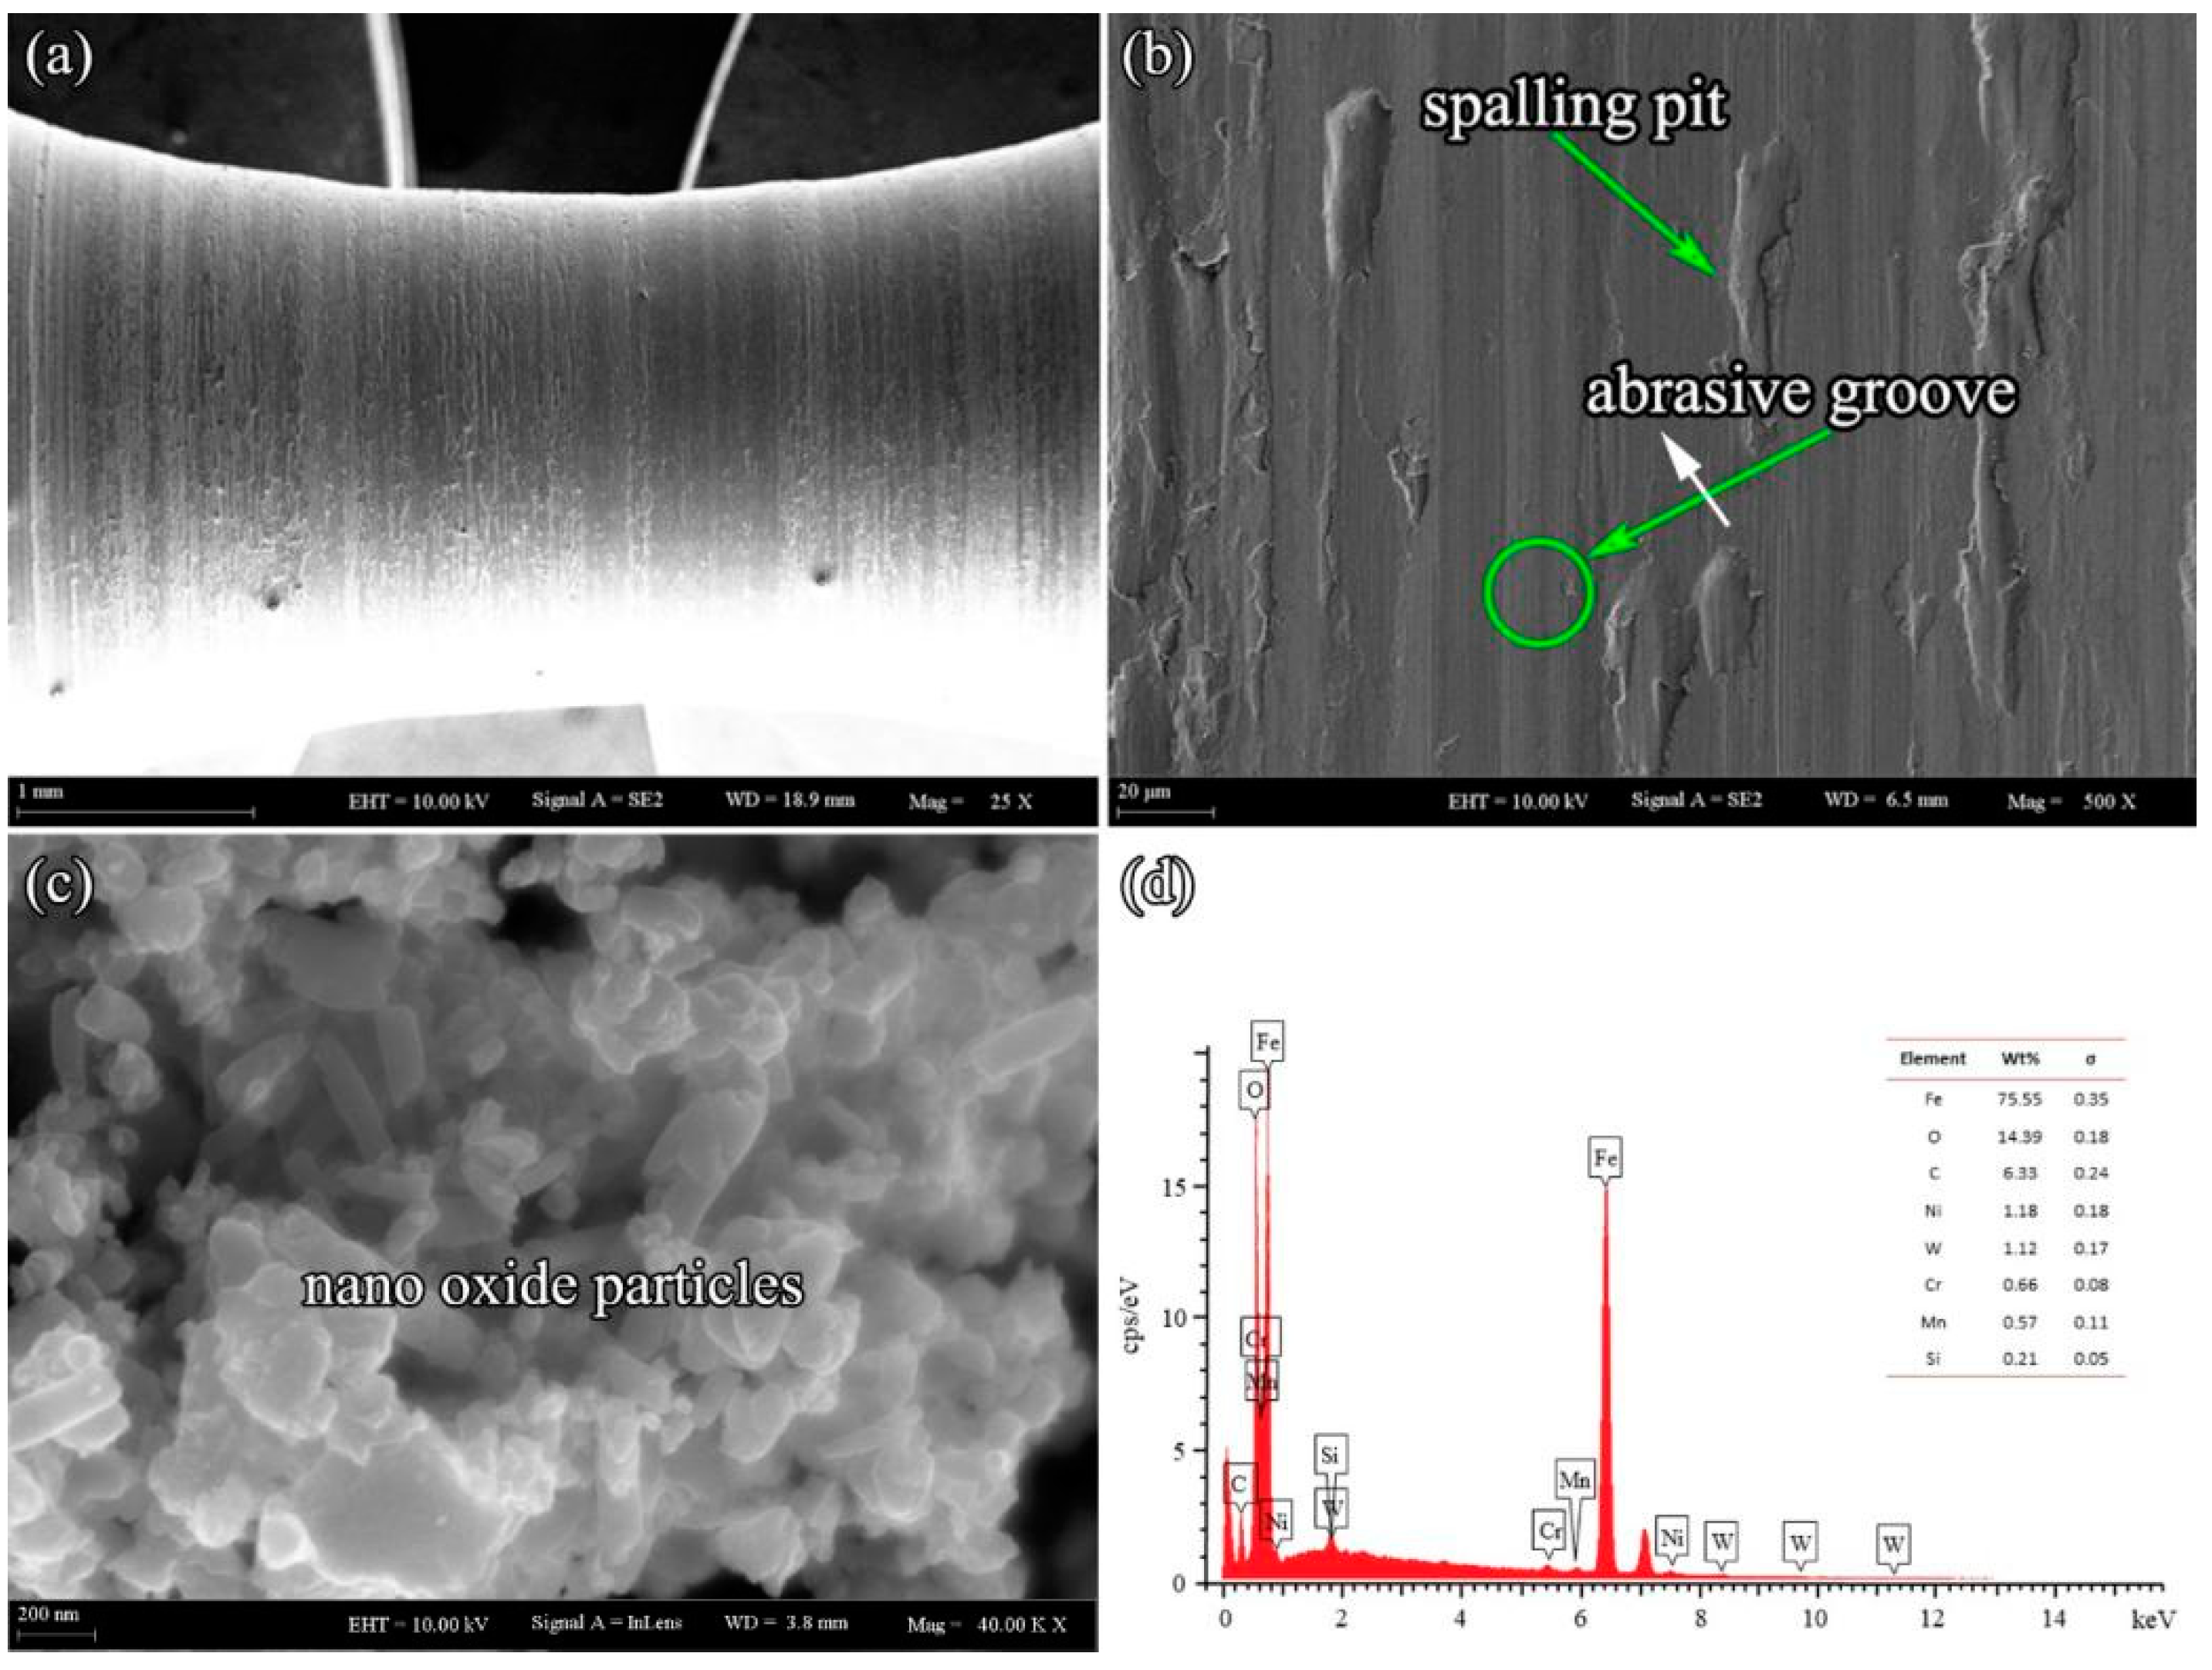
The microscopic morphology of the contact surface under a wear load of 20 N, bending stress of 468 MPa, and cycles of 1 × 10⁷, is depicted in Figure 4. The observation from Figure 4a and its magnification in Figure 4b revealed that grinding wear and peeling were the predominant wear mechanisms, while the surface of the sample remained relatively intact without any adhesive pits or cracks. The increase in wear load will lead to the contact stress increase, thereby resulting in the formation of cracks on the contact surface of the sample. Figure 4c reveals a significant presence of wear debris, with the magnified observation indicating their nanoscale nature. The EDS spectra of the wear debris, as depicted in Figure 4d, indicate an oxygen content of approximately 14%. The aforementioned oxide nanoparticles have been conclusively identified as the primary constituents of the self-lubricating layer formed during dry sliding. These nanoscale oxide particles are formed and retained on the contact surface, which serve as a third body to fill the pits resulting from adhesive wear, thereby facilitating smooth friction. Meanwhile, the layer of oxide particles is inherently brittle and prone to developing internal cracks, which in turn diminishes a portion of the frictional energy and reduces the overall shear stress. The participation of a significant number of oxide nanoparticles additionally enhances the contact area, enabling the thin layer to withstand positive pressure and frictional shear force, thereby effectively suppressing adhesive wear. The Fe2O3 particles, in particular, demonstrate an enhanced propensity for compaction and sintering at the contact surface, thereby resulting in a reduction of the coefficient of friction. The surface wear should therefore be minimized to the nano-scale under small loads. In this case, the formation of cracks with specific length and depth on the surface can be prevented, while any existing micro-cracks can be eliminated prior to their further propagation into the material.
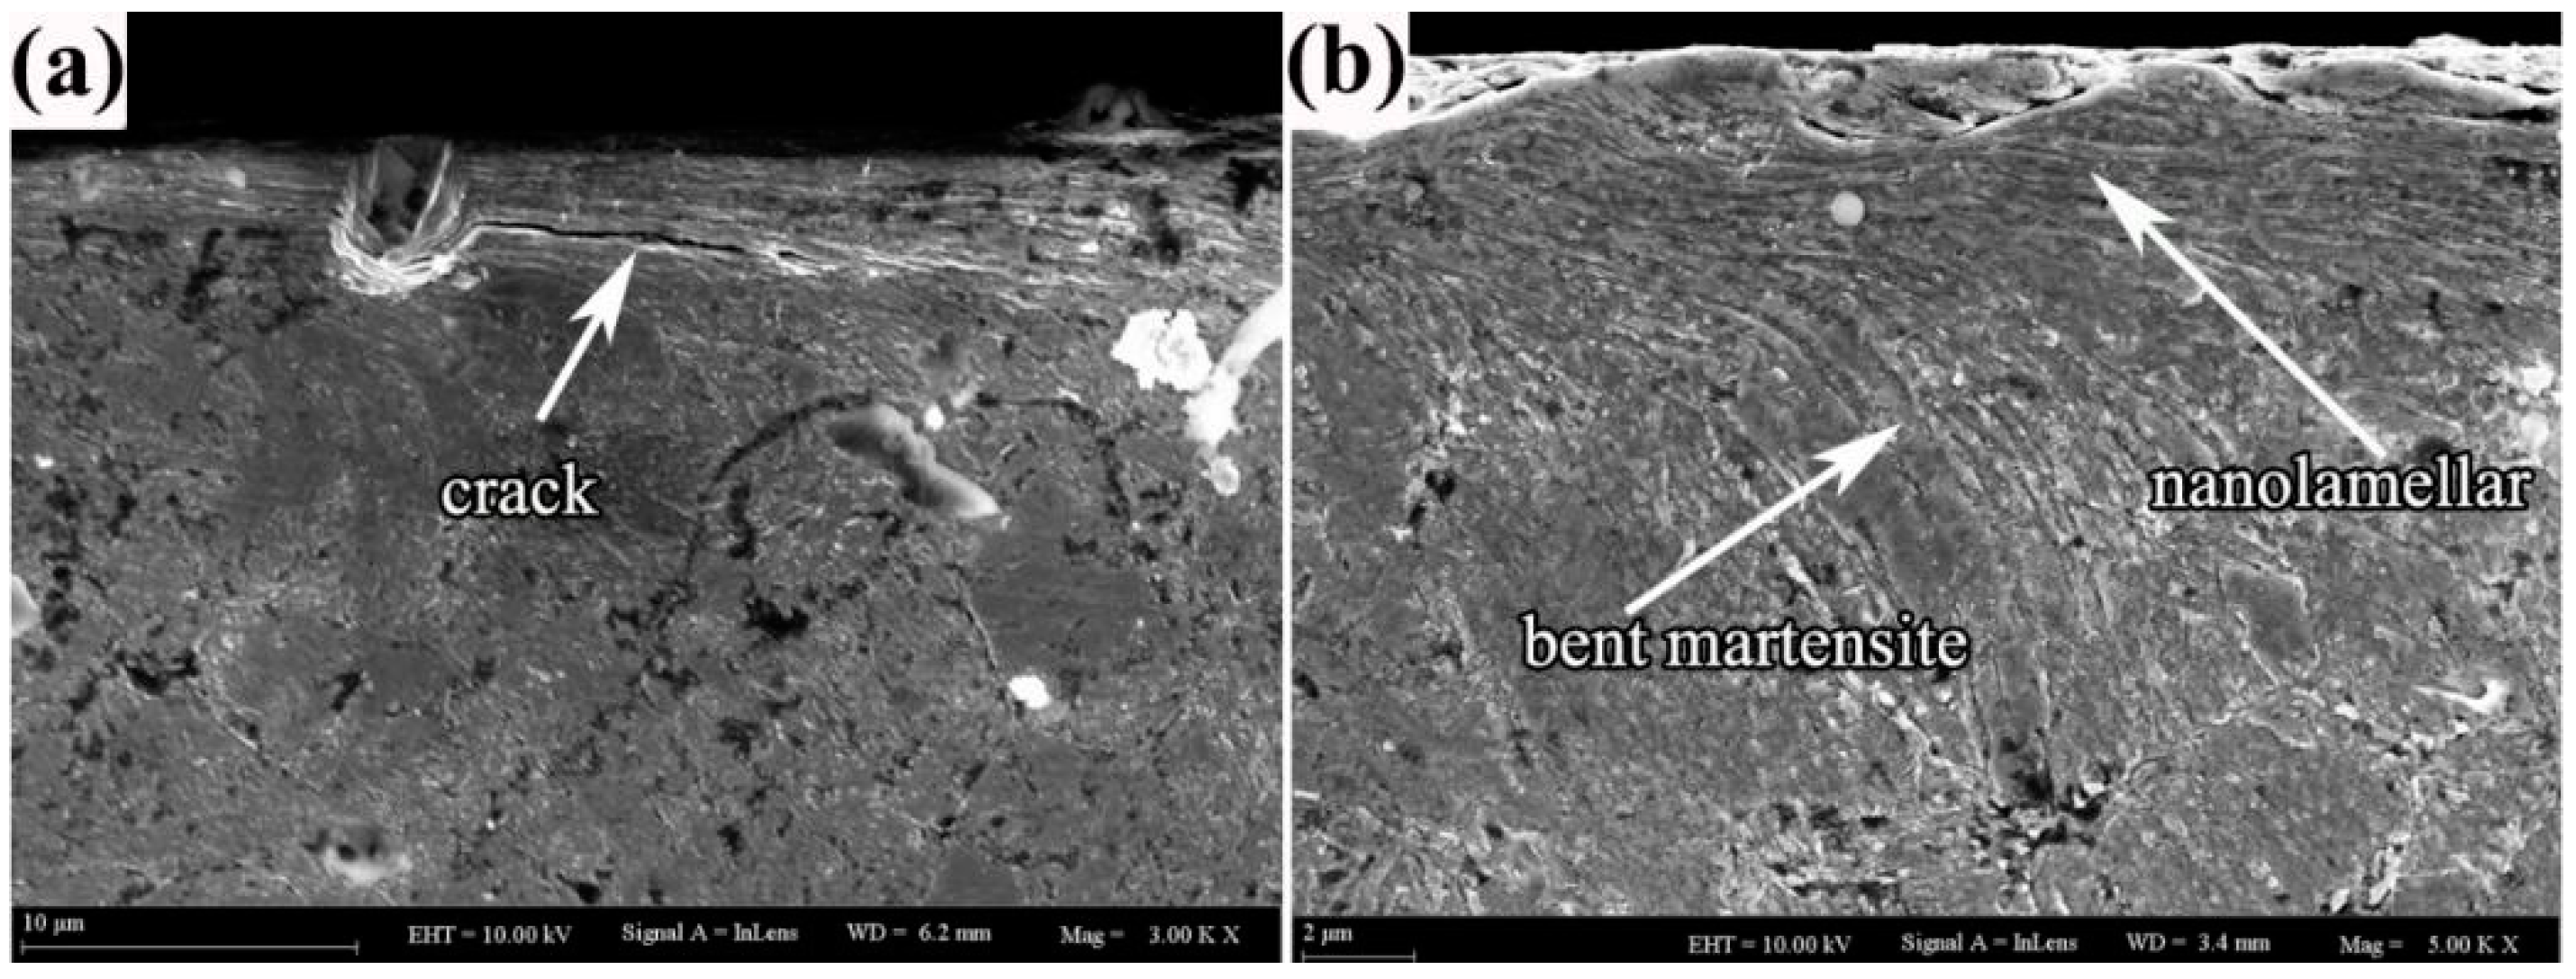
The SEM images of the sample cross section are depicted in Figure 5. The observation from Figure 5b revealed that, under bending fatigue stress, a peeling pit gradually developed under the surface. However, the damage depth remained minimal (approximately 1~2 μm), indicating negligible propagation of cracks in the depth direction. Additionally, it was evident that the sub-structures in the near surface regions exhibited a nearly parallel alignment with the sliding direction. This alignment could result in a gradual propagation of cracks towards the surface rather than deeper into the material [23]. The conclusion could also be supported by the characterization of fracture toughness in different material orientations, which revealed that the fracture toughness perpendicular to shear deformation was four-times higher than the parallel-to-deformation direction [24]. Even if the cracks propagate through the aforementioned regions, the microstructure within the plastic deformation layer withstands shear strain and initiates twisting parallel to the surface (martensite bending). Consequently, cracks within the deformation layer are influenced and extended in alignment with the bending direction. The crack propagation rate of a type I crack along the shear direction was significantly enhanced within the plastic deformation layer. The main crack propagation path was predominantly parallel to the surface, resulting in wear failure rather than fracture failure. The sample’s minimum diameter decreased by 38.3% from the initial value of 4.7 mm to 2.9 mm after 1 × 10⁷ cycles due to wear behavior, which only led to a reduction in size but did not result in failure of the sample.
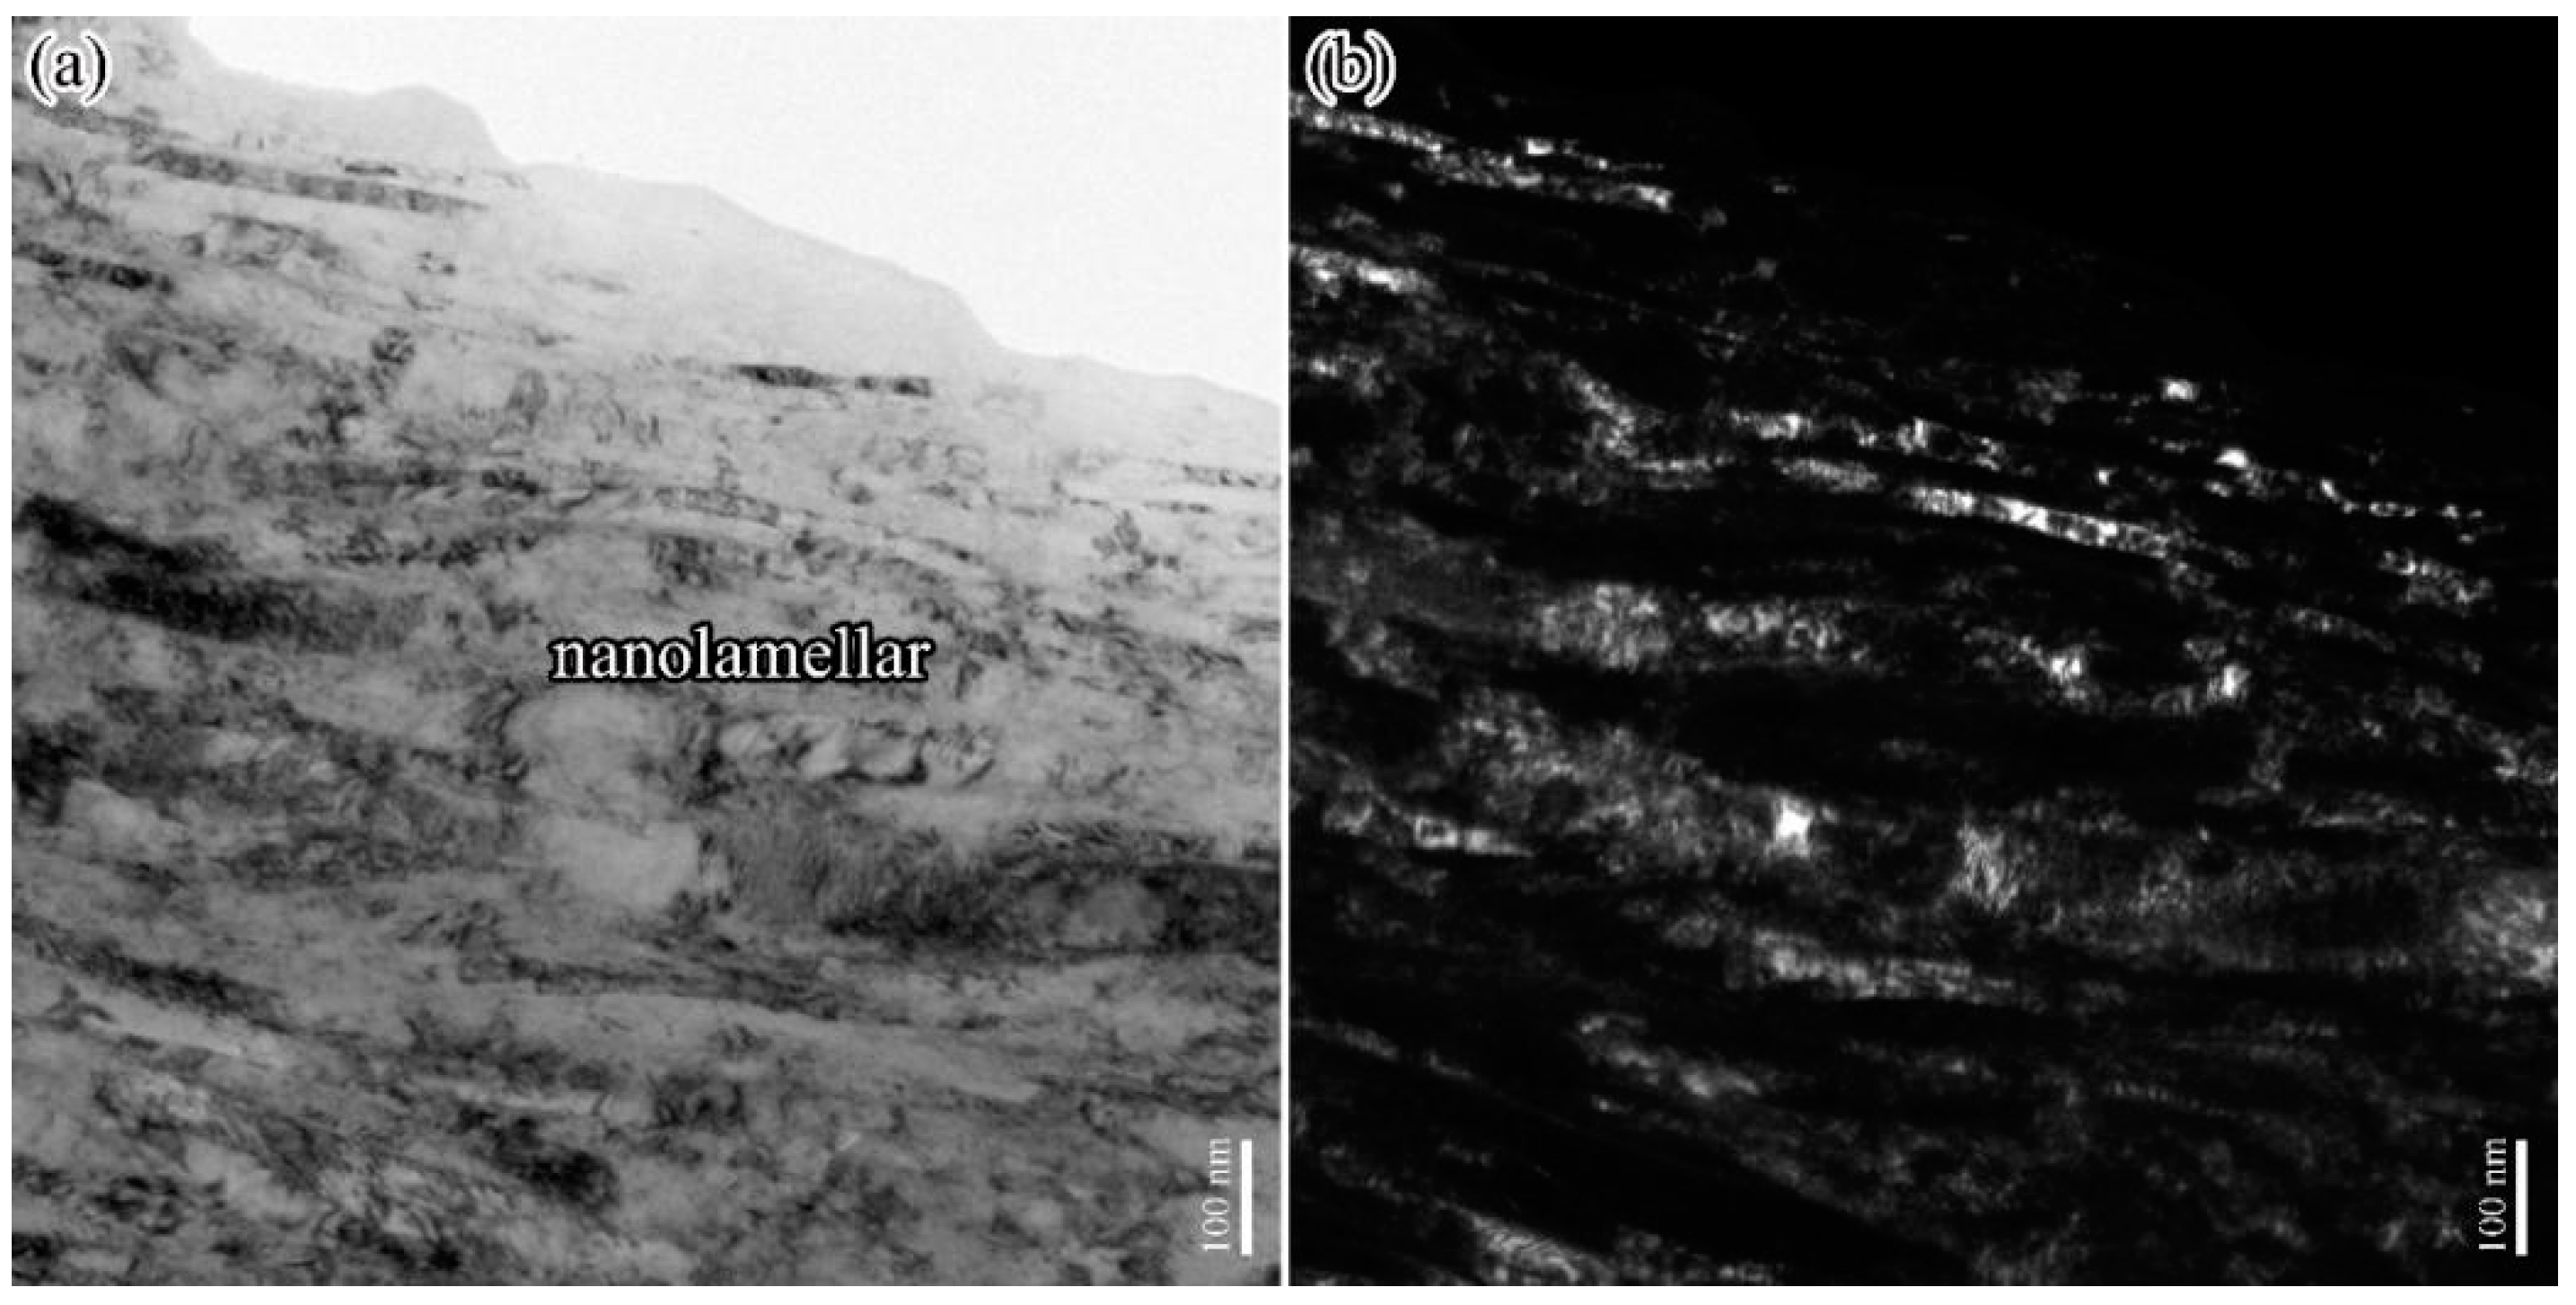
According to our previous results [23], with the increase in cumulative strain and strain gradient during dry sliding friction, the nanolamella structures form at the region of 0~5 μm from the top-most surface. The nanolamellar are shown in Figure 6, and the interfaces between these nanolamellar can hinder the dislocation movement. If the thickness of these nanolamellar are considered as the size of the effective grain, their contribution to strength is equivalent to that of strain-induced nanocrystalline structures, which effectively impeding dislocation movement and enhancing material strength.

3.2. Wear Effect on Wear–Fatigue Behavior under High Bending Stress

The results presented in Table 2 demonstrate that the wear–fatigue life is influenced by the applied wear load, while maintaining a bending stress of 550 MPa. The results clearly show that the wear–fatigue life of the sample significantly decreased as the wear load increased when the bending stress was 550 MPa.
When the wear load was 5 N, the sample remained intact after 1 × 10⁷ cycles. The wear rate and net fatigue crack propagation rate along the depth direction were in equilibrium, and there was no large stress concentration. However, after the wear load exceeded 10 N, as the load was further increased, the sample became more and more prone to failure. Microcracks were formed at the contact surface due to Hertz contact stress and local plastic deformation. These microcracks propagated along the direction parallel to the surface and the depth direction under bending fatigue stress. When the bending fatigue stress was 468 MPa, the microcracks mainly dissipated energy in the form of wear. The increase in wear load caused the cracks to be parallel to the surface and the wear rate and crack propagation rate reached the balance to the depth; therefore, the corresponding fatigue life was relatively high. However, once bending fatigue stress was increased to 550 MPa, the crack propagation rate along the depth direction was greatly increased and the crack propagation surface tended to be perpendicular to the surface. In this case, if wear resulted in greater stress concentration on the surface, deep cracks soon extended along the depth direction. This was the main reason for the large life reduction after increasing wear load. The wear rate was much smaller than the crack propagation rate along the depth direction, and surface cracks could not be eliminated by wear.
The sample surface topography at a wear load of 5 N and bending fatigue stress of 550 MPa after 2 million cycles is illustrated in Figure 7. It can be seen from the figure that abrasive wear was still the main wear mechanism, with roughness Ra = 2.60 μm, which was the same as the surface topography of the sample at a wear load of 20 N and bending fatigue stress of 468 MPa after 1 × 10⁷ cycles. Under high bending stress and low wear load, there were no deep initial cracks and greater stress concentration on the worn surface.
Sample contact surfaces after 2 million cycles under bending stress of 550 MPa and wear load of 20 N are illustrated in Figure 8a. In the figure, a shot crack is witnessed at the worn surface, and there is an inclination angle between propagation and sliding directions. This indicated that the initial surface cracks were mainly caused by wear. When the cycle number was increased to 2.3 million, the number of microscopic cracks on the surface was significantly increased, as illustrated in Figure 8b. In terms of wear mechanism and surface roughness, it was actually different from that at a bending stress of 468 MPa and wear load of 20 N. This indicated that an increase in bending stress could accelerate surface crack propagation. It further proved that when the bending fatigue stress was large, the surface cracks caused by wear mainly expanded along the depth direction. After increasing the wear load, the surface crack formation speed was accelerated, and cracks were expanded along the depth direction at a faster speed. If the wear load matched the bending stress, surface cracks were quickly eliminated by wear. However, the cracks caused by wear expanded toward the depth under a high bending stress, eventually leading to fractures. Local amplification images of the macroscopic fracture morphology under a bending stress of 550 MPa and wear load of 20 N are shown in Figure 8c,d. It was observed that the crack source area was very small, and the crack surface was very rough near the surface, with deep and wide gullies (all caused by wear). Usually, fatigue cracks occur in internal inclusions, but the introduction of wear load changes the initiation position from central inclusions to the wear surface. As small surface cracks, it quickly changes from a small crack propagation phase to a long surface crack extension phase. It was seen from the fracture that the fatigue crack initiation time was short. Wear caused the initial surface crack initiation to quickly expand along the depth direction under high bending fatigue stress eventually leading to fractures.

3.3. Rotation Speed Effect on Wear–Fatigue Behavior

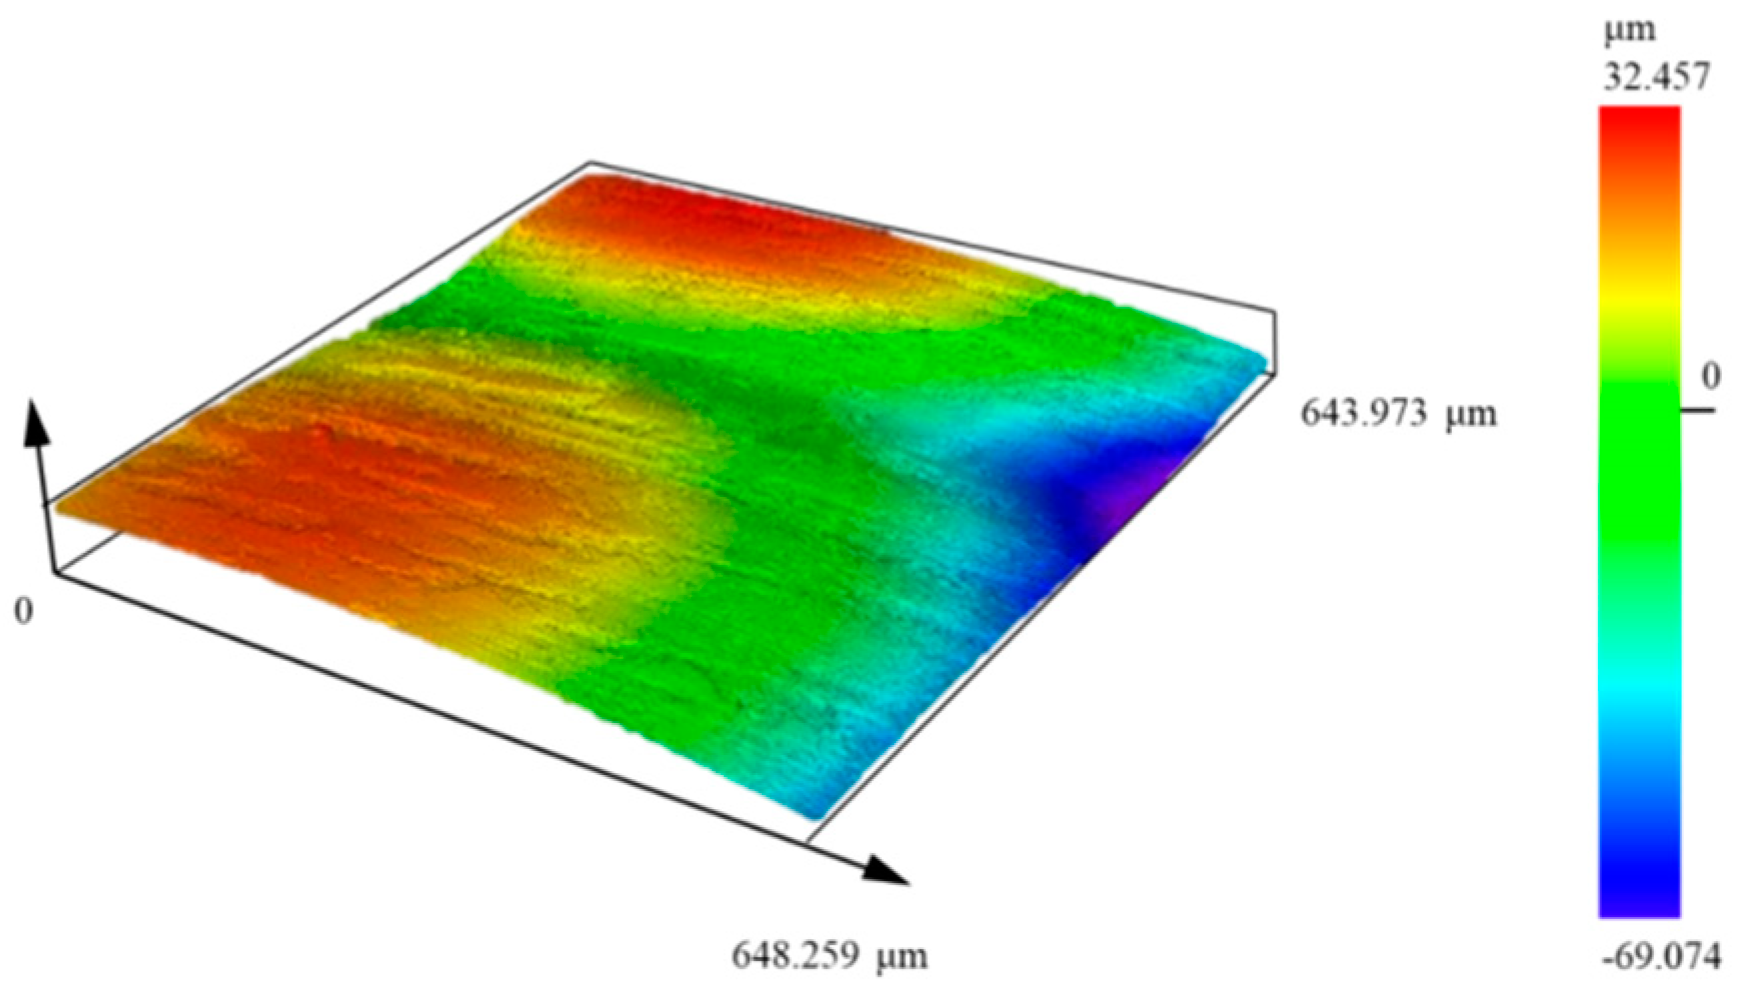
In order to explore the rotation speed effect on wear–fatigue behavior, the rotation speed was set at 1200 and 3000 r/min under a wear load of 30 N. The results revealed that at a rotation speed of 1200 r/min, samples experienced 1 × 10⁷+ cycles and the minimum diameter was decreased to 2.9 mm, and when rotation speed increased to 3000 r/min, samples failed after 3.49 × 10⁶ cycles. Figure 9 illustrates a surface topography with a rotation speed of 1200 r/min observed by a laser scanning confocal microscope. It can be seen from the figure that the contact surface was smooth with roughness Ra = 3.23 μm.
During the test at rotation speed 1200 r/min, part of the debris was also collected and observed under a laser scanning confocal microscope to capture the morphology and height map of debris, as illustrated in Figure 10. It was seen that the debris had lost its metallic luster, was light yellow, mainly became iron oxides, and the width was small (all within 20 μm, even nanoscale), and the thickness was about 1~2 μm. This was due to the large plastic deformation of the contact surface resulting in microstructural refinement, forming nanolamellar [25,26], which increased the diffusion coefficient of oxygen atoms from the external environment to material subsurface. The contact surface nanolamellar was oxidized, and the oxidized nanolamellar fell off to form small debris. The thickness of these debris was small because the microcracks caused by surface strong plastic deformation were not deep. The wear mechanism was mainly oxidative wear and abrasive wear under a bending stress of 468 MPa, wear load of 30 N, and rotation speed of 1200 r/min.
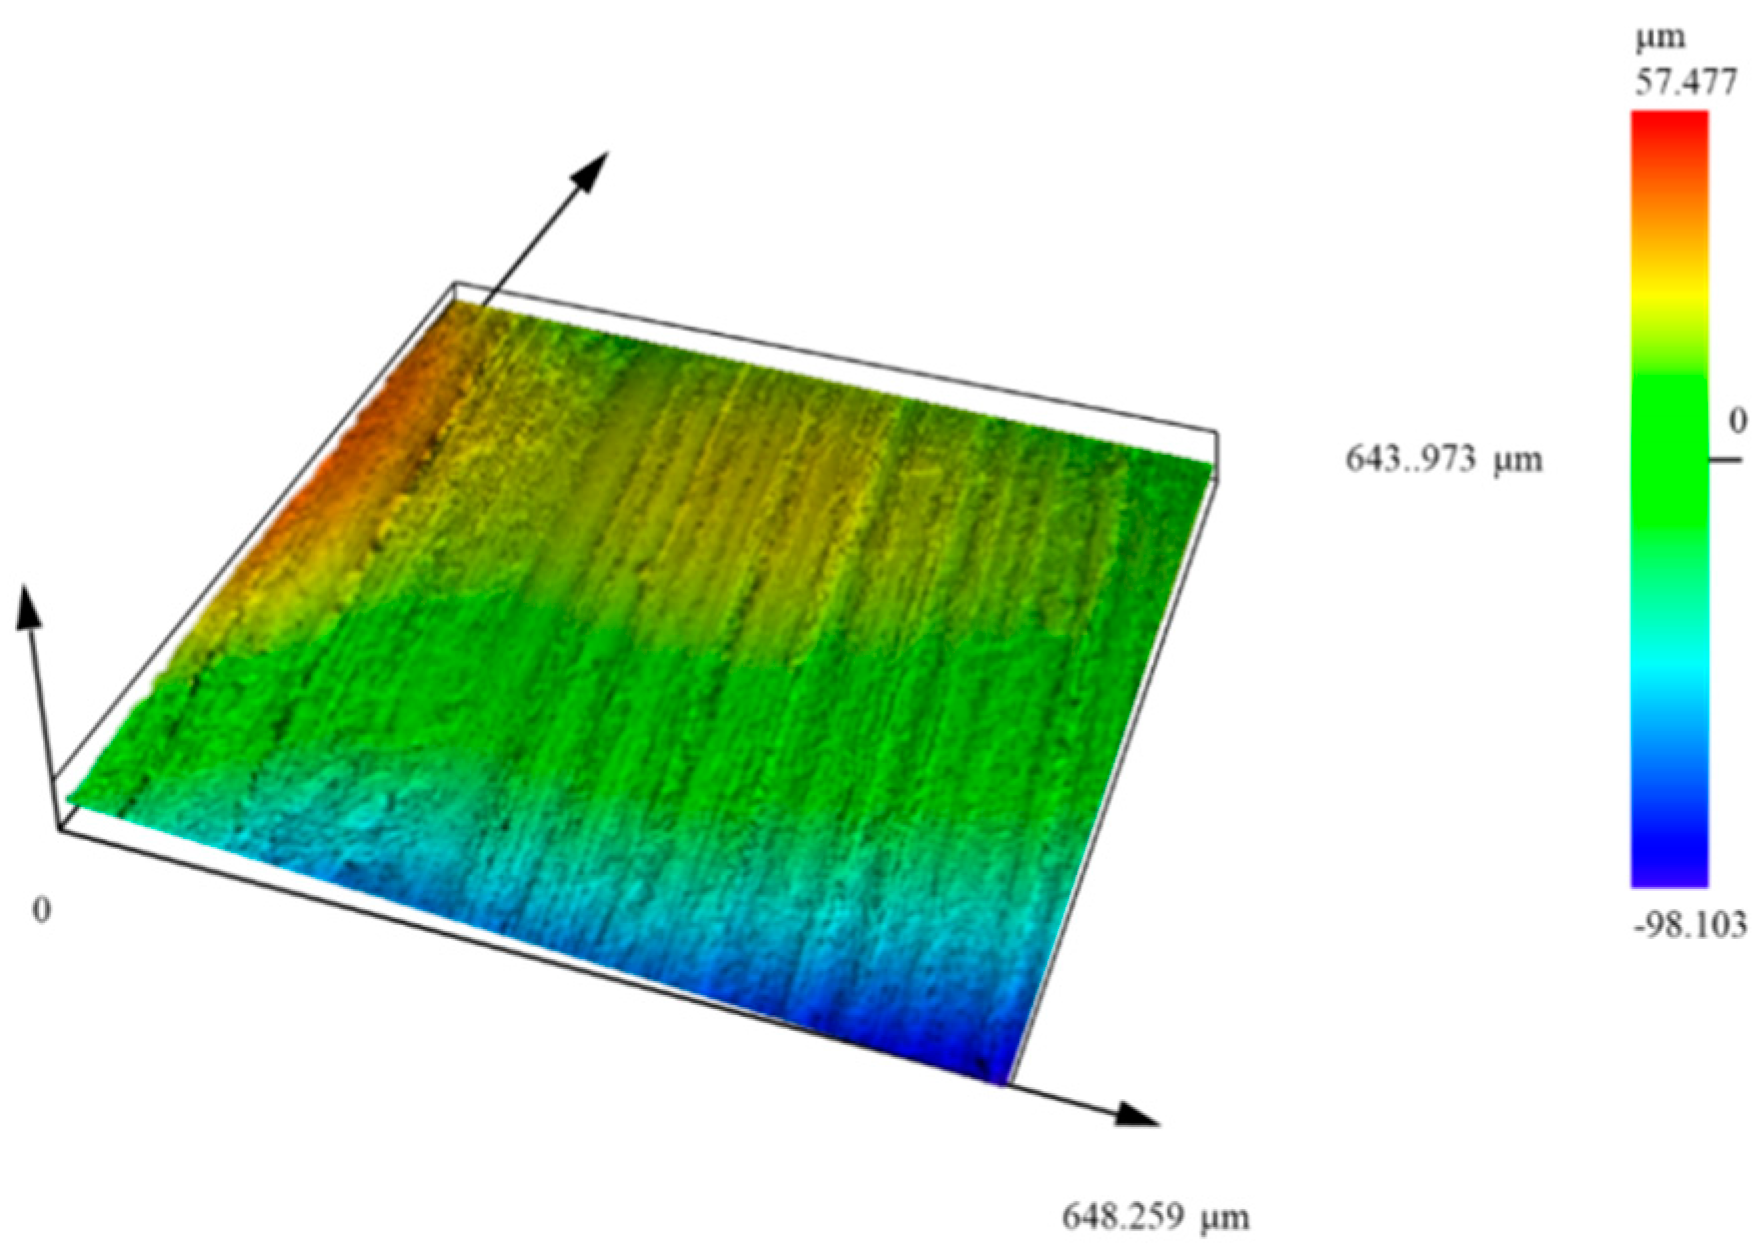
Figure 11 shows a surface topography of a wear–fatigue sample with a rotation speed of 3000 r/min. It was seen that the contact surface roughness was significantly higher than that at 1200 r/min, with a roughness value of Ra = 7.445 μm, and there were some adherent ridges, which indicated that adhesive wear occurred on the contact surface.
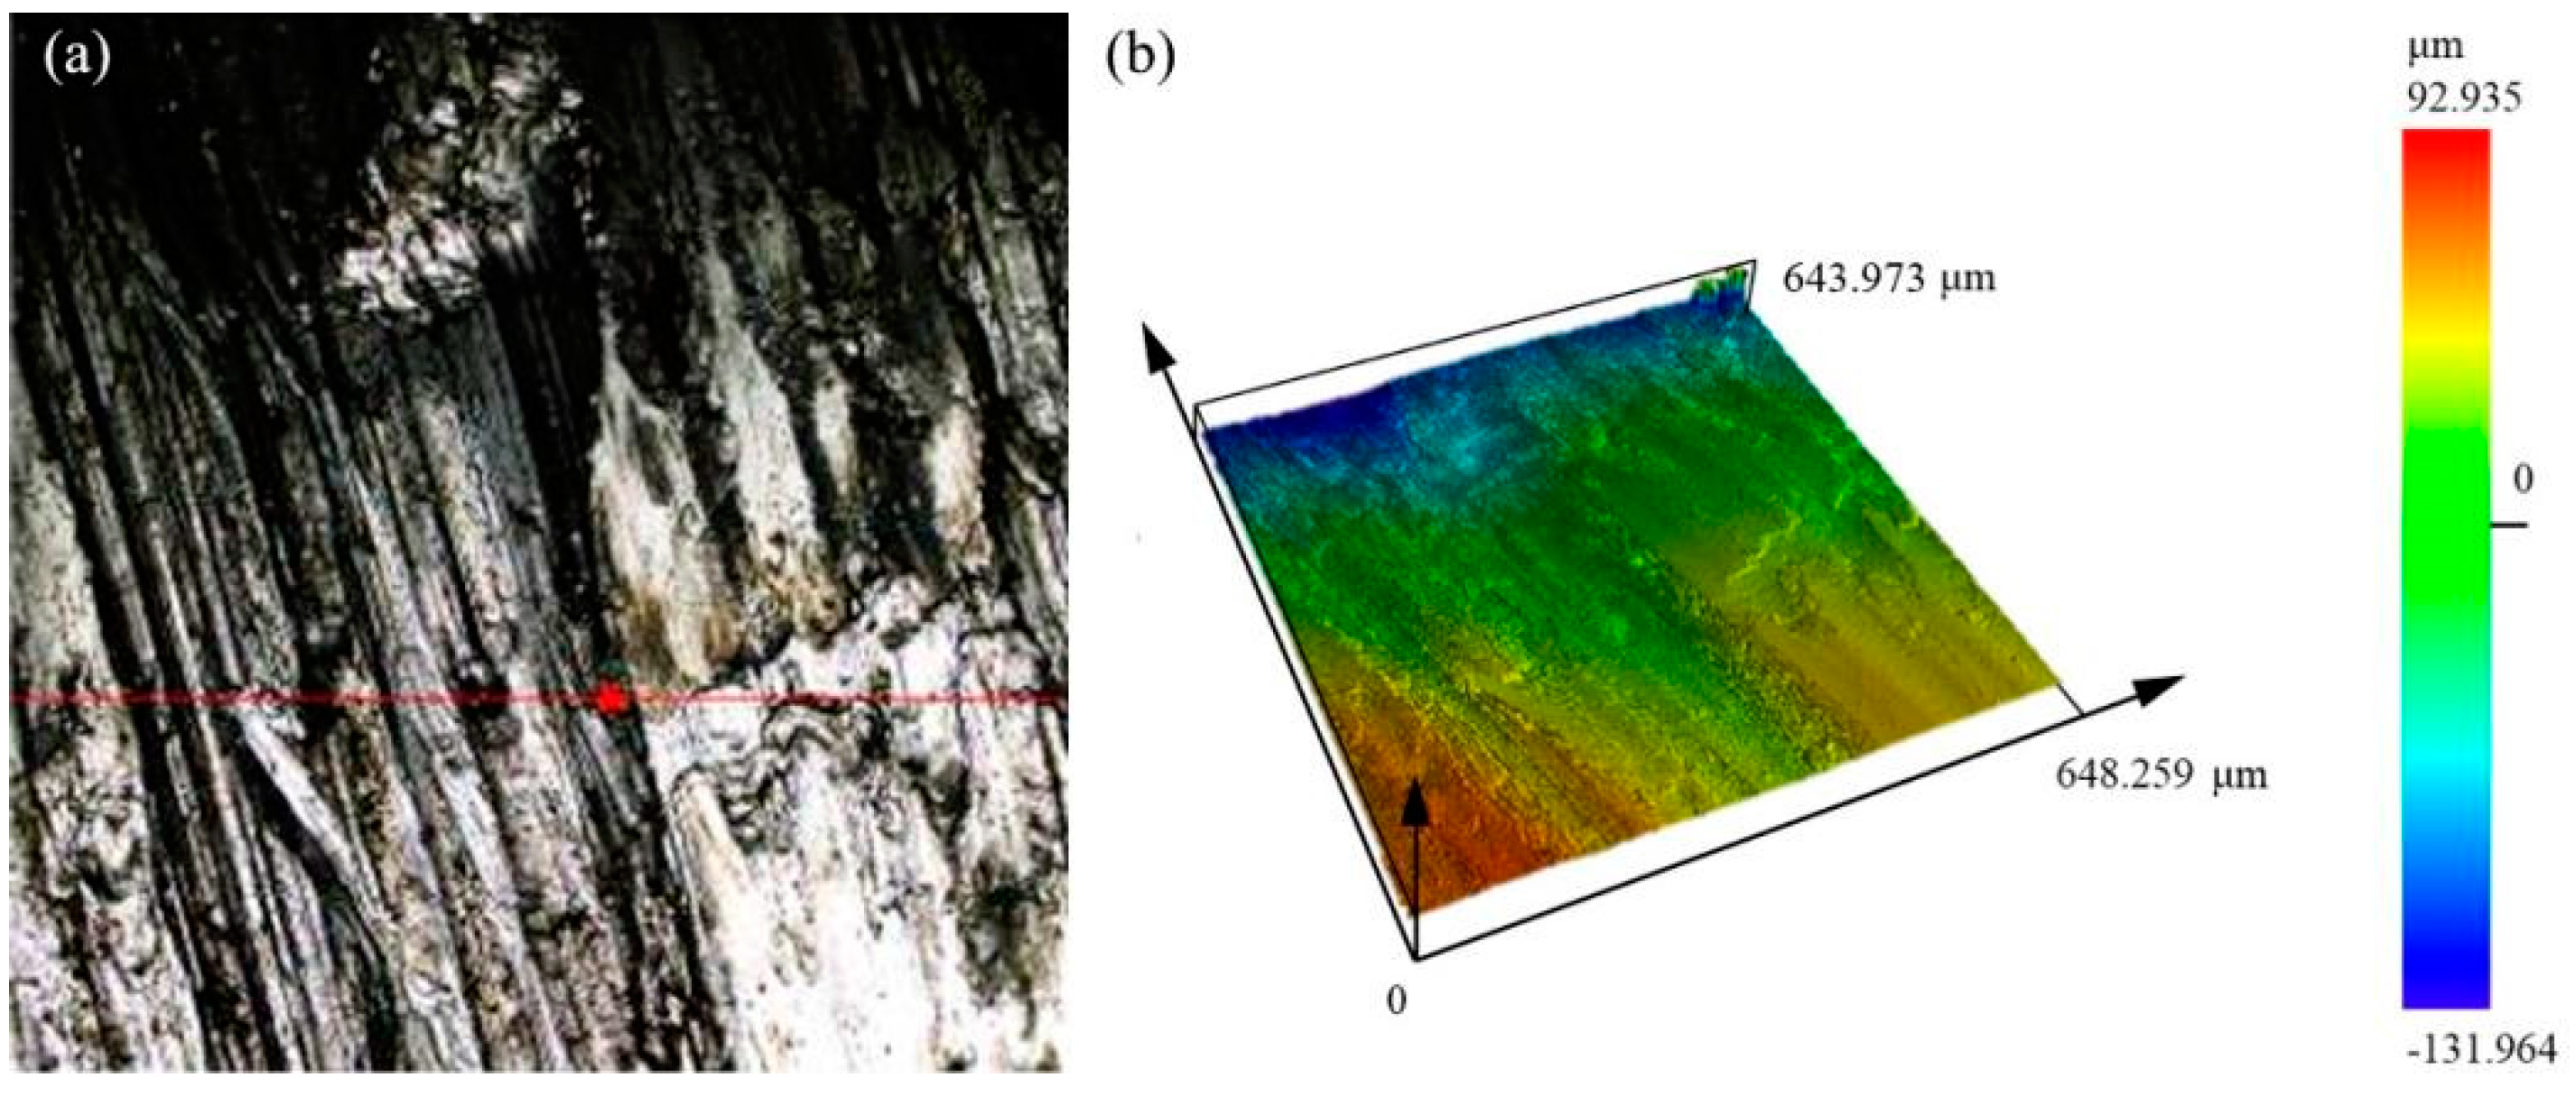
It was seen from Figure 12 that at a rotation speed of 3000 r/min, the debris size was large (about 200 μm), with obvious metallic luster, cracks and furrows were faintly visible on debris, and the thickness was very high, about 50 μm. The wear mechanism on the contact surface was adhesive wear, which was significantly higher than that at 1200 r/min.
Generally, higher sliding speeds resulted in higher corresponding friction coefficients; therefore, the wear rate along the depth direction was also increased. Adhesive wear predominated at higher sliding speeds, with large adhesive pits appearing on the sliding contact surface [27]. Adhesive wear aggravation led to a large increase in debris size, which meant that surface oxidation had fallen off if the premise was not sufficient, which greatly reduced the protective effect of oxidation [28]. At low rotation speeds, the surface wear mechanism was slight oxidative wear and relatively slight peeling of the oxide layer. At too high rotation speeds, friction heat was greatly increased, surface material was softened, surface plastic deformation was serious, wear became more intense, and the wear mechanism mostly changed from abrasive wear to adhesive wear. Once a more severe adhesive wear was generated, the depth of the formed surface microcrack was greatly increased, so that the initial crack depth exceeded the deformation layer thickness. In this way, the beneficial effect of wear on the wear–fatigue behavior no longer existed but accelerated the wear–fatigue loss, leading to fracture failure after a short cycle.

4. Conclusions

In this research, under large displacement sliding wear and rotary bending fatigue load, wear–fatigue behavior of 20CrNi2Mo martensitic steel with lamellar structures were examined using self-developed equipment, and these results provide a stronger experimental and theoretical basis for the investigation of wear–fatigue systems. The following conclusions can be drawn.
  • If the wear mechanism is mainly slight oxidative wear with oxide nanoparticles forming on the contact surface, the fatigue life is long under low bending stress, and substructures in the near-surface areas are almost parallel to the sliding direction.
  • If bending stress is high, the wear–bending fatigue life is long under low wear load. On the other hand, an increase in wear load sharply reduced the wear–bending fatigue life.
  • If other experimental conditions are fixed, an increase in the sliding speed will lead to a wear mechanism change from oxidative wear and grinding wear to adhesive wear, resulting in a significant decrease in wear–fatigue life.
In the future, non-destructive testing and other methods can be considered to observe the crack under different cycles, and the calculation model of the crack propagation rate can be established by analyzing these data combined with the tribolayer, wear rate, and mechanical property parameters of materials.

Author Contributions

Conceptualization, C.Y. and X.Q.; methodology, C.Y.; formal analysis, H.H. and X.L.; investigation, H.H. and X.Q.; writing—original draft preparation, C.Y. and X.Q.; writing—review and editing, X.L. and C.Y.; funding acquisition, C.Y. and X.Q. All authors have read and agreed to the published version of the manuscript.

Funding

Guizhou Provincial Basic Research Program (Natural Science) (Grant No. ZK [2022] general 137), Talent Project of Guizhou University and Natural Science Foundation of Guizhou University (Grant No. 202201), The Open Laboratory Project of Guizhou University SYSKF2024-44, the Project of the Education Department of Guizhou Province (NO. [2021]315).

Data Availability Statement

Data are contained within the article.

Acknowledgments

The authors would like to thank Liang Yilong for his guidance.

Conflicts of Interest

Author Cunhong Yin was employed by the company Guizhou Anji Aviation Precision Casting Co., Ltd. The remaining authors declare that the research was conducted in the absence of any commercial or financial relationships that could be construed as a potential conflict of interest.

References

  1. Madge, J.; Leen, S.; Shipway, P. A combined wear and crack nucleation–propagation methodology for fretting fatigue prediction. Int. J. Fatigue 2008, 30, 1509–1528. [Google Scholar] [CrossRef]
  2. McCarthy, O.J.; McGarry, J.P.; Leen, S.B. Micro-mechanical modelling of fretting fatigue crack initiation and wear in Ti–6Al–4V. Int. J. Fatigue 2014, 62, 180–193. [Google Scholar] [CrossRef]
  3. O’Halloran, S.M.; Shipway, P.H.; Connaire, A.D.; Leen, S.B.; Harte, A.M. A combined wear-fatigue design methodology for fretting in the pressure armour layer of flexible marine risers. Tribol. Int. 2017, 108, 7–15. [Google Scholar] [CrossRef]
  4. Cardoso, R.A.; Doca, T.; Néron, D.; Pommier, S.; Araújo, J.A. Wear numerical assessment for partial slip fretting fatigue conditions. Tribol. Int. 2019, 136, 508–523. [Google Scholar] [CrossRef]
  5. Lv, J.H.; Wang, W.Z.; Tu, S.T.; Liu, S.W. Failure Cases Analysis in Aerospace Field. Mater. Sci. Forum 2020, 993, 1277–1285. [Google Scholar] [CrossRef]
  6. Sherbakov, S.S.; Zhuravkov, M.A. Interaction of several bodies as applied to solving tribo-fatigue problems. Acta Mech. 2013, 224, 1541–1553. [Google Scholar] [CrossRef]
  7. Yan, Y.; Jiang, C.; Li, W. Simulation on coupling effects between surface wear and fatigue in spur gear. Eng. Fail. Anal. 2022, 134, 106055. [Google Scholar] [CrossRef]
  8. Khan, S.A.; Persson, I.; Lundberg, J.; Stenström, C. Prediction of top-of-rail friction control effects on rail RCF suppressed by wear. Wear 2017, 380–381, 106–114. [Google Scholar] [CrossRef]
  9. Llavori, I.; Zabala, A.; Mendiguren, J.; Gómez, X. A coupled 3D wear and fatigue numerical procedure: Application to fretting problems in ultra-high strength steel wires. Int. J. Fatigue 2021, 143, 106012. [Google Scholar] [CrossRef]
  10. Liu, H.; Liu, H.; Zhu, C.; Tang, J. Study on gear contact fatigue failure competition mechanism considering tooth wear evolution. Tribol. Int. 2020, 147, 106277. [Google Scholar] [CrossRef]
  11. Roy, M. Failure Analysis of Bearings of Aero-Engine. J. Fail. Anal. Prev. 2019, 19, 1615–1629. [Google Scholar] [CrossRef]
  12. Kapoor, A.; Fletcher, D.I.; Franklin, F.J. The Role of Wear in Enhancing Rail Life. Tribol. Ser. 2003, 41, 331–340. [Google Scholar]
  13. Cantini, S.; Cervello, S. The competitive role of wear and RCF: Full scale experimental assessment of artificial and natural defects in railway wheel treads. Wear 2016, 366–367, 325–337. [Google Scholar] [CrossRef]
  14. Kang, J.-J.; Xu, B.-S.; Wang, H.-D.; Wang, C.-B. Investigation of a novel rolling contact fatigue/wear competitive life test machine faced to surface coating. Tribol. Int. 2013, 66, 249–258. [Google Scholar] [CrossRef]
  15. Basseville, S.; Cailletaud, G. An evaluation of the competition between wear and crack initiation in fretting conditions for Ti–6Al–4V alloy. Wear 2015, 328–329, 443–455. [Google Scholar] [CrossRef]
  16. Wang, W.J.; Guo, J.; Liu, Q.Y.; Zhu, M.H.; Zhou, Z.R. Study on relationship between oblique fatigue crack and rail wear in curve track and prevention. Wear 2009, 267, 540–544. [Google Scholar] [CrossRef]
  17. Zhang, F.T.; Liang, Y.L.; Wu, Y.Z.; Yin, C.H.; Zhang, J.; Yang, S.Y.; Huang, X. Microstructure evolution of a drive shaft spline from an aero-engine fuel pump during fretting wear. Mater. Res. Express 2022, 9, 046513. [Google Scholar] [CrossRef]
  18. Masoudi Nejad, R.; Shariati, M.; Farhangdoost, K. Effect of wear on rolling contact fatigue crack growth in rails. Tribol. Int. 2016, 94, 118–125. [Google Scholar] [CrossRef]
  19. Trummer, G.; Marte, C.; Scheriau, S.; Dietmaier, P.; Sommitsch, C.; Six, K. Modeling wear and rolling contact fatigue: Parametric study and experimental results. Wear 2016, 366–367, 71–77. [Google Scholar] [CrossRef]
  20. Trummer, G.; Marte, C.; Dietmaier, P.; Sommitsch, C.; Six, K. Modeling surface rolling contact fatigue crack initiation taking severe plastic shear deformation into account. Wear 2016, 352–353, 136–145. [Google Scholar] [CrossRef]
  21. Trummer, G.; Six, K.; Marte, C.; Dietmaier, P.; Sommitsch, C. An approximate model to predict near-surface ratcheting of rails under high traction coefficients. Wear 2014, 314, 28–35. [Google Scholar] [CrossRef]
  22. Yin, C.; Liang, Y.; Liang, Y.; Li, W.; Yang, M. Formation of a self-lubricating layer by oxidation and solid-state amorphization of nano-lamellar microstructures during dry sliding wear tests. Acta Mater. 2019, 166, 208–220. [Google Scholar] [CrossRef]
  23. Yin, C.H.; Liang, Y.L.; Jiang, Y.; Yang, M.; Long, S.L. Formation of nano-laminated structures in a dry sliding wear-induced layer under different wear mechanisms of 20CrNi2Mo steel. Appl. Surf. Sci. 2017, 423, 305–313. [Google Scholar] [CrossRef]
  24. Hohenwarter, A.; Taylor, A.; Stock, R.; Pippan, R. Effect of Large Shear Deformations on the Fracture Behavior of a Fully Pearlitic Steel. Metall. Mater. Trans. A 2010, 42, 1609–1618. [Google Scholar] [CrossRef]
  25. Zou, J.H.; Liang, Y.L.; Jiang, Y.; Yin, C.H.; Huang, C.W.; Liu, D.; Zhu, Z.L.; Wu, Y.Z. Fretting fatigue mechanism of 40CrNiMoA steel subjected to the ultrasonic surface rolling process: The role of the gradient structure. Int. J. Fatigue 2023, 167, 107383. [Google Scholar] [CrossRef]
  26. Yin, C.-H.; Yang, C.; Wu, Y.-Z.; Liang, Y.-L.; Zhu, Z.-L. Synergistic effect of cementite amorphization and oxidation on forming a nanocomposite self-lubricating surface during sliding. Compos. Part B-Eng. 2022, 236, 109799. [Google Scholar] [CrossRef]
  27. Liang, C.; Li, C.; Lv, X.X.; An, J. Correlation between friction-induced microstructural evolution, strain hardening in subsurface and tribological properties of AZ31 magnesium alloy. Wear 2014, 312, 29–39. [Google Scholar] [CrossRef]
  28. Tong, Y.; Zhang, T.; Zhang, S. Influence of oxides on the formation of self-lubricating layer and anti-wear performance during sliding. Tribol. Int. 2023, 179, 108188. [Google Scholar] [CrossRef]
Figure 1. Test device setup.
Lubricants 12 00157 g001
Figure 2. The schematic diagram of the experimental method.
Lubricants 12 00157 g002
Figure 3. The schematic diagram of wear–fatigue sample.
Lubricants 12 00157 g003
Figure 4. Worn surface and wear debris of the wear–fatigue sample at a wear load of 20 N and bending stress of 468 MPa: (a) microscopic morphology of the contact surface, (b) magnification image, (c) oxide nanoparticles, and (d) the EDS spectra of the wear debris.
Lubricants 12 00157 g004
Figure 5. The cross-section SEM image of wear–fatigue sample at a wear load of 20 N and bending stress of 468 MPa: (a) microscopic morphology of the crack and (b) martensite and nanolamellar in the tribolayer.
Lubricants 12 00157 g005
Figure 6. The SEM image of nanolamellar: (a) dark field and (b) bright field.
Lubricants 12 00157 g006
Figure 7. Sample surface topography at wear load of 5 N and bending fatigue stress of 550 MPa after 2 million cycles.
Lubricants 12 00157 g007
Figure 8. Surface cracks and fractures at bending fatigue stress of 550 MPa and wear load of 20 N: (a) 2 million cycles; (b) 2.3 million cycles; (c) fracture topography; (d) crack initiation area.
Lubricants 12 00157 g008
Figure 9. Wear surface at rotation speed of 1200 r/min under wear load of 30 N and bending stress of 468 MPa.
Lubricants 12 00157 g009
Figure 10. Wear debirs at rotation speed of 1200 r/min under wear load of 30 N and bending stress of 468 MPa: (a) morphology feature and (b) height dimension.
Lubricants 12 00157 g010
Figure 11. Wear surface at rotation speed of 3000 r/min under wear load of 30 N and bending stress of 468 MPa: (a) morphology feature and (b) height dimension.
Lubricants 12 00157 g011
Figure 12. Wear debirs at rotation speed of 3000 r/min under wear load of 30 N and bending stress of 468 MPa: (a) morphology feature and (b) height dimension.
Lubricants 12 00157 g012
Table 1. Wear–fatigue test parameters and results under low bending stress.
Bending Stress (MPa)Wear Load F (N)Cycle Number (Times)Fatigue Life
46851 × 107+pass
101 × 107+pass
151 × 107+pass
201 × 107+pass
251 × 107+pass
301 × 107+pass
Table 2. Wear–fatigue test parameters and results under high bending stress.
Bending Stress (MPa)Wear Load (N)Cycles Fatigue Life
55051.0 × 107+pass
105.36 × 10⁶failure
153.21 × 10⁶failure
202.61 × 10⁶failure
252.14 × 10⁶failure
302.34 × 10⁶failure
Disclaimer/Publisher’s Note: The statements, opinions and data contained in all publications are solely those of the individual author(s) and contributor(s) and not of MDPI and/or the editor(s). MDPI and/or the editor(s) disclaim responsibility for any injury to people or property resulting from any ideas, methods, instructions or products referred to in the content.