Abstract
The focus of this study was the combined effects of sliding velocity (SV) and martensite volume fraction (MVF) on the tribological behavior of dual-phase (DP) steel. Dry frictional tests were realized on a ball-on-disk tribometer by unidirectional sliding at 0.1 m/s, 0.6 m/s, and 1 m/s. Considering the increase in SV, both the friction coefficient (COF) and wear rate decrease due to the increase in oxidative wear. At 0.1 m/s, the major wear mechanism is abrasive wear, accompanied by partial material flaking and less oxidation wear; at 0.6 m/s, the wear mechanism is in the transition between abrasive wear and oxidation wear; at 1 m/s, oxidation wear becomes the dominant wear mechanism. For the same SV, specimens with lower MVF exhibited lower wear compared to specimens with higher MVF; this phenomenon is especially evident at low SV. As the SV increases, the effect of MVF on the wear decreases, and the velocity becomes the dominant factor.
1. Introduction
Traditionally, sliding velocity (SV) is considered one of the most significant parameters in tribological systems [1,2,3,4]. In engineering applications, most mechanical components are fabricated by heat-treated steels and typically serve in dry conditions with SV below 1 m/s [5,6,7]. Numerous studies [2,3,8,9,10,11] have been devoted to the impact of SV on the tribological performance of steel.
Owing to differences in tribological systems (e.g., differing steel compositions, loads, and temperatures), the wear mechanisms typically change, which is evidently the source of inconsistent and even contradictory results with respect to the effect of SV on tribological behavior. In the case of oxidative wear as the dominant wear mechanism, wear rate generally decreases as the SV increases [12,13,14,15]. The oxide layer formed by friction oxides during the friction process provides a protection to the worn surface, which is an accepted explanation. When the wear mechanism is predominantly adhesive wear, the wear becomes severe with increasing SV [2,16,17,18,19]. The main argument is that the increasing SV leads to an increase in contact temperature, which results in an increasing adhesion between interfaces and therefore an increase in wear rate. In addition, some investigations [8,9,20] have suggested that surface hardening and changing mechanical friction layers caused by SV also contribute to variations in wear rate.
Dual-phase (DP) steel, as the name implies, consists of two phases (martensite and ferrite) in its microstructure. Martensite provides high hardness, and the ferrite shows a larger plastic deformation capability. The combination of different proportions of martensite and ferrite allows a wide range of mechanical properties for dual-phase steel [21]. As a high-strength steel, dual-phase steel is widely applied in the automotive and mining industries, as well as in agricultural machinery [22,23,24].
The martensite volume fraction (MVF), one of the characteristic signatures of DP steels, has an important impact on the tribological performance of DP steels. The results reported by Aksoy et al. [25] demonstrate that the wear resistance of DP steel improves at a linear rate with increasing martensitic hardness. Some studies [22,26,27,28,29,30] argued that the wear rate of DP steel reduces as a function of increasing MVF. The increasing proportion of the harder martensitic phase is responsible for the increased macrohardness and thereby enhances the wear resistance, which is a major interpretation for the varying wear rate. In contrast, Jha et al. [31] suggested that microstructures with little soft ferrite provide better wear resistance compared to fully martensitic microstructures. The existence of ferrite significantly reduces the brittleness and enhances the overall fatigue resistance and wear resistance. Similarly, the results reported by Xu et al. [20] support the notion that a dual-phase microstructure with partial ferrite exhibited better wear resistance, although it was explained by strain-hardening behavior. In addition, Penfornis et al. [32] investigated the tribological behavior of martensite and ferrite separately in specimens with differing MVFs. In this case, the wear resistance of martensite decreased with increasing MVF.
In practical engineering applications, materials are normally subjected to multi-affecting conditions. However, there is still a lack of knowledge on the combined effects of the SV and MVF on the tribological behavior of DP steels. The focus of this paper is the combined effects of SV and MVF on the tribological properties of DP steels. Moreover, the impact degree of MVF and SV on wear is compared separately under different conditions. Dry sliding friction experiments were realized by a ball-on-disk tribological apparatus (CSM tribometer). Wear volume was calculated on a 3D optical profilometer (Sensofar Metrology). Scanning electron microscopy (SEM) and energy-dispersive X-ray spectroscopy (EDS) were used to characterize worn surfaces and to analyze wear mechanisms.
2. Experiment Method
2.1. Materials and Heat Treatments
The material utilized for this experiment is 25CD4 low alloy steel, with the chemical composition shown in Table 1. All specimens were cut into discs (55 mm diameter and 3 mm thickness).

Table 1.
Elemental composition of 25CD4 low-alloy steel (%).
A DP microstructure consisting of martensite and ferrite was achieved by a step-quenching heat treatment as shown in Figure 1. Initially, the specimens were kept in an experimental heating oven at 900 °C for 30 min to achieve complete austenization. Later, the samples were transferred directly to the oven at a temperature of 725 °C. The transfer time was controlled within 3 s. Each specimen was kept at the critical annealing temperature of 725 °C for varying durations (0, 1, 2, 3, 6, and 7 min). In this process, austenite was progressively transformed to ferrite. The volume of ferrite generated by austenite transformation varied due to the differing annealing durations. Lastly, all specimens were water-quenched. During the water-quenching process, all the remaining austenite was transformed into martensite, whereas the ferrite developed in the critical annealing phase was not changed by water quenching. The varying holding durations of the critical annealing led to the various volume fractions of the martensite and ferrite following water quenching. As a result, DP microstructures with differing MVF required for the experiments were achieved.
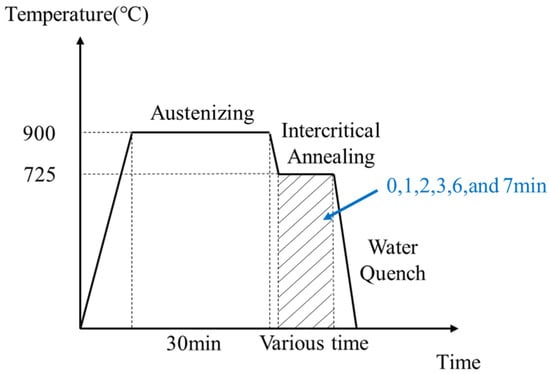
Figure 1.
Diagram of step quenching heat treatment.
2.2. Microstructure Characterization
Following the heat treatment, all specimens were first ground with 80 grit SiC abrasive paper to remove the dark oxide reaction layer covering the material surface due to water quenching. Then, further mechanical grinding was performed by SiC abrasive paper with grit sizes in the range of 180 to 4000. Once the grinding was completed, the surfaces were polished with 3 μm and 1μm diamond paste to achieve a surface roughness of Ra 0.25–0.30 μm. Then, the polished samples were placed in an ethanol solution for 15 min of ultrasonic vibration cleaning. Finally, all samples were etched with 1% Nital solution for 3 s, followed by ultrasonic cleaning for 10 min in ethanol solution and surface drying immediately afterwards.
Microstructure photographs of each specimen were obtained with a ZEISS Sigma field emission electron gun scanning electron microscope (FEG-SEM) at 15 keV. For each specimen, five independent SEM images were obtained. The MVF for each sample was determined by ImageJ software analyzed and calculated with 5 SEM images.
2.3. Friction Coefficient
The dry sliding tribological experiments were performed on a ball/disk rotating tribometer as shown in Figure 2a. The 6 mm diameter balls are made of ceramic Al2O3, which are commercial standard samples. The surface roughness of the disc samples was in the range of Ra 0.25–0.30 μm. The experiments were designed in a unidirectional rotation mode to provide a relatively high velocity difference, which worked as shown in Figure 2b. The SVs were 0.1 m/s, 0.6 m/s, and 1 m/s, with a constant load of 15 N in an ambient environment. For different SVs, the number of rotating revolutions was constant at 10,000. A challenge for this type of wear experiment is the rapidly varying conditions, especially contact pressure, when the ball enters and rubs the disc. The literature [1] demonstrates that the approach using concentric worn tracks of varying radii offers identical friction and wear outcomes on the disc surface for tracks worn at different radii. This provides a reliable justification to study the impact of SV on the tribological behavior of DP steels at the same MVF.
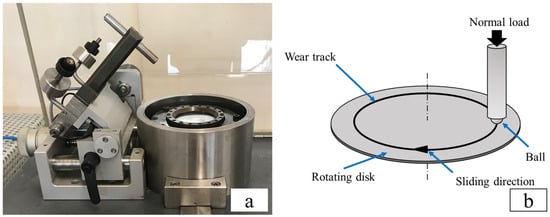
Figure 2.
Apparatus and principle of tribological testing: (a) CSM tribometer; (b) working principle of unidirectional rotation mode.
Prior to the rubbing test, each sample was washed with ultrasonic vibration in ethanol for 10 min, followed by immediate surface drying. All tests were performed at ambient temperature (23 °C) with humidity of 50–60%.
The COF was accessed directly from the tribometer, which was equipped with load cells and piezoelectric sensors. The instantaneous COF values were collected every 0.03 s and transmitted to the connected computer for recording.
2.4. Wear Rate
In order to obtain the wear rate, the worn tracks were characterized with a 3D optical profilometer. The detailed calculation method and procedure are described in Figure 3. The value of wear rate for each track is obtained by the average of 8 locations. First, profile scanning was performed individually for each worn track in the red area shown in Figure 3a, and the obtained images were adopted as measurement samples. The scan results of each red observation area are shown in Figure 3b. Then, three cross-sectional position selections were made for each measurement sample using the SensoMAP application, and the cross-sectional profile images of the worn track at the corresponding positions were obtained, as shown in Figure 3c. The green areas on both sides of the worn track represent the volume of plastic deformation resulting from the extrusion, and the red area in the middle is the material loss of the disk during the rubbing.
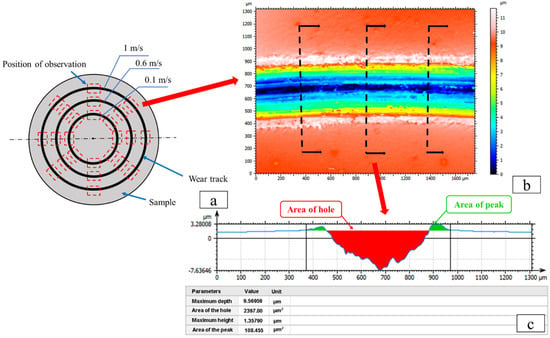
Figure 3.
Measurement of wear rate: (a) position selection; (b) selected location of cross-section profile for wear track; (c) area calculation for section profile.
The equation for calculating the wear rate is as follows:
where, Shole and Speak are the areas of the “peak” and “hole”, respectively (shown as Figure 3c), V is the volume loss, d is the total sliding distance, R is the radius of the track, and N is the number of revolutions. The average wear rate of 24 cross-section calculations is taken to represent the final wear rate for a given condition.
2.5. Macrohardness and Wear Mechanisms
Macrohardness measurements were achieved with a Vickers indenter under a 10 kg load. The reported macrohardness values were determined as the mean of 10 measurements at different positions on each specimen.
After the tribological tests, the worn tracks were characterized by an FEG-SEM ZEISS Sigma (equipped EDS), and semi-quantitative elemental measurements of the different compositions were carried out by EDS. The SEM and EDS results provided supports to investigate the variations in the wear mechanisms.
3. Results
3.1. Microstructure and Macrohardness
Figure 4 demonstrates the variation in the MVF of the specimen with holding duration at the critical annealing temperature. The MVF tends to decrease as the holding duration increases. Full martensitic microstructure, i.e., 100% MVF, was achieved for the specimens that were directly water-quenched. The specimen with the longest holding duration at 725 °C had an MVF of 48%, which was also the minimum MVF among all experimental samples.
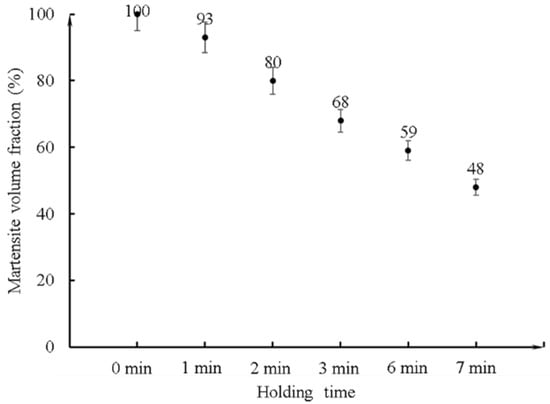
Figure 4.
The martensite volume fraction (MVF) as a function of holding time at critical annealing temperature.
Figure 5 shows SEM photomicrographs of specimens with different MVFs. As the MVF decreases, the progressively growing ferrite divides the bulk martensite into islands.
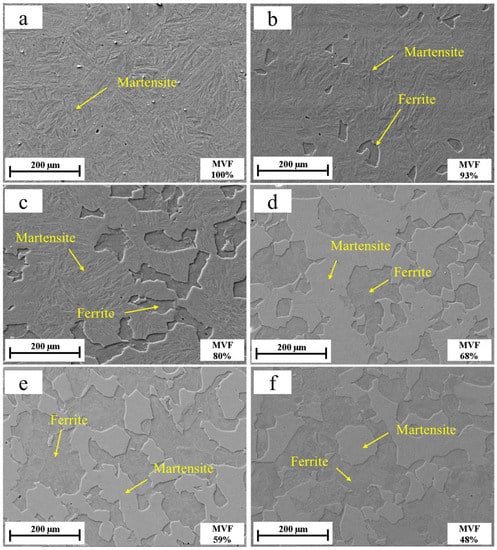
Figure 5.
SEM images of microstructures with various MVF: (a) MVF100%, (b) MVF93%, (c) MVF80%, (d) MVF68%, (e) MVF59%, and (f) MVF48%.
In general, the hardness of the martensitic phase is greater than that of the ferrite phase, which has also been confirmed in many in previous studies [21,24,32,33]. Higher martensite content implies higher macrohardness. Figure 6 illustrates the variation in the macrohardness with MVF of the specimens after heat treatment. The macrohardness gradually increases with increasing MVF. The maximum macrohardness value occurs for the specimen with 100% MVF and 638 HV, and the minimum macrohardness value appears for the specimen with 48% MVF and 347 HV. Thus, it can be concluded that the variation in MVF has a significant impact on the macrohardness of DP steel.
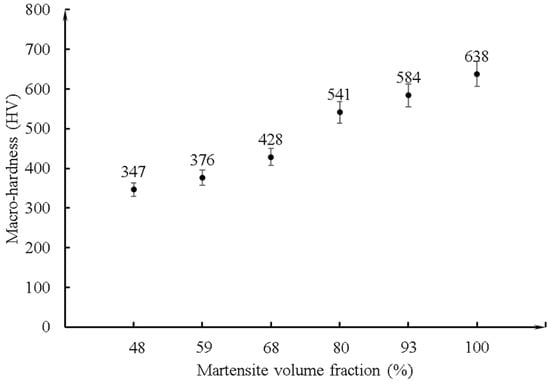
Figure 6.
Variation in macrohardness with MVF.
3.2. Friction Coefficient
Figure 7 shows the change in the instantaneous COF with the number of revolutions for specimens with different MVFs at different SVs. The COF decreases with increasing SV, regardless of the MVF of the specimens. The number of revolutions is significant for the COF to reach a steady state. The COF increases rapidly with the number of sliding revolutions at the beginning, and then fluctuates within a certain range after reaching a steady state. All experiments exhibited a significant running in period, owing to the establishment of a transfer layer between the interfaces [16]. For low sliding speeds, the fluctuation of COF is more pounced from the initial state to the steady state. At steady state, the COF has greater oscillations at 0.6 m/s compared to 0.1 m/s and 1 m/s. Nevertheless, it is more distinct on the specimens with higher MVFs. Both SV and MVF have an impact on the COF. Zhang and Alpas [7] indicated that the COF increased significantly with sliding speed with Si3N4 steel balls rubbing against stainless steel, which is not in consistent with the results reported herein.
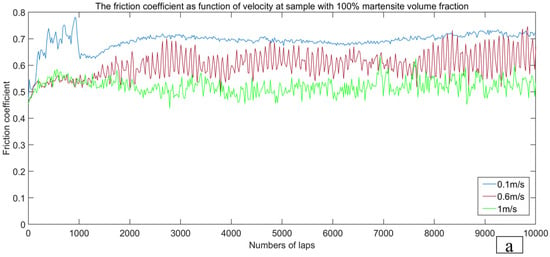
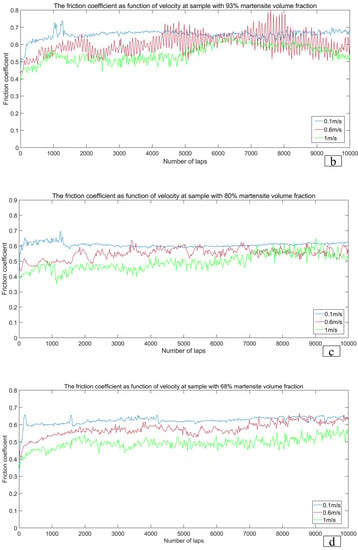
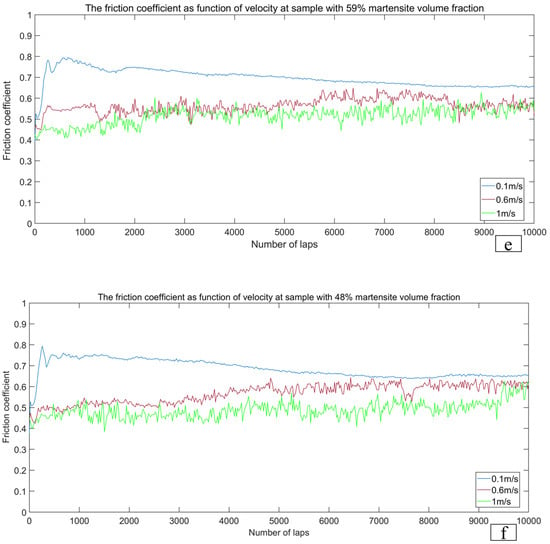
Figure 7.
COF in relation to sliding velocity (SV) for specimens of (a) MVF100%, (b) MVF93%, (c) MVF80%, (d) MVF68%, (e) MVF59%, and (f) MVF48%.
Figure 8 shows that the average steady-state COF is a function of SV on specimens with different MVFs. The average steady-state COF decreases with increasing SV. The maximum average steady-state COF occurs at 0.1 m/s, and the minimum value occurs at 1 m/s. These outcomes are in agreement with the data reported by Quinn et al. [34] and Sasada and Norose [35], as well as the trend shown by So [36]. Furthermore, the effect of MVF on the average steady-state COF does not show a distinct regularity under the working conditions applied in this experiment.
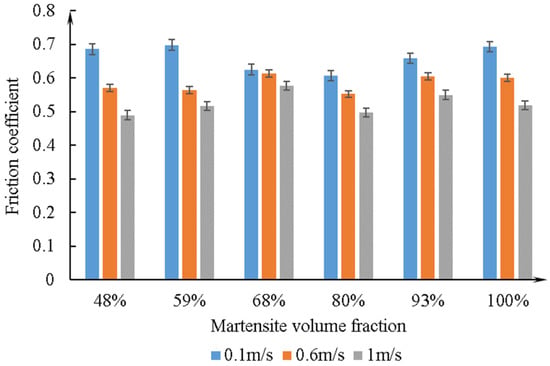
Figure 8.
Average COF versus SV with varying MVF.
3.3. Wear Rate
Figure 9 presents the wear rate versus SV at varying MVF values. Overall, the wear rate decreases as the SV increases. The minimum wear rate occurs at 1 m/s. However, for samples with low MVF (MVF 48% and MVF 59%), the wear rate at 0.1 m/s is slightly less than that at 0.6 m/s due to the combined effect of MVF and SV on the wear rate under this condition. Compared to specimens with low MVF (MVF 48% and MVF 59%), the wear rate is higher on specimens with higher MVF (MVF ≥ 68%). This phenomenon becomes increasingly obvious as the SV decreases. Especially at 0.1 m/s, the wear rate on specimens with high MVF is 4–8 times higher than that of low-MVF specimens, indicating that, in addition to the velocity, the variation in the MVF also impacts the wear resistance of DP steels.
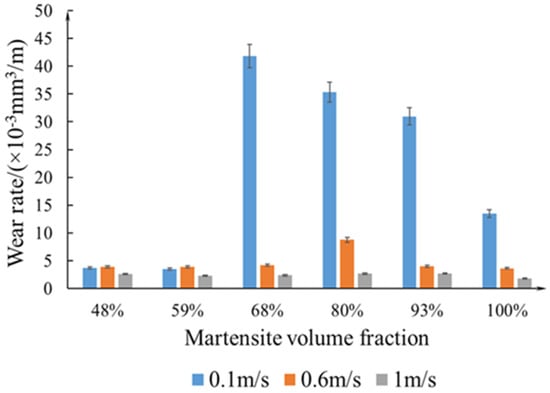
Figure 9.
Wear rate as function of SV with varying MVF.
Figure 10 exhibits the worn surface of Al2O3 balls at different SV values. The diameter of the worn Al2O3 ball decreases with increasing SV. The maximum worn diameter of Al2O3 balls is observed at 0.1 m/s. Moreover, the area covered by black material on the worn surface of the Al2O3 ball increases with the SV. The black adhering material is difficult to remove from the ball surface. It is also difficult to directly determine the composition under electron microscopy due to the poor electrical conductivity of the ceramic alumina balls. However, it can be presumed from the literature [37] that the black material might be an accumulation of oxide wear debris generated during the sliding process.

Figure 10.
Variation of worn diameter of Al2O3 balls with SV at MVF 93%: (a) 0.1 m/s, (b) 0.6 m/s, (c) 1 m/s.
The average diameter of the worn Al2O3 ball as function of SV in all experiments is given in Figure 11. The wear trend of Al2O3 balls is consistent with that of the DP steel discs, i.e., the wear decreases with increasing SV. The worn diameter of the ball was lower when rubbed against DP steel with low MVF (MVF 48% and MVF 59%) than against DP steel with high MVF (MVF ≥ 68%).
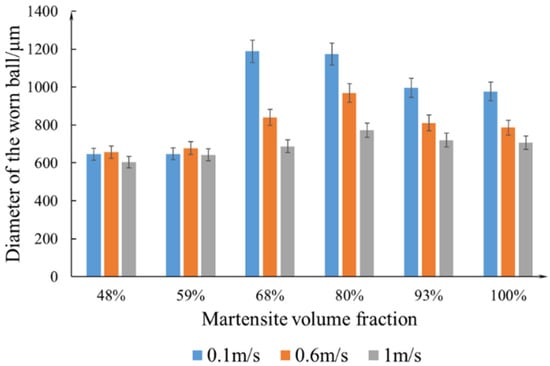
Figure 11.
Diameter of the worn Al2O3 ball versus SV with varying MVF.
3.4. Wear Mechanisms
Figure 12 shows SEM images of the worn tracks of the specimens with varying MVF at different SVs. With increasing speed, the dark area of the worn track increases, and the width of the worn track tends to decrease.
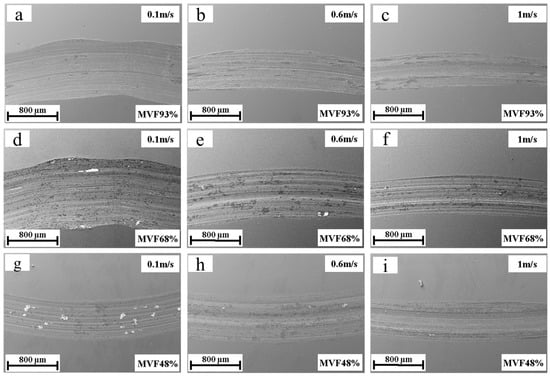
Figure 12.
SEM images of worn tracks under different MVF and sliding velocities: (a) MVF93% and 0.1 m/s, (b) MVF93% and 0.6 m/s, (c) MVF93% and 1 m/s, (d) MVF68% and 0.1 m/s, (e) MVF68% and 0.6 m/s, (f) MVF68% and 1 m/s, (g) MVF48% and 0.1 m/s, (h) MVF48% and 0.6 m/s, (i) MVF48% and 1 m/s.
Figure 13 and Table 2 display the findings of the EDS elemental composition analysis on the worn and unworn surface points. It is clear that there is a higher oxygen content in wear debris and dark or black regions of the track, indicating that oxidation was generated during the sliding process at the tested positions. There is low oxygen concentration in the light gray zone, which is essentially the same as the oxygen content in the unworn surface, which can be identified as an unoxidized surface.
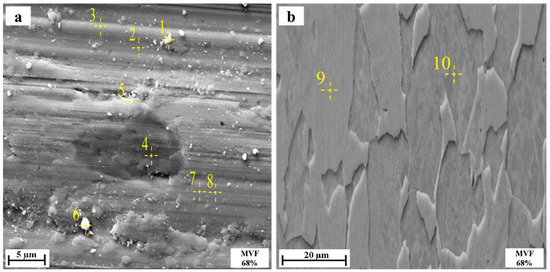
Figure 13.
EDS analysis on the points: (a) worn track (points 1–8) at 1 m/s and MVF 68%, (b) unworn surface (points 9,10).

Table 2.
Elemental composition (at%.) by EDS for a worn track at 1 m/s under MVF 68% and an unworn surface.
Figure 14 presents the evolution of the average oxygen content in the wear surface of the specimen under different SVs. The SV has a major impact on element transfer during the experiment. The oxygen concentration on the worn surface increases with SV. This means that the frictional oxide increases as the SV increases. For the same SV, the generation of oxides in the worn tracks is reduced for specimens with high MVF compared to those with low MVF.
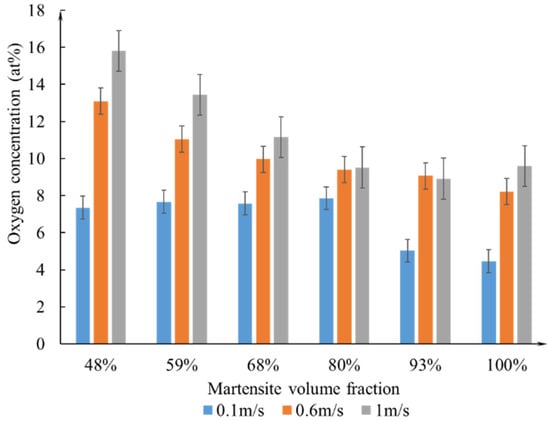
Figure 14.
Oxygen concentration (in at%.) as a function of SV with varying MVF.
Figure 15 shows additional micrographs and local enlargements of the worn tracks formed with varying MVF and SV to facilitate more accurate observation and analysis of the wear mechanism.
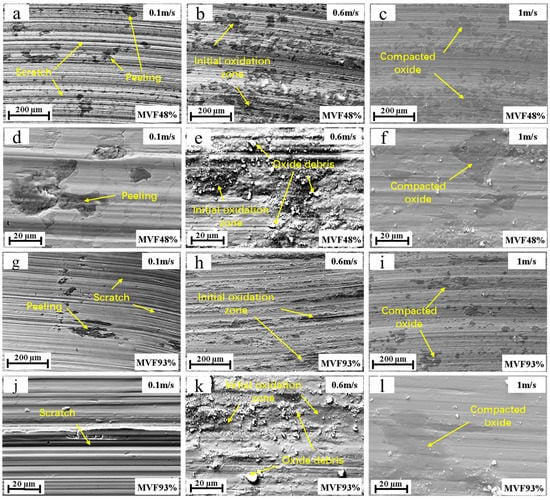
Figure 15.
Micrographs and local enlargements of the worn tracks formed with varying MVF and SV: (a–c) are the worn tracks at MVF48% and different speeds; (d–f) are the enlarged views of (a–c); (g–i) are the worn tracks at MVF93% and different speeds; (j–l) are the enlarged views of (g–i).
As shown in Figure 15a,g, at 0.1 m/s, a large number of deep grooves appear on the worn surface, but no visible wear debris is generated. Further observation of these grooves (Figure 15j) indicates the occurrence of plastic deformation on both sides of the groove. This is an obvious characteristic of ploughing. Some areas of the worn surface exhibit material peeling and a high oxygen content, as shown in Figure 15d. As shown in Figure 15a,d,g,j, at 0.1 m/s, ploughing is predominant and accompanied by less oxidative wear, which results in a larger volume of material removal. As the SV increases to 0.6 m/s, a significant amount of grinding snowball-shaped oxidized wear particles appear on the worn surface, and the oxidized region gradually increases (shown in Figure 15b,e,h,k), in contrast to the worn surface generated at 0.1 m/s. In addition, the grooves on the worn surface at 0.6 m/s are relatively reduced, with increased depth. With a further increase in the speed to 1 m/s, numerous oxidized wear particles disappear, and only a few remain on the worn track, as shown in Figure 15c,f,i,l. Notably, smooth oxide regions formed by compacted debris appear partially on the worn surface. Figure 15c shows, representatively, that as the number of compacted smooth oxide islands increases; those initially in isolation gradually connect and may eventually cover the entire contact surface, in contrast to the microscopic morphology of the worn tracks formed at 0.1 m/s and 0.6 m/s. Meanwhile, the number and depth of grooves on the worn surface are further minimized. At this point, it seems that oxidation wear gradually replaces abrasive wear in a dominant position.
Figure 15a–c and Figure 15g–i present the worn tracks on the specimens with high MVF (93%) and low MVF (48%), respectively, with varying SV, illustrating the effect of MVF on oxidative wear. Regardless of the SV adopted in this experiment, more oxidized zones (dark areas in Figure 15) are observed on the specimens with relatively low MVF compared to those with high MVF, indicating that specimens with low MVF are more sensitive to oxidation during the wear process in order to form an oxide layer covering the wear surface.
4. Discussion
The effects of SV and MVF on COF, wear rate, and the wear mechanism were discussed in combination with SEM images and EDS analysis outcomes.
Generally, when sliding occurs between two mating surfaces, frictional heating can raise the contact temperature. If the SV is sufficient, the flash temperature at the contact asperities might result in oxidation. Once the oxide achieves a critical thickness, it may be fractured, generating wear debris. This is the oxidative wear mechanism, which was first modeled by Quinn et al. [34]. Oxidative wear, one of the two basic categories of non-lubricated sliding wear [38], is characterized by the generation of oxidative wear debris and smooth oxidative worn surfaces. This type of wear evidently concerns reactions with the surroundings, especially with oxygen [39]. In addition, when sliding surfaces are submitted to thermal oxidation, whether the heat is provided by an external heat source or internally by frictional heat generated by sliding contact, an oxidative wear mechanism is induced. In steels, this wear mechanism normally occurs SVs of more than 1 m/s, with a flash temperature of more than 400 °C [15,40]. However, experience demonstrates that oxidative wear might also occur at lower SV values for heat-treated high-strength steels, although the thermal effect is not sufficient to cause direct asperity oxidation.
This is of considerable significance, as the oxidation wear that occurs at low SV is commonly related to the achievement of a mild wear. In this case, the compaction and sintering of the iron oxide forms a particularly compact and smooth friction layer, also called ‘glaze’—a name suggested by Stott et al. [41]. The existence of the ‘glaze’ leads to a reduction in the adhesion and prevents metal-to-metal contact, avoiding severe adhesive wear. This is known as “low-sliding velocity oxidative wear” [42].
In this experiment, as the SV increased from 0.1 m/s to 1 m/s, both the COF and wear rate decreased. When the SV is low (0.1 m/s), frictional heating is not evident, and the oxidation of the contact surface is relatively light. At this point, the main wear mechanism is ploughing, accompanied by material peeling and less oxidation. This is the explanation for the higher COF and wear rate at 0.1 m/s. As the SV increases to 0.6 m/s, oxidative wear is enhanced, and a considerable amount of oxidative debris develops on the worn surface. The appearance of oxidized worn debris leads to variations in the COF [43]. Generally, wear debris acts as a roller or ball at the contact interface, reinforcing the movement between sliding parts and reducing the COF [2,44]. For wear rate, wear particles are typically critical in the dry sliding process as a type of “third body” [45,46]. In some situations, if oxide particles are harder than the underlying substrate, they can behave as a third wear body, leading to increased wear, such as in the case of NiAl [47]. On the other hand, oxides formed on iron-based materials are generally softer and more adhesive than other metal oxides, leading to slight wear formation called mild oxidative wear [36,40]. Furthermore, oxides may bear part of the normal load so that the underlying metal matrix is protected from wear [36]. Studies of wear on several high-carbon steels showed that a transition to lower wear occurs as oxide particles form on the sliding surface, whether the oxide particles are formed in situ [48] or provided to the asperity from an outside source [49]. With high SV (1 m/s), the flash temperature is further increased, and the wear debris melted or micro-welded to the contact interface is gradually compacted as the sliding process proceeds, resulting in a smooth oxide ‘glaze’. The relatively continuous, smooth, and compact oxide ‘glaze’ affects the direct metal–metal contact, causing a reduced strength of the coordinated covalent bonds among the adhesion effects. The harder oxide layer that fits well with the substrate also reduces the abrasive wear to some extent. At this time, oxidation wear progressively replaces abrasive wear as the leading wear mechanism, which explains the lowest COF and wear rate obtained at 1 m/s.
In summary, it can be concluded that as the SV increases, high temperatures generated by friction lead to certain chemical reactions between the contact surface of specimens, resulting in a series of wear effects. During the sliding process, although only a small amount of frictional oxide is present, it modifies the wear behavior—even the wear mechanism. As the SV increases, the wear mechanism transforms from predominantly ploughing at low velocities to oxidative wear at high velocities. The formation of a relatively continuous, smooth, compacted oxide layer effectively limits the COF and wear rate of the material.
Combining the COF, wear rate, average oxygen content, and SEM images of specimens with varying MVF, we found that specimens with lower MVF (MVF 48% and MVF 59%) exhibited a lower wear rate compared to those with high MVF (MVF ≥ 68%). A possible explanation for this phenomenon is that specimens with lower MVF are more prone to oxidative wear during sliding wear. Both the SEM micrographs and the oxygen content of the worn track clearly demonstrate this point. Previous experimental results [21,24] revealed that as the MVF decreased, plastic deformation increased, and the size of the wear debris decreased, supporting the argument that specimens with low MVF are more susceptible to oxidative wear. In addition, there is a combined effect of MVF and SV on wear rate for DP steel. As the experimental factors vary, SV and MVF may affect the wear rate to varying degrees. At lower SVs (0.1 m/s), the MVF acts as the main factor affecting the wear rate. With increasing SV, the MVF becomes a less significant factor for wear rate, and the SV provides the dominant impact on the wear rate. The increase in oxidative wear caused by increasing SV is the main contributor to a lower wear rate. Although the variation in MVF also has an effect on oxidative wear [21,24], it is obvious that SV exerts a greater impact on oxidative wear than MVF.
5. Conclusions
In this study, the tribological behavior of DP steels with varying MVF and SV were systematically investigated. The wear mechanism and its transformation during the changing SV were also explored. Furthermore, the role of friction oxides in the wear process of DP steels was explained. The following consequences can be concluded from the above analysis:
- Both the COF and wear rate decrease with increasing SV, owing to the increase in oxidative wear as the SV increases. The frictional oxide layer induced by the SV plays a protective role on the metal surface;
- The transformation of the wear-affected zone at varying SV leads to a transformation in the wear mechanism and eventually to a modification of the wear behavior;
- At 0.1 m/s, the major wear mechanism is ploughing, accompanied by partial material flaking and reduced oxidation wear; at 0.6 m/s, the wear mechanism is in the transition between ploughing and oxidation wear; at 1 m/s, oxidation wear becomes the dominant wear mechanism;
- For the MVF, specimens with lower MVF exhibited lower wear rate compared to those with higher MVF. More oxidative wear occurs at lower MVF, which is the major reason for the variation in wear rate due to MVF. This phenomenon is especially evident at low SV.
- Both of MVF and SV play important roles in the tribological behaviors of DP steel, with differing degrees of impact depending on the conditions. At low SV, the MVF is a predominant factor affecting the wear rate. As the SV increases, the effect of MVF on the wear rate decreases, and the SV becomes the dominant factor.
Author Contributions
Y.Z.: Conceptualization, Investigation and Writing—Original Draft; A.J.: Conceptualization, Supervision, and Writing—Reviewing and Editing. All authors have read and agreed to the published version of the manuscript.
Funding
Yunbo Zhang acknowledges the financial support of the China Scholarship Council (file no. 201801810062) to fund the doctoral scholarship of Yunbo ZHANG.
Data Availability Statement
Not applicable.
Acknowledgments
The authors gratefully acknowledge Université de Technologie de Compiègne (UTC), which provided apparatus and materials used for the experiments.
Conflicts of Interest
The authors declare no conflict of interest.
References
- Okonkwo, P.C.; Kelly, G.; Rolfe, B.F.; Pereira, M.P. The effect of sliding speed on the wear of steel–tool steel pairs. Tribol. Int. 2016, 97, 218–227. [Google Scholar] [CrossRef]
- Palanikumar, P.; Gnanasekaran, N.; Subrahmanya, K.; Kaliveeran, V. Effect of sliding speed and rise in temperature at the contact interface on coefficient of friction during full sliding of SS304. Mater. Today Proc. 2020, 27, 1996–1999. [Google Scholar] [CrossRef]
- Tang, L.; Gao, C.; Huang, J.; Zhang, H.; Chang, W. Dry sliding friction and wear behaviour of hardened AISI D2 tool steel with different hardness levels. Tribol. Int. 2013, 66, 165–173. [Google Scholar] [CrossRef]
- Zhang, J.; Alpas, A. Transition between mild and severe wear in aluminium alloys. Acta Mater. 1997, 45, 513–528. [Google Scholar] [CrossRef]
- Straffelini, G.; Molinari, A.; Trabucco, D. Sliding wear of austenitic and austenitic-ferritic stainless steels. Metall. Mater. Trans. A 2002, 33, 613–624. [Google Scholar] [CrossRef]
- Williams, J.a.A. Wear modelling: Analytical, computational and mapping: A continuum mechanics approach. Wear 1999, 225, 1–17. [Google Scholar] [CrossRef]
- Zhang, Y. Dry Tribology of Materials; Science Press: Beijing, China, 2007. [Google Scholar]
- Boromei, I.; Ceschini, L.; Martini, C.; Sola, R. Aluminium bronze-steel sliding contact in packaging applications: Failure analysis and lab-scale tribological tests. Eng. Fail. Anal. 2020, 112, 104528. [Google Scholar] [CrossRef]
- Jayashree, P.; Turani, S.; Straffelini, G. Effect of temperature and sliding speed on the dry sliding behavior of a SiC-graphite composite against martensitic steel. Wear 2020, 450, 203242. [Google Scholar] [CrossRef]
- Jiang, W.; Zhu, S.; Wang, S. Effect of sliding speed and hardness on wear behavior and mechanism of AISI H13 steel. Proc. Inst. Mech. Eng. Part J J. Eng. Tribol. 2020, 234, 1822–1833. [Google Scholar] [CrossRef]
- Ruiz-Andres, M.; Conde, A.; De Damborenea, J.; García, I. Friction and wear behaviour of dual phase steels in discontinuous sliding contact conditions as a function of sliding speed and contact frequency. Tribol. Int. 2015, 90, 32–42. [Google Scholar] [CrossRef]
- Bourithis, L.; Papadimitriou, G.; Sideris, J. Comparison of wear properties of tool steels AISI D2 and O1 with the same hardness. Tribol. Int. 2006, 39, 479–489. [Google Scholar] [CrossRef]
- Inman, I.; Rose, S.; Datta, P. Development of a simple ‘temperature versus sliding speed’wear map for the sliding wear behaviour of dissimilar metallic interfaces. Wear 2006, 260, 919–932. [Google Scholar] [CrossRef]
- Sen, U.; Unal, H.; Mimaroglu, A.; Yilmaz, S.; Sen, S. Wear behavior of alumina and AISI 52100 steel against molybdeniym boreide coated AISI D2 steel. Tehnol. Inovativa 2007, 59, 105–108. [Google Scholar]
- Straffelini, G.; Trabucco, D.; Molinari, A. Oxidative wear of heat-treated steels. Wear 2001, 250, 485–491. [Google Scholar] [CrossRef]
- Gåård, A.; Hallbäck, N.; Krakhmalev, P.; Bergström, J. Temperature effects on adhesive wear in dry sliding contacts. Wear 2010, 268, 968–975. [Google Scholar] [CrossRef]
- Gåård, A.; Krakhmalev, P.; Bergström, J.; Hirvonen Grytzelius, J.; Zhang, H.M. Experimental study of the relationship between temperature and adhesive forces for low-alloyed steel, stainless steel, and titanium using atomic force microscopy in ultrahigh vacuum. J. Appl. Phys. 2008, 103, 124301. [Google Scholar] [CrossRef]
- So, H. Characteristics of wear results tested by pin-on-disc at moderate to high speeds. Tribol. Int. 1996, 29, 415–423. [Google Scholar] [CrossRef]
- Wang, Y.; Li, X.D.; Feng, Z. The relationship between the product of load and sliding speed with friction temperature and sliding wear of a 52100 steel. Scr. Metall. Et Mater. 1995, 33. [Google Scholar] [CrossRef]
- Xu, X.; van der Zwaag, S.; Xu, W. The effect of ferrite–martensite morphology on the scratch and abrasive wear behaviour of a dual phase construction steel. Wear 2016, 348, 148–157. [Google Scholar] [CrossRef]
- Zhang, Y.; Jourani, A. Effect of Martensite Volume Fraction on Oxidative and Adhesive Wear. Materials 2021, 14, 2964. [Google Scholar] [CrossRef]
- Trevisiol, C.; Jourani, A.; Bouvier, S. Effect of martensite volume fraction and abrasive particles size on friction and wear behaviour of a low alloy steel. Tribol. Int. 2017, 113, 411–425. [Google Scholar] [CrossRef]
- Trevisiol, C.; Jourani, A.; Bouvier, S. Effect of microstructures with the same chemical composition and similar hardness levels on tribological behavior of a low alloy steel. Tribol. Int. 2018, 127, 389–403. [Google Scholar] [CrossRef]
- Zhang, Y.; Jourani, A. Combined Effect of Microstructure and Gaseous Environments on Oxidative and Adhesive Wear of Dual-Phase Steel. J. Mater. Eng. Perform. 2021, 30, 9333–9351. [Google Scholar] [CrossRef]
- Aksoy, M.; Karamiş, M.; Evin, E. An evaluation of the wear behaviour of a dual-phase low-carbon steel. Wear 1996, 193, 248–252. [Google Scholar] [CrossRef]
- Hamza, G.; Omar, A.; Sami, Z. Microstructural and Tribological Characterization of API X52 Dual-Phase Steel; Research Square AJE LLC: Durham, NC, USA, 2021. [Google Scholar]
- Saghafian, H.; Kheirandish, S. Correlating microstructural features with wear resistance of dual phase steel. Mater. Lett. 2007, 61, 3059–3063. [Google Scholar] [CrossRef]
- Tyagi, R.; Nath, S.; Ray, S. Effect of martensite content on friction and oxidative wear behavior of 0.42 Pct carbon dual-phase steel. Metall. Mater. Trans. A 2002, 33, 3479–3488. [Google Scholar] [CrossRef]
- Tyagi, R.; Nath, S.; Ray, S. Modelling of dry sliding oxidation-modified wear in two phase materials. Wear 2003, 255, 327–332. [Google Scholar] [CrossRef]
- Zidelmel, S.; Allaoui, O.; Laidi, O.; Benchatti, A. Influence of the Heat Treatments on Martensite Microstructure and Abrasive Wear Behavior of X52 Dual-phase Steel. Adv. Model. Anal. A. 2017, 86, 582–592. [Google Scholar] [CrossRef]
- Jha, A.K.; Prasad, B.K.; Modi, O.P.; Das, S.; Yegneswaran, A.H. Correlating microstructural features and mechanical properties with abrasion resistance of a high strength low alloy steel. Wear 2003, 254, 120–128. [Google Scholar] [CrossRef]
- Penfornis, C.; Jourani, A.; Mazeran, P.-E. Experimental and modelling study of the effect of martensite volume fraction on friction and wear of dual-phase steel at microscopic scale. Wear 2021, 484, 203878. [Google Scholar] [CrossRef]
- Trevisiol, C.; Jourani, A.; Bouvier, S. Experimental study and modelling of the effect of microstructure on friction and wear mechanisms of low alloy steel. Mater. Res. Express 2017, 4, 125802. [Google Scholar] [CrossRef]
- Quinn, T.; Sullivan, J.; Rowson, D. Origins and development of oxidational wear at low ambient temperatures. Wear 1984, 94, 175–191. [Google Scholar] [CrossRef]
- Sasada, T.; Norose, S. The Dependence of Wear Rate on Sliding Velocity and Sliding Distance for Dry Cu/Fe and Ni/Fe. Wear Mater. 1985, 1985, 432–436. [Google Scholar]
- So, H. The mechanism of oxidational wear. Wear 1995, 184, 161–167. [Google Scholar] [CrossRef]
- Li, C.; Deng, X.; Wang, Z. Friction behaviour and self-lubricating mechanism of low alloy martensitic steel during reciprocating sliding. Wear 2021, 482, 203972. [Google Scholar] [CrossRef]
- Archard, J.F.; Hirst, W. The wear of metals under unlubricated conditions. Proceedings of the Royal Society of London. Ser. A. Math. Phys. Sci. 1956, 236, 397–410. [Google Scholar]
- Quinn, T. Review of oxidational wear: Part I: The origins of oxidational wear. Tribol. Int. 1983, 16, 257–271. [Google Scholar] [CrossRef]
- Lim, S.; Ashby, M. Overview no. 55 wear-mechanism maps. Acta Metall. 1987, 35, 1–24. [Google Scholar] [CrossRef]
- Stott, F.; Jordan, M. The effects of load and substrate hardness on the development and maintenance of wear-protective layers during sliding at elevated temperatures. Wear 2001, 250, 391–400. [Google Scholar] [CrossRef]
- Stachowiak, G.; Batchelor, A. Engineering Tribology, Tribology Series 24; Elsevier: Amsterdam, The Netherlands, 1993. [Google Scholar]
- Lafon-Placette, S.; Delbé, K.; Denape, J.; Ferrato, M. Tribological characterization of silicon carbide and carbon materials. J. Eur. Ceram. Soc. 2015, 35, 1147–1159. [Google Scholar] [CrossRef]
- Attia, M.H.; Waterhouse, R.B. Standardization of Ffretting Fatigue Test Methods and Equipment; ASTM International: West Conshohocken, PA, USA, 1992. [Google Scholar]
- Godet, M. The third-body approach: A mechanical view of wear. Wear 1984, 100, 437–452. [Google Scholar] [CrossRef]
- Kennedy, F.E.; Lu, Y.; Baker, I.; Munroe, P.R. The influence of sliding velocity and third bodies on the dry sliding wear of Fe30Ni20Mn25Al25 against AISI 347 stainless steel. Wear 2017, 374, 63–76. [Google Scholar] [CrossRef]
- Kennedy, F.E.; George, M.; Baker, I.; Johnson, B.J.; Chang, N. Influence of composition and environment on wear of NiAl and Ni–Fe–Al. In Proceedings of the International Tribology Conference, Yokohama, Japan, 29 October–2 November 1995. [Google Scholar]
- Powell, D.; Earles, S. Wear of unlubricated steel surfaces in sliding contact. Asle Trans. 1968, 11, 101–108. [Google Scholar] [CrossRef]
- Iwabuchi, A.; Hori, K.; Kubosawa, H. The effect of oxide particles supplied at the interface before sliding on the severe-mild wear transition. Wear 1988, 128, 123–137. [Google Scholar] [CrossRef]
Publisher’s Note: MDPI stays neutral with regard to jurisdictional claims in published maps and institutional affiliations. |
© 2022 by the authors. Licensee MDPI, Basel, Switzerland. This article is an open access article distributed under the terms and conditions of the Creative Commons Attribution (CC BY) license (https://creativecommons.org/licenses/by/4.0/).