Abstract
As one of the most-critical components in space optical cameras, the performance of space mirrors directly affects the imaging quality of space optical cameras, and the lightweight form of mirror blanks is a key factor affecting the structural quality and the surface-shape accuracy of mirrors. For the design requirements of lightweight and high surface-shape accuracy with space mirrors, this study proposes a design and manufacturing method that integrates topology-optimization with additive-manufacturing technology. This article firstly introduced the basic process and key technologies of space-mirror design and analyzed the superiority of combining a topology-optimized configuration design and additive-manufacturing technology; secondly, the topology-optimized design method of a back-open-structure mirror was used to complete the scheme design of a 260 mm aperture mirror; finally, the laser selective-melting manufacturing technology was used to complete the 260 mm aperture mirror blank. The mirror and its support structure were assembled and tested in a modal mode; the resonant frequencies of the mirror assembly were all over 600 Hz; and the deviation from the analytical results was within 2%. The optical surface of the mirror was turned by the single-point diamond-turning (SPDT) technique. The accuracy of the optical surface was checked by a Zygo interferometer. The RMS accuracy of the mirror surface was 0.041 ( is the wavelength; = 632 nm). In the test of the influence of gravity on the surface-shape accuracy, the mirror was turned over, which was equivalent to twice the gravity, and the RMS of the mirror surface-shape accuracy was 0.043, which met the requirement. The verification results show that the mirror designed and fabricated by the additive-manufacturing-based mirror-topology-optimization method can be prepared by the existing process, and the machinability and mechanical properties can meet the requirements, which provides an effective development method for improving the structural design and optimizing the manufacturing of space reflectors.
1. Introduction
For the design of a space-optical remote camera, the position accuracy and surface-shape accuracy of a large-aperture mirror, as an important part of the optical system, are directly related to the imaging quality of the camera. Since the installation and testing of the mirror assembly are all carried out under the gravity environment on the ground and since its working condition is in the micro-gravity environment in space, the impact of the difference between the ground environment and the space environment on the imaging quality of the space optical camera must be considered in order to ensure the accuracy of the mirror. To ensure the accuracy of the mirror, it is necessary to ensure the minimum displacement of the mirror after gravity release. However, the absolute stiffness of the light-weighted mirror decreases with respect to the initial mirror mass, and the sensitivity to the support force increases. Therefore, how to achieve high precision, high stability, and high reliability in the design and manufacture of large-aperture mirrors is an important research content of large-aperture mirror components, and it is also the focus and difficulty of space-optical camera development.
Talapatra [1] conducted a study on lightweight and high-stiffness mirror structures and proposed that the arch-shaped structure has certain advantages in weight and stiffness compared with the traditional flat-backed structure in the optimal structural design of the mirror. In the study of the mirror design, Valente and Vukobratovich [2] investigated the design of the mirror with different lightweight apertures in terms of the deformation caused by the self-weight of the structure and the manufacturing constraints. Fan et al. [3] analyzed the advantages and disadvantages of mirror configurations with various back shapes and lightweight holes in terms of the lightweight rate, structural stiffness, thermal stability, and manufacturing processability, which have a certain guiding significance for the lightweight structure design of mirrors.
According to the type of design variables, structural optimization design can be divided into size optimization, shape optimization, and topology optimization. Topology optimization is a method to find the optimal material distribution in the design domain of a structure under a given constraint. The object of topology optimization is the descriptive parameters of the topological configuration of the structure, which commonly include the relative density method of finite cells [4], the nodal density method [5], and the level-set function method [6]. At present, many scholars have tried to apply the topology-optimization method to the structural design of space mirrors. Park et al. [7] designed a lightweight mirror based on a three-dimensional solid mirror body with the solid unit density as the design variable under the joint action of the structural self-weight and the polishing pressure load, and its mirror lightweight rate reached 78%. Lee et al. [8] used the idea of homogenization to discrete the mirror into a mirror structure composed of several small units, and they applied the topology-optimization method to optimize the back reinforcement layout of the small unit structure, but the design process only considered the effect of the mirror polishing pressure and did not consider the effect of gravitational deformation. Liu et al. [9,10,11] used topology-optimization application theory for the structural design of space mirrors, and they obtained some mirror structures tha tare better than the traditional configurations. However, because specific manufacturability constraints are not considered in the topology-optimization model, it is difficult to obtain clear weight reduction holes or reinforcement layouts in the optimal material distribution results, while the extraction of conceptual configurations still mainly relies on the designer’s previous design experience.
In 2011, Brackett [12] described the significance of combining the topology-optimization method with additive-manufacturing technology and presented the manufacturability problems faced by structural topology-optimization results when applied to additive manufacturing: including the fineness of meshing, the addition of manufacturability constraints, and the post-processing of complex redundant structures. Thus, it opens up a precedent for the research of the topology-optimization method for additive manufacturing. Additive manufacturing (AM) is the process of preparing structures by adding layers of materials. The advent of additive-manufacturing technologies has led to highly complex geometric forms, and it makes the preparation of multiple geometric scale structures from micro and nano to macro possible. It has overturned the limitations of traditional manufacturing technology and solved the problem of “manufacturing determines design” in product development. In 2015, Corning prepared a honeycomb lightweight high-performance aluminum mirror by additive-manufacturing technology with the same lightweight form as the traditional metal mirror lightweight form, both with a back honeycomb lightweight structure [13,14]. Compared with the traditional metal mirror substrate preparation, the additive-manufacturing technology improves the processing and forming efficiency of the mirror substrate. In the literature [15], a metallic mirror made of AlSi12 alloy material with an aperture of 86 mm and a closed back hexagonal honeycomb lightweight structure was fabricated by using SLM technology, and the lightweight rate reached 63.5%. After the diamond precision turning, plating, and polishing process, the surface roughness meeting the optical requirements of the visible band with a PV value of 109 nm and an RMS value of 12.5 nm was obtained. Moreover, the surface-shape RMS value of this mirror only decreased by 0.1 nm after two years of storage under suitable conditions. This is an attempt of additive manufacturing in mirror design and manufacturing, and the results show that the optical and mechanical properties of metal mirrors based on additive-manufacturing technology can meet their working requirements. In the literature, [16] introduced an aluminum mirror based on additive manufacturing; the surface quality was 0.384 (PV) and 0.093 (RMS) ( = 632.8 nm) after machining. Long et al. [17] proposed a methodology on the topological design of a porous structure, and the proposed method is capable of accurately limiting the upper bound of global and local volume fractions, which opens up new possibilities for additive manufacturing. Additive manufacturing is a core technology for “rapid prototyping” as a “moldless agile manufacturing” technology that can significantly reduce the R&D cycle and cost. Topology-optimization-design technology breaks through the existing design limits to obtain innovative structural designs.
In summary, the combination of additive-manufacturing technology and topology-optimization technology can overturn the limitations of traditional manufacturing technology, fully release the space for structural optimization design, improve the light weight of the mirror, and ensure its performance. Therefore, it is of great significance to carry out research on topology-optimization technology for low-areal-density mirrors with the additive-manufacturing method, which can break through the traditional design limits and obtain mirrors with low areal density, high specific stiffness, and lightweight configurations.
This study proposes a design and manufacturing method that integrates topology-optimization and additive-manufacturing technology, and it completed the design of a topology-optimization scheme for a 260 mm aperture mirror based on this method; it also developed the mirror of 260 mm aperture AlSi10Mg material by using selective laser melting (SLM)-technology. The single-point diamond-turning (SPDT) technique was used to turn the optical surface of the mirror; meanwhile, the modal test of the mirror assembly was completed to verify the effectiveness and versatility of the design and manufacturing method of the topology-optimization technology and the additive-manufacturing technology.
2. Three-Dimensional Solid Mirror Topology Optimization Design Method
Through analysis, it is found that the structural form of the mirror back is one of the key factors affecting the quality of the mirror structure and the accuracy of the mirror surface-shape. The topology-optimization method can be used to obtain the optimal configuration of the mirror structure at the conceptual-design stage. However, it is difficult to obtain a mirror structure that can be well-machinable without manufacturability constraints. In view of the above considerations, a method for describing the manufacturability constraints corresponding to the open mirror structure was investigated in the design of the commonly used back-open mirrors, and a topology optimization conformation method based on the back-solid mirror structure was established.
2.1. Analysis Method for Surface Accuracy of Space Mirrors
The purpose of the lightweight design of large-aperture space mirrors is to obtain a mirror structure that minimizes the surface-shape errors caused by the dead load and that minimizes the mirror mass. The surface-shape error of the mirror is obtained by fitting the deformation result of the mirror surface after removing the rigid body displacement with the Zernike method [18,19]. As shown in Equation (1).
where , and is the normal displacement of the mirror. The three order terms of the Zernike polynomial, , , and , represent the tip, tilt, and defocus of the mirror, respectively. is the number of mirror nodes, and is the area fraction of the ith grid area relative to the entire optical surface.
2.2. Description of the Back Ribs Layout and Height-Constraint Design Method of Space Mirror
Based on the idea of topological optimization for the continuum structure, the initial solid mirror structure was finely discretized using solid cells, and at the same time, the presence/absence factor of each cell with a cell material description was taken as 1 or 0. According to the solid isotropic microstruture/material with penalty (SIMP) method in the topology-optimization variable-density method, the unit material is taken as a porous material, and its relative density is chosen as the description factor of the material; then, the elastic modulus describing the unit material properties can be expressed as
with and representing the relative density of materials and the modulus of elasticity for the cell, respectively; is the modulus of elasticity for a given material ( = 1); P is the penalty factor; and, in this study, the penalty factor was taken as P = 3 for the study calculation, with and representing the lower and upper limits of cell density, respectively.
From Equation (2), is equal to 1 or 0 indicating that the material of the cell is taken as the selected material or no material, respectively. Therefore, the configuration of the structure can be described by the relative density of the material of each cell. The design variables of the configuration design can be expressed as
In order to obtain the results of the layout and the height-optimization design for the ribs of lightweighted mirror, an explicit parametric model considering the draft constraints was introduced for the cell relative density in the design domain. The idea of the model was: to take each string of units along the draft direction to establish a unit group and, in each unit group, to connect the variables, so that all the units in the group and the corresponding units on the base have the same unit relative density value, by the value of 0 or 1 to describe the layout of the reinforcing rib; at the same time, the Heaviside function with parameters in each unit group was introduced to describe the height of the reinforcing rib. The format of the parameterized unit relative density is shown in the following equation.
where is the number of cell groups in the design domain, is the design variable describing the existence of cell groups, = 1 indicates the existence of cell groups, = 0 indicates the absence of cell groups, H is the Heaviside function, is the design variable describing the height of reinforcing rib (used to define the location of the intersection of solid and hollow cells in the jth cell group after optimization), and is the normalized center point coordinates of any cell in the cell group. The schematic diagram of the cell density parameterization is shown in Figure 1. At this point, the design variables represented by Equation (3) are transformed into:
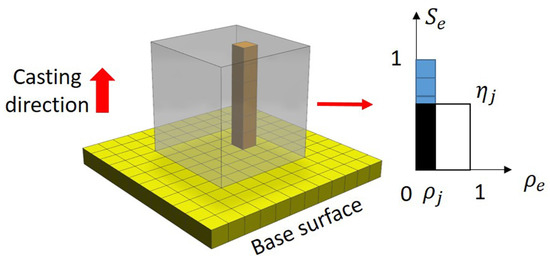
Figure 1.
Parametric sketch of element density considering draft constraint.
In order to utilize the gradient-based optimization method, the Heaviside function in Equation (4) needs to be smoothed, and the approximation function chosen is shown in the following equation:
where > 0 is used to control the smoothness of the approximation function. In order to ensure convergence to the optimal solution during the optimization iterations while obtaining clear topological results, will gradually become larger as the iterations proceed. The derivative of the above equation with respect to the design variables is
2.3. Mathematical Modeling of the Topology Optimization for the Back-Solid Mirror
In practical engineering structural-design applications, it is often difficult to implement RMS as the response to topology optimization.
In contrast, solving the topology-optimization problem with the minimum structural flexibility as the objective function is quite mature. Both structural flexibility and RMS are response functions related to the overall displacement U of the structure, and both can be used to measure the magnitude of the overall structural stiffness. Therefore, this study adopted the minimum flexibility of the mirror structure as the objective function to maximize the overall stiffness of the structure. Thus, the optimization objective of minimizing RMS was achieved, and the performance of the mirror structure was evaluated by calculating the RMS value of the mirror surface-shape error. The structural flexibility is calculated as:
where is the displacement vector of the structure, is the load vector of the structure (including self-weight and polishing pressure loads), and is the overall stiffness matrix of the structure. is denoted as , where is the stiffness matrix of the unit. The mass constraint can be expressed as
where is the density of the given material, is the volume of the cell, is the upper limit of the specified mass fraction, and is the mass of the initial structure. At this point, a mathematical model for the topological optimization of the mirror can be developed, expressed as
Using the direct method, the sensitivity of the objective function to the design variables is calculated as
The sensitivity of the constraint function to the design variables is given by
For the topological-optimization problem with self-weight considered, the derivative of the objective function c with respect to the accompanying method is obtained as
Since the magnitude of the self-weight load is related to and is not zero, the value of the derivative of the above equation is not always negative, and the sensitivity of c to and can be positive or negative after bringing in Equation (11) or even changing the sign with the change of design variables. At this time, the objective function is non-monotonic relative to the design variables. When solving this kind of optimization problem, in order to get the result close to the optimal solution as much as possible, it is necessary to make the optimal convex approximation of the objective function. In this study, the method of moving asymptotes (MMA) algorithm was used to solve the optimization problem (Equation (10)).
2.4. Optimized Configuration Extraction Method and Detailed Design
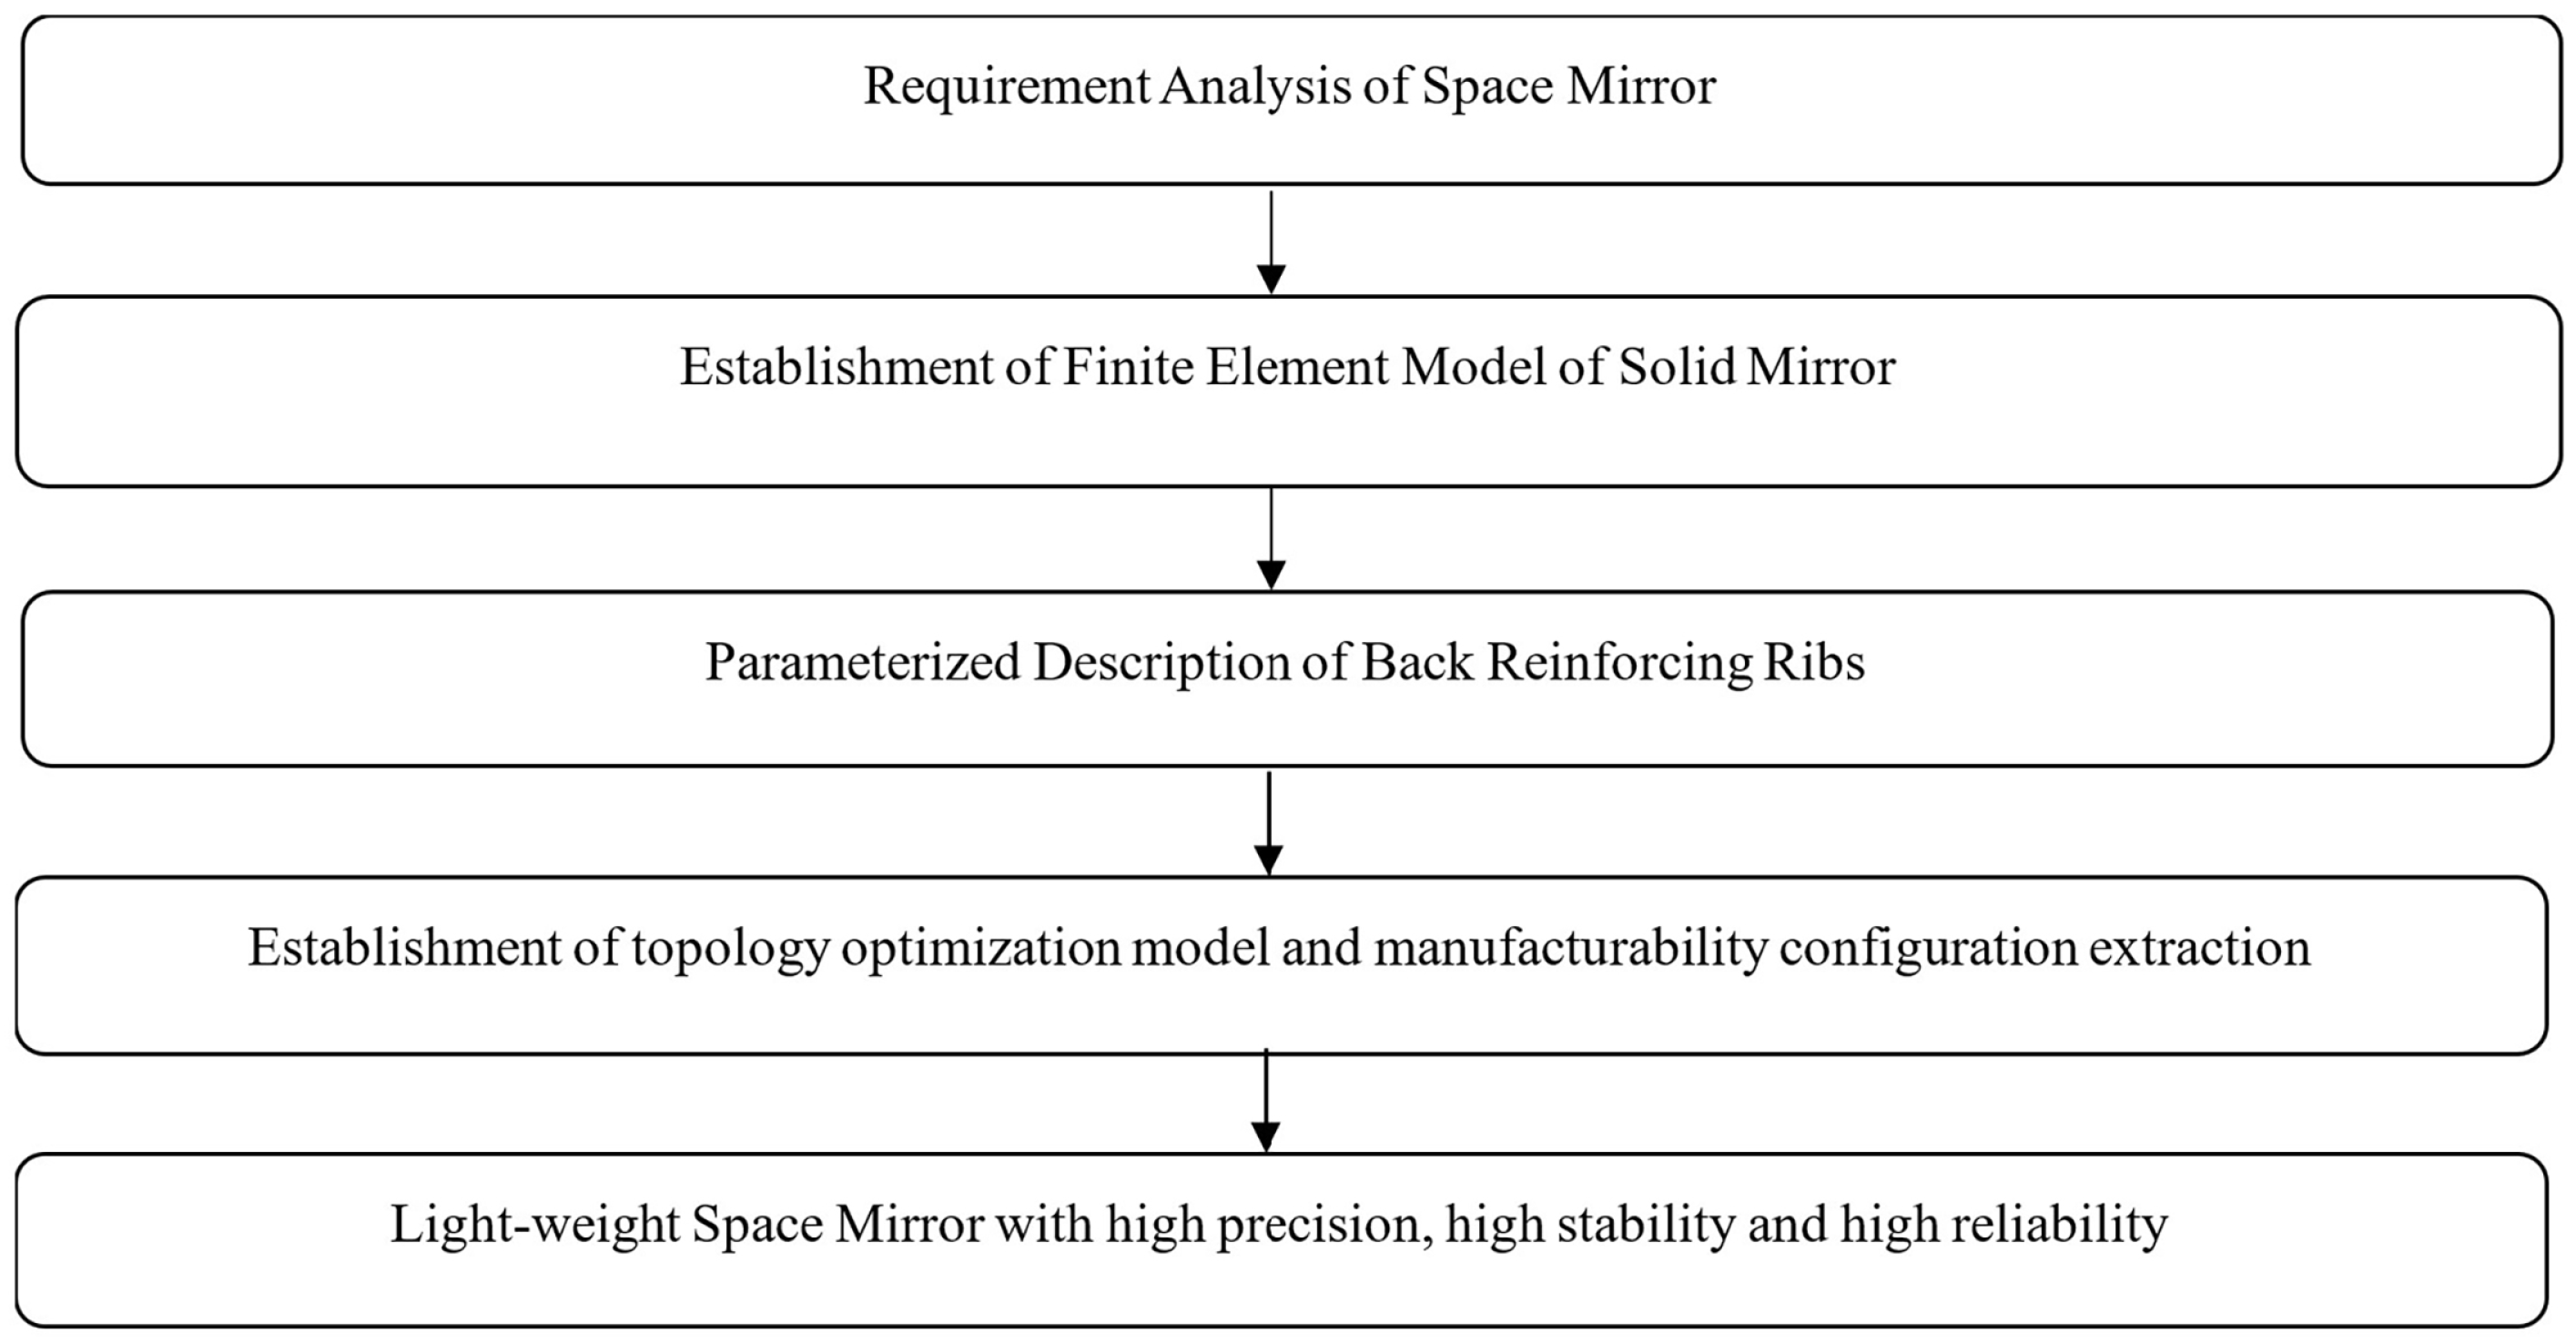
After solving the optimization model (10), the topology-optimization result was obtained as the optimal distribution form of the substrate material on the back of the mirror. The layout of the material in the mirror surface and the distribution of the height direction may be very irregular. When determining the layout and height of reinforcing ribs, it is necessary to combine the characteristics of some manufacturing processes to appropriate regularization of the layout and the height of the ribs, respectively. Referring to the material distribution results of topology optimization, the thickness of each rib was set, and a 3D CAD model of the mirror was established as the initial design for dimensional optimization, which was used to adjust the thickness of the reinforcing ribs. By using the thickness of the reinforcing ribs as the design variable and the RMS value of the mirror surface-shape error caused by the self-weight as the design constraint, with the minimum structural mass as the design objective, a parametric optimization model was established. After solving the model, the thickness of each reinforcing rib was updated, and a suitable chamfer was arranged at the intersection of the reinforcing ribs in combination with the manufacturing process to obtain the optimized lightweight structure of the mirror. The flow of the optimized design method is shown in Figure 2.
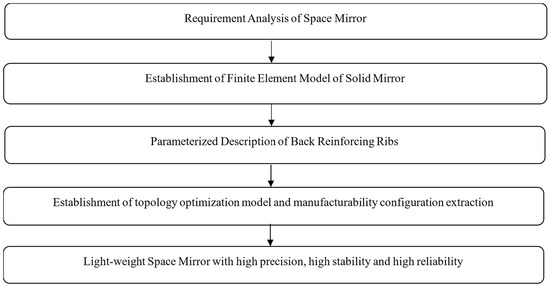
Figure 2.
Optimizing design process of light-weight space mirror.
3. Topology-Optimization-Design Results of Additive-Manufacturing Space Mirror
The proposed design method was applied to the design of the primary mirror of a space-optical camera of 260 mm magnitude. The geometric parameters of the primary mirror model designed in this study are shown in Table 1.

Table 1.
Geometric information of primary mirror.
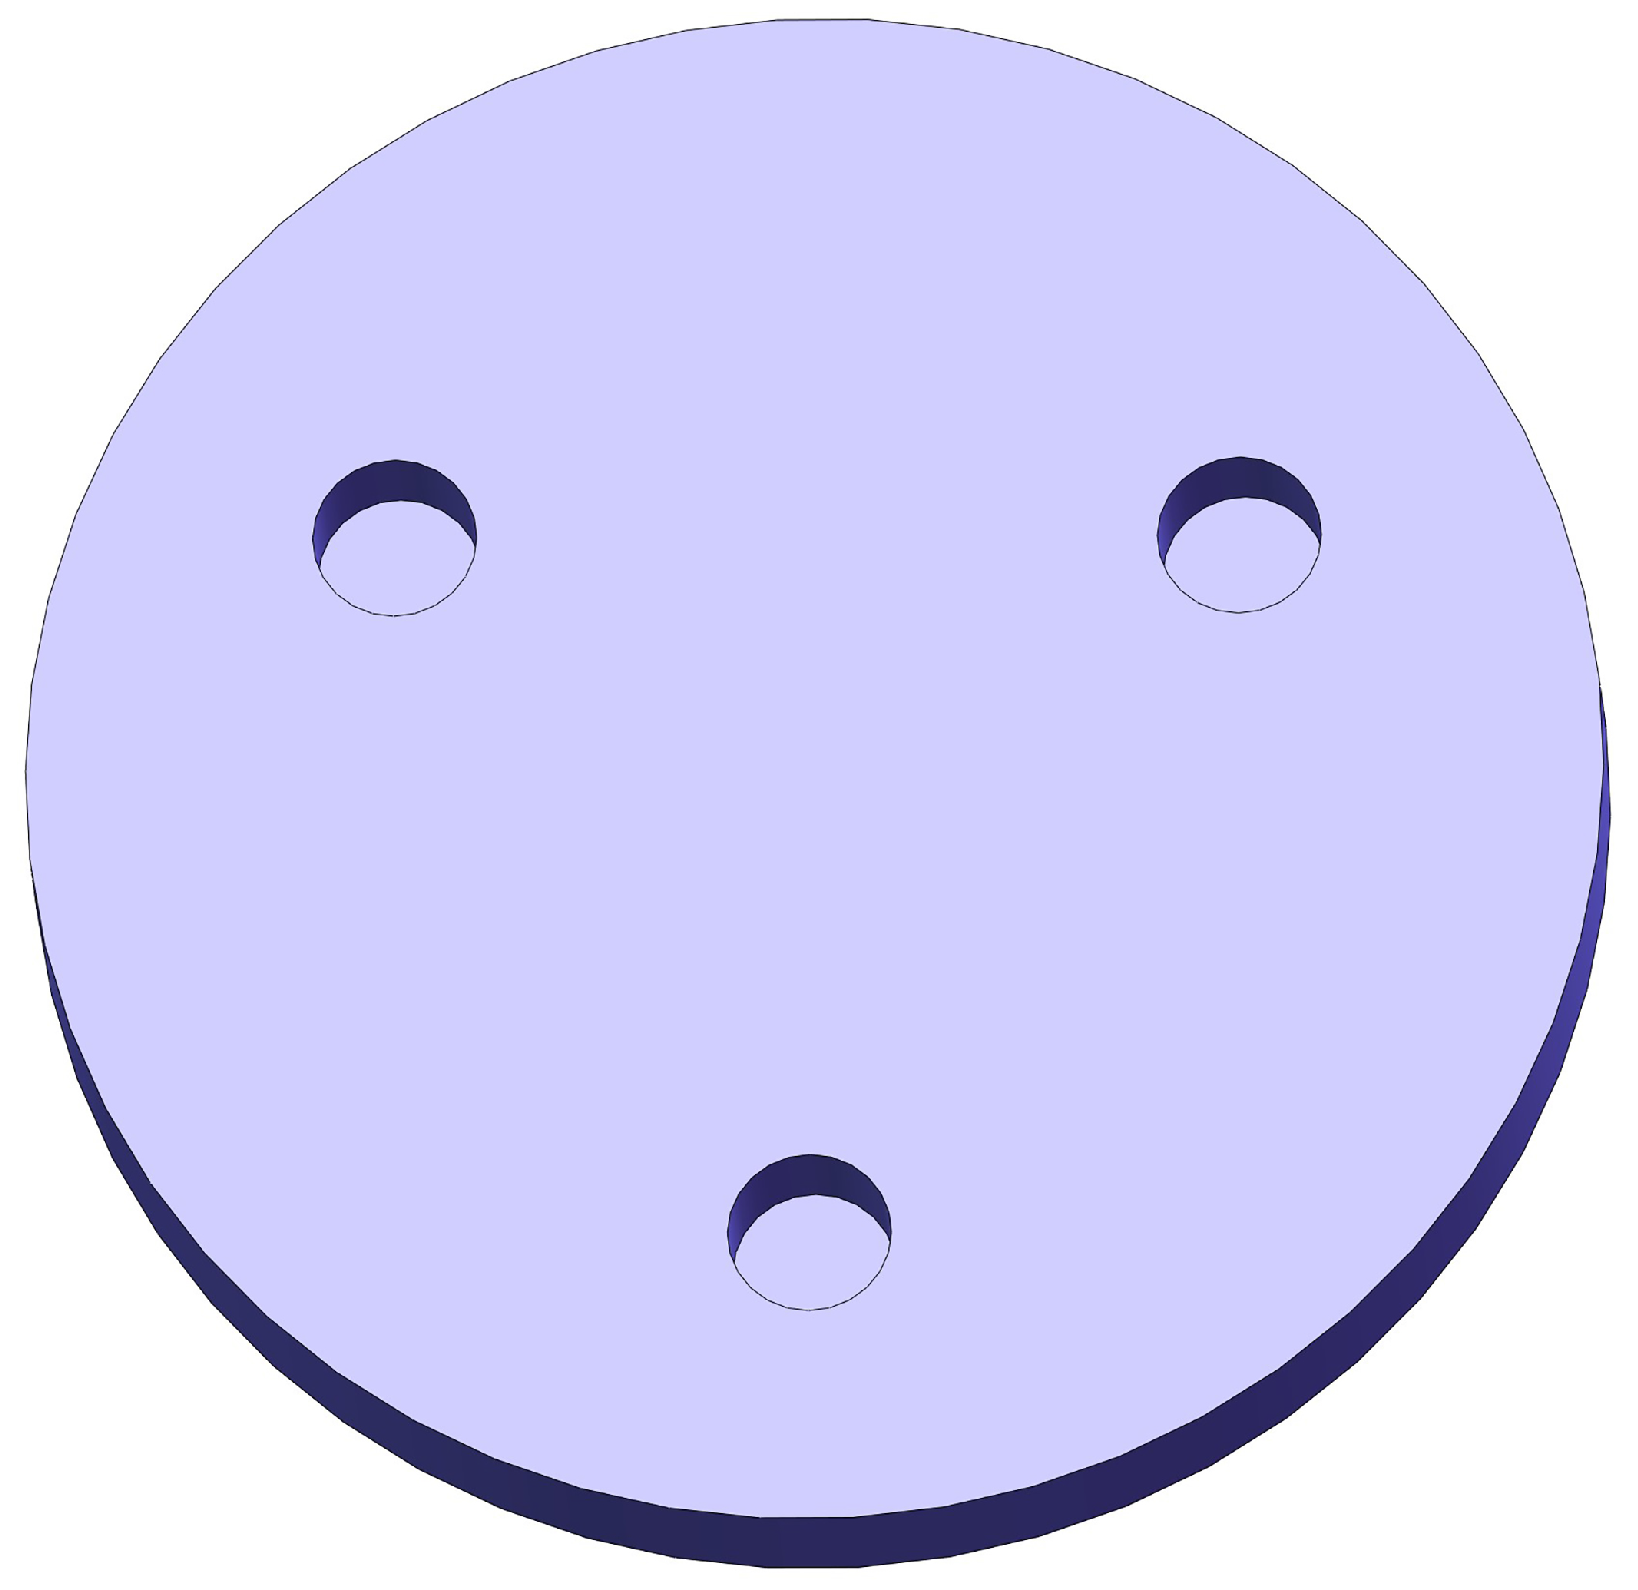
The geometric model of the mirror is shown in Figure 3, and the mirror is supported by three points at the back. The mirror support position is determined by finite-element-method optimization, and constraints were applied at the support point position during topology optimization. The material used for the mirror was AlSi10Mg, where the density was 2.65 g/cm, the modulus of elasticity was 69 GPa, and the Poisson’s ratio was 0.33. The design constraints of the mirror are shown in Table 2.
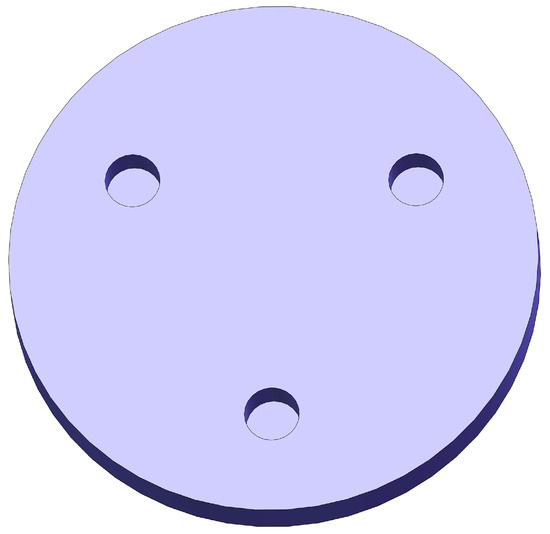
Figure 3.
Initial structure of the mirror.

Table 2.
Mirror design constraints.
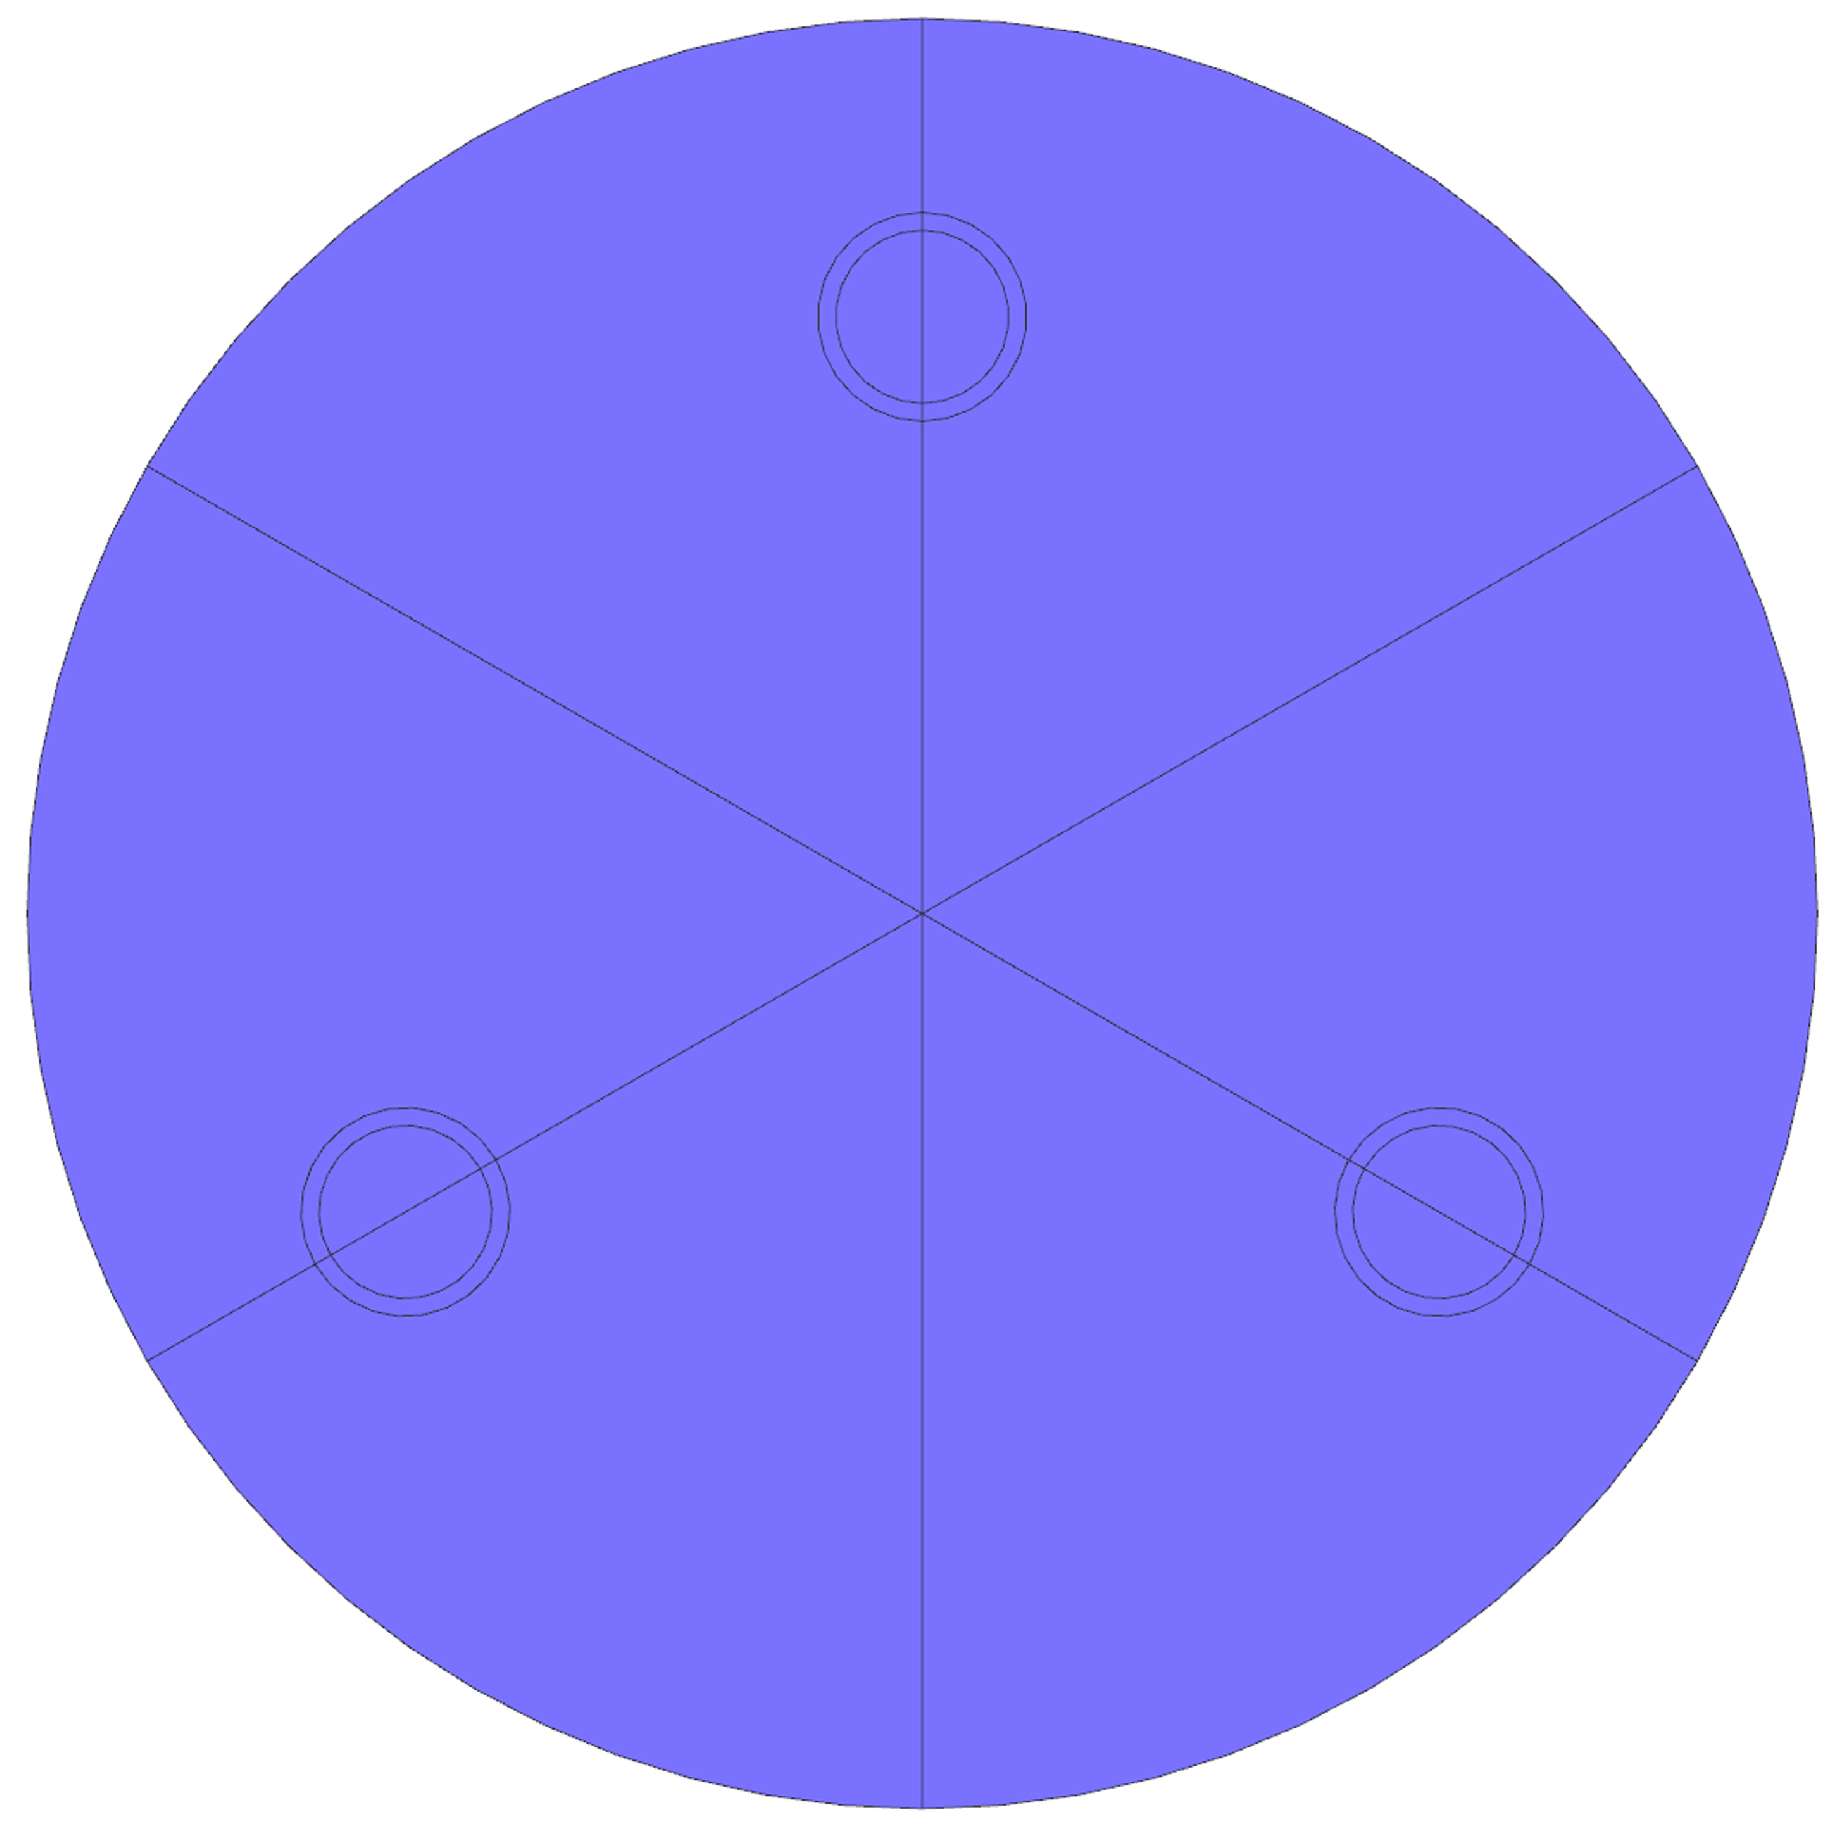
A finite-element model of the mirror with a flat-backed solid structure was established. In order to reduce the computational effort of topology optimization and to ensure the optimized structure has a circumferential symmetry according to the characteristics of the current geometric model, a responsive symmetric mesh was established. Taking the three constrained holes as the base points, take 1/3 of the model, and then take 1/2 of the selected model for meshing according to the axisymmetric characteristics of the 1/3 model; the following Figure 4 shows the established geometric partition model of the mirror.
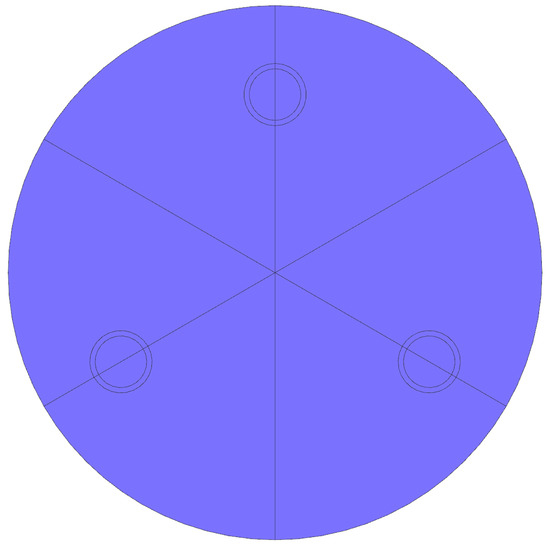
Figure 4.
Geometric segmentation model of mirror structure.
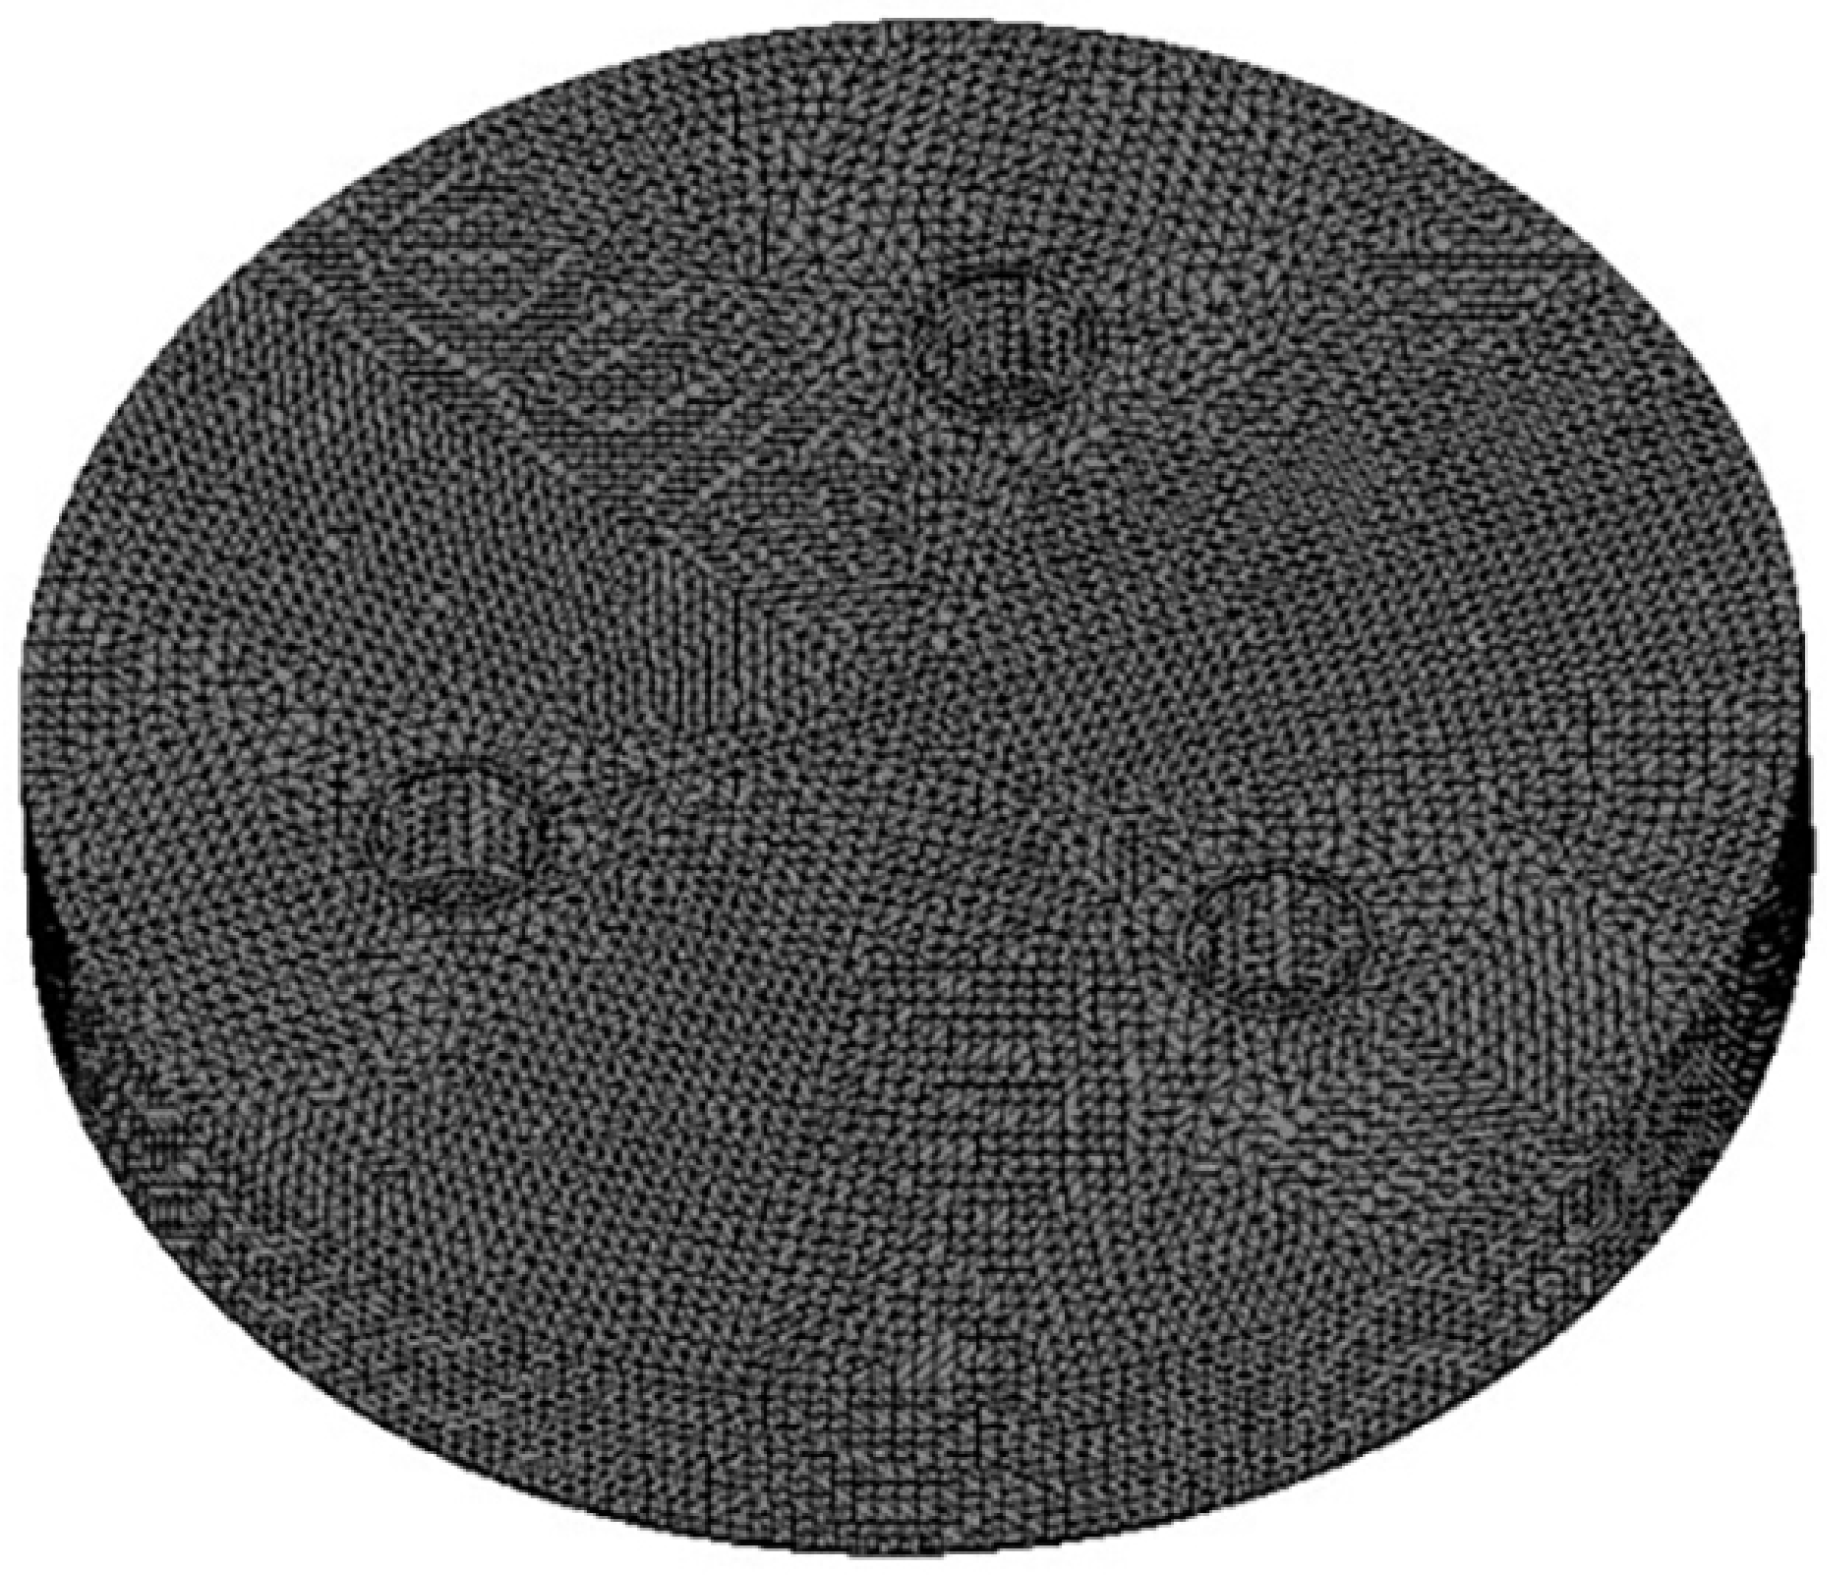
The reserved thickness of the back support edge and the surface of the mirror was 6 mm, and the entire finite-element model was meshed with linear tetrahedral cells, with 443,682 finite elements and 83,323 nodes, as shown in Figure 5. In actual use, the mirror is fixed by hinges at the support hole, and in the finite-element simulation, the full constraint at the support hole is used for fixing in order to simplify the processing, and the uniform load is applied on the mirror surface as the static-load condition for optimization. A certain thickness is reserved at the edge of the mirror and the support hole, which is the non-design area, and the other parts are used as the design area for optimization. For the design area, in order to minimize the workload of process design and processing, the topology optimization is repeatedly constrained for the structure definition mode, so that the mirror forms a symmetrical structure for design and processing.

Figure 5.
Finite-element model of mirror structure.
The topology optimization was carried out with the objective function of minimizing the structural flexibility of the mirror, and the self-weight load condition must be considered in the optimization process. With the upper limit of the mass fraction set to = 0.17, the objective function converged after 152 iterative steps, and the surface density (including surface and back support structure) was 20.6 kg/m, with a lightweight rate of 81%, while meeting the minimum structural size requirement. After topology optimization, the optimal distribution of the mirror material was obtained as shown in Figure 6a. To observe the distribution pattern of the material more clearly, it was projected along the thickness of the mirror to obtain the top view shown in Figure 6b. According to the optimization results, the materials that have a greater impact on the stiffness and strength of the mirror were mainly distributed around the support holes at the back of the mirror, which is where the mirror surface is theoretically subjected to greater forces. The perimeter of the support hole showed a non-equal distribution of material along the direction of each branch, where the height is smaller the further away from the support hole, and both the radial and circumferential back-reinforcing rib heights along the mirror were characterized by an arch-shaped distribution.
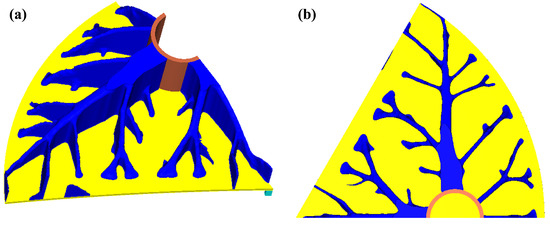
Figure 6.
Topology optimization results when = 0.17. (a) Three-dimensional stereogram. (b) Top view.
When establishing the lightweight 3D model according to the topology-optimization results, the optimal material layout and height distribution of reinforcing ribs are in the form of irregular curves, considering that the structure of the mirror will make it significantly more difficult in the additive-manufacturing process if it is too complex. Therefore, when reconstructing the three-dimensional model of the mirror, the problem of unsmooth structure can be solved to a certain extent by the method of density filtering and then further flattened by 3D reconstruction. Finally, the manufacturable topology-optimization mirror was obtained, as shown in Figure 7.
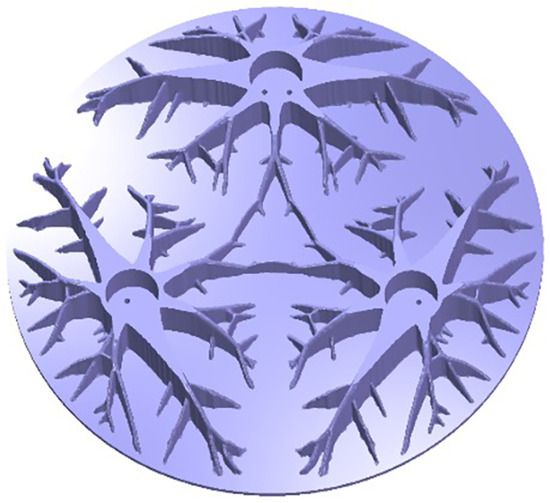
Figure 7.
Configuration of mirror topology-optimization scheme.
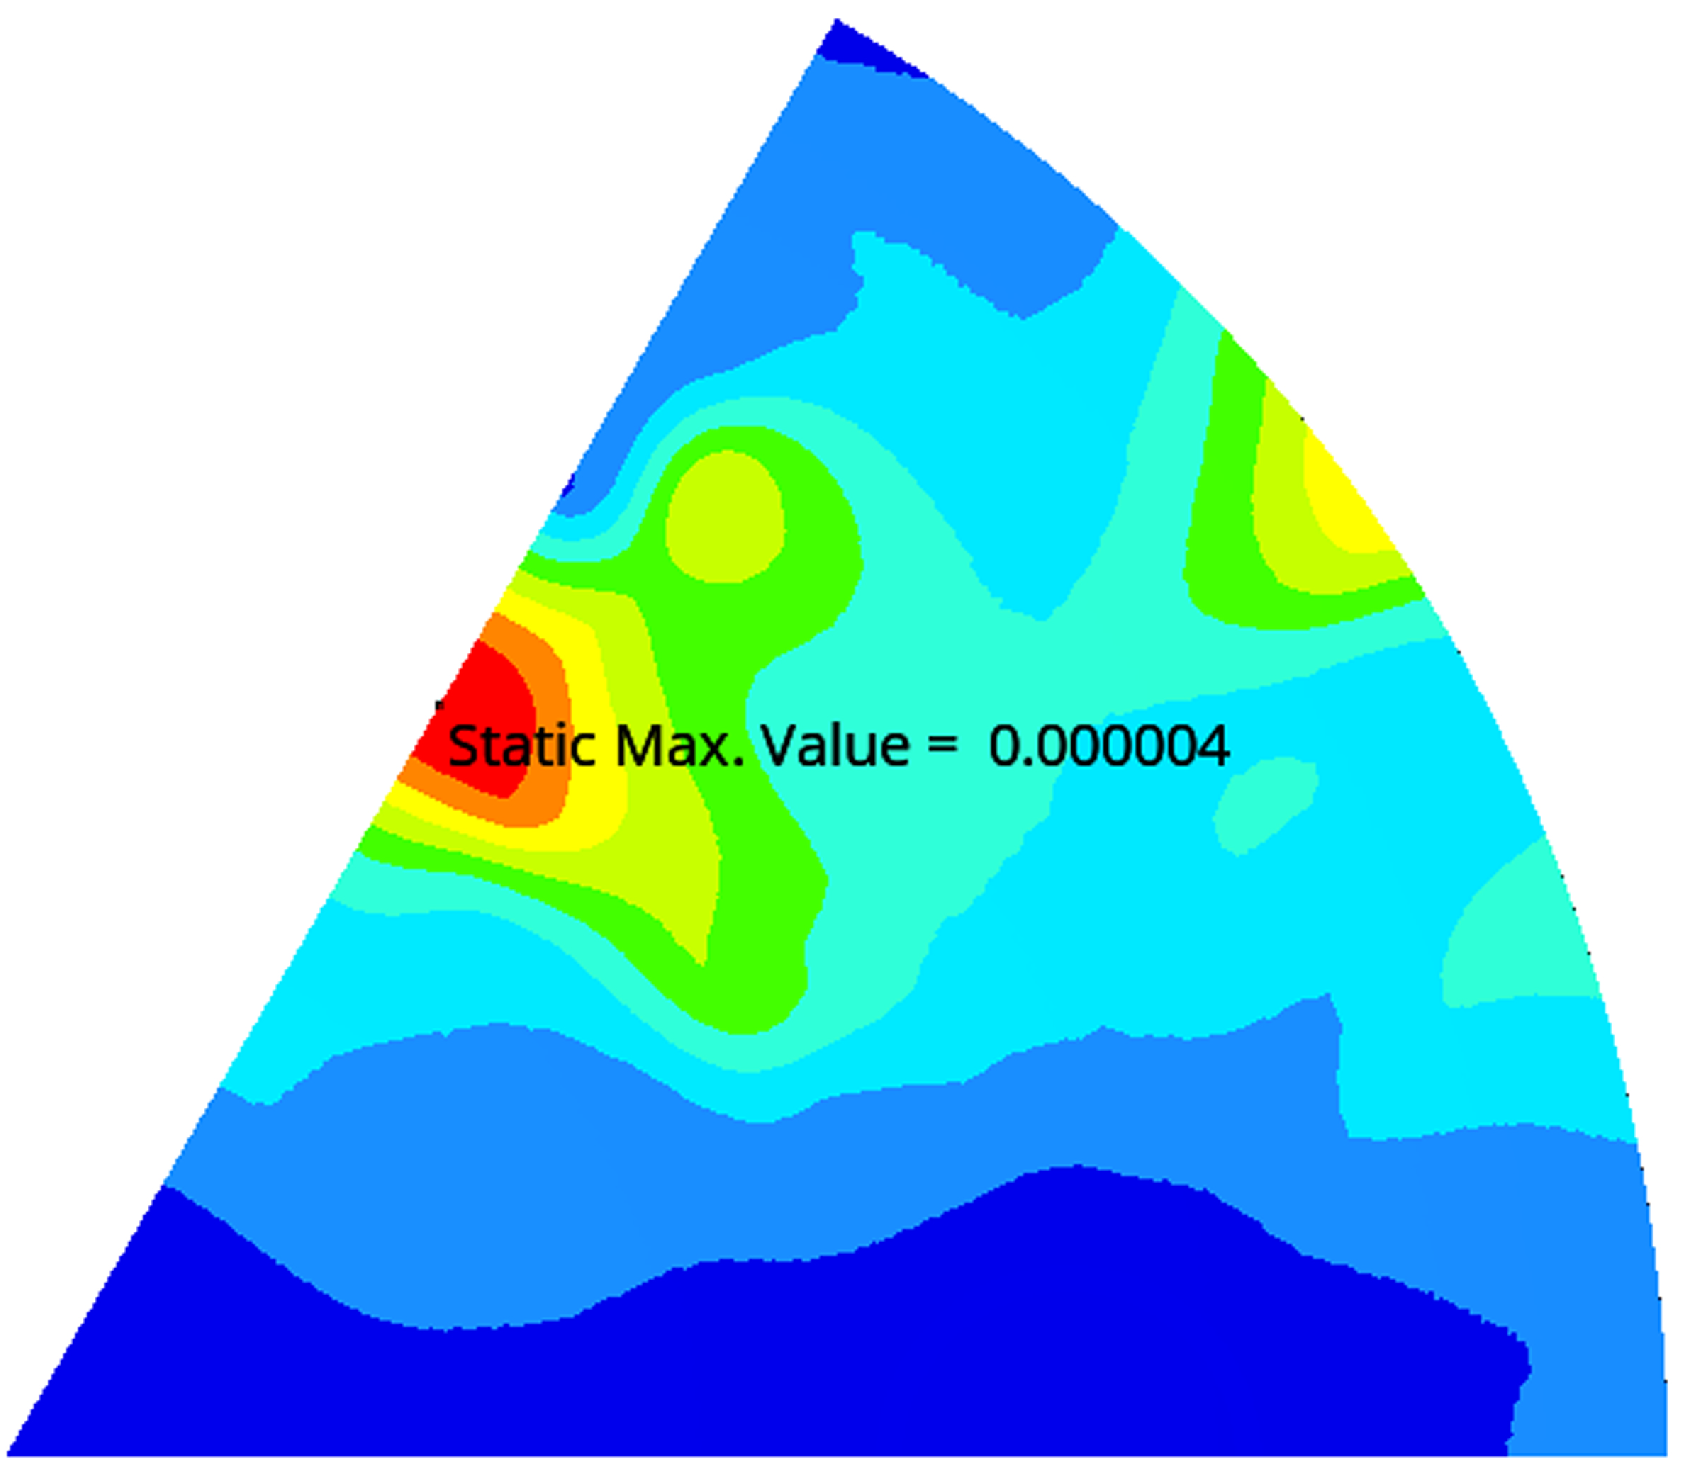
Apply a self-weight load to the mirror under the state of processing, assembly, and alignment (optical axis horizontal), and the deformation caused by gravity was accurately analyzed by the finite-element method; the mirror-displacement data were obtained, and the deformed surface was fitted with the standard Zernike polynomial to remove the effects of rigid body deflection and defocusing error. Then, the corresponding surface-shape error was calculated. The RMS value was 9.7 nm considering the processing residual (which is usually better than 25 nm RMS); the surface-shape error met the requirement better than /20 ( = 632 nm); and the normal displacement clouds of the mirrors are shown in Figure 8.

Figure 8.
The mirror deformation under gravity.
4. Mirror Preparation and Performance Verification
4.1. Mirror Preparation Verification
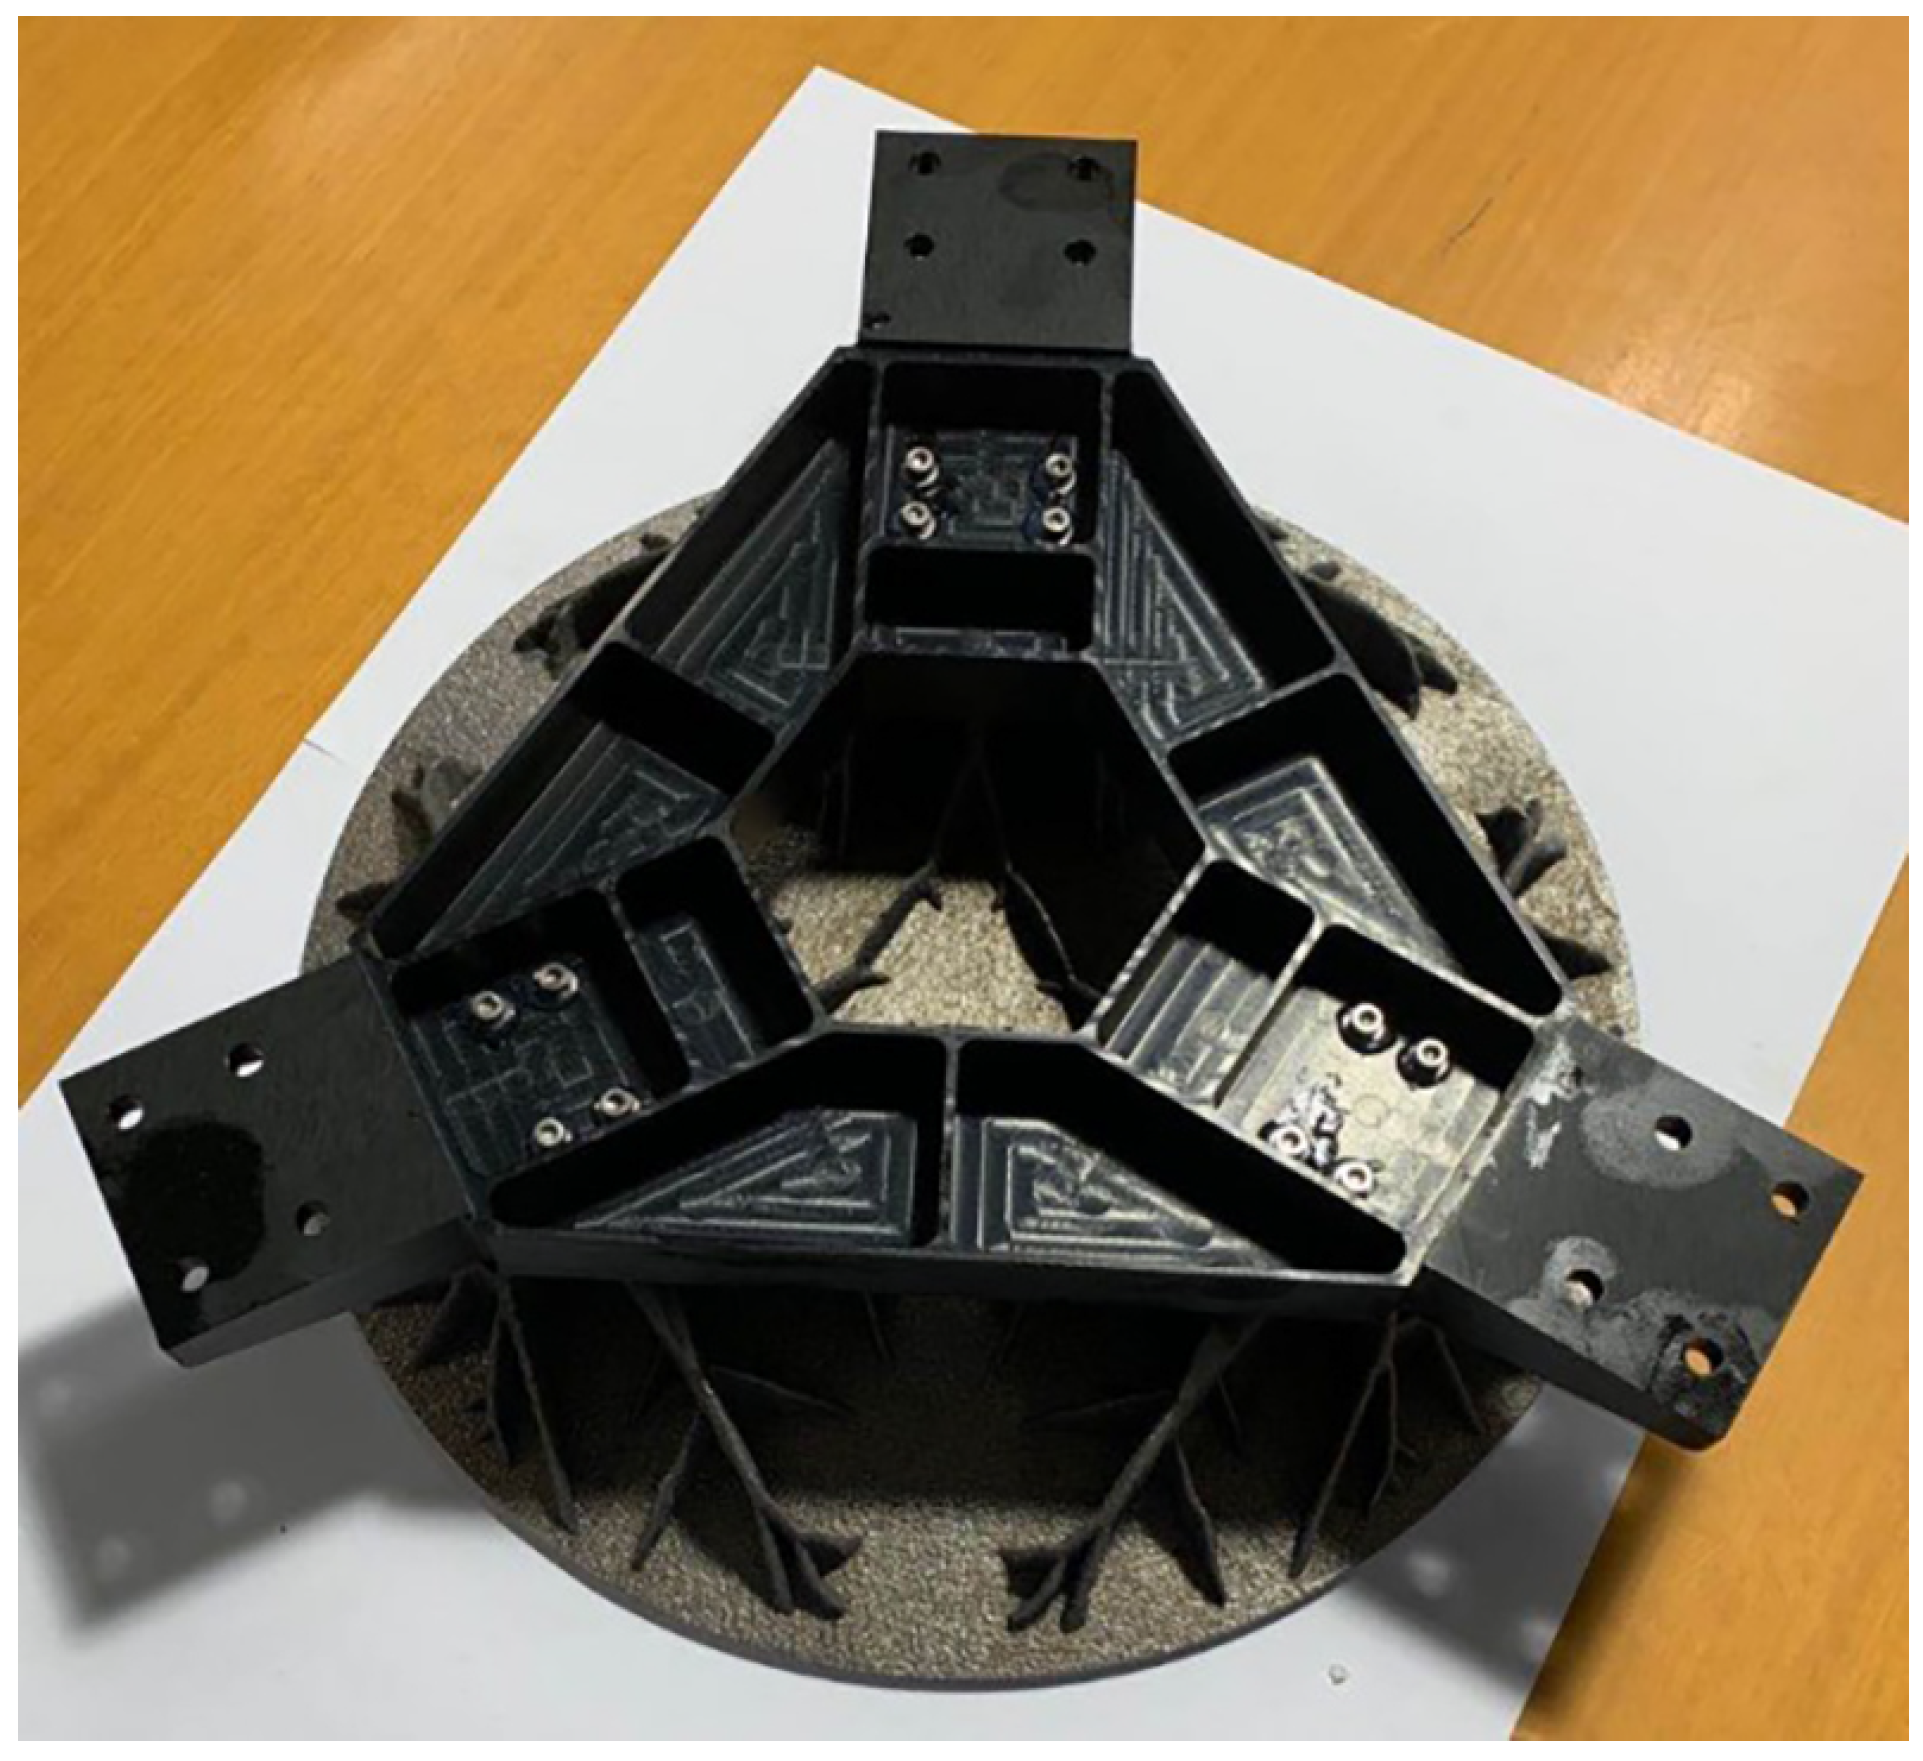
The manufacturability verification of the mirror was carried out by using SLM-based additive-manufacturing technology with AlSi10Mg material, as shown in Figure 9. The aperture of the mirror was 260 mm, and the weight was 1.09 kg. The area density was 20.5 kg/m, and the lightweight rate was 81.2%, which all met the design constraints. Vukobratovich et al. [20] designed and manufactured a 600 mm-diameter aluminum alloy mirror, which adopted the traditional triangular lightweight design scheme, with a mass of 20 kg and an area density of 70.7 kg/m. Therefore, compared with the traditional lightweight structure, the combination of additive-manufacturing technology and topology-optimization technology can subvert the limitations of traditional manufacturing technology, greatly improving the lightweight degree of the mirror and ensuring its performance.
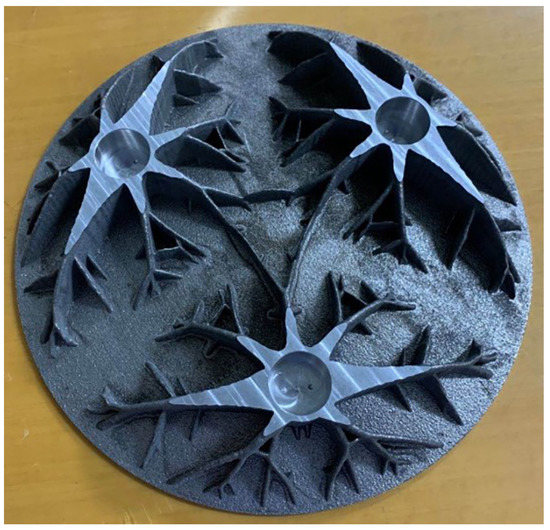
Figure 9.
The 260 mm aperture mirror blank using SLM-based additive-manufacturing technology.
Due to the fact that the structure of the lightweight mirror designed by topology optimization is relatively complicated, we compared the variations through mass comparison. The results show that the mass of the printed part is slightly different from the simulated CAD model; the deviation from the analytical results was within 1.9%.The comparison of the mirror’s mass is shown in Table 3.

Table 3.
Comparison of mirror’s mass.
4.2. Mechanical Performance Verification
We developed the support structure of the mirror and completed the assembly; the mirror assembly is shown in Figure 10.

Figure 10.
260 mm aperture aluminum alloy mirror assembly.
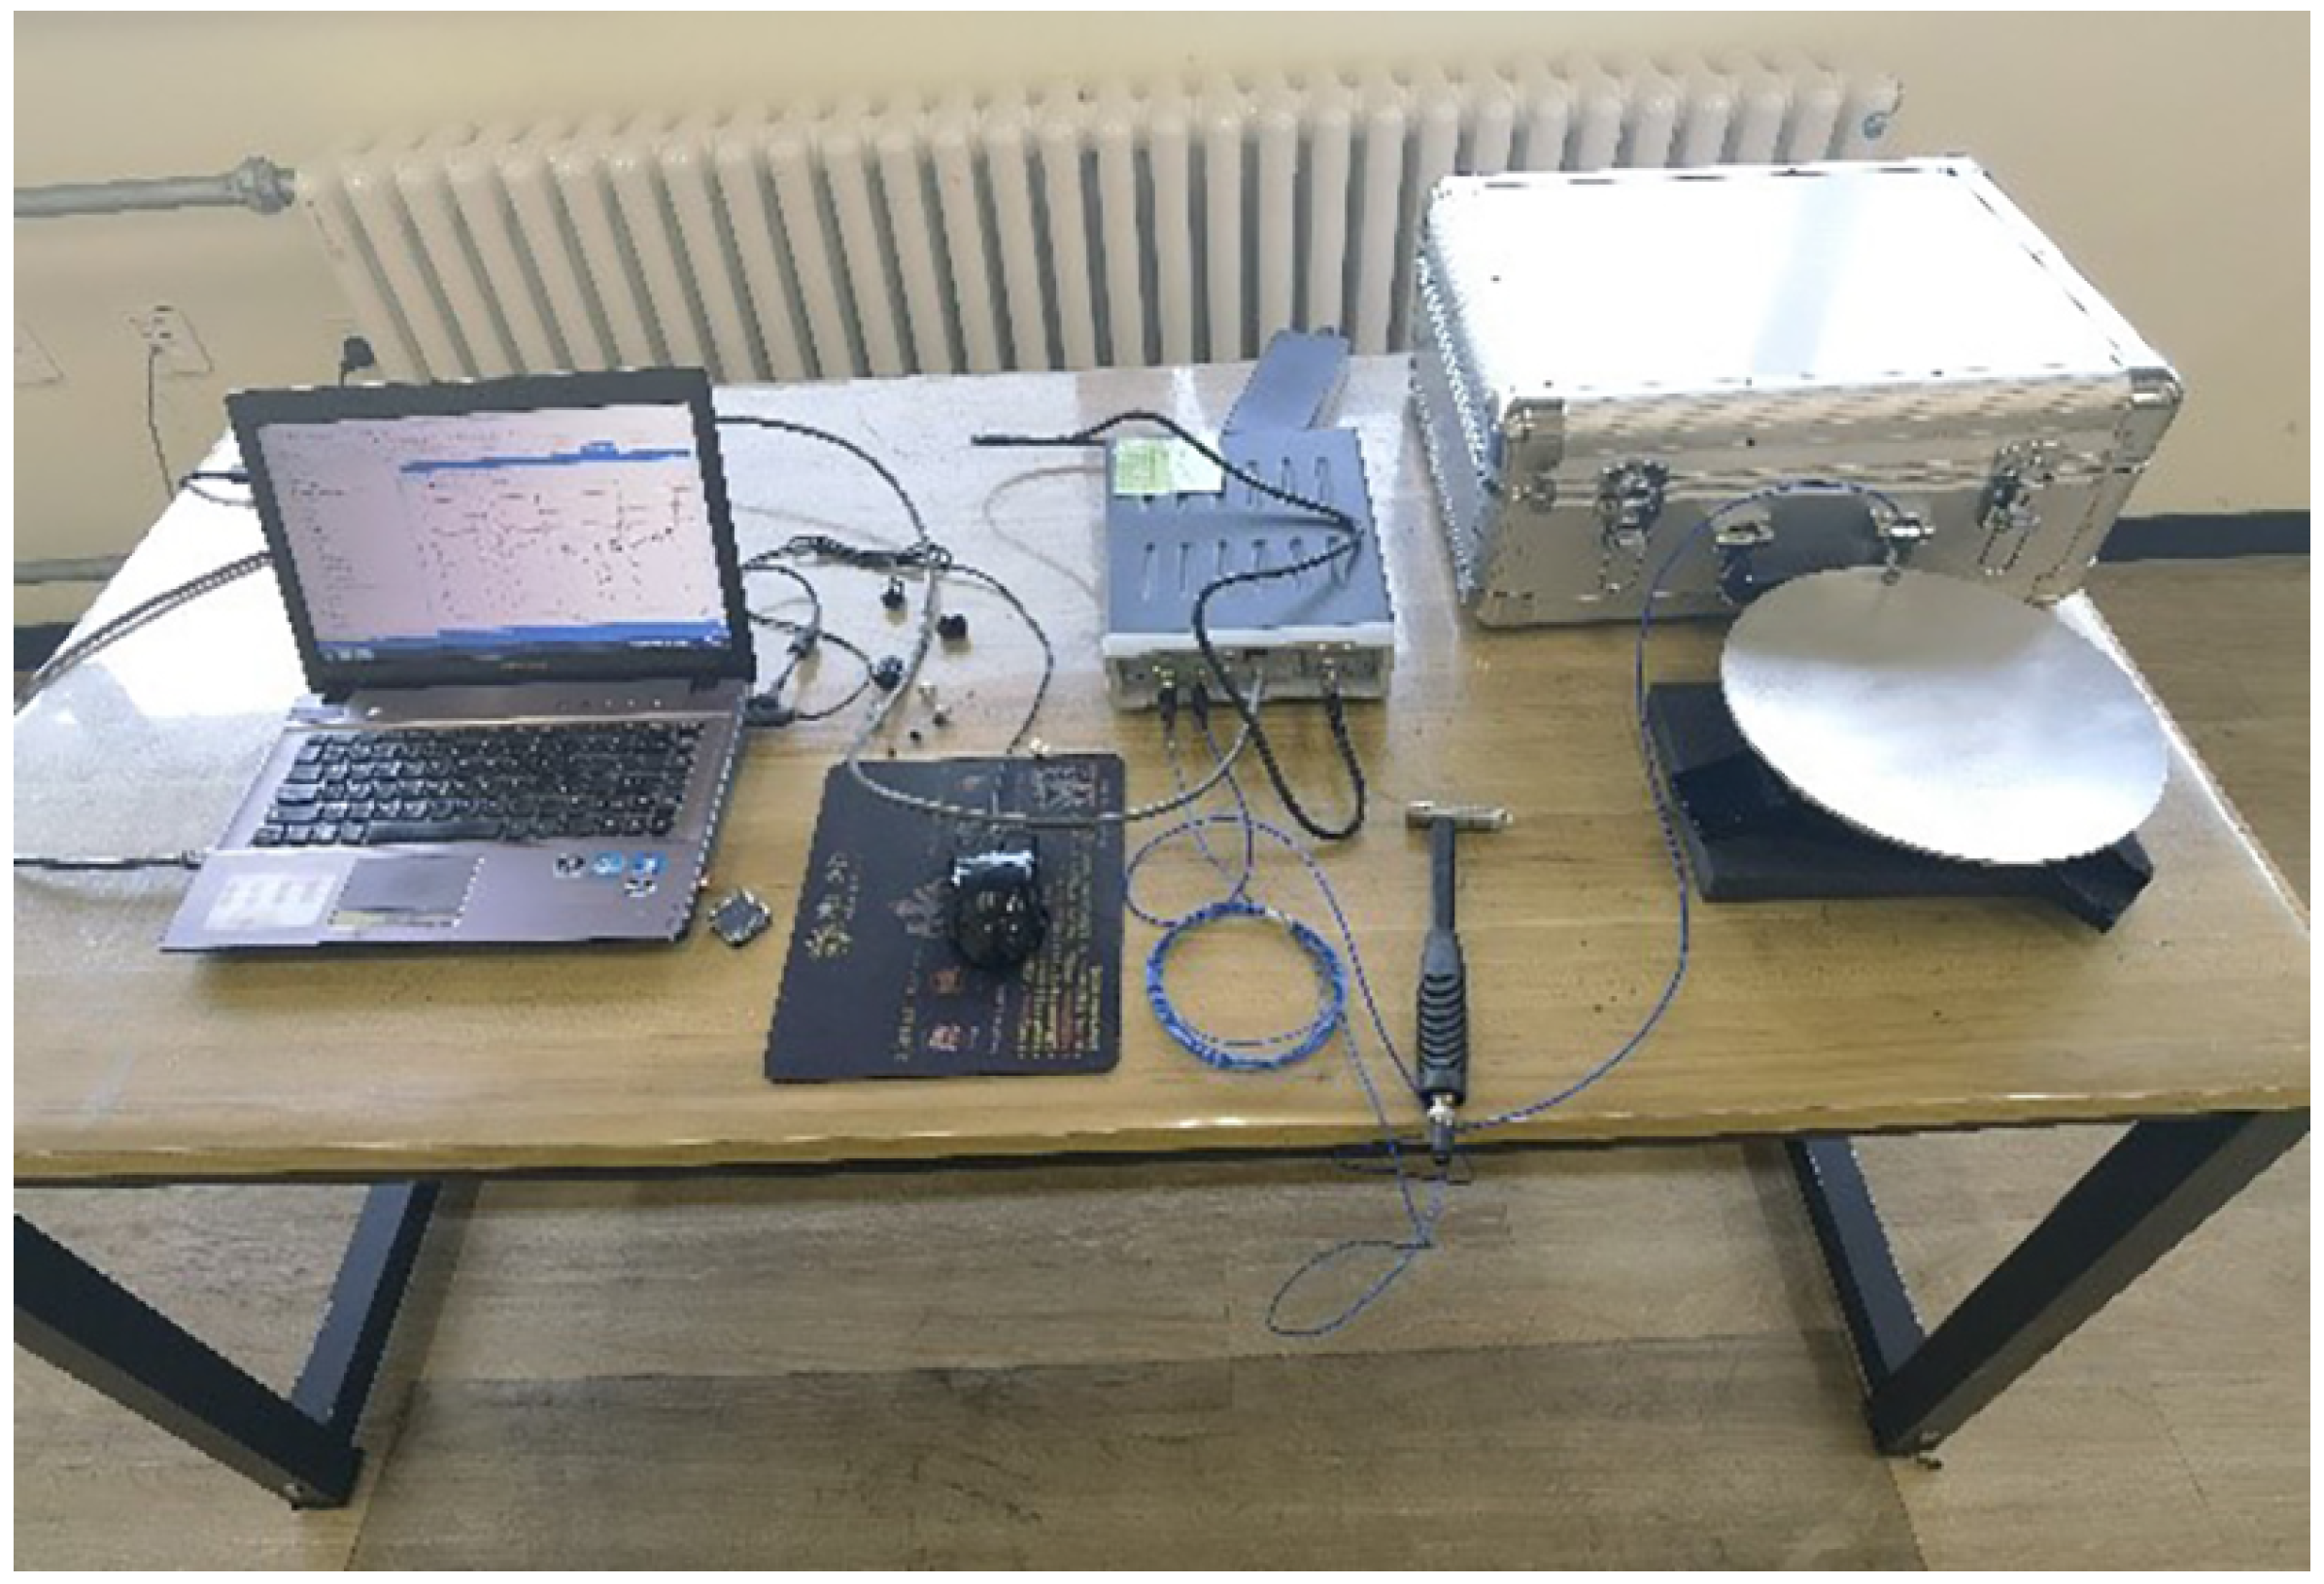
In order to verify the dynamic performance of the overall structure of the mirror assembly, a test based on the hammering method for determining the inherent frequency of the mirror was conducted. In order to avoid the influence from the external environment on the ground, the mirror assembly was lifted vertically by a rubber band during the test. The required test equipment is shown in Figure 11, and the equipment parameters are shown in Table 4.

Figure 11.
Mirror modal test equipment.

Table 4.
Test equipment parameters.
During the test, the mirror hammer point was gently struck three times with a hammer, and the test state is shown in Figure 12. The parameters of the first mode to the third mode measured in the test are shown in Table 5.
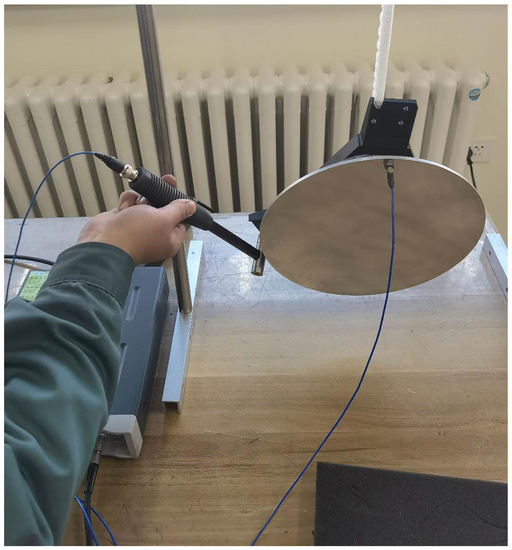
Figure 12.
Test status of mirror modal frequency.

Table 5.
Comparison of mirror modal test results and analysis results.
The resonant frequencies of the mirror assembly were all over 600 Hz, and the deviation from the analytical results was within 2%. The mirror and its supporting structure met the requirements of stiffness and strength, and the structure will not be damaged under complex vibration load conditions, which has good dynamic performance.
4.3. Machinability Verification
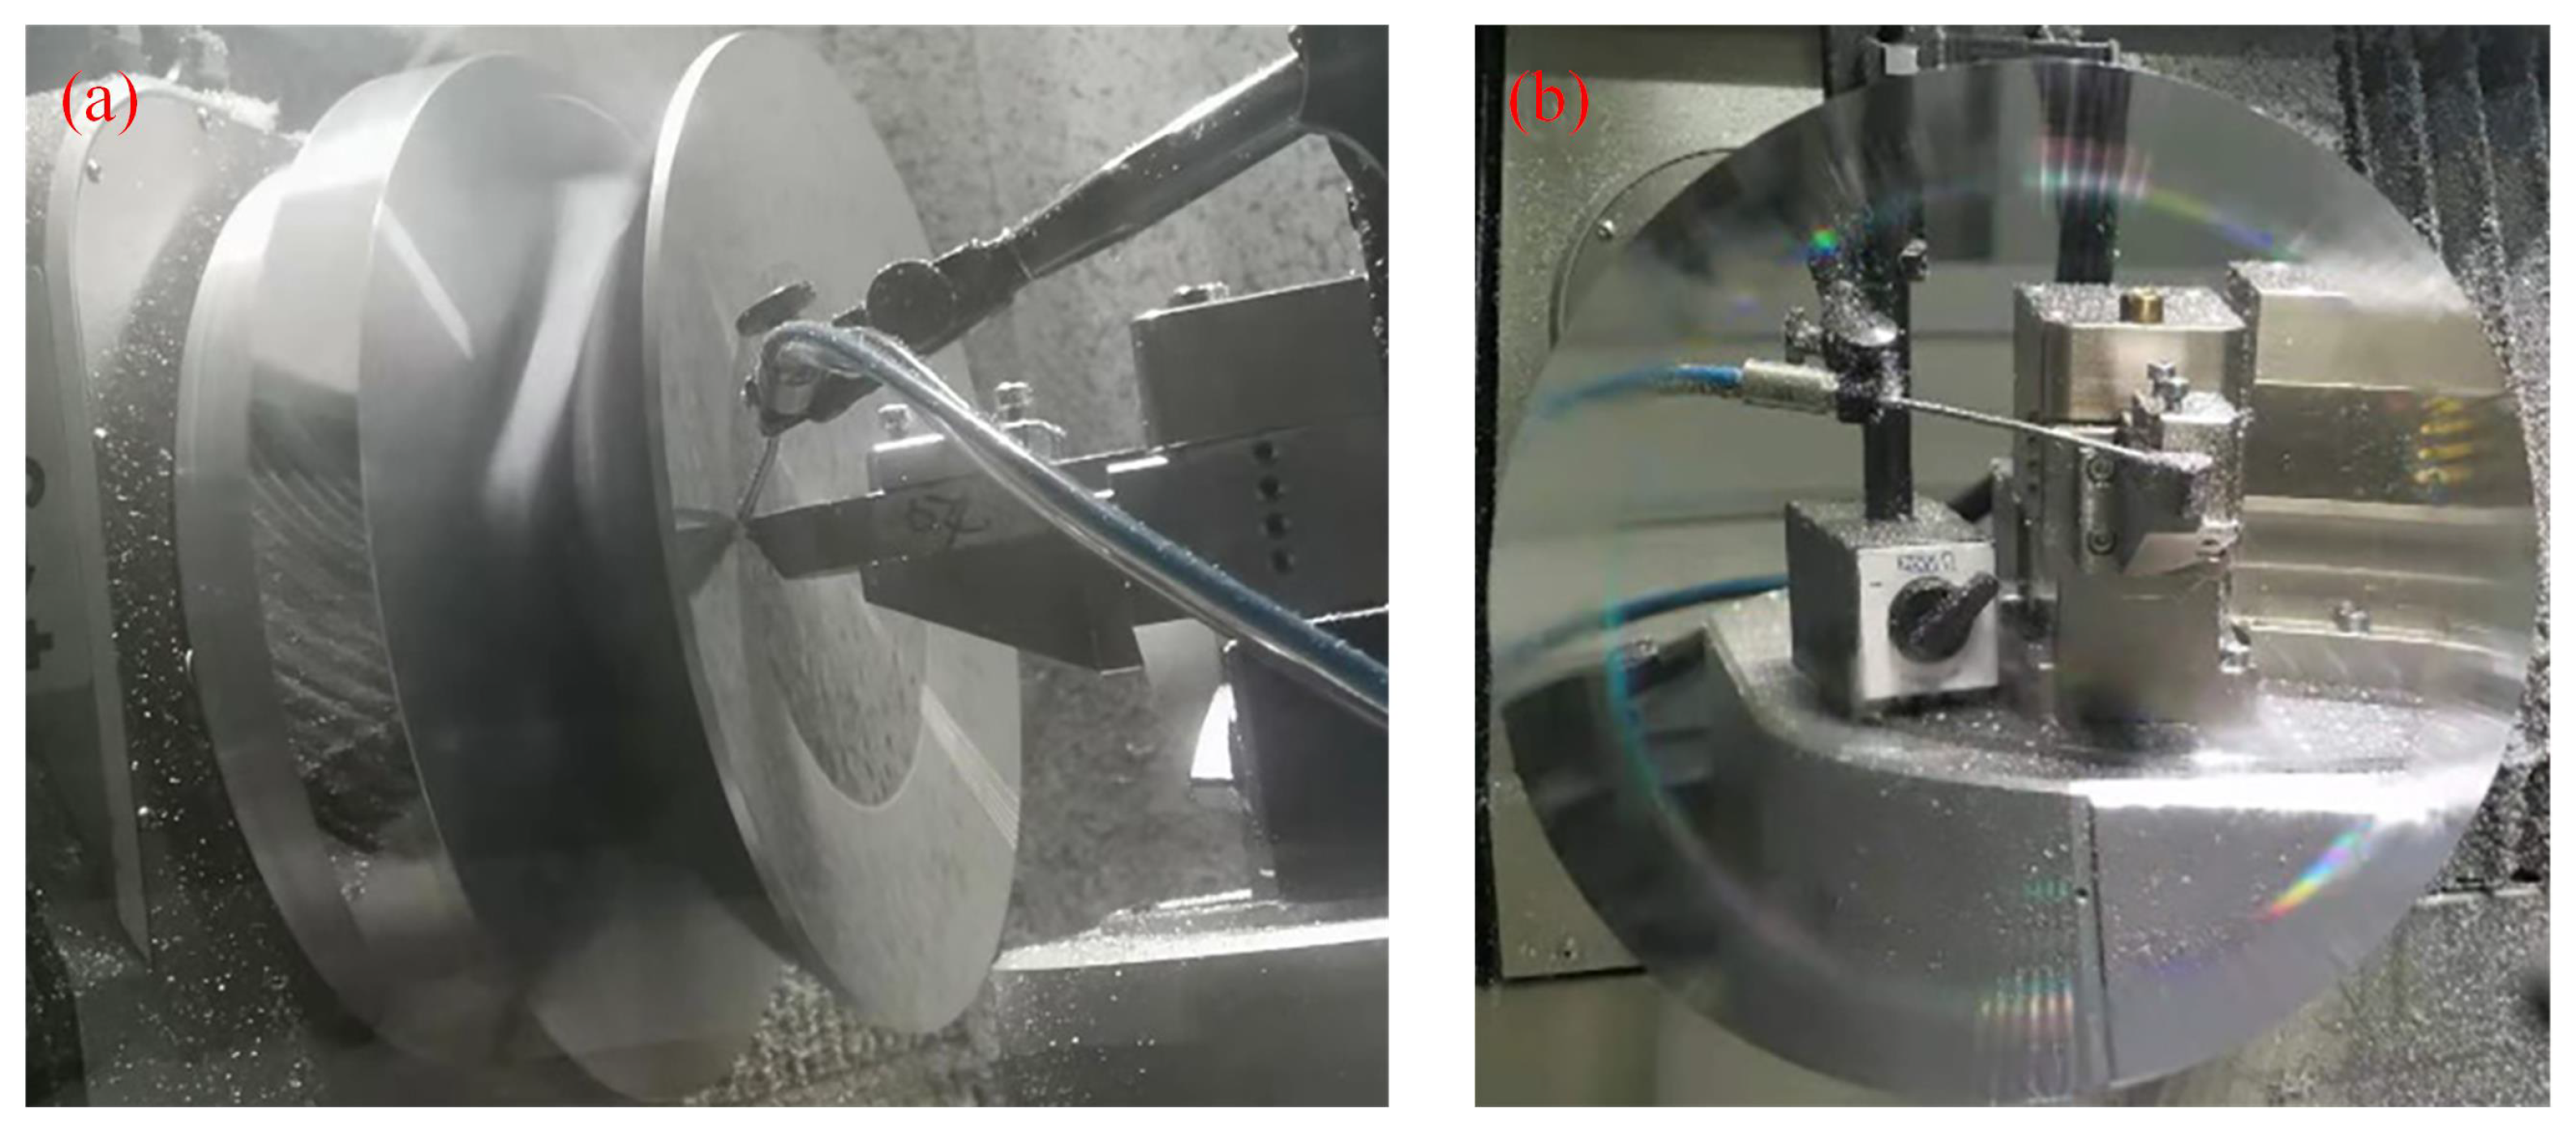
Ultra-precision machining of the optical surface of the mirror using single-point diamond-turning (SPDT) technology was carried out, as shown in Figure 13a.
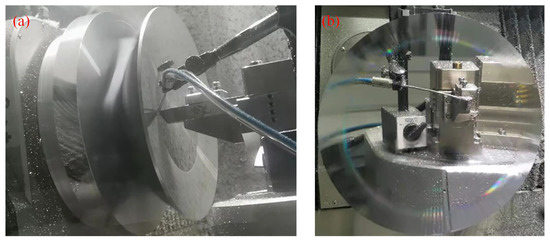
Figure 13.
Single-point diamond-turning of optical surface of SLM aluminum alloy mirror. (a) Single-point diamond-turning of optical surface. (b) Optical processing of SLM aluminum alloy mirror surface processing of SLM aluminum alloy mirror surface.
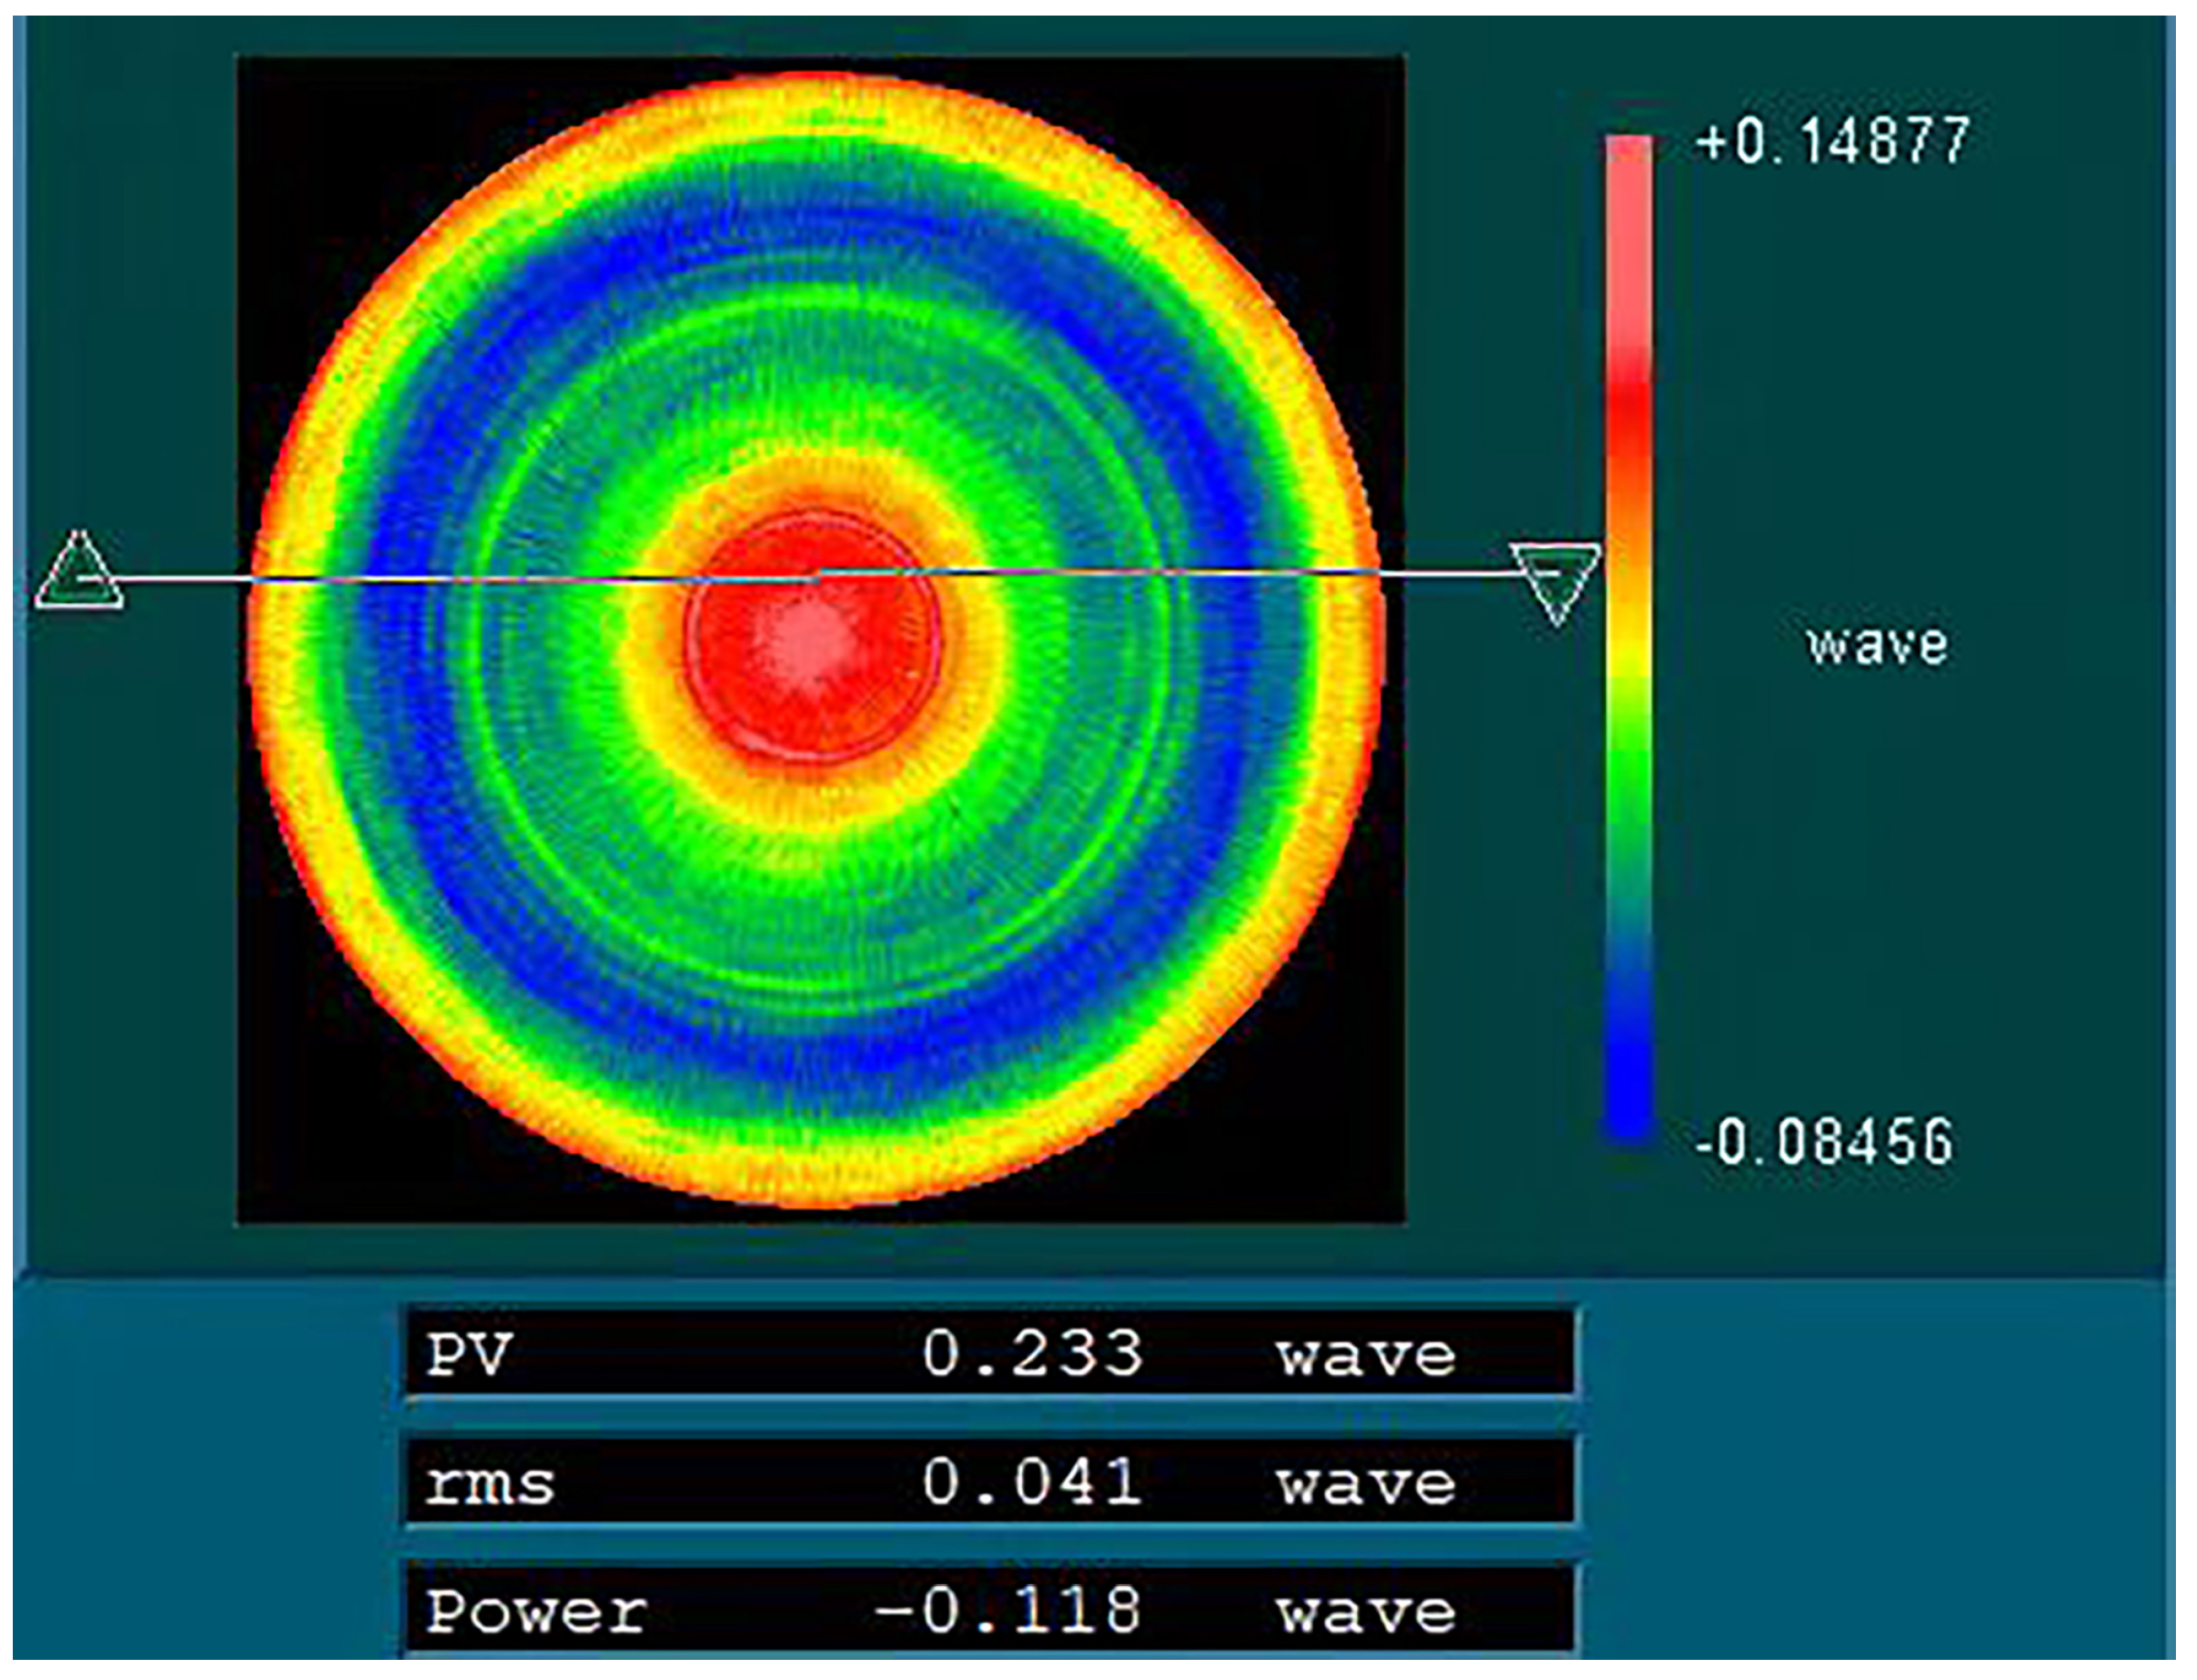
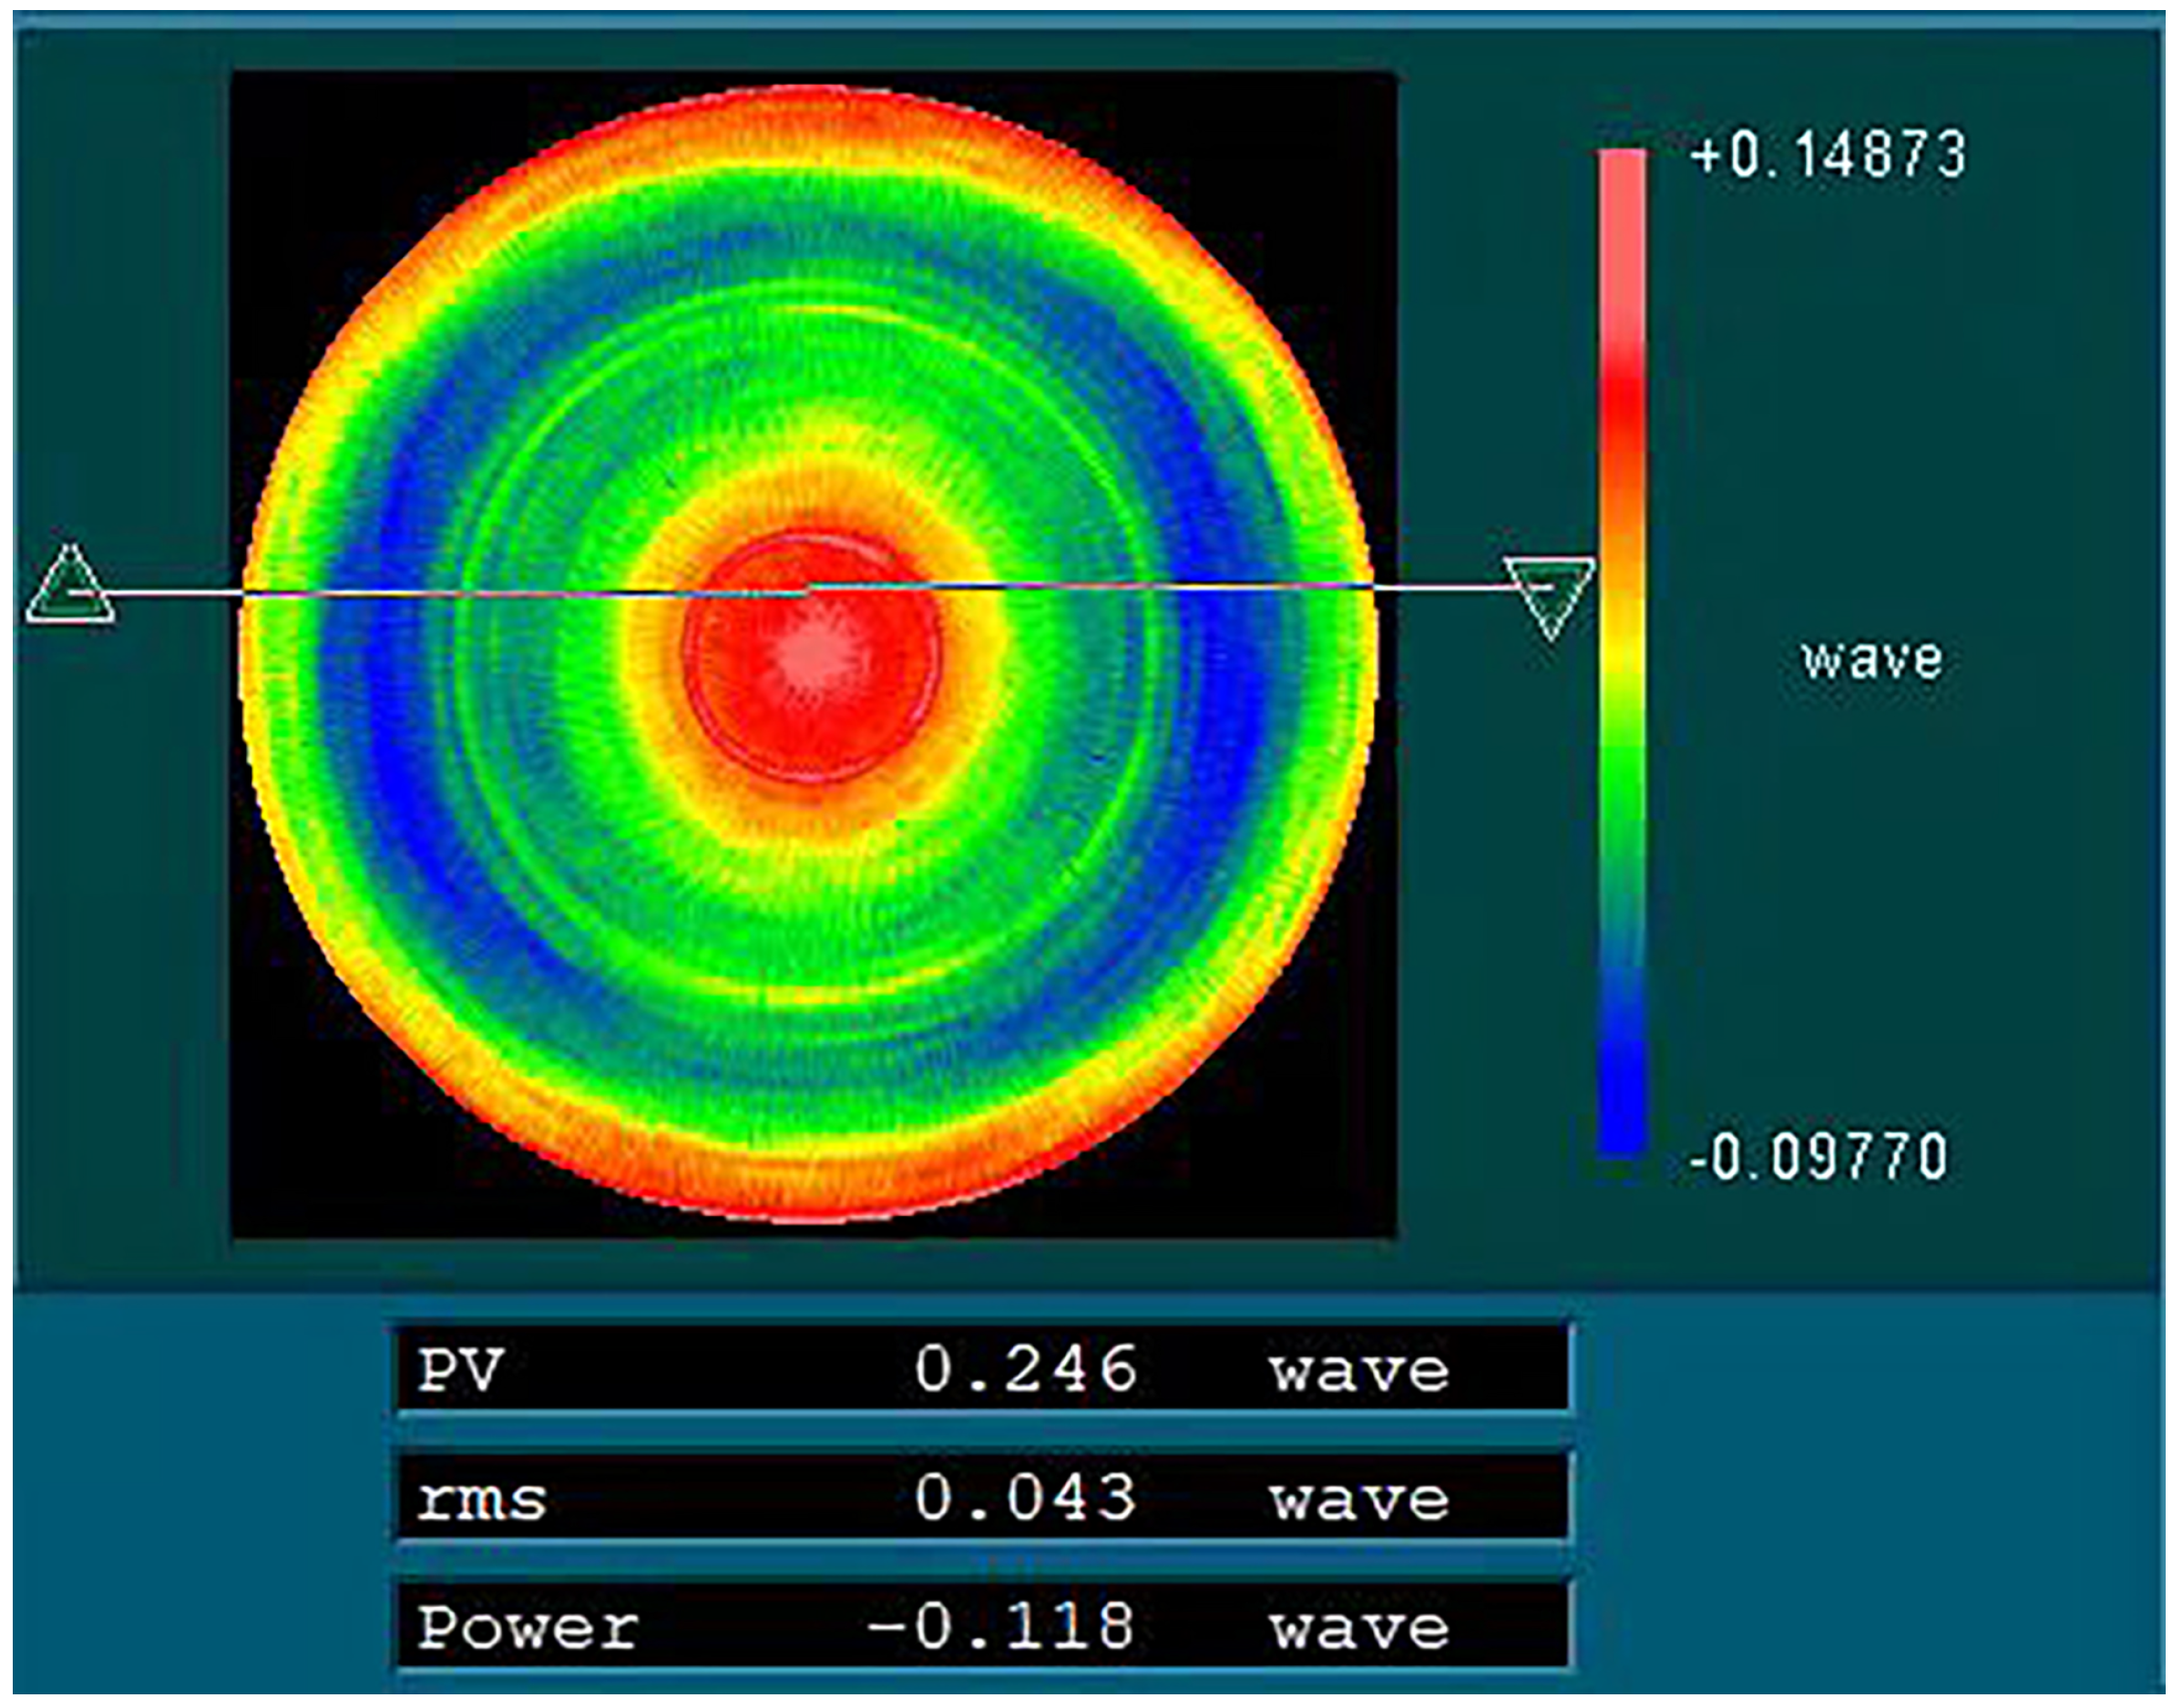
The surface-shape accuracy of the aluminum alloy mirror was tested using a Zygo interferometer after optical processing, and the test results are shown in Figure 14. The RMS of the mirror surface-shape accuracy reached 0.041 ( is the wavelength; = 632 nm). The test of the influence of gravity on the surface-shape accuracy was carried out. In the test, the mirror was turned over, which was equivalent to twice the gravity, and the RMS of the mirror surface-shape accuracy was 0.043, as shown in Figure 15, which met the requirement.

Figure 14.
Surface-shape accuracy test of 260 mm aperture aluminum alloy mirror.
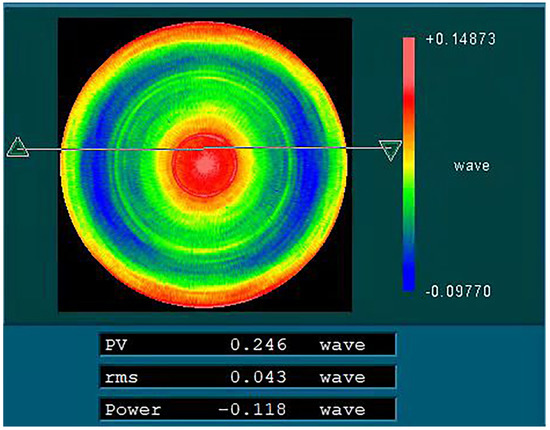
Figure 15.
The test of the influence of gravity on surface-shape accuracy.
5. Conclusions
In this study, we proposed a design and manufacturing method that integrates topology-optimization with additive-manufacturing technology. We took the primary mirror of a space-optical remote camera as an example. According to the design requirements of the mirror, the topology optimization design of the mirror with an aperture of 260 mm was completed, and the lightweight rate, the surface density, and the mirror deformation under the self-weight of the structure all met the requirements. The mirror was manufactured by selective laser melting (SLM) technology, and a modal test was conducted on the mirror assembly. The test results showed that the mirror meets the requirements of stiffness and strength, and the structure will not be damaged under complex-vibration-load conditions, which has good dynamic performance. We also used a single-point diamond-turning process to complete the mirror machining of aluminum alloy additive-manufacturing mirror, and the mirror surface-shape reached 0.041, which verified the machinability of the mirror made of combined technologies. Therefore, the design and manufacturing technology of topology optimization and additive manufacturing will provide an effective development method to improve the structural design and to optimize the manufacturing of space mirrors.
Author Contributions
Conceptualization, Y.F.; methodology, D.D. and Q.L.; validation, Z.Z., L.Y. and Y.G.; formal analysis, D.D.; investigation, Y.S. and C.L.; writing—original draft preparation, D.D. and F.W.; writing—review and editing, Y.F. and F.W. All authors have read and agreed to the published version of the manuscript.
Funding
This work was supported in part by the National Natural Science Foundation of China under Grant 11873007 and 42001345 and in part by the Civil Aerospace Pre-research Project under Grant D040101.
Institutional Review Board Statement
Not applicable.
Informed Consent Statement
Not applicable.
Acknowledgments
We sincerely acknowledge the project’s funding support.
Conflicts of Interest
The authors declare no conflict of interest.
References
- Talapatra, D.C. On the Self-weight Sag of Arch-like Structures in the Context of Light-weight Mirror Design. Opt. Acta Int. J. Opt. 1975, 22, 745–759. [Google Scholar]
- Valente, T.M.; Vukobratovich, D. A Comparison of the Merits of Open-Back, Symmetric Sandwich, and Contoured Back Mirrors as Light-Weighted Optics. In Proceedings of the Precision Engineering and Optomechanics, San Diego, CA, USA, 7–11 August 1989; Volume 1167, pp. 20–36. [Google Scholar]
- Fan, Y.C.; Chai, F.M.; Li, Z.L.; Yang, H.S. Lightweight Design of Primary Mirror with Large Aperture for Optical Remote Sensor. Opto-Electron. Eng. 2012, 39, 123–128. [Google Scholar]
- Bendsoe, M.P.; Kikuchi, N. Generating optimal topologies in structural design using a homogenization method. Comput. Methods Appl. Mech. Eng. 1988, 71, 197–224. [Google Scholar] [CrossRef]
- Guest, J.K.; Prévost, J.H.; Belytschko, T. Achieving minimum length scale in topology optimization using nodal design variables and projection functions. Int. J. Numer. Methods Eng. 2004, 61, 238–254. [Google Scholar] [CrossRef]
- Wang, M.Y.; Wang, X.M.; Guo, D.M. A level set method for structural topology optimization. Comput. Methods Appl. Mech. Eng. 2003, 192, 227–246. [Google Scholar] [CrossRef]
- Park, K.S.; Chang, S.Y.; Youn, S.K. Topology optimization of the primary mirror of a multi-spectral camera. Struct. Multidiscip. Optim. 2003, 25, 46–53. [Google Scholar] [CrossRef]
- Lee, D.C.; Lee, J.I. Structural optimization design for large mirror. Opt. Lasers Eng. 2004, 42, 109–117. [Google Scholar] [CrossRef]
- Liu, L.; Gao, M.H.; Li, L.F.; Tan, Z.A. Primary mirror topological optimum design of space camera. Infrared Laser Eng. 2010, 39, 1066–1069. [Google Scholar]
- Li, Y.W.; Yang, H.B.; Geng, Q.X.; Liu, X.B.; Lei, C.H. Large-aperture lightweight primary mirror design method using topology optimization. Opt. Tech. 2008, 34, 236–238. [Google Scholar]
- Wang, X.; Wang, W. A new primary mirror based on topology optimization. In Proceedings of the International Symposium on Photoelectronic Detection and Imaging 2013: Imaging Sensors and Applications, Beijing, China, 25–27 June 2013; Volume 8908, pp. 165–189. [Google Scholar]
- Brackett, D.; Ashcroft, I.; Hague, R. Topology optimization for additive manufacturing. In Proceedings of the 24th Solid Freeform Fabrication Symposium, Austin, TX, USA, 17 August 2011; pp. 6–8. [Google Scholar]
- Woodard, K.S.; Myrick, B.H. Progress on high-performance rapid prototype aluminum mirrors. In Proceedings of the Advanced Optics for Defense Applications: UV through LWIR II, Anaheim, CA, USA, 9–13 April 2017; Volume 10181, p. 101810T. [Google Scholar]
- Woodard, K.S.; Comstock, L.E.; Wamboldt, L.; Sutherland, J.S. Optimum selection of high performance mirror substrates for diamond finishing. In Proceedings of the Advanced Optics for Defense Applications: UV through LWIR, Baltimore, MD, USA, 17–21 April 2016; Volume 9822, p. 98220C. [Google Scholar]
- Hilpert, E.; Hartung, J.; Risse, S.; Eberhardt, R.; Tünnermann, A. Precision manufacturing of a lightweight mirror body made by selective laser melting. Precis. Eng. 2018, 53, 310–317. [Google Scholar] [CrossRef] [Green Version]
- Tan, S.; Ding, Y.; Xu, Y.; Shi, L. Design and fabrication of additively manufactured aluminum mirrors. Opt. Eng. 2020, 59, 013103. [Google Scholar] [CrossRef]
- Long, K.; Chen, Z.; Zhang, C.; Yang, X.; Saeed, N. An Aggregation-Free Local Volume Fraction Formulation for Topological Design of Porous Structure. Materials 2021, 14, 5726. [Google Scholar] [CrossRef] [PubMed]
- Mahajan, V.N. Circle Polynomials and Optical Aberrations of Systems with Circular Pupils. Appl. Opt. 1994, 33, 8121–8124. [Google Scholar] [CrossRef] [PubMed]
- Doyle, K.B.; Genberg, V.L.; Michels, G.J. Integrated Optomechanical Analysis, 2nd ed.; SPIE Press: Bellingham, WA, USA, 2012; p. 31. [Google Scholar]
- Vukobratovich, D.; Schaefer, J.P. Large stable aluminum optics for aerospace applications. In Proceedings of the Optomechanics 2011: Innovations and Solutions, San Diego, CA, USA, 21–25 August 2011; Volune 8125, p. 81250T. [Google Scholar]
Publisher’s Note: MDPI stays neutral with regard to jurisdictional claims in published maps and institutional affiliations. |
© 2021 by the authors. Licensee MDPI, Basel, Switzerland. This article is an open access article distributed under the terms and conditions of the Creative Commons Attribution (CC BY) license (https://creativecommons.org/licenses/by/4.0/).


