1. Introduction
The parallel robot, connected by several links, inherently has a closed-loop structure consisting of several branches of legs. Therefore, it has many advantages, such as high precision, high rigidity, stable structure, strong carrying capacity, and excellent dynamic performance compared to a serial robot with an open-loop structure [
1,
2,
3,
4,
5,
6,
7]. Proposed by R. Clavel [
8], a delta robot is a parallel robot with three degrees of freedom (DOF) and is successfully used in a practical assembly line of manufacturing.
The workspace of a robot manipulator is defined as the set of points that can be maximally reached by its end-effector [
9]. The workspace analysis of a robot is essential for acquiring more manipulation capability and satisfying more flexible motion requirement in a limited workspace volume [
10,
11].
The movement of every single joint variable creates a subspace for the operating range of the joint actuator of the typical serial robot. The union operation of all generated subspaces can usually form the whole workspace of the serial robot. Meanwhile, the movements of several joint variables consisting of a leg branch create a geometrically complex subspace for the parallel robot with a closed form of several leg branches [
12,
13,
14,
15,
16]. Intersection operation between all generated subspaces finally forms the whole workspace of the parallel robot. The workspace volume of the parallel robot is generally smaller than that of the serial robot because the intersection operation creates a smaller space than the union operation. Usually, the workspace-creation process of a parallel robot is more complicated than that of a serial robot because of the geometrical complexity of the subspace and the intersection operation.
The creation of the workspace for the delta robot begins by solving the kinematic equations of the leg branch. The kinematic equations have a complex algebraic form, requiring a lot of effort to be solved. There are mainly numerical and geometrical methods to estimate the workspace of the delta robot.
The numerical method uses a direct solution of the kinematic equations without a geometrical understanding of the physical workspace. The advantage of the numerical method is that it can be applied to estimate the workspace quickly. However, this method usually takes a lot of time to calculate the workspace with many points. The sampling technique, e.g., the Monte Carlo method, is used to estimate the workspace for a small number of points in the workspace but inherently causes degradation of the workspace [
9,
17,
18].
The geometrical method uses geometric forms of the kinematic equations of the delta robot. The basic geometric shape of the kinematic equation represents a torus geometry in space, so that the solution of several kinematic equations represents the intersection between the created tori with a set operation. Therefore, the intersection operation between these tori determines the workspace in the geometrical method [
13,
14,
15,
16,
17,
18,
19,
20,
21]. Although the geometrical method is more complicated than the numerical method, the accuracy and quality of the workspace of the geometrical method are better than those of the numerical method. The intersection operation between geometries does not cause data leakage of the workspace with 3D CAD software.
The main contributions of this paper are as follows.
Firstly, previous studies have been interested only in the mathematical equations and the torus geometry, not in the viewpoint of where the torus is generated in the delta robot. The workspace of the delta robot should be considered from the viewpoint of the kinematic configuration of the robot. Therefore, this study introduces a new concept of a zero-platform delta robot, which is useful for directly bringing the torus configuration into the links of the robot to configure and generate the workspace conveniently.
Secondly, previous studies focused on analysis of the workspace using 3D CAD software to deal with the torus and intersection process, which gives only the final result but does not provide the qualitative estimation of the workspace. 3D CAD makes accurate geometry creation and intersection possible. However, it takes a lot of time, and it is difficult to predict the workspace in advance. This study introduces a new way of using a cross-section diagram to predict the shape and size of the workspace based on the zero-platform delta robot.
Thirdly, parametric studies on the volume and shape of the workspace have been previously conducted with respect to the change in dimensionless variables [
19,
22,
23,
24,
25]. However, the dimensionless variables could not provide direct insight into the effect of parameter variation. Moreover, the results without the geometrical consideration of the torus could not provide a good understanding of the delta robot. Therefore, this study performed the parametric analysis based on a cross-section diagram with three key parameters that are not dimensionless.
This study explains the kinematic equations of the delta robot, the torus geometry of these equations, and the three key parameters affecting the shape and size of the workspace. The changes of the torus shapes are explained according to parameter changes, and the definition of the zero-platform delta robot is proposed. Subsequently, a cross-section diagram of the torus is described. Finally, the parametric analysis with three key parameters is carried out by applying the cross-section diagram of the torus and comparing it with that of 3D CAD software.
2. Kinematics and Three Key Parameters of the Delta Robot
2.1. Kinematic Equation of the Delta Robot
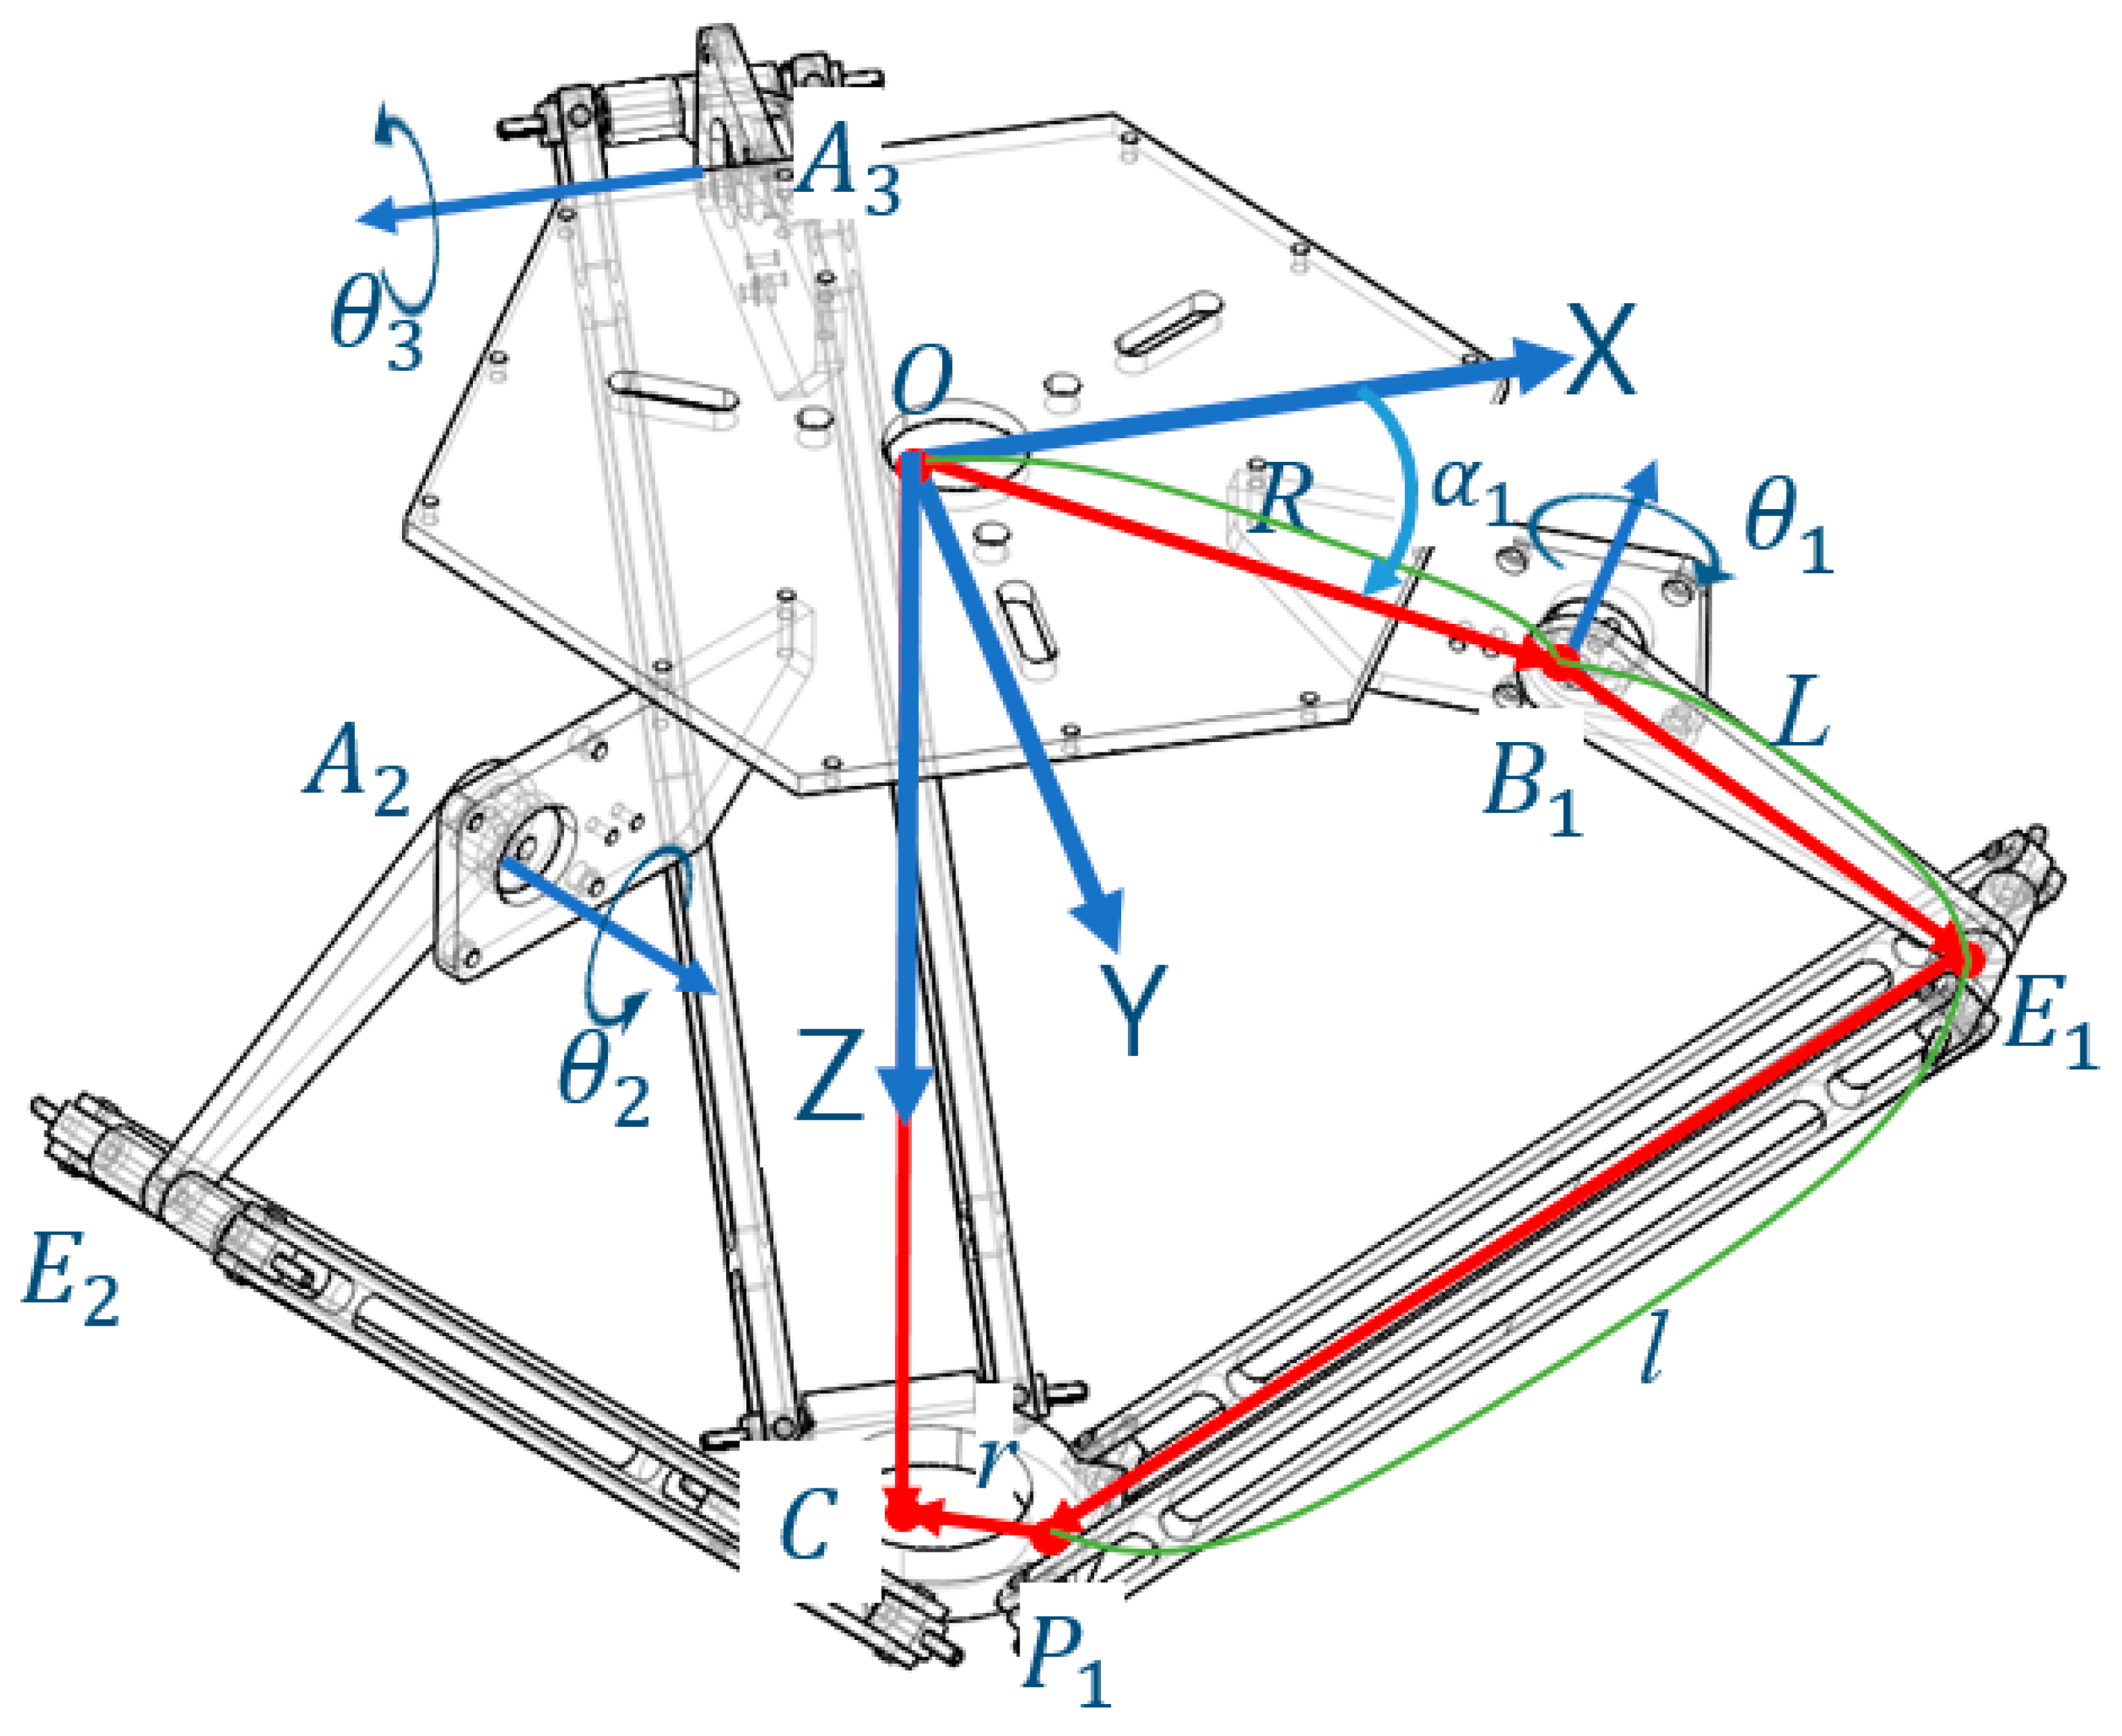
The delta robot comprises three identical kinematic leg branches in parallel between the top fixed base and the bottom moving platform, as shown in
Figure 1. The leg branch consists of an upper and lower leg. The top revolute joints are actuated by rotational actuators fixed at the base. The motion is transmitted to the moving platform through the upper leg and parallelogram of the lower leg, as shown in
Figure 1.
Three actuated joint angles
,
and
, are measured when the actuating link is moving from the horizontal plane of the base. The geometric parameters of the robot are
, and r, as shown in
Figure 1. A description of the parameters is provided in
Table 1.
The length l is the length of the virtual lower link through the center of each parallelogram. The angle
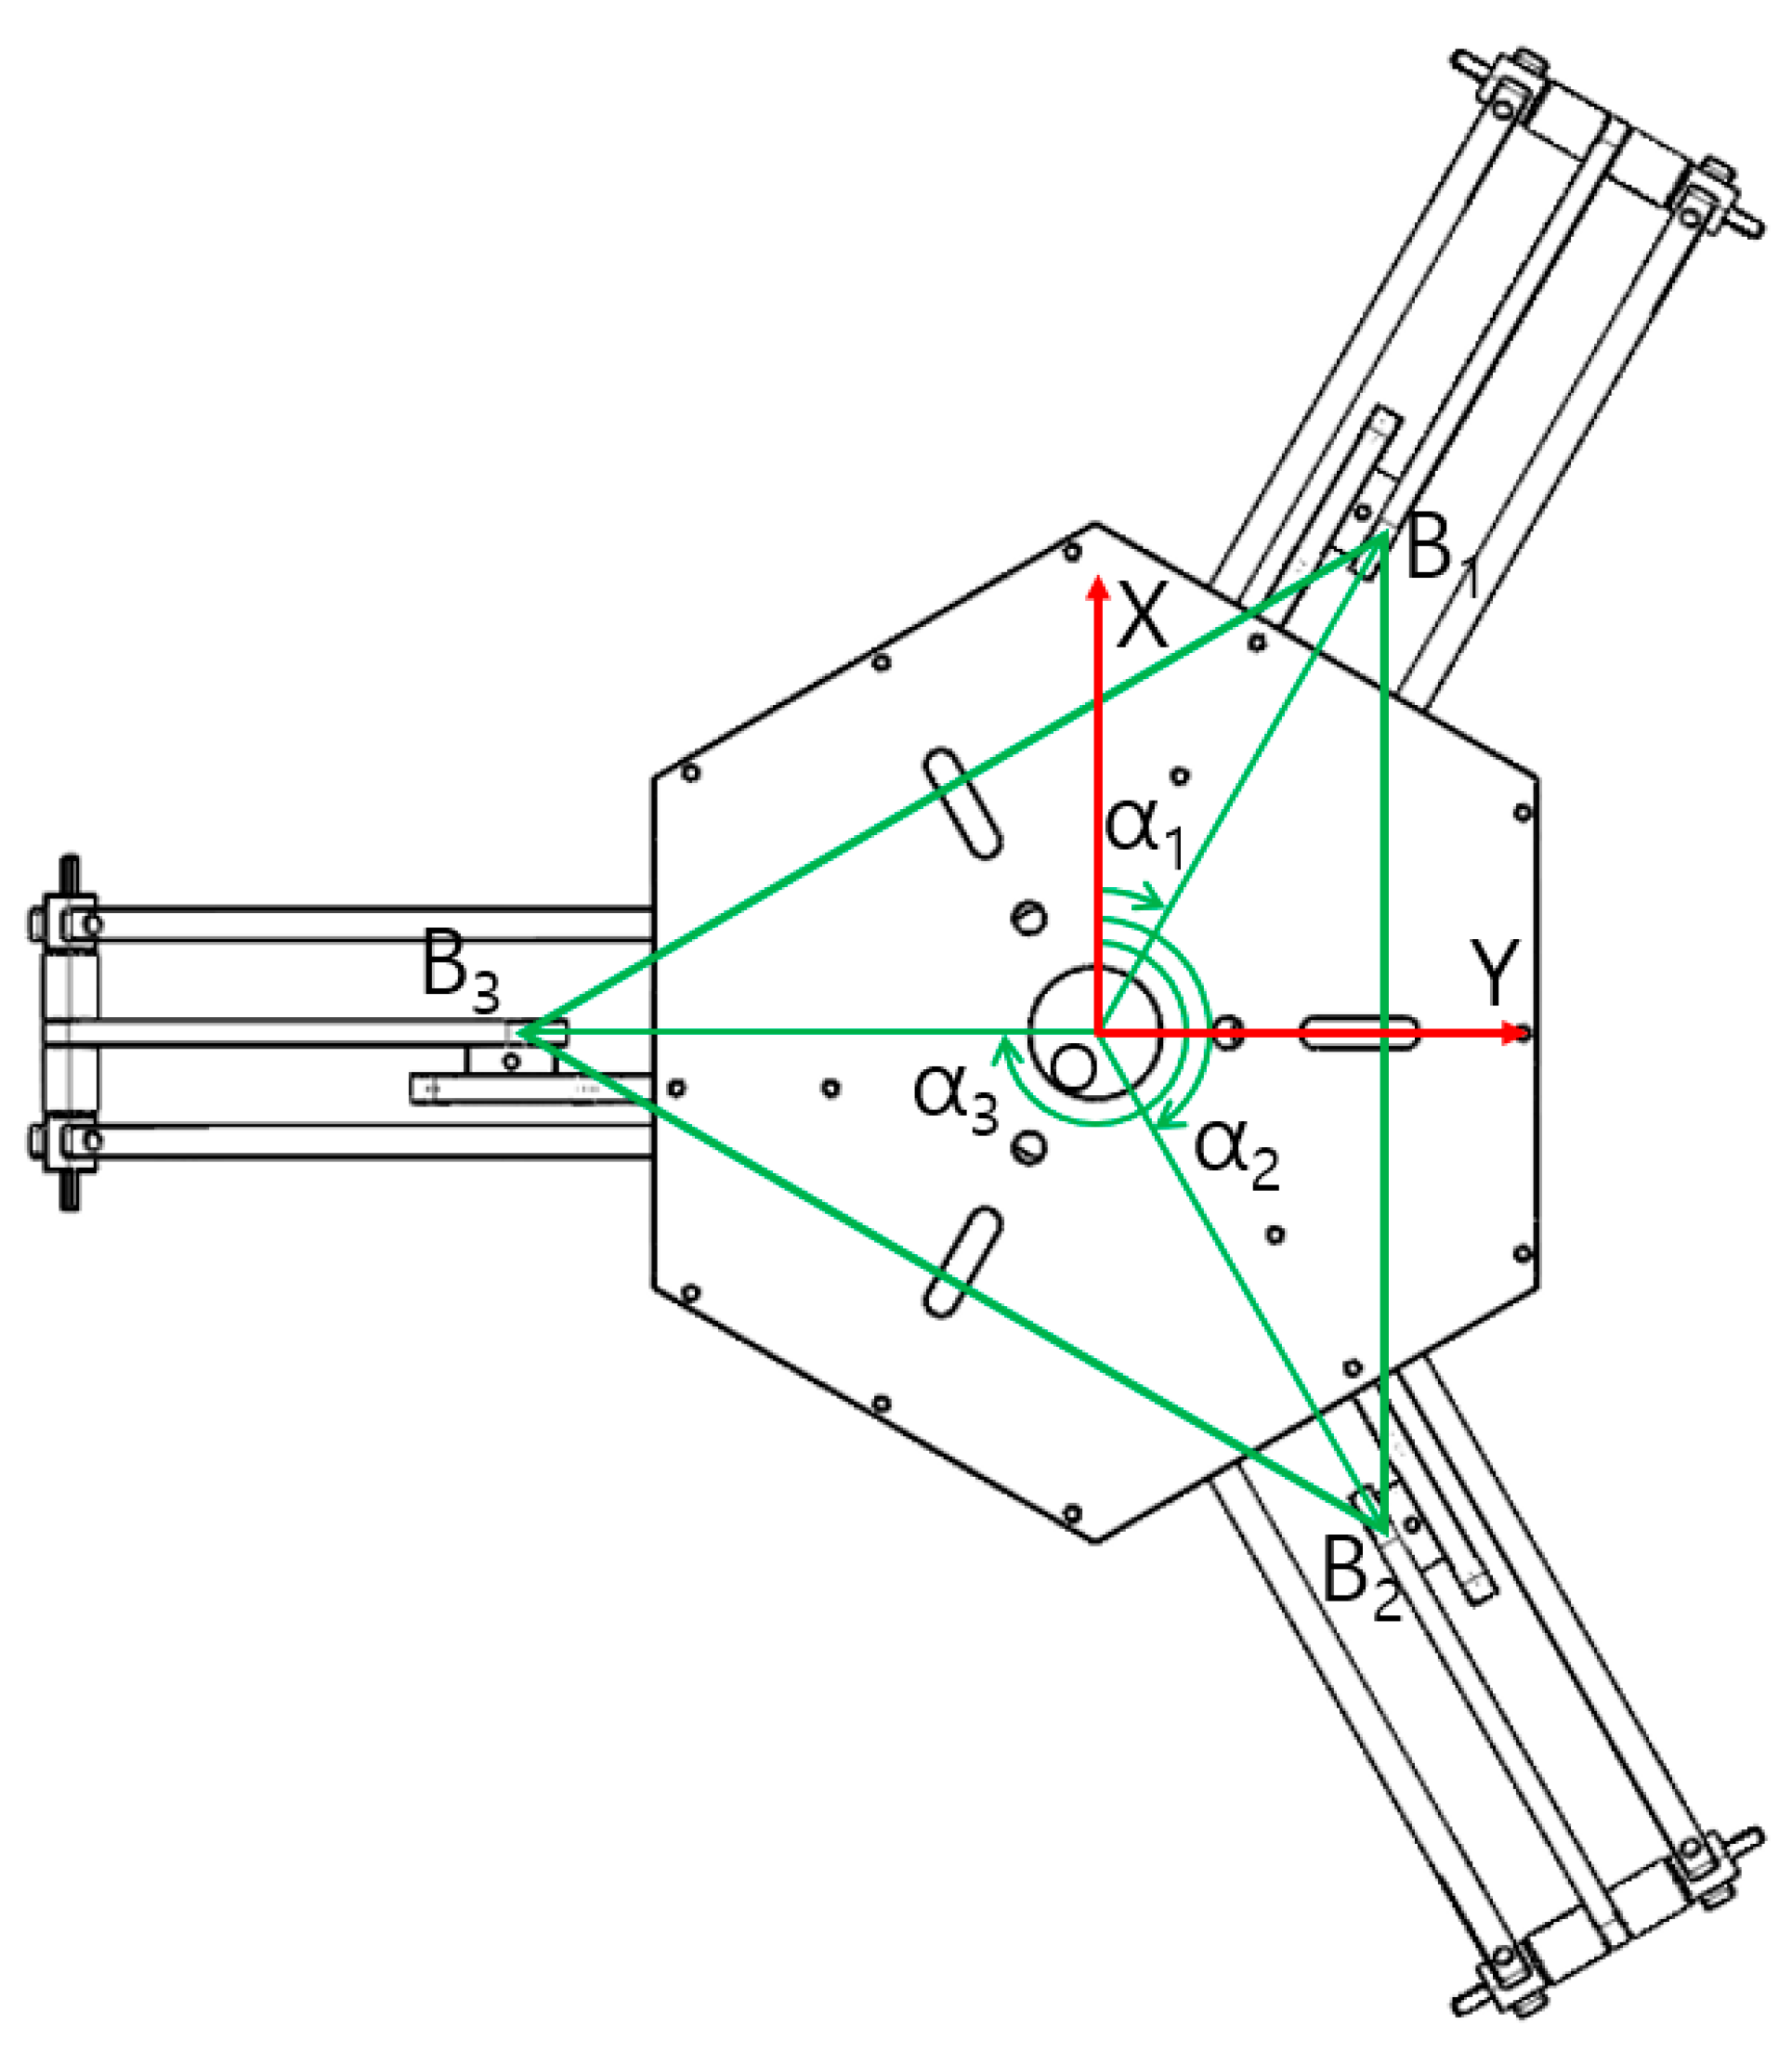
is the location angle of the actuator on the top base, as shown in
Figure 2. The reference coordinate system
, {R(x,y,z)} is placed on the point O, that is, the center of the top base. The point
, the center of the bottom platform, is the end-effector point of the robot, which is described as the vector [x,y,z].
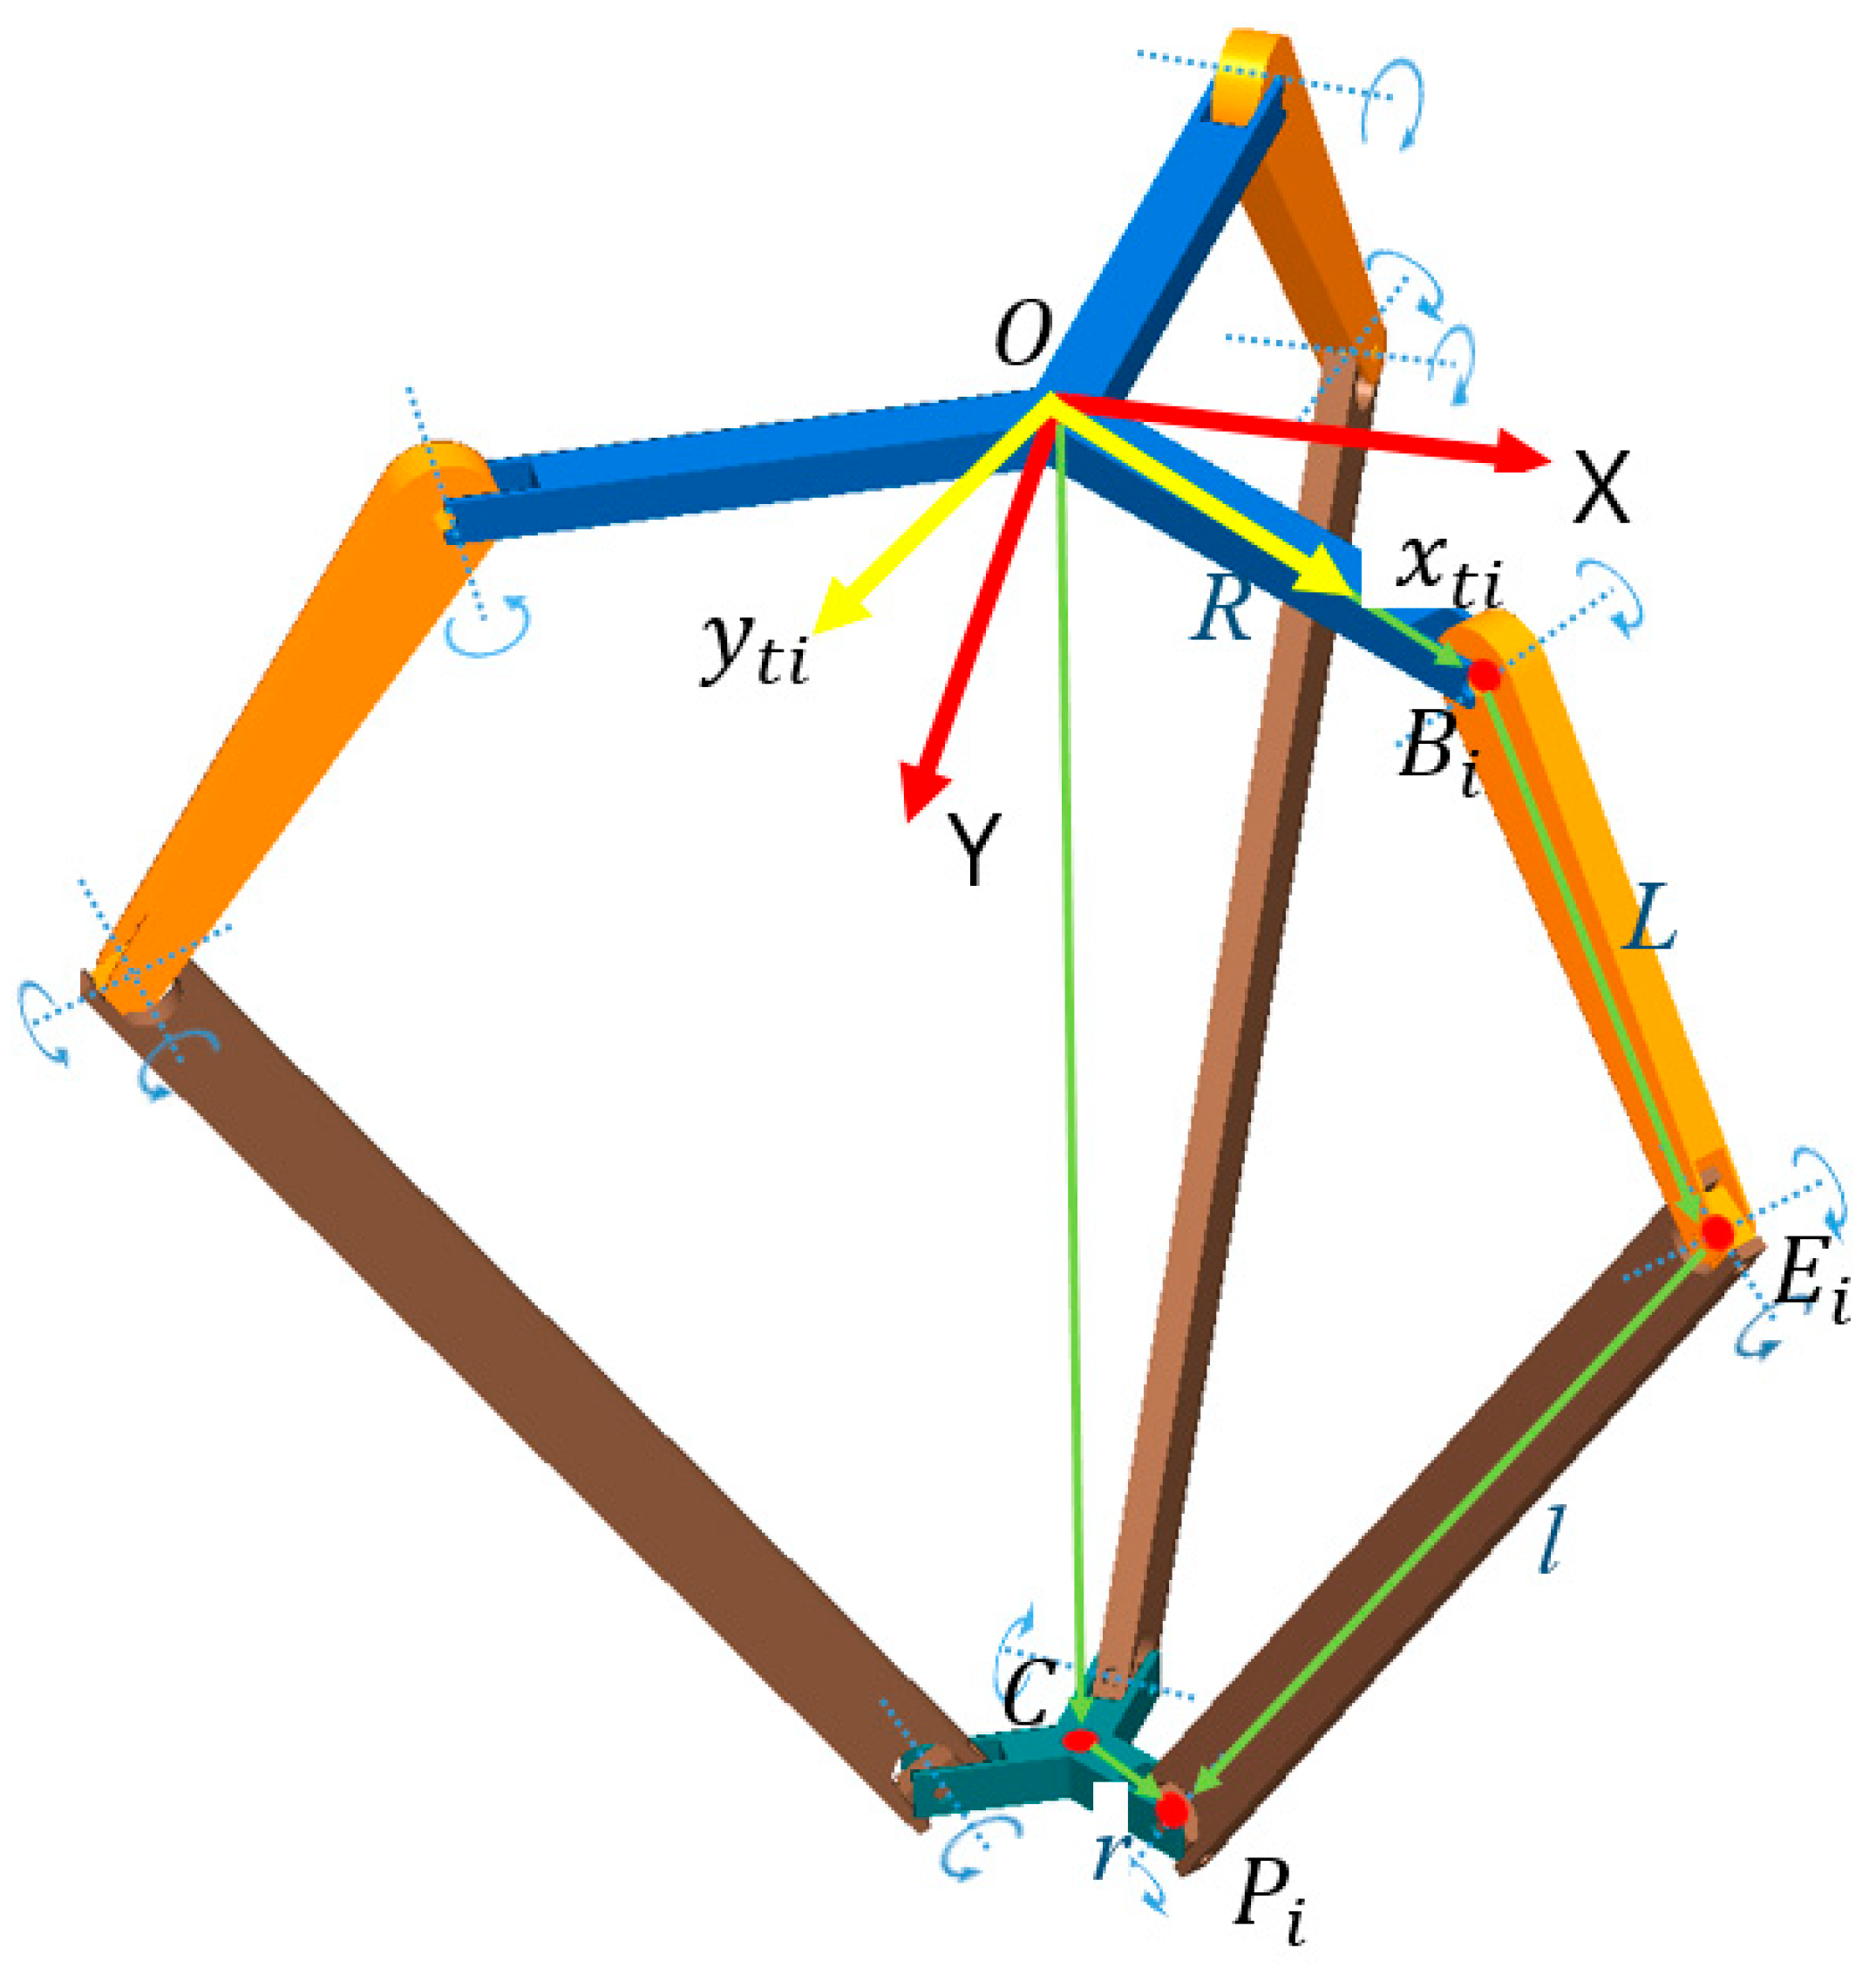
The links and joints of the parallelogram of the lower leg in
Figure 1 can be simplified to a single virtual link with two joints due to the kinematical equivalence shown in
Figure 3. The virtual line through the center of the parallelogram becomes a single binary link. As shown in
Figure 3, the two joints in this binary link connecting the upper leg and the platform become a universal joint and a revolute joint, respectively.
From each leg branch in
Figure 3, the vector loop equation is generated with several vectors:
where
Since the lower leg
always has a constant length l in this equation, Equation (1) can be replaced using length constraint.
This quadratic equation means a sphere with the center
and radius .
This equation can be arranged about
as shown below.
where
Let
be
. Then, Equation (4) becomes
The solution of the above quadratic equation is obtained by using the quadratic formula.
This solution exists if and only if
This inequality can be arranged to the following quadratic forms about
x,
y, and
z:
The set of points satisfying this inequality represents the workspace element of a leg loop for the delta robot, and
denotes the boundary of the workspace element. Let the reference coordinate system
be rotated with
about the Z axis. Then, the new transformed coordinate system {
can be defined as follows:
The boundary of the workspace
rearranged by a transformed frame becomes
The above equation is the standard geometrical equation of a torus. The center of the torus is
, where
is the offset amount of the torus center, and subscripts
T and
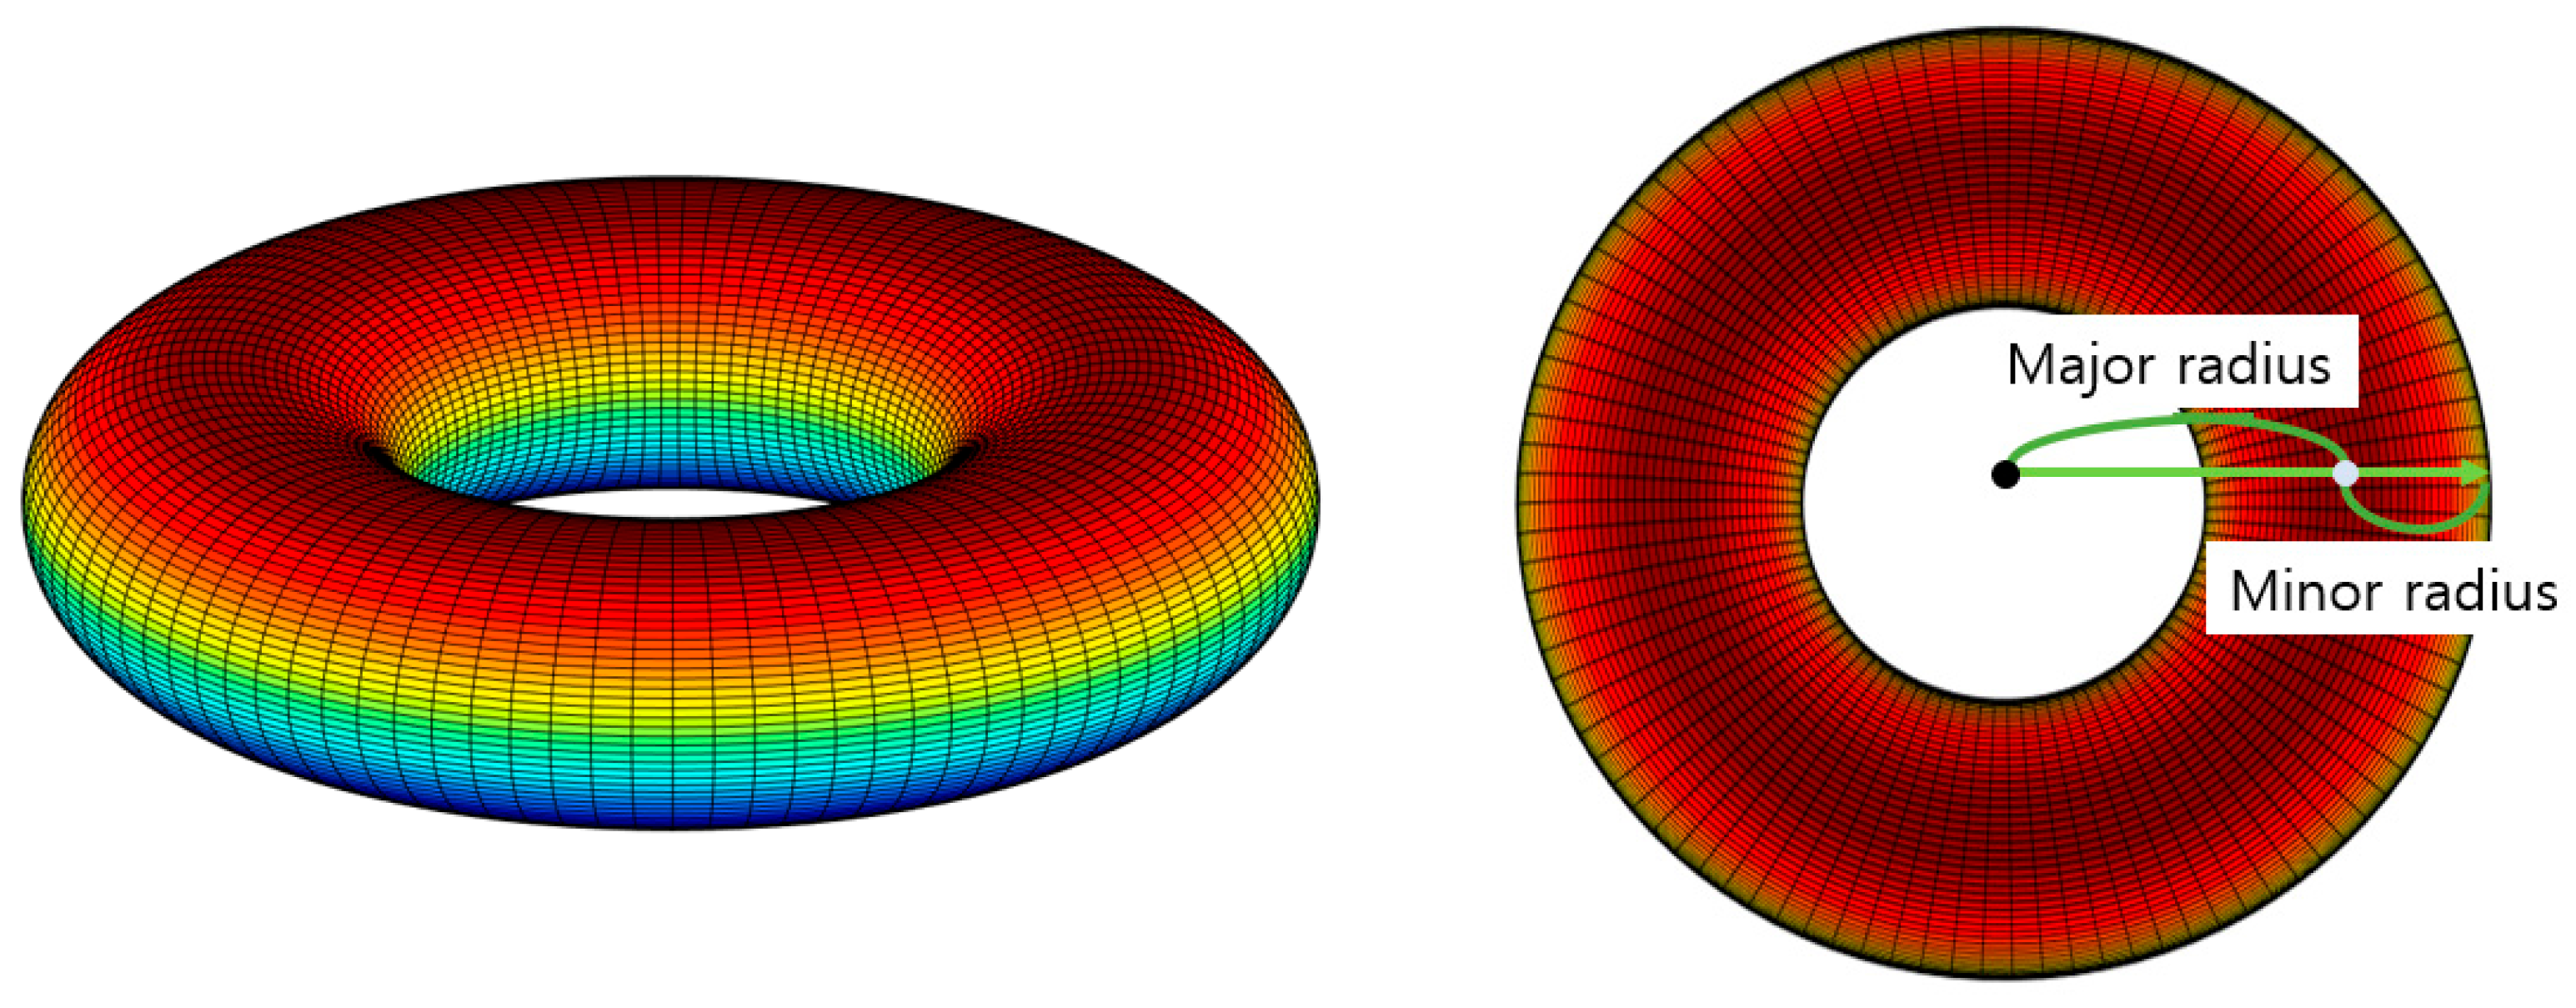
R denote the transformed and the reference frame, respectively. The major radius of torus
is the distance between the center of the tube and the center of the torus, and the minor radius of torus
implies the radius of the tube, as shown in
Figure 4.
Considering three-leg branches (
), the delta robot has three subspaces
concerning three equations of tori. Since the space simultaneously satisfying the three equations becomes the workspace of the delta robot, the intersection of the three tori implies the final workspace
of the delta robot, as Equation (12) shows:
2.2. Three Parameters of the Delta Robot
In Equation (11), the significant parameters to determine the tori configuration are , and . The parameters , and are the major radius, minor radius, and shift of the torus, respectively.
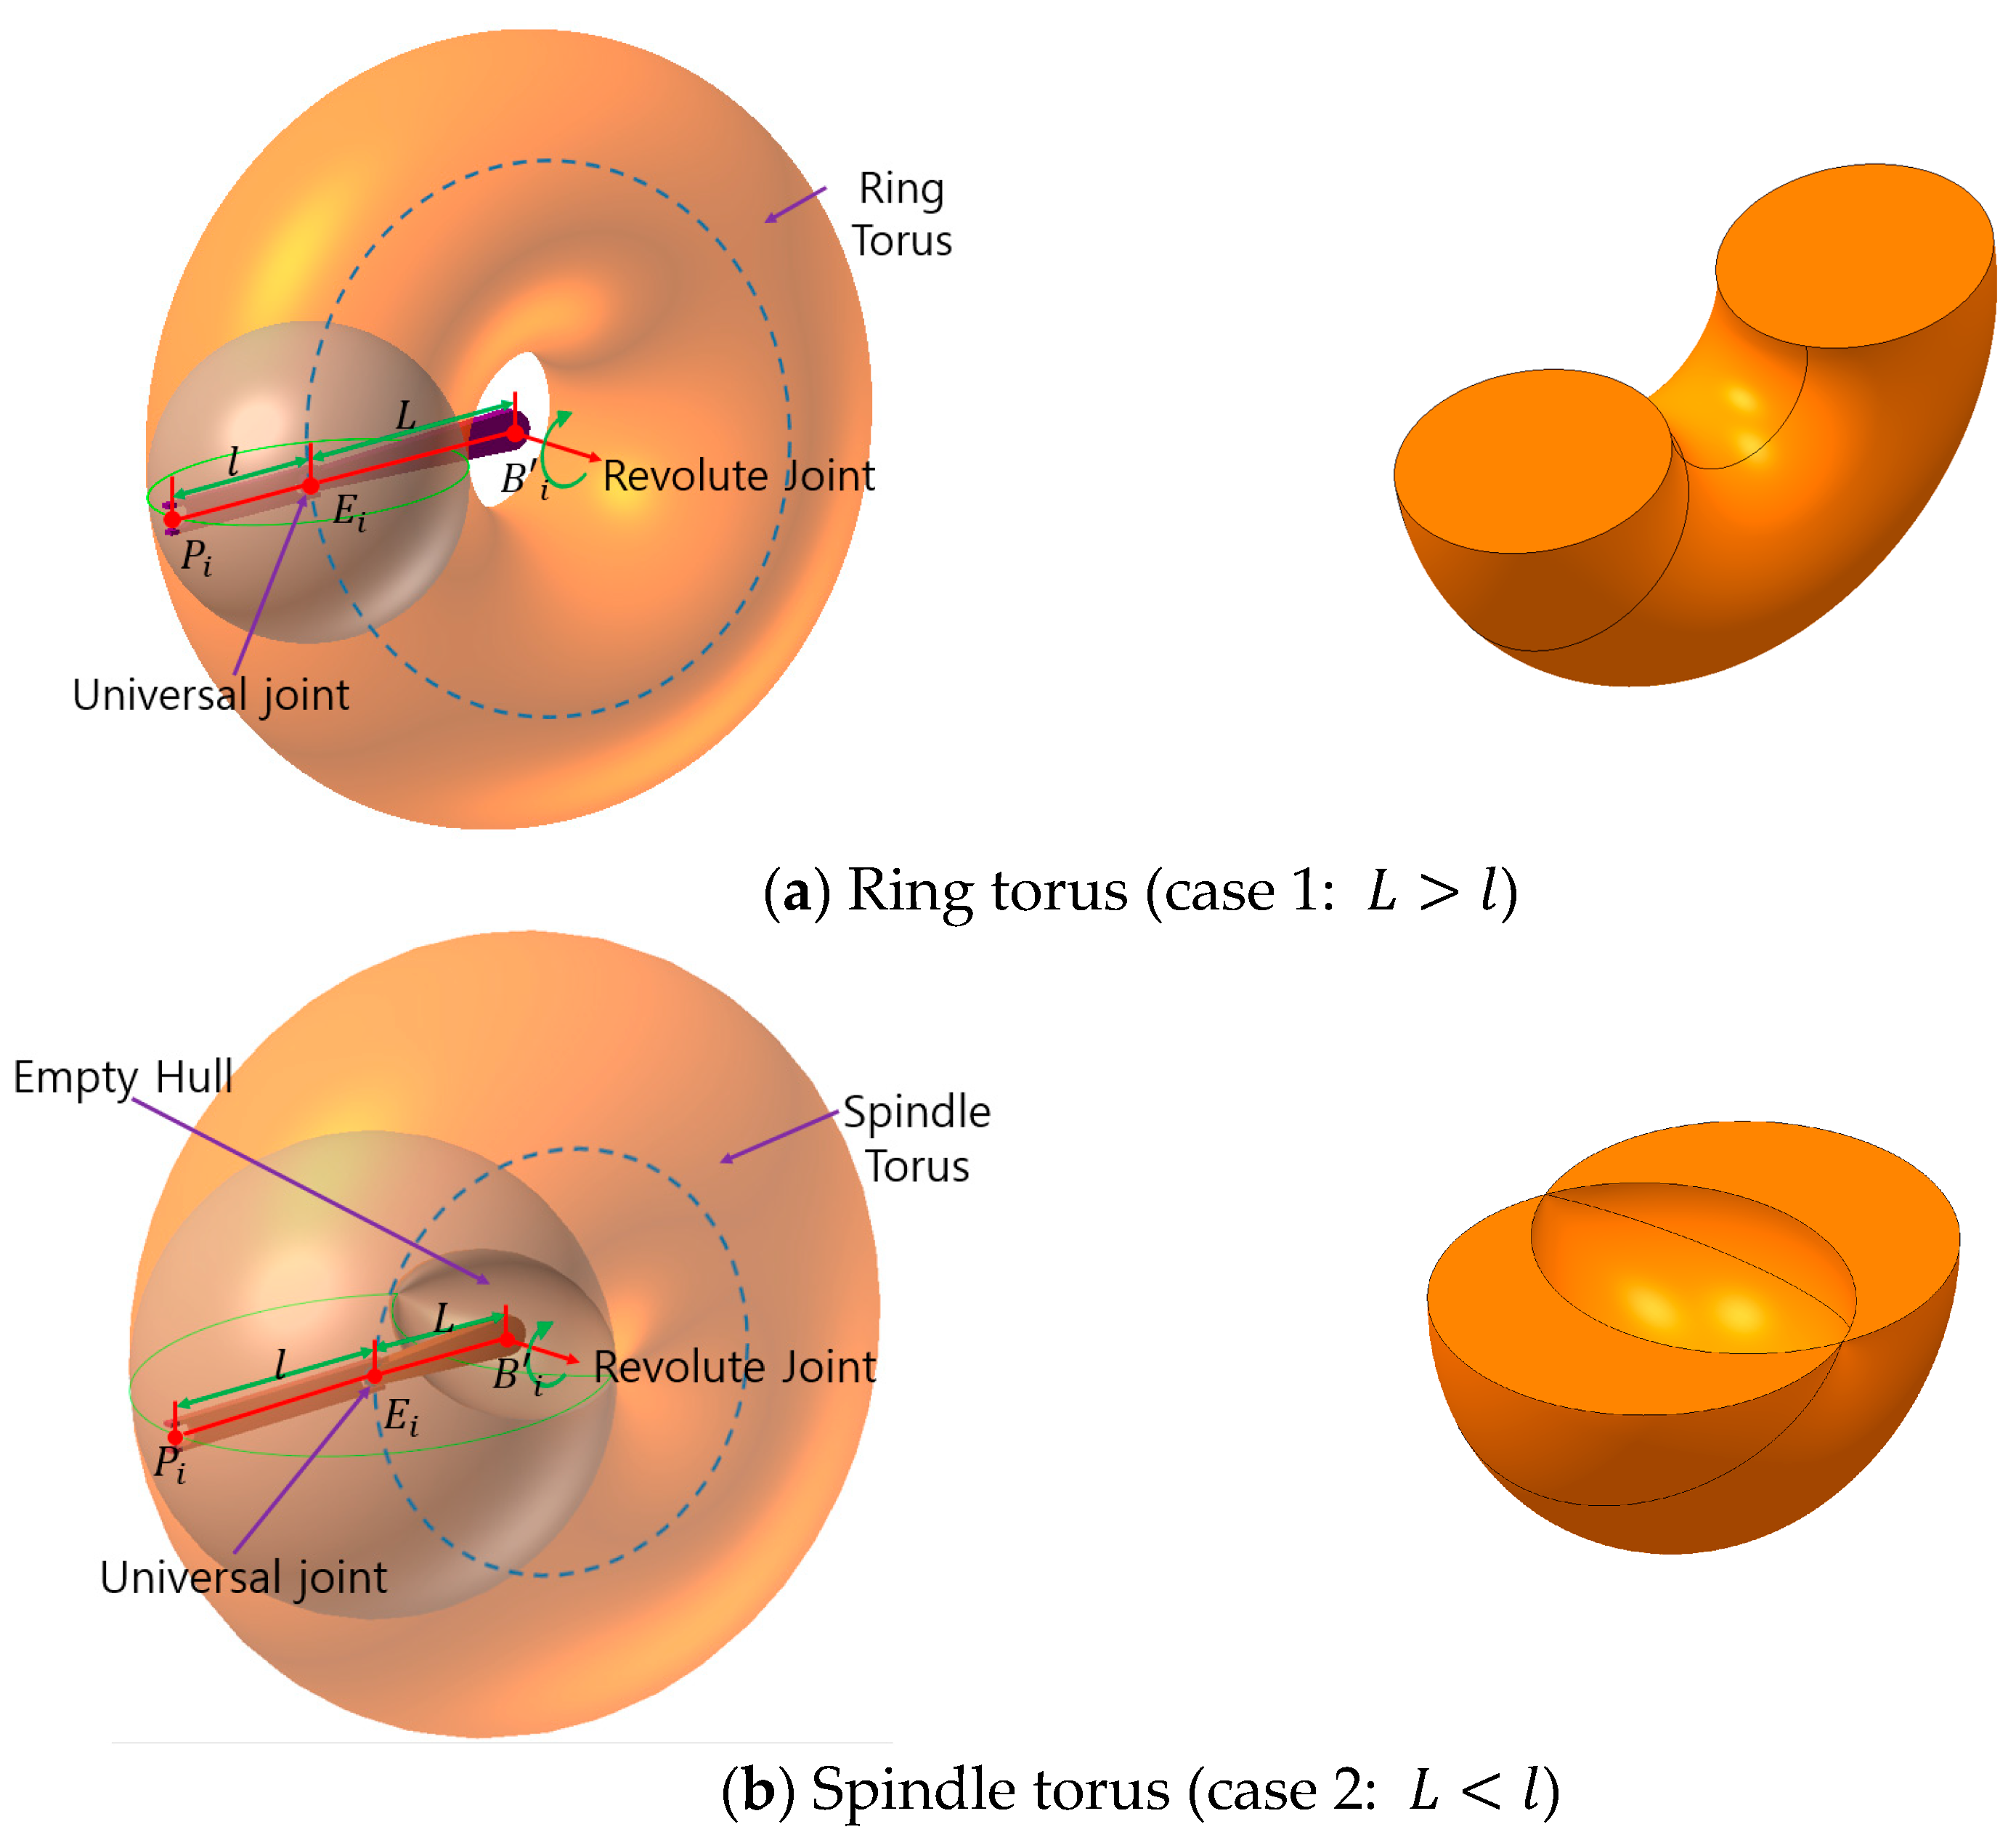
The parameters
and
are the lengths of the upper and lower legs and represent the major and minor radius of the torus, respectively. They determine the shape and size of the torus. If
is lager than
(case 1), the torus becomes ring-shaped, as shown on the left of
Figure 5a, and the space satisfying the inequality
is the internal space where the inside is full, as shown in the crossed shape of
Figure 5a. If
is less than
(case 2), the torus becomes spindle-shaped, as shown on the left of
Figure 5b, and the space satisfying the inequality
is the internal space where the center hollow exists, as shown in the crossed shape of
Figure 5b.
Considering the intersection of the three tori of cases 1 and 2, the intersection volume of case 1 is possibly smaller than that of case 2 because most of the intersections of case 1 occur in either of the separated ring parts of the torus. On the other hand, the intersection of case 2 occurs in the united body of the torus so that the intersection volume can be larger than that of case 1. Because of the larger workspace of case 2, most commercial delta robots have the shape of case 2, that is, .
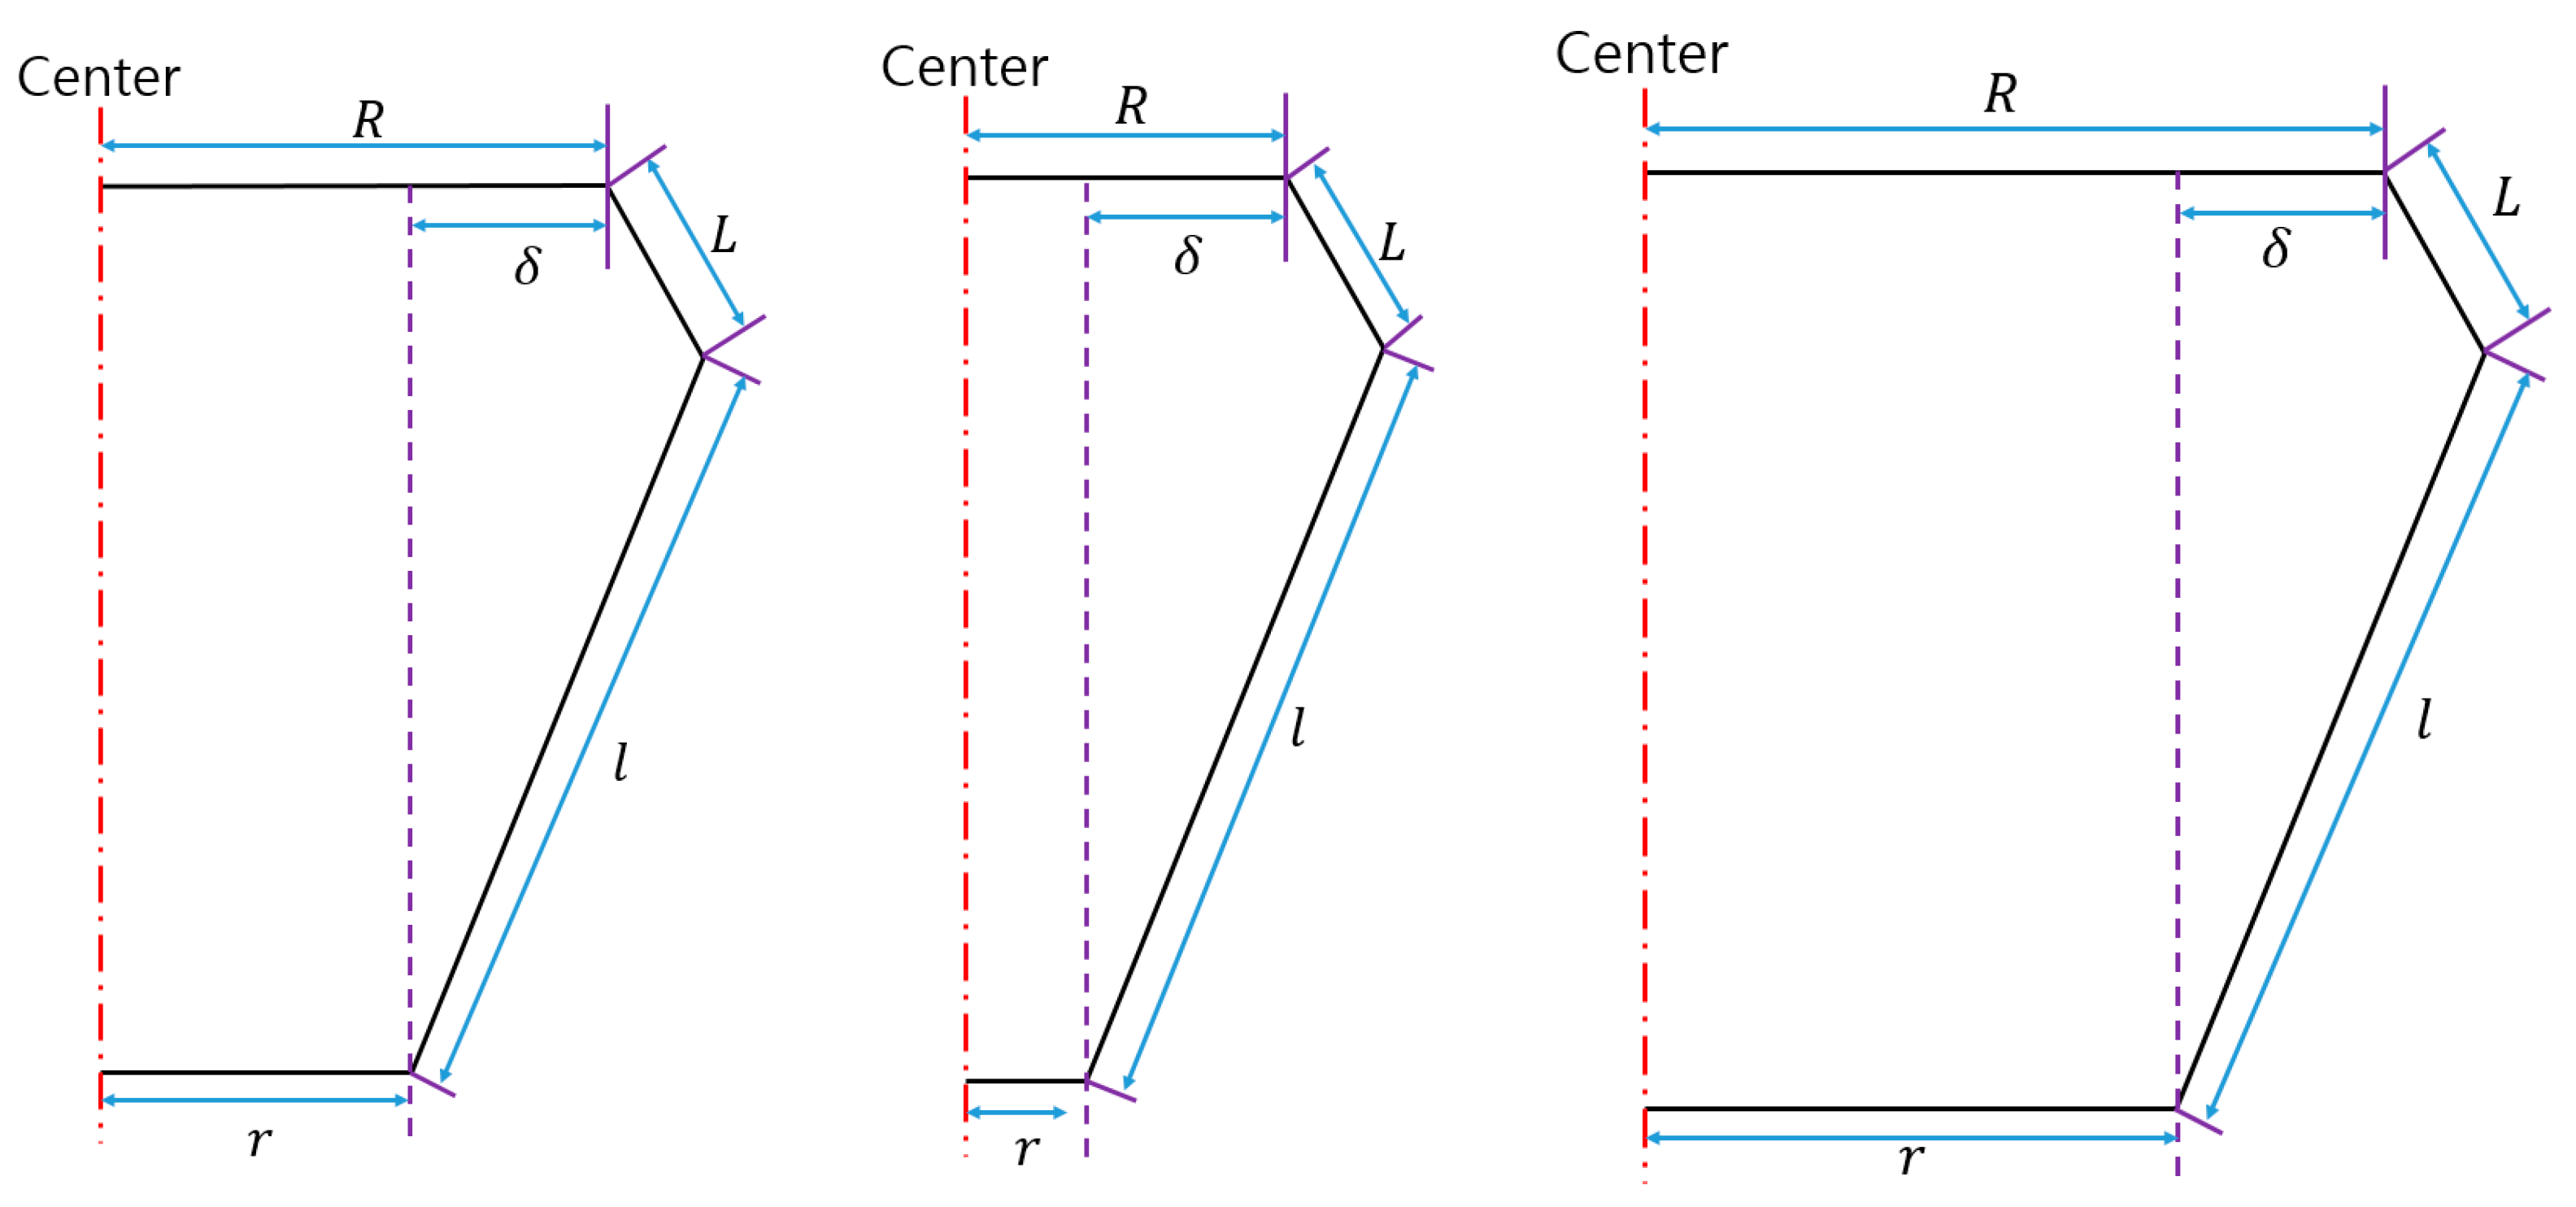
The radius difference is the difference in the length between the base and platform radius, which means the shifted length of the torus center from the origin . The distance between the center of the torus and the origin increases as the radius difference increases. Thus, affects not the shape and size of each torus but the intersection volume. Consequently, and are characteristics of the torus itself, and is the relative characteristic of the three tori.
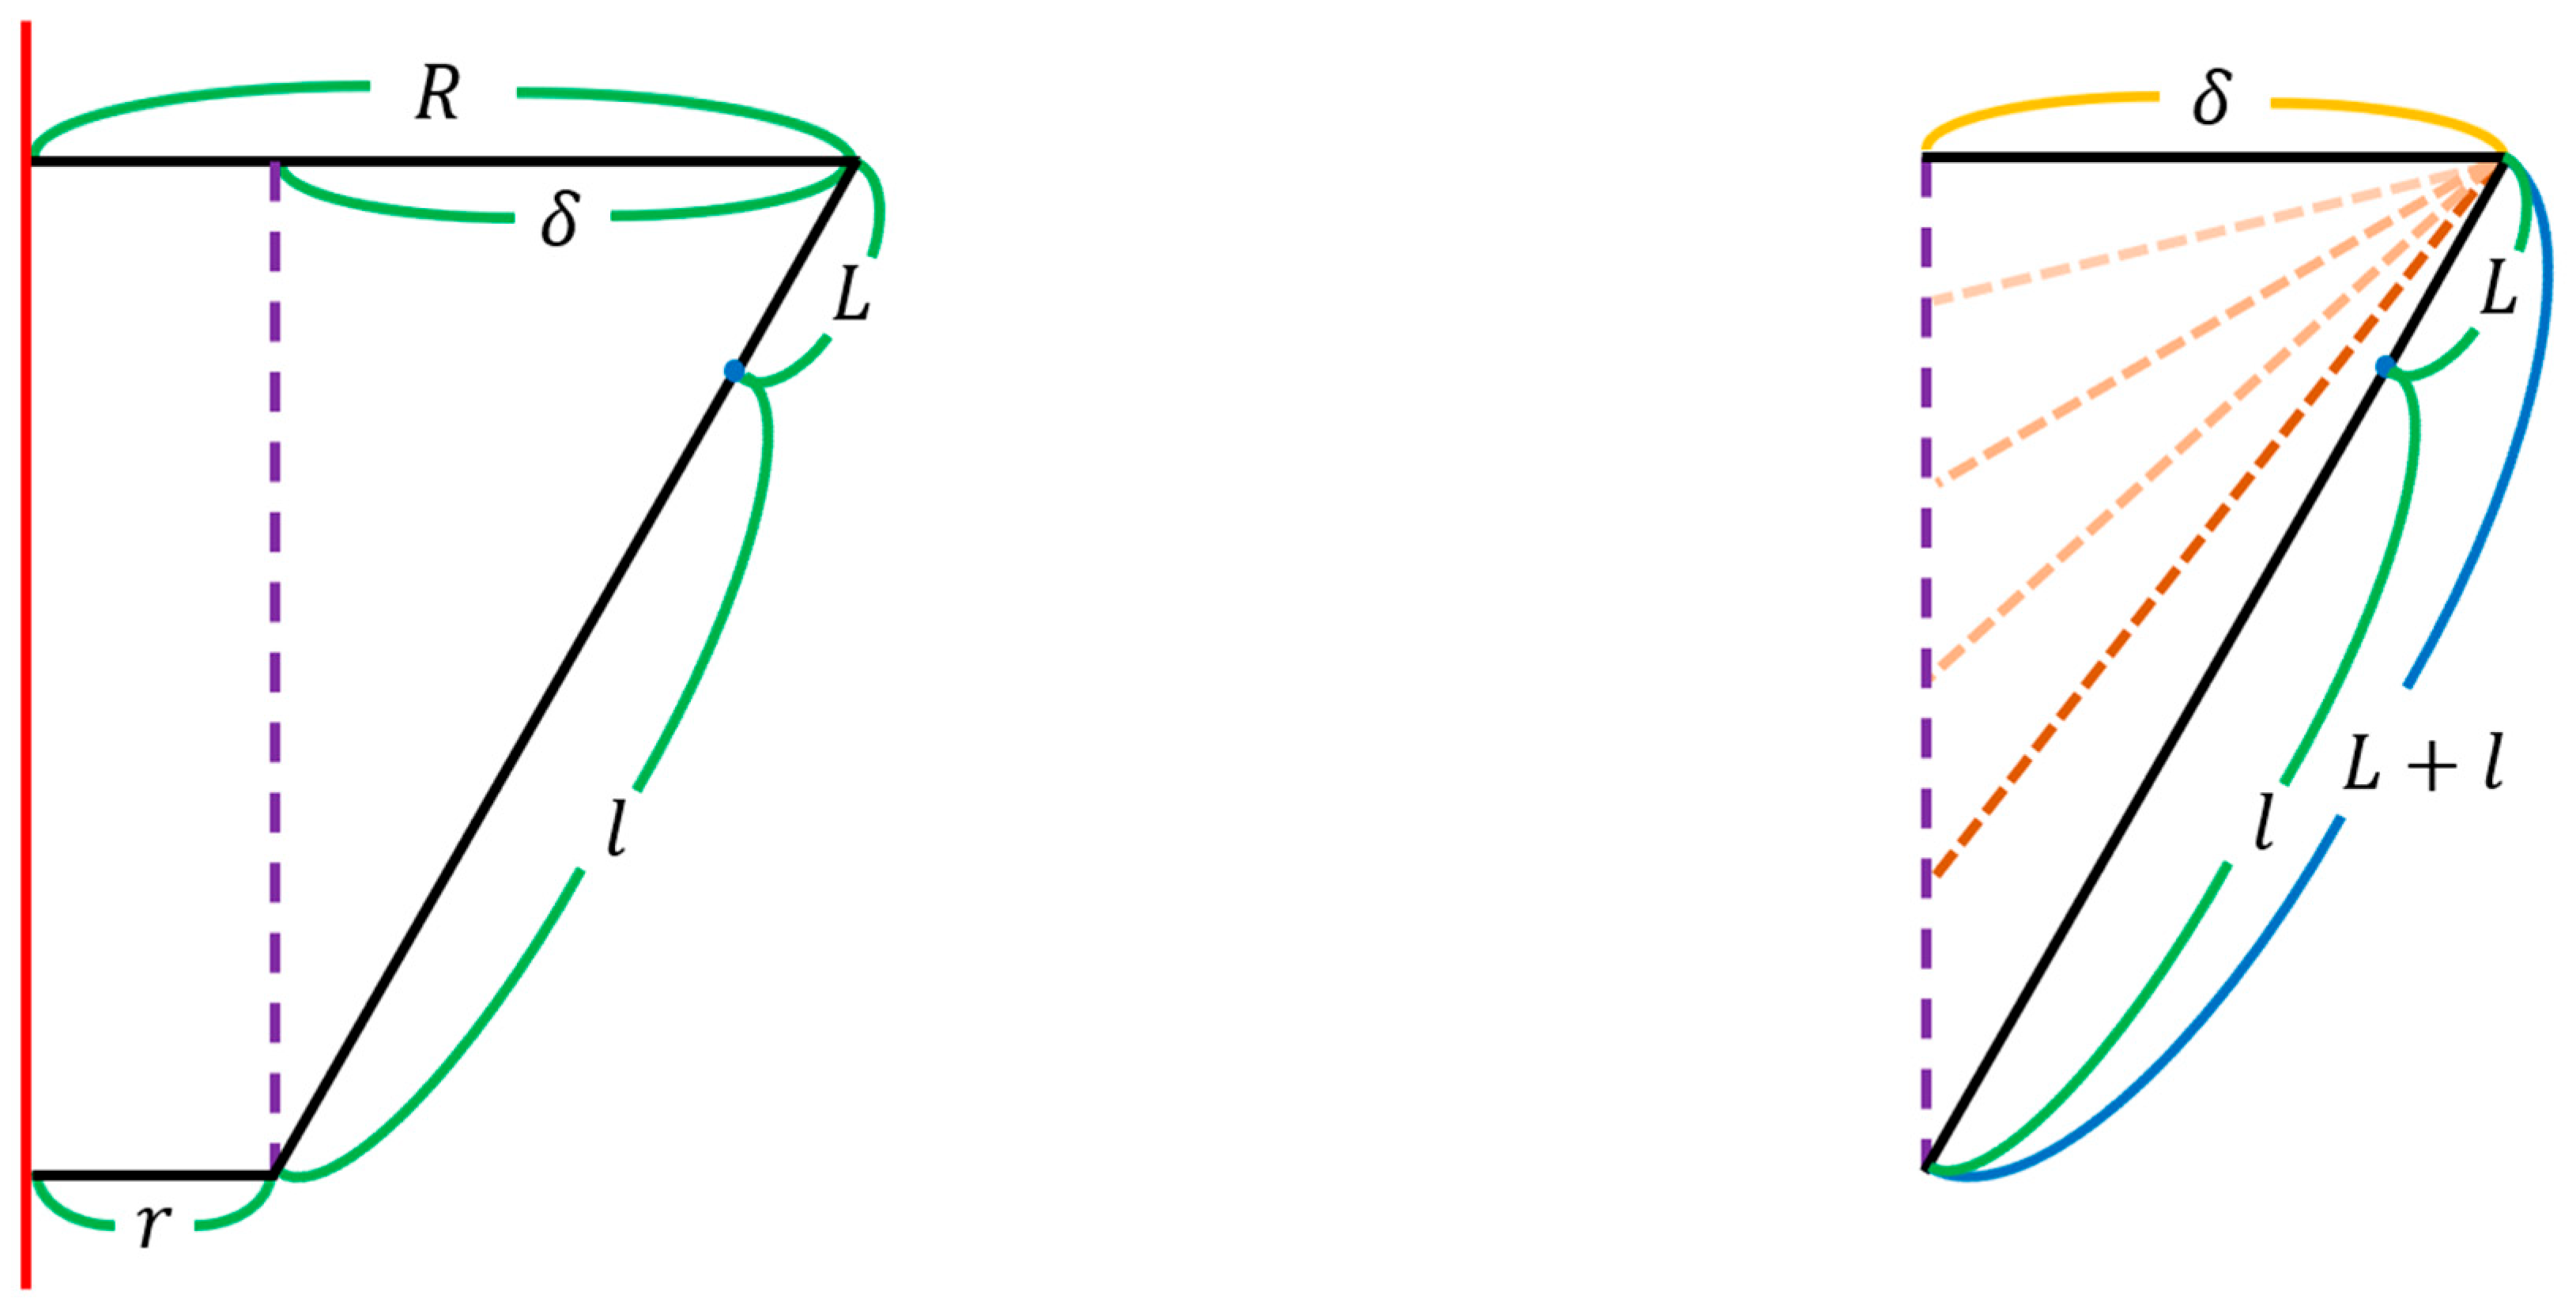
It is a particular point to note that because
is the difference value between
and
, even in the different cases of
and
, the same
occurs, as shown in
Figure 6. This means that the delta robot with varying radii
and
can make the same torus.
Note that
could be identical for different
and
because
is the length difference between
and
, as shown in
Figure 6. This means that the delta robot with different radii
and
can have the same torus.
In summary, the change in parameters and affects the shape and size of the torus, and the change in the parameters affects the shape and size of the workspace. The three parameters are important for estimating the shape and size of the torus and workspace of the delta robot. Therefore, parametric variation analysis of these parameters is necessary to evaluate the workspace of the delta robot.
2.3. Zero-Platform Delta Robot
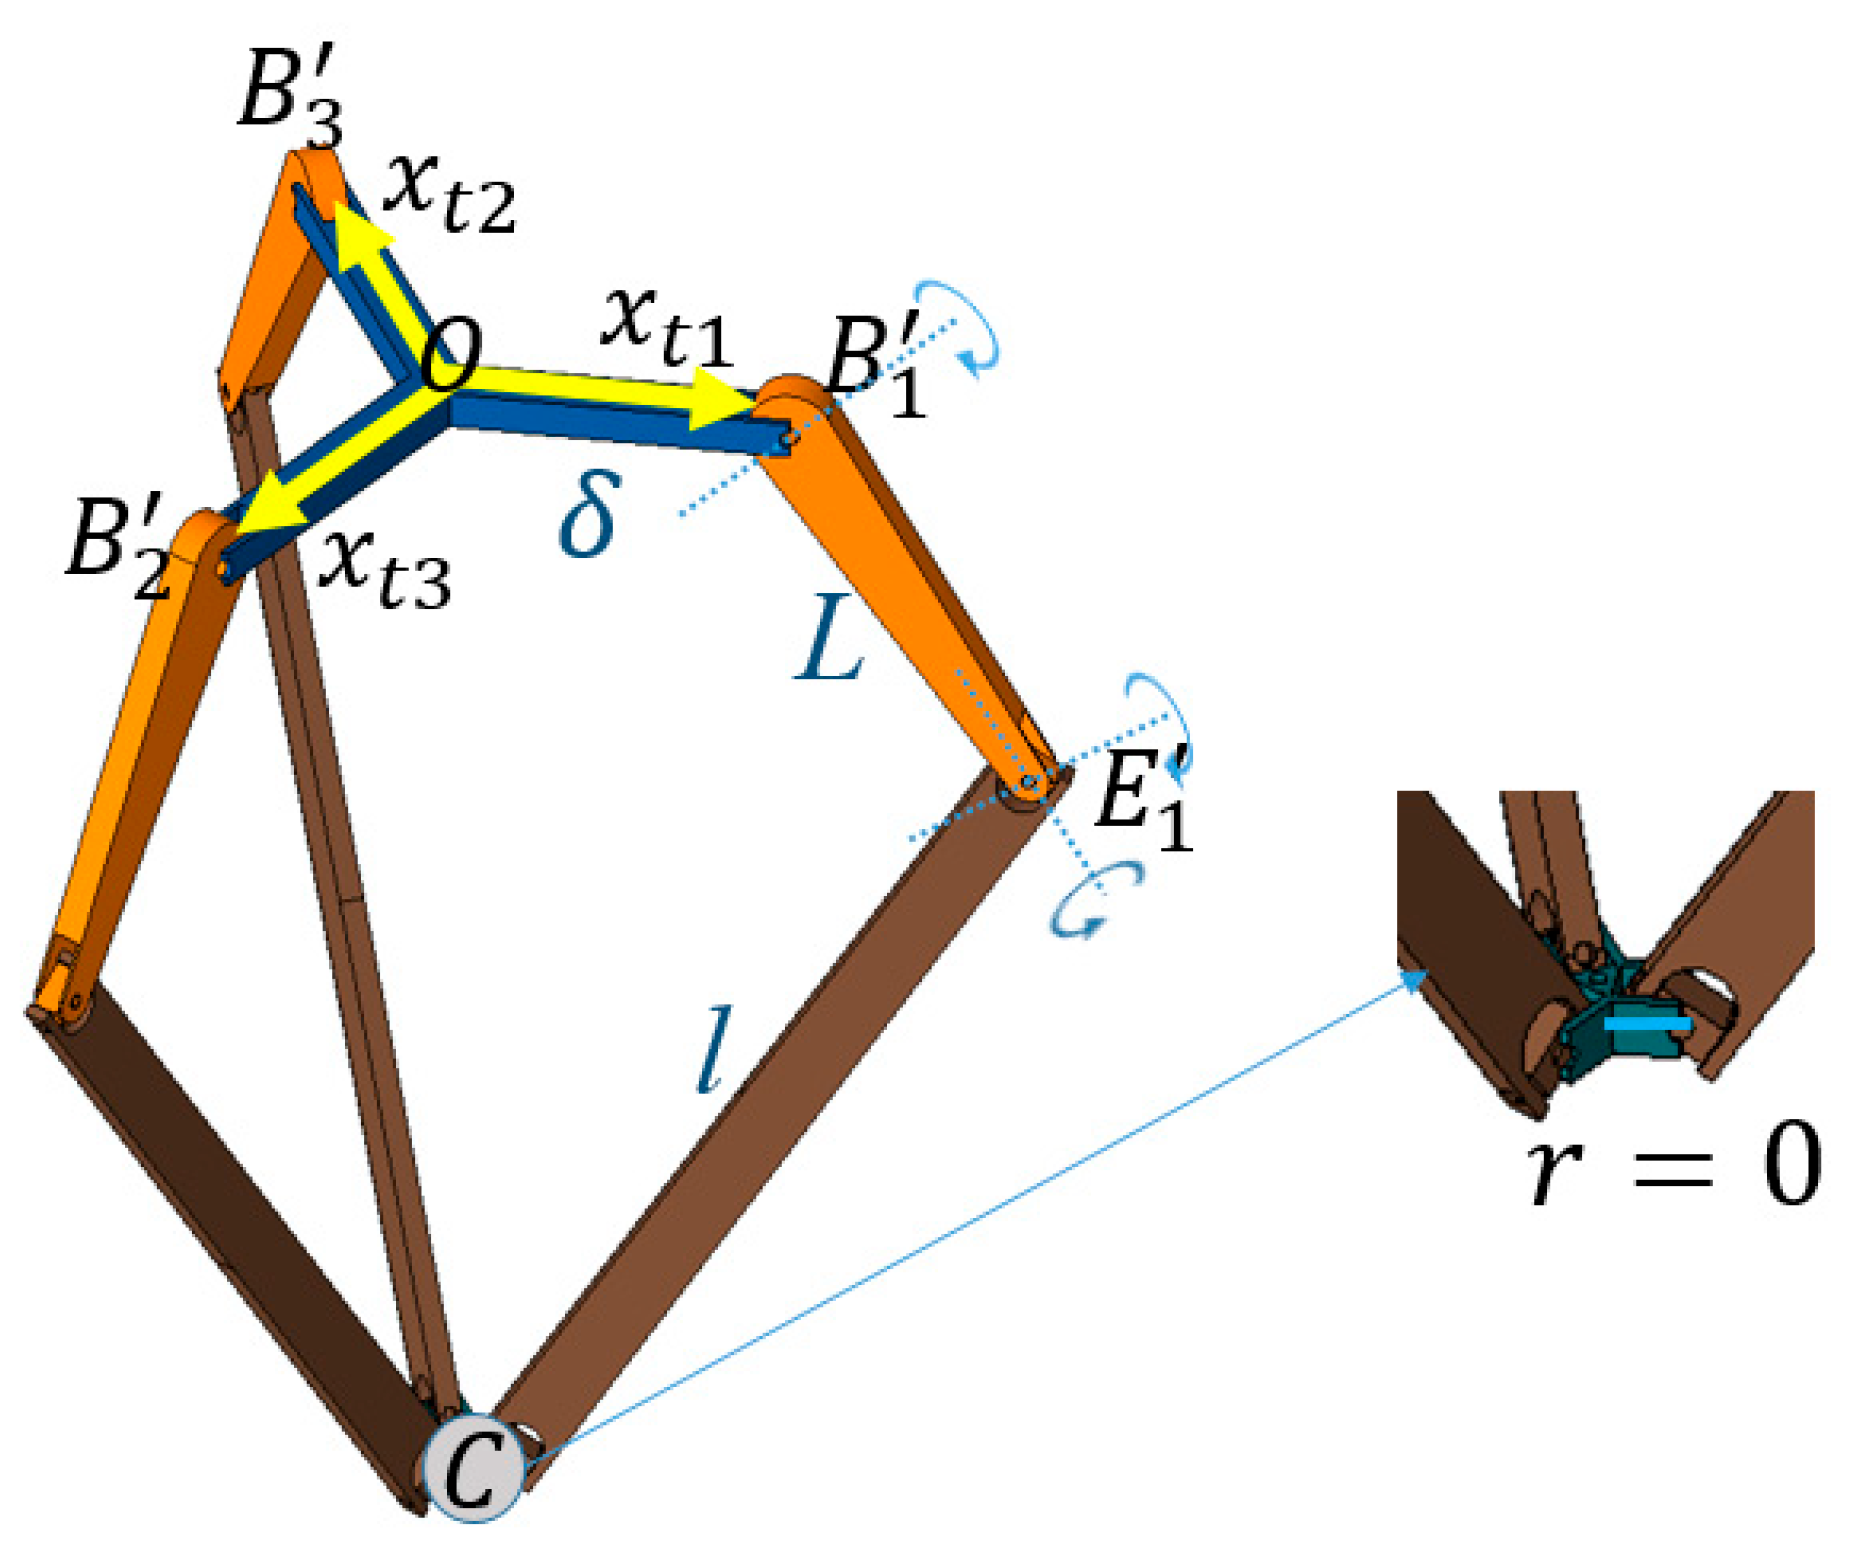
The parameter
δ can be directly applied to the geometry of the delta robot. In this case, the equivalent kinematic structure of the delta robot shown in
Figure 3 can be redrawn in
Figure 7. Here, the origin,
, and
are not changed, but the platform size
becomes zero. In this structure, the radius of the base is
, which makes the center of the torus to be placed directly on the boundary position of the base,
, conveniently. For example, at
the upper leg has a revolute joint to make a circular motion with the major radius of the torus. The lower leg has a universal joint to make a spherical motion with the minor radius of the torus. Therefore, the torus motion of a leg branch and the intersection of the three tori positioned at three
s are easily configured in this structure of the delta robot. In this study, the new concept of a zero-platform delta robot in this structure is introduced to configure and generate the workspace of the delta robot.
The torus caused by the rotation of one branch of the zero-platform delta robot is shown in
Figure 8. The upper leg has circular motion about
with radius
, and the lower leg has spherical motion about
with radius
. Thus, the center point
of the platform makes a spindle torus with the major radius
(dotted circle) and the minor radius
(the shaded sphere).
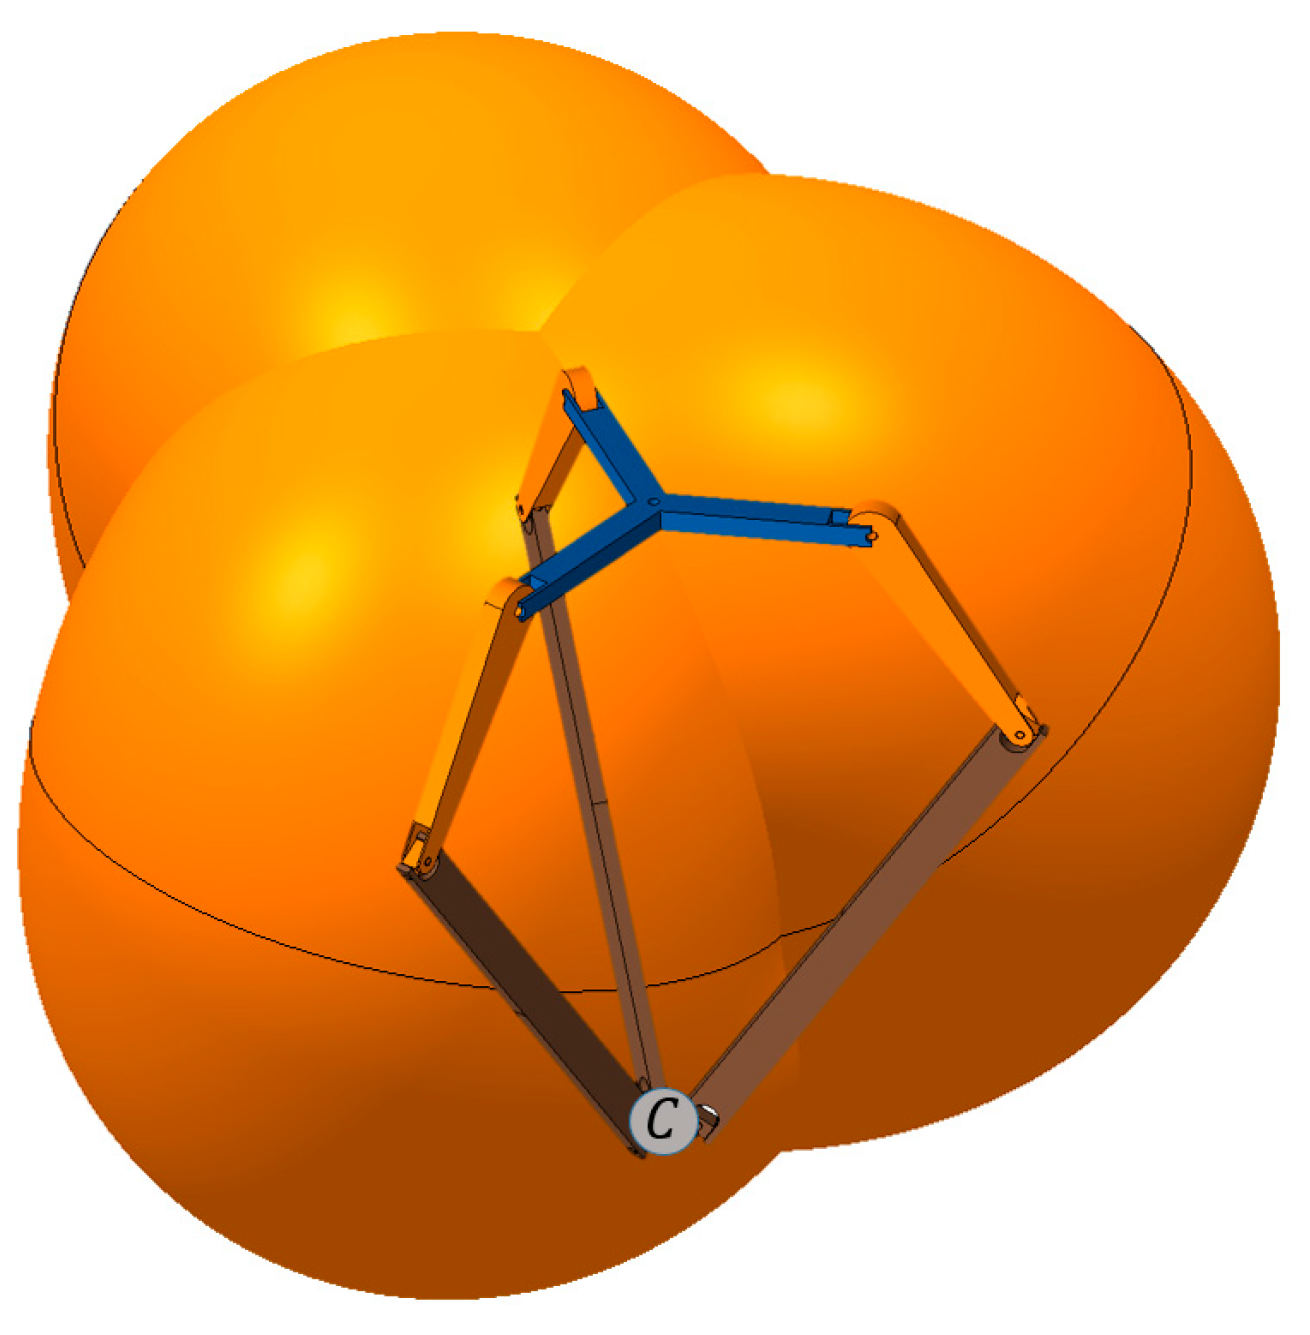
Figure 9 shows the three tori drawn at three leg branches on the zero-platform delta robot, and the overlapped intersection spaces are the final workspace of the robot.
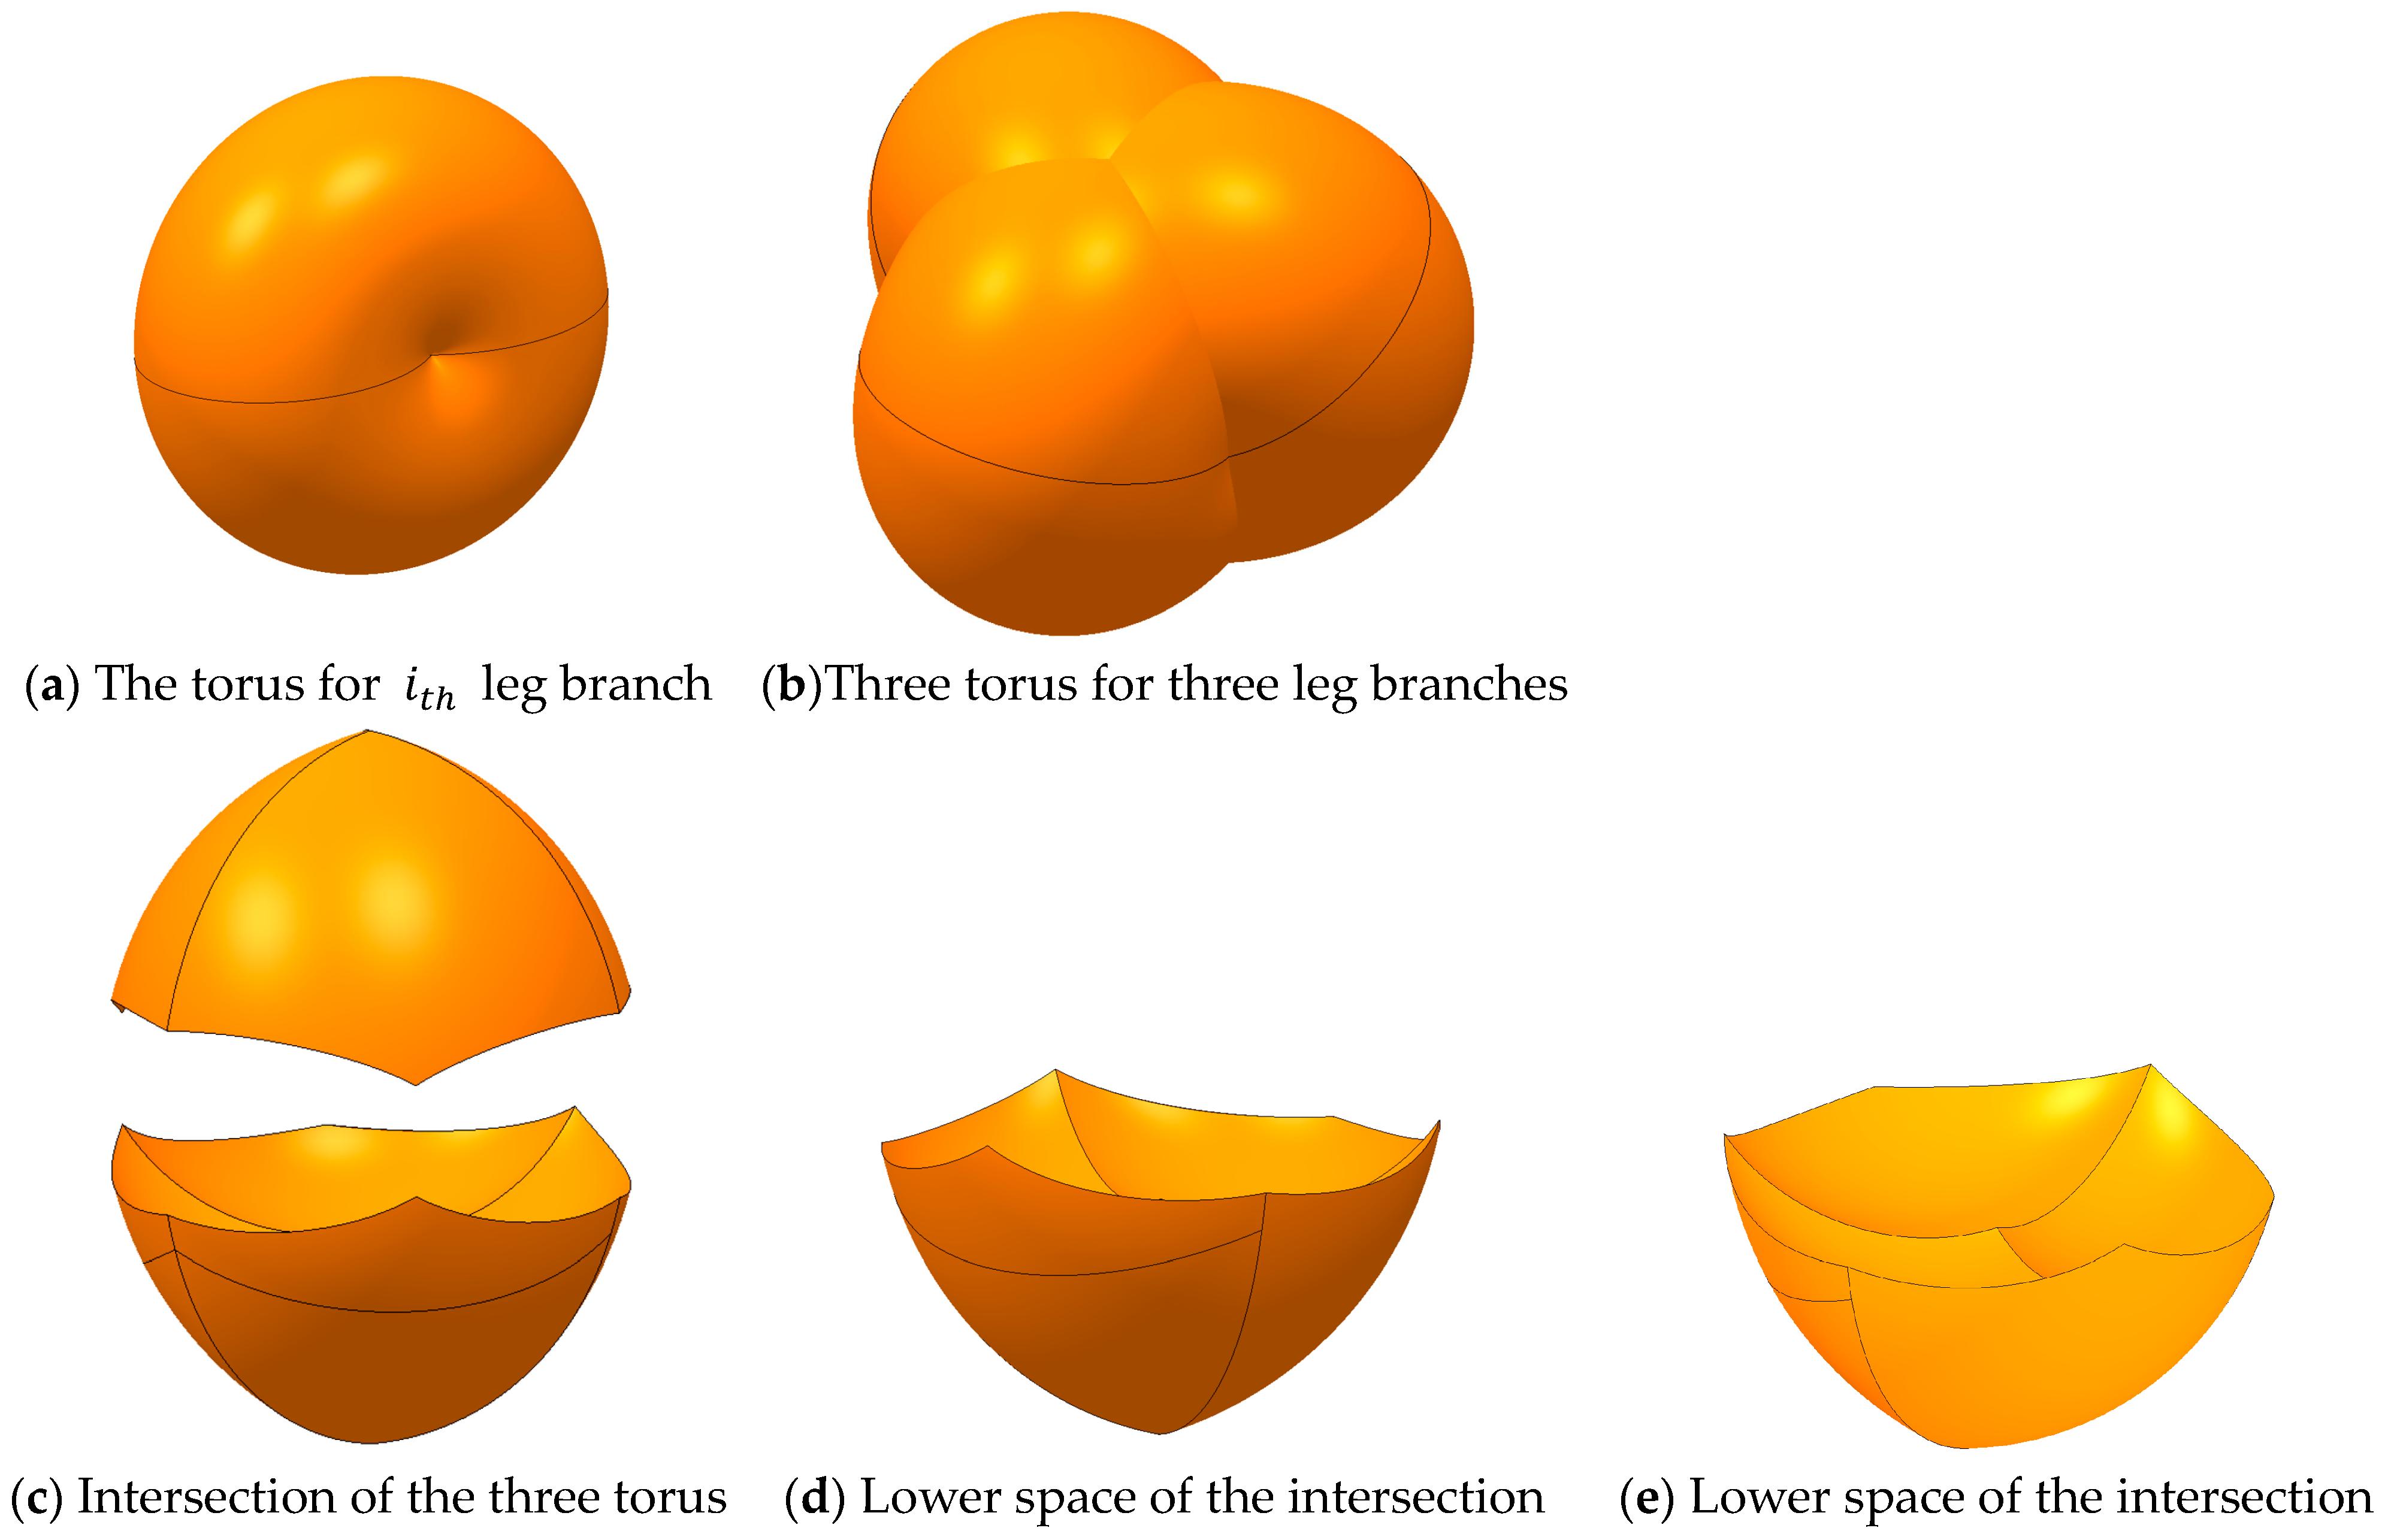
The following figure explains the procedure of the generation of the workspace. In most commercial delta robots, the minor radius
is longer than the major radius of the torus,
. Therefore, this torus becomes spindle-shaped, as shown in
Figure 10a. The three tori and their intersections are shown in
Figure 10b and
Figure 10c, respectively. The two parts of the lower and upper intersections in
Figure 10c are symmetric because the torus has symmetrical geometry for the horizontal plane and the actuated joint angles
can have an upward or downward motion for the plane. The lower space is selected as shown in
Figure 10d,e because
in most delta robots usually has a downward motion.
3. Cross-Section Diagram of the Torus and Its Application
3.1. Subsection
This section may be divided into subheadings. It should provide concise and precise cross-sections of tori from the top view of
Figure 5a (
), which is drawn on the left of
Figure 11a. The centerline coincides with the Z axis of frame {R}, and the torus center is shifted
from the origin
of {R}. The colored cross-section diagram on the right is used for the intersection of the three tori to obtain the workspace. The cross-section diagram of the case
is shown in
Figure 11b. The dark-colored part on the right in
Figure 11a indicates the hollow of the spindle torus.
Generating a workspace with the cross-section diagram consists in overlapping and rotating the three tori at the same angle, using different colors (green, blue, red), and intersecting three cross-section diagrams in order. The overlapped configuration for the three spindle tori is shown on the left of
Figure 12. As shown in
Figure 12, the overlapped colors of the three tori are slightly darker than the original colors (R, G, B). The triple-overlapped areas are the intersection of the three tori, so that they are the workspace of the delta robot. The actual workspace in this case is shown on the right of
Figure 12. The overlapped exterior areas in the cross-section diagram correspond to the six outer petal-shaped regions in the top face of the 3D workspace. The overlapped interior areas in the cross-section diagram also correspond to the six inner petal-shaped areas in the 3D workspace. The sunk region comes from the hollow of the spindle torus. There is good agreement between the results in the 2D and 3D cross-section diagrams.
The procedure to obtain the workspace takes a lot of time because it requires 3D data handling, such as generating the tori and intersection in the 3D CAD software. Meanwhile, the shape and size of the workspace is easily estimated with the cross-section diagrams and overlapping
The process of estimating the workspace with a cross-section diagram uses the 2D operation of three tori diagrams with different colors for each cross-section diagram: green, blue, and red. The intersection produces an overlapped color area, which is darker than the non-workspace area. Thus, the workspace area and non-workspace area are clearly distinguished, and the hollow region is represented by a darker area than the workspace area.
3.2. Relationship of the Limit Position Using the Cross-Section Diagram
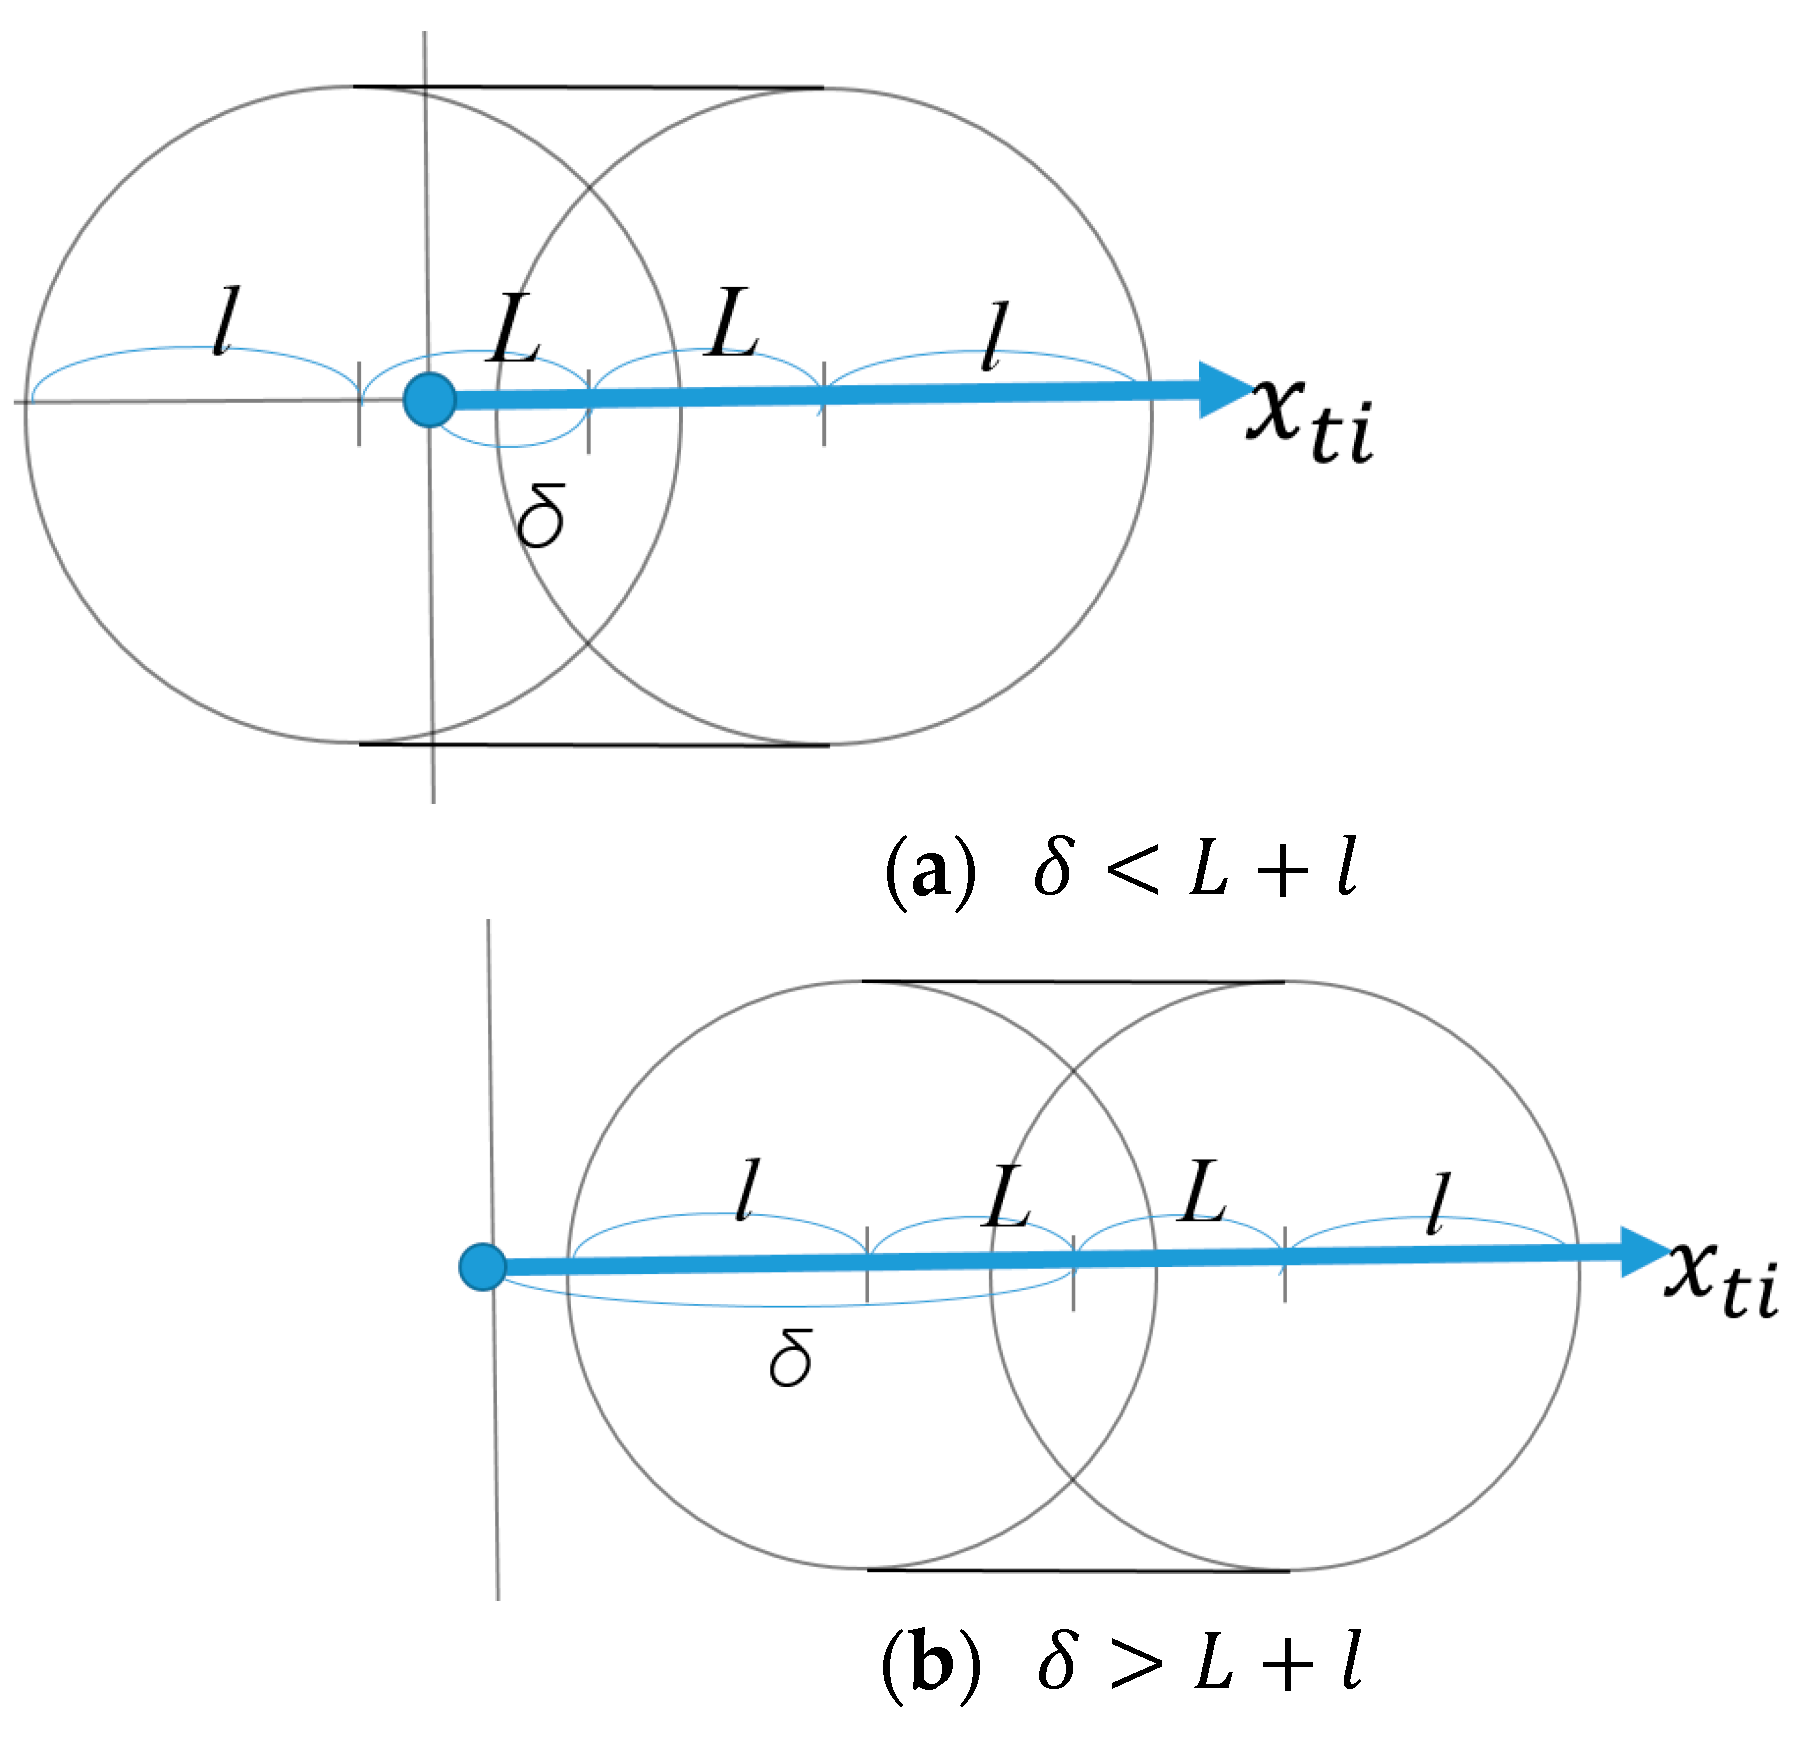
Figure 13 shows that the lower leg of the delta robot is on the same line as the upper leg. Then, the delta robot is in a limit position where all legs cannot move any further because the transmission angle from the actuating link (upper leg) is zero. This position is the boundary of the workspace of the delta robot. Based on the triangle configuration, the inequality
is obtained with the length condition of the triangle.
This inequality of
can also be obtained from a cross-section diagram of the torus. In the case of the spindle-type torus, if
is less than
, as shown in
Figure 14a, the tori can have intersected space between the two other tori because the torus is not shifted out to the right of the origin of the {R} frame. If
is larger than
, as shown in
Figure 14b, the whole torus is shifted to the right of the centerline, and there is no intersected space because the two other tori exist in the left region of the centerline.
4. The Parametric Analysis for the Workspace Using the Cross-Section Diagram
A torus is generated from the rotation of the three branches of the zero-platform delta robot legs, and the intersection of the three tori generates the workspace. The shape and size of the torus are affected by two parameters, and . The relative position of the three tori depends on , which affects the intersection results of the three tori. Therefore, the shape and size of the final workspace are affected by three parameters: , , and .
Parametric analysis is performed for three key parameters to evaluate the cross-section diagram. Previous studies have performed parametric studies of the volume and shape of a workspace considering the change in dimensionless variables [
15,
16], which could not give direct insight into parameter variations. In addition, the result without geometrical consideration of the torus is just a list of numbers. In this study, the parametric analysis used a dimensional parameter instead of a dimensionless number and analyzed it based on the cross-section diagram.
In parametric analysis, one parameter can be changed, while two other parameters are fixed. There are three cases for the parametric analysis, as follows. Note that in the parametric variation, all parameters are changed, keeping the inequality satisfied.
If is changing with fixed and
If is changing with fixed and
If is changing with fixed and
Parametric analysis for these three cases is performed, and the workspace shape and size from parameter variation are analyzed using the cross-section diagram. The results are compared with those of 3D CAD software to show the cross-section diagram’s advantages and effectiveness.
4.1. L Is Changing with Fixed l and δ
In this case,
changes from zero to a certain value, while
and
have fixed values. Because the type of the torus is determined to be a spindle or a ring by whether
is greater than or smaller than
,
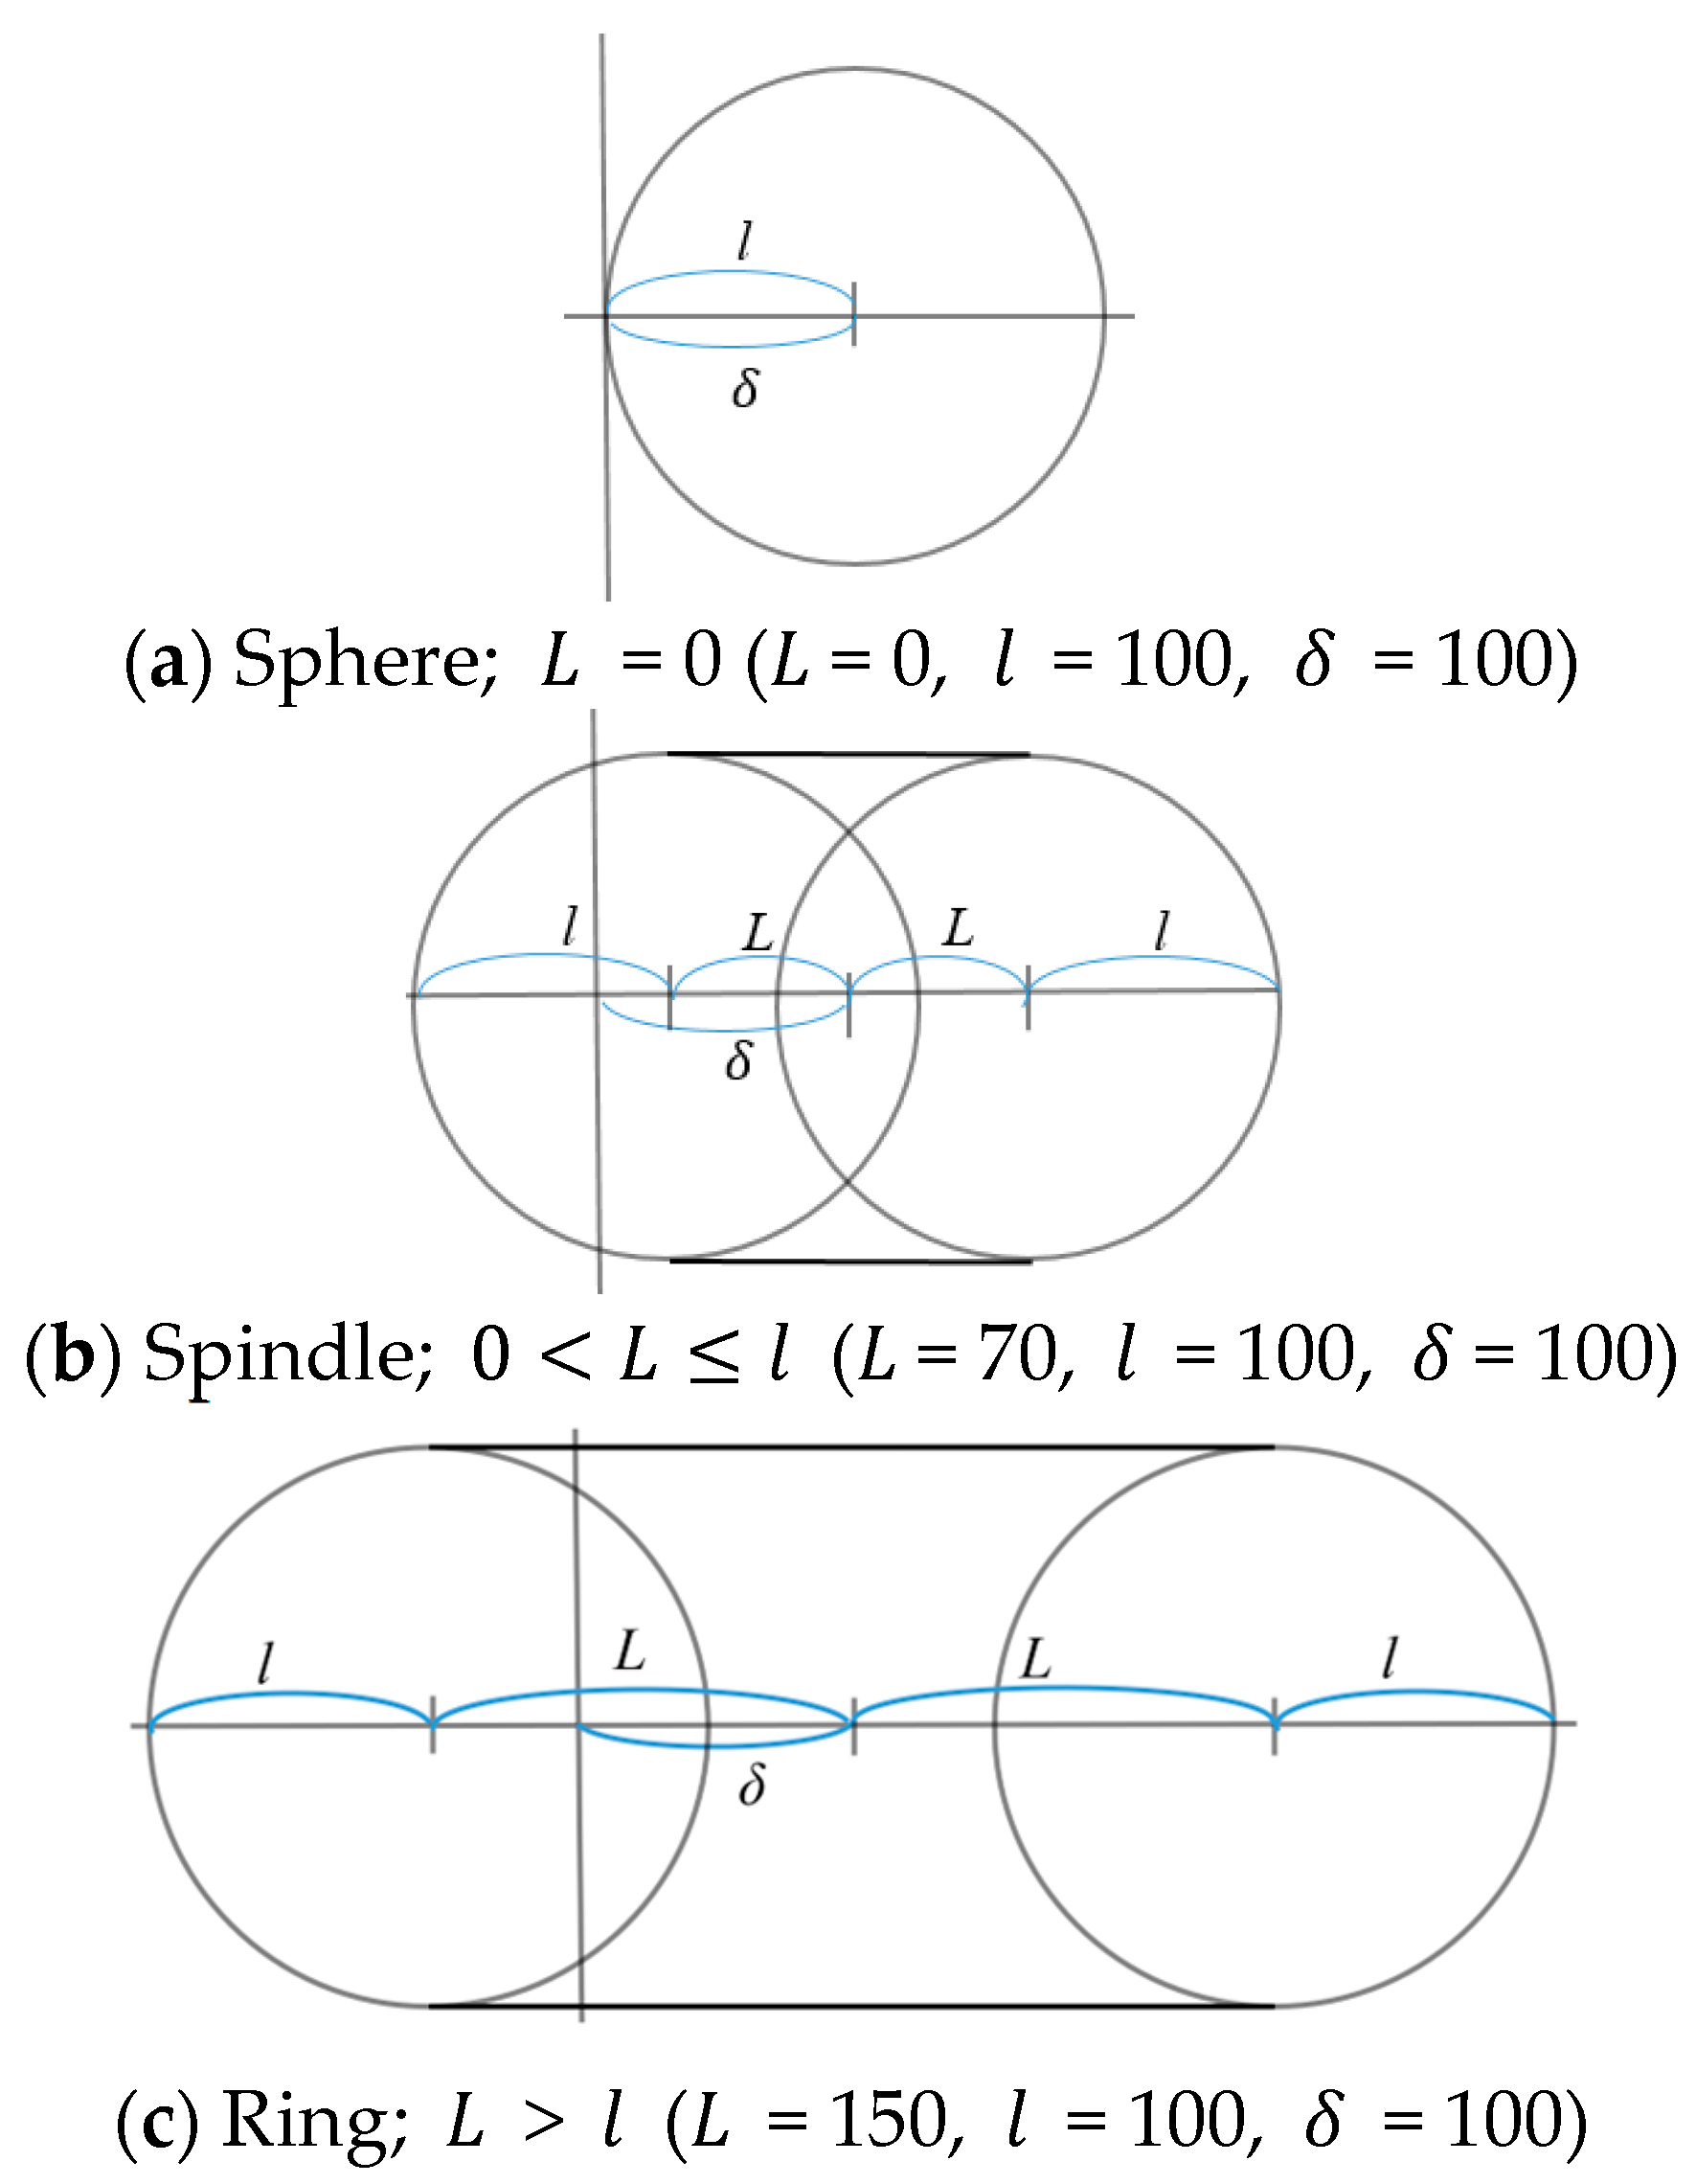
is divided into two sections:
and
. If
, the torus is a simple sphere. If
is less than
, it becomes spindle type. If
is more than
, it becomes ring type, as shown in
Figure 15. The testing values of
and
are selected as
= 100 and
= 100, respectively.
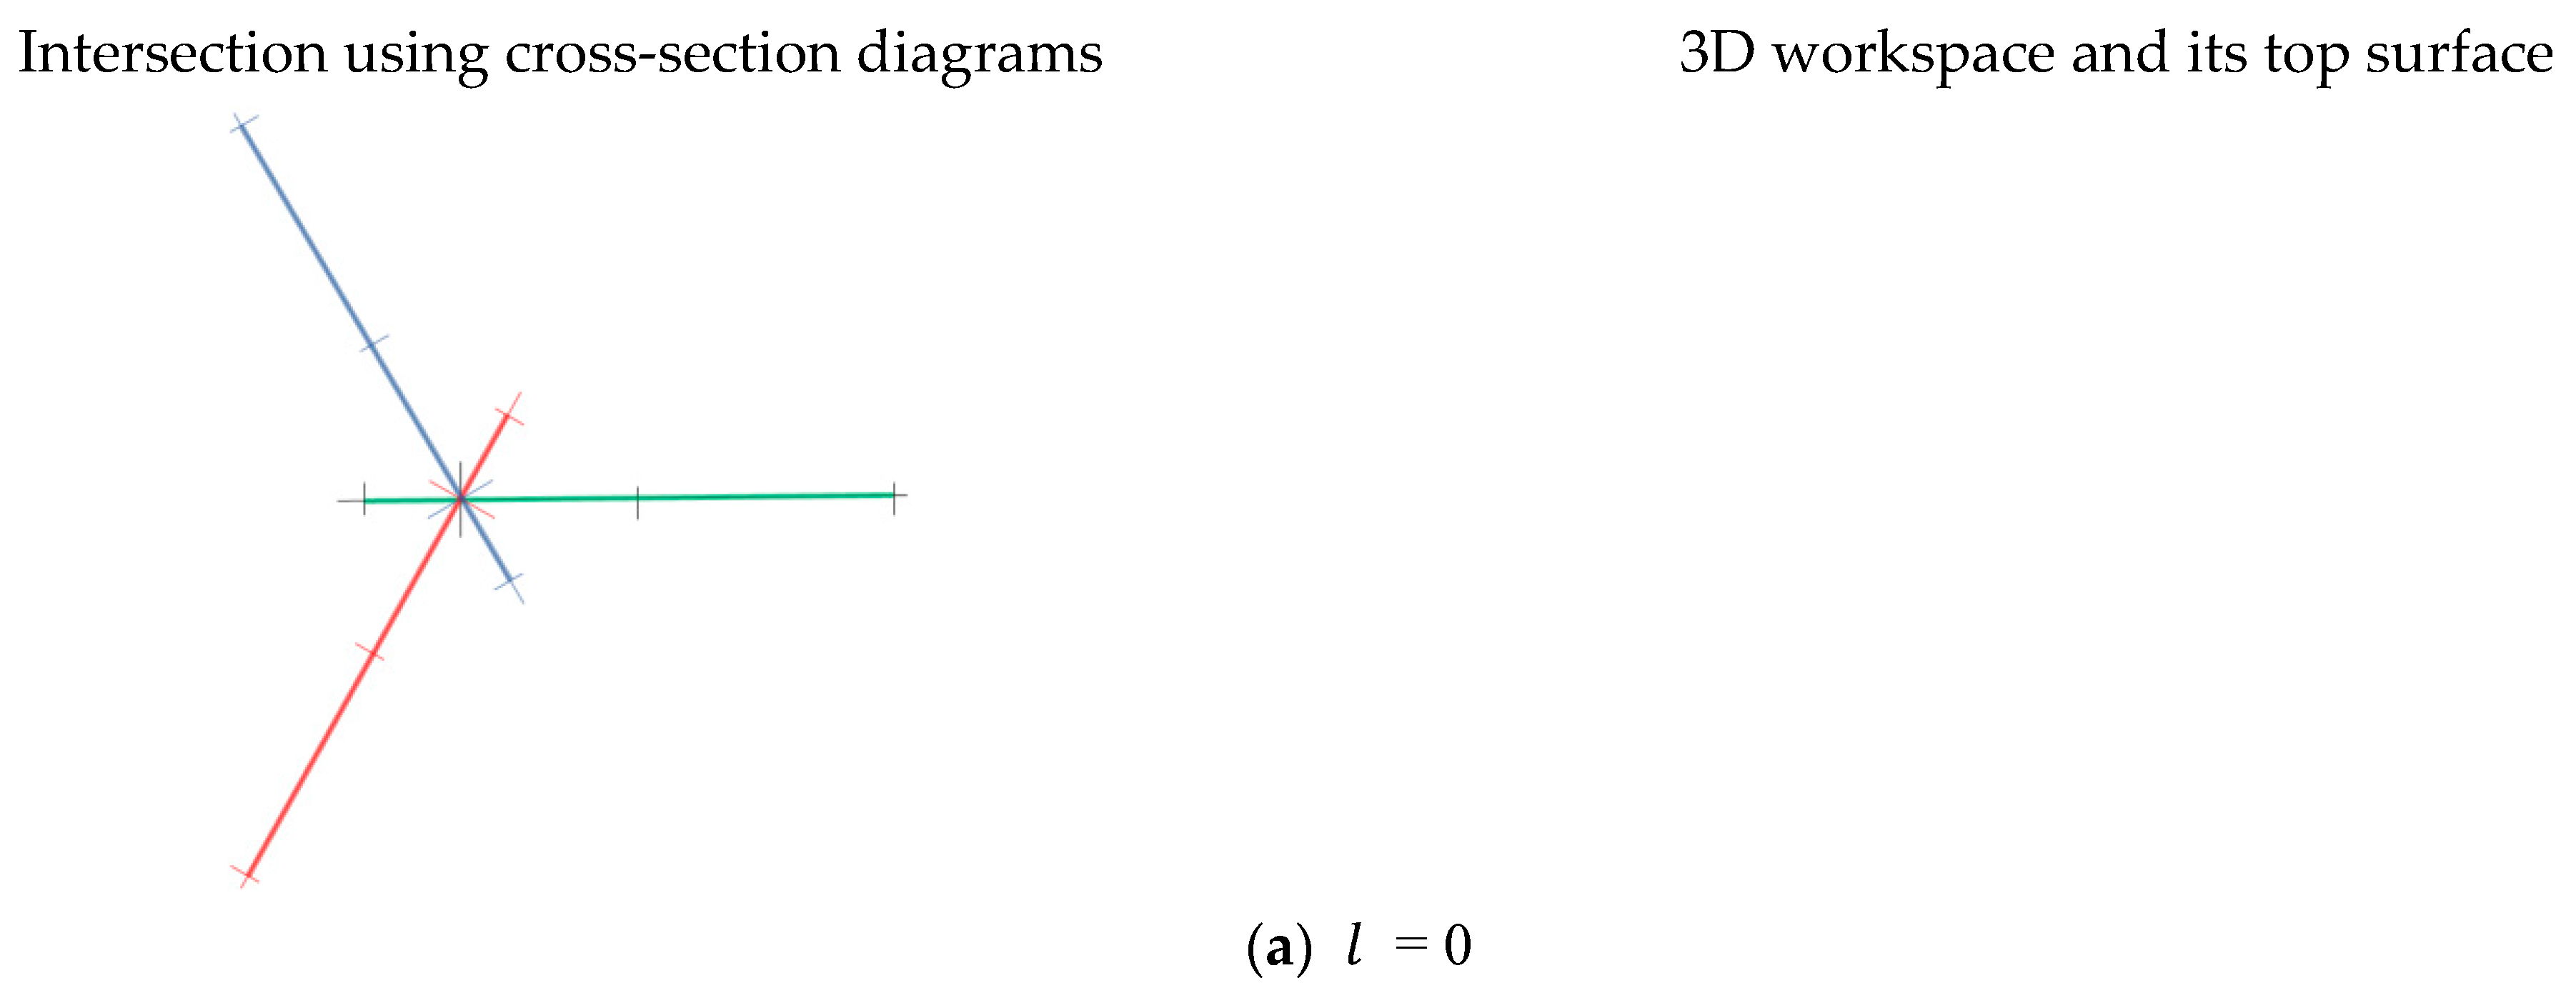
If
, the cross-section diagram becomes a simple sphere with radius
, as shown in
Figure 15a. The colored cross-section diagram for each sphere is on the left of
Figure 16a, whose inside is empty because
makes a uni-spherical motion of the end-effector. Intersecting the three cross-section diagrams on the left of
Figure 16a, the triple-overlapped area has one point. Similarly, the workspace on the right of
Figure 16a is also a point.
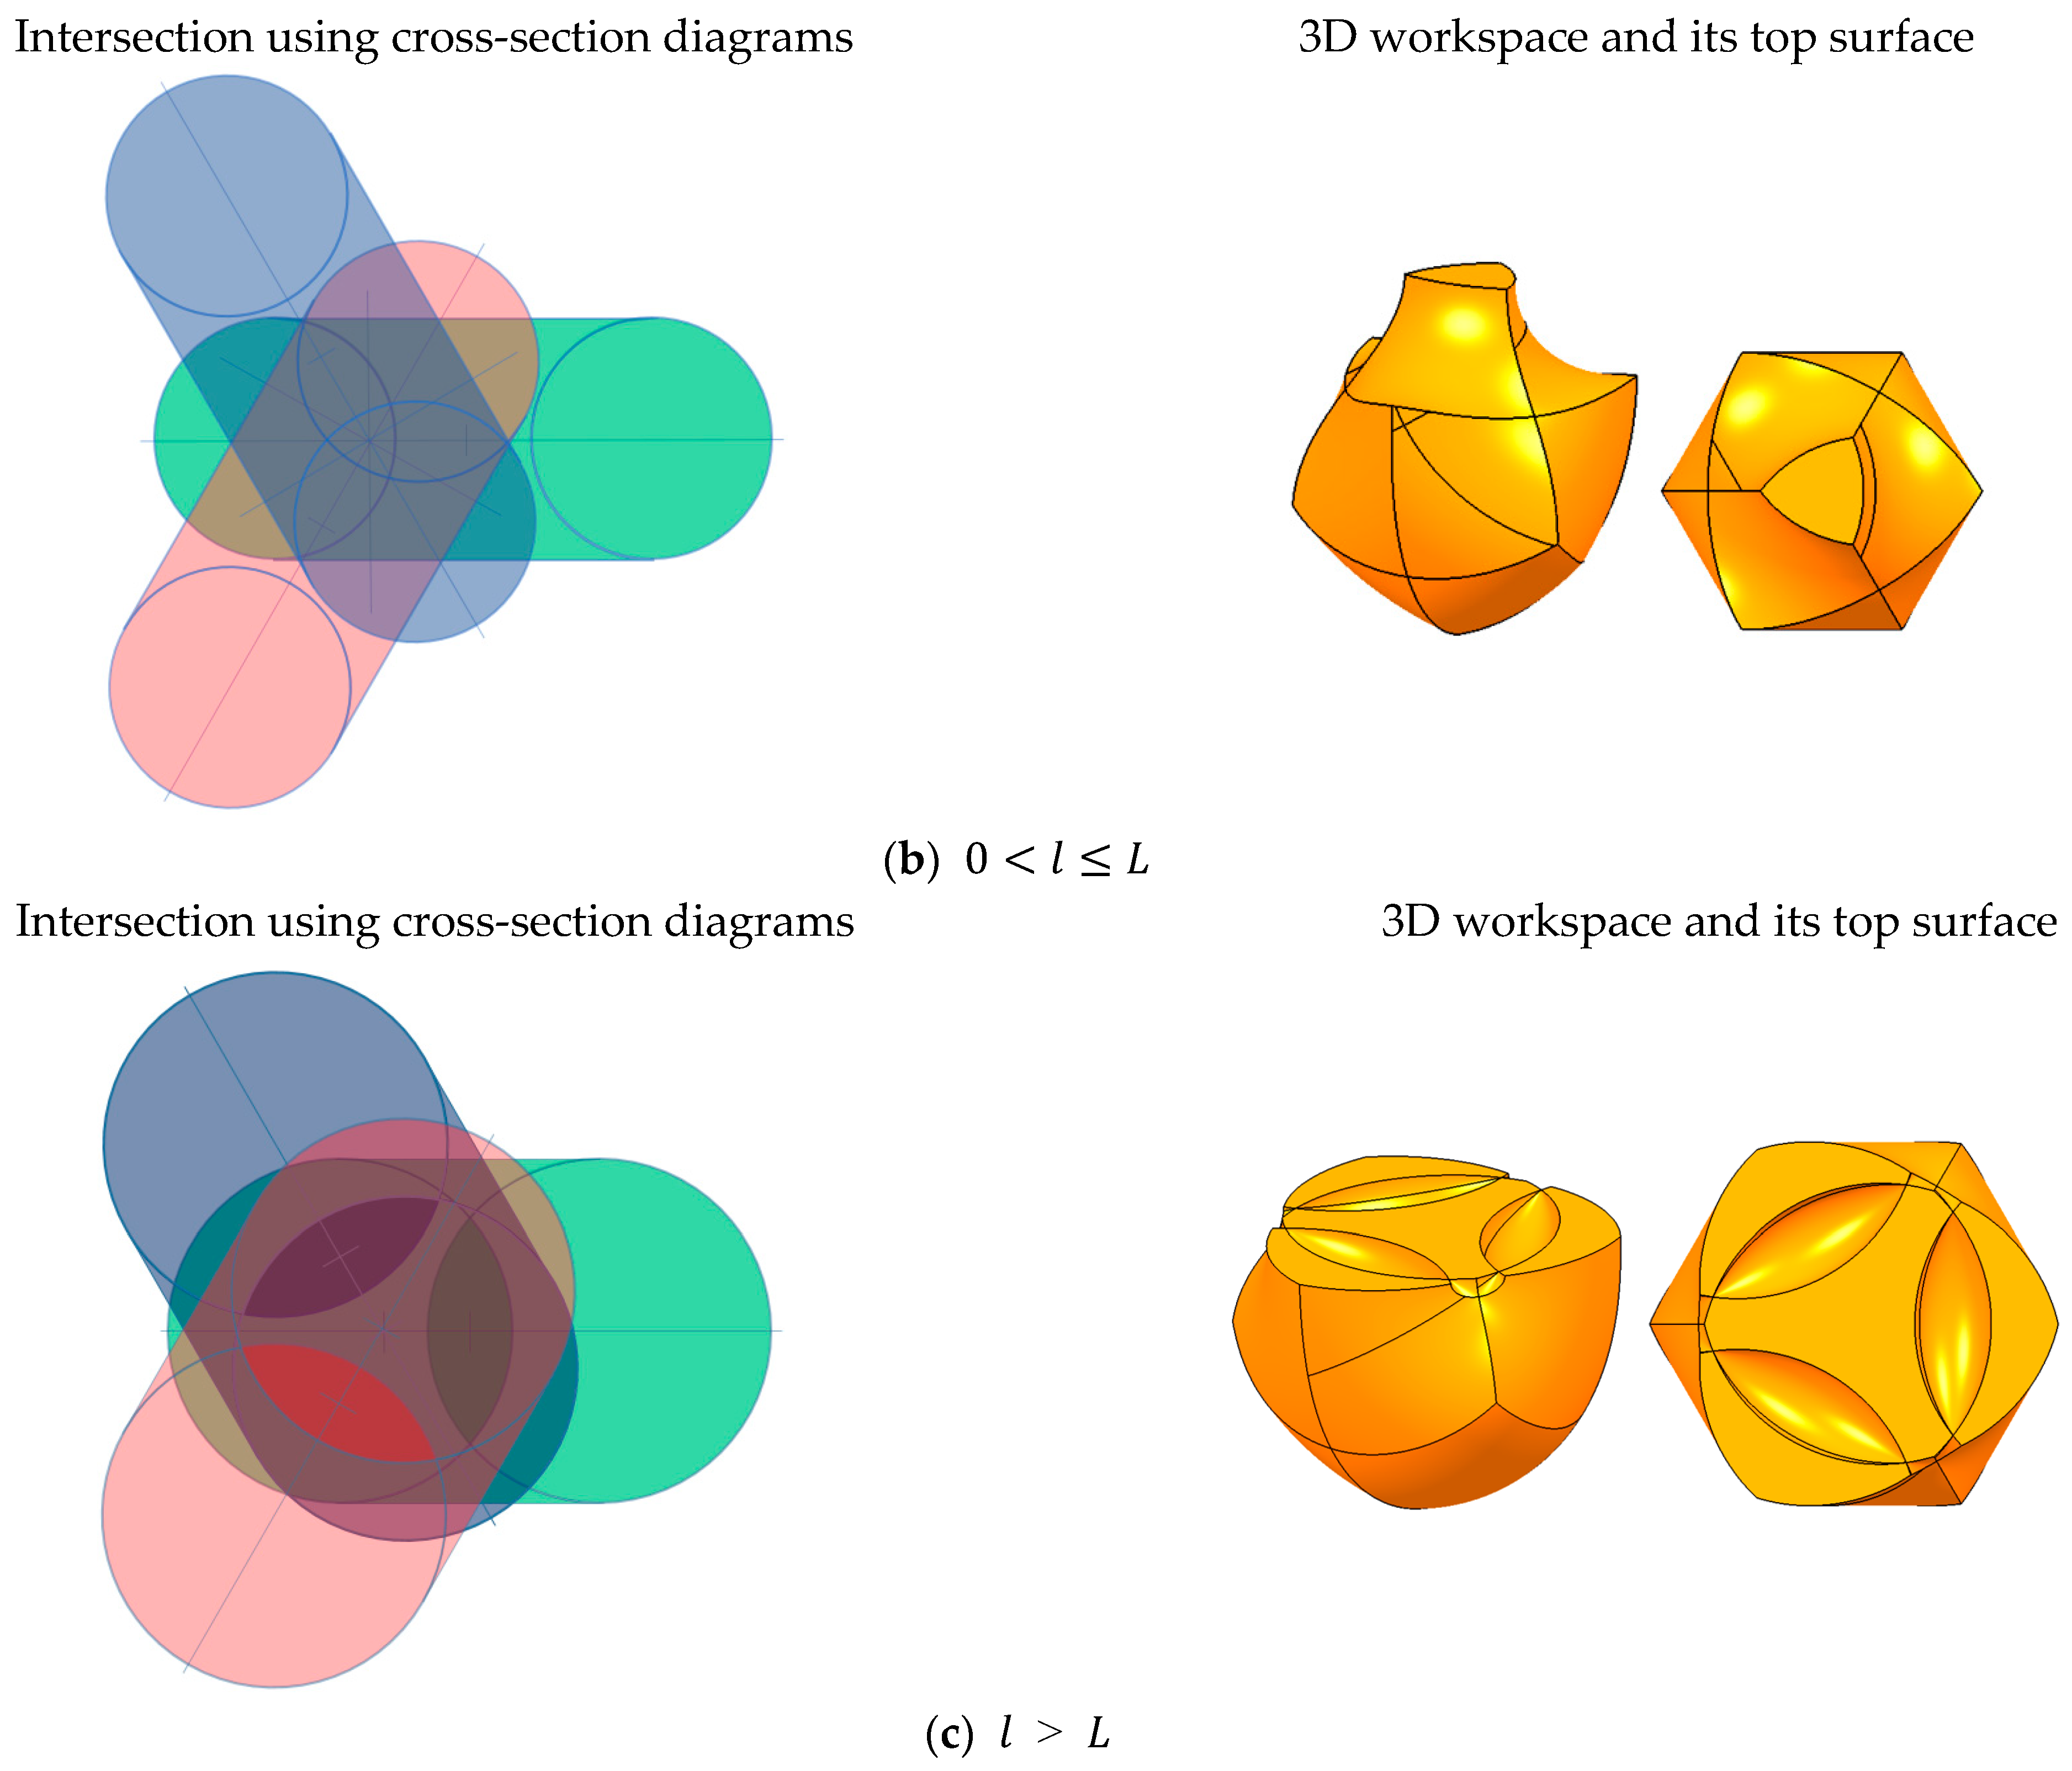
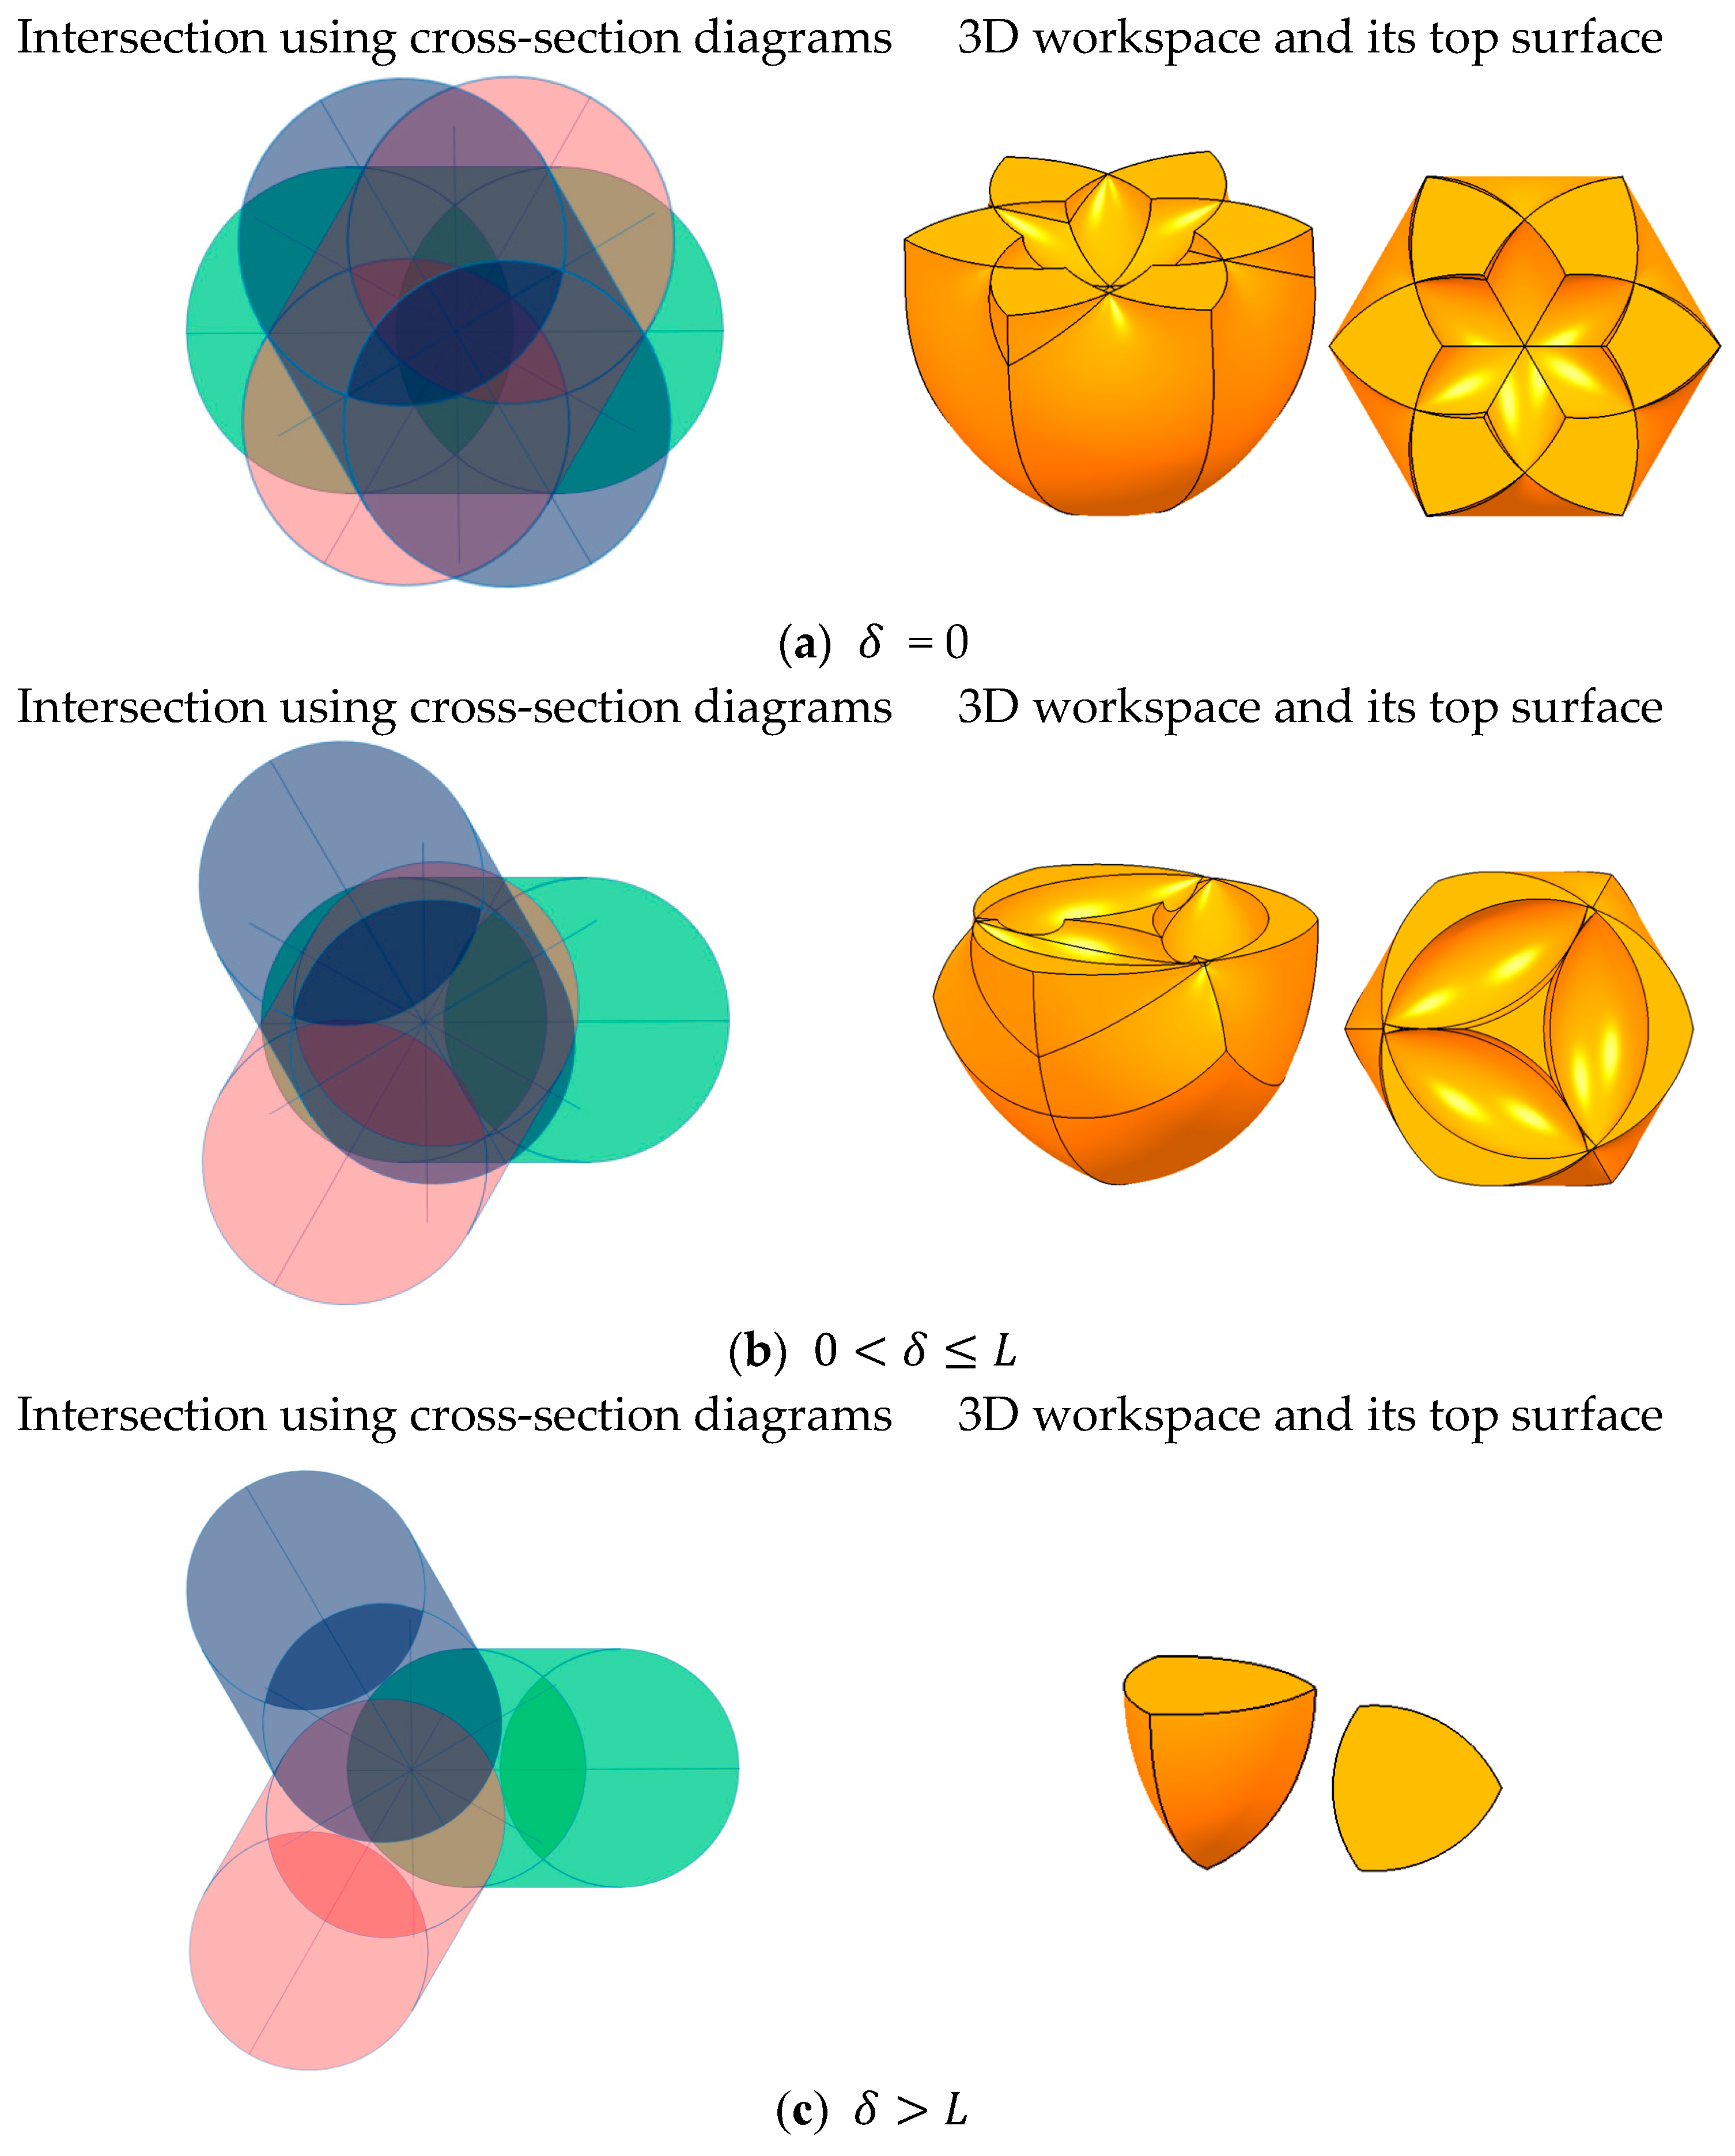
If
, the cross-section diagram becomes spindle type, as shown in
Figure 15b. The colored cross-section diagram for each torus is on the left of
Figure 16b, whose inside is full. It is because nonzero
makes a multi-spherical motion of the end-effector and composes a full inside spindle torus. Note that most subsequent cross-section diagrams are full inside. Intersecting the three cross-section diagrams on the left of
Figure 16b, the triple-overlapped area has a triangular outline with three hollowed corners that overlap the hollows of the spindle tori. Similarly, the workspace on the right of
Figure 16b is trilateral on the side and has three hollowed corners on the top. If
increases while
, the volume of the spindle torus increases, leading to a rise in the major radius, so that the volume of the workspace increases accordingly.
If
, the cross-section diagram becomes ring type, as shown in
Figure 15c. The colored cross-section diagram for each torus is on the left of
Figure 16c. Intersecting the three cross-section diagrams on the left of
Figure 16c, the triple-overlapped area has a hexagonal outline, with a convex triangle internally. Similarly, the workspace on the right of
Figure 16c is hexalateral on the side and bulging triangular on the top. Even if
increases while
, the overlapped volume of the ring tori seldom increases because the overlapped areas mostly occur in the ring region of the torus. This is easily checked from the left of
Figure 16c because the overlapped ring region does not change even with the rise of
.
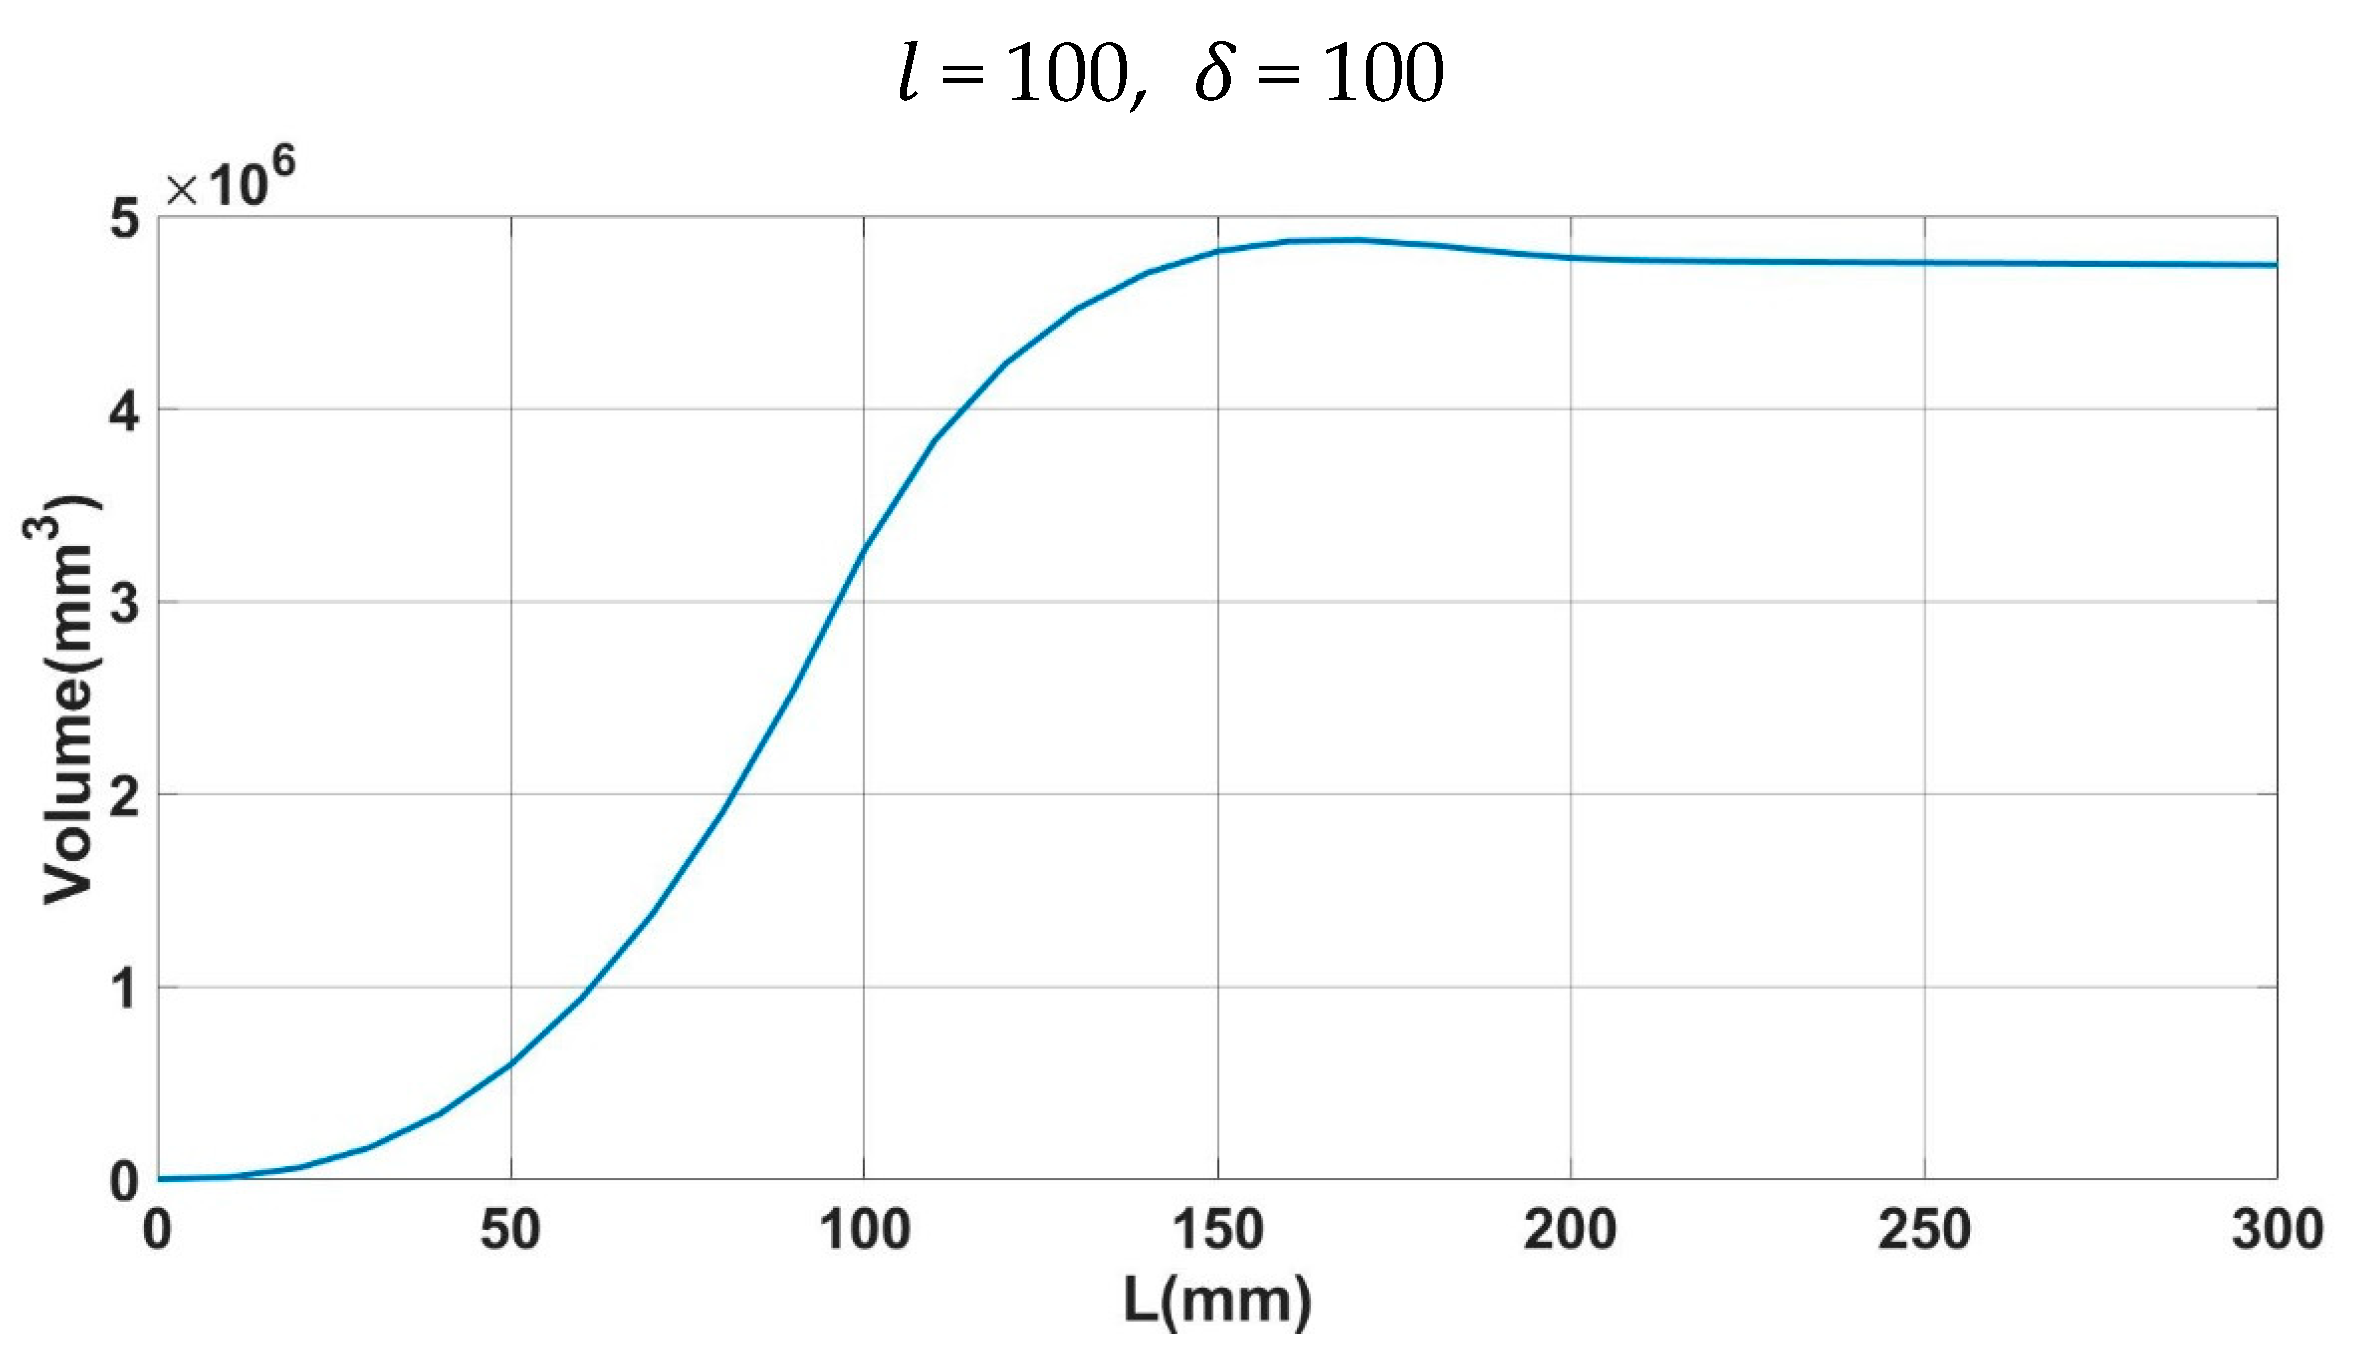
The results of workspace volume for
variations are shown in
Figure 17, which is obtained from the geometry operation of 3D CAD software. If
is less than
, the torus is spindle type, and the workspace rapidly expands as the overlapping region of the circles shifts from the outer edges towards the center as
increases, which is very similar to the estimation of the cross-section diagram in statement (b). When
,
, and
become equal, the workspace overlaps in the central region of the circles. When
is greater than
, the torus takes on a ring shape, and since the overlapping region gradually decreases as it passes through the center of the circles, the rate of increase in the workspace volume diminishes. After
becomes larger than
, the workspace volume saturates, which is also very similar to the estimation of the cross-section diagram in statement (c). The volume saturates because the expanding ring of the torus with increasing major radius
is constrained by the consistent overlap of the torus with minor radius
. Therefore, the workspace volume of 3D CAD is similar to that of the cross-section diagram in the entire range of the
variation.
The 3D workspace analysis results are similar to the results from the cross-section diagram from both analyses for the size and volume of the workspace.
4.2. l Is Changing with Fixed L and δ
In this case,
changes from zero to a certain value, while
and
are fixed values. Because the type of the torus is determined to be ring or spindle by whether
is greater than or smaller than
,
is divided into two sections:
and
. If
, the torus is a simple line; if
increases and
is less than
, the torus becomes ring type; and if
is more than
, it becomes spindle type, as shown in
Figure 18. The testing values of
and
are selected as
= 150 and
= 100, respectively.
If
, the cross-section diagram becomes a simple line with radius
, as shown in
Figure 18a, because
makes a linear motion of the end-effector from the top view. The colored cross-section diagram for each line is on the left of
Figure 18a. Intersecting the three cross-section diagrams on the left of
Figure 19a, the triple-overlapped area is one point because three lines intersect at a point. Similarly, the workspace on the right of
Figure 19a is also a point.
If
, the cross-section diagram becomes ring type, as shown in
Figure 18b. The colored cross-section diagram for each torus is on the left of
Figure 19b. Intersecting the three cross-section diagrams on the left of
Figure 18b, the triple-overlapped area has a hexagonal outline, with a convex triangle internally. Similarly, the workspace on the right of
Figure 19b is hexalateral on the side and bulging triangular on the top. Even if
increases while
, the overlapped volume of the ring tori seldom increases because the overlapped areas mostly occur in the ring region of the torus, as referred to previously in
Section 4.1 Figure 15c.
If
the cross-section diagram becomes spindle type, as shown in
Figure 18c. The colored cross-section diagram for each torus is on the left of
Figure 18c. Intersecting the three cross-section diagrams on the left of
Figure 19c, the triple-overlapped area has a hexagonal outline with three hollowed lens shapes that overlap the hollows of the spindle tori. Similarly, the workspace on the right of
Figure 19c is hexalateral on the side and three hollowed lens-shaped on the top. If
increases while
, the volume of the torus increases, leading to a rise in the major radius, and the volume of the workspace increases accordingly, as referred to in
Section 4.1 Figure 15b.
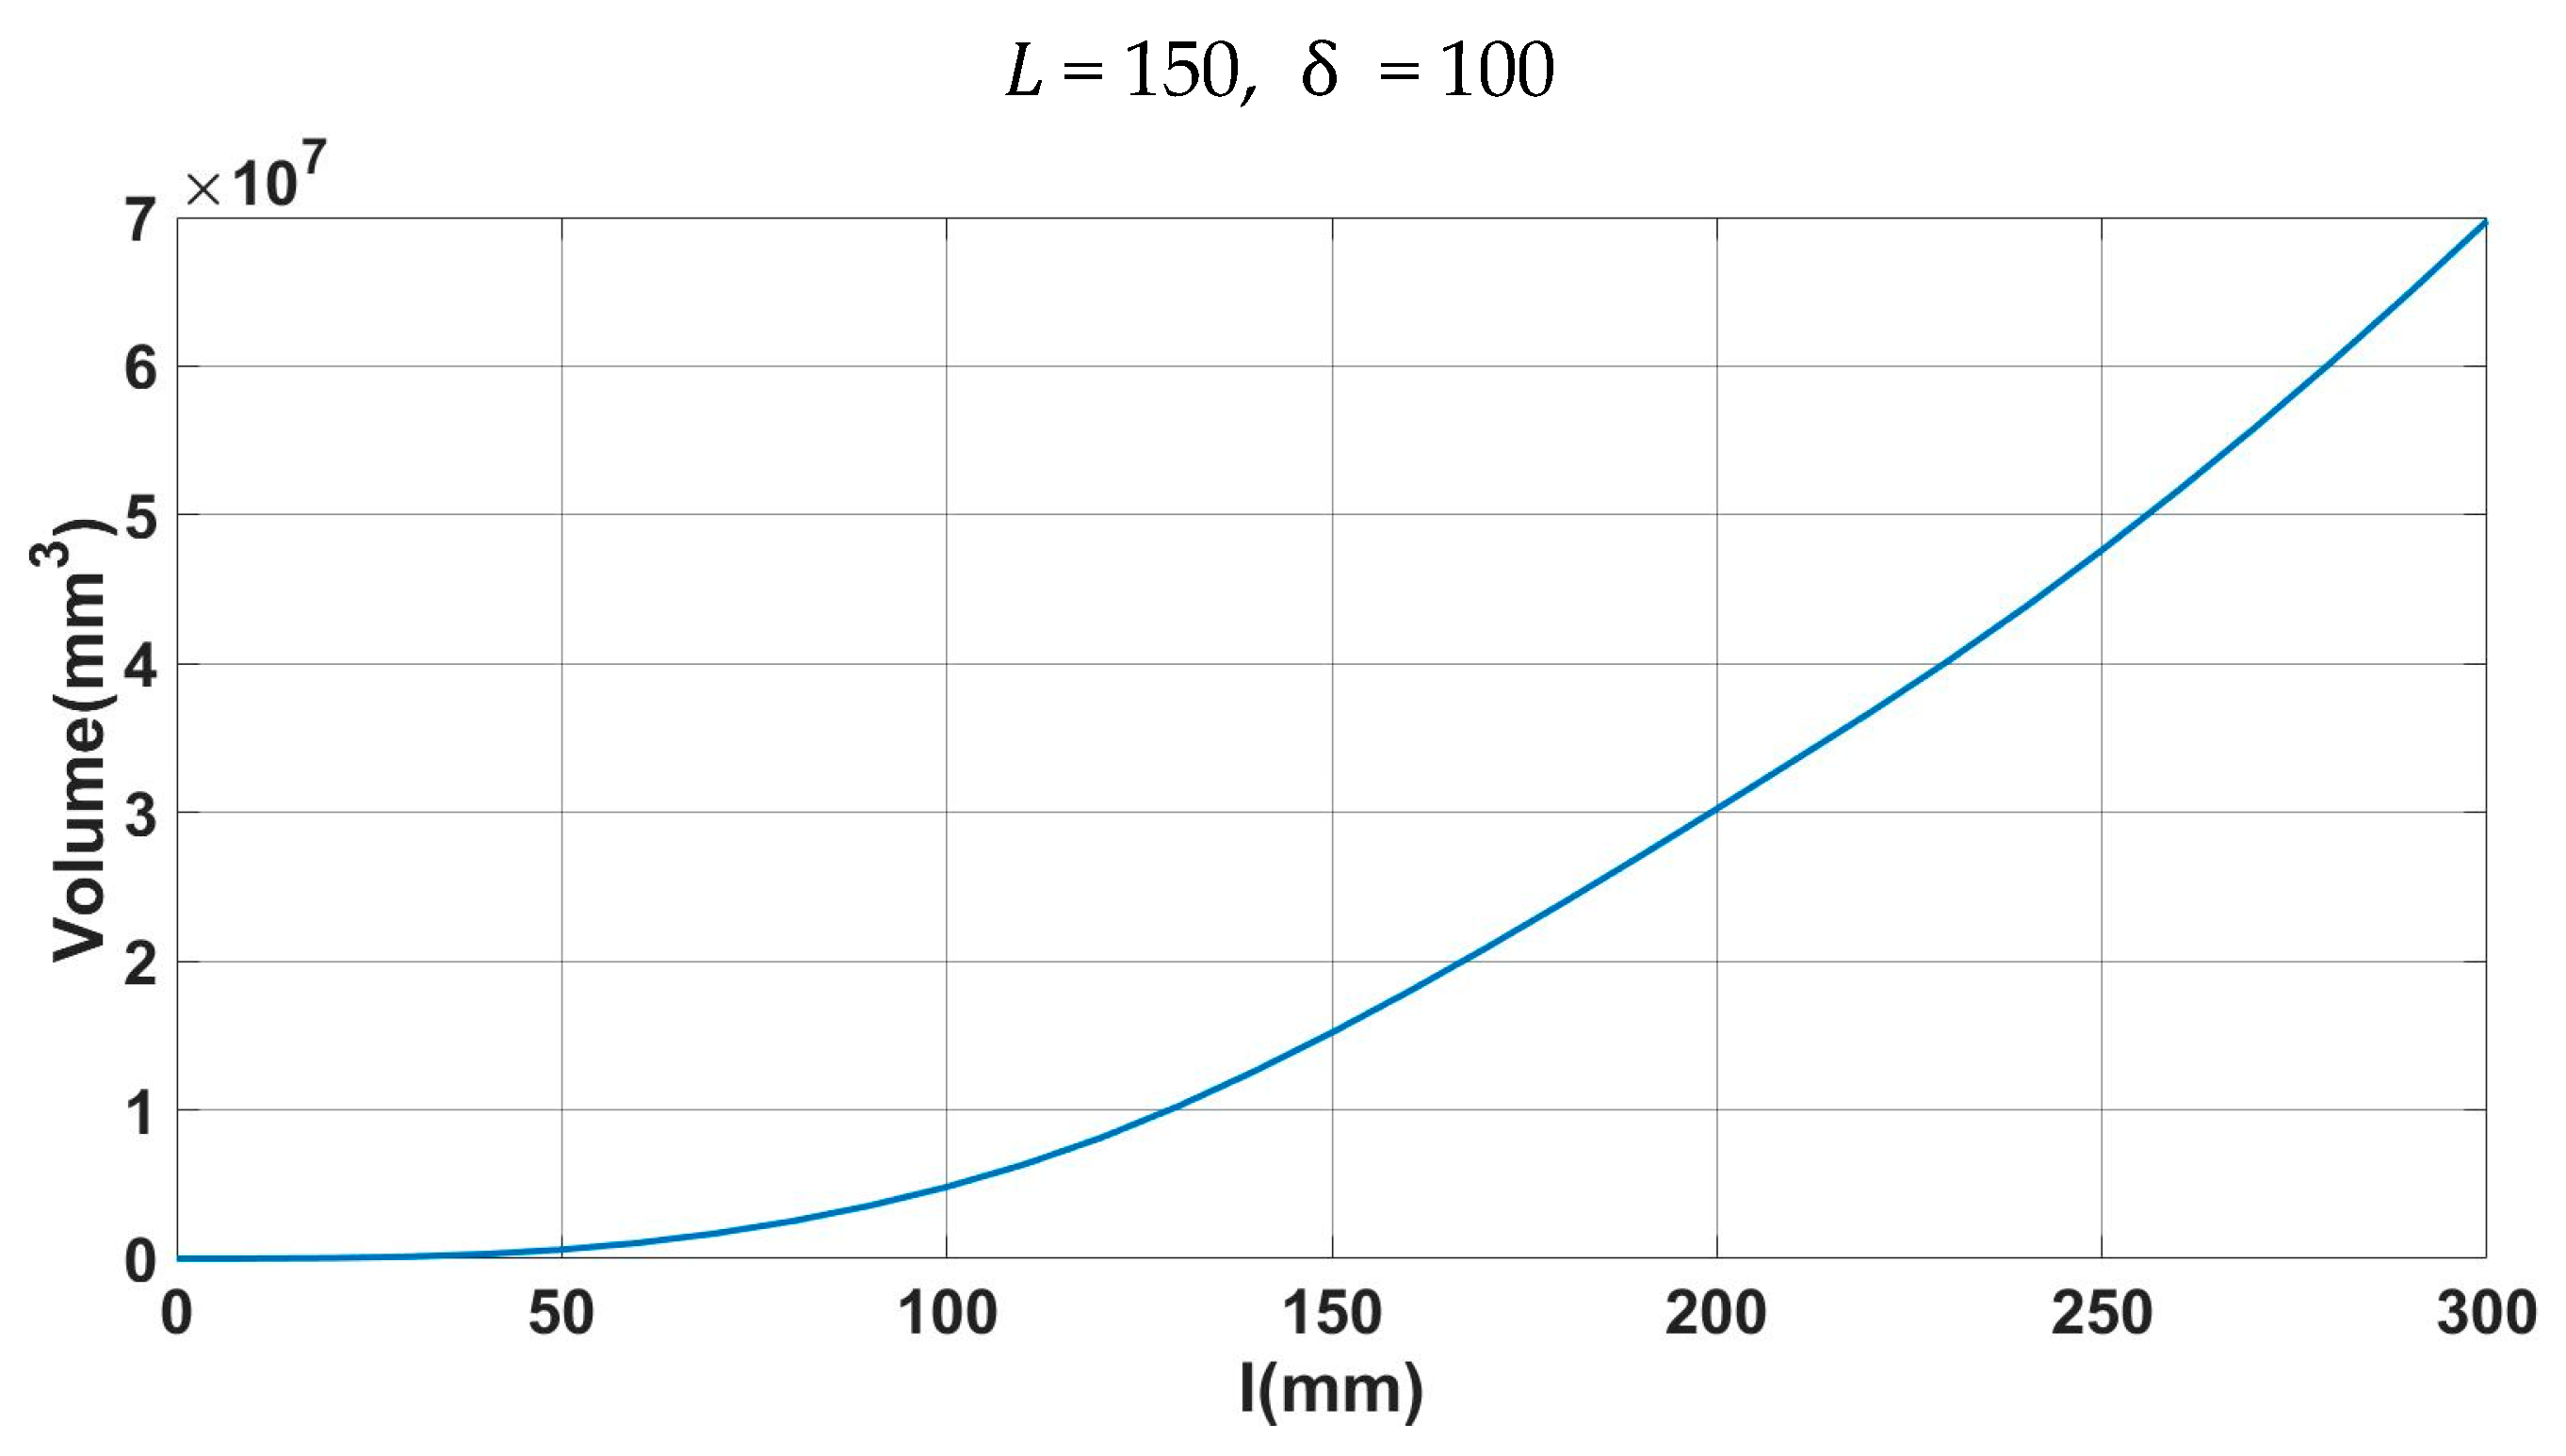
The results of workspace volume for
variation are shown in
Figure 20, which is obtained from the geometry operation of 3D CAD software. If
is less than
, the torus is ring type, and the workspace volume increases as
increases, which is very similar to the estimation of the cross-section diagram in statement
Figure 15b. If
is more than
, the torus is spindle type, and the workspace volume increases as
increases, which is also very similar to the estimation of the cross-section diagram in statement
Figure 15c. Therefore, the workspace volume of 3D CAD is similar to that of the cross-section diagram in the entire range of the
variation.
The 3D workspace analysis results are similar to the cross-section diagram results from both analyses for the workspace’s size and volume.
As seen from
Figure 20, the workspace volume increases, leading to a rise in
below and around
because, in this range, the torus is spindle type and the rise in
increases the volume. If
is more than
, as written in statement (c), the workspace volume increases, leading to a rise in
because the torus is spindle type, and the rise in
increases the volume. This result of workspace volume from the 3D analysis is very similar to the result of the estimation from the cross-section diagram.
The results of size and volume from the 3D workspace analysis are similar to the results from the cross-section diagram.
4.3. δ Is Changing with Fixed L and l
4.3.1. Case of
In this case,
changes from zero to a certain value, while
and
are fixed values satisfying
<
. The type of the torus is always spindle because
<
. Because the top shape of the intersection between the three tori is determined to be non-triangular or triangular by whether
is greater than or smaller than
,
is divided into two sections:
and
. If
increases, the torus is shifted out to the right of the centerline, and the intersectable space decreases because the three tori exist far in the left region of the centerline in
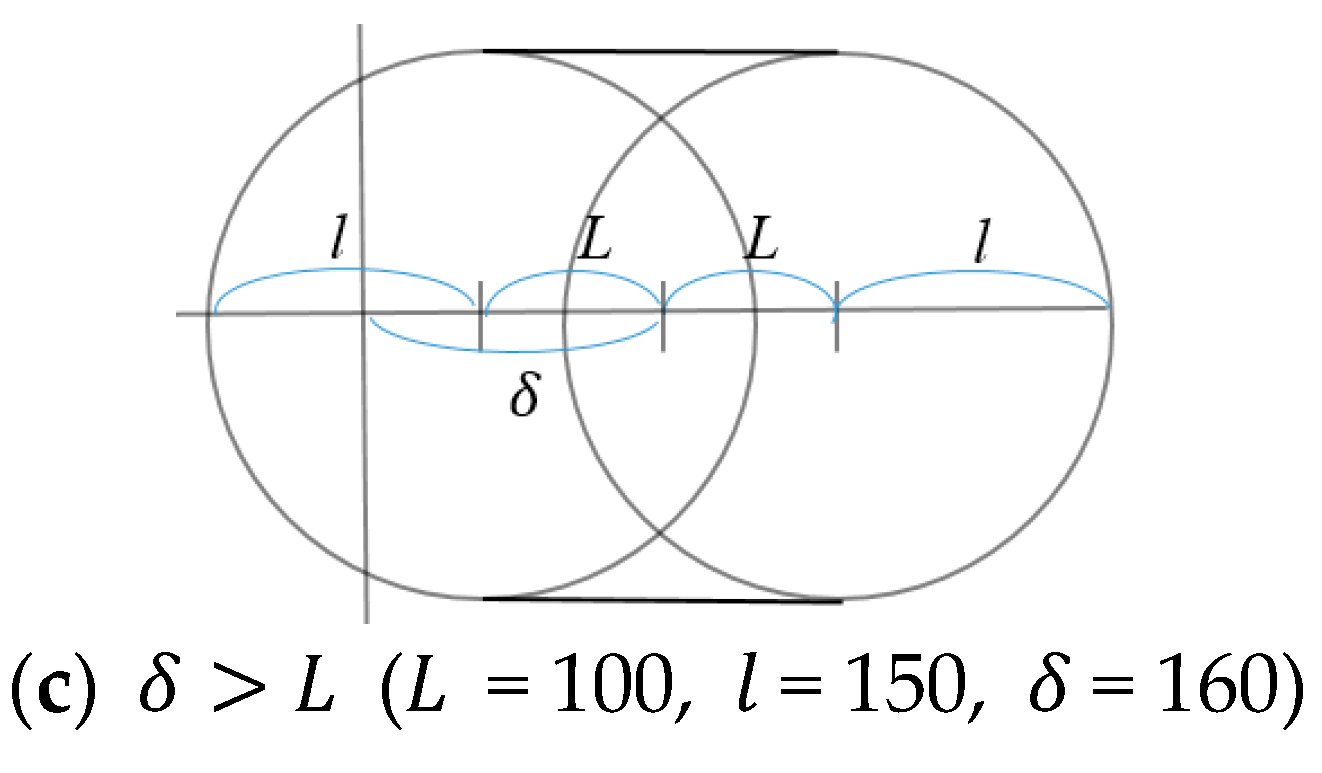
Figure 21. The testing values of
and
are selected as
= 100 and
= 150, respectively.
If
, the cross-section diagram becomes spindle type, as shown in
Figure 21a. The colored cross-section diagram for each torus is shown on the left of
Figure 22a. Intersecting the three cross-section diagrams on the left of
Figure 22a, the triple-overlapped area has a six-petal outline, with a six-petal hollow internally that overlaps the hollows of the spindle tori. Similarly, the workspace on the right of
Figure 22a is six-petaled hexalateral on the side and six-petal hollowed on the top.
If
, the cross-section diagram becomes spindle type, as shown in
Figure 21b. The colored cross-section diagram for each torus is shown on the left of
Figure 22b. Intersecting the three cross-section diagrams on the left of
Figure 22b, the triple-overlapped area has a hexagonal outline with three hollowed lens shapes that overlap the hollows of the spindle tori. Similarly, the workspace on the right of
Figure 22b is hexalateral on the side and three hollowed lens-shaped on the top. If
increases while
, the intersectable space decreases because the three tori exist far from the centerline of the cross-section diagram, and the volume of the workspace decreases accordingly.
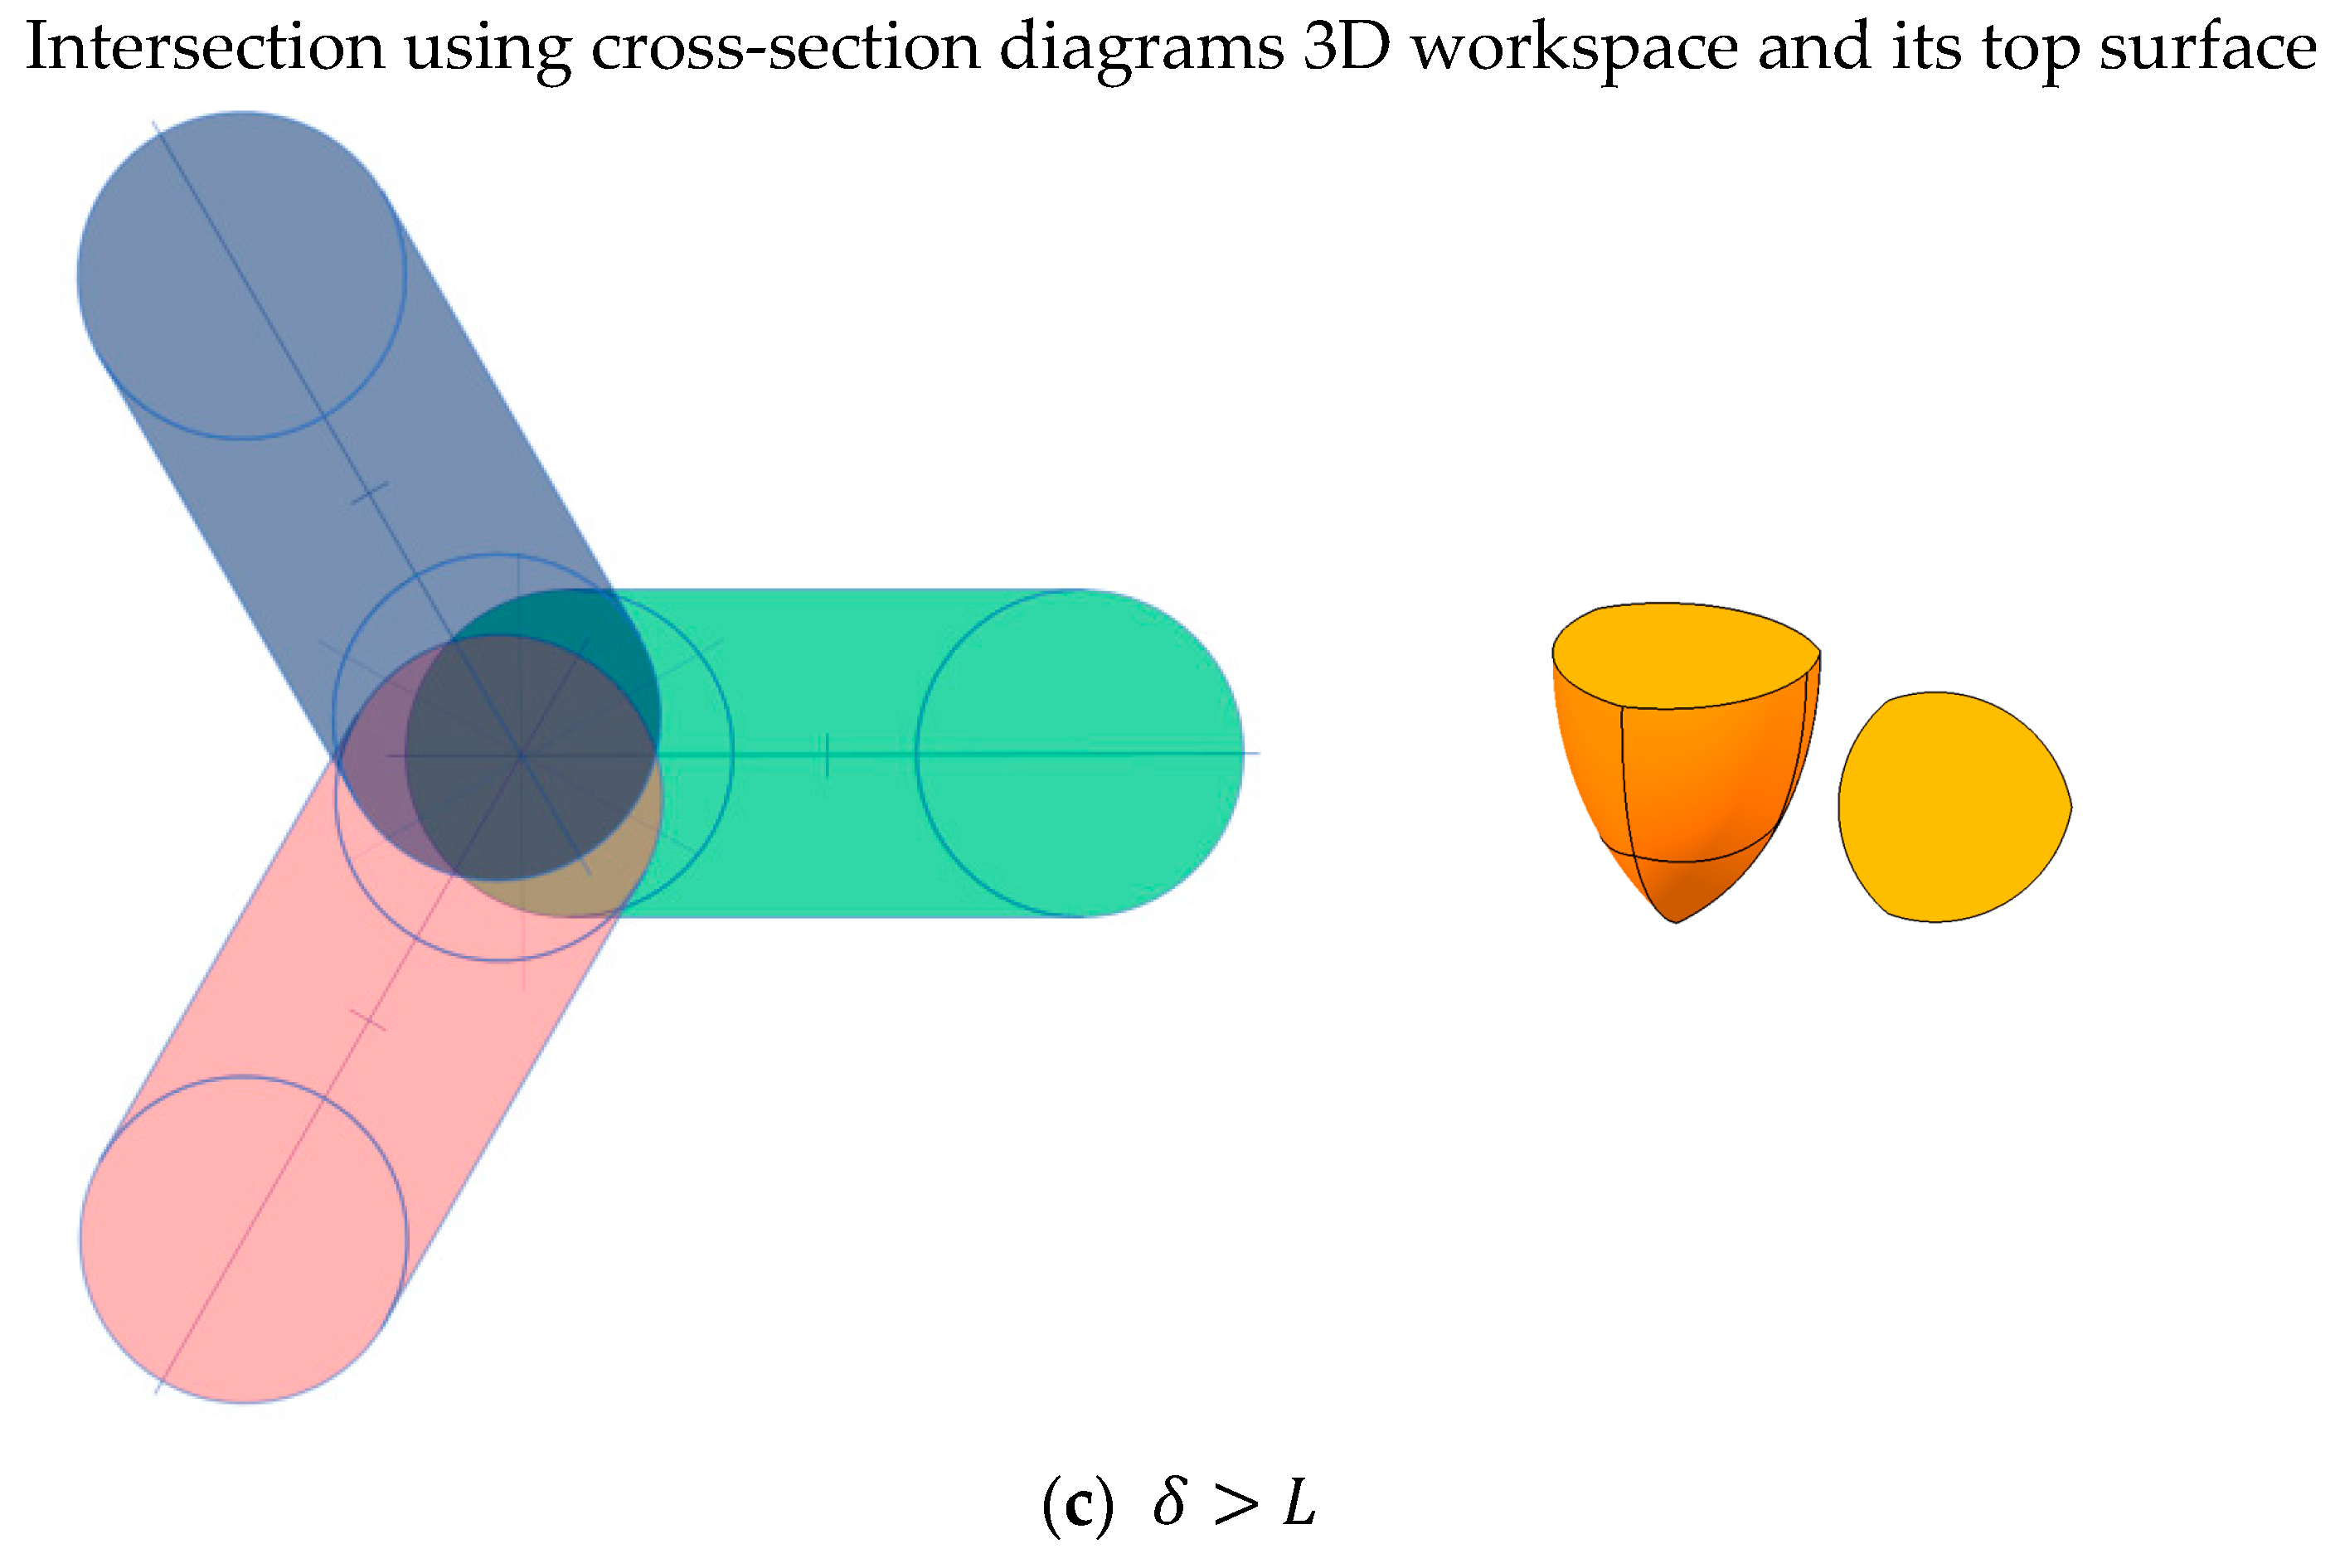
If
, the cross-section diagram becomes spindle type, as shown in
Figure 21c. The colored cross-section diagram for each torus is on the left of
Figure 22c. Intersecting the three cross-section diagrams on the left of
Figure 22c, the triple-overlapped area has a triangular outline. Similarly, the shape of the workspace is trilateral on the side, as shown on the left of
Figure 22c. If
increases while
, the intersectable space decreases because the three tori exist far from the centerline of the cross-section diagram, and the volume of the workspace decreases accordingly; if
is larger than
, the distance between the three tori is so large that there is no intersectable workspace and the volume is zero.
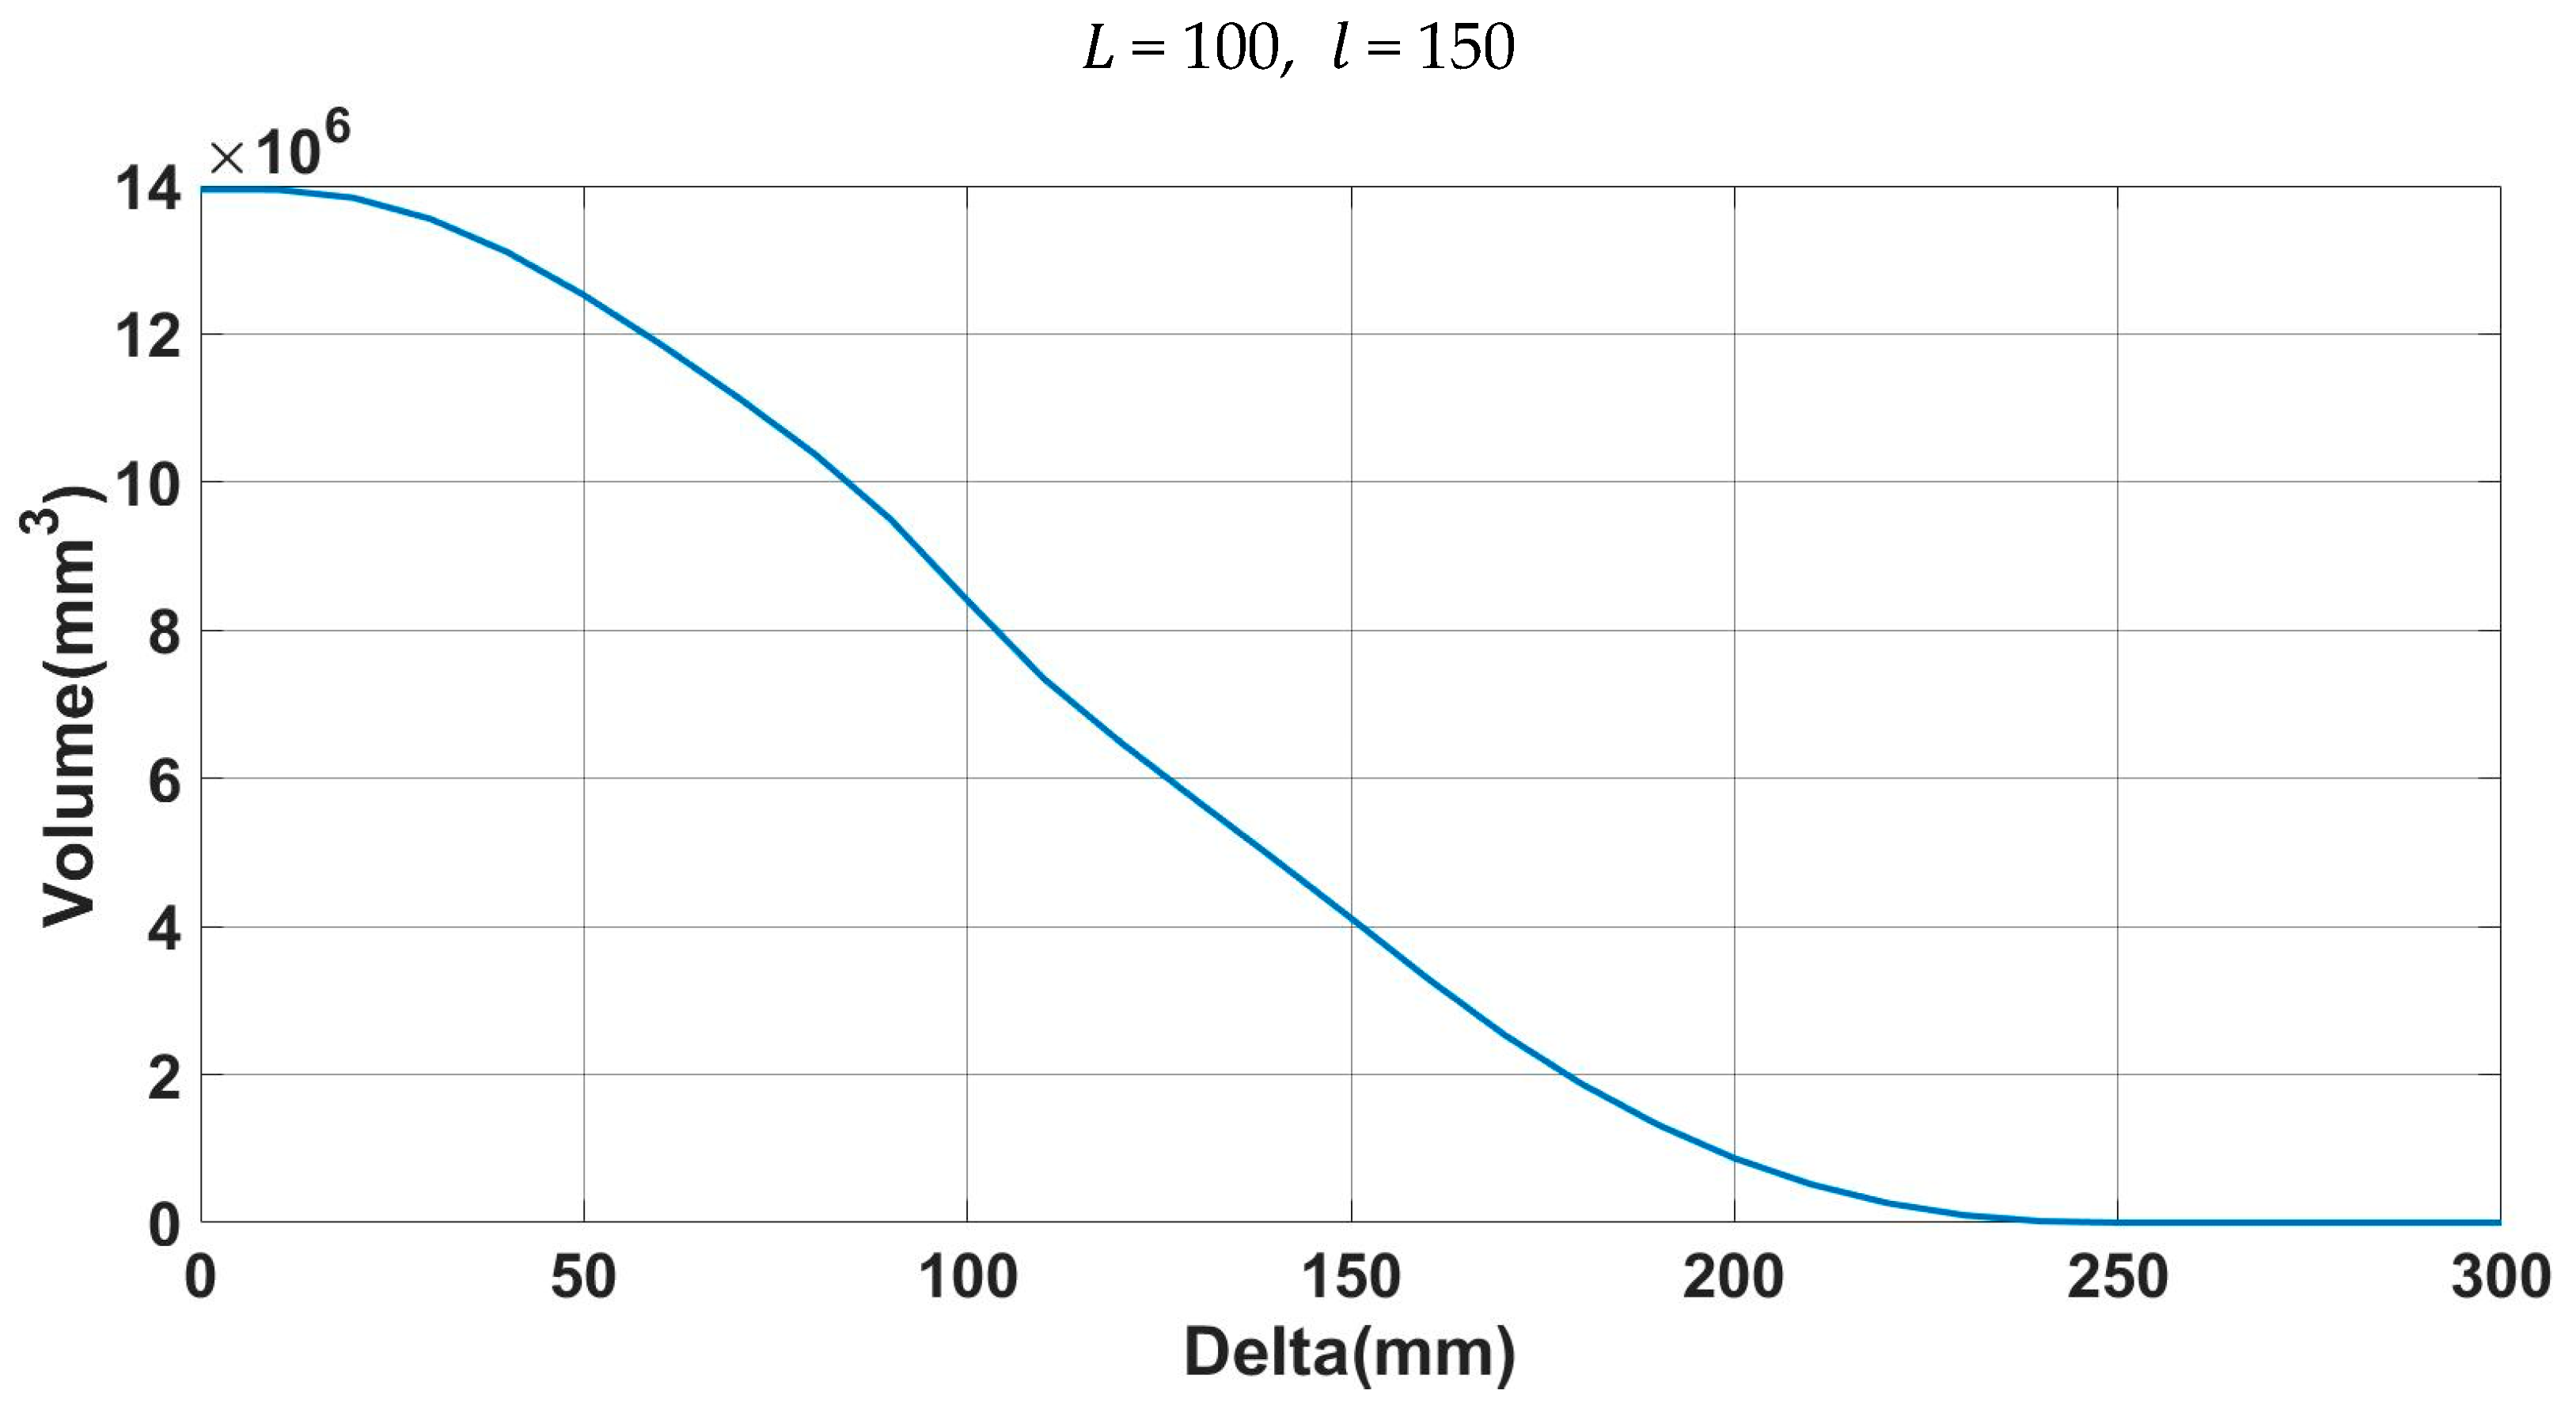
The results of workspace volume for
variations are shown in
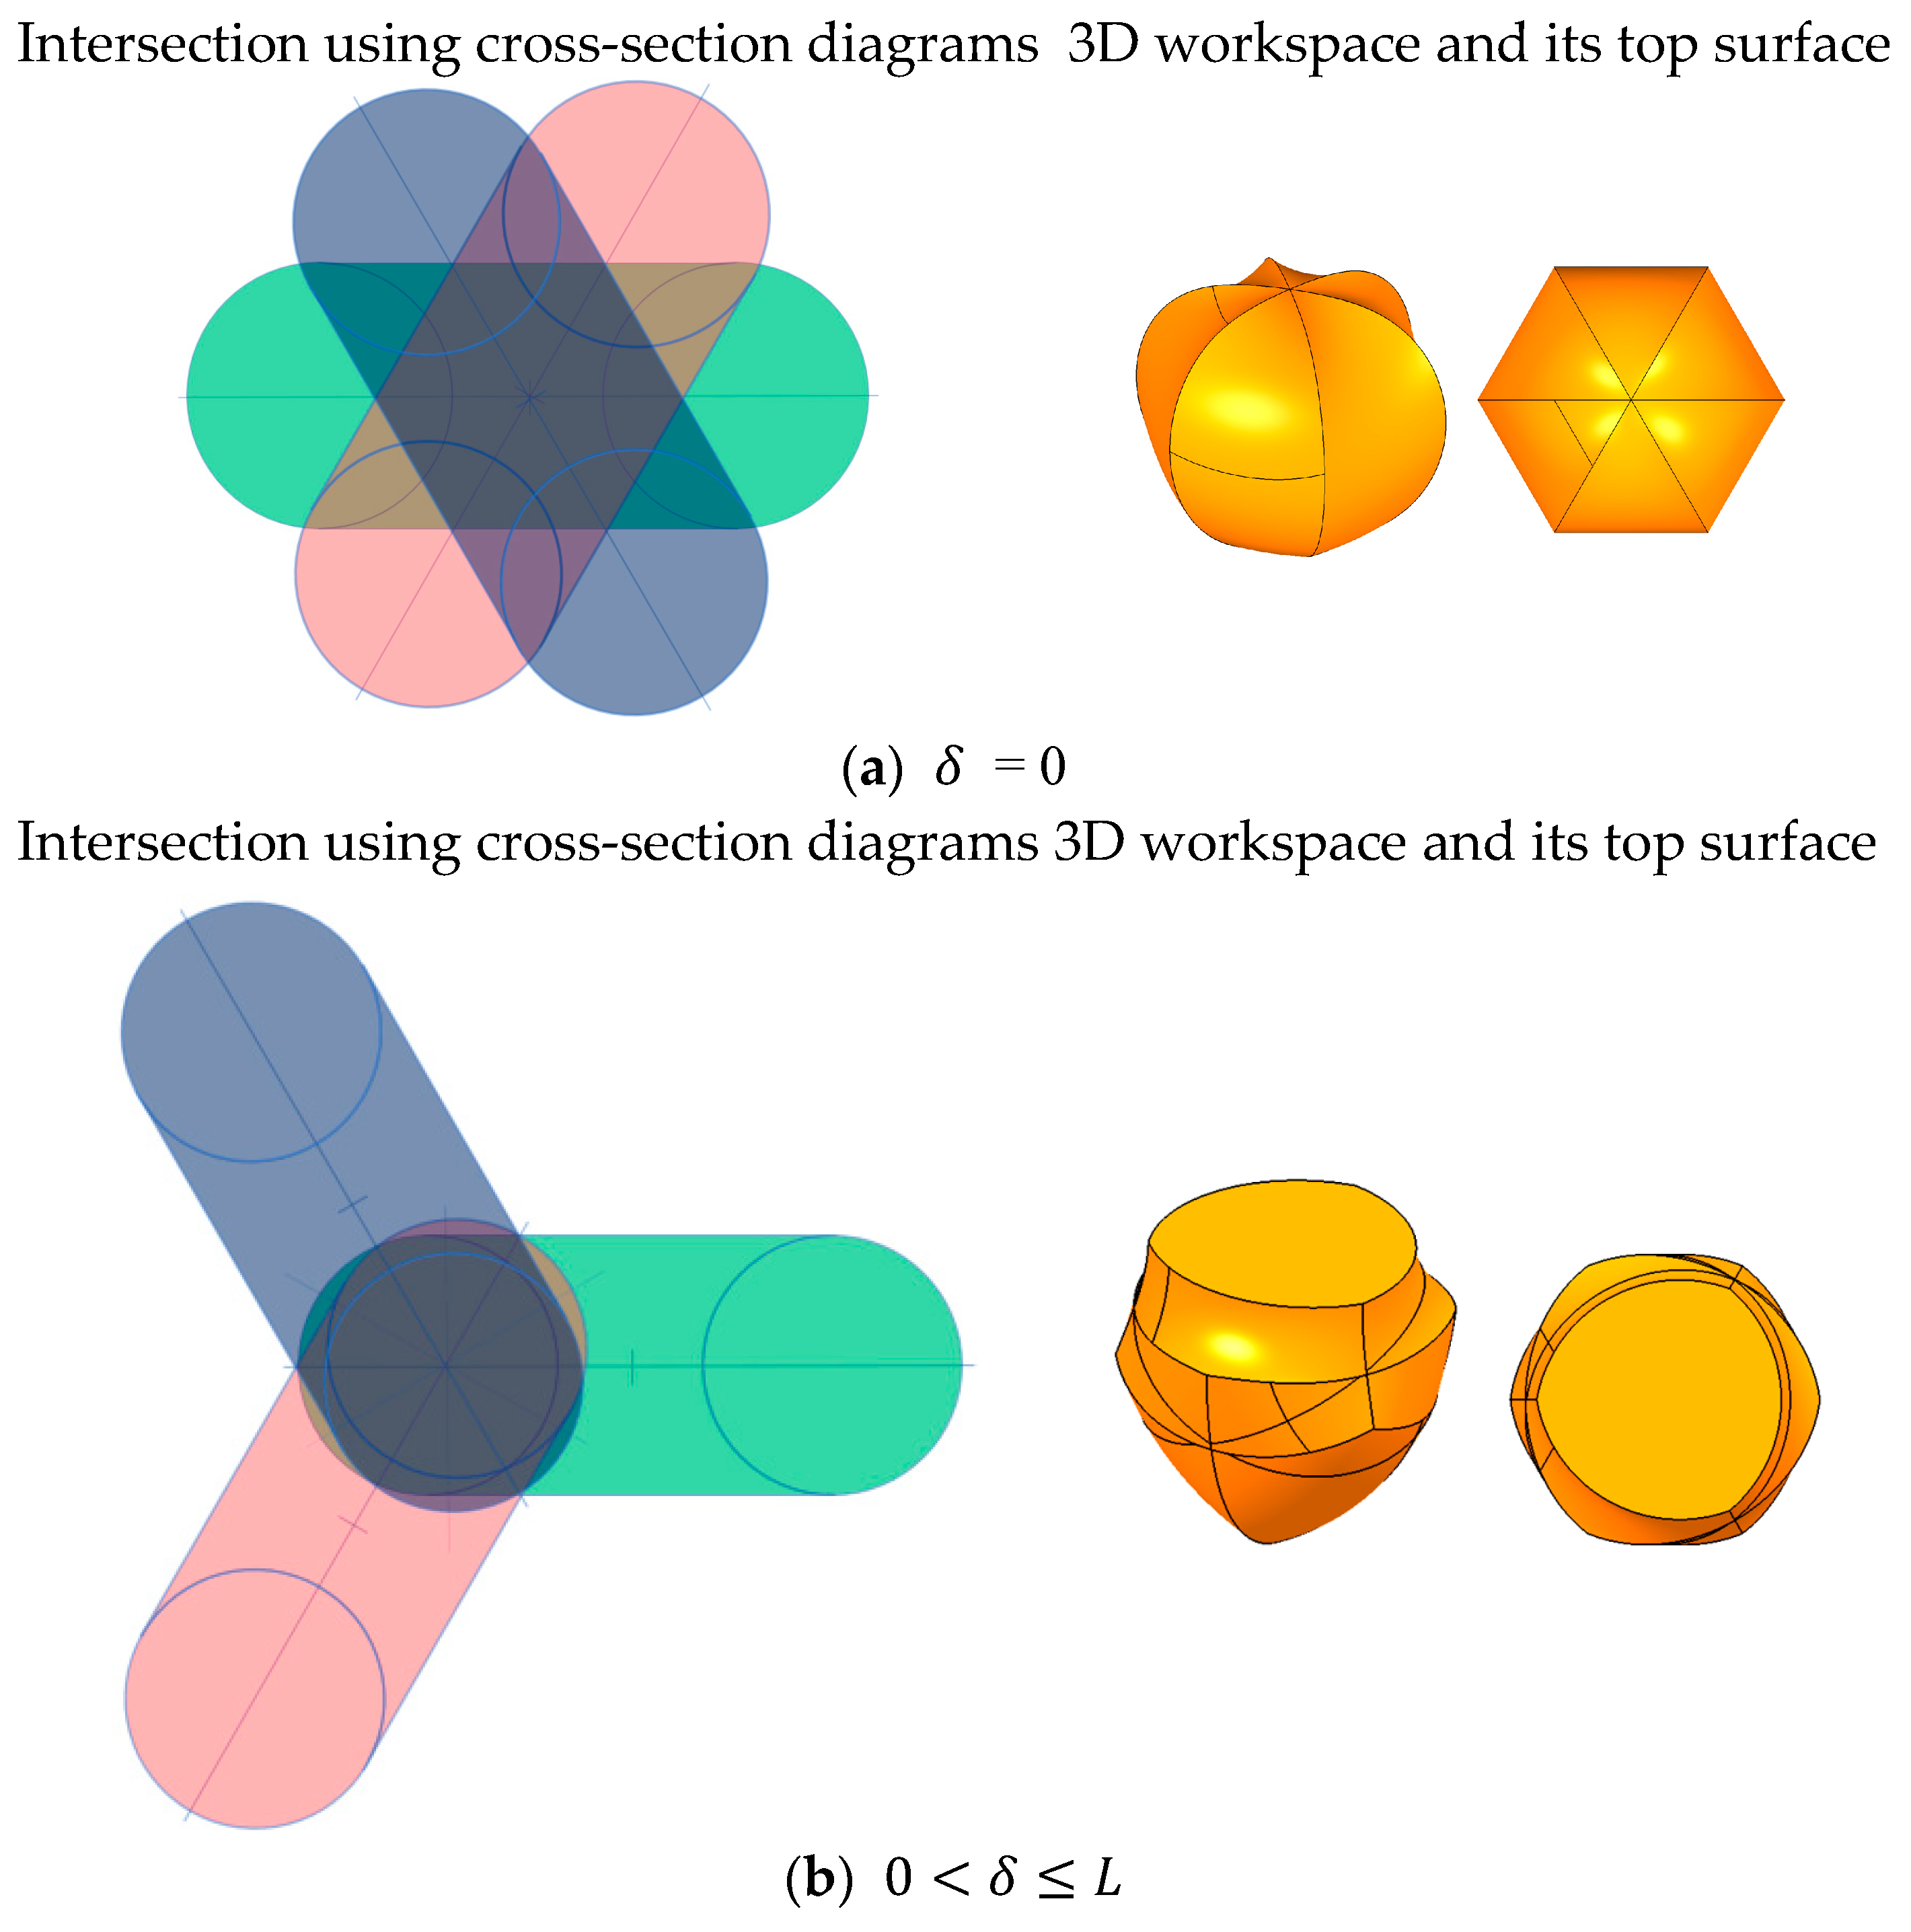
Figure 23, which is obtained from the geometry operation of 3D CAD software. If
is less than
, the workspace volume decreases as
increases in
Figure 23, which is very similar to the estimation of the cross-section diagram in statement (b). If
is more than
, the workspace volume decreases and becomes zero after
is larger than
, which is very similar to the estimation of the cross-section diagram in statement (c). The workspace volume of 3D CAD is similar to that of the cross-section diagram in the entire range of the
variation.
The 3D workspace analysis results are similar to the results from the cross-section diagram from both analyses for the size and volume of the workspace.
4.3.2. Case of
In this case,
changes from zero to a certain value, while
and
are fixed values satisfying
>
. The type of the torus is always ring because
<
. Because the top shape of the intersection between the three tori is determined to be non-triangular or triangular by whether
is greater than or smaller than
,
is largely divided into two sections:
and
. If
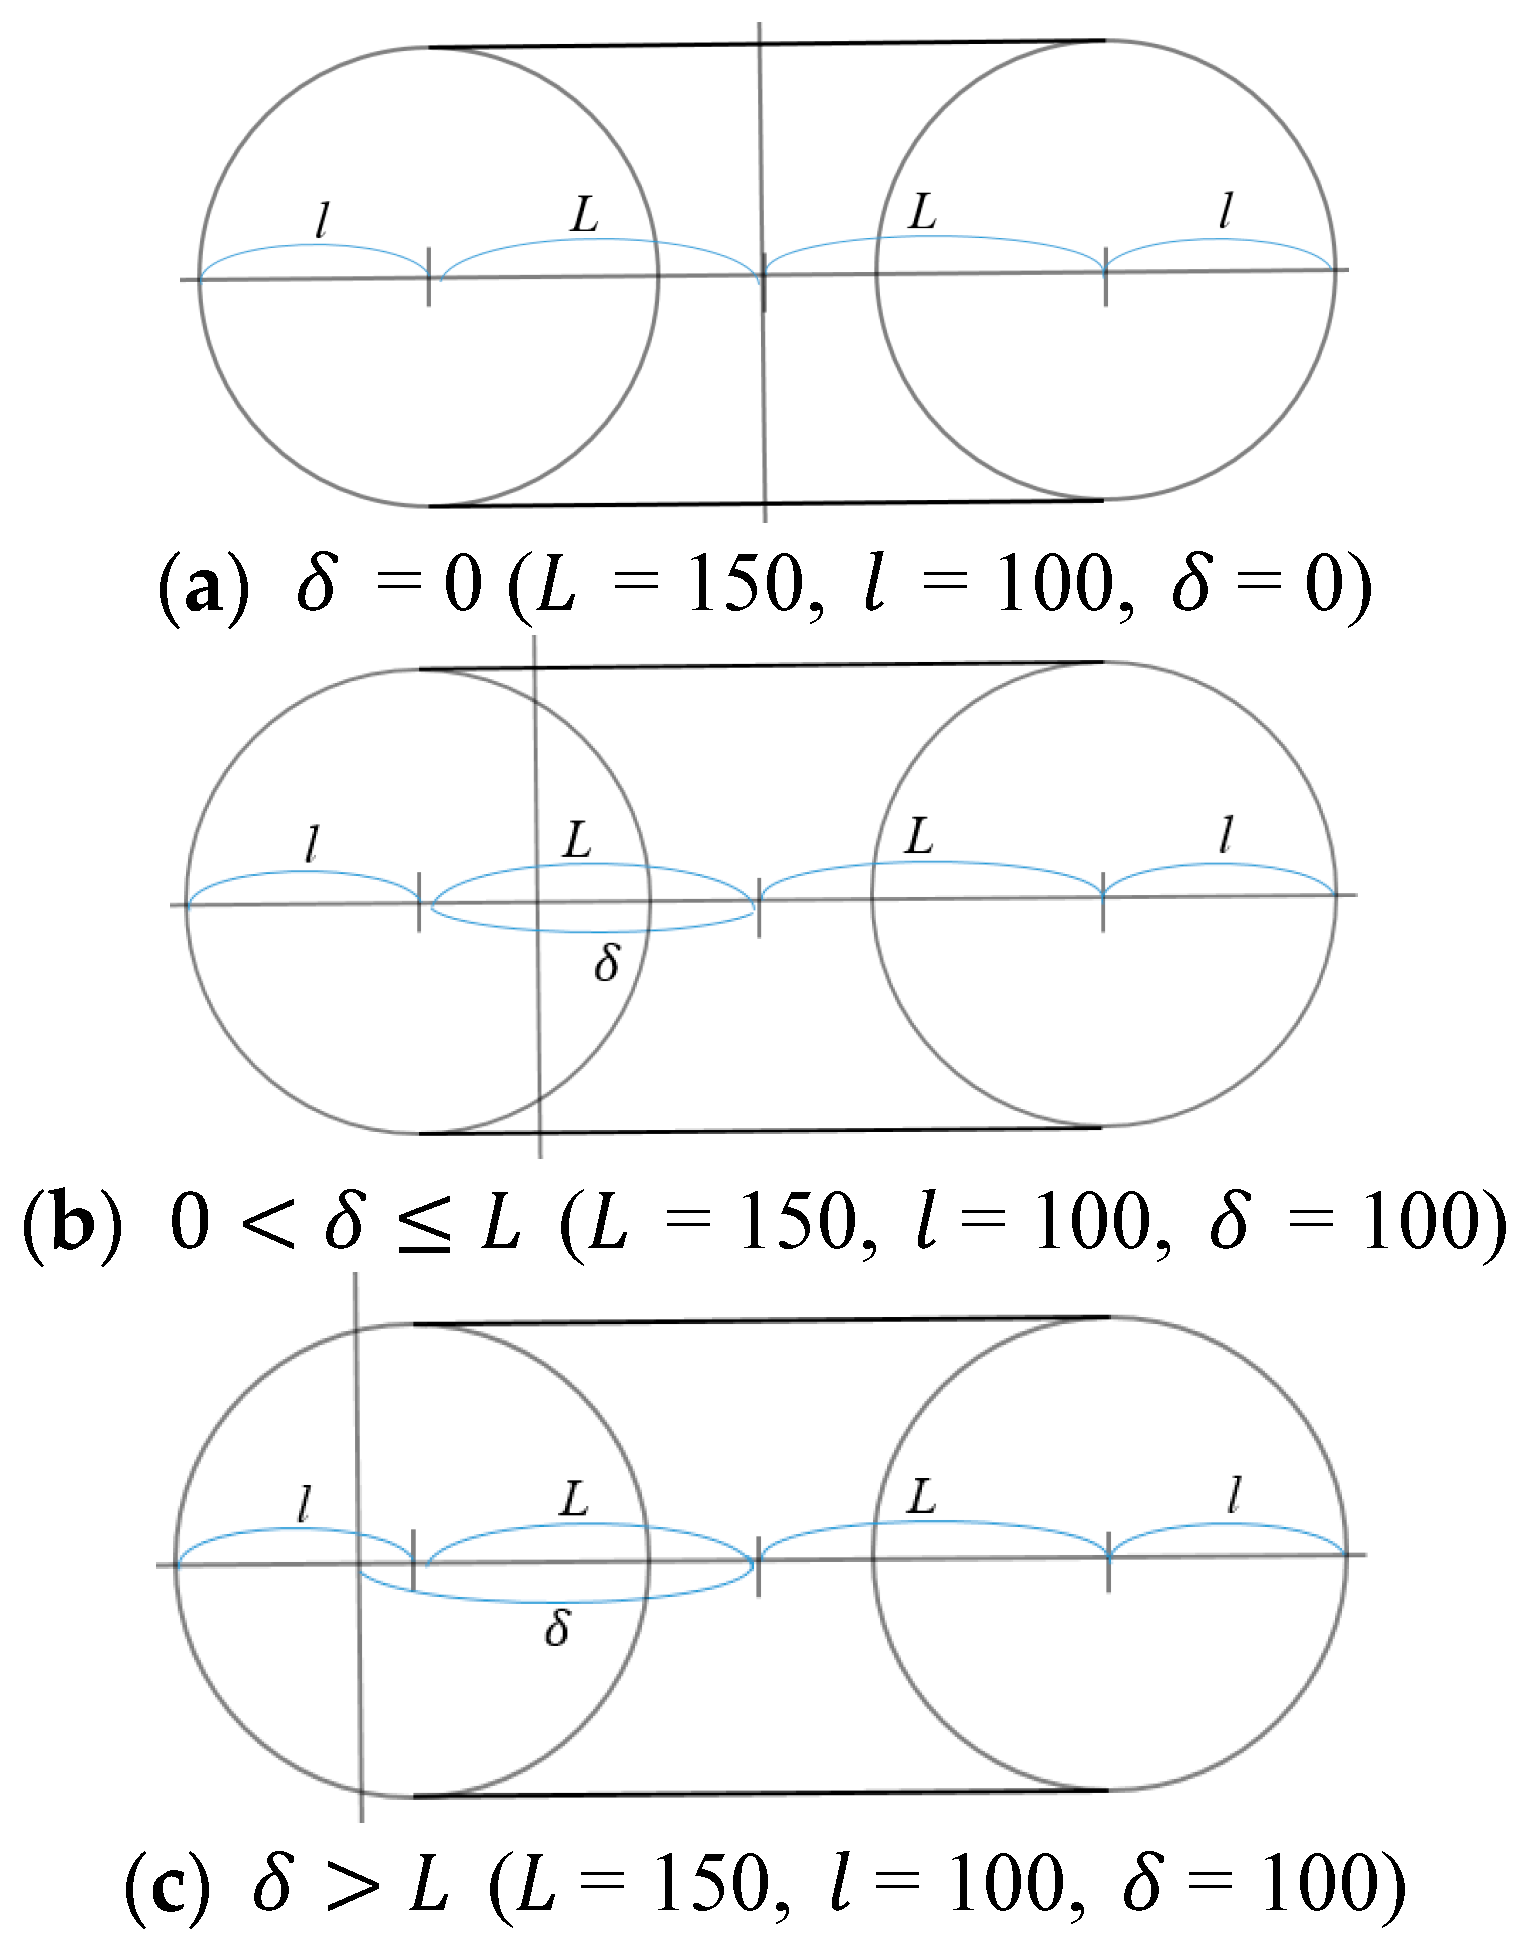
increases, the torus is shifted out to the right of the centerline, and the intersectable space decreases because the three tori exist far in the left region of the centerline, as shown in
Figure 21. The testing values of
and
are selected as
= 150 and
= 100, respectively.
If
, the cross-section diagram becomes ring type, as shown in
Figure 24a. The colored cross-section diagram for each torus is shown on the left of
Figure 25a. Intersecting the three cross-section diagrams on the left of
Figure 25a, the triple-overlapped area has a hexagonal outline. Similarly, the workspace on the right of
Figure 25a is hexalateral on the side.
If
, the cross-section diagram becomes ring type, as shown in
Figure 24b. The colored cross-section diagram for each torus is shown on the left of
Figure 25b. Intersecting the three cross-section diagrams on the left of
Figure 25b, the triple-overlapped area has a hexagonal outline, with a convex triangle internally. Similarly, the workspace on the right of
Figure 25b is hexalateral on the side and bulging triangular on the top. If
increases while
, the intersectable space does not decrease because even with
variation in this range, the intersection occurs mostly in the ring part, which has a volume with a constant lengthy shape. (Note that in the spindle torus (case
<
of
Section 4.3.1), if
increases, the intersectable space decreases faster than in the case
>
because the intersection occurs in the center part of the spindle torus, which has a volume with variable shape, such as hollows.)
If
, the cross-section diagram becomes ring type, as shown in
Figure 24c. The colored cross-section diagram for each torus is shown on the left of
Figure 25c. Intersecting the three cross-section diagrams on the left of
Figure 25c, the triple-overlapped area has a triangular outline. Similarly, the workspace on the right of
Figure 25c is trilateral on the side. If
increases while
, the intersectable space decreases because the three tori exist far from the centerline of the cross-section diagram, and the volume of the workspace decreases accordingly; if
is larger than
, the distance between the three tori is so far that there is no intersectable workspace and the volume is zero.
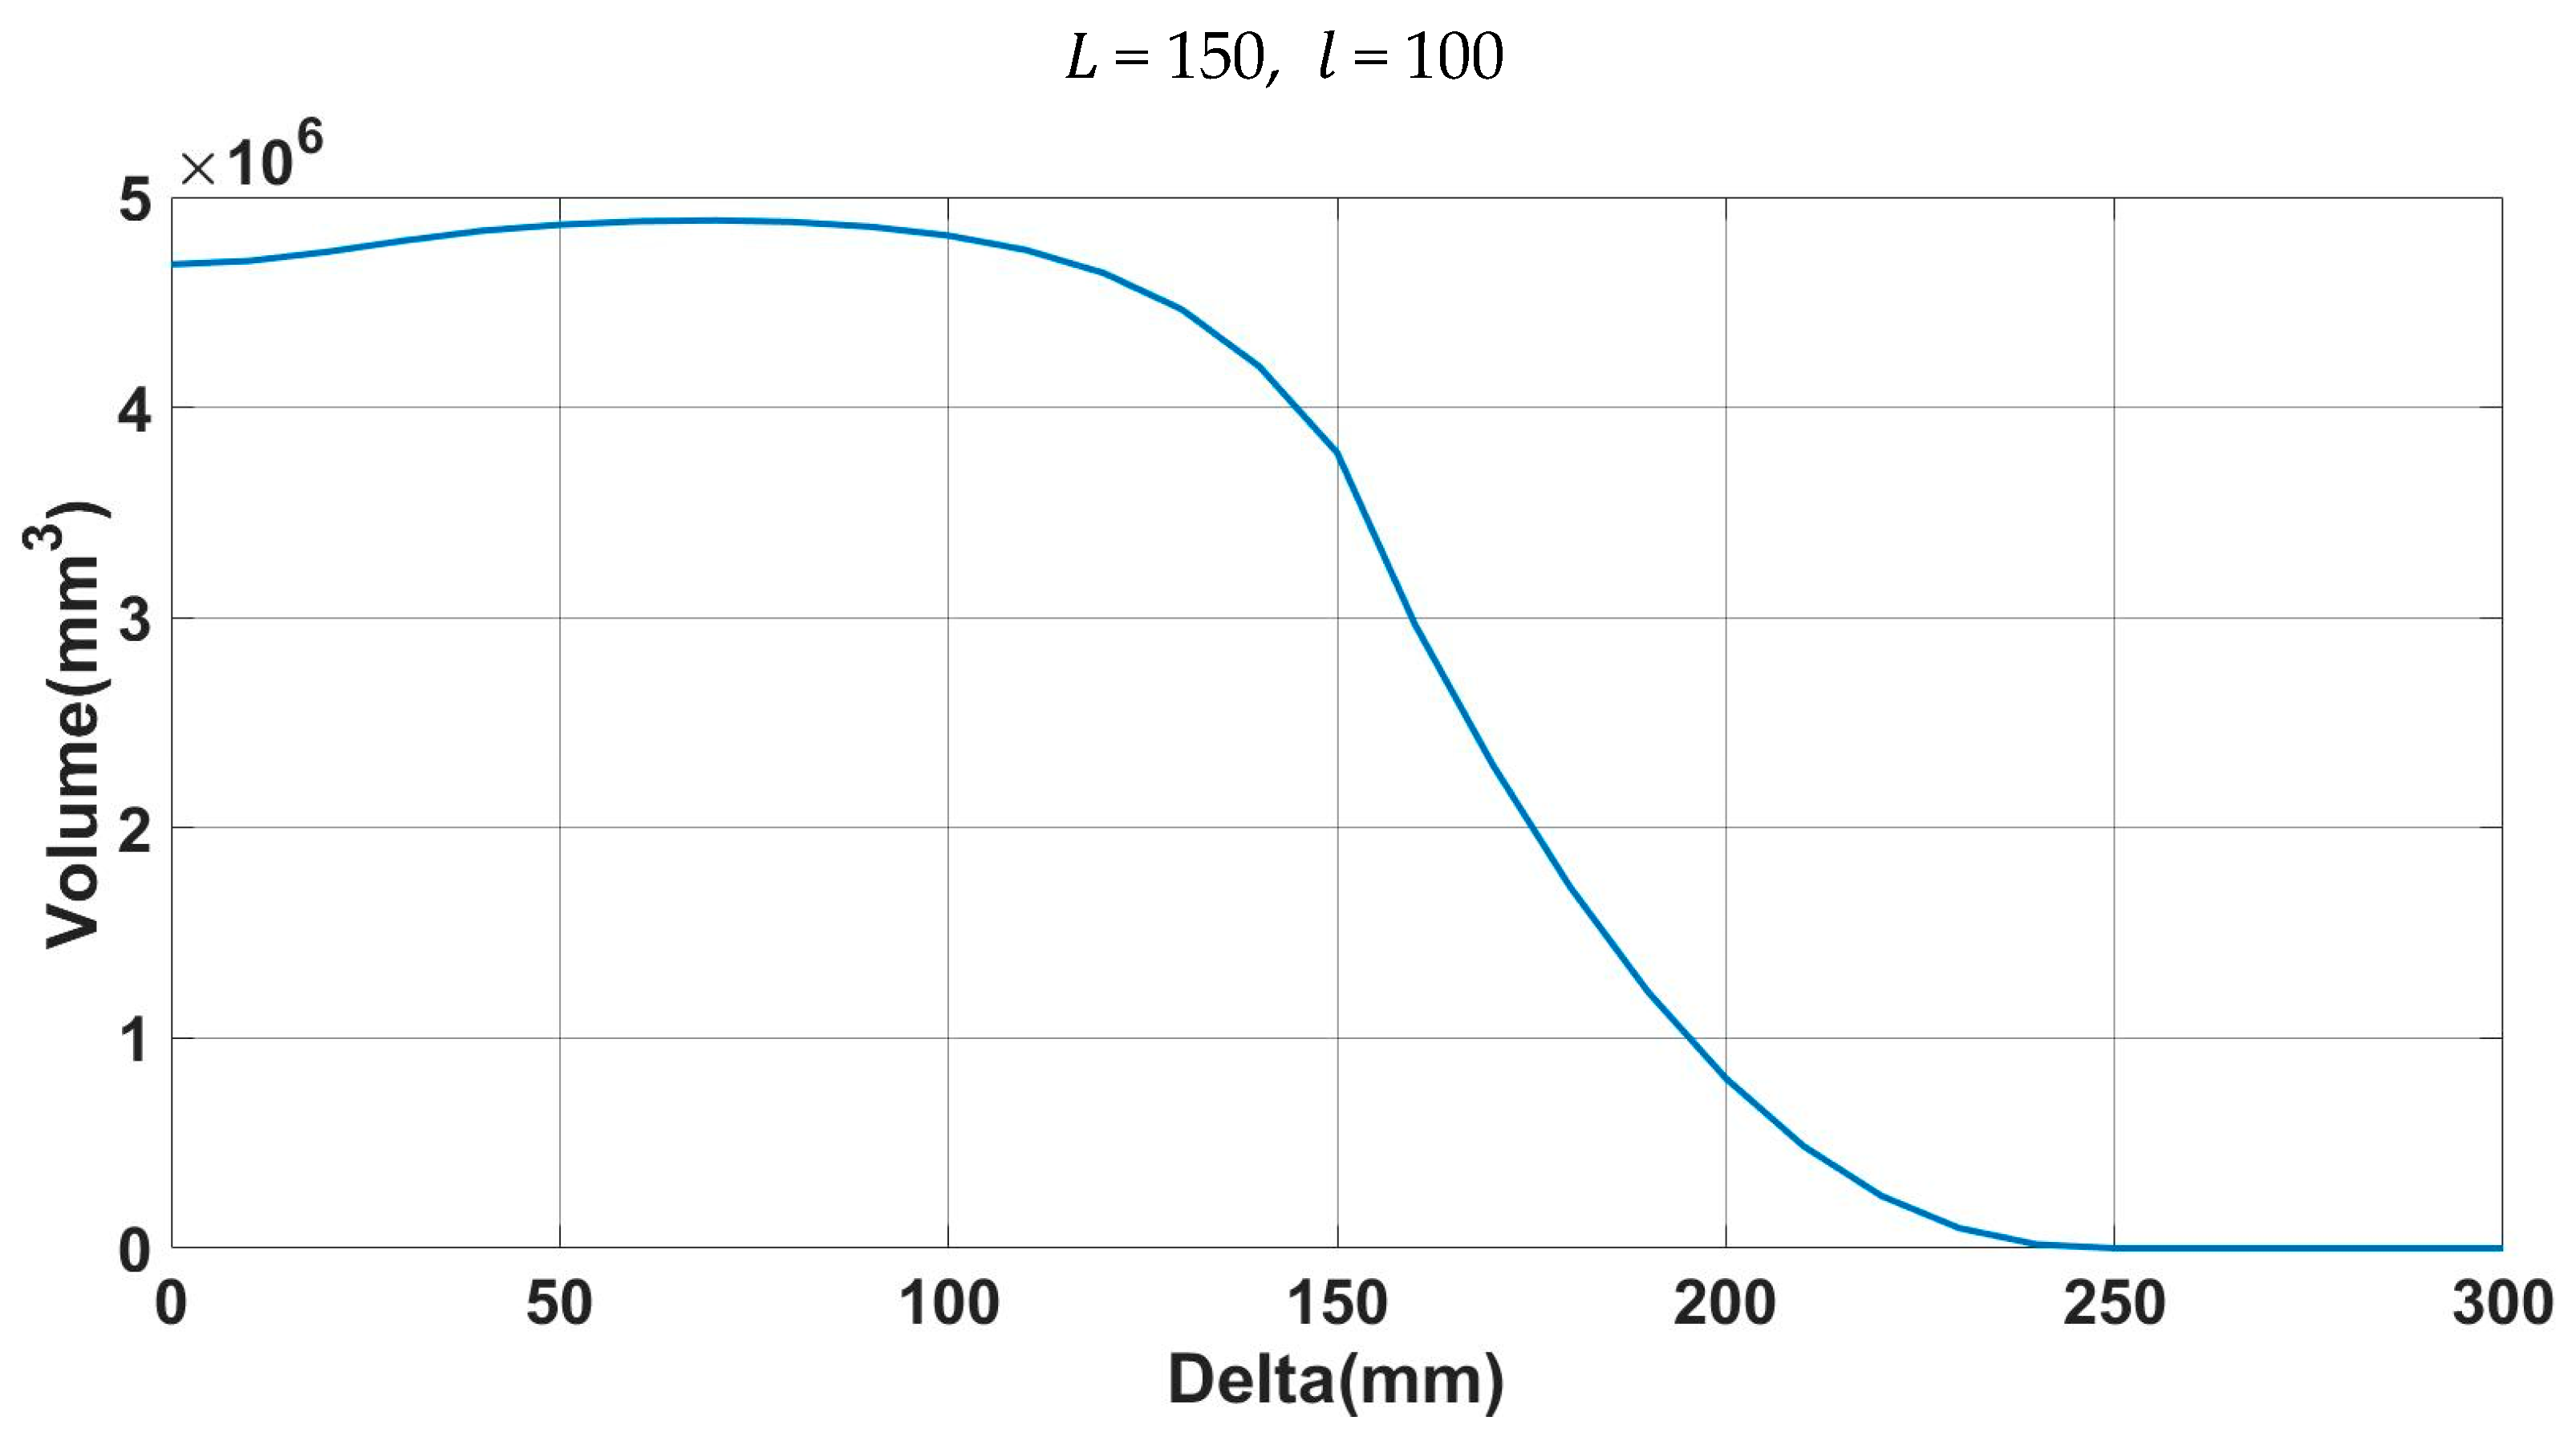
The results of workspace volume for
variations are shown in
Figure 26, which is obtained from the geometry operation of 3D CAD software. If
is less than
, the workspace volume does not decrease as
increases in
Figure 26, which is very similar to the estimation of the cross-section diagram in statement (b). If
is more than
, the volume of the workspace decreases and becomes zero after
is larger than
, which is very similar to the estimation of the cross-section diagram in statement (c). Therefore, the workspace volume of 3D CAD is similar to that of the cross-section diagram in the entire range of the
variation.
The 3D workspace analysis results are similar to the results from the cross-section diagram from both analyses for the size and volume of the workspace.
5. Conclusions
A new concept of a zero-platform delta robot based on three key parameters has been introduced. This concept simplifies the kinematic equations of the delta robot by eliminating the platform length variable, making it easier to understand the shape of the workspace. These parameters are derived from the kinematic equations of the delta robot and influence the shape and size of the workspace. The concept has been directly applied to the torus configuration on the robot’s links, demonstrating its usefulness in conveniently configuring and generating the workspace. By using the zero-platform delta robot to position the tori on each leg branch, the workspace of the delta robot can be easily configured and intuitively generated.
Based on the zero-platform delta robot, a new method has been proposed to quickly estimate the shape and size of the workspace using cross-sectional diagrams instead of traditional 3D CAD software, which requires significant computation time and lacks geometric considerations. The cross-sectional diagram requires only 2D operations of the torus, allowing robot engineers to rapidly estimate the shape and size of the delta robot’s workspace. The cross-sectional diagram uses three colors for tori—green, blue, and red—producing clearly distinguishable overlapping color areas at the intersections. Therefore, the intersection of the three colors represents the desired workspace. The effectiveness of the cross-sectional diagram has been validated through several examples of parameter analysis.
Next, parametric analysis was performed using a cross-sectional diagram based on variations of the three key parameters of the delta robot. The analysis was conducted by varying one parameter while keeping the other two parameters fixed. In all cases, the shape and volume of the workspace were compared between the cross-sectional diagram and 3D CAD software, and the changes in workspace volume with parameter variations were graphed. The effects of parameter variations on the shape and size of the workspace for several variation cases were analyzed. Through a series of parametric analyses, the cross-sectional diagram was shown to have the advantage of quickly estimating the shape and size of the workspace and providing a more geometrical understanding of the workspace compared to 3D CAD software.
In the future, we intend to extend this concept to parallel robots with three or more degrees of freedom, where workspace estimation is more challenging. This will further explore the relationship between the link structure and the shape and size of the workspace.
Author Contributions
Conceptualization, J.-H.H.; data curation, J.-H.H.; project administration, D.S.; supervision, D.S.; validation, J.-H.L.; writing—original draft, J.-H.H.; writing—review and editing, J.-H.L., E.L. and D.S. All authors have read and agreed to the published version of the manuscript.
Funding
This research was supported by “Regional Innovation Strategy (RIS)” through the National Research Foundation of Korea(NRF) funded by the Ministry.
Data Availability Statement
The datasets generated and/or analyzed during the current study are not publicly available due to the reason of non-availability. These data are available from the corresponding author upon request.
Conflicts of Interest
The authors declare no conflicts of interest.
References
- Romdhane, L. Design and analysis of a hybrid serial-parallel manipulator. Mech. Mach. Theory 1999, 34, 1037–1055. [Google Scholar] [CrossRef]
- Dasgupta, B.; Mruthyunjaya, T.S. The Stewart platform manipulator: A review. Mech. Mach. Theory 2000, 35, 15–40. [Google Scholar] [CrossRef]
- Yang, G.; Chen, I.M.; Lim, W.K.; Yeo, S.H. Design, and kinematic analysis of modular reconfigurable parallel robots. In Proceedings of the IEEE International Conference on Robotics and Automation, Detroit, MI, USA, 10–15 May 1999; Volume 4, pp. 2501–2506. [Google Scholar]
- Di Gregorio, R.; Parenti-Castelli, V. Mobility Analysis of the 3-UPU Parallel Mechanism Assembled for a Pure Translational Motion. In Proceedings of the IEEE/ASME International Conference on Advanced Intelligent Mechatronics, Atlanta, GA, USA, 19–23 September 1999; pp. 520–525. [Google Scholar]
- Maya, M.; Castillo, E.; Lomelí, A.; González-Galván, E.; Cárdenas, A. Workspace and Payload-Capacity of a New Reconfigurable Delta Parallel Robot. Int. J. Adv. Robot. Syst. 2013, 10, 56. [Google Scholar] [CrossRef]
- Cretescu, N.; Neagoe, M.; Saulescu, R. Dynamic Analysis of a Delta Parallel Robot with Flexible Links and Joint Clearances. Appl. Sci. 2023, 13, 6693. [Google Scholar] [CrossRef]
- Kim, H. Dynamics Modeling and Control of a Delta High-speed Parallel Robot. J. Korean Soc. Manuf. Process Eng. 2014, 13, 90–97. [Google Scholar]
- Clavel, R. Conception d’un Robot Parallèle Rapide à 4 Degrés de Liberté. Ph.D. Thesis, École Polytechnique Fédérale de Lausanne, Lausanne, Switzerland, 1991. [Google Scholar]
- Cao, Y.; Lu, K.; Li, X.; Zang, Y. Accurate Numerical Methods for Computing 2D and 3D Robot Workspace. Int. J. Adv. Robot. Syst. 2011, 8, 76. [Google Scholar] [CrossRef]
- Zhang, G.; Liu, G.; Chen, W.; Lin, X.; Guan, Y. Workspace Analysis and Dynamic Obhect Tracking with a Delta Parallel Robot. In Advances in Reconfigurable Mechanisms and Robot II; Springer International Publishing: Berlin/Heidelberg, Germany, 2016; Volume 36. [Google Scholar]
- Deabs, A.; Gomaa, F.R.; Khader, K. Parallel Robot. J. Eng. Sci. Technol. Rev. 2021, 14, 10–27. [Google Scholar] [CrossRef]
- Affi, Z.; Romdhane, L.; Maalej, A. Dimensional synthesis of a 3-translational-DOF in-parallel manipulator for a desired workspace. Eur. J. Mech.-A/Solids 2004, 23, 311–332. [Google Scholar] [CrossRef]
- Laribi, M.A.; Romdhane, L.; Zeghloul, S. Analysis and dimensional synthesis of the DELTA robot for a prescribed workspace. Mech. Mach. Theory 2007, 42, 859–870. [Google Scholar] [CrossRef]
- Merlet, J.P.; Gosselin, C.M.; Mouly, N. Workspace of Planar Parallel Manipulators. Mech. Mach. Theory 1998, 33, 7–20. [Google Scholar] [CrossRef]
- Gosselin, C. Determination of the workspace of 6-DOF parallel manipulators. J. Mech. Des. 1990, 112, 331–336. [Google Scholar] [CrossRef]
- Dash, A.K.; Chen, I.M.; Yeo, S.H.; Yang, G. Workspace generation and planning singularity-free path for parallel manipulators. Mech. Mach. Theory 2005, 40, 776–805. [Google Scholar] [CrossRef]
- Carretero, J.A.; Nahon, M.; Podhorodeski, R.P. Workspace analysis of a 3-DOF parallel mechanism. IEEE/RSJ Int. Conf. Intell. Robot. Syst. 1998, 2, 1021–1026. [Google Scholar]
- Brinker, J.; Corves, B.; Takeda, Y. Kinematic and Dynamic Dimensional Synthesis of Extended Delta Parallel Robots. In Robotics and Mechatronics; Springer International Publishing: Berlin/Heidelberg, Germany, 2019; Volume 72. [Google Scholar]
- Aboulissane, B.; Bakkali, L.E.; Bahaoui, J.E. Workspace Analysis and Optimization of the Parallel Robots Based on Computer-Aided Design Approach. Facta Univ. Mech. Eng. 2020, 18, 79–89. [Google Scholar] [CrossRef]
- Liu, X.-J.; Wang, J.; Zheng, H. Workspace atlases for the computer aided design of the Delta robot. Proc. Inst. Mech. Eng. J. Mech. Eng. Sci. Part C 2003, 217, 861–869. [Google Scholar] [CrossRef]
- Ben Hamida, I.; Laribi, M.A.; Mlika, A.; Romdhane, L.; Zeghloul, S. Geometric Based Approach for Workspace Analysis of Translational Parallel Robots. In Romansy 22—Robot Design, Dynamics and Control; Springer International Publishing: Berlin/Heidelberg, Germany, 2018; Volume 584, pp. 180–188. [Google Scholar]
- Liu, X.J.; Wang, J.; Gao, F. Performance atlases of the workspace for planar 3-DOF parallel manipulators. Robotica 2000, 18, 563–568. [Google Scholar] [CrossRef]
- Bai, Q.; Shehata, M.; Nada, A. Efficient Modeling Procedure of Novel Grating Tiling Device Using Multibody System Approach. In Proceedings of the International Symposium on Multibody Systems and Mechatronics, Córdoba, Argentina, 12–15 October 2021; Volume 92. [Google Scholar]
- Shehata, M.; Elshami, M.; Bai, Q.; Zhao, X. Parameter Estimation for Multibody System Dynamic Model of Delta Robot from Experimental Data. IFAC Pap. 2021, 54, 72–77. [Google Scholar] [CrossRef]
- Jia, J.; Zhang, M.; Zang, X.; Zhang, H.; Zhao, J. Dynamic Parameter Identification for a Manipulator with Joint Torque Sensors Based on an Improved Experimental Design. Sensors 2019, 19, 2248. [Google Scholar] [CrossRef] [PubMed]
Figure 1.
Kinematic diagram of the delta robot with geometric parameters.
Figure 1.
Kinematic diagram of the delta robot with geometric parameters.
Figure 2.
Location angle of actuators, .
Figure 2.
Location angle of actuators, .
Figure 3.
Kinematical equivalent diagram of the delta robot.
Figure 3.
Kinematical equivalent diagram of the delta robot.
Figure 4.
Major and minor radius of the torus.
Figure 4.
Major and minor radius of the torus.
Figure 5.
The shape of a torus according to link length variation.
Figure 5.
The shape of a torus according to link length variation.
Figure 6.
Different and results for the same .
Figure 6.
Different and results for the same .
Figure 7.
Zero-platform delta robot for generating the workspace.
Figure 7.
Zero-platform delta robot for generating the workspace.
Figure 8.
The torus generated on the leg branch on the zero-platform delta robot.
Figure 8.
The torus generated on the leg branch on the zero-platform delta robot.
Figure 9.
Three tori generated on three leg branches on the zero-platform delta robot.
Figure 9.
Three tori generated on three leg branches on the zero-platform delta robot.
Figure 10.
The procedure of generating the workspace with the intersection of three tori.
Figure 10.
The procedure of generating the workspace with the intersection of three tori.
Figure 11.
The cross-section diagram of the torus.
Figure 11.
The cross-section diagram of the torus.
Figure 12.
Workspace area using the cross-section diagrams and actual 3D workspace.
Figure 12.
Workspace area using the cross-section diagrams and actual 3D workspace.
Figure 13.
The limit position of the delta robot.
Figure 13.
The limit position of the delta robot.
Figure 14.
The condition of and .
Figure 14.
The condition of and .
Figure 15.
The cross-section diagram of the torus with changing .
Figure 15.
The cross-section diagram of the torus with changing .
Figure 16.
Intersection using cross-section diagrams and the workspace with changing .
Figure 16.
Intersection using cross-section diagrams and the workspace with changing .
Figure 17.
Workspace volume with variation.
Figure 17.
Workspace volume with variation.
Figure 18.
The shape of the torus with changing .
Figure 18.
The shape of the torus with changing .
Figure 19.
Intersection using cross-section diagram and the workspace with changing .
Figure 19.
Intersection using cross-section diagram and the workspace with changing .
Figure 20.
Workspace volume with variation.
Figure 20.
Workspace volume with variation.
Figure 21.
The shape of the spindle torus with changing .
Figure 21.
The shape of the spindle torus with changing .
Figure 22.
Intersected workspace of spindle tori with changing .
Figure 22.
Intersected workspace of spindle tori with changing .
Figure 23.
Workspace volume with variation.
Figure 23.
Workspace volume with variation.
Figure 24.
The shape of the ring torus with changing .
Figure 24.
The shape of the ring torus with changing .
Figure 25.
Intersected workspace of ring tori with changing .
Figure 25.
Intersected workspace of ring tori with changing .
Figure 26.
Workspace volume with variation.
Figure 26.
Workspace volume with variation.
Table 1.
The parameters of the delta robot.
Table 1.
The parameters of the delta robot.
| Name | Meaning |
|---|
| Upper leg length |
| Lower leg length in the parallelogram |
| |
| |
| Angles of actuators on the base platform (30°, 150°, 270°) |
| Disclaimer/Publisher’s Note: The statements, opinions and data contained in all publications are solely those of the individual author(s) and contributor(s) and not of MDPI and/or the editor(s). MDPI and/or the editor(s) disclaim responsibility for any injury to people or property resulting from any ideas, methods, instructions or products referred to in the content. |
© 2024 by the authors. Licensee MDPI, Basel, Switzerland. This article is an open access article distributed under the terms and conditions of the Creative Commons Attribution (CC BY) license (https://creativecommons.org/licenses/by/4.0/).
