Article

Influence of Laser Texturing and Coating on the Tribological Properties of the Tool Steels Properties

1
Faculty of Materials Science and Technology in Trnava, Institute of Production Technology, Slovak University of Technology in Bratislava, 917 24 Trnava, Slovakia
2
Faculty of Materials Science and Technology in Trnava, Institute of Materials Science, Slovak University of Technology in Bratislava, 917 24 Trnava, Slovakia
*
Author to whom correspondence should be addressed.
Machines 2024, 12(5), 311; https://doi.org/10.3390/machines12050311
Submission received: 31 March 2024 / Revised: 26 April 2024 / Accepted: 29 April 2024 / Published: 2 May 2024
(This article belongs to the Special Issue Precision Manufacturing and Machine Tools)

Abstract

:
The article is aimed at identifying the influence of laser texturing and subsequent coating with a hard, wear-resistant coating AlCrSiN (nACRo®) on selected tribological properties of the analyzed tool steels for cold work, produced by conventional and powder metallurgy. The substrate from each steel was heat treated to achieve optimal properties regarding the chemical composition and the method of production of the material. Böhler K100 and K390 Microclean® steels were used. These are highly alloyed tool steels used for various types of tools intended for cold work. The obtained results show that the coefficient of friction is increased by coating, but the wear rate is lower compared to the samples which were only textured.

1. Introduction

Tribological properties are very important for tool life because of their contribution to longer tool life. The material of the tool is significantly influenced by various external influences. Among them, we can include friction, thermal load, chemical load, and mechanical load in terms of applied force and possible vibrations. These influences interact with each other, as a result of which the integrity of the tool’s surface is disrupted, and this significantly negatively affects its service life and usability [1,2,3].
The tool, which is locally significantly mechanically stressed, is used, for example, in metal spinning of various profiles. There is significant local loading of the active part of the tool, which changes and moves along the active surface of the metal spinning tool during the shaping of the semi-finished product. For this reason, it is important to choose the material of the tool itself, the method of its primary production, and the method of surface modification on the active part of the tool to achieve a reduction in the coefficient of friction, which results in a smaller thermal load, and thus a smaller influence on the surface layers of the tool affected by mechanical stress during the metal spinning of the product. A tool for metal spinning requires contradictory properties, such as high toughness, but also high hardness of the active surface of the tool [4,5].
Tribology, the goal of which is to determine the consistency of a material’s surface in relation to other materials, is involved in the mentioned issues. It is considered an important interdisciplinary field that includes mechanical engineering, materials engineering, chemistry, and chemical engineering. Tribological characteristics mainly include friction, wear, and roughness (lubrication) [1,2,6,7].
Friction is defined as a material’s resistance to movement. The amount of resistance is a function of the material, geometry, operating conditions, and surface properties of the bodies in contact. By minimizing friction, the efficiency of the component or process is maximized. An increase in friction is associated with an increase in load and surface roughness. A reduction in friction can be achieved by using a lubricant. The effect of friction is also an increase in the surface temperature of sliding materials [2,3,8].
During the development and selection of materials, coatings and surface treatments, their testing is required. Such testing includes accelerated friction, wear, and corrosion tests. Accelerated tests are cheap and fast and simulate operating conditions. After performing such tests and ranking the results, the most suitable candidates are subjected to functional tests under operating conditions to which the part or component will be subjected [1].
Another indicator is the Hertzian pressure acting between two bodies. The first knowledge is recorded from 1882 in the work of Heinrich Hertz “On the contact of elastic solids”. The contact stress created between two curved surfaces, which are simultaneously deformed by pressure, depends on the normal force, the radii of curvature of the bodies and the modulus of elasticity of the bodies. This insight is a building block of contact mechanics with extensive use, from geotechnical applications to determining the fatigue life of bodies whose surfaces are in contact. The Hertz solution is widely used in the determination of material properties and characterization of the deformation course [9,10].
The maximum contact stress σmax, caused by the force F in point contact (spherical contact) of the contacting surface, is given by the relation [10]:
σ max = 3 2 F π a 2                       N . mm 2
where
  • F—applied force [N];
  • a—main semi-axis of the elliptical contact surface [mm].
Methods that improve the integrity of the surface and at the same time reduce the coefficient of friction between the contacting surfaces can be included among the options that allow the reduction of the coefficient of friction and the reduction of the thermal load. This includes options such as surface hardening, chemical-heat treatment (carburizing, nitriding and boriding), laser welding, laser texturing and, finally, coating (PVD, CVD) and others [11,12,13,14,15,16,17,18].
The possible applications of surface laser texturing are very wide. In this application, it is important to save the lubricant and decrease the coefficient of friction. Other possible applications are the increase in heat dissipation [19], reduction in corrosion of stainless steels [20], or enhancement of the adhesion with other substrate types [21].
Coatings that improve tribological properties can also be created using electrodeposition of Ni-W coating [22] or on semiconductors by electrodeposition of micro-copper structure on silicon surface [23], for example.
In a previous work [24], two types of cold work tool steels, namely Böhler K100 produced by conventional metallurgy and K390 Microclean® steel produced by powder metallurgy, which were laser textured after heat treatment, were analyzed. This work is focused on using the same textures and the same heat treatment, but the textured surface [24] was still coated with a high-hard AlCrSiN nanocomposite coating known as nACRo® [25]. The article will present a comparison of the influence of the nanocomposite coating on the tribological properties of the tool steel surface treated in this way. Figure 1 documented the various microstructure types between the analyzed tool steels. The K100 tool steel contains the coarse carbides arranged in the lines, and K390 Microclean® contains the fine carbide particles distributed homogeneously in the microstructure.

2. Materials and Methods

As mentioned, two types of tool steels designed for cold work, produced by different primary technologies, were used. K100 steel was produced using a classic conventional metallurgical process and, due to the production process, has coarse carbide phases in the volume of the material. The second analyzed steel was the K390 Microclean® tool steel, which was produced by the powder metallurgy method and this steel has very fine, homogeneously distributed carbide phases in the volume of the material [26]. The steels were produced at Voestalpine Böhler Edelstahl GmbH & Co KG, Kapfenber, Austria. The chemical composition of the analyzed tool steels is shown in Table 1.
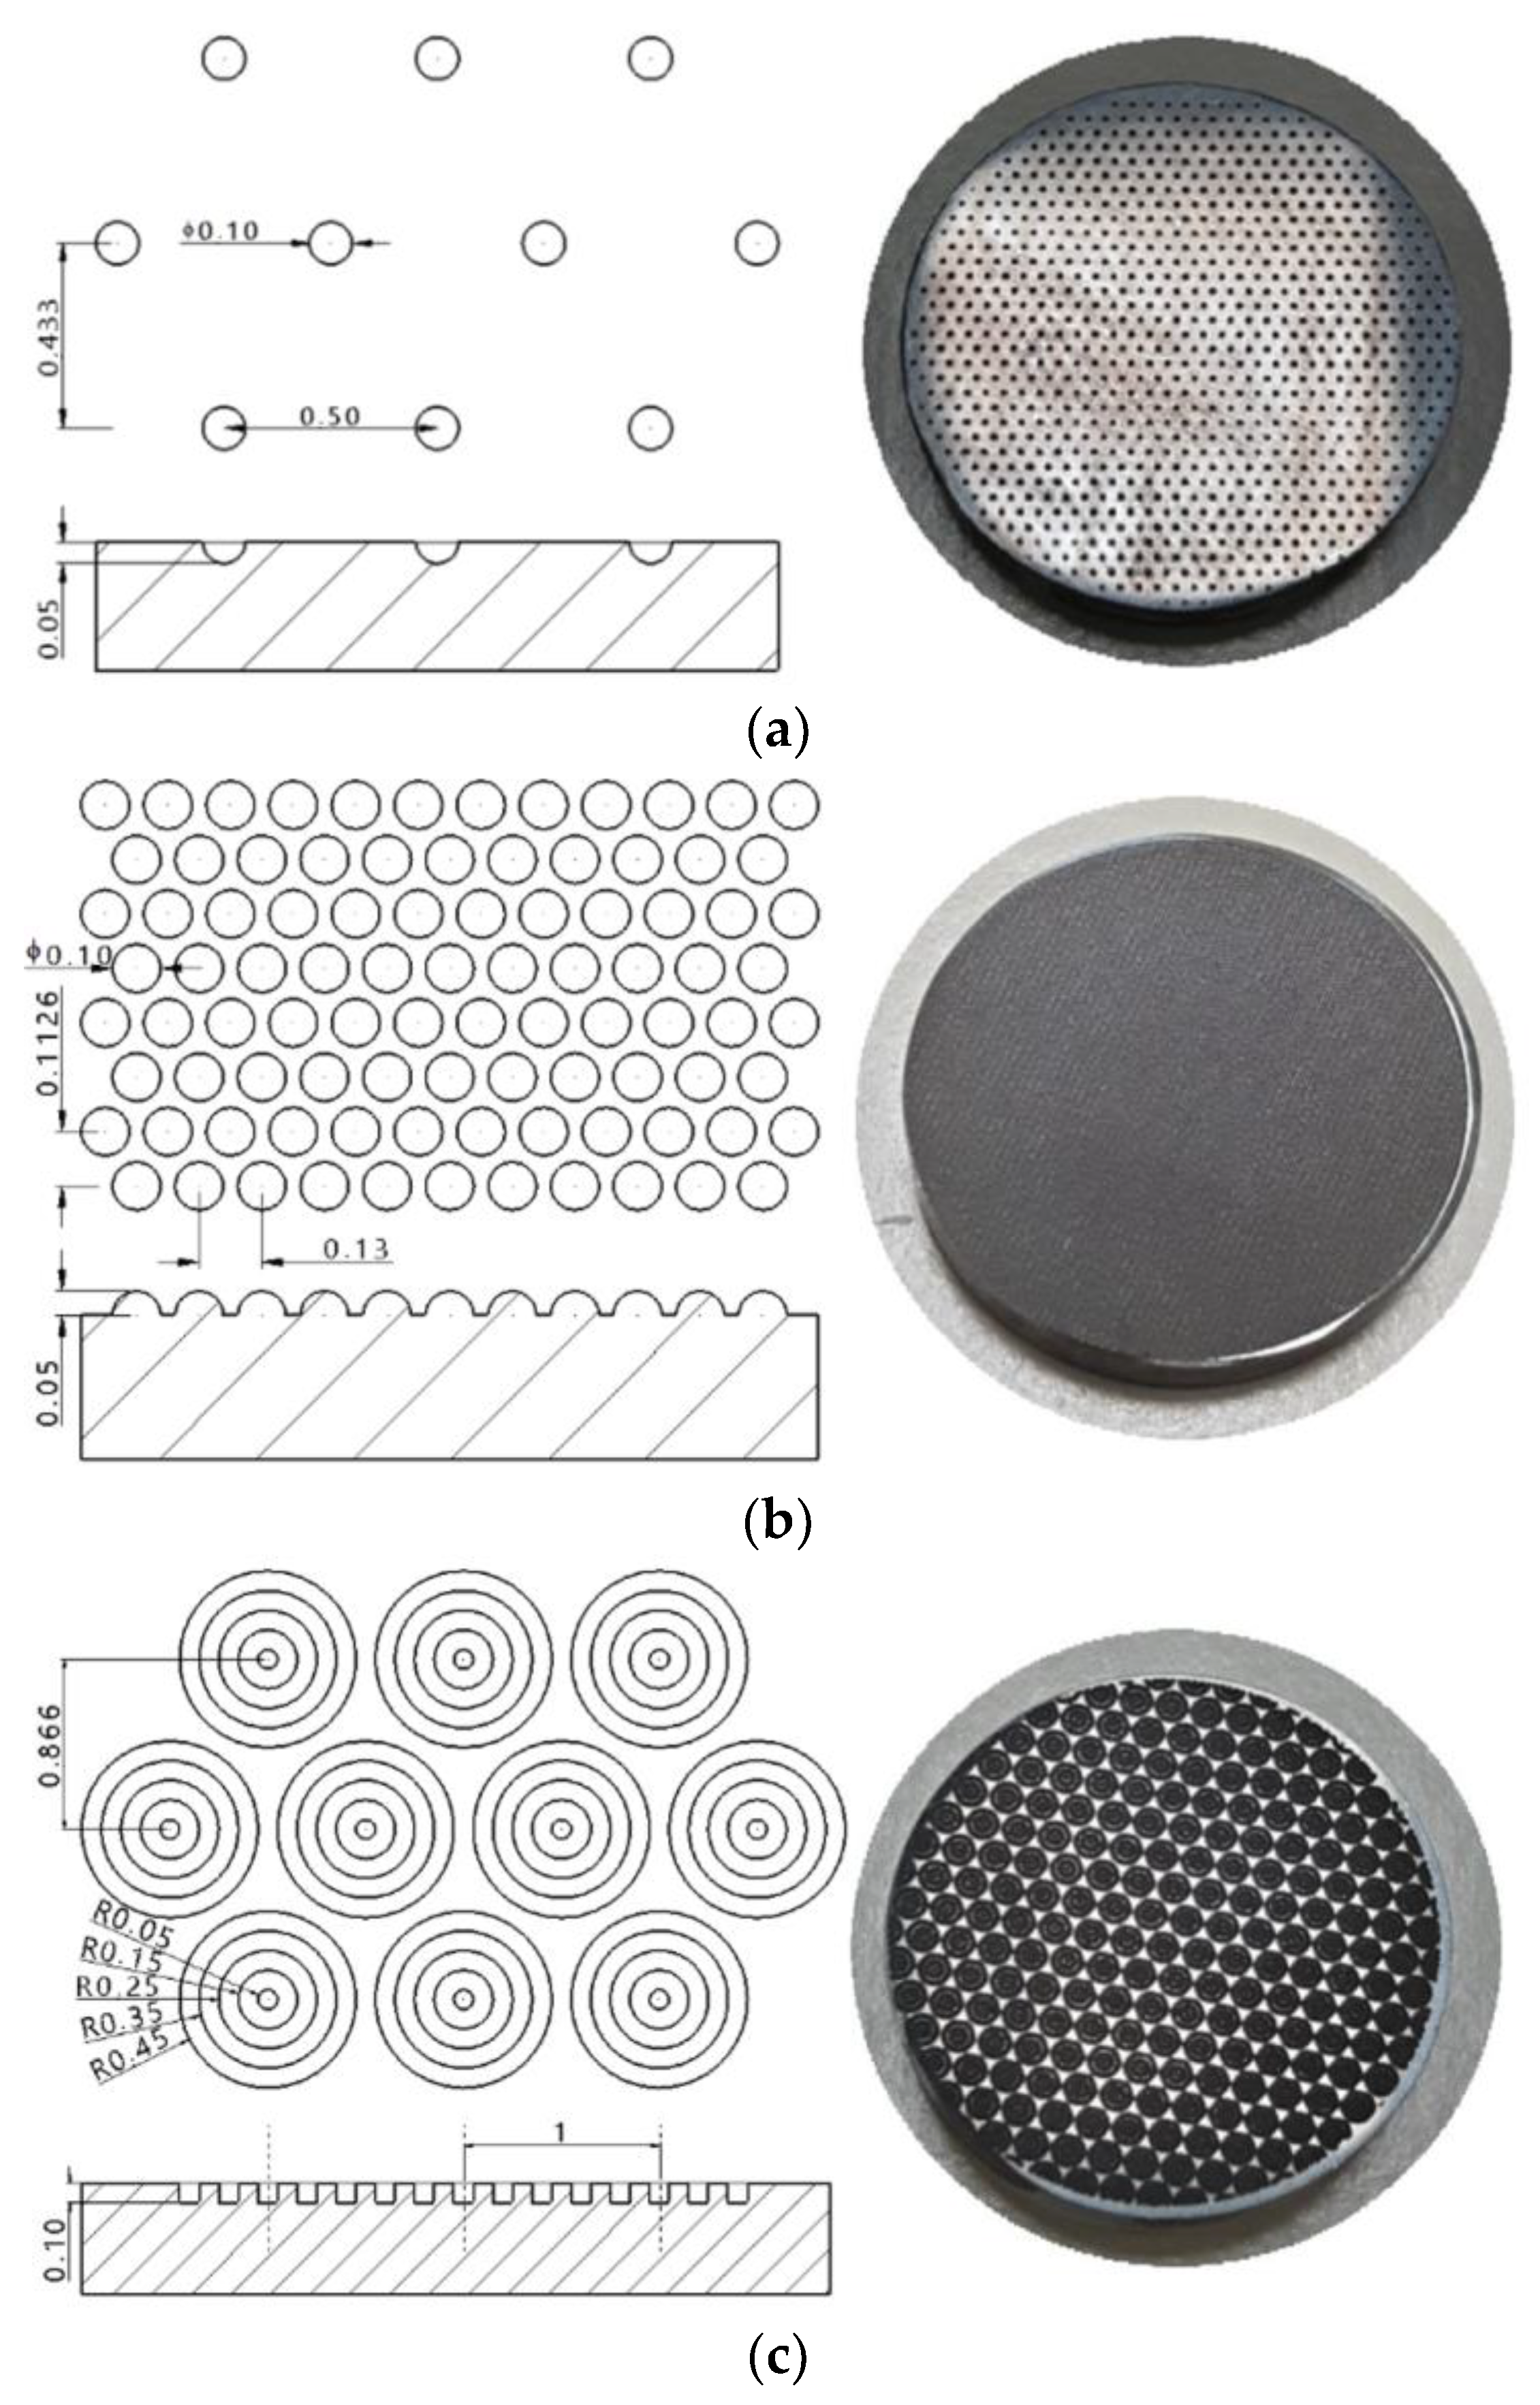
Heat treatment and measured values of hardness according to Rockwell method C according to [29] for both tool steels are shown in Table 2. The measured average value of the roughness (according to [30]) of the prepared surfaces was Ra ≈ 0.018 µm determined by the measuring device Surfcom 5000. The samples processed in this way were laser textured with different motifs (Figure 2) on a 5-axis device SAUER Lasertec 80 Shape used the Nd:YAG laser with the following parameters: pulse separation 10 µm; frequency 70 kHz; movement speed 1500 mm.s−1; power 48.7 W for K100 and 51.5 W for K390 Microclean®. Three types of lasered textures with different densities of the textured surface were prepared as presented in [24] for laser texturing only:
(a)
T1—textured density 6.3%;
(b)
T2—textured density 93.7%;
(c)
T3—textured density 38%.
Subsequently, the samples were coated on a Platit π80+DLC device to form a hard AlCrSiN (nACRo®) nanocomposite coating. The coating is formed with nanocrystalline AlCrN grains in an amorphous Si3N4 matrix [25]. The coating parameters are listed in Table 3 [25]. This coating is characterized by high adhesion, high hardness, low coefficient of friction (0.5), high crack resistance, and low modulus of elasticity [25]. Also, this coating has excellent oxidation resistance and a low coefficient of friction (0.35) at elevated temperatures [31,32].
The prepared samples were subjected to tribological tests using the ball-on-disc method at the Slovak Academy of Sciences, Institute of Materials Research in Košice, Slovak Republic. The universal tribometer Bruker UMT 3 was used. The aim was to determine the friction coefficient between the functional surface and the friction ball made from 100Cr6 hardened steel with 6 mm in diameter. The parameters of the tribological test were as follows [22]:
  • Applied load 70 N;
  • Sliding velocity 0.1 m.s−1;
  • Track length 200 m;
  • Track radius 3.5 mm;
  • Time of load 2000 s.
The load during the tribological tests was designed based on the local high load of the tool, intended for metal spinning. During the ball-on-disc test, both the tangential component of friction force (Fx) and the normal component of friction force (Fz) were collected. The friction coefficient was calculated as a relative ratio of Fx and Fz and recorded every 0.01 s. Wear depths were measured by two physically different methods: (a) the laser confocal microscopy (Zeiss LSM 700) and (b) the Zeiss Surfcom 5000 equipped with a stylus with a 2 µm tip radius.
The weight loss after tribological tests was determined by the precise laboratory balance Mettler Toledo with an accuracy ± 0.0001 g. Based on the achieved results, individual tribological characteristics were determined for the ball-on-disc method used in accordance with the ISO 20808:2016 standard [33].

3. Results and Discussion

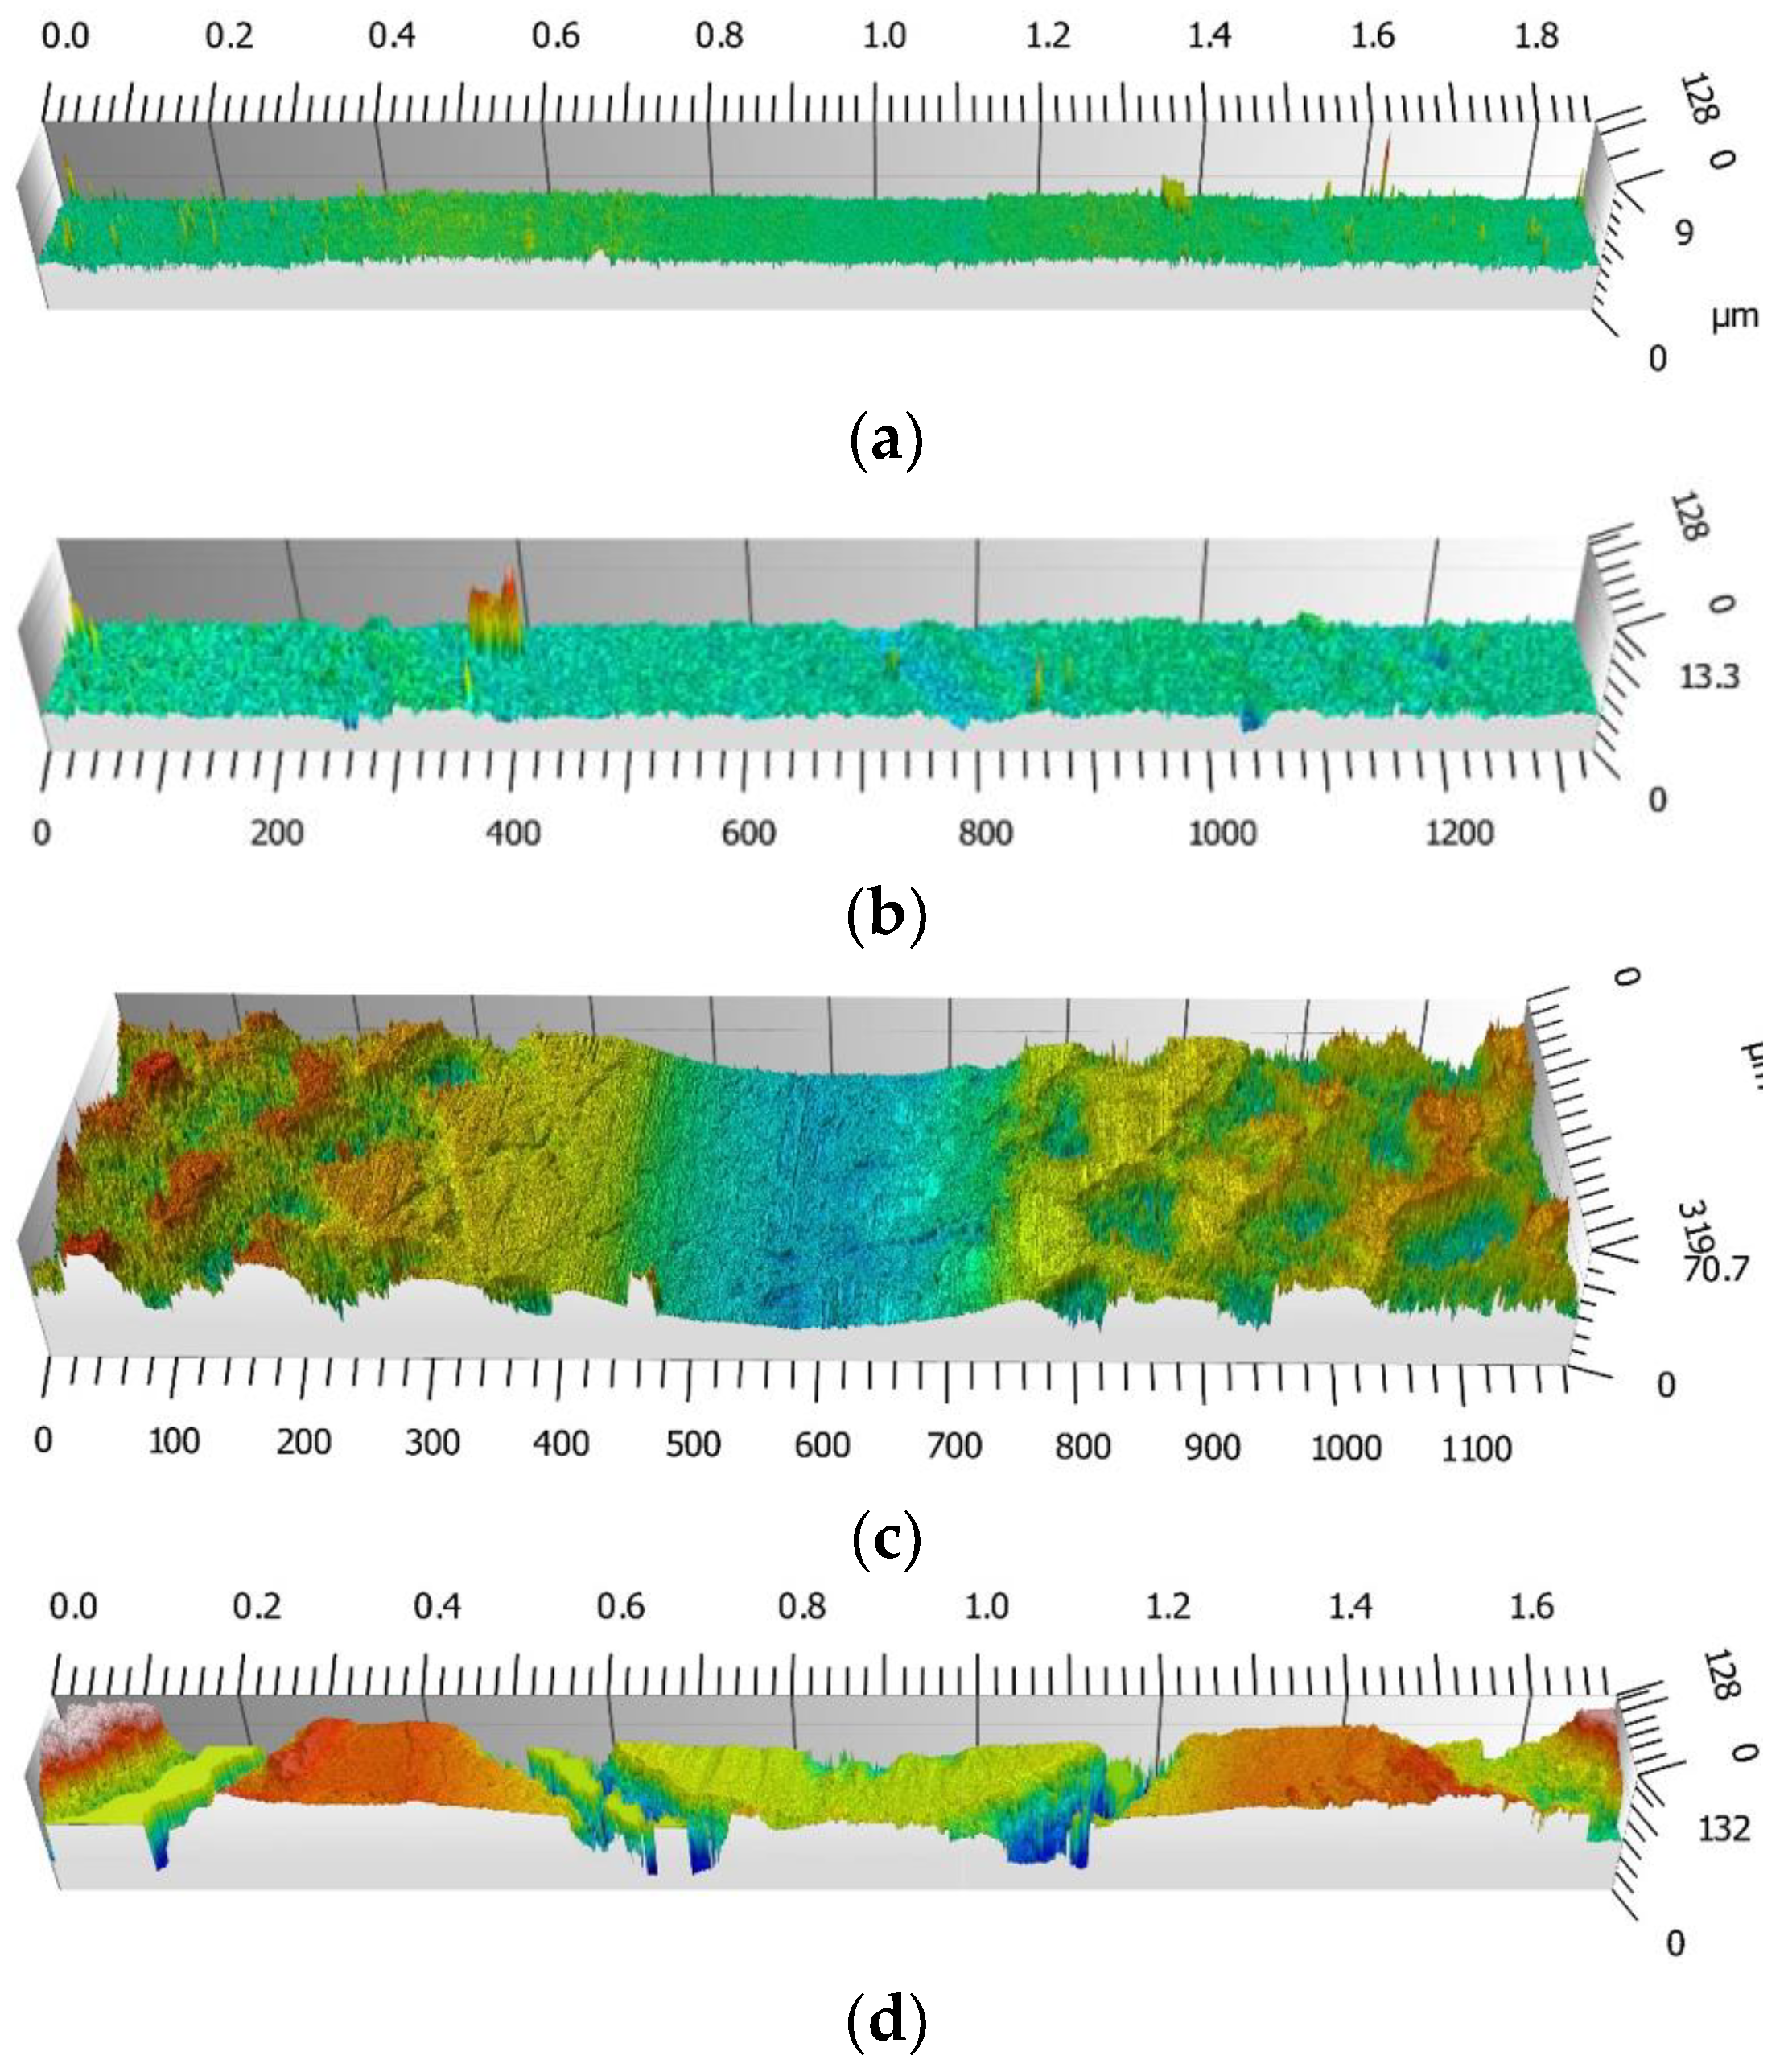
Samples of obtained surfaces after texturing and coating obtained by laser confocal microscope are shown in Figure 3 for steel K100.
By comparing the measured data after the tribological test, it can be noticed that the wear is visually lower after the application of the AlCrSiN nanocomposite coating compared to the samples after only laser texturing.
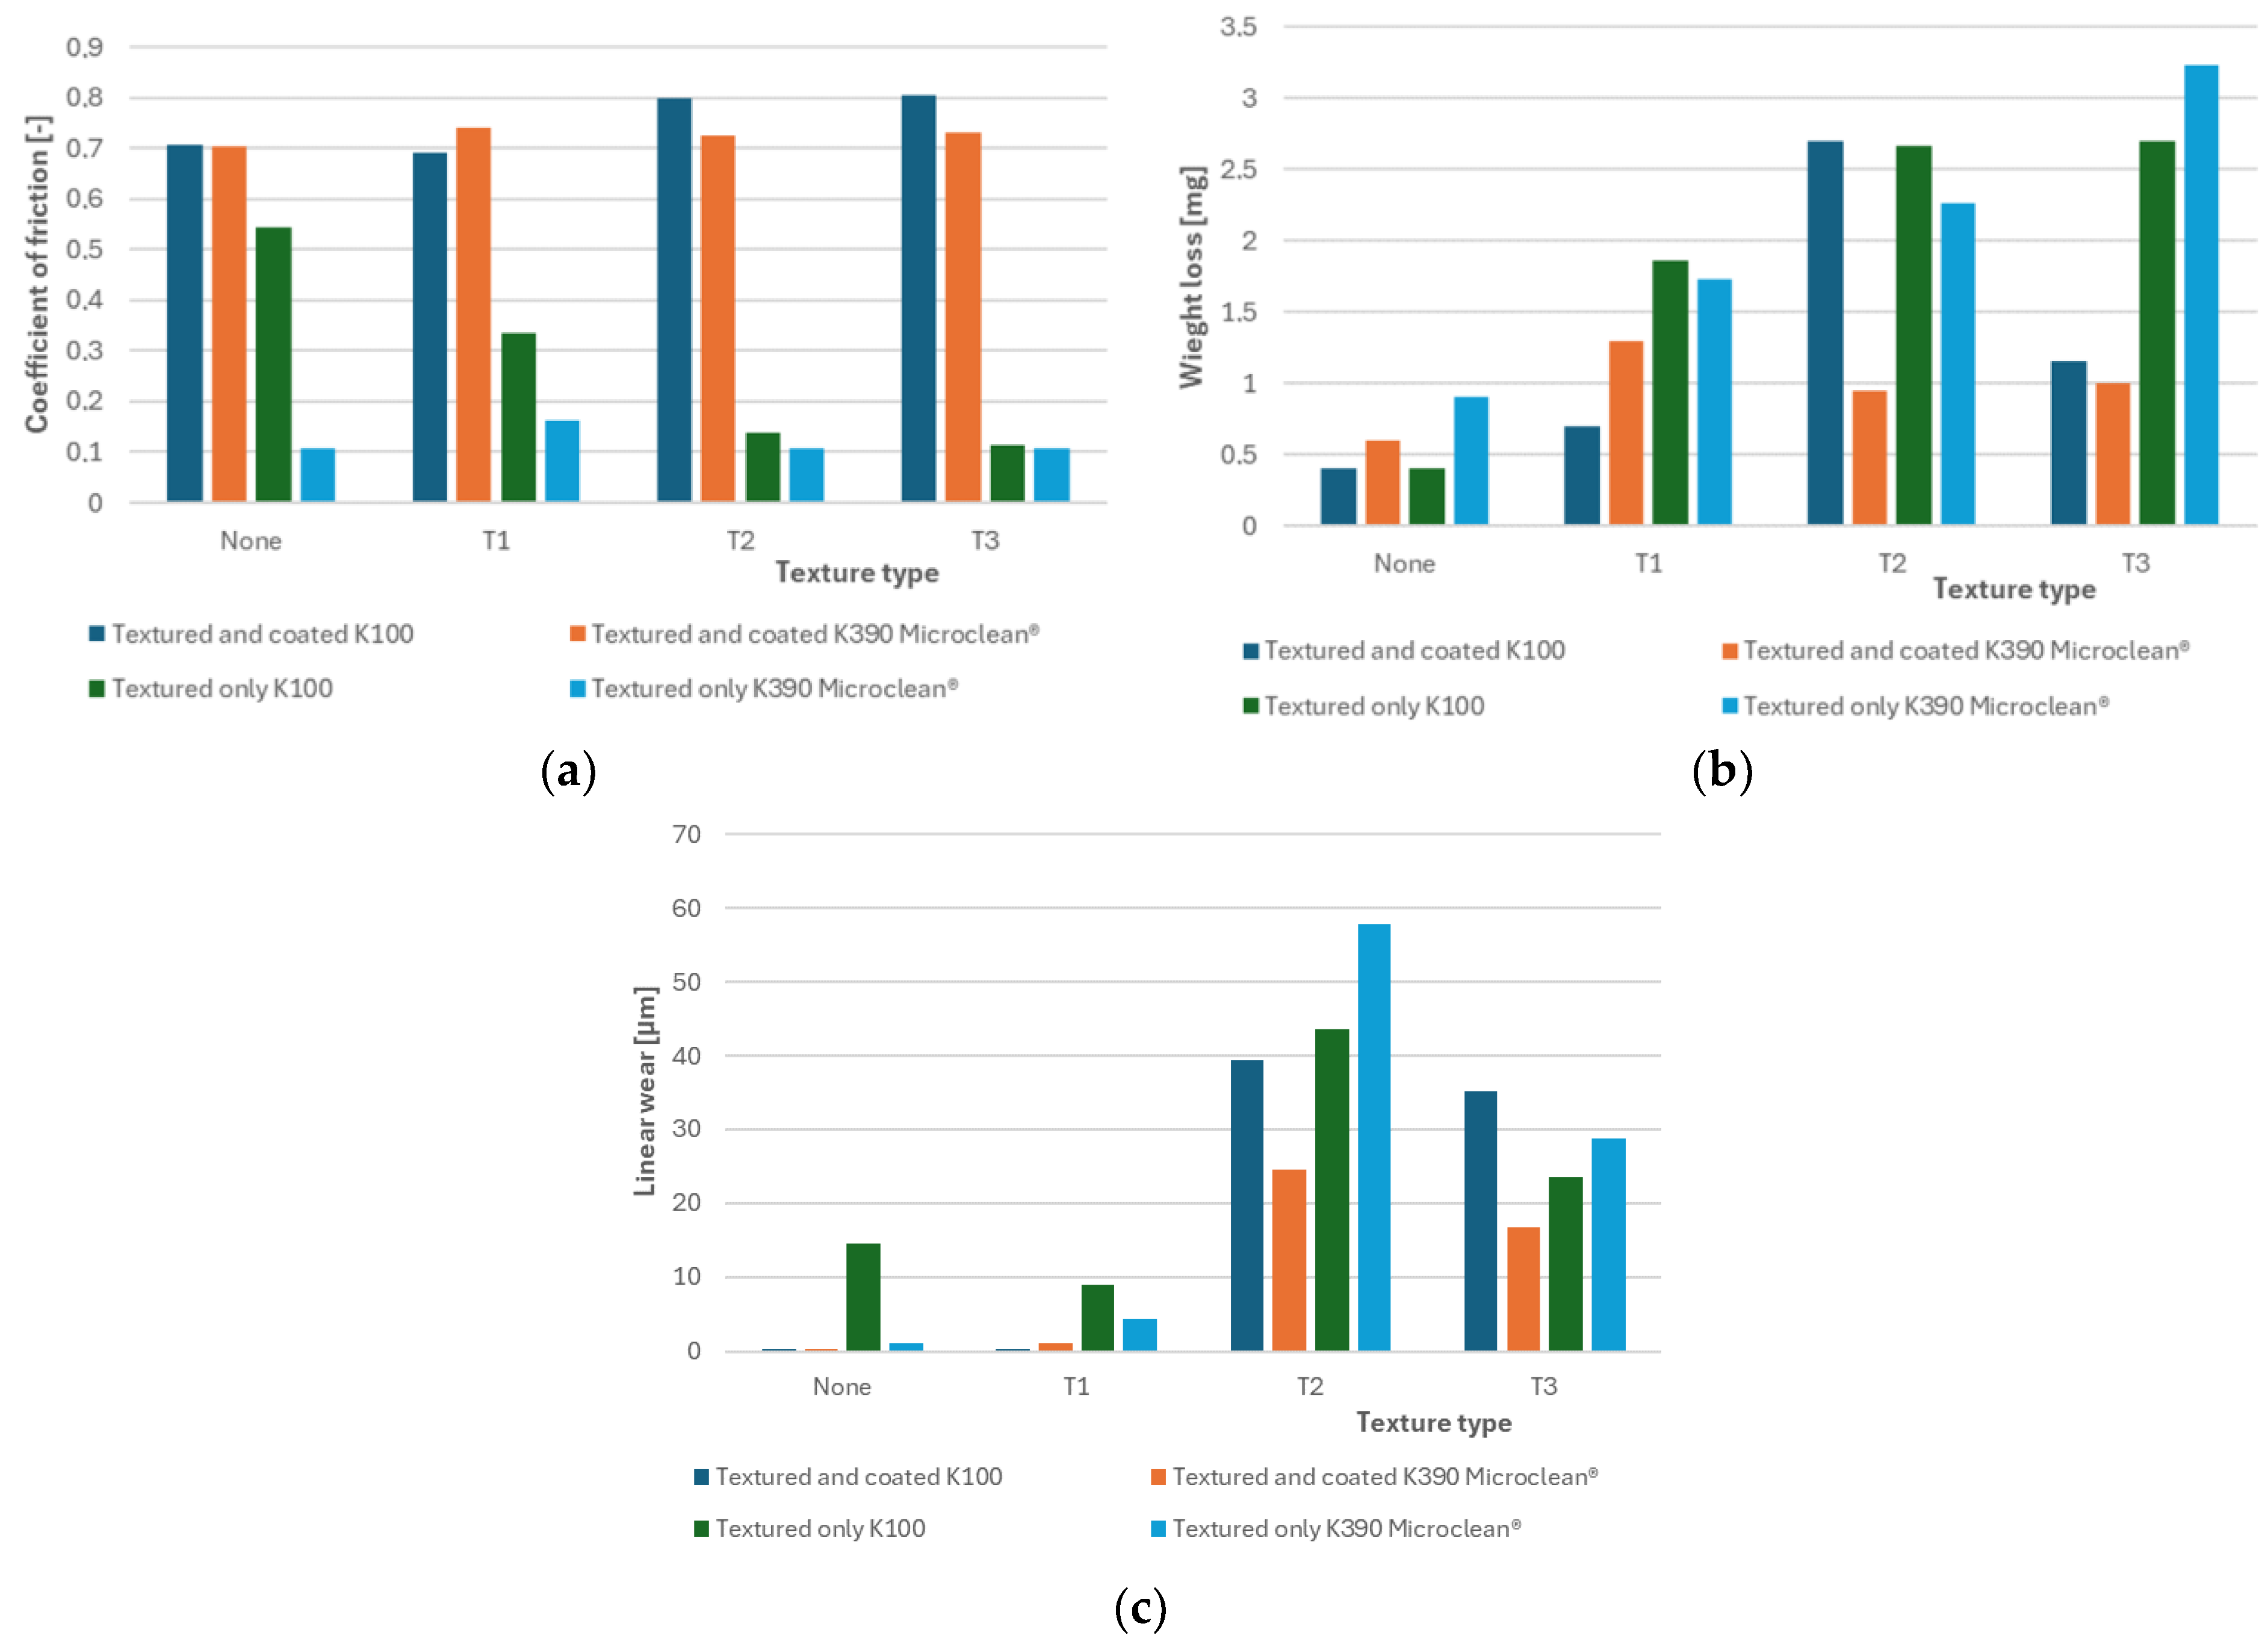
The ball-on-disc test recorded the tangential force Fx and the normal force Fz. Using the ratio of these forces, the coefficient of friction is obtained. The resulting coefficient of friction of individual samples is the calculated average value of the ratio of forces (coefficient of friction) depending on time. Table 4 shows the determined values of the coefficient of friction of individual samples from the ball-on-disc test in comparison to previous results achieved after only texturing. We can see that the coefficient of friction of coated surfaces is higher compared to textured surfaces only.
Weight change was measured using a METTLER Toledo precision laboratory balance with an accuracy of ±0.0001 g. Table 5 shows the measured weight values before the test, after the test and the calculated material loss of the analyzed steels. The weight loss is for coated samples lower in compared to textured surfaces only.
Measurement of linear wear was carried out using a laser scanning confocal microscope LSM 700 from Carl Zeiss (Figure 3). The microscope uses laser light in a confocal beam path to capture defined optical sections of the sample and to combine the sections into a three-dimensional pattern. The laser light is connected to the microscope and hits the sample at the focus of the objective lens. Light reflected or emitted by the surface of the sample passes through the objective lens and is then captured by the tube lens. The laser beam converges in the second optically conjugate focus. Using a motorized XY scan stage, a quick overview of the sample is captured using a mosaic of images.
Using the obtained profile of the surface of the sample, the linear wear data was read, which represents the depth of wear on the surface of the samples caused by the ball-on-disc tribological test. The determined values are recorded in Table 6. From the graphical interpretation of achieved results (Figure 4), we can see that only textured samples have higher linear wear compared to textured and coated surfaces, except for the texture T3 for the K100 cold working tool steel.
From the measured values, we calculated the specific wear volume of the disc based on standard [33]. The wear volume of the disc specimen from the cross-sectional area of the wear track determined by the ACCTee Contour Pro S5000 profilometer made in Tokyo Seimitsu, Japan was calculated for each analyzed sample. For calculation, we used equation:
V disc = π · R · S 1 + S 2 + S 3 + S 4 2                     m 3
where
  • Vdisc is the wear volume of disc specimen [m3];
  • R is the radius of wear track [m];
  • S1 to S4 represent the cross-sectional areas at four places on wear track circle [m2].
Calculated values of the specific wear volume of the disc specimen are shown in Table 7. Calculated values are very low, which corresponds to linear wear of analyzed specimens.
The measured results document that the application of a nanocomposite coating on a laser-textured surface has a positive effect on the abrasion resistance and material loss in almost all types of created laser textures.
The tool steel K100 does not show significant changes for both compared conditions (textured only vs. textured and coated) except for the increase in the coefficient of friction.
However, the K390 Microclean® tool steel achieves less wear after applying the nanocomposite coating, despite the increased value of the wear coefficient.
However, the disadvantage is the increased coefficient of friction, which, after coating, is significantly higher on all textures due to the coefficient of friction of the applied coating itself. However, due to the composition of the coating, the abrasion resistance of the material surface was increased in almost all other indicators compared to the textured surface only, as can be seen from the following experimental results. Although the applied nanocomposite coating increases the coefficient of friction (dry friction without lubricant), the wear rate of the surfaces (textured and non-textured) is lower. This means that if lubricants were used, it is highly likely that both the coefficient of friction itself and the rate of wear will be reduced. From the above, it can be concluded that the process of creating a nanocomposite coating can positively influence the overall evaluation, and thereby also increase the life of the used tool for very high loading methods, which will also be positively affected by lubrication.
Based on calculated values of wear volume of the disc specimen was calculated the specific wear rate of the disc specimen by equation [26]:
W s disc = V disc F p · L m 2 · N 1
where
  • Ws(disc) is the specific wear rate of disc specimen [m2·N−1];
  • Fp is the applied load [N];
  • L is the sliding distance [m].
Calculated values of the specific wear rate of the disc specimen are shown in Table 8. Calculated values are very low.
The textures of T2 and T3 are very fragmented and structurally affected in the laser-affected area. Due to these facts, the wear rate is high in dry friction. The mentioned textures can be used at lower loads, where the lubricants would maintain a low coefficient of friction, thus helping to extend the life of the given tool.
The type of substrate microstructure also plays a role in the wear rate. The different behavior of classic steel (K100 with coarse carbides) and steel produced by powder metallurgy (K390 with fine carbides) can be observed in textures that are more fragmented in shape (T2 and T3). The finer carbides were stabilized after the application of the nanocomposite coating and thus did not contribute to increasing the wear rate of K390 steel during the tribological test. Coarser carbides in the microstructure of K100 steel had a comparable effect on wear during the tribological test for coated and uncoated samples.
Textures T2 and T3 are not suitable for high loads due to the large surface fragmentation and also the influence of the protrusions by laser radiation (high temperature), which increases their hardness, and thus also the susceptibility to more brittle breakage during high load values during the tribological test.

4. Conclusions

In the presented work, tribological tests were carried out to determine the effect of coating with a hard nanocomposite coating nACRo® applied to the laser-textured surfaces of heat-treated two types of steel intended for cold work. One steel was produced by conventional metallurgical process and the second steel was produced by powder metallurgy. The size and distribution of carbide phases contribute to the wear process during tribological tests. Based on the achieved and presented results, the following conclusions can be drawn:
  • Coating reduces the loss of material and also the rate of linear wear of the processed surface compared to only a textured surface, especially in the case of K390 Microclean® steel,
  • Coated surfaces (textured and non-textured) are characterized by higher values of the coefficient of friction on all analyzed forms of surfaces, while non-textured and coated samples had the lowest COF value. The higher COF values for the untextured samples are due to the high normal applied load and the AlCrSiN coating itself,
  • More textured surfaces are characterized by increased weight loss and increased linear wear in both analyzed cases (coated and uncoated), which could potentially be positively influenced by lubrication of textured surfaces with a lubricant that could potentially reduce COF, as well as wear on treated surfaces,
  • In most indicators, the K100 tool steel appears to be the most advantageous, although it has a higher coefficient of friction than the K390 Microclean® steel, but achieves a lower weight loss, as well as a lower linear wear than the K390 Microclean® steel, especially on slightly wavy surfaces. The reason is probably the larger carbide particles localized in the microstructure, which prevent the loss of material during the tribological test due to their high hardness, and thus the higher abrasive resistance of the steel under high load,
  • K390 Microclean® steel, on the other hand, achieves better results with more wavy surfaces after their coating,
  • Only textured surfaces achieve low COF values for all analyzed samples compared to laser-textured and coated samples.

Author Contributions

Conceptualization, J.M. and R.M.; writing—original draft preparation, J.M. and R.M.; writing—review and editing, J.M. and R.M.; sample preparation, J.M., R.M. and M.N.; investigation, J.M., R.M. and M.S.; validation, J.M., R.M., M.S. and M.N. All authors have read and agreed to the published version of the manuscript.

Funding

This work was funded by the Scientific Grant Agency of the Ministry of Education, Science, Research and Sports of the Slovak Republic and the Slovak Academy of Sciences VEGA (projects nos. 1/0266/23 and 1/0345/22), and the Slovak Research and Development Agency (project no. APVV-20–0124).

Data Availability Statement

The data presented in this study are available on request from the corresponding author. The data are not publicly available due to the large data capacity.

Acknowledgments

The authors would also like to thank the staff at the research laboratory Promatech at the Institute of Materials Research of Slovak Academy of Science in Košice, for help with the execution of tribological experiments.

Conflicts of Interest

The authors declare no conflicts of interest. The funders had no role in the design of the study; in the collection, analyses, or interpretation of data; in the writing of the manuscript; or in the decision to publish the results.

References

  1. Bhusnan, B. Introduction to Tribology, 2nd ed.; John Wiley & Sons, Ltd.; Ohio State University: Columbus, OH, USA, 2013; ISBN 978-1-119-94453-9. [Google Scholar]
  2. Why Is Tribology Important. Available online: https://www.stle.org/files/What_is_tribology/Tribology.aspx (accessed on 15 February 2024).
  3. Anton Paar. Basics of Tribology. Available online: https://wiki.anton-paar.com/en/basics-of-tribology/ (accessed on 15 February 2024).
  4. Metal Spinning (Metal Spinners). Available online: https://www.iqsdirectory.com/articles/metal-spinning.html (accessed on 12 January 2024).
  5. Metal Spinning 101: A Guide. Available online: https://www.metalcraftspinning.com/metal-spinning/ (accessed on 12 January 2024).
  6. Sahoo, P.; Das, S.K.; Davim, J.P. Tribology of materials for biomedical application. In Mechanical Behavior of Biomaterials, 1st ed.; Woodhead Publishing: Sawston, UK; Elsevier: Amsterdam, The Netherlands, 2019; pp. 1–45. [Google Scholar] [CrossRef]
  7. Sadowski, P.; Stupkiewicz, S. Friction in lubricated soft-on-hard, hard-on-soft and soft-on-soft sliding contacts. Tribol. Int. 2019, 129, 246–256. [Google Scholar] [CrossRef]
  8. Maculotti, G.; Goti, E.; Genta, G.; Mazza, L.; Galetto, M. Uncertainty-based comparison of conventional and surface topography-based methods for wear volume evaluation in pin-on-disc tribological test. Tribol. Int. 2022, 165, 107260. [Google Scholar] [CrossRef]
  9. Gourgiotis, P.A.; Zisis, T.; Giannakopoulos, A.E.; Georgiadis, H.G. The Hertz contact problem in couple-stress elasticity. Int. J. Solids Struct. 2019, 168, 228–237. [Google Scholar] [CrossRef]
  10. Tribonet. Hertzian Contact Equations for Elliptical, Spherical and Cylindrical Contacts. Available online: https://www.tribonet.org/wiki/hertz-equations-for-elliptical-spherical-and-cylindrical-contacts/ (accessed on 15 February 2024).
  11. Etsion, I. Improving tribological performance of mechanical components by laser surface texturing. Tribol. Lett. 2004, 17, 733–737. [Google Scholar] [CrossRef]
  12. Youssef, A.A.; Budzynski, P.; Filiks, J.; Surowiec, Z. Improvement of tribological properties of aluminum by nitrogen implantation. Vacuum 2005, 78, 599–603. [Google Scholar] [CrossRef]
  13. Ueda, M.; Berni, L.A.; Castro, R.M.; Reuther, H.; Lepienski, C.M.; Soares, P.C. Improvements of tribological properties of CrNiMo and CrCoMo alloys by nitrogen plasma immersion ion implantation. Surf. Coatings Technol. 2005, 200, 594–597. [Google Scholar] [CrossRef]
  14. Tang, M.; Zhang, L.; Shi, Y.; Zhu, W.; Zhang, N. Research on the improvement effect and mechanism of micro-scale structures treated by laser micro-engraving on 7075 Al alloy tribological properties. Materials 2019, 12, 630. [Google Scholar] [CrossRef] [PubMed]
  15. Chen, T.; Koyama, S.; Yu, L. Improvement of mechanical, tribological, and fricative reduction properties of pure titanium by boriding. Appl. Sci. 2021, 11, 4862. [Google Scholar] [CrossRef]
  16. Liu, Q.; Liu, Y.; Li, X.; Dong, G. Pulse laser-induced cell-like texture on surface of titanium alloy for tribological properties improvement. Wear 2021, 477, 203784. [Google Scholar] [CrossRef]
  17. Oñate, J.I.; Alonso, F.; García, A. Improvement of tribological properties by ion implantation. Thin Solid Films 1998, 317, 471–476. [Google Scholar] [CrossRef]
  18. Šugárová, J.; Šugár, P.; Frnčík, M. Friction evaluation of laser textured tool steel surfaces. Acta Mech. Autom. 2017, 11, 129–134. [Google Scholar] [CrossRef]
  19. Mesquita-Guimarães, J.; Ferreira, N.M.; Reis, R.M.S.; Gonzalez-Julian, J.; Pinho-da-Cruz, J. Laser surface texturing and numerical simulation of heat flux on Cr2AlC MAX phase heat exchangers. J. Eur. Ceram. Soc. 2023, 43, 5894–5903. [Google Scholar] [CrossRef]
  20. Outón, J.; Córdoba, T.; Gallero, E.; Vlahou, M.; Stratakis, E.; Matres, V.; Blanco, E. Corrosion behavior of nanostructured ferritic stainless steel by the generation of LIPSS with ultrashort laser pulses. J. Mater. Res. Technol. 2023, 27, 7422–7433. [Google Scholar] [CrossRef]
  21. Sorrentino, L.; Parodo, G.; Turchetta, S. Influence of Laser Treatment on End Notched Flexure Bonded Joints in Carbon Fiber Reinforced Polymer: Experimental and Numerical Results. Materials 2022, 15, 910. [Google Scholar] [CrossRef] [PubMed]
  22. Huang, P.C.; Chou, C.C.; Hsu, L.S. Preparation and tribological research of the electrodeposited NiW alloy coatings for piston ring application. Surf. Coat. Technol. 2021, 411, 126980. [Google Scholar] [CrossRef]
  23. Zhu, H.; Zhang, M.; Ren, W.; Saetang, V.; Lu, J.; Wu, Y.; Xu, K.; Liu, Y.; Zhang, Z. Laser-induced localized and maskless electrodeposition of micro-copper structure on silicon surface: Simulation and experimental study. Opt. Laser Technol. 2024, 170, 110315. [Google Scholar] [CrossRef]
  24. Moravčíková, J.; Moravčík, R.; Kusý, M.; Necpal, M. Influence of Laser Surface Texturing on Tribological Performance of Tool Steels. J. Mater. Eng. Perform. 2018, 27, 5417–5426. [Google Scholar] [CrossRef]
  25. Pannon Platit. nACRo®. Available online: https://www.pannonplatit.com/bevonat/16/nacro (accessed on 15 February 2024).
  26. Moravčík, R. Tool Steels of Ledeburite Type; IFW Dresden: Dresden, Germany, 2013; ISBN 978-3-9808314-4-4. [Google Scholar]
  27. BÖHLER K100. Available online: https://www.bohler.sk/app/uploads/sites/92/productdb/api/k100_sk.pdf (accessed on 20 March 2024).
  28. K390 Microclean®. Available online: https://www.bohler.sk/app/uploads/sites/92/2020/12/productdb/api/k390en.pdf (accessed on 20 March 2024).
  29. EN ISO 6508-1:2016; Metallic Materials. Rockwell Hardness Test. Part 1: Test Method. International Organization for Standardization: Geneva, Switzerland, 2016; revised 2023.
  30. EN ISO 4288:1996; Geometrical Product Specifications (GPS)—Surface Texture: Profile Method—Rules and Procedures for the Assessment of Surface Texture. International Organization for Standardization: Geneva, Switzerland, 1985; revised 1995.
  31. Švec, P.; Bošanský, M.; Gondár, E.; Toth, F.; Protasov, R. Wear of AlCrN and CrAlSiN coatings applied to nonstandard involute gears. Lubricants 2021, 9, 54. [Google Scholar] [CrossRef]
  32. Cai, F.; Gao, Y.; Zhang, S.; Zhang, L.; Wang, Q. Gradient architecture of Si containing layer and improved cutting performance of AlCrSiN coated tools. Wear 2019, 424–425, 193–202. [Google Scholar] [CrossRef]
  33. ISO 20808:2016; Fine Ceramics (Advanced Ceramics, Advanced Technical Ceramics) Determination of Friction and Wear Characteristics of Monolithic Ceramics by Ball-on-Disc Method. International Organization for Standardization: Geneva, Switzerland, 2016; revised 2021.
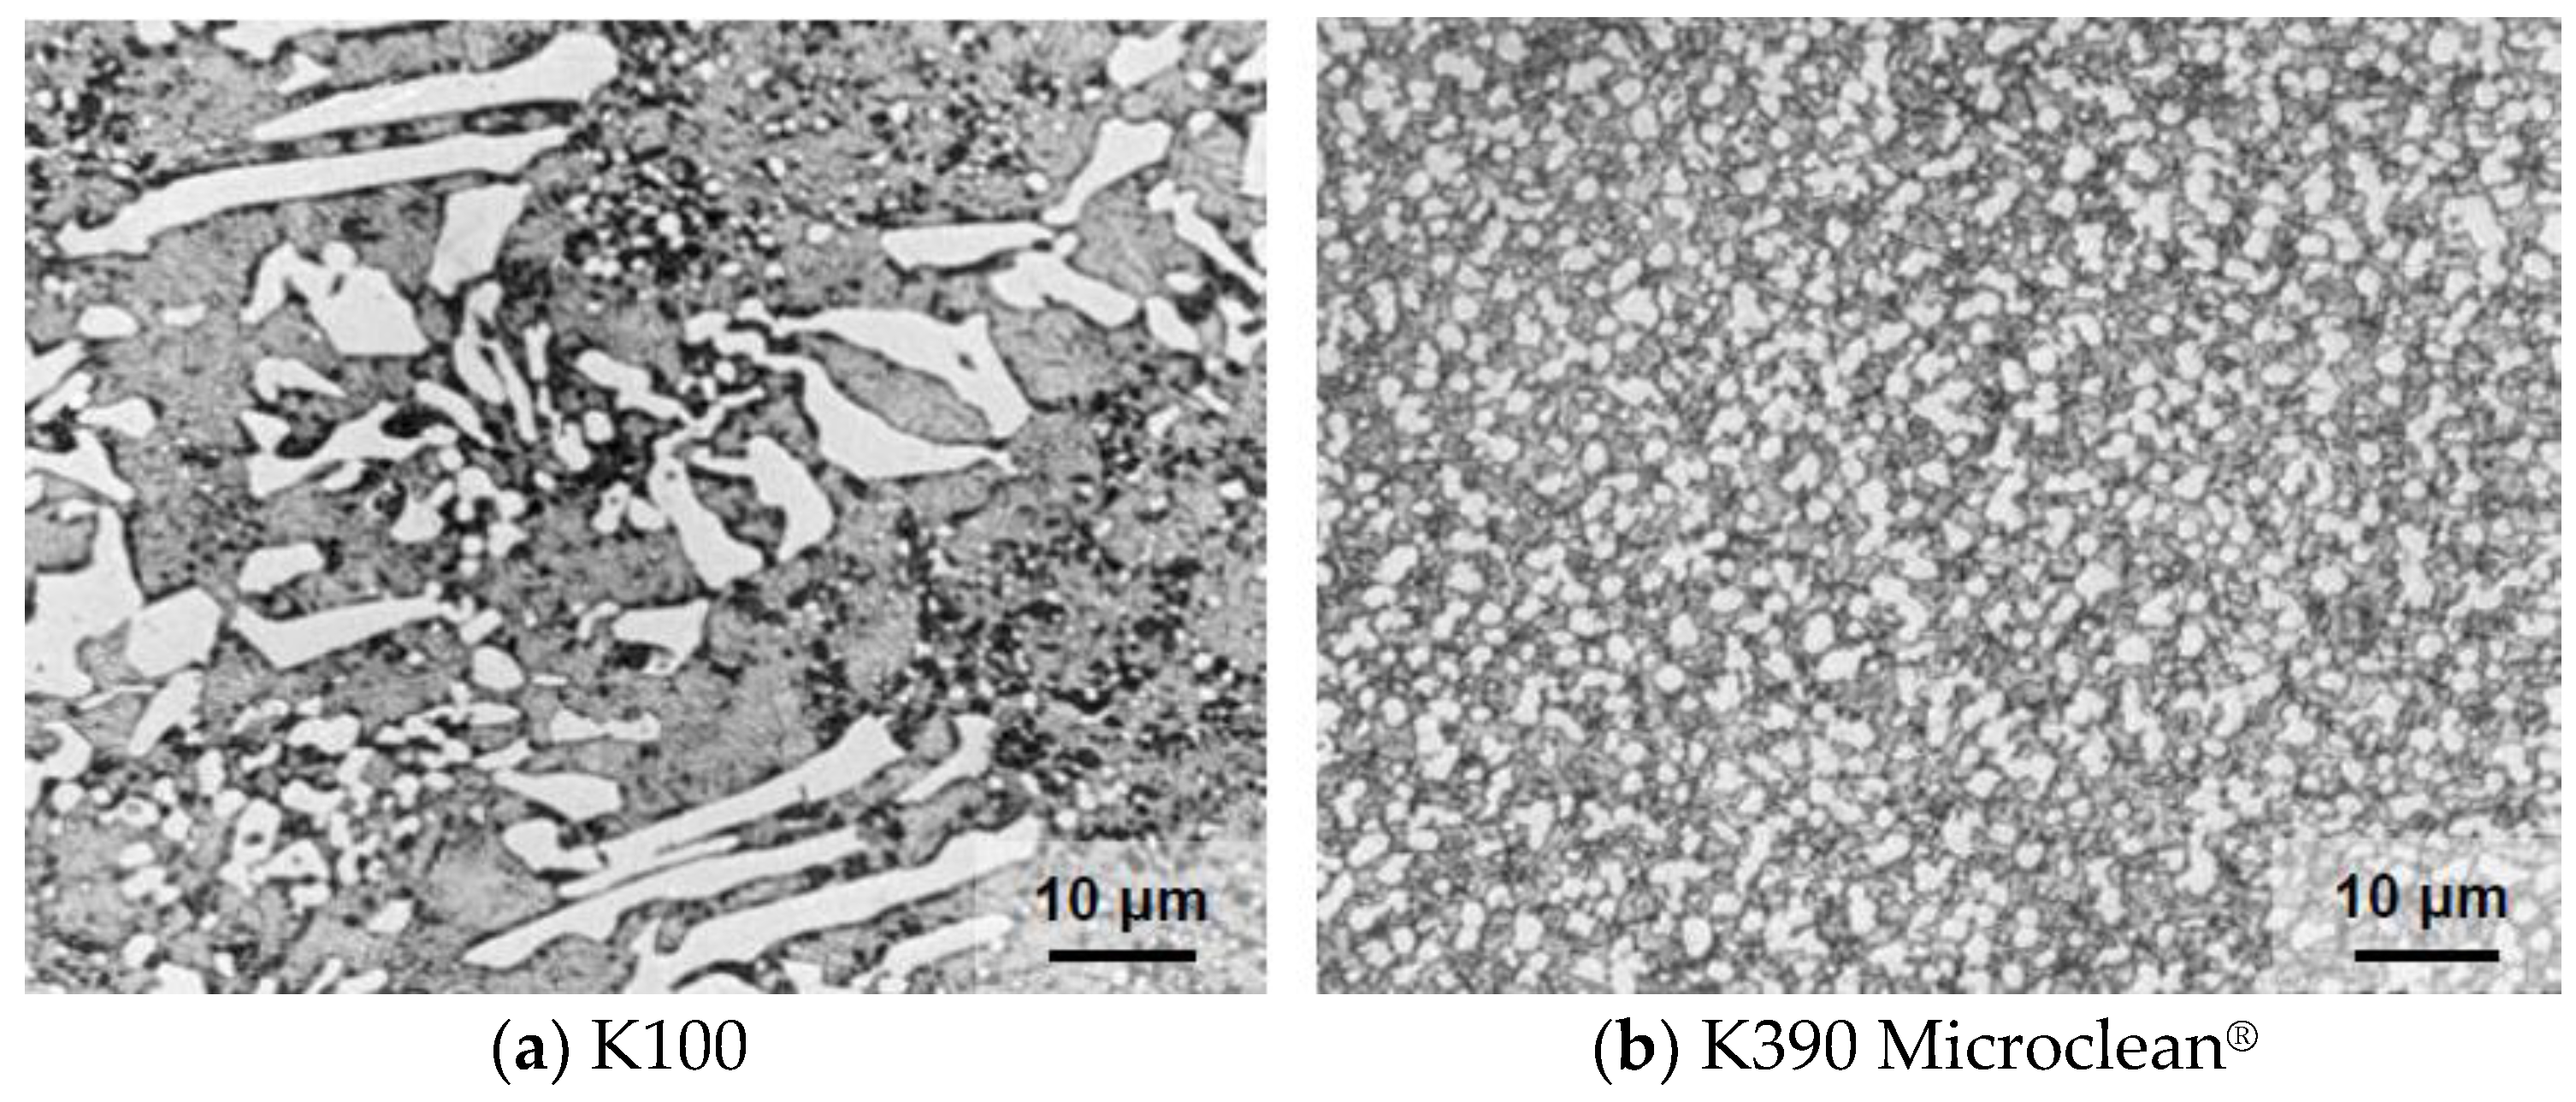
Figure 1. Microstructure types of analyzed tool steels.
Machines 12 00311 g001
Figure 2. Used texture types on the samples. (a) texture type T1; (b) texture type T2; (c) texture type T3.
Machines 12 00311 g002
Figure 3. Sample of surfaces after tribology test from laser confocal microscope. (a) Not textured; (b) texture T1 type; (c) texture T2 type; (d) texture T3 type.
Machines 12 00311 g003
Figure 4. Graphically preview of measured values after tribologial test. (a) Coefficient of friction; (b) Weight loss; (c) Linear wear.
Machines 12 00311 g004
Table 1. Nominal chemical composition of analyzed cold working tool steels [27,28].
Chemical Composition [wt. %]CSiMnCrMoVWCo
K1002.000.250.3511.50----
K390 Microclean®2.470.550.404.203.809.001.002.00
Table 2. Heat treatment conditions of analyzed cold working tool steels [24].
K100K390 Microclean®
Hardening [°C]9501050
Tempering [°C]250550
Rockwell hardness59.3 ± 0.6 HRC57.3 ± 1.2 HRC
Table 3. Parameters of coating AlCrSiN type [25].
Nanohardness
[GPa]
Coating Thickness
[µm]
Max. Working Temperature
[°C]
39 ÷ 411 ÷ 41100
Table 4. Average values for coefficient of friction [-] of the analyzed samples.
Textured and CoatedTextured Only [24]
TextureK100K390 Microclean®K100K390 Microclean®
None0.7080.7030.5450.107
T10.6910.7410.3350.162
T20.7990.7250.1380.109
T30.8060.7320.1140.107
Table 5. Measured values of weight loss of samples in [mg].
Textured and CoatedTextured Only [24]
TextureK100K390 Microclean®K100K390 Microclean®
None0.400.600.400.900
T10.701.301.8671.733
T22.700.952.6672.267
T31.151.002.7003.233
Table 6. Measured values of linear wear in [µm].
Textured and CoatedTextured Only [24]
TextureK100K390 Microclean®K100K390 Microclean®
None0.2760.28114.6101.100
T10.2511.0678.9534.383
T239.30024.65043.55357.743
T335.20016.8023.64728.747
Table 7. Calculated values of the specific wear volume of the disc specimen [m3].
Textured and CoatedTextured Only
K100K390 Microclean®K100K390 Microclean®
None2.08861 × 10−112.14787 × 10−118.02172 × 10−91.65736 × 10−10
T11.79941 × 10−111.58324 × 10−103.84809 × 10−91.3181 × 10−9
T23.539 × 10−81.75799 × 10−84.12875 × 10−86.30289 × 10⁻⁸
T32.99989 × 10−89.89136 × 10−91.65179 × 10−82.21401 × 10⁻⁸
Table 8. Calculated values of the specific wear rate according to wear volume [m2·N−1].
Textured and CoatedTextured Only
K100K390 Microclean®K100K390 Microclean®
None1.49187 × 10−151.5342 × 10−155.7298 × 10−131.18383 × 10⁻¹⁴
T11.28529 × 10−151.13089 × 10−142.74864 × 10−139.41499 × 10⁻¹⁴
T22.52786 × 10−121.25571 × 10−122.94911 × 10−124.50207 × 10⁻¹²
T32.14278 × 10−127.06526 × 10−131.17985 × 10−121.58144 × 10⁻¹²
Disclaimer/Publisher’s Note: The statements, opinions and data contained in all publications are solely those of the individual author(s) and contributor(s) and not of MDPI and/or the editor(s). MDPI and/or the editor(s) disclaim responsibility for any injury to people or property resulting from any ideas, methods, instructions or products referred to in the content.