Abstract
Nano aluminum oxide was prepared by the combustion method using aluminum nitrate as the oxidizer and urea as a fuel. Characterization of synthesized materials was performed using SEM (scanning electron microscope), powder XRD (X-ray diffraction), FTIR (Fourier transform infrared spectroscopy), and TEM (transmission electron microscope). Al-Mg/Al2O3 (2, 4, 6, and 8 wt%) metal matrix nanocomposites were prepared by liquid metallurgy route-vertex technique. The homogeneous dispersion of nano Al2O3 particles in Al-Mg/Al2O3 metal matrix nanocomposites (MMNCs) was revealed from the field emission SEM analysis. The reinforcement particles present in the matrix were analyzed through energy-dispersive X-ray spectroscopy method. The properties (corrosion and mechanical) of the fabricated composites were evaluated. The mechanical and corrosion properties of the prepared nanocomposites initially increased and then decreased with the addition of nano Al2O3 particles in Al-Mg Matrix. The studies show that, the presence of 6 wt% of nano Al2O3 particles in the matrix improved the properties of other combinations of nano Al2O3 in the Al-Mg matrix material. Further, the Al-Mg/Al2O3 (6 wt%) MMNCs are joined by friction stir welding and evaluated for microstructural, mechanical, and corrosion properties. Al-Mg/Al2O3 MMNCs may find applications in the marine field. The response surface method (RSM) was used for the optimization of tensile strength, Young’s modulus, and microhardness of the synthesized material which resulted in a 95% of statistical confidence level. Artificial neural network (ANN) analysis was also carried out which perfectly predicted these two properties. The ANN model is optimized to obtain 99.9% accurate predictions by changing the number of neurons in the hidden layer.
1. Introduction
A large variety of methods are available commercially for the synthesis of nanoparticles and these are based on the expense of nanoparticles’ production, easiness, and morphological features. Among these methods, an auto-proliferating combustion process is considered to be the best alternative as by following this simple method, the required phase can be obtained with greater control over stoichiometric ratio [1,2,3]. This method of combustion synthesis requires the application of temperatures, where organic material is utilized to initiate the decomposition process of precursor metal salts [3,4,5]. The morphological features of the prepared samples mainly depend on the temperature and gases produced in the process during complex decomposition and are influenced by the fuel content, fuel/oxidizer proportion, temperature during the chemical process, etc. [1].
Aluminum alloys reinforced with ceramic particles result in high stiffness, high elastic modulus, and wear resistance [6]. Cluster formation and heterogeneous distribution of reinforcement throughout the medium due to casting or powder metallurgy manufacturing techniques is a common problem associated with aluminum matrix composites (AMCs). This non-homogeneous distribution of reinforcements in the crystal structure of the Base Metal can influence the isotropy of material characteristics. Friction stir welding (FSW) is a better process as it prevents clustered reinforcement because of the continuous stirring motion of the machine and brings uniform dispersion in the weldment owing to material blending and extreme plastic distortion [7,8,9,10]. It is a solid-state welding method that occurs far below the material’s melting temperature and avoids the negative impacts of traditional fusion welding. Additionally, it has developed itself as a popular method of joining AMCs [9]. It was introduced by the Welding Institute [11] which involves minimum heat intake and the bonding happens well below the alloys’ melting temperature. Hence it is ideal for low MP metals like Al and Mg [12]. The spinning tool used by FSW is non-consumable. This spinning tool fuses the work piece’s two faying surfaces together. This connecting strategy effectively connects metals, alloys, and MMCs that are hard to connect with traditional methods [10].
The schematic representation of the FSW method is displayed in Figure 1. In general, because of the rotation of the equipment, the FSW method reaches a temperature of about 80% of the metal melting temperature. It results in reallocation and refining of reinforcement, recrystallization, and the growth of grain in the nugget zone [7]. The formulation of variables for FSW is based on a hit and trial method for the determination of process variables and the design of welding tools [13]. The quality of the weldment can be evaluated primarily by its macrostructure and microstructure. FSW was found to produce microstructural variations across the weld due to the thermo-mechanical treatment involved in the process. Such variations result in local changes in mechanical properties [14]. During FSW, due to continuous tool motion, the parts are subjected to thermal cycles and extreme plastic deformation at elevated temperatures. The microstructure of the nugget zone is highly affected by the rotor velocity of the tool and the amount of heat input. It is possible to increase the weld quality by monitoring the weld zone temperature [7]. In general, transverse microhardness measurements are preferred; they provide a hint of the transition of different phases and reinforcement dispersion in the FSW of AMMCs. The maximum hardness appears in the middle of the nugget zone, because of more grain refinement owing to dynamic recrystallization and increasingly homogeneous distribution of smaller reinforcement particulates in the weld zone because of the stirring motion [7,15,16,17,18,19].
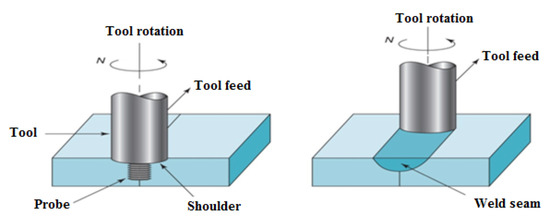
Figure 1.
Pictorial depiction of FSW Method.
The influence of graphite reinforcement addition on surface roughness during turning of AA7075-ZrB2 in situ Metal Metrix Composites (MMC) was studied by Sivasankaran et al. [20]. This was observed that for 1% of Gr and 3% ZrB2 hybrid in situ composites resulted in a good surface finish. Thirumoorthy et al. [21] reviewed the latest research development in aluminum MMCs.
The work in [21,22] focused on the mechanical properties like hardness and crystal structure in FSW Al6061-TiB2 composite formed by the method of stir casting. Grain refining and uniform re-distribution of small TiB2 particulates in the stir zone takes place after FSW was noticed by comparing the microstructure results before and after welding. Faraji and Asadi [23] able to notice that, much better distribution of Al2O3 particles in MMCs using the square pin profile tool due to significant pulsating stirring action. In another study, Tanvir et al. [24] fabricated FS-welded joints by adding Al2O3 nanoparticles in the base matrix to refine the nugget zone’s crystalline structure and to impede granular growth in the HAZ. They found that the introduction of Al2O3 nanoparticles across the joint line contributes to a notable grain refinement structure of the weld zone relative to the base material and unreinforced nugget joints. For the reinforced FSW joint, tensile strength, microhardness, and wear properties were significantly improved relative to the unreinforced joint due to the presence of nanoparticles. In an attempt to assess the impact of SiC and TiC nanoparticles on the weld nugget of AA6082-T6 butt welds, optical and electron microscopy, as well as microhardness testing, were carried by Karakizis et al. [25]. They mainly focused on the distribution of dislocations and the inclusion of particles in the weld that was intermetallic and reinforcing. They observed that, due to the complex recrystallization process, the particle sizes of all the samples were severely reduced. This also caused a lot of the intermetallic particles of the base metal to be diluted and the dislocations to multiply. They also observed increased elongation and micro-hardness with the addition of SiC and TiC nanoparticles. Tanvir et al. [26] carried an experimental study to find the impact of the volume fraction of Al2O3 nanoparticles on the rheological, mechanical, and micro-structural properties of particulate-nanocomposite (P-NCs)-based aluminum alloy 6061-T6 produced by FSW techniques. In order to determine the distribution of Al2O3 nanoparticles in the nugget region, optical microscopy (OM) and SEM were used and the crystal structures of the generated nanocomposites; the extent of nanocomposites formed on the alloy matrix; and the properties of fractures and wear were evaluated. They found a dramatic rise in micro-hardness to 127 HV, which is better than AA6061-T6, with the rise in the volume fraction of Al2O3 nanoparticles. They also observed an increment in the tensile strength and wear resistance of generated P-NCs at 0.3 vol fraction of Al2O3 nanoparticles as compared to 0.2 and 0.4 vol fraction. Sharifitabar et al. [27] analyzed the mechanical and tribological features of the friction stir processed (FSP) 5052Al/Al2O3 surface composite and the influence of various FSP pass on their features. Friction stir processed by one to four passes was used in two sample series with and without powder. The research revealed that with the escalation of the FSP pass, the grain size of the stir zone reduced and also resulted in a uniform distribution of Al2O3 particles in the matrix and nano-composite output with a mean cluster size of 70 nm. They also observed an increase in tensile and yield strengths of the composites.
Mahdi et al. [28] analyzed the influence of the rotational speed of the tool on tribological and mechanical properties of magnesium-based surface nanocomposites fabricated using FSP. They found an increment in the grain size of the composite with an increase in rotational velocity. They also observed an improvement in the distribution of Al2O3 nanoparticles despite a decrease in the hardness with an increase in rotational velocity. Vijay et al. [29] analyzed the influence of tool pin profile on the characteristics of FSW Al-TiB2 MMCs. They suggested that square pin profile results with improved properties in comparison with the rest of the profiles used in their study. Nandipati et al. [30] stated that FSW metal matrix composites yield significant grain refinement and homogeneous particle distribution, with increased strength than the base metal. Khalique et al. [31] investigated the impact of mechanical properties and microstructure of 6082 aluminium alloy with various percentages of Al2O3 reinforcements using the FSW process. To evaluate the optimum values ANOVA and RSM method was also used. Shettigar et al. [32] developed the AMCs using the stir casting method and welded using the FSW method. They also studied the microstructure and joint strength of the welded joints and obtained a joint efficiency of 97% perpendicular, according to the tensile test. Prabhuraj and Rajakumar [33] used FSW to weld rolled aluminum plates of 10 mm thickness. Later in a 3.5 wt% sodium chloride solution, the electrochemical corrosion activity of FSW joints was studied. They found that the stir zone has a higher corrosion potential than the parent metal. Kumar et al. [34] investigated the impact of various parameters that affected the mechanical properties of aluminum-based materials produced using the friction stir process. They found an improvement in strength and hardness and a decrease in wear rate after processing these materials for 3–4 passes using FSW. When the rotational speed is increased, the wear rate decreases. Rao and Trinadh [35] used the FSW method to make aluminum alloy composites with hybrid reinforcements (different amounts of B4C and TiB2 particles). They found an increase in the mechanical properties, especially with 75 percent TiB2 and 25 percent B4C.
From the literature review, it is very much clear that, processing aluminum using the FSW method has a lot of benefits. Additionally, the addition of nanoparticles (Al2O3) as a reinforcement material increases the various properties of the base material. From the review, it is also evident that many research studies have been performed only on carbide and oxide-based reinforcements. No sufficient research work has been carried out on the inclusion of nitride and oxide particle reinforcement in aluminum alloys. However, the introduction of nitride reinforcement and the addition of oxides with nitrides enhances the properties. The research gap on the use of modern characterization methods in the analysis of the composite continues to remain.
Thus, the main objective of the present research is to explore Al-Mg/Al2O3 MMNCs at atmospheric and high temperatures for their mechanical properties and static immersion corrosion behavior in a 3.5 wt% sodium chloride solution using the FSW method. The impact of the size and volume fraction of Al2O3 particles on mechanical and corrosion features will be investigated. This composite has a wide range of applications including marine and aircraft applications. The exploration of these properties is very important as the usage of these composites involves marine application which has a very corrosive environment. Additionally, it finds application in the aircraft industry especially during the landing of aircraft which involves a great deal of wear-resistant and this composite is found to have good wear-resistant properties.
2. Experimental Details
2.1. Synthesis of Nano Aluminium Oxide
A flow chart to show the different steps in the synthesis of nano Al2O3 is displayed in Figure 2. While the muffle furnace that was used in this analysis is shown in Figure 3a. Aluminum nitrate (Al2(NO3)2) was used as an oxidizer and urea (NH2CONH2) was employed as a fuel to produce aluminum oxide by relatively low-temperature solution combustion process. By determining the oxidizer and fuel total valences and maintaining their ratio as one, the stoichiometric content of the mixture was computed. The precursor solution was continuously stirred well enough in a bowl for about 10 min using filtered water, the prepared solution was continuously stirred well enough to obtain a uniform solution and thereafter inserted into the preheated muffle furnace which was maintained at 400 °C temperature.
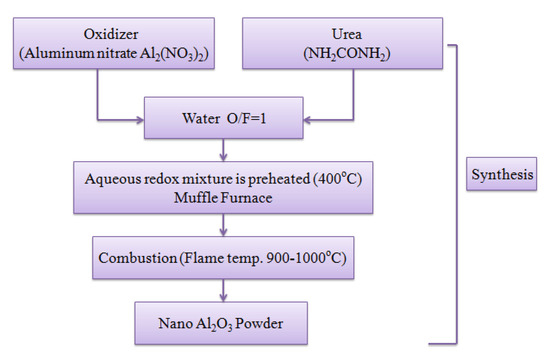
Figure 2.
Flow chart of synthesis of nano Al2O3.
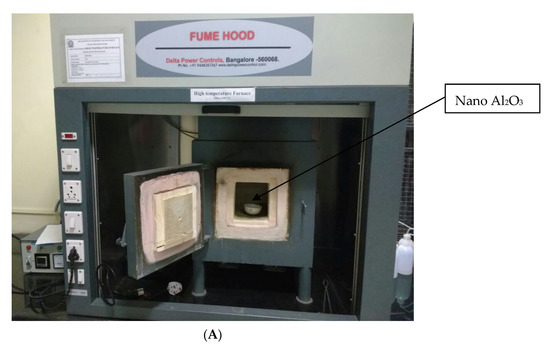
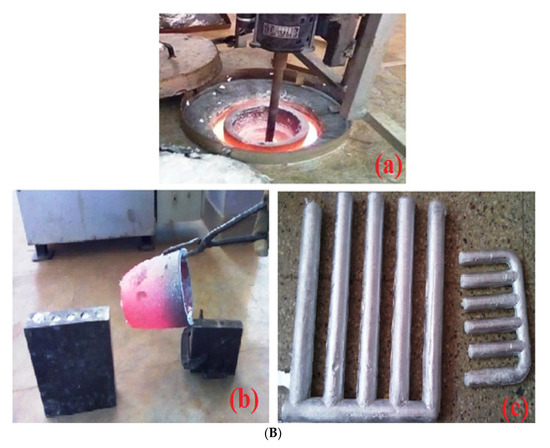
Figure 3.
(A) Schematic depiction of the electrical resistance muffle furnace used in this analysis. (B) Stir casting technique, (a) melting, (b) pouring molten metal into a die, and (c) casted parts.
The mixture undergoes thermal dehydration, gets heated, and forms a viscoelastic liquid that can catch fire, it can get instantaneously stimulated, emitting a very large amount of gaseous materials, leading to fluffy Al2O3 nanopowder production. In about 5 min, the solution combustion synthesis method can be finished.
Assuming the above process was completed, the Al2O3 formulation equation can be expressed as follows:
Al2(NO3)2 + NH2CONH2 → Al2O3 + CO2 + 2N2 + 2H2O
The energy required for the synthesis was released during the process. The process propagates without further additional heating and reaction heating was sufficient for the decomposition of the redox mixture.
2.2. Synthesis of Al-Mg/Al2O3 Metal Matrix Nanocomposites
Al-Mg alloy as matrix and 2, 4, 6, and 8 wt% nano alumina particles as reinforcement composites were synthesized by using a standardized two-step stir casting process. The base alloy was heated to about 750 °C in a graphite crucible until the base metal melts completely. Then the melt was held for about 20 min. The nano aluminum oxide particles are packed in an aluminum foil, preheated to 300 °C, to have a moisture-free surface which allows greater wettability with the Al-Mg alloy in the molten state. The temperature of the melt was recorded; it was around 600 °C. At this temperature, preheated reinforcement particles were introduced into the Al-Mg alloy melt, and then the mixture was mechanically stirred for about 20 min. The melting temperature at this point was about 580 °C. Afterwards, this temperature was raised to 750 °C and a vortex is formed due to the continuous mechanical stirring. This was done to improve the proper mixing of reinforcement in a matrix for about 8–10 min. Then, the molten composite slurry was cleaned (slag removed from the top surface) and poured into permanent molds which were preheated; having a length of 350 mm, 100 mm, and thickness of 10 mm. The synthesized composites were characterized for structural, mechanical, and corrosion properties. A quick review of the above methods can be seen in Table 1a.

Table 1.
(a) Specifications of methods for stirring. (b) Composition of Al-Mg alloy in wt%.
2.3. The Procedure of FSW Welding
The optimized weight percent reinforcement dispersed Al-Mg alloy composite plates with measurement 300 × 60 × 6 mm were utilized to friction stir weld in a single pass using FSW machine (FSWB 10-300, Make-R V Machine Tools, Coimbatore, Tamil Nadu, India) displayed in Figure 3b. The compound composition of the Al-Mg alloy is specified in Table 1b. Using a specialized fixture, the plates were correctly placed and tightened. Three different tool geometries have been utilized in the present research such as straight cylindrical (SC), tapered cylindrical (TC), and straight square (SS) [35]. Due to its greater strength, good hot toughness, simple production, easily obtainable, and reduced-price, high carbon high chromium steel was chosen as a cutting tool [36]. Using a computer numerical controlled (CNC) turning center and wire cut electron discharge machining, the FSW tools are fabricated. A method of heat treatment (hardened to 62 HRC). The instrument had a shoulder diameter of 25 mm, a pin length of 5.7 mm, and a pin diameter of 6 mm straight cylindrical (SC), Square 6 mm Straight Square (SS), and Tapered cylindrical (TC) tapered from 6 to 3 mm. The manufactured tools are shown in Figure 4.
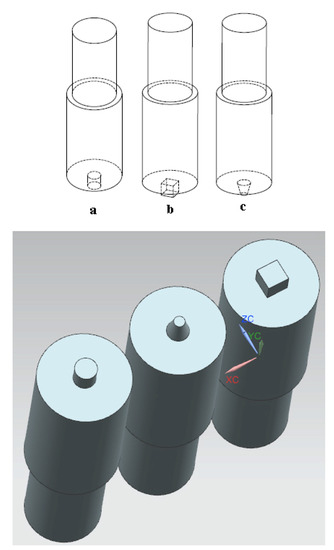
Figure 4.
Different profiles of the tool pin used as cylinders: (a) straight, (b) square (straight), and (c) tapered.
Large groups of input factors are available that can monitor the FSW operation shown in Table 2 and Table 3. In order to assess the important factors and their range, some basic tests were conducted. Figure 5 shows the input factors affecting the character of the synthesized composite. In this examination, three-process variables namely tool speed of rotation, welding speed, and tool pin profiles, were considered. A three-factor, three-level CCD matrix comprising of 20 sets of coded conditions composed of full factorial, 23 = 8 + six center points and six-star points. The determination of the linear, polynomial, and two-way interaction effect of the process variables on the characteristics of the weld metal was thus made possible by 20 experimental trials. As shown in Table 3, the upper bound of a variable was coded as +1 and the lower bound was coded as −1. As shown in Table 3, the face-centered CCD involves twenty sets of coded conditions [36,37].

Table 2.
Levels for DOE.

Table 3.
Layout matrix for L20 test runs and responses.
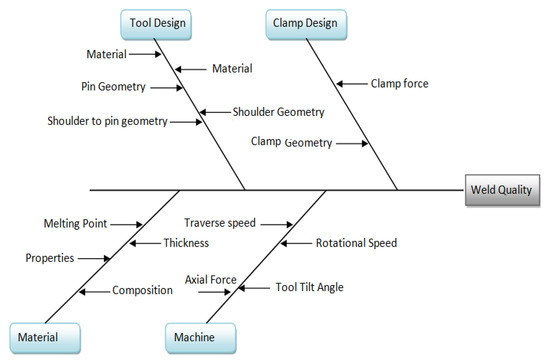
Figure 5.
FSW parameters influencing the properties of the joints.
2.4. Characterizations
The PXRD patterns were recorded to know the nanocrystalline phase of the combustion-derived powder using an X-ray diffractometer (PANalytical X’pert-3) based on Cu-Kα radiation over the 2θ range: 10–80 °C. The FTIR (Spectrum Two, 100300) spectra of the Al2O3 were recorded in KBr solution under ambient conditions. SEM micrographs were analyzed by means of a scanning electron microscope (Vega3 Tescan). TEM analyses were conducted to determine the accurate crystallite size of the samples. The metal matrix nanocomposites were characterized to confirm the presence of reinforcement using density test according to ASTM B311-08 [38], tensile strength as per ASTM E08 standards using UTM (model: TUE-C-400, 40 T capacity) having a maximum load capacity of 25 KN and Vickers microhardness using digital microhardness tester (make: Highwood DMH7—TTC unlimited INC—Japan, Model: HWMMT-X7). On welded joints, weld quality attributes, such as ultimate tensile strength (UTS), yield strength (YS), elongation percentage (percent E), and mean hardness at the nugget zone (NZ), were determined. The details of the above characterization equipment’s used along with number of samples tested is mentioned in Table 4. Complete details of the tensile and hardness test are given in Table 4. In Table 5 the complete details of hardness and tensile testing is provided.

Table 4.
Details of characterization equipment’s used.

Table 5.
Details of hardness and tensile test.
At ambient conditions and 40 °C, static immersion corrosion experiments were performed. To estimate the rate of corrosion of Al-Mg MMNCs with an accuracy of 0.1 mg, weight loss was determined. The specimens were ground, washed with DI water, accompanied by methanol cleaning, and dried until being dissolved in 3.5 weight percent sodium chloride solution. Every sample was weighed first before being dissolving in 3.5 weight percent sodium chloride solution and after 24, 240, and 720 h, respectively, taken out.
After drying thoroughly, the samples were weighed again. Weight loss was assessed and transformed to corrosion rate represented as mm penetration per year (mm/year) [25]. Utilizing SEM, the corroded surfaces were studied. For the purpose of an elevated temperature (40 °C) corrosion test, an electric heating mantle was used. To avoid evaporation, the samples were placed into the hot solution and a glass cover was positioned at the tip of the container. The rate of corrosion (CR) (from mass loss) was determined by:
where the corrosion rate (mm/year) is CR, K is a constant (8.766 × 10⁴), T is the exposure time (h) to the nearest 0.01 h, A is the area (cm2), W is the weight loss in the nearest 1 mg, and D is the material density (g/cm3).
3. Results and Discussion
3.1. XRD Analysis
The XRD pattern of the nano Al2O3 and nanocomposites shown in Figure 6. The pattern reveals that Al2O3 has a crystalline structure. Figure 6 shows the powder X-ray diffraction pattern for Al-Mg nanocomposites at 8 wt% of Al2O3 nanoparticle content. It can be observed that the X-ray diffraction patterns showed five sharp peaks corresponding to that of FCC aluminum. All five peaks correspond to Al (1 1 1), Al (2 0 0), Al (2 2 0), Al (3 1 1), and Al (2 2 2) FCC phase after the indexing process. Further, it is interesting to note that the Al2O3 nanoparticles are not visible in the X-ray diffraction peak in the case of Al-Mg/2 wt% Al2O3 nanocomposite while in other nanocomposites it is visible at 2θ = 29.2° which corresponds to the Al2O3 (2 0 2) phase. The obtained results are in good agreement with the available literature [37,38].
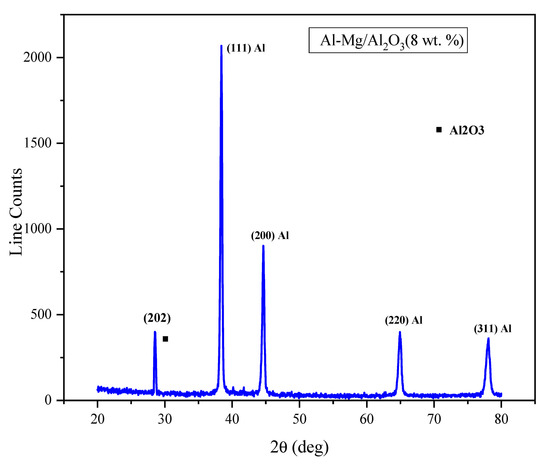
Figure 6.
Powder X-ray diffraction patterns of Al-Mg/Al2O3 (8 wt. %) nanocomposites.
3.2. FTIR Analyses
Molecular bonds vibrate at various frequencies depending on the elements and the type of bonds. For any given bond, there are several specific frequencies at which it can vibrate. According to quantum mechanics, these frequencies correspond to the ground state (lowest frequency) and several excited states (higher frequencies). One way to cause the frequency of a molecular vibration to increase is to excite the bond by having it absorb light energy. For any given transition between two states, the light energy must exactly equal the difference in the energy between the ground state and the first excited state.
Figure 7 shows the FTIR spectra of as-synthesized Al2O3 nano particles. It can be seen that there are multiple peaks in the 500–900 cm−1 range which indicates that the Al2O3 nano particles synthesized are crystalline in nature. Another peak observed at 977 cm−1 is mainly due to vibration of mode of OH groups. IR bands at 520, 570, and 970 cm−1 are indicating possible α-AlOOH diaspore traces. A peak observed at 1630 cm−1 corresponds to bending of surface adsorbed water and bending modes of hydroxyl group. The presence of the bumps and of the water molecule bending mode at about 1630 cm−1 indicates that another hydrate form is present. These bands can be assigned to the stretching mode of OH. The presence of water molecules is clearly shown with the 1630–1650 cm−1 band [37,38]. A sharp peak observed at 1630 cm−1 corresponds to bending of surface adsorbed water and bending modes of hydroxyl group. Further the large band at 3549–3656 cm−1 is result of superposition of from isolated OH groups, bonded hydroxyl groups, and adsorbed water molecules. Here the presence of hydroxyl groups could be related to the water used during the preparation of the nano particles [39,40].
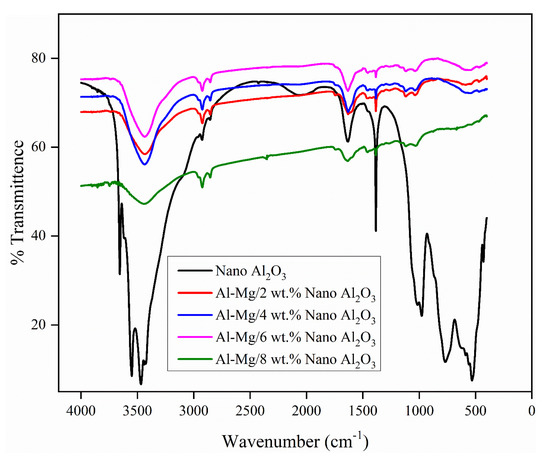
Figure 7.
FTIR spectra of Al-Mg/Al2O3 (2, 4, 6, and 8 wt. %) nanocomposites.
FTIR spectra of Al-Mg/Al2O3 (2, 4, 6, and 8 wt. %) nanocomposites are shown in Figure 7. Major characteristic stretching wavenumbers were observed and tabulated in Table 6. The peak at 3438.73 cm−1 for Al-Mg/Al2O3 (2 wt. %) composite was due to -OH vibration. The other bands were also shown that, the characteristic stretching wavenumbers of Al-Mg/Al2O3 (2, 4, 6 wt. %) nanocomposites absorption at around 3400 cm−1. The peak at 3400 cm−1 was assigned to the N-H ring stretch. The peak at 1119 cm−1 was the C=C stretch plane deformation in Al-Mg/Al2O3 (4 wt. %) nanocomposite and the peak at 563 cm−1 was due to C-C stretching in Al-Mg/Al2O3 (6 wt. %) nanocomposite and the peak at 2800 cm−1 was due to C=O stretching in Al-Mg/Al2O3 (8 wt. %) nanocomposite. These respective peak positions are mentioned in Table 7. FTIR spectra have been revealed the functional groups of chemical compositions of synthesized samples.

Table 6.
Major characteristic stretching frequencies for the Al-Mg/Al2O3 nanocomposites and nano Al2O3 powder.

Table 7.
Reference bond vibration energies as per literature.
Major characteristic stretching wavenumbers were observed and tabulated in Table 4. The peak at 3438.73 cm−1 for Al-Mg/Al2O3 (2 wt. %) composite was due to -OH vibration. The other bands were also shown that, the characteristic stretching wavenumbers of Al-Mg/Al2O3 (2, 4, and 6 wt. %) nano composites absorption at around 3400 cm−1. The peak at 3400 cm−1 was assigned to the N-H ring stretch. The peak at 1119 cm−1 was the C=C stretch plane deformation in Al-Mg/Al2O3 (4 wt. %) nano composite and the peak at 563 cm−1 was due to C-C stretching in Al-Mg/Al2O3 (6 wt. %) nano composite and the peak at 2800 cm−1 was due to C=O stretching in Al-Mg/Al2O3 (8 wt. %) nano composite. FTIR spectra have been revealed the functional groups of chemical compositions of synthesized samples.
Molecular bonds vibrate at various frequencies depending on the elements and the type of bonds. For any given bond, there are several specific frequencies at which it can vibrate. According to quantum mechanics, these frequencies correspond to the ground state (lowest frequency) and several excited states (higher frequencies). One way to cause the frequency of a molecular vibration to increase is to excite the bond by having it absorb light energy. For any given transition between two states the light energy must exactly equal the difference in the energy between the ground state and the first excited state.
3.3. TEM and SEM Analyses
The SEM photograph (Figure 8) of nano Al2O3 powder shown that there is a presence of foamy agglomerated particles with a wide distribution. Higher percent of urea and calcinations of powder product at low temperature promotes crystalline nature (Figure 9) of the nano Al2O3 dispersed Al-Mg alloy. Additionally, urea promotes high flame and, hence, agglomeration of particles. SEM and TEM studies were carried out on Al2O3 nanoparticles to study morphology and size which is shown in Figure 8a–c. It can be observed from TEM micrographs shown in Figure 8a,c that the size of Al2O3 nanoparticles is in the range of 20–50 nm. The extent of agglomeration between the nanoparticles is minimal as each nanoparticle can be seen clearly in the TEM images. Additionally, the bright satellite spots are seen in Figure 8b suggest that the synthesized powder particles are crystalline in nature.
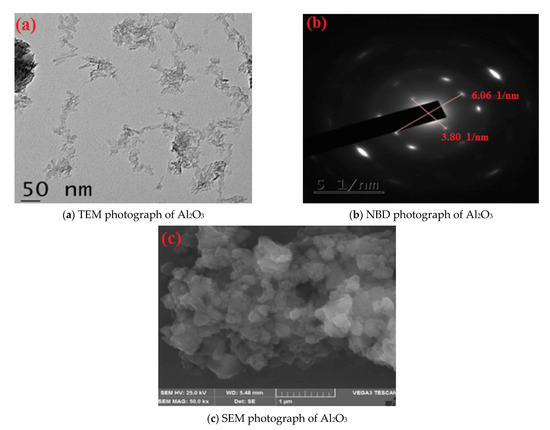
Figure 8.
(a)TEM, (b) NBD and (c) SEM photographs of nano Al2O3 powder.
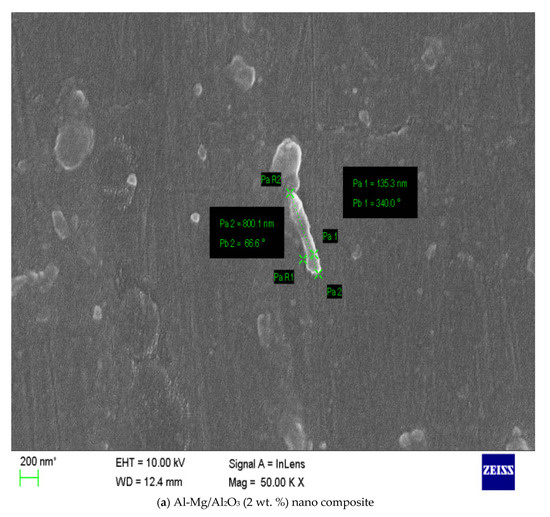
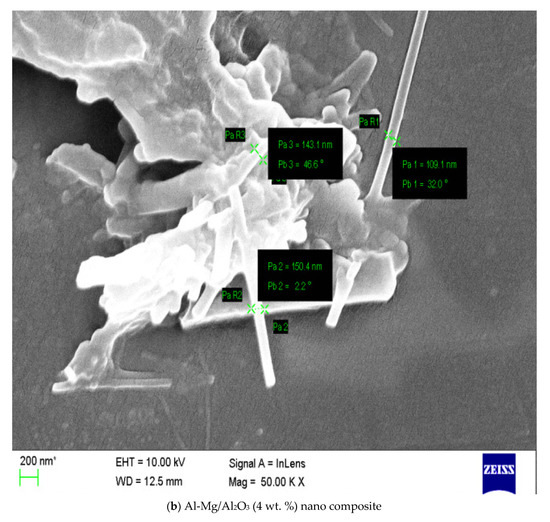
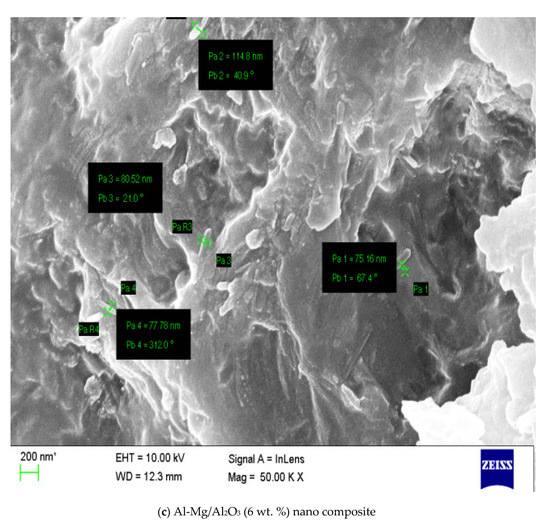
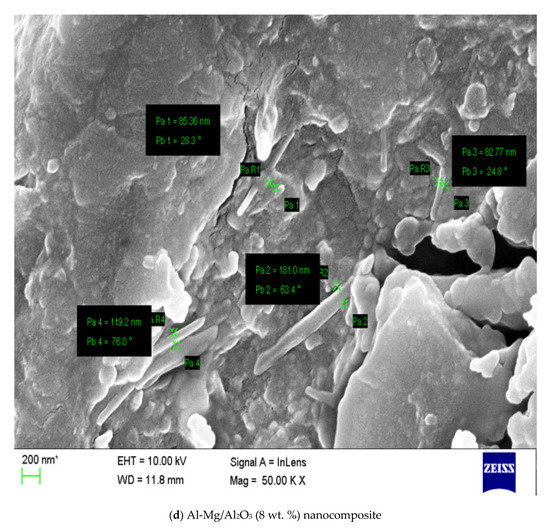
Figure 9.
SEM photographs of Al-Mg/Al2O3 (2, 4, 6, and 8 wt. %) nanocomposites.
Figure 9 shows the SEM micrographs of the Al-Mg/Al2O3 (2, 4, 6, and 8 wt. %) nanocomposites. These SEM micrographs show the presence of Al2O3 nanoparticles in Al-Mg matrix material. It is noted that, for low weight percentage of 2 wt. % of Al2O3 nanoparticles in nanocomposites no clustering of particles but as the weight percentage is increased from 4 to 8 wt. % the clustering of Al2O3 nanoparticles is quite visible. The clustering is mainly due to the presence of weak van der Waals forces acting between the Al2O3 nanoparticles. Further, the closer view in the case of Al-Mg/2 wt. % Al2O3 nanocomposites the bonding of Al2O3 nanoparticles with the Al-Mg matrix is very good. The interfacial bonding is so good that there is hardly any gap between the nanoparticle and Al-Mg matrix. The clean interface between the Al2O3 nanoparticles and Al-Mg alloy indicates that there are no interfacial products formed. The formation of any kind of interfacial product can be detrimental to the mechanical and tribological properties of nanocomposites.
3.4. Corrosion Studies
Figure 10 clearly indicates that the surface of the Al-Mg/Al2O3 (2, 4, 6, and 8 wt. %) nanocomposites underwent deterioration, particularly across the grain boundaries. Owing to the gap in the surface because of the alteration in shape, these grain boundaries offer favorable corrosion activation locations [33]. On account of Al-Mg/Al2O3 (2 wt. %) composite, along with attack along the grain boundary, pitting happened only at the sites where Al2O3 particles aggregate. Figure 11 indicates the large magnification of the corroded layer SEM micrograph for Al-Mg/wt. % percentage of Al2O3 composites in 3.5 weight percent sodium chloride solution at 40 °C for 720 h. It’s indeed obvious that perhaps the pitting developed near the sites where the aggregation of Al2O3 particles occurred. Compared to the pure aluminum matrix, the increased corrosion strength of Al-Mg/Al2O3 composites at 40 °C is due to ceramic Al2O3 particle which remains inactive in the sodium chloride solution. While the rate of corrosion of Al-Mg/Al2O3 composites is lower compared to Al matrix metal, the production of pits on the surface was demonstrated by the Al-Mg/Al2O3 composites. However, with the growth of particulates relative to that in the base metal and also in the lower percent of reinforcement, the number of the pit reduced.
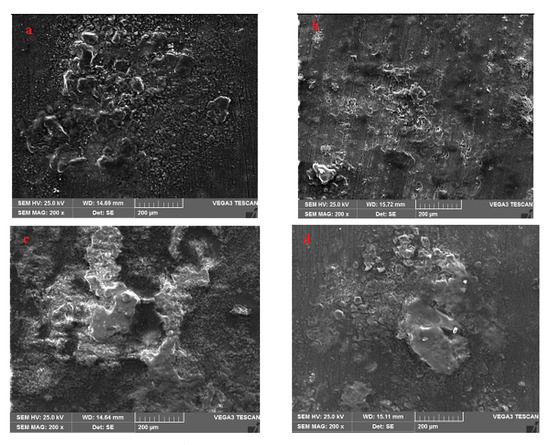
Figure 10.
SEM photographs of Al-Mg/Al2O3 (a) 2, (b) 4, (c) 6, and (d) 8 wt% nanocomposites when exposed for 30 days in NaCl solution with 3.5 wt% at 40 °C.
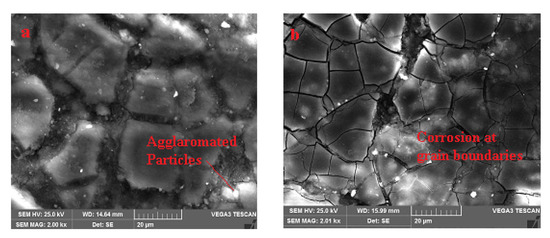
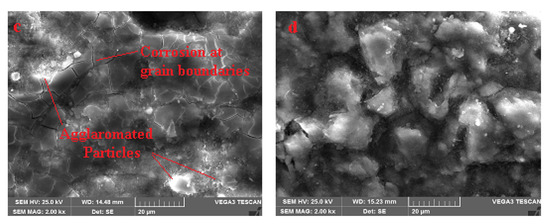
Figure 11.
SEM photographs with high magnification of Al-Mg/Al2O3 (a) 2, (b) 4, (c) 6, and (d) 8 wt. % nanocomposites when exposed for 30 days in NaCl solution with 3.5 wt. % at 40 °C.
It has been noticed that increasing the wt% of the Al2O3 particles decreases the number of the pit. In addition, there is confirmation in the Al-Mg/Al2O3 composites, of the existence of grain boundary corrosion and pitting corrosion. Figure 12 shows low (200×) and high (2000×) intensification corroded surface SEM micrograph of FSWed Al-Mg/Al2O3 (6 wt. %) composites after exposure for 720 h at 40 °C in 3.5 weight percentage sodium chloride solution. The resistance to corrosion of MMNCs depends on the reinforcement volume, scale, and shape. During FSW, due to continuous stirring and dynamic recrystallization, the size and shape of the reinforcement get altered, which is having a greater influence on the corrosion rate. The fine grain structure of the nugget region has been noted to contribute to decreased corrosion rates. Figure 13 shows an SEM photograph of the bulk material in the alumina reinforced sample weld nugget. In Table 8 we have tabulated the EDS chemical assessment data of the base material in the alumina strengthened sample weld nugget. The EDS measurement was done using a silicon/silicon drift detector in which the measurement is based on the area. Three measurements were performed for each sample. It can be seen that the standard deviation for both the data (wt. % and at%) are very high indicating that the data points are spread out over a large range of values. To see if this difference is statistically significant, the ANOVA, T-test, and F-test are further performed.
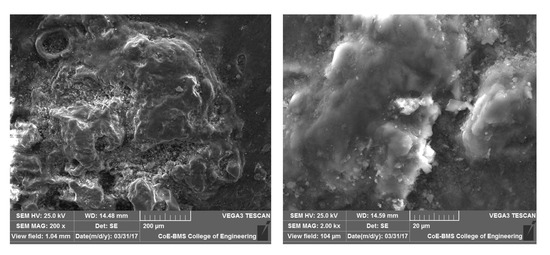
Figure 12.
SEM photographs with low and high magnification of friction stir welded Al-Mg/Al2O3 (6 wt. %) composite when exposed for 30 days in NaCl solution with 3.5 wt. % at 40 °C.
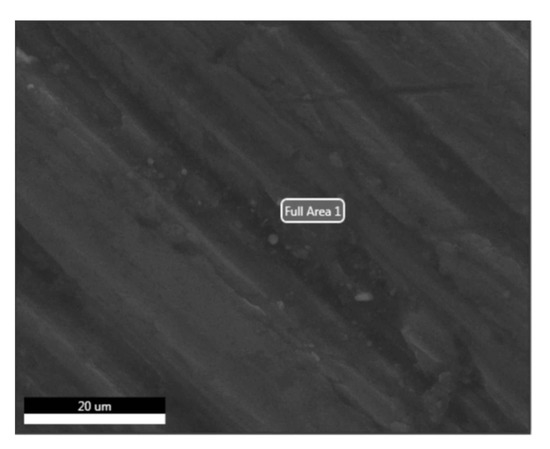
Figure 13.
SEM photograph of the bulk material in the weld nugget of the alumina reinforced specimen.

Table 8.
EDS chemical analysis data of the bulk material in the weld nugget of the alumina reinforced specimen.
Figure 14 shows the characteristic rate of corrosion curve (given in mm/Year) with respect to varying weight percentages of reinforcement. Corrosion rate depends on the exposure time and the temperature of the solution, which increases with increasing exposure time and temperature. On the other hand, the degree of corrosion deterioration was diminished with increasing reinforcement, it is believed that which may be because of solid interfacial bonding strength between the matrix and reinforcement in MMCs [40,41]. Material reduction from corrosion was fundamentally higher in the case of base alloy and lower wt. % Al2O3 MMCs than in the higher wt. % Al2O3 MMCs such as 6 and 8 wt. % Al2O3. Corrosion rate decreases as the percentage of reinforcement increase with respect to matrix alloy, same trend has been noticed in the literature [42,43].
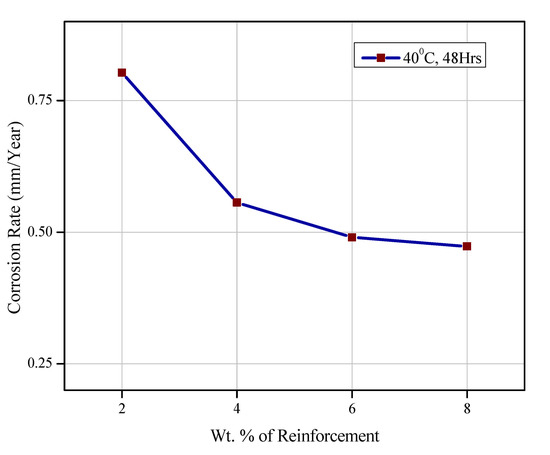
Figure 14.
The graph of corrosion rate (mm/year) and wt. % of reinforcement.
A significant part of a barrier is assumed to be the reinforcement particles. For the start and growth of corrosion pits, a particle serves as a comparative barrier [38]. The manufacture and preparation of MMCs often result in the creation of interphase in between the matrix and reinforcements that could also affect corrosion [38]. The corrosion resistance of MMCs depends on a number of variables, including the processing method; matrix alloy form and its other features; reinforcement type and quantity; and corrosive media form, and ecological factors [44]. The corrosion behavior of MMCs can also be influenced by the strengthening phase by changing the arrangement of intermetallic stages in the Al alloys [38]. Increasing the number of intermetallic particulates leads to greater rates of corrosion.
3.5. Mechanical Characterization
Figure 15a–c shows UTS, YS, and percentage increase in strength with respect to reinforcement addition, respectively. Figure 15d indicates the hardness profiles for different wt% reinforced MMCs. The tensile tests on the composites confirm that the addition of ceramic reinforcement to the aluminum matrix alloy increases tensile strength. Additionally, the percentage of nanopowders influences the tensile properties of the MMNCs [6,7,8]. The ultimate tensile strength was increased to a certain value and further decreased with an increase in the percentage of reinforcement with respect to matrix alloy [39]. It was found to increase with the addition of Al2O3 nanoparticles up to 6 wt. % in the Al-Mg matrix and then decrease slightly for 8 wt. % Al2O3 nanoparticles in the Al-Mg matrix. The decrement can be attributed to agglomeration and segregation of the particles towards the eutectic phase. The agglomerated particles would present a weaker zone in the structure, which may act as a ‘crack initiator’ in the specimen and, hence, lowers strength. The tensile and yield strength values observed for Al-Mg alloy were 158.52 and 139.10 MPa respectively while, for Al-Mg/6 wt. % Al2O3 nanocomposites, the tensile strength was found to have a value of 203.95 and 180.62 Mpa. The increase in tensile and yield strength for Al-Mg/6 wt. % Al2O3 nanocomposites were found to be about 28.65% and 29.84%, respectively when compared to that Al-Mg alloy. Further, the elongation of Al-Mg alloy which is 5.87% was found to be high when compared to that of nanocomposites. Here, the increase in tensile and yield strength of the nanocomposites can be mainly due to grain refinement of Al-Mg matrix by Al2O3 nanoparticles and generation of dislocations due to thermal mismatch between the Al-Mg alloy and Al2O3 nanoparticles. The presence of Al2O3 nanoparticles in the Al-Mg matrix reduces the grain size by restricting the grain growth during processing time. Further, with the increase in Al2O3 nanoparticle content, the grain size decreases as the number of obstacles to inhibit grain growth is more. Secondly, the dislocations are generated due to a large thermal mismatch between the Al-Mg alloy and Al2O3 nanoparticles. This leads to work hardening of Al-Mg matrix and subsequent increase in the yield strength of the nanocomposites.
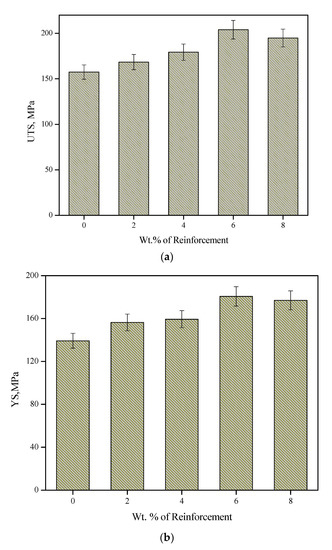
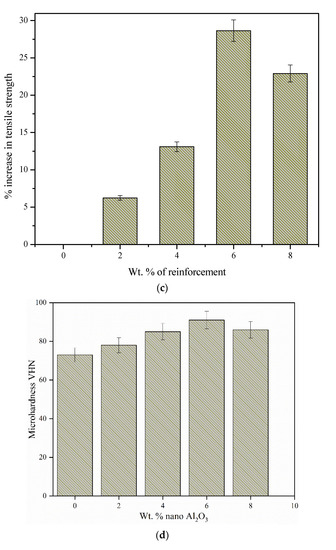
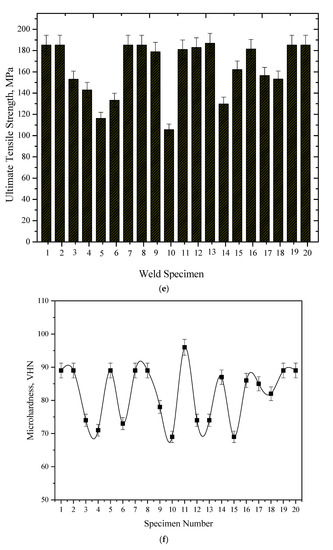
Figure 15.
(a) Ultimate tensile strength for different wt. % reinforced MMCs. (b) Yield strength for different wt. % reinforced MMCs. (c) Percentage increase in tensile strength for different wt. % reinforced MMCs. (d) Hardness profiles for different wt. % reinforced MMCs. (e) Ultimate tensile strength for different FSWed specimens. (f) Hardness profiles for different FSWed specimens.
The mechanical and corrosion properties are initially increased and then decreased of the nano Al2O3 particles added in the Al-Mg matrix. The studies show that, the presence of 6 wt. % of nano Al2O3 particles in the matrix improved the properties of other combinations of nano Al2O3 in the Al-Mg matrix material. It can be observed that the composite containing 6% wt. aluminum oxide particles show higher hardness. The addition of the particles beyond this brings down the hardness. Hence, in this investigation, the range of reinforcement is restricted to 8 wt. %. An improvement of about 37.82% for Al-Mg/6 wt. % Al2O3 nanocomposites were observed when compared to that of the unreinforced Al-Mg alloy. This is mainly due to two important factors, firstly in contribution to hardness value of nanocomposites by virtue of high hardness and uniform dispersion in Al-Mg matrix helps in improving the inhibition of dislocation movement during the plastic deformation caused by the indenter. It is well known that Al2O3 nanoparticles are harder in nature when compared to that Al-Mg alloy due to which the Al2O3 nanoparticles render their inherent property of hardness to the soft matrix Al-Mg matrix. Secondly, uniform dispersion of Al2O3 nanoparticles in metal matrix generates dislocation due to the difference between the coefficients of thermal mismatch between the two constituents. The dislocations are generated at the interface between the Al-Mg and Al2O3 nanoparticles mainly due to the coefficients of thermal mismatch of Al2O3 nanoparticles and Al-Mg matrix. This punching of dislocations leads to work hardening of Al-Mg alloy which in turn increases the hardness of the overall nanocomposites. Further, the Al-Mg/Al2O3 (6 wt. %) MMNCs are joined by friction stir welding with various process parameters as per the design matrix and evaluated for structural, mechanical, and corrosion properties. Figure 15e,f shows the tensile and hardness properties for the conducted welds. The joint fabricated using a rotational speed of 1000 rpm, a welding speed of 60 mm/min, and a square pin profiled tool with an axial force of 4 kN showed higher tensile strength and hardness compared to other joints. The majority of the welded joints fail at the heat-affected zone during the tensile test. A considerable amount of plastic deformation was found observed before the failure. As evident from the hardness profile, the lower hardness values were observed outside the weld zone (i.e., in HAZ) as compared to the nugget zone of the weldment. It is also well proven from the tensile plot. Hence, the tensile failure also occurred at heat-affected zone. Additionally, it is evident from the data that the tool pin profile has a great impact on the tensile strength of the joints. The joint produced by using the square pin profile tool has given superior tensile properties as compared to the rest of the tool. The basic factors which determine the tensile strength of joints are degree of plastic flow and amount of mixing of both materials. In the case of the tapered pin profile tool maybe because of these two reasons low strength was noticed. There is not much pulsating action involved in the tapered pin profiled tool because it almost resembles a straight cylindrical pin profiled tool. Out of the used tools, the tapered cylindrical and straight cylindrical pin profile sweeps less material when compared to that of straight square pin tool, joints produced with square pin profile exhibit superior properties.
4. RSM Optimization
For the model, response surfaces were formulated efficiently and the optimized response location was precisely defined. Using variance analysis (ANOVA), with the aid of MINITAB 16, the adequacy of the established models was checked. The ANOVA results are listed in Table 9, Table 10, Table 11 and Table 12. As the p-value is much smaller than 0.05, factors such as tool rotational speed (N), traverse speed (S), and tool profile (T) are important. Through this study, an effort was made to maximize the response, corresponding to the highest value of the US (186.36 MPa) and micro-hardness (96 Hv), the optimum process parameters were selected, which were estimated for 1000 rpm rotational speed, 60 mm/min welding speed with a straight square pin profile for 6 mm plate thickness. The estimated values from the response surface are in great concurrence with the data obtained from the experiments. To understand the FSW process in terms of yield strength, US, and hardness, mathematical models were formulated by employing the multiple linear regression method. Estimated regression coefficients for yield strength (YS) is given in Equation (1) and its coefficients of correlation R-Sq. is 96.52%. Similarly, ultimate strength (US) and Hardness are given in Equations (2) and (3) and R-Sq. values are 93.02% and 95.24%.

Table 9.
ANOVA test results for yield strength (statistical confidence level: 95%).

Table 10.
ANOVA test results for ultimate tensile strength (statistical confidence level: 95%).

Table 11.
Notations used in RSM contours and surface plots.

Table 12.
ANOVA test results for hardness (statistical confidence level: 95%).
Regression Equation
Yield strength (YS), MPa = 63.8945 + 0.058525 N + 0.0732 S + 11.45 T
R-Sq = 96.52%, R-Sq (adj) = 84.40%
R-Sq = 96.52%, R-Sq (adj) = 84.40%
Ultimate Strength (US), MPa = 113.033 + 0.045535 N + 0.1293 S + 12.292 T
R-Sq = 93.02%, R-Sq (adj) = 85.01%
R-Sq = 93.02%, R-Sq (adj) = 85.01%
Ultimate Strength (US), MPa = 113.033 + 0.045535 N + 0.1293 S + 12.292 T
R-Sq = 93.02%, R-Sq (adj) = 85.01%
Hardness (VHN) = 68.55 + 0.016 RS − 0.055 TS + 1.4 Tool
R-Sq = 95.24%, R-Sq (adj) = 91.95%
R-Sq = 93.02%, R-Sq (adj) = 85.01%
Hardness (VHN) = 68.55 + 0.016 RS − 0.055 TS + 1.4 Tool
R-Sq = 95.24%, R-Sq (adj) = 91.95%
The 3D response surface plots for the US, YS and micro-hardness are displayed in Figure 16 and Figure 17. In the response surface graphs corresponding parameters for highest values (i.e., rotational speed of 1000 rpm, translational speed of 60 mm/min and square pin tool profile) were considered as optimum values. Figure 16a represents a relationship between tool rotational speed, translational speed, and the yield strength. It can be seen that the strength improves with the rise in ‘N’ up to 1000 rpm, at a set translation speed value and pin tool profile and then it decreases for 1200 rpm within the range of experimentation. It is assumed that the heat influx related to the method contributes to better integration and material flow in the welded zone at about 1000 rpm. Conversely, for higher values of N (1200 rpm), a small decrease in the strength is noted. This may be attributed to the semi-solid material intensified turbulence, which decreases the action of integration and causes a discontinuation of the grain structure, resulting in a void defect in the weldment. Figure 16b represents a relationship between tool rotational speed, pin tool profile, and the yield strength. It can be seen that for a given tool profile, the yield strength increases as the value of ‘N’ increases, for the reasons explained previously. On the other hand, for a given value of ‘N’, the yield strength is observed to be high for SS tool profile because it covers a greater area during the rotation of the edges of the square. Thus, operation using a SS tool profile gives good yield strength as compared to other tool profiles. Figure 16c represents a relationship between translational speed, tool profile, and the yield strength. It can be seen for a given tool profile, the yield strength increases with increase in the translational speed for a speed of 60 mm/min.
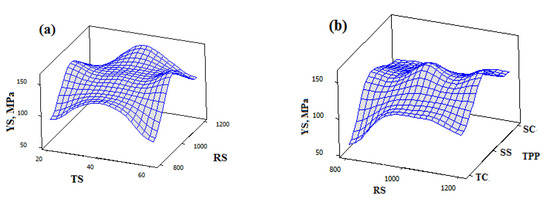
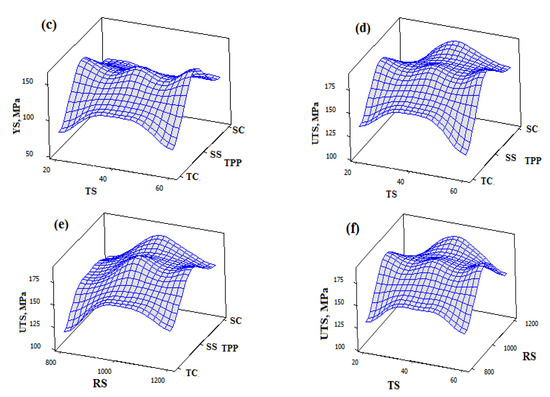
Figure 16.
Response surface graphs of UTS and YS corresponding to the process parameters (a) Yield strength vs. tool rotational and transverse speed (b) Yield strength vs. transverse speed and tool pin profile (c) Yield strength vs. tool rotational and tool pin profile (d) Ultimate tensile strength vs. transverse speed and tool pin profile (e) Ultimate tensile strength vs. transverse speed and tool pin profile (f) Ultimate tensile strength vs. tool rotational and transverse speed.
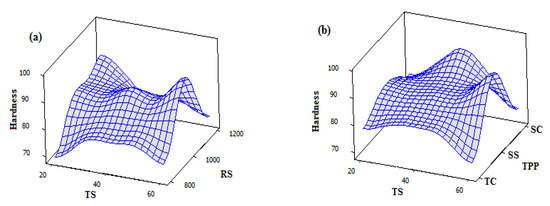
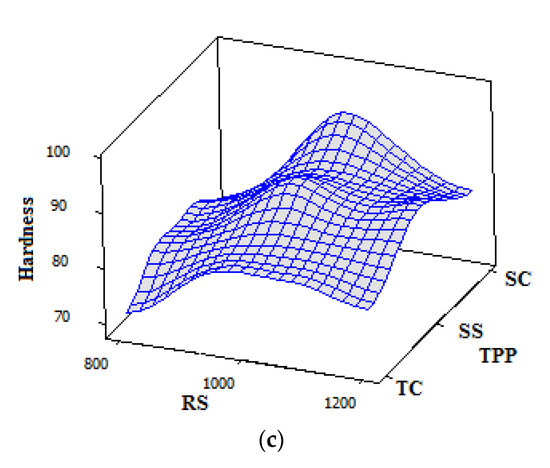
Figure 17.
Response surface graph for hardness (a) effect of tool rotational and transverse speed (b) effect of and transverse speed and tool pin profile (c) tool rotational and tool pin profile.
Figure 16d represents a relationship between transverse speed, tool profile, and the ultimate tensile strength. Again the ultimate tensile strength increases with increase in TS, till the speed of 60 mm/min and thereafter it decreases when the tool profile is kept constant. Figure 16e represents a relationship between tool rotational speed, tool profile, and the ultimate tensile strength. It can be observed that for a given tool profile, the ultimate tensile strength increases with increases in the tool rotational speed and thereafter it decreases. Additionally, for a given tool rotational speed, the SS tool profile gives the highest value of Ultimate tensile strength. Figure 16f represents a relationship between tool rotational speed, transverse speed and the ultimate tensile strength. It can be seen that the ultimate strength increases with the increase in both the speed but there is a limit to it (RS = 60 mm/min and TS = 100 rpm), and thereafter it decreases.
The 3D response surface plots for the hardness are shown in Figure 17. In the response surface graphs corresponding parameters for highest values, i.e., rotational speed of 1000 rpm, transverse speed of 60 mm/min, and square pin tool profile were considered as optimum values. Figure 17a represents the effect of transverse speed and tool rotational speed on hardness, and it shows the highest hardness for 60 mm/min and 1000 rpm. The outcomes of the micro-hardness follow similar trends of tensile strength. It can also be noticed that at a fixed value of translational speed, the hardness increases with an increase in tool rotational speed up to 1000 rpm and then decreased for 1200 rpm within the range of experimentation. Further, at high rotational speed of 1200 rpm, a slight reduction in the hardness is observed. It can be concluded that the hardness value increases with increase in both the speeds and reaches a maximum value thereafter it decreases. Figure 17b represents transverse speed and tool pin profile on hardness, and it can be noticed that for TS of 60 mm/min and straight square tool pin yields highest hardness. It can also be seen that for a given TS, the SS tool profile gives the highest hardness for the reasons explained in the above section. Figure 17c represents rotational speed and tool pin profile on hardness, it can be noticed that for RS of 1000 rpm and straight square tool pin yields highest hardness for the reasons explained in the previous section. In summary it can be concluded that the tool rotational speed is the one which influences the weld properties to a great extent than the other factors of the study.
The tensile tests on the composites confirm that the addition of ceramic reinforcement to the aluminum matrix alloy increases tensile strength. Additionally, the percentage of nanopowders influences the tensile properties of the MMNCs. The ultimate tensile strength was increased to a certain value and further decreased with an increase in the percentage of reinforcement with respect to matrix alloy [39]. It was found to increase with the addition of Al2O3 nanoparticles up to 6 wt. % in the Al-Mg matrix and then decrease slightly for 8 wt. % Al2O3 nanoparticles in the Al-Mg matrix. The decrement can be attributed to agglomeration and segregation of the particles towards the eutectic phase. The agglomerated particles would present a weaker zone in the structure, which may act as a ‘crack initiator’ in the specimen and, hence, lowers strength. The tensile and yield strength values observed for Al-Mg alloy were 158.52 and 139.10 MPa, respectively, while, for Al-Mg/6 wt. % Al2O3 nanocomposites, the tensile strength was found to have a value of 203.95 and 180.62 Mpa. The increase in tensile and yield strength for Al-Mg/6 wt. % Al2O3 nanocomposites were found to be about 28.65% and 29.84%, respectively, when compared to that Al-Mg alloy. Further, the elongation of Al-Mg alloy which is 5.87% was found to be high when compared to that of nanocomposites. Here, the increase in tensile and yield strength of the nanocomposites can be mainly due to grain refinement of Al-Mg matrix by Al2O3 nanoparticles and generation of dislocations due to thermal mismatch between the Al-Mg alloy and Al2O3 nanoparticles. The presence of Al2O3 nanoparticles in the Al-Mg matrix reduces the grain size by restricting the grain growth during processing time. Further, with the increase in Al2O3 nanoparticle content, the grain size decreases as the number of obstacles to inhibit grain growth is more. Secondly, the dislocations are generated due to a large thermal mismatch between the Al-Mg alloy and Al2O3 nanoparticles. This leads to work hardening of the Al-Mg matrix and a subsequent increase in the yield strength of the nanocomposites.
5. ANN Modeling
A three-layer feed-forward ANN framework is proposed in this research and included one input layer, one hidden layer, and one output layer, respectively. In the input layer, the neurons were two, while the output layer has one neuron for the Avg. tensile strength (N/mm2). The experimental data were implemented as the inputs for the ANN framework, in which each data denotes a complex conglomeration of variables of the hand lay-up process (treatment method, materials used, etc.). The data were categorized into 3, where 70, 15, and 15% of all data were used for training, validation, and testing. In Table 13 and Table 14 the correlation coefficient of ANN models is shown for testing, training, and validation data. To train the model, the Levenberg–Marquardt algorithm was utilized. It has been adopted for learning networks. The ANN was iteratively trained to minimize the mean squared error (MSE) performance function between the outputs of the ANN and the corresponding target data.

Table 13.
ANN results for the predicting yield strength.

Table 14.
ANN results for predicting the ultimate strength.
To find the best network architecture for both the networks, a “trial-and-error method” was used and the investigation was carried out over 1000 distinct network architectures. The inverse of the mean absolute error on the testing set was used to measure the network fitness score on each network with a different configuration (number of hidden layers, number of nodes, etc.). With a higher fitness ranking, the best network architecture has been selected. Table 10 and Table 11 shows the results of ANN simulations for the foregoing neural network. It can be seen that for all cases, ANN modeling with fewer neurons in a single hidden layer guesses the yield strength with the partial data. Nonetheless, due to the optimum value of the modeling coefficient, 20 and 14 neurons in a single hidden layer structure were assumed to present the ANN modeling outcome. Yield strength and ultimate strength from ANN modeling is shown in Figure 18 and Figure 19, for 20 and 14 hidden neurons within a single hidden neural network layer as it provides the highest accuracy and hence the lowest prediction error. The relation between the goal (experimental values) and the ANN model performance values in the three sub-datasets can be seen in the figure, which shows expected yield strength values for the various datasets. The dots and solid lines in Figure 18 depict the data and best-fit linear regression with R-values of 0.86865, 0.999172, and 0.99184 for training, validation, and testing sub-datasets respectively, while the overall R value of 0.92734 was obtained for the overall training phase as shown in Figure 18. The R of the ANN models is close to one, which is appropriate and confirms the model’s predictive potential. Similarly for the prediction of Ultimate tensile strength, the R-values from the ANN model was close to one, hence this model also confirms the ANN predictive ability.
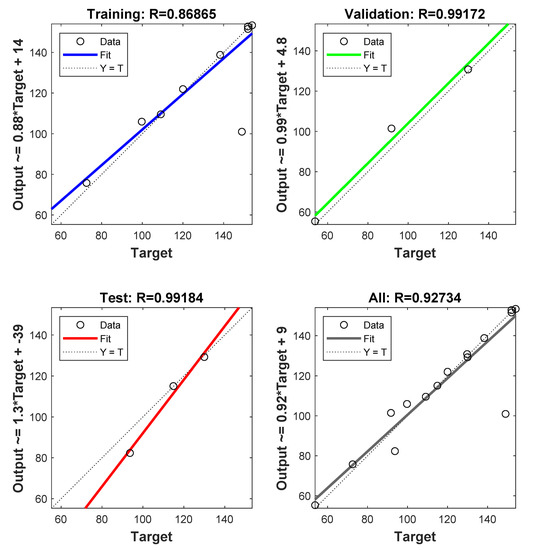
Figure 18.
Optimized result obtained at 20 neurons in the hidden layer.
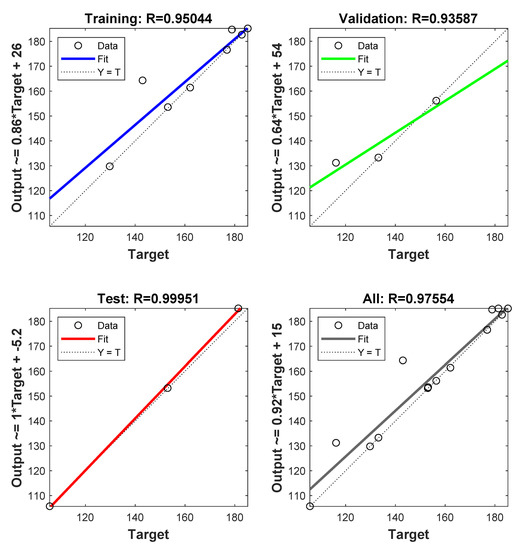
Figure 19.
Optimized result obtained at 14 neurons in the hidden layer.
Table 13 and Table 14 shows the results of ANN simulations for the foregoing neural network. It can be seen that for all cases, ANN modeling with fewer neurons in a single hidden layer guesses the yield strength with the partial data. Nonetheless, due to the optimum value of the modeling coefficient, 20 and 14 neurons in a single hidden layer structure were assumed to present the ANN modeling outcome. Yield strength and ultimate strength from ANN modeling are shown in Figure 19 for 20 and 14 hidden neurons within a single hidden neural network layer. The predicted yield strength and ultimate strength data obtained from ANN is compared with the experimental data (Figure 20a,b). It can be seen that the prediction of the results by ANN is significantly better.
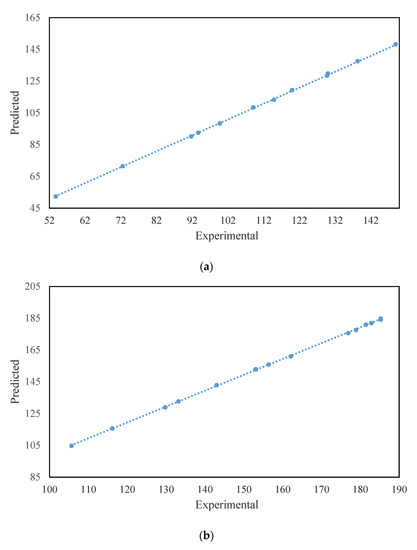
Figure 20.
(a) Comparison of ANN modeling results with the experimental result (yield strength). (b) Comparison of ANN modeling results with the experimental result (ultimate strength).
6. Conclusions
Nano Al2O3 dispersed (0–8 wt. %) of composites were fabricated by two-step stir casting technique. The maximum tensile strength of 203.95 ± 0.15 MPa was obtained for 6 wt. % nano Al2O3 dispersed MMNCs. The joint fabricated using a rotational speed of 1000 rpm, a welding speed of 60 mm/min, and a square pin profiled tool with an axial force of 4 kN showed higher tensile strength and hardness compared to other joints. An extensive grain refinement may be attributed to severe thermomechanical action and dynamic recrystallization in the stir zone leads to an increase of properties. Increased grain growth has decreased the hardness in the heat-affected zone. It has been found that the Al-Mg/Al2O3 nanocomposites showed better corrosion resistance when compared with the pure Al matrix. Increasing the volume fraction of the nano Al2O3 particulates, increasing the corrosion resistance of the Al-Mg/Al2O3 composites.
The response surface analysis of yield strength, ultimate strength, and microhardness has revealed that there exists a strong interaction between these properties and tool rotational speed. Then comes the transverse speed and profile of the tool pin. ANN modeling of the yield strength and ultimate strength as performed using the experimental values. The fitness between the ANN prediction and experimental values is 99.9% accurate. The ANN model is optimized to get this accuracy varying the number of neurons from 6 to 16 in the hidden layer.
Author Contributions
C.A.: Conceptualization, B.V.C.: methodology, A.A.: software, D.A.V.: project administration, A.R.K.: writing—review and editing, S.A.: validation, writing, A.S.C.: formal analysis, V.T.: investigation. All authors have read and agreed to the published version of the manuscript.
Funding
Deanship of Scientific Research at King Khalid University, grant no. R.G.P.2/127/42.
Informed Consent Statement
Not applicable.
Acknowledgments
The authors extend their appreciation to the Deanship of Scientific Research at King Khalid University, Saudi Arabia for funding this work through the Research Group Program under grant no. R.G.P.2/127/42.
Conflicts of Interest
The authors declare no conflict of interest.
References
- Dhananjaya, N.H.; Nagabhushana, B.M.; Nagabhushana, R.P.S.; Chakradhar, C.; Shivakumara, B. Synthesis, characterization and photoluminescence properties of Gd2O3: Eu3+ nanophosphors prepared by solution combustion method. Phys. B Condens. Matter 2010, 410, 3795–3799. [Google Scholar] [CrossRef]
- Shilpa, C.J.; Akila-Kadgathur, J.N.; Dhananjaya, H.; Nagabhushana, S.C.; Prashantha, D.V.; Sunitha, S.C.; Sharma, C.; Shivakumara, B.; Nagabhushana, M. GdAlO3: Eu3+: Bi3+ nanophosphor: Synthesis and enhancement of red emission for WLEDs. Spectrochim. Acta Part A Mol. Biomol. Spectrosc. 2014, 133, 550–558. [Google Scholar] [CrossRef] [PubMed]
- Madhusudhana, H.C.; Shobhadevi, S.N.; Nagabhushana, B.M.; Chaluvaraju, B.V.; Murugendrappa, M.V.; Hari-Krishna, V.; Nagabhushana, H.; Radeep, N.R. Effect of fuels on conductivity, dielectric and humidity sensing properties of ZrO2 nanocrystals prepared by low temperature solution combustion method. J. Asian Ceram. Soc. 2016, 3, 309–318. [Google Scholar] [CrossRef]
- Prashanth, P.A.; Raveendra, R.S.; Hari-Krishna, R.; Ananda, S.; Bhagya, N.P.; Nagabhushana, B.M.; Lingaraju, K.; Raja-Naika, H. Synthesis, characterizations, antibacterial and photoluminescence studies of solution combustion-derived α-Al2O3 nanoparticles. J. Asian Ceram. Soc. 2015, 3, 345–351. [Google Scholar] [CrossRef]
- Sun, S.; Xiaoyan, Y.; Yi, Z.; Fan, Z.; Jianjun, D.; Jun, B.; Chen, G. Enhanced photocatalytic activity of sponge-like ZnFe2O4 synthesized by solution combustion method. Prog. Nat. Sci. Mater. Int. 2012, 22, 639–643. [Google Scholar] [CrossRef]
- Dinaharan, I. Influence of ceramic particulate type on microstructure and tensile strength of aluminum matrix composites produced using friction stir processing. J. Asian Ceram. Soc. 2016, 4, 209–218. [Google Scholar] [CrossRef]
- Salih, O.; Hengan, S.; Ou, S.; Sun, W.; McCartney, D.G. A review of friction stir welding of aluminium matrix composites. Mater. Des. 2015, 86, 61–71. [Google Scholar] [CrossRef]
- Kalaiselvan, K.; Dinaharan, I.; Murugan, N. Characterization of friction stir welded boron carbide particulate reinforced AA6061 aluminum alloy stir cast composite. Mater. Des. 2014, 55, 176–182. [Google Scholar] [CrossRef]
- Subramanya, P.; Murthy, A.; Shettigar, A.; Herbert, M.; Rao, S. Friction stir welding of Aluminium matrix composites—A Review. MATEC Web Conf. 2018, 144, 03002. [Google Scholar] [CrossRef][Green Version]
- Parikh, V.K.; Badgujar, A.D.; Ghetiya, N.D. Joining of metal matrix composites using friction stir welding: A review. Mater. Manuf. Process. 2019, 34, 123–146. [Google Scholar] [CrossRef]
- Thomas, W.M. Friction Stir Butt Welding, International Patent Application No. PCT/GB92. U.S. Patent 9,125,978,8, 6 December 1991. [Google Scholar]
- John, T.; Jata, R.K.V.; Sadananda, K. Residual stress effects on near-threshold fatigue crack growth in friction stir welds in aerospace alloys. Int. J. Fatigue 2003, 25, 939–948. [Google Scholar] [CrossRef]
- Hasim, K.; Nuran, A. The Effect of Post Heat Treatment on The Fatigue Behavior of friction Stir Welded Aluminum 6013 Alloy for use in Aerospace Structures. J. Int. Sci. Publ. Mater. Methods Technol. 2003, 8, 405–418. [Google Scholar]
- Schneider, J.; Nunes, A.C.; Brendel, M.S. The Influence of Friction Stir Weld Tool form and Welding Parameters on Weld Structure and Properties: Nugget Bulge in Self-Reacting Friction Stir Welds. In Proceedings of the 8th International Symposium on Friction Stir Welding, Timmendorfer Strand, Germany, 18–20 May 2010. [Google Scholar]
- Di Paola, M.; Falchero, A.; Cabibbo, M.; Evangelista, E.; Meccia, E.; Spigarelli, S. Mechanical and microstructural characterisation of an aluminum friction stir-welded butt joint. Metall. Sci. Tecnol. 2002, 20, 17–21. [Google Scholar]
- Feng, A.H.; Xiao, B.L.; Ma, Z.Y. Effect of microstructural evolution on mechanical properties of friction stir welded AA2009/SiCp composite. Compos. Sci. Technol. 2008, 68, 2141–2148. [Google Scholar] [CrossRef]
- Cavaliere, P.; Cerri, E.; Marzoli, L.; dos Santos, J. Friction stir welding of ceramic particle reinforced aluminium based metal matrix composites. Appl. Compos. Mater. 2014, 11, 247–258. [Google Scholar] [CrossRef]
- Periyasamy, P.; Mohan, B.; Balasubramanian, V. Effect of heat input on mechanical and metallurgical properties of friction stir welded AA6061-10% SiCp MMCs. J. Mater. Eng. Perform. 2012, 21, 2417–2428. [Google Scholar] [CrossRef]
- Dinaharan, I.; Murugan, N. Effect of friction stir welding on microstructure, mechanical and wear properties of AA6061/ZrB2 in situ cast composites. Mater. Sci. Eng. A 2012, 543, 257–266. [Google Scholar] [CrossRef]
- Sivasankaran, S.; Saminathan, E.; Sidharth, S.; Harisagar, P.T.; Sasikumar, P. Effect of Graphite addition on surface roughness during turning of AA 7075-ZrB2 in-situ metal matrix composites. Procedia Mater. Sci. 2014, 5, 2122–2131. [Google Scholar] [CrossRef][Green Version]
- Thirumoorthy, A.; Arjunan, T.V.; Senthil-Kumar, K.L. Latest research development in aluminum matrix with particulate reinforcement composites—A review. Mater. Today Proc. 2018, 5, 1657–1665. [Google Scholar] [CrossRef]
- Keshavamurthy, R.A.; Prakash, C.P.S. Microstructure and hardness distribution in friction stir welded Al6061-TiB2 in-situ metal matrix composite. Int. J. Mech. Prod. Eng. 2014, 2, 73–76. [Google Scholar]
- Ghader, F.; Asadi, P. Characterization of AZ91/alumina nanocomposite produced by FSP. Mater. Sci. Eng. A 2011, 528, 2431–2440. [Google Scholar]
- Singh, T.; Tiwari, S.K.; Shukla, D.K. Effects of Al2O3 nanoparticles volume fractions on microstructural and mechanical characteristics of friction stir welded nanocomposites. Nanocomposites 2020, 6, 76–84. [Google Scholar] [CrossRef]
- Karakizis, P.N.; Pantelis, D.I.; Fourlaris, G.; Tsakiridis, P. Effect of SiC and TiC nanoparticle reinforcement on the microstructure, microhardness, and tensile performance of AA6082-T6 friction stir welds. Int. J. Adv. Manuf. Technol. 2018, 95, 3823–3837. [Google Scholar] [CrossRef]
- Singh, T.; Tiwari, S.K.; Shukla, D.K. Production of AA6061-T6/Al2O3 reinforced nanocomposite using friction stir welding. Eng. Res. Express 2019, 1, 025052. [Google Scholar] [CrossRef]
- Sharifitabar, M.; Sarani, S.; Khorshahian, S.; Shafiee-Afarani, M. Fabrication of 5052Al/Al2O3 nanoceramic particle reinforced composite via friction stir processing route. Mater. Des. 2011, 32, 4164–4172. [Google Scholar] [CrossRef]
- Azizieh, M.; Larki, A.N.; Tahmasebi, M.; Bavi, M.; Alizadeh, E.; Kim, H.S. Wear behavior of AZ31/Al2O3 magnesium matrix surface nanocomposite fabricated via friction stir processing. J. Mater. Eng. Perform. 2018, 27, 2010–2017. [Google Scholar] [CrossRef]
- Vijay, S.J.; Murugan, N. Influence of tool pin profile on the metallurgical and mechanical properties of friction stir welded Al–10 wt.% TiB2 metal matrix composite. Mater. Des. 2010, 31, 3585–3589. [Google Scholar] [CrossRef]
- Nandipati, G.; Damera, N.R.; Nallu, R. Effect of microstructural changes on mechanical properties of friction stir welded nano SiC reinforced AA6061composite. Int. J. Eng. Sci. Technol. 2010, 2, 6491–6499. [Google Scholar]
- Ejaz, A.K.; Nagesh, B.M.; Raju, B.S.; Drakshayani, D.N.; Holla, A.S.C. Studies on the effect of welding parameters for friction stir welded AA6082 reinforced with Aluminium oxide. Mater. Today Proc. 2020, 20, 108–119. [Google Scholar]
- Arun, S.; Herbert, M.; Rao, S. Study on Mechanical and microstructural characteristics of Friction Stir Welded Aluminium Matrix composite. Mater. Today Proc. 2020, 24, 1183–1189. [Google Scholar]
- Prabhuraj, P.; Rajakumar, S.; Balasubramanian, V. Electro chemical response of stir zone in friction stir welded AA7075-T651 joint in sodium chloride solution. Mater. Today Proc. 2020, 22, 546–550. [Google Scholar] [CrossRef]
- Tiwari, R.K.; Bharti, A.; Tripathi, H.; Kumar, N.; Saxena, K.K. A re-investigation of mechanical properties of aluminium-based surface composites prepared by friction stir processing. Mater. Today Proc. 2021. [Google Scholar] [CrossRef]
- Rao, D.S.; Trinadh, S.S. Improvements in mechanical properties of aluminium alloy-titanium di boride and boron carbide hybrid composite produced through friction stir processing route. Mater. Today Proc. 2021. [Google Scholar] [CrossRef]
- Palanivel, R.; Koshy-Mathews, P.; Murugan, N.; Dinaharan, I. Prediction and optimization of wear resistance of friction stir welded dissimilar aluminum alloy. Procedia Eng. 2012, 38, 578–584. [Google Scholar] [CrossRef]
- Colomban, P. Structure of oxide gels and glasses by infrared and Raman scattering, Part 1 Alumina. J. Mater. Sci. 1989, 24, 3002–3010. [Google Scholar] [CrossRef]
- Colomban, P. Structure of oxide gels and glasses by Infrared and Raman Scattering, Part 2 Mullites. J. Mater. Sci. 1989, 24, 3011–3020. [Google Scholar] [CrossRef]
- Kalaiselvan, K.; Murugan, N. Role of friction stir welding parameters on tensile strength of AA6061–B4C composite joints. Trans. Nonferrous Met. Soc. China 2013, 23, 616–624. [Google Scholar] [CrossRef]
- Elatharasan, G.; Senthil-Kumar, V.S. An experimental analysis and optimization of process parameter on friction stir welding of AA 6061-T6 aluminum alloy using RSM. Procedia Eng. 2013, 64, 1227–1234. [Google Scholar] [CrossRef]
- Zakaria, H.M. Microstructural and corrosion behavior of Al/SiC metal matrix composites. Ain. Shams Eng. J. 2014, 5, 831–838. [Google Scholar] [CrossRef]
- Chandrashekara, K.N.; Narasimhamurthy, B.; Krupakara, P.V. Stress Corrosion Studies of Aluminium 6013-Red Mud Metal Matrix Composites. J. Chem. Chem. Sci. 2017, 7, 640–646. [Google Scholar]
- Rashmi, M.; Pruthviraj, R.D. Corrosion studies of silicon carbide (sic) reinforced aluminium 7075 metal matrix composites (mmcs) in acidic and alkaline media. Ann. Fac. Eng. Hunedoara-Int. J. Eng. 2020, 4, 107–116. [Google Scholar]
- Feng, Z.; Lin, C.; Lin, J.; Luo, J. Pitting behavior of SiCp/2024 Al metal matrix composites. J. Mater. Sci. 1998, 33, 5637–5642. [Google Scholar] [CrossRef]
Publisher’s Note: MDPI stays neutral with regard to jurisdictional claims in published maps and institutional affiliations. |
© 2021 by the authors. Licensee MDPI, Basel, Switzerland. This article is an open access article distributed under the terms and conditions of the Creative Commons Attribution (CC BY) license (http://creativecommons.org/licenses/by/4.0/).